Posted on — Leave a comment

Polenta Recipe: How to Make Creamy Italian Polenta

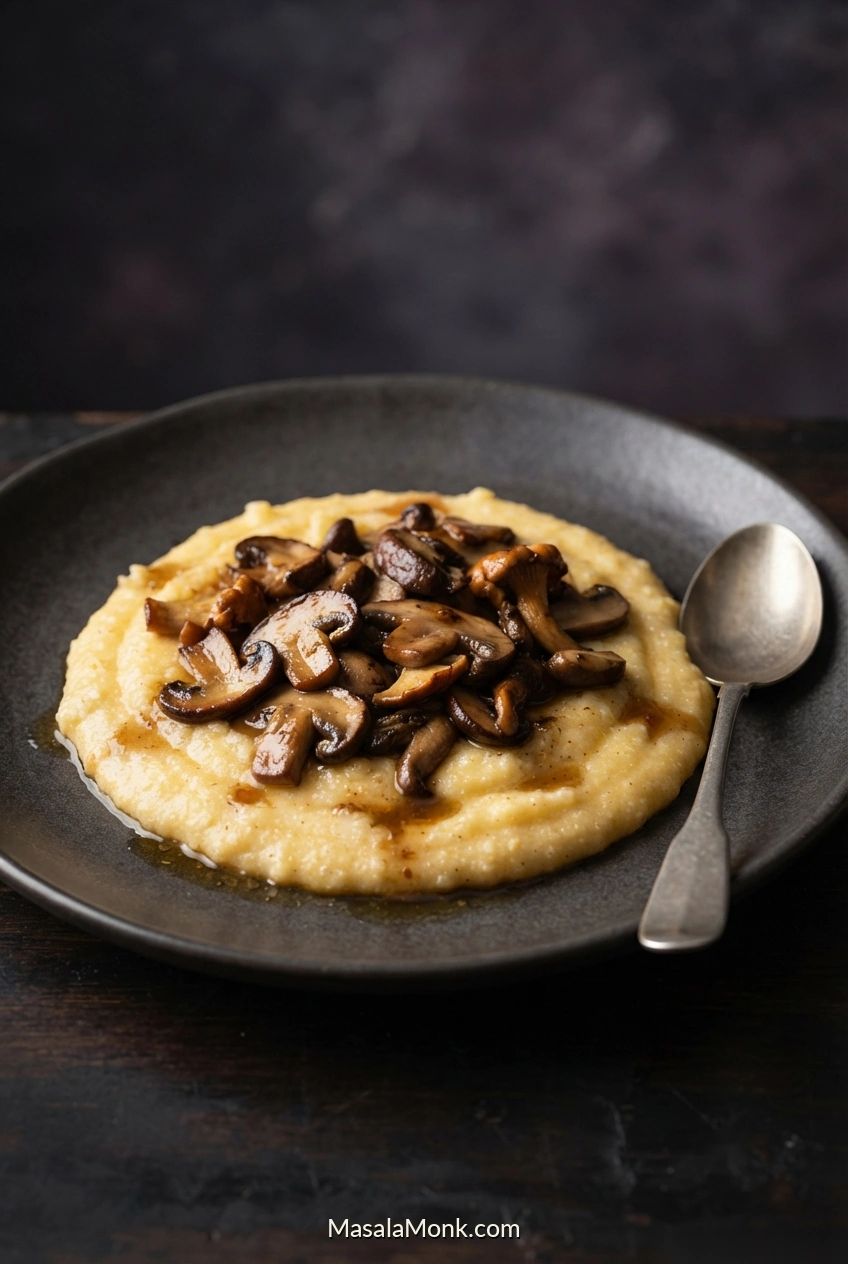
Golden creamy polenta on a dark charcoal plate, topped with sliced browned mushrooms and glossy pan juices; a spoon lies alongside.

Warm polenta is especially good with browned mushrooms and their pan juices. It has a gentle sweetness of its own, and when the cornmeal has cooked through, the mixture becomes creamy without any added cream.

A northern Italian staple, polenta is made by simmering ground maize until tender. This creamy polenta recipe uses ordinary medium-ground yellow cornmeal and water, with butter and optional Parmesan at the end. Try it with fresh tomato sauce and sautéed greens.

Looking for a particular answer? Recipe at a glance · Which cornmeal to buy · Fix grainy or lumpy polenta · Make ahead and reheat

Creamy Italian Polenta Recipe

Polenta Recipe at a Glance

Serves: 4 side portions, or 2 hearty bowls with substantial toppings.

Timing: Prep about 5 minutes; cook the cornmeal for 30–60 minutes after adding it. Allow roughly 40–75 minutes overall, including heating the water. Very coarse cornmeal or extra reduction can take longer.

Stirring: Whisk as you add the cornmeal, then monitor the gentle simmer and stir every 5–10 minutes. You don’t need to stand over the pot stirring for an hour.

Equipment: A deep, heavy-bottomed saucepan with a lid (about 3–4 L / 3–4 US qt), a whisk and a long-handled spoon or heatproof spatula. A kitchen scale and measuring jug are useful.
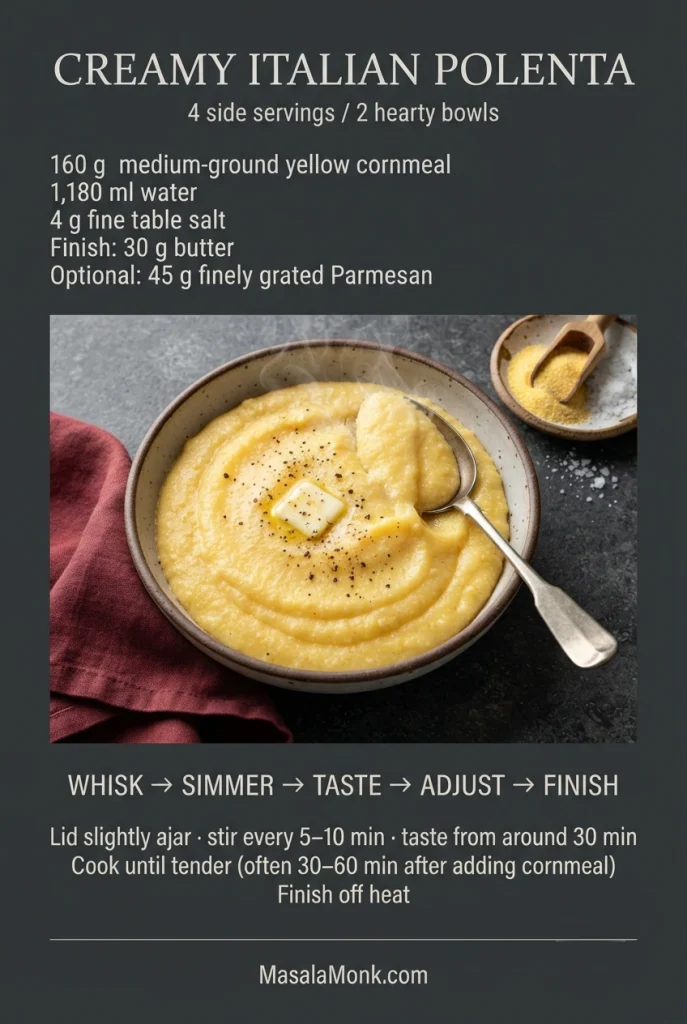
Creamy polenta recipe card with a finished bowl, 160 g cornmeal and 1,180 ml water in the ingredients, plus illustrated cooking steps.
Use this visual as a quick route through the method: whisk, simmer, taste, adjust and finish. The written ingredient list below remains the reference for precise weights, optional add-ins and any extra water.

Ingredients

  • 160 g regular medium-ground yellow polenta or cornmeal — about 1 US cup; choose dry, slow-cooking cornmeal rather than instant or ready-cooked polenta
  • 1,180 ml (5 US cups) water — the starting cooking liquid
  • 4 g fine table salt — about ⅔ teaspoon, then adjust to taste
  • 30 g unsalted butter — about 2 tablespoons, to finish (see dairy-free variation below)
  • 45 g finely grated Parmesan — roughly ½ cup, depending on the grate; optional finish
  • Freshly ground black pepper — optional, to serve
  • Extra hot water, if needed — have 120–240 ml (½–1 cup) available for adjustments

Measure the cornmeal by weight if possible. Different grinds pack differently into a cup; 160 g is the intended starting amount. Unsure which packet you have? Compare regular, quick-cooking and ready-cooked polenta before starting.
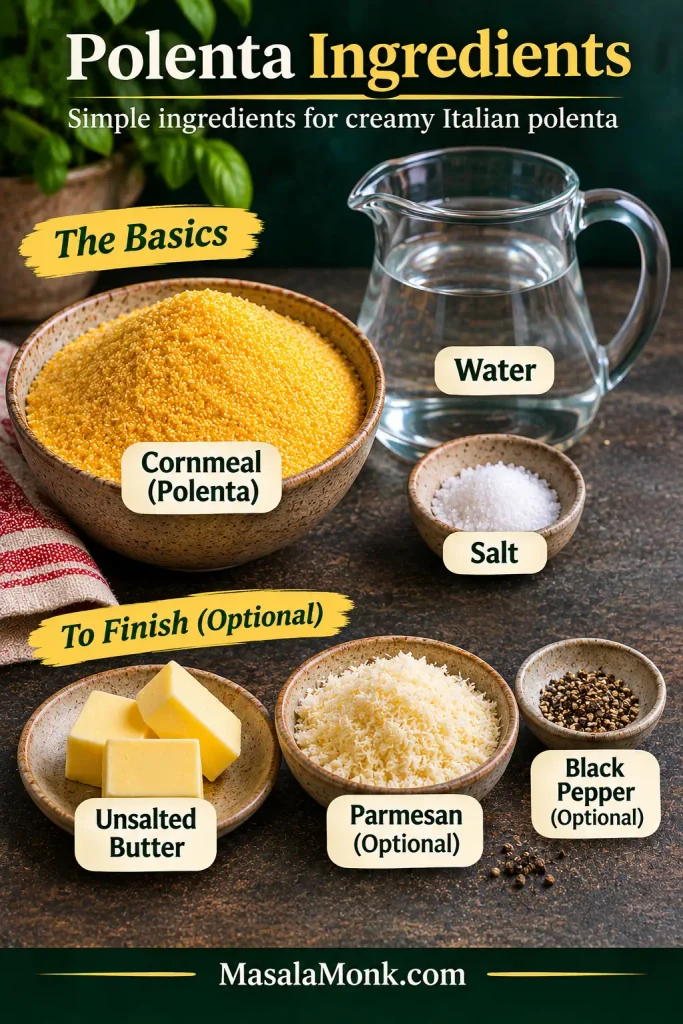
Labeled ingredient arrangement with bowls of yellow cornmeal, salt, butter, grated Parmesan and pepper beside a clear water pitcher.
These ingredient bowls are illustrative, not measured portions. Because salt crystals vary in size, use the recipe’s 4 g of fine salt; butter is standard, whereas Parmesan and black pepper are optional finishes.

Half batch (2 side portions): Use 80 g cornmeal (about ½ US cup), 590 ml water (2½ US cups), 2 g fine table salt (about ⅓ teaspoon), 15 g butter (1 tablespoon) and about 23 g Parmesan (roughly ¼ cup), if using. Cook in a smaller heavy saucepan; use the same tenderness test.

How to Make Creamy Polenta

1. Whisk the Cornmeal Into the Water

Bring the 1,180 ml water and salt to a boil, then lower the heat. Pour in the cornmeal in a thin stream while whisking continuously. Keep whisking for 2–3 minutes, reaching the base and corners of the pan; turn the heat down further if the thickening mixture begins to bubble hard.
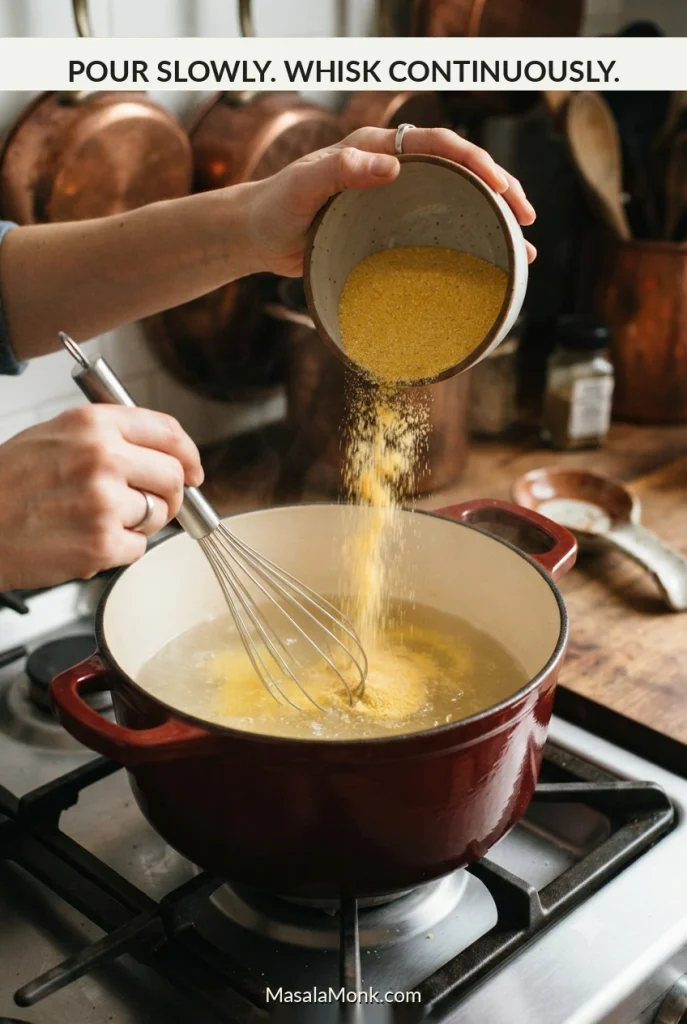
Hands pouring yellow cornmeal into a saucepan while whisking; instructional heading emphasizes pouring slowly and whisking continuously.
If dry cornmeal begins to pile up while pouring, pause the stream but keep whisking. Once the surface clears, resume slowly; this prevents a wet shell forming around a dry pocket.

The water turns yellow and begins to thicken. Break apart small lumps now, before their outsides cook around dry centers.
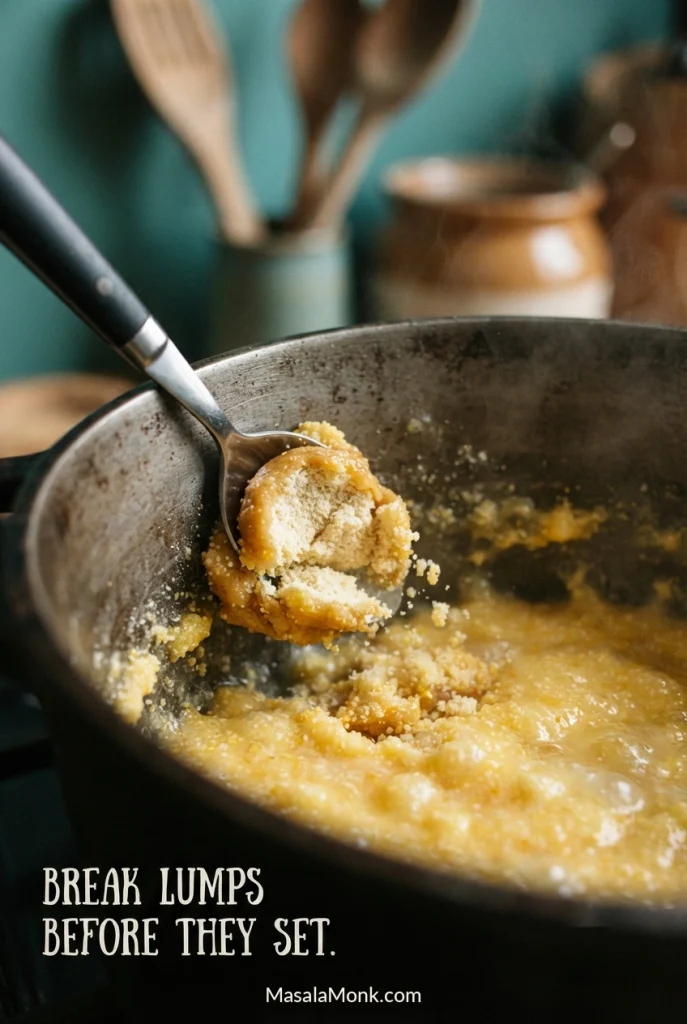
Close-up of a cracked yellow polenta clump on a spoon, exposing a pale dry center above a saucepan.
A lump with a pale, dry center is different from polenta’s natural graininess. Split it open with a spoon or whisk; otherwise, the outer layer can keep the trapped meal from hydrating.

2. Cook at a Gentle Simmer

Reduce the heat to a gentle simmer. Set the lid on slightly ajar, leaving a gap for steam, and stir every 5–10 minutes, scraping the bottom and sides. Check the pot between stirs and turn down the heat if the bubbling becomes vigorous.

Take care with the hot pot. Thick polenta can spit scalding starch. Use a deep saucepan and a long-handled utensil, lower the heat if bubbles become violent, and keep your face clear when lifting the lid.
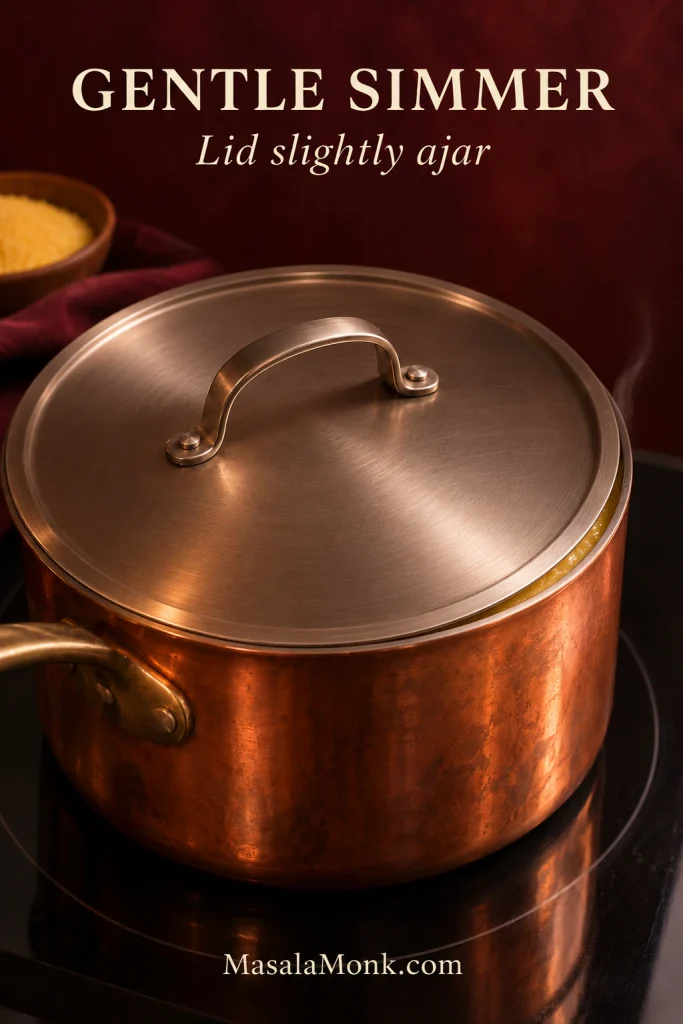
Copper saucepan with an almost-closed metal lid, a thin opening along the right rim and faint escaping steam.
The lid needs only a narrow, stable opening: propping it wide can evaporate liquid before the cornmeal grains soften. When checking the simmer, lift the lid away from your face to avoid the steam.

A few slow bubbles are enough. During each scheduled stir, sweep the spatula across the base and around the saucepan edge, where thick polenta can stick first. If the mixture begins to catch or bubble hard, reduce the heat.
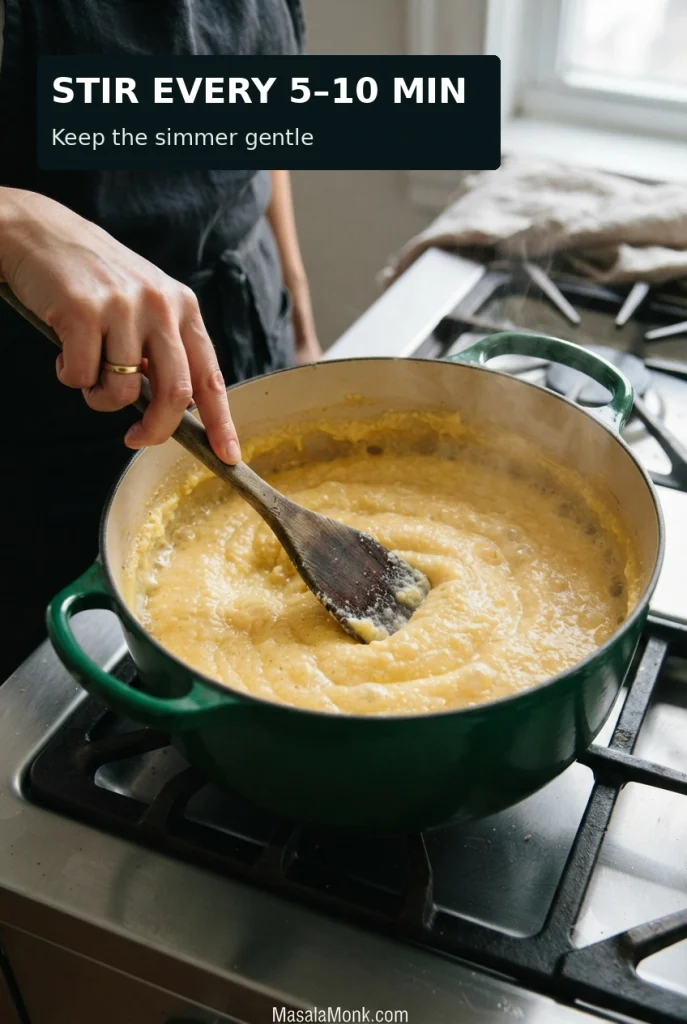
Wooden spatula stirring thick golden polenta in a deep green pot; text reads “Stir every 5–10 min.”
Thick polenta often catches where the saucepan bottom meets its wall, even when the center looks smooth. After broad stirring strokes, trace that inner edge with a long-handled spatula.

3. Taste for Tenderness

After about 30 minutes, cool a small spoonful and taste it. The grains should be tender, without hard or chalky centers. If they are still gritty, keep simmering and taste again after 5–10 minutes. Add 30–60 ml (2–4 tablespoons) hot water only if the mixture is too thick for the grains to finish cooking comfortably.
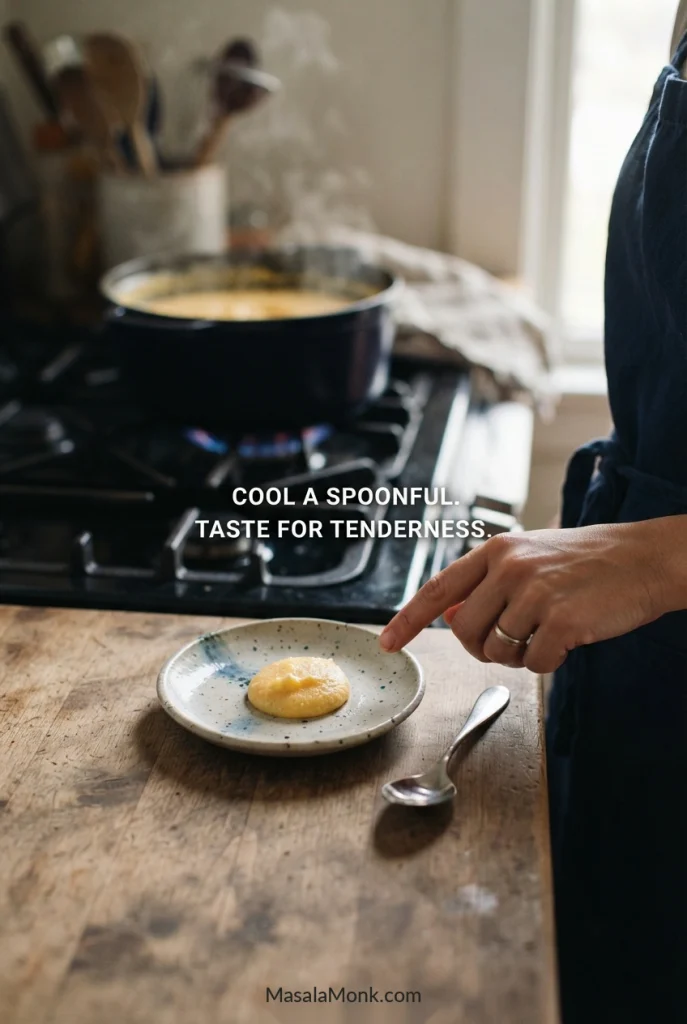
Small sample of yellow polenta on a saucer with a spoon, a saucepan in the background and a hand indicating the sample.
A thin smear on a saucer cools faster than a heaped spoonful. Taste only once it is comfortable in your mouth; the aim is to check the grain centers without risking a burn.

Medium-ground cornmeal usually needs 30–60 minutes after entering the water; coarser meal can take longer. If the grains are still hard and the pot becomes difficult to stir, add a little hot water and continue the gentle simmer. Uncover only when the grains are nearing tenderness and excess liquid remains. For persistent grit, see what to do after an hour.
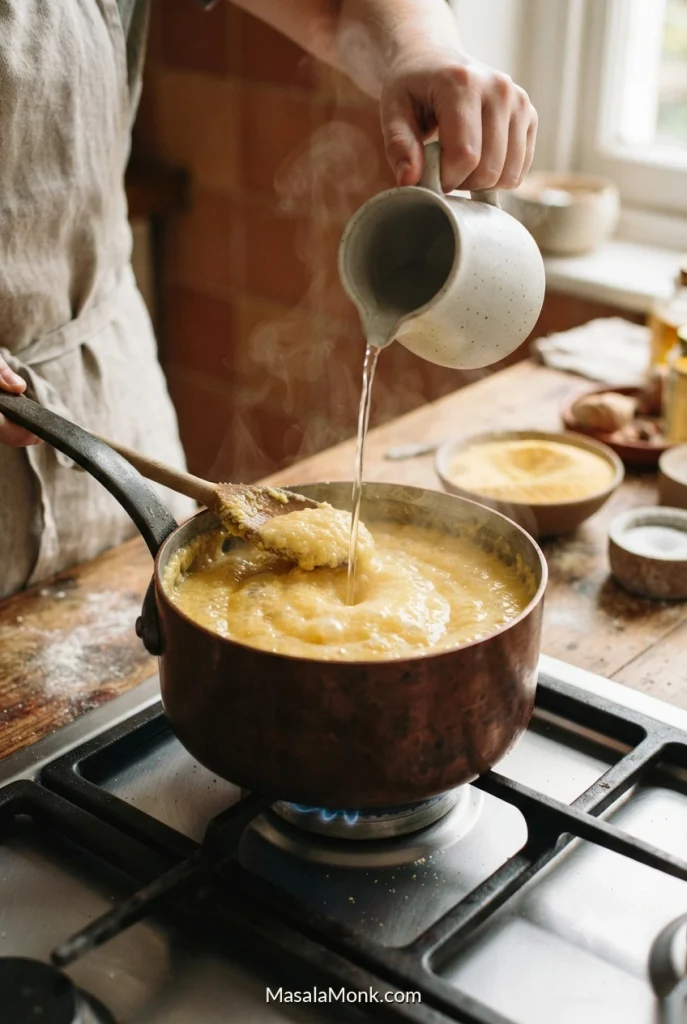
Water poured from a plain unmarked jug into thick golden polenta in a saucepan beside a stirring utensil.
If undercooked polenta becomes difficult to stir, a little hot water restores movement without cooling the pot abruptly. However, loosening it is not the same as cooking it: gritty centers still need simmering.

4. Set the Final Consistency

Tender but too stiff? Add hot water 30–60 ml (2–4 tablespoons) at a time and stir until the polenta falls slowly from the spoon.
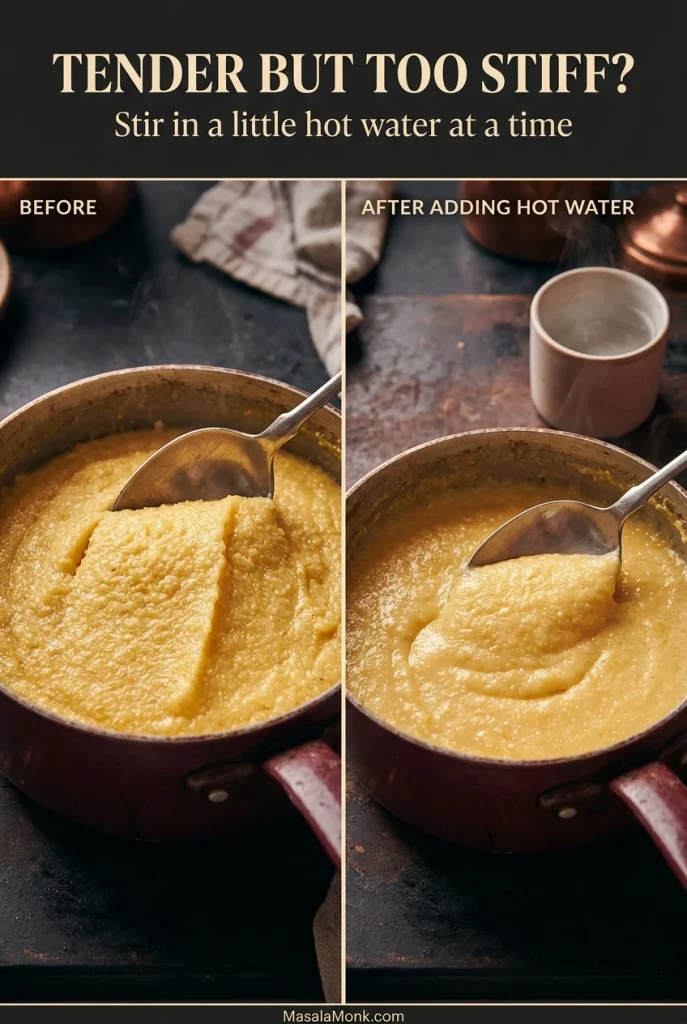
Before-and-after comparison of stiff cooked polenta at left and more relaxed, spoonable polenta at right after adding water.
For tender but stiff polenta, add hot water gradually and stir between additions. Stop when the spoon ridges relax into soft folds; waiting until liquid pools around the edges means you have gone too far.

Tender but too loose? Simmer uncovered, stirring regularly, until a spoonful settles softly on a warm plate rather than spreading into a puddle. If there is a lot of liquid left, this can take extra time; keep the heat gentle to avoid splattering.
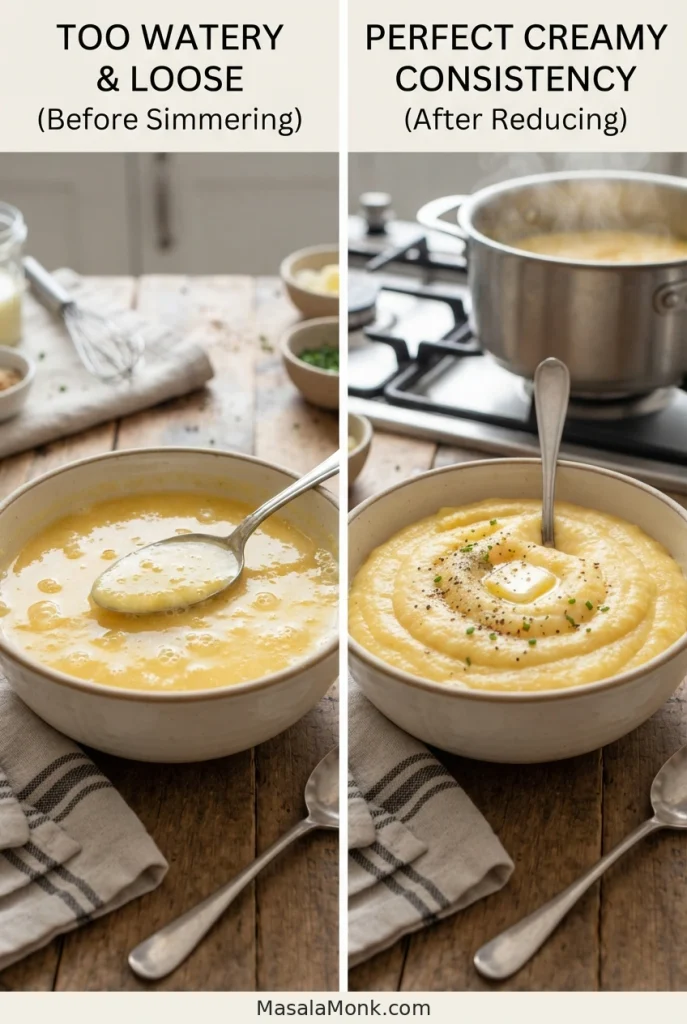
Before-and-after comparison of runny yellow polenta and a thicker finished bowl with herbs and melting butter.
Reduce excess liquid while the polenta is still plain. The butter and herbs shown in the finished panel come afterward, not as a thickener; adding fresh dry meal instead would introduce uncooked grains.

It should be soft and spoonable, not rigid. Stop slightly looser than you want at the table; polenta thickens as it cools. If you are unsure which correction applies, use the four-state troubleshooting guide.
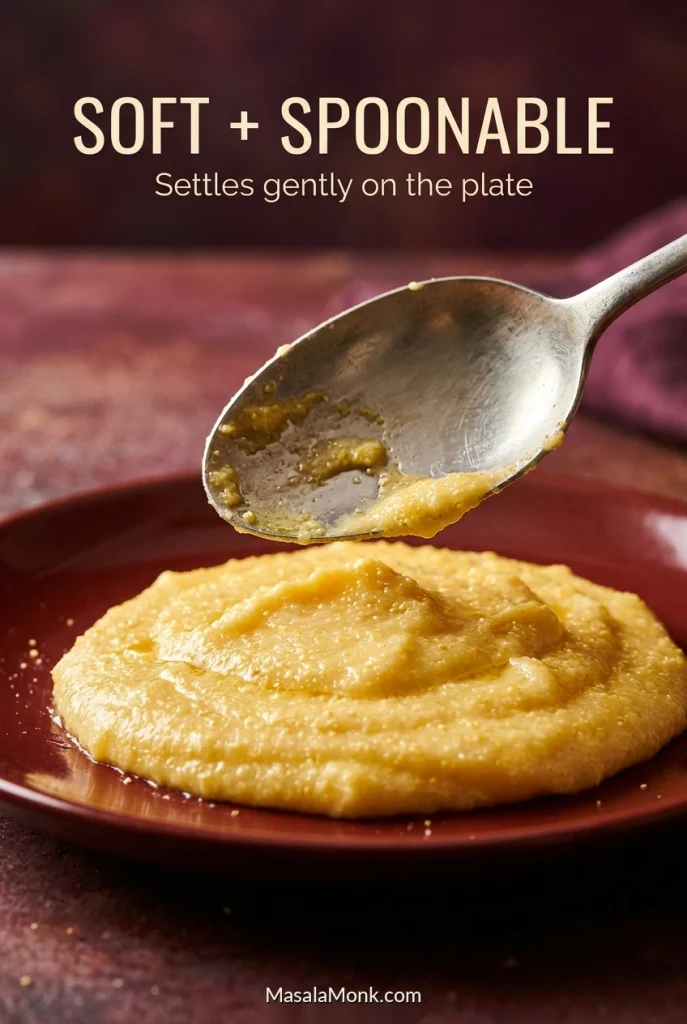
Soft golden polenta settling into a low mound on a red plate under a serving spoon; heading says “Soft + Spoonable.”
To judge serving consistency, place a spoonful on a warm plate: soft polenta should relax into low folds, not hold a tall peak or flood the surface. Judge grain tenderness separately by tasting.

5. Finish and Serve

When the grains are tender and the thickness is right, remove the pan from the heat. Stir in the butter, then the finely grated Parmesan if using. Taste before adding salt—the cheese may have seasoned it enough. Add black pepper if you like, and loosen with a small splash of hot water if it thickens before serving. If the cheese becomes oily or stringy, see how to handle separated Parmesan polenta.
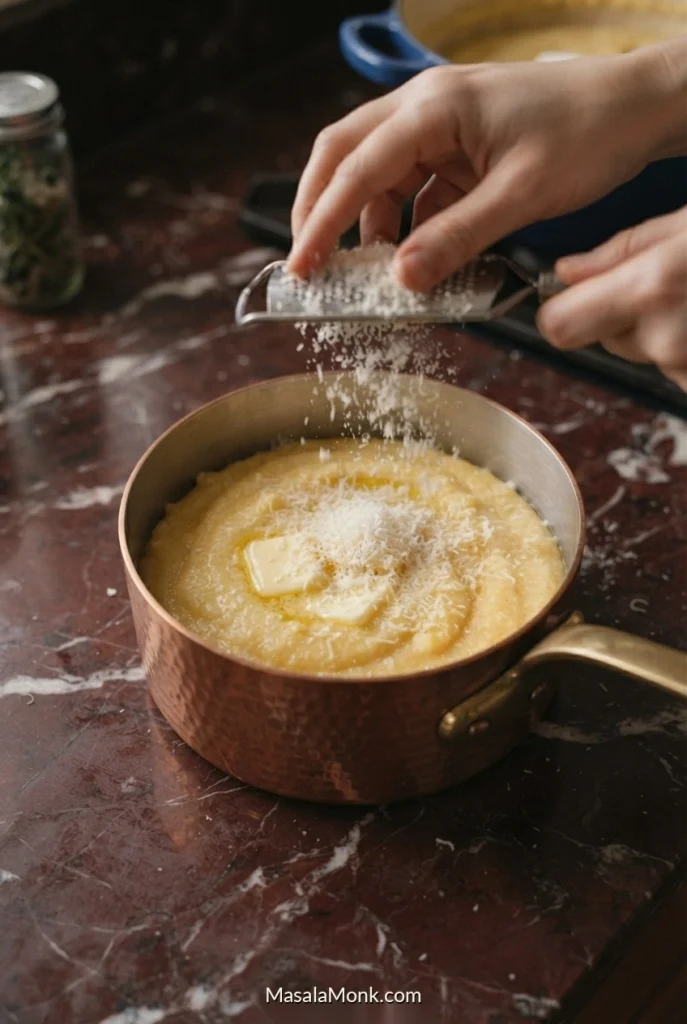
Hands grating Parmesan over golden polenta in a copper saucepan with a pat of melting butter.
Grate Parmesan finely before the polenta is ready so residual heat can incorporate it with minimal stirring. Large shavings may remain in clumps; by contrast, a fine grate spreads the savory flavor more evenly.

The cooked cornmeal itself creates a creamy texture, so no cream is required. Spoon the finished polenta into warm bowls; for a richer dinner, try our creamy mushroom sauce and reduce the optional Parmesan in the base if you prefer.
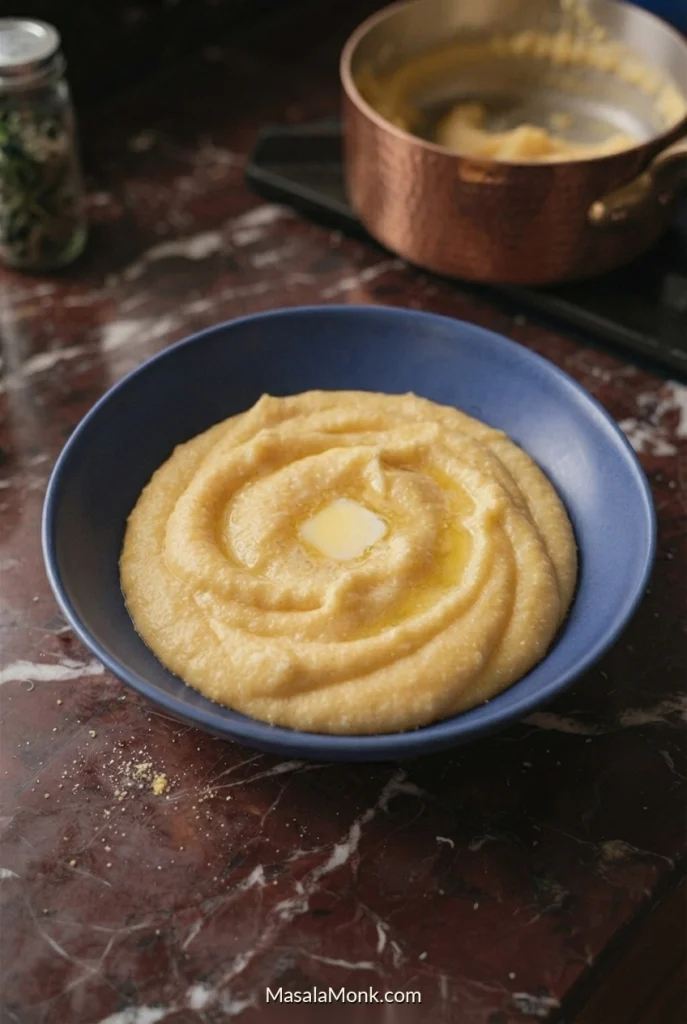
Blue shallow bowl of creamy yellow polenta with broad spoon swirls and a melting pat of butter.
The broad spoon swirls show that the finished polenta still moves gently rather than holding a rigid shape. Serve it promptly in warmed bowls, since cooling will make even properly cooked polenta firm up.

Which Cornmeal Is Best for Creamy Polenta?

Use regular medium-ground yellow cornmeal for this recipe. You don’t need an imported Italian product or a bag specifically labeled “polenta.”

When the grind isn’t named, look for small, distinct granules rather than powdery flour or large, rough pieces. If the packet promises polenta in five minutes, follow those quick-cooking directions instead. Leftover medium-ground cornmeal also works in our Southern cornbread recipe.
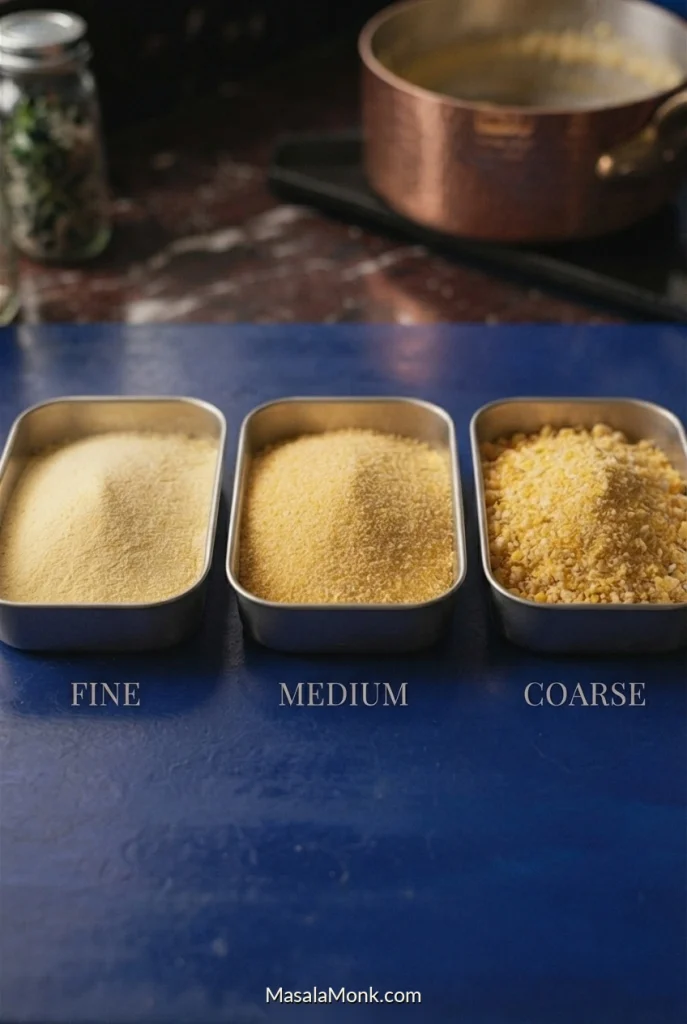
Three labeled metal trays on a blue worktop, containing fine, medium and coarse yellow cornmeal with increasingly large particles.
In an unlabeled packet, medium-ground meal should have small distinct particles rather than flourlike dust or very large fragments. Compare the grain size visually before assuming it will cook like the recipe’s cornmeal.

Regular, Quick-Cooking and Ready-Cooked Polenta

Some products labeled “polenta” are uncooked meal; others are processed for faster cooking or sold already set. Compare the preparation directions before following the water ratio in this recipe.
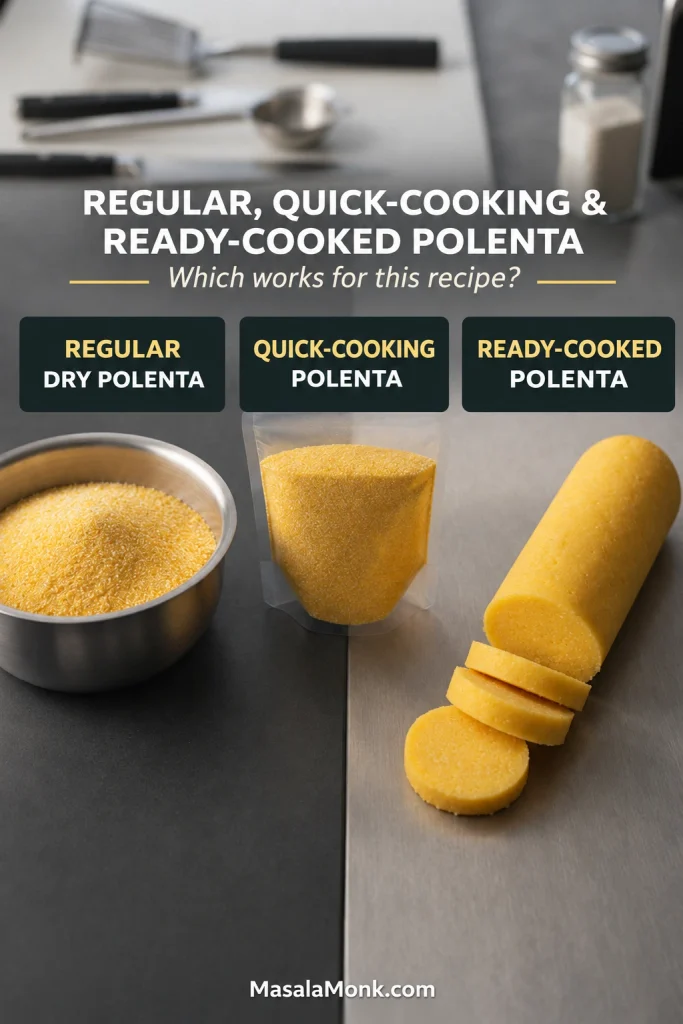
Comparison of regular dry polenta in a bowl, quick-cooking polenta in a clear pouch and sliced ready-cooked polenta log, each labeled.
A dry-looking packet is not proof that its cornmeal is slow-cooking; instant versions may look similar. Read the cooking directions, whereas a firm ready-cooked log can be sliced and heated without starting from dry meal.
Corn productHow it behaves
Regular medium-ground yellow polenta or cornmealThe best match for this recipe; tender and creamy with some corn texture.
Coarse-ground polentaLarger particles give a more rustic result and may need more time and liquid.
Stone-ground cornmealDescribes the milling method, not grain size; check whether it is fine, medium or coarse.
Fine yellow cornmealThickens sooner and can feel smoother or pastier; begin tasting earlier.
Instant or quick-cooking polentaProcessing differs by product. Follow its own water ratio and cooking time.
Ready-cooked polenta in a tubeAlready cooked and set; slice or reheat rather than simmering from dry.
GritsA related ground-corn product, but the processing and ratios can differ; see our shrimp and grits recipe for a distinct preparation.
UK cornflour / cornstarchPrimarily starch, not the ground corn required for this dish.

Makki Atta and International Cornmeal Names

Names change across markets. In the UK, cornflour usually means cornstarch; in the US, corn flour can mean finely ground whole corn. In India, makki atta sold for makki roti is often finer than medium-ground polenta cornmeal, so check the actual grind. Masa harina is made from nixtamalized corn and behaves differently. None is an automatic substitute for the cornmeal specified here.
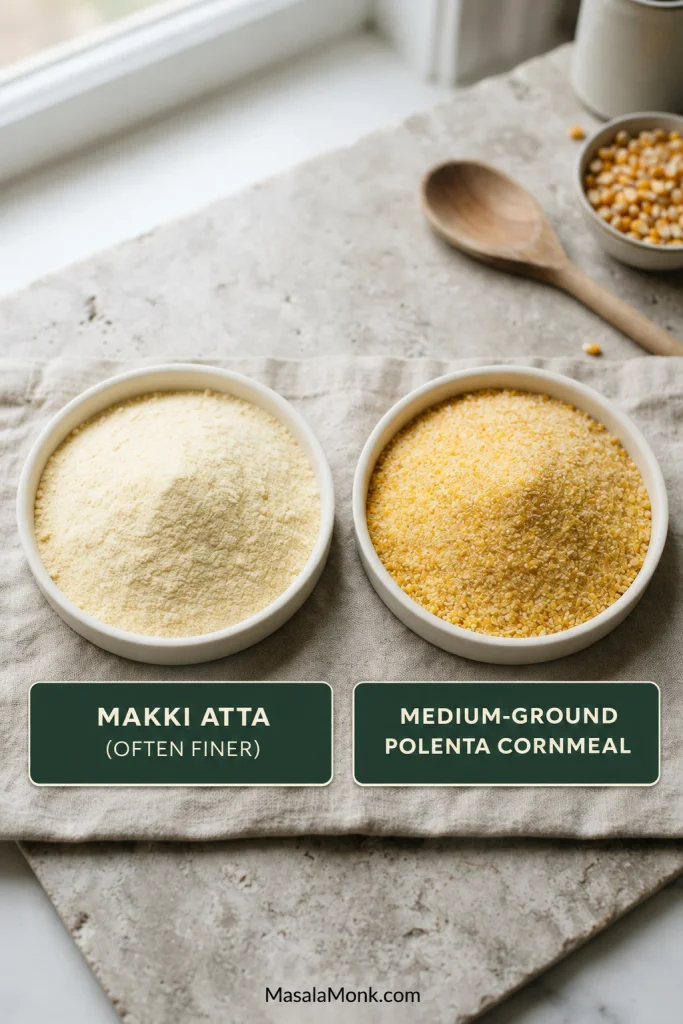
Two white bowls on beige linen: pale, fine makki atta on the left and coarser golden medium-ground polenta cornmeal on the right.
Indian makki atta often has a flourlike grind, whereas medium-ground polenta meal has distinct granules. A finer substitute may thicken sooner and feel pastier, so do not assume the same cooking behavior from the name “maize.”

Is Polenta Gluten-Free?

Yes. Polenta made from plain cornmeal and water is naturally gluten-free. For someone with celiac disease, choose appropriately labeled gluten-free cornmeal, check any stock or toppings, and prevent contact with gluten-containing ingredients on shared surfaces or utensils. The Celiac Disease Foundation’s guidance on sources of gluten and cross-contact explains why labels and preparation matter.
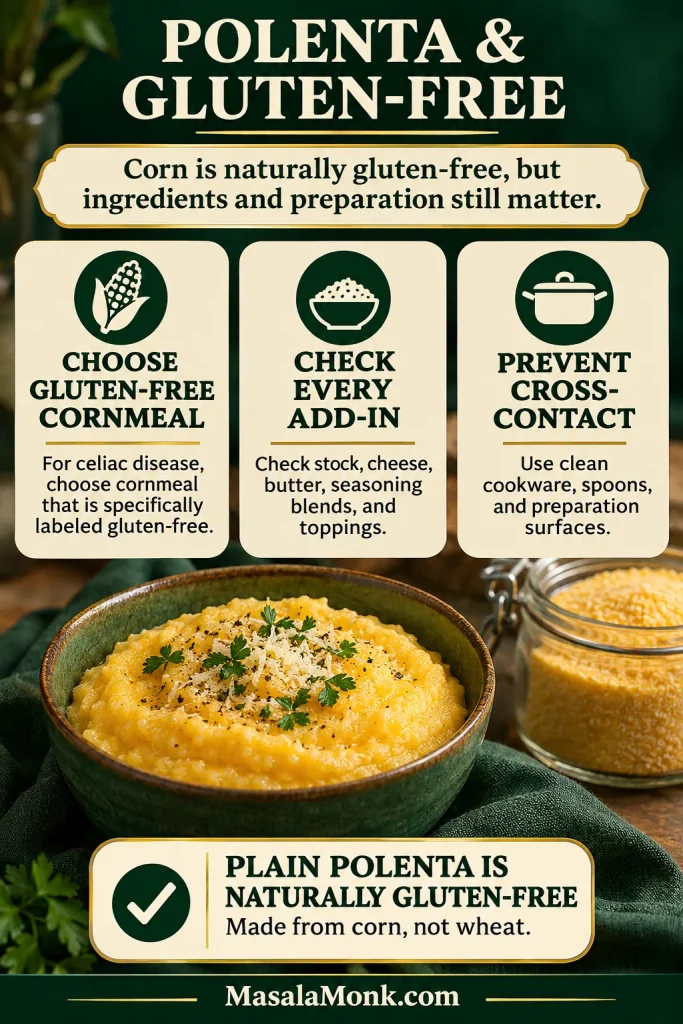
Gluten-free polenta safety infographic beside a bowl topped with herbs and grated cheese; three panels advise checking cornmeal, add-ins and cross-contact.
The finished bowl looks ordinary, but its appearance cannot establish celiac safety. For example, flour on a shared counter or a bulk-bin scoop can cause cross-contact even when corn itself contains no gluten.

↑ Back to the polenta recipe

Why Polenta Thickens Before the Grains Are Tender

Polenta can look finished before it tastes cooked. Starch thickens the water while the grains are still firm; continued gentle cooking makes them tender. The spoon shows how thick it is; your taste tells you whether it is cooked.
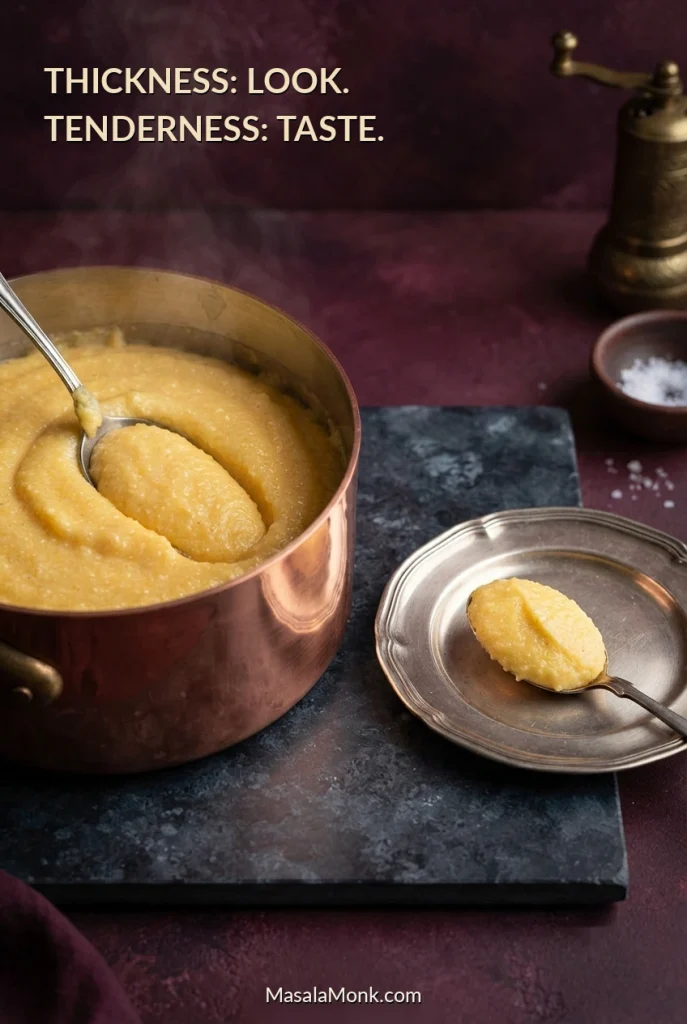
Copper pot of thick yellow polenta with a tasting spoon on a saucer; headline reads “Thickness: Look. Tenderness: Taste.”
A thick spoon trail may appear long before every cornmeal grain is tender. If a cooled bite feels chalky, postpone the butter-and-cheese finish; keep the grains moist and gently simmering first.

Why Is My Polenta Grainy, Lumpy or Too Thick?

First, Check the Grains: Hard or Tender?

Something not quite right? Cool and taste a spoonful before judging its thickness. Two equally stiff pots may need different fixes if one still has hard grains.
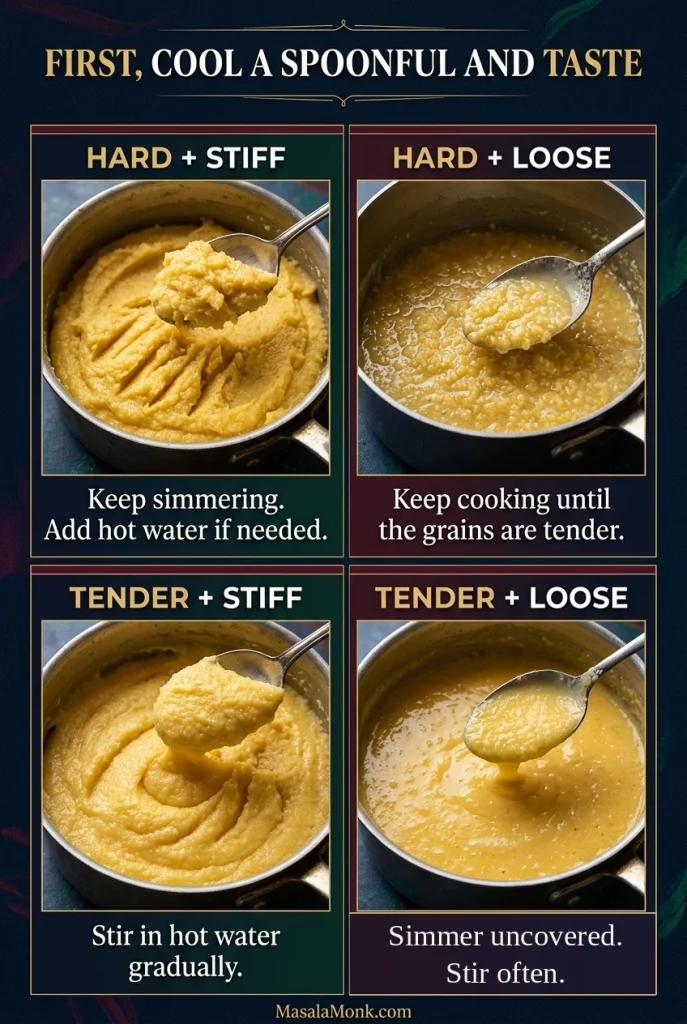
Four-panel polenta guide: hard and stiff needs more cooking and possibly water; hard and loose needs cooking; tender and stiff needs water; tender and loose needs uncovered reduction.
Two watery pots can need opposite treatments. If the grains are still hard, let them cook; if they are already tender, a gentle uncovered simmer can reduce extra liquid without introducing raw cornmeal.

Quick Fixes for Common Polenta Problems

What happenedWhat to do now
Thick but grittyIf the grains are hard, continue the gentle simmer. Add 30–60 ml hot water if the pot is too stiff, then taste after another 5–10 minutes.
Lumps with dry centersBreak them against the side of the saucepan and stir the exposed dry meal back into the pot so it can cook. Fresh small lumps are easier to whisk out.
Tender but stiffStir in hot water a little at a time until the polenta is soft enough to settle from the spoon.
Tender but thin or waterySimmer uncovered and stir often until the whole mixture is softly spoonable, even if no separate water is visible. Allow more time if needed.
Watery and still hardKeep simmering until the grains soften. Adding raw meal would introduce more grains that also need to cook.
Too firm when platedWarm gently and loosen with hot water before serving. Warm plates slow down setting.
Sticking or scorched bottomIf it is sticking, lower the heat and stir more often. If it has burned, move any unaffected polenta to a clean pan without scraping the bottom. Discard it if a burnt taste has spread throughout.
Hot bubbles spittingReduce the heat immediately, keep your face away and use a long-handled spoon. Don’t stir faster to try to control a violent boil.
Bland after adding cheeseTaste for salt before adding more fat. Black pepper or a well-seasoned topping may be enough.

Sticking or Scorching Polenta

Sticking is an early warning, while scorching can already affect flavor. If the spatula begins catching on the pan base, lower the heat before browned residue develops; the guide below shows when transferring the unaffected portion may still help.
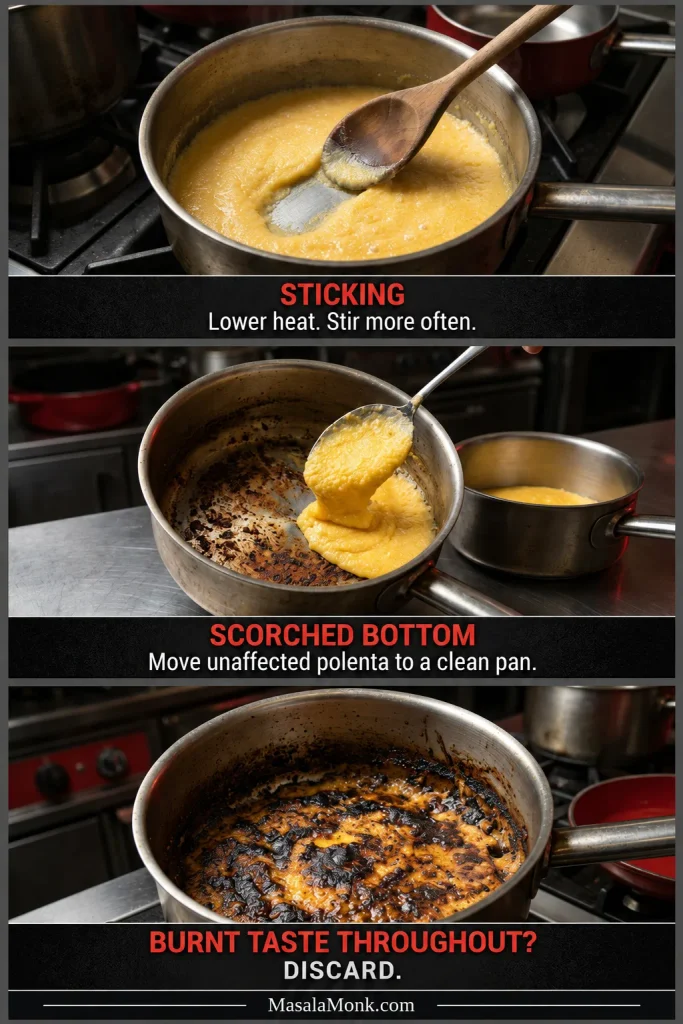
Three stacked saucepan scenes labeled sticking, scorched bottom and burnt taste throughout, with “Discard” beneath the final burnt pan.
When the bottom scorches, do not scrape burnt residue into otherwise edible polenta. Transfer an unaffected upper portion to a clean pan; however, if the burnt flavor has spread throughout, discard the batch.

Still Sandy After an Hour?

If the cornmeal still feels sandy after an hour, first check that the pan is gently simmering. Add 30–60 ml hot water if it has become stiff, cook another 10–15 minutes and taste again. Coarse cornmeal may stay textured but should not have hard centers; check the packet if it seems to make no progress. If the grind is unclear, revisit the cornmeal comparison.
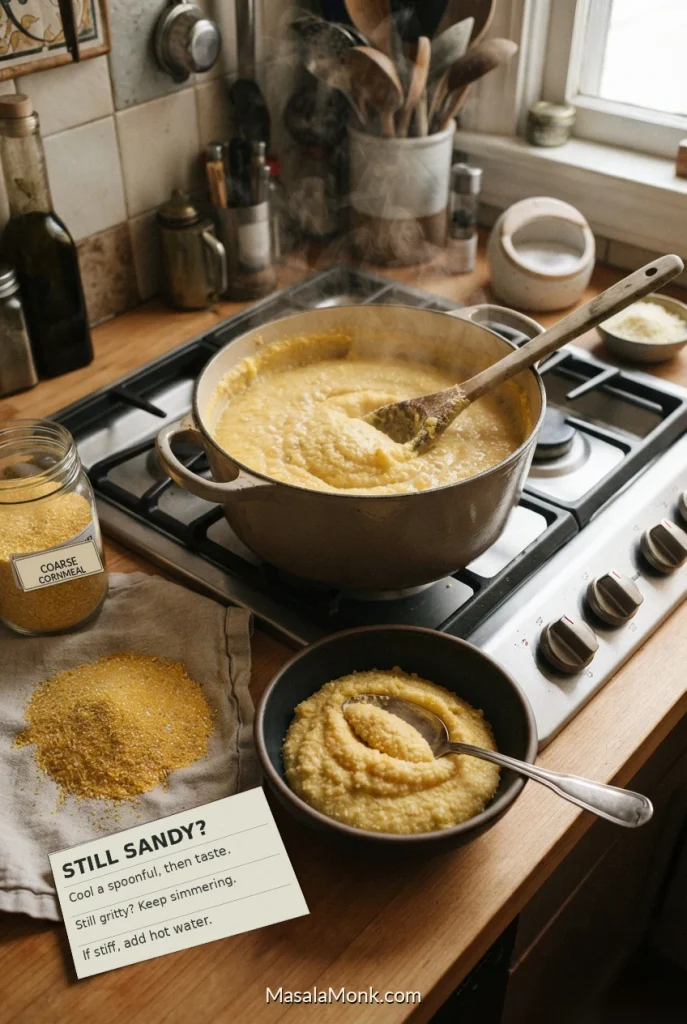
Saucepan of cooked polenta near a jar of coarse cornmeal, small tasting sample and a troubleshooting note reading “Still Sandy?”
Coarse cornmeal may retain a little texture after its centers become tender. Before increasing the heat or extending cooking again, cool and taste a sample; harsh boiling can evaporate moisture without fixing a genuinely hard center.

Why Parmesan Polenta Turns Oily or Stringy

Parmesan can turn clumpy or release oily droplets when heated too aggressively. That is different from plain polenta having too much water: correct the consistency before adding cheese, then finish off the heat.

If the mixture loosens after adding cheese: Remove it from the heat, stir gently and allow a brief rest. It may thicken as it stands; only warm it very gently again if necessary.

If the cheese becomes oily or stringy: Keep the pan off the heat and stir gently. A small splash of hot water may help, although badly separated cheese might not recover. For the next batch, use finely grated cheese and avoid boiling after adding it.
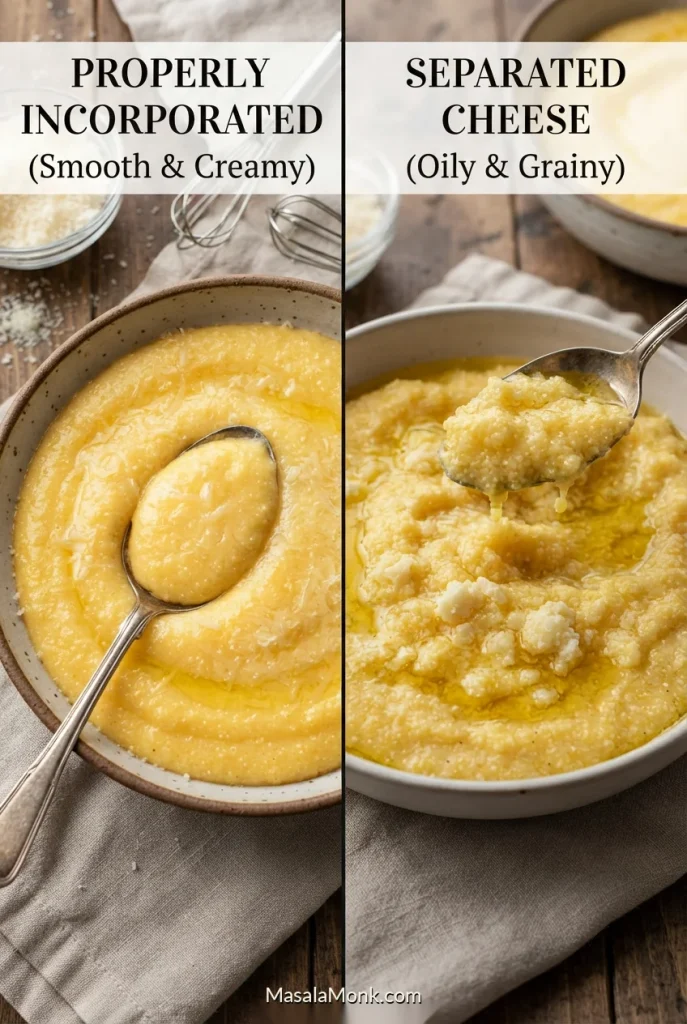
Two bowls compare smooth Parmesan polenta on the left with oily, clumpy cheese separation on the right.
Look for glossy oil around cheese clumps rather than a uniform loose texture. This visual difference matters: cheese separation rarely improves with more vigorous boiling, even if the dish initially seems thin.

↑ Recipe at a glance · Back to full method

Parmesan Polenta, Vegan Polenta and Other Finishes

Butter adds richness and Parmesan a savory finish, but neither needs to overwhelm the corn. Our Parmesan versus Parmigiano Reggiano guide explains the differences. Cooking for vegetarians? Traditional Parmigiano Reggiano uses animal rennet; check the cheese or choose a vegetarian hard cheese.

For vegan polenta, leave out the butter and cheese and finish with about 30 ml (2 tablespoons) olive oil. You can replace some of the cooking water with vegetable stock. For a non-vegetarian dairy-free version, chicken stock also works. Taste any stock before adding the full amount of salt.
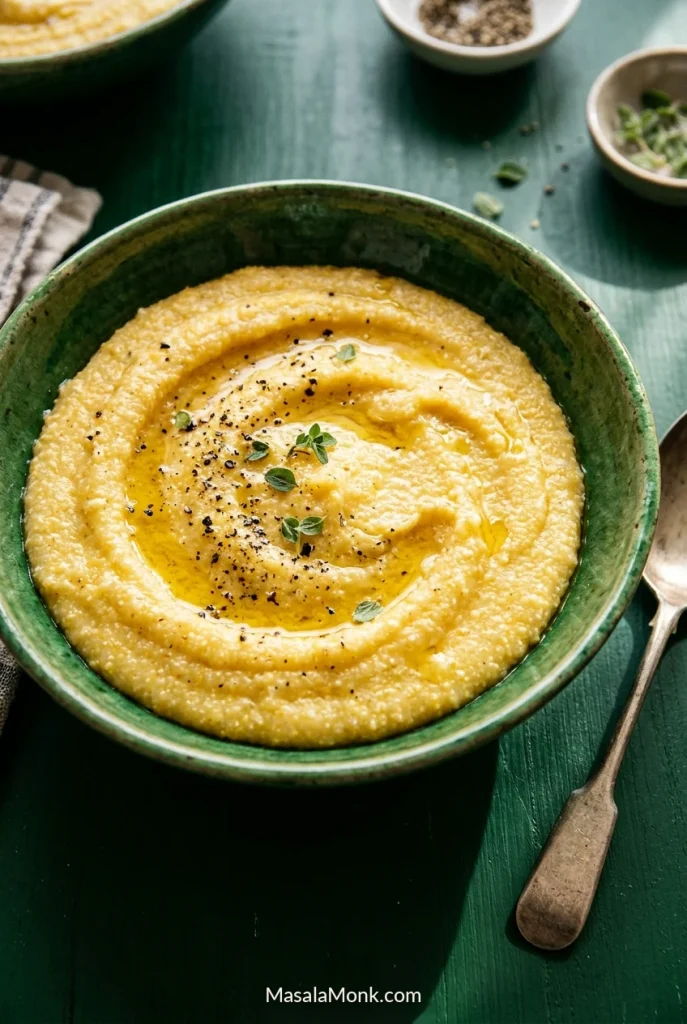
Golden creamy polenta in an emerald-green ceramic bowl with an olive-oil sheen, black pepper and scattered herbs.
For vegan creamy polenta, stir olive oil through the hot cornmeal instead of relying only on a surface drizzle. That way, each spoonful gets the richness while the visible oil stays a light finishing accent.

For a milk-enriched version, replace up to 240 ml (1 US cup) of the starting water with milk, keeping the total liquid at 1,180 ml. Warm the water and milk together to a gentle simmer before whisking in the cornmeal; do not boil vigorously. Keep the heat low and stir more often to prevent scorching.
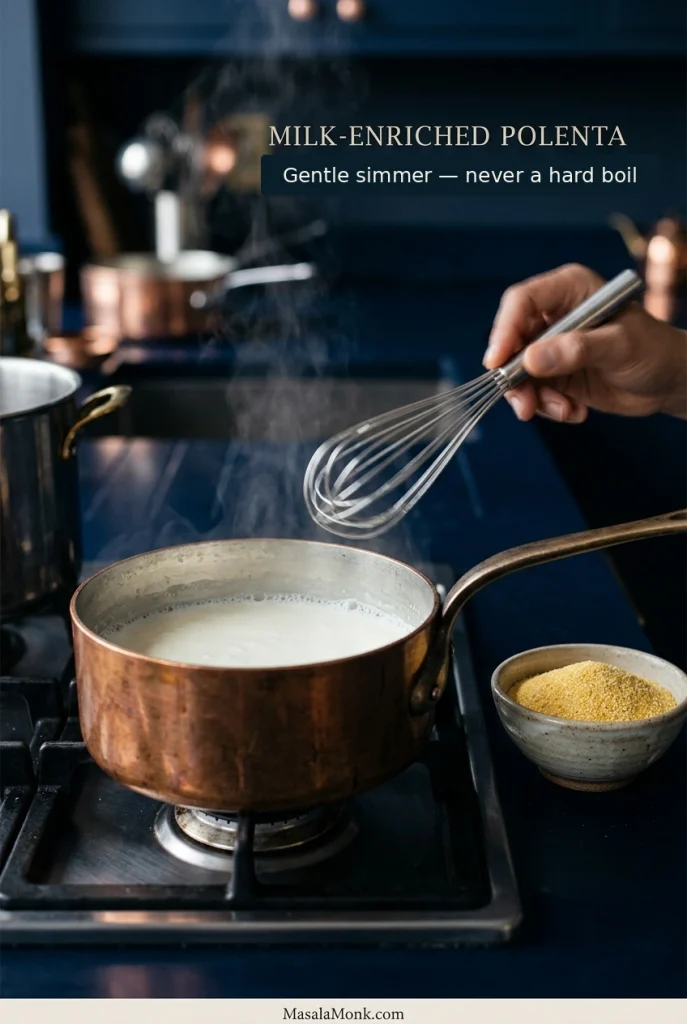
Whisk held over a copper saucepan of pale milk-and-water liquid with small edge bubbles; dry cornmeal sits nearby.
A milk-and-water base needs gentler heat than plain water. Watch for tiny edge bubbles instead of a rolling boil; meanwhile, stir along the saucepan bottom, where milk solids may catch before the surface changes.

What to Serve With Creamy Polenta

Vegetable and Mushroom Sauces

In northern and central Italy, soft polenta is often served with a generous sauce. For a vegetable supper, try our ratatouille with its soft peppers, eggplant and tomato juices. Or spoon over mushroom stroganoff when you want something richer.

Ratatouille: If the ratatouille has cooled, reheat it separately before spooning it over the polenta. Cold vegetables can make the cornmeal firm up before dinner reaches the table.
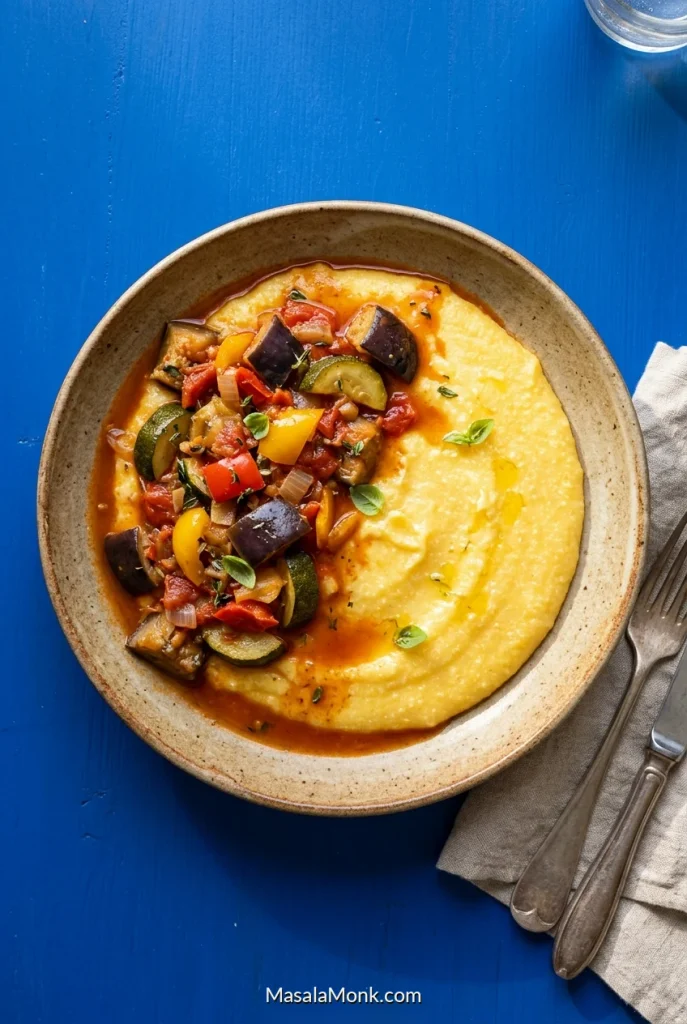
Overhead plate of creamy polenta topped on one side with cooked eggplant, zucchini, peppers and tomato-rich ratatouille on a blue tabletop.
Keep ratatouille vegetables tender but identifiable rather than blending them into a uniform sauce. Their pieces contrast with the soft polenta, while a modest spoonful of tomato juices seasons the cornmeal without turning it soupy.

Mushroom stroganoff: If the stroganoff is too thick to spoon, loosen the mushroom sauce first rather than adding extra liquid to the cooked polenta underneath.
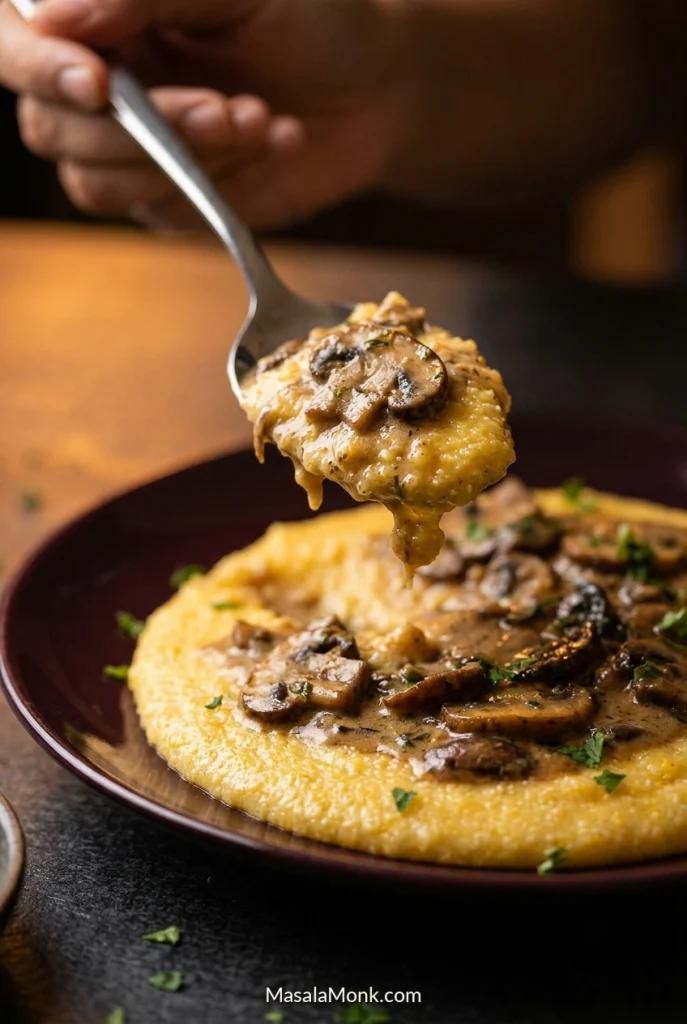
Spoon lifting soft golden polenta coated with creamy mushroom stroganoff above a burgundy dish of browned mushrooms.
Use the lifted spoon as a sauce-coating cue: mushroom stroganoff should cling to creamy polenta instead of running straight off. If needed, thicken the mushroom sauce separately so the cornmeal itself stays soft.

Slow-Cooked Meat and Seafood

Slow-cooked meat is another natural partner. Serve brisket with onion gravy over warm polenta, letting the gravy run into the cornmeal. Tomato-braised chicken or garlic-lemon shrimp work well, too.

Braised brisket: Reheat any leftover brisket gently in its onion gravy. Then add the hot slices over the polenta so the meat stays moist.
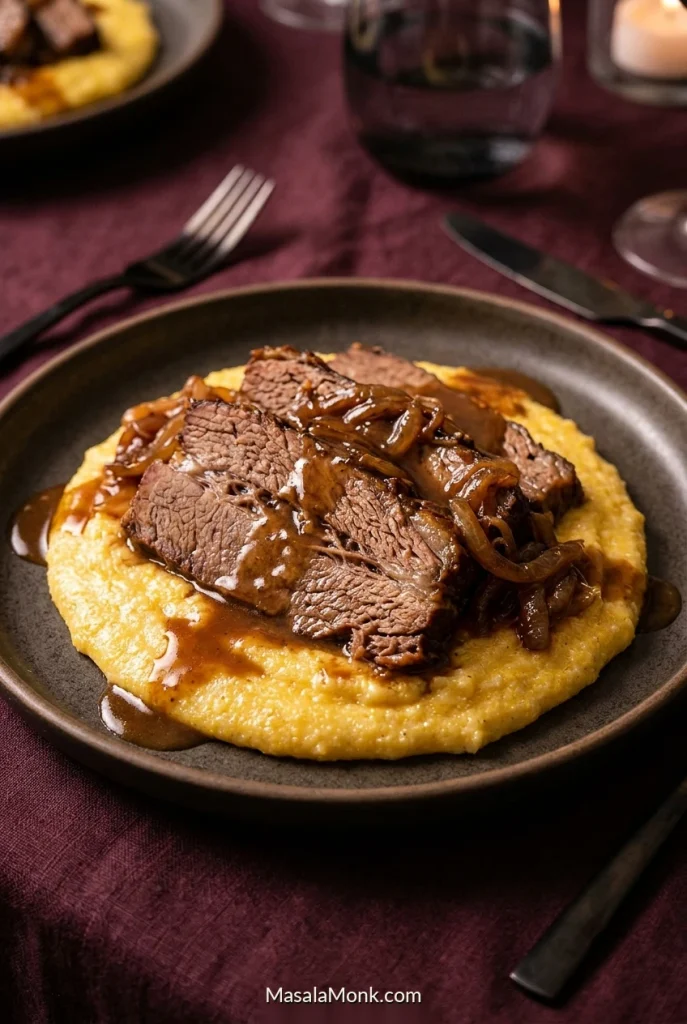
Braised brisket slices with softened onions and glossy dark gravy over creamy yellow polenta on a dark plate.
For brisket over polenta, slice the slow-cooked meat across the grain so the fibers are easier to bite through. Serve onion gravy in stages, leaving some golden cornmeal visible rather than soaking the entire plate.

Garlic-lemon shrimp: Use just enough lemony pan juices to coat the shrimp and lightly season the polenta. Too much thin sauce can overwhelm the soft base.
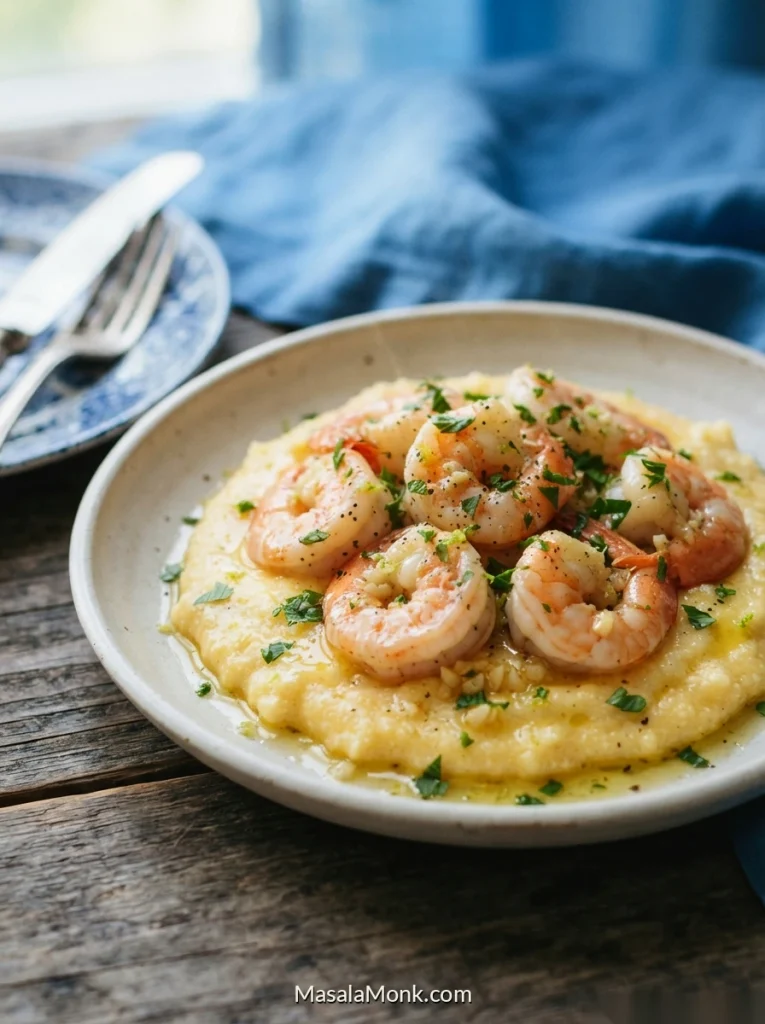
Pale shallow bowl of golden creamy polenta topped with pink curled shrimp, chopped herbs and glossy garlic-lemon pan juices.
Garlic-lemon shrimp cooks in minutes. Therefore, have its ingredients ready and sauté it when the polenta is nearly tender; make the final liquid adjustment just before serving so both arrive hot.

Everyday Meatless Toppings

For a simple meatless supper, pile garlicky white beans and wilted greens onto the polenta. Finish with a drizzle of olive oil and plenty of black pepper.

White beans and greens: Warm cooked beans before serving instead of adding them cold. This helps the golden polenta stay pleasantly soft beneath the topping.
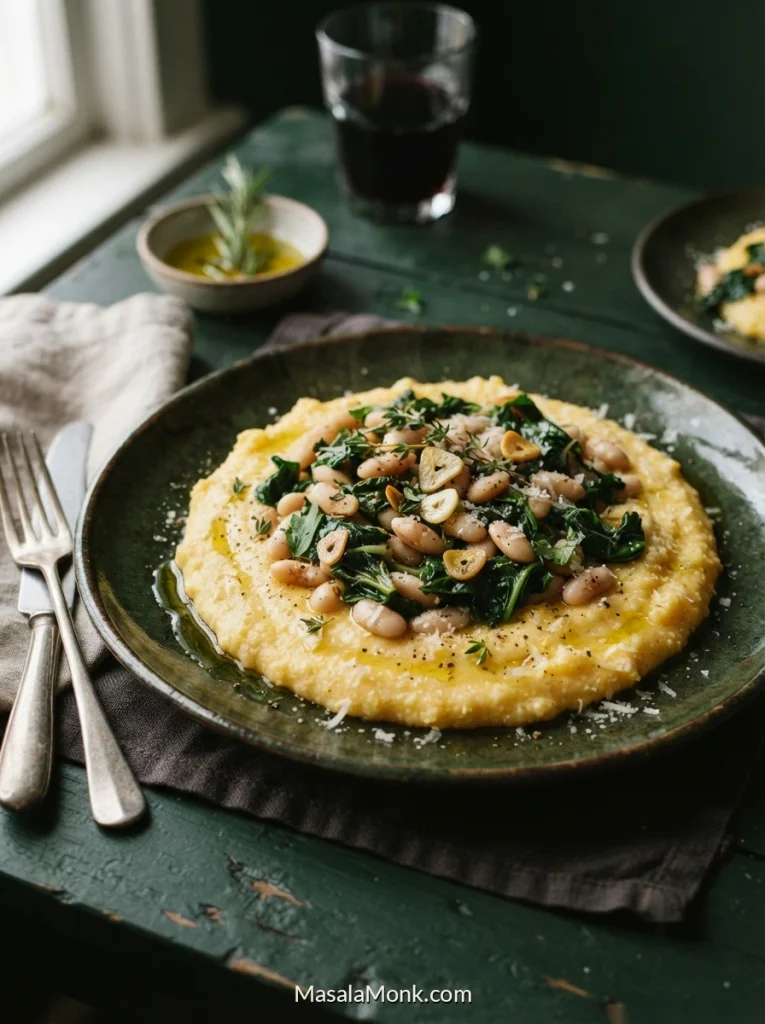
Golden polenta on a dark green plate topped with white beans, wilted greens and slices of sautéed garlic.
If using canned white beans, drain excess packing liquid before warming them with garlic. Add wilted greens near the end; otherwise, a watery topping may loosen the polenta just as you are ready to serve.

Fresh tomato sauce and greens: A little tomato juice seasons the cornmeal, but reduce a watery sauce before plating. The polenta should still be visible around the red sauce and greens.
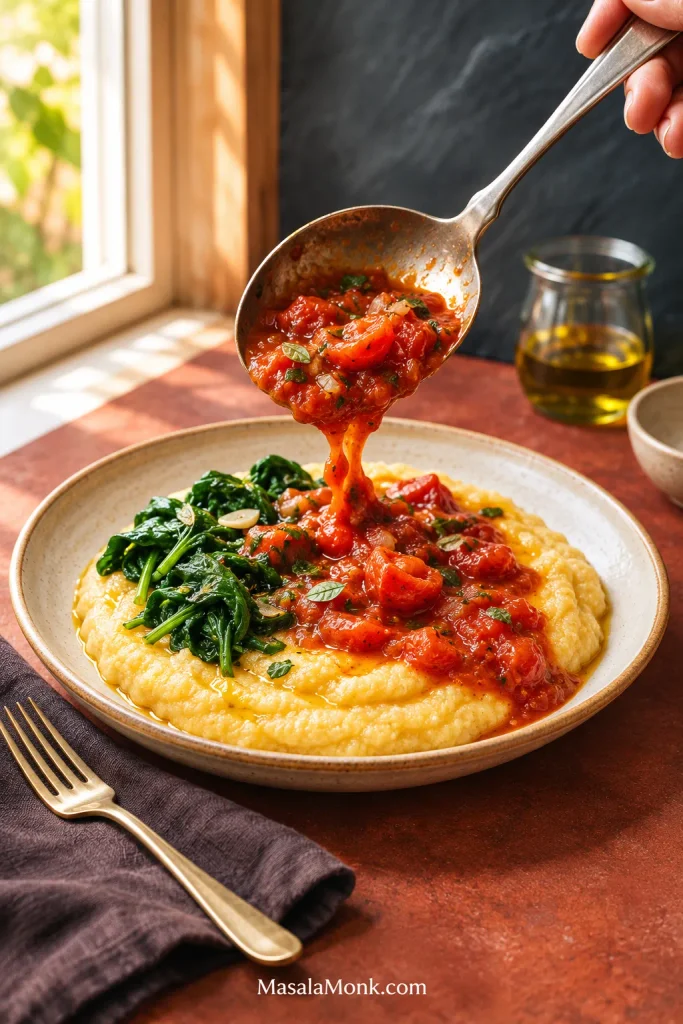
Serving spoon pouring chunky cooked red tomato sauce onto creamy golden polenta beside sautéed dark-green leaves on a pale plate.
For a brighter alternative to beans, season chunky tomato sauce before spooning it onto polenta; balancing the sauce is harder after the two mix. Then add sautéed greens for a contrasting savory bite.

Make-Ahead Polenta: Holding, Storing and Reheating

For braises, stews and other slow-cooked toppings, make the sauce ahead and finish the polenta close to serving. Our bean stew, for example, can reheat while the cornmeal simmers. Quick-cooking shrimp is different: sauté it when the polenta is nearly ready. If dinner is delayed by 10–15 minutes, cover the polenta off the heat and gently loosen it with hot water before serving.

For longer hot holding, use suitable equipment to keep cooked polenta at 60°C (140°F) or above; a covered pot left on an unheated stove cannot do this reliably. Otherwise, cool it promptly and refrigerate.

How Long Does Cooked Polenta Keep in the Fridge?

Transfer leftovers to shallow containers and refrigerate within two hours of cooking, or within one hour when the surrounding temperature is above 32°C (90°F). Keep the fridge at 4°C (40°F) or below and use within 3–4 days, or freeze for longer storage. See FoodSafety.gov’s chilling and storage guidance for the refrigeration rules and storage-chart reference.
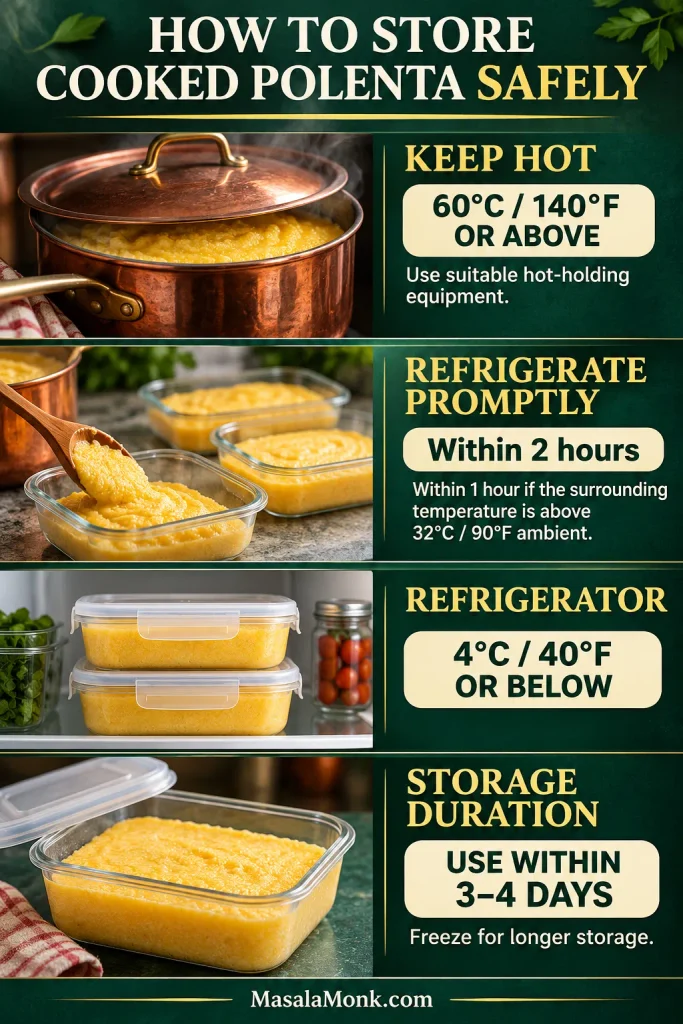
Four-panel cooked-polenta storage guide: hold hot at 60°C/140°F or higher; refrigerate within two hours, or one hour above 32°C/90°F ambient; keep the fridge at 4°C/40°F or lower; use within 3–4 days.
Label each shallow container with its cooking date when refrigerating leftover polenta. That small habit makes the 3–4-day window easier to track; it also helps you use the oldest portion first without guessing.

How to Reheat Polenta Until Creamy Again

Chilled polenta sets firmly. For one side portion, begin with 30–60 ml (2–4 tablespoons) water, milk or stock in a saucepan. Warm gently, stirring until soft and spoonable; larger portions will need more liquid. It may not return to exactly the same texture as freshly cooked polenta. Reheat leftovers to 74°C (165°F) throughout and check with a food thermometer.
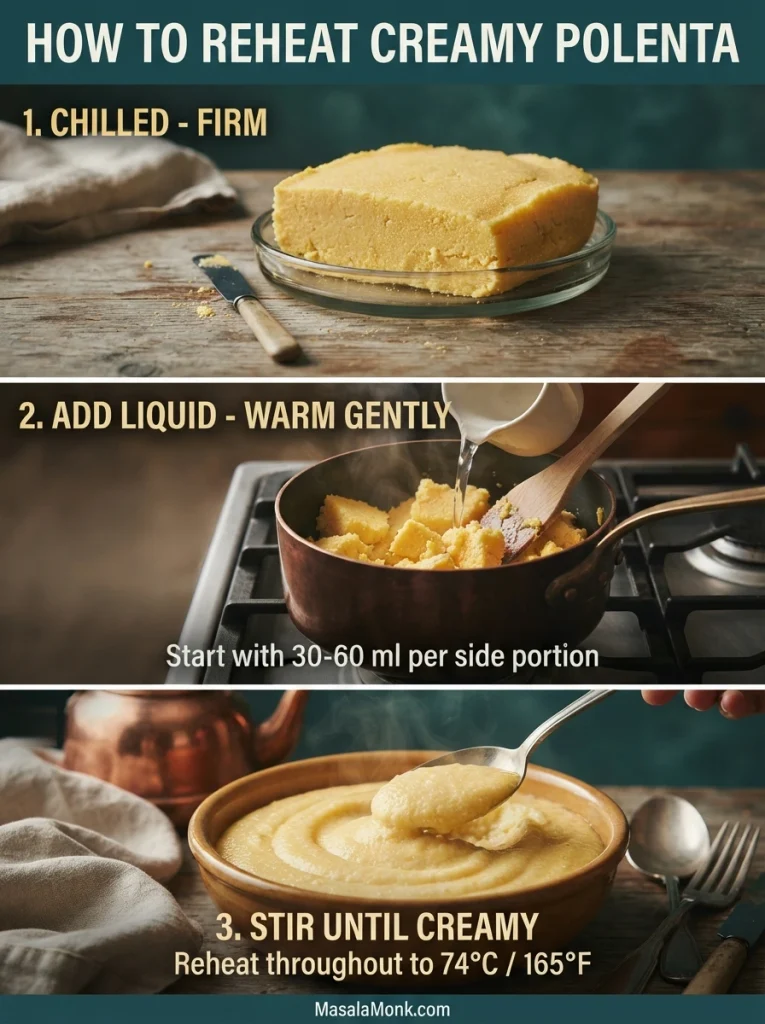
Three-step reheating graphic showing firm chilled polenta, pieces warming in liquid in a saucepan and a soft spoonable result; the text specifies 74°C/165°F.
Break chilled polenta into smaller pieces before reheating so added liquid reaches more of the firm surface. Then stir gently, adding just enough water, milk or stock to restore a soft texture without making it watery.

The next time you make polenta, taste the grains rather than watching only the clock. Once they’re tender, you can set the texture to suit dinner. If you make this recipe, tell us which cornmeal you used and what you served with it.
↑ Recipe at a glance · ↑ Back to top

Posted on — Leave a comment

Southern Cornbread Recipe: Old-Fashioned, Crispy & Moist

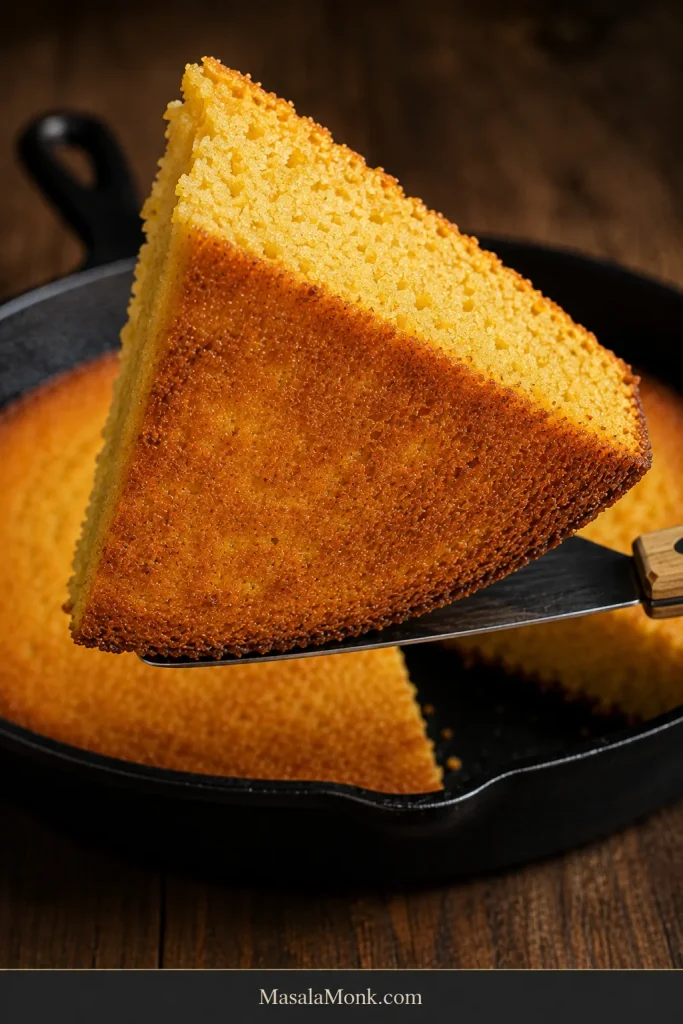
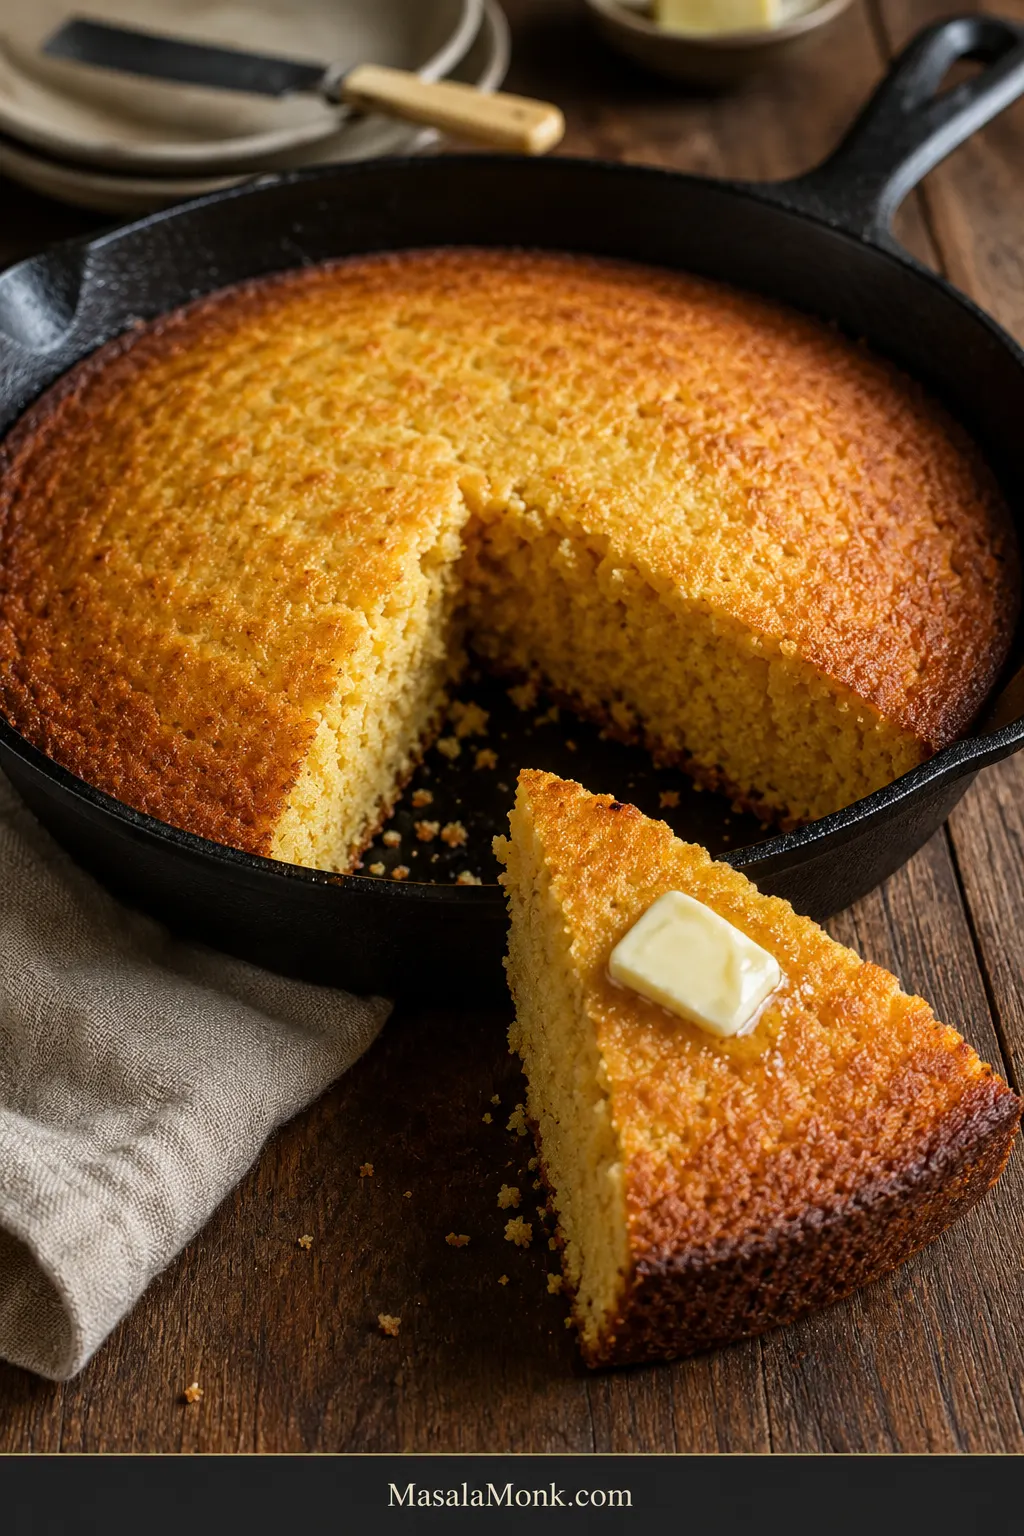
Golden Southern cornbread in a black cast-iron skillet with one wedge removed and a buttered slice in front, showing a browned crust and moist golden crumb.

Good Southern cornbread announces itself twice: first with the sizzle when the batter hits the cast-iron skillet, then with the faint scrape of a knife through the browned bottom crust.

This one is savory and old-fashioned, with plenty of corn flavor, buttermilk for tenderness, and just enough flour and egg to hold the moist crumb together without turning it soft and cakey. The base recipe has no sugar, with measured options if the cornbread you know and love carries a little sweetness.

If the cornbread you came looking for has a deeply browned skillet edge, a tender but slightly rugged middle, and tastes more of corn than sugar, you are in the right place.

Cornbread itself isn’t fussy. Most batches go right when the skillet is properly hot, the batter isn’t overmixed, and you begin checking before the inside dries out. When a batch behaves differently, the cornmeal, pan and oven usually leave clues.

Jump to Recipe · Choose Your Cornbread · Fix Common Problems

Quick Answer: How Do You Make Southern Cornbread?

For savory, old-fashioned Southern cornbread, make a cornmeal-heavy batter with buttermilk, eggs and a modest amount of flour, then pour it into a fully heated 10-inch / 25 cm cast-iron skillet coated with hot bacon drippings, oil or shortening.

Bake on the center rack at 425°F / 218°C for 18–24 minutes, starting your checks around 18 minutes. The edge should be deeply browned, the middle set and lightly springy, and a tester pushed into the thickest part should come back without wet batter. Rest for 5 minutes before cutting.

Choose Your Cornbread: Savory, Balanced or Lightly Sweet

Southern cornbread traditions do not agree on sugar, and we do not need to settle that argument before dinner. Pick the version that tastes right at your table.

VersionSugarWhat You Get
Savory / base recipe0 gStrong corn flavor with no detectable sweetness
Balanced12–13 g / 1 tbspRounds the corn flavor without making the bread taste sweet
Lightly sweet25 g / 2 tbspA noticeable touch of sweetness while still tasting clearly like skillet cornbread

The main batch below uses no sugar, keeping the corn flavor firmly in front. That also leaves room for sweeter dishes at the table, including saucy baked beans. Honey can always go on the warm piece for anyone who wants sweetness there instead.

With the full 2 tablespoons of sugar, the top and edges may color sooner, so start checking around 18 minutes.

Southern Cornbread Recipe

These proportions are built for a 10-inch / 25 cm cast-iron skillet.

Yield8 generous pieces
Skillet10-inch / 25 cm cast iron
Oven425°F / 218°C
PrepAbout 15 minutes
Bake18–24 minutes
Rest5 minutes
StyleSavory, crisp-bottomed and moist inside

Equipment

  • 10-inch / 25 cm cast-iron skillet
  • Large mixing bowl
  • Medium mixing bowl
  • Whisk
  • Flexible spatula or wooden spoon
  • Kitchen scale and/or measuring cups and spoons
  • Toothpick, thin skewer or cake tester

Ingredients

Dry ingredients

  • 250 g / 8.8 oz medium-grind plain cornmeal, about 1¾ cups; use the weight when possible because brands and grinds vary
  • 80 g / 2.8 oz all-purpose flour, about ⅔ cup
  • 8 g baking powder, about 2 teaspoons
  • 2 g baking soda, about ½ teaspoon
  • 5 g fine or table salt, about ⅞ teaspoon
  • 0–25 g granulated sugar, optional

Wet ingredients

  • 360 ml / 1½ cups cultured buttermilk, plus more only if needed
  • 2 large eggs
  • 56 g / 2 oz unsalted butter, 4 tablespoons, melted and cooled until warm
  • 30 ml / 2 tablespoons neutral oil, such as vegetable or canola

For the skillet

  • 30 ml / 2 tablespoons bacon drippings, vegetable or canola oil, or shortening
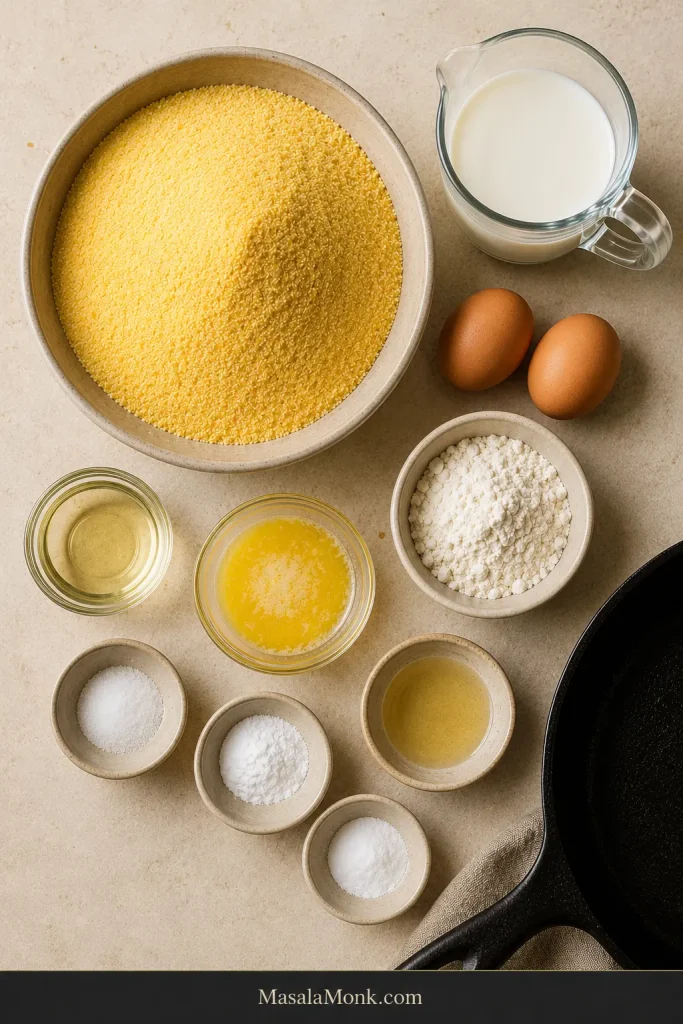
Overhead arrangement of cornmeal, flour, buttermilk, eggs, melted butter, oil, salt and leavening beside a black cast-iron skillet.
Keep the oil for the batter separate from the skillet fat: they do different jobs, and this prevents the hot-pan portion from disappearing into the mixing bowl.

Instructions

  1. Heat the oven and skillet. Put a rack in the center of the oven. Place the empty cast-iron skillet on it and preheat to 425°F / 218°C. Leave the skillet heating while you mix the batter so the iron is thoroughly hot when you are ready to pour.
  2. Mix the dry ingredients. Whisk the cornmeal, flour, baking powder, baking soda, salt and sugar, if using, until evenly combined. Give the bowl a few extra turns so the leaveners are well dispersed.
  3. Mix the wet ingredients. In the second bowl, whisk the buttermilk and eggs until smooth. Whisk in the melted butter and neutral oil. The butter should be warm, not piping hot.

Check the Cornbread Batter Consistency

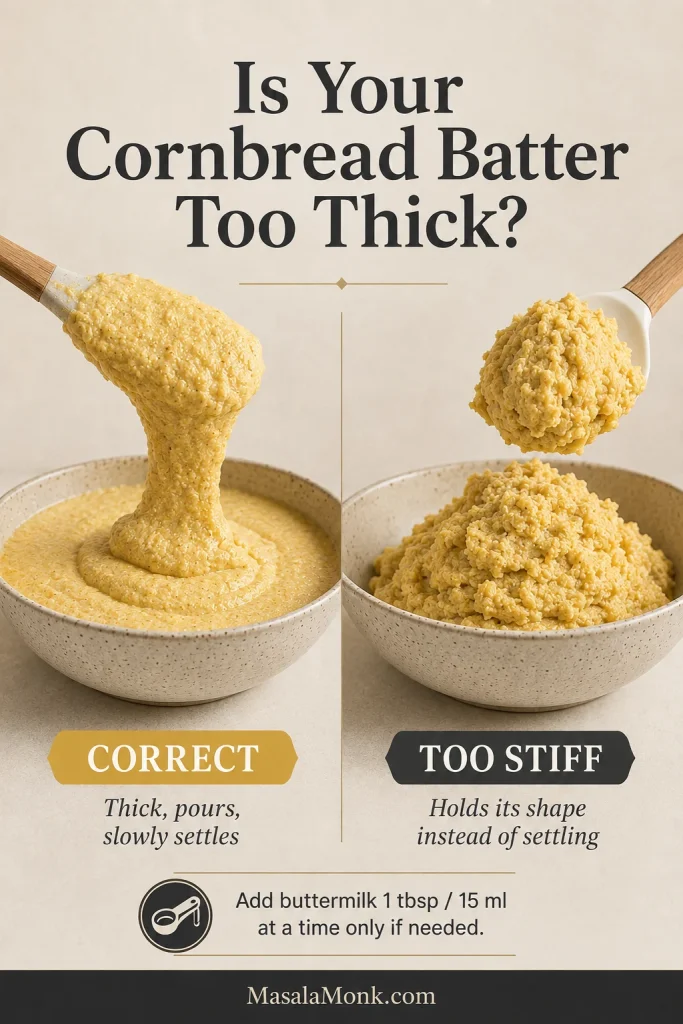
  1. Bring the batter together. Pour the wet mixture into the dry ingredients and fold just until the dry pockets disappear. Small lumps are fine. The batter should have body but still pour and slowly settle. Batter that stands stiffly like soft dough needs more buttermilk; fold it in 1 tablespoon / 15 ml at a time.
Side-by-side comparison of thick but pourable cornbread batter and overly stiff batter that remains heavily mounded.
Drag the spatula through the batter: the groove should slowly relax toward the center. If a pronounced ridge stays put, the batter is too stiff.

Finish in the Hot Skillet

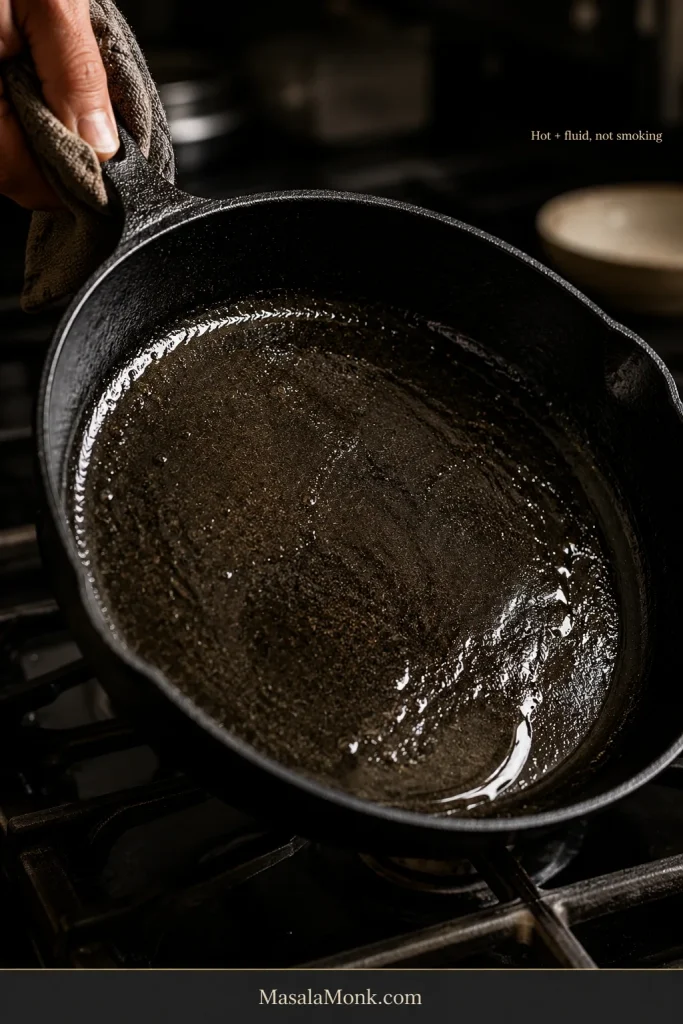
  1. Coat the hot skillet. Carefully remove the skillet from the oven. Add the bacon drippings, oil or shortening and swirl it across the bottom and partway up the sides. The fat should be hot and fluid; it does not need to smoke.
Hot liquid fat coating the bottom and lower sides of a tilted black cast-iron skillet on a stovetop.
Tilt the skillet before pouring and look for bare patches. A continuous film of hot fat helps the bottom brown evenly and release cleanly.
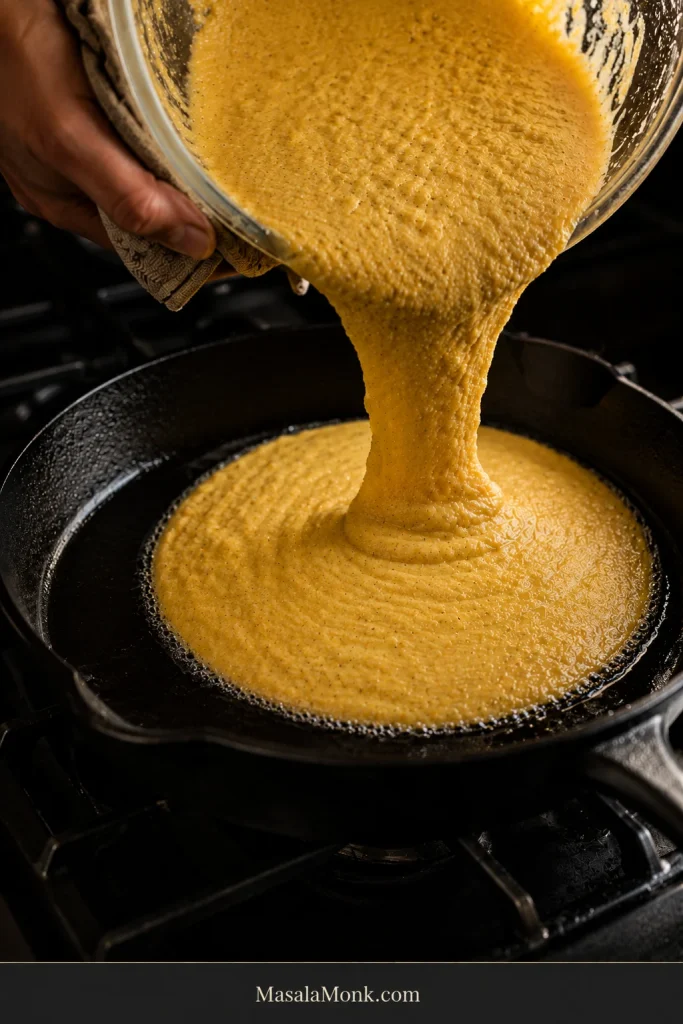
  1. Pour in the batter. A lively sizzle around the perimeter tells you the skillet was ready. That first contact begins setting the crust immediately.
Thick cornmeal batter pouring into a hot greased cast-iron skillet as bubbles form around the edge where batter meets the pan.
Pour near the center in one steady stream so the batter spreads outward evenly while the hot fat moves around the edge.
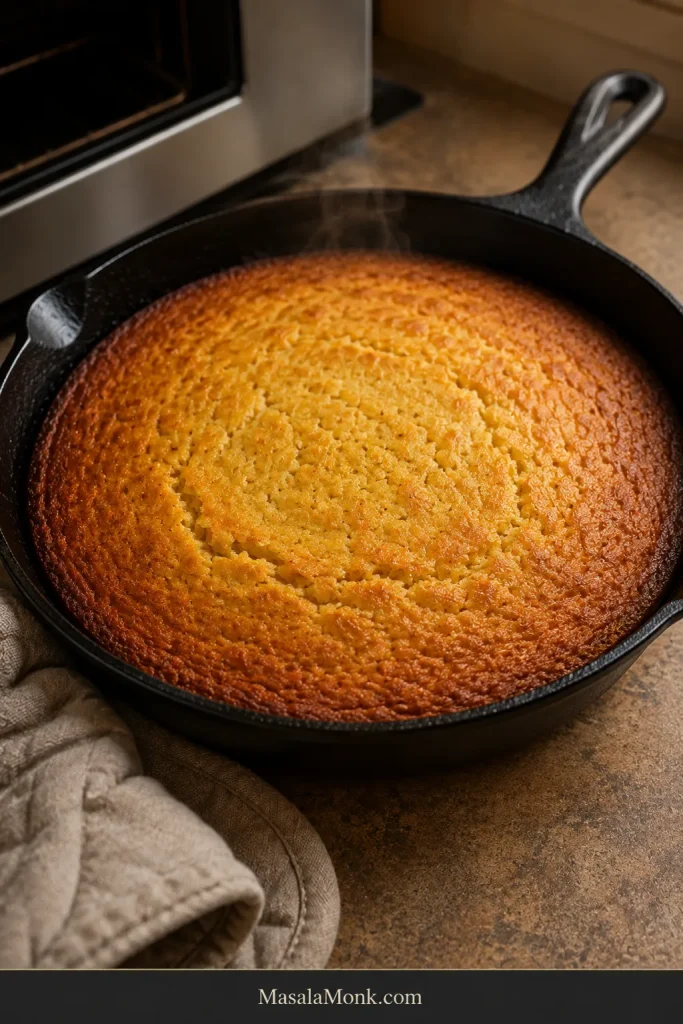
  1. Bake. Return the skillet to the center rack and bake for 18–24 minutes. Start checking around 18 minutes. Look for a deeply browned edge, a set interior that springs lightly when touched, and no wet batter on a tester pushed into the thickest part.
  2. Rest for 5 minutes. Give the hot crumb a few minutes to settle before cutting so the first pieces lift more cleanly. Serve while the underside is still crisp and butter melts almost on contact.
Freshly baked Southern cornbread in a black cast-iron skillet with a browned perimeter and small natural cracks across the set top.
A slight pull-away from the skillet edge during the 5-minute rest is normal and can make the first wedge easier to release cleanly.

If your skillet is already in the oven, you have everything you need.

In This Guide

Get the Cornbread Right

Choose, Fix & Serve

What Makes This Old-Fashioned Southern Cornbread?

By old-fashioned here, we mean a savory, cornmeal-led skillet bread made with buttermilk and hot fat. Sugar is optional rather than central, and corn remains the loudest flavor in the pan.

Cornbread traditions get specific quickly: white or yellow meal, sugar or none, flour or no flour, one egg or two or none, bacon drippings or shortening or oil. Southern kitchens have never all made it exactly the same way.

Nobody needs this recipe to prove somebody else’s grandmother wrong. This is simply one savory, skillet-baked branch of a much bigger Southern cornbread family.

Why This Recipe Works

Cornmeal brings the flavor and rustic texture. Flour and eggs give each piece enough structure to hold, buttermilk keeps the inside tender, and hot skillet fat creates the crust.

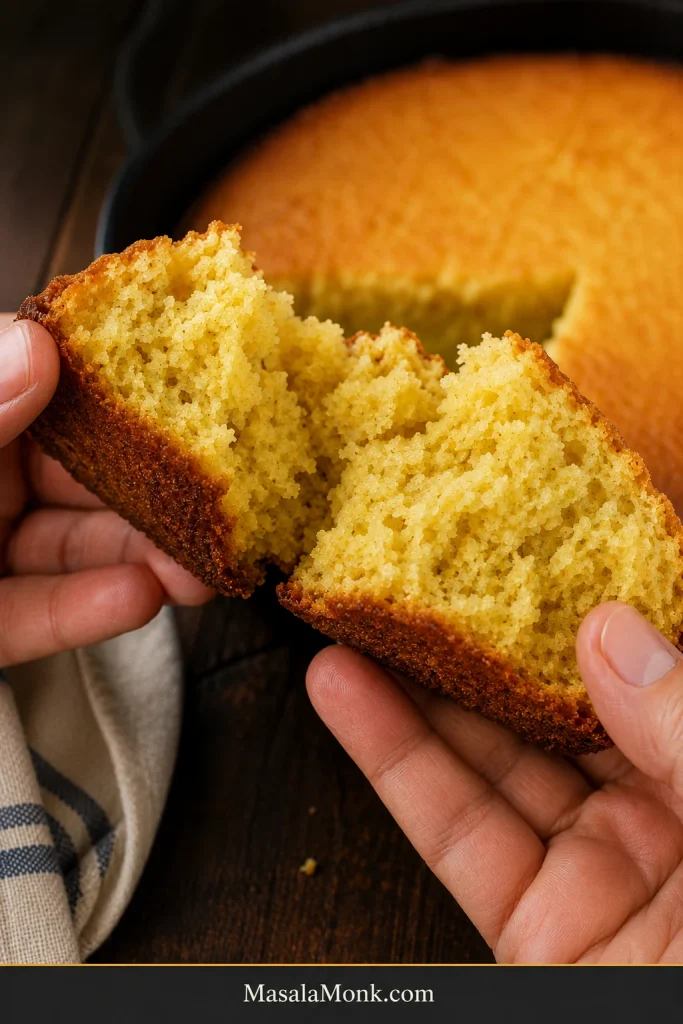
Hands pulling apart a piece of Southern cornbread to reveal a moist cohesive crumb with small irregular air pockets and browned crust.
Small, irregular holes are normal here. A cohesive cornmeal crumb does not need the uniform, sponge-like pores of a softer cake-style bread.

There is a little over three times as much cornmeal as flour by weight, so wheat never takes over the bread. The eggs help that small amount of flour hold everything together, while buttermilk adds moisture, body and a faint tang that sits naturally beside corn.

Butter flavors the cornbread itself. The hot fat in the skillet is what gives the underside its crust. A warm piece should hold easily in your hand, then break naturally when you pull it apart.

Which Cornmeal Should You Use?

For this recipe, use medium-grind plain cornmeal. It gives you obvious corn character without making every bite aggressively coarse, and it leaves the salt and leavening under your control.

From there, choose by texture rather than worrying about which color or grind is supposed to be “correct.”

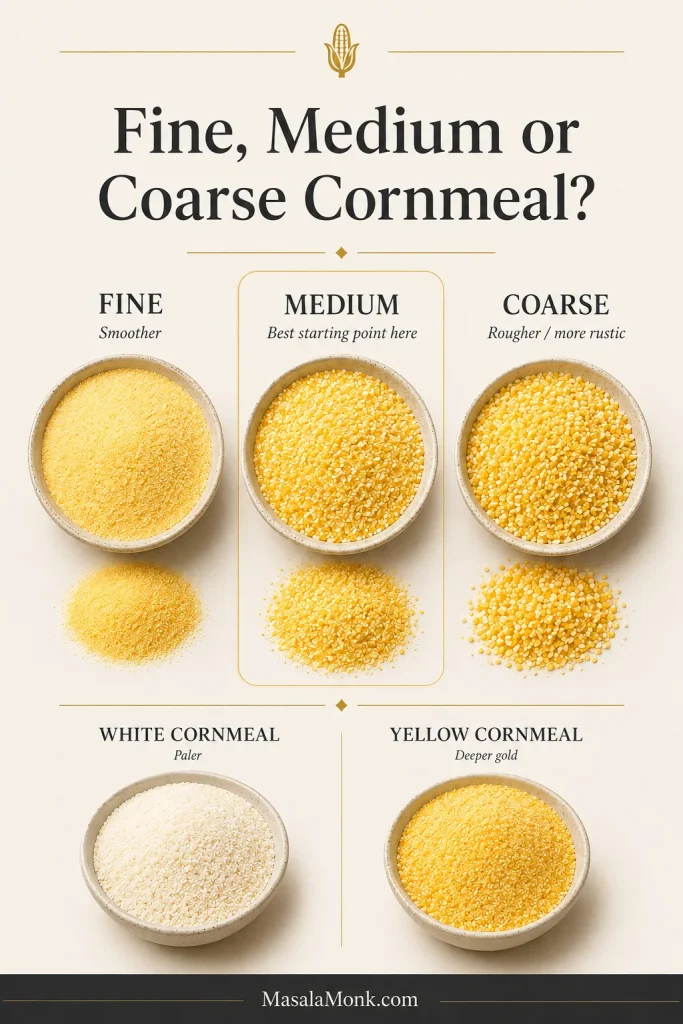
Fine, Medium or Coarse?

CornmealWhat the Crumb Is LikeBest For
FineSmoother and tighterIf you dislike noticeable graininess
MediumDistinct cornmeal texture without excessive gritBest starting point here
Coarse / stone-groundRougher and more noticeably grainyIf you genuinely enjoy a rustic crumb
Comparison of fine, medium and coarse cornmeal textures with smaller samples of white and yellow cornmeal.
If the bag does not name the grind, inspect the particles: medium meal shows distinct grains without the large, grit-like fragments of coarse cornmeal.

Choose coarse meal because you enjoy its rougher texture. Sandy, dry-feeling bites usually call for a finer grind, not another ingredient. Stone-ground whole-grain meal can also absorb liquid differently, so an unusually stiff batter may need more buttermilk.

White or Yellow Cornmeal?

Both work comfortably here. White cornmeal is associated with many Southern cornbread traditions and gives a paler crumb. Yellow meal brings the familiar deeper gold and, depending on the corn and milling, can taste more assertive.

Choose the one whose flavor and texture you prefer. Color matters much less here than using the grind that gives you the crumb you actually enjoy eating.

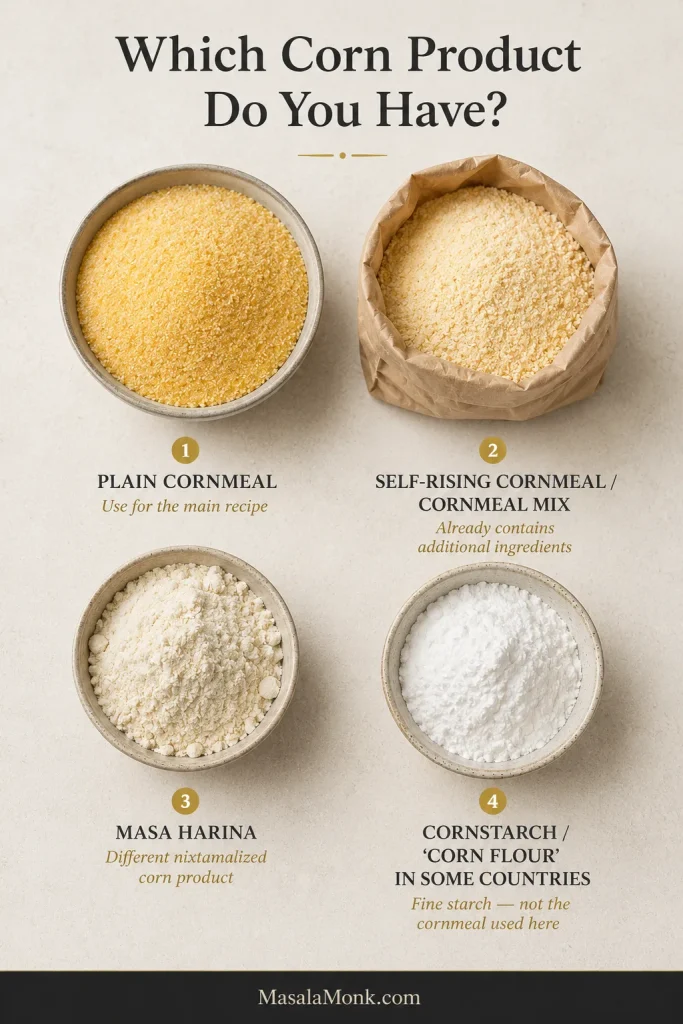
Plain Cornmeal, Self-Rising Cornmeal and Cornmeal Mix

Package SaysWhat It Means Here
Plain cornmealUse the main recipe as written
Self-rising cornmealAlready contains leavening and salt; use proportions intended for that product
Self-rising cornmeal mixOften contains flour as well as leavening and salt
Corn muffin mixA different, usually sweeter convenience product
Masa harinaNixtamalized corn flour; a different ingredient
Ingredient guide comparing plain cornmeal, self-rising cornmeal mix, masa harina and cornstarch.
Check the ingredient list when the package name is vague: plain cornmeal is essentially ground corn; added flour, salt or leaveners signal a prepared product.

Ingredient names can be confusing outside the United States. In some countries, corn flour means the very fine starch Americans call cornstarch; that is not the ingredient needed here. Look for ground dried corn sold as cornmeal. A polenta product can sometimes work when the grind is appropriate, but check what is actually in the package instead of relying on the name alone.

Why weighing helps: cornmeal brands and grinds do not all fill a cup the same way. Use the 250 g amount when you have a scale. With cups, treat 1¾ cups as approximate and watch the batter before it reaches the skillet.

The rest of the bag won’t go to waste: plain cornmeal also gives these Southern-style salmon croquettes their crisp exterior.

Cast Iron, Pan Size & the Crispy Crust

The skillet changes the food, not just the presentation.

Heavy cast iron holds onto heat. When batter reaches the hot, greased pan, the underside begins cooking immediately while the inside is still fluid. That head start is what gives the bottom its distinctive crispness.

Why a 10-Inch Skillet?

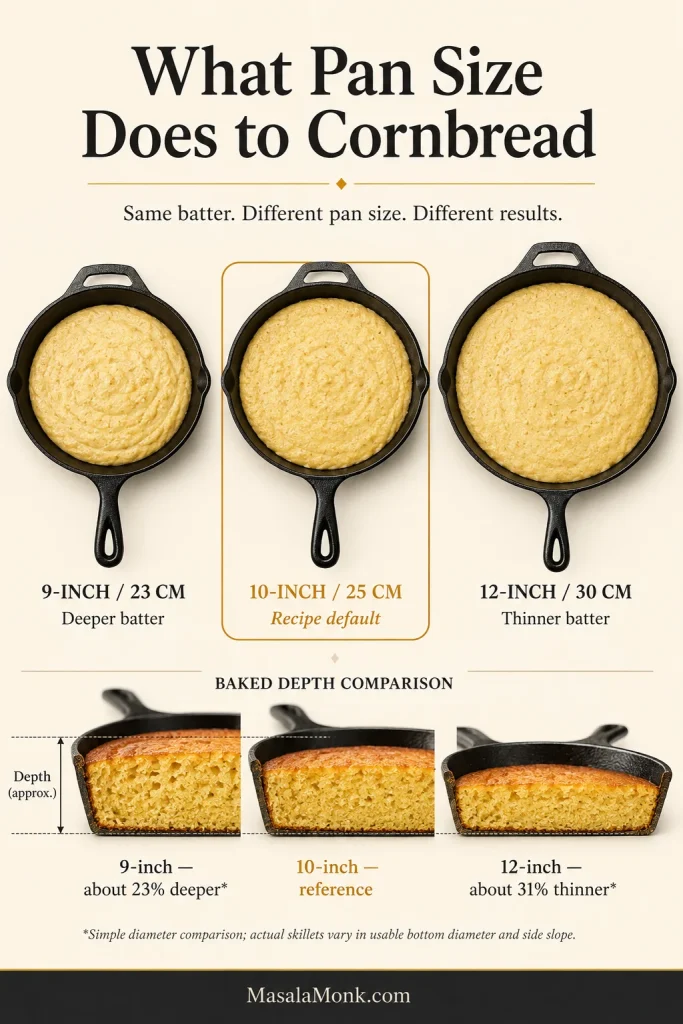
A 10-inch / 25 cm skillet gives this amount of batter a good balance between height and crust.

PanWhat Changes
9-inch / 23 cmDeeper batter, taller pieces and generally a longer bake
10-inch / 25 cmRecipe default: balanced crust and moist crumb
12-inch / 30 cmThinner bread, more crust relative to crumb and an earlier doneness check
Infographic comparing cornbread batter in 9-inch, 10-inch and 12-inch skillets, with deeper batter in the smaller pan and thinner batter in the larger pan.
Cast-iron skillets often have sloped sides, so nominal diameter can mislead. Compare the usable interior area and resulting batter depth when changing pan size.

As a simple diameter comparison, the same amount of batter would sit about 23% deeper in a 9-inch round than in a 10-inch one, while a 12-inch round would spread it about 31% thinner. Those numbers are only a rough way to show how much pan size can matter; cast-iron skillets slope differently and do not all have the same usable bottom diameter.

Pale Bottom or Over-Browned Bottom?

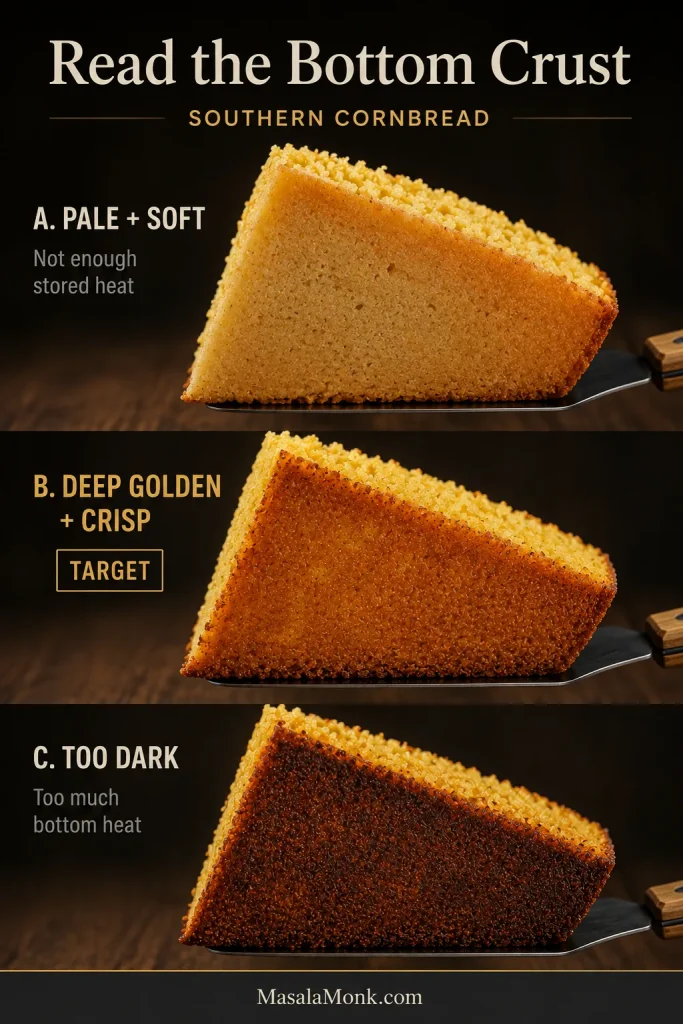
Begin on the center rack. A consistently pale underside, even with a thoroughly heated skillet, is a reason to move the pan one rack lower next time. A bottom that darkens well before the inside is ready calls for one rack higher.

Three cornbread wedges showing a pale soft underside, a deep-golden crisp underside and an overly dark bottom crust.
Judge the underside beneath the middle as well as the rim; the darkest perimeter can make the whole bottom seem browner than it really is.

Let your own oven tell you which way to go. There is no prize for putting every skillet on the lowest possible rack.

No Cast Iron?

Use a heavy metal cake pan or another oven-safe metal skillet of similar diameter and preheat it with the oven. A lighter pan can still make excellent cornbread, although the underside will usually be softer and paler because the metal carries less stored heat into the batter.

Metal is the straightforward substitute for this hot-pan method. Skip preheating an empty glass baking dish.

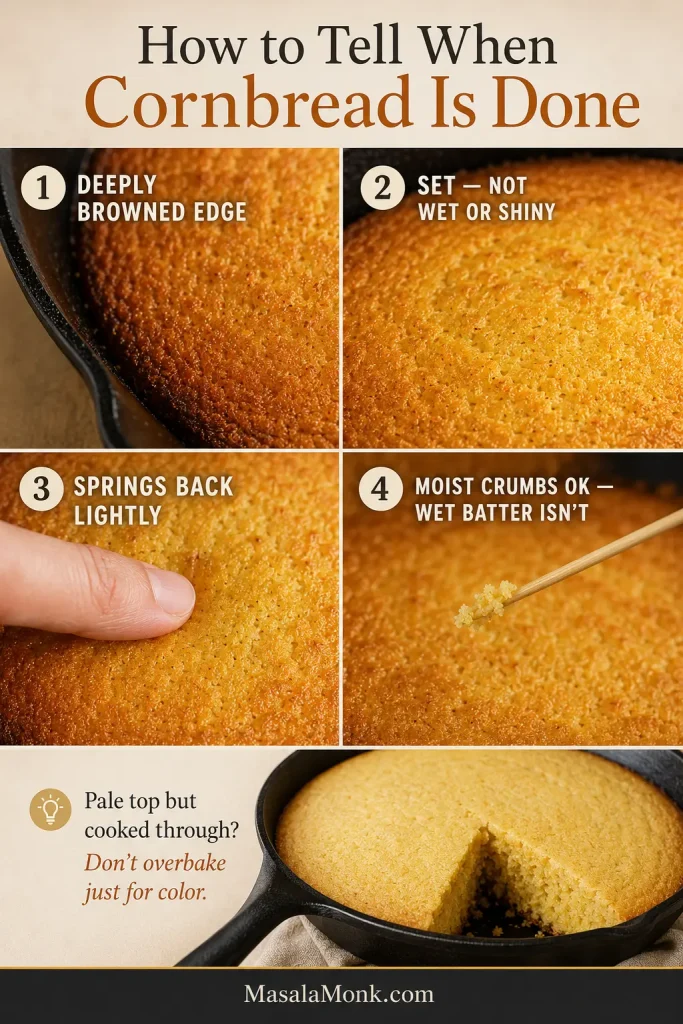
How to Know When It’s Done

Start looking around 18 minutes. By then the kitchen should smell unmistakably of toasted corn.

Four Cornbread Doneness Checks

  1. Look for a deeply browned edge.
  2. The interior should look set, with no wet or shiny batter.
  3. Press the middle gently; it should spring back lightly.
  4. A tester should come back without wet batter; a few moist crumbs are fine.
Cornbread doneness guide showing a browned edge, set center, gentle finger press, tester with moist crumbs and a paler fully cooked example.
Cracks alone do not mean underdone. Look inside them: matte, set crumb is very different from a shiny streak of uncooked batter.

A cooked-through cornbread with a pale top does not need a long extra bake just for color. Unsweetened cornbread often browns less dramatically on top than a sweeter batch. For a darker surface, use a very brief broil and stay close—the change can happen quickly.

Cornbread Rescue at a Glance

Something looks wrong after the skillet comes out? Deal with the pan in front of you first.

What You SeeWhat to Do Now
Middle still wetReturn it to the oven for 3–5 minutes; loosely shield a dark top if needed
Top pale, bread cookedUse a very brief broil instead of extending the whole bake
Breaking apart while hotStop cutting and give it the full 5-minute rest
A little dryServe warm with butter, broth, beans or gravy
Bottom softer than hopedToast buttered slices in a skillet
Leftovers lost their crustUse the oven or skillet instead of relying only on the microwave

Not every rough edge needs rescuing. A rustic crack across the top or some crumble at the cut edge can be completely normal for this style of cornbread.

A slightly dry piece can still be very good beside something deliberately saucy, such as this thick bean stew. The crumb gets to drink up what is in the bowl.

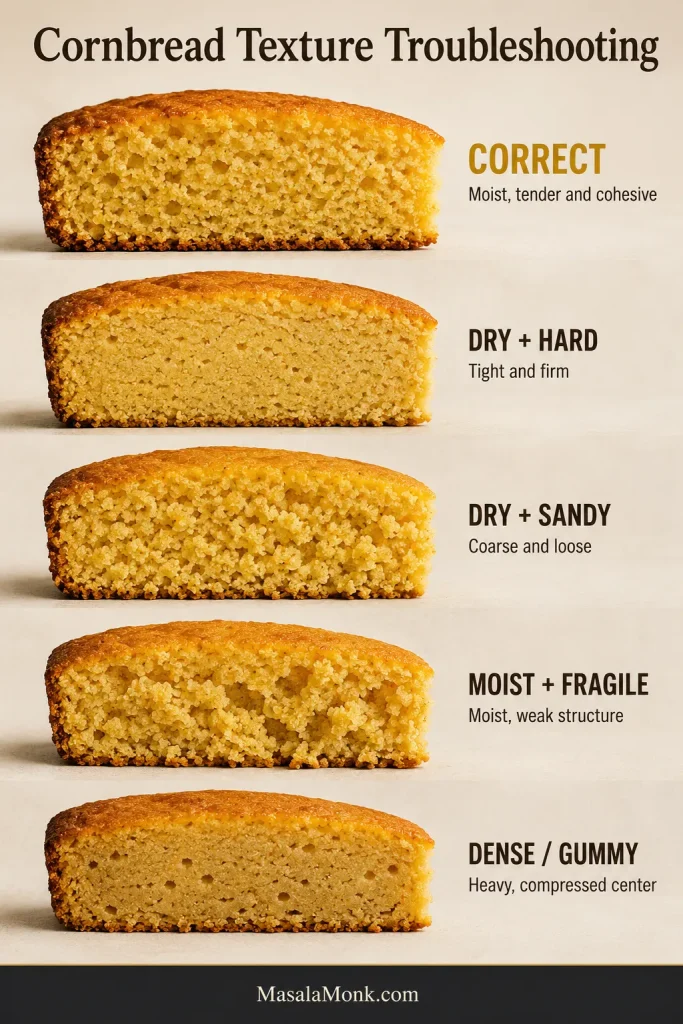
Why Did My Cornbread Turn Out This Way?

Think back to what you saw, felt or heard while you were making it. One clue is often enough.

Five cornbread cross sections comparing correct texture, dry and hard, dry and sandy, moist and fragile, and dense or gummy crumb.
Use touch as well as sight: dry, hard cornbread resists pressure, while a sandy piece sheds loose crumbs readily.

Dry, Hard or Falling Apart?

A dry, firm piece and a dry, sandy piece usually point to different problems.

  • Dry and hard: the cornbread probably baked too long or your oven ran hot.
  • Dry and sandy: the cornmeal may have been unusually coarse or the batter needed more liquid.
  • Moist but fragile: it may have been cut too soon, or the meal may be particularly coarse.
  • Dense and tough: too much mixing becomes a stronger suspect.

A little crumble belongs here. Properly rustic cornbread should still soften readily once warm butter, bean broth or gravy reaches it.

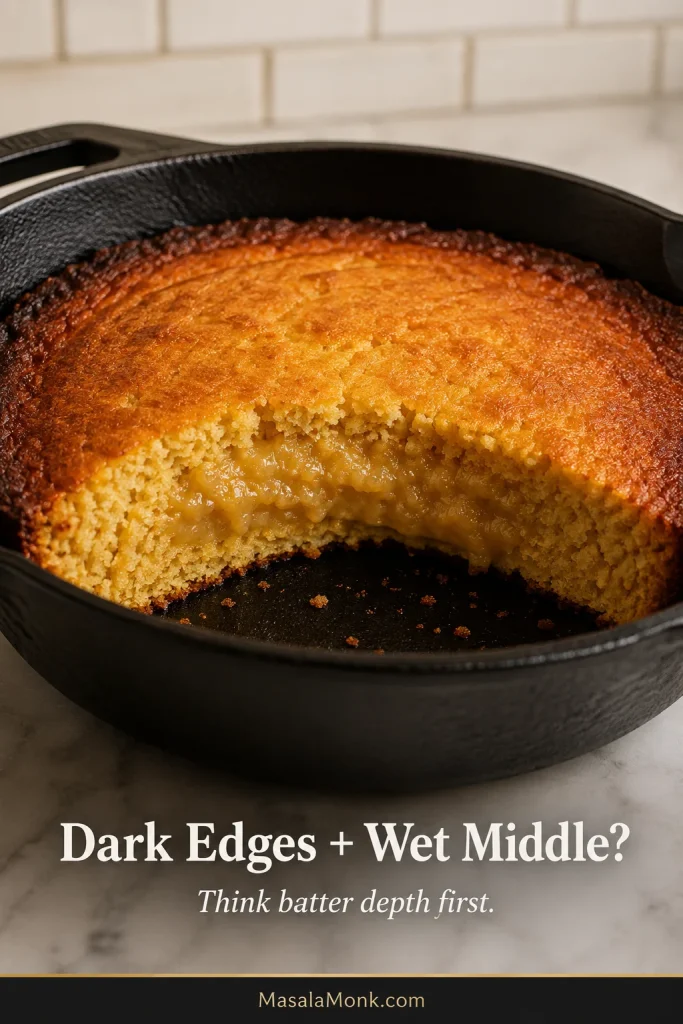
Dark Edges, Wet Middle

Dark edges around a shiny or wet middle usually make batter depth the first suspect. The same amount of batter sits deeper in a smaller skillet, so the outside can finish while the thickest part still needs time.

Cut skillet cornbread with deeply browned outer edges surrounding a visibly sticky, under-set center.
A center that sinks noticeably during the first minutes of cooling, while the browned edge stays firm, is another clue the middle was under-set.

With the intended 10-inch pan, repeated dark-edge/wet-middle batches are a reason to move the skillet one rack higher or check whether the oven runs hotter than its setting suggests.

No Crisp Bottom? Start With the Skillet

Think back to the moment the batter hit the iron. An almost silent pour is a strong clue that the skillet had not stored enough heat.

Check the fat too. You want a visible coating between batter and iron, not a pan that merely looks polished.

Gritty or Sandy Cornbread

A pleasantly coarse crumb and a sandy one are different experiences. Very coarse meal is the first thing to check. Keeping that rough grind may require more buttermilk so the baked crumb stays pleasantly textured instead of dry.

Cornmeal should announce itself. It should not feel as if you accidentally baked sand.

Dense or Gummy Cornbread

A damp, heavy patch through the middle usually means the cornbread needed more time or the batter sat unusually deep in the pan.

Heaviness throughout the whole crumb points more toward old baking powder or too much mixing. Small lumps are harmless. Beating the batter perfectly smooth is not an upgrade.

Bitter, Chemical or Too Salty?

Start with the package label. Self-rising cornmeal and cornmeal mixes may already contain leavening and salt, so adding the full amounts from the main recipe can push both too far.

Salt can also surprise you when measured by spoons. Fine salt and different kosher salts do not pack identically. Weighing 5 g keeps that variable under control; King Arthur’s guide to salt for baking explains why spoon-for-spoon swaps can change the result.

Give old cornmeal or saved bacon drippings a sniff too. Whole-grain meal and cooking fats can turn stale, and sweetness will not hide that flavor.

Stuck or Burned on the Bottom

Sticking sends you back to three things: enough skillet fat, thoroughly heated iron, and reasonably good seasoning.

A burned underside means the bottom received too much heat before the rest of the cornbread was ready. Move the pan one rack higher next time, begin checking earlier, and remember that a sweeter batch can brown faster.

No Buttermilk, Self-Rising Cornmeal & Other Swaps

No Buttermilk? Use Acidified Milk

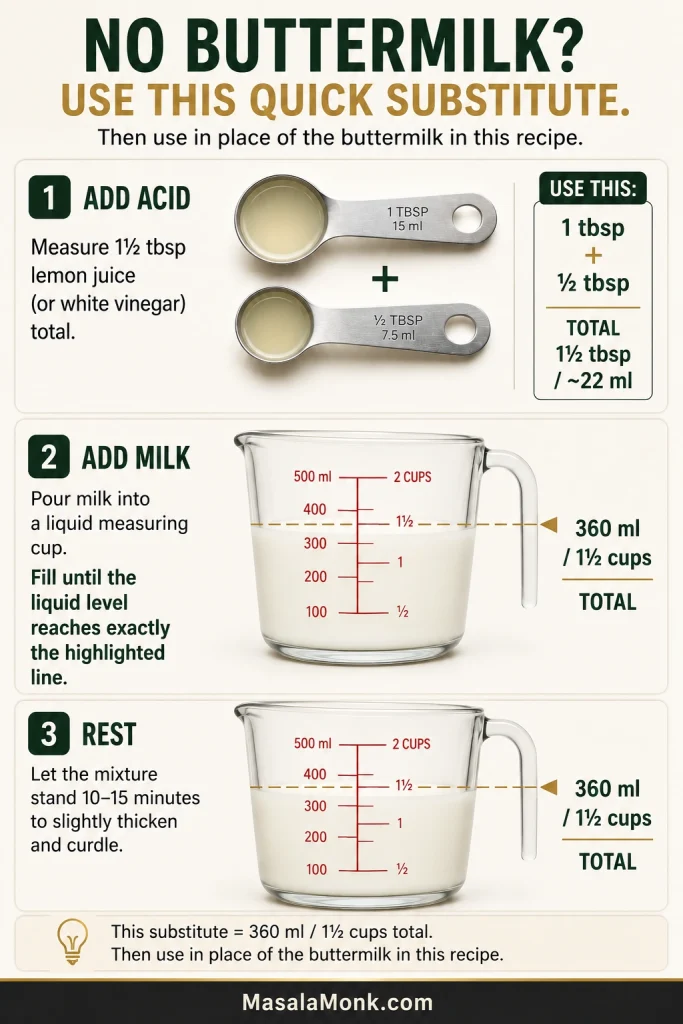
Put 1½ tablespoons / about 22 ml lemon juice or plain white vinegar into a measuring jug, then add milk until the total reaches 1½ cups / 360 ml.

Let it stand for 10–15 minutes, then use it in place of the buttermilk. It won’t have quite the same cultured tang and may be a little thinner, but the added acid gives the baking soda what it needs to react properly.

Three-step guide showing lemon juice or white vinegar being measured, milk added to a total of 360 ml, and the mixture resting for 10 to 15 minutes.
Acidified milk can stay looser than cultured buttermilk. Do not add more acid; let the finished batter consistency decide whether extra liquid is needed.

A carton of cultured buttermilk is easy to use up elsewhere; the leftovers can go into these fluffy buttermilk pancakes the next morning.

Using Self-Rising Cornmeal

A bag labeled self-rising already contains leavening and salt, so pause before measuring either from the main recipe. Follow the proportions intended for the product in your hand; formulations vary enough that guessing is not worth it.

Using White Lily Self-Rising Cornmeal Mix: For its buttermilk option, White Lily’s official Southern cornbread uses 2 cups mix, 1½ cups / 360 ml buttermilk, 1 egg and ¼ cup / 60 ml oil, plus 1 teaspoon shortening for the pan and optional sugar. It bakes in a preheated 8-inch / 20 cm pan at 425°F / 218°C for 25–30 minutes. Another brand may call for different proportions.

Flourless or Eggless Southern Cornbread?

Flourless: Flourless cornmeal breads belong comfortably within Southern cooking traditions. Removing the 80 g flour changes the balance of this batter, so use proportions designed for a flourless version.

Eggless: Eggless Southern cornbread exists too. Both eggs in this batch help the inside hold together. For an eggless version, start with a recipe designed to work without eggs.

Butter vs Oil in the Skillet

Butter works, but its milk solids brown quickly in a very hot pan. Bacon drippings, vegetable or canola oil, or shortening are more forgiving here. Butter is better used where its flavor is easiest to notice: in the batter and melting over the finished piece.

← Back to the Southern Cornbread Recipe · ↑ Back to top

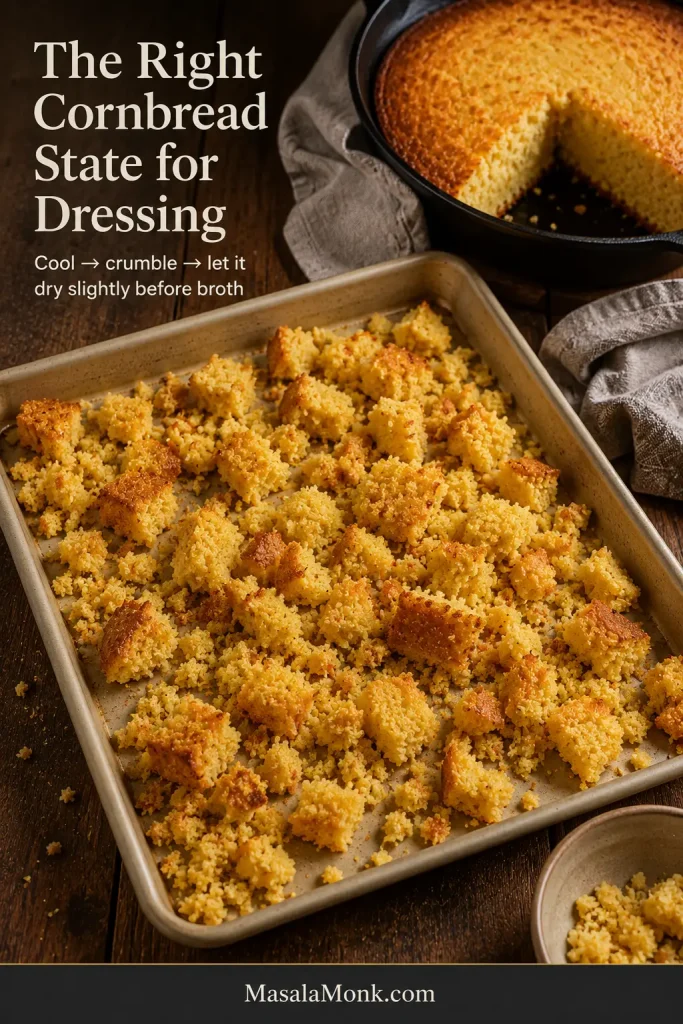
Using This Cornbread for Dressing

Yes—this cornbread works well for Southern cornbread dressing. Use the savory version and, when practical, bake it a day ahead.

Cooled Southern cornbread broken into larger chunks and smaller crumbs on a tray, with part of the original skillet cornbread behind it.
For dressing, uneven pieces help: smaller crumbs absorb broth quickly, while larger chunks preserve pockets of recognizable cornbread texture after baking.

The small amount of flour helps the crumbled bread absorb broth while keeping some structure. Cool the skillet completely, crumble the cornbread, and give some of its fresh-baked moisture time to escape before adding broth.

Slightly drier cornbread is easier to control. It can soak up broth without beginning the dressing already soft and saturated.

What to Serve With Southern Cornbread

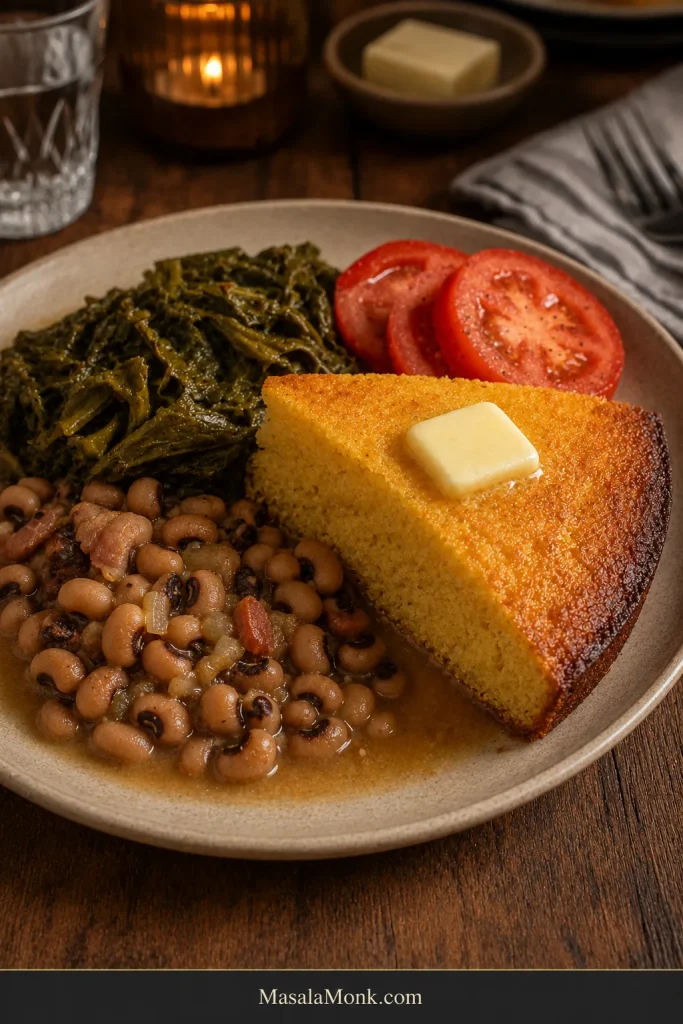
Savory cornbread is happiest beside food with broth, gravy, beans or smoky juices for the crumb to catch.

Dinner plate with a buttered wedge of Southern cornbread beside saucy black-eyed peas, cooked greens and sliced red tomatoes.
Set the cut face near beans or gravy instead of burying the whole wedge, so the crumb can soften while part of the skillet crust stays crisp.

For a cold-weather dinner, put a warm piece beside crockpot chili. The part touching the broth softens while the browned edge stays sturdy enough to scoop with.

Gravy may be an even better excuse. These smothered pork chops come with the kind of onion-rich sauce that settles straight into the cut face of the cornbread.

Barbecue is another natural fit: pair slow cooker pulled pork with something cold and crunchy such as coleslaw on the side.

For a more old-fashioned Southern plate, think field peas or black-eyed peas, cooked greens and sliced summer tomatoes. Those softer, juicier foods are exactly where a crisp piece of skillet cornbread earns its place.

And if crumbled cornbread with cold buttermilk is part of the tradition you know, this savory version fits naturally there too.

It does not need a full meal either. Split a warm piece, add butter, and let it soak into the little cracks. Put honey nearby for anyone who wants it.

How to Store, Freeze & Reheat Cornbread

Cornbread is at its best the day it is baked, when the contrast between crisp crust and tender crumb is strongest. Let it cool completely before wrapping or sealing it; trapped steam softens the crust quickly.

For the same day or overnight, keep the cooled bread well covered at room temperature. For longer keeping, refrigerate it well wrapped or in an airtight container for 3–4 days for best quality.

Reheating Cornbread

Microwave: best when you want one warm piece quickly. Heat in short bursts just until the middle is warm. The crust will soften, so this is the convenience option rather than the crispest one.

Oven: for several pieces, 350°F / 177°C for roughly 10–15 minutes is a useful starting point. Check smaller pieces early. Loosely cover cornbread that is beginning to dry, then uncover near the end if you want the outside to firm again.

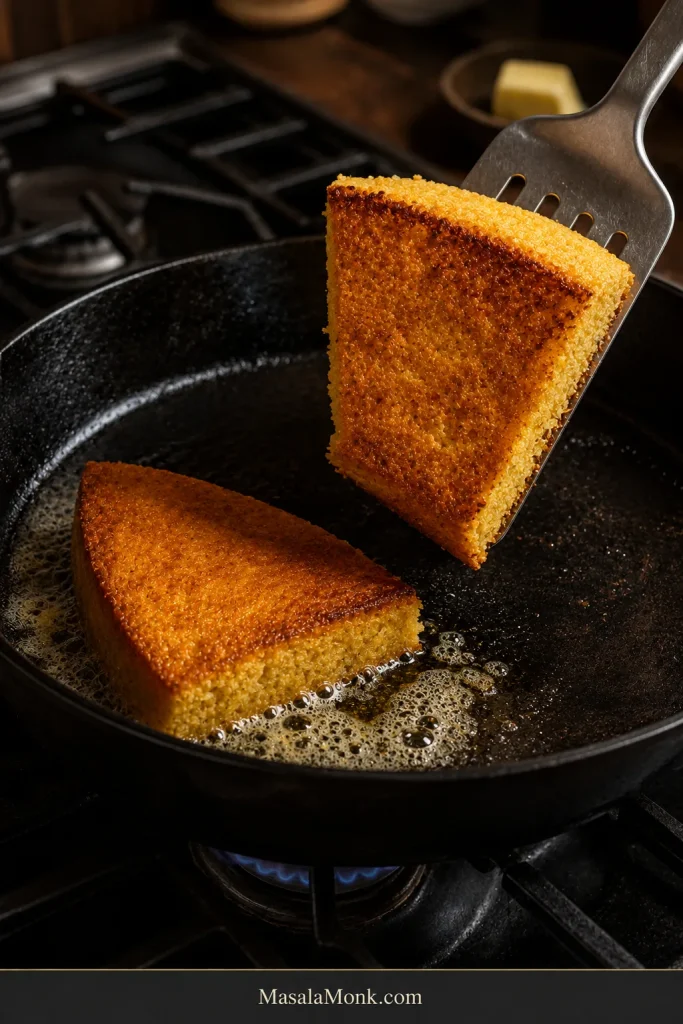
Best Leftover Crust: Butter + Skillet

This is the method worth remembering.

  1. Split or slice the cornbread.
  2. Spread butter over the cut surfaces.
  3. Place them cut-side down in a hot skillet.
  4. Toast until browned and crisp outside and hot through the middle.
Cornbread pieces toasting in butter in a cast-iron skillet, with one wedge lifted to show a newly browned flat cut surface.
Let the buttered cut face brown before moving it repeatedly. Moderate, steady heat warms the center without scorching the surface.

The leftover develops a new crust of its own: browned butter against toasted cornmeal with a tender middle underneath.

A second-day piece that has dried slightly is also excellent with something gravy-rich such as slow cooker beef stew. What seemed thirsty on its own becomes very good at catching the sauce.

Freezing Cornbread

Cool the cornbread completely, divide it into useful portions and wrap them well. Freeze for up to 3 months for best quality. Thaw before reheating, then use the oven or skillet if you want some of the crust back.

The Cornbread We Are After

The best moment is not when the timer rings.

Low-angle view of a Southern cornbread wedge lifted from a cast-iron skillet, showing a thin deep-golden crisp underside beneath a tender crumb.

It is when the first piece comes free and you can see the contrast: a browned underside and crisp rim surrounding a warm, moist crumb that still looks unmistakably like ground corn.

Butter disappears into the little cracks. The edge is sturdy enough to pick up. The middle breaks rather than bounces. And the savory version is just as comfortable soaking up bean broth and gravy as it is carrying a little honey at the table.

If you make it, tell us which cornmeal you used, your skillet size, whether you added sugar, and how long yours took in the oven. Those details can tell the next cook far more than simply saying it worked.

← Back to the Southern Cornbread Recipe · ↑ Back to top