Blackberry jam sounds simple until the berries hit the pan. Then the real questions begin: will it set, should you use pectin, what about the seeds, can frozen blackberries work, and what changes if you want pantry jars?
This blackberry jam recipe is for the bowl of berries from the market, the frozen bag you forgot about, the wild blackberries that came home with leaves still attached, and the cook who wants jam that tastes like fruit instead of just sugar.
The main method is a no-pectin blackberry jam with deep berry flavor, a spoonable set, and clear cues for when to stop cooking. Make the main cold-storage version first, then use the seedless, pectin, canning, freezer, low-sugar, and troubleshooting sections only as needed.
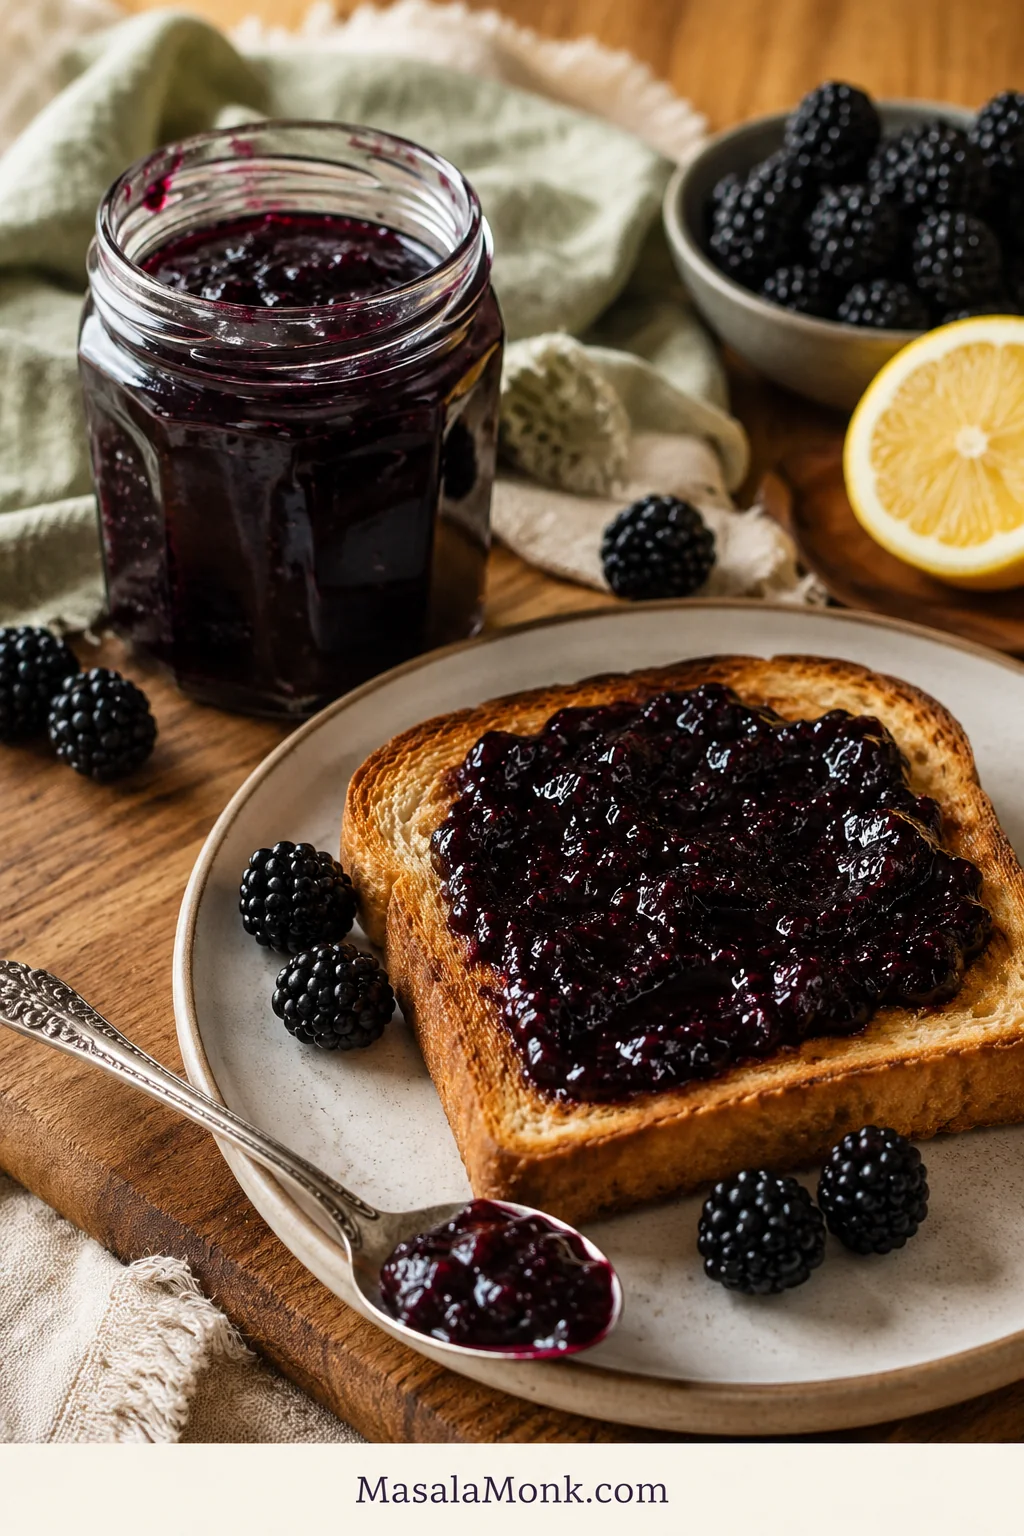
The best blackberry jam is glossy, dark, and just loose enough to spread. It should taste like the berries first: tart at the edges, sweet through the middle, and rich enough to make plain toast feel like something special.
Most of all, it should be the kind of jar you reach for again the next morning, even if all you have is toast.
Quick Answer: Blackberry Jam That Sets
To make blackberry jam without pectin, cook crushed blackberries with sugar and lemon juice in a wide pan until the mixture turns glossy, darker, and thick enough to pass the cold plate test. At sea level, jam usually sets around 105°C / 220–221°F, but the cold plate test is often the easiest way to judge texture at home.
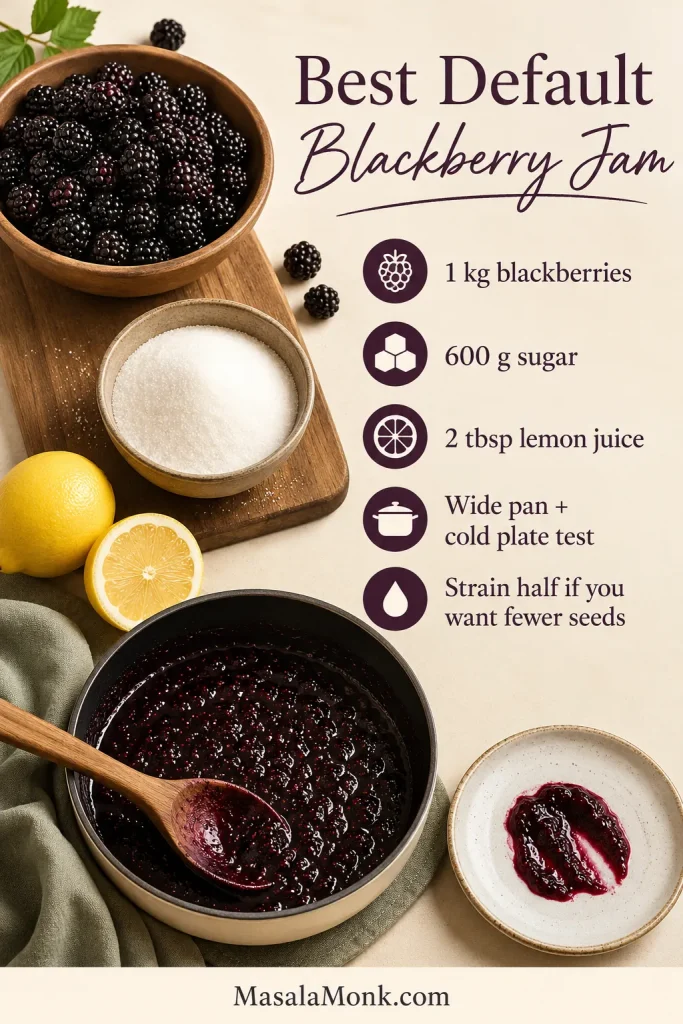
MasalaMonk’s best default path: use 1 kg blackberries, 600 g sugar, 2 tablespoons lemon juice, a wide pan, and the cold plate test. Strain half the berries if you want fewer seeds without losing jammy body.
For a flexible no-pectin batch, use about 1 kg / 6½–7 cups blackberries, 500–650 g / 2½–3¼ cups sugar, and 2 tablespoons lemon juice. Use the lower sugar range for a sharper cold-storage jam and the higher range for a sweeter, firmer, more classic set.
Fresh blackberries give the brightest result, but thawed frozen blackberries also work. Frozen berries may give a slightly softer set or smaller yield because they release more liquid. For shelf-stable jars, switch to a proper canning method with the correct jar size, headspace, processing time, and altitude adjustment.
If this is your first batch, do not worry about every variation yet. Make the main no-pectin version, store it in the fridge or freezer, and remember this: stop when the cooled spoonful wrinkles, not when the bubbling pot looks thick.
Best Default Blackberry Jam Path
If you are unsure where to begin, start with the default path: a balanced fruit-to-sugar ratio, a wide pan, and a cold plate test.
Blackberry Jam Recipe
Blackberry Jam Without Pectin
This is the main stovetop version: ripe blackberries cooked with sugar and lemon juice until glossy, thick, and spreadable. It is written as a cold-storage jam unless you follow a shelf-stable canning recipe.
Recipe Details
| Prep time | 10 minutes |
| Optional rest | 10 minutes |
| Cook time | 25–40 minutes after the sugar dissolves |
| Total time | 45–60 minutes, including optional rest |
| Yield | About 720–960 ml / 3–4 cups / 3–4 half-pint jars, depending on cook-down and straining |
| Set cue | 105°C / 220–221°F or cold plate wrinkle test |
| Storage | Refrigerate or freeze unless using shelf-stable canning instructions |
Ingredients
- 1 kg / about 6½–7 cups blackberries, fresh or thawed frozen
- 500–650 g / about 2½–3¼ cups granulated sugar
- 30 ml / 2 tablespoons lemon juice
- Pinch of salt, optional
Best beginner version: Use 600 g sugar, strain half the softened berries if seeds bother you, and stop cooking when a chilled spoonful wrinkles softly instead of running back like syrup.
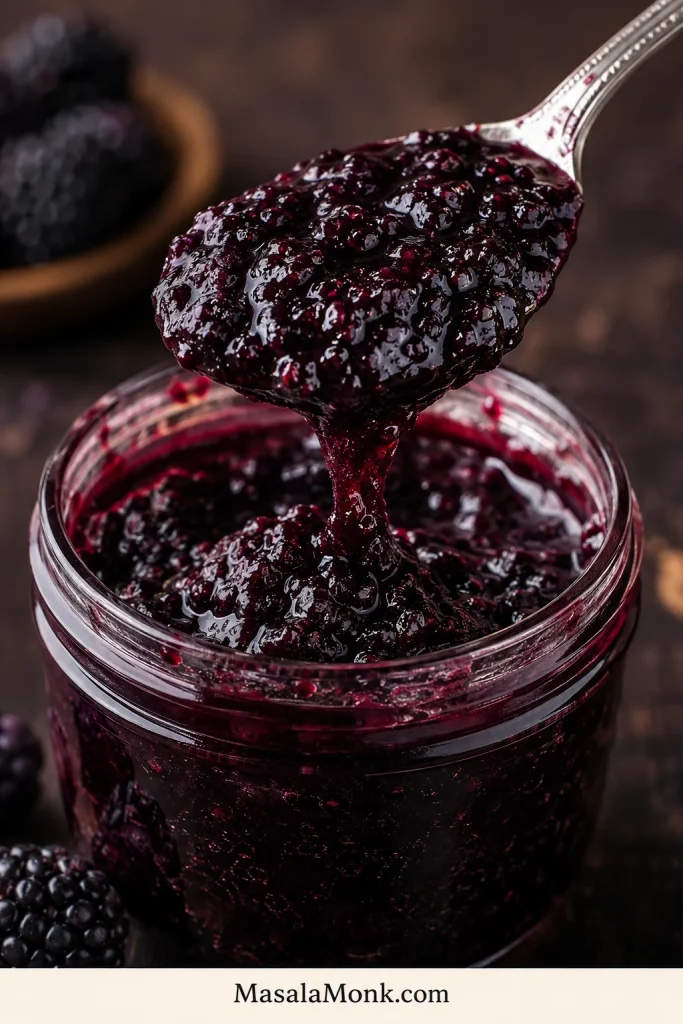
Texture cue: Finished blackberry jam should be thick enough to mound on a spoon once cooled, but still soft enough to spread without tearing toast.
Sugar note: Use 500 g sugar for a sharper, softer cold-storage jam. Use 650 g for a sweeter, firmer, more classic set. Berry cup measurements are approximate because blackberries vary in size; weight is more reliable.
Instructions
- Sort and rinse the berries. Remove stems, leaves, spoiled berries, and anything moldy. Rinse gently and drain well.
- Crush the fruit. Add the blackberries to a wide, heavy-bottomed pan. Mash with a potato masher until juicy but not completely smooth.
- Add sugar and lemon juice. Stir in the sugar, lemon juice, and optional pinch of salt. Let the mixture sit for 10 minutes if you have time.
- Dissolve the sugar gently. Warm over medium heat, stirring often, until the sugar dissolves and the mixture looks syrupy rather than gritty. This helps prevent grainy jam.
- Boil the jam. Increase the heat and bring the mixture to a lively boil. Stir often, scraping the bottom and sides as it thickens. Lower the heat slightly near the end if the jam starts catching on the bottom.
- Watch the texture. The jam will foam first, then darken and turn glossy. Near the end, the bubbles look slower and heavier.
- Test for set. Start testing after 20–25 minutes. Use a cold plate or cook to about 105°C / 220–221°F at sea level. Do not wait for the hot jam to look as thick as cooled jam.
- Jar and cool. Remove from heat. Skim foam if desired. Ladle into clean jars, let the jam cool until no longer steaming, then cover and refrigerate or freeze.
For seedless jam: strain half or all of the softened fruit before the final cook-down. See the seedless section below for details.
Do not miss: Use a wide pan, make two batches instead of doubling in one pot, and treat this as cold-storage jam unless you follow a proper shelf-stable canning method.
What the Finished Blackberry Jam Should Look Like
Use this cooled spoon cue as your texture target: the jam should mound, drip slowly, and still spread softly after the boil is over.
Need the next cue? Cold Plate Test · Seedless Option · Back to Recipe
Find What You Need
The recipe above gives you the basic batch. Below, the no-pectin fridge/freezer version can be adjusted for texture, sweetness, storage, pectin, jelly, or canning needs.
Choose Your Path
Make the Jam
Choose Your Version
Fix and Use It
At a Glance: Choose Your Blackberry Jam Version
| Decision | Best Choice |
|---|---|
| Want classic no-pectin jam | Start with the main recipe above |
| Want a good first-batch sugar level | Use 600 g sugar per 1 kg blackberries |
| Want fewer seeds | Strain half the cooked berries for the best balance |
| Using frozen berries | Thaw first and expect a slightly longer cook time |
| Want a firmer, sweeter set | Use the higher sugar range |
| Want less sugar | Treat it as cold-storage jam unless using a canning-safe low-sugar method |
| Want pantry storage | Follow a proper canning method with full processing instructions |
| Want clear jelly | A clear jelly needs a separate strained-juice method |
Ready to choose? Pick the Best Path · Best Ratio · Canning Notes
Pick the Best Path for Your Batch
Before choosing your version, separate flexible jam from pantry-safe jam. A fridge or freezer batch gives you room to adjust sweetness and texture; a shelf-stable jar needs a proper canning method.
This recipe is for the flexible no-pectin version. If your goal is clear jelly, sugar-free pantry storage, brand-specific pectin jam, or full shelf-stable canning, use a dedicated method built for that purpose.
Use This Recipe For
- Blackberry jam without pectin
- Fresh or frozen blackberries
- Rustic, half-strained, or seedless texture
- Fridge or freezer storage
- Learning the cold plate set test
- A flexible sweetness range
Use a Separate Method For
- A clear blackberry jelly with no pulp
- A sugar-free pantry jam without a tested low/no-sugar method
- A commercial-style firm gel
- A pectin-brand recipe with exact packet instructions
- A pantry-stable canning recipe with full processing instructions
- Any wax-sealed or paraffin-sealed jar method
Blackberry Jam Rules That Matter
You do not need perfect berries or special pectin to make a good jar. Most blackberry jam problems come from the same few things: a crowded pan, undissolved sugar, judging the jam while it is still hot, or trying to make a flexible batch behave like a canned preserve.
| Do This | Not This |
|---|---|
| Use a wide pan | Do not crowd a deep pot |
| Dissolve sugar before boiling hard | Do not rush into a hard boil while the mixture is still gritty |
| Test on a cold plate | Do not judge hot jam by thickness alone |
| Make two batches if needed | Do not double everything in one pot |
| Use cold storage for flexible ratios | Do not pantry-store an improvised low-sugar jam |
| Strain half for balanced texture | Do not strain all the fruit unless you want a very smooth jar |
Ingredients You Need
The base is simple, but every ingredient has a job: berries bring flavor, sugar builds body, lemon brightens, and a tiny pinch of salt deepens the fruit.

Blackberries
Use ripe blackberries that taste sweet-tart and smell fruity. Fully ripe berries give the best flavor. A few slightly underripe berries can help the jam set because underripe fruit usually has more natural pectin.
Good jam starts before the stove. If the berries taste flat in your hand, they will taste flat in the jar. Avoid moldy, fermented, or collapsing berries because cooking concentrates both the good flavor and the tired one.
If you bought extra blackberries and want more ways to use them beyond jam, MasalaMonk’s blackberry nutrition guide is a useful follow-up beyond the jam pot.
Sugar
Sugar sweetens the jam, but it also helps with body, shine, and set. Reducing sugar can be useful, especially for a sharper fridge or freezer batch, but the texture will usually be softer and the yield smaller.
The goal is not the least sugar possible; it is enough sugar to help the berries become jam without burying their tartness. For this no-pectin version, the most useful range is 500–650 g sugar per 1 kg blackberries.
Lemon Juice
Lemon juice brightens the flavor and helps the jam set. Fresh lemon juice is fine for fridge and freezer jam. For canning recipes, follow the recipe’s specified acid. Many tested recipes use bottled lemon juice because its acidity is consistent.
Salt
A small pinch of salt is optional. It does not make the jam salty; it simply rounds the sweetness and makes the blackberry flavor taste deeper.
Equipment for Blackberry Jam
The jam itself is simple, but a wide pan and a way to test the set make the whole process calmer, especially the first time you watch a loose purple pot slowly turn into jam.
- Wide heavy-bottomed pan: helps water cook off quickly, so the jam reaches set before the fruit tastes dull or overcooked.
- Potato masher: crushes the berries while keeping some fruit texture.
- Wooden spoon or silicone spatula: helps you stir and scrape the bottom as the jam thickens.
- Cold plates or thermometer: help you test the set instead of relying only on time.
- Fine mesh sieve, food mill, or chinois: useful if you want seedless blackberry jam.
- Clean jars: needed for fridge or freezer storage.
- Canning tools: needed only for a proper shelf-stable canning process.
Fresh vs Frozen Blackberries
This comparison matters before cooking because frozen berries bring extra liquid into the pan, which changes timing more than the basic method.
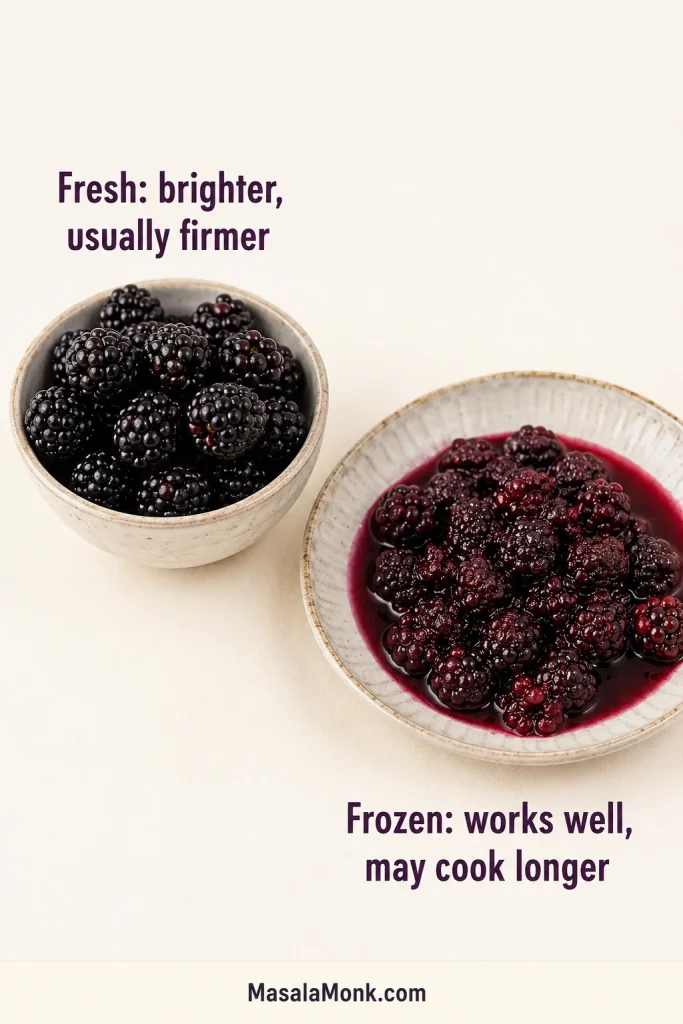
During peak season, fresh blackberries make beautiful jam when they are ripe but still firm. The flavor is bright, and the berries usually cook down evenly.
Frozen blackberries work too. Thaw them first, then use the berries and their juices unless they release a large amount of watery liquid. Frozen fruit breaks down faster in the pan, but because it releases more moisture, the batch may take a few extra minutes before the bubbles turn glossy and heavy.
When thawed berries taste mild, use the higher end of the sugar and lemon range. If they taste sharp and concentrated, start lower and adjust after the fruit warms.
Leftover frozen berries can go into a thick berry smoothie recipe instead of being thawed for more jam than you need.
Best Blackberry Jam Ratio
The best ratio depends on how you want the jam to taste and how you plan to store it. Traditional jam uses more sugar and sets more firmly. Lower-sugar jam tastes fruitier but may cook longer and set softer.
Blackberry Jam Ratio Guide
The ratio guide turns the sugar range into practical choices: a small test batch, the balanced default batch, or a softer low-sugar jar.
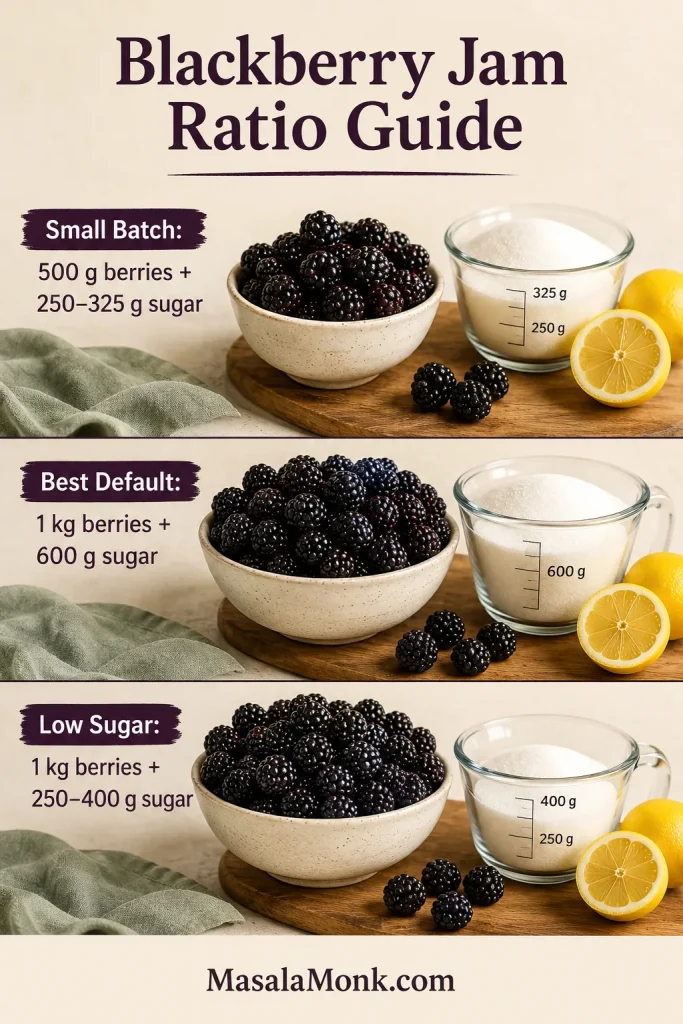
| Batch Style | Blackberries | Sugar | Lemon Juice | Best Use |
|---|---|---|---|---|
| Small batch | 500 g / about 3¼–3½ cups | 250–325 g / about 1¼–1⅝ cups | 1 tbsp | Testing the recipe or making 1–2 jars |
| Main batch | 1 kg / about 6½–7 cups | 500–650 g / about 2½–3¼ cups | 2 tbsp | Balanced no-pectin jam |
| Best default | 1 kg / about 6½–7 cups | 600 g / about 3 cups | 2 tbsp | First batch with balanced flavor and set |
| Traditional sweeter set | 1 kg / about 6½–7 cups | Up to 1 kg / about 5 cups | 2–3 tbsp | Classic firmer jam |
| Low-sugar fridge/freezer style | 1 kg / about 6½–7 cups | 250–400 g / about 1¼–2 cups | 2 tbsp | Softer, fruit-forward cold-storage jam |
For a small batch, use the higher end of the sugar range if you want a firmer, more classic set.
Do not double casually: Need more jam? Make two smaller batches instead of crowding one pot. A crowded pan slows evaporation, stretches the cooking time, and can leave you with jam that is runny, scorched, or overcooked before it sets.
Low-sugar reminder: Reducing sugar does not only change sweetness. It changes how fast the jam sets, how glossy it looks, how much it yields, and how long it keeps.
Why This Blackberry Jam Works
- A wide pan speeds up evaporation. The batch sets faster when excess water can cook off efficiently.
- Lemon keeps the flavor bright. It balances the sugar and helps the fruit’s natural gel structure.
- Moderate sugar keeps the berry flavor alive. The recipe is sweet enough to set but not so sweet that the fruit disappears.
- A cold plate test prevents guessing. It shows how the jam behaves once cooled, not just how it looks while boiling.
- Seed control is built in. You can leave the spread rustic, strain half for balance, or strain all for a smoother jar.
- The method fits blackberries. Blackberries are naturally seedy and tart, so the recipe builds in both seed control and acid balance.
The same fridge/freezer-first logic also works well in MasalaMonk’s fig jam recipe, where the flexible no-pectin method stays separate from canning-safe notes.
How to Make Blackberry Jam Without Pectin
The no-pectin method is less about complicated ingredients and more about watching the pan. The mixture begins loose and syrupy, then foams, reduces, darkens, and finally moves more slowly as the water cooks off.
1. Sort and Crush the Berries
Pick through the blackberries and remove leaves, stems, spoiled berries, or anything moldy. Rinse gently and drain well. Place the berries in a wide pan and crush them with a potato masher until the juices release.
2. Add Sugar and Lemon Juice
Stir in the sugar and lemon juice. Let the mixture sit for about 10 minutes if time allows. This short rest pulls juice from the berries and helps the sugar dissolve more evenly.
3. Dissolve the Sugar Gently
Warm the mixture over medium heat, stirring often. The goal is to dissolve the sugar before the jam reaches a hard boil. If sugar crystals remain on the sides of the pan, try not to scrape them back into the pot.
4. Boil Until the Jam Thickens
Increase the heat and bring the mixture to a lively boil. Stir regularly, especially once it begins to thicken. The bubbles will look light and foamy at first. Later, they become slower, glossier, and heavier.
5. Test Before You Stop
Start testing after 20–25 minutes for a main batch, sooner for a small batch. Do not rely only on time. Frozen berries, watery berries, low sugar, and narrow pans can all change the cooking time.
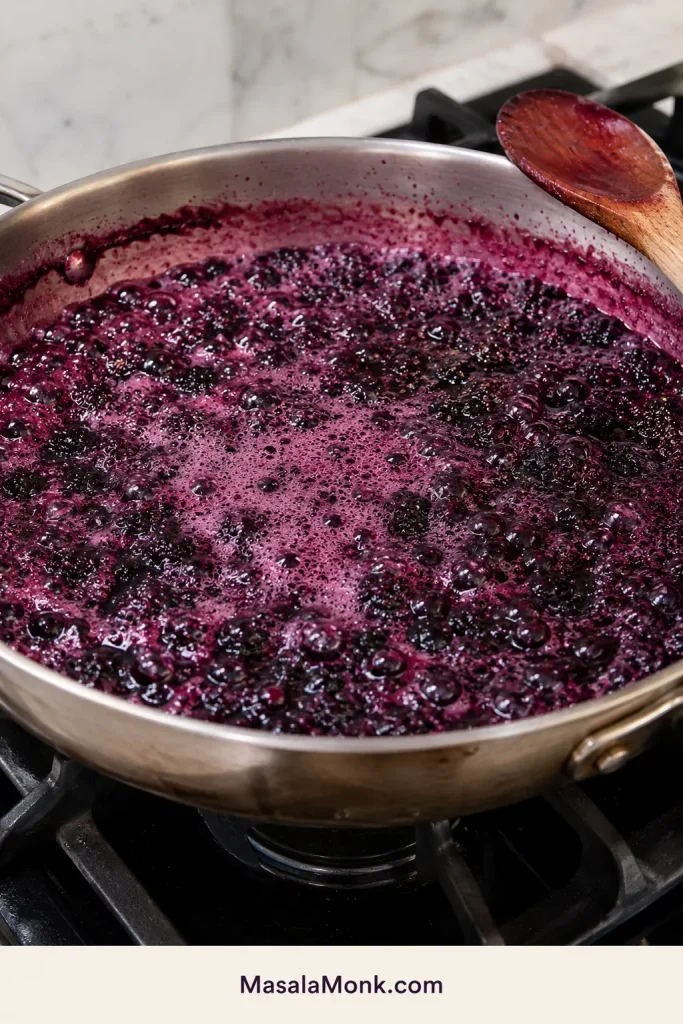
What the Jam Looks Like as It Cooks
This is the part that makes many first batches feel uncertain. Early on, the jam looks too loose before it looks right, and that does not mean anything has gone wrong.
- At first, the berries look loose, purple, juicy, and foamy. This is normal because the fruit is releasing water.
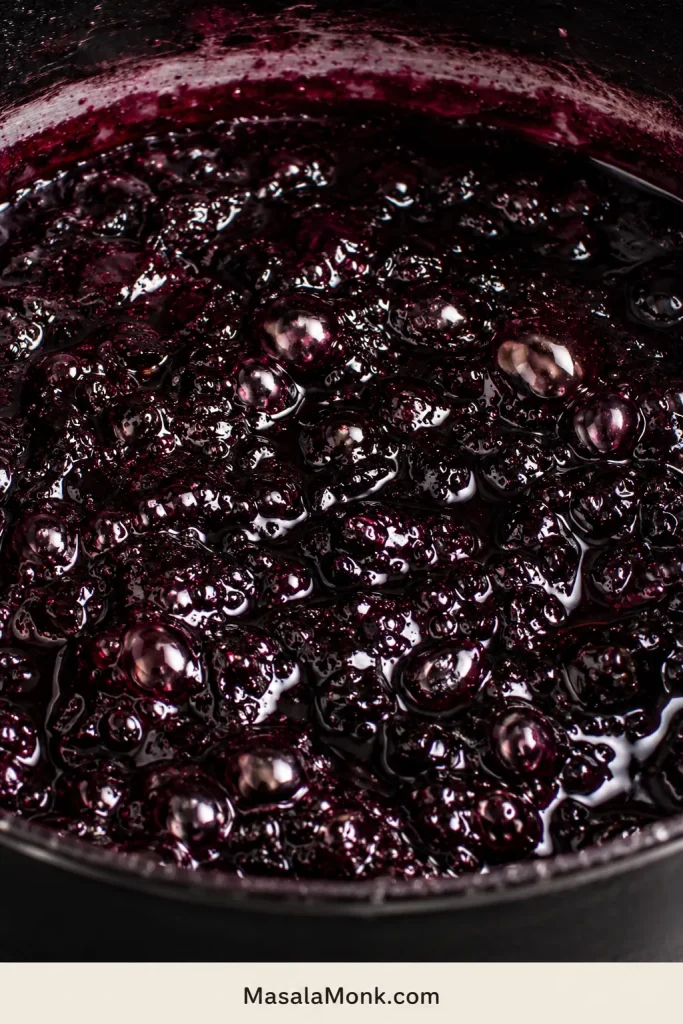
- In the middle, the bubbles rise quickly, the fruit softens, and the color deepens. The pan may still look more like syrup than jam.
- Near the set point, the bubbles slow down, the surface looks glossier, and a spoon begins to leave a brief trail through the mixture.
- If it goes too far, the jam starts looking dull, sticky, and heavy. It may drag across the pan instead of bubbling freely.
The pot does not go from syrup to jam all at once. It changes in small signs: the bubbles slow, the color deepens, the spoon drags, and the chilled spoonful finally wrinkles.
Early Foamy Boil
The early boil looks messy because water is cooking off; keep stirring, then watch for darker, heavier bubbles as the jam reduces.
Glossy Bubbles Near Set
After the foam settles, darker and slower bubbles tell you the jam is close enough to test.
Spoon Trail Before Testing
Treat the spoon trail as a warning light, not the finish line; it tells you the jam is close enough to test, not automatically done.
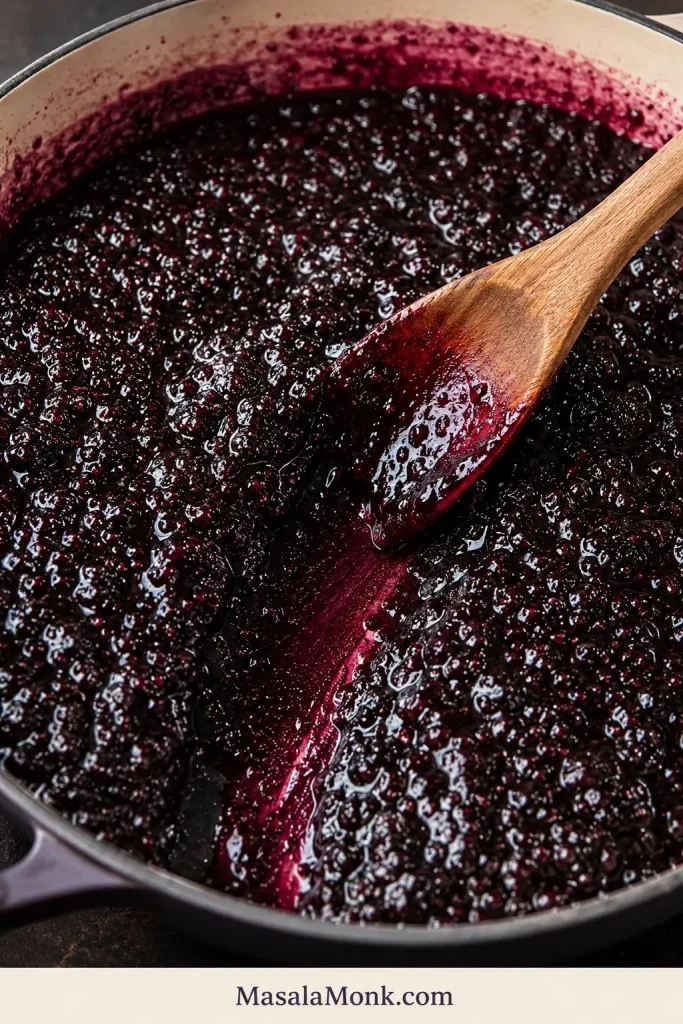
As the jam gets close, the kitchen starts to smell darker and more berry-rich, not just sweet. The color deepens from bright purple to a glossy blackberry wine shade, and the spoon feels a little more resistance as you stir.
This is the moment many beginners are tempted to keep cooking. Test first.
You are not waiting for the jam to look solid in the pot. The goal is a jam that cools into a spread.
Test before you stop: Cold Plate Test · Troubleshooting · Back to Recipe
How to Know Blackberry Jam Is Set
Jam thickens as it cools, so it will not look completely finished while it is bubbling in the pan. Use a test instead of waiting until it looks stiff. By then, it may already be overcooked.
Cold Plate Test
Put two small plates in the freezer before cooking. To test, remove the pan from the heat, spoon a little jam onto a chilled plate, and wait 30–60 seconds. Push the jam with your finger. If it wrinkles, mounds, or moves slowly instead of flooding back like syrup, the jam is ready.
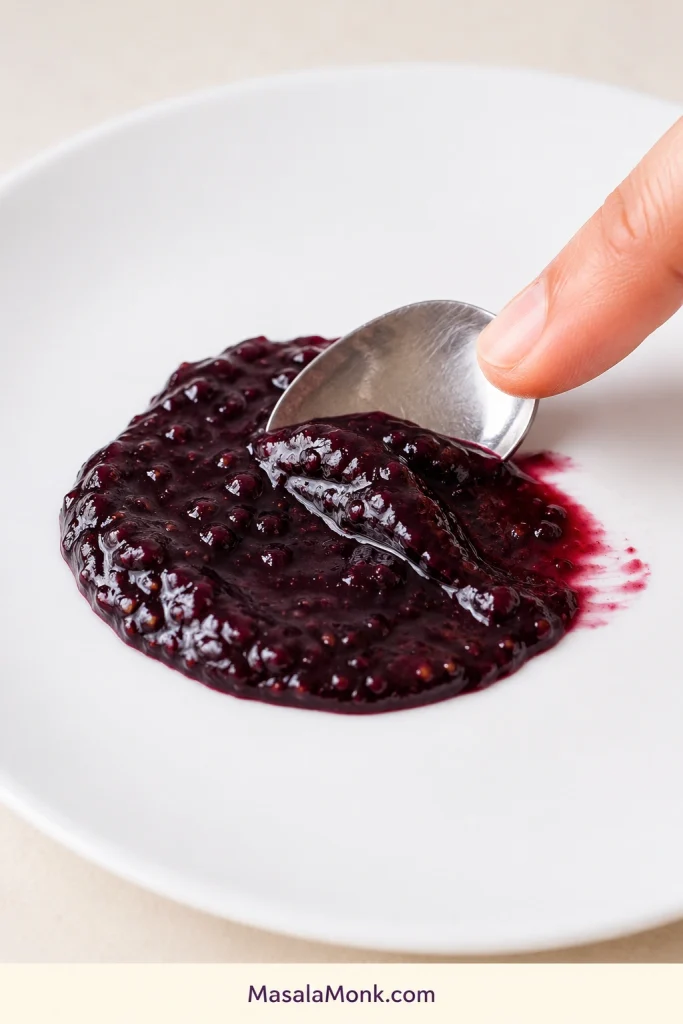
When the spoonful on the cold plate wrinkles for the first time, the whole batch suddenly makes sense. That is the moment you stop guessing and start trusting the jam.
Thermometer Test
At sea level, blackberry jam usually sets around 105°C / 220–221°F. This number is useful, but not perfect for every kitchen. Altitude, sugar level, batch size, and berry moisture can all affect the final texture.
Spoon Test
Lift a spoonful of jam and let it fall back into the pan. Early in cooking, it drips quickly. As it gets close to set, it falls more slowly in thicker drops or sheets.
Better slightly soft than overcooked: If you are unsure, stop a little early and test again. Runny jam can often be simmered longer. Jam that has cooked into a stiff, rubbery paste is harder to rescue.
The first batch teaches you what the bubbles look like. After that, blackberry jam becomes much less mysterious.
Choose your texture next: Seedless Option · Jam vs Jelly · Back to Recipe
Seedless Blackberry Jam
Blackberry seeds are part of the fruit, but they do not have to dominate the jar. This is where homemade jam becomes personal: some people love the old-fashioned seediness, while others want the fruit without the crunch.
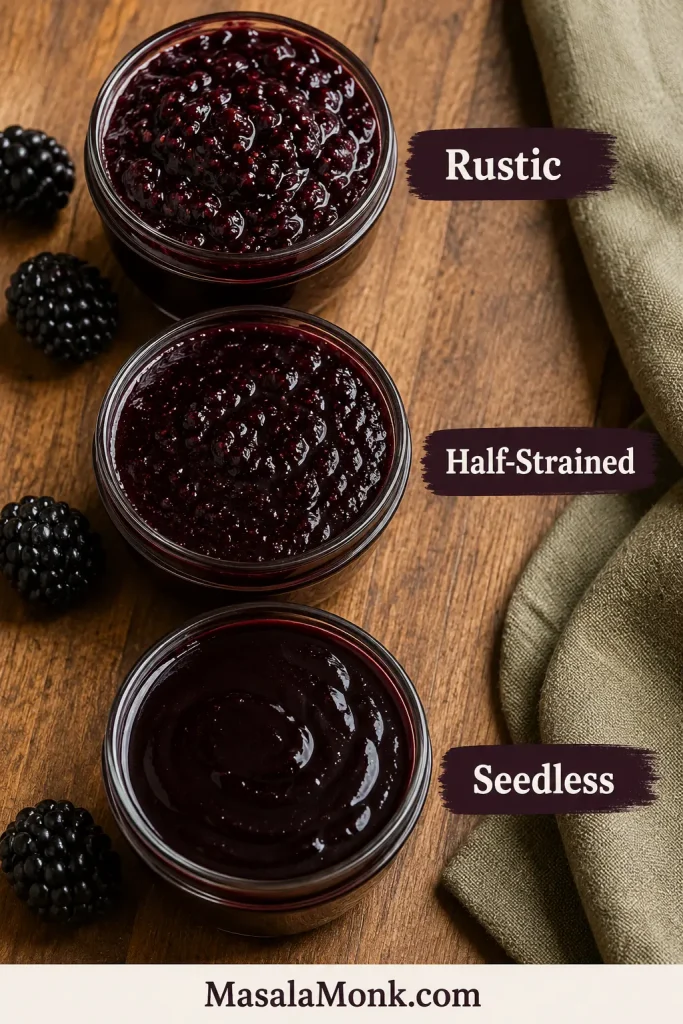
For most readers, straining half the berries is the best default. It reduces grit while keeping enough pulp and body for real jam texture. Half-strained jam is often the sweet spot because it still feels homemade without making every bite about seeds.
| Seed Method | Result | Best For |
|---|---|---|
| Leave all seeds in | Rustic, thick, full fruit texture | Fastest old-fashioned jam |
| Strain half the berries | Smoother but still jammy | Best balance for most people |
| Strain all the cooked berries | Very smooth seedless jam | People who dislike blackberry seeds |
| Drain through a jelly bag without pressing | Clear blackberry jelly | Jelly, not jam |
Seedless Straining Step
For seedless jam with real body, press the softened fruit firmly enough to capture thick pulp, not just thin juice.
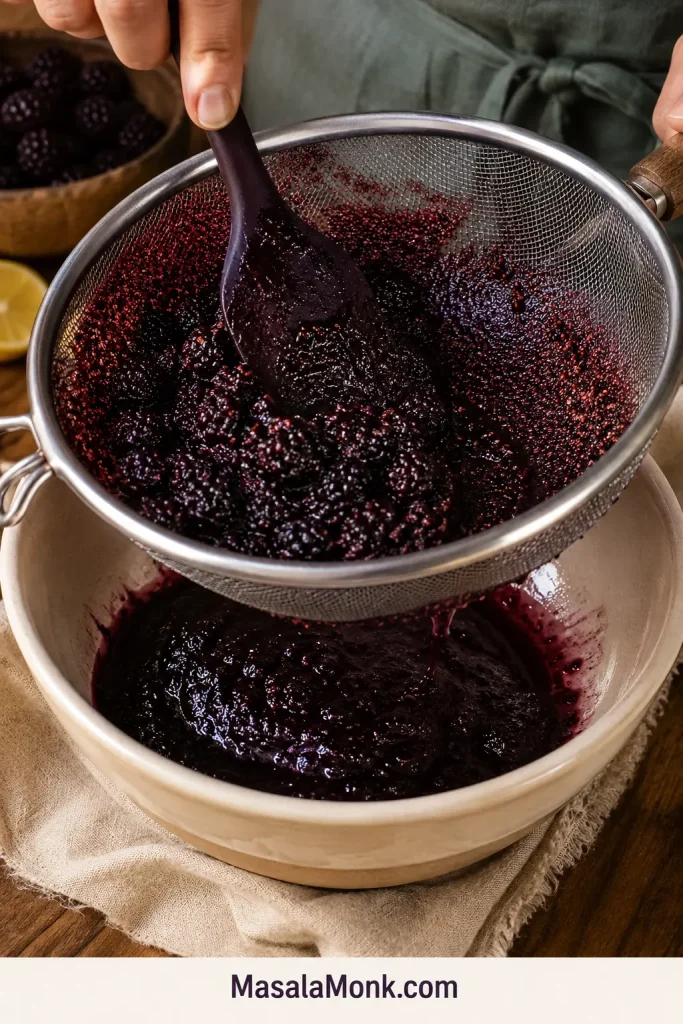
To strain half, cook the berries until softened, then press half the fruit through a fine mesh sieve, food mill, or chinois. Return the strained pulp and juice to the pan with the unstrained half. This keeps the jam thick and fruity without letting the seeds take over.
If you strain all the berries, press firmly enough to capture pulp, not just juice. For clear blackberry jelly, do not press the bag. Let the juice drip naturally so the jelly stays clearer.
Rustic, Half-Strained, or Seedless Texture
Compare the textures before straining all the fruit, because rustic, half-strained, and fully seedless jam each eat differently.
After choosing texture: Jam vs Jelly vs Preserves · Pectin Version · Troubleshooting
What Is Blackberry Jam?
Blackberry jam is crushed fruit cooked with sugar until it thickens into a spread. Unlike jelly, jam keeps some fruit body. Compared with preserves, it is usually less chunky and more evenly spreadable.
The best jar keeps the berry’s natural tartness. If it is undercooked, it runs like syrup. When overcooked, it can turn stiff and sticky. The sweet spot is glossy, spoonable, and thick enough to mound softly on toast.
Blackberry Jam vs Jelly vs Preserves
Once you start removing seeds, this distinction becomes important. Seedless jam still keeps fruit pulp, while blackberry jelly is built from strained juice.
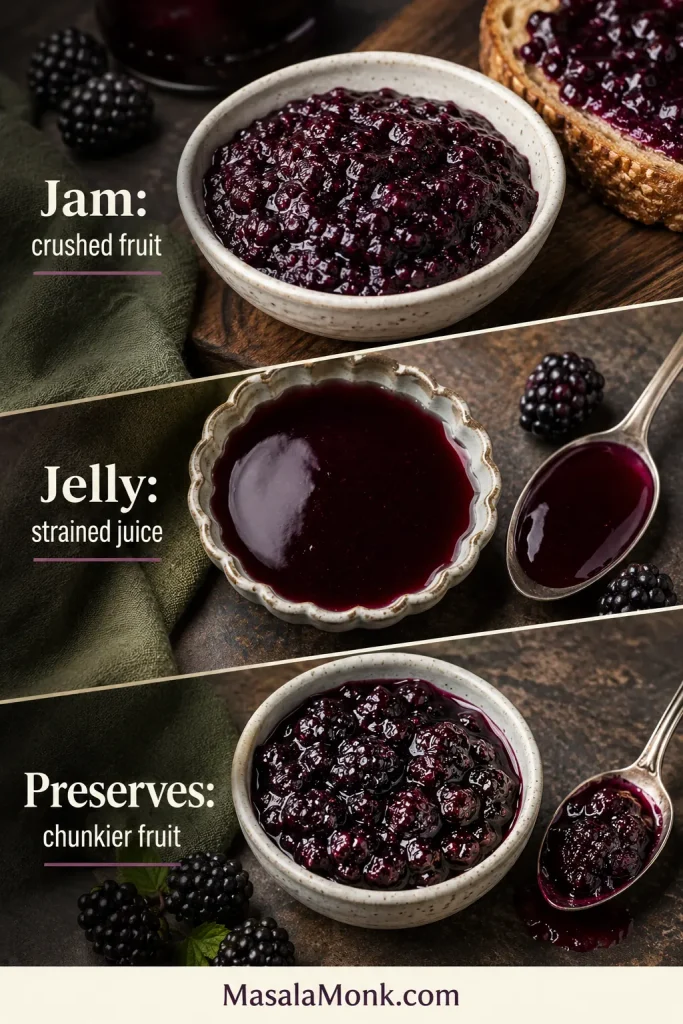
| Type | What It Is | Texture | Best Use |
|---|---|---|---|
| Blackberry jam | Crushed fruit cooked with sugar | Thick, spreadable, fruit texture | Toast, biscuits, cakes, yogurt |
| Blackberry jelly | Strained blackberry juice cooked to gel | Smooth, clear, no seeds or pulp | Toast, glazing, clean seedless texture |
| Blackberry preserves | Larger fruit pieces in a syrupy set | Chunkier and looser | Desserts, spooning, cheese boards |
| Blackberry freezer jam | Jam stored frozen instead of canned | Usually softer and fresher | Beginners, small batches, quick storage |
For another fruit-spread example, MasalaMonk’s pineapple jam and preserves shows how a smoother jam and chunkier preserve can come from the same fruit but eat very differently.
A smooth, clear, seedless spread may be better as blackberry jelly. Jam keeps fruit pulp; jelly starts with strained juice. For clear jelly, strain the cooked berries through a jelly bag or damp cheesecloth and avoid pressing the solids. With seedless jam, you can press softened fruit through a sieve or food mill because pulp belongs in the jar.
Blackberry Jam With Pectin
Pectin is useful when you want a faster, more predictable set, especially with very ripe, watery, or low-pectin berries. It is not better or worse than no-pectin jam; it is simply a less flexible method with its own order and ratios.
No-pectin jam gives deeper cooked-berry flavor and more flexibility, while pectin recipes trade that flexibility for speed and predictability. If you are using Sure-Jell, Ball, Certo, Pomona, or another pectin brand, follow that product’s fruit amount, sugar amount, acid, pectin type, and boiling order. In many pectin recipes, the order matters as much as the ingredients.
- Use pectin if you want a faster, more predictable set.
- Skip pectin if you want a deeper cooked berry flavor and do not mind a longer cook.
- Use low/no-sugar pectin if you want reduced sugar with a more reliable set.
- Do not guess conversions between liquid, powdered, regular, and low-sugar pectin.
Pectin can help with texture, but it does not replace safe canning steps. Pantry storage is a separate decision.
Canning Blackberry Jam Safely
If your jars are going into the fridge or freezer, the recipe can stay flexible. Pantry shelves are different: storage becomes part of the recipe.
Safety note: The main no-pectin recipe is written for fridge or freezer storage. For shelf-stable blackberry jam, use a tested canning recipe and follow the correct jar size, headspace, processing time, and altitude adjustment.
Can you can this exact lower-sugar recipe? Not as written. Use it for the fridge or freezer, or switch to a tested canning formula.
Canning is where jam-making becomes less flexible. That is not because canning is scary; it is because room-temperature storage needs a recipe built for it.
In other words, the jar is not the safety step; the full process is.
Tested No-Pectin Berry Jam Reference
For shelf-stable berry jam without added pectin, the National Center for Home Food Preservation gives a tested berry jam formula using 9 cups crushed berries and 6 cups sugar, yielding about 7–8 half-pint jars. The hot jam is packed into hot sterile jars with ¼ inch headspace and processed in a boiling-water canner with timing adjusted by altitude.
That canning ratio is different from the flexible lower-sugar fridge/freezer recipe in this post. This reference is included to show how shelf-stable jam differs; it is not a substitute for following full canning instructions from start to finish.
- Use half-pint / 8 oz / about 240 ml jars unless the canning recipe says otherwise.
- Choose proper canning jars and new lids.
- Fill hot jam into hot jars.
- Leave ¼ inch headspace for canned jam or jelly.
- Wipe rims before adding lids.
- Process in a boiling-water canner.
- Adjust processing time for altitude.
- Use low/no-sugar pectin instructions written for canning if preserving reduced-sugar jam.
- Do not use paraffin or wax seals for modern home-canned jam.
For detailed safety guidance, use a trusted home-preservation source such as the National Center for Home Food Preservation’s jam and jelly canning guidance. If you specifically want a tested berry jam method, their berry jams without pectin guidance is the better reference than improvising a pantry-stable version from a flexible fridge jam.
For many small batches, freezing is the easier answer. You still get homemade jam, but you do not have to turn it into a pantry-stable preserve.
Not canning today? Freezer Jam · Storage · Back to Recipe
Blackberry Freezer Jam
Blackberry freezer jam is the low-stress route when you want the homemade jar without the full canning afternoon. It is stored in the freezer instead of the pantry, so the process is more forgiving.
This post uses the cooked-jam route. Classic pectin freezer jam follows the pectin package method instead, so use those instructions if you are working from a freezer-pectin recipe.
Freezer jam is usually softer and fresher-tasting than canned jam. Some versions use pectin, while others are simply cooked down and frozen. Either way, use freezer-safe jars or containers and leave about ½ inch headspace so the jam can expand as it freezes.
- Cool jam before freezing.
- Use freezer-safe containers.
- Leave expansion space at the top.
- Thaw in the refrigerator.
- Keep thawed jam refrigerated.
Low-Sugar, No-Sugar, and Sugar-Free Blackberry Jam
Low-sugar blackberry jam can taste wonderfully fruit-forward. This is often the version people want when the berries are especially good and they do not want sugar to cover them up.
Low sugar is not just less sweet. It is a different texture. Less sugar usually means a softer set, longer cooking time, smaller yield, and shorter storage unless you use a reliable low-sugar canning method.
- Low sugar: less sugar, softer set, and fridge/freezer storage unless you follow a canning-safe method.
- No sugar or sugar-free: usually needs special pectin, chia seeds, or cold storage.
- Pantry-safe low sugar: requires a tested low/no-sugar canning method with its own processing instructions.
For fridge or freezer jam, start with 250–400 g sugar per 1 kg blackberries if you want a sharper, less sweet spread. Cook it until thickened, then rely on the cold plate test rather than the clock.
No-sugar or sugar-free blackberry jam usually needs special low/no-sugar pectin, chia seeds, or refrigerator/freezer storage. Do not assume a sugar-free jam is pantry-safe just because it looks thick; use the canning notes if shelf storage is the goal.
For a softer, small-batch preserve idea with apple and berries, MasalaMonk’s quick strawberry and apple preserve is a useful comparison.
Blackberry Jam Variations
These are flavor ideas for small fridge/freezer batches unless you are following a tested canning recipe for that exact combination.
Apple Blackberry Jam or Bramble Jam
Apple softens blackberry’s sharp edge and gives the jam a cozy autumn feel, especially when the berries are very ripe. In the UK, blackberry jam is often discussed as bramble jam, especially when made with foraged berries.
Blackberry Rhubarb Jam
Rhubarb pushes the jar brighter and sharper, which is lovely if you like tart jam. It also changes acidity, water content, and texture, so use a dedicated tested recipe if you want to can it.
Blackberry Jalapeño Jelly
Blackberry jalapeño jelly belongs on the savory-sweet side: cheese boards, crackers, sandwiches, and holiday appetizers. Treat it as its own jelly recipe rather than a small tweak to breakfast jam.
Blackberry Chia Jam
Blackberry chia jam is the quick breakfast version, soft-set and refrigerator-only. It uses berries, a little sweetener, lemon, and chia seeds instead of a traditional jam set.
Blackberry Vanilla Jam
Vanilla turns blackberry jam into more of a dessert spooning jam, especially for yogurt, cheesecake, oatmeal, and cake layers. Add vanilla near the end so it stays fragrant instead of cooked away.
Blackberry Lemon Jam
Blackberry lemon jam is the brighter jar. Lemon zest gives the fruit a fresher edge, as long as you use only the yellow zest and avoid the bitter white pith.
If your jam is not perfect the first time, you probably still have something useful: syrup, sauce, cake filling, yogurt topping, or a batch that just needs a few more minutes.
Troubleshooting Blackberry Jam
Most jam problems are not disasters; they usually come from water, sugar, heat, or patience falling slightly out of balance.
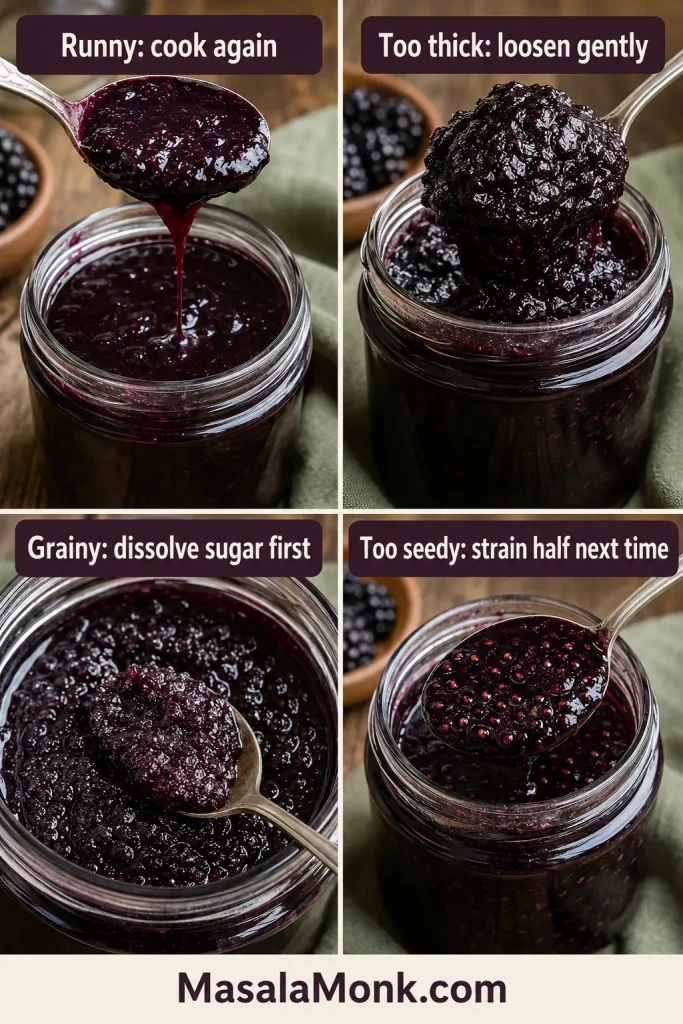
Why Is My Blackberry Jam Runny?
Runny blackberry jam usually means it needed more cooking, the berries were watery, the sugar was reduced too much, or the batch was too large. Frozen berries and low-sugar batches often need extra time.
To fix soft fridge jam, return it to a wide pan and simmer again. Stir often and use the cold plate test. If it stays loose, use it as blackberry syrup for pancakes, yogurt, oatmeal, or desserts.
Why Is My Jam Too Thick?
Jam becomes too thick when it is overcooked or cooked too aggressively near the end. For immediate use, warm it gently with a spoonful of water or lemon juice to loosen it. Do not casually re-can adjusted jam without safe canning guidance.
Why Is My Jam Grainy?
Grainy jam often comes from undissolved sugar or sugar crystals. Warm the fruit, sugar, and lemon gently at first, and stir until the sugar dissolves before boiling hard.
Why Is My Jam Foamy?
Foam is normal when berries and sugar boil. Skim it near the end if you want a cleaner-looking jar. A tiny amount of butter is sometimes used in pectin recipes to reduce foam, but it is not needed for this no-pectin version.
Why Is My Jam Too Seedy?
Blackberries are naturally seedy. Next time, strain half the cooked fruit for a balanced texture or strain all of it for smoother seedless blackberry jam. For clear jelly, drain the juice without pressing the pulp.
Why Did My Jam Scorch?
Jam can scorch if the heat is too high near the end, the pan is too thin, or the batch is too large. Use a wide heavy pan, stir more often as the jam thickens, and avoid oversized batches.
Once fixed or cooled: Storage · How to Use It · Back to Recipe
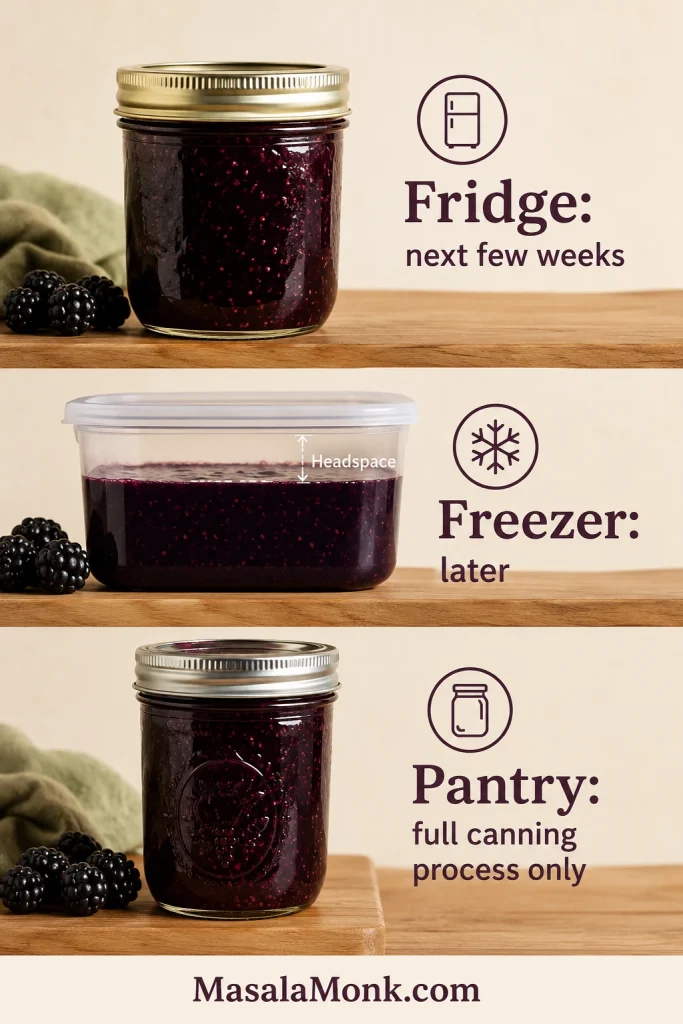
Storage and Freezing
Storage depends on how the jam was made. Flexible no-pectin and low-sugar batches belong in cold storage unless they were prepared with a tested canning process.
| Storage Type | How to Store | Notes |
|---|---|---|
| Fridge jam | Cool, cover, and refrigerate | Best within 2–3 weeks |
| Freezer jam | Use freezer-safe jars or containers | Best within 3–6 months for flavor; leave ½ inch headspace |
| Canned jam | Store sealed jars in a cool, dark place | Follow the canning recipe’s shelf-life guidance |
| Opened canned jar | Refrigerate after opening | Use within a few weeks |
| Moldy or fermented jam | Discard | Do not scrape mold off jam and keep eating |
A fridge jar is for the next few breakfasts, a freezer jar is for later, and a pantry jar only belongs on the shelf when the full canning process was built for it.
After storage: How to Use It · FAQ · Back to Top
Once the jar has cooled, the real reward is how easily it fits into breakfast, dessert, and the small snacks in between.
How to Use Blackberry Jam
Blackberry jam is sweet enough for breakfast but tart enough for desserts and cheese boards. A good jar cuts through creamy, buttery, and sweet foods instead of tasting flat.
It is especially good anywhere you want something sweet but not flat: buttery toast, plain yogurt, sharp cheese, or a simple cake that needs a little fruit.
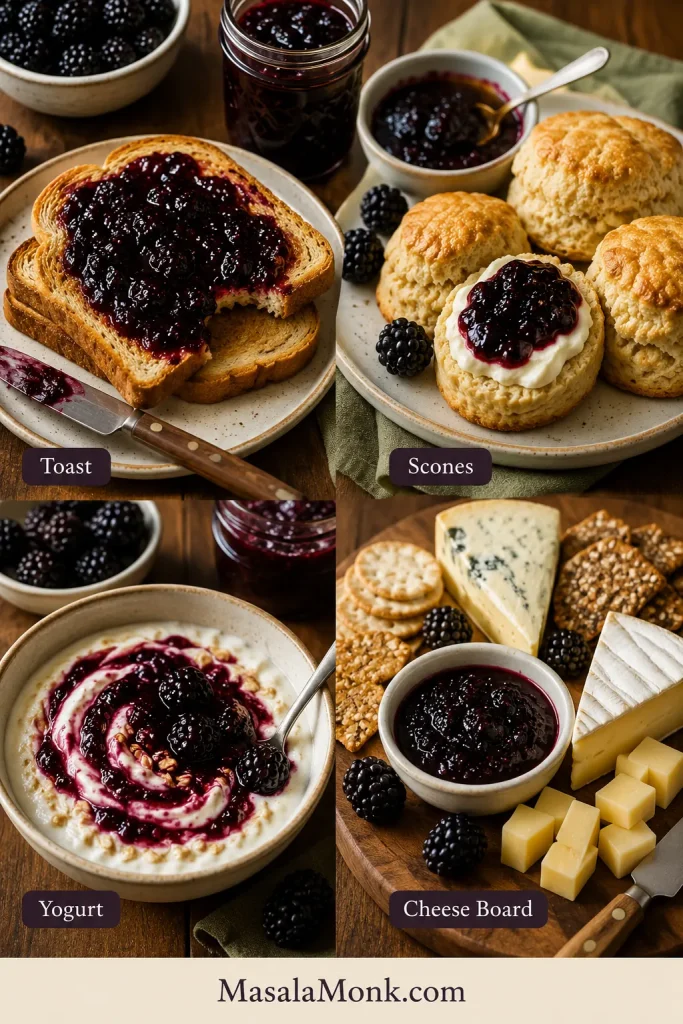
- Spread on toast, biscuits, croissants, or easy English scones.
- Spoon over Japanese pancakes, waffles, oatmeal, yogurt, or ice cream.
- Swirl a spoonful into overnight oats or layer it with plain yogurt and granola.
- Use as a cake filling, cheesecake topping, or spooned dessert sauce with homemade whipped cream.
- Swirl into thumbprint cookies or shortbread bars.
- Serve with sharp cheddar, goat cheese, crackers, or warm biscuits.
- Warm gently and brush over a simple cake as a berry glaze.
- Stir into sparkling water, mocktails, or cocktails for a berry syrup effect.
FAQ
Most of the big decisions happen before the jar cools. These quick answers cover the questions that usually come up while cooking, storing, or planning the next batch.
Does blackberry jam need pectin?
No. It can set without added pectin when cooked with sugar and lemon juice until thick enough. Use the cold plate test or thermometer test instead of relying only on time.
Do frozen blackberries work for jam?
Yes. Thaw them first, then use the berries and their juices unless the liquid looks thin and watery. Frozen berries may take a little longer to cook down.
How long should blackberry jam cook?
A main batch usually takes 25–40 minutes after the sugar dissolves. Small batches cook faster; frozen, watery, or low-sugar batches often take longer.
What temperature makes blackberry jam set?
At sea level, it usually sets around 105°C / 220–221°F. Because altitude and sugar level affect the exact set point, the cold plate test is still useful.
Why did my blackberry jam stay runny?
It may need more cooking, or the berries may be watery, low in pectin, low in sugar, or crowded in the pan. Return soft fridge jam to a wide pan and cook again, testing often.
What is the best way to make seedless blackberry jam?
Cook the berries until soft, then press some or all of the fruit through a fine mesh sieve, food mill, or chinois. Straining half gives a smoother jam while keeping enough body.
Should blackberry seeds be removed?
No. Leave them in for rustic jam, or strain some of the fruit if you prefer a smoother texture.
How much sugar can be reduced?
For fridge or freezer jam, you can reduce the sugar to about 250–400 g per 1 kg blackberries. The jam will usually set softer and keep for less time.
Is low-sugar blackberry jam safe for canning?
Only when made with a tested low-sugar canning recipe or a low/no-sugar pectin method with its own processing instructions.
Blackberry jam or blackberry jelly: what is the difference?
Jam uses crushed fruit, so it has body and texture. Jelly uses strained juice, so it is smoother, clearer, and seedless.
How are blackberry preserves different?
Preserves are usually chunkier and looser than jam, with more whole or partial berries in the spread.
How long does homemade blackberry jam last?
Fridge jam is best within 2–3 weeks. Freezer jam is best within 3–6 months for flavor. Canned jam depends on proper processing and a good seal.
Does blackberry jam freeze well?
Yes. Cool it first, use freezer-safe containers, leave about ½ inch space for expansion, and thaw in the refrigerator.
Which pectin works best?
The best pectin is the one your recipe was written for: powdered, liquid, regular, or low/no-sugar. They are not always interchangeable, so follow that product’s order and ratios.
Should this recipe be doubled?
No. Make two separate batches. Doubling in one pot slows evaporation and can make the final set less reliable.
What tastes good with blackberry jam?
Toast, scones, pancakes, yogurt, oatmeal, cakes, cheesecake, ice cream, cheese boards, and whipped cream all work well.
Final Thought
A good blackberry jam should taste like the fruit led the recipe and the sugar only helped it along.
Once you learn the signs — glossy bubbles, a slower spoon, and that little wrinkle on a cold plate — the process stops feeling like guesswork. Then every batch becomes your choice: rustic or seedless, soft or firm, fresh or frozen, fridge jam or properly canned. That is when blackberry jam becomes less of a guessing game and more of a jar you know how to make again.


