Posted on 7 Comments

Fish and Chips Reimagined: 5 Indian Twists (Recipe + Method)

Hands pull apart a crispy masala-battered fish fillet to reveal steaming white flakes, with thick chips and a bowl of green chutney dip on a dark background. Text overlay reads “5 Indian Twists – Fish & Chips – Crisp Masala Batter • Chutney Dips” and “MasalaMonk.com.”

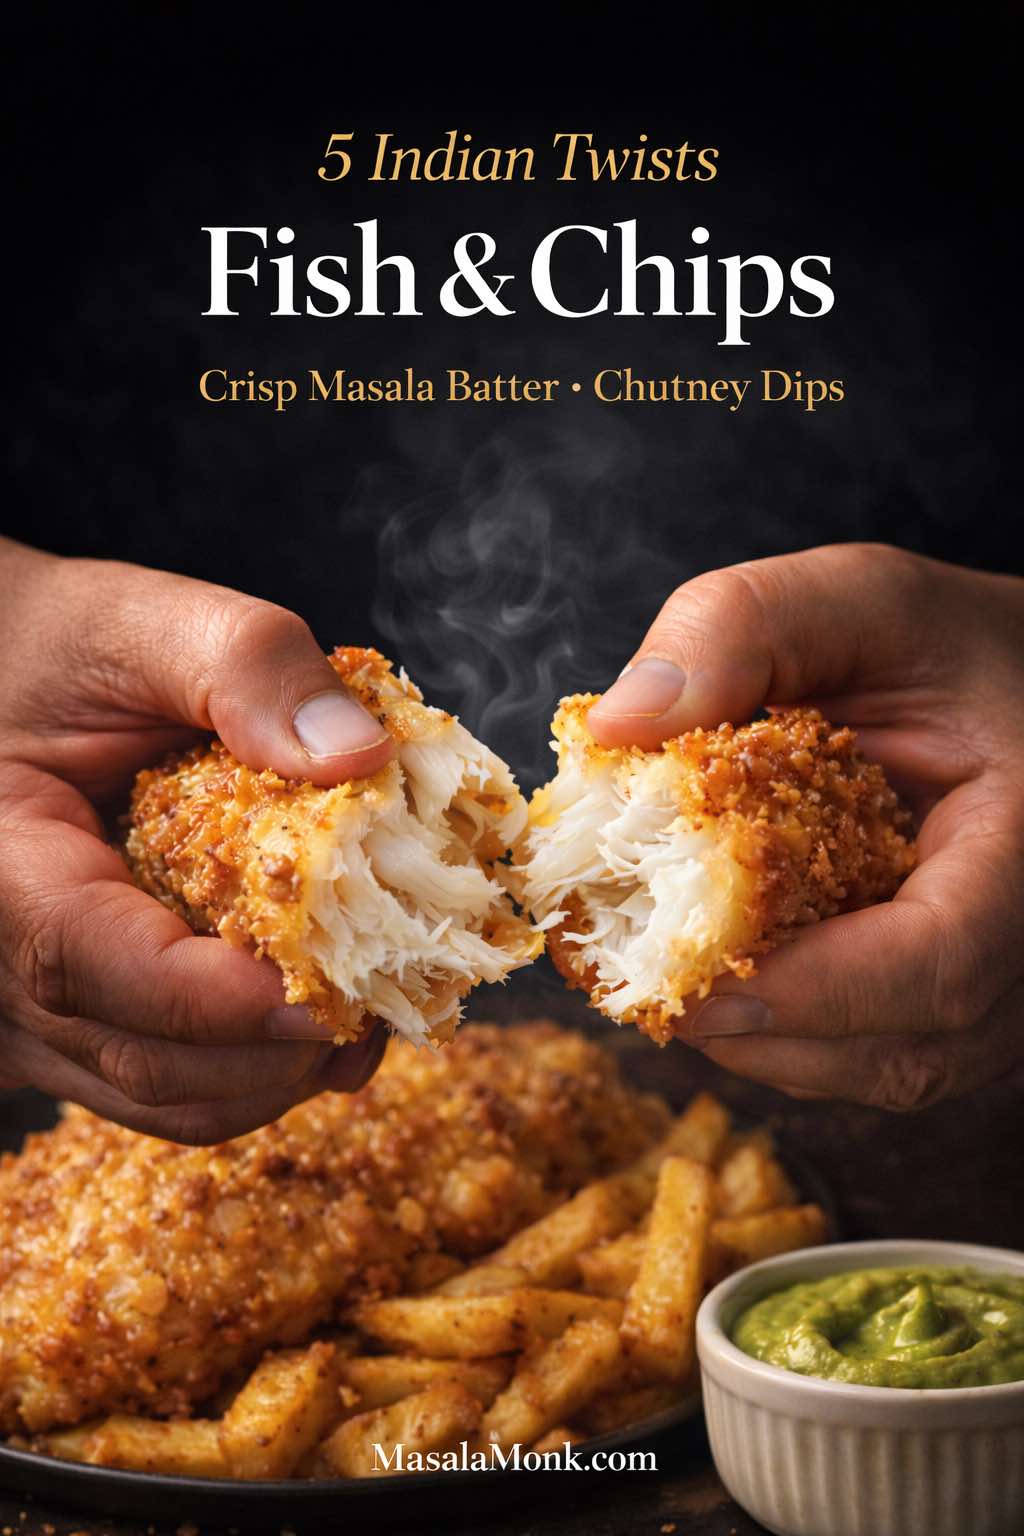
There’s a reason fish and chips never really leaves the cultural conversation. It’s not just comfort food; it’s a texture ritual. You crack through a crisp shell, hit steamy flakes of fish, then chase it with a chip that’s somehow crunchy at the edges and pillowy in the middle. Even when it’s simple, it feels like an event.

At the same time, fish and chips can be stubbornly one-note if you make it the same way every time. The solution isn’t to reinvent the dish into something unrecognizable. Instead, keep the bones of a British-style fish and chips plate—fish that stays juicy, chips that stay crisp—then apply Indian flavor logic in the places where it actually belongs: in the seasoning, in the coating, and in the dips.

That’s what this post is about: fish and chips with Indian twists. The classic stays the hero. The twists simply make the story more interesting.

Dark editorial comparison card titled “Classic vs Indian Twist” showing a split plate of fish and chips. Left side labeled Classic: plain battered fish, thick chips, lemon wedge, and a pale tartar-style dip. Right side labeled Indian Twist: masala-speckled crispy fish, chaat-dusted thick chips, green chutney dip, and a small bowl of spices. Text reads “Same crunch. New flavor logic.” Footer: MasalaMonk.com.
Fish & chips doesn’t need a makeover—it needs a smarter flavor system. This quick classic vs Indian twist card shows the whole idea in one glance: keep the crunchy battered fish and thick chips, then add masala batter, chutney dips, and chaat-style seasoning for a bolder plate. Save this for your next comfort-food night, then cook your way through fish and chips with Indian twists—from chutney dips to spice-forward coatings—so every batch tastes new without losing the classic crunch.

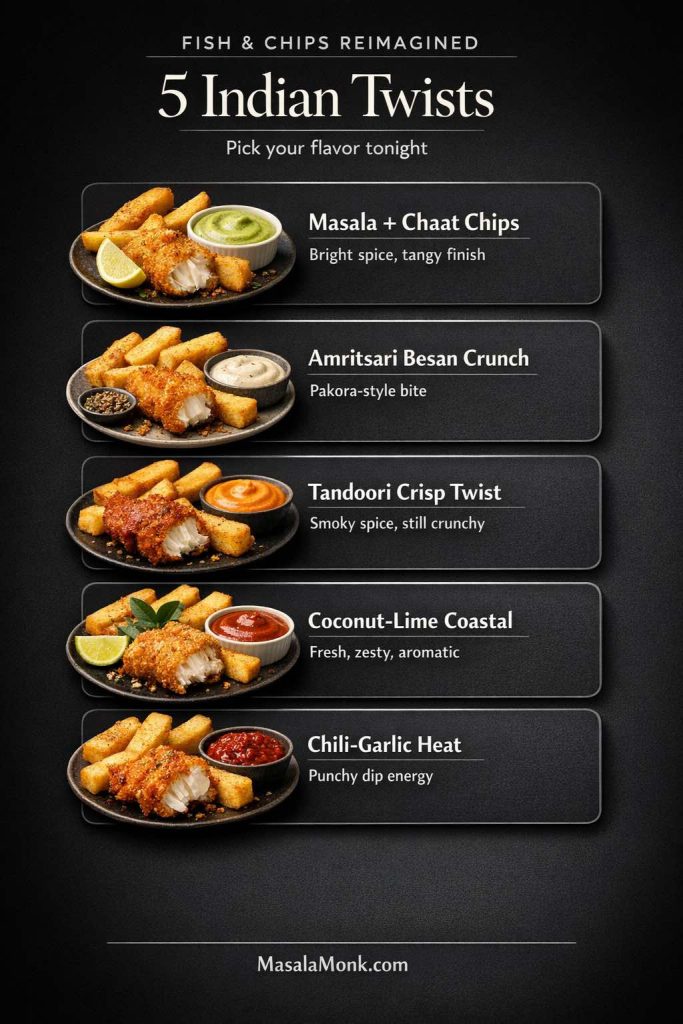
You’ll still get the timeless cues of traditional fish and chips—the hot oil, the batter, the satisfying crunch. However, you’ll also get five Indian twists on fish and chips that feel natural: a masala-forward version with chaat-style chips, an Amritsari-inspired besan crunch, a tandoori direction that stays crisp, a coastal coconut-lime take, and a punchy chili-garlic twist for heat lovers. Along the way, you’ll see how to handle fish and chips batter without making it heavy, how to keep fried fish and chips crisp after the oil, and how to choose chips that don’t collapse the moment a dip shows up.

If you grew up loving a chip shop plate, you’ll recognize the structure. If you grew up loving pakoras, tandoori grills, chutneys, and masala fries, you’ll recognize the flavor decisions. Put them together and you get a plate that feels both nostalgic and new.


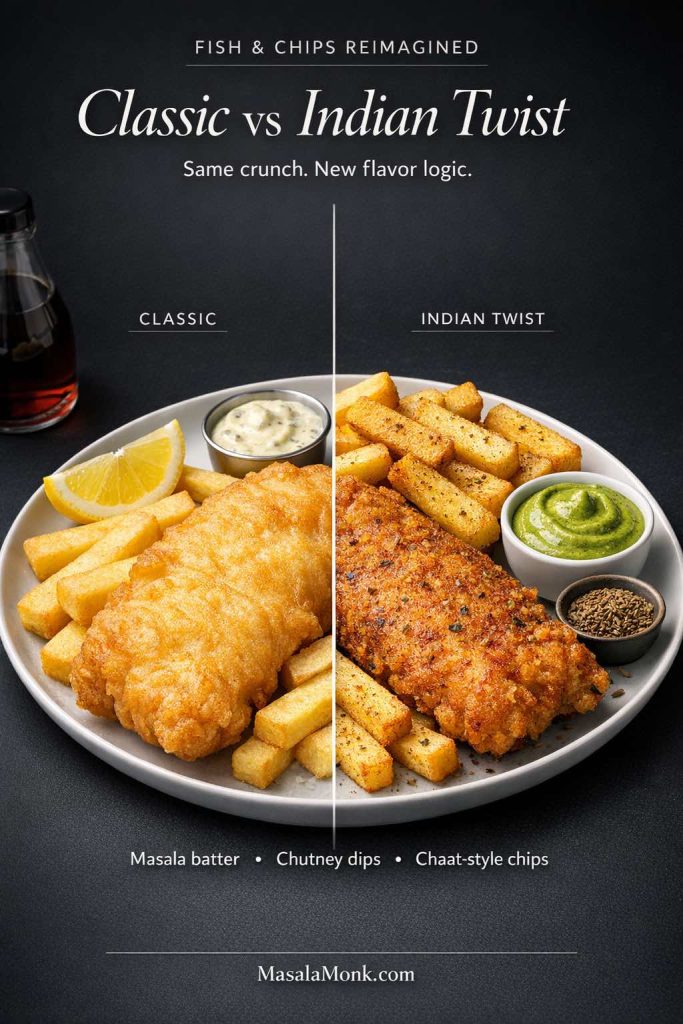
Fish and chips with Indian twists: what stays classic, what changes

Before we cook, it helps to define the boundary lines. Fish and chips works because it has a clean architecture:

  • A seasoned fish fillet that stays moist
  • A crisp coating that shatters rather than chews
  • Chips that are sturdy enough to stay good with salt, vinegar, and sauces
Want Indian-style fish and chips without overcomplicating it? Save this quick “classic vs Indian twist” decoder: keep the same crunchy architecture (moist fish, shatter-crisp coating, sturdy chips) and change only the accents—batter/coating, fish seasoning, and dips + chips. The easiest win: masala chips + green chutney mayo. Get the full Fish & Chips Reimagined guide with 5 Indian twists, exact steps, and dip ideas on MasalaMonk.com—then save this for your next fry night.

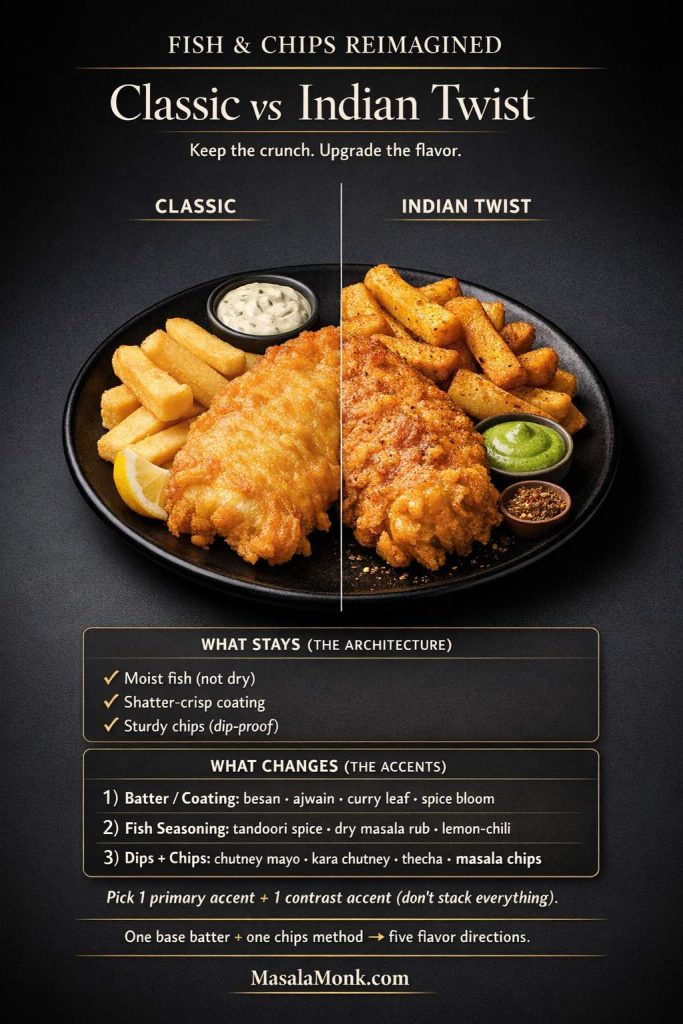
So in this reimagined version, that architecture stays. What changes is the accent system. Indian food doesn’t rely on “one sauce does everything.” Instead, it layers flavor through spice blends, acid choices, aromatics, and dips that bring contrast. When you bring those choices into fish and chips, you get variety without chaos.

In practice, the best Indian twists on fish and chips usually fall into one of three categories:

  1. Twists in the batter or coating
    Think besan, ajwain, curry leaves, or a subtle spice bloom. This is where the crunch can carry flavor.
  2. Twists in the fish seasoning
    Tandoori-style yogurt spice, a dry masala rub, or a bright lemon-chili approach. This is where you make the fish itself memorable.
  3. Twists in the dips and chips
    Chutney-mayo, spicy yogurt, kara chutney, thecha, or masala chips. This is where you turn “fish and chips” into a full plate.
Vertical guide card titled “One Base. Five Twists.” showing a matte-black plate with crispy battered fish, thick British chips, and a lemon wedge. Below, a “Base (do this once)” box lists: cook chips twice (soft to crisp), mix batter cold (small lumps), and fry at 175–185°C / 350–365°F. Five colored rows list Indian twist finishes: Masala + Chaat Chips, Amritsari Besan Crunch, Tandoori Crisp Twist, Coconut-Lime Coastal, and Chili-Garlic Heat, plus the line “Pick 1 twist + 1 contrast dip—serve hot.” Footer reads MasalaMonk.com.
Use this as your quick roadmap: one reliable chips method + one cold batter gives you the classic crunch, then you choose one Indian finish (masala, Amritsari besan, tandoori, coconut-lime, or chili-garlic) to change the whole plate without extra stress. Save it for weeknights when you want fish and chips—just with smarter flavor.

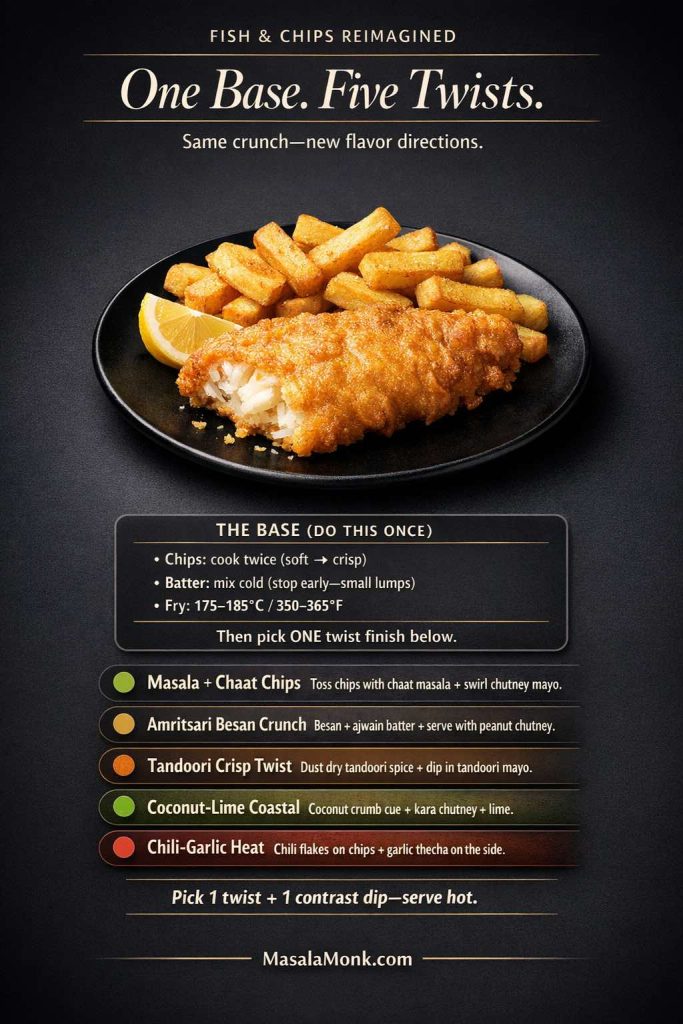
Because those categories are flexible, you can do five variations without feeling like you’re repeating yourself. Even better, you can keep your kitchen workflow efficient: one base batter, one chips method, then five flavor directions.

Also Read: Keto Hot Chocolate Recipe (Sugar-Free Hot Cocoa) + Best Homemade Mix


British style fish and chips recipe base: the method that keeps everything crisp

A “twist” only tastes as good as the base it sits on. So let’s lock down the base method first, in a way that supports both traditional fish and chips and these Indian twists on fish and chips.

Choosing fish for fried fish and chips (fresh or frozen)

Classic British chips pair well with mild, firm white fish. Cod and haddock are the famous choices, yet plenty of other firm white fish works beautifully. What matters more than the specific species is the thickness and structure of the fillet.

  • Thicker fillets give you more forgiveness. They stay juicy while the coating crisps.
  • Very thin fillets can overcook quickly, especially if your batter is thick.
  • Very delicate fish can flake too soon, which makes battering fiddly.
Vertical guide card titled “Choose the Right Fish” on a dark studio background. A black tray shows two raw white fish fillets with a 2–3 cm thickness label and a thinner fillet marked “too thin,” plus a frozen fillet pack and a towel for “dry well.” Panels explain the thickness rule, fresh vs frozen, and thaw-and-blot steps for crisp fish and chips.
Choosing fish for fish and chips is less about “fancy” and more about structure. This quick guide shows the one rule that matters most—2–3 cm thick fillets—so your fish stays juicy while the batter turns shatter-crisp. It also breaks down when frozen fish is a great choice (hint: it can be excellent) and the simple thaw + blot routine that keeps the crust crisp instead of watery. Save this as your fish-counter cheat sheet before your next fry night.

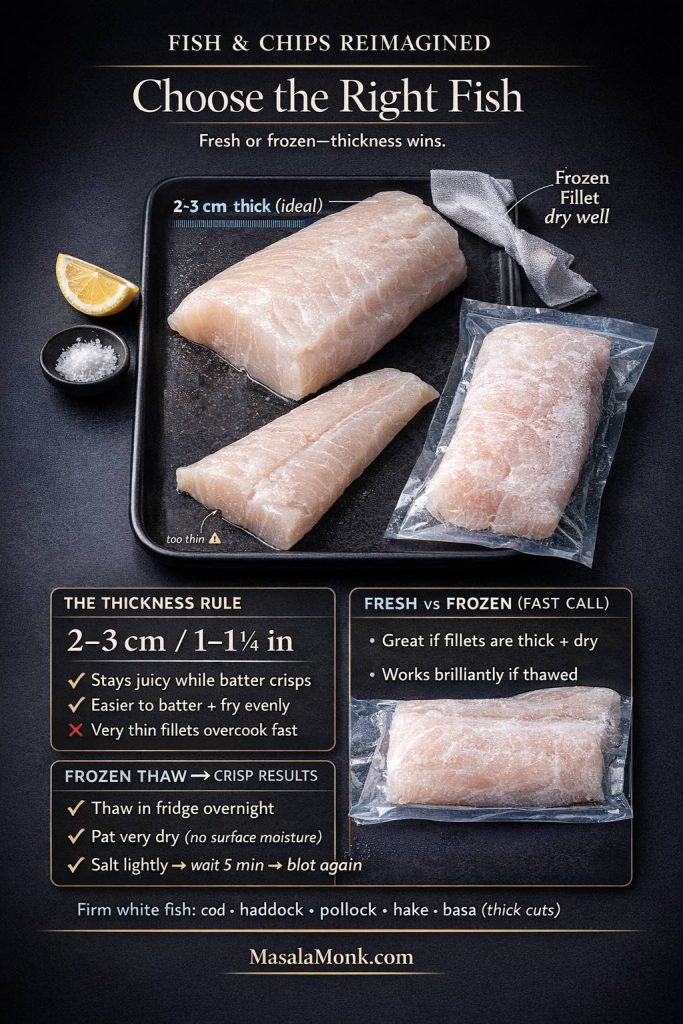
Frozen fish can be excellent for fish and chips, which is why “best frozen fish and chips” gets so much attention. The trick is simply to thaw properly and remove surface moisture. If you thaw fish in the fridge overnight, then blot well before seasoning, you can get results that rival fresh.

When you’re choosing fish for fried fish and chips, thickness beats “fancy.” Aim for fillets that are about 2–3 cm thick so the fish stays juicy while the coating crisps. If cod or haddock is pricey where you live, don’t overthink it—use any firm white fish that holds its shape, then focus on drying the surface well before battering. If you want a quick reference for sensible cod/haddock choices, keep the sustainable cod and haddock guide bookmarked; for easy substitutes when cod isn’t practical, these whitefish swaps are handy.

The real goal of fish and chips batter: light shell, not a thick coat

Fish and chips batter isn’t supposed to taste like bread. It’s supposed to act like a crisp, airy jacket that protects the fish while adding crunch.

Vertical guide card showing two glass bowls of fish and chips batter on a dark studio background. Left bowl is labeled “RIGHT (LOOSE)” with batter flowing in a thin ribbon from a spoon. Right bowl is labeled “WRONG (THICK)” with paste-like batter clinging to a spoon. Text explains loose pancake batter, small lumps are fine, and cold batter plus 175–185°C oil makes a crisp, not greasy shell. MasalaMonk.com footer.
Want that classic fish & chips crunch—light, airy, and shatter-crisp? This quick “batter decoder” shows the #1 difference: loose batter that ribbons off the spoon vs. thick batter that turns bready and greasy. Keep the bowl cold, stop mixing early (lumps are fine), and fry hot in the 175–185°C / 350–365°F zone for a thin, crisp shell that protects the fish without tasting like bread. Save this for next fry night and use it with any of the Indian twist dips + masala chips in the post.

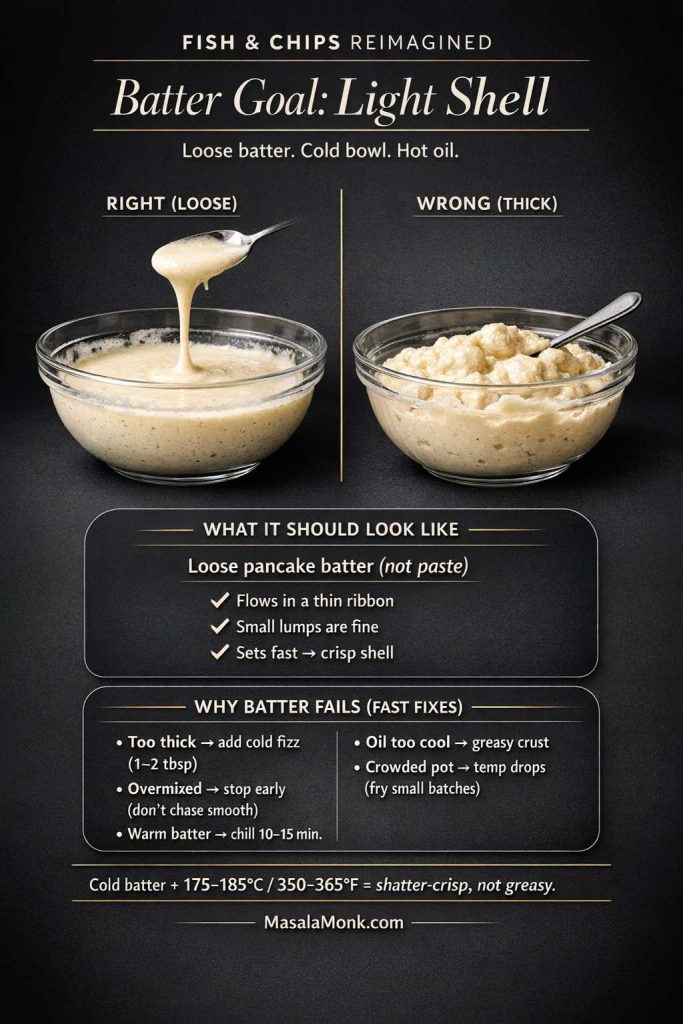
When batter goes wrong, it usually goes wrong in predictable ways:

  • Too thick and it becomes bready, sometimes even gummy.
  • Overmixed and it becomes tough.
  • Warm batter and it absorbs oil more readily.
  • Oil too cool and the batter drinks fat instead of crisping.

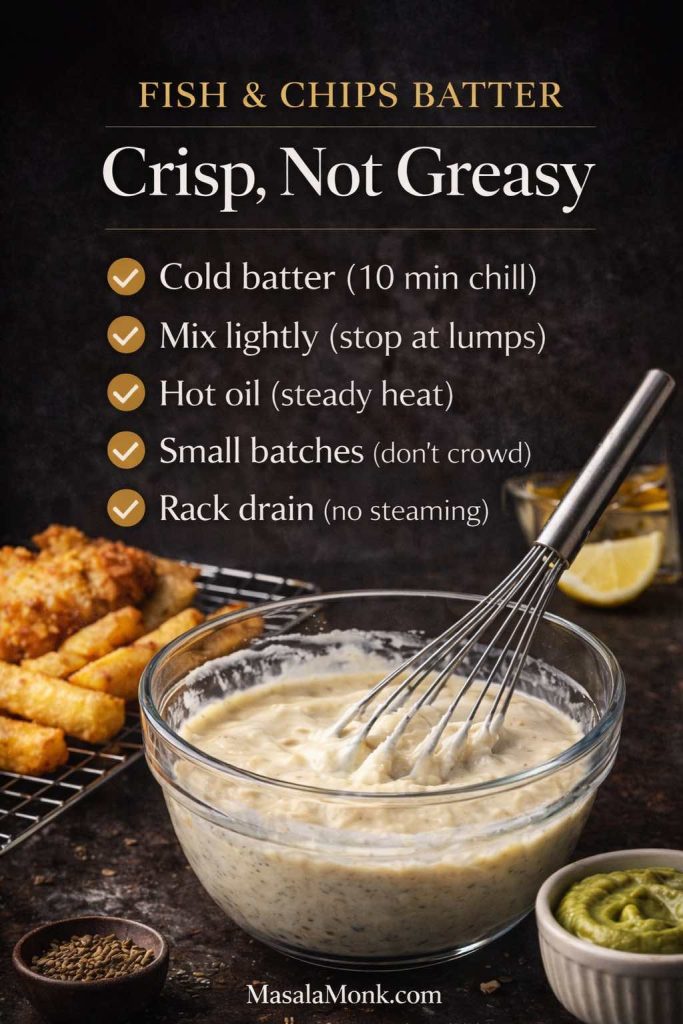
A good fish and chips batter should look like loose pancake batter, not a thick paste. Mix just until the flour disappears; a few small lumps are fine and actually help keep the crust light. Then chill it while your oil heats—cold batter hitting hot oil sets faster and stays crisper. If you want a classic baseline for batter texture and handling, BBC Good Food’s next-level fish & chips is a solid reference point.

How to make fish and chips batter for Indian twists on fish and chips

You’ll notice that the five variations later will sometimes change the seasoning or flour choices. Still, the core approach stays the same.

Dark, magazine-style guide card showing a glass bowl of fish and chips batter with a whisk, chips and a piece of fried fish on a rack in the background, plus a small bowl of green chutney dip. Text overlay reads “Fish & Chips Batter: Crisp, Not Greasy” and lists tips: cold batter, mix lightly, hot oil, small batches, rack drain. Footer says “MasalaMonk.com.”
Want fish and chips batter that turns crisp, not greasy? This quick guide saves you from the two biggest disappointments—heavy coating and soggy crust. Chill the batter, mix lightly, keep the oil hot, fry in small batches, and always drain on a rack so steam can’t ruin the crunch. Save this card for your next fish & chips night—then use it to nail every one of our 5 Indian twists (masala batter + chutney dips included).

Base batter structure (adaptable):

  • A flour base (all-purpose flour as the backbone)
  • A crisping assistant (a little cornstarch or rice flour)
  • Salt
  • A cold fizzy liquid (sparkling water or beer)
  • Optional lift (a small pinch of baking powder)

The fizzy liquid matters because bubbles help keep the batter airy. Meanwhile, the cornstarch or rice flour helps the crust dry into a crisp shell rather than staying tender.

The biggest reason fried fish and chips turns heavy is temperature drop: too much fish at once pulls heat from the oil, and batter soaks instead of setting. Fry in smaller batches and let the oil return to temperature between rounds. Also, drain on a wire rack, not a plate—steam is what ruins that first-crack crunch. Serious Eats breaks down these fundamentals clearly in their fish and chips recipe, especially the parts about oil temperature and rack draining.

Oil temperature and timing: the hidden backbone of traditional fish and chips

Fried fish and chips is less about “how long” and more about “how hot.” Oil temperature influences everything: crust, greasiness, and how quickly the fish cooks.

Aim for oil that stays in a steady hot zone—around the mid-170s °C / mid-300s °F is a common target. If the oil drops too low after adding fish, the batter will absorb oil before it sets. On the other hand, if the oil is wildly hot, the crust can brown too quickly and the fish won’t have time to cook through.

Oil temperature guide for crispy fish and chips on a dark studio background. A deep pot of hot oil holds a clip-on thermometer, with thick chips and a fried fish piece on a rack behind. Text overlay shows three ranges: too low 160–170°C (320–340°F) greasy, sweet spot 175–185°C (350–365°F) crisp shell, too hot 190°C+ (375°F+) browns fast and undercooked center. MasalaMonk.com footer.
If fish turns greasy or chips go limp, it’s usually not the recipe—it’s the oil temp. This “sweet spot” card shows the crisp zone that sets batter fast, keeps the crust light, and helps chips stay sturdy. Use it while you cook, then pair it with any of our 5 Indian twists on fish & chips (masala batter, chutney dips, chaat-style chips). Save this for your next fry night and share it with a fellow crisp-chaser.

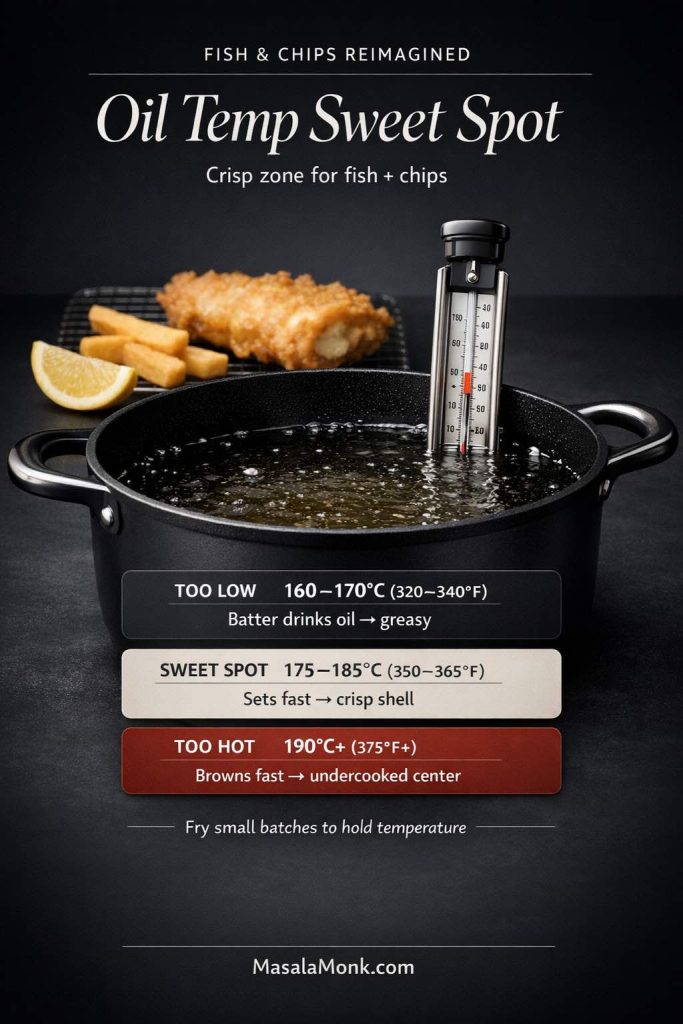
There’s also an unglamorous detail that makes a huge difference: how you drain. If you put freshly fried fish on a flat plate, steam collects under it and softens the crust. If you put it on a rack, air circulates and the crust stays crisp. Serious Eats calls this out clearly in their approach, and it’s one of those tiny moves that changes the whole result.

Don’t guess doneness by color alone. Fish is done when it flakes easily in thick sections and the center turns opaque, but the cleanest check is temperature: pull it when the thickest part hits 145°F / 62.8°C. That number comes straight from the USDA’s safe temperature chart. Hitting it means the fish stays moist while the crust stays crisp—no dry, cottony fillets.

Also Read: 10 Low Carb Chia Pudding Recipes for Weight Loss (Keto, High-Protein, Dairy-Free)


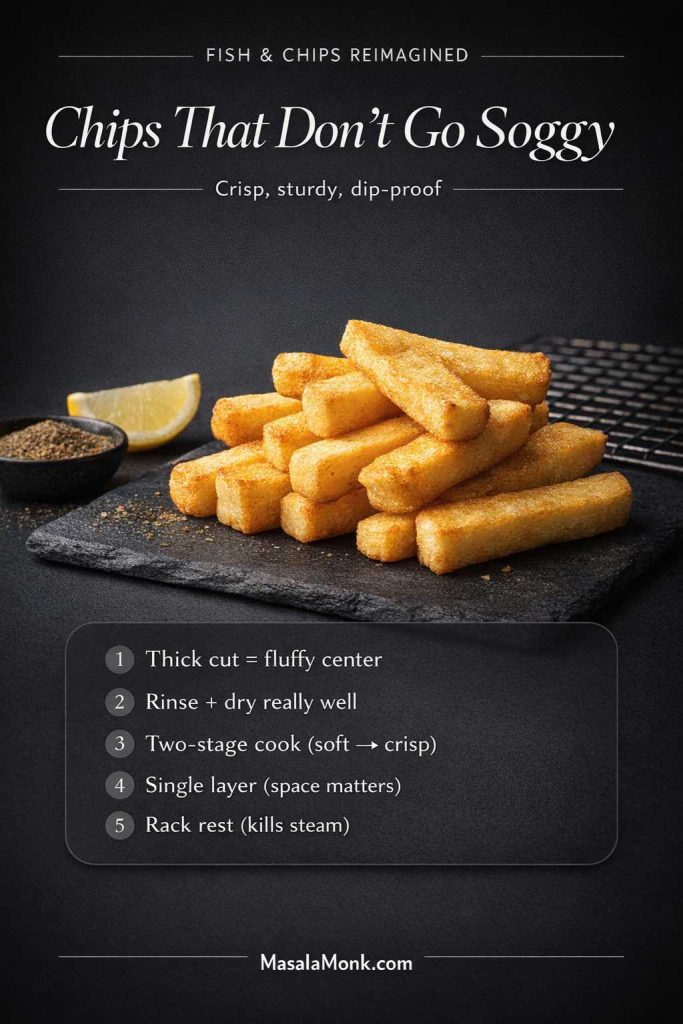
How to make chips for fish and chips with Indian twists (crisp, sturdy, dip-proof)

Chips are often treated like the sidekick, but in fish and chips they’re half the point. If you want the vibe of old English fish and chips, chips shouldn’t be thin and delicate. They should be thick enough to keep a fluffy center.

Different people use different words here—British chips, English chips, fries, chips—but the key is the cut and the cooking strategy.

Dark editorial guide card titled “Chips That Don’t Go Soggy” showing thick British-style chips stacked on a slate board with a lemon wedge, a small bowl of seasoning, and a wire rack in the background. Text overlay lists five tips: thick cut fluffy center, rinse and dry well, two-stage cook, single layer, and rack rest to stop steam. Footer reads “MasalaMonk.com.”
Soggy chips can ruin even perfect fish. This quick guide keeps your fish and chips chips crisp, sturdy, and dip-proof: go thick cut for a fluffy center, rinse and dry really well, cook in two stages (soft → crisp), keep a single layer so heat can circulate, and finish with a short rack rest to kill steam. Save this card for every fish & chips night—especially when you’re doing fish and chips with Indian twists and serving chutney dips.

The potato choice matters more than most people admit

If you’ve ever made chips that looked golden but tasted hollow, the potato may have been the reason. Some potatoes crisp beautifully; others turn soft too easily.

If you want a quick guide to potato choices for crisp fries and chips, MasalaMonk has a helpful breakdown in these best potatoes for French fries. It’s not just trivia. The potato you choose affects how well your chips survive:

  • spice blends
  • vinegar or lemon
  • chutneys and mayo dips

The simplest chip method for a home kitchen

If you’re not trying to run a chip shop, keep it doable. You can still get the “proper chips” feel with a method that respects the basics:

  1. Cut thicker batons, not shoestrings.
  2. Rinse to remove surface starch, then dry extremely well.
  3. Cook in two stages: a softer cook first, then a crisp finish.
Want proper chips at home without overthinking it? Save this: the secret is a two-stage cook—a softer first cook for a fluffy center, then a hotter finish for crisp edges. Rinse off surface starch, dry really well, and always rack-rest 3–5 minutes so steam escapes (that’s how chips stay crunchy). Use this method for classic fish and chips—or any of our Indian twist versions.

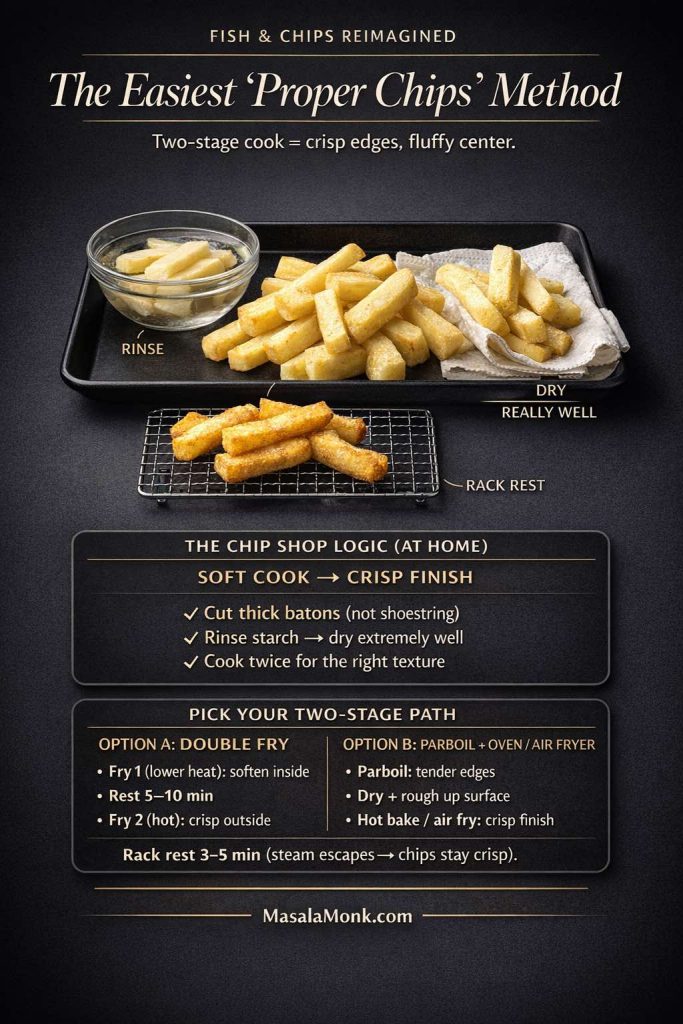
That “two-stage” idea is the backbone of chip-shop chips. You can do it as a double fry if you love deep-frying. Alternatively, you can do a parboil followed by a hot oven or air-fryer crisp stage.

If you’re making chips from scratch, the fastest upgrade is a two-stage cook: a gentler first cook to soften the inside, then a hotter finish to crisp the outside. That second stage is where you win the “proper chip” texture—crisp edges, soft center. If you want a full step-by-step with multiple cut styles and finishes, MasalaMonk’s crispy homemade French fries guide is a good companion piece to keep handy.

Crinkle chips, frozen chips, and the “weeknight fish and chips” reality

Sometimes you’re not in the mood to soak potatoes and baby-sit oil. That’s when crinkle chips and frozen chips earn their keep.

Crinkle chips are especially good for Indian twists on fish and chips because the ridges trap seasoning. They hold onto spice blends and chutney-mayo in a way that smooth chips can’t.

Weeknight fish and chips doesn’t have to mean soggy chips. This quick decoder shows why crinkle-cut chips grab seasoning better, plus the simple frozen chips crisp plan for oven or air fryer: single layer, hot cook, flip once, finish blast, then rack rest so steam escapes. Save this card for busy nights—then use it with any of the 5 Indian fish & chips twists (masala chips, chutney-mayo dips, thecha heat). Full step-by-step + twists on MasalaMonk.

Frozen chips can also work well if you bake them hot, give them space, and finish with a quick crisp blast. The key is to avoid steam build-up. Spread them well, flip halfway, then let them sit briefly on a rack before serving. That short rack rest helps them stay crisp, especially if you’re serving with dips.

If you’re doing chips in an oven or air fryer, treat space like an ingredient. Overcrowding traps moisture and turns crisp edges into soft, steamed potato. Spread chips out, flip once, then let them rest briefly so surface steam escapes before you plate. If you want a quick checklist for the common mistakes that kill crispness, this MasalaMonk guide on air fryer mistakes is worth a skim.

Also Read: Garlic & Paprika Cabbage Rolls (Keto-Friendly Recipes) – 5 Bold Savory Twists


Fish and chips with Indian twists: the five variations that actually make sense

Now the fun part. These five Indian twists on fish and chips are built so they don’t fight the dish. Each one respects the crunch, keeps the fish moist, and adds flavor where it belongs.

Dark editorial guide card titled “Fish & Chips Reimagined: 5 Indian Twists” with five stacked option panels. Each panel shows crispy fried fish with thick chips and a dip: Masala + Chaat Chips (green chutney mayo), Amritsari Besan Crunch, Tandoori Crisp Twist (orange dip), Coconut-Lime Coastal (red dip), and Chili-Garlic Heat. Footer reads “MasalaMonk.com.”
Not sure which version to make first? Use this quick picker: fish and chips with Indian twists in five craveable directions—Masala + Chaat Chips, Amritsari besan crunch, Tandoori crisp, Coconut-lime coastal, and Chili-garlic heat. Each one keeps the classic crunch, then adds the Indian flavor logic through batter, spices, and chutney dips. Save this card for your next comfort-food night, then choose your twist and cook along with the full fish & chips reimagined guide here on MasalaMonk.

To make this feel manageable, think in a modular way:

  • One chip method (choose your preferred approach)
  • One base batter workflow
  • Then you shift flavor through spice blends, coatings, and dips

This keeps the cooking calm instead of chaotic.

Also Read: Eggless Yorkshire Pudding (No Milk) Recipe


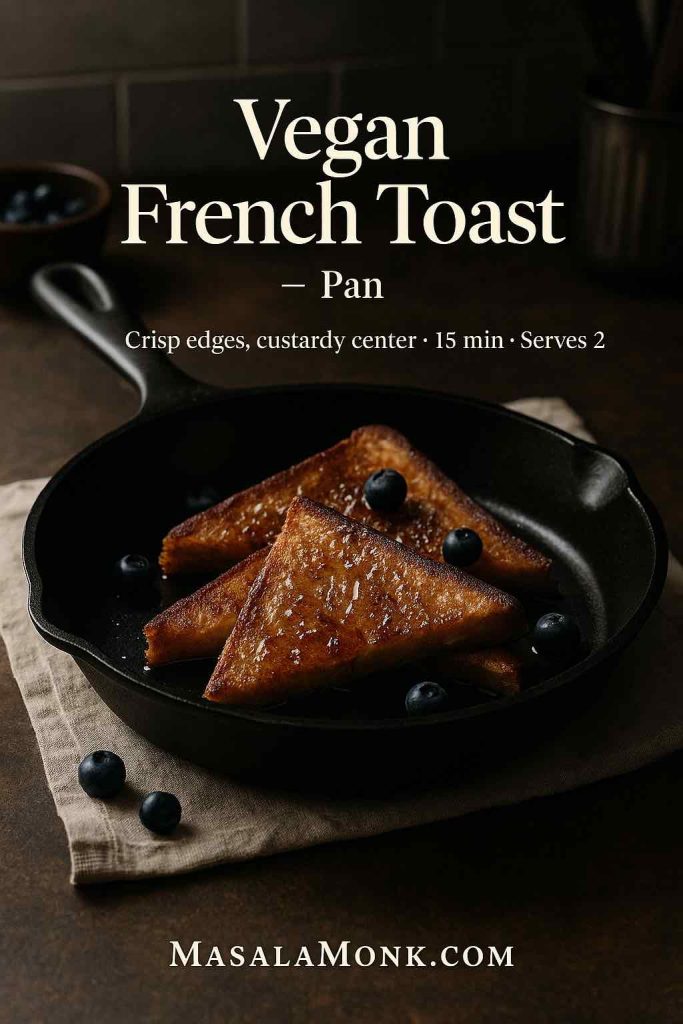
1) Masala twist: fish and chips with chaat-style chips and bright spice

If you’re only going to try one variation first, this is the friendliest entry point. It tastes instantly exciting, yet it doesn’t ask you to relearn the technique.

The masala twist works because it uses the chaat playbook: salt, acid, spice, and a little aromatic lift. Done well, it tastes like something you’d genuinely crave, not something you tried once for novelty.

Vertical recipe card on a dark charcoal background titled “Masala Fish & Chips.” A matte-black plate holds a golden crispy battered fish fillet with a flaky white corner, thick British chips dusted with chaat masala, a ramekin of green chutney mayo, and a lemon wedge. Bottom panel lists quick ingredients and a “crisp plan” steps. MasalaMonk.com in footer.
Masala Fish & Chips—British-style crunch with an Indian twist: chaat-spiced chunky chips and a creamy green chutney mayo dip. This card is your quick “build + crisp plan” so you can nail the crackly batter and keep chips dip-proof. Save this for your next fry-night, then head to MasalaMonk for the full method, timing, and all 5 Indian twists (plus dips and crispness fixes).

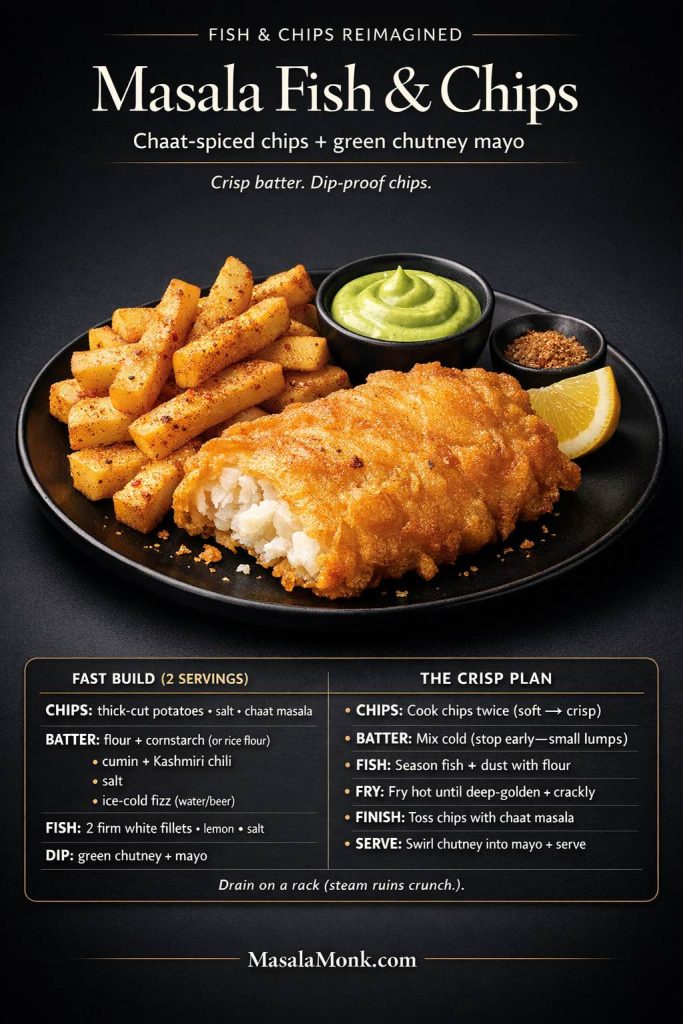
Masala fish and chips batter (spice in the right place)

Here’s the trick: don’t overload batter with harsh chili powders. Instead, build warmth and aroma with small amounts of spices that tolerate frying:

  • cumin (roasted if you have it)
  • Kashmiri chili for color and mild heat
  • a pinch of ajwain for that snack-shop fragrance
  • black pepper for bite

Keep the batter cold, mix quickly, and fry hot. The goal is still a crisp shell.

If you want a deeper read on batter mechanics—why some batters stay crisp while others go heavy—Serious Eats also has a helpful explanation of batter and frying principles across their frying guides, and their fish and chips recipe itself remains a strong anchor point: classic fish and chips technique.

Chaat-style chips that still behave like chips

This is where the plate becomes “Indian” without becoming confusing.

Toss hot chips with:

  • chaat masala
  • roasted cumin
  • a pinch of black salt (optional but addictive)
  • chili-lime seasoning if you like tangy heat

Because chips are hot, seasoning sticks. Because chips are dry, seasoning tastes vibrant rather than muddy.

The dip that makes the masala twist feel complete

A classic tartar sauce brings creaminess and acid. In this variation, a green chutney mayo does the same job, but with an Indian accent.

For the masala version, think of green chutney mayo as tartar sauce’s louder cousin: creamy base, sharp herbs, bright acid. Blend the chutney until smooth so the dip clings to chips instead of sliding off, then stir into mayo with a squeeze of lemon to keep it snappy. Use MasalaMonk’s green chutney recipe as the base; if you prefer egg-free, their eggless mayonnaise gives you the same rich texture without changing the flavor logic.

This dip is one of those small moves that makes fish and chips with Indian twists feel intentional rather than experimental.

Also Read: Crock Pot Chicken Breast Recipes: 10 Easy Slow Cooker Dinners (Juicy Every Time)


2) Amritsari-inspired twist: besan crunch that feels like a pakora moment

If the masala twist is bright and snacky, the Amritsari direction is deeper and more savory. It borrows the snack DNA of Punjabi fish fry without breaking the fish and chips structure.

This variation is especially satisfying if you love pakoras, because the coating has that familiar besan perfume.

A dark, magazine-style recipe card titled “Amritsari Besan Crunch” showing a matte-black plate with pakora-style besan-crusted fried fish, thick-cut chips, a ramekin of tan tangy peanut chutney, a lemon wedge, and a small bowl of ajwain seeds. Text panels list “Fast Build (2 servings)” and “The Crisp Plan” steps for chips and frying.
Amritsari Besan Crunch Fish & Chips — pakora-style gram-flour crust, thick British chips, and a bold tangy peanut chutney dip. Use this card as your quick checklist (cold batter + rack drain = max crunch), then jump into the full post for exact ratios, all 5 Indian twists, and the matching chutney/dip ideas on MasalaMonk.

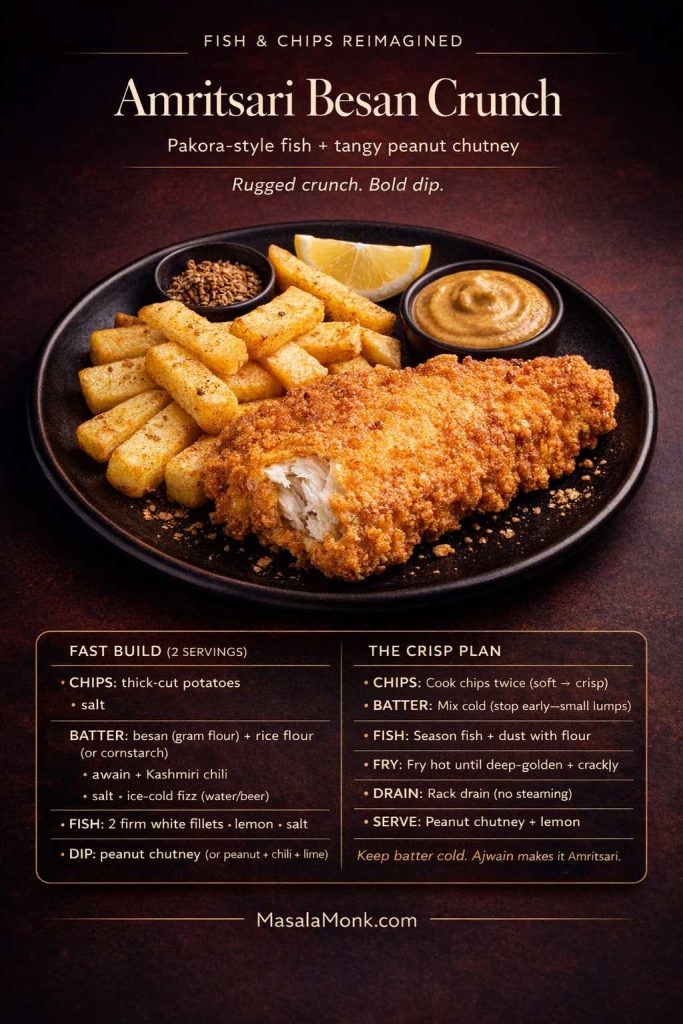
Besan-forward coating: why it works

Besan brings two things:

  • a nutty, savory taste that feels instantly Indian
  • a texture that can crisp beautifully when supported correctly

The support matters. Besan alone can sometimes go dense. So you bring in a bit of rice flour or cornstarch to encourage crispness.

Season the batter with:

  • ajwain (carom) for the signature fragrance
  • ginger and garlic for bite
  • chili and black pepper for heat
  • salt, always

Besan works in fish and chips because it creates a deeper, snack-shop crunch—more like a pakora shell than a neutral batter. The key is balancing it: a little rice flour or cornstarch keeps the crust crisp instead of dense, and ajwain keeps the flavor unmistakably Indian. If you want the quick “what besan does and why it behaves differently,” MasalaMonk’s piece on besan (chickpea flour) is a useful reference.

How to keep this coating crisp, not heavy

Besan batters reward restraint. Mix until combined, then stop. Keep the batter cold. Fry in small batches.

Drain on a rack, then serve quickly. That last part matters because besan crusts are at their best right after frying—when they’re crisp and fragrant.

Dip options that respect the Amritsari vibe

Instead of a mayo-heavy dip, you can go in a slightly lighter direction:

  • A spicy yogurt dip with lemon and roasted cumin
  • A green chutney side (or green chutney yogurt)
  • A tangy peanut chutney for a rich but non-mayo option

Peanut chutney is a smart partner for fried fish because it brings creaminess without turning the plate heavy. It also holds up against heat and spice—so it won’t disappear next to an Amritsari-style coating. Serve it thick enough to scoop with chips, then loosen with a spoon of water or yogurt only if you want it drizzly. MasalaMonk’s tangy spicy peanut chutney is a great starting point.

Also Read: Mozzarella Sticks Recipe (Air Fryer, Oven, or Fried): String Cheese, Shredded Cheese, and Every Crunchy Variation


3) Tandoori twist: fish and chips with a tandoori-style flavor layer that still stays crisp

Tandoori flavors are bold, yet they can sabotage crispness if you apply them the wrong way. Yogurt marinades are moist; moisture is the enemy of crunch. So you handle it with a little strategy.

This twist is about getting the taste of tandoori fish with the satisfaction of fish and chips.

Recipe card for Tandoori Crisp Twist fish and chips on a black plate with thick-cut chips, crispy tandoori-spiced fried fish showing flaky white interior, lemon wedge, and a ramekin of pale-orange tandoori mayo dip on a dark background. Text includes a fast build list and crisp plan steps.
Tandoori Crisp Twist = smoky tandoor flavor with proper pub-style crunch. This card shows the fast build (chips, cold batter, spice cues) plus the crisp plan so your fish stays crackly and your chips stay sturdy for dipping. Make the tandoori spice dry, keep the sauce on the side, and you’ll nail that deep-golden crust every time. Save this for your next fry night—and head to MasalaMonk for the full Fish & Chips Reimagined post with all 5 Indian twists, dips, and timing tips.

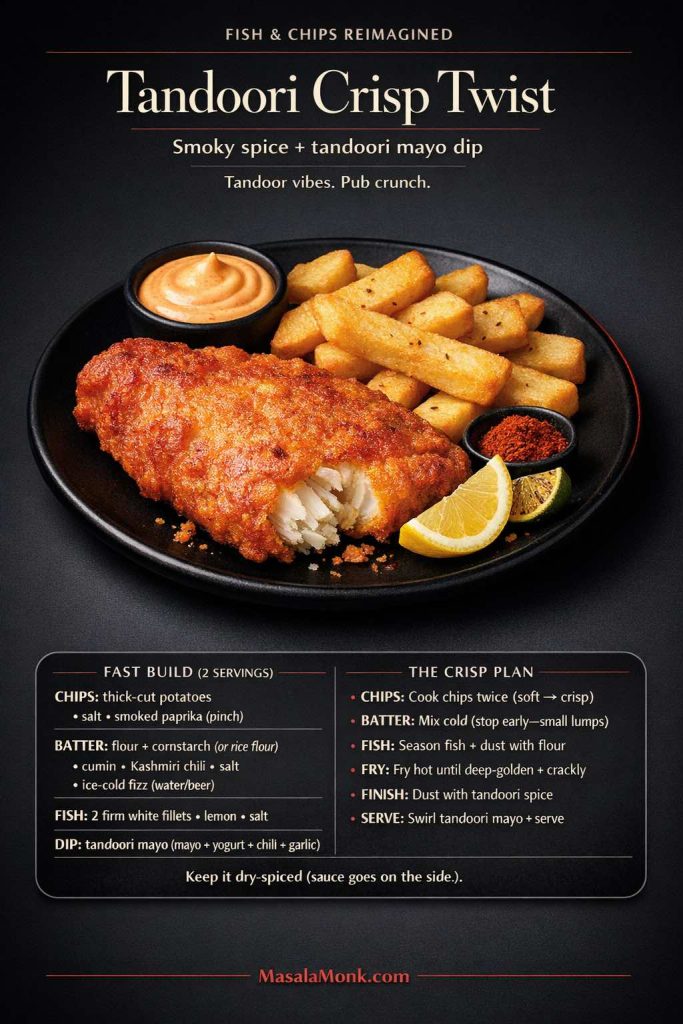
How to do the tandoori layer without soggy batter

Marinate fish in a thick yogurt spice mix—enough to flavor the fish, not so much that it drips.

Then, before coating or frying:

  • wipe off excess marinade gently
  • give the fish a light dusting of starch (rice flour or cornstarch)

From there, you have two good paths:

  1. Light batter path
    Use a thinner fish and chips batter and let the fish carry the tandoori identity.
  2. High-heat roast + crisp finish path
    Roast at high heat to set the tandoori coating, then finish with a quick crisp stage (hot oven or a brief dip in oil) if you want extra crunch.

Either way, the fish stays juicy and the exterior stays crisp enough to feel like traditional fish and chips, just louder.

Dips that match the tandoori direction

A tandoori mayo is the obvious crowd-pleaser, especially for people who love creamy dips. Start with a mayo base, then add tandoori spice and lemon.

Tandoori mayo works because it mirrors the fish: warm spice + lemony brightness, softened by creaminess. Stir tandoori masala into mayo, add lemon, then taste for salt—mayo can mute seasoning, so it usually needs a little more spice than you expect. If you want a flexible base recipe to build different mayo dips from, MasalaMonk’s homemade mayonnaise guide

For a lighter pairing, a lemony yogurt dip works brilliantly because it echoes the marinade without doubling down on heaviness.

Also Read: Sourdough Starter Recipe: Make, Feed, Store & Fix Your Starter (Beginner Guide)


4) Coastal coconut-lime twist: crunch that feels South Indian and still belongs on the plate

This is the variation that feels genuinely fresh, especially if you’ve made fish and chips the same way for years. Coconut adds a sweet, nutty crunch. Lime adds brightness. Chili adds the necessary bite.

However, coconut can burn quickly in hot oil, so you want a coating strategy that protects it.

Coconut-Lime Coastal Fish & Chips = the crispiest “coastal” twist: toasted coconut crust, thick-cut chips, and a punchy kara chutney dip with a bright lime finish. This card is your quick build + crisp plan so you can nail the crunch without guessing (and keep the chutney on the side so the crust stays crackly). Save it for your next fish night, then head to MasalaMonk.com for the full Fish & Chips Reimagined post with all 5 Indian twists, dip ideas, and step-by-step timings. Pin it, share it, and tell me which dip you’d pair first.

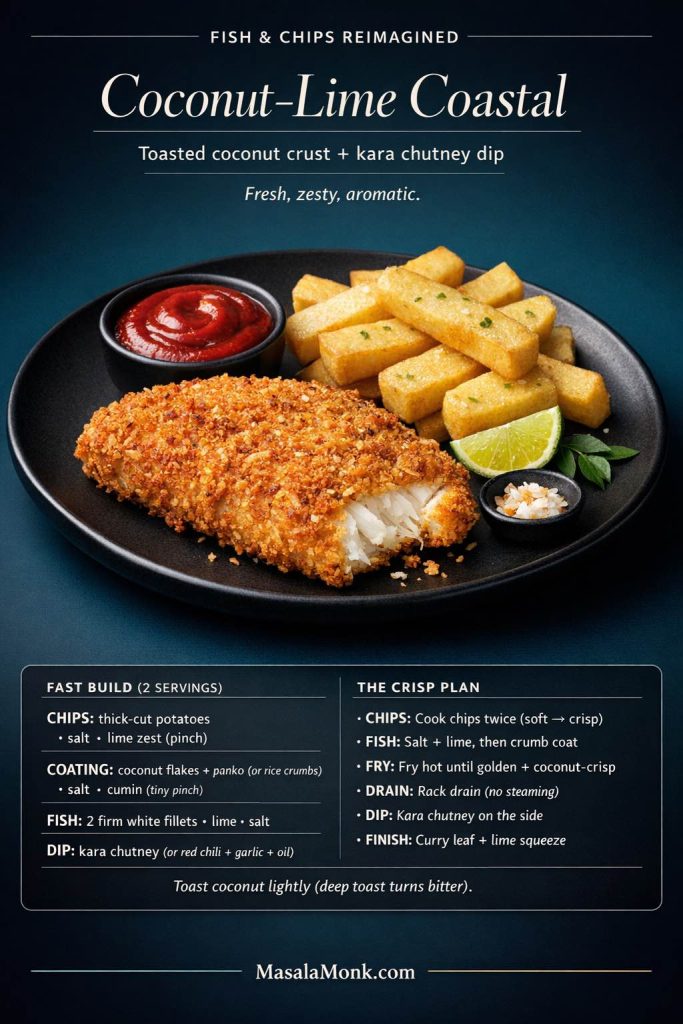
Two ways to build the coconut crunch

Option A: Coconut crumb coating
Combine:

  • shredded coconut (fine, not long strands)
  • rice flour (helps with crispness and browning control)
  • crushed curry leaves (optional but incredible)
  • salt, chili, a touch of black pepper

Then coat fish lightly so coconut doesn’t form a thick layer.

Option B: Coconut in the “after” stage
If you’re nervous about coconut browning too quickly, keep the batter classic, then finish with toasted coconut and curry leaves sprinkled over the fish right before serving. This keeps the crunch aromatic rather than risky.

Chips pairing ideas that fit the coastal vibe

Coconut-lime fish loves a chip that can carry bright seasoning without turning soggy. Crinkle chips are great here because the ridges grab onto chili-lime salt and stay punchy even after dipping. If you’re cutting potatoes yourself, go for thick British-style chips—fluffy inside, crisp outside—then finish with lime zest, a squeeze of lime, and a clean salt. The result tastes coastal and fresh, not heavy.

If you want a playful swap, banana chips can echo the coastal snack energy, yet that’s optional. If you do it, treat banana chips like a crunchy side element, not as a replacement for every chip on the plate.

Dip pairing that makes coconut feel balanced

A spicy chutney works better here than a heavy mayo. MasalaMonk’s kara chutney is a strong match because it’s built for savory snacks. Meanwhile, a limey yogurt dip also works beautifully if you want something calmer.

Also Read: How to make No-Bake Banana Pudding: No Oven Required Recipe


5) Chili-garlic twist: fish and chips with heat that doesn’t taste harsh

This final variation is for people who want a punch. The mistake many cooks make is pushing heat into the batter itself. Fried chili powders can taste bitter if overused, and batter can amplify that harshness.

So instead, keep the batter relatively classic and bring heat through a condiment that’s meant to be intense.

“Chili-garlic fish and chips recipe card on a dark background: crispy battered fish fillet, thick-cut chips with chili flakes, and a deep red garlic thecha dip in a small ramekin, with lemon wedges on a black plate. Text overlay shows fast build ingredients and a crisp frying plan for two servings. MasalaMonk.com.
Craving spicy fish and chips with a serious kick? This Chili-Garlic Heat twist pairs crackly battered fish + thick-cut chips with a bold garlic thecha dip (that deep red heat does the talking). Save this card for your next fry night, then head to the full Fish & Chips Reimagined post on MasalaMonk.com for all 5 Indian twists, dip ideas, and the exact crisping method that keeps chips dip-proof. Save it, share it, and tell me—team mild thecha or extra hot?

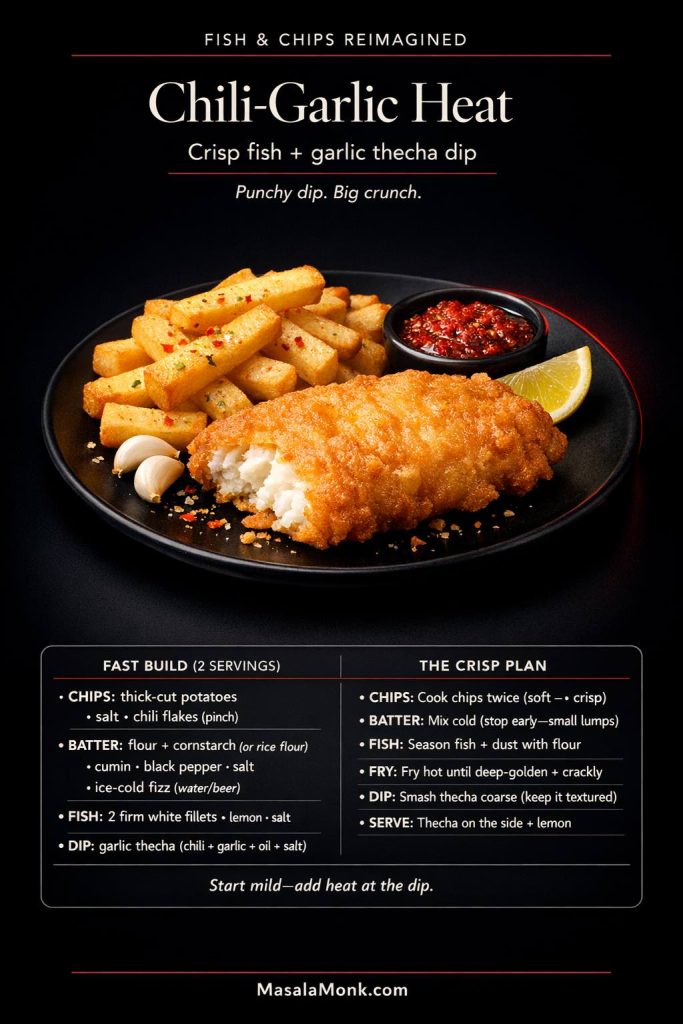
Thecha-style heat: sharp, alive, and addictive

Thecha is one of those condiments that instantly makes fried food feel exciting. It’s punchy, garlicky, and alive in a way that bottled hot sauces sometimes aren’t.

Thecha belongs here because it gives you “fresh heat,” not just heat—garlic bite, chili sharpness, and that addictive, slightly coarse texture that makes you keep dipping. Spoon it on the side for chips, or swirl a little into mayo when you want the burn softened and creamier. Use MasalaMonk’s thecha recipe as your base.

How to serve the chili-garlic twist so it feels balanced

Keep the fish and chips base classic:

  • crisp batter
  • well-salted chips

Then offer thecha in one of two ways:

  • on the side as a dip for chips
  • swirled into mayo for a creamy heat sauce

This gives readers control. Some people want a gentle kick; others want the full fire.

If you want a heat option that feels more familiar than thecha, a simple chili sauce or pepper sauce works brilliantly with chips—especially for the “chili-garlic” twist. Keep it bright (vinegar or citrus), not syrupy, so it cuts the richness instead of adding weight. MasalaMonk’s pepper sauce guide gives you several directions depending on whether you want smoky, sharp, or fruity heat.

Also Read: Chicken Adobo — Step-by-Step Recipe — Classic Filipino Adobong Manok


Dips that make fish and chips with Indian twists feel complete

A great fish and chips plate often comes down to contrast: hot vs cool, crisp vs creamy, salt vs acid. Dips are the easiest way to control that contrast.

Instead of treating dips like an afterthought, treat them like the finishing move.

Dark editorial guide card titled “Chutney Dip Flight” for fish and chips, showing four white ramekins: green chutney mayo, kara chutney, tangy peanut chutney, and thecha. Text under each dip suggests the best pairing with Indian twists (masala + chaat chips, coconut-lime coastal, Amritsari besan crunch, chili-garlic heat). A crispy fish piece and thick chips sit at the bottom right. Footer reads “MasalaMonk.com.”
A great fish & chips plate is all about contrast—crisp, creamy, spicy, tangy. This chutney dip flight makes your fish and chips with Indian twists feel complete: green chutney mayo for masala + chaat chips, kara chutney for coconut-lime coastal vibes, tangy peanut chutney for Amritsari besan crunch, and thecha for chili-garlic heat lovers. Save this guide for your next fish & chips night, then mix-and-match dips as you cook through the full “5 Indian twists” version, here on MasalaMonk.

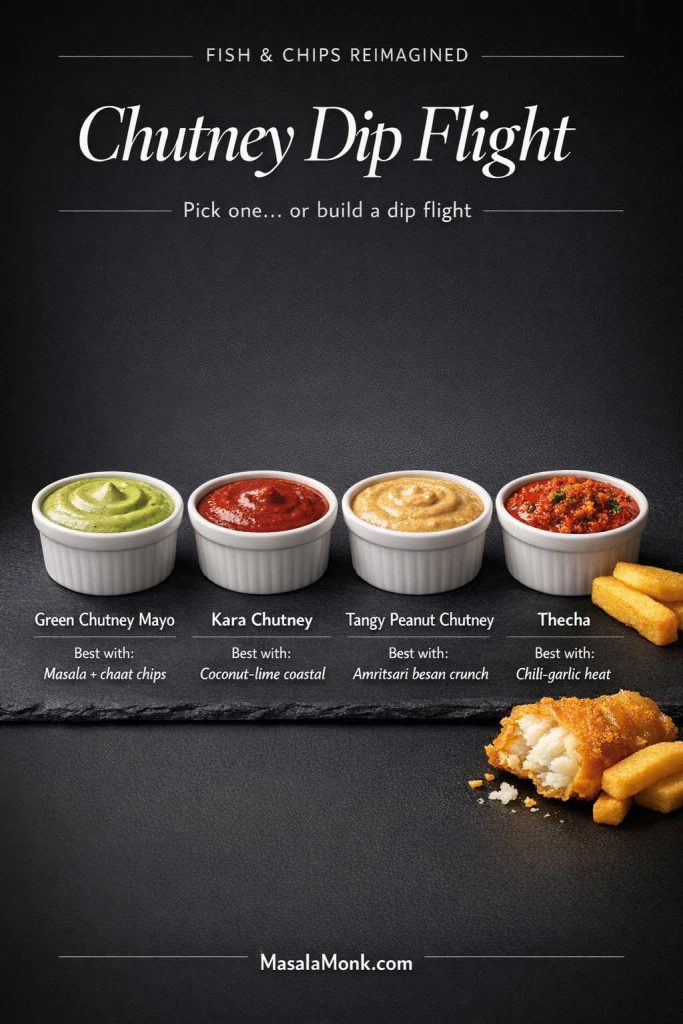
Green chutney mayo (bright, creamy, classic-friendly)

This is the most universal dip in the lineup. It behaves like tartar—cool and creamy—yet tastes unmistakably Indian.

Start with MasalaMonk’s green chutney and swirl it into mayo. If you want egg-free, MasalaMonk’s eggless mayonnaise gives you the same creamy base.

Kara chutney (spicy South Indian dip energy)

Kara chutney is especially good with the coastal coconut-lime twist because it’s sharp, spicy, and built for savory snacks—exactly what fried food wants. Serve it thick and punchy for dipping, or thin it slightly for drizzling over fish right before serving. MasalaMonk’s kara chutney recipe fits the flavor direction perfectly.

Tangy peanut chutney (creamy without mayo)

If you want a dip that’s creamy but not heavy, peanut chutney is a strong move. MasalaMonk’s tangy spicy peanut chutney is especially useful because it’s snack-friendly and balanced.

Thecha (sharp heat for chips and fish)

If you like heat that feels alive—garlic bite, fresh chili punch, and a slightly coarse texture—thecha is the dip that makes chips disappear fast. Spoon it on the side for dunking, or swirl a little into mayo when you want the burn softened and creamier. Use MasalaMonk’s thecha recipe as your base, then adjust the chili level to match your tolerance.

Also Read: Sweetened Condensed Milk Fudge: 10 Easy Recipes


Bringing it all together: a calm workflow for a dramatic plate

Fish and chips can feel like a juggling act because you’re managing hot oil, batter, and timing. Meanwhile, adding five Indian twists on fish and chips might sound like extra complexity. In reality, the twists are mostly seasoning decisions.

Here’s a workflow that keeps you sane:

  1. Choose your chip path first
    If you’re doing thick chips from scratch, start them early. If you’re doing frozen chips or crinkle chips, you can start later.
  2. Prep dips while chips cook
    Chutneys and mayo mixes can be done in minutes. They also taste better when they sit briefly.
  3. Season fish and prepare batter last
    Batter hates waiting. Fish benefits from a few minutes of seasoning, yet you don’t want it sitting wet too long.
  4. Fry fish in small batches and drain on a rack
    This is the crispness move that makes fried fish and chips taste like it came from a proper shop.
Dark, premium guide card titled “Keep It Crisp” for fish and chips. A crispy fried fish fillet and thick British chips sit on a wire rack over a sheet pan near an open oven, with a lemon wedge. Text overlay shows: HOLD—Oven 95°C/200°F, rack on tray, 10–20 min; REHEAT—Oven 220°C/425°F, rack on tray, 8–12 min, flip once; “No microwave (steam kills crunch).” MasalaMonk.com footer.
Leftovers don’t have to be sad. This quick “hold + reheat” cheat sheet keeps fish and chips crispy while you finish the batch—and brings back crunch the next day without drying the fish. Use the rack-on-tray method (it vents steam, so the crust stays snappy), then pick your favorite from our 5 Indian twists on fish & chips with chutney dips and chaat-style chips. Save this for fry night and share it with someone who always ends up with soggy chips.

As you cook, remember that even old English fish and chips was never just “fried fish and potato.” It was always about timing, texture, and salt. The Indian twists simply give you new ways to build that same satisfaction.

Also Read: Peanut Butter Fudge: Recipes & Guide (8 Methods + Easy Variations)


A few details that quietly upgrade every version

Some upgrades are loud, like coconut-lime crust. Others are quiet, yet they change everything.

These “quiet upgrades” make every fish & chips twist taste cleaner and stay crisp longer—whether you’re doing masala chips, Amritsari besan crunch, tandoori spice, coconut-lime coastal, or chili-garlic thecha. Save this checklist for next time: salt while hot, add bright acid (lemon/lime/tamarind/chutney), keep oil clean (strain bits), and fry in small batches so the crust stays shatter-crisp—not greasy. Use it as your final pre-serve ritual, then pick your twist and enjoy the crunch.

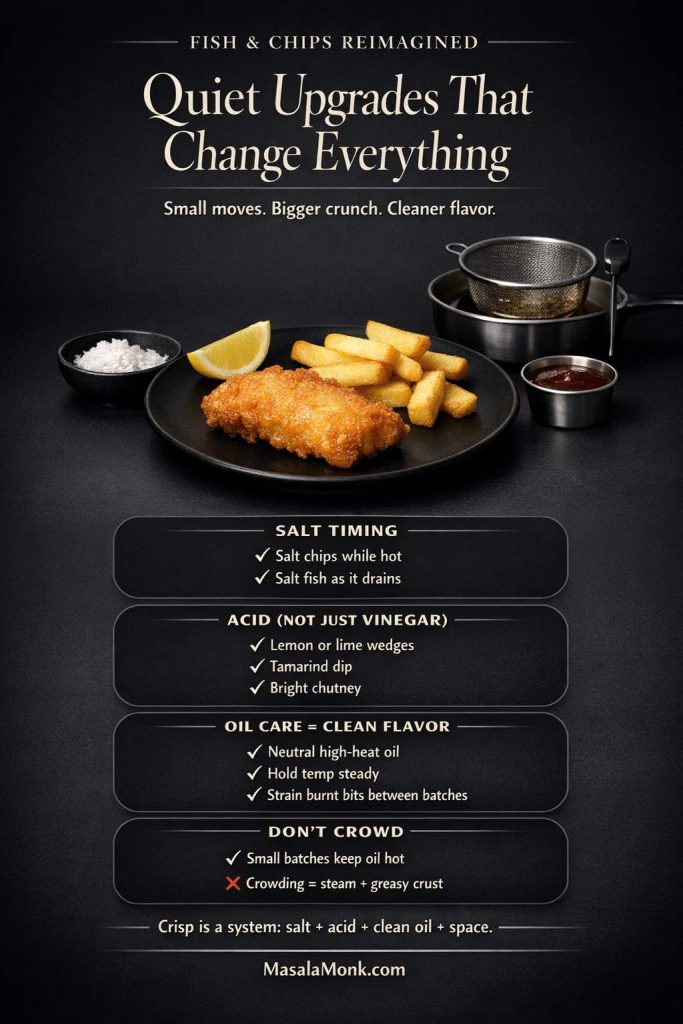
Salt timing matters more than salt amount

Salt chips while they’re hot. Also salt the fish while it drains. Because salt is not just seasoning here; it’s part of the crunch experience.

Acid doesn’t have to be vinegarx

Traditional fish and chips often comes with vinegar, yet Indian twists on fish and chips can use other acids:

  • lemon wedges
  • a squeeze of lime
  • a tamarind dip
  • a chutney with brightness

Acid wakes up fried food. It’s what stops the plate from feeling heavy.

Oil choice and care keeps flavors clean

If your oil tastes tired, everything tastes tired.

Clean-tasting oil is the difference between “crispy” and “heavy.” Choose a neutral oil that can handle high heat, keep the temperature steady, and strain out burnt bits between batches—those little fragments are what make oil taste bitter. If you want a simple breakdown of oils and heat behavior, MasalaMonk’s cooking with oils guide is a helpful companion.

The “don’t crowd the fryer” rule is non-negotiable

Crowding drops oil temperature. Then batter absorbs oil. Then crispness disappears. Even if you’re using a fish and chip fryer at home, small batches win every time.

Also Read: Sourdough Recipe: 10 Easy Bread Bakes (Loaves, Rolls & Bagels)


Why these Indian twists still respect traditional fish and chips

It’s easy to throw spices into a classic and call it a twist. It’s harder to keep the classic soul intact. That’s why each variation here follows a simple rule: the spice should enhance the crunch ritual, not compete with it.

  • The masala twist plays nicely with chips because chaat logic was designed for snacks.
  • The Amritsari besan twist works because pakora logic was designed for frying.
  • The tandoori twist works because the fish itself can carry spice without burdening the batter.
  • The coconut-lime twist works because South Indian snack flavors already pair with seafood.
  • The chili-garlic twist works because condiments like thecha were built for crisp foods.

So you still get the plate you want. You simply get five different moods of it.

Also Read: 10 Vegan Chocolate Cake Recipes (Easy, Moist, & Dairy-Free)


A quick note on credibility sources that support the crispness mechanics

When you’re making fish and chips at home, small technique decisions add up. If you ever want to cross-check the classic baseline method—oil temperature, batter texture, rack draining—Serious Eats is a strong reference: classic fish and chips recipe. Likewise, BBC Good Food’s method is useful for batter discipline and “don’t overmix” cues: next-level fish & chips.

Meanwhile, for a clean, confidence-building doneness reference, the USDA’s safe temperature chart is straightforward and reader-friendly.

These sources aren’t here to complicate your cooking. They’re here because a crisp fish and chips batter behaves according to physics, not vibes. When you understand the cues, you stop guessing.

Also Read: Kahlua Drinks: 10 Easy Cocktail Recipes (Milk, Vodka, Coffee)


Closing: choose your twist, keep the ritual

Fish and chips doesn’t need saving. It needs remixing. The ritual—crisp crust, juicy fish, sturdy chips—still hits every time. Yet once you start treating the plate as a canvas, you get variety without sacrificing what makes it lovable.

Not sure which Indian fish & chips variation to start with? Save this “twist picker” and choose by mood: Masala + chaat chips for bright tang, Amritsari besan crunch for pakora-style rugged bite, tandoori crisp for smoky warmth, coconut-lime coastal for fresh zing, or chili-garlic thecha for heat that feels alive. Keep the ritual the same—crisp crust, juicy fish, sturdy chips—then let the accents do the work. Use this card as your closing checklist, and come back anytime you want a new direction without changing the method.

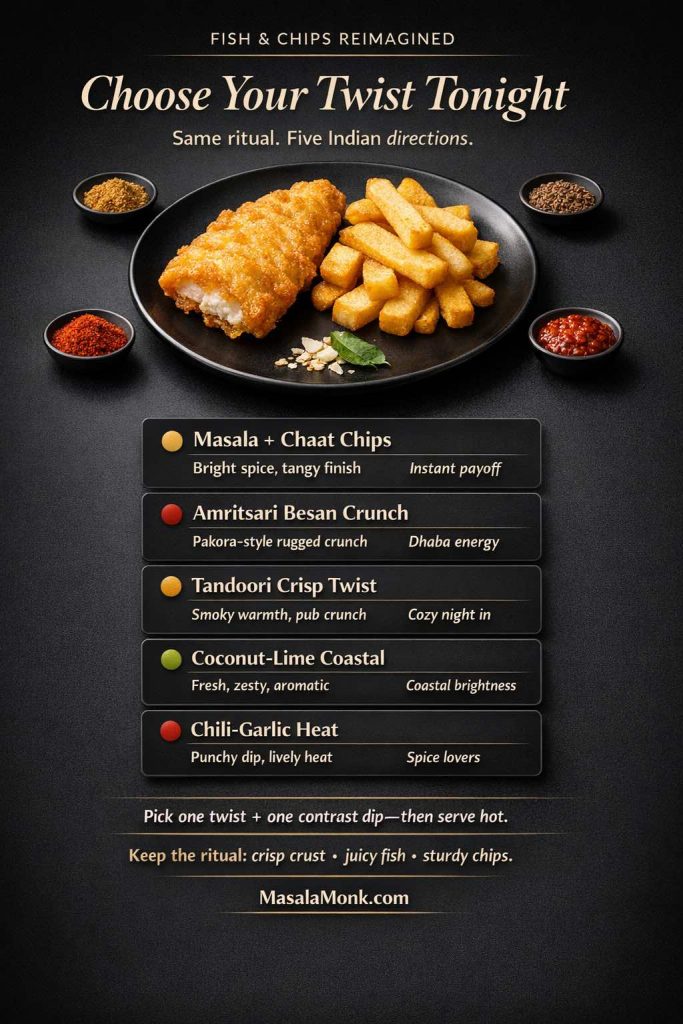
Start with the masala twist if you want instant payoff. Go Amritsari if you want that pakora crunch. Choose the tandoori direction when you want smoky warmth. Pick coconut-lime when you want coastal brightness. Bring in thecha when you want heat that feels alive.

Either way, you’re not abandoning traditional fish and chips. You’re keeping it—and giving it five Indian twists that feel like they belonged there all along.

Also Read: Hot Chocolate Coffee: 3 Easy Recipes (Cocoa, Mix, or Espresso)

FAQs

1) What makes fish and chips with Indian twists different from traditional fish and chips?

Fish and chips with Indian twists keeps the classic structure—crisp battered fish and sturdy chips—while shifting the flavor through Indian spice blends, chutney-style dips, and seasonings like chaat masala or chili-lime. In other words, it’s still traditional fish and chips at heart, just reimagined with bolder aromatics and brighter finishes.

2) Is this still British style fish and chips if I use Indian spices?

Yes. British style fish and chips is defined by technique and texture: a light fish and chips batter, hot oil, and proper draining so the crust stays crisp. Indian spices simply change the seasoning profile, not the essential method.

3) How do I keep fish and chips batter light and crispy?

Start with cold batter and mix only until combined—overmixing makes the coating tougher. Also, fry in small batches so the oil stays hot; otherwise the batter absorbs oil before it sets. Finally, drain on a rack instead of a plate so steam doesn’t soften the crust.

4) What’s the best oil temperature for fried fish and chips?

A steady, hot frying temperature is key. If the oil is too cool, fried fish and chips turns greasy; if it’s too hot, the coating browns before the fish cooks through. Aim for a consistent medium-high frying heat and let the oil recover between batches.

5) How do I know when fried fish and chips is done without a thermometer?

Look for a deep golden crust and fish that flakes cleanly in the thickest part. The center should be opaque and moist, not translucent. If the fish resists flaking, give it a short extra fry and let it rest briefly so carryover heat finishes the middle.

6) Can I use frozen fish for fish and chips with Indian twists?

Absolutely. Frozen fillets can work beautifully as long as they’re fully thawed and blotted dry. Excess surface moisture is the main reason batter slides off or turns soft, so drying the fish well matters more than whether it started fresh or frozen.

7) What’s the best frozen fish and chips approach for a quick dinner?

Use thicker frozen fish fillets and thicker-cut chips, then focus on crisping: cook at high heat, avoid crowding the tray, and let everything rest briefly on a rack. That short rest helps moisture escape, which keeps the coating and chips from softening.

8) What are the best chips for fish and chips with Indian twists?

Thick British chips (chunkier cuts) stay fluffy inside and hold up to dips. Meanwhile, crinkle chips are excellent for Indian twists on fish and chips because the ridges trap masala seasoning and stay flavorful even after dipping.

9) Why do my chips go soggy next to fish and chips?

Usually it’s steam. If chips are piled in a bowl or covered, trapped moisture softens them fast. Spread chips out, salt while hot, and keep them uncovered until serving. Similarly, drain the fish on a rack so it doesn’t steam the chips on the plate.

10) Can I bake fish and chips with Indian spices instead of frying?

Yes, although the texture changes slightly. Baking can still be satisfying if you dry the fish well, use a lighter coating, and cook at high heat. For chips, thicker cuts and adequate spacing on the tray help a lot.

11) Can I air-fry fish and chips with Indian twists?

You can, especially if you use a coating designed for air frying rather than a wet batter. For chips, avoid overcrowding and shake/flip midway. Air frying tends to reward smaller batches, so cooking in rounds often gives better crispness.

12) What’s the best fish for fish and chips if I can’t get cod or haddock?

Choose any firm, mild white fish that holds together—thicker fillets are more forgiving. The key is even thickness so the fish cooks through while the batter crisps, which matters whether you’re making British style fish and chips or fish and chips with Indian twists.

13) How do I make an Amritsari-style fish and chips batter?

Use besan (gram flour) as the main flour, then add a crisping helper like rice flour or cornstarch. Season with ajwain, ginger, garlic, chili, and black pepper. Keep the batter cold and fry hot so it sets quickly and stays crunchy.

14) How do I get a tandoori twist without ruining crispness?

Keep the tandoori flavor in the fish (spiced yogurt marinade), then wipe off excess marinade before cooking. After that, either use a lighter batter or a dry coating. This way you get the aroma of tandoori seasoning while preserving the crisp bite of fish and chips.

15) What dips go best with Indian twists on fish and chips?

Chutney-style dips are a natural match: mint-coriander, tamarind sweet-heat, spicy yogurt, or chili-garlic dips. They play the same role as tartar sauce—cooling, brightening, and adding contrast—while making the plate feel distinctly “twisted.”

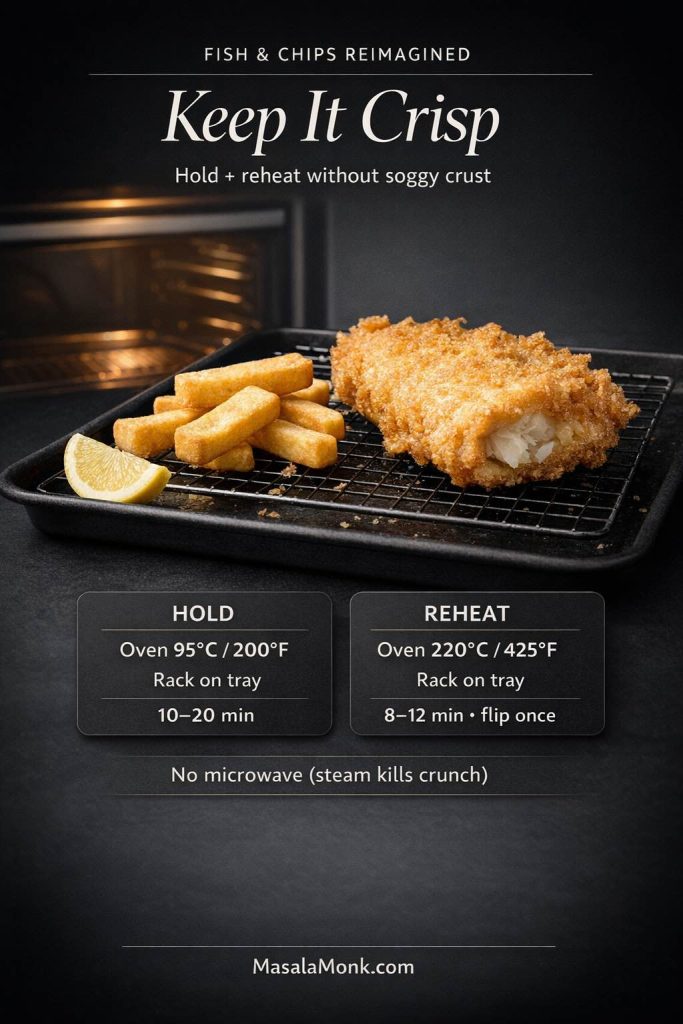
16) How do I reheat fish and chips and keep it crispy?

Skip the microwave. Instead, reheat in a hot oven or air fryer until the crust re-crisps. Keep the fish and chips separated on a rack or perforated tray so hot air can circulate and moisture can escape.

17) Why does fish and chips batter fall off the fish?

It usually happens when the fish is wet or the coating has nothing to cling to. Pat the fish very dry, dust lightly with flour or starch before dipping into batter, and avoid letting battered fish sit too long before frying.

18) Can I make fish and chips with Indian twists ahead of time for guests?

You can prep almost everything: cut potatoes, mix spice blends, and prepare dips in advance. Then, fry or bake close to serving time for best texture. If needed, keep fried fish warm on a rack in a low oven so it stays crisp until you’re ready to plate.

Posted on 13 Comments

Vegan French Toast: 6 Easy Recipes (Pan, Air Fryer, GF & High-Protein)

Hand dusting powdered sugar over golden vegan French toast on a cooling rack; cover for 6 recipe variations including air fryer, gluten-free, and high-protein. How to make Vegan French Toast Recipes Post.

If you’ve been craving vegan french toast (Dairy and Egg Free) that delivers diner-level crisp edges and a plush, custardy center—without eggs or dairy—you’re exactly where you need to be. This guide starts with a reliable base batter and then branches into five more variations that cover air fryer convenience, freezer-friendly sticks, gluten-free tweaks, chickpea-powered protein, and a beautifully silky tofu custard. Along the way, you’ll pick up small adjustments that transform “pretty good” slices into the ones everybody fights over. Moreover, you’ll find helpful links to deepen your understanding—whether you want to make your own almond milk, understand browning, or choose better gluten-free bread.

Before we cook, a quick mindset: french toast isn’t only a recipe; it’s a tiny set of decisions—bread, batter thickness, soak time, and heat. Tweak those four, and breakfast turns into brunch. Consequently, this page is organized to help you see exactly which lever to pull for your situation, so you can enjoy a stack that’s crisp outside, custardy inside, and absolutely worth repeating.


Core Vegan French Toast Recipe (Pan Method)

A classic slice needs a custard that clings. Here, eggs are replaced with a plant-milk base and a spoon of starch, which acts as a gentle thickener. Once the dipped bread hits the pan, that thin coating sets into a delicate shell while the interior remains soft. As a result, you get structure and tenderness without scrambling a single egg.

Ingredients (serves 2)

  • 1 cup unsweetened oat or almond milk
  • 1 Tbsp cornstarch (or 1½ Tbsp arrowroot)
  • 1½ Tbsp sugar or maple syrup
  • 1 tsp vanilla extract
  • ½ tsp ground cinnamon
  • Pinch of fine salt
  • 4 slices day-old thick bread (vegan)
  • 1 tsp neutral oil + 1 tsp vegan butter
Crisp vegan french toast in a pan with berries, brushed steel knife and linen napkin in a classy, moody kitchen setting.
Pan-seared vegan french toast with maple and berries. A quick custard, a steady medium heat, and a minute on a rack—that’s the formula.

Method for Dairy and Egg Free French Toast

First, whisk the cornstarch with a splash of plant milk until lump-free. Then add the remaining milk, sugar, vanilla, cinnamon, and salt; whisk again until the mixture looks smooth and lightly thickened. Meanwhile, set a nonstick pan or griddle over medium and add the oil plus vegan butter; let the fats mingle and shimmer. Next, dip each slice for 10–20 seconds per side (or 30–60 seconds if you’re using thick-cut bread), let the excess drip, and lay it into the hot pan. Cook 2–3 minutes per side for regular slices or 3–4 minutes for thick ones, turning once, until each face turns deep golden and the edges feel crisp. Finally, transfer the slices to a wire rack for a minute so steam escapes and the underside doesn’t soften.

Why this works

Put simply, starch helps keep the recipe egg free and delivers the grip that eggs usually provide. It gelatinizes as it heats, which helps the custard hug the bread instead of sliding off. At the same time, a little sugar encourages browning, while vanilla and cinnamon do the aromatic heavy lifting. Importantly, the rack rest is not negotiable; by elevating the slice even briefly, you preserve that fragile crispness you just created.

Browning, briefly

Oat or soy milk often brown more readily than very lean almond milk because they typically carry more natural sugars and a touch more protein—two participants in the Maillard reaction (the chemistry that gives you that rich, toasty flavor). However, if almond milk is your favorite, you can absolutely get great color: keep the batter’s small dose of sugar, preheat thoroughly, and avoid crowding the pan. Prefer to control ingredients from the start? Try making your own with this straightforward tutorial for homemade almond milk (clean flavor, short ingredient list, and pleasantly affordable).


Vegan French Toast — Ingredients & Ratios

For consistent results, keep this pocket rule close: per 4 standard slices, use 1 cup plant milk + 1 Tbsp starch. If you’re cooking for a crowd, double everything; if your bread is especially thick, extend the soak rather than thinning the batter. Conversely, if your loaf is very fresh and soft, lightly pre-toast the slices for a sturdier crumb that holds its shape. Moreover, remember that sweetness in the bread itself counts; cinnamon-raisin and similar loaves brown faster and need a touch lower heat.

Also Read: Easy Homemade Oats Milk with just One Ingredient- Non Slimy, at last


Vegan French Toast — Step-by-Step & Browning Tips

To avoid sogginess, let the custard cling and then drip cleanly; don’t send it into the pan dripping rivers of batter. Next, keep the heat at medium—hot enough to brown, gentle enough to set the interior. In addition, rotate slices if your pan has hot spots, and, if needed, nudge the heat down for sugar-rich breads so the exterior doesn’t darken before the center firms. Curious about the science behind that gorgeous color? A friendly primer on the Maillard reaction shows why proteins plus sugars under heat equal deep flavor and golden edges.

As a tiny flourish, dust one face of the dipped slice with a whisper-thin veil of cornstarch just before it hits the pan, then cook that side first. Consequently, you’ll get a glassier, extra-crisp crust without altering the interior at all.


How to make Vegan French Toast in Air Fryer

Some mornings, hands-off wins. The air fryer delivers consistent browning, less stovetop babysitting, and easy batching.

Two slices of vegan french toast from the air fryer on a wire rack over a tray, maple drizzle and linen.
The air fryer takes over while you pour coffee—375°F, a mid-cook flip, and a brief rack rest for that diner-style crunch.

Whole slices

Preheat to 190°C / 375°F and lightly coat the basket. Meanwhile, dip and drain the slices, then lay them in a single layer—no touching corners. Cook 6–8 minutes total, flipping at 4 minutes. Because space equals crispness, work in batches and resist stacking. To keep the first batch snappy, set finished slices on a rack instead of a plate. For a helpful benchmark that lives in the same temperature neighborhood (even though it uses sticks), this air-fryer range for french toast sticks is a useful reference you can adapt to whole slices.

If your air fryer runs hot, reduce the temperature by 10–15 degrees and add a minute to the total time; if it runs cool, go the other way. Furthermore, if the underside looks pale after flipping, mist lightly with oil and continue—little adjustments like that make a visible difference to this Egg and Dairy Free French Toast Recipe.

Also Read: 5 Delicious High-Protein Vegan Meal Prep Ideas Using an Air Fryer


Vegan French Toast Sticks (Air Fryer)

These are a guaranteed hit: easy to hold, perfect for dunking, and surprisingly freezer-friendly.

How to

After dipping, slice each piece into 3–4 sticks. Next, for a snack-shop crunch, roll the wet sides in fine panko or lightly crushed cornflakes. Subsequently, arrange in a single layer and air-fry 7–9 minutes, shaking or flipping at 4 minutes. Finally, rest the sticks for 1 minute; the coating sets as it cools, so patience pays off.

Air-fried vegan french toast sticks with light cornflake crunch cooling on a tray, tongs and linen beside a maple ramekin.
Cut, coat, air-fry. A quick dunk, a light crumb, and a brief rack rest turn simple sticks into a snack-shop classic.

Make-ahead, the simple way

Bake or air-fry a full tray, cool completely, and freeze the sticks in a single layer on a sheet pan. Then bag them. Later, reheat straight from frozen—no thawing—in a hot air fryer or toaster oven until the edges sing. If you prefer a clear workflow, this tutorial on freezing and speedy reheats lays out the steps in a way that’s easy to adapt to vegan batter.

For packed-lunch convenience, include a small lidded container of maple or a quick cinnamon-sugar dip. Notably, sticks travel better than whole slices; they keep their texture longer and fit neatly into bento-style boxes.


Gluten-Free Vegan French Toast

Gluten-free french toast can be crisp and custardy—no compromises—if you start with the right bread and thicken the custard slightly.

Choose sturdier breads

Seek out GF loaves that use psyllium husk (often with xanthan). In practice, psyllium forms a gel that mimics gluten’s elasticity, which helps slices survive a quick soak and a decisive flip. If you enjoy the “why,” this clear baking overview of psyllium’s role in structure explains how it strengthens doughs, while this sandwich loaf example shows the concept in a trustworthy recipe. Additionally, Bon Appétit’s take on psyllium for gluten-free baking is a handy companion read if you love nerdy kitchen notes.

Crisp gluten-free vegan french toast with powdered sugar on a stone counter; gluten-free loaf blurred in the background.
Structure first: choose a psyllium-supported GF loaf, dip briefly, then let the surface set before you flip for that deep golden finish.

Small tweaks, big payoff

  • Shorten the soak to 8–12 seconds per side; gluten-free crumb hydrates quickly.
  • Add ½ Tbsp extra cornstarch per cup of plant milk to the batter for a firmer set.
  • Prefer oat or soy milk when you want deeper browning on GF loaves.
  • If slices feel a touch dry after cooking, brush the edges with melted vegan butter just before serving.

Because readers often ask “who needs gluten-free, anyway?”, a concise explainer helps. This friendly overview—what is gluten—frames the basics without getting preachy. Consequently, you can give context without derailing the recipe.


High-Protein Vegan French Toast Recipe with Chickpea Flour

On days you want more protein and a gentle “eggy” vibe, chickpea flour (besan) shines.

Dairy and Egg Free Custard swap (serves 2)

  • 1 cup plant milk
  • 2 Tbsp chickpea flour
  • 1–2 Tbsp sugar or maple
  • 1 tsp vanilla, ½ tsp cinnamon, pinch salt
  • Optional ⅛ tsp baking powder for a soft lift
High-protein vegan french toast made with chickpea flour, crisp exterior and custardy interior on a ceramic plate.
Whisk plant milk with besan, cook gently, then rest on a rack: the result is crisp edges and a protein-rich, custardy bite.

Whisk until perfectly smooth and proceed exactly like the base recipe. Because chickpea flour binds so well, thick slices flip confidently and come off the pan with crisp, tidy edges. Moreover, the gram-flour aroma leans subtly savory in a way that many people associate with classic diner toast—especially if you stir in a pinch of kala namak (black salt) for that faint eggy aroma.

If you enjoy seeing how gram-flour batters behave in other cuisines, Meera Sodha’s beloved Pondicherry toast is a delightful read; although it’s a savory cousin, it demonstrates how crisp and golden a chickpea batter can be.

Also Read: 5 Facts about Besan (Chickpea Flour) and Its Place in the Keto Diet


Silken-Tofu Vegan French Toast Recipe (Blended Custard)

Prefer a silkier, richer bite? Silken tofu emulsifies into a creamy custard that sets like a dream.

Blend this (serves 2)

  • 150 g silken tofu
  • ½ cup plant milk
  • 1–2 Tbsp sugar or maple
  • 1 tsp vanilla, ½ tsp cinnamon, pinch salt
Hand dusting powdered sugar over golden vegan French toast on a cooling rack; cover for 6 variations including air fryer, gluten-free, and high-protein.
Blend silken tofu into the custard, cook low and steady, then rest briefly on a rack for a crisp edge and a velvet-soft middle.

Blend until completely smooth and glossy. Then dip briefly—this mixture clings—and cook over medium to medium-low so the surface doesn’t over-brown before the center sets. In addition, rest the slices on a rack for one minute to maintain that tender perimeter crunch.

If you’re currently avoiding soy, swing back to the starch-based master batter; it delivers excellent crispness with pantry staples and zero legumes. On the other hand, if you adore creamier centers, tofu delivers that “custard pull” when you cut the slice.

Also Read: ‘Tofu’ Instead of ‘Eggs’: 5 High Protein Plant-Based Breakfast Ideas


Flavor Add-Ins & Vegan Toppings

Once the base is set, it’s time to play. Because the batter is intentionally balanced, it welcomes many directions without seizing or splitting.

  • Vanilla-cinnamon classic: keep the base ratios as written.
  • Brown sugar + nutmeg: add 1 Tbsp brown sugar and a scant ⅛ tsp nutmeg to the custard.
  • Banana custard: mash ½ ripe banana into the mix and reduce plant milk by ¼ cup; consequently, you’ll get banana-bread vibes without going overly sweet.
  • Chocolate-hazelnut swirl: dot a dairy-free spread over hot slices so it melts into rivulets.
  • Bananas Foster topping: caramelize banana with a little vegan butter and brown sugar; optionally, finish with a splash of rum.
  • Ice-cream sundae breakfast: crown warm slices with a scoop of vegan vanilla and a ribbon of maple.

Meanwhile, if you like to prep a second dish the night before, a jar of creative chia puddings offers an effortless, dairy-free counterpoint—cool and creamy against hot and crisp. Alternatively, when you want a heartier plate, this roundup of quinoa breakfast and prep ideas delivers extra protein without crowding the skillet.


Bread Choices, Soak Times, and Crispness

Bread thickness, dryness, and sugar content steer results more than almost anything else, regardless of the custard you choose.

  • Thick, enriched loaves (vegan brioche or Texas-style sandwich bread) love a 30–60 second soak and 3–4 minutes per side. As a result, you’ll get that spoon-tender center people rave about.
  • Standard sandwich slices prefer a 10–20 second dip and 2–3 minutes per side cook—fast, tidy, weeknight-friendly.
  • Very fresh bread tends to go soft; therefore, pre-toast briefly to add backbone.
  • Cinnamon-raisin or sweeter breads brown faster; thus, reduce the heat slightly and lengthen the cook by 30–60 seconds.
  • Gluten-free loaves need shorter soaks and slightly thicker batter (see the GF section above).

Crucially, let slices rest on a wire rack rather than stacking them on a plate; otherwise, trapped steam softens the crust you carefully built. Additionally, if you want a glassier finish, dust one face of a dipped slice with cornstarch right before searing and cook that side first. Conversely, if you prefer a softer exterior, skip the dusting and cover the pan for the final minute to create a gentle steam.

Read More: Why is modern sandwich bread different from ‘real’ bread?


Plant Milks for Vegan French Toast (Oat vs Almond)

To keep Recipe of French Toast Vegan and free from dairy, choosing the milk is really important, as it shapes both flavor and color. By contrast with very lean almond milk, oat milk typically brings more carbohydrates—and sometimes a smidge more protein—which can deepen browning and enhance aroma. Nevertheless, almond milk has a wonderfully clean taste and keeps sweetness in check. Therefore, if you use almond milk, keep that small measure of sugar in the batter and preheat the pan until a drop of custard sizzles on contact. Furthermore, barista-style oat milks may be sweeter than you expect; if yours tastes notably sweet, reduce the added sugar by a teaspoon to maintain balance.

Prefer to skip additives and minimize packaging? Here’s a practical, step-by-step on almond milk from scratch you can keep on hand. Beyond that, consider experimenting with soy milk when you want extra browning; its protein content often nudges the Maillard reaction along.

Also Read: Coconut Milk Nutrition Facts & Glycemic Index Impact


Make-Ahead, Freezer-Friendly, and Crowd Service

If you’re cooking for more than two, organization beats speed. First, heat the oven to 95–120°C / 200–250°F and place a wire rack over a sheet pan. As each slice finishes, transfer it to the rack so it stays crisp while you finish the batch. Secondly, for brunch service, keep the pan at medium and rotate slices through in an even rhythm; it’s calmer than cranking the heat and hoping.

For weekly planning, the stick format is your friend. Prepare a double batch on Sunday, freeze them flat, and reheat on weekday mornings. Not only do they keep beautifully, but they also return to crisp with minimal fuss—especially in an air fryer. Meanwhile, if your family prefers whole slices, you can cool them on a rack, freeze between sheets of parchment, and reheat directly from frozen in a toaster oven.


Serving Ideas & Natural Pairings

Because the pan is already hot, you can build a small spread without extra stress. For instance, a bowl of berries and a spoonful of coconut yogurt turn a couple of slices into a complete breakfast. Alternatively, a wedge of citrus brightens heavier toppings like banana and brown sugar. Moreover, a sprinkle of toasted nuts or seeds adds welcome contrast—walnuts with maple, pistachios with rose syrup, almonds with cinnamon.

If you enjoy putting something make-ahead on the table, assemble a jar of chia pudding ideas the night before. For a higher-protein side, a warm quinoa breakfast bowl with fruit and nuts sits comfortably beside cinnamon-forward toast. And if you’re celebrating, vegan ice cream on hot slices never fails; it melts into the ridges like a sauce you didn’t have to make.


Troubleshooting on the Fly

  • Center still wet? Shorten the soak next time and add ½ Tbsp more starch per cup of plant milk. Also, give the slices another minute in a low oven on a rack; that gentle finish works wonders.
  • Edges burn before the interior sets? Lower the heat a notch and extend the cook by 30–60 seconds per side. Additionally, consider whether the bread is very sugary; if so, dial back batter sugar by a teaspoon.
  • Pale color? Preheat properly, avoid crowding (steam is the enemy of browning), and use oat or soy milk when you want deeper color. A dab more sugar in the custard can also help.
  • Slices fall apart when flipping? Reduce the soak, choose sturdier bread, and, for gluten-free, pick loaves with psyllium; the structure matters more than you think.
  • Texture too dry? Brush the edges lightly with melted vegan butter right before serving, or shorten the rack rest to 30 seconds instead of a minute.

Also Read: Vegan Keto Smoothie Kick-Start: 5 Macadamia Nut Recipes for Nutrient-Packed Mornings


The Six Vegan French Toast Recipes, At a Glance

For quick reference, here are compact summaries. Each follows the bread guidance above; timings assume medium heat on the stove or a preheated 190°C / 375°F air fryer.

1) Vegan French Toast — Pan (Base)

  • Batter: 1 cup plant milk + 1 Tbsp cornstarch + 1½ Tbsp sugar + 1 tsp vanilla + ½ tsp cinnamon + pinch salt.
  • Dip: 10–20 sec/side (30–60 sec for thick slices).
  • Cook: 2–3 min/side (3–4 for thick), then rest on a rack.

2) Vegan French Toast — Air Fryer (Whole Slices)

  • Batter: same as base.
  • Cook: 6–8 min total at 190°C / 375°F; flip at 4 min.
  • Note: leave space between slices for crispness; mist lightly with oil if needed.

3) Vegan French Toast Sticks — Air Fryer

  • Batter: base batter.
  • Form: cut each dipped slice into 3–4 sticks; optionally coat in fine panko or crushed cornflakes.
  • Cook: 7–9 min at 190°C / 375°F; shake/flip at 4 min.
  • Freeze & reheat: cool completely, freeze flat, then bag; reheat directly from frozen.

4) Gluten-Free Vegan French Toast

  • Batter: base batter + ½ Tbsp extra cornstarch per cup.
  • Bread: sturdier GF loaf with psyllium.
  • Dip: 8–12 sec/side.
  • Cook: 2–3 min/side; rest on a rack.

5) High-Protein Vegan French Toast — Chickpea Flour

  • Batter: 1 cup plant milk + 2 Tbsp chickpea flour + sugar + vanilla + cinnamon + salt (optional ⅛ tsp baking powder).
  • Dip/Cook: as base; go slightly lower/slower for thick bread.
  • Aroma tweak: a pinch of kala namak adds that classic breakfast note.

6) Silken-Tofu Vegan French Toast — Blended Custard

  • Batter: blend 150 g silken tofu + ½ cup plant milk + sugar + vanilla + cinnamon + salt until silky.
  • Dip: brief; this custard clings well.
  • Cook: medium to medium-low so it sets before over-browning.

Parting thought

Above all, remember that vegan french toast is more technique than trick. With a clingy batter, a measured soak, steady heat, and a short rest on a rack, you’ll serve stacks that taste as indulgent as anything from your favorite brunch spot—only friendlier to your pantry and your routine. Now pass the maple, pour the coffee, and enjoy the kind of breakfast that makes the whole day feel easier.

Also Read: Eggless French Toast Recipe – Crispy, Fluffy & Totally Irresistible!

FAQs

1) What is the best plant milk for vegan French toast?

Oat milk usually browns faster and tastes fuller; almond milk stays cleaner and less sweet; soy milk boosts Maillard browning thanks to protein. Choose based on flavor and color goals.

2) How do I get crisp edges and a custardy center without eggs?

Use a clingy batter (about 1 cup plant milk + 1 Tbsp starch for 4 slices), dip just long enough for the crumb to hydrate, cook over steady medium heat, then rest slices on a wire rack for one minute.

3) Why is my vegan French toast soggy?

Excess batter and overcrowding trap steam. Let slices drip cleanly, keep space in the pan, and avoid ultra-fresh bread unless lightly pre-toasted.

4) How long should I soak the bread?

Standard sandwich slices: 10–20 seconds per side. Thick vegan brioche or Texas toast: 30–60 seconds. Gluten-free slices: 8–12 seconds since the crumb hydrates quickly.

5) Which bread works best?

Day-old, sturdy loaves hold shape and deliver structure. Enriched vegan brioche gives a plush interior; plain sandwich bread is weeknight-friendly; psyllium-based gluten-free loaves flip reliably.

6) Can I make gluten-free vegan French toast?

Absolutely. Slightly thicken the batter (+½ Tbsp starch per cup of milk), shorten the soak, and choose a GF loaf with psyllium for elasticity and resilience.

7) What’s the ideal pan temperature?

Medium. Too hot scorches edges before the center sets; too low dries the slice without browning. A faint sizzle on contact signals you’re in the sweet spot.

8) How do I keep the exterior from burning on sweeter breads?

Dial the heat down a notch and extend cooking by 30–60 seconds per side. Cinnamon-raisin and similar loaves caramelize quickly, so patience pays off.

9) Can I use an air fryer for vegan French toast?

Yes. Preheat to 190°C / 375°F, arrange slices in a single layer, flip at the halfway point, and rest on a rack. For sticks, cut each slice into 3–4 pieces and cook a touch longer.

10) How can I add more protein?

Swap the starch for 2 Tbsp chickpea flour (besan) per cup of milk, or blend silken tofu into the custard. Optionally add a pinch of kala namak for a classic breakfast aroma.

11) What if my slices tear when flipping?

Reduce soak time, pick sturdier bread, and slide a thin spatula under the crust side first. For gluten-free, the psyllium crumb matters more than thickness alone.

12) How do I boost browning without over-sweetening?

Maintain a small amount of sugar in the batter, preheat thoroughly, and prefer oat or soy milk. Alternatively, dust one dipped face very lightly with cornstarch and cook that side first.

13) Can I meal-prep or freeze vegan French toast?

Definitely. Air-fry or bake sticks, cool completely, freeze flat, then bag. Reheat from frozen in an air fryer or toaster oven until crisp at the edges.

14) What toppings match vegan French toast?

Fresh berries, citrus wedges, toasted nuts, coconut yogurt, or a drizzle of maple keep balance; dairy-free chocolate-hazelnut spread or quick caramelized banana leans indulgent.

15) How do I adjust sweetness across milks and breads?

Taste your milk first—barista-style oat can be sweeter—then trim added sugar by 1 teaspoon if needed. Conversely, lean almond milk benefits from keeping the full measure for flavor and color.

16) What’s the quick ratio I should memorize?

Per 4 slices: 1 cup plant milk + 1 Tbsp starch + 1½ Tbsp sweetener + 1 tsp vanilla + ½ tsp cinnamon + pinch salt. Dip, sear over medium, then rack-rest to finish.

Posted on 1 Comment

5 Facts about Besan (Chickpea Flour) and Its Place in the Keto Diet

BESAN ON A KETO DIET?

When it comes to navigating the world of keto-friendly ingredients, besan (also known as gram flour or chickpea flour) often sparks debate. Packed with nutrients, gluten-free, and a staple in many South Asian kitchens, besan is a powerhouse of flavor and function. But does it have a place in a ketogenic diet, which demands extremely low carbohydrate intake? Let’s explore this in-depth and provide actionable insights you can use right away.


What is Besan?

Besan is a flour made from ground chana dal (split brown chickpeas). It has a slightly nutty flavor and is a key ingredient in Indian, Pakistani, Bangladeshi, and Sri Lankan cooking. From pakoras to chilla, its versatility is unmatched. Nutritionally, it boasts:

  • ~387 calories per 100g
  • ~22g protein
  • ~56g carbohydrates
  • ~10-11g dietary fiber
  • ~6g fat

This brings the net carbs (total carbs minus fiber) to around 45g per 100g, which is high by keto standards.


Keto Diet: A Quick Refresher

The ketogenic diet is a low-carb, high-fat diet where the body enters a state of ketosis — burning fat for energy instead of carbohydrates. Most keto plans recommend 20-50g of net carbs per day, depending on the individual’s metabolism and goals.

Clearly, 100g of besan would exceed the daily carb limit. But can it be used strategically within those boundaries?


Can Besan Be Used in a Keto Diet?

Short Answer: Not as a Staple, But Sparingly

While besan is high in carbs, it also provides a unique nutrient profile — rich in plant protein, fiber, iron, folate, magnesium, and B-vitamins. It has a moderate glycemic index (GI ~44), which is better than refined flours, but still too high for large-scale use in keto cooking.

The Practical Answer: Use Micro-Portions

Think of besan not as a flour base, but as a flavor enhancer or binder. Here are a few smart ways to use it without breaking ketosis:

  1. Chickpea Batter for Fritters
    • Mix 1 tbsp of besan (~8g carbs, ~2g fiber) with shredded zucchini, spices, and almond flour.
    • Pan-fry for savory snacks without blowing your carb budget.
  2. Low-Carb Roti Substitute
    • Combine 1 tbsp besan with coconut flour, psyllium husk, and boiling water.
    • Roll thin and dry-toast on a skillet.
  3. As a Binding Agent
    • A teaspoon of besan can replace eggs in vegan recipes or act as a binder in keto-friendly veggie patties.
  4. In Mixed Flour Recipes
    • Use besan (1 part) with almond flour (3 parts) to retain flavor while controlling carbs.

Comparison: Besan vs. Popular Keto Flours

Flour TypeNet Carbs (per 100g)ProteinFiberKeto-Friendly?
Besan (Chickpea)45-50g22g10g❌ Only in small doses
Almond Flour~10g21g10g✅ Yes
Coconut Flour~20g7g38g✅ Yes

Besan clearly has more carbs than almond or coconut flour. So if you’re strictly keto, besan should never be the main ingredient.


The Bottom Line

Besan is nutrient-dense, gluten-free, and versatile, but it is not keto-friendly as a primary flour. However, with mindful planning and very limited portions, it can enhance keto dishes without sabotaging your state of ketosis.

Final Tips:

  • Track your macros closely if you include besan.
  • Avoid daily use — reserve for special meals.
  • Pair with low-carb flours like almond or coconut.
  • Use as a flavoring/binder, not a base.

Want to Try It?

Here’s a mini recipe to get you started:

Low-Carb Zucchini Besan Fritters

  • 1 tbsp besan
  • 2 tbsp almond flour
  • ½ grated zucchini (squeezed dry)
  • Salt, turmeric, chili flakes
  • Pan-fry in ghee or avocado oil

~6-7g net carbs per serving. Delicious, satiating, and keto-smart.

🔍 Frequently Asked Questions (FAQs)

1. Is besan (chickpea flour) keto-friendly?

Not by default. Besan has around 45–50g net carbs per 100g, which is too high for a standard ketogenic diet. However, it can be used in small quantities alongside low-carb ingredients.


2. How much besan can I safely use on keto?

Most keto diets allow 20–50g of net carbs daily. Limit besan to 1 tablespoon or less per meal (~6–8g net carbs), and balance it with other low-carb foods.


3. Why does besan have so many carbs if it’s high in fiber?

While besan has about 10–11g fiber per 100g, it still contains significant starches, making the net carbs high compared to keto flours like almond or coconut.


4. Can I use besan to replace almond or coconut flour on keto?

No. Besan cannot be used as a full substitute due to its high net carb count. Instead, blend small amounts with almond or coconut flour for taste and texture.


5. Is besan better than wheat flour for low-carb diets?

Yes, in terms of glycemic impact and nutrition, besan is better than wheat flour. It’s gluten-free, richer in protein and fiber—but still not ideal for strict keto.


6. What are the health benefits of besan despite its carbs?

Besan is rich in plant protein, fiber, iron, magnesium, folate, and B vitamins. It promotes satiety, helps manage blood sugar (better than wheat), and supports gut health.


7. Does besan spike insulin or blood sugar?

It has a moderate glycemic index (~44–55), meaning it causes a slower rise in blood sugar than refined flours, but can still affect insulin in higher doses.


8. Is roasted or cooked besan lower in carbs?

Cooking doesn’t significantly reduce the carb content. However, roasted besan may have slightly better digestibility and flavor but remains unsuitable in large keto servings.


9. What are some keto-friendly dishes that use a little besan?

  • Zucchini besan fritters
  • Chilla with mixed low-carb flours
  • Pakora with extra fiber (psyllium, flaxseed)
  • Keto wraps using 1 tsp besan for flavor

10. Is besan good for low-carb diets other than keto?

Yes. For moderate low-carb or carb-cycling diets, besan can be used more liberally due to its nutrient density and slower digestion profile.

Posted on Leave a comment

Besan: Is Chickpea Flour a Good Choice for a Keto Diet?


Besan, also known as chickpea flour or gram flour, is a versatile ingredient widely used in various cuisines around the world. It’s made by grinding dried chickpeas into a fine powder. But can besan be a good choice for a keto diet? In this post, we’ll explore the nutritional profile of besan, its potential benefits, and how it can fit into a keto lifestyle.


Understanding the Keto Diet 🥑

Before we delve into the details of besan, let’s quickly review the basic principles of the keto diet. The ketogenic diet is a low-carbohydrate, high-fat dietary approach that aims to shift the body’s fuel source from glucose to fat. By drastically reducing carbohydrate intake and increasing fat consumption, the body enters a metabolic state called ketosis, where it relies on stored fat for energy.

On a standard keto diet, the macronutrient breakdown typically involves consuming around 70-75% of calories from fat, 20-25% from protein, and only 5-10% from carbohydrates. This significant reduction in carbohydrate intake forces the body to burn fat for fuel, leading to weight loss and other health benefits associated with the keto diet.


The Nutritional Profile of Besan 🌾

Besan is derived from chickpeas, which are known for their nutritional value. Let’s take a closer look at the macronutrient composition of besan per 100 grams:

  • Calories: Approximately 387 calories
  • Carbohydrates: Around 53 grams
  • Fiber: Roughly 11 grams
  • Fat: Approximately 6 grams
  • Protein: Around 22 grams

Besan is relatively high in carbohydrates compared to other keto-friendly flours such as almond flour or coconut flour. However, it’s important to note that besan contains a significant amount of dietary fiber, which can help slow down the digestion and absorption of carbohydrates, potentially reducing the impact on blood sugar levels.


Besan and the Keto Diet 🌾

While besan may contain a higher carbohydrate content than other keto-friendly flours, it can still be incorporated into a keto diet with certain considerations:

  1. Portion Control: Due to its carbohydrate content, it’s essential to consume besan in moderation to stay within your daily carbohydrate limit. Be mindful of portion sizes and track your intake to ensure you’re maintaining ketosis.
  2. Balance with Other Ingredients: When using besan in recipes, it’s beneficial to balance it with high-fat ingredients to maintain the desired macronutrient ratios of the keto diet. For instance, combining besan with sources of healthy fats like avocado, coconut oil, or nuts can help offset the higher carbohydrate content.
  3. Use in Moderation: While besan can add flavor and texture to dishes, be cautious about relying too heavily on it as a primary ingredient. It’s best to consider besan as an occasional addition rather than a staple in your keto meals.
  4. Consider Individual Tolerance: Each person’s tolerance to carbohydrates can vary. Some individuals may find that they can include small amounts of besan in their keto diet without experiencing significant effects on ketosis, while others may need to strictly limit their intake.
  5. Effect on Blood Sugar: Despite its carbohydrate content, besan has a lower glycemic index compared to refined wheat flour, which means it has a slower impact on blood sugar levels. The presence of fiber and protein in besan helps regulate blood sugar spikes, making it a potentially better option for individuals with diabetes or those aiming to manage their blood sugar levels.

Potential Benefits of Besan 🌾

Besan offers several potential health benefits that make it an attractive choice, even if you’re following a keto diet:

  1. Rich in Protein: Besan is a good source of plant-based protein, which is essential for tissue repair and growth. Including besan in your keto diet can help meet your protein needs, particularly if you follow a vegetarian or vegan keto lifestyle.
  2. Dietary Fiber: Besan is high in dietary fiber, which can support digestive health, promote satiety, and aid in weight management. The fiber in besan slows down the digestion of carbohydrates, potentially minimizing blood sugar spikes and keeping you feeling fuller for longer.
  3. Vitamins and Minerals: Besan contains various vitamins and minerals, including folate, iron, magnesium, and zinc. These nutrients are essential for energy production, immune function, and overall well-being.
  4. Gluten-Free Option: Besan is naturally gluten-free, making it a suitable choice for individuals with gluten sensitivities or those following a gluten-free keto diet.

Incorporating Besan into Your Keto Meals 🍽️

Here are some ideas for incorporating besan into your keto diet:

  1. Low-Carb Baking: Use besan in combination with other low-carb flours like almond flour or coconut flour to create keto-friendly baked goods such as bread, pancakes, or flatbreads. This blend provides a balance between flavor, texture, and carbohydrate content.
  2. Batter Coating: Use besan as a gluten-free coating for meat, poultry, or vegetables before frying or baking. It adds a crispy texture and absorbs less oil compared to traditional wheat-based coatings.
  3. Thickening Agent: Add besan to sauces, soups, or stews as a natural thickening agent. It adds a mild nutty flavor and helps create a smooth and velvety texture.
  4. Pancakes and Crepes: Prepare besan-based pancakes or crepes by combining it with eggs, cream, or non-dairy milk for a satisfying keto breakfast or snack option. You can also experiment with adding keto-friendly flavorings like vanilla extract or cinnamon for added taste.
  5. Pakoras and Fritters: Create keto-friendly pakoras or fritters by combining besan with low-carb vegetables, herbs, and spices. Fry them in a high-quality cooking oil or bake them for a healthier alternative.
  6. Dosa and Chilla: Make savory dosas or chillas, similar to pancakes, by blending besan with water, spices, and optional vegetables. These can be enjoyed as a wholesome and filling keto meal.

Conclusion 💡

Besan, or chickpea flour, can be a flavorful and nutritious addition to your keto diet when consumed in moderation. While it contains a higher carbohydrate content compared to other keto flours, its fiber content and nutrient profile make it a viable option for some individuals following a keto lifestyle. As with any food, it’s crucial to monitor your portion sizes, consider your individual tolerance to carbohydrates, and balance besan with other keto-friendly ingredients to maintain ketosis and achieve your desired health goals.