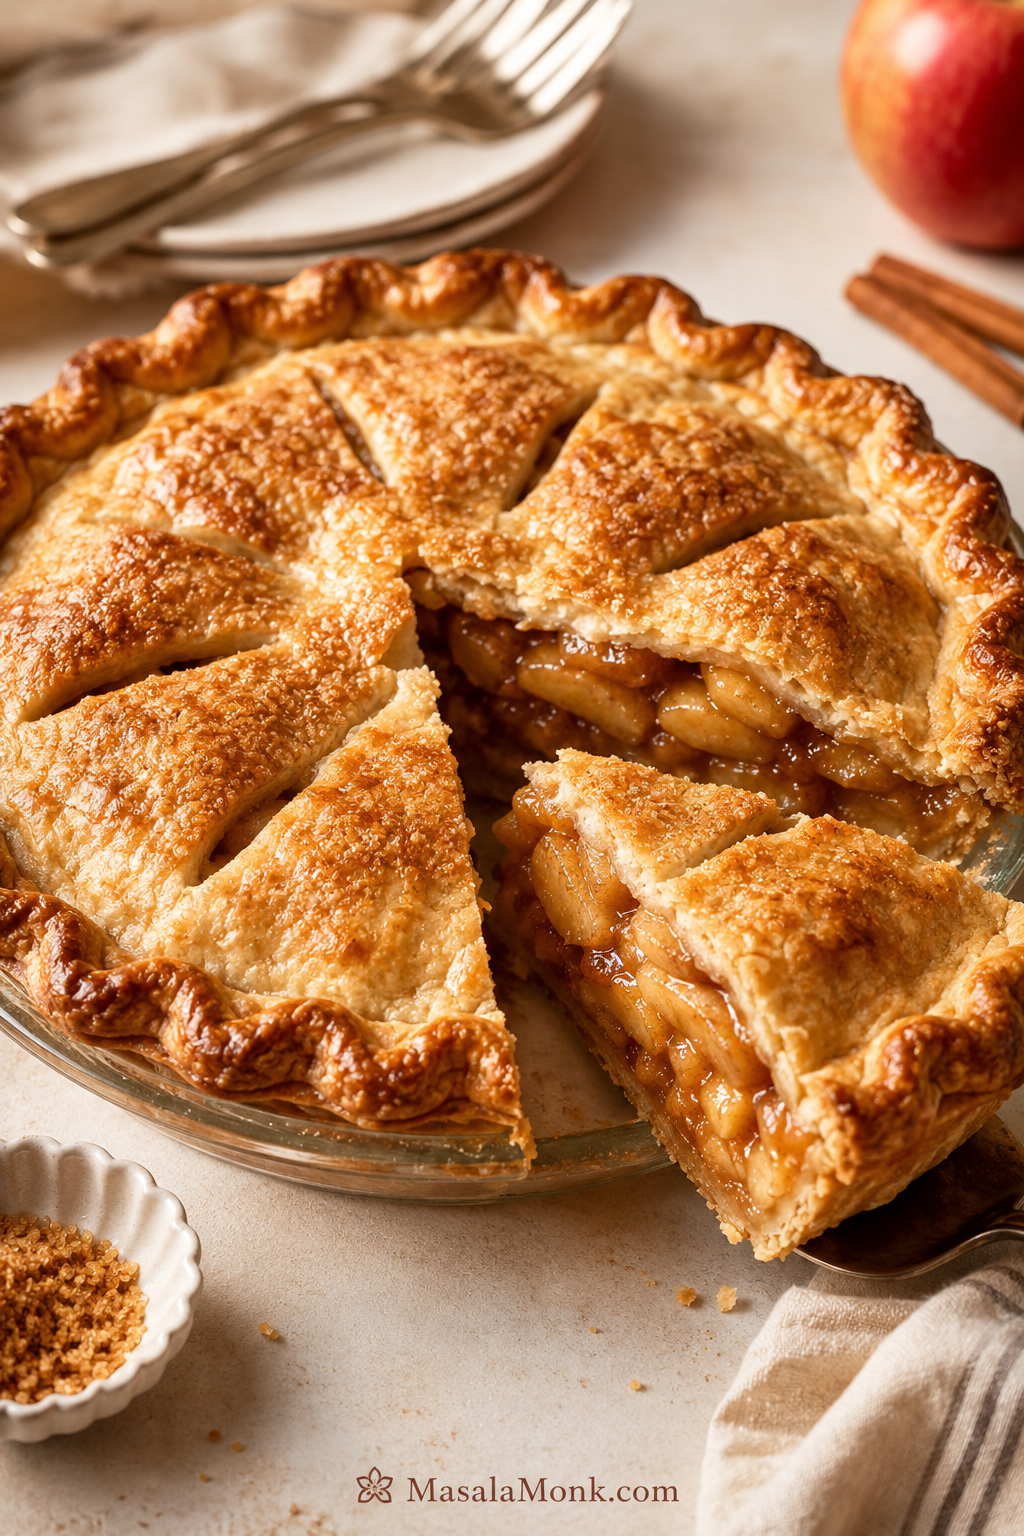
This apple pie with apple pie filling is for the moment when you want real apple pie without peeling, slicing, simmering, and starting from scratch. Use canned filling for the fastest version, or homemade apple pie filling if you already have a batch ready. Premade crust keeps it easy; homemade crust makes it feel more from-scratch.
The trick is not just spooning filling into crust. A little lemon, spice, salt, butter, and enough cooling time can turn a shortcut pie into something golden, cozy, and sliceable, with flaky pastry, warm cinnamon-apple filling, and pieces that feel like dessert instead of a last-minute fix.
Below, you will find the easy no-par-bake method, a better-bottom-crust option, exact filling amounts, canned filling upgrades, premade crust tips, and fixes for the common problems: runny filling, pale crust, soggy bottoms, and slices that fall apart when you cut them.
In This Guide
Quick Answer
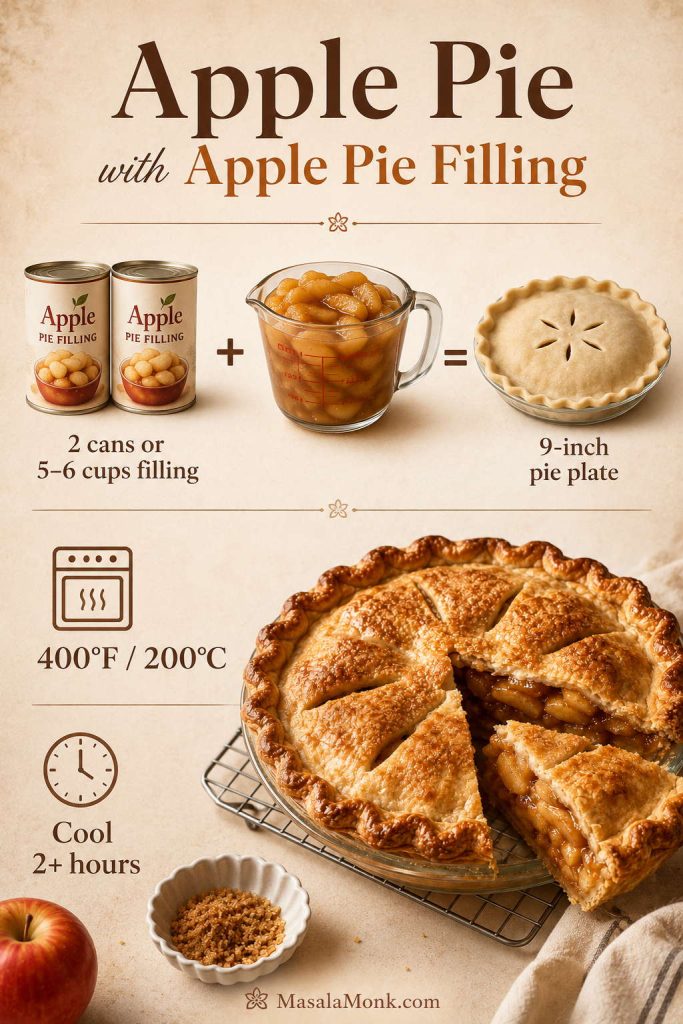
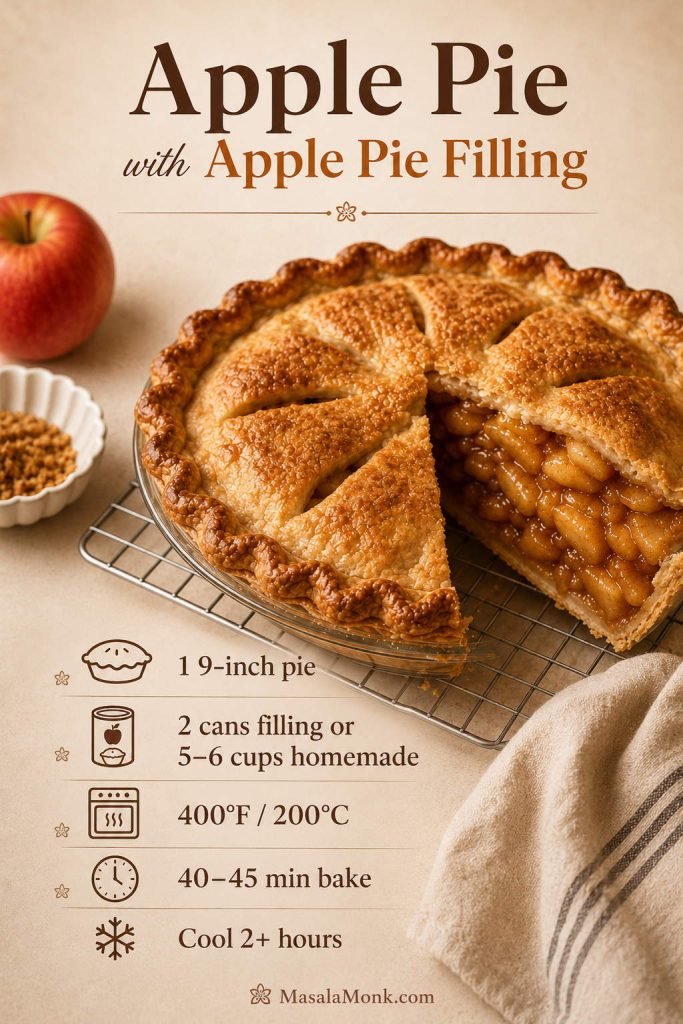
For a 9-inch apple pie with apple pie filling, use 2 cans of 20–21 oz filling or about 5–6 cups homemade apple pie filling. Add it to a chilled bottom crust, top with a second crust or lattice, vent well, brush with egg wash, and bake at 400°F / 200°C for 40–45 minutes, until the crust is deeply golden and the filling bubbles through the vents.
For the fastest version, skip par-baking and keep the crust cold before filling. For the crispest bottom crust, par-bake the base first. Either way, let the pie cool for at least 2 hours before slicing. The hardest part is waiting, but it is what helps the filling settle instead of running all over the plate.
Need the exact amounts? Go to the recipe card, or check the filling amount guide first if you are using one can, two cans, or homemade filling.
Most homemade flavor: homemade filling + homemade pie crust.
Most reliable crust fix: par-bake the bottom crust before adding the filling.
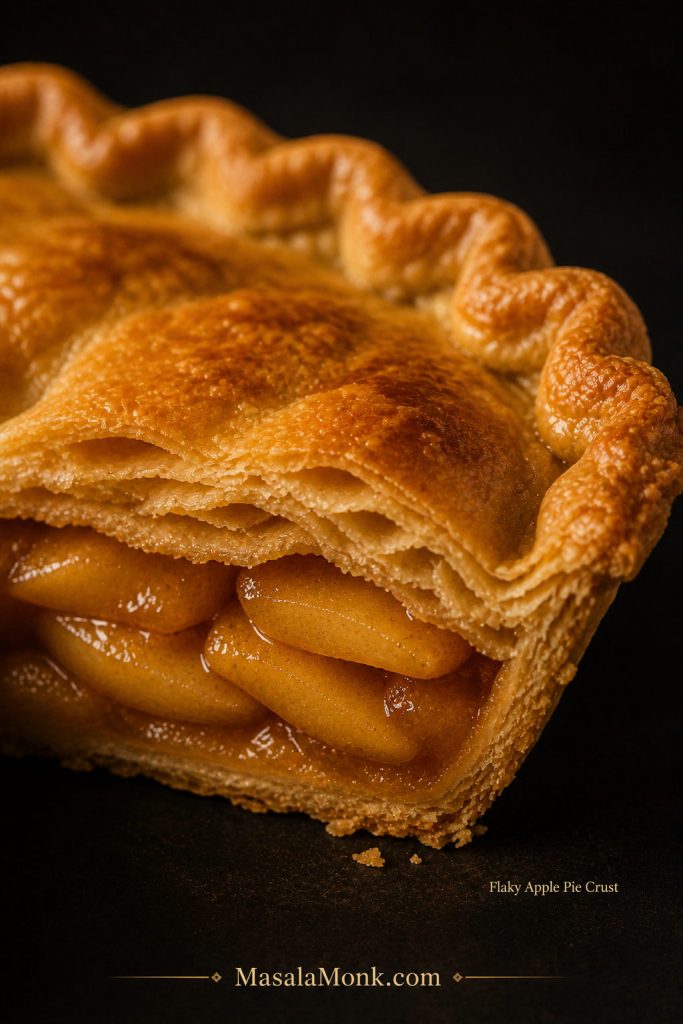
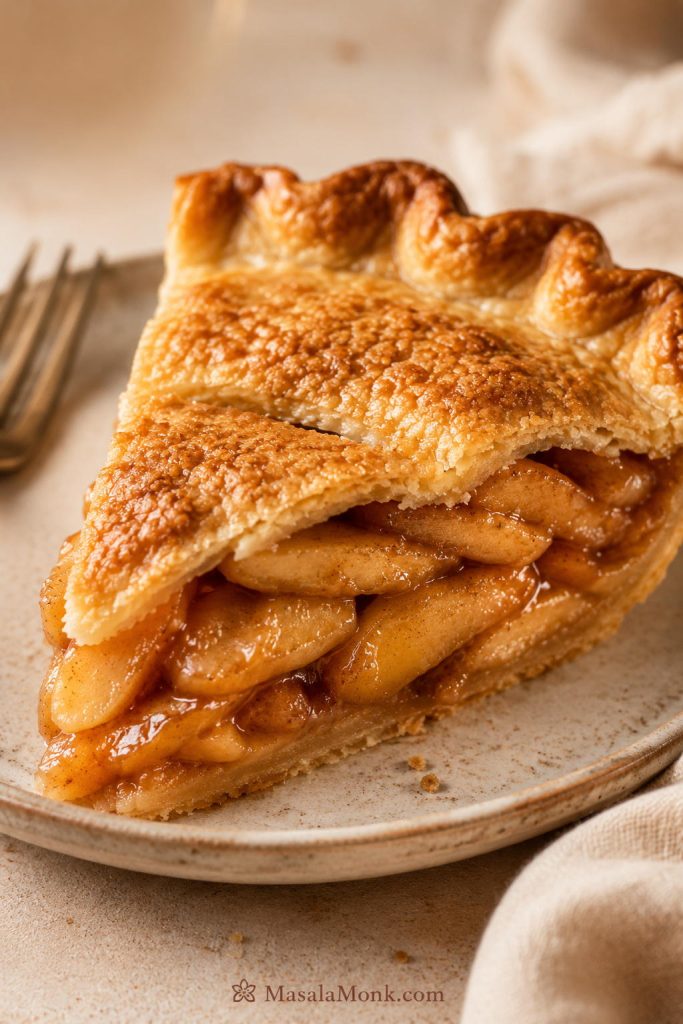
What the Finished Apple Pie Slice Should Look Like
A well-rested pie should slice cleanly without looking dry or stiff. The filling can be glossy and soft, but it should still hold together enough to sit on the plate instead of spreading into a puddle.
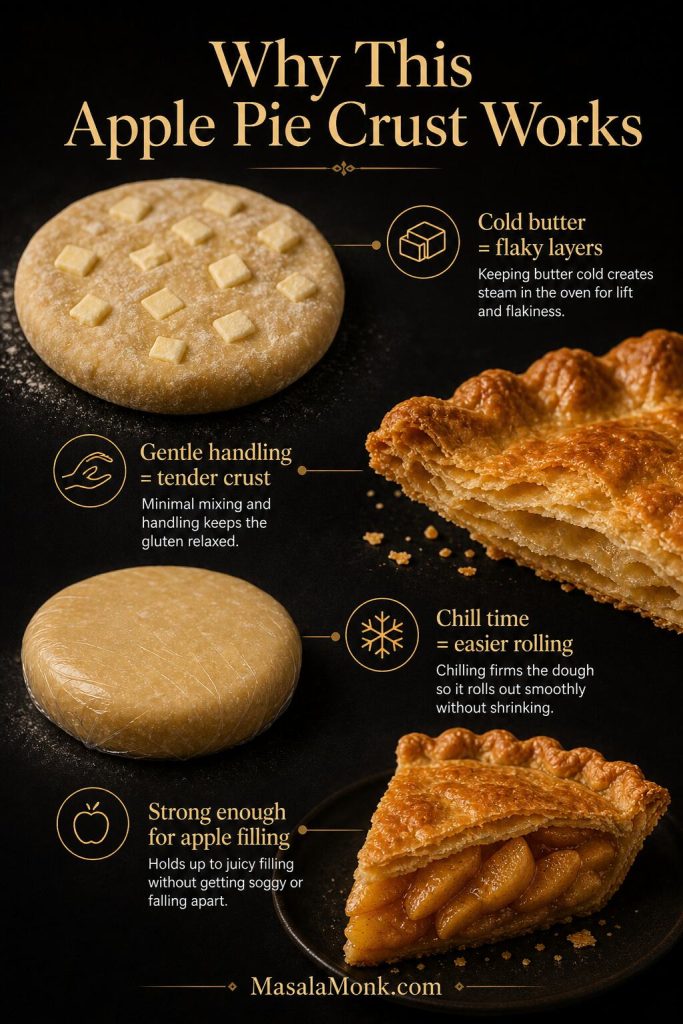
Why This Easy Apple Pie Works
A prepared-filling apple pie can taste flat or turn soggy when the filling is too sweet, the crust is too warm, or the pie is sliced before it has time to set. However, this version fixes those problems without making the recipe complicated.
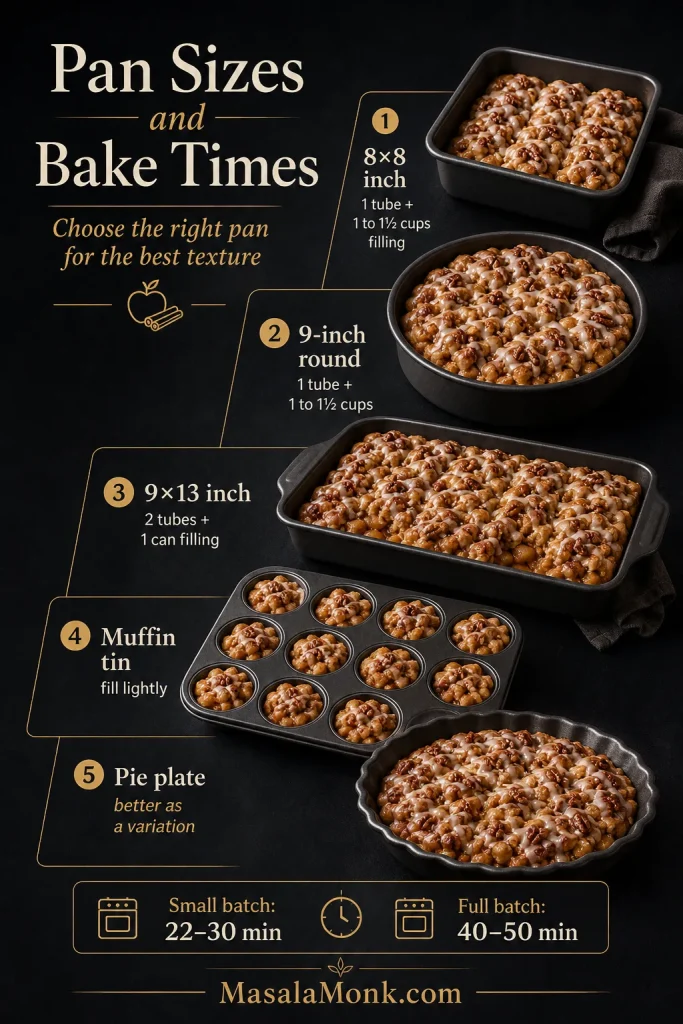
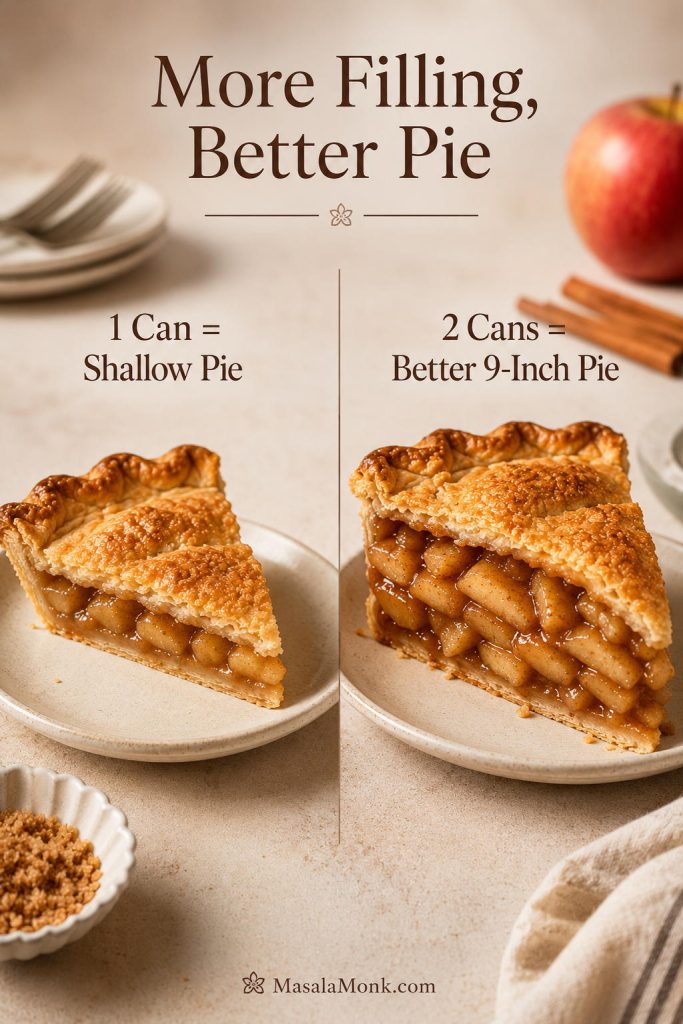
- Two cans give the pie enough body. One can usually makes a shallow pie, while two cans work better for most regular 9-inch pies.
- Small upgrades do the heavy lifting. Lemon, salt, spice, vanilla, butter, and an optional tart apple make canned filling taste brighter and less one-note.
- Cornstarch helps loose filling set. This is especially useful when canned filling looks syrupy.
- Egg wash improves premade crust. It helps the top bake golden instead of pale.
- Cooling gives cleaner slices. Even a properly baked pie needs time before cutting.
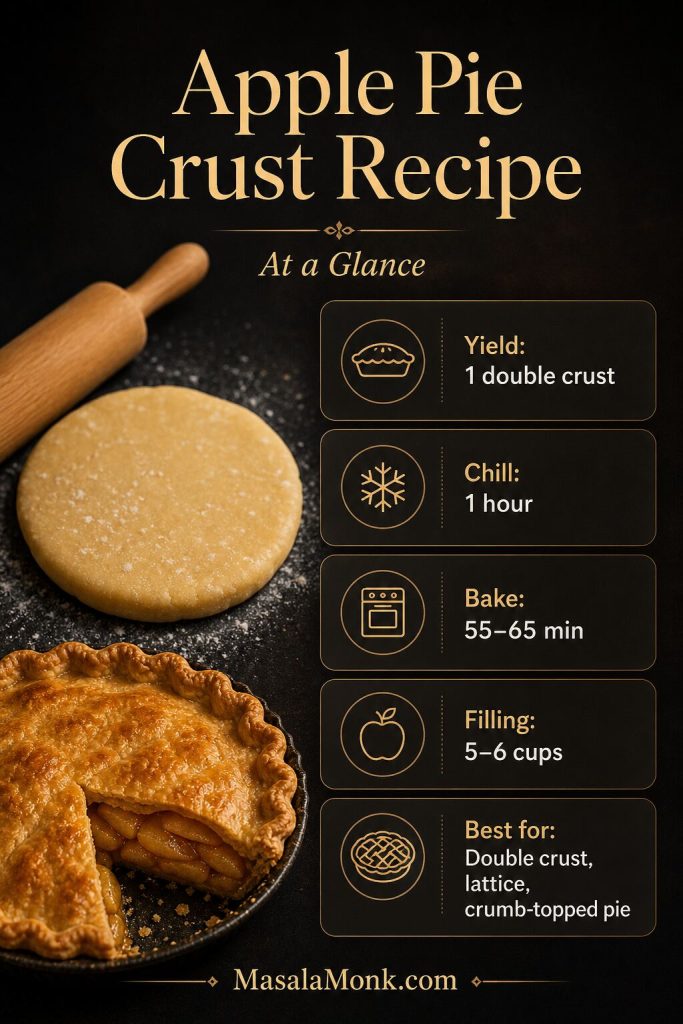
Apple Pie with Apple Pie Filling at a Glance
| Detail | Good Default |
|---|---|
| Pie size | Standard 9-inch pie |
| Filling amount | 2 cans for most regular 9-inch pies; 5–6 cups for a fuller homemade-filling pie |
| Crust | Double crust, lattice, or crumb topping |
| Oven temperature | 400°F / 200°C for the easy method |
| Bake time | 40–45 minutes, or until the crust is fully golden and the filling bubbles |
| Cooling time | 2 hours minimum; 3–4 hours for cleaner slices |
| Fastest version | Canned filling + premade crust |
| Most homemade-style version | Homemade apple pie filling + homemade crust |
| Crispest bottom | Par-bake the bottom crust and use cooled filling |
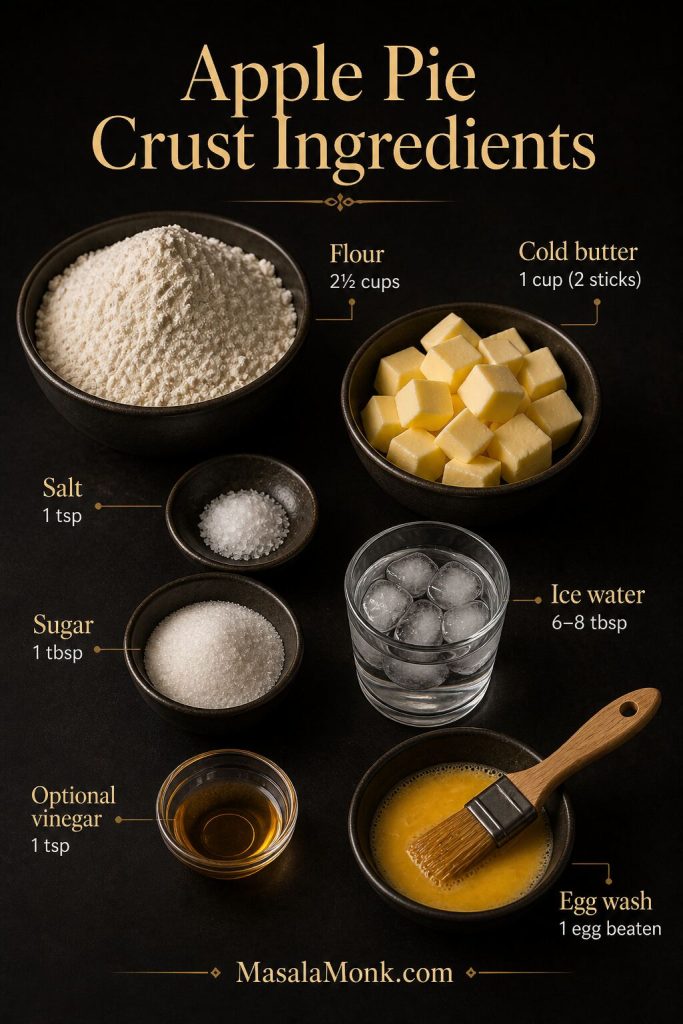
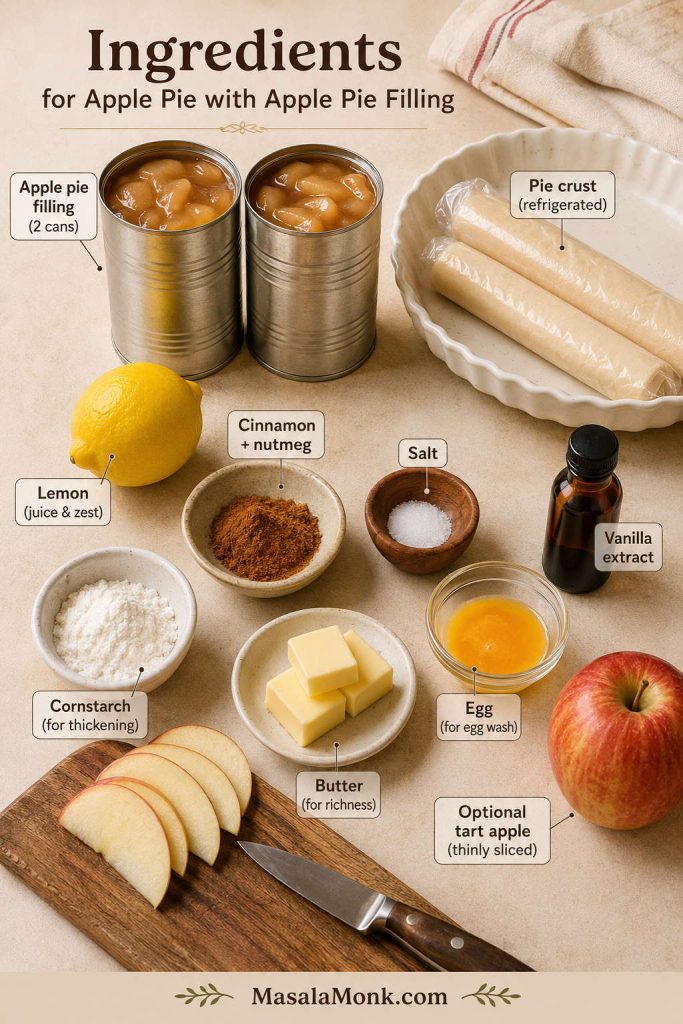
Ingredients for Apple Pie with Apple Pie Filling
This recipe can be as simple as crust, filling, and egg wash. Still, a few small additions make a big difference. Lemon juice keeps the pie from tasting overly sweet, salt wakes everything up, warm spices make the apples taste more homemade, and a little cornstarch helps loose filling set as the pie cools.
For the Crust
- 1 box refrigerated pie crusts, 14.1 oz / about 400 g, usually 2 crusts
- Or 1 homemade double pie crust
- 1 large egg, for egg wash
- 1 tablespoon / 15 ml water or milk, for egg wash
- 1–2 teaspoons coarse sugar or granulated sugar, optional, for sprinkling
For the Filling
- 2 cans apple pie filling, 20–21 oz / 567–595 g each
- 1 teaspoon ground cinnamon
- ¼ teaspoon ground nutmeg
- ⅛ teaspoon salt
- 1 tablespoon / 15 ml lemon juice
- 1 teaspoon / 5 ml vanilla extract, optional
- 1 tablespoon / about 8 g cornstarch, or 2 tablespoons / 16 g if the filling looks loose
- 1 tablespoon / 14 g butter, cut into small pieces
- 1 small tart apple, optional, peeled and thinly sliced, about 100–120 g
The tart apple is optional, but it is one of the most useful upgrades if your canned filling tastes soft or flat straight from the can. A little fresh apple gives the pie more bite and makes the texture feel less processed.
Slice the fresh apple very thinly. Since canned filling is already cooked, thick fresh apple slices may stay too firm by the time the crust is done.
To avoid cornstarch clumps, mix the cornstarch with the cinnamon, nutmeg, and salt first, then fold that mixture into the filling. If the canned filling is very thick and gelled, loosen the cornstarch mixture with the lemon juice before stirring it in.
Using canned filling? The canned filling upgrade guide shows exactly how to fix filling that tastes too sweet, flat, runny, or overly gelled.
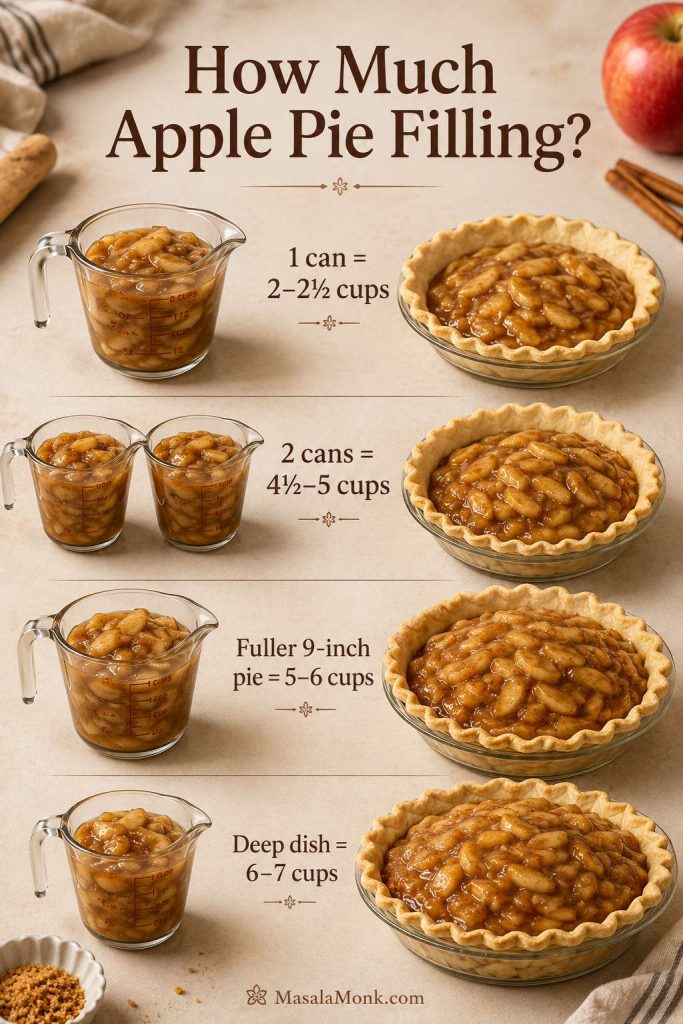
How Much Apple Pie Filling for One Pie?
One can looks tempting, but it usually makes a shallow pie. For most standard 9-inch pies, 2 cans of 20–21 oz apple pie filling work well, especially if you are using a regular pie plate. However, if you want a fuller, more generous pie, add one thinly sliced tart apple or use about 5–6 cups homemade filling.
If you want to make the filling from scratch ahead of time, use this homemade apple pie filling recipe. It is cooked until glossy and spoonable, then cooled before going into pie crust.
| Pie or Filling Use | Amount to Use |
|---|---|
| 1 can apple pie filling | About 2–2½ cups; usually too shallow for a full 9-inch double-crust pie |
| 2 cans apple pie filling | About 4½–5 cups; enough for most regular 9-inch pies |
| Fuller 9-inch pie | 5–6 cups filling, or 2 cans plus 1 small sliced tart apple |
| Shallow 9-inch pie | 4–5 cups filling |
| Deep-dish 9-inch pie | 6–7 cups filling |
| Homemade filling replacement | Use 5–6 cups for one generous 9-inch pie |
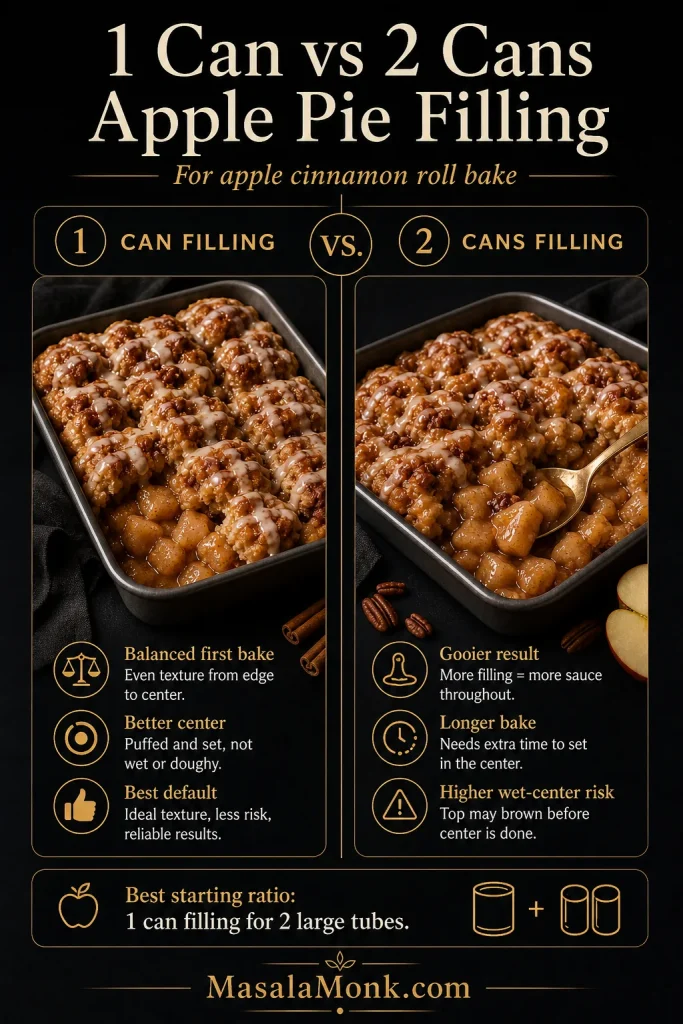
One Can vs Two Cans of Apple Pie Filling
One can may work for a shallow pie, small pie, or tart-style dessert. However, two cans usually give a regular 9-inch pie the fuller slice most people expect from a classic double-crust apple pie.
Leave a little headroom once the filling is in the crust. A pie that is packed all the way to the rim may look generous before baking, but it is more likely to bubble over in the oven.
Once you know how much filling you need, go straight to the step-by-step method.
Canned Apple Pie Filling vs Homemade Apple Pie Filling
Both work. The better choice depends on whether you want speed or texture. Canned filling is fast and reliable, but it often needs a little balancing. Meanwhile, homemade filling gives you more control over the apples, sweetness, and spice; however, it should be cooled before it goes into the crust.
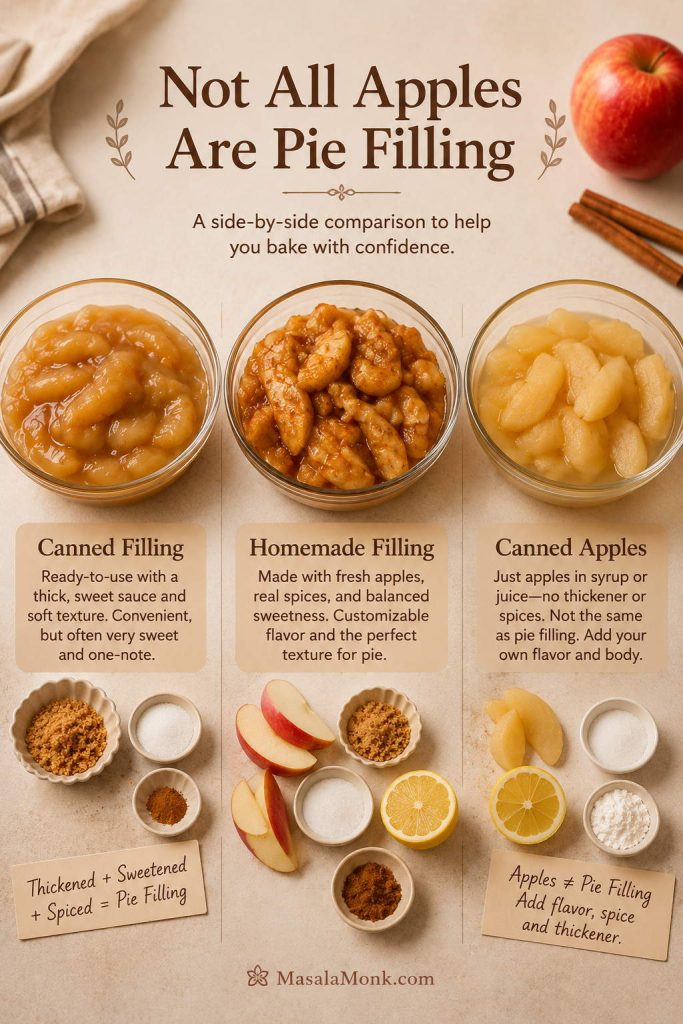
| Filling Type | Best For | What to Know |
|---|---|---|
| Canned apple pie filling | Fastest version | Add lemon, salt, cinnamon, vanilla, and butter for better flavor. |
| Homemade apple pie filling | Better texture and fresher apple flavor | Use 5–6 cups and cool it before adding it to the crust. |
| Canned apples | A separate shortcut when you do not have pie filling | Usually need sugar, spice, lemon, and thickener because they are not already prepared as pie filling. |
| Fresh apples | Best for a full from-scratch apple pie | Use only a small amount here as a texture upgrade; a full fresh-apple filling needs a different method. |
The most important difference is thickness. Apple pie filling is already sweetened and thickened. Canned apples are usually just apples in liquid or syrup, so they need more help before they behave like pie filling.
How to Make Canned Apple Pie Filling Taste Homemade
Canned filling is convenient, but it can taste too sweet, too soft, or a little flat. Do not panic if it tastes unimpressive straight from the can. That is exactly what the lemon, salt, spice, butter, and optional tart apple are here to fix.
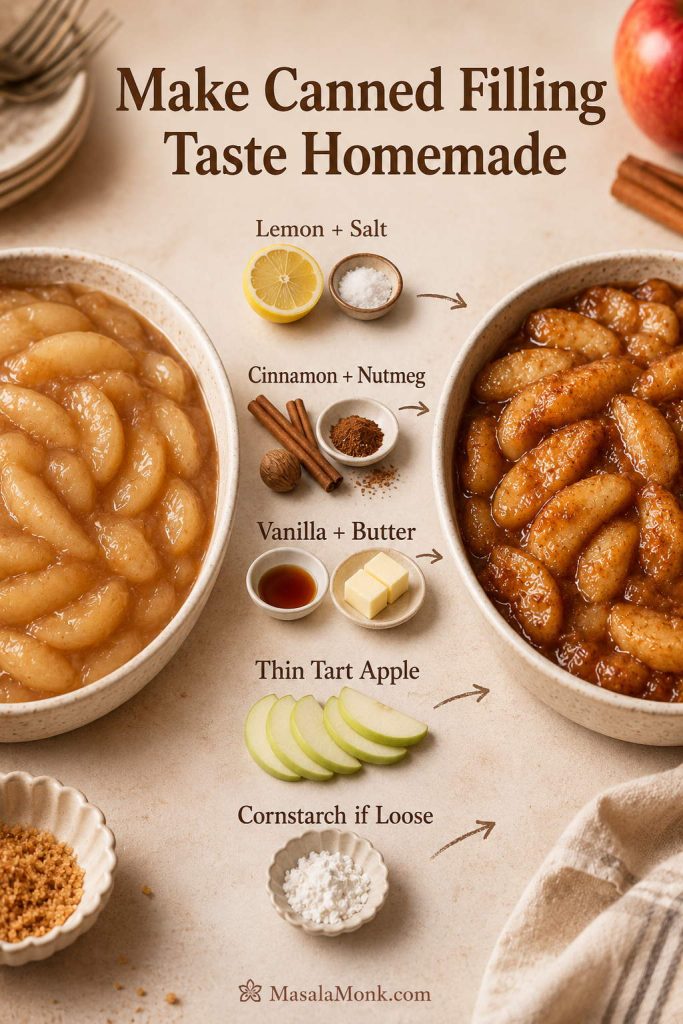
| Filling Problem | What to Add | Why It Works |
|---|---|---|
| Overly sweet filling | 1 tablespoon lemon juice + ⅛ teaspoon salt | Balances the syrupy sweetness and makes the apples taste brighter. |
| Flat flavor | Cinnamon, nutmeg, and vanilla | Adds warmth and makes the filling taste more like homemade apple pie. |
| Soft apple texture | 1 small tart apple, very thinly sliced | Adds fresh apple texture and a little bite. |
| Runny or loose filling | 1–2 tablespoons cornstarch | Helps syrupy filling set as the pie bakes and cools. |
| Canned flavor | Butter, lemon, spice, and vanilla | Rounds out the flavor and softens the processed taste. |
| Thick or gelled filling | Stir gently; add a tiny splash of apple juice only if needed | Loosens the texture without making the pie watery. |
Cornstarch and Thin Apple Fixes for Canned Filling
These two small fixes solve different problems. Cornstarch helps loose filling set, while very thin tart apple slices add fresher texture without staying hard after the crust is baked.

Taste the filling before it goes into the crust. If it tastes dull, add a little more lemon. If it tastes sharp, leave it alone; the crust and butter will soften the edges as it bakes.
Go easy on extra sugar. Most canned filling is already sweet enough. If you want a deeper flavor, use only 1–2 tablespoons brown sugar. If the filling already tastes very sweet, lemon and salt will help much more than more sugar.
Already happy with your filling? Skip ahead to the baking method, or use the soggy-bottom fixes if crust texture is your main worry.
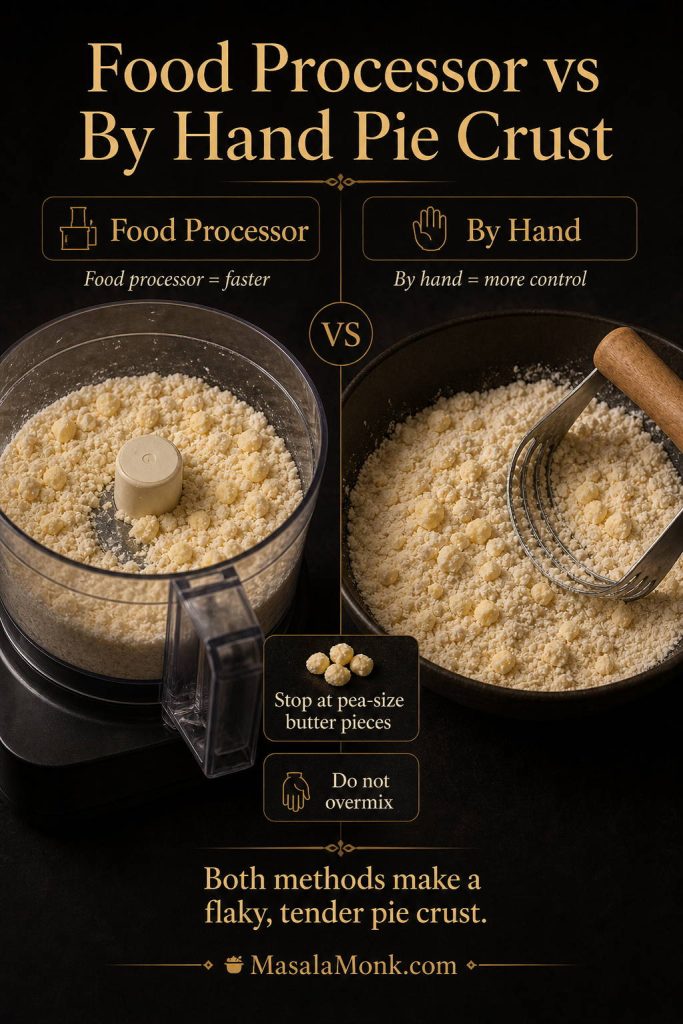
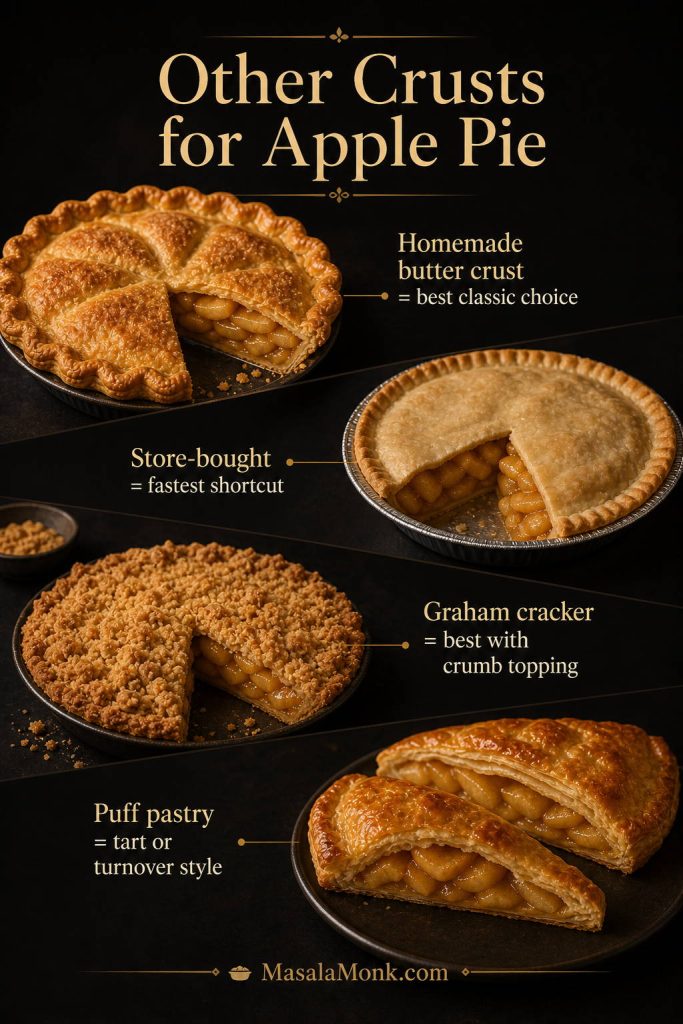
Premade Pie Crust vs Homemade Crust for Apple Pie
For the fastest version, refrigerated premade crust is the easiest choice. It usually comes as a two-crust pack, so you can make a classic double-crust pie, a lattice top, or cutout shapes without mixing dough from scratch.
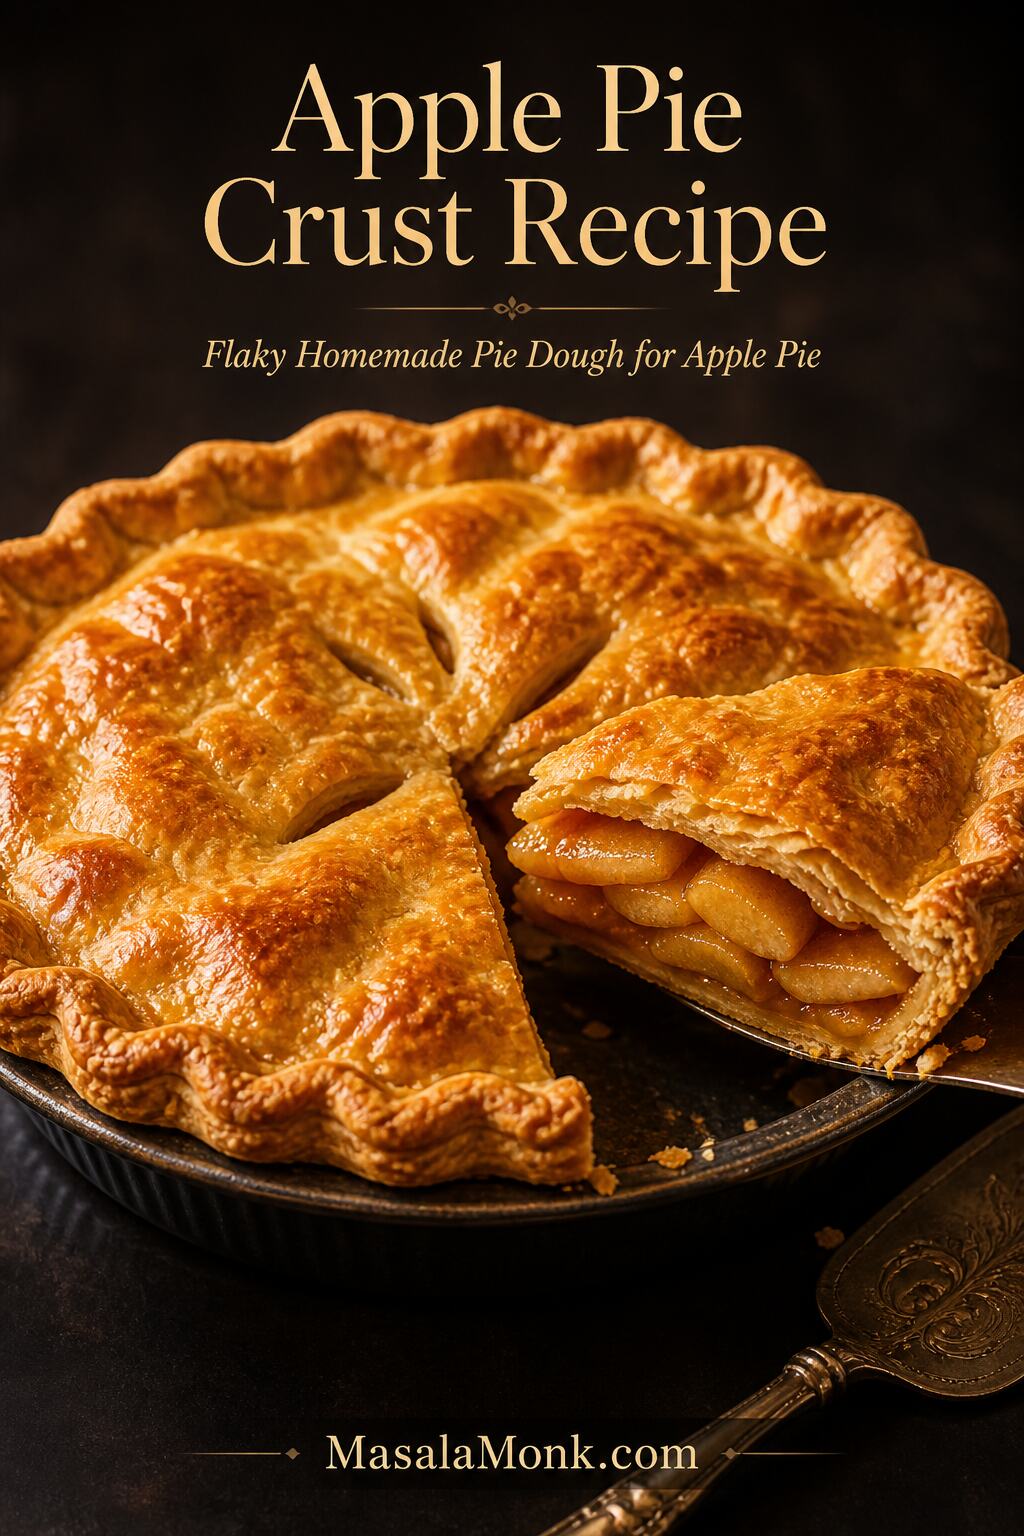
For better flavor and flake, use homemade crust. If you want a buttery crust that works for apple pie, lattice, and double-crust bakes, use this apple pie crust recipe as the base.
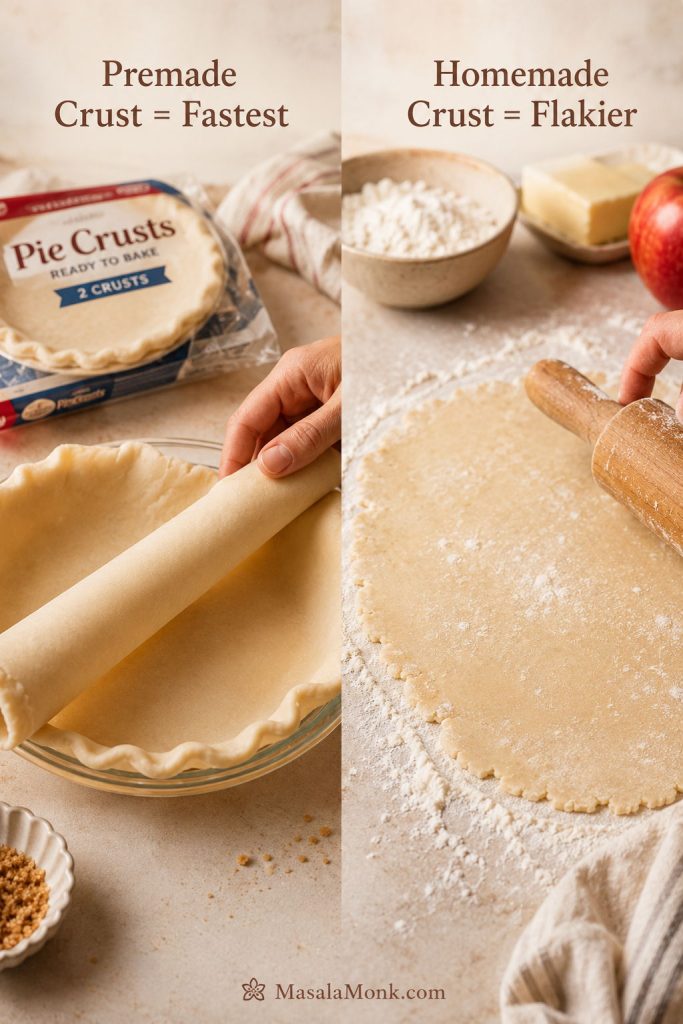
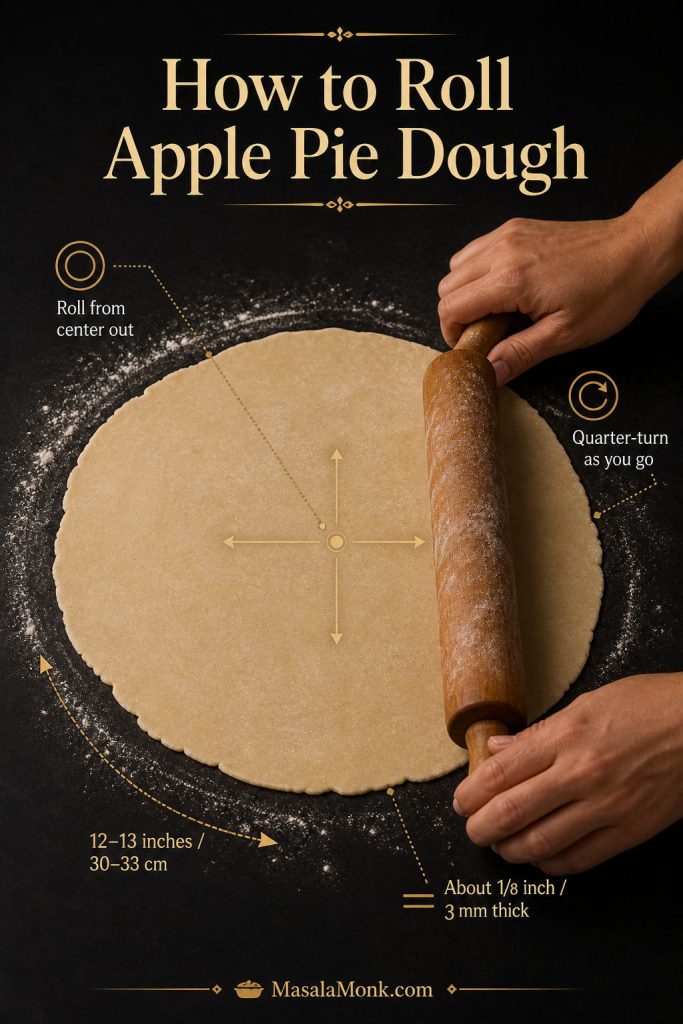
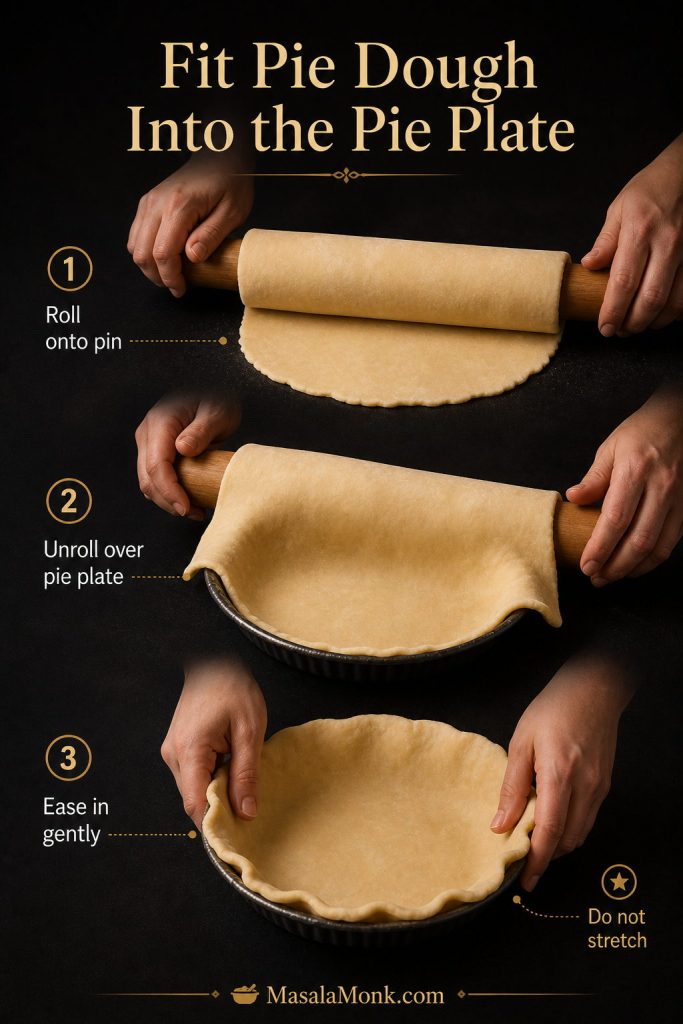
- Refrigerated pie crust: fastest and easiest. Let it soften just enough to unroll, then keep it cold once it is in the plate.
- Homemade pie crust: better flavor and flake. Keep the dough cold and do not stretch it into the pie plate.
- Frozen pie shell: useful for crumb-topped versions, but less flexible for a full double-crust pie.
- Graham cracker crust: not ideal here. It is better for chilled or biscuit-base desserts, like banoffee pie, than bubbling apple filling.
Worried about the bottom crust? Read the soggy-bottom fixes before you bake.
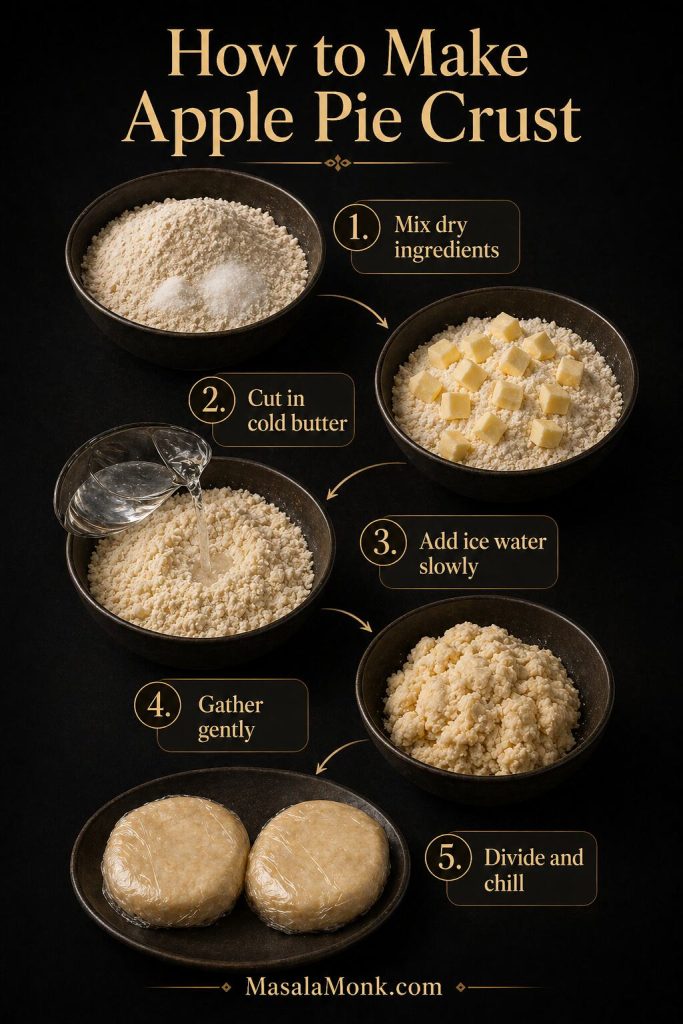
How to Make Apple Pie with Apple Pie Filling
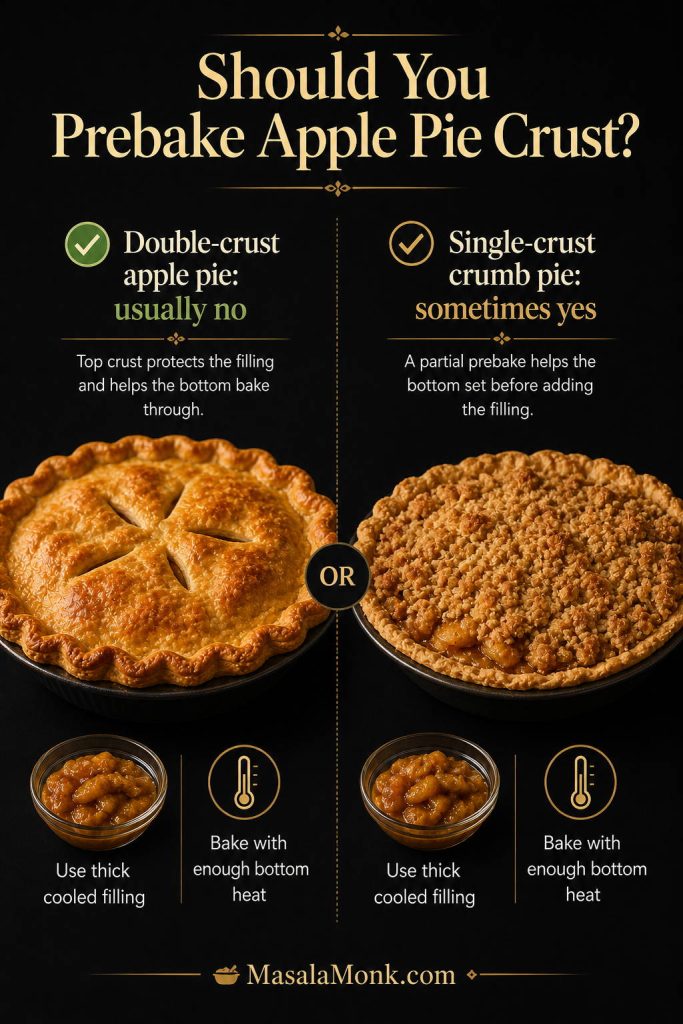
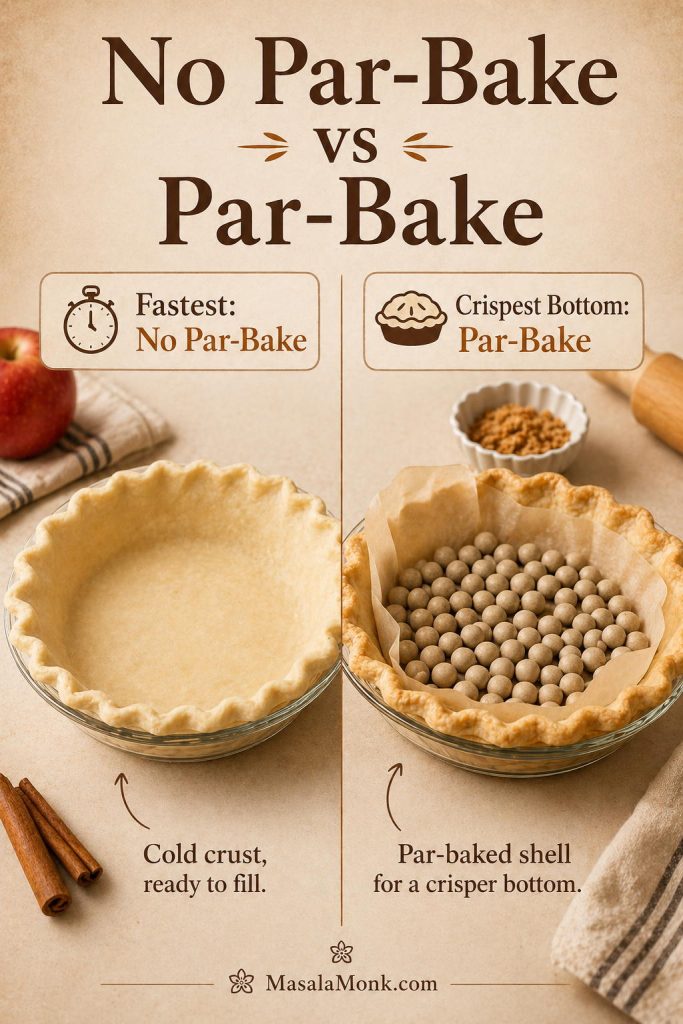
There are two good ways to make this pie. The fast method is for the easiest possible bake. The par-baked method is for anyone who wants more protection against a soft bottom crust.
No-Par-Bake vs Par-Bake Apple Pie
Use the no-par-bake route when speed matters most. However, if you care more about bottom-crust texture, par-baking gives the crust a head start before the prepared filling goes in.
Fast Apple Pie with Canned Filling Method
This is the simplest route when you want a low-stress holiday dessert or a quick pie that still feels homemade.
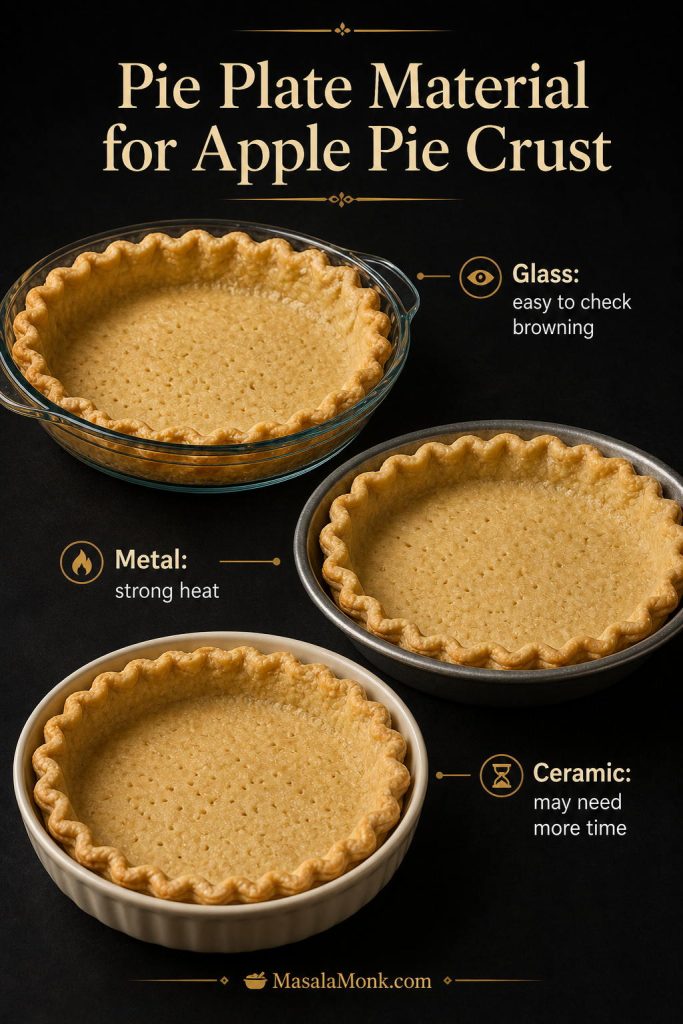
Choosing the Right Pie Plate: Metal vs Glass
Pie plate material changes how the crust bakes. A metal pan usually browns faster, while glass lets you see the crust but needs gentler handling around sudden heat changes.

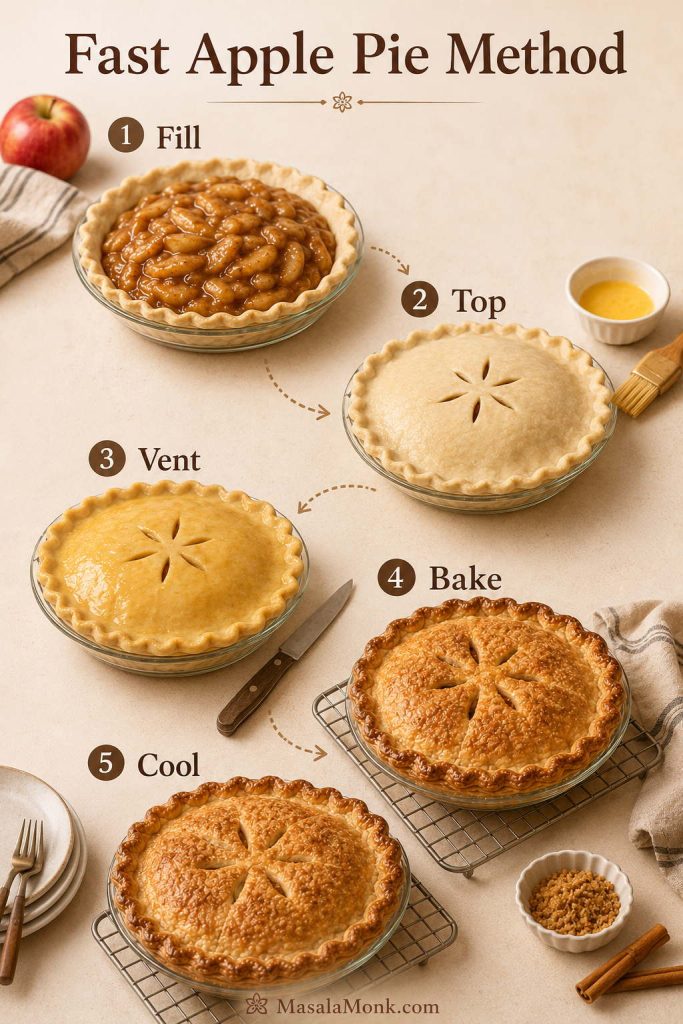
- Heat the oven. Preheat to 400°F / 200°C. If using a metal pie plate, you can preheat a rimmed baking sheet and bake the pie on it for better bottom browning. If using a glass pie plate, avoid sudden temperature changes and use a room-temperature sheet pan underneath to catch drips.
- Prepare the crust. Fit one pie crust into a 9-inch pie plate without stretching it. Chill the crust while you mix the filling.
- Mix the filling. In a small bowl, mix the cornstarch with the cinnamon, nutmeg, and salt. Gently fold that mixture into the filling with the lemon juice, vanilla, and optional sliced tart apple.
- Fill the pie. Spoon the apple mixture into the chilled bottom crust, then dot the top with small pieces of butter.
- Add the top crust. Cover with the second crust, make a lattice, or add cutouts. Seal and crimp the edges.
- Vent and wash. Cut steam vents if using a full top crust. Whisk the egg with water or milk, brush lightly over the crust, and sprinkle with sugar if using.
- Bake. Start at 400°F / 200°C for 20 minutes. Then, tent the edges or top lightly with foil if browning too fast and continue baking for 20–25 minutes more.
- Cool. Let the pie rest for at least 2 hours before slicing. For the cleanest slices, cool 3–4 hours.
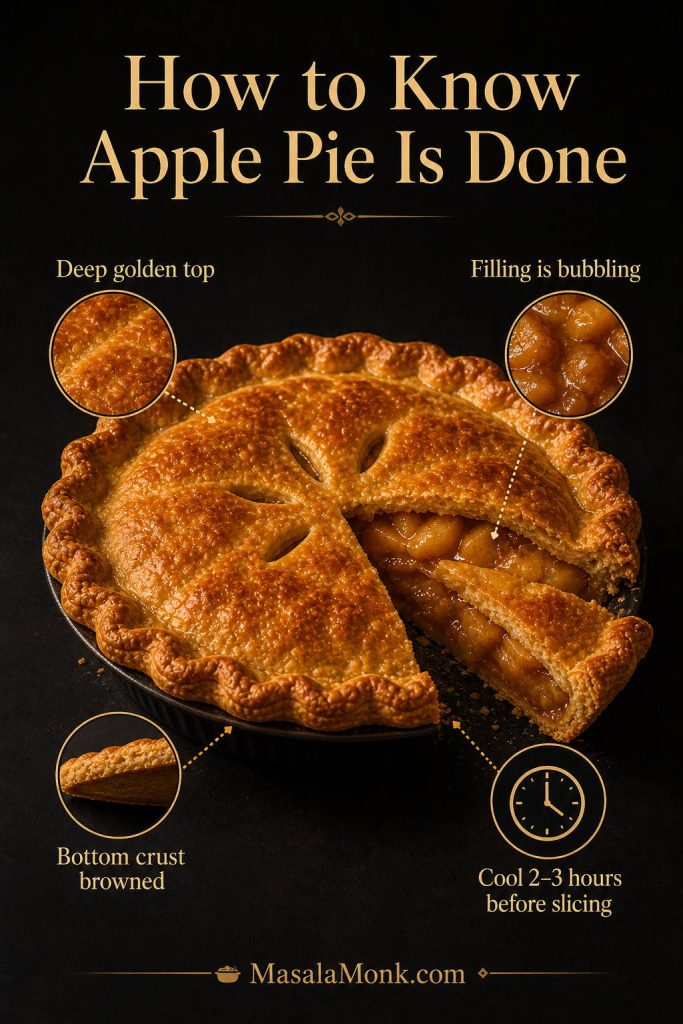
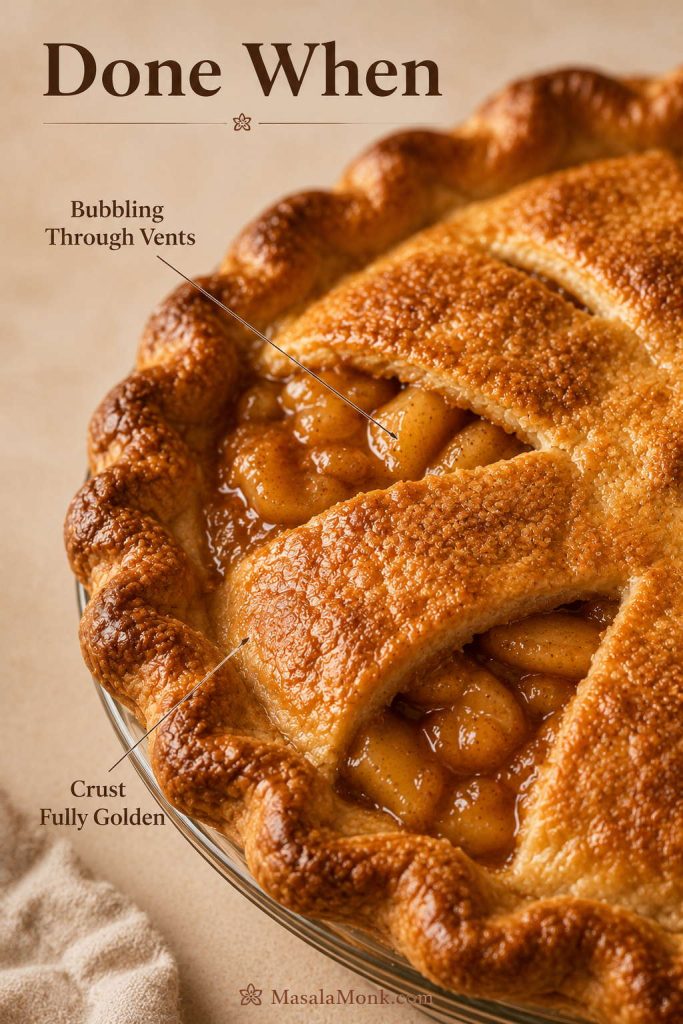
How to Tell When the Pie Is Done
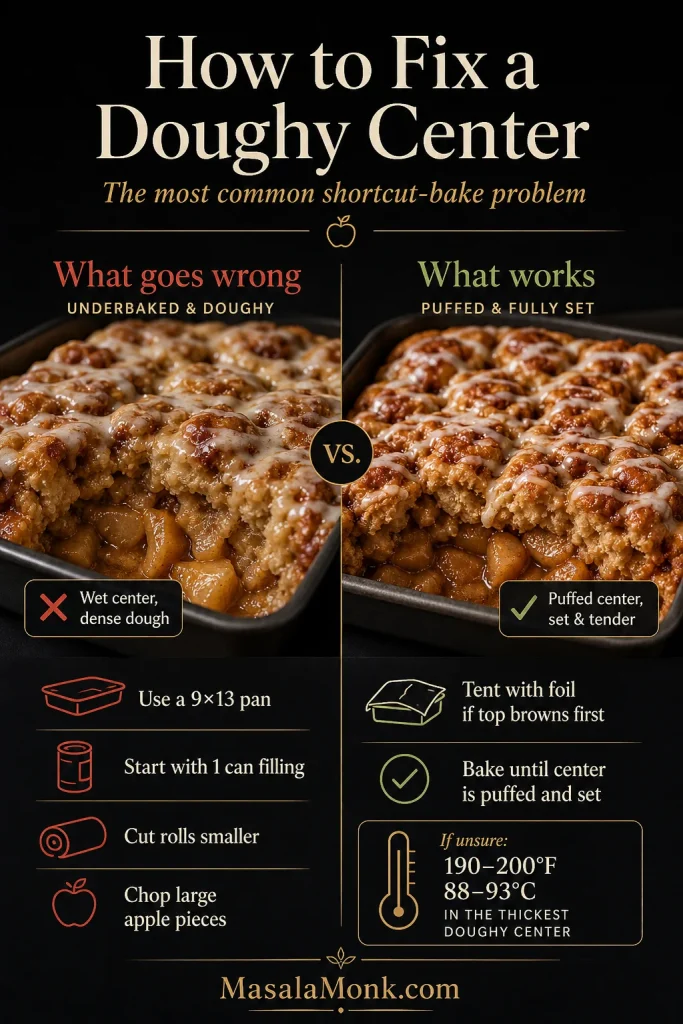
For fruit pies, visual cues matter more than the timer. A properly baked pie should show active bubbling through the vents or lattice, and the crust should be fully golden, not pale. For another helpful bake-doneness cue, King Arthur Baking recommends waiting until the filling shows vigorous bubbling.
If your filling looks loose or your pies often have a soft base, use the soggy-bottom guide or the par-baked crust option.
Better Bottom Crust Method
Use this method if your filling looks loose, your pie plate is deep, or you have had wet-bottom pies before. It adds time, but it gives the base a head start before the filling goes in.
- Fit and chill the bottom crust. Place the bottom crust in a 9-inch pie plate and chill for 20–30 minutes.
- Par-bake. Line the crust with parchment and fill with pie weights, dried beans, or rice. Bake at 375°F / 190°C for 15–18 minutes.
- Set the base. Remove the weights and parchment. If the crust looks damp, bake for another 2–3 minutes. For extra protection, brush the bottom lightly with egg wash and bake 2–3 minutes more.
- Add filling and top crust. Spoon in the upgraded filling, dot with butter, add the top crust or lattice, and seal the edges.
- Bake the filled pie. Increase the oven to 400°F / 200°C and bake for 35–45 minutes, until the top is golden and the filling bubbles through the vents.
- Rest before slicing. Let the pie settle fully so the filling holds better when cut.
A lattice or crumb topping is easiest with a par-baked bottom crust. If using a full top crust, brush the par-baked rim lightly with egg wash or water, press gently to seal, and shield the edges if they brown too quickly.
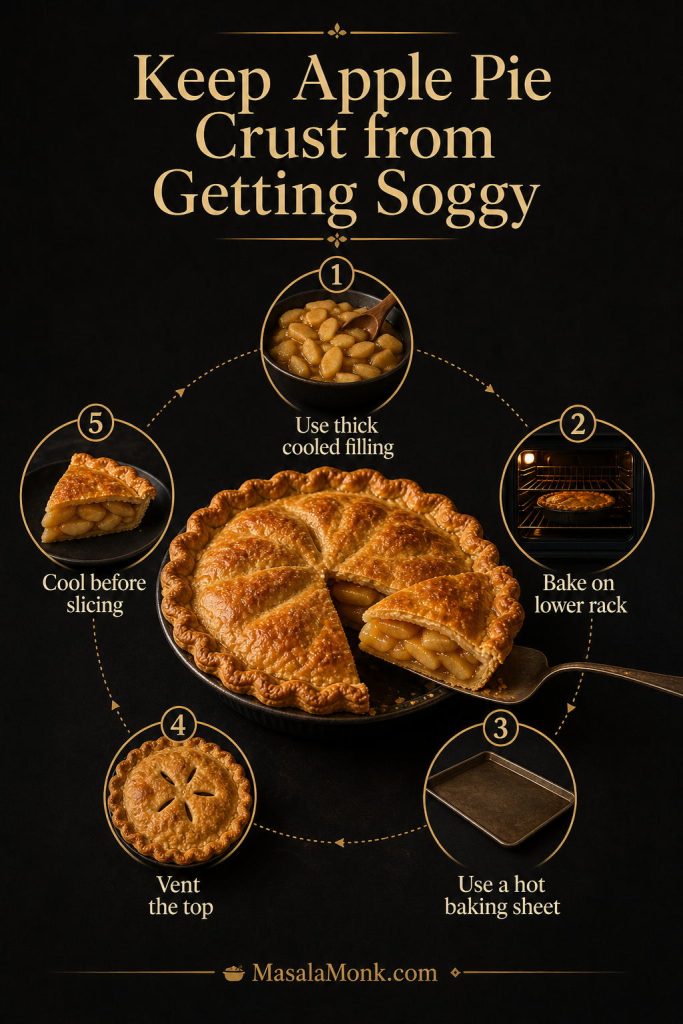
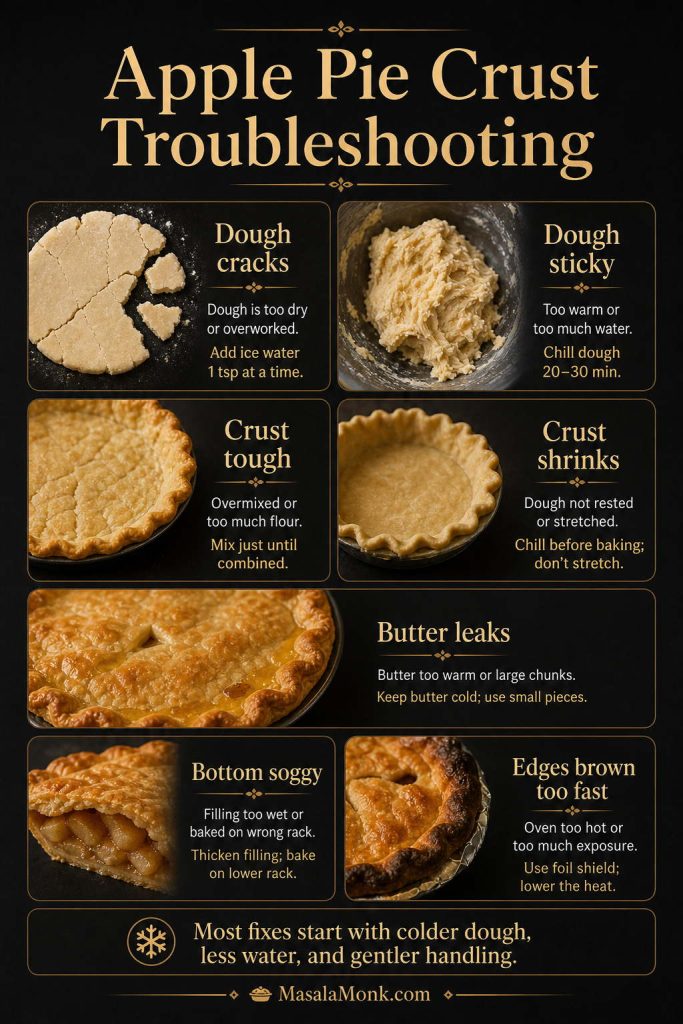
How to Stop the Bottom Crust from Getting Soggy
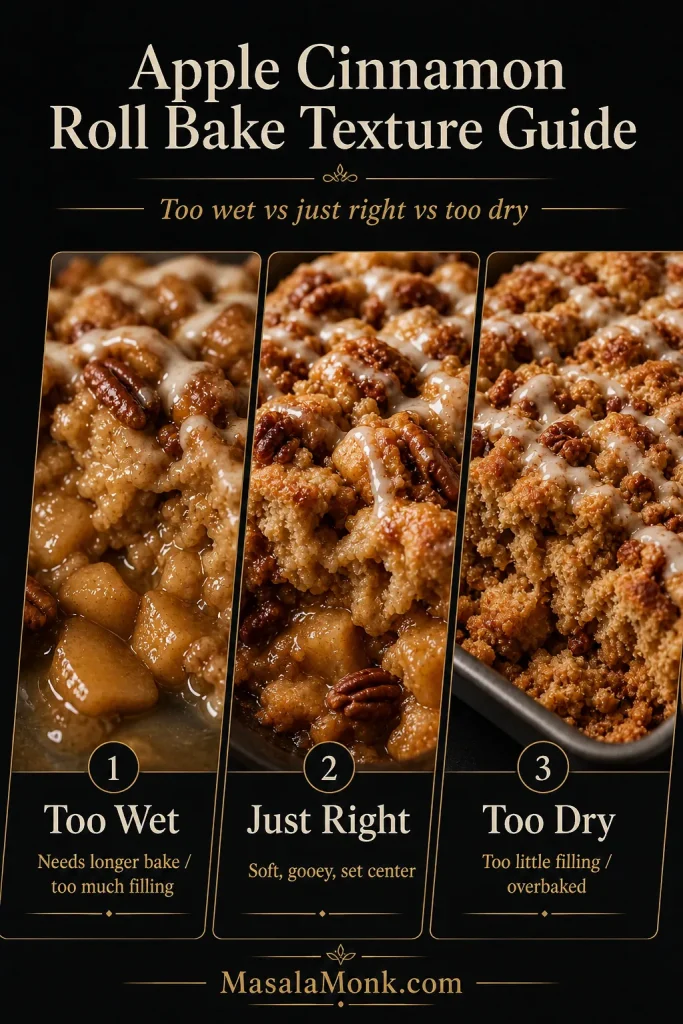
A soggy bottom usually happens when the filling is too wet, the crust is too warm, the pie is underbaked, or the pie is sliced before the filling has settled. This version is especially vulnerable if the canned filling is soft and syrupy.
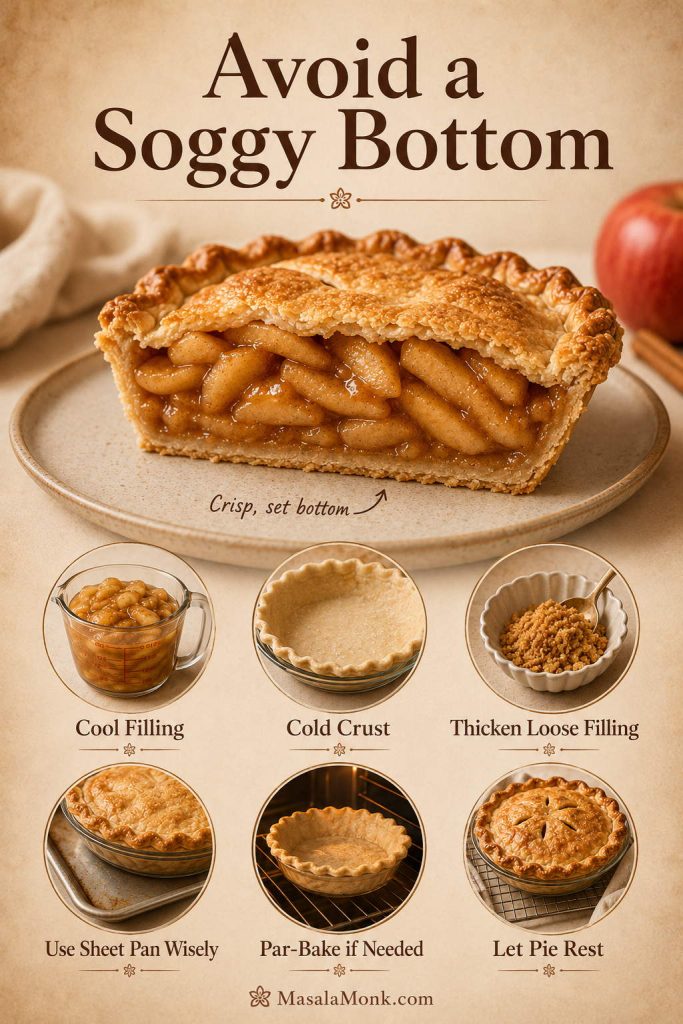
- Use cooled filling. If using homemade filling, let it cool before adding it to the crust.
- Thicken loose filling. Add 1 tablespoon cornstarch for normal canned filling or 2 tablespoons if it looks runny.
- Keep the crust cold. Chill the bottom crust after fitting it into the pie plate.
- Use a glass or metal pie plate. These usually brown the bottom crust better than flimsy disposable foil pans.
- Use a sheet pan wisely. A hot sheet pan can help bottom browning with a metal pie plate. With glass, use a room-temperature sheet pan to avoid sudden temperature changes.
- Do not underbake. Look for a deeply browned crust and active bubbling through the vents, not just the timer.
- Par-bake when needed. This is the safest option when crust texture matters most.
- Give the pie time to settle. This matters especially if you want neat pieces instead of a loose filling spill.
If you are making this for a holiday table, bake it earlier than you think. Apple pie slices better after it rests, and individual slices can always be warmed gently before serving.
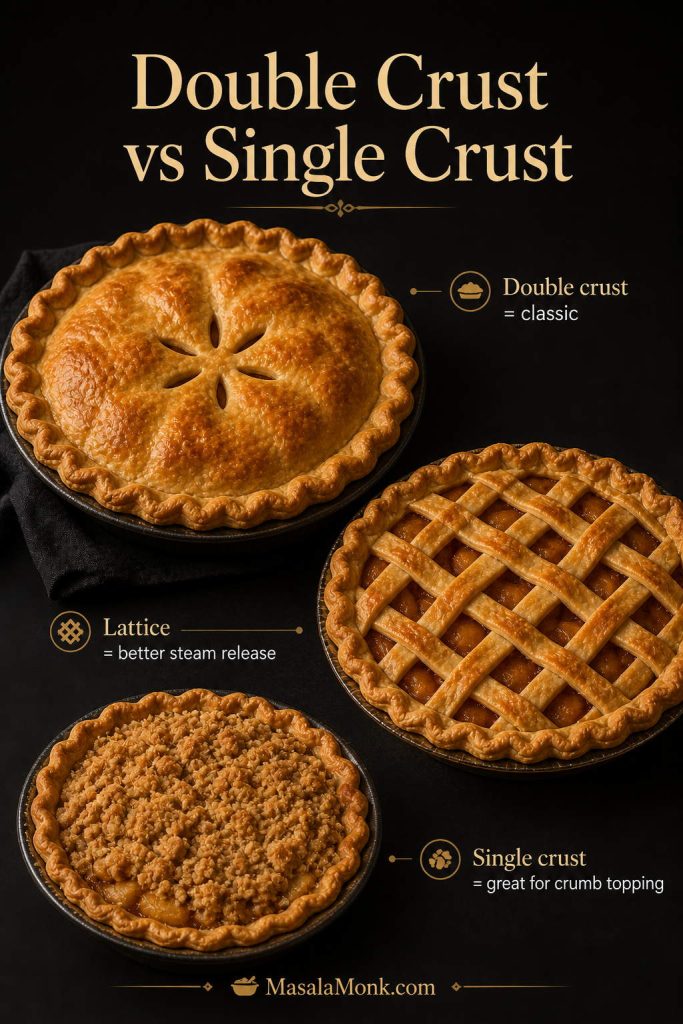
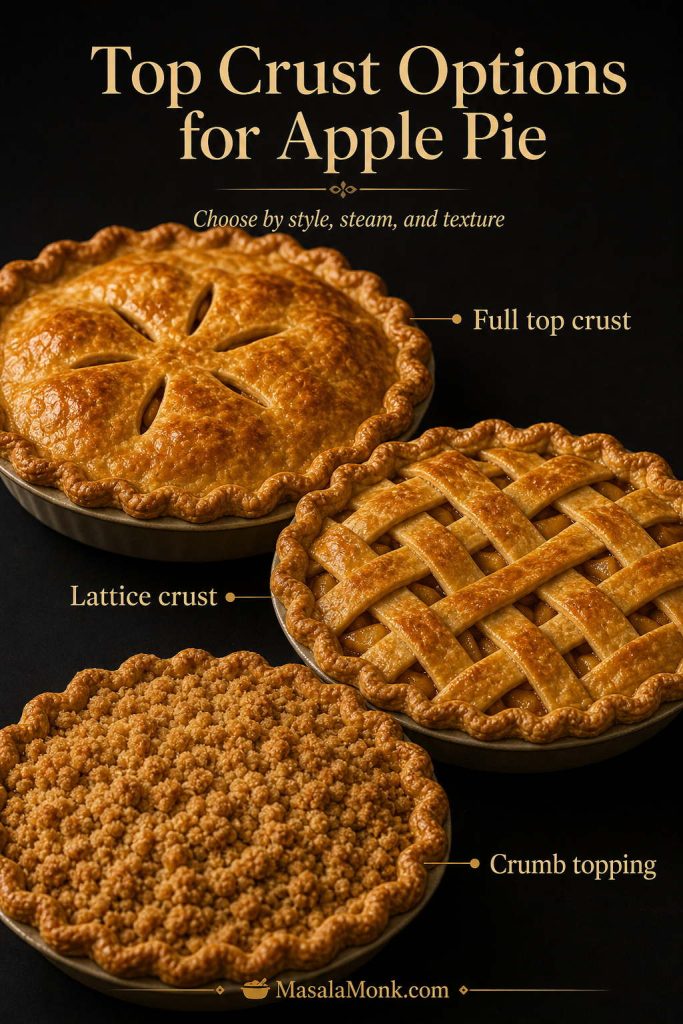
Top Crust Options
A full top crust is the classic choice, but a lattice, cutout crust, or crumb topping can work beautifully too. Since the filling is already prepared, the top is mostly about texture, looks, and steam release.

- Full top crust: classic apple pie look. Cut several vents so steam can escape.
- Lattice crust: pretty, traditional, and naturally well-vented.
- Cutout crust: great for holiday pies. Leave enough gaps for steam.
- Crumb topping: easier than a top crust and gives the pie a Dutch-style feel. This is the direction to take if you want more buttery crumble than pastry.
- No top crust: not ideal for this exact recipe unless you reduce the filling or turn it into a tart-style dessert.
If you use a full top crust, vents are not optional. Prepared filling still bubbles as it heats, and steam needs a place to escape.
Troubleshooting Apple Pie with Apple Pie Filling
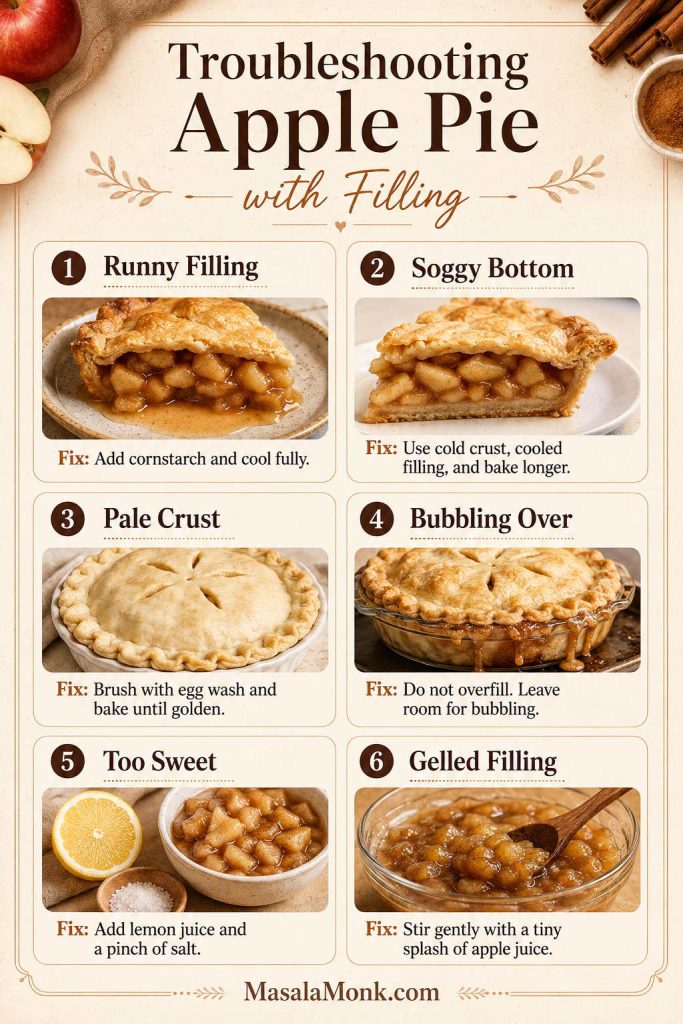
| Problem | Likely Cause | Fix |
|---|---|---|
| Bottom crust is soggy | Filling was too wet, crust was warm, or pie was underbaked | Use cooled filling, thicken loose filling, chill the crust, and par-bake next time. |
| Filling runs everywhere | Pie was sliced too hot | Let the pie rest fully before cutting; warm filling will always look looser. |
| Filling tastes canned | Not enough acid, salt, spice, or fresh texture | Add lemon juice, cinnamon, vanilla, salt, butter, and optional tart apple. |
| Pie is too sweet | Canned filling is already sweet | Add lemon juice and a tart apple. Avoid extra sugar unless the filling truly needs it. |
| Top crust browns too fast | Edges are exposed to direct heat | Tent loosely with foil or use a pie shield. |
| Pie bubbles over | Too much filling or not enough headroom | Bake on a sheet pan and avoid overfilling the crust. |
| Crust tastes bland | Plain premade crust did not brown enough | Use egg wash, a little sugar, and bake until deeply golden. |
| Filling is too thick or gelled | Canned filling texture is very firm | Stir gently before filling the pie and add only a tiny splash of apple juice if needed. |
Ready to bake? Use the recipe card for the exact amounts, timing, and optional par-bake method.
How to Serve This Apple Pie So It Feels Homemade
This pie is best when it has cooled long enough to slice cleanly, then served slightly warm. If the pie has fully cooled, warm individual slices gently in the oven so the crust perks back up and the filling softens. Then, serve it with something creamy, crunchy, or caramel-like to make the shortcut feel more special.
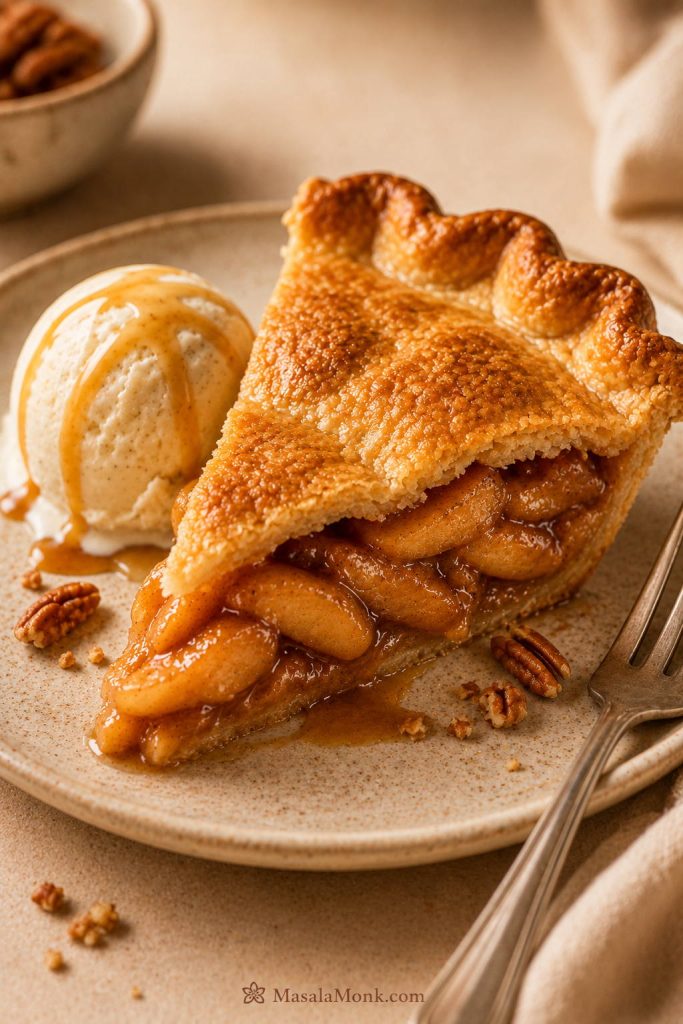
- Vanilla ice cream: the classic pairing, especially with a warm slice.
- Whipped cream: lighter than ice cream and good when the pie is already sweet.
- Caramel drizzle: great for a sweeter, holiday-style dessert, especially if you want the pie to lean more caramel-apple.
- Toasted pecans or walnuts: add crunch if the filling is very soft.
- Extra cinnamon sugar: sprinkle lightly over the crust before baking for a more bakery-style finish.
For the nicest serving moment, warm the slice instead of the whole pie. The crust stays neater, the filling softens gently, and the slice still holds its shape on the plate.
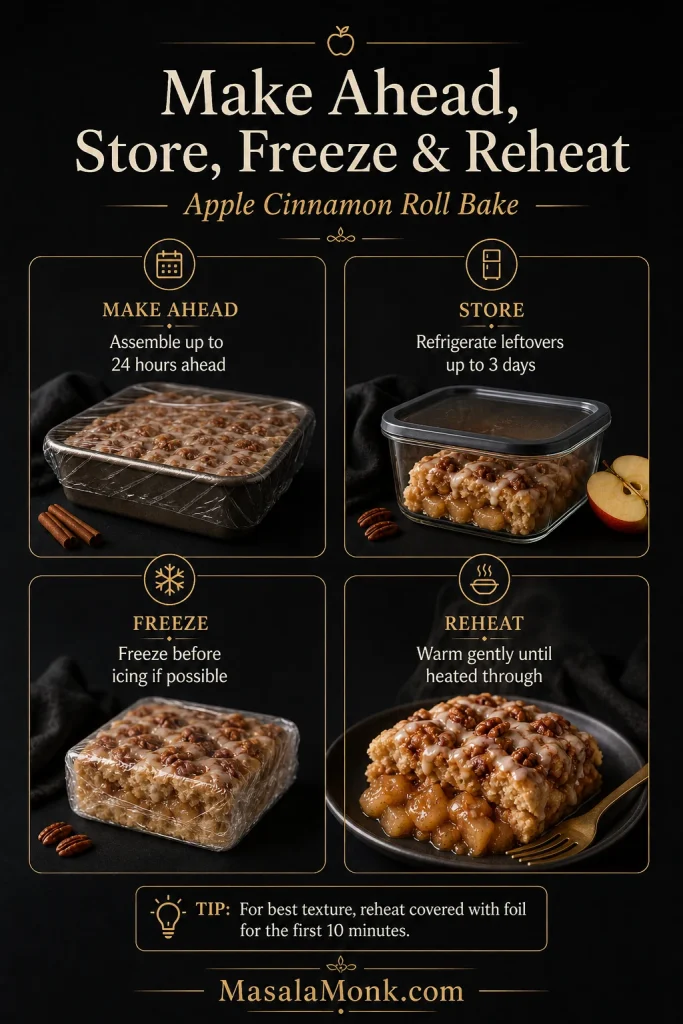
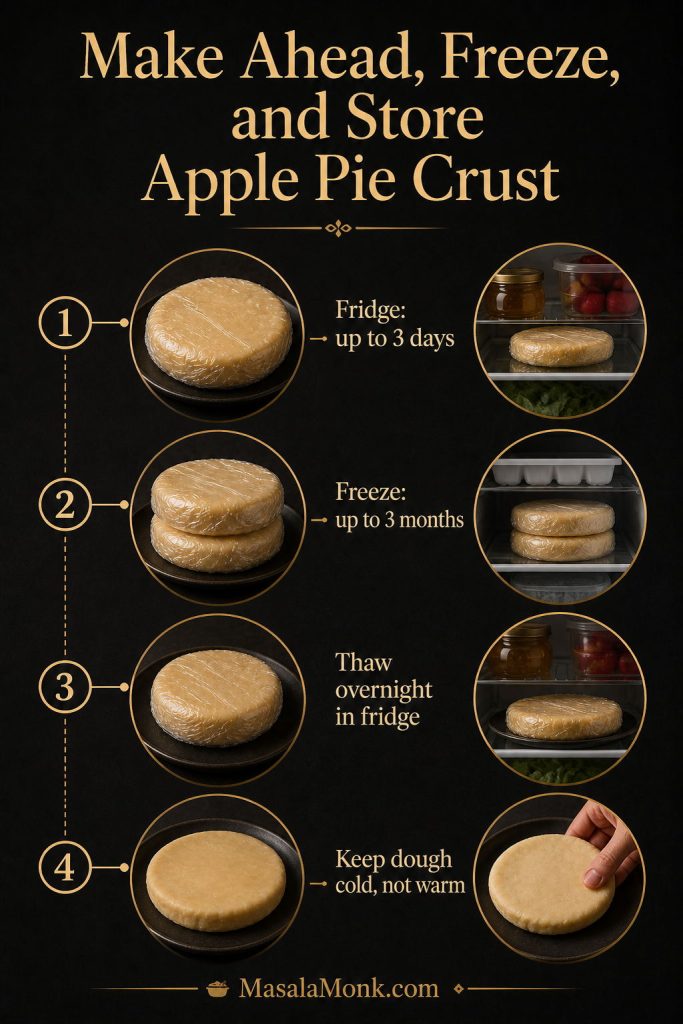
Make-Ahead, Storage, Freezing, and Reheating
This is a good make-ahead pie because it needs time to cool anyway. Bake it earlier in the day, let it rest fully, then warm slices before serving if you want that fresh-from-the-oven feeling.
- Make ahead: bake the pie several hours before serving so the filling has time to settle.
- Room temperature: for best crust texture, keep loosely covered the day it is baked. Fruit pies made with sugar are commonly kept at room temperature for up to 2 days, but refrigerate sooner if your kitchen is warm.
- Refrigerator: store covered for 3–4 days.
- Freezer: freeze baked pie or slices tightly wrapped. The filling freezes well, but the crust may soften slightly after thawing.
- Reheating slices: warm in a 325°F / 160°C oven until heated through. An air fryer also works well for individual slices.
- Microwave note: the microwave is fast, but it softens the crust.
For a deeper food-safety note, Iowa State Extension has a helpful guide to fruit pie storage.
More Desserts with Apple Pie Filling
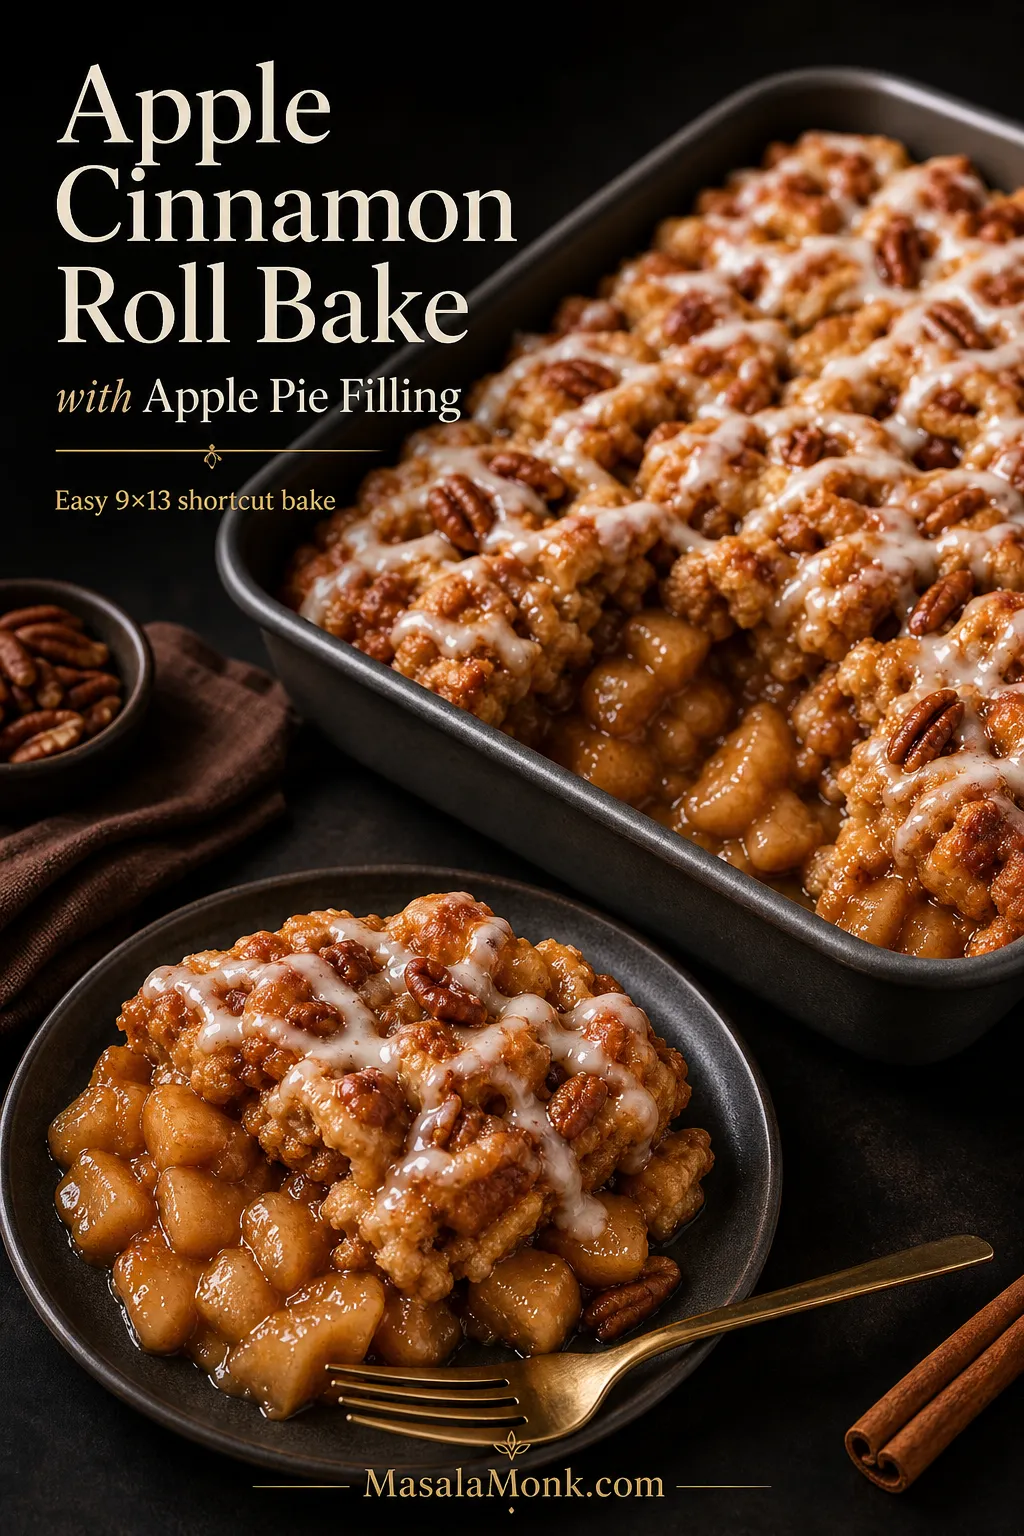
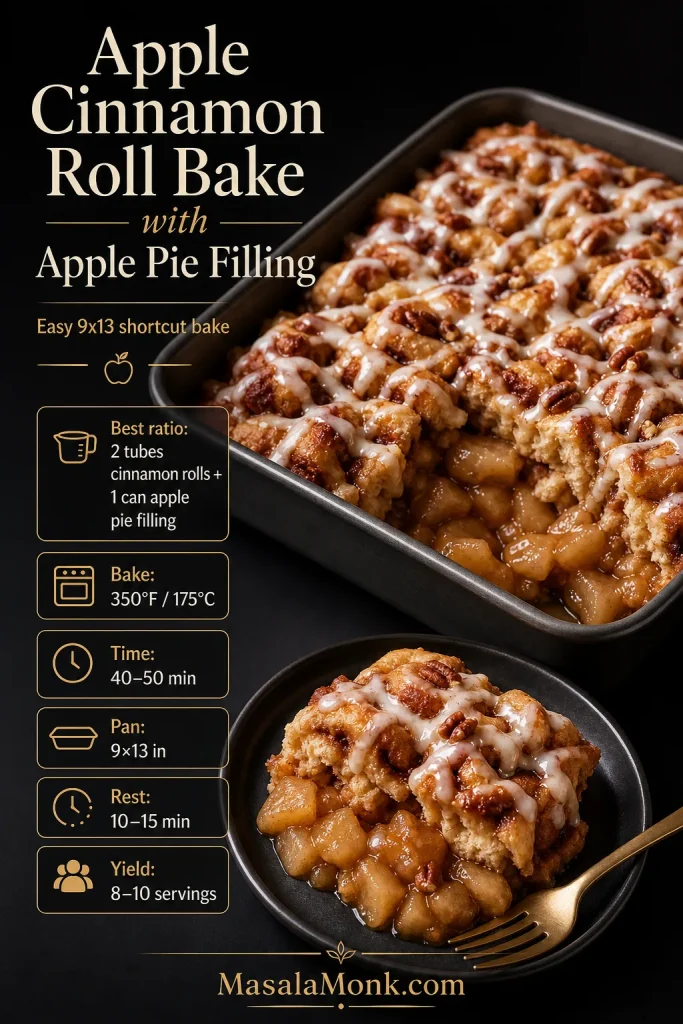
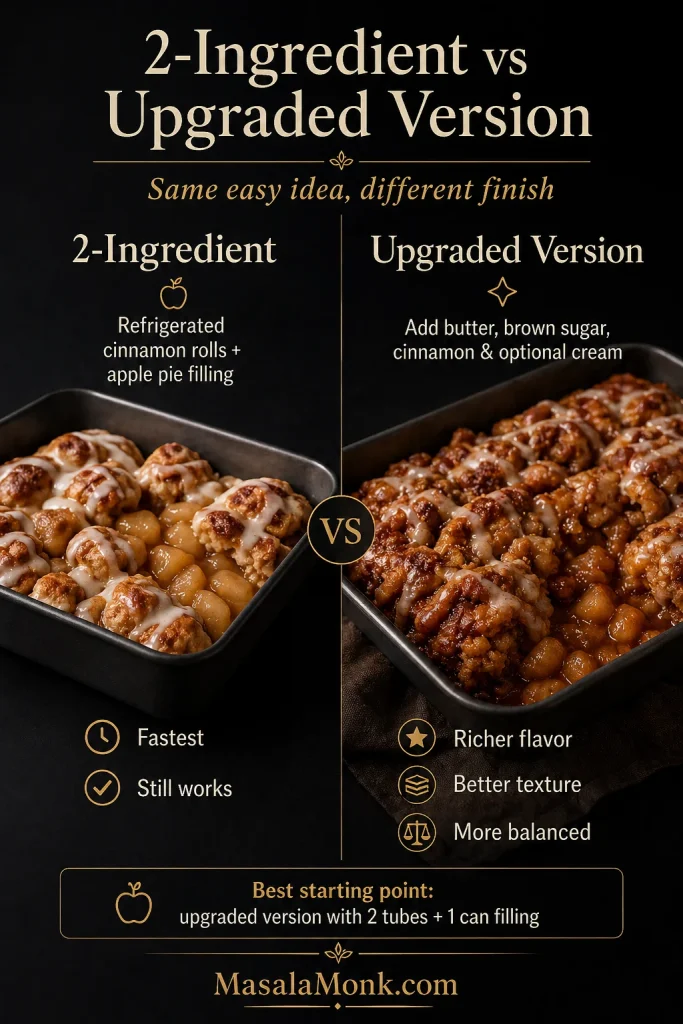
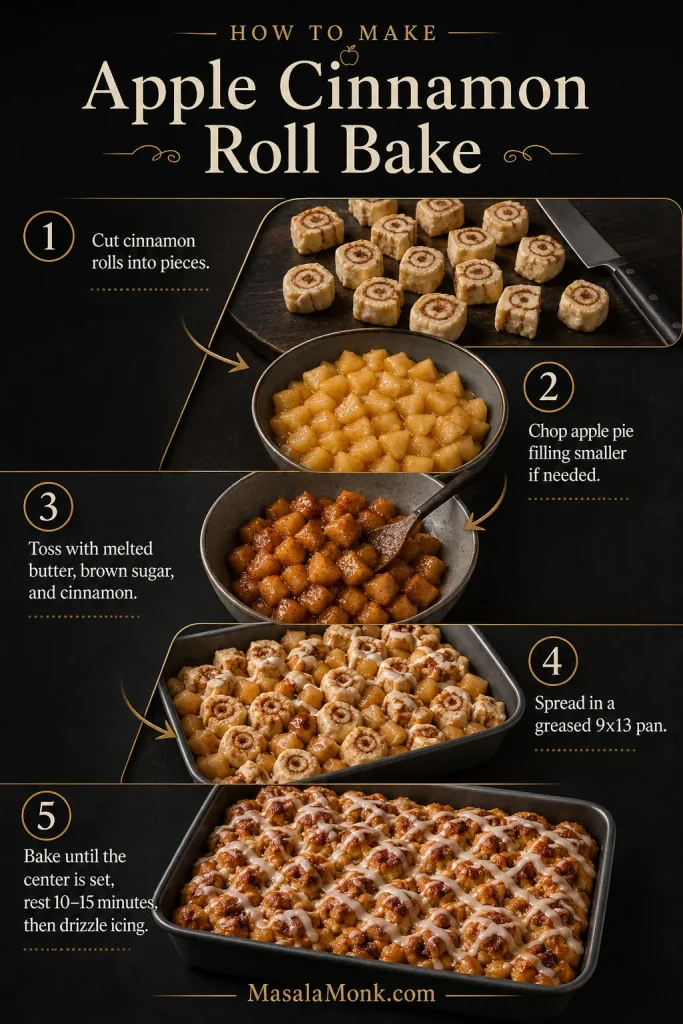
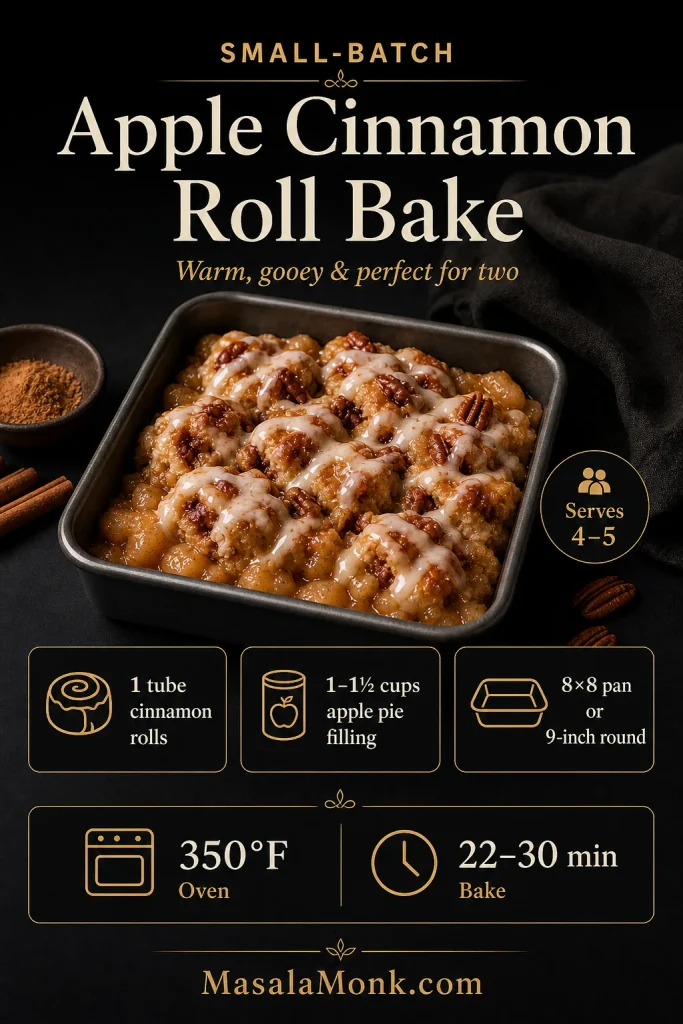
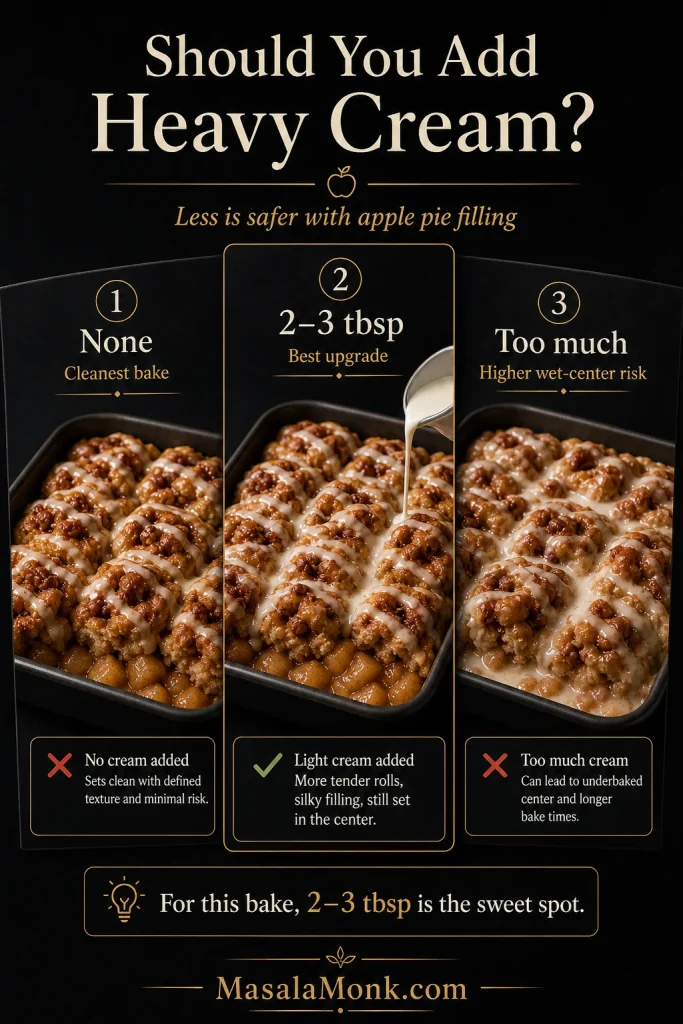
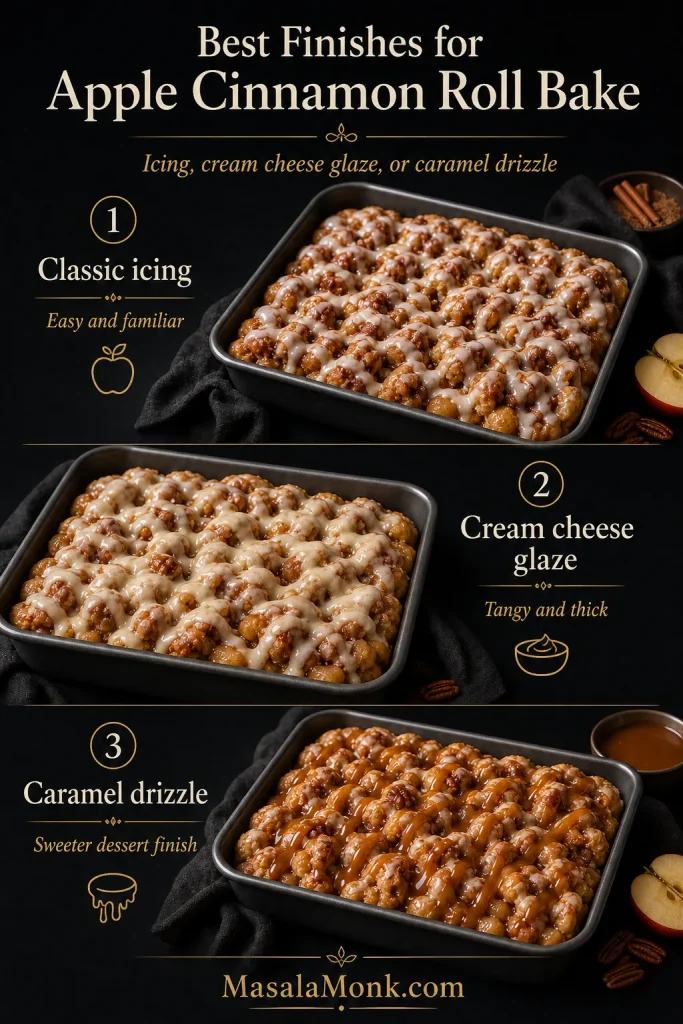
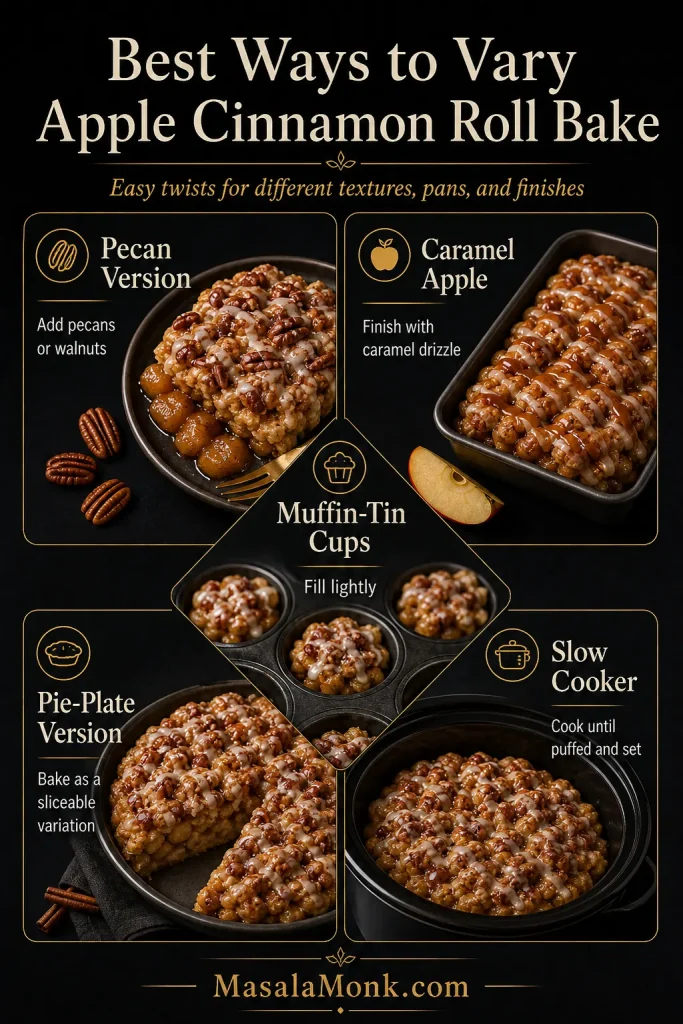
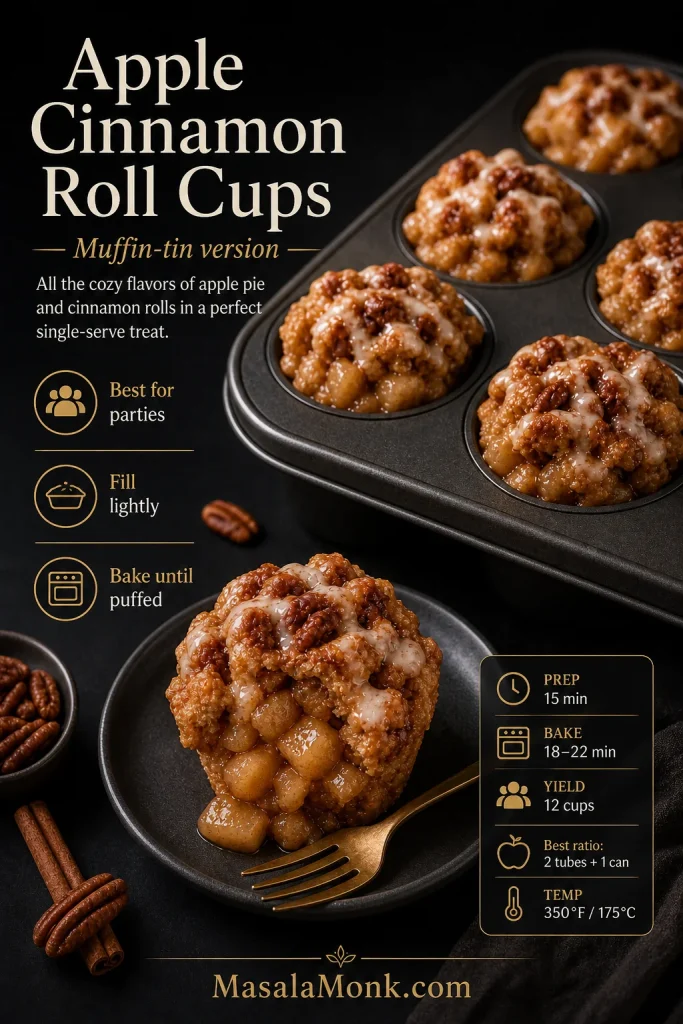
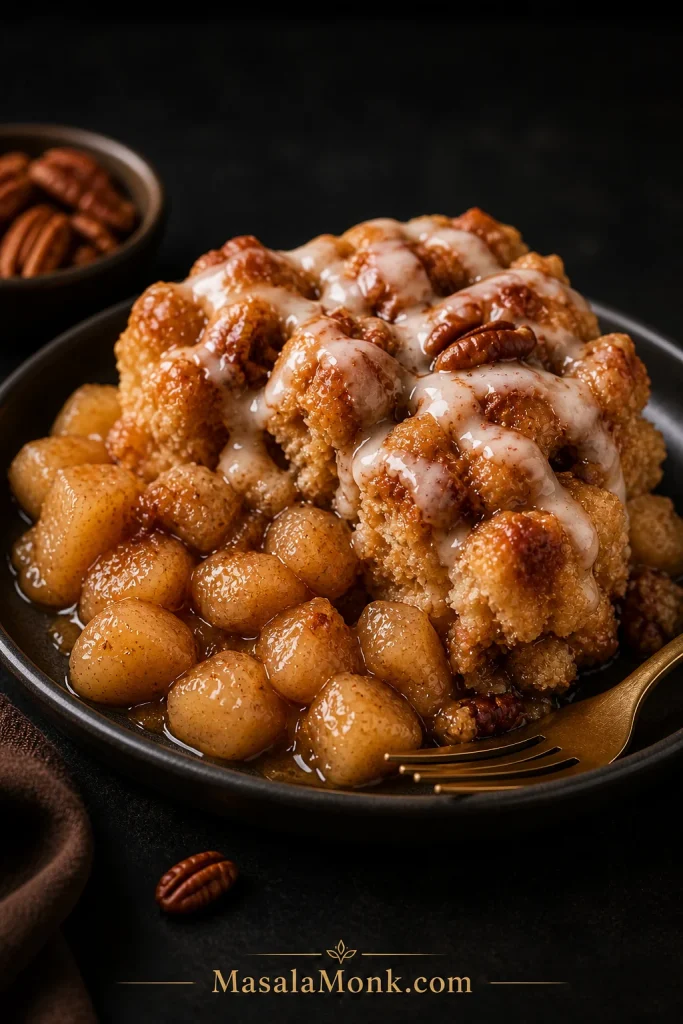
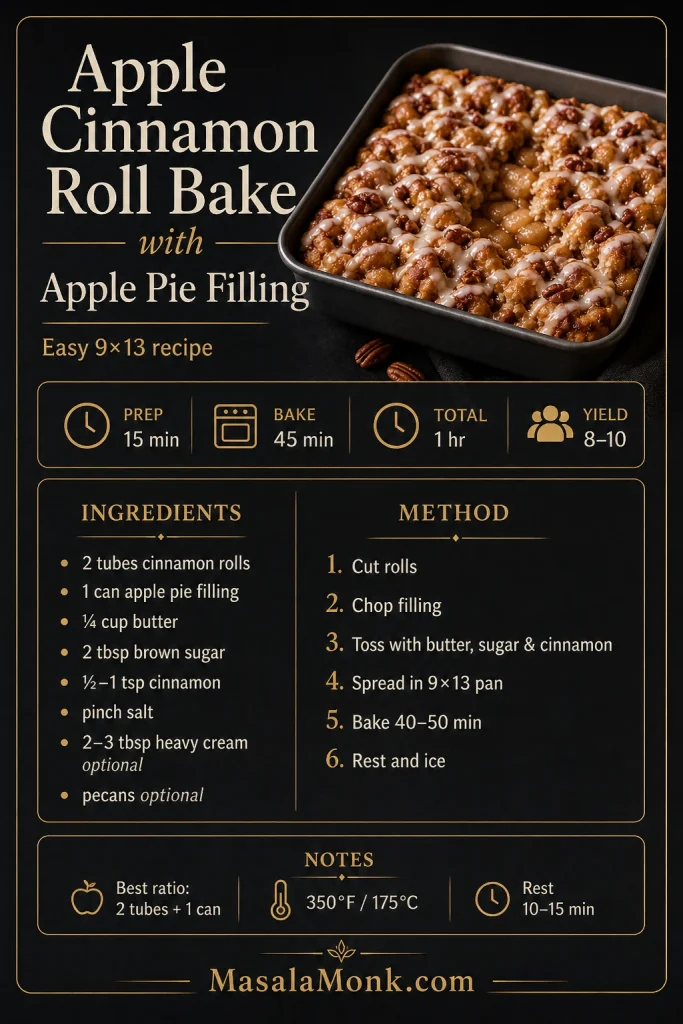
If you have extra filling, you can use it in more than pie. For an easy breakfast-style dessert, try this apple cinnamon roll bake with apple pie filling. It uses the same shortcut idea but turns the filling into a soft, gooey cinnamon roll casserole.
Prepared apple filling also works well in crisps, dump cakes, hand pies, mini pies, turnovers, and puff pastry desserts. Once you know the right amount and texture, it becomes much easier to use across different apple desserts without making them watery or overly sweet.
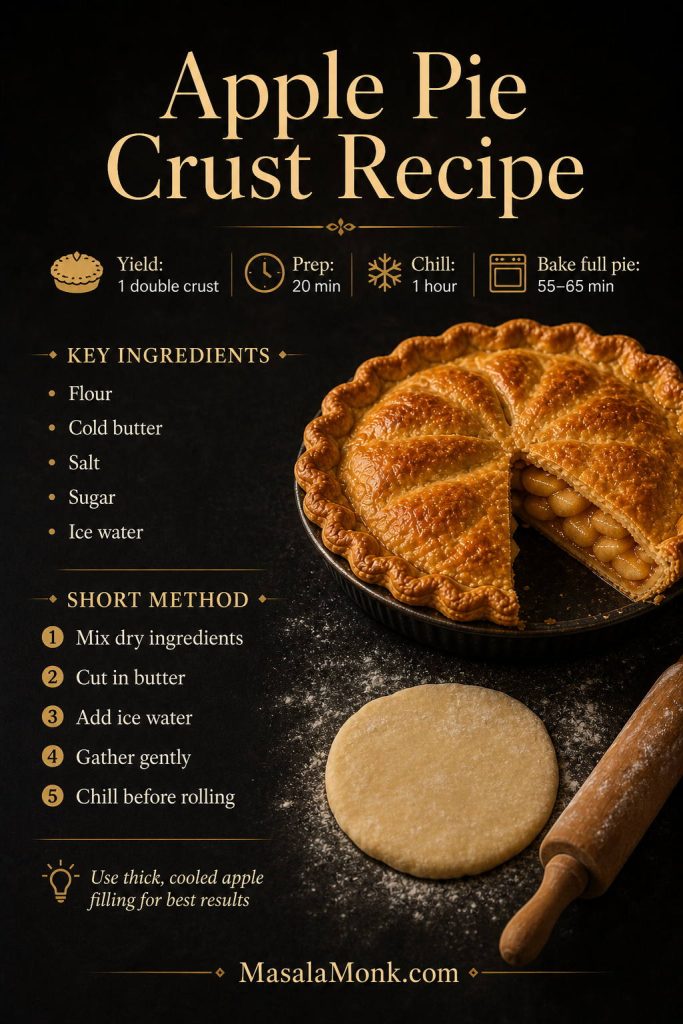
Apple Pie with Apple Pie Filling Recipe Card
Apple Pie with Apple Pie Filling Recipe
This easy apple pie uses canned or homemade filling, premade or homemade crust, and a few simple upgrades for better flavor, cleaner slices, and a golden crust.
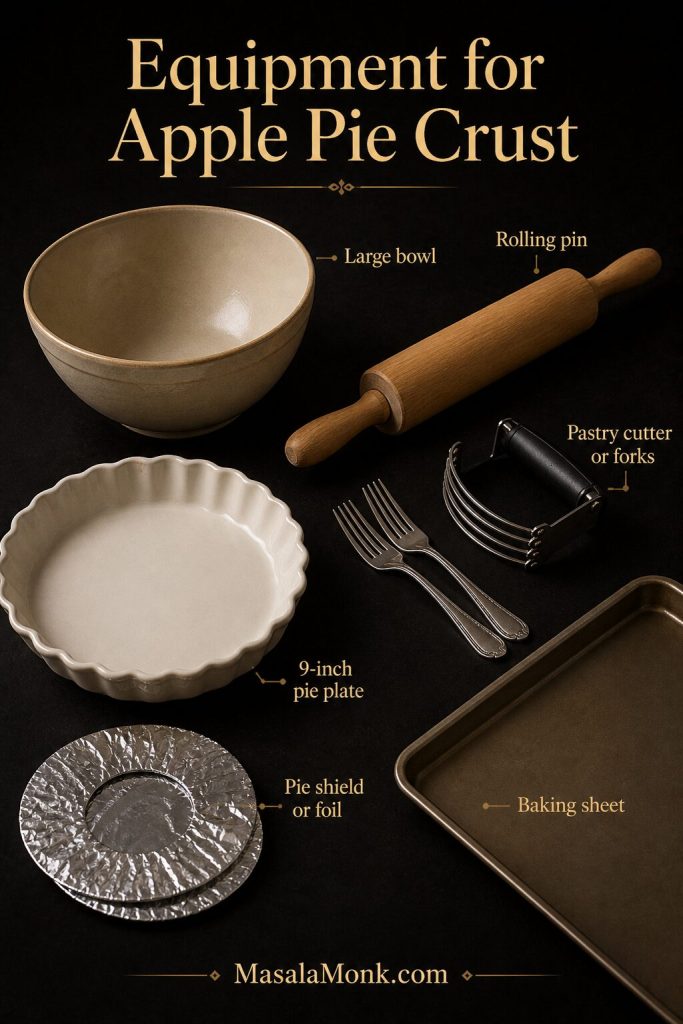
Equipment
- 9-inch pie plate
- Mixing bowl
- Small bowl
- Rimmed baking sheet
- Pastry brush
- Foil or pie shield
- Cooling rack
- Pie weights, dried beans, or rice if par-baking
Ingredients
- 1 box refrigerated pie crusts, 14.1 oz / about 400 g, 2 crusts, or 1 homemade double pie crust
- 2 cans apple pie filling, 20–21 oz / 567–595 g each
- 1 teaspoon ground cinnamon
- ¼ teaspoon ground nutmeg
- ⅛ teaspoon salt
- 1 tablespoon / 15 ml lemon juice
- 1 teaspoon / 5 ml vanilla extract, optional
- 1 tablespoon / about 8 g cornstarch, or 2 tablespoons / 16 g if the filling is loose
- 1 tablespoon / 14 g butter, cut into small pieces
- 1 small tart apple, peeled and very thinly sliced, optional
- 1 large egg
- 1 tablespoon / 15 ml water or milk
- 1–2 teaspoons coarse sugar or granulated sugar, optional
Instructions
- Preheat the oven to 400°F / 200°C. If using a metal pie plate, preheat a rimmed baking sheet and bake the pie on it for better bottom browning. If using glass, use a room-temperature sheet pan underneath to catch drips and avoid sudden temperature changes.
- Fit one pie crust into a 9-inch pie plate. Do not stretch the dough. Chill the crust while you prepare the filling.
- In a small bowl, mix the cornstarch with the cinnamon, nutmeg, and salt. In a larger bowl, gently fold that mixture into the apple pie filling with the lemon juice, vanilla, and optional sliced tart apple.
- Spoon the filling into the chilled bottom crust. Dot the top with small pieces of butter.
- Add the second crust as a full top crust, lattice, or cutouts. Seal and crimp the edges. Cut vents if using a full top crust.
- Whisk the egg with water or milk. Brush lightly over the top crust and sprinkle with sugar if using.
- Bake at 400°F / 200°C for 20 minutes. If the edges brown quickly, cover them loosely with foil or a pie shield.
- Continue baking for 20–25 minutes more, until the crust is golden and the filling bubbles through the vents.
- Move the pie to a cooling rack. Cool at least 2 hours before slicing, or 3–4 hours for cleaner slices.
Optional Par-Baked Bottom Crust Method
- Fit the bottom crust into the pie plate and chill for 20–30 minutes.
- Line with parchment and fill with pie weights, dried beans, or rice.
- Bake at 375°F / 190°C for 15–18 minutes.
- Remove the weights and parchment. Bake 2–3 minutes more if the crust looks damp.
- For extra protection, brush the bottom lightly with egg wash and bake another 2–3 minutes.
- Add the filling and top crust, then bake at 400°F / 200°C for 35–45 minutes, until the pastry is golden and the filling is actively bubbling.
Notes
- Two cans of apple pie filling work well for most regular 9-inch pies.
- For a fuller pie, use 5–6 cups homemade apple pie filling, or add 1 small very thinly sliced tart apple to 2 cans of filling.
- Before adding cornstarch, mix it with the cinnamon, nutmeg, and salt so it folds in more evenly.
- If the filling looks loose, increase the cornstarch from 1 tablespoon to 2 tablespoons.
- After baking, let the pie cool before slicing. Cutting too early is the most common reason the filling runs.
- When crust texture matters most, use the par-baked method for a crisper bottom.
Storage
Cool completely before covering. Store leftovers in the refrigerator for 3–4 days. Reheat slices in a 325°F / 160°C oven for the best crust texture.
If you try this with a favorite canned filling brand, a crumb topping, or homemade apple pie filling, make a note of what worked best. Small changes in filling thickness can make a real difference in how neatly the pie slices.
FAQs
How much apple pie filling goes in a 9-inch pie?
A regular 9-inch pie usually works with 2 cans of 20–21 oz apple pie filling. For a fuller pie, use about 5–6 cups filling or add one small thinly sliced tart apple to the canned filling.
One can or two cans: which makes a better apple pie?
Two cans make a better standard 9-inch apple pie. One can may work for a shallow pie, small pie, or tart-style dessert, but it usually does not give enough filling for a classic double-crust pie.
What is the best way to thicken canned apple pie filling?
Use 1 tablespoon cornstarch for normal canned filling or 2 tablespoons if the filling looks loose. Mix the cornstarch with the cinnamon, nutmeg, and salt first so it does not clump when folded into the filling.
How do you make canned apple pie filling taste homemade?
Add lemon juice, a pinch of salt, cinnamon, nutmeg, vanilla, and a little butter. For fresher texture, stir in one small tart apple that has been peeled and thinly sliced.
Should the bottom crust be baked before adding apple pie filling?
It does not have to be baked first, but par-baking helps prevent a soft bottom crust. For the fastest version, chill the bottom crust and bake the pie fully. For the crispest base, par-bake before adding the filling.
How long should apple pie cool before slicing?
Cool apple pie for at least 2 hours before slicing. For cleaner slices, especially with canned filling, cool it for 3–4 hours. Slicing too early makes the filling run even if the pie was baked properly.
What is the difference between canned apples and canned apple pie filling?
Canned apple pie filling is already sweetened, spiced, and thickened. Canned apples are usually just apples in liquid or syrup, so they need sugar, spice, lemon, and thickener before they work like pie filling.
Is homemade apple pie filling better for this recipe?
Homemade filling usually gives better texture and fresher flavor, but canned filling is faster. If using homemade filling, cool it before adding it to the crust and use about 5–6 cups for one 9-inch pie.
What top crust works best for apple pie with filling?
A full top crust gives the most classic look, while a lattice crust vents steam better and looks more decorative. A crumb topping also works well if you want a Dutch-style pie.
How should leftover apple pie be stored?
Cool the pie completely, then cover and refrigerate leftovers for 3–4 days. Reheat slices in the oven for the best crust texture. The microwave works, but it softens the crust.