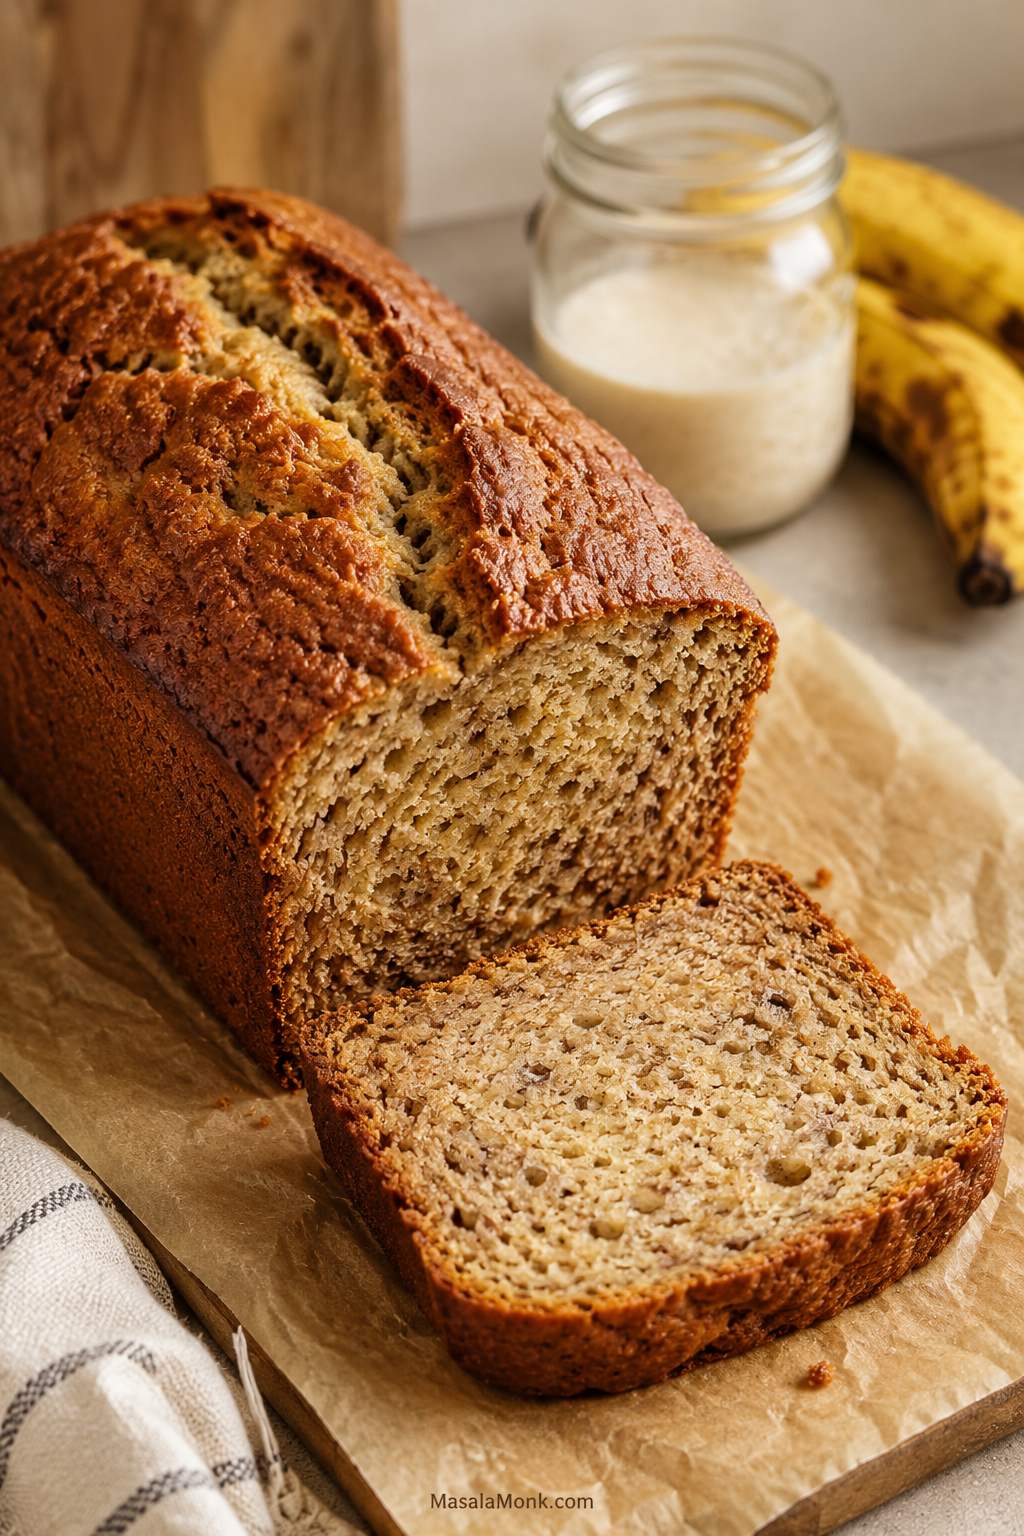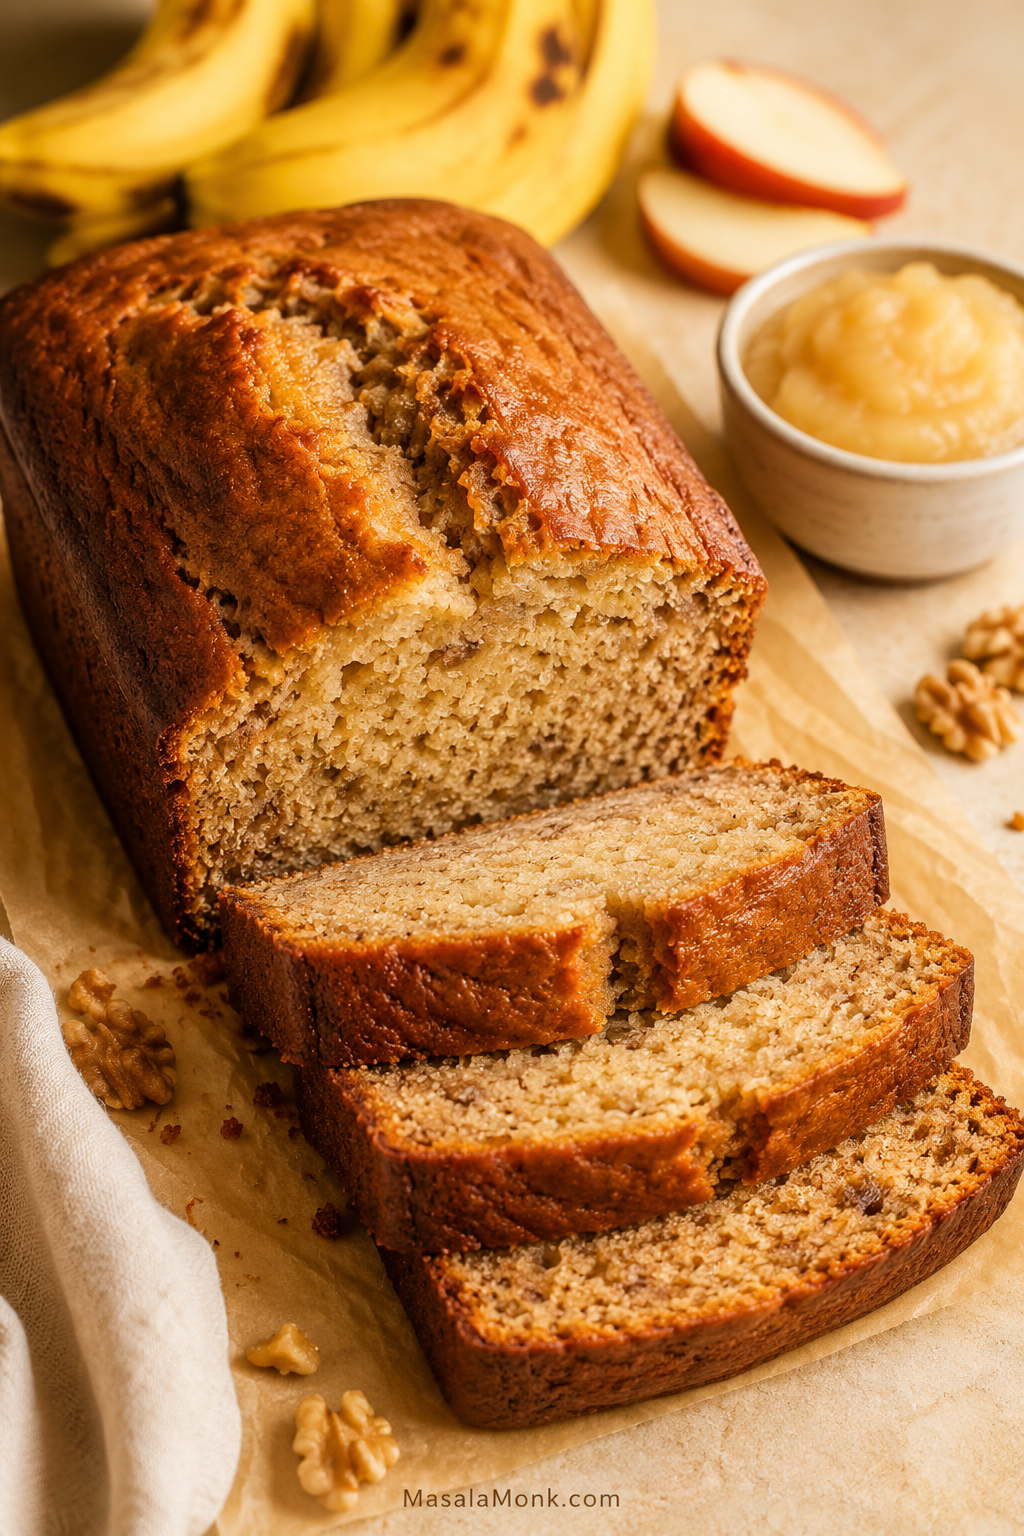
This banana bread with applesauce recipe is for the moment when the bananas on the counter are almost too soft for the fruit bowl but perfect for baking. The loaf comes out moist, sliceable, and a little lighter than classic banana bread, while still holding together after it cools.
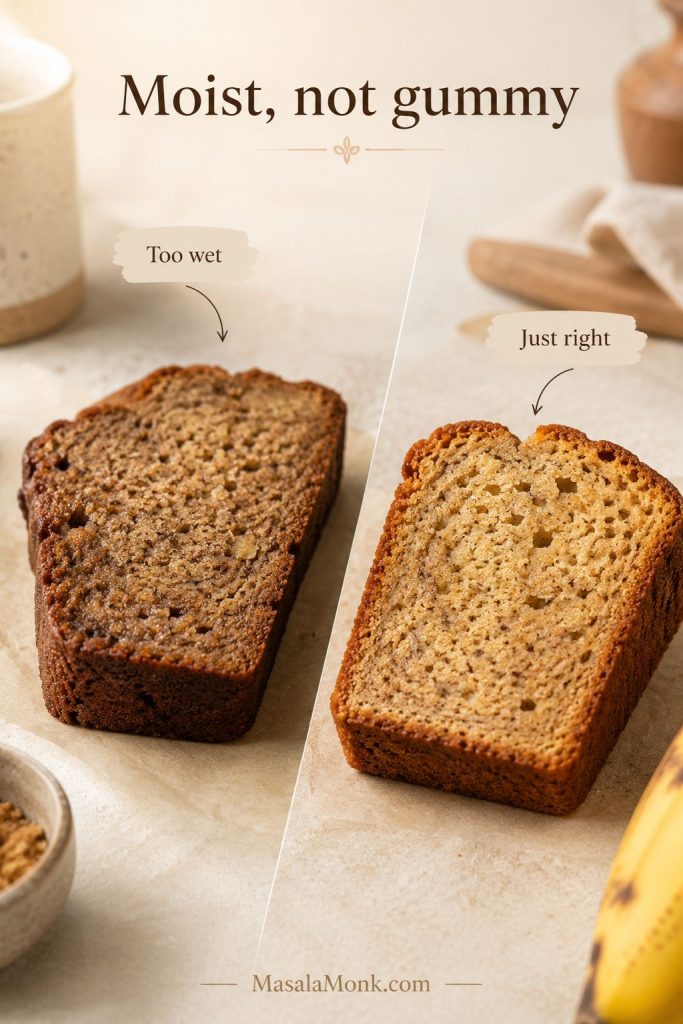
The texture comes down to balance. Applesauce is wonderful in banana bread because it adds moisture and lets you use less fat, but it also brings water into the batter. With the wrong ratio, the top can look beautifully baked while the center stays heavy, damp, or gummy.
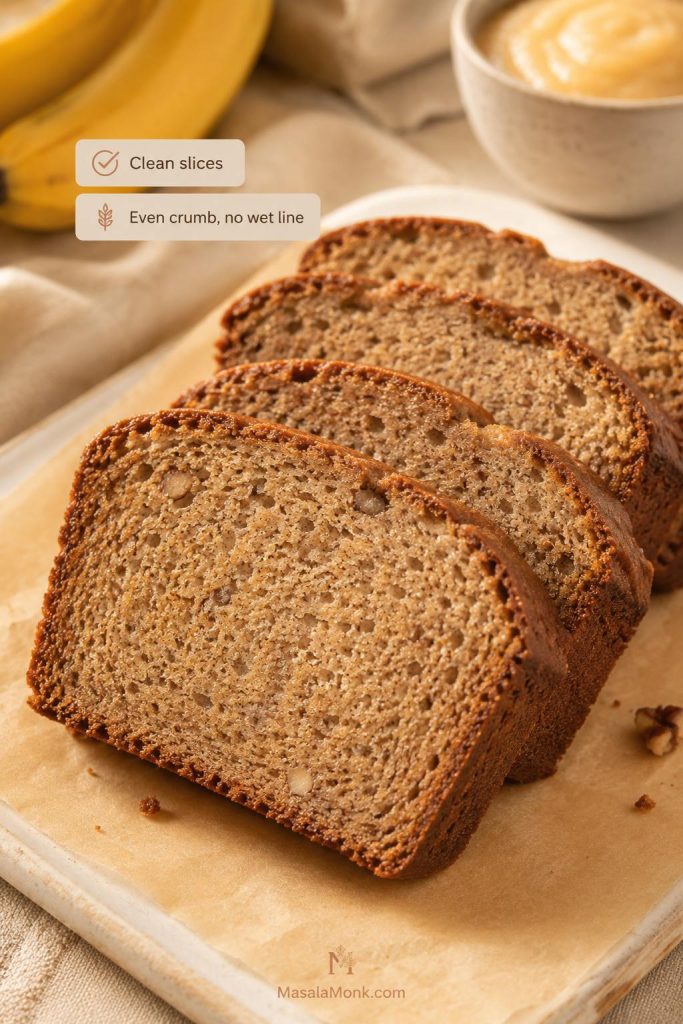
The goal is a loaf that smells like ripe bananas and cinnamon, slices without dragging, and feels plush rather than damp when you pick up a piece.
Table of Contents
Use this guide to make a reliable banana-applesauce loaf, choose the right ratio, and avoid the common texture mistakes.
Make the Loaf
Quick Answer: Banana Bread with Applesauce
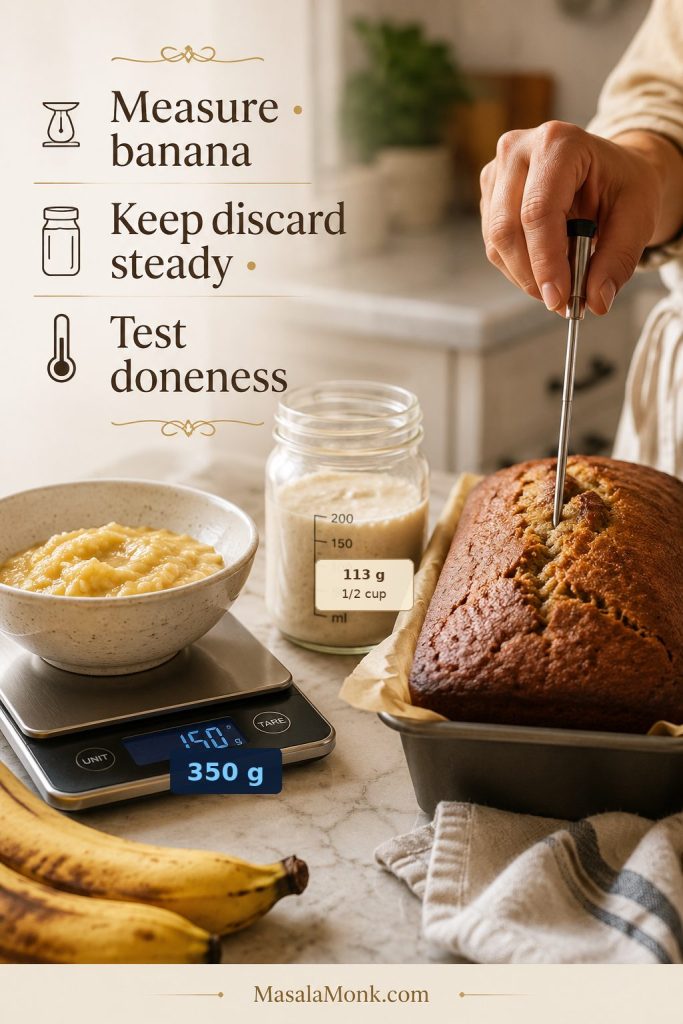
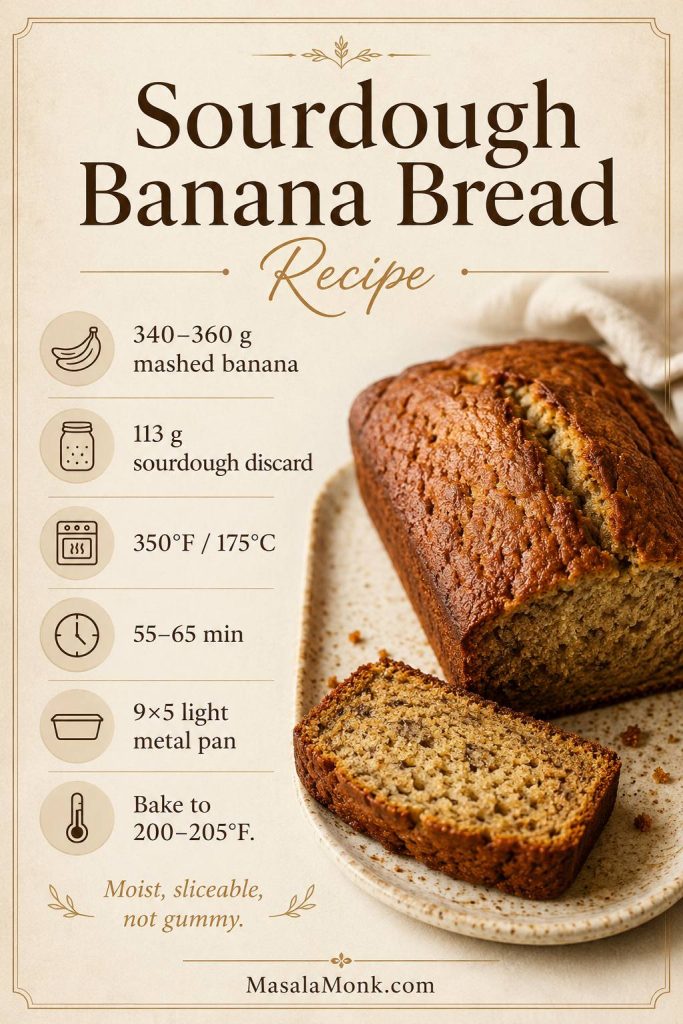
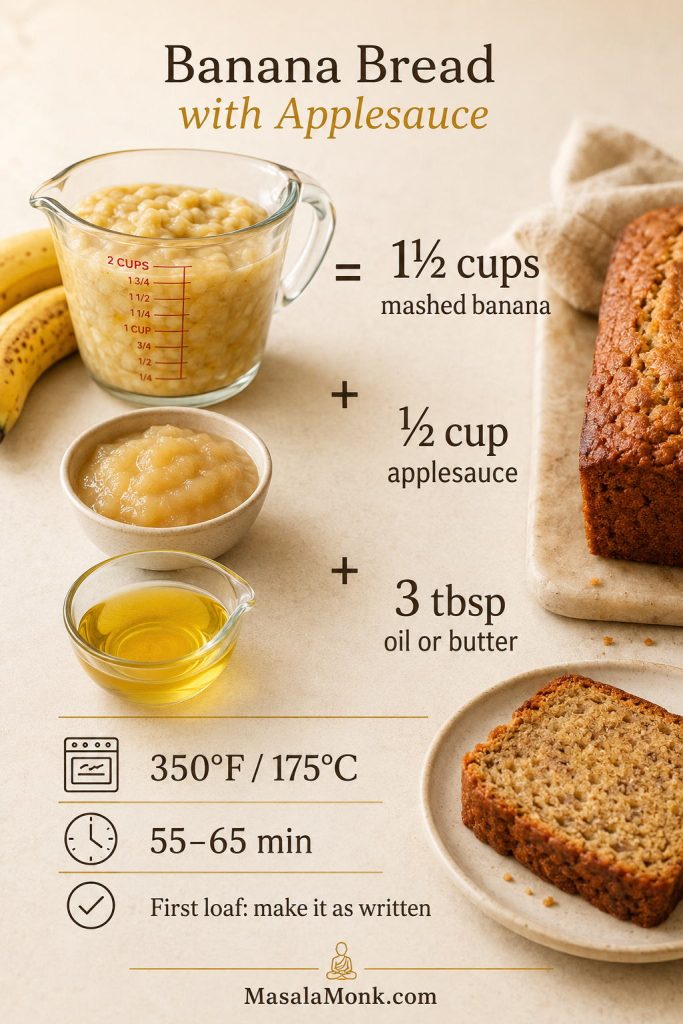
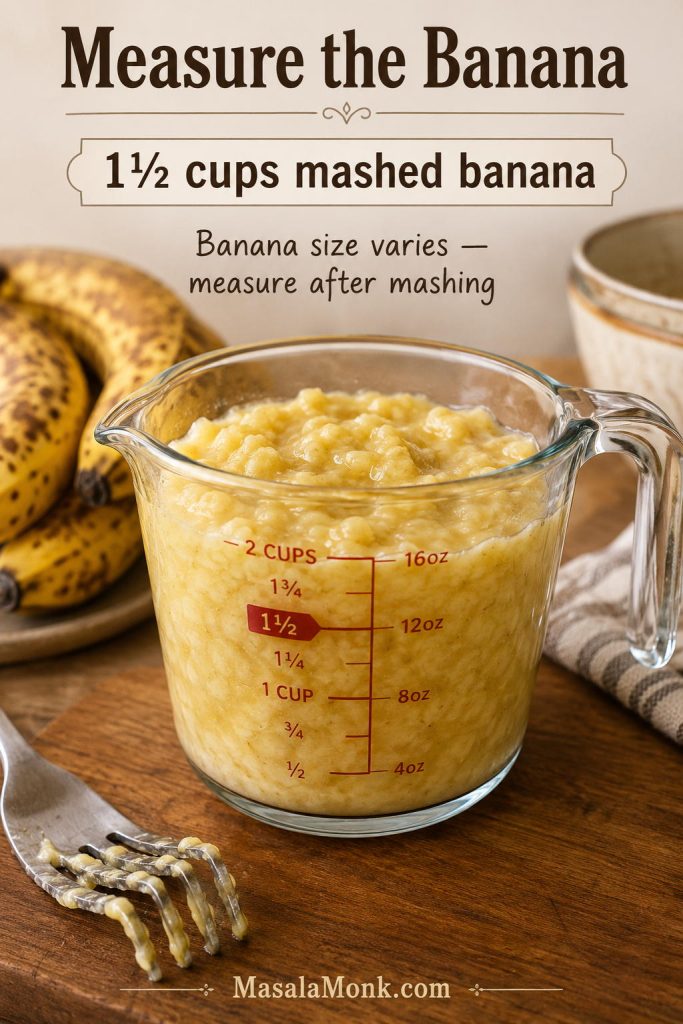
For one moist loaf, the sweet spot is 1½ cups mashed ripe banana plus ½ cup unsweetened applesauce, with 3 tablespoons oil or melted butter to keep each slice from feeling rubbery or fragile. Bake it in a 9×5-inch loaf pan at 350°F / 175°C until the middle bakes through and the crumb looks even, not shiny or wet.
This is not a fully no-oil loaf by default because applesauce replaces moisture better than it replaces tenderness. The small amount of fat keeps the crumb softer, cleaner, and easier to slice neatly.
This version is built around the texture problem applesauce banana bread often has: plenty of moisture, but not enough structure to slice cleanly. That is why the banana and applesauce are measured, a little fat stays in the batter, and the loaf gets time to bake through and cool before slicing.
For the first bake, make the recipe as written before reducing the oil, cutting the sugar further, or swapping in more whole wheat flour. Once you know how the batter should look and how the cooled loaf should slice, the variations become much easier to control.
What This Loaf Tastes Like
This is a banana-forward loaf first, with gentle apple sweetness in the background. It does not taste like apple cake. The applesauce mostly shows up in the texture: an even crumb, a little extra moisture, and slices that still taste pleasant the next day.
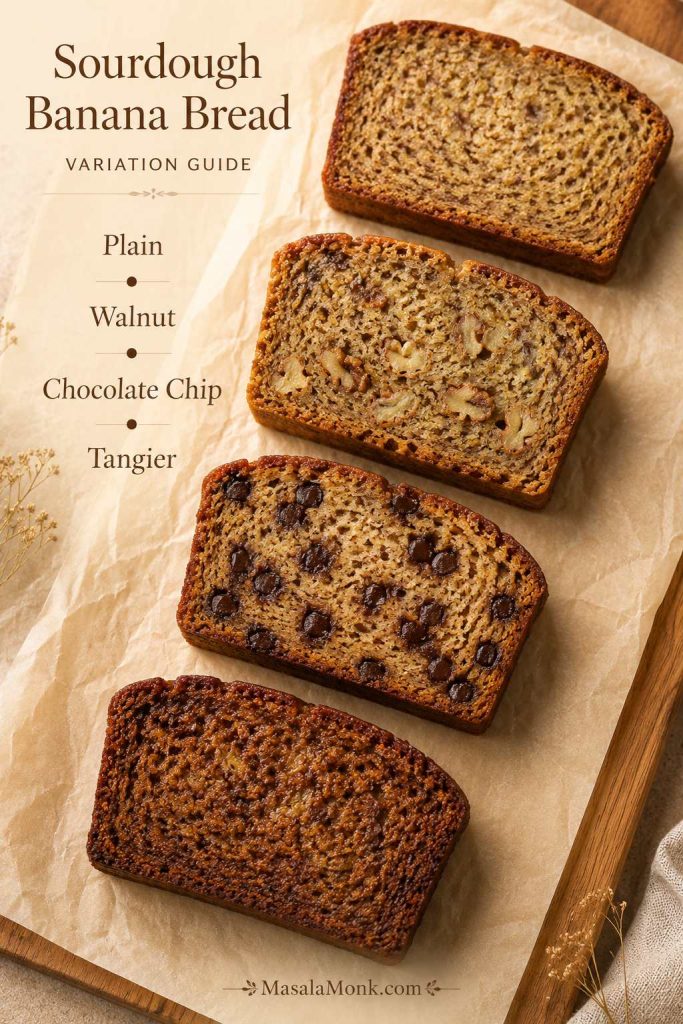
Cinnamon, vanilla, and brown sugar make the banana flavor warmer. If you add walnuts or pecans, the loaf becomes more classic and bakery-style. If you skip them, it stays simple, easy to slice, and lunchbox-friendly.
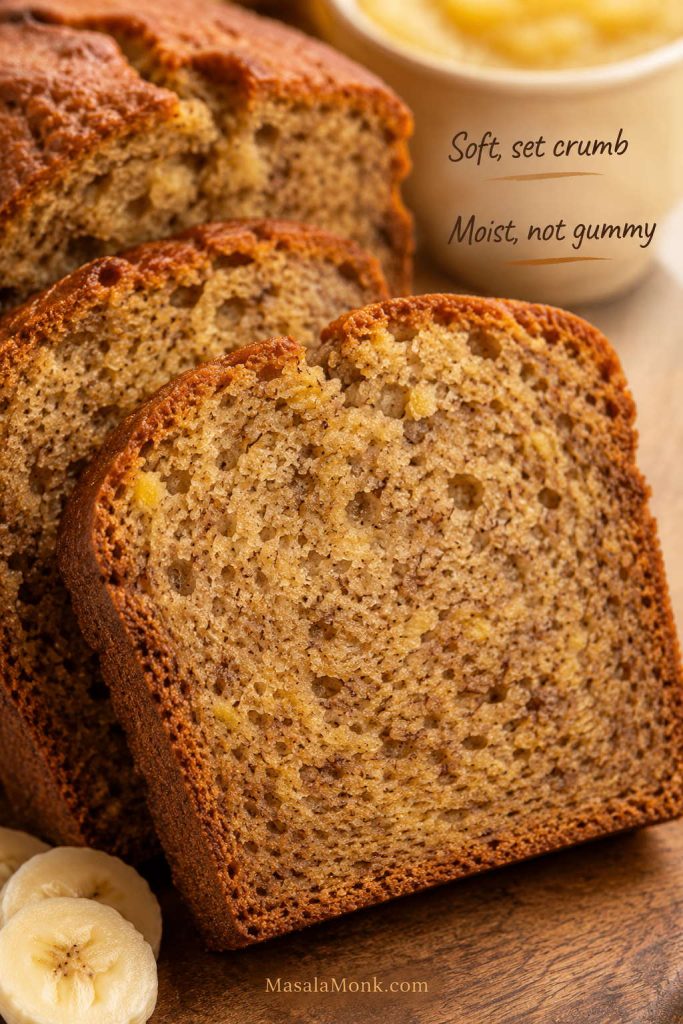
It should taste like a cozy banana loaf with a softer crumb, not like applesauce trying to take over. It is still a quick bread, so expect a soft, sturdy crumb rather than an airy cake texture.
Why You’ll Love This Recipe
- Moist without the gummy middle: the banana, applesauce, flour, fat, and bake time are balanced so the loaf sets properly.
- Still tastes like real banana bread: applesauce lightens the loaf, but a small amount of oil or butter keeps each slice from feeling rubbery or fragile.
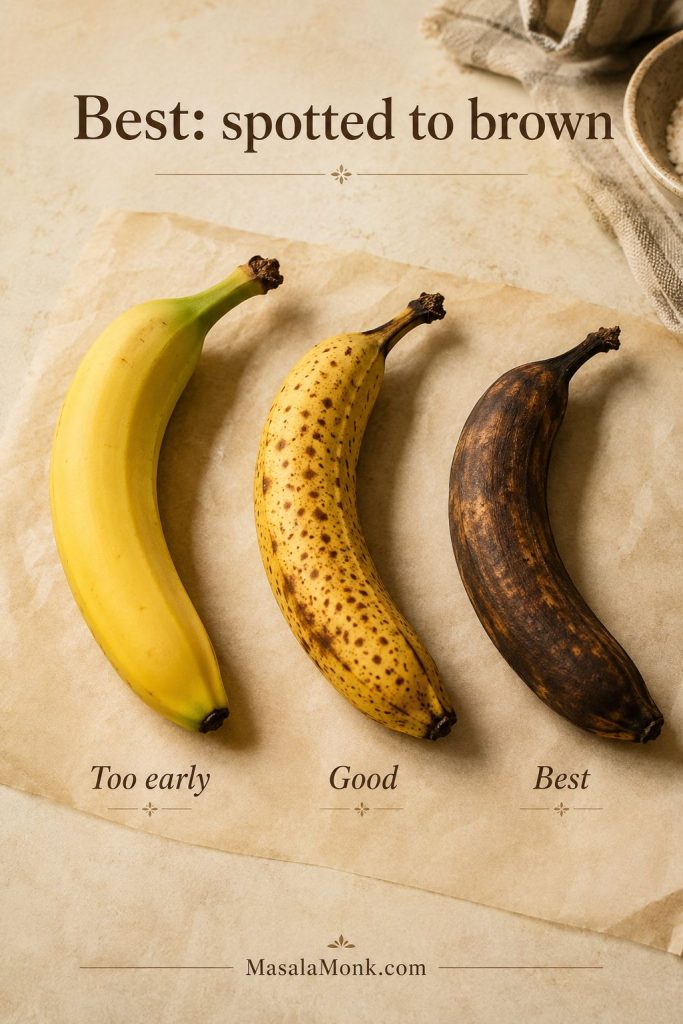
- Uses the bananas you were about to lose: heavily speckled bananas give the deepest flavor and natural sweetness.
- Easy to adjust after the first bake: make it nuttier, less sweet, lower fat, dairy-free, vegan, or muffin-style without starting from scratch.
Why Applesauce Works in Banana Bread
Banana bread already depends on fruit puree, so applesauce fits naturally into the batter. It adds gentle sweetness and helps the loaf stay fresh-tasting for longer.
The catch is that applesauce is not the same as butter or oil. Fat helps coat the flour, which gives the crumb a softer bite. Applesauce brings extra water and fruit solids, which is why the batter needs the right balance. When the batter gets too wet, quick breads can turn dense, chewy, or gummy.
For that reason, this recipe keeps a small amount of oil or melted butter in the batter. It still feels lighter than a classic loaf, but it slices more cleanly once cooled.
You see the same idea in a good applesauce cake, where the applesauce keeps the crumb moist and even without making the cake feel wet.
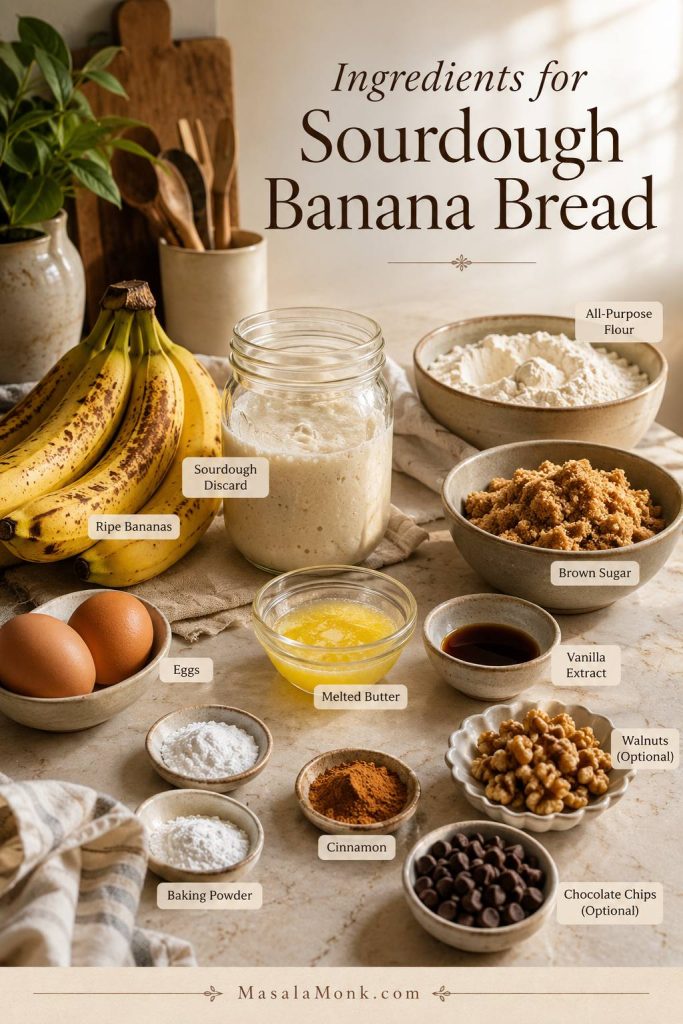
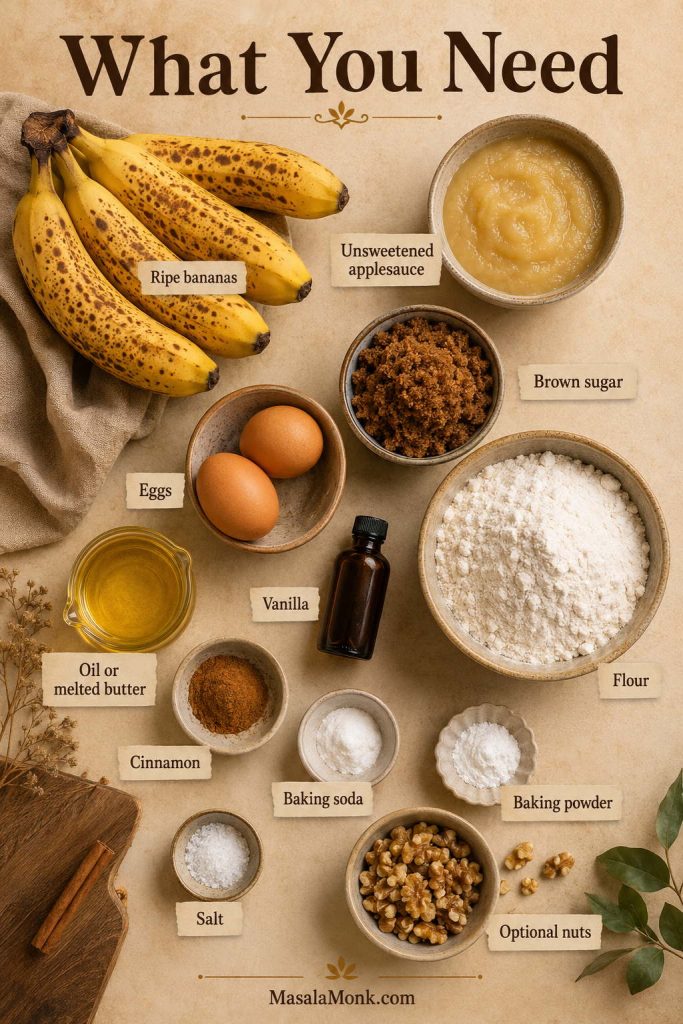
Ingredients for Banana Bread with Applesauce
The ingredients are familiar, but measuring them makes the loaf much more reliable. A little too much banana or applesauce can make the crumb feel compressed instead of tender.
Very Ripe Bananas
Use bananas that are heavily speckled or mostly brown on the outside. They mash easily, taste sweeter, and give the loaf its deep banana flavor. If the bananas are still too yellow, use the ripening shortcuts before you start.
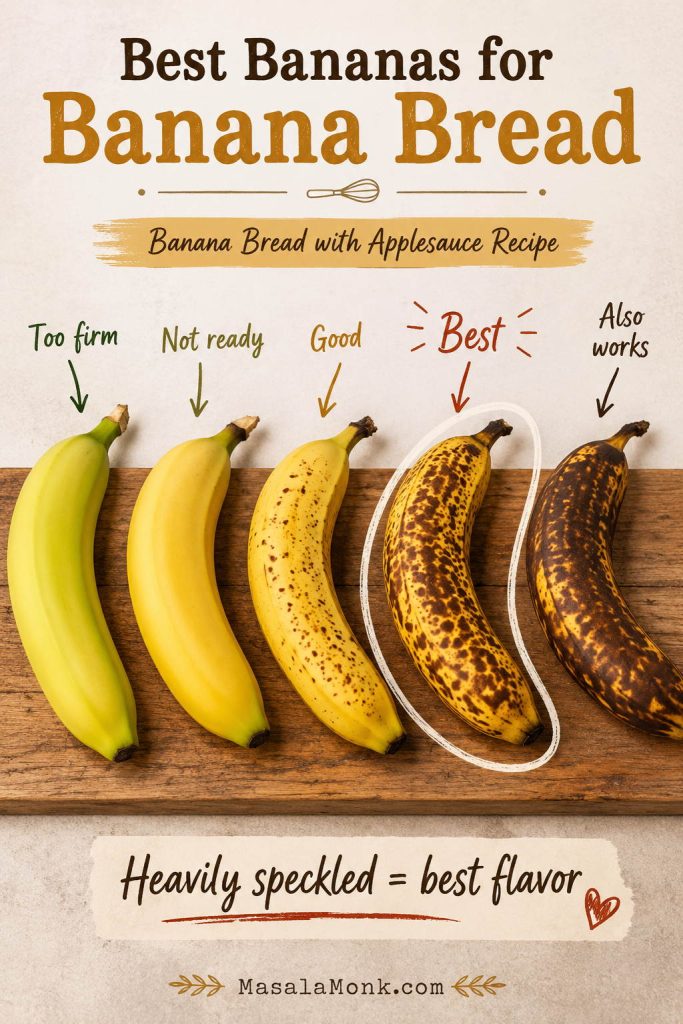
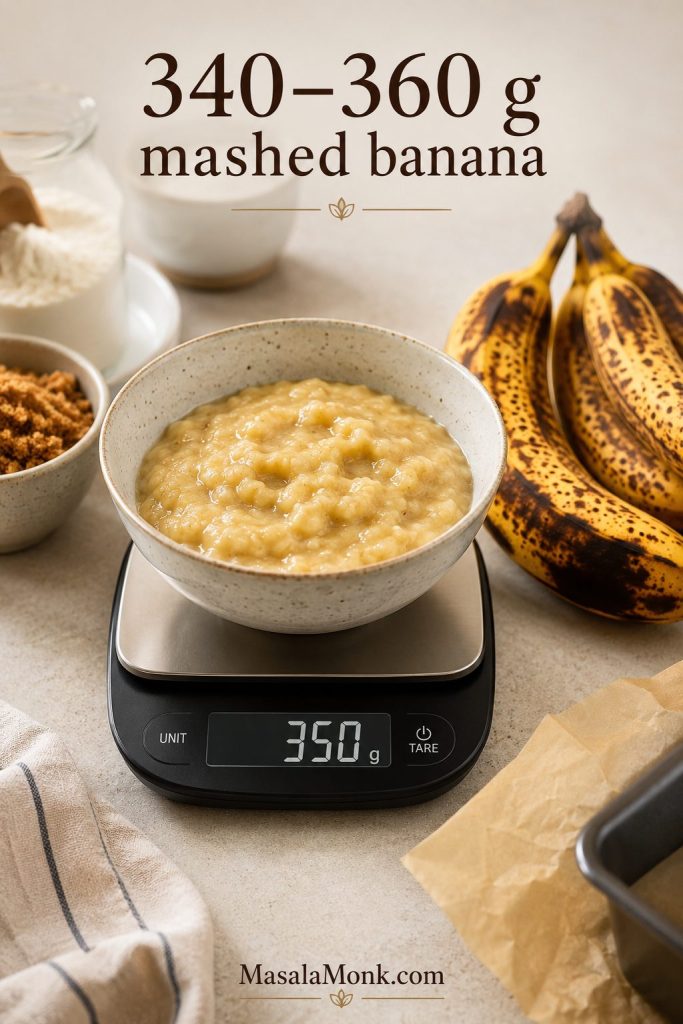
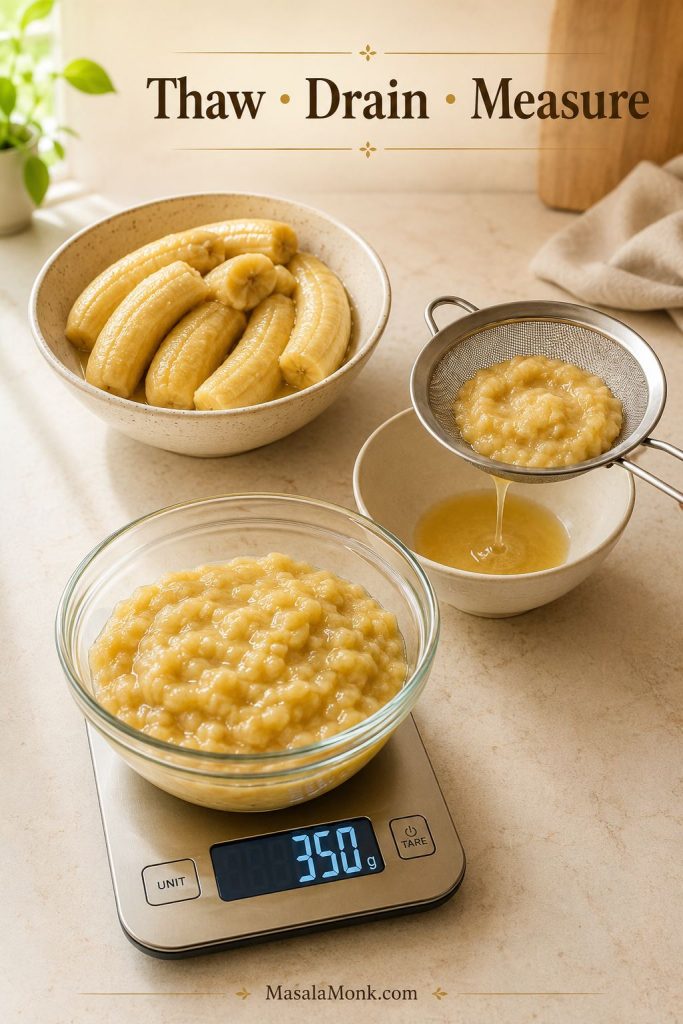
If a banana looks too far gone for eating out of hand, it may be exactly right for this batter. For this recipe, measure 1½ cups mashed banana, which is usually about 3 large bananas or 4 smaller ones. Too little banana gives a bland loaf, while too much can make the middle heavy, especially with applesauce in the batter. Using freezer bananas? Drain them before measuring.
Frozen bananas also work. Thaw them first, drain off excess liquid, then mash and measure. They can release a lot of moisture, so measuring is even more important if you are using bananas from the freezer.

How to Ripen Bananas Faster
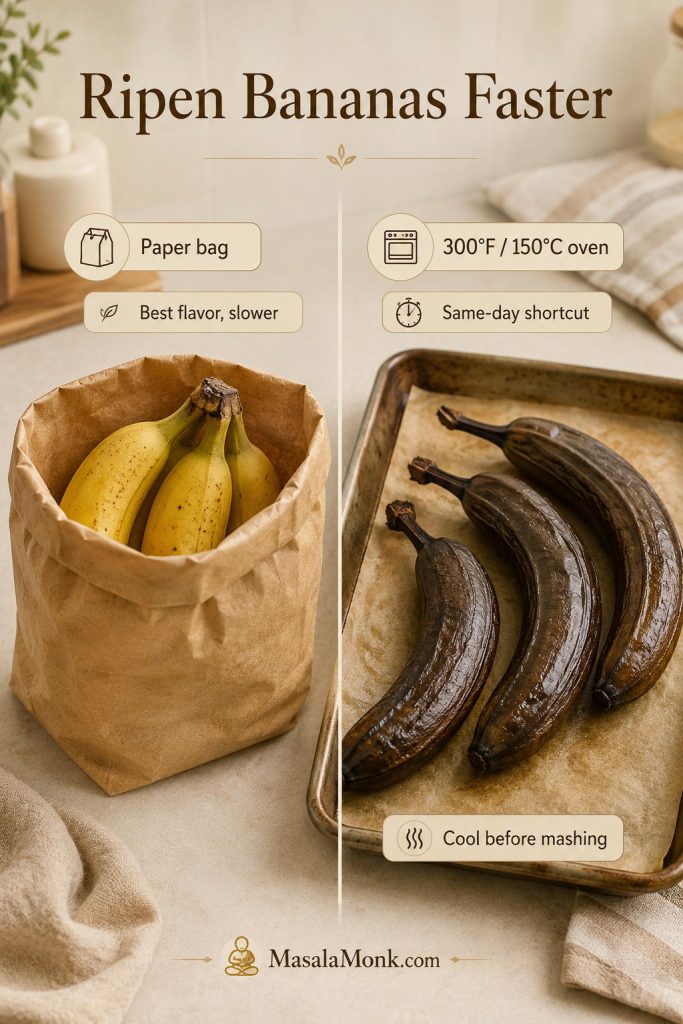
If your bananas are yellow but not soft yet, place them in a paper bag and leave them at room temperature until the peels become heavily speckled. For a same-day option, bake unpeeled bananas on a lined baking sheet at 300°F / 150°C until the peels darken and the fruit softens, then cool before mashing.
This shortcut helps with texture, but it does not create the same deep flavor as bananas that ripen naturally over several days. Use it when you need banana bread today, not when you are chasing the strongest banana flavor.
If the bananas release liquid as they cool, leave that liquid behind before measuring so you do not add extra water to the batter.
Unsweetened Applesauce
Plain unsweetened applesauce is best because it adds moisture without making the loaf too sweet. Homemade or store-bought both work, as long as the applesauce is smooth enough to blend evenly into the batter.
Sweetened applesauce is fine, but reduce the brown sugar slightly if you prefer a less sweet loaf. Cinnamon applesauce works too, especially if you want a warmer, spiced flavor.
A Small Amount of Oil or Melted Butter
The few tablespoons of fat are not there by accident. You can make a no-oil version, but the texture is usually more fragile. Three tablespoons of neutral oil or melted butter give the crumb a better bite while keeping the recipe lighter than a traditional butter-heavy loaf.
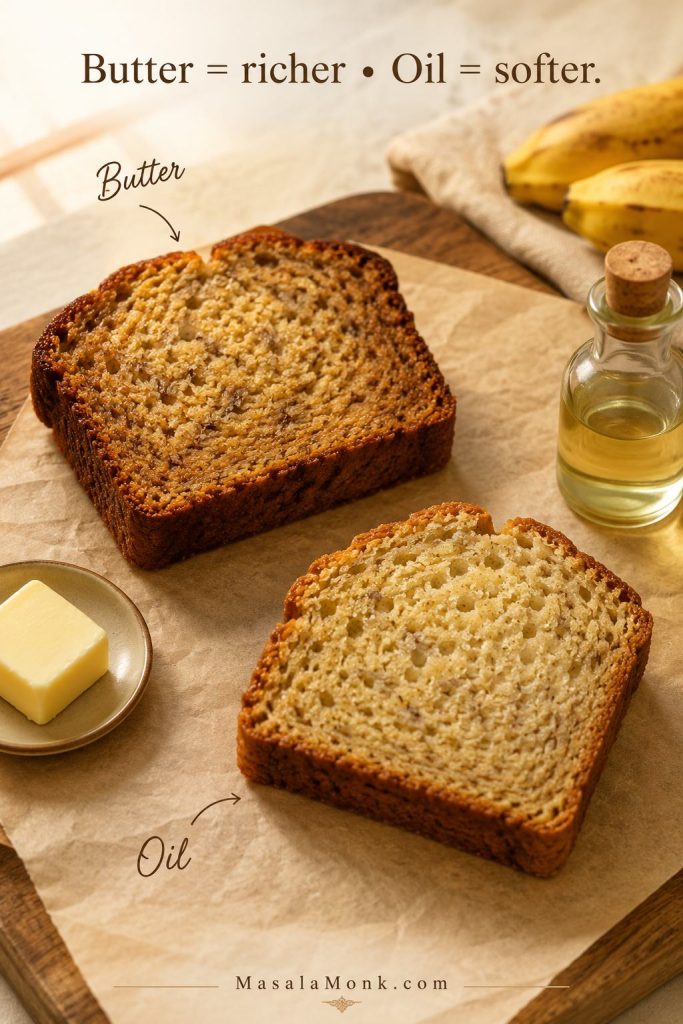
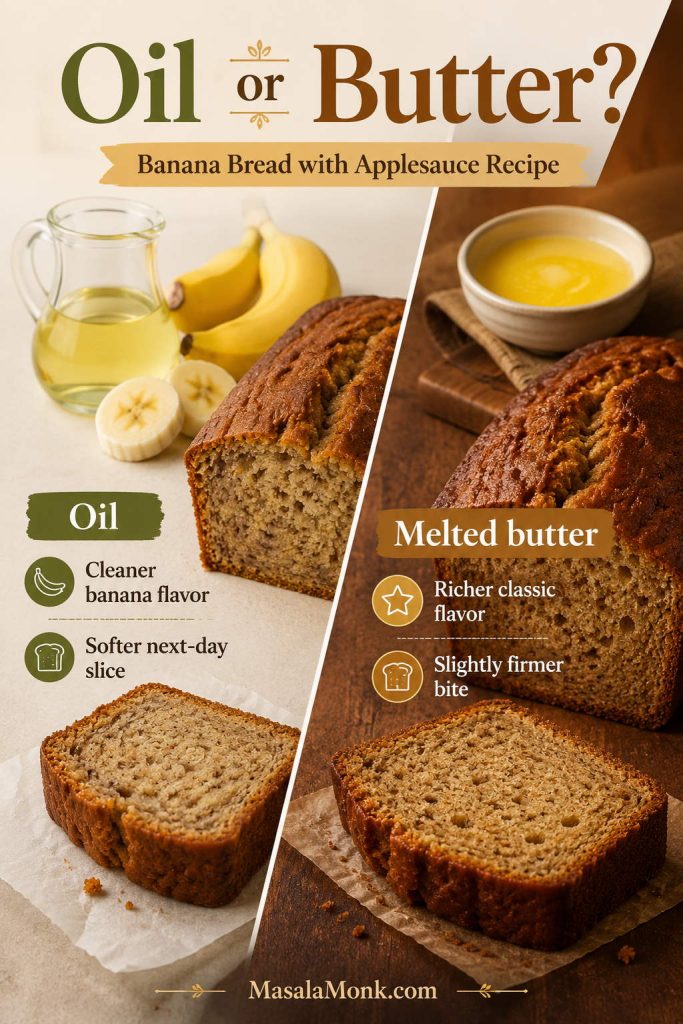
Use neutral oil when you want the banana flavor to stay clean and simple, with a softer next-day slice. Use melted butter if you want a richer, more classic banana bread flavor and a slightly firmer bite once the loaf cools. Trying to reduce more fat? Compare the applesauce-oil options later in the post.
Flour, Eggs, Sugar, and Leavening
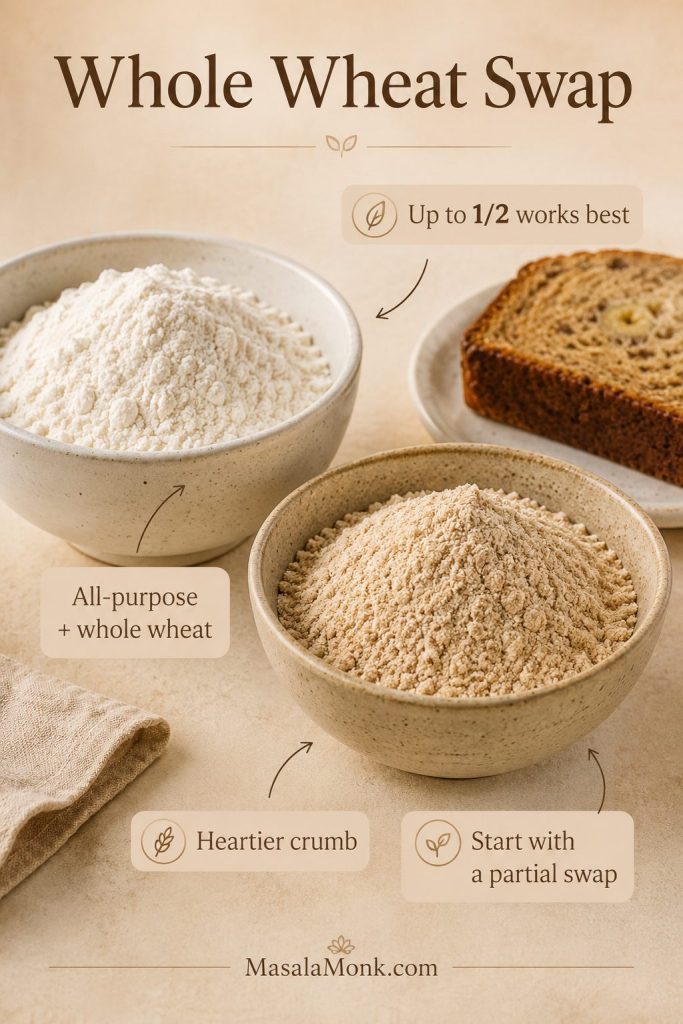
All-purpose flour gives the most reliable loaf. You can replace up to half of it with whole wheat flour for a heartier flavor, but using all whole wheat flour will make the bread denser and may need a little extra moisture.
If you want a banana loaf built around oats instead of regular flour, try this healthy banana bread with oat flour for a more oat-forward version.
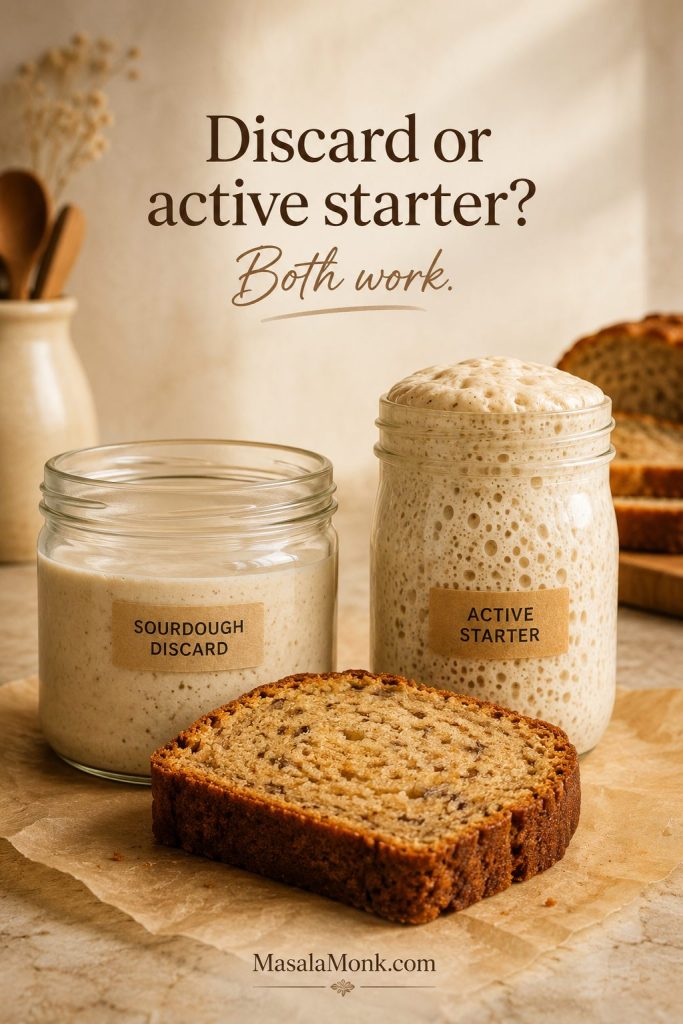
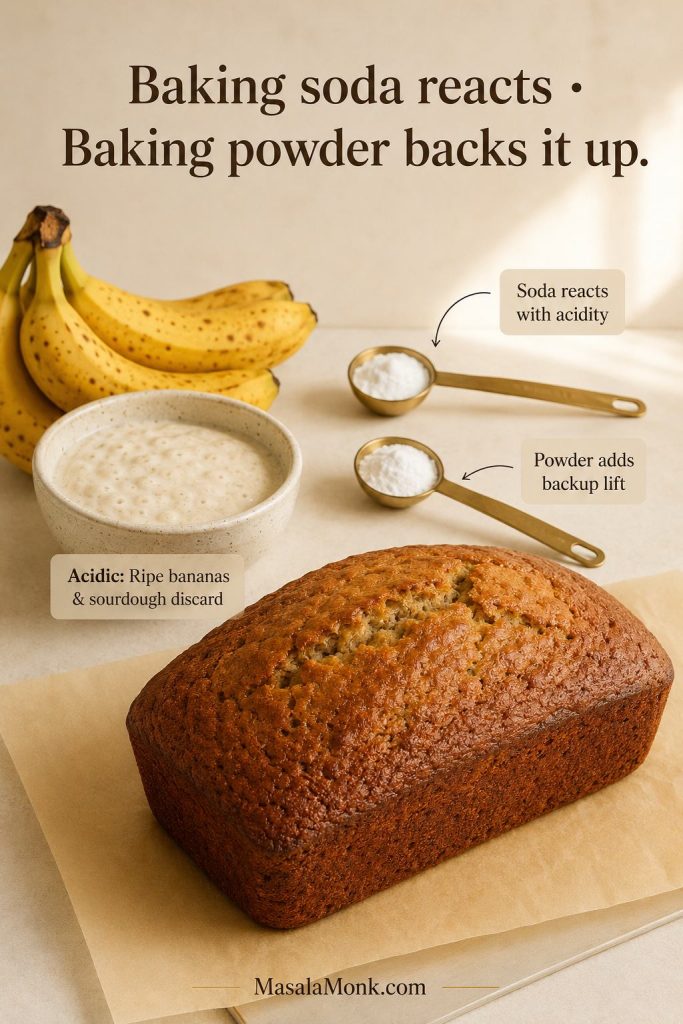
Brown sugar is doing more than sweetening here. It brings a light caramel note that makes the banana taste rounder, especially when the applesauce is plain and unsweetened. Eggs help the batter set, and a mix of baking soda plus a little baking powder helps lift the fruit-heavy batter.
Walnuts, Pecans, or Chocolate Chips
Walnuts and pecans turn this into banana nut bread with applesauce. Use ½ cup for a lighter crunch or up to ¾ cup for a more classic banana nut loaf. Chocolate chips also work, but they make the bread sweeter and more dessert-like.

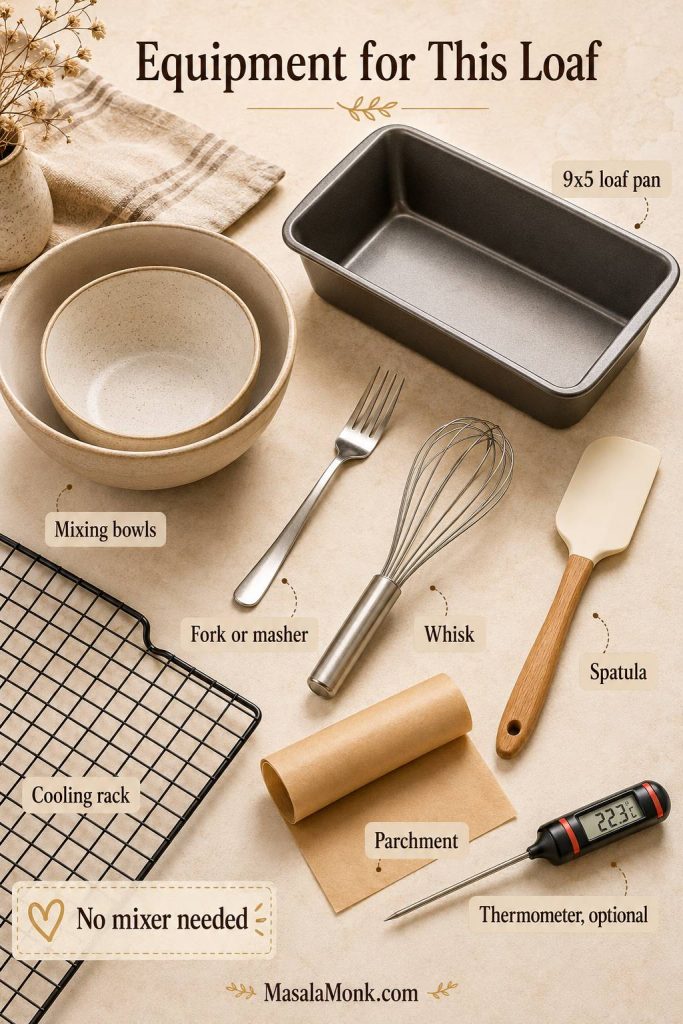
Equipment for This Loaf
You do not need a mixer for this loaf. In fact, mixing by hand is better because it helps prevent a rubbery crumb. A few small banana lumps are fine; beaten batter is not what you want here.
- 9×5-inch loaf pan
- Large mixing bowl
- Medium bowl for dry ingredients
- Fork or potato masher for the bananas
- Whisk
- Flexible spatula
- Parchment paper, optional
- Cooling rack
- Digital thermometer, optional
The important part is not special equipment. It is gentle mixing, the right pan, and enough cooling time before slicing. A digital thermometer removes the guesswork from fruit-heavy loaves, where the top can brown before the center is ready.
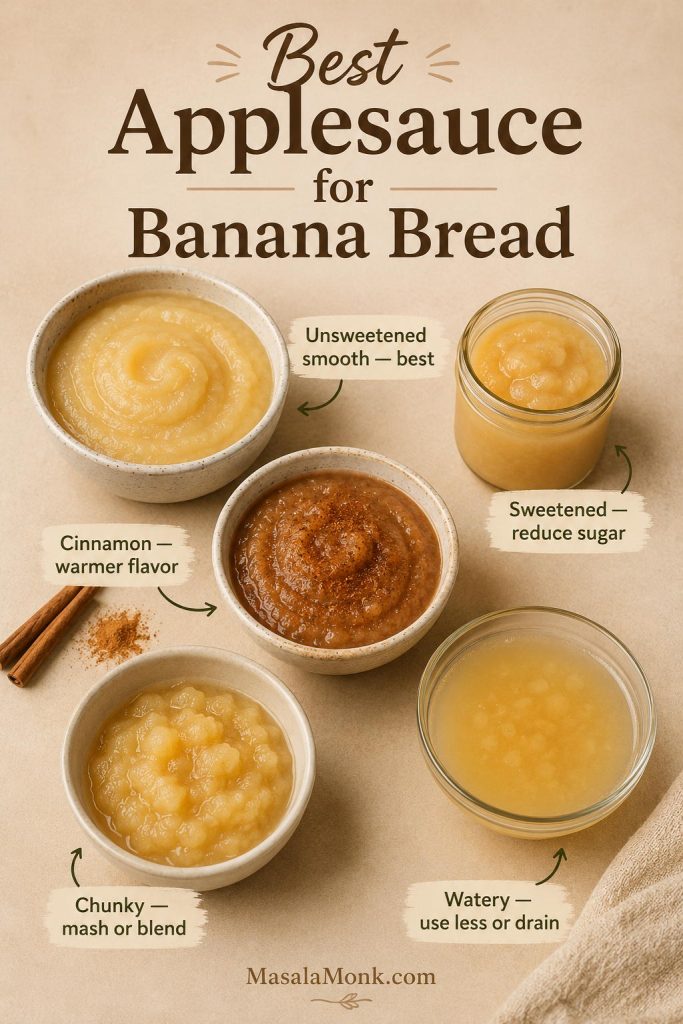
What Kind of Applesauce Should You Use?
The applesauce you use changes more than sweetness. It can change how loose the batter feels and how quickly the middle bakes through. If you are trying to avoid a damp center, this is one of the easiest places to stay in control.
| Applesauce Type | Works? | What to Adjust |
|---|---|---|
| Unsweetened smooth applesauce | Best choice | No change needed |
| Sweetened applesauce | Yes | Reduce the brown sugar slightly if you want a less sweet loaf |
| Cinnamon applesauce | Yes | Reduce or skip the extra cinnamon if needed |
| Homemade applesauce | Yes | Use smooth applesauce that is not watery |
| Chunky applesauce | Sometimes | Mash or blend first for a more even crumb |
| Very watery applesauce | Risky | Drain slightly or use 1–2 tablespoons less |
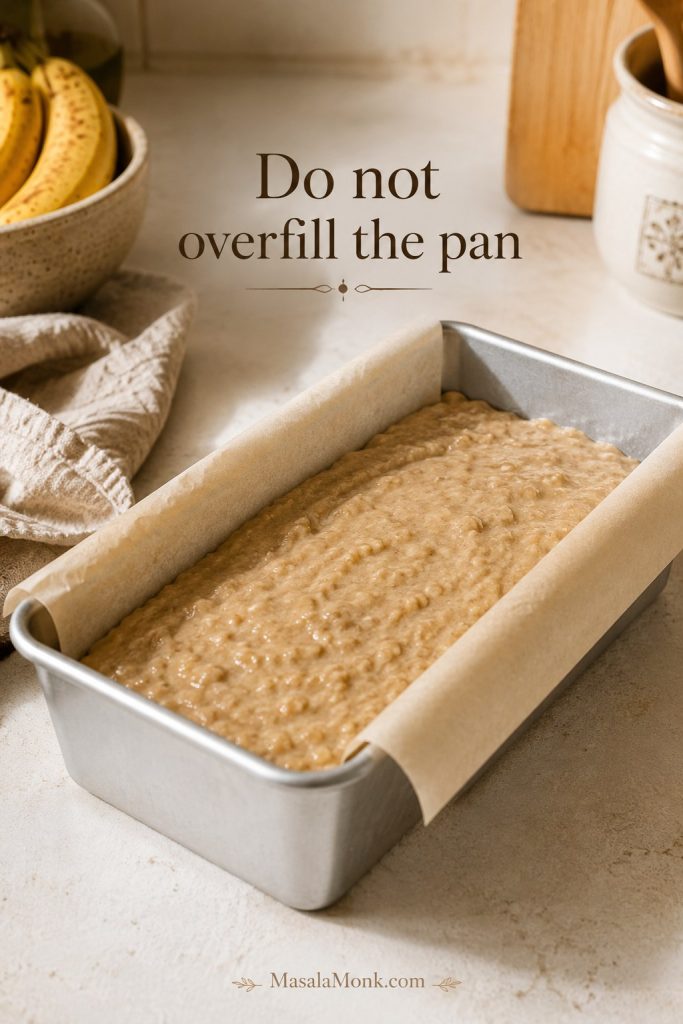
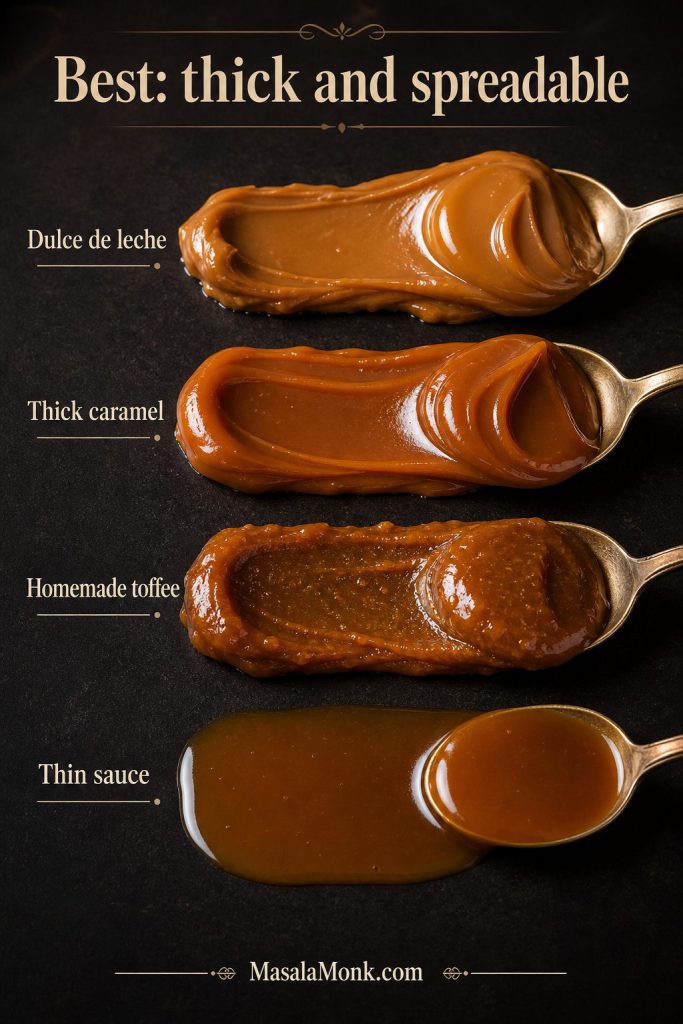
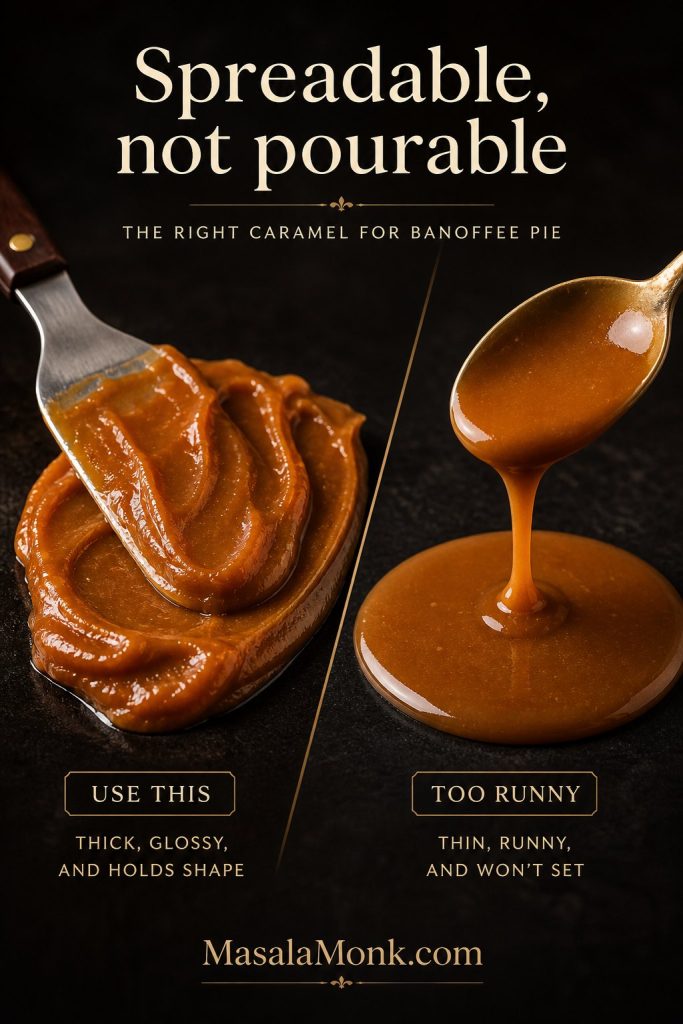
If your applesauce looks loose and watery, hold back a little instead of adding extra. The batter may seem thick at first, but extra water shows up later in the baked crumb. The finished batter should mound softly in the pan, not pour like pancake batter.
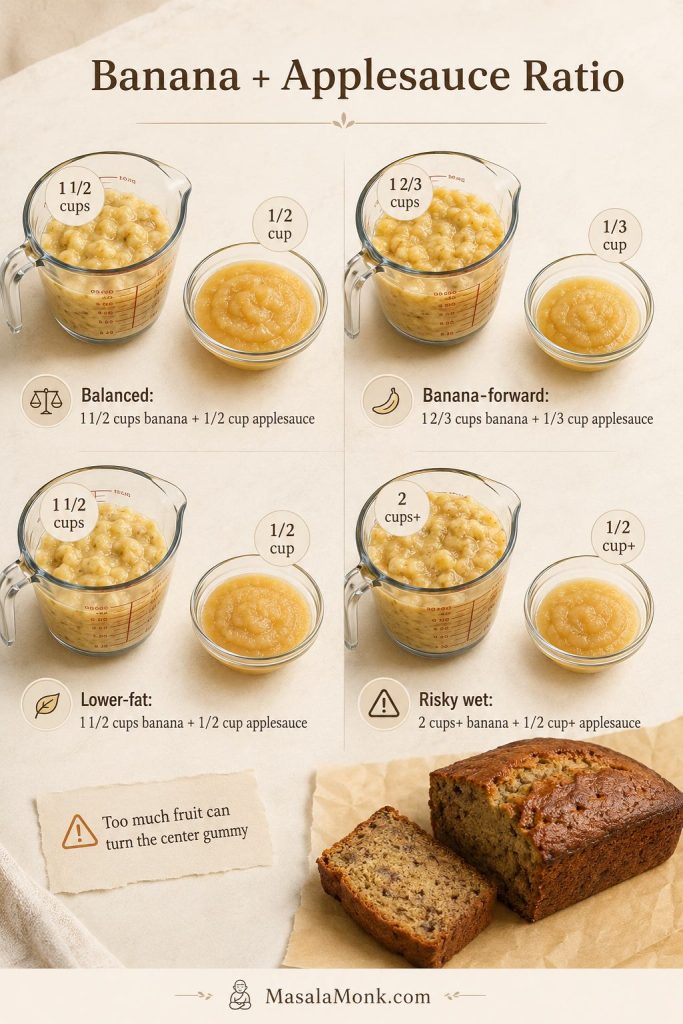
Best Banana-to-Applesauce Ratio
The best starting ratio for one standard loaf is 1½ cups mashed banana to ½ cup applesauce. That gives enough banana flavor and enough applesauce moisture without flooding the batter.
Applesauce is not the problem. The problem is stacking too much banana and applesauce without giving the loaf enough flour, eggs, bake time, and cooling time.
| Loaf Style | Mashed Banana | Applesauce | Result |
|---|---|---|---|
| Balanced classic | 1½ cups | ½ cup | Moist and sliceable |
| More banana-forward | 1⅔ cups | ⅓ cup | Stronger banana flavor with slightly less added moisture |
| Lower-fat style | 1½ cups | ½ cup | Lighter and more delicate, especially if you reduce the oil |
| Risky wet loaf | 2 cups or more | ½ cup or more | More likely to bake up dense or gummy in the center |
When the balance is right, the loaf tastes fruit-rich without feeling heavy. The first slice should smell warm, hold together, and look set rather than damp or compressed.
That balance is what keeps the loaf tasting like real banana bread, not like a lighter version where the texture feels like a compromise.
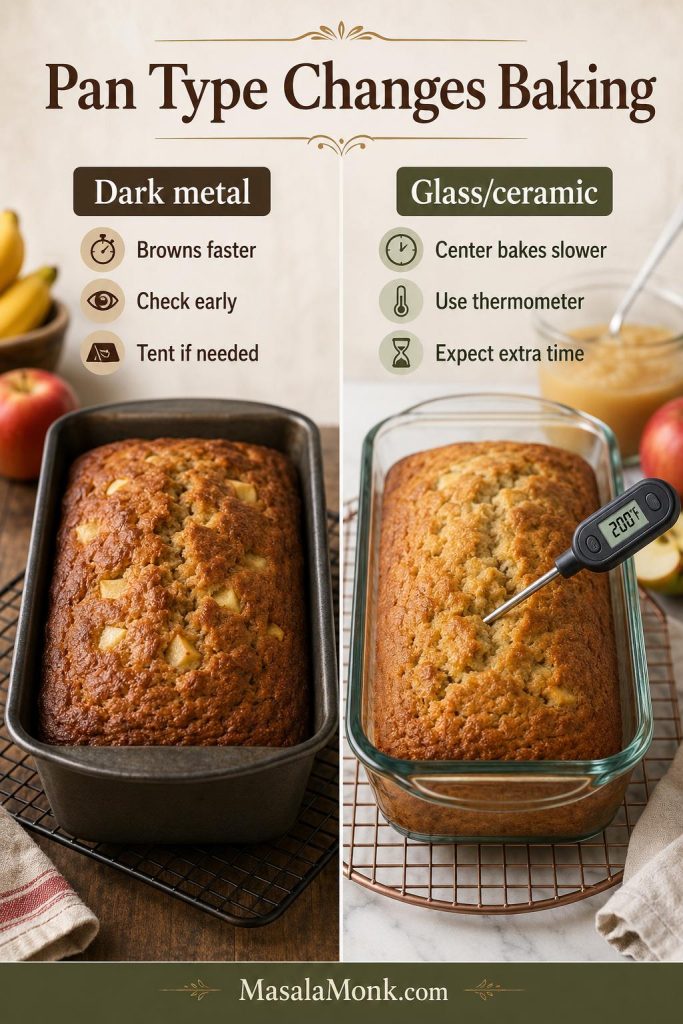
Best Pan Size and Pan Type for Banana Bread with Applesauce
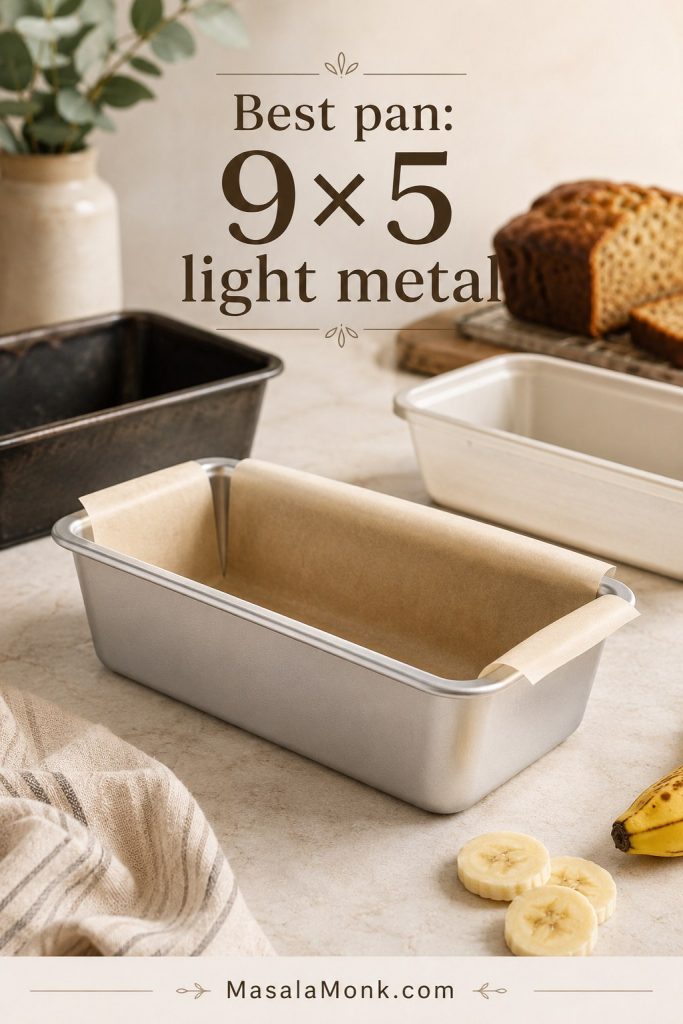
Pan size changes how deep the batter sits, which changes how quickly the center sets. For this fruit-rich batter, a 9×5-inch loaf pan is the safest default.
| Pan | What Changes | How to Bake It |
|---|---|---|
| 9×5-inch loaf pan | Best default; bakes most evenly | 55–65 minutes at 350°F / 175°C |
| 8½x4½-inch loaf pan | Taller loaf; center takes longer | Start checking around 55 minutes, but expect extra time |
| 8×5-inch loaf pan | Works, but the center can be slower | Use a thermometer if possible and avoid pulling early |
| Dark metal loaf pan | Browns faster on the outside | Check early, tent if needed, and reduce the oven by 25°F / about 15°C if it over-browns |
| Glass or ceramic loaf pan | Can bake more slowly through the center | Expect extra time and use a thermometer; tent if the top browns before the middle is done |
| Mini loaf pans | Smaller loaves bake faster | Start checking around 30–35 minutes |
| Muffin tin | Fastest bake with more edges | 20–25 minutes at 350°F, or 18–20 minutes at 375°F |

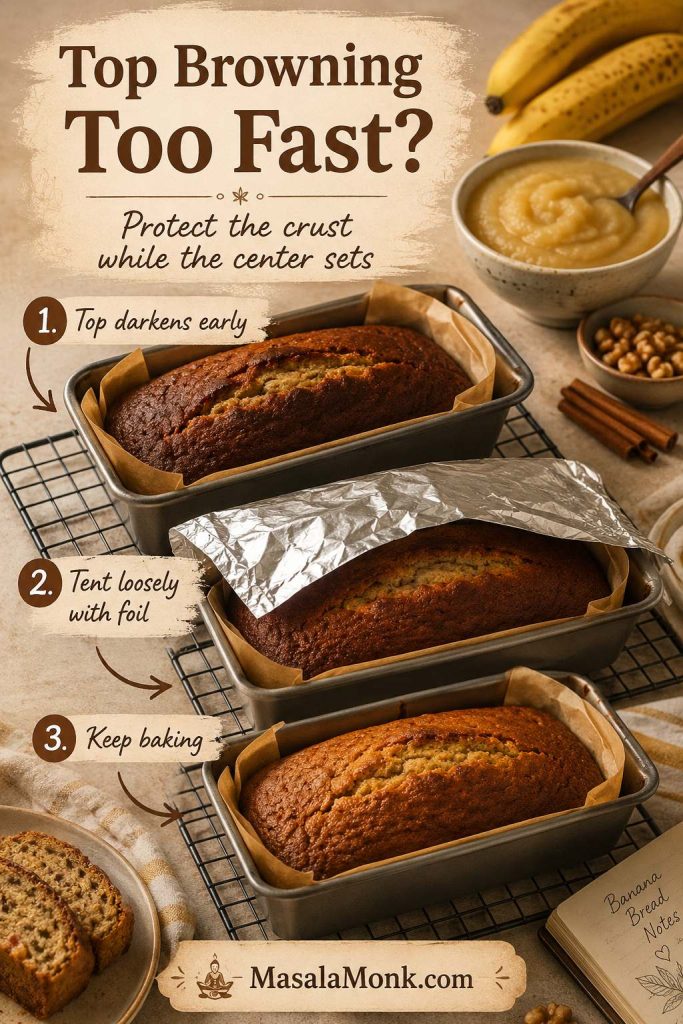
If the top browns before the middle is done, tent the loaf loosely with foil and continue baking. This is especially useful with smaller loaf pans, dark metal pans, glass pans, ceramic pans, or very ripe bananas.
How to Make Banana Bread with Applesauce
Once the fruit and applesauce are measured, the method is simple. The main thing is to mix gently and give the center enough time to bake through. If you are unsure near the end, use the doneness guide instead of judging by color alone.
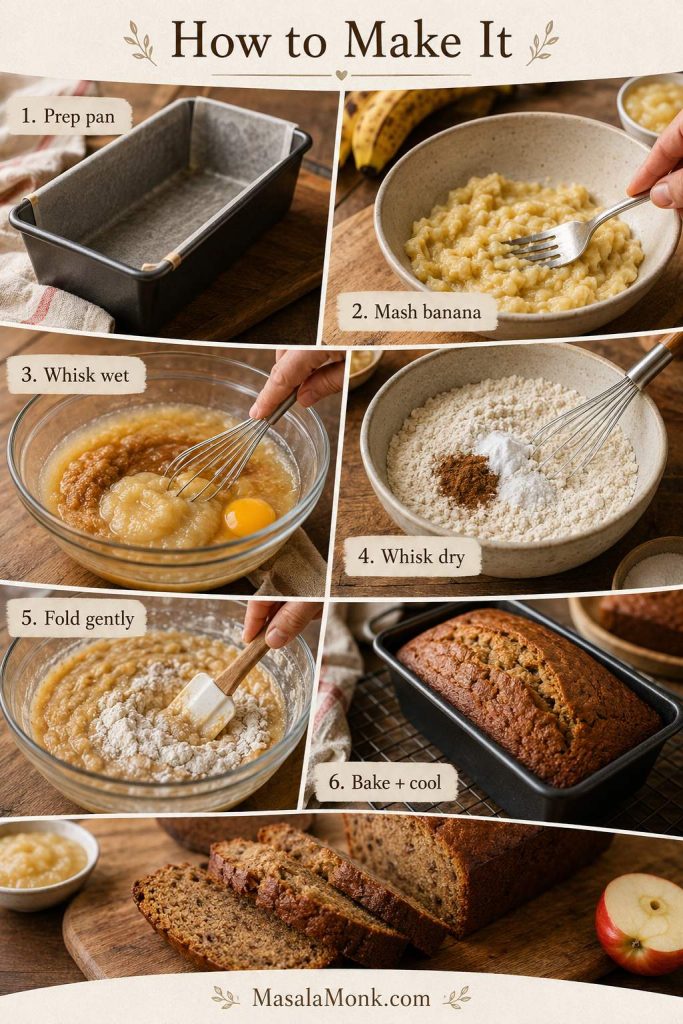
1. Prepare the Pan
Heat the oven to 350°F / 175°C. Grease a 9×5-inch loaf pan and line it with parchment if you want to lift the loaf out easily.
2. Mash and Measure the Bananas
Mash the ripe bananas with a fork, then measure 1½ cups. A few small banana lumps are fine. They make the loaf feel homemade and keep the crumb from becoming too uniform.
3. Mix the Wet Ingredients
Whisk the mashed banana, applesauce, eggs, brown sugar, oil or melted butter, and vanilla until combined. The mixture will look loose and glossy.
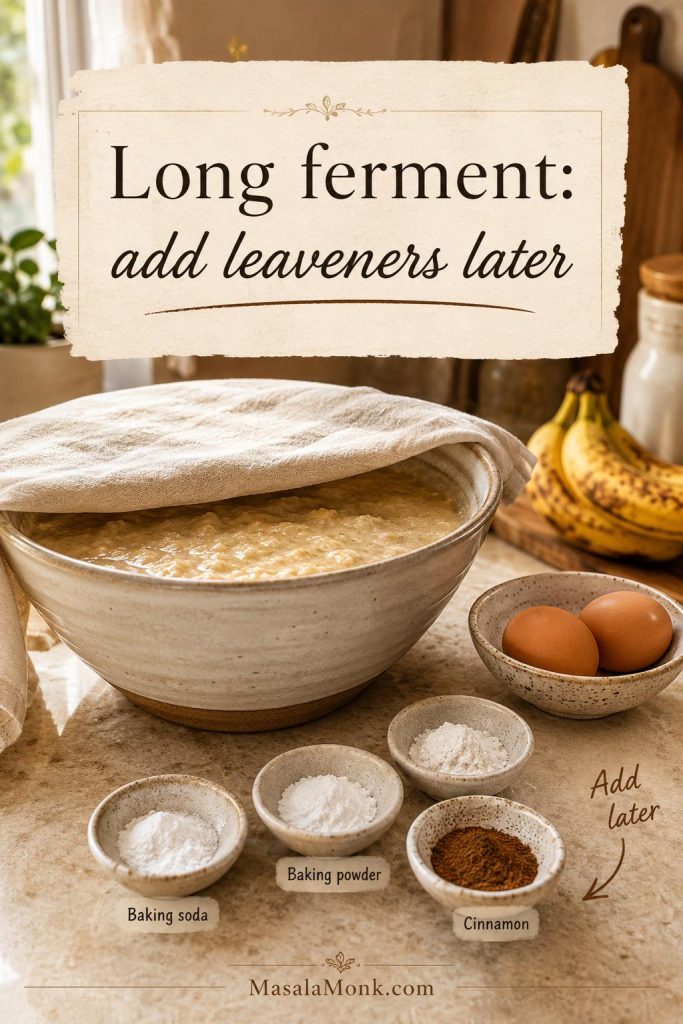
4. Mix the Dry Ingredients Separately
In another bowl, whisk the flour, baking soda, baking powder, cinnamon, and salt. This helps the leavening spread evenly through the thick fruit-based batter.
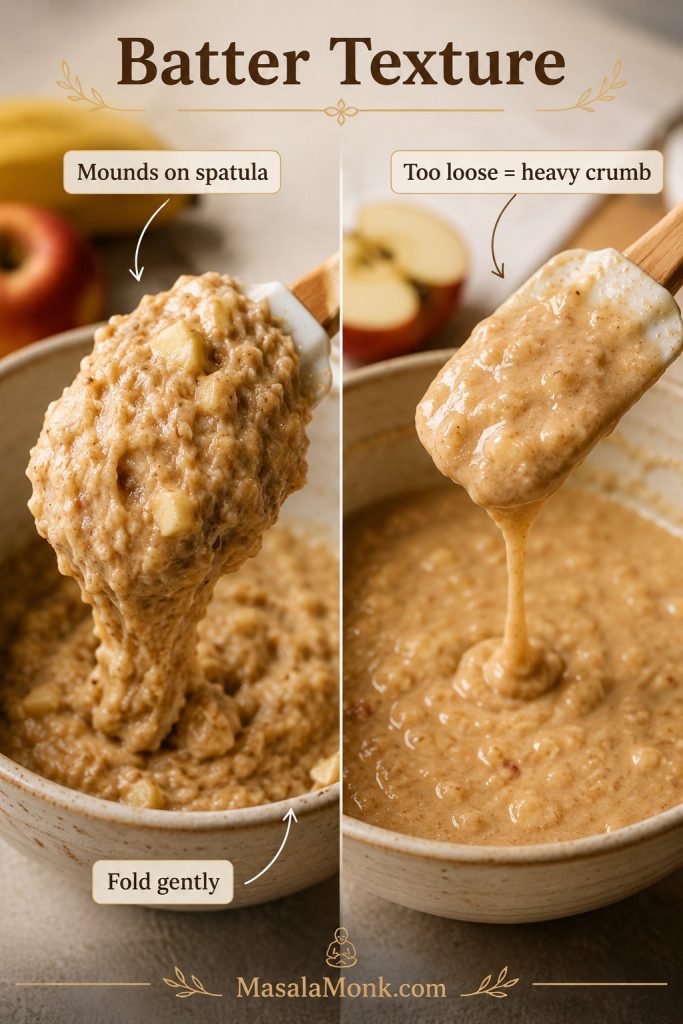
5. Fold Gently
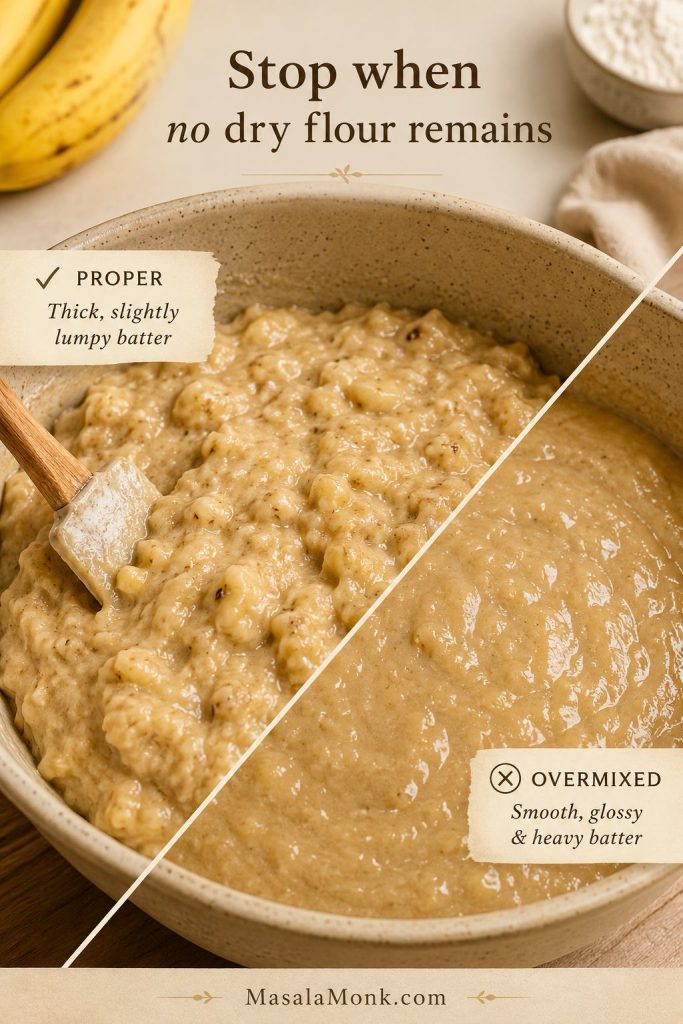
Add the dry ingredients to the wet ingredients and fold with a spatula until no dry flour remains. A mixer is not needed here; overmixing is one of the easiest ways to make the crumb rubbery.
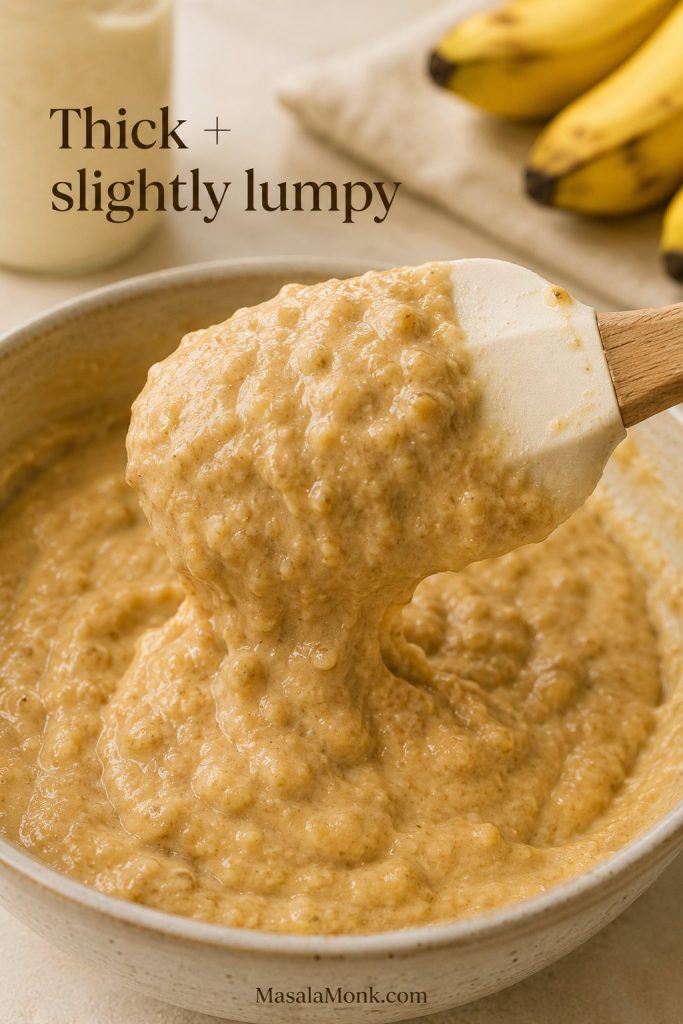
The batter should be thick enough to mound on the spatula. If it looks loose before it goes into the oven, the finished crumb is more likely to feel heavy.
6. Add Nuts if Using
Fold in walnuts or pecans at the end. For a prettier top, save a small handful and scatter them over the batter before baking.
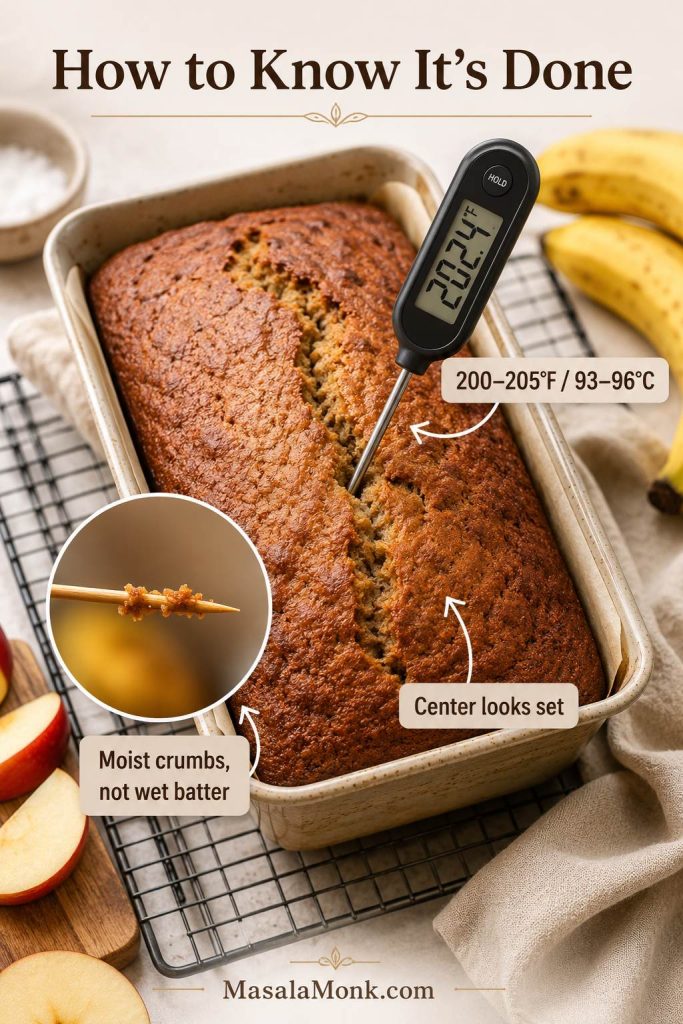
7. Bake Until the Center Is Set
Spread the batter into the prepared pan and bake for 55 to 65 minutes. A browned top is only part of the story; this fruit-heavy batter still needs time for the center to finish baking.
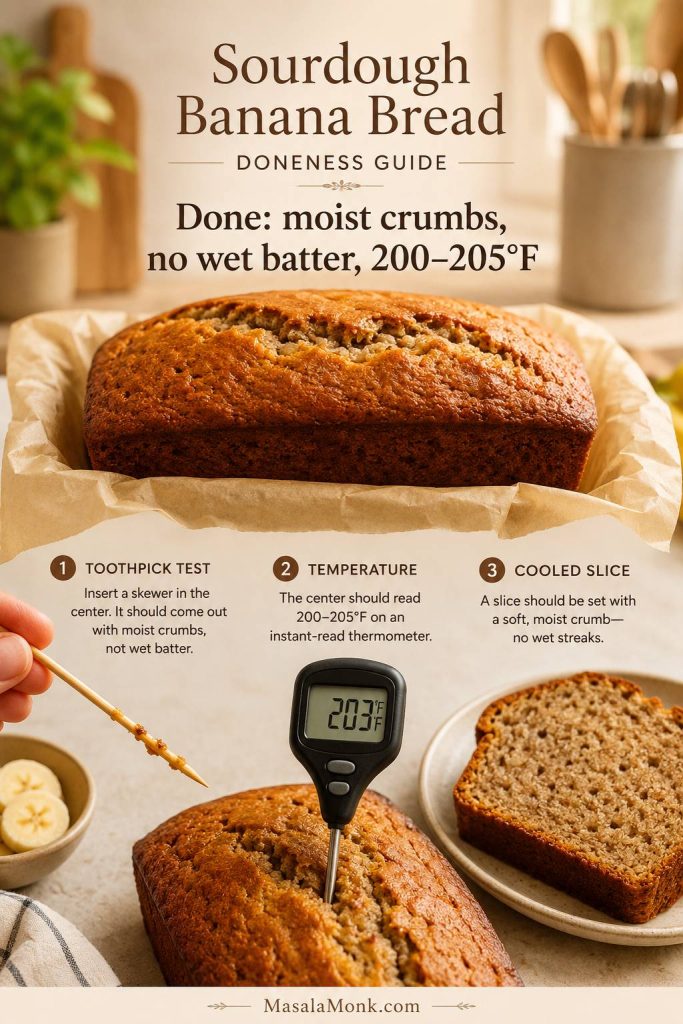
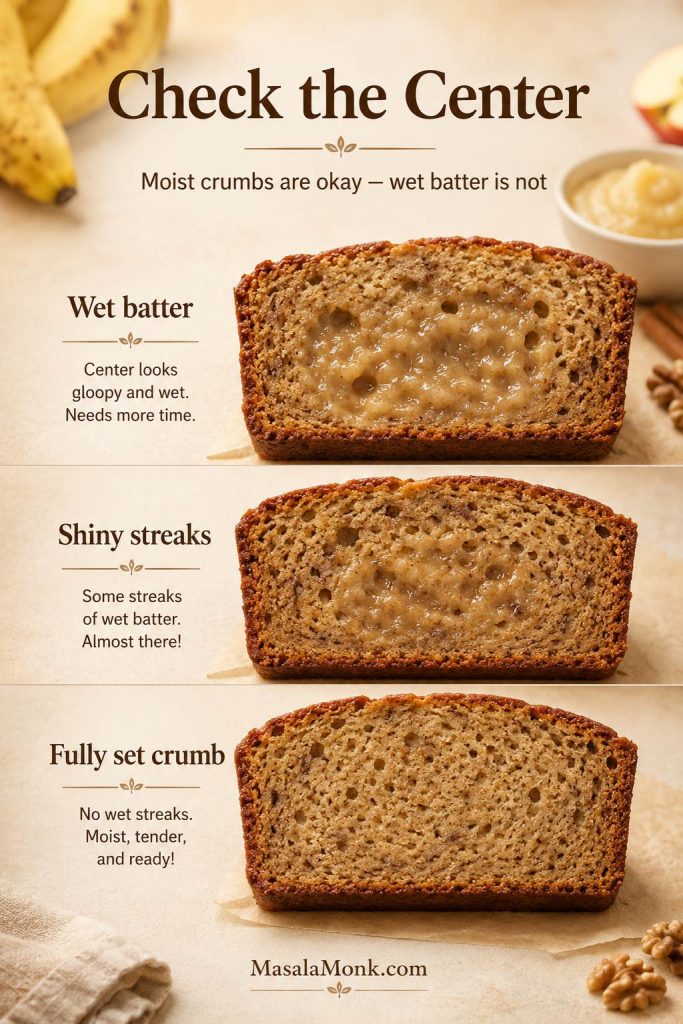
Near the end, the loaf should smell deeply banana-rich, and the center should look set rather than glossy. The bread is done when a toothpick inserted into the center comes out with moist crumbs but no wet batter. For the most reliable check, use a digital thermometer; the center should register about 200°F to 205°F / 93°C to 96°C. King Arthur Baking also recommends this internal-temperature range for banana bread doneness in its banana bread doneness guide.
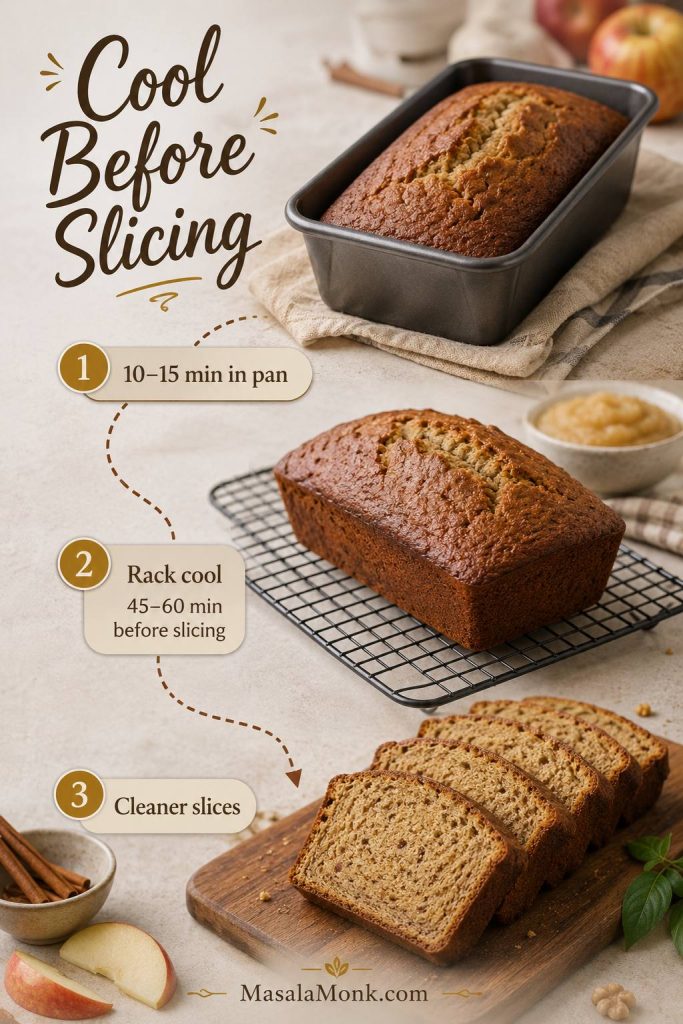
8. Cool Before Slicing
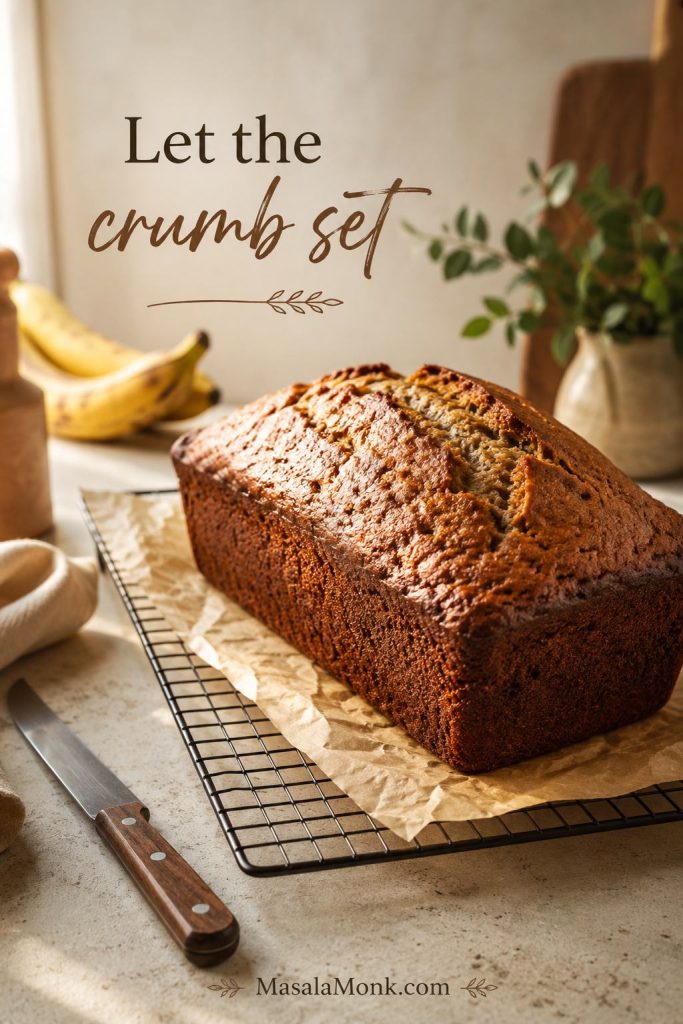
Let the loaf cool in the pan for 10 to 15 minutes, then move it to a rack. Banana bread continues to set as it cools, especially when applesauce is in the batter.
Cutting too early can make a properly baked loaf look underdone, because the crumb has not had time to settle. Waiting is annoying, but it is one of the easiest ways to get clean slices.
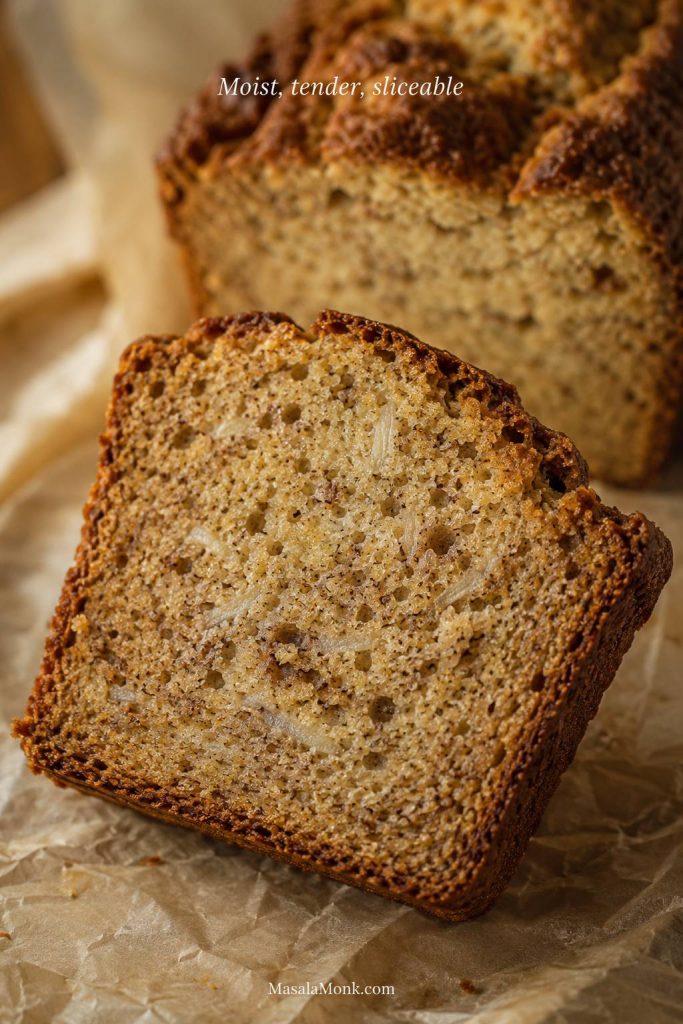
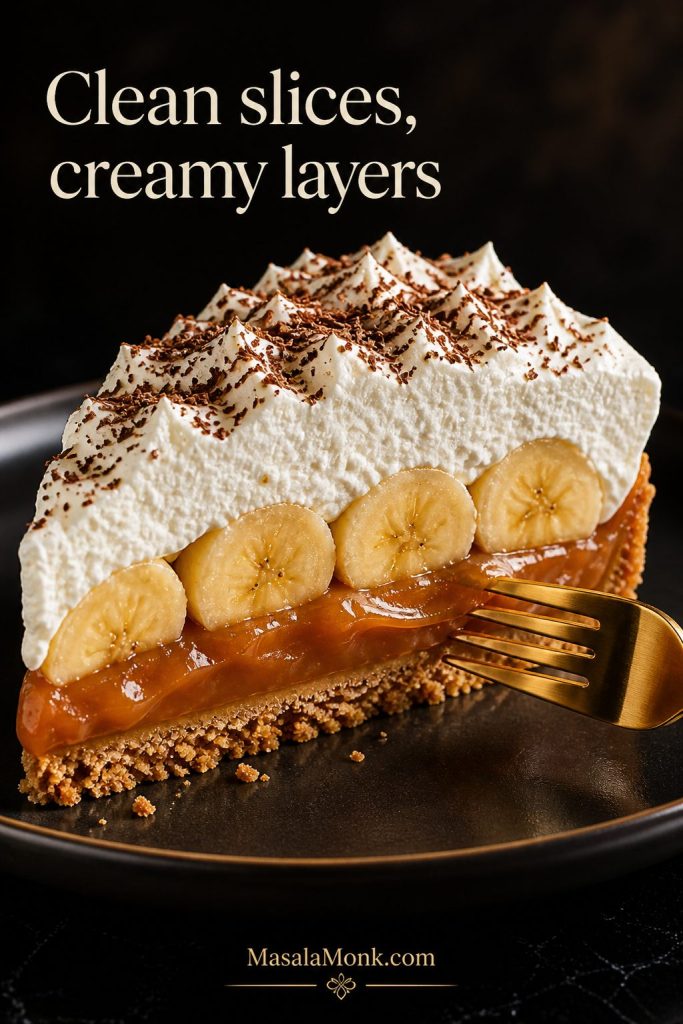
Once cooled, the slices should look even and plush, with tiny banana flecks through the crumb instead of a shiny wet line in the center.
Before you use the recipe card, remember the three texture cues that matter most: measured banana, batter that mounds instead of pours, and a fully cooled loaf before the first cut.
Banana Bread with Applesauce Recipe
This fruit-rich loaf is lighter than classic banana bread but still soft, fragrant, and sturdy enough to slice cleanly once cooled.
Pan: 9×5-inch loaf pan
Oven: 350°F / 175°C
Ingredients
- 1½ cups mashed very ripe banana, about 340 g
- ½ cup unsweetened applesauce, about 120 g
- 2 large eggs
- ½ cup packed light brown sugar, about 105 g
- 3 tablespoons neutral oil, about 45 ml, or 3 tablespoons melted butter, about 42 g
- 2 teaspoons vanilla extract
- 2 cups all-purpose flour, 240 g
- 1 teaspoon baking soda
- ½ teaspoon baking powder
- 1 teaspoon ground cinnamon
- ½ teaspoon fine salt
- ½ cup chopped walnuts or pecans, optional, about 55–65 g
Method
- Heat the oven to 350°F / 175°C. Grease a 9×5-inch loaf pan and line it with parchment if you want easier lifting.
- Mash the bananas, then measure 1½ cups. Banana size varies so much that measuring gives you a more reliable loaf than counting bananas alone.
- In a large bowl, whisk the mashed banana, applesauce, eggs, brown sugar, oil or melted butter, and vanilla.
- In a separate bowl, whisk the flour, baking soda, baking powder, cinnamon, and salt.
- Add the dry ingredients to the wet ingredients and fold gently until no dry flour remains. The batter should be thick enough to mound on the spatula, not runny.
- Fold in walnuts or pecans if using.
- Spread the batter into the prepared pan. Bake for 55–65 minutes, or until a toothpick inserted in the center comes out with moist crumbs but no wet batter. For the most reliable check, the center should read about 200–205°F / 93–96°C.
- If the top browns before the center is done, tent the loaf loosely with foil and keep baking.
- Cool in the pan for 10–15 minutes, then move to a rack. Let the loaf cool for at least 45–60 minutes before slicing so the crumb can finish setting.
Notes
- For your first loaf, use the full 3 tablespoons oil or melted butter. Once you know the texture, you can reduce it to 2 tablespoons for a lighter but more delicate loaf.
- Use up to ¾ cup nuts, about 85 g, if you want a more classic banana nut loaf.
- For a less sweet loaf, reduce the brown sugar to ⅓ cup if your bananas are very ripe.
- If using frozen bananas, thaw and drain off excess liquid before measuring.
- For the cleanest slices, cool the loaf fully before cutting.
After the first loaf, the best tweak is personal: richer with butter, cleaner with oil, crunchier with walnuts, softer as muffins, or lighter with a little less fat. The sections below help you adjust without losing the clean-slicing texture.
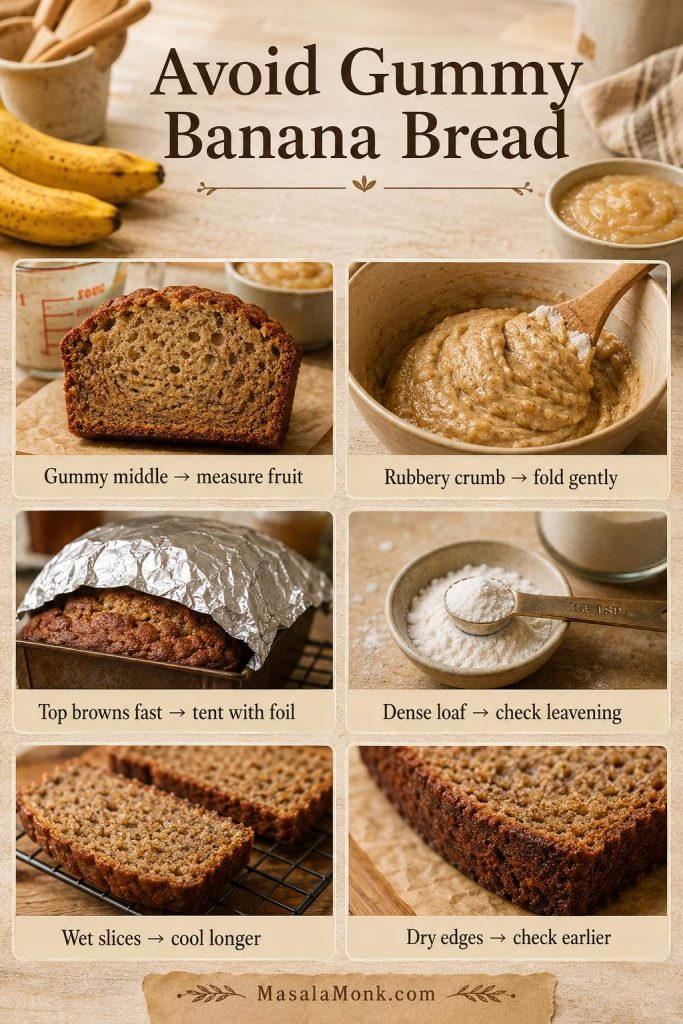
How to Avoid Gummy Banana Bread with Applesauce
A good slice should hold together, with an even crumb and a set center. If your last loaf looked beautiful on top but cut into a compressed middle, you probably do not need a completely different recipe. You usually need better measurement, a little more bake time, and enough cooling before cutting.
Most gummy loaves come from a combination of too much wet fruit, heavy mixing, not enough time in the oven, or slicing before the crumb has set. The good news is that it usually does not mean you are bad at banana bread; it comes down to one of a few fixable choices.
Texture Problems and Fixes
| Problem | Likely Cause | How to Fix It |
|---|---|---|
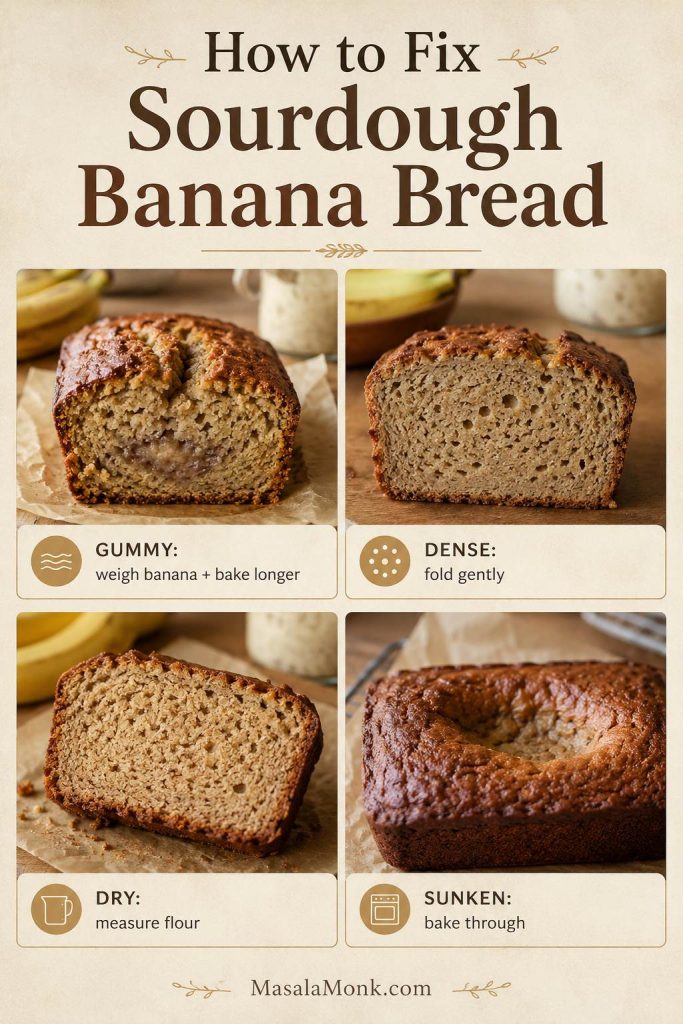
| Gummy middle | Too much banana or applesauce, or the loaf was underbaked | Measure the banana, keep applesauce to ½ cup, and bake until the middle no longer looks shiny or wet |
| Rubbery texture | The batter was overmixed | Fold gently by hand and stop when the flour disappears |
| Top browns too fast | The outside is browning before the center finishes | Tent loosely with foil and continue baking |
| Dense loaf | Too much wet ingredient or weak leavening | Use fresh baking soda and baking powder, and follow the banana-to-applesauce ratio |
| Wet-looking slices | The loaf was sliced too hot | Cool at least 45 minutes before slicing |
| Dry edges | Dark pan, overbaking, or too little wet ingredient | Check earlier, use parchment, and try a lighter pan next time if the edges keep drying out |
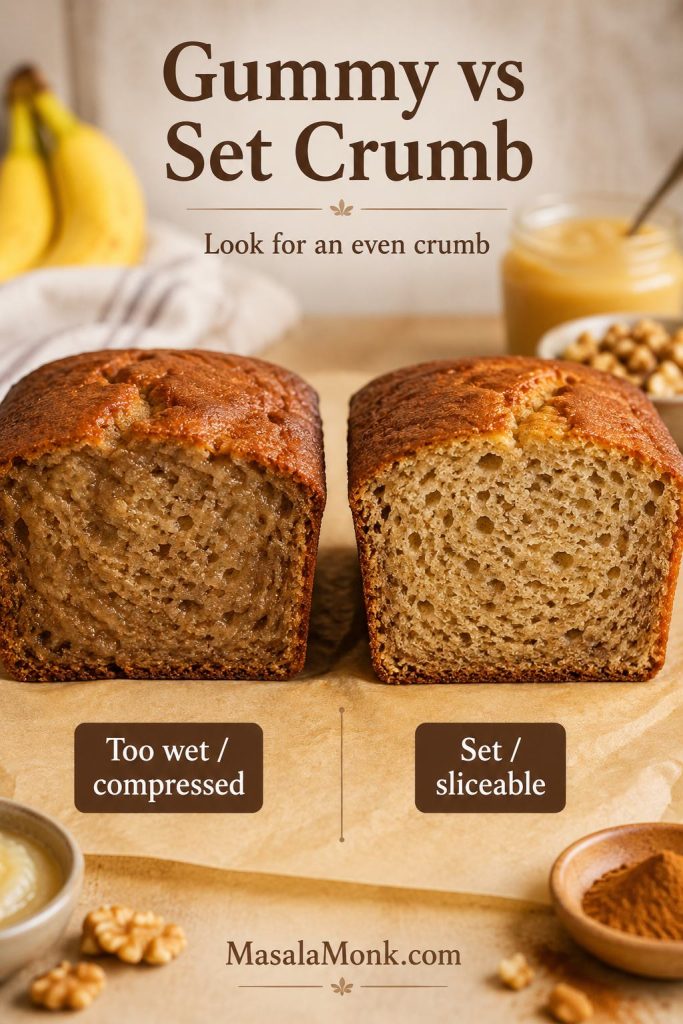
Wet Center vs Fully Baked Crumb
A clean toothpick is not always the best goal for banana bread. A few soft crumbs on the toothpick are fine. Wet batter, shiny streaks, or a sunken center mean the loaf needs more time.
What to Do If the Top Browns Too Fast
If the top is dark but the center still has wet batter, lay a loose piece of foil over the loaf and continue baking. This keeps the crust from getting too dark while the middle finishes.
Can Applesauce Replace Oil or Butter in Banana Bread?
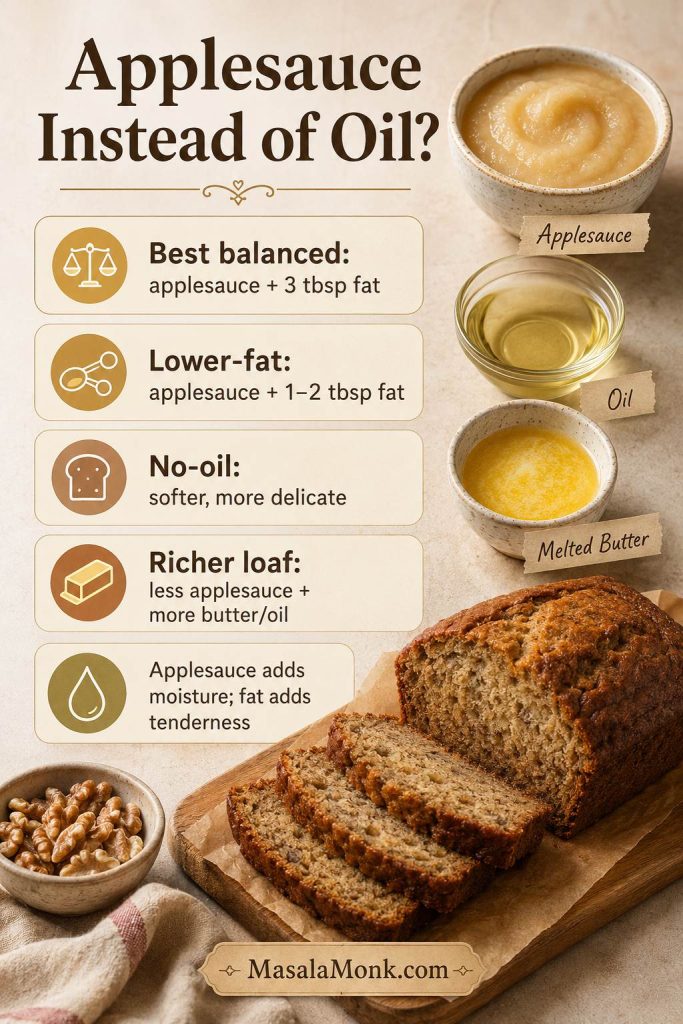
Applesauce can lighten banana bread beautifully, but it cannot do everything butter or oil does. It brings moisture; fat brings richness, tenderness, and a cleaner bite.
Because banana bread already contains mashed fruit, it handles applesauce better than many cakes or cookies. Even so, a small amount of oil or melted butter helps prevent the loaf from becoming springy, tough, or too delicate in the middle.
Think of applesauce as a helper, not a perfect stand-in for every bit of fat. Bon Appétit explains this tradeoff in its guide to using applesauce instead of oil or butter.
| Version | What to Use | Texture |
|---|---|---|
| Best balanced | ½ cup applesauce + 3 tablespoons oil or melted butter | Moist, rich enough, and sliceable |
| Lower-fat | ½ cup applesauce + 1–2 tablespoons oil | Lighter and more delicate |
| No-oil | ½ cup applesauce and no added fat | Moist but more delicate, with a higher risk of a soft center |
| Richer loaf | ⅓ cup applesauce + ¼ cup melted butter or oil | More classic banana bread texture |
After the first loaf, you can reduce the oil slightly if you prefer a softer, lower-fat version.
Banana Bread with Applesauce and Yogurt
Yogurt works best as a small swap, not a big extra addition, because banana, applesauce, and yogurt all bring moisture. For a tangier, softer loaf, replace 2 tablespoons of the applesauce with plain Greek yogurt or regular plain yogurt.
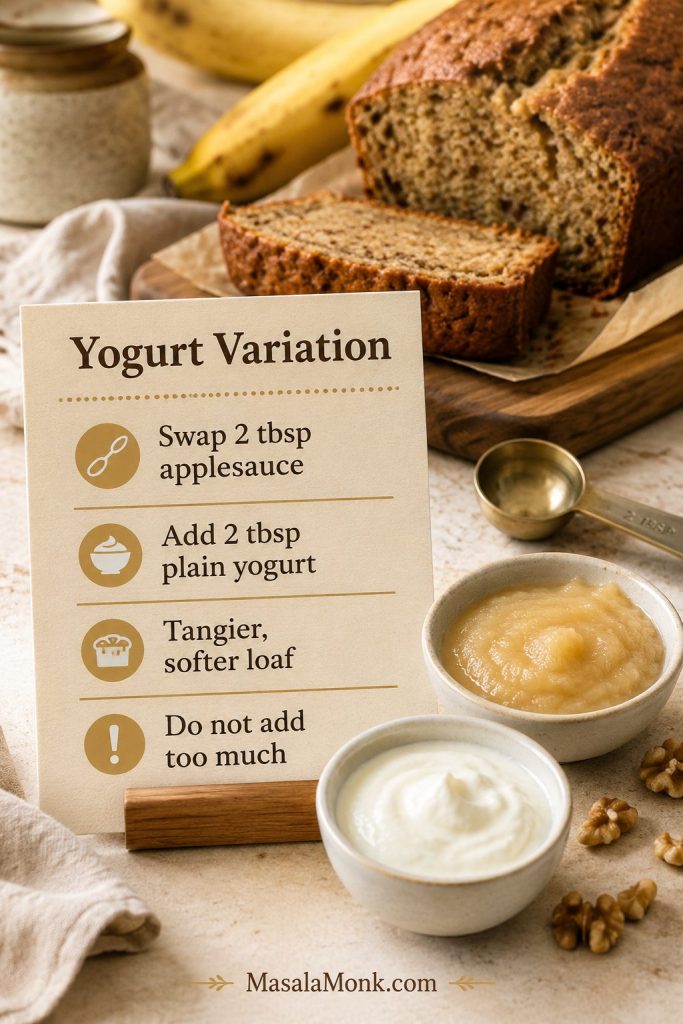
It gives the loaf a little tang and softness without turning it into a completely different bake.
Adding a full extra ½ cup yogurt can make this batter too wet unless you also adjust the flour or bake time. The flavor may be good, but the center can turn heavy.
Banana Nut Bread with Applesauce
For banana nut bread with applesauce, fold ½ to ¾ cup chopped walnuts or pecans, about 55–85 g, into the batter just before baking. Walnuts make the loaf taste more old-school; pecans make it a little softer and sweeter.
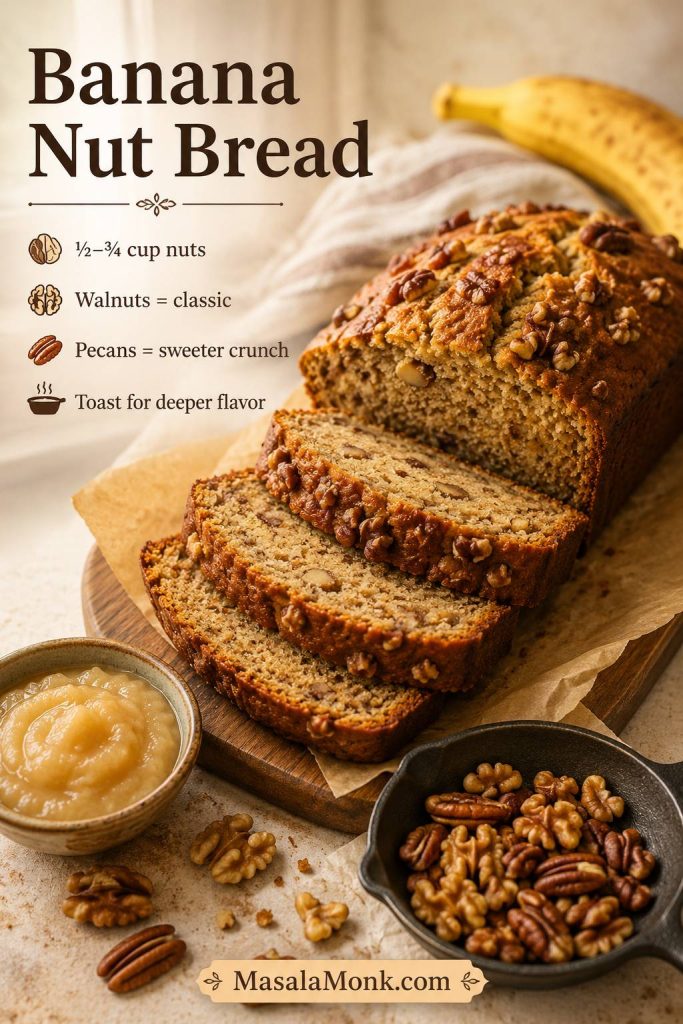
This is the version to make when you want the loaf to feel more classic and bakery-style, with a little crunch against the soft fruit-rich crumb.
Toasting the nuts first gives deeper flavor without changing the recipe. Warm them in a dry skillet for 3–5 minutes, or on a baking sheet for 6–8 minutes at 350°F / 175°C, then cool before folding them into the batter.
Too many nuts can make the loaf crumbly and weigh down an already-moist batter. Keep it under 1 cup if you want neat slices.
No Added Sugar Banana Bread with Applesauce
A no-added-sugar version works best when the bananas are deeply ripe, but it will taste more like a breakfast loaf than a dessert loaf. The bananas carry most of the sweetness, so this is not the place for pale, barely ripe fruit.
This version is not truly sugar-free because bananas and applesauce contain natural sugars. However, you can skip the brown sugar or reduce it to 2 to 3 tablespoons if your bananas are very sweet and heavily speckled.
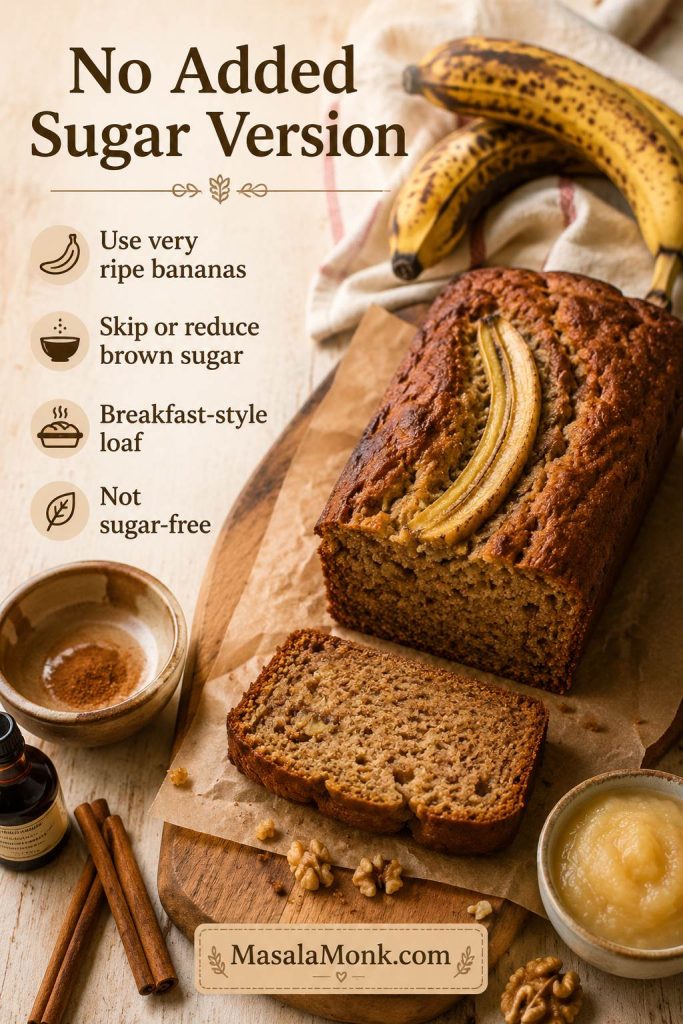
For better flavor in a no-added-sugar loaf, use extra cinnamon, vanilla, and a pinch more salt. These small touches make the banana flavor taste fuller even without much added sugar.
Eggless or Vegan Banana Bread with Applesauce
For a vegan version, use neutral oil instead of butter and replace the eggs with 2 flax eggs. To make 2 flax eggs, mix 2 tablespoons ground flaxseed with 5 tablespoons water and let it thicken for about 10 minutes before adding it to the batter.
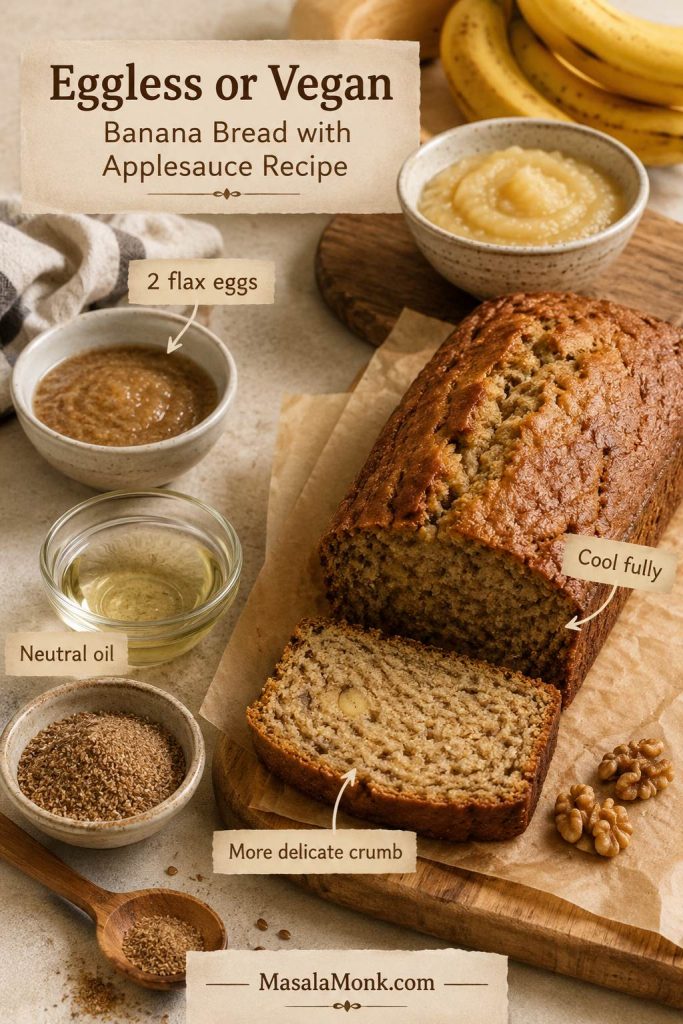
It is a helpful option when the loaf needs to work for more people at the table, but full cooling matters even more because the crumb is more delicate.
Applesauce helps with moisture and a little binding, but it does not behave exactly like eggs. An eggless loaf will usually be more delicate and slightly denser, so let it cool completely before slicing.
If you only need the recipe to be dairy-free, the fix is easier: use neutral oil instead of melted butter. The rest of the main recipe can stay the same.
Banana Muffins with Applesauce
This batter also works as banana muffins with applesauce. Divide it into a lined muffin tin, filling each cup about ¾ full. Bake at 350°F / 175°C for about 20 to 25 minutes, or until the tops spring back and a toothpick comes out with moist crumbs.
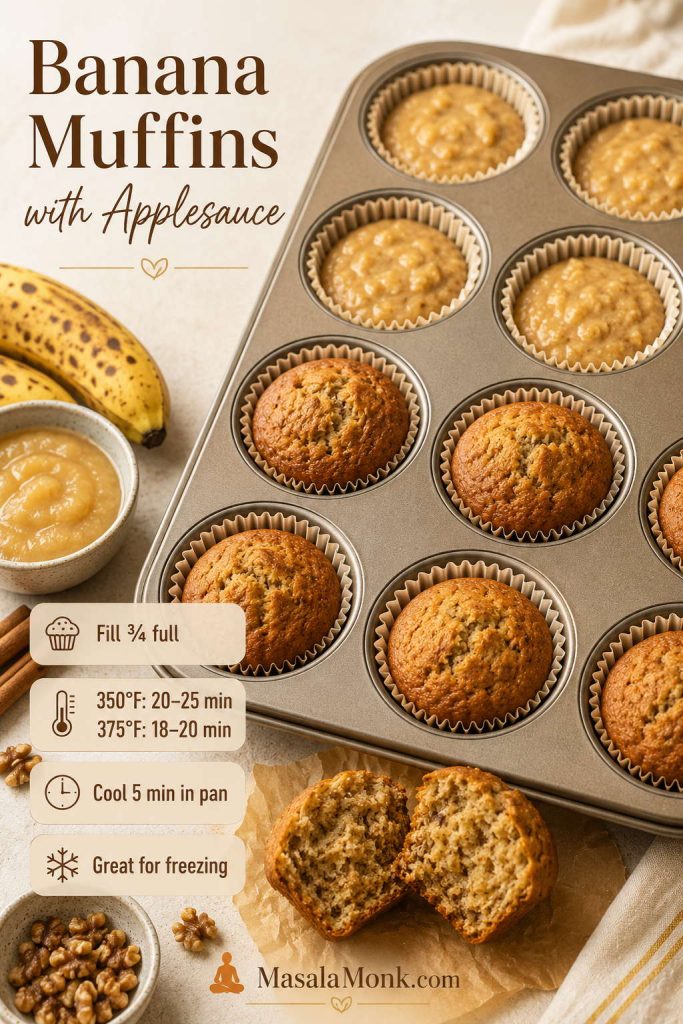
Muffins are the better choice when you want faster cooling, easy freezing, or smaller grab-and-go portions with the same banana-applesauce flavor. Overbaking while waiting for a dark top can dry the edges, so look for tops that are set and spring back lightly.
For slightly taller muffin tops, bake at 375°F / 190°C and start checking around 18 to 20 minutes. Muffins bake faster than a loaf, so watch them closely near the end.
This recipe usually makes about 12 standard muffins. Let them sit in the pan for 5 minutes, then move them to a rack so the bottoms do not steam and turn damp.
For a more filling meal-prep bake, these high protein muffins are a good next step.
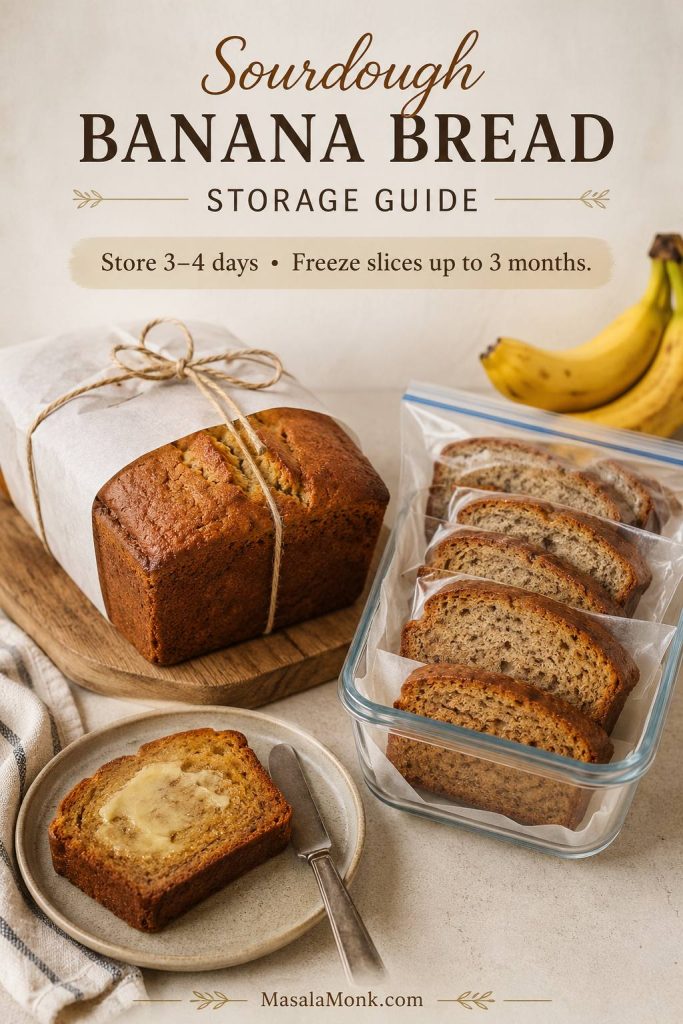
Storage and Freezing
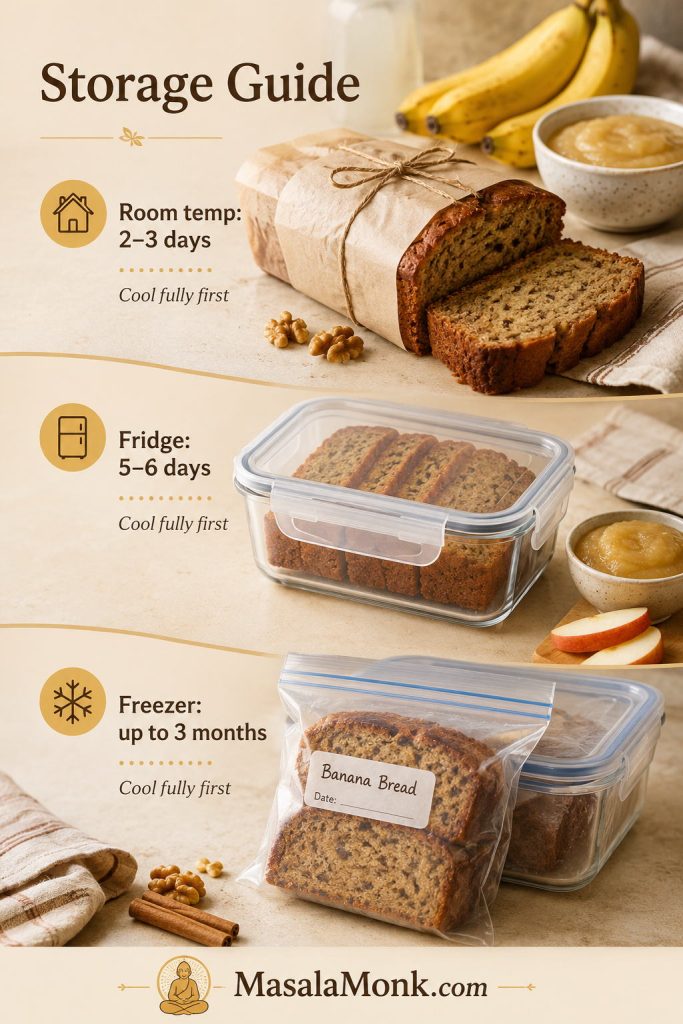
How to Store the Loaf
Because this loaf is fruit-rich, storage matters almost as much as baking. Wrap it too soon and the outside can turn sticky; cool it fully and the slices keep beautifully. Want smaller portions instead? Use the muffin conversion.
- Room temperature: keep tightly wrapped or in an airtight container for 2–3 days once fully cool.
- Refrigerator: store for 5–6 days if your kitchen is warm, though the crumb may firm slightly.
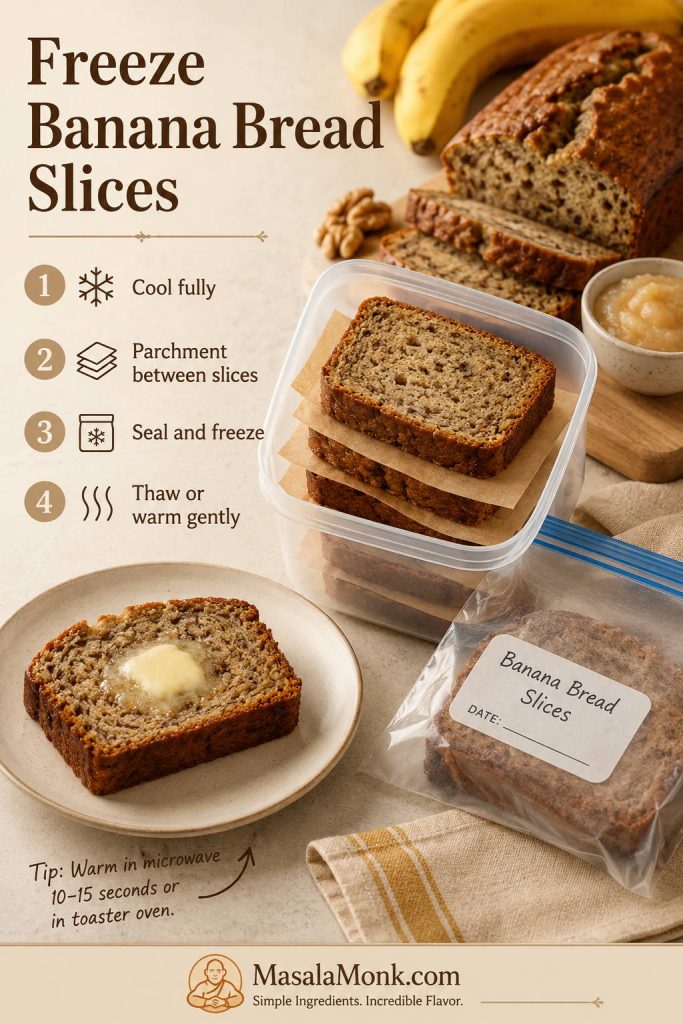
- Freezer: freeze slices for up to 3 months with parchment between them for easier thawing. For the cleanest setup, use the slice-freezing method below.
How to Freeze Slices
To serve frozen slices, thaw at room temperature or warm gently. A quick warm-up makes the banana flavor taste fresher and softens the crumb again.
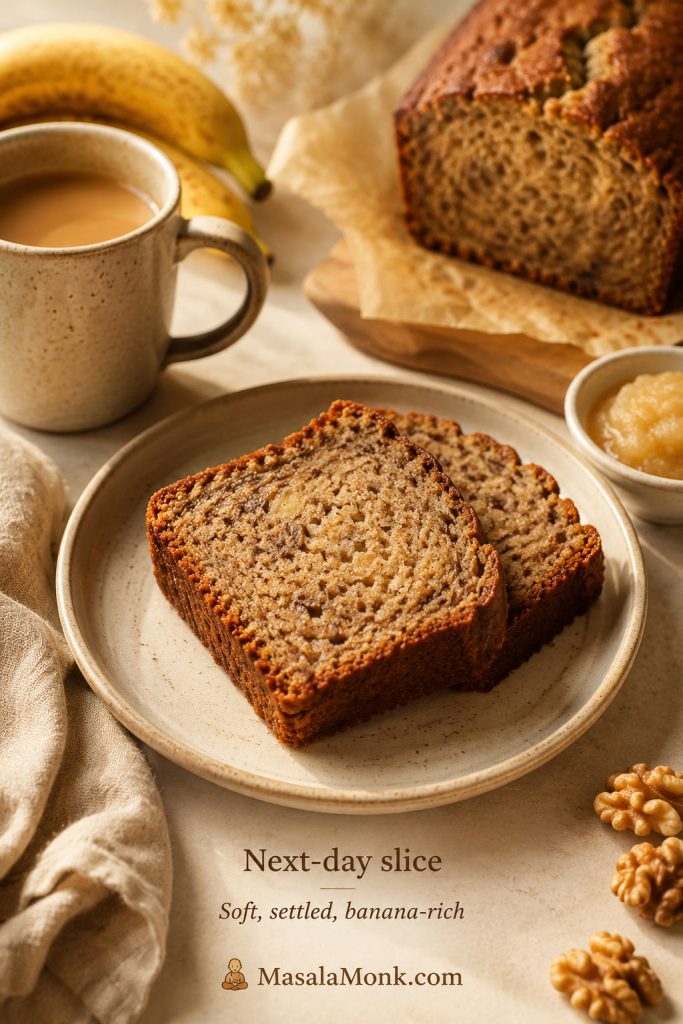
It is especially good the next day, when the banana flavor has had time to settle into the crumb.
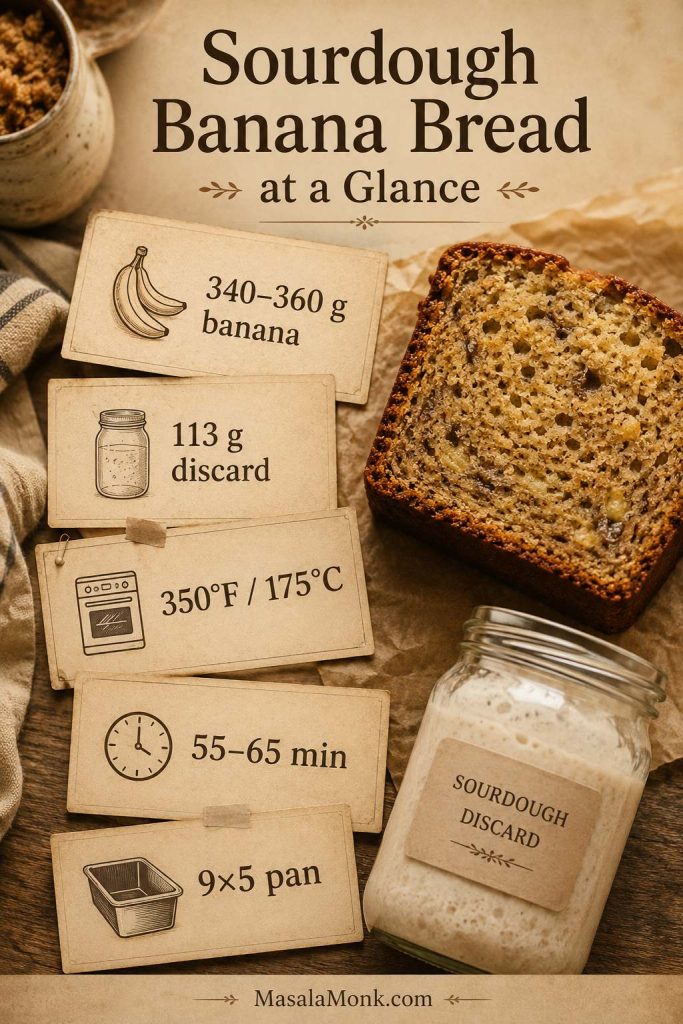
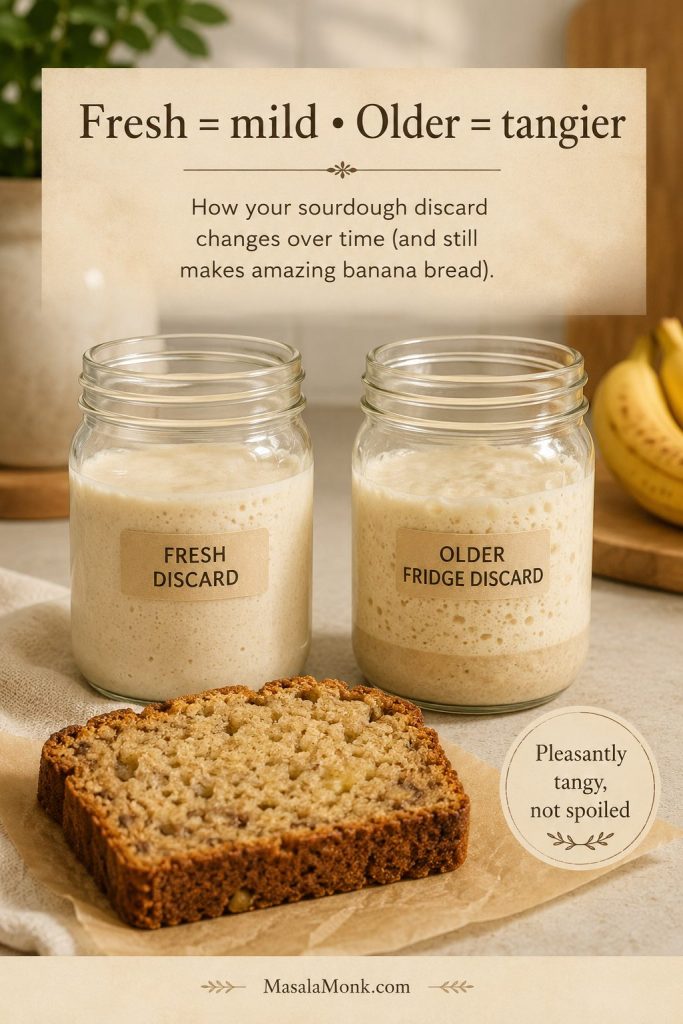
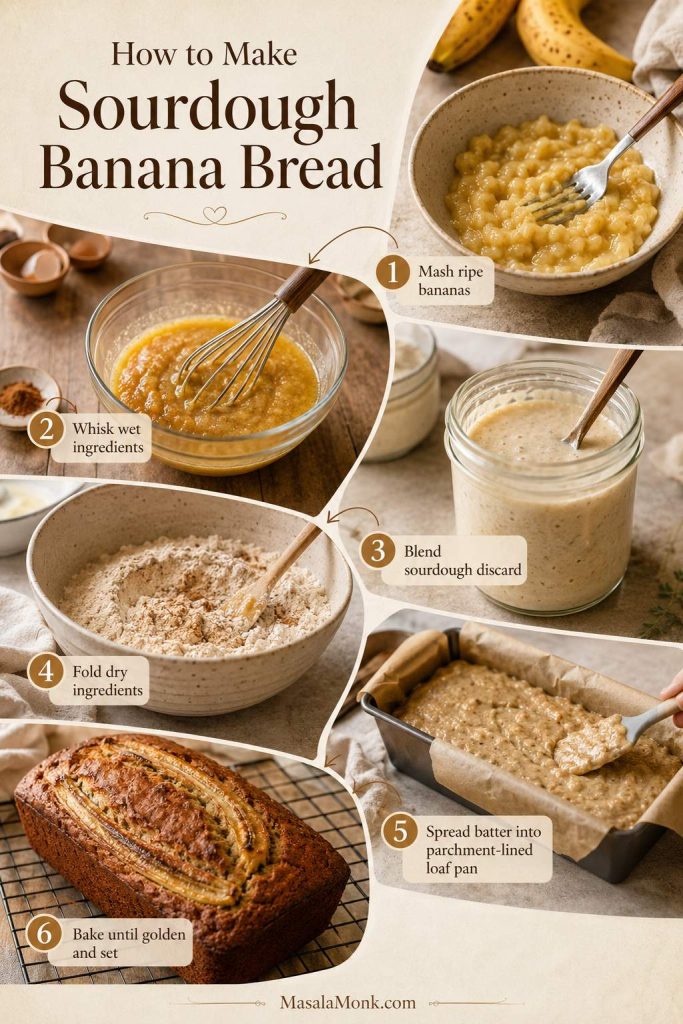
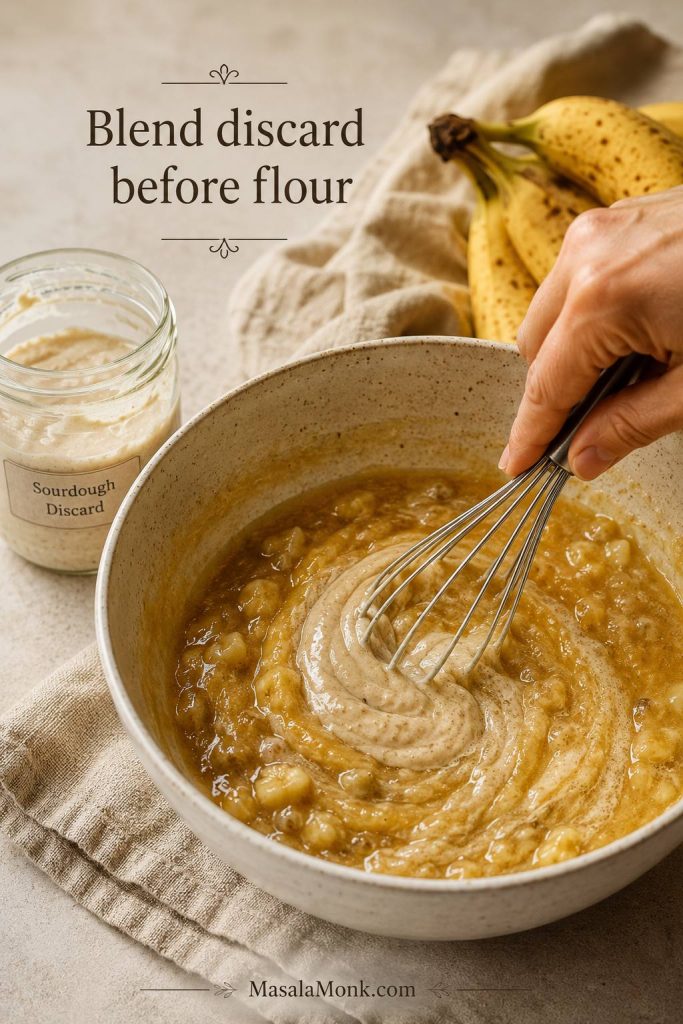
If you are baking through ripe bananas often, this sourdough banana bread recipe is another good make-ahead loaf for the same breakfast-and-snack lane.
The Next-Day Slice
Once you know the texture cues, this becomes the kind of banana bread you stop overthinking: ripe bananas, a measured scoop of applesauce, a thick batter, and enough cooling time for clean slices. The first slice is soft and fragrant, but the next-day slice may be even better — more settled, more banana-rich, and exactly the reason those spotted bananas were worth saving.
After the first bake, pay attention to your favorite version: oil for a cleaner banana flavor, melted butter for a richer slice, walnuts for a classic banana bread feel, or plain for a softer breakfast loaf. That little preference is what turns the recipe into your house version.
FAQs About Banana Bread with Applesauce
How much applesauce belongs in one loaf of banana bread?
For one standard 9×5-inch loaf, ½ cup applesauce is the best starting point. It adds moisture without making the batter too loose, especially when paired with about 1½ cups mashed banana.
Does applesauce replace all the oil or butter?
Applesauce can replace some of the fat, but the best texture usually comes from keeping a small amount of oil or melted butter in the batter. A fully no-oil loaf can work, although it will be more delicate.
Why did my applesauce banana bread turn gummy?
The usual causes are too much wet ingredient, overmixing, underbaking, or slicing while the loaf is still hot. Measure the banana, keep the applesauce to ½ cup, fold gently, and bake until the middle no longer looks shiny or wet.
Do frozen bananas work?
They do, but thawing and draining matter. Frozen bananas release extra liquid, so drain off the excess, mash the fruit, and then measure the 1½ cups.
How much whole wheat flour can I use?
Up to half is the safest swap. Replacing all the all-purpose flour with whole wheat flour makes the loaf heartier and denser, so start with a partial swap before changing the whole recipe.
What happens if I skip the added sugar?
The loaf will taste more breakfast-style than dessert-style. Very ripe bananas help, but bananas and applesauce still contain natural sugars, so “no added sugar” is the more accurate description.
How do I make this into banana nut bread?
Fold ½ to ¾ cup chopped walnuts or pecans into the batter before baking. Toasted walnuts give the most classic banana nut bread flavor.
Which applesauce types work best?
Unsweetened smooth applesauce is the easiest choice. Sweetened applesauce works if you reduce the sugar slightly, cinnamon applesauce adds warmth, and chunky applesauce should be mashed or blended first.
How do I make it eggless or vegan?
For a vegan loaf, use neutral oil instead of butter and replace the eggs with 2 flax eggs. The loaf will be more delicate and slightly denser, so cool it completely before slicing.
Where does yogurt fit into the recipe?
A small amount works best. Replace 2 tablespoons of the applesauce with plain yogurt for a tangier loaf, but avoid adding much more unless you adjust the flour or bake time.
How do I know the middle is fully baked?
A toothpick should come out with moist crumbs, not wet batter or shiny streaks. For a more precise check, the center should register about 200°F to 205°F / 93°C to 96°C on a digital thermometer.
{ “@context”: “https://schema.org”, “@graph”: [ { “@type”: “Organization”, “@id”: “https://masalamonk.com/#organization”, “name”: “MasalaMonk.com”, “url”: “https://masalamonk.com/”, “logo”: { “@type”: “ImageObject”, “@id”: “https://masalamonk.com/#logo”, “url”: “https://masalamonk.com/wp-content/uploads/2018/04/masala-monk-logo.png”, “contentUrl”: “https://masalamonk.com/wp-content/uploads/2018/04/masala-monk-logo.png” } }, { “@type”: “WebSite”, “@id”: “https://masalamonk.com/#website”, “url”: “https://masalamonk.com/”, “name”: “MasalaMonk.com”, “publisher”: { “@id”: “https://masalamonk.com/#organization” }, “inLanguage”: “en-US” }, { “@type”: “ImageObject”, “@id”: “https://masalamonk.com/banana-bread-with-applesauce-recipe/#primaryimage”, “url”: “https://masalamonk.com/wp-content/uploads/2026/05/banana-bread-with-applesauce-recipe.jpg”, “contentUrl”: “https://masalamonk.com/wp-content/uploads/2026/05/banana-bread-with-applesauce-recipe.jpg”, “caption”: “Banana bread with applesauce sliced to show a soft, set crumb.” }, { “@type”: “WebPage”, “@id”: “https://masalamonk.com/banana-bread-with-applesauce-recipe/#webpage”, “url”: “https://masalamonk.com/banana-bread-with-applesauce-recipe/”, “name”: “Banana Bread with Applesauce Recipe”, “headline”: “Banana Bread with Applesauce Recipe”, “description”: “A moist banana bread with applesauce recipe that uses ripe bananas, measured applesauce, and a little oil or butter for tender slices without a gummy center.”, “isPartOf”: { “@id”: “https://masalamonk.com/#website” }, “publisher”: { “@id”: “https://masalamonk.com/#organization” }, “primaryImageOfPage”: { “@id”: “https://masalamonk.com/banana-bread-with-applesauce-recipe/#primaryimage” }, “mainEntity”: { “@id”: “https://masalamonk.com/banana-bread-with-applesauce-recipe/#recipe” }, “datePublished”: “2026-05-28”, “dateModified”: “2026-05-28”, “isAccessibleForFree”: true, “inLanguage”: “en-US” }, { “@type”: “Recipe”, “@id”: “https://masalamonk.com/banana-bread-with-applesauce-recipe/#recipe”, “mainEntityOfPage”: { “@id”: “https://masalamonk.com/banana-bread-with-applesauce-recipe/#webpage” }, “url”: “https://masalamonk.com/banana-bread-with-applesauce-recipe/”, “name”: “Banana Bread with Applesauce Recipe”, “headline”: “Banana Bread with Applesauce Recipe”, “description”: “Moist banana bread with applesauce, ripe bananas, and a small amount of oil or butter for tender slices without a gummy center.”, “image”: [ { “@type”: “ImageObject”, “@id”: “https://masalamonk.com/banana-bread-with-applesauce-recipe/#image-finished-loaf”, “url”: “https://masalamonk.com/wp-content/uploads/2026/05/banana-bread-with-applesauce-recipe.jpg”, “contentUrl”: “https://masalamonk.com/wp-content/uploads/2026/05/banana-bread-with-applesauce-recipe.jpg”, “caption”: “Sliced banana bread with applesauce showing a soft, set crumb.” }, { “@type”: “ImageObject”, “@id”: “https://masalamonk.com/banana-bread-with-applesauce-recipe/#image-slice-texture”, “url”: “https://masalamonk.com/wp-content/uploads/2026/05/banana-bread-with-applesauce-slice-texture-683×1024.jpg”, “contentUrl”: “https://masalamonk.com/wp-content/uploads/2026/05/banana-bread-with-applesauce-slice-texture-683×1024.jpg”, “caption”: “Close-up of banana bread with applesauce slices showing an even crumb.” }, { “@type”: “ImageObject”, “@id”: “https://masalamonk.com/banana-bread-with-applesauce-recipe/#image-clean-slices”, “url”: “https://masalamonk.com/wp-content/uploads/2026/05/clean-slices-of-banana-bread-with-applesauce-683×1024.jpg”, “contentUrl”: “https://masalamonk.com/wp-content/uploads/2026/05/clean-slices-of-banana-bread-with-applesauce-683×1024.jpg”, “caption”: “Clean slices of banana bread with applesauce showing no wet line.” }, { “@type”: “ImageObject”, “@id”: “https://masalamonk.com/banana-bread-with-applesauce-recipe/#image-next-day-slice”, “url”: “https://masalamonk.com/wp-content/uploads/2026/05/banana-bread-with-applesauce-next-day-slice-683×1024.jpg”, “contentUrl”: “https://masalamonk.com/wp-content/uploads/2026/05/banana-bread-with-applesauce-next-day-slice-683×1024.jpg”, “caption”: “Next-day banana bread with applesauce served as a breakfast slice.” } ], “thumbnailUrl”: “https://masalamonk.com/wp-content/uploads/2026/05/banana-bread-with-applesauce-recipe.jpg”, “author”: { “@id”: “https://masalamonk.com/#organization” }, “publisher”: { “@id”: “https://masalamonk.com/#organization” }, “datePublished”: “2026-05-28”, “dateModified”: “2026-05-28”, “inLanguage”: “en-US”, “prepTime”: “PT15M”, “cookTime”: “PT1H5M”, “totalTime”: “PT2H20M”, “recipeYield”: “1 standard loaf (about 10 slices)”, “recipeCategory”: [ “Quick Bread”, “Breakfast”, “Snack” ], “recipeCuisine”: “American”, “keywords”: “banana bread with applesauce, applesauce banana bread, moist banana bread, banana bread recipe, banana nut bread with applesauce, no added sugar banana bread, eggless banana bread, vegan banana bread, banana muffins with applesauce”, “recipeIngredient”: [ “1½ cups mashed very ripe banana, about 340 g”, “½ cup unsweetened applesauce, about 120 g”, “2 large eggs”, “½ cup packed light brown sugar, about 105 g”, “3 tablespoons neutral oil, about 45 ml, or 3 tablespoons melted butter, about 42 g”, “2 teaspoons vanilla extract”, “2 cups all-purpose flour, 240 g”, “1 teaspoon baking soda”, “½ teaspoon baking powder”, “1 teaspoon ground cinnamon”, “½ teaspoon fine salt”, “½ cup chopped walnuts or pecans, optional, about 55–65 g” ], “recipeInstructions”: [ { “@type”: “HowToStep”, “@id”: “https://masalamonk.com/banana-bread-with-applesauce-recipe/#prepare-the-pan”, “position”: 1, “name”: “Prepare the pan”, “url”: “https://masalamonk.com/banana-bread-with-applesauce-recipe/#prepare-the-pan”, “text”: “Heat the oven to 350°F / 175°C. Grease a 9×5-inch loaf pan and line it with parchment if you want easier lifting.”, “image”: “https://masalamonk.com/wp-content/uploads/2026/05/how-to-make-banana-bread-with-applesauce-step-by-step-683×1024.jpg” }, { “@type”: “HowToStep”, “@id”: “https://masalamonk.com/banana-bread-with-applesauce-recipe/#mash-and-measure-bananas”, “position”: 2, “name”: “Mash and measure the bananas”, “url”: “https://masalamonk.com/banana-bread-with-applesauce-recipe/#mash-and-measure-bananas”, “text”: “Mash the bananas, then measure 1½ cups. Banana size varies, so measuring gives you a more reliable loaf than counting bananas alone.”, “image”: “https://masalamonk.com/wp-content/uploads/2026/05/measure-mashed-bananas-for-banana-bread-683×1024.jpg” }, { “@type”: “HowToStep”, “@id”: “https://masalamonk.com/banana-bread-with-applesauce-recipe/#mix-wet-ingredients”, “position”: 3, “name”: “Mix the wet ingredients”, “url”: “https://masalamonk.com/banana-bread-with-applesauce-recipe/#mix-wet-ingredients”, “text”: “In a large bowl, whisk the mashed banana, applesauce, eggs, brown sugar, oil or melted butter, and vanilla.”, “image”: “https://masalamonk.com/wp-content/uploads/2026/05/how-to-make-banana-bread-with-applesauce-step-by-step-683×1024.jpg” }, { “@type”: “HowToStep”, “@id”: “https://masalamonk.com/banana-bread-with-applesauce-recipe/#mix-dry-ingredients”, “position”: 4, “name”: “Mix the dry ingredients”, “url”: “https://masalamonk.com/banana-bread-with-applesauce-recipe/#mix-dry-ingredients”, “text”: “In a separate bowl, whisk the flour, baking soda, baking powder, cinnamon, and salt.”, “image”: “https://masalamonk.com/wp-content/uploads/2026/05/how-to-make-banana-bread-with-applesauce-step-by-step-683×1024.jpg” }, { “@type”: “HowToStep”, “@id”: “https://masalamonk.com/banana-bread-with-applesauce-recipe/#fold-gently”, “position”: 5, “name”: “Fold the batter gently”, “url”: “https://masalamonk.com/banana-bread-with-applesauce-recipe/#fold-gently”, “text”: “Add the dry ingredients to the wet ingredients and fold gently until no dry flour remains. The batter should be thick enough to mound on the spatula, not runny.”, “image”: “https://masalamonk.com/wp-content/uploads/2026/05/banana-bread-batter-texture-guide-683×1024.jpg” }, { “@type”: “HowToStep”, “@id”: “https://masalamonk.com/banana-bread-with-applesauce-recipe/#add-nuts-if-using”, “position”: 6, “name”: “Add nuts if using”, “url”: “https://masalamonk.com/banana-bread-with-applesauce-recipe/#add-nuts-if-using”, “text”: “Fold in walnuts or pecans if using.”, “image”: “https://masalamonk.com/wp-content/uploads/2026/05/mix-ins-for-banana-bread-with-applesauce-683×1024.jpg” }, { “@type”: “HowToStep”, “@id”: “https://masalamonk.com/banana-bread-with-applesauce-recipe/#bake-until-center-is-set”, “position”: 7, “name”: “Bake until the center is set”, “url”: “https://masalamonk.com/banana-bread-with-applesauce-recipe/#bake-until-center-is-set”, “text”: “Spread the batter into the prepared pan. Bake for 55–65 minutes, or until a toothpick inserted in the center comes out with moist crumbs but no wet batter. For the most reliable check, the center should read about 200–205°F / 93–96°C.”, “image”: “https://masalamonk.com/wp-content/uploads/2026/05/banana-bread-doneness-guide-683×1024.jpg” }, { “@type”: “HowToStep”, “@id”: “https://masalamonk.com/banana-bread-with-applesauce-recipe/#foil-tent-banana-bread”, “position”: 8, “name”: “Tent with foil if needed”, “url”: “https://masalamonk.com/banana-bread-with-applesauce-recipe/#foil-tent-banana-bread”, “text”: “If the top browns before the center is done, tent the loaf loosely with foil and keep baking.”, “image”: “https://masalamonk.com/wp-content/uploads/2026/05/top-browning-too-fast-banana-bread-fix-683×1024.jpg” }, { “@type”: “HowToStep”, “@id”: “https://masalamonk.com/banana-bread-with-applesauce-recipe/#cool-before-slicing-step”, “position”: 9, “name”: “Cool before slicing”, “url”: “https://masalamonk.com/banana-bread-with-applesauce-recipe/#cool-before-slicing-step”, “text”: “Cool in the pan for 10–15 minutes, then move to a rack. Let the loaf cool for at least 45–60 minutes before slicing so the crumb can finish setting.”, “image”: “https://masalamonk.com/wp-content/uploads/2026/05/cool-banana-bread-before-slicing-683×1024.jpg” } ] } ] }