Are you looking for high-protein, plant-based meal prep ideas that don’t rely on ultra-processed “fake meat” or endless chickpeas? Maybe you’re trying to cut back on beef, eat more sustainably, or just love mushrooms and want to make them the star of your weekly lunches.
You’re in the right place.
In this post, we’ll dive deep into why mushrooms are gaining ground as a powerful meat alternative, how to optimize their protein potential, and—most importantly—give you five seriously delicious, meal-preppable recipes that will keep you fueled all week.
Why Mushrooms? (And What the Science Says)
Let’s be honest: mushrooms are not beef—but that’s their superpower. Unlike many plant foods, mushrooms bring an umami-packed, meaty texture to dishes without the cholesterol, saturated fat, or environmental baggage of red meat. But can they compete on protein?
Nutritional Science: Mushrooms vs. Beef
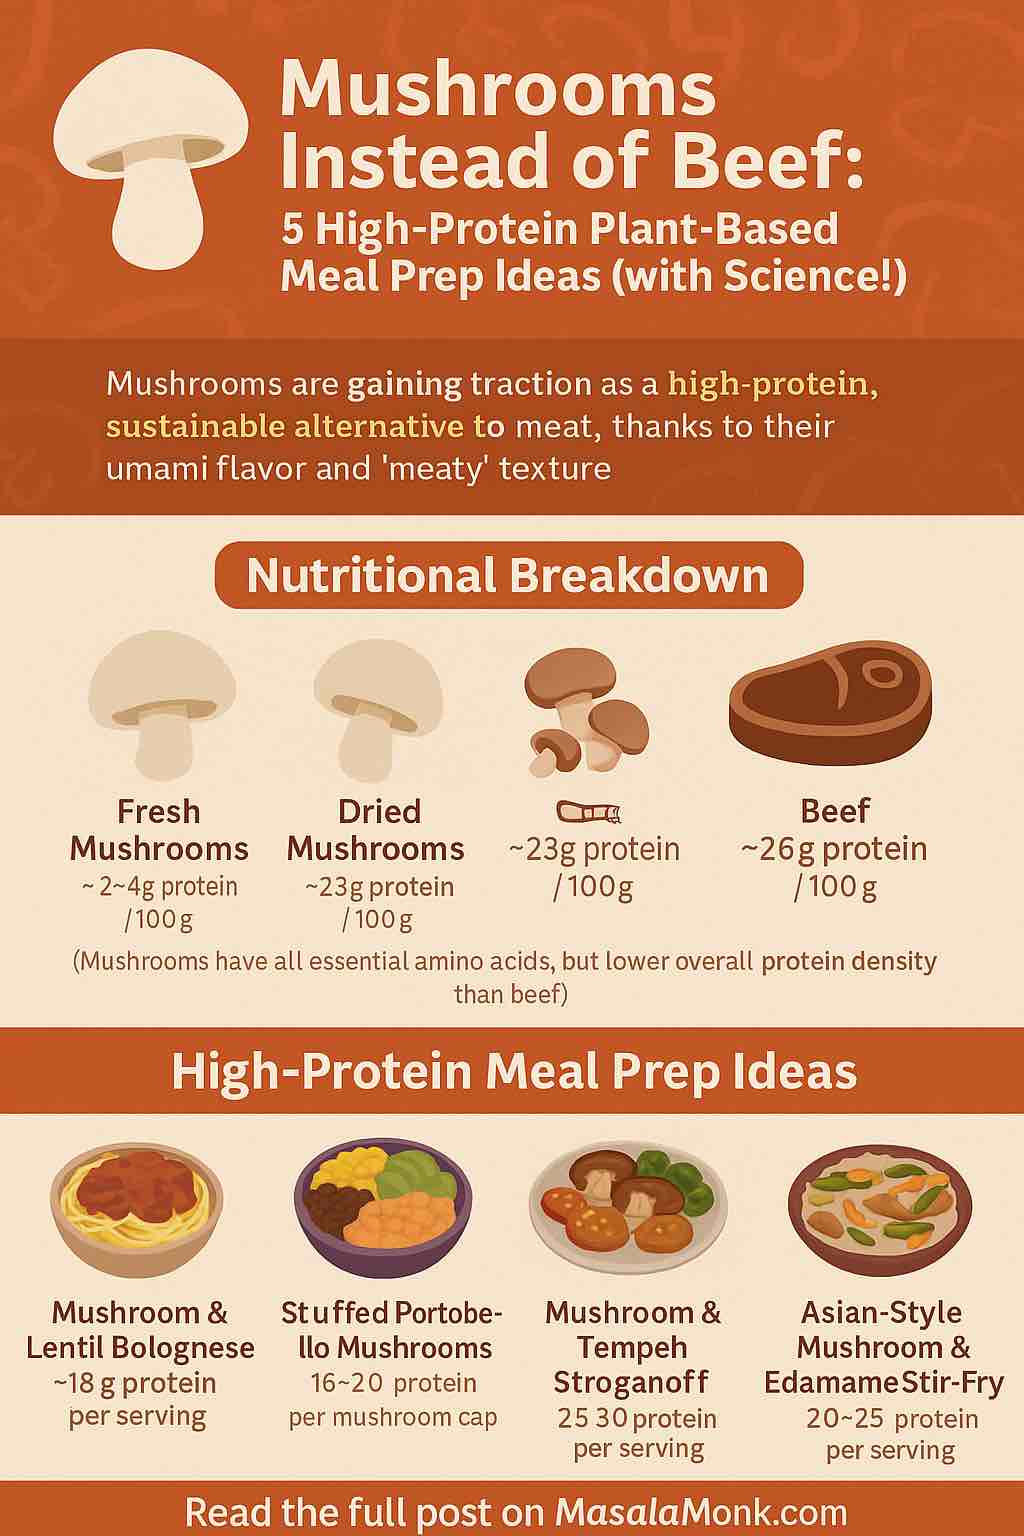
- Fresh mushrooms (e.g., white button, cremini, portobello) contain about 2–4 grams of protein per 100 grams—less than beef, which typically clocks in around 26g/100g.
- Dried mushrooms (shiitake, porcini, or even dried blends) can contain up to 23g of protein per 100g, thanks to water loss concentrating their nutrients.
- New research shows that mushrooms have a complete amino acid profile (including all nine essentials), particularly when you include their mycelium or pair them with other plant proteins.
Pro tip: For real protein power, combine mushrooms with legumes (like lentils, black beans), soy (tofu, tempeh, edamame), or high-protein grains (quinoa, buckwheat). This creates meals that match or exceed the protein of many meat dishes.
Sustainability Bonus
Mushrooms are a low-impact food superstar. Replacing just 20% of beef consumption with fungi-based proteins could cut global deforestation in half and slash water and land use.
Meal Prep Philosophy: How to Make Mushrooms Work for You
Meal prep is all about ease, nutrition, and flavor. Mushrooms:
- Store and reheat well (especially in saucy, stewy, or baked dishes)
- Absorb flavors beautifully
- Pair naturally with beans, grains, and herbs
Below, you’ll find five meal prep-friendly recipes, each with an emphasis on practical prep, protein content, and customization.
5 High-Protein, Mushroom-Based Meal Prep Ideas
1. Hearty Mushroom & Lentil Bolognese
Why it works:
Mushrooms’ earthy umami replaces ground beef perfectly, while lentils pump up the protein.
Meal Prep Plan:
- Sauté diced onions, garlic, and carrots in olive oil.
- Add 500g finely chopped mushrooms (mix of button, cremini, shiitake for depth), cook until browned.
- Stir in 1 cup dried lentils, 1 can crushed tomatoes, a splash of red wine (optional), Italian herbs, and simmer until lentils are tender.
- Serve over protein-rich pasta (like chickpea or lentil pasta) or zucchini noodles for a lower-carb option.
Protein Power:
Each serving with lentil pasta: 20–25g protein.
Storage:
Keeps in the fridge for up to 5 days or freeze for 3 months.
2. Smoky Mushroom, Black Bean & Tofu Burrito Bowls
Why it works:
Layering mushrooms with two powerhouse plant proteins (tofu and black beans) creates a complete, super-satisfying meal.
Meal Prep Plan:
- Cube and roast extra-firm tofu (press out moisture, toss with spices, bake until golden).
- Sauté mushrooms with smoked paprika, cumin, and chili powder.
- Assemble with cooked brown rice or quinoa, black beans, corn, and salsa.
- Pack avocado or guacamole separately.
Protein Power:
Each bowl: 23–28g protein.
Storage:
Store bowls and toppings separately for max freshness (avocado oxidizes quickly).
3. Stuffed Portobello Mushrooms with Quinoa & Chickpeas
Why it works:
Big portobellos = built-in meal containers! Quinoa and chickpeas ensure these are way more than a side dish.
Meal Prep Plan:
- Mix cooked quinoa with canned or cooked chickpeas, spinach, diced bell pepper, lemon zest, and nutritional yeast.
- Remove mushroom stems, brush caps with olive oil, stuff, and bake at 200°C (400°F) until golden (about 25 minutes).
- Drizzle with tahini-lemon sauce after reheating.
Protein Power:
One large cap: 16–20g protein.
Storage:
Best reheated in the oven or air fryer, but microwave works in a pinch.
4. Creamy Mushroom & Tempeh Stroganoff
Why it works:
Tempeh brings serious protein and a firm, “meaty” bite. Mushrooms and a cashew cream sauce give richness without dairy.
Meal Prep Plan:
- Sauté sliced mushrooms and onions, add cubed tempeh, brown well.
- Add garlic, smoked paprika, splash of tamari, and simmer with veggie broth.
- Blend soaked cashews with lemon juice, mustard, and water—add to pan to make it creamy.
- Serve over whole wheat noodles or brown rice.
Protein Power:
One serving: 24–30g protein.
Storage:
Keeps in fridge up to 4 days; sauce thickens, so thin with water when reheating.
5. Asian-Inspired Mushroom & Edamame Stir-Fry
Why it works:
Edamame is a top-tier vegan protein. Quick cooking locks in texture and nutrients.
Meal Prep Plan:
- Stir-fry shiitake, oyster, and/or cremini mushrooms with ginger, garlic, snap peas, bell peppers.
- Add pre-cooked, shelled edamame and toss in a simple sauce (soy, rice vinegar, sesame oil, optional chili flakes).
- Serve over brown rice, quinoa, or buckwheat soba noodles.
Protein Power:
Per serving: 20–25g protein.
Storage:
Great hot or cold; holds up well for 3–4 days in the fridge.
Bonus: How to Maximize Mushroom Protein in Meal Prep
- Use dried mushrooms or mushroom powder: Rehydrated, these are protein-dense and add extra umami.
- Pair with “complete” proteins: Lentils, beans, soy (tofu, tempeh, edamame), quinoa, and nuts.
- Batch cook and freeze: Most mushroom-based sauces, stews, and bakes freeze very well.
Final Thoughts
Mushrooms might not be as protein-packed as beef on their own, but with the right partners and prep, they can anchor a week’s worth of filling, nutritious, and planet-friendly meals.
Plus, you get all the health benefits—antioxidants, fiber, vitamins B and D, and a lower carbon footprint.
Ready to Cook?
Pick one or two of these recipes to try this week. Experiment with mushroom varieties and flavor combos.
Eat boldly, eat better, eat mushrooms. 🌱🍄
FAQs
1. Are mushrooms really a good substitute for beef in terms of protein?
Answer:
While mushrooms alone contain less protein than beef (2–4g per 100g fresh vs. 26g for beef), they offer a complete amino acid profile and, when paired with legumes, soy, or grains, can help create high-protein, balanced meals.
2. Which types of mushrooms are best for meal prep and protein content?
Answer:
Cremini, portobello, shiitake, and oyster mushrooms offer great texture and flavor. Dried mushrooms are the most protein-dense and can be added to boost overall content.
3. How can I make sure my mushroom-based meal is high in protein?
Answer:
Always combine mushrooms with other protein-rich plant foods like lentils, beans, tofu, tempeh, edamame, or quinoa. This ensures a complete amino acid profile and higher total protein per meal.
4. Do mushroom-based meals keep well in the fridge or freezer?
Answer:
Yes! Most mushroom dishes (stews, sauces, casseroles, baked dishes) store and reheat well. Use airtight containers and consume within 3–5 days, or freeze for up to 3 months.
5. Can I use store-bought mushroom meat substitutes?
Answer:
Absolutely. Mycoprotein (like Quorn) and other fungi-based products are high in protein and fiber, and have a low environmental footprint. Just check the ingredients for allergens and additives.
6. Are mushroom-based meals suitable for people with gluten intolerance?
Answer:
Yes, as long as you avoid adding wheat-based ingredients (like seitan or regular pasta). Use gluten-free grains (quinoa, brown rice, gluten-free pasta) and double-check sauces and seasonings.
7. How can I make mushroom dishes taste “meatier”?
Answer:
Use a mix of mushroom varieties, roast or brown them well to concentrate flavor, and add umami-rich ingredients like soy sauce, tamari, miso, smoked paprika, or nutritional yeast.
8. Are mushrooms safe for everyone to eat?
Answer:
Most culinary mushrooms are safe for the general population. However, people with compromised immune systems should eat only well-cooked mushrooms. Always buy from reputable sources and never forage wild mushrooms unless you’re an expert.
9. What are the health benefits of including more mushrooms in my diet?
Answer:
Mushrooms are rich in B vitamins, fiber, antioxidants, selenium, copper, potassium, and can be a source of vitamin D if UV-exposed. They’re low in calories, fat, and sodium.
10. Can I meal prep these recipes for the whole week?
Answer:
Yes! These dishes are designed for batch cooking and reheating. For best texture, store grains, sauces, and fresh toppings (like avocado or greens) separately and assemble when ready to eat.