Posted on Leave a comment

Mango Shrikhand: Classic Recipe and 5 Twists

MANGO SHRIKHAND

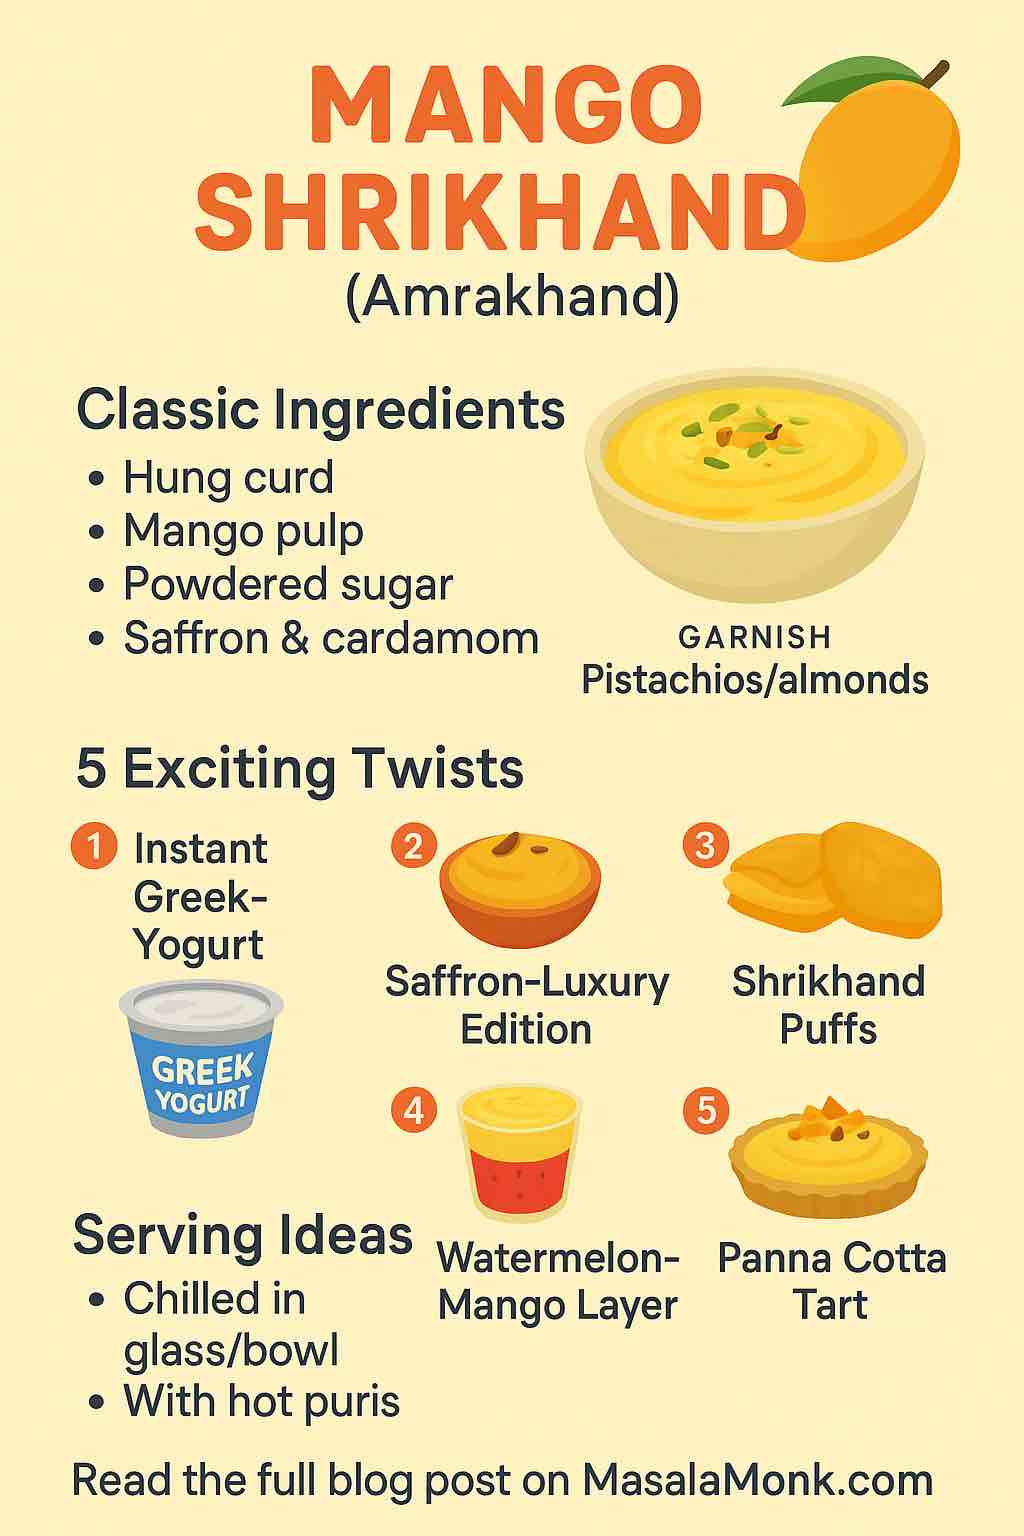
When summer rolls in with the golden abundance of ripe mangoes, there’s no better way to celebrate the season than with a bowl of chilled Mango Shrikhand. Known traditionally as Amrakhand, this creamy, luscious yogurt-based dessert from Western India is the perfect blend of simplicity and indulgence. In this comprehensive guide, we’ll cover the classic method, creative serving ideas, modern shortcuts, flavor variations, and expert tips to help you perfect this timeless treat.


🌿 What is Mango Shrikhand?

Shrikhand is a traditional Indian dessert made by straining yogurt to remove whey and then sweetening and flavoring the resulting thick curd. Mango Shrikhand, or Amrakhand, takes this base and blends it with ripe mango pulp to create a rich, fruit-forward dessert.

It’s especially popular in Gujarat and Maharashtra, often served chilled with hot puris during festivals like Gudi Padwa and Raksha Bandhan.


šŸ„› Ingredients for the Classic Recipe (Serves 4–6)

  • 2 cups full-fat plain yogurt (or 3 cups if accounting for straining)
  • 1 cup mango pulp (fresh Alphonso or Kesar preferred, or canned if off-season)
  • 1/2 cup powdered sugar (adjust to taste and mango sweetness)
  • 8–10 saffron strands, soaked in 1 tbsp warm milk
  • 1/4 tsp green cardamom powder
  • Garnish: Chopped pistachios, almonds, mango cubes, saffron strands

āœ… Step-by-Step Method: Classic Mango Shrikhand

Step 1: Prepare the Hung Curd

  • Place the yogurt in a muslin or cheesecloth.
  • Tie the cloth and hang over a bowl in the fridge for 4–6 hours (or overnight) to drain excess water.
  • After straining, you should have about 1.5 to 2 cups of thick hung curd.

Step 2: Whisk It Smooth

  • Transfer the hung curd to a mixing bowl.
  • Whisk until smooth and creamy, removing all lumps. This step is crucial for the signature velvety texture.

Step 3: Add the Flavors

  • Add powdered sugar, saffron-infused milk, and cardamom powder.
  • Mix thoroughly, ensuring the sugar dissolves completely.
  • Fold in mango pulp and blend until the mixture is uniform and silky.

Step 4: Chill and Serve

  • Refrigerate for at least 1 hour to allow the flavors to meld.
  • Serve chilled, garnished with chopped nuts and mango cubes.

🌈 5 Creative Twists on Mango Shrikhand

1. Instant Greek Yogurt Amrakhand

Skip the straining process by using thick Greek yogurt. Just whisk with sugar, mango pulp, saffron, and cardamom. It’s quick, easy, and just as delicious.

2. Saffron-Luxury Shrikhand

Enhance the saffron presence by soaking a generous pinch in warm milk for 30 minutes. This version offers a regal color and aromatic depth.

3. Shrikhand Puff Pastry Bites

Spoon mango shrikhand into baked puff pastry shells. Top with chopped pistachios. A perfect bite-sized fusion dessert.

4. Layered Watermelon-Mango Cups

Layer chilled watermelon cubes and mango shrikhand in glasses. The juicy freshness of watermelon balances the rich shrikhand beautifully.

5. Mango Shrikhand Tart

Fill a cookie or gingersnap crust with mango shrikhand. Top with fresh fruit and nuts. This is a show-stopping dessert for any dinner party.


ā˜• Expert Tips for Perfect Shrikhand

  • Use full-fat yogurt for creaminess and richness.
  • Choose sweet, non-fibrous mangoes like Alphonso or Kesar for best flavor.
  • Sweetness check: Always taste and adjust sugar after adding mango pulp.
  • Texture matters: Use a hand whisk or immersion blender to remove any graininess.
  • Chill well: Shrikhand improves in flavor after resting in the fridge.

šŸ½ļø How to Serve

  • Traditionally served with hot puris.
  • Can be served in dessert glasses as part of a modern Indian menu.
  • Garnish with edible silver foil (varak) for festive occasions.

šŸ“† Storage and Shelf Life

  • Store in an airtight container in the refrigerator.
  • Stays fresh for up to 3–4 days.
  • Not ideal for freezing due to texture changes upon thawing.

šŸ“ Final Thoughts

Mango Shrikhand is a summer favorite that delivers maximum flavor with minimal effort. Whether you stick with the classic or try a creative twist, it’s a dessert that wins hearts and cools the soul. So the next time you spot juicy mangoes at the market, you know what to do.

Have a favorite variation of your own? Drop it in the comments!

āœ… 10 Frequently Asked Questions (FAQs)

  1. Can I use store-bought yogurt for Mango Shrikhand?
    Yes, full-fat plain yogurt works best. If it’s watery, strain it overnight to get thick hung curd. Avoid flavored or low-fat yogurts.
  2. What is the best mango variety for Shrikhand?
    Alphonso (Hapus) and Kesar mangoes are ideal due to their sweetness, aroma, and smooth pulp. Ataulfo is a good substitute outside India.
  3. How long should I strain the yogurt?
    Strain for at least 4–6 hours in the fridge. For the creamiest texture, overnight straining is best.
  4. Can I make Mango Shrikhand without sugar?
    Yes, you can use natural sweeteners like honey, maple syrup, or powdered jaggery. Adjust the quantity based on mango sweetness.
  5. Is Greek yogurt a good shortcut?
    Absolutely. Greek yogurt is already strained and provides a quick, creamy base. Just mix in your mango pulp and spices.
  6. Can I make Mango Shrikhand vegan?
    Yes. Use thick coconut yogurt or cashew yogurt as a base. Ensure it’s unflavored and full-fat for the best results.
  7. How do I prevent watery shrikhand?
    Proper straining of yogurt is essential. Also, avoid overly juicy or fibrous mangoes. Chill before serving to set the texture.
  8. What are some creative toppings or garnishes?
    Chopped pistachios, almonds, saffron strands, mango cubes, rose petals, or even pomegranate seeds work beautifully.
  9. How long can I store Mango Shrikhand?
    Store it in an airtight container in the fridge for up to 3–4 days. Always serve it chilled.
  10. Can I prepare Mango Shrikhand in advance for parties?
    Yes! Prepare it a day ahead and refrigerate. You can even pipe it into tart shells or glasses just before serving.
Posted on 1 Comment

Garlic and Honey: A Dynamic Duo for Health and Healing

GARLIC AND HONEY

In a world flooded with synthetic health remedies, more people are turning to ancient, natural solutions that have withstood the test of time. One such powerful combination making waves across modern wellness circles is the duo of garlic and honey. This seemingly simple pairing is garnering attention not only from holistic health enthusiasts but also from scientists exploring its medicinal potential. Let’s dive into why fermented garlic and honey could be your next kitchen remedy powerhouse.


The Science Behind the Power Combo

Both garlic and honey are well-known individually for their health-promoting properties:

  • Garlic is packed with sulfur-containing compounds like allicin, known for its antimicrobial, anti-inflammatory, and heart-protective properties.
  • Honey (especially raw or Manuka) offers potent antibacterial and antioxidant benefits, thanks to enzymes, phenolic acids, and flavonoids.

But when combined, these two ingredients don’t just add their benefits—they enhance each other’s effects through a synergistic relationship.

1. Immune System Support

Recent studies (2023-2025) reveal that fermented garlic honey boosts immune cell activity, particularly macrophages, which help the body fight infections. Regular consumption during cold and flu season may reduce the frequency and duration of respiratory infections.

2. Antimicrobial Powerhouse

Lab studies show the garlic-honey combo outperforms either ingredient alone against bacteria like E. coli, S. aureus, and Streptococcus pneumoniae. Adding ingredients like black cumin oil further enhances this antimicrobial effect.

3. Cardiovascular Benefits

Garlic lowers blood pressure and LDL cholesterol, while honey improves vascular function via antioxidants. Taken daily, fermented garlic honey can support heart health, reduce inflammation markers like CRP, and even modulate blood sugar levels.

4. Wound Healing and Skin Health

When used topically, honey and garlic mixtures promote wound healing, reduce infection, and support tissue regeneration. Manuka honey infused with garlic has shown improved outcomes in healing infected wounds in preliminary studies.


How to Make Fermented Garlic Honey at Home

Making your own batch is easy, but it requires some patience and attention to hygiene.

You’ll Need:

  • 1 cup raw, unfiltered honey (Manuka or organic recommended)
  • 10–20 peeled garlic cloves
  • A clean glass jar with an airtight lid

Steps:

  1. Slightly crush each garlic clove to activate allicin.
  2. Place them in the jar and cover with honey.
  3. Leave some headspace for bubbling (fermentation).
  4. Seal the jar and place it in a dark, cool place.
  5. Every day, open the jar briefly (“burp it”) to release gases.
  6. Fermentation is noticeable within a week and ready to use in 3–4 weeks.

Tips:

  • Garlic may turn blue/green—this is safe and due to sulfur compound reactions.
  • Stir or flip the jar gently every few days.

How to Use It Practically

Daily Wellness:

  • Take one garlic clove with a spoonful of honey each morning.

At First Sign of Cold:

  • Take 1–2 cloves every 4–6 hours to soothe symptoms and support immunity.

Topical Use:

  • Mix with aloe or coconut oil and apply to minor wounds (test first on skin).

Culinary:

  • Drizzle over roasted vegetables, mix into dressings, or stir into herbal teas.

Cautions and Considerations

  • Not for infants: Honey should never be given to babies under 1 year due to botulism risk.
  • Monitor blood sugar: While honey has medicinal properties, it’s still high in sugars.
  • Medication interactions: Garlic can interact with blood thinners and some medications—consult your doctor.
  • Fermentation safety: Use clean jars and raw honey; watch for mold or strange smells and discard if uncertain.

Final Thoughts: More Than a Folk Remedy

Garlic and honey aren’t just ingredients in grandma’s cold remedy—they are a scientifically supported, synergistic duo that offers a multitude of health benefits when used correctly. Whether you ferment it yourself or use it raw, this combination deserves a place in your wellness routine. With emerging studies confirming its efficacy and safety, garlic and honey have stepped beyond folklore into functional nutrition.

So why not take a cue from nature and start a jar today? Your future self might thank you with fewer colds, better heart health, and a stronger immune system.

FAQs

1. Is fermented garlic honey safe to consume daily?
Yes, in moderate amounts. Most adults can safely consume 1–2 teaspoons per day. However, those on blood-thinning medications or with allergies should consult a healthcare provider first.

2. How long does fermented garlic honey last?
Stored properly in a sealed jar in a cool, dark place, it can last up to 12 months. Always check for off smells, mold, or bubbling that doesn’t subside after the fermentation period.

3. Can I use cooked garlic or paste instead of raw garlic?
No. Raw garlic is essential because cooking destroys allicin, the compound responsible for most of garlic’s medicinal properties. Use fresh, crushed cloves for best results.

4. Is it necessary to burp the jar daily during fermentation?
Yes. Burping releases gases produced during fermentation, preventing pressure build-up and potential leakage or spoilage. Do this daily for the first 2 weeks.

5. What if my garlic turns blue or green? Is it safe?
Yes, this is a natural reaction between sulfur compounds in garlic and acidic elements in honey. It’s harmless and safe to consume.

6. Can children consume fermented garlic honey?
Children over 1 year can take small amounts (¼ to ½ tsp). Never give honey to infants under 1 due to the risk of infant botulism.

7. Does it help with sore throats and coughs?
Yes. Anecdotal and lab evidence supports its use for soothing sore throats, easing coughs, and reducing upper respiratory symptoms.

8. Can I refrigerate it?
It’s not necessary, and refrigeration may slow or halt fermentation. Room temperature storage (cool, dark spot) is ideal.

9. What kind of honey is best to use?
Raw, unfiltered honey is best. Manuka or local organic honey offers stronger antibacterial properties. Avoid pasteurized or processed honey.

10. Can I take it if I have diabetes?
While honey has medicinal value, it’s high in natural sugars. Diabetics should consult a doctor before using it regularly, and consider very small doses only.

Posted on Leave a comment

Cape Gooseberry and Mint Jam: Homemade Preserve

There’s something incredibly satisfying about making your own jam the simmering fruit, the sweet fragrance filling the kitchen, and that rewarding pop of the jar sealing just right. An extremely delicious, uniquely flavoured cape gooseberry jam that titillates the palate slightly fruity, tangy, mildly sweet Cape Gooseberry & Mint Jam to add the right amount of crunch and piquant to your breakfast or dessert. With its tangy sweet flavor, golden hue, and fresh herbal lift from mint, this jam is a refreshing twist on traditional fruit preserves. It pairs beautifully with toast, pancakes, cheese platters, or even as a glaze for desserts.

Today’s recipe is a little different and absolutely delightful: Cape Gooseberry and Mint Jam.

Ingredients:

  • 500g Cape gooseberries (also called Rasbhari or golden berries), husked and rinsed
  • 350g sugar (adjust to your taste)
  • 1 tbsp lemon juice (for brightness and natural acidity)
  • 1 tsp natural pectin (optional, depending on how thick you like your jam)
  • 2 tbsp fresh mint leaves, finely chopped

Instructions:

Gently rinse the cape gooseberries, remove their papery husks, and pat them dry. Cut larger ones in half. In a heavy-bottomed pan, combine the gooseberries, sugar, and lemon juice. Let it sit for 15–20 minutes to macerate this helps release the juices.

Turn on the heat to medium and bring the mixture to a boil. Stir frequently as the fruit begins to break down and the sugar dissolves. Skim off any foam that forms. Once the jam starts to thicken (about 15–20 mins), add the chopped mint and natural pectin. Stir continuously for another 5–7 minutes until it reaches your desired consistency.

Use the cold plate test: drop a small spoonful on a chilled plate, wait a few seconds, then run your finger through it. If it wrinkles and holds its shape, it’s done! Pour the hot jam into sterilized jars, leaving a little space at the top. Seal immediately and let it cool. Store in the refrigerator if not canning for long-term storage.

Spread on hot buttered toast or scones, swirl into yogurt or oatmeal, Pair with cheese boards or Dollop on pancakes or waffles for a gourmet touch.

Tips & Tricks:

  • Cape gooseberries naturally contain some pectin, so you can skip added pectin if you’re okay with a softer-set jam.
  • The mint should be added towards the end of cooking to retain its fresh flavor and green flecks.
  • You can blend the jam slightly if you prefer a smoother texture.
  • For a bolder citrus note, add some lemon zest along with juice.

This Cape Gooseberry and Mint Jam is sunshine in a jar tangy, sweet, and kissed with herbal freshness. Whether you’re a seasoned jam maker or a curious beginner, this recipe is simple to follow and incredibly rewarding. Try it once, and it just might become your favorite homemade preserve. Find out more jam recipe here!

If you try this recipe, do give us a shout out. Just click a picture and tag us onĀ @masala.monkĀ or use the hashtag #MasalaMonkRecipe and share onĀ InstagramĀ andĀ Facebook. We would love to hear from you. šŸ™‚Happy cooking!

Posted on 2 Comments

Vegan Keto Smoothie Kick-Start: 5 Macadamia Nut Recipes for Nutrient-Packed Mornings

VEGAN KETO SMOOTHIE KICK-START 5 MACADAMIA NUT RECIPES

In today’s world of fast-paced mornings and conscious eating, vegan keto smoothies have emerged as a perfect fusion of health, convenience, and flavor. Among the many ingredients available, macadamia nuts stand out for their unparalleled nutritional profile and creamy texture, making them an excellent choice for those seeking a low-carb, high-fat, plant-based start to their day.

In this comprehensive post, we’ll dive deep into:

  • Why macadamia nuts are keto and vegan-friendly
  • Nutritional benefits
  • Pro tips for the perfect smoothie
  • 5 delicious macadamia nut smoothie recipes
  • Customization options for every taste

🌰 Why Macadamia Nuts Are Perfect for Vegan Keto Smoothies

If you’re following a vegan keto lifestyle, you know how tricky it can be to strike the right balance: high healthy fats, moderate protein, and ultra-low carbohydrates. Here’s where macadamia nuts shine:

  • Ultra-Low Carbs: Only ~3.9 grams of carbs per ounce, with about 2.3 grams of fiber, bringing net carbs down to ~1.6 grams.
  • Rich in Healthy Fats: 75% monounsaturated fat — great for heart health and stable energy.
  • Nutrient-Dense: High in manganese, thiamine, copper, magnesium, and antioxidants.
  • Creamy Texture: Blends effortlessly into smoothies, adding rich body and silkiness.

🧬 Health Benefits Backed by Science

Multiple studies support macadamia nuts’ role in:

  • Heart Health: Lower LDL cholesterol and triglycerides.
  • Blood Sugar Management: Improve insulin sensitivity.
  • Anti-Inflammatory Effects: Antioxidants help reduce oxidative stress.
  • Weight Control: High satiety index supports appetite management.

Perfectly tailored for anyone looking to maximize nutrient intake while keeping their blood sugar and insulin levels stable.


🄤 Pro Tips for The Perfect Vegan Keto Smoothie

1ļøāƒ£ Use Fresh or Soaked Macadamia Nuts
Soaking overnight (6-8 hrs) improves digestibility and creates an even creamier base.

2ļøāƒ£ DIY Macadamia Milk
Blend 1 cup of macadamia nuts with 3-4 cups water, a pinch of salt, and optional vanilla extract. No straining necessary unless desired.

3ļøāƒ£ Balance Macros
Aim for:

  • 70-75% fat
  • 15-20% protein
  • 5-10% carbs

4ļøāƒ£ Sweeteners
Use monk fruit, stevia, or erythritol to keep it keto-friendly.

5ļøāƒ£ Boosters

  • MCT oil for extra ketones
  • Chia or hemp seeds for fiber
  • Vegan protein powders for muscle support

🧪 The Base Smoothie Formula

Every great smoothie starts with a solid base you can customize. Here’s the go-to formula:

  • 1 cup unsweetened macadamia milk (or almond/coconut milk)
  • 1/4 cup raw macadamia nuts
  • 1 scoop vegan protein powder (vanilla, chocolate, or unflavored)
  • 1 tbsp MCT oil or coconut oil
  • Sweetener of choice
  • Optional add-ins: avocado, spinach, berries, chia seeds, cacao powder

šŸ¹ The 5 Must-Try Macadamia Nut Smoothies

1ļøāƒ£ Creamy Vanilla Macadamia Kick-Start

Ingredients:

  • 1 cup macadamia nut milk
  • 1/4 cup macadamia nuts
  • 1 scoop vanilla vegan protein powder
  • 1/2 tsp vanilla extract
  • 1 tbsp MCT oil
  • Stevia or monk fruit to taste
  • Handful of ice

Macros (approx):

  • Calories: 350
  • Fat: 32g
  • Protein: 15g
  • Net Carbs: 3g

Perfect for: Simple mornings where you want something fast, creamy, and satisfying.


2ļøāƒ£ Green Macadamia Powerhouse

Ingredients:

  • 1 cup coconut milk
  • 1/4 cup macadamia nuts
  • 1/2 avocado
  • 1 cup spinach or kale
  • 1 scoop unflavored vegan protein
  • 1 tbsp lemon juice
  • Stevia to taste
  • Ice

Macros (approx):

  • Calories: 400
  • Fat: 35g
  • Protein: 18g
  • Net Carbs: 4g

Perfect for: Detox mornings and those needing extra fiber, antioxidants, and micronutrients.


3ļøāƒ£ Chocolate Macadamia Delight

Ingredients:

  • 1 cup almond milk
  • 1/4 cup macadamia nuts
  • 2 tbsp unsweetened cacao powder
  • 1 scoop chocolate vegan protein
  • 1 tbsp MCT oil
  • Stevia or monk fruit
  • Pinch of sea salt
  • Ice

Macros (approx):

  • Calories: 375
  • Fat: 33g
  • Protein: 20g
  • Net Carbs: 3g

Perfect for: Chocoholics who want indulgence without breaking ketosis.


4ļøāƒ£ Coconut Macadamia Bliss

Ingredients:

  • 1 cup coconut milk
  • 1/4 cup macadamia nuts
  • 2 tbsp shredded coconut
  • 1 tbsp coconut oil
  • 1 scoop vanilla vegan protein
  • Stevia
  • Ice

Macros (approx):

  • Calories: 420
  • Fat: 38g
  • Protein: 18g
  • Net Carbs: 3g

Perfect for: Tropical vibes and maximum MCT intake for sustained energy.


5ļøāƒ£ Berry Macadamia Blast

Ingredients:

  • 1 cup almond milk
  • 1/4 cup macadamia nuts
  • 1/4 cup mixed berries (blackberries, raspberries)
  • 1 scoop berry-flavored vegan protein
  • 1 tbsp hemp seeds
  • Stevia
  • Ice

Macros (approx):

  • Calories: 350
  • Fat: 28g
  • Protein: 18g
  • Net Carbs: 5g

Perfect for: Antioxidant boost while keeping carbs minimal.


šŸ‹ļøā€ā™‚ļø Batch-Prep for the Busy Week

šŸ”ø Pre-pack dry ingredients (macadamias, protein powder, shredded coconut, seeds) in individual jars or zip-locks.

šŸ”ø Freeze avocado chunks, spinach, and berries in portioned bags.

šŸ”ø Blend fresh each morning with your choice of liquid, sweetener, and boosters.

Result: 2-minute morning routine that keeps you full, focused, and energized for hours.


🚫 Allergy & Caution Note

Macadamia nut allergy is rare but possible. Always consult your healthcare professional if introducing new foods into your diet, especially with keto or vegan restrictions.


šŸŽÆ Conclusion: Nutrient-Dense Simplicity

The Vegan Keto Macadamia Nut Smoothie Kick-Start offers an elegant solution for busy individuals seeking:

  • Plant-based, low-carb nutrition
  • Long-lasting satiety
  • Heart and brain health
  • Convenience without sacrificing taste

Start experimenting with the recipes above, fine-tune to your preferences, and make mornings the healthiest part of your day.

šŸ”Ž 10 FAQs for Vegan Keto Macadamia Nut Smoothies

1ļøāƒ£ Are macadamia nuts really keto-friendly?

Yes. Macadamia nuts are one of the most keto-friendly nuts. They have around 3.9g total carbs per ounce, but with about 2.3g fiber, their net carbs are only ~1.6g. Their high monounsaturated fat content makes them perfect for keto.


2ļøāƒ£ Can I use store-bought macadamia milk instead of homemade?

Yes, but check the label carefully. Many store-bought versions contain added sugars, gums, or preservatives that can increase carb count. Look for unsweetened, clean-ingredient macadamia milk for best results.


3ļøāƒ£ How can I make my smoothie creamier without adding carbs?

Add half an avocado, a tablespoon of chia seeds, or extra macadamia nuts. These ingredients enhance creaminess, boost fiber and healthy fats without adding significant carbs.


4ļøāƒ£ What is the best vegan protein powder for these smoothies?

Look for plant-based protein powders that are:

  • Low in carbs (0–2g net carbs/serving)
  • Sweetened with stevia or monk fruit (or unsweetened)
  • Made from pea, hemp, rice, or pumpkin seed protein

Brands like Nuzest, Orgain Keto, Sunwarrior, or Vega Sport (low carb versions) work well.


5ļøāƒ£ Are berries allowed on vegan keto?

Yes, in moderation. Stick to low-carb berries like raspberries, blackberries, and strawberries. Limit to 1/4 to 1/3 cup per smoothie to stay keto-friendly.


6ļøāƒ£ Can I prep these smoothies in advance?

Absolutely. You can pre-portion the dry ingredients (nuts, protein powder, seeds, etc.) into jars or bags. Freeze fresh ingredients like spinach, avocado, and berries. Blend fresh each morning with liquid for best taste and texture.


7ļøāƒ£ Do macadamia nuts cause allergies?

Though rare, macadamia nuts are tree nuts and may cause allergies in some people. Always consult your healthcare provider if you have any known nut allergies.


8ļøāƒ£ Is it safe to have these smoothies daily?

Yes, as long as you balance your overall diet. These smoothies provide healthy fats, plant protein, fiber, and micronutrients. Rotate recipes to ensure nutritional variety.


9ļøāƒ£ How many calories should my keto smoothie have?

For most people, a keto breakfast smoothie should be 300-450 calories, depending on your personal calorie and macro goals. Each recipe above falls roughly within this range.


šŸ”Ÿ Can I add supplements like MCT oil or collagen?

Yes! MCT oil boosts ketone production and energy. Vegan-friendly collagen boosters made from plant peptides or amino acid blends can also be added for skin, joint, and gut health.


Posted on Leave a comment

Garlic Bread Reimagined: Elevating the Classic with a Keto Twist and Irresistible Variations!

KETO GARLIC BREAD

Few foods captivate the senses quite like garlic bread. The golden, crusty exterior, the rich aroma of garlic butter, the indulgent chew — it’s an iconic comfort food that’s universally loved.

But if you’re following a keto or low-carb lifestyle, traditional garlic bread is a problem: loaded with refined carbs and wheat flour, one slice can easily contain more carbs than your entire daily allowance.

Thankfully, the world of keto innovation has transformed garlic bread into something not only possible but better — deeply flavorful, indulgent, and entirely macro-friendly. This comprehensive guide walks you through everything you need to master keto garlic bread, offering multiple variations, practical recipes, expert techniques, ingredient science, and flavor innovations.


🌟 Why Reinvent Garlic Bread for Keto?

Let’s start with the problem.

Traditional garlic bread:

  • Made from French bread or Italian loaf
  • Typically 25-30g carbs per slice
  • Refined flour, no fiber, spikes blood sugar

The keto lifestyle requires:

  • 20-30g carbs total per day
  • Higher fat, moderate protein
  • Minimal sugars and refined starches

The goal: capture the same satisfying taste, texture, and mouthfeel of garlic bread while staying true to keto macros. This is absolutely achievable — once you understand the building blocks.


🧬 The Science of Keto Bread: Replacing Gluten & Carbs

Traditional bread owes its structure to gluten, which creates the elastic network that traps air bubbles, giving bread its signature chew.

Keto bread replaces gluten structure by manipulating:

  • Protein matrices (from cheese, eggs, or whey protein)
  • Fiber binders (psyllium husk, xanthan gum)
  • Fat emulsifiers (cream cheese, sour cream, ghee)

The result: chewy, satisfying bread analogs that hold together, brown beautifully, and offer complex flavor.


šŸž The Best Keto Garlic Bread Bases

Here’s a complete breakdown of your options — each with its strengths, trade-offs, and ideal use cases.


1ļøāƒ£ Fathead Dough (The Keto Classic Workhorse)

Core Ingredients:

  • Shredded mozzarella (protein matrix)
  • Cream cheese (fat and tenderness)
  • Almond flour (structure)
  • Egg (binding)
  • Baking powder (lift)
  • Psyllium husk (for elasticity and chew)

Why it’s fantastic:

  • Excellent bread-like chew
  • Flexible for loaves, rolls, sticks, or pull-apart bread
  • Freezes well for make-ahead batches

Pro Tip:
Use block mozzarella shredded at home for best melt and elasticity. Pre-shredded often contains anti-caking agents that affect dough texture.


2ļøāƒ£ Air Fryer Cheese Wrap Garlic Bread (The Ultra-Fast Version)

Core Ingredients:

  • Store-bought keto cheese wraps (e.g. egg-thin wraps, almond flour wraps)
  • Butter + garlic mixture
  • Parmesan or shredded mozzarella

Why it’s fantastic:

  • Lightning-fast — ready in under 10 minutes
  • Air fryer gives crispy edges and gooey centers
  • Great for quick snacks or appetizers

Method:

  • Brush wrap with garlic butter
  • Sprinkle cheese generously
  • Air fry at 375°F for 5-7 minutes

3ļøāƒ£ Cloud Bread (The Fluffy, Light Option)

Core Ingredients:

  • Egg whites (foaming structure)
  • Cream cheese or mascarpone
  • Cream of tartar (stabilizes meringue)
  • Garlic powder or fresh garlic

Why it’s fantastic:

  • Virtually zero carbs
  • Extremely light and airy — almost melts in your mouth
  • Perfect paired with lighter dishes like soups or salads

Limitation:
It lacks the chewiness of regular bread but delivers a wonderfully light texture that works for those preferring softer bites.


4ļøāƒ£ Almond Flour Loaf (The Sliceable, Bread-Like Classic)

Core Ingredients:

  • Almond flour (main structure)
  • Baking powder (leavening)
  • Eggs (binding)
  • CrĆØme fraĆ®che or sour cream (moisture, tenderness)
  • Mozzarella or Parmesan (depth of flavor)
  • Garlic and herbs

Why it’s fantastic:

  • Slices like traditional bread
  • Stores well, easy for batch baking
  • Holds up to slicing, spreading, and toasting

Pro Tip:
Use blanched almond flour for finer texture and less grittiness.


šŸ§„ The Flavor Centerpiece: Keto Garlic Butter

No matter which base you choose, garlic butter is what transforms keto bread into garlic bread.

Essential Garlic Butter Formula:

  • ½ cup unsalted butter (softened)
  • 3-5 cloves minced or roasted garlic
  • 1 tbsp chopped fresh parsley
  • 1 tsp salt
  • 1 tsp lemon juice or apple cider vinegar (optional, balances richness)

Flavor Variations:

Add-OnFlavor Benefit
Truffle oilDeep, earthy luxury
Chili flakesSpicy heat
Smoked paprikaSubtle smoky depth
Bacon bitsSalty, meaty crunch
Pesto drizzleFresh herbal brightness
Fresh rosemaryMediterranean savory notes

Pro Tip:
Roasting your garlic beforehand makes it milder, sweeter, and more complex.


šŸ”„ Cooking Techniques to Perfect Keto Garlic Bread

Both traditional ovens and air fryers can deliver exceptional results — depending on your base and goal.

MethodBest ForCook Time
Air FryerWraps, quick bakes, smaller portions5-7 minutes at 375°F
Oven BakeLoaves, pull-apart bread, rolls15-25 minutes at 350-375°F
Broiler/Blow TorchFinal blistering, golden finish1-2 minutes

Pro Tip:
For pull-apart bread, baste with garlic butter both before and after baking to lock in moisture and create rich layers of flavor.


🧮 Macronutrient Breakdown (Sample — Fathead Version)

NutrientPer Serving
Net Carbs2-3g
Fat16-20g
Protein8-10g
Calories200-250

Perfectly aligned with standard keto macros, allowing you to indulge without guilt.


šŸ³ Complete Keto Garlic Bread Recipe (Highly Practical Guide)

Ingredients (Makes 8 servings)

For the dough:

  • 1 ½ cups shredded mozzarella
  • 2 tbsp cream cheese
  • ¾ cup almond flour
  • 1 egg
  • 1 tbsp psyllium husk
  • 1 tsp baking powder

For the garlic butter:

  • ½ cup unsalted butter, softened
  • 4 cloves roasted garlic, mashed
  • 2 tbsp fresh parsley, chopped
  • 1 tbsp grated Parmesan
  • Salt, to taste

Directions

Step 1 — Make the Dough:

  1. Melt mozzarella and cream cheese together in microwave-safe bowl (90 seconds).
  2. Stir thoroughly until smooth.
  3. Add almond flour, psyllium husk, baking powder, and egg.
  4. Knead mixture until a uniform dough forms.

Step 2 — Shape the Bread:

  • Roll into loaf shape, pull-apart rolls, or flatbread depending on your preference.

Step 3 — Bake:

  • Preheat oven to 375°F.
  • Bake for 15-20 minutes until golden and set.

Step 4 — Prepare Garlic Butter:

  • Mix softened butter with roasted garlic, parsley, Parmesan, and salt.

Step 5 — Finish:

  • Brush garlic butter over hot bread.
  • Optional: broil for 1-2 minutes to achieve a gorgeous golden blister.

šŸ½ Serving Suggestions

  • Dipping Sauces: Low-sugar marinara, garlic aioli, pesto, or keto ranch.
  • Main Pairings: Keto pasta alternatives (zucchini noodles, shirataki), grilled meats, hearty stews.
  • Appetizers: Slice into sticks or knots for party platters.
  • Meal Prep: Make ahead, refrigerate for up to 3 days, reheat in air fryer for maximum crisp.

šŸ’” Creative Variations to Explore

VariationHighlight
Pull-Apart Garlic Bread BitesEntertaining crowd-pleasers
Truffle Butter Garlic KnotsGourmet dinner parties
Air Fryer Garlic Bread ChipsKeto snacking
Bacon & JalapeƱo Garlic BreadSmoky-spicy indulgence
Dairy-Free Almond Cheese VersionPlant-based option

šŸš€ Pro Tips for Success

  • Use parchment paper for easier handling of sticky dough.
  • Always cool slightly before slicing to maintain structure.
  • Don’t skip roasting garlic — it’s a game changer.
  • For ultra-soft texture, add 1 tbsp sour cream or crĆØme fraĆ®che to dough.

šŸ” Why Keto Garlic Bread Is Worth Mastering

  • Satisfies intense bread cravings.
  • Customizable to every flavor preference.
  • Fits seamlessly into keto macros.
  • Impressive for entertaining — your guests may not realize it’s keto!
  • Easy to batch-cook and store for busy weeks.

Final Thought:
With the power of keto recipe science and a little creativity, you can enjoy garlic bread that’s not just ā€œgood for ketoā€ — it’s outstanding, period.

You don’t need to compromise flavor, texture, or indulgence to stay on track. Mastering keto garlic bread might just become one of your most satisfying keto cooking achievements.


Ready to bake? Pick your base, prep your garlic butter, and elevate your keto comfort food game to delicious new heights.

šŸ”Ž 10 FAQs and Answers for Keto Garlic Bread


1ļøāƒ£ Can I make keto garlic bread without almond flour?

Yes. You can substitute coconut flour (using about ¼ the amount of almond flour) or use fathead variations that rely more heavily on cheese. Cloud bread is also entirely almond flour-free. Each option gives a different texture, so choose based on your preference.


2ļøāƒ£ What’s the lowest-carb version of keto garlic bread?

The cloud bread version typically has less than 1g net carb per serving, making it the lowest-carb option. Air fryer cheese wraps are also extremely low-carb and fast to prepare.


3ļøāƒ£ Can I freeze keto garlic bread?

Absolutely. Fathead-based or almond flour loaves freeze very well. Cool completely, slice, and store in freezer bags for up to 3 months. Reheat directly from frozen in the oven or air fryer for best texture.


4ļøāƒ£ Is dairy-free keto garlic bread possible?

Yes, but more challenging. Substitute dairy-free mozzarella (almond or coconut-based) and use vegan cream cheese. The structure may be softer, but it’s achievable with some recipe adjustments.


5ļøāƒ£ Why does my fathead dough feel too sticky or oily?

This usually happens if:

  • The cheese wasn’t melted evenly.
  • The almond flour wasn’t fully incorporated.
  • The dough wasn’t allowed to cool slightly before kneading.

Knead with lightly oiled hands or chill for a few minutes to firm it up before shaping.


6ļøāƒ£ What’s the best type of mozzarella for fathead dough?

Use low-moisture, full-fat block mozzarella. Avoid pre-shredded varieties, as anti-caking agents prevent smooth melting and elasticity.


7ļøāƒ£ Can I make keto garlic bread in the air fryer?

Yes, very successfully! Cheese wraps, fathead dough mini-loaves, or garlic butter-topped chaffles work beautifully in the air fryer. Typical air frying time is 5–7 minutes at 375°F.


8ļøāƒ£ How do I make garlic bread more fluffy and less dense?

  • Add 1–2 tablespoons of sour cream or crĆØme fraĆ®che to the dough.
  • Do not overmix.
  • Use fresh baking powder for maximum lift.
  • Allow the dough to rest before baking.

9ļøāƒ£ Can I make pull-apart or party versions?

Definitely. Roll the fathead dough into small balls, arrange them close together, brush with garlic butter, and bake. This creates shareable pull-apart garlic bread that’s perfect for parties.


šŸ”Ÿ How do I prevent keto garlic bread from being too “eggy”?

Use only the required amount of egg — don’t add extra. For stronger garlic butter flavors, roast your garlic beforehand to help balance any remaining egg taste.