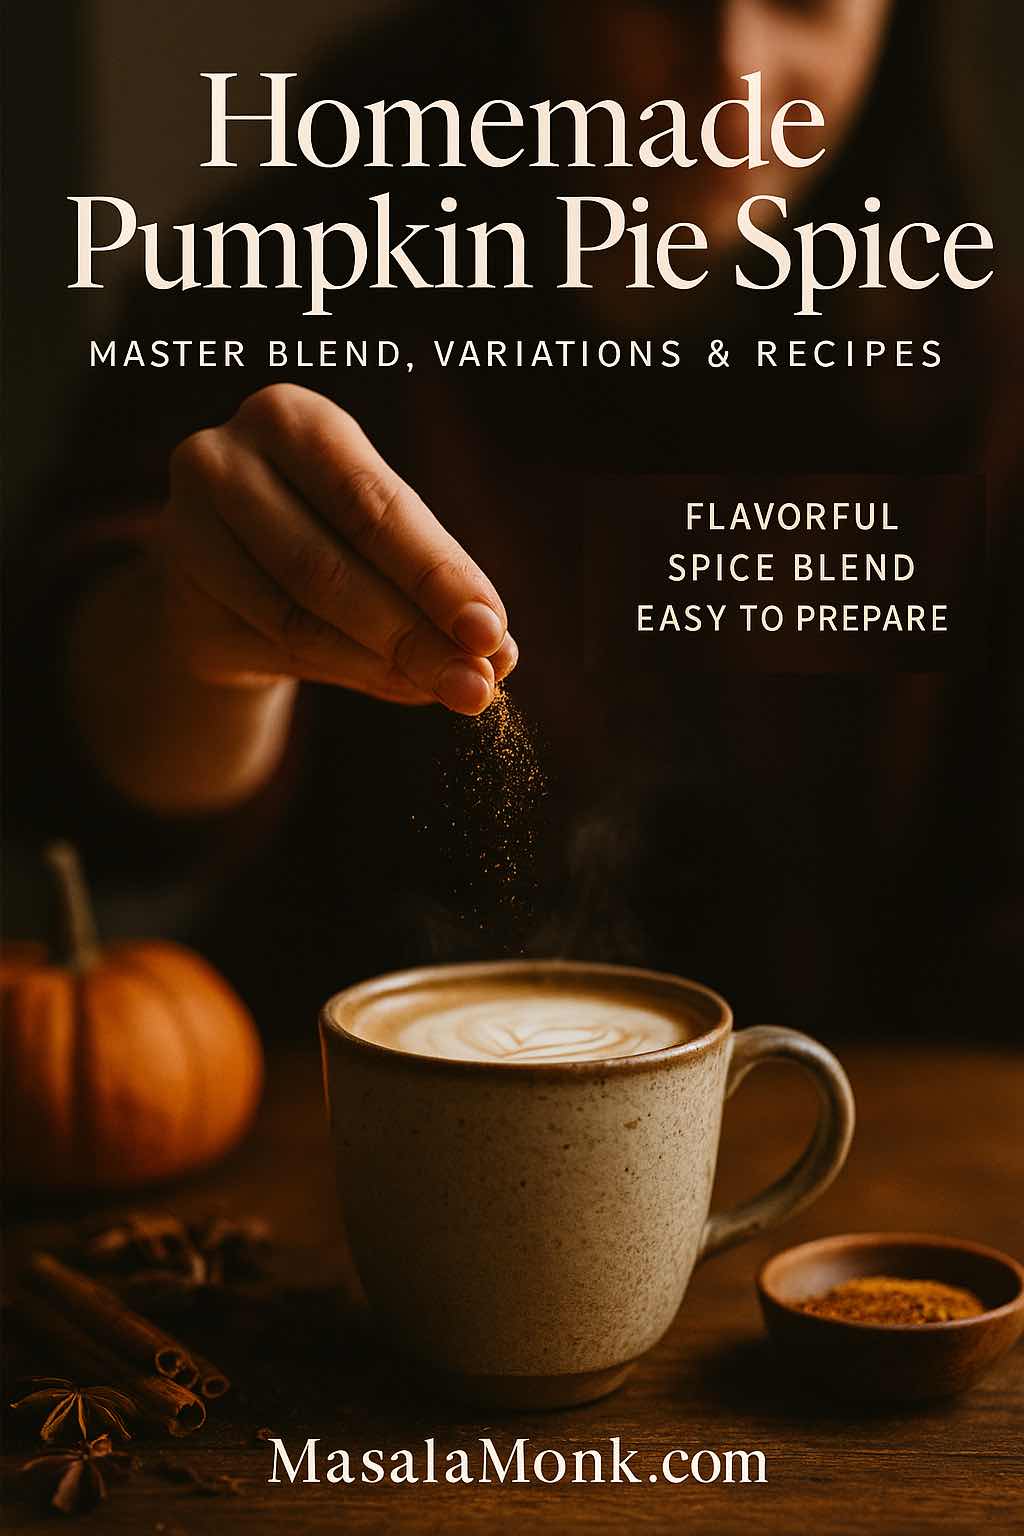
As the air turns crisp and kitchens come alive again, a reliable homemade pumpkin pie spice becomes your most versatile fall tool. Instead of chasing labels, you’ll craft a balanced DIY pumpkin spice blend once and, subsequently, use it confidently in pies, breakfasts, drinks, and even savory sides. Moreover, we’ll cover why to toast or bloom spices for fuller aroma; we’ll also clarify tricky ingredients—especially allspice—so first-timers feel right at home.
What Is Homemade Pumpkin Pie Spice (and Why It Works)?
At its core, pumpkin pie spice is a warm baking blend—no actual pumpkin required. Typically, cinnamon provides body; ginger adds lift; nutmeg rounds the flavor; allspice and cloves deepen the base. Historically, cooks have paired these spices with pumpkin and other squashes for generations; for a readable lens on how the blend evolved, see The Food Historian’s look at the secret history of pumpkin pie spice. Meanwhile, if you’ve ever wondered whether pumpkin products contain pumpkin or simply the spice profile, this quick explainer clarifies the distinction: Is there actual pumpkin in pumpkin spice?
Allspice, defined: Despite the name, allspice is not a mixture. Rather, it’s the dried unripe berry of Pimenta dioica, often described as naturally echoing cinnamon, nutmeg, and clove. For a concise primer, see Wikipedia: Allspice; for a friendly culinary explainer, glance at Food & Wine: What Is Allspice?.
The Master Mix for Homemade Pumpkin Pie Spice (Volume + Weight)
Before we branch into chai pumpkin spice, ginger-forward, or clove-light variants, let’s establish a balanced base you can scale anywhere.
By volume (about 6 Tbsp total)
3 Tbsp cinnamon
2 tsp ginger
2 tsp nutmeg
1½ tsp allspice
1½ tsp cloves
By weight (for precision)
Cinnamon 30 g · Ginger 8 g · Nutmeg 8 g · Allspice 4 g · Cloves 4 g
Stir thoroughly and store airtight. For a 9-inch pie filling, use 1–1½ tsp; for batters, beverages, and oats, start with ½–1 tsp per cup and adjust to taste. Even so, for bolder aroma, consider the technique below.
Technique That Matters: Toast or Bloom Your Spice Blend
First, toasting whole spices amplifies volatile aromatics; second, blooming ground spices in a little fat or syrup dissolves fat-soluble flavor compounds so they perfume the dish rather than taste dusty. Practically speaking, warm whole spices gently in a dry skillet just until fragrant; cool; then grind and blend. Alternatively, in wet recipes, bloom the spice mix 30–60 seconds in melted butter or warm syrup before adding the rest. For the why and how, see Blooming Spices (Serious Eats).
Variations of Homemade Pumpkin Pie Spice You’ll Actually Use
Because palates vary—and because different recipes benefit from different accents—use the master mix as a base and nudge it thoughtfully:
Chai-leaning pumpkin spice — add ½ tsp cardamom and a pinch of black pepper to each 6-Tbsp batch for cozy tea-house vibes; for extraction cues (blooming/tempering), borrow method ideas from MasalaMonk’s chai recipes.
Ginger-forward pumpkin spice — increase ginger by 25–50% for snappier cookies and quick breads.
Clove-light pumpkin spice — halve cloves; slightly increase allspice for warmth without intensity.
Savory pumpkin spice — omit cloves and allspice; add a whisper of coriander and white pepper for squash soups and roasted vegetables (see a primer on toasting seeds in MasalaMonk’s coriander insights).
Apple-pie crossover — reduce nutmeg and boost cinnamon; this leans more fruit-forward while staying familiar.
Furthermore, remember: many seasonal items rely on the spice blend alone; actual pumpkin purée is optional depending on the recipe.
Classic Pumpkin Pie from Scratch (Using Your DIY Blend)
Makes one 9-inch pie · Bake 45–55 minutes
Filling (one 9-inch pie)
2 large eggs + 1 yolk
1⅔ cups pumpkin purée
¾ cup evaporated milk or cream (full-fat coconut milk works, too)
½ cup brown sugar + ¼ cup white sugar
1½ tsp homemade pumpkin pie spice
½ tsp fine salt
1 tsp vanilla (optional)
Method (precise yet simple)
Whisk filling until smooth.
Pour into a partially baked crust.
Bake at 190 °C / 375 °F until edges set and the center softly quivers. For a silky custard, pull around 65–70 °C / 150–160 °F (yes, a thermometer helps). See ThermoWorks: Secrets to Silky Pumpkin Pie for doneness cues.
Tip: Many “pumpkin” pies benefit from sweet squashes; if you enjoy a denser, slightly sweeter profile, try a butternut-forward purée.
Because the blend is flexible—and because busy mornings demand shortcuts—mix it into simple templates you can repeat all season. Additionally, the internal guides below help with ratios, texture, and make-ahead strategies.
Overnight oats with pumpkin spice — stir ½ tsp spice + 2 tsp maple per cup of oats; for method fundamentals and ratios, see Harnessing the Power of Oats and Chia.
Chia pudding (pumpkin spice twist) — use ½ tsp spice per cup of liquid; whisk, rest, whisk again, then chill. For variations and ratio reminders, try Keto Chia Pudding with Almond Milk or this fruit-first angle: Chia-Seed Mango Pudding.
Pumpkin spice granola — toss 2 tsp spice per ~8 cups of oats/nuts before baking. Because DIY granola lets you control sweetness and oil, skim Weight-Loss-Friendly Granola Tips.
Pumpkin spice syrup for coffee or tea — bloom 1–2 tsp spice in simple syrup; then use 1–2 Tbsp per cup of coffee, tea, or steamed milk. For spice-first extraction cues (very chai-adjacent), see MasalaMonk’s chai methods.
Roasted squash & roasted pumpkin seeds — for 500 g squash: 1 tsp blend + ½ tsp salt; for seeds: 1 tsp blend per 2 cups seeds, roast low and slow.
Smoothies — for additional fall flavor, fold the blend into pumpkin-seed smoothies; start with these pumpkin seed smoothie ideas.
Nutrition Notes
Pumpkin—and its close cousins like butternut and kabocha—naturally brings fiber and beta-carotene to the table, so every slice or spoonful feels a little more nourishing. Meanwhile, roasted pepitas (pumpkin seeds) add gentle protein, useful minerals, and satisfying crunch, which means your pies, oats, and salads can taste indulgent yet still feel balanced.
If you’re curious about exact numbers, you can quickly verify them. First, head to USDA FoodData Central; then, use its FoodData Central search to look up specific entries like pumpkin purée or roasted seeds. For faster snapshots, you might also check MyFoodData’s canned pumpkin and MyFoodData’s roasted pepitas; however, when you need the most authoritative citation, it’s still best to reference USDA.
Finally, as you fold this homemade pumpkin pie spice into breakfasts or desserts, consider a small sprinkle of pepitas on top. Not only do they add texture, but they also gently boost protein—so your cozy fall treats feel just a bit more sustaining.
Storage & Freshness (So Your Blend Stays Vibrant)
Because ground spices fade, store your homemade pumpkin pie spice in an airtight jar away from light and heat; label it and use within several months for best aroma. Whenever possible, buy whole spices, toast lightly, and grind just before blending; consequently, you’ll extend flavor and control texture. Curious about the chemistry? Revisit the blooming/tempering guide to see how gentle heat unlocks fat-soluble aromatics.
FAQs about Homemade Pumpkin Pie Spice
1) What is homemade pumpkin pie spice made of?
A classic DIY pumpkin spice blend usually includes cinnamon, ginger, nutmeg, allspice, and cloves. Moreover, you can tweak ratios—for instance, go ginger-forward for snap or clove-light for a gentler finish.
2) How much pumpkin spice should I use in a 9-inch pumpkin pie?
As a rule of thumb, start with 1–1½ teaspoons of your homemade pumpkin pie spice per pie filling; then, adjust to taste after a quick test bake or by spoon-testing a warm sample of the custard.
3) How much should I add to coffee, tea, or lattes?
Begin with ¼–½ teaspoon per cup. For even fuller aroma, first bloom the spice in a spoon of hot syrup or milk, and then stir it into the drink.
4) Can I make a chai-leaning pumpkin spice?
Absolutely. Simply add a pinch of black pepper and ½ teaspoon cardamom per small batch; consequently, you’ll get cozy chai vibes without overpowering sweetness.
5) What if I find cloves too strong?
However tasty cloves are, they can dominate. Halve the cloves and, if you like, nudge up allspice slightly to keep warmth without harshness.
6) What exactly is allspice—is it a mix?
Despite the name, allspice is not a blend. Instead, it’s the dried berry of Pimenta dioica that tastes like a natural echo of cinnamon, nutmeg, and clove.
7) How long does homemade pumpkin pie spice stay fresh?
Generally, ground blends are most vibrant for 3–6 months in an airtight jar kept cool, dark, and dry. Beyond that, flavor slowly fades—so, label the date and mix smaller batches.
8) Should I toast or bloom the spices?
Yes—first toast whole spices lightly before grinding for deeper aroma; second, bloom ground spice 30–60 seconds in warm fat or syrup. Consequently, your recipes taste rounder and less “dusty.”
9) Can I make a savory pumpkin spice for soups and roasted veg?
Certainly. Omit cloves and allspice; meanwhile, add a whisper of coriander and a pinch of white pepper. Then, use about 1 teaspoon per 500 g of squash or veg plus salt.
10) What’s the difference between pumpkin pie spice and apple pie spice?
Both are warmly spiced; nevertheless, apple-pie blends often lean heavier on cinnamon and lighter on nutmeg/clove. If you want a crossover, simply reduce nutmeg a touch and keep cinnamon prominent.
11) Can I substitute mace for nutmeg or skip allspice?
Yes. Use ½ the amount of mace for nutmeg to start (mace is potent). If you’re out of allspice, replace it with equal parts cinnamon and nutmeg, then taste and adjust.
12) Is the blend vegan and gluten-free?
By default, yes—the spices are plant-based and gluten-free. Still, check for cross-contamination warnings if allergies are a concern, and, importantly, avoid anti-caking additives if you need a very clean label.
13) Should I use fresh pumpkin purée or canned for pie?
Either works. Canned is consistent and convenient; meanwhile, fresh (or sweet winter squash like butternut) can taste slightly sweeter and denser. In any case, drain watery purée to avoid a loose custard.
14) How do I fix a too-spicy or clove-heavy mix?
First, dilute by adding more cinnamon and a pinch of ginger. Next, retest in a small batch (e.g., oatmeal) before using it in a full pie. In short, balance intensity before you scale up.
15) What are smart storage practices for maximum flavor?
Store your DIY blend in a small, opaque, airtight jar; furthermore, keep it away from heat, light, and moisture. If possible, grind just what you need monthly and top up in small increments.
16) Can I use the blend beyond desserts—say, in breakfasts?
Definitely. Try overnight oats, granola, chia pudding, and smoothies. Subsequently, you’ll get cozy flavor with little effort—start around ½–1 teaspoon per cup of base and refine from there.
Great coffee should be calm, fragrant, and unmistakably yours. A homemade coffee creamer—tuned for sweetness, body, and aroma—makes that happen fast. Instead of guessing what’s inside a bottle, you’ll build café-level creaminess from pantry staples, then layer flavors like bright French vanilla, cozy pumpkin spice, nostalgic Italian sweet cream, and week-day workhorses such as zero-sugar and powdered mixes. Because readers arrive with varied goals—DIY coffee creamer, coffee creamer with condensed milk, powdered non-dairy creamer, healthy homemade creamer, and zero-sugar French vanilla creamer—this guide covers each path clearly, while keeping the tone natural and the methods dependable. Moreover, every recipe includes metric + imperial measurements so scaling remains painless.
You’ll move from a flexible base to flavor riffs deliberately; meanwhile, you’ll see internal how-tos for almond, coconut, and oat milks, plus technique articles that actually teach (brew methods, iced coffee vs. cold brew), not sales pages. When a regulatory definition or nutrition reference helps, you’ll get an authoritative link (for example: the legal standard for “half-and-half”, USDA FoodData Central for macros, and FDA guidance on allulose). Ultimately, whether you’re optimizing for cost, nutrition, or pure indulgence, you’ll get a blueprint that adapts to your routine. So whisk a batch, chill it, and pour a cup that tastes exactly the way you like it—every single morning.
Can’t Buy “Half-and-Half”? Easy Global Equivalents (and Why It Matters)
Because “half-and-half” is a North American product name rather than a global staple, you might not see it on shelves. In practice, it’s a light dairy blend around 10–12% milk fat; that fat level gives coffee body without heaviness. If you want the formal definition, see the U.S. standard of identity for half-and-half (fat %, optional ingredients, and processing) here: What “half-and-half” means.
Mix your own anywhere (choose what you have):
36% cream + whole milk = 1:3 ratio → ~12% fat. Example:120 ml / 4 oz cream + 360 ml / 12 oz milk → 480 ml / 16 oz “half-and-half.”
18–20% single cream + whole milk = 3:2 ratio → ~12% fat. Example:300 ml / 10 oz single cream + 200 ml / 6.8 oz milk → 500 ml / 17 oz equivalent.
India (~25% cream): ~40% cream : 60% milk lands close to 12%.
No cream around? Use evaporated milk as a stop-gap; it’s legally defined and richer than milk, though not identical: What “evaporated milk” is.
Plant-based equivalents (any country):
Coconut “half-and-half”: 1 part coconut cream : 3 parts almond or oat milk.
Cashew “half-and-half”: Blend 100 g raw cashews + 180–200 ml water silky; then mix 1 part cashew cream : 2 parts plant milk.
Barista oat milk: often works straight, since it’s pre-emulsified.
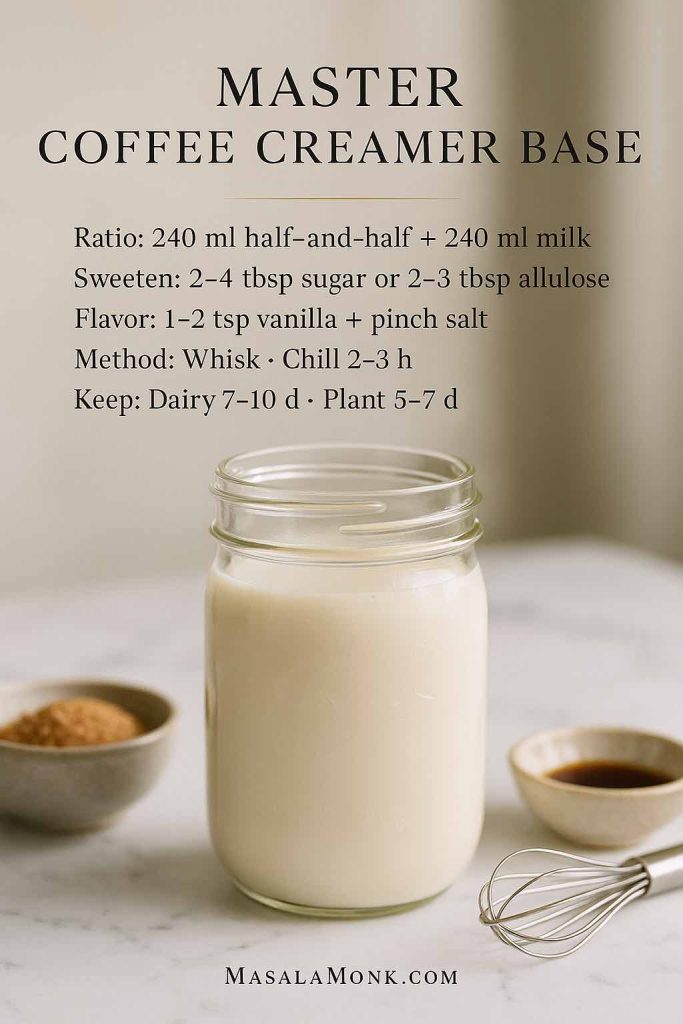
Master DIY Coffee Creamer Base (Reusable, Flexible, Keyword-Friendly)
A dependable base unlocks every variation—from French vanilla coffee creamer to pumpkin spice creamer and zero-sugar options. Crucially, this blend balances body, sweetness, and pourability so it disperses evenly in hot coffee and iced coffee alike. Furthermore, you can swap dairy for plants without sacrificing texture.
Yield: ~480 ml / 16 oz (about 2 cups) Active time: 5 minutes
Ingredients
Half-and-half (or your local equivalent) — 240 ml / 8 oz
Milk (dairy or plant) — 240 ml / 8 oz
Sweetener — 24–48 g / 2–4 tbsp sugar or maple; or18–24 g / 2–3 tbsp allulose/erythritol for zero-sugar
Pure vanilla extract — 5–10 ml / 1–2 tsp
Fine salt — ~0.5 g / pinch
Start here for any homemade coffee creamer—use the base ratio, then riff into French vanilla, pumpkin spice, zero-sugar, or powdered non-dairy versions.
Method Whisk until dissolved (or shake in a jar). Then chill 2–3 hours so flavors round out and the mouthfeel relaxes.
How to use & store Dairy versions keep 7–10 days; plant versions keep 5–7 days. Shake before each pour. Prefer a healthy homemade coffee creamer? Use 360 ml / 12 oz unsweetened almond milk + 120 ml / 4 oz coconut cream for body. If you love true DIY, you can make almond milk at home, make coconut milk at home, or even make oat milk at home. For a primer on fat levels and texture tradeoffs with coconut, skim our internal overview of coconut milk nutrition facts.
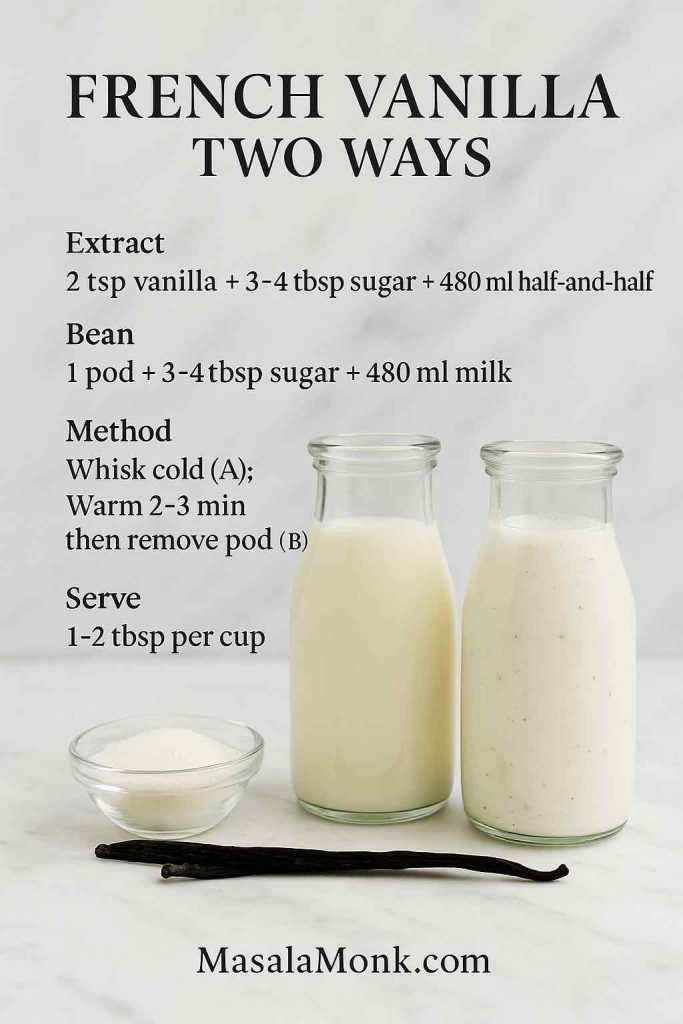
French Vanilla Coffee Creamer (Two Ways)
Because vanilla should taste soft and present—not fake—this flavor remains the gateway to homemade coffee creamer. The extract version is perfect for weekdays; the bean version brings speckles and perfume.
Yield: ~480 ml / 16 oz Active: 5–10 minutes
Weekday fast: extract. Luxe brunch: vanilla bean coffee creamer. Both pour cleanly into hot coffee or iced lattes—start with 1–2 tbsp per cup.
A) Fast Extract Version
Half-and-half — 480 ml / 16 oz
Sugar or maple — 36–45 g / 3–4 tbsp
Pure vanilla extract — 10 ml / 2 tsp
Whisk cold; chill.
B) Vanilla-Bean Version
Whole milk (or full-fat coconut milk) — 480 ml / 16 oz
Warm on low 2–3 minutes to infuse gently. Remove pod, cool, bottle.
Serve & keep Use 15–30 ml / 1–2 tbsp per 240 ml / 8 oz cup. If you need to hit a sweetness target precisely, cross-check your milk’s macros in USDA FoodData Central and adjust sugar a touch so your DIY coffee creamer stays consistent week after week.
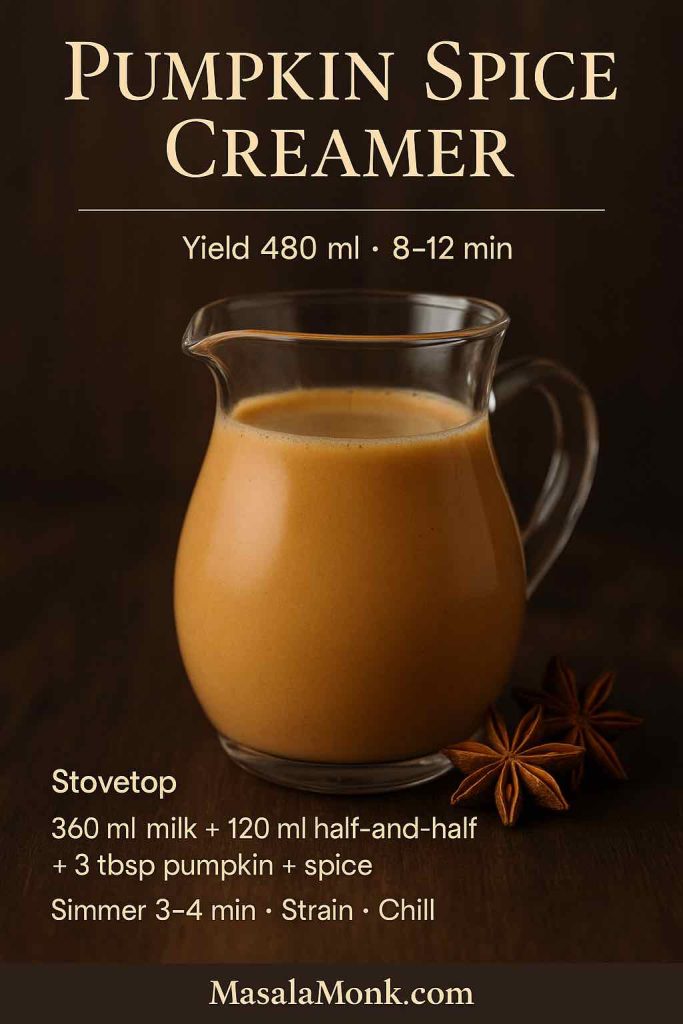
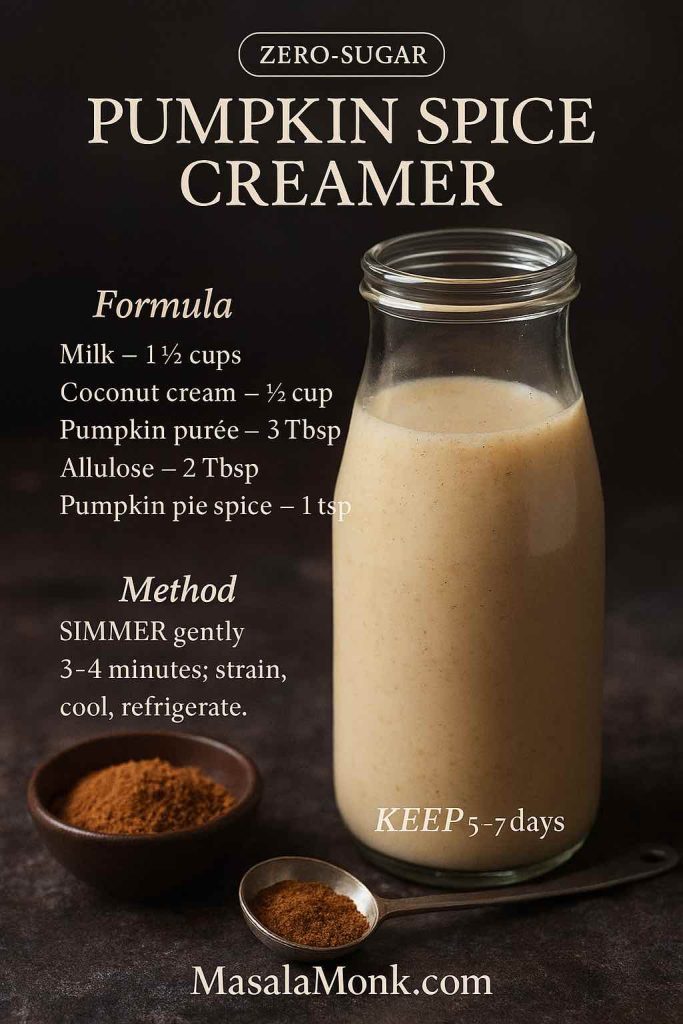
Real pumpkin purée adds color and silk; a brief simmer blooms the spice. Consequently, this pumpkin spice creamer tastes like a latte from a friendly café, not a candle. And in case you want to make your pumpkin spice, do not forget to browse our post on Pumpkin Spice, Your Way: Master Blend, Variations & Real-World Recipes.
Yield: ~480 ml / 16 oz Active: 8–12 minutes
Bloom spices for café-smooth pumpkin spice creamer—no candle flavor. Great for iced coffee; strain for a silkier finish.
Stovetop Version
Milk (dairy or almond) — 360 ml / 12 oz
Half-and-half (or coconut cream) — 120 ml / 4 oz
Pumpkin purée — 45 g / 3 tbsp
Maple syrup — 30–40 ml / 2–2½ tbsp, or sugar 24 g / 2 tbsp + vanilla 2–3 ml / ½ tsp
Pumpkin pie spice — 2.5–3 g / 1–1¼ tsp
Simmer very gently 3–4 minutes; strain for silk. Cool and refrigerate.
Clean-tasting zero sugar pumpkin spice creamer—allulose keeps sweetness with fewer sugar calories; refrigerate 5–7 days and shake well.
Zero-Sugar Pumpkin SpiceHomemade Coffee Creamer Swap maple for 24–30 g / 2 tbsp allulose; raise vanilla to 5 ml / 1 tsp. The FDA recognizes allulose differently on labels—excluded from “Total/Added Sugars” and counted at ~0.4 kcal/g—so sweetness perception stays high with minimal impact: FDA on allulose.
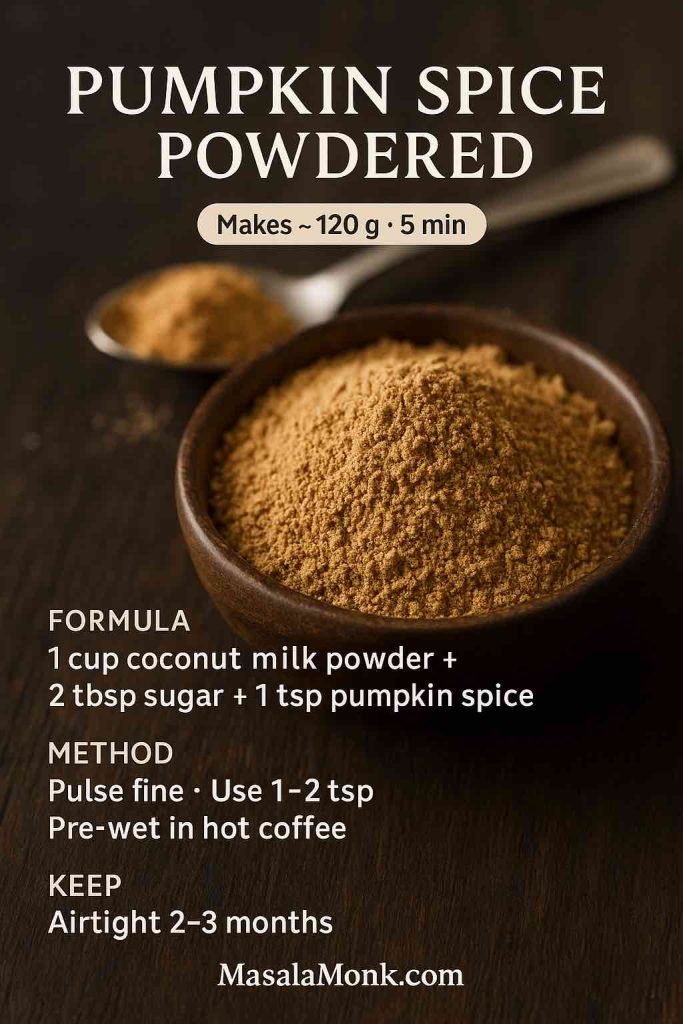
Travel-ready powdered non-dairy creamer: pulse ultra-fine and pre-wet in hot coffee for lump-free pumpkin spice flavor anywhere.
Powdered Pumpkin Spice Creamer (Pantry-Friendly)
Coconut milk powder — 100 g / ~1 cup
Sugar — 24 g / 2 tbsp, or allulose 18–24 g / 1½–2 tbsp
Pumpkin pie spice — 2.5 g / 1 tsp
Pulse until talc-fine. Use 3–6 g / 1–2 tsp per cup; dissolve in a splash of hot coffee first.
Pour & store Liquid versions keep 5–7 days; powder stays airtight 2–3 months. If you’re brewing iced drinks, remember that cold brew vs. iced latte behave differently with spice and fat; this post helps you learn about different bases: cold brew vs. iced latte.
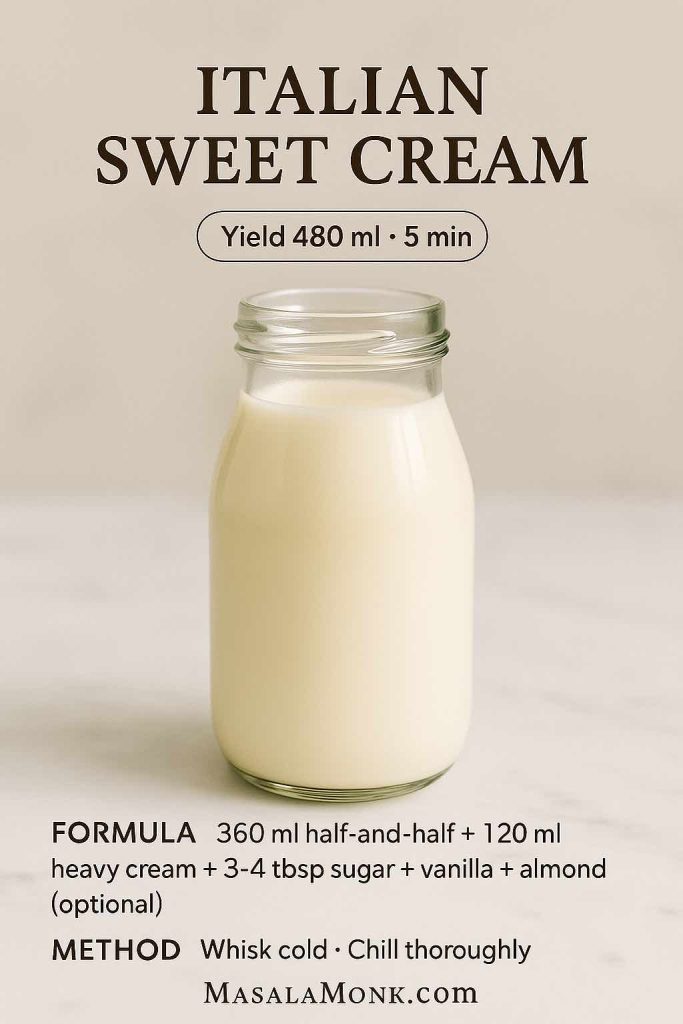
Italian Sweet Cream (Sweet Cream Bliss, Copycat-Friendly)
When you want a plush, dessert-leaning DIY coffee creamer that still pours cleanly, Italian sweet cream delivers. Because a micro-dose of almond extract echoes icing, the cup feels luxurious without being heavy.
Yield: ~480 ml / 16 oz Active: 5 minutes
Plush, dessert-leaning Italian sweet cream—a copycat-friendly coffee creamer that pours cleanly. Whisk cold, chill, and use a light pour; ideal for hot coffee, iced coffee, or microfoam at 55–65 °C.
Ingredients
Half-and-half — 360 ml / 12 oz
Heavy cream — 120 ml / 4 oz
Sugar — 36–48 g / 3–4 tbsp
Vanilla extract — 5 ml / 1 tsp
Almond extract — 1–1.25 ml / ¼ tsp (optional)
Whisk until dissolved; chill thoroughly.
Enjoy & adapt Use a light pour; it’s rich. If you prefer barista-style foam, steam or heat to 55–65 °C / 139–149 °F—the sweet spot for stable microfoam often taught in SCA-aligned training. Exceed ~70 °C / 158 °F and proteins denature, killing foam.
When you want velvet texture with long-lasting sweetness, homemade coffee creamer with sweetened condensed milk wins. Besides gloss, it resists separation in iced drinks.
Yield: ~740 ml / 25 oz Active: 3 minutes
Velvet-smooth coffee creamer with sweetened condensed milk—whisk with milk (or water + coconut cream for dairy-free). Keeps 10–14 days; start with 1–2 tbsp per cup.
Ingredients
Sweetened condensed milk — 395 g / 14 oz can
Milk — 360 ml / 12 oz, or water 300 ml / 10 oz + coconut cream 60 ml / 2 oz (dairy-free)
Vanilla extract — 5 ml / 1 tsp (optional)
Whisk smooth.
How to use & store Often keeps 10–14 days. Start with 15–30 ml / 1–2 tbsp per cup. If you’re exploring other cold formats, this concise overview of coffee brewing methods helps you pick the right base and grind for creamier results: coffee brewing methods.
Powdered Non-Dairy Coffee Creamer (Travel-Ready)
Because desk drawers, carry-ons, and camping exist, a powdered coffee creamer earns its keep. Pre-wetting in a teaspoon of hot coffee makes it dissolve flawlessly.
Yield: ~120 g (small jar) Active: 5 minutes
Packable powdered coffee creamer: coconut milk powder, a touch of sugar or allulose for zero-sugar, and vanilla powder. Pulse extra fine and pre-wet in hot coffee for smooth, lump-free cups; stores airtight 2–3 months.
Ingredients
Coconut milk powder — 100 g / ~1 cup
Sugar — 24 g / 2 tbsp, or allulose 18–24 g / 1½–2 tbsp
Vanilla powder — 2 g / 1 tsp (or ground vanilla 0.5–1 g / ¼–½ tsp)
Pulse until talc-fine.
Serving & shelf life Use 3–6 g / 1–2 tsp per cup. Store airtight 2–3 months. If you prefer a lighter macro profile, compare plant-milk powders in FoodData Central before you stock up.
For a healthy homemade creamer that still drinks creamy, almond milk plus a small amount of fat provides body without heaviness. Because cashew is neutral, it’s a great swap if coconut notes aren’t your thing.
Yield: ~480 ml / 16 oz Active: 5 minutes
Everyday almond milk coffee creamer with coconut or cashew cream for body; blend 20–30 seconds until glossy. Sweeten with maple or allulose for a zero-sugar version; keep 5–7 days refrigerated.
Ingredients
Unsweetened almond milk — 360 ml / 12 oz
Coconut cream or thick cashew cream — 120 ml / 4 oz
Maple syrup — 30 ml / 2 tbsp, or allulose 18–24 g / 1½–2 tbsp
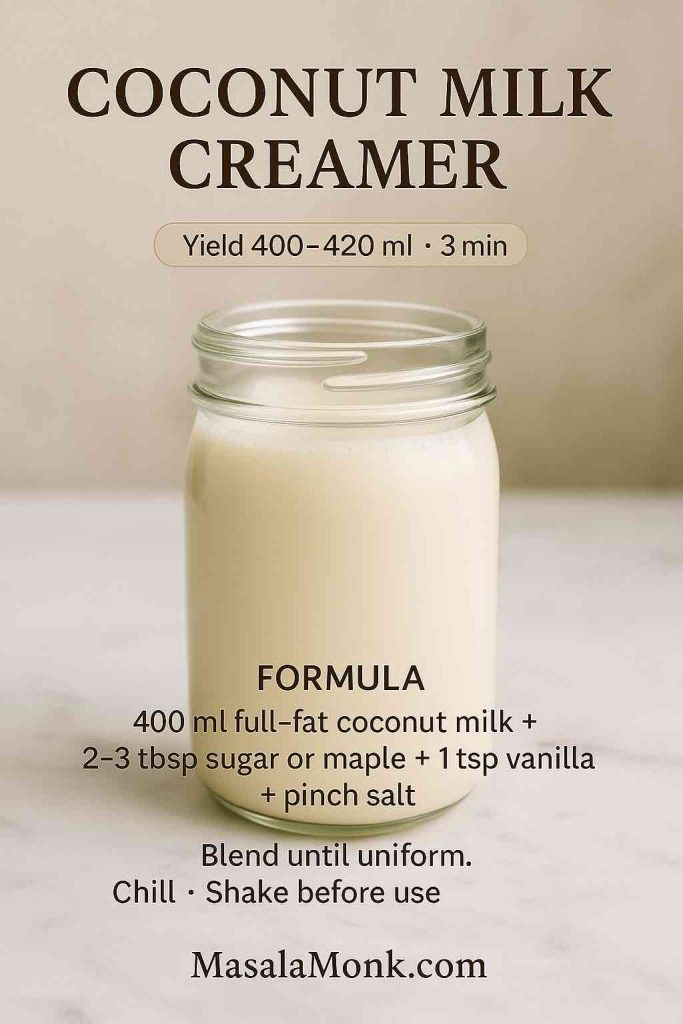
Whenever you want dairy-free coffee creamer with true body, full-fat coconut milk performs reliably. A micro-pinch of salt softens edges and increases perceived sweetness.
Yield: ~400–420 ml / 13.5–14 oz Active: 3 minutes
Rich, dairy-free coconut milk coffee creamer that froths well; chill and shake before use. If coconut tastes strong, cut with 2–4 oz oat milk.
Ingredients
Full-fat coconut milk — 400 ml / 13.5 oz can
Sugar or maple — 24–36 g / 2–3 tbsp
Vanilla extract — 5 ml / 1 tsp
Fine salt — 0.5 g / pinch
Blend until uniform.
Use & keep Chill and shake before pouring. If coconut feels dominant, cut with 60–120 ml / 2–4 oz oat milk. For fat-level tradeoffs and texture expectations, see our internal overview: coconut milk nutrition facts.
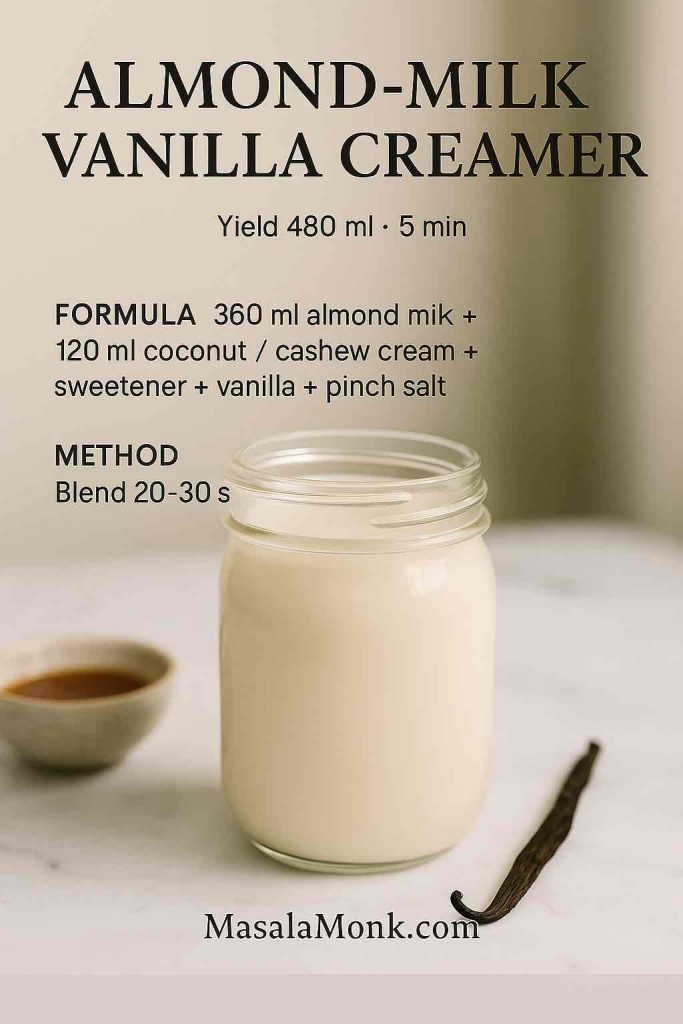
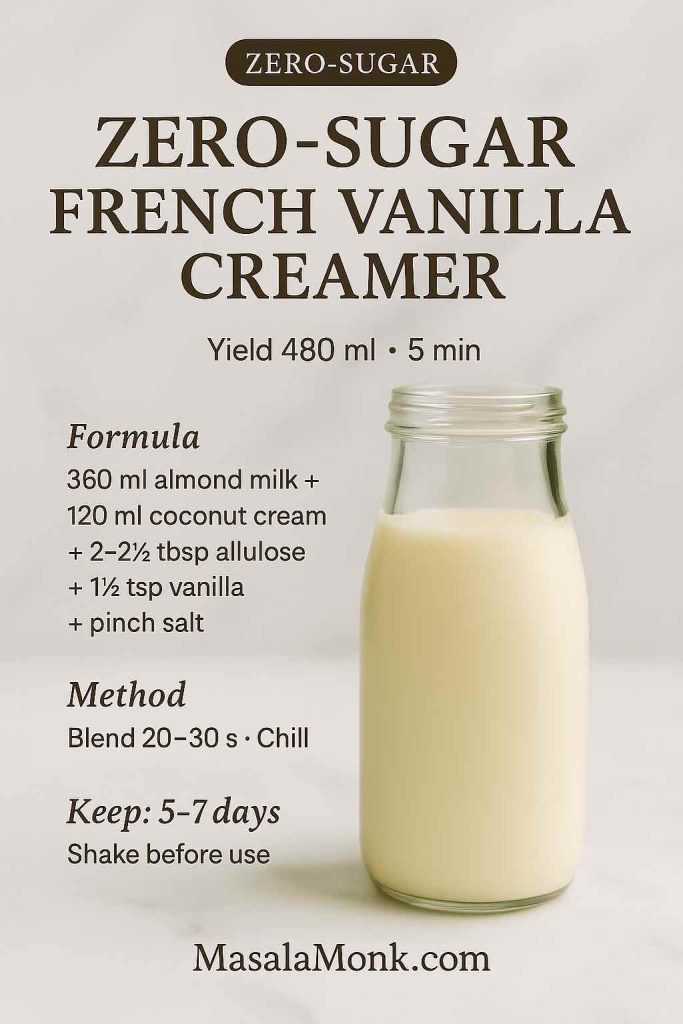
Zero-Sugar French Vanilla DIY Creamer (Copycat Texture, Clean Finish)
Because zero-sugar French vanilla creamer is frequently requested, this version uses allulose for clean sweetness and coconut cream for body—therefore avoiding grit or aftertaste.
Yield: ~480 ml / 16 oz Active: 5 minutes
Copycat-smooth zero sugar French vanilla creamer—allulose for clean sweetness and coconut cream for body. Blend 20–30 s, chill, and shake before use; keeps 5–7 days.
Ingredients
Unsweetened almond milk — 360 ml / 12 oz
Coconut cream — 120 ml / 4 oz
Allulose — 24–30 g / 2–2½ tbsp, or stevia 15–20 drops
Vanilla extract — 7.5 ml / 1½ tsp
Fine salt — 0.5 g / pinch
Blend; chill.
Why it works & how to store Allulose integrates cleanly and, as noted by the FDA, is treated differently in labeling. Consequently, you can maintain sweetness perception with fewer sugar calories: FDA on Allulose. Shake before each use and keep 5–7 days.
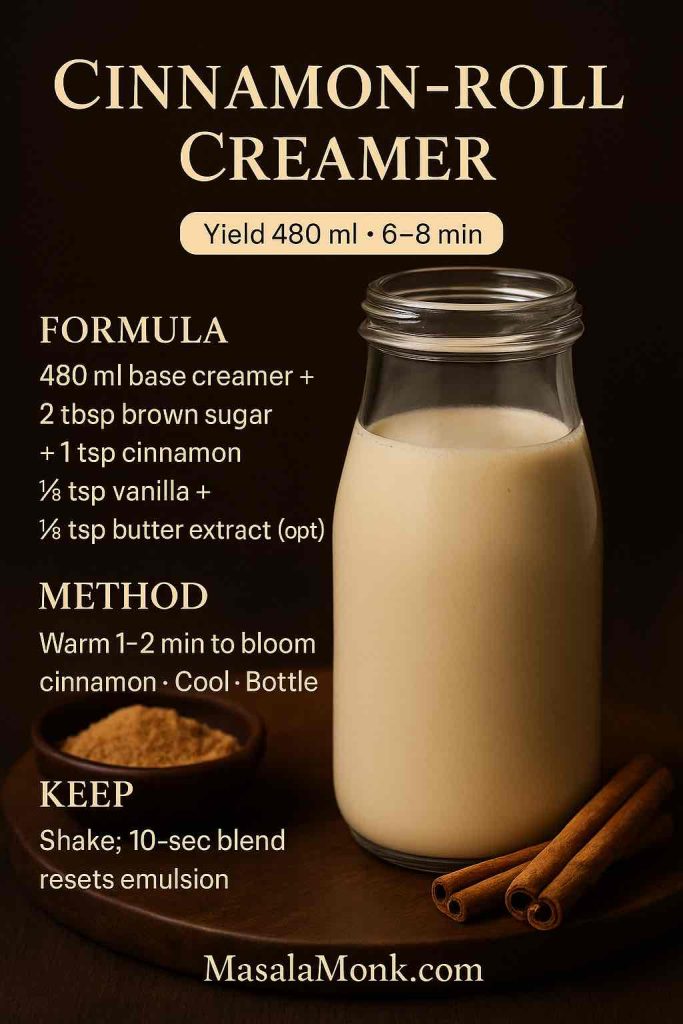
Cinnabon-Style Cinnamon-Roll Coffee Creamer
Warm spice plus a hint of “icing” makes even a simple brew feel special. Because cinnamon can settle, a brief warm-up helps it bloom and disperse.
Yield: ~480 ml / 16 oz Active: 6–8 minutes
Warm-spice cinnamon roll coffee creamer—bloom cinnamon for 1–2 minutes for bakery aroma, then cool and bottle. Shake before pouring; a quick 10-second blend re-emulsifies for iced coffee.
Ingredients
Base creamer (dairy or almond) — 480 ml / 16 oz
Brown sugar — 27 g / 2 tbsp, or maple 30 ml / 2 tbsp
Ground cinnamon — 2 g / 1 tsp
Vanilla extract — 2.5 ml / ½ tsp
Butter extract — 0.6 ml / ⅛ tsp (optional)
Warm 1–2 minutes to bloom cinnamon; cool and bottle.
Serving note & storage Shake before pouring; a 10-second blend resets the emulsion for cold foam. Notably, the aroma intensifies on day two, so resist over-sweetening on day one.
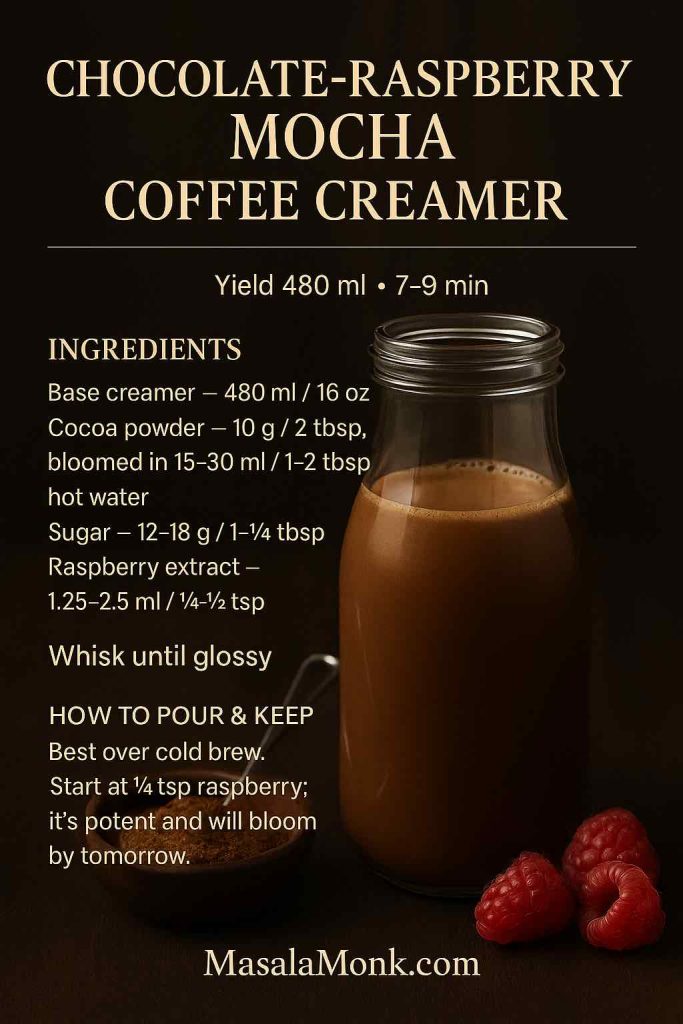
Chocolate-Raspberry Mocha Coffee Creamer
When you want patisserie vibes, homemade chocolate-raspberry coffee creamer balances cocoa’s bitter edge with bright berry perfume. Consequently, iced coffee suddenly drinks like a specialty café treat.
Yield: ~480 ml / 16 oz Active: 7–9 minutes
Pâtisserie-style chocolate coffee creamer with a bright raspberry finish—bloom cocoa powder in hot water for gloss, then whisk into the base. Start at ¼ tsp raspberry extract; flavors deepen by day two, perfect for cold brew.
Ingredients
Base creamer — 480 ml / 16 oz
Cocoa powder — 10 g / 2 tbsp, bloomed in 15–30 ml / 1–2 tbsp hot water
Sugar — 12–18 g / 1–1½ tbsp
Raspberry extract — 1.25–2.5 ml / ¼–½ tsp
Whisk until glossy.
How to pour & keep Best over cold brew. Start at ¼ tsp raspberry; it’s potent and will bloom by tomorrow. If you prefer less sweetness overall, reduce sugar by 4–6 g and extend the bloom time a minute for better cocoa dispersion.
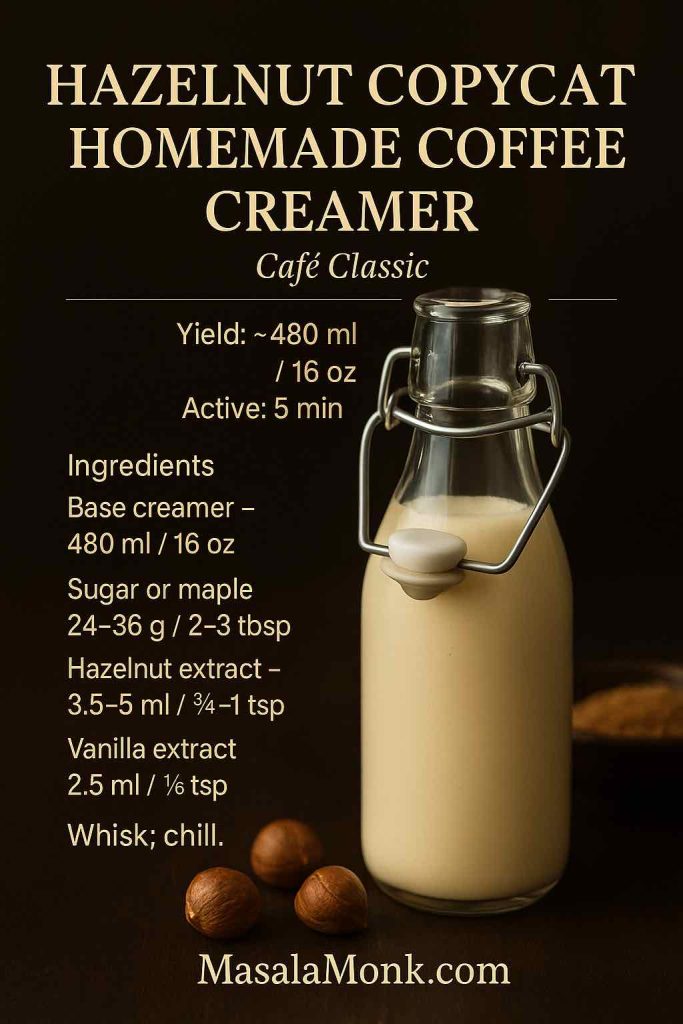
A hazelnut profile reads cozy and familiar, especially in cappuccino-style drinks. Because extracts vary widely, begin conservatively.
Yield: ~480 ml / 16 oz Active: 5 minutes
Cozy hazelnut coffee creamer—start light on hazelnut extract (¾ tsp), then adjust on day two. Pours cleanly in cappuccino-style drinks; chill after whisking.
Ingredients
Base creamer — 480 ml / 16 oz
Sugar or maple — 24–36 g / 2–3 tbsp
Hazelnut extract — 3.5–5 ml / ¾–1 tsp
Vanilla extract — 2.5 ml / ½ tsp
Whisk; chill.
Flavor targeting & storage Flavors intensify overnight, so taste again on day two before adjusting. If acidity bothers you with flavored lattes, consider using cold brew; it’s naturally lower in acid and can be gentler for some readers with reflux: low-acid cold brew note.
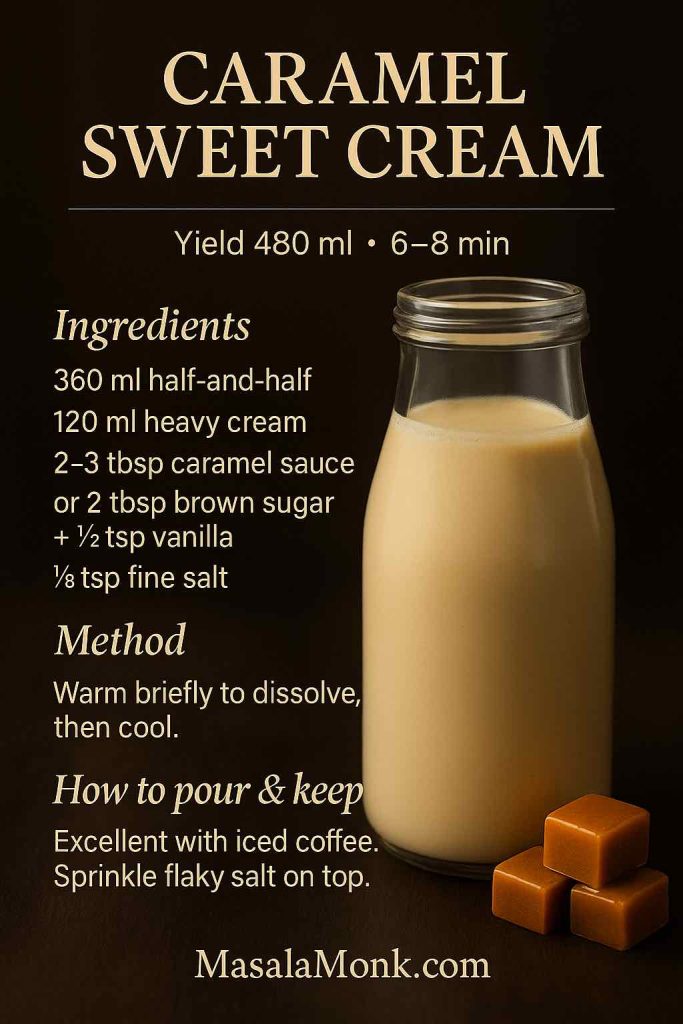
Caramel Sweet Cream Coffee Creamer (Salt-Kissed)
Silky caramel turns an ordinary mug into a treat. Nevertheless, a pinch of salt matters; it punctuates sweetness and sharpens flavor.
Yield: ~480 ml / 16 oz Active: 6–8 minutes
Salt-kissed caramel coffee creamer—warm briefly to dissolve caramel, then cool. Pours like cream for iced coffee; add a tiny sprinkle of flaky salt to sharpen flavor.
Ingredients
Half-and-half — 360 ml / 12 oz
Heavy cream — 120 ml / 4 oz
Caramel sauce — 30–45 ml / 2–3 tbsp, or brown sugar 24 g / 2 tbsp + vanilla 2.5 ml / ½ tsp
Fine salt — 0.75 g / ⅛ tsp
Warm briefly to dissolve, then cool.
How to pour & keep Excellent with iced coffee and a tiny sprinkle of flaky salt on top. If your caramel is thick, loosen the batch with a splash more milk until it pours like cream.
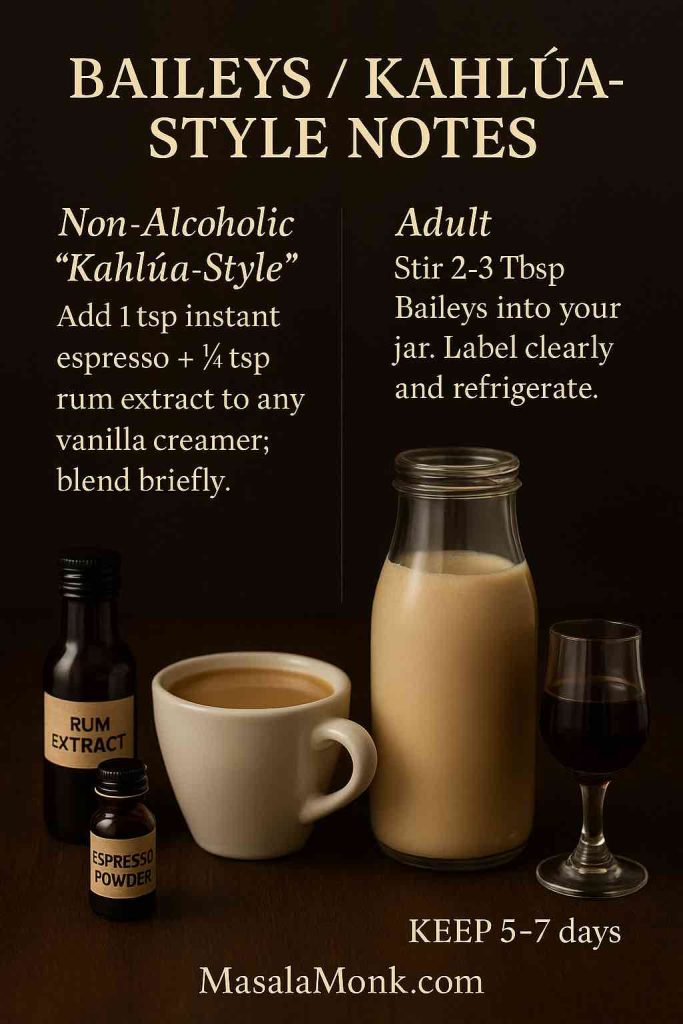
Queries for coffee and Baileys or Kahlúa coffee creamer spike every winter. Consequently, here are two safe approaches.
Yield: ~480 ml / 16 oz Active: 2–3 minutes
Two safe options for winter searches: Non-Alcoholic Kahlúa-style (instant espresso + rum extract in vanilla creamer) and Adult Baileys (2–3 Tbsp stirred in). Label clearly; refrigerate 5–7 days.
Non-Alcoholic “Kahlúa-Style”
Add 1 tsp instant espresso + ¼ tsp rum extract to any vanilla creamer; blend briefly.
Adult Batch
Stir 30–45 ml / 2–3 tbsp Baileys into your jar. Label clearly and refrigerate.
Use & keep Always keep chilled and consume within 5–7 days. If you want festive mugs beyond coffee, these quick reads help you experiment responsibly: coffee + Baileys mix ideas • Kahlúa cocktail starters
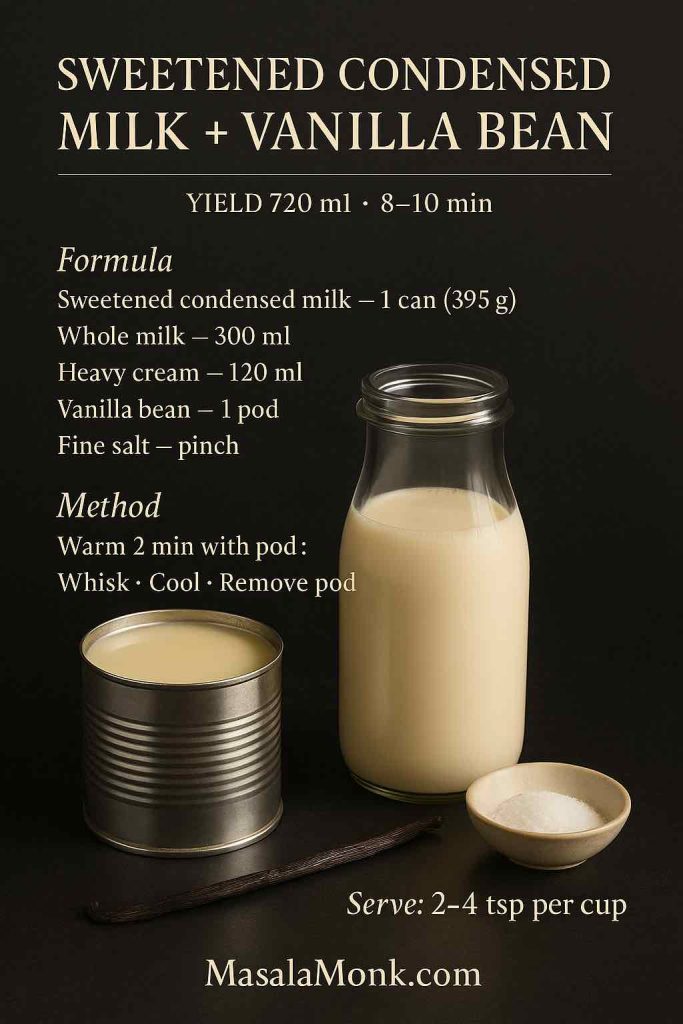
Because condensed milk gives unmatched silk while vanilla bean adds perfume, this hybrid of a homemade coffee creamer bridges weekday ease and weekend decadence. Additionally, it stands up well to darker roasts.
Yield: ~720 ml / 24 oz Active: 8–10 minutes
Ultra-silky coffee creamer with sweetened condensed milk plus vanilla bean for aroma; warm 2 minutes with the pod, whisk, cool, and remove. Rich enough that 2–4 tsp per cup is plenty—great with darker roasts and iced lattes.
Ingredients
Sweetened condensed milk — 395 g / 14 oz
Whole milk — 300 ml / 10 oz
Heavy cream — 120 ml / 4 oz
Vanilla bean — 1 pod / 5–6 g, split & scraped
Fine salt — 0.5 g / pinch
Warm 2 minutes with the pod; whisk, cool, remove pod, bottle.
How to serve & store Because the base is rich, start with 10–20 ml / 2–4 tsp per cup. The long finish means a little goes a long way, especially in iced lattes where dilution can mask subtle flavors.
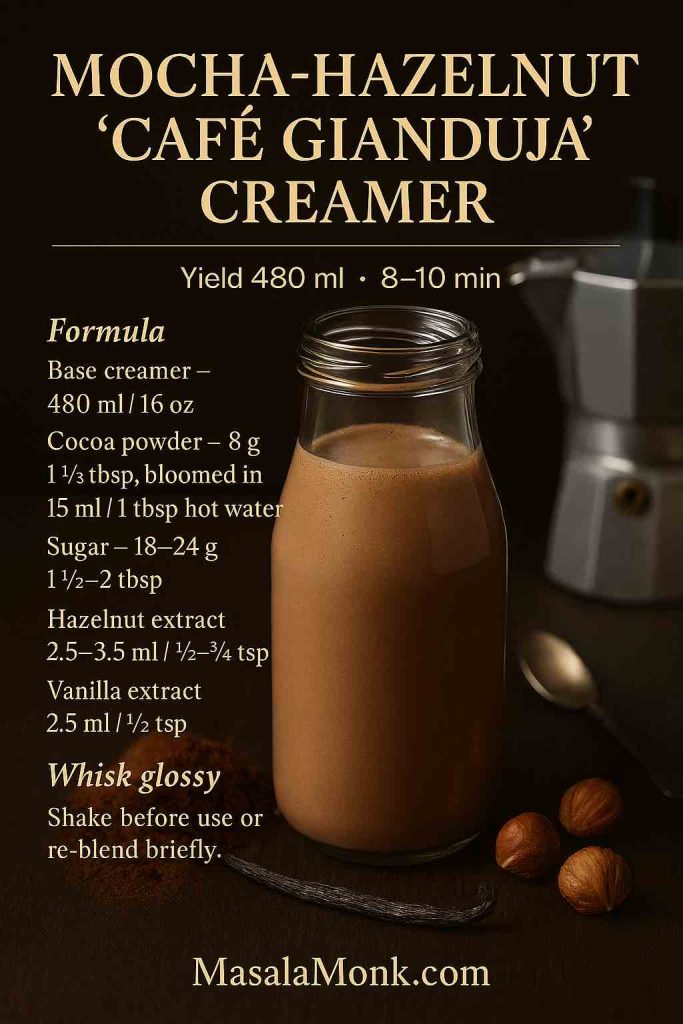
Mocha-Hazelnut “Café Gianduja” Creamer
Inspired by chocolate-hazelnut spreads, this homemade coffee creamer pairs especially well with iced Americanos and moka-pot shots. Meanwhile, it doubles as a quick dessert sauce when warmed a touch.
Yield: ~480 ml / 16 oz Active: 8–10 minutes
Chocolate-forward mocha hazelnut coffee creamer inspired by gianduja; bloom cocoa powder for gloss, then whisk with the base. Shake before use or re-blend for cold foam; brilliant over iced Americanos and moka-pot shots.
Ingredients
Base creamer — 480 ml / 16 oz
Cocoa powder — 8 g / 1½ tbsp, bloomed in 15 ml / 1 tbsp hot water
Sugar — 18–24 g / 1½–2 tbsp
Hazelnut extract — 2.5–3.5 ml / ½–¾ tsp
Vanilla extract — 2.5 ml / ½ tsp
Whisk until glossy.
How to use & keep Pour over ice and add espresso for instant mocha vibes. Because cocoa settles, shake before use or re-blend briefly for cold foam.
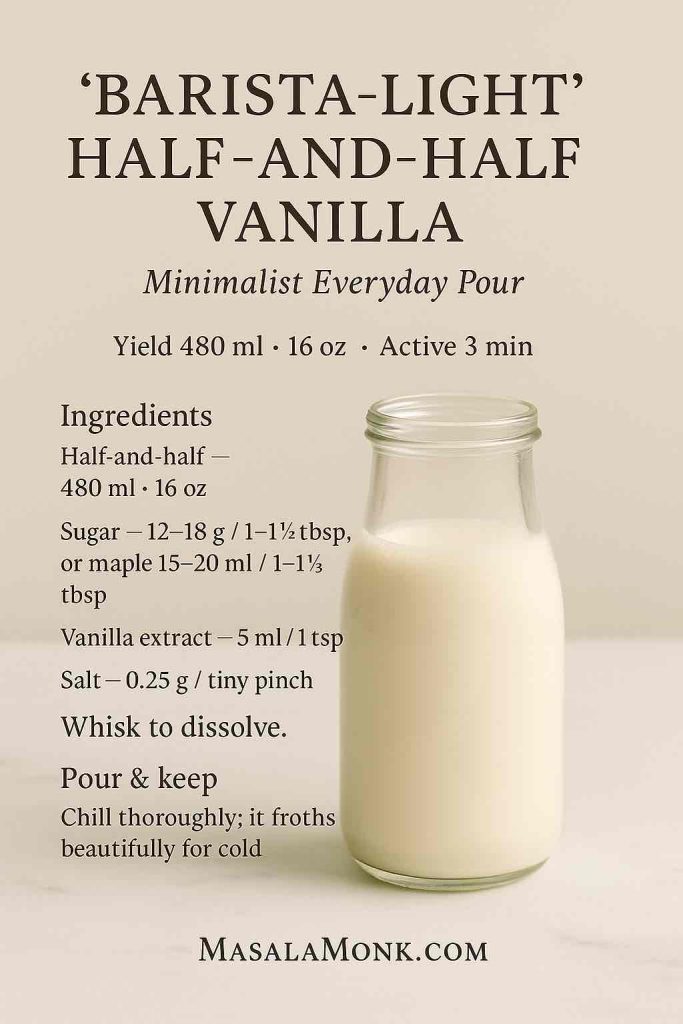
Some days you want a barely sweet, highly pourable DIY & Homemade coffee creamer that plays nicely with any roast. Therefore, this minimalist mix stays versatile.
Yield: ~480 ml / 16 oz Active: 3 minutes
Minimalist half-and-half vanilla coffee creamer—just sweet enough and highly pourable. Whisk to dissolve, chill thoroughly, and enjoy silky cold-foam at 55–65 °C if you steam.
Ingredients
Half-and-half — 480 ml / 16 oz
Sugar — 12–18 g / 1–1½ tbsp, or maple 15–20 ml / 1–1⅓ tbsp
Vanilla extract — 5 ml / 1 tsp
Salt — 0.25 g / tiny pinch
Whisk to dissolve.
Pour & keep Chill thoroughly; it froths beautifully for cold foam. If you need less sweetness, drop sugar by 4 g and add a dash more vanilla for aroma lift.
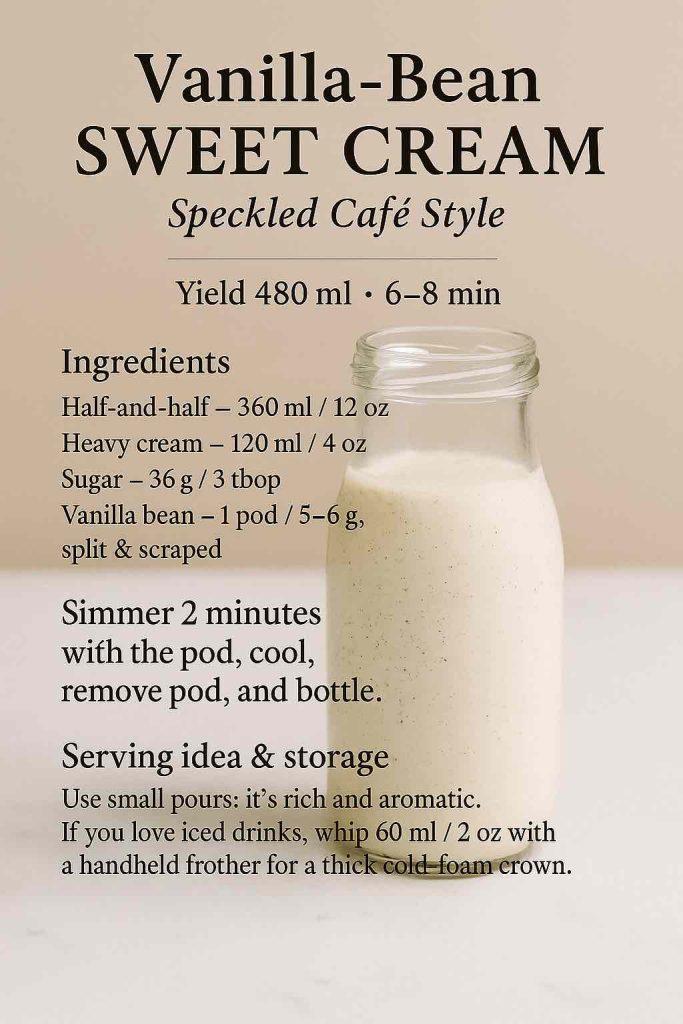
Vanilla-Bean Sweet Cream (Speckled Café Style)
A showpiece for brunches, speckled vanilla-bean sweet cream lands squarely in “treat” territory yet still stirs cleanly into hot or iced coffee.
Yield: ~480 ml / 16 oz Active: 6–8 minutes
Speckled vanilla bean coffee creamer with café-level richness; simmer briefly with the pod, then cool and remove. Use small pours or whip 2 oz into thick cold foam for iced drinks.
Ingredients
Half-and-half — 360 ml / 12 oz
Heavy cream — 120 ml / 4 oz
Sugar — 36 g / 3 tbsp
Vanilla bean — 1 pod / 5–6 g, split & scraped
Simmer 2 minutes with the pod, cool, remove pod, and bottle.
Serving idea & storage Use small pours; it’s rich and aromatic. If you love iced drinks, whip 60 ml / 2 oz with a handheld frother for a thick cold-foam crown.
Storage, Frothing & Troubleshooting (Smooth Results, Every Time)
Separation happens, especially in homemade dairy-free coffee creamer. Consequently, shake before each pour. For a more stable emulsion, blend in 5 ml / 1 tsp neutral MCT or 15 g / 1 tbsp cashew butter, then chill.
Shelf life: Dairy bases generally last 7–10 days; plant bases 5–7 days. Nevertheless, trust your senses—sour smell, fizzing, or curdling after shaking means discard.
Frothing temps: Aim for 55–65 °C / 139–149 °F for stable microfoam; much hotter and proteins collapse the foam.
Sweetness strategy: Start lower; coffee amplifies sweetness. If you need to keep macros tight, compare your exact milk or plant base in FoodData Central before standardizing a weekly batch.
Iced coffee tips: Bloom dry powders (cocoa, spices) in a teaspoon of hot coffee before filling the cup; lumps disappear and flavors disperse evenly.
Batching & gifts: Double recipes and use swing-top bottles; label with flavor and date. Friends will ask for refills—inevitably.
Ultimately, crafting a homemade coffee creamer means choosing your ingredients, calibrating sweetness, and embracing seasonality—without relying on additives. Because the DIY coffee creamer base takes five calm minutes, you can rotate French vanilla for weekday comfort, pumpkin spice for crisp mornings, Italian sweet cream for bakery nostalgia, and zero-sugar options for mindful sipping. Furthermore, you can pivot instantly: condensed-milk for silk, powdered for travel, coconut milk for dairy-free richness, or hazelnut + mocha for café drama at home. In other words, you’re building a small, delicious habit that improves every cup—day after day, season after season.
FAQs
1) What is homemade coffee creamer, and why make it yourself?
A homemade coffee creamer is a simple milk-and-flavor blend you build at home; therefore, you control sweetness, texture, and ingredients. Consequently, you can create French vanilla, pumpkin spice, or even zero-sugar French vanilla creamer without additives. Moreover, it’s cheaper per serving and scales beautifully.
2) How long does a DIY coffee creamer last in the fridge?
Generally, dairy-based homemade coffee creamer keeps 7–10 days, while plant-based versions keep 5–7 days. However, always sniff and shake; if it smells sour or separates irreversibly after shaking, discard it. Additionally, label jars with the make date to stay consistent.
3) I can’t buy half-and-half—what’s the global substitute?
Because “half-and-half” is regional, just mix 1 part cream : 3 parts whole milk to land near 10–12% fat. Alternatively, if you have single/light cream (18–20%), combine 3 parts single cream : 2 parts milk. For plant options, blend 1 part coconut cream : 3 parts almond or oat milk for similar body.
4) Can I make a healthy homemade creamer that’s still creamy?
Absolutely. For a healthy homemade creamer, use unsweetened almond milk plus coconut cream (or cashew cream) for body. Furthermore, sweeten with allulose or a few stevia drops; the mouthfeel stays lush while sugars stay low.
5) What’s the easiest homemade coffee creamer recipe for beginners?
Start with the master base: milk + half-and-half, a touch of sugar (or allulose), vanilla, and a pinch of salt. Then, whisk, chill, and adjust sweetness in the cup. Afterwards, branch into a coffee creamer recipe like French vanilla coffee creamer or pumpkin spice creamer recipe.
6) How do I make a zero sugar French vanilla creamer that isn’t gritty?
Use allulose (dissolves cleanly) and add a little coconut cream for body. Meanwhile, a pinch of salt and pure vanilla round the flavor. Consequently, you get a smooth zero sugar French vanilla creamer with a classic café finish.
7) What’s the difference between coffee creamer and half-and-half?
Half-and-half is simply milk and cream; it’s unsweetened and unflavored. Coffee creamer, however, is a flavored, sweetened mix—dairy or non-dairy—designed to disperse easily. Therefore, if you want flavor (vanilla bean, hazelnut, pumpkin), choose a DIY coffee creamer; if you want neutral richness, use half-and-half.
8) Which milk works best for almond-milk or coconut-milk coffee creamer?
For almond milk coffee creamer, pick unsweetened and add a spoon of coconut cream or cashew cream so it doesn’t taste watery. Conversely, for coconut milk coffee creamer, use full-fat cans for stable texture; then, thin with oat milk if coconut notes feel strong.
9) Can I make a coffee creamer with condensed milk?
Yes—coffee creamer condensed milk is ultra-silky and nearly foolproof. Simply whisk sweetened condensed milk with milk (or water + coconut cream) and, optionally, vanilla. As a result, the sweetness is built-in, so start with a small pour.
10) How do I make powdered coffee creamer for travel or the office?
Blend coconut milk powder with a little sugar (or allulose) and vanilla powder. Then, store it airtight and use 1–2 teaspoons per cup. For lump-free results, dissolve the powdered coffee creamer in a splash of hot coffee first; afterwards, top up with more coffee or ice.
11) What’s the best way to stop separation in non-dairy creamer?
First, chill thoroughly and shake before each pour. Next, for extra stability, briefly blend the batch with 1 teaspoon neutral oil or 1 tablespoon cashew butter. Consequently, the emulsion tightens and stays smooth in hot coffee as well as iced coffee.
12) How do I keep spices from clumping in pumpkin spice creamer?
Warm the mixture gently and whisk; spices bloom and disperse. Alternatively, if you’re adding to iced coffee, pre-bloom spices (or cocoa) in 1 tablespoon hot water, then stir into your pumpkin spice creamer. Therefore, you’ll avoid gritty cups.
13) Can I froth homemade coffee creamer for cold foam?
Definitely. For reliable microfoam, aim for 55–65 °C (139–149 °F) for dairy bases. Meanwhile, barista-style oat milk or almond-oat blends froth well for non-dairy foam. Nevertheless, avoid overheating; beyond ~70 °C, foam collapses.
14) Does heavy whipping cream in coffee replace creamer?
It can—heavy cream is rich and unsweetened. However, because it’s dense, start with 1–2 teaspoons per cup and, if needed, thin with milk. Alternatively, whisk heavy cream into the master base to create a sweet cream style homemade creamer.
15) What flavors should I try after French vanilla and pumpkin spice?
Go broad: Italian sweet cream, hazelnut, chocolate-raspberry mocha, vanilla bean sweet cream, and caramel sweet cream. Moreover, for seasonal fun, rotate egg-nog style (holiday) or cinnamon-roll in colder months; consequently, mornings never feel repetitive.
16) Can I make a dairy-free, sugar-free creamer that still tastes indulgent?
Yes—blend almond milk with coconut cream (or cashew cream) and sweeten with allulose. Then, add vanilla bean or cinnamon for aroma. In short, you’ll get a dairy-free, zero-sugar homemade coffee creamer that still feels café-rich.
17) Is it safe to freeze homemade coffee creamer?
You can, although texture may change slightly after thawing. Consequently, freeze in ice-cube trays; later, drop cubes into iced coffee so it stays cold and creamy. However, for best flavor, use frozen creamer within 1 month.
18) How do I scale a coffee creamer recipe for weekly prep?
Double (or triple) the coffee creamer recipe and store in two smaller bottles instead of one large jar; thus, you open less often and preserve freshness. Additionally, keep a sticky note with the ratio you love—e.g., 20 ml (4 tsp) per 240 ml (8 oz) cup—so you hit your sweet spot every time.
19) My creamer tastes flat—how do I fix it quickly?
Add a pinch of salt to round bitter edges, then bump vanilla by ¼ teaspoon. If it’s still dull, add 1–2 teaspoons maple (or ½ teaspoon allulose) and taste again. Finally, if texture’s thin, blend 1–2 teaspoons coconut cream for immediate body.
20) Which is better for iced coffee: powdered, condensed-milk, or classic homemade creamer?
Each shines differently. Powdered non-dairy creamer is convenient and mixes cleanly (once pre-wetted). Condensed-milk creamer brings lush sweetness that survives dilution. Meanwhile, classic homemade coffee creamer is the most flexible—especially when you want vanilla bean coffee creamer or a pumpkin spice creamer recipe with adjustable sweetness.
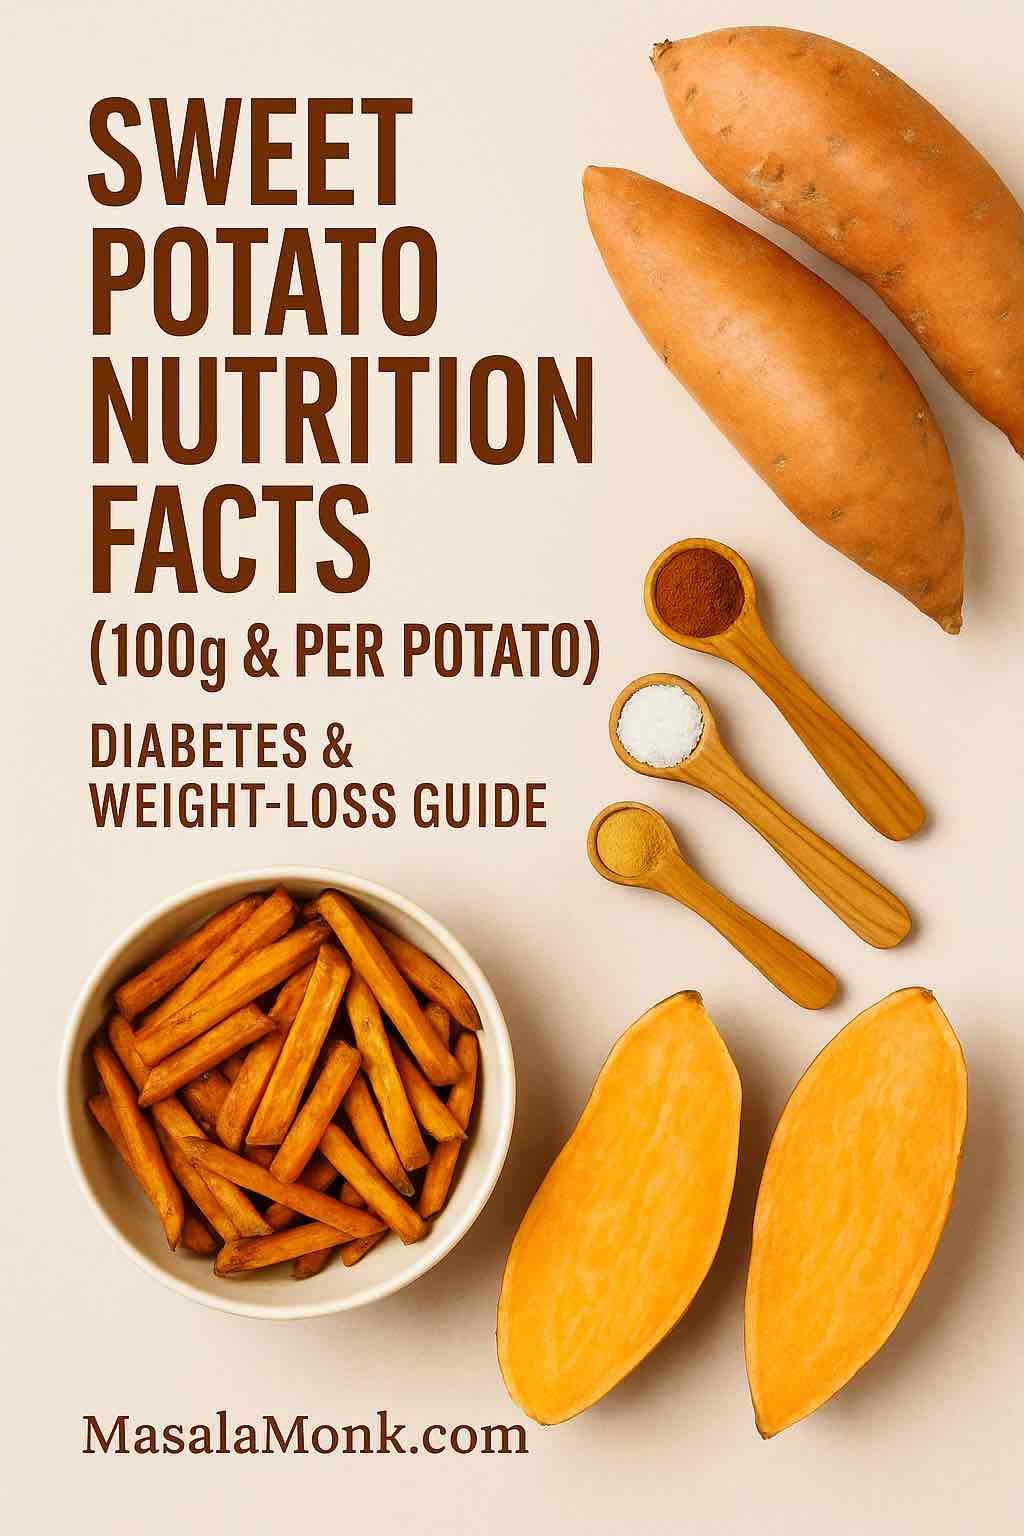
If you came here for sweet potato nutrition facts, you’re in exactly the right place. Right from the first bite, sweet potatoes deliver comfort; yet, underneath that velvet sweetness lies a nutrition profile that’s both practical and powerful. In this guide, you’ll find per-100 g numbers, per-potato estimates, and deeply usable advice for type 2 diabetes, weight management, and smarter fries. Moreover, you’ll get cooking methods that truly change the numbers, guidance on skins and fiber, clarity on white vs. purple vs. “yams,” and elegant meal blueprints that turn information into dinner. When you want to double-check any figure, lean on authoritative resources like USDA FoodData Central and MyFoodData’s baked sweet potato profile.
Sweet Potato Nutrition Facts (Per 100 g, Cooked): The Label You Can Trust
To begin, let’s ground the discussion in sweet potato nutrition facts per 100 g cooked (typical baked or boiled). These ranges are realistic for home cooks and menu planners:
Calories: ~86–103 kcal
Carbohydrates: ~20–21 g
of which fiber: ~3.0–3.3 g
Protein: ~1.6–2.0 g
Fat: ~0.1–0.2 g
Potassium: ~337 mg
Vitamin A (RAE): ~700+ μg (primarily as beta-carotene)
Vitamin C: ~2–3 mg
Manganese: ~0.3 mg
Additionally, sweet potatoes provide smaller but notable amounts of vitamin B6, copper, magnesium, and pantothenic acid—micronutrients that often slip under the radar yet support energy metabolism and skin integrity. Numbers shift slightly by variety and method; nevertheless, this label-style snapshot is a sturdy, real-world baseline. For raw-to-cooked changes, micronutrient depth, or amino-acid profiles, verify in USDA FoodData Central or the readable label at MyFoodData.
Cook’s note: Keep the skin on whenever possible. It lifts fiber without effort, helps retain water-soluble vitamins, and—delightfully—holds seasonings on the surface.
Sweet Potato Nutrition Facts (Per Potato): What a “Potato” Actually Means
Because shoppers pick tubers—not grams—here are sweet potato nutrition facts per potato using edible-portion estimates. Consequently, you can portion intelligently without a scale:
Size
Example edible weight
Calories
Carbs
Fiber
Small
~120 g
~103 kcal
~24 g
~3–4 g
Medium
~160 g
~138 kcal
~32 g
~4–5 g
Large
~220 g
~189 kcal
~44 g
~6–7 g
If you’re counting carbohydrates, ½ medium sweet potato is roughly 15–20 g carbs, which dovetails with the common “one carb choice” teaching in diabetes education. For precise cooked forms (boiled flesh only, baked with skin, mashed with milk), cross-check the specific entries on MyFoodData.
Sweet Potato Nutrition Facts for Type 2 Diabetes: The Sensible Playbook
Principle #1: budget carbohydrates rather than banning foods. Because carbohydrates influence blood glucose most, the American Diabetes Association recommends carb counting and flexible planning rather than rigid restrictions: see Carb Counting & Diabetes. Additionally, the CDC offers an accessible orientation to the 15-gram carb choice concept here: Carb Counting to Manage Blood Sugar.
Now, apply those principles to sweet potato nutrition facts:
Portion first. Begin with ½ medium (~15–20 g carbs). Then, test your glucose response; consequently, you’ll discover your personal tolerance.
Method matters.Boiled or steamed sweet potato often yields a gentler immediate glycemic impact than baked, roasted, or fried versions. Moreover, cooling and reheating can increase resistant starch, which behaves more like fiber.
Pair smart. Combine your portion with lean protein (eggs, fish, tofu, paneer) and non-starchy vegetables. A drizzle of olive oil, a scatter of nuts, or a dollop of yogurt slows digestion and improves satisfaction.
Keep the skin. The extra fiber supports steadier post-meal glucose and better satiety.
For an easy visual, the ADA’s Meal-Planning & Plate Method lays out a reliable template you can reuse nightly. And if you’re comparing tubers on principle, here’s a thoughtful editorial look at texture, nutrients, and kitchen behavior: The Potato Debate: White vs Sweet.
Glycemic Index (GI) & Glycemic Load (GL): Making Sweet Potato Nutrition Facts Practical
Because blood sugar response matters, let’s add GI and GL to your sweet potato nutrition facts so you can act with confidence.
Quick definitions (warm + simple):
Glycemic Index (GI) estimates how fast a carb food raises blood glucose per gram of carbohydrate.
Glycemic Load (GL) captures both speed and size of the carb hit: ∗∗GL=(GI×netcarbsingrams)÷100∗∗**GL = (GI × net carbs in grams) ÷ 100**∗∗GL=(GI×netcarbsingrams)÷100∗∗ (Net carbs = total carbs − fiber.)
Typical GI by Cooking Method (variety matters, so think in ranges)
Preparation (cooked)
Typical GI range*
Why it varies
Boiled / Steamed
~45–60
Moist heat keeps starches less available; often gentler on glucose.
Baked / Roasted
~60–80
Dry heat concentrates sugars and promotes caramelization.
Mashed (warm)
~65–80
More surface area + warmth = faster digestion.
Fries (deep-fried)
~70–85
High heat and low moisture push GI upward.
Cooled then reheated (any method)
slightly lower vs hot fresh
Cooling can increase resistant starch, acting more like fiber.
*GI for sweet potatoes varies widely by cultivar (orange, Japanese, purple), ripeness, and test protocol. Use these as directional ranges, then let your meter be the final judge.
GL Examples You Can Use Tonight
Using the nutrition baselines from your post (per 100 g: ~20.5 g carbs, ~3.1 g fiber → ~17.4 g net carbs; ½ medium potato: ~16 g carbs, ~2.4 g fiber → ~13.6 g net carbs):
Per 100 g, boiled (assume GI 50): GL ≈ 50 × 17.4 ÷ 100 = ~8.7 → Low
Per 100 g, baked/roasted (assume GI 70): GL ≈ 70 × 17.4 ÷ 100 = ~12.2 → Medium
½ medium potato, boiled (GI 50): GL ≈ 50 × 13.6 ÷ 100 = ~6.8 → Low
½ medium potato, baked (GI 70): GL ≈ 70 × 13.6 ÷ 100 = ~9.5 → Low-to-Medium
Restaurant fries, ~150 g serving (assume 33 g carbs, 3 g fiber → 30 g net; GI 75): GL ≈ 75 × 30 ÷ 100 = ~22.5 → High
How to Use GI/GL Without Overthinking It
Prefer moist heat (boil/steam) on days you want the calmest glucose curve; cool, then reheat when you meal-prep.
Scale portions: starting at ½ medium potato keeps GL low for most people.
Pair smart: protein + non-starchy veg + a little healthy fat (olive oil, nuts, yogurt) soften the spike, even when you choose baked wedges.
Save fries for “sometimes”: delicious, yes—yet their GL is high, especially in restaurant-size servings.
In short, GI tells you how fast; GL tells you how much. Together with your sweet potato nutrition facts, they make plate decisions wonderfully clear.
Sweet Potato Nutrition Facts for Weight Management: Satiety Without the Sulk
Crucially, sweet potato nutrition facts sketch a food that satisfies per calorie. At ~86–103 kcal per 100 g cooked and ~3 g fiber per 100 g, sweet potatoes deliver structure, subtle sweetness, and volume—the sensory trifecta behind portion control.
Three tactics make the difference:
Season boldly, cook simply. Skip butter-and-sugar habits in favor of olive oil, citrus, chilli, pepper, and herbs. Consequently, you’ll highlight the vegetable’s inherent sweetness and keep calories reasonable.
Swap refined sides. Replace bread baskets, sugary casseroles, or frosting-heavy “bakes” with roasted wedges, yogurt-lightened mash, or warm salads. Therefore, you quietly elevate micronutrients while controlling energy.
Build contrast. Crisp edges plus cooling yogurt, crunchy seeds, and fresh herbs trick your brain (in the best way) into perceiving abundance at modest portion sizes.
Cooking Methods Through the Lens of Sweet Potato Nutrition Facts
As we know cooking transforms both numbers and experience, think of method as a dial you can tune to your goals:
Boiling/Steaming: Often the gentlest immediate glycemic impact. Salt after cooking; finish with olive oil and herbs to keep flavors lifted without calorie creep.
Baking/Roasting: Drives surface caramelization and intensifies sweetness. Consequently, employ acids (lime, vinegar), heat (chilli), and bitter notes (rocket/greens) to balance the richer flavor and keep portions natural.
Cooling & Reheating: Encourages resistant starch formation; some diners notice smoother post-meal curves. Use this for meal prep—roast on Sunday, reheat during the week.
Frying: A weekend treat. Meanwhile, air-frying or high-heat baking mimics crispness with a fraction of the fat—perfect for weeknights.
Because method interacts with variety, don’t be surprised if an orange, moisture-rich cultivar behaves differently from a denser Japanese type. Keep your meter (or your hunger cues) as the final judge.
Fries & Chips, But Make Them Honest (Still Rooted in Sweet Potato Nutrition Facts)
Let’s address the question everyone cares about: can fries fit? Yes—if you control fat, salt, and portion, and if you respect what sweet potato nutrition facts tell you about calories and carbs.
Air-Fryer/Baked Sweet Potato Fries (serves 2)
You need: 2 small sweet potatoes (skins on), 2 tsp olive oil, pinch salt, paprika/garlic powder.
Method: Slice into thin batons. Toss evenly with oil and seasoning. Spread in a single layer. Air-fry at 200 °C for 12–15 minutes (shake once) or bake at 220 °C for 20–25 minutes until the edges caramelize.
Why it aligns with your goals: You use far less oil than deep-frying, you keep the fiber-rich skins, and you choose the portion. For baseline macro estimates, consult the label-style sweet potato nutrition facts at MyFoodData.
Fiber, Skins, and a Happier Gut (Explained with Sweet Potato Nutrition Facts)
Since sweet potato nutrition facts reveal both soluble and insoluble fiber (roughly ~3 g/100 g cooked), leaving skins on is an elegant uplift—no supplements needed. Fiber supports gut regularity, blunts post-meal glucose, and enhances fullness. However, fiber works best with adequate fluids and light movement; therefore, sip water through the day and consider a brisk 10-minute walk after meals.
If you puree, consider “fold-backs”: stir finely chopped, well-scrubbed skins back into mash for delicate speckles of texture. Likewise, roasted skin shards make a clever garnish on soups and salads. For detailed fiber comparisons by method or variety, search USDA FoodData Central and pick the exact entry that matches your cooking style.
Purple, White & “Yams”: What Color and Botany Actually Mean
Even within the umbrella of sweet potato nutrition facts, color and species signal important differences:
Purple sweet potatoes: Packed with anthocyanins, the same pigment family found in blueberries. Although research is ongoing, rotating colors plausibly diversifies antioxidant intake—deliciously so.
White sweet potatoes: Milder sweetness, paler flesh, and lower provitamin A than orange types; however, they still provide fiber and potassium.
True yams (Dioscorea): A different plant entirely. In many markets, “yam” is used colloquially for sweet potatoes; nonetheless, true yams are usually far lower in vitamin A and have a different texture. When labels confuse, confirm via the USDA FoodData Central search.
Variety does influences both flavor and glycemic response, it’s worth experimenting. Japanese sweet potatoes (often denser and sweeter), for instance, roast beautifully and pair well with sharp, lemony greens.
Micronutrient Nuance: Beyond Calories and Carbs
While sweet potato nutrition facts headline beta-carotene and potassium, a deeper glance reveals subtler helpers:
Vitamin B6: Supports amino-acid metabolism and neurotransmitter synthesis; useful when your plate leans protein-forward.
Copper & Manganese: Trace minerals that, nevertheless, contribute to antioxidant defenses and connective tissue health.
Vitamin C: Modest amounts still aid collagen formation and iron absorption—helpful if your diet is plant-centric.
Moreover, because vitamin A from beta-carotene is fat-soluble, a minimal amount of healthy fat (olive oil, seeds, tahini) enhances absorption. Consequently, that drizzle of oil is more than a flavor move; it’s functional nutrition.
Athlete & Active-Life Angle: Fuel, Recovery, and Convenience
For active people, sweet potato nutrition facts map neatly onto pre- and post-workout needs:
Before training: A small serving (e.g., 100–150 g cooked) delivers easily digestible carbs with a modest fiber load—enough for steady energy without heaviness.
After training: Pair roasted cubes with a protein source (chicken, eggs, Greek yogurt, tofu) and greens to replenish glycogen while supporting muscle repair.
On the go: Bake a tray on Sunday; consequently, you can build fast bowls with eggs or chickpeas all week. The cool-then-reheat rhythm also encourages resistant starch formation, which some athletes find gentler on the gut.
We know that travel derails routines, pack a little jar of spice mix (smoked paprika, chilli, garlic powder) and tiny olive-oil bottle; hotel-microwaved sweet potato with a pinch of salt and that blend is surprisingly satisfying.
Breakfast, Lunch, and Dinner: Blueprints You’ll Actually Use
Breakfast (choose one; rotate across the week):
Yogurt-Mash Bowl: Warm 100 g mashed sweet potato, top with Greek yogurt, roasted seeds, cinnamon, and a drizzle of honey if desired. Consequently, you get a macro balance that feels like brunch.
Egg-and-Hash Skillet: Pan-crisp diced sweet potato with onions and cumin; crack in two eggs; finish with coriander and lime. Moreover, it reheats well for packed mornings.
Smooth(-ish) Not-Juice: Blend roasted sweet potato with yogurt, water, ginger, and a squeeze of orange. However, avoid juicing (which removes fiber and concentrates sugars); keep the fiber in the blender.
Lunch (simple but composed):
Two-Texture Salad: Roast cubes until char-speckled; toss warm with rocket, toasted seeds, and lime-tahini dressing. Additionally, it packs neatly for the office.
Tray-Bake Power Plate: Roast sweet potato wedges beside chicken thighs or tofu; add a quick cucumber-herb salad. Therefore, you achieve a restaurant-clean composition with Tuesday-night effort.
Chaat-Inspired Bowl: Boiled cubes, thick yogurt, tamarind, mint chutney, roasted chana, and herbs. Meanwhile, spice and tang provide big satisfaction without big calories.
Dinner (crowd-pleasing and meter-friendly):
Coconut-Ginger Soup: Simmer chunks with ginger and garlic; add coconut milk; blitz to velvet. Finish with lime zest and chopped peanuts. Consequently, it’s luxurious without cream.
Silky Mash with Yogurt & Chives: Boil, drain thoroughly, mash with Greek yogurt, olive oil, and chives; serve with pan-seared fish or grilled paneer.
The Honest Fry Night: Air-fried batons + grilled protein + zingy slaw. For protein ideas that travel well between cuisines, browse 5 High-Protein Vegan Air-Fryer Ideas.
Portioning by Goal: A Quick Reference Using Sweet Potato Nutrition Facts
Everyone’s goals differ, use this goal-based portion guide anchored to sweet potato nutrition facts:
Weight maintenance:100–150 g cooked (≈ 86–130 kcal) as a side, 1× daily. Pair with protein and veg.
Weight loss:75–125 g cooked (≈ 65–110 kcal) as a side, focusing on texture contrast and acid to enhance satisfaction.
Endurance training days:150–250 g cooked across meals (timed pre-/post-workout).
Type 2 diabetes (general starting point):½ medium (~15–20 g carbs) at a time, paired sensibly; adjust based on meter readings.
Naturally, these are templates. Therefore, keep an eye on satiety, performance, and any clinical markers you track.
“Sweet potatoes are automatically low-GI.” Not automatically. Variety and method matter; therefore, boiled/steamed tends to be gentler than baked/fried, and portions still count. If you use a CGM or meter, your data trumps broad claims.
“White potatoes bad; sweet potatoes good.” Too binary. Both can fit a balanced plate when portioned and paired. For a 100 g side-by-side, try the MyFoodData comparison tool; meanwhile, for culinary context, see The Potato Debate: White vs Sweet.
“Fries are always unhealthy.” Context decides. Air-fryer or oven fries with minimal oil and skins-on can align with both diabetes-aware and weight-conscious eating—especially alongside lean protein and salad.
“Yams = sweet potatoes.” Not quite. “Yam” is often a nickname; however, true yams are different and generally lower in vitamin A. When in doubt, verify via USDA FoodData Central.
“Juicing sweet potatoes is better than eating them.” Not necessarily. Juicing strips fiber, which matters for satiety and glycemic control. Consequently, if you prefer a drinkable format, blend roasted sweet potato into smoothies so the fiber remains.
Sensory Science: Why These Dishes Feel So Satisfying
Understanding why sweet potato nutrition facts translate into real satisfaction helps you cook with intent:
Texture contrast (crisp edges + creamy interiors) engages more senses, which, in turn, increases fullness signals.
Aromatics (ginger, garlic, warm spices) and acids (lime, vinegar) brighten perceived sweetness so you need less added sugar.
Temperature play (hot wedges against cool yogurt) reads as indulgent even at modest calories.
Color rotation (orange, purple, white) keeps boredom at bay while diversifying antioxidants.
Therefore, if you build plates with contrast, color, and acid, you’ll feel like you ate more than the calorie math suggests—an invaluable trick for both weight management and contentment.
Putting It All Together: A Weeknight Plate That Loves You Back
Finally, let’s pull the threads tight and turn sweet potato nutrition facts into a plate you’ll actually repeat:
A tray of skin-on wedges hits a 220 °C oven for about 22 minutes.
At minute 10, paprika-garlic chicken thighs (or tofu slabs) slide onto the same tray for the remaining 12 minutes.
On the counter, a bowl of lemon-zested Greek yogurt waits with a swirl of olive oil, salt, and black pepper.
A peppery green salad gets tossed at the end with lime and chilli flakes.
Consequently, dinner lands as a four-part, high-satisfaction composition: crisp-tender wedges, juicy protein, cooling creaminess, and bright greens. It looks restaurant-polished, eats comfort-first, and fits smart nutrition without feeling like homework.
In short: Treat 100 g as your mental ruler. Keep skins when you can. Boil or steam for calm days; roast when you crave drama; air-fry when fries call your name. Additionally, pair with protein, flood the plate with vegetables, and let acid and heat carry flavor so portions stay comfortable. If you live with diabetes, let your meter be the critic that matters. If you’re trimming calories, remember that texture and seasoning do the heavy lifting for satisfaction.
Source Hubs You Can Trust
USDA:FoodData Central — the authoritative database for nutrient values across raw and cooked forms.
Editor’s note: Values vary by cultivar and preparation; use these figures as practical averages. For medical advice, always consult your clinician.
1) What are the key sweet potato nutrition facts per 100 g?
Warmly put: per 100 g cooked you’ll usually see ~86–103 kcal, ~20–21 g carbs, ~3 g fiber, ~1.6–2 g protein, and standout vitamin A. Moreover, these numbers make portioning simple—and delicious.
2) How many calories and carbs are in one sweet potato?
Typically, a small (~120 g) is ~103 kcal/~24 g carbs; a medium (~160 g) is ~138 kcal/~32 g carbs; a large (~220 g) is ~189 kcal/~44 g carbs. Therefore, starting with ½ medium keeps carbs near 15–20 g.
3) Are sweet potatoes good for type 2 diabetes?
Yes—however, portions and method matter. Boil or steam for gentler spikes, pair with protein and non-starchy veg, and keep the skin for fiber. In short, your meter will confirm how the sweet potato nutrition facts fit your day.
4) Do sweet potatoes help with weight loss?
They can—because fiber aids fullness and the calorie density is modest. Additionally, season boldly (citrus, chilli, herbs) and cook simply (roast, boil, air-fry) so satisfaction stays high while calories stay reasonable.
5) What’s healthier: sweet potato fries baked/air-fried or deep-fried?
Baked/air-fried, hands down. Consequently, you use far less oil, keep skins for fiber, and control salt and portion. For even better results, shake the basket halfway and serve with a protein-rich main.
6) Does the skin actually add meaningful nutrition?
Absolutely. Notably, leaving skins on bumps fiber and helps preserve water-soluble vitamins. Therefore, scrub well and keep them on for wedges, fries, and mash-with-texture.
7) Are purple sweet potatoes more nutritious?
They’re different, not automatically “better.” Purple varieties bring anthocyanins (antioxidants), while orange types excel at beta-carotene (vitamin A). Moreover, rotating colors broadens your nutrient palette without any fuss.
8) Are yams the same as sweet potatoes?
No. Meanwhile, many markets use “yam” loosely, but true yams (Dioscorea) are a different plant and generally lower in vitamin A. For clarity, rely on the sweet potato nutrition facts on your package or database.
9) What’s the best serving size for everyday eating?
As a side, 100–150 g cooked (≈86–130 kcal) suits most balanced plates. For diabetes management, start with ½ medium and adjust. Additionally, add protein and a pile of non-starchy veg to round things out.
10) Do sweet potatoes help with constipation?
Often, yes. Because they offer ~3 g fiber/100 g, they can support regularity—especially with skins on. Finally, pair with fluids and a short post-meal walk for best results.
11) Are sweet potatoes good for eyesight?
They can be supportive. Thanks to high beta-carotene (provitamin A), they contribute to healthy vision as part of a varied diet. However, balance matters—mix in leafy greens and other colorful veg, too.
12) What are the sweet potato nutrition facts for fries or chips?
Homemade baked/air-fried fries generally land ~120–160 kcal per 100 g (oil-dependent), with ~22–27 g carbs and ~3–4 g fiber. Deep-fried restaurant servings, by contrast, can quickly double calories; consequently, home control wins.
13) Is juicing sweet potatoes a good idea?
Not really. Because juicing removes fiber, you lose one of the best parts of the sweet potato nutrition facts. Instead, blend roasted sweet potato into smoothies so the fiber—and satisfaction—stay intact.
14) Are sweet potato noodles healthy?
They can be, yet remember they’re mostly starch. Therefore, treat them like any noodle: mind portions, add protein (eggs, tofu, chicken), and load the bowl with vegetables to balance the sweet potato nutrition facts.
15) Which cooking method best supports steady blood sugar?
Generally, boiling or steaming is gentler than baking or frying. Additionally, cooling and reheating can increase resistant starch. Therefore, on days you want calm curves, choose moist heat and pair wisely.
16) Can I eat sweet potatoes daily?
You can, provided portions fit your goals and the rest of your diet stays varied. Moreover, rotate with other starches (beans, whole grains) and colors (purple/orange/white) so you don’t lean on one nutrient profile alone.
17) What’s the healthiest way to make mashed sweet potatoes?
Boil, drain well, then mash with Greek yogurt, a drizzle of olive oil, salt, and chives. Consequently, you get creamy texture, extra protein, and all the comfort—without the heavy cream.
18) Do sweet potato leaves have benefits?
They’re edible and nutrient-rich in many cuisines. However, availability varies; if you find them, sauté like spinach with garlic and a squeeze of citrus to complement the core sweet potato nutrition facts on your plate.
19) Are white sweet potatoes less nutritious?
They’re simply different—typically milder and lower in provitamin A than orange types, yet still a solid source of carbs, fiber, and potassium. Additionally, they roast beautifully and balance spicy mains.
20) How do I use sweet potato nutrition facts to build a plate?
Start with your target portion (e.g., 100–150 g cooked). Then, add lean protein (egg, chicken, fish, tofu) and double the volume with non-starchy veg. Finally, finish with acid (lime, vinegar) and herbs so smaller portions feel abundant.
21) What about healthy casseroles—do they ever fit?
They can, if you tame sugar and fat. For example, skip marshmallows and syrup; instead, bake slices with olive oil, salt, warm spices, and toasted nuts. Consequently, you keep the sweet potato nutrition facts on your side.
22) Are sweet potato supplements worth it?
Whole foods are usually the better bet. Notably, supplements can’t replace the fiber, water, and synergy of real ingredients. Therefore, default to food first unless a clinician suggests otherwise.
23) How do sweet potato nutrition facts compare with white potatoes?
Both are wholesome. Sweet potatoes lead in beta-carotene; white potatoes can be higher in vitamin C (and sometimes potassium). Moreover, method and portion influence the health impact more than the label alone.
24) Any quick meal ideas that respect the numbers?
Absolutely: roasted wedges with lemony yogurt and herbs; black-bean & sweet-potato tacos; coconut-ginger soup; or air-fried batons with a grilled protein and crunchy slaw. Additionally, batch-roast on Sunday to save time all week.
25) Final word—how do I keep this simple?
In short, let sweet potato nutrition facts guide, not police. Choose 100–150 g cooked as your mental ruler, keep skins on, pick boiling/steaming for gentler days, and, finally, balance every plate with protein and colorful vegetables.
There’s a moment—right after the first shake—when mango and citrus perfume the air and the tin goes icy in your hands. That’s when a mango martini stops being just another summer drink recipe and becomes a small celebration. Because mango carries sunshine in its fibers and vodka carries clarity in its bones, they meet in the glass with effortless grace. However, the difference between a sweet, muddled fruit drink and a crisp, bar-quality cocktail is in the balance: just enough acid to lift, just enough orange liqueur to sparkle, and just enough dilution to glide.
Today, we’ll start with a classic Mango Martini recipe you can learn by heart. Then, we’ll move through five high-intent riffs people love making at home: Spicy, Passion Fruit (“Pornstar”-style), Frozen, Mango-Vodka, and Mango–Pineapple. Along the way, we’ll drop in helpful technique links, because sometimes you want a second opinion or a deeper dive. Moreover, you’ll find small upgrade notes inside each recipe so you can dial flavor exactly to your liking. And although these builds are quick, they’re not shortcuts; instead, they’re flexible frameworks that welcome your taste and your pantry.
If you’re picking fruit right now, choose mangoes you’d happily eat out of hand. For quick guidance on texture and sweetness, skim Best Mango for Aamras; it’s a handy companion when you’re puréeing for drinks. Similarly, if you prefer a published point of reference for the classic shape of this cocktail, both SAQ’s Mango Martini and this straightforward mango martini cocktail echo the same structure you’ll see below.
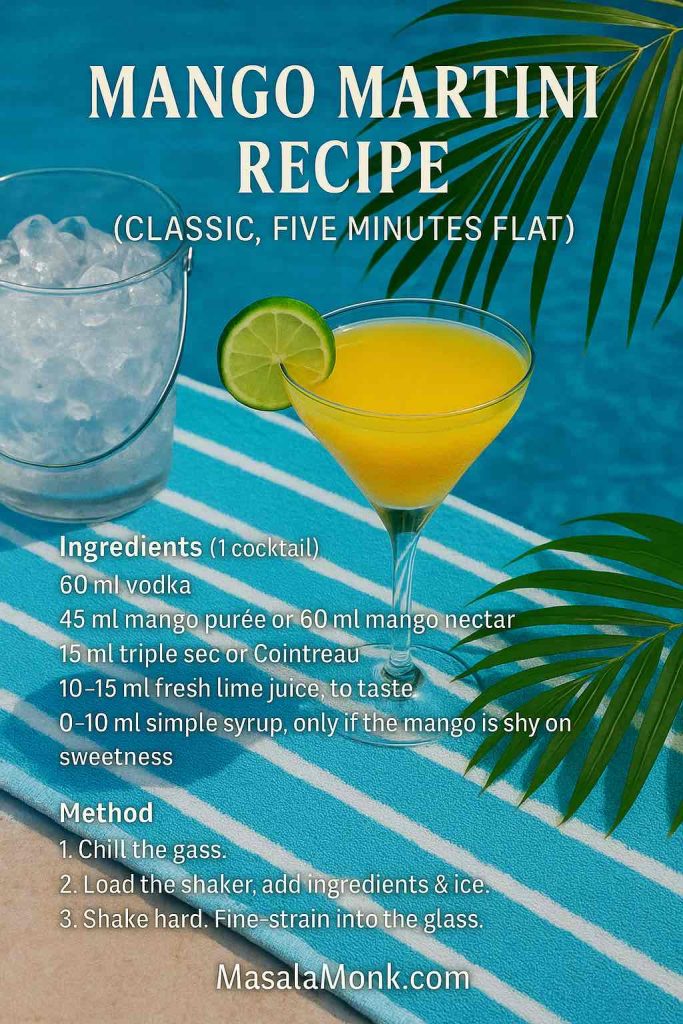
A good mango martini is a study in contrast. On one hand, mango brings velvety body; on the other, lime juice cuts a clean path through the sweetness. Furthermore, a measured pour of orange liqueur adds a bright, candied orange aroma that reads as “cocktail” rather than “smoothie.” Finally, a hard shake and a fine strain give you that hotel-bar polish at home.
Ingredients (1 cocktail)
60 ml vodka
45 ml mango purée or 60 ml mango nectar
15 ml triple sec or Cointreau
10–15 ml fresh lime juice, to taste
0–10 ml simple syrup, only if the mango is shy on sweetness
Poolside serve: pre-chill the coupe in an ice bucket, shake to a tight frost, and strain fast so the towel setup stays crisp. For two drinks of Mango Martini, double the mix but keep shaking time the same to preserve texture.
Method
Chill the glass. Place a coupe or martini glass in the freezer while you prep.
Load the shaker. Add vodka, mango, orange liqueur, lime, and—if needed—simple syrup to a shaker with plenty of ice.
Shake hard. Go for 12–15 seconds until the tin frosts. Consequently, you’ll build proper dilution and a satiny texture.
Fine-strain. Double-strain into the chilled glass to catch fibers and ice chips.
Garnish. Express an orange peel over the surface or perch a mango slice on the rim.
Notes & Tiny Upgrades
Purée vs nectar: Purée gives plush texture; nectar is lighter. Therefore, if you swap nectar in, reduce or skip simple syrup.
Citrus balance: Limes vary wildly. Start at 10 ml; then taste and adjust. Likewise, if your mango is overripe, lean into the lime for lift.
Technique reassurance: For another published baseline that mirrors this balance, check SAQ’s recipe and this home-kitchen mango martini cocktail.
Spicy Mango Martini Recipe (Jalapeño or Tajín Rim)
Spice wakes mango up. Nevertheless, you don’t need to set your mouth on fire; you just need enough heat to add rhythm. Because jalapeño brings grassy warmth and Tajín brings chile-lime electricity, you can customize the style two ways: in the glass with a gentle muddle, or on the rim with a neat, photogenic halo. Importantly, the rim-only route delivers aroma and a balanced first sip without the risk of over-infusing the drink itself.
Ingredients (1 cocktail)
60 ml vodka
40–45 ml mango purée
15 ml triple sec
15 ml fresh lime juice
2–3 thin jalapeño slices (optional, for in-glass heat)
Tajín + lime wedge (for the rim)
For clean heat, rim the glass first and keep jalapeño slices in the shaker for only one or two presses—then discard before straining. Fine-strain to catch seeds, and mix a small jar of chile-salt in advance (2:1 Tajín to fine salt) for faster service on busy nights.
Add controlled heat. If you want spice in the drink, lightly muddle jalapeño in the shaker—just one or two presses.
Shake & strain. Add remaining ingredients and ice; shake hard; fine-strain into the rimmed glass.
Garnish. Use a jalapeño coin or a lime wheel.
Try This Too
Prefer fragrance without extra fire? Skip the muddle and rely solely on the rim. Conversely, if you love intensity, add a razor-thin sliver of habanero—then taste before you commit.
For more chile-rim technique (with photos), browse our watermelon margarita variations; the same steps apply, even though the base spirit changes.
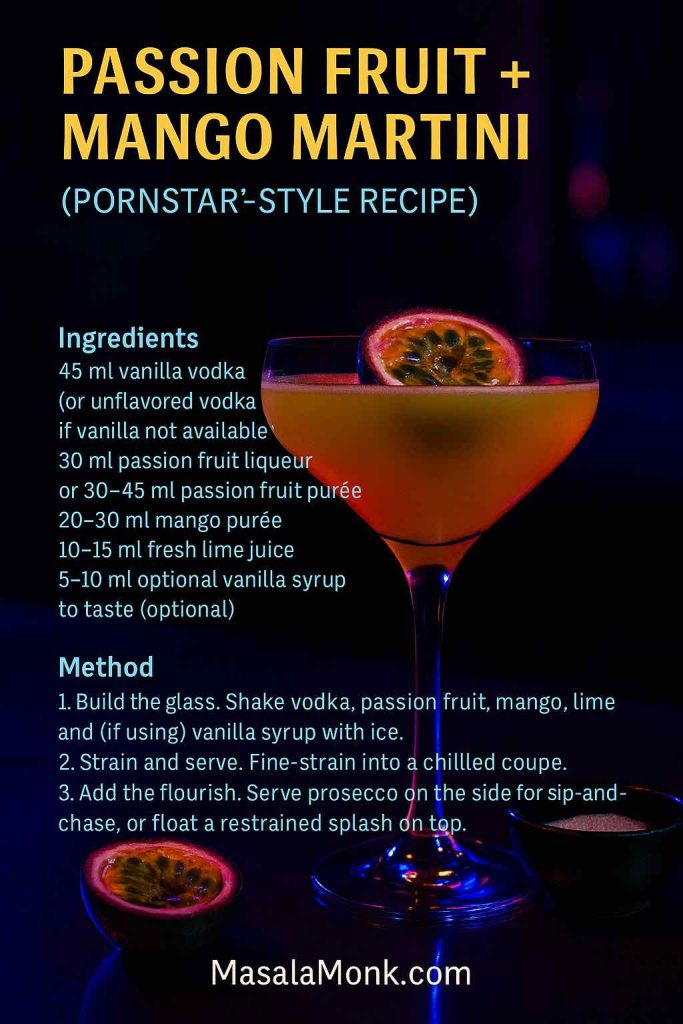
Passion Fruit + Mango Martini (“Pornstar”-Style Recipe)
This riff channels a modern classic: vanilla-tinted vodka, tangy passion fruit, and a side of bubbles for contrast. Because mango loves passion fruit, the pairing feels inevitable—lush meets zesty, tropical meets sparkling. For background and deeper technique notes, see Difford’s Porn Star Martini, Bon Appétit’s recent update, and BBC Good Food’s home version. Collectively, they confirm the essentials: passion fruit’s tartness, a hint of vanilla, and that playful prosecco companion.
Ingredients (1 cocktail)
45 ml vodka (vanilla vodka if available)
30 ml passion fruit liqueur or 30–45 ml passion fruit purée
20–30 ml mango purée
10–15 ml fresh lime juice
5–10 ml vanilla syrup (optional, to taste)
Optional: 30–60 ml chilled prosecco on the side
Chill a tiny prosecco glass alongside the coupe so every sip-and-chase stays sparkling. For a truer “Pornstar” profile, keep mango and passion fruit equal, then finish with a whisper of vanilla sugar on the rim instead of extra syrup.
Method
Build the core. Shake vodka, passion fruit, mango, lime, and (if using) vanilla syrup with ice.
Strain and serve. Fine-strain into a chilled coupe.
Add the flourish. Serve prosecco on the side for sip-and-chase, or float a restrained splash on top.
Try This Too
Split the fruit evenly—mango = passion fruit—for a perfectly balanced tang. Alternatively, if you want a drier finish, drop the syrup and let the liqueur (or purée) speak.
Vanilla doesn’t need to shout. Consequently, if you don’t have vanilla syrup, a scant pinch of vanilla sugar stirred in before shaking does the job beautifully.
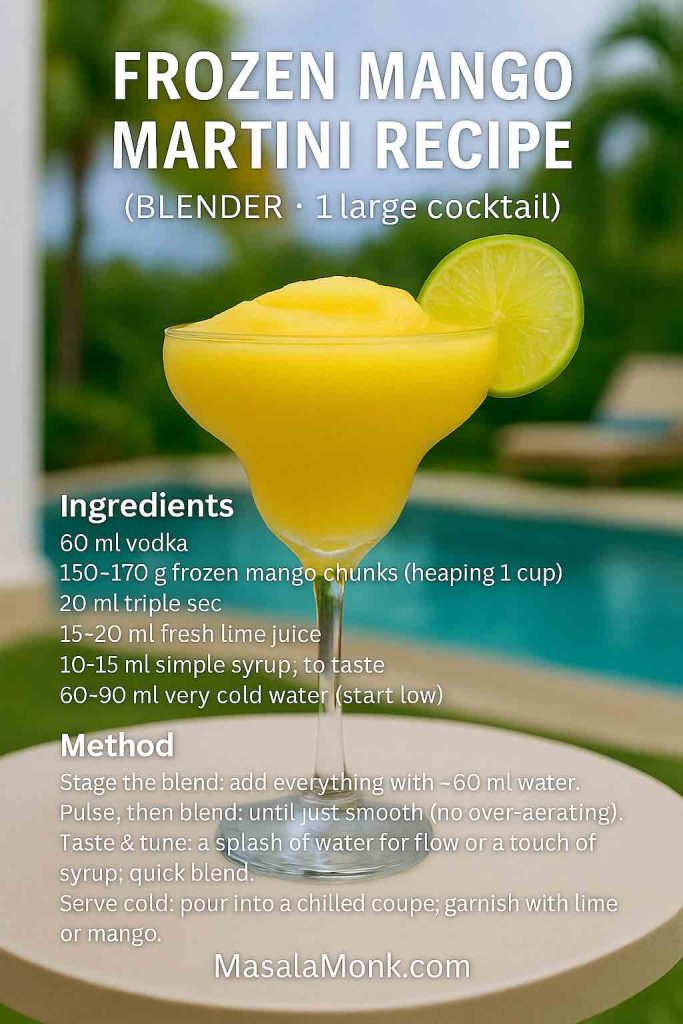
Frozen Mango Martini (Blender, Summer-Ready Recipe)
Sometimes the air itself begs for a blender. Even so, a great frozen cocktail is more technique than guesswork. Because ice can drown flavor if you’re not careful, measure your frozen fruit and liquid, blend in stages, and taste as you go. Notably, the frozen daiquiri method popularized in serious cocktail writing explains why measured dilution matters; for a quick primer on that logic, read The Best Frozen Daiquiri and adapt the principles to mango.
Ingredients (1 large cocktail)
60 ml vodka
1 heaping cup frozen mango chunks (about 150–170 g)
20 ml triple sec
15–20 ml fresh lime juice
10–15 ml simple syrup (to taste)
60–90 ml very cold water (start low; add as needed)
Tip for silkier texture: freeze mango in small chunks and chill the blender jug for 10 minutes. Start with the lower end of water, blend briefly, then adjust with teaspoon splashes until the pour just ribbons—this prevents watery flavor and keeps the slush tight.
Method
Stage the blend. Add everything to the blender with ~60 ml water.
Pulse, then blend. Pulse a few times; then blend only until smooth. Therefore, you won’t over-aerate or over-dilute.
Taste and tune. Add a splash more water for flow or a touch of syrup for ripeness; give it one short blend.
Serve cold. Pour into a chilled coupe. Garnish with a lime wheel or a tiny mango slice.
Try This Too
A pinch of salt brightens fruit, just as it does in good cooking. Likewise, swapping water for coconut water adds a gentle tropical hum without heaviness. For additional tropical ideas, wander through Coconut Water Cocktails.
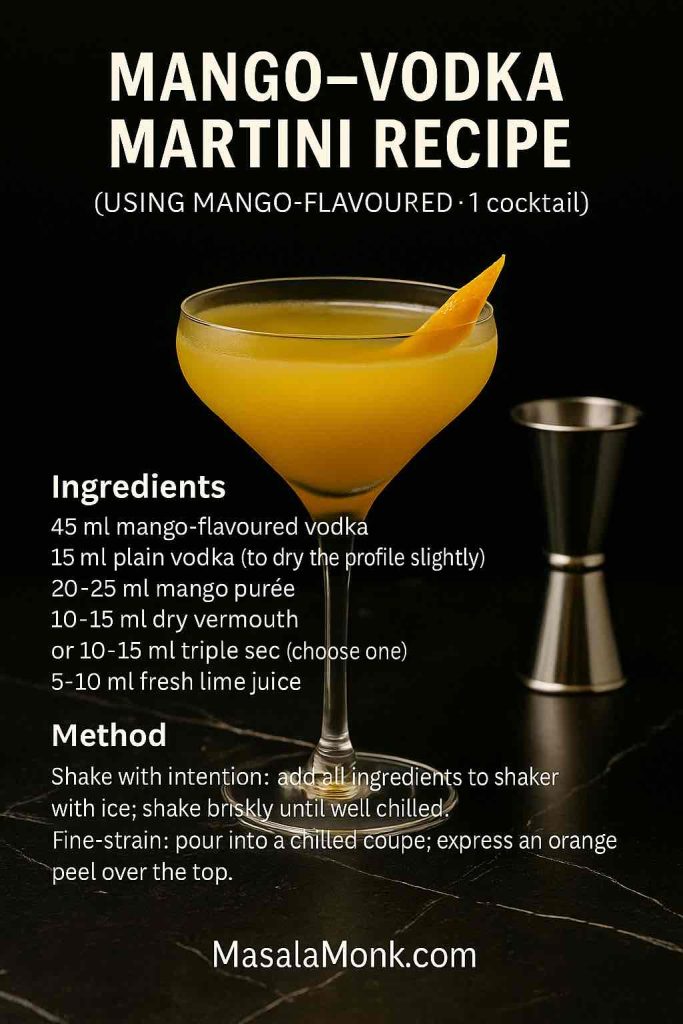
Mango-Vodka Martini (Using Mango-Flavoured Vodka)
Flavoured vodkas can be divisive; nevertheless, mango versions have a devoted following, especially Absolut Mango and Cîroc Mango. Because those spirits already contribute fruit and aroma, the key is restraint elsewhere. Instead of piling on purée and liqueur, keep the structure lean so the drink stays elegant. For a spirit-forward template—and a sense of how dry vermouth can shape the edges—take a look at Difford’s Mango Vodka Martini.
Ingredients (1 cocktail)
45 ml mango-flavoured vodka
15 ml plain vodka (to dry the profile slightly)
20–25 ml mango purée (easy does it)
10–15 ml dry vermouthor 10–15 ml triple sec (choose one)
5–10 ml fresh lime juice
Keep the bottle of dry vermouth refrigerated and dose sparingly—10 ml dries the drink without muting mango. If using Cîroc Mango (softer), add the plain vodka to sharpen the finish; with Absolut Mango (brighter), you can dial the purée to 20 ml and rely on a firm orange-peel express for aroma.
Method
Shake with intention. Add everything to a shaker with ice; shake briskly until well chilled.
Fine-strain. Pour into a chilled coupe; express an orange peel over the top.
Try This Too
To steer closer to a classic “martini” posture, choose dry vermouth and keep purée at the low end. Conversely, if you’d like a fruitier party vibe, pick triple sec and nudge mango up by 5 ml.
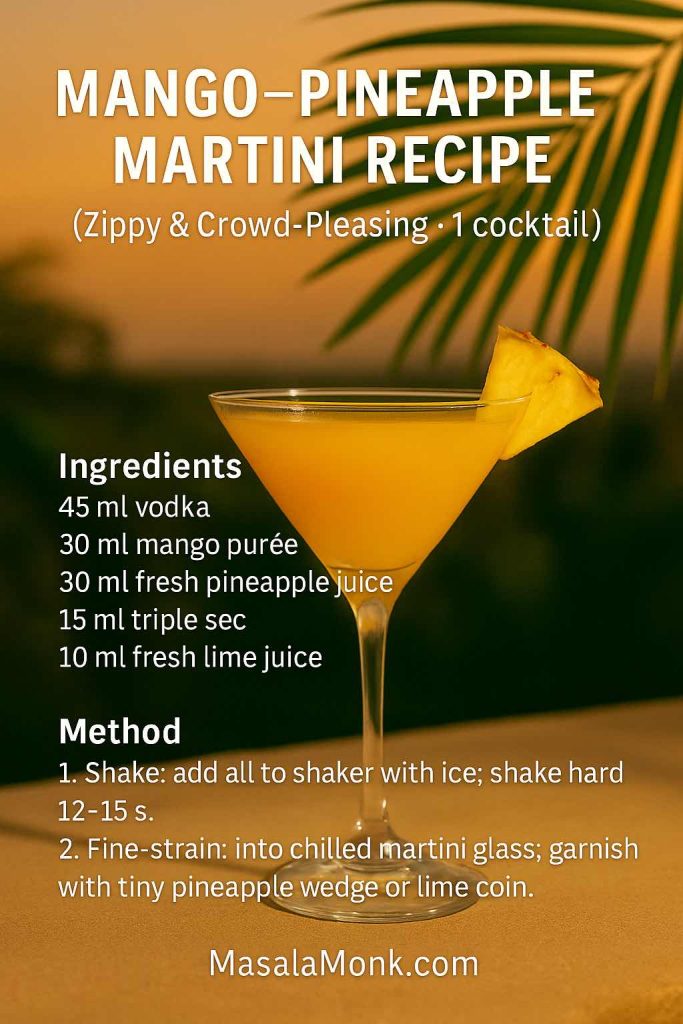
Mango–Pineapple Martini Recipe (Zippy & Crowd-Pleasing)
Pineapple is mango’s lively friend. Because it carries natural acidity and foam-friendly proteins, it both brightens the palate and gives a gentle froth when shaken hard. Moreover, the combo tastes like a beach afternoon while still behaving like a martini. Consequently, it’s the riff people keep making “just one more” of.
Ingredients (1 cocktail)
45 ml vodka
30 ml mango purée
30 ml fresh pineapple juice
15 ml triple sec
10 ml fresh lime juice
Shake with fresh pineapple juice for a light, natural foam; if using carton juice, add 5 ml aquafaba or pineapple gomme for the same silky head. Batch the vodka + mango purée + triple sec in advance, keep it cold, then add lime and juice when you shake to order.
Method
Build and shake. Add everything to a shaker with ice; shake hard for 12–15 seconds.
Fine-strain and garnish. Strain into a chilled martini glass; garnish with a tiny pineapple wedge or a lime coin.
Try This Too
Add a dash of coconut water for length and softness. Alternatively, micro-grate fresh nutmeg over the top for a quiet tiki nod.
If you want to compare builds for fruit-forward “martini” structure, revisit SAQ’s mango martini and adjust ratios to suit your pineapple.
Although recipes matter, technique carries the day. Therefore, here’s a compact list you can actually use while you shake.
Chill everything. Cold glass, cold shaker, cold ingredients—everything tastes tighter and cleaner. Consequently, you’ll need less ice time to reach balance.
Shake like you mean it. Ten gentle shakes won’t cut it. Instead, shake hard for 12–15 seconds to knit acids, alcohol, and fruit.
Fine-strain always. Mango fibers and ice shards dull texture. Thus, double-straining gives that “why does this feel so smooth?” moment.
Taste, then nudge. After the first sip, decide: one dash more lime for brightness, or one teaspoon of simple for roundness. Likewise, a pinch of salt often wakes up fruit without obvious “saltiness.”
Rims: lime, not water. For chile-salt or Tajín rims, swipe with lime; then dip. Water turns rims drippy; citrus makes a tacky surface that stays put. For a quick visual, use this Tajín salt rim guide and this pro rimming guide.
Frozen logic. Measured liquid + measured frozen fruit = repeatable texture. Consequently, you avoid bland, watery slush. For the “why” behind it, see Serious Eats’ frozen daiquiri method and borrow the ratios.
Pantry & Substitutions (Because Real Life Happens)
Even with the best intentions, sometimes you don’t have the exact bottle or the perfect fruit. Fortunately, mango is forgiving, and so are these builds.
Vodka: Any clean, mid-shelf vodka works. However, if you enjoy a little aromatic lift, a grain-based vodka often reads slightly sweeter, while a grape-based vodka reads softer.
Mango purée vs nectar: Purée equals body and ripe impact; nectar equals convenience and consistency. Accordingly, drop or dial back simple syrup when using nectar.
Orange liqueur: Triple sec is bright and linear; Cointreau is richer and a touch more bitter-orange. Either fits; therefore, pick the one that matches your mood.
Citrus swap: No lime? Use lemon, but reduce slightly; then taste and adjust. Meanwhile, a micro-splash of orange juice can round sharp edges if your citrus is too aggressive.
Heat source: Jalapeño is classic for approachable spice. Alternatively, serrano gives tighter heat, while habanero brings a floral blast—use a sliver, not a slice.
Sweeteners: Standard simple syrup (1:1) keeps things quick; rich syrup (2:1) sweetens with less water, which can be helpful in the shaken versions. If you’re blending, either works—just taste before you pour.
Service & Garnish (Small Things, Big Payoff)
Great drinks often come down to finishing touches. Therefore, give yourself an extra minute for presentation.
Glassware: A coupe feels classic and forgiving; a V-stem martini glass feels dramatic and photogenic. Nevertheless, use what you have; the liquid is the star.
Garnish choices: Mango slice, lime coin, or orange twist all make sense. Similarly, edible flowers skimmed across the surface look graceful on the Passion Fruit riff.
Ice management: Fast, vigorous shaking builds a tight texture quickly; conversely, lazy shaking melts more ice and blurs the flavors.
Batching for friends: Multiply the non-citrus ingredients in a bottle and chill. Then, when guests arrive, measure into the shaker, add fresh citrus, and shake to order. Consequently, every glass tastes first-round fresh.
When to Choose Which Mango Martini Riff/Recipe
Admittedly, choosing is half the fun. Even so, here’s a quick guide for mood-pairing.
Classic: Date night, starters, or when you want a clean read on the fruit you bought today.
Spicy: Grilled shrimp, chaat, or anything salty and crunchy; the chile-lime halo makes flavors ping.
Passion Fruit: Brunch, birthdays, or any moment that welcomes a side of sparkle; vanilla tucks the acidity into a plush pillow.
Frozen: Poolside, balcony evenings, or after a hot afternoon; measured dilution keeps it vibrant, not watery.
Mango-Vodka: Cocktail hour for the flavoured-vodka loyalists; dry vermouth makes it adult, not candy.
Mango–Pineapple: Happy chaos: game nights, family cookouts, and lazy weekends; it’s friendly without being simple.
Helpful Links to Learn More (If You Like Rabbit Holes)
While you can make everything above with confidence right now, you may occasionally want to dive deeper. In that case, use these as touchstones:
Cocktails often feel like tiny theater: a few props, a few gestures, and suddenly the room sparkles. Yet the real magic in a mango martini is simple attention—cold glass, fresh citrus, ripe fruit, and a confident shake. Because you now have a classic you can throw together from memory, you also have a launchpad for evenings that want a twist. Therefore, pick the riff that fits your mood, rim a glass if you’re feeling festive, and trust your palate as you taste and tune.
And if mangoes are already perfuming the kitchen, you’re halfway there. Consequently, tonight’s the night: ice in the tin, lime at the ready, music on. Cheers.
FAQs
1) What’s the simplest Mango Martini Recipe I can memorize?
Start with a 2–1.5–0.5–0.25 pattern: 2 oz vodka, 1.5 oz mango purée, 0.5 oz orange liqueur, and 0.25–0.5 oz fresh lime juice. Shake hard, fine-strain, and garnish. Moreover, if your mango is super ripe, you can skip any extra sugar.
2) Mango purée, nectar, or juice—which one works best?
Purée gives body and that luxurious mouthfeel; nectar is lighter and convenient; juice is the most delicate. Consequently, when using nectar or juice, taste first and—if needed—add a touch of simple syrup to keep the Mango Martini Recipe balanced.
3) Can I make a Mango Martini Recipe without a shaker?
Yes. Although a shaker gives better texture, you can add ingredients to a jar with ice, seal tightly, and shake for 20–25 seconds. Then, strain through a fine sieve. Ultimately, colder and more dilution-controlled equals better flavor.
4) How do I get that bar-quality silky finish?
Two steps: shake vigorously and fine-strain through a small mesh strainer. Additionally, chill the glass first; colder service keeps flavors sharp and, therefore, more elegant.
5) What kind of vodka should I choose?
Any clean, mid-shelf vodka works. However, for a fruit-forward style, neutral grain or grape-based vodkas keep the mango in the spotlight. If you’re using mango-flavored vodka, reduce the purée slightly so the Mango Martini Recipe stays crisp, not candy-sweet.
6) How do I make a spicy Mango Martini Recipe without overpowering heat?
Do a Tajín rim for aromatic spice, and then skip muddling chiles in the shaker. Alternatively, if you want a gentle kick, lightly press 2–3 jalapeño slices—no more—before shaking. Meanwhile, taste and adjust; you can always add heat, but you can’t remove it.
7) Can I swap the spirit—say, gin or rum—instead of vodka?
Absolutely. Gin adds botanical snap, while white rum leans tropical and round. Therefore, when swapping, keep mango at 1–1.5 oz and nudge the citrus up by a barspoon if it tastes too sweet.
8) My drink tastes flat—what should I tweak first?
First, add a small squeeze of lime; brightness snaps flavors into focus. Next, if it’s still dull, stir in a pinch of salt (yes, really). Finally, if the fruit was underripe, add ¼ oz simple syrup and shake again. Consequently, you’ll find the sweet-acid balance that defines a great Mango Martini Recipe.
9) How do I batch a Mango Martini Recipe for a party?
Combine vodka, mango purée, and orange liqueur in a bottle and chill well. Just before serving, measure a portion into a shaker, add fresh lime, and shake with ice. In addition, always fine-strain so the last glass tastes as polished as the first.
10) Can I make a Frozen Mango Martini without it turning watery?
Yes—use frozen mango as the “ice,” add measured cold water (start small), and blend in short bursts. Besides, taste and adjust with tiny additions of water or syrup; that way, the texture stays lush and the flavor remains concentrated.
11) What garnishes pair best with a Mango Martini?
A thin mango slice, a lime coin, or an expressed orange peel all work beautifully. Moreover, for the passion-fruit riff, a vanilla sugar rim or a half passion fruit looks stunning without complicating the Mango Martini Recipe itself.
12) Do I need simple syrup—and if so, how much?
Often you don’t. However, if the mango isn’t very sweet (or you used juice), add ¼ oz simple syrup, shake, and retaste. Therefore, you’ll sweeten just enough to smooth edges while keeping the drink bright.
13) What’s the best way to rim the glass without mess?
Use citrus, not water. Rub the rim with a lime wedge, dip into your salt/sugar/Tajín mix, and tap off excess. Consequently, the rim sticks cleanly and doesn’t slide down the glass.
14) Any quick food pairings for a Mango Martini Recipe?
Think salty, crunchy, and fresh: sev puri, grilled prawns, chili-lime nuts, or even a mango-and-paneer skewer. Meanwhile, for the spicy version, add cooling sides—cucumber slices or yogurt-mint dip—to balance the heat.
15) How do I keep flavors consistent if my mangoes vary?
Standardize the process: after shaking, taste a small sip before straining. If it reads too tart, add a teaspoon of syrup; if it’s too sweet, add a teaspoon of lime and shake again. Ultimately, that tiny checkpoint is how every Mango Martini Recipe becomes reliably great at home.
Potatoes are the great equalizer. They delight picky kids and impress seasoned food lovers; they soothe weeknights and energize parties. More importantly, they deliver drama for pennies: shattering edges, buttery interiors, and aromas that make people drift toward the platter. Yet truly memorable potato appetizers don’t happen by accident. Instead, they rely on three repeatable disciplines—dryness, direct heat, and bold finishing—that turn humble spuds into the first tray to disappear.
First, dryness. After boiling or rinsing, water clings to starch. However, a quick steam-dry in a colander (or on a warm sheet pan) drives off surface moisture. Consequently, oil clings, seasoning sticks, and browning starts immediately instead of after a texture-killing wait.
Second, direct heat. A preheated, lightly oiled sheet pan (or a hot grill, or an uncrowded air-fryer basket) mimics restaurant sizzle. Therefore, you get fast contact browning and true crisp edges. Similarly, spacing matters; if pieces touch, they steam. Besides, shaking once mid-cook exposes new sides to hot air and evens color.
Third, bold finishing. Richness loves lift. So, add acid, add herbs, add something cool and bright. A squeeze of lemon on croquettes. A cool dairy dip with bacon-wrapped bites. A tuft of dill on canapés. Moreover, contrast—crisp vs. creamy, hot vs. cool, salty vs. sweet—keeps guests returning to the board of potato appetizers.
Crisp rule (memorize this): Parboil, steam-dry, and cook on a preheated, lightly oiled surface—or air-fry in a single, uncrowded layer. Consequently, edges shatter while centers stay plush.
1) Loaded Potato Skins — The Icon of Potato Appetizers
At a glance — Time: ~60 min • Yield: 16 halves • Oven: 220°C / 425°F • Air fryer: 200°C / 390°F How to: Bake russets, scoop to a ¼-inch shell, crisp empty shells, then fill and broil.
Intro Among potato appetizers, loaded skins are nostalgic and—done right—surprisingly elegant. The trick isn’t the topping; it’s the shell. Crisp the empty shell first, then melt the cheese. Consequently, every bite lands hot, crunchy, and creamy at once.
Ingredients Russet potatoes (medium), butter or neutral oil, fine salt, pepper, sharp cheddar (grated), cooked bacon (crumbled), sour cream, chives.
Crispy Loaded Potato Skins: Game-day friendly—prep and scoop russets ahead, then re-crisp empty shells 10–12 min before guests arrive (or air-fry 6–8 min). Broil to melt cheddar + bacon, and garnish tableside with sour cream and chives for shatter-crisp edges and creamy centers.
Method
Scrub and prick; bake on a rack until just tender (35–45 min).
Halve lengthwise; carefully scoop to a ¼-inch shell.
Brush inside and out with butter/oil; season assertively.
Return empty shells to the oven 10–12 min until glassy-crisp.
Add cheddar and bacon; broil briefly until bubbling.
Finish with sour cream and chives.
Air-Fryer Option Crisp empty shells 6–8 min; fill; air-fry 1–2 min to melt.
Make-Ahead & Storage Bake and scoop shells up to 2 days ahead; keep chilled. Re-crisp, then top. Hold briefly on a low oven rack.
Serve & Pairing Drizzle or dunk in blue cheese dip; the tang cuts cheddar and bacon without dulling the crunch. If you’re pouring, a bright Lemon Drop Martini resets the palate between bites.
At a glance — Time: 40–50 min • Serves: 6–8 • Oven: 230°C / 450°F • Air fryer: 200°C / 390°F How to: Parboil → steam-dry → roast on a preheated, oiled tray; add cheese at the end.
Intro These low-effort, high-glory potato appetizers thrive on dryness and heat. Parboil, steam-dry, and roast on a hot, oiled tray. Then, in the last minutes, shower with parmesan so it fuses into a lacy crust.
Caterer’s trick for even color: after parboil, leave potatoes in the colander 5–10 minutes until the skins look matte; then go onto a preheated, lightly oiled tray. Finish with lemon zest right before plating so the aroma lands at the table.
Method (oven)
Parboil 8–10 min until just tender; drain.
Steam-dry 5 min until surfaces look matte.
Toss with oil, salt, and optional garlic powder.
Preheat an oiled sheet pan; roast 20–25 min, shaking once.
In the final 3–4 min, add parmesan so it melts and crisps.
Finish with lemon zest and a squeeze of juice.
Air-Fryer Option Single layer; 14–18 min; shake once; cheese in the last 2 min.
Variations & Swaps Lemon-pepper + parsley; Cajun + lime; ranch + chive; peri-peri + a touch of honey.
Make-Ahead & Storage Parboil ahead; roast to finish just before serving. Re-crisp on a hot tray for 5–7 min if needed.
Serve & Pairing Keep it simple: lemon wedges at the ready, and a pitcher of watermelon mocktails on ice—clean, cold, and refreshing alongside the crust.
At a glance — Time: 30–35 min • Yield: 24 mini bites • Oven: 200°C / 400°F • Air fryer: 190°C / 375°F How to: Mix cold mash + egg + cheese, portion into a mini-muffin tin, bake until puffed and bronzed.
Intro Cold mash is a blank canvas. With egg and cheese, it behaves like soft dough that puffs and bronzes in mini-muffin wells. Consequently, you get crisp rims and creamy centers—without deep-frying. For the base approach, see The Kitchn’s mashed-potato puffs.
Ingredients Cold mashed potatoes, egg, shredded cheese, chives, black pepper, butter or oil for greasing.
Best texture hack: use cold mash, then pack the wells to the rim so the tops dome and the edges crisp. Loosen while warm, rest 2 minutes on a rack, then return to a hot oven for 3–4 minutes to re-crisp before serving.
Method
Mix mash, egg, cheese, chives, and pepper until cohesive.
Grease a mini-muffin tin; pack to the rim.
Bake 18–22 min until bronzed and lightly puffed.
Loosen while warm so rims stay crisp.
Air-Fryer Option Walnut-sized mounds on a lined basket; 10–12 min, turning once.
Variations & Swaps Caramelized onions; crisp bacon; roasted corn; finely chopped spinach + nutmeg. Add a spoon of fine breadcrumbs if you want extra structure.
Make-Ahead & Storage Bake, cool, and refrigerate up to 24 hours; re-crisp 6–8 min in a hot oven.
Serve & Pairing These are plush, so contrast lightly—chives, lemon, and a grown-up zero-proof lane from lychee mocktails (crisp, floral, not cloying).
At a glance — Time: ~45 min • Yield: 4–6 servings • Oven: 230°C / 450°F How to: Boil → steam-dry → smash to ½-inch → roast with butter + a little oil.
Intro When you want “how are these so crispy?” reactions, make smashed bites. Boil; steam-dry; smash thin; roast on a hot, oiled tray. Thus the edges frill like lace while the centers remain plush. For a masterclass, see RecipeTin Eats’ smashed potatoes.
Ingredients Small waxy potatoes, butter, oil, salt, pepper.
For maximum “lace”: steam-dry until skins wrinkle, then smash to ½-inch on parchment and slide the sheet onto a preheated pan—no sticking, faster browning. Salt as soon as they come out; hold on a wire rack in a low oven so edges stay shattery.
Method
Boil until just tender; drain.
Steam-dry thoroughly so skins wrinkle and surfaces roughen.
Transfer to a hot, oiled tray; smash to ½-inch with a glass.
Brush with butter + oil; season generously.
Roast 20–25 min until undersides are deep gold and edges frill.
Air-Fryer Option Smash on a board; move carefully to the basket; cook in one layer 12–16 min, turning once.
Make-Ahead & Storage Boil and smash earlier; hold covered (not stacked). Roast to finish just before service so edges stay shattery.
Serve & Pairing Serve while they’re shatter-crisp; a dot of lemon is enough. If you’re pouring, a citrus-forward Lemon Drop Martini works beautifully between bites.
5) Potato-and-Cheese Balls (Croquettes) — Party Croquette Potato Appetizers
At a glance — Time: ~45 min (incl. chill) • Yield: ~24 • Fry: 175–180°C / 350–360°F • Air fryer: 200°C / 390°F How to: Wrap seasoned mash around tiny mozzarella cubes, chill, bread thoroughly, then fry or air-fry.
Intro Plush inside, crackly outside, and endlessly adaptable—these croquettes are party catnip. Because the centers turn molten, you need a firm exterior. Therefore, chilling and thorough breading matter most.
Burst-proof method: form around tiny cheese cubes, chill 20–30 min, then bread flour → egg → crumbs and rest 5 min so crumbs hydrate. Fry at 175–180°C (oil recovers faster in a Dutch oven). For air-fryer batches, mist lightly and flip once; season while hot. Make-ahead: bread and freeze on a tray; cook from frozen, +1–2 min.
Method
Wrap mash around cheese cubes; roll tight.
Chill 20–30 min so balls set.
Bread: flour → egg → crumbs; rest 5 min to hydrate crumbs.
Variations & Swaps Cheddar cubes; smoked mozzarella; feta folded into the mash; herbs in the crumb.
Make-Ahead & Storage Form and bread; freeze on a tray; fry from frozen, adding 1–2 min.
Serve & Pairing Set croquettes on a warm board and pass lemon wedges; for game-night energy that still reads fresh, shake up watermelon margarita variations.
At a glance — Time: ~40 min • Yield: ~24 pieces • Oven: 220°C / 425°F How to: Parboil chunks → wrap with ½ slice bacon → bake on a rack over a tray so fat renders.
Intro Salty-smoky bacon around tender potato is simple, yes, yet irresistible. However, if you bake on a flat tray, bottoms stew. On a rack, fat renders away and edges lacquer instead.
Render, then lacquer: parboil and pat dry, wrap with ½ slice bacon, and cook elevated (grill grates or a rack over a tray) so fat drains and the bacon crisps. Brush a thin maple-chili glaze in the last 2–3 minutes, rest on a wire rack 3–4 minutes, then finish with cracked pepper and lime.
Method
Parboil chunks; pat completely dry.
Wrap each with half a slice of bacon; secure with a pick.
Arrange on a rack over a tray; roast until mahogany.
Finish with pepper; rest 3–4 min.
Air-Fryer Option If your basket has a raised grate, cook 12–16 min, turning once.
Variations & Swaps Brush a thin maple-chili glaze during the last 2–3 min; or keep it simple with pepper + lime.
Make-Ahead & Storage Parboil and wrap earlier; chill on a rack. Roast just before serving for maximum crisp.
Serve & Pairing Let the bacon lead, then finish with cracked pepper and lime; for the zero-proof crowd, pour from these low-sugar summer mocktails—cold, bright, and not syrupy.
At a glance — Time: 35–40 min • Yield: ~24 rounds • Oven: 220°C / 425°F How to: Roast ½-inch rounds → top with whipped goat cheese + pecans + honey → finish with thyme + chili.
Intro Not every platter should be brown and crunchy. These glossy coins bring color, perfume, and balance. Moreover, their sweet-salty-creamy-crunchy profile resets the palate between heavier potato appetizers. For ratios and presentation cues, see Well Plated’s sweet-potato rounds and Recipe Runner’s goat-cheese bites.
Toast pecans first (5–7 min at 175°C/350°F) so they stay crisp on the creamy topping. For lift, whip the goat cheese with a spoon of yogurt and a pinch of salt, then add a micro-zest of orange right before serving—sweet + acid keeps the bites bright.
Method
Slice into ½-inch rounds; toss with oil and salt.
Roast 18–22 min, flipping once for even caramelization.
Cool briefly; pipe or spoon whipped goat cheese.
Top with pecans; thread on honey; finish with thyme + chili.
Air-Fryer Option One layer; 12–15 min, turning once.
Make-Ahead & Storage Roast rounds; cool and chill. Rewarm briefly; pipe cheese and finish at the last minute.
Serve & Pairing The goat cheese and honey want something lifted and clean; add a tiny squeeze of orange zest and, if readers ask nutrition questions, point them (once) to sweet-potato benefits & nutrition.
8) Twice-Baked Mini Potatoes — Elegant Potato Appetizers
At a glance — Time: 55–65 min • Yield: ~24 halves • Oven: 200°C / 400°F How to: Roast → scoop a shallow well → mash centers with sour cream + butter + cheese → rebake.
Intro These read like tiny jackets with whipped, tangy centers. Because they’re structured, they travel well and hold heat. Additionally, they welcome endless flavor detours and pair seamlessly with other potato appetizers. For a flame-kissed direction (easy to scale to minis), see Serious Eats: grilled, loaded twice-baked potatoes.
For tall, tidy swirls: pass the mash through a ricer, season boldly, then pipe while warm. Brush the peaks with a touch of melted butter before the second bake—faster browning, glossy finish. Hold on a wire rack in a low oven so the bottoms stay dry.
Method
Roast until tender; cool slightly; halve.
Scoop a shallow well; mash centers with sour cream, butter, and cheese; season boldly.
Refill neatly; bake again until peaks brown lightly.
Top with chives.
Air-Fryer Option If the oven is crowded, set tops in a preheated basket 3–5 min.
At a glance — Time: ~45 min • Yield: ~30 canapés • Oven: 200°C / 400°F How to: Roast tiny potatoes → trim a tiny base to stand → scoop a small well → pipe fillings.
Intro When you want one-bite elegance, make these. They look expensive yet stay simple. Meanwhile, because you control the filling, the flavor can skew Mediterranean, American, or Nordic without changing the base—useful when you’re composing a board of mixed potato appetizers. Prefer a lacy base? Pan-fry bite-size boxty using Serious Eats’ template.
Ingredients Petite potatoes, oil, salt, dill, lemon zest, sour cream or yogurt, feta, roasted red pepper, olive tapenade, parsley, goat cheese, capers.
For perfect “stand-up” canapés, trim a 2–3 mm base before scooping the well, then pre-crisp empty shells 5–6 min so they don’t weep. Pipe chilled fillings right before serving and finish with a pinch of lemon zest + flaky salt to wake up the potatoes.
Method (shells)
Roast until just tender; cool briefly.
Trim a tiny base so each stands; scoop a small well from the top.
At a glance — Time: 35–45 min • Yield: 18–24 • Pan or Air fryer: medium-high / 200°C How to: Mix spiced mash with ginger, chilies, coriander + a bit of cornflour → form patties → pan-fry/air-fry → turn into chaat with chutneys + yogurt + sev.
Intro This is the show-stopper path: simple spiced patties that transform into chaat with chutneys, yogurt, sev, and onion. Because textures contrast wildly—hot vs. cool, crisp vs. creamy—the plate feels like a mini festival of potato appetizers. For garnish cadence and proportion cues, use Bon Appétit’s aloo tikki as a frame.
Ingredients Boiled potatoes, grated ginger, chopped green chilies, coriander leaves, garam masala, cumin, chaat masala, salt, cornflour, oil; plus yogurt, tamarind and green chutneys, sev, onion for chaat.
For chaat that pops: keep yogurt thick (hung or Greek) and layer tamarind → green chutney → yogurt → sev → onion → chaat masala. Salt the tikkis the moment they leave the pan, then plate and finish fast so the sev stays crisp.
Method
Mash potatoes with spices and herbs; season confidently.
Add cornflour; form small patties; chill briefly so edges set.
Pan-fry in shallow oil until deep golden; or brush with oil and air-fry, flipping once.
For chaat, plate hot tikkis; spoon tamarind + green chutneys; add thick yogurt, sev, onion, and a final dusting of chaat masala.
Air-Fryer Option Lightly oil both sides; cook 10–14 min, turning once; rest 2 min.
Variations & Swaps Stuff with a pea masala; add beet for color; or swap some potato with sweet potato.
Make-Ahead & Storage Form patties and chill up to a day. Fry to order. Hold cooked tikki briefly in a low oven.
Serve & Pairing Because the plate is lively—hot, cool, crisp, creamy—keep drinks crisp and not sweet: digestive-leaning ACV & cranberry mocktails pair surprisingly well.
Smarter Hosting for Potato Appetizers (Make-Ahead, Reheat & Flow)
Skins: bake, scoop, and pre-crisp empty shells up to two days ahead; re-crisp 5–7 min, then top and broil.
Croquettes: form and bread; freeze on a tray; fry from frozen, adding 1–2 min.
Smashed: boil and smash earlier; roast right before serving so edges keep their shatter.
Canapés: keep bases and fillings separate; assemble last minute so textures stay lively.
Air-fryer juggling: when the oven is full, finish small trays in the air fryer; however, never stack or they’ll steam. Crowding kills crisp; if color stalls, this roundup of common air-fryer mistakes is a fast rescue.
Fast fixes If skins feel limp, give empty shells more high heat before topping. And if croquettes threaten to burst, chill longer and bread thoroughly. Bites look pale? Raise heat and spread them out. If the air fryer under-browns, add a minute or two and shake once. Therefore, service stays smooth while stress stays low.
Ingredient Notes That Actually Help Potato Appetizers
Potatoes
Russet: drier flesh, fluffy interiors—ideal for skins and twice-baked minis.
Waxy baby reds or yellows: hold shape—best for bites, smashed, and canapés.
Yukon Gold: creamy all-rounder—great for mash-based fillings and croquettes. For diet-minded readers, one calm pointer is enough: how potatoes can fit a weight-loss plan—portioning and cooking method matter more than panic.
Cheese Cheddar for melt and flavor; parmesan for lacy finishes; gruyère for nutty depth; feta or goat cheese for salty brightness; mozzarella for stretch. Additionally, grate fresh—pre-shredded blends often resist quick melt.
Acid & Heat Balance richness with lemon or lime. Add chili (fresh or flake) or a cool dairy dip for lift. Instead of heavy sauces, offer small bowls so guests tune their own bite of potato appetizers.
Scaling Smart Double trays; stagger oven times by 10 minutes. As a result, hot food flows without bottlenecks. For board layout sanity, the charcuterie 3-3-3-3 rule keeps things balanced without overbuying.
Conclusion: Small Bites, Big Joy
Ultimately, potato appetizers multiply delight while minimizing effort. Once you lean into dryness and direct heat, the rest becomes play—choose a cheese, pick an herb, add a spark of acid, and finish confidently. Meanwhile, the structure of these recipes lets you prep ahead and still serve crisp food without guarding the oven door. Consequently, the platters return empty, the room gets louder, and you—finally—enjoy your own party.
FAQs
1) What are the best potatoes for potato appetizers (skins, bites, and hors d’oeuvres)?
For crispy shells and fluffy centers, russets win; their drier flesh makes loaded potato skins and twice-baked minis sing. Meanwhile, waxy baby reds or yellows hold shape beautifully for crispy potato bites, smashed bites, and stuffed baby potatoes. Yukon Golds sit happily in the middle—creamy enough for mashed potato bites and croquettes, yet sturdy enough for pan work.
2) How do I keep potato skins extra crisp and not soggy?
First, bake whole potatoes until just tender. Then, scoop to a ¼-inch shell, brush inside and out with oil or butter, and—crucially—re-crisp the empty shells before filling. Consequently, moisture won’t creep back in, and the final broil merely melts cheese instead of steaming the shell.
3) Oven vs. air fryer: which method is best for potato appetizers?
Both shine, but differently. The oven handles big trays and yields even browning; the air fryer delivers fast, concentrated heat for small batches. Therefore, use the oven for parties and the air fryer when you want a quick round of baked potato bites or air-fryer potato appetizers before guests arrive.
4) What temperatures and times should I start with (so I don’t guess)?
As a starting grid:
Loaded potato skins: 220°C / 425°F until tender; re-crisp shells 10–12 minutes; broil to finish.
Croquettes: fry at 175–180°C / 350–360°F for 3–4 minutes. Adjust by a few minutes for size and spacing; if color stalls, spread pieces out.
5) How do I adapt these potato appetizers for the air fryer?
Go single-layer, preheat if your model suggests it, and avoid crowding. Generally: bites 14–18 minutes at ~200°C / 390°F; smashed 12–16 minutes; mashed-bite mounds 10–12 minutes; skins 6–8 minutes to crisp shells, then 1–2 minutes after topping. Shake once mid-cook and, moreover, add cheese in the final 1–2 minutes so it melts without over-browning.
6) Can I make potato appetizers ahead for a party?
Absolutely. Bake and scoop skins a day or two ahead, then re-crisp just before service. Boil and smash smashed bites in advance; roast to finish right before serving. Form and bread croquettes earlier and freeze; fry from frozen, adding 1–2 minutes. As a result, you get hot platters with almost no last-minute stress.
7) What’s the secret to truly crispy potato bites?
Dryness + direct heat. After parboiling, let potatoes steam-dry until surfaces turn matte. Next, roast on a preheated, lightly oiled tray (or a hot air-fryer basket) with room to breathe. Finally, season assertively; salt draws out a touch of moisture and helps browning, while a last-minute sprinkle of finely grated hard cheese creates a lacy crust.
8) How do I prevent croquettes, cheese balls, or potato and cheese balls from bursting?
Chill the formed balls so they firm up, bread thoroughly (flour → egg → crumbs), and rest 5 minutes so crumbs hydrate. Fry hot enough to set the crust quickly, but not so hot the outside browns before the center warms. Similarly, tiny cheese cubes inside behave better than large ones.
9) What about sweet potato appetizers—any quick rules?
Because sweet potatoes run moister and sweeter, slice thicker (about ½-inch) for rounds and roast hot for caramelized edges. Pair with salty, tangy toppings—goat cheese, feta, herbs, citrus—to balance sweetness. Consequently, sweet potato bites feel bright and modern, not dessert-like.
10) Which cheeses melt best for cheesy potato bites and skins?
Sharp cheddar melts smoothly and tastes assertive. Parmesan turns lacy and crisp in the final minutes. Gruyère adds nutty depth; mozzarella brings stretch but needs salt and acid for balance. For twice-baked minis, a mix (cheddar + a little parmesan) gives both flavor and texture.
11) What are easy vegetarian or gluten-free swaps for potato hors d’oeuvres?
Skip bacon and lean on smoked paprika, roasted peppers, or crisped mushrooms for savory depth. Most recipes are naturally gluten-free if you avoid breadcrumbs; for croquettes, use gluten-free crumbs or a thin rice-flour coating. Likewise, plant-based yogurt or cashew cream can stand in for sour cream on canapés.
12) Can I freeze any of these potato appetizers?
Yes—especially croquettes and mashed potato bites. Freeze in a single layer until firm, then bag. Bake/fry from frozen, adding a minute or two. As for loaded potato skins, freeze the empty, pre-crisped shells; thaw briefly, re-crisp, fill, and broil.
13) How many pieces per person should I plan for party potato appetizers?
For a spread with multiple items, plan 3–4 pieces per person per hour—more at the start, fewer later. For a game-day or all-apps party, scale to 6–8 pieces per person total, mixing rich bites (skins, croquettes) with lighter or zesty options (smashed bites with lemon, sweet-potato rounds).
14) What are smart seasoning lanes that always work?
Go “bright and salty”: lemon zest, parsley, and olive oil. Or “spicy and cool”: chili flakes plus a creamy element on the side. Alternatively, try “herby and nutty”: dill, chive, and a dusting of parmesan. Meanwhile, a squeeze of citrus just before plating wakes up every one of these potato appetizers.
15) My air-fryer potato appetizers aren’t browning—what now?
First, reduce the load and cook in two rounds; crowding traps steam. Next, pat drier and add a teaspoon more oil to help conduction. Finally, raise the temperature slightly or extend 1–3 minutes. Therefore, you’ll get color without overcooking the centers.
16) Which dips pair well (besides the usual suspects) with appetizers made with potatoes?
Think “contrast, not camouflage.” Blue cheese dip adds tangy punch to loaded potato skins and bacon-wrapped bites. A lemony yogurt or thin sour-cream sauce lifts smashed potato bites and twice-baked minis. For sweet potato hors d’oeuvres, go clean—whipped feta or light goat cheese with herbs.
17) Any quick plating tips so my potato party snacks look premium?
Yes—group by texture and temperature. Put hot-and-crisp items together so aromas stack; nearby, set warm-and-creamy bites for contrast. Add a color break with sweet-potato rounds. Garnish sparingly: chives, dill, thin radish slices, and lemon wedges. Consequently, your board looks intentional, not crowded.
18) How do I keep baked potato appetizers hot without losing crunch?
Use a low oven (90–100°C / 200–210°F) and a wire rack so air circulates under the pieces. Instead of holding for long stretches, serve in waves—small trays every 10–15 minutes. As a result, guests always meet crisp edges and creamy centers.
19) What’s the simplest way to turn leftovers into tomorrow’s potato appetizer bites?
Chill leftover mash, fold in an egg and a little grated cheese, then portion into a mini-muffin tin and bake until puffed. Alternatively, form patties and pan-sear for quick mashed potato bites. Meanwhile, leftover skins re-crisp beautifully; refill with whatever cheese or veg you have.
20) Lastly, what are the biggest mistakes to avoid with easy potato appetizer recipes?
Overcrowding trays, skipping the steam-dry step, and adding cheese too early (it over-browns before the potatoes crisp). Also, scooping skins too thick (they eat heavy) or too thin (they collapse). Fix these, and—therefore—your potato appetizers will reliably steal the show.