If you have diabetes, you’ve probably been warned about bananas: “They’re too sweet!” or “Bananas will spike your blood sugar!” But is it true? Or is this tropical fruit unfairly maligned? Let’s cut through the confusion with the latest science and five golden rules for safely—including deliciously—enjoying bananas in your diabetic diet.
🍌 The Truth: Are Bananas Bad for Diabetes?
Bananas have long gotten a bad rap in diabetic circles. Yes, they’re sweet. Yes, they contain carbs. But not all carbs—or bananas—are created equal.
- A small-to-medium banana (100–120g) contains about 20–25g of carbohydrates.
- The glycemic index (GI) of bananas varies by ripeness: green bananas are low GI (30–45), while very ripe bananas are higher (up to 62).
- Bananas are also packed with fiber, potassium, vitamin B6, antioxidants, and unique compounds called resistant starches.
Recent research even suggests that eating the right kind of banana, in the right way, can support blood sugar, gut health, and even weight loss—especially if you’re smart about it.
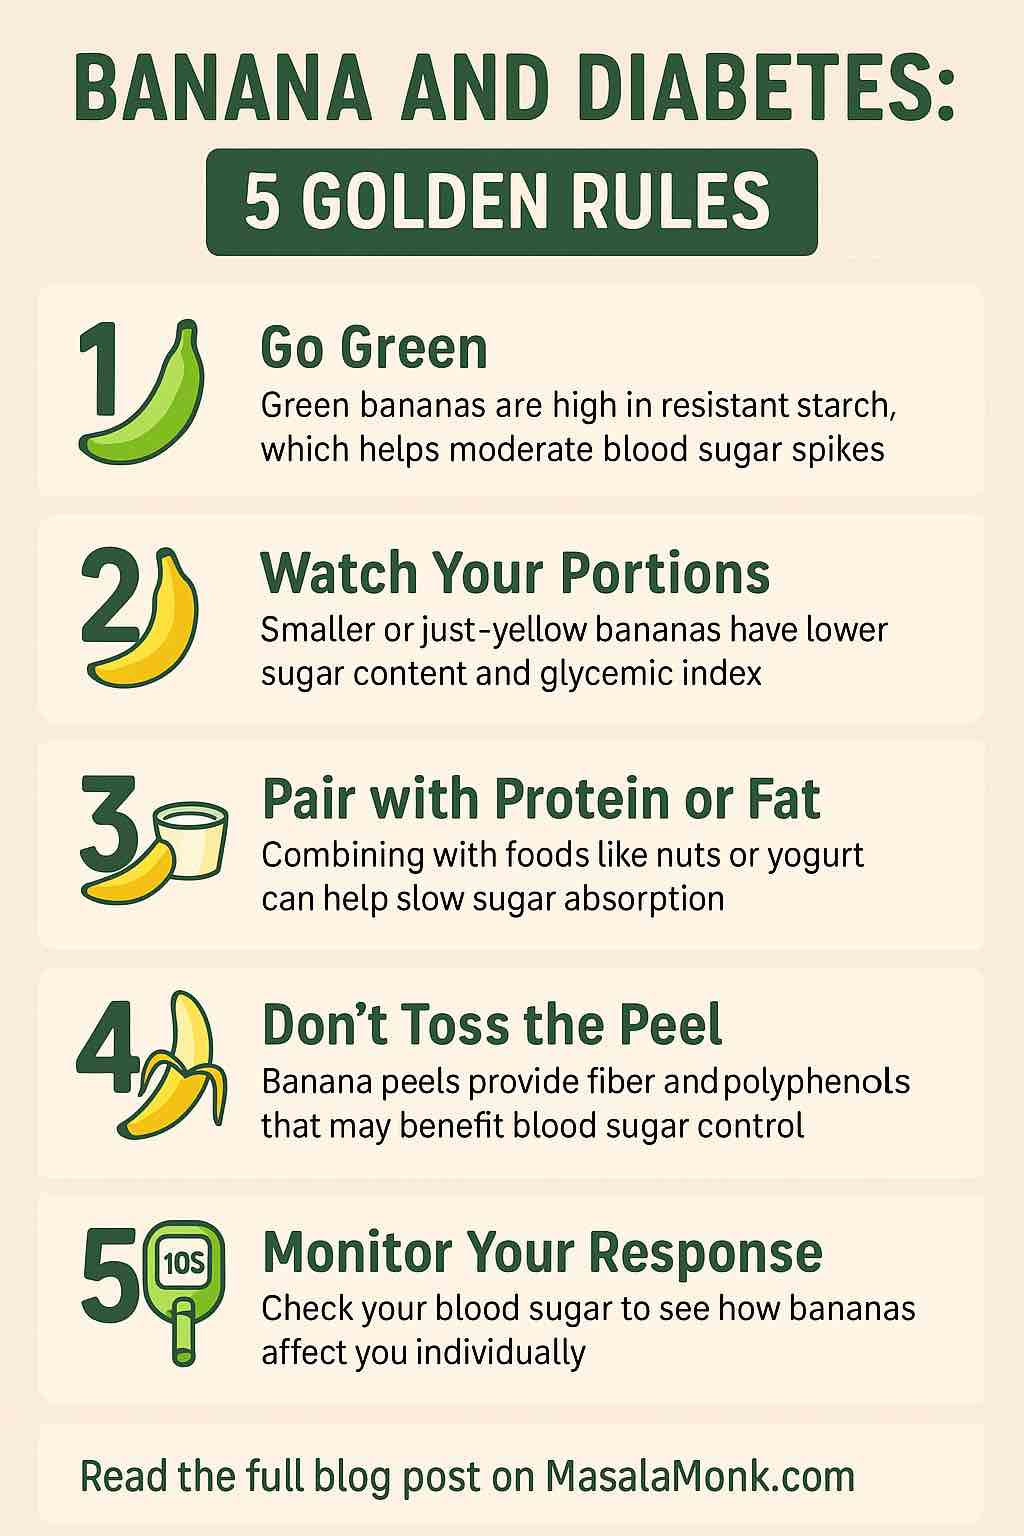
🏆 The 5 Golden Rules: Bananas in a Diabetic Diet
1. Go Green—Resistant Starch is Your Friend
Forget the yellow, spotty banana you’ve always eaten. Green (unripe) bananas are a superfood for diabetics. Here’s why:
- Green bananas are high in resistant starch—a special carbohydrate that behaves more like fiber than sugar.
- Resistant starch isn’t digested in the small intestine. Instead, it feeds your good gut bacteria and slows the rise of blood sugar after eating.
- Recent clinical trials (2024–2025) found that daily green banana biomass (like flour or mashed green banana) reduced fasting blood glucose, HbA1c, cholesterol, and even body weight in people with diabetes.
Practical tip:
- Slice or mash green bananas into porridge, smoothies, or curries.
- Try green banana flour in pancakes, breads, or as a soup thickener.
2. Watch Your Portions—Size & Ripeness Matter
A “one-size-fits-all” approach doesn’t work with bananas. Here’s how to keep portions in check:
- A small banana (about 6 inches) = 18g carbs.
- A medium banana (7–8 inches) = 23–27g carbs.
- A large banana (9 inches) = 30–35g carbs.
And remember: the riper the banana, the higher its sugar content and GI. The best choice for most people with diabetes is a small, just-yellow or slightly green banana.
Practical tip:
- If you want a sweeter, riper banana, eat just half and save the rest for later.
- Don’t eat bananas as dessert right after a high-carb meal; space them out.
3. Pair Bananas With Protein or Healthy Fat
Bananas eaten alone are digested quickly. But combining them with protein or fat slows sugar absorption and flattens blood sugar spikes.
Winning combos:
- Banana with Greek yogurt
- Banana and almond or peanut butter
- Sliced banana on cottage cheese
- Green banana flour in a protein smoothie
Practical tip:
- Never eat bananas on an empty stomach or with refined carbs (like white bread). Always pair with a protein or healthy fat!
4. Don’t Toss the Peel—Bioactives for Better Blood Sugar
The humble banana peel is having a renaissance in diabetes research. New studies (2024–2025) show banana peel is packed with polyphenols, antioxidants, fiber, and even natural enzyme blockers that slow carbohydrate digestion.
How to use it:
- Wash the peel thoroughly, boil it, and blend into smoothies, curries, or even banana bread batter.
- Look for “banana peel flour” in health food stores—great for gluten-free baking and a fiber boost.
Practical tip:
- Start small—try blending a strip of boiled banana peel into a smoothie and see how you like the taste and texture.
5. Monitor & Personalize—Test Your Response
Everyone’s blood sugar response to bananas is a little different, depending on your gut microbiome, medications, and more.
Practical tip:
- Use your blood glucose meter or a continuous glucose monitor (CGM) to test your blood sugar 1–2 hours after eating banana-based snacks.
- Track what works for you: maybe you tolerate green banana pancakes but not a ripe banana after a meal.
Over time, you’ll find the ideal portion, ripeness, and pairing strategy that lets you enjoy bananas confidently.
📝 Real-Life Meal Ideas
- Breakfast: Green banana flour pancakes with ricotta and walnuts.
- Snack: Half a small banana with peanut butter.
- Lunch: Steamed green banana slices tossed with olive oil, lemon, and herbs.
- Dinner: Add banana peel (boiled and blended) to your favorite curry or stew.
- Dessert: Frozen banana “nice cream” (just half a banana, protein powder, almond butter, and cinnamon—blended).
📊 The Science, in a Nutshell
| Rule | Why It Matters | Practical Example |
|---|---|---|
| Choose green/unripe banana | More resistant starch, lower sugar spike | Green banana flour in pancakes |
| Manage portion & ripeness | Lower total carbs, lower GI | Half a small banana with Greek yogurt |
| Pair with protein/fat | Blunts glucose rise, better satiety | Banana + almond butter |
| Use banana peel/bioactives | Extra fiber, polyphenols, and natural “carb blockers” | Boiled peel in smoothies or curries |
| Monitor your own response | Find what works best for your body | Use a blood glucose meter |
🚦 The Bottom Line
Bananas are NOT off-limits for people with diabetes.
With smart choices—favoring green or just-yellow bananas, watching portions, pairing with protein/fat, and using every part of the fruit—you can make bananas a metabolism-friendly part of your diet.
Banana pancakes for breakfast, anyone?
Ready to bring bananas back to your menu? Try one of the tips above and let us know your experience!
10 FAQs: Bananas and Diabetes
1. Can people with diabetes eat bananas at all?
Yes! Bananas can be included in a diabetic diet if you pay attention to portion size, ripeness, and food pairings. They are not “forbidden” but should be eaten mindfully.
2. Are green bananas better than ripe bananas for blood sugar?
Yes. Green (unripe) bananas are higher in resistant starch, which digests slowly and leads to a lower rise in blood sugar compared to fully ripe bananas.
3. How much banana is safe to eat at one time?
For most people with diabetes, half to one small banana (about 4–6 inches long) per serving is reasonable. Always consider your personal carbohydrate targets and test your blood sugar response.
4. What is the glycemic index (GI) of a banana?
Banana GI varies by ripeness: green bananas ~30–45 (low), just-yellow ~51, ripe ~62 (medium). The riper the banana, the higher its GI.
5. Should I avoid bananas if my blood sugar is high?
If your blood sugar is currently elevated, it’s best to avoid bananas or any fruit until your glucose is more controlled. Once stable, you can enjoy bananas with portion and pairing awareness.
6. Can I eat banana peel? Is it safe?
Yes, banana peel is edible and rich in fiber, antioxidants, and beneficial plant compounds. Wash thoroughly, boil to soften, and blend into dishes for extra nutrients.
7. Is banana flour good for diabetes?
Green banana flour is high in resistant starch and fiber, making it a great choice for baking or adding to smoothies. It can help support gut health and stabilize blood sugar.
8. What are good foods to pair with bananas for better blood sugar control?
Pair bananas with protein (e.g., Greek yogurt, cottage cheese) or healthy fats (e.g., nut butters, seeds). This slows digestion and minimizes blood sugar spikes.
9. Can bananas help with weight management?
Bananas—especially green ones—contain fiber and resistant starch that promote fullness and may help with weight control when eaten in moderation as part of a balanced diet.
10. How do I know if bananas work for me?
Use a blood glucose meter or CGM to check your blood sugar 1–2 hours after eating bananas. Track your personal response and adjust serving size, ripeness, or pairings accordingly.