Salmon is one of those dinners that can feel either effortlessly elegant or weirdly stressful, depending on how the cooking goes. One minute it looks glossy and promising, and the next minute it turns dry, chalky, or overdone at the edges while the center still looks undercooked. That’s exactly why this air fryer salmon recipe earns a permanent place in a real home kitchen: it gives you a repeatable method that stays simple, cooks fast, and leaves plenty of room for flavor.
Once you get the rhythm right, making salmon in air fryer stops feeling like guesswork. You learn the temperature that works best in your machine, you understand how thickness changes the timing, and you know what to look for when the fillet is done. From there, everything gets easier. A plain lemon garlic version becomes a weeknight staple. A teriyaki glaze turns into a quick dinner that feels restaurant-ish. A blackened variation suddenly becomes your go-to when you want something bolder.
This post is built as a full, reader-friendly guide, so you can come back to it whether you’re making your first fillet or trying to dial in the best salmon in air fryer for your own taste. We’ll cover the base method, time it takes to air fry a salmon and temp, skin-on versus skinless, seasoning directions, serving ideas, and the easiest way to reheat leftovers without drying them out.
And because salmon is already a naturally rich, satisfying fish, it doesn’t need much to taste good. A few small decisions—patting it dry, seasoning it evenly, cooking it at the right heat, and checking doneness early—make all the difference.
Why this air fryer salmon recipe works
The best thing about an air fried salmon is how quickly it gets from raw to beautifully cooked without asking for much from you. You don’t need a complicated marinade. You don’t need a cast iron pan smoking on the stove. And you don’t even need a long ingredient list. Instead, the circulating heat does most of the heavy lifting, and the salmon naturally brings richness and flavor on its own.
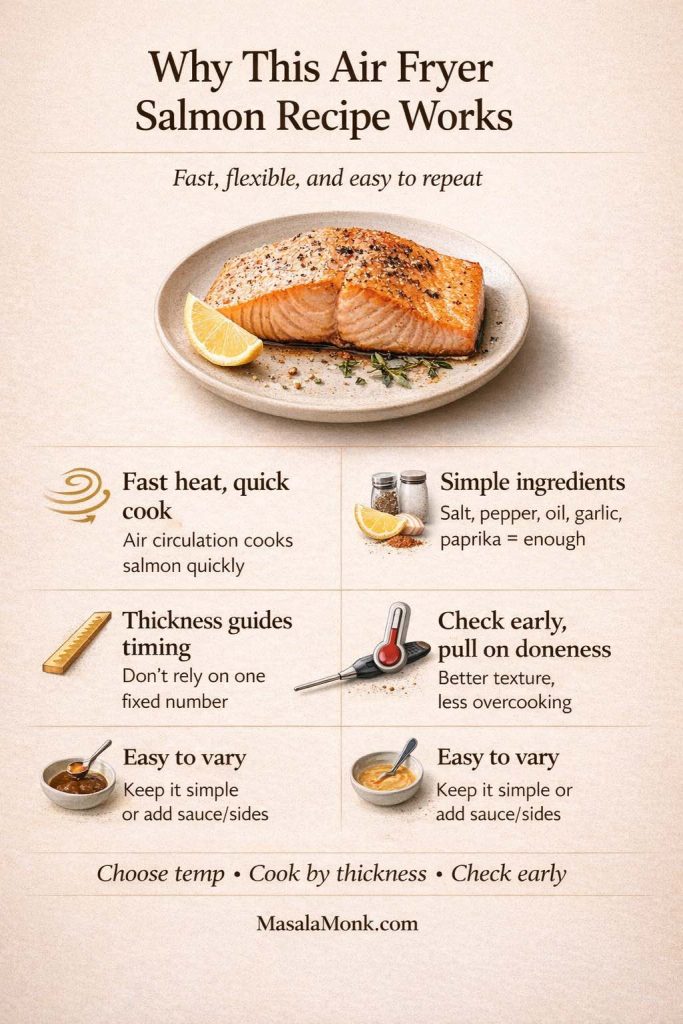
Even so, speed can be a trap if you treat salmon like chicken or a frozen snack. Fish cooks quickly, and salmon fillets vary a lot in thickness. That’s why this method focuses less on a single magic number and more on a reliable flow: choose a temperature, use thickness as your timing guide, and start checking before you think it’s done.
That approach works whether you’re making a simple salmon air fryer recipe on a busy weekday or trying a more dressed-up dinner for guests. It also gives you flexibility. You can keep the seasoning minimal and serve it with a sauce, or you can build flavor directly into the fish and keep the sides light.
There’s another reason this method lands so well in a weekly rotation: salmon already fits neatly into a balanced dinner without much effort. It’s filling, it pairs with almost anything, and it doesn’t need a lot of oil to cook well. The American Heart Association also continues to recommend eating fish, especially fatty fish, as part of a heart-healthy eating pattern, which is one more reason salmon tends to show up so often in practical meal plans. (www.heart.org)
Also Read: Crock Pot Chicken Breast Recipes: 10 Easy Slow Cooker Dinners (Juicy Every Time)
Ingredients for air fryer salmon
You can make excellent salmon in the air fryer with just a handful of pantry basics. In fact, the simpler the starting point, the easier it is to branch into different versions later.
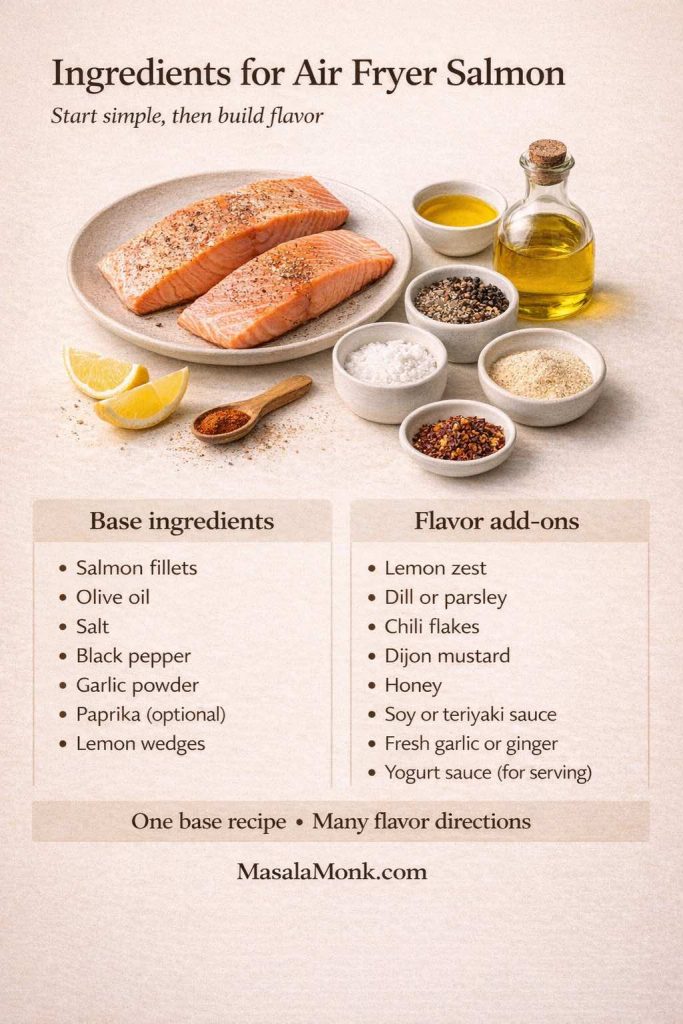
Base ingredients for a simple salmon done in an air fryer recipe
- 2 salmon fillets (about 5 to 7 ounces each, ideally similar thickness)
- 1 to 1½ tablespoons olive oil
- 1 teaspoon kosher salt
- ½ teaspoon black pepper
- ½ teaspoon garlic powder
- ½ teaspoon paprika (optional, but nice for color)
- Lemon wedges, for serving
That’s enough for a clean, dependable version that tastes great on its own and also works as a base for different sauces and add-ons.
Optional ingredients for flavor variations
Once you’ve made the base version once or twice, these are useful to keep around:
- Lemon zest
- Dried dill or parsley
- Chili flakes
- A little Dijon mustard
- Honey (for honey garlic style finishes)
- Soy sauce or teriyaki sauce
- Fresh garlic or ginger
- A spoonful of yogurt-based sauce for serving
If you enjoy changing the feel of the same dish without changing the method, this is where salmon really shines. One night you can top it with a cool spoon of Greek tzatziki. Another night, you can go bright and herbal with chimichurri. And when you want something sweeter and glossier, a homemade teriyaki sauce does the job beautifully.
Also Read: Eggless Yorkshire Pudding (No Milk) Recipe
How to prep salmon fillets for the air fryer
Before the air fryer even turns on, a few small prep moves set you up for a better result.
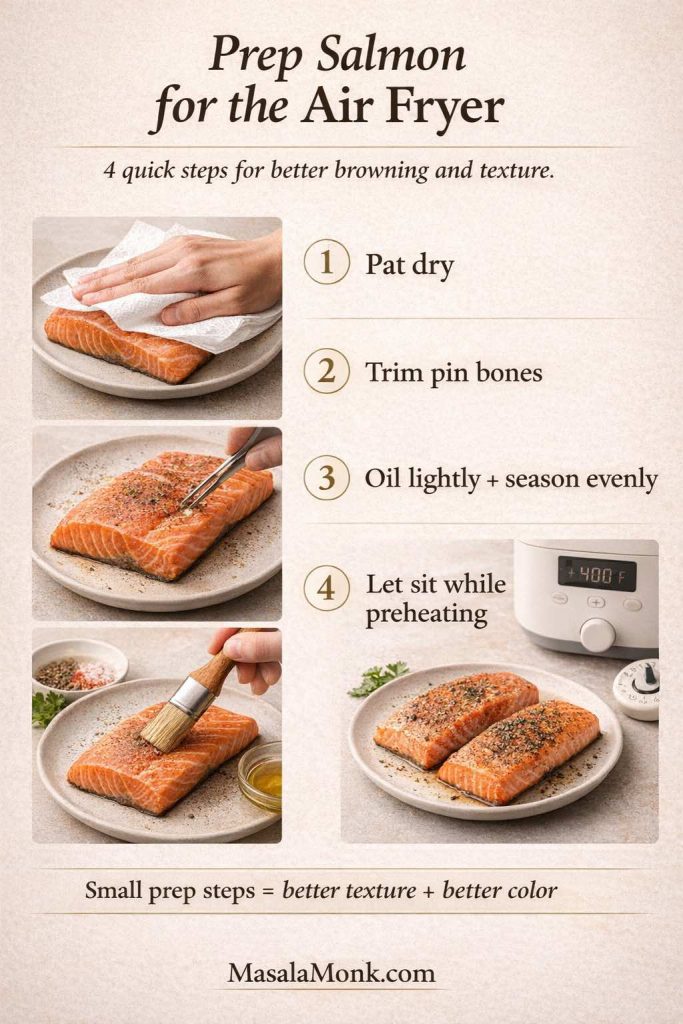
Pat the salmon dry first
This step looks minor, but it changes everything. Surface moisture slows browning, softens the seasoning layer, and can make the salmon look steamed instead of roasted. Use paper towels and pat both sides dry, especially if the fillets were just unwrapped.
If you’re making skin-on salmon in air fryer, pay extra attention to the skin side. A drier surface gives you a better chance of getting nicer texture, especially if you like the skin.
Trim pin bones if needed
Many fillets are sold with pin bones already removed, but not all of them. Run a finger lightly over the center line of the fillet. If you feel little bones sticking up, pull them out with clean tweezers or kitchen pliers. This takes a minute and makes the final dish much easier to eat.
Oil lightly, then season evenly
Brush or rub a light coating of oil over the fillets. You don’t need much. The goal is just enough to help the seasonings stick and to support gentle browning.
Then season the fish evenly. Don’t dump everything in the center and hope it spreads. A more even layer cooks more evenly and tastes more balanced.
For a classic everyday version, salt, pepper, garlic powder, and paprika are enough. If you want a stronger flavor, add lemon zest or chili flakes at this stage.
Let the fillets sit while the air fryer preheats
A short rest on the counter—just a few minutes—is useful while you preheat. It takes the chill off slightly and gives the seasoning time to adhere. You don’t need a long rest. Just enough time to get your air fryer ready and your basket set.
Also Read: Garlic & Paprika Cabbage Rolls (Keto-Friendly Recipes) – 5 Bold Savory Twists
How to cook salmon in the air fryer
This is the core method you’ll come back to again and again. Once you’re comfortable with this, it becomes easy to adapt into all the common variations: honey glazed air fried salmon, teriyaki salmon that is air fried, blackened salmon, lemon salmon recipe air fryer, and more.
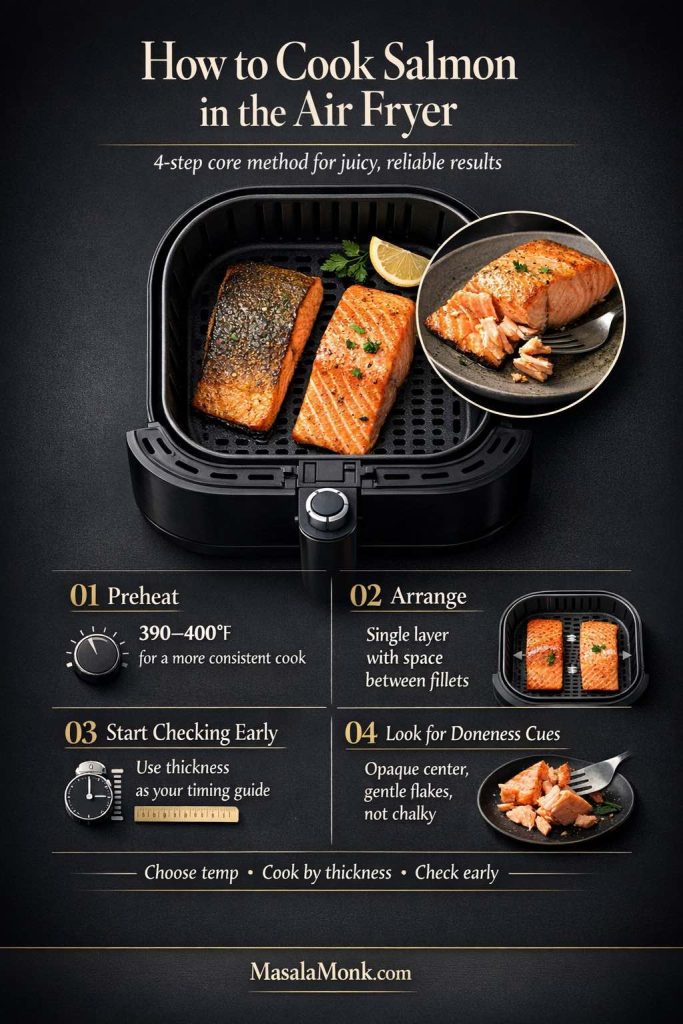
Preheat your air fryer
Not every air fryer behaves the same way, but in general, salmon cooks more consistently when the machine is preheated. A short preheat helps the exterior start cooking right away instead of warming slowly.
Set your air fryer to 390°F or 400°F and let it heat for a few minutes.
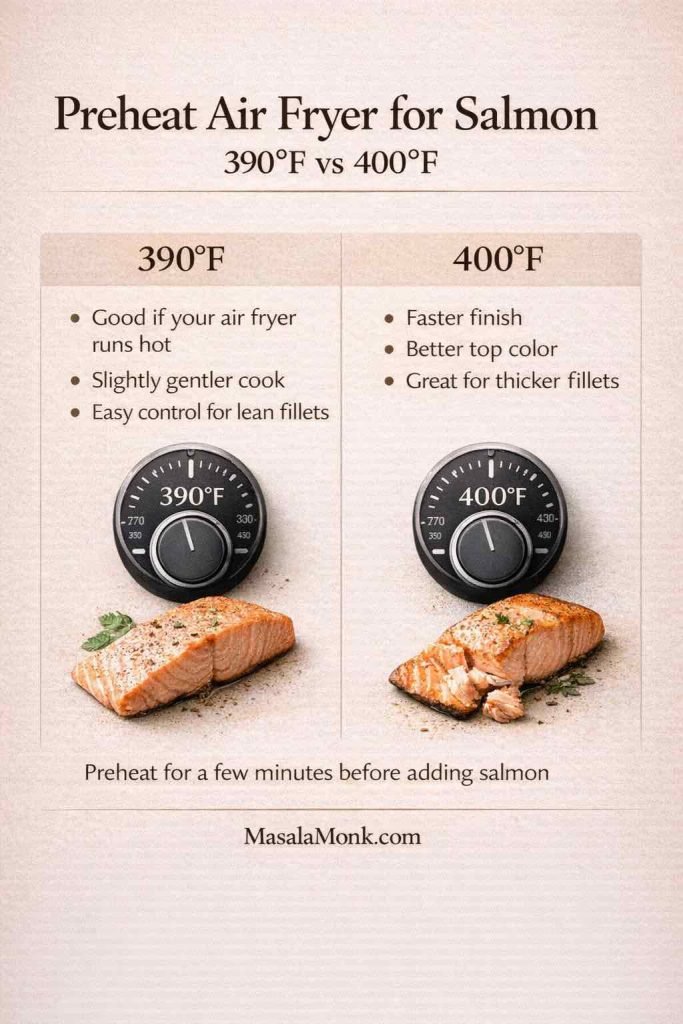
If your model runs hot, start at 390°F. If your model is gentle and you want a slightly deeper top color, go with 400°F.
Arrange the salmon in a single layer
Place the fillets in the basket with space between them. Air fryers need airflow to do their job, so crowding the basket is one of the fastest ways to get uneven cooking.
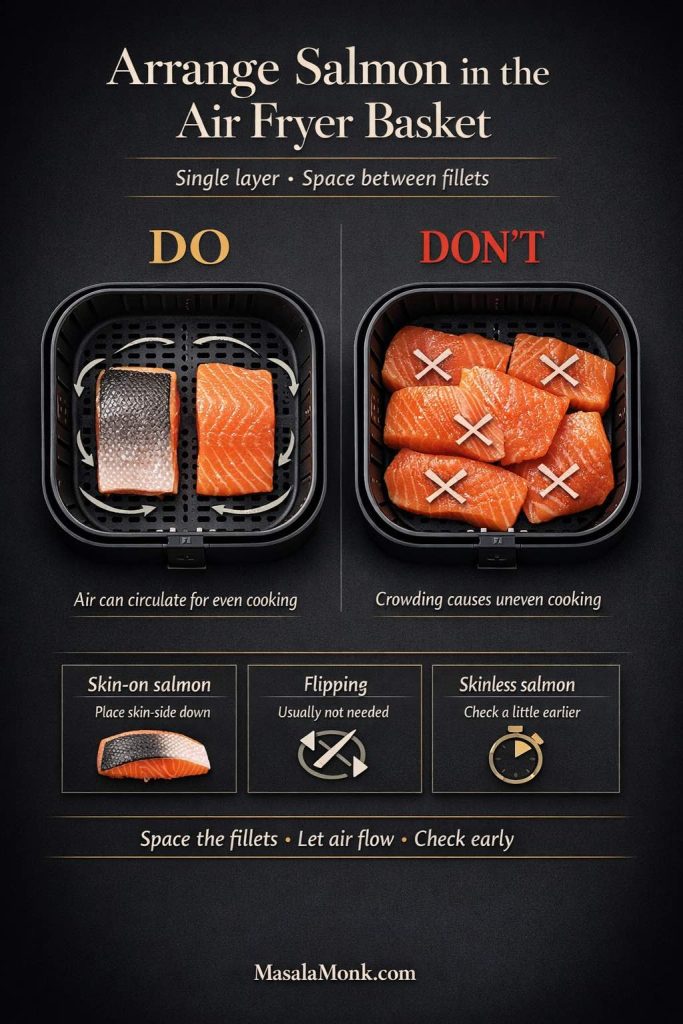
For skin-on salmon:
- Place the fillets skin-side down
- Leave them in place while cooking
- Skip flipping unless your machine cooks very unevenly (most don’t need it)
For skinless salmon:
- You still usually don’t need to flip
- Just plan to check a little earlier
This is true whether you’re making salmon fillet in air fryer, salmon steaks, or slightly smaller portions.
Cook, but start checking early
This is the biggest habit shift that makes air fried salmon better.
Even if a recipe says 10 minutes, don’t wait until 10 minutes to check. Start early. A lot of fillets are done faster than expected, especially thinner pieces or tail-end portions.

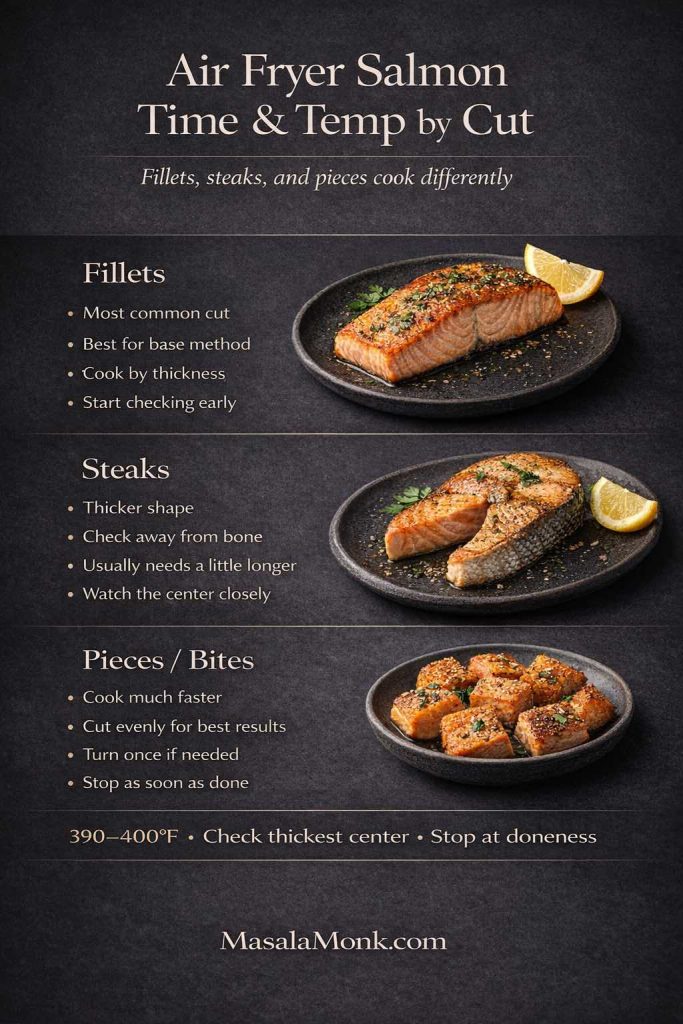
As a general range:
- Thin fillets can finish in 5 to 7 minutes
- Average fillets often finish in 7 to 10 minutes
- Thick center-cut fillets can take 9 to 12 minutes
The exact number depends on thickness, air fryer model, and whether the fish is skin-on or skinless. That’s why checking early matters more than memorizing a single time.
Look for visual doneness cues
Before you even touch a thermometer, your eyes tell you a lot.
The salmon is getting close when:
- The flesh turns more opaque
- The center no longer looks very translucent
- The top firms up slightly
- The fillet flakes when you press gently with a fork
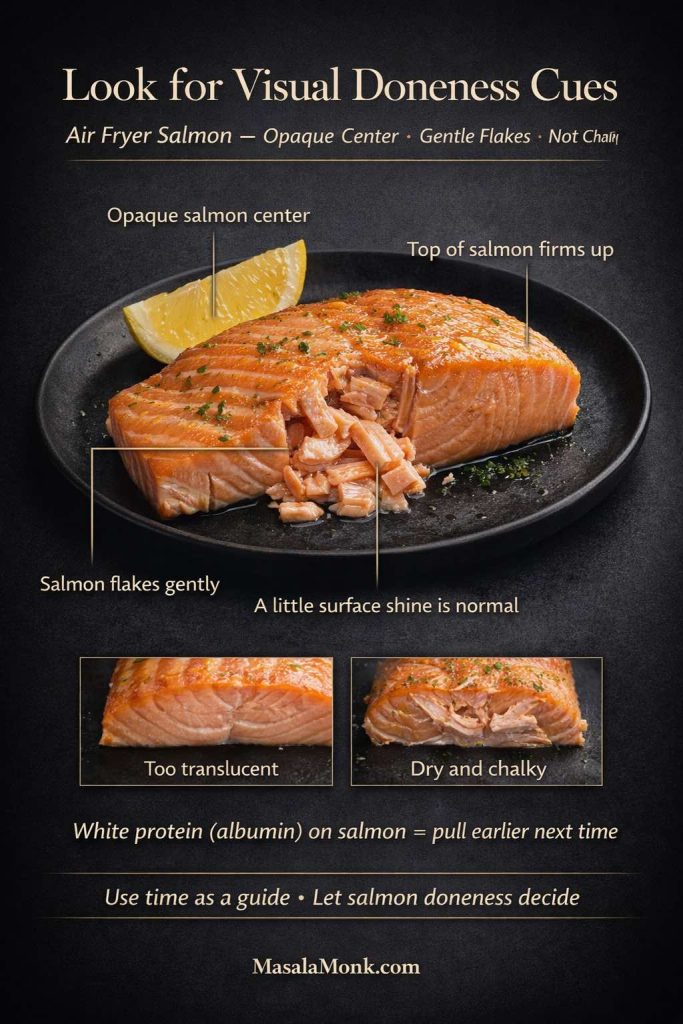
A little shine is normal. Dry, chalky flesh is not the goal.
If white protein (albumin) starts pushing out aggressively from the sides, it usually means the salmon is heading past ideal doneness. It’s still edible, but that’s your cue to pull earlier next time.
Also Read: 10 Low Carb Chia Pudding Recipes for Weight Loss (Keto, High-Protein, Dairy-Free)
Air fryer salmon time and temp
This is the part most people come back to, and it’s worth getting right. There’s no single cook time that works for every fillet, but there is a reliable way to think about it.
Air fryer salmon time and temp by thickness
For best results, think in terms of thickness instead of just weight.
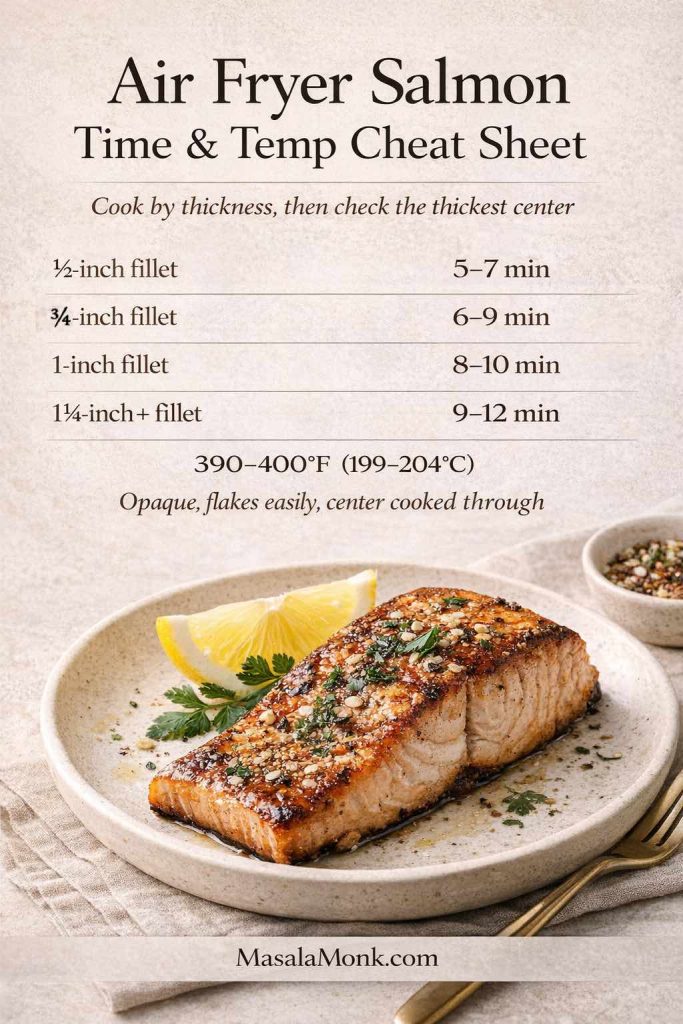
At 390°F to 400°F, use this as a practical guide:
- Very thin fillets or tail pieces (about ½ inch): 5 to 7 minutes
- ¾-inch fillets: 6 to 9 minutes
- 1-inch fillets: 8 to 10 minutes
- Thick fillets (1¼ inch or more): 9 to 12 minutes
That timing applies to fresh salmon in air fryer, including common cuts like Atlantic salmon and many standard grocery fillets.
If you’re working with a fattier cut, it may tolerate a tiny bit more time without drying out. If you’re working with leaner salmon, check even earlier.
Best temperature for air fryer salmon
If you’re wondering about the best way to cook salmon in air fryer, the answer is less about finding one “perfect” number and more about choosing a temperature you can repeat confidently.
For most kitchens, the sweet spot is:
- 400°F for a faster finish and a little more top color
- 390°F if your machine runs hot or you want a slightly gentler cook
Both produce excellent results. What matters more is consistency. If you always cook at the same temperature, you learn your machine faster, and your salmon turns out more reliably every time.
Time and temp for salmon in air fryer without overcooking
A lot of people are curious about “salmon air fryer temp and time,” “time to cook salmon in air fryer,” or “air fried salmon cooking time,” and the real answer is this:
Use the clock as a guide, but let doneness decide when to stop.
That’s the difference between salmon that’s technically cooked and salmon that actually tastes great. The best air fried salmon isn’t just “hot enough.” It’s cooked through while still tender and juicy in the center.
Also Read: Keto Hot Chocolate Recipe (Sugar-Free Hot Cocoa) + Best Homemade Mix
How to tell when salmon is done
This is where confidence really kicks in. Once you know what done salmon looks and feels like, you stop second-guessing every batch.
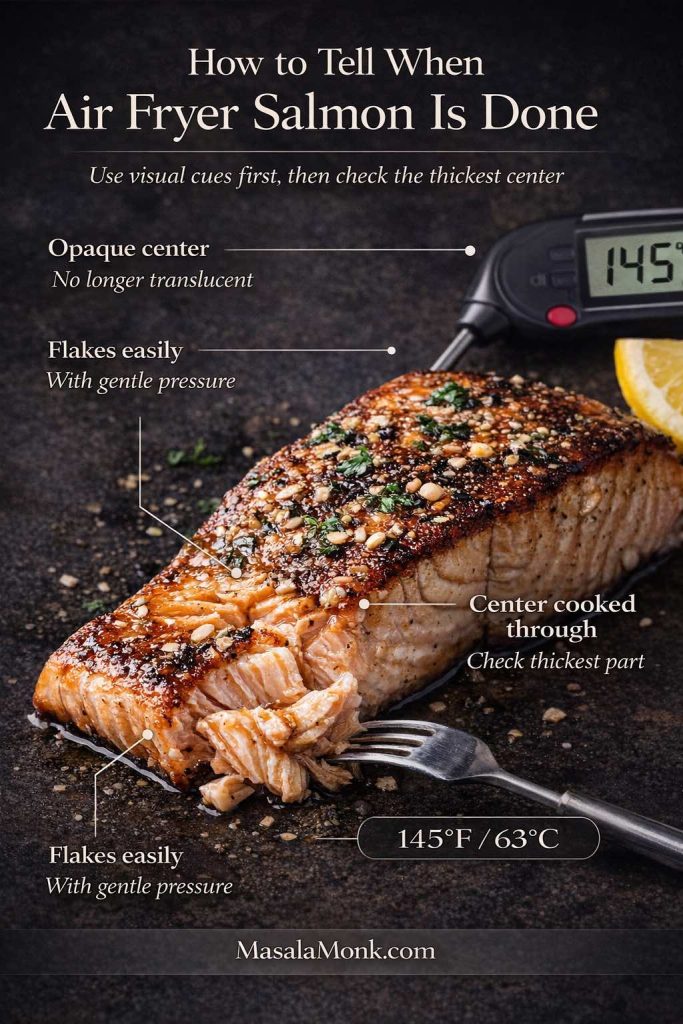
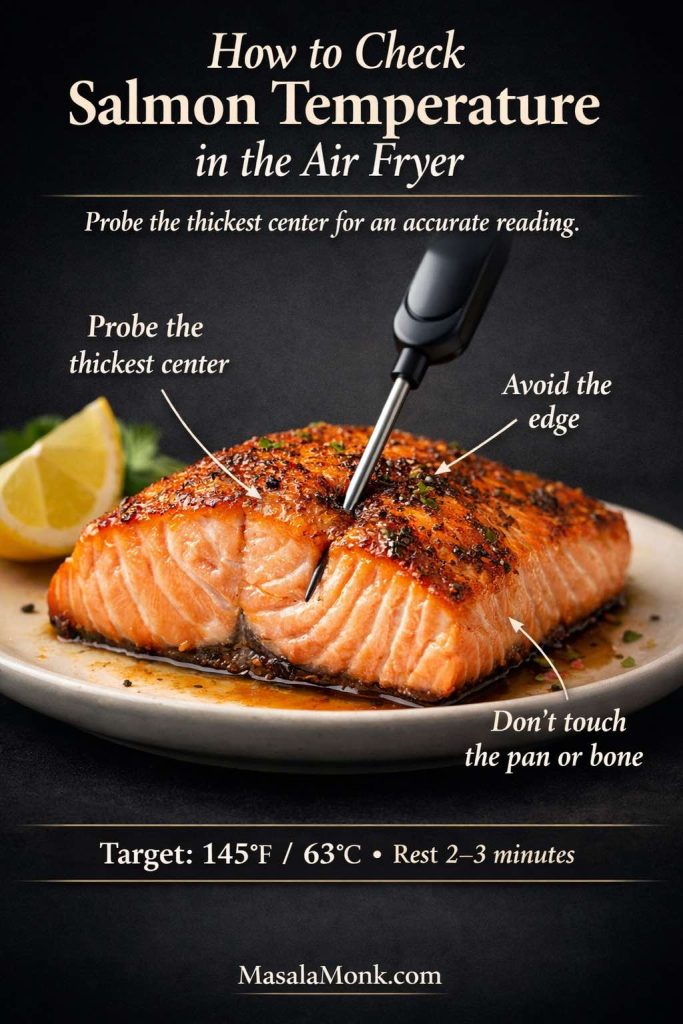
Use the thermometer in the thickest center
If you want consistency, a thermometer is your best friend.
Insert it into the thickest part of the fillet, not the thin edge. FoodSafety.gov lists fish (including salmon) at 145°F (63°C), and it also notes the classic visual cue that fish should be opaque and separate easily with a fork. (FoodSafety.gov)
That temperature is a strong, practical benchmark for a general home-cooking recipe, especially if you’re cooking for a family and want a clear doneness target.
The USDA safe temperature chart also lists fish and shellfish at 145°F, which aligns with the same guidance. (Food Safety and Inspection Service)
What done salmon looks like
When salmon is done, the flesh:
- Looks opaque rather than raw-looking in the middle
- Flakes with gentle pressure
- Feels tender, not mushy
- Holds together when you lift it
If it still looks very translucent in the center, give it another minute and check again.
If it’s dry and crumbly, it’s gone a little too far. Not a disaster, but you’ll want to reduce the cook time next time.
Rest briefly before serving
Salmon doesn’t need a long rest like a large roast, but 2 to 3 minutes helps.
That short pause lets the juices settle and makes the fillet easier to plate neatly. It also gives you a moment to finish a side dish, squeeze lemon, or spoon on a sauce.
Also Read: Dirty Martini Recipe (Classic, Extra Dirty, No Vermouth, Spicy, Blue Cheese, Tequila + Batched)
Air fryer salmon with skin vs skinless
Both versions work well, but they behave a little differently. Knowing the difference helps you avoid overcooking and gets you a better texture.
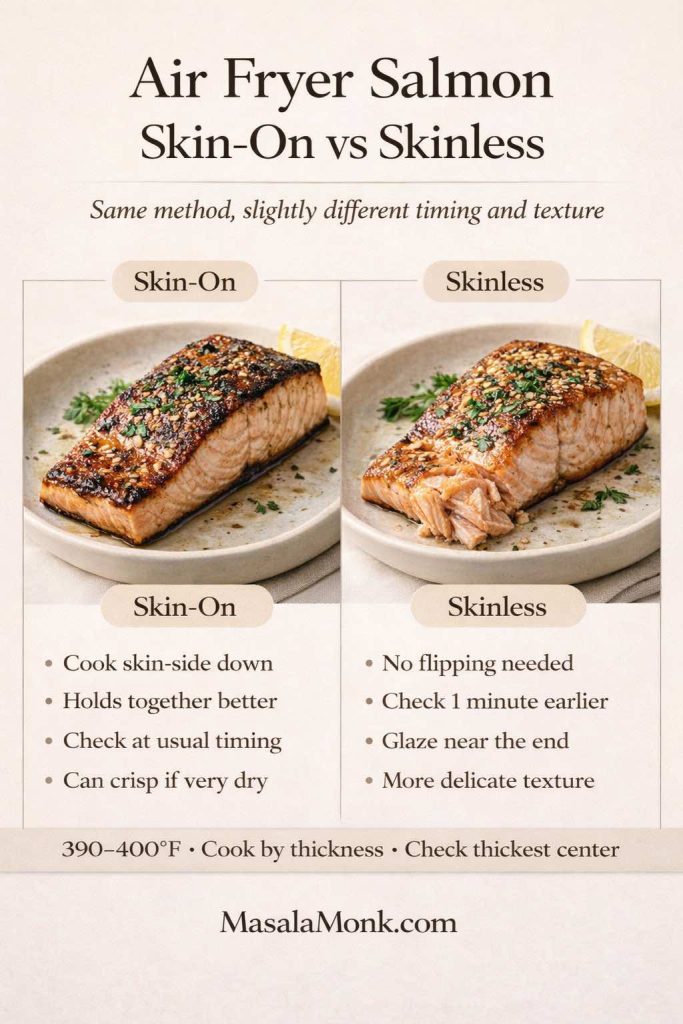
How to cook skin-on salmon in air fryer
Skin-on salmon is often easier for beginners because the skin helps protect the bottom of the fillet and makes it easier to move after cooking.
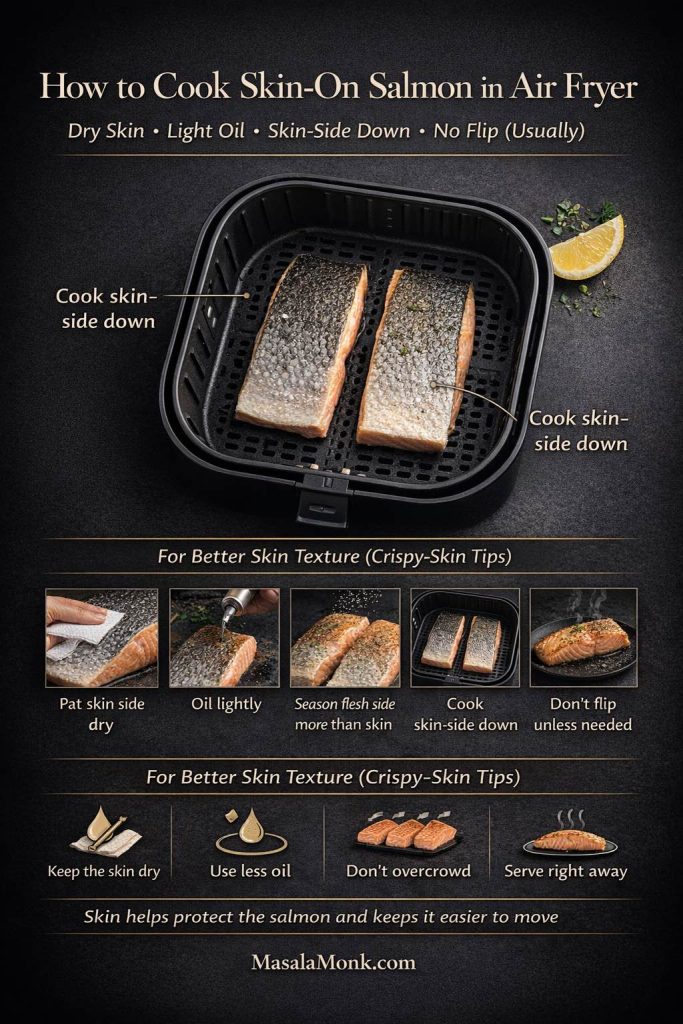
For air fryer salmon with skin:
- Pat the skin side dry
- Oil lightly
- Season the flesh side more heavily than the skin
- Cook skin-side down
- Don’t flip unless absolutely necessary
The skin doesn’t always get ultra-crispy in every air fryer, but it usually cooks well and helps the fish stay moist.
If you like crispy skin salmon air fryer style, a few small moves help:
- Keep the skin dry
- Avoid too much oil
- Don’t overcrowd the basket
- Serve right away (steam softens crisp skin quickly)
Skinless salmon in the air fryer
Skinless salmon in the air fryer works beautifully too, but it tends to cook a little faster and can dry out more easily if you overshoot the timing.
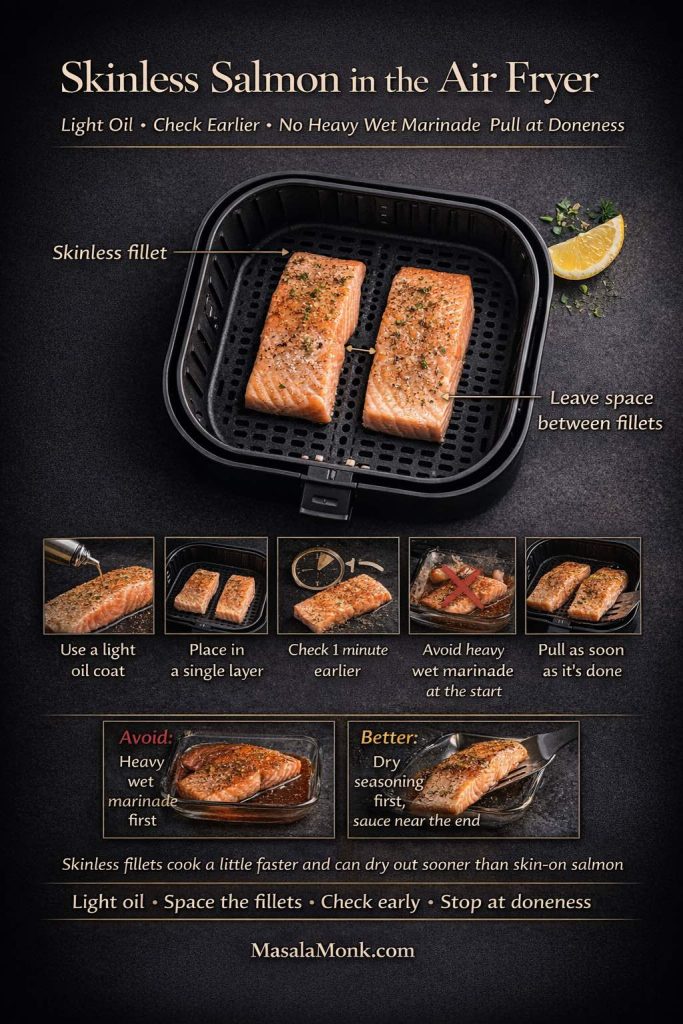
For skinless fillets:
- Use a light oil coat
- Check one minute earlier than usual
- Avoid heavy wet marinades at the start
- Pull the fillet as soon as it reaches doneness
This is especially important if you’re making thinner cuts or smaller salmon portions.
If sticking is an issue in your basket, a lightly greased perforated liner can help, but avoid blocking too much airflow.
Salmon steak in air fryer
Salmon steaks are a little different from fillets because the shape is thicker and more uneven around the center bone.
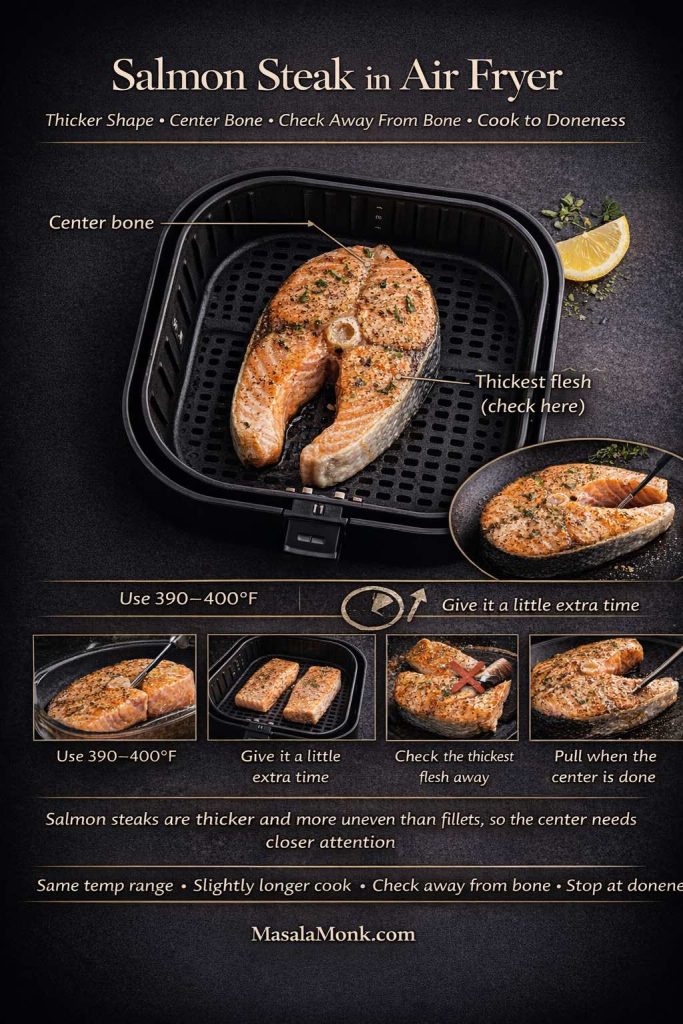
If you’re cooking salmon steak air fryer style:
- Use the same temperature range (390°F to 400°F)
- Add a little extra time
- Check doneness in the thickest part, away from the bone
The same doneness rules apply, but the steak shape means you’ll want to watch the center closely.
Also Read: Fish and Chips Reimagined: 5 Indian Twists (Recipe + Method)
Best seasoning for air fryer salmon
This is where the fun starts. Once you have the base method down, seasoning is what keeps air fryer salmon from feeling repetitive.

Simple seasoning for air fryer salmon
The most reliable version is still the simplest:
- Salt
- Pepper
- Garlic powder
- Paprika
- Lemon to finish
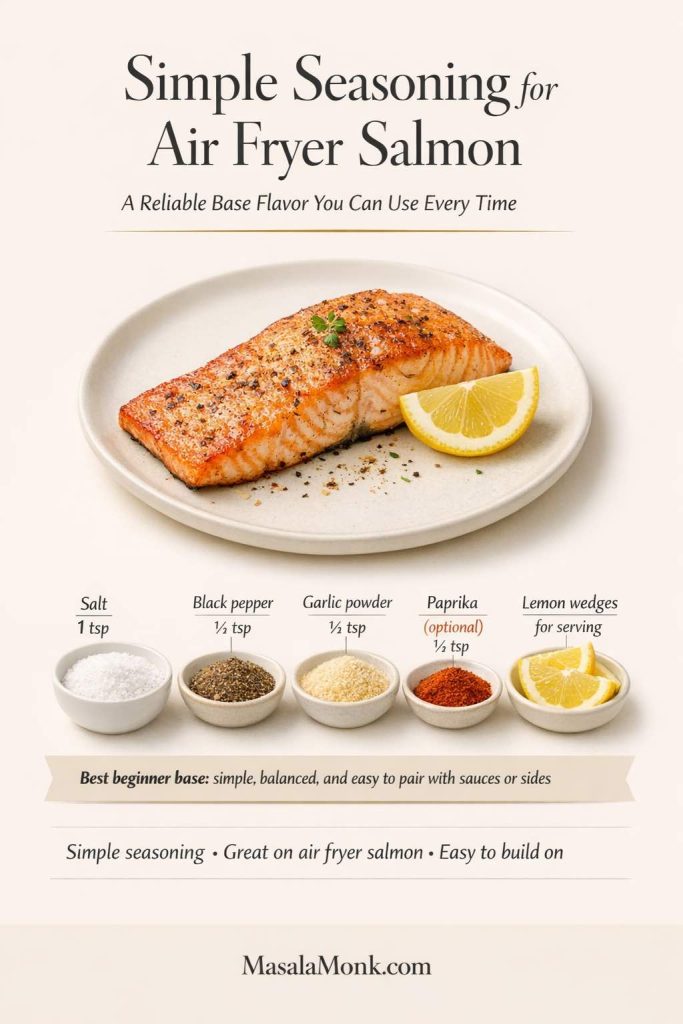
This combination works with almost any side and leaves room for a sauce if you want one. It’s also the best starting point if you’re new to cooking salmon in an air fryer.
Lemon garlic salmon recipe in air fryer
For a bright, fresh variation:
- Add lemon zest before cooking
- Use a touch more garlic
- Finish with lemon juice right after cooking
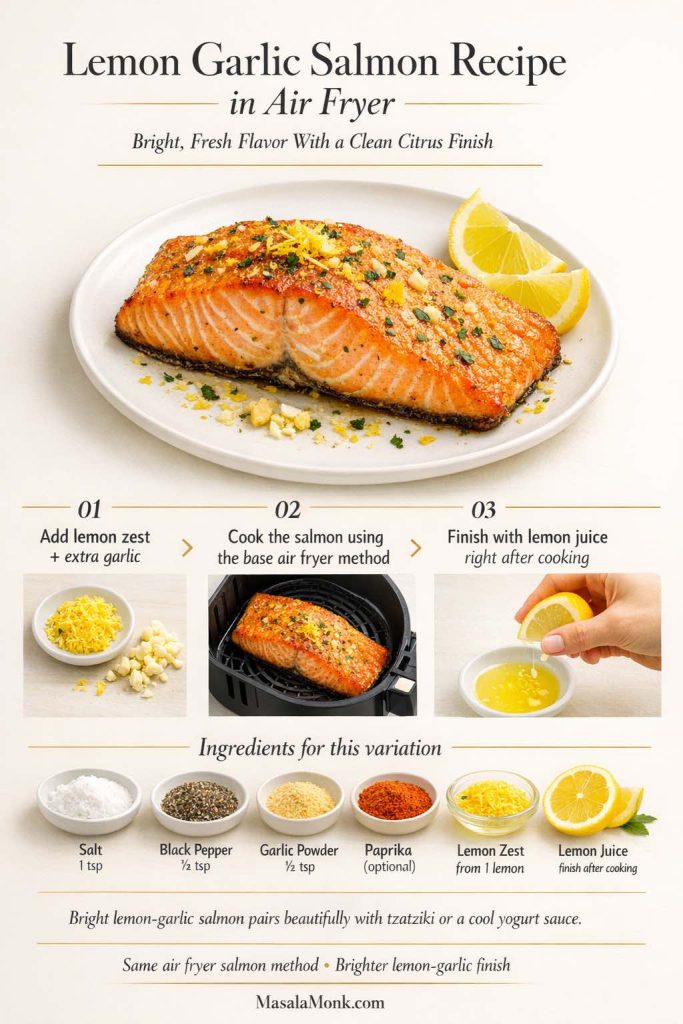
This version tastes clean and balanced, and it pairs really well with cool sauces. A spoonful of tzatziki on the side gives it a creamy contrast without making the dish heavy.
Blackened air fryer salmon
Blackened salmon in the air fryer works beautifully because the hot circulating air sets the spice coating quickly.
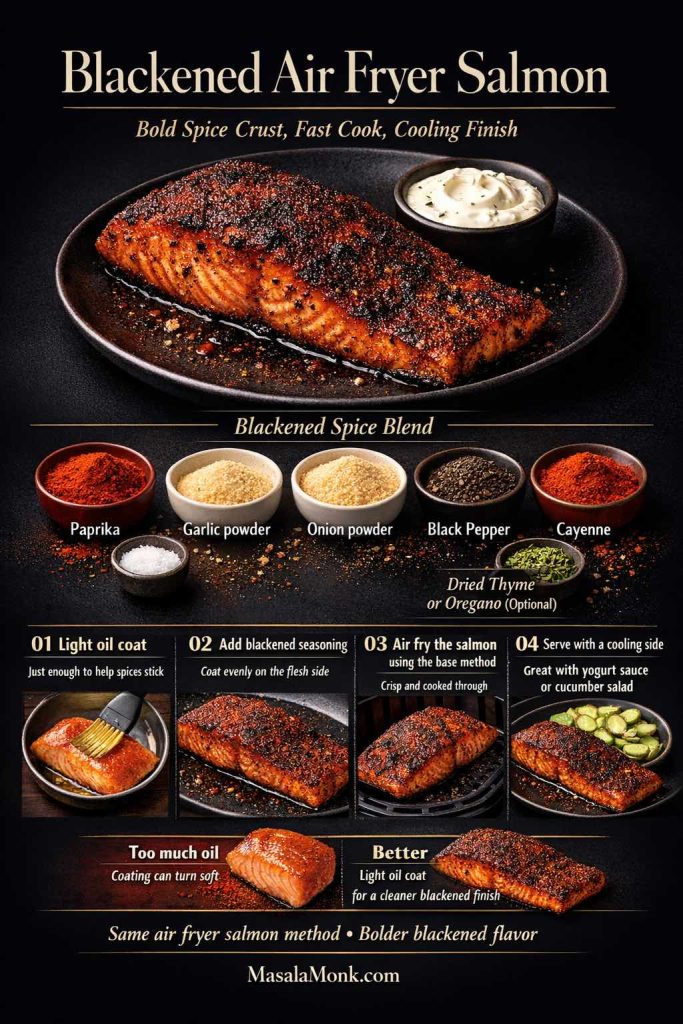
A good blackened-style blend includes:
- Paprika
- Garlic powder
- Onion powder
- Black pepper
- Cayenne
- Dried thyme or oregano (optional)
Use just enough oil to help the spices stick. Too much oil can make the coating patchy or overly soft.
This version is excellent with something cooling and tangy on the side, like yogurt sauce or a quick cucumber salad.
Teriyaki salmon in air fryer
Teriyaki is one of the easiest upgrades, but timing matters.
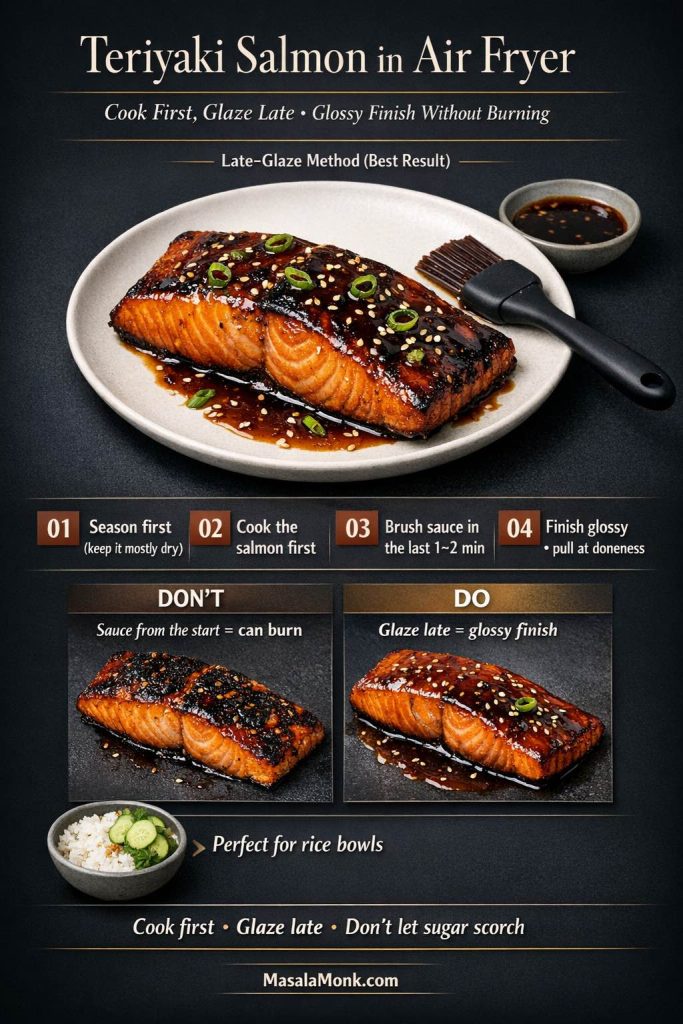
Instead of starting with a thick sweet sauce, cook the salmon most of the way first. Then brush on teriyaki during the last 1 to 2 minutes so it turns glossy without burning.
That late-glaze method gives you a much better finish than adding sauce from the beginning.
If you want a homemade option, MasalaMonk’s teriyaki sauce recipe is especially useful because it includes a thicker glaze-style version as well as lighter directions, so you can choose what suits your salmon best.
Honey garlic salmon air fryer style
Honey garlic salmon is another favorite, and the same glaze rule applies.
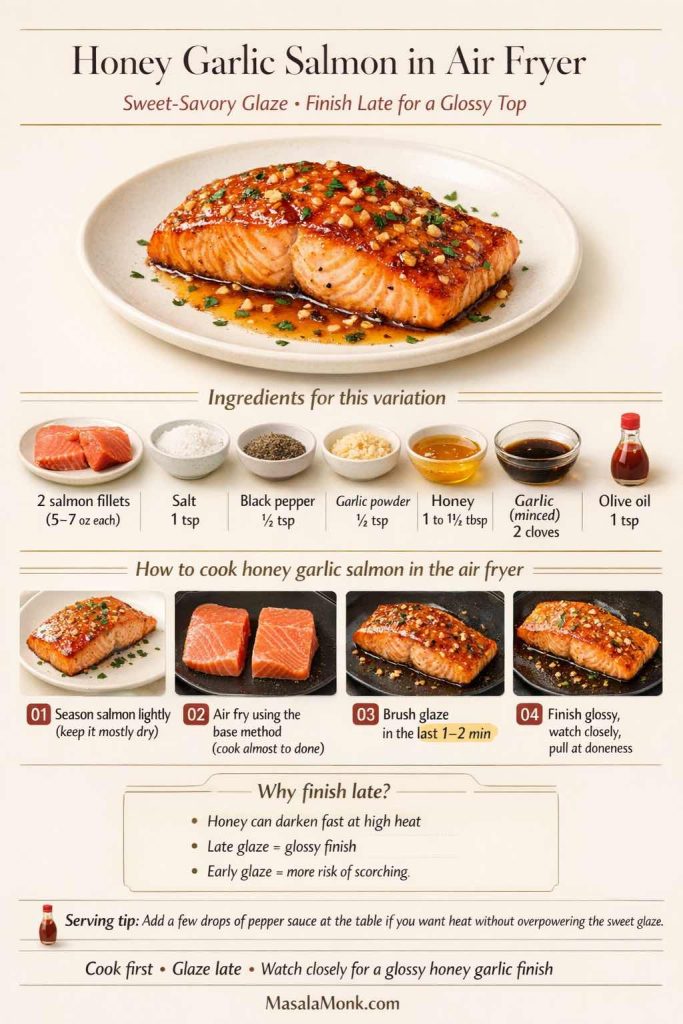
A simple honey garlic finish works best when you:
- Cook the salmon almost to done
- Brush on the glaze
- Finish for 1 to 2 minutes
- Watch closely
Sweet glazes can darken quickly at high heat. Finishing late keeps the top glossy and flavorful instead of scorched.
If you want extra spice, add a few drops of pepper sauce at the table instead of mixing it into the glaze. That way, the sweetness stays balanced, and everyone can adjust the heat level.
Salmon marinade for air fryer
A quick note on marinades: they work, but wet marinades can reduce browning if you use too much.
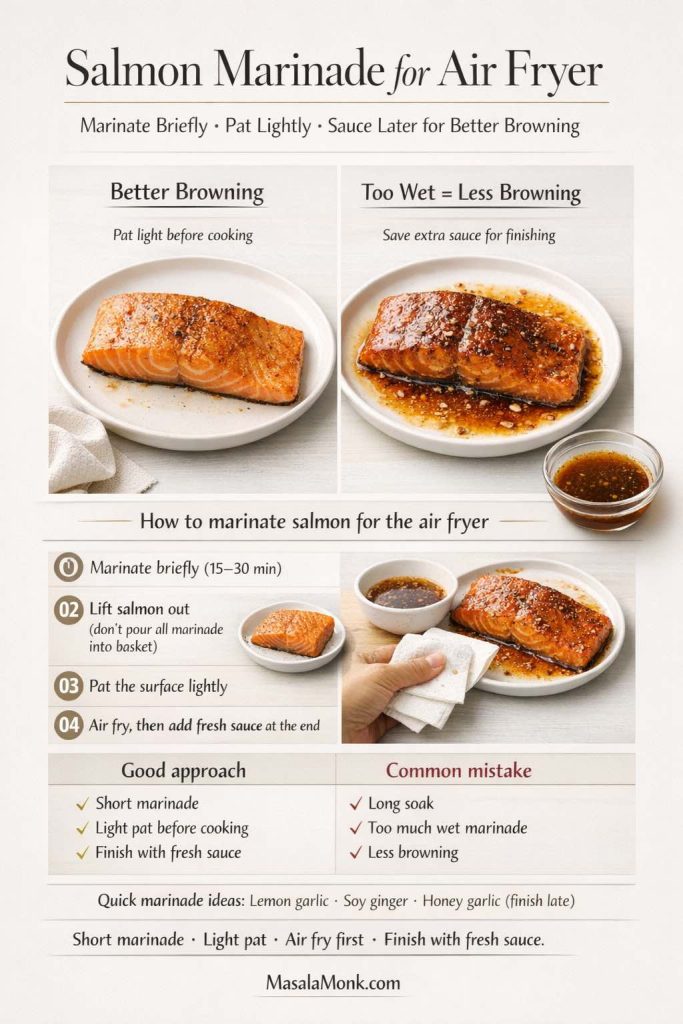
If you want to marinate:
- Keep it short (15 to 30 minutes is usually enough)
- Pat the surface lightly before cooking
- Save some fresh sauce for the end
This is why a lot of the best air fryer salmon recipes rely on dry seasoning first and sauce second.
Also Read: Ravioli Recipe Reinvented: 5 Indian-Inspired Twists on the Italian Classic
Common air fryer salmon mistakes and how to fix them
Even with a good method, a few things can throw off the final result. The good news is that most of them are easy to correct.
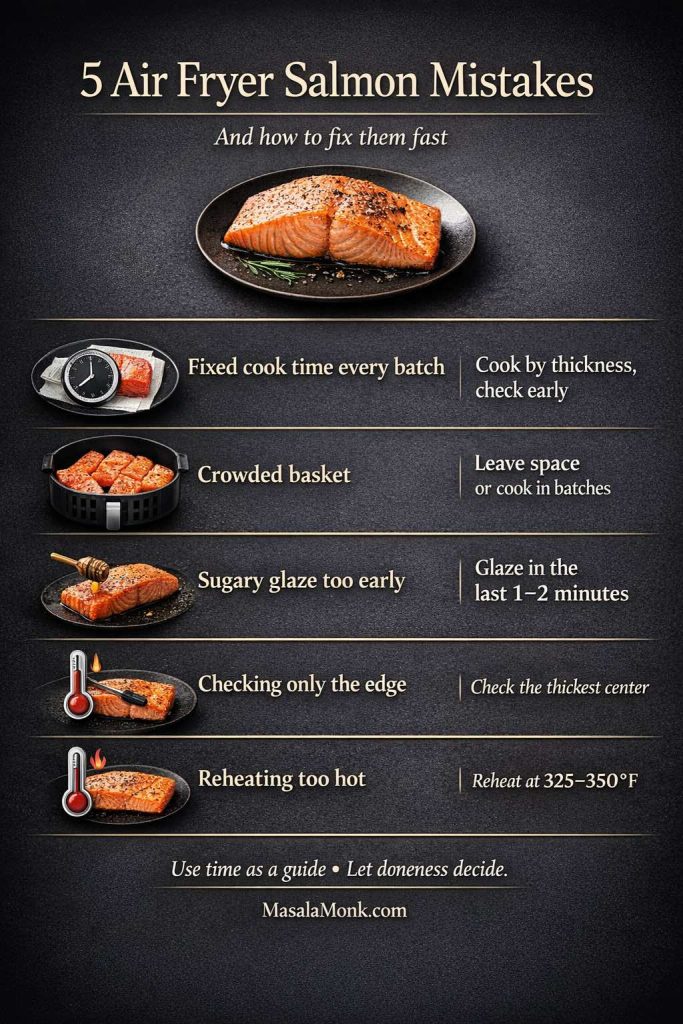
Mistake 1: Cooking by one fixed time every time
No two fillets are exactly the same. Thickness changes everything.
Fix it by using a timing range, then checking early. Once you start treating the clock like a guide rather than a rule, your salmon gets more consistent immediately.
Mistake 2: Crowding the basket
When fillets are packed too tightly, hot air can’t move around them properly. The result is uneven cooking and weaker browning.
Fix it by cooking in batches if needed. It’s better to cook two good fillets than four crowded ones.
Mistake 3: Starting with a sugary glaze
Honey, teriyaki, and similar sauces taste great, but they burn fast.
Fix it by glazing near the end. Let the salmon cook first, then brush and finish.
Mistake 4: Not checking the thickest part
The edge of the fillet will look done before the center. If you only look at the edges, you’ll pull too early or keep cooking too long while trying to “fix” the wrong spot.
Fix it by checking the center every time.
Mistake 5: Overcooking leftovers during reheating
A lot of people blame the original cook when the real problem happens the next day. Reheating salmon too hot or too long dries it out fast.
Fix it by reheating gently at a lower temperature and just warming it through.
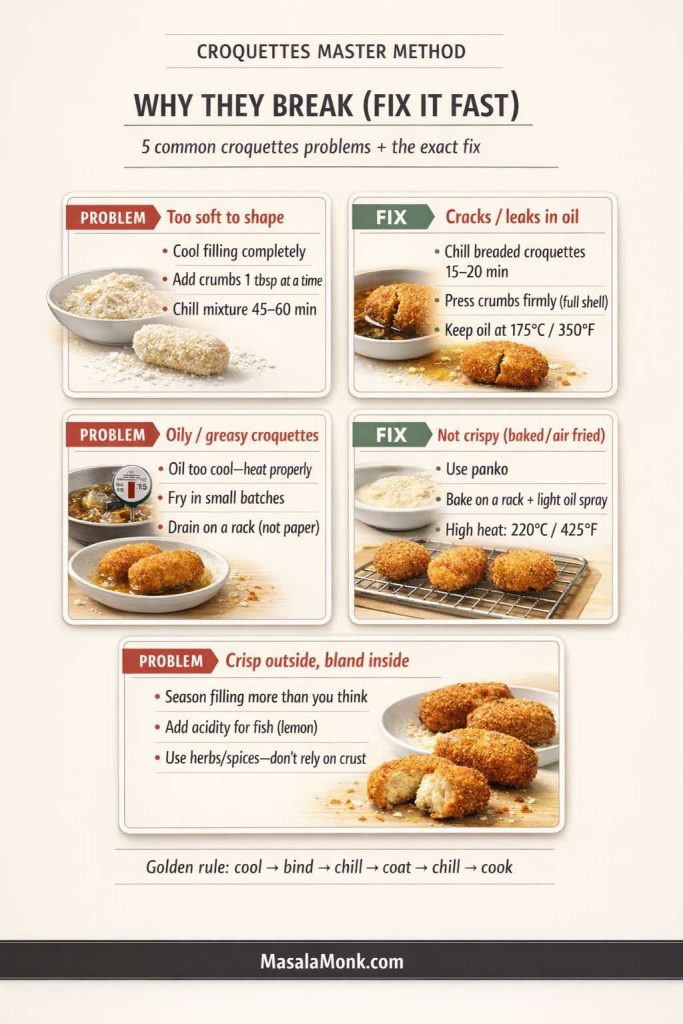
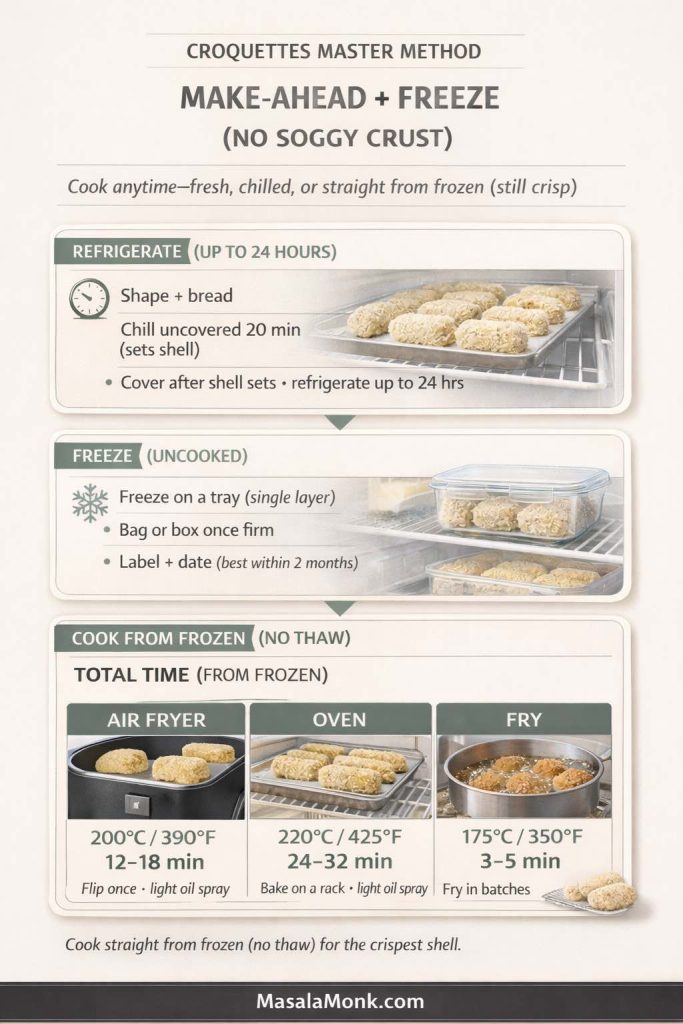
Also Read: Croquettes Recipe: One Master Method + 10 Popular Variations
Easy air fryer salmon variations for weeknights
One of the best parts of a solid salmon air fryer recipe is how easily it turns into several dinners with very little extra work.
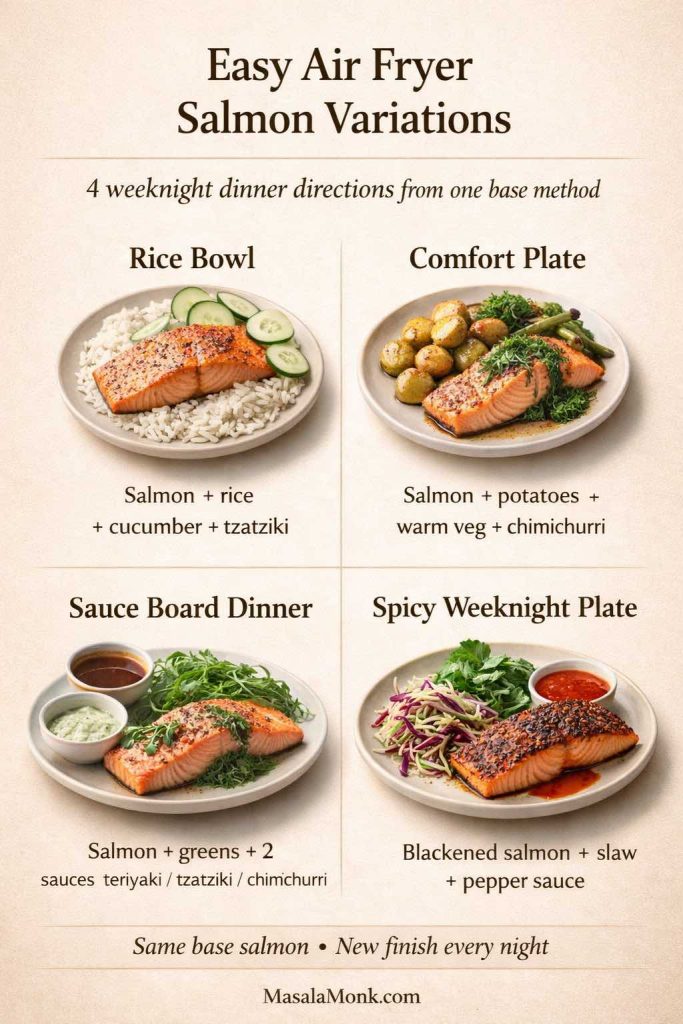
Air fryer salmon bowl with rice and herbs
A salmon bowl is one of the easiest ways to turn this into a full meal.
Start with a base of rice, then add:
- Flaked air fryer salmon
- Sliced cucumber
- Fresh herbs
- Lemon wedges
- Tzatziki or a yogurt sauce
- Chili flakes, if you like heat
If you need a dependable rice base, MasalaMonk’s how to cook rice guide is a great companion because it walks through different rice types and methods in a way that makes weeknight bowls much easier to build.
Crispy-style salmon plate with a side of croquettes
When you want something a little more fun than the usual rice-and-veg combo, pair the salmon with a crisp side.
This is where a side like croquettes fits surprisingly well. MasalaMonk’s croquettes recipe guide is especially useful if you like the idea of one method that can be baked, fried, or air-fried and reused with different fillings. It also naturally opens the door to leftover salmon ideas later in the week.
Sauce-board salmon dinner
Another easy way to make the same salmon feel new is to serve it with more than one sauce.
A simple plate with the same air fryer salmon fillets can feel completely different when you offer:
- Chimichurri for a bright, herb-heavy finish
- Tzatziki for cool creaminess
- Teriyaki sauce for sweet-savory gloss
That setup works especially well when people at the table like different flavor styles, and it makes the meal feel more generous without much extra cooking.
Lemon herb salmon with pesto on the side
Pesto is often associated with pasta, but it works beautifully with salmon too.
A spoonful of pesto on warm salmon adds richness, herbs, and a lot of flavor very quickly. It’s a great pairing if you’re keeping the salmon seasoning simple and want the sauce to do more of the work.
This version also pairs well with roasted potatoes, rice, or a crisp salad.
Spicy salmon with pepper sauce finish
If you enjoy heat, a bright pepper sauce works better than an overly aggressive spice rub in many cases.
You can keep the salmon seasoned simply, then finish with a few drops of pepper sauce at the table. That gives you more control over the spice level and keeps the salmon from tasting flat or one-note.
It’s a small move, but it makes the same basic air fryer salmon feel much more dynamic.
Also Read: How to Make a Flax Egg (Recipe & Ratio for Vegan Baking)
What to serve with air fryer salmon
Salmon is flexible enough to go in several directions, so this part depends on the kind of meal you want: clean and light, cozy and comforting, or a little more dinner-party style.
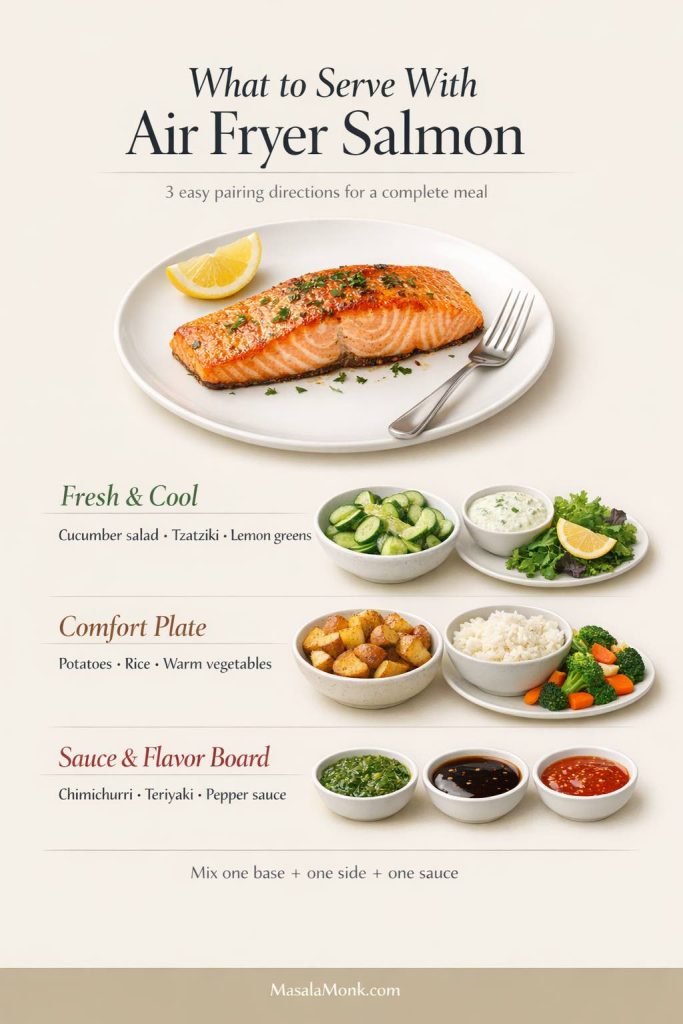
Fresh, cool sides that balance salmon well
Because salmon is naturally rich, cool sides are a great match.
Some of the easiest options:
- Cucumber salad
- Lemony greens
- Yogurt-herb sauce
- Tomato and onion salad
- Light slaw
If you want a more substantial cold side, a scoop of potato salad works especially well. MasalaMonk’s potato salad recipes post is handy here because it includes multiple styles, so you can pair a sharper German-style salad with glazed salmon or a creamier version with lemon garlic salmon.
Warm sides for a more filling dinner
If you want a heartier plate, salmon pairs beautifully with:
- Rice
- Roasted potatoes
- Steamed vegetables with butter and lemon
- Sautéed greens
- Simple pasta
Rice is one of the easiest choices because it absorbs sauces well and turns leftover salmon into an easy next-day bowl.
Sauce-led pairings that make the same salmon feel different
Sometimes the side isn’t the main decision. The sauce is.
If you want to keep the salmon method exactly the same and still avoid boredom, rotate sauces:
- Pesto for a rich herb finish
- Chimichurri for brightness and bite
- Tzatziki for cooling contrast
- Teriyaki sauce for a sweet-savory glaze
- Pepper sauce for heat
That rotation alone can carry multiple weeks of dinners without changing how you cook the fish.
Drinks and desserts that round out the meal
If you like building a complete dinner experience, this is an easy place to add a little personality without complicating the main recipe.
For drinks, a crisp non-alcoholic option pairs really well with salmon, especially when the seasoning leans citrusy or spicy. MasalaMonk’s keto mocktails guide is a good place to pull ideas like fresh, low-sugar coolers and citrus-forward drinks.
For dessert, a simple make-ahead option works especially well after fish:
- No-bake banana pudding if you want something easy and comforting
- Orange olive oil cake if you want a lighter citrus finish
Those pairings make the meal feel complete without pulling you into an overly heavy dessert.
Also Read: Pork Tenderloin in Oven (Juicy, Easy, 350°F or 400°F) Recipe
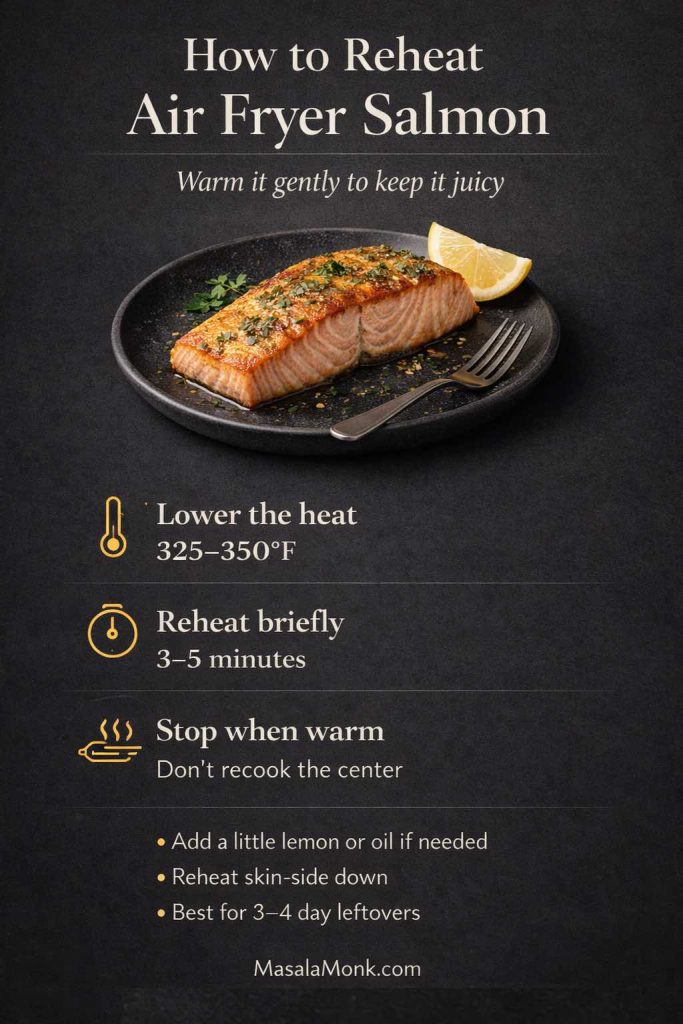
Reheating salmon in air fryer without drying it out
Leftovers are where a lot of salmon recipes quietly fail, not because the original dish was bad, but because the reheating is too aggressive.
The good news: reheating salmon in air fryer works really well when you treat it gently.
How to store cooked salmon first
Before reheating, proper storage matters.
Let the salmon cool slightly, then transfer it to an airtight container and refrigerate it. The USDA’s Ask USDA guidance states that cooked fish and seafood can be safely stored in the refrigerator for 3 to 4 days. (Ask USDA)
That’s a great practical window for meal planning: dinner on day one, leftovers on day two or three.
For broader seafood handling and storage basics, the FDA’s seafood safety guidance is also useful, especially its advice on keeping seafood cold and handling fresh or frozen seafood properly. (U.S. Food and Drug Administration)
Best way to reheat salmon in air fryer
To reheat without drying:
- Set the air fryer to 325°F to 350°F
- Reheat for 3 to 5 minutes
- Check early and stop as soon as it’s warmed through
That lower-temperature approach is much better than trying to re-crisp it at 400°F.
If the salmon seems a little dry from the fridge, brush on a tiny bit of oil or squeeze lemon over it before reheating. A spoon of sauce after reheating also helps a lot.
Reheating skin-on salmon
If your leftover salmon has skin, reheat skin-side down. It won’t be exactly the same as fresh, but it keeps the fillet stable and helps avoid tearing.
You can also flake leftover salmon and warm it briefly for:
- Rice bowls
- Salads
- Wraps
- Grain bowls
- Quick pasta tosses
That’s often the easiest way to reuse salmon without worrying about perfect texture the second time.
Also Read: Chicken Pesto Pasta (Easy Base Recipe + Creamy, One-Pot, Baked & More)
Fresh vs frozen salmon in the air fryer
This post is focused on fresh salmon, but it’s still useful to understand where frozen fits in.
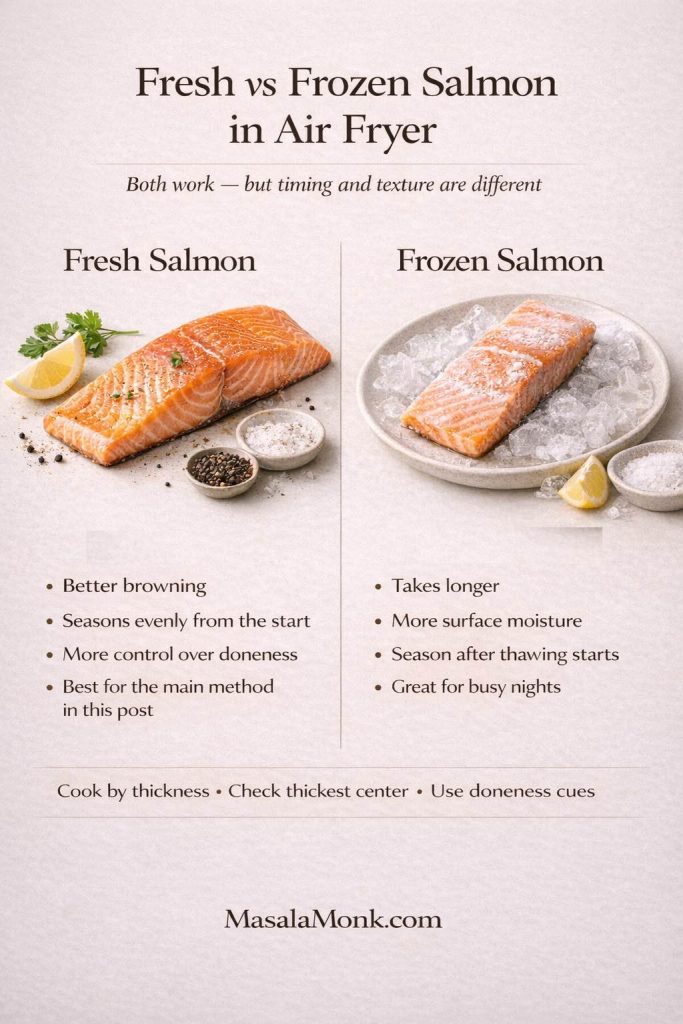
Fresh salmon in air fryer gives you more control
Fillets of fresh salmon are easier to season evenly, easier to monitor, and usually cook more predictably. You get better browning and more control over the final texture.
That’s one reason this guide uses fresh salmon as the baseline method.
Frozen salmon in air fryer can still work
Frozen salmon in air fryer is absolutely possible, and it can be a lifesaver on busy nights. The process is just different:
- It usually takes longer
- Surface moisture changes the texture
- Seasoning often works better partway through
If you cook frozen salmon often, it’s worth eventually giving it its own dedicated method because the timing, seasoning flow, and texture cues are different from fresh fillets.
For now, if you’re cooking from frozen and want the best result, the same principle still helps: cook by doneness, not just by the clock.
Also Read: Chicken Pesto Pasta (Easy Base Recipe + Creamy, One-Pot, Baked & More)
Air fryer salmon for different cuts and salmon types
Once you’ve made basic fillets a few times, you can use the same logic across different salmon cuts.
Salmon fillets in air fryer
This is the easiest and most common format. The base method in this post is designed around salmon fillets, including:
- Atlantic salmon
- Coho salmon
- Sockeye salmon
- Wild salmon portions
- Farmed salmon fillets
The exact time changes, but the process stays the same.
Sockeye salmon air fryer notes
Sockeye is often leaner than some other salmon types, so it can overcook a little faster.
If you’re making sockeye salmon air fryer style:
- Start checking a bit earlier
- Don’t rely on a long cook time
- Consider a sauce or glaze for extra moisture and richness
Coho and Atlantic salmon in air fryer
Coho and Atlantic fillets often behave very well in the air fryer, especially in standard grocery-store thicknesses.
Atlantic salmon tends to be richer and more forgiving, which makes it a nice choice if you’re learning the method. Coho can be excellent too, just a little less forgiving if overcooked.
Salmon pieces and smaller portions
If you’re cooking salmon pieces in air fryer (smaller cuts, trimmed portions, or bite-sized pieces), reduce the time and watch closely. Small pieces cook very fast.
For salmon bites, it helps to:
- Cut pieces evenly
- Coat lightly
- Avoid over-saucing at the start
- Shake or turn once if needed
Also Read: Slow Cooker Pork Tenderloin (Crock Pot Recipe) — 3 Easy Ways
A few easy dinner directions you can keep in rotation
Once you’ve made this salmon recipe a few times, it helps to have a few “default directions” in mind so dinner doesn’t feel repetitive.
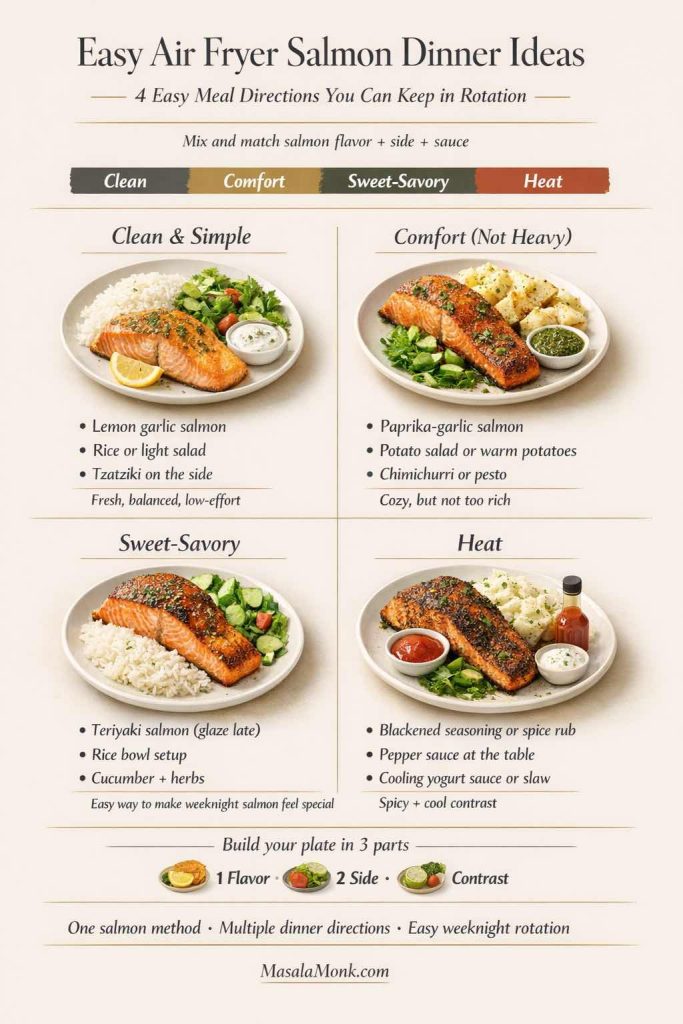
When you want something clean and simple
Go with:
- Lemon garlic salmon
- Rice or a light salad
- Tzatziki on the side
It feels fresh, balanced, and low-effort.
When you want a little comfort without a heavy meal
Go with:
- Paprika-garlic salmon
- Potato salad or warm potatoes
- Chimichurri or pesto for a flavor lift
You still get a cozy plate, but it doesn’t feel too rich.
When you want a sweet-savory finish
Go with:
- Teriyaki salmon in air fryer (glaze at the end)
- Rice bowl setup
- Cucumber and herbs for contrast
This is one of the easiest ways to make salmon feel special on a weekday.
When you want heat
Go with:
- Blackened seasoning or a simple spice rub
- Pepper sauce at the table
- A cooling side like yogurt sauce or slaw
The contrast is what makes it work.
Also Read: Keto Mocktails: 10 Low Carb, Sugar Free Recipes
Final thoughts
A really good air fryer salmon recipe is less about chasing a perfect one-time result and more about learning a method you can trust. Once you know your air fryer, your preferred temperature, and your doneness cues, the rest becomes easy. You stop hovering. You stop overcooking “just in case.” And suddenly salmon becomes one of the fastest, most dependable dinners in your kitchen.
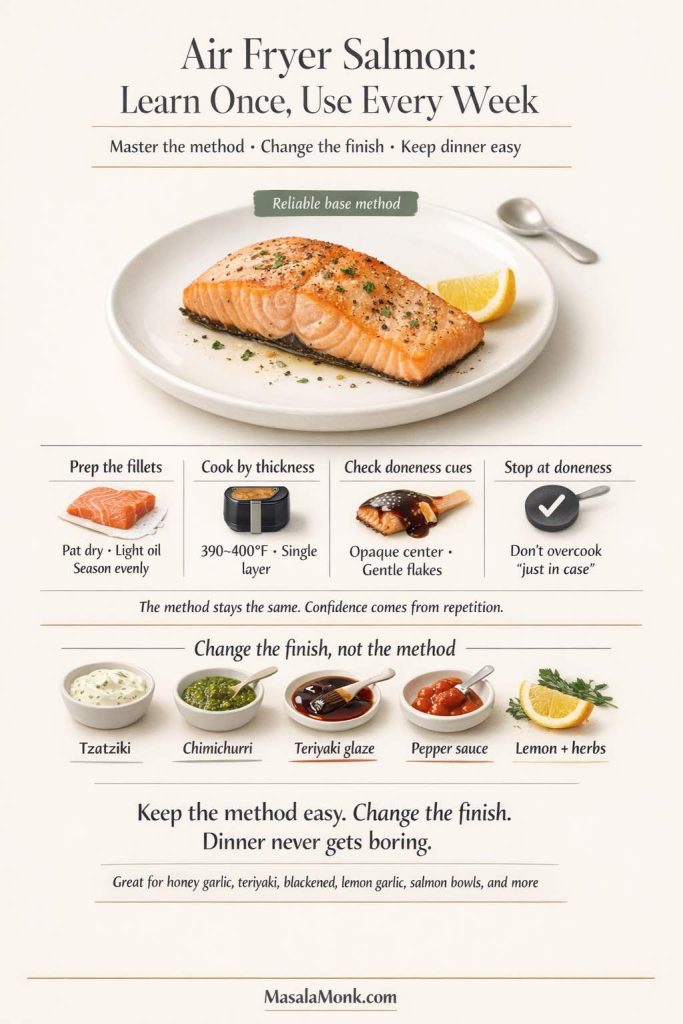
That’s why this base method is worth learning first.
It covers the fundamentals—how to prep the fillets, how to cook salmon in the air fryer, how to handle air fryer salmon time and temp, how to work with skin-on or skinless pieces, and how to reheat leftovers properly. From there, you can branch into all the versions people actually make in real life: honey garlic air fryer salmon, teriyaki salmon, blackened salmon, lemon salmon, salmon bowls, and more.
And if you want to keep the same fish but make dinner feel completely different next time, the easiest move is usually not changing the cooking method at all. Just change the finish: a spoon of chimichurri, a swipe of tzatziki, a teriyaki glaze, a little pepper sauce, or a fresh pesto on the side.
That way, the method stays easy, but the meal never gets boring.
Also Read: Crock Pot Pork Chops and Sauerkraut (No Dry Chops Recipe)
Frequently Asked Questions
1. How long does salmon take in the air fryer?
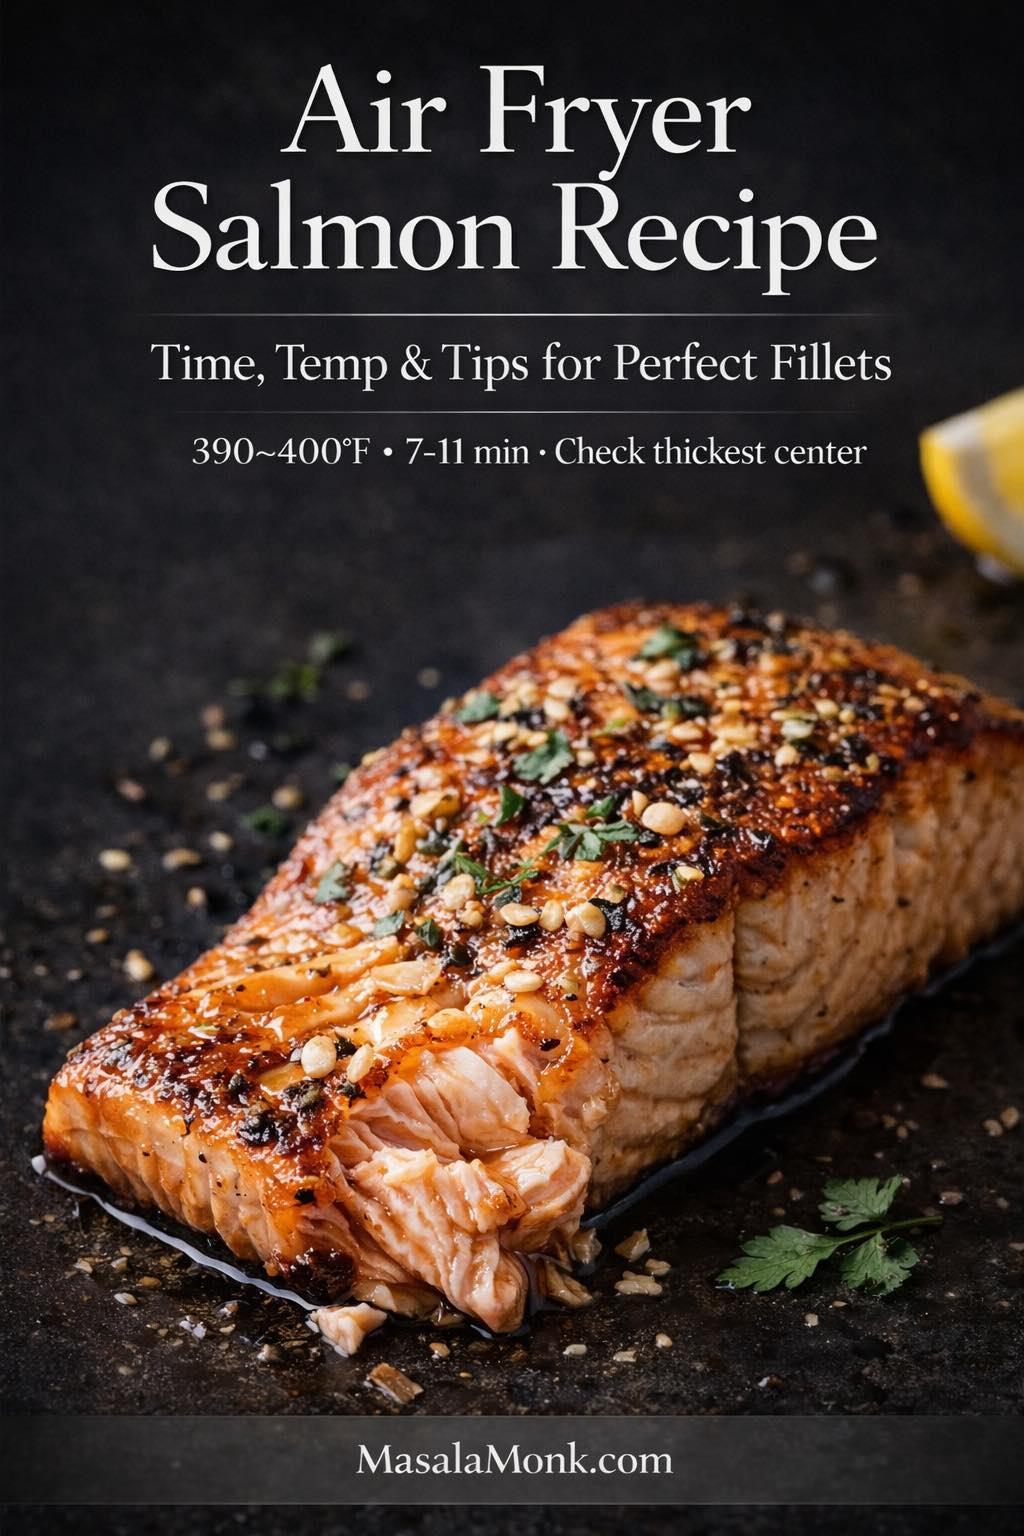
In most cases, salmon in the air fryer takes about 7 to 11 minutes at 390°F to 400°F, but the exact time depends on thickness. Thin fillets can finish in 5 to 7 minutes, while thicker center-cut pieces may need 9 to 12 minutes. Rather than relying on one fixed time, start checking early and finish based on doneness.
2. What is the best temperature for air fryer salmon?
For most fillets, the best temperature for air fryer salmon is 390°F to 400°F. If your air fryer runs hot, 390°F gives you a little more control. On the other hand, 400°F is great when you want a quicker cook and a slightly more roasted top.
3. How do I know when air fryer salmon is done?
The easiest way to tell is by checking the thickest center of the fillet. The salmon should look opaque and flake gently with a fork. If you use a thermometer, check the center and cook until it reaches the proper internal temperature for fish. In addition, avoid judging doneness by the edges alone, because they cook faster than the middle.
4. Do I need to flip salmon in the air fryer?
Usually, no. Most air fryer salmon recipes cook well without flipping, especially when the fillets are placed in a single layer with space around them. If you’re cooking skin-on salmon, keep it skin-side down and leave it undisturbed for the best texture.
5. Can I cook salmon with skin in the air fryer?
Yes, and air fryer salmon with skin is often easier to cook well. The skin helps hold the fillet together and can protect the bottom from overcooking. For better texture, pat the skin dry, use a light coating of oil, and cook skin-side down.
6. How do I get crispy skin salmon in the air fryer?
To get crispier skin, start with very dry skin, use only a light layer of oil, and avoid overcrowding the basket. Also, serve the salmon right away, because trapped steam softens the skin quickly. While every air fryer behaves a little differently, these steps noticeably improve crispy skin salmon in air fryer cooking.
7. Can I make salmon fillets in the air fryer without drying them out?
Absolutely. The key is to cook by thickness, not just by the clock. Keep the temperature steady, check early, and stop cooking as soon as the salmon is done. As a result, your salmon fillet in air fryer stays moist instead of turning chalky or dry.
8. What seasoning works best for air fryer salmon?
A simple mix of salt, pepper, garlic powder, and paprika works beautifully for everyday air fryer salmon. After that, you can build other flavors easily—lemon garlic, blackened, teriyaki, or honey garlic—without changing the core cooking method.
9. Can I use a marinade for salmon in the air fryer?
Yes, although lighter marinades usually work better than very wet ones. If the marinade is too heavy, the salmon can steam instead of roast. For better results, marinate briefly, pat off excess moisture, and add glaze-style sauces near the end of cooking.
10. Can I cook frozen salmon in air fryer?
Yes, frozen salmon in air fryer is possible and very convenient. However, it takes longer than fresh salmon and often needs a slightly different seasoning approach because of the extra surface moisture. If you cook from frozen often, it helps to use a separate method with its own time and temperature flow.
11. What is the best way to cook frozen salmon in air fryer?
The best way to cook frozen salmon in air fryer is to start cooking first, then season once the surface thaws enough for seasoning to stick properly. Since frozen fillets release moisture as they cook, check doneness in the thickest center and expect a longer total cook time than fresh salmon.
12. Can I cook salmon steak in the air fryer?
Yes, salmon steak in air fryer works well, but it may take a little longer than a fillet because the cut is thicker and shaped differently around the center bone. Use the same temperature range (390°F to 400°F), then check the thickest part for doneness.
13. What’s the difference between cooking fresh salmon and frozen salmon in the air fryer?
Fresh salmon in air fryer usually gives you better browning and more control over seasoning from the start. Frozen salmon in the air fryer is still a great option, though it cooks differently because moisture releases as it thaws. In either case, checking doneness early makes the biggest difference.
14. Can I make teriyaki salmon in the air fryer?
Yes, teriyaki salmon air fryer style is one of the easiest variations. Still, the best approach is to cook the salmon most of the way first, then brush on teriyaki sauce in the last minute or two. That way, the glaze turns glossy without burning.
15. Can I make honey garlic salmon in the air fryer?
Definitely. Honey garlic salmon air fryer recipes work best when the glaze is added near the end, just like teriyaki. Because honey can darken quickly at high heat, finishing late helps you get a sweet, sticky coating without scorching.
16. How do I reheat salmon in air fryer without drying it out?
For reheating salmon in air fryer, use a lower temperature than you used for cooking—usually 325°F to 350°F. Warm it for 3 to 5 minutes, then stop as soon as it’s heated through. A small brush of oil or a squeeze of lemon can help keep the texture moist.
17. How long can I keep cooked air fryer salmon in the fridge?
Cooked salmon is best within a few days when stored in an airtight container in the refrigerator. For the best texture, reheat gently instead of using very high heat. Likewise, flaking leftover salmon into bowls or salads is a great way to use it without overcooking.
18. Can I cook salmon in a Ninja air fryer using the same method?
Yes, the same overall method works for salmon in a Ninja air fryer, including seasoning, basket spacing, and checking doneness early. Even so, different models can run hotter or faster, so use the recommended time range as a guide and check the fillet a little early the first time.
19. Why is my salmon overcooked in the air fryer?
Usually, overcooked salmon happens because the fillet was cooked by a fixed time instead of checked by thickness and doneness. Another common reason is using a sugary glaze too early, which can make the outside look done before the center is ready. Starting your doneness check earlier solves most of this.
20. What is the easiest air fryer salmon recipe for beginners?
The easiest air fryer salmon recipe for beginners is a simple fillet with olive oil, salt, pepper, garlic powder, and paprika cooked at 390°F to 400°F. Once that base is working well, you can branch into lemon garlic, blackened, teriyaki, or honey glazed salmon without changing the core method.