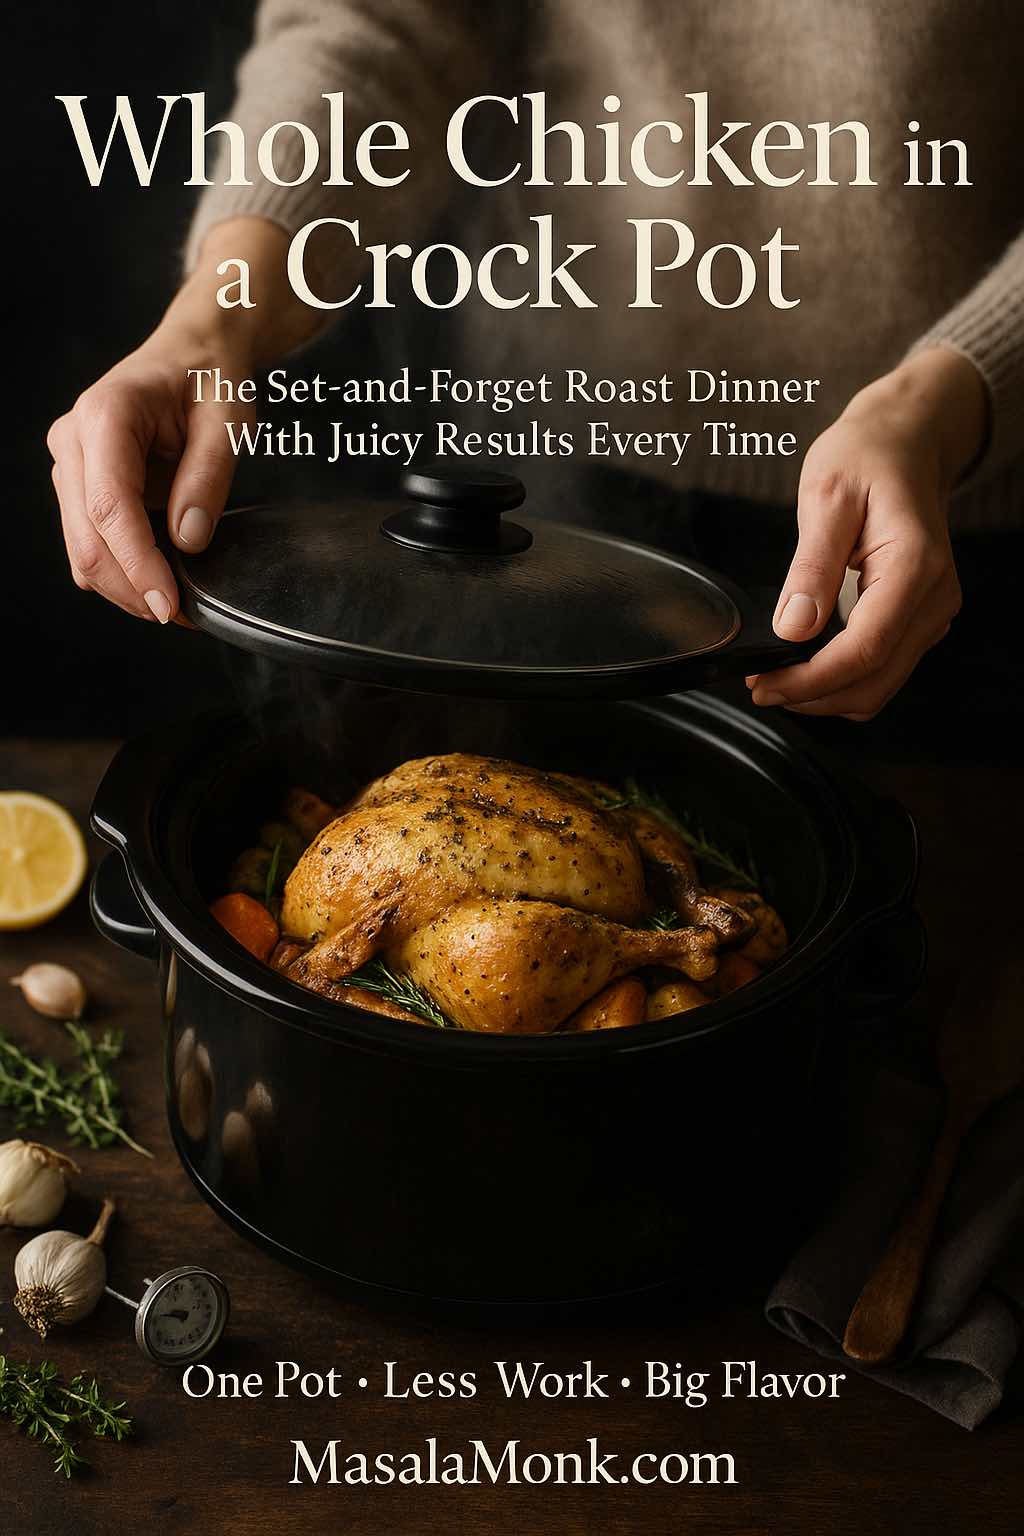
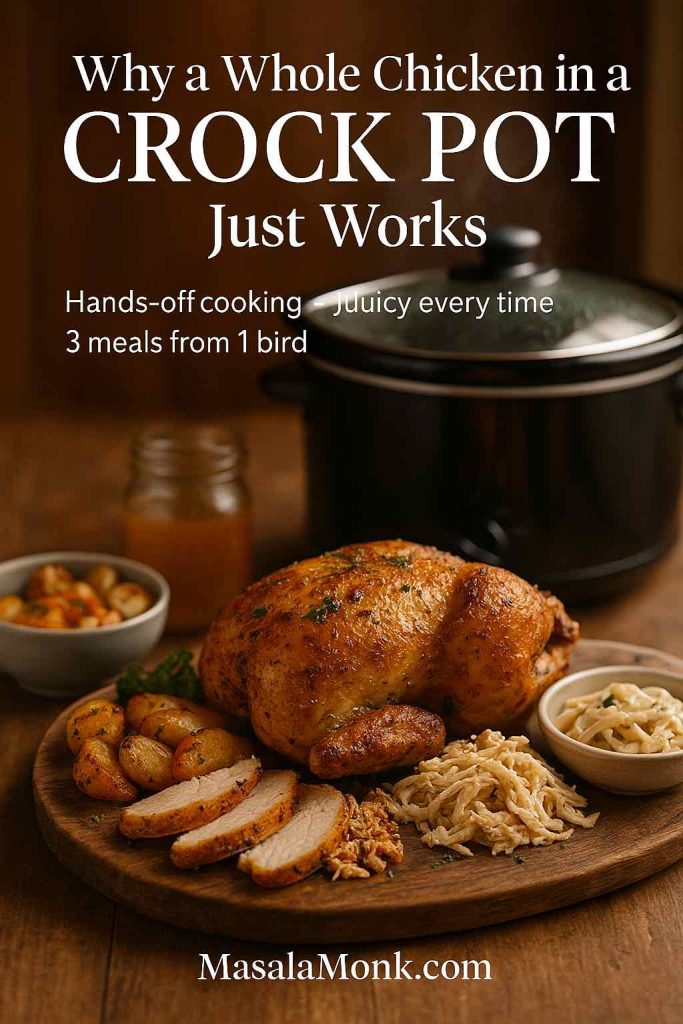
There’s something quietly luxurious about dropping a whole chicken in a crock pot, flicking a switch, and knowing dinner is basically taking care of itself. No wrestling with hot roasting pans, no constant basting, no stressing over oven timings. Just a pot humming away in the background while your house slowly fills with the smell of slow cooker roast chicken.
This method gives you everything people love about a Sunday roast—tender meat, rich juices, soft potatoes and vegetables—without demanding your full attention. It also turns one affordable bird into several meals, from roast-style dinners and chicken pot roast to leftovers for sandwiches, pasta and soups.
What follows is a complete guide to cooking a whole chicken in the slow cooker, turning it into a one-pot meal, adapting the technique for thighs and drumsticks, playing with BBQ and rotisserie-style variations, and making the most of every last scrap.
Why Cook a Whole Chicken in a Slow Cooker (Crock Pot)?
Before getting into the nuts and bolts, it’s worth pausing on why a whole chicken in crock pot is so useful to have in your regular rotation.
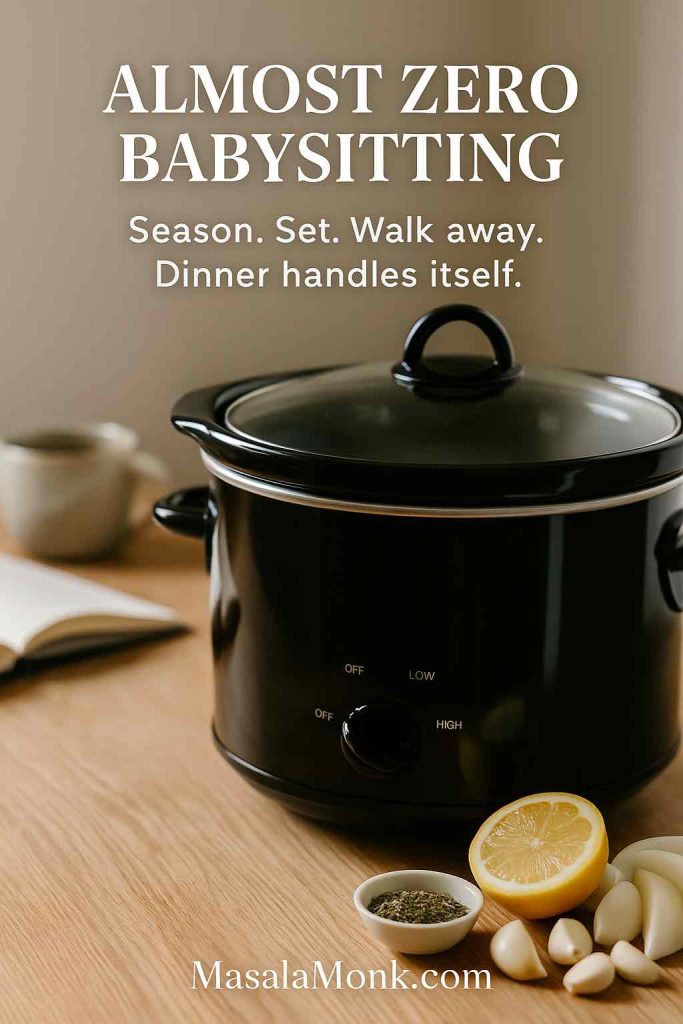
Almost zero babysitting
Traditional roast chicken is wonderful, but it wants attention: preheating, timing, checking, basting, turning, and making sure nothing dries out. With a whole chicken in a slow cooker, you do a little work up front and then the machine does the rest.
You:
- Season the bird
- Sit it on a bed of onions or vegetables
- Add a splash of liquid
- Put the lid on and walk away
Hours later, you lift the lid on a complete chicken crock pot roast. You don’t have to be home to keep an eye on it; the slow cooker hums along steadily while you’re at work, wrangling kids, or just enjoying your day.
Incredibly forgiving texture
Because slow cookers use gentle, moist heat, the meat stays juicy far more easily than in a hot, dry oven. When you slow cook a whole chicken, the connective tissues in the thighs and wings slowly melt, turning everything silky and tender.
You can carve it neatly if you cook for less time, or leave it longer for that “fall-apart shredded chicken” effect. Recipes like this lemon garlic slow cooker roast chicken show the same idea: shorter cooking gives a firmer, carve-able bird; longer cooking gives something you barely need a knife for.
One bird, several meals
A single chicken, cooked well, goes surprisingly far:
- Night one: whole chicken in crock pot with potatoes and vegetables
- Night two: leftovers in chicken Alfredo pasta or stuffed into sandwiches
- Night three: stock and soup made from the bones
When you combine that with the hands-off nature of slow cooking, it’s easy to see why whole chicken recipes slow cooker crock pot approaches are favourite “Sunday prep” moves for busy weeks.
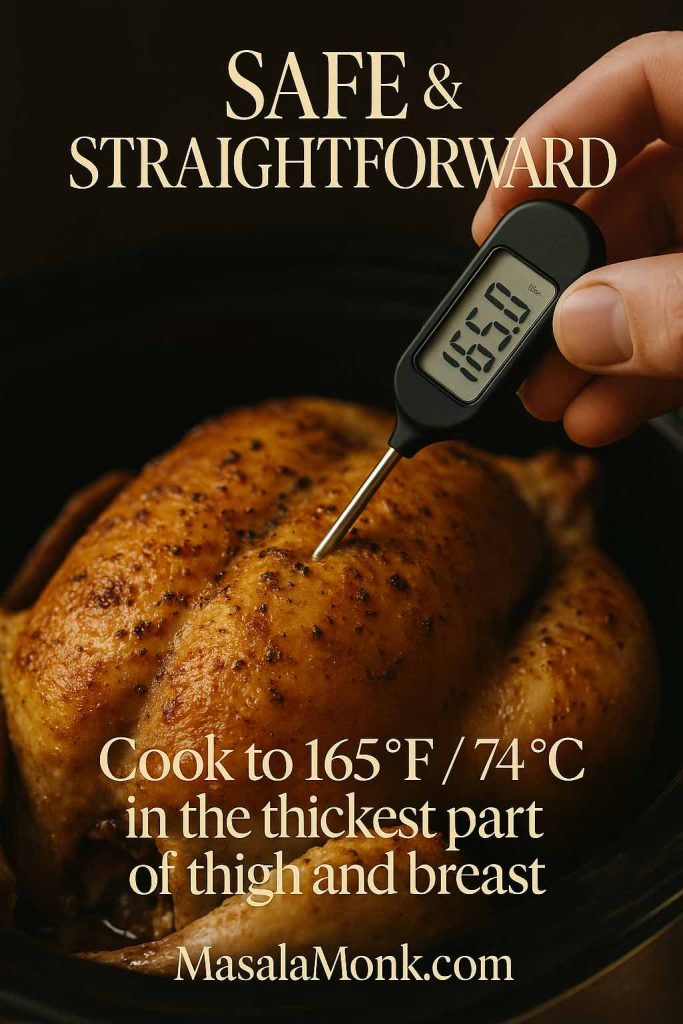
Safe and straightforward
Poultry always raises food-safety questions, and rightly so. Fortunately, the rules are simple:
- Start with a thawed chicken, not a frozen one
- Keep the lid on so the crock pot can heat efficiently
- Cook until the thickest parts of the meat reach 165°F / 74°C
That 165°F number isn’t random. It’s the same temperature recommended on the FoodSafety.gov safe minimum cooking temperature chart for all poultry, including whole chicken. It applies whether you use an oven, grill, Instant Pot, or slow cooker.
A basic digital thermometer is enough to keep your slow cooker roast chicken both tender and safe.
Choosing the Chicken and the Crock Pot
A little thought up front about bird size and slow-cooker capacity makes everything smoother.
What size chicken works best?
Most whole chicken in crock pot recipes shine when you use birds that:
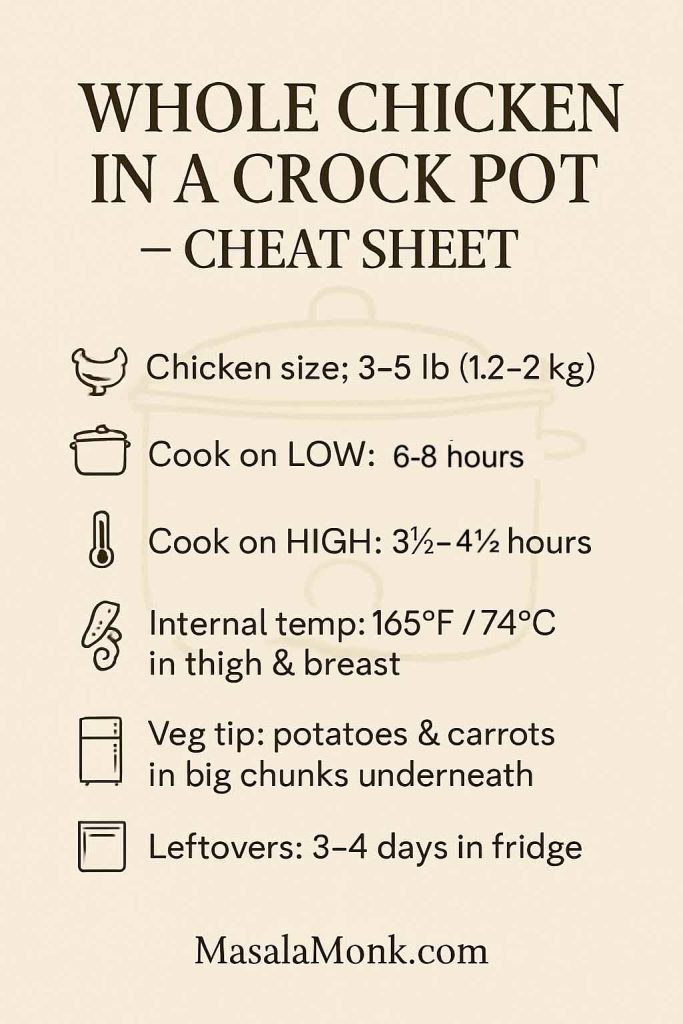
- Weigh between 1.2–2.2 kg (around 3–5 lb)
- Fit comfortably in the crock with the lid closing fully
- Leave a little space around the sides for heat to circulate
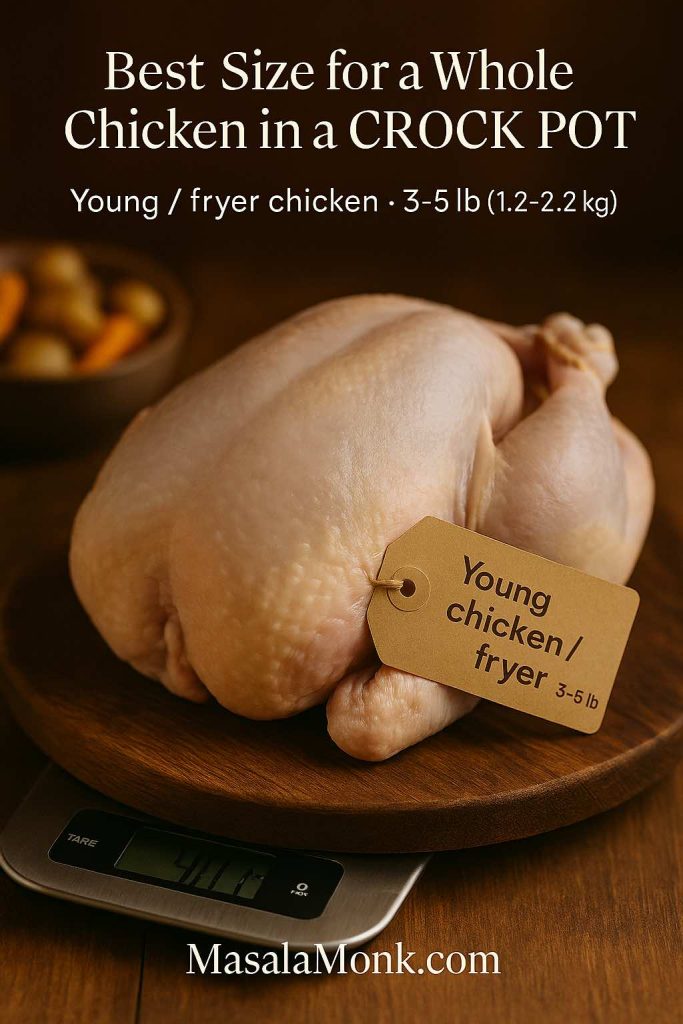
A small whole chicken in slow cooker (3–3½ lb) is perfect for two or three people, especially if you add potatoes and other vegetables underneath. For families or planned leftovers, aim nearer 4½–5 lb.
You’ll sometimes see “young chicken” or “fryer chicken” on the label. These tend to be more tender, which is ideal for slow cook whole chicken recipes. If you’re always feeding a crowd, you can also combine one small whole bird with extra thighs or drumsticks, which we’ll get to later.
Matching it to your slow cooker
A quick test before you start:
- Put the wrapped chicken into your cold slow cooker.
- Close the lid.
If you have to press hard or the lid doesn’t sit flat, the chicken is too big for that cooker. For reliable results with whole chicken recipes slow cooker crock pot, it helps to follow the usual slow-cooker guideline of filling the pot roughly halfway to two-thirds full. That leaves room for circulation and keeps the heating even.

For most people:
- A 5–6 quart crock pot is perfect for a medium or large whole chicken plus vegetables.
- A 3.5–4 quart slow cooker works well for a smaller bird without many extras.
The USDA’s advice on slow cooker safety also mentions not overfilling and keeping the lid on as much as possible, which lines up neatly with what you’re doing here.
The Core Recipe: Whole Chicken in Crock Pot, Step by Step
This is the backbone of everything that follows. Once you nail this simple whole chicken in a crock pot method, variations are easy.
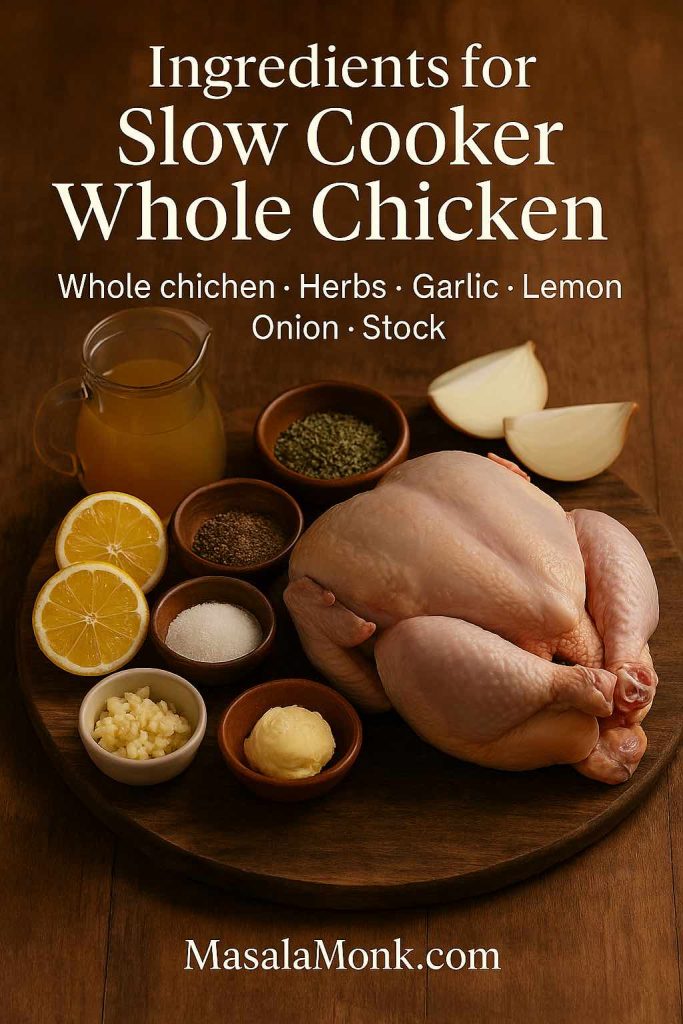
Ingredients for a Whole Chicken in Crock Pot (Slow Cooker Roast)
- 1 whole chicken (about 3–5 lb / 1.2–2.2 kg), fully thawed
- 2–3 teaspoons fine salt
- 1–1½ teaspoons black pepper
- 2–3 teaspoons dried herbs
- thyme, oregano, rosemary, Italian seasoning, or a mix
- 4–6 cloves garlic, crushed or finely minced
- 2–3 tablespoons softened butter or olive oil
- 1 lemon, halved (optional)
- 1 large onion, peeled and thickly sliced or cut into wedges
- ¼–½ cup (60–120 ml) chicken stock or water
These simple ingredients create a very flavourful slow cooker roast chicken with barely any fuss.
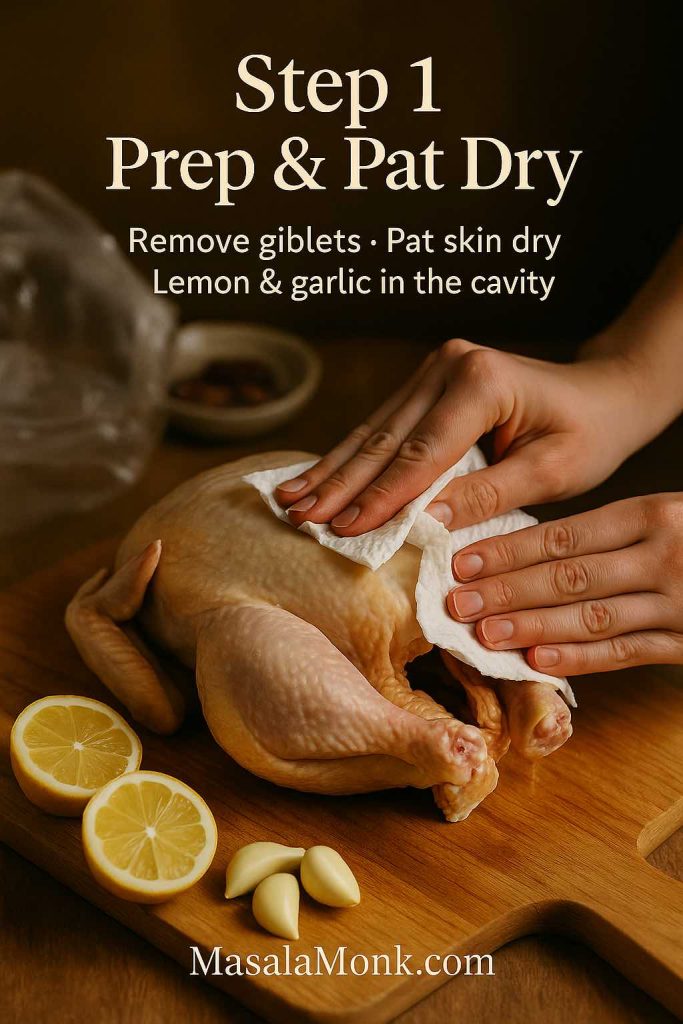
Step 1: Prepare and dry the chicken
Remove the chicken from its packaging. Check inside the cavity for giblets and remove them if present. You can reserve these for stock if you like.
Pat the whole bird dry with paper towels. This step matters more than it seems: drying the skin encourages roasting rather than steaming, and is one reason this feels like a baked chicken crock pot recipe rather than boiled chicken.
Sprinkle a small pinch of salt and pepper inside the cavity. If you’re using lemon, tuck the halves inside along with a clove or two of garlic. It smells like a proper chicken pot roast before you even start cooking.
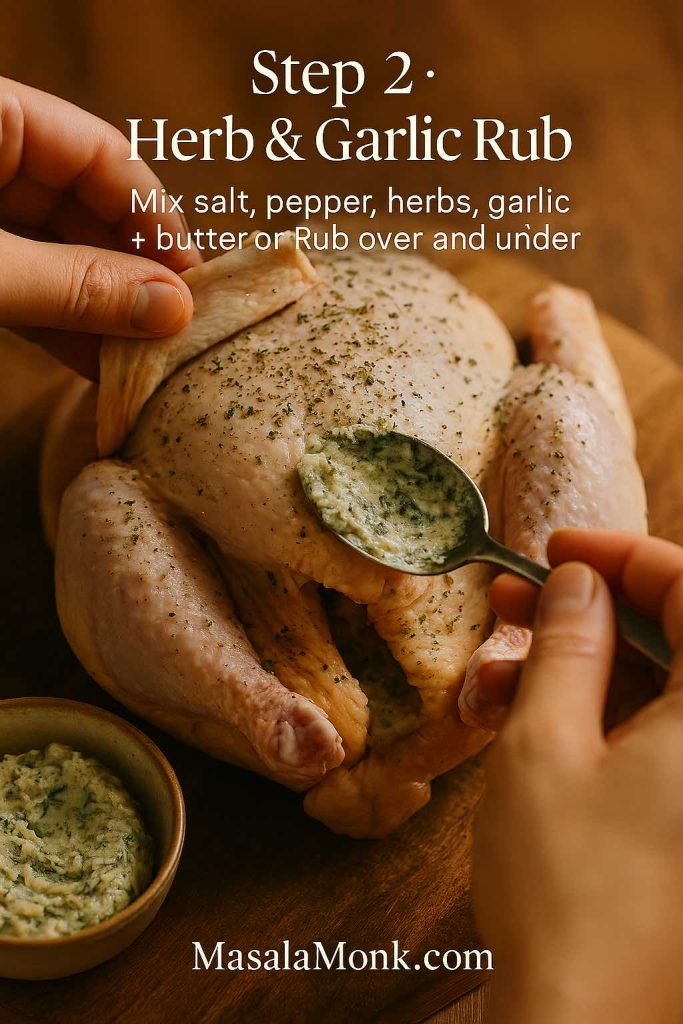
Step 2: Mix the herb and garlic rub
In a small bowl, stir together:
- The remaining salt
- The remaining black pepper
- Your chosen dried herbs
- Crushed garlic
- Butter or olive oil
You want a soft paste that’s easy to spread. Rub this all over the chicken, including:
- Over the breast, thighs, wings, and legs
- Under the skin on the breast if you can loosen it gently with your fingers
The more of the surface you cover, the more flavour your whole chicken in crock pot will have.
If you like, you can customise the rub:
- Add smoked paprika and a pinch of chili for something closer to BBQ or paprika chicken.
- Use extra rosemary, lemon zest, and garlic if you’re aiming for a very classic roast chicken recipe rosemary vibe.
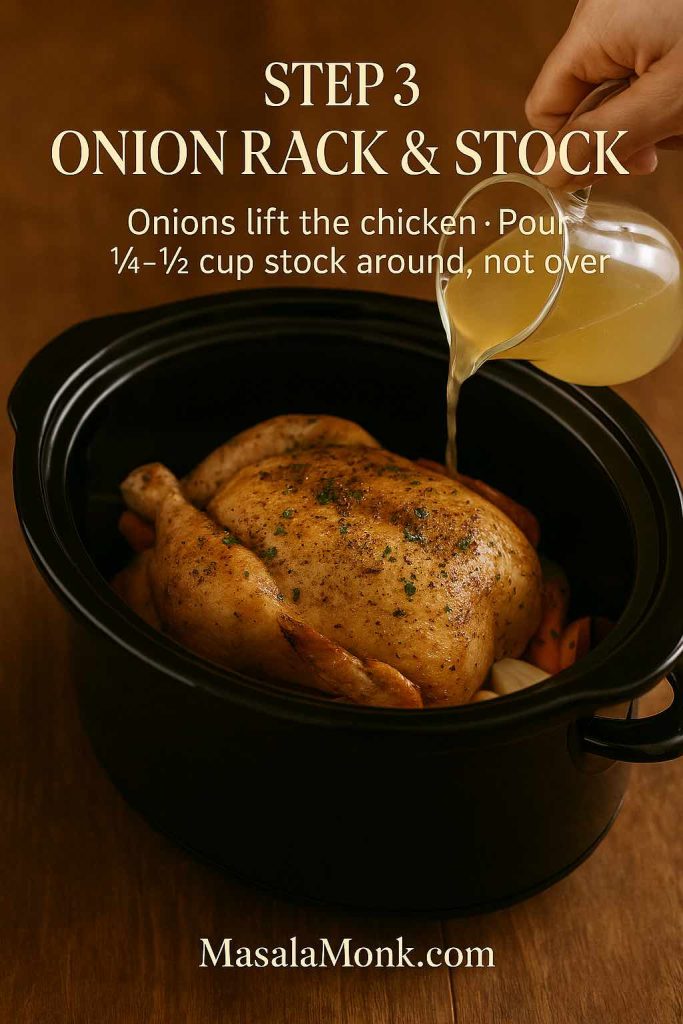
Step 3: Build an onion “rack”
Scatter the onion slices or wedges evenly across the bottom of your slow cooker. They’ll act as a makeshift rack, lifting the chicken slightly so it doesn’t sit in the liquid the whole time.
Place the seasoned chicken breast-side up on top of the onions.
Pour the stock or water around the bird, not over it. Slow cookers generate plenty of moisture on their own—this small amount of liquid just helps everything get started and leaves you with good pan juices in the end.
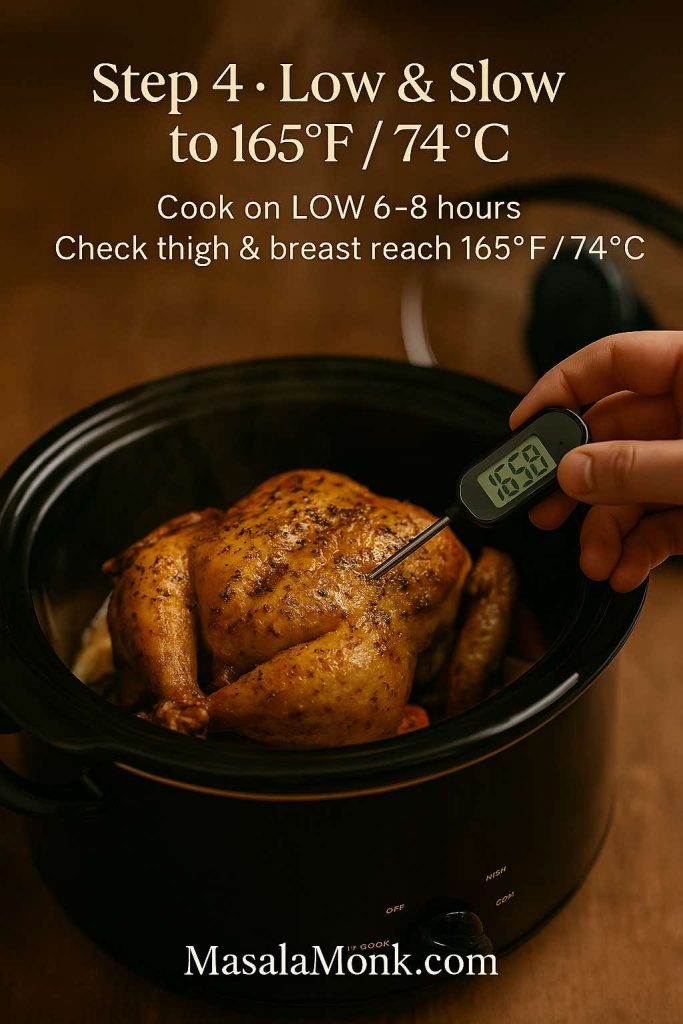
Step 4: Cook on LOW until tender and safe
Put the lid on, set the crock pot to LOW, and leave it to work. As a general guide for this whole chicken recipes slow cooker crock pot method:
- A smaller chicken (around 3–3½ lb) usually needs about 6 hours on LOW
- A larger bird (around 4½–5 lb) often takes 7–8 hours on LOW
Every slow cooker heats slightly differently, though, so these are starting points, not commandments. The real test is internal temperature and feel.
About an hour before you expect it to be done, start checking. Insert a digital thermometer into:
- The thickest part of the thigh, avoiding the bone
- The thickest part of the breast
Both should read at least 165°F / 74°C. That’s the same number you’ll see in the FoodSafety.gov temperature chart and USDA guidelines, and it’s what turns raw chicken into safe, succulent slow cooker roast chicken.
If the reading is a little low, put the lid back on and cook longer, checking every 20–30 minutes. When the chicken is ready:
- The legs will move easily in the sockets
- Juices will run clear, not pink
- The meat will feel soft and ready to fall from the bone
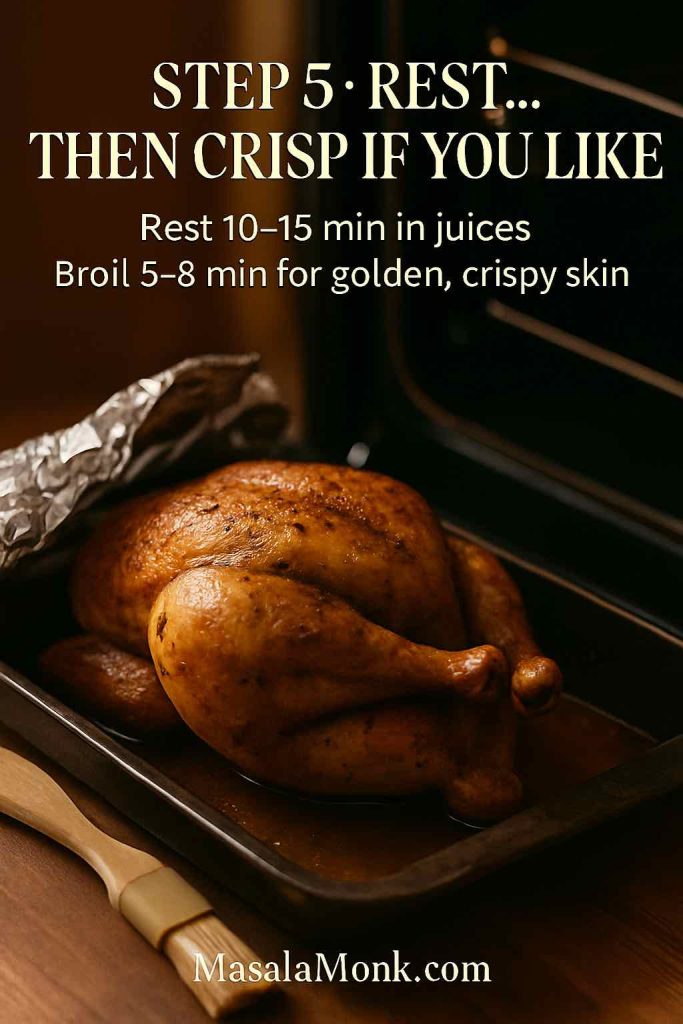
Step 5: Rest and optionally crisp the skin
Turn the slow cooker off and let the chicken rest in the hot juices for about 10–15 minutes. This gives the meat time to relax and reabsorb some of the juices, so it slices or shreds more cleanly.
For many people, that’s enough. The meat is tender, the onions and juices are delicious, and you can go straight to carving and serving.
If you’d like something that looks more like a traditional baked chicken crock pot hybrid, though, you can quickly crisp the skin:
- Heat your oven’s grill or broiler to high.
- Carefully lift the chicken out of the slow cooker and onto a roasting pan. It will be delicate, so use two spatulas or a big spoon under the cavity plus tongs for support.
- Spoon or brush a little of the fat from the crock pot over the skin.
- Grill or broil for about 5–8 minutes, until the skin is golden and crisp in spots.
This trick is very similar to what you see in recipes like this slow cooker whole chicken: cook low and slow in the crock, then finish under heat for colour. It’s a lovely way to get the best of both worlds.
Whole Chicken in Crock Pot with Potatoes and Vegetables (One-Pot Roast Dinner)
The base recipe already gives you a delicious slow cooker whole chicken with plenty of juices. However, you can easily turn it into a complete chicken pot roast recipe by adding potatoes and vegetables under the bird.
Choosing vegetables that can handle long cooking
Because a whole chicken in crock pot spends many hours simmering, you want vegetables that won’t completely disintegrate. Good choices include:
- Baby potatoes or chunks of regular potatoes
- Carrots, cut into thick pieces
- Onion wedges or thick slices
- Parsnips, chopped
- Celery sticks, cut into 3–4 cm sections
These vegetables soak up the flavour from the chicken and aromatics, turning into soft, savoury little flavour bombs.
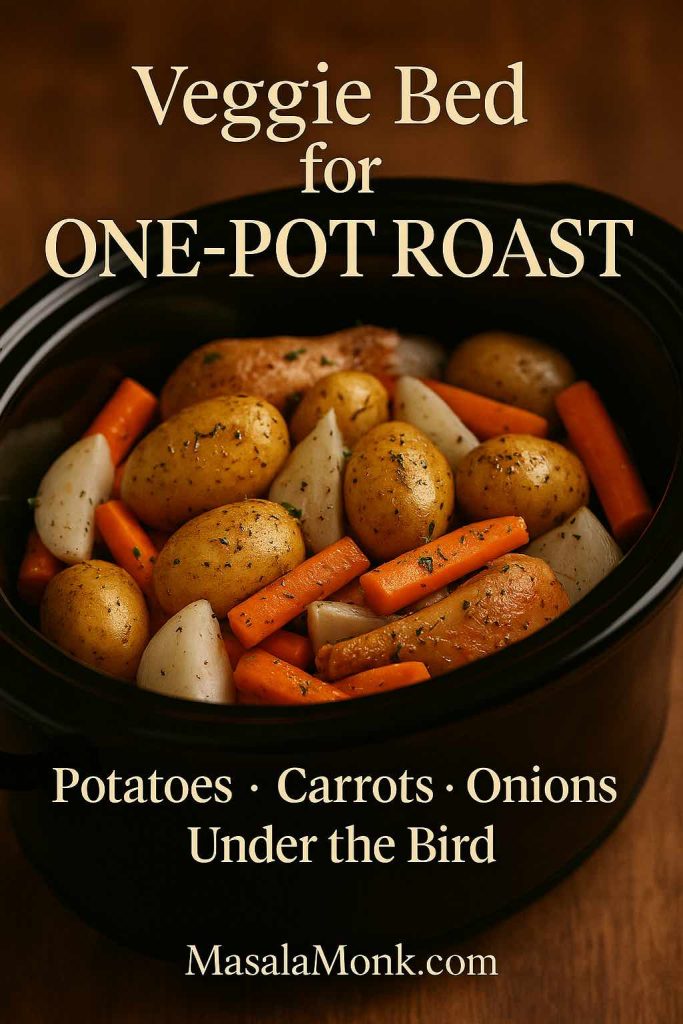
Building the One-Pot Layer for a Whole Chicken in Crock Pot
To make a full roast chicken one pot meal:
- Toss the potatoes and carrots in a bowl with a little oil, salt, pepper and herbs.
- Spread them in an even layer on the bottom of the slow cooker.
- Add onion wedges and any parsnips or celery on top.
- Place your seasoned whole chicken on this vegetable bed.
Everything else stays the same: a splash of liquid around the sides, lid on, cook on LOW until your whole chicken in a crock pot is done.
By the end, you get:
- Soft potatoes infused with chicken juices
- Sweet carrots and onions
- A pool of savoury liquid at the bottom acting as a light gravy
This is exactly the “veggie nest” approach you’ll see in recipes like this slow cooker whole chicken with vegetables, and it’s ideal when you want dinner to be more or less ready straight from one pot.

How to Serve Your Whole Chicken in Crock Pot with Vegetables
When the chicken is cooked:
- Transfer it gently to a carving board and let it rest.
- Use a slotted spoon to lift out potatoes and vegetables onto a warm platter.
- Arrange the chicken on top or beside them.
- Spoon some of the juices over everything.
A sprinkle of chopped parsley or chives brightens it up visually and adds a fresh note. For extra contrast, adding a small bowl of Greek tzatziki sauce on the table gives you something cool, creamy, and garlicky to swipe chicken and potatoes through.
“Baked” Whole Chicken in Crock Pot: Roast Feel Without the Oven
Many people ask specifically for baked chicken crock pot or baked chicken crock pot slow cooker ideas because they want the taste and look of roast chicken without managing oven time. The good news is your base method is almost there already.
To push the “baked” vibe further:
- Use butter rather than oil in the herb rub
- Keep the chicken lifted up well on onions or potatoes
- Only add a small amount of liquid
- Always finish under the grill or broiler for crisp skin
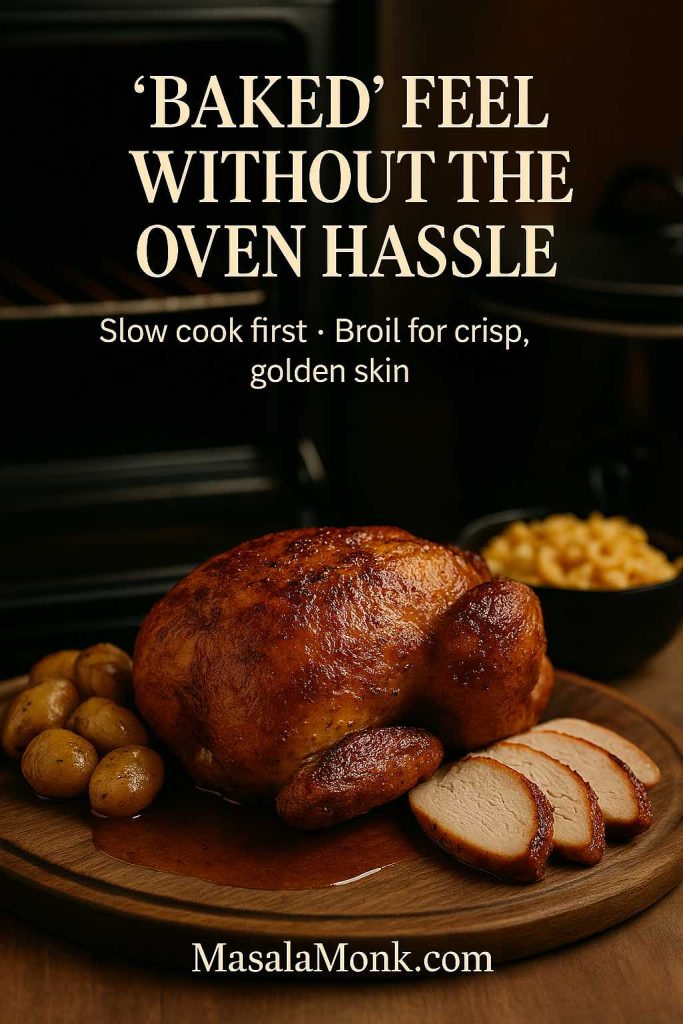
In practice, that means you follow the same steps as the core whole chicken recipes slow cooker crock pot method, then:
- Lift the cooked chicken out
- Pop it under a hot grill for a few minutes
- Carve it on a board so slices still have crispy bits on top
Serve this “baked” style crock pot chicken with soft potatoes from the pot and a simple salad. For full comfort-food mode, it’s hard to beat a slab of macaroni and cheese on the same plate, or even a side of crispy homemade French fries if you want that roast-chicken-and-chips feeling.
Beyond a Whole Chicken in Crock Pot: Thighs, Quarters and Drumsticks in the Slow Cooker
So far, everything has centred on a full whole chicken in crock pot. However, the same approach works beautifully with chicken pieces, which is handy if:
- You prefer dark meat
- Only thighs or drumsticks were on sale
- You want quicker cook times

Basic method for thighs and quarters
For chicken quarters in crock pot or bone-in thighs:
- Pat the pieces dry with paper towels.
- Season them generously with salt, pepper, herbs, garlic and a little oil or butter.
- Arrange them in a single layer in the crock pot, skin-side up.
- Pour in a small splash of stock or water—around ¼ cup is still enough.
- Cook on LOW until tender:
- Thighs and drumsticks: about 4–5 hours
- Leg quarters: about 5–6 hours
You can tuck potatoes and carrots underneath to create a dark-meat version of chicken pot roast in slow cooker. The juices from thighs and legs are particularly rich, so the vegetables turn out very flavourful.
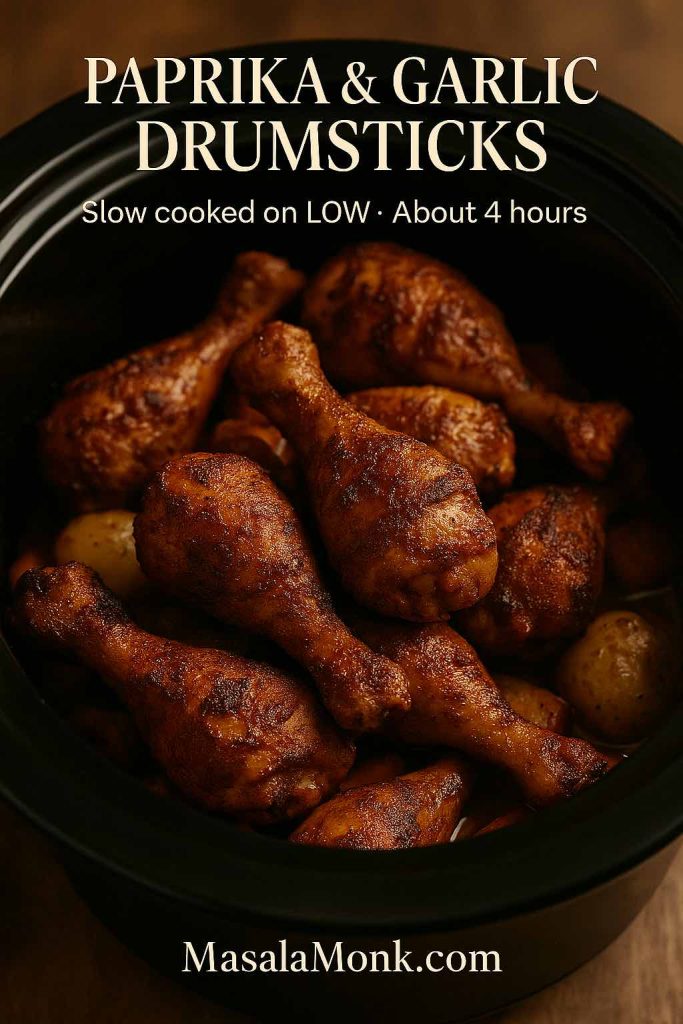
Slow cooked drumsticks
For slow cooked chicken drumstick recipes, you can lean into paprika and garlic:
- Season drumsticks heavily with salt, pepper, smoked paprika, garlic, and a bit of oil.
- Cook on LOW with a splash of liquid until the meat pulls back from the bone and feels tender, usually around 4 hours.
This creates something like slow roasted chicken legs without the oven, ideal for a casual, hands-on dinner.
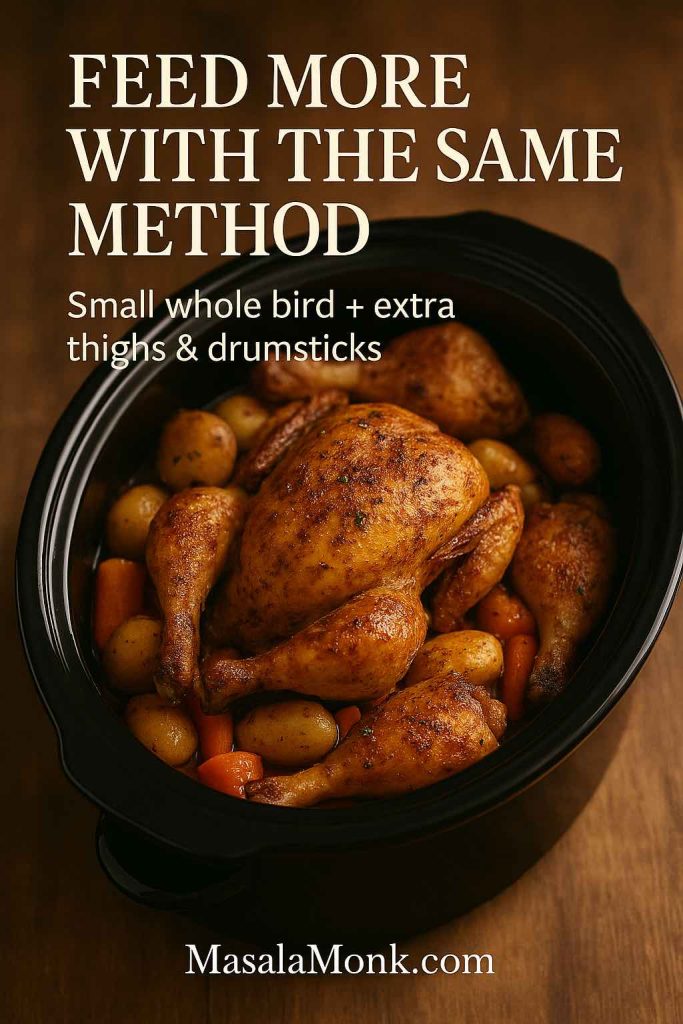
Stretching a Whole Chicken in Crock Pot with Extra Pieces
If you want the presentation of a whole chicken in crock pot but need more portions, you can combine both approaches:
- Place a small whole bird on your vegetable bed.
- Nestle seasoned thighs or drumsticks around the sides.
Everything cooks together in the same slow cooker roast chicken environment, and you end up with a mixture of white and dark meat to serve.
Frozen Whole Chicken in Crock Pot? Why Thawing Matters
It’s tempting, especially on busy days, to think, “I’ll just put a frozen whole chicken in the crock pot and let it go all day.” It sounds convenient, but it’s not a great idea.
Slow cookers heat food gently over a long period. If you start with a solid frozen block, the centre of the chicken can sit for too long at temperatures where bacteria thrive before it finally reaches 165°F. That’s why official advice from sources like FoodSafety.gov is clear: thaw meat and poultry safely in the refrigerator before putting them into a slow cooker.
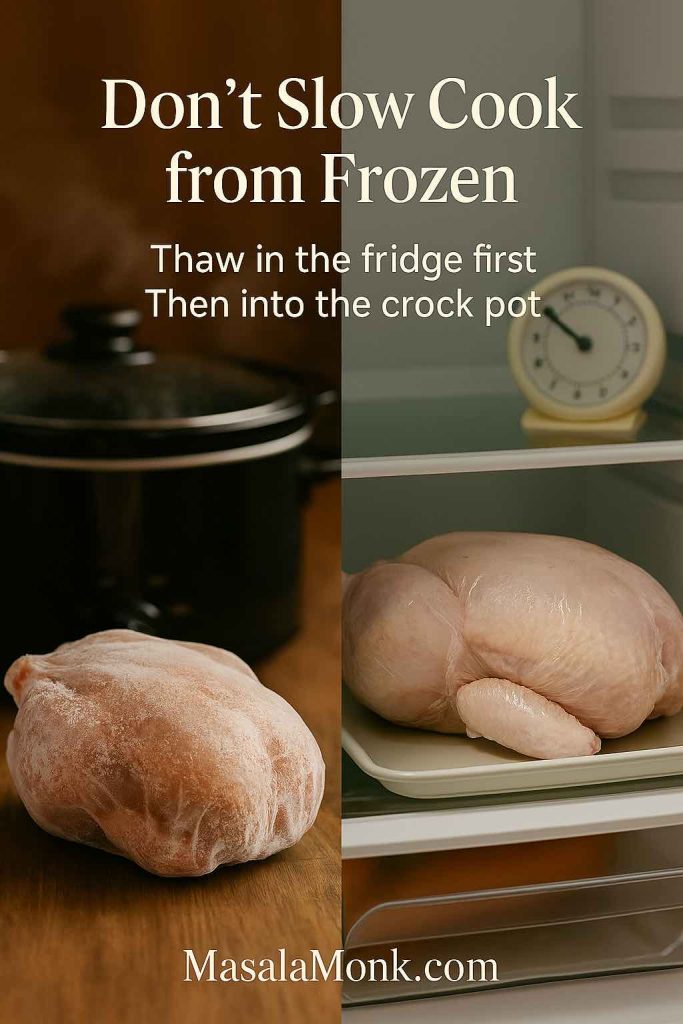
So instead of chasing crockpot frozen whole chicken shortcuts, it’s much safer to:
- Thaw the chicken fully in the fridge.
- Pat it dry and follow the whole chicken in crock pot method.
- Check the internal temperature to confirm it’s reached the safe zone.
If you often forget to thaw and find yourself in a rush, it’s better to lean on a pressure cooker or Instant Pot recipe designed for frozen poultry. Something like this Instant Pot rotisserie-style chicken shows how quickly a pressure cooker can handle a whole bird, including from frozen, without the drawn-out lukewarm phase a slow cooker would go through.
BBQ, Stuffed and Rotisserie-Style Slow Cooker Chicken
Once you’re confident with the basic whole chicken recipes slow cooker crock pot format, you can start changing the flavours and finishing touches.
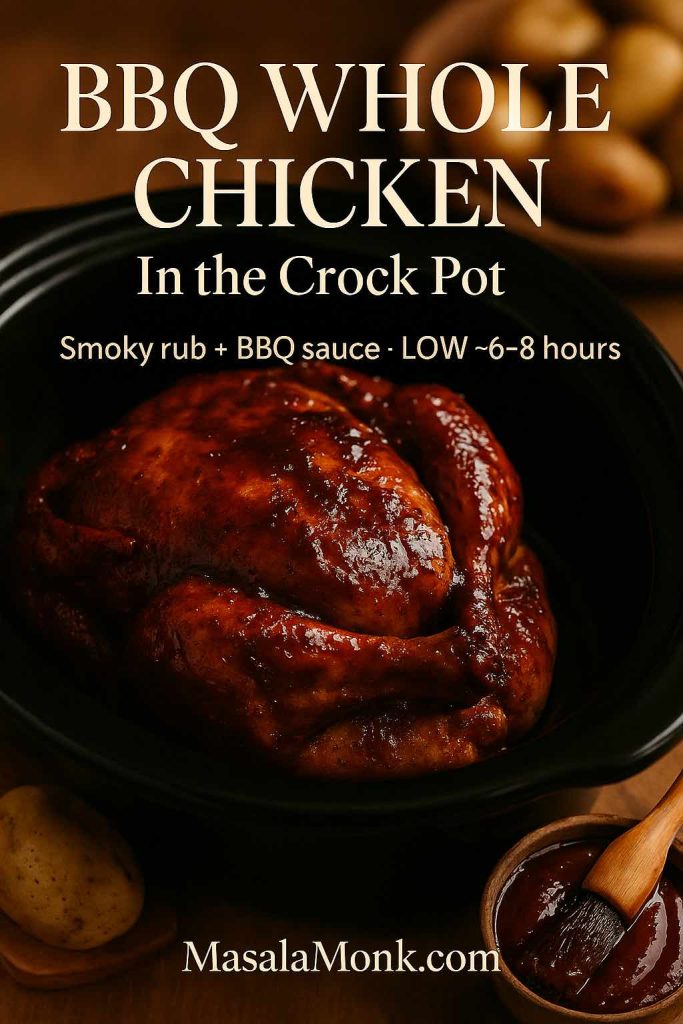
BBQ whole chicken
For a crock pot whole chicken BBQ feel:
- Stir together salt, pepper, smoked paprika, garlic powder, onion powder, and a little brown sugar.
- Rub this spice mix all over the chicken.
- Sit the bird on onions in the crock pot.
- Pour a small amount of stock and a few tablespoons of BBQ sauce around the base.
Cook on LOW until done. At the end, you can:
- Brush the top with extra BBQ sauce and crisp it under the grill, or
- Shred the meat in the crock and add more sauce for a pulled-chicken style dish
Pile it onto buns, add slaw, and dinner becomes a casual BBQ sandwich night. If you want fresh ideas for sandwich fillings, the collection of chicken sandwich recipes offers everything from classic combos to spicy twists.

Stuffed whole chicken in the crock pot
A stuffed whole chicken crock pot feels very special, but the method is familiar:
- Assemble a loose bread-based or rice stuffing.
- Spoon it gently into the chicken’s cavity—it should be comfortably filled, not tightly packed.
- Season the outside as usual and cook on LOW.
Because stuffing is dense, you need to make sure:
- The thickest parts of the meat reach 165°F
- The centre of the stuffing also reaches 165°F
It’s the same principle you’d follow for stuffed roast chicken in the oven; using a thermometer for both meat and stuffing keeps this cosy version of chicken pot roast safely on track.
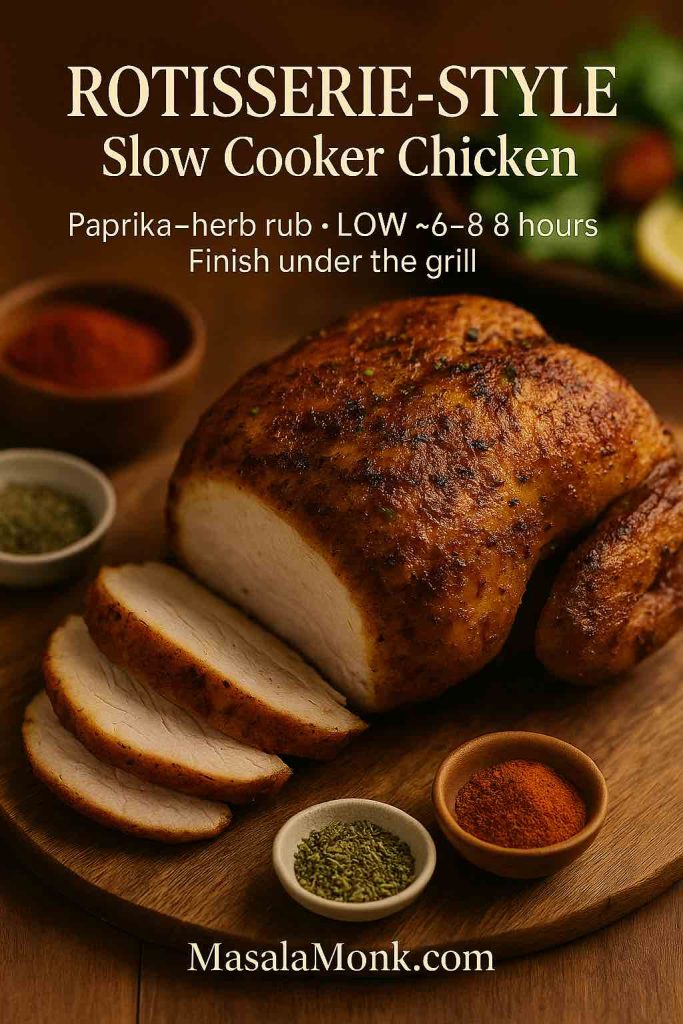
Rotisserie-style slow cooker chicken
When people talk about a crockpot rotisserie chicken recipe, they usually mean slow-cooked chicken with that familiar rotisserie-spice flavour and slightly crisp skin.
To approximate that:
- Make a rub with salt, pepper, paprika, garlic powder, onion powder and dried thyme.
- Rub it thoroughly over the chicken, including under the skin where possible.
- Use enough onion or potato underneath to keep the chicken lifted above the liquid.
- Cook on LOW until fully done.
- Finish under a grill for rotisserie-like colour and texture.
From there, you can slice the meat neatly like a store-bought rotisserie chicken, or shred it to use in things like chicken Alfredo pasta, quesadillas, tacos, or a bubbling buffalo chicken dip for parties.
What to Serve with Whole Chicken in Crock Pot Dinners
Once your whole chicken in crock pot is done, the fun part begins: putting everything on the table.
Bright and fresh sides
Slow-cooked chicken and potatoes are rich and comforting, so something fresh and tangy on the side keeps the plate lively:
- A crisp green salad with lemony dressing
- Sliced cucumbers and tomatoes tossed with olive oil and vinegar
- A bowl of Greek tzatziki sauce for dipping chicken and vegetables
These light sides work particularly well if you’ve made a chicken pot roast recipe with lots of potatoes and carrots underneath the bird.
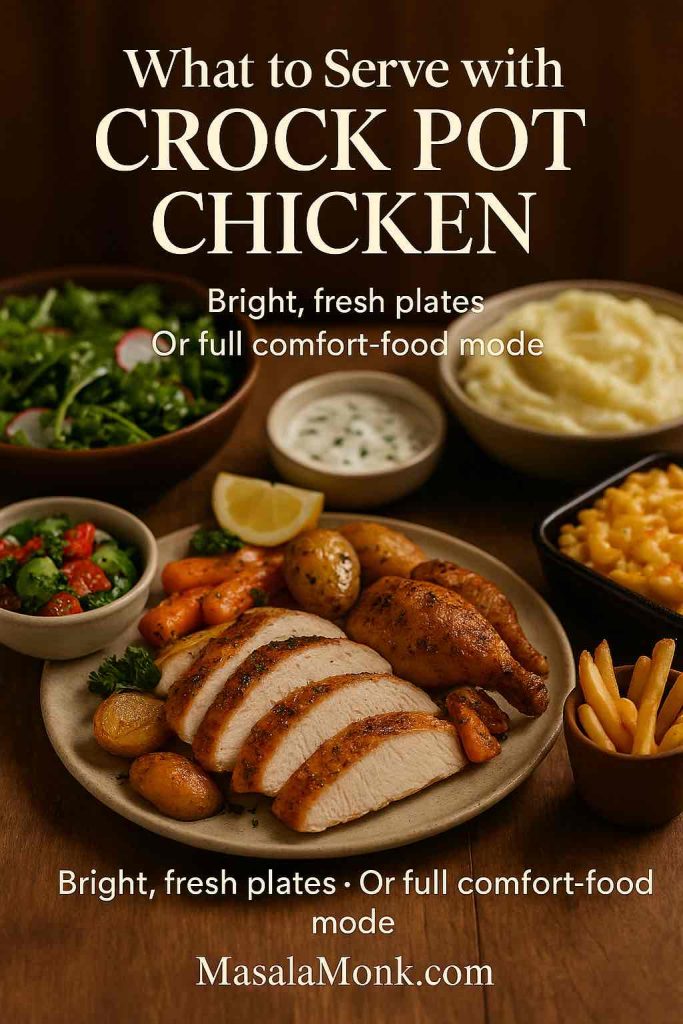
Classic comfort sides
On cold evenings or when you just want maximum comfort:
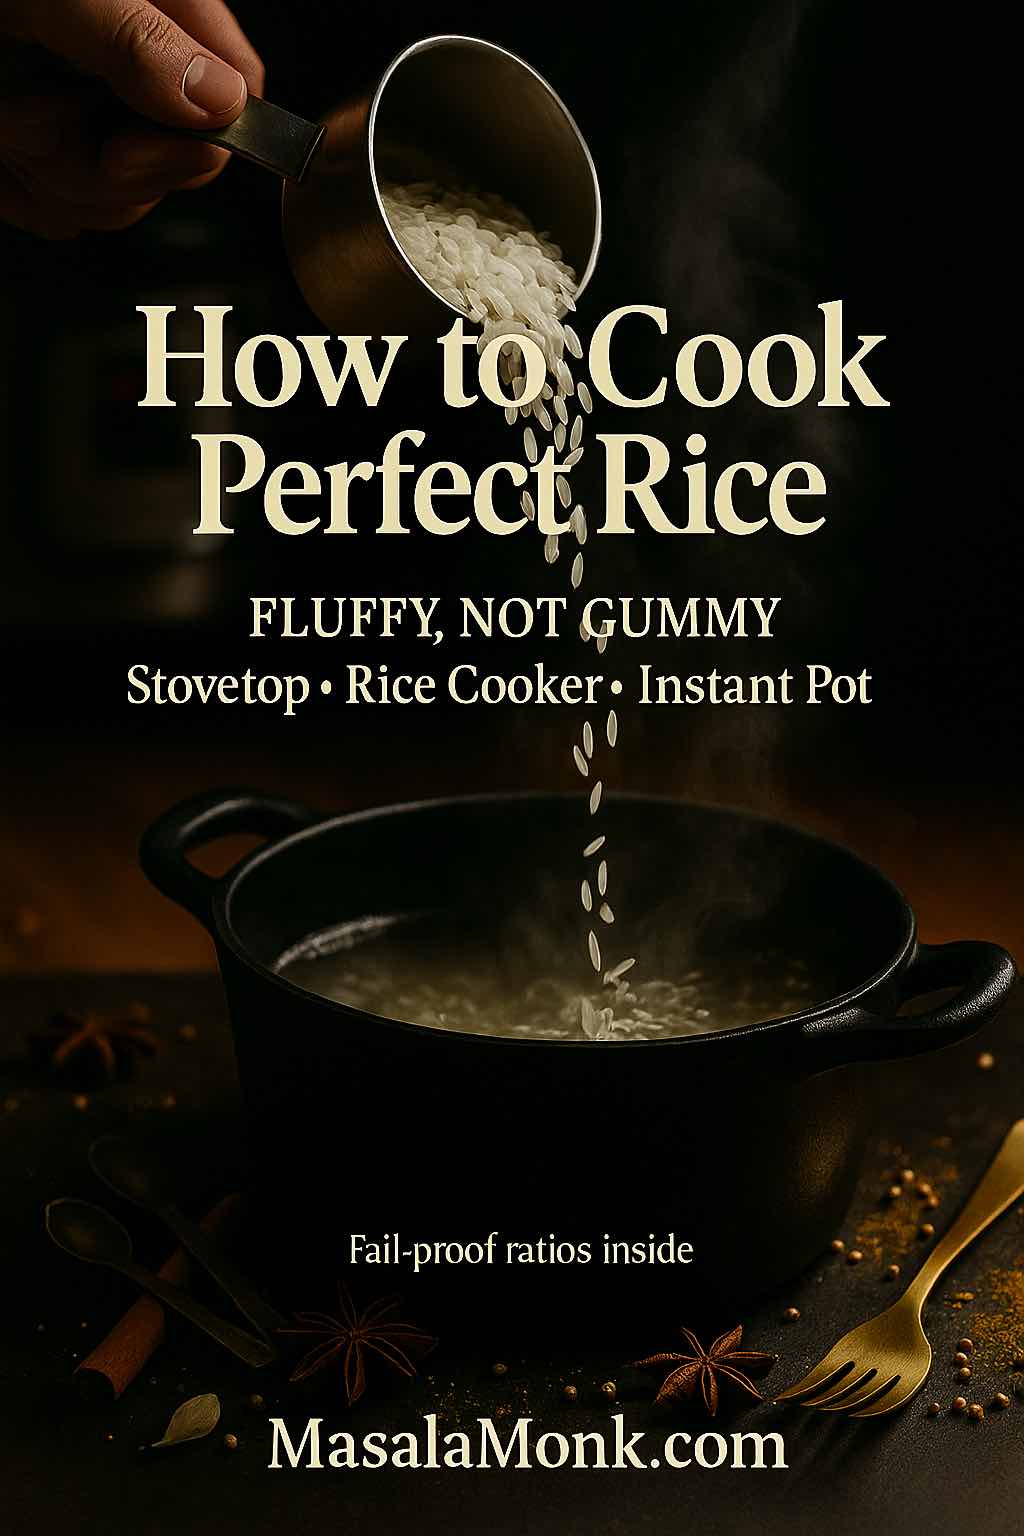
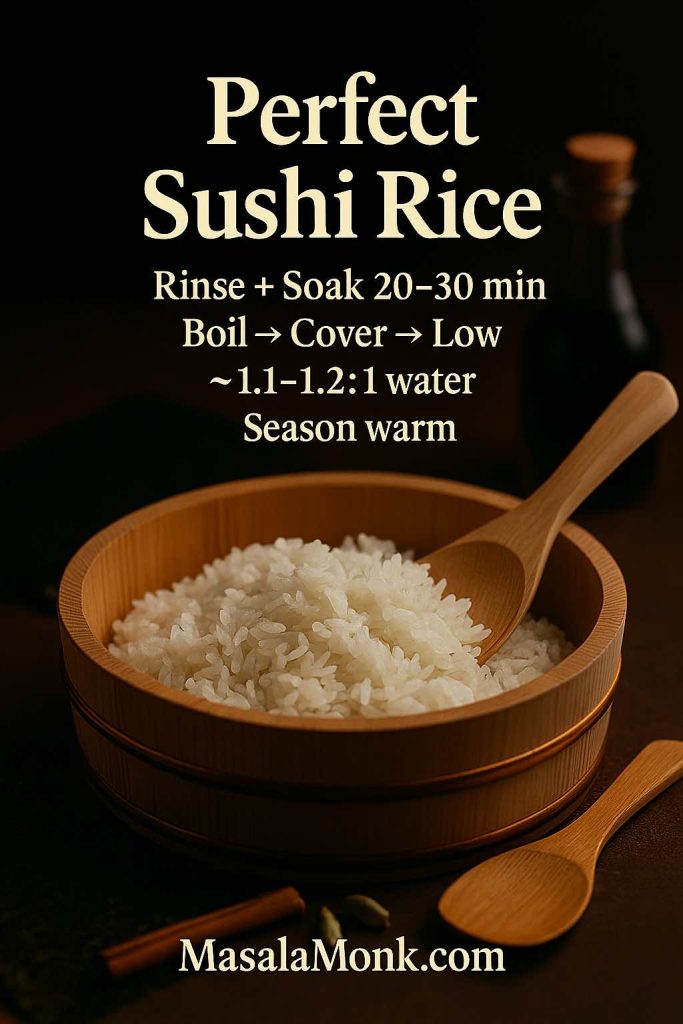
- Spoon the chicken pot roast in slow cooker over buttery mashed potatoes or rice. If rice sometimes trips you up, the detailed guide on how to cook rice walks through several foolproof methods.
- Add a baking dish of macaroni and cheese for a rich, indulgent side.
- Fry up a batch of homemade French fries if your household loves the roast-chicken-and-fries combination.
If you’re feeding a crowd, you can also serve the shredded chicken as part of a “build your own plate” spread: rolls or flatbreads, pickles, raw vegetables, dips like spinach dips and buffalo dip, plus bowls of roasted vegetables from the crock. Everyone assembles their own perfect plate.
Making the Most of Leftover Whole Chicken from the Crock Pot
One of the best things about a whole chicken in crock pot is how generous the leftovers are.
Storing safely
As soon as dinner is over and the chicken has cooled slightly:
- Pull off any remaining meat from the bones.
- Chop or shred it into bite-size pieces.
- Store the meat in an airtight container in the fridge for up to 3–4 days.
Strain the cooking juices into a jar. Once chilled, you’ll see a layer of fat on top and rich jelly-like stock underneath. Both are useful:
- Use the fat for frying onions or potatoes.
- Use the stock as a base for soups, sauces, or to cook rice and grains.
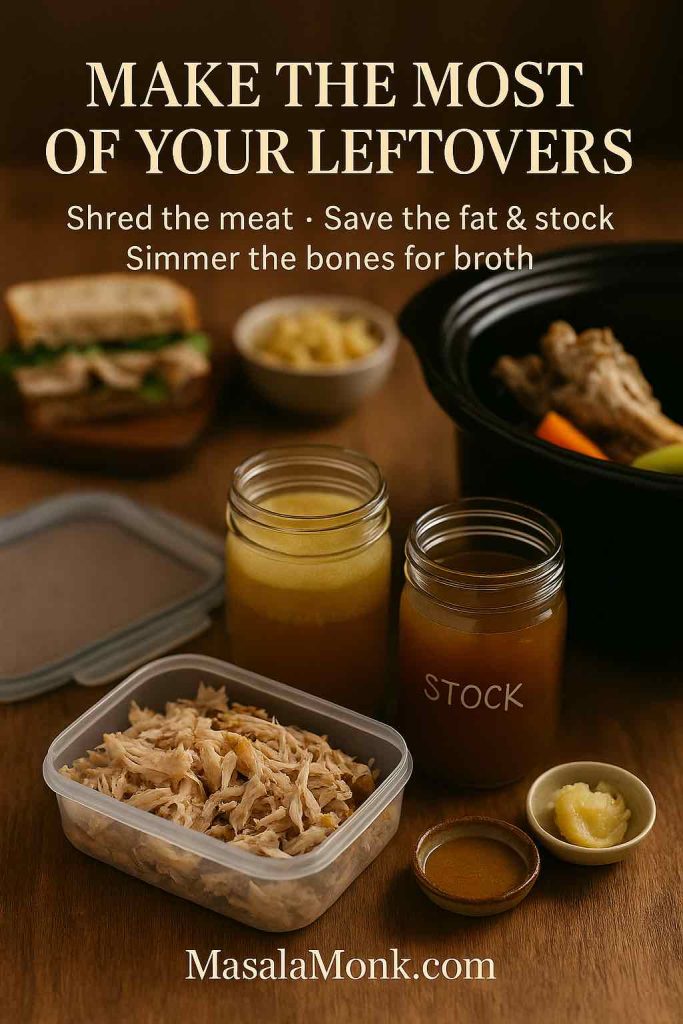
Leftover meal ideas
There are endless ways to use leftover slow cooker roast chicken. A few easy ones:
- Stir shredded chicken into chicken Alfredo pasta for a quick, creamy dinner.
- Stuff it into sandwiches or wraps with ideas borrowed from the chicken sandwich recipes collection—BBQ, cheesy melts, buffalo style and more.
- Toss it into salads with crisp lettuce, cucumber, cherry tomatoes and a sharp dressing.
- Fold it into soups or stews, using the crock pot juices as part of the broth.
- Combine it with cooked vegetables and gravy, then top with pastry or mashed potatoes to make comforting chicken pies.
Meanwhile, the bones can go right back into the slow cooker with fresh water, an onion, a carrot and a stick of celery. Let them simmer overnight on LOW and you’ll wake up to a simple homemade stock, ready to be strained, cooled and frozen in portions.
Pulling It All Together
When you step back, a whole chicken in crock pot is one of those quiet kitchen skills that makes life easier without a lot of fanfare. With one method, you can:
- Make a complete slow cooker roast chicken with very little hands-on time
- Turn it into a one-pot dinner with potatoes and vegetables
- Adapt it for thighs, quarters and drumsticks
- Explore BBQ, stuffed and rotisserie-style variations
- Stretch leftover meat and bones into several more meals

It’s also a technique that fits easily inside good food-safety practice: thaw the chicken first, keep the lid on, cook on LOW until a thermometer reads 165°F in the thickest parts, just as guides like FoodSafety.gov’s slow cooker safety article recommend.
Once you’ve cooked a couple of whole chicken recipes slow cooker crock pot style, you’ll probably start tweaking them instinctively—extra garlic one week, more lemon the next, maybe a smoky paprika-heavy rub after that. The beauty is that the core never really changes: a seasoned bird, a gentle heat, a few hours of patience, and you’re rewarded with a pot full of tender meat, vegetables, and aroma that makes your kitchen feel like home long before anyone sits down to eat.
FAQs
1. How long does it take to cook a whole chicken in crock pot on LOW?
For a 3–5 lb bird, a whole chicken in crock pot usually takes about 6–8 hours on LOW. Smaller chickens finish closer to six hours, while larger ones need nearer eight. Always check that the thickest part of the breast and thigh reaches 165°F / 74°C before serving.
2. Can I cook a whole chicken in crock pot on HIGH instead of LOW?
Yes, you can cook a whole chicken in crock pot on HIGH if you’re short on time. In that case, expect roughly 3½–4½ hours of cooking. However, LOW gives a more tender, juicy result, so use HIGH only when you really need to speed things up.
3. What size bird is best for whole chicken in crock pot recipes?
Most whole chicken in crock pot recipes work best with birds between 3 and 5 lb (1.2–2.2 kg). That size usually fits comfortably in a standard slow cooker and cooks evenly. If the chicken barely fits or pushes the lid up, it’s better to choose a smaller one.
4. Do I need to add liquid for a slow cooker whole chicken?
You only need a small amount of liquid for a slow cooker whole chicken recipe. About ¼–½ cup of stock or water is enough to get things going and prevent scorching. The chicken releases plenty of juices as it cooks, so too much liquid can make the flavour watery.
5. Can I cook potatoes and vegetables with my whole chicken in crock pot?
Absolutely. A whole chicken in crock pot with potatoes and vegetables is one of the easiest one-pot dinners. Place sturdy vegetables like potatoes, carrots and onions under the chicken so they soak up the juices while everything cooks together.
6. Will the vegetables get mushy in a chicken pot roast in slow cooker?
If you cut them too small, they can. For a chicken pot roast in slow cooker, keep potatoes and carrots in larger chunks. That way they become soft and flavourful, but still hold their shape by the time your slow cooker whole chicken is done.
7. Is it safe to cook a frozen whole chicken in a slow cooker?
No, it’s not recommended to put a frozen whole chicken in slow cooker. The centre takes too long to heat up, which can keep it in the “danger zone” for bacteria. Always thaw the chicken in the fridge first, then follow your favourite whole chicken slow cooker recipe.
8. How can I get crispy skin on a whole chicken slow cooker recipe?
A slow cooker makes meat tender but doesn’t crisp the skin. To mimic a baked chicken crock pot result, transfer the cooked chicken to a roasting pan and put it under a hot grill or broiler for a few minutes. The skin will brown and crisp while the inside stays juicy.
9. How do I know when my whole chicken in crock pot is done?
The best way is to use a thermometer. For a safe whole chicken in crock pot, the thickest part of the breast and thigh should read 165°F / 74°C. The legs should also move easily and the juices should run clear, not pink.
10. Can I stuff a whole chicken for a crock pot chicken roast?
Yes, but you have to be careful. For a stuffed crock pot chicken roast, keep the stuffing loose rather than packed, and check the temperature in the centre of the stuffing as well as in the meat. Both should reach 165°F / 74°C before you serve.
11. Do I have to brown the chicken before putting it in the slow cooker?
No, you don’t have to brown the chicken first for a whole chicken in slow cooker. The recipe works perfectly well without that extra step. If you want a deeper flavour, you can brown it in a pan first, but it’s optional rather than essential.
12. Can I cook just chicken thighs or drumsticks instead of a whole chicken in crock pot?
Definitely. The same method works for slow cook whole chicken recipes and for pieces. Bone-in thighs, drumsticks and leg quarters cook faster—usually in 4–6 hours on LOW—so they’re a good option when you don’t need a full bird.
13. How should I store leftover slow cooker whole chicken?
Once your slow cooker whole chicken has cooled slightly, remove the meat from the bones and store it in an airtight container in the fridge. It keeps well for about 3–4 days. You can also freeze leftover chicken for easy future meals.
14. What can I make with leftover whole chicken from the crock pot?
There are lots of options. Shredded meat from a whole chicken in crock pot is perfect for sandwiches, wraps, quesadillas, pasta, fried rice, and soups. You can also use the carcass to make homemade stock for the next batch of chicken pot roast or soup.
15. Is a whole chicken in crock pot healthier than fried chicken or takeout?
Generally, yes. A whole chicken in crock pot uses simple ingredients and doesn’t require deep frying. You control the amount of salt, fat and seasoning, and you can pair it with plenty of vegetables, which usually makes it lighter than most takeout options.
16. Can I use boneless chicken for this slow cooker whole chicken style recipe?
You can adapt the flavours, but it won’t really be a whole chicken in crock pot recipe anymore. Boneless chicken cooks faster and can dry out more easily. If you want the same juicy, roast-style result, bone-in and skin-on pieces are a better substitute.
17. Why does my whole chicken in crock pot fall apart when I lift it out?
That’s usually a good sign. A very tender whole chicken in crock pot can be hard to move because the meat is so soft. Use two large spatulas or a slotted spoon plus tongs, or simply carve and serve it directly from the slow cooker instead of lifting it whole.
18. Can I prepare the chicken the night before and start the crock pot in the morning?
Yes, as long as you handle it safely. You can season your whole chicken in crock pot the night before, cover it and keep it in the fridge. In the morning, place it into the slow cooker insert, add vegetables and liquid, then start cooking immediately.