Posted on — 10 Comments

Ravioli Recipe: 6 Fillings + 4 Sauces with Indian Twists

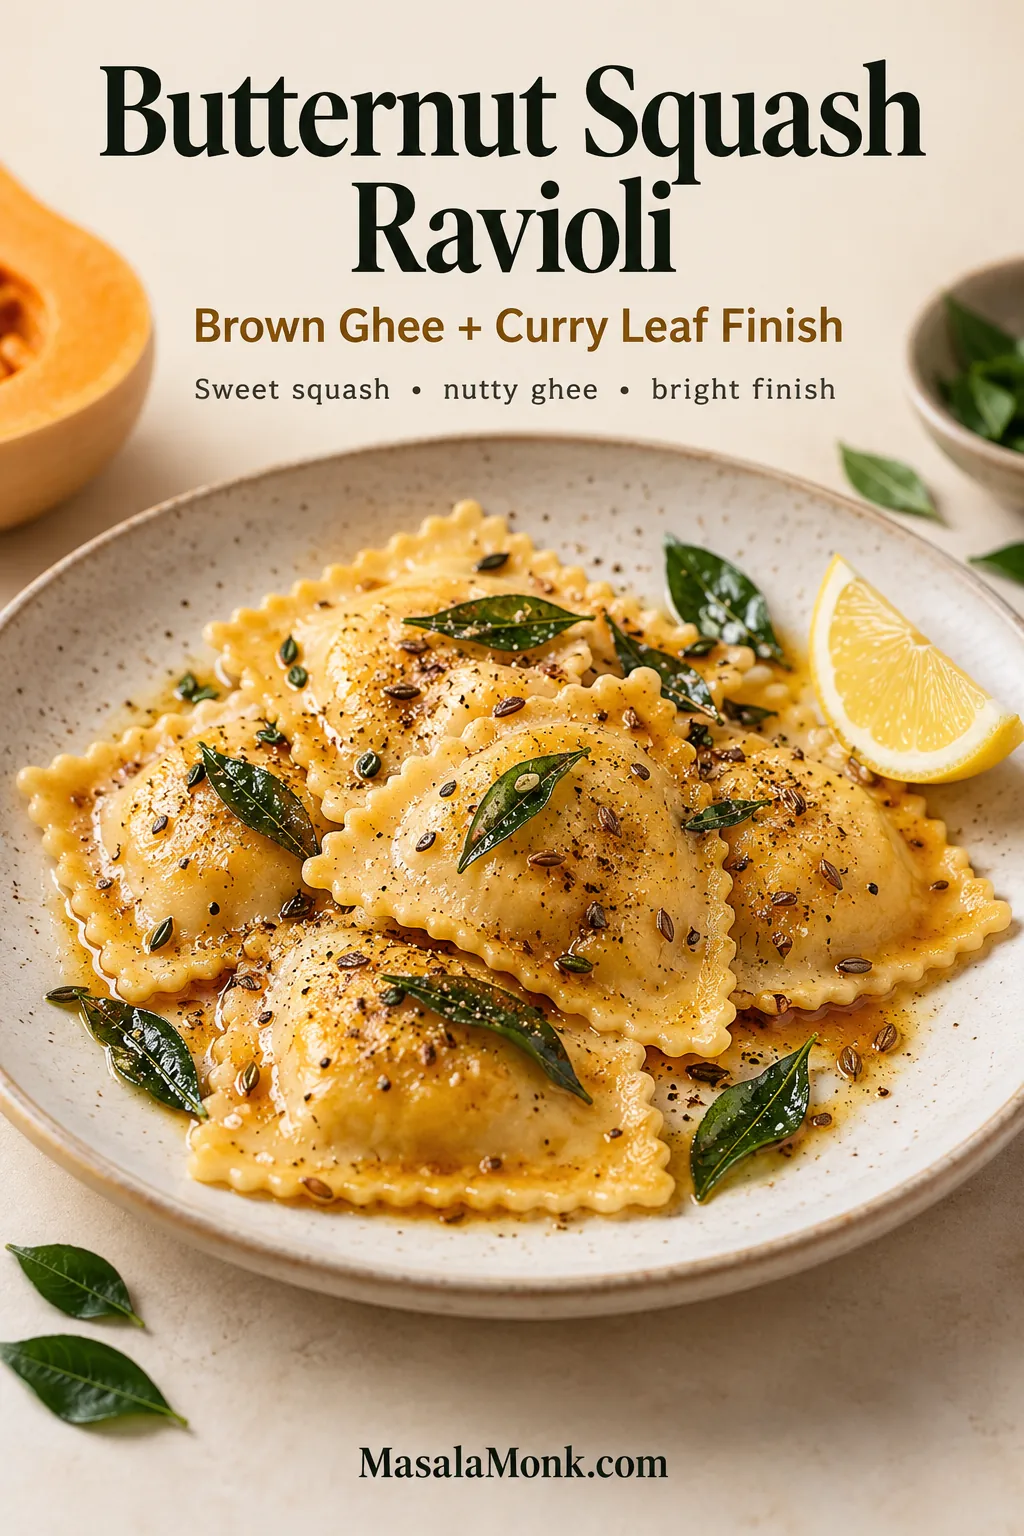
Butternut squash ravioli finished with nutty ghee, curry leaves, cumin, black pepper and lemon.

This post was last updated on

• Recipe research and editorial by MasalaMonk.com.

Ravioli can be a quiet bowl of buttered pasta on a Tuesday or the dish you bring out when dinner deserves a little ceremony. Either way, a good ravioli recipe lives or dies on surprisingly small details: cook the pasta gently, keep the filling inside it, and use a sauce that coats rather than floods. This guide covers those basics first, then takes ravioli in a distinctly MasalaMonk direction with ghee, curry leaves, kasuri methi, paneer, keema and chutneys.

Making everything from scratch? Start with the egg dough, sealing guide and six filling ideas. Using refrigerated or frozen ravioli? Skip straight to the cooking times and sauces.

The five main twists move from butternut squash with brown ghee and curry leaves to mushroom malai, lobster with a curry-leaf tadka, makhani-style tomato cream and crisp toasted ravioli with Indian chutneys. None of them needs a long spice list. One or two well-chosen Indian flavors are enough when they make sense with the filling already inside.

The same approach runs through our Indian-inspired Alfredo pasta. For a brighter, herb-led pasta night, the pesto pasta guide is a useful companion—especially for the pasta-water and sauce-cling techniques that come up here too.

One thing is worth settling before the flour comes out: ravioli does not need to look factory-perfect. A slightly wonky edge is harmless. Trapped air, watery filling and a violent boil are the things that cause trouble. Get those under control and the rest becomes much more forgiving.


Ravioli Cooking Times: Fresh, Frozen & Refrigerated

The package matters less than the water and the finish. Fresh ravioli needs the gentlest handling; frozen ravioli needs a little more time without a hard boil; refrigerated ravioli sits somewhere in between. In all three cases, have the sauce warm before the pasta is done. Filled pasta deteriorates quickly when it sits wet in a colander.
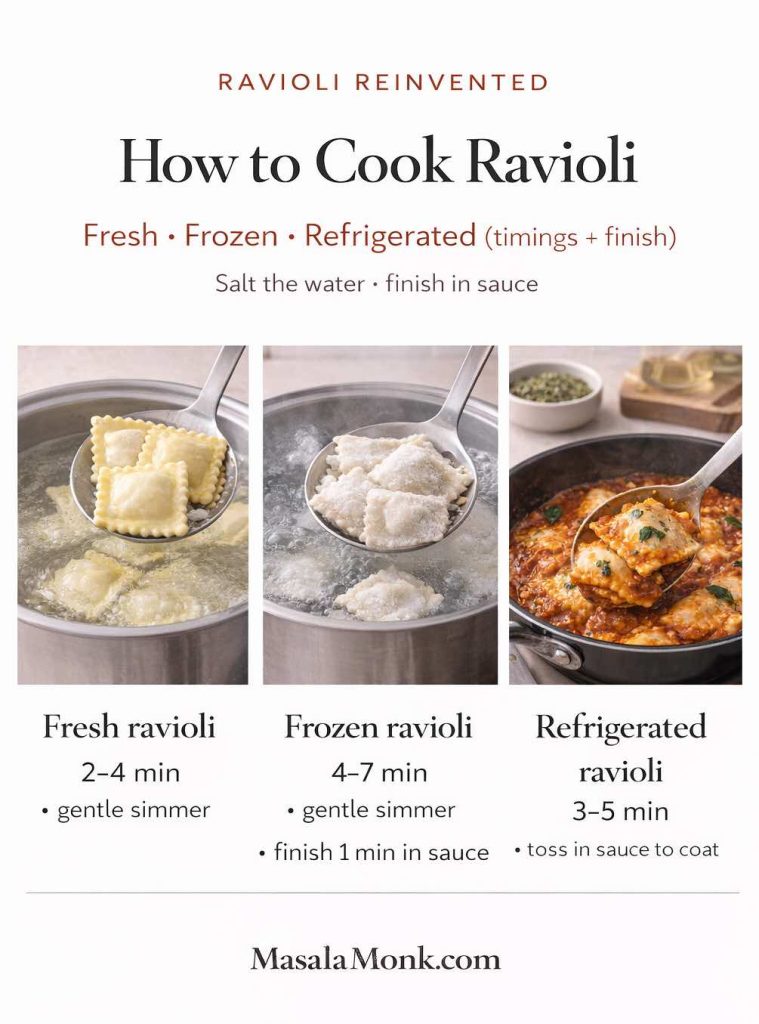
Infographic comparing ravioli cook times: fresh 2–4 minutes, refrigerated 3–5 minutes, and frozen 4–7 minutes.
Use the clock as a starting point, not the finish line. Keep the water at a controlled simmer and check the wrapper and filling before lifting the ravioli into sauce.

Treat the timings below as check windows, not a stopwatch. Ravioli size, wrapper thickness and filling all change the final minute, so use the clock to know when to start checking and texture to decide when to stop.

For a second visual reference on rolling, filling and shaping handmade pasta, King Arthur’s ravioli guide is a useful companion. If you cook stuffed pasta often, our tortellini cooking guide covers the same fresh-versus-frozen timing problem in a different shape.

How to Cook Fresh Ravioli Without Bursting

Fresh ravioli is delicate enough that a wide pot helps. Salt the water, bring it to a boil, then ease it back to a lively simmer before the pasta goes in. You want small, steady bubbles moving the ravioli around—not a rolling boil that throws one piece into another.
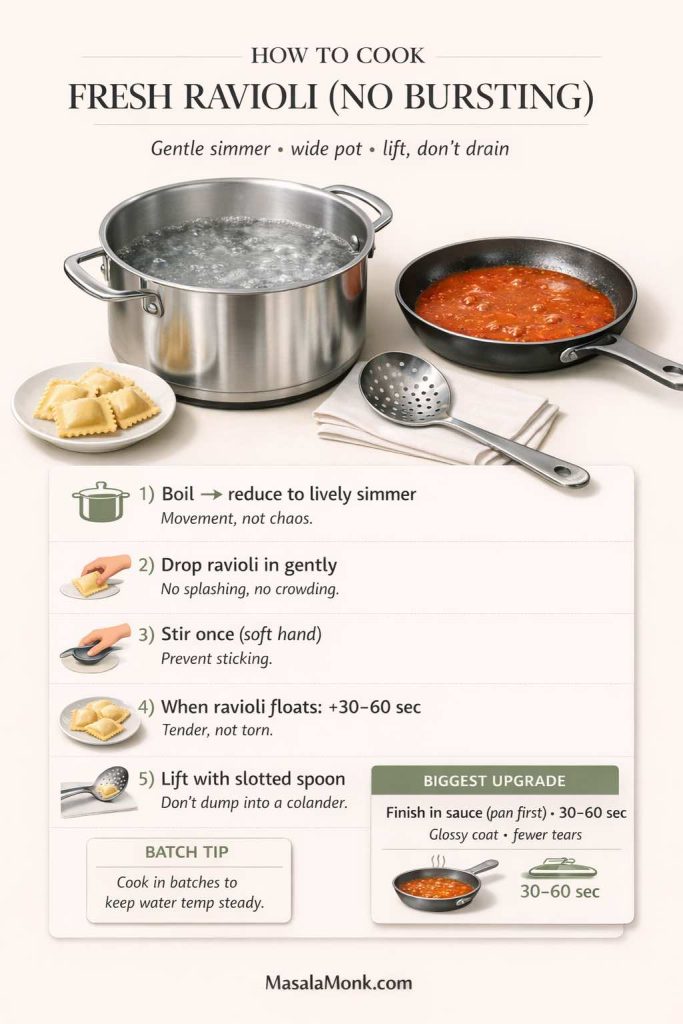
Five-step fresh ravioli guide from gentle simmer to slotted-spoon transfer and finishing in sauce.
A wide pot gives delicate seams room to move. Stir once, check 30–60 seconds after floating, then lift each piece with a slotted spoon.

Use this simple rhythm:

  • Bring water to a boil, then reduce to a lively simmer.
  • Drop ravioli in gently.
  • Stir once with a soft hand to prevent sticking.
  • When ravioli floats, give it another 30–60 seconds.
  • Lift out with a slotted spoon, not a colander.

Warm the sauce in a wide skillet before the ravioli is ready. Lift the pasta straight into that pan, add a spoonful of cooking water if the sauce needs loosening, and spoon the sauce over gently. Aggressive tossing is what stresses delicate seams; thirty to sixty seconds is usually enough to coat the surface.

Very delicate handmade ravioli is easier to manage in batches. The water temperature recovers faster, the pieces have room to move, and you can lift them out without fishing through a crowded pot.

How to Cook Frozen Ravioli So It Stays Tender

Cook frozen ravioli straight from the freezer. Thawing softens the wrapper before the filling is hot and makes sticking more likely. Once the pieces go into the pot, keep the water at a steady simmer and stir only enough to stop them settling on the bottom.
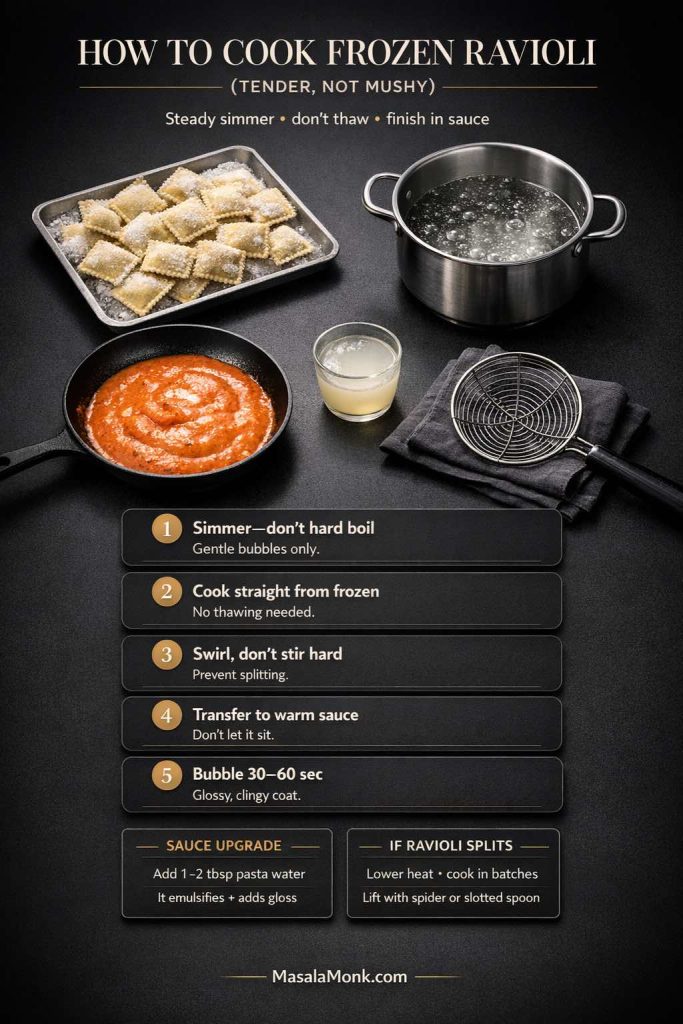
Frozen ravioli cooked from frozen, then moved from a gentle simmer into warm sauce with pasta water.
Frozen ravioli does better with steady heat than a hard boil. A spoonful of starchy water in the sauce helps it coat the pasta instead of collecting underneath.

Lift frozen ravioli directly into warm sauce and let it bubble there for 30–60 seconds. A tablespoon or two of starchy cooking water helps butter, tomato or cream sauce cling to the wet wrapper instead of pooling underneath. That brief pan finish does more for the bowl than an elaborate garnish.

If frozen ravioli splits, lower the heat first. A gentle swirl is often enough to prevent sticking, and a spider or slotted spoon is kinder than pouring the whole pot through a colander.

How to Cook Refrigerated Ravioli

Refrigerated ravioli is quick but usually sturdier than handmade pasta. Treat it much like fresh ravioli: salted water, a controlled simmer and an early check for doneness.
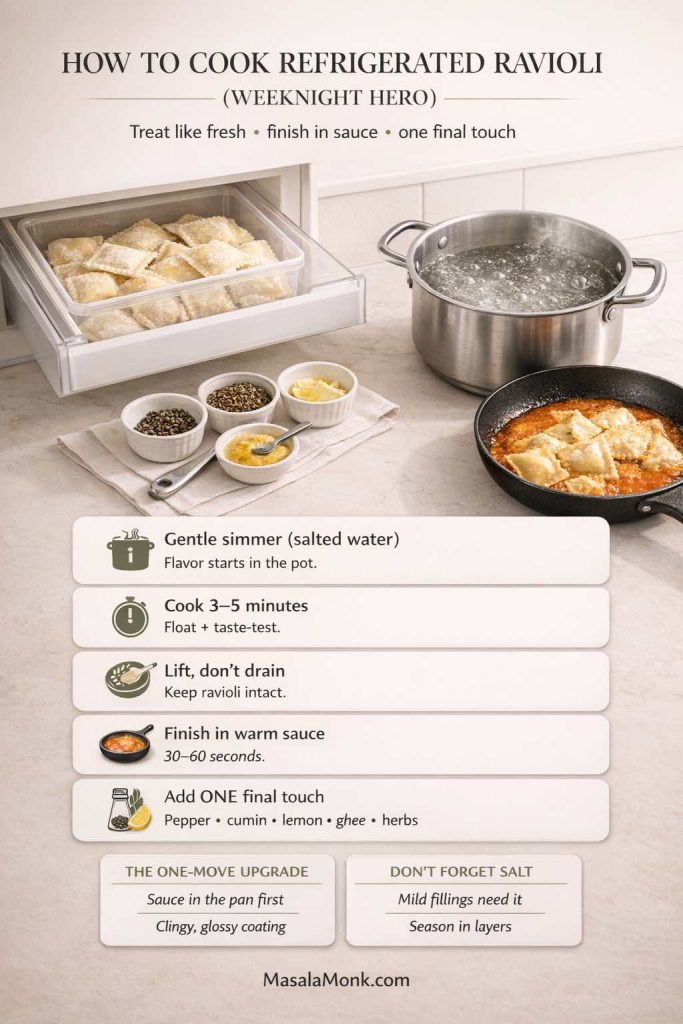
Refrigerated ravioli guide with a 3–5 minute simmer, slotted-spoon transfer, and simple finishing accents.
Three to five minutes is a useful check window for refrigerated ravioli. Finish it in warm sauce, then choose one accent—pepper, lemon, herbs or spiced ghee.

Once it reaches the sauce, choose one finishing note: black pepper for bite, lemon for acidity, toasted cumin for warmth, spiced ghee for aroma, or fresh herbs for lift. The filling is already seasoned; several accents at once usually blur it.

That small finish is often all a refrigerated packet needs to feel like a composed dinner.

Do not leave all the seasoning to the sauce. A mild cheese or spinach filling benefits from properly salted cooking water; otherwise the wrapper can taste flat even when the sauce is well balanced.

↑ Back to Ravioli Recipe Contents


Ravioli Dough, Sealing & Shortcut Wrappers

Homemade dough is worth doing when the making is part of the evening. On a busy night, wonton wrappers are a completely different—but useful—route. Whichever path you take, the same rules decide whether the ravioli survives: a dry-enough filling, clean edges, trapped air pressed out and a firm seal.

How to Seal Ravioli Without Leaks

Most leaks begin before the ravioli reaches the pot. Keep the border free of filling, press outward from the center to remove trapped air, and use a modest amount of filling so the dough is not stretched tight. A short 5–10 minute rest after shaping helps the seam settle before cooking.
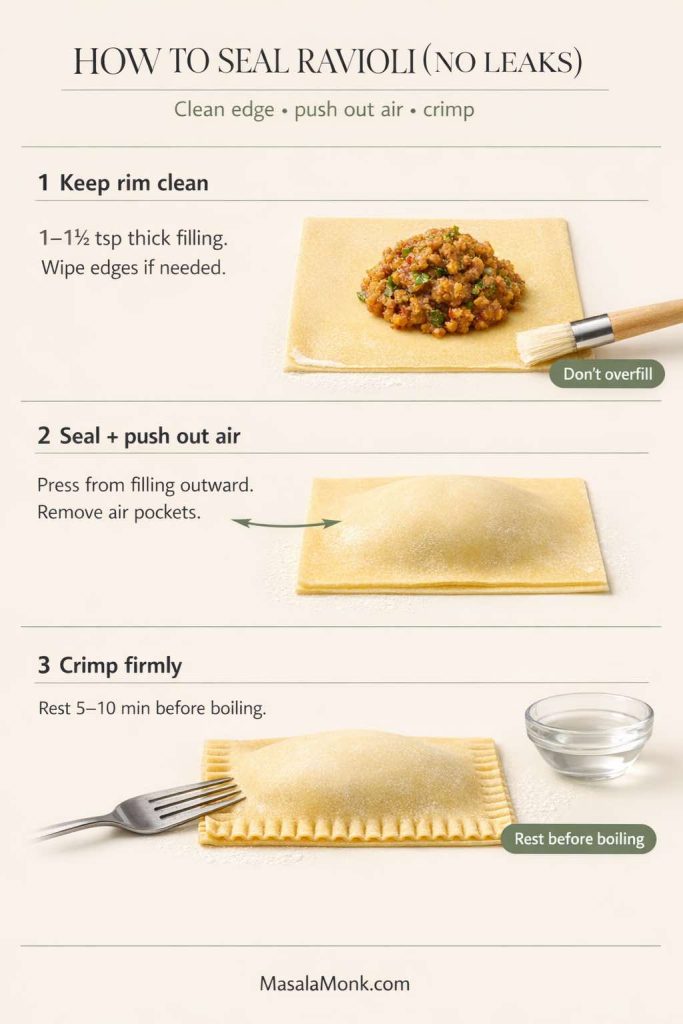
Ravioli sealing infographic: clean borders, 1–1½ teaspoons filling, air pressed out, crimped edges, and a 5–10 minute rest.
Most leaks start before the pot. Keep filling off the rim, press air outward, crimp firmly and give the shaped pasta a short rest.

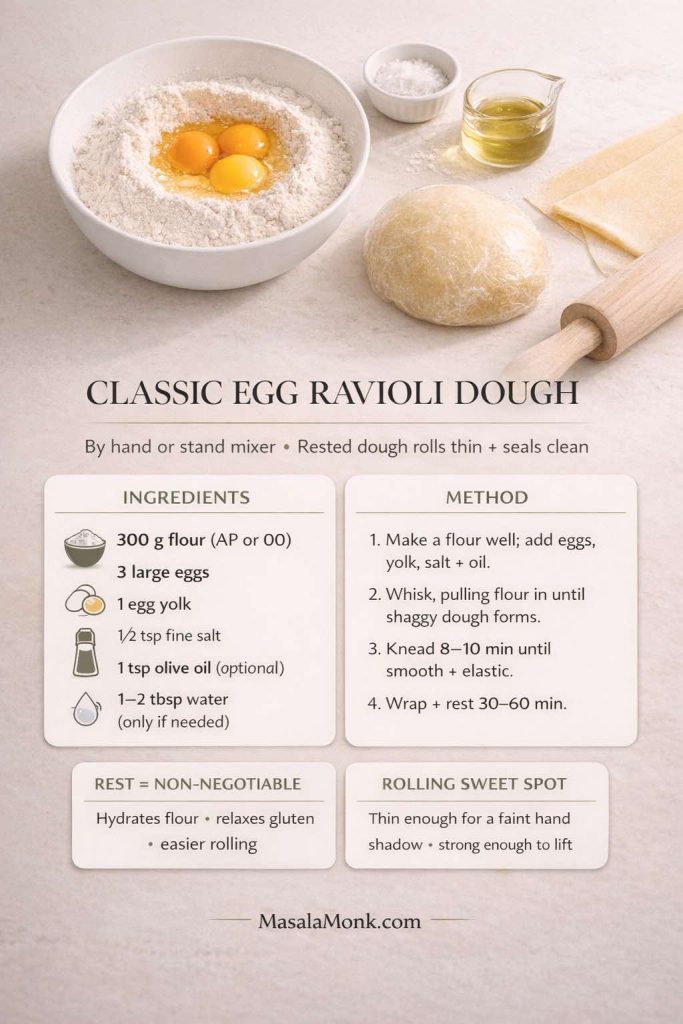
Classic Egg Ravioli Dough

By hand or in a mixer, the dough needs to become smooth enough to stretch without tearing and relaxed enough to roll thin. The 30–60 minute rest does more for easy rolling than adding extra water to a tight dough.

Ingredients

  • 300 g flour (all-purpose works; 00 flour is lovely if you have it)
  • 3 large eggs
  • 1 egg yolk (for elasticity and richer color)
  • 1/2 tsp fine salt
  • 1 tsp olive oil (optional, helps handling)
  • 1–2 tbsp water only if needed
Egg ravioli dough card with flour, eggs, yolk, salt, optional olive oil, kneading and resting.
The dough should feel smooth and elastic after kneading. Rest it for 30–60 minutes before rolling; a faint shadow of your hand through the sheet is a useful thickness cue.

Method

  1. Make a mound of flour, create a well, add eggs, yolk, salt, and oil.
  2. Whisk inside the well, slowly pulling flour inward until a shaggy dough forms.
  3. Knead 8–10 minutes until smooth and elastic.
  4. Wrap and rest 30–60 minutes.

During the rest, the flour finishes hydrating and the gluten relaxes. The dough should roll with much less spring-back afterward. Keep the sheets thin and the filling modest; thick pasta and overfilled centers are two common reasons homemade ravioli feels heavy.

The dough itself is covered in full here; use the sealing guide above when you start shaping so the filling stays away from the border.

A useful visual test: hold the sheet over your hand. You should be able to see a faint shadow through it, but the sheet should still lift without stretching under its own weight. If it feels leathery, keep rolling; if it looks translucent and fragile around the edges, stop.

Eggless Ravioli Dough

Eggless dough has less built-in elasticity, so hydration matters more. Add the warm water gradually and stop when the dough is smooth and pliable rather than sticky.
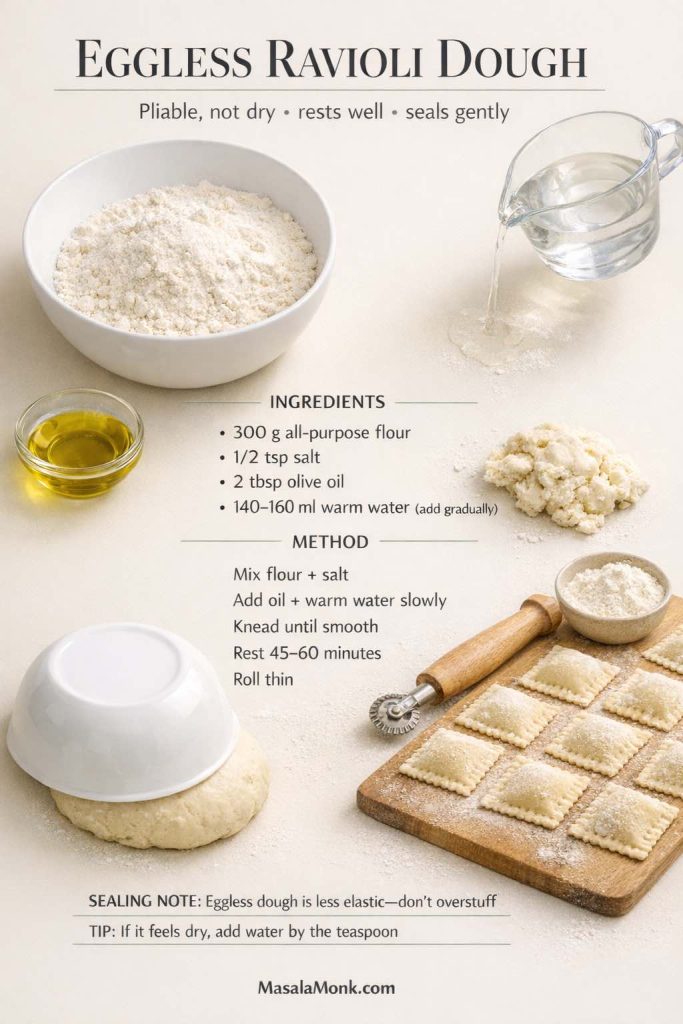
Eggless ravioli dough card with flour, salt, olive oil, warm water, kneading and a 45–60 minute rest.
Add the water a little at a time and stop as soon as the dough turns pliable. Rest it well, then avoid stretching the wrapper around too much filling.

Ingredients

  • 300 g all-purpose flour
  • 1/2 tsp salt
  • 2 tbsp olive oil
  • ~140–160 ml warm water (add gradually)

Knead until smooth, rest 45–60 minutes, and roll thin. Eggless dough can be slightly less elastic, so seal carefully and avoid overstuffing.

Wonton-Wrapper Ravioli for a Faster Night

Wonton wrappers do not taste exactly like fresh pasta, but they solve the hardest part of homemade ravioli: getting thin, even sheets. They work best with a thick filling and a gentle simmer.
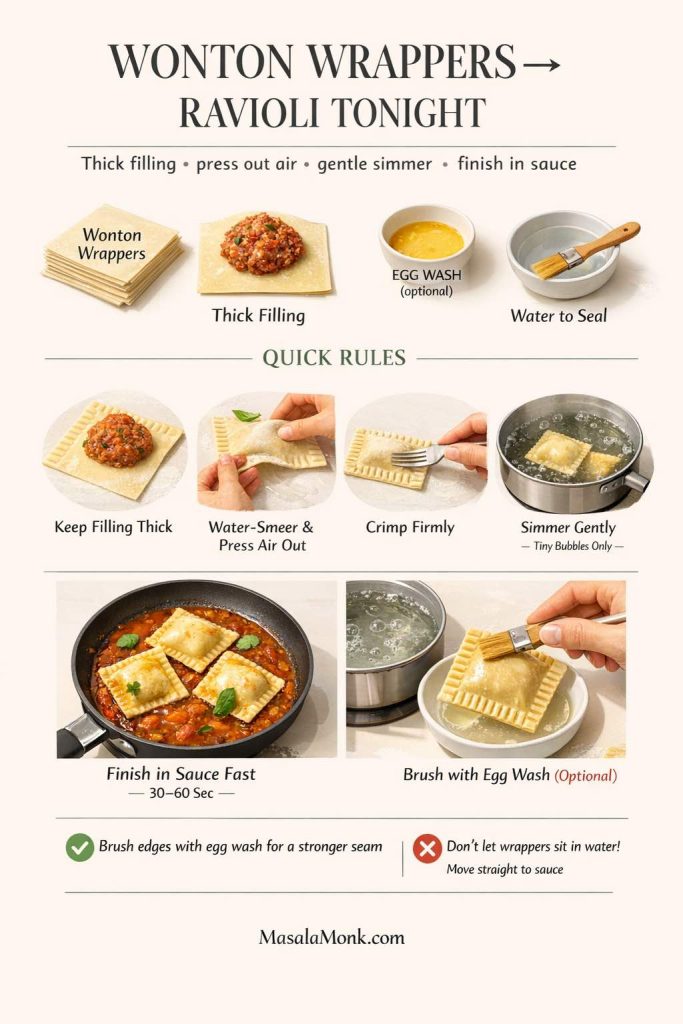
Wonton-wrapper ravioli guide covering filling, wetting the edge, removing air, crimping, simmering and saucing.
Wonton wrappers save the rolling step, but they soften faster than egg pasta. Keep the filling thick, seal carefully and serve soon after cooking.

For the cleanest seals:

  • Keep filling thick, not wet.
  • Seal with a thin smear of water, press out air, and crimp firmly.
  • Simmer gently—don’t boil hard.
  • Finish in sauce quickly; don’t let wrappers sit too long in water.

Expect a softer, slightly more delicate wrapper than classic pasta dough. That difference matters less once the ravioli is filled well and moved straight from the pot into sauce.

A thin brush of egg wash gives the seam a little more insurance, particularly with wetter fillings. Keep the water gentle and serve soon after cooking; wonton wrappers soften faster than egg-pasta sheets.

↑ Back to Ravioli Recipe Contents


Twist 1: Butternut Squash Ravioli with Brown Ghee & Curry Leaves

Butternut squash is naturally sweet, so it needs nuttiness, aroma and a little acidity around it. Brown butter and sage do that beautifully. Here, ghee brings its own toasted, nutty character while curry leaves add a sharper, citrusy-herbal edge.
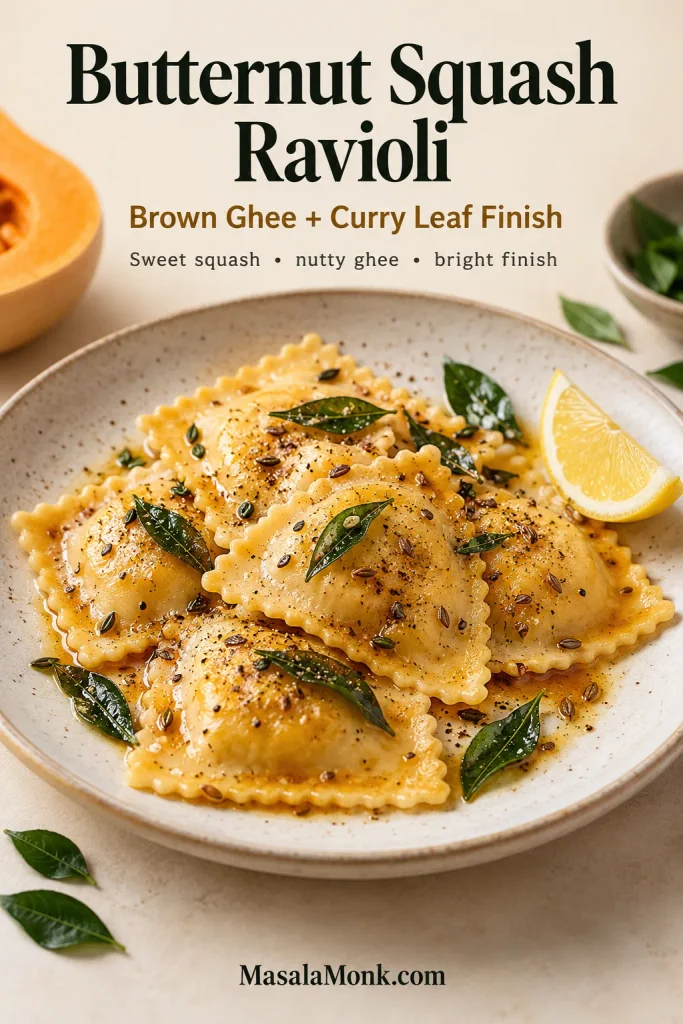
Butternut squash ravioli finished with nutty ghee, curry leaves, cumin, black pepper and lemon.
Sweet squash gets its contrast from fragrant ghee, crisp curry leaves, cumin and black pepper. Add lemon at the end only when the filling needs a brighter edge.

The result should still read as squash ravioli first. Here, “brown ghee” means ghee warmed until fragrant and slightly deeper in color—not butter browned with its milk solids, because finished ghee has already had most of those removed. Let the curry leaves splutter in the hot fat, add cumin and black pepper, and reach for lemon only if the filling needs a brighter edge.

Brown Ghee & Curry Leaf Sauce for Squash Ravioli

Use this finish with homemade or store-bought squash ravioli, and with pumpkin ravioli too. It is especially useful when the filling tastes sweeter than expected.
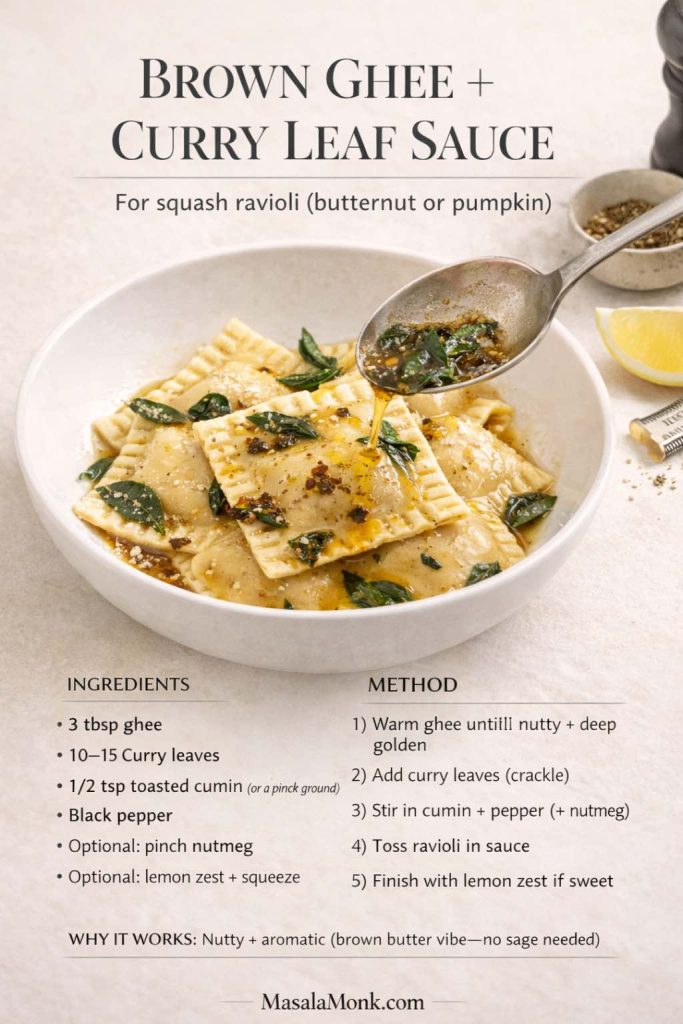
Brown ghee and curry leaf sauce card for squash ravioli with cumin, black pepper and optional lemon.
Warm the ghee until fragrant, let the curry leaves crackle, then add cumin and pepper. Toss the ravioli gently and adjust with lemon only if the squash reads too sweet.

Ingredients

  • 3 tbsp ghee
  • 10–15 curry leaves (fresh is best; dried works in a pinch)
  • 1/2 tsp toasted cumin seeds or a pinch of ground cumin
  • Black pepper
  • Optional: pinch of nutmeg
  • Optional: lemon zest + a squeeze of lemon

Method

  1. Warm ghee in a small pan until fragrant and slightly deeper in color; do not try to brown it like whole butter.
  2. Add curry leaves. They’ll crackle and perfume the ghee.
  3. Stir in cumin and black pepper.
  4. Add nutmeg for a warmer, slightly sweet background note.
  5. Toss cooked ravioli in the sauce and finish with lemon zest if the ravioli is very sweet.

Ghee already brings toasted, nutty flavor; blooming curry leaves and cumin in it adds aroma without turning the finish into a gravy. That is enough contrast for sweet squash, with lemon as an optional final correction.

Pumpkin Ravioli Variation

Pumpkin ravioli can take a small pinch of Kashmiri chili in the ghee. Use it for color and gentle warmth, not enough to turn the sauce hot.

A few roasted pistachios are optional but useful: the crunch gives very soft pumpkin ravioli some texture, and their nuttiness echoes the nutty ghee.

Butternut Squash & Cumin-Paneer Ravioli Filling

For homemade squash ravioli, the filling needs to sit in a mound rather than spread. Roasting concentrates the squash; a short cook after mashing removes more moisture; paneer adds body without making the center runny.

Yield: enough filling for roughly 24–30 standard ravioli.
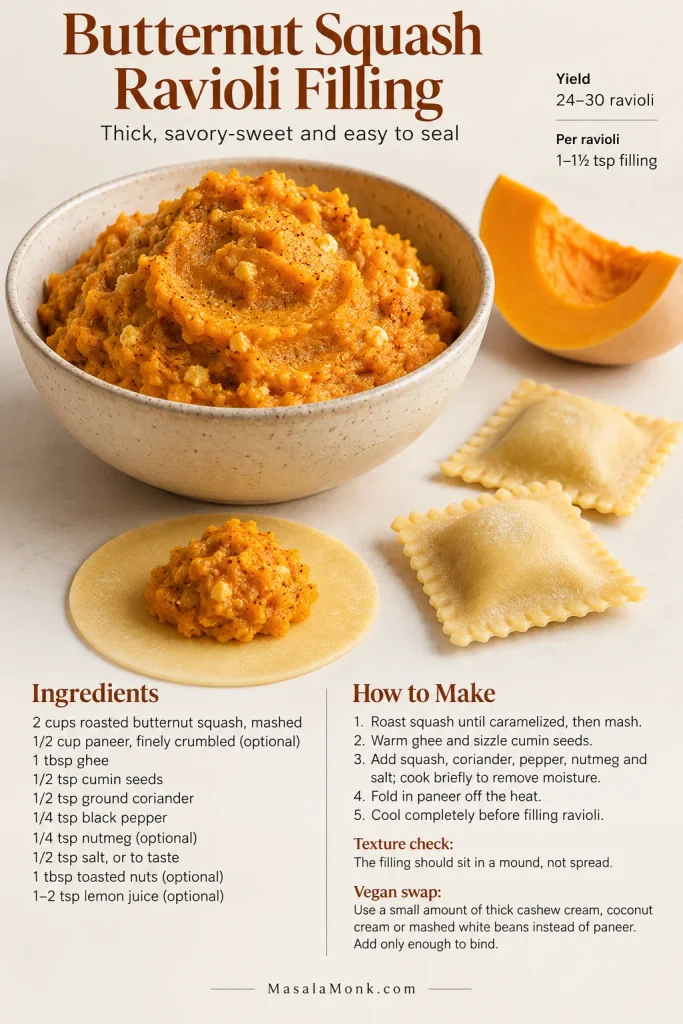
Butternut squash ravioli filling guide showing thick mashed squash, an open ravioli wrapper, finished ravioli and filling quantities.
A spoonful should stay where you put it. Roast the squash well, cook off excess moisture and use about 1–1½ teaspoons for each standard ravioli.

Ingredients

  • 2 cups roasted butternut squash (roast cubes until caramelized, then mash)
  • 1/2 cup paneer, finely crumbled (optional but excellent)
  • 1 tbsp ghee
  • 1/2 tsp cumin seeds
  • 1/2 tsp ground coriander
  • 1/4 tsp black pepper
  • 1/4 tsp nutmeg (optional, but gorgeous with squash)
  • 1/2 tsp salt (adjust)
  • 1 tbsp finely chopped toasted nuts (optional)
  • 1–2 tsp lemon juice (optional, for brightness)

Method

  1. Roast squash until edges caramelize, then mash until smooth.
  2. Heat ghee, add cumin seeds, let them sizzle briefly.
  3. Stir in mashed squash and spices, cook 2–3 minutes to evaporate excess moisture.
  4. Fold in paneer off heat so it stays creamy.
  5. Let cool completely before filling ravioli.

Vegan swap: replace the paneer with a small amount of thick cashew cream, coconut cream or mashed white beans. Add only enough to bind; a loose filling is much harder to seal.

Assembly: use about 1 to 1½ teaspoons for a standard ravioli. It should look slightly underfilled before sealing. Press out the air and use the no-leak sealing method above.

For a tangier variation, replace part of the paneer with goat cheese. Keep the amount modest so the filling remains squash-forward and the curry-leaf ghee still has room to come through.

Twist 2: Mushroom Ravioli with a Peppery Malai-Style Sauce

Mushroom ravioli already carries plenty of earthiness, so the sauce does not need a large spice list. Brown more mushrooms, use black pepper generously and let a small pinch of kasuri methi sit in the background.
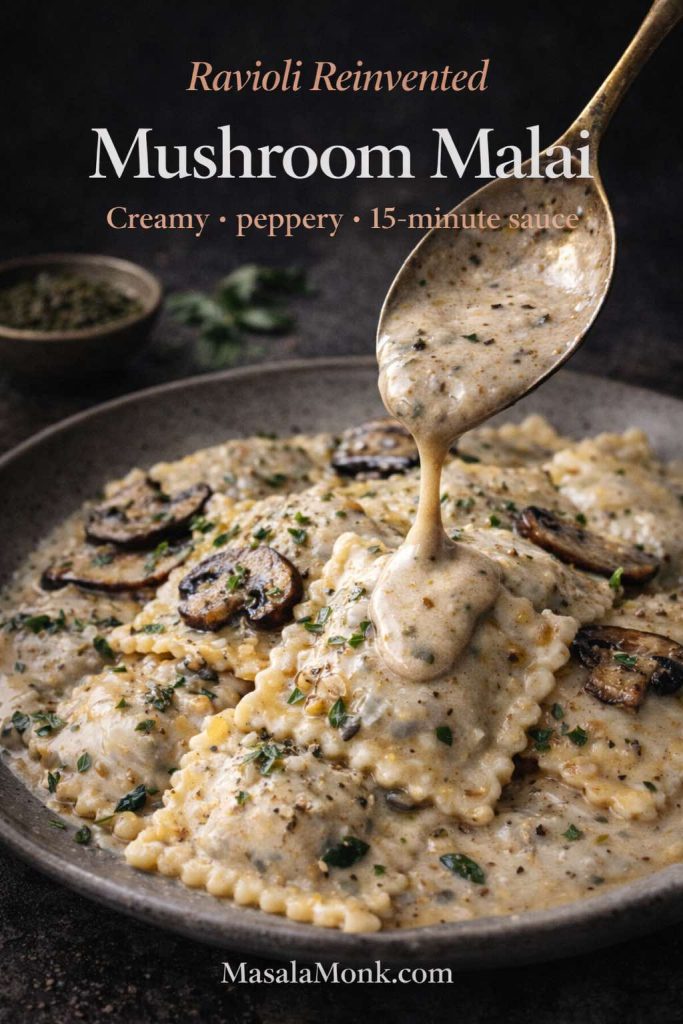
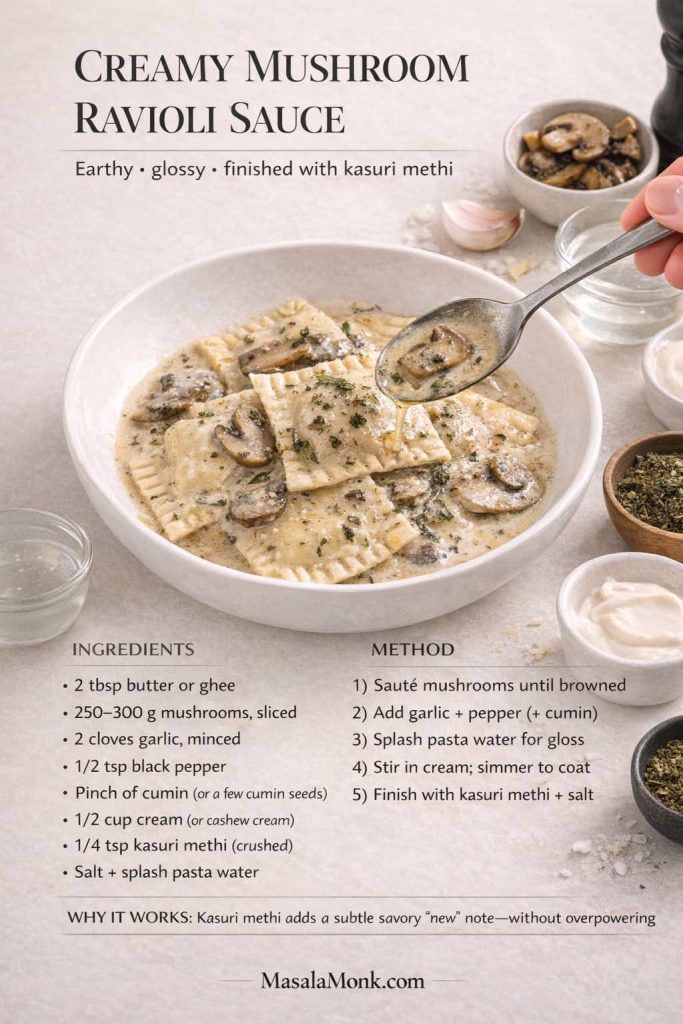
Mushroom ravioli in creamy malai-style sauce with browned mushrooms, black pepper and kasuri methi.
This one should taste mushroom-first. Brown the mushrooms well, keep the cream loose, and add kasuri methi near the end so it stays in the background.

This is closer to a peppery mushroom cream than a curry. Cream rounds the browned mushrooms, cumin adds warmth, and crushed kasuri methi gives the finish a dry, savory aroma that works unexpectedly well with ricotta or cheese-filled pasta.

Creamy Mushroom Malai Sauce

The sauce suits mushroom ravioli best, but it is also good with cheese or spinach-filled ravioli. Once the mushrooms are sliced, the sauce itself usually comes together in about 15 minutes; wetter mushrooms may need a little longer to give up their water and brown. For a more classic version without the Indian finish, see our creamy mushroom sauce guide.

Ingredients

  • 2 tbsp butter or ghee
  • 250–300 g mushrooms, sliced
  • 2 cloves garlic, minced
  • 1/2 tsp black pepper (more if you love peppery sauces)
  • Pinch of cumin (or a few cumin seeds toasted first)
  • 1/2 cup cream (or cashew cream for a plant-based ravioli dinner)
  • 1/4 tsp kasuri methi, crushed between your palms
  • Salt
  • A splash of pasta water
Mushroom ravioli sauce card with browned mushrooms, garlic, cream, pasta water, pepper and kasuri methi.
Watch the spoon: once the sauce coats it lightly, stop reducing. Pasta water can loosen the cream without muting the mushroom flavor.

Method

  1. Sauté mushrooms in butter/ghee until they release water and start browning.
  2. Add garlic and pepper; cook until fragrant.
  3. Add a splash of pasta water to create a glossy base.
  4. Stir in cream; simmer until thick enough to coat a spoon.
  5. Finish with kasuri methi and adjust salt.

Crush the kasuri methi between your palms before adding it at the end. Heat softens its aroma quickly, so a late addition gives you the most character without making the sauce taste medicinal or dusty.

For a Darker, More Savory Mushroom Finish

For a darker, more savory finish, push the mushrooms further. Let them brown until their edges are dark, use a little more black pepper, and finish with butter or ghee and Parmesan.

Three small changes are enough:

  • Brown mushrooms harder for deeper savoriness.
  • Use more black pepper than you normally would.
  • Finish with a small gloss of butter/ghee and a sprinkle of Parmesan.

The sauce ends up darker, nuttier and more savory without one perfume dominating the bowl.

Because the sauce is rich, a bitter green salad or simply dressed vegetables make a better counterpoint than another creamy side. Keep the plate fairly spare and let the mushrooms do the work.

Mushroom Masala & Ricotta Ravioli Filling

Mushrooms can look ready while they are still steaming out water. Keep cooking until the pan stops looking wet and the chopped mushrooms begin to brown; only then cool them completely before folding in the ricotta.
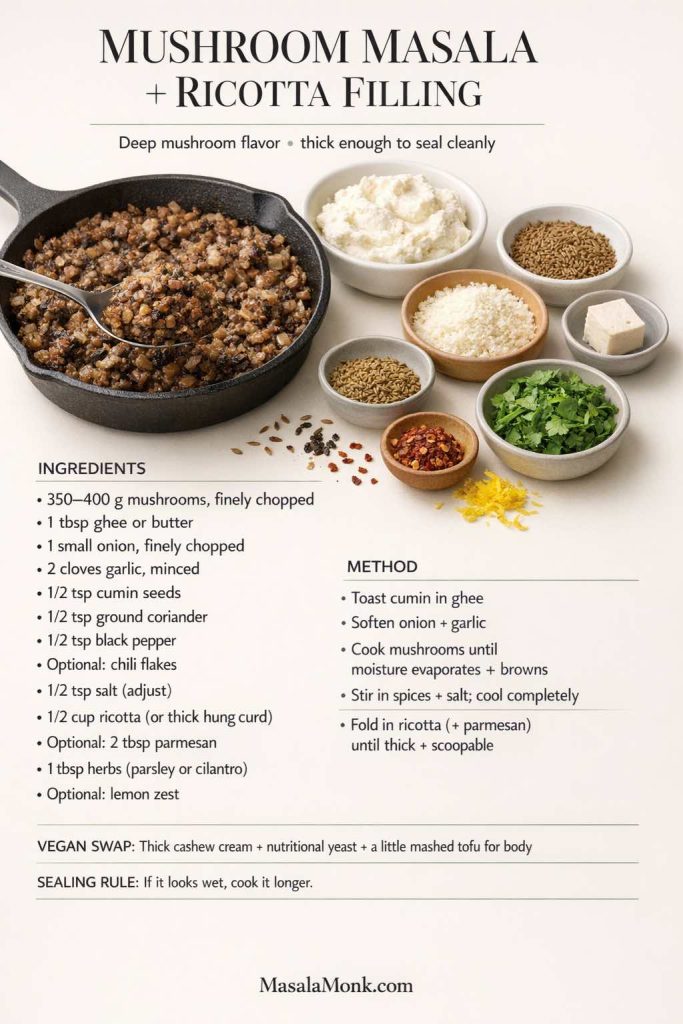
Mushroom masala and ricotta filling card with dry-cooked mushrooms and a thick, scoopable finished texture.
The pan should look nearly dry before the ricotta goes in. Cool the mushrooms completely, then fold in the cheese until a spoonful holds its shape.

Ingredients

  • 350–400 g mushrooms, finely chopped (a mix is best, but even one type works)
  • 1 tbsp ghee or butter
  • 1 small onion, finely chopped
  • 2 cloves garlic, minced
  • 1/2 tsp cumin seeds
  • 1/2 tsp ground coriander
  • 1/2 tsp black pepper
  • 1/4 tsp chili flakes (optional)
  • 1/2 tsp salt (adjust)
  • 1/2 cup ricotta (or thick hung curd; ricotta is classic)
  • 2 tbsp grated Parmesan (optional, but helps structure)
  • 1 tbsp chopped herbs (parsley or cilantro—either works)
  • 1 tsp lemon zest (optional)

Method

  1. Heat ghee, toast cumin seeds briefly.
  2. Add onion, cook until translucent, then add garlic.
  3. Add mushrooms and cook until moisture evaporates and the mixture browns.
  4. Stir in spices and salt, cook another minute.
  5. Cool completely.
  6. Fold in ricotta and Parmesan; mix until thick and scoopable.

Vegan option: use thick cashew cream, a spoonful of nutritional yeast and a little mashed tofu. Add them after the mushrooms cool, and stop as soon as the filling holds its shape.

Pair the filling with the mushroom malai sauce for a deep, earthy plate, or use a lighter butter-and-pepper finish when you want the filling to stand out more.

Twist 3: Lobster Ravioli with Butter-Garlic Cream & Curry Leaves

Lobster and crab ravioli need a lighter hand than meat or mushroom fillings. The seafood is delicate, the filling is usually already rich, and a heavy sauce can flatten both. Butter, garlic, cream and lemon make a familiar base; the Indian turn comes from a small curry-leaf and Kashmiri-chili tadka at the end.
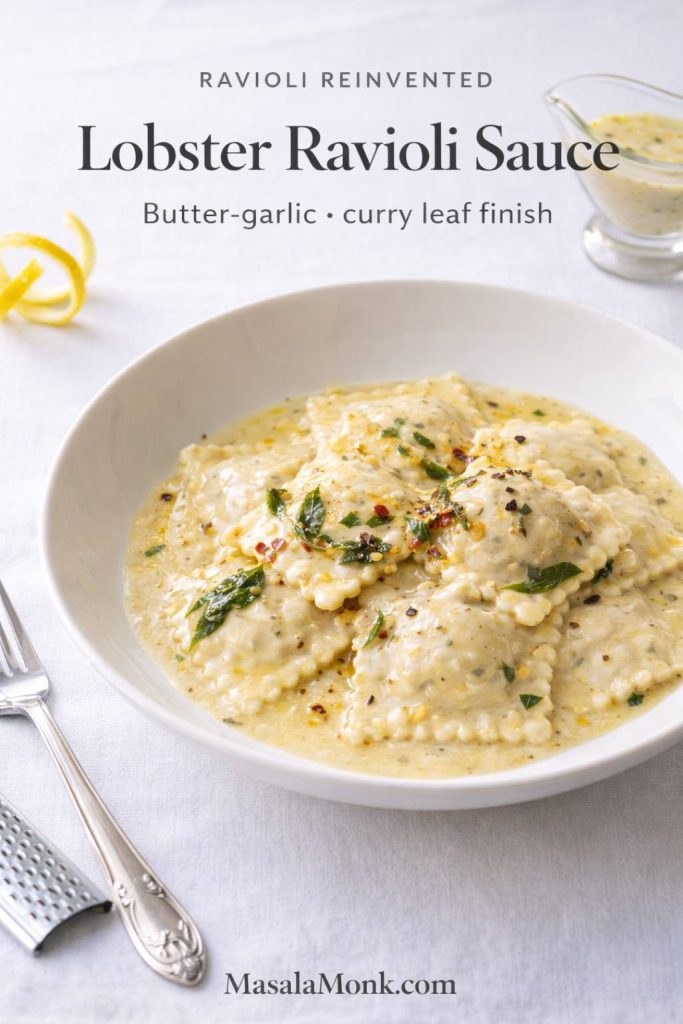
Lobster ravioli in loose butter-garlic cream with curry leaves, Kashmiri chili, black pepper and lemon.
Keep the cream sauce fluid enough to move when the pan tilts. Lemon lifts the seafood; the curry-leaf tadka belongs at the very end so its aroma stays vivid.

Keep the garlic pale; browned garlic becomes too assertive here. Use pasta water to loosen the cream until the sauce moves around the ravioli when the pan tilts instead of hiding the filling.

Butter-Garlic Cream Sauce for Lobster Ravioli

This sauce is deliberately short: butter, garlic, cream, pasta water, lemon and black pepper.

Ingredients

  • 2 tbsp butter (or ghee)
  • 2 cloves garlic, minced
  • 1/2 cup cream
  • Lemon zest + a squeeze of lemon
  • Black pepper
  • A splash of pasta water

Method

  1. Melt butter, sauté garlic gently (don’t brown it aggressively).
  2. Stir in cream and a splash of pasta water.
  3. Simmer until slightly thick and glossy.
  4. Finish with lemon and pepper.

Make the tadka separately so the curry leaves stay crisp and aromatic.
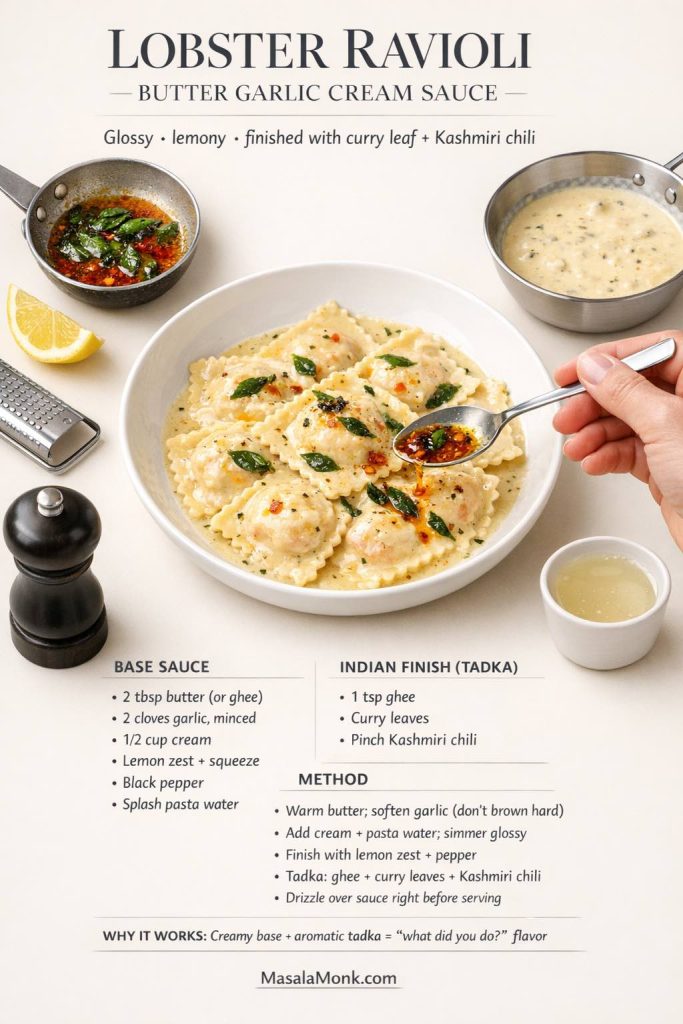
Lobster ravioli sauce card with butter, garlic, cream, pasta water, lemon and curry-leaf chili tadka.
Pale garlic gives a softer base than browned garlic here. Loosen the cream with pasta water, finish with lemon, then spoon the tadka over just before serving.

Curry Leaf & Kashmiri Chili Tadka

In a separate small pan:

  • Warm 1 tsp ghee.
  • Add a handful of curry leaves (they crackle instantly).
  • Add a pinch of Kashmiri chili.

Drizzle the tadka over the plated ravioli at the last moment. Simmering it into the cream dulls the curry-leaf aroma; the hot ghee should stay distinct while the chili adds color and mild warmth.

If you are preparing the seafood filling from scratch, keep cooked lobster or crab cold until you mix the filling and refrigerate shaped ravioli promptly. FoodSafety.gov’s fish and shellfish guidance is the external safety reference used for this section.

How to Balance a Butter-Garlic Ravioli Sauce

Butter and cream can make seafood ravioli taste dull if there is no acidity. Add lemon zest first, then a small squeeze of juice after the pan comes off the heat. Black pepper gives the sauce bite; pasta water keeps the fat and cream from feeling greasy.

The same base also works with cheese or spinach ravioli, although the curry-leaf tadka is especially good with lobster and crab.

Lobster or Crab Ravioli Filling

For homemade seafood ravioli, chop the cooked lobster or crab finely enough that the filling can be portioned cleanly. Ricotta or cream cheese binds the pieces and reduces free liquid; the short chill makes the mixture easier to seal.
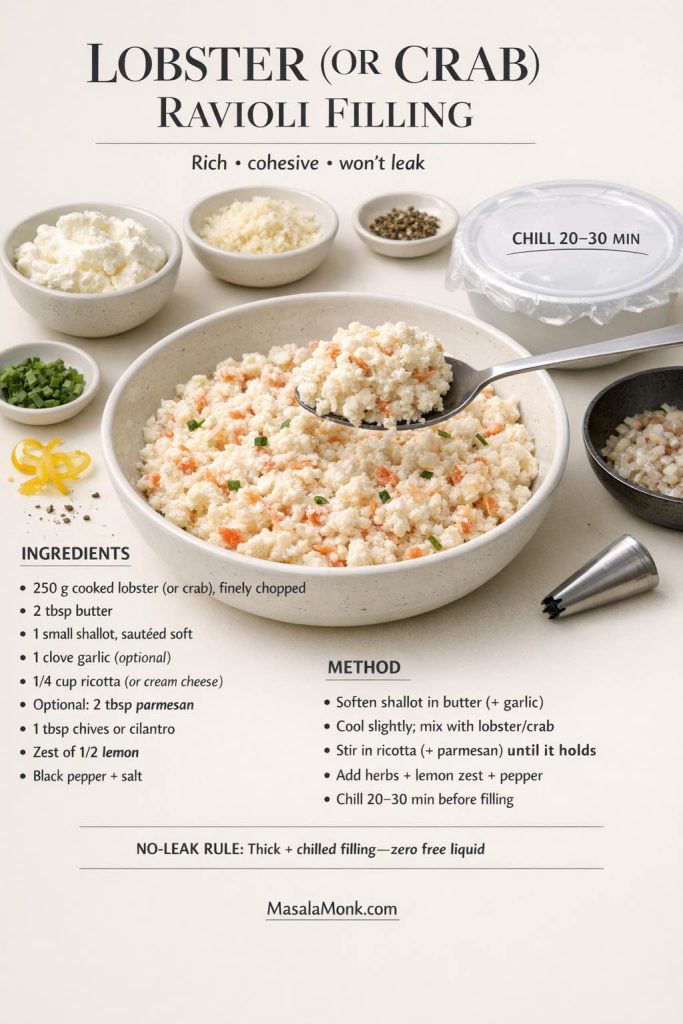
Lobster or crab ravioli filling card with shallot, ricotta or cream cheese, herbs, lemon zest and chilling.
Finely chopped seafood plus a little soft cheese makes a cohesive center. Chill the mixture for 20–30 minutes so it portions cleanly and stays away from the seams.

Ingredients

  • 250 g cooked lobster meat (or crabmeat), finely chopped
  • 2 tbsp butter
  • 1 small shallot (or very finely chopped onion), sautéed until soft
  • 1 clove garlic, minced (optional)
  • 1/4 cup ricotta (or cream cheese for a firmer set)
  • 2 tbsp grated Parmesan (optional)
  • 1 tbsp chopped chives or cilantro
  • Zest of 1/2 lemon
  • Black pepper
  • Salt to taste

Method

  1. Sauté shallot in butter until soft; add garlic briefly if using.
  2. Cool slightly, then combine with chopped lobster/crab.
  3. Stir in ricotta and Parmesan until the mixture holds together.
  4. Add herbs, lemon zest, pepper, and salt.
  5. Chill 20–30 minutes so it firms up before filling.

Texture check: the chilled filling should hold on a teaspoon without dripping. If it looks loose, chill it longer before adding more cheese or binder.

Pair it with the butter-garlic cream sauce for the lightest treatment, or move to the tomato-cream sauce below for more acidity.

Twist 4: Makhani-Style Tomato-Cream Sauce for Ravioli

The tomato base should look dark and concentrated before the cream ever goes in. Cream then turns it glossy without washing out the tang, while kasuri methi arrives as a dry, savory aroma at the end; use garam masala only as a tiny background note.
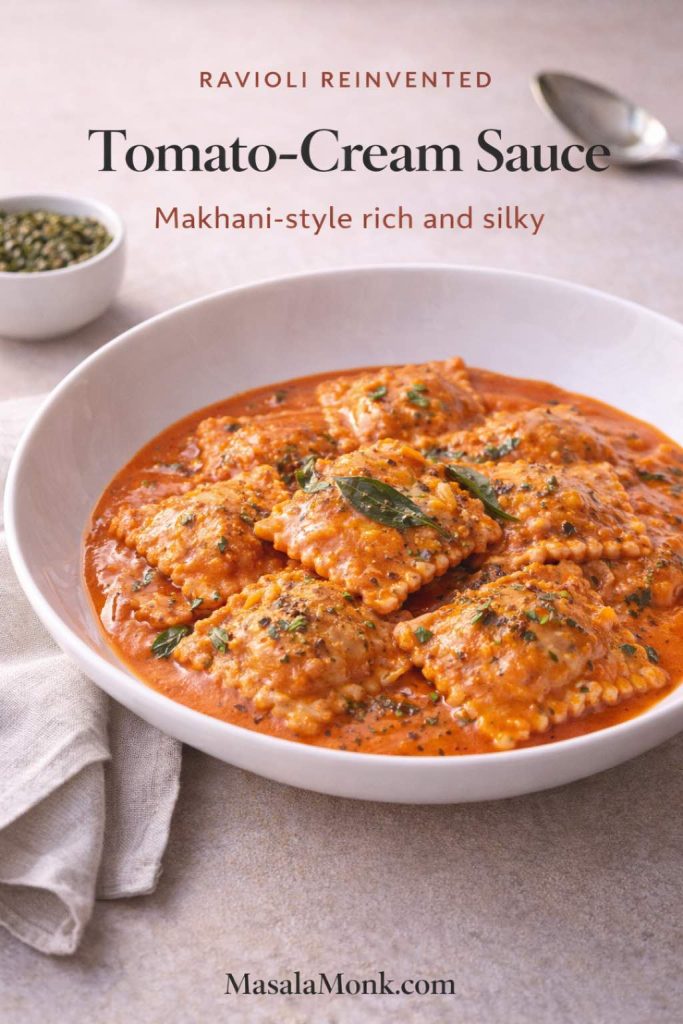
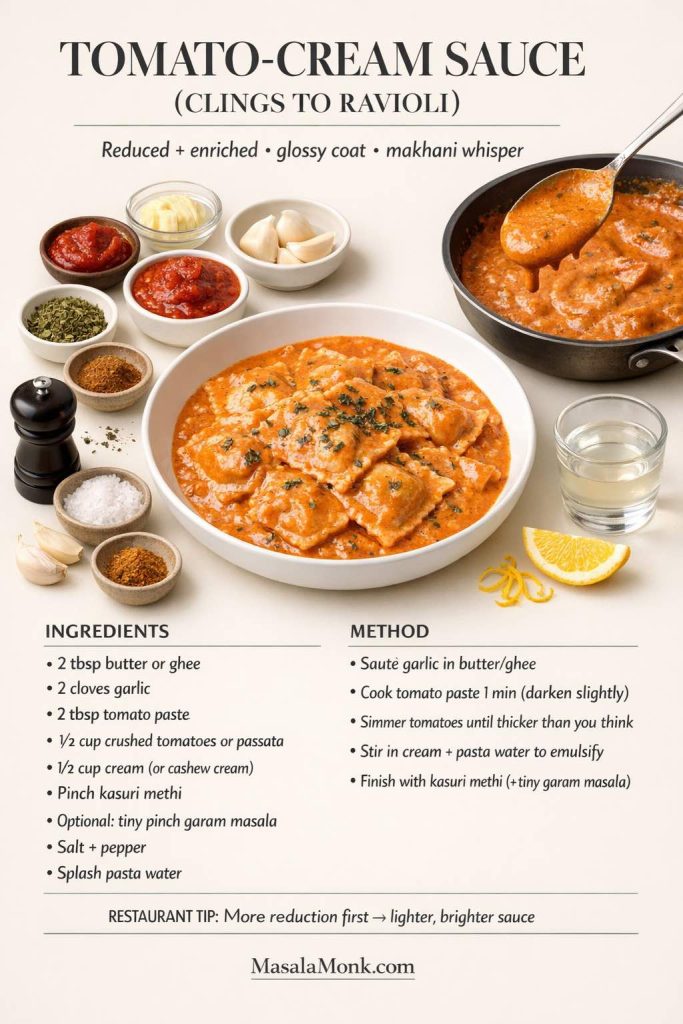
Ravioli in tomato-cream sauce with butter, cream, kasuri methi and a restrained garam masala finish.
Reduce the tomato base first; cream should enrich it, not rescue a watery sauce. Kasuri methi and garam masala belong in small amounts so tomato remains the lead flavor.

Tomato-Cream Sauce That Clings to Ravioli

A ravioli sauce should leave a thin coating on the pasta when you lift it from the pan. If tomato liquid runs straight back to the bottom, reduce it longer before adding cream.

Ingredients

  • 2 tbsp butter or ghee
  • 2 cloves garlic
  • 2 tbsp tomato paste
  • 1/2 cup crushed tomatoes or passata
  • 1/2 cup cream (or cashew cream)
  • Pinch of kasuri methi
  • Pinch of garam masala (optional, keep it light)
  • Salt, pepper
  • Pasta water
Tomato-cream ravioli sauce card with tomato paste, crushed tomato, cream, pasta water and kasuri methi.
Cling comes from reduction. Cook the tomato base until concentrated, stir in cream, and add pasta water only when the sauce needs loosening.

Method

  1. Heat butter/ghee, sauté garlic.
  2. Add tomato paste and cook it for a minute until it darkens slightly.
  3. Add crushed tomatoes; simmer until thicker than you think it needs to be.
  4. Add cream/cashew cream and a splash of pasta water to emulsify.
  5. Finish with kasuri methi and, optionally, a tiny pinch of garam masala for a more distinctly makhani finish.

Use it with lobster, crab, cheese or meat-filled ravioli. A brighter homemade tomato base also works here; our fresh tomato sauce guide explains how to reduce tomatoes without losing their clean flavor.

Keep Tomato-Cream Sauce Rich but Balanced

When the sauce tastes heavy, adjust the edges before changing the whole recipe:

  • lemon zest
  • black pepper
  • a hint of heat
  • or simply more reduction before adding cream

Taste again after each adjustment. Often a little acid or pepper is enough to make the tomato and cream feel separate and clear rather than muddy.

For a dairy-free version, cashew cream gives the sauce body without introducing a strong coconut flavor. Add it after the tomato has reduced and keep the heat gentle once it is in the pan.

Keema Ravioli Filling

Keema makes a naturally good ravioli filling because minced meat can be cooked down until dry, finely textured and intensely seasoned. The important part is evaporating the tomato and meat juices before the mixture cools.

Yield: enough filling for roughly 24–30 standard ravioli.
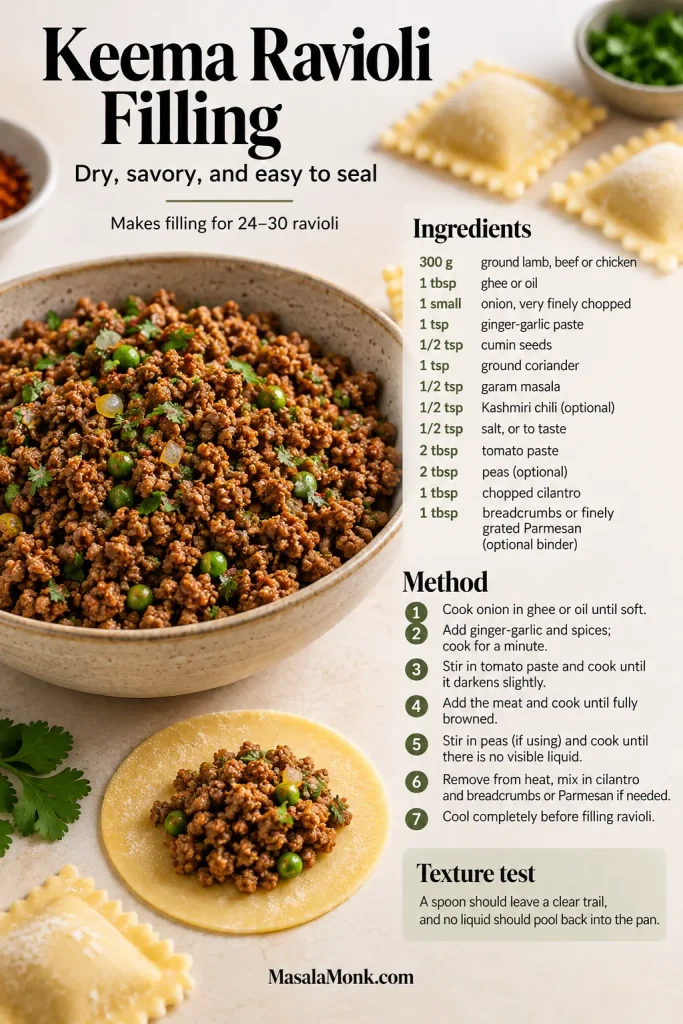
Keema ravioli filling guide with dry spiced minced meat, filled ravioli wrappers, ingredients, method and texture check.
Cook the keema until a spoon leaves a clear trail and no liquid pools back into the pan. Cool it completely before filling so the ravioli seals cleanly.

Ingredients

  • 300 g ground meat (lamb, beef, or chicken)
  • 1 tbsp ghee or oil
  • 1 small onion, very finely chopped
  • 1 tsp ginger-garlic paste (or minced ginger + garlic)
  • 1/2 tsp cumin seeds
  • 1 tsp ground coriander
  • 1/2 tsp garam masala
  • 1/2 tsp Kashmiri chili (optional)
  • 1/2 tsp salt (adjust)
  • 2 tbsp tomato paste (or finely chopped tomato cooked down)
  • 2 tbsp peas (optional, classic keema touch)
  • 1 tbsp chopped cilantro
  • 1 tbsp breadcrumbs or finely grated Parmesan (optional binder)

Method

  1. Heat ghee, toast cumin seeds.
  2. Add onion, cook until golden.
  3. Add ginger-garlic, cook until fragrant.
  4. Add meat, break it up, cook until browned.
  5. Stir in spices, salt, and tomato paste; cook until the mixture looks dry and cohesive.
  6. Add peas if using; cook briefly.
  7. Cool completely; fold in cilantro and a binder if needed.

Texture check: drag a spoon through the pan. The path should stay visible and no liquid should run back into it. If the keema is dry but too crumbly, bind it with a spoonful of ricotta, cream or finely grated Parmesan.

Two sauces work particularly well:

  • butter-garlic cream with curry leaf tempering for a luxurious feel, or
  • tomato-cream makhani style for a warmer, more tomato-forward finish.

Twist 5: Toasted Ravioli with Chutney Dips

Toasted ravioli changes the texture completely: the wrapper becomes crisp, the filling stays soft, and suddenly a pasta dinner can be eaten with your fingers. Cheese, meat and mushroom fillings all work; very delicate seafood ravioli is better saved for a sauce.
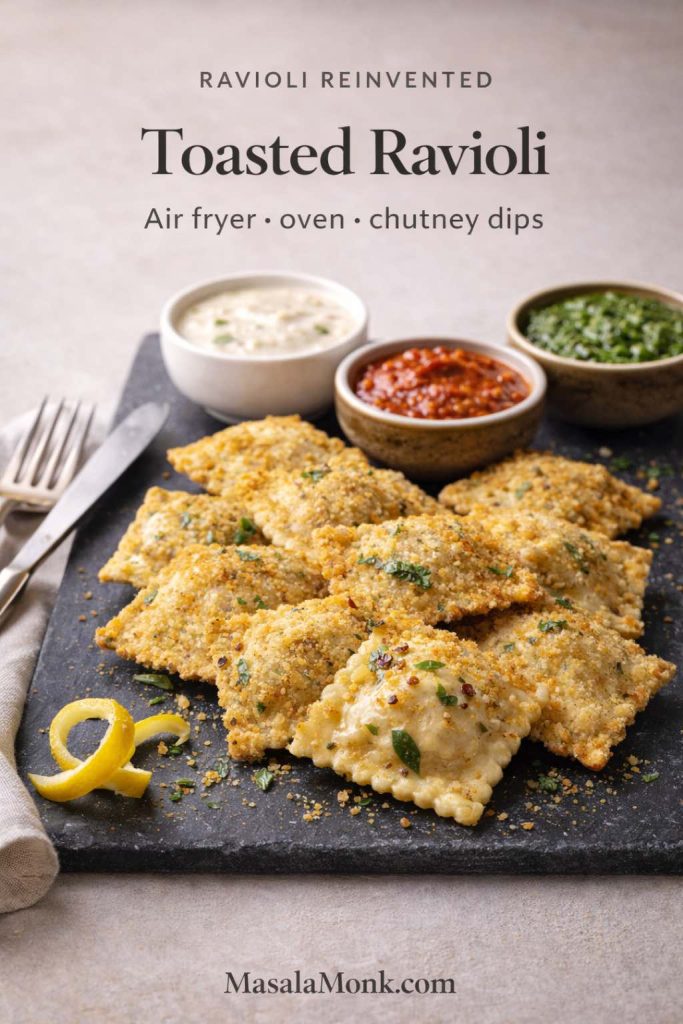
Crisp toasted ravioli served with coconut chutney, kara chutney and thecha.
The dips work because they do different jobs: coconut cools, kara chutney brings roasted chili depth, and thecha adds sharp garlic heat. Two contrasting dips are usually enough.

Marinara still works, but chutneys are what make this feel different from a standard toasted-ravioli plate; the detailed dip pairings come later.

For one batch

  • 450 g / 1 lb ravioli (cheese, meat or mushroom; refrigerated or frozen)
  • 1 tbsp neutral oil or cooking spray, plus more as needed
  • 1 large egg, beaten (optional, for breading)
  • 1 cup breadcrumbs or panko (optional, for breading)
  • Coconut chutney, kara chutney, thecha or marinara, for serving

For meat-filled ravioli, follow the package directions and make sure the filling is fully cooked before serving. The times below are crisping ranges; they are not a substitute for safely cooking a raw meat filling.

Air-Fryer Toasted Ravioli

Refrigerated ravioli is easiest to bread because the surface is pliable. Frozen ravioli can work too; if the coating will not adhere while it is rock-hard, thaw it only long enough to become easy to handle. Ravioli size and package directions still take priority.

Method

  1. For a breaded crust, dip the ravioli in beaten egg, coat in breadcrumbs or panko and mist lightly with oil. For an unbreaded version, toss the ravioli with a thin film of oil.
  2. Air fry in a single layer at 390°F / 200°C for 6–10 minutes, flipping halfway. Start checking at 6 minutes.
  3. Remove the ravioli when the edges are deep golden and the shell feels crisp; serve while the coating is still dry and crunchy.

Air fryers vary in fan strength and basket size, so the range matters more than one exact minute. Small refrigerated ravioli may finish near the lower end; larger or frozen pieces can take longer.

Oven-Baked Toasted Ravioli

Heat the oven to 425°F / 220°C. A rack over a sheet pan keeps hot air moving around both sides; without a rack, flip the ravioli halfway so the underside does not steam against the tray.

  1. Arrange breaded ravioli in a single layer on a lightly oiled rack or sheet pan and mist the tops with oil.
  2. Bake for 10–15 minutes, flipping halfway if the ravioli sits directly on the tray.
  3. Pull the tray when the crumb coating is dry, crisp and golden at the edges.

Quick comparison: toasted ravioli three ways. Air frying is the easiest small-batch option, the oven handles a tray with less fuss, and deep-frying gives the crispest shell.
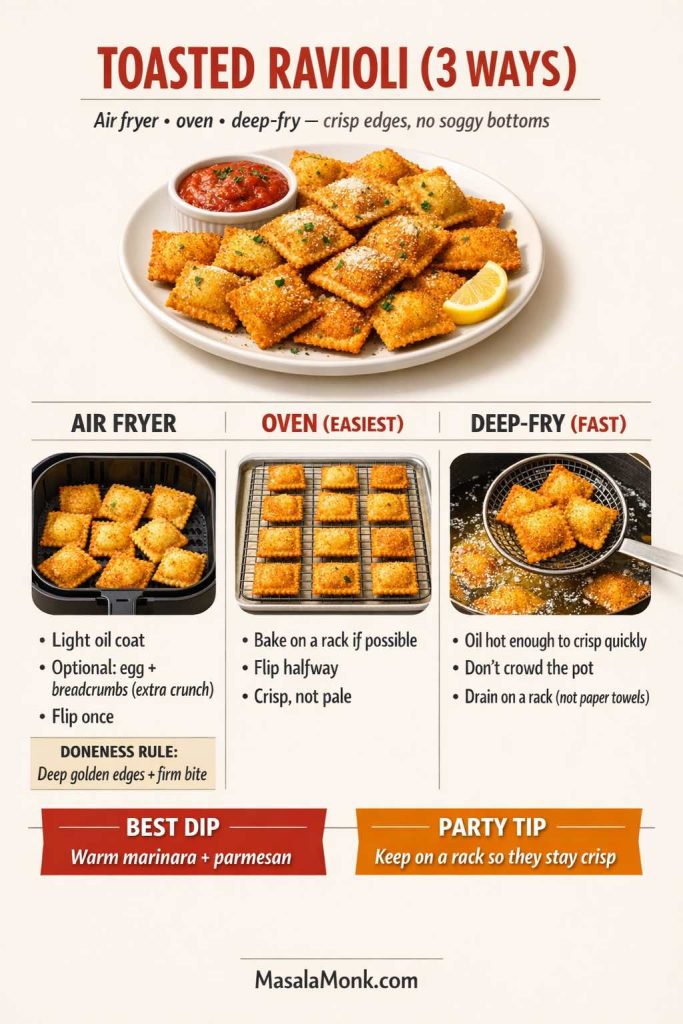
Comparison infographic for air-fried, oven-baked and deep-fried toasted ravioli.
For a starting point, air fry at 390°F / 200°C for 6–10 minutes, bake at 425°F / 220°C for 10–15 minutes, or deep-fry at 350°F / 175°C for about 2–4 minutes. Stop at deep-golden edges.

Deep-Fried Ravioli

Deep-frying gives the most even, brittle crust. Use a thermometer if you have one and give the oil time to return to temperature between batches; each new handful cools it quickly.

  1. Heat about 2 inches / 5 cm neutral oil to 350°F / 175°C.
  2. Fry in uncrowded batches for about 2–4 minutes, turning as needed, until the coating is evenly deep golden.
  3. Lift to a wire rack and let the oil return to 350°F / 175°C before adding the next batch.

The rack matters because steam can escape from underneath; a flat paper-lined plate softens the crust more quickly.

Chutney Dips for Toasted Ravioli

Choose dips with different jobs—one cool, one tangy or roasted, and one hot:

  • For cool, creamy contrast: South Indian coconut chutney, especially with cheese or spinach ravioli.
  • For roasted chili and tomato depth: kara chutney.
  • For sharper garlic heat: thecha; serve a smaller spoonful because it can dominate a mild filling.

A platter works best when one dip cools, one brings acidity and one brings heat. That gives each bite somewhere different to go without burying the ravioli.

Palak-Paneer Ravioli Filling

Palak-paneer filling works because both components help with structure: squeezed spinach loses the water that causes leaks, while crumbly paneer absorbs moisture and keeps the center tender.

Yield: enough filling for roughly 24–30 standard ravioli.
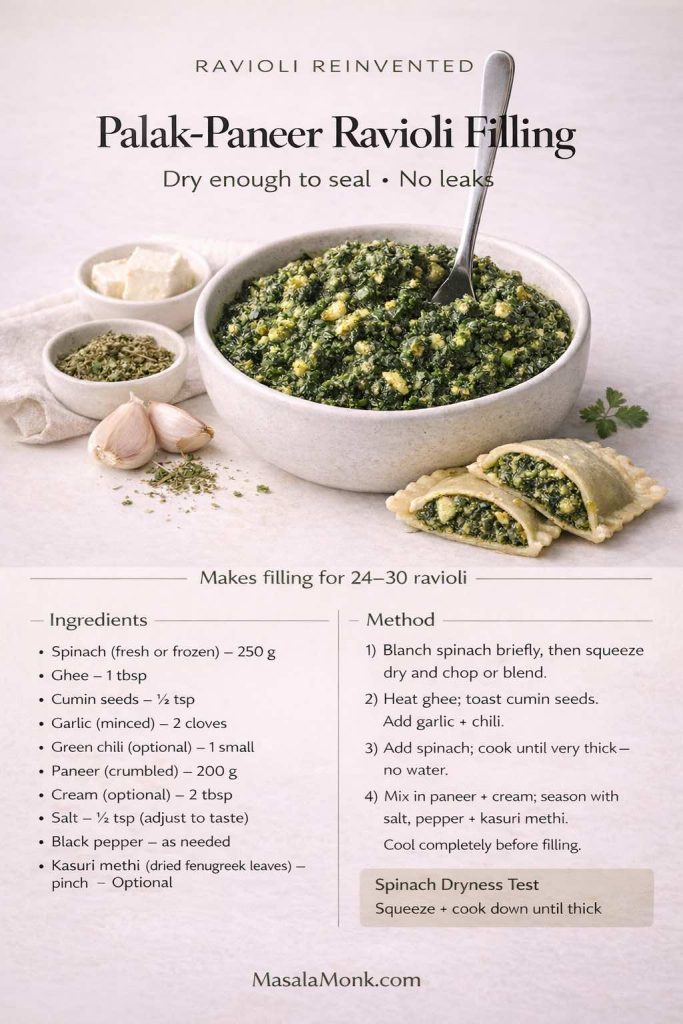
Palak-paneer ravioli filling card with squeezed spinach, paneer, cumin, garlic, chili, cream and kasuri methi.
Squeeze the spinach before it ever reaches the pan, then cook until no water remains. Paneer gives the filling body without making the center heavy.

Ingredients

  • 250 g spinach (fresh or frozen)
  • 1 tbsp ghee
  • 1/2 tsp cumin seeds
  • 2 cloves garlic, minced
  • 1 small green chili (optional, adjust)
  • 200 g paneer, crumbled finely
  • 2 tbsp cream (optional, for richness; use only if the filling remains thick)
  • 1/2 tsp salt (adjust)
  • Black pepper
  • Optional: pinch of kasuri methi

Method

  1. Blanch spinach quickly, squeeze out moisture, then chop finely or blend.
  2. Heat ghee, toast cumin seeds, add garlic and chili.
  3. Add spinach and cook until thick and not watery.
  4. Mix in paneer, salt, pepper and kasuri methi. Add cream only if wanted and the filling is still thick enough to hold its shape.
  5. Cool completely before filling ravioli.

Squeezed spinach and crumbly paneer leave very little free liquid, which is why this filling seals so reliably. For softer homemade paneer, our homemade paneer guide explains how pressing time changes the texture.

It also holds up well in the baked ravioli casserole later in the post because the filling remains cohesive under longer heat.

↑ Back to Ravioli Recipe Contents


Ravioli Variations: Keto, Low-Carb, Vegan & Gluten-Free

Ravioli is a three-part construction: wrapper, filling and sauce. Change one of those and the other two need to carry a little more of the texture or flavor. That is the useful way to think about keto, vegan and gluten-free versions.

Keto Ravioli with a Cheese Wrapper

With a mozzarella wrapper, the filling has to do more of the structural work. Keep it compact and fairly dry, and work while the cheese is just pliable enough to fold without cracking.
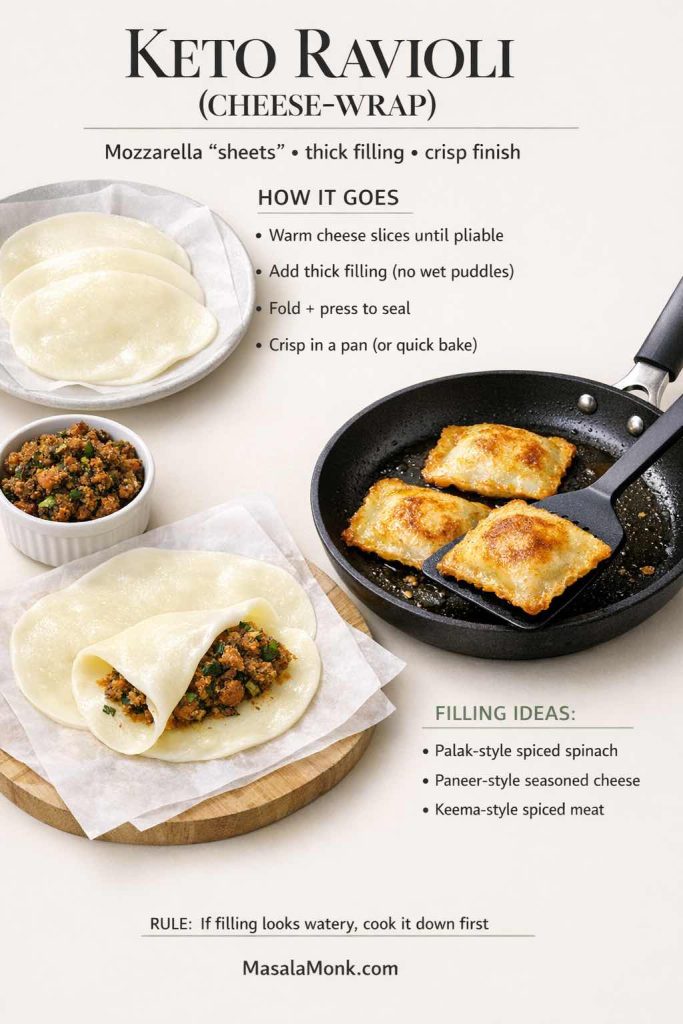
Keto ravioli card using warmed mozzarella slices as wrappers for thick spinach, paneer or keema-style fillings.
Look for flexibility, not a full melt: the mozzarella should bend around a thick filling without cracking before you seal and crisp it.

How it goes

  • Use thin mozzarella slices as “sheets.”
  • Warm until pliable.
  • Add a thick filling, fold, and seal.
  • Crisp lightly in a pan or bake briefly.

Thick, strongly seasoned fillings work best:

  • palak-style spiced spinach
  • paneer-style seasoned cheese
  • keema-style spiced meat

A Lower-Carb Ravioli Plate

If you are lowering carbs without replacing the pasta wrapper, treat ravioli as a smaller part of the plate:

  • choose a richer sauce (butter-garlic cream, mushroom malai, tomato-cream)
  • add protein and vegetables on the side
  • serve fewer ravioli, but make each bite count

Vegan Ravioli Filling Ideas

Vegan fillings are easiest to seal when they are naturally thick:

  • lentil filling (dal-style, reduced until thick)
  • spiced mushroom-onion filling
  • coconut vegetable filling with mustard seeds and curry leaves

Pair lentil or mushroom fillings with tomato sauce for contrast, or use a coconut-based sauce when you want a softer, rounder finish.

Gluten-Free Ravioli

Gluten-free ravioli is more sensitive to hydration and handling than the egg dough above. Use a gluten-free pasta dough or wrapper formula designed for filled pasta rather than simply swapping flour cup-for-cup, then keep the filling thick and the simmer gentle.

The mechanics do not change: clean border, modest filling, trapped air pressed out, firm seal. Use the same sealing checklist and handle the gluten-free wrapper with less stretching.

Vegan Red Lentil Dal Ravioli Filling

Red lentils are unusually well suited to ravioli because they become cohesive as they cook down. The filling should mound on a spoon; if it spreads, keep reducing it.

Ingredients

  • 1 cup red lentils
  • 2 1/2 cups water
  • 1 tbsp oil
  • 1/2 tsp cumin seeds
  • 1 small onion, finely chopped
  • 1 tsp ginger-garlic paste
  • 1 tsp ground coriander
  • 1/2 tsp turmeric
  • 1/2 tsp salt (adjust)
  • Lemon juice
  • Chopped cilantro
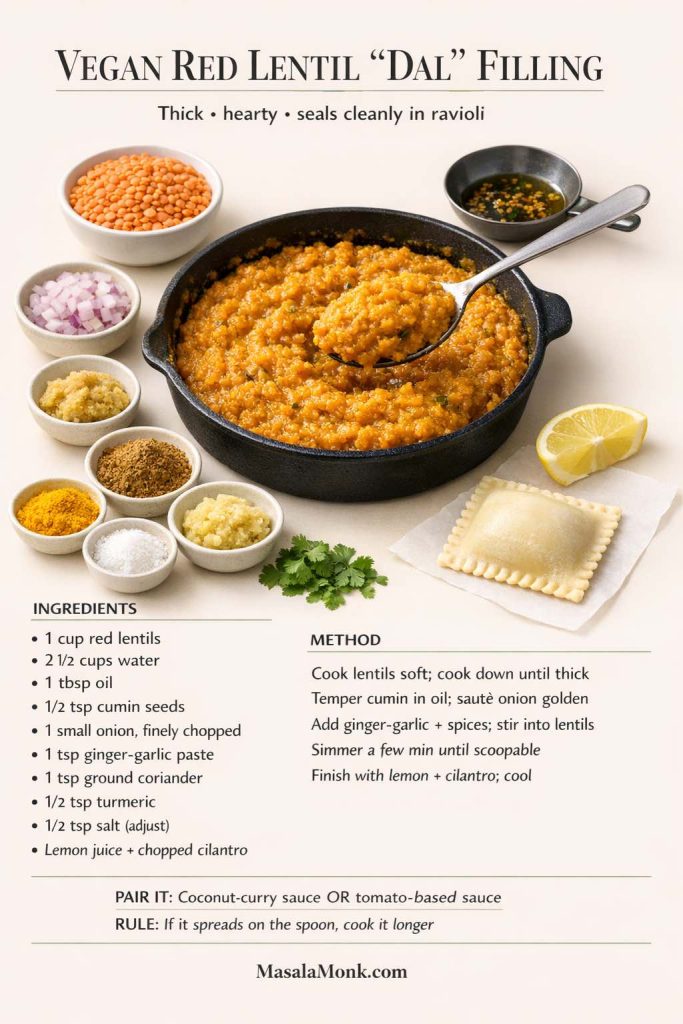
Vegan red-lentil ravioli filling card with cumin, onion, ginger-garlic, spices, lemon and cilantro.
Cook the lentils past soft until they hold a mound on the spoon. Once cool, the filling should be easy to portion without spreading toward the dough edge.

Method

  1. Cook lentils until soft; then cook down until thick.
  2. In a separate pan, temper cumin in oil, sauté onion until golden.
  3. Add ginger-garlic and spices, then stir into lentils.
  4. Cook another few minutes until the mixture is scoopable.
  5. Finish with lemon and cilantro, then cool.

Use a tomato-based sauce for acidity or a coconut-based sauce for a softer finish. Let the lentils provide the body rather than trying to mimic cheese.


How to Match Ravioli with the Right Sauce

There is no single best sauce because the filling has already done half the seasoning. Ask what it needs next: sweet squash likes nutty fat and acid, mushrooms like pepper and restrained cream, seafood wants brightness, and mild cheese is flexible.
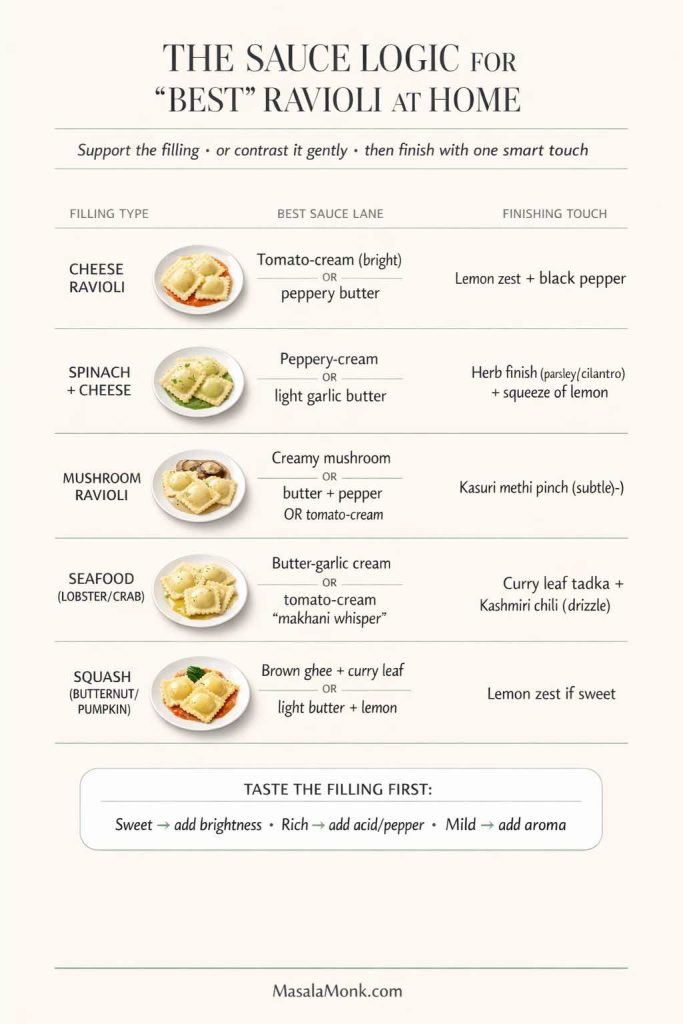
Decision chart matching cheese, spinach-cheese, mushroom, seafood and squash ravioli with compatible sauces.
Use the chart as a troubleshooting shortcut: sweet fillings often need acidity, earthy ones like pepper, and seafood usually benefits from the lightest finish.

Sauces for Cheese Ravioli

Mild cheese fillings are flexible. Good options include:

  • tomato-cream sauce with a little brightness
  • butter sauce with black pepper and lemon zest
  • a thin drizzle of spiced ghee for an Indian accent without changing the whole dish

Cheese ravioli is also one of the easiest choices for toasting because the filling usually stays stable while the wrapper crisps.

Sauces for Spinach & Cheese Ravioli

Spinach-and-cheese ravioli usually needs pepper, acid or garlic more than extra richness:

  • cream sauce that’s peppery and not too thick
  • a light garlic butter sauce
  • or a spinach-forward sauce that feels palak-inspired

If the bowl tastes flat, add black pepper and a little lemon before adding more cheese or cream.

Sauces for Mushroom Ravioli

Mushroom ravioli can go rich or spare:

Sauces for Seafood Ravioli

For lobster or crab fillings, keep the sauce bright:

  • butter-garlic cream with curry leaf tadka
  • tomato-cream makhani style for a richer, warmer finish

Sauces for Squash Ravioli

For butternut or pumpkin fillings, balance the sweetness:

Taste the filling before deciding on the finish. Sweet fillings need brightness, rich fillings need acid or pepper, and mild fillings benefit from aroma. That small check prevents most sauce mismatches.

↑ Back to Ravioli Recipe Contents

Build a Ravioli Dinner Without Overthinking It

Once the ravioli and sauce are decided, the rest of dinner should get simpler. Rich or creamy bowls benefit from something sharp and green; crisp ravioli can stand on its own as a snack; and a crowd is usually easier to feed with a baked or slow-cooker version than with individual plates.
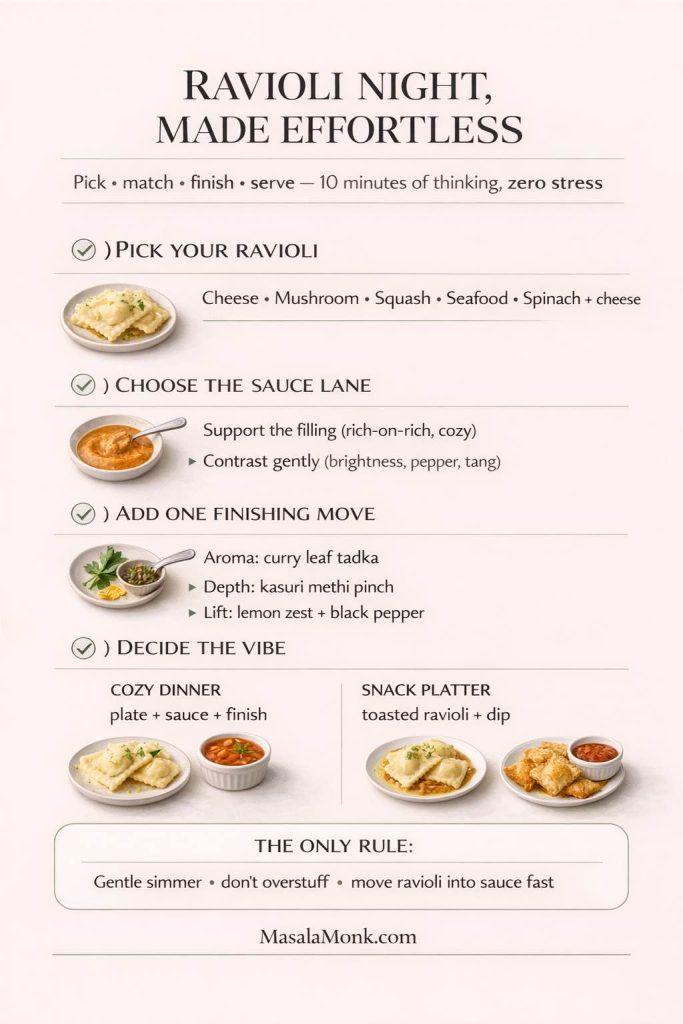
Ravioli dinner planning infographic: choose filling, sauce, one finishing accent, then plated or snack style.
Use the graphic as a stop rule, not a shopping list: choose the filling, sauce and one finishing accent, then decide whether the meal needs a side at all.

Toasted ravioli with two contrasting chutneys is enough for a snack plate. Mushroom ravioli with the malai-style sauce needs little more than a bitter salad or green vegetable; squash or lobster ravioli can take a lemony salad when the sauce is rich.

When the job is feeding more people, move away from individual plating. The baked casserole and slow-cooker versions below trade delicacy for convenience and are much easier to serve at the table.


Baked Ravioli Casserole

Baked ravioli uses the filled pasta as both noodle and filling layer, which is why it comes together faster than lasagna. Frozen cheese or meat ravioli is the most forgiving choice. Keep the sauce thick enough to coat the layers, cover for most of the bake, then uncover only long enough to brown the top.

Baked ravioli casserole with tomato sauce and melted cheese, a spoon lifting a cheesy portion.
This is the crowd-friendly branch of ravioli night: assemble it earlier, refrigerate, then bake when you need it. Because each ravioli already carries a filling, the casserole stays simpler than lasagna.

Baked Ravioli Casserole Recipe

Ingredients

  • 1 to 1.5 kg ravioli (frozen or refrigerated)
  • 3–4 cups sauce (choose one below)
  • 2 cups shredded mozzarella (or a mix of mozzarella + cheddar)
  • 1/2 cup Parmesan (optional)
  • 1 tbsp butter or ghee (for greasing)
  • Optional: sautéed mushrooms, spinach, or cooked keema as an extra layer

Sauce options

  1. Tomato-cream makhani-style sauce: thick, glossy, clingy
  2. Mushroom malai sauce: rich and earthy
  3. Simple marinara-style tomato sauce finished with curry leaf tempering (lighter, still special)
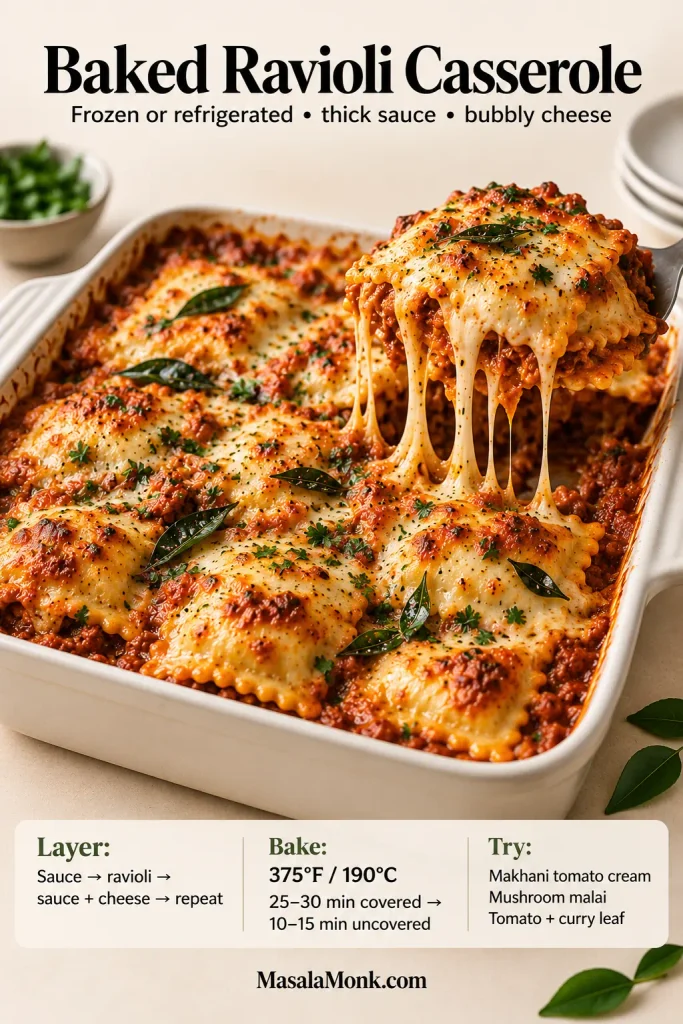
Baked ravioli casserole with thick tomato sauce, melted cheese and curry leaves, with a cheesy ravioli portion being lifted.
Layer sauce, ravioli, then sauce and cheese; repeat and bake at 375°F / 190°C. Keep the sauce thick so the casserole sets instead of turning soupy.

For meat-filled ravioli, use commercially prepared ravioli whose package directions allow this baking method, or make sure a homemade meat filling is fully cooked. The casserole times below are baking ranges, not a substitute for safely cooking a raw meat filling.

Method

  1. Heat oven to 190°C / 375°F.
  2. Grease a baking dish with butter/ghee.
  3. Add a thin layer of sauce.
  4. Layer ravioli in a single layer.
  5. Spoon sauce over, then add cheese.
  6. Repeat layers until you’re done, finishing with sauce and cheese.
  7. Cover with foil and bake 25–30 minutes.
  8. Uncover and bake another 10–15 minutes until bubbly and browned.

Make ahead: assemble the casserole earlier in the day, cover and refrigerate it, then bake when needed. A chilled casserole may take a little longer; use a hot, bubbling center and browned top as the final cues.

Each ravioli already contains a filling, so the casserole does not need a separate ricotta layer. For a fuller bake, add one thin layer of keema or browned mushrooms between the ravioli; too many extras make the layers heavy and wet.

Finish after baking, not before: a spoonful of curry-leaf ghee keeps its aroma, while crushed kasuri methi gives a tomato-cream casserole a drier, savory edge. If baked pasta is the format you cook most often, our baked ziti guide goes deeper on saucy layers and preventing a dry bake.

Baking Lobster Ravioli

Lobster ravioli needs enough sauce to stay moist in the oven. Use:

  • a gentle tomato-cream sauce
  • or a butter-cream sauce with lemon

Do not chase a dark crust with seafood-filled ravioli. Bake only until the center is hot and the sauce bubbles; prolonged heat can make the lobster or crab filling firm and dry.

Crock Pot Ravioli / Slow Cooker Ravioli Lasagna

Slow-cooker ravioli is essentially a shortcut lasagna: frozen ravioli, thick sauce and cheese layered directly in the crock pot. It is less precise than boiling ravioli to order, but useful when the meal needs to hold for a group.
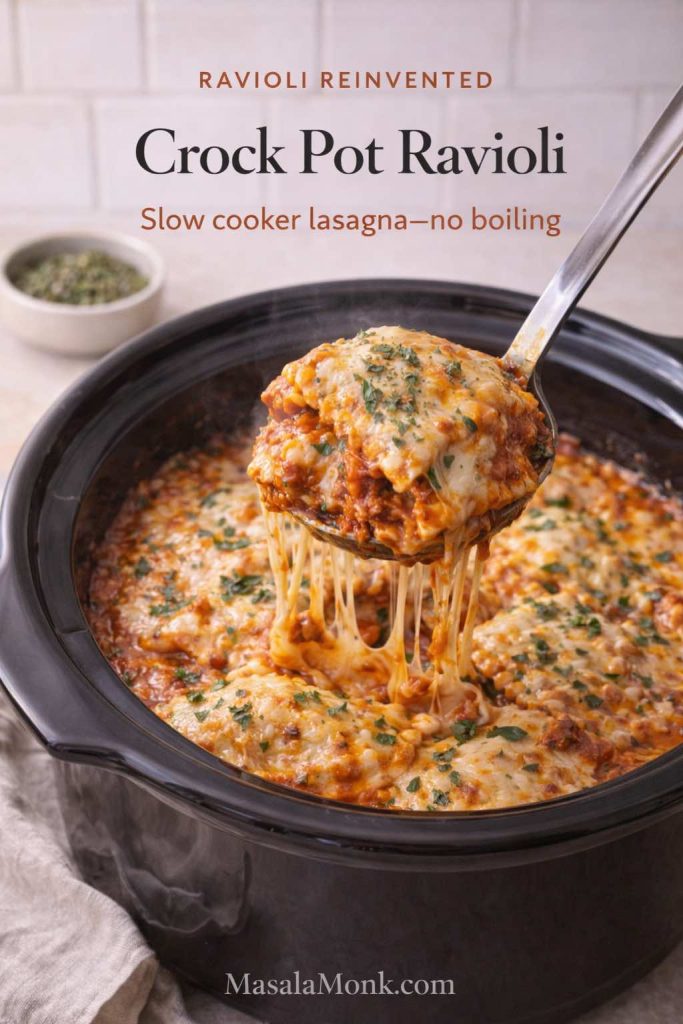
Slow-cooker ravioli lasagna with layers of sauce, ravioli and melted cheese.
A slow cooker traps more steam than an oven, so start with sauce that looks slightly too thick for stovetop pasta. That extra body helps the finished layers hold.

Crock Pot Ravioli Recipe

Ingredients

  • 1 kg frozen ravioli (cheese ravioli is the easiest starting point)
  • 4 cups sauce (thicker is better)
  • 2 cups shredded mozzarella
  • 1/2 cup Parmesan (optional)
  • Optional add-ins: cooked keema, sautéed mushrooms, spinach, or roasted vegetables

Method

  1. Lightly grease the slow cooker.
  2. Spread a thin layer of sauce on the bottom.
  3. Add a layer of frozen ravioli.
  4. Add sauce, then cheese.
  5. Repeat layers.
  6. Cook on LOW for 3–4 hours or HIGH for 1.5–2.5 hours, depending on your slow cooker.
  7. Let it sit 10–15 minutes before serving so it sets.

Use a thick sauce. The slow cooker traps steam, so a loose sauce becomes thinner as the ravioli cooks. Start thicker than you would for stovetop pasta and let the finished dish rest before serving.
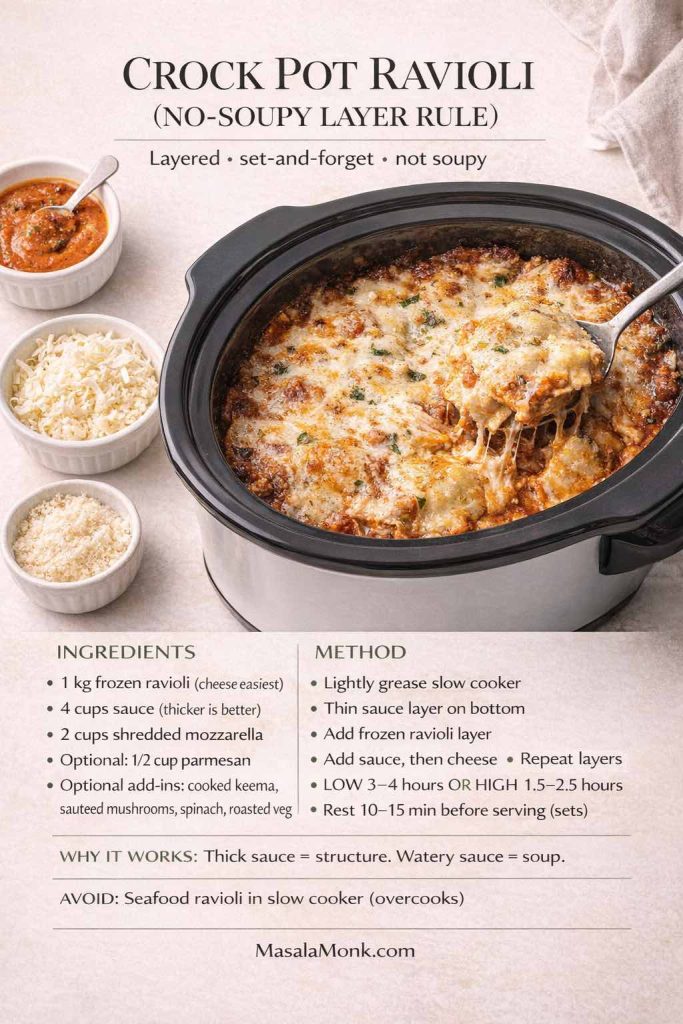
Slow-cooker ravioli card with frozen ravioli, thick tomato sauce, mozzarella, low/high times and resting guidance.
Layer sauce, frozen ravioli and cheese, then leave the finished dish alone for 10–15 minutes before serving. The rest is what turns bubbling layers into cleaner portions.

Indian-Inspired Slow Cooker Variations

  • Makhani-style: use the tomato-cream sauce and add a light kasuri methi finish at the end.
  • Keema ravioli lasagna: add the cooked keema filling as a thin layer between ravioli.
  • Palak-paneer: layer the spinach-paneer filling lightly between ravioli, or use spinach-and-cheese ravioli with a creamy sauce.

Skip seafood-filled ravioli in the slow cooker. Cheese, mushroom, spinach, squash and cooked-keema versions tolerate the longer holding time far better.

↑ Back to Ravioli Recipe Contents


Why These Indian-Inspired Ravioli Twists Work

These five combinations work because the Indian element answers something the ravioli already needs:

  • Curry leaves take over sage’s aromatic role with squash, while ghee keeps the nutty richness that sweet fillings already like.
  • Mushrooms can handle kasuri methi because both lean earthy; cream keeps the combination familiar rather than turning it into a heavy curry.
  • Lobster gets the tadka at the very end, so aroma arrives on top of the butter-garlic sauce without burying the seafood.
  • Tomato and cream already sit close to makhani territory; a little dried fenugreek nudges the sauce in that direction without changing its basic identity.
  • Crisp ravioli needs contrast more than another heavy sauce, which is why coconut chutney, kara chutney and thecha work so well beside it.

Use the same logic beyond these recipes: identify whether the filling is sweet, earthy, rich or mild; choose a sauce with the right weight; then add one Indian accent only where it improves aroma, acidity or texture.
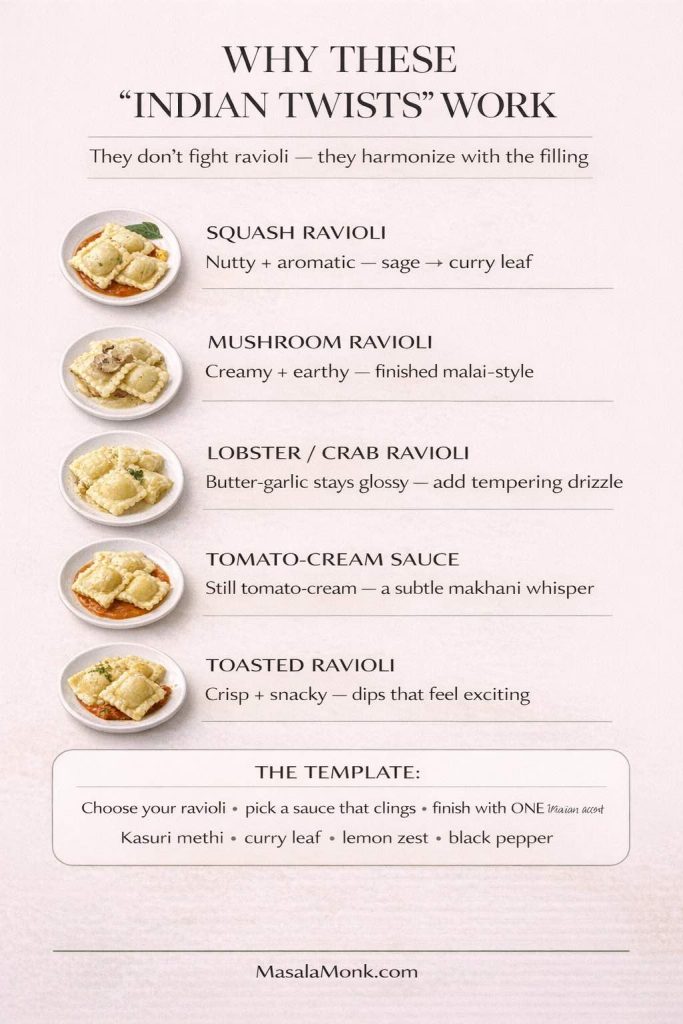
Infographic explaining the pairing logic behind five Indian-inspired ravioli variations.
The common thread is restraint: use the Indian accent to solve a flavor problem already on the plate—more aroma, more depth, more brightness or sharper contrast.

That restraint is what keeps the crossover coherent. Curry leaves take over the aromatic job sage often does with squash. Kasuri methi deepens cream without taking over the sauce, and chutneys sit beside crisp ravioli because contrast is the point. The pasta should still taste like ravioli when you are done.

Ravioli FAQs

The full methods live above; these are the few questions that still benefit from a quick answer.

Cooking & Timing

1) How do you cook ravioli so it doesn’t fall apart?

Use a wide pot and keep the water at a lively simmer, not a rolling boil. Stir once, then lift cooked ravioli with a slotted spoon straight into warm sauce. Handmade ravioli also depends on clean seams and pressed-out air; see How to Seal Ravioli Without Leaks.

Dough & Sealing

2) What flour is best for ravioli dough?

All-purpose flour works well in most kitchens, while Italian “00” flour can give a silkier sheet. A little semolina can add chew, but good kneading and enough rest matter more than chasing one perfect flour.

3) How thin should ravioli dough be?

Thin enough that you can see a faint shadow of your hand through the sheet, but sturdy enough to lift without stretching or tearing. Thick dough makes the seams bulky; paper-thin dough is more likely to split around the filling.

Sauces & Fillings

4) What is the best sauce for ravioli?

Match the sauce to the filling: cheese is flexible, mushroom likes pepper and restrained cream, squash likes nutty fat and acidity, and seafood benefits from butter and lemon. Use the ravioli sauce chart for a quick match.

5) What makes a good homemade ravioli filling?

Flavor matters, but texture decides whether the ravioli survives. A good filling is cool, thick and scoopable with no loose liquid. The squash-paneer, mushroom-ricotta, lobster, keema, palak-paneer and red-lentil fillings in this guide all follow that rule.

Serving & Leftovers

6) Is ravioli healthy?

It depends on the wrapper, filling, sauce and portion. For a lighter plate, choose a vegetable or lean-protein filling, use a less-heavy sauce and serve a modest ravioli portion with vegetables or salad.

7) What is the best way to reheat ravioli?

For sauced ravioli, warm it gently in a covered skillet with a spoonful of water or extra sauce. For toasted ravioli, use the oven or air fryer so the coating crisps again. Avoid high microwave heat for long stretches; filled pasta dries at the edges quickly.

8) How should cooked ravioli be stored?

Cool leftovers promptly, refrigerate them in a covered container and keep enough sauce with the pasta to prevent the wrapper drying out. Seafood-filled ravioli deserves extra care with chilling and reheating; use the FoodSafety.gov seafood guidance linked in the lobster section for handling details.


↑ Back to Ravioli Recipe Contents

Posted on — 9 Comments

Fish and Chips Reimagined: 5 Indian Twists (Recipe + Method)

Hands pull apart a crispy masala-battered fish fillet to reveal steaming white flakes, with thick chips and a bowl of green chutney dip on a dark background. Text overlay reads “5 Indian Twists – Fish & Chips – Crisp Masala Batter • Chutney Dips” and “MasalaMonk.com.”

There’s a reason fish and chips never really leaves the cultural conversation. It’s not just comfort food; it’s a texture ritual. You crack through a crisp shell, hit steamy flakes of fish, then chase it with a chip that’s somehow crunchy at the edges and pillowy in the middle. Even when it’s simple, it feels like an event.

At the same time, fish and chips can be stubbornly one-note if you make it the same way every time. The solution isn’t to reinvent the dish into something unrecognizable. Instead, keep the bones of a British-style fish and chips plate—fish that stays juicy, chips that stay crisp—then apply Indian flavor logic in the places where it actually belongs: in the seasoning, in the coating, and in the dips.

That’s what this post is about: fish and chips with Indian twists. The classic stays the hero. The twists simply make the story more interesting.

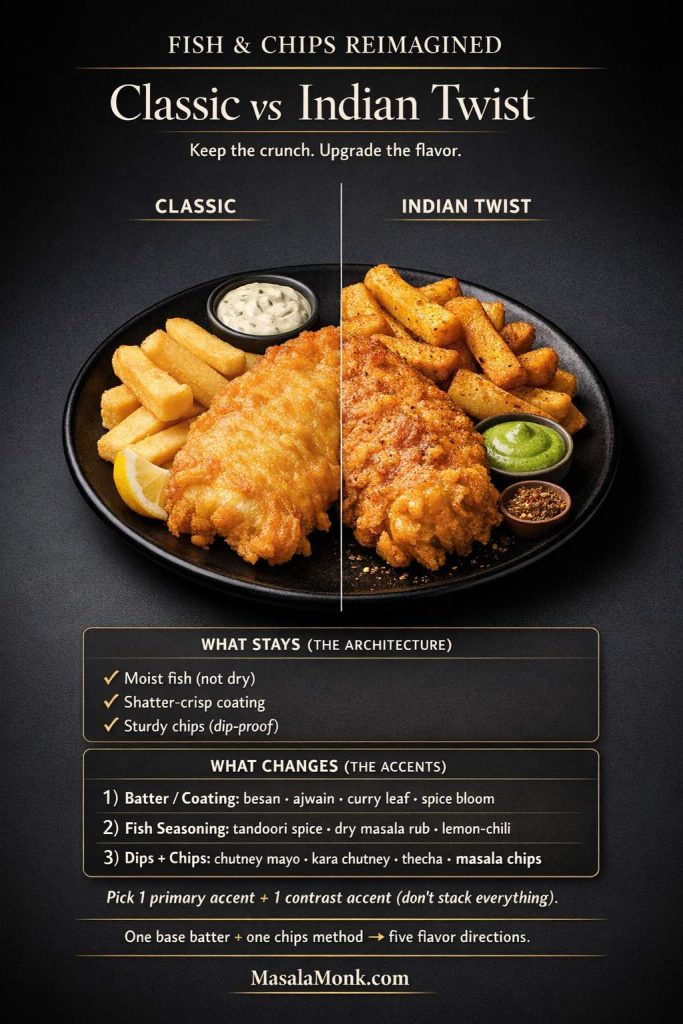
Dark editorial comparison card titled “Classic vs Indian Twist” showing a split plate of fish and chips. Left side labeled Classic: plain battered fish, thick chips, lemon wedge, and a pale tartar-style dip. Right side labeled Indian Twist: masala-speckled crispy fish, chaat-dusted thick chips, green chutney dip, and a small bowl of spices. Text reads “Same crunch. New flavor logic.” Footer: MasalaMonk.com.
Fish & chips doesn’t need a makeover—it needs a smarter flavor system. This quick classic vs Indian twist card shows the whole idea in one glance: keep the crunchy battered fish and thick chips, then add masala batter, chutney dips, and chaat-style seasoning for a bolder plate. Save this for your next comfort-food night, then cook your way through fish and chips with Indian twists—from chutney dips to spice-forward coatings—so every batch tastes new without losing the classic crunch.

You’ll still get the timeless cues of traditional fish and chips—the hot oil, the batter, the satisfying crunch. However, you’ll also get five Indian twists on fish and chips that feel natural: a masala-forward version with chaat-style chips, an Amritsari-inspired besan crunch, a tandoori direction that stays crisp, a coastal coconut-lime take, and a punchy chili-garlic twist for heat lovers. Along the way, you’ll see how to handle fish and chips batter without making it heavy, how to keep fried fish and chips crisp after the oil, and how to choose chips that don’t collapse the moment a dip shows up.

If you grew up loving a chip shop plate, you’ll recognize the structure. If you grew up loving pakoras, tandoori grills, chutneys, and masala fries, you’ll recognize the flavor decisions. Put them together and you get a plate that feels both nostalgic and new.


Fish and chips with Indian twists: what stays classic, what changes

Before we cook, it helps to define the boundary lines. Fish and chips works because it has a clean architecture:

  • A seasoned fish fillet that stays moist
  • A crisp coating that shatters rather than chews
  • Chips that are sturdy enough to stay good with salt, vinegar, and sauces
Want Indian-style fish and chips without overcomplicating it? Save this quick “classic vs Indian twist” decoder: keep the same crunchy architecture (moist fish, shatter-crisp coating, sturdy chips) and change only the accents—batter/coating, fish seasoning, and dips + chips. The easiest win: masala chips + green chutney mayo. Get the full Fish & Chips Reimagined guide with 5 Indian twists, exact steps, and dip ideas on MasalaMonk.com—then save this for your next fry night.

So in this reimagined version, that architecture stays. What changes is the accent system. Indian food doesn’t rely on “one sauce does everything.” Instead, it layers flavor through spice blends, acid choices, aromatics, and dips that bring contrast. When you bring those choices into fish and chips, you get variety without chaos.

In practice, the best Indian twists on fish and chips usually fall into one of three categories:

  1. Twists in the batter or coating
    Think besan, ajwain, curry leaves, or a subtle spice bloom. This is where the crunch can carry flavor.
  2. Twists in the fish seasoning
    Tandoori-style yogurt spice, a dry masala rub, or a bright lemon-chili approach. This is where you make the fish itself memorable.
  3. Twists in the dips and chips
    Chutney-mayo, spicy yogurt, kara chutney, thecha, or masala chips. This is where you turn “fish and chips” into a full plate.
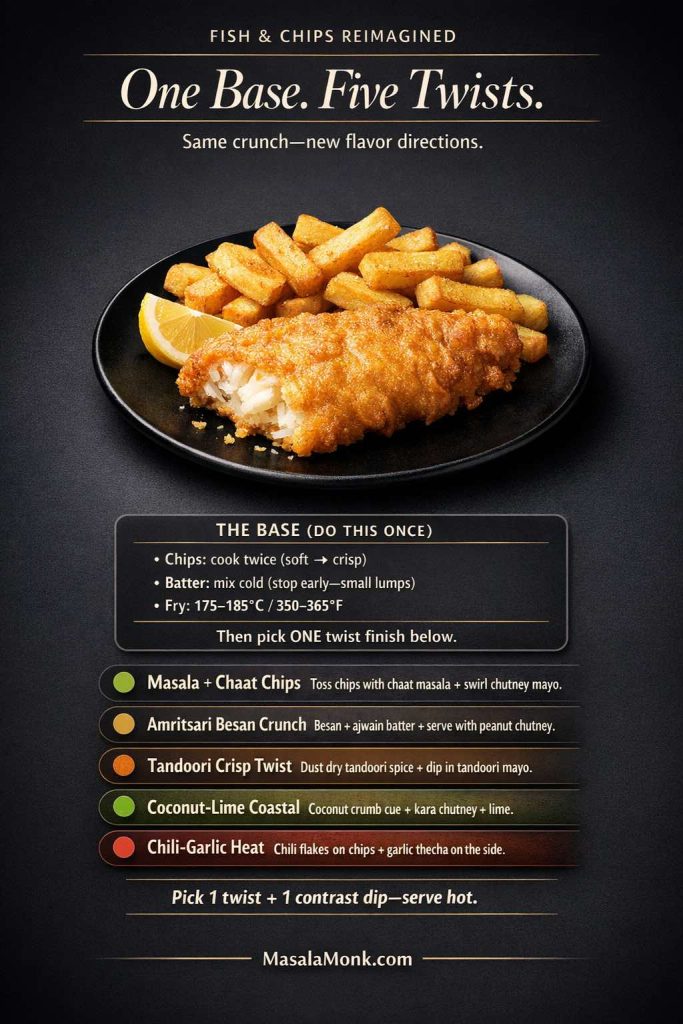
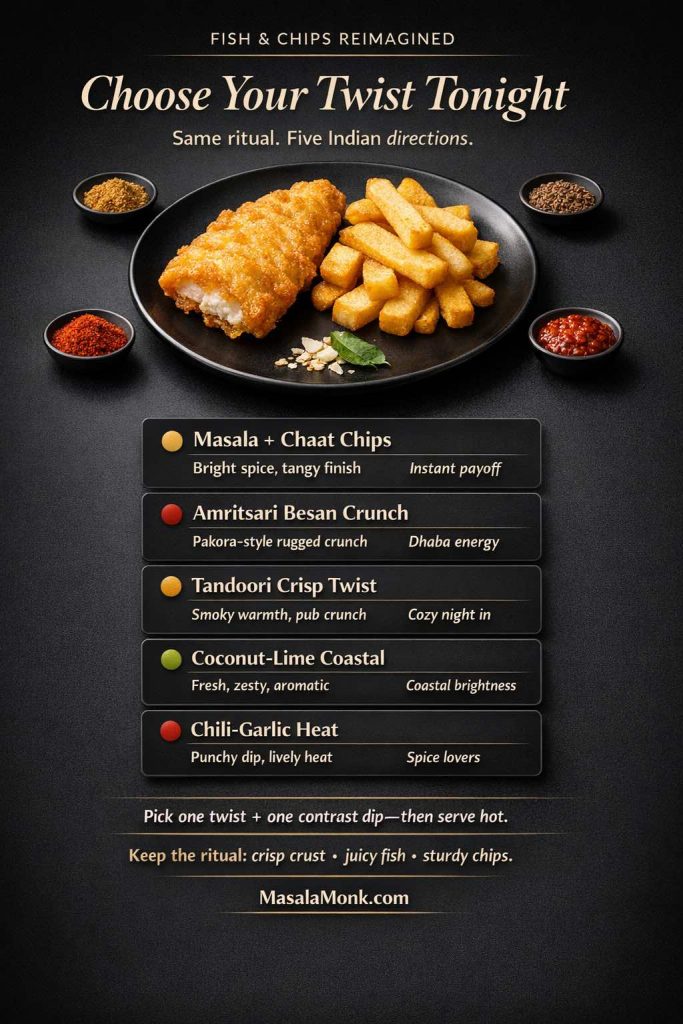
Vertical guide card titled “One Base. Five Twists.” showing a matte-black plate with crispy battered fish, thick British chips, and a lemon wedge. Below, a “Base (do this once)” box lists: cook chips twice (soft to crisp), mix batter cold (small lumps), and fry at 175–185°C / 350–365°F. Five colored rows list Indian twist finishes: Masala + Chaat Chips, Amritsari Besan Crunch, Tandoori Crisp Twist, Coconut-Lime Coastal, and Chili-Garlic Heat, plus the line “Pick 1 twist + 1 contrast dip—serve hot.” Footer reads MasalaMonk.com.
Use this as your quick roadmap: one reliable chips method + one cold batter gives you the classic crunch, then you choose one Indian finish (masala, Amritsari besan, tandoori, coconut-lime, or chili-garlic) to change the whole plate without extra stress. Save it for weeknights when you want fish and chips—just with smarter flavor.

Because those categories are flexible, you can do five variations without feeling like you’re repeating yourself. Even better, you can keep your kitchen workflow efficient: one base batter, one chips method, then five flavor directions.

Also Read: Keto Hot Chocolate Recipe (Sugar-Free Hot Cocoa) + Best Homemade Mix


British style fish and chips recipe base: the method that keeps everything crisp

A “twist” only tastes as good as the base it sits on. So let’s lock down the base method first, in a way that supports both traditional fish and chips and these Indian twists on fish and chips.

Choosing fish for fried fish and chips (fresh or frozen)

Classic British chips pair well with mild, firm white fish. Cod and haddock are the famous choices, yet plenty of other firm white fish works beautifully. What matters more than the specific species is the thickness and structure of the fillet.

  • Thicker fillets give you more forgiveness. They stay juicy while the coating crisps.
  • Very thin fillets can overcook quickly, especially if your batter is thick.
  • Very delicate fish can flake too soon, which makes battering fiddly.
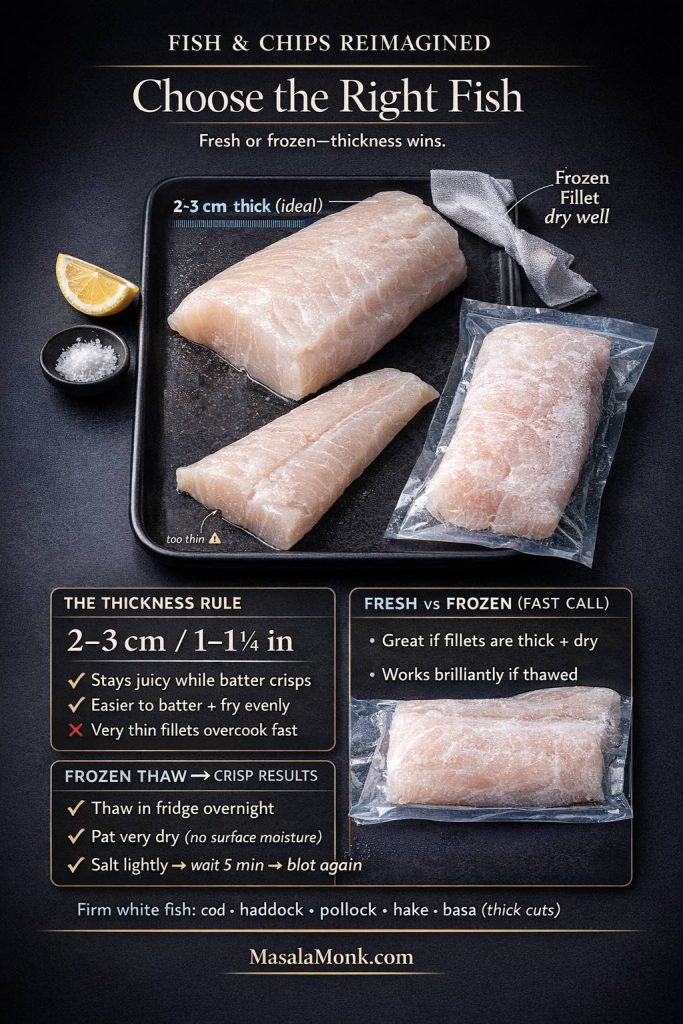
Vertical guide card titled “Choose the Right Fish” on a dark studio background. A black tray shows two raw white fish fillets with a 2–3 cm thickness label and a thinner fillet marked “too thin,” plus a frozen fillet pack and a towel for “dry well.” Panels explain the thickness rule, fresh vs frozen, and thaw-and-blot steps for crisp fish and chips.
Choosing fish for fish and chips is less about “fancy” and more about structure. This quick guide shows the one rule that matters most—2–3 cm thick fillets—so your fish stays juicy while the batter turns shatter-crisp. It also breaks down when frozen fish is a great choice (hint: it can be excellent) and the simple thaw + blot routine that keeps the crust crisp instead of watery. Save this as your fish-counter cheat sheet before your next fry night.

Frozen fish can be excellent for fish and chips, which is why “best frozen fish and chips” gets so much attention. The trick is simply to thaw properly and remove surface moisture. If you thaw fish in the fridge overnight, then blot well before seasoning, you can get results that rival fresh.

When you’re choosing fish for fried fish and chips, thickness beats “fancy.” Aim for fillets that are about 2–3 cm thick so the fish stays juicy while the coating crisps. If cod or haddock is pricey where you live, don’t overthink it—use any firm white fish that holds its shape, then focus on drying the surface well before battering. If you want a quick reference for sensible cod/haddock choices, keep the sustainable cod and haddock guide bookmarked; for easy substitutes when cod isn’t practical, these whitefish swaps are handy.

The real goal of fish and chips batter: light shell, not a thick coat

Fish and chips batter isn’t supposed to taste like bread. It’s supposed to act like a crisp, airy jacket that protects the fish while adding crunch.

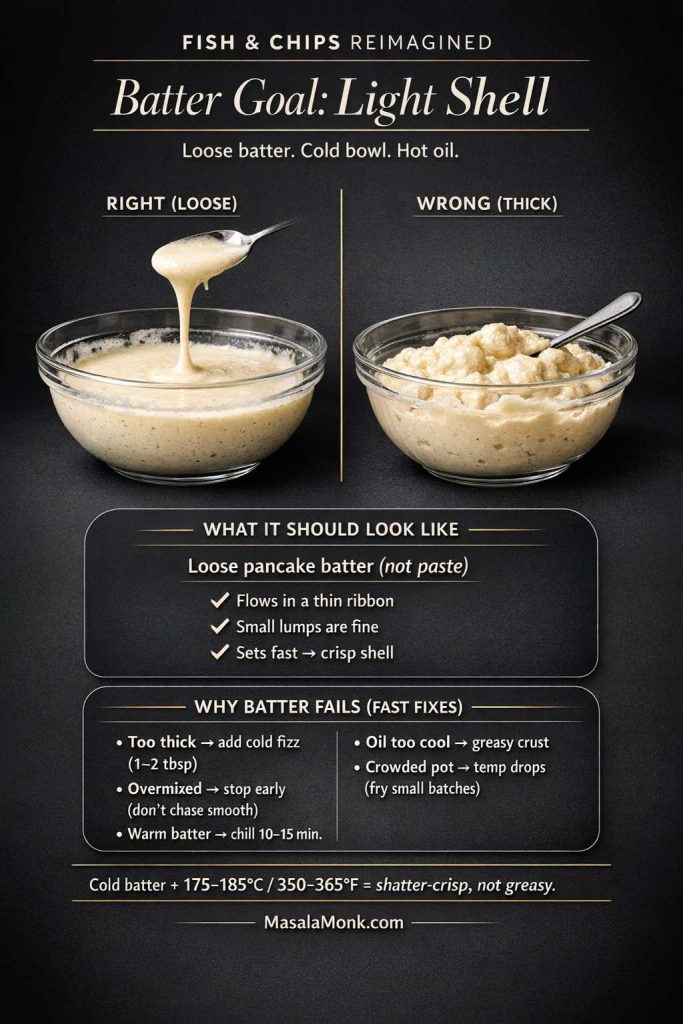
Vertical guide card showing two glass bowls of fish and chips batter on a dark studio background. Left bowl is labeled “RIGHT (LOOSE)” with batter flowing in a thin ribbon from a spoon. Right bowl is labeled “WRONG (THICK)” with paste-like batter clinging to a spoon. Text explains loose pancake batter, small lumps are fine, and cold batter plus 175–185°C oil makes a crisp, not greasy shell. MasalaMonk.com footer.
Want that classic fish & chips crunch—light, airy, and shatter-crisp? This quick “batter decoder” shows the #1 difference: loose batter that ribbons off the spoon vs. thick batter that turns bready and greasy. Keep the bowl cold, stop mixing early (lumps are fine), and fry hot in the 175–185°C / 350–365°F zone for a thin, crisp shell that protects the fish without tasting like bread. Save this for next fry night and use it with any of the Indian twist dips + masala chips in the post.

When batter goes wrong, it usually goes wrong in predictable ways:

  • Too thick and it becomes bready, sometimes even gummy.
  • Overmixed and it becomes tough.
  • Warm batter and it absorbs oil more readily.
  • Oil too cool and the batter drinks fat instead of crisping.

A good fish and chips batter should look like loose pancake batter, not a thick paste. Mix just until the flour disappears; a few small lumps are fine and actually help keep the crust light. Then chill it while your oil heats—cold batter hitting hot oil sets faster and stays crisper. If you want a classic baseline for batter texture and handling, BBC Good Food’s next-level fish & chips is a solid reference point.

How to make fish and chips batter for Indian twists on fish and chips

You’ll notice that the five variations later will sometimes change the seasoning or flour choices. Still, the core approach stays the same.

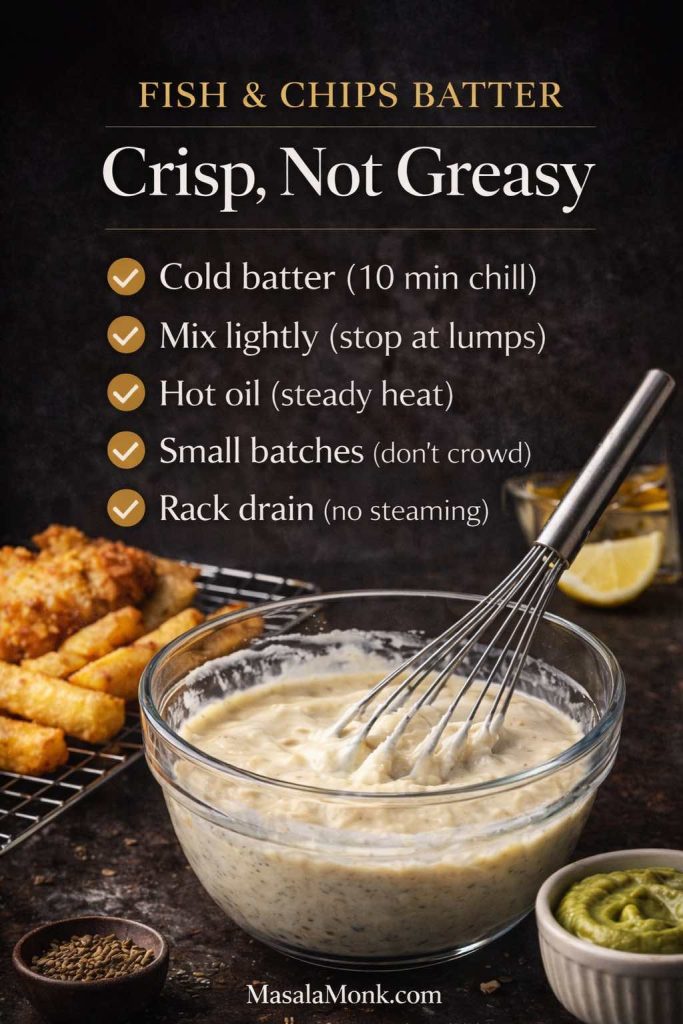
Dark, magazine-style guide card showing a glass bowl of fish and chips batter with a whisk, chips and a piece of fried fish on a rack in the background, plus a small bowl of green chutney dip. Text overlay reads “Fish & Chips Batter: Crisp, Not Greasy” and lists tips: cold batter, mix lightly, hot oil, small batches, rack drain. Footer says “MasalaMonk.com.”
Want fish and chips batter that turns crisp, not greasy? This quick guide saves you from the two biggest disappointments—heavy coating and soggy crust. Chill the batter, mix lightly, keep the oil hot, fry in small batches, and always drain on a rack so steam can’t ruin the crunch. Save this card for your next fish & chips night—then use it to nail every one of our 5 Indian twists (masala batter + chutney dips included).

Base batter structure (adaptable):

  • A flour base (all-purpose flour as the backbone)
  • A crisping assistant (a little cornstarch or rice flour)
  • Salt
  • A cold fizzy liquid (sparkling water or beer)
  • Optional lift (a small pinch of baking powder)

The fizzy liquid matters because bubbles help keep the batter airy. Meanwhile, the cornstarch or rice flour helps the crust dry into a crisp shell rather than staying tender.

The biggest reason fried fish and chips turns heavy is temperature drop: too much fish at once pulls heat from the oil, and batter soaks instead of setting. Fry in smaller batches and let the oil return to temperature between rounds. Also, drain on a wire rack, not a plate—steam is what ruins that first-crack crunch. Serious Eats breaks down these fundamentals clearly in their fish and chips recipe, especially the parts about oil temperature and rack draining.

Oil temperature and timing: the hidden backbone of traditional fish and chips

Fried fish and chips is less about “how long” and more about “how hot.” Oil temperature influences everything: crust, greasiness, and how quickly the fish cooks.

Aim for oil that stays in a steady hot zone—around the mid-170s °C / mid-300s °F is a common target. If the oil drops too low after adding fish, the batter will absorb oil before it sets. On the other hand, if the oil is wildly hot, the crust can brown too quickly and the fish won’t have time to cook through.

Oil temperature guide for crispy fish and chips on a dark studio background. A deep pot of hot oil holds a clip-on thermometer, with thick chips and a fried fish piece on a rack behind. Text overlay shows three ranges: too low 160–170°C (320–340°F) greasy, sweet spot 175–185°C (350–365°F) crisp shell, too hot 190°C+ (375°F+) browns fast and undercooked center. MasalaMonk.com footer.
If fish turns greasy or chips go limp, it’s usually not the recipe—it’s the oil temp. This “sweet spot” card shows the crisp zone that sets batter fast, keeps the crust light, and helps chips stay sturdy. Use it while you cook, then pair it with any of our 5 Indian twists on fish & chips (masala batter, chutney dips, chaat-style chips). Save this for your next fry night and share it with a fellow crisp-chaser.

There’s also an unglamorous detail that makes a huge difference: how you drain. If you put freshly fried fish on a flat plate, steam collects under it and softens the crust. If you put it on a rack, air circulates and the crust stays crisp. Serious Eats calls this out clearly in their approach, and it’s one of those tiny moves that changes the whole result.

Don’t guess doneness by color alone. Fish is done when it flakes easily in thick sections and the center turns opaque, but the cleanest check is temperature: pull it when the thickest part hits 145°F / 62.8°C. That number comes straight from the USDA’s safe temperature chart. Hitting it means the fish stays moist while the crust stays crisp—no dry, cottony fillets.

Also Read: 10 Low Carb Chia Pudding Recipes for Weight Loss (Keto, High-Protein, Dairy-Free)


How to make chips for fish and chips with Indian twists (crisp, sturdy, dip-proof)

Chips are often treated like the sidekick, but in fish and chips they’re half the point. If you want the vibe of old English fish and chips, chips shouldn’t be thin and delicate. They should be thick enough to keep a fluffy center.

Different people use different words here—British chips, English chips, fries, chips—but the key is the cut and the cooking strategy.

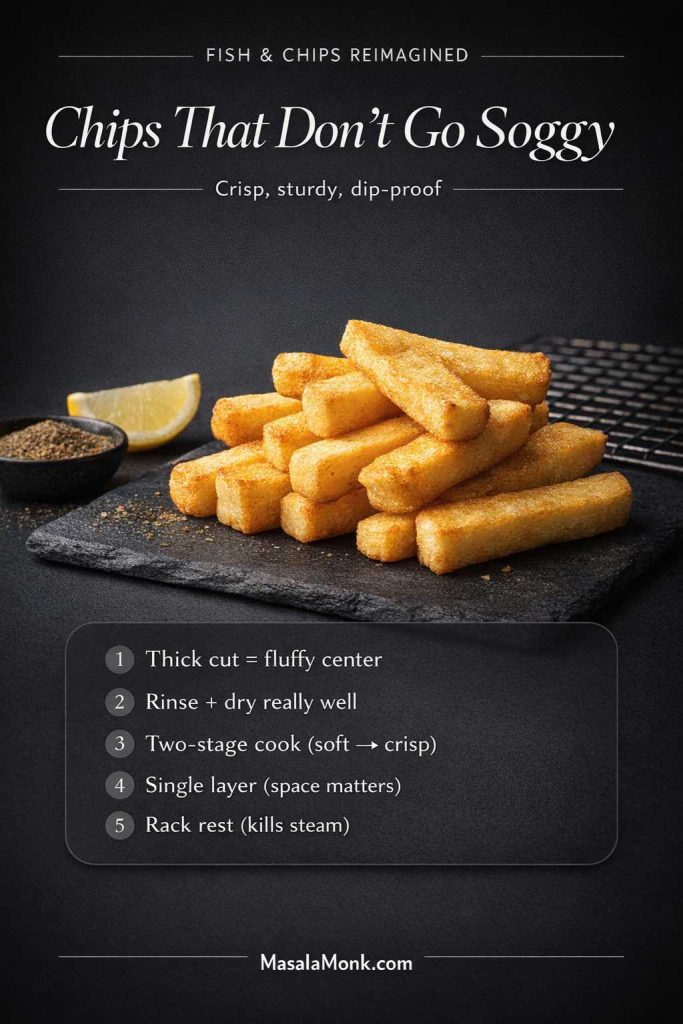
Dark editorial guide card titled “Chips That Don’t Go Soggy” showing thick British-style chips stacked on a slate board with a lemon wedge, a small bowl of seasoning, and a wire rack in the background. Text overlay lists five tips: thick cut fluffy center, rinse and dry well, two-stage cook, single layer, and rack rest to stop steam. Footer reads “MasalaMonk.com.”
Soggy chips can ruin even perfect fish. This quick guide keeps your fish and chips chips crisp, sturdy, and dip-proof: go thick cut for a fluffy center, rinse and dry really well, cook in two stages (soft → crisp), keep a single layer so heat can circulate, and finish with a short rack rest to kill steam. Save this card for every fish & chips night—especially when you’re doing fish and chips with Indian twists and serving chutney dips.

The potato choice matters more than most people admit

If you’ve ever made chips that looked golden but tasted hollow, the potato may have been the reason. Some potatoes crisp beautifully; others turn soft too easily.

If you want a quick guide to potato choices for crisp fries and chips, MasalaMonk has a helpful breakdown in these best potatoes for French fries. It’s not just trivia. The potato you choose affects how well your chips survive:

  • spice blends
  • vinegar or lemon
  • chutneys and mayo dips

The simplest chip method for a home kitchen

If you’re not trying to run a chip shop, keep it doable. You can still get the “proper chips” feel with a method that respects the basics:

  1. Cut thicker batons, not shoestrings.
  2. Rinse to remove surface starch, then dry extremely well.
  3. Cook in two stages: a softer cook first, then a crisp finish.
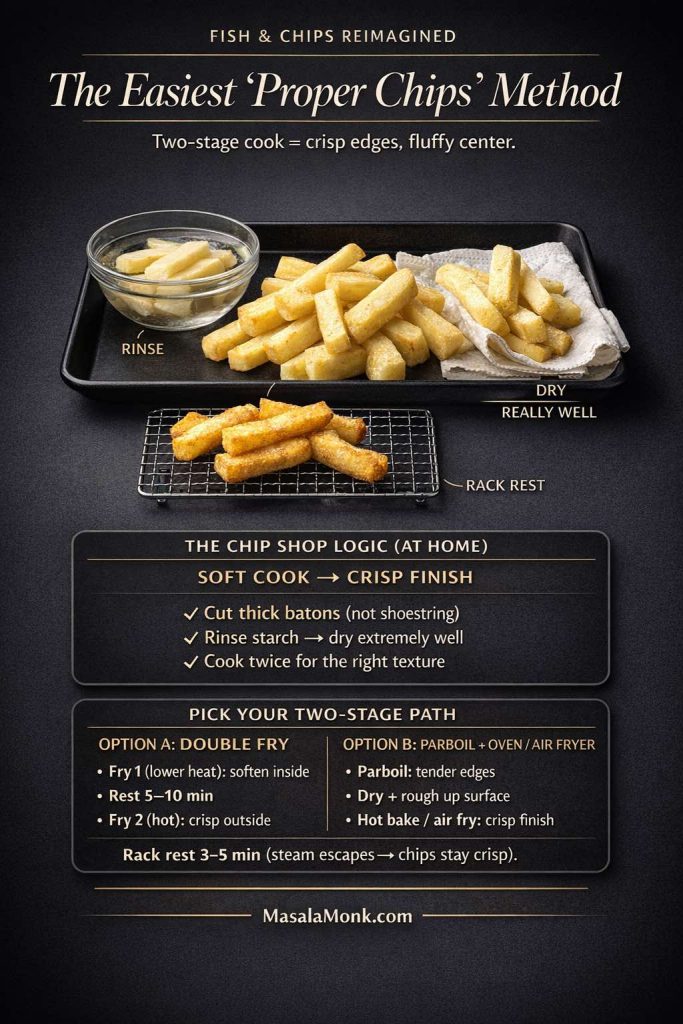
Want proper chips at home without overthinking it? Save this: the secret is a two-stage cook—a softer first cook for a fluffy center, then a hotter finish for crisp edges. Rinse off surface starch, dry really well, and always rack-rest 3–5 minutes so steam escapes (that’s how chips stay crunchy). Use this method for classic fish and chips—or any of our Indian twist versions.

That “two-stage” idea is the backbone of chip-shop chips. You can do it as a double fry if you love deep-frying. Alternatively, you can do a parboil followed by a hot oven or air-fryer crisp stage.

If you’re making chips from scratch, the fastest upgrade is a two-stage cook: a gentler first cook to soften the inside, then a hotter finish to crisp the outside. That second stage is where you win the “proper chip” texture—crisp edges, soft center. If you want a full step-by-step with multiple cut styles and finishes, MasalaMonk’s crispy homemade French fries guide is a good companion piece to keep handy.

Crinkle chips, frozen chips, and the “weeknight fish and chips” reality

Sometimes you’re not in the mood to soak potatoes and baby-sit oil. That’s when crinkle chips and frozen chips earn their keep.

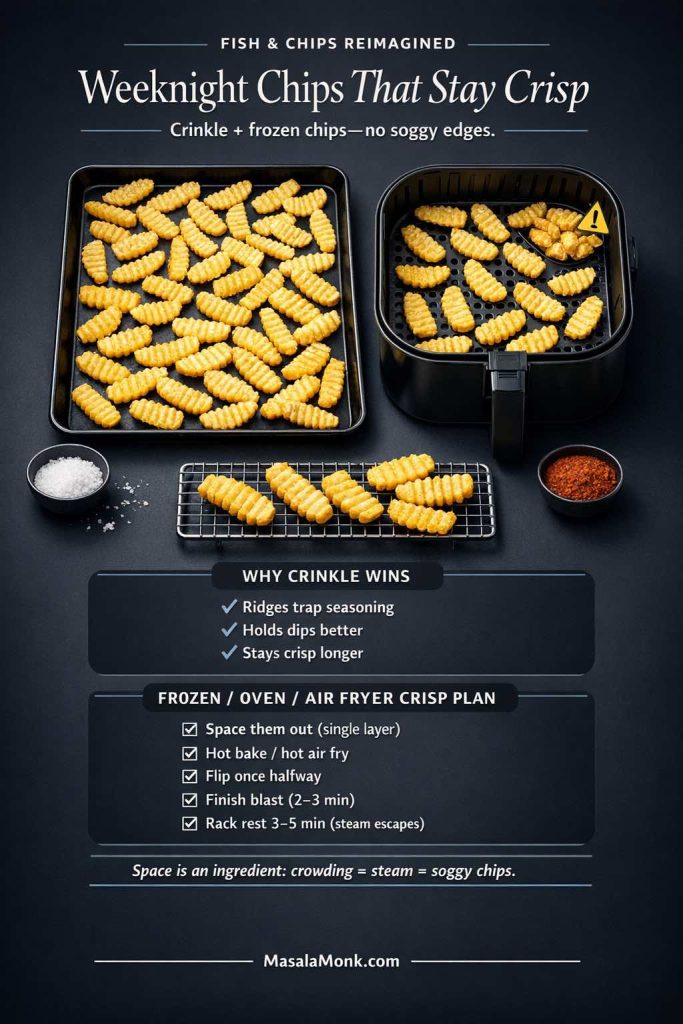
Crinkle chips are especially good for Indian twists on fish and chips because the ridges trap seasoning. They hold onto spice blends and chutney-mayo in a way that smooth chips can’t.

Weeknight fish and chips doesn’t have to mean soggy chips. This quick decoder shows why crinkle-cut chips grab seasoning better, plus the simple frozen chips crisp plan for oven or air fryer: single layer, hot cook, flip once, finish blast, then rack rest so steam escapes. Save this card for busy nights—then use it with any of the 5 Indian fish & chips twists (masala chips, chutney-mayo dips, thecha heat). Full step-by-step + twists on MasalaMonk.

Frozen chips can also work well if you bake them hot, give them space, and finish with a quick crisp blast. The key is to avoid steam build-up. Spread them well, flip halfway, then let them sit briefly on a rack before serving. That short rack rest helps them stay crisp, especially if you’re serving with dips.

If you’re doing chips in an oven or air fryer, treat space like an ingredient. Overcrowding traps moisture and turns crisp edges into soft, steamed potato. Spread chips out, flip once, then let them rest briefly so surface steam escapes before you plate. If you want a quick checklist for the common mistakes that kill crispness, this MasalaMonk guide on air fryer mistakes is worth a skim.

Also Read: Garlic & Paprika Cabbage Rolls (Keto-Friendly Recipes) – 5 Bold Savory Twists


Fish and chips with Indian twists: the five variations that actually make sense

Now the fun part. These five Indian twists on fish and chips are built so they don’t fight the dish. Each one respects the crunch, keeps the fish moist, and adds flavor where it belongs.

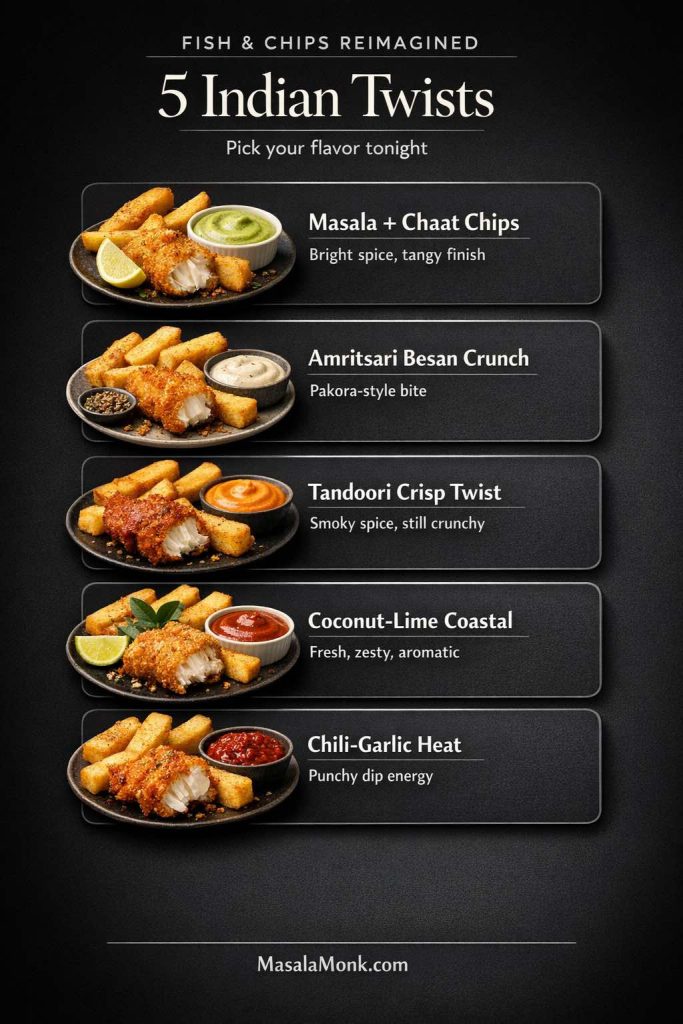
Dark editorial guide card titled “Fish & Chips Reimagined: 5 Indian Twists” with five stacked option panels. Each panel shows crispy fried fish with thick chips and a dip: Masala + Chaat Chips (green chutney mayo), Amritsari Besan Crunch, Tandoori Crisp Twist (orange dip), Coconut-Lime Coastal (red dip), and Chili-Garlic Heat. Footer reads “MasalaMonk.com.”
Not sure which version to make first? Use this quick picker: fish and chips with Indian twists in five craveable directions—Masala + Chaat Chips, Amritsari besan crunch, Tandoori crisp, Coconut-lime coastal, and Chili-garlic heat. Each one keeps the classic crunch, then adds the Indian flavor logic through batter, spices, and chutney dips. Save this card for your next comfort-food night, then choose your twist and cook along with the full fish & chips reimagined guide here on MasalaMonk.

To make this feel manageable, think in a modular way:

  • One chip method (choose your preferred approach)
  • One base batter workflow
  • Then you shift flavor through spice blends, coatings, and dips

This keeps the cooking calm instead of chaotic.

Also Read: Eggless Yorkshire Pudding (No Milk) Recipe


1) Masala twist: fish and chips with chaat-style chips and bright spice

If you’re only going to try one variation first, this is the friendliest entry point. It tastes instantly exciting, yet it doesn’t ask you to relearn the technique.

The masala twist works because it uses the chaat playbook: salt, acid, spice, and a little aromatic lift. Done well, it tastes like something you’d genuinely crave, not something you tried once for novelty.

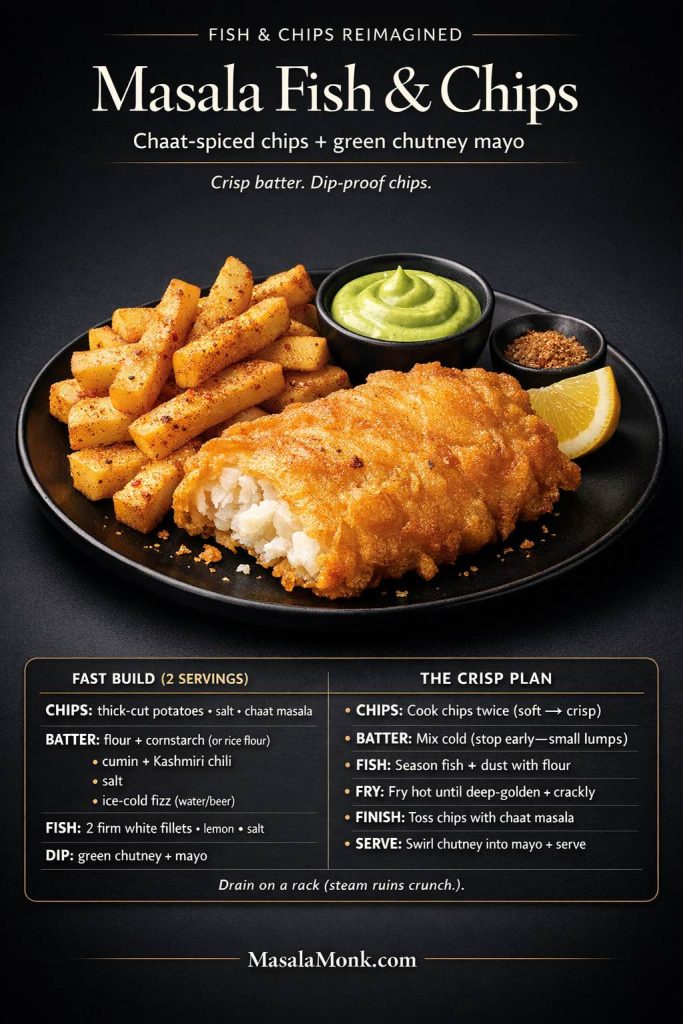
Vertical recipe card on a dark charcoal background titled “Masala Fish & Chips.” A matte-black plate holds a golden crispy battered fish fillet with a flaky white corner, thick British chips dusted with chaat masala, a ramekin of green chutney mayo, and a lemon wedge. Bottom panel lists quick ingredients and a “crisp plan” steps. MasalaMonk.com in footer.
Masala Fish & Chips—British-style crunch with an Indian twist: chaat-spiced chunky chips and a creamy green chutney mayo dip. This card is your quick “build + crisp plan” so you can nail the crackly batter and keep chips dip-proof. Save this for your next fry-night, then head to MasalaMonk for the full method, timing, and all 5 Indian twists (plus dips and crispness fixes).

Masala fish and chips batter (spice in the right place)

Here’s the trick: don’t overload batter with harsh chili powders. Instead, build warmth and aroma with small amounts of spices that tolerate frying:

  • cumin (roasted if you have it)
  • Kashmiri chili for color and mild heat
  • a pinch of ajwain for that snack-shop fragrance
  • black pepper for bite

Keep the batter cold, mix quickly, and fry hot. The goal is still a crisp shell.

If you want a deeper read on batter mechanics—why some batters stay crisp while others go heavy—Serious Eats also has a helpful explanation of batter and frying principles across their frying guides, and their fish and chips recipe itself remains a strong anchor point: classic fish and chips technique.

Chaat-style chips that still behave like chips

This is where the plate becomes “Indian” without becoming confusing.

Toss hot chips with:

  • chaat masala
  • roasted cumin
  • a pinch of black salt (optional but addictive)
  • chili-lime seasoning if you like tangy heat

Because chips are hot, seasoning sticks. Because chips are dry, seasoning tastes vibrant rather than muddy.

The dip that makes the masala twist feel complete

A classic tartar sauce brings creaminess and acid. In this variation, a green chutney mayo does the same job, but with an Indian accent.

For the masala version, think of green chutney mayo as tartar sauce’s louder cousin: creamy base, sharp herbs, bright acid. Blend the chutney until smooth so the dip clings to chips instead of sliding off, then stir into mayo with a squeeze of lemon to keep it snappy. Use MasalaMonk’s green chutney recipe as the base; if you prefer egg-free, their eggless mayonnaise gives you the same rich texture without changing the flavor logic.

This dip is one of those small moves that makes fish and chips with Indian twists feel intentional rather than experimental.

Also Read: Crock Pot Chicken Breast Recipes: 10 Easy Slow Cooker Dinners (Juicy Every Time)


2) Amritsari-inspired twist: besan crunch that feels like a pakora moment

If the masala twist is bright and snacky, the Amritsari direction is deeper and more savory. It borrows the snack DNA of Punjabi fish fry without breaking the fish and chips structure.

This variation is especially satisfying if you love pakoras, because the coating has that familiar besan perfume.

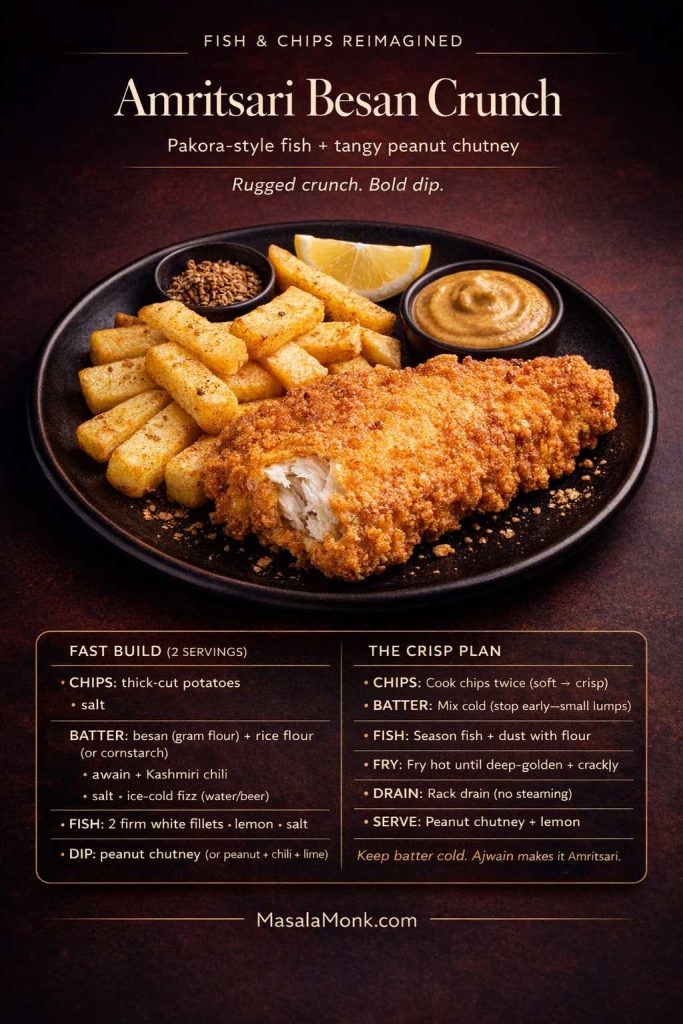
A dark, magazine-style recipe card titled “Amritsari Besan Crunch” showing a matte-black plate with pakora-style besan-crusted fried fish, thick-cut chips, a ramekin of tan tangy peanut chutney, a lemon wedge, and a small bowl of ajwain seeds. Text panels list “Fast Build (2 servings)” and “The Crisp Plan” steps for chips and frying.
Amritsari Besan Crunch Fish & Chips — pakora-style gram-flour crust, thick British chips, and a bold tangy peanut chutney dip. Use this card as your quick checklist (cold batter + rack drain = max crunch), then jump into the full post for exact ratios, all 5 Indian twists, and the matching chutney/dip ideas on MasalaMonk.

Besan-forward coating: why it works

Besan brings two things:

  • a nutty, savory taste that feels instantly Indian
  • a texture that can crisp beautifully when supported correctly

The support matters. Besan alone can sometimes go dense. So you bring in a bit of rice flour or cornstarch to encourage crispness.

Season the batter with:

  • ajwain (carom) for the signature fragrance
  • ginger and garlic for bite
  • chili and black pepper for heat
  • salt, always

Besan works in fish and chips because it creates a deeper, snack-shop crunch—more like a pakora shell than a neutral batter. The key is balancing it: a little rice flour or cornstarch keeps the crust crisp instead of dense, and ajwain keeps the flavor unmistakably Indian. If you want the quick “what besan does and why it behaves differently,” MasalaMonk’s piece on besan (chickpea flour) is a useful reference.

How to keep this coating crisp, not heavy

Besan batters reward restraint. Mix until combined, then stop. Keep the batter cold. Fry in small batches.

Drain on a rack, then serve quickly. That last part matters because besan crusts are at their best right after frying—when they’re crisp and fragrant.

Dip options that respect the Amritsari vibe

Instead of a mayo-heavy dip, you can go in a slightly lighter direction:

  • A spicy yogurt dip with lemon and roasted cumin
  • A green chutney side (or green chutney yogurt)
  • A tangy peanut chutney for a rich but non-mayo option

Peanut chutney is a smart partner for fried fish because it brings creaminess without turning the plate heavy. It also holds up against heat and spice—so it won’t disappear next to an Amritsari-style coating. Serve it thick enough to scoop with chips, then loosen with a spoon of water or yogurt only if you want it drizzly. MasalaMonk’s tangy spicy peanut chutney is a great starting point.

Also Read: Mozzarella Sticks Recipe (Air Fryer, Oven, or Fried): String Cheese, Shredded Cheese, and Every Crunchy Variation


3) Tandoori twist: fish and chips with a tandoori-style flavor layer that still stays crisp

Tandoori flavors are bold, yet they can sabotage crispness if you apply them the wrong way. Yogurt marinades are moist; moisture is the enemy of crunch. So you handle it with a little strategy.

This twist is about getting the taste of tandoori fish with the satisfaction of fish and chips.

Recipe card for Tandoori Crisp Twist fish and chips on a black plate with thick-cut chips, crispy tandoori-spiced fried fish showing flaky white interior, lemon wedge, and a ramekin of pale-orange tandoori mayo dip on a dark background. Text includes a fast build list and crisp plan steps.
Tandoori Crisp Twist = smoky tandoor flavor with proper pub-style crunch. This card shows the fast build (chips, cold batter, spice cues) plus the crisp plan so your fish stays crackly and your chips stay sturdy for dipping. Make the tandoori spice dry, keep the sauce on the side, and you’ll nail that deep-golden crust every time. Save this for your next fry night—and head to MasalaMonk for the full Fish & Chips Reimagined post with all 5 Indian twists, dips, and timing tips.

How to do the tandoori layer without soggy batter

Marinate fish in a thick yogurt spice mix—enough to flavor the fish, not so much that it drips.

Then, before coating or frying:

  • wipe off excess marinade gently
  • give the fish a light dusting of starch (rice flour or cornstarch)

From there, you have two good paths:

  1. Light batter path
    Use a thinner fish and chips batter and let the fish carry the tandoori identity.
  2. High-heat roast + crisp finish path
    Roast at high heat to set the tandoori coating, then finish with a quick crisp stage (hot oven or a brief dip in oil) if you want extra crunch.

Either way, the fish stays juicy and the exterior stays crisp enough to feel like traditional fish and chips, just louder.

Dips that match the tandoori direction

A tandoori mayo is the obvious crowd-pleaser, especially for people who love creamy dips. Start with a mayo base, then add tandoori spice and lemon.

Tandoori mayo works because it mirrors the fish: warm spice + lemony brightness, softened by creaminess. Stir tandoori masala into mayo, add lemon, then taste for salt—mayo can mute seasoning, so it usually needs a little more spice than you expect. If you want a flexible base recipe to build different mayo dips from, MasalaMonk’s homemade mayonnaise guide

For a lighter pairing, a lemony yogurt dip works brilliantly because it echoes the marinade without doubling down on heaviness.

Also Read: Sourdough Starter Recipe: Make, Feed, Store & Fix Your Starter (Beginner Guide)


4) Coastal coconut-lime twist: crunch that feels South Indian and still belongs on the plate

This is the variation that feels genuinely fresh, especially if you’ve made fish and chips the same way for years. Coconut adds a sweet, nutty crunch. Lime adds brightness. Chili adds the necessary bite.

However, coconut can burn quickly in hot oil, so you want a coating strategy that protects it.

Coconut-Lime Coastal Fish & Chips = the crispiest “coastal” twist: toasted coconut crust, thick-cut chips, and a punchy kara chutney dip with a bright lime finish. This card is your quick build + crisp plan so you can nail the crunch without guessing (and keep the chutney on the side so the crust stays crackly). Save it for your next fish night, then head to MasalaMonk.com for the full Fish & Chips Reimagined post with all 5 Indian twists, dip ideas, and step-by-step timings. Pin it, share it, and tell me which dip you’d pair first.

Two ways to build the coconut crunch

Option A: Coconut crumb coating
Combine:

  • shredded coconut (fine, not long strands)
  • rice flour (helps with crispness and browning control)
  • crushed curry leaves (optional but incredible)
  • salt, chili, a touch of black pepper

Then coat fish lightly so coconut doesn’t form a thick layer.

Option B: Coconut in the “after” stage
If you’re nervous about coconut browning too quickly, keep the batter classic, then finish with toasted coconut and curry leaves sprinkled over the fish right before serving. This keeps the crunch aromatic rather than risky.

Chips pairing ideas that fit the coastal vibe

Coconut-lime fish loves a chip that can carry bright seasoning without turning soggy. Crinkle chips are great here because the ridges grab onto chili-lime salt and stay punchy even after dipping. If you’re cutting potatoes yourself, go for thick British-style chips—fluffy inside, crisp outside—then finish with lime zest, a squeeze of lime, and a clean salt. The result tastes coastal and fresh, not heavy.

If you want a playful swap, banana chips can echo the coastal snack energy, yet that’s optional. If you do it, treat banana chips like a crunchy side element, not as a replacement for every chip on the plate.

Dip pairing that makes coconut feel balanced

A spicy chutney works better here than a heavy mayo. MasalaMonk’s kara chutney is a strong match because it’s built for savory snacks. Meanwhile, a limey yogurt dip also works beautifully if you want something calmer.

Also Read: How to make No-Bake Banana Pudding: No Oven Required Recipe


5) Chili-garlic twist: fish and chips with heat that doesn’t taste harsh

This final variation is for people who want a punch. The mistake many cooks make is pushing heat into the batter itself. Fried chili powders can taste bitter if overused, and batter can amplify that harshness.

So instead, keep the batter relatively classic and bring heat through a condiment that’s meant to be intense.

“Chili-garlic fish and chips recipe card on a dark background: crispy battered fish fillet, thick-cut chips with chili flakes, and a deep red garlic thecha dip in a small ramekin, with lemon wedges on a black plate. Text overlay shows fast build ingredients and a crisp frying plan for two servings. MasalaMonk.com.
Craving spicy fish and chips with a serious kick? This Chili-Garlic Heat twist pairs crackly battered fish + thick-cut chips with a bold garlic thecha dip (that deep red heat does the talking). Save this card for your next fry night, then head to the full Fish & Chips Reimagined post on MasalaMonk.com for all 5 Indian twists, dip ideas, and the exact crisping method that keeps chips dip-proof. Save it, share it, and tell me—team mild thecha or extra hot?

Thecha-style heat: sharp, alive, and addictive

Thecha is one of those condiments that instantly makes fried food feel exciting. It’s punchy, garlicky, and alive in a way that bottled hot sauces sometimes aren’t.

Thecha belongs here because it gives you “fresh heat,” not just heat—garlic bite, chili sharpness, and that addictive, slightly coarse texture that makes you keep dipping. Spoon it on the side for chips, or swirl a little into mayo when you want the burn softened and creamier. Use MasalaMonk’s thecha recipe as your base.

How to serve the chili-garlic twist so it feels balanced

Keep the fish and chips base classic:

  • crisp batter
  • well-salted chips

Then offer thecha in one of two ways:

  • on the side as a dip for chips
  • swirled into mayo for a creamy heat sauce

This gives readers control. Some people want a gentle kick; others want the full fire.

If you want a heat option that feels more familiar than thecha, a simple chili sauce or pepper sauce works brilliantly with chips—especially for the “chili-garlic” twist. Keep it bright (vinegar or citrus), not syrupy, so it cuts the richness instead of adding weight. MasalaMonk’s pepper sauce guide gives you several directions depending on whether you want smoky, sharp, or fruity heat.

Also Read: Chicken Adobo — Step-by-Step Recipe — Classic Filipino Adobong Manok


Dips that make fish and chips with Indian twists feel complete

A great fish and chips plate often comes down to contrast: hot vs cool, crisp vs creamy, salt vs acid. Dips are the easiest way to control that contrast.

Instead of treating dips like an afterthought, treat them like the finishing move.

Dark editorial guide card titled “Chutney Dip Flight” for fish and chips, showing four white ramekins: green chutney mayo, kara chutney, tangy peanut chutney, and thecha. Text under each dip suggests the best pairing with Indian twists (masala + chaat chips, coconut-lime coastal, Amritsari besan crunch, chili-garlic heat). A crispy fish piece and thick chips sit at the bottom right. Footer reads “MasalaMonk.com.”
A great fish & chips plate is all about contrast—crisp, creamy, spicy, tangy. This chutney dip flight makes your fish and chips with Indian twists feel complete: green chutney mayo for masala + chaat chips, kara chutney for coconut-lime coastal vibes, tangy peanut chutney for Amritsari besan crunch, and thecha for chili-garlic heat lovers. Save this guide for your next fish & chips night, then mix-and-match dips as you cook through the full “5 Indian twists” version, here on MasalaMonk.

Green chutney mayo (bright, creamy, classic-friendly)

This is the most universal dip in the lineup. It behaves like tartar—cool and creamy—yet tastes unmistakably Indian.

Start with MasalaMonk’s green chutney and swirl it into mayo. If you want egg-free, MasalaMonk’s eggless mayonnaise gives you the same creamy base.

Kara chutney (spicy South Indian dip energy)

Kara chutney is especially good with the coastal coconut-lime twist because it’s sharp, spicy, and built for savory snacks—exactly what fried food wants. Serve it thick and punchy for dipping, or thin it slightly for drizzling over fish right before serving. MasalaMonk’s kara chutney recipe fits the flavor direction perfectly.

Tangy peanut chutney (creamy without mayo)

If you want a dip that’s creamy but not heavy, peanut chutney is a strong move. MasalaMonk’s tangy spicy peanut chutney is especially useful because it’s snack-friendly and balanced.

Thecha (sharp heat for chips and fish)

If you like heat that feels alive—garlic bite, fresh chili punch, and a slightly coarse texture—thecha is the dip that makes chips disappear fast. Spoon it on the side for dunking, or swirl a little into mayo when you want the burn softened and creamier. Use MasalaMonk’s thecha recipe as your base, then adjust the chili level to match your tolerance.

Also Read: Sweetened Condensed Milk Fudge: 10 Easy Recipes


Bringing it all together: a calm workflow for a dramatic plate

Fish and chips can feel like a juggling act because you’re managing hot oil, batter, and timing. Meanwhile, adding five Indian twists on fish and chips might sound like extra complexity. In reality, the twists are mostly seasoning decisions.

Here’s a workflow that keeps you sane:

  1. Choose your chip path first
    If you’re doing thick chips from scratch, start them early. If you’re doing frozen chips or crinkle chips, you can start later.
  2. Prep dips while chips cook
    Chutneys and mayo mixes can be done in minutes. They also taste better when they sit briefly.
  3. Season fish and prepare batter last
    Batter hates waiting. Fish benefits from a few minutes of seasoning, yet you don’t want it sitting wet too long.
  4. Fry fish in small batches and drain on a rack
    This is the crispness move that makes fried fish and chips taste like it came from a proper shop.
Dark, premium guide card titled “Keep It Crisp” for fish and chips. A crispy fried fish fillet and thick British chips sit on a wire rack over a sheet pan near an open oven, with a lemon wedge. Text overlay shows: HOLD—Oven 95°C/200°F, rack on tray, 10–20 min; REHEAT—Oven 220°C/425°F, rack on tray, 8–12 min, flip once; “No microwave (steam kills crunch).” MasalaMonk.com footer.
Leftovers don’t have to be sad. This quick “hold + reheat” cheat sheet keeps fish and chips crispy while you finish the batch—and brings back crunch the next day without drying the fish. Use the rack-on-tray method (it vents steam, so the crust stays snappy), then pick your favorite from our 5 Indian twists on fish & chips with chutney dips and chaat-style chips. Save this for fry night and share it with someone who always ends up with soggy chips.

As you cook, remember that even old English fish and chips was never just “fried fish and potato.” It was always about timing, texture, and salt. The Indian twists simply give you new ways to build that same satisfaction.

Also Read: Peanut Butter Fudge: Recipes & Guide (8 Methods + Easy Variations)


A few details that quietly upgrade every version

Some upgrades are loud, like coconut-lime crust. Others are quiet, yet they change everything.

These “quiet upgrades” make every fish & chips twist taste cleaner and stay crisp longer—whether you’re doing masala chips, Amritsari besan crunch, tandoori spice, coconut-lime coastal, or chili-garlic thecha. Save this checklist for next time: salt while hot, add bright acid (lemon/lime/tamarind/chutney), keep oil clean (strain bits), and fry in small batches so the crust stays shatter-crisp—not greasy. Use it as your final pre-serve ritual, then pick your twist and enjoy the crunch.

Salt timing matters more than salt amount

Salt chips while they’re hot. Also salt the fish while it drains. Because salt is not just seasoning here; it’s part of the crunch experience.

Acid doesn’t have to be vinegarx

Traditional fish and chips often comes with vinegar, yet Indian twists on fish and chips can use other acids:

  • lemon wedges
  • a squeeze of lime
  • a tamarind dip
  • a chutney with brightness

Acid wakes up fried food. It’s what stops the plate from feeling heavy.

Oil choice and care keeps flavors clean

If your oil tastes tired, everything tastes tired.

Clean-tasting oil is the difference between “crispy” and “heavy.” Choose a neutral oil that can handle high heat, keep the temperature steady, and strain out burnt bits between batches—those little fragments are what make oil taste bitter. If you want a simple breakdown of oils and heat behavior, MasalaMonk’s cooking with oils guide is a helpful companion.

The “don’t crowd the fryer” rule is non-negotiable

Crowding drops oil temperature. Then batter absorbs oil. Then crispness disappears. Even if you’re using a fish and chip fryer at home, small batches win every time.

Also Read: Sourdough Recipe: 10 Easy Bread Bakes (Loaves, Rolls & Bagels)


Why these Indian twists still respect traditional fish and chips

It’s easy to throw spices into a classic and call it a twist. It’s harder to keep the classic soul intact. That’s why each variation here follows a simple rule: the spice should enhance the crunch ritual, not compete with it.

  • The masala twist plays nicely with chips because chaat logic was designed for snacks.
  • The Amritsari besan twist works because pakora logic was designed for frying.
  • The tandoori twist works because the fish itself can carry spice without burdening the batter.
  • The coconut-lime twist works because South Indian snack flavors already pair with seafood.
  • The chili-garlic twist works because condiments like thecha were built for crisp foods.

So you still get the plate you want. You simply get five different moods of it.

Also Read: 10 Vegan Chocolate Cake Recipes (Easy, Moist, & Dairy-Free)


A quick note on credibility sources that support the crispness mechanics

When you’re making fish and chips at home, small technique decisions add up. If you ever want to cross-check the classic baseline method—oil temperature, batter texture, rack draining—Serious Eats is a strong reference: classic fish and chips recipe. Likewise, BBC Good Food’s method is useful for batter discipline and “don’t overmix” cues: next-level fish & chips.

Meanwhile, for a clean, confidence-building doneness reference, the USDA’s safe temperature chart is straightforward and reader-friendly.

These sources aren’t here to complicate your cooking. They’re here because a crisp fish and chips batter behaves according to physics, not vibes. When you understand the cues, you stop guessing.

Also Read: Kahlua Drinks: 10 Easy Cocktail Recipes (Milk, Vodka, Coffee)


Closing: choose your twist, keep the ritual

Fish and chips doesn’t need saving. It needs remixing. The ritual—crisp crust, juicy fish, sturdy chips—still hits every time. Yet once you start treating the plate as a canvas, you get variety without sacrificing what makes it lovable.

Not sure which Indian fish & chips variation to start with? Save this “twist picker” and choose by mood: Masala + chaat chips for bright tang, Amritsari besan crunch for pakora-style rugged bite, tandoori crisp for smoky warmth, coconut-lime coastal for fresh zing, or chili-garlic thecha for heat that feels alive. Keep the ritual the same—crisp crust, juicy fish, sturdy chips—then let the accents do the work. Use this card as your closing checklist, and come back anytime you want a new direction without changing the method.

Start with the masala twist if you want instant payoff. Go Amritsari if you want that pakora crunch. Choose the tandoori direction when you want smoky warmth. Pick coconut-lime when you want coastal brightness. Bring in thecha when you want heat that feels alive.

Either way, you’re not abandoning traditional fish and chips. You’re keeping it—and giving it five Indian twists that feel like they belonged there all along.

Also Read: Hot Chocolate Coffee: 3 Easy Recipes (Cocoa, Mix, or Espresso)

FAQs

1) What makes fish and chips with Indian twists different from traditional fish and chips?

Fish and chips with Indian twists keeps the classic structure—crisp battered fish and sturdy chips—while shifting the flavor through Indian spice blends, chutney-style dips, and seasonings like chaat masala or chili-lime. In other words, it’s still traditional fish and chips at heart, just reimagined with bolder aromatics and brighter finishes.

2) Is this still British style fish and chips if I use Indian spices?

Yes. British style fish and chips is defined by technique and texture: a light fish and chips batter, hot oil, and proper draining so the crust stays crisp. Indian spices simply change the seasoning profile, not the essential method.

3) How do I keep fish and chips batter light and crispy?

Start with cold batter and mix only until combined—overmixing makes the coating tougher. Also, fry in small batches so the oil stays hot; otherwise the batter absorbs oil before it sets. Finally, drain on a rack instead of a plate so steam doesn’t soften the crust.

4) What’s the best oil temperature for fried fish and chips?

A steady, hot frying temperature is key. If the oil is too cool, fried fish and chips turns greasy; if it’s too hot, the coating browns before the fish cooks through. Aim for a consistent medium-high frying heat and let the oil recover between batches.

5) How do I know when fried fish and chips is done without a thermometer?

Look for a deep golden crust and fish that flakes cleanly in the thickest part. The center should be opaque and moist, not translucent. If the fish resists flaking, give it a short extra fry and let it rest briefly so carryover heat finishes the middle.

6) Can I use frozen fish for fish and chips with Indian twists?

Absolutely. Frozen fillets can work beautifully as long as they’re fully thawed and blotted dry. Excess surface moisture is the main reason batter slides off or turns soft, so drying the fish well matters more than whether it started fresh or frozen.

7) What’s the best frozen fish and chips approach for a quick dinner?

Use thicker frozen fish fillets and thicker-cut chips, then focus on crisping: cook at high heat, avoid crowding the tray, and let everything rest briefly on a rack. That short rest helps moisture escape, which keeps the coating and chips from softening.

8) What are the best chips for fish and chips with Indian twists?

Thick British chips (chunkier cuts) stay fluffy inside and hold up to dips. Meanwhile, crinkle chips are excellent for Indian twists on fish and chips because the ridges trap masala seasoning and stay flavorful even after dipping.

9) Why do my chips go soggy next to fish and chips?

Usually it’s steam. If chips are piled in a bowl or covered, trapped moisture softens them fast. Spread chips out, salt while hot, and keep them uncovered until serving. Similarly, drain the fish on a rack so it doesn’t steam the chips on the plate.

10) Can I bake fish and chips with Indian spices instead of frying?

Yes, although the texture changes slightly. Baking can still be satisfying if you dry the fish well, use a lighter coating, and cook at high heat. For chips, thicker cuts and adequate spacing on the tray help a lot.

11) Can I air-fry fish and chips with Indian twists?

You can, especially if you use a coating designed for air frying rather than a wet batter. For chips, avoid overcrowding and shake/flip midway. Air frying tends to reward smaller batches, so cooking in rounds often gives better crispness.

12) What’s the best fish for fish and chips if I can’t get cod or haddock?

Choose any firm, mild white fish that holds together—thicker fillets are more forgiving. The key is even thickness so the fish cooks through while the batter crisps, which matters whether you’re making British style fish and chips or fish and chips with Indian twists.

13) How do I make an Amritsari-style fish and chips batter?

Use besan (gram flour) as the main flour, then add a crisping helper like rice flour or cornstarch. Season with ajwain, ginger, garlic, chili, and black pepper. Keep the batter cold and fry hot so it sets quickly and stays crunchy.

14) How do I get a tandoori twist without ruining crispness?

Keep the tandoori flavor in the fish (spiced yogurt marinade), then wipe off excess marinade before cooking. After that, either use a lighter batter or a dry coating. This way you get the aroma of tandoori seasoning while preserving the crisp bite of fish and chips.

15) What dips go best with Indian twists on fish and chips?

Chutney-style dips are a natural match: mint-coriander, tamarind sweet-heat, spicy yogurt, or chili-garlic dips. They play the same role as tartar sauce—cooling, brightening, and adding contrast—while making the plate feel distinctly “twisted.”

16) How do I reheat fish and chips and keep it crispy?

Skip the microwave. Instead, reheat in a hot oven or air fryer until the crust re-crisps. Keep the fish and chips separated on a rack or perforated tray so hot air can circulate and moisture can escape.

17) Why does fish and chips batter fall off the fish?

It usually happens when the fish is wet or the coating has nothing to cling to. Pat the fish very dry, dust lightly with flour or starch before dipping into batter, and avoid letting battered fish sit too long before frying.

18) Can I make fish and chips with Indian twists ahead of time for guests?

You can prep almost everything: cut potatoes, mix spice blends, and prepare dips in advance. Then, fry or bake close to serving time for best texture. If needed, keep fried fish warm on a rack in a low oven so it stays crisp until you’re ready to plate.

Posted on — 7 Comments

Belgian Waffle Recipe + 5 Indian Twists on a Breakfast Classic

Magazine-style cover image of Belgian waffles with an Indian twist—stacked waffles drizzled with jaggery syrup, topped with caramelized peanuts, with chai and spices in the background.

A Belgian waffle recipe has a particular kind of charm. To begin with, it’s the sound: the soft click of the waffle maker closing, the gentle hiss as batter hits heat, the tiny pause while steam builds. Then comes the moment the lid lifts and a golden grid appears—crisp at the edges, tender at the center, and made for whatever you’re craving: syrup, fruit, chocolate, chutney, even spicy chicken.

If you’ve been looking for a recipe that feels dependable and still leaves room for playful Indian flavours, you’re in exactly the right place. We’ll start with a classic Belgian waffle batter you’ll want to keep forever. After that, we’ll take five Indian detours that feel completely natural rather than forced: a coconut–jaggery waffle recipe without milk, peanut butter waffles with chikki-style crunch, a “paneer-style” protein waffle recipe using cottage cheese, soft yogurt waffles with dahi and elaichi, and finally a bold tandoori chicken and waffles sandwich that turns brunch into a proper event.

Before long, you’ll also have a simple waffle mix recipe you can stash in a jar for quick mornings, plus a handful of desi-leaning drizzles and toppings that make every plate feel intentional. So, with that in mind, let’s warm up the waffle iron and get into it.


Belgian Waffle Recipe, Desi Edition: Why This Waffle Recipe Works Every Time

A great waffle is all about contrast. On one hand, you want a crisp exterior that holds its shape and tastes lightly toasted. On the other, you want a soft interior that feels comforting—almost like cake, but lighter. Meanwhile, you also want pockets deep enough to catch every last drop of syrup, sauce, or chutney, so each bite tastes complete.

Torn Belgian waffle showing a crisp golden edge and fluffy interior with syrup pouring into deep pockets; Indian pantry accents like cardamom, yogurt, and peanut butter in the background; text overlay about texture with MasalaMonk.com footer.
Pro tip for that iconic Belgian waffle contrast: cook until deep golden (a shade darker than pancakes), then rest on a wire rack so steam escapes and the pockets stay crisp for syrups, chutneys, and sauces.

That balance is why a classic Belgian waffle recipe is such a keeper. Better still, it’s one of those bases that welcomes small, smart changes. Swap milk for coconut milk and suddenly you’ve got a no milk waffle recipe that tastes like dessert. Stir in peanut butter and the waffle turns richer and more filling. Add yogurt and the crumb gets tender with a pleasant tang. Fold in cottage cheese and it becomes a true protein waffle recipe without tasting “diet.” Push it into savoury territory and it becomes a full waffle breakfast sandwich experience.

In other words, you’re not learning five different recipes. Instead, you’re learning one waffle batter and then remixing it with purpose.

If you like comparing your fundamentals to well-known technique sources, this classic approach to waffles from King Arthur Baking is a steady reference point for ratios and method: classic waffles. Likewise, if you enjoy the “why” behind crispness, browning, and texture, Serious Eats explains waffle mechanics beautifully here: buttermilk vanilla waffles.

Now, let’s build the foundation.

Also Read: Mayo Recipe: 15+ Homemade Mayonnaise Variations


Belgian Waffle Recipe Batter: Ingredients for Belgian Waffle Batter

This Belgian waffle batter is your master key. Even though the twists will change the flavour, the structure stays steady.

Belgian waffle batter ingredients (makes about 6–8 waffles)

  • 2 cups (260 g) all-purpose flour
  • 2 tbsp sugar
  • 2 tsp baking powder
  • 1/2 tsp baking soda
  • 1/2 tsp salt
  • 2 large eggs
  • 1 3/4 cups milk
  • 1/2 cup melted butter (or neutral oil)
  • 1 tsp vanilla extract

At first glance, it’s simple. Nevertheless, each ingredient has a job—especially once we start making variations like waffle recipe without milk, vegan waffle batter, or oat flour waffles.

Belgian waffle batter ingredients arranged with milk, eggs, flour, sugar, leaveners and swap ideas like coconut milk, dahi, peanut butter and cottage cheese for Indian-style Belgian waffles.
Use this as your ‘base batter map’: keep the dry mix constant, then change one wet ingredient (coconut milk / dahi / peanut butter / cottage cheese) to control texture—crisp outside, tender inside—without rewriting the recipe.

What each ingredient is doing in this Belgian waffle recipe

Flour gives structure. Without enough structure, waffles tear when you lift them out or collapse under toppings. With too much, they turn bready.

Baking powder gives the main lift. That lift creates the light interior that makes Belgian waffles so satisfying.

Baking soda supports browning and helps the waffle colour evenly, particularly when the batter includes something slightly acidic (like yogurt later on).

Eggs bring richness and help the waffle set. They also support browning and help waffles hold together when you’re building bigger plates like a chicken and waffles sandwich.

Milk provides moisture, flavour, and tenderness. Still, it’s also one of the easiest ingredients to swap—coconut milk makes a dreamy no milk waffle recipe.

Butter (or oil) helps the exterior crisp while keeping the interior tender. Butter brings flavour. Oil brings practicality. Both work.

Sugar isn’t just sweetness. It encourages browning and that faint caramel flavour that makes waffles taste “toasted” instead of pale.

Vanilla and salt are the quiet heroes. Vanilla adds warmth. Salt sharpens everything so the waffle tastes alive rather than flat.

With the ingredients ready, it’s time to cook.

Also Read: Whole Chicken in Crock Pot Recipe (Slow Cooker “Roast” Chicken with Veggies)


How to Make Waffles: Belgian Waffle Recipe Method in a Waffle Maker or Waffle Iron

The method stays the same for every twist. Consequently, once you learn this rhythm, all the variations feel easy.

Step 1: Preheat the waffle maker properly

Start by turning on your waffle maker (or waffle iron) and letting it fully preheat. If it has a readiness light, wait for it. Even so, don’t rush—give it another minute after it signals hot.

Why? Because heat is the secret behind crispness. When the iron is truly hot, the batter sets quickly at the surface, creating that crisp shell. When the iron is only “kind of warm,” the batter steams and stays soft.

Preheating a Belgian waffle maker with steam rising for crispy Belgian waffles; tip to wait 60–90 seconds after the ready light for better texture.
Extra crisp hack: once the light says ‘ready,’ give the iron another minute—high heat sets the outside fast, so the inside stays fluffy instead of turning steamy.

Step 2: Whisk the dry ingredients

In a large bowl, whisk together flour, sugar, baking powder, baking soda, and salt. This isn’t busywork. Rather, it spreads the leavening evenly so every waffle rises and browns consistently.

Whisking dry ingredients for Belgian waffle batter to evenly distribute baking powder and baking soda for consistent rise and crisp waffles.
Pro tip: whisk the dry mix thoroughly so baking powder/soda don’t clump—uneven mixing can cause bitter pockets and patchy browning.

Step 3: Whisk the wet ingredients

In a second bowl, whisk eggs, milk, melted butter (or oil), and vanilla until smooth. If your butter is very hot, let it cool slightly first—warm is fine, scorching is not.

Whisking eggs, milk and vanilla for Belgian waffle batter while pouring cooled melted butter to prevent scrambled eggs and keep waffles tender.
Pro move: let melted butter cool slightly, then whisk it in slowly—your batter stays smooth, your waffles stay light, and the iron won’t steam out a gummy center.

Step 4: Combine gently

Pour wet into dry. Stir until you don’t see dry flour. Then stop. A few small lumps are fine. In fact, chasing perfectly smooth batter often leads to overmixing—and overmixing is the fastest route to dense waffles.

Close-up of Belgian waffle batter being folded in a bowl with a spatula, showing small lumps for lighter, fluffier waffles.
Pro texture move: fold just until the dry flour disappears. A few lumps = steam pockets + lift; overmixing develops gluten and makes waffles bread-like.

Step 5: Rest the waffle batter briefly

Let the batter rest for 5–10 minutes. Meanwhile, keep the waffle maker hot. During the rest, flour hydrates and the batter settles into a better consistency.

Covered bowl of Belgian waffle batter resting for 5–10 minutes with a timer and cardamom, showing why resting batter helps crisp edges and reduces sticking.
Pro tip: resting lets flour hydrate and bubbles stabilize—your batter spreads more evenly in the iron, releases cleaner, and the waffle browns more uniformly (especially helpful for eggless and coconut-milk versions).

Step 6: Cook until deep golden

Lightly grease the plates if your waffle iron tends to stick. Pour in batter, close the lid, and cook until the waffle is richly golden and smells toasted. Don’t pull it out too pale. In contrast to pancakes, waffles often benefit from deeper colour.

Belgian waffle releasing cleanly from a hot waffle iron as steam slows—tip for crisp waffles and preventing sticking.
Pro cue: when the steam drops from a heavy hiss to a light wisp, the waffle has set—this is when it lifts cleanly and stays crisp.

Step 7: Cool on a rack

Move each waffle onto a wire rack, not a plate. Otherwise, steam trapped underneath softens the crust. On a rack, air circulates and the waffle stays crisp longer.

Belgian waffles cooling on a wire rack vs a plate to prevent sogginess and keep edges crispy, with airflow tip overlay.
Pro move: cool waffles on a rack for 1–2 minutes before topping—steam escapes instead of soaking back in, so the pockets stay crisp for syrups and chutneys.

That’s the base. Before we get into crisp vs fluffy, let’s cover two common situations: making waffles without a waffle maker, and making eggless waffles without losing texture. Even without a waffle iron—or if you’re cooking egg-free—you can still use the same batter ideas. Here are two practical routes that work beautifully in an Indian kitchen.

Also Read: Air Fryer Hard-Boiled Eggs (No Water, Easy Peel Recipe)


How to Make Waffles Without a Waffle Maker (Skillet / Pan Method)

No waffle iron? You can still make a satisfying waffle-style breakfast at home using a heavy skillet or tawa. You won’t get the deep grid pattern, yet you can still achieve crisp edges and a soft center.

Use your regular waffle batter (the Belgian waffle batter works here too). Aim for a slow-pouring consistency: thicker than crepe batter, but not so thick it sits in a lump. If it feels runny, whisk in 1–2 tablespoons flour. If it feels too thick, loosen it with a small splash of milk, coconut milk, or water.

Tawa waffles cooking on a cast-iron skillet with a lid to steam-cook the center, showing a no-waffle-maker waffle method with pour-cover-flip-rack steps.
Pro tip for better texture: keep the flame medium-low and cover for 2–3 minutes so the middle sets before browning; then flip and finish, and cool on a rack so the crust stays crisp instead of steaming soft.

Quick skillet checklist (waffles in a skillet):

  • Heat a heavy pan/tawa on medium-low for 2–3 minutes
  • Grease lightly (too much oil can fry the surface)
  • Pour batter, spread to about ½ inch thick
  • Cover with a lid so the center cooks through
  • Flip once set, cook until deep golden
  • Rest on a wire rack for crisp edges

Now cook it: heat the pan, grease lightly, then pour about ⅓ to ½ cup batter into the center. Spread into a round about ½ inch thick and cover with a lid immediately. The lid matters because trapped heat helps the center cook through without burning the base.

Cook for 2–3 minutes until the underside is deep golden and the top looks mostly set. Flip carefully and cook the second side for 1–2 minutes until it smells toasted. If you want extra crispness, flip once more for 20–30 seconds per side.

Finally, rest it on a wire rack for a minute instead of a plate. That quick step helps waffles without a waffle iron stay crisp instead of steaming soft. Serve like a classic pan waffle with jaggery drizzle, yogurt, peanut butter, fruit, or a savoury filling.

Also Read: Authentic Louisiana Red Beans and Rice Recipe (Best Ever)


Eggless Waffles (Waffle Recipe Without Egg)

Eggless waffles are a natural fit for Indian kitchens. The goal is to replace what eggs usually do—binding and structure—so your waffle recipe without egg still holds together, tastes rich, and cooks up golden.

Keep your dry ingredients exactly the same as the base recipe. Then choose one of these eggless methods depending on what you have.

Option A: Dahi method (most “desi”, very dependable)

In your wet bowl:

  • Skip the 2 eggs
  • Add ½ cup thick dahi/curd (plain yogurt)
  • Add 2 tablespoons extra melted butter or oil (to bring back richness)
  • Keep milk the same, or reduce milk by ¼ cup if your curd is very thick
  • Add an extra ½ teaspoon baking powder for lift
Eggless waffle batter made with thick dahi (curd) being whisked in a bowl, showing the “dahi method” for a waffle recipe without egg.
Pro tip: Eggless batters need a slightly longer cook for clean release—wait for deeper golden edges, then rest the waffle on a rack for 1–2 minutes to firm up and stay crisp.

Whisk until smooth, combine wet into dry gently, and rest the batter for 10 minutes. Cook until the waffles are a deeper golden than usual—eggless batters often need that extra minute to set firmly and release cleanly.

Option B: Flax method (eggless and vegan-leaning)

Replace 2 eggs with 2 flax eggs:

  • Mix 2 tbsp ground flaxseed + 6 tbsp water
  • Let it sit 8–10 minutes until gel-like
  • Whisk it into the wet ingredients
Spoon lifting gelled flax egg (ground flaxseed + water) from a glass bowl with ratio text overlay—easy binder for eggless waffle batter; MasalaMonk.com footer.
Fast egg substitute for waffles: 2 tbsp ground flax + 6 tbsp water, rest 8–10 min until gelled. Use this to replace 2 eggs (best for peanut butter, coconut–jaggery, and oat-flour waffle variations).

This option pairs especially well with coconut–jaggery, peanut butter waffles, and oat flour swaps.

One last tip: once cooked, rest waffles on a wire rack for 1–2 minutes. That short pause helps eggless waffles firm up and keeps the edges crisp. For a straightforward reference recipe style, you can look at vegan waffles.

Now that you can make waffles with or without eggs—and even without a waffle iron—let’s talk texture and choose your ideal finish.

Also Read: Double Chocolate Chip Cookies – Easy Recipe with 7 Variations


How to Make Belgian Waffles Crispy or Fluffy: Crispy Waffle Method vs Fluffy Waffle Method

Different mornings call for different waffles. Sometimes you want a crispy waffle recipe style bite with crackly edges. Other times, you want a fluffy waffle recipe feel—soft, tender, and comforting.

Side-by-side Belgian waffles showing crispy vs fluffy texture—one cooled on a rack for crunch, one plated to highlight a soft, airy crumb.
Quick texture cheat: darker color = more crunch, and a wire rack prevents steam from softening the crust—pick your finish based on toppings (syrup-heavy plates love the crispier side).

Crispy waffle method (for crisp outside, tender inside)

  • Preheat the waffle maker thoroughly
  • Cook to deep golden brown
  • Cool on a wire rack
  • Avoid stacking waffles on a plate

Fluffy waffle method (for soft, cake-like tenderness)

  • Mix gently and stop early
  • Rest the batter
  • Cook until golden (not too dark)
  • Serve soon after cooking

The sweet spot (what most people love)

Cook until richly golden, then let the waffle sit on a rack for a moment. The crust sets. The interior stays tender. You get the classic Belgian waffle contrast without effort.

Now we can start the Indian twists.

Also Read: Negroni Recipe: Classic Cocktail & Its Variation Drinks


Homemade Waffle Mix Recipe: DIY Waffle Mix for Quick Mornings

Sometimes the craving hits, but you don’t want to measure five powders while half awake. That’s when a jar of homemade waffle mix makes life easier. Additionally, it keeps your base consistent, which means your flavour experiments taste more controlled.

Portrait photo of a labeled glass jar filled with homemade waffle mix on a kitchen counter, surrounded by flour and measuring spoons, with text overlay showing the dry mix ratios and wet add-ins for quick Belgian waffles; MasalaMonk.com in the footer.
Meal-prep win: label the jar with the date and batch size—then you only measure wet ingredients on waffle mornings. Store airtight and keep the jar away from humidity so the leavening stays effective.

DIY waffle mix (dry)

Whisk together and store airtight:

  • 2 cups flour
  • 2 tbsp sugar
  • 2 tsp baking powder
  • 1/2 tsp baking soda
  • 1/2 tsp salt

How to use waffle mix in a waffle maker

For every 2 cups of dry mix, whisk:

  • 2 eggs
  • 1 3/4 cups milk
  • 1/2 cup melted butter or oil
  • vanilla (optional)

Then combine wet into dry, rest briefly, and cook as usual.

From here, you can transform the batter by changing only the wet bowl: coconut milk, yogurt, peanut butter, cottage cheese, jaggery. As a result, you can create a full waffle spread without making five separate batters.

Also Read: Béchamel Sauce for Lasagna: Classic, Vegan & Ricotta Sauce Recipe


Waffle Recipe Without Milk: Coconut–Jaggery Belgian Waffles

If you’ve ever needed a waffle recipe without milk, you already know the risk: some no-milk batters taste thin. Coconut milk fixes that immediately. It adds richness and aroma, while jaggery brings that deep caramel warmth that feels unmistakably Indian.

If you’d like a simple explanation of jaggery for anyone unfamiliar, this is a clean reference: jaggery.

Dairy-free coconut–jaggery Belgian waffle batter being poured into a hot waffle iron, with coconut milk, grated jaggery and desiccated coconut shown for a no-milk waffle variation.
Coconut milk keeps the crumb rich even without dairy, while jaggery browns faster than sugar—cook a shade deeper golden, then cool on a rack for crisp edges.

Dairy-free waffle batter variation (coconut–jaggery)

Start with the base Belgian waffle batter, then swap and add:

  • Replace milk with coconut milk (same quantity)
  • Replace butter with neutral oil or melted coconut oil
  • Replace sugar with grated jaggery (2–4 tbsp, to taste)
  • Add 1/2 tsp cardamom
  • Optional: 2 tbsp desiccated coconut

Cooking coconut–jaggery waffles

Because jaggery browns quickly, trust aroma and colour. Wait until the waffle is deep golden and smells toasted, almost like caramelised coconut. Then cool it on a rack so crispness sets.

Coconut jaggery waffle topping ideas

  • Quick jaggery syrup (jaggery warmed with a splash of water until glossy)
  • Toasted coconut + chopped cashews
  • A tiny pinch of salt to sharpen sweetness
  • Thick curd on the side if you enjoy sweet-tang contrast

If this flavour feels like your comfort zone, you’ll probably love the coconut dessert world too—these traditional coconut ladoos share a similar coconut-forward warmth.


Peanut Butter Waffles With Chikki Crunch: Peanut Butter Waffle Recipe Twist

Peanut butter waffles are comforting on their own. However, once you bring in jaggery and roasted peanuts, the flavour becomes distinctly Indian—like chikki in waffle form.

If readers want context for the “chikki” idea, this quick reference works neatly: chikki.

Peanut butter waffles topped with roasted peanuts, jaggery drizzle, and chikki crunch—Indian-style Belgian waffle variation.
Pro tip: warm the jaggery with a splash of water for 30–45 seconds so it turns glossy and pours into the waffle pockets; finish with a pinch of salt to make the peanut flavour pop.

Peanut butter waffle batter add-ins

Start with the base batter and add:

  • 3 tbsp peanut butter (creamy works best)
  • 1–2 tbsp jaggery or brown sugar (optional)
  • 1/4 tsp cardamom or cinnamon (choose one)

Peanut butter thickens batter. If it seems too stiff, add a splash of milk or coconut milk until it pours smoothly.

Cooking peanut butter waffles

Cook until deeply golden. Peanut butter tastes best when it’s a little toasted, so let the waffle develop colour. Afterward, cool it on a rack for a minute so the surface stays crisp.

Chikki-style topping for waffles

  • Crushed roasted peanuts
  • Warm jaggery drizzle
  • Pinch of salt

If you like a sweet-and-spicy plate, peanut flavours pair surprisingly well with chutney too. This spicy peanut chutney (no onion, no garlic) is a punchy companion, especially when you want contrast.


Protein Waffle Recipe: Cottage Cheese Belgian Waffles, Paneer-Style

A protein waffle recipe doesn’t have to feel like a compromise. Cottage cheese makes waffles tender and rich, with a mild flavour that takes beautifully to cardamom, nuts, and honey. If you’ve ever loved paneer-based sweets, this “paneer-style” direction will feel familiar in the best way.

This twist also fits naturally with what many people look for when they want cottage cheese waffles: satisfying, filling, and still delicious.

Protein waffle recipe made with blended cottage cheese (paneer-style), topped with yogurt, honey and pistachios, with tips for crisp edges.
Quick texture fix: blend cottage cheese until smooth, then cook 1–2 minutes longer than usual—this gives you a crisp shell with a soft, high-protein center.

Cottage cheese waffle batter (paneer-style)

Add to the base batter:

  • 1/2 cup cottage cheese, blended smooth
  • 1/2 tsp cardamom
  • 2 tbsp chopped pistachios or cashews
  • Optional: 1 tbsp honey or sugar if you like it sweeter

Blend the cottage cheese first; otherwise, the batter can feel bumpy rather than creamy. Then whisk it into the wet ingredients before combining wet and dry.

Cooking protein waffles without losing crispness

Because cottage cheese adds moisture, cook until deep golden and let the waffle rest on a rack. That extra browning helps the outside stay crisp while the inside stays tender.

High-protein waffle toppings (still indulgent)

  • Thick yogurt + honey + pistachios
  • Saffron honey drizzle
  • Mango slices when in season
  • A spoon of something creamy and fragrant

If you enjoy protein-focused breakfast ideas beyond waffles, you might also like these high-protein plant-based breakfast ideas.


Yogurt Waffles: Dahi–Elaichi Belgian Waffle Recipe, Waffle Yogurt Variation

Yogurt waffles are quietly wonderful. They come out tender, lightly tangy, and perfect with fruit and nuts. Using dahi keeps it familiar; adding cardamom keeps it fragrant.

This is also a natural home for what people mean by “waffle yogurt” or “yogurt waffle batter,” except we’re leaning into Indian pantry logic rather than forcing an imported style.

Dahi–elaichi yogurt Belgian waffle variation topped with thick curd, honey drizzle, and crushed pistachios, with quick batter-thickness tips and MasalaMonk.com footer.
Pro tip: if your dahi is very thick, whisk it smooth first, then loosen with 1 tbsp water at a time—this keeps the batter pourable and helps the waffle cook through without losing crisp edges.

Yogurt waffle batter (dahi–elaichi)

Start with the base batter, then adjust:

  • Replace 1/2 cup of milk with thick yogurt/curd
  • Add 1/2 tsp cardamom
  • Optional: lemon zest for brightness
  • Optional: 1 tbsp sugar if the yogurt is very tangy

Whisk yogurt into the wet ingredients until smooth, then combine gently with the dry bowl.

Cooking yogurt waffles

Since yogurt adds moisture, cook slightly longer for a crisp exterior. Even so, the inside stays plush and soft, which is exactly what you want in this variation.

Mango shrikhand topping for waffles

When mangoes are in season, this combination is hard to beat: warm waffle + chilled creamy topping + pistachios. If you want inspiration for that topping, this mango shrikhand direction is perfect for waffles.


Chicken and Waffles Sandwich, Tandoori Style: Waffle Breakfast Sandwich

Now we go savoury, and not subtly.

Classic chicken and waffles works because it’s built on contrast: crisp waffles, juicy chicken, savoury seasoning, and a sauce that pulls everything together. The Indian version keeps that logic and changes the flavour language—tandoori spice, chutney, yogurt, onions, lemon.

For a simple reference on the classic pairing, this is unobtrusive: chicken and waffles.

Step-by-step tandoori chicken and waffles sandwich assembly guide with chutney base, sliced onions, lemon squeeze, and yogurt sauce drizzle on Belgian waffles.
Build order matters: spread chutney first (it protects the waffle from sogginess), keep onions thin, squeeze lemon before the yogurt drizzle, and finish with a light zig-zag so the waffle stays crisp.

What you need for a chicken and waffles sandwich

  • 2 waffles (smaller waffles are easiest as a sandwich)
  • Cooked tandoori-style chicken, sliced thin
  • Thin onion slices
  • Lemon wedge
  • Yogurt sauce: yogurt + salt + pinch of chaat masala
  • Chutney

For a bold chutney option that brings heat and depth, this kara chutney works beautifully with chicken.

Waffle breakfast sandwich assembly

Spread chutney on the first waffle. Layer chicken. Add onions. Drizzle yogurt sauce. Squeeze lemon. Close with the second waffle and press gently.

Tandoori chicken and waffles sandwich cut in half with green chutney, onion, and yogurt sauce; text overlay shows the build order and a honey-in-yogurt flavor hack; MasalaMonk.com footer.
Keep the waffle crisp: toast the waffle for 30–45 seconds after cooking, then assemble fast. For a cleaner bite, spread chutney thick (not runny) and drizzle yogurt sauce last.

Variations that keep the same spirit

  • Paneer tikka waffle sandwich for a vegetarian version
  • Butter chicken filling for a richer, saucier plate—this butter chicken recipe is a natural fit
  • Add cucumber slices for freshness
  • Add a tiny honey drizzle to the yogurt sauce if you love sweet-savoury contrast

Belgian Waffle Recipe Variants: Chocolate Waffles, Banana Waffles, Cinnamon Comfort

Once your base Belgian waffle recipe is second nature, classic flavours become easy. Besides, they’re perfect when you want variety without planning a whole new list of twists.

Portrait triptych showing Belgian waffle recipe variants—chocolate waffle, banana waffle, and cinnamon waffle—with quick mix-in tips and MasalaMonk.com footer.
Use this as your quick decision chart: cocoa + a little extra sugar for chocolate, 1 mashed banana (reduce liquid slightly) for banana, and a cinnamon-spice dry-mix boost for cozy, bakery-style waffles.

Chocolate waffles: Belgian waffle recipe with cocoa and warm spice

To make chocolate waffles, add to the dry ingredients:

  • 1/4 cup cocoa powder
  • 2 tbsp extra sugar (cocoa needs balance)
  • Pinch of cardamom or cinnamon

Cook until deep golden, then top with chocolate sauce, nuts, or fruit. Alternatively, add a jaggery-cocoa drizzle for a deeper sweetness that feels less “candy” and more “grown-up dessert.”

Banana waffles: Belgian waffle recipe with jaggery and cinnamon

Mash 1 ripe banana into the wet ingredients, then add:

  • 1/2 tsp cinnamon
  • Optional: swap some sugar for jaggery

These banana waffles are especially good with peanut butter, roasted nuts, and honey. In fact, they’re a natural bridge between comfort and indulgence.

Cinnamon waffle recipe comfort, without rewriting the batter

Add 1 tsp cinnamon to the dry mix and finish with butter and cinnamon sugar. On cooler mornings, this tastes like instant coziness.

Also Read: Greek Tzatziki Sauce Recipe (1 Master Sauce + 10 Easy Variations)


Oat Flour Waffles and Oatmeal Flour Waffles: Belgian Waffle Recipe With a Hearty Swap

Oat flour waffles are popular because they taste hearty and pair beautifully with bananas, peanut butter, and honey. Still, oat flour can weaken structure if you swap too much at once. So, rather than going all in immediately, start gently.

Side-by-side comparison of oat flour waffles (1/3 flour swap) versus classic Belgian waffles, showing texture differences and tips for crisp edges.
Quick oat-flour swap guide: start with ⅓ oat flour, loosen batter with 1–2 tbsp liquid if needed, and cook one shade darker for crisp edges.

Oat flour waffle batter approach

Replace one-third of the all-purpose flour with oat flour. Keep the rest the same. Then cook until deep golden and cool on a rack.

Once you like the result, you can increase the oat flour portion. Either way, the flavour pairs naturally with jaggery, cinnamon, banana, and nuts—so it fits perfectly with the Indian direction of this post.

Also Read: Healthy Oat Protein Bars – 5 Easy No Sugar Recipes for Snacks


Waffle Recipe Without Milk, Again: No Milk Waffle Recipe Shortcuts That Still Taste Rich

If you’re returning to the waffle recipe without milk idea on busy mornings, coconut milk is the easiest win. Yet there are other workable no-milk directions too.

Portrait infographic with three no-milk waffle batter options—coconut milk, dahi + water, and water with extra oil + vanilla—plus MasalaMonk.com footer.
Quick swap guide for dairy-free waffles: choose coconut milk for richness, dahi + water when you need body + gentle tang, or water + extra oil + vanilla when you’re improvising—then cook a shade darker and cool on a rack for crisp edges.
  • If you have coconut milk, use it.
  • If you only have water, add a little extra fat (oil) and a touch more vanilla to keep flavour rounded.
  • If you have yogurt but no milk, use yogurt plus water to thin it slightly, then whisk until smooth.

Even when you’re improvising, the key is to keep batter pourable and cook until the waffle is deeply golden so it tastes toasted, not pale.

Also Read: 10 High Calorie Protein Shakes & Smoothie Recipes for Healthy Weight Gain


Waffle Batter Confidence: How to Tell When Waffle Batter Is “Right” Without Overthinking

Batter consistency matters, yet it doesn’t need to become stressful. A good waffle batter should pour, but not run like water. It should settle into the grid when you close the lid, not explode out the sides immediately.

Waffle batter consistency guide showing the 10-second ribbon test—too thick, just right, and too thin—with quick fixes for Belgian waffle batter.
Quick fix guide: if your batter drops in clumps, loosen with 1 tbsp milk/coconut milk; if it runs like water, add 1 tbsp flour—aim for a slow ribbon that disappears in ~2 seconds.

If your batter is too thick, add liquid one splash at a time. If it’s too thin, add a spoon of flour and whisk gently. Then, once you cook one waffle, you’ll know exactly what to adjust.

With that settled, let’s make toppings feel as exciting as the waffles themselves.

Also Read: Simple Bloody Mary Recipe – Classic, Bloody Maria, Virgin & More


Waffle Syrup and Waffle Toppings, Desi Style: From Jaggery Drizzle to Saffron Honey

Waffles exist for toppings. The pockets practically demand syrup. Maple is lovely, of course, but Indian pantry drizzles can feel even more exciting with coconut, jaggery, peanut butter, yogurt, and cardamom.

Triptych showing three Indian waffle toppings—jaggery syrup, saffron honey, and rose-lemon drizzle—poured over Belgian waffles, with MasalaMonk.com footer.
Quick rule: warm your syrup for 15–20 seconds so it flows into the pockets. Finish with a tiny pinch of salt (especially with jaggery) to make the flavours pop.

Jaggery waffle syrup

Warm jaggery with a splash of water until glossy. Then add cardamom and a pinch of salt. This syrup is perfect for coconut–jaggery waffles, banana waffles, and peanut chikki waffles.

Saffron honey drizzle

Warm honey gently and steep saffron strands for a few minutes. This tastes especially good on yogurt waffles and cottage cheese protein waffles.

Rose drizzle

Rose syrup with lemon and a tiny pinch of cardamom turns waffles into something festive—especially with pistachios.

Ice cream and waffle dessert plates

If you want a dessert moment, warm waffles plus ice cream is always a win. For mango season inspiration, these mango kulfi ideas are brilliant as waffle toppings too.


Bubble Waffles and Hong Kong Waffles: Street-Style Filling Ideas That Feel Indian

Bubble waffles—often called bubble waffles, bubbles waffles, or Hong Kong waffle—are lighter, snack-like, and made for stuffing and folding.

If you want a quick reference for the style, this explains it clearly: egg waffle. For a baseline recipe format, this is approachable: bubble waffles.

Pro tip for bubble waffles: keep the waffle warm, build with one cold element (kulfi/ice cream), and always drizzle sauces at the end—your “egg waffle” stays crisp longer instead of turning cakey.

Bubble waffle filling ideas (Indian street-dessert style)

  • Kulfi scoop + nuts + rose syrup
  • Rabri-like drizzle + pistachios + saffron
  • Chocolate + banana + crushed biscuits
  • Mango ice cream + cardamom sugar + toasted coconut

Even if you don’t have a bubble waffle maker, the flavour ideas still work with Belgian waffles. Make smaller waffles, fold them like cones, fill them, and eat them like street food.

Also Read: Peanut Butter Cookies (Classic Recipe & 3 Variations)


Belgian Waffle Recipe, One Base, Endless Plates

Ultimately, the reason to keep a Belgian waffle recipe in your back pocket is simple: one batter, many moods.

Sometimes you want coconut–jaggery comfort from a waffle recipe without milk. Other times you want peanut butter waffles with chikki crunch. On busy days, a “paneer-style” protein waffle recipe feels like a gift. When you want soft and fragrant, yogurt waffles deliver. And when brunch needs to be bold, a tandoori chicken and waffles sandwich becomes the centerpiece.

If you want another India-leaning waffle idea to explore next, these sabudana waffles are a fun companion read—especially if you enjoy Indian pantry twists.

FAQs

1) What is a Belgian waffle recipe, and how is it different from regular waffles?

A Belgian waffle recipe typically makes waffles that are thicker, airier, and built with deeper pockets. As a result, they hold syrup, sauces, and toppings more generously than thinner, “regular” waffles.

2) Can I make a Belgian waffle recipe without a Belgian waffle maker?

Yes. Even if your waffle iron makes thinner waffles, the same batter still works; the main change is that cook time may be shorter and the waffles may turn out crispier rather than thick.

3) How do I make waffles crispy on the outside and soft inside?

For that classic contrast, preheat the waffle maker thoroughly, cook until deep golden, and place cooked waffles on a rack instead of stacking them. That combination helps the crust stay crisp while the center remains tender.

4) Why are my waffles turning out soggy after cooking?

Most often, waffles go soft because steam gets trapped—especially when waffles are stacked on a plate. Instead, let them cool briefly on a rack so moisture can escape.

5) What’s the best waffle batter consistency for a Belgian waffle recipe?

The ideal waffle batter should pour easily but still feel slightly thick—similar to a smooth pancake batter. If it runs like water, it may spread too fast and steam; if it’s too stiff, it may cook unevenly.

6) Can I make waffle batter ahead of time for breakfast?

You can mix the dry ingredients ahead, and you can also whisk the wet ingredients ahead. However, once everything is combined, it’s usually best to cook within a few hours so the leavening stays effective.

7) What is a waffle mix, and can I make waffle mix at home?

Waffle mix is a pre-mixed dry blend (flour, sugar, salt, leavening) that you combine with wet ingredients later. Homemade waffle mix works well and makes weekday waffles much faster.

8) How do I make a waffle recipe without milk that still tastes rich?

Use coconut milk, oat milk, or another creamy plant milk, and include enough fat (oil or dairy-free butter). In addition, vanilla and a pinch of salt help round out flavor.

9) Are dairy-free waffles the same as vegan waffles?

Not always. Dairy-free waffles avoid milk and butter, but they can still include eggs. Vegan waffles avoid all animal products, so you’ll replace both dairy and eggs.

10) How do I make vegan waffles that don’t fall apart?

Use a good binder such as a flax “egg” (ground flax mixed with water) and cook waffles until fully set and golden. Also, avoid opening the waffle maker too early.

11) Can I make eggless waffles that still rise properly?

Yes. Eggless waffles can rise well with fresh baking powder and a binder like flax, yogurt alternatives, or fruit puree. Even so, slightly longer cooking helps them set firmly.

12) What’s the easiest way to make gluten-free waffles?

A reliable gluten-free flour blend is the simplest option because it’s designed for structure. If you’re experimenting, start with a blend before trying single flours.

13) Can I make oat flour waffles with a Belgian waffle recipe?

Absolutely. Replace part of the all-purpose flour with oat flour to keep structure. Gradually increasing oat flour works better than swapping all flour at once.

14) How do I make protein waffles that still taste good?

A protein waffle recipe tastes best when the “protein” comes from ingredients that also improve texture, like cottage cheese or yogurt. Furthermore, balanced sweetness and vanilla keep flavor pleasant.

15) Are cottage cheese waffles the same as paneer-style waffles?

They’re not identical, yet cottage cheese waffles can feel “paneer-style” in spirit—mild, creamy, and perfect with cardamom, nuts, and honey.

16) Can I add peanut butter to waffle batter?

Yes, peanut butter waffles are a popular variation. Since peanut butter thickens batter, add a splash of milk (or plant milk) if the batter becomes too dense.

17) How can I make peanut butter waffles taste more “Indian”?

Try adding jaggery and cardamom, then top with roasted peanuts for a chikki-like finish. This approach creates a warm, nutty profile rather than a plain “PB” taste.

18) What are yogurt waffles, and why add yogurt to waffle batter?

Yogurt waffles use curd or yogurt in the batter to add tenderness and a gentle tang. Consequently, they pair especially well with fruit, honey, and nuts.

19) Can I use thick curd (dahi) instead of milk in waffles?

Yes. You can replace a portion of milk with thick curd, then whisk until smooth. If the batter becomes too thick, thin it with a small splash of water.

20) What toppings go best with Indian-style waffles?

Jaggery syrup, saffron honey, rose drizzle, chopped nuts, coconut, shrikhand-style toppings, and fresh fruit all work beautifully. Additionally, savory waffles pair well with chutneys and yogurt sauces.

21) What is the best syrup for waffles if I don’t have maple syrup?

Jaggery syrup is a great alternative, and honey works well too. For a more festive vibe, saffron-infused honey or rose-lemon drizzle can feel special.

22) Can I make a chicken and waffles sandwich at home?

Definitely. Use waffles as the “bun,” then layer spiced chicken, onions, and a yogurt-based sauce. For extra punch, add a chutney spread.

23) What kind of chicken works best for chicken and waffles?

Crispy fried chicken is classic, yet grilled or tandoori-style chicken works beautifully with Indian flavors. The key is juicy chicken with bold seasoning.

24) Can I make a vegetarian version of chicken and waffles?

Yes. Paneer tikka, crispy tofu, or spiced potato patties can stand in for chicken, especially when paired with chutney and a creamy sauce.

25) What are bubble waffles, and how are they different from Belgian waffles?

Bubble waffles (often called Hong Kong egg waffles) are lighter and designed to be folded and filled. By comparison, Belgian waffles are thicker with deeper pockets meant for syrup and toppings.

26) Can I make bubble waffles with Belgian waffle batter?

Not exactly. Bubble waffles usually use a different batter and a different waffle maker. Nonetheless, you can mimic the “filled-and-folded” idea using smaller Belgian waffles.

27) How do I stop waffles from sticking to the waffle iron?

Preheat fully, grease lightly if needed, and cook until the waffle releases easily. Often, sticking happens when waffles are undercooked and tear during removal.

28) Why do my waffles taste bland even when they look good?

Bland waffles usually need more salt, vanilla, or sweetness. Also, cooking a bit longer to deepen browning can intensify flavor noticeably.

29) Can I freeze waffles and reheat them later?

Yes. Let waffles cool completely, freeze in a single layer first, then store in a bag. Later, reheat in a toaster or oven so they crisp up again.

30) What’s the best way to reheat waffles so they stay crispy?

Use a toaster or an oven rather than a microwave. The microwave adds moisture; meanwhile, dry heat restores crisp edges and keeps the center warm.

Posted on — 3 Comments

All About Gluten: Symptoms, Testing, Diet & 7-Day Gluten-Free Meal Plan

Portrait cover image for a gluten sensitivity diet: gluten-free millet salad on rustic table with text “Symptoms, Testing & 7-Day Plan” – MasalaMonk

If you’re wondering whether a gluten sensitivity diet could finally calm the bloating, brain fog, fatigue, or stubborn skin issues—you’re far from alone. Yet the landscape can be confusing: is it celiac disease, non-celiac gluten sensitivity (NCGS), or a wheat allergy? And once you figure that out, what exactly should you eat? This guide clears the path step by step—so you can move from guesswork to a steady routine that supports your gut, your energy, and your everyday life.

Before we dive into testing, food lists, and meal plans, a brief refresher helps. If you’re new to the topic, start with our quick primer on what gluten actually is—it’ll make everything else easier to follow.

⚠️ Disclaimer: This article is for educational purposes only and is not medical advice. It does not diagnose, treat, cure, or prevent any condition. Always consult a qualified healthcare professional for personalized guidance, especially before starting a gluten sensitivity diet, changing medications, or interpreting tests. If you have urgent or severe symptoms, seek medical care immediately.


Celiac, NCGS, or Wheat Allergy—Why Your Diagnosis Shapes the Gluten Sensitivity Diet

Although the symptoms can overlap, these conditions aren’t the same—and the plan you follow depends on which one you have.

  • Celiac disease (CeD) is an autoimmune condition: gluten triggers immune damage in the small intestine. Left untreated, it can lead to nutrient deficiencies, anemia, bone loss, and more.
  • Non-celiac gluten sensitivity (NCGS) involves gluten-related symptoms without celiac’s intestinal damage and without wheat-allergy markers. Interestingly, a subset of people with NCGS-like symptoms may actually be reacting to fructans (fermentable carbohydrates found in wheat) rather than gluten itself; Monash’s overview explains how wheat is rich in fructans, and a randomized trial explored whether fructans—not gluten—trigger symptoms in some. See Monash on wheat and fructans and the study via PubMed.
  • Wheat allergy is an IgE-mediated allergy to wheat proteins (not just gluten). Reactions can include hives, wheezing, and—rarely—anaphylaxis, which clearly requires a different approach.

Because treatment and strictness differ, testing first—and only then committing to a gluten sensitivity diet—is the smartest move.


Gluten Sensitivity Symptoms: What to Watch For

If you’re considering a gluten sensitivity diet, it helps to recognize the most common gluten intolerance symptoms first. Although everyone’s experience differs, the patterns below appear consistently in clinical summaries and patient reports.

Core digestive signs of Gluten Sensitivity

To begin with, keep an eye on:

  • Bloating and gas (often within hours)
  • Abdominal pain or cramping
  • Diarrhea, constipation, or an alternating pattern
  • Nausea and early fullness
  • Reflux/heartburn after wheat-heavy meals

For a clear, medical overview of GI complaints (including how they differ by age), see the NIDDK symptom summary and the Celiac Disease Foundation symptoms list.

Extra-intestinal symptoms of Gluten Sensitivity (the sneaky ones)

Meanwhile, many people notice issues outside the gut: persistent fatigue, brain fog or headaches, mood changes, joint or muscle aches, and skin flares. For accessible detail, skim Mayo Clinic’s celiac symptoms page.

Possible nutrient-deficiency clues of Gluten Sensitivity

Over time, malabsorption can show up as iron-deficiency signs (dizziness, brittle nails), mouth ulcers, or even hair thinning. Notably, dental enamel defects in kids can be an early clue—dentists are encouraged to refer when they spot tell-tale enamel patterns. Start with the NIDDK note on enamel defects and CDF’s oral-health overview.

In children (additional pointers on Gluten Sensitivity )

By contrast, kids may present with growth faltering, frequent tummy aches, loose stools, or irritability—sometimes long before anyone suspects gluten. A concise digest for families appears in CDF’s symptoms page and the NIDDK children overview.

Timing, dose, and patterns

Just as important, symptoms can spike within 30 minutes up to 48 hours after eating gluten. Some people notice a dose–response (bigger portions → bigger flares). Others discover that wheat’s fructans—a FODMAP, not gluten—drive bloating and gas; in that case, a short low-FODMAP strategy (not lifelong strict GF) may help. For context, read Monash on avoiding wheat during the low-FODMAP phase and their brief fructan/oligos explainer.

When to seek care (don’t DIY this part)

However, certain red flags need prompt medical evaluation rather than diet trials: unintentional weight loss, blood in stool, persistent vomiting, fever, severe dehydration, or night sweats. A reliable, plain-English checklist appears in Mayo Clinic’s guidance.

Quick self-audit before you change everything

Before you overhaul your routine, keep a 3–5 day food & symptom log (time eaten, portion, symptoms 0–10). Note oats, sauces/spice blends, and possible cross-contact (shared fryers, toasters, or boards). Bring the log to your appointment; clinicians can then decide on testing first—and only afterward a tailored gluten sensitivity diet. For accuracy, remember you should be on gluten before serology; the rationale is laid out in the NIDDK provider handout.


Testing First (Then Diet): How to Avoid False Negatives and Frustration

Here’s the crucial rule many people miss: don’t remove gluten before screening, or blood tests can turn falsely negative.

  • First-line bloodwork typically includes tissue transglutaminase IgA (tTG-IgA) with a total IgA to check for IgA deficiency. Some clinicians add deamidated gliadin (DGP) antibodies, particularly in younger children. For approachable, trustworthy guidance, see the American College of Gastroenterology’s celiac disease overview and the NIDDK’s clear explainer for clinicians and patients on celiac testing.
  • Confirmation: when screens are positive, specialists usually confirm celiac disease with an endoscopy and small-bowel biopsies.
  • Why “stay on gluten” matters: the NIDDK’s provider handout is explicit—patients should be consuming gluten before testing to ensure accuracy. Skipping this step risks months of confusion. See the NIDDK PDF guidance: Provider Points—Celiac Disease.

Once you’re properly screened, you can commit to the right path—be it a strict celiac protocol or a carefully structured gluten sensitivity diet for non-celiac cases.

⚠️ Disclaimer: This article is for educational purposes only and is not medical advice. It does not diagnose, treat, cure, or prevent any condition. Always consult a qualified healthcare professional for personalized guidance, especially before starting a gluten sensitivity diet, changing medications, or interpreting tests. If you have urgent or severe symptoms, seek medical care immediately.


“Is It Gluten-Free?”—Clear Answers You Can Trust (So Labels Don’t Drive You Mad)

Label reading gets overwhelming quickly; nevertheless, a few rules of thumb dramatically reduce stress.

  • Oats / Oatmeal: Oats are naturally gluten-free, but they’re frequently contaminated with wheat, barley, or rye during harvesting and processing. Choose certified gluten-free oats and introduce them gradually if you’re sensitive; a small subset of people reacts to avenin (the oat protein). For a balanced overview, see the Celiac Disease Foundation’s explainer on oats and contamination. Meanwhile, the FDA clarifies that gluten-free claims generally mean <20 ppm gluten—use their resources to understand labels: FDA gluten & food labeling and the consumer piece, Gluten-Free Means What It Says.
    For kitchen-level practicality, compare our quick primers on rolled vs old-fashioned oats and quick vs instant oats.
  • Sourdough bread: Despite the buzz, regular wheat sourdough is not gluten-free or celiac-safe. Only sourdough made entirely with gluten-free grains and a gluten-free starter is safe. For clarity, see Beyond Celiac—Is sourdough bread gluten-free?.
  • Quinoa: Naturally gluten-free, higher in protein than most grains, and fantastic for pulao, upma, bowls, and salads.
  • Coffee: Plain black coffee is gluten-free; flavored products may vary—check labels.
  • Ezekiel bread: The classic sprouted version contains wheat; it’s not gluten-free. If you love the texture, look specifically for GF-labeled sprouted breads.

Meanwhile, many Indian staples are naturally GF. To diversify your pantry (and your recipes), explore our primer on millets—the gluten-free superfood.


The Core of a Gluten Sensitivity Diet (So You Feel Satiated, Not Deprived)

A sustainable gluten sensitivity diet leans on naturally gluten-free foods, treats packaged items with care, and prioritizes satisfaction (so you’ll actually stick with it).

Build your plate around:

  • Protein: dal, chickpeas, rajma, tofu/tempeh, paneer, eggs, fish, chicken.
  • High-fiber carbs: rice, millets (jowar, bajra, ragi), quinoa, potatoes, sweet potatoes, buckwheat (kuttu).
  • Colorful plants: as many vegetables and fruits as you’ll enjoy daily.
  • Healthy fats: olive oil, ghee (if tolerated), avocado, nuts and seeds.
  • Smart pantry swaps: GF tamari (instead of soy sauce), GF pasta when you want convenience, chickpea flour (besan), tapioca, and cornstarch for binding and crisping.

Label-reading shortcut: Prefer products clearly marked “gluten-free.” In many markets, that aligns with the <20 ppm rule; the FDA pages above are handy to link inside your shopping sections so readers can fact-check in one tap.

Treats, thoughtfully: A little joy helps long-term adherence. Keep a couple of easy add-ons—like our quick dairy- and gluten-free chocolate syrup for pancakes, fruit, or yogurt (or dairy-free alt).


Pantry Setup and Batch-Cooking: The Secret Sauce of Consistency

Because weeknights are busy, a gluten sensitivity diet works best when your kitchen is prepped for “grab-and-combine.”

Your weekend hour, well spent:

  1. Cook two grains (say, quinoa and rice or millet) and refrigerate in clear containers.
  2. Pressure-cook two legumes (moong/masoor or chickpeas/rajma) and freeze in meal-size portions.
  3. Prep sauces you love—tahini-lemon, mint-yogurt (or coconut yogurt), and a jar of GF tamari-ginger.
  4. Wash and chop a big tray of vegetables; store in zip bags or boxes for stir-fries, upma, khichdi, bowls, and quick sides.

As a result, dinner becomes assembly: grain + protein + veg + sauce. Ten minutes, tops.

Also Read: How to Make Lentil Patties that Are Better Than Meat? Vegan Protein-Rich Recipe.


Your 7-Day Gluten Sensitivity Diet Meal Plan (Flexible, Flavor-First, and Realistic)

This plan favors batch cooking and repeats pantry staples to lower effort. Nevertheless, it remains varied—so you won’t feel boxed in. Wherever helpful, we’ve linked to MasalaMonk ideas you can plug in immediately.

Day 1

  • Breakfast: Certified GF oats porridge with chia + berries (add cinnamon)
  • Lunch: Millet khichdi (moong + carrots/peas) with a squeeze of lemon
  • Dinner: Lemon rice + sautéed paneer/veg or chicken tikka (check spice blends are GF)
  • Snack: Roasted chana; seasonal fruit

Day 2

  • Breakfast: Ragi dosa + coconut chutney
  • Lunch: Quinoa pulao with peas and carrots
  • Dinner: Grilled fish (or tandoori chicken), herbed potatoes, kachumber salad
  • Snack: Yogurt (or coconut yogurt) with seeds and a drizzle of honey

Day 3

  • Breakfast: Millet pancakes with a light drizzle of our gluten-free chocolate syrup recipe.
  • Lunch: Brown rice + rajma (verify masala blends are GF)
  • Dinner: Stir-fried tofu/veg with GF tamari; top with sesame seeds (for more plant-based swap ideas, see our lentil-forward meal prep guide)
  • Snack: Peanut chaat with lemon

Day 4

  • Breakfast: Besan chilla + mint chutney
  • Lunch: Kuttu (buckwheat) rotis + mixed sabzi
  • Dinner: Baked sweet potato, black beans, salsa, avocado (squeeze of lime)
  • Snack: A small handful of nuts + dates

Day 5

  • Breakfast: Poha (confirm GF processing) with peanuts and coriander
  • Lunch: Quinoa upma with mixed vegetables
  • Dinner: Rice, dal tadka, cucumber salad
  • Snack: Roasted makhana, lightly spiced

Day 6

  • Breakfast: Smoothie (banana, spinach, peanut butter, milk or plant milk)
  • Lunch: Millet bowl—jowar, chickpeas, roasted veg, tahini-lemon dressing
  • Dinner: GF pasta aglio e olio with tomatoes and basil; side salad
  • Snack: Dark chocolate (check label)

Day 7

  • Breakfast: Scramble (eggs or tofu) with peppers and onions
  • Lunch: Rice paper rolls (shrimp or tofu) + peanut dip (GF)
  • Dinner: Slow-cooked dal + jeera rice + kachumber
  • Snack: Hummus with veggie sticks

Dairy-free tweaks: Swap yogurt/milk for coconut or almond options; use olive oil or ghee if tolerated. Additionally, consider a calcium source (tofu set with calcium, leafy greens, fortified plant milks) if you’re dairy-free long-term.


Shopping Made Simple (Copy This to Notes Before You Head Out)

Grains & starches: basmati + parboiled rice, quinoa, millets (jowar, bajra, ragi), certified GF oats, buckwheat flour, potatoes, sweet potatoes, GF pasta.
Proteins: eggs, chicken/fish, paneer/tofu/tempeh, moong, masoor, chickpeas, rajma.
Pantry & swaps: besan, cornstarch, tapioca, GF tamari, tomato paste, coconut milk, tahini, seeds (chia/linseed), nuts, extra-virgin olive oil.
Spices: prefer single-ingredient spices; double-check blends for wheat fillers.
Treats & condiments: dark chocolate (check label), honey, nut butters, etc.

When deciding between brands, opt for those clearly marked “gluten-free,” which (in many regions) aligns with the <20 ppm standard; the FDA’s resources are concise and dependable: Gluten & Food Labeling and Gluten-Free Means What It Says.


Cross-Contact: The Invisible Gotcha (and How to Avoid It)

Even with perfect shopping, cross-contact can undo your efforts—especially if someone at home still eats gluten. Therefore:

  • Divide utensils and surfaces: dedicate a toaster, cutting board, and strainer for GF foods.
  • Handle flour carefully: airborne flour can linger; keep GF prep separate in time and space.
  • Fryers and oil: avoid shared fryers; batter residues contaminate oil.
  • Sauces and spreads: use squeeze bottles or separate knives; crumbs are sneaky.

These small systems are the backbone of a reliable gluten sensitivity diet at home.


Eating Out Without Anxiety (And Actually Enjoying It)

Restaurants vary widely in their knowledge and kitchen setup; cross-contact can happen in shared fryers, toasters, or chopping boards. Nevertheless, you can dine out more confidently by calling ahead, asking about separate prep areas, and clarifying sauces, marinades, and dessert toppings.

For discovery, use tools that crowdsource experience and certification. Apps like Find Me Gluten Free are a practical starting point, while the National Celiac Association’s restaurant resources can point you toward vetted venues and programs.


Troubleshooting Symptoms on a Gluten Sensitivity Diet (When You’re Still Not Feeling Great)

Sometimes, even after removing gluten, symptoms linger. In that case, consider a short, structured audit:

  1. Hidden gluten: re-check spice blends, sauces, and “natural flavors.” If in doubt, switch to single-ingredient spices and brands that explicitly label GF.
  2. Cross-contact: scrutinize toasters, fryers, wooden spoons, cutting boards, and baking trays.
  3. Oats tolerance: even certified GF oats can bother a subset of people; remove oats for 2–3 weeks and reassess. For background on why certified oats matter, read the CDF oats explainer above and the FDA labeling resources.
  4. FODMAP overlap: if gas, bloating, or pain are dominant, consider whether fructans and other FODMAPs might be the bigger trigger; Monash’s guidance is especially practical for this. See Monash on wheat/fructans.
  5. Nutrition review: check iron, B12, folate, vitamin D if fatigue persists—speak with your clinician about labs and tailored supplementation.

When in doubt, circle back to your clinician, share your food log, and refine from there.


Weight Loss—or Gain—on a Gluten Sensitivity Diet

Going gluten-free doesn’t automatically cause weight change; energy balance and satiety still rule. However, a gluten sensitivity diet that’s rich in protein, fiber, and minimally processed foods tends to stabilize appetite.

  • If your goal is weight loss: base meals around protein (dal, chickpeas, tofu, fish/chicken) and high-fiber carbs (millets, quinoa), load up on vegetables, and keep sauces simple.
  • If your goal is healthy weight gain: fold in energy-dense but nutrient-rich picks—tahini, nut butters, olive oil, avocado—and, for to find other great options for a weight gain diet, read our post on Best Weight Gain Foods for Fast, Healthy Gains.

Either way, consistency beats perfection; the plan you repeat wins.


Bringing It Together: Your Next Three Steps

  1. Finish testing (if pending), then commit: after proper screening, decide with your clinician whether you need a strict celiac protocol or a flexible gluten sensitivity diet. Start with the ACG’s overview and NIDDK’s testing guidance to feel confident in the process: ACG—Celiac Disease and NIDDK—Diagnosis.
  2. Stock your pantry and prep once: set up two grains, two legumes, and two sauces every weekend. For variety—especially at breakfast—lean on millets as a gluten-free superfood and customize with oats if you tolerate certified GF oats (use our oat primers on rolled vs old-fashioned and quick vs instant).
  3. Batch-cook and repeat favorites: pick two days from the 7-day plan and double them next week. Consequently, you’ll eat well without starting from scratch each evening.

Final Word (and Why This Works)

A gluten sensitivity diet doesn’t have to feel restrictive. Instead, by emphasizing naturally gluten-free foods, verifying labels, and building meals you actually enjoy, you can reduce symptoms while staying satisfied. Furthermore, the framework above keeps decisions simple: protein + fiber-rich carbs + plants + a little fat. Over time, that combination steadies digestion, improves energy, and makes “eating gluten-free” feel like a normal, delicious routine—not a medical chore.

And remember: your best plan is the one you’ll gladly follow. Start small, iterate weekly, and keep it tasty.


⚠️ Disclaimer: This article is for educational purposes only and is not medical advice. It does not diagnose, treat, cure, or prevent any condition. Always consult a qualified healthcare professional for personalized guidance, especially before starting a gluten sensitivity diet, changing medications, or interpreting tests. If you have urgent or severe symptoms, seek medical care immediately.


FAQs

1) What is a gluten sensitivity diet—and who needs it?

A gluten sensitivity diet is an eating pattern that removes gluten (proteins in wheat, barley, and rye) to reduce symptoms like bloating, brain fog, fatigue, and skin issues. It’s used by people with diagnosed celiac disease, suspected non-celiac gluten sensitivity (NCGS), or those advised by a clinician to trial gluten removal. Importantly, test for celiac disease before starting the diet to avoid false negatives.

2) What are the most common signs and symptoms of gluten intolerance?

Typical symptoms include abdominal pain, bloating, gas, diarrhea or constipation, nausea, headaches, brain fog, fatigue, and sometimes skin rashes. Additionally, some notice joint pain or mood changes. However, symptoms alone can’t confirm the cause—proper testing is key.

3) How is gluten intolerance different from celiac disease and wheat allergy?

Celiac disease is an autoimmune condition that damages the small intestine when gluten is eaten. NCGS causes symptoms without that autoimmune damage or IgE allergy markers. Meanwhile, wheat allergy is an IgE-mediated response to wheat proteins (not just gluten) and may involve hives, wheezing, or, rarely, anaphylaxis. Consequently, each requires a different management plan.

4) Which blood tests are used to check for celiac disease?

Common first-line tests include tTG-IgA plus a total IgA check. In certain cases (for example, young children), DGP antibodies may be used. Nevertheless, you must be eating gluten for a period before testing; otherwise, results may be inaccurate.

5) What does a strict gluten-free diet actually include?

Focus on naturally gluten-free foods: rice, millets (jowar, bajra, ragi), quinoa, potatoes, sweet potatoes, legumes, eggs, poultry, fish, meat, fruits, vegetables, and most dairy (if tolerated). Additionally, keep pantry swaps handy—GF pasta, chickpea flour (besan), cornstarch, tapioca, and gluten-free tamari.

6) Are oats gluten free?

Oats are naturally gluten-free; however, they’re often contaminated during farming or processing. Choose certified gluten-free oats and introduce slowly. A small subset of people may still be sensitive to avenin (oat protein), so monitor how you feel.

7) Is sourdough bread gluten free?

Regular wheat sourdough is not gluten-free, even though fermentation reduces some gluten. Only loaves made entirely with gluten-free flours and starters are safe on a gluten sensitivity diet.

8) Is quinoa gluten free—and is it a good substitute?

Yes. Quinoa is naturally gluten-free, high in protein, and versatile. Moreover, it cooks quickly and works in pulao, upma, salads, and warm bowls, making it a smart staple for beginners.

9) What about Ezekiel bread, spaghetti, and coffee?

Traditional Ezekiel bread (sprouted grains) contains wheat and is not gluten-free. Choose GF-labeled breads instead. As for spaghetti, select gluten-free versions made from rice, corn, quinoa, or legumes. Plain coffee is naturally gluten-free; flavored products may vary, so always check labels.

10) Can a gluten sensitivity diet be both gluten-free and dairy-free?

Absolutely. Many people also remove lactose or dairy to troubleshoot symptoms. Consequently, use alternatives like almond or coconut yogurt, lactose-free milk, or tofu/paneer swaps if tolerated. Still, prioritize balanced meals with protein, fiber-rich carbs, healthy fats, and plenty of vegetables.

11) How do I handle eating out or “gluten-free near me” situations?

Call ahead and ask about separate prep areas, dedicated fryers, and ingredient lists. Additionally, explain cross-contact (shared toasters, cutting boards, or oil) and request simple grilled or steamed options with sauces on the side. Ultimately, clear questions lead to safer plates.

12) What is cross-contact—and why does it matter so much?

Cross-contact happens when gluten-containing foods or crumbs touch gluten-free items. Even tiny amounts can trigger symptoms for sensitive individuals. Therefore, at home, keep separate toasters, strainers, cutting boards, and knives for GF foods; in restaurants, ask about shared fryers and prep surfaces.

13) Can a gluten sensitivity diet help with weight loss—or weight gain?

It can support either goal when you structure meals well. For weight loss, anchor plates around protein and high-fiber carbs (millets, quinoa) and keep sauces light. For healthy weight gain, add energy-dense options—nut butters, tahini, olive oil, avocado—while still avoiding gluten. Ultimately, consistency beats perfection.

14) Do I need supplements on a gluten-free plan?

Maybe. Some people benefit from iron, B12, folate, vitamin D, or calcium depending on labs and intake. However, don’t self-supplement blindly. Instead, review symptoms, diet quality, and testing with a healthcare professional for a tailored plan.

15) What are the effects of gluten sensitivity if I don’t change my diet?

You might experience ongoing GI issues, fatigue, headaches, or skin flare-ups. In celiac disease specifically, continued gluten exposure can damage the small intestine and affect absorption. Consequently, accurate testing and an appropriate dietary plan are essential.

16) Can millets and other traditional grains fit into a gluten sensitivity diet?

Yes—beautifully. Millets like jowar, bajra, and ragi are naturally gluten-free and fiber-rich. Additionally, they’re easy to batch-cook and pair well with dals, veggies, and lean proteins, keeping meals satisfying and diverse.

17) How do I start a beginner-friendly gluten-free meal plan?

Begin with a simple 7-day rotation: two grains (say, rice and millet), two legumes (moong/rajma), and two sauces (tahini-lemon and a GF tamari mix). Batch-cook on the weekend. Consequently, weeknights become quick assemblies—grain + protein + veg + sauce—in under 15 minutes.

18) Will going gluten-free help hypothyroidism or Hashimoto’s?

Some individuals report symptom improvements, but evidence is mixed. Nevertheless, if you have Hashimoto’s and persistent symptoms, discuss a supervised trial with your clinician—especially to ensure adequate nutrients (selenium, iodine, iron, vitamin D) and to avoid unnecessary restriction.

19) What’s the best gluten intolerance or sensitivity test I can take at home?

Home kits exist, yet they can’t replace clinical evaluation. Moreover, interpretation is tricky, and some tests aren’t validated for diagnosis. Ideally, coordinate testing with your clinician, remain on gluten beforehand, and follow up with appropriate confirmation if results are positive.

20) What does a “strict gluten-free diet” look like day to day?

It means avoiding wheat, barley, rye, and cross-contact—every day. Additionally, you’ll read labels for hidden gluten in sauces, spice blends, and processed foods; choose clearly GF-labeled items; and set up separate kitchen tools where needed. Ultimately, it becomes routine—and much easier than it sounds.

Posted on — 4 Comments

Are Lentils Good for Weight Loss? Benefits, Recipes, and Science Explained

ARE LENTILS GOOD FOR WEIGHT LOSS? WHY EAT LENTILS FOR WEIGHT LOSS?

Lentils have been a dietary staple around the world for thousands of years, valued for their affordability, quick cooking time, and dense nutritional profile. In recent years, however, they’ve gained special recognition for their potential to support weight loss and fat reduction. So if you’ve ever wondered, “Are lentils good for weight loss?” or “Can lentils help you shed fat naturally?”, you’re not alone. These questions have become increasingly common as more people turn to whole foods for sustainable health results.

In this post, we’ll walk you through everything you need to know about lentils and weight loss—starting with the science behind their nutritional benefits, then moving into the best lentil types, cooking tips, and practical ways to incorporate them into your daily meals. Along the way, we’ll also answer common questions and share low-calorie lentil recipes that align with your weight management goals.

By the end, you’ll understand why lentils are often called a superfood for weight loss—and how you can use them strategically in your diet without worrying about unwanted weight gain.

My Person experience 147 Kgs to 90 Kgs: 3 Lentils for Fat Loss Win.


Why Lentils Are a Hidden Gem for Weight Loss

Let’s start with the basics. Lentils are small, mighty legumes packed with nutrients. But what makes them especially powerful for weight loss is their low calorie density, high fiber, and protein content. These three factors work together to keep you full, satisfied, and energized without overeating.

One cup of cooked lentils provides 230 calories, 18 grams of protein, and 15 grams of fiber — a simple way to stay full while losing weight.
Infographic showing nutritional facts of lentils per 1 cup cooked: 230 calories, 18g protein, 15g fiber, low glycemic index, and rich in iron.

A Look at the Numbers

Here’s what one cup (about 198 grams) of cooked lentils offers:

  • Calories: ~230
  • Protein: ~18 grams
  • Fiber: ~15 grams
  • Fat: Less than 1 gram
  • Glycemic Index: Low (21–30 depending on type)

In simple terms: You get a lot of food volume and nutrients, for relatively few calories. That’s a winning combo for weight loss.


Nutritional Profile of Lentils: Why They’re Great for Weight Loss

Before exploring how lentils affect weight loss directly, it’s important to understand their nutritional foundation.

1. Calorie Content

Lentils are relatively low in calories compared to many other protein-rich foods. For instance, one cup (about 198 grams) of cooked lentils provides approximately 230 calories. This makes them an excellent choice for those looking to reduce their calorie intake without sacrificing satisfaction or fullness.

2. High Protein Content

Protein plays a crucial role in weight loss because it helps maintain lean muscle mass while promoting satiety. Lentils offer around 18 grams of protein per cooked cup, which is impressive for a plant-based source. As a result, they serve as a smart alternative to animal proteins, especially for vegetarians and vegans focused on weight management.

3. Fiber-Rich Food

Another key benefit of lentils is their fiber content. A single cooked cup delivers about 15 grams of dietary fiber. This not only slows digestion and extends the feeling of fullness but also helps regulate blood sugar levels. Together, these effects can reduce overeating and curb unhealthy snacking—two essential factors in successful fat loss.

4. Low Glycemic Index

Lentils have a low glycemic index (GI), which means they release glucose into the bloodstream gradually. This helps maintain steady energy levels and reduces fat storage associated with insulin spikes. It’s especially beneficial for individuals managing insulin resistance or type 2 diabetes, which are commonly linked to excess weight.

5. Rich in Micronutrients

Beyond macronutrients, lentils provide a variety of essential vitamins and minerals that support metabolic health. These include:

  • Iron, which aids in energy production and oxygen transport
  • Magnesium, important for metabolism and muscle function
  • Folate, which supports cell repair and DNA synthesis
  • Potassium, which regulates fluid balance and blood pressure

These nutrients work together to support healthy metabolism and energy balance, both of which are foundational for sustainable weight loss.

Summary: Why Lentils Are Nutrient-Dense for Weight Loss

  • Low in calories (230 per cooked cup)
  • High in protein (18g) to promote satiety and preserve muscle
  • Packed with fiber (15g) to aid digestion and reduce cravings
  • Low glycemic index to support blood sugar control
  • Rich in essential vitamins and minerals that fuel metabolism

Taken together, these attributes make lentils one of the best foods for healthy, long-term weight loss.


Are Lentils Good for Weight Loss? What Does the Science Say?

So, are lentils truly good for weight loss? The evidence strongly suggests they are.

How Lentils Promote Weight Loss

Lentils support fat loss through several mechanisms. First, their combination of protein and fiber increases satiety, helping you feel full longer and reduce overall calorie intake. Second, the fiber slows digestion and stabilizes blood sugar levels, preventing insulin spikes that lead to fat storage and sugar cravings.

Additionally, lentils contain prebiotic fibers that feed beneficial gut bacteria. An increasingly large body of research links a healthy gut microbiome with better weight regulation, reduced inflammation, and improved metabolic health.

Lentils are also low in caloric density, which means you can eat satisfying portions without consuming excessive calories. This makes them a great option for people who want to feel full while still creating a calorie deficit.

What the Research Really Says About Lentils and Weight Loss

When it comes to losing weight in a healthy, sustainable way, lentils offer more than just nutrition—they’re backed by science. From supporting satiety and gut health to regulating blood sugar and improving metabolic markers, here’s what the research shows.

Lentils Can Help You Eat Less Without Feeling Hungry

A systematic review and meta-analysis found that eating just one serving of pulses like lentils per day helped people lose weight—without making any other dietary changes. Participants also experienced improved cholesterol levels, further reinforcing lentils’ heart-healthy benefits.

Smiling young woman eating a healthy lentil salad, with overlay text saying ‘Stay Full, Snack Less — Protein + Fiber keep hunger away for hours’.
Enjoying a fresh lentil salad — protein and fiber together help you stay full and snack less.

They Improve Blood Sugar and Inflammation

In a 2024 clinical trial, adults at higher metabolic risk who replaced meat with lentils saw notable improvements in their blood sugar response and inflammation markers—without reporting digestive discomfort. You can read more about that here.

Fiber and Resistant Starch Support Your Gut and Metabolism

Lentils are rich in both soluble and insoluble fiber, as well as resistant starch—components that help stabilize blood sugar, prolong fullness, and feed beneficial gut bacteria. According to Harvard’s School of Public Health, these properties make lentils a powerful tool in managing weight and improving digestion over time.

Lentils vs. Animal Protein: Why It Matters

Unlike red meat or cheese, lentils contain no cholesterol, are low in fat, and offer more fiber per gram. That’s why the Cleveland Clinic lists lentils as one of the best plant-based proteins for improving heart health and supporting weight loss.

Higher Fiber = Lower Risk of Disease and Death

A large 2022 study involving over 86,000 adults found that higher dietary fiber intake—including from lentils—was linked to significantly reduced risk of death from heart disease and cancer. For the full breakdown, check the Health.com report.


Which Lentils Are Best for Weight Loss?

While all lentils are healthy, some varieties may be slightly more effective for supporting weight loss due to their specific nutritional profiles.

Red Lentils

These cook quickly and have a soft texture, making them ideal for soups and purees. They’re slightly lower in calories and still provide a solid amount of protein and fiber.

If you’re looking for easy ways to use them, don’t miss these red lentil recipes that support weight loss.

Green Lentils

Known for holding their shape after cooking, green lentils are excellent in salads and side dishes. They typically contain more fiber and slightly more protein compared to red lentils.

Brown Lentils

As the most commonly available type, brown lentils are highly versatile. They have a balanced ratio of protein to fiber and work well in stews, curries, and mixed dishes.

Black Lentils (Beluga)

These small, shiny lentils are dense in protein, fiber, and antioxidants. They also have the lowest caloric content per gram, making them especially nutrient-dense for those focused on weight loss.

You can explore some of our favorite black lentil recipes designed for weight loss.

Which Lentil is Best?

If you’re targeting maximum fiber and protein per serving, green and black lentils are excellent choices. However, all lentil types contribute positively to a weight loss plan. Feel free to choose based on your preferred flavor, texture, or recipe.


How to Eat Lentils for Weight Loss

Your preparation method can significantly influence how lentils support your weight loss goals.
Portion Control

Aim for one to two cups of cooked lentils per day to ensure you’re getting adequate protein and fiber without consuming too many calories. Keep in mind that lentils expand as they cook—one cup of dry lentils yields roughly 2.5 cups cooked.

Cooking Tips

Stick to healthy preparation methods. Avoid frying or using cream-based sauces, and instead opt for boiling, pressure cooking, or simmering in broth. Flavor them with herbs, spices, lemon juice, or low-calorie sauces.

You can also pair lentils with nutrient-dense, non-starchy vegetables like spinach, bell peppers, or cucumbers to add bulk and enhance their fat-burning benefits.

Eating Lentils Daily

Adding lentils to your meals every day can help reduce appetite, improve blood sugar stability, and promote steady energy throughout the day. Many people report feeling fuller and more satisfied when lentils are a regular part of their diet.


Healthy Recipe Ideas to Enjoy Lentils and Lose Weight

One of the best things about lentils—besides their nutrition—is how incredibly versatile and delicious they are. Whether you’re craving something warm and comforting, light and refreshing, or even something with a bit of a spicy kick, there’s a lentil recipe that fits. Here are some easy, healthy ideas to get you started.

Recipe graphic showing three healthy lentil dishes: lentil soup cooked with tomatoes and spices, a colorful lentil salad with vegetables, and whole-grain tortillas filled with seasoned lentils and avocado.
Healthy lentil recipes made simple — from cozy lentil soup to refreshing salad and nourishing lentil tacos.

Lentil Soup (Comfort in a Bowl)

When you’re in the mood for something hearty and nourishing, lentil soup is a perfect choice. Start with a base of low-sodium vegetable broth, then add in diced tomatoes, chopped onions, garlic, and your favorite vegetables. To give it depth and warmth, season generously with spices like turmeric, cumin, paprika, and black pepper. Let it simmer until everything is tender and fragrant. It’s the kind of meal that feels like a hug on a cold day—and it just so happens to be great for your waistline, too.

For more inspiration, check out our vegan lentil soup recipes for weight loss.

Lentil Salad (Light, Fresh & Filling)

If you prefer something cooler and crisp, lentil salad is quick to throw together and endlessly customizable. Mix cooked green or brown lentils with chopped cucumbers, tomatoes, bell peppers, and red onions. Then drizzle with fresh lemon juice and olive oil, and toss in some fresh herbs like parsley or cilantro. For extra flavor, add a pinch of cumin or a splash of apple cider vinegar. It’s a refreshing meal or side that keeps you full without weighing you down.

Lentil Tacos (Plant-Based and Packed with Flavor)

Looking for a fun and creative way to use lentils? Try turning them into taco filling! Cook lentils with onions, garlic, cumin, chili powder, and a bit of tomato paste or crushed tomatoes. Once thickened, scoop the mixture into crisp lettuce wraps or whole-grain tortillas. Top with shredded cabbage, avocado slices, fresh salsa, or a dollop of Greek yogurt. It’s a satisfying, protein-rich dinner that even meat-lovers will enjoy—plus it’s completely customizable.

Lentil Curry (Rich, Warming, and Satisfying)

Nothing beats a cozy lentil curry when you want something deeply satisfying but still healthy. Red or brown lentils work especially well here. Sauté garlic, onions, and ginger in a bit of oil, then add curry powder, cumin, and turmeric. Stir in crushed tomatoes and your lentils, and let everything simmer until soft and creamy. You can toss in some spinach or cauliflower for added fiber and nutrients. Serve with a small portion of brown rice or enjoy it on its own for a one-pot, plant-powered meal.


Lentil Diet Plans and Tips for Weight Loss

Incorporating lentils into your daily meals doesn’t have to be complicated. In fact, once you get into the rhythm of it, they can become the foundation of a delicious, nutrient-dense eating routine that supports steady, sustainable fat loss.

To help you get started, here’s a simple one-day sample meal plan that shows how easy it is to make lentils a part of your day. Of course, you can mix and match ingredients to suit your tastes, and feel free to swap in seasonal produce or different proteins as needed.

For those who like to prep ahead, here are some plant-based high-protein lentil meal prep ideas that work beautifully for weight loss.

🥣 Breakfast: Light, Energizing, and Fiber-Filled

Begin your day with a breakfast that’s both light and satisfying. A fruit and nut bowl is a great place to start—think sliced banana, berries, a handful of almonds or walnuts, and maybe a sprinkle of chia or flax seeds for added fiber. This kind of meal helps regulate your appetite and sets the stage for more mindful eating throughout the day.

Alternatively, if you’re someone who prefers to drink their breakfast, a smoothie is a fantastic option. Blend almond milk or oat milk with a scoop of protein powder, frozen berries, spinach, and a spoonful of nut butter or flaxseed. It’s quick, refreshing, and keeps you fueled all morning.

🥗 Lunch: Refreshing, Filling, and Balanced

By midday, you’ll want something that’s hearty enough to fill you up, yet balanced enough to avoid that post-lunch slump. A lentil salad checks all the boxes. Start with a base of cooked green or brown lentils, and add in chopped cucumber, cherry tomatoes, red onion, and mixed greens. Then drizzle on a dressing of lemon juice and olive oil for a fresh, zesty flavor.

For an extra protein boost, consider adding grilled tofu, a boiled egg, or lean grilled chicken. This kind of lunch offers the perfect mix of fiber, protein, and healthy fats to carry you through the afternoon without cravings.

🥕 Snack: Crunchy, Satisfying, and Guilt-Free

Rather than letting hunger sneak up on you later in the day, plan ahead with a simple, wholesome snack. Raw vegetables like carrots, bell peppers, or cucumber slices pair well with a few tablespoons of hummus. If you’re in the mood for something crunchy, try roasted chickpeas or a small handful of almonds or pumpkin seeds.

Not only do these snacks satisfy your taste buds, but they also help keep your energy levels steady between meals—so you’re less likely to overeat at dinner.

🍛 Dinner: Comforting, Nutrient-Dense, and Easy to Prepare

As the day winds down, dinner should be comforting yet light enough to support restful digestion and sleep. A bowl of lentil soup or a gently spiced lentil curry makes for the perfect evening meal. Use ingredients like garlic, onion, tomatoes, ginger, turmeric, and cumin to boost both flavor and health benefits.

To round out your plate, add a serving of steamed vegetables—such as broccoli, zucchini, or spinach—and if you need a little more substance, include a small portion of whole grains like brown rice or quinoa. This combination is not only delicious but also deeply nourishing and naturally supportive of your weight loss goals.

Key Tips

  • Balance your meals by combining lentils with healthy fats and lean proteins
  • Stay hydrated, especially when increasing your fiber intake
  • Vary your meals to avoid boredom and improve nutrient diversity
  • Exercise regularly to maximize fat loss
  • Watch portions, even with healthy foods

Want More Lentil Inspiration?

If you’re excited to start cooking with lentils but want a bit more variety or meal prep guidance, we’ve got you covered. Whether you’re into comforting soups, quick salads, or prepping ahead for the week, these posts will give you fresh, weight-loss-friendly ideas.

Explore These Reader Favorites:

These posts are full of practical tips, balanced meal ideas, and step-by-step recipes to keep your lentil journey exciting and effective.


Can You Eat Only Lentils?

Lentils are highly nutritious, but eating only lentils isn’t advisable for the long term. Your body requires a wide range of nutrients that only a varied diet can provide. For best results, use lentils as a base and build your meals around them using other whole foods.


Nutrition Chart of Common Types of Lentils (per 1 cup cooked, ~198g):

Type of LentilCaloriesProtein (g)Fiber (g)Carbs (g)Fat (g)Iron (% DV)Glycemic Index
Red Lentils23017.815.639.90.837%Low (21–29)
Green Lentils23018.015.639.00.835%Low (22–30)
Brown Lentils23018.015.039.90.836%Low (29–32)
Black Lentils (Beluga)18024.017.930.00.740%Very Low (~21)
Yellow Lentils (Split Moong)21014.015.438.00.728%Moderate (~32–35)
Masoor Dal (Split Red Lentils)23018.015.640.00.837%Low (21–29)

⚠️ Note:

  • Nutritional values can vary slightly by source, preparation method, and origin of lentils.
  • %DV (Daily Value) is based on a 2,000-calorie diet.
  • Glycemic Index (GI) estimates are approximate and vary depending on processing and how lentils are cooked.

Key Takeaways:

  • Best for Weight Loss (Fiber + Protein): Black lentils (Beluga)
  • Most Versatile: Brown and green lentils (hold shape well, good for salads and soups)
  • Quickest Cooking & Best for Soups/Purees: Red lentils and Masoor dal
  • Gentlest on Digestion: Yellow lentils (Split Moong)

If you’re curious how to cook Beluga or Black Lentil creatively, don’t miss our guide on Beluga lentil benefits and recipes for fat loss.


Common Questions and Myths About Lentils and Weight Loss

Are lentils fattening?

Not at all. Lentils are naturally low in fat and calories, and they’re packed with fiber and protein—both of which actually help prevent overeating. As long as you’re not adding heavy cream or frying them in oil, lentils are one of the least “fattening” foods you can eat.

Can lentils cause weight gain?

Only if you’re consistently eating more calories than your body needs—including from lentils. But on their own, lentils are unlikely to cause weight gain. In fact, most people find that lentils help them feel full on fewer calories, which makes weight gain less likely.

Are lentils really good for weight loss?

Yes, absolutely. Lentils support weight loss in multiple ways—they keep you full, stabilize your blood sugar, and offer a high amount of protein and fiber without a lot of calories. Plus, they’re inexpensive and easy to prepare, which makes healthy eating more sustainable.

Is dal good for weight loss?

It can be! Dal—essentially lentil stew—is great for weight loss when made with minimal oil and plenty of vegetables. Use spices like cumin, turmeric, and coriander to add flavor without the extra calories. Just avoid adding too much ghee, butter, or fried toppings.

How much lentils should I eat per day to lose weight?

Around 1 to 2 cups of cooked lentils per day is a good target. That gives you enough fiber and protein to feel full and satisfied without going overboard on calories.

Can I eat lentils every day?

Yes, and many people do. Lentils are gentle on digestion, easy to cook, and work well in a variety of meals. Just be sure to also eat a range of other foods—like vegetables, fruits, whole grains, and healthy fats—for balanced nutrition.

Which lentils are best for weight loss?

Green and black lentils are often considered the best for weight loss because they’re slightly higher in fiber and protein. But all lentils—red, brown, yellow—are good choices, so feel free to mix it up based on what you enjoy eating.

What’s the best way to cook lentils for fat loss?

Boiling or pressure cooking is best. Avoid frying or adding high-calorie ingredients like cream or lots of oil. Instead, season with herbs, lemon, garlic, or low-sodium broth for flavor without the calories.

Do lentils help with belly fat?

Lentils won’t “target” belly fat specifically, but because they help reduce overall calorie intake and improve blood sugar balance, they can support full-body fat loss—including belly fat—when combined with a healthy diet and regular exercise.

What happens if I eat lentils for 30 days?

Most likely, you’ll feel more full, snack less, and notice more stable energy levels. Some people even report weight loss just from swapping processed carbs with lentil-based meals. Just be sure to keep meals balanced with other nutrient-rich foods.

Are lentils high in carbs?

They do contain carbohydrates, but they’re complex carbs paired with fiber and protein—which means they’re digested slowly and don’t cause blood sugar spikes. Unlike refined carbs, lentils keep you full and energized.

Can I eat lentils at night?

Yes, lentils are a great dinner option. Their fiber and protein can actually help prevent late-night snacking. Just keep portions reasonable and avoid pairing them with heavy, oily foods.

What’s healthier—lentils or rice?

Both can be part of a healthy diet, but lentils generally offer more protein, fiber, and nutrients per calorie. That said, combining lentils with small portions of whole grains like brown rice or quinoa gives you a balanced, satisfying meal.

Can lentils help reduce sugar cravings?

They can! Because they stabilize blood sugar and promote satiety, lentils help curb the cravings that come from energy crashes. Try having a lentil-based lunch and see how much more stable your afternoon energy feels.

Do I need to soak lentils?

Not always. Most lentils (especially red and yellow varieties) don’t require soaking. However, soaking can help reduce cooking time and may improve digestion for some people.

A rustic bowl filled with cooked lentils with bold text overlay reading ‘Lentils for Weight Loss’ highlighting how lentils are affordable, nutritious, and backed by science.
Lentils for weight loss — affordable, nutritious, and backed by science at MasalaMonk.

Final Thoughts: Why Lentils Are a Weight Loss Superfood

Lentils combine all the key qualities that support weight loss:

  • Low in calories yet nutrient-dense
  • High protein to preserve muscle and reduce appetite
  • Rich fiber to control hunger and stabilize blood sugar
  • Versatile and easy to incorporate into many meals
  • Affordable and accessible for most diets

In summary, lentils offer a unique combination of nutrients that make them ideal for weight loss: they’re low in calories, yet rich in protein and fiber, which helps keep you full and satisfied.

Unlike many processed weight-loss products, lentils are natural, unprocessed, and incredibly versatile. Whether you prefer soups, salads, curries, or tacos, lentils can easily be integrated into your meals without sacrificing flavor or nutrition.

Moreover, their high fiber content aids digestion, their low glycemic index stabilizes blood sugar, and their impressive micronutrient profile supports your metabolism. All things considered, lentils are not just weight-loss-friendly—they’re one of the most effective, affordable, and accessible foods for anyone looking to lose weight in a healthy, sustainable way.

So, whether you’re starting your weight loss journey or looking to optimize your current diet, lentils deserve a place on your plate. By including lentils regularly in your diet—whether as soups, salads, curries, or snacks—you can enhance fullness, reduce overall calorie intake, and promote healthy fat loss without feeling deprived.