Posted on — Leave a comment

Chana Masala Recipe: Authentic Punjabi Chickpea Curry

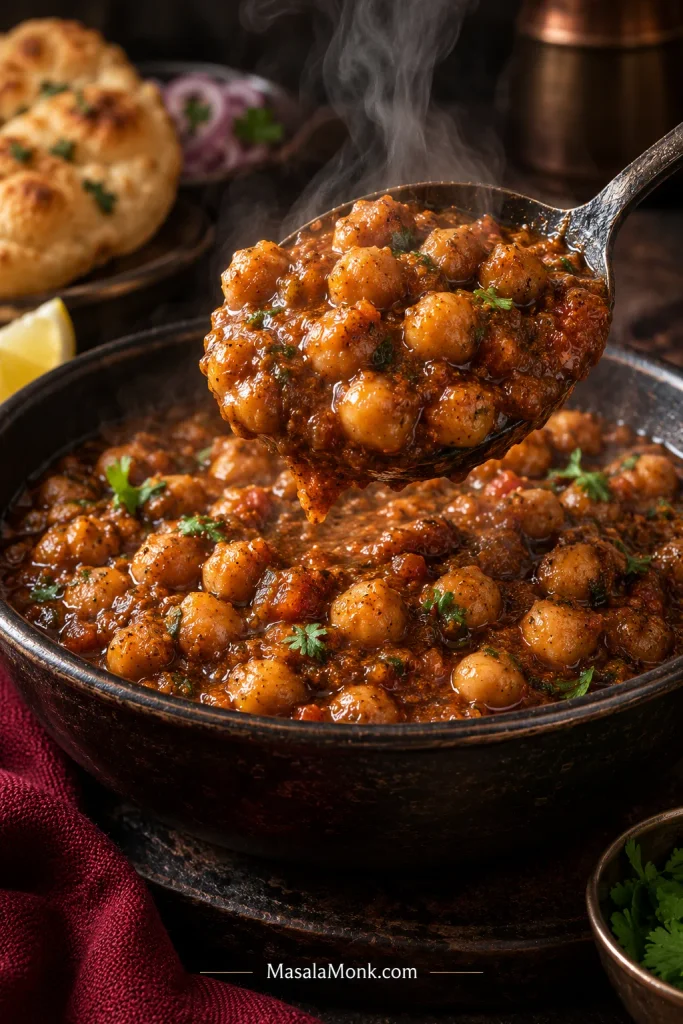
Punjabi-style chana masala with plump chickpeas coated in thick reddish-brown onion-tomato gravy, lightly garnished with coriander.

Lift one chickpea through the gravy and you can tell pretty quickly whether a pot of chana masala has worked. It should yield easily when you bite it. The gravy should come with it instead of sliding back into the bowl. On the first taste, it should be savoury and warmly spiced, with the tang arriving afterwards rather than taking over.

A torn piece of roti should come back coated. With rice, the gravy should settle between the grains instead of leaving the chickpeas sitting in thin tomato liquid. Those small things matter more than whether the curry is exactly the same shade of brown as the chole you remember from a restaurant.

Chana masala is a North Indian chickpea curry made with white chickpeas in a spiced onion-tomato gravy. This chana masala recipe takes a Punjabi-style, gravy-based approach, using kabuli chana—also called garbanzo beans—and enough simmering time for the chickpeas and masala to stop tasting separate.

There is no single formula followed by every Punjabi household, dhaba or restaurant. Some versions are darker, some drier, some smoother, and the souring may come from tomato, amchur (dry mango powder), anardana (ground dried pomegranate seeds) or a combination. A few things really matter; once those are right, the final heat, tang, richness and colour are yours.

Choose Your Chana Masala Route

Best control over textureDried chickpeas
Dinner tonight, no soak2 cans · about 45–50 minutes
Least cleanup after soakingOne-pot Instant Pot
Table of Contents

Cook It Right

Adjust, Fix & Serve

Three Things to Get Right

Three physical cues matter more than perfect timing.

  1. Chickpea: it crushes easily, with no hard or chalky centre.
  2. Masala: the onion-tomato base is concentrated and no longer smells raw.
  3. Gravy: it coats the chickpeas instead of collecting as thin liquid underneath.
Three chana masala cooking cues showing a tender chickpea being crushed, concentrated onion-tomato masala, and roti lifting chickpeas coated in thick gravy.
Think of crush, concentrate and cling as three checkpoints: tenderness comes first, flavour develops in the masala, and the finished gravy proves whether the two have come together.

Those are the parts worth being fussy about. A little thicker for bread, a little looser for rice, more tang, less chilli, darker chickpeas or a richer finish can all move according to the bowl you actually like eating.

Chana Masala Recipe

Serves4
Active timeAbout 35–45 minutes
Soaking8–12 hours
Total after soakingAbout 1½–2 hours, depending on chickpea age and pressure release
Quick canned versionAbout 45–50 minutes
DietVegan as written; gluten-free if your spice blend is gluten-free

Using canned chickpeas? Use the ingredient list below, replacing the dried chickpeas with 2 standard cans. Skip Phase 1 completely—including the salt used to cook dried chickpeas—then make the masala as written. The canned-chickpea section gives the shorter simmer and final salt guidance.

Equipment: for dried chickpeas, use a stovetop pressure cooker, Instant Pot or heavy saucepan for open-pot cooking. You will also need a heavy kadai, sauté pan or Dutch oven for the masala. A blender and small pan for tempering are optional.

Ingredients

For the chickpeas

  • 200 g / 7 oz / about 1 cup dried kabuli chana
  • 900 ml–1 litre / about 4 cups water, for soaking, or enough to cover generously
  • 600 ml / about 2½ cups fresh water, as a starting point for pressure cooking
  • ½ tsp fine salt

For the masala

  • 30 ml / 2 tbsp neutral oil
  • 1 tsp cumin seeds
  • 1 bay leaf
  • Optional: 1 black cardamom pod, lightly cracked
  • 140–150 g / 5 oz / about 1 cup finely chopped onion
  • 10 g fresh ginger, finely grated
  • 10 g garlic, minced or crushed
  • 1–2 green chillies, finely chopped
  • 225–250 g / 8–9 oz / about 1¼ cups chopped or puréed fresh tomatoes
  • ½ tsp turmeric
  • ½–1 tsp Kashmiri or degi chilli powder, for colour and gentle heat
  • 10 g homemade Chana Masala Powder
  • ½ tsp fine salt, then more to taste

No scale for the spice blend? If you calibrated a teaspoon when making our homemade blend, use that jar-specific conversion for 10 g. Otherwise, weighing is more reliable because different grind sizes pack differently into a spoon.

Using a commercial chana or chole masala instead? Start with the amount suggested on its label and taste before adding extra salt or souring. Commercial blends can differ considerably in heat, salt and tang.

No Chana Masala Powder?

For the main four-serving recipe, start with 1 tsp garam masala + 1 tsp ground coriander + ½ tsp ground cumin + ½ tsp amchur, with ¼ tsp ground anardana if you have it. Keep the turmeric and chilli already listed in the recipe, then adjust the salt and tang at the end. It will not taste identical to the complete blend, but it is a practical fallback that lets you finish the curry. The Chana Masala Powder guide explains the full blend and how the flavours fit together.

Measured ground-spice substitute using garam masala, coriander, cumin, amchur and optional anardana in polished measuring spoons.
This measured fallback rebuilds the essential warm, earthy and tangy structure of chana masala powder; however, the finished curry still benefits from tasting before any extra acid or salt.

To finish

  • 1 tsp kasuri methi (dried fenugreek leaves), crushed between your palms
  • 2–3 tbsp chopped fresh coriander/cilantro
  • Optional: ¼–½ tsp amchur
  • Optional: 1–2 tsp lemon juice

The extra acid is deliberately optional. The homemade blend already contains anardana and amchur, and the tomatoes bring acidity of their own. Finish the curry first and taste before adding more.

The ingredient list is only half the story. The difference between a thin tomato chickpea curry and a gravy that tastes fully integrated is mostly built through onion browning, tomato reduction and the final simmer.

Method

Phase 1: Cook the Chickpeas

  1. Soak. Rinse the chickpeas, cover generously with water and refrigerate for 8–12 hours or overnight. Drain and rinse again.
  2. Pressure cook.
    Instant Pot: start with 20 minutes on High Pressure, then let the pressure release naturally. Do not use Quick Release for the chickpeas.
    Stovetop pressure cooker: cook for roughly 15–20 minutes at pressure, followed by natural release.
    Use about 600 ml / 2½ cups fresh water and ½ teaspoon salt for either method.
  3. Check one. Press a chickpea between your fingers or against the back of a spoon. It needs to crush completely without a chalky centre. Older chickpeas may need another 5–10 minutes under pressure; fresher ones may already be exactly where you want them. Reserve the cooking liquid.

Phase 2: Build the Bhuna Masala

  1. Temper the whole spices. Heat the oil over medium heat. Add cumin, bay leaf and optional black cardamom. Let them sizzle for 20–30 seconds, just until fragrant.
  2. Brown the onion. Cook for about 8–12 minutes, stirring regularly. Look for soft onion with clear golden colour, especially around the edges, and a sweeter aroma than the onion you started with.
  3. Add ginger, garlic and chilli. Cook for another 1–2 minutes. The sharp raw smell will soften and the pan will start smelling warmer and more savoury.
  4. Reduce the tomatoes. Add the tomatoes and remaining ½ teaspoon salt. Cook for roughly 10–15 minutes, longer when they are especially juicy. The mixture is ready when it has become thick and glossy and the raw tomato smell has gone; depending on the pan and tomatoes, a little oil may also begin showing around the edges.
  5. Add the ground spices. Lower the heat and stir in turmeric, Kashmiri/degi chilli and the 10 g chana masala powder for 20–30 seconds. Add a spoonful of water if the pan looks dry.

Phase 3: Simmer and Finish

  1. Add the chickpeas. Pour in about 250–300 ml / 1–1¼ cups reserved cooking liquid with the cooked chickpeas. Start there; loosen the curry later if needed.
  2. Simmer for 20–30 minutes. Keep it gentle and stir occasionally. This is where the pot changes most: the chickpeas stop tasting like plain beans wearing sauce, and the masala begins to carry through the whole bite.
  3. Mash a few chickpeas. Press 2–4 tablespoons worth against the side of the pan and stir them back in. Give the starch a minute or two to work into the gravy naturally.
  4. Finish by taste. Remove the bay leaf and black cardamom. Stir the crushed kasuri methi into the hot curry, then add the coriander. Taste a chickpea as well as the gravy. Taste for salt first, then decide whether the pot needs any extra tang or heat.
  5. Rest for 5–10 minutes. The gravy tightens slightly as it sits. Add a little hot cooking liquid if you want it looser for rice.

Canned shortcut One-pot Instant Pot Troubleshooting

The recipe above gives you the sequence. The next few sections look more closely at the stages where ingredients and timing vary most, starting with the chickpeas.

Getting the Chickpeas Really Tender

Dried chickpeas do not all behave alike. Bean age, storage and soaking can shift the pressure time considerably, which is why 20 minutes is a starting point rather than a promise. If yours takes longer, let it.

Three chickpea textures showing a hard bean with a chalky centre, a properly cooked chickpea that crushes easily, and an over-soft mushy chickpea.
A timer cannot show the centre of a chickpea. Split or crush one instead: chalkiness means keep cooking, while a creamy centre that yields cleanly is the useful target.

Acid also matters. Tomato, lemon, tamarind and other acidic ingredients can slow softening, so get the beans where they need to be before building the sourness. The University of Nebraska–Lincoln’s dry-bean guidance gives the same general advice.

Cooking Chickpeas Without a Pressure Cooker

Put the soaked chickpeas in a heavy saucepan, cover generously with fresh water and add the ½ teaspoon salt from the chickpea ingredients. Bring to a boil, lower the heat and simmer for roughly 60–90 minutes, topping up with hot water when needed. Older chickpeas can take longer.

Do not chase the clock on this one. If the centre is still firm, keep cooking.

If the Chickpeas Refuse to Soften

Longer cooking is the preferred first fix. Baking soda is sometimes used for stubborn chickpeas, but it is not necessary for this recipe; too much can make the beans mushy and leave an alkaline taste.

Chana masala does not require chickpeas taken quite as soft as hummus, but a firm centre is still a firm centre. A beautiful masala cannot rescue a bean that is still dry and chalky inside.

Quick Chana Masala With Canned Chickpeas

For a same-evening version with no soaking or pressure cooking, use 2 standard 15 oz / 425 g cans of chickpeas. Most give roughly 480–500 g drained chickpeas altogether, although the drained weight on the label is the best number to use when one is provided.

Canned chana masala shortcut showing two cans of chickpeas, drained chickpeas in a metal sieve, and a pan of finished chickpea curry with quantity guidance.
The shortcut is the chickpea-cooking stage, not the flavour-building: canned chickpeas save the soak and pressure time, while onion browning, tomato reduction and the final simmer still matter.

For this route, use the full masala ingredient quantities from the main recipe, replacing the dried chickpeas with the two cans. Skip Phase 1 completely and begin with Phase 2: Build the Bhuna Masala.

Drain and rinse the chickpeas, then press one before it goes into the curry. Some canned chickpeas are already soft enough; others remain surprisingly firm. If one is firm or chalky, simmer the chickpeas in plain water until they crush easily before introducing the acidic tomato masala.

Skip the ½ teaspoon salt used for cooking dried chickpeas. Start with up to the ½ teaspoon salt listed with the masala, using less if your chickpeas or commercial spice blend are already salty; finish by taste.

Finish the Canned Version

Cook the onion-tomato masala through Phase 2, then add the drained chickpeas with enough fresh water to create a medium-thick gravy. Simmer for at least 10–15 minutes; give it closer to 20 minutes when you have time and want the chickpeas and gravy more fully integrated. Mash a few chickpeas, then finish with kasuri methi, coriander and any extra tang the curry actually needs.

Using just 1 standard can? Halve the recipe approximately and use 5 g chana masala powder. One can commonly yields around 240–250 g drained chickpeas.

The easy rule is: 200 g dried chickpeas or 2 cans for the main recipe = 10 g powder; 1 can = 5 g.

Instant Pot Chana Masala

For the standard Instant Pot route, follow Phase 1 of the main recipe. Start the soaked chickpeas at 20 minutes on High Pressure, allow a natural release, then check one before deciding whether they need more time.

For more bhuna depth, build the masala separately and combine it with the tender chickpeas for the final simmer. If washing another pan feels unnecessary tonight, the one-pot method below keeps everything in the cooker and trades a little bhuna depth for easier cleanup.

One-Pot Instant Pot Chana Masala

This route still uses soaked chickpeas. Use the full ingredient quantities from the main recipe; follow the order and timings below instead of the main method.

One-pot Instant Pot chana masala sequence showing deglazed aromatics, soaked chickpeas pressure-cooked until tender, tomato added afterward, and spice blend added during the final Sauté.
The crucial one-pot rule is sequence rather than speed: tenderise the chickpeas before tomato and the full chana masala blend, then use Sauté to rebuild concentration.

The One-Pot Sequence

  1. On Sauté, temper the cumin, bay leaf and optional black cardamom. Brown the onion, then cook the ginger, garlic and green chilli.
  2. Use a splash of the 600 ml / 2½ cups fresh cooking water to scrape the base of the inner pot clean, then add the rest with the soaked chickpeas, ½ teaspoon salt, turmeric and Kashmiri/degi chilli. Hold back the tomatoes and chana masala powder until the chickpeas are tender so their acidic ingredients do not interfere with softening.
  3. Pressure cook for 20 minutes on High and let the pressure release naturally. Do not Quick Release the chickpeas. Check one; if the centre is still firm, give the cooker another 5 minutes at pressure and release naturally again.
  4. Once tender, remove excess cooking liquid so roughly 250–300 ml / 1–1¼ cups remains with the chickpeas.
  5. Switch back to Sauté and add the tomatoes and remaining ½ teaspoon salt. Cook until the tomato loses its raw edge and the mixture reduces around the chickpeas.
  6. Stir in the full 10 g chana masala powder and simmer for another 5–10 minutes, stirring often. Mash a few chickpeas. Remove the bay leaf and black cardamom, then finish with kasuri methi, coriander and any extra acidity the curry needs.

Because the tomato is reducing in a wetter pot, this version tastes a little fresher and less deeply bhuna than the separate-pan method. Let Sauté mode do enough work at the end.

How to Know When the Masala Is Ready

The masala is ready when it has changed from loose and raw-smelling to concentrated and savoury; oil may appear at the edges, but it does not have to.

Bhuna masala readiness guide showing onions from pale to golden to deeper brown, tomato masala reducing from loose to concentrated, and two ready masalas with different amounts of visible oil.
Read the board as a sequence: onion colour builds sweetness, tomato reduction removes rawness, and visible oil is only an optional final clue—not the endpoint by itself.

A recipe can give you 10 or 12 minutes for the tomatoes, but tomatoes do not read timers. A juicy batch in a narrow pan can stay loose considerably longer than a drier batch spread across a wide sauté pan.

How Far to Cook the Onion

For this gravy, clearly golden is enough. Take the onion further and you get more roasted sweetness and a deeper-looking curry; stop while it is merely soft and the whole dish stays lighter.

What the Tomato Stage Is Actually Doing

Reduction removes excess water and concentrates the onion, tomato, ginger and garlic into a base that can cling to the chickpeas later. As it cooks, the sharp smell of fresh tomato softens and the warmer smell of browned onion and spice begins to take over. This is the point where the pan starts smelling less like separate ingredients and more like dinner.

Visible oil at the edges is useful when it happens, but it is not the only proof of readiness. Loss of the raw tomato smell and the change from loose to concentrated matter more.

Undercook this stage and the finished curry can stay tomato-forward even when the spice quantities are correct. Push it too hard in a dry pan and the ground spices can turn bitter.

Very juicy tomatoes may need another five minutes. Let them have it.

Ground Spices Need Only Brief Heat

The homemade chana masala powder has already been roasted before grinding. A brief 20–30 seconds in the cooked tomato base is enough to wake it up. When the pan looks dry, add a spoonful of water rather than trying to fry the powder harder.

The Final Simmer Is Part of the Recipe

Pressure cooking makes the chickpea tender. The final simmer makes it taste like chana masala.

The starchy cooking liquid, mashed chickpeas and reduced masala begin behaving like one gravy during these final 20–30 minutes. What started as beans, tomato and spices becomes a curry in which each bite carries all three.

Drag a spoon through the pan near the end. When the gravy is ready, it closes slowly behind the spoon and leaves a light coating without looking stodgy.

Chana masala shown before and after the final simmer, with a spoon dragged through thick finished gravy to demonstrate a slowly closing trail.
The spoon trail should close slowly, not stay carved into the pan. If it remains sharply open, the gravy is already moving toward too thick.

Taste a chickpea, not just the sauce. A good-looking gravy can still be hiding a bean that needs another pinch of salt.

If a chickpea crushes easily, the gravy clings and the curry tastes integrated rather than raw or tomato-forward, the essential work is done. Everything from here is preference.

← Back to recipe Troubleshooting Serving

Restaurant-Style Chana Masala: What to Change

Once the chickpeas are tender and the gravy has the body you want, “restaurant-style” becomes less about correctness and more about which quality you want to emphasize: colour, smoothness, body or richness.

For darker chickpeas, add 1 plain black tea bag or 2–3 dried amla (Indian gooseberry) pieces while pressure cooking the main 200 g dried-chickpea recipe, then remove them afterwards.

Dark vs Deep: Colour Is Not Flavour

Dark is a colour; deep is a flavour. Tea or amla changes the first. More savoury depth comes from taking the onion further, fully reducing the tomatoes and giving the finished curry enough time to simmer.

Side-by-side chana masala comparison showing a darker curry with tea and amla cues and a deeper-flavoured curry with browned onion and reduced tomato masala.
Tea or amla can change the shade before the gravy has gained enough body; therefore, judge depth by aroma, concentration and cling rather than darkness alone.

For a silkier gravy, remove the bay leaf and black cardamom and blend the cooked onion-tomato masala before adding the chickpeas. More body comes from mashing a few extra chickpeas and reducing the curry uncovered.

For a ginger tadka—a quick aromatic finish of ginger fried in fat—cook thin ginger juliennes in about 1 teaspoon ghee until fragrant and just beginning to colour, then spoon them over the curry. Neutral oil works for a vegan finish. A little coriander-mint green chutney alongside brings a fresh, sharp contrast.

Restaurant-style chana masala guide showing tea or amla for darker colour, blending for a silkier gravy, mashing for more body, deeper browning and reduction, and ginger tadka for aroma.
Treat these restaurant-style adjustments as independent switches. You might want darker chickpeas but a rustic gravy, or a silkier sauce without changing the colour at all.

Troubleshooting Your Chana Masala

Correct the most obvious problem first and taste again before changing something else. Several rushed fixes at once can turn one solvable problem into a completely different curry.

Quick Fixes by Symptom

  • Hard or chalky chickpeas: keep cooking them. Add hot water if needed and leave the gravy adjustments until the beans themselves are tender; the tender-chickpea section shows what to look for.
  • Raw tomato dominates: simmer uncovered so the tomato can reduce and lose that fresh, sharp edge.
  • Too sour: stop adding acid. The pot already contains tomato plus the amchur and anardana in the spice blend. More cooked chickpeas are the cleanest correction when available; otherwise loosen with a little unsalted cooking liquid and simmer again.
  • Thin gravy pooling beneath the chickpeas: mash a few chickpeas into the sauce and reduce uncovered. Give the starch a few minutes before deciding it has not worked; the final-simmer section shows the spoon-trail cue.
  • Too thick: loosen with hot reserved cooking liquid a little at a time. The curry thickens further as it cools.
  • Bitter: scorched spices can make the whole curry bitter. If the bottom of the pan has scorched but the curry above it still tastes clean, transfer the unburnt portion to a fresh pan without scraping up the burnt layer.
  • Too spicy: add more chickpeas or unsalted liquid/base. Large amounts of sugar tend to leave the curry both hot and oddly sweet.
  • Dark but still weak: more tea will not help. Check the salt, then simmer uncovered a little longer so the gravy concentrates. Next time, use the masala-readiness cues to take the onion and tomato further before combining.
Chana masala troubleshooting guide covering hard chickpeas, raw tomato flavour, excess sourness, thin or thick gravy, scorching, excess heat, and dark but weak curry.
Use this board as a fork in the road, not a checklist: texture problems usually need more cooking or liquid control, while weak flavour often needs salt or concentration.

If Plenty of Spice Still Tastes Bland

Chana masala can taste bland despite plenty of spice when the salt is low or the onion, tomato and final simmer have not developed enough flavour.

Start with salt. Under-salted chickpeas make cumin, coriander, chilli and the rest of the masala all seem quieter than they really are.

What looks like too little spice is often incomplete cooking. An onion stopped too pale, tomato left too watery or curry taken off the heat too soon can all taste underpowered despite plenty of ground masala. Another ten minutes of simmering may do more than another spoonful of powder.

Chana masala flavour diagnostic showing salt, pale versus browned onion, loose versus reduced tomato masala, and briefly versus fully simmered curry.
This diagnostic order helps prevent over-spicing: correct salt and concentration first, because both can make the cumin, coriander and chilli already in the pot taste much louder.

← Back to recipe Serving ideas Storage & reheating ↑ Back to top

Useful Substitutions

Fresh tomatoes: plain canned crushed tomatoes or passata can stand in at roughly the same weight. Cook them to the same concentrated endpoint. Tomato paste is much more concentrated and should not replace the tomatoes gram-for-gram.

Oil and ghee: neutral oil keeps the main recipe vegan. Ghee gives the curry a rounder, buttery finish when dairy is welcome.

Extra amchur: lemon, a little tamarind or anardana can all provide acidity, but taste first—the tomatoes and homemade spice blend may already have given the curry enough.

No chana masala powder: use the measured garam-masala fallback given with the ingredients above. It will not duplicate the complete blend exactly, but it makes a very workable curry; the Chana Masala Powder guide has the full formula.

What to Serve With Chana Masala

Keep the gravy thick for bhatura or poori, medium-thick for roti or paratha, and slightly looser for rice. All three can be right; they simply ask different things from the gravy.

Chana masala served with poori or bhatura, roti or paratha, and basmati rice, showing thicker gravy for breads and slightly looser gravy for rice.
Serving several accompaniments at once? Keep the main chana masala medium-thick, then loosen only the portion headed for rice instead of compromising the gravy for bread.

With bhatura or poori, a torn piece should lift a thick swipe of gravy and a few chickpeas with it instead of the sauce running straight back onto the plate. With rice, loosen the curry just enough for the gravy to settle between the grains.

Plain basmati is enough, though jeera rice is especially good with the warm cumin and tang in the curry; our rice cooking guide covers both stovetop and pressure-cooker methods.

Sliced onion, coriander, green chilli, lemon and a little pickle all work around the bowl. The contrast of hot, thick chana with cold crisp onion is particularly good. If dairy is on the table, palak raita brings cool curd, spinach and cumin alongside a hotter batch.

Give the curry a few minutes to settle before ladling it out, then eat it while the kasuri methi, coriander and any ginger tadka are still fragrant.

Make Ahead, Store and Reheat

Chana masala often tastes more settled the next day, while chickpea starch makes the chilled gravy noticeably thicker.

Chana masala storage guide showing shallow refrigerated containers, freezer storage, reheated curry, and cooked chickpeas stored with some cooking liquid for make-ahead preparation.
Reheat first, then decide whether to add water. Thinning cold chana masala is easy to overdo because chickpea starch loosens again as the curry gets hot.
  • Refrigerate: divide the curry into shallow containers and refrigerate within 2 hours, or within 1 hour if the temperature is above 90°F / 32°C; use within about 3–4 days.
  • Freeze: portion into airtight containers and use within about 2–3 months for best quality.
  • Reheat: begin warming the curry gently. As it loosens, decide whether it actually needs more liquid; if so, add hot water or reserved cooking liquid a little at a time. Heat until steaming hot throughout. The USDA’s leftovers guidance recommends reheating leftovers to 165°F / 74°C.

Making It Ahead for Guests

Cook the chickpeas in advance and refrigerate them with some of their cooking liquid. Build the masala later, combine the two and finish the final simmer closer to serving. It keeps the slowest part of the job out of the way while letting the curry arrive at the table freshly finished rather than simply reheated.

Doubling the Recipe

Double the ingredients only when your cooker has enough room. Chickpeas expand and foam during pressure cooking, so follow your cooker’s limit for legumes and other expanding foods. Instant Pot’s guidance says these foods should not go above the 1/2 mark. A larger pan of finished curry also needs more time to reduce; the pressure time itself does not automatically double.

← Back to recipe FAQs ↑ Back to top

Chana Masala and Chole: What’s the Difference?

Chana masala is often used as the broader term, while Punjabi chole often refers to a darker, more robustly seasoned chickpea preparation—but the names overlap considerably in everyday use.

The boundary is not rigid. Families, cities and restaurants do not all draw the line in exactly the same place, so two noticeably different bowls can both be sold as chana masala or chole without either necessarily being mislabeled.

This is a gravy-based Punjabi-style chana masala rather than a Pindi chole or Amritsari chole preparation. Those styles use different methods and flavour balances.

Frequently Asked Questions

1. Does chana masala need black tea?

No. Black tea is optional and mainly darkens the chickpeas. Chana masala does not require it; the Dark vs Deep section explains what tea changes and what actually builds flavour.

2. Can I make chana masala without onion and garlic?

Yes, but expect a lighter, sharper gravy because the onion in this version provides body and sweetness as well as flavour. Ginger, chilli, tomato and the spice blend can still make a good curry without onion and garlic, but it will not have quite the same texture or depth as this Punjabi-style version.

3. How spicy should chana masala be?

It can be hot, but chilli should not overwhelm the earthy chickpeas, warm spices and tang. Kashmiri or degi chilli gives colour and relatively gentle warmth; increase the green chilli or use a hotter chilli powder for a hotter bowl.


The Last Spoonful

Partially eaten bowl of chana masala with basmati rice, torn roti and red onion while a spoon lifts several chickpeas coated in thick gravy.

When the last spoonful lifts chickpeas and gravy together instead of leaving one behind, the pot has done what it needed to do. Eat it hot with roti, rice, poori or bhatura. The technique has a few rules; the personality of the curry is yours.
← Recipe card ↑ Back to top

Posted on — Leave a comment

Chana Masala Powder Recipe: Homemade Chole Masala Blend

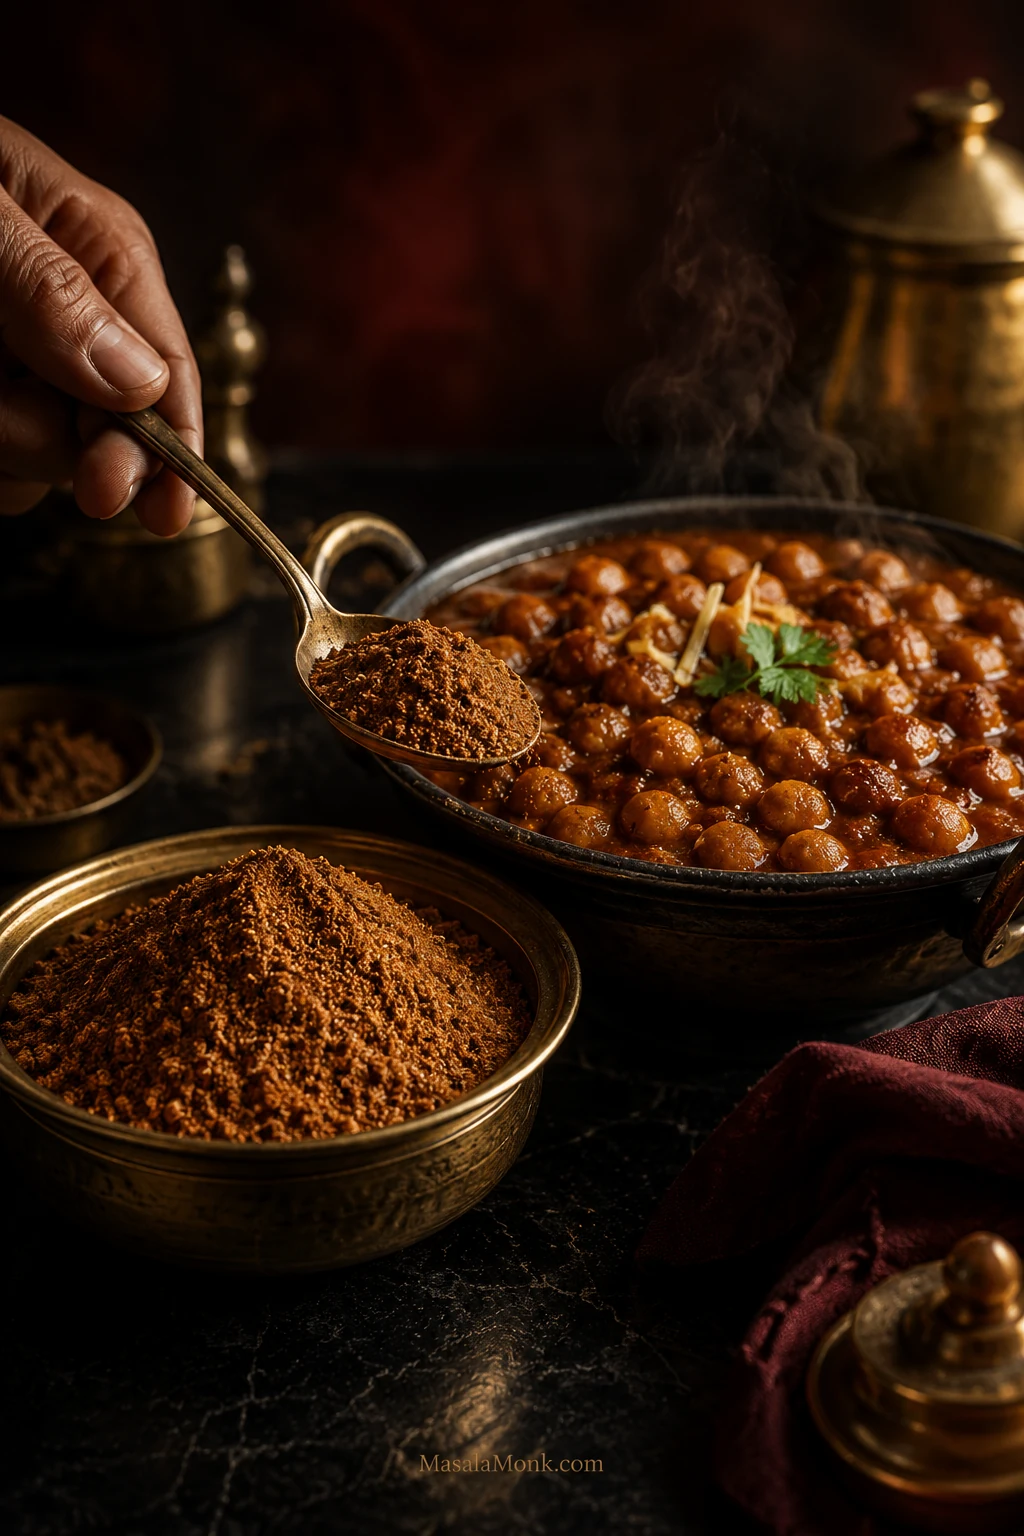
Bowl of rust-brown homemade chana masala powder beside steaming chole, with a spoon carrying the spice blend toward the curry.

Your chole can smell wonderfully spicy and still taste strangely flat. Maybe the first spoonful is mostly tomato and chickpea, then the chilli arrives afterwards. Or perhaps it is plenty hot but somehow doesn’t taste like the chole you were trying to make.

If you’ve already reached for more cumin, another spoonful of garam masala or a hotter chilli, you probably don’t need a mystery ingredient. The balance between the spices you already have matters more.

This homemade chana masala powder recipe, also called chole masala powder, is built for the common “hot but flat” problem. Coriander and cumin get the longer toast, quicker aromatics join later, and amchur stays out of the pan so the blend keeps its depth without letting one note take over.

The result is earthy, tangy and warmly aromatic without letting chilli dominate. Heat is only one dial. Once you separate it from tang, earthiness and aroma, a disappointing pot becomes much easier to understand.

Homemade Chana Masala Powder Recipe

Making the powder is straightforward. Keep the pan gentle and the spices moving; aroma matters more than chasing a darker colour.

  • MakesAbout 90 g / 3.2 oz
  • Active timeAbout 15–20 minutes
  • Cooling10–15 minutes
  • TotalAbout 25–35 minutes
  • Chilli heatMild–medium with Kashmiri/Byadgi chillies
  • Peak aromaBest within 2–3 months

Starting dose: about 5 g per 100 g dried chickpeas, or around 2 g per 100 g cooked or drained chickpeas.

Ingredients

Use the gram weights when you can. Spoon and count measures are rough guides, but chillies, cinnamon sticks, cardamom pods and dried leaves don’t come in standard sizes.

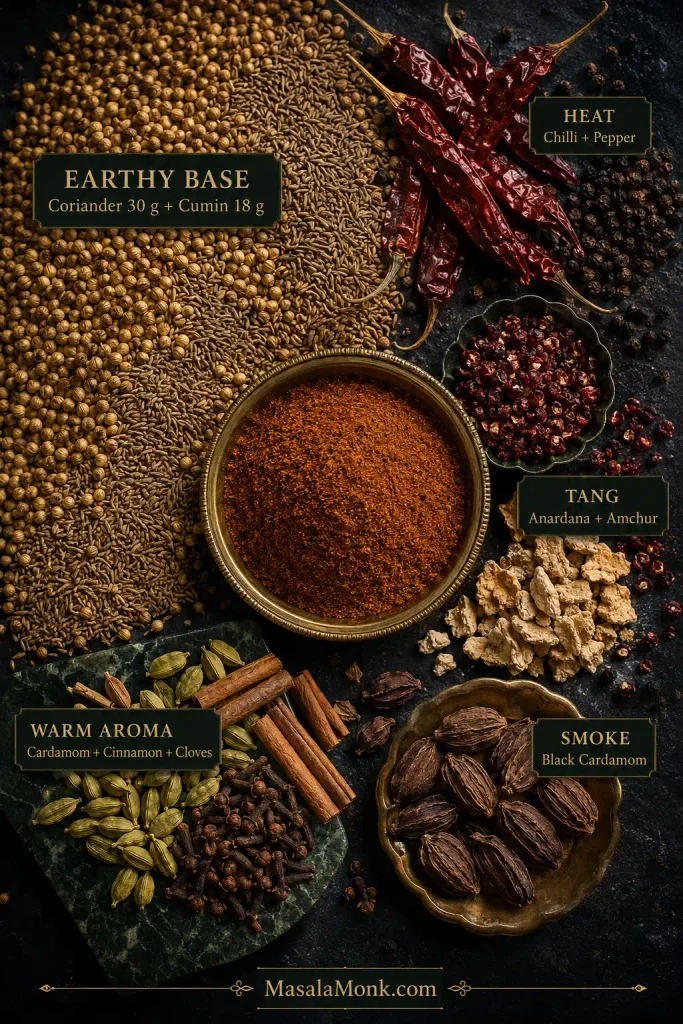
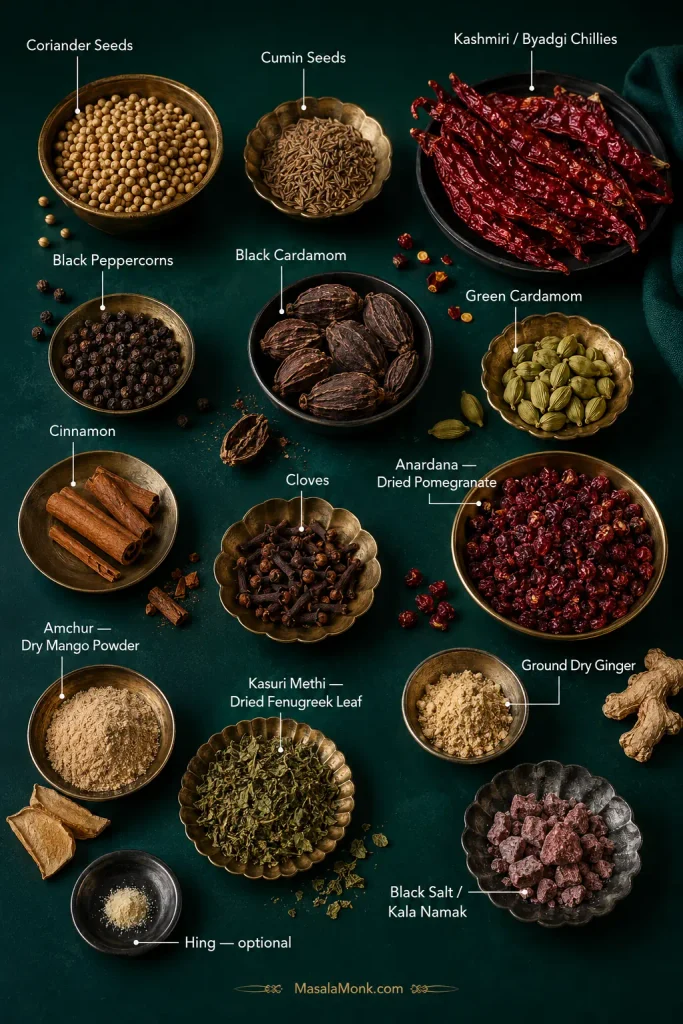
Overhead arrangement of coriander, cumin, dried red chillies, peppercorns, cardamom, cinnamon, cloves, anardana, amchur, kasuri methi, dry ginger, black salt and hing.
A visual guide to the whole blend: identify the less familiar ingredients here, then use the gram-weighted list below for the actual formula.
  • 30 g coriander seeds — about 6 tablespoons
  • 18 g cumin seeds — about 3 tablespoons
  • 8 g Kashmiri or Byadgi dried red chillies, stems removed — roughly 6–10 depending on sizeA hotter chilli needs a smaller amount.
  • 4 g black peppercorns — about 1½ teaspoons
  • 2 g black cardamom — roughly 1–2 large pods or about 2 smaller podsUse the weight if yours are unusually large.
  • 1 g green cardamom — roughly 5 pods
  • 3 g cinnamon — roughly one moderate 2-inch / 5-cm pieceA thin curl and a thick cassia stick can weigh very differently.
  • 2 g cloves — about 1 teaspoon
  • 10 g dried anardana / dried pomegranate seeds — roughly 1–1½ tablespoons
  • 6 g amchur / dry mango powder — about 2½–3 teaspoons
  • 2 g kasuri methi / dried fenugreek leaves — about 1–2 tablespoons, loosely crumbledThis is dried fenugreek leaf, not fenugreek seed.
  • 2 g ground dry ginger — about 1 teaspoon
  • 2 g black salt / kala namak — about ⅓ teaspoon
  • Optional: a tiny pinch of ordinary compounded hing / asafoetida, added after grindingAvoiding gluten? Check the label; some compounded asafoetida contains wheat flour.

Before You Start

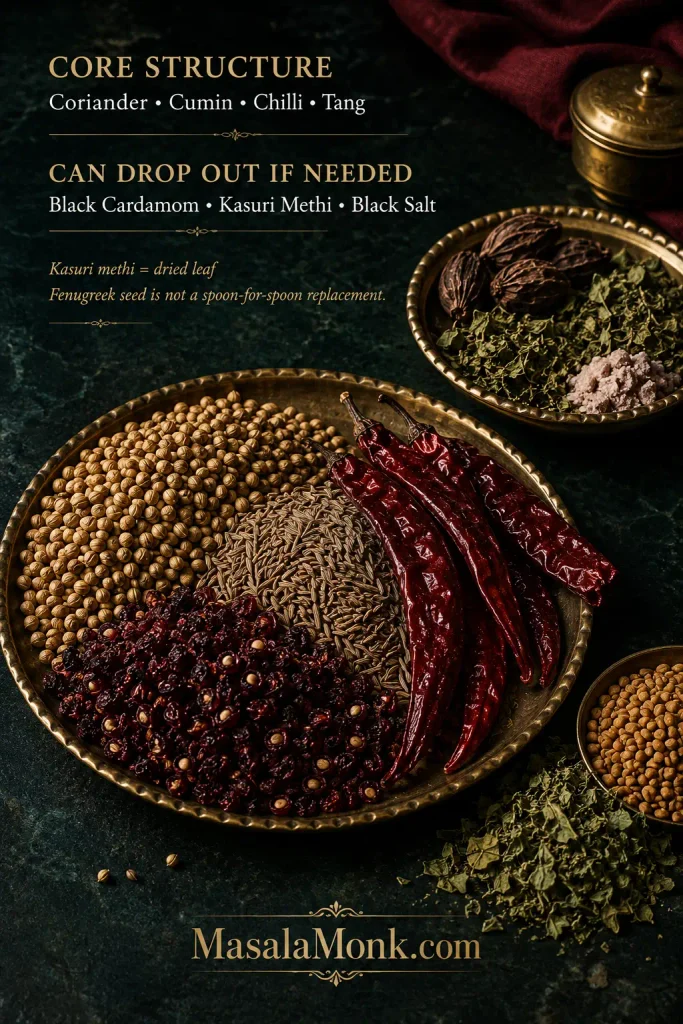
Don’t have every last spice? Keep going. The heart of the blend is coriander, cumin, chilli and tang. Black cardamom, kasuri methi and black salt can drop out when necessary and you’ll still have a perfectly workable chole masala. See what you can leave out and what not to substitute.

Turmeric and regular cooking salt are left out deliberately. Both are easier to adjust in the finished chole.

You’ll need a dry skillet or kadai, a cooling plate, a spice grinder or mixer grinder, and a dry airtight jar. A fine sieve helps when cinnamon or anardana refuses to grind cleanly.

Method

For this blend, don’t chase dark colour in the pan. Some chole formulas deliberately roast their spices more deeply, but this recipe uses a gentler roast. For darker Pindi- or chole-bhature-style chickpeas, build the colour while cooking the chickpeas—some methods use dried amla (Indian gooseberry) or black tea—instead of scorching this powder.

Roast the Spices in Stages

  1. Measure everything first. Check the coriander, cumin and anardana for grit, stones or damaged pieces, especially if the spices were bought loose. Remove the chilli stems and keep a cool plate beside the stove.
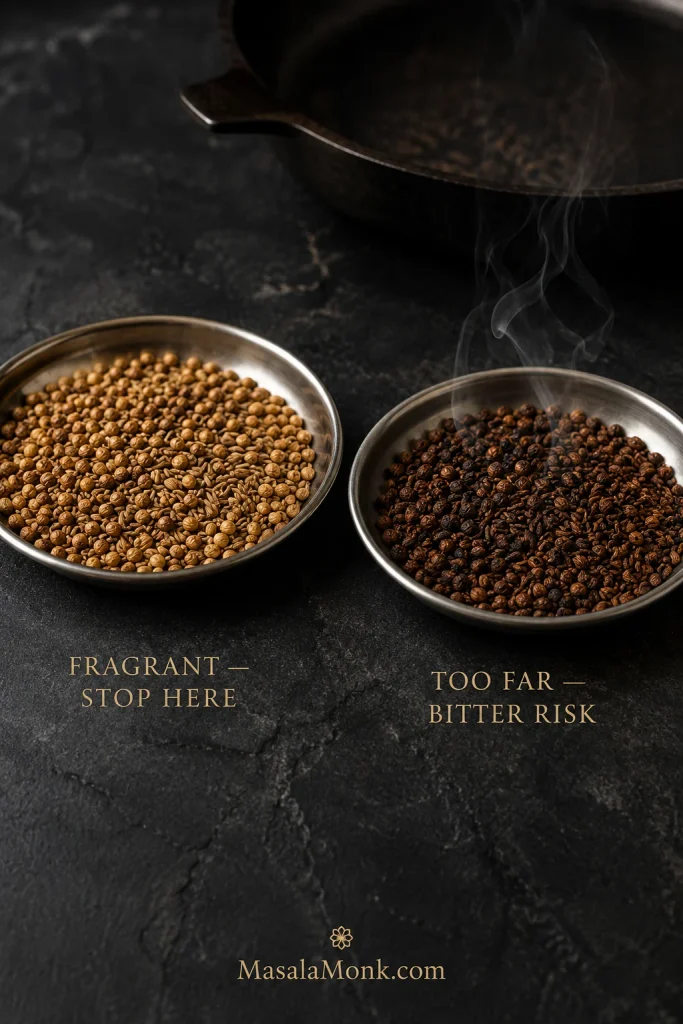
  1. Heat a dry skillet over low to medium-low heat. Add the coriander and cumin and stir or shake the pan frequently for about 3–4 minutes. They should smell clearly fragrant before they change much colour. Smoke or very dark cumin means the pan is too hot.
Two steel dishes compare lightly toasted coriander and cumin with much darker over-roasted spices, with smoke rising from the darker side.
Take coriander and cumin off the flame a little earlier than your eyes may suggest. Their stored heat keeps working after they leave the pan, so a fragrant, gently deepened roast gives you more margin than waiting for dramatic browning.
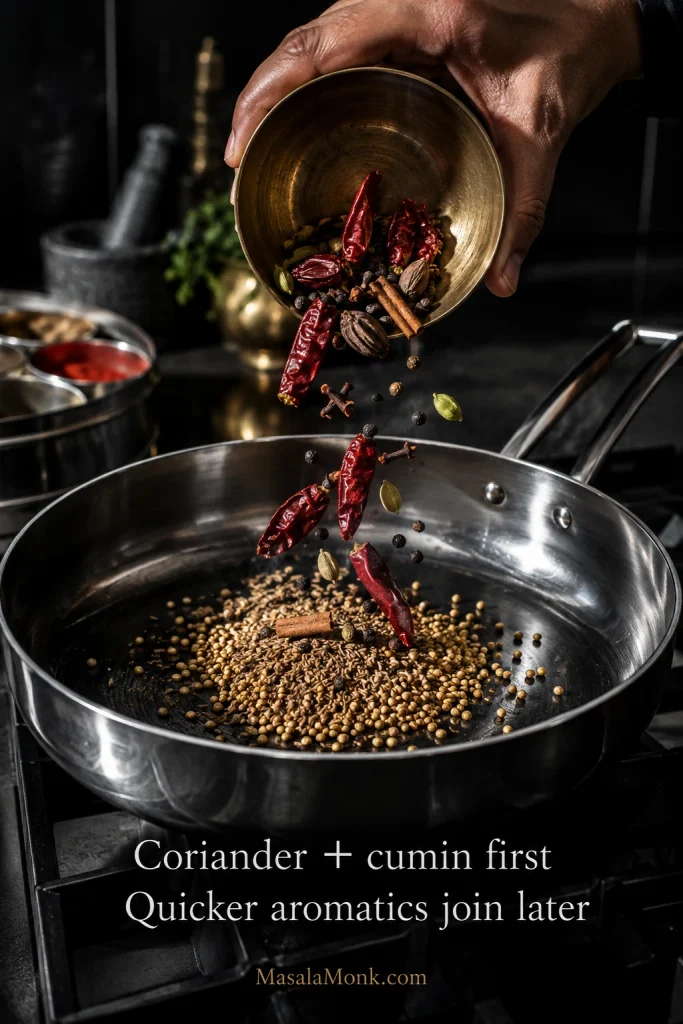
  1. Add the chillies, pepper, black cardamom, green cardamom, cinnamon and cloves. Stir continuously for another 1–2 minutes. The chillies should feel drier and may puff slightly. Once the aroma becomes vivid, tip everything onto the cool plate.
Hand adding dried chillies, peppercorns, cardamom, cinnamon and cloves to a pan that already contains coriander and cumin seeds.
Different spices reach their aromatic peak at different speeds. Coriander and cumin can take the head start; meanwhile, bringing chillies, pepper and the warmer aromatics in later gives them enough heat to bloom without making scorched notes part of the blend.
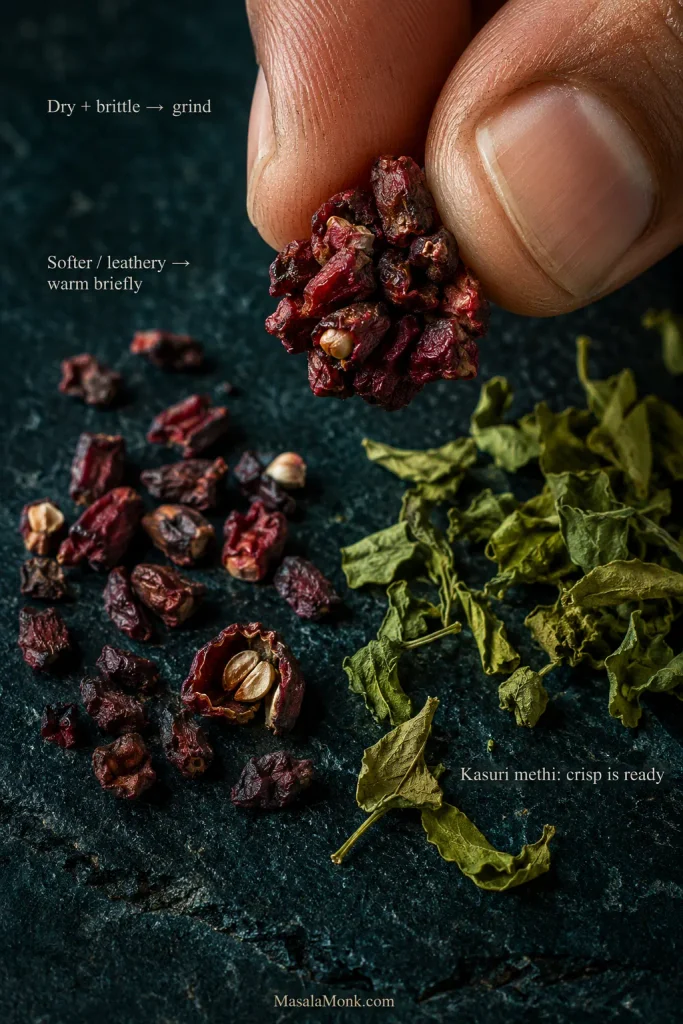
  1. Check the anardana and kasuri methi. Very dry, brittle anardana can go straight to the grinder. Softer or leathery seeds benefit from a brief warming over low heat so they grind more cleanly. Crisp kasuri methi can go in as-is; softer leaves only need a few seconds of gentle heat. Cool anything you warmed.
Close view of dried pomegranate arils held between fingers beside loose anardana and crisp dried kasuri methi leaves.
Clean grinding is the goal. Already-brittle anardana and crisp kasuri methi need no extra roasting just for colour.

Cool, Grind and Jar the Blend

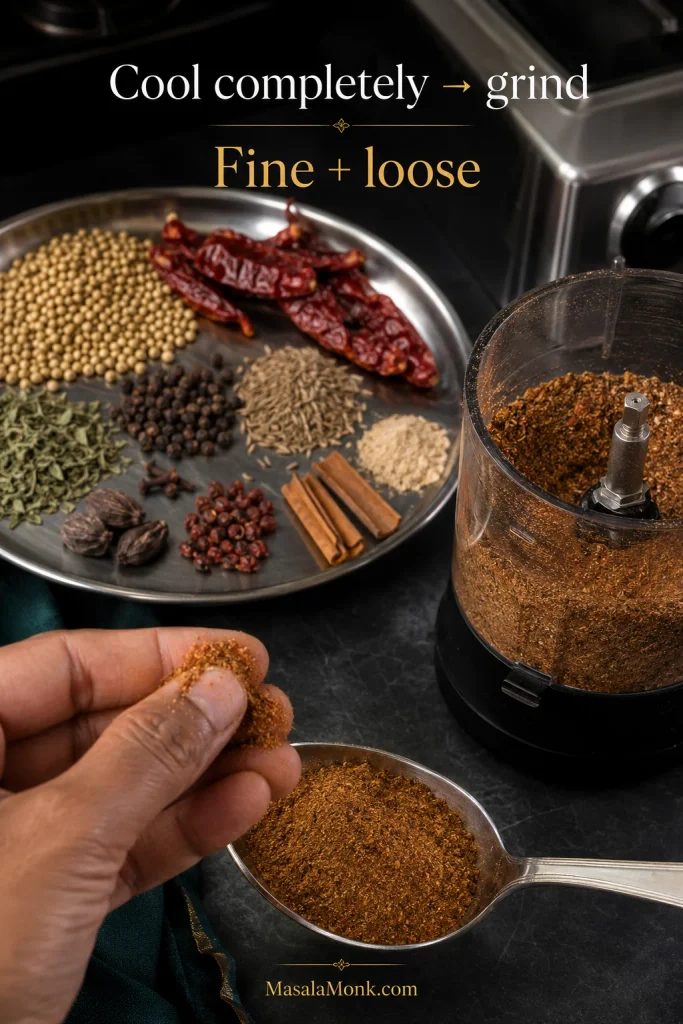
  1. Let everything cool completely, usually 10–15 minutes. There shouldn’t be obvious warmth left when you pick up the spices.
  2. Pulse the cooled whole spices until fairly fine. Add the amchur, dry ginger, black salt, cooled kasuri methi and optional hing, then pulse again just until evenly mixed. A noticeably hot grinder needs a break before you continue.
  3. Rub a little powder between your fingers. It should feel fine and loose, never damp or pasty. Tiny flecks are fine; obvious cinnamon or pomegranate pieces need another grind. Let the dust settle for a few seconds before opening the grinder. With hotter chillies, keep your face back, avoid touching your eyes and wash your hands well after handling them; good ventilation helps.
Roasted whole spices beside a grinder, with fingers rubbing a pinch of finely ground chana masala powder over a spoon.
If only a few pieces refuse to grind finely, sieve them out and regrind those fragments rather than repeatedly heating the entire batch. That keeps the finished powder fine while reducing unnecessary grinder heat.
  1. Transfer the completely cool powder to a clean airtight jar. Smell it before you close the lid. Coriander and cumin should come first, followed by fruity anardana, pepper and chilli. Cloves and black cardamom should remain in the background.
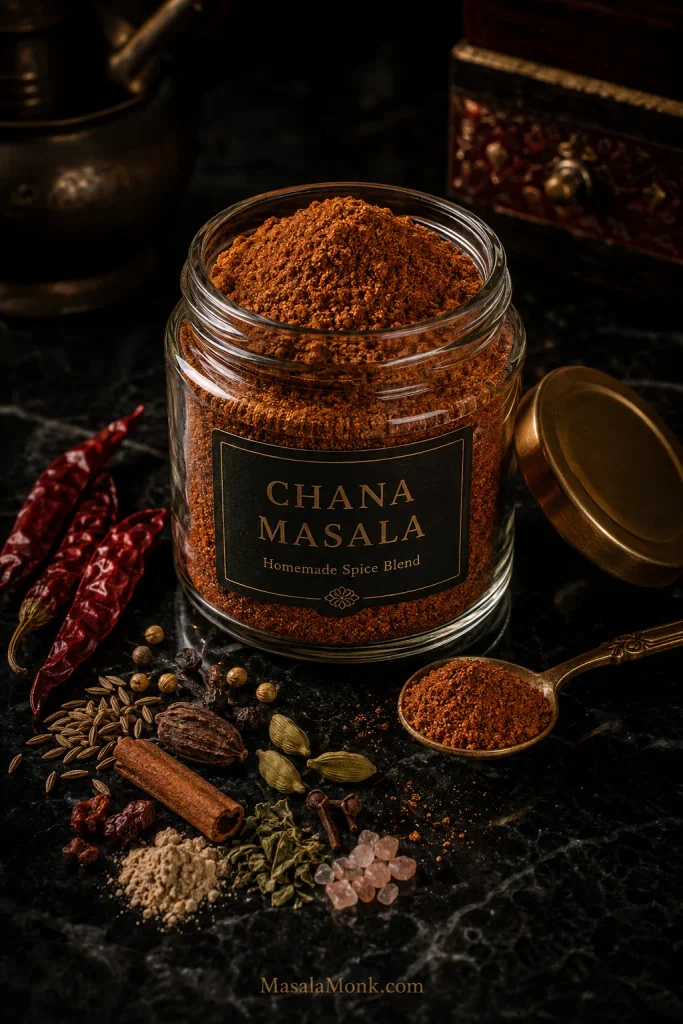
Clear glass jar filled with homemade chana masala powder, labeled Chana Masala Homemade Spice Blend, with a spoon and whole spices nearby.
Give the finished jar one last smell before you put it away. If a small aromatic ingredient such as clove or black cardamom is shouting over the coriander-cumin base, it is easier to rebalance the powder now than after it has seasoned an entire pot.

How Much Chana Masala Powder Should You Use?

Starting Dosage by Chickpea Weight

One recipe tells you to use a couple of teaspoons; another seems to want tablespoons. Both can make sense when the powders themselves aren’t equally concentrated.

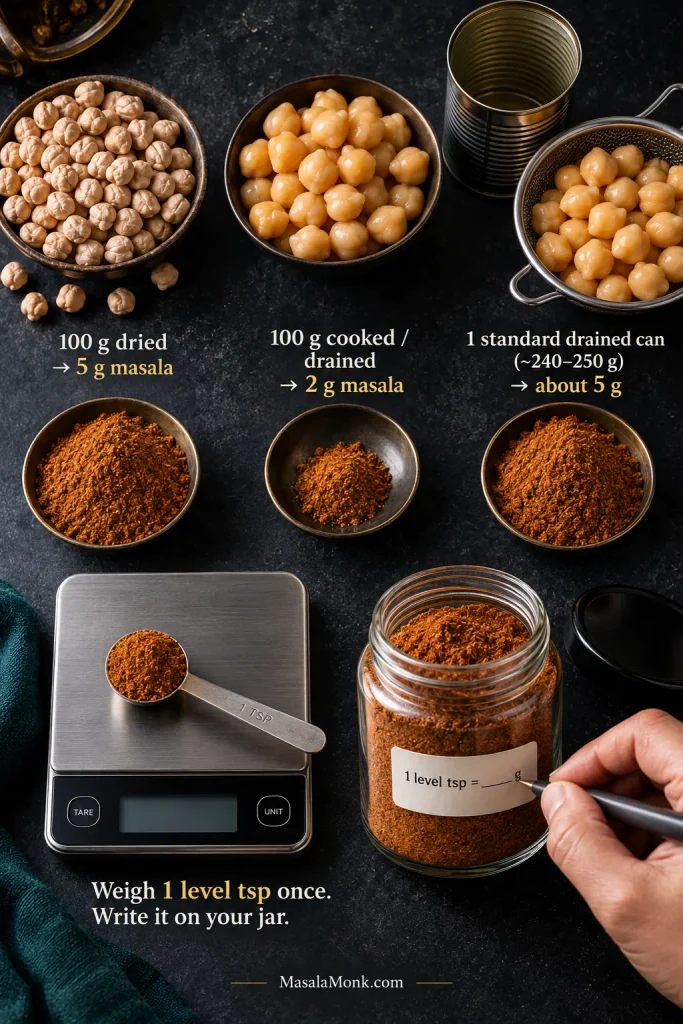
For this homemade masala, start with 5 g for every 100 g dried chickpeas, or roughly 2 g for every 100 g cooked or drained chickpeas.

The blend is not your pot’s total salt adjustment. Season the finished chole separately, especially when using canned chickpeas or a packet spice blend.

ChickpeasStart with this blend
Starting with dried chickpeas
100 g / 3.5 oz driedAbout 5 g
200 g / 7 oz dried, roughly 1 cupAbout 10 g
250 g / 8.8 oz driedAbout 12–13 g
Starting with cooked or canned chickpeas
400 g / 14 oz cookedAbout 8 g
About 3 cups cooked, roughly 450–500 gAbout 9–10 g
1 standard 15-oz / 425-g can, about 240–250 g after drainingAbout 5 g
2 standard cans, about 480–500 g drainedAbout 10 g

Calibrate Your Teaspoon

No scale beside the stove? Weigh one level teaspoon from your finished batch once and write that weight on the jar. Grind fineness changes density, so your own teaspoon conversion is more reliable than a universal spoon measure.

Dosage guide showing dried chickpeas, cooked chickpeas and drained canned chickpeas with measured masala, plus a level teaspoon on a digital scale.
Write your calibrated teaspoon weight on the jar, then recheck it after a major grind or formula change. A finer powder can pack more densely into the same spoon.

Let the first dose simmer into the gravy before deciding it is weak. If the pot really needs salt, a direct adjustment to tang, or a few more minutes of reducing, fix that directly instead of using extra masala as a catch-all.

Using a packet? Follow that packet first. Commercial chole masalas vary enormously in salt, chilli, acidity and concentration, so the table above belongs to this homemade blend. See why packet and homemade measurements don’t transfer directly.

When to Add the Powder

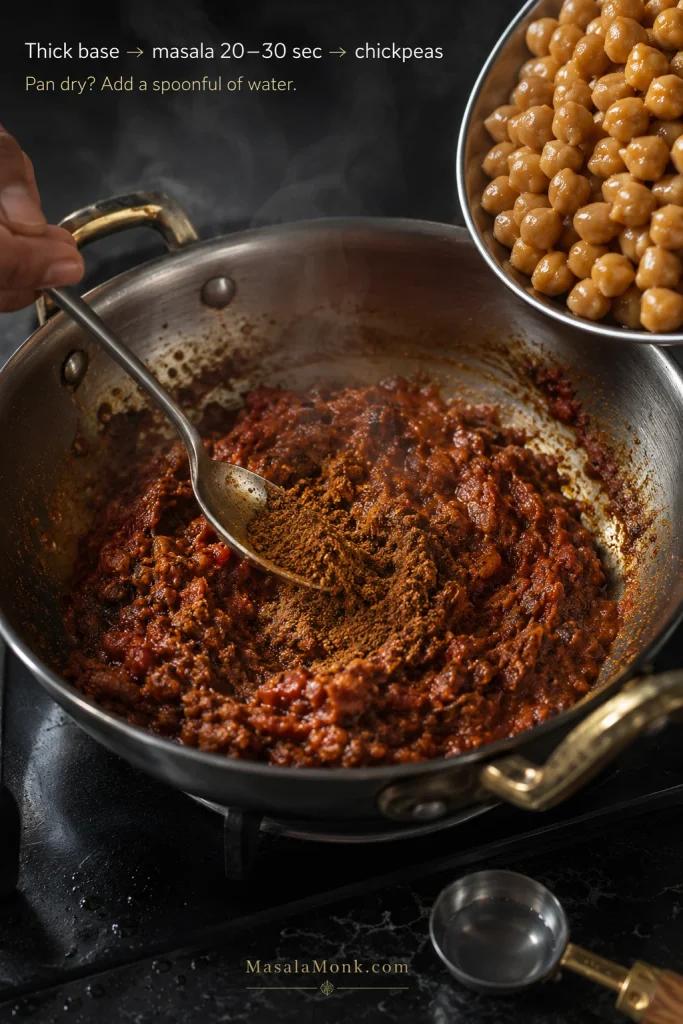
Cook the onion-tomato base until it is thick and no longer smells raw. Lower the heat, stir in most of the masala and give it about 20–30 seconds. A dry pan needs a spoonful of water before the spices catch. Add the chickpeas and cooking liquid straight afterwards.

When the chole tastes balanced but the aroma seems quiet, a small finishing dose works better than another long cook.

Spoon stirring chana masala powder into a thick cooked onion-tomato base, with chickpeas ready to be added and a small measure of water nearby.
A brief bloom is enough: keep the reduced base moving and get the chickpeas in before the ground spices scorch.

Made the Powder? Here’s Dinner

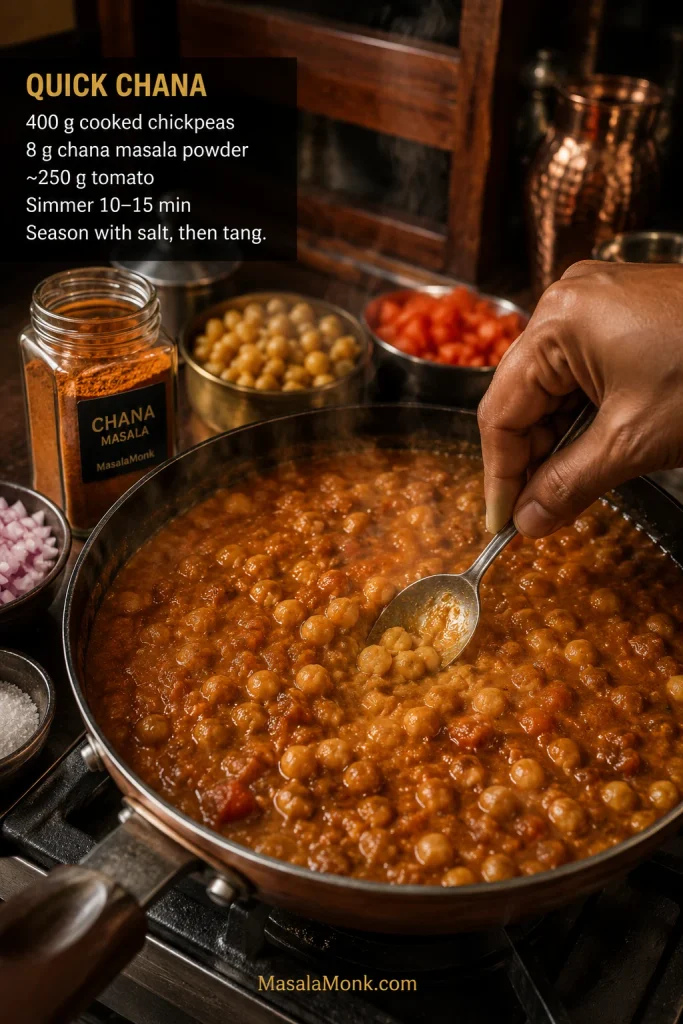
For an easy everyday chana, soften and lightly brown 1 medium chopped onion, about 120–140 g, in 1–2 tablespoons oil or ghee. Add about 1 teaspoon each of grated ginger and garlic, if using, then about 250 g chopped or puréed tomato. Cook until the tomato has reduced into a thick base.

Lower the heat and stir in 8 g of this chana masala powder for 400 g / 14 oz fully tender cooked chickpeas. Give it 20–30 seconds, adding a spoonful of water when the pan looks dry, then add the chickpeas and enough water or cooking liquid for the consistency you like.

Steaming pan of quick chana being lightly mashed with a spoon, with cooked chickpeas, chopped tomato, onion and a chana masala jar nearby.
Mash only a small portion of the chickpeas while the curry simmers. The released starch gives the gravy extra body, so it coats the remaining whole chickpeas more naturally without needing flour, cream or an unnecessarily long reduction.

Finish the Chole

Simmer for 10–15 minutes and mash a small spoonful of chickpeas into the gravy for body. Season with salt, then taste for tang. Only after those are right should you decide whether the pot needs another little dose of masala.

What are you aiming for? Tender chickpeas coated in gravy that clings instead of pooling around them. The first bite should taste savoury and tangy, and the chilli should warm the finish instead of arriving afterwards as a separate blast.

Large spoon lifting steaming chickpeas coated in thick reddish-brown gravy from a dark bowl of chole.
Do not use colour alone as your doneness test. Chole can legitimately finish lighter or darker depending on the method; instead, pay closer attention to whether the chickpeas are fully tender and whether the gravy moves with them rather than separating around them.

That is enough for a dependable everyday chana. The rest of the guide is about understanding the blend and changing it when you want something different.

What Is Chana Masala Powder?

Chana masala powder and chole masala powder usually refer to the same broad family of spice blends made for chickpeas. There is no single fixed formula.

This version leaves onion and garlic for the curry base instead of putting them into the stored powder; some commercial chana masalas include dried garlic.

Chana masala powder is also not besan or chickpea flour. “Chana powder” can sometimes mean ground chickpeas or gram flour; here we’re talking about a spice mixture.

The easiest way to remember the blend is by the job each group does. Coriander and cumin form the earthy base. Chilli and pepper control heat. Anardana and amchur bring tang. Cardamom, cinnamon and cloves supply warm aroma, while black cardamom adds smoke. Most of the salt stays in the curry.

Overhead spice arrangement showing coriander and cumin as the largest group, with separate chilli, tangy spices, warm aromatics and black cardamom around a bowl of chana masala powder.
Use the flavour map when a batch feels “hot but flat”: identify the missing dimension first instead of adding more chilli by reflex.

How the Blend Is Balanced

The 30 g coriander to 18 g cumin ratio keeps coriander in front. It brings a fresh, citrusy earthiness; cumin takes the flavour deeper. Together they give the masala enough body to settle into the gravy instead of leaving only warm spice on top.

Chilli and pepper have different jobs too. Kashmiri or Byadgi chilli carries colour and a broad warmth; pepper catches up later with a sharper heat.

Cardamom, cinnamon and cloves should remain in the background.

Why Chole Masala Recipes Look So Different

Compare five good recipes and you may find five convincing formulas. Some nearly match coriander and cumin. Others lean much harder on coriander. One uses amchur, another anardana, while plenty use both. Kasuri methi, black salt, turmeric, fennel, ajwain, mace and nutmeg come and go.

The grind changes as well. A coarse masala can feel pleasantly rustic; a finer one disappears more easily into gravy and is easier to dose consistently.

Punjabi chole isn’t one rigid template. Pindi and Amritsari styles alone can differ noticeably in method, gravy and seasoning, and family versions move again. One family’s spice tin may smell smokier, another’s fruitier with anardana, and both can taste immediately like chole.

Adjusting the Tang: Anardana and Amchur

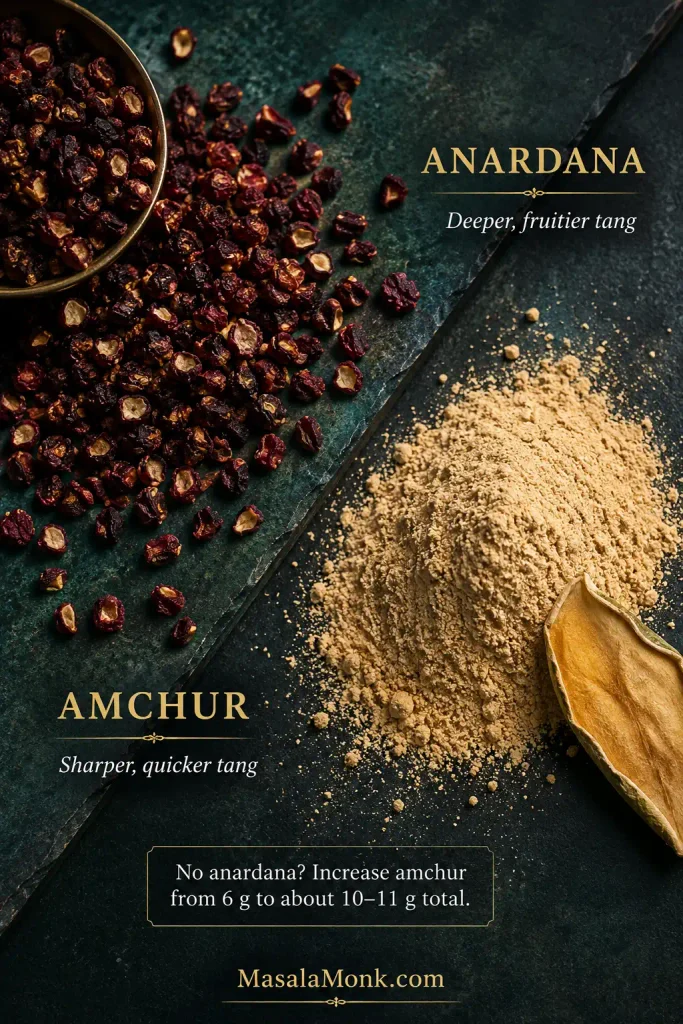
Tang is one of the biggest reasons two chole masalas can taste so different. Anardana and amchur aren’t identical: anardana gives a deeper, fruitier tang, while amchur is sharper and hits sooner on the tongue.

This recipe uses 10 g anardana with 6 g amchur so the tang has both depth and lift.

Small dried burgundy anardana seeds beside pale amchur powder on a dark green surface, with a piece of dried mango nearby.
More amchur can replace the acidity of missing anardana, but it will not recreate its fruitiness. Judge the substitute by balance, not by trying to make the two taste identical.

Out of anardana? Skip the 10 g anardana and increase the amchur from 6 g to about 10–11 g total. The blend will taste sharper and less fruity. No amchur? Leave it out and let the anardana carry the dry tang, then finish the cooked chole with lemon if it needs more lift.

Count the sour ingredients already in the pot. Tomato, anardana, amchur, lemon, tamarind and acids in some packet masalas can pile up faster than you expect.

Chana Masala Powder vs Garam Masala

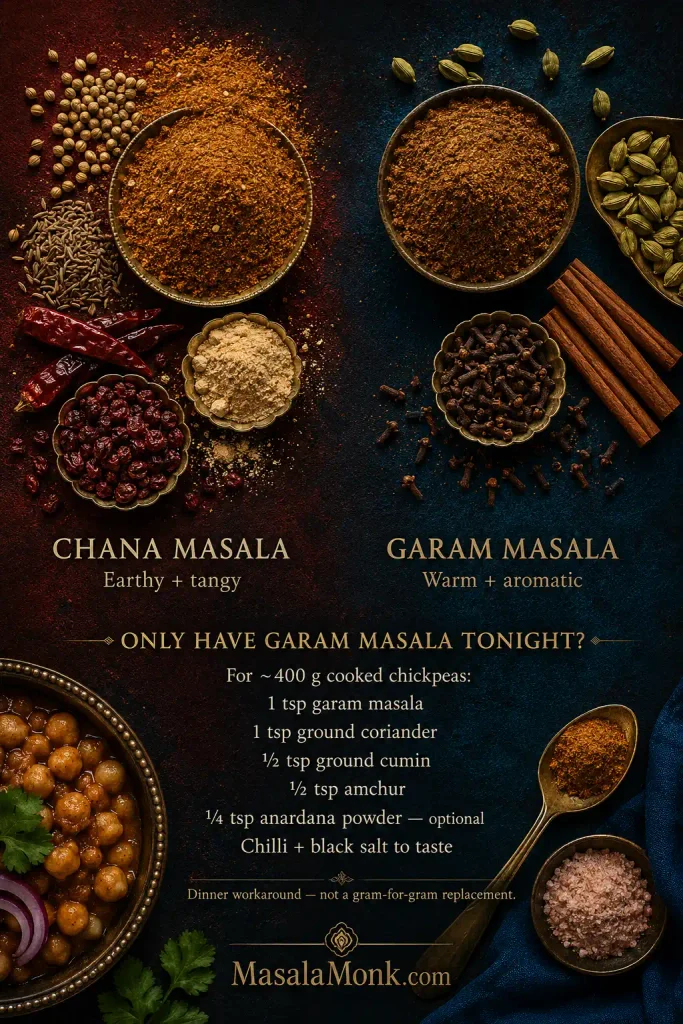
Garam masala can stand in for chana masala powder in a pinch, but it usually needs help from coriander, cumin and something tangy.

The two blends share several warm spices. Garam masala generally leans much more towards aroma, while chole masala usually has a clearer coriander-cumin base and often gets part of its character from anardana or amchur. Chickpeas seasoned only with garam masala can smell wonderful yet miss the earthy, tangy flavour you were chasing.

Our homemade garam masala makes that contrast easy to see ingredient by ingredient.

A Garam Masala Workaround

For about 400 g cooked chickpeas, start with:

  • 1 teaspoon garam masala
  • 1 teaspoon ground coriander
  • ½ teaspoon ground cumin
  • ½ teaspoon amchur
  • ¼ teaspoon anardana powder, optional
  • chilli and black salt to taste

Think of this as a dinner workaround, not a gram-for-gram copy of the blend above. Simmer it into the gravy before deciding whether it needs more; the result will depend on the garam masala you started with. Making dinner now? Jump back to the quick chana method.

Overhead comparison of chana masala with coriander, cumin, chilli and souring spices beside garam masala with green cardamom, cinnamon and cloves.
If the workaround smells fragrant but the chickpeas still taste flat, rebuild the missing earthy and tangy structure instead of piling on more warm spice.

Using Ground Spices Instead of Whole

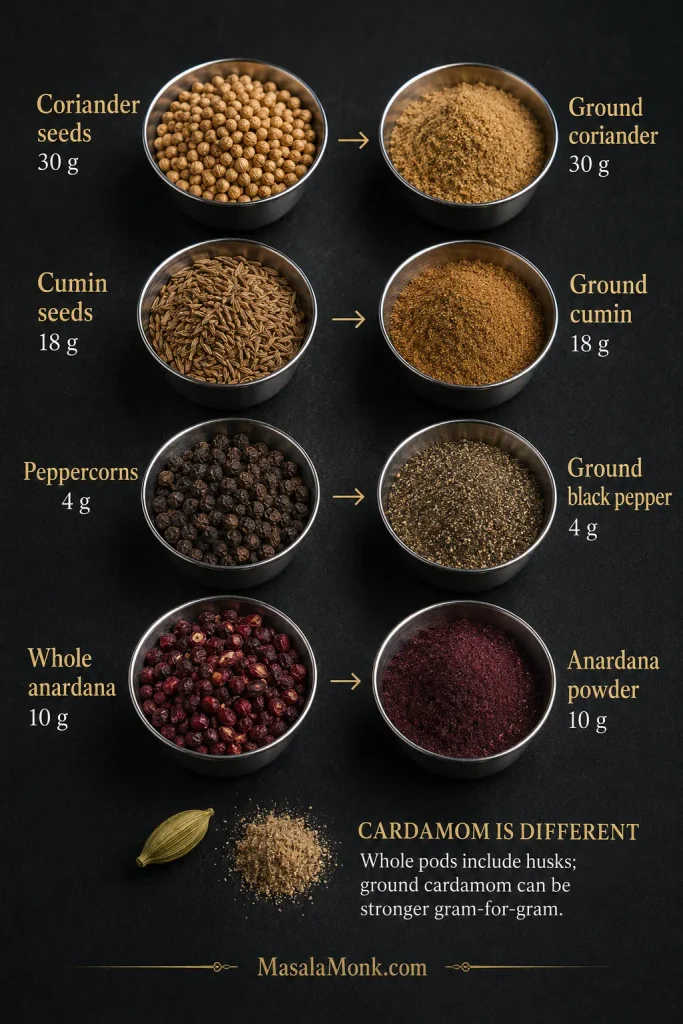
For coriander, cumin, pepper and anardana, approximately equal weight is a sensible starting point. Pre-ground spices vary in freshness and strength, so equal weight does not promise identical flavour.

  • 30 g coriander seeds → about 30 g ground coriander
  • 18 g cumin seeds → about 18 g ground cumin
  • 4 g peppercorns → about 4 g ground black pepper
  • 10 g whole anardana → about 10 g anardana powder
Four pairs compare whole coriander, cumin, peppercorns and anardana with equal-weight ground versions, while cardamom is shown separately as an exception.
Once spices are pre-ground, freshness can matter more than the arithmetic. Equal weight is a starting point, but an old jar may contribute far less aroma than a fresh grind at the same weight.

Pre-ground coriander, cumin and pepper don’t need the same dry-roasting treatment as whole spices. Mix them in unheated when finishing the blend, or toss them for a few seconds in the pan’s residual warmth after taking it off the stove. They scorch quickly.

Old ground cumin or coriander is a different problem. A jar that has been open for months may smell much quieter even at the same weight. Judge the cooked chole before automatically adding more.

Cardamom is the exception to the easy weight swap. Whole pods include husks; ground cardamom may contain mostly seed and can be much stronger gram-for-gram.

What You Can Leave Out

Black cardamom adds a distinctive low smoky note, but the masala works without it. Don’t compensate with extra green cardamom; that takes the blend in a sweeter, more floral direction.

Kasuri methi can go too. Fenugreek seed is much more bitter, so don’t replace the leaf spoon-for-spoon with seed.

No black salt? Salt the finished chole normally.

Large tray of coriander, cumin, dried red chillies and anardana beside a smaller dish containing black cardamom, kasuri methi and black salt.
When an accent ingredient is missing, omission is often cleaner than forced substitution. Protect the earthy, hot and tangy foundation first; then decide which smoky, herbal or mineral accents can disappear.

Tune the Next Batch

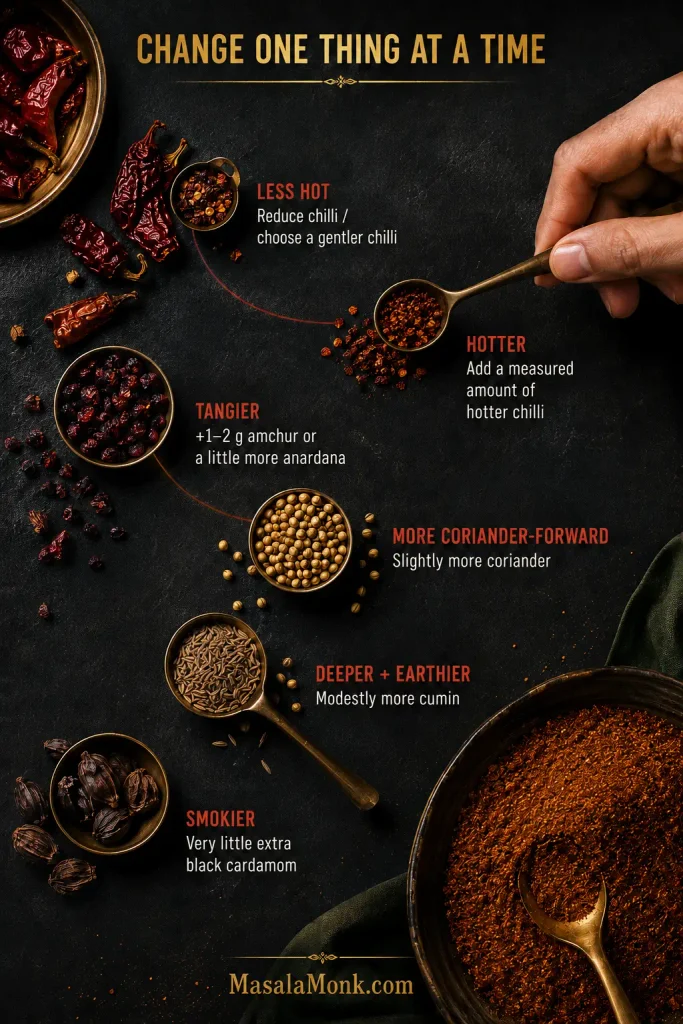
Changing one part of the blend changes one part of the flavour. More chilli makes the next batch hotter; it doesn’t make it tangier or more aromatic. Change one thing at a time so you know which adjustment actually improved the blend.

When you make the next batch, small changes are enough:

  • Less hot: reduce the chilli or choose a gentler variety.
  • Hotter: keep Kashmiri/Byadgi chilli for colour and add a measured amount of something hotter.
  • Tangier: add another 1–2 g amchur or a little more anardana.
  • More coriander-forward: increase the coriander slightly.
  • Deeper and earthier: increase the cumin modestly.
  • Smokier: add very little black cardamom at a time.
Overhead spice guide showing separate chilli, anardana, coriander, cumin and black cardamom adjustments while a hand moves one unmarked spoon of chilli.
Keep the main formula steady, change one lever, and jot the change on the jar. That turns the next batch into useful feedback instead of guesswork.

A jar that smells more perfumed than appetising already has plenty going on. Check the cloves, cinnamon and cardamom before reaching for more chilli.

Trying to repair this batch rather than change the next one? Go to the powder troubleshooting section.

Homemade vs Packet Chana Masala

Homemade gives you control over chilli, tang and salt. A packet gives you consistency—and sometimes that consistency is exactly what you’re trying to reproduce.

A packet can be part of the flavour memory too.

Shan Chana Masala shows why packet and homemade measurements don’t transfer neatly. Its ingredient list starts with salt and includes dried garlic, and its directions call for 25 g mix with 250 g dried chickpeas. This entire homemade recipe contains only 2 g black salt. Equal spoonfuls clearly aren’t equivalent.

Use the packet’s own directions as your first guide. Draining and rinsing canned chickpeas also gives you more control over salt before the gravy reduces.

If a packet gives you exactly the chole you like, use it. Homemade matters when you want to choose the balance yourself.

My Chana Masala Powder Tastes Wrong

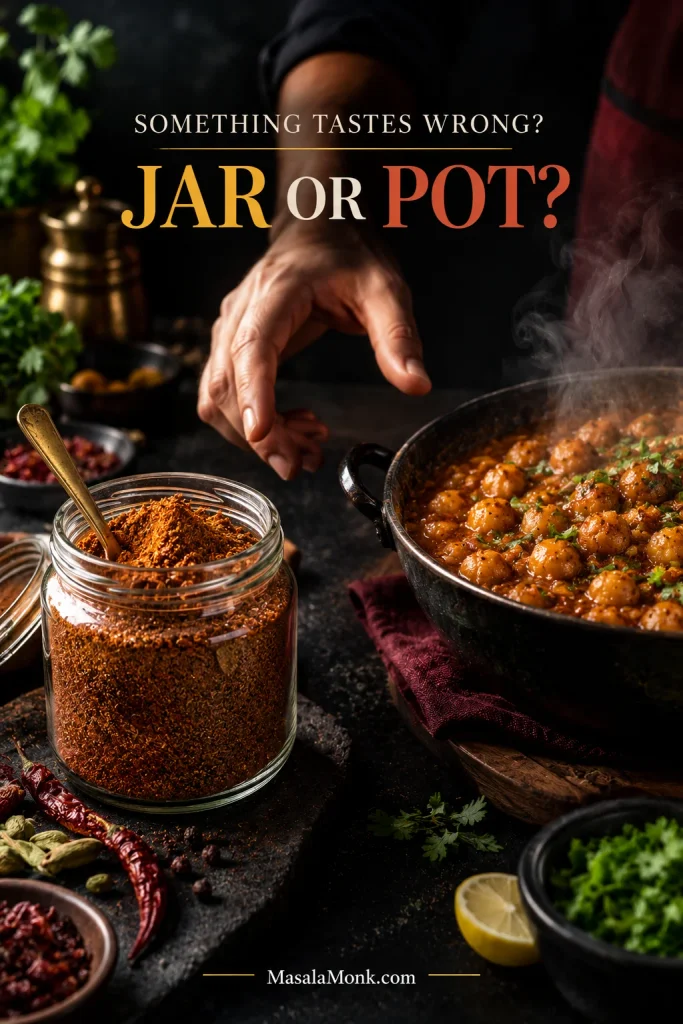
First decide whether the problem is in the jar or in the pot. Taste a tiny pinch of the powder and notice what arrives first: chilli, clove, tang, smoke—or almost nothing. The jar itself can tell you a lot.

Hand hovering between an open jar of chana masala powder and a steaming pan of chole beneath the words “Something tastes wrong? Jar or pot?”
A fast diagnostic question is: would this flaw follow the powder into every pot? If yes, investigate the jar. Otherwise, look harder at cooking variables such as chickpea tenderness, reduction, salt and final acidity before adding another spoonful of masala.

Match the Symptom to the Fix

When a batch needs diluting, make a small fresh portion built mainly around coriander and cumin. Leave out whichever ingredient is dominating, then mix the fresh portion into the original powder gradually, tasting as you go.

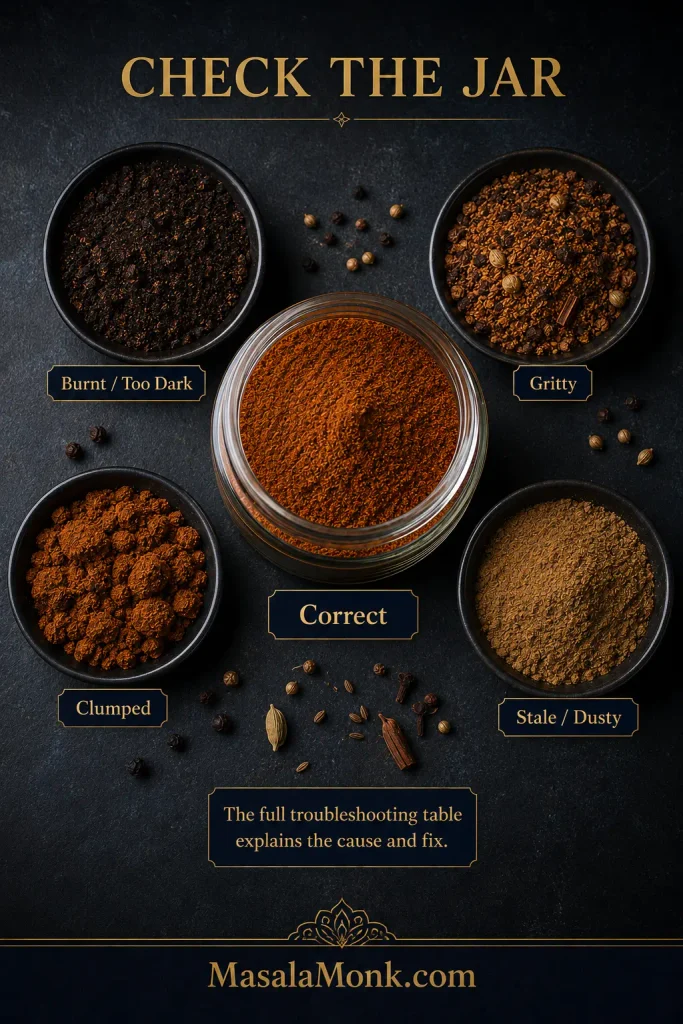
Overhead comparison of correct chana masala powder with separate burnt, gritty, clumped and faded stale-looking spice samples.
Use appearance to decide what to investigate first: darkening, clumps and coarse fragments each point somewhere different. Heat, tang and aromatic balance still need your nose and palate.
ProblemLikely causeTry this
BitterScorched spices, overheated pepper or a hot grinderBurnt: discard. Mild bitterness: add the fresh coriander-cumin-heavy portion gradually.
Hot but flatChilli is too far ahead of the earthy base or tangAdd a chilli-free coriander-cumin-heavy portion, then reassess the tang.
Too tangyToo much anardana or amchurAdd fresh coriander-cumin-heavy masala with no extra souring ingredients.
Too smokyBlack cardamom dominatesAdd the fresh portion with no extra black cardamom. More chilli won’t hide the smoke.
Perfumed or medicinalClove, cinnamon or cardamom is too strongAdd fresh coriander-cumin-heavy masala with no extra clove, cinnamon or cardamom.
Flat or dustyOld spices or prolonged hot grindingA fresh batch will help more than doubling stale powder in the curry.
GrittyAnardana, cinnamon or cardamom husk hasn’t ground finelySieve and regrind the coarse pieces.
ClumpyMoisture, warm powder, a wet spoon or steamFix the storage problem; discard if you see clear signs of spoilage.

Before You Blame the Masala, Check the Chole

And sometimes there is nothing wrong with the jar at all. A perfectly good masala cannot rescue chickpeas that are chalky in the centre or gravy that hasn’t reduced enough.

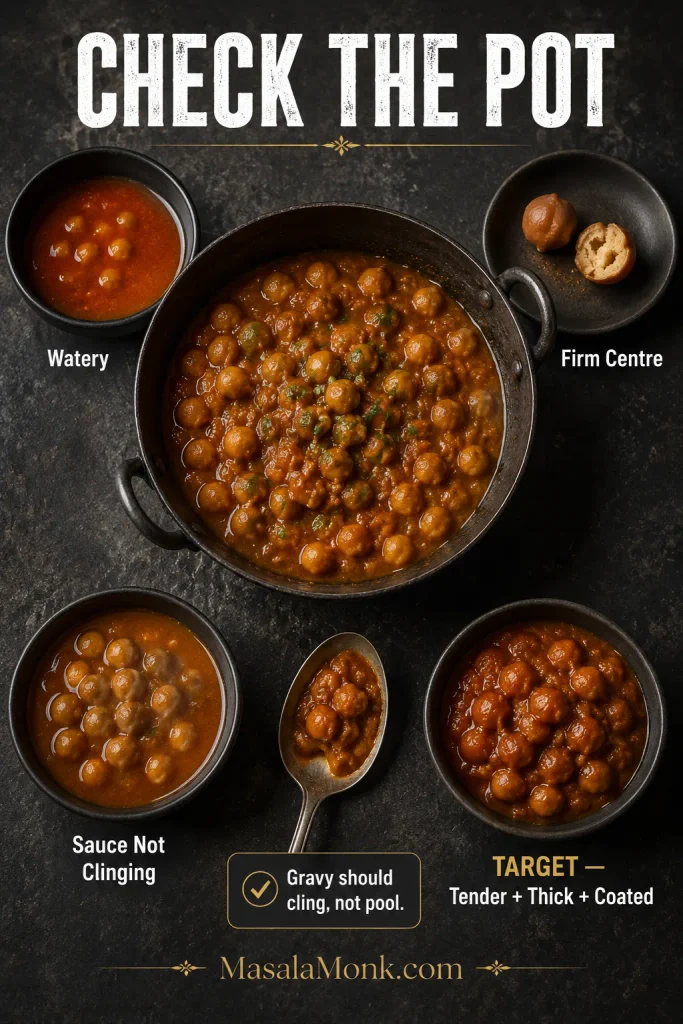
Overhead chole troubleshooting display comparing watery gravy, a split firm chickpea, sauce that does not cling and thick gravy coating tender chickpeas.
Fix the curry’s physical state before chasing seasoning. A spice blend cannot soften an undercooked chickpea, and extra masala will not rescue watery gravy; once texture and concentration are right, seasoning becomes much easier to judge.
Your chole is…More masala?Check first
Bland overallMaybeSalt and gravy concentration
Hot but one-noteUsually noTang, warm-spice balance and salt
WateryNoReduce the gravy; mash a few chickpeas if useful
Chickpeas are firmNoCook them until fully tender
Beans taste separate from the sauceNoSimmer longer; mash a small portion into the gravy
Too tangyNoCount tomato, amchur, anardana, lemon, tamarind and packet acidity together
Bitter or oddly soapyNoCheck scorched aromatics or masala, excess hing, and too much baking soda/alkalinity
Too saltyNoPacket masala, chickpea brine and added cooking salt
Balanced, but aroma is quietA littleAdd a small finishing dose

Press one chickpea between your fingers. A properly tender centre should crush easily instead of feeling chalky or springing back.

If the gravy tastes weak at first but leaves a strong spice aftertaste, it often needs time more than another spoonful. Once the sauce clings and the chickpeas are tender, the seasoning becomes much easier to judge.

If the curry’s texture and seasoning seem right but the powder itself tastes wrong, check the jar instead.

How to Store Chana Masala Powder

For the liveliest aroma, aim to use the powder within about 2–3 months. That is a freshness target, not a hard spoilage deadline. A dry blend kept clean and properly stored may remain usable longer, but coriander, chilli and cardamom gradually lose their lift.

Keep it in an airtight jar in a cool, dark cupboard away from the stove. Jar the powder only when it is completely cool, use a dry spoon, don’t hold the open container over a steaming pan, and date the jar when you make it.

Cook chole only occasionally? Halve the recipe. The full batch seasons roughly 9–11 batches made with about 400–500 g / 14–18 oz cooked chickpeas each, so a half batch is more likely to stay aromatic right to the bottom.

The masala also works with kala chana, aloo chana, pindi chole, chole bhature and other drier chickpea preparations. Start a little lighter when there is less gravy to absorb the tang and spice.

Doubling the recipe? Roast and grind it in two batches so neither the pan nor the grinder is crowded.


Once You Know the Balance

The recipe gives you a dependable place to begin. After a few pots, the useful part isn’t remembering every gram. It’s knowing what you want more of—and what to leave alone.

Then make the chole you remember, the one your family makes, the restaurant bowl you’ve been chasing, or simply the bowl you want tonight.

Posted on — 24 Comments

How to Cook Perfect Rice Every Time (Recipe)

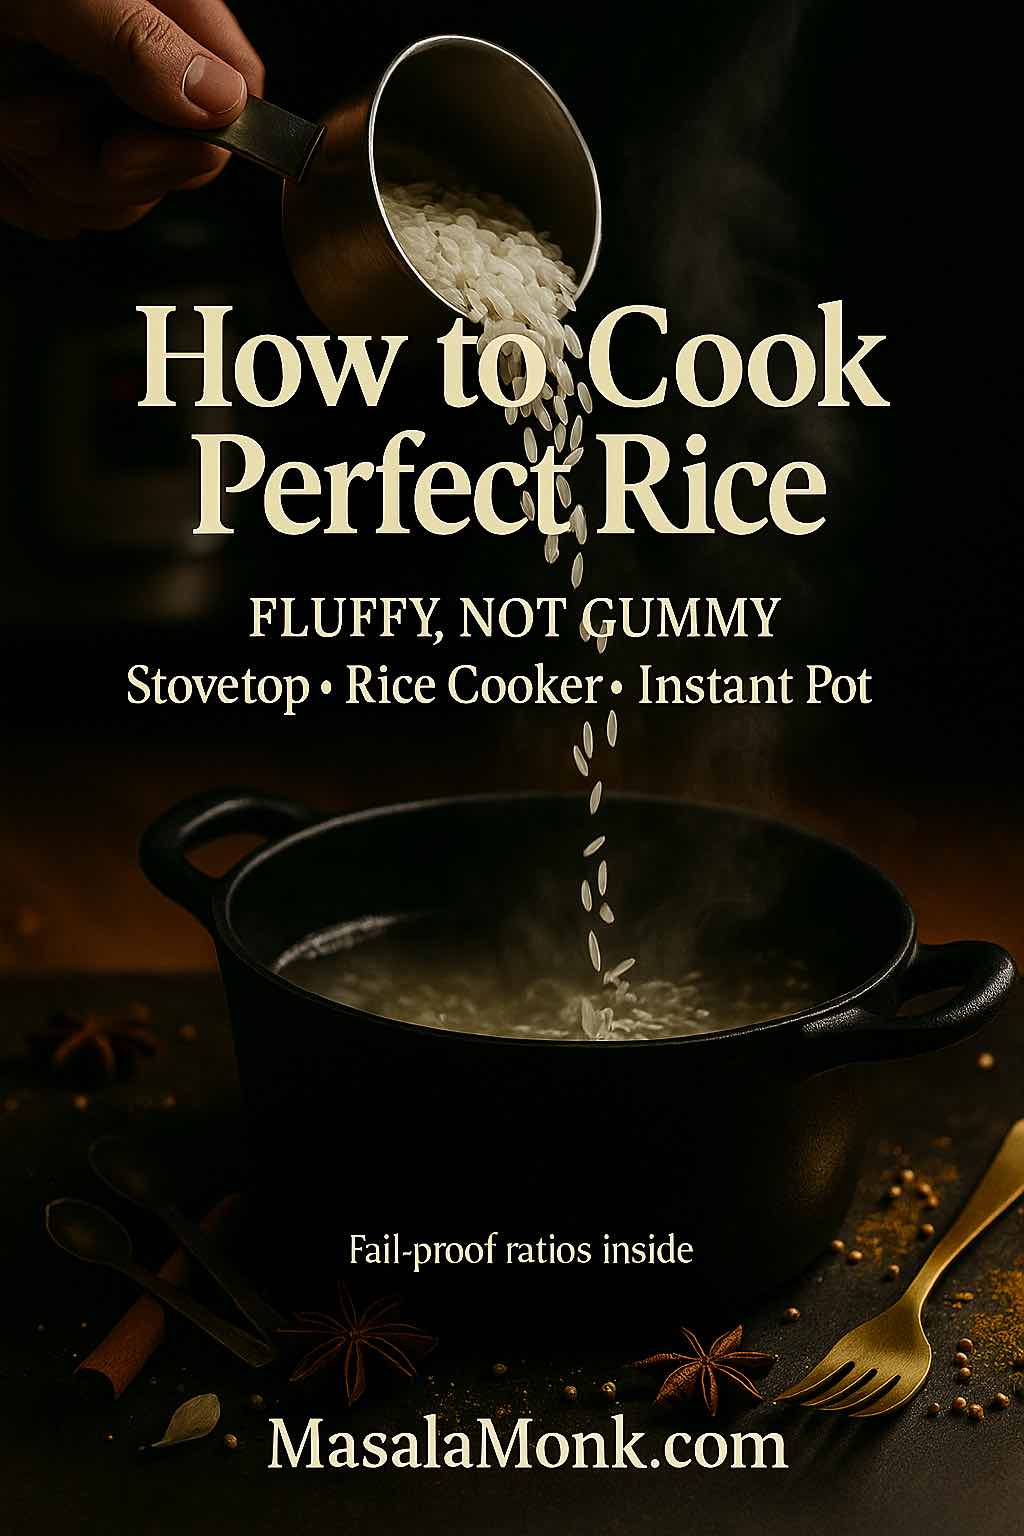
How to cook perfect rice — uncooked white rice pours from a measuring cup into a steaming black pot, with warm spices around; fluffy, not gummy.

Rice ought to be effortless. Nevertheless, a little too much water or a quick peek under the lid can turn a pot of promise into clumpy frustration. This guide shows how to cook perfect rice across methods and varieties—with crystal-clear steps, practical ratios, and why the small moves matter. You’ll learn a base stovetop technique, then branch into basmati, jasmine, sushi, and brown rice; after that, we’ll cover rice cookers and Instant Pots, storing and reheating safely, and turning leftovers into fast, satisfying meals. Along the way, you’ll find carefully chosen links for follow-up reading and technique deep dives woven naturally into the text.

The Baseline: How to Cook Perfect Rice on the Stovetop

If you only remember one method, make it this one. It delivers fluffy, separate grains without gimmicks, and it adapts to most long-grain white rices.

Daylight kitchen: water pours from a glass measuring cup into a pot of rinsed white rice; stovetop method—boil, cover, low 12 minutes, rest 10.
Perfect White Rice (Stovetop): Rinse well, bring to a boil, cover and cook on low for 12 minutes, then rest 10 before fluffing—reliable, fluffy results every time.

You’ll need: 1 cup long-grain white rice, 1½ cups water, a pinch of salt, a heavy pot with a tight lid, and a fork.

  1. Rinse thoroughly. Place the rice in a fine-mesh strainer and rinse under cold water, swishing with your hand until the water runs mostly clear. This removes excess surface starch so grains don’t glue together later.
  2. Measure precisely. For long-grain white rice on the stovetop, use 1½ cups water per 1 cup rice. Add a pinch of salt if you like.
  3. Boil, then cover. Bring the water to a rolling boil, stir in the rice once to break up any clumps, clamp on the lid, and immediately reduce the heat to low.
  4. Simmer gently for 12 minutes. No peeking. Lifting the lid dumps steam and derails even cooking.
  5. Rest for 10 minutes, still covered. The residual heat finishes the centers without overcooking the outer layers.
  6. Fluff and vent. Off the heat, uncover and fluff with a fork. If you want extra-dry, restaurant-style grains, briefly vent another 2–3 minutes.

As an optional flourish, place a clean kitchen towel between the pot and the lid during the rest; it absorbs condensation and prevents drip-back, yielding lighter, drier rice. For a quick visual explanation of this trick, see the concise breakdown of the towel-under-lid rest.

Why this works

Rinsing reduces sticky surface starch; an immediate drop to low heat stabilizes simmering; the undisturbed rest lets steam equalize moisture from the outside in. Moreover, the ratios here are calibrated for typical long-grain white rice; once you navigate specialty varieties, you’ll tweak the numbers a bit, but the underlying logic stays consistent.

Also Read: Homemade Hot Chocolate with Cocoa Powder Recipe

At-a-Glance Cheatsheet for Cooking Perfect Rice

Standard Water Ratios (by volume) for Making Rice by various Methods

Rice typeRinse?Soak?Stovetop water : riceRice cookerInstant Pot (HP)Microwave rice cooker
Long-grain whiteYesNo1.5 : 11.1–1.2 : 1 (or to line)1 : 1, 3–4 min + 10 min NR1.5 : 1, 10–12 min, 5 min rest
JasmineYes10 min (optional)1.25–1.33 : 1~1.1–1.2 : 11 : 1, 3 min + 10 min NR1.5 : 1, 10–12 min
BasmatiRinse very well20–30 min1.5 : 11.2 : 11 : 1, 6 min + 10 min NR1.5 : 1, 12–14 min
Short-grain / SushiRinse until clear20–30 min1.1–1.2 : 1~1.1 : 11 : 1, 5 min + 10 min NR1.25–1.33 : 1, 10–12 min
Brown (long-grain)Rinse20 min (optional)2–2.25 : 11.4–1.5 : 11.25–1.33 : 1, 22–25 min + 10 min NR2 : 1, 20–22 min
Cheat Sheet for How to Cook different types of Rice at Home using various methods & devices.

NR = Natural Release (don’t vent; let pressure drop for the stated time).

Also Read: Peanut Butter Cookies (Classic Recipe & 3 Variations)

How to Cook Perfect Rice for Basmati

Basmati rewards gentle handling and a short soak. Its hallmark is long, elegant grains that stay separate, so our moves aim to protect structure rather than chase stickiness.

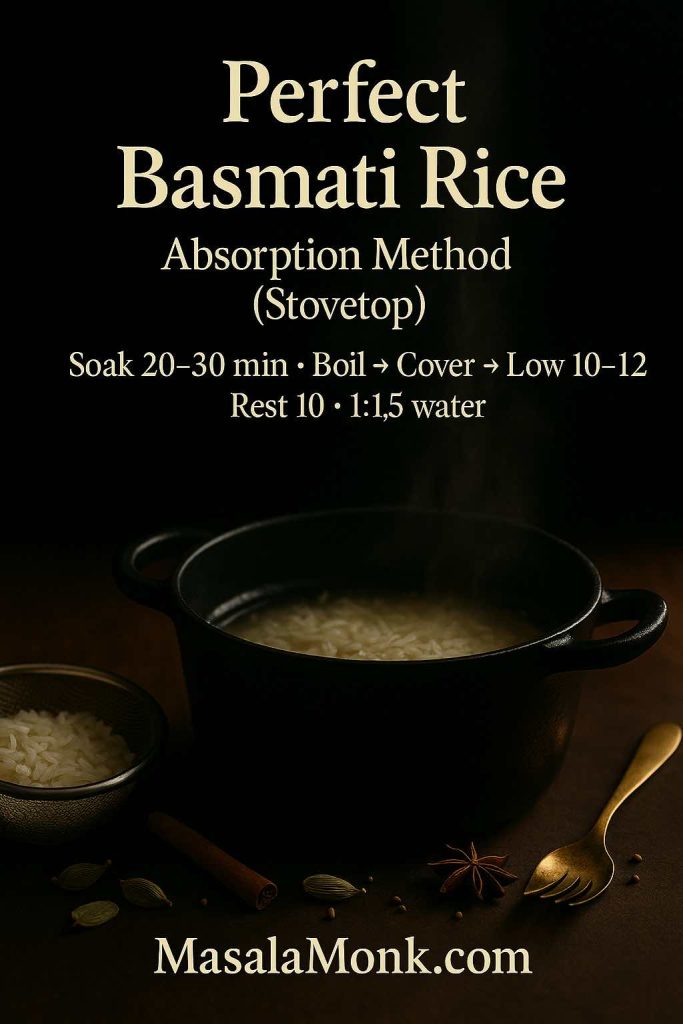
Black enamel pot with steam and soaked basmati; soak 20–30 min, boil → cover → low 10–12, rest 10; 1:1.5 water.
Perfect Basmati Rice: Rinse well, soak 20–30, drain thoroughly, boil → cover → low 10–12, rest 10. Ratio 1 cup : 1½ cups water.
  1. Rinse very well until the water is almost clear—this usually takes 2–3 changes.
  2. Soak 20–30 minutes. Hydrating the core ensures the grains elongate without bursting. Drain thoroughly.
  3. Use 1½ cups water per cup of rice on the stovetop. Bring to a boil, cover, reduce to low, and simmer 10–12 minutes.
  4. Rest 10 minutes covered, then fluff. For even airier grains, spread the rice on a tray for 2–3 minutes to vent.

Beyond texture, many cooks pick basmati for its gentler impact on blood sugar compared with some other white rices. If that angle matters to you, explore a compact primer on basmati rice GI and nutrition and a broader look at GI vs GL across rice types. Because context helps, you might also skim a practical guide to reducing the glycemic impact of rice using cook-cool-reheat strategies you can fold into weekly meal prep.

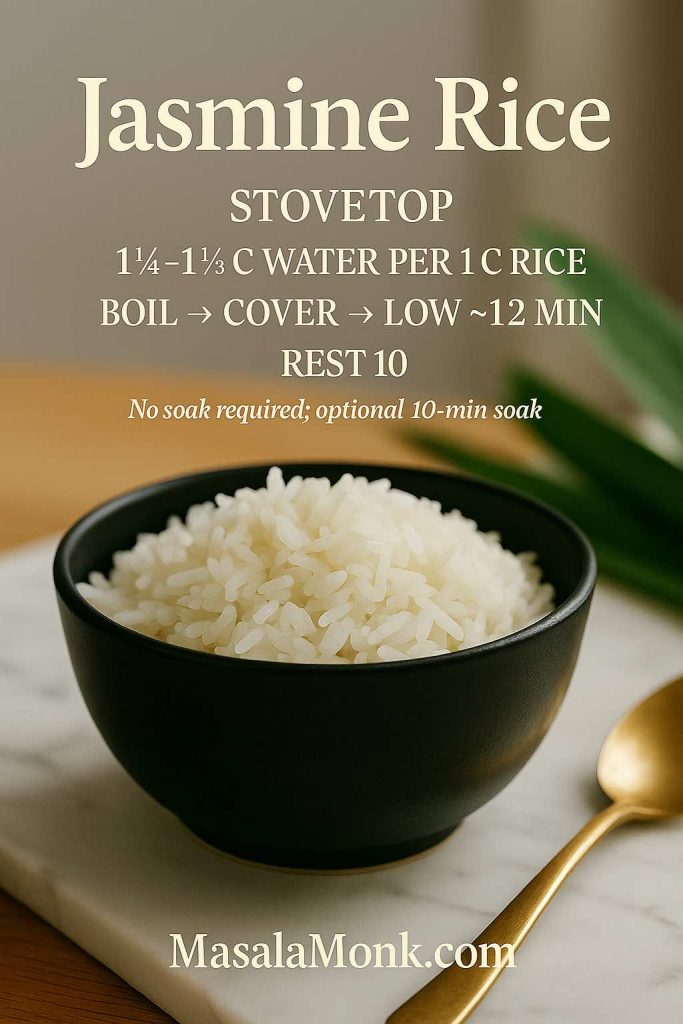
How to Cook Perfect Jasmine Rice

Jasmine sits between fluffy and plush. It wants slightly less water than standard long-grain; too much and it edges toward soft and clingy.

Black enamel pot with steaming jasmine rice; no soak needed; 1¼–1⅓ water; boil, cover, low ~12, rest 10.
Jasmine Rice (Stovetop): Slightly less water than standard long-grain keeps jasmine plush—not soggy.
  • Rinse until the water mostly clears; an optional 10-minute soak can soften the core.
  • Measure 1¼–1⅓ cups water per cup of rice, depending on how dry or tender you prefer it.
  • Cook like the baseline: boil → cover → low simmer ~12 minutes → 10-minute rest.

For a ratio-first discussion that aligns with testing across brands, skim this practical stovetop jasmine/white rice method. It mirrors the idea that jasmine benefits from slightly less water than old “2:1” rules of thumb.

Also Read: Green Tea Shot with Jameson | Recipe & 10 Variations

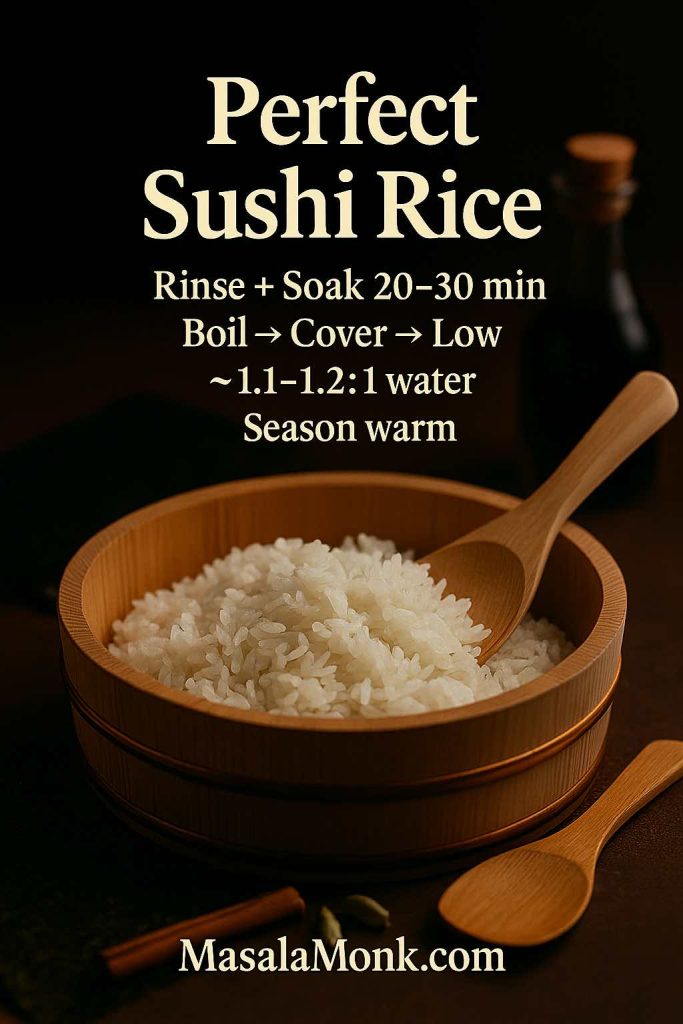
How to Cook Perfect Rice for Sushi (Short-Grain)

Sushi rice is meant to cling. Nevertheless, the goal is glossy and supple—not mushy—so gentle handling and proper seasoning matter.

Hangiri filled with glossy sushi rice; rinse and soak 20–30 minutes, boil then cover and cook on low with ~1.1–1.2:1 water; rest 10 minutes and season warm.
Perfect Sushi Rice: Rinse, soak 20–30 min, cook with ~1.1–1.2 : 1 water, rest 10, then season while warm for shine and gentle cling.
  1. Rinse until the water is nearly clear to remove powdery starch.
  2. Soak 20–30 minutes; drain. This gives the short grains an even, tender finish.
  3. Use ~1.1–1.2 : 1 water to rice on the stovetop or your cooker’s dedicated “sushi” line.
  4. Cook, rest 10 minutes, then season while warm with sushi vinegar (rice vinegar plus sugar and salt).
  5. Fold, don’t mash. Fan as you cut and turn the rice to keep grains intact and shiny.

For well-illustrated steps and classic proportions, follow a reliable reference like Just One Cookbook’s sushi rice method. And because short-grain techniques differ from long-grain instincts, returning to photos mid-process can be surprisingly helpful.

Also Read: Béchamel Sauce for Lasagna: Classic, Vegan & Ricotta Sauce Recipe

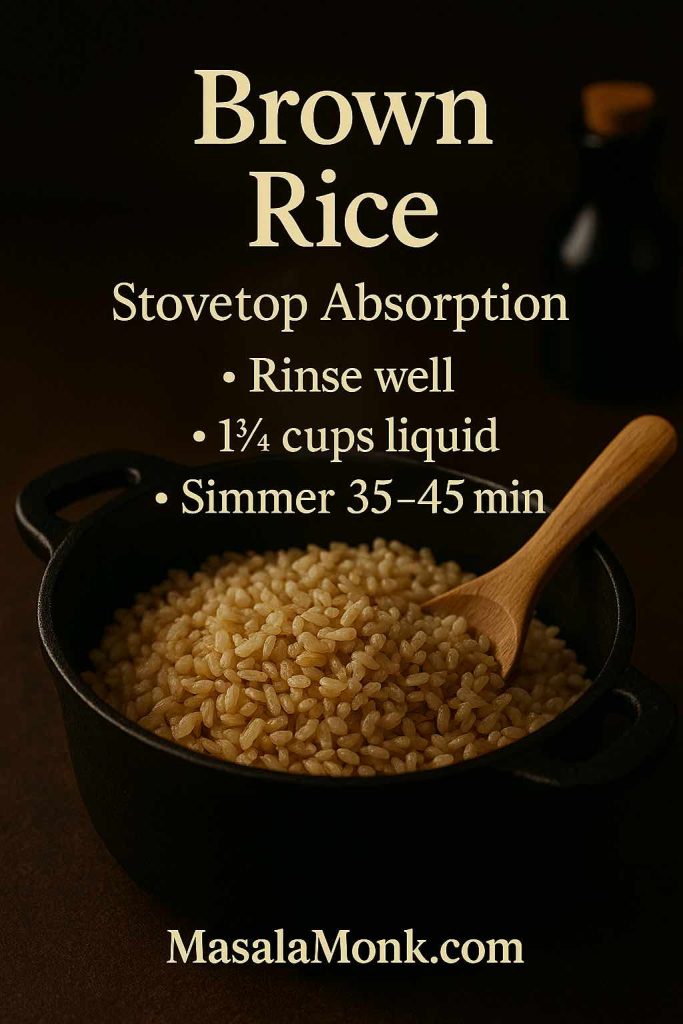
How to Cook Perfect Brown Rice (Tender Without the Chalk)

Brown rice asks for more water and time because the bran and germ slow hydration. Still, done right, it’s deeply satisfying—nutty, chewy, and never chalky.

Cast-iron pot of cooked brown rice; stovetop absorption method—rinse, 2–2¼ cups water per cup rice, boil then cover and low simmer 35–45 minutes, rest 10.
Brown Rice (Stovetop): Rinse well, use 2–2¼ : 1 water, boil → cover → low simmer 35–45, then rest 10 for nutty, tender grains.
  • Stovetop: Use 2–2¼ : 1 water to rice. Bring to a boil, cover, and simmer 35–45 minutes until the water is absorbed; rest 10 minutes before fluffing.
  • Instant Pot: Measure 1.25–1.33 : 1 water to rice. Cook 22–25 minutes on high pressure, then let it naturally release for 10 minutes before venting.

If nutrition is part of your decision tree, it’s worth reading the FDA’s consumer resources on arsenic in rice and rice products and the agency’s technical risk assessment overview. Among practical takeaways, an excess-water method (boil in plenty of water, then drain) can reduce inorganic arsenic—a trade-off to consider if that aligns with your health priorities. Meanwhile, if you’re comparing grains for weekly menus, this side-by-side look at quinoa vs rice is a handy complement.

Also Read: Crock Pot Lasagna Soup (Easy Base + Cozy Slow-Cooker Recipes)

Rice Cookers Demystified

A good rice cooker is like cruise control: set it and focus on something else. Still, understanding its logic helps you get the most out of it.

  • Trust the lines. Most cookers calibrate for specific varieties; fill to the marked lines instead of relying on generic kitchen ratios. If you want brand-specific guidance, browse Zojirushi’s concise white rice instructions or the broader manuals page.
  • Rinse and drain well. Excess water clinging to the grains can skew the cooker’s assumptions.
  • Let it rest. When the switch flips to “warm,” give the rice 10 minutes before opening; this small pause improves texture noticeably.
  • Fluff and vent briefly. Loosen the rice, then leave the lid ajar for a minute or two for drier, separate grains—especially useful when the next stop is a stir-fry.

Even in the cooker, basmati appreciates a 20–30-minute soak and jasmine benefits from slightly less water than standard long-grain. Sushi rice, on the other hand, thrives when you follow your model’s dedicated short-grain settings.

Also Read: Cottage Cheese Lasagna Recipe | Chicken, Spinach, & Ricotta

Instant Pot and Pressure Cooker Shortcuts

Pressure cookers shine when you want predictability. Because they operate in a sealed environment, small ratio changes matter; nevertheless, the results are consistent once dialed in.

  • White rice (long-grain or jasmine): 1:1 water to rice, 3–4 minutes on high pressure, 10-minute natural release.
  • Basmati: 1:1, 6 minutes on high, 10-minute natural release.
  • Short-grain for sushi: 1:1, 5 minutes on high, 10-minute natural release.
  • Brown: 1.25–1.33:1, 22–25 minutes on high, 10-minute natural release.

For model-specific variations, it’s wise to refer to the manufacturer’s documentation; start at the Instant Pot manuals hub and, if you want a baseline reference recipe, browse an official white rice example by Instant Pot. Because factors like altitude and personal texture preference play a role, adjust subsequent batches a tablespoon or two of water at a time rather than reinventing ratios from scratch.

Also Read: How to Make Churros (Authentic + Easy Recipe)

Texture Control: From Feather-Light to Just-Sticky-Enough

Understanding what affects texture allows you to steer the outcome. Consider these levers:

  • Rinse level. More rinsing = more separation. Minimal rinsing = more cling. Consequently, long-grain white benefits from thorough rinsing; sushi demands cleaning but then recruits seasoning to achieve stickiness.
  • Soaking. Basmati and sushi gain even doneness from soaking; jasmine may soften slightly with a short soak but doesn’t require it.
  • Agitation. Stir only once after adding rice to boiling water; further agitation releases starch, which binds grains.
  • Lid discipline. Steam is your friend; lifting the lid mid-cook vents heat, lengthens cooking, and risks uneven texture.
  • Rest time. A 10-minute rest evens moisture and turns “good” rice into “great” rice. Additionally, a towel-under-lid rest (during the off-heat phase) curbs condensation and keeps the top layer from turning soggy—see the towel trick for a quick demo.

Also Read: How to Cook Bacon in the Oven (Crispy, No-Mess, Crowd-Ready Recipe)

Scaling Up Without Guesswork

Perhaps you’re cooking for a crowd. Fortunately, the math scales cleanly as long as your pot is wide enough and the heat stays gentle.

  • 1 cup rice → 1½ cups water (stovetop long-grain white)
  • 3 cups rice → 4½ cups water
  • 4 cups rice → 6 cups water

For jasmine, aim for 1¼–1⅓ : 1; for basmati, 1½ : 1 with a soak; for brown, 2–2¼ : 1 on the stove or 1.25–1.33 : 1 under pressure. Rather than leap to big changes when scaling, adjust by 2–3 tablespoons of water per cup of rice after your first larger batch to match your stove, pot, and preference.

Also Read: French Toast Sticks (Air Fryer + Oven Recipe) — Crispy Outside, Custardy Inside

Storing, Cooling, and Reheating Safely

Rice is easy to make ahead, but it deserves the same diligence you’d give to chicken or soup. Cool it quickly, refrigerate promptly, and reheat thoroughly.

  • Cool fast. Spread hot rice on a sheet pan to release steam; once warmth dissipates, pack into shallow containers.
  • Refrigerate within 1–2 hours. The quicker you chill, the safer your leftovers.


  • Reheat to 165°F/74°C. In the microwave, sprinkle a tablespoon of water over each cup of rice, cover, and heat until piping hot; on the stovetop, add a spoonful of water and steam briefly. For authoritative guidance, bookmark the USDA’s page on leftovers and safe reheating.

If you’re exploring broader nutrition or contaminant questions around rice varieties and cooking methods, take a moment with the FDA’s resources on arsenic in rice and products. They’re balanced, practical, and help you decide when to use absorption versus excess-water techniques.

Also Read: 10 Best Chicken Sandwich Recipes (BBQ, Parm, Buffalo & More)

How to Cook Perfect Rice on Busy Weeknights

Life happens. Even so, you can still put excellent rice on the table without hovering over a pot.

  • Use the Instant Pot for white rice when you’re juggling multiple dishes. Measure 1:1, set 3 minutes on high, and walk away; dinner’s starch will be ready right as you need it.
  • Batch-cook basmati on Sunday. Soak, cook, fluff, cool quickly, and refrigerate. Basmati reheats beautifully and still eats light.
  • Lean on a rice cooker for hands-off consistency. Follow the model’s lines, then give it a 10-minute warm rest before fluffing. If you’re new to your machine, the brand’s manuals page is a shortcut to specifics.

Meanwhile, finishers make weeknight rice feel special: a pat of butter or ghee, a thread of olive oil, or a splash of toasted sesame oil right before serving. Even a few slices of ginger bloomed in oil at the start can transform a plain bowl.

Also Read: 10 Best Espresso Martini Recipe Variations (Bar-Tested)

Flavor Boosters and Simple Add-Ins

Before adding water, briefly warm 1 teaspoon oil or ghee in the pot and bloom aromatics—sliced garlic, crushed cardamom, or a bay leaf. During the rest, fold in chopped herbs (cilantro, scallions, or dill) or a handful of frozen peas for color. As you explore, keep a few ideas in your back pocket:

  • For an almost effortless rice bowl, toss hot grains with a splash of balsamic and olive oil, then crown with roasted vegetables. It’s a fast route to a satisfying dinner when time is scarce.
  • When a craving for dessert strikes, pivot to a silky Thai-style treat using coconut milk and ripe fruit—this approachable walkthrough on mango + coconut milk turns pantry items into a crowd-pleaser: creamy mango-coconut how-to. If you want a festival-worthy finish with sticky rice, try the kitchen’s fully detailed authentic mango sticky rice recipe.

Also Read: Macaroni & Cheese Recipe: Creamy Stovetop, Baked & Southern

Leftovers You’ll Look Forward To

Great rice rarely goes to waste, but planning for leftovers turns tomorrow’s meal into an easy win.

Same-Day Fried Rice (When You Just Cooked the Rice)

When fried rice is on tonight’s menu, lower the water for your white rice by 2 tablespoons per cup, then spread the cooked rice on a tray and chill it for 15–20 minutes. This brief drying step helps the grains sear rather than steam in the pan. For a crisp, minimal baseline, use a straightforward, wok-friendly technique like this classic egg fried rice walkthrough. If you prefer a vegetable-forward version loaded with texture, Kenji’s method-first approach shows how to balance heat, oil, and moisture for vivid results: easy vegetable fried rice.

Also Read: Vegan French Toast: 6 Easy Recipes (Pan, Air Fryer, GF & High-Protein)

Day-Old Transformations

Day-old rice is ideal for fried rice, obviously, yet it also shines in croquettes and stuffed vegetables. For a snack that feels special, use those leftovers to make crisp, melty arancini; the step-by-step guide to shaping, breading, and frying is here: turn leftover rice into arancini. Serve with a quick marinara or a garlicky yogurt dip and you’ve got a win either way.

How to Cook Perfect Rice for Meals that Fit Your Goals

If you’re mindful of post-meal energy or simply tracking macros, small technique choices can help. Cooling and reheating can modestly increase resistant starch, while your choice of variety matters too. For a practical, non-dogmatic overview that connects kitchen moves to outcomes, start with this field guide to reducing the glycemic impact of rice. For a zoomed-out look across varieties and contexts, the side-by-side on GI vs GL for common rices is useful; pair it with the FDA resources on arsenic in foods if you’re choosing methods with both texture and safety in mind.

Also Read: Homemade Electrolytes for Fasting: 7 Precise Recipes

Frequently Used Ratios and Timings, Explained in Plain Language

Because recipes scatter numbers everywhere, let’s unify the essentials so you can adjust confidently.

  • Long-grain white (stovetop): 1.5 : 1 water → 12-minute simmer, 10-minute rest. This yields about 3 cups cooked per cup raw.
  • Jasmine (stovetop): 1¼–1⅓ : 1 water → 12 minutes, 10-minute rest; tenderness sits between fluffy and plush. A thorough overview appears in this tested stovetop ratio piece.
  • Basmati (stovetop): 1.5 : 1 water after a 20–30-minute soak → 10–12 minutes, 10-minute rest; texture is light and separate. For health context, see the basmati GI briefing.
  • Sushi/short-grain: ~1.1–1.2 : 1 water after a 20–30-minute soak → cook + 10-minute rest, then season gently; technique photos here: sushi rice guide.
  • Brown (Instant Pot): 1.25–1.33 : 1 water → 22–25 minutes high pressure, 10-minute natural release; for stovetop, plan 2–2¼ : 1 water and 35–45 minutes simmer time.
  • Rice cooker: Follow the unit’s water lines for your variety; it’s the design assumption. If you’re curious how manufacturers expect you to use those markings, peek at Zojirushi’s white rice instructions and their manuals page.

Also Read: Pumpkin Spice, Your Way: Master Blend, Variations & Real-World Recipes

Troubleshooting: Fix It Today, Improve It Tomorrow

Even experienced cooks occasionally miss by a little. Here’s how to correct in the moment and calibrate for next time.

  • Too wet or soft? You likely used too much water or lifted the lid. Spread the rice on a tray and let it vent for a few minutes; next time, reduce the water by 2–3 tablespoons per cup and resist peeking.
  • Undercooked in the center? Sprinkle over 2–4 tablespoons of hot water, cover, and cook on the lowest heat for 3–5 minutes; extend the rest before fluffing.
  • Starchy clumps? Rinse more thoroughly and avoid stirring after the initial boil. If you want extra separation, adopt the towel-under-lid rest technique—again, the quick explainer for that move is here: how the towel rest helps.
  • Scorched base? The heat was too high or the pot too thin. Use a heavier pan, lower the flame, and keep ratios consistent.
  • Basmati breaking? The soak ran too long or you stirred during the simmer. Keep the pre-cook soak to 20–30 minutes, then handle gently.

Because kitchens vary—burners, pots, even the mineral content of your water—log your favorite ratio the first time you nail it. From then on, you’re just repeating success.

Also Read: Homemade & DIY Coffee Creamer: 16 Flavor Recipes (French Vanilla, Pumpkin Spice & More)

How to Cook Perfect Rice, Then Make It Sing

Mastering the basics is liberating. Once you can produce perfect rice without thinking, it becomes a canvas for flavor.

  • Ghee and cumin (jeera rice). Warm a spoon of ghee, bloom cumin seeds until fragrant, then add cooked rice to coat.
  • Ginger-garlic steam. Start the pot with a few slices of ginger and a crushed clove of garlic before adding water; the aroma perfumes the whole batch.
  • Pandan or bay leaf. Add either to the pot and retrieve before fluffing for a subtle, sophisticated note.
  • Coconut finish. Fold a splash of coconut milk into hot rice for a plush side that loves grilled fish and veggies.
  • Curd rice twist. For cooling comfort, stir yogurt, mustard seeds, and a little tempering into leftover rice; if you want a vivid variation, the beet-brightened take is here: curd rice with beetroot.

Meanwhile, when you want a sweet ending, keep it simple: ripe mango, creamy coconut milk, and warm rice are an unbeatable trio; the pantry-friendly method is spelled out in this mango + coconut milk guide, and for a celebration-level classic, make the authentic mango sticky rice.

Also Read: Classic vs. Authentic Alfredo: 5 Essential Recipes

Putting It All Together

At this point, how to cook perfect rice should feel far less mysterious. Start with the baseline stovetop method—rinse, 1.5 : 1 water, 12-minute simmer, 10-minute rest—and you’ll win most nights. For basmati, soak briefly and keep the water at 1.5 : 1. If its jasmine, dial water down to 1¼–1⅓ : 1. For sushi, rinse thoroughly, soak, and season gently after cooking. And when cooking brown, commit to more time or use pressure for convenience. When using machines, trust rice cooker lines and lean on manufacturer documents like Zojirushi’s manuals or the Instant Pot manuals hub. For nuanced texture, adopt the towel-under-lid rest demonstrated in the towel trick explainer.

Finally, keep your leftovers safe and delicious: cool quickly, refrigerate promptly, and reheat to 165°F/74°C, following the USDA’s guidance on leftovers and safe reheating. Then have some fun—turn a bowl into egg fried rice with this reliable wok-side walkthrough, go veg-heavy with Kenji’s stir-fry method, or roll day-old grains into golden arancini.

When a staple tastes this good and works this reliably, dinner stops being a question mark. It becomes a rhythm: measure, simmer, rest, fluff—and enjoy.

Also Read: Lemon Drop Martini Recipe (Classic, 3-Ingredient, & More)

FAQs

1) How to cook perfect rice on the stove without it getting mushy?

Rinse until the water runs mostly clear, then use a precise water-to-rice ratio (typically 1.5:1 for long-grain white). Bring to a boil, cover, reduce to low, simmer about 12 minutes, and let it rest covered for 10 minutes before fluffing. Consequently, grains stay separate and tender.

2) What is the best water-to-rice ratio for white rice?

Generally, long-grain white rice thrives at about 1.5 cups water per 1 cup rice on the stovetop. For slightly drier rice, reduce the water by 2–3 tablespoons per cup; for softer results, add the same amount. Thus, you can fine-tune texture to taste.

3) How long does it take to cook rice?

For white or jasmine rice on the stove, expect roughly 12 minutes of gentle simmering plus a 10-minute rest. Brown rice usually needs 35–45 minutes on the stove. Meanwhile, pressure cooking shortens the timeline considerably.

4) How to cook perfect rice in a rice cooker?

Rinse, drain well, and fill water to your cooker’s variety line (or use the same ratios you’d use on the stove). Start the cycle, then allow a 10-minute warm rest before you open. Afterwards, fluff and briefly vent for drier, separate grains.

5) How to cook perfect rice in an Instant Pot or pressure cooker?

Use a 1:1 ratio for most white rices (3–4 minutes high pressure, 10 minutes natural release). For basmati, still 1:1 but about 6 minutes high; for brown, 1.25–1.33:1 and 22–25 minutes high. Importantly, let pressure drop naturally before venting for the best texture.

6) How much water for jasmine rice?

Jasmine prefers slightly less water than standard long-grain: about 1¼–1⅓ cups water per cup of rice on the stovetop. Moreover, an optional 10-minute soak softens the core without making it soggy.

7) How to make basmati rice fluffy and long?

Rinse thoroughly, soak 20–30 minutes, drain well, then cook at roughly 1.5:1 water to rice. Keep heat low and the lid tight; rest 10 minutes. Consequently, grains elongate beautifully without breaking.

8) Do I need to soak rice?

Not always. Basmati and sushi benefit from soaking (20–30 minutes) for even doneness. Conversely, most long-grain white and jasmine work fine without soaking, though a brief soak can soften edges slightly.

9) How to cook perfect rice for sushi (short-grain)?

Rinse until nearly clear, soak 20–30 minutes, drain, then use about 1.1–1.2:1 water. Cook gently, rest 10 minutes, and season warm rice with a vinegar mixture while folding—never mashing. Hence, you get glossy, clinging grains.

10) How to keep rice from sticking together?

Rinse thoroughly to remove surface starch, avoid stirring once it returns to a simmer, and let it rest before fluffing. Additionally, use a heavy pot and steady low heat so the bottom doesn’t scorch and glue the batch.

11) How to make fluffy rice every time?

Measure accurately, keep the simmer gentle, and give that 10-minute covered rest. Likewise, a quick post-cook vent (lid off 2–3 minutes) drives off excess steam for lighter, more separate grains.

12) How much water for 1 cup, 3 cups, or 4 cups of rice?

For long-grain white on the stove, start at 1.5:1. That’s 1.5 cups water for 1 cup rice; 4.5 cups water for 3 cups rice; 6 cups water for 4 cups rice. Notably, different varieties may require small adjustments.

13) How to cook perfect brown rice that isn’t chalky?

Use 2–2¼ cups water per cup on the stove (35–45 minutes simmering), or 1.25–1.33:1 in a pressure cooker (22–25 minutes high). Afterward, rest 10 minutes before fluffing to let moisture even out.

14) Can I make rice in the microwave?

Yes. In a microwave-safe bowl or microwave rice cooker, use about 1.5:1 for white rice. Cook on high 10–12 minutes for 1 cup (your microwave may vary), rest 5 minutes covered, then fluff. Remarkably convenient for small batches.

15) How to cook perfect rice for fried rice the same day?

Cook white rice with 2 tablespoons less water per cup, spread it on a tray, and chill 15–20 minutes to dry. Thereafter, stir-fry over high heat with minimal moisture so the grains sear rather than steam.

16) Why is my rice gummy or clumpy?

Usually, either insufficient rinsing, too much water, or stirring after boiling. Reduce water slightly, rinse more, and avoid agitation during the simmer. Ultimately, a calm pot yields cleaner texture.

17) Why is the bottom of my rice pot scorched?

Heat was too high, the pot too thin, or water too low. Next time, use a heavier pot, lower the flame, and follow proven ratios. Furthermore, never lift the lid during the cook, which can trigger uneven heating.

18) How to reheat rice so it tastes fresh?

Add a spoonful of water, cover, and steam until piping hot (microwave or stovetop). Break up clumps gently with a fork halfway through. Consequently, grains regain moisture without turning soggy.

19) How to boil rice vs. steam/absorption—what’s the difference?

Boiling in excess water and draining offers forgiving doneness but slightly less aroma retention; absorption (our standard method) locks flavor in the pot and produces fluffier texture. Nevertheless, both work—choose based on preference and variety.

20) How to cook perfect rice if my tap water is hard or soft?

Hard water can firm grains; soft water can push them toward mushy. Therefore, if your batches are consistently too firm, add a tablespoon or two of extra water per cup; if too soft, subtract the same amount.

21) How to make plain rice taste great without heavy sauces?

Bloom a teaspoon of ghee or oil with aromatics (garlic, ginger, cumin, bay, or pandan) before adding rice and water. Then, finish with butter or toasted sesame oil and a pinch of salt. Instantly more character, minimal effort.

22) Is “balsamic rice” the same as basmati rice?

Often it’s a typo or mishearing of “basmati.” However, if you literally want balsamic-glazed rice, toss hot cooked white rice with a little balsamic and olive oil, then season. Simple, bright, and surprisingly good.

23) How to cook perfect rice when doubling or tripling a recipe?

Scale water linearly (keep the same ratio) and use a wider pot so steam circulates evenly. Keep the simmer gentle and extend the rest by a couple of minutes. Consequently, larger batches finish evenly without soggy centers.

24) Should I salt the water for rice?

Yes—seasoning the water yields rice that tastes good on its own. Start with about ½ teaspoon fine salt per cup of raw rice. Alternatively, swap some water for light broth if you prefer layered flavor.

25) How to store cooked rice safely?

Cool quickly in shallow containers, refrigerate promptly, and eat within a few days. Reheat until steaming hot. As a result, you keep texture appealing while maintaining good food safety habits.

26) How to cook perfect rice when I want it extra dry?

After the 10-minute rest, fluff and leave the lid off for 2–3 minutes to vent steam. Alternatively, reduce water by 1–2 tablespoons per cup of rice next time. Subtle tweaks deliver a distinctly lighter bite.

27) What’s the difference between jasmine and basmati in cooking?

Jasmine leans softer and uses a touch less water; basmati prefers a soak and keeps a firmer, longer grain with a standard 1.5:1 ratio. Consequently, match your technique to the variety for best results.

28) How much rice per person should I cook?

As a side, plan ¼–⅓ cup raw rice per person (about ¾–1 cup cooked). For rice-centric meals or big appetites, move toward ½ cup raw per person. Naturally, leftovers are easy to repurpose.

29) How to cook perfect rice with oil or butter—before or after?

Either works. A teaspoon of fat before cooking blooms aromatics and improves mouthfeel; a small knob after cooking adds gloss and flavor. Nevertheless, keep amounts modest so grains don’t turn heavy.

30) Can I skip rinsing?

You can, but expect more stickiness, especially with long-grain white. For fluffy, non-sticky results, rinsing pays off. Even so, for sushi, you’ll still rinse—then you’ll deliberately add seasoning to achieve cling by design.

Posted on — 6 Comments

7 Benefits of Mustard Oil

MUSTARD OIL: BENEFITS AND RISKS

For centuries, mustard oil has been a staple in South Asian kitchens and medicine chests. The pungent aroma, the golden hue, the unmistakable flavor—mustard oil is more than just a cooking medium. It’s part of tradition, culture, and even home remedies. But what does modern science say about this ancient oil? Is it as healthy as our grandmothers claimed, or are there risks lurking beneath its spicy allure?

In this blog, we’ll peel back the layers on mustard oil: exploring its benefits, the latest research—including some surprises from 2024—and practical ways you can use it safely and effectively in your life.


What Is Mustard Oil?

Mustard oil is extracted from the seeds of the mustard plant (Brassica juncea, Brassica nigra, or Brassica alba). There are two main types:

  • Expressed mustard oil: The pungent, edible oil used for cooking, massage, and traditional remedies.
  • Essential mustard oil: A concentrated extract mainly used for flavoring or as a topical agent.

What sets mustard oil apart is its unique composition: it contains a mix of monounsaturated (MUFA), polyunsaturated (PUFA), and saturated fats, plus a powerful bioactive called allyl isothiocyanate (AITC)—responsible for both its bite and some of its health effects. However, it also contains a controversial compound: erucic acid.


7 Practical Benefits of Mustard Oil (with Science!)

1. Heart Health: Good Fats with a Caveat

Mustard oil is rich in unsaturated fats—especially omega-3 (alpha-linolenic acid, ALA) and omega-6 fatty acids. Studies suggest that these healthy fats can help reduce “bad” LDL cholesterol and boost “good” HDL cholesterol, supporting cardiovascular health. Some research shows regular users have a lower risk of heart disease compared to those using saturated fats like ghee or butter.

Practical Tip: If you’re switching from butter or palm oil to mustard oil (in moderation), you’re likely making a heart-healthy move—provided you use pure, cold-pressed oil.

2. Antimicrobial and Antifungal Power

That pungent bite isn’t just for show. Allyl isothiocyanate (AITC) in mustard oil has proven antibacterial and antifungal effects. In lab studies, it inhibits the growth of common pathogens like E. coli and Staphylococcus aureus. This property makes it popular for traditional wound care and for treating minor skin infections.

Practical Tip: Mustard oil can be dabbed (in diluted form) on minor cuts or mixed with coconut oil for a natural antifungal foot rub. Always do a patch test!

3. Anti-inflammatory Effects

Mustard oil’s natural anti-inflammatory compounds—AITC, omega-3s, selenium—make it a favorite for massage in Ayurvedic and Unani medicine. It’s often used to relieve joint pain, muscle soreness, and even symptoms of arthritis.

Practical Tip: Warm the oil slightly and massage into aching joints or muscles for soothing relief, but avoid using on broken skin.

4. Glowing Skin and Strong Hair

It’s no secret in India and Bangladesh: mustard oil is a beauty powerhouse. The vitamin E in the oil protects skin from free radical damage, locks in moisture, and can help treat mild scalp infections or dandruff.

Practical Tip: For hair, massage a small amount into your scalp, leave for 30–60 minutes, then shampoo. For skin, blend with a lighter oil to avoid irritation.

5. Digestive Boost

A little mustard oil in your food may actually aid digestion. It’s believed to stimulate the production of digestive juices and bile, helping your system break down food efficiently.

Practical Tip: Use mustard oil to sauté spices at the start of curries or stir-fries—not only for flavor, but for a digestive edge.

6. Respiratory Relief

Chest congestion? In many households, a mustard oil chest rub (sometimes with a pinch of salt or camphor) is a go-to remedy for colds and coughs. The pungency of the oil, when gently heated and massaged onto the chest or inhaled as steam, may help open airways and reduce congestion.

Practical Tip: For adults, mix warm mustard oil with a bit of camphor and rub on the chest and back. Avoid this in infants and always patch-test first.

7. Emerging Research: Metabolism and Neuroprotection

Recent animal studies (2023–2024) indicate mustard oil might improve insulin sensitivity and reduce inflammation in diabetic models. Some evidence also hints that erucic acid—a once-feared compound—could have neuroprotective roles, potentially helping with nerve repair. Human trials are still limited, but these findings are intriguing for those looking at functional foods.

Practical Tip: If you have diabetes or metabolic syndrome, talk to your doctor about using mustard oil as part of a broader dietary approach—never as a sole intervention.


What’s New? Latest Scientific Discoveries (2023–2025)

Thrombocytopenia (Low Platelet Count)

A striking 2024 study from Bangladesh found that people who regularly consumed mustard oil were significantly more likely to have low platelet counts. However, these individuals did not show symptoms of bleeding. The link appears to be associated with erucic acid, but more research is needed to know if this is a concern for everyone or only certain populations.

Neuroprotective Potential

Recent reviews have started to re-examine erucic acid’s reputation. While high doses can cause heart issues in animals, some studies suggest it may support nerve myelin repair and offer antioxidant benefits in the brain—a new angle that could change how we view this traditional oil.

Microbiome and Digestion

Cutting-edge studies indicate that mustard oil might promote the growth of friendly gut bacteria, particularly certain Lactobacillus species, further supporting digestive and immune health.

📝 Summary of Latest Findings

Benefit/Risk AreaLatest Insight (2024–25)
Erucic Acid EffectsStill no human cardiotoxic proof; potential neurological benefits under study
Metabolic HealthAnimal data support improved insulin/reduced glucose
Platelet CountLinked to thrombocytopenia in one human population study
Inflammation & LungsAITC reduces inflammation; supports decongestion
NeuroprotectionErucic acid may aid myelin repair and antioxidant defense
Gut MicrobiomePromotes beneficial Lactobacillus growth
Regulation & SafetyHigh erucic acid content keeps many countries restricting its dietary use

Risks and Safety: What You Need to Know

Erucic Acid: The Controversy

Erucic acid, present in high levels in traditional mustard oil, has been shown to cause heart and liver issues in animals when consumed in excess. This led to regulatory restrictions in the US, Canada, and Europe. However, many South Asian communities use mustard oil daily with little apparent harm—likely due to moderation and dietary context.

  • Regulatory Status: In the US, expressed mustard oil is not permitted for cooking; only essential oil (as a flavor or external agent) is allowed. In India and Bangladesh, edible mustard oil is regulated and widely used.
  • Adulteration Concerns: Always choose reputable brands. Past food safety crises have involved contaminated or adulterated oils.

Allergic Reactions and Skin Sensitivity

Mustard oil is potent and can cause skin irritation or allergic reactions in some people, especially if used undiluted. Always patch-test before using on skin.


How to Use Mustard Oil Safely and Deliciously

For Cooking

  • Heat to Smoking Point: Mustard oil should be heated until it just starts to smoke, which removes the raw taste and some of the pungency. This is called “smoking the oil” and is essential in Indian cooking.
  • Use in Moderation: Combine with other healthy oils if you have cardiovascular risk factors or are concerned about erucic acid.

For Massage

  • Dilute with Lighter Oils: Especially for sensitive skin, mix with coconut, olive, or almond oil.
  • Warm Slightly: Test temperature before applying to skin.

For Hair and Skin

  • Blend with Carrier Oils: To reduce risk of irritation.
  • Short Contact: Leave for 30–60 minutes before washing off.

Final Thoughts

Mustard oil is a remarkable traditional oil—rich in history, flavor, and unique health effects. The latest science suggests that, for most people, moderate use of pure, cold-pressed mustard oil is both safe and potentially beneficial. However, it isn’t risk-free. Stay informed, use trusted brands, and balance it within a varied, wholesome diet.

Have a favorite mustard oil recipe, or a family remedy that works wonders? Share your stories below—let’s keep the conversation spicy and smart!


For medical questions, always consult a healthcare professional.

10 FAQs about Mustard Oil

1. Is mustard oil safe for everyday cooking?

Answer:
Yes, mustard oil is safe for everyday cooking in regions where it is regulated as edible, like India and Bangladesh. If you live in a country where expressed mustard oil isn’t approved for cooking (like the US), look for “edible grade” on the label and use only as recommended. Always use in moderation due to its high erucic acid content.


2. What are the main health benefits of mustard oil?

Answer:
Mustard oil supports heart health, may lower cholesterol, has antimicrobial and anti-inflammatory effects, and is great for skin and hair. It can also promote digestion and has emerging evidence for supporting metabolic and neurological health.


3. Why is erucic acid in mustard oil controversial?

Answer:
Erucic acid, found in high concentrations in traditional mustard oil, was linked to heart issues in animal studies at very high doses. Human evidence is less clear, but some countries regulate or restrict mustard oil to minimize potential risk. Newer research is also exploring possible health benefits of erucic acid, especially for the nervous system.


4. Can I use mustard oil for baby massage?

Answer:
Mustard oil is a traditional baby massage oil in many cultures. However, some babies have sensitive skin or allergies. Always do a patch test first and consult your pediatrician before regular use.


5. How should I store mustard oil to keep it fresh?

Answer:
Store mustard oil in a cool, dark place away from direct sunlight, in a tightly sealed bottle. This helps preserve its flavor and prevents oxidation.


6. Does mustard oil help with hair growth or dandruff?

Answer:
Many people report improved scalp health, less dandruff, and shinier hair after using mustard oil. Its vitamin E and antifungal properties may support scalp and hair health, though scientific studies are limited.


7. Can mustard oil cause skin irritation?

Answer:
Yes, mustard oil can cause irritation or allergic reactions in some people, especially if applied directly to the skin. Always do a patch test or dilute with a lighter carrier oil before use.


8. What should I look for when buying mustard oil?

Answer:
Look for cold-pressed, unadulterated, food-grade (edible) mustard oil from a reputable brand. Check the label for “edible grade” if you plan to use it in food, and avoid oils with artificial colors or additives.


9. Is mustard oil good for people with diabetes?

Answer:
Some animal studies suggest mustard oil may improve insulin sensitivity and lower blood sugar. While promising, human studies are still needed. Diabetics should use mustard oil as part of a balanced diet and consult their healthcare provider.


10. Are there any groups of people who should avoid mustard oil?

Answer:
People with known mustard allergies, certain blood or liver disorders, or low platelet counts should be cautious. Pregnant women and those with sensitive skin should consult their doctor before using mustard oil regularly.

Posted on — 2 Comments

The Power of Six: Amazing Benefits of Common Indian Spices

BENEFITS OF INDIAN SPICES

When we think of Indian cuisine, the first thing that often comes to mind is its explosion of colors, aromas, and flavors. But behind these vibrant dishes lies a centuries-old tradition of using spices not just for taste but also for their powerful health benefits.

Indian spices have been a cornerstone of Ayurvedic medicine and holistic health practices for millennia. Today, modern science is validating many of these traditional uses, making Indian spices an essential part of global wellness conversations.

In this article, we explore the powerful health benefits of six common Indian spices, their uses, and why you should consider incorporating them into your daily routine.


Why Indian Spices Are Healthy

Before we dive into our list, let’s address a common question:
Are Indian spices healthy? Are Indian spices good for you?

Absolutely. Indian spices are rich in bioactive compounds, antioxidants, anti-inflammatory agents, and essential nutrients. They support digestion, boost immunity, fight chronic diseases, and promote overall well-being. What makes them even more special is that they are easily accessible and simple to incorporate into everyday meals.

Now, let’s take a deep dive into the six super spices you should know about.


1. Turmeric (Haldi) — The Golden Healer

Key Compound: Curcumin

Turmeric is often called the “golden spice” of India — and for good reason. It contains curcumin, a powerful antioxidant and anti-inflammatory compound that has been widely studied for its health benefits.

Health Benefits:

  • Anti-inflammatory powerhouse: Helps reduce chronic inflammation, which is linked to diseases like heart disease, cancer, and Alzheimer’s.
  • Antioxidant effects: Neutralizes free radicals, reducing oxidative stress.
  • Joint health: Alleviates symptoms of arthritis and joint pain.
  • Brain function: May enhance cognitive function and protect against neurodegenerative diseases.
  • Supports immune system: Strengthens the body’s natural defense mechanisms.
  • Heart health: Helps maintain healthy blood pressure and cholesterol levels.

Traditional Uses:

  • Curries, dals, rice dishes
  • Golden milk (turmeric latte)
  • Herbal teas and wellness shots
  • Skin care remedies (face masks)

Pro Tip: Pair turmeric with black pepper to enhance curcumin absorption significantly.


2. Cumin (Jeera) — The Digestive Aid

Key Compounds: Thymol, Cuminaldehyde

Cumin seeds have been used for centuries to aid digestion and improve gut health.

Health Benefits:

  • Digestive support: Stimulates the secretion of digestive enzymes, reducing bloating and indigestion.
  • Blood sugar regulation: May help lower blood sugar levels.
  • Weight management: Boosts metabolism and may aid in fat loss.
  • Rich in iron: Supports hemoglobin production and combats anemia.
  • Antimicrobial: Helps fight bacteria and parasites.

Traditional Uses:

  • Tadka (tempering) in dals and curries
  • Rice dishes like jeera rice
  • Roasted snacks
  • Herbal infusions (jeera water)

Pro Tip: Soak cumin seeds in water overnight and drink in the morning for digestive benefits.


3. Coriander (Dhaniya) — The Detoxifier

Key Compounds: Linalool, Quercetin

Both the seeds and leaves of coriander are widely used in Indian cooking, offering a fresh, citrusy flavor.

Health Benefits:

  • Heart health: Lowers bad cholesterol (LDL) and increases good cholesterol (HDL).
  • Antioxidant rich: Helps combat oxidative stress.
  • Anti-inflammatory: Reduces inflammation in the body.
  • Supports digestion: Relieves bloating and promotes gut health.
  • Detoxification: Helps the body eliminate heavy metals and toxins.
  • Antibacterial: Fights infections and supports oral health.

Traditional Uses:

  • Curries and gravies
  • Chutneys and sauces
  • Garnishing salads, soups, and snacks
  • Coriander seed tea for digestion

Pro Tip: Coriander seeds can be dry-roasted to enhance their flavor and medicinal properties.


4. Ginger (Adrak) — The Universal Remedy

Key Compounds: Gingerol, Shogaol

Ginger is a versatile spice known for its therapeutic effects across cultures.

Health Benefits:

  • Anti-nausea: Effective against motion sickness, morning sickness, and nausea.
  • Digestive aid: Stimulates digestion and relieves bloating.
  • Anti-inflammatory: Reduces joint pain and muscle soreness.
  • Boosts immunity: Helps ward off infections.
  • Cardiovascular support: Improves blood circulation and heart health.
  • May reduce cancer risk: Shown to inhibit the growth of certain cancer cells.

Traditional Uses:

  • Masala chai (spiced tea)
  • Curries and stir-fries
  • Soups and broths
  • Ginger shots and teas

Pro Tip: Fresh ginger juice with lemon and honey is an excellent natural remedy for colds.


5. Fenugreek (Methi) — The Hormone Balancer

Key Compounds: Saponins, Trigonelline

Fenugreek is a nutrient-dense spice often used for its hormone-balancing effects.

Health Benefits:

  • Blood sugar control: Lowers blood glucose levels, beneficial for diabetics.
  • Cholesterol reduction: Lowers LDL cholesterol and triglycerides.
  • Supports lactation: Increases milk production in breastfeeding mothers.
  • Digestive aid: Reduces constipation and bloating.
  • Anti-inflammatory: Alleviates arthritis symptoms.
  • Hormonal balance: May help manage symptoms of PCOS.

Traditional Uses:

  • Curries and dals
  • Methi paratha (flatbreads)
  • Pickles
  • Sprouted fenugreek salads

Pro Tip: Soak fenugreek seeds overnight and consume in the morning for metabolic benefits.


6. Black Pepper (Kali Mirch) — The Bioavailability Booster

Key Compound: Piperine

Black pepper, often called the “King of Spices,” not only adds heat to dishes but also enhances nutrient absorption.

Health Benefits:

  • Enhances bioavailability: Increases the absorption of nutrients like curcumin from turmeric.
  • Antioxidant effects: Fights oxidative stress.
  • Gut health: Stimulates digestive enzymes.
  • Respiratory support: Helps relieve congestion and respiratory issues.
  • Anti-inflammatory: Reduces inflammation and supports joint health.
  • Brain function: May help improve cognitive performance.

Traditional Uses:

  • Spice blends like garam masala
  • Soups, stews, and gravies
  • Marinades and salad dressings
  • Herbal teas with honey and ginger

Pro Tip: Add freshly ground black pepper at the end of cooking to preserve its health benefits.


How to Incorporate Indian Spices into Your Daily Routine

  • Start your day with warm water infused with turmeric and black pepper.
  • Use cumin and coriander in your everyday cooking.
  • Add ginger to your morning tea or smoothies.
  • Include fenugreek seeds in your salads or soak them overnight.
  • Finish your meals with freshly ground black pepper.

Moderation is key: While these spices offer many benefits, excessive consumption can cause side effects. Always consult with a healthcare professional if you have any underlying health conditions.


Conclusion: The Timeless Power of Indian Spices

Indian spices are far more than culinary ingredients — they are nature’s pharmacy, offering a wide array of health benefits that have been recognized for generations. By incorporating these six common spices — turmeric, cumin, coriander, ginger, fenugreek, and black pepper — into your diet, you can enjoy delicious flavors while supporting your overall health and well-being.

The power of six is simple, accessible, and profoundly effective.

Start small, explore new recipes, and let the ancient wisdom of Indian spices enhance your modern lifestyle.

10 FAQs with Answers

1️⃣ What are the most common Indian spices?

The most common Indian spices include turmeric (haldi), cumin (jeera), coriander (dhaniya), ginger (adrak), fenugreek (methi), and black pepper (kali mirch). These spices are staples in most Indian kitchens and offer a range of health benefits.

2️⃣ How do Indian spices improve digestion?

Many Indian spices like cumin, coriander, ginger, and fenugreek stimulate digestive enzymes, reduce bloating, prevent gas formation, and improve nutrient absorption, thereby promoting healthy digestion.

3️⃣ Can I consume turmeric daily?

Yes, consuming turmeric daily in moderate amounts is generally safe and beneficial due to its anti-inflammatory and antioxidant properties. However, high doses should be taken under medical supervision, especially if you are on blood thinners or have gallbladder issues.

4️⃣ Which Indian spices help with immunity?

Turmeric, ginger, black pepper, and cumin are particularly known to boost immunity by reducing inflammation, fighting infections, and enhancing the body’s natural defense mechanisms.

5️⃣ Do Indian spices have side effects?

In moderation, Indian spices are safe for most people. Overconsumption may cause side effects like heartburn, digestive upset, or interact with certain medications. Always consult your healthcare provider if unsure.

6️⃣ Can Indian spices help with weight loss?

Yes. Spices like cumin, turmeric, and fenugreek can support metabolism, blood sugar control, and appetite regulation, which may assist in healthy weight management when combined with a balanced diet and exercise.

7️⃣ Are Indian spices suitable for people with diabetes?

Many Indian spices such as fenugreek, cumin, and turmeric help regulate blood sugar levels, making them beneficial for people managing diabetes. Always consult your doctor for personalized guidance.

8️⃣ How can I start using Indian spices if I’m new to them?

Start by adding small amounts of turmeric, cumin, or coriander to soups, stews, and rice. Ginger and black pepper can be added to teas or salads. Gradually experiment with traditional Indian recipes to get familiar with flavors.

9️⃣ Do Indian spices lose their benefits when cooked?

Some heat-sensitive compounds may degrade with prolonged cooking. To retain maximum benefits, add spices like black pepper towards the end of cooking, while others like cumin and turmeric can handle heat better.

🔟 Are Indian spices the same as masala?

Masala refers to a blend of multiple spices, while individual spices like turmeric, cumin, and coriander are the building blocks. Masala mixes can offer a combination of health benefits depending on their ingredients.