
Some recipes feel trendy for a season and then vanish. A really good spinach dip recipe is the opposite. It shows up at potlucks, game nights, Diwali parties, Christmas dinners, and casual Friday evenings, and somehow the bowl is always scraped clean.
This long, cozy guide gathers several kinds of spinach dip recipes into one place: classic cold party dip, ranch-style, vegetable soup mix in a bread bowl, two versions of spinach artichoke dip (cold and baked), a lighter yogurt-based dip, a cheesy queso-style dip, plus a few ultra-simple three- and five-ingredient options. Along the way, you’ll find ideas for what to serve with them, how to handle fresh versus frozen spinach, and a little bit of context about spinach itself.
If you’d like to nerd out on the health side later, you can always read more about spinach nutrition and weight loss benefits on MasalaMonk or check the nutrient breakdown on Healthline’s spinach nutrition page. For now, though, let’s get straight into creamy bowls and warm bread.
Why spinach makes such a good dip base
Before diving into the first spinach dip recipe, it helps to quickly appreciate why spinach works so well in dips.
Spinach has a fairly mild, earthy flavor that doesn’t overpower other ingredients, yet it adds a lovely deep green color and just enough personality. Because it shrinks dramatically when cooked or thawed, a small amount of raw spinach turns into a concentrated, almost buttery pile of greens that blends beautifully into sour cream, yogurt, mayonnaise, and cheese.
Nutritionally, spinach is one of those leafy greens that keeps turning up in research. It’s naturally low in calories yet high in vitamins A, C, K, several B vitamins including folate, and minerals such as iron and potassium. If you want to dig into the numbers, the USDA’s FoodData Central database lists exact values for fresh and cooked spinach. Spinach also contains plant compounds like carotenoids and nitrates, which are frequently associated with heart and eye health in studies cited by major nutrition sources.
Of course, the creamy parts of a spinach dip recipe still make this more of a treat than a salad. However, it’s a treat with at least some leafy-green goodness baked in, which is a nice bonus.
Also Read: How to Cook Bacon in the Oven (Crispy, No-Mess, Crowd-Ready Recipe)
Fresh, frozen, or canned spinach: choosing the right one
A question that comes up surprisingly often is whether fresh, frozen, or canned spinach is “best” for a spinach dip recipe. The honest answer is that all three can work, as long as you handle them properly.
Frozen spinach
Frozen chopped spinach is usually the easiest option for dips. It’s already blanched and chopped, so the main task is thawing and squeezing.
- Thaw overnight in the fridge or quickly in the microwave.
- Squeeze out as much water as possible.
- For most recipes here, one 10 oz / 280 g packet of frozen spinach is perfect.
Because it’s blanched soon after harvest, frozen spinach keeps much of its nutritional value. If you like numbers, both Healthline and similar sources note that cooked or frozen spinach often contains more concentrated amounts of certain vitamins and minerals per serving than raw spinach, simply because the volume shrinks.
Fresh spinach
Fresh spinach is fantastic when you already have a big bag in the fridge.
- Rinse and dry the leaves.
- Wilt them in a pan with a splash of water or a tiny amount of oil.
- Once cool, squeeze out the liquid and chop.
You’ll need more fresh spinach by weight than frozen, because it shrinks significantly. Roughly 300–350 g of raw leaves will give you a similar amount of cooked spinach to one frozen packet.
Canned spinach
Canned spinach is less common, yet it can absolutely stand in when that’s what you have.
- Pour it into a sieve and rinse briefly.
- Press firmly with the back of a spoon or your hands to remove excess liquid.
- Measure out about 1½ cups of firmly packed, drained spinach for one batch of dip.
As long as you treat any of these options like a sponge that needs wringing out, your spinach dip recipe will be thick and creamy instead of runny.
Also Read: How to Make Churros (Authentic + Easy Recipe)
Classic cold spinach dip recipe (your party-style base)
This is the backbone of everything that follows. Once you can make this classic cold spinach dip recipe with your eyes closed, you can riff on it endlessly.
Ingredients (about 3 cups)
- 1 packet (10 oz / 280 g) frozen chopped spinach, thawed
- 1 cup (240 ml) sour cream
- 1 cup (240 ml) mayonnaise
- ½ cup (about 50 g) finely grated hard cheese (parmesan or similar, optional but delicious)
- 2–3 tablespoons finely minced onion or 2 teaspoons dried minced onion
- 1–2 cloves garlic, finely minced or ½ teaspoon garlic powder
- ½–1 teaspoon salt, to taste
- ¼–½ teaspoon black pepper
- Optional mix-ins
- ½ cup finely chopped water chestnuts for crunch
- ¼–½ cup sliced green onions
- ¼ cup finely diced bell pepper or pimentos

Step-by-step Recipe – How to make a Spinach Dip
1. Thaw and squeeze the spinach
Start by thawing the frozen chopped spinach. You can do this overnight in the fridge, in a bowl of cold water, or quickly in the microwave. Once thawed, gather the spinach in your hands or in a clean kitchen towel and squeeze firmly over the sink. Quite a lot of liquid will come out; keep going until it feels as dry as you can manage.
This part might seem fussy, yet it makes all the difference between a thick, scoopable spinach dip recipe and a watery one.

2. Build the creamy base
In a medium mixing bowl, whisk together the sour cream and mayonnaise until smooth. Add the onion, garlic, salt, and pepper. Give it another good stir so the seasonings are nicely dispersed.
If you’re one of those people who likes a mild onion flavor, start with the lower end of the onion amount and adjust later. It will intensify as the dip rests.

3. Fold in the spinach
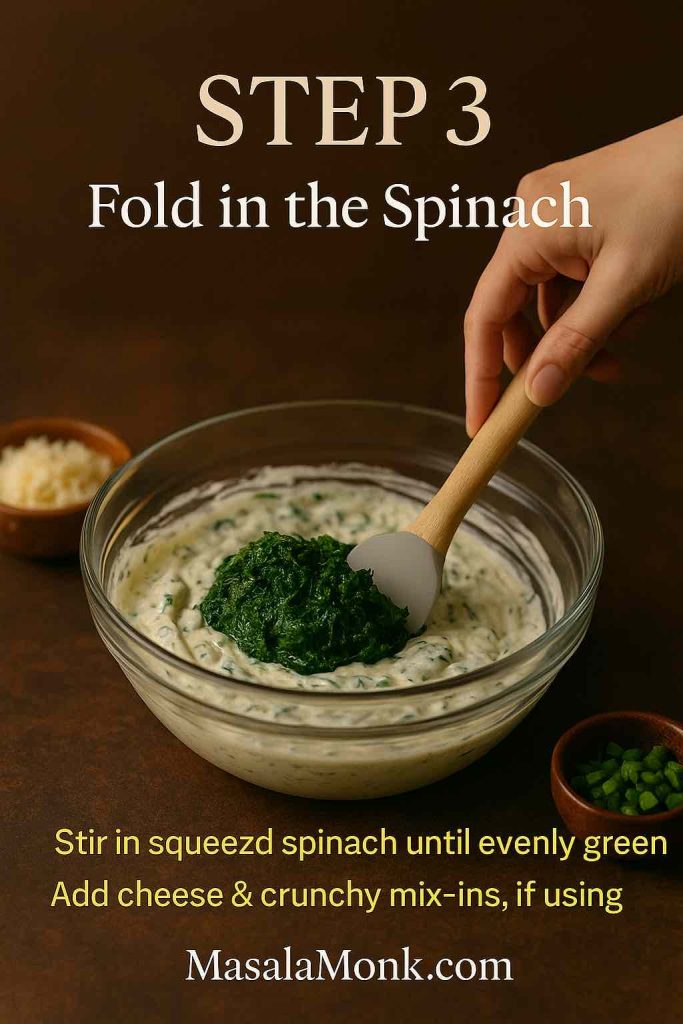
Next, add the squeezed spinach to the bowl. Use a spoon or spatula to fold it into the creamy base, breaking up any clumps so the greens are evenly moved through the mixture. At this stage you can also sprinkle in parmesan (or another hard cheese) if you’re using it, along with optional water chestnuts, green onions, or bell peppers.
4. Chill to develop flavor
Cover the bowl and refrigerate for at least 1–2 hours. If you can, prepare this spinach dip recipe the day before and let it rest overnight. The onion softens, the garlic mellows, and the spinach flavor infuses into the creamy base in a way that simply doesn’t happen if you eat it right away.

5. Taste and serve
Just before serving, give the dip a stir, then taste it. Adjust the salt and pepper if needed. If it feels a little too thick, you can loosen it with a tablespoon or two of milk, cream, or yogurt.

Spoon into a serving bowl and surround it with sliced bread, vegetables, or any dippers you like. Later in this post we’ll get into detailed serving ideas; for now, you’ve just made a classic cold spinach dip recipe that can stand on its own at any gathering.
If this made you fall in love with the creamy-spinach combo, you might also enjoy the Indian-inspired spinach raita (palak raita), which takes similar flavors in a lighter, yogurt-based direction.
Ranch spinach dip recipe variation
Once you’ve mastered the base, the next easy twist is a ranch spinach dip recipe. Ranch seasoning brings herbs, garlic, onion, and a slight tang, turning the classic dip into something just a little more familiar and “snacky”.
What you’ll need
- 1 batch classic cold spinach dip base
- 1 packet ranch-style seasoning mix (about 1 oz)
or 3–4 tablespoons thick ranch dressing - A splash or two of milk or yogurt if the dip ends up too thick

How to make ranch spinach dip
To keep things simple, start by mixing the ranch with the creamy ingredients before adding spinach:
- In a clean bowl, whisk together the sour cream and mayonnaise from the base recipe with the ranch seasoning mix until it’s completely blended.
- Add the squeezed, chopped spinach and fold it through.
- Taste before adding extra salt; most ranch mixes bring plenty of salt on their own.
- Chill the ranch spinach dip recipe for at least an hour, then adjust the seasoning once more if needed.
This version is excellent with crunchy vegetable sticks, but it really shines next to potatoes. For a full party-snack spread, you can pair it with some of these easy potato appetizers, which range from crispy bites to cheesy loaded options.
Vegetable soup mix spinach dip recipe in a bread bowl
For many people, the most nostalgic spinach dip recipe involves a packet of vegetable soup mix and a big round loaf of bread. It’s the kind of thing that appears on buffet tables surrounded by chunks of bread and vanishes within an hour.
Ingredients
- 1 batch classic spinach dip recipe base, without onion and garlic added yet
- 1 packet dry vegetable soup and dip mix
- ½ cup finely chopped water chestnuts
- ½ cup chopped green onions or sautéed leeks
- 1 large round loaf of bread (sourdough, rye, or pumpernickel all work)

Method
1. Stir the soup mix into the base
Whisk together sour cream and mayonnaise in a large bowl. Sprinkle in the dry vegetable soup mix and stir well. Let this sit for 5–10 minutes so the dehydrated vegetables can soften slightly.
2. Add spinach and mix-ins
Fold in the drained, chopped spinach. Stir through the water chestnuts for crunch and the green onions or leeks for a sweet onion note.
3. Chill thoroughly
Because the soup mix needs a little time to hydrate, this version benefits from at least 2 hours in the fridge, and overnight is even better.
4. Turn it into a bread bowl
While the dip chills, prepare your bread:
- Slice off the top of the loaf like a lid.
- Hollow out the center with your hands, leaving a good 2–3 cm wall so the dip bowl is sturdy.
- Cut the removed bread into rough bite-sized cubes.
Just before serving, spoon the dip into the hollowed loaf and arrange the bread cubes around it on a platter. Add some fresh vegetables for color and extra crunch.
If you’d like an even more indulgent bread pairing another time, consider baking a homemade garlic bread loaf and cutting it into chunks for dipping. On days when you want something heartier but still relatively wholesome, slices of quick and healthy oatmeal bread also make a great base for spinach dip.
To turn the whole setup into a full grazing platter, you can borrow some ideas from the guide on assembling charcuterie boards using the 3-3-3-3 rule, then tuck this bread-bowl dip right into the center.
Spinach artichoke dip recipes: cold and baked
Whenever people talk about restaurant-style spinach dip, they’re usually imagining spinach artichoke dip. The artichokes add a tangy, tender bite that cuts through the richness. It’s worth having both a cold version and a baked one in your personal spinach dip recipe collection.
Cold spinach artichoke dip
This version is brilliant when you need something make-ahead that can sit on a buffet.
Ingredients
- 1 batch classic cold spinach dip recipe
- 1 cup chopped marinated artichoke hearts, drained
- ½ cup shredded mozzarella or mild cheese blend (optional)
- 2–3 tablespoons lemon juice

Directions
- Prepare the classic spinach dip base and let it chill for at least an hour.
- Stir in the chopped artichoke hearts and shredded cheese, if using.
- Add lemon juice a tablespoon at a time, tasting as you go, until it feels bright but not sour.
- Chill for another hour so the flavors mingle.
Serve with crackers, toasted bread slices, or vegetable sticks. The artichokes make this spinach dip recipe feel more complex, even though the method stays very simple.
Baked spinach artichoke dip (hot and bubbly)
For a cozier option, especially in cooler months, a baked spinach artichoke dip recipe gives you that golden top and stretchy cheese pull.
Ingredients
- 1 block (8 oz / 225 g) cream cheese, softened
- ½ cup sour cream
- ½ cup mayonnaise
- 1 cup shredded mozzarella
- ½ cup grated parmesan or similar hard cheese
- 1½ cups cooked, chopped spinach (frozen and thawed, or sautéed fresh)
- 1 cup chopped artichoke hearts
- 2 cloves garlic, minced
- Salt and pepper, to taste

Instructions
- Preheat your oven to 180°C / 350°F. Lightly grease a small baking dish.
- Beat the cream cheese in a mixing bowl until smooth. Add the sour cream and mayonnaise and blend again.
- Stir in mozzarella, parmesan, garlic, spinach, and artichokes. Season with a small pinch of salt and pepper; the cheeses are salty, so it’s easy to overdo it.
- Spread the mixture into the baking dish in an even layer.
- Bake for 20–25 minutes, until hot and bubbling at the edges.
- For a browned top, switch to the broiler for 2–3 minutes at the end, watching carefully to avoid burning.
Place the hot dish on a board surrounded by baguette slices, breadsticks, and roasted vegetables. If you’re planning a fuller meal, this cheesy, comforting bowl sits nicely beside cozier dishes like cottage cheese lasagna with spinach or green bean casserole recipe ideas for holiday or Sunday dinners.
Lighter spinach and yogurt spinach dip recipe
Sometimes you want the flavor of a spinach dip recipe without quite so much heaviness. A yogurt-forward version keeps everything creamy but brings in more protein and a pleasant tang.
Ingredients
- 1 cup thick Greek yogurt or hung curd
- ½ cup light mayonnaise or additional yogurt
- 1 packet (10 oz) frozen chopped spinach, thawed and squeezed dry
- 2 cloves garlic, minced
- 2–3 tablespoons lemon juice
- 2–3 tablespoons chopped fresh herbs (dill, parsley, coriander – choose your favorite)
- Salt and pepper, to taste

Directions
- In a bowl, whisk together the yogurt and mayonnaise until smooth.
- Add garlic, lemon juice, salt, and pepper, and whisk again.
- Fold in the spinach and chopped herbs.
- Chill for at least 1 hour so the garlic and herbs soften and flavor the yogurt.
- Taste, then adjust salt, pepper, and lemon juice.
This lighter spinach dip recipe pairs wonderfully with fresh vegetables and seeded crackers. Because yogurt plays the starring role, it feels especially at home next to Indian-leaning dishes. If you enjoy this style, you might also like the creamy spinach raita mentioned earlier or the hung curd spinach cheese sandwich, which uses strained yogurt in a protein-rich filling.
For a completely different spin, check out the idea of lentil-and-green dips like the lentil and spinach hummus. It’s another clever way to bring spinach into snack time, this time with extra fiber and plant protein from pulses.
Simple 3-ingredient and 5-ingredient spinach dip recipes
On some days, there’s time to shop and prep; on others, you want a spinach dip recipe that works almost like a magic trick. That’s where minimalist versions come in handy.
3-ingredient spinach dip
For a basic three-ingredient bowl:
- 1 cup sour cream or thick Greek yogurt
- 1 cup mayonnaise or softened cream cheese
- 1 packet (10 oz) frozen chopped spinach, thawed and squeezed dry
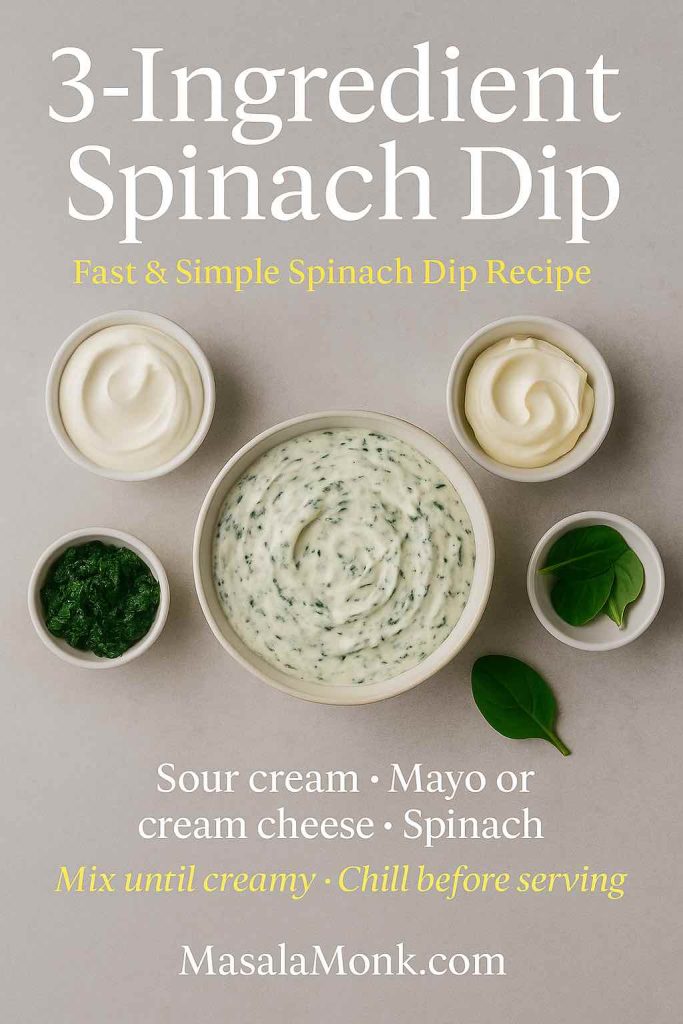
Stir everything together, season lightly with salt and pepper, and chill. If you’d like more flavor without technically adding a “fourth ingredient”, you can use a seasoned cream cheese or a flavored mayonnaise to sneak in herbs and spices.
5-ingredient baked spinach artichoke dip
Another shortcut version keeps the ingredient list short but still gives you an impressive baked dish:
- 1 block (8 oz) cream cheese
- 1 cup shredded cheese (mozzarella or a blend)
- ½ cup sour cream or yogurt
- 1 cup chopped spinach
- 1 cup chopped artichoke hearts
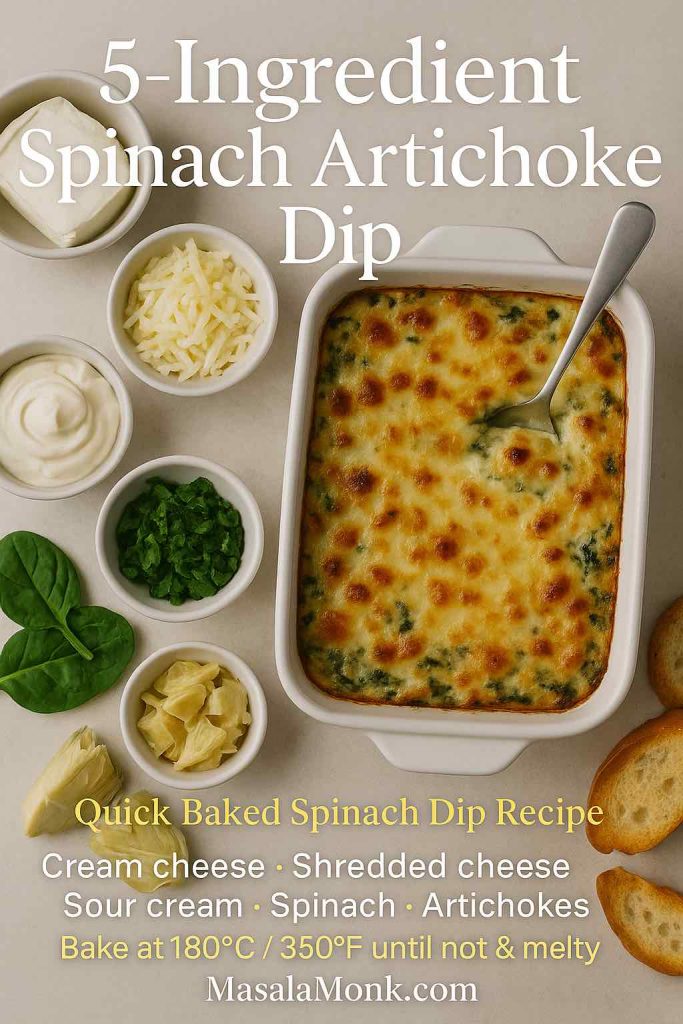
Beat the cream cheese until smooth, then stir in sour cream, cheese, spinach, and artichokes. Spread into a small baking dish and bake at 180°C / 350°F for 20 minutes or so, until everything is hot and melty.
These versions are especially useful when you already have something like baked jalapeño poppers or cheese balls with Indian-inspired flavors in the oven and just want one more dish without adding much work.
Warm cheesy spinach queso dip
If you’re hosting game night or movie night, a spinach dip recipe with a queso twist always gets attention. It’s stretchy, melty, and perfect with crunchy sides.
Ingredients
- 250 g processed melting cheese or cheese loaf, cubed
- ½ cup milk or cream
- 1 cup cooked, chopped spinach
- Optional:
- ½ cup diced tomatoes with green chilies, drained
- 1 jalapeño, finely chopped
- ½ teaspoon onion powder or garlic powder

Method
- Add the cheese cubes and milk to a small saucepan or deep skillet.
- Warm over low heat, stirring often, until the cheese melts into a smooth sauce.
- Stir in spinach and any optional add-ins.
- Keep over very low heat, just enough to keep the queso fluid, not boiling.
Serve this warm spinach dip recipe in a heat-safe bowl. Although tortilla chips are a classic pairing, it’s also fun with toasted bread fingers, roasted potato wedges, and even vegetable sticks for contrast.
Also Read: Air Fryer Chicken Wings (Super Crispy, No Baking Powder)
What to serve with your favorite spinach dip recipe
Once you’ve chosen which spinach dip recipe to make, the next question is what to put around the bowl. The possibilities are genuinely endless, but a few categories cover most occasions.
Breads and crackers
Bread and spinach dip are such a natural pairing that it’s easy to build a whole platter around them.
- Cubes of crusty bread or baguette
- Slices of homemade garlic bread loaf for extra flavor
- Toasted slices of oatmeal bread when you want something a little heartier
- Pita chips, breadsticks, or crispbread
- Seeded crackers for crunch
If you enjoy assembling boards, you can place the dip as the centerpiece of a small grazing board. Surround it with breads, crackers, nuts, and fruit, taking cues from the charcuterie tips in the 3-3-3-3 rule guide.
Vegetables
Creamy dips always benefit from fresh, crisp vegetables as dippers. They add color, crunch, and a lighter option for guests who don’t want too much bread.
Try:
- Carrot and cucumber sticks
- Bell pepper strips
- Cherry tomatoes
- Blanched broccoli or cauliflower florets
- Snap peas or green beans
Spinach is already part of the leafy-greens family that many nutrition experts say we should eat more of; adding assorted vegetables around the bowl brings you even closer to that goal. If you ever want to zoom out and read more about the role of vegetables and fruits in healthy eating patterns, Harvard’s Nutrition Source has an accessible overview.
Other appetizers for a full spread
For a larger gathering, it’s nice to add a few more bite-sized dishes so your spinach dip recipe shares the table with other flavors and textures.
Some options that work beautifully alongside dip include:
- Baked jalapeño poppers for a spicy, cheesy contrast
- Cheese balls with Indian-inspired variations
- Classic deviled eggs with twists
- A platter of creative potato appetizers
Together with one or two spinach dips, these give you an appetizer table that feels far more elaborate than the actual work involved.
Drinks that pair well with spinach dips
Because most spinach dip recipes are rich and creamy, they pair best with drinks that either cut through that richness or wrap around it in a cozy way.
For a sparkling, citrusy option, a French 75 cocktail is a classic choice. The combination of gin, lemon, a touch of sugar, and sparkling wine feels bright and celebratory, and the bubbles help refresh the palate between bites of dip.
If you prefer something on the slightly bitter side, you might like the balance of a Negroni with variations, while fans of shaken sour cocktails can explore the classic whiskey sour recipe with its sharp lemon edge. On evenings when you’d rather keep things non-alcoholic or cozy, mugs of homemade hot chocolate with cocoa powder feel surprisingly right next to hot spinach artichoke dip and roasted potatoes.
If you’re in the mood to experiment further, a roundup of creative gin cocktail recipes or playful ideas like the green tea shot with Jameson can help you match your drinks to the energy of the evening.
Storing spinach dips safely
Finally, because most versions of a spinach dip recipe are built on sour cream, yogurt, mayonnaise, and cheese, it’s worth paying attention to storage.
A few simple guidelines go a long way:
- Keep spinach dips refrigerated in a covered container.
- Try to eat them within 3–4 days for the best quality and safety.
- During gatherings, avoid letting the dip sit out at room temperature for more than 2 hours. If the weather is very hot, aim for 1 hour. After that point, it’s safer to discard leftovers that have been sitting out.
If you’d like specific, broader advice beyond dips, the general recommendations on FoodSafety.gov are a useful reference for how long different chilled foods can safely stay out and how long they should be stored in the fridge.
For long parties, a good strategy is to serve half the dip at a time and keep the rest chilled. When the bowl runs low, swap in fresh, cold dip rather than topping up what’s been sitting out for hours.
Also Read: 6 Wellness Shot Recipes to Boost Your Immune System

Bringing it all together
By now, you’ve walked through a whole mini-universe of spinach dip recipes: the classic cold party version, ranch and vegetable soup mix twists, spinach artichoke variations (both cold and baked), lighter yogurt-based dips, shortcut three- and five-ingredient bowls, and a cheesy queso option for game day. You’ve also seen how to adapt fresh, frozen, or canned spinach, how to build a simple but impressive appetizer table around your dip, and how to think about drinks and storage.
You don’t have to make all of them at once. Instead, treat this as your personal spinach dip recipe toolbox. Pick one for a quiet evening with toasted bread and a movie, another for a big holiday meal with green bean casserole and lasagna, and keep the quickest versions in mind for those nights when someone messages, “We’re stopping by in 20 minutes,” and you still want to put something homemade on the table.
Also Read: What to Eat with Hummus for Weight Loss 🏋️♀️
FAQs
1. Can I make a spinach dip recipe ahead of time?
Yes, a spinach dip recipe actually tastes better when made ahead. Firstly, mixing everything together and letting it sit in the fridge for a few hours allows the onion, garlic, herbs, and spinach to fully flavor the creamy base. Secondly, the texture improves as the dip thickens slightly while it chills. Ideally, make your spinach dip 8–24 hours in advance, then give it a good stir and a quick taste before serving. If it feels too thick after chilling, you can gently loosen it with a tablespoon or two of milk, cream, or yogurt. In short, “make ahead” is not just okay; it is one of the secrets to a truly delicious spinach dip recipe.
2. Should I use fresh, frozen, or canned spinach for spinach dip?
All three can work in a spinach dip recipe; they simply need slightly different handling. Frozen chopped spinach is the most convenient option because it is already blanched and finely cut. After thawing, you only have to squeeze out as much water as possible. Fresh spinach is lovely when you already have it at home; just wilt it in a pan, cool it down, squeeze well, and chop. Canned spinach is the least common, yet it is still usable if you drain it thoroughly and press out the extra liquid. Overall, the most important step—no matter which kind you choose—is removing excess moisture, so the spinach dip stays thick and creamy instead of watery.
3. How do I stop my spinach dip recipe from being watery?
Excess water in the spinach is almost always the culprit. Therefore, the first step is to squeeze the spinach very well, whether it is frozen, fresh, or canned. Additionally, avoid adding watery ingredients like tomatoes or cucumbers directly into the dip; serve them on the side as dippers instead. If you accidentally end up with a loose spinach dip, you can stir in a bit of extra cream cheese, sour cream, or grated hard cheese to help thicken it. Another simple trick is to chill the dip for a longer time, since it tends to firm up as it rests in the refrigerator. Ultimately, good draining plus proper chilling are the best defenses against a runny spinach dip recipe.
4. What is the best base for a cold spinach dip recipe—sour cream, mayo, or cream cheese?
Each base creates a slightly different personality for your spinach dip recipe. Sour cream gives a tangy, smooth texture and classic “party dip” flavor. Mayonnaise adds richness and a glossy mouthfeel, making the dip feel more luxurious. Cream cheese, on the other hand, produces a thicker, spreadable consistency that is excellent for bread and crackers. Very often, the tastiest dips use a combination of these: for example, half sour cream and half mayonnaise, or sour cream with a portion of cream cheese for extra body. As a general guideline, use more sour cream and yogurt if you want a lighter dip, and more mayonnaise or cream cheese if you prefer something richer and denser.
5. Can I make a healthier spinach dip recipe with yogurt?
Absolutely, you can create a lighter spinach dip recipe by replacing part or even all of the sour cream and mayonnaise with thick yogurt or hung curd. To begin, choose a full-bodied yogurt like Greek yogurt so the dip does not become too runny. Then mix it with a smaller amount of mayonnaise or olive oil for smoothness and flavor. Moreover, you can lean on garlic, lemon juice, herbs, and black pepper to make the dip exciting without needing loads of fat. Over time, you can adjust the ratio in favor of yogurt as your taste buds get used to a tangier, fresher flavor. This kind of spinach and yogurt dip works wonderfully with raw vegetables and whole-grain crackers, and it still feels indulgent even though it is a bit kinder to your daily calories.
6. How can I turn a basic spinach dip recipe into a spinach artichoke dip?
Transforming a classic spinach dip recipe into a spinach artichoke dip is surprisingly straightforward. Simply fold in chopped artichoke hearts—marinated or canned both work—after you have mixed the base. As a starting point, add about one cup of chopped artichokes to a standard batch of dip. Additionally, consider including shredded mozzarella and a little extra parmesan if you are aiming for that familiar restaurant-style flavor. If you want a cold dip, you can serve it immediately after chilling. Conversely, for a baked spin on the same idea, spread the mixture into an oven-safe dish, sprinkle more cheese on top, and bake until it is hot and bubbling. In either case, the artichokes add a lovely tang and texture that makes the spinach dip feel even more special.
7. What is the difference between a cold spinach dip recipe and a baked one?
A cold spinach dip recipe is usually based on sour cream, mayonnaise, and sometimes yogurt, and it relies on chilling time to thicken and develop flavor. It stays soft and scoopable straight from the refrigerator and is perfect for bread, chips, and raw vegetables. A baked spinach dip, in contrast, features more cheese—especially mozzarella, parmesan, and cream cheese—and is heated in the oven until hot and gooey. As a result, it has a stretchy, melty texture and a lightly browned top. Because of that, baked versions feel cozier and more suited to winter dinners, holiday parties, and game nights. Cold dips, meanwhile, are especially refreshing for warm-weather gatherings but also hold their own at any buffet table.
8. Can I make a spinach dip recipe without mayonnaise?
Yes, you can absolutely create a spinach dip recipe without mayonnaise. One straightforward option is to replace mayonnaise entirely with sour cream, Greek yogurt, or a blend of both. Cream cheese also works well as a base; it produces a thick, spreadable dip when combined with sour cream or yogurt. Furthermore, seasonings like garlic, onion, lemon juice, pepper, and herbs will provide plenty of flavor so you do not miss the mayonnaise at all. If you want even more richness without mayo, you can add a small splash of olive oil or a bit of grated cheese to round out the taste. In the end, the structure of the dip comes from something creamy plus the spinach, while the flavor comes mainly from aromatics and spices, so you have lots of freedom.
9. How can I make a gluten-free spinach dip recipe?
A spinach dip recipe is often naturally close to gluten-free, but there are a few details to check. Firstly, the core ingredients—spinach, sour cream, yogurt, mayonnaise, cream cheese, and most cheeses—do not contain gluten. The potential issues usually come from packets of soup mix, seasoning blends, and certain processed cheeses. Therefore, you need to read the labels on any mixes or flavored ingredients to ensure they are certified gluten-free. Instead of using packaged vegetable or onion soup mix, you can season your dip with plain dried herbs, garlic powder, onion powder, smoked paprika, and salt. As for serving, choose gluten-free dippers such as rice crackers, corn chips labeled gluten-free, sliced vegetables, or gluten-free bread. Once you take these simple steps, your spinach dip recipe can be enjoyed safely by guests who avoid gluten.
10. Can a spinach dip recipe be made vegan or dairy-free?
Yes, with a few strategic swaps you can create a dairy-free or even fully vegan spinach dip recipe. To begin, replace sour cream and yogurt with plant-based alternatives made from coconut, soy, or almonds. Next, swap out cream cheese and other cheeses for vegan cream cheese or shredded plant-based cheese. In addition, use a vegan mayonnaise made from vegetable oils instead of eggs. As you adjust these ingredients, you might need to rely more heavily on garlic, lemon juice, nutritional yeast, and herbs to build up a satisfying savory flavor. For a thicker texture, you can blend in a small amount of soaked cashews or silken tofu. When everything is combined and chilled, you will have a creamy, scoopable spinach dip that fits into a dairy-free or vegan lifestyle while still feeling indulgent.
11. How long does a homemade spinach dip recipe last in the fridge?
As a general guideline, a homemade spinach dip recipe keeps well in the refrigerator for about three to four days. The ingredients—especially sour cream, yogurt, mayonnaise, and cheeses—are all perishable, so they need to be stored in a covered container at a consistently cold temperature. Try not to leave the dip out at room temperature for more than two hours during parties; if it has been sitting out for longer than that, it is safer to discard the remainder. One practical approach is to serve part of the dip in a bowl and keep the rest chilled, refilling as needed. In this way, the majority of your spinach dip remains at a safe temperature while guests are enjoying the portion on the table.
12. Can I freeze leftover spinach dip?
Freezing a spinach dip recipe is possible, although the results depend on the ingredients. Dips that are mostly cream cheese and shredded cheese tend to freeze and thaw better, because they have less water. On the other hand, dips with a high proportion of sour cream or yogurt can sometimes become grainy or separated after freezing. If you choose to freeze spinach dip, place it in an airtight container, leaving a little room for expansion. When you want to use it again, thaw it slowly in the refrigerator, then stir it thoroughly. If the texture feels slightly broken, you can try whisking in a spoonful of fresh cream cheese or yogurt to smooth it out. Even so, for the very best texture and flavor, it is usually preferable to enjoy a spinach dip recipe freshly made or only chilled in the fridge.
13. What can I do with leftover spinach dip besides serving it with bread or crackers?
Leftover spinach dip is surprisingly versatile, so you do not have to keep eating it in exactly the same way. Firstly, you can transform it into a pasta sauce by thinning it with a little milk or pasta cooking water, then tossing it with hot pasta and extra parmesan. Secondly, you can spread it over pizza dough as a “white” sauce base for a spinach dip pizza topped with mozzarella and vegetables. Additionally, it works well as a filling in stuffed mushrooms or as a layer inside baked sandwiches and wraps. You can even spoon a thicker spinach dip recipe into baked potatoes or use it as a topping for grilled chicken or fish. With just a bit of imagination, the leftovers become an ingredient rather than a problem.
14. How can I add more flavor to a basic spinach dip recipe?
If your basic spinach dip recipe tastes a little flat, you have lots of options for boosting flavor. Garlic and onion are the first and most obvious helpers; you can use them fresh, sautéed, or in powdered form. Beyond that, herbs like dill, parsley, coriander, basil, and chives add freshness. Spices such as smoked paprika, cayenne, black pepper, and mustard powder introduce warmth and complexity. A squeeze of lemon juice or a splash of vinegar brightens everything, especially in richer dips. Grated parmesan or another sharp cheese can also deepen the savory notes. Finally, a pinch of salt added after chilling can tighten the flavors, since cold food often needs slightly more seasoning than warm dishes. Bit by bit, these small additions turn a simple spinach dip recipe into something truly memorable.


