Posted on — Leave a comment

Hasselback Potatoes Recipe: Crispy, Buttery & Perfectly Roasted

Golden Hasselback potato fanned open on a dark glossy surface, with crisp browned ridges, herbs, coarse salt and melted butter visible between the slices.

This Hasselback potatoes recipe turns an ordinary potato into dozens of crisp, golden edges wrapped around a soft, tender middle. As the cuts open in the oven, they create little pockets for seasoned butter and spread into the distinctive fan that makes Hasselbacks worth the extra knife work.

They’re the potatoes to make when you want baked-potato tenderness and roast-potato edges in a side dish that feels a little more special on the table.

That same shape is also what makes them easy to get wrong. Sometimes the slices barely move. Sometimes the base stays hard. And sometimes the potato looks beautifully roasted on top while the thick part underneath still catches on the knife.

The trick is recognizing that the fan and the thick body of the potato are cooking at different speeds. Use potatoes of similar size, cut almost to the bottom, season again after the slices loosen, and don’t mistake brown for cooked.

4 Things That Make Hasselback Potatoes Work

Cut thin. More cuts mean more edges that can turn crisp.

Keep the hinge thin. The uncut base—the hinge holding the potato together—needs enough substance to stay intact, but not so much that the fan stays rigid.

Baste once the cuts open. That’s when seasoned butter can finally get down between the slices instead of mostly running over the outside.

Check the base, not the brown. The top can look beautifully finished while the thick potato underneath is still firm.

Four-part Hasselback potato guide showing thin slicing, an attached base, melted butter brushed into opened cuts and a knife checking doneness near the bottom of the potato.
The fan and the base are separate cooking problems: the slices need room to crisp, while the hinge must stay flexible enough for the thick base to cook through.

Hasselback Potatoes Recipe

The quantities and timing below are built around medium potatoes weighing about 6–8 oz / 170–225 g each. Using much smaller or larger potatoes? Check the size-based timing guide first.

First time making them? Use medium Yukon Golds, roast them from raw, start with oil, add seasoned butter once the cuts open and save the fresh garlic for the end.

Serves: 4
Prep: about 15 minutes
Cook: typically 55–70 minutes; allow up to about 75 minutes if extra crisping is needed
Total: about 1 hour 10 minutes to 1 hour 30 minutes
Oven: 425°F / 220°C conventional; about 400°F / 200°C fan or convection
You’ll need: a sharp knife, 2 fairly slim chopsticks or wooden spoon handles, a rimmed metal baking sheet and a pastry brush

Step-by-step Hasselback potato method using a medium Yukon Gold potato, with oil added before roasting, butter brushed into opened slices and garlic added near the end.

Ingredients

  • 4 medium Russet or Yukon Gold potatoes, about 6–8 oz / 170–225 g each
  • 3 tbsp / 1½ fl oz / 45 ml extra-virgin olive oil, divided
  • 2 tbsp / 1 oz / 28 g unsalted butter, divided
  • 1 tsp fine sea salt / about 6 g, divided, plus more to taste
  • ½ tsp freshly ground black pepper
  • 2 garlic cloves, finely grated or minced
  • 1 tsp finely chopped fresh rosemary or thyme
  • 2–3 tbsp / ⅓–½ oz / 10–15 g finely grated Parmesan, optional
  • 1 tbsp chopped parsley or chives, optional, for finishing

Using kosher salt? Crystal size varies between brands, so the gram amount is the better reference.

Leave the skins on for less prep and another surface that can crisp. Peel them if you prefer a softer exterior.

Why oil and butter? Oil handles the long roast and crisping well; butter goes on later for flavor, once the cuts are open enough to hold it.

Method

  1. Heat the oven to 425°F / 220°C. Use about 400°F / 200°C for fan or convection. Put a rack in the middle of the oven. A shallow rimmed metal baking sheet is ideal; parchment is optional.
  2. Scrub and dry the potatoes. Set each one on its broadest side. If it rolls, shave a paper-thin strip from underneath—just enough to steady it.
  3. Slice almost to the bottom. Put the potato between two fairly slim chopsticks or wooden spoon handles and make crosswise cuts at roughly 2–3 mm intervals. On a medium potato, roughly ¼ inch / 6 mm left at the base is a useful guide, not a rule.
  4. Oil and season. Brush with 2 tbsp / 1 fl oz / 30 ml olive oil, then add about ¾ tsp of the salt and all of the pepper. A raw potato won’t open much yet; there’s no need to force the slices apart.

Roast Until the Fan Begins to Open

  1. Roast for about 30 minutes. Keep space between the potatoes. You should now see small gaps appearing between at least some of the slices. It still won’t look especially dramatic, and that’s normal—the cuts have only just started loosening.
  2. Add the herb butter. Melt 1 tbsp / 14 g butter with the remaining 1 tbsp / ½ fl oz / 15 ml olive oil, the rosemary or thyme and the remaining ¼ tsp salt. Brush it over the potato and down into the openings. This is where the pastry brush really earns its keep.
  3. Roast for another 15–20 minutes. The slices should open farther and the finest tips should be turning golden. This is the stage where the potato finally starts looking like the Hasselback you were aiming for.
  4. Check tenderness. Slide a thin knife into the thickest part. If you still feel obvious resistance, roast at the original temperature for another 5–10 minutes, then check again.

The roasting progression below is a useful reality check: the fan develops gradually, so a potato that still looks fairly compact halfway through the cook can be exactly on track.

Four roasting stages of a Hasselback potato, from raw sliced potato to partially cooked, opened and basted, then fully golden with crisp separated ridges.
Small gaps are the turning point: once the fan begins to open, butter can reach between the slices instead of coating only the outside.

Finish for Color, Garlic & Crispness

Need more color? If the potato is nearly tender but still pale, briefly raise the oven to 450°F / 230°C conventional, or about 425°F / 220°C fan/convection before adding garlic or cheese. Check after about 3 minutes and continue only if necessary, watching the thinnest ridges closely. Then return the oven to its original temperature.

  1. Add the garlic butter and finish. Melt the remaining 1 tbsp / 14 g butter and stir in the garlic. Brush it mostly between the slices. Add Parmesan now if using. Roast for another 3–5 minutes, until the garlic is fragrant, the Parmesan is melted or lightly golden and a thin knife slides easily through the thickest part down to the base.
  2. Serve while the edges are crisp. Finish with parsley or chives. The narrowest ridges should be crisp while the potato underneath yields easily. The end slices are often the crispiest.

Go deeper: Choose the potato · Cutting guide · Time & doneness

Which Potatoes Are Best for Hasselback Potatoes?

Choose fairly smooth, oval 6–8 oz / 170–225 g potatoes for easier cutting and more predictable cooking. Yukon Gold is the more forgiving choice; Russet gives the strongest fluffy-middle/crisp-edge contrast.

Potato typeWhat you get
RussetFluffy center with drier, starchier crisp edges
Yukon GoldCreamier center with a denser, naturally buttery texture
Red or other waxy potatoesA firmer, denser Hasselback rather than a fluffy one

Similar size matters more than chasing one supposedly perfect variety. A batch of evenly sized potatoes is much easier to manage than a mixture of narrow potatoes and much larger, rounder ones.

Long, fairly smooth potatoes are easier to slice consistently than deeply knobbled ones, too.

Yukon Gold and Russet Hasselback potatoes shown side by side, with exposed interiors comparing the creamier Yukon Gold texture with the fluffier Russet texture.

How to Cut Hasselback Potatoes Without Cutting Through

Cut Hasselback potatoes at roughly 2–3 mm intervals, stopping about ¼ inch / 6 mm above the board on a medium potato. Fairly slim chopsticks or wooden spoon handles on either side make an easy knife stop.

Close view of a potato being sliced between slim wooden guides, with closely spaced 2–3 millimeter cuts and a marker showing about 6 millimeters of intact potato at the base.
Treat ~6 mm as remaining depth, not a rigid horizontal line. Tapered ends often need a little more potato left intact.

Stay nearer 3 mm for easier knife work and a sturdier potato; go nearer 2 mm for finer, crisper edges. A few wonky slices disappear surprisingly well once everything opens and browns.

Why Cutting Guide Thickness Matters

The guides prevent a complete cut-through, but their thickness matters. Very thick chopsticks or spoon handles can leave a broad untouched platform underneath, which keeps the fan stiff. Use slimmer guides or control the final depth carefully by hand. The goal isn’t thirty laboratory-perfect cuts; you just need a base thin enough to flex without breaking.

Comparison showing a thick chopstick guide leaving a thick, stiff potato base and a slimmer guide leaving a thinner attached hinge that opens into a wider fan.
The guide is a safety stop, not the required hinge thickness; an overly thick guide can keep the fan too rigid.

At the narrow ends, don’t chase exactly the same depth as through the thick middle. Leave a little more potato intact if necessary rather than cutting an end piece free.

Cut all the way through one section? Put it back where it belongs and keep going. A wooden toothpick can hold a larger split together while it roasts; remove it before serving or microwaving.

Do you need to soak Hasselback potatoes? No. A soak may remove some loose starch, but it isn’t necessary here. Drying matters more. Soaking plays a much bigger role in homemade French fries, where surface starch and moisture matter more to the crust.

Ready to cook? Back to recipe · Time & doneness · Crispy edges

Hasselback Potato Cooking Time, Temperature & Doneness

For 6–8 oz / 170–225 g potatoes, 425°F / 220°C is a good working oven temperature. Most medium potatoes land somewhere around 55–70 minutes, but begin checking sooner rather than treating that window as a promise.

Potato sizeApprox. weightFirst baste / opening checkStart checking for doneness
Small3–5 oz / 85–140 g20–25 minAround 40 min
Medium6–8 oz / 170–225 gAbout 30 minAround 50–55 min
Large9–12+ oz / 255–340+ g30–35 minAround 65–70 min
Hasselback potato timing chart comparing small, medium and large potatoes with weight ranges, suggested basting times and approximate points to begin checking doneness.
Use the timing chart to sequence your checks, not synchronize the tray. Remove smaller or narrower potatoes as soon as their bases are tender.

These are checking points, not finish times. Shape matters almost as much as weight. A slim 6-ounce Russet and a round 10-ounce Yukon Gold won’t finish together simply because they entered the same oven.

The potato is cooked when a thin knife slides easily through the thickest part down to the base. Open, golden ridges tell you the exterior is where you want it; they don’t prove the potato underneath is ready.

Brown ridges are only half the test. Check the base.

Two similarly browned Hasselback potatoes labeled not done and done, with cutaway views comparing a firm dense lower section with a tender fluffy cooked base.
Test through actual potato flesh in the thickest area—not an open gap. Resistance near the base is what matters.

How to Get the Edges Crisp Without Drying Out the Potato

For crisp Hasselback potatoes, dry them thoroughly, leave room around each potato, baste again after the cuts open, and use a short hotter finish only once the potato is nearly tender.

Crowding traps moisture. If the potatoes are almost touching, use a second sheet rather than hoping extra oven time will fix weak browning.

Extra oil at the beginning doesn’t help much because tight raw cuts can’t hold it. The later butter is more useful once there are actual openings for it to settle into.

The hotter finish works because it concentrates browning on the exposed ridges without forcing the whole potato through another long roast. If a nearly tender potato is still pale, use that short burst of higher heat before adding exposed garlic or cheese, then return to the gentler finishing stage.

You’re aiming for narrow ridges that crunch rather than bend while the thicker potato underneath still yields easily. Once the knife reaches the base easily, stop chasing brown.

Extreme close-up of a roasted Hasselback potato showing dry blistered brown edges, soft pale potato inside and melted butter deeper between the slices.
Crisp ridges should look dry and blistered, with the gloss concentrated deeper in the buttery grooves.

Toppings—and When to Add Them

The potato may need an hour in the oven. Fresh garlic and grated cheese do not.

WhenAdd
At the startOlive oil, most of the salt and black pepper
When the cuts open
about 30 min for medium potatoes
Butter, remaining salt, rosemary or thyme
Final few minutesFresh garlic and Parmesan, cheddar, Gruyère or another melting cheese
After roastingCrisp bacon, parsley, chives, lemon zest or other fresh finishes
Four-stage Hasselback potato topping guide showing oil, salt and pepper at the start, melted herb butter after the cuts open, garlic and cheese near the end, and fresh toppings after roasting.

Cheesy Hasselbacks: add Parmesan for the final few minutes, or tuck small amounts of cheddar or Gruyère into some of the opened cuts once the potato is nearly tender.

Loaded Hasselbacks: add cheese late and scatter crisp bacon over the finished potatoes rather than roasting the bacon for the entire cook.

Add smoked paprika, cayenne or chili flakes to the herb butter when you want heat. A vegan version works with olive oil or plant-based butter. And when the potato already feels rich enough, chimichurri brings the herbs and acidity that all that butter is asking for.

Troubleshooting: What Went Wrong?

Six-part Hasselback potato troubleshooting guide showing a hard base, tight fan, pale edges, burnt garlic, split potato and dry ridges, with a cause and suggested correction for each.
What you seeLikely reasonWhat to do
Brown outside, hard underneathThe exterior is ahead of the thick bodyLower the heat, shield very dark ridges if needed and continue until a knife passes easily through the potato
Slices barely openCuts are too thick, too shallow or the base is too substantialLet the potato soften, then gently loosen the slices with the brush
Pale, soft edgesMoisture or crowdingGive the potatoes more room and use a brief hotter finish once nearly cooked through, before adding exposed garlic or cheese
Garlic burnsFresh garlic went on too early or sat in clumps on topAdd it only near the end and brush most of it between the slices
The potato splitsYou cut through the baseReposition the section and use a wooden toothpick if necessary
Dry, hard ridgesThe potato stayed in too long while chasing colorStop when the potato is tender; use only short high heat for extra browning
Inside tastes blandMost seasoning stayed on the outsideBrush seasoned butter into the opened cuts later in the cook
Potatoes finish at different timesDifferent sizes or shapesRemove finished potatoes individually
Potato keeps rollingUnstable shapeTurn it onto its broadest side or shave a very thin strip from underneath
Cheese burnsIt went on before the potato was nearly doneAdd cheese only for the final few minutes

Emergency Rescue for One Undercooked Potato

Dinner is already waiting? A short microwave assist can rescue one stubbornly undercooked potato. Remove any toothpick, skewer or other support first, and never put metal in the microwave. Once the potato softens, return it to the hot oven briefly to bring some crispness back.

Should You Parboil Hasselback Potatoes?

For this oven method, medium Hasselback potatoes don’t need parboiling. Roasting from raw is simpler, and a firm potato is easier to slice and handle.

A partial pre-cook becomes more useful with a very large potato, an air fryer that browns aggressively or a big batch where you need more control over timing. Other methods deliberately parboil first to push the result toward a fluffier middle and more aggressive crisping. Parboiling, steaming or microwaving can all work, but softened Hasselbacks are noticeably easier to break.

Air Fryer Hasselback Potatoes

Small-to-medium potatoes work best. For potatoes around 6–8 oz / 170–225 g, start around 390–400°F / 200–205°C. Begin checking at about 25 minutes; many will need roughly 30–40 minutes, depending on their shape and the air fryer.

Oil the potatoes, air fry for about 20–25 minutes, baste again once the cuts loosen, then continue until a thin knife reaches the base without resistance. Leave room for air to circulate around each potato.

Three-stage air fryer Hasselback potato guide showing an oiled potato cooking at 390 to 400 degrees Fahrenheit, basting after the cuts open and a crisp finished potato after roughly 30 to 40 minutes.
Once the fan opens, a second baste reaches newly exposed surfaces just as circulating hot air starts crisping them.

The air fryer is excellent at crisping exposed edges, which is also why a large potato can fool you: the outside races ahead while the thick part is still catching up. If that happens, lower the temperature a little or partially pre-cook very large potatoes rather than simply extending the high-heat cook.

Make Ahead, Store & Reheat

Cutting Them Ahead

You can cut Hasselback potatoes up to a day ahead. Keep them fully submerged in cold water in the refrigerator, then drain and dry them extremely well before oiling. Those narrow cuts hold more water than the outside of the potato suggests.

For entertaining, get the fiddly knife work out of the way early. Roasting is much easier to manage later.

Roasting Them Ahead

Best texture: do most of the roast ahead and stop before the final garlic-butter stage. Cool and refrigerate the potatoes within 2 hours. Later, reheat and re-crisp them first, then add garlic butter and optional cheese for the final few minutes.

Simplest: cook the potatoes fully through before refrigerating, then reheat and re-crisp them later. If you’re adding fresh garlic or cheese, put those on only after the potato is hot and nearly as crisp as you want it. The edges won’t be quite as crisp as potatoes finished straight from the first roast, but the workflow is easier.

There are three useful make-ahead routes: cut them ahead, partly roast for the best final texture, or fully cook them when simpler service matters more.

Make-ahead Hasselback potato guide showing a best-texture reheating route, a simpler fully cooked route, and raw sliced potatoes stored in cold water before draining and drying.

Cooking for a Crowd

Use two sheet pans rather than squeezing a large batch onto one. Choose similarly sized potatoes and remove individual potatoes as they finish. There is no prize for leaving a perfect 6-ounce potato in the oven while a 10-ounce one catches up.

Storing and Reheating Leftovers

Refrigerate cooked Hasselback potatoes within 2 hours and use them within 3–4 days. That follows USDA leftovers guidance.

To reheat a medium potato, start around 350°F / 175°C for 15–20 minutes and continue until hot throughout. USDA guidance for reheated leftovers is 165°F / 74°C if you’re checking with a thermometer. An air fryer also works well; a microwave is faster but softens the crisp edges.

Cooked Hasselbacks can be frozen, but the texture is noticeably softer after thawing. Refrigeration is the better option when the crisp ridges are part of the appeal.

What to Serve With Hasselback Potatoes

Hasselbacks are especially good beside anything with pan juices, gravy or a good sauce because those opened slices catch it. Alongside smothered pork chops, for example, the crisp ridges give the onion gravy somewhere to settle without turning the whole potato soft.

Two golden Hasselback potatoes on a dark dinner plate with glossy pan sauce running into the opened ridges, served with vegetables and a secondary sauced main.
Spoon sauce into some open grooves rather than drowning the potato, so neighboring ridges can stay crisp.

For lighter plates, keep the finish simpler with olive oil, herbs, lemon or another fresh acidic element instead of loading every opening with cheese. Either way, get them to the table while the narrow edges are still crisp.

What Are Hasselback Potatoes?

Hasselback potatoes are whole potatoes cut into closely spaced slices that remain attached along the bottom. Roasting exposes all those cut surfaces to the heat while the potato stays in one piece.

The preparation is Swedish and is commonly called Hasselbackspotatis. Restaurant Hasselbacken in Stockholm attributes the dish to a student chef working at the restaurant school there in 1953.

You may also see them called fan potatoes or scored potatoes. A classic Hasselback stays connected underneath; fully separated baked potato slices are a different preparation.

The names are sometimes used loosely, but the modern preparations are usually different:

FeatureHasselback potatoAccordion potato
Potato shapeWhole potatoUsually a thick slab or plank
CutsRepeated cuts from one sideCuts made from opposite sides
What holds it togetherUncut base or hingeAlternating lattice of potato
Finished shapeFanStretchable accordion or lattice
Comparison of a whole Hasselback potato with one-sided cuts and an attached base beside an accordion potato slab with alternating opposite-side cuts, shown before and after stretching open.

Fully separated sliced baked potatoes are different again because no hinge remains underneath. Sweet potatoes can also be cut Hasselback-style, but their softer, sweeter flesh tends to soften and darken more quickly, so they deserve their own timing rather than being treated as a direct swap.

FAQs

1. What potatoes are best for Hasselback potatoes?

Yukon Gold is a forgiving first choice because it stays creamy and holds its shape well. Russets give a fluffier center and crisper, starchier edges. Fairly smooth potatoes of similar size are easier to cook evenly.

2. How thin should Hasselback potato slices be?

Aim for cuts at roughly 2–3 mm intervals. Around 3 mm is easier to cut; closer to 2 mm gives finer, crisper edges.

3. Why aren’t my Hasselback potatoes opening?

The cuts may be too thick or shallow, or the base may be too substantial. Raw slices are also naturally tight; they usually loosen much more after the potato begins to soften in the oven.

4. How do you know Hasselback potatoes are done?

A Hasselback potato is cooked when a thin knife slides easily through the thickest part down to the base. Golden, open slices are a good finish cue, but surface color alone does not prove the potato underneath is tender.

5. Can Hasselback potatoes be made ahead?

Yes. You can cut them up to a day ahead and refrigerate them submerged in cold water, or do most of the roasting ahead and save the reheating, re-crisping and final garlic-butter finish for closer to serving.

Hasselback Potatoes Cheat Sheet

Use this quick reference to separate the setup numbers from the doneness cues worth carrying into the kitchen.

Hasselback potato reference graphic listing 425 degrees Fahrenheit or 220 Celsius, medium potato weight, 2–3 millimeter cuts, about a 6 millimeter base, basting timing, typical roasting time and the knife doneness check.

Once a knife slips easily through the base and those narrow ridges are crisp, get the potatoes to the table—that contrast is at its best while they’re hot.
↑ Back to recipe · Back to top ↑

Posted on — Leave a comment

Ranch Roasted Potatoes Recipe

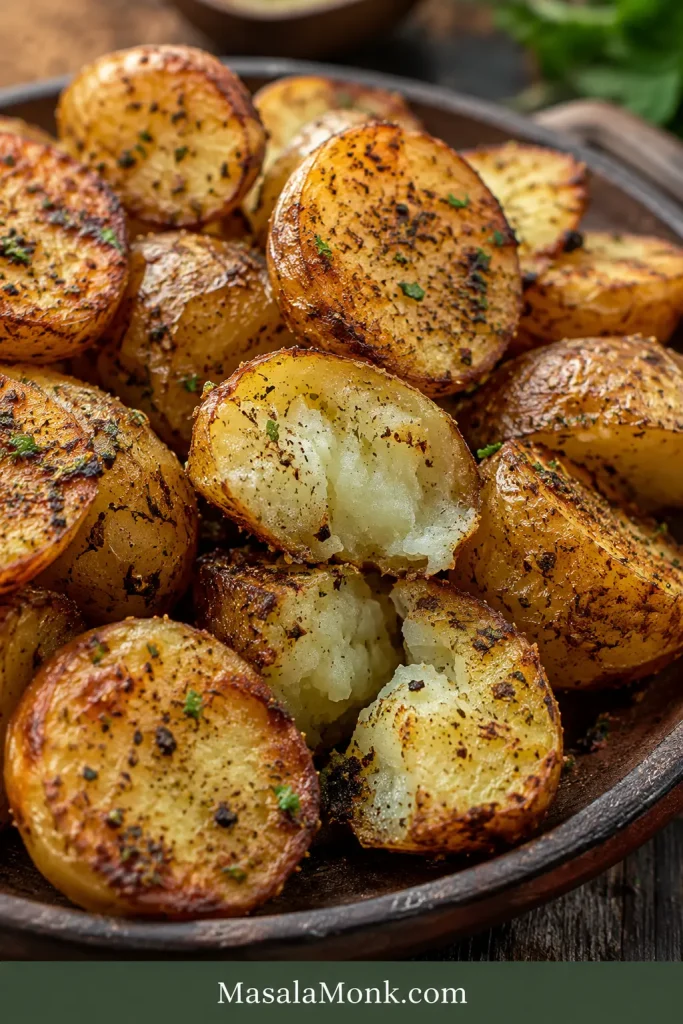
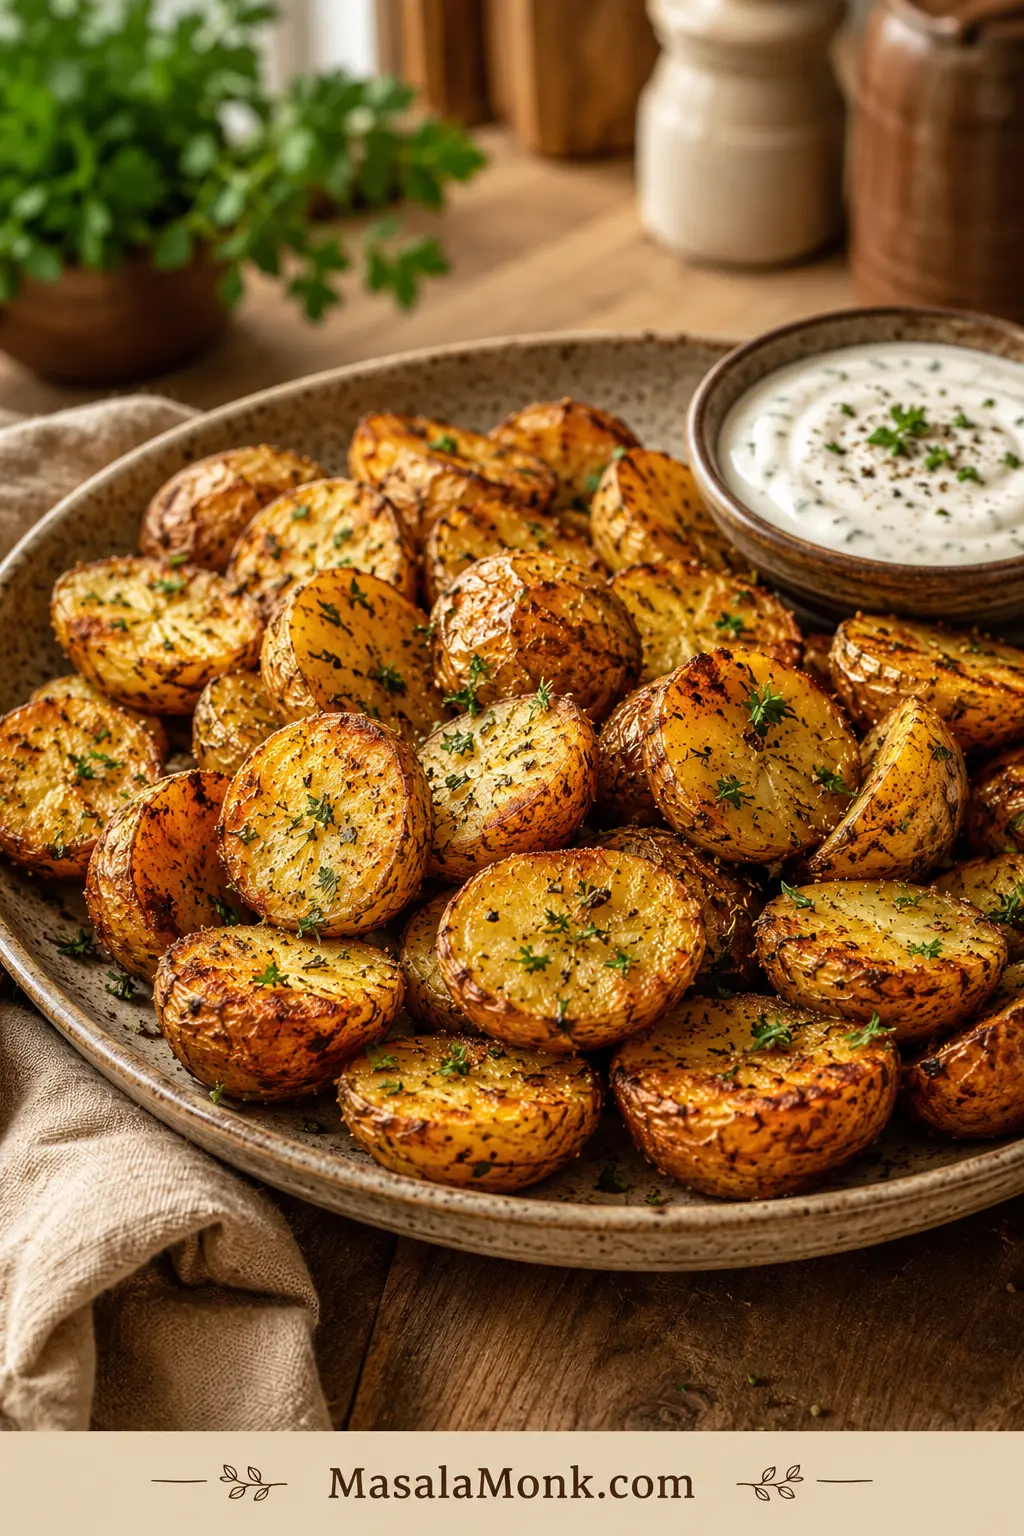
Crispy ranch roasted potatoes on a rustic platter with browned cut sides, chopped herbs, black pepper, and a small bowl of ranch dip.

Ranch roasted potatoes are the easy sheet-pan side you make when dinner needs something crispy, salty, herby, and almost no fuss. Cut the potatoes, toss them with oil and dry ranch seasoning, spread them out, and let a hot oven do the work.

The key is using dry ranch seasoning, not bottled ranch dressing, before roasting. Dry mix gives you crisp edges and bold flavor; bottled ranch is better as a dip or drizzle after the potatoes are browned.

Remember the simple rhythm: dry potatoes, oil first, ranch second, plenty of space. That is what turns a basic ranch packet into golden potatoes people start stealing from the tray before dinner is even served.

Quick Answer: How to Make Ranch Roasted Potatoes

For crispy ranch roasted potatoes, cut 2 lb / 900 g potatoes into 1-inch / 2.5 cm pieces. Toss with 3 tablespoons / 45 ml oil, then add 1 standard 1 oz / 28 g packet dry ranch seasoning, or about 3 tablespoons dry ranch seasoning from a jar. Spread on a large rimmed sheet pan and roast at 425°F / 218°C for 30 to 35 minutes, flipping once halfway through.

For darker, faster browning, roast at 450°F / 232°C and start checking around 25 minutes. The potatoes are done when the flat sides are golden, the edges look roasted, and a fork slides through the centers easily.

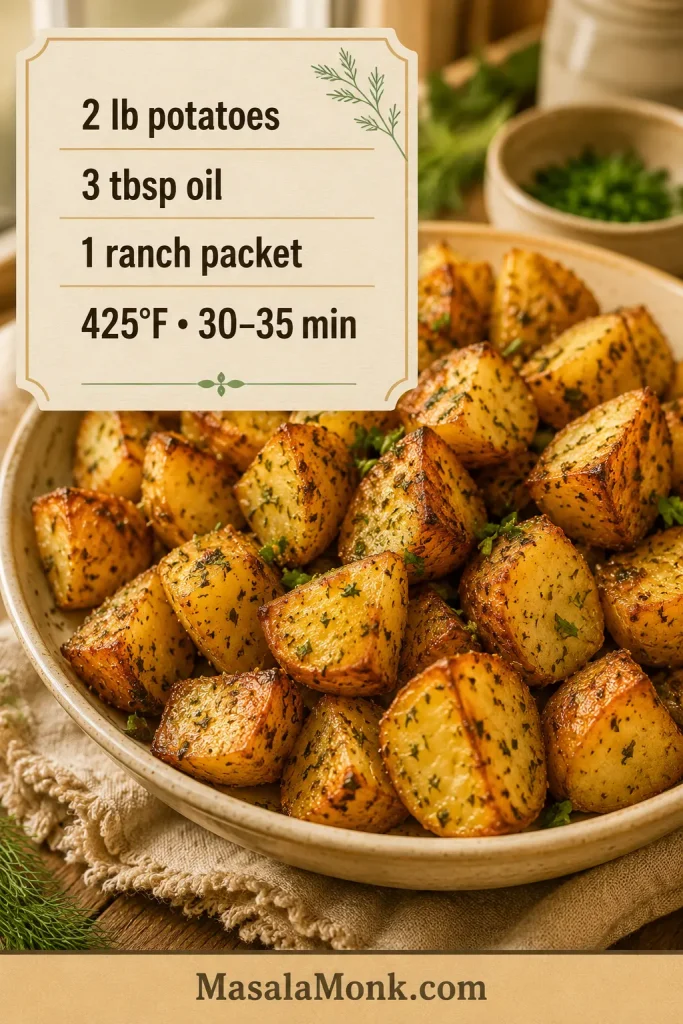
The simple ranch potato ratio

This visual keeps the ranch potato ratio easy to check before you move into the full recipe card.

Recipe ratio card for ranch roasted potatoes showing 2 lb potatoes, 3 tbsp oil, 1 ranch packet, and 425°F for 30 to 35 minutes.
Start with the base ratio: 2 lb potatoes, 3 tablespoons oil, 1 ranch packet, and 425°F for a reliable sheet-pan batch.

Ranch Roasted Potatoes Recipe Card

Crispy Ranch Roasted Potatoes

Description: Crispy ranch roasted potatoes made with dry ranch seasoning, oil, and a hot sheet pan. The edges turn golden and salty-herby while the centers stay soft and creamy.

What to look for: The potatoes should be browned on the flat sides, tender when pierced with a fork, and seasoned all the way around — not dusty in one bite and plain in the next.

Prep Time10 minutes
Cook Time30 to 35 minutes
Total Time40 to 45 minutes
Servings4 to 6
MethodOven roasted
Best PanLarge rimmed sheet pan

Ingredients

  • 2 lb / 900 g potatoes, such as baby red potatoes, baby Yukon gold potatoes, Yukon gold potatoes, russets, or creamer potatoes
  • 3 tablespoons / 45 ml olive oil or neutral oil
  • 1 standard 1 oz / 28 g packet dry ranch seasoning, or about 3 tablespoons dry ranch seasoning from a jar
  • ½ teaspoon black pepper
  • ½ teaspoon garlic powder, optional
  • ¼ cup / 20 to 25 g finely grated parmesan, optional
  • 1 to 2 tablespoons chopped parsley, chives, or dill, optional, for finishing

Instructions

  1. Heat the oven to 425°F / 218°C. For faster, darker browning, use 450°F / 232°C and start checking the potatoes earlier.
  2. Wash the potatoes and dry them well. Cut them into 1-inch / 2.5 cm pieces. Halve very small baby potatoes and quarter larger ones.
  3. Add the potatoes to a large bowl. Pour in the oil and toss until every piece looks lightly glossy.
  4. Add the dry ranch seasoning, black pepper, and garlic powder if using. Toss again until the seasoning is evenly distributed.
  5. Spread the potatoes on a large rimmed sheet pan in one layer. Place as many cut sides down as possible for better browning.
  6. Roast for 30 to 35 minutes, flipping once around the 18 to 20 minute mark, until the potatoes are browned outside and tender inside.
  7. Finish with parmesan, herbs, cooked bacon, shredded cheese, or a small drizzle of ranch dressing after roasting. Serve hot.

Recipe note: Use up to 4 tablespoons jarred ranch seasoning only if your mix is mild or salt-free. If your ranch mix tastes salty on its own, start with less and add more after roasting if needed.

Tested Notes for Best Results

  • Best potatoes: baby red and baby Yukon gold potatoes are the easiest because they hold their shape and brown well.
  • Russets work: they give fluffy centers and rougher edges, but toss them gently because they break more easily.
  • Seasoning order: dry the potatoes, coat them with oil, then add the ranch seasoning.
  • Pan choice: a bare metal sheet pan browns better; parchment makes cleanup easier.
  • Texture tip: spread the potatoes in one layer and place some cut sides down.
  • Browning rule: pan space matters more than the exact ranch seasoning brand.

Choose your version: Want the easiest tray? Use the recipe card. Want the crispiest tray? Use the parboil option. Want the fastest small batch? Use the air fryer method.

Once that basic rhythm is clear, the rest is just choosing the right potato, the right heat, and the right finish. Here is how to make the tray crisp, not soggy.

Why This Works

Ranch potatoes are simple, but they are not random. The crisp version depends on three things: dry seasoning, steady heat, and enough space on the pan. Dry ranch seasoning gives concentrated flavor without adding the moisture that comes from bottled dressing. Oil helps that seasoning cling and gives the cut sides enough surface fat to brown.

One-inch pieces are small enough to cook through before the seasoning gets too dark, but large enough to stay creamy inside. A large sheet pan lets them roast instead of steam. When a few cut sides sit directly against the pan, they pick up the golden crust that makes roasted potatoes feel like more than boiled potatoes with seasoning.

The best pieces should have a toasted flat side, a soft middle, and that salty ranch flavor baked into the surface. Those are usually the bites people pick at first.

Ingredients and Ranch Seasoning Amount

What you need before roasting

Keep the base simple, then use optional add-ins only when you want a sharper, cheesier, or fresher finish.

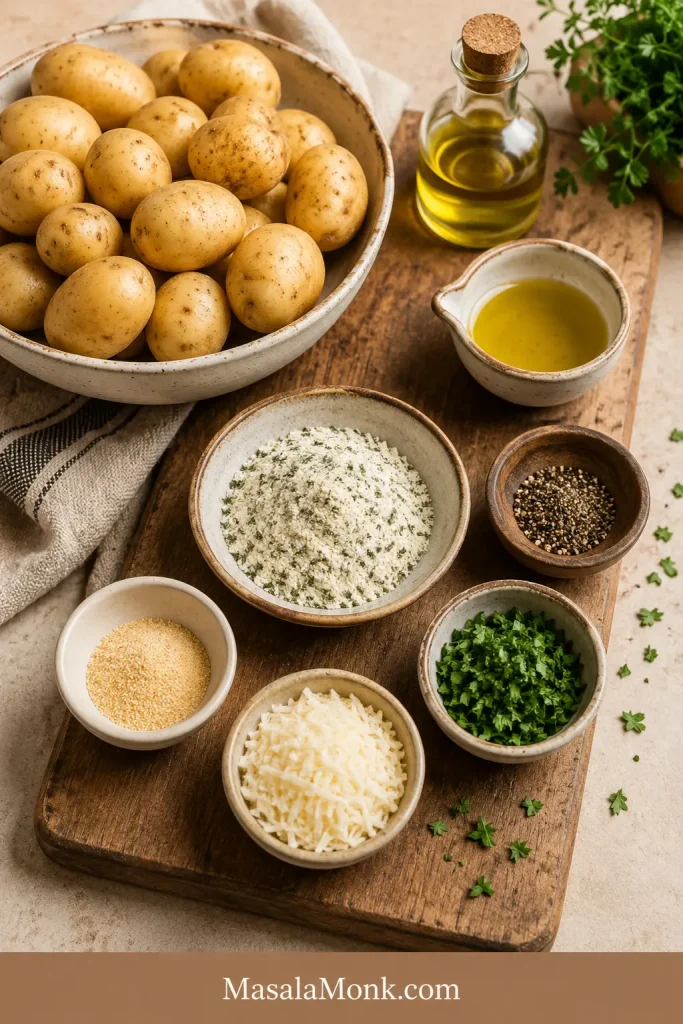
Ingredients for ranch roasted potatoes on a wooden board, including potatoes, dry ranch seasoning, oil, black pepper, garlic powder, parmesan, and chopped herbs.
Potatoes, oil, and dry ranch seasoning build the base flavor; then pepper, garlic powder, parmesan, and herbs can add a sharper, fresher finish.

Potatoes

Most potatoes will work here, but they do not all give you the same bite. Baby red potatoes stay creamy and neat. Yukon gold potatoes taste buttery and tender. Russets give you fluffier centers and rougher browned edges, but they can break if you toss them too hard.

If you are unsure, choose baby red potatoes or baby Yukon gold potatoes. They are the least fussy and look good even when cut quickly. If you often choose between Yukon golds and russets, the same creamy-versus-fluffy split matters in mashed potatoes too.

Oil

No fancy oil needed. Olive oil, avocado oil, canola oil, vegetable oil, or another neutral roasting oil will work. For 2 pounds of potatoes, 3 tablespoons should make the pieces lightly glossy, not greasy.

Dry Ranch Seasoning

Dry ranch seasoning is the main flavor. It usually brings herbs, garlic, onion, salt, and tangy dairy-style flavor in one packet. A standard ranch packet is usually about 1 oz / 28 g, which is a good amount for 2 lb / 900 g potatoes.

If your seasoning comes from a jar, start with about 3 tablespoons. Go up to 4 tablespoons only if the mix is mild or salt-free. If you also use ranch packets for snacks, the same dry-mix logic shows up in these ranch oyster crackers: fat helps the seasoning cling, while too much moisture softens the crunch.

Ranch Seasoning Ratio

Use this ratio when you are making a smaller tray, doubling for a crowd, or trying to avoid a too-salty batch.

PotatoesOilDry Ranch SeasoningBest Pan Setup
1 lb / 450 g1½ tbsp / 22 ml½ packet or about 1½ tbspSmall to medium sheet pan
2 lb / 900 g3 tbsp / 45 ml1 packet / 28 g or about 3 tbsp1 large sheet pan
4 lb / 1.8 kg6 tbsp / 90 ml1½ to 2 packets, depending on saltiness2 large sheet pans

If you are adding bacon, cheese, parmesan, or a ranch drizzle, start on the lighter side with the seasoning. Those toppings bring salt too.

Using a Hidden Valley-style packet? You do not need a separate method. Use the same base recipe: 2 lb / 900 g potatoes, 3 tablespoons / 45 ml oil, and 1 standard 1 oz / 28 g dry ranch packet. Roast at 425°F / 218°C for control or 450°F / 232°C for deeper browning. If the packet tastes salty or you are adding bacon or cheese, use a little less and finish with more only if needed.

Pepper, Garlic Powder, Parmesan, and Herbs

Black pepper gives the potatoes a sharper finish. Garlic powder is optional because ranch seasoning already contains garlic, but a small amount makes the flavor fuller. Parmesan, chives, parsley, or dill are best as finishing touches. They make the tray taste fresher without changing the base recipe.

Dry Ranch Seasoning vs Bottled Ranch Dressing

This is the ranch-potato choice that changes texture most. Dry ranch seasoning and bottled ranch dressing do not behave the same way in the oven.

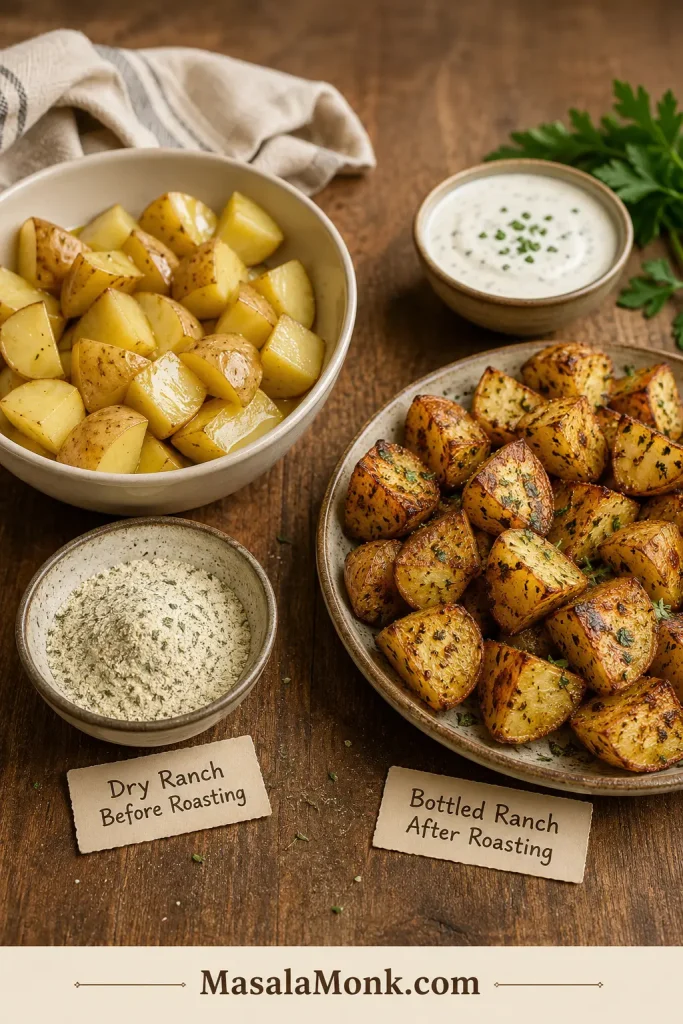
Dry mix before roasting, bottled ranch after

Keep the powdered mix in the oven step and the creamy dressing at the table.

Dry ranch seasoning beside oiled potato chunks with finished roasted potatoes and a bowl of ranch dressing for dipping.
Use dry ranch mix before roasting for crisp edges; then save bottled ranch for dipping or drizzling once the potatoes are browned.
Ranch ProductBest UseWhat Happens
Dry ranch seasoning packetCrispy roasted potatoesStrong flavor, less moisture, better browning
Dry ranch dressing mix from a jarCrispy roasted potatoesWorks like a packet when measured carefully
Homemade ranch seasoningMore control over salt and ingredientsGood flavor, but you may need to adjust salt
Bottled ranch dressingDipping, drizzling, or creamy potato bakesAdds moisture and softens the roasted finish
Bottled ranch before roastingSofter, saucier baked potatoesLess browning, more casserole-style texture

Bottled ranch makes more sense in a softer, saucier potato bake. In this sheet-pan version, let the dry mix bake into the edges, then bring in bottled ranch later as a dip or drizzle.

Ready to cook? Jump back to the recipe card. Want crispier results? See the crispy potato tips.

Best Potatoes to Use

Choose based on what you already have and the kind of bite you want.

Best potatoes for ranch roasting

Red and Yukon-style potatoes are the most forgiving, while russets give a fluffier bite when handled gently.

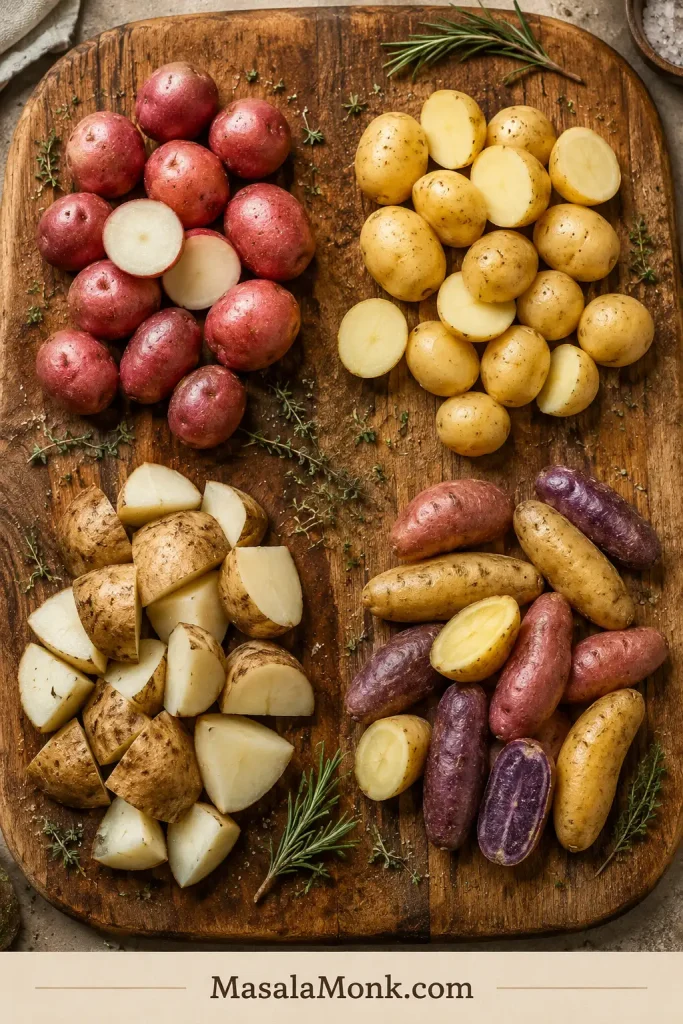
Red potatoes, yellow baby potatoes, russet chunks, and fingerling potatoes arranged in separate groups on a wooden board.
Baby red and baby Yukon gold potatoes are the easiest choices because they roast evenly and hold their shape; meanwhile, russets give fluffier centers but break more easily.
PotatoBest ForResultPeel or Not?
Baby red potatoesBest no-peel optionClassic ranch potato texture, creamy centers, thin skinsNo need to peel
Baby Yukon gold potatoesBest overallButtery, tender, reliable browningNo need to peel
Yukon gold potatoesBest creamy biteSoft centers and good flavorPeeling optional
Russet potatoesBest fluffy centerFluffy inside, browned edges, more fragilePeeling optional
Fingerling potatoesBest presentationPretty side dish, good roasted flavorNo need to peel

Red potatoes are especially easy here because the skins are thin and the pieces hold together well. Scrub, dry, cut, season, and roast. No peeling needed.

425°F vs 450°F

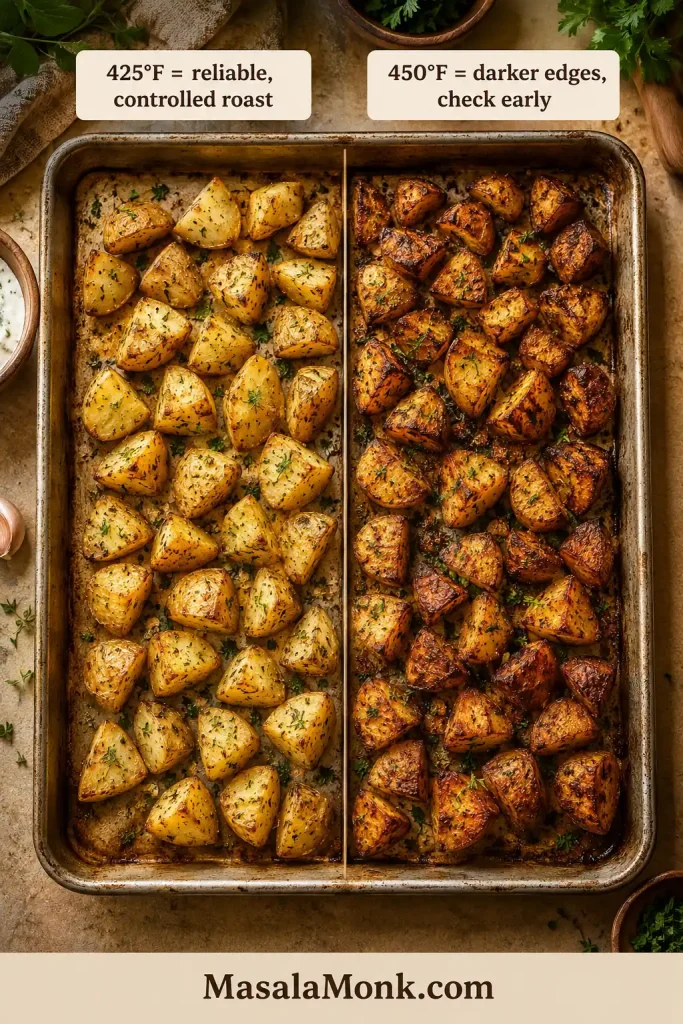
For the easiest tray, 425°F / 218°C is the safest default. The potatoes have time to soften before the ranch seasoning gets too dark. Use 450°F / 232°C when you want deeper color and are willing to check the pan a little earlier.

Choose the oven temperature

The hotter tray browns faster, but the lower temperature gives you more control if your oven runs strong.

Oven temperature comparison showing ranch roasted potatoes at 425°F with lighter golden edges and 450°F with darker browned edges.
The 425°F tray gives you more control, while 450°F creates deeper color if you are willing to check early.
Oven TemperatureBest ForWatch Out For
425°F / 218°CBest default and most reliable roastSlightly slower browning, but better control
450°F / 232°CDarker edges and faster browningRanch seasoning can darken faster, so check early
400°F / 200°CCheesy or saucier baked potato versionsLess crisp for plain roasted potatoes

When your oven runs hot, stay with 425°F the first time. Once you know your oven is steady and you like darker edges, 450°F gives a more roasted finish.

How to Roast Them in the Oven

1. Heat the oven

Heat the oven to 425°F / 218°C. For a faster, darker tray, use 450°F / 232°C, but check earlier so the seasoning does not over-darken.

2. Cut and dry the potatoes

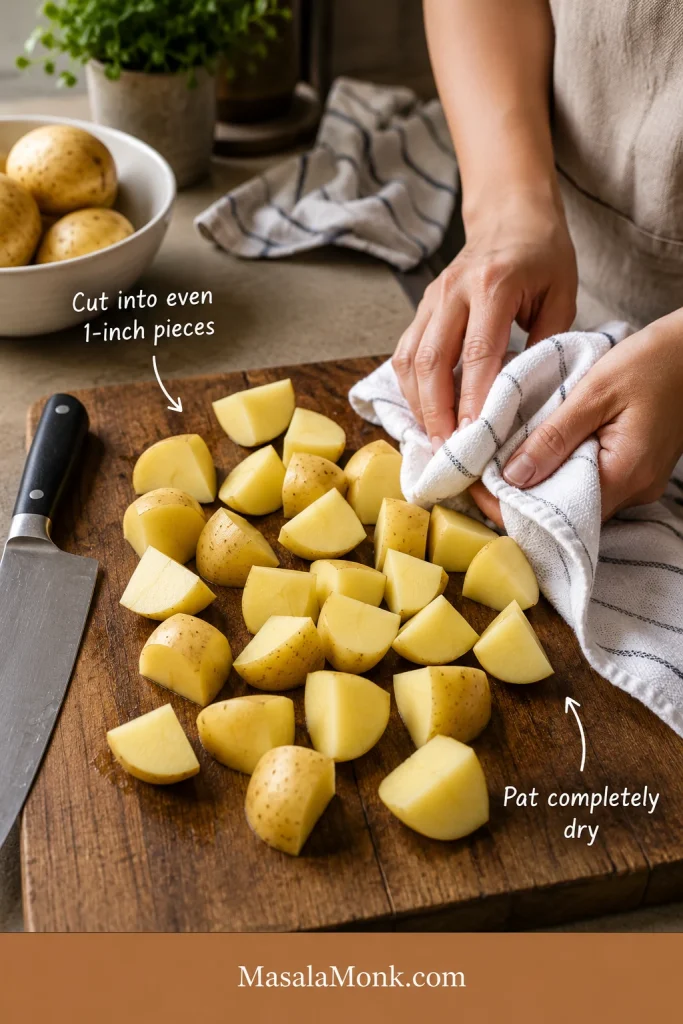
Cut the potatoes into 1-inch / 2.5 cm pieces. Small baby potatoes can be halved, larger baby potatoes can be quartered, and bigger potatoes should be cut into even chunks. Pat the pieces dry before seasoning so the oil and ranch mix cling properly.

Visual cue: cut and dry before seasoning

Cut size and surface moisture decide whether this step browns or steams.

Hands drying cut potato pieces with a towel on a wooden cutting board beside a chef’s knife and whole potatoes.
Even 1-inch pieces give the oven a fair shot; drying the surface helps the seasoning roast cleanly instead of steaming.

3. Toss with oil, then ranch seasoning

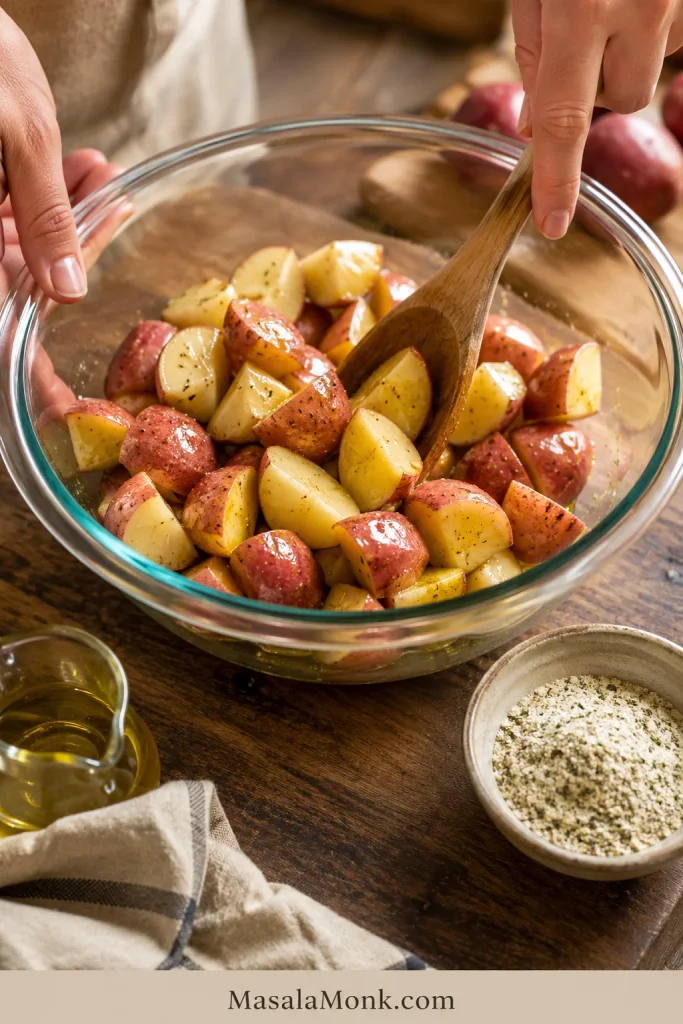
Add the potatoes to a large bowl and coat them with oil first. Then add the dry ranch seasoning, black pepper, and garlic powder if using. This keeps the dry mix from clumping in dusty patches. The pieces should look lightly glossy, not oily or wet.

Visual cue: oil first, ranch second

Do this in two tosses: oil first, ranch second.

Potato chunks being tossed with oil in a glass mixing bowl, with a small bowl of dry ranch seasoning nearby.
A light oil coating gives the dry ranch mix something to grab, so the flavor lands evenly instead of clumping.

Visual cue: even ranch coating

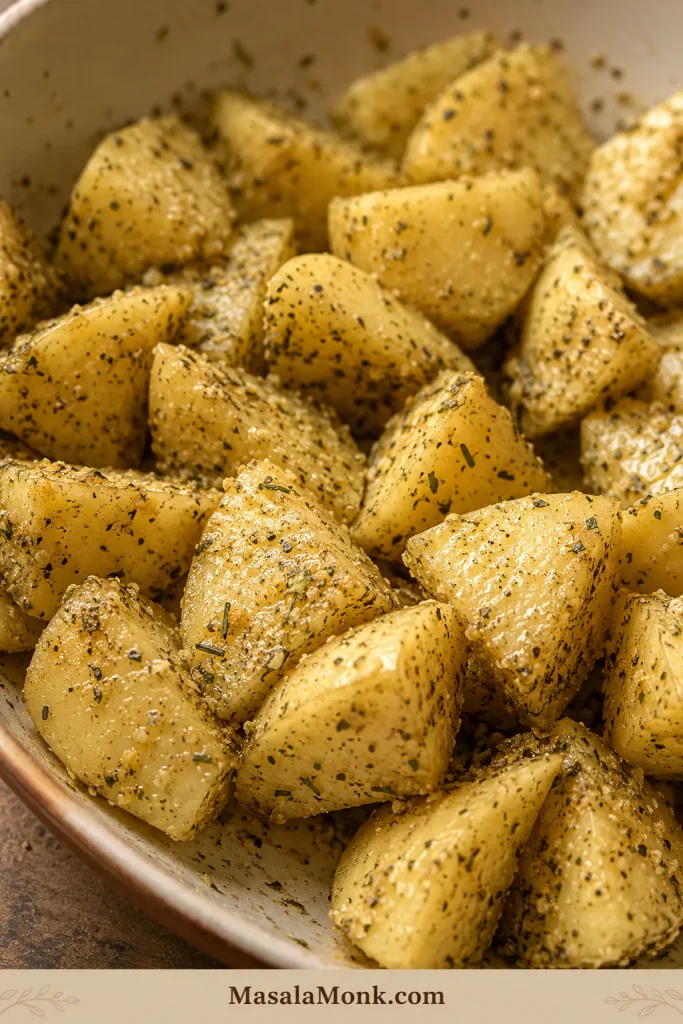
Before roasting, every piece should look lightly speckled, not buried in mix.

Close-up of raw potato chunks evenly coated with dry ranch seasoning, herbs, pepper, and oil in a mixing bowl.
A thin, even ranch coating means every bite seasons the same; if you see dusty spots, toss a little longer.

4. Spread on a sheet pan

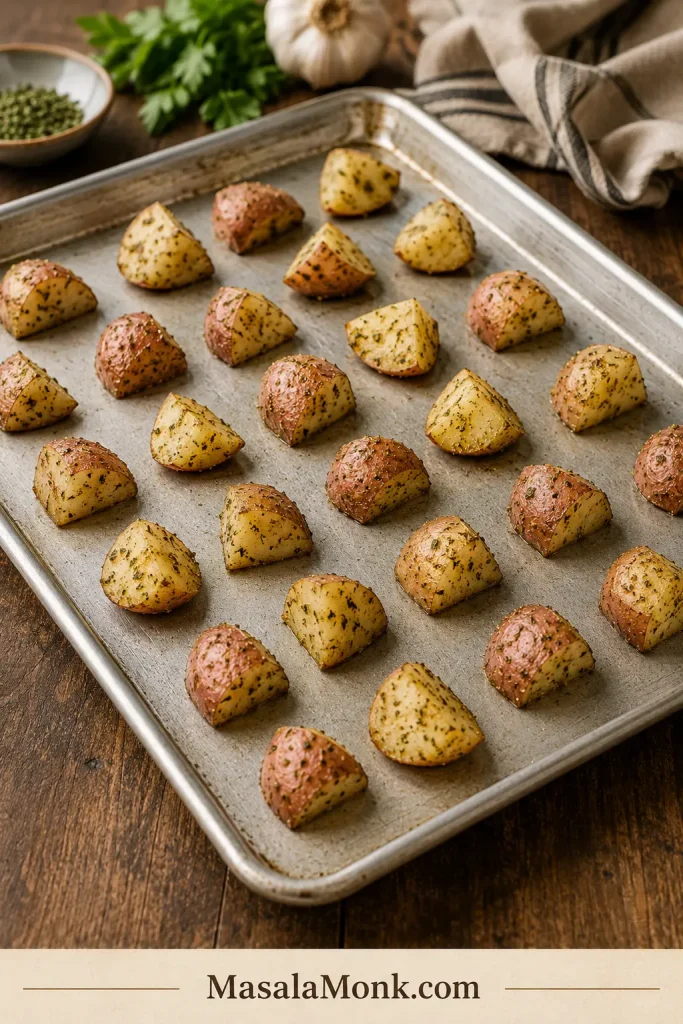
Spread the potatoes in one layer on a large rimmed sheet pan. Leave a little space between the pieces and turn some cut sides down against the pan. Those flat sides usually become the best bites.

Visual cue: give the potatoes room to brown

A little space around the pieces helps hot air move across the pan and gives cut sides better contact.

Ranch seasoned potato pieces spread apart on a rimmed metal sheet pan with several cut sides facing down.
Space is what turns seasoned potatoes into roasted potatoes; the cut sides need room and pan contact to brown.

5. Roast, flip, and finish

Roast for 30 to 35 minutes, flipping once around the 18 to 20 minute mark. The potatoes are ready when the flat sides are golden, the edges look roasted, and a fork slides easily into the centers. Finish with herbs, parmesan, bacon, cheese, or a small ranch drizzle after roasting.

Visual cue: what done potatoes should look like

The timer helps, but color, crisp edges, and a tender center are the better doneness signs.

Close-up of roasted ranch potatoes with browned flat sides, crisp edges, herb flecks, and a broken piece showing a soft center.
Look for browned flat sides, crisp edges, and tender centers; these visual cues are more reliable than the timer alone.

Want to push the texture further? Read the crisping rules or try the extra-crispy parboil method.

Tips for Crispy Potatoes

If you remember only a few things, make them these crisping rules.

  • Dry the potatoes. Wet potatoes steam before they brown.
  • Oil before ranch. The oil helps the dry mix cling evenly.
  • Use a sheet pan, not a deep dish. A deep casserole dish traps moisture.
  • Give every piece breathing room. Use two pans if needed.
  • Put cut sides down. The flat side browns better against the pan.

A zip-top bag works if you like the classic packet-recipe shake method. Parchment makes cleanup easier, but direct contact with the pan gives stronger browning. Add cheese near the end so it melts without burning.

The goal is not just “done.” The best pieces have golden flat sides, soft centers, and ranch flavor baked onto the edges. Space is what turns ranch potatoes from seasoned and soft into browned and snacky.

Biggest mistake to avoid: do not crowd the pan. If the potatoes touch too much, they steam before they brown. Use two pans for a double batch.

For Extra Crispy Potatoes

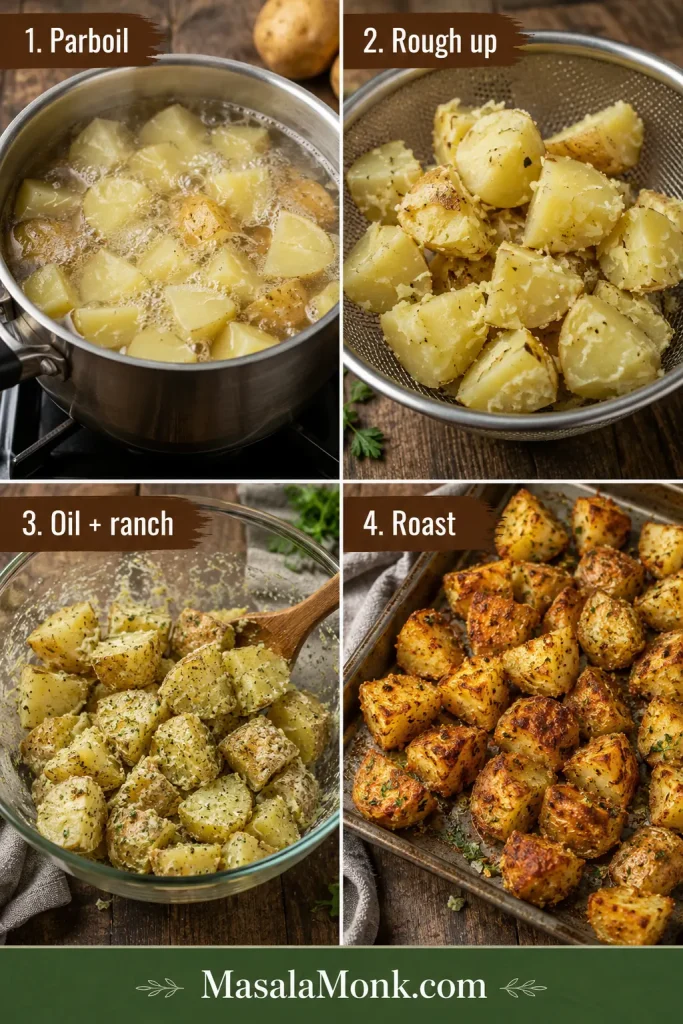
The main recipe keeps things simple. For a more pub-style crispy bite, add a quick parboil before roasting. It roughs up the potato edges so they brown more aggressively in the oven.

Parboil for extra crisp edges

This optional method creates rougher potato surfaces, which means more places for the oil and ranch seasoning to brown.

Four-step guide showing potatoes being parboiled, roughened after draining, tossed with oil and ranch seasoning, and roasted until crispy.
For extra crispy ranch potatoes, parboil briefly, rough up the edges, coat with oil and ranch seasoning, and then roast until deeply browned.
  1. Cut the potatoes into 1-inch / 2.5 cm pieces.
  2. Boil in lightly salted water for 6 to 8 minutes, just until the edges begin to soften. If your ranch mix is already very salty, use unsalted water.
  3. Drain very well.
  4. Shake the potatoes gently in the pot for a few seconds to rough up the edges.
  5. Let them steam-dry for 2 to 3 minutes.
  6. Toss with oil first, then dry ranch seasoning.
  7. Roast on a hot sheet pan at 425°F / 218°C or 450°F / 232°C until deeply browned and tender.

This method takes a few extra minutes, but it gives you more craggy edges for the seasoning to cling to. If you like crisp-edge potato sides, you may also like these homemade French fries, which go deeper into potato choice, soaking, drying, oven fries, air fryer fries, and loaded variations.

Keeping it simple instead? Go back to the main recipe. Making a smaller batch? Use the air fryer method.

Homemade Ranch Seasoning Option

No packet? You can still make ranch-style potatoes with a quick homemade mix. It will not taste exactly like a packet, but it gives you a fresher, less salty coating.

IngredientAmount
Dried parsley1 tablespoon
Dried dill1 teaspoon
Dried chives, optional1 teaspoon
Garlic powder1 teaspoon
Onion powder1 teaspoon
Black pepper½ teaspoon
Fine salt½ to ¾ teaspoon, to taste
Buttermilk powder, optional1 tablespoon

Without buttermilk powder, use the whole homemade mix for 2 lb / 900 g potatoes. With buttermilk powder, start with about 3 tablespoons, then add the rest after roasting only if the potatoes need more ranch flavor.

Air Fryer Method

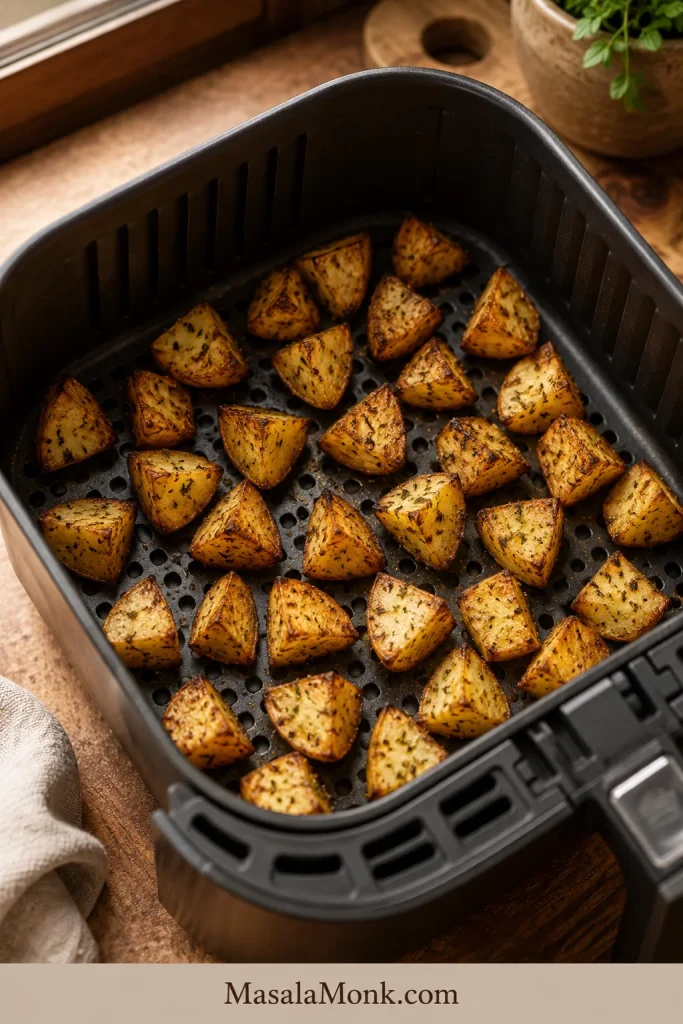
Air fryer ranch potatoes are great for a faster, smaller batch, but the basket still needs space. A crowded air fryer basket will cook the potatoes, but it will not crisp them well.

Air fryer spacing matters too

The same anti-crowding rule applies in the basket, especially when you want browned edges instead of soft potatoes.

Ranch seasoned potato chunks with browned edges arranged in a single layer inside an air fryer basket.
Air fryer ranch potatoes still need breathing room, so arrange them in a single layer or cook in batches for better browning.

Keep the seasoning amount the same, but reduce the oil. For 2 lb / 900 g potatoes, 1½ to 2 tablespoons oil is usually enough because the air fryer circulates heat closely around the pieces.

Potato SizeAir Fryer TimeTemperature
Small baby potato halves12 to 15 minutes400°F / 200°C
1-inch / 2.5 cm chunks15 to 20 minutes400°F / 200°C
Larger chunks20 to 22 minutes400°F / 200°C
  1. Cut the potatoes into even pieces.
  2. Toss with oil and dry ranch seasoning.
  3. Air fry at 400°F / 200°C.
  4. Shake the basket halfway through, or every 5 to 7 minutes for more even browning.
  5. Cook in batches if your air fryer basket is small.

Start checking early if your pieces are small or your air fryer runs hot. Air fryers vary more than ovens, so use the timing as a guide and look for browned edges with tender centers. If you use the air fryer for potato sides often, this air fryer hash browns guide is also useful for timing, shaking, thin layers, and fixing soft potato batches.

Once the potatoes are browned, choose a variation or fix common ranch potato problems.

Easy Variations

Think of the base recipe as the reliable weeknight tray. The variations are for nights when you want the potatoes to feel more like a snack, a party side, or something loaded enough to steal attention from the main dish.

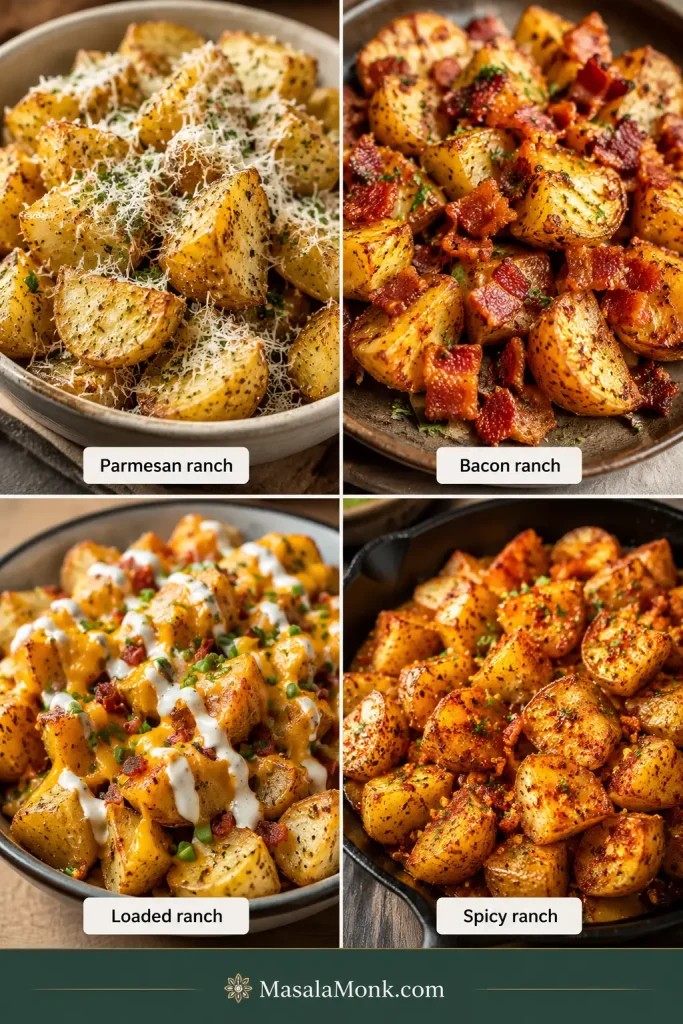
Four ways to finish the tray

These ideas keep the base method the same while changing the final flavor and serving style.

Four ranch potato variations showing parmesan ranch potatoes, bacon ranch potatoes, loaded ranch potatoes with cheese and drizzle, and spicy ranch potatoes.
Once the base tray is roasted, you can make parmesan ranch, bacon ranch, loaded ranch, or spicy ranch potatoes without changing the main method.

More ranch potato variation ideas

VariationHow to Make It
Parmesan ranch potatoesAdd ¼ cup / 20 to 25 g finely grated parmesan during the last 8 to 10 minutes of roasting, or sprinkle it over the potatoes right after they come out of the oven.
Garlic ranch potatoesAdd ½ teaspoon garlic powder with the ranch seasoning. If using fresh garlic, add it during the last 10 minutes so it does not burn.
Bacon ranch potatoesRoast the potatoes as usual, then toss with cooked crumbled bacon before serving. Use a little less ranch seasoning if the bacon is salty.
Cheesy ranch potatoesRoast until almost done, sprinkle with shredded cheddar, Monterey Jack, mozzarella, or a cheese blend, then return to the oven for 3 to 5 minutes.
Loaded ranch potatoesFinish with melted cheese, bacon, chives, and a small drizzle of ranch dressing or sour cream.
Spicy ranch potatoesAdd smoked paprika, cayenne, chili flakes, or a little hot sauce after roasting. Start small because ranch seasoning is already bold.
Ranch potatoes with onionsAdd thick onion wedges to the pan with the potatoes so they soften and brown without burning before the potatoes are done.

Creamy ranch potato bake note: A cheesy ranch potato bake made with bottled ranch dressing is softer and more casserole-like than these sheet-pan potatoes. Here, the cheesy version simply means roasted potatoes finished with melted cheese. If you are in the mood for a full potato casserole instead of a crisp side, this tater tot casserole is a better fit for a creamy, cheesy casserole-style dinner.

Serving these tonight? See what goes with ranch potatoes. Making them ahead? Check storage and reheating tips.

What to Serve with Ranch Potatoes

Serve ranch potatoes with burgers, steak, pork chops, BBQ mains, baked chicken tenders, or this baked chicken breast when you want a simple oven dinner. They also work with eggs for brunch or as a game-day potato tray with cheese, bacon, and chives.

For dipping, use ranch dressing, sour cream, spicy mayo, a yogurt-herb sauce, or this easy garlic aioli. If the potatoes taste salty from the ranch seasoning, choose a cooler dip instead of another salty one.

To balance the plate, add something crisp or fresh, like a chickpea salad or simple green salad. The loaded version can turn them from a side dish into the thing people hover around.

Make-Ahead, Storage, and Reheating

  • Cut ahead: Cut potatoes can sit covered in cold water in the refrigerator for up to a day. Drain and dry them very well before roasting.
  • Season ahead: Season right before roasting. Salt in the ranch mix can pull moisture from the potatoes if they sit too long.
  • Double batch: For 4 lb / 1.8 kg potatoes, double the oil and use two large sheet pans. Start with about 1½ packets if adding bacon, cheese, or parmesan.
  • Rotate pans: If using two pans, rotate them halfway through roasting if your oven has hot spots.
  • Refrigerate: Store leftovers in an airtight container for 3 to 4 days.
  • Reheat: Use the oven, air fryer, or a lightly oiled skillet for the best texture. The microwave is fine for speed, but the potatoes will soften.
  • Freeze: You can freeze them, but the texture is not ideal. Roasted potatoes often turn softer and slightly grainy after freezing and thawing.

For broader leftover timing and cold-storage guidance, the FoodSafety.gov cold food storage chart is a helpful reference.

If the potatoes seem dry after chilling, toss them with a tiny drizzle of oil before reheating. The oven or air fryer is what brings the edges back.

Troubleshooting

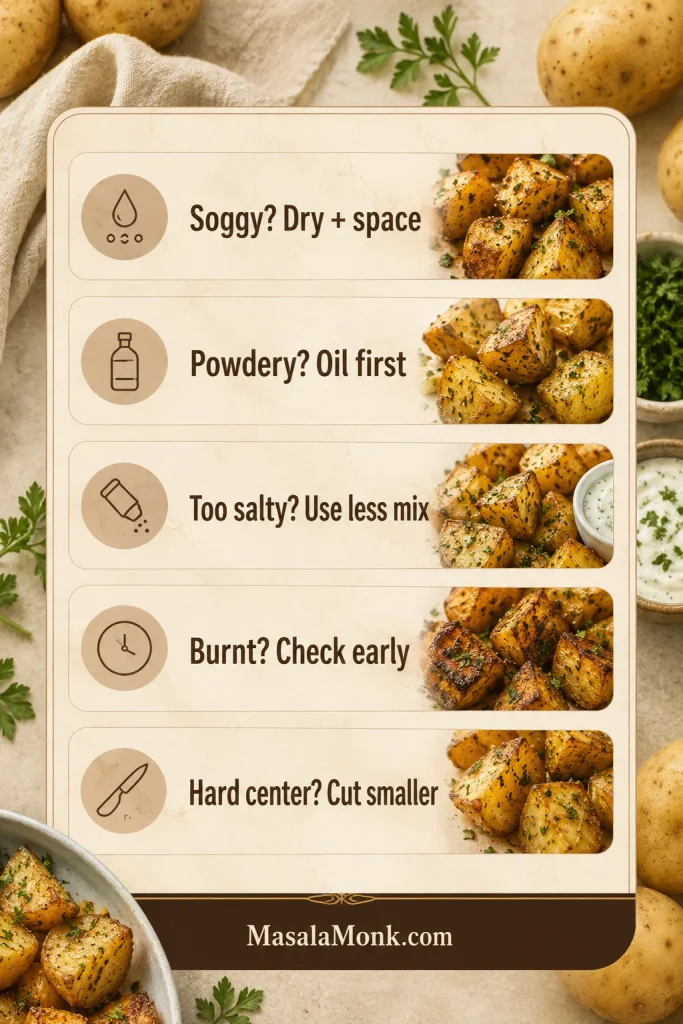
If your first batch is softer than you wanted, it is usually not a recipe failure. Ranch potatoes go soggy for predictable reasons, and most of them are easy to fix next time.

Quick fixes for common ranch potato problems

The same few causes show up again and again, which makes the fixes easy to remember.

Troubleshooting guide for ranch potatoes with tips for soggy, powdery, salty, burnt, and hard-centered potatoes beside small roasted potato photos.
When a tray goes wrong, check moisture, crowding, seasoning amount, oven heat, and potato size first.
ProblemLikely CauseHow to Fix It
Soggy potatoesWet potatoes, crowded pan, deep dish, low heat, or bottled ranch before roastingDry well, use a sheet pan, spread in one layer, and use dry ranch seasoning
Burnt seasoningOven too hot too long, pieces too small, seasoning clumped, or not enough oilOil first, cut 1-inch pieces, toss evenly, and check early at 450°F / 232°C
Too saltySalty ranch packet plus bacon, cheese, or parmesanUse less ranch seasoning next time; serve with sour cream, yogurt dip, herbs, or lemon
Potatoes taste powderyToo much dry ranch mix or seasoning added unevenlyToss with oil first, use less mix next time, and finish with herbs or a small ranch drizzle
Browned outside, hard insidePotato pieces too large or oven too hot for their sizeCut smaller next time; lower the oven slightly and continue roasting
Sticking to the panNot enough oil or potatoes moved before crust formedUse enough oil, let the cut sides brown, then flip with a thin spatula
Uneven flavorSeasoning added before oil or not tossed well enoughToss with oil first, then add ranch seasoning and toss again

Problem solved? Return to the recipe card or back to top.

FAQ

Is ranch seasoning the same as ranch dressing mix?

In many recipes, yes. Dry ranch seasoning and dry ranch dressing mix usually mean the powdered mix used to make ranch dressing or season foods.

How much ranch seasoning do I use for 2 pounds of potatoes?

For 2 pounds of potatoes, use 1 standard 1 oz / 28 g packet, or about 3 tablespoons dry ranch seasoning from a jar. Go up to 4 tablespoons only if the mix is mild or salt-free.

Should I use dry ranch mix or bottled ranch dressing?

Dry ranch mix is best before roasting. Bottled ranch works better after roasting as a dip or drizzle, or in softer cheesy potato bakes.

What temperature is best?

425°F / 218°C is the best default. Use 450°F / 232°C when you want darker edges and are comfortable checking the pan earlier.

How long do ranch potatoes take in the oven?

Most 1-inch potato pieces take 30 to 35 minutes at 425°F / 218°C. They are done when the flat sides are golden and a fork slides through the centers easily.

Do red potatoes need to be peeled?

No. Red potato skins are thin and help the pieces hold together. Scrub, dry, cut, and roast.

Will russet potatoes work?

Yes. Russets give you fluffy centers and browned edges, but they are more fragile than red or Yukon gold potatoes, so toss them gently.

How do I make ranch potatoes crispier?

Dry the potatoes well, oil before seasoning, spread them in one layer, and place cut sides down. For extra crispiness, parboil for 6 to 8 minutes, rough up the edges, then roast.

Air fryer version: what changes?

Keep the seasoning amount the same, but reduce the oil to about 1½ to 2 tablespoons for 2 lb / 900 g potatoes. Air fry 1-inch pieces at 400°F / 200°C for 15 to 20 minutes, shaking halfway through.

Can I add cheese and bacon?

Yes. Add cooked bacon after roasting, and add shredded cheese during the last few minutes so it melts without burning. Use less ranch seasoning if your bacon or cheese is salty.

A Good Pan of Ranch Potatoes

Good ranch potatoes should taste bold and comforting without turning heavy. The outside should be seasoned and browned, the inside should be soft, and the ranch flavor should feel baked onto the potatoes instead of sitting on top as a wet dressing.

Once you learn the dry-potatoes, oil-first, ranch-second rhythm, this becomes the tray you can make without looking at the recipe.

Back to top ↑