Posted on Leave a comment

Sopapilla Cheesecake Recipe: Easy Crescent Roll Cheesecake Bars

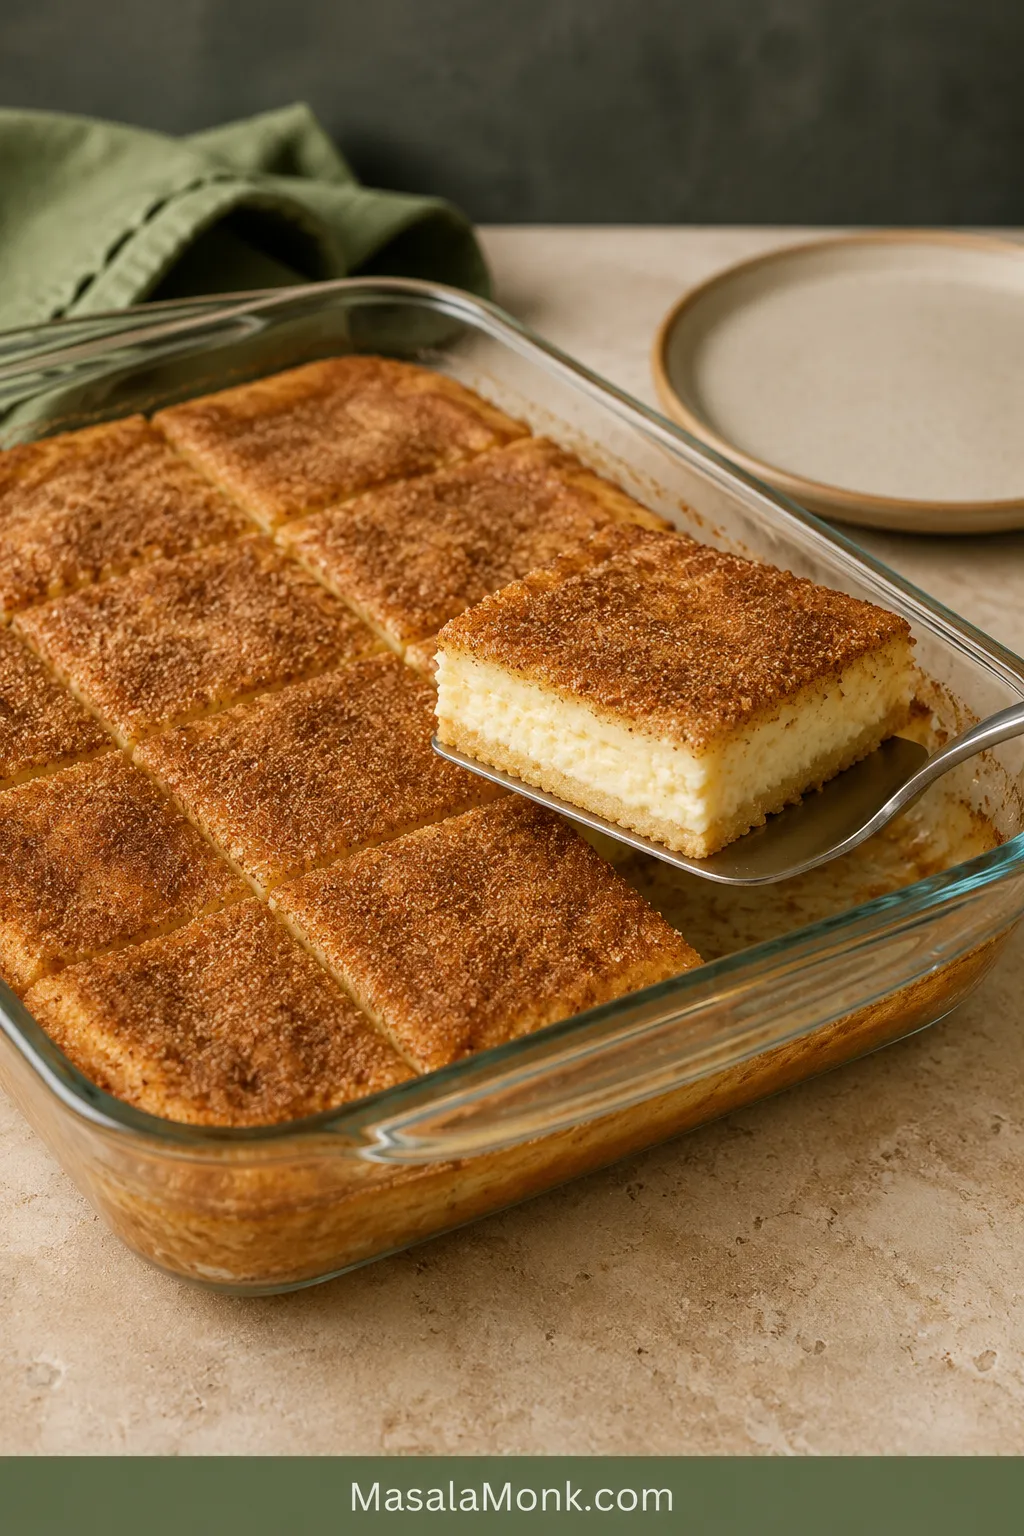
Clear glass pan of Sopapilla Cheesecake with one corner bar lifted on a metal spatula, revealing a cinnamon-sugar top, creamy filling and baked crescent base.

Two packages of crescent dough, one creamy filling and a cinnamon-sugar crust turn into a pan of Sopapilla Cheesecake with about 20 minutes of hands-on work. The top bakes golden and lightly crisp, the center settles into a smooth cheesecake layer, and the kitchen smells like cinnamon rolls and cheesecake arriving at the same time.

Yet one quiet problem trips people up: the upper pastry can look beautifully golden while the dough underneath is still pale and gummy.

Golden on top is not enough—check the bottom before you pull the pan.

Quick Answer: How to Make Sopapilla Cheesecake

Sandwich a lightly sweetened cream cheese filling between two cold crescent-dough sheets. Brush the top with melted butter, cover it with cinnamon sugar and bake at 350°F / 175°C.

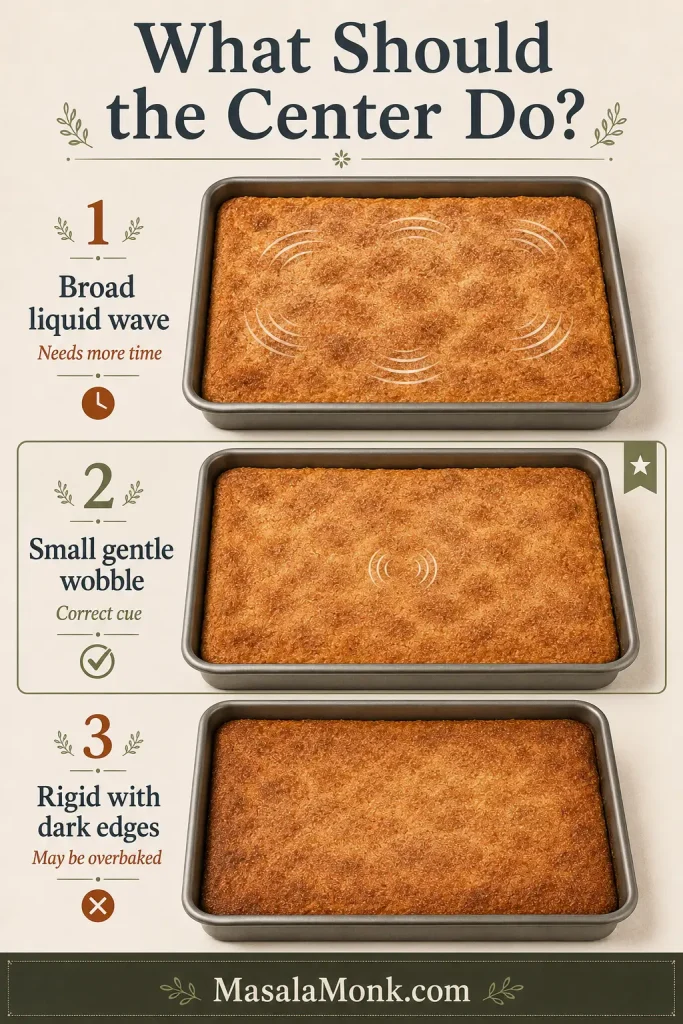
In a conventional oven, begin checking at about 28 minutes. The edges should look set with only a gentle wobble in the middle, and the lower pastry should look baked through—not pale and doughy. Cool for at least 20 minutes, or wait about one hour for bars that hold an edge.

Sopapilla Cheesecake Recipe

Easy Sopapilla Cheesecake Bars

Creamy, tangy cheesecake between tender crescent layers, finished with a crisp cinnamon-sugar top that tastes buttery without feeling heavy.

Active preparation20 minutes
Conventional ovenBegin checking at 28 minutes; usually 30–35 minutes
Fan-assisted ovenStart checking at about 25 minutes; continue until all three doneness cues are present
Cooling20 minutes to 1 hour
Total, excluding softeningAbout 1¼–2 hours
Optional chilling2–3 additional hours for the neatest squares
Yield16 standard bars
Pan9×13 inches / 23×33 cm
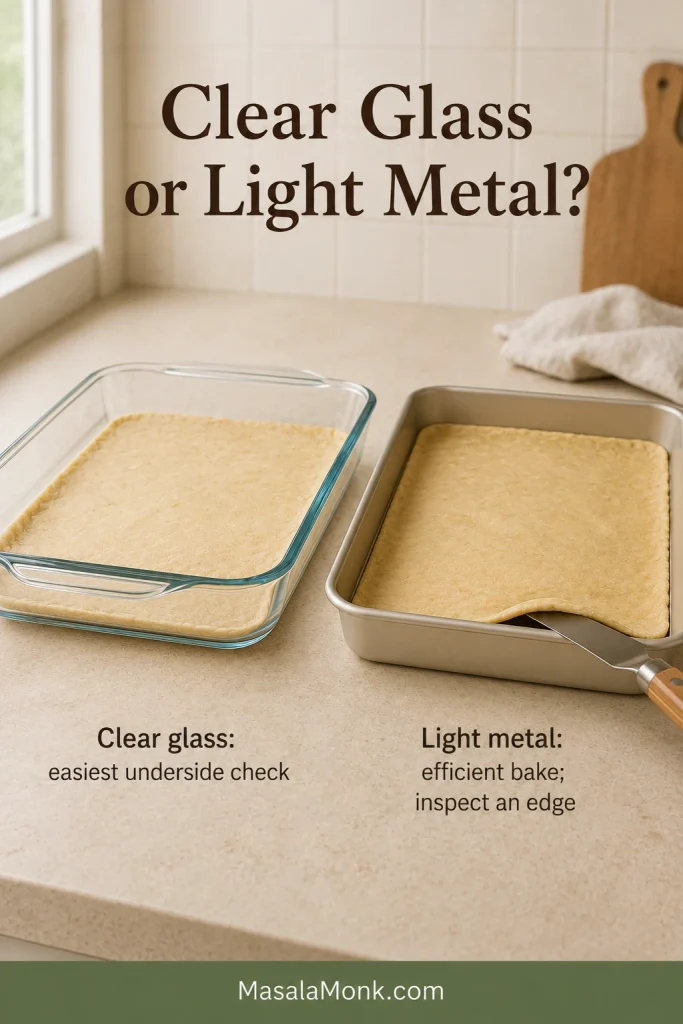
Clear glass makes the underside easiest to inspect. Light-colored metal may finish sooner, while glass and thick ceramic may need the longer end of the range.

Before you begin: Set out the cream cheese and egg. The cream cheese may need 45–60 minutes to soften; cutting it into smaller pieces will shorten the wait.

Equipment and Pan Choice

  • 9×13-inch / 23×33 cm clear glass baking dish for the easiest underside check, or a light-colored metal baking pan
  • Large mixing bowl and electric mixer
  • Flexible spatula and thin spatula
  • Parchment paper for shaping the upper dough
  • Small bowl and pastry brush or spoon

Pastry Layers

  • 2 packages refrigerated crescent dough sheets, 8 oz / 227 g each, 16 oz / 454 g total
  • Nonstick cooking spray or a small amount of additional softened butter, for the pan

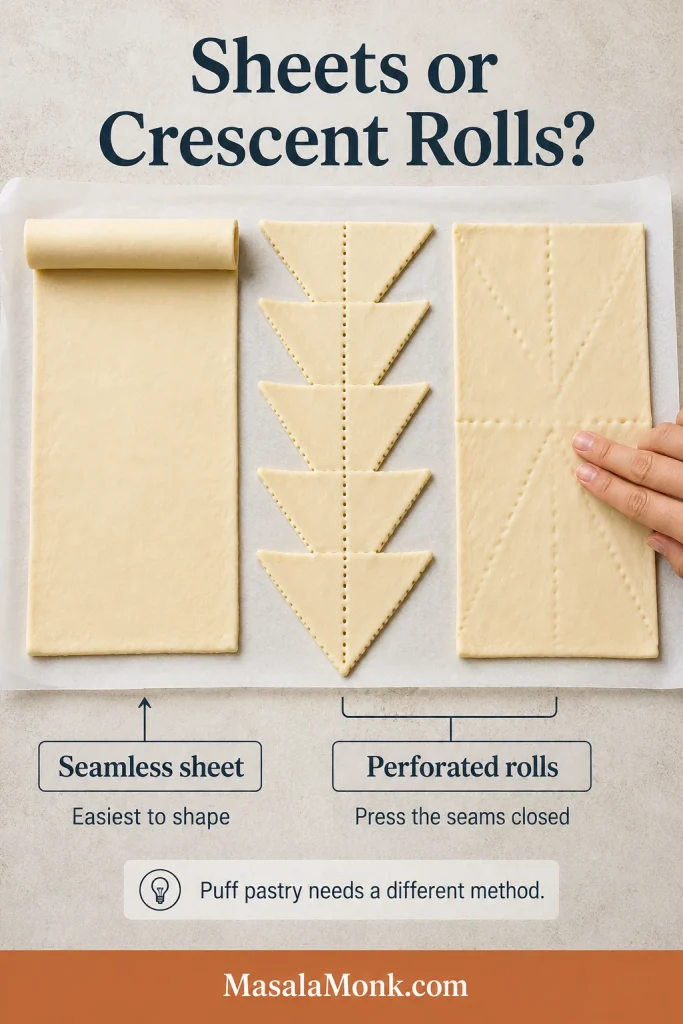
Regular perforated crescent rolls work too. Press the seams closed before assembling the dessert.

Cheesecake Filling

  • 16 oz / 454 g full-fat block cream cheese, softened
  • ¾ cup / 150 g granulated sugar
  • 1 large egg, about 50 g without the shell, at room temperature
  • 1½ teaspoons / 7.5 mL vanilla extract
  • ¼ teaspoon fine salt, about 1.5 g

Cinnamon-Sugar Top

  • 4 tablespoons / 57 g unsalted butter, melted and slightly cooled
  • ⅓ cup / 67 g granulated sugar
  • 2 teaspoons ground cinnamon, about 5 g
  • 2–4 tablespoons / 30–60 mL honey, optional, for serving

Before mixing, separate the filling sugar from the cinnamon-topping sugar. One sweetens the cheesecake layer, while the other creates the crisp upper crust; the ingredient board below shows the complete full-pan quantities together.
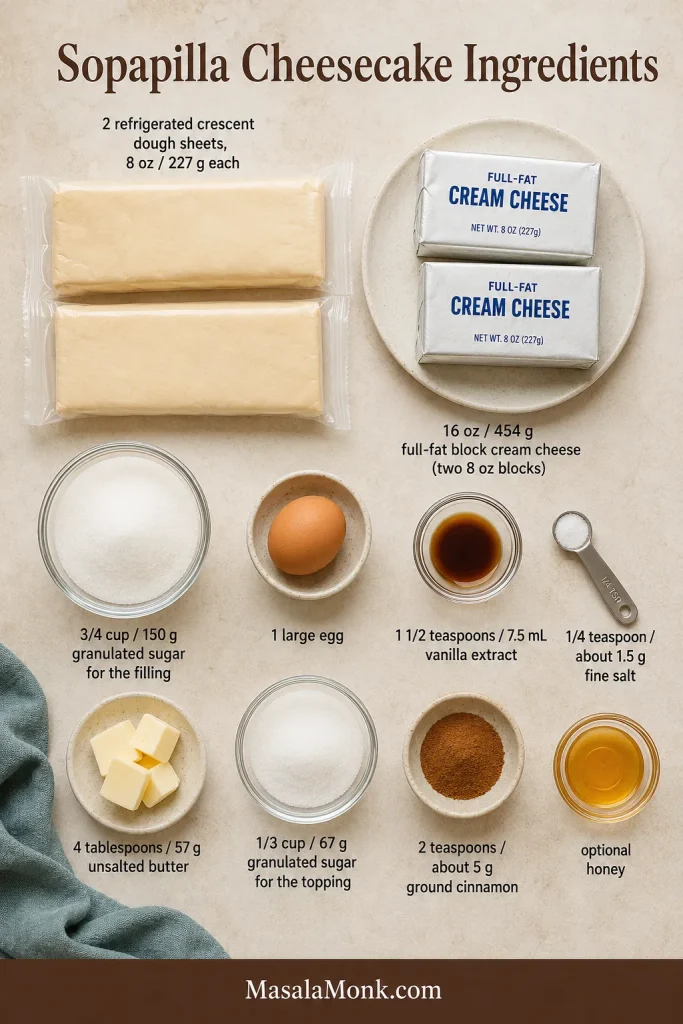
Instructions

Assemble the Layers
  1. Prepare the oven and pan. Arrange a rack in the middle. Preheat to 350°F / 175°C conventional, or 325°F / 160°C fan-assisted. Lightly coat the pan with nonstick spray or additional softened butter. Mix the cinnamon and topping sugar in a small bowl.
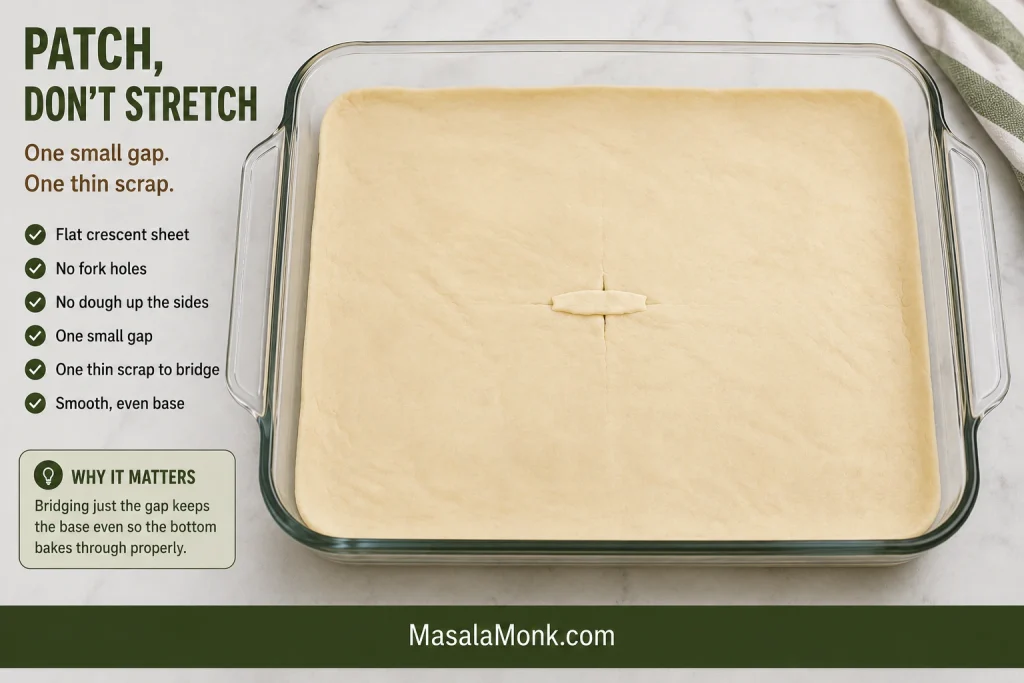
  2. Fit the lower dough into the pan. Press one crescent sheet toward the corners without pulling it paper-thin. If a small gap remains, patch it with a scrap of dough instead of stretching the whole sheet further. Seal any perforations.

A small gap does not require reshaping the whole base; bridge it with one thin scrap and keep the dough flat across the pan.
  1. Mix and spread the filling. Beat the softened cream cheese until smooth, scraping the bowl once. Add the sugar and salt, followed by the egg and vanilla. Mix only until combined, then spread the filling gently over the lower dough.

Place several small mounds across the lower dough, then join them with light strokes so the spatula does not drag or fold the base.
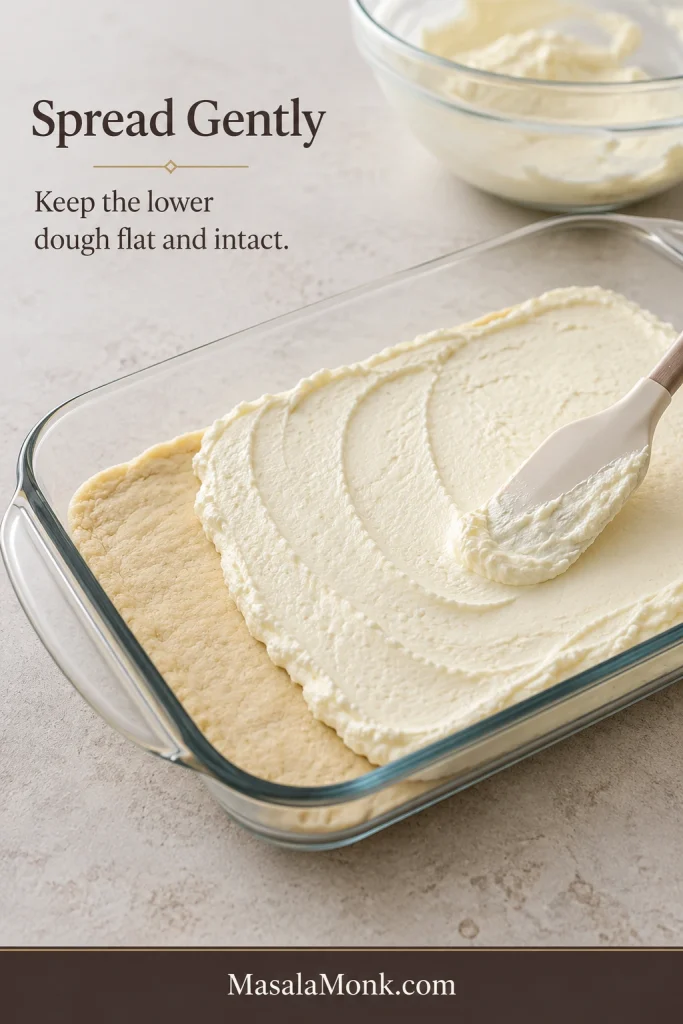
Cream cheese filling being spread over the lower crescent dough in a clear glass pan, with part of the pastry base still visible.
Level the filling so the center and edges set at a similar pace.
  1. Add the upper dough. Shape the second sheet on parchment, flip it over the cheesecake and peel away the paper. If the dough tears, stop stretching and patch the gap with a small scrap. The sheet doesn’t need to reach every corner perfectly.

Shape the upper sheet while it is cold, flip it onto the filling and peel away the parchment before the dough softens.
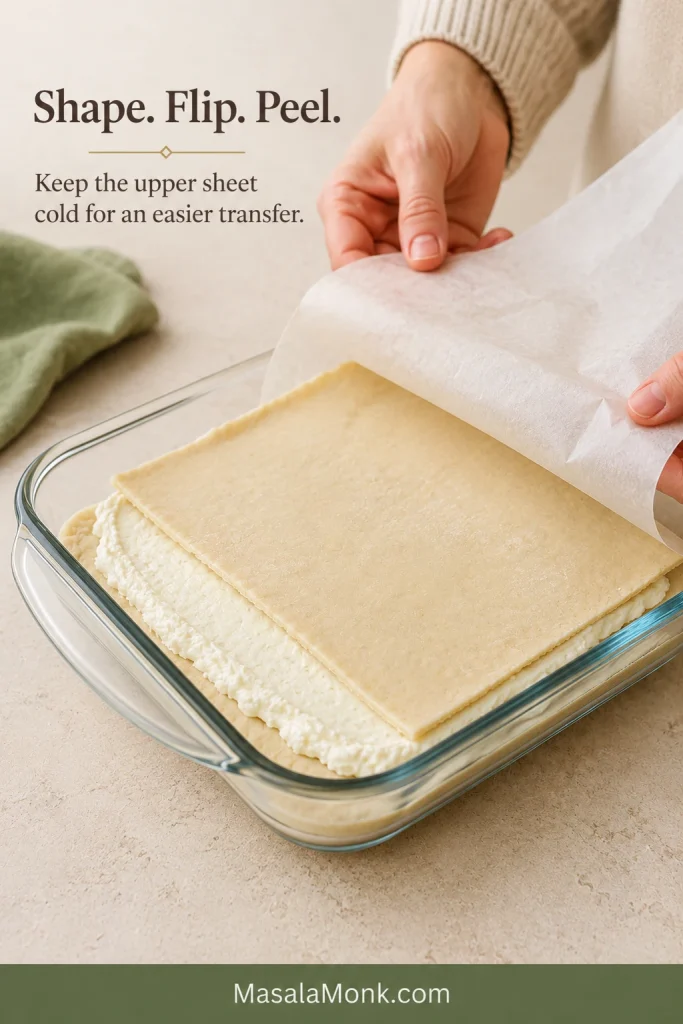
Hands peeling parchment from the upper crescent dough sheet after transferring it onto the cream cheese filling in a glass pan.
Keep the upper sheet cold, then flip and peel before it softens or stretches.
Bake, Check and Serve
  1. Top and bake. Spread the slightly cooled butter over the dough, then cover it evenly with cinnamon sugar. Begin checking a conventional oven at about 28 minutes and a fan-assisted oven at about 25 minutes. The edges should look set, with only a gentle wobble in the middle.

Spread the butter thinly, then add the cinnamon sugar in an even layer so no area begins the bake wet or bare.
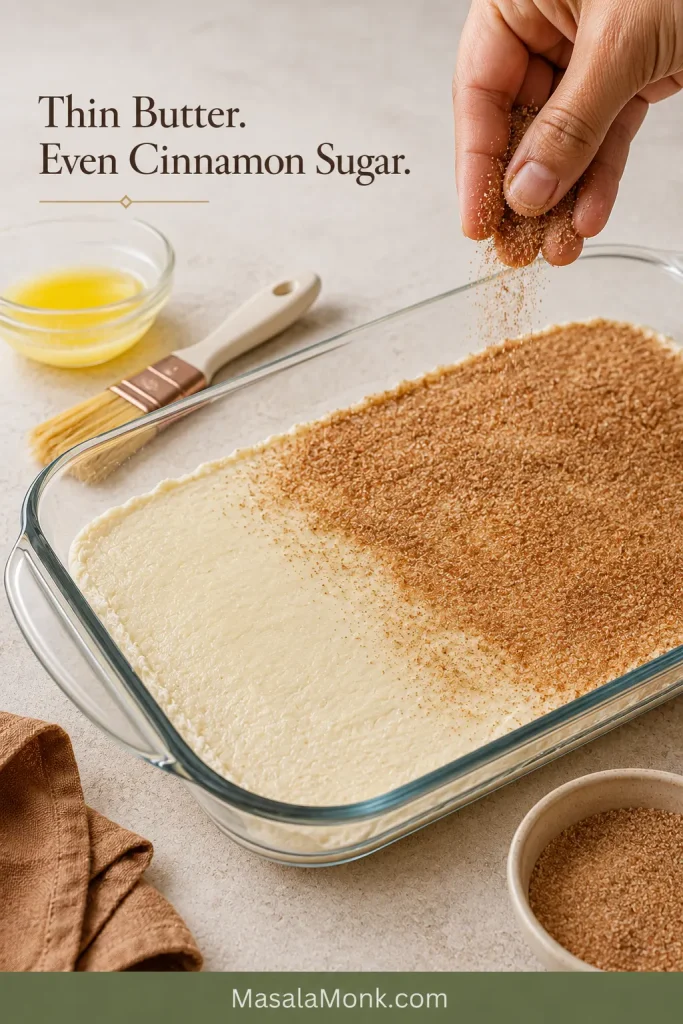
Cinnamon sugar being sprinkled over a lightly buttered crescent dough top, with coated and uncoated areas visible.
A light butter sheen anchors the cinnamon sugar without creating greasy pools.

Before the pan goes into the oven, check that no filling is exposed through a large tear and that the butter forms a light sheen rather than standing pools.
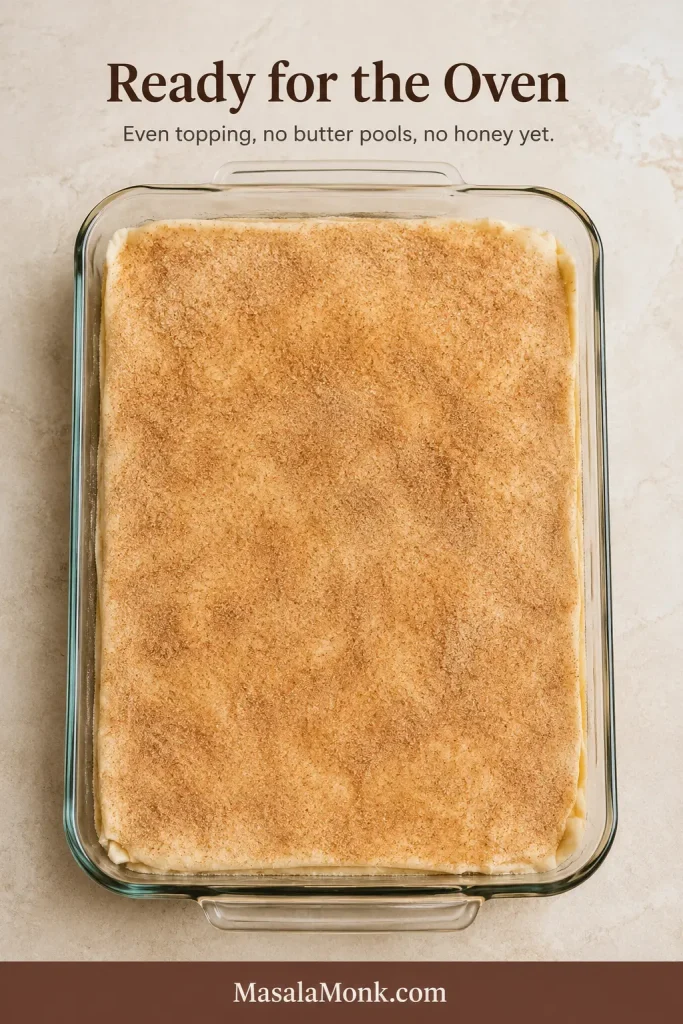
  1. Check the lower pastry. Glass dish: Look through the bottom for pastry that appears baked instead of white and raw. Metal pan: Lift one exposed corner gently with a thin spatula. It should lift as pastry and show visible layers without smearing like paste. Top already dark? Cover it loosely with foil while the base finishes.
  2. Cool to the texture you want. Rest the pan for at least 20 minutes for warm, soft pieces served on plates, or about one hour for bars that hold an edge. Chill the cooled pan for 2–3 hours for the neatest squares.
  3. Cut and serve. Press down with a long, sharp knife instead of sawing through the pastry. Wipe the blade between cuts. Add honey just before serving when you want the cinnamon top to stay crisper.

In This Guide

Choose Your Serving Texture

The cleanest square and the crispiest square are rarely the same square. Serving time determines which texture you get because cooling firms the cheesecake while gradually softening the pastry.
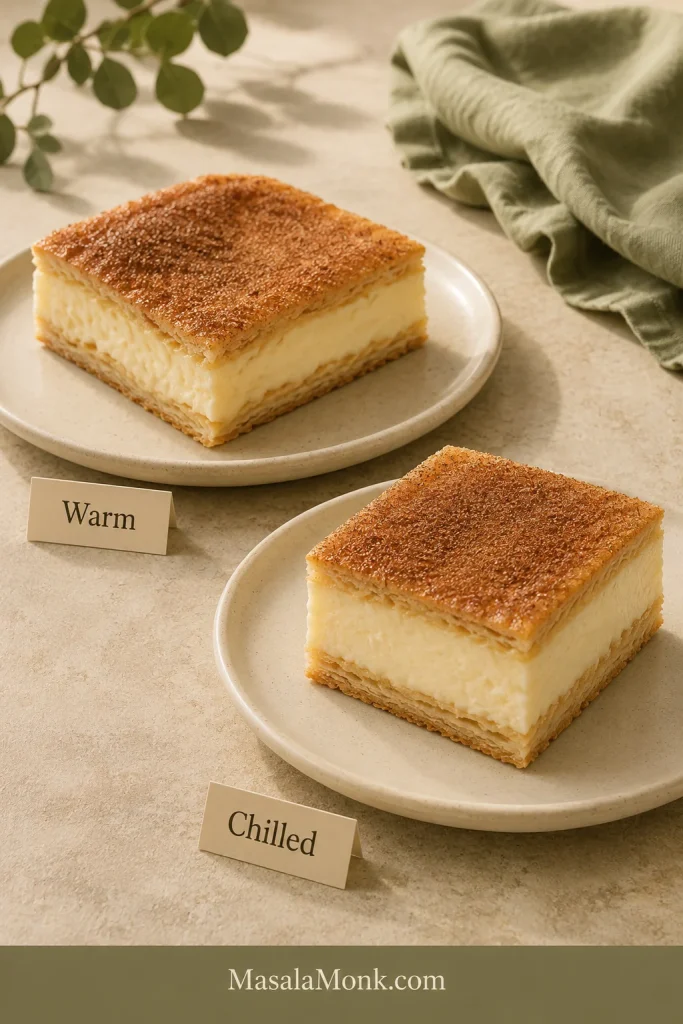
If You WantCooling TimeWhat to Expect
Warm dessert pieces20–30 minutesFragrant pastry and a soft center; best served on plates
Creamy bars that hold an edgeAbout 1 hourA delicate cinnamon crackle with a center that stays together when cut
Neat potluck squaresCool fully, then chill 2–3 hoursThe firmest center and tidiest edges, with a less crisp refrigerated crust
Make-ahead dessertChill overnightVery neat pieces; let them stand briefly before serving for a softer bite
A potluck pan needs tidy squares; a quiet evening at home does not.

Cutting, Carrying and Serving

For a buffet or potluck, chill and transport the bars in their original pan, then move them to a serving tray after arrival. The colder center holds its shape better, while the pan protects the edges from shifting in transit.
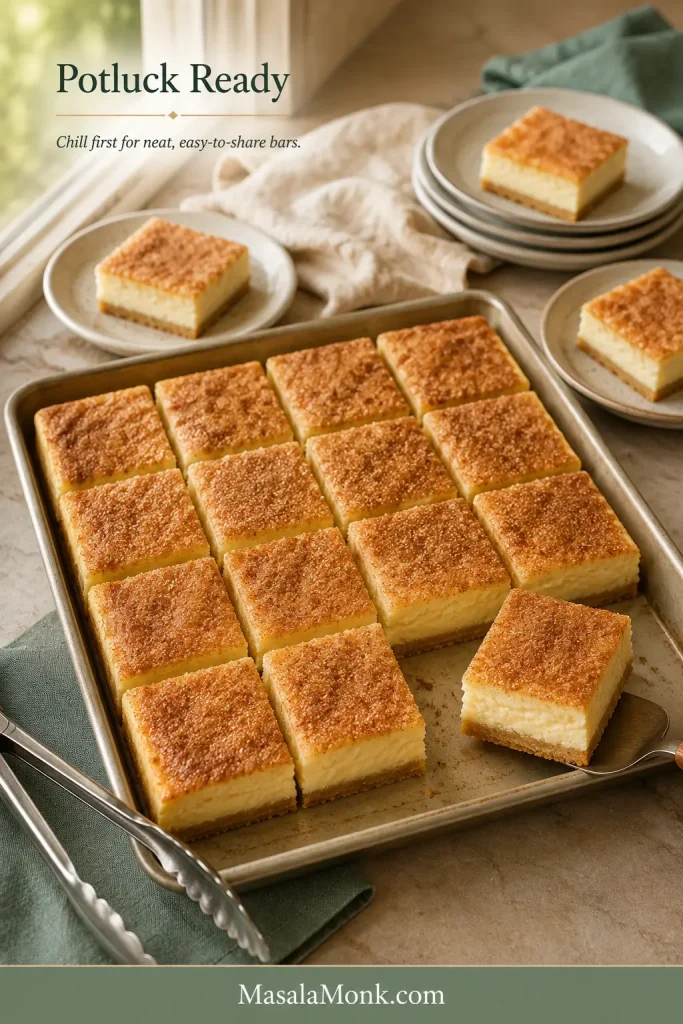
Neatly cut chilled Sopapilla Cheesecake bars arranged on a serving tray with small dessert plates nearby.
Chill before transporting so the bars hold their shape and lift cleanly.

A warm first piece may lean or smear a little. That is simply what warm cheesecake does—not a sign that the bake failed.

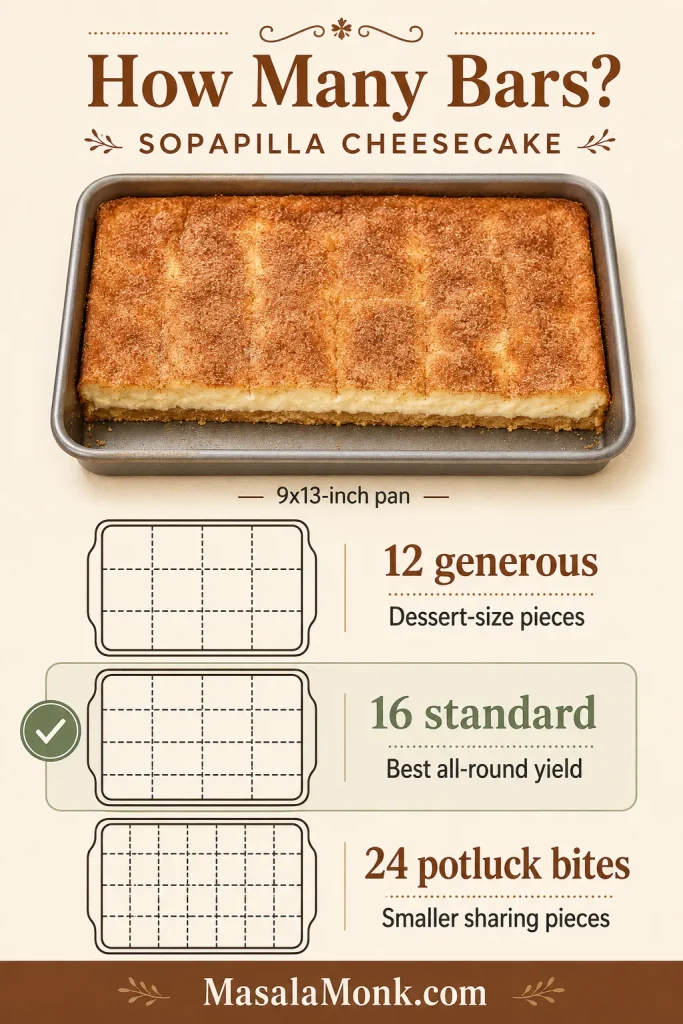
For clean slices, press down decisively with a sharp knife and wipe the blade after each cut. Divide the pan into 12 large pieces, 16 standard bars or 24 smaller potluck squares. Cooling plays the same useful role in these pecan pie bars, where the filling becomes easier to portion after it settles.
Prefer a fully chilled dessert with a crumb crust? This no-bake cream cheese pie is the closer match.

What Is Sopapilla Cheesecake—and What Makes This Version Different?

Sopapilla Cheesecake lands somewhere between cheesecake bars, a cream cheese danish and cinnamon pastry. Sweetened cream cheese sits between two thin layers of refrigerated crescent dough, finished with butter and cinnamon sugar.
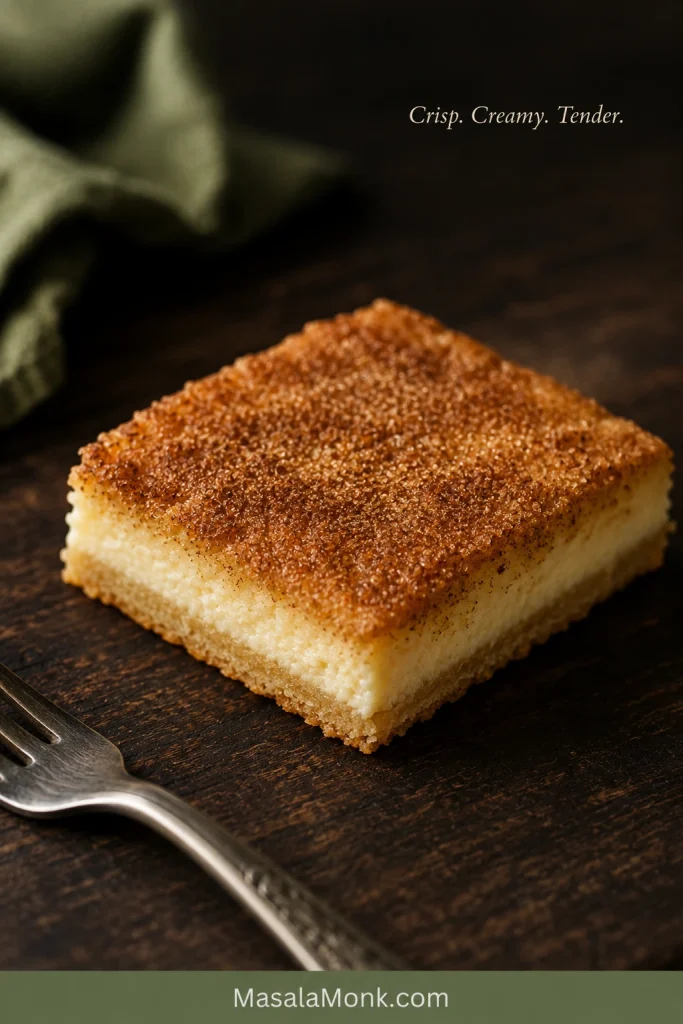
Close-up of one Sopapilla Cheesecake bar with a crackled cinnamon-sugar top, pale creamy center and thin baked crescent dough base.
The base should look like tender baked crescent pastry—not a thick crumb crust.

You may also see this recipe called crescent roll cheesecake bars or Churro Cheesecake. Some websites use the name “Mexican Cheesecake Bars,” though that is a loose online recipe label rather than one traditional Mexican cheesecake style.

It needs no crumb crust, springform pan or water bath. A New York cheesecake is the better choice when you want a tall, dense center and a more traditional baked-cheesecake structure.

One Egg and Two Blocks of Cream Cheese

Two pans of Sopapilla Cheesecake can look almost identical and still cut very differently. One egg helps this filling hold together without turning firm or custardy. Two blocks of cream cheese create a generous center while leaving the crescent layers noticeable in every bite.
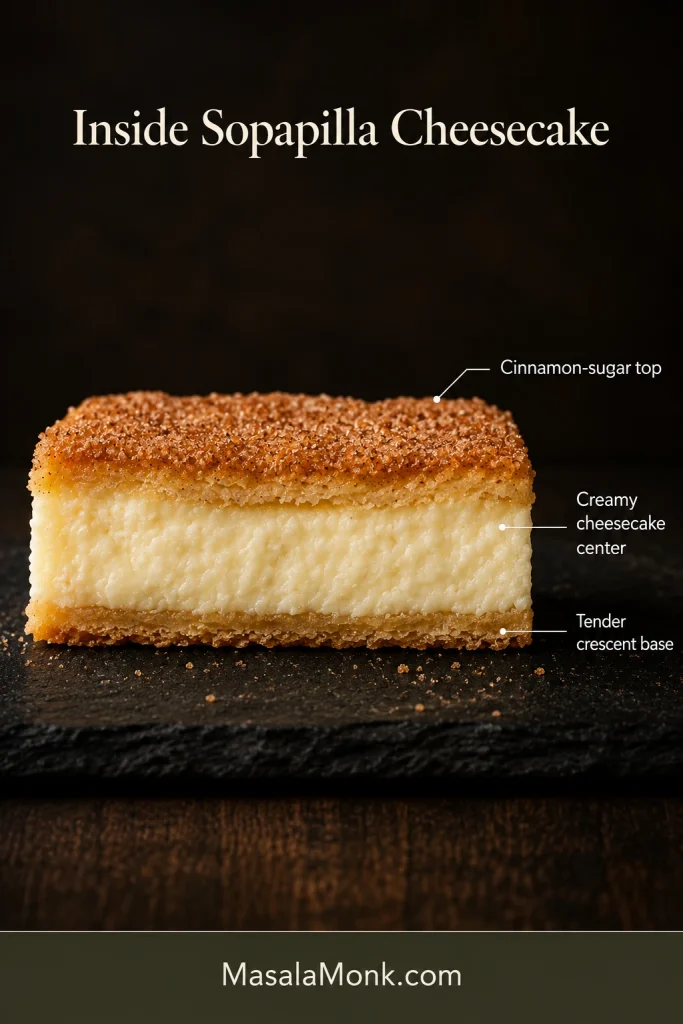
Why the egg matters: Leave it out of this filling and the center becomes looser and more pastry-like. A third block of cream cheese changes the depth and texture enough to require its own egg, sugar and baking balance.

Cold Dough and Softened Cream Cheese

Leave each dough package refrigerated until it is needed. Cold dough behaves; warm dough stretches, sticks and fights back.

The cream cheese needs the opposite treatment. It should press easily while still feeling cool and holding its shape. Tiny specks may disappear during baking, but smooth out any larger cold lumps before spreading the filling. Tub-style cream cheese can contain more moisture and may leave the center loose.
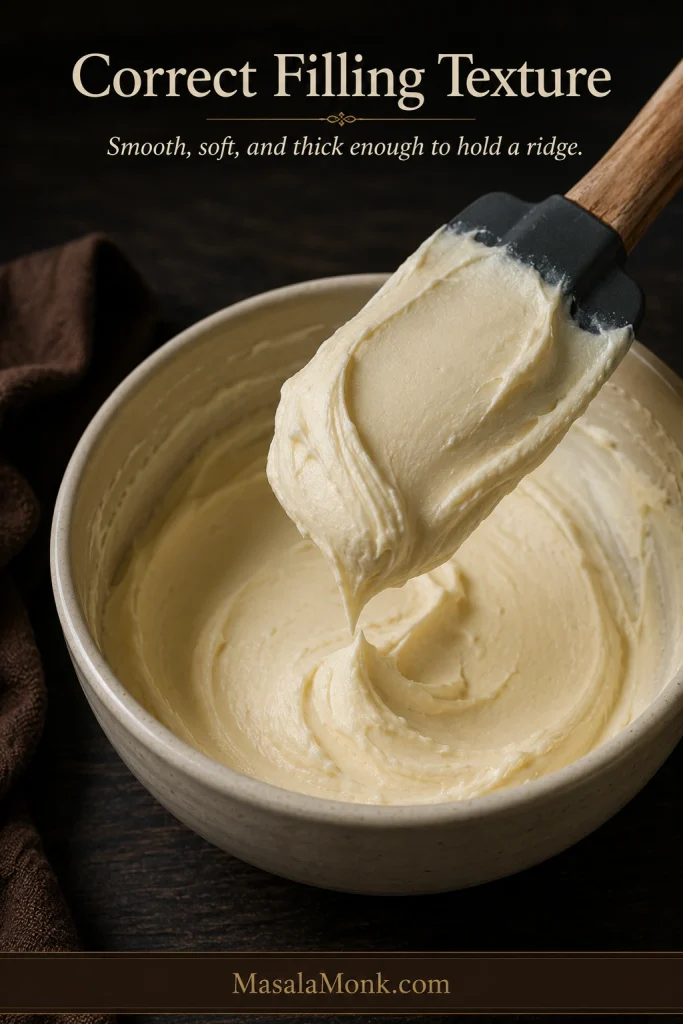
Close-up of smooth pale cream cheese filling lifted on a flexible spatula and holding a soft ridge over a mixing bowl.
Smooth the cream cheese before adding sugar and egg, when cold lumps are easiest to remove.

Sugar, Butter and Cinnamon

The filling remains lightly sweet so the cream cheese tang still comes through. A thin, even coat of butter helps the cinnamon sugar bake into a crisp top without leaving oily patches.

Honey is optional. Pour it over warm pastry when you want it to soak in. To keep the remaining crust crisper, add it only to the pieces being served.
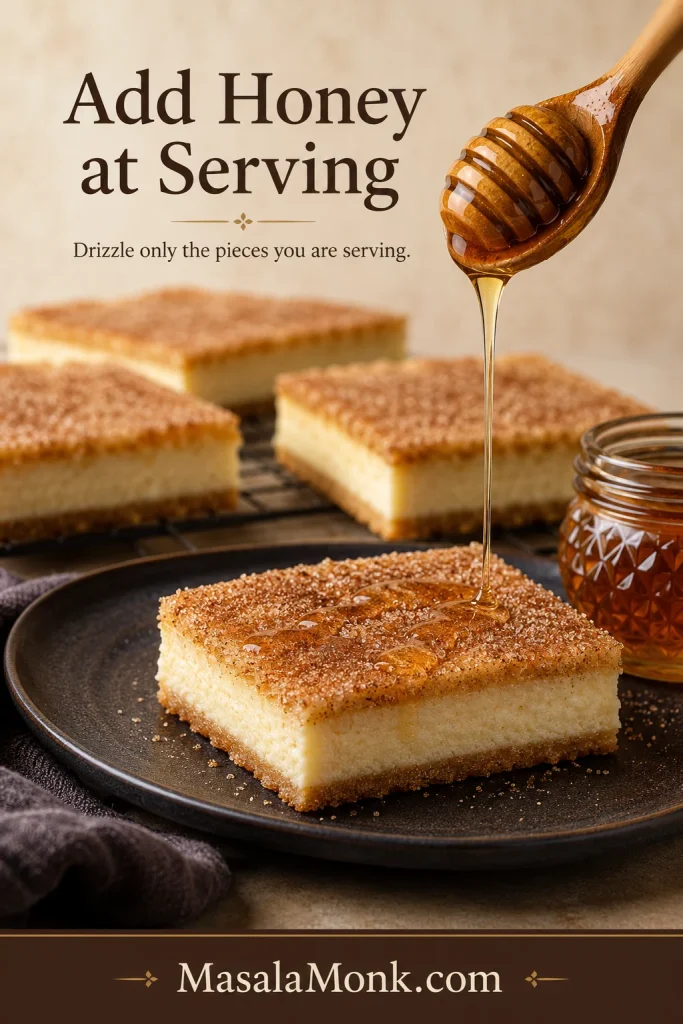
Thin stream of honey falling onto one plated Sopapilla Cheesecake bar, with undrizzled bars visible in the background.
Add honey only to the pieces being served if you want the remaining crust to stay crisp.

For the full yeast-dough version of that cinnamon aroma, this cinnamon roll recipe takes the longer, softer route.

Which Crescent Dough Works Best?

Crescent dough is not merely the shortcut here; its tender, lightly flaky texture is part of the dessert people expect.

  • Seamless crescent sheets are the easiest to shape and transfer.
  • Perforated crescent rolls work well once the seams are pressed closed.
  • Puff pastry flakes more dramatically and needs its own temperature, chilling and timing.
How to Tell When It Is Done

Once the top smells deeply of cinnamon, it is tempting to pull the pan. Give the center and lower pastry one final check first.
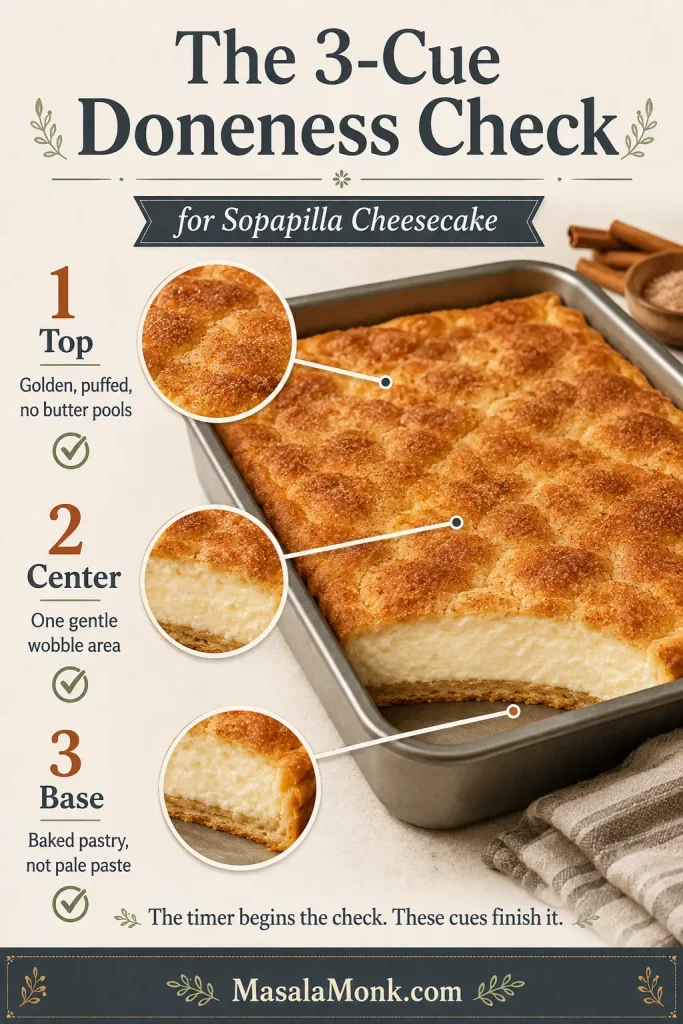
  1. Top: puffed, richly golden and mostly free of standing butter.
  2. Center: set around the edges, with one small area in the middle moving gently as a unit.
  3. Base: baked into a tender sheet that lifts without smearing or clinging like paste.

A liquid wave crossing the pan means the filling needs more time. Once all three cues are present, remove the pan. After cooling, the cinnamon top should crackle lightly under the knife.
How the Pan Changes the Check

  • Clear glass: easiest for first-time bakers because the lower pastry remains visible.
  • Light-colored metal: heats efficiently and may finish earlier. Check one exposed corner or edge with a thin spatula.
  • Ceramic: looks attractive on the table, though thick walls may slow the bake.
  • Dark metal: browns the edges more aggressively, so begin checking early.
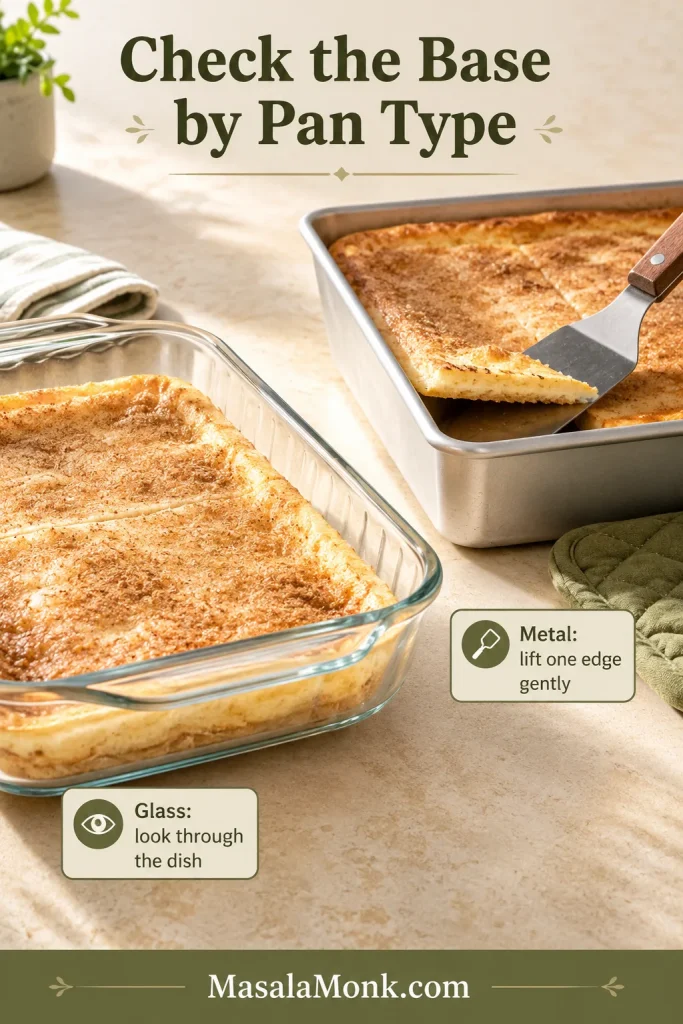
If the surface is already dark, protect it loosely with foil while the base finishes.

Troubleshooting

Most problems come down to ingredient temperature, uneven butter or not giving the pan enough baking or cooling time.
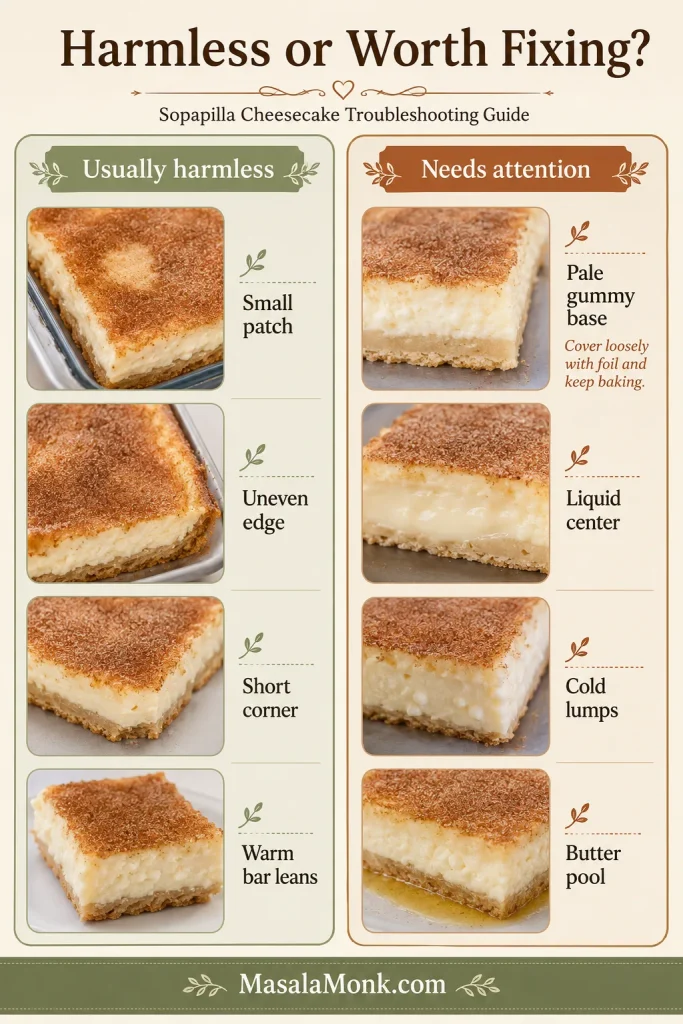
ProblemWhy It Happens and What to Do
Top is dark but the base is paleThe upper sheet finished first. Protect the surface with foil and let the base continue baking.
Upper dough toreThe sheet became warm or was stretched too far. Patch the tear with a small dough scrap.
Filling contains white lumpsThe cream cheese was still too cold. Smooth large lumps before assembly; tiny specks are unlikely to matter.
Hot bars fall apartThe center has not cooled enough to hold an edge. Serve the pieces on plates or let the pan cool longer.
Topping looks greasy or powderyThe butter pooled or missed parts of the dough. Spread it in a thin, even coat before adding the cinnamon sugar.
A previous batch stayed doughy underneathConfirm that the oven reaches the set temperature, use clear glass when you want to monitor the base and allow additional baking time after the top looks ready.
Fix the cause first; changing the whole recipe usually creates another problem.

How to Make a Half Batch

When a full party pan feels like too much, an 8×8-inch / 20×20 cm pan gives you the same layered dessert in a more manageable batch.
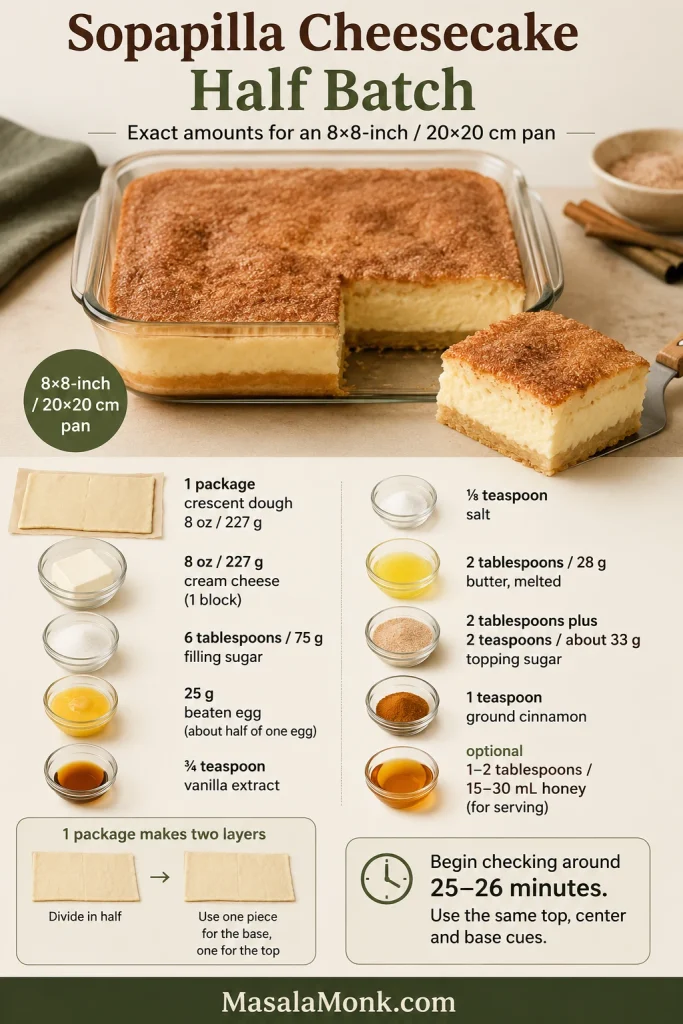
Cut one crescent sheet crosswise. Shape each half separately on parchment to roughly 8×8 inches—one for the base and one for the top.

The pastry will be slightly thinner than in the full batch, so stop stretching if it begins to tear and patch the gap instead. With perforated rolls, use four triangles per layer.

IngredientHalf-Batch Amount
Crescent dough1 package, 8 oz / 227 g, divided equally
Full-fat block cream cheese8 oz / 227 g
Filling sugar6 tablespoons / 75 g
EggWhisk one large egg and use 25 g, or about 1 tablespoon plus 2 teaspoons
Vanilla¾ teaspoon
Fine salt⅛ teaspoon
Butter2 tablespoons / 28 g
Topping sugar2 tablespoons plus 2 teaspoons / about 33 g
Cinnamon1 teaspoon
Honey, optional1–2 tablespoons / 15–30 mL
Weighing the beaten egg is the easiest way to divide it accurately.

Begin checking around 25–26 minutes. Use the same top, center and base cues; depending on the pan, the half batch may still need close to the full baking time.

Variations and Ingredient Changes

Small Flavor Changes

  • Add 1–2 teaspoons finely grated orange or lemon zest to the filling.
  • Replace up to ¼ teaspoon of the vanilla with almond extract.
  • Reduce the topping sugar by 1–2 tablespoons for a less sweet cinnamon crust.

Can You Make Sopapilla Cheesecake Without Egg?

If you simply leave the egg out of this filling, it will be looser and more pastry-like after baking. That can still be enjoyable, but it will not hold the same edge as the main version after cooling.

When avoiding both eggs and the oven matters more than keeping the crescent layers, this no-bake cheesecake recipe is the simpler option.

Changes That Need Their Own Method

Fruit filling releases moisture directly above the lower dough, making a gummy base more likely. Pumpkin, homemade dough and gluten-free pastry also change the moisture level or the way the bars hold together.

Each can produce a good dessert, but none is a simple add-in for the method above.

Make Ahead, Storage and Freezing

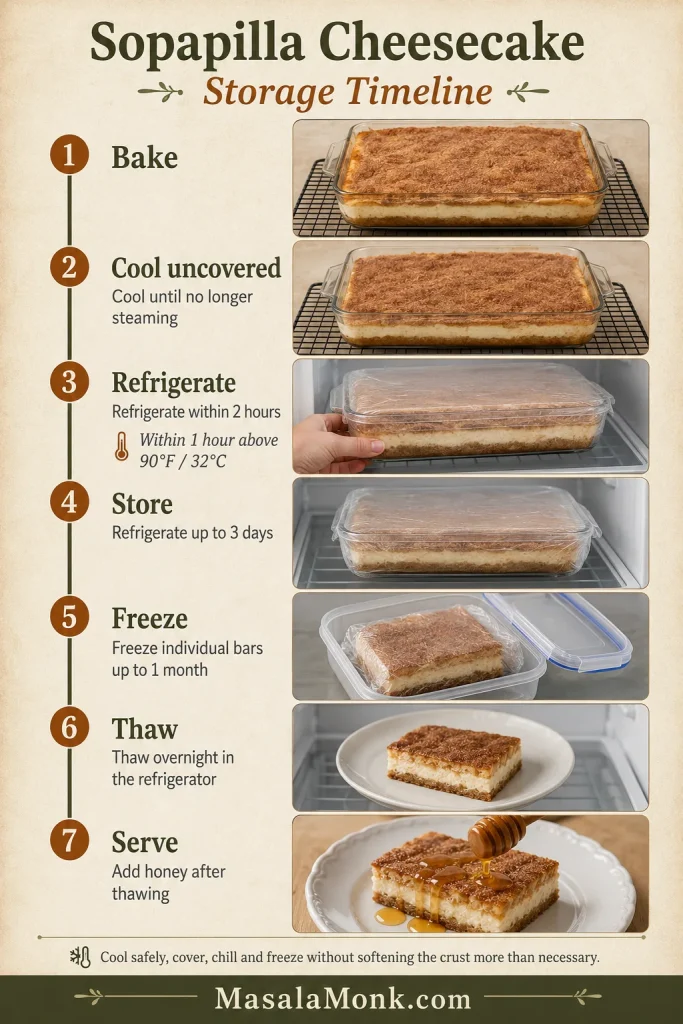
This is an easy dessert to make a day ahead, especially when neat party squares matter more than a crisp, just-baked top. Chill the whole pan overnight, cut it while cold and let the pieces stand briefly before serving.
Does Sopapilla Cheesecake Need to Be Refrigerated?

Yes. Keep the bars at room temperature for no more than two hours—or one hour when the temperature is above 90°F / 32°C—in line with USDA guidance for perishable food. Let the pan cool uncovered until it is no longer steaming, then cover and refrigerate it. Store the bars for up to three days.

To take the chill off a refrigerated bar, leave it at room temperature for about 15 minutes. For a faster result, warm it at half microwave power in five-second bursts and stop as soon as the center softens slightly.

Freezing

  • Freeze fully cooled individual bars without honey.
  • Wrap each piece tightly and place it in a freezer-safe container.
  • Freeze for up to one month for the best pastry quality.
  • Thaw overnight in the refrigerator.
  • Add honey after thawing.

The cheesecake layer freezes well, though the pastry will be less crisp after thawing.

Refrigerated dough is useful for other quick bakes too. This apple cinnamon roll bake takes the same shortcut in a fruitier direction.

Sopapilla Cheesecake vs Churro Cheesecake

The names overlap in many online recipes. Recipes called “Churro Cheesecake” usually put more emphasis on the cinnamon-sugar coating, while “Sopapilla Cheesecake” more often includes honey and references the fried pastry behind the name.
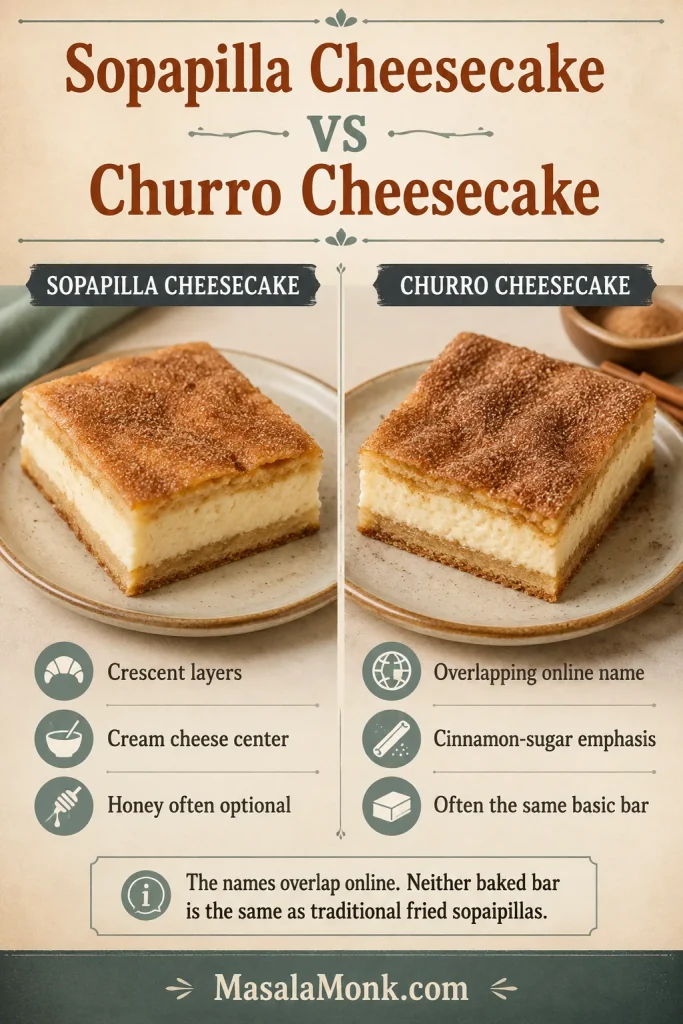
Sopaipilla is another common spelling of sopapilla. In New Mexico, traditional sopaipillas are puffed pieces of fried dough commonly served with honey. The crescent-roll dessert borrows that combination but bakes it into cheesecake bars.

For the crisp fried dough itself, this guide to homemade churros follows a different technique altogether.

Frequently Asked Questions

Can I Use Regular Crescent Rolls Instead of Sheets?

Yes. Press the seams closed before transferring the dough, and keep the sheet cold so it remains easy to move. See the crescent dough comparison for the easiest handling method.

Can I Bake Sopapilla Cheesecake the Day Before?

Yes. Bake and chill the pan overnight, cut it while cold and let the bars stand briefly before serving. Follow the make-ahead and storage guide for cooling and refrigeration timing.

Why Is the Bottom Dough Still Raw?

The cream cheese layer insulates the lower dough, so it may need longer than the golden top. Protect the surface with foil and follow the glass- or metal-pan check in the doneness guide.

Can I Use Low-Fat or Tub-Style Cream Cheese?

Full-fat block cream cheese is the most dependable choice for a filling that sets neatly. Tub-style and lower-fat products can contain more moisture and may leave the center looser after cooling. The filling-texture section shows what properly softened block cream cheese should look like.

Keep the dough cold, bake the lower layer through and cool the pan to the texture you want. Those choices matter more than a perfectly smooth top.

A Pan Worth Sharing

At its best, every bite moves from a crisp cinnamon-sugar crust to a smooth cheesecake center and tender pastry underneath. It is easy enough for an ordinary evening and generous enough for a crowded table.

The first warm corner belongs to the cook; the rest of the pan is made for sharing.
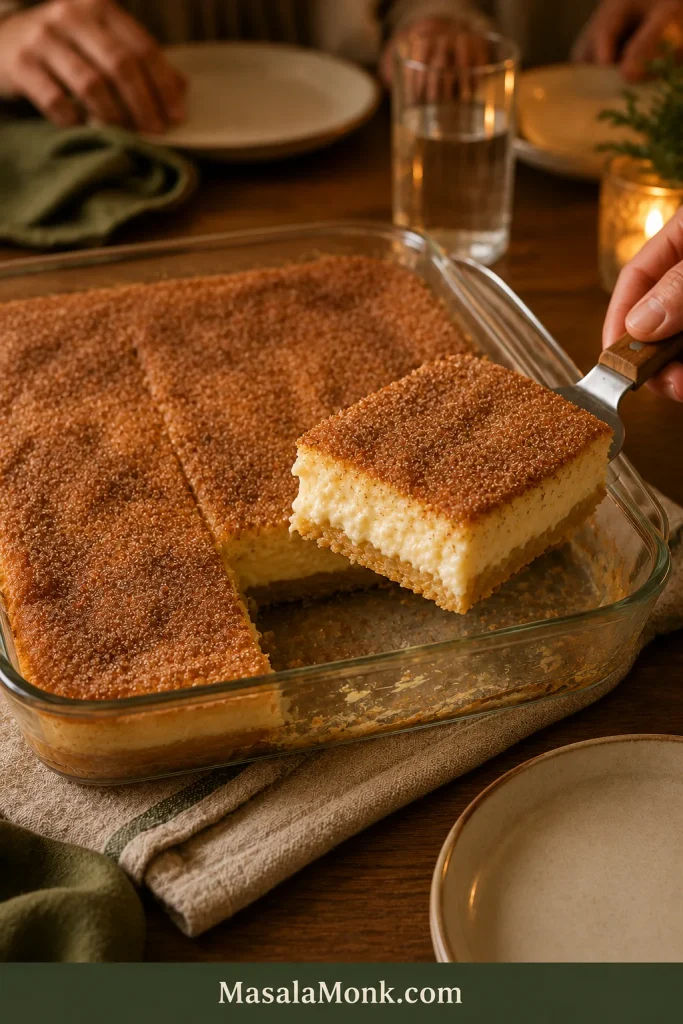
Hand lifting a warm corner bar from a mostly intact glass pan of Sopapilla Cheesecake on a softly lit shared table.
Warm, soft and worth claiming first.

Did you serve the bars warm and soft or chill them for neat squares? Leave a comment and tell us which texture won at your table.

Return to recipe card ↑ Back to top ↑

Posted on 18 Comments

How to Make Churros (Authentic + Easy Recipe)

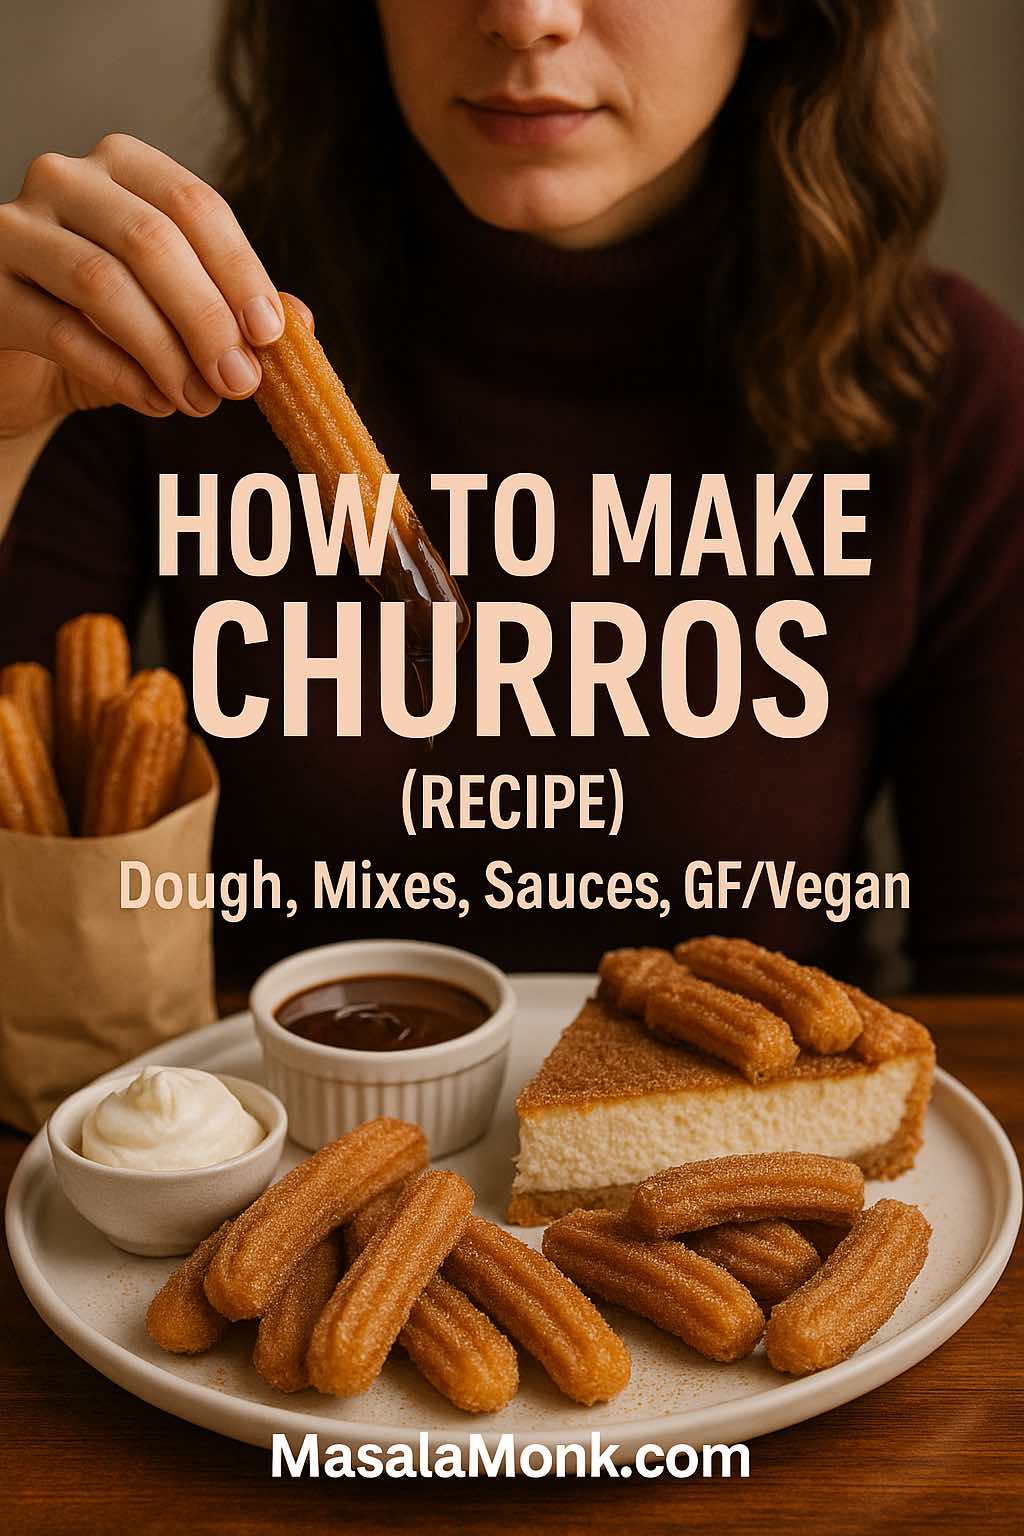
Person dipping a cinnamon-sugar churro into thick chocolate, with churro cheesecake and dips on a tray—cover image for how to make churros.

If the thought of crisp, cinnamon-sugar ridges dunked into warm chocolate makes you grin, you’re in the right kitchen. Today you’ll learn how to make churros from start to finish—no stress, no special machine, and plenty of variations so you can serve a crowd or spoil yourself on a quiet evening. We’ll move from the classic egged dough most home cooks adore to the iconic egg-free style you’ll find in Spanish churrerías. Along the way, we’ll fold in sauces, swaps for vegan and gluten-free eaters, reheating that actually works, and party strategies so everyone gets a hot, snappy bite.

Before we heat the oil, a quick bit of context. Churros are a beloved fried-dough pastry with deep Spanish and Portuguese roots, typically paired with a thick hot chocolate for dunking. If you enjoy a brief origin story, you can peek at a balanced overview of the tradition here: what churros are and how they’re served. That heritage explains why texture matters so much: ridges for crunch, a tender center for contrast, and a dip that clings.

Meanwhile, because you’ll want a sauce the instant the first batch comes out, it helps to make one now. For pure convenience, whisk up this quick, glossy homemade chocolate syrup (dairy- and gluten-free); it’s ready in minutes and happens to suit most dietary preferences. Alternatively, for a richer, classic pairing that nods to Spain, a simple ganache-style dip such as this reliable churros + chocolate sauce method stays silky on the table and feels wonderfully old-world.

Also Read: 10 Creative Chia Pudding Recipes for Every Taste


The Ingredients That Build Crunch and Contrast

Although churros are famously uncomplicated, little details swing the result from “fine” to “can’t stop eating.” You’ll use water, butter (or oil), flour, and eggs for the plush home-style dough. You’ll also mix cinnamon sugar so it’s ready the moment draining finishes; coating while warm ensures every ridge gets a sparkly jacket. In addition, you’ll want a large open-star tip because the sharp edges carve channels into the dough as you pipe, increasing the surface area that crisps in the oil. If you’ve ever wondered why that tip matters, this brief, practical recipe explainer shows the benefit clearly: why a star tip improves texture. For an exact model, here’s the spec page for a sturdy favorite, the Ateco 829 open-star tip.

Stack of cinnamon-sugar churros on a plate with a small glass of thick chocolate; “What Are Churros?” cover graphic.
Churros are a Spanish fried-dough classic—crisp ridges for crunch, a tender center for contrast, and traditionally served with thick hot chocolate.

As for sugar and spice, classic cinnamon never fails. Still, you can nudge the flavor profile in gentle, memorable ways—cardamom for warmth, a whisper of clove for depth, or even chai-leaning blends inspired by riffs like these aromatic Indian-style waffle ideas. Those seasonings ride beautifully on fried dough.

Also Read: How to Cook Bacon in the Oven (Crispy, No-Mess, Crowd-Ready Recipe)


How to Make Churros: The Reliable Step-by-Step

You’ll start with a simple panade, cool it briefly, beat in eggs, and then fry in a steady temperature window. That’s all. Nevertheless, paying attention to two visual cues—the ribbon test and the color of the crust—takes your results from “good” to “repeatable and great.”

1) Simmer and stir (the panade). In a medium saucepan, bring water, sugar, salt, and butter to a gentle simmer. Remove from the heat, dump in the flour in one go, and stir with a firm spoon until the mixture becomes a smooth, cohesive ball and leaves a thin film on the bottom of the pan. That film tells you the starches have gelatinized enough to hold structure.

2) Cool just enough. Spread the dough up the sides of the pan to vent steam. The goal is warm—not hot—so the eggs incorporate without scrambling. Five minutes usually does it.

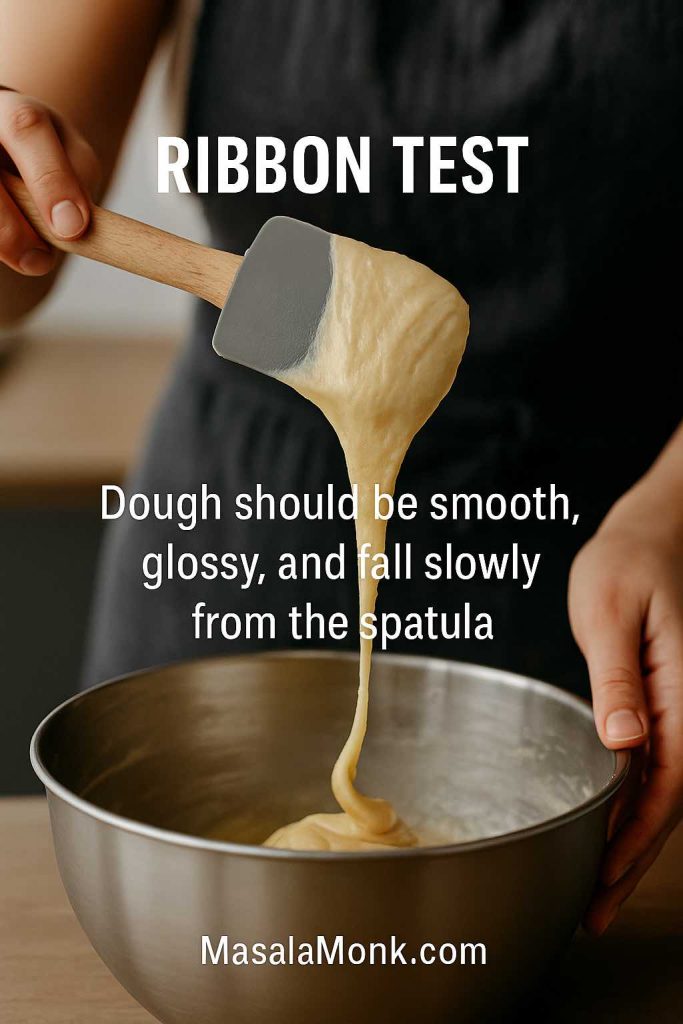
Hands performing the ribbon test, lifting glossy churro dough from a mixing bowl with a spatula so it falls in a slow V-shaped ribbon.
Stop mixing when the dough falls in a slow, glossy ribbon—too stiff causes splitting; too loose leads to greasy, faint ridges.

3) Beat in eggs to the right texture. Add eggs one at a time, beating thoroughly after each addition. The moment the dough turns glossy and falls from the spatula in a slow V-shaped ribbon that eventually “snaps,” you’re there. If it’s too stiff to pipe, a teaspoon or two of water relaxes it; if it’s slumping, a spoonful of flour tightens things.

4) Heat the oil to a dependable window. Aim for 350–375°F (180–190°C). That range is forgiving: too cool and the dough drinks oil; too hot and the ridges scorch while the center lags. This approach tracks with test-kitchen guidance you’ll see in solid technique pieces like this practical step-by-step churros guide.

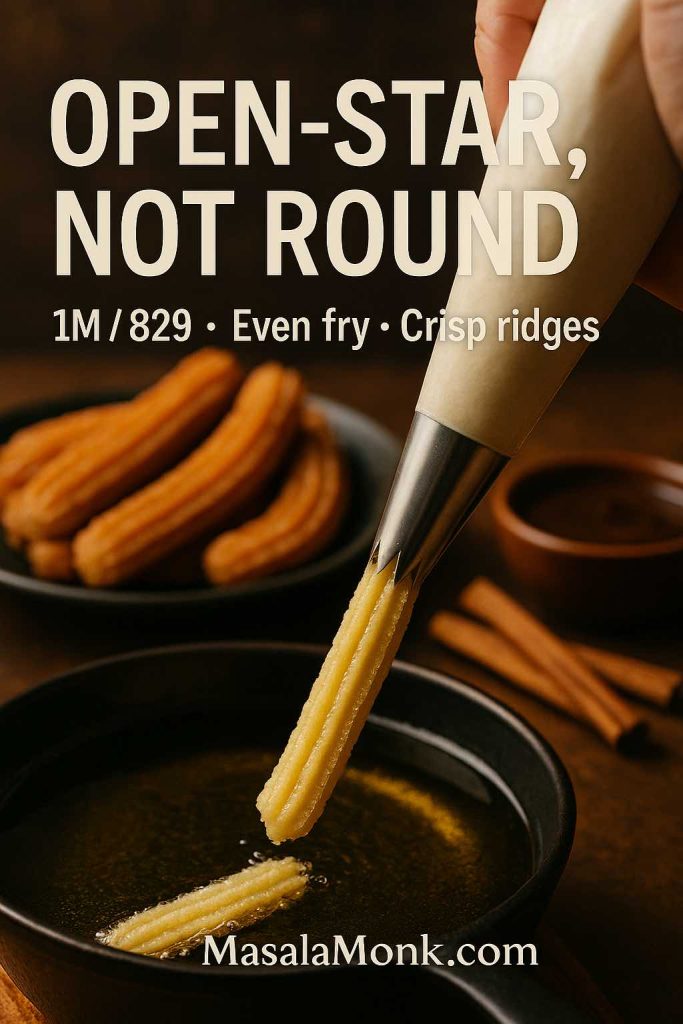
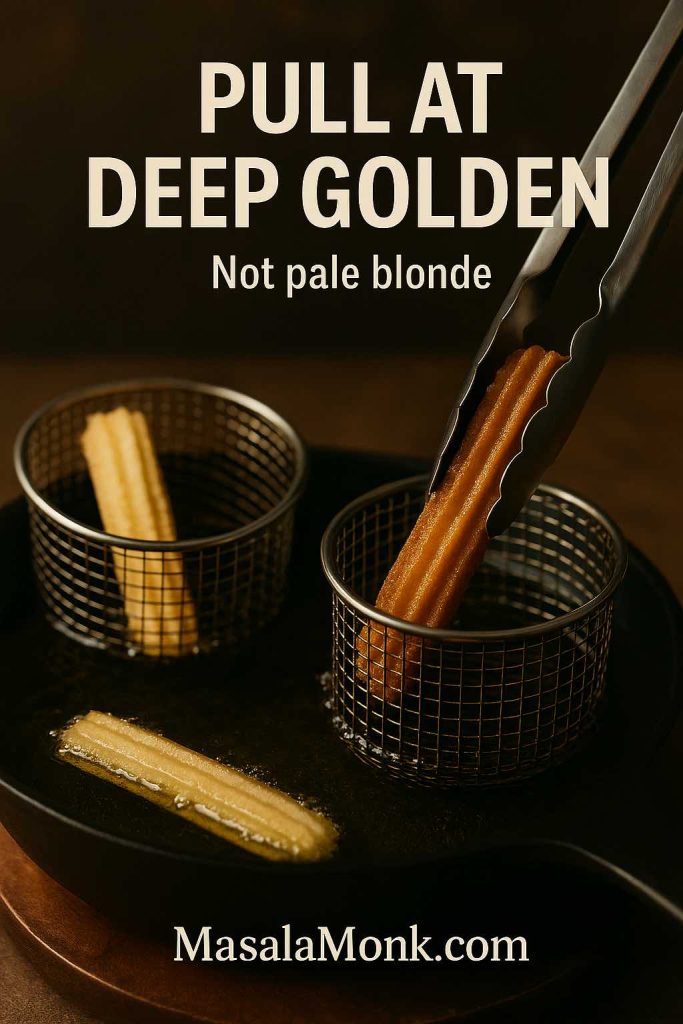
5) Pipe and fry with control. Fit your piping bag with the open-star tip and load it with warm dough. Pipe 15–18 cm (6–7 in) lengths directly into the oil and snip cleanly with kitchen shears. Keep batches modest so the temperature doesn’t plunge. Turn once; pull when they’re deep golden, not pale. The ridges should look distinctly crisp.

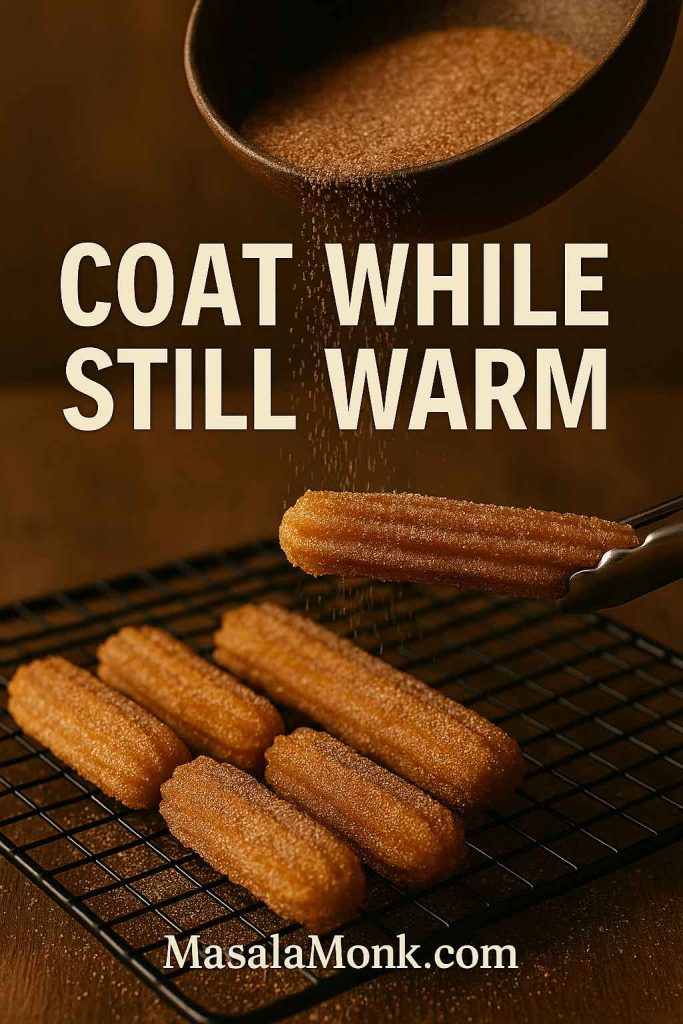
6) Drain and coat while warm. Give each batch a quick rest on a rack, then toss in cinnamon sugar before heat fully leaves the crust. Serve at once, while the contrast between crackle and tenderness is dramatic.

Close-up of a large open-star piping tip (1M/829) extruding churro dough into hot oil with plated churros and chocolate in the background.
Pipe with a large open-star tip (1M/829) for sharp grooves—faster, even frying and better cinnamon-sugar adhesion with fewer splits.

At this point, you’ve made celebratory churros. However, there’s more to explore—authentic dough variations, sauces, desserts that borrow churro flavors, and methods that take the pressure off when you’re hosting.

Also Read: Baked Jalapeño Poppers (Oven) — Time, Temp & Bacon Tips


Authentic vs Easy: Two Ways to Shape Your Style

In many home kitchens, the egged method above wins on reliability and texture; it’s soft-centered without being cakey, and it pipes effortlessly. Conversely, the authentic egg-free style travels closer to what you’ll find in Madrid and beyond. Without eggs, the water-flour dough is firmer to pipe and fries to an even snappier crust with a slightly drier interior—perfect for dunking in sip-able chocolate.

To switch tracks, skip the eggs and increase the water slightly in the panade so it’s pipeable while still warm. Because this dough relies entirely on gelatinized starch for structure, it benefits from assertive ridges, which you’ll get from the same open-star tip mentioned earlier. For the dip, the more classic, thick chocolate aligns with the cultural pairing; a trustworthy rendition sits here: traditional-leaning churros with chocolate. If you’re serving a late-night crowd, that rich sauce keeps spirits high long after the platter is empty.

Comparison of pale and deep golden churros in hot oil with tongs lifting the correctly fried stick.
Pull when ridges are deep golden; pale blonde fries up greasy and soft.

Also Read: 10 Best Chicken Sandwich Recipes (BBQ, Parm, Buffalo & More)


Dough, Batter, and Mixes: Getting the Feel Right

Although recipes give grams and cups, churros reward cooks who watch consistency. Imagine the finished dough as thick, glossy, and obedient: it holds the ridges the tip creates yet flows just enough to avoid seams or splits. Should you be using a store-bought mix, no problem—simply fry a miniature test churro first. If it bulges oddly or bursts along the sides, the dough is likely too stiff; add a teaspoon of water and test again. If it emerges greasy with soft ridges, add a tablespoon of flour to strengthen the structure. The “test and tweak” approach pays off quickly.

On equipment, you genuinely don’t need much: a heavy pot or countertop fryer, a thermometer, and a star tip. The quiet hero, of course, is the open-star. For a quick rationale and home-cook visuals, this short explainer shows how the edges help heat penetrate evenly: star-tip texture basics. If you’re buying a single tip that will do the job for years, you can check dimensions and sizing on the Ateco 829 product page.

Also Read: 10 Best Espresso Martini Recipe Variations (Bar-Tested)

Fresh churros tossed in cinnamon sugar while warm on a rack.
Coat while still warm so the cinnamon sugar adheres to every ridge—wait too long and it slides off.

Sauces and Seasonings: From Classic to Playful

Once you nail how to make churros, sauces become the playground. Start with one dependable chocolate and then add something bright or creamy so every plate gets choice.

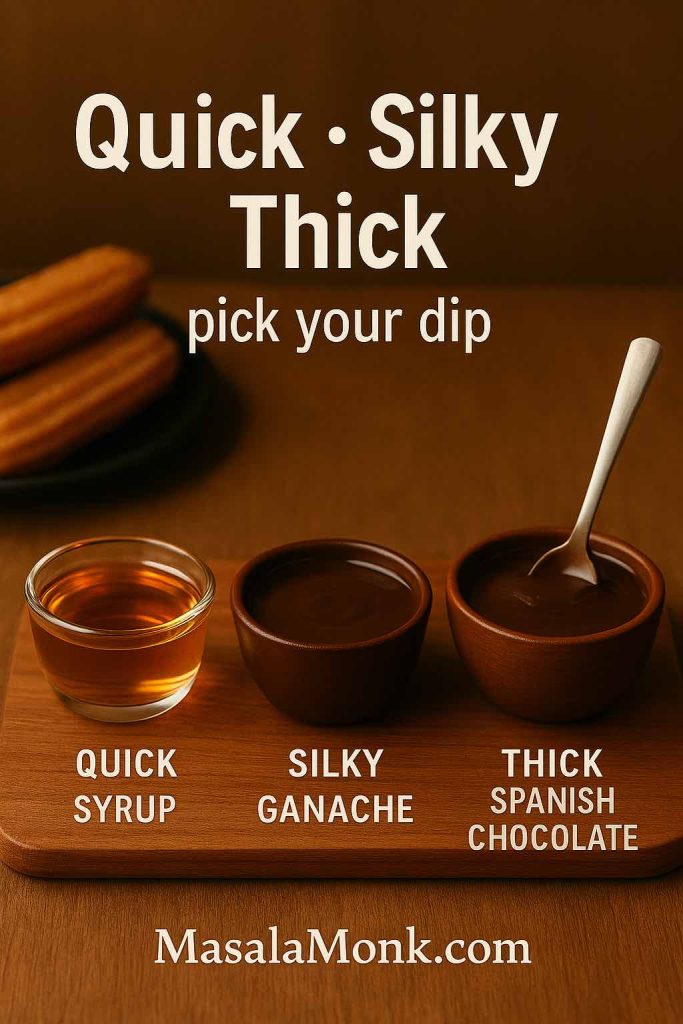
Fast and glossy. If you’re chasing speed without sacrificing shine, this ultra-quick chocolate syrup is a winner. It happens to be dairy- and gluten-free, which is convenient when guests are reading labels.

Ganache-style richness. For a sit-down dessert with candles on the table, ganache offers a silkier cling. The method is low-stress and consistent, as shown in this reliable chocolate dip approach.

Spice sugar, not just cinnamon. Cardamom delivers perfume without heat, while a little clove deepens the aroma. You can take even more cues from Indian-leaning flavors—masala chai, saffron, pistachio—using these playful waffle spice riffs as a starting point and adapting them to your sugar bowl.

Three churro dips on a wooden board: quick syrup, silky ganache, and thick Spanish-style chocolate with a spoon.
Pick your dip: quick pourable syrup for speed, silky two-ingredient ganache for gloss, or thick Spanish chocolate for classic dunking.

A quick dipping bar. For relaxed hosting, place two chocolates and one fruit-forward sauce on the counter. If you need shelf-stable helpers because your stovetop is busy, browse a few jars from the Sauces, Spreads & Dips shop selection and let guests choose their path.

Also Read: Macaroni & Cheese Recipe: Creamy Stovetop, Baked & Southern


Variations and Desserts: More Than One Way to Churro

Because the dough is so versatile, you can remold it into snacks, plated desserts, and party bites. Furthermore, you can borrow the churro profile—cinnamon, sugar, chocolate—and apply it to other forms when frying isn’t practical.

Churro bites. Pipe 2–3 cm nuggets directly into the oil for snackable, one-bite pieces. They fry quickly and hold beautifully in a warm oven while you cycle batches.

Churro waffles. Prefer less oil or serving brunch? Press the egged dough in a hot, lightly greased waffle iron until crisp, then shower with cinnamon sugar. The spirit matches clever “no deep-fry” approaches that trade crunch for convenience; if you like reading about technique, this broader churros walk-through offers smart frying cues you can adapt for waffle-iron timing too.

Churros and ice cream. Fry short sticks, let them cool just enough to avoid melt-down, and assemble ice-cream sandwiches. Vanilla and dulce de leche are obvious; mango ice cream with cardamom sugar is electric.

Festival twists. Embrace warm spices and garnish with pistachios or rose petals. For flavor inspiration, raiding the chai-and-saffron ideas in those Indian-style waffle riffs gives you a shortcut to a spectacular dessert board.

Party-table alternates. When you need an additional tray that eats like a cousin to churros, these finger-friendly French Toast Sticks (Air Fryer + Oven) echo the same cinnamon-sugar joy and pace perfectly with a chocolate dip.

Also Read: Vegan French Toast: 6 Easy Recipes (Pan, Air Fryer, GF & High-Protein)


Dietary Swaps -How to make GF and Vegan Churros

Delicious churros don’t need to exclude anyone. With a couple of adjustments, the signature texture and flavor can shine just as brightly for gluten-free and vegan eaters.

Gluten-free. A straightforward mix of rice flour and tapioca starch produces a crisp exterior and a tender crumb. Because gluten-free dough tends to brown more quickly, stay on the lower end of the temperature window and test a mini first. For dairy-free pairing, that quick chocolate syrup is both shiny and dependable. If you want more plant-based dessert ideas—especially fruity sauces that love cinnamon sugar—flip through this sunny collection of vegan dessert recipes with mango at the center; several of the sauces double as churro dips.

Vegan. The authentic, egg-free path is tailor-made for vegan churros. Use neutral oil instead of butter in the panade, and pipe while the dough is still warm and pliable. If you’re curious about techniques that replace eggs in sweet dishes, this friendly set of swaps—silken tofu, aquafaba, and plant milks—translates well into batter and coating ideas: vegan French toast strategies. Borrowing those tricks makes the rest of your menu harmonize.

Also Read: Pumpkin Spice, Your Way: Master Blend, Variations & Real-World Recipes


How to Make Churros for a Party (Scaling, Holding, Reheating)

Whether it’s a movie night or a birthday, how to make churros at scale comes down to organization. You’ll portion accurately, stagger batches, and keep everything crisp without frantic multitasking.

Plan quantities without guesswork. Count on 2–3 full-size churros per adult or 3–4 minis per kid. If you’re mixing ages and appetites, minis offer the most flexibility—guests take what they want and dips go further.

Stage the sugar and the rack. Set two sheet trays: one with a wire rack for draining, one with a deep bowl of cinnamon sugar. Churros hop from oil to rack to sugar in about a minute; you never want to be searching for bowls while the first batch cools.

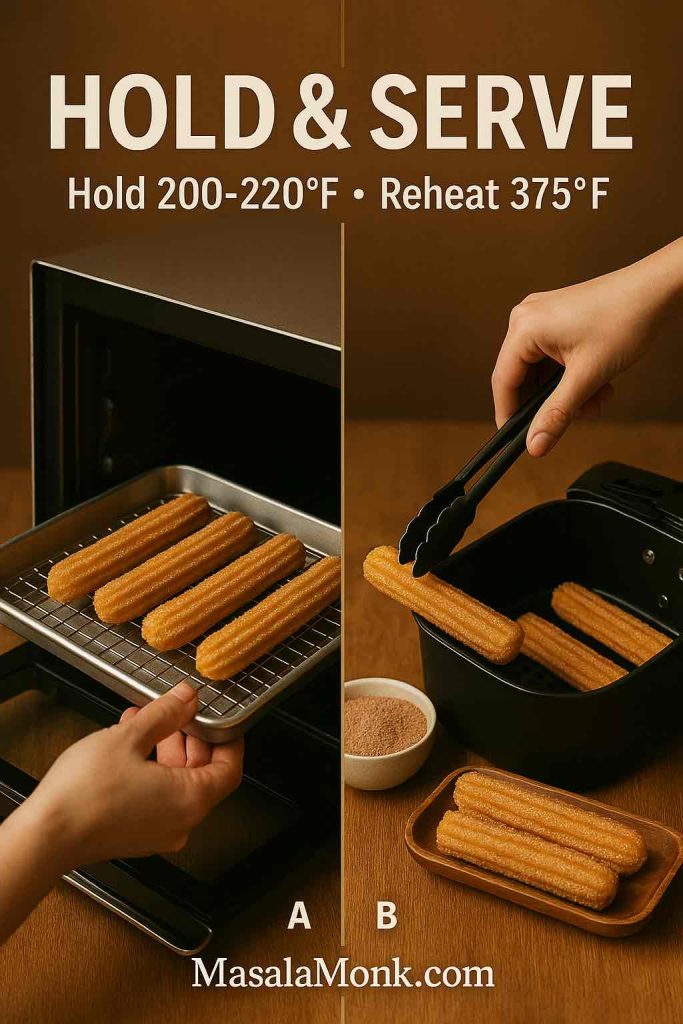
Hold smart, not long. Keep finished churros on a rack in a 95–105°C / 200–220°F oven for up to 15 minutes. Right before serving, toss briefly in fresh cinnamon sugar for that sparkling finish. Holding any longer softens the crust.

Reheat efficiently. If you’re cooking earlier in the day, refrigerate loosely covered, then return to snappy in an air fryer at 190°C / 375°F for 2–3 minutes. Oven reheating at a similar temperature works as well; just spread them on a rack-lined tray so air circulates.

Split image showing churros held on a rack in a warm oven and reheated in an air fryer; “Hold 200–220°F, Reheat 375°F.”
For parties, hold churros on a rack at 200–220°F to keep them crisp, then reheat at 375°F in the air fryer just before serving.

Build a small dipping station. Put out two chocolates—one classic, one bittersweet—and one fruit option. If your schedule is packed, let a couple of jars do the heavy lifting; the Sauces, Spreads & Dips collection makes setup painless.

Offer an alternate tray for balance. A second, cinnamon-sugar-friendly option such as these French Toast Sticks slots in seamlessly and keeps guests nibbling while you finish the last batch of churros.

Also Read: Lemon Drop Martini Recipe (Classic, 3-Ingredient, & More)


Texture Cues and Troubleshooting While You Learn How to Make Churros

Even confident cooks appreciate a quick triage guide. If something looks off, small tweaks usually snap everything back into line.

Greasy or pale. The oil is cooler than you think, or the pot is overcrowded. Reduce batch size and keep the thermometer honest. You’ll see guidance around the 350–375°F / 180–190°C window echoed in solid testing like this practical churros walkthrough.

Scorched ridges, raw centers. That’s the flip side: oil too hot or pieces too thick. Drop back toward 350°F / 180°C and pipe slightly thinner lengths.

Splitting along the sides. Typically the dough is too stiff or your bag is too flimsy. Add a teaspoon of water to the dough and use a sturdy piping bag with a sharp-edged star tip. If you want a quick nudge on why the star matters, revisit this clear, home-cook-friendly explainer; for a durable tool, check the Ateco 829 open-star tip details.

Sugar won’t stick. Coating relies on warmth. If you’ve held churros in the oven, give them a whisper of moisture (a barely damp pastry brush works) and re-toss in sugar just before serving.

Bland sweetness. Cinnamon is standard, yet you can deepen flavor with cardamom or a tiny dash of clove. For delightfully fragrant spins, borrow ideas from these chai-inspired waffle notes and pull them into your sugar mix.

Also Read: Piña Colada: Classic Recipe + 10 Variations (Virgin & On the Rocks)


A Smooth Kitchen Flow From Prep to Plate

A graceful service feels almost like choreography. First, measure sugar and cinnamon into a large bowl; whisk to combine and set beside the stove. Next, assemble your piping bag and tip before turning on the burner. Then, as the panade cools, set your thermometer and line the sheet trays—one with a rack, one for sugaring. After that, pipe your first test churro to confirm oil temperature and dough texture. Immediately you’ll know whether to tweak with a teaspoon of water or a touch of flour. Consequently, every subsequent batch behaves.

If you’re cooking solo for guests, it helps to alternate between piping and sugaring rather than trying to do both at once. In practice, you’ll pipe six or seven lengths, snip them quickly, then rest the bag, flip the frying batch, and ready the sugar bowl. Because churros move from oil to rack to sugar in a rhythm, you’ll find your cadence by the time the second batch lands. Ultimately, you end up with a platter that looks abundant without the cook looking flustered.

Also Read: 6 Wellness Shot Recipes to Boost Your Immune System


Flavor Roadmap: Small Changes, Big Personality

Once you’ve mastered how to make churros, you can tweak elements like you would a favorite brownie recipe—tiny changes, outsized delight.

Sugars. Swap some white sugar for light brown to bring in a hint of molasses. Alternatively, pulse granulated sugar briefly to fine it down; a finer grain coats more evenly and glitters.

Citrus. Toss in zest to the sugar bowl. Orange is classic with chocolate; lime surprises in the best way, especially if your dip leans toward dark, bittersweet notes like the BBC Good Food chocolate sauce.

Nuts. Dust the finished churros with finely chopped pistachio or almond for texture and color. If you’ve leaned into saffron or rose in your sugar, pistachio makes the whole board look composed.

Fruit dips. Mango purée folded into chocolate is sunshine on a spoon. For vegan gatherings, several sauces in this mango-forward dessert collection double as gorgeous churro dips.

Caramel. Salted caramel is both expected and irresistible. To keep service smooth, warm it gently until it ribbons rather than gloops. A caramel next to a darker chocolate lets guests mix dips to taste.

Also Read: Coconut Water Cocktails: 10 Easy, Refreshing Drinks


From Brunch to Late-Night: When and How to Serve

Churros aren’t just a dessert; they’re a mood. Serve them at brunch with strong coffee and a fruit salad; plate them after dinner with candlelight and a thick chocolate; bring them out at midnight during a game and watch the platter disappear.

For brunch, the waffle direction might suit your stove space more generously. If you’d like to stick with the fried version, present minis in paper cones for easy munching. For dinner parties, line them up on a warm platter, dust with fresh sugar at the table, and pass two dips in small pitchers. When the clock pushes late, an effortless sauce keeps things moving; that’s where the quick chocolate syrup earns its place. If you’re populating a dessert buffet, a balancing tray of cinnamon-sugar cousins—these French Toast Sticks—spreads the work and keeps the energy lively.

Also Read: How to Cook Bacon in the Oven (Crispy, No-Mess, Crowd-Ready Recipe)


A Gentle Nod to Tradition

Although we’re cooking at home with practical gear, it’s gratifying to remember that churros are part of a larger ritual: late-night stops at a chocolatería; mornings begun with coffee and a twist of dough; conversations around a shared plate. If that spirit appeals to you, a single classic reference grounds your table in that world—start with this concise cultural sketch: what churros are and how they’re served. Then bring that feeling into your kitchen by serving your chocolate in small cups, not just bowls, so the first dunk feels ceremonial.

Also Read: Easy and Healthy Oat Cookies- No Sugar | No Butter | No Refined Flour


Recap: How to Make Churros, Your Way

Make the panade, cool briefly, beat in eggs until the ribbon falls slowly, and keep the oil heat honest as you fry. Pipe through a large open-star tip for pronounced ridges—a detail championed in approachable guides like this one—and drain on a rack before sugaring while warm. Choose the style: plush egged dough for ease or crisp, egg-free authenticity for that old-world snap. Pair with something simple and shiny, perhaps the 3-minute chocolate syrup, or luxuriate with a thick, classic dip like this ganache-style sauce. For flavor play, follow your nose—chai-spiced sugar, citrus zest, pistachio dust, mango-kissed chocolate—and for the table, balance the platter with a friendly alternate such as French Toast Sticks.

Once you see how easily the dough comes together and how quickly batches cycle, churros shift from “special project” to “Why don’t we?” dessert. And that’s the real secret to how to make churros at home: a short list of ingredients, a handful of trustworthy cues, and a kitchen full of people ready to dunk, laugh, and reach for just one more.

Also Read: Mango Martini + 5 Variants of Classic Cocktail

FAQs

1) How to make churros at home step-by-step?

To begin with, simmer water, sugar, salt, and fat, then stir in flour off heat to form a smooth panade. After that, cool slightly, beat in eggs until the dough ribbons, and pipe with a star tip into 180–190°C oil. Finally, fry to deep golden, drain briefly, and coat in cinnamon sugar.

2) How do you make churros from scratch without eggs (authentic)?

Conversely, for an authentic, egg-free version, increase the water a touch, work the warm dough through a sturdy star nozzle, and fry immediately. Thus, you’ll get extra-crisp ridges and a drier crumb perfect for thick chocolate.

3) What is the easiest way to make churros for beginners?

Notably, the easiest route is the egged dough: it pipes smoothly, tolerates small mistakes, and stays tender inside. Moreover, keep batches small and the thermometer honest, and success follows.

4) What’s the best churros recipe temperature and timing?

Importantly, aim for 350–375°F (180–190°C). Subsequently, most sticks cook in 2–3 minutes per batch; pull when the ridges are deep golden rather than pale blonde.

5) Which piping tip is best for churros?

Likewise, a large open star works beautifully—think Ateco 829 or Wilton 1M. Hence, sharp ridges increase surface area, reduce splitting, and hold cinnamon sugar better.

6) What’s the best piping bag for churros?

Beyond that, pick a heavy-duty disposable or a reinforced cloth bag. Otherwise, thinner bags may burst under the warm, stiff dough’s pressure.

7) Can I use a churro piping nozzle, pastry tip, or star nozzle interchangeably?

Indeed, you can; they’re simply different ways of saying “open-star tip.” Nevertheless, wider openings create sturdier ridges and a more classic look.

8) How to make churros dough (and fix it if it’s off)?

For starters, target a thick, glossy dough that falls in a slow ribbon. If too stiff (splits when frying), add 1–2 teaspoons water; if too loose (greasy, faint ridges), knead in a spoon of flour.

9) Is churro batter the same as churro dough?

Meanwhile, recipes often say “batter,” but churros rely on a cooked dough (panade) similar to pâte à choux. Therefore, expect a pipeable paste, not a pourable batter.

10) Can I use a churro mix or churro batter mix?

Absolutely. However, mixes vary; consequently, always fry one tester, then adjust with a teaspoon of water or flour until the ridges hold and the centers set.

11) How to make churros easy in the oven or air fryer?

Instead of deep-frying, pipe onto parchment and bake at 220°C until golden, brushing with butter before sugaring. Alternatively, air-fry at 200°C until crisp; texture is lighter but still delightful.

12) What chocolate sauce for churros pairs best?

Generally, three styles shine: a quick syrup for speed, a ganache for silk, and a thick, Spanish-style cocoa for nostalgia. Consequently, keep one dark and one milk/bittersweet to please everyone.

13) How to make cinnamon churros extra fragrant?

Subsequently, bloom the cinnamon in warm sugar by stirring while the churros fry. Additionally, a whisper of cardamom or clove adds depth without stealing the spotlight.

14) How to keep churros crispy for a party?

Crucially, drain on a rack, hold in a 95–105°C oven for up to 15 minutes, then re-toss in fresh cinnamon sugar just before serving. Ultimately, avoid covering tightly, which traps steam.

15) How many churros for a crowd?

As a rule, plan 2–3 full-size per adult or 3–4 minis per child. Consequently, for 20 guests, budget ~45 full-size or ~60 minis.

16) What are churro minis, churro bites, and churro twists?

Broadly, minis are shortened sticks, bites are 2–3 cm nuggets, and twists are spiraled lengths. Furthermore, each fries faster; test at 60–90 seconds per side for bites.

17) Can churros be stuffed?

Certainly. After frying, inject pastry cream, dulce de leche, or chocolate using a filling tip. Alternatively, wrap dough around a dowel to create a hollow before frying.

18) How to reheat churros without turning them soggy?

Preferably, air-fry at 190°C for 2–3 minutes or bake at 190°C on a rack-lined tray for 5–7 minutes. In short, skip the microwave, which softens ridges.

19) Are gluten free churros possible?

Yes. Use a blend such as rice flour plus tapioca, and add a pinch of binder if needed. Additionally, keep to the lower end of the fry range because GF dough browns quickly.

20) What about churro gluten free mixes?

Go ahead; just expect different water ratios. Hence, fry a tester, then tweak hydration so the star-cut ridges remain defined.

21) Are vegansk churros (vegan churros) different?

Functionally, vegan churros mirror authentic egg-free ones: water, flour, oil, and salt. Moreover, pipe while warm for easier shaping and a clean snap.

22) How to make churros at home with minimal gear?

Fortunately, a heavy pot, thermometer, sturdy piping bag, and star tip are enough. Apart from that, kitchen shears and a wire rack streamline the workflow.

23) What’s a good churro dessert recipe beyond the classic sticks?

Consider churro waffles, cupcake churros, churro cake layers dusted with cinnamon sugar, or churro cheesecake bars topped with mini sticks. Thus, the flavor profile stretches across formats.

24) Is churro cheesecake worth the effort?

Undoubtedly. Build a cinnamon-sugar base, pour in a creamy filling, and finish with a churro crumble or mini churro garnish. Consequently, texture and aroma sing together.

25) Can I make churros and ice cream as sandwiches?

Absolutely; fry short sticks, cool slightly, and sandwich with vanilla or dulce de leche. Additionally, roll edges in pistachios for crunch.

26) What is a snowy churro or sweet churro?

Colloquially, “snowy” refers to a powdered-sugar finish, while “sweet” often just means cinnamon-sugar heavy. Nevertheless, both benefit from pronounced ridges for better adhesion.

27) What’s the difference between churros and cream vs. churro cream?

Typically, “churros and cream” means pairing with whipped or pastry cream, whereas “churro cream” can be a cinnamon-sugar custard used for filling. Consequently, choose based on serving style.

28) Are frozen churros, pre made churros, or churros to buy worth it?

They’re convenient for volume. However, reheating properly—in a hot oven or air fryer on a rack—matters; otherwise, texture suffers.

29) Where do frozen churros show up most often?

Frequently, supermarkets and warehouse clubs carry them; product names vary by region. Additionally, bakeries sometimes sell par-fried sticks you can finish at home.

30) What’s the simplest churro seasoning beyond cinnamon sugar?

Besides the classic, try cardamom-vanilla sugar, orange-zest sugar, or espresso sugar for moody, late-night boards. Consequently, a small tweak transforms the whole plate.

31) What size star tip for churros yields the best ridges?

Generally, larger open stars (around 8–12 mm opening) create bold grooves. Furthermore, wider tips reduce internal pressure, which helps prevent splitting.

32) Do I need a churros fryer machine, churro cooker, or churros making kit?

Not necessarily. Instead, a heavy pot and thermometer do the job. Kits can be handy for frequent batches, yet they aren’t required for excellent results.

33) How to pipe churros neatly if I’m new?

Firstly, hold the bag at a slight angle, squeeze steadily, and snip with shears for a clean end. Secondly, practice over parchment before piping into oil for confidence.

34) How to make churros easy with kids helping?

Safest of all, let kids roll warm churros in sugar and measure ingredients, while adults handle frying. Consequently, everyone participates without worry.

35) What’s a good churro dessert lineup for parties?

Ideally, serve cinnamon churros, churro bites, a churro cheesecake tray, and a chocolate-plus-caramel dip duo. Moreover, add a fruit sauce to brighten the spread.

36) How to package a bag of churros or churros in a bag?

Prefer paper over plastic so steam escapes. Additionally, sugar just before bagging and keep the top slightly open to preserve crunch.

37) Can I make cupcake churros or cake churros?

Certainly; fold cinnamon sugar into a simple batter, then crown cupcakes with mini fried sticks. Consequently, you get bakery-style drama without fuss.

38) What are churro chips or churro twists?

They’re thin, crunchy variations—either cut from dough or made from flat extrusions—dusted with cinnamon sugar. Meanwhile, they store better than classic sticks for snacking.

39) How to choose a good churro mix or churro mixture at the store?

Look for clear directions, a star-tip recommendation, and consistent reviews about crispness. Additionally, prioritize mixes that specify oil temperature ranges.

40) What qualifies as the best churros recipe for me?

Ultimately, the one that fits your kitchen flow: egged for plush interiors and easy piping, or egg-free for classic snap and dunk-able texture. Thus, pick based on mouthfeel, not hype.