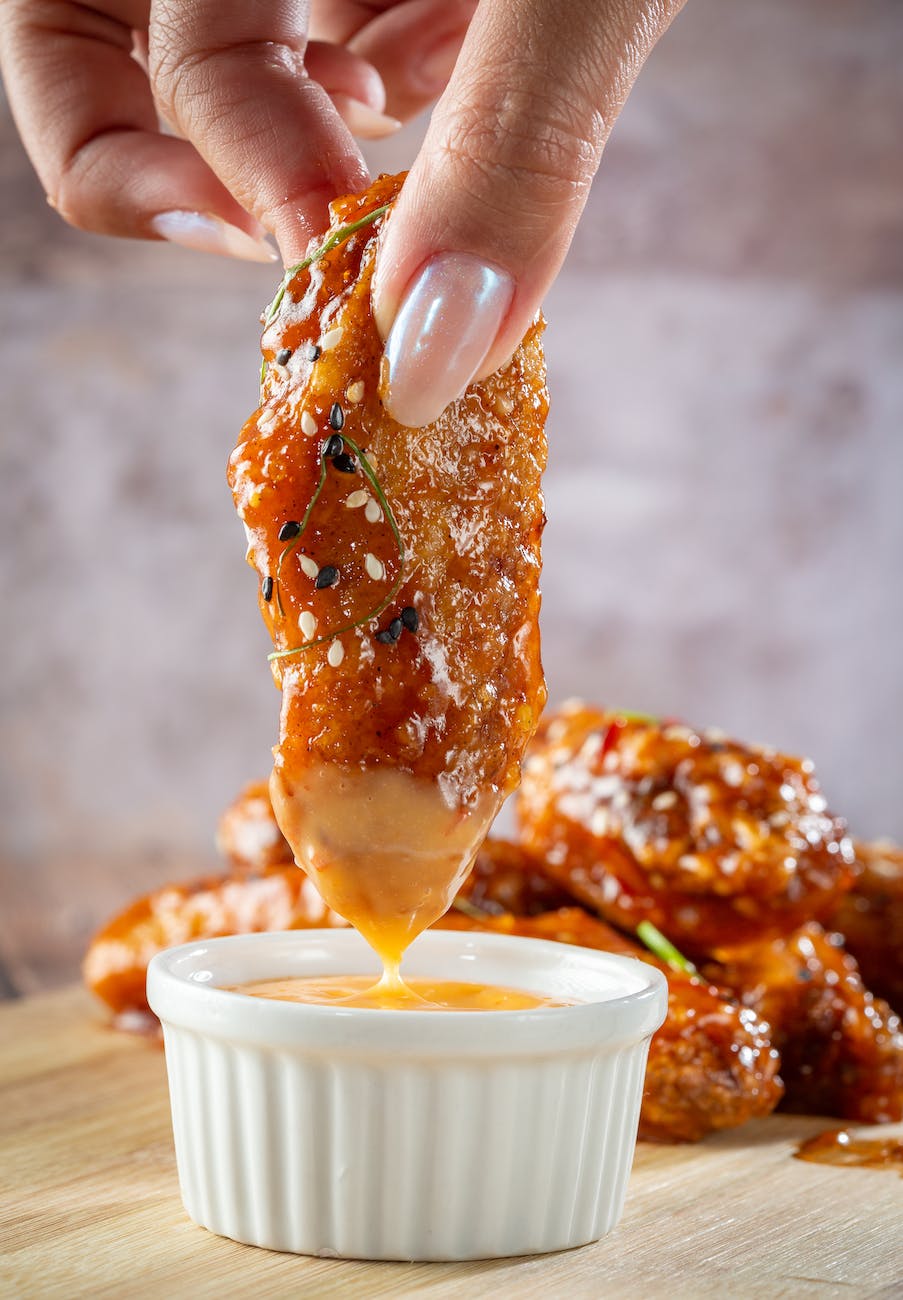
There’s a very particular kind of happiness that comes from a tray of lemon pepper chicken wings landing on the table. The first thing you notice is the smell: hot chicken, citrus, and black pepper all hitting your nose at once. Then you see the skin, blistered and golden, flecked with tiny bits of lemon zest and coarse pepper. And finally there’s that crunch when you bite in, followed by juicy meat and a bright, salty, lemony finish that makes your fingers impossible not to lick.
You do not need a restaurant fryer or a game-day catering budget to make wings like that at home. With a bag of wings, a couple of lemons, and a bit of patience, you can build your own version that’s just as addictive—maybe more, because you can tweak it exactly the way you like.
In this long, detailed guide, you’ll walk through:
- A flexible base recipe for lemon pepper chicken wings
- Three cooking methods: air fryer, oven-baked, and shallow-fried
- A fresh homemade lemon pepper seasoning you can keep in a jar
- A buttery “lemon pepper wet” sauce for glossy, saucy wings
- Variations like honey lemon pepper, spicy three-pepper wings, and lemon pepper ranch
- Side dishes, dips, and drinks that turn wings into a full spread
- How to store and reheat leftovers safely while keeping them crisp
Grab a drink, skim once to see which method you’ll use, and then dive back in with your wings and spices ready to go.
Also Read: What to Mix with Jim Beam: Best Mixers & Easy Cocktails
Why Lemon Pepper Chicken Wings Hit So Hard
Before getting into the practical stuff, it helps to understand what we’re chasing.
Texture: Crispy Outside, Juicy Inside
The dream lemon pepper chicken wing is all about contrast:
- Skin: tight, dry, and crisp enough that you hear it crackle
- Meat: tender and still juicy, never stringy or overcooked
- Coating: light enough to cling, bold enough to taste in every bite
That combination comes from a few small habits: drying the wings, seasoning them well, and cooking them with enough heat and airflow that the skin really dehydrates and browns. Certain techniques, like using a little baking powder in the dry rub, are popular because they raise the pH of the skin and help it crisp more deeply, a trick explored in depth in testing-focused cooking articles.

Flavor: Bright, Salty, Peppery
Then there’s the flavor profile:
- Lemon: zesty and fresh, with just enough juice to be tangy
- Pepper: freshly cracked and slightly floral, not just dusty heat
- Salt: present but balanced, never harsh
- Butter or oil: there in the background, carrying all the other flavors
A good lemon pepper seasoning hits those notes cleanly. In its traditional form, lemon pepper is made by infusing dried lemon zest into cracked black pepper and then combining it with salt and optional aromatics. When you build your own version at home, you can decide how lemony, how peppery, and how salty you want it.
Comfort: Casual but Special
Finally, wings have that special status of being both casual and celebratory. They fit into:
- Friday-night snacks
- Game-day spreads
- Lazy family dinners
- Potluck tables where everybody grabs with their fingers
Lemon pepper in particular has a kind of “grown-up” flavor profile—more sharp and aromatic than heavily sweet sauces—while still being totally approachable.
That’s what we’re aiming for: wings that feel like something you’d order from a favorite place, only made at home, exactly to your taste.
Also Read: Katsu Curry Rice (Japanese Recipe, with Chicken Cutlet)
Ingredients for Lemon Pepper Chicken Wings
To keep things painless, let’s group everything into four parts: the wings, the base seasoning, the lemon pepper blend, and the optional wet sauce.
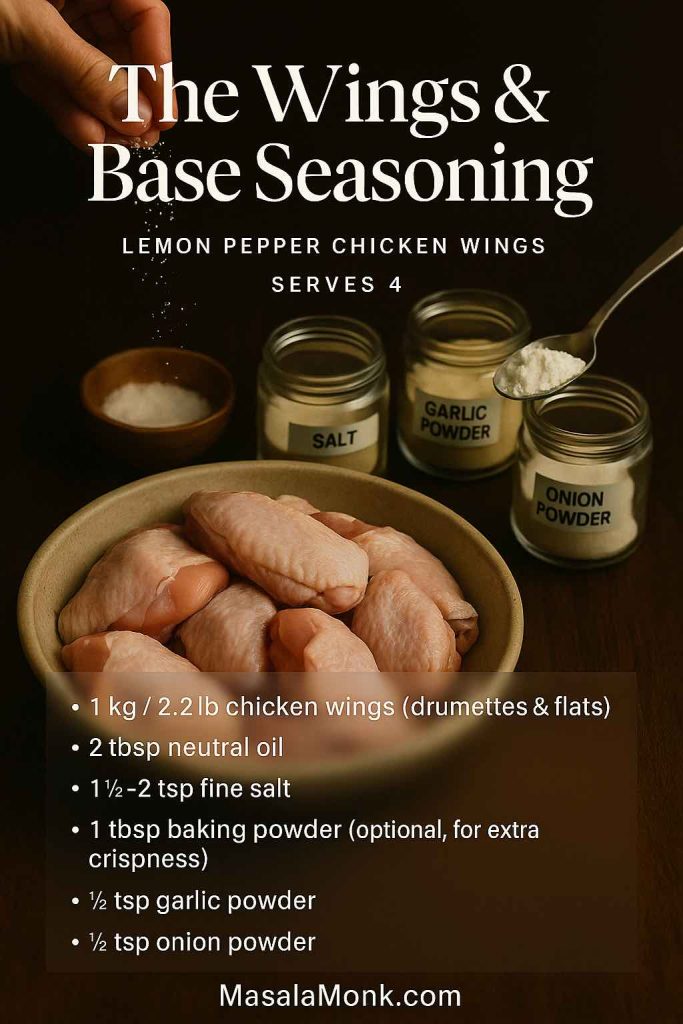
The Wings and Base Seasoning
For roughly 4 servings (or fewer, if everyone is wing-obsessed), you’ll want:
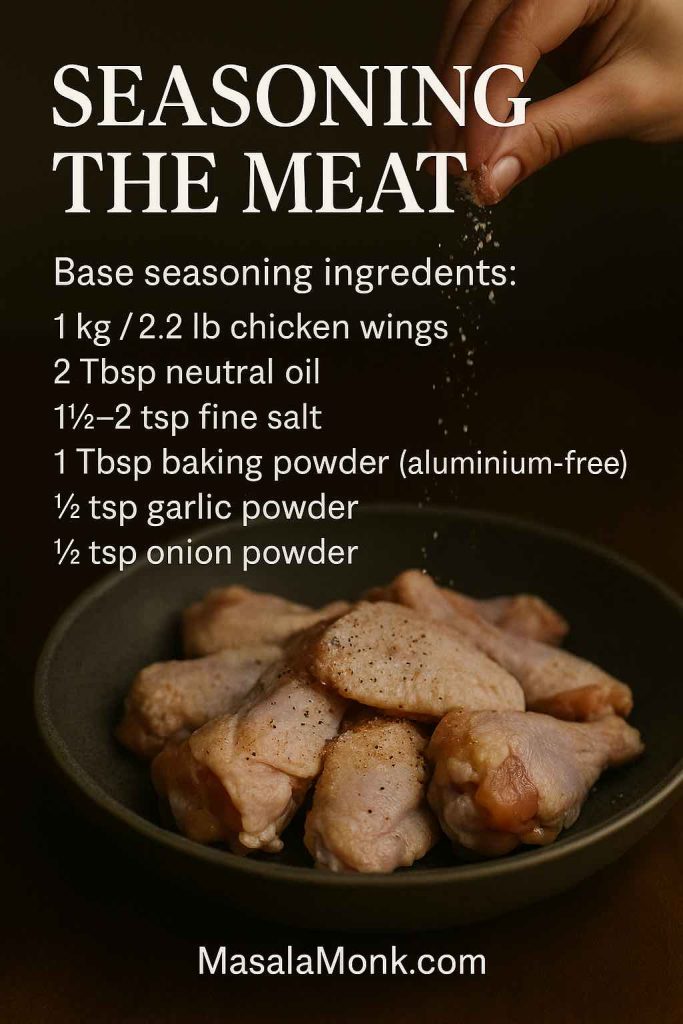
- 1 kg / 2.2 lb chicken wings, split into drumettes and flats, wing tips removed
- 2 tablespoons neutral oil (such as avocado, sunflower, or canola)
- 1½–2 teaspoons fine salt, adjusted according to your lemon pepper blend
- 1 tablespoon baking powder (aluminium-free; optional but excellent for crispness)
- ½ teaspoon garlic powder
- ½ teaspoon onion powder
This base seasoning gives the wings a solid, savory foundation. If you’ve ever wondered why some baked or air-fried wings feel a bit flabby, it’s often because the skin never really dries out or because there isn’t enough salt on the meat itself.
The baking powder is a small but powerful addition. Tests on crispy poultry have shown that an alkaline coating encourages browning and crunch, which is why this trick shows up again and again in recipes for crispy baked wings and roasted chicken skin.
If you’d rather skip it, you absolutely can; just make a point of drying the wings very thoroughly and not overcrowding them during cooking.
Also Read: Simple Bloody Mary Recipe – Classic, Bloody Maria, Virgin & More
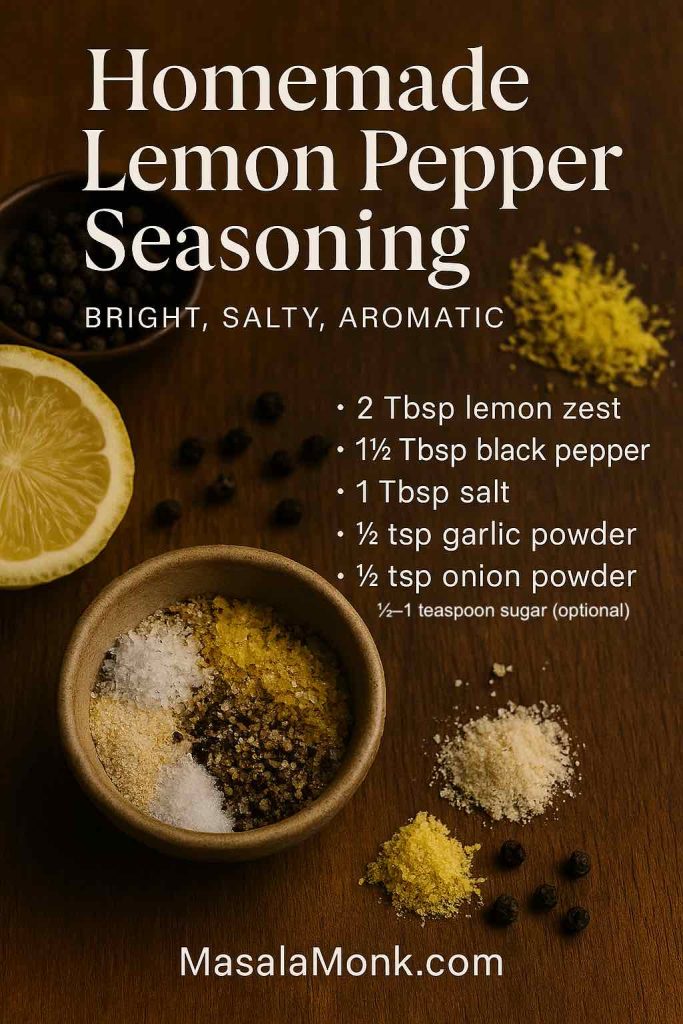
Homemade Lemon Pepper Seasoning
There are many store-bought lemon pepper seasonings available, and some are genuinely tasty. However, they also vary hugely in saltiness and lemon intensity, and quite a few are mostly salt with a faint citrus scent.
Making your own gives you control. You can keep it bright, adjust the salt, and even decide how fine or coarse the pepper should be.
For a small jar:
- 2 tablespoons finely grated lemon zest (preferably from unwaxed lemons)
- 1½ tablespoons freshly cracked black pepper
- 1 tablespoon flaky or coarse salt
- ½ teaspoon garlic powder
- ½ teaspoon onion powder
- ½–1 teaspoon sugar (optional, but it rounds off any bitterness and helps browning)
To prepare it:
- Spread the lemon zest in a thin layer on a plate or small tray.
- Let it air-dry for a few hours, or place it in a very low oven until it’s no longer wet to the touch.
- Combine the dried zest with the pepper, salt, and other seasonings, then stir thoroughly.
- Store in an airtight jar away from direct heat and light.
If you’d like reassurance on the proportions or want another perspective, you can glance at a similar homemade lemon pepper seasoning recipe that uses dried lemon zest, black pepper, and salt as its backbone.
For each kilo of wings, plan on 1½–2 tablespoons of this seasoning, plus more at the table for anyone who likes an extra sprinkle.
Also Read: Air Fryer Hard-Boiled Eggs (No Water, Easy Peel Recipe)
Lemon Pepper “Wet” Sauce
Some people love their lemon pepper chicken wings dry and crisp, with the seasoning clinging directly to the skin. Others adore the “wet” style: glossy, buttery, and intensely lemony.
For a small batch of wet sauce:
- 4 tablespoons unsalted butter, melted
- 1–2 tablespoons fresh lemon juice, to taste
- 1 tablespoon lemon pepper seasoning
- Optional: 1 teaspoon hot sauce if you like an extra kick

Whisk it all together until smooth. Taste and adjust the lemon, salt, and heat. If it feels too sharp, a pinch more butter or a drop of honey will smooth things out. If it tastes flat, a bit more lemon juice or seasoning will wake it up.
You’ll toss fresh-cooked wings in this sauce to make them “lemon pepper wet”.
Also Read: Tres Leches – Mexican 3 Milk Cake Recipe
Optional Extras
Depending on your mood, you can also have these on standby:
- Extra fresh lemon wedges for squeezing
- A little more freshly cracked black pepper at the table
- Honey for quick honey lemon pepper wings
- Cayenne pepper or chili flakes for a spicier batch
- Ranch dressing or yogurt-based sauces for dipping
Now that everything’s assembled, it’s time to get the wings ready to cook.
Prepping the Wings Properly
Spending ten minutes on prep makes a huge difference later. Instead of jumping straight into cooking, take a moment to set the wings up for success.

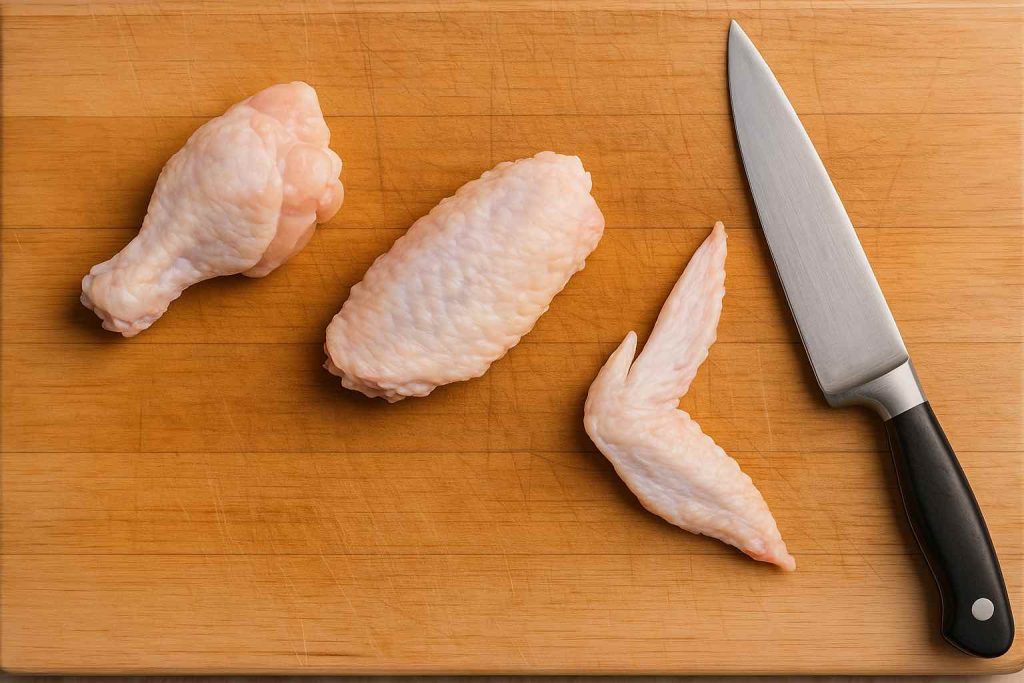
Trimming and Splitting
If your wings aren’t already separated, start by cutting each whole wing into:
- The drumette (the meaty piece that looks like a tiny drumstick)
- The flat (the two-boned middle section)
- The tip (which you can save for stock if you like)
Sharp kitchen shears work well; a small chef’s knife is also fine. Once you’ve separated them, discard any stray feathers or bits of skin.
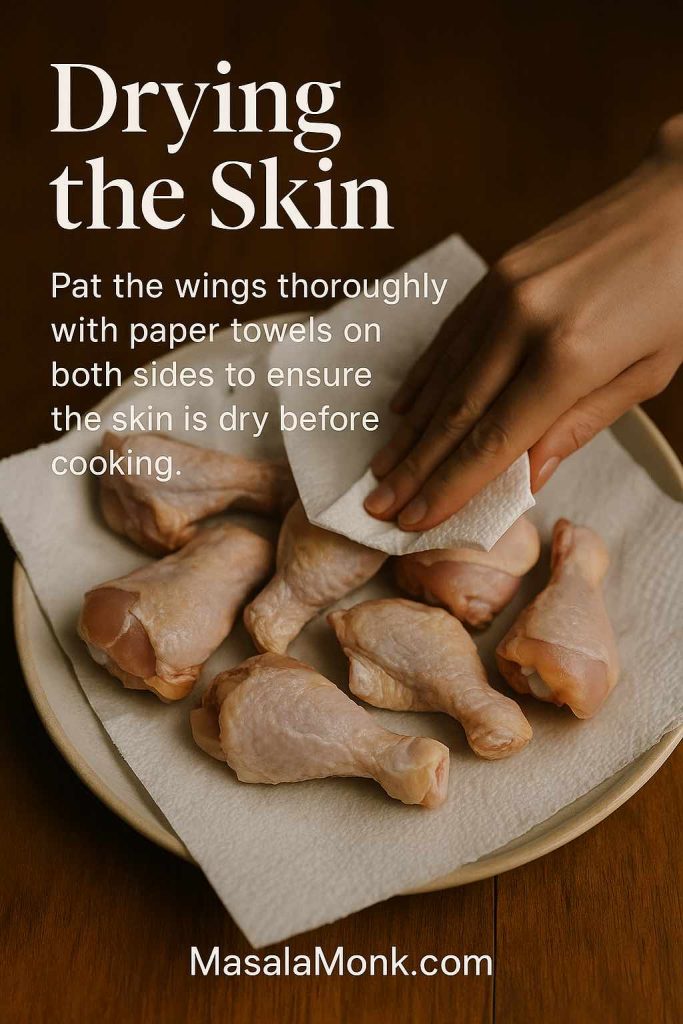
Drying the Skin
Next, lay the pieces out on a tray or large plate lined with paper towels. Pat every side dry. Flip them and pat again. It may feel a little tedious, but this step is one of the keys to crisp wings later, especially in the oven or air fryer.
If you’re planning ahead, you can put the tray of dried wings into the fridge, uncovered, for an hour or two. The circulating air helps dry the skin even further. Some cooks even leave them overnight.
Seasoning the Meat
Once the wings are dry, slide them into a big bowl. Sprinkle over base seasoning or:
- The oil
- Salt
- Baking powder
- Garlic powder
- Onion powder
Using your hands or a spatula, toss everything until the wings are evenly coated. Make sure the baking powder doesn’t clump; it should be completely mixed into the other seasonings.
At this stage you can cook right away, or you can let the wings sit in the fridge for about half an hour to absorb the salt and spices. That short rest is a kind of mini dry brine; it helps season the meat all the way through and encourages a beautiful, even color on the skin.
Notice that we still haven’t added the lemon pepper seasoning. That comes later, once the wings are cooked and still hot. Adding it at the end protects the lemon zest from burning and keeps the flavor bright.
Also Read: Peanut Butter Cookies (Classic Recipe & 3 Variations)
Base Method: From Raw Wings to Golden and Ready
Although the details differ from method to method, the basic flow is always the same:
- Prep and season the wings
- Cook using air fryer, oven, or oil
- Toss hot wings in lemon pepper seasoning and/or wet sauce
- Check internal temperature
- Serve and enjoy
With that structure in mind, you can choose the cooking approach that fits your kitchen and mood.
Air Fryer Lemon Pepper Chicken Wings
If you own an air fryer, this is likely to become your favorite method. It’s fast, fairly clean, and makes crisp wings with very little oil.
Preheating and Setup
Begin by preheating your air fryer to 190–200°C / 375–400°F. Preheating ensures the wings start crisping immediately, rather than steaming while the machine warms up.
While it heats, lightly oil the basket if things tend to stick, and double-check that the air vents are clear. Basic air fryer safety guidelines, such as keeping the unit on a heat-resistant surface and avoiding obstructed vents, help everything cook evenly and safely.
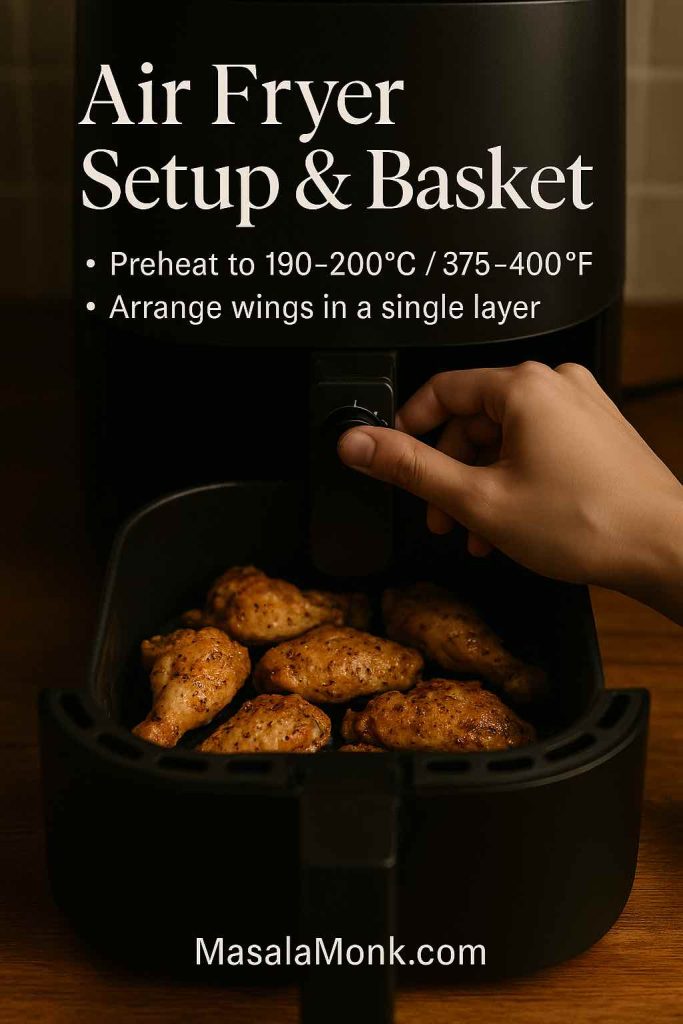
Arranging the Wings
Place the seasoned wings into the basket in a single layer. It’s okay if they’re a little close, but try to avoid stacking them. Air fryers crisp food by blasting it with hot moving air; when air can’t circulate, you get pale, soft spots instead of even browning. Overcrowding is one of the most common reasons for disappointing results.
If you have more wings than comfortably fit in one layer, plan on cooking them in batches rather than forcing everything in at once.
Cooking Time and Turning
Slide the basket in and air fry the wings for about 22–26 minutes, flipping or shaking them halfway through. The exact time depends on:
- The size of your wings
- Your specific air fryer model
- How packed the basket is

Around the 20-minute mark, start checking their color and texture. The skin should look golden to deep brown and feel firm when you tap it with tongs.
Seasoning While Hot
As soon as the wings are cooked, transfer them to a clean bowl while they’re still sizzling. Sprinkle over 1½–2 tablespoons lemon pepper seasoning and toss until every piece looks speckled with zest and pepper.
If you’re going for air-fried lemon pepper wet wings, drizzle in some of the butter–lemon sauce and toss again. The residual heat helps the flavors sink in and the butter cling without separating.
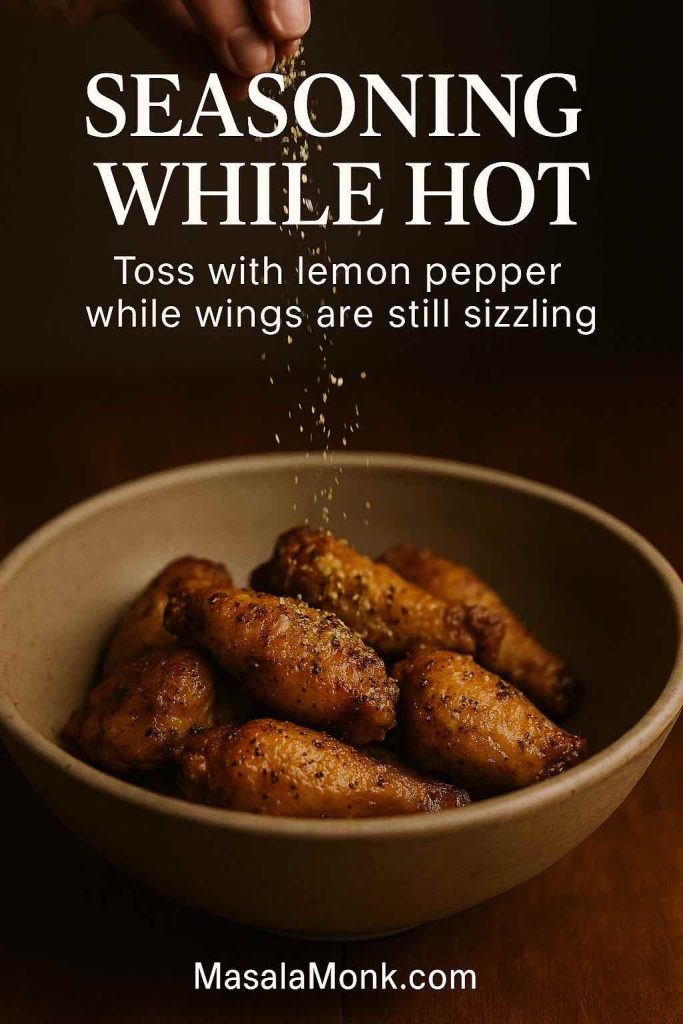
Pile the wings onto a platter, garnish with fresh lemon wedges for squeezing, and bring them straight to the table.
Also Read: Homemade Hot Chocolate with Cocoa Powder Recipe
Oven-Baked Lemon Pepper Chicken Wings
When you’re feeding more than a couple of people, the oven suddenly becomes your best friend. A single large tray can handle a mountain of wings at once.
Preheating the Oven
Set your oven to 220°C / 425°F. If it has a convection (fan) option, switch it on; that extra air movement mimics the air fryer effect and encourages crisp skin.
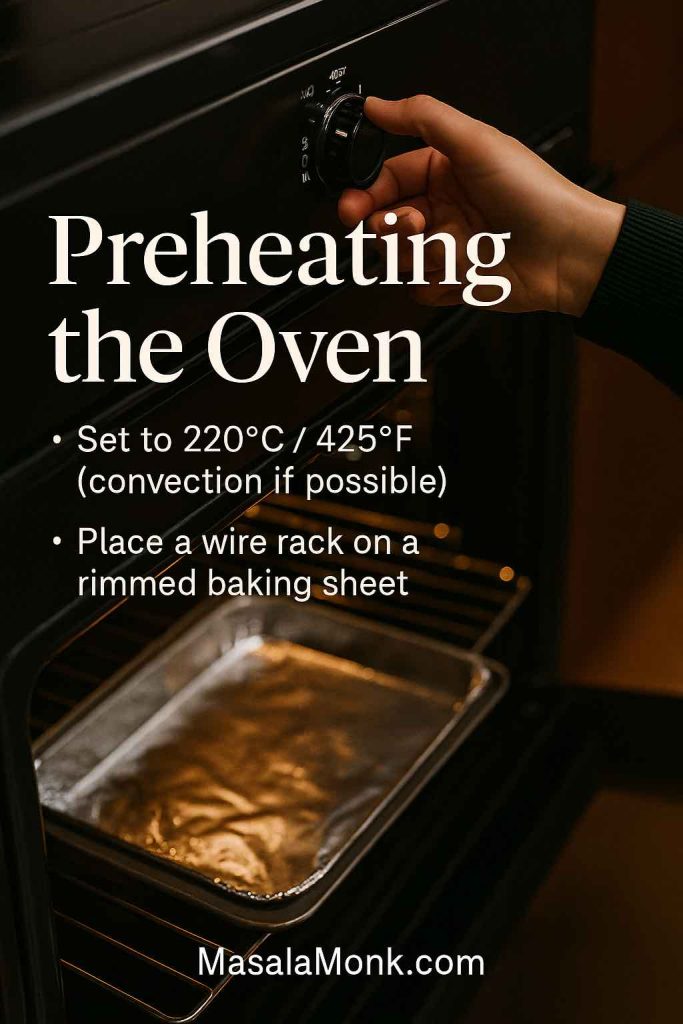
Place a wire rack on a rimmed baking sheet and line the sheet with foil or parchment for easier cleanup. The rack keeps wings elevated, allowing hot air to circulate underneath, which is especially helpful when the sheet is crowded.
Arranging and Baking
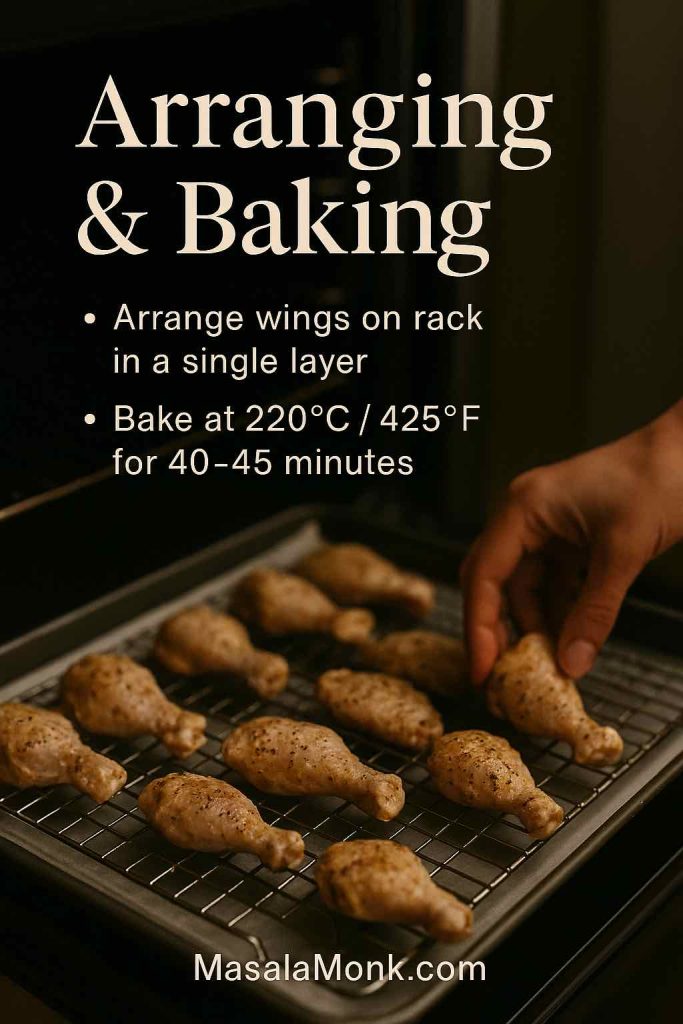
Spread the seasoned wings out in a single layer on the rack. Avoid stacking them; if necessary, use two trays and swap their positions halfway through baking.
Slide the tray into the hot oven and bake for 40–45 minutes, turning the wings once in the middle of the cooking time. As they roast, the skin will gradually tighten and brown, and the fat will drip down onto the tray.
If, towards the end, they look well-cooked but not quite crisp enough for your taste, you can switch on the broiler for the last 2–3 minutes. Watch carefully at this stage; the lemon and pepper can go from perfect to scorched very quickly under direct heat.
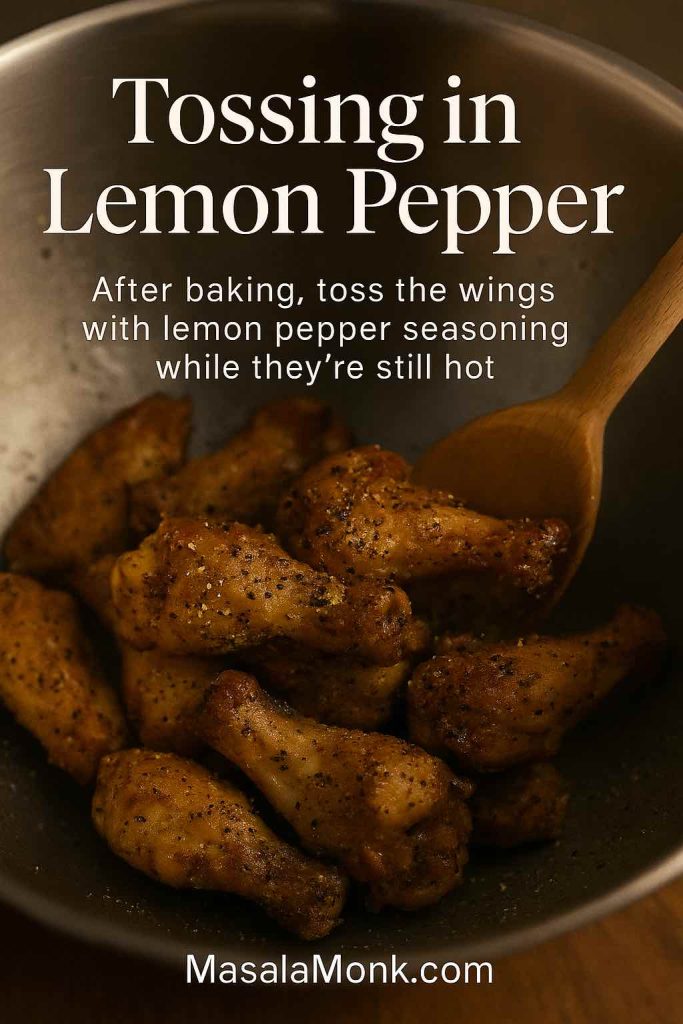
Tossing in Lemon Pepper
Once they’re sizzling and golden, transfer the wings to a mixing bowl. Immediately dust them with lemon pepper seasoning and toss gently but thoroughly. If you’d like some of them wetter, move half to another bowl and toss those in your butter–lemon sauce.
The baked method gives you lemon pepper chicken wings with a little less hands-on time than frying, plenty of crunch, and the satisfaction of pulling a huge, steaming tray from the oven.
Also Read: Watermelon Daiquiri: A Refreshing Twist on a Classic Cocktail
Fried Lemon Pepper Chicken Wings
There’s something undeniably satisfying about fried wings. The oil helps create that deeply blistered, crunchy skin that many people associate with their favorite wing spots.
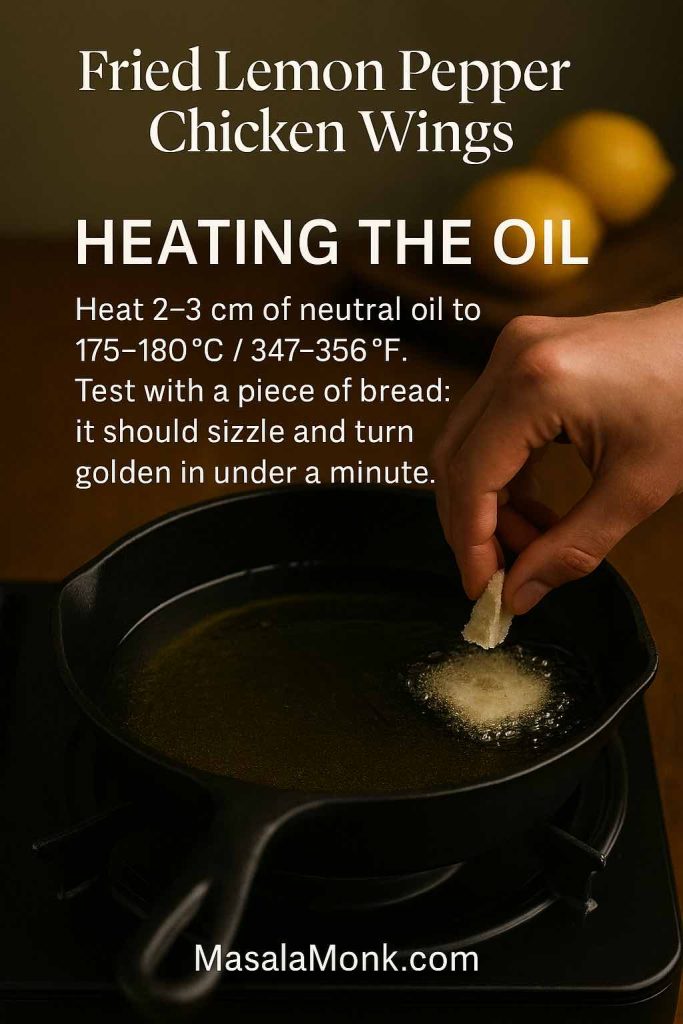
Heating the Oil
Choose a wide, heavy pan—a deep skillet or Dutch oven works well—and pour in 2–3 cm of neutral oil. Heat it to 175–180°C / 347–356°F. If you don’t have a thermometer, you can use the old bread test: a small piece of bread should sizzle and turn golden in under a minute.
Keep the handle turned inward and the pan on a stable burner. Having a splatter guard or lid nearby is handy, just in case.
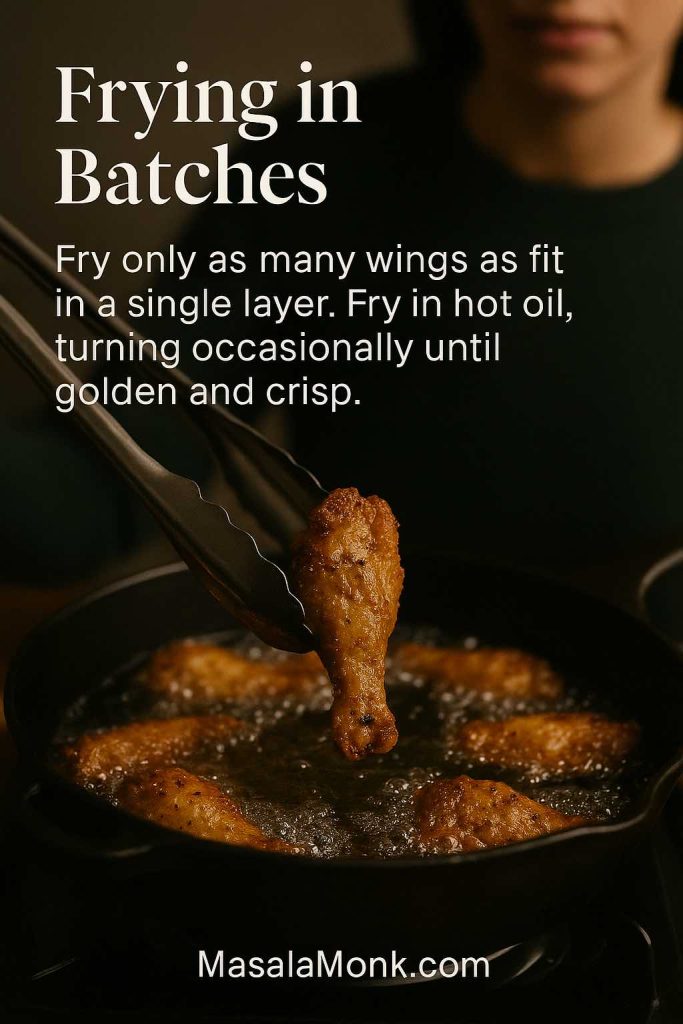
Frying in Batches
Lower the wings into the oil carefully, placing them away from you to minimize splashes. Fry only as many as fit comfortably in a single layer; crowding cools the oil and leads to greasy, unevenly cooked wings.
Let them sizzle for 10–12 minutes, turning occasionally so they brown on all sides. Heavier wings may need a little longer. The skin should be deeply golden and crisp, and the meat cooked through.
Check the internal temperature of a few wings with an instant-read thermometer; it should read at least 165°F / 74°C, matching the recommended safe minimum temperature for chicken.
Transfer cooked wings to a wire rack set over a tray or to paper towels to drain.
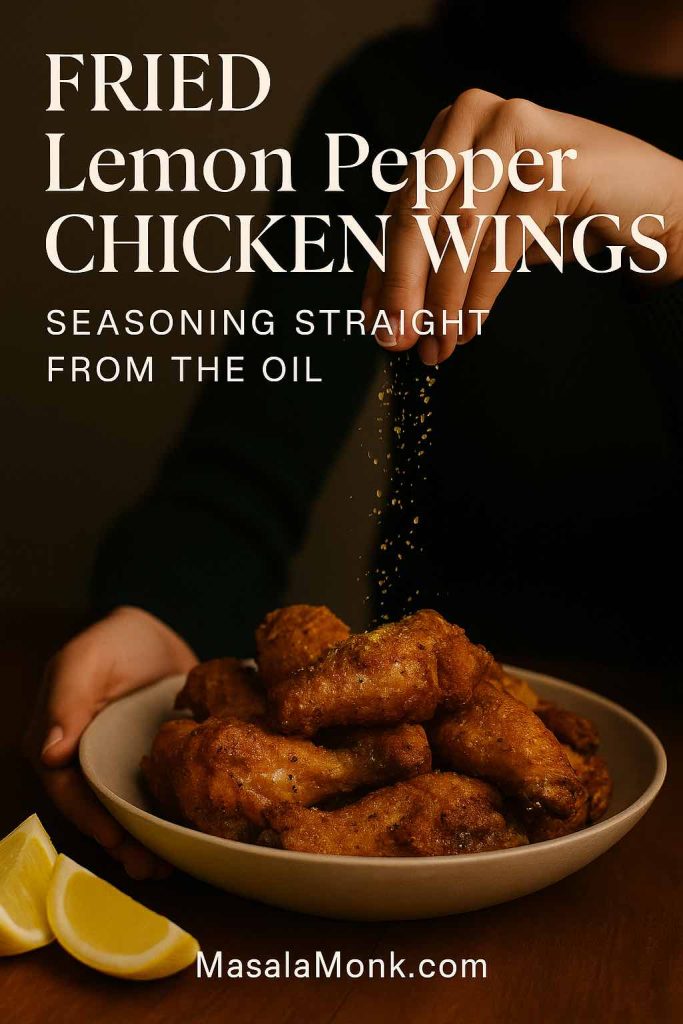
Seasoning Straight from the Oil
While the wings are still hot and glistening, move them into a bowl and shower them with lemon pepper seasoning. Any residual oil on the surface helps the spices cling and bloom. For a truly indulgent batch, pour in some of the buttery lemon mixture too and toss until everything looks shiny.
If you’re cooking several rounds of fried wings, you can hold finished ones in a low oven (around 140°C / 285°F) for a short time. Just remember the usual game-day safety guidance: cooked foods shouldn’t sit in the “danger zone” between cold and hot for extended periods.
Also Read: Authentic Butter Chicken Recipe (Murgh Makhani) Creamy and Flavorful
Lemon Pepper Chicken Wings Variations
Once you’ve done a straightforward batch, it’s hard to resist playing. Fortunately, the base lemon pepper chicken wings recipe is like a blank canvas that welcomes small tweaks.
Honey Lemon Pepper Chicken Wings
To turn a portion into honey lemon pepper wings:
- Stir 2–3 tablespoons honey into your melted butter–lemon sauce.
- Toss a batch of hot wings in this mixture until they’re evenly coated and shining.
- Taste one and adjust with another splash of lemon juice or a pinch of salt if needed.
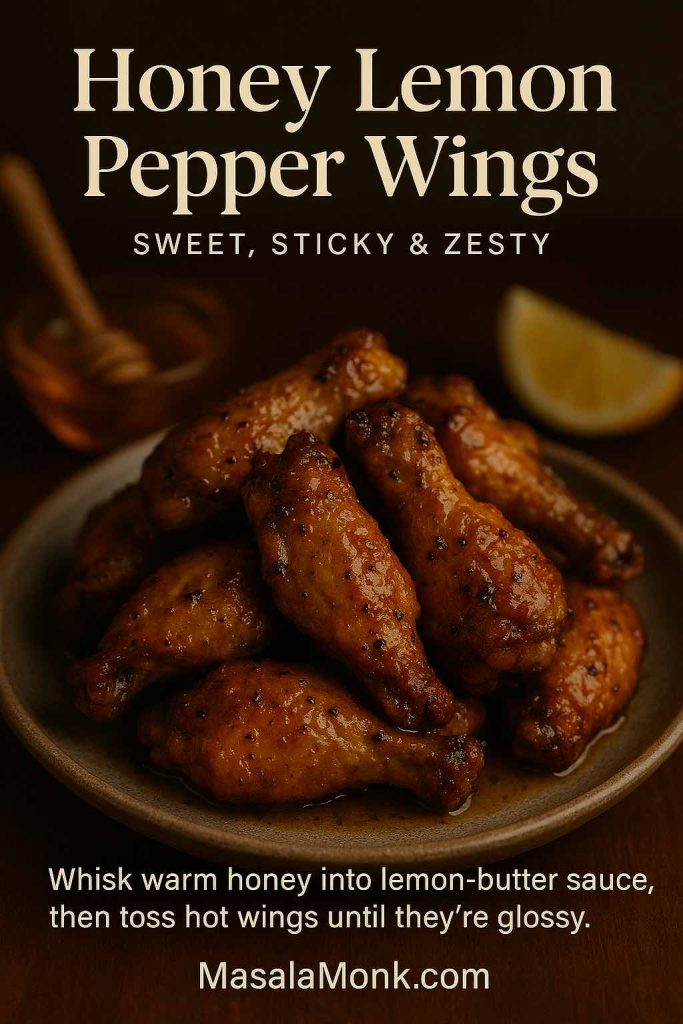
The honey softens the sharp edges of the lemon and pepper, so this variation is especially popular with people who like a gentler, slightly sweet wing.
Spicy Lemon Pepper Chicken Wings
If your crowd enjoys a bit more heat, you can make spicy lemon pepper wings by layering in a few extra flavors.
For the dry rub, add:
- ½–1 teaspoon cayenne pepper, chili powder, or a mix of your favorite hot spices
For the finishing sauce, consider:
- A spoonful of hot sauce
- Extra cracked black pepper on top
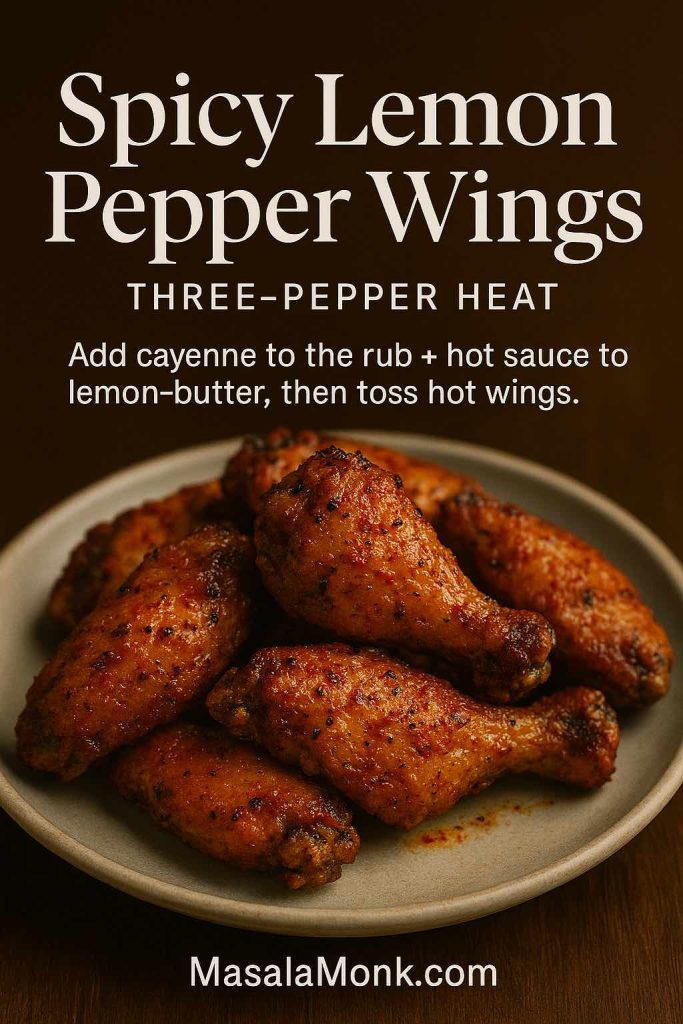
The idea is to pull heat from three places: the black pepper, the cayenne or chili, and the hot sauce. That way, you get a “three-pepper” style intensity without losing the citrusy brightness that makes lemon pepper wings so distinctive.
Also Read: Kali Mirch Paneer | Black Pepper Paneer- Kid Friendly Recipe
Lemon Pepper Ranch Chicken Wings
When you want to lean toward creamy, herby flavors without giving up the lemon-pepper backbone, ranch steps in.
There are a couple of simple routes:
- Lemon Pepper Ranch Dip
Stir some lemon pepper seasoning into a bowl of thick ranch. Use it as a dip for classic lemon pepper wings, vegetable sticks, and maybe some potato wedges. - Ranch-Coated Lemon Pepper Wings
Thin ranch with a bit of lemon juice until it’s just pourable. Toss freshly cooked, lightly lemon-peppered wings in a small amount of this dressing so they get a light ranch glaze.
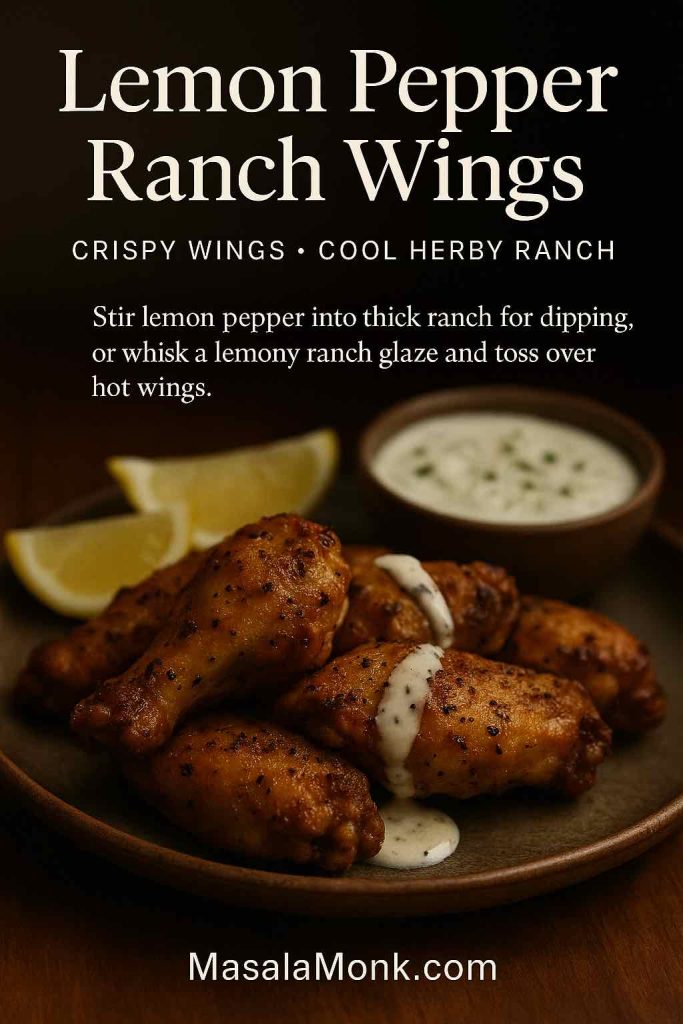
Either way, you keep the zing of lemon and the bite of black pepper, while adding the familiar tang and herbs of ranch.
Extra Twists to Try
As you get comfortable, you might experiment with:
- Garlic Lemon Pepper Wings – Add minced garlic to the butter sauce or increase the garlic powder in the base rub.
- Smoky Lemon Pepper Wings – Add a little smoked paprika or chipotle powder to the seasoning mix.
- Herby Lemon Pepper Wings – Finish with chopped parsley or thyme for fresh, green notes.
Small changes can dramatically shift the personality of your wings without requiring a completely new recipe.
Dips, Sides, and Extras for Wing Night
A platter of lemon pepper chicken wings is already a good time, yet pairing them with a few well-chosen sides turns everything into a proper event. You don’t need to go overboard; two or three complementary dishes go a long way.

Cool and Creamy Dips
First, let’s talk dips. Wings love anything creamy or tangy that cools the palate.
A versatile approach is to offer more than one option:
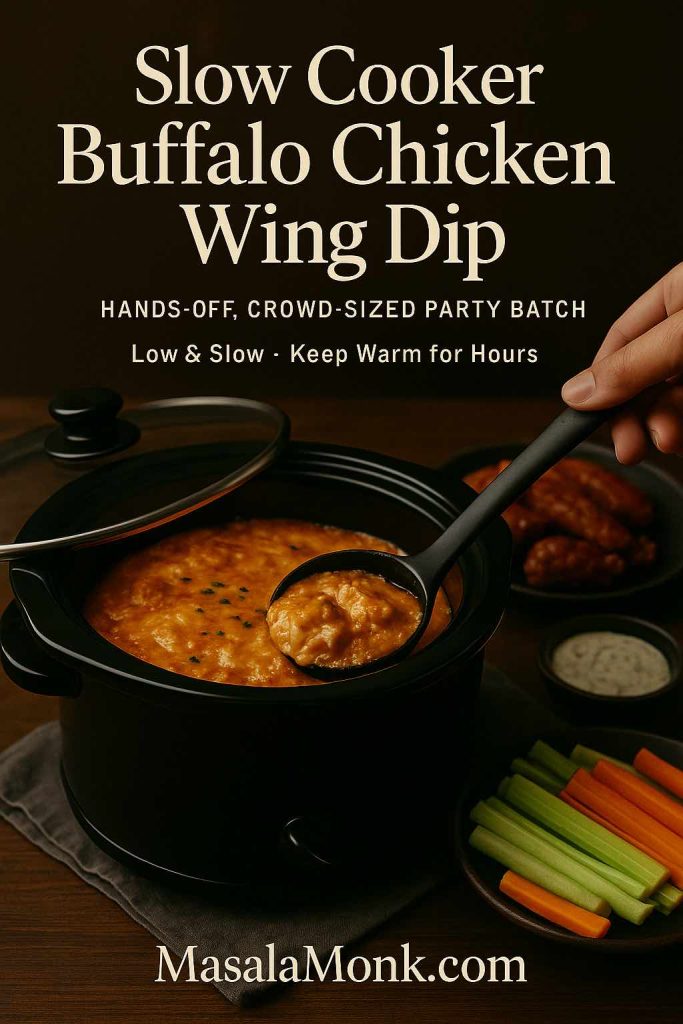
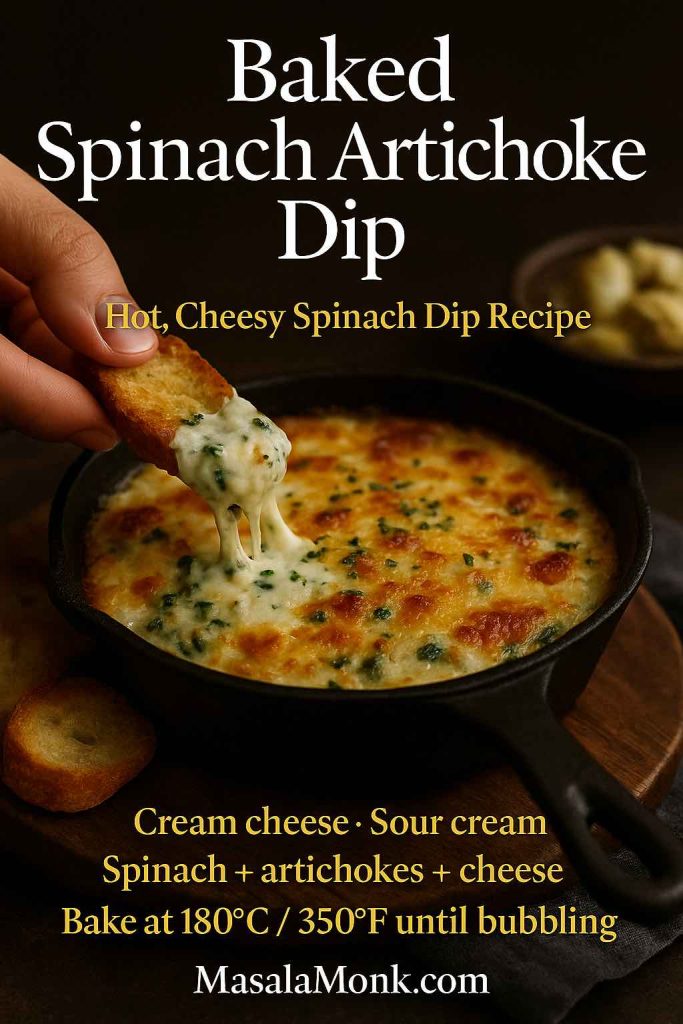
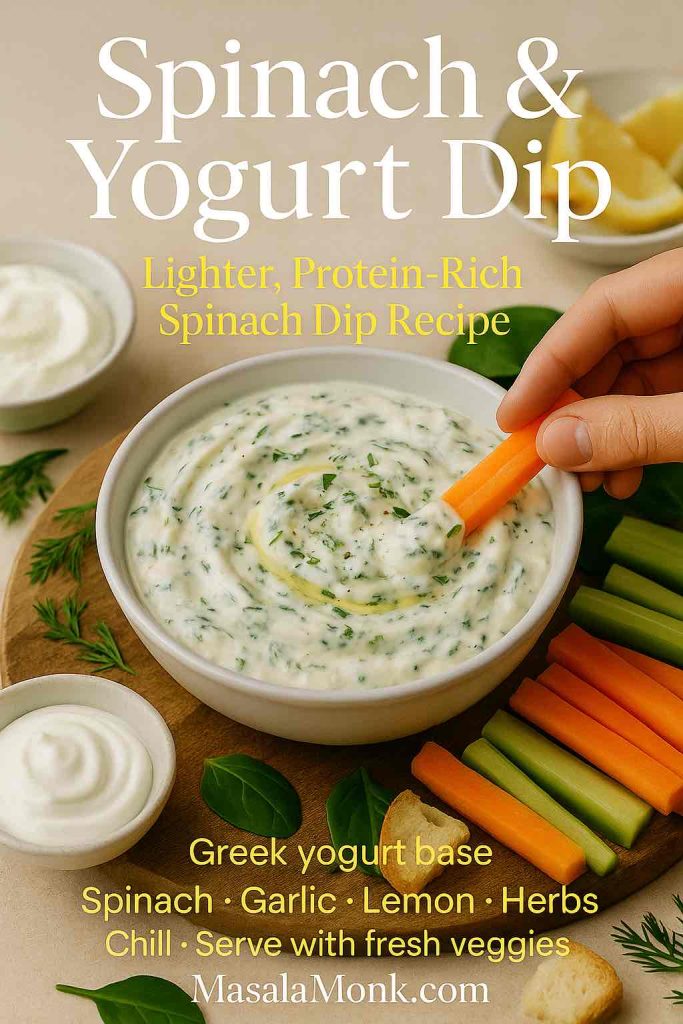
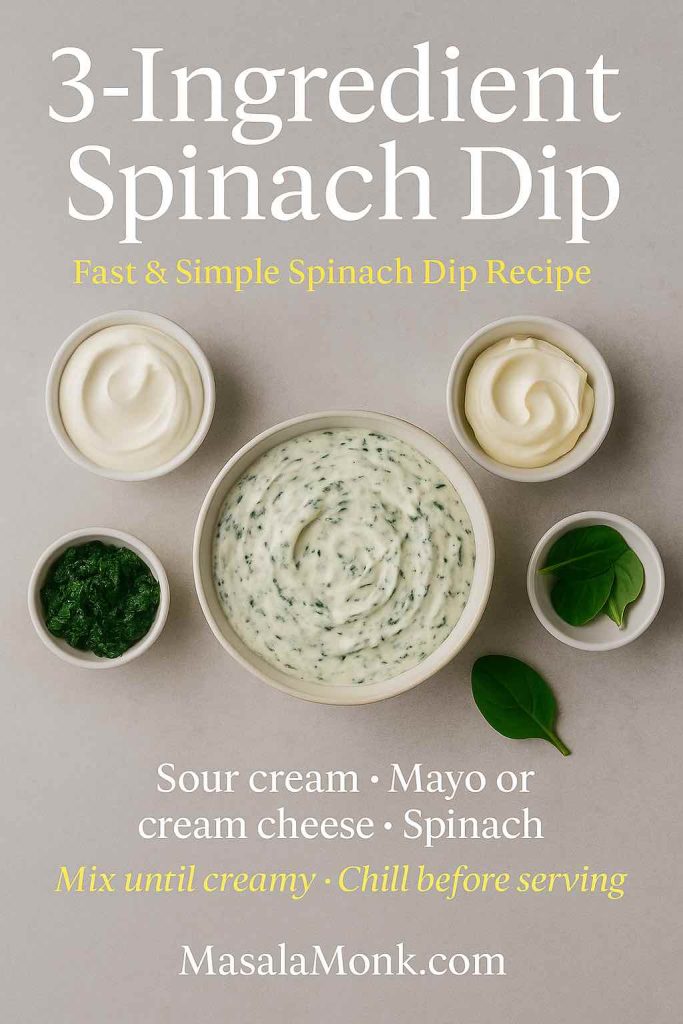
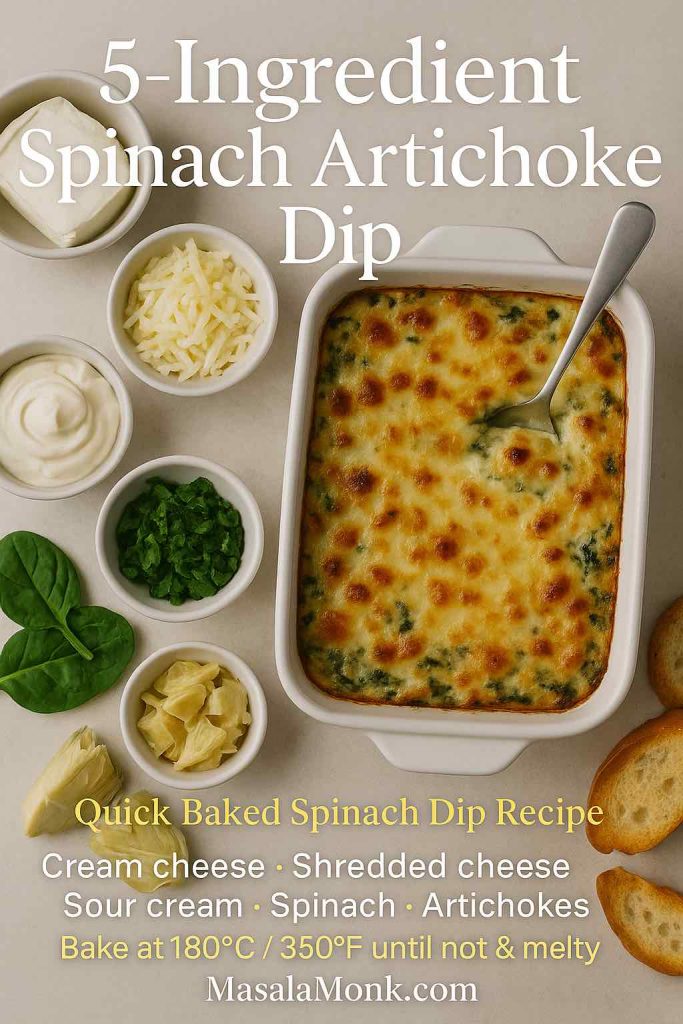
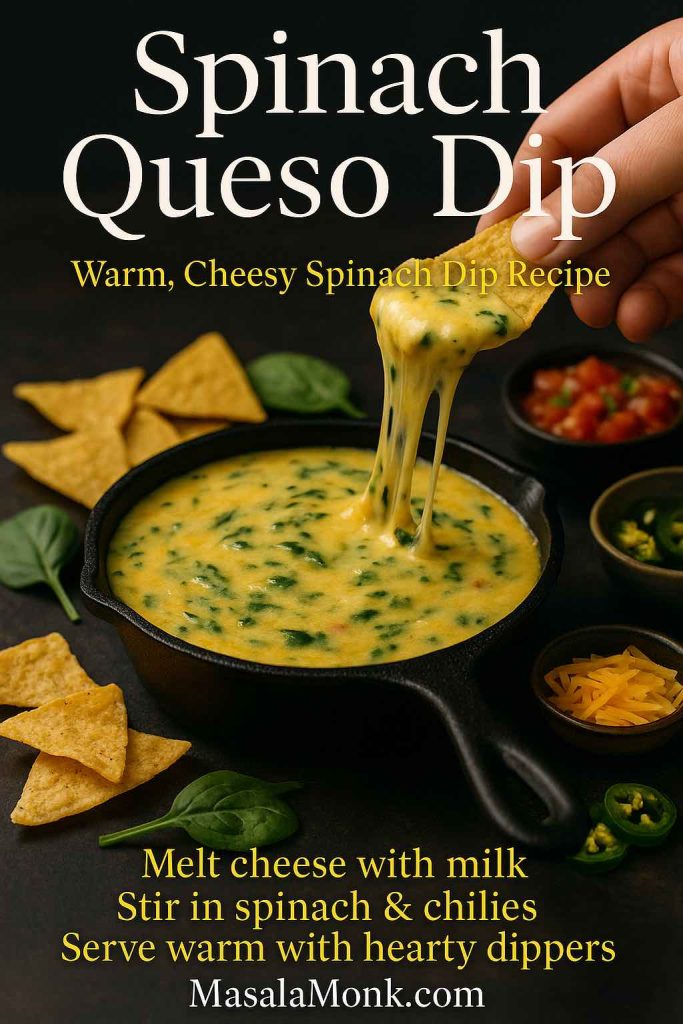
- A selection pulled from spinach dip recipes gives you both cold and hot spinach-based dips, including a classic spinach-artichoke style that is fantastic with salty, zesty chicken.
- When the wings are bright and peppery, a chilled bowl of yogurt, cucumber, lemon, and garlic based on a Greek tzatziki sauce recipe brings a cooling, refreshing contrast and feels lighter than a traditional ranch.
You can also keep a simple blue cheese dip or herbed mayonnaise around, especially if you’re making a spicy batch.
All the Potato Things
Next come the potatoes, because wings and potatoes are a classic duo.
For a straightforward side that always disappears, a big tray of crispy homemade French fries does the job. You can season them simply with salt or play around with variations: garlic-parmesan, chili, or even a light dusting of lemon pepper to echo the wings.
If you feel like branching out, take a look at 10 easy potato appetizers. There you’ll find ideas like smashed potatoes, loaded bites, and other crispy snacks that sit happily beside a wing platter and give people something else to nibble between drumettes.
Comfort Sides That Make It a Meal
Sometimes you want the wings to feel like the centerpiece of a hearty dinner rather than just snacks. In that case, adding one or two warm, substantial dishes helps.
A bubbling pan of macaroni and cheese brings creamy comfort to the table. Next to lemon pepper chicken wings, the rich cheese sauce and soft pasta respond beautifully to the tangy, crisp chicken.
For an additional spicy, creamy bite, baked jalapeño poppers fit right in. They have their own crunch and heat, yet they don’t duplicate the exact flavors of the wings, which keeps the spread interesting.
And if you want a sweet finish without getting too formal, you might end with churros. Using the method from how to make churros, you can fry or bake ridged sticks of dough, roll them in cinnamon sugar, and serve them with chocolate or caramel sauce. They feel playful and shareable, which matches the whole mood of wing night.
Drinks That Pair with Lemon Pepper Chicken Wings
Although you can absolutely just set out a cooler of cold drinks and call it a day, matching your beverages to lemon pepper wings is surprisingly fun.
Because lemon is already a star here, citrusy drinks are natural partners. A chilled lemon drop martini style drink echoes the lemon while bringing a sweet-tart edge that works nicely with salty, peppery chicken. You can make a non-alcoholic version using lemon juice, simple syrup, and sparkling water served in glasses with sugared rims.
During cooler months, you might also lean into autumnal flavors by offering a pumpkin-spice-flavored latte or dessert built from your own spice blend, especially if you already have the oven and stove busy with wings and sides.
Storing and Reheating Lemon Pepper Chicken Wings
With a big batch, you’ll often have a few wings left over. Stored and reheated properly, they make an easy next-day lunch or snack that’s almost as good as the original round.
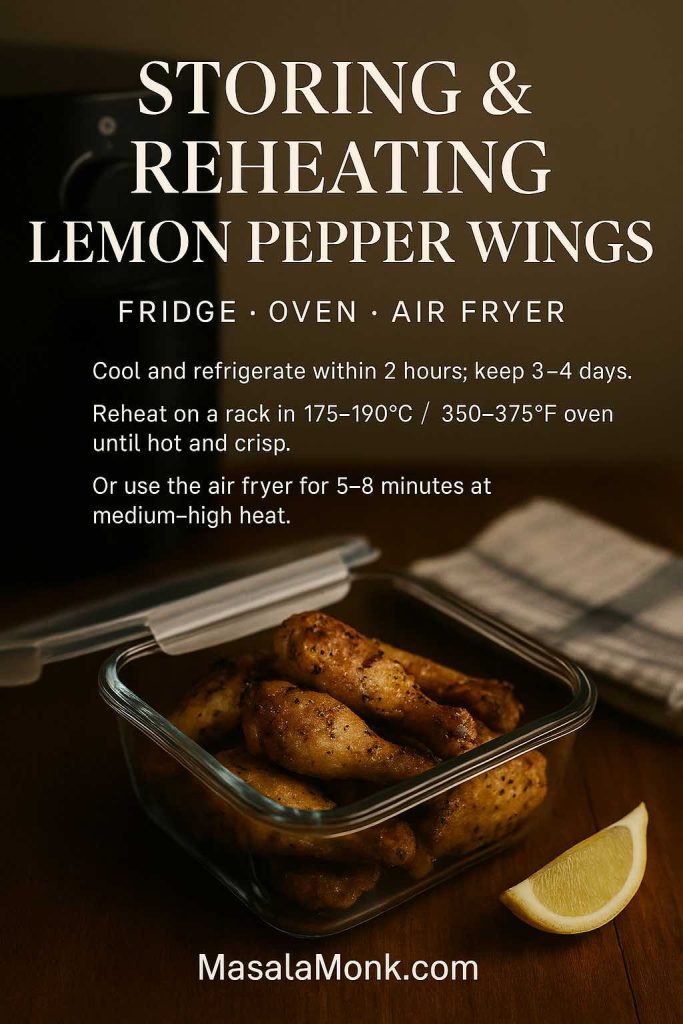
Storing Safely
After everyone has eaten, let the wings cool down briefly, then transfer them into an airtight container. Try to get them into the refrigerator within two hours of cooking. Game-day food safety advice consistently emphasizes this 2-hour window for hot foods like wings, to avoid letting them sit in the temperature range where bacteria grow fastest.
In the fridge, cooked wings will usually keep well for 3–4 days.
Reheating in the Oven
For a fairly large batch or whenever you want the most uniform results, the oven is a good choice:
- Bring the wings out of the fridge while the oven preheats to 175–190°C / 350–375°F.
- Arrange them on a wire rack set over a baking sheet.
- Warm them for 8–12 minutes, turning once if necessary, until they’re hot, the skin has re-crisped, and a thermometer reads at least 165°F / 74°C in the thickest part.
Comparisons of reheating methods often find that the oven returns the best combination of juicy meat and crisp skin, while the microwave tends to make the coating soft.
Reheating in the Air Fryer
If you only have a handful of wings to reheat, the air fryer shines:
- Preheat to about 175–180°C / 350–360°F.
- Place the wings in a single layer in the basket.
- Heat for 5–8 minutes, shaking once, until they’re sizzling again and the skin feels crisp.
The air fryer works quickly and restores a nice crunch without needing much effort. Guides on reheating wings in an air fryer recommend similar temperatures and timings, with the same target internal temperature for safety.
Once more, the microwave is best kept as a last resort. It will heat the meat, but it tends to steam the skin, undoing all your crisping work.
Also Read: French Toast Sticks (Air Fryer + Oven Recipe) — Crispy Outside, Custardy Inside
Using Leftover Lemon Pepper Chicken Wings in New Ways
Interestingly, leftover lemon pepper chicken wings don’t have to stay wings. If you strip the meat from the bones, you suddenly have a bowl of tender, lemony chicken that’s perfect for other dishes.
For instance, you can:
- Toss the meat with a little mayonnaise or yogurt, chopped celery, and herbs for a quick lemon pepper chicken salad.
- Sprinkle it over greens with cherry tomatoes, cucumbers, and a light vinaigrette for an easy lunch.
- Layer it into sandwiches or sliders, using ideas from chicken sandwich recipes—anything from Buffalo to BBQ styles can overlap nicely with the lemon pepper flavor, especially if you add cheese, lettuce, and pickles.
In this way, one batch of wings can stretch into multiple meals without feeling repetitive.
Bringing It All Together
By now you’ve seen that making excellent lemon pepper chicken wings at home isn’t complicated; it’s just a series of small, thoughtful steps:
- Drying and seasoning the wings so they’re flavorful before they ever hit the heat
- Choosing the cooking method that matches your gear and your crowd
- Finishing with a fresh, lively lemon pepper seasoning and, if you’re in the mood, a buttery wet sauce
- Adding simple variations—honey, spice, ranch—to keep things interesting
- Surrounding the wings with dips, potatoes, and a few extras to turn them into a full occasion
- Handling leftovers in a way that keeps them both safe and delicious
Whether you’re planning a game-night spread, a relaxed weekend dinner, or just a kitchen experiment on a random afternoon, this approach lets you take a humble pack of wings and transform it into something everyone reaches for.
Next time you see a pile of wings at the shop, you’ll know exactly what to do: grab a couple of lemons, check your pepper grinder, and give yourself permission to fill your kitchen with the smell of hot, crackling, lemon pepper chicken wings.
FAQs about Lemon Pepper Chicken Wings
1. What are the ingredients for lemon pepper chicken wings?
For classic lemon pepper chicken wings, you usually need chicken wings, oil, salt, black pepper, lemon zest or lemon pepper seasoning, and a few simple pantry spices. Typically, the ingredients for lemon pepper chicken include wings, garlic powder, onion powder, a small amount of baking powder for crispiness, and either a homemade or store-bought lemon pepper blend. For saucy versions, you simply add butter and a splash of lemon juice to turn the dry rub into a glossy coating.
2. How do I make lemon pepper chicken wings crispy?
Firstly, pat the wings very dry with paper towels before you season them. Then, toss them with a little oil, salt, and a light dusting of baking powder along with your spices. After that, cook the lemon pepper wings in a hot oven or air fryer without crowding the tray or basket, so the skin has room to dry and blister. Finally, toss them in lemon pepper once they’re cooked and still hot; this way, you get crisp skin plus a fresh coating of seasoning instead of burnt lemon.
3. Can I cook lemon pepper chicken wings in the air fryer?
Absolutely, air fryer lemon pepper wings are one of the easiest options. First, preheat your air fryer so the wings start cooking in hot air right away. Next, arrange the wings in a single layer and cook them until the skin is golden and crisp, flipping once. Afterward, toss the hot wings in lemon pepper seasoning or a butter-lemon sauce to finish. Because the air fryer circulates hot air around each piece, air fryer chicken wings lemon pepper usually turn out very crispy with minimal oil.
4. How do I bake lemon pepper wings in the oven?
To make baked lemon pepper wings, start by preheating the oven to a high temperature, usually around 220°C / 425°F. Place the seasoned wings on a rack set over a baking sheet so air can circulate underneath. Then bake until the wings are brown and crisp, turning once halfway. Right after they come out of the oven, toss them in lemon pepper seasoning or melted butter with lemon and pepper, and you’ll have oven baked lemon pepper chicken with a satisfying crunch and bright flavor.
5. Can I use frozen wings for lemon pepper chicken wings?
Yes, you can, although the process changes slightly. Ideally, you thaw frozen wings in the fridge overnight so you can dry and season them properly. If you must cook from frozen, you can start them plain in the oven or air fryer until they’re mostly cooked, then drain off any excess moisture, pat them as dry as you can, and season them before finishing. This method works, but thawed wings still give the crispiest lemon pepper chicken wings.
6. What is the best way to make lemon pepper wet wings?
For lemon pepper wet wings, you cook the wings until the skin is crisp, then toss them in a butter-based sauce. Typically, the sauce includes melted butter, lemon juice, and lemon pepper seasoning; sometimes a little garlic or hot sauce goes in as well. Once the wings are done, you immediately coat them in this mixture, creating shiny, saucy lemon pepper wings that still have a bit of crunch underneath the glaze.
7. How can I make honey lemon pepper wings?
To create honey lemon pepper wings, you start with regular lemon pepper chicken wings and simply sweeten the finishing sauce. Melt butter, stir in lemon juice, lemon pepper seasoning, and then add honey until the balance of sweet and tangy feels right. When the wings are finished cooking, toss them in this honey-lemon mixture. As a result, you get sticky, glossy honey lemon pepper wings that keep the citrus and pepper bite but add a gentle caramel sweetness.
8. Are lemon pepper chicken wings spicy?
On their own, most lemon pepper chicken wings are more tangy and peppery than truly spicy. Black pepper brings a mild heat and a floral bite, while the lemon makes everything feel bright. If you enjoy spice, you can turn them into spicy lemon pepper wings by adding cayenne, chili flakes, or hot sauce to the dry rub or finishing butter. Conversely, if you prefer a milder flavor, you can reduce the pepper and let the lemon and garlic stand out more.
9. Can I make salt and pepper chicken wings using the same method?
Yes, the same base technique works beautifully for salt and pepper chicken wings. Instead of finishing with lemon pepper, you season the wings with salt, black pepper, and sometimes garlic, spring onions, or chopped chilies after cooking. In other words, you follow the same steps for drying, seasoning, and crisping the wings, then swap the lemon for extra aromatics. This way, you can easily make both salt and pepper chicken and lemon pepper chicken in one session.
10. What are the ingredients for lemon pepper chicken breast or boneless lemon pepper wings?
The ingredients for lemon pepper chicken breast are almost identical to those for wings. You need chicken breast or boneless pieces, oil, salt, garlic powder, onion powder, and lemon pepper seasoning, plus optional butter and lemon juice for a sauce. For boneless lemon pepper wings, you cut boneless chicken into chunks or strips, coat them lightly, cook them until golden, and then toss them in lemon pepper seasoning or a lemon-butter sauce. Essentially, you’re using the same flavors, just on boneless pieces instead of whole wings.
11. How long should I marinate or season lemon pepper chicken wings?
Interestingly, you don’t have to marinate lemon pepper chicken wings for hours to get good flavor. Usually, it’s enough to season the wings with salt, spices, and oil, then let them rest in the fridge for 30–60 minutes. That short rest works like a dry brine and helps the meat absorb the salt. Later, you finish with lemon pepper seasoning or a wet sauce after cooking, which keeps the lemon taste bright. If you want to marinate longer, you can, but it’s better to keep strong acids like lemon juice for the end so they don’t toughen the meat.
12. How do I keep lemon pepper wings from drying out?
To keep lemon pepper wings juicy, start by not overcooking them. Use a thermometer and aim for an internal temperature of 165°F / 74°C, then pull them from the heat. Additionally, try not to trim away too much skin or fat, because those help keep the meat moist while it crisps. Finally, avoid long, harsh marinating in pure lemon juice; instead, add most of the acid at the end in a sauce or final seasoning so you get flavor without dryness.
13. Can lemon pepper chicken wings be made gluten-free or dairy-free?
In many cases, lemon pepper chicken wings are naturally gluten-free if you avoid flour or breadcrumb coatings and choose a gluten-free lemon pepper seasoning. If you’re sensitive, double-check that your baking powder and spices are labeled safe. For a dairy-free version, you simply skip the butter and use oil instead when you make the finishing sauce, or you stick to a dry lemon pepper rub. Consequently, you can still enjoy lemon pepper wings even with gluten-free or dairy-free needs.
14. Can I prepare lemon pepper chicken wings ahead of time?
Yes, preparing ahead is very practical. First, you can season the wings with the base spices and refrigerate them, uncovered or loosely covered, for a few hours or overnight; this helps the skin dry and the meat absorb salt. Then, you cook them close to serving time so they’re fresh and crisp. Alternatively, you can fully cook the lemon pepper chicken wings, chill them, and reheat them later in the oven or air fryer. As long as you cool and store them properly and heat them back to a safe temperature, they keep their flavor and much of their crunch.
15. How do I reheat lemon pepper wings so they stay crispy?
To reheat lemon pepper wings without losing texture, avoid the microwave whenever possible. Instead, use a hot oven or air fryer. In an oven, place the wings on a rack set over a baking sheet and warm them at a moderate temperature until they’re hot through and the skin re-crispens. When using an air fryer, reheat them in a single layer at a medium-high setting for a few minutes, shaking once. In short, dry, circulating heat restores crispiness far better than steaming or microwaving does.
16. Can I turn this recipe into black pepper chicken or black pepper chicken sauce?
You can absolutely borrow the same flavor base for black pepper chicken or a simple black pepper chicken sauce. Instead of focusing on lemon, you boost the pepper and add soy sauce, garlic, and maybe a little stock or water to create a glossy stir-fry sauce. Then you cook sliced chicken pieces and vegetables, such as onions and peppers, in that mixture. Although the result is different from lemon pepper chicken wings, it uses the same balance of savory, peppery heat and can be a nice way to enjoy similar flavors in a completely new dish.