Posted on 2 Comments

Healthy Iron Rich Pancake- Kid Friendly Recipe

Kids have limited appetite. Give your child the best nutrition in that little food that they eat. The biggest struggle for vegetarians or vegans is to fulfill their child’s iron needs. While balanced diet here is the key but we all know how balanced it gets with the children especially the ones who are picky eaters.

So, I am going to share with you a simple recipe which has a great balance of protein and iron.

We all make BESAN CHEELAS at home. Sharing with you a simple way wherein you can make the best out that one Cheela that your child eats. 😊 And trust me it comes out delicious and packed with flavours. Also, this makes a great lunch box recipe too.

This recipe requires no elaborate preparations, so don’t need to plan ahead either. Just stir together the ingredients to make a batter, pour it on a hot griddle & cook up a delicious healthy meal.

What is Cheela?

Cheela is a sweet or savory Indian Pancakes made using lentils, cereal or grain flour. They are often made without any leavening agents, so they are considered to be healthy.

What is Besan?

Besan is a Hindi word which means “gram flour”. It is a pulse flour made using channa dal or chickpea flour. So besan cheela is gram flour pancakes. These pancakes are Gluten Free, vegan and nutritious. Gram flour is a fabulous source of protein, iron, magnesium, potassium, vitamin B6. Just 100 grams of gram flour can give you 22 grams of easy to digest natural protein. You can make these pancakes with basic ingredients as well but when you add green leafy vegetables to it, it not only enhances the taste but also makes it wholesome and an amazing source of iron for your kids.

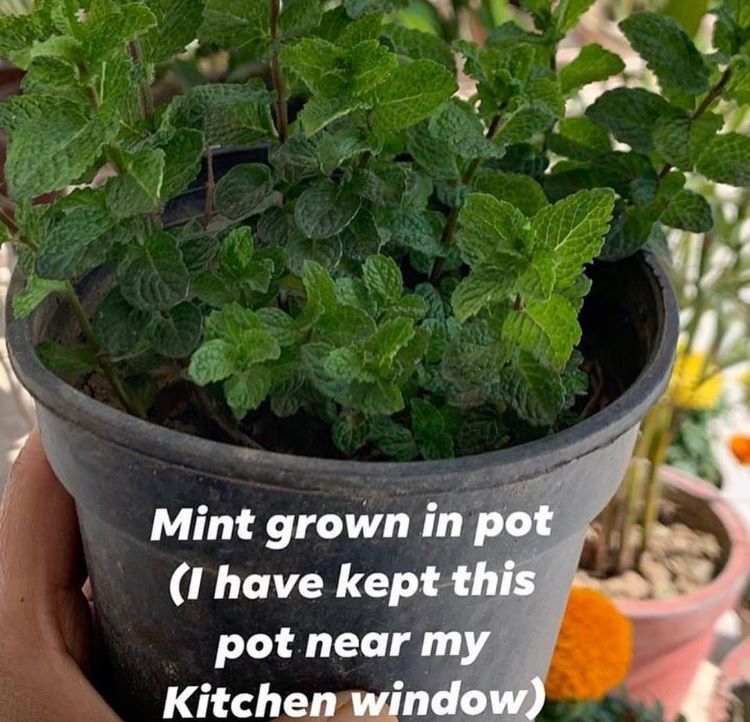
Also the vegetables I have added are all homegrown. If you don’t have enough space, grow them in small pots. It’s no rocket science. Just get a few pots or grow bags, potting soil and seeds from any nursery near your house. Engage your children while planting it. The satisfaction of eating your homegrown organic vegetables is unmatchable. Try it!

Ingredients

Prep time: 5 minsServing: makes 3 Pancakes
Cook time: 5 mins
  • Besan/Chickpea flour: 1/2 cup
  • Sattu/Roasted Gram flour: 1/4th cup
  • Semolina/Suji: 1/4th cup
  • Cumin seeds/Jeera:  1/8th tsp
  • Bishop seeds/Ajwain: 1/8th tsp
  • Garam Masala: 1/4th tsp
  • Roasted Cumin powder: 1/4th tsp
  • Turmeric: 1/4th tsp
  • Salt & Black pepper to taste
  • Chat Masala to taste (optional)
  • Coriander powder: 1/2 tsp
  • Water as required 
  • Chopped Methi (Fenugreek), Spinach, Radish leaves, Mint leaves, Curry leaves & Coriander leaves: 1 cup
  • Onion: 2 tbsp, finely chopped
  • Ginger: 2” long, grated
  • Ghee or Oil as required 

Method

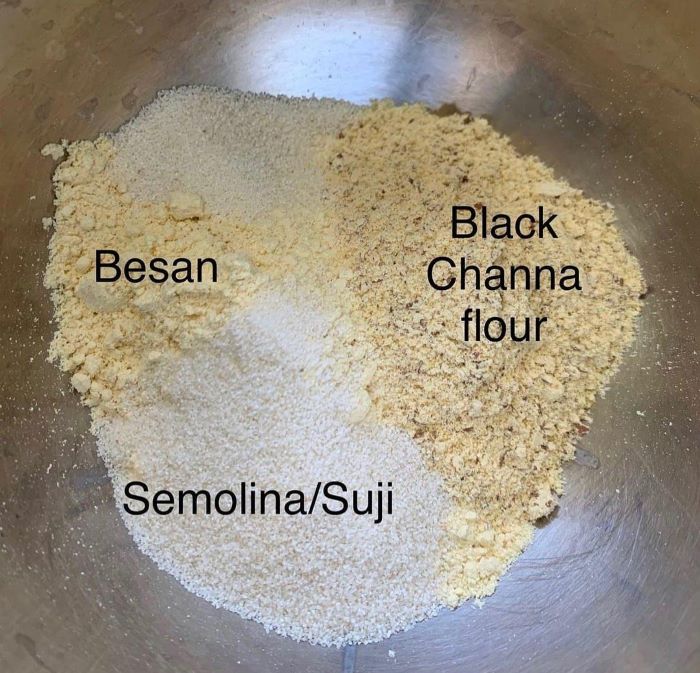
1 Take Besan/Chickpeas flour, Sattu or Roasted Gram flour (great source of protein) and Semolina/Suji (for crispiness) in a bowl.

2. To this add turmeric, cumin seeds, ajwain/bishop seeds, garam masala, roasted cumin powder, black pepper, salt, chaat masala and coriander powder. Mix it well. Add enough water to make a thin but not a runny batter. Start with 1/4th cup water and the gradually add more as required. Continue whisking until the batter has a smooth, flowing consistency. There shouldn’t be any lumps, so make sure to break those up while mixing the batter.

Tip: Use a wire whisk to whisk the batter. This will ensure that your batter is lump free.

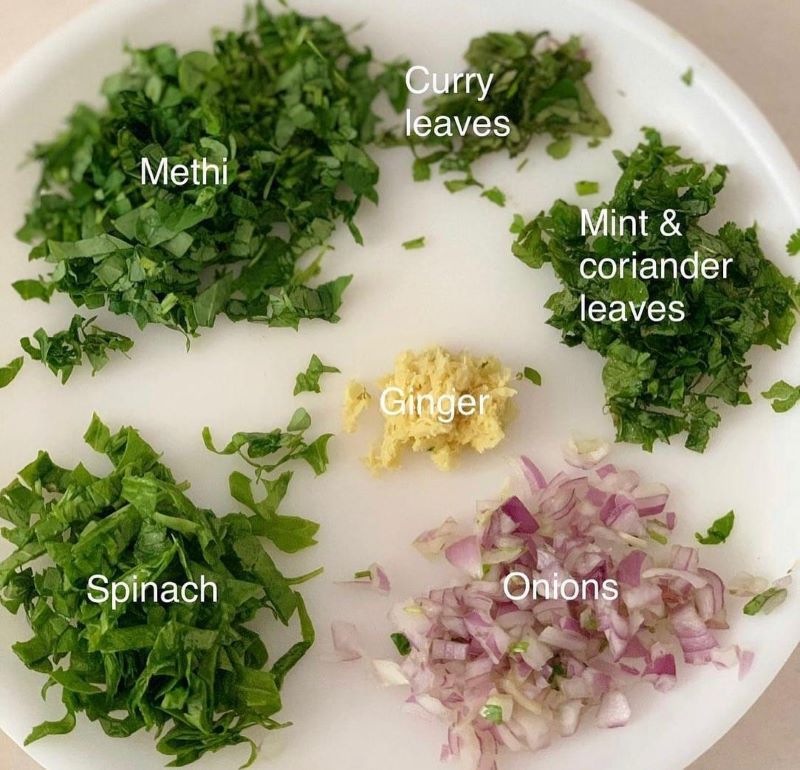
3. Now add chopped methi (fenugreek) leaves, spinach leaves, onion, grated ginger (fabulous food for digestion), curry leaves, coriander & mint leaves. Use the leaves that are in season. All the green leaves are a great source of iron and this is one of the best ways to incorporate this in your child’s and your diet.

4. Keep the batter aside for 10 minutes. Heat a cast iron tawa on a medium to low heat. I have made it on normal tawa in which we make rotis but if you can’t make it on tawa then you can use a non stick pan as well.

5. Brush the tawa with desi ghee or oil. Add generously to avoid dry cheelas because besan tends to soak ghee/oil. Take a ladle or ¼ to ⅓ of a measuring cup full of the batter and pour on the pan. Spread the batter evenly with the back of your ladle to make thin cheelas.

6. Then continue to cook the chilla on a low to medium-low heat until the top begins to set. You can drizzle some more oil or ghee along the edges for a crispy cheela.

7. You can flip the chilla once or twice for even cooking.
Once the base gets golden brown, it’s time to flip the cheela. Cook the other sides till you see golden spots on cheela. You can flip the cheela once or twice for even cooking.

8. Finally, fold it and then serve it mint chutney, homemade ketchup or the way your child likes it.

Enjoy!! 😊

Notes:

  • If some of the spices mentioned above are not available, feel free to skip them.
  • Incase you don’t find sattu or roasted gram flour, feel free to skip it and add more besan or chickpea flour. However, sattu is a great source of protein and iron, so it’ll be great if you can get your hands on it.
Posted on Leave a comment

Surprise Everyone with This Peach Condensed Milk Cake

Peach Fantasy by Masala Monk

Hello, food lovers! 🍽️💕 Today, we’re diving into a delightful dessert recipe that’s sure to impress everyone at your next gathering. We’re talking about a Peach Condensed Milk Cake, a dessert that’s not only incredibly flavorful but also easy to make! This fantastic recipe comes from the YouTube channel Amo Receitas, a wonderful resource for anyone looking for simple yet tasty meal ideas.

🎉 Join the Foodie Community! 🍽️

If you try these recipes or have other delicious recipes to share, join the vibrant and engaging food lovers community on Facebook. It’s a place where you can share your culinary experiments, discover new recipes, and connect with fellow food enthusiasts.

🍑 The Magic of Peach Condensed Milk Cake 🍰

Peach Condensed Milk Cake is a dessert that combines the sweet and tangy flavor of peaches with the creamy richness of condensed milk. The result is a cake that’s moist, flavorful, and absolutely delicious. Plus, it’s a versatile dessert that can be served at any occasion, from a casual family dinner to a special celebration.

🍽️ The Recipe: How to Make Peach Condensed Milk Cake 🍑

The recipe starts with the cake batter, which is made from 3 1/2 cups of flour, 1 cup of sugar, 3 eggs, 3/4 cup of oil, 1 1/4 cup of milk, 1 tablespoon of baking powder, and 1 teaspoon of vanilla sugar. The ingredients are mixed together until smooth.

Next, the batter is poured into a greased baking dish. Slices of peach are arranged on top of the batter, and then 1 1/2 cups of condensed milk is poured over the peaches. The cake is then baked until golden and set.

🍴 Enjoying Peach Condensed Milk Cake: Tips and Suggestions 🍽️

When enjoying Peach Condensed Milk Cake, here are a few tips and suggestions:

  • Feel free to adjust the amount of condensed milk to suit your taste. If you prefer a less sweet cake, you can reduce the amount of condensed milk.
  • This cake is best served chilled, so consider making it a day ahead and storing it in the refrigerator overnight.
  • Peach Condensed Milk Cake makes a great dessert for any meal. Serve it with a cup of coffee or tea for a delightful afternoon treat.

🎉 Join the Foodie Community! 🍽️

If you try this recipe or have other delicious recipes to share, join the vibrant and engaging food lovers community on Facebook. It’s a place where you can share your culinary experiments, discover new recipes, and connect with fellow food enthusiasts.

🙏 Credits 🙏

A big thank you to Amo Receitas for sharing this fantastic Peach Condensed Milk Cake recipe. Their channel is a treasure trove of delicious recipes that are easy to follow and absolutely delightful to taste. If you’re a fan of simple and tasty recipes, be sure to check out their YouTube channel for more culinary inspiration

So, are you ready to bring a taste of this delicious Peach Condensed Milk Cake into your kitchen? With this recipe, you can enjoy a delicious and unique dessert right at home. Happy cooking! 🍽️🎉

Remember to check out more amazing recipes on Amo Receitas‘s YouTube channel. Enjoy the delicious day! 🌞🍡🌭

Posted on Leave a comment

How to make No-Bake Blueberry Cheesecake?

Greetings, dessert enthusiasts! 🍽️💕 Today, we’re embarking on a culinary journey into the realm of no-bake desserts, with a spotlight on a delightful and refreshing treat – the No-Bake Blueberry Cheesecake. Our guide for this journey is none other than the talented baker behind the YouTube channel 조꽁드Joconde’s Baking. Known for its vast repertoire of baking recipes and easy-to-follow instructions, 조꽁드Joconde’s Baking has become a go-to resource for dessert lovers. Today, we’re delving into their popular video titled “No-Bake Blueberry Cheesecake”.🍰🍇

If you’re a food enthusiast who loves experimenting with new recipes and sharing your culinary creations, consider joining our Vibrant and Engaging Food Lovers community on Facebook. It’s a place where food lovers from around the world can share their favorite recipes, cooking tips, and foodie adventures. We can’t wait to see what delicious dishes you’ll create next!

🌟 The Magic of No-Bake Desserts 🌟

No-bake desserts are a culinary marvel. They offer the sweet satisfaction of a baked dessert, without the need for an oven. This makes them an excellent choice for those hot summer days when turning on the oven feels like a chore. They’re also a great option for those who are new to baking or simply want a quick and easy dessert option. The No-Bake Blueberry Cheesecake from 조꽁드Joconde’s Baking perfectly embodies the charm of no-bake desserts. It’s a simple yet elegant dessert that boasts a delightful blend of creamy cheesecake and the tangy sweetness of blueberries.

🍇 The Star Ingredient: Blueberries 🍇

Blueberries take center stage in this cheesecake, lending their sweet and tangy flavor to the creamy cheesecake base. But blueberries aren’t just about taste; they’re also packed with antioxidants, making this dessert a healthy treat. In this recipe, blueberries are used in two ways: they’re pureed and mixed into the cheesecake filling, and they’re also used to create a jelly layer that adds a beautiful visual element to the finished dessert. This dual use of blueberries ensures that every bite of the cheesecake is bursting with their refreshing flavor.

🍰 The Cheesecake Base 🍰

The base of this cheesecake is a creamy, tangy mixture of cream cheese, sugar, plain yogurt, fresh cream, lemon juice, and lemon zest. This combination creates a rich and flavorful cheesecake filling that pairs wonderfully with the sweet blueberry layers. The addition of gelatin helps to set the cheesecake, giving it a firm yet creamy texture that’s simply irresistible.

🍪 The Oreo Crust 🍪

The crust of this cheesecake is made from Oreo cookies and melted butter. This combination creates a crunchy, chocolatey base that adds a delightful contrast to the creamy cheesecake and fruity blueberry layers. The crust is easy to make and sets in the fridge, making it a perfect base for this no-bake dessert.

🎂 Assembling the Cheesecake 🎂

Assembling this cheesecake is like creating a work of art. It involves carefully layering the different components in a round mousse ring. The process starts with pressing the Oreo crust into the bottom of the ring. Then, a layer of the blueberry cream cheese filling is added, followed by a layer of blueberry jelly. Finally, the remaining cream cheese filling is spread on top. The cheesecake is then refrigerated for several hours to allow it to set. The result is a visually stunning and delicious dessertthat’s sure to impress.

🍽️ Enjoying the No-Bake Blueberry Cheesecake 🍽️

Once the cheesecake is set, it’s ready to be enjoyed! The combination of the creamy cheesecake, sweet blueberry layers, and crunchy Oreo crust creates a symphony of flavors and textures in every bite. This dessert is perfect for any occasion, whether it’s a special celebration or a simple weeknight treat. It’s a dessert that’s sure to delight your taste buds and leave you craving for more.

📝 Recipe Notes 📝

The creator of this recipe, 조꽁드Joconde’s Baking, recommends adjusting the amount of gelatin based on the weather or the condition of your fridge. In hotter weather, you might need to use more gelatin to ensure the cheesecake sets properly. Also, it’s important to strain the blueberry puree to remove any seeds or skin that could affect the texture of the cheesecake. These little tips can make a big difference in the final result, ensuring that your No-Bake Blueberry Cheesecake turns out perfect every time.

🎉 Join the Food Lovers Community 🎉

If you’re a food enthusiast who loves experimenting with new recipes and sharing your culinary creations, consider joining our Vibrant and Engaging Food Lovers community on Facebook. It’s a place where food lovers from around the world can share their favorite recipes, cooking tips, and foodie adventures. We can’t wait to see what delicious dishes you’ll create next!

🙏 Credits 🙏

A big thank you to 조꽁드Joconde’s Baking for sharing this delightful No-Bake Blueberry Cheesecake recipe. Be sure to check out their YouTube channel for more delicious baking recipes and tips.

Posted on Leave a comment

Mango Cheese Mousse Cake: Recipe with La Passion Sucrée

Hello, dessert lovers! 🍽️💕 Today, we’re going to explore a delightful dessert that’s perfect for any season – Mango Cheese Mousse Cake. And who better to guide us through this journey than the dessert connoisseur, La Passion Sucrée. With their vast culinary experience and easy-to-follow recipe videos, La Passion Sucrée has become a favorite among dessert enthusiasts. Today, we’re diving into one of their popular videos titled “Mango Cheese Mousse Cake Recipe 6 inches|芒果芝士慕斯蛋糕”. 🥭🍰

And don’t forget to join our Secret Facebook group of Vibrant Engaging Food Lovers, where you can share your cooking experiments and results with a community of food enthusiasts. We would love to see your take on the Mango Cheese Mousse Cake!

Mango Cheese Mousse Cake: A Tropical Delight 🌴

Before we delve into the recipe, let’s talk about Mango Cheese Mousse Cake. This dessert, made from fresh mango puree, cream cheese, and a sponge cake base, is a delight for the taste buds. It’s known for its creamy texture and refreshing mango flavor, making it a perfect dessert for any occasion. Moreover, it’s incredibly easy to prepare and can be a great way to enjoy the king of fruits – Mango!

The Health Benefits of Mango Cheese Mousse Cake 🍏

Mango Cheese Mousse Cake is not just a tasty dessert; it’s also packed with numerous health benefits. The fresh mango used in the recipe is rich in vitamin C, which boosts immunity and keeps your skin healthy. Moreover, mangoes are also high in fiber, which aids digestion. Cream cheese provides a good source of protein and calcium, which are essential for bone health. So, while you’re enjoying this delicious dessert, you’re also nourishing your body!

Preparing Mango Cheese Mousse Cake: Step-by-Step Guide 🍰

Now, let’s dive into the recipe as shared by La Passion Sucrée:

  1. Sponge Cake: Start by preparing the sponge cake. Mix eggs, vegetable oil, milk, cake flour, caster sugar, lemon juice, and vanilla extract. Bake at 140°C for 45 minutes.
  2. Mango Puree: Prepare the mango puree by blending mango, caster sugar, and lemon juice. Heat the mixture on medium heat for 8 minutes, stirring continuously.
  3. Mousse: Prepare the mousse by whipping cream, caster sugar, and cream cheese. Add 3/4 of the mango puree and gelatin sheets soaked in cold water to the mixture.
  4. Assembly: Place a slice of the sponge cake in a mold, pour about a third of the mousse mixture, and refrigerate for half an hour. Repeat the process with another layer of sponge cake and mousse. Finally, add the remaining mango puree mixed with gelatin on top. Refrigerate for at least 3 hours.
  5. Decoration: Decorate the cake with mango balls and green leaves. Enjoy this refreshing dessert!

This recipe is not just about making a dessert; it’s about enjoying the process and treating yourself to a homemade, refreshing, and healthy treat. So, why not give it a try?

If you enjoyed this recipe and want to explore more, do check out La Passion Sucrée’s YouTube channel for more dessert inspiration. And don’t forget to join our Secret Facebook group of Vibrant Engaging Food Lovers, where you can share your cooking experiments and results with a community of food enthusiasts. We would love to see your take on the Mango Cheese Mousse Cake!

Stay cool and refreshed with this delightful dessert! 🥭🍰💕

Posted on Leave a comment

How to make a Mango Cake? OTG, Microwave and No-bake Versions

If you’re a fan of luscious mangoes and sweet treats, then Mango Cake is a dessert that will truly captivate your taste buds. Packed with the tropical flavors of ripe mangoes, this delightful cake is moist, flavorful, and perfect for any occasion. In this post, we’ll explore the art of making a scrumptious Mango Cake from scratch, provide tips on selecting the best mangoes, and guide you through the step-by-step process. We’ll also offer creative ideas to take your cake to the next level, including a no-bake version and alternatives for those who don’t have an oven. Get ready to savor the divine taste of Mango Cake! 🥭🍰🌿

Why Mango Cake? 🥭🍰 Mango Cake is a fantastic way to celebrate the sweetness and vibrant flavors of mangoes in a delightful dessert form. The natural sweetness of ripe mangoes adds a unique twist to a classic cake, creating a moist and fruity flavor profile that is both refreshing and indulgent. Whether you’re hosting a special occasion, planning a birthday party, or simply craving a tropical treat, Mango Cake is sure to impress both your eyes and taste buds.

Crafting a Scrumptious Mango Cake 🥭🍰🌿 Now, let’s dive into the process of making a delectable Mango Cake:

Ingredients:

For the Cake:

  • 2 cups all-purpose flour
  • 1 1/2 teaspoons baking powder
  • 1/2 teaspoon baking soda
  • 1/4 teaspoon salt
  • 1/2 cup unsalted butter, softened
  • 1 cup granulated sugar
  • 2 large eggs
  • 1 teaspoon vanilla extract
  • 3/4 cup mango puree (made from ripe mangoes)
  • 1/4 cup milk

For the Mango Buttercream Frosting:

  • 1/2 cup unsalted butter, softened
  • 3 cups powdered sugar
  • 1/4 cup mango puree
  • 1 teaspoon vanilla extract

Instructions:

  1. Preheat your oven to 350°F (175°C). Grease and flour two 9-inch round cake pans or line them with parchment paper.
  2. In a medium bowl, whisk together the all-purpose flour, baking powder, baking soda, and salt. Set aside.
  3. In a large mixing bowl, cream together the softened butter and granulated sugar until light and fluffy. You can use an electric mixer or do it manually with a wooden spoon.
  4. Add the eggs, one at a time, beating well after each addition. Stir in the vanilla extract.
  5. Gradually add the dry flour mixture to the creamed butter and sugar, alternating with the mango puree and milk. Begin and end with the dry ingredients, mixing just until combined after each addition. Be careful not to overmix the batter.
  6. Divide the batter equally between the prepared cake pans and smooth the tops with a spatula.
  7. Bake in the preheated oven for approximately 25-30 minutes, or until a toothpick inserted into the center of the cakes comes out clean.
  8. Remove the cakes from the oven and let them cool in the pans for about 10 minutes. Then, transfer them to a wire rack to cool completely.
  9. While the cakes are cooling, prepare the Mango Buttercream Frosting. In a mixing bowl, beat the softened butter until creamy. Gradually add the powdered sugar, mango puree, and vanilla extract, and continue to beat until smooth and fluffy.
  10. Once the cakes are completely cooled, place one cake layer on a serving plate. Spread a generous amount of Mango Buttercream Frosting on top. Place the second cake layer on top and frost the entire cake with the remaining frosting.
  11. For an extra touch, you can decorate the cake with mango slices, edible flowers, or a sprinkle of toasted coconut.
  12. Slice and serve the Mango Cake, and enjoy the tropical bliss with every bite!

No-Bake Mango Cake Variation 🍓🌿 If you prefer a no-bake version of Mango Cake, you can try this alternative method:

Ingredients:

For the Crust:

  • 2 cups crushed graham crackers or digestive biscuits
  • 1/2 cup melted butter

For the Filling:

  • 2 cups mango puree (made from ripe mangoes)
  • 1 cup heavy cream, chilled
  • 1/2 cup powdered sugar
  • 1 teaspoon vanilla extract
  • 1 tablespoon gelatin (dissolved in 2 tablespoons of warm water)

For the Topping:

  • Fresh mango slices or diced mangoes

Instructions:

  1. In a bowl, combine the crushed graham crackers or digestive biscuits with melted butter. Mix well until the crumbs are evenly coated.
  2. Press the crumb mixture into the bottom of a springform pan or a deep dish to form the crust. Place it in the refrigerator to set while you prepare the filling.
  3. In a mixing bowl, whip the chilled heavy cream until it reaches soft peaks. Add the powdered sugar and vanilla extract, and continue whipping until stiff peaks form.
  4. Gently fold in the mango puree and dissolved gelatin into the whipped cream until well combined.
  5. Pour the mango filling over the prepared crust and smooth the top with a spatula.
  6. Place the cake in the refrigerator for at least 4 hours, or until it is set and firm.
  7. Before serving, garnish the top of the cake with fresh mango slices or diced mangoes.
  8. Slice and serve the refreshing No-Bake Mango Cake to enjoy the tropical flavors in every bite!

Alternative for Those Without an Oven 🍓🌿 If you don’t have an oven, you can still enjoy a delightful Mango Cake with this alternative method:

Ingredients:

  • 2 cups all-purpose flour
  • 1 1/2 teaspoons baking powder
  • 1/2 teaspoon baking soda
  • 1/4 teaspoon salt
  • 1/2 cup unsalted butter, softened
  • 1 cup granulated sugar
  • 2 large eggs
  • 1 teaspoon vanilla extract
  • 3/4 cup mango puree (made from ripe mangoes)
  • 1/4 cup milk

Instructions:

  1. In a mixing bowl, whisk together the all-purpose flour, baking powder, baking soda, and salt.
  2. In a separate bowl, cream together the softened butter and granulated sugar until light and fluffy. Add the eggs, one at a time, and beat well after each addition. Stir in the vanilla extract.
  3. Gradually add the dry flour mixture to the creamed butter and sugar, alternating with the mango puree and milk. Mix until well combined.
  4. Grease a microwave-safe dish or baking pan with butter or cooking spray.
  5. Pour the batter into the greased dish and smooth the top with a spatula.
  6. Place the dish in the microwave and cook on medium power for about 6-8 minutes, or until the cake is set and a toothpick inserted into the center comes out clean.
  7. Remove the cake from the microwave and let it cool in the dish for a few minutes. Then, carefully transfer it to a wire rack to cool completely.
  8. Once the cake is cooled, you can proceed to frost it with Mango Buttercream Frosting or enjoy it as is.

Tips for Selecting Ripe Mangoes 🥭🌟 Selecting ripe and flavorful mangoes is key to achieving the best taste in your Mango Cake. Here are some tips to help you choose the perfect mangoes:

  • Color and Texture: Look for mangoes with vibrant hues and a slightly soft texture when gently pressed. Avoid mangoes that are too firm or too mushy.
  • Aroma: Smell the stem end of the mangoes. A ripe mango should have a sweet and fragrant aroma.
  • Varieties: Depending on availability in your region, choose mango varieties such as Alphonso, Ataulfo, or Kent for their rich sweetness and smooth texture, which work wonderfully in cakes.

Creative Ideas to Elevate Your Mango Cake 🌈🥭🍰 While a simple Mango Cake is already delightful, you can explore some creative ideas to take it to the next level:

  1. Mango Cream Cheese Frosting: Instead of Mango Buttercream Frosting, try a luscious cream cheese frosting with a hint of mango flavor. Combine softened cream cheese, powdered sugar, mango puree, and a touch of vanilla extract for a tangy and creamy frosting.
  2. Mango and Coconut Cake: Add shredded coconut to the cake batter for an extra tropical twist. The combination of mango and coconut creates a delightful flavor combination that transports you to a sunny paradise.
  3. Mango Mousse Filling: Fill the cake layers with a fluffy mango mousse. Prepare a mango mousse by folding whipped cream and mango puree together, then layer it between the cake layers for an airy and fruity filling.
  4. Mango Coulis Drizzle: Drizzle a homemade mango coulis over the cake for an extra burst of mango flavor. Simply blend ripe mangoes with a touch of sugar and a squeeze of lemon juice until smooth. Strain the mixture to remove any fibers and seeds, and drizzle it over the frosted cake.
  5. Mango and White Chocolate Ganache: Create a white chocolate ganache infused with mango puree. Combine white chocolate and mango puree, and melt them together to create a creamy and luxurious topping for your Mango Cake.

Join Us for More Culinary Adventures! 🍽️🌍 If you’re passionate about exploring new flavors and connecting with fellow food enthusiasts, we invite you to join our vibrant community of foodies! Discover new recipes, share your culinary creations, and engage in conversations about all things food. Join our secret Facebook group, Eatlo, by visiting https://www.facebook.com/groups/eatlo and be a part of a community that celebrates the joy of cooking and the love for delicious food.

Conclusion Mango Cake is a delightful dessert that showcases the tropical flavors of ripe mangoes in a moist and flavorful cake. By following the simple steps outlined in this recipe, you can create your very own Mango Cake that will impress your family and friends. Whether you choose the traditional baked version, the refreshing no-bake variation, or the alternative method for those without an oven, you can indulge in the irresistible delight of Mango Cake and savor the sweetness of mangoes with every bite! 🥭🍰🌿