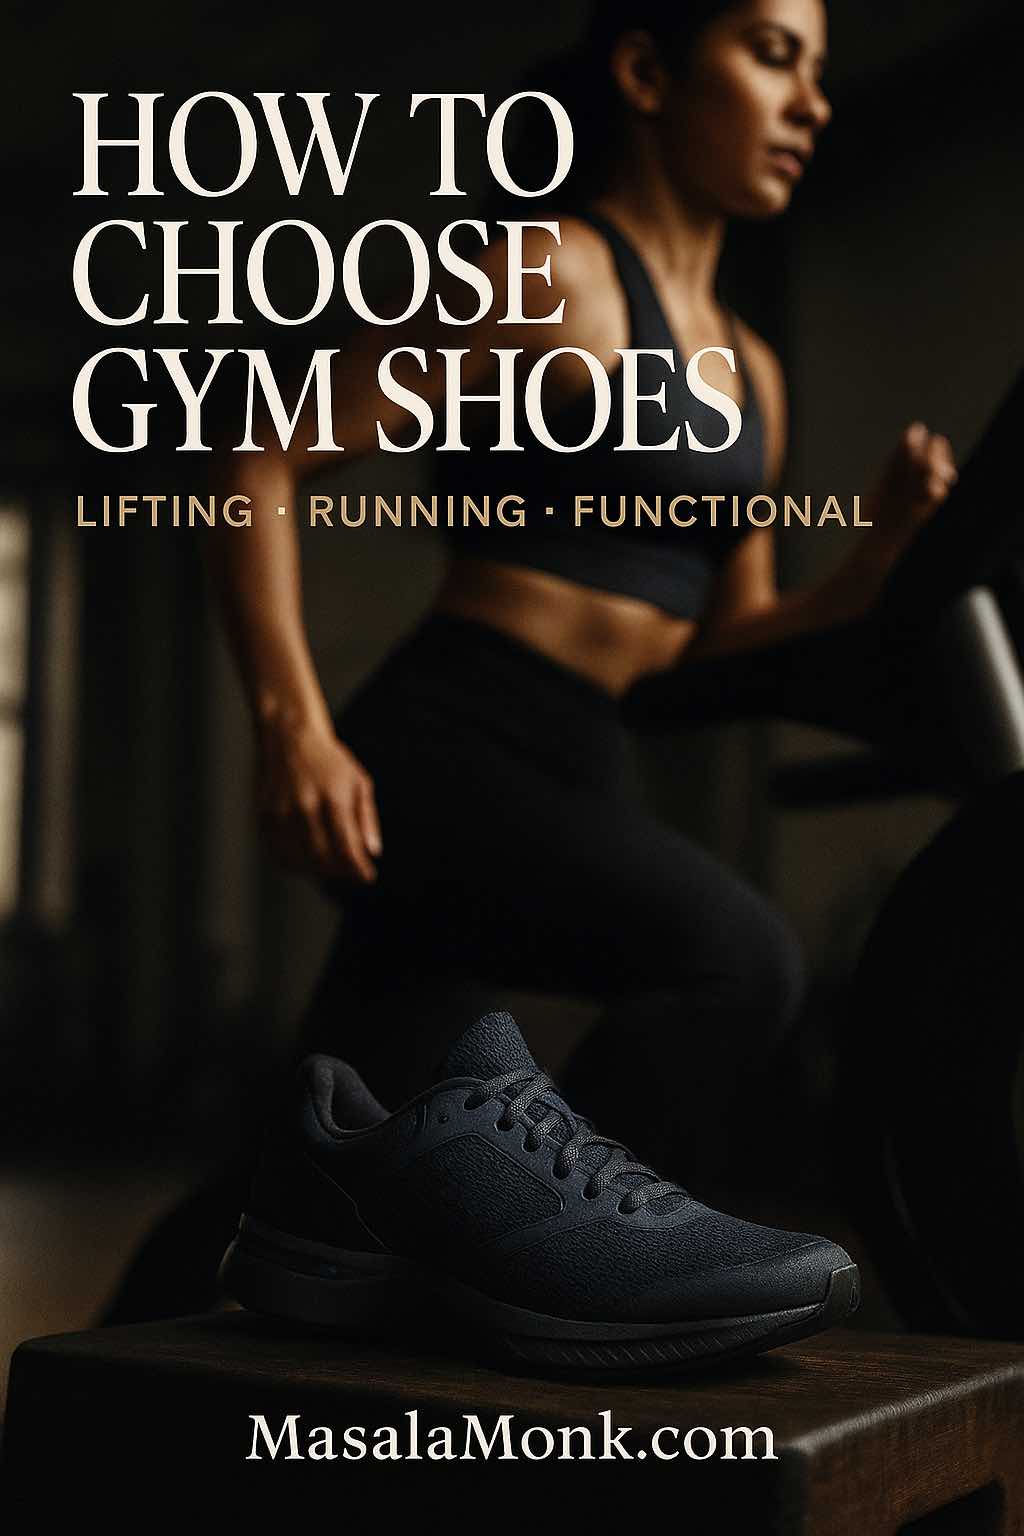
You don’t need a gym to get stronger. With no equipment calisthenics at home, you can build practical strength, steadier balance, and genuine confidence using movements that scale to your current level. All you need is a few square feet of floor, a stable surface, and a plan you can actually follow. This guide gives you a crisp exercise list, two plug-and-play routines, and a four-week progression that fits real life. Moreover, the structure aligns with public-health guidance—roughly 150 minutes of weekly activity plus two or more days of muscle-strengthening work—so you’ll improve health markers while you get stronger. For the official language, see the WHO physical activity fact sheet and the CDC guidelines for adults.
Why No Equipment Calisthenics at Home Works—And Keeps Working
To begin with, it’s accessible. You can start today with zero purchases and minimal setup. Next, it’s scalable. You’ll begin with friendly variations—knee push-ups, table rows, and short planks—then progress toward tougher versions at a pace that feels sustainable. Furthermore, it’s habit-friendly. Because the barrier to entry is tiny, workouts actually happen; consistency follows almost automatically. Consequently, progress arrives earlier than you expect.
Beyond convenience, no equipment calisthenics at home is evidence-aligned. Short sessions accumulated across the week help you reach those activity targets without rearranging your life. If you’re unsure what “counts,” the CDC’s plain-English explainer on what counts as activity confirms that practical movement, done consistently, matters. In turn, strength work at home checks the “muscle-strengthening” box while sharpening coordination and control.
Moreover, this approach supports more than muscle. Short sessions accumulate toward those weekly movement targets without overhauling your schedule. If you like gentle, low-impact options on off days, try wall-assisted mobility and core activation to stay in the groove without fatigue.
Fast Setup With Minimal Friction
First, clear a small rectangle of floor so you can step forward, back, and sideways without bumping into furniture. Then choose a sturdy table, countertop, or door frame—you’ll use it for supported rows or hands-elevated push-ups. Afterward, put down a mat or towel for traction, place water within reach, and cue a short playlist. That’s your entire gym. Additionally, link training to an existing habit—after coffee, during lunch, or just before dinner—so the decision to move becomes automatic. As a result, you’ll start more often and finish more sessions.
When you need a low-impact stand-in, swap a session for this standing Pilates workout—no floor work, still a full-body feel.
No Equipment Calisthenics at Home — Beginner Exercise List
Rather than memorize dozens of exercises, master five movement families that cover the whole body. From there, you’ll progress by adjusting leverage, tempo, or range of motion. When you want visual cues, jump to reputable references for a quick form check—or borrow ideas from focused sessions like Lower Body Strength (Day 22) or Core Power (Day 23) to sharpen form.
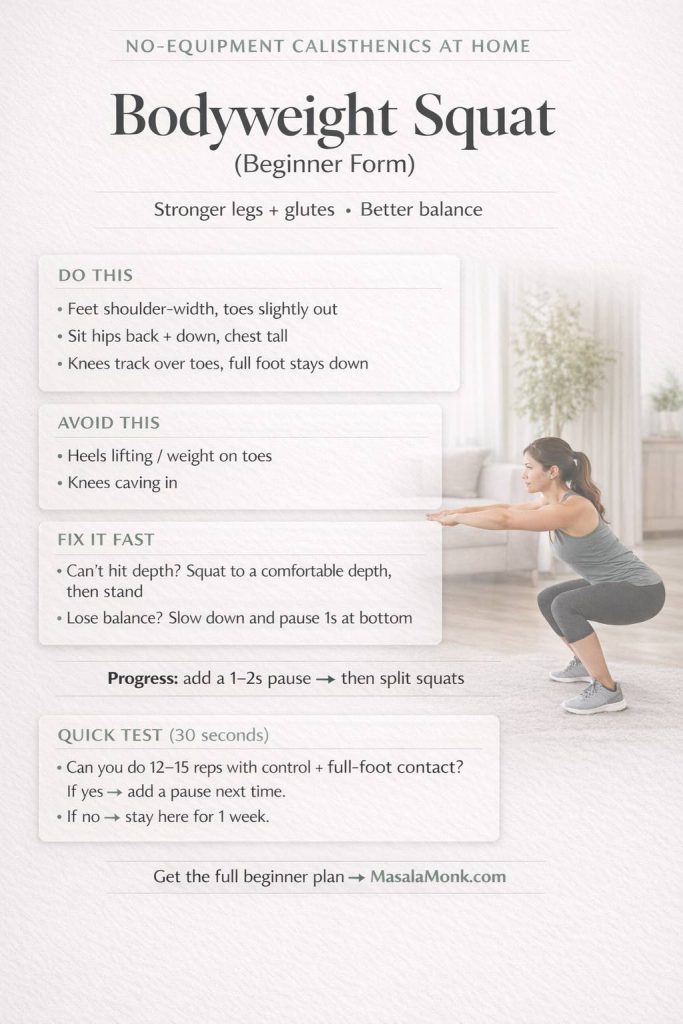
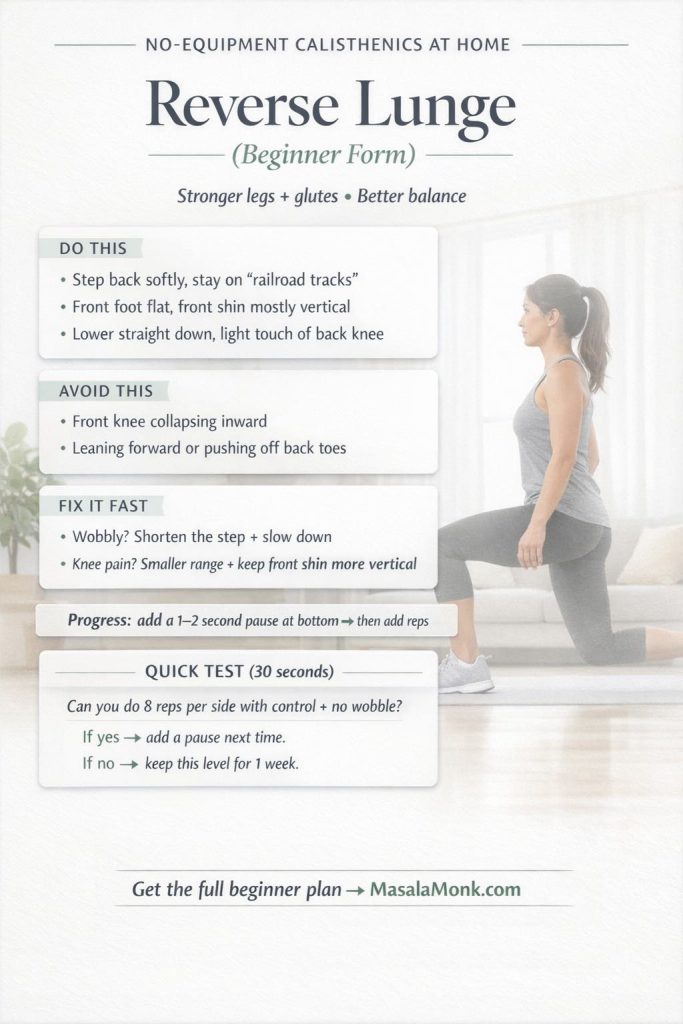
Squat → Reverse Lunge
Sit the hips back, keep the chest tall, and press through the whole foot. Pause for one second at the bottom to build control. Subsequently, introduce reverse lunges to train one leg at a time and improve balance.
Save this squat form checklist for your next workout—stable feet, clean depth, and an easy 30-second test.
Save this reverse lunge checklist for your next workout—better balance, cleaner reps, and knee-friendly form cues.
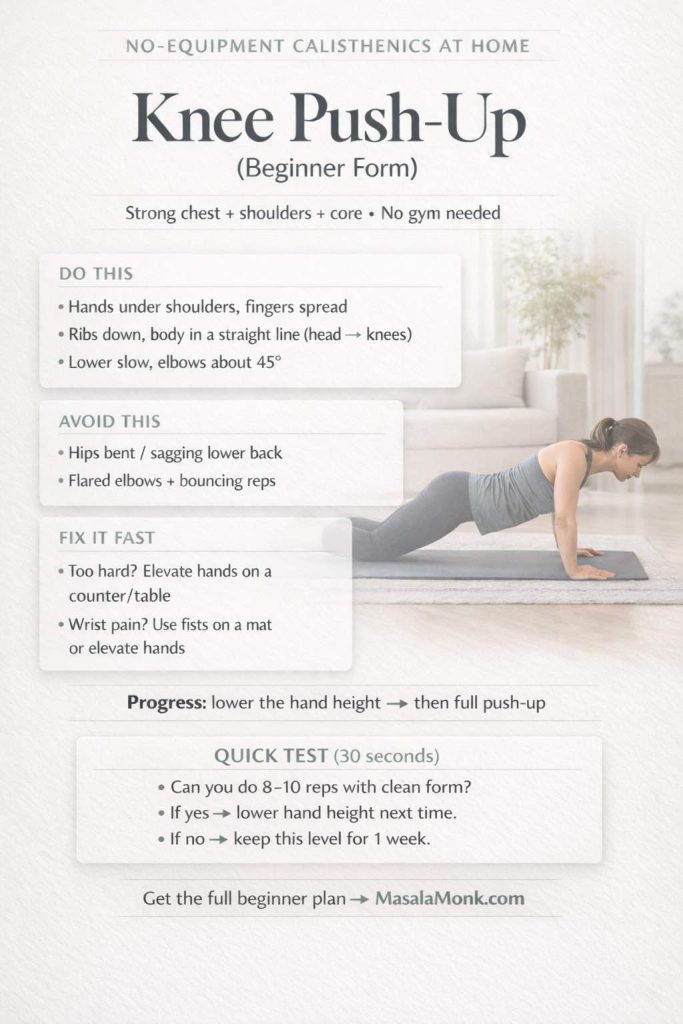
Knee Push-Up → Push-Up
Begin on knees or elevate the hands on a table or countertop. Lower smoothly with elbows about 45 degrees from your sides and keep ribs down. For a concise walkthrough, skim this bent-knee push-up guide from ACE. Afterwards, reduce the elevation, then move to full floor reps once sets feel tidy.
On days you prefer a gentler push pattern, lean against a wall and follow cues from our Wall Pilates for Beginners.
Save this knee push-up checklist for your next workout—stronger reps, happier wrists, and a simple “ready to progress?” test.
Save this push-up checklist for your next workout-strong reps, safer shoulders, and a quick 30-second test.
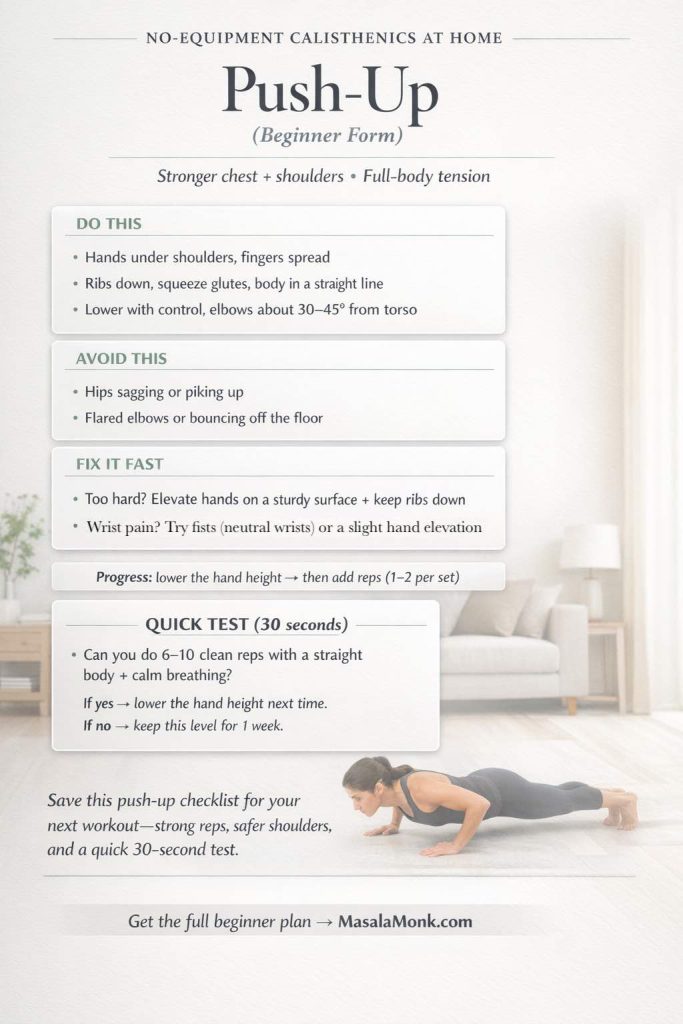
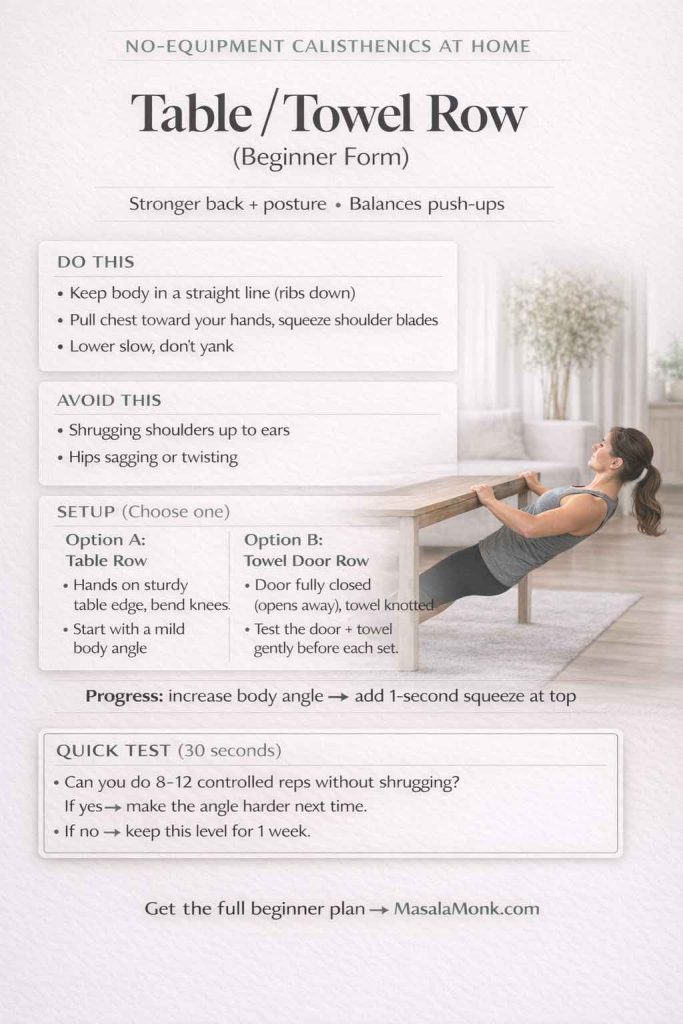
Table / Towel Row
Use a sturdy table for a light inverted row, or loop a towel through a door and pull your chest toward the anchor. Notably, always test the setup before each set. Start with a mild body angle and bent knees; then, as strength improves, walk your feet forward to increase the challenge.
Save this row checklist for your next workout—safer setup, better back activation, and a quick test to level up the angle.
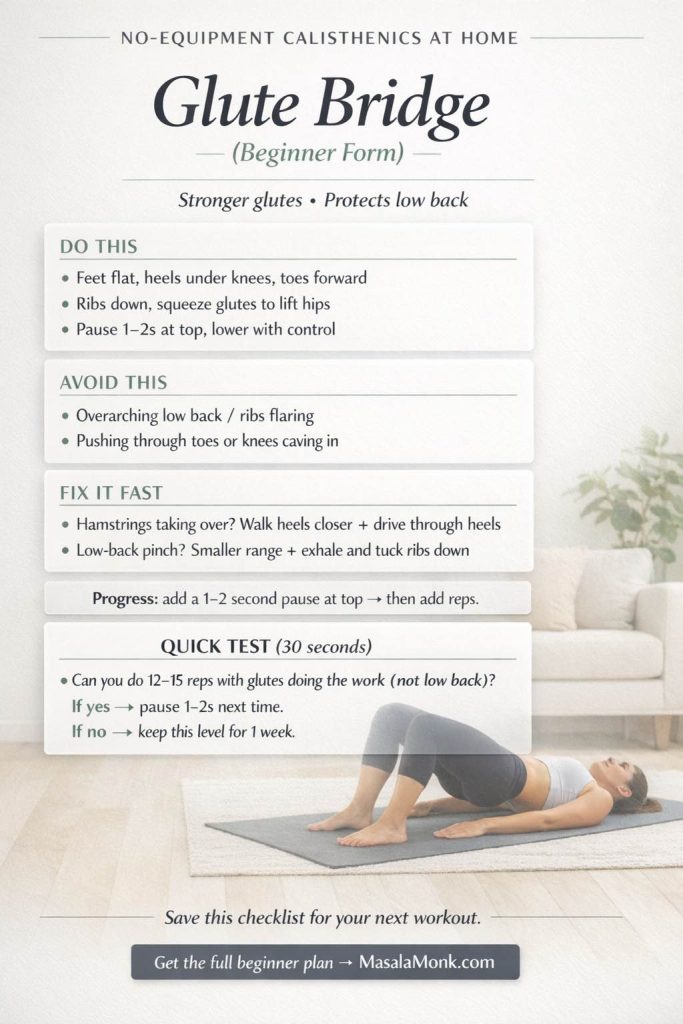
Glute Bridge
Lie on your back, set feet flat, and drive through the heels. Squeeze at the top without arching the lower back. Hence, think “hips up, ribs down.” If you want more tension without extra gear, add a two-second pause at the top.
Save this glute bridge checklist for your next workout—stronger glutes, a safer low back, and a simple 30-second test.
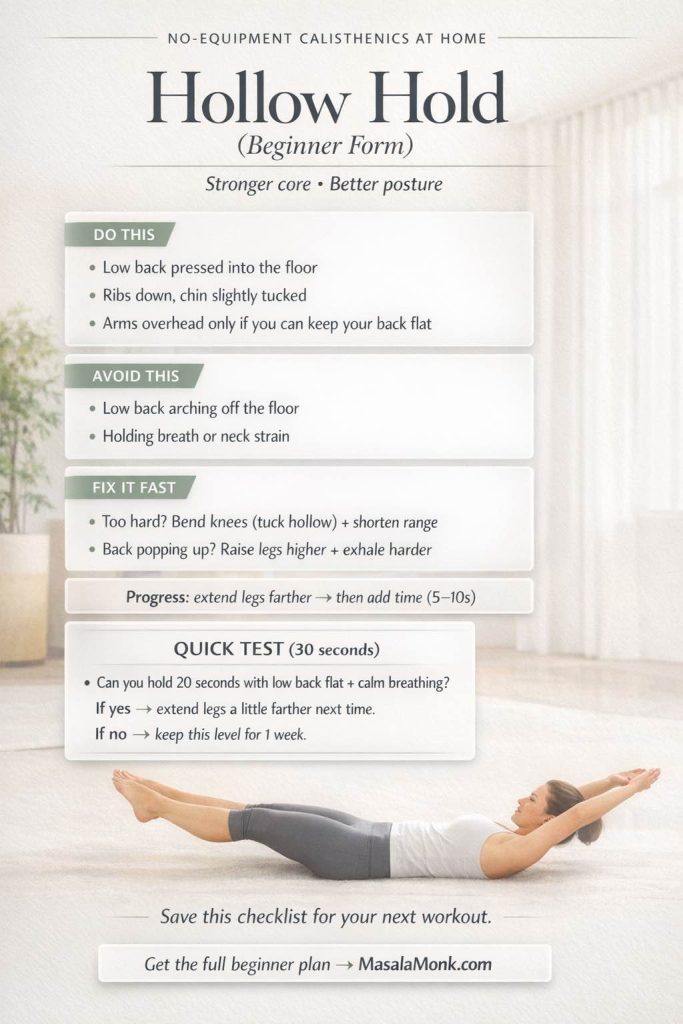
Plank → Dead Bug → Hollow Hold
Brace the torso while breathing calmly. Keep the spine neutral. Initially, use short, repeatable holds. Later, progress to dead bug for anti-extension strength and then to hollow body positioning for deeper control.
Save this plank form checklist for your next workout—ribs down, steady breathing, and a quick 30-second test to level up.

Save this dead bug checklist for your next workout—keep your low back flat, move with control, and progress without strain.

Save this hollow hold checklist for your next workout—keep your low back flat, breathe calmly, and level up safely.
If you prefer gentler options or chair-friendly progressions, the NHS provides home-friendly strength exercises and short strength & resistance videos. Conversely, if you enjoy variety, these clips pair well with off days.
Smart Warm-Up and Steady Cool-Down
Start with three to five minutes: ankle rocks, hip circles, arm swings, and two slow squats. Importantly, the warm-up should make the first set feel better—not drain energy. After finishing, cool down with unhurried breathing and light mobility. For instance, try cat-camel, gentle thoracic rotations, and an easy forward fold. Ultimately, these bookends keep joints happy and mark the session complete.
No Equipment Calisthenics at Home — Two Beginner Routines
Train three days per week at the start. Alternate these sessions. Keep the moves familiar so your body learns positions and patterns quickly. However, if a movement feels shaky, step back one progression and reclaim clean form.
Routine A — 20-Minute Circuit (Full Body)
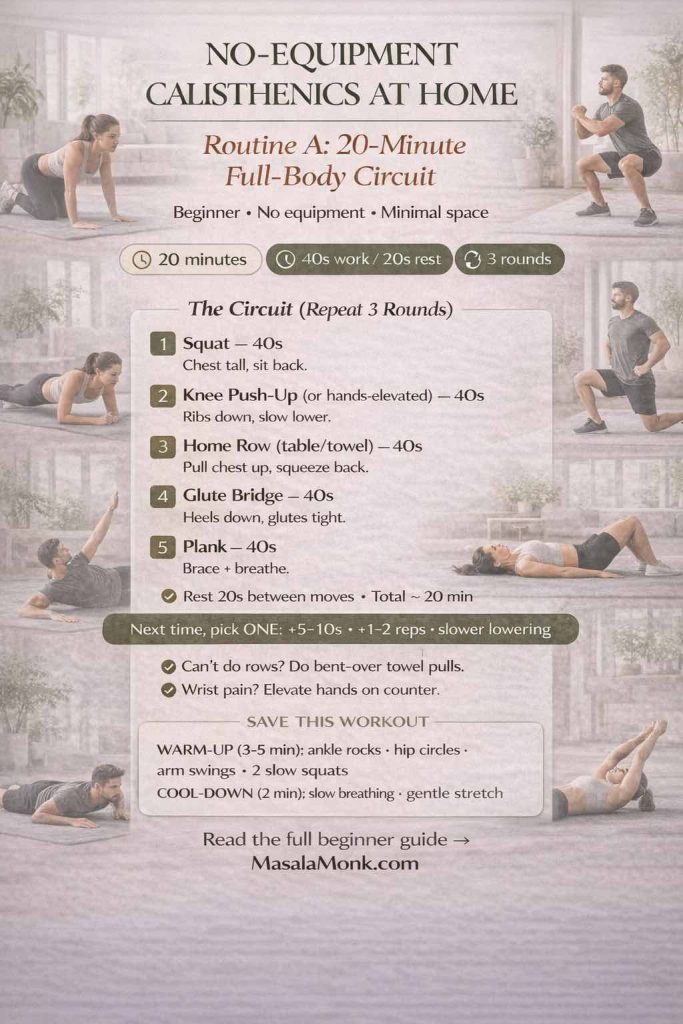
- Squats — 40 seconds work / 20 seconds rest
- Knee Push-Ups (or hands-elevated push-ups) — 40 / 20
- Table / Towel Rows — 40 / 20
- Glute Bridges — 40 / 20
- Plank — 40 / 20
Complete 3 rounds. Progress by adding five to ten seconds per hold, slipping in one or two extra reps, or slowing the lowering phase. In essence, tiny changes create new stimulus without crushing recovery.
Routine B — 30-Minute Sets × Reps (Full Body)
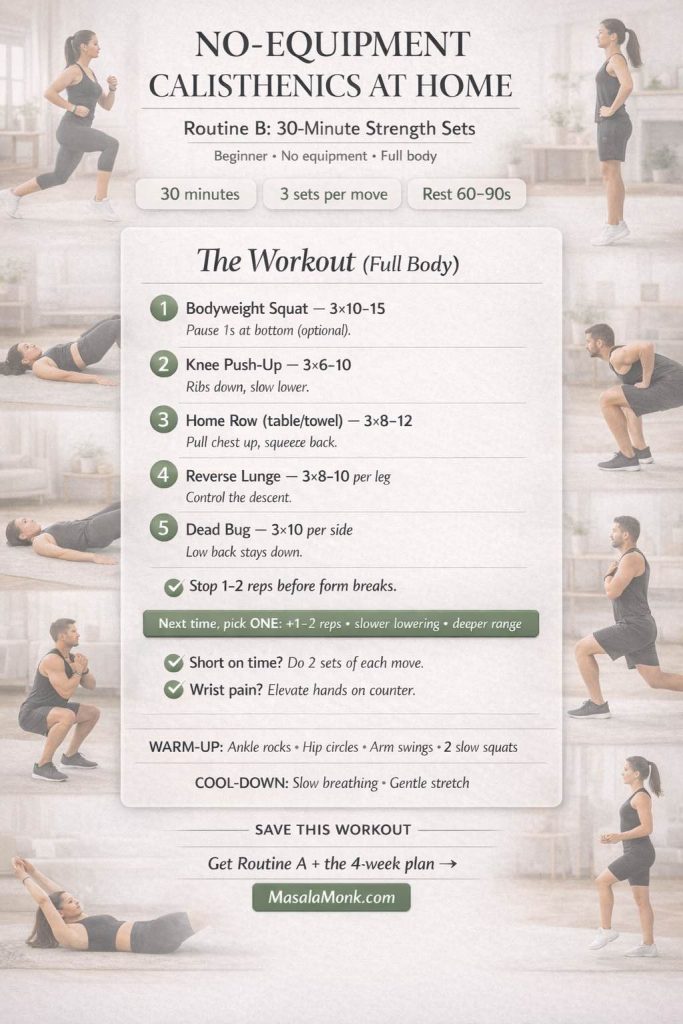
- Bodyweight Squat — 3×10–15
- Knee Push-Up — 3×6–10
- Table / Towel Row — 3×8–12
- Reverse Lunge — 3×8–10 per leg
- Dead Bug — 3×10 per side
Rest 60–90 seconds between sets. If everything feels easy, add a slow three-second descent or a one-second pause at the hardest point. Conversely, if form breaks, trim each set by two reps and rebuild next time. For dependable technique photos and simple regressions, browse the ACE no-equipment exercise library.
Brief reminder: short, regular sessions help you satisfy both the “muscle-strengthening” target and a sizable portion of your weekly movement minutes. Consequently, the payoff compounds when you keep the plan simple.
No Equipment Calisthenics at Home — 4-Week Beginner Plan
You’ll now plug the two routines into a clear calendar. The plan is brief, progressive, and repeatable. Crucially, you’ll leave a little in the tank so the rest of the day still feels good.
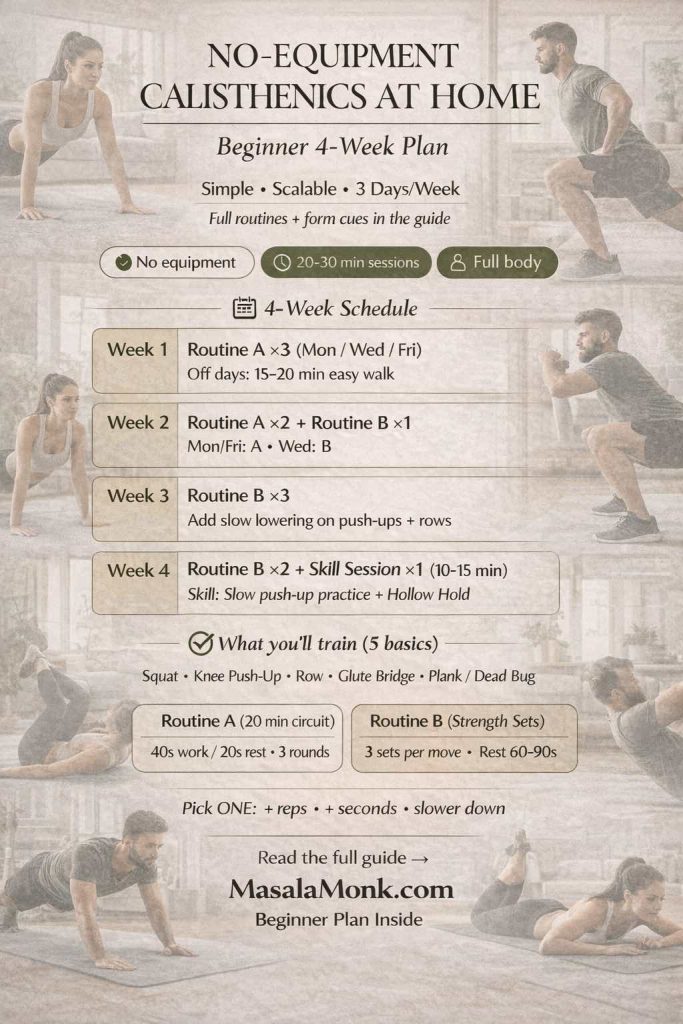
- Week 1 — Routine A ×3 (e.g., Mon / Wed / Fri). On off days, walk 15–20 minutes at a conversational pace.
- Week 2 — Routine A ×2 + Routine B ×1 (Mon / Fri = A, Wed = B). Keep tempo calm and crisp.
- Week 3 — Routine B ×3. Add slow negatives on push-ups and rows; hold planks five seconds longer than last week.
- Week 4 — Routine B ×2 + one short skill session (10–15 minutes): practice push-up technique for 2–3 sets of 3–5 slow reps, then finish with hollow holds (3×20–30 seconds).
When you want a day-by-day map with built-in momentum, step into our beginner-friendly 30-day calisthenics challenge. It turns intention into action with small, specific tasks you can actually complete.
Progressions That Prevent Plateaus
After four weeks, you’ll feel steadier. At that point, nudge difficulty without changing everything. Adjust leverage, pace, or range—then write down what you did. Subsequently, add a little more next time.
- Squat family
Add a two-second pause at the bottom to build control. Later, switch to split squats for unilateral strength and balance. Eventually, try reverse lunges with a slower descent for extra time under tension. - Push-ups
Reduce hand elevation week by week, moving from countertop to table to floor. Then, once full reps feel honest, elevate the feet slightly for more load. Notably, keep the body line rigid and the ribcage tucked. - Rows
When using a towel, step farther from the door to steepen the angle. Or, under a sturdy table, place the feet forward so the torso is closer to horizontal. Squeeze the shoulder blades together at the top and pause briefly. If you later add gear, short finishers from battle rope workouts can complement your pull days. - Core
Shift from forearm plank to high plank. Introduce hollow body holds in short, deliberate sets. Meanwhile, breathe quietly through the nose so the torso stays braced.
Small tweaks deliver real changes. Clean reps now beat sloppy “PRs” you can’t repeat later. Therefore, build conservatively and let momentum accumulate.
Cardio That Complements Strength
The routines above tick the “muscle-strengthening” box. To approach the 150-minute activity goal, add short, easy cardio that doesn’t complicate your day. For instance, take brisk walks, cycle casually, or dance in the living room. Spread it out: several 20-minute bouts, or daily 10–15-minute chunks. If time is scarce, climb stairs for five minutes and count it. On the other hand, if you prefer structured ideas, the CDC’s page on what counts as activity offers helpful examples. Ultimately, the mission is simple: collect minutes without turning life upside down.
When you crave gentle variety, rotate in a day from the 28-day wall Pilates challenge to blend cardio-style movement with core-friendly strength.
Troubleshooting: Smooth Fixes for Common Hiccups
Wrists ache during push-ups
Use hands-elevated push-ups on a countertop to reduce wrist extension. Alternatively, make fists and place knuckles on a mat so the wrists stay neutral. Add light wrist circles and palm lifts before the first set.
Rows feel awkward with a towel
Fold the towel thick, close the door on the knot, and test the anchor with a gentle lean. Initially, use a small angle with bent knees. Gradually walk the feet forward to increase challenge. If uncertainty lingers, switch to table rows until the groove feels natural.
Out of breath too soon
Slow the tempo. Rest 60–75 seconds between sets. Temporarily skip long end-range holds. Even so, keep showing up—your engine adapts quickly when the plan is simple and repeatable.
Short on time
Run two rounds of Routine A and call it a win. Next day, do two sets of squats, push-ups, and rows. Consistency compounds; perfection does not.
Motivation dips
Lay the mat out the night before. Pair training with a favorite playlist or podcast. Promise five minutes. Frequently, a five-minute start becomes twenty once you begin.
Optional Add-Ons After Four Weeks (Low Cost, Big Payoff)
Although no equipment calisthenics at home will take you far, a few inexpensive tools unlock new progressions and keep training fresh.
- Resistance band
Perfect for face pulls, band-assisted rows, and pull-apart patterns that build the upper back. Additionally, bands make tempo work natural and joint-friendly. - Doorway pull-up bar
Begin with passive hangs and scapular pull-ups. Over time, progress to full pull-ups. Incidentally, hangs also decompress the shoulders after desk hours. - Yoga mat
Comfort matters. When floor work feels good, you’ll do more of it. A mat improves traction on planks and hollow holds.
For a practical breakdown—what’s worth buying, what to skip, and how to set up a minimalist corner—see our essential equipment for home & office workout. The list stays focused so purchases remain intentional.
Recovery, Sleep, and Food—Without Complexity
Strength gains arrive between sessions. Sleep accelerates them. Aim for a consistent bedtime and a dark, cool room. Walk after meals when possible. Drink water. Eat enough protein to support recovery, but avoid chasing perfection. Whole foods most of the time is more than fine. If soreness lingers, reduce total volume slightly next session and polish technique. Then, re-add sets once you feel fresh.
If you want an easy on-ramp, try beginner meal prep to automate lunches, or follow a Mediterranean-style template most days.
Meanwhile, consider micro-recovery during the day: stand up every hour, stretch the hips for thirty seconds, and take a minute of slow breathing when stress climbs. Individually, these moments feel small; collectively, they stabilize energy and improve readiness for the next session.
Also Read: The Science of Protein: Maximizing Muscle Growth and Recovery
Mindset: Make the Habit Obvious, Easy, and Satisfying
Habits stick when they’re visible and rewarding. Therefore, leave your mat where you’ll see it. Schedule sessions as you would a meeting. Keep a tiny log—date, routine, one note. Celebrate small wins: a first full push-up, a longer plank, or a week with three sessions done. Likewise, set “minimums” for hectic days: one round of the circuit, or two sets of squats and rows. Even minimal effort maintains identity—I’m someone who trains—and that identity keeps momentum alive.
If you enjoy structure and accountability, join our beginner-friendly 30-day calisthenics challenge. It provides daily prompts and sensible progressions, which, in practice, means fewer decisions and more done sessions.
Curious about tailoring cardio or calories to your body type? Skim our endomorph, ectomorph, and mesomorph guides for quick orientation. They’re optional, but useful if you’re experimenting.
Form Support When You Want It
Every so often, you’ll want visual confirmation that a setup is right. On those days, pull a single cue from a dependable source rather than doom-scrolling. For clear step-by-step photos, explore the ACE exercise library by body part. If you prefer gentle follow-alongs, the NHS offers short strength & resistance videos that pair well with off days. Prefer written checklists? The NHS strength exercises page includes simple progressions you can print or save.
No Equipment Calisthenics at Home — Bringing It All Together
Let’s connect the dots. You now have a simple system: two reliable routines that hit every major muscle group, a four-week plan that respects time and energy, and progressions that don’t require gear. Along the way, short walks or easy cardio help you reach the weekly movement target recommended by the WHO and the CDC. For technique check-ins, the ACE no-equipment exercise library remains a dependable reference. For gentle options or guided clips, the NHS has you covered with strength exercises and short strength & resistance videos.
Ultimately, no equipment calisthenics at home is enough to start, enough to progress, and enough to feel better in your body. Choose a routine. Set a tiny timer. Move with intent. Then, the next day, do it again.
Next Step: Pick Your Line and Go
If you’re brand new, start with Routine A tomorrow and keep the rests honest. For those who have trained before, begin at Week 2 and run the 30-minute plan once. People who prefer a daily program with crystal-clear prompts, can jump into the 30-day calisthenics challenge. And if a minimalist setup with two or three smart tools sounds appealing, the essential equipment guide will keep purchases focused and effective.
FAQs
1. What is “no equipment calisthenics at home” and who is it for?
No equipment calisthenics at home means full-body strength training using only your bodyweight. Moreover, it suits beginners, busy professionals, and anyone returning to exercise who wants scalable, joint-friendly workouts without buying gear.
2. How do I start calisthenics at home as a beginner?
Begin with five basics: squats, knee push-ups, table/towel rows, glute bridges, and planks. Additionally, train three days per week, keep 1–2 reps in reserve, and record sets so you can progress gradually.
3. Can I build muscle with no equipment calisthenics at home?
Yes. Consequently, you’ll grow by increasing reps, time under tension (slow eccentrics, pauses), and range of motion over weeks. Furthermore, aim for consistent sleep and adequate protein to support recovery.
4. How many days per week should I train?
Start with 3 days weekly. Subsequently, add a fourth day once sets feel tidy and recovery stays solid. Likewise, sprinkle easy walks on non-lifting days to maintain momentum.
5. What’s a simple beginner routine I can follow today?
Try 3 rounds of: squats 40s, knee push-ups 40s, table/towel rows 40s, glute bridges 40s, plank 40s; rest 20s between moves. Notably, keep breathing steady and stop one rep before form breaks.
6. Do I need cardio in addition to no equipment calisthenics at home?
Ideally, yes. Hence, add short, conversational-pace walks or light cycling on off days to reach weekly activity targets while still recovering between strength sessions.
7. What’s the best way to progress if I can’t do full push-ups yet?
Use hands-elevated push-ups on a stable surface; thereafter, lower the surface over time until you reach the floor. Importantly, keep a straight line from head to heels and control the descent.
8. How do I make rows at home without equipment?
Anchor a sturdy towel in a closed door or use a solid table for light inverted rows. Alternatively, bend the knees and reduce the angle first; then, as strength improves, walk the feet forward to increase difficulty.
9. How long should a beginner session last?
Generally 20–30 minutes. Thus, you’ll complete warm-up, 5 movements, and a brief cool-down without draining energy for the rest of the day.
10. What if I’m short on time?
Do one condensed circuit: squats, push-ups, rows—two rounds only. Even so, this mini-workout maintains habit strength while still nudging progress.
11. Which muscles does no equipment calisthenics at home train?
Specifically: legs (squats, lunges), chest and shoulders (push-ups), back and biceps (rows), and core (planks, dead bugs, hollow holds). Akin to gym sessions, these cover every major area.
12. How soon will I see results?
Beginners often feel better coordination within 1–2 weeks. Thereafter, visible strength changes typically appear in 4–6 weeks, provided you train consistently and recover well.
13. What if my wrists hurt during push-ups?
Switch to hands-elevated push-ups or use knuckles on a mat. Additionally, warm up with gentle wrist circles and palm lifts to prepare the joints.
14. Is equipment ever necessary for progress?
Not inherently. Nevertheless, a resistance band or doorway bar later on allows extra variations. For now, prioritize crisp technique and small weekly improvements.
15. How do I avoid plateaus with no equipment calisthenics at home?
Rotate one variable at a time: add reps, extend holds, slow eccentrics, or deepen range. Moreover, log sessions so you can nudge a single metric upward each week.
16. What’s a safe rep range for beginners?
Aim for 6–12 reps on strength moves and 20–40 seconds on core holds. Consequently, you’ll balance challenge with form and recover faster between sessions.
17. Should I train full body or split days?
Full body works best at first. Subsequently, once you’re consistent, you may alternate push/pull/legs days; however, keep volume moderate to protect recovery.
18. How do I warm up quickly at home?
Perform 3–5 minutes of ankle rocks, hip circles, arm swings, and two slow squats. Likewise, finish with one easy set of your first exercise to groove the pattern.
19. What’s the right rest time between sets?
For beginners, 60–90 seconds is sufficient. Thus, you’ll preserve quality without letting the session drag.
20. How can I keep motivation high?
Set a tiny “minimum”—five minutes. Importantly, celebrate small wins (first clean push-up, longer plank). Subsequently, string together weeks, not heroic days.