If you’ve ever wandered the cereal aisle, flipped through a healthy cookbook, or browsed breakfast recipes online, you’ve probably seen “oats” and “oatmeal” used in ways that seem interchangeable—or completely different. Sometimes you buy “oats,” sometimes you’re told to “make oatmeal.” So what do these words actually mean, how do they relate, and does it matter for your cooking, health, or grocery list?
Let’s break down the differences and clear up the confusion—once and for all.
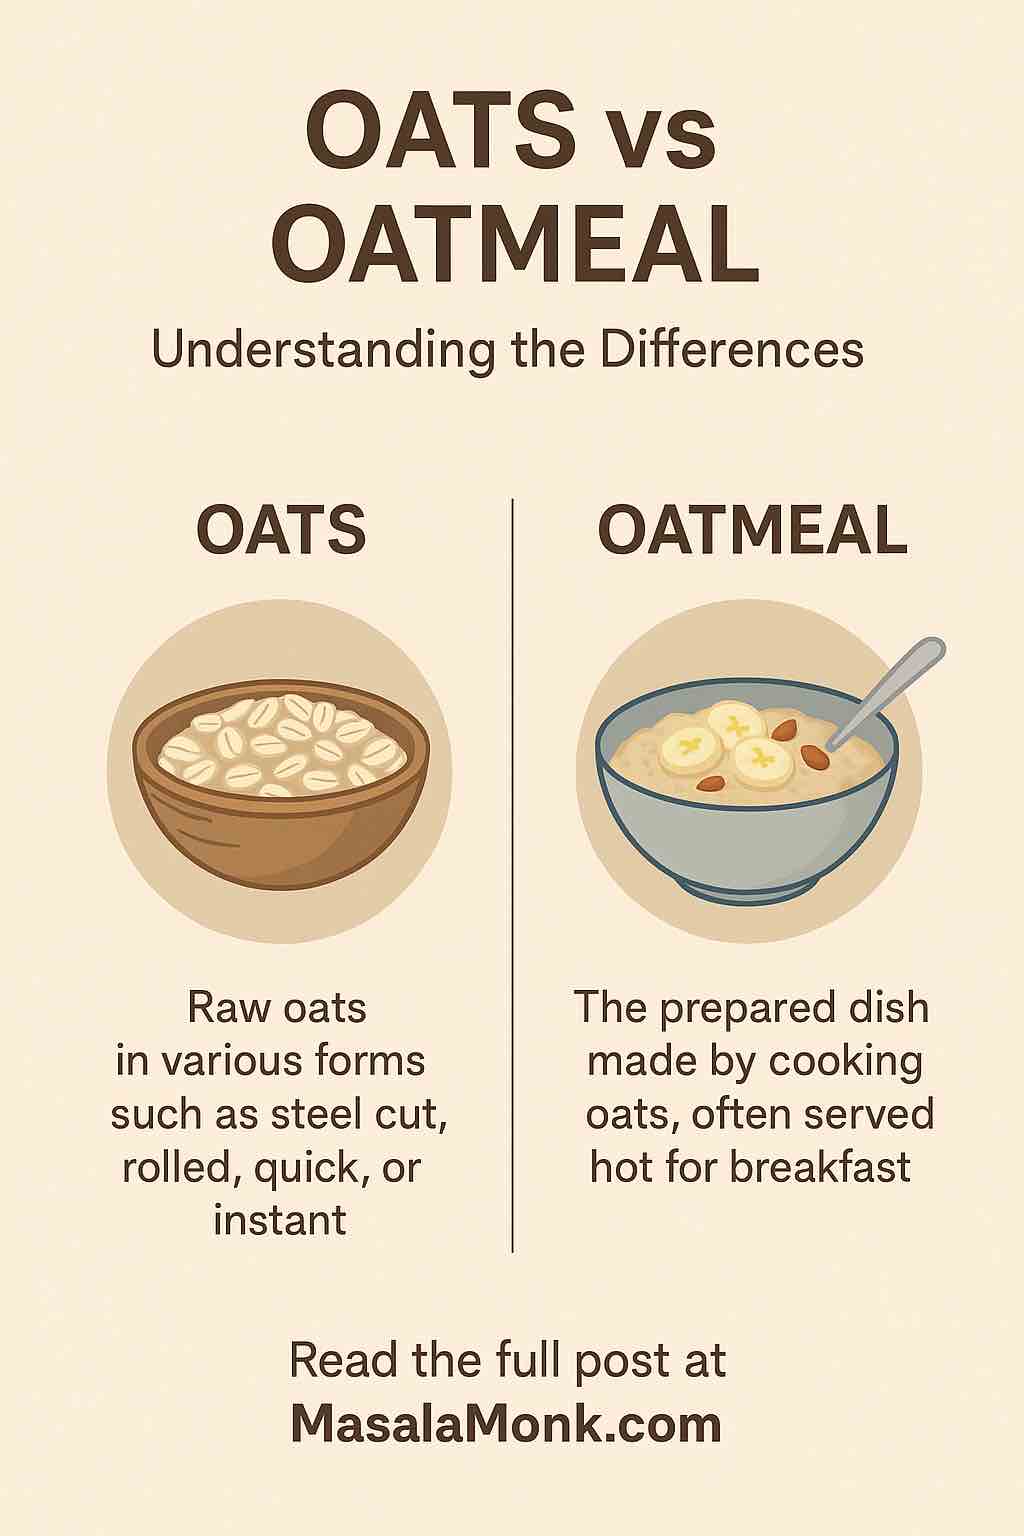
Oats: The Starting Point of Everything
Oats are a whole grain, the edible seed of the oat plant (Avena sativa).
Before they ever reach your kitchen, oats go through several stages:
- Harvested from the field
- Cleaned and hulled (removing inedible outer layer)
- Processed into different forms for the market
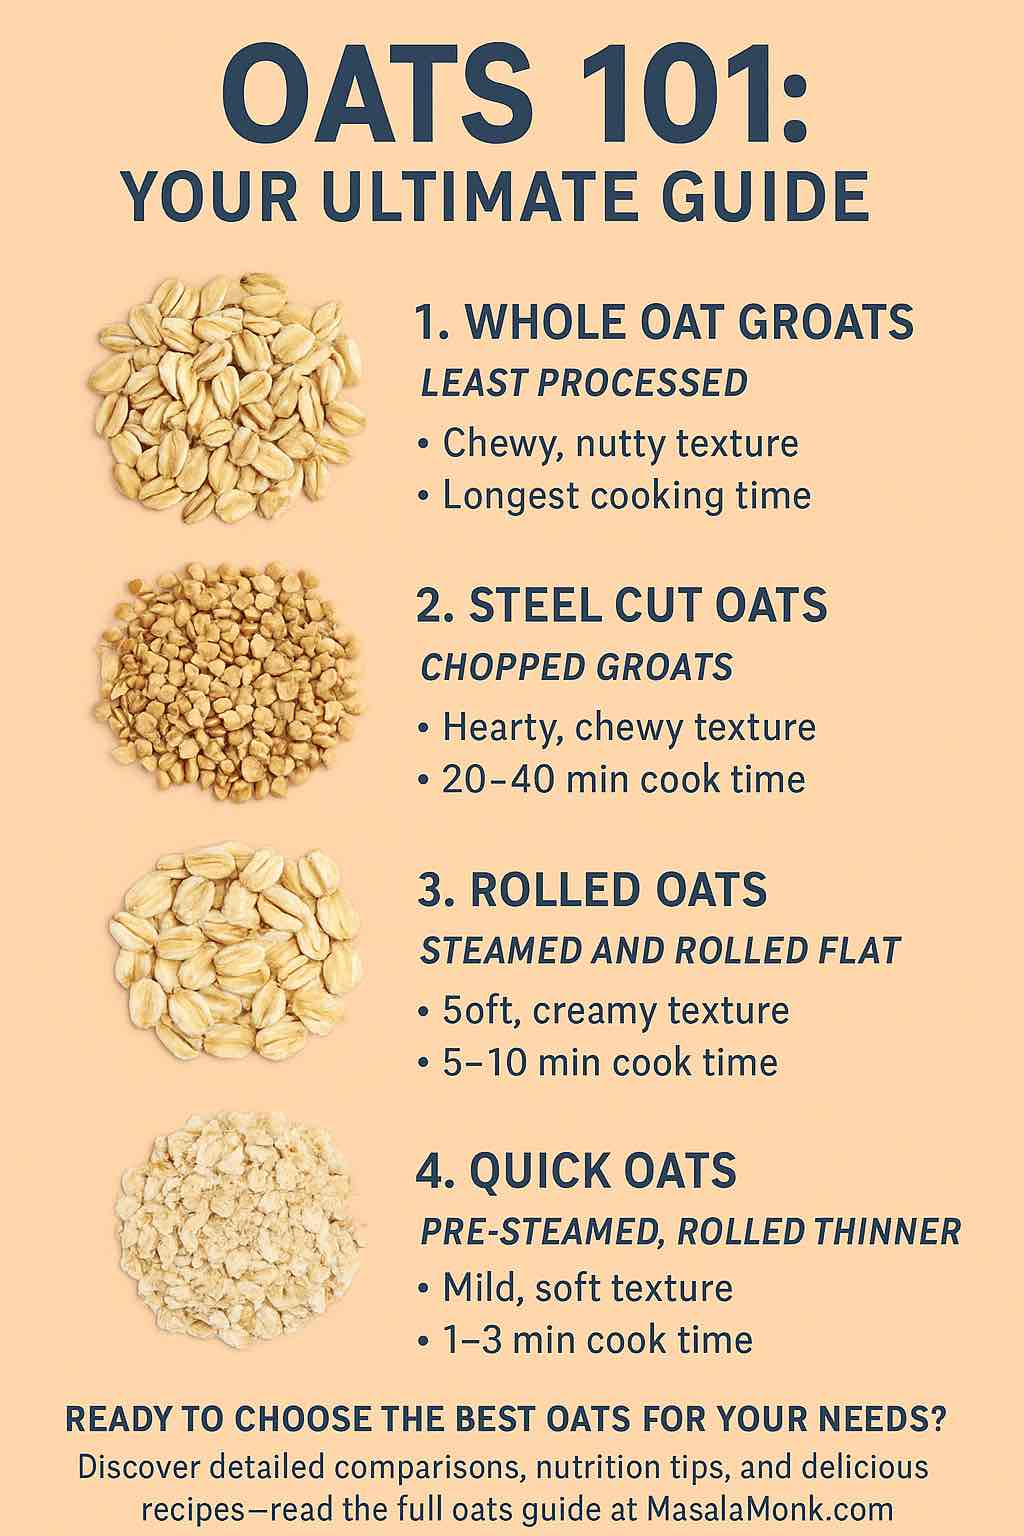
All oat products start with the oat groat—the unprocessed, whole grain. From here, how they’re cut, steamed, or rolled determines what kind of oat you end up with.
If you’re curious about all the ways oats are processed and what types you’ll find in stores, check out our Ultimate Guide to Oats: Types, Nutrition, and Differences Explained. It covers steel cut, rolled, quick, and instant oats in detail.
What Is Oatmeal? (And Why the Term Changes by Country)
The word oatmeal can mean two things, depending on where you are and who you ask:
- In the US, Canada, and India: “Oatmeal” almost always refers to the hot, cooked porridge made from oats (any type).
- In the UK, Ireland, and some other countries: “Oatmeal” can also mean finely ground oats used in baking, coatings, and sometimes for porridge.
So, “oatmeal” might mean the dish (cooked oats, usually eaten hot for breakfast) or, in some cases, a specific form of processed oat.
- When you see a recipe for “oatmeal cookies,” it means cookies made with rolled oats, not ground oats.
- If you see “oatmeal” on a UK or European ingredient list, check if it means ground oats or cooked porridge.
If you want to know exactly which oat type makes the best oatmeal (dish), see Steel Cut Oats vs Rolled Oats: Nutrition, Taste, Cooking & More, which explains the texture and flavor differences in real-life bowls.
When Do You Use “Oats” and When “Oatmeal”?
- Oats = The raw ingredient in all its forms: steel cut, rolled, quick, instant, and even whole groats.
Example: “Add 1 cup of oats to your batter.” - Oatmeal = Most often the prepared porridge (the dish) you eat for breakfast.
Example: “Oatmeal with bananas and almonds is my favorite breakfast.”
But there’s overlap:
- Some packaging (especially in the UK) uses “oatmeal” to describe ground oats or even instant oats.
- Some recipes use “oats” when they mean “oatmeal” as the finished dish.
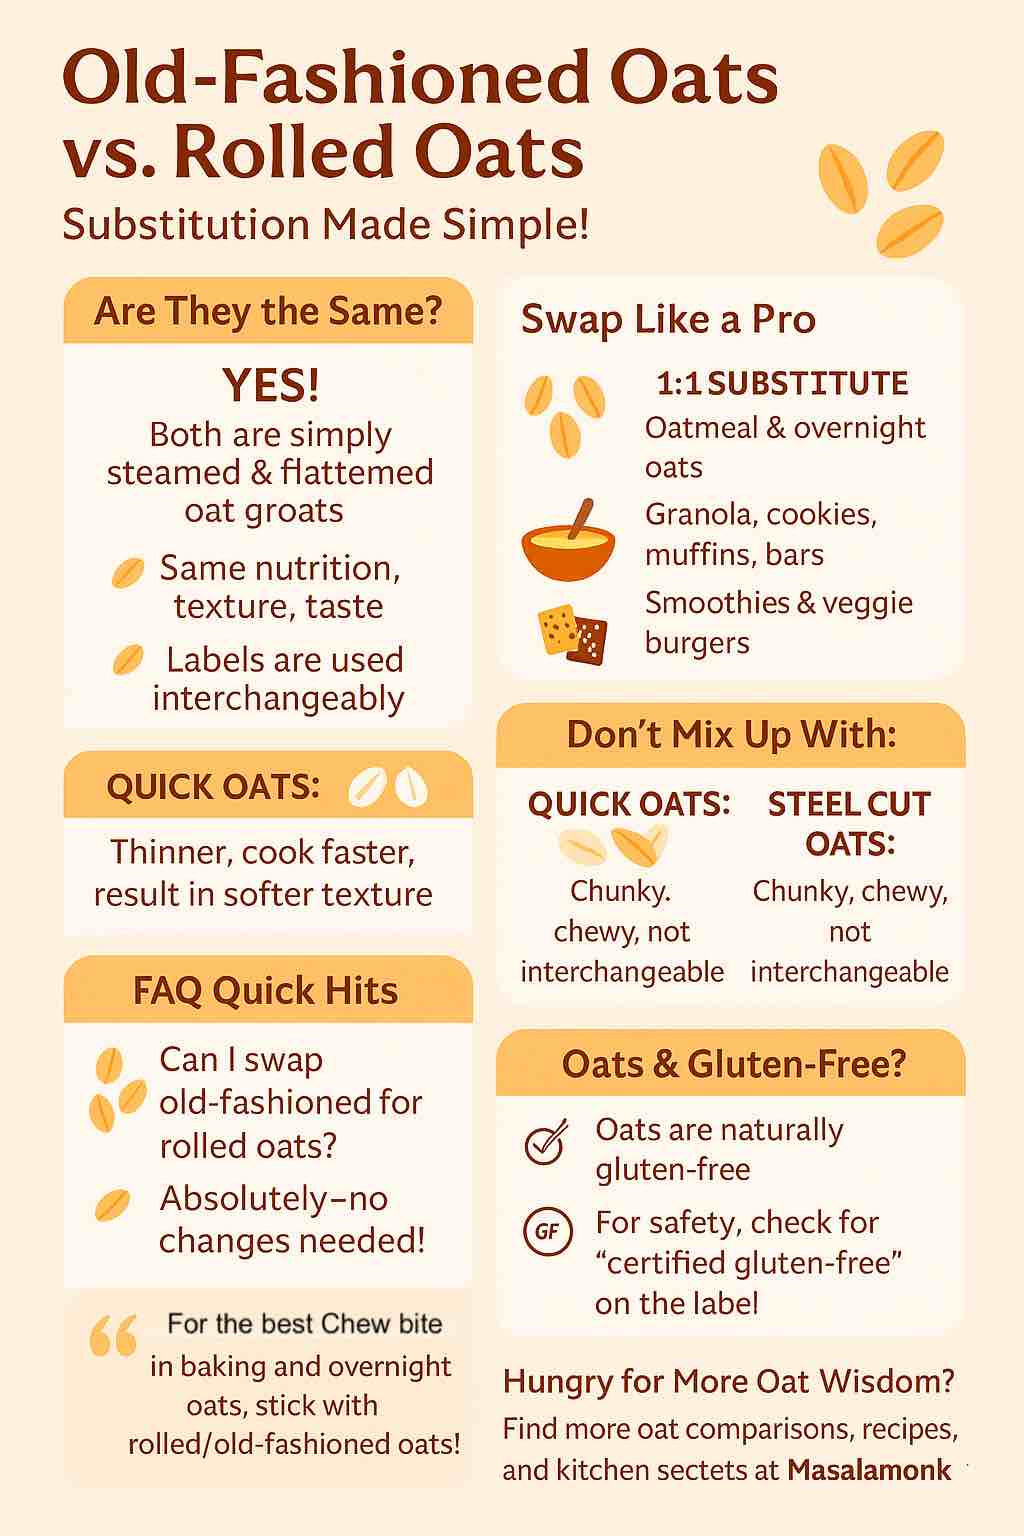
If you ever wonder what type a recipe wants, refer to our Can You Substitute Old-Fashioned Oats for Rolled Oats? for clarity on the most commonly used oats in baking and porridge.
Types of Oats Commonly Used for Oatmeal
You can make oatmeal (the dish) with nearly any type of processed oat.
But the oat type you choose changes everything:
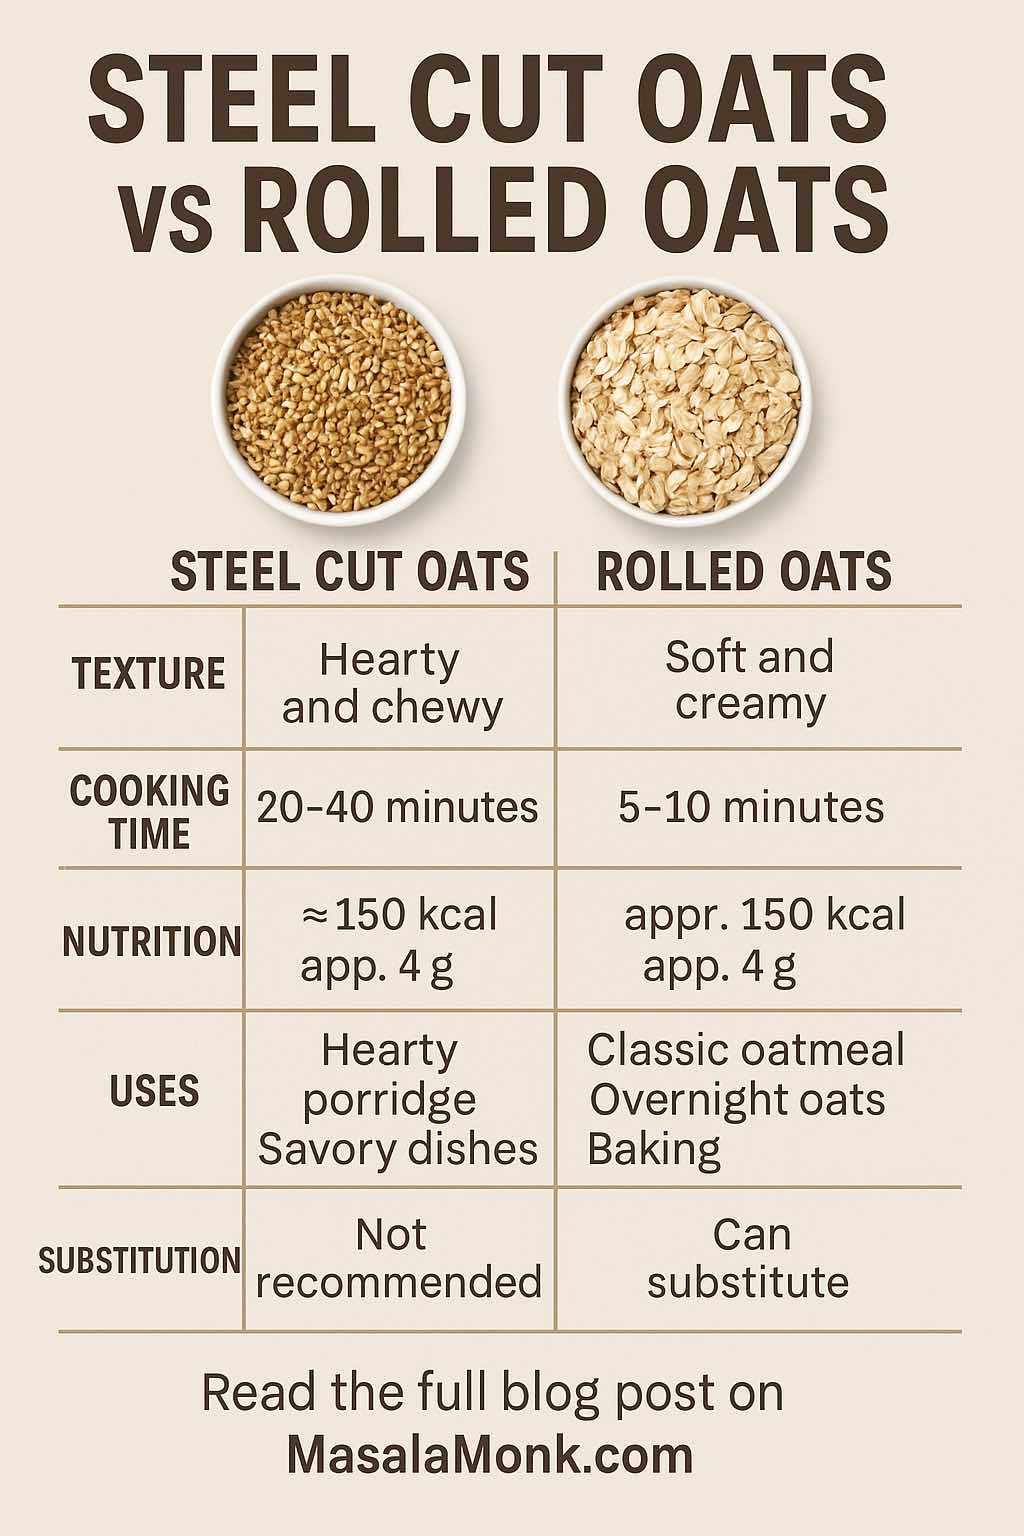
- Steel cut oats: Chewy, hearty, and nutty; takes longest to cook.
(See the in-depth taste and nutrition comparison: Steel Cut Oats vs Rolled Oats) - Rolled oats (old-fashioned oats): Creamy and classic; ready in 5–10 minutes.
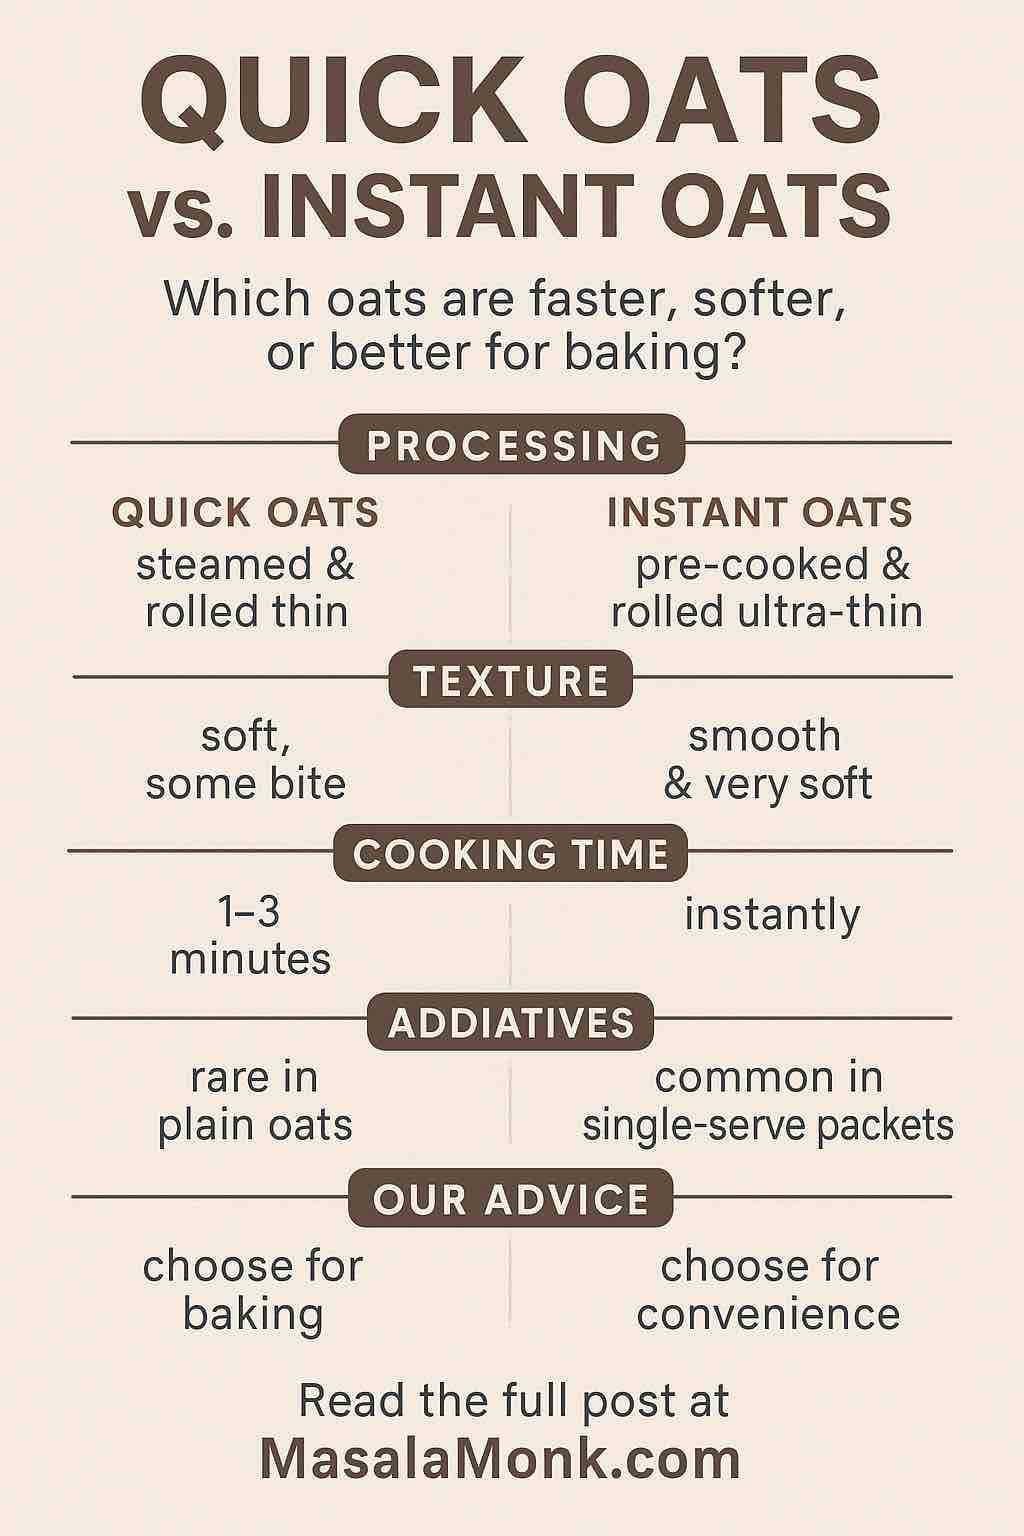
- Quick oats: Very soft, fast to cook, good for smoother bowls or quick baking.
- Instant oats: Silky, ready in seconds, often pre-flavored (read the labels!).
(Want to know how quick oats and instant oats really compare? Are Quick Oats the Same as Instant Oats?)
For most traditional oatmeal (porridge) recipes, rolled oats are the most popular and versatile. If you want a softer or mushier bowl, use quick or instant oats. For a heartier, longer-cooking meal, choose steel cut.
Oats in Baking vs. Oatmeal in Baking
- If a recipe calls for oats in baking (like granola bars, cookies, or bread), it usually means rolled oats or old-fashioned oats.
- If it says “oatmeal” as an ingredient (sometimes seen in older British or Irish recipes), it might be referring to ground oats or oat flour.
For modern recipes, the safest bet is to use rolled oats unless the recipe says otherwise.
Wondering if you can swap quick oats, instant oats, or rolled oats in baking? Our post on Are Quick Oats the Same as Instant Oats? covers when substitutions work and when they’ll change your texture.
Nutrition: Oats vs. Oatmeal
Whether you eat oats raw (in muesli or smoothies) or as oatmeal (cooked porridge), you’re getting a nutrient-packed whole grain:
- Oats: Naturally high in fiber (especially beta-glucan), protein, vitamins, and minerals.
- Oatmeal: The nutrition of the finished dish depends on your oat type and what you add (milk, water, sweeteners, fruit, nuts, etc.).
All unsweetened oat types—steel cut, rolled, quick, and instant—are naturally healthy. The biggest nutritional difference comes when you buy flavored instant oatmeal, which can be high in sugar and sodium.
Learn how all oat types compare for health and diet in our Ultimate Guide to Oats.
Real-Life Examples and International Variations
- In the US and Canada: “Oatmeal” always means the hot breakfast bowl (no matter the oat type), and “oats” are the raw ingredient.
- In the UK/Ireland: “Oatmeal” often means ground oats; “porridge oats” or “rolled oats” are for making breakfast bowls.
- In India: “Oats” is the more common term for the ingredient, while “oatmeal” is usually the finished dish, often made with rolled or quick oats.
When following recipes from different countries, always double-check which oat type is being used. Our main Guide to Oats: Types, Nutrition, and Differences Explained has a section on UK, US, and Indian terminology, and can help you buy the right ingredient every time.
Frequently Asked Mistakes and Kitchen Tips
- Don’t confuse old-fashioned oats and rolled oats—they are the same! (Need more? Can You Substitute Old-Fashioned Oats for Rolled Oats?)
- For classic oatmeal, use rolled oats for the best blend of creaminess and texture.
- Avoid using instant oats in recipes where you want a chewy texture—they dissolve quickly and can turn bakes to mush.
If you’re not sure about the best oats for porridge, baking, or meal prep, see our popular deep dives:
- Steel Cut Oats vs Rolled Oats: Nutrition, Taste, Cooking & More
- Are Quick Oats the Same as Instant Oats?
Conclusion: How to Choose (and Talk About) Oats and Oatmeal
Oats is the umbrella term for the raw grain in all its processed forms: steel cut, rolled, quick, instant, or even whole groats.
Oatmeal is most often the comforting, nourishing bowl of porridge made by cooking oats, though in some countries it can mean ground oats as well.
Understanding these terms (and regional differences) helps you shop smarter, follow recipes more confidently, and get the best results in your kitchen.
And if you want to know how to use each oat for every recipe, or discover which is truly healthiest, don’t miss our full Ultimate Guide to Oats: Types, Nutrition, and Differences Explained.
Ready to take your oats knowledge further?
Explore our most-read posts:
- Steel Cut Oats vs Rolled Oats: Nutrition, Taste, Cooking & More
- Are Quick Oats the Same as Instant Oats?
- Can You Substitute Old-Fashioned Oats for Rolled Oats?
Have a question, or a favorite oat recipe? Drop it in the comments—we’d love to hear from you!
10 FAQs – Oats vs Oatmeal: What’s the Difference?
1. Are oats and oatmeal the same thing?
No. Oats are the raw grain in various forms (steel cut, rolled, quick, instant), while oatmeal usually refers to the hot porridge made by cooking oats.
2. Why do some recipes say “oatmeal” when they mean “oats”?
This is often due to regional differences or old-fashioned language. In the UK and Ireland, “oatmeal” can mean ground oats, while in the US, it often means the cooked dish.
3. What type of oats should I use to make oatmeal?
Rolled oats (old-fashioned oats) are most common for classic oatmeal. Steel cut oats make a chewier porridge, and quick/instant oats create a softer, creamier bowl.
4. Can I use any type of oats to make oatmeal?
Yes, but the texture and cook time will vary. Steel cut oats take longest and are chewiest; rolled oats are classic and creamy; quick/instant oats cook fastest and are softest.
5. Is there a nutrition difference between oats and oatmeal?
The nutrition is similar. The difference comes from what you add to your oatmeal (milk, water, sugar, fruit, etc.) or if you use pre-flavored instant oats.
6. Is oatmeal always hot, or can it be cold?
Oatmeal is traditionally hot, but overnight oats are a popular cold version made with rolled oats soaked in milk or yogurt.
7. What is “oatmeal” in UK recipes?
In the UK, “oatmeal” often refers to ground oats, not the cooked porridge. Always check the recipe context.
8. Is it possible to use oatmeal (the dish) in baking?
No. Most baking recipes use dry oats (usually rolled oats), not cooked oatmeal.
9. Can I substitute oats for oatmeal in recipes?
Only if the recipe is clear about which form it means. If it says “oatmeal” but lists it with dry ingredients, it probably means ground oats or rolled oats.
10. Which is healthier: oats or oatmeal?
Both are healthy. Oats are the base ingredient; oatmeal is simply cooked oats. Just watch what you add for flavor or sweetness.