Posted on 5 Comments

Apple Pie Crust Recipe: Flaky Homemade Pie Dough for Apple Pie

A flaky apple pie crust starts with cold butter, gentle handling, and enough baking time. Once it is deeply golden, the crust can hold the apple filling without turning soft or heavy.

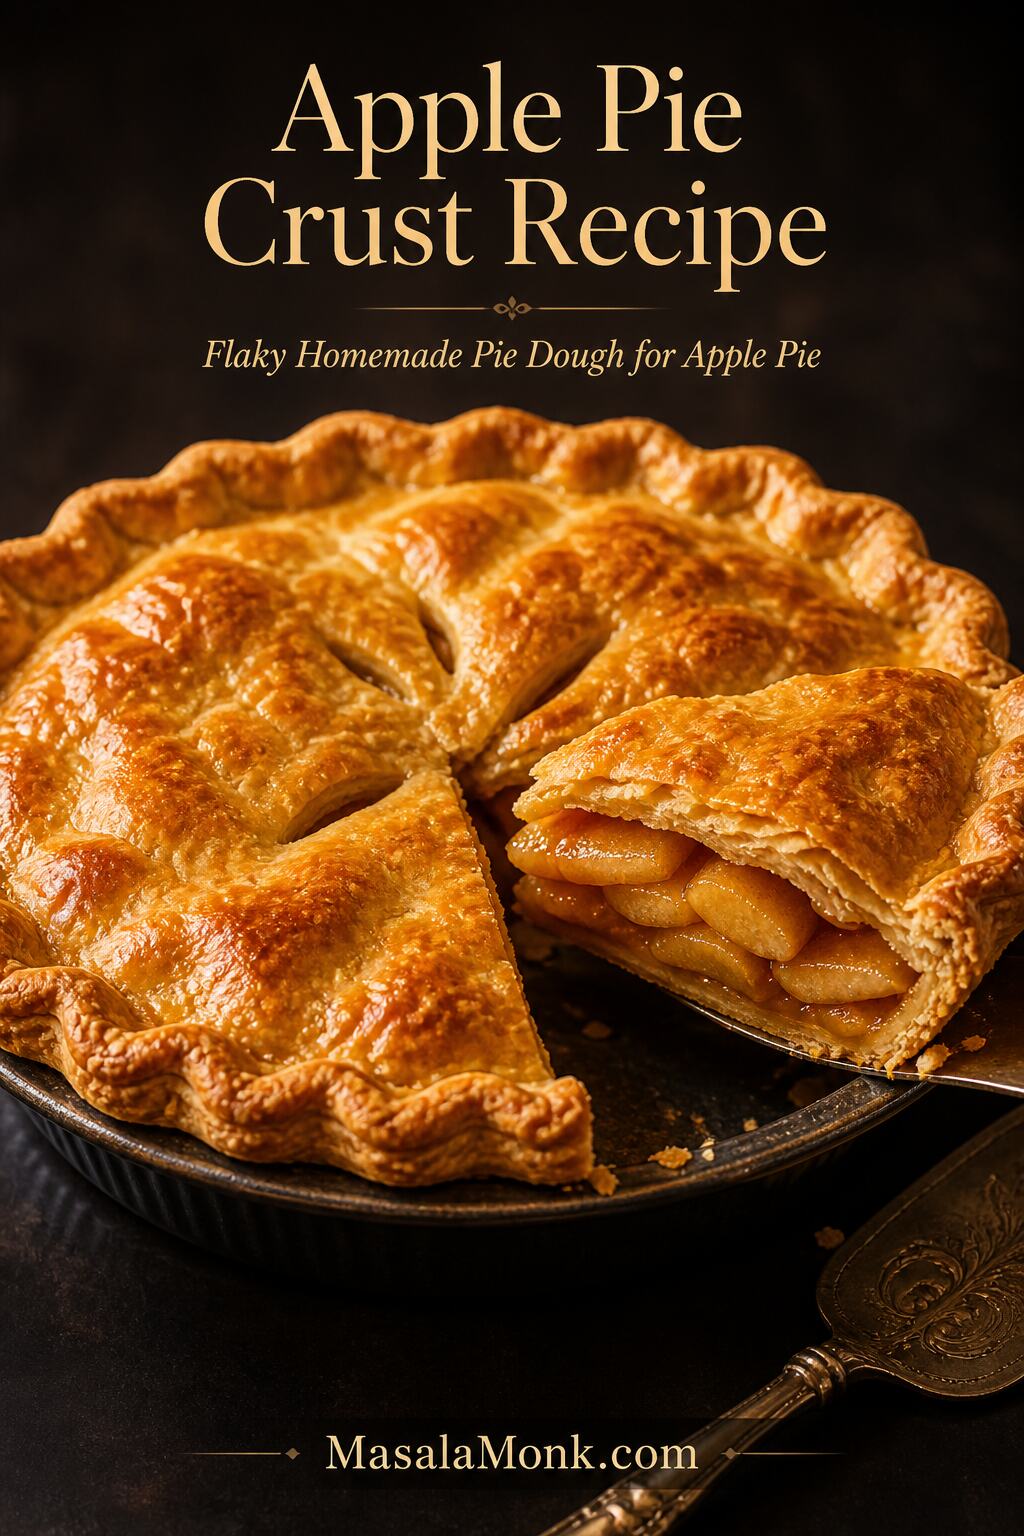
A good apple pie crust recipe should give you dough that is buttery, flaky, and strong enough to hold a juicy apple filling without turning tough or soggy. The crust is often the part that makes people nervous: butter softens, dough cracks, bottoms turn pale, and filling leaks where it should not. However, once the dough is cold enough and hydrated just enough, the whole process becomes much calmer.

This homemade pie dough is made for a classic 9-inch / 23-cm apple pie. It gives you enough for a bottom crust and a top crust, so you can make a full double-crust pie, a lattice pie, or a single-crust pie if you want to save the second disk for later. Because apple filling is heavier and juicier than many dessert fillings, the dough needs to be tender without being weak.

The method is simple, but the details matter. Keep the butter cold, add the water slowly, chill the dough before rolling, and avoid stretching it into the pie plate. Then, when you are ready to fill it, use a thick and cooled filling like this homemade apple pie filling recipe so the bottom crust has a better chance of baking up crisp and flaky.

The goal here is not a fancy pastry-school crust. It is a reliable apple pie crust that rolls without falling apart, seals cleanly around the filling, and bakes up flaky enough for a holiday pie. If the dough cracks a little or needs a patch, that is fine. Pie crust is more forgiving than it looks once you keep the butter cold and stop trying to make the dough perfectly smooth.

Quick Answer: The Best Crust for Apple Pie

The best crust for apple pie is a flaky, buttery pie dough that can hold fruit filling without collapsing, cracking apart, or turning soggy on the bottom. For a classic 9-inch / 23-cm apple pie, make a double batch of dough: one round for the bottom crust and one for the top crust or lattice.

This apple pie crust recipe uses all-purpose flour, cold butter, salt, a little sugar, and ice water. The butter gives the crust its rich flavor and flaky layers. Meanwhile, the chill time helps the dough relax, roll more cleanly, and shrink less once it hits the oven.

For a traditional double-crust apple pie, you usually do not need to prebake the bottom crust. Instead, use a filling that is thick rather than watery, let it cool before adding it to the pastry, vent the top crust, and bake until the crust is deeply golden. If you are making a single-crust apple pie with crumb topping, partial prebaking can sometimes help the bottom stay crisp.

A crust choice is not just decoration. It changes how the pie bakes, how steam escapes, and how sturdy the slices feel later. A double-crust pie, a crumb-topped pie, a graham cracker crust pie, and a puff pastry apple dessert all need slightly different handling, so it helps to choose the direction before you start rolling dough.

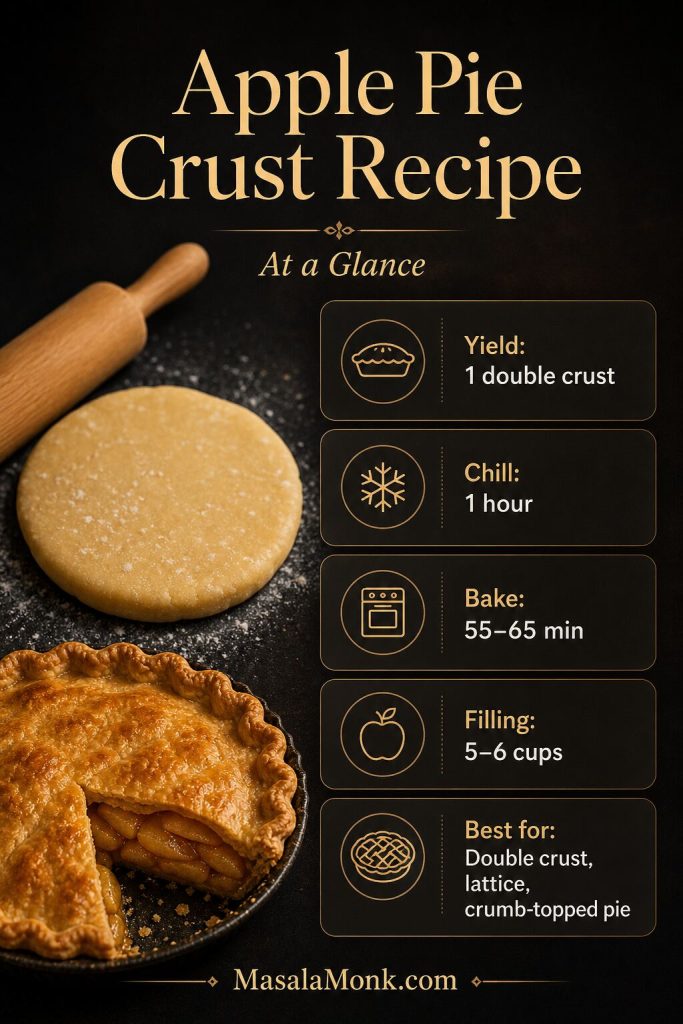
Apple Pie Crust at a Glance

Yield: this recipe makes enough crust for one 9-inch / 23-cm apple pie or two single-crust pies
Best for: classic apple pie, lattice pie, and crumb-topped single-crust pie
Dough chill time: at least 1 hour
Rest before rolling: 5 to 10 minutes if the dough is very firm
Assembled pie chill: 15 to 20 minutes if the dough has softened
Full pie bake time: about 55 to 65 minutes, plus 2 to 3 hours cooling
Filling amount: 5 to 6 cups / about 1.1 to 1.4 kg / 2.5 to 3 lb cooled apple pie filling
Prebake? Usually no for double-crust apple pie; sometimes yes for single-crust crumb pies
At-a-glance apple pie crust recipe board showing yield, chill time, bake time, filling amount, and best uses.
Before you start, check the timing and yield. This apple pie crust recipe makes one double crust, needs at least 1 hour of chilling, and works best with thick cooled apple filling.

Apple Pie Crust Help

Use these sections to make flaky pie dough, choose the right crust style, and fix the most common apple pie crust problems.

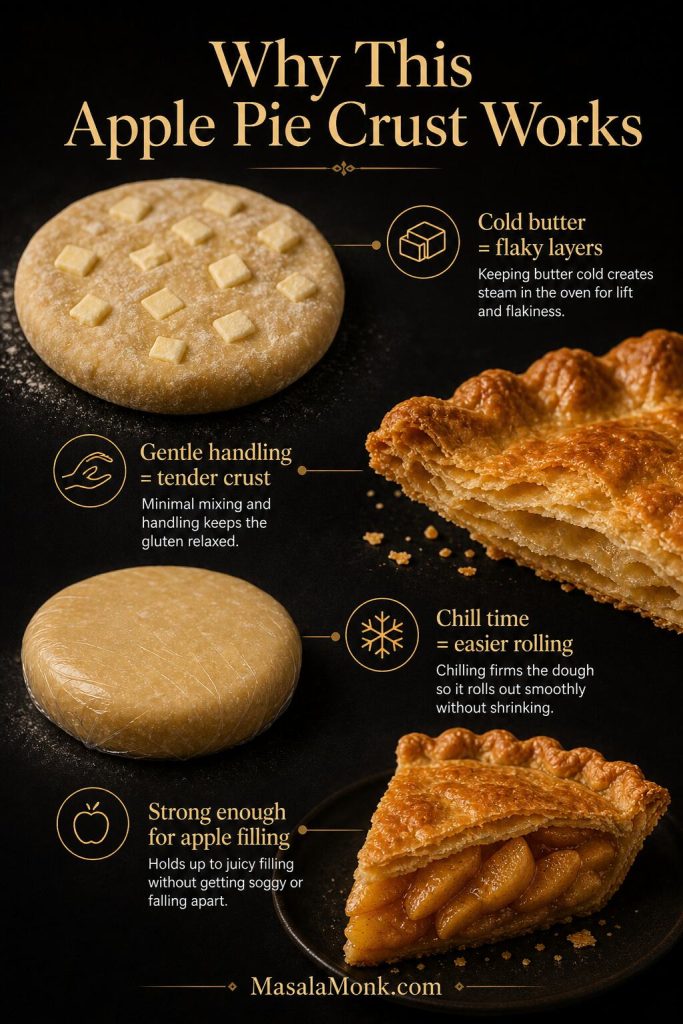
Why This Apple Pie Dough Works

Apple pie is harder on crust than it looks. The filling is juicy, the bake time is long, and the bottom pastry has to hold up while the apples soften and bubble. Because of that, a crust that works for a cream pie or a tiny tart may not always behave the same way under a heavy apple filling.

In this apple pie crust recipe, cold butter, careful hydration, and enough chill time work together. None of those details is complicated on its own, but together they make the dough easier to roll and much less likely to bake up tough or greasy.

Cold butter creates flaky layers

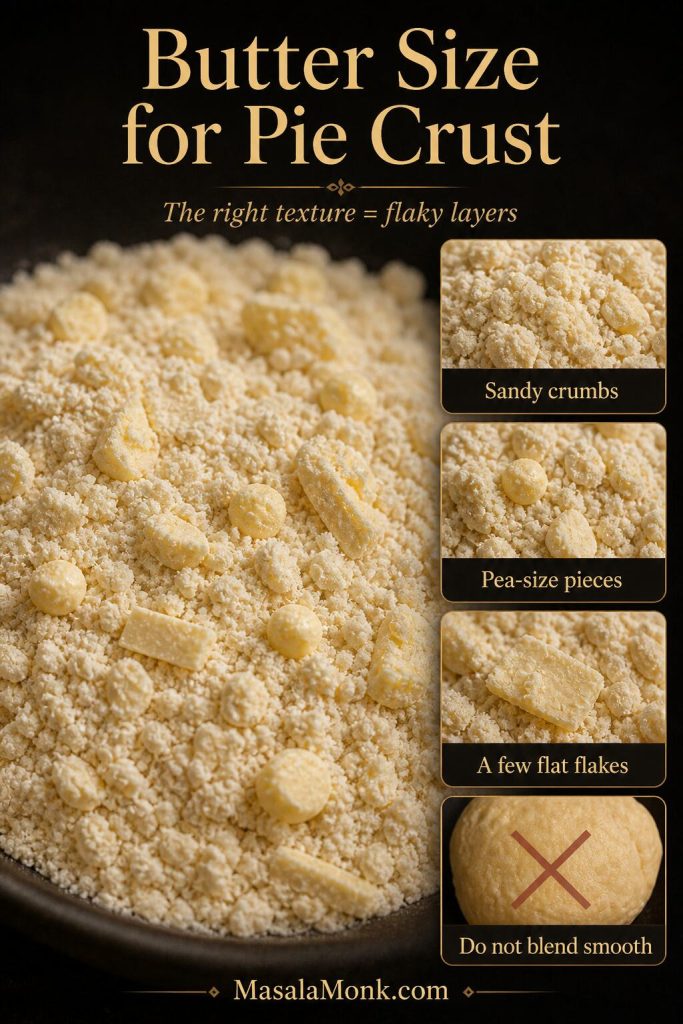
Cold butter does most of the visible work. As the pie bakes, the butter melts and releases steam, which helps separate the dough into flaky layers. That is why you want sandy crumbs, pea-size butter pieces, and a few flat flakes instead of a perfectly smooth mixture.

If the butter gets too warm before baking, it can melt into the flour too early. Then the crust may taste rich, but it will not have the same light, flaky structure. So whenever the dough feels soft or greasy, chilling is the fix.

Gentle handling keeps the crust tender

Flour gives the pastry enough structure to hold apple filling, but too much mixing can make the crust tough. The goal is to bring the dough together just until it holds when pressed, not to knead it until it looks smooth.

A little sugar helps with browning, while salt keeps the crust from tasting flat. Meanwhile, slow hydration helps you avoid adding too much water, which is one of the most common reasons homemade pie dough turns hard instead of tender.

Chill time makes the dough easier to roll

Resting the dough gives the flour time to hydrate and the butter time to firm up again. As a result, the dough rolls more smoothly, seals more easily, and shrinks less in the oven.

You do not need a food processor for this dough. A bowl, your fingertips, a pastry cutter, or two forks are enough, and working by hand also makes it easier to feel when the butter and water are right.

Once those details are handled, the crust becomes reliable enough for a classic apple pie: sturdy around the fruit filling, tender at the bite, and flaky enough to feel properly homemade.

Apple pie crust explanation board with dough, butter, flaky crust, and callouts for cold butter, gentle handling, chill time, and apple filling support.
This dough works because the butter stays cold, the dough is handled gently, and the chill time lets it relax. As a result, the crust rolls more easily and bakes into flaky layers.

Before You Start: What Matters Most

If you remember only three things, keep the butter cold, add water slowly, and do not stretch the dough into the pie plate. Everything else is easier to fix. A small crack can be patched, a sticky dough can be chilled, and uneven edges can be trimmed after the crust is in the plate.

A perfect-looking dough disk is not the goal. You want dough that is cold, lightly hydrated, and just gathered enough to roll. Once it rests, it becomes easier to handle.
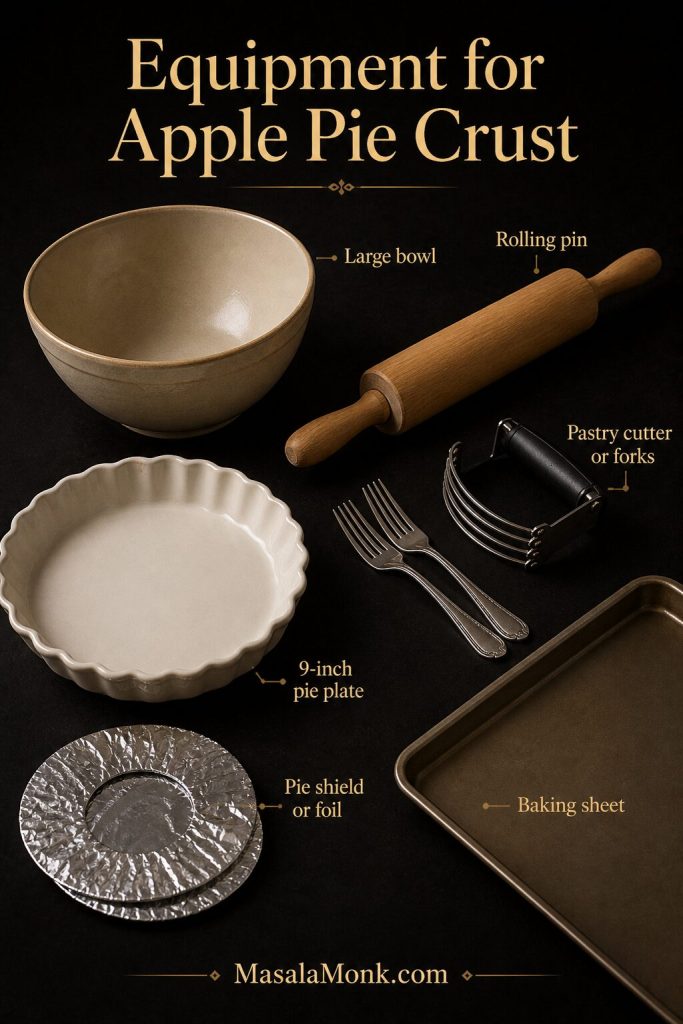
Equipment You Need

You do not need special equipment for this apple pie crust recipe, but a few basic tools make the dough easier to handle. If you do not have a pastry cutter, use your fingertips or two forks instead.

Tool Why it helps
Large mixing bowl Gives you enough room to toss the flour, butter, and water without overworking the dough.
Pastry cutter, fork, or fingertips Helps cut cold butter into the flour without needing a food processor.
Rolling pin Rolls the dough into a 12- to 13-inch / 30- to 33-cm round.
9-inch / 23-cm pie plate The recipe is sized for a standard 9-inch apple pie.
Baking sheet Catches drips and can help give the bottom crust stronger heat.
Foil or pie shield Protects the edges if they brown before the center is done.
Apple pie crust equipment guide showing mixing bowl, rolling pin, pastry cutter or forks, 9-inch pie plate, baking sheet, and pie shield or foil.
You do not need fancy pastry tools for homemade apple pie crust. However, a rolling pin, mixing bowl, pie plate, baking sheet, and simple shield for the edges make the process much easier.

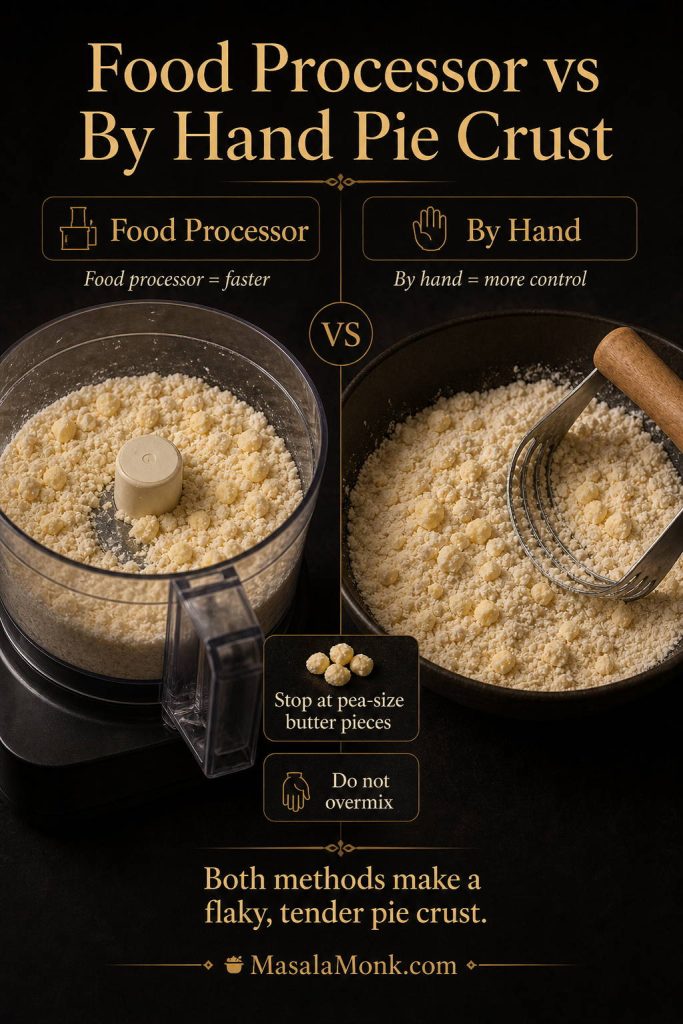
Can You Make Pie Crust in a Food Processor?

Yes, a food processor can make apple pie crust faster, but it also makes overmixing easier. Pulse the flour, salt, and sugar first, then add the cold butter and pulse only until pea-size pieces remain. After that, add ice water slowly and stop as soon as the dough begins to clump.

By hand, you get more control because you can feel the butter and dough changing as you work. In a food processor, the key is restraint: do not let the dough turn into a smooth ball in the machine. Once it reaches the shaggy stage, finish gathering it by hand.

Comparison board showing pie crust made in a food processor and by hand, with pea-size butter pieces and do-not-overmix reminders.
A food processor is faster, but mixing by hand gives you more control. Either way, stop when pea-size butter pieces remain, because overmixing can make the crust tough.

Apple Pie Crust Ingredients

You only need a few ingredients for this apple pie crust recipe, but each one affects the final texture. Since pie dough is so simple, measuring carefully and keeping everything cold will make a noticeable difference.
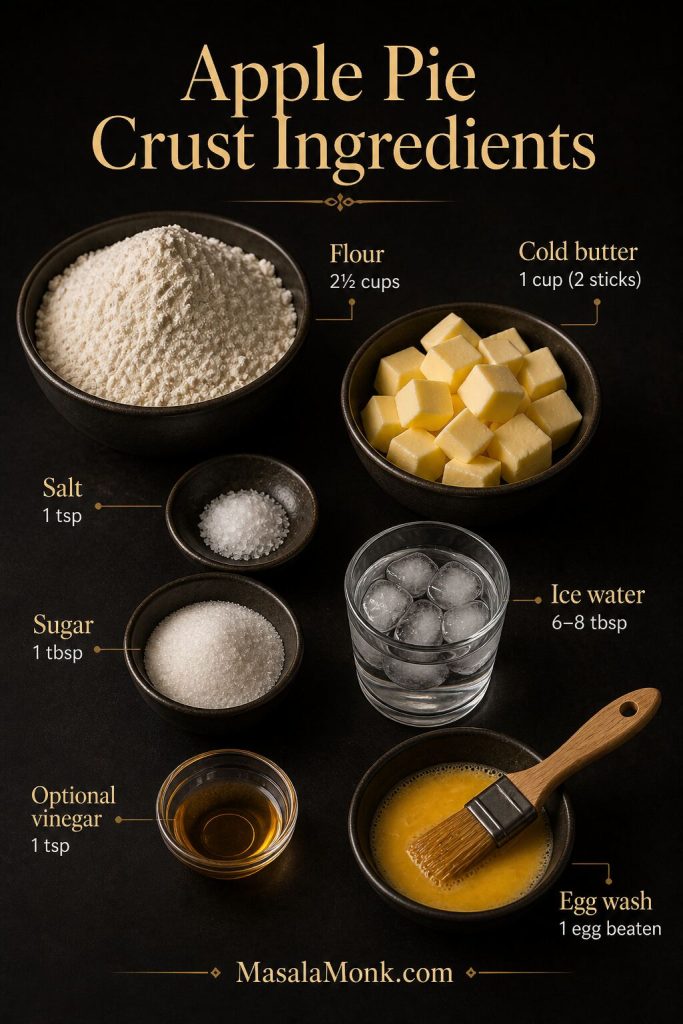
Apple pie crust ingredients board with flour, cold butter, salt, sugar, ice water, optional vinegar, and egg wash.
Because pie dough has so few ingredients, each one matters. Cold butter creates flakiness, flour gives structure, and ice water brings the dough together without making it tough.

All-purpose flour

All-purpose flour gives the crust enough strength to hold apple filling without making the pastry heavy. If you use cups, spoon the flour into the measuring cup and level it off. Otherwise, too much flour can make the dough dry, crumbly, and difficult to roll.

Cold unsalted butter

Butter gives the crust its best flavor. It also helps create those flaky layers that make homemade pastry worth the effort. Cut the butter into small cubes, then keep it cold until you are ready to mix. You want a mix of sandy crumbs, pea-size butter pieces, and a few flatter flakes of butter in the dough.

Most importantly, do not work the butter in until it disappears completely. Those visible butter pieces may look imperfect, but they help the crust bake up flaky instead of dense.

Close-up pie dough mixture showing sandy crumbs, pea-size butter pieces, flat butter flakes, and a do-not-blend-smooth reminder.
Instead of blending the butter completely into the flour, leave a mix of sandy crumbs, pea-size pieces, and a few flat flakes. Those uneven butter pieces help create a flaky pie crust.

Salt

Salt keeps the pastry from tasting dull. Even though apple pie is sweet, the crust still needs balance. Without enough salt, the butter flavor and apple filling will both taste flatter.

A little sugar

Sugar is not always necessary in pie crust, but it works well here because it helps the dough brown and adds a gentle warmth to the pastry. Use only a small amount, though. The crust should still taste like pastry, not like a cookie.

The crust itself stays simple, but the filling can lean warmer if you like more spice. Cinnamon is usually enough for apple pie, although a small pinch of homemade pumpkin pie spice can add ginger, nutmeg, allspice, and clove notes.

Ice water

Ice water brings the dough together. Add it slowly, because flour does not always absorb the same amount of water every time. On a humid day, you may need less. In a dry kitchen, you may need a little more. So the feel of the dough matters more than the exact tablespoon count.

The dough is ready when it holds together after you squeeze it in your hand. It should still look shaggy, not wet or smooth.

Optional apple cider vinegar

A small splash of apple cider vinegar can make the dough a little more forgiving. It is optional, and the crust will not taste sour. However, if you often end up with tough pastry, it can be a helpful backup.

Egg wash

Egg wash is used after the pie is assembled, not inside the dough. It helps the top crust bake up glossy and golden. For a simple finish, beat one egg with a tablespoon / 15 ml of milk or water, then brush it lightly over the chilled top crust before baking.

How to Make Apple Pie Crust

The main rule in any good apple pie crust recipe is simple: keep the butter cold and handle the dough gently. You are not kneading bread dough. Instead, you are bringing pastry together just enough so it can roll, chill, and bake into flaky layers.

If pie dough has ever cracked on you or turned sticky halfway through rolling, you are not doing anything unusual. Most crust problems are temperature problems. Chill the dough, use a little flour, patch what tears, and keep going.

Step-by-step apple pie crust board showing dry ingredients, cold butter, ice water, gathered dough, and chilled dough disks.
The method is simple, but the order matters. First mix the dry ingredients, then cut in cold butter, add ice water slowly, gather gently, and chill before rolling.

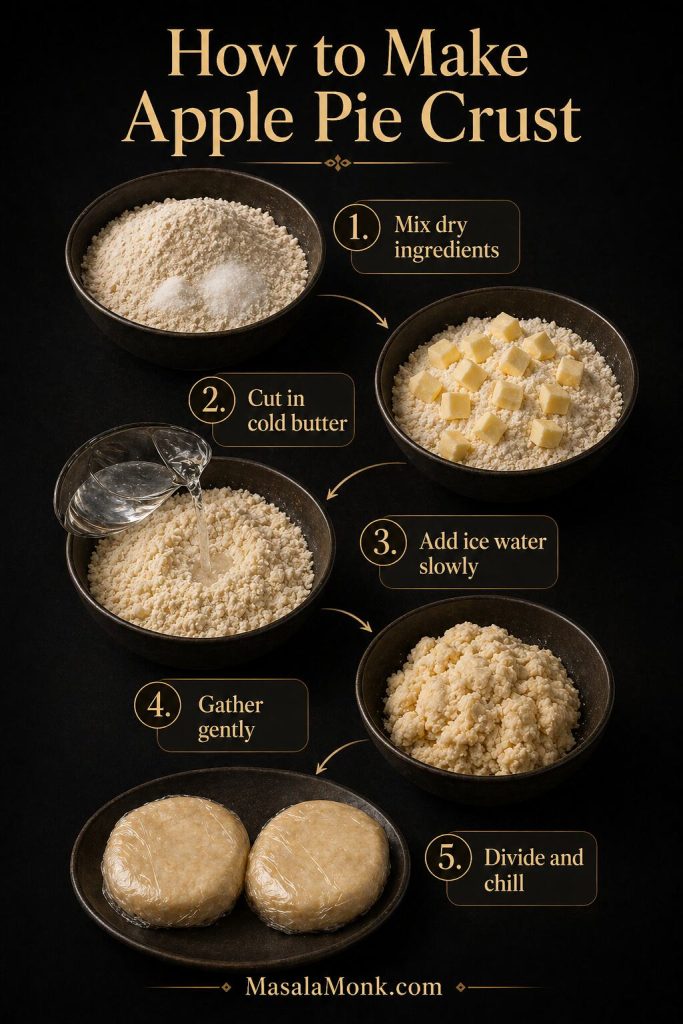
1. Mix the dry ingredients

Add the flour, salt, and sugar to a large mixing bowl. Then whisk them together so the salt and sugar are evenly distributed before the butter goes in.

This step is quick, but it matters. If the salt is not mixed evenly, some bites of crust can taste bland while others taste too salty.

2. Cut in the cold butter

Add the cold butter cubes to the flour mixture. Use your fingertips, a pastry cutter, or two forks to work the butter into the flour. Stop when the mixture has sandy crumbs, pea-size butter pieces, and a few thin, flat flakes of butter.

At this stage, the mixture should not look smooth. In fact, a little unevenness is useful because those butter pieces create steam pockets in the oven. If the butter starts to soften or smear, place the bowl in the refrigerator for 10 to 15 minutes before moving on.

3. Add ice water slowly

Drizzle in 1 tablespoon / 15 ml of ice water at a time, tossing the mixture with a fork after each addition. At first, the dough will look dry and loose. After several tablespoons, it will begin to clump together.

Stop adding water when a handful of dough holds together when squeezed. If the dough is sticky in the bowl, it has probably gone too far. On the other hand, if it falls apart completely, add another teaspoon or two of water and toss again.

4. Bring the dough together

Turn the shaggy dough onto a lightly floured surface. Then gather it gently with your hands and press it together until no large dry patches remain. Avoid kneading it smooth, because too much handling can make the crust tough.

If a few crumbly spots remain, press them into the dough with your hands. If needed, dampen your fingers lightly and pat the dry spots together. However, do not add water just to make the dough look neat. Pie dough should look a little rough before it chills.

5. Divide and chill the dough

Divide the dough into two equal pieces. Shape each piece into a flat disk about 1 inch / 2.5 cm thick. A disk chills faster and rolls more evenly than a ball of dough, so this small step makes rolling easier later.

Wrap each disk tightly and refrigerate for at least 1 hour. During that time, the flour hydrates, the butter firms up again, and the gluten relaxes. As a result, the dough becomes easier to roll and less likely to shrink in the oven.

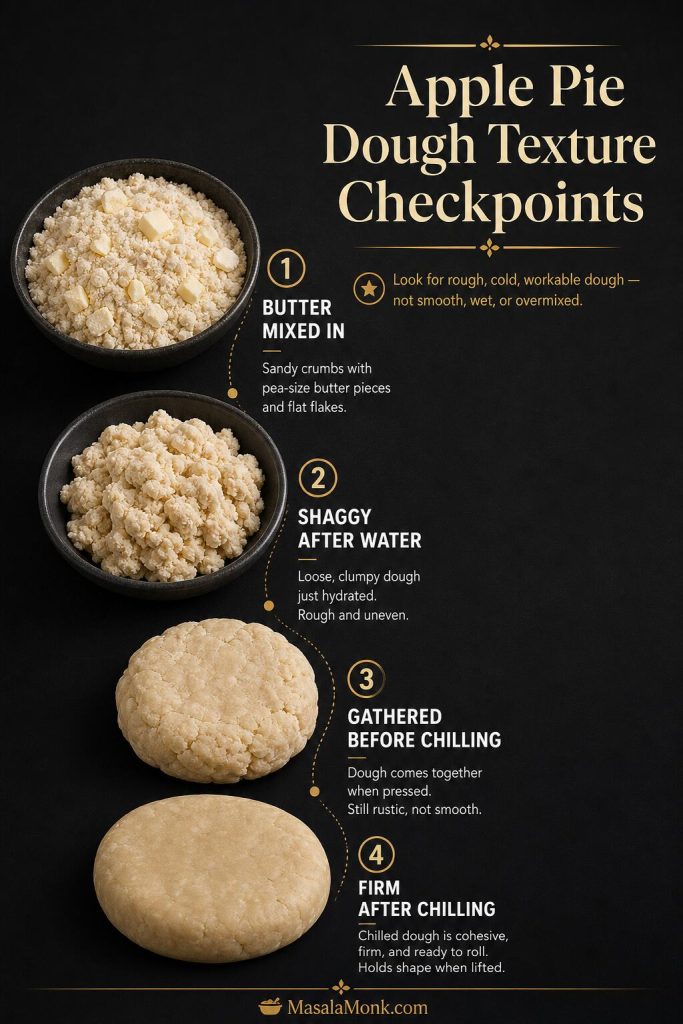
Apple Pie Dough Texture Checkpoints

Pie dough is easier when you know what each stage should feel like. Instead of trying to make it look perfect, use these checkpoints as you work.

Stage What it should look or feel like What to do if it is wrong
Butter mixed into flour Sandy crumbs with pea-size pieces and a few flat flakes of butter If the butter smears, chill the bowl for 10 to 15 minutes.
After adding water Shaggy dough that holds together when squeezed If it falls apart, add water 1 teaspoon at a time.
Before chilling Rough but gathered, not smooth or sticky If sticky, dust lightly with flour and chill sooner.
After chilling Firm but rollable after a few minutes at room temperature If it cracks hard, rest it 5 more minutes before rolling.
Apple pie dough texture checkpoint board showing butter mixed in, shaggy dough after water, gathered dough before chilling, and firm chilled dough.
Each stage should look rough, cold, and workable rather than smooth or wet. Press a small handful together; when it holds without smearing, the dough is usually hydrated enough.
Comparison board showing too-dry crumbly pie dough, just-right shaggy dough held in a hand, and too-wet sticky dough.
Crumbly dough usually needs ice water a teaspoon at a time. Sticky or smeary dough usually needs chilling instead. The best pie dough is shaggy, cool, and firm enough to hold when squeezed.

How to Roll Apple Pie Dough

Let the chilled dough soften slightly

Once the dough has chilled, let one disk sit at room temperature for 5 to 10 minutes if it feels too firm to roll. It should be cool but not rock-hard. If it cracks immediately under the rolling pin, give it another minute or two.

Lightly flour your work surface and rolling pin. Then roll from the center outward, rotating the dough a quarter turn every few rolls. This keeps the round even and helps prevent sticking without forcing the dough into shape.

Hands rolling round apple pie dough with callouts for rolling from the center, quarter-turning, 12 to 13 inch size, and 1/8 inch thickness.
For a 9-inch apple pie, roll the dough from the center outward and turn it as you go. This keeps the crust round, even, and wide enough to fit the pie plate without stretching.

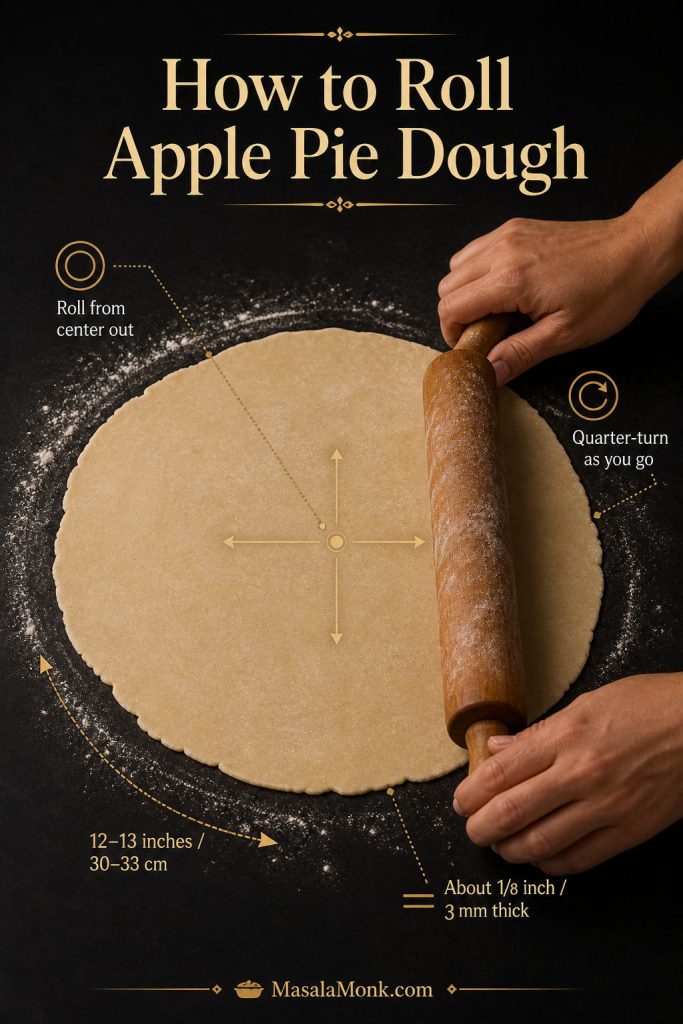
Roll to the right size and thickness

For a 9-inch / 23-cm apple pie, roll the bottom crust into a 12- to 13-inch / 30- to 33-cm round. Aim for a crust that is about 1/8 inch / 3 mm thick. If it is much thicker, it may bake up heavy; if it is much thinner, it can tear or soften under the filling.

For this apple pie crust recipe, that size gives you enough dough to settle into the pie plate and still leave a little overhang for trimming and crimping. Add small amounts of flour only as needed, because too much loose flour can make the crust dry.

Fit the dough without stretching it

To transfer the dough, loosely roll it around the rolling pin, then unroll it over the pie plate. After that, ease the dough into the bottom and sides without pulling it tight. Stretching may seem harmless, but it is one of the most common reasons pie crust shrinks while baking.

Three-step guide showing pie dough rolled onto a pin, unrolled over a pie plate, and gently eased into the dish without stretching.
Once the dough is rolled, move it gently instead of pulling it into place. Rolling it over the pin, unrolling it over the plate, and easing it in helps prevent shrinking.

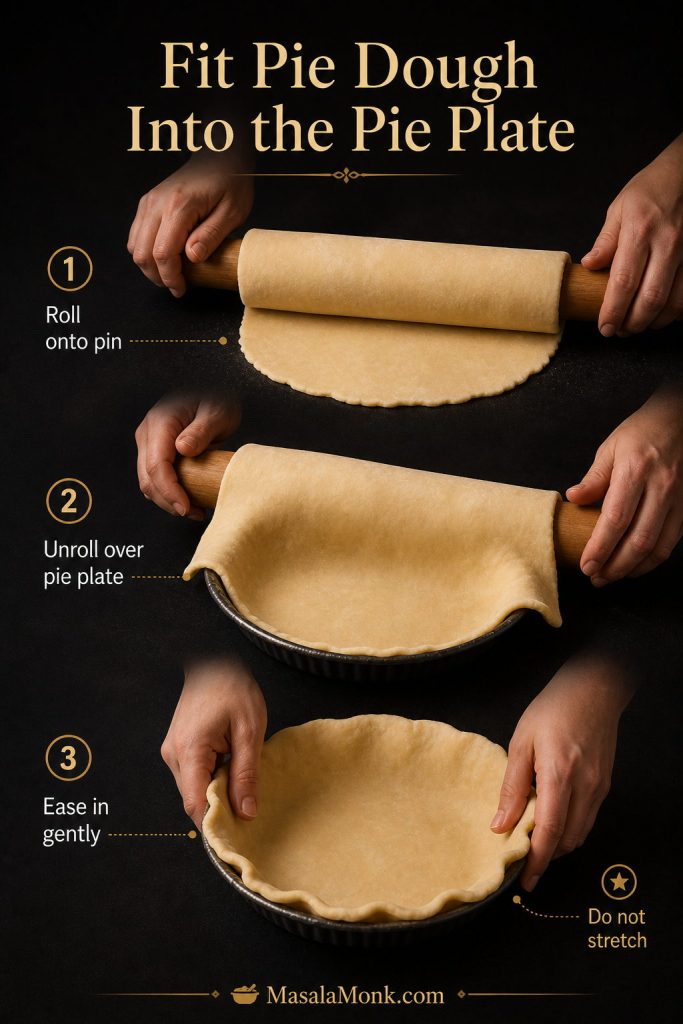
If the dough tears, patch it with a small piece from the edge and press it gently into place. Once the filling goes in and the pie bakes, small patches will not matter.

Double Crust vs Single Crust Apple Pie

Classic apple pie is usually a double-crust pie, which means it has a bottom crust and a top crust. However, not every apple pie needs two pastry layers. A crumb-topped pie, for example, only needs a bottom crust, while a graham cracker crust pie behaves more like a no-roll dessert.

Crust style Best for What to know
Double crust Classic apple pie Uses one crust on the bottom and one on top. It is the most traditional choice for homemade apple pie.
Lattice crust Apple pies with juicy filling Looks beautiful and lets steam escape through the open spaces, which can help the filling bake evenly.
Single crust Crumb topping or Dutch apple pie Easier than a double crust and useful when you do not want to roll a top crust.
Graham cracker crust No-roll apple pie Better for crumb-topped apple pie than for a classic sealed double-crust pie.
Puff pastry Quick apple desserts More tart-like or turnover-like than traditional apple pie crust.
Comparison of double-crust apple pie, lattice apple pie, and single-crust crumb-topped apple pie on a dark background.
A double crust gives apple pie its classic look, while lattice helps steam escape. Meanwhile, a single crust works beautifully when you want a crumb-topped apple pie.

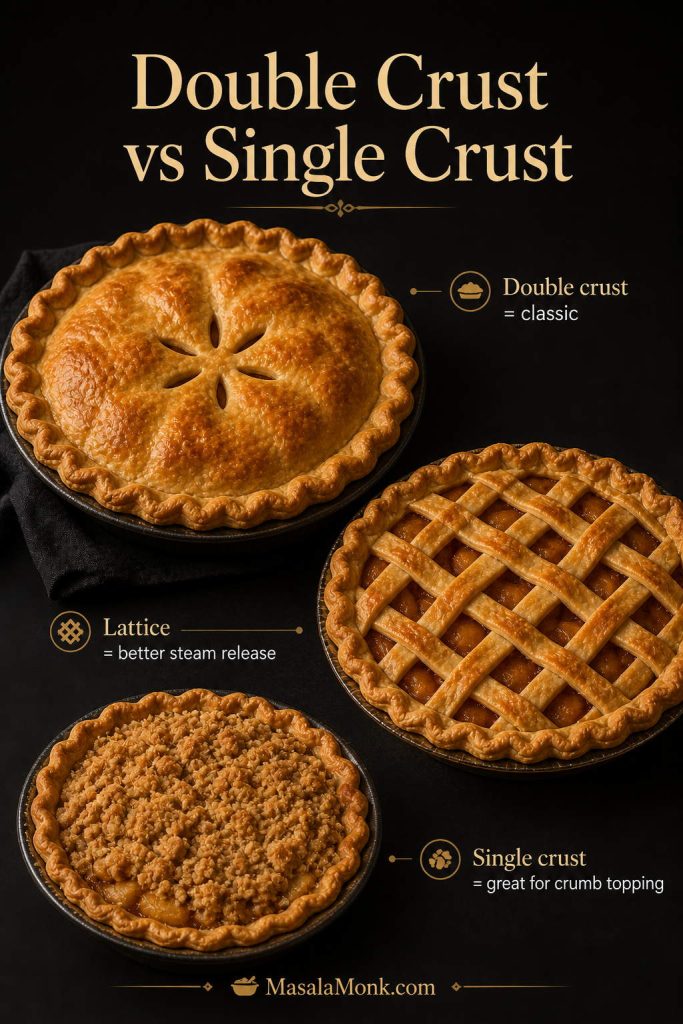
If you are making homemade apple pie for the first time, a double crust or lattice crust is the safest place to start. Both use the same dough, and both pair well with a thick apple filling.

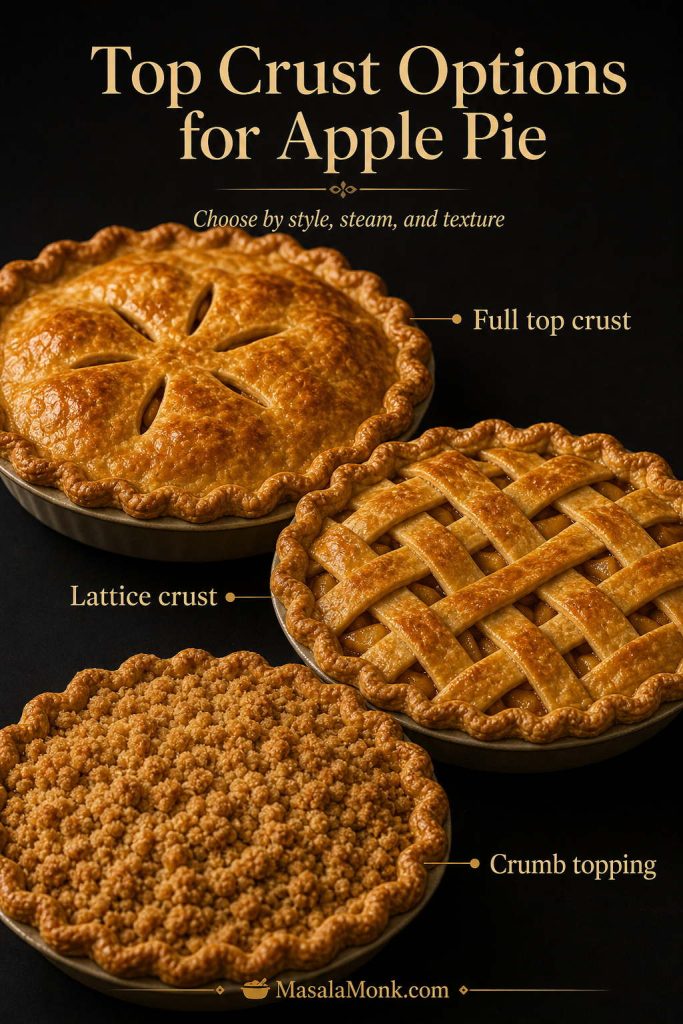
Full Top Crust, Lattice, or Crumb Topping?

A full top crust gives apple pie its most traditional look. After adding the filling, roll out the second disk of dough, lay it over the apples, trim the overhang, seal the edges, and cut vents in the top. Those vents are important because apple filling releases steam as it bakes.

A lattice crust is slightly more decorative, but it is not only for looks. Because the top is open in places, steam can escape naturally. To make a lattice, roll the second disk of dough, cut it into strips, weave the strips over the filling, and then seal and crimp the edges.

A crumb topping changes the pie completely. Instead of covering the apples with pastry, you cover them with a buttery crumble. This is closer to Dutch apple pie or apple crumble pie. It is also a good choice when you want a single-crust apple pie or when you do not feel like rolling a top crust.

For a classic apple pie, this crust works as a full top, lattice, or single bottom layer with crumb topping. If you use only one disk for a crumb-topped pie, wrap and freeze the second disk for another bake.

Top crust options for apple pie showing a full top crust, lattice crust, and crumb topping with labels.
The top crust changes more than appearance. A full crust feels classic, a lattice lets steam escape, and crumb topping gives a softer, buttery contrast to the apple filling.

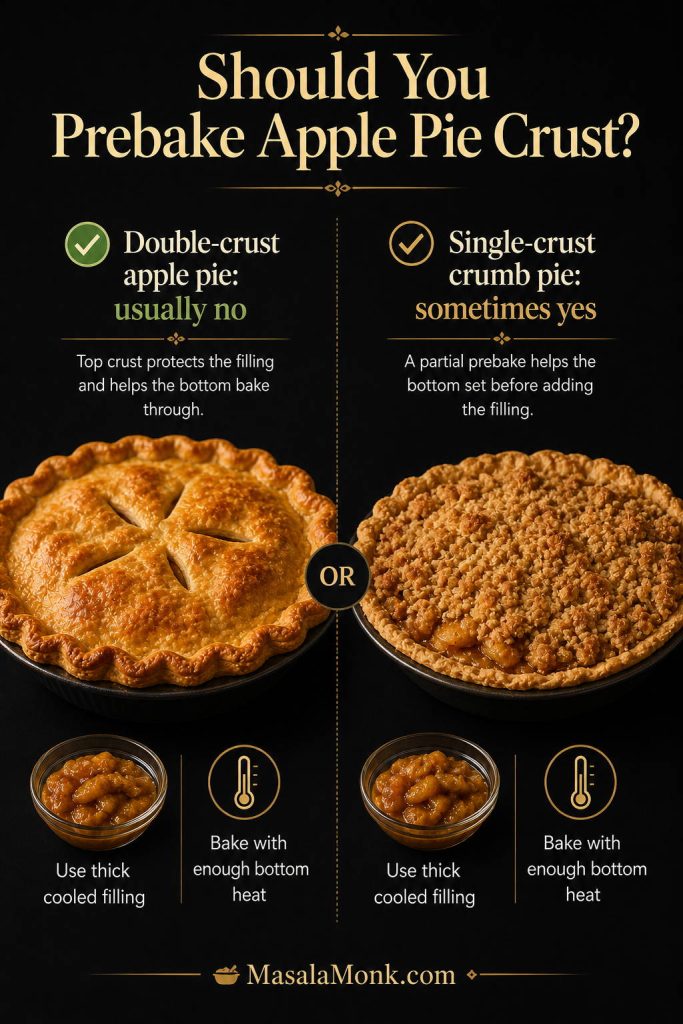
Should You Prebake Apple Pie Crust?

For a traditional double-crust apple pie, you usually should not fully prebake the bottom crust. Once the bottom crust is baked, it becomes harder to seal it to a raw top crust. In addition, a classic apple pie bakes long enough for the bottom crust to cook through as long as the filling is not too wet.

Instead of fully prebaking, focus on the details that help this apple pie crust recipe bake properly: use cooled filling, keep the dough cold, avoid stretching it, bake long enough, and place the pie where it gets enough bottom heat.

Single-crust apple pie is different. If you are making a pie with crumb topping, partial prebaking can help when your bottom crust often turns pale or soft. Since there is no raw top crust to seal, you have more flexibility. King Arthur’s guide to prebaking pie crust makes the same practical distinction between single-crust pies and double-crust fruit pies.

Also, do not poke holes in the bottom crust for a raw fruit pie unless you are blind baking it first. Docking is useful for some empty crusts, but in a juicy apple pie, those holes can let filling leak underneath the pastry.

Simple rule: do not fully prebake crust for classic double-crust apple pie. However, consider partial prebaking for a single-crust apple pie with crumb topping if soggy bottoms are a recurring problem.
Decision board explaining that double-crust apple pie usually does not need prebaking, while single-crust crumb pie sometimes does.
For classic double-crust apple pie, prebaking is usually not needed. However, a single-crust crumb pie may benefit from a partial prebake if soggy bottoms are a recurring problem.

How to Keep Apple Pie Crust from Getting Soggy

Soggy bottom crust usually comes from excess moisture, hot filling, weak bottom heat, or underbaking. Fortunately, most of those problems are easy to prevent once you know where the moisture is coming from.

Soggy apple pie crust prevention guide with thick cooled filling, lower oven rack, hot baking sheet, vented top crust, and cooling before slicing.
To avoid a soggy bottom crust, start with thick cooled filling, bake with enough bottom heat, vent the top, and let the pie cool before slicing. Together, these steps protect the crust.

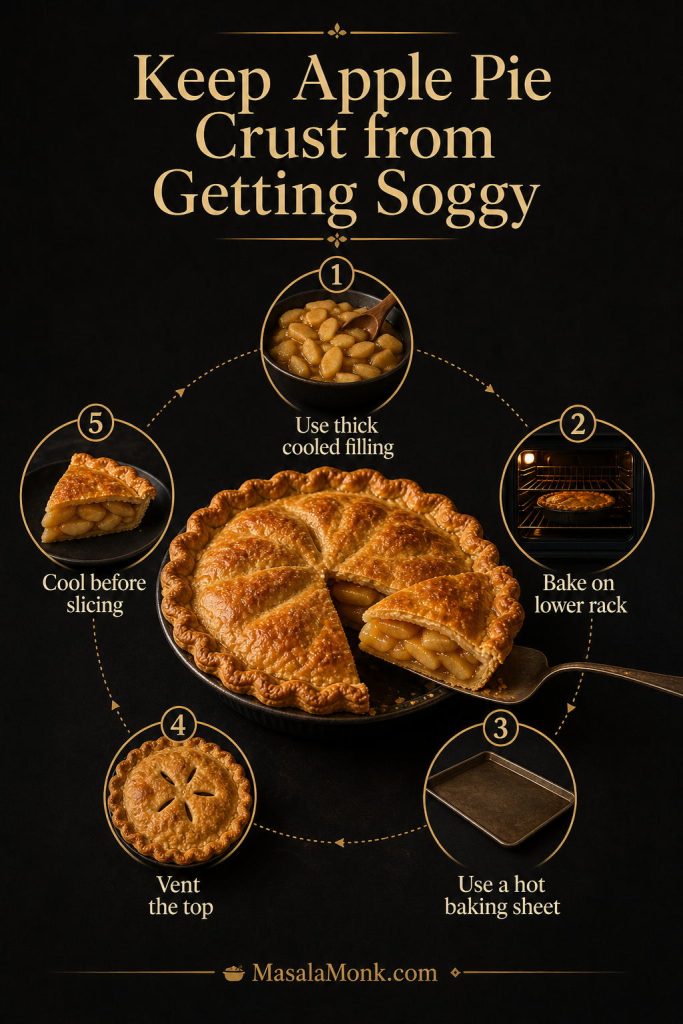
Start with thick, cooled filling

First, use thick apple pie filling. If the filling is loose and watery, the crust will absorb that liquid before it has time to set. A cooked, glossy filling gives you more control because the apples have already released some of their moisture before the pie goes into the oven.

Second, cool the filling before adding it to the crust. Hot filling melts the butter in the dough too early, which can make the pastry soft or greasy before baking even begins. So the filling should be spoonable and glossy, not steaming hot, when it goes into the pie shell.

Give the bottom crust enough heat

Third, bake the pie long enough for the bottom crust to cook through. A golden top does not always mean the bottom is done. If your oven runs cool or your pie plate is thick, the bottom may need more time.

Finally, use bottom heat to your advantage. Bake on a lower oven rack or place the pie plate on a preheated baking sheet. For another helpful reference, this apple pie crust guidance from Martha Stewart also emphasizes giving the bottom crust enough heat and enough time to brown properly.

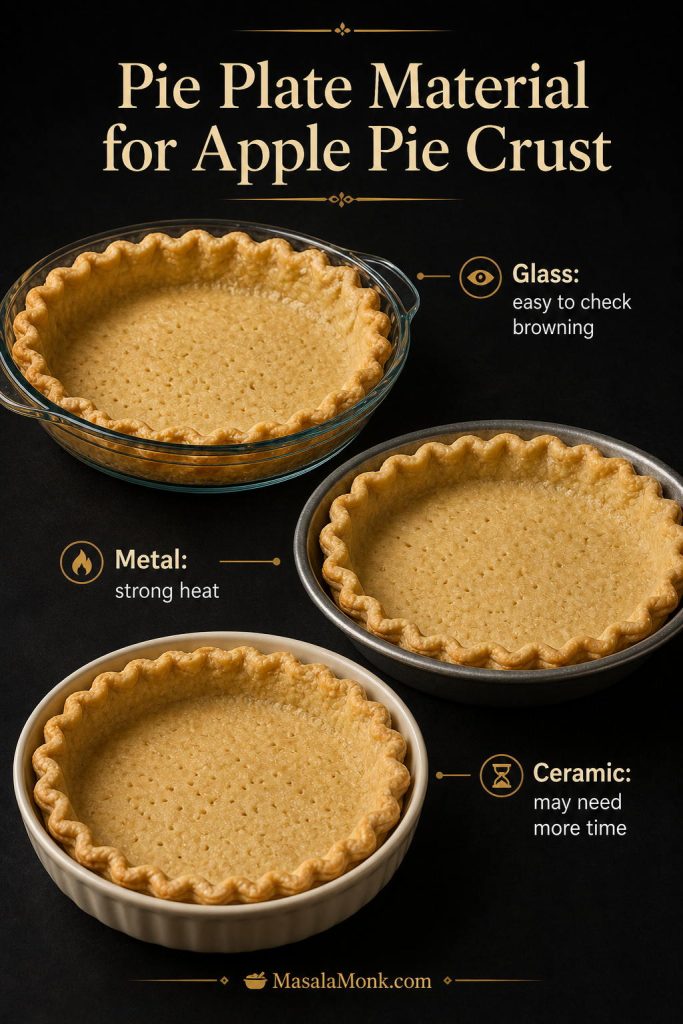
Choose the right pie plate

Pie plate material also matters. A glass pie plate makes it easier to check whether the bottom crust is browning, while metal usually conducts heat more quickly. Thick ceramic dishes can work beautifully, but they often need enough time and a lower oven rack so the bottom crust can finish baking.

Pie plate material guide comparing glass, metal, and ceramic dishes for apple pie crust browning and baking time.
The pie plate affects how the bottom crust bakes. Glass makes browning easier to check, metal conducts heat well, and ceramic may need a little more time.
Problem Best fix
Filling is watery Use thick apple pie filling and avoid pouring loose liquid into the crust.
Filling is hot Cool the filling before adding it to the dough.
Bottom crust is pale Bake on a lower rack or place the pie on a preheated baking sheet.
Top crust traps steam Cut vents in a full top crust or use a lattice crust.
Pie is sliced too soon Let the pie cool for at least 2 to 3 hours so the filling can thicken and settle.

For the easiest pairing, use this crust with cooled apple pie filling. The filling should be glossy and spoonable, not loose, watery, or steaming hot.

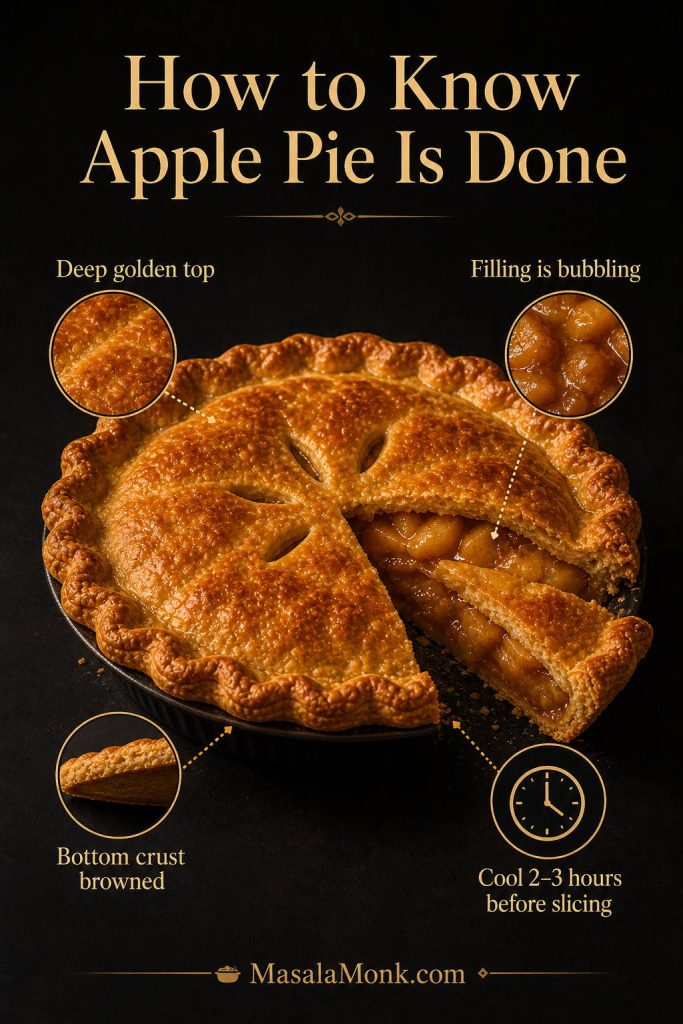
How to Know Apple Pie Crust Is Fully Baked

Apple pie is done when the top crust is deeply golden, the filling is bubbling through the vents or lattice, and the bottom crust has had enough time to brown. If the top looks ready but the bottom still seems pale, cover the edges loosely with foil and give the pie more time on the lower rack.

After baking, let the pie cool for at least 2 to 3 hours before slicing. Otherwise, even a well-baked crust can seem soft because the filling has not had time to thicken and settle.

Finished apple pie with callouts for deep golden top crust, bubbling filling, browned bottom crust, and cooling 2 to 3 hours before slicing.
A finished apple pie should be more than lightly golden. Look for a deep golden top, bubbling filling, and a browned bottom crust; then let it cool so the filling can settle.

Other Crusts You Can Use for Apple Pie

Homemade butter crust is the best choice for a classic apple pie, but it is not the only option. Sometimes convenience matters. Other times, you may want a no-roll crust, a crumb topping, or a quicker apple dessert. In those cases, the main thing is to match the crust to the kind of pie you are actually making.

For classic apple pie, use this homemade butter crust. If speed matters, store-bought crust can still make a good apple pie when the filling is thick and the crust stays cold. For a no-roll version, graham cracker crust works better with crumb topping than with a sealed top crust. For a faster pastry-style dessert, puff pastry is useful, although it behaves more like a tart or turnover than classic pie crust.

Other crusts for apple pie board showing homemade butter crust, store-bought crust, graham cracker crumb pie, and puff pastry turnovers.
Homemade butter crust is best for classic apple pie. Still, store-bought crust, graham cracker crust, and puff pastry can work when you match each one to the right style of dessert.

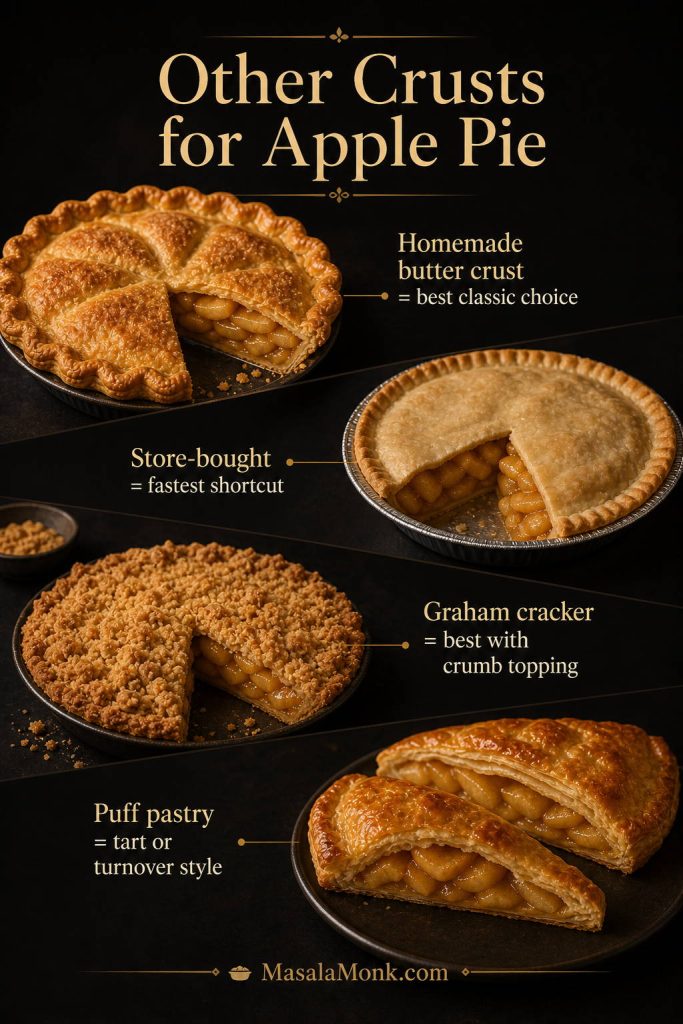
Can I use store-bought crust?

Yes. Keep the crust cold, use a filling that is thick rather than runny, and cut vents in the top so steam can escape. Homemade dough tastes better and usually bakes flakier, but a premade crust can still make a solid apple pie when the filling and baking are handled well.

Can I use graham cracker crust?

Yes, although it works better for a single-crust apple pie with crumb topping than for a traditional double-crust pie. Graham cracker crust cannot form a sealed pastry top, so treat it as a different dessert style rather than a direct swap for pie dough.

Can I use puff pastry?

Yes, but puff pastry gives you a quicker, more tart-like apple dessert. It works well for turnovers, slab-style bakes, and apple pie-inspired pastries. However, it does not have the same tender, sturdy bite as homemade apple pie crust.

Is shortcrust pastry the same thing?

In many kitchens, pie crust, pie dough, pie pastry, shortcrust pastry, and pie shell describe similar flour-and-fat doughs. The exact formula can vary, but the goal for apple pie is the same: a tender crust that can hold fruit filling and bake into a flaky shell.

Using This Dough for Mini Apple Pies and Hand Pies

This apple pie crust dough also works for mini apple pies and hand pies, but the handling changes slightly. Smaller pastries need a thinner roll, less filling, tighter sealing, and a closer eye in the oven because they bake faster than a full 9-inch / 23-cm apple pie.

For mini apple pies, roll the dough a little thinner than you would for a deep pie, then cut rounds large enough to fit a muffin pan, mini pie pans, or small tart tins. Press the dough in gently without stretching it, add a small spoonful of cooled apple filling, and avoid overfilling so the juices do not leak over the edges.

For hand pies, diced cooled apple filling works better than long apple slices because it fits neatly inside the dough and seals more easily. After filling, press the edges firmly with a fork, cut a small vent in the top, and chill the shaped pies briefly before baking. That short chill helps the crust hold its shape and gives the filling less chance to burst out.

The same rules still matter: keep the dough cold, use thick filling, and do not stretch the pastry. Since mini pies and hand pies are smaller, start checking them earlier and pull them when the crust is golden and the filling is bubbling.

Mini apple pies and hand pies made with golden flaky dough, diced apple filling, sealed edges, and one cut-open hand pie showing filling.
This same dough can also make mini apple pies and hand pies. Because smaller pastries bake faster, use diced cooled filling, seal the edges well, and watch the crust color closely.
Most apple pie crust problems come from five things: warm butter, too much water, overworking the dough, stretching the crust into the pie plate, or adding hot/watery filling.

Apple Pie Crust Troubleshooting

Pie crust problems are common, especially if your kitchen is warm or you are making dough for the first time. Still, most issues come from a few fixable causes: warm butter, too much water, overworking, stretching the dough, or using filling that is too wet.

What went wrong Likely cause How to fix it next time
Dough cracks while rolling Too dry or too cold Let it rest for 5 minutes, then patch small cracks with damp fingers.
Dough feels sticky Too much water or butter is warming Dust lightly with flour and chill the dough before continuing.
Crust is tough Too much water or too much handling Add water slowly and stop mixing once the dough holds together.
Crust shrinks Dough was stretched or not chilled Ease the dough into the plate without pulling, then chill before baking.
Butter leaks out Dough got too warm Keep the butter cold and chill the assembled pie before baking.
Bottom crust is soggy Wet filling, hot filling, or not enough bottom heat Use cooled thick filling and bake on a lower rack or hot baking sheet.
Edges brown too fast Edges are thinner than the rest of the crust Use a pie shield or loose foil once the edges are golden.
Filling bubbles over Pie is overfilled or not vented well Leave a little space, cut vents, and bake on a lined sheet pan.
Apple pie crust troubleshooting board showing cracked dough, sticky dough, tough crust, shrinking crust, butter leaks, soggy bottom, and over-browned edges.
Most apple pie crust problems trace back to temperature, moisture, or handling. Therefore, many fixes begin with colder dough, less water, gentler mixing, and enough time to chill.

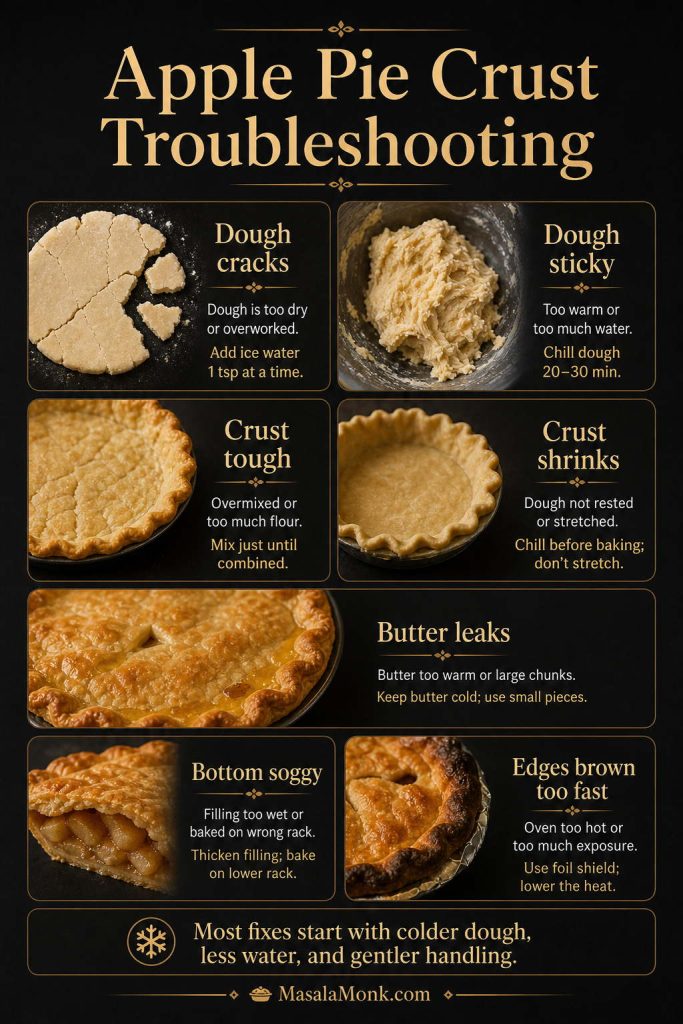
If the dough gives you trouble, do not panic. Chill it, patch it, and keep going. Small cracks and rough edges usually disappear once the pie is filled, sealed, brushed with egg wash, and baked until golden.

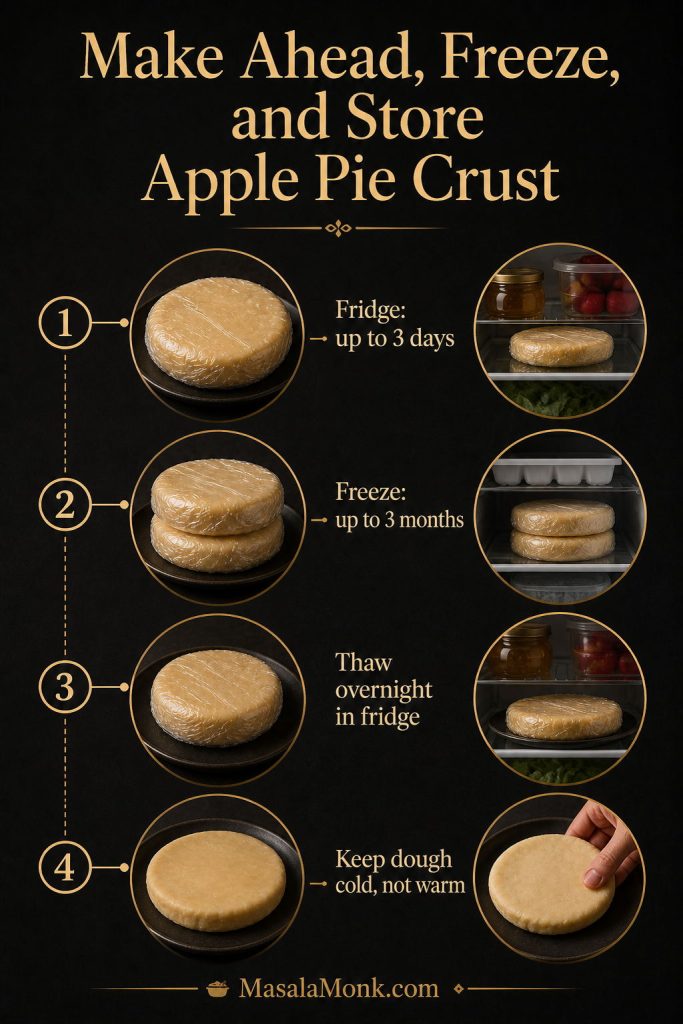
Make Ahead, Freeze, and Store

Apple pie crust is a good make-ahead recipe because the dough actually benefits from chilling. You can make the disks in advance, keep them wrapped in the refrigerator, and roll them when you are ready to assemble the pie.

For short-term storage, wrap the dough disks tightly and refrigerate them for up to 3 days. For longer storage, place the wrapped disks in a freezer bag and freeze them for up to 3 months.

When you are ready to use frozen dough, thaw it overnight in the refrigerator. If it feels too firm to roll, let it sit at room temperature for a few minutes. However, do not let it become warm or greasy, because softened butter can make the crust bake up heavy.

You can also roll the bottom crust, fit it into the pie plate, cover it well, and refrigerate it before filling. This is useful when you want to prepare the crust ahead but assemble the apple pie closer to baking time.

If you have extra cooked apples or leftover filling, you do not have to make another pie right away. Spoon them over buttermilk pancakes with stewed cinnamon apples for a softer breakfast-style use.

Make-ahead apple pie crust storage guide showing wrapped dough disks, fridge storage, freezer storage, thawing overnight, and keeping dough cold.
Pie dough is a good make-ahead recipe because chilling helps it relax. For best results, refrigerate it up to 3 days, freeze it up to 3 months, and thaw it overnight in the fridge.

Apple Pie Crust Recipe Card

Apple Pie Crust Recipe: Flaky Homemade Pie Dough

This buttery apple pie crust recipe makes enough dough for one 9-inch / 23-cm double-crust apple pie or two single-crust pies.

Prep Time20 minutes
Chill Time1 hour
Total Dough Time1 hour 20 minutes
Yield1 double crust

Ingredients

  • 2 1/2 cups all-purpose flour, or 315 g / about 11 oz
  • 1 teaspoon fine salt
  • 1 tablespoon granulated sugar, or about 12 g
  • 1 cup cold unsalted butter, cut into cubes, or 226 g / 8 oz
  • 6 to 8 tablespoons ice water, or 90 to 120 ml / 3 to 4 fl oz, plus more only if needed
  • Optional: 1 teaspoon / 5 ml apple cider vinegar

For finishing and filling

  • 5 to 6 cups cooled apple pie filling, about 1.1 to 1.4 kg / 2.5 to 3 lb, if baking a full 9-inch / 23-cm apple pie
  • 1 egg
  • 1 tablespoon / 15 ml milk or water
  • Optional coarse sugar for sprinkling

Instructions

  1. Whisk the flour, salt, and sugar together in a large bowl.
  2. Add the cold butter cubes and cut them into the flour until the mixture has sandy crumbs, pea-size butter pieces, and a few flatter butter flakes.
  3. Add ice water 1 tablespoon / 15 ml at a time, tossing with a fork after each addition.
  4. Stop adding water when the dough holds together when squeezed. It should look shaggy, not wet or smooth.
  5. Turn the dough onto a lightly floured surface and gather it gently with your hands. Do not knead it smooth.
  6. Divide the dough into two equal pieces, flatten each into a disk about 1 inch / 2.5 cm thick, wrap tightly, and refrigerate for at least 1 hour.

To use this crust for a full apple pie

  1. Place a rack in the lower third of the oven and preheat to 425°F / 220°C. For extra bottom heat, place a baking sheet in the oven while it preheats.
  2. Roll one disk into a 12- to 13-inch / 30- to 33-cm round, about 1/8 inch / 3 mm thick, and fit it into a 9-inch / 23-cm pie plate without stretching.
  3. Add 5 to 6 cups cooled apple pie filling, about 1.1 to 1.4 kg / 2.5 to 3 lb, or enough to fill the pie without mounding it too aggressively.
  4. Roll the second disk for a full top crust, or cut it into strips for lattice. Then seal and crimp the edges.
  5. Chill the assembled pie for 15 to 20 minutes if the dough has softened.
  6. Beat the egg with milk or water, then brush lightly over the top crust. Sprinkle with coarse sugar if using.
  7. Bake at 425°F / 220°C for 20 minutes. Then reduce the heat to 375°F / 190°C and continue baking for 35 to 45 minutes, or until the crust is deeply golden and the filling is bubbling. If the edges brown too quickly, cover them loosely with foil or a pie shield.
  8. Let the pie cool for at least 2 to 3 hours before slicing so the filling can thicken and settle.

Notes

  • Keep the butter cold for the flakiest crust.
  • Add water slowly; too much water can make the crust tough.
  • Do not knead the dough until smooth. Gentle handling keeps the pastry tender.
  • For classic double-crust apple pie, do not fully prebake the bottom crust.
  • Use thick, cooled apple pie filling to help prevent a soggy bottom crust.
  • The dough can be refrigerated for up to 3 days or frozen for up to 3 months.
Apple pie crust recipe card with yield, prep time, chill time, bake time, key ingredients, short method, and a finished apple pie.
Use this quick recipe card when you need the basic apple pie crust steps in one place: mix, cut in butter, add ice water, gather gently, and chill before rolling.

FAQs

What makes this a good apple pie crust recipe?

It uses cold butter for flaky layers, enough dough for a 9-inch / 23-cm apple pie, and clear chilling, rolling, and baking cues so the crust stays tender instead of tough.

Is apple pie crust the same as pie dough?

Usually, yes. Apple pie crust, pie dough, pie pastry, and pie shell often mean the same basic flour-and-fat dough. For apple pie, however, the dough should be flaky but sturdy enough to hold fruit filling.

Do I need two crusts for apple pie?

For a classic double-crust pie, yes. You need one crust on the bottom and one on top. However, if you are making a crumb-topped or Dutch-style apple pie, one bottom crust is enough.

Should apple pie crust be prebaked?

For a traditional double-crust pie, usually no. Instead, use cooled filling, keep the dough cold, and bake the pie long enough for the bottom crust to brown. For a single-crust pie with crumb topping, partial prebaking can help if the bottom often turns soft.

Why is my apple pie crust tough?

Tough crust usually comes from too much water, too much mixing, or kneading the dough until smooth. So add water slowly and stop handling the dough once it holds together.

Why is my bottom crust soggy?

The filling may have been too wet or too hot, or the pie may not have baked long enough. Use cooled, thick filling and bake on a lower rack or preheated baking sheet so the bottom gets enough heat.

Can I use this crust for lattice apple pie?

Yes. This dough makes enough for a bottom crust and lattice top. Roll the second disk, cut it into strips, weave the strips over the filling, and then seal the edges well.

Can I use store-bought crust instead?

Yes. Keep the crust cold, use thick filling, and vent the top so steam can escape. Homemade dough usually tastes better, but premade crust can still make a good apple pie.

Can I use graham cracker crust for apple pie?

Yes, but it works best for a crumb-topped apple pie rather than a sealed double-crust pie. Since graham cracker crust cannot form a pastry top, treat it as a separate no-roll apple pie style.

Can I use puff pastry for apple pie?

Yes, but puff pastry works better for apple turnovers, slab-style apple desserts, or tart-like bakes than for a classic deep apple pie. Keep it cold, avoid overfilling it, seal the edges well, and cut vents so steam can escape.

Can I make apple pie crust ahead?

Yes. Wrap the dough disks tightly and refrigerate them for up to 3 days or freeze them for up to 3 months. Then thaw frozen dough overnight in the refrigerator before rolling.

Final Tips for Flaky Apple Pie Crust

A reliable apple pie crust recipe comes down to cold butter, gentle handling, enough chill time, and filling that is thick rather than watery. Once the dough is ready, add cooled apple pie filling, seal the edges well, vent the top, and bake until the crust is deeply golden.

Close-up of flaky golden apple pie crust layers with glossy apple filling inside.
A good apple pie crust should look flaky at the edges and sturdy around the filling. When the layers are golden and crisp, every slice feels more homemade.

If your first pie is not perfect, the fix is usually simple. Next time, chill the dough longer, add less water, avoid stretching the crust into the plate, and make sure the filling is not hot when it touches the pastry.

A perfect-looking crust is not the goal. A crust that tastes buttery, holds the filling, and flakes when you cut into it is already a win.

If you try this crust with a different apple pie filling, crumb topping, or pie plate, leave a note with what changed. Those small details often help the next baker more than a perfect-looking slice ever could.

Posted on Leave a comment

Homemade Ketchup Recipe

Thick glossy homemade ketchup in a bowl with a spoon, fresh tomatoes, and tomato paste nearby.

A good homemade ketchup recipe should taste bright, tangy, lightly sweet, deeply tomato-forward, and smooth enough for dipping, spreading, spooning, or squeezing. It should be thicker than tomato sauce, sharper than tomato chutney, and balanced enough for fries, burgers, sandwiches, wraps, pakoras, grilled snacks, and quick dipping sauces. You can also use it as a simple meatloaf glaze or a base for burger sauce.

This homemade tomato ketchup gives you the full fresh tomato method first: ripe tomatoes cooked down with onion, garlic, vinegar, sweetener, salt, mustard, and warm spices until glossy and thick. Then, because real kitchens are not always full of perfect summer tomatoes, you also get a quick tomato paste ketchup recipe, a sugar-free option, texture fixes, storage guidance, and clear canning notes.

In many kitchens, especially in India, this would simply be called a tomato ketchup recipe or homemade tomato sauce. Here, though, the goal is classic ketchup texture: smooth, glossy, thick, tangy-sweet, and easy to dip.

Most importantly, this is a recipe about control. Once you understand the tomato-to-vinegar-to-sweetener balance, you can make ketchup sweeter, tangier, smoother, thicker, spicier, lower in sugar, or closer to bottled ketchup without guessing. That way, the same base can work for fries, burgers, wraps, snacks, and quick sauces without needing a separate recipe every time.

For that reason, the recipe below does not force one version on every kitchen. Instead, it shows you when fresh tomatoes are worth the longer simmer and when tomato paste is the smarter shortcut.

At-a-glance guide summarizing homemade ketchup options, flavor target, texture goal, and storage guidance.
If you want the short version first, this guide shows the key homemade ketchup decisions: which method to choose, how it should taste, and how to store it safely.

Before you start: choose the version based on your tomatoes. If they are ripe and flavorful, use the fresh tomato method. However, if they are watery or bland, use the tomato paste shortcut instead. That way, you get a thick, balanced ketchup without fighting the ingredients.

Quick Answer: The Best Homemade Ketchup Recipe Ratio

Fresh Tomato Ketchup Ratio

To make homemade ketchup with fresh tomatoes, first cook ripe tomatoes with onion and garlic until soft. Next, blend them smooth and strain them for a finer texture. From there, simmer the tomato puree with vinegar, sugar or jaggery, salt, mustard powder, and warm spices until thick and glossy.

Tomato Paste Ketchup Ratio

For a faster version, whisk tomato paste with water, vinegar, sweetener, salt, onion powder, garlic powder, mustard powder, and a tiny pinch of warm spice. Then, simmer it for 5–8 minutes. Compared with the fresh tomato version, tomato paste ketchup is quicker, smoother, and more predictable, although it tastes less seasonal.

As a starting point, use the fresh tomato ratio when flavor matters most and the tomato paste ratio when speed and smoothness matter more.

Version Quick Ratio Best For
Fresh tomato ketchup 1 kg tomatoes + 75–90 ml vinegar + 50–75 g sweetener + 8–10 g salt Ripe summer tomatoes, fresh flavor, and from-scratch ketchup
Tomato paste ketchup 170 g tomato paste + 120–150 ml water + 45 ml vinegar + 20–35 g sweetener Quick ketchup, smooth texture, burgers, fries, and weeknight meals
Ratio guide comparing homemade ketchup made with fresh tomatoes and ketchup made with tomato paste.
Use the fresh tomato ratio when flavor matters most, and the tomato paste ratio when speed, smoothness, and consistency matter more.

That is why this ketchup recipe gives you two practical paths: a fresh tomato version for deeper flavor and a quick tomato paste version for speed.

Because this ketchup recipe is homemade, you can adjust the vinegar, sweetener, salt, and spices near the end instead of being locked into one fixed bottled flavor.

How the Ketchup Should Taste

Flavor target: good ketchup should taste tomato-rich first, then tangy, lightly sweet, salty enough to pop, and only gently spiced. If you can clearly taste cinnamon, clove, or allspice, the warm spice is too strong.

That flexibility is what makes a homemade ketchup recipe useful: the method gives you a starting point, but the final balance comes from tasting and adjusting.

The finished ketchup should taste tomato-rich, tangy-sweet, savory, and gently spiced in the background. When it tastes like plain tomato sauce, it needs more vinegar, sweetener, salt, mustard, or a tiny pinch of warm spice. However, when it tastes like chutney, the warm spices or sweetener are probably too strong.

Which Homemade Ketchup Version Should You Make?

Before you start cooking, decide what problem you are solving. Fresh tomatoes give the best homemade flavor when they are ripe, while tomato paste gives better control when the tomatoes are watery, pale, or out of season.

The easiest way to choose is to look at your tomatoes, your time, and how you plan to store the ketchup. When the tomatoes are ripe and red, fresh tomatoes give the best homemade flavor. On the other hand, when the tomatoes are watery, pale, or out of season, tomato paste gives the fastest, smoothest, most predictable result. If you are reducing sugar, however, the ketchup needs a little more balancing so it still tastes like ketchup instead of plain tomato sauce.

Decision guide showing when to make homemade ketchup with fresh tomatoes and when to use tomato paste.
Fresh tomatoes are best when they are ripe and flavorful, while tomato paste is the smarter shortcut when you want faster, smoother, more predictable ketchup.

In other words, the best homemade version is not always the longest ketchup recipe. It is the version that fits your tomatoes, your time, and the way you want to serve it.

Situation Best Version Why It Works
Ripe summer tomatoes Fresh tomato ketchup This gives the best flavor and the most homemade character.
Watery, pale, or bland tomatoes Tomato paste ketchup The paste gives more predictable color, body, and flavor.
Ketchup needed in about 10 minutes Quick tomato paste ketchup recipe No long reduction is needed.
Lower-sugar ketchup Sugar-free ketchup option This lets you control the sweetener while keeping the sauce balanced.
Pantry-stable jars Tested canning recipe only A flexible fridge ketchup should not be canned casually.

Why This Recipe Works

This recipe works because it treats ketchup as a balance problem, not just a tomato puree. The tomatoes soften first so their flavor turns rounded, the mixture is blended and strained for texture, and the seasoned puree reduces slowly until the vinegar, sweetener, salt, mustard, and spices taste like one glossy sauce.

The fresh tomato version gives deeper homemade flavor, while the tomato paste version gives speed and consistency. Together, they cover both real kitchen situations: good ripe tomatoes and the nights when you need a quick ketchup for fries, burgers, wraps, or snacks. Because both versions use the same sweet-acid-salt logic, you can adjust them in the same way near the end.

Homemade Ketchup Ingredients: Tomatoes, Vinegar, Sugar, Salt and Spices

Ketchup tastes simple, but it depends on balance. Tomatoes give the sauce body, while vinegar adds the sharp tang. Sweetener rounds the acidity, and salt makes the tomato flavor pop. Finally, onion, garlic, mustard, and warm spices turn cooked tomato into ketchup instead of plain tomato sauce.

Because the sauce reduces as it cooks, the balance of vinegar, salt, and sweetener becomes more concentrated near the end. Therefore, it is better to start slightly cautious and adjust after the sauce thickens.

What Is Ketchup Made Of?

Ketchup is usually made from tomatoes or tomato paste, vinegar, sugar or another sweetener, salt, onion, garlic, mustard, and warm spices. The main ingredient is tomato, but the familiar ketchup flavor comes from the balance of tomato, vinegar, sweetness, salt, and spice.

Compared with many bottled ketchup ingredients lists, homemade ketchup gives you more control. You can choose fresh tomatoes or tomato paste, adjust the sugar, use 5% acidity vinegar, control the salt, and keep the spice level gentle.

Ingredients for homemade ketchup including tomatoes, vinegar, sweetener, salt, onion, garlic, mustard powder, and warm spices.
Homemade ketchup gets its classic flavor from balance: tomatoes for body, vinegar for tang, sweetener for roundness, salt for depth, and spices for warmth.

Tomatoes and Vinegar

Tomatoes give the ketchup body, color, and fresh flavor. Meanwhile, vinegar gives the sauce its sharp ketchup tang. For this small-batch fridge version, apple cider vinegar gives a rounder flavor, while white vinegar tastes cleaner and sharper.

Sweetener, Salt and Spices

Sweetener balances tomato acidity, salt sharpens the flavor, and spices make the sauce taste like ketchup instead of plain tomato sauce. In this ketchup recipe, the homemade flavor comes from restraint: mustard powder, cinnamon, and a tiny pinch of clove or allspice are enough. Too much warm spice can push the sauce toward chutney.

Once you understand what each ingredient does, the recipe becomes easier to adjust. The table below shows the fresh tomato amounts first because that version depends most on balance and reduction.

Measurement note: metric weights are more accurate for tomatoes, onion, sweetener, and salt. The US cup and spoon measures are included for convenience, but final yield can vary because tomatoes contain different amounts of water.

Fresh Tomato Ketchup Ingredient Amounts

Ingredient Amount for Fresh Tomato Ketchup Why It Matters
Ripe red tomatoes 1 kg / 2.2 lb Tomatoes form the body, color, and main flavor. Roma, plum, San Marzano-style, or other meaty tomatoes reduce faster and taste richer.
Onion 80–100 g / 3–3.5 oz / 1 small onion Onion builds a savory base and helps the ketchup taste rounded.
Garlic 8–12 g / 2–3 cloves Garlic deepens the flavor. Use less if you want a cleaner bottled-style ketchup.
5% acidity vinegar 75–90 ml / 5–6 tbsp Vinegar gives ketchup its sharp tang. Apple cider vinegar tastes rounder; white vinegar tastes cleaner and sharper.
Sugar, jaggery, or brown sugar 50–75 g / 1.75–2.6 oz / about ¼–⅓ cup packed Sweetener balances tomato acidity and keeps the sauce from tasting like sour tomato puree.
Fine salt 8–10 g / about 1½ tsp Salt sharpens the tomato flavor. Add it carefully because reduction concentrates the sauce.
Mustard powder 1–2 g / ½–1 tsp Mustard powder brings the classic ketchup sharpness without making the sauce taste mustardy.
Cinnamon Pinch to ⅛ tsp A small amount adds warmth. Too much can push the ketchup toward chutney.
Clove or allspice Tiny pinch / 1/16 tsp or less This gives the familiar background spice, but it becomes overpowering quickly.
Cayenne or chili powder Optional, ⅛–¼ tsp Use this for mild heat without turning the ketchup into hot sauce.

How Much Sugar Is in This Homemade Ketchup?

This ketchup recipe uses 50–75 g added sugar, jaggery, or brown sugar for a homemade batch that finishes at about 2–2½ cups. That works out to roughly 1.25–2.3 g added sweetener per tablespoon, depending on your final yield and how much sweetener you use.

For a less sweet ketchup, start with 50 g sweetener and adjust only after the sauce has reduced. Because reduction concentrates flavor, the ketchup may taste sweeter and saltier near the end than it did at the start. Still, do not remove all sweetness unless you want a sharper tomato-sauce-style condiment. Instead, reduce the sweetener gradually and taste again after the ketchup cools.

It is also useful when you want a no-corn-syrup ketchup and prefer to choose the sweetener yourself. For a lighter or more controlled version, homemade ketchup lets you adjust the sugar, salt, and vinegar instead of relying on a fixed bottled formula.

Use 5% acidity vinegar for this recipe, especially when you are also reading the canning section. For regular fridge ketchup, apple cider vinegar, white vinegar, or a mix of the two all work. Apple cider vinegar gives a slightly fruitier ketchup; by contrast, white vinegar gives a cleaner, sharper ketchup.

Important: this flexible recipe is for fridge and freezer storage. If you want shelf-stable canned ketchup, use a tested canning formula and do not casually change vinegar, tomato, onion, vegetable, jar, or processing-time ratios.

Homemade Ketchup Recipe with Fresh Tomatoes

This is the main ketchup-from-scratch version to make when tomatoes are ripe, red, and flavorful. In practice, it starts with 1 kg / 2.2 lb fresh tomatoes and reduces into about 500–600 g / 17.5–21 oz / 2–2½ cups of ketchup, depending on the tomato variety and how thick you cook it.

The method is simple, even though the simmer takes time: soften the tomatoes, blend, strain if needed, season, then reduce until the sauce turns glossy and spoonable.

Step-by-step guide showing how to make homemade ketchup with fresh tomatoes by softening, blending, straining, seasoning, and reducing.
The fresh tomato method is simple: soften the tomatoes, blend them smooth, strain if needed, season, and reduce until the ketchup turns glossy and spoonable.

Best Tomatoes for Homemade Ketchup

The best tomatoes for homemade ketchup are meaty, ripe, and deeply red. For example, Roma, plum, San Marzano-style, and other paste tomatoes are ideal because they have more flesh and less water. Regular round tomatoes also work; however, they usually take longer to reduce. In addition, cherry tomatoes can make a sweet ketchup, although they are often seedier and may need straining.

Homemade ketchup may look slightly darker or softer red than bottled ketchup, especially if you use brown sugar, jaggery, apple cider vinegar, or long cooking. For the brightest color, use ripe red paste tomatoes, white vinegar, white sugar, and gentle heat.

Guide to tomato types for homemade ketchup, including Roma tomatoes, plum tomatoes, San Marzano-style tomatoes, round tomatoes, cherry tomatoes, and pale tomatoes.
Meaty, ripe, deeply red tomatoes make the best homemade ketchup because they reduce faster, taste richer, and give the sauce better color.
Tomato Type How It Works in Ketchup Adjustment
Roma / plum tomatoes Best balance of flesh, flavor, and low water Follow the main formula.
San Marzano-style tomatoes Excellent for smooth, rich ketchup Use the recipe as written.
Regular round tomatoes Good flavor but often watery Give them extra simmering time in a wide pan.
Cherry tomatoes Sweet and bright but more skins/seeds Blend thoroughly, then strain for a smoother finish.
Pale or underripe tomatoes Sharper, less sweet, less red Increase the sweetener slightly or switch to tomato paste.

Step 1: Cook the Tomatoes, Onion, and Garlic

Wash and roughly chop 1 kg / 2.2 lb ripe tomatoes. Then, add them to a wide heavy-bottomed pan with 80–100 g chopped onion and 2–3 garlic cloves. Once everything is in the pan, cover and cook over medium-low heat for 15–20 minutes, until the tomatoes collapse, release their juices, and soften completely.

At this stage, do not add the vinegar, sugar, or salt yet. Starting with just the tomatoes, onion, and garlic lets the vegetables soften evenly before the final reduction.

Step 2: Blend and Strain

After the tomatoes soften, blend the mixture until smooth. An immersion blender is easiest, but a countertop blender gives a finer texture. When using a countertop blender, work in batches and let steam escape safely.

Texture Goal What to Do
Rustic homemade ketchup Blend only, leaving a little skin and seed texture.
Smooth ketchup Pass the blended mixture through a coarse sieve.
Bottled-style ketchup Use a food mill or fine sieve, then blend again after reducing.

For a smoother finish, strain the puree before the final reduction. If you are new to reducing fresh tomatoes, MasalaMonk’s guide to tomato sauce from fresh tomatoes is useful because it explains the food mill method, the no-food-mill path, and why tomato reduction changes texture.

Step 3: Add Vinegar, Sweetener, Salt, and Spices

From there, return the blended and strained tomato puree to the pan. Add:

  • 75–90 ml / 5–6 tbsp 5% acidity vinegar
  • 50–75 g sugar, brown sugar, or jaggery
  • 8–10 g fine salt, or about 1½ tsp
  • ½–1 tsp mustard powder
  • Pinch to ⅛ tsp cinnamon
  • Tiny pinch clove or allspice
  • Optional ⅛–¼ tsp cayenne or chili powder

Start with the lower amount of sugar and vinegar when your tomatoes are already sweet and flavorful. If the tomatoes taste flat, watery, or very acidic, use the higher amount instead. Either way, taste again near the end because the flavor changes as the ketchup reduces.

Step 4: Simmer Until Thick and Glossy

Simmer the ketchup uncovered over low to medium-low heat for 45–70 minutes after blending and seasoning, stirring more often as it thickens. The total cook time is usually 60–90 minutes including the first tomato-softening stage, but watery tomatoes can take longer.

The pan should show small, steady bubbles, not an aggressive boil. Near the end of cooking, the ketchup can catch on the bottom quickly, so use a splatter screen when needed and stir more often as it thickens. Instead of rushing the heat, give the sauce time to reduce slowly; that way, it stays brighter, smoother, and less bitter.

Heat cue: keep the ketchup at a gentle simmer with small, steady bubbles, not a rolling boil. If the sauce spits aggressively, darkens quickly, or sticks to the bottom, lower the heat and stir more often. Gentle reduction gives you brighter flavor, smoother texture, and better color.

Stage Approximate Amount Visual Cue
Fresh chopped tomatoes 1 kg / 2.2 lb Chunky, raw, watery
After softening and blending About 900 ml–1.1 L Loose tomato puree
After straining About 750–950 ml Smoother but still thin
Final ketchup About 500–600 g / 2–2½ cups Glossy, thick, spoonable

Step 5: Test the Thickness

Rather than relying only on time, use the texture as your guide. Because tomatoes vary so much, the exact cook time can shift from batch to batch. Near the end of cooking, check the ketchup with one or more of these doneness tests:

Test What You Should See
Spoon mound test The ketchup should mound slightly on a spoon instead of running off like tomato juice.
Trail test Drag a spatula through the pan; the trail should close slowly, not immediately flood back.
Cold plate test Drop a little ketchup on a chilled plate. After 30 seconds, it should hold shape instead of spreading into a watery puddle.

When in doubt, stop slightly before it looks perfect because ketchup thickens as it cools.

Step 6: Taste and Adjust

Once the ketchup is thick, taste it before you store it. A flat flavor usually needs a little salt first. When the sauce tastes too sweet, add vinegar 1 teaspoon at a time. If the flavor leans too sour, balance it with sweetener in small amounts. When it tastes like plain tomato sauce instead of ketchup, add vinegar, sweetener, salt, mustard, and a very tiny pinch of clove or cinnamon until the flavor tastes rounded.

Do not worry if the ketchup tastes slightly sharp while hot. After cooling, the vinegar softens, the sweetness feels rounder, and the texture becomes thicker.

Step 7: Cool and Store

Before you store it, let the ketchup cool fully. Then, transfer it to a clean glass jar. Refrigerate and use within 2 weeks for best quality, or freeze for longer storage.

For the best flavor, chill the ketchup for at least 2 hours before serving. While it is hot, freshly cooked ketchup can taste sharper than expected. After cooling, the sweetness, acidity, salt, and spices settle into a rounder flavor.

Quick Tomato Paste Ketchup: How to Make Ketchup from Tomato Paste

When fresh tomatoes are weak or you need ketchup quickly, tomato paste is the better starting point. Because it has already been cooked down, this version thickens in minutes, needs less guesswork, and gives you a smoother, more predictable ketchup. It is not as fresh-tasting as the fresh tomato version, but it is much faster.

A standard 6 oz / 170 g can of tomato paste is the easiest starting point for this shortcut. If your paste is very thick or double-concentrated, start with the higher amount of water and adjust after simmering.

Step-by-step guide showing how to make ketchup from tomato paste with water, vinegar, sweetener, salt, onion powder, garlic powder, mustard, and warm spice.
Tomato paste ketchup is the fast route: whisk the ingredients smooth, simmer for a few minutes, cool, and adjust the thickness or tang before serving.
Detail Spec
Yield About 300–350 g / 10.5–12 oz / 1¼–1½ cups
Prep time 3 minutes
Cook time 5–8 minutes
Total time 8–12 minutes
Best for Fries, burgers, sandwiches, dips, and weeknight meals

Tomato Paste Ketchup Ingredients

Ingredient Metric US / Imperial
Tomato paste 170 g 6 oz can
Water 120–150 ml ½–⅔ cup
5% acidity vinegar 45 ml 3 tbsp
Sugar, honey, jaggery, or maple syrup 20–35 g 1½–2½ tbsp
Fine salt 4–5 g About ¾ tsp
Onion powder ½ tsp
Garlic powder ¼–½ tsp
Mustard powder ¼–½ tsp
Cinnamon, clove, or allspice Tiny pinch

How to Make Ketchup from Tomato Paste

  1. Add tomato paste, water, vinegar, sweetener, salt, onion powder, garlic powder, mustard powder, and spices to a small saucepan.
  2. Whisk until the mixture is completely smooth.
  3. Simmer over low heat for 5–8 minutes, stirring often.
  4. If it is too thick, add more water 1 tablespoon at a time.
  5. For more tang, add vinegar 1 teaspoon at a time.
  6. Cool before judging the final thickness.

Best use: tomato paste ketchup is the easiest version for burgers, fries, sandwiches, wraps, and quick mayo-ketchup sauce. It is not as fresh-tasting as the fresh tomato version, but it is smoother and faster.

Sugar-Free, No-Sugar and Keto Homemade Ketchup Option

Classic ketchup needs sweetness to balance tomato acidity. Without any sweetness, the sauce will not taste like familiar bottled ketchup. Instead, it will taste sharper, more acidic, and more like seasoned tomato sauce. However, you still have several good options depending on what “sugar-free” means for you.

This section is for readers looking for ketchup without sugar, no-sugar tomato ketchup, zero-sugar ketchup, or a lower-carb ketchup option. The key point is that ketchup still needs sweetness for balance, so the best sugar-free version uses a low-carb sweetener instead of removing sweetness completely.

Guide comparing no refined sugar, keto low-carb, and no-sweetener options for homemade ketchup.
Ketchup still needs some sweetness for balance, so the best sugar-free version replaces sweetness thoughtfully instead of removing it completely.

Once the basic ketchup tastes balanced, you can lower the sugar more safely. The important thing is to replace sweetness thoughtfully instead of removing it all at once.

Sweetener Options for Sugar-Free Ketchup

Version What to Use Flavor Result
No refined sugar Dates, raisins, apple, jaggery, honey, or maple syrup Still rounded and ketchup-like, but not strictly sugar-free
Keto / low-carb Allulose, monk fruit, or a tiny amount of stevia Closest low-carb option, especially with tomato paste ketchup
No sweetener Skip sweetener Sharper, tangier, more like tomato sauce than ketchup

How to Adjust the Sweetness

In the fresh tomato recipe, replace the 50–75 g sugar with 40–60 g chopped dates or raisins and blend very thoroughly. For keto ketchup, the tomato paste version is easier because it is already thick and consistent. Start with 1–2 tablespoons allulose or monk fruit sweetener, then adjust after simmering.

The best sugar-free ketchup still tastes slightly sweet. If you remove sweetness completely, the sauce becomes tangy tomato sauce, not classic ketchup.

If you are building low-carb burger plates or bowls, this sugar-free ketchup variation fits better than sugary bottled sauces. MasalaMonk’s keto hamburger recipes also explain why ketchup-heavy sauces can become a hidden carb trap.

Fresh Tomato Ketchup vs Tomato Paste Ketchup

Neither version is automatically better. Instead, the right choice depends on your tomatoes and your timing. When tomatoes are ripe and flavorful, fresh tomato ketchup gives the best flavor. By contrast, tomato paste ketchup works better when you want speed, smoothness, and consistency.

In short, the best homemade ketchup recipe for you depends on whether you care more about fresh tomato flavor, speed, smoothness, or consistency.

Need Fresh Tomato Ketchup Tomato Paste Ketchup
Fresh flavor Best when tomatoes are ripe and sweet Good, although less fresh
Speed Slower because it needs reduction Fastest option because paste is already concentrated
Texture Smooth only after careful straining Usually smooth and consistent
Predictability Depends on the tomatoes More predictable because the base is concentrated
Summer tomatoes Ideal choice when tomatoes are in season Useful when fresh tomatoes are weak
Beginner-friendliness Good, although slower Easiest because it skips long reduction
Canning suitability Only with a tested canning recipe Only with a tested canning recipe

How to Make Homemade Ketchup Smooth and Thick

In practice, the two biggest homemade ketchup problems are texture and thickness. Because fresh tomatoes contain a lot of water, ketchup needs reduction. If you stop too early, it tastes like thin tomato sauce. However, if you cook it too hard or too long, it can scorch, darken, or become pasty. Therefore, the goal is slow reduction, not aggressive boiling.

The texture goal is glossy and spoonable, not watery like tomato puree and not stiff like tomato paste.

Texture guide for homemade ketchup showing a spoon mound test, slow-closing trail test, and chilled plate test.
Good homemade ketchup should look glossy, mound slightly on a spoon, leave a slow-closing trail in the pan, and hold shape on a chilled plate.

Use a Wide Pan

A wide pan helps water evaporate faster. By contrast, a tall narrow pot traps steam and makes the ketchup take longer to thicken. For a 1 kg tomato batch, a 26–30 cm / 10–12 inch wide pan is ideal.

Strain for a Smoother Finish

Tomato skins and seeds can make homemade ketchup feel rough. For a smoother finish, blend the softened tomatoes, then pass them through a sieve or food mill before the final reduction.

Reduce Slowly

Keep the ketchup at a gentle simmer. As it thickens, stir more often and scrape the bottom of the pan. The sauce should look glossy, not dry or scorched.

Cool Before Judging Thickness

Hot ketchup looks thinner than cooled ketchup. Therefore, stop when it is slightly looser than your ideal final texture, then let it cool before deciding whether it needs more reduction.

Texture reminder: after cooling, ketchup becomes thicker and smoother. Because of that, stop a little early rather than reducing it until it looks perfect in the hot pan.

How to Fix Homemade Ketchup

Homemade ketchup is easy to adjust when you know what is wrong. First, decide whether the problem is texture, flavor, or color. Then, make small changes and taste again after the ketchup cools slightly on a spoon.

Troubleshooting guide for homemade ketchup showing fixes for ketchup that is too thin, too thick, too sour, too sweet, too salty, bland, spicy, or rough.
Most homemade ketchup problems are easy to fix once you know whether the issue is texture, acidity, sweetness, salt, or spice.

Texture Fixes

Problem Likely Cause Fix
Runny or thin Watery tomatoes or not enough reduction Simmer uncovered in a wide pan until the ketchup thickens and the extra water cooks off.
Stiff or pasty Over-reduced sauce or too much tomato paste Loosen it with water, tomato juice, or vinegar 1 tablespoon at a time.
Rough or seedy Skins or seeds remain Blend longer, then strain through a sieve or food mill for a smoother texture.

Flavor and Color Fixes

Problem Likely Cause Fix
Sharp or sour Too much vinegar or underripe tomatoes Add sugar, jaggery, honey, dates, or raisins in small amounts until the acidity tastes rounded.
Overly sweet Too much sweetener Add vinegar 1 teaspoon at a time. Afterward, add a small pinch of salt or mustard powder if the flavor still feels flat.
Salty or harsh Salt added early or sauce reduced too far Dilute the flavor with unsalted tomato paste, tomato puree, or a little water, then simmer briefly.
Flat or bland Not enough salt, vinegar, or spice Start with salt. Then add vinegar, mustard powder, or warm spice in small amounts.
Too spicy Too much cayenne or chili Round out the heat with tomato paste and a little sweetener.
Brown or dull Overcooking, burning, dark sugar, or dull tomatoes Next time, use ripe red tomatoes, lower the heat, stir more often, and avoid scorching.
Tomato-sauce flavor Missing ketchup’s sweet-acid-spice balance Build ketchup flavor with vinegar, sweetener, salt, mustard powder, and a tiny pinch of clove or cinnamon.

How to Store Homemade Ketchup

After the ketchup tastes right, storage matters as much as flavor. This is especially true for small-batch homemade ketchup because it does not have commercial stabilizers or a tested shelf-stable process.

Store it in a clean glass jar, use a clean spoon, and keep it refrigerated. After serving, return the jar to the fridge rather than leaving it on the counter.

Storage guide for homemade ketchup showing fridge storage, freezer storage, and tested canning safety information.
This small-batch ketchup is best treated as a fridge or freezer condiment unless you follow a tested canning recipe exactly.

Fridge, Freezer and Room Temperature Storage

Storage Method Recommendation
Fridge For best quality, use within 2 weeks.
Freezer For longer storage, freeze for 4–6 months in small portions.
Room temperature Only keep ketchup at room temperature when it has been properly canned with a tested recipe.
After thawing After thawing, stir well; if watery, simmer briefly to bring the texture back.
Jar hygiene Because homemade ketchup has no commercial stabilizers, use clean jars and clean spoons every time.

Can You Can Homemade Ketchup?

Think of this recipe as a fridge ketchup, not a pantry ketchup. You can freeze it safely, but do not treat it like a shelf-stable jarred product unless you follow a tested canning recipe.

For that reason, this flexible MasalaMonk ketchup recipe is not a shelf-stable canning formula.

For canning ketchup, use a tested canning formula from a reliable source such as the National Center for Home Food Preservation tomato ketchup recipe. Do not casually reduce vinegar, increase tomatoes, add extra onion, add extra vegetables, change jar size, change headspace, or shorten processing time.

For context, the NCHFP tomato ketchup formula is a large tested batch using 24 lb ripe tomatoes, 3 cups chopped onions, 3 cups 5% acidity cider vinegar, sugar, salt, and whole spices, with a yield of 6–7 pints. That is a different type of recipe from this flexible small-batch fridge ketchup.

Canning safety note: fridge ketchup is flexible. Canning ketchup is not. For shelf-stable jars, follow a tested recipe exactly, use vinegar with 5% acidity, and process jars according to the tested time for your altitude.

Healthy Canning’s quick ketchup guidance explains the same principle clearly: sweetness, salt, and dry spices are more flexible, but vinegar and low-acid vegetable ratios should not be casually changed in a water-bath canning recipe. If you want a pantry-stable ketchup, use tested canning instructions instead of adapting this small-batch fridge recipe.

Homemade Catsup vs Ketchup: Are They the Same?

Catsup and ketchup usually refer to the same sweet-tangy tomato condiment. “Ketchup” is the dominant modern spelling, but some readers still search for homemade catsup, homemade tomato catsup, or a recipe for tomato catsup.

If you came here looking for catsup, you are in the right place. The spelling changes, but the method is the same: tomatoes are reduced with vinegar, sweetener, salt, mustard, and spices until the sauce becomes thick, glossy, tangy, and balanced.

Close-up of thick glossy homemade ketchup in a bowl with a spoon, with fries in the background.
Homemade ketchup should look smooth, glossy, and spoonable, with enough body to coat fries and burgers without tasting heavy.

Ways to Use Homemade Ketchup

Homemade ketchup is more than a dip for fries. Once you have a jar in the fridge, it becomes a quick base for sauces, glazes, spreads, marinades, and snack plates. For everyday meals, that means one batch can cover burgers, wraps, fries, bowls, and quick dipping sauces.

Guide showing ways to use homemade ketchup with fries, burgers, mayo-ketchup sauce, meatloaf glaze, barbecue sauce, pakoras, wraps, and rice bowls.
A jar of homemade ketchup can do much more than dip fries — it also works in burger sauce, glazes, barbecue-style sauces, and snack platters.
Use How to Use the Ketchup
Fries Pair chilled ketchup with hot crispy homemade French fries.
Burgers Use it on burger buns or fold it into mayo for a creamy burger sauce.
Mayo ketchup sauce Stir 2 parts mayo with 1 part ketchup for a quick fry sauce. MasalaMonk’s homemade mayonnaise guide already covers mayo-ketchup sauce as a useful variation.
Meatloaf glaze Blend ketchup with brown sugar or honey and a splash of vinegar, then brush it over meatloaf.
BBQ sauce base Turn it into a quick barbecue-style sauce with vinegar, brown sugar, smoked paprika, black pepper, and Worcestershire-style seasoning.
Pakoras and snacks Serve it as a tangy-sweet dip when chutney feels too sharp.
Wraps and sandwiches Add a thin layer inside grilled cheese, paneer rolls, tofu wraps, or egg sandwiches.
Rice bowls Spoon it into spicy tomato rice, fried rice-style bowls, or quick sauce bases.

For a fruitier, hotter homemade sauce, try MasalaMonk’s mango habanero sauce. For a sharper fruit-and-mustard dip, try the mango mustard sauce. Both fit naturally into the same homemade sauce and condiment family.

Recipe recap board for homemade ketchup showing fresh tomato and tomato paste versions with a short method summary.
This quick visual recap summarizes both homemade ketchup routes, while the full recipe card below gives the detailed method and ingredient options.

Before you jump to the recipe card: choose the fresh tomato version when tomatoes are ripe and flavorful. However, choose the tomato paste shortcut when you want a faster, smoother, more predictable ketchup. Either way, taste again after cooling because ketchup thickens and mellows in the fridge.

Homemade Ketchup Recipe with Fresh Tomatoes or Tomato Paste

A smooth, tangy homemade ketchup made with ripe fresh tomatoes, vinegar, sweetener, salt, onion, garlic, mustard, and warm spices. This small-batch recipe includes a tomato paste shortcut, sugar-free notes, storage guidance, and texture fixes.

Prep Time15 minutes
Cook Time60–90 minutes
Total Time1 hr 15 min–1 hr 45 min
Yield500–600 g / 2–2½ cups

Equipment

  • Wide heavy-bottomed pan or Dutch oven
  • Immersion blender or countertop blender
  • Sieve or food mill, optional but recommended
  • Spatula
  • Clean glass jar

Ingredients

  • 1 kg / 2.2 lb ripe red tomatoes, roughly chopped
  • 80–100 g / 3–3.5 oz onion, chopped
  • 2–3 garlic cloves, about 8–12 g
  • 75–90 ml / 5–6 tbsp 5% acidity vinegar, apple cider or white vinegar
  • 50–75 g / about ¼–⅓ cup packed brown sugar, jaggery, or sugar
  • 8–10 g fine salt, about 1½ tsp
  • ½–1 tsp mustard powder
  • Pinch to ⅛ tsp ground cinnamon
  • Tiny pinch ground clove or allspice, 1/16 tsp or less
  • Optional: ⅛–¼ tsp cayenne or chili powder
  • Optional: ¼ tsp black pepper

Method

  1. Prep the tomatoes. Wash and roughly chop the tomatoes. Chop the onion and garlic.
  2. Soften. Place the tomatoes, onion, and garlic in a wide pot. Cover and cook over medium-low heat for 15–20 minutes, until the tomatoes collapse and release their juices.
  3. Blend. Blend the mixture until smooth with an immersion blender or countertop blender.
  4. Strain, optional. For smoother ketchup, pass the blended mixture through a sieve or food mill. For rustic ketchup, skip this step.
  5. Season. Return the tomato puree to the pot. Stir in vinegar, sweetener, salt, mustard powder, cinnamon, clove or allspice, and optional cayenne or black pepper.
  6. Reduce. Simmer uncovered over low to medium-low heat for 45–70 minutes. Stir more often as the ketchup thickens so it does not catch on the bottom.
  7. Test. Check that the ketchup mounds slightly on a spoon, leaves a slow-closing trail in the pan, and holds shape on a chilled plate.
  8. Adjust. Taste before storing. Add sweetener if sour, vinegar if sweet, salt if flat, or water if too thick.
  9. Cool and store. Cool the ketchup, transfer it to a clean jar, and refrigerate. Use within 2 weeks for best quality.

Quick Tomato Paste Option

Whisk together 170 g / 6 oz tomato paste, 120–150 ml / ½–⅔ cup water, 45 ml / 3 tbsp vinegar, 20–35 g sweetener, 4–5 g salt, ½ tsp onion powder, ¼–½ tsp garlic powder, ¼–½ tsp mustard powder, and a tiny pinch of cinnamon or clove. Simmer 5–8 minutes, then cool.

Notes

  • For faster thickening and better color, use ripe, meaty tomatoes.
  • A 26–30 cm / 10–12 inch pan works best for a 1 kg tomato batch because it evaporates water faster.
  • Ketchup thickens as it cools, so stop reducing slightly before it looks perfect.
  • For the best flavor, chill the ketchup for at least 2 hours before serving.
  • If you want a smoother bottled-style finish, strain the tomato mixture before the final reduction.
  • If using a countertop blender, blend hot tomatoes in batches and vent the lid so steam can escape safely.
  • Reduction concentrates flavor, so add salt carefully.
  • When doubling the recipe, use a wider pan or expect a longer reduction time. A double batch will not thicken in the same time.
  • For a lower-sugar or sugar-free variation, use allulose, monk fruit, dates, or raisins.
  • This homemade ketchup recipe is flexible for fridge and freezer storage, but it should not be used as a canning formula. For shelf-stable jars, follow a tested canning recipe exactly.

FAQs About Homemade Ketchup

How do I make homemade ketchup from fresh tomatoes?

Fresh tomatoes make excellent homemade ketchup when they are ripe, red, and flavorful. To make it, cook them with onion and garlic, then blend, strain if needed, and reduce with vinegar, sweetener, salt, mustard, and spices until thick.

How do I make ketchup from tomato paste?

Tomato paste ketchup is the fastest version because the tomato base is already concentrated. To make it, whisk tomato paste with water, vinegar, sweetener, salt, onion powder, garlic powder, mustard powder, and a tiny pinch of spice. Then simmer for 5–8 minutes.

Why is my homemade ketchup too thin?

Thin ketchup usually means the tomatoes were watery or the sauce has not reduced enough. To fix it, simmer the ketchup uncovered in a wide pan and stir often as it thickens. The sauce is ready when it mounds slightly on a spoon and holds shape on a chilled plate.

Why does my ketchup taste too sour?

Too much vinegar, underripe tomatoes, or not enough sweetener can make ketchup taste sour. To balance it, gradually add sugar, jaggery, honey, dates, raisins, or a low-carb sweetener until the acidity tastes rounded.

Why does my homemade ketchup taste like tomato sauce?

Your ketchup can taste like tomato sauce when it does not have enough sweet-acid-spice balance. To fix that, add a little vinegar for tang, sweetener for roundness, salt for depth, mustard powder for sharpness, and a tiny pinch of clove, cinnamon, or allspice for classic ketchup flavor. After that, chill it briefly and taste again.

Is homemade ketchup good without sugar?

You can make homemade ketchup without refined sugar, but the flavor changes. For a no-refined-sugar version, use dates, raisins, apple, honey, maple, or jaggery. Meanwhile, keto ketchup works better with allulose, monk fruit, or a very small amount of stevia. Without any sweetener, however, the sauce will taste more like tangy tomato sauce than classic ketchup.

How long does homemade ketchup last?

This small-batch fridge ketchup is best within 2 weeks. For that reason, keep it refrigerated in a clean jar and use a clean spoon. For longer storage, freeze it in small portions for 4–6 months. After thawing, stir before serving.

Does homemade ketchup freeze well?

Freezing works well for homemade ketchup. After cooling, use small containers or ice cube trays. Then, after thawing, stir well. If it separates or turns watery, simmer it briefly to bring the texture back.

Is this homemade ketchup recipe safe for canning?

Do not can this flexible recipe as written. Instead, use it for fridge and freezer storage. For shelf-stable canning, use a tested ketchup canning recipe from a reliable source and follow the vinegar, jar size, headspace, and processing-time instructions exactly.

Is catsup the same as ketchup?

Usually, yes. Catsup and ketchup are alternate names for the same sweet-tangy tomato condiment. Today, ketchup is the more common spelling; however, homemade catsup and homemade tomato catsup usually refer to the same type of recipe.

What makes this a homemade ketchup recipe instead of tomato sauce?

A homemade ketchup recipe uses tomato, vinegar, sweetener, salt, mustard, and warm spices in a tighter balance than tomato sauce. As a result, the finished ketchup tastes tangy-sweet, glossy, concentrated, and dip-friendly.

What is ketchup made of?

Ketchup is usually made from tomatoes, vinegar, sugar or another sweetener, salt, onion or onion powder, garlic or garlic powder, mustard, and warm spices. For homemade ketchup, cinnamon, clove, allspice, or celery seed should stay in the background rather than dominate the sauce. Otherwise, the ketchup can start tasting like chutney instead of a classic dip.

Back to top

Posted on 3 Comments

Mango Habanero Sauce Recipe: Sweet-Spicy Hot Sauce for Wings, Tacos & Chicken

Glossy mango habanero sauce in a bowl with fresh mango, orange habanero peppers, lime, garlic and wings in the background.

A good mango habanero sauce recipe should taste fruity, fiery, tangy, and balanced. The mango should come through clearly, the habanero should bring real heat, and the vinegar, lime, salt, garlic, and onion should keep the sauce sharp enough for wings, tacos, grilled chicken, shrimp, fish, paneer, tofu, burgers, wraps, fries, and rice bowls.

The useful part is that this homemade mango habanero sauce starts with one flexible base. From there, you can thin it into hot sauce, finish it with butter for wings, reduce it into a glaze, stir it into a creamy dip, or push it toward a BBQ-style sauce. Instead of locking you into one narrow version, it shows you how to control heat, texture, sweetness, acidity, and storage.

Here, the sauce starts as a cooked blender mango habanero sauce: mango, habanero, onion, garlic, vinegar, water, and salt simmer first, then everything is blended smooth and finished with lime juice and sweetener. As a result, the finished sauce tastes rounder than a raw blend, smoother than a salsa, and more useful than a plain vinegar hot sauce.

It is also easy to make. The base simmers in one pan, then blends into a smooth, pourable sauce without special hot sauce equipment. For that reason, you can make a bold homemade hot sauce at home without fermenting, canning, or buying specialty tools.

The one thing to respect is the habanero itself. It is seriously hot, so this recipe gives you a clear heat guide before you cook. Start with one pepper for a medium-hot mango habanero sauce, use two for a properly hot version, and only go beyond that if you already know you love very spicy sauces.

Quick Answer: What Is Mango Habanero Sauce?

Mango habanero sauce is a sweet-spicy homemade sauce made with ripe mango, habanero peppers, vinegar, lime juice, garlic, onion, salt, and a little sweetener. In this recipe, the sauce is cooked and blended, so it becomes smooth, bright orange, fruity, tangy, and hot.

Unlike mango mustard sauce, this mango habanero sauce recipe is hotter and more chili-forward. Where mango salsa stays chunky and fresh, this sauce is cooked, blended, and pourable. Amba sauce, by contrast, leans more sour and pickle-like, while mango habanero sauce is sweeter, fruitier, and built around habanero heat.

Its biggest advantage is flexibility. For example, you can drizzle it over tacos and eggs, toss it with wings, brush it onto grilled shrimp or salmon, serve it with fries, or spread it inside burgers and wraps.

At a glance: This homemade mango habanero sauce recipe makes about 1¾ cups / 420 ml. Use 1 habanero for medium-hot, 2 for hot, and 3+ only if you love serious heat. The base sauce is cooked, smooth, fruity, tangy, and pourable. Increase the vinegar for a thinner hot sauce, or finish the sauce with butter for a glossy wing sauce.

This version is best for readers who want a homemade mango habanero sauce that is hot but still usable, not a sauce so fiery that it only works a few drops at a time.

Homemade mango habanero sauce in a jar with arrows showing how to turn one base into hot sauce, wing sauce, glaze, dip, marinade, and BBQ-style sauce.
One homemade mango habanero sauce can go several directions. Thin it with vinegar for hot sauce, finish it with butter for wings, reduce it with honey for a glaze, stir it into mayo or yogurt for a creamy dip, or loosen it with lime and oil for a quick marinade.

Why This Mango Habanero Sauce Recipe Works

The balance starts with the mango. It gives the sauce body, color, and natural sweetness. The habanero brings the heat, but it also adds a floral, fruity aroma. Meanwhile, vinegar and lime keep everything sharp, while salt makes the mango and chili taste complete.

Cooking the base first also matters. It softens the onion, garlic, mango, and habanero before blending, so the finished sauce tastes rounder instead of raw or harsh. As a result, the cooked base tastes smoother, while the lime added at the end keeps the sauce bright.

That balance makes the sauce flexible at home. For example, keep it medium-thick for dipping, thin it with extra vinegar for hot sauce, finish it with butter for wings, or reduce it into a glaze for grilled food.

What Does Mango Habanero Sauce Taste Like?

At first, mango habanero sauce should taste fruity and bright. After a few seconds, the habanero heat should build. The mango gives the recipe ripe tropical sweetness, the vinegar and lime keep the sauce tangy, and the habanero adds a floral heat that lingers.

A good batch should not taste like mango jam, and it should not taste like plain vinegar hot sauce either. Instead, the best version lands in that sweet and spicy middle ground: fruity enough for dipping, sharp enough for tacos, and bold enough for wings.

Mango habanero sauce flavor balance guide showing mango sweetness, habanero heat, vinegar and lime brightness, savory depth, and honey roundness.
A good mango habanero sauce should land in the middle: fruity from mango, hot from habanero, bright from vinegar and lime, savory from garlic, onion, and salt, and rounded with just enough sweetener.

When one flavor takes over, adjust the sauce in stages. First, fix flatness with salt. Next, use lime or vinegar when the sauce tastes too sweet. Finally, when the habanero heat is running the show, bring the sauce back into balance with more mango or a little honey.

Ingredients for This Mango Habanero Sauce Recipe

Think of the ingredients in roles, not just measurements. Mango gives body, sweetness, and color. Habanero gives heat and aroma. Vinegar gives sharpness, lime gives freshness, garlic and onion give depth, and sweetener rounds the edges.

The table below gives you a balanced starting point. Once the sauce is blended, you can adjust sweetness, heat, acid, salt, and thickness to match how you want to use it.

Ingredients for mango habanero sauce including ripe mango, habanero peppers, lime, vinegar, garlic, onion, honey, salt, and finished sauce.
Each ingredient has a job in mango habanero sauce: ripe mango gives body and sweetness, habanero brings heat, vinegar and lime keep it tangy, garlic and onion add depth, and honey or sugar rounds the edges.
Ingredient US Amount Metric Amount Why It Matters
Ripe mango, diced 1½ cups 250 g / 8.8 oz Sweetness, body, color, and fruit flavor
Fresh habanero peppers 1–2 peppers about 10–20 g / 0.35–0.7 oz Heat and floral chili aroma
Onion, chopped ¼ cup 40 g / 1.4 oz Savory body and depth
Garlic 2 cloves 6 g / 0.2 oz Sharpness and backbone
Apple cider vinegar or white vinegar ⅓ cup 80 ml / 2.7 fl oz Tang and hot-sauce character
Fresh lime juice 2 tbsp 30 ml / 1 fl oz Fresh brightness
Water ¼ cup 60 ml / 2 fl oz Helps the sauce simmer and blend
Honey, sugar, or maple syrup 1–2 tbsp 20–40 g honey/maple or 12–25 g sugar Balances heat and acid
Fine sea salt ¾ tsp 4–5 g Makes the sauce taste complete

Optional flavor additions include ½–1 teaspoon grated ginger for tropical warmth, ¼ teaspoon cumin for earthiness, ¼ teaspoon smoked paprika for a BBQ-style direction, or a tiny pinch of allspice for a Caribbean-style note. However, for a first batch, keep the sauce simple before adding too many extra spices.

Best Mango to Use: Fresh, Frozen or Mango Pulp

For the brightest fresh mango flavor, use ripe mango that smells sweet before you cut it. Since mango is the body of this sauce recipe, the fruit should taste good before it goes into the pan.

Best mango options for mango habanero sauce, showing fresh mango, thawed frozen mango, mango pulp or puree, and finished mango habanero sauce.
Fresh mango gives mango habanero sauce the brightest flavor, thawed frozen mango is the easiest year-round option, and mango pulp or puree makes the sauce extra smooth. If using sweetened pulp, start with less honey or sugar and adjust after blending.

Meanwhile, mango habanero sauce with frozen mango can also taste excellent when fresh mango is out of season. Thaw frozen mango first, then use it like fresh diced mango. It often blends smoothly and gives the sauce a consistent color and texture.

Mango pulp or mango puree can also work, especially when you want a very smooth sauce. However, the one thing to watch is sweetness. Many mango pulps are already sweetened, so start with little or no honey or sugar and adjust after blending.

On the other hand, underripe mango will make the sauce sharper and less fruity. Very fibrous mango can also make the finished sauce harder to blend smooth, so strain it through a fine mesh sieve if needed.

Can You Use Mango Pulp or Mango Puree?

Yes, mango pulp or mango puree can work well in this mango habanero sauce recipe. Use about 1 cup / 250 g mango pulp in place of the diced mango. If the pulp is sweetened, skip the honey or sugar at first and adjust only after the sauce has simmered and blended.

Heat Guide for This Mango Habanero Sauce Recipe

This is the section to read before cutting the peppers. Habaneros are much hotter than jalapeños; the Chile Pepper Institute lists orange habanero at around 250,000 Scoville Heat Units. That kind of habanero pepper heat can take over a mango sauce quickly.

For that reason, one seeded habanero is the best first batch for most people. After blending, you can always add more heat in small amounts. Once too much habanero is blended into the whole sauce, though, it is much harder to fix.

Heat guide for mango habanero sauce showing ½ pepper, 1 pepper, 2 peppers, 3 peppers, and 4+ habaneros from gentle heat to serious heat.
Start lower when making mango habanero sauce. One seeded habanero is the safest first batch for most people, while two peppers make it hot and three or more should be saved for serious heat lovers.

Use the table below to make a mild mango habanero sauce, medium-hot sauce, hot sauce, or extra hot mango habanero sauce without guessing.

Heat Level Habanero Amount Prep Method Best For
Gentle but still spicy ½ pepper Seeds and membrane removed First-time habanero users
Medium-hot 1 pepper Mostly seeded Best first batch
Hot 2 peppers Some membrane left Wings, tacos, spicy bowls
Very hot 3 peppers Some seeds and membrane included Hot sauce lovers
Extreme 4+ peppers Use with caution Serious heat lovers only
Heat tip: Start with less habanero than you think. You can always blend in more heat later, but you cannot remove it once the whole batch is too hot.
Gloved hands removing seeds and white membrane from an orange habanero pepper for mango habanero sauce.
Wear gloves when cutting habaneros, avoid touching your face, and remove some of the white membrane if you want better heat control. The membrane carries much of the pepper’s heat, so removing it makes the mango habanero sauce easier to manage.

Before cutting the peppers, wear gloves. In addition, avoid touching your eyes, nose, lips, or face after handling habaneros. The white membrane inside the pepper carries a lot of the heat, so removing it gives this sauce recipe more control.

Equipment You Need

You need a small saucepan, a blender or immersion blender, gloves for handling habaneros, a spoon or spatula, and a clean jar or bottle for storing the finished sauce. A high-speed blender gives the smoothest mango habanero sauce, but an immersion blender works if you do not mind a slightly thicker texture. For a very smooth, bottle-friendly hot sauce, keep a fine mesh sieve nearby so you can strain the sauce after blending.

How to Make This Mango Habanero Sauce Recipe

The method is simple, but the order matters: cook first, blend second, brighten last. First, simmering softens the mango, onion, garlic, and habanero. Next, blending turns them into a smooth sauce. Finally, lime juice and sweetener go in near the end so the finished sauce tastes bright instead of dull.

Three-step method for mango habanero sauce showing mango and habanero simmering, blending smooth, and finishing with lime and sweetener.
The order matters for smooth mango habanero sauce: simmer the mango, habanero, onion, garlic, vinegar, and water first, blend the softened mixture until smooth, then finish with lime juice and sweetener for brightness.

1. Prep the habaneros safely

First, put on gloves. Remove the stems from the habaneros. For less heat, cut the peppers open and scrape out most of the seeds and white membrane.

2. Simmer the mango and habanero base

Next, add the mango, habanero, onion, garlic, vinegar, water, and salt to a small saucepan. Bring the mixture to a visible boil over medium heat, then reduce it to a gentle simmer.

Simmer for 10–15 minutes, stirring often, until the mango and onion are soft. This cooking step rounds out the onion, garlic, and habanero, so the finished sauce tastes smoother and less raw.

3. Cool slightly and blend

After that, let the mixture cool for about 5 minutes. Blend until completely smooth. If using a blender, vent the lid slightly and cover it with a towel so steam does not build pressure.

4. Finish the sauce

At this point, return the sauce to the pan. Stir in lime juice, honey or sugar, and any optional spices. Then, simmer for another 2–5 minutes, until the mango habanero sauce looks glossy and unified.

5. Taste and adjust

Finally, taste carefully, using only a tiny spoon at first. Habanero heat builds as you eat, so the sauce may feel hotter after a few seconds.

  • If the sauce tastes flat, add salt.
  • If the mango habanero sauce tastes too sweet, add lime juice or vinegar.
  • If the recipe tastes too sharp or too hot, add mango or honey.
  • If the sauce is too thick, add water a spoonful at a time.
  • If the sauce is too thin, simmer uncovered until it reduces.
Common mistakes to avoid: Do not add all the habaneros at once if you are unsure about heat. Also, do not skip the salt, because the sauce will taste flat. Do not over-thin the sauce before blending; you can always add water later. Finally, do not assume this homemade mango habanero sauce is shelf-stable just because it contains vinegar.

Use the mango habanero sauce recipe below as the master version. From there, adjust the thickness and finish depending on whether you want hot sauce, wing sauce, glaze, dip, marinade, or BBQ-style sauce.

Mango Habanero Sauce Recipe

This homemade mango habanero sauce recipe makes a cooked blender sauce that is fruity, fiery, tangy, smooth, and flexible enough for wings, tacos, chicken, shrimp, fish, paneer, tofu, fries, burgers, wraps, and bowls.

YieldAbout 1¾ cups / 420 ml / 14 fl oz
Prep Time10 minutes
Cook Time15–20 minutes
Total Time25–30 minutes

Ingredients

  • 1½ cups / 250 g ripe mango, diced
  • 1–2 habanero peppers, stemmed
  • ¼ cup / 40 g chopped onion
  • 2 garlic cloves / 6 g, roughly chopped
  • ⅓ cup / 80 ml apple cider vinegar or white vinegar, preferably 5% acidity
  • ¼ cup / 60 ml water
  • ¾ tsp / 4–5 g fine sea salt
  • 2 tbsp / 30 ml fresh lime juice
  • 1–2 tbsp honey, sugar, or maple syrup
  • Optional: ½–1 tsp grated ginger
  • Optional: ¼ tsp cumin
  • Optional: ¼ tsp smoked paprika
  • Optional: tiny pinch to ¼ tsp allspice

Instructions

  1. Wear gloves before handling the habaneros. Remove the stems. For less heat, remove seeds and most of the white membrane.
  2. Add mango, habanero, onion, garlic, vinegar, water, and salt to a small saucepan.
  3. Bring to a visible boil over medium heat, then reduce to a gentle simmer.
  4. Simmer for 10–15 minutes, stirring often, until the mango and onion are soft.
  5. Cool for 5 minutes, then blend until completely smooth.
  6. Return the sauce to the pan. Stir in lime juice, sweetener, and any optional spices.
  7. Simmer for 2–5 minutes more, until glossy and slightly thickened.
  8. Taste carefully. Adjust salt, lime/vinegar, sweetener, or water as needed.
  9. Cool the mango habanero sauce and store it in a clean jar or bottle in the refrigerator.

Recipe Notes

  • Use 1 habanero for a medium-hot sauce and 2 habaneros for a hotter version.
  • For a thinner homemade mango habanero hot sauce, increase the vinegar to ½ cup / 120 ml and strain after blending.
  • For a thicker glaze, simmer uncovered for a few extra minutes.
  • For wing sauce, use the butter-finished conversion below.
  • This is a refrigerator sauce recipe, not a tested shelf-stable canning recipe.
Mango habanero sauce texture guide showing how one base becomes hot sauce, all-purpose sauce, wing sauce, glaze, dip, marinade, and BBQ-style sauce.
Use the master mango habanero sauce as a base, then adjust the texture for the job: add vinegar for hot sauce, butter for wing sauce, honey for glaze, mayo or yogurt for dip, lime and oil for marinade, or tomato and smoke for a BBQ-style sauce.

Homemade Mango Habanero Hot Sauce Version

Choose this version when you want something bottle-friendly. More vinegar makes the sauce thinner, sharper, and easier to drizzle over tacos, eggs, grilled food, bowls, and roasted vegetables.

Element All-Purpose Sauce Hot Sauce Version
Vinegar ⅓ cup / 80 ml ½ cup / 120 ml
Water ¼ cup / 60 ml ¼ cup / 60 ml, plus more if needed
Sweetener 1–2 tbsp 1 tbsp to start
Final simmer 2–5 minutes 5 minutes
Texture Medium-thick Thin and pourable
Optional step Usually no strain Strain for bottle-smooth sauce

Compared with the all-purpose sauce, this hot sauce version tastes sharper, thinner, and more vinegar-forward. Therefore, use it when you want a real hot sauce texture rather than a thicker dipping sauce.

Homemade mango habanero hot sauce in a glass bottle with mango, habanero peppers, lime, vinegar, and a spoonful of orange sauce.
For a thinner mango habanero hot sauce, add extra vinegar, blend until smooth, and strain if you want a bottle-friendly texture. This version is sharper and more pourable than the thicker all-purpose sauce.

Mango Habanero Wing Sauce

For wings, the sauce needs to cling. Butter gives it gloss, honey helps it stick, and gentle heat brings everything together. In other words, this is the sweet heat version to use when you want glossy mango habanero sauce for wings.

This wing version works for chicken wings, boneless wings, tenders, cauliflower wings, paneer bites, or crispy tofu. For best results, warm the sauce first, then toss it with hot cooked wings just before serving.

Mango habanero wing sauce formula showing ½ cup sauce, butter, honey, warm sauce, whisk in butter, add honey, and toss with hot wings.
Turn the base mango habanero sauce into a glossy wing sauce by warming ½ cup sauce with butter and a little honey. The butter helps the sauce cling, while the honey gives the wings a sweet, sticky finish.

For 2 lb / 900 g Wings

Ingredient US Amount Metric Amount
Mango habanero sauce ½ cup 120 ml / 4 fl oz
Butter 1–2 tbsp 14–28 g / 0.5–1 oz
Honey or brown sugar 1–2 tsp 7–14 g honey or 4–8 g sugar
Lime juice or vinegar, optional 1 tsp 5 ml
Salt Pinch To taste

First, warm the mango habanero sauce in a small pan over low heat. Next, whisk in the butter until glossy. If you want a stickier wing sauce, add honey or brown sugar. Finally, if the sauce tastes too sweet, add lime juice or vinegar before tossing it with hot cooked wings.

Optional Baked Wings

For a simple oven version, use 2 lb / 900 g chicken wings, 1 tbsp / 10–12 g aluminum-free baking powder, ¾ tsp / 4 g kosher salt, ½ tsp garlic powder, and ½ tsp smoked paprika. First, pat the wings very dry. Then, toss them with the seasoning, arrange them on a rack, and bake at 425°F / 220°C for 45–50 minutes, flipping halfway.

After the wings are cooked, toss them with warm mango habanero wing sauce. For food safety, chicken wings should reach 165°F / 73.9°C internally, following USDA poultry temperature guidance.

Glossy mango habanero chicken wings on a plate with mango, habanero peppers, lime wedges, and a bowl of orange wing sauce.
Toss hot cooked wings with warm mango habanero wing sauce just before serving so the buttery, sweet-spicy glaze clings instead of sliding off. The sauce should look glossy, sticky, and bright orange once it coats the wings.

Mango Habanero Glaze

For a glaze, reduce the sauce instead of thinning it. A few extra minutes in the pan makes it thicker, shinier, and better for brushing onto grilled chicken, salmon, shrimp, pork, paneer, tofu, roasted vegetables, or skewers.

Ingredient Amount
Mango habanero sauce ¾ cup / 180 ml
Honey 1 tbsp / 20 g
Lime juice or vinegar 1 tsp / 5 ml
Butter or oil, optional 1 tbsp / 14 g butter or 1 tsp / 5 ml oil

Simmer for 5–8 minutes, until the glaze lightly coats the back of a spoon. Then, brush it onto food near the end of cooking so the sugars do not burn.

Mango habanero glaze and marinade guide showing sauce brushed on grilled food, thinned with lime and oil, and spooned over cooked shrimp.
Use mango habanero sauce as a glaze, marinade, or finishing sauce depending on texture. Brush sweet glazes near the end of cooking so they do not burn, thin the sauce with lime and oil for a marinade, or spoon it over cooked shrimp, chicken, paneer, tofu, or vegetables just before serving.

Mango Habanero Sauce Variations

Once the master sauce is balanced, the variations are easy. In fact, you can keep the same mango-habanero base, then change the texture, sweetness, smokiness, or cooking method depending on how you want to serve it.

For your first batch, however, keep the sauce simple. It is easier to learn your preferred heat and acid level before adding extra spices or turning the sauce into BBQ sauce, salsa, aioli, or a fermented hot sauce.

Mango habanero sauce variations guide showing mild, extra hot, BBQ-style, pineapple, no-cook, salsa, creamy dip, and fermented hot sauce options.
Once the base mango habanero sauce is balanced, you can take it in several directions. Add more mango for a milder sauce, more habanero for extra heat, pineapple for tropical tang, tomato and smoke for BBQ-style sauce, or mayo and yogurt for a creamy dip.

Mild Mango Habanero Sauce

For a milder sauce, use ½ seeded habanero and remove most of the white membrane. After blending, add extra mango if the heat still feels too sharp. You can also add a small amount of cooked orange bell pepper for body and color, but keep mango as the main flavor.

Extra Hot Mango Habanero Sauce

For an extra hot mango habanero sauce, use 3 or more habaneros only if you already enjoy very spicy sauces. Even then, add the extra pepper gradually so the sauce stays usable.

Mango Habanero BBQ Sauce

For a smoky, thicker version, simmer 1 cup / 240 ml mango habanero sauce with 2 tbsp / 30 g tomato paste, 1 tbsp / 12–14 g brown sugar, 1 tbsp / 15 ml apple cider vinegar, ½ tsp smoked paprika, ¼ tsp cumin, and 1 tsp / 5 ml Worcestershire sauce if you use it. As a result, the sauce becomes darker, thicker, and smoky-sweet after 8–10 minutes.

Pineapple Mango Habanero Sauce

For a brighter tropical variation, replace ½ cup / 80–90 g of the mango with pineapple. This version tastes sharper, juicier, and especially good with grilled shrimp, fish, chicken, tacos, and pork.

No-Cook Mango Habanero Sauce

For a faster, fresher version, blend the mango, habanero, vinegar, lime juice, garlic, salt, and sweetener without simmering. However, use less onion, or skip the onion, because raw onion can become sharp in a no-cook sauce.

This version tastes brighter and fruitier. However, it also tastes sharper and less rounded than the cooked sauce. Use the no-cook version within 2–3 days, and keep it refrigerated the whole time.

Mango Habanero Salsa

For a chunky salsa-style version, mix 1½ cups / 250 g diced mango with ½–1 very finely minced habanero, ¼ cup / 40 g red onion, 2 tbsp / 30 ml lime juice, 2 tbsp chopped cilantro, ½ tsp / 3 g salt, and optional tomato, cucumber, or pineapple. Then, rest the salsa for 10 minutes before serving.

For a chunkier mango topping with onion, cilantro, lime, and optional tomato or cucumber, see the full mango salsa recipe.

Mango Habanero Aioli or Creamy Dip

For a creamy dip, stir 1–2 tbsp cooled mango habanero sauce into ¼ cup mayonnaise, Greek yogurt, sour cream, or vegan mayo. Then, use it as a dip or sandwich spread for fries, burgers, wraps, tacos, nuggets, and roasted vegetables.

Fermented Mango Habanero Hot Sauce

Fermented mango habanero hot sauce is a different process from this quick cooked sauce. Instead of simmering first, the peppers, mango, onion, and garlic are usually fermented in a salt brine or mash before being blended with vinegar or lime.

Fermentation changes the safety and storage rules, so this quick cooked recipe should not be treated as a fermented sauce. If you want a fermented version, follow a dedicated fermented hot sauce method and pay attention to acidity, cleanliness, gas buildup, refrigeration, and pH if storing longer.

How to Use Mango Habanero Sauce

This is where the sauce earns its place in the fridge. For example, you can keep it medium-thick for dipping, thin it for drizzling, reduce it for glazing, or loosen it into a quick marinade.

Use this mango habanero sauce for chicken, shrimp, salmon, fish tacos, rice bowls, burgers, wraps, roasted vegetables, paneer, tofu, and fries. In other words, it works anywhere you want sweet heat with a bright mango finish.

What to eat with mango habanero sauce, including wings, tacos, shrimp, salmon, fries, paneer or tofu, burgers, wraps, and bowls.
Mango habanero sauce works as a dip, drizzle, glaze, or finishing sauce. Use it with wings, tacos, shrimp, salmon, fries, paneer, tofu, burgers, wraps, bowls, or roasted vegetables whenever you want sweet heat with a bright mango finish.

As a hot sauce

As a hot sauce, it works best when the texture is thin and pourable. Drizzle it on tacos, eggs, nachos, rice bowls, grilled vegetables, beans, burritos, wraps, and roasted potatoes. For a thinner hot sauce texture, use the extra-vinegar version above.

As a wing sauce

For wings, warm it first so it coats evenly. Toss it with chicken wings, boneless wings, tenders, nuggets, cauliflower wings, paneer bites, or crispy tofu just before serving.

As a glaze

When using it as a glaze, brush it on grilled chicken, shrimp, salmon, pork, paneer, tofu, roasted carrots, sweet potatoes, or skewers near the end of cooking. Otherwise, the sugars in the mango and honey can scorch if they cook too long.

As a marinade

For a quick mango habanero marinade, thin the sauce with a little extra lime juice, vinegar, or oil. Use it for chicken, shrimp, fish, paneer, tofu, or vegetables. However, avoid marinating delicate seafood for too long because the acid can change the texture.

As a dip

For dipping, keep the texture thicker. This works as a mango habanero dipping sauce for fries, potato wedges, onion rings, pakoras, chips, crackers, chicken tenders, nuggets, vegetable sticks, or roasted cauliflower. If the sauce feels too hot, mix a spoonful into mayo or yogurt.

As a sandwich sauce

Inside sandwiches and wraps, a little goes a long way. Use it on burgers, fried chicken sandwiches, grilled cheese, wraps, rolls, spicy mayo-style spreads, and grilled paneer sandwiches. The sweet, spicy, tangy flavor works especially well with rich or crispy fillings.

Mango Habanero Sauce vs Hot Sauce vs Wing Sauce vs Salsa

The names can get confusing because mango and habanero show up in several forms. However, the difference is mostly texture and use: hot sauce is thinner, wing sauce is buttery, glaze is reduced, salsa is chunky, marinade is looser, and BBQ sauce is smoky-sweet.

Mango habanero sauce comparison showing sauce, hot sauce, wing sauce, glaze, marinade, salsa, and BBQ-style sauce with different textures.
Mango habanero sauce can take several forms. Keep it smooth and pourable as an all-purpose sauce, thin it into hot sauce, finish it with butter for wings, reduce it into a sticky glaze, loosen it for marinade, make it chunky as salsa, or push it smoky and thick for BBQ-style sauce.
Version Texture Main Flavor Best Use
Mango habanero sauce Smooth, medium-thick, pourable Sweet, fruity, tangy, hot Wings, tacos, chicken, shrimp, dipping
Mango habanero hot sauce Thinner and more vinegar-forward Sharper, brighter, hotter Tacos, eggs, bowls, grilled food
Mango habanero wing sauce Glossy, buttery, clingy Sweet-hot and slightly sticky Chicken wings, tenders, cauliflower wings
Mango habanero marinade Loose, tangy, lightly sweet Bright, spicy, acidic Chicken, shrimp, fish, paneer, tofu
Mango habanero salsa Chunky or roasted Fresh, juicy, spicy Chips, tacos, fish, bowls
Mango habanero BBQ sauce Thicker, smoky, sticky Sweet, smoky, spicy Grilled chicken, ribs, burgers, sandwiches

Sauce Texture Guide

After blending, texture is the easiest thing to change. For example, a spoonful of vinegar can turn the base into a hot sauce, while a few extra minutes of simmering can turn it into a glaze. Use this guide to adjust the sauce for the way you want to serve it.

Version Texture Best Use How to Adjust
Mango habanero hot sauce Thin, pourable Tacos, eggs, bowls, grilled food Add more vinegar or water; strain if needed
All-purpose mango habanero sauce Medium-thick, pourable Chicken, tacos, fish, dipping Use the master recipe
Mango habanero wing sauce Glossy, clingy Wings, tenders, cauliflower wings Add butter and simmer briefly
Mango habanero glaze Thick, lacquered Grilled chicken, shrimp, salmon, paneer Add honey and reduce
Mango habanero dipping sauce Thick, spoonable Fries, tenders, pakoras, nuggets, vegetables Simmer slightly longer or stir into mayo/yogurt
Mango habanero marinade Loose, pourable Chicken, shrimp, fish, paneer, tofu Thin with lime, vinegar, or oil
Mango habanero BBQ sauce Thick, smoky-sweet Grilling, ribs, burgers Add tomato paste, brown sugar, and smoked paprika

How to Fix Mango Habanero Sauce

Sauces are adjustable, especially before serving. Because mango sweetness, vinegar sharpness, and habanero heat can vary from batch to batch, taste the sauce after blending and fix it while it is still warm.

Troubleshooting guide for mango habanero sauce showing fixes for sauce that is too hot, too sweet, too sharp, too thick, too thin, flat, or fibrous.
Mango habanero sauce is easy to adjust while it is still warm. Add mango and honey if it is too hot, lime, vinegar, and salt if it is too sweet, water or vinegar if it is too thick, and simmer uncovered if it is too thin.
Problem Likely Cause Fix
Too hot Too much habanero or membrane Add more mango first; then round it with honey, lime, or butter if making wing sauce
Too sweet Very ripe mango plus too much sweetener Add vinegar, lime, and salt
Too sharp Too much acid or not enough simmering Simmer 3–5 minutes more; add mango or honey
Too thin Too much water or juicy mango Simmer uncovered until reduced
Too thick Dense mango or over-reduction Add water, vinegar, or lime 1 tbsp / 15 ml at a time
Bitter Burned garlic/onion or too much pepper pith Add mango and sweetener; avoid browning garlic next time
Flat Not enough salt or acid Add salt first. If it still tastes dull, add lime or vinegar
Not mango-forward Mango was bland or underripe Add ripe mango, thawed frozen mango, or mango pulp
Grainy or fibrous Fibrous mango or weak blender Blend longer, strain, or use smoother mango/frozen mango

Scaling the Recipe

Scaling is easy for mango, vinegar, lime, garlic, onion, sweetener, and salt. However, habaneros are the exception. Their size and heat vary so much that they should be scaled by taste, not strict multiplication.

If you double the mango and liquid, you can usually double the garlic, onion, vinegar, lime, sweetener, and salt. With habaneros, start lower, blend, taste carefully, and increase only if the sauce needs more heat.

Scaling guide for mango habanero sauce showing small batch, standard batch, and double batch with a reminder to add habaneros carefully.
Scale mango habanero sauce by weight when possible, but add the habaneros more carefully than the mango, vinegar, lime, salt, and aromatics. Pepper heat varies, so start with fewer habaneros, taste after blending, and add more only if needed.
Ingredient Small Batch: ~¾ cup / 180 ml Standard: ~1¾ cups / 420 ml Double: ~3½ cups / 840 ml
Mango 125 g / ¾ cup 250 g / 1½ cups 500 g / 3 cups
Habanero ½–1 pepper 1–2 peppers 2–4 peppers, added carefully
Onion 20 g / 2 tbsp 40 g / ¼ cup 80 g / ½ cup
Garlic 1 clove / 3 g 2 cloves / 6 g 4 cloves / 12 g
Vinegar 40 ml / 2 tbsp + 2 tsp 80 ml / ⅓ cup 160 ml / ⅔ cup
Lime juice 15 ml / 1 tbsp 30 ml / 2 tbsp 60 ml / ¼ cup
Water 30 ml / 2 tbsp 60 ml / ¼ cup 120 ml / ½ cup
Honey 10–20 g 20–40 g 40–80 g
Salt 2–2.5 g 4–5 g 8–10 g

Storage, Freezing, and Canning Safety

Storage is the one place where homemade hot sauce should stay conservative. After the sauce cools, store it in a clean glass jar or bottle in the refrigerator. For best flavor and freshness, use it within 1–2 weeks. For longer storage, freeze small portions instead.

Mango habanero sauce storage guide showing sauce cooling, being bottled, refrigerated for 1–2 weeks, frozen in small portions, and not canned as written.
Treat this homemade mango habanero sauce as a refrigerator sauce. Cool it completely, store it in a clean jar or bottle, refrigerate for 1–2 weeks, or freeze small portions for longer storage. Do not can this recipe as written unless you are using tested canning guidance.

Even though the sauce contains vinegar and lime juice, it also contains mango, onion, garlic, and fresh peppers. Therefore, it should be treated as a refrigerator sauce, not a shelf-stable canned hot sauce, unless you are following tested preservation guidance.

For hot sauce safety, SDSU Extension explains that hot sauce should have a pH below 4.6 and include acid such as vinegar. For canning-style recipes, use vinegar labeled 5% acidity; Illinois Extension notes that tested USDA and National Center for Home Food Preservation recipes are built around that acidity level.

Canning note: Do not water-bath can this sauce as written. For shelf-stable preservation, use a tested canning recipe and proper acidity controls.

The National Center for Home Food Preservation has separate tested mango sauce canning guidance. In other words, do not treat this refrigerator mango habanero sauce recipe as a shelf-stable canning recipe.

FAQs

Is mango habanero sauce very spicy?

Yes, it can be. Because habaneros are very hot peppers, this mango habanero sauce recipe can become intense quickly. Use ½ to 1 seeded habanero for a more controlled first batch, or 2 habaneros for a properly hot sauce.

Can I make this mango habanero sauce recipe less spicy?

Yes. First, use fewer habaneros. Next, remove the seeds and membrane before cooking. If the finished sauce is still too hot, add more mango, honey, lime, or butter if you are turning it into wing sauce.

Is this mango habanero sauce easy to make?

Yes. This is an easy cooked blender sauce: simmer the mango, habanero, onion, garlic, vinegar, water, and salt, then blend and finish with lime juice and sweetener.

Can I make mango habanero sauce at home without special equipment?

Yes. You only need a saucepan, blender, gloves, spoon or spatula, and a clean jar or bottle. For a smoother homemade hot sauce, however, a high-speed blender and fine mesh sieve are helpful.

Can I use frozen mango?

Yes. Frozen mango works well in this sauce recipe. Thaw it before cooking so the mango simmers evenly and blends smoothly with the habanero, vinegar, garlic, and onion.

Can I use mango pulp or mango puree?

Yes. Use about 1 cup / 250 g mango pulp or mango puree instead of diced mango. If the pulp is sweetened, skip the honey or sugar at first, then adjust the sauce after blending.

Should mango habanero sauce be cooked?

For this style, yes. Cooking the mango, habanero, onion, and garlic before blending makes the sauce smoother, rounder, and more versatile. A raw blender version can taste fresher, but it will also taste sharper and less polished.

How do I make mango habanero hot sauce thinner?

Increase the vinegar to ½ cup / 120 ml, add water as needed, blend very smooth, and strain if you want a bottle-friendly texture. This gives the mango habanero sauce a thinner, sharper hot sauce consistency.

How do I make mango habanero wing sauce?

Warm ½ cup / 120 ml mango habanero sauce with 1–2 tbsp / 14–28 g butter, plus a little honey if you want it stickier. Then, toss hot cooked wings in the warm sauce just before serving.

Can I make mango habanero sauce without sugar?

Yes. If your mango is ripe and sweet, you can skip the honey, sugar, or maple syrup. However, the sauce will taste sharper and more hot-sauce-like, so adjust with extra mango or a little more salt if needed.

Can I make mango habanero sauce without vinegar?

You can reduce the vinegar and use more lime juice for a fresher flavor. However, the sauce will taste less like hot sauce and should still be refrigerated. For storage and hot-sauce character, vinegar is the better choice.

Is habanero mango sauce the same as mango habanero sauce?

Yes. Habanero mango sauce and mango habanero sauce usually mean the same thing: a sweet-hot sauce made with mango and habanero peppers. Mango habanero sauce is the more common way to describe it because the mango gives the sauce its body, color, and sweetness.

Is mango habanero sauce the same as mango habanero salsa?

No. Mango habanero sauce is usually smooth, cooked, and pourable. Mango habanero salsa is usually chunky, fresher, and made for chips, tacos, fish, shrimp, and bowls.

What vinegar is best for mango habanero sauce?

Apple cider vinegar gives the sauce a rounder, fruitier tang. White vinegar tastes sharper and more classic for hot sauce. Either works, but use vinegar labeled 5% acidity if you are following preservation-style guidance.

What can I use instead of habanero peppers?

Scotch bonnet peppers are the closest substitute because they have a similar fruity heat. Use the same cautious approach: start with ½ to 1 pepper, then increase only after tasting. For a milder sauce, use jalapeño, serrano, or Fresno peppers. The recipe will not have the same floral habanero punch, but it will still make a good spicy mango sauce.

Does mango habanero sauce need to be refrigerated?

Yes. This homemade mango habanero sauce should be refrigerated because it contains mango, onion, garlic, and fresh peppers. Store it in a clean jar or bottle and use it within 1–2 weeks for best flavor and freshness.

How long does mango habanero sauce last?

Store this mango habanero sauce recipe in the refrigerator and use it within 1–2 weeks for best flavor and freshness. For longer storage, freeze small portions instead of leaving the sauce at room temperature.

Can you freeze mango habanero sauce?

Yes. Freeze it in small portions, then thaw only what you need. The texture may loosen slightly after thawing, so shake, stir, or blend it again before serving.

Can I can mango habanero sauce?

Do not can this recipe as written. It is a refrigerator sauce, not a tested shelf-stable canning recipe. Use a tested canning recipe and proper pH controls if you want shelf-stable preservation.

Save this mango habanero sauce recipe for the next time you want a sweet, spicy, tangy sauce for wings, tacos, bowls, grilled food, or dipping.

Mango habanero sauce recipe pin with glossy orange sauce in a jar, spoon pour, mango, habanero peppers, lime, garlic, and honey.
This mango habanero sauce recipe makes a sweet, spicy, tangy sauce for wings, tacos, bowls, dipping, glazing, and drizzling. The mango gives body and sweetness, while habanero, lime, vinegar, and garlic keep it bright and fiery.

Back to top

Posted on 4 Comments

Mango Mustard Sauce Recipe

Creamy mango mustard sauce in a bowl with fries, fried chicken, pakoras, green mango, mustard seeds, chili and lemon for a quick dipping sauce.

A good mango mustard sauce should taste sweet, tangy, sharp, lightly spicy, and useful enough to go with more than one meal. It should work as a dipping sauce for fries, chicken tenders, wings, pakoras, and nuggets, but also as a spread for burgers, sandwiches, wraps, and rolls.

This mango mustard sauce recipe gives you the most useful version first: a fast blender sauce made with ripe mango, mustard, lemon or vinegar, chili, salt, and a creamy base such as mayonnaise, thick yogurt, coconut cream, or soaked cashews. It takes only a few minutes, yet it tastes brighter and more interesting than plain honey mustard or a regular mayo-based dip.

At the same time, there is a sharper Indian/Bengali direction to know. In Bengali cooking, aam kasundi or mango kasundi usually means a pungent raw mango mustard sauce made with green mango, mustard seeds, mustard oil, green chili, turmeric, and salt. Because the two styles serve different needs, this guide keeps the fast blender sauce as the main recipe, then shows you how to move it toward an aam kasundi-style version when you want a stronger, sharper mustard flavor.

Quick Answer

Mango mustard sauce is a sweet-tangy sauce made with mango and mustard. In its easiest form, it blends ripe mango or unsweetened mango pulp with mustard, lemon juice or vinegar, chili, salt, and a creamy base such as mayonnaise, thick yogurt, coconut cream, or soaked cashews. As a result, it works as a dip, spread, drizzle, dressing, or quick sauce for chicken, fries, wings, burgers, fish, shrimp, pakoras, paneer, and wraps.

For a softer, creamier sauce, use ripe mango and mayo, yogurt, or coconut cream. By contrast, a sharper Indian/Bengali-style version starts with raw mango, mustard seeds, mustard oil, green chili, turmeric, and salt. That second version is closer to aam kasundi or mango kasundi, which is more pungent, sour, and mustard-forward than a creamy mango mustard dip.

  • Best quick version: ripe mango, Dijon or yellow mustard, lemon, chili, salt, and mayo or yogurt.
  • Best no-mayo version: use coconut cream, thick curd, Greek yogurt, or soaked cashews.
  • Best Indian-style version: use kasundi or make the aam kasundi-style raw mango variation below.
  • Best for dipping: keep the sauce thick and creamy.
  • Best for drizzling: thin it with water, lemon juice, vinegar, or a little oil.
  • Best for chicken and wings: keep it tangy, slightly sweet, and medium-spicy.

Which Mango Mustard Sauce Should You Make?

Choose the version based on how you want to serve it. The quick creamy sauce is best for dipping and spreading, the no-mayo version is better for lighter drizzles and bowls, and the aam kasundi-style version is sharper, sourer, and more mustard-forward.

If You Want… Make This Version Best With
A creamy dipping sauce Ripe mango + Dijon or yellow mustard + mayo or yogurt Fries, chicken tenders, wings, nuggets, burgers
A no-mayo sauce Ripe mango + mustard + coconut cream, thick yogurt, or cashews Wraps, bowls, shrimp, fish, roasted vegetables
A sharper Indian-style sauce Ripe mango + kasundi, or raw mango + mustard seeds Pakoras, rolls, paneer, fish, fried snacks
A Bengali-style aam kasundi Raw mango + mustard seeds + mustard oil + green chili Rice, fish, Bengali meals, chops, pakoras
Decision guide comparing creamy mango mustard sauce, no-mayo mango mustard sauce, Indian-style mango mustard sauce, and aam kasundi-style sauce with serving ideas.
Choose the mango mustard sauce that fits your meal: creamy for fries and chicken, no-mayo for lighter bowls and seafood, Indian-style for pakoras and paneer, or aam kasundi-style when you want raw mango and mustard seed sharpness.

Quick Mango Mustard Sauce

This quick mango mustard sauce is creamy, tangy, lightly spicy, and ready in minutes. For the best first batch, use ripe mango, Dijon mustard, lemon juice, chili, salt, and mayonnaise or thick yogurt. After that, adjust it toward a no-mayo, vegan, honey mustard, or aam kasundi-style version.

Prep Time
5 minutes
Cook Time
0 minutes
Rest Time
10 minutes, optional
Total Time
5 to 15 minutes
Yield
About 1 cup

Ingredients

  • 1 cup diced ripe mango or unsweetened mango pulp, about 160–170 g / 6 oz
  • 2 tablespoons Dijon mustard, yellow mustard, or kasundi, about 30 ml
  • 2 to 3 tablespoons mayonnaise, Greek yogurt, thick curd, or coconut cream, about 30–45 g
  • Or, for a cashew version: 2 tablespoons soaked cashews, about 18–22 g, plus 1 to 2 tablespoons water
  • 1 tablespoon fresh lemon juice or apple cider vinegar, about 15 ml
  • 1/4 teaspoon chili flakes or cayenne, or 1 small green chili, finely chopped
  • 1/4 teaspoon fine salt, about 1.5 g, plus more to taste
  • 1 to 2 teaspoons honey or sugar, about 5–10 ml honey or 4–8 g sugar, optional
  • 1 to 2 tablespoons cold water, about 15–30 ml, only if needed to thin

Instructions

  1. Add everything to a blender. Add the mango, mustard, creamy base, lemon juice or vinegar, chili, and salt. Do not add all the honey or sugar yet unless your mango is very tart.
  2. Blend until smooth. Blend until the sauce looks creamy, glossy, and fully combined. Scrape down the sides if needed.
  3. Check the texture. For a dip, the sauce should coat the back of a spoon. For a drizzle, it should fall in a thin ribbon. For a dressing, thin it until pourable but still creamy.
  4. Adjust in small amounts. Add mustard 1 teaspoon at a time for more sharpness, lemon or vinegar 1 teaspoon at a time for brightness, water 1 teaspoon at a time for a thinner sauce, and salt 1 small pinch at a time if the flavor tastes flat.
  5. Rest briefly. Let the sauce sit for 10 minutes if possible. The mustard sharpness settles and the mango flavor becomes rounder.
  6. Serve or chill. Use right away, or refrigerate in a clean airtight jar.

Notes

  • This makes about 1 cup, enough for 4 to 6 servings as a dip or 6 to 8 servings as a drizzle.
  • Use ripe mango for the quick creamy version.
  • Use unsweetened mango pulp when you want the smoothest blender sauce.
  • If using sweetened mango pulp, skip the honey or sugar and add extra lemon, vinegar, or mustard to keep the sauce savory.
  • If using cashews, soak them in hot water for 20 to 30 minutes, then drain before blending.
  • Use kasundi instead of Dijon when you want a sharper Indian-style mango mustard sauce.
  • Use coconut cream or soaked cashews for a vegan no-mayo mango mustard sauce.
  • Honey or sugar is optional. Add it only if the mango is tart or the mustard tastes harsh.

For the first serving, try this mango mustard sauce with fries, chicken tenders, pakoras, grilled paneer, roasted vegetables, fish, shrimp, burgers, wraps, or sandwiches. Ideally, it should taste sweet-tangy first, mustard-sharp second, and spicy only as much as you want it to be.

Why This Mango Mustard Sauce Works

  • Ripe mango gives body and sweetness. It makes the sauce smooth, golden, and fruity without needing much added sugar.
  • Mustard keeps it savory. Dijon, yellow mustard, or kasundi stops the sauce from tasting like plain mango puree.
  • Lemon or vinegar adds lift. The acidity keeps the creamy base from feeling heavy and makes the sauce better with fried, grilled, and roasted foods.
  • The creamy base controls the texture. Mayo makes it rich, yogurt makes it tangier, coconut cream makes it vegan, and soaked cashews make it thick and neutral.
  • The aam kasundi-style option solves the raw mango question. It gives readers a sharper Bengali-style path without making the whole recipe traditional, time-heavy, or confusing.

Once blended, the finished sauce should be smooth, glossy, and spoonable. For dipping, it should cling to fries, pakoras, or chicken tenders. When used as a drizzle, it should fall from a spoon in a thin ribbon. As a spread, it should stay thicker and creamier.

What Is Mango Mustard Sauce?

Mango mustard sauce is a condiment made by combining mango with mustard, acid, salt, and heat. In its easiest form, it is a quick blender sauce made with ripe mango, prepared mustard, lemon or vinegar, chili, and something creamy. Therefore, it tastes like a brighter, fruitier mustard dip and works especially well with fried, grilled, roasted, or snacky foods.

However, mango mustard sauce can also point toward aam kasundi, a Bengali-style mango mustard condiment made with raw mango, mustard seeds, mustard oil, green chili, turmeric, salt, and sometimes garlic or ginger. That version is sharper, more pungent, sourer, and more mustard-heavy than a creamy dipping sauce.

For that reason, this recipe gives you both paths. Make the fast blender version when you need a sauce for fries, chicken, burgers, wraps, wings, fish, or pakoras. Meanwhile, use the aam kasundi-style variation when you need a bolder raw mango mustard flavor for rice, fish, rolls, fried snacks, Bengali-style meals, or kasundi mayo.

For a fresh, chunky mango topping instead of a mustard sauce, try this mango salsa recipe. Mango salsa is brighter, fresher, and diced, while mango mustard sauce is smoother, sharper, and more condiment-like.

For a tangier pickled mango sauce with turmeric, fenugreek, chili, and vinegar, use the amba sauce guide.

Mango Mustard Sauce Ingredients

The ingredient list is simple, but each ingredient has a job. First, mango brings body and sweetness. Then, mustard gives bite. Meanwhile, lemon or vinegar keeps the sauce from tasting heavy. Finally, the creamy base decides whether the sauce feels like a dip, spread, drizzle, or dressing.

Mango mustard sauce ingredients guide showing mango, mustard, lemon or vinegar, creamy base, chili, salt, and optional honey with each ingredient’s role.
Each ingredient has a job in mango mustard sauce: mango gives body and sweetness, mustard adds savory bite, lemon or vinegar brings tang, and the creamy base turns it into a dip, spread, or drizzle.

Ripe mango or mango pulp

Use ripe mango for the fast blender version because it gives the sauce sweetness, color, body, and a smooth fruit flavor. Fresh mango gives the brightest taste, while mango pulp gives the smoothest texture and the most consistent result. Whenever possible, choose unsweetened mango pulp. However, sweetened pulp can still work if you skip the honey or sugar and add extra lemon, vinegar, or mustard to keep the sauce savory.

Mustard

Mustard is what keeps the sauce savory. Dijon mustard gives the cleanest sharpness, while yellow mustard gives a familiar tangy dip flavor. By contrast, kasundi gives a deeper Indian/Bengali-style bite. When you use mustard seeds, the sauce moves closer to aam kasundi.

Lemon juice or vinegar

Acid keeps mango mustard sauce lively. Lemon juice tastes fresh and bright, while apple cider vinegar tastes rounder and slightly fruitier. White vinegar, on the other hand, tastes sharper. Start with a small amount, then adjust after blending.

Creamy base

Mayonnaise gives the richest, smoothest dipping sauce. By comparison, Greek yogurt or thick curd makes the sauce lighter and tangier. Meanwhile, coconut cream makes a vegan no-mayo version that works especially well with shrimp, fish, and snacks. For a neutral vegan base instead, soaked cashews make the sauce creamy without adding a strong coconut flavor.

Chili

Use chili flakes, cayenne, fresh green chili, jalapeño, or a little hot sauce depending on how spicy you want the sauce. For an all-purpose dip, keep the heat moderate. Then, for wings, grilled meats, or a spicy mango habanero mustard variation, increase the chili gradually.

Salt and optional honey

Salt makes the mango and mustard taste complete. Honey or sugar is optional, so use it only if the mango is tart, the mustard tastes harsh, or you prefer a softer honey mustard-style sauce.

Which Mustard Should You Use?

The mustard changes the whole personality of the sauce. For the easiest all-purpose version, start with Dijon. If you want something milder for fries, burgers, or kids, use yellow mustard instead. However, when you want the sauce to taste sharper and more Indian, kasundi is the better choice.

Mustard Best For Flavor
Dijon mustard Everyday mango mustard sauce, chicken, fish, sandwiches, wraps. Sharp, smooth, balanced, not too sweet.
Yellow mustard Fries, burgers, nuggets, chicken tenders, kid-friendly dipping sauce. Mild, tangy, familiar, less pungent.
Kasundi Indian-style dipping sauce, pakoras, rolls, paneer, fish, fried snacks. Sharper, deeper, more pungent, mustard-forward.
Mustard seeds Aam kasundi-style sauce, raw mango mustard sauce. Strongest bite, more traditional, more textured if not blended fully.
Honey mustard Softer variation for chicken, wraps, sandwiches, and fries. Sweeter, rounder, less sharp.
Mustard chooser guide for mango mustard sauce comparing Dijon mustard, yellow mustard, kasundi, mustard seeds, and honey mustard with best uses.
Dijon is the best first choice for balanced mango mustard sauce, yellow mustard makes it milder, kasundi adds Indian-style sharpness, mustard seeds move it toward aam kasundi, and honey mustard makes it sweeter and softer.

If you are unsure, use Dijon for the first batch. It gives the cleanest balance and lets the mango stay clear. After that, you can make the sauce sharper with kasundi or milder with yellow mustard.

Ripe Mango vs Raw Mango

This is the most important decision in the recipe. On one hand, ripe mango gives you a sweet, smooth, creamy dipping sauce. On the other hand, raw mango gives you a sharper, sourer, aam kasundi-style sauce. Both are useful, but they are not the same.

Mango Type Best For Flavor How to Adjust
Ripe mango Quick creamy mango mustard sauce. Sweet, fruity, mellow. Add lemon/vinegar and mustard to keep it savory.
Unsweetened mango pulp Fast blender sauce, smooth dipping sauce. Very smooth, consistent, often sweeter than fresh mango. Skip extra honey unless needed.
Raw mango / green mango Aam kasundi-style mango mustard sauce. Sour, sharp, more traditional. Balance with salt, mustard oil, chili, and a little sugar if needed.
Frozen mango Backup option for quick sauce. Convenient, softer, sometimes watery. Thaw and drain first, then blend.
Comparison guide showing ripe mango, unsweetened mango pulp, raw green mango, and frozen mango for making mango mustard sauce or aam kasundi-style sauce.
Use ripe mango or unsweetened mango pulp for a smooth, sweet-tangy mango mustard sauce. Choose raw green mango when you want a sharper, sourer, mustard-forward aam kasundi-style sauce.

For the everyday blender sauce, use ripe mango or unsweetened mango pulp. For the aam kasundi-style variation, use raw mango or firm green mango. When the two are swapped, the sauce still works, but the flavor moves in a different direction: ripe mango tastes sweeter and smoother, while raw mango tastes sharper and more mustard-forward.

How to Make Mango Mustard Sauce

The quick version is a blender sauce. Even so, the final tasting step matters because mangoes and mustards vary a lot.

Step-by-step guide showing how to make mango mustard sauce in a blender by adding mango and mustard, adding a creamy base, blending, adjusting thickness, and serving.
This quick mango mustard sauce comes together in a blender: start with mango and mustard, add your creamy base, blend until glossy, then adjust the thickness for dipping or drizzling.

1. Add the mango and mustard

Add the ripe mango or mango pulp to a blender with the mustard. For the cleanest flavor, use Dijon. For a milder dip, choose yellow mustard instead. Alternatively, use kasundi for a sharper Indian-style sauce.

2. Add the creamy base

Next, add mayonnaise, Greek yogurt, thick curd, coconut cream, or soaked cashews with a little water. Use more creamy base for a thicker dipping sauce and less for a lighter drizzle.

3. Add acid, chili, and salt

After that, add lemon juice or vinegar, chili, and salt. Because mango usually brings enough sweetness on its own, do not add too much sweetener at the beginning.

4. Blend until smooth

Blend until the sauce is smooth, glossy, and spoonable. After that, scrape down the sides if needed so no mango pieces or mustard streaks remain.

5. Adjust the sauce

After blending, taste the sauce before adding anything else. When it tastes too sweet, add mustard, lemon, vinegar, chili, or salt. If it tastes too sharp, round it out with more mango or creamy base. Finally, when the flavor seems flat, add salt first before reaching for more lemon.

6. Rest before serving

Let the sauce sit for 10 minutes if you can. During that short rest, the mustard sharpness settles, the mango flavor comes forward, and the sauce tastes more complete.

Creamy vs No-Mayo Mango Mustard Sauce

You do not have to use mayonnaise. Instead, the creamy base simply decides how rich, tangy, vegan, or pourable the sauce becomes.

Base Best For What It Does
Mayonnaise Classic dipping sauce, fries, wings, chicken tenders, burgers. Richest, smoothest, most dip-like.
Greek yogurt / thick curd Grilled chicken, wraps, bowls, sandwiches. Lighter, tangier, less rich.
Coconut cream Vegan/no-mayo sauce, shrimp, fish, fried snacks. Creamy with a mild tropical note.
Soaked cashews Vegan creamy sauce without coconut flavor. Thick, neutral, smooth.
Olive oil + lemon or vinegar Dressing-style sauce for salads, bowls, and roasted vegetables. Thinner, brighter, more pourable.
Creamy vs no-mayo mango mustard sauce guide showing mayonnaise, Greek yogurt, coconut cream, soaked cashews, and olive oil with lemon as base options.
The creamy base changes the whole texture of mango mustard sauce: use mayonnaise for the richest dip, yogurt for a lighter tangy sauce, coconut cream or cashews for a vegan version, and olive oil with lemon for a thinner drizzle.

For the most crowd-friendly sauce, use mayonnaise or thick yogurt. Meanwhile, coconut cream or soaked cashews give you a vegan mango mustard sauce without losing body. When you want a dressing instead of a dip, use less creamy base and thin the sauce with lemon juice, vinegar, water, or olive oil.

For a smoother mango-based dressing rather than a mustard sauce, this sweet and spicy mango salad dressing is a better fit for salads, bowls, and lighter drizzles.

Aam Kasundi-Style Mango Mustard Sauce

Aam kasundi, also called mango kasundi or aam kashundi, is a sharper Bengali-style mango mustard condiment. Traditionally, it is usually made with raw mango, mustard seeds, mustard oil, green chili, turmeric, and salt. Compared with the fast blender sauce above, it tastes sourer, hotter, more pungent, and more mustard-forward.

This version is an aam kasundi-style refrigerator sauce. In other words, it gives you the raw mango mustard flavor without treating the sauce as shelf-stable or canned.

Aam kasundi-style ingredient guide showing raw green mango, mustard seeds, mustard oil, green chili, turmeric, salt, and acid for a refrigerator sauce.
Aam kasundi-style mango mustard sauce gets its sharper flavor from raw green mango, mustard seeds, mustard oil, green chili, turmeric, salt, and acid. This version is a refrigerator sauce, not a shelf-stable preserve.

Aam Kasundi-Style Ingredients

  • 1 cup grated raw mango or finely chopped green mango
  • 1 1/2 tablespoons yellow mustard seeds
  • 1 to 2 teaspoons black mustard seeds, optional, for stronger bite
  • 1 to 2 green chilies
  • 1/2 teaspoon turmeric
  • 1 small garlic clove or 1/2 teaspoon grated ginger, optional
  • 1 to 2 tablespoons food-grade mustard oil
  • 1 tablespoon vinegar or lemon juice
  • 1/2 teaspoon salt, plus more to taste
  • 1/2 to 1 teaspoon sugar, optional
  • Water as needed to blend

Use food-grade mustard oil where available. Without mustard oil, replace it with neutral oil and add a little extra prepared mustard or kasundi for sharper flavor.

How to Make the Aam Kasundi-Style Version

  1. Soak the mustard seeds in water for 20 to 30 minutes, then drain.
  2. Add the drained mustard seeds, raw mango, green chili, turmeric, salt, vinegar or lemon juice, garlic or ginger if using, and a splash of water to a blender.
  3. Blend to a coarse or smooth paste, depending on the texture you like.
  4. Stir in the mustard oil.
  5. Taste and adjust with more salt, vinegar, chili, or a small amount of sugar.
  6. Transfer to a clean jar and refrigerate.

If you are new to kasundi-style sauces, start with the smaller amount of black mustard seeds. You can always make the next batch sharper, but it is harder to fix a sauce that turns too bitter or pungent.

Important: This aam kasundi-style sauce is a refrigerator condiment, not a shelf-stable preserve. Keep it refrigerated, use a clean spoon, and do not store it at room temperature. For traditionally preserved kasundi or mango pickle, follow a trusted preservation recipe and do not casually change vinegar, water, salt, oil, or food proportions.

Use this sharper version with rice, fish, pakoras, rolls, Bengali-style meals, fried snacks, grilled paneer, or as a base for kasundi mayo. However, when it tastes too strong on its own, mix a spoonful into mayonnaise, yogurt, coconut cream, or mango pulp for a milder dip.

Mango Mustard Sauce vs Aam Kasundi

Mango mustard sauce and aam kasundi overlap, but they are not exactly the same. In general, the fast blender sauce is creamy and made with ripe mango. By contrast, aam kasundi is usually sharper, more pungent, and made with raw mango and mustard seeds.

Side-by-side comparison of creamy mango mustard sauce made with ripe mango and prepared mustard versus aam kasundi made with raw mango, mustard seeds, and mustard oil.
Mango mustard sauce is usually a smooth, creamy ripe-mango dip for fries, chicken, wings, and burgers. Aam kasundi is sharper, more pungent, and built around raw mango, mustard seeds, mustard oil, and green chili.
Sauce Mango Mustard Texture Flavor Best Use
Quick mango mustard sauce Ripe mango or mango pulp Dijon, yellow mustard, or kasundi Creamy and smooth Sweet-tangy, mild to sharp Fries, chicken, wings, burgers, wraps
No-mayo mango mustard sauce Ripe mango or mango pulp Prepared mustard or kasundi Creamy or pourable Lighter, tangy, less rich Snacks, salads, bowls, shrimp, fish
Aam kasundi / mango kasundi Raw mango / green mango Mustard seeds + mustard oil Pungent, thicker, sometimes coarse Sharp, sour, spicy, mustard-heavy Rice, fish, pakoras, rolls, Bengali meals
Mango honey mustard Ripe mango Mustard + honey Smooth Sweeter, softer, rounder Chicken tenders, sandwiches, wraps
Mango habanero mustard Ripe mango Mustard + habanero Smooth or slightly seedy Hot, fruity, sharp Wings, grilled meats, burgers

How to Use Mango Mustard Sauce

Mango mustard sauce is useful because it can be thick, creamy, pourable, or sharp depending on how you adjust it. Keep it thicker for dipping and spreading. When you need a drizzle or dressing, thin it slightly with water, lemon juice, vinegar, or oil.

As a simple rule, use the creamy ripe-mango version with fries, chicken, burgers, sandwiches, and wraps. Use the thinner no-mayo version with bowls, salads, grilled fish, shrimp, and roasted vegetables. Use the aam kasundi-style version when you want a sharper, mustard-heavy sauce for rice, fish, pakoras, rolls, or Bengali-style meals.

Guide showing how to use mango mustard sauce as a dip, spread, drizzle, glaze, or sharper sauce with fries, chicken, burgers, fish, shrimp, paneer, rice, and pakoras.
Mango mustard sauce works beyond dipping: keep it thick for fries, wings, burgers, and wraps, thin it for fish, shrimp, bowls, and vegetables, or use the sharper aam kasundi-style version with rice, fish, pakoras, and Bengali-style meals.

Best foods for dipping

Use thick mango mustard sauce with chicken tenders, fries, potato wedges, wings, pakoras, nuggets, onion rings, chips, crackers, and vegetable sticks. For this use, keep the sauce creamy enough to cling instead of running off the food.

Mango Mustard Sauce for Chicken

For chicken tenders, nuggets, fried chicken sandwiches, grilled chicken, or wings, keep the sauce tangy and medium-thick. Use Dijon for a sharper sauce, yellow mustard for a softer family-style dip, or kasundi for a stronger Indian-style chicken sauce. When using it as a glaze, brush it on near the end of cooking so the mango and creamy base do not scorch.

Best places to spread it

Spread mango mustard sauce on burgers, sandwiches, wraps, rolls, grilled cheese, paneer wraps, tofu wraps, and fried chicken sandwiches. For spreading, keep it thicker than a dressing so it stays in place.

Best meals for drizzling

Thin mango mustard sauce slightly and drizzle it over grilled chicken, fish, shrimp, roasted vegetables, grain bowls, salads, grilled paneer, tofu bowls, and rice bowls. For a lighter drizzle, use yogurt, coconut cream, cashews, or olive oil instead of a heavy mayo base.

Glaze, marinade, or finishing sauce

For chicken, fish, shrimp, paneer, or tofu, use mango mustard sauce as a finishing glaze, table sauce, or short marinade. A 20 to 30 minute marinade is usually enough because the sauce is acidic and strongly flavored. When the sauce contains yogurt, mayo, or coconut cream, avoid brushing it too early over high heat because it can split or scorch. Instead, add it near the end of cooking, or spoon it over the finished dish at the table.

If the sauce has touched raw chicken, fish, shrimp, paneer, or tofu, do not reuse it as a table sauce unless it has been cooked properly. For serving, keep a clean portion separate before marinating.

For Bengali-style meals

The aam kasundi-style version is stronger and sharper. Therefore, it works especially well with rice, fish, pakoras, rolls, chops, fried snacks, or mustard-forward dishes. For a milder snack dip, mix a small spoonful into mayo, yogurt, or thick curd.

Mango Mustard Sauce Variations

Once the base sauce tastes balanced, you can move it sweeter, hotter, creamier, tangier, or more Indian-style depending on what you are serving. In other words, the same base can become a dip, glaze, dressing, or sharper kasundi-style sauce with only a few changes.

Mango mustard sauce variations guide showing mango honey mustard, mango habanero mustard, yogurt mango mustard, coconut mango mustard, kasundi mayo, and mango chili mustard.
Start with the basic mango mustard sauce, then adjust it into a sweeter honey mustard, hotter habanero sauce, lighter yogurt version, vegan coconut sauce, sharper kasundi mayo, or bright mango chili mustard.

Mango Honey Mustard

Add 1 to 2 teaspoons honey and use Dijon or yellow mustard. As a result, this version becomes softer, sweeter, and especially good with chicken tenders, sandwiches, wraps, and fries.

Mango Habanero Mustard

Add a very small amount of minced habanero or habanero hot sauce. Since habanero heat builds quickly, start with less than you think you need. This variation is best with wings, grilled meats, burgers, and spicy sandwiches.

Coconut Mango Mustard Sauce

Use coconut cream instead of mayo or yogurt. This version is vegan, creamy, slightly tropical, and especially good with shrimp, fish, roasted vegetables, and fried snacks.

Yogurt Mango Mustard Sauce

Use Greek yogurt or thick curd for a lighter, tangier sauce. Because it has more acidity and less richness than mayo, it works well with grilled chicken, wraps, bowls, paneer, and roasted vegetables.

Kasundi Mayo

Mix 1 tablespoon kasundi with 2 tablespoons mayo or yogurt and 1 to 2 tablespoons mango pulp. This gives you a fast, sharp, creamy dip for fries, pakoras, rolls, sandwiches, and snacks.

Mango Chili Mustard Sauce

Add chili flakes, fresh green chili, cayenne, or a small amount of chili sauce. However, keep the mango and mustard balanced so the sauce tastes fruity and sharp, not just hot.

How to Fix Mango Mustard Sauce

Mangoes, mustards, and creamy bases all vary. Therefore, after blending, taste the sauce and adjust it before serving.

Troubleshooting guide for mango mustard sauce showing how to fix sauce that is too sweet, too sharp, too bitter, too thick, too thin, too hot, too flat, or too heavy.
Taste mango mustard sauce after blending and adjust it before serving: sharpen sweetness with mustard and lemon, soften harshness with mango and creamy base, add salt when it tastes flat, or thin it slowly for drizzling.
Problem What Happened How to Fix It
Too sweet The mango or mango pulp is very sweet. Add lemon juice, vinegar, mustard, chili, or a pinch of salt.
Too sharp There is too much mustard or acid. Add more mango, mayo, yogurt, coconut cream, or a tiny bit of honey.
Too bitter The mustard seeds or mustard are too strong. Add mango and creamy base. Next time, use less mustard seed or a milder mustard.
Too thick There is too much mango pulp, cashew, mayo, or coconut cream. Thin with water, lemon juice, vinegar, or a little oil.
Too thin There is too much liquid or the mango is watery. Add mayo, yogurt, cashew paste, coconut cream, or more mango pulp.
Too hot The chili is stronger than expected. Add more mango and creamy base.
Too flat The sauce is under-salted or lacks acid. Add salt first, then lemon or vinegar if it still needs brightness.
Too heavy There is too much mayo or cream. Add lemon juice, vinegar, chili, mango, or mustard to lift it.

Store-Bought vs Homemade Mango Mustard Sauce

Store-bought aam kasundi, mango kasundi, or mango mustard sauce can be convenient, but the flavor varies a lot. Some versions are sharp, salty, oily, and pungent. Others, however, are sweeter, creamier, or closer to a mild mustard dip.

Store-bought vs homemade mango mustard sauce guide showing a jarred sauce, adjustment spoons with mango, lemon, chili, salt, mustard, and vinegar, and a fresh homemade sauce bowl.
Store-bought mango mustard sauce or mango kasundi can be convenient, but homemade sauce gives you more control. Use mango and a creamy base to soften sharpness, lemon, chili, and salt to brighten mild sauce, or mustard and vinegar to balance extra sweetness.

Homemade mango mustard sauce gives you more control. Instead of accepting one fixed flavor, you can make it creamy or no-mayo, sweet or sharp, mild or spicy, thick for dipping, or thin for drizzling. However, if you already have store-bought kasundi, you can still turn it into a fast sauce by whisking a spoonful with mango pulp and mayo, yogurt, coconut cream, or soaked cashews.

When store-bought kasundi tastes too sharp, soften it with mango pulp and a creamy base. If it tastes too mild, brighten it with lemon, chili, or a pinch of salt. When it leans too sweet, bring back the mustard bite with extra mustard, vinegar, or lemon juice.

Storage

Storage depends on the version you make. Because the fast blender sauce contains fresh mango and often mayo, yogurt, coconut cream, or cashews, treat it as a fresh refrigerator sauce.

Quick creamy mango mustard sauce

  • Store in a clean airtight jar or container in the refrigerator.
  • Use within 3 to 4 days.
  • Stir before serving because the sauce may thicken slightly as it sits.
  • Use a clean spoon every time.
  • Do not leave the sauce at room temperature for more than 2 hours, or more than 1 hour in very hot weather.

Aam kasundi-style refrigerator sauce

  • Store in a clean jar in the refrigerator.
  • For best flavor and freshness, use within 5 to 7 days.
  • Use a clean spoon to avoid introducing moisture or crumbs.
  • Treat it as a refrigerator condiment, not a shelf-stable preserve.
  • Discard if it smells off, grows mold, or changes texture in an unpleasant way.
Important: For shelf-stable mustard, kasundi, or mango pickle, use a tested preservation recipe. Do not casually adjust vinegar, water, salt, oil, or food proportions in preserved condiments.

For general safe pickling principles, see the National Center for Home Food Preservation’s pickling guidance.

Mango Mustard Sauce FAQs

What is mango mustard sauce made of?

Mango mustard sauce is usually made with mango, mustard, lemon juice or vinegar, chili, salt, and a creamy base such as mayonnaise, yogurt, coconut cream, or soaked cashews. A sharper aam kasundi-style version, however, uses raw mango, mustard seeds, mustard oil, green chili, turmeric, and salt.

Is mango mustard sauce the same as aam kasundi?

Not exactly. Quick mango mustard sauce is usually creamy and made with ripe mango and prepared mustard. By contrast, aam kasundi is a sharper Bengali-style mango mustard condiment made with raw mango, mustard seeds, mustard oil, and green chili.

What is mango kasundi?

Mango kasundi, also called aam kasundi or aam kashundi, is a Bengali-style raw mango mustard sauce. Because it uses raw mango and mustard seeds, it is usually sharper, sourer, and more pungent than a creamy mango mustard dipping sauce.

Can I make mango mustard sauce without mayo?

Yes. Instead of mayonnaise, use Greek yogurt, thick curd, coconut cream, or soaked cashews. For a vegan no-mayo version, coconut cream and cashews are the best options.

Can I use mango pulp?

Yes. Mango pulp works well for a smooth blender sauce. Unsweetened mango pulp is best; however, if the pulp is very sweet, skip the honey or sugar and add extra lemon juice or mustard if needed.

Which mustard is best?

Dijon mustard is the best first choice because it is sharp, smooth, and balanced. Yellow mustard makes a milder dipping sauce. Meanwhile, kasundi gives the sauce a stronger Indian/Bengali-style flavor, and mustard seeds are best for the aam kasundi-style version.

Is mango mustard sauce good with chicken?

Yes. Mango mustard sauce works well with grilled chicken, chicken tenders, chicken wings, chicken sandwiches, wraps, and rice bowls. Depending on the meal, use it as a dip, spread, drizzle, or finishing glaze.

Can I use mango mustard sauce as a marinade?

Yes, but it works best as a short marinade or finishing glaze. For a marinade, 20 to 30 minutes is usually enough. Since the sauce may contain mayo, yogurt, or coconut cream, avoid cooking it over very high heat for too long because it can split or scorch. For grilling, brush it on near the end or serve it on the side.

What do you eat with mango mustard sauce?

Serve mango mustard sauce with fries, chicken tenders, wings, pakoras, nuggets, onion rings, burgers, sandwiches, wraps, grilled chicken, fish, shrimp, paneer, tofu, roasted vegetables, grain bowls, or salads.

How long does mango mustard sauce last?

The quick creamy version usually keeps for 3 to 4 days in the refrigerator in a clean airtight container. Meanwhile, the aam kasundi-style version should also be refrigerated and used within 5 to 7 days for best flavor and freshness.

Can I make mango habanero mustard?

Yes. Add a very small amount of minced habanero or habanero hot sauce to the quick mango mustard sauce. Since habanero heat builds quickly, start with less than you think you need.

Is mango mustard sauce sweet or spicy?

It can be both, but the best version is balanced. Ripe mango gives sweetness, mustard gives sharpness, lemon or vinegar gives tang, and chili adds heat. Therefore, you can make it mild, medium, or hot depending on how much chili you use.

Final Tips for the Best Mango Mustard Sauce

Before you make your first batch, keep these final points in mind.

  • Use ripe mango for the quick creamy sauce and raw mango for the aam kasundi-style version.
  • Start with Dijon if you want the cleanest all-purpose mango mustard sauce.
  • Use kasundi when you want a sharper Indian-style flavor.
  • Keep the sauce thick for dipping and thinner for drizzling.
  • Add salt before adding more lemon or vinegar if the sauce tastes flat.
  • Use coconut cream or soaked cashews for a vegan no-mayo version.
  • Let the sauce rest for 10 minutes before final judging.
  • Keep homemade mango mustard sauce refrigerated.

↑ Back to top

Posted on 10 Comments

Mango Salsa Recipe

Fresh mango salsa recipe in a bowl with diced mango, red onion, jalapeño, cilantro, lime, and tortilla chips, shown chunky and glossy without tomato.

A mango salsa recipe should do more than taste sweet and bright. It should stay chunky instead of turning watery, balance lime and heat without burying the fruit, and work whether you use it as a salsa dip with chips, a spoonable mango salsa sauce for tacos, or a fresh topping for fish, shrimp, or chicken.

This version starts with the cleanest, most useful base: ripe mango, red onion, jalapeño, cilantro, lime, and salt. It is the best first version to make because it stays bright, fresh, and flexible. From there, you can adjust it depending on how you plan to serve it: add tomato for a scoopable chip dip, avocado for a richer topping, or more chile for a hotter bowl that still tastes fresh instead of harsh.

If you are making mango salsa for the first time, make this clean version first. It gives you the brightest mango flavor, then lets you move toward a chunkier taco topping, a scoopable salsa dip, a saucier spoonful for salmon or shrimp, or a spicy variation without guessing.

Quick Answers

If you want the shortest useful answer, start here. The best mango salsa recipe uses ripe but still firm mangoes, not very soft ones, so the bowl stays fresh and chunky instead of slumping into liquid. The best first version is usually no tomato. That cleaner build lets the mango stay bright and distinct, whether you serve it as a fresh salsa dip, a taco topping, or a spoonable mango salsa sauce for fish, shrimp, grilled chicken, and bowls.

  • Best mangoes: ripe but still firm, so the salsa holds a neat dice.
  • Best first version: no tomato, because it tastes cleaner and works better as a topping.
  • Best for chips: add tomato if you want a more pico-like, scoop-friendly bowl.
  • Best saucier move: mash or blend a few spoonfuls, then stir them back in instead of blending the whole bowl.
  • Best for tacos and fish: keep it fruit-forward, sharp, chunky, and lightly spicy.
  • Best heat move: start with jalapeño, then add more chile only if the bowl tastes flat.
  • Best make-ahead window: a short rest is fine, but it is best the day you make it.
  • Frozen mango: usable in a pinch, but fresh mango gives better texture.

At a Glance

  • Best first version: no tomato
  • Best for: tacos, fish, shrimp, grilled chicken, burrito bowls
  • Best chip-dip tweak: add 1 small seeded tomato
  • Best salsa sauce tweak: mash a small portion and fold it back in
  • Texture goal: chunky, glossy, not watery
  • Heat level: mild to medium, easy to adjust
  • Make-ahead: best the same day

The finished salsa should look glossy, not puddled. The mango pieces should stay distinct when spooned, and the bowl should smell bright and savory, not sharply acidic or raw.

Mango salsa recipe at-a-glance guide showing no tomato as the best first version, serving ideas, chip dip tweak, texture goal, heat level, and make-ahead timing.
Start with the no-tomato version when you want the mango to stay bright and distinct; add tomato only when the salsa is mainly for chips and you want a juicier, more scoopable bowl.

Mango Salsa Recipe Ingredients

The ingredient list for this mango salsa recipe is short on purpose. Because the bowl relies on freshness and contrast, every ingredient should help the mango rather than compete with it.

  • 2 large ripe but firm mangoes, diced small (about 2 cups / 330 to 360 g diced mango)
  • 1/4 to 1/3 cup finely chopped red onion (about 35 to 50 g)
  • 1 small jalapeño, finely chopped
  • 2 to 3 tablespoons chopped cilantro
  • 1 to 2 tablespoons fresh lime juice, plus more to taste
  • 1/4 teaspoon fine salt, plus more to taste
  • Optional: 1/4 cup finely chopped red bell pepper
  • Optional: 1 small tomato, seeded and finely diced
  • Optional: 1/2 avocado, diced

The mango

Use mangoes that smell ripe and feel slightly soft when pressed, but not squishy. Once diced, the pieces should hold clean edges rather than collapse or smear when stirred.

The onion

Red onion gives the bowl the sharp, savory edge that stops it from drifting toward fruit salad. Finely chopped onion works best because it spreads that bite evenly. If your onion tastes very harsh, rinse it briefly under cold water or soak it in cold water for 5 minutes, then dry it well before adding it.

The jalapeño

Jalapeño adds heat, but more importantly, it gives shape to the sweetness. For a milder bowl, remove the seeds and white membranes. For a medium bowl, leave in a little of the membrane. Start smaller than you think you need, then taste.

The cilantro, lime, and salt

Cilantro keeps the salsa tasting green and fresh. Lime lifts everything, while salt makes the fruit and aromatics taste more like themselves. Add lime gradually. You want the mango lightly coated, not sitting in a shallow pool at the bottom of the bowl.

The useful extras

Red bell pepper adds crunch without changing the identity of the bowl very much, so it is the safest extra if you want more texture. Tomato is best when the salsa is mainly for chips. Seed it well, then let the diced tomato sit on a paper towel for a minute if it seems very juicy. Avocado makes the bowl richer and softer, which is especially good over salmon, grilled chicken, or grain bowls. If you use avocado, add it at the very end and fold it in gently.

Best Mangoes to Use

The fruit decides a lot here. Even a well-seasoned bowl struggles if the mango is watery, stringy, or collapsing under the knife.

Mango ripeness guide for mango salsa showing too firm, just right, and too soft mangoes with tips for sweetness, clean dice, and avoiding watery salsa.
Choose mangoes that are ripe enough to taste sweet but still firm enough to hold a clean dice; very soft mangoes break down quickly once lime and salt are added.

Ripe but firm is the sweet spot

The best mangoes for salsa give slightly when pressed, smell fragrant, and taste sweet without turning mushy as soon as you cut them. Ataulfo, Champagne, honey, or Kent mangoes can all work well if they are firm enough to dice cleanly, but firmness matters more than variety.

Avoid overly soft mangoes

Very soft mangoes are better in sorbet, smoothies, or dressing. In salsa, they break down quickly once lime and salt are added, and the bowl becomes watery faster than you want.

If your mango is extra sweet or extra tart

When the fruit is especially sweet, lean a little harder on lime, salt, and jalapeño. For mangoes that taste more tart than expected, use less lime at first and let the fruit stay the focus. Taste before serving and adjust there instead of trying to fix everything at once.

How to Cut Mango for Salsa

How you cut the fruit affects both texture and usability in a mango salsa recipe. A good mango salsa should be easy to scoop, easy to spoon, and pleasant to eat in one bite.

Use the cheek-and-score method

Stand the mango upright, slice off the two cheeks, then score the flesh in a grid without cutting through the skin. Turn the cheek outward slightly and slice off the cubes. Then trim the remaining fruit from around the pit.

For another visual reference on cutting around the pit, this mango cutting guide from the National Mango Board is helpful.

Dice small, but not tiny

The mango should be small enough to scoop easily with chips or sit neatly on tacos, yet large enough to stay distinct. Aim for roughly small bean-sized pieces rather than large chunks or very fine mince.

Mix gently

Once the fruit is cut, treat it carefully. Fold the salsa together rather than stirring it hard. Otherwise, even good fruit starts to look tired before it reaches the table.

How to Make This Mango Salsa Recipe

This mango salsa recipe comes together quickly, but the order helps you keep both the texture and the balance under control.

Step-by-step mango salsa recipe guide showing diced mango, chopped onion, jalapeño and cilantro, lime and salt, gentle folding, resting, and finished salsa.
Add the lime and salt lightly at first, then fold instead of stirring hard; this keeps the mango pieces clean-edged, glossy, and distinct when the salsa is served.

1. Dice the mango

Dice the mango into small, even cubes and place them in a medium bowl. The pieces should look clean-edged and firm enough to hold shape when lifted on a spoon.

2. Chop the supporting ingredients

Finely chop the red onion, jalapeño, and cilantro. If you are using red bell pepper, chop that finely too. The onion pieces should be small enough not to dominate a bite, and the jalapeño should be dispersed rather than concentrated in a few hot pockets.

3. Combine gently

Add the onion, jalapeño, cilantro, and bell pepper to the mango. Toss gently so the fruit stays intact. At this stage, the bowl should already look colorful and structured, not crushed.

4. Add lime and salt

Start with 1 tablespoon lime juice and 1/4 teaspoon salt. Toss again, gently, then look at the bottom of the bowl. You want a light gloss on the fruit, not visible pooling liquid.

5. Rest briefly, then taste again

Let the salsa sit for 10 minutes if you have time. That is enough to bring the flavors together without softening the fruit too much. After that short rest, the salsa should smell bright and savory, with the onion and lime settled into the fruit instead of shouting separately.

6. Adjust before serving

When the salsa tastes too sweet, add a little more lime, salt, or jalapeño. For a bowl that tastes too sharp, add a bit more mango. Flat flavor usually means it needs salt. Serve cool or lightly chilled, not ice-cold straight from the back of the fridge, so the flavor reads clearly.

Mango Salsa Recipe

Yield: About 2 cups, enough for 4 to 6 as a topping or 4 as a dip

Prep time: 15 minutes
Cook time: 0 minutes
Total time: 15 minutes

Ingredients

  • 2 large ripe but firm mangoes, diced small (about 2 cups / 330 to 360 g)
  • 1/4 to 1/3 cup finely chopped red onion
  • 1 small jalapeño, finely chopped
  • 2 to 3 tablespoons chopped cilantro
  • 1 to 2 tablespoons fresh lime juice
  • 1/4 teaspoon fine salt, plus more to taste
  • Optional: 1/4 cup finely chopped red bell pepper

Instructions

  1. Add the diced mango to a medium bowl.
  2. Add the red onion, jalapeño, cilantro, and bell pepper if using.
  3. Add 1 tablespoon lime juice and the salt, then toss gently.
  4. Let the salsa sit for 10 minutes, then taste.
  5. Add more lime or salt as needed.
  6. Serve right away for the freshest texture.

Notes

  • Use firm-ripe mangoes, not very soft ones.
  • The finished salsa should look glossy, not puddled.
  • For a milder salsa, remove the jalapeño seeds and membranes.
  • For chips, add 1 small seeded tomato if you want a more dip-like bowl.
  • For a saucier mango salsa, mash or blend 2 to 3 tablespoons of the finished salsa with a squeeze of lime, then stir it back into the bowl.
  • If using avocado, fold it in at the very end.
  • This salsa is best the day you make it.

Why This Mango Salsa Recipe Works

This recipe works because it keeps the job of the salsa clear. It should brighten the food around it, not smother it.

It balances sweet, sharp, and spicy

The mango gives sweetness, but the onion, jalapeño, lime, and salt keep that sweetness from drifting into dessert territory. The result tastes bright and savory rather than merely fruity.

It stays chunky

Because the fruit is diced instead of blended, the finished salsa stays textured and spoonable. That texture is part of what makes it feel useful at the table.

It fits more than one meal

Although it is excellent with chips, it is even more valuable because it works over fish tacos, salmon, shrimp, grilled chicken, burrito bowls, and taco salads.

Tomato or No Tomato?

This is the biggest choice in mango salsa. Some people want a bright topping. Others want a bowl that feels more like a classic fresh dip.

Comparison card showing no-tomato mango salsa for tacos, fish, shrimp, and chicken beside mango salsa with tomato for chips and pico-style dip.
Tomato is not wrong in mango salsa, but it changes the job of the bowl: skip it when you want a cleaner, chunkier topping for tacos or fish; add it when you want a juicier salsa for chips.

When no-tomato mango salsa is better

A no-tomato version is usually better for tacos, fish, shrimp, grilled chicken, and bowls. It tastes cleaner, lets the fruit stay more distinct, and avoids extra moisture.

When tomato makes sense

Add tomato when the bowl is mainly for chips or when you want a more familiar pico-like feel. Seed it first, then keep the pieces small so the salsa stays balanced instead of watery.

How to Fix the Balance

If it tastes too sweet

Add a little more lime, a pinch more salt, or a bit more jalapeño.

If it tastes too sharp

Add more mango first. Extra fruit is usually a cleaner fix than sweetener.

If it tastes too mild

It usually needs a touch more salt or lime.

If it turns watery

Wateriness usually comes from overly soft fruit, overmixing, too much resting time, or undrained tomato. Drain off a little excess liquid if needed, then taste again.

If you want it more like a salsa sauce

If you want a mango salsa sauce for tacos, fish, shrimp, chicken, or bowls, do not blend the whole recipe. Mash or blend 2 to 3 tablespoons of the finished salsa with a little lime juice, then stir it back into the bowl. That makes it more spoonable while keeping the fresh mango pieces intact.

If it feels too spicy

Add more mango if you have it. Avocado can soften the heat too if you want a richer version.

What to Serve with Mango Salsa

Once the bowl is made, use it as a salsa dip, taco topping, fresh side, or spoonable mango salsa sauce depending on the meal.

Guide to what to serve with mango salsa, including tortilla chips, fish tacos, salmon, grilled chicken, shrimp, bowls, and salads with serving tips.
Mango salsa works best when you match the texture to the meal: keep it chunkier and drier for tacos or fish, add tomato for chips, and use a few spoonfuls to brighten bowls and salads.

Tortilla chips

For chips, a slightly juicier bowl is fine. This is the best place to add seeded tomato and use a slightly smaller dice if you want a more scoopable, party-friendly dip.

Fish tacos

For fish tacos, keep the salsa chunkier and a little drier. The no-tomato version works best here because it brings brightness and sweetness without making the taco wet or heavy. It pairs especially well with flaky grilled or pan-seared white fish.

Salmon

With baked, grilled, or pan-seared salmon, the lime, onion, and jalapeño do especially useful work. A spoonful on top cuts through the richness and makes a simple fillet feel more finished. If you want a softer, richer topping for salmon, the avocado variation below is the best branch.

Grilled chicken

Chicken gives the salsa a neutral base to wake up. It works especially well with grilled chicken breasts, thighs, or fajita-style chicken. A slightly punchier lime finish works well here, especially if the chicken is smoky, charred, or warmly spiced. For a full meal to pair it with, try these sheet pan chicken fajitas.

Shrimp

Shrimp and mango salsa are a natural pairing. Keep the salsa bright and lightly spicy rather than heavy or very wet. Spoon it over grilled shrimp skewers, tuck it into shrimp tacos, or use it over rice bowls when you want something fresh and quick.

Burrito bowls and taco salads

This is one of the smartest ways to use leftovers. A few spoonfuls add acidity, freshness, and texture to bowls with rice, beans, avocado, chicken, or shrimp.

Variations

Mango salsa with tomato

Add 1 small seeded and finely diced tomato if you want the salsa to feel more like a classic fresh dip. Keep the amount modest so the mango still leads.

Mango avocado salsa

Add diced avocado when you want a richer, softer bowl. Fold it in at the end so it stays intact. This version is especially good with salmon, grilled chicken, and burrito bowls.

Mango salsa variations guide showing tomato, avocado, habanero, pineapple, black bean, and no-cilantro options for changing the base recipe.
Once the base mango salsa tastes balanced, choose the variation by use: tomato for chips, avocado for richness, habanero for heat, pineapple for sweetness, or black beans for a heartier bowl.

Spicy mango habanero salsa

Swap in a very small amount of habanero if you want a hotter, fruitier heat. Go carefully so the brightness of the base recipe still comes through.

Pineapple mango salsa

Add a small amount of finely diced pineapple if you want a more tropical twist. Keep the ratio in favor of mango so the recipe still reads clearly as mango salsa.

Black bean mango salsa

Add rinsed and well-drained black beans if you want a heartier bowl for chips, burrito bowls, or taco salads. Keep the mango pieces distinct so the salsa still tastes fresh rather than heavy.

Pickled jalapeño or pickled onion

Use a little pickled jalapeño or pickled red onion if you want a sharper, brighter variation. Add these carefully because they bring both acidity and salt.

No cilantro version

If you do not like cilantro, use a smaller amount of parsley or fresh mint instead. The flavor will change, but the salsa can still taste fresh and balanced.

For a smoother mango-based topping for salads, grilled chicken, or seafood, try this sweet and spicy mango salad dressing.

Common Mistakes

Troubleshooting card for avoiding watery mango salsa with tips to use firm-ripe mangoes, add lime gradually, seed tomato, fold gently, and serve the same day.
Watery mango salsa usually starts with fruit that is too soft, too much lime, juicy tomato, or rough mixing. Keep the bowl glossy instead of puddled by seasoning gradually and folding gently.
  • Using very soft mangoes: they may taste good, but they break down fast and make the bowl watery.
  • Adding too much lime at the start: the fruit should be coated lightly, not swimming.
  • Leaving onion pieces too large: big pieces make the salsa taste sharper and rougher than it should.
  • Not drying soaked onion or juicy tomato: extra water shows up later in the bowl.
  • Not seeding tomato for the chip-dip version: the salsa can turn loose fast.
  • Overmixing: stirring hard bruises the fruit and dulls the texture.
  • Letting it sit too long before serving: a short rest helps, but too long softens the mango and blurs the flavor.

Storage and Make-Ahead

Mango salsa is best fresh, and that is part of what makes it so good.

Best the day you make it

The texture is best on the day it is made. The fruit is firmer, the flavors feel brighter, and the bowl still looks clean and lively.

How long it lasts

Stored in an airtight container in the fridge, it will usually keep well for about 2 days, sometimes 3 depending on the fruit.

What changes after a few hours

A short rest of 10 to 20 minutes can help the flavors settle. After several hours, though, the mango softens more, liquid collects more easily, and the bowl becomes less crisp and defined.

How to freshen leftovers

If leftover salsa seems dull, drain off a little excess liquid, then add a small squeeze of lime and a pinch of salt. Let it sit for a minute, then taste again.

The best bowl is the one that still looks clean when you spoon it: distinct mango pieces, light lime gloss, no puddle at the bottom, and enough salt and chile to keep the sweetness lively.

Mango Salsa Recipe FAQs

Can I make mango salsa ahead of time?

Yes, but it is best within the same day if texture matters to you. Overnight storage softens the fruit and draws out more liquid.

Is mango salsa sauce the same as mango salsa?

Usually, yes. People often use mango salsa sauce to mean mango salsa served as a dip, taco topping, or spoonable sauce. Fresh mango salsa is normally chunky, not fully blended. If you want it saucier, mash or blend a small portion with lime juice and stir it back in instead of turning the whole bowl into a smooth mango sauce.

Is mango salsa better with tomato or without?

Neither is universally better. No-tomato mango salsa is usually better for tacos, fish, shrimp, and chicken, while tomato is better when you want a more scoopable dip for chips.

What mangoes are best for a mango salsa recipe?

Ripe but still firm mangoes are best. Ataulfo, Champagne, honey, and Kent mangoes can all work if they are firm enough to dice cleanly.

Can I use frozen mango?

You can, but fresh mango is better for a truly chunky bowl. Frozen fruit tends to soften more as it thaws.

What goes with mango salsa?

Tortilla chips, fish tacos, salmon, grilled chicken, shrimp, burrito bowls, and taco salads all work well.

Is mango salsa good with shrimp?

Yes. Mango salsa is excellent with grilled shrimp, shrimp tacos, coconut shrimp, shrimp rice bowls, and chilled shrimp appetizers. Keep it bright, lightly spicy, and not too wet so it lifts the shrimp without making the dish soggy.

How spicy should mango salsa be?

Usually just spicy enough to sharpen the sweetness. Most people do not need a very hot bowl unless they are intentionally making a spicy variation.

How long does mango salsa last in the fridge?

Usually 2 days, sometimes up to 3 depending on the fruit. It is most appealing sooner rather than later.

Can I use mango salsa for fish tacos?

Yes. The clean no-tomato base version is especially good here because it brightens the fish without making the taco feel soggy or overloaded.

If you want the best first version, make the clean no-tomato bowl, use firm-ripe mangoes, season lightly and carefully, and serve it while the texture is still bright and distinct. That version gives you the most flexibility and the clearest mango flavor.

↑ Back to top