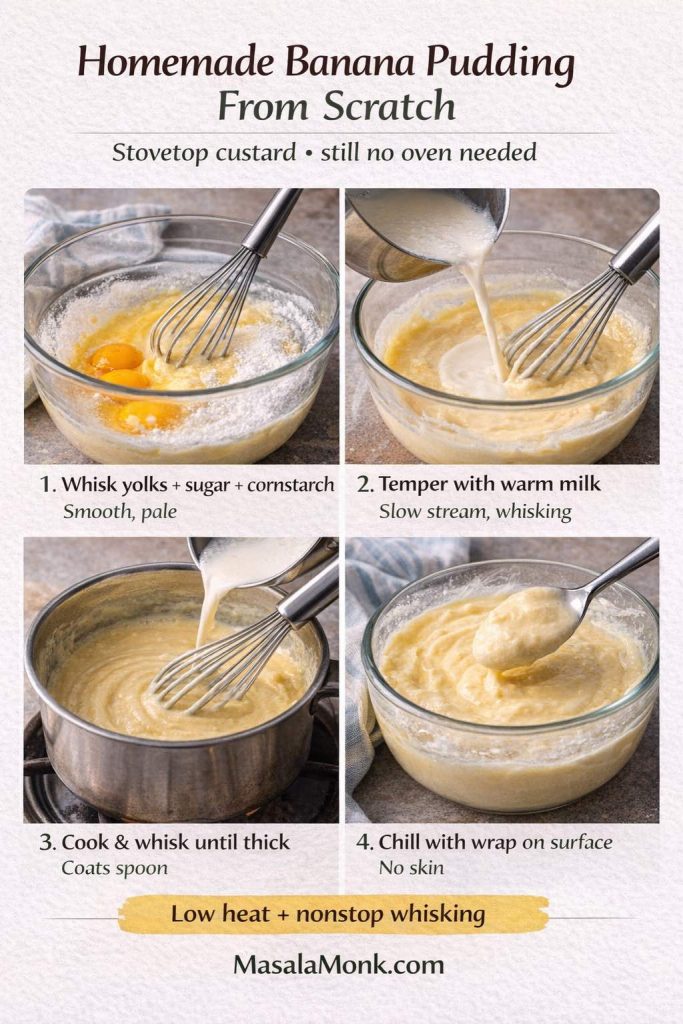
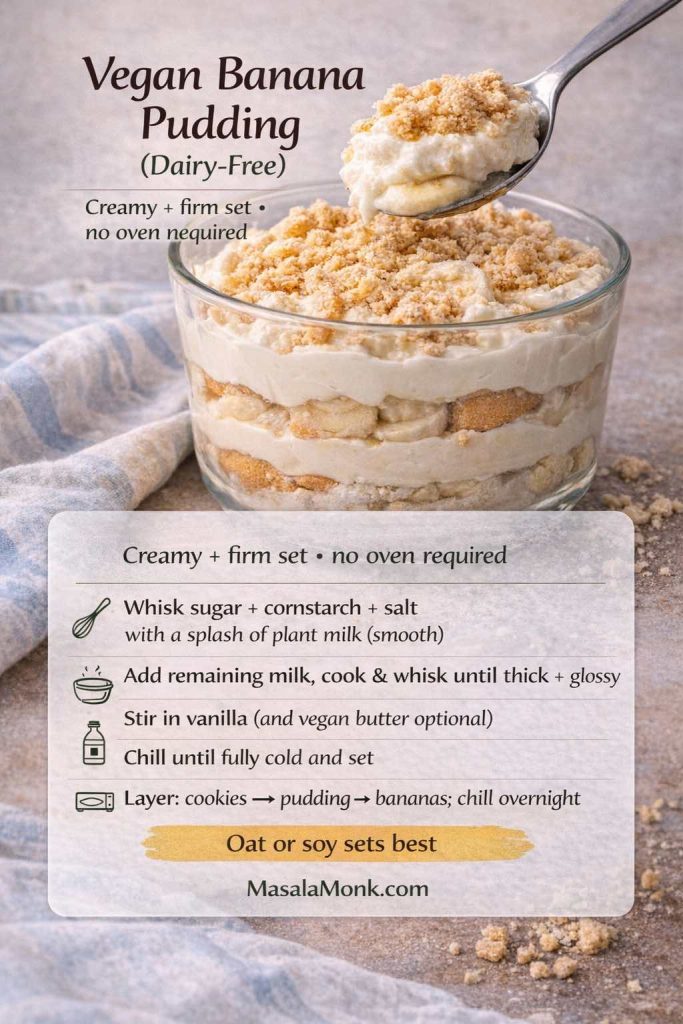
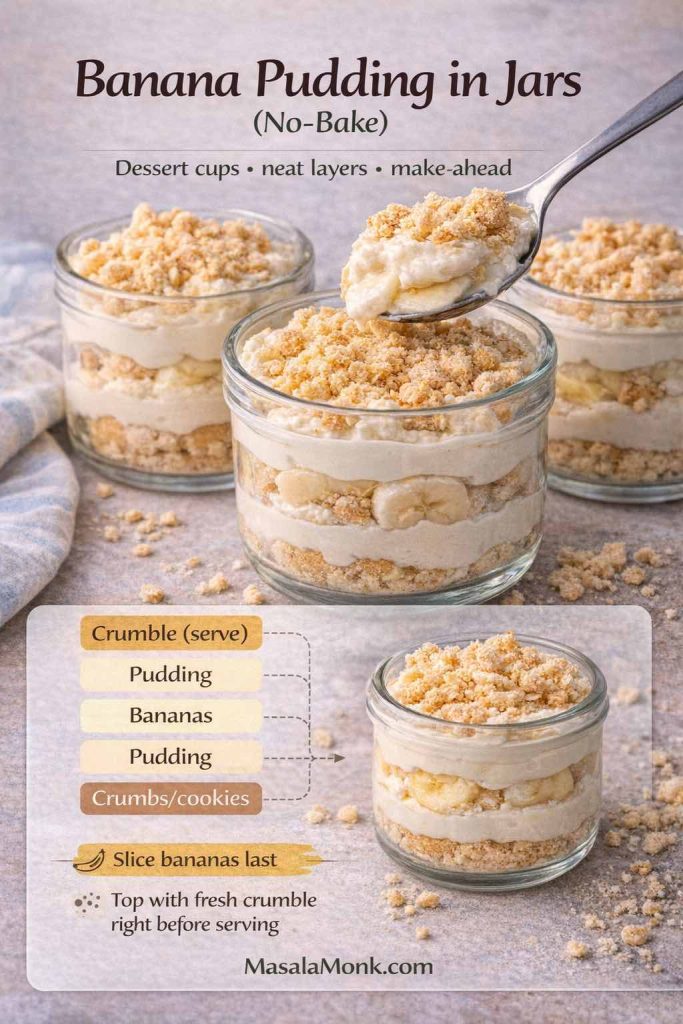
This baked haddock recipe gives you tender, flaky white fish with a golden buttery topping in about 25 minutes. It is simple oven fish, but with the small details that keep haddock from turning dry, watery, bland, or hidden under soggy crumbs.
Haddock cooks quickly, which can feel a little unforgiving at first. The rhythm is simple: dry the fish, season it directly, add a buttery topping, and stop baking when the fish is done. After that, it becomes one of the easiest weeknight seafood dinners.
Quick Answer: Bake Time, Temperature, and Doneness
Bake haddock fillets at 400°F / 200°C for 12 to 16 minutes, depending on thickness. The fish is done when it turns opaque, flakes easily with a fork, and reaches 145°F / 63°C in the thickest part.
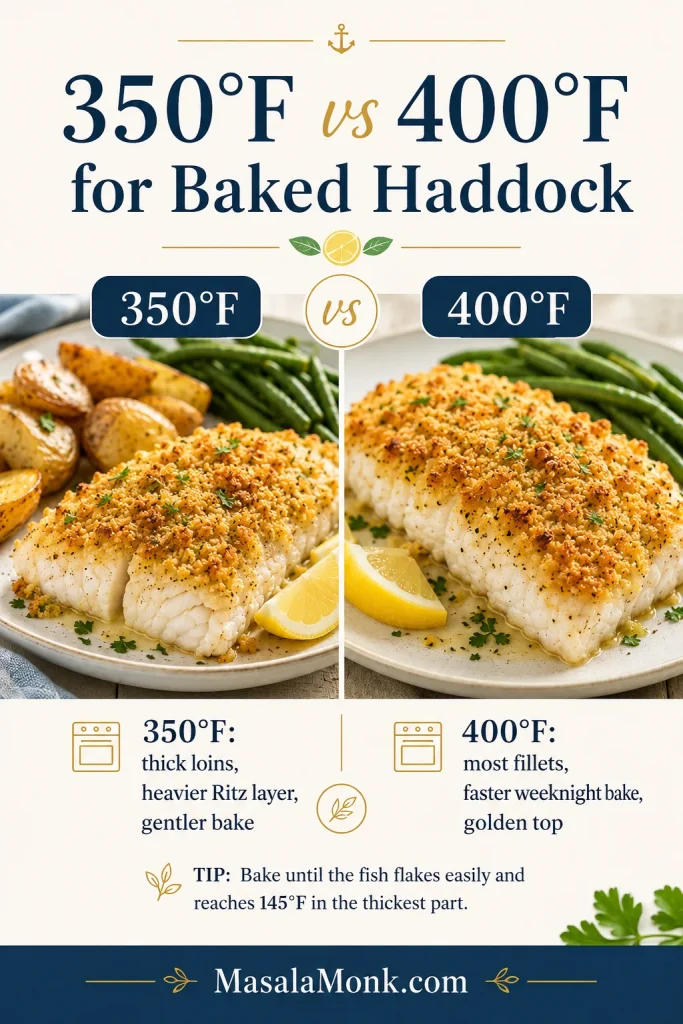
400°F / 200°C is the easiest everyday temperature for quick, flaky baked haddock.
350°F / 175°C is gentler for thick haddock loins, a heavier Ritz cracker topping, or a more traditional New England-style bake.
Bake uncovered when using panko, breadcrumbs, or Ritz crackers.
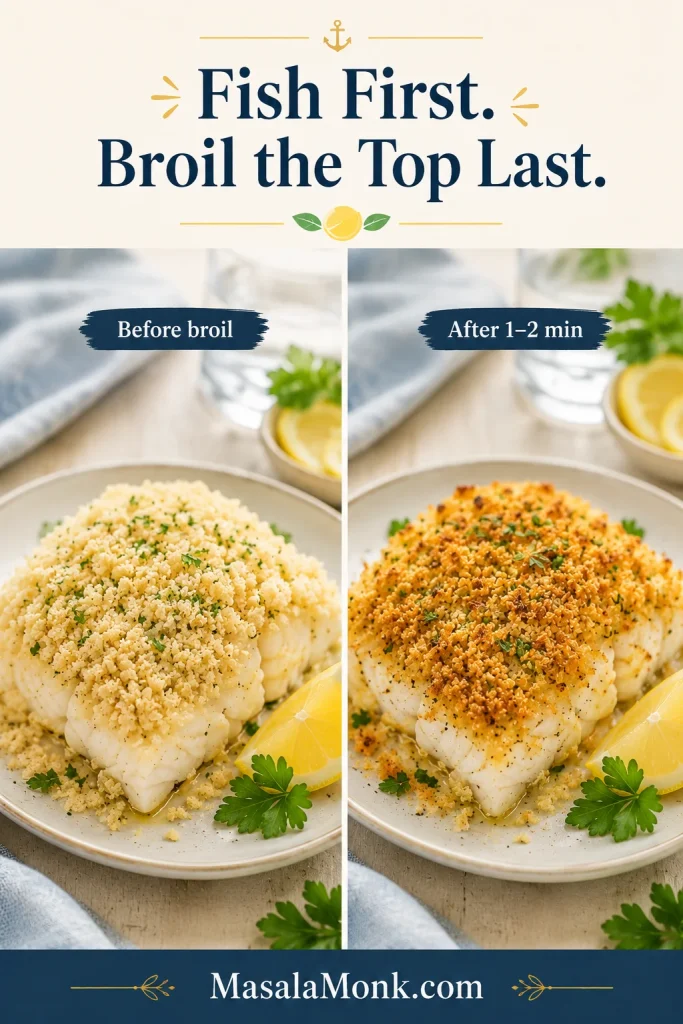
The fish comes first. The crumbs come second. Pull the haddock when it is done; the broiler can finish a pale surface in a minute.
A pale topping can be fixed. Overcooked fish cannot. That one idea makes this recipe much easier.
For most haddock fillets, 400°F gives a fast oven bake; then 145°F confirms the center is cooked without drying out.
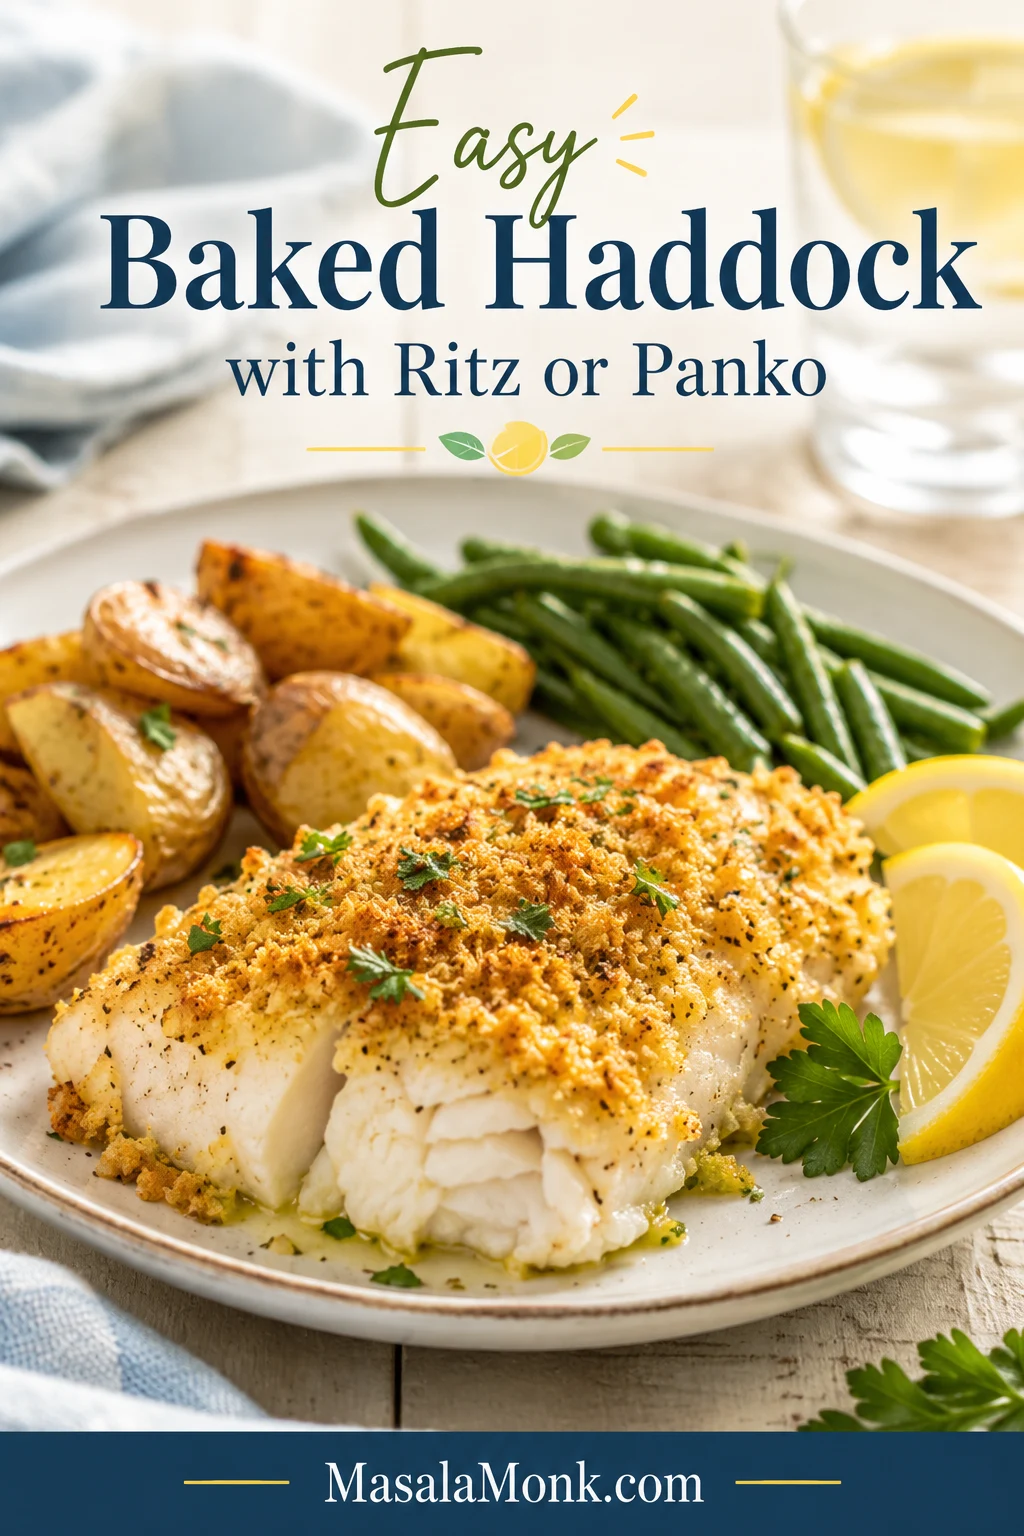
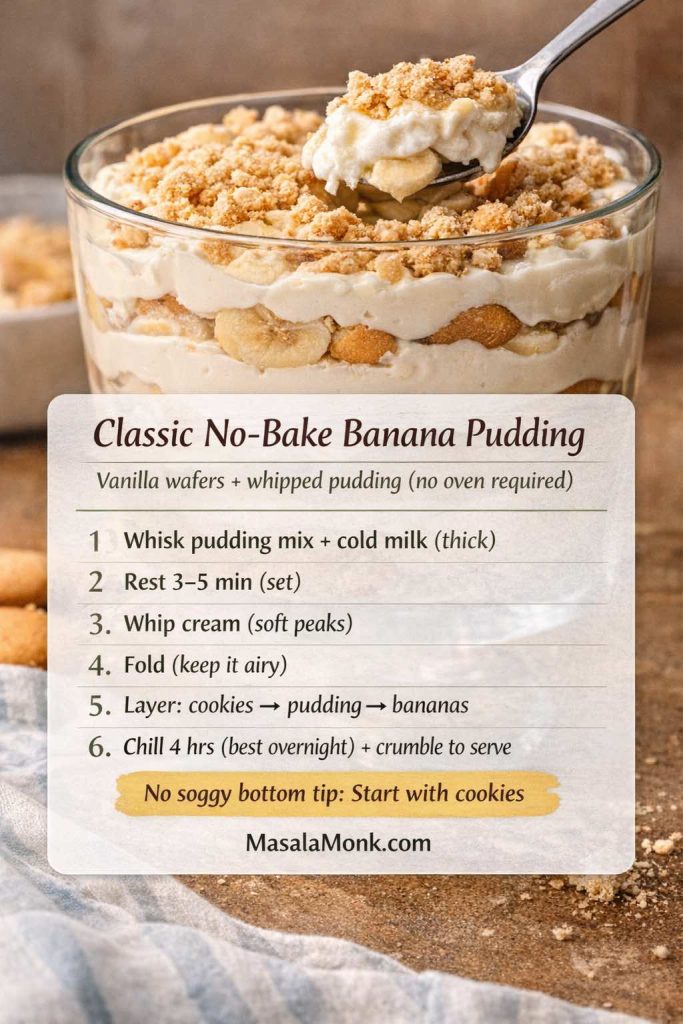
Easy Baked Haddock Recipe
Easy Baked Haddock with Buttery Ritz or Panko Topping
Mild haddock fillets baked with lemon, butter, herbs, and your choice of panko, breadcrumbs, or crushed Ritz crackers. The fish turns soft and flaky while the surface becomes golden and savory.
Prep Time
10 minutes
Cook Time
12 to 16 minutes
Total Time
About 25 minutes
Servings
4
Yield
4 baked haddock fillets
Oven Temperature
400°F / 200°C
Doneness
145°F / 63°C, opaque, and flaky
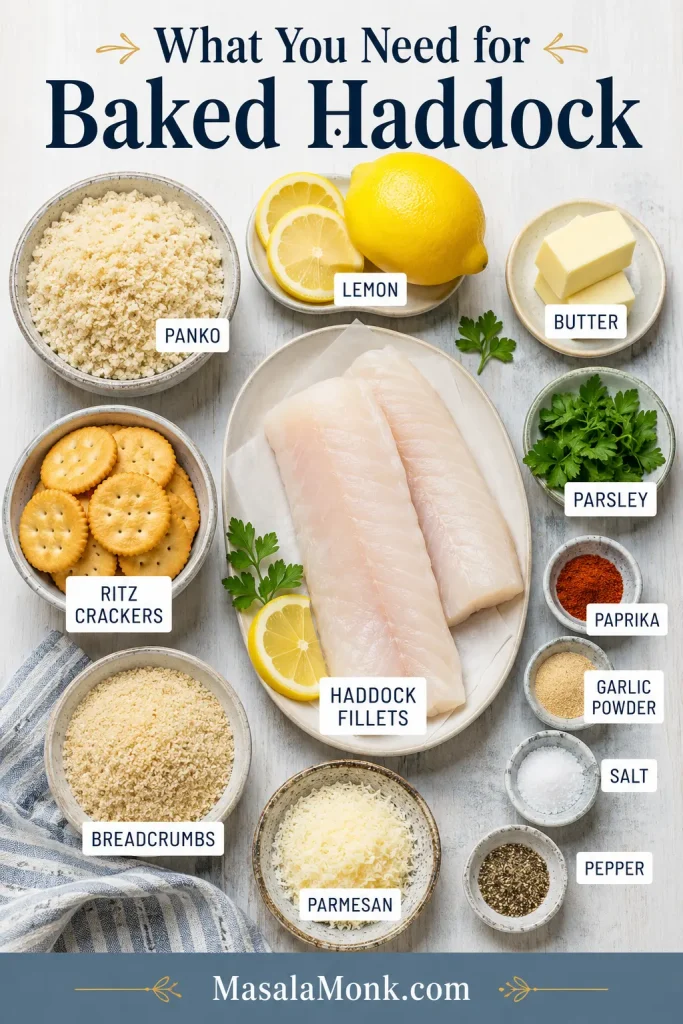
Ingredients
4 skinless boneless haddock fillets, about 6 oz / 170 g each, or about 1 1/2 lb / 680 g total
1 tablespoon olive oil or melted butter, for the baking dish and fish
Fine salt, to taste: about 3/4 teaspoon for plain crumbs, or 1/4 to 1/2 teaspoon for Ritz crackers, salted butter, or Parmesan
1/4 teaspoon black pepper
1 tablespoon lemon juice / 15 ml, plus lemon wedges for serving
1 teaspoon lemon zest, optional but excellent in the topping
1/2 teaspoon garlic powder
1/2 teaspoon paprika
2 tablespoons chopped parsley, plus more for serving
For a Breadcrumb or Panko Topping
3/4 to 1 cup panko or breadcrumbs
4 tablespoons melted butter / 56 g
1/4 cup grated Parmesan / about 22 g, optional
For a Ritz Cracker Topping
1 sleeve Ritz crackers, about 34 crackers / roughly 90 to 100 g, crushed
3 to 4 tablespoons melted butter / 42 to 56 g
1/4 to 1/2 teaspoon fine salt total, added only after tasting the cracker mixture
Instructions
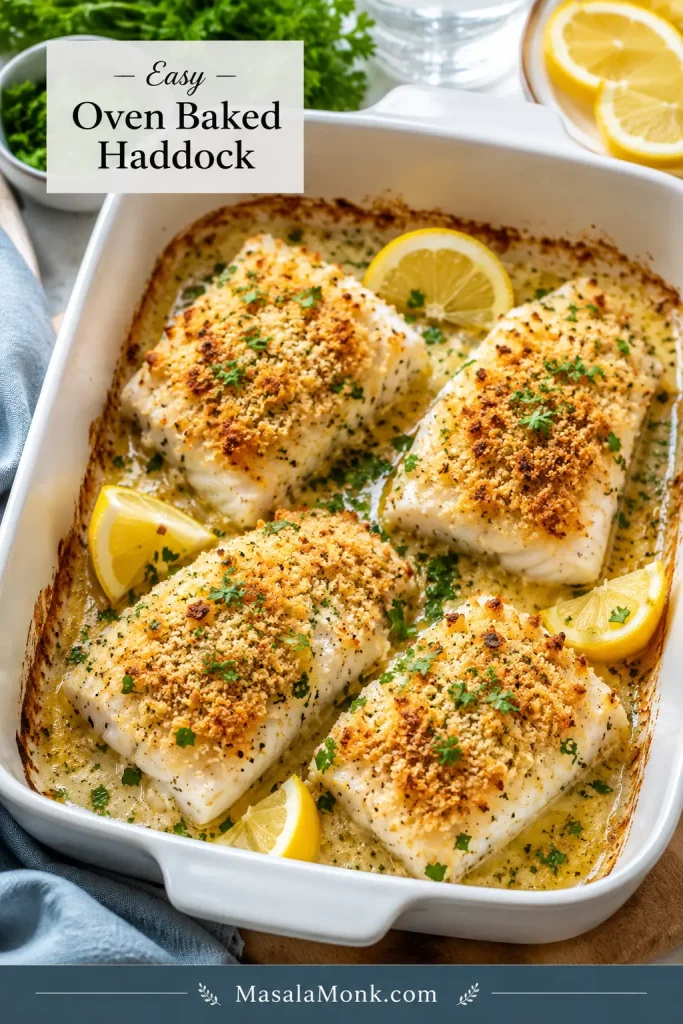
Preheat the oven. Heat the oven to 400°F / 200°C. Lightly grease a 9×13-inch / 23×33 cm baking dish.
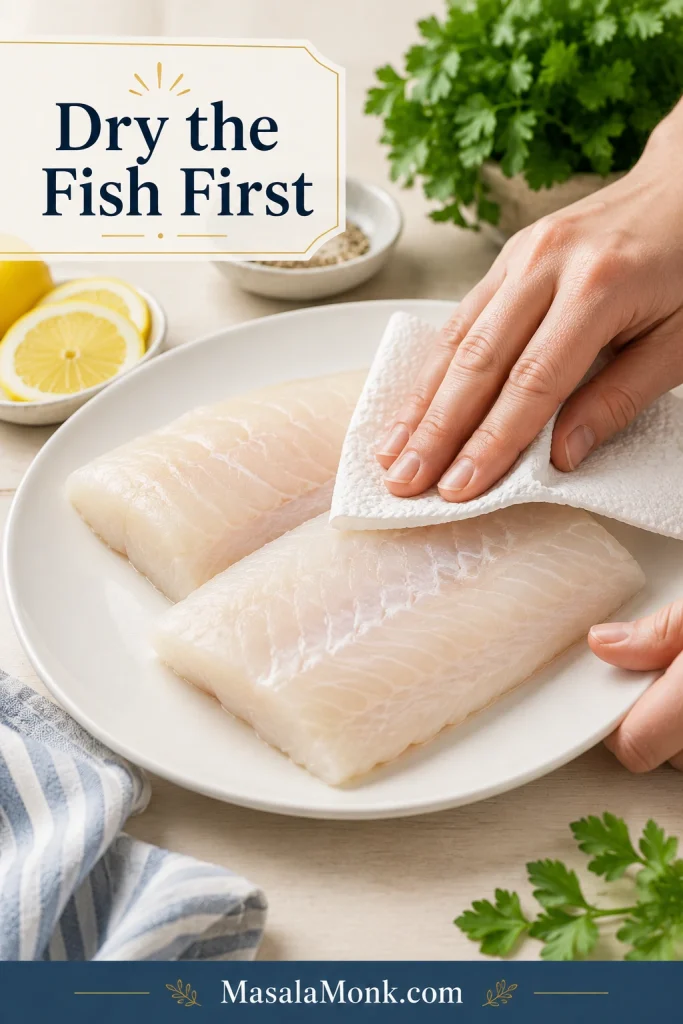
Dry the haddock. Pat the fillets very dry with paper towels. Dry fish before the oven means better texture after the oven.
Season the fish. Arrange the fillets in one layer. Brush lightly with olive oil or melted butter, then season with salt, pepper, lemon juice, garlic powder, and paprika.
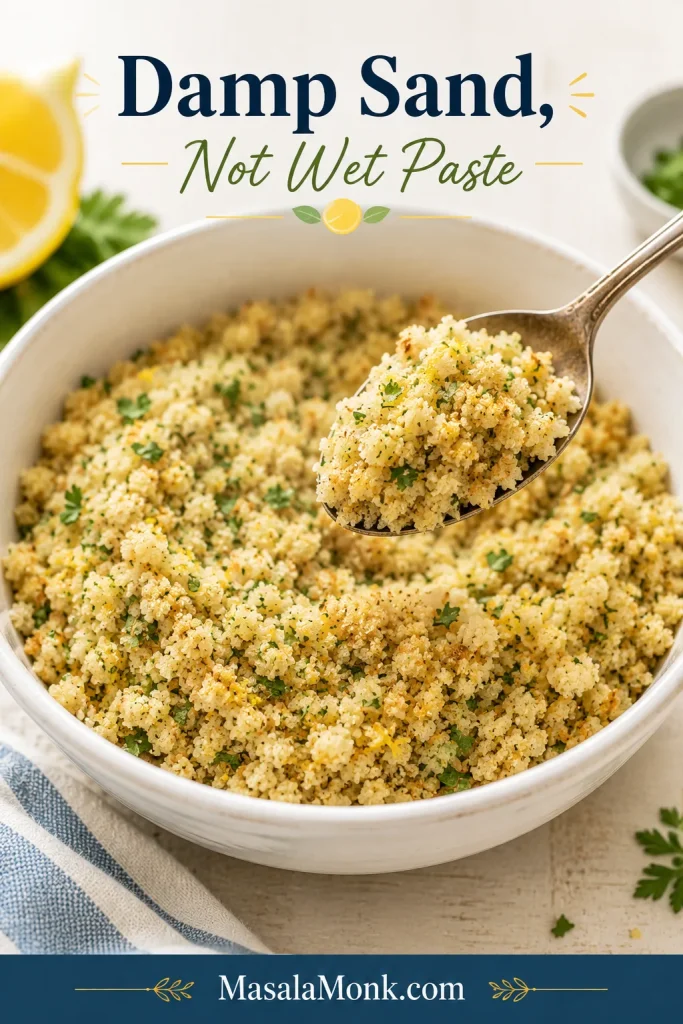
Make the topping. Mix panko, breadcrumbs, or crushed Ritz crackers with melted butter, lemon zest, parsley, and Parmesan if using. The mixture should look like damp sand, not wet paste.
Top the fillets. Spoon the mixture over the fish and press gently so it sticks. Keep the layer loose rather than packed down.
Bake uncovered. Bake for 12 to 16 minutes, depending on thickness, until the fish is opaque and flakes easily.
Check doneness. For the most reliable result, check the thickest part with an instant-read thermometer. Haddock is done at 145°F / 63°C.
Brown only if needed. If the fish is done but the topping is pale, broil, or use the oven grill, for 1 to 2 minutes. Watch closely.
Rest and serve. Let the fish rest for 2 minutes, then serve with lemon wedges and more parsley.
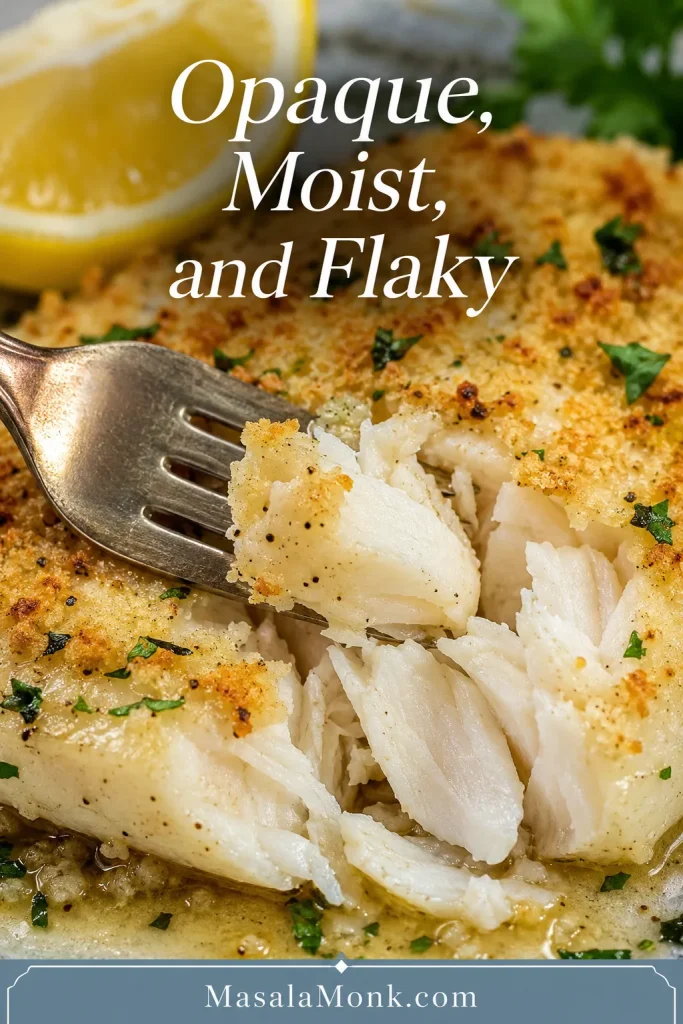
When it is right, the fish should lift in soft flakes, the center should look opaque and moist, and the buttery layer should be golden without feeling greasy.
Recipe Notes
For thicker haddock loins or a heavier Ritz layer, bake at 350°F / 175°C for 18 to 25 minutes instead.
Thin fillets may be done in less than 12 minutes, so start checking early.
If using a fan or convection oven, begin checking 2 to 3 minutes early.
Mixed-size fillets need mixed timing: lift out thinner pieces first and let thicker ones finish.
Serve soon after baking. The fish stays moist, but the golden layer is best while warm and fresh.
Baking the fillets uncovered helps the topping toast while the haddock underneath stays tender, moist, and easy to lift from the dish.
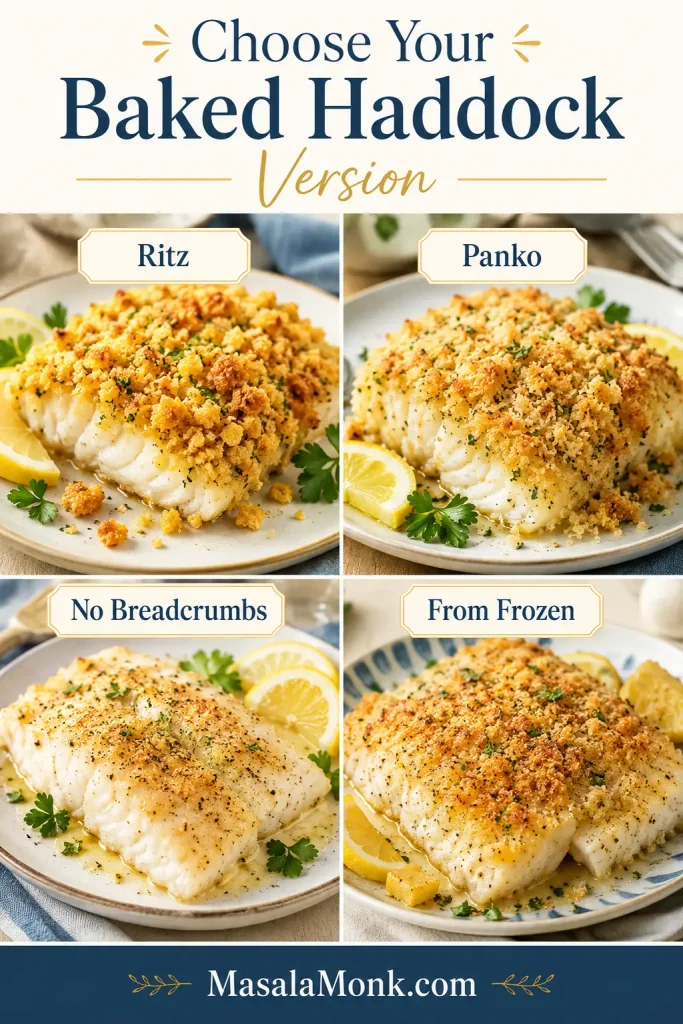
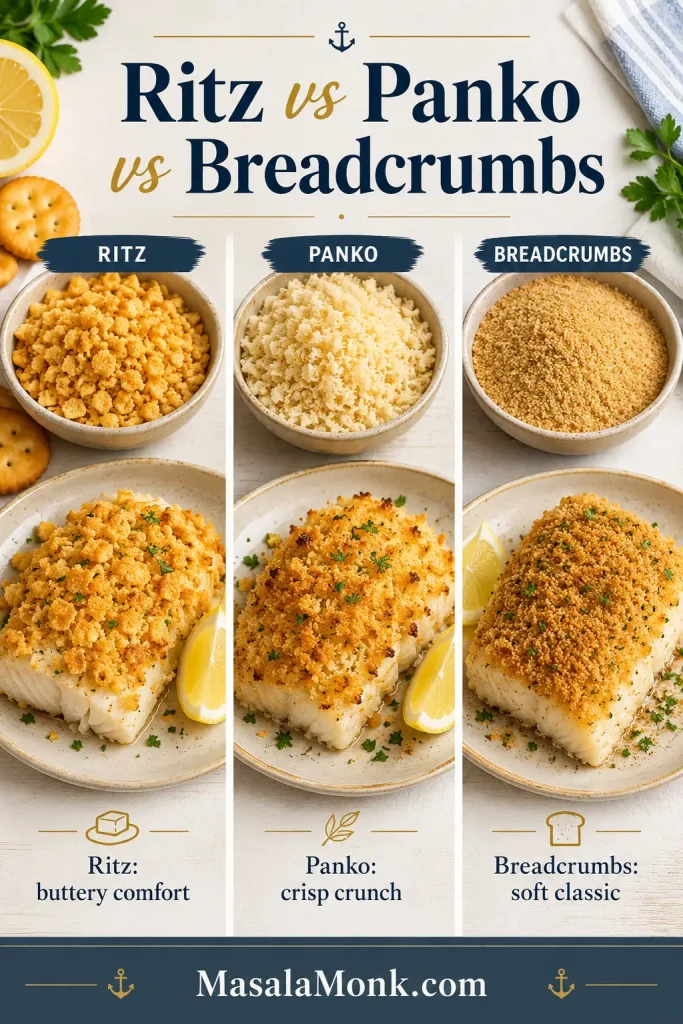
Start with the dinner you want, then choose the topping. Ritz gives you buttery New England comfort, panko gives you crunch, breadcrumbs keep it classic, and lemon butter keeps the plate lighter.
Once you know the style you want, this guide helps you choose between Ritz, panko, no breadcrumbs, or a from-frozen method.
Best Topping by Dinner Style
What You Want
Use
Best Temperature
Why It Works
New England baked haddock
Crushed Ritz crackers
350°F or 400°F
Buttery, cozy, and classic with lemon and parsley.
Crispy baked haddock without frying
Panko and Parmesan
400°F
Light crunch without a pot of oil.
Soft classic baked fish
Plain breadcrumbs
375°F or 400°F
Gentler texture and familiar flavor.
Baked haddock without breadcrumbs
Lemon, butter or olive oil, herbs
400°F
Clean, bright, and lighter.
Thick center-cut haddock
Haddock loins
350°F or longer 400°F timing
Thicker fish needs gentler timing.
Baked haddock from frozen
Emergency frozen method
400°F
Bake briefly first, blot moisture, then season.
Use this topping comparison to choose the texture you want before you bake: buttery Ritz, crisp panko, or softer breadcrumbs.
Choose Ritz for buttery New England baked haddock, panko for a crisp finish, or breadcrumbs for a softer classic crust.
For a first try, choose Ritz if you want the coziest fish dinner and panko if you want the crispest finish. Both make mild haddock feel more complete than plain baked fish.
Craving fried fish instead of baked fish? This fish batter recipe is the better path.
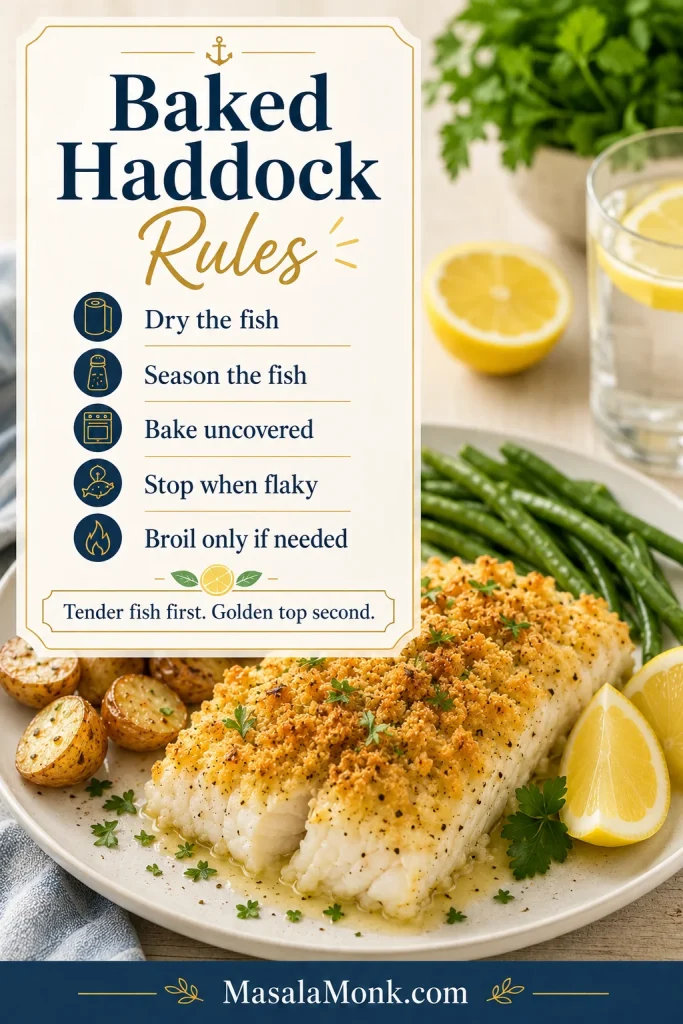
Haddock needs three things: a dry surface, seasoning on the fish itself, and the confidence to stop baking before the fillets turn firm. The buttery layer adds flavor and comfort, but the fish is still the main event.
If baked fish has disappointed you before, it was probably not because you did anything dramatic wrong. Delicate white fish simply rewards early checking. Once you learn that, this recipe feels relaxed instead of risky.
The buttered surface protects the fish, the lemon keeps the flavor bright, and the broiler gives you a backup plan when the fish is done before the surface looks perfect.
Ingredients You’ll Need
The ingredient list is short, so balance matters. Haddock is mild; it needs direct seasoning and enough butter in the topping to brown without turning greasy.
Before choosing your topping, gather the essentials: mild haddock, lemon, butter, herbs, and either Ritz crackers, panko, or breadcrumbs.
Haddock Fillets
Skinless boneless haddock fillets are easiest. Four fillets, about 6 oz / 170 g each, fit well in a 9×13-inch baking dish. Thinner pieces cook quickly; thick haddock loins need more time. Skin-on haddock can still be baked skin-side down.
Butter or Olive Oil
Butter gives the most classic flavor and helps the surface turn golden and savory. Olive oil works when you want a lighter plate, especially with plenty of lemon and herbs.
Panko, Breadcrumbs, or Ritz Crackers
Panko gives the lightest crunch. Fine breadcrumbs make a softer classic crust. Ritz crackers bring buttery New England comfort and need a lighter hand with salt.
Crush Ritz crackers into coarse pieces, not powder. You want little buttery bits that toast on top of the fish.
Lemon, Garlic, Paprika, and Herbs
Lemon brightens the fish, garlic powder seasons evenly, paprika adds color, and parsley keeps the plate fresh. For a seafood-seasoning flavor, replace the paprika with a small pinch of seafood seasoning and reduce the salt.
Parmesan
Parmesan is optional, but it works beautifully with panko. It adds savory depth and helps the panko crust taste more finished.
Step-by-Step Tips for Better Baked Haddock
The recipe card gives you the fast version. These cues help with thin fillets, thick loins, frozen fish, and heavier toppings.
1. Start with dry fillets
Pat both sides of the fish with paper towels. This one step helps seasoning stick and keeps the dish from turning watery.
First, pat the haddock dry; otherwise, extra surface moisture can make the fish steam and soften the topping.
2. Season the fish, not just the topping
Add salt, pepper, lemon juice, garlic powder, and paprika before the topping goes on. The golden layer should support the fish, not carry all the flavor by itself.
Next, season the haddock itself with lemon, salt, pepper, garlic, and paprika so the fish tastes good beneath the topping.
3. Keep the topping loose
Mix the panko, breadcrumbs, or crushed crackers with melted butter until the texture looks like damp sand. Spoon it over the fish, press gently, and stop there. A loose layer browns better than a packed one.
The topping should feel like damp sand because that texture browns better than dry crumbs or a greasy butter paste.
After mixing the crumbs, keep the layer loose on top of the fillets so the heat can move through the fish.
Spoon the topping on lightly instead of pressing it down, because a loose layer leaves room for heat to cook the fish evenly.
4. Bake uncovered
An uncovered dish gives the surface a chance to toast. Covering traps steam, which is useful for some foods but not for buttery topping on delicate fish.
5. Let the fish win
Pull the haddock when it flakes, even if the top is not quite as golden as you hoped. A minute under the broiler can fix the color.
If the haddock is done but the surface looks pale, broil the topping briefly instead of extending the bake time.
Once the topping choice is clear, the only real timing question is temperature.
A middle path when the topping browns quickly but the fish is thick
14 to 20 minutes
400°F / 200°C
Most everyday baked haddock fillets
12 to 16 minutes
425°F / 220°C
Very thin fillets or quick browning at the end
8 to 12 minutes
For most weeknight dinners, 400°F / 200°C is the easiest default. For a thicker loin or a heavy Ritz layer, 350°F / 175°C gives the fish more time to cook gently.
Use 400°F for most weeknight haddock fillets; however, thicker loins or a heavier Ritz layer often bake better at 350°F.
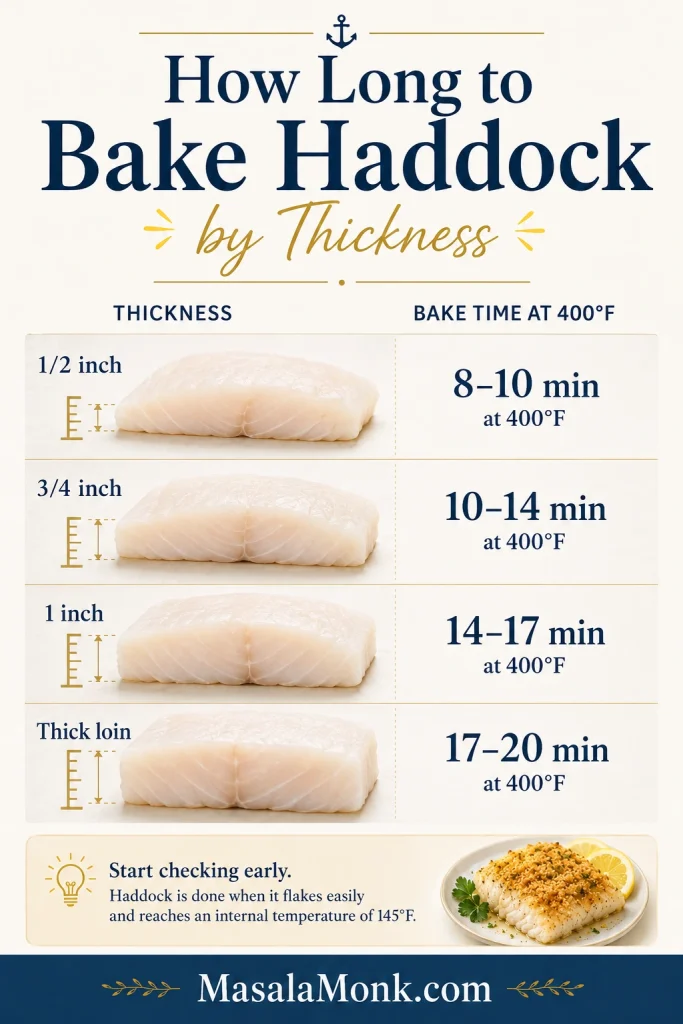
How Long to Bake Haddock by Thickness
Thickness matters more than weight. A thin 6 oz fillet can cook faster than a smaller but thicker haddock loin.
Fillets vs Loins
Haddock fillets are usually thinner and cook quickly, while haddock loins are thicker center-cut pieces that need more time and often do better with gentler heat.
If your dish has mixed sizes, remove the thinner fillets as soon as they are done and let the thicker pieces finish. This simple move prevents dry edges and underdone centers.
Haddock Thickness
At 400°F / 200°C
At 350°F / 175°C
Thin fillet, about 1/2 inch
8 to 10 minutes
12 to 15 minutes
Medium fillet, about 3/4 inch
10 to 14 minutes
15 to 18 minutes
Thick fillet, about 1 inch
14 to 17 minutes
18 to 22 minutes
Very thick haddock loin
17 to 20 minutes
22 to 25 minutes
Start checking at the early end of the range. Haddock rewards early checking more than extra oven time.
Because thickness changes bake time more than weight, thin fillets need early checking while thick haddock loins need extra minutes.
How to Know When Haddock Is Done
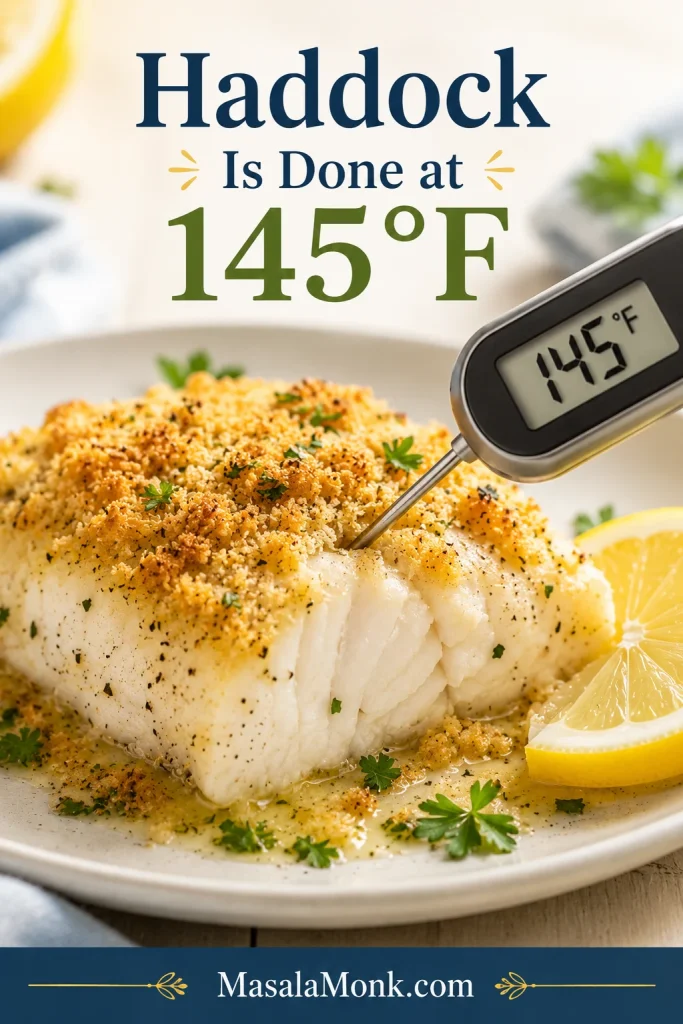
Haddock is done when the center is opaque, moist-looking, and flakes with gentle pressure. The most reliable check is an instant-read thermometer in the thickest part.
Temperature: 145°F / 63°C in the thickest part
Fork test: soft flakes separate without force
Visual cue: opaque center, not translucent or glossy
The first time, a thermometer is helpful. After that, you will start recognizing the soft flakes and opaque center by sight.
When the center turns opaque and separates into soft flakes, pull the haddock from the oven before the delicate fish overcooks.
A thermometer gives the clearest first-time answer: haddock is done when the thickest part reaches 145°F.
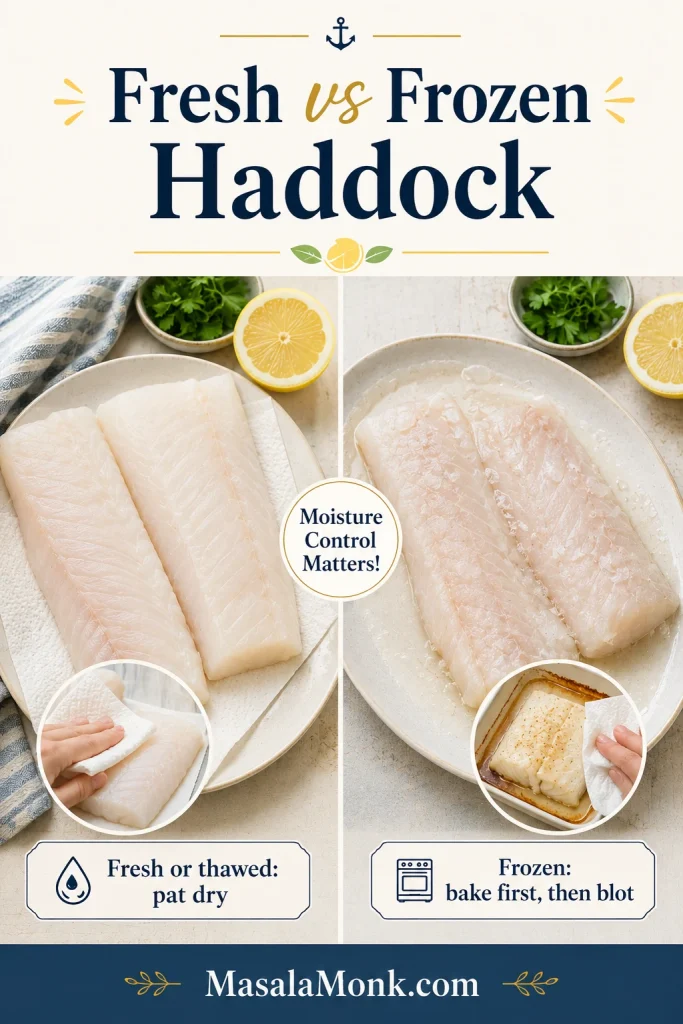
Fresh haddock is easiest, but frozen haddock works well when it is thawed and dried properly. Crumb-topped fish needs a dry surface more than extra liquid in the dish.
Fresh or thawed haddock needs a dry surface; for frozen haddock, a short first bake and a quick blot help control moisture.
Best Method: Thaw First
Thaw frozen haddock overnight in the refrigerator. For a faster method, keep the fish sealed and thaw it in cold water, changing the water every 30 minutes. The USDA describes refrigerator thawing, cold-water thawing, and microwave thawing as safe defrosting methods. Fish thawed by cold water or microwave should be cooked right away.
After thawing, unwrap the fillets and pat them dry before seasoning. That is the difference between a golden top and a wet crust.
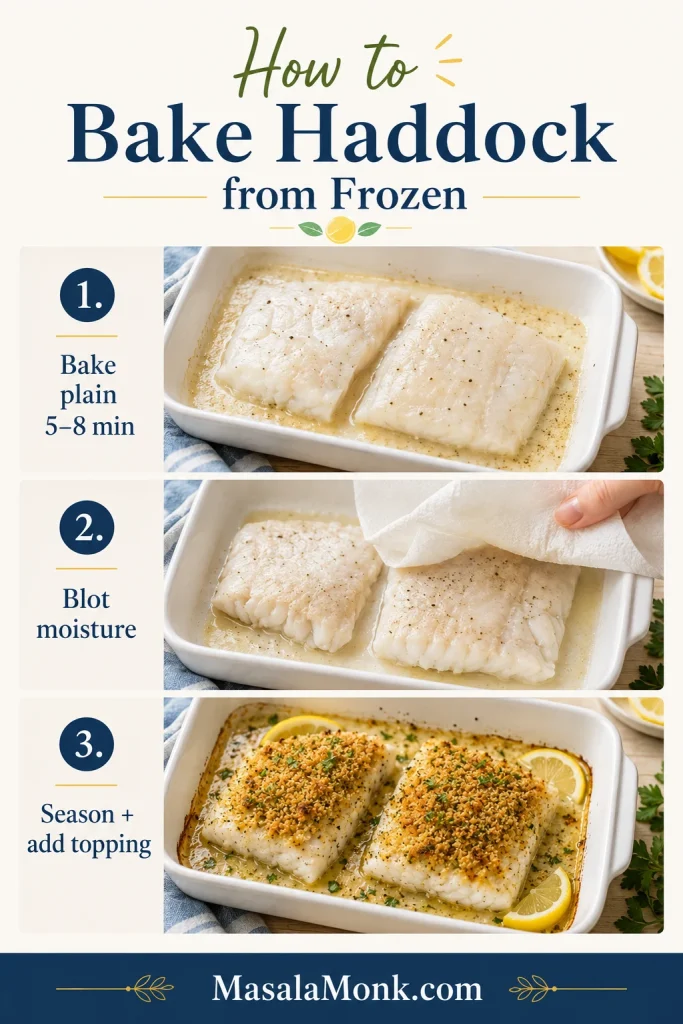
Emergency Method: Baking Haddock from Frozen
Thawed fish gives the best texture, but frozen fillets can still become dinner. Keep the topping off at first.
Heat the oven to 400°F / 200°C.
Place frozen fillets in a lightly greased baking dish.
Bake plain for 5 to 8 minutes, just until surface ice melts and moisture starts to release.
Blot or drain the dish carefully.
Season the fish, add the topping, and continue baking until the center reaches 145°F / 63°C.
This will get dinner on the table, but thawed fish gives you a drier surface and a better topping.
When baking haddock from frozen, bake it plain first, blot the released moisture, and only then add seasoning and topping.
Choose one flavor direction and keep it simple. Haddock is mild, so it does not need a crowded topping.
New England Baked Haddock with Ritz Crackers
This is the buttery comfort version: crushed Ritz crackers, melted butter, lemon, and parsley over mild white fish. Bake at 350°F for a gentler old-school feel, or 400°F when you want dinner faster. Keep the salt light and let the crackers do their job.
Crushed Ritz crackers give this New England baked haddock its buttery comfort, while lemon and parsley keep each bite balanced.
Panko Parmesan Baked Haddock
Panko and Parmesan give you the crunch of fried fish without pulling out a pot of oil. This version is best at 400°F so the panko crust can toast while the fish stays tender.
Panko and Parmesan add crispness without frying, so this baked haddock version works well when you want crunch with less mess.
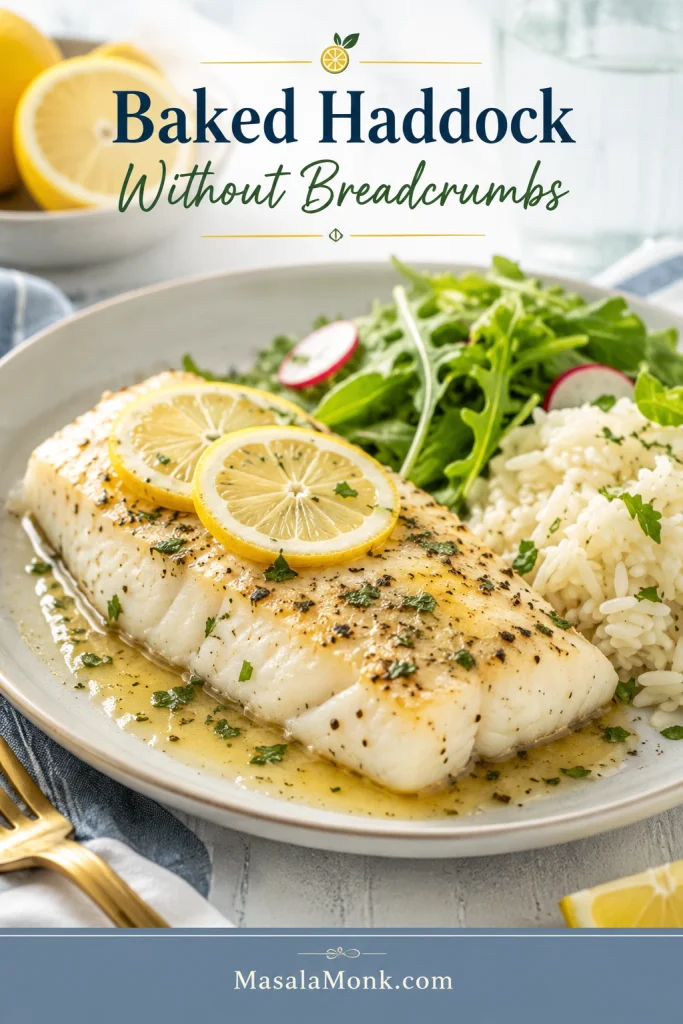
Lemon Butter Haddock
Skip the crumbs and let lemon butter lead. This is the lightest path, especially when the fish is fresh and you want a clean, bright dinner.
For a lighter baked haddock variation, skip the crumbs and let lemon butter, herbs, and gentle oven heat carry the flavor.
Garlic Butter Haddock
Add garlic powder or a little finely grated garlic to the melted butter, then finish with parsley and lemon. Fresh garlic can burn under the broiler, so use a light hand.
Warm Paprika or Chili Crumb Haddock
Add a small pinch of smoked paprika, mild chili powder, or Kashmiri chili powder to the buttered crumbs. Keep the warmth gentle; haddock tastes best when the spice supports the fish instead of taking over.
Healthy Baked Haddock
Use olive oil instead of some of the butter, keep the topping thin, and add lemon, herbs, and quick-cooking vegetables around the fish. The plate stays lighter, but the golden finish still makes it feel like dinner.
Cod or Another White Fish
This method also works with cod, pollock, hake, or another mild white fish. Cod is often thicker and meatier than haddock, so use the thickness chart instead of only the clock.
For a crisp battered dinner instead, save this fish and chips recipe for another night.
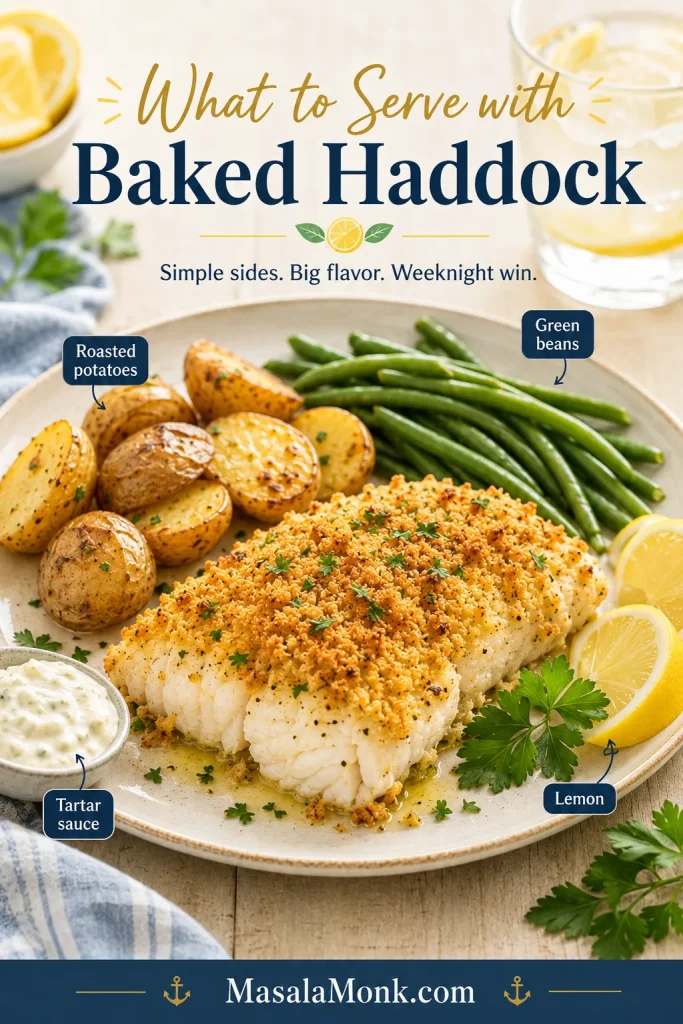
What to Serve with Baked Haddock
For the easiest comfort plate, serve the haddock with roasted potatoes, green beans, lemon wedges, and a spoonful of tartar sauce. It feels classic, but still light enough for a weeknight.
To make baked haddock feel like a full dinner, pair the flaky fish with roasted potatoes, green beans, lemon, and tartar sauce.
Keep the sides simple so the fish still feels like the center of the plate. For something brighter than tartar sauce, spoon a little mango salsa over the lemon-butter version, especially with rice or salad.
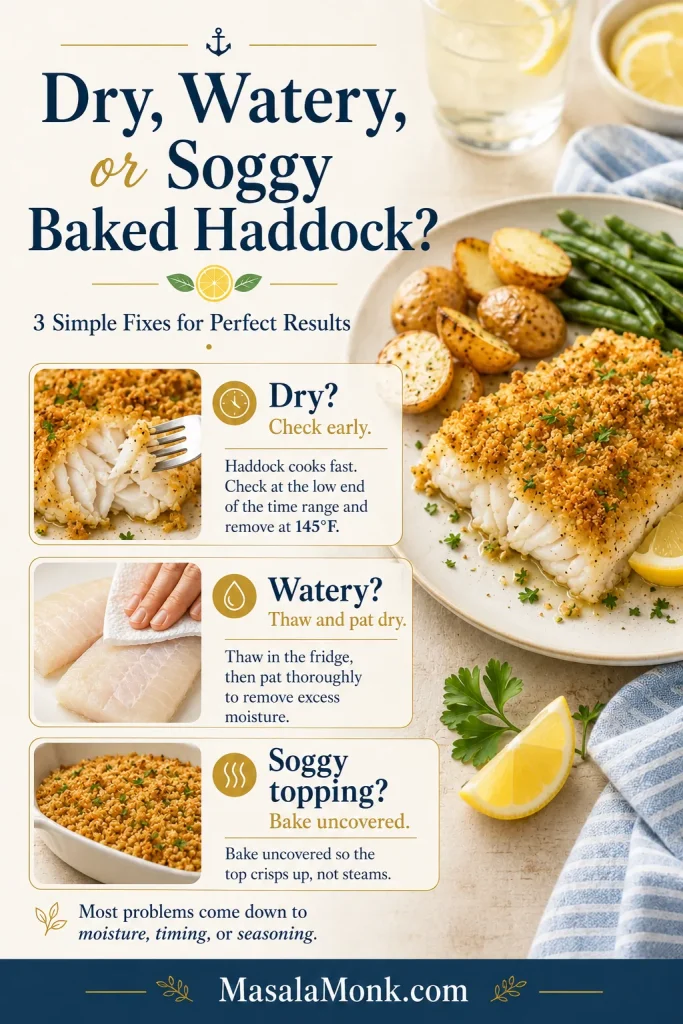
Troubleshooting
Most baked haddock problems come down to moisture, timing, or seasoning. The fix is usually simple.
Three things to remember: Start with dry fillets, bake uncovered when using a topping, and pull the fish when it is done. The surface can always be browned for one more minute.
If baked haddock turns dry, watery, or soggy, adjust the timing, dry the fillets better, and bake uncovered next time.
Problem
Likely Cause
How to Fix It
Haddock is dry
It baked too long or the fillets were thin.
Check early and pull the fish when it reaches 145°F / 63°C.
Fish is watery
The fish was frozen, not fully thawed, or crowded in the dish.
Thaw fully, pat dry, and leave space between fillets.
Topping is soggy
Too much moisture or a covered dish.
Bake uncovered and avoid adding extra liquid under the topping.
Topping is pale
The fish cooked before the surface browned.
Broil for 1 to 2 minutes after the fish is done.
Fish tastes bland
Only the topping was seasoned.
Season the fish directly before adding the top layer.
Fish fell apart
It was overcooked or lifted too roughly.
Rest for 2 minutes and use a thin fish spatula.
Topping is greasy
Too much butter, especially with crackers.
Use less butter with Ritz and keep the layer loose.
Fish smells too strong
The fish may not be fresh or was stored too long after thawing.
Use fresh-smelling fish and cook soon after thawing.
Assemble this recipe right before baking. You can thaw the fish ahead and mix the dry topping ahead, but add butter, seasoning, and the final layer close to oven time.
How to Store Leftovers
Store leftovers in an airtight container in the refrigerator for up to 2 days. Keep extra lemon wedges separate and add fresh lemon after reheating.
Flaked leftovers are useful, not wasted. Fold them into potato and herbs for simple fish cakes, or tuck them into fish tacos with slaw, lime, and a creamy sauce.
Leftover baked haddock still has options: flake it into bowls, shape it into fish cakes, or tuck it into tacos with slaw and lime.
How to Reheat It
Reheat gently in a low oven or air fryer until warmed through. The microwave works in a pinch, but it softens the topping and can make fish smell stronger.
Can You Freeze Cooked Haddock?
Cooked crumb-topped haddock does not freeze beautifully. The fish can turn watery and the topping usually softens. For best texture, freeze raw haddock, thaw it safely, and bake it fresh.
FAQ
What temperature is best for baked haddock?
For most fillets, 400°F / 200°C is the easiest everyday temperature. It cooks the fish quickly while giving the topping time to turn golden. For thicker loins or a heavier Ritz cracker topping, 350°F / 175°C gives a gentler bake.
How long does haddock take in the oven?
Most medium fillets take 12 to 16 minutes at 400°F / 200°C. Thin pieces may be ready in 8 to 10 minutes, while thick loins may need 17 to 20 minutes or more.
Should baked haddock be covered or uncovered?
Bake it uncovered when using a crumb topping. Covering traps steam, which helps some dishes but makes buttery crumbs soft instead of golden.
Can I bake frozen haddock?
Yes, but thawing first gives a drier surface and a better topping. For a frozen emergency, bake the plain fish briefly, blot the released moisture, season, add the topping, and continue baking until done.
Can I use cod instead of haddock?
Yes — cod works well here, but it is often thicker and meatier than haddock. Use the thickness chart and doneness cues instead of relying only on the clock.
Is haddock done at 145°F?
Yes. For safety, fish should reach 145°F / 63°C in the thickest part. It should also look opaque and flake easily with a fork.
Why did my baked haddock turn watery?
Watery haddock usually means the fish carried too much moisture into the oven. Fully thaw frozen fillets, pat them dry, and leave space in the dish so the fish bakes instead of steaming.
Can I make baked haddock without breadcrumbs?
Yes. Use melted butter or olive oil, lemon juice, lemon zest, parsley, salt, and pepper. Bake just until the fish is opaque and flaky. It will be lighter and softer, more lemon-butter fish than crisp-topped fish.
What is the best topping for baked haddock?
Ritz crackers give the buttery New England-style finish. Panko gives the crispest bite. Plain breadcrumbs give a softer, classic baked-fish texture.
Can I use smoked haddock for this recipe?
You can, but reduce the salt because smoked haddock is already salty and stronger in flavor. Smoked haddock is also excellent in chowder, Cullen skink, fish pie, and kedgeree.
A Few Last Tips Before You Bake
Baked haddock should feel simple, not stressful. Dry the fish, season the fish, bake it uncovered, and stop when the center is flaky and moist. The surface can always get one more minute under the broiler; the fish cannot be uncooked.
Finally, remember the core baked haddock rules: dry the fish, season it directly, bake uncovered, stop when flaky, and broil only if needed.
Whether you choose buttery Ritz crackers, crisp panko, plain breadcrumbs, or lemon butter, the goal is the same. You want tender haddock with enough golden flavor on top to make it feel like a proper dinner.
If you make this baked haddock, leave a comment and tell us which version you chose: Ritz, panko, breadcrumbs, or lemon butter. Also mention whether you used thin fillets, thick loins, or frozen haddock. Your notes help other readers choose their own path.
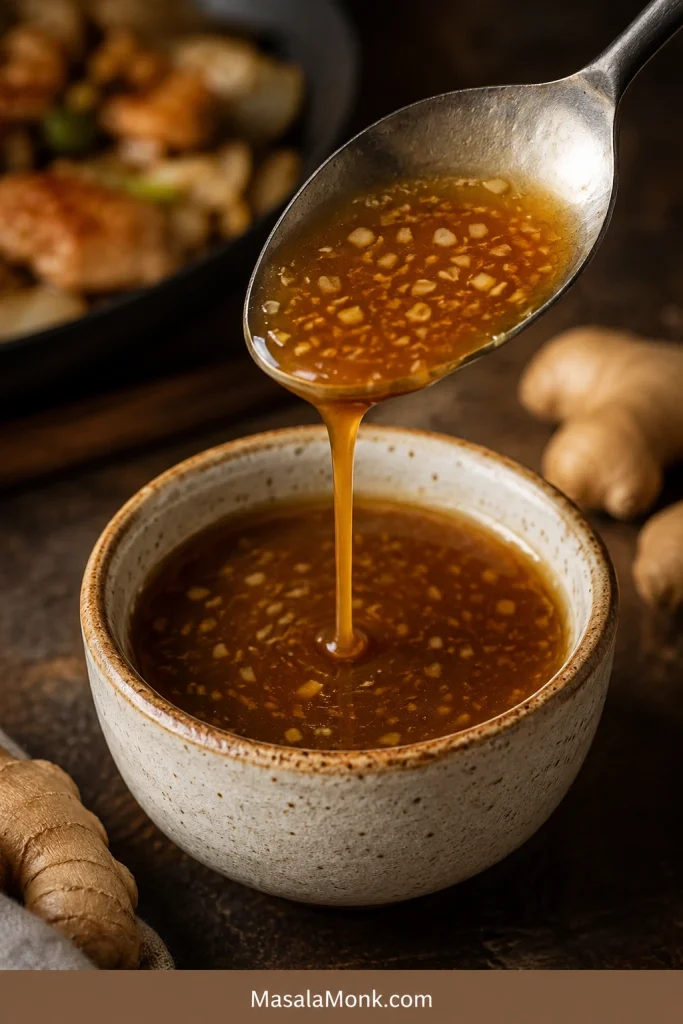
If you have ever dipped hibachi shrimp, steak, or fried rice into that sharp brown ginger sauce and wished you had a jar at home, this is the one to make.
This hibachi ginger sauce is pourable, tangy, salty, lightly sweet, and full of fresh ginger-onion bite. It is the brown dipping sauce from the little Japanese steakhouse cup — not creamy yum yum sauce and not the orange ginger dressing from the salad.
The first spoonful should taste like the dip you remember: salty at the start, bright in the middle from lemon and rice vinegar, and warm with ginger at the end. Blend it in 5 minutes, chill it if you can, and serve it with shrimp, steak, chicken, fried rice, noodles, vegetables, dumplings, tofu, or rice bowls.
Before You Blend
Use fresh ginger if possible. Ginger paste works in a pinch, but fresh ginger gives the cleanest bite.
Choose low-sodium soy sauce. Regular soy sauce can make this dip too salty after it rests.
Pulse, don’t fully puree. Tiny ginger and onion flecks are part of the steakhouse-style texture.
Let it chill when you can. One hour in the fridge softens the raw onion and makes the sauce taste more rounded.
Hibachi ginger sauce is a Japanese steakhouse-style dipping sauce made with fresh ginger, onion, soy sauce, rice vinegar, lemon juice, and a little sugar. It is usually served with grilled meats, seafood, vegetables, noodles, and fried rice.
When people ask for the brown sauce from hibachi restaurants, they usually mean this ginger-soy dipping sauce. Yum yum sauce is the creamy pink-orange one. On salad, the orange or tan sauce is usually Japanese ginger dressing.
It is especially good with shrimp fried rice, steak bites, grilled chicken, sautéed mushrooms, zucchini, dumplings, spring rolls, tofu, salmon, and rice bowls.
Hibachi Ginger Sauce Recipe
A 5-minute no-cook Japanese steakhouse-style ginger sauce made with fresh ginger, onion, soy sauce, rice vinegar, and lemon juice. The flavor is salty-tangy first, then bright and gingery, with a little onion bite that mellows after chilling.
Prep Time
5 minutes
Cook Time
0 minutes
Optional Chill Time
1 hour
Total Time
5 minutes, or 1 hour 5 minutes with chilling
Yield
About 1 cup / 240 ml
Servings
8
Serving Size
2 tablespoons / 30 ml
Texture
Pourable, lightly textured
Ingredients
2 tablespoons fresh ginger, peeled and grated or finely chopped, about 15 g
½ cup chopped yellow onion, about 70–80 g
⅓ cup low-sodium soy sauce or tamari, 80 ml
3 tablespoons rice vinegar, 45 ml
2 tablespoons fresh lemon juice, 30 ml
1 teaspoon sugar or brown sugar, 4 g
½ teaspoon lemon zest, optional
1 small garlic clove, optional
Equipment
Blender, food processor, or mini chopper
Microplane, grater, or sharp knife
Cutting board
Measuring cups and spoons
Small jar or airtight container
No blender? Grate the ginger, mince the onion as finely as possible, then shake everything hard in a jar. The dip will be chunkier and more intense, but it still works for dipping.
Instructions
Peel the ginger and grate it, or chop it finely so it blends easily.
Chop the onion into small pieces. Smaller pieces help the mixture blend faster without turning foamy.
Add the ginger, onion, soy sauce, rice vinegar, lemon juice, sugar, and optional lemon zest or garlic to a blender or food processor.
Pulse until the sauce is loose and spoonable. Stop while tiny pieces of ginger and onion are still visible.
Taste before you change anything. Add more lemon juice if it tastes flat, a tiny pinch of sugar if it tastes too strong, or 1–2 tablespoons water if it tastes too salty.
Serve right away, or cover and chill for 1 hour so the flavor tastes smoother and more rounded.
Recipe Notes
Do not judge the sauce in the first minute after blending. Raw onion and ginger taste loud at first; chilling is part of the recipe if you want a smoother restaurant-style flavor.
Start with 2 tablespoons fresh ginger. Very mild ginger can take another ½ tablespoon after blending. Older, woody, or very hot ginger should rest in the sauce before you add more.
Low-sodium soy sauce keeps the sauce from becoming too salty.
Use a food processor for a slightly textured sauce and a blender for a smoother one.
The dip may separate in the fridge. Stir or shake before serving.
Yield may vary slightly depending on how finely the onion is chopped and blended.
Store in an airtight jar in the refrigerator and use within 5 days.
The main recipe is balanced for home cooking: bold enough for hibachi-style plates, but not so salty that it overwhelms rice, vegetables, or dumplings. Use this quick guide before you add more soy sauce, sugar, or lemon.
Start with the base sauce, then adjust it for the meal in front of you. Keep it loose for fried rice, make it bolder for steakhouse plates, or add garlic and sesame oil when serving it with dumplings.
Want This Result?
Do This
Closest steakhouse bite
Add extra soy sauce, rice vinegar, lemon, and ginger from the stronger restaurant-style adjustment below.
Less salty everyday sauce
Stay with the main recipe and use low-sodium soy sauce.
Best for dumplings
Add the optional garlic and a few drops of toasted sesame oil.
Best for fried rice
Keep it loose and bright. Do not thicken it.
Best texture
Pulse until tiny ginger and onion flecks remain.
No blender version
Grate the ginger, mince the onion finely, and shake everything in a jar.
Some restaurant-style ginger sauces lean hard on soy sauce and vinegar. They taste bold with grilled steak or shrimp, but they can become too salty for home dinners. This version keeps the familiar ginger-onion base and balances it with lemon, rice vinegar, and a small amount of sugar.
The finished sauce should hit salty first, then tangy, then gingery. It should not taste creamy, oily, syrupy, or thick. If the onion tastes raw right away, chill the sauce before changing the recipe.
Quick Taste Check
The dip should taste balanced, not sweet or heavy. Flat sauce needs lemon, a too-strong batch needs chill time, and salty sauce needs water 1 tablespoon at a time. When one bite of rice makes you want another, the balance is right.
Plain rice is the quickest way to test the flavor because it does not hide the sauce. When the bite tastes lightly salty, bright, and gingery, the hibachi ginger sauce is ready.
That balance is why the dip works with a whole plate, not just one bite. It cuts through butter, soy, and seared edges without covering up the shrimp, steak, rice, or vegetables. Use it as a dip, a spoon-over sauce for fried rice, or a brighter alternative when a thicker stir fry sauce would feel too heavy.
What Is Hibachi Ginger Sauce?
The easiest way to understand hibachi ginger sauce is by where it sits on the plate: beside grilled food, not on salad. It cuts through richness, wakes up rice, and adds a fresh ginger bite to shrimp, steak, chicken, vegetables, and noodles.
You may see it called Japanese steakhouse ginger sauce, Benihana-style ginger sauce, hibachi brown sauce, or simply ginger sauce. Most of those names point to the same ginger-soy dipping cup sauce.
Ingredients You’ll Need
The goal is not to make the strongest sauce possible. Aim for that familiar first dip: bright, salty, gingery, and balanced enough that you keep going back for one more bite of rice.
Fresh ginger and onion create the bite, while soy sauce, rice vinegar, lemon, and a small amount of sugar bring balance. Together, they keep the sauce savory and bright instead of flat, sour, or overly salty.
Fresh Ginger
Fresh ginger is the main flavor. It gives the sauce its clean bite, gentle heat, and bright fragrance. Peel it first, then grate or finely chop it so it blends evenly.
Two tablespoons gives the sauce a clear ginger flavor without overwhelming everything else. Use 1½ tablespoons for a milder dip or 2½ tablespoons for a stronger one.
Yellow Onion
Onion is what keeps the dip from tasting like soy sauce with ginger stirred in. Yellow onion gives the best balance; white onion tastes sharper, and red onion changes the color and flavor too much for this style.
Soy Sauce or Tamari
Soy sauce brings salt, color, and savory depth. Low-sodium soy sauce is the safest choice because this is a dipping sauce, and salt builds quickly.
Tamari works well for a deeper flavor or a gluten-free version. Coconut aminos can work for a soy-free version, but it is sweeter and less salty, so reduce or skip the sugar and brighten the sauce with extra vinegar or lemon if needed.
For a sweeter cooked soy-ginger glaze instead of a fresh dipping sauce, this teriyaki sauce recipe is the better direction.
Rice Vinegar
Rice vinegar gives the sauce a clean tang without making it harsh. Unseasoned rice vinegar gives you the most control. If using seasoned rice vinegar, blend first, then add sugar only if the sauce still needs rounding.
Lemon Juice
Fresh lemon juice lifts the ginger, keeps the soy sauce from tasting heavy, and gives the dip a clean finish. Lemon zest is optional; use only a little because too much can make the sauce bitter.
Sugar
The sugar is not there to make the sauce sweet. It just rounds off the raw onion, vinegar, lemon, and ginger so the dip tastes balanced instead of harsh. Brown sugar tastes rounder; white sugar keeps the flavor cleaner.
Garlic, Optional
Garlic pushes the dip away from the clean steakhouse flavor and toward a stronger dumpling or noodle sauce. Add one small clove for that version, or leave it out for a cleaner ginger-onion base.
Fresh Ginger vs Ginger Paste vs Ground Ginger
Fresh ginger is best here because the sauce is supposed to taste lively. Dried ginger cannot give the same clean bite.
Ginger Option
Does It Work?
How to Use It
Fresh ginger
Best choice
Use 2 tablespoons / about 15 g for the main recipe.
Ginger paste
Works in a pinch
Start with 1½ tablespoons, blend, then add more after tasting.
Ground ginger
Emergency only
Start with ¼ teaspoon. The flavor will be warmer and duller.
Check the label on ginger paste. Some brands include salt, vinegar, oil, or preservatives, and those can change the balance.
How to Make Ginger Sauce
No cooking needed here — just chop, blend, taste, and rest. A blender or food processor gives the cleanest texture, but a hand-chopped jar version still works when you want the sauce quickly.
1. Prep the ginger and onion
Peel the ginger and grate it, or chop it finely. Cut the onion into small pieces so it breaks down quickly.
Grating the ginger before blending helps its flavor spread evenly through the sauce. Likewise, chopping the onion small gives body without leaving big raw pieces in the finished dip.
2. Add the sauce ingredients
Add the ginger, onion, soy sauce, rice vinegar, lemon juice, sugar, and optional lemon zest or garlic to a blender or food processor.
This no-cook ginger sauce comes together in the food processor. Add the aromatics and liquids together, then pulse in short bursts so the sauce stays loose and lightly textured.
3. Pulse until spoonable
Pulse until the sauce is loose and easy to pour. Stop before it becomes a creamy puree. Tiny visible bits of ginger and onion are a good sign.
Stop pulsing while tiny ginger and onion flecks are still visible. That light texture is what gives Japanese steakhouse ginger sauce its fresh bite instead of a dull, over-blended finish.
4. Taste and adjust
Taste before you change anything, and do not panic if it feels loud at first. This sauce can swing from perfect to too salty quickly, so small adjustments are better than big ones. Add lemon if it tastes flat, a tiny pinch of sugar if it tastes too strong, or 1–2 tablespoons water if it tastes too salty.
5. Chill for smoother flavor
You can serve the sauce right away, but it tastes better after resting. After about an hour in the fridge, the onion relaxes, the ginger settles, and the sauce starts tasting more like the restaurant cup.
Blender vs Food Processor: What Texture Should Ginger Sauce Have?
Both tools work, but they give slightly different results.
Use a blender for a smoother ginger sauce and a food processor for a more flecked steakhouse-style dip. Either works, but the tool changes the final texture.
Tool
Best For
Texture
Blender
Smoother sauce
More even, less textured, easy to pour.
Food processor
Steakhouse-style texture
Lightly textured, with tiny ginger and onion flecks.
Mini chopper
Small batches
Works well, but scrape the sides once or twice.
No blender
Quick hand-chopped version
Chunkier and stronger, but still useful for dipping.
The ideal texture is pourable and lightly flecked. It should not look like mayonnaise, salad dressing, or a thick glaze.
If the sauce turns pale or foamy after blending, let it sit for a few minutes and stir. Air can lighten the color temporarily; after resting, the sauce usually settles into a deeper brown.
Taste and Texture Target
You’ll know the sauce is right when it smells gingery, pours easily from a spoon, tastes bright but not biting, and leaves tiny flecks behind in the cup. It should be brighter than salad dressing and lighter than teriyaki sauce.
The finished sauce should fall easily from a spoon. That pourable texture lets it brighten rice, shrimp, steak, chicken, and vegetables without feeling heavy like a glaze.
How to Adjust the Sauce After Blending
Once the dip is blended, change it slowly. A spoonful of water, lemon, sugar, or soy sauce can move the whole batch.
Goal
What to Do
More restaurant-style
Add 1–2 tablespoons soy sauce, 1 tablespoon rice vinegar, and a little extra grated ginger.
Less salty
Add 1–2 tablespoons water after blending, or use a little less soy sauce next time.
Less intense
Chill for 1 hour and add ½ teaspoon sugar if needed.
More gingery
Add ½ tablespoon more fresh grated ginger.
More textured
Use a food processor and stop while tiny pieces are visible.
Smoother
Use a blender and blend a little longer, but stop before it turns foamy.
Gluten-free
Use tamari or certified gluten-free soy sauce.
Soy-free
Use coconut aminos, reduce or skip the sugar, and add extra vinegar or lemon to balance the sweetness.
Better for dumplings
Add the optional garlic and a few drops of toasted sesame oil.
Benihana-Style Notes
Think of this as Benihana-style, not a claim that it is the restaurant’s exact formula. Benihana’s own ginger sauce notes emphasize fresh ginger, onion, rice vinegar, lemon juice, and low-sodium soy sauce, which lines up with the flavor profile people expect from the brown dipping sauce.
This version keeps that profile but adjusts the balance for a home kitchen. Use the stronger adjustment below when the sauce in your memory was sharper, saltier, and more intense. For a dip you can spoon over rice and use all week, stay with the main recipe.
For a stronger Benihana-style direction, add soy sauce, rice vinegar, lemon, and extra ginger a little at a time. Small changes matter because this dipping sauce can turn too salty quickly.
For a Stronger Restaurant-Style Sauce
After blending the main recipe, make it sharper and more soy-forward by adding:
1–2 extra tablespoons soy sauce
1 extra tablespoon rice vinegar
½ tablespoon extra lemon juice
½ tablespoon extra grated ginger
Add these slowly and taste as you go. It is easier to make the sauce stronger than to rescue a sauce that has become too salty or too sour.
Ginger Sauce vs Ginger Dressing vs Yum Yum Sauce
These sauces often get mixed up because they all show up around hibachi and Japanese steakhouse meals. The easiest way to tell them apart is to look at where they show up on the table: ginger sauce is for the dipping cup, ginger dressing is for salad, and yum yum sauce is the creamy one people spoon over shrimp and fried rice.
This side-by-side view clears up the common hibachi sauce mix-up. Brown ginger sauce is for dipping, yum yum sauce is creamy, and Japanese ginger dressing usually belongs on salad.
Sauce
Texture
Main Flavor
Best Use
Hibachi ginger sauce
Brown, pourable, lightly textured
Ginger, onion, soy, vinegar, lemon
Shrimp, steak, chicken, vegetables, fried rice
Japanese ginger dressing
Orange or tan, dressing-like
Carrot, onion, ginger, oil, vinegar
Green salad
Yum yum sauce
Creamy, pale pink or orange
Mayo, tomato or ketchup, sugar, spices
Shrimp, chicken, fried rice, vegetables
Hibachi mustard sauce
Smooth, mustard-forward
Mustard, soy, sesame, or cream depending style
Steak and chicken
Ginger scallion sauce
Oil-based and spoonable
Ginger, scallions, hot oil
Rice, noodles, poached chicken, tofu
For salad, ginger dressing is usually the better match. Beside hibachi shrimp, steak, chicken, vegetables, or fried rice, this brown ginger sauce is the right one.
What to Eat With Ginger Sauce
Use this sauce beside something rich: buttery mushrooms, seared shrimp, fried rice, grilled steak, or chicken thighs. It makes rice taste brighter, shrimp taste sweeter, and steak feel less heavy after a few bites.
For a creamier dip beside spring rolls or noodles, keep this ginger sauce as the bright option and add a bowl of peanut sauce for contrast.
This brown ginger dipping sauce also works beyond hibachi dinners. Try it with dumplings, potstickers, spring rolls, and lettuce wraps when you want a bright soy-ginger dip instead of a creamy sauce.
A flexible salmon bowl when you want the sauce with fish
Complete Your Hibachi Night
For a full hibachi-style plate, serve this ginger sauce with fried rice or steamed rice, sautéed zucchini and mushrooms, shrimp or chicken, and one creamy sauce on the side. The ginger sauce brings the bright tang; the creamy sauce brings richness.
Serve this ginger sauce beside rich hibachi foods. Its ginger, lemon, vinegar, and soy cut through fried rice, seared shrimp, steak, chicken, mushrooms, and buttery vegetables.
Cold leftover rice works especially well because the sauce cuts through the salty, savory flavor. For a fresh base, use this how to cook rice guide before adding shrimp, steak, chicken, tofu, or vegetables.
Optional Warm Drizzle for Bowls and Noodles
Classic hibachi ginger sauce is served cold or at room temperature. But if you want a warmer drizzle for noodles, bowls, or stir-fried vegetables, you can thicken a small portion.
Quick thickened version
Mix ½ teaspoon cornstarch with 1 tablespoon water.
Add ½ cup ginger sauce to a small pan.
Warm over medium-low heat.
Stir in the cornstarch slurry.
Cook for 1–2 minutes, stirring, until lightly thickened.
Heating changes the personality of the sauce. It becomes more of a warm bowl drizzle, and the fresh ginger-onion bite softens. Thicken only what you plan to use right away and keep the rest cold for dipping.
Troubleshooting Ginger Sauce
Fresh ginger and onion can taste strong before they rest. Most problems are easy to fix with a small adjustment.
Fix the sauce in small steps after blending: lemon wakes up a flat batch, chilling softens onion bite, water reduces saltiness, and sugar rounds out too much acid.
Problem
Why It Happened
How to Fix It
Too oniony
Too much raw onion or not enough resting time
Chill for 1 hour. Add a small splash of soy sauce or lemon juice. Use less onion next time.
Overly salty
Regular soy sauce or too much soy sauce
Add 1–2 tablespoons water, a little more onion, or a squeeze of lemon.
Sharp or sour
Too much vinegar or lemon juice
Add ½–1 teaspoon sugar and a small splash of soy sauce.
Flavor feels intense
Ginger, onion, vinegar, and lemon are all strong
Chill the sauce. Add a tiny bit more sugar. Dilute with 1 tablespoon water if needed.
Bitter
Too much lemon zest or old ginger
Skip zest next time. Add a little sugar to round out the bitterness.
Runny texture
Classic ginger sauce is naturally loose
Serve as-is, or use the warm drizzle variation for bowls and noodles.
Chunky texture
Not blended enough
Pulse 10–20 seconds more, or strain only if you prefer a cleaner pour.
Smooth or foamy
Over-blended
Let it settle and stir. Next time, pulse instead of blending continuously.
Store the sauce in an airtight jar in the refrigerator and use it within 5 days for the freshest flavor.
Store homemade hibachi ginger sauce in an airtight jar and shake before serving. As it rests, the fresh ginger, onion, and soy-vinegar base can naturally settle.
The flavor is loudest right after blending. After 1 hour in the fridge, the onion and ginger settle down and the soy, vinegar, and lemon taste more balanced. By the next day, the sauce feels rounder, and it is the kind of small jar you end up spooning over leftover rice, cold chicken, or roasted vegetables without planning to.
Shake or stir before serving because the sauce can separate as it sits.
Can you freeze ginger sauce?
You can freeze it in small portions, but the texture will not be as fresh after thawing. The onion and ginger can become slightly watery. For the best dipping texture, make it fresh and refrigerate it instead.
Can you use ginger sauce as a marinade?
Yes, but it is best as a dipping sauce first and a quick marinade second. Use it for shrimp, chicken, tofu, or vegetables when you want a fast ginger-soy flavor.
Because it contains vinegar and lemon juice, do not marinate delicate seafood for too long. Shrimp or fish only needs 10–15 minutes; chicken or tofu can sit for 15–30 minutes.
FAQ
What is the brown sauce at hibachi restaurants?
It is usually ginger sauce: a soy-based dipping sauce made with fresh ginger, onion, vinegar, and lemon. Restaurants commonly serve it with shrimp, steak, chicken, vegetables, noodles, and fried rice.
Is this the same as Benihana ginger sauce?
It is Benihana-style, not the restaurant’s exact formula. The recipe keeps the fresh ginger, onion, soy, vinegar, and lemon profile while using a balanced home-kitchen ratio. Benihana says its signature ginger sauce is prepared fresh and is not sold in stores or bottles. Read Benihana’s note here.
Is ginger sauce the same as yum yum sauce?
No. Ginger sauce is brown, tangy, and soy-based. Yum yum sauce is creamy, usually mayo-based, and pale pink or orange.
Is hibachi ginger sauce the same as ginger salad dressing?
No. Hibachi ginger sauce is a dipping sauce for grilled food and rice. Japanese ginger dressing is usually smoother, often made with carrot, onion, ginger, oil, vinegar, and soy sauce, and served on salad.
Do you serve ginger sauce hot or cold?
Serve it cold, chilled, or at room temperature. It can sit beside hot steak, shrimp, chicken, vegetables, or fried rice, but the sauce itself does not need to be heated.
How long does homemade ginger sauce last?
Use it within 5 days for the freshest flavor. Keep it in an airtight jar in the refrigerator and stir or shake before serving.
Fresh ginger, paste, or powder — which is best?
Fresh ginger is best. Ginger paste can work as a shortcut, but it may contain salt or vinegar. Ground ginger is not recommended because it does not give the same lively flavor.
Can I make ginger sauce without a blender?
Yes. Grate the ginger, mince the onion very finely, add the remaining ingredients to a jar, and shake hard. The sauce will be chunkier and stronger, but it still works for dipping.
Why does my ginger sauce taste too oniony?
Raw onion can taste strong right after blending. Chill the sauce for 1 hour before judging it. If it still tastes too oniony, add a little soy sauce, lemon juice, or sugar to balance it. Next time, use slightly less onion.
What can I serve with ginger sauce?
Serve it with hibachi shrimp, steak, chicken, fried rice, noodles, grilled vegetables, dumplings, spring rolls, tofu, salmon, rice bowls, or roasted vegetables.
Final Tip
The sauce should taste like the first bright bite at the hibachi table: salty, tangy, gingery, and fresh enough to make you want another spoonful of rice or another piece of shrimp. Blend it, chill it if you can, and keep the texture lightly flecked. That little bit of ginger and onion is the whole point.
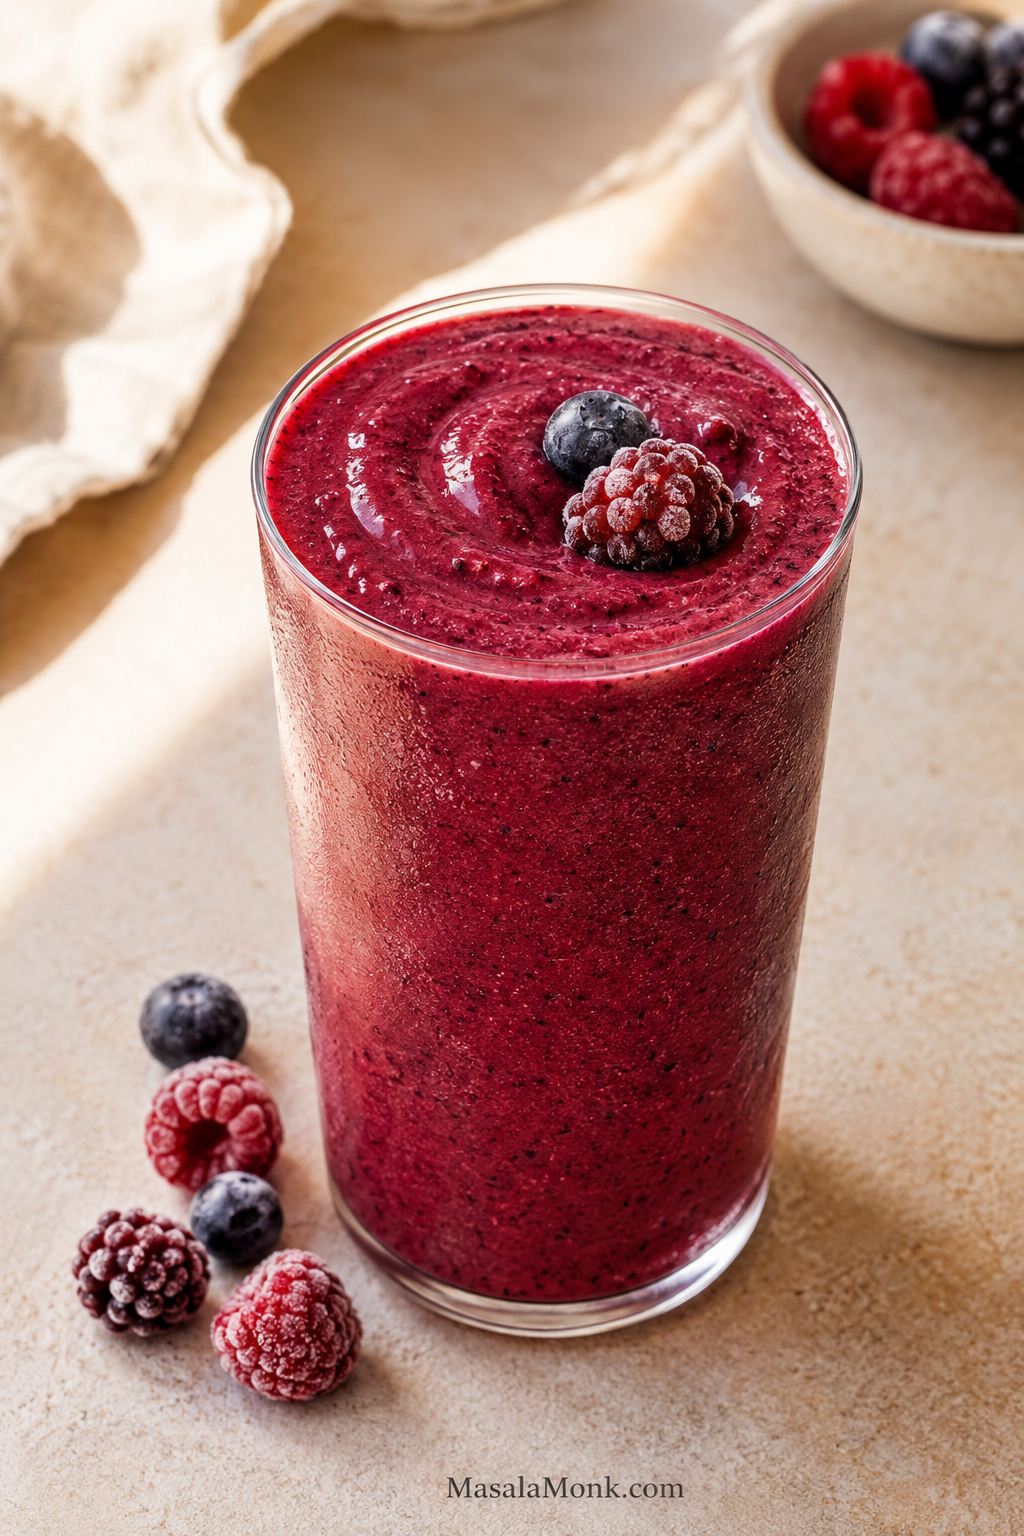
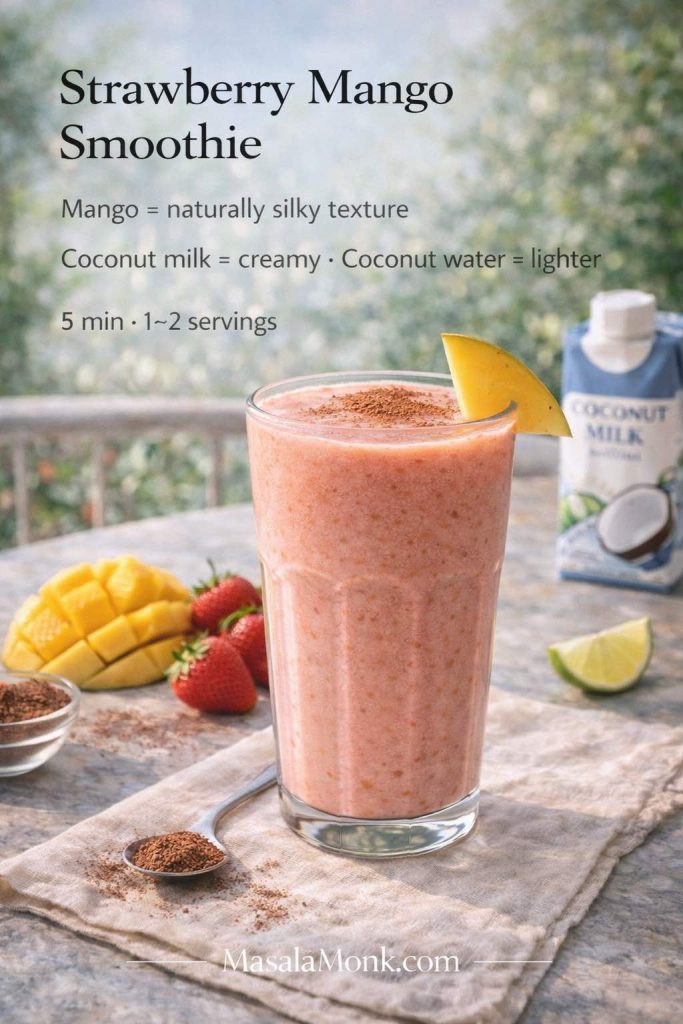
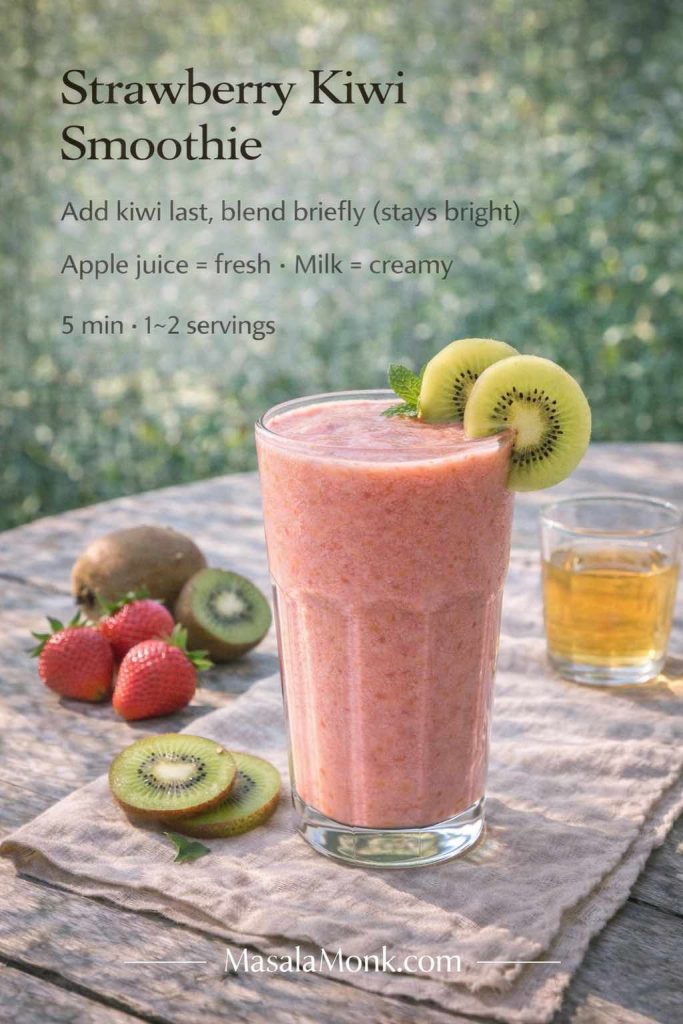
A good berry smoothie should taste like real berries first: cold, creamy, bright, and thick enough to pour slowly. It should feel like a real breakfast or snack, not a glass of watered-down fruit milk.
This berry smoothie recipe starts with one reliable base, then shows you how to adjust it for the way smoothies actually happen at home: a frozen berry bag, half a banana, a spoon of yogurt, almond milk, protein powder, spinach, oats, chia, or whatever needs using up in the fridge.
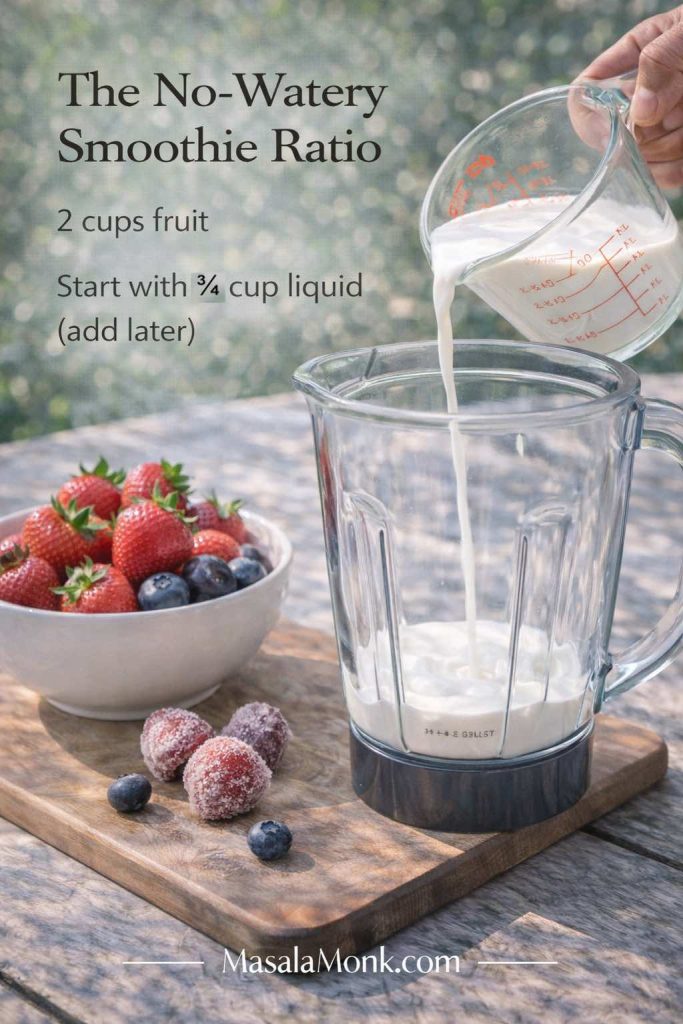
The main rule is simple: start with frozen berries and less liquid than you think. Once the blender starts moving, you can always loosen the smoothie. If it turns watery first, you have to build the texture back with more frozen fruit or another thickener.
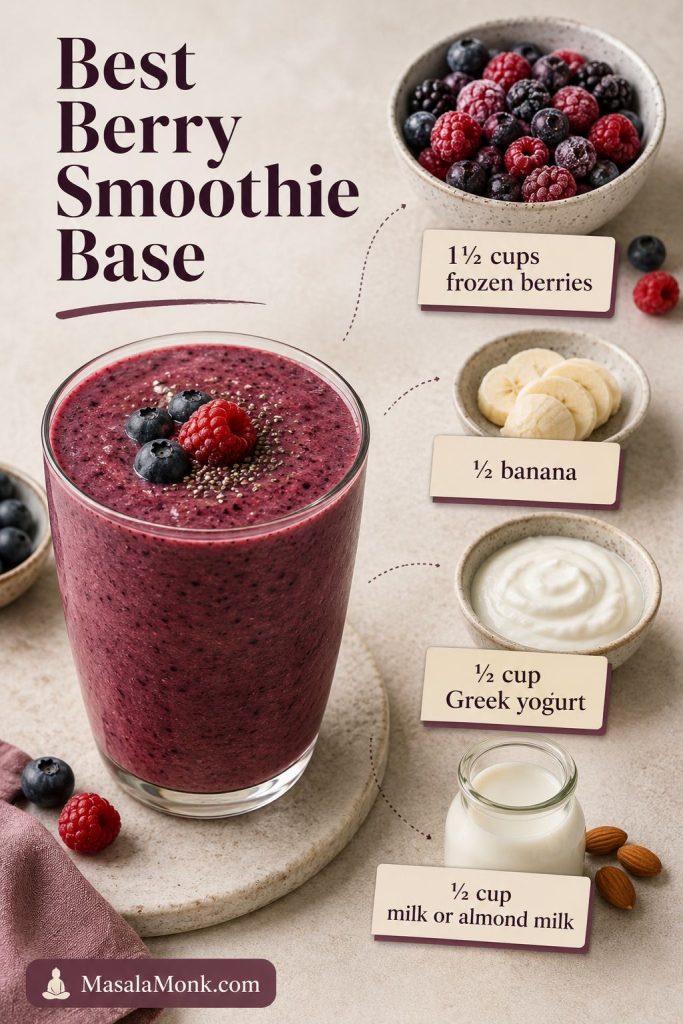
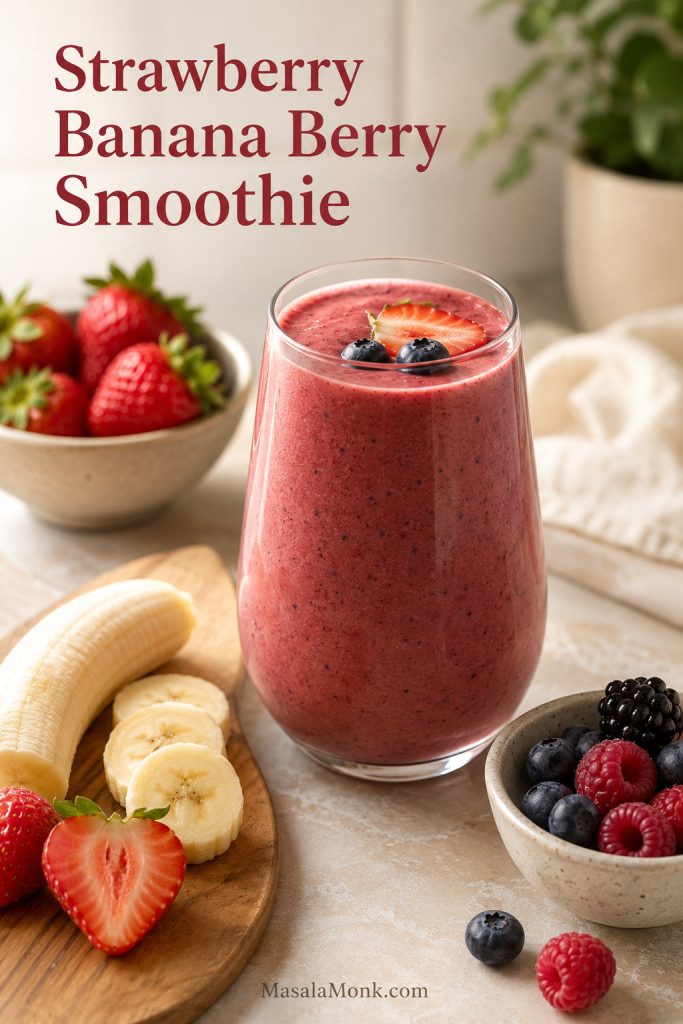
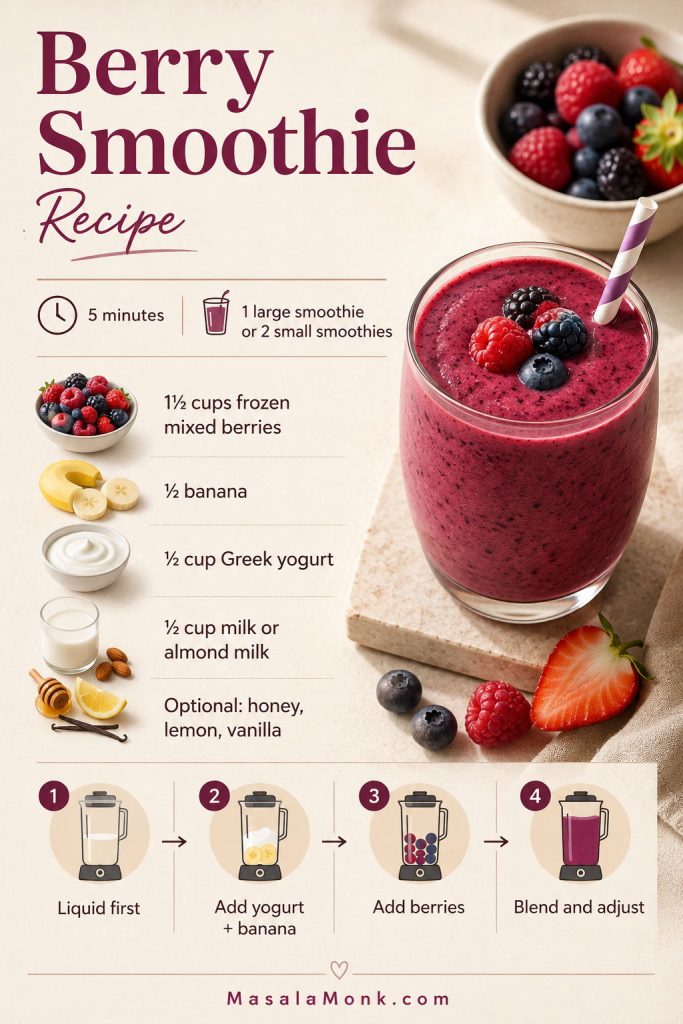
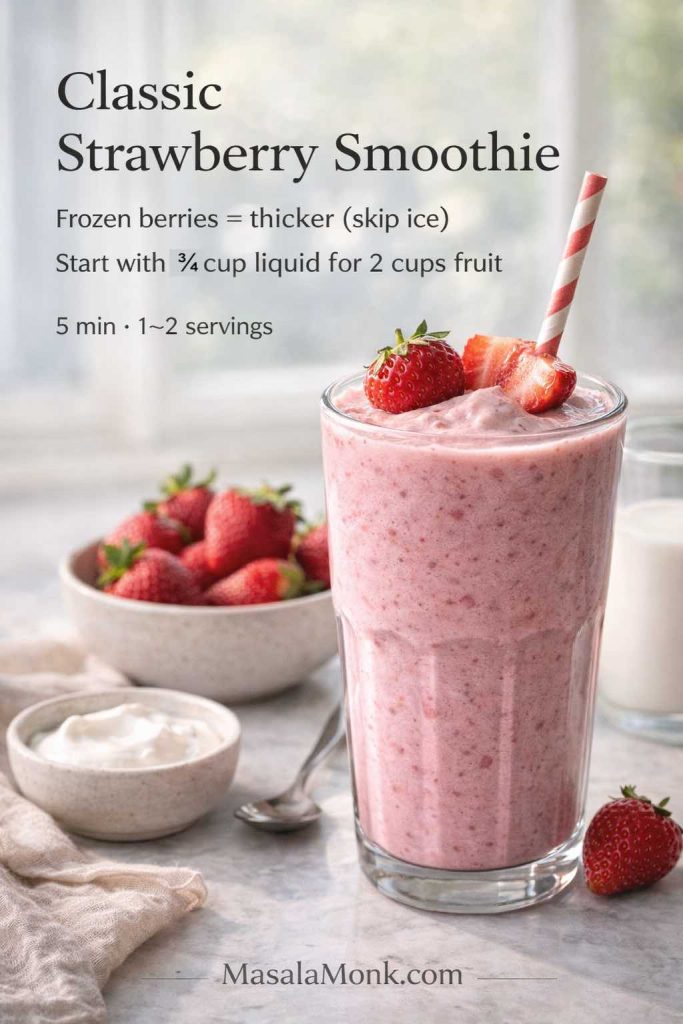
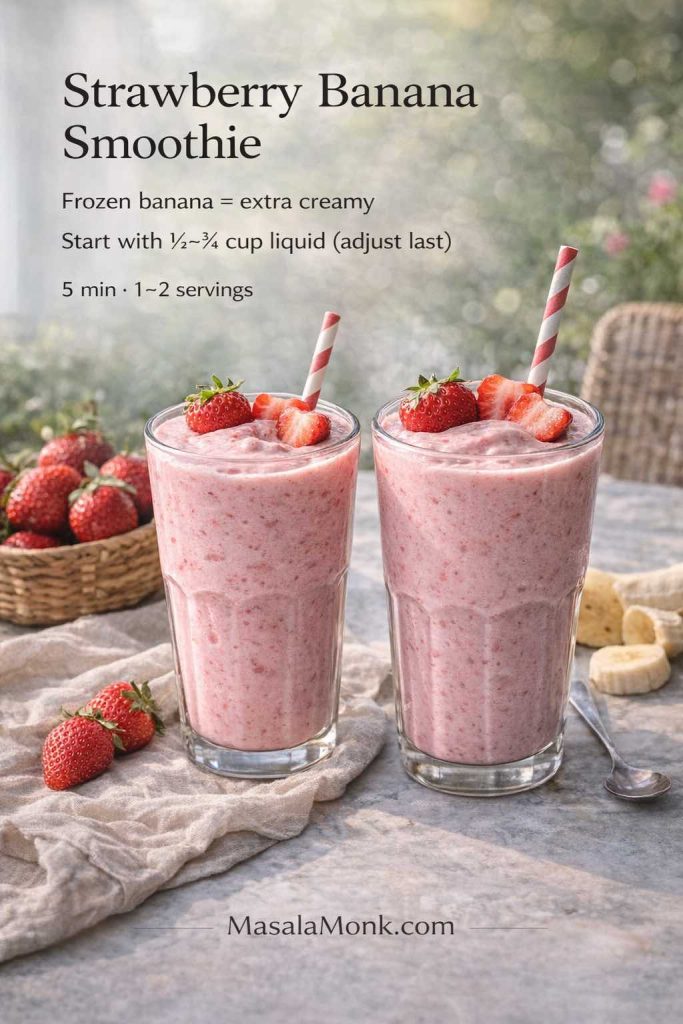
For a thick, drinkable berry smoothie, blend 1 1/2 cups frozen berries, 1/2 banana, 1/2 cup Greek yogurt, and 1/2 cup milk or almond milk. Add the liquid first, then the yogurt and banana, then the frozen berries. Blend until smooth, adding more liquid 1 tablespoon at a time only if the blender stalls.
This base ratio gives you a reliable starting point: frozen berries build texture, banana softens the flavor, yogurt adds creaminess, and milk helps the blender move.
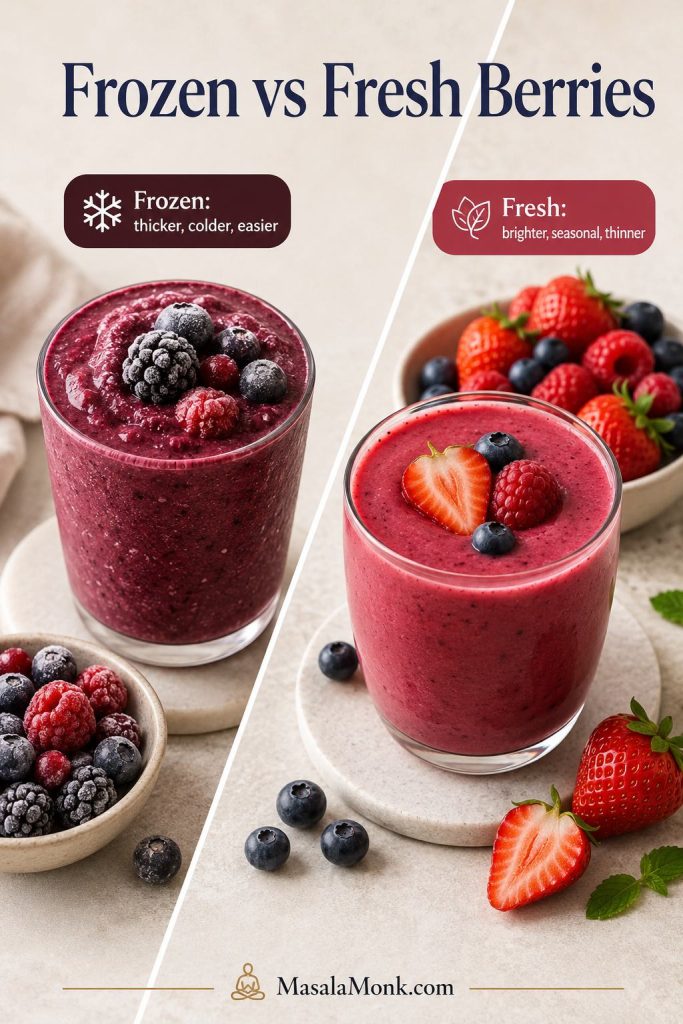
Frozen berries make the thickest, coldest smoothie because they chill the drink and build texture at the same time. Fresh berries work beautifully when they are sweet and in season, but they usually need help from frozen banana, yogurt, oats, chia, or a small amount of ice.
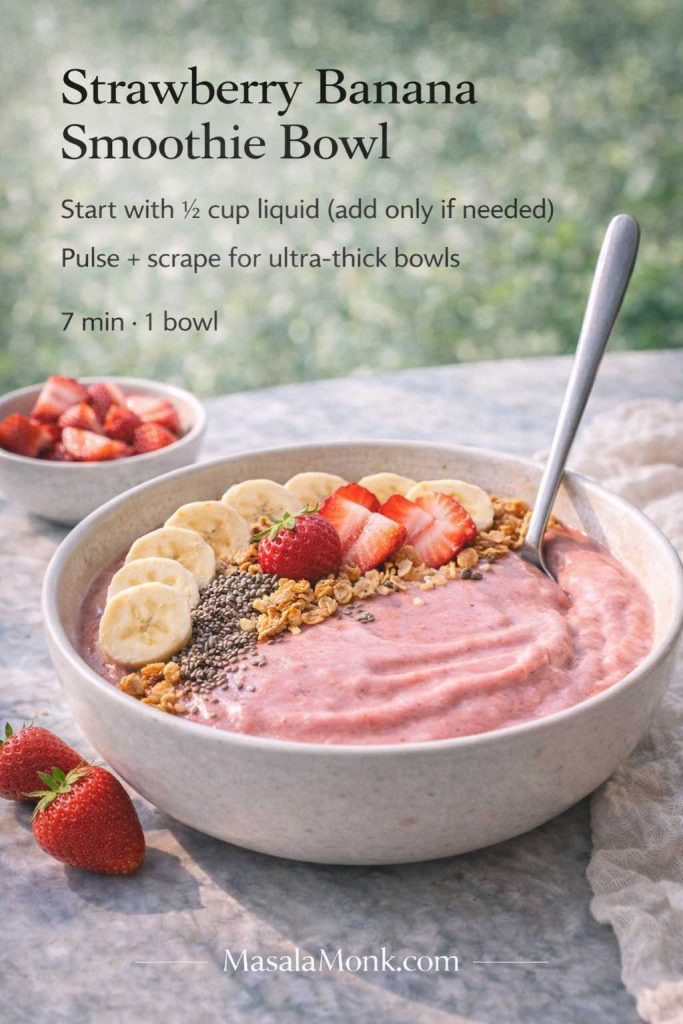
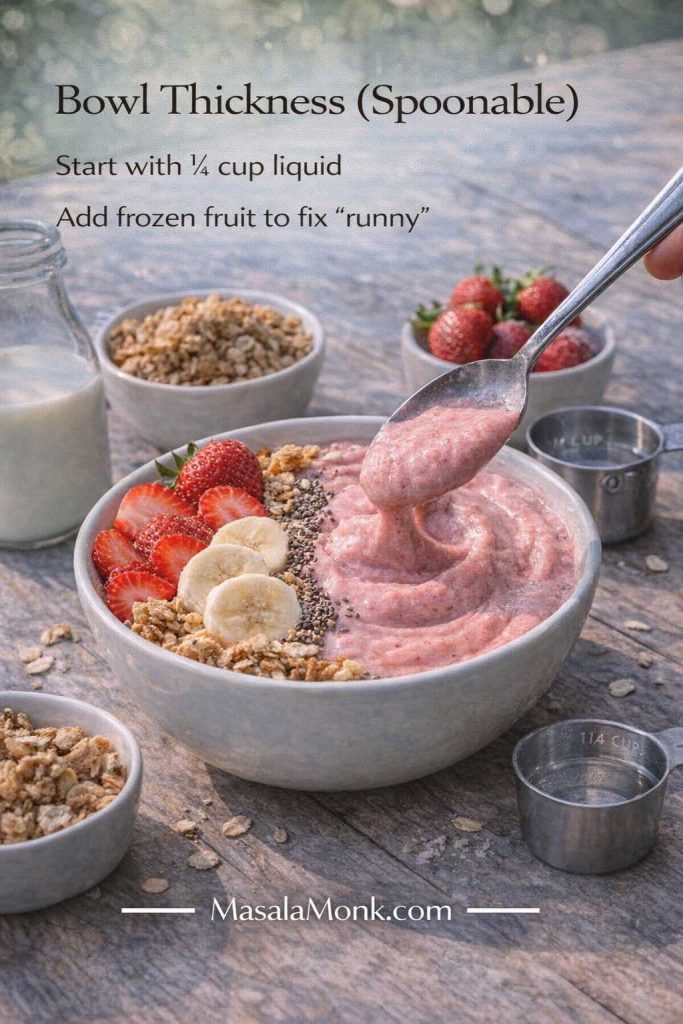
At a glance: 5 minutes, no cooking, about 2 cups / 475 ml total. Use 1/2 cup / 120 ml liquid for a thick drinkable smoothie, or 2–5 tablespoons / 30–75 ml for a spoonable smoothie bowl.
When the ratio is right, the smoothie tastes cold and full, not watered down — the kind of breakfast you can drink slowly instead of rushing through.
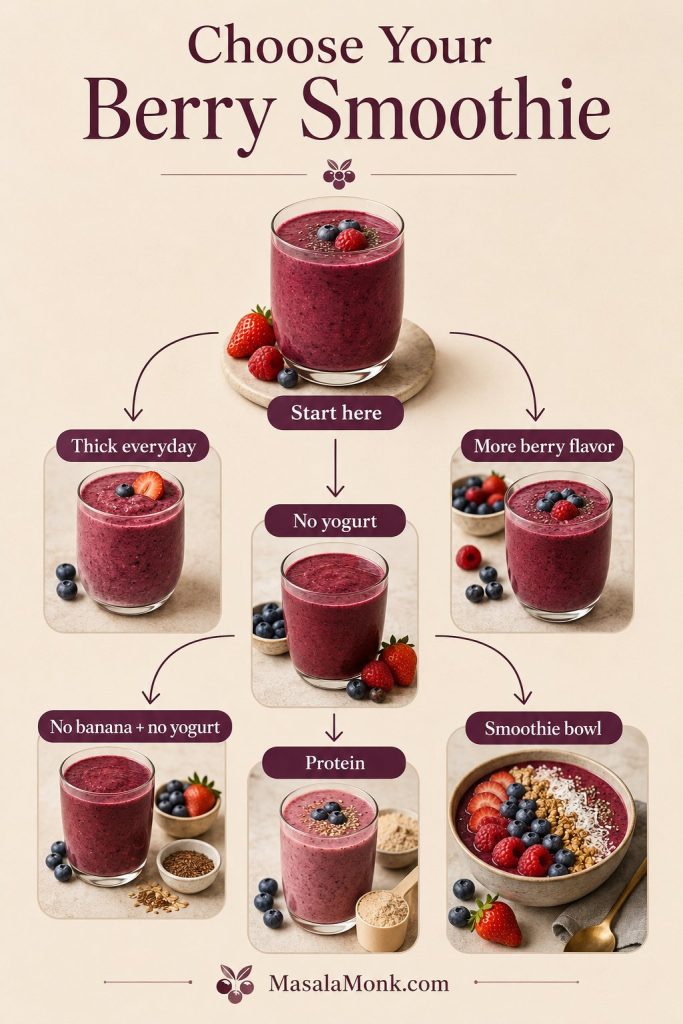
Use this quick table when you know what you want but do not want to read every variation first.
Choose the berry smoothie version based on what you need today: thicker texture, stronger berry flavor, no yogurt, no banana, more protein, or a spoonable bowl.
This recipe works because it treats a smoothie like a flexible ratio instead of a rigid formula. Berries bring the flavor, frozen fruit brings thickness, yogurt or banana brings creaminess, and the liquid decides whether the final texture is slow-pouring, light, or spoonable.
That is why the same freezer bag can give you either a thin, forgettable drink or a smoothie that feels cold, full, and breakfast-worthy. The difference is not complicated technique; it is starting with enough frozen fruit and not flooding the blender before the texture has a chance.
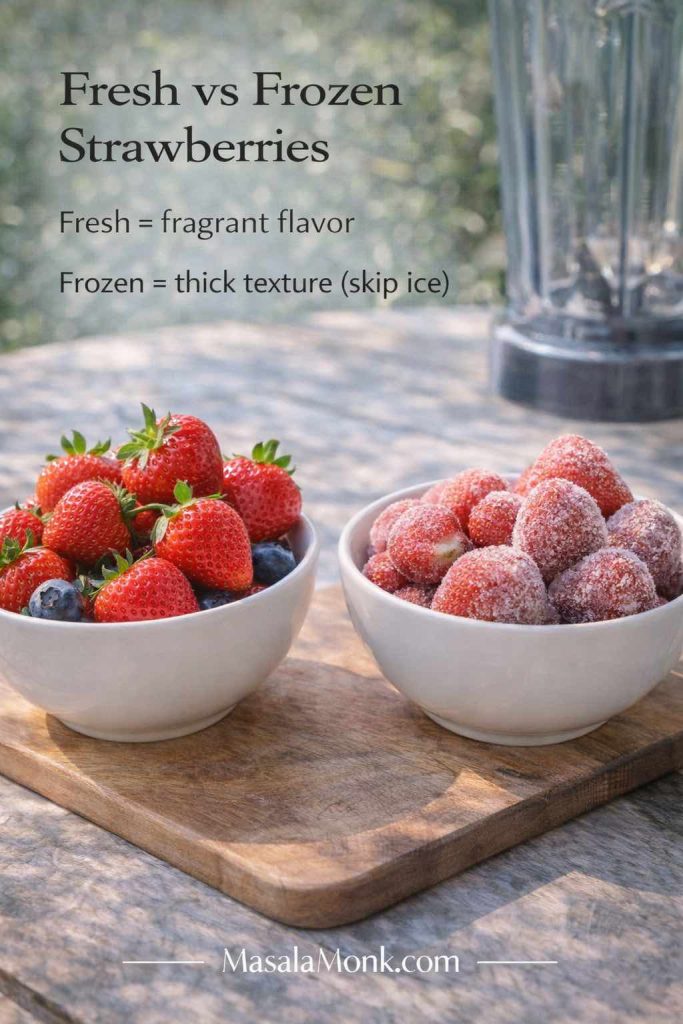
Ice makes a smoothie colder, but it can also water down the berry flavor as it melts. Frozen berries do the job better because they add chill, flavor, and thickness at the same time. For a deeper look at why frozen fruit often gives smoothies better body, see this fresh vs frozen fruit smoothie test.
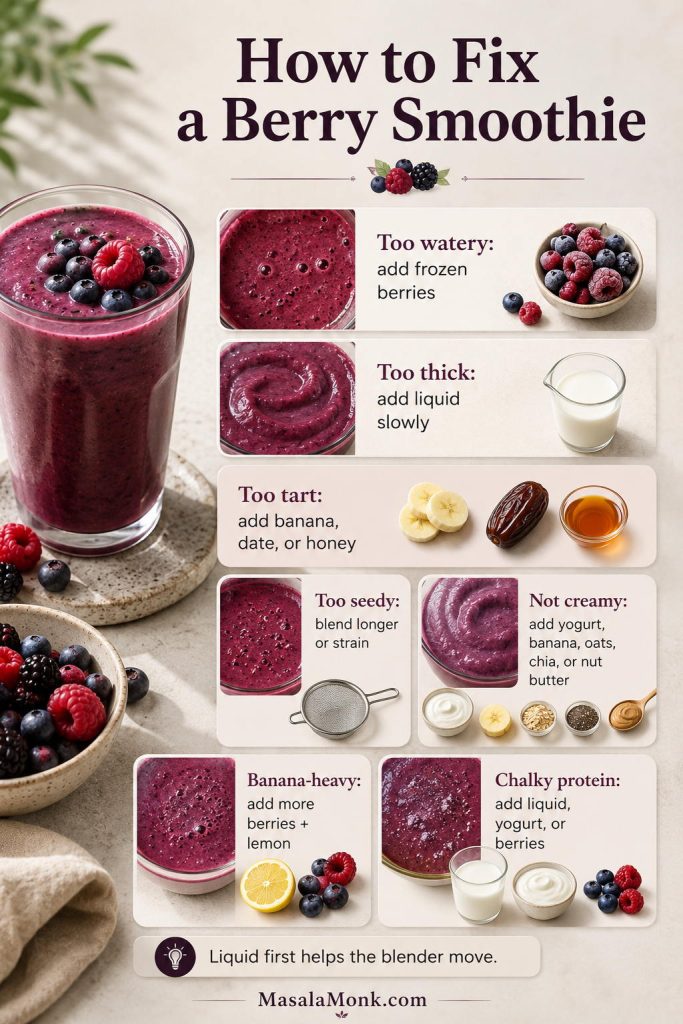
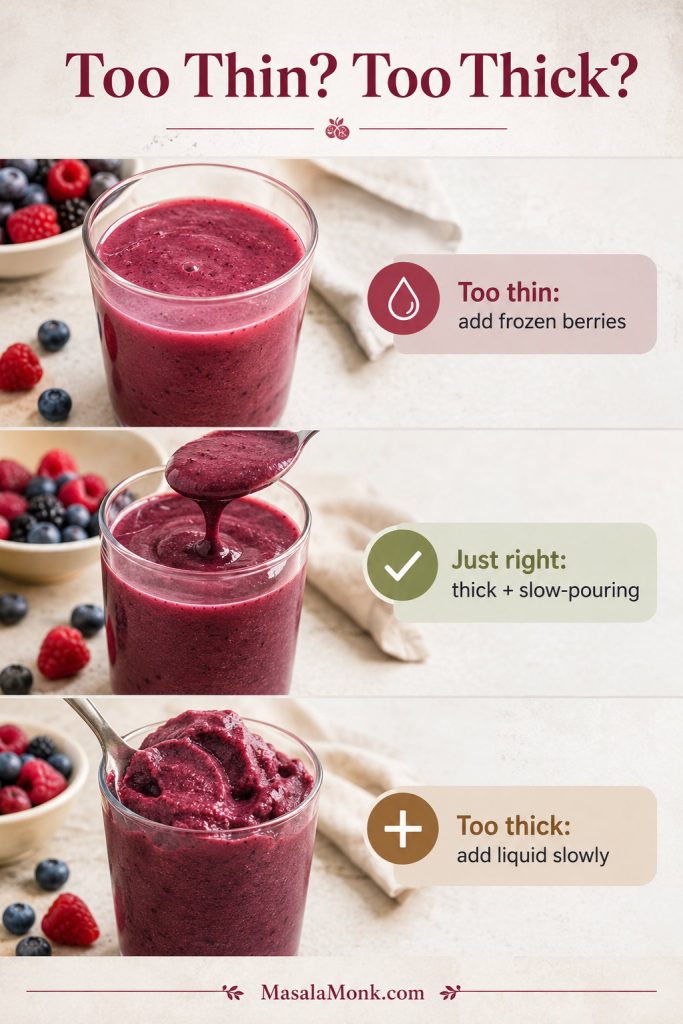
The texture goal: A good berry smoothie should pour slowly, not splash like juice. If it is thin, add frozen fruit. If the blender sounds angry, add liquid one tablespoon at a time.
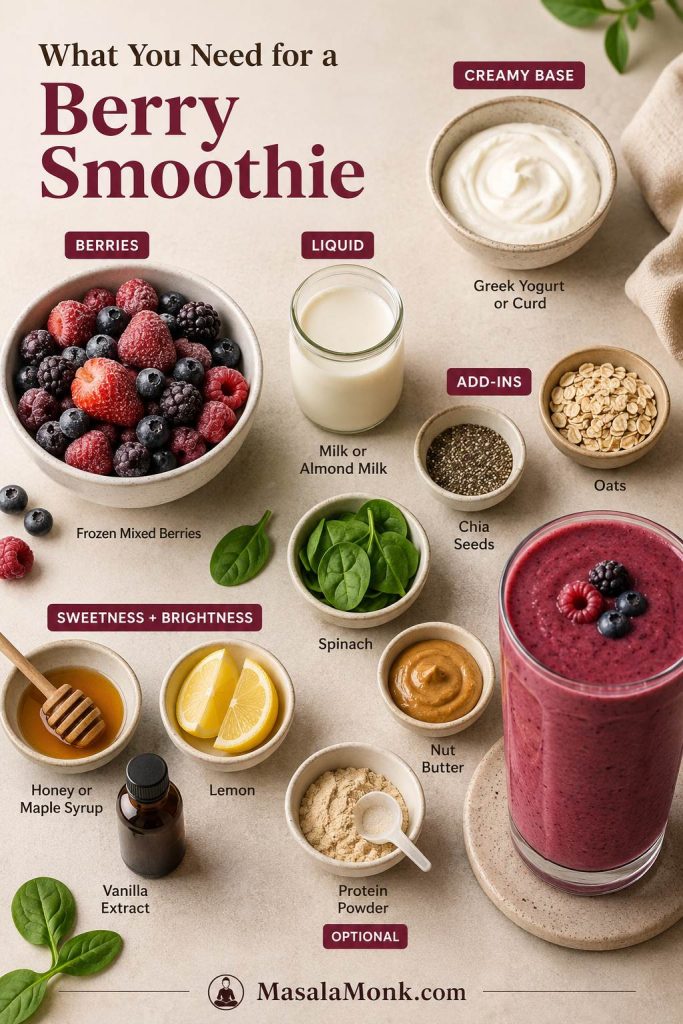
Ingredients That Control Flavor and Texture
You only need a few ingredients, but each one changes the result. Choose the berries first, then decide whether you want banana, yogurt, dairy-free liquid, protein, greens, or a thicker breakfast-style smoothie.
Once you know each ingredient’s job, the recipe becomes easier to fix. Berries bring flavor, creamy add-ins give body, and small extras adjust sweetness, brightness, or thickness.
Frozen berries are the easiest choice for a thick smoothie. They are already cold, blend into a frosty texture, and reduce the need for ice. A frozen mixed berry bag with strawberries, blueberries, raspberries, and blackberries is usually the most convenient option.
Fresh berries are best when they are sweet and juicy. Since they are not frozen, they usually make a thinner smoothie, so use them with frozen banana, Greek yogurt, oats, chia, a handful of frozen berries, or a little ice when you want more thickness.
Frozen berries are the safer choice when texture matters, while fresh berries are best for peak-season flavor. Choose frozen for thickness and fresh for brightness.
Do not thaw frozen berries first unless your blender is struggling badly. Thawed berries release juice, and that extra juice can make the smoothie thinner.
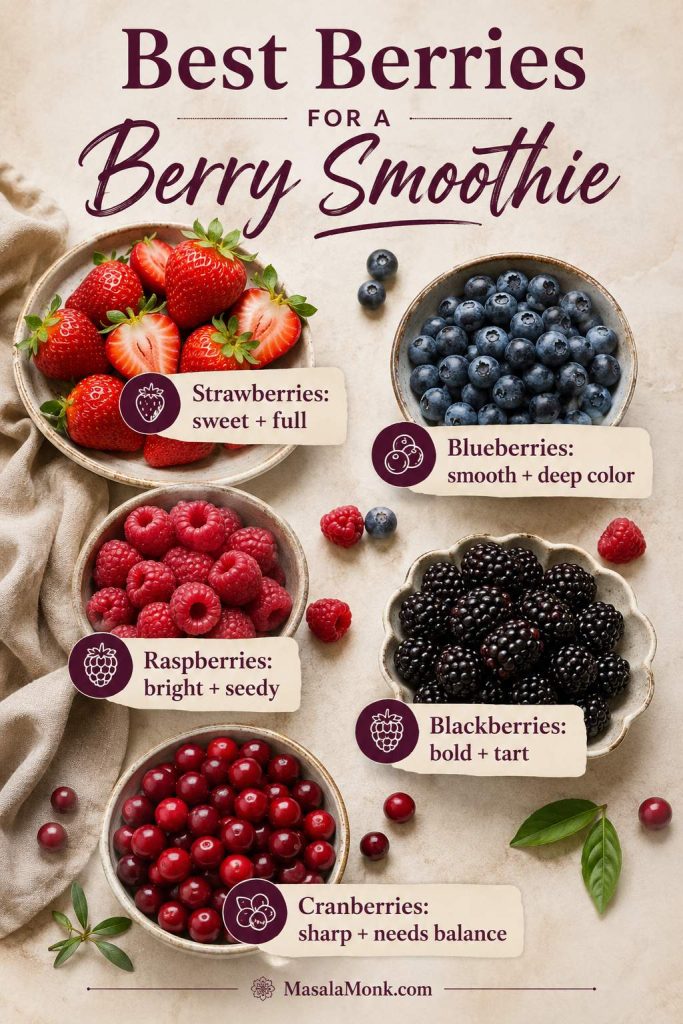
Best Berries for a Smoothie
Different berries behave differently in the blender. This is why one mixed berry smoothie can taste sweet and creamy, while another turns tart, seedy, or flat.
Strawberries and blueberries make a smoother everyday blend, while raspberries, blackberries, and cranberries bring brighter tartness. That means the berry mix changes both flavor and texture.
Berry
What It Adds
Watch Out For
Strawberries
Sweetness, body, and classic smoothie flavor
Can taste mild if the smoothie has too much liquid
Blueberries
Deep color, mild sweetness, and smoother texture
Can taste flat without lemon juice or a little sweetness
Raspberries
Bright tart flavor and strong berry aroma
Can be seedy and sharp
Blackberries
Deep berry flavor and bold color
Can be seedy and tart
Cranberries
Sharp, tangy berry flavor
Usually need banana, dates, honey, or juice to balance them
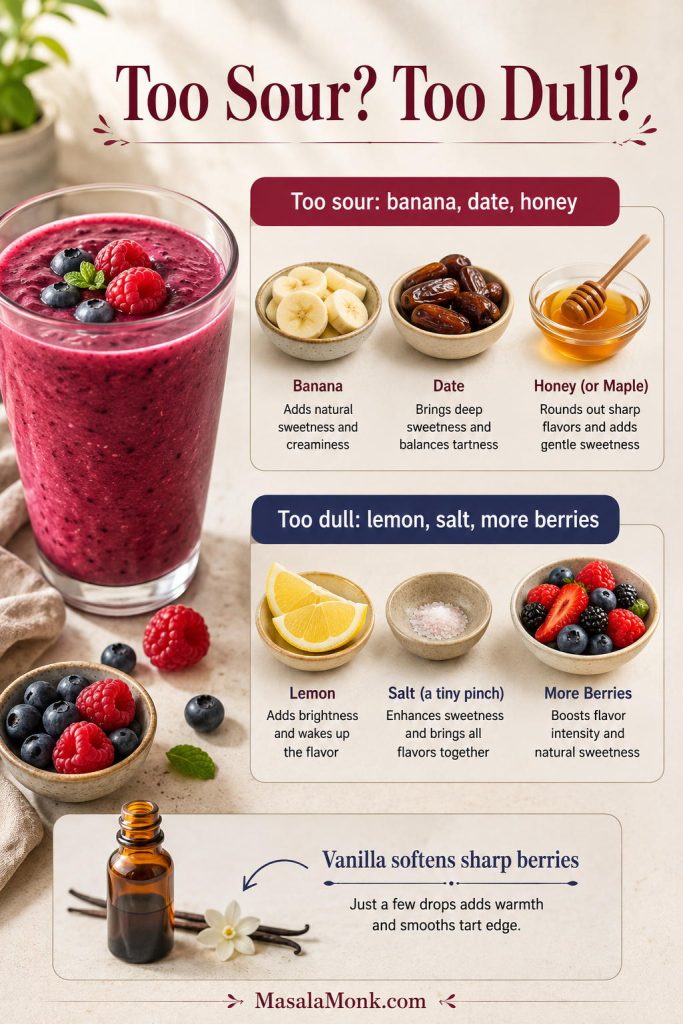
If your smoothie tastes sharp or gritty, the berry mix may be the reason, not your method. A strawberry-blueberry-heavy blend is usually the safest everyday choice; raspberry-blackberry-heavy blends are more vivid, but they need more balancing.
For the smoothest texture, lean on strawberries and blueberries more than raspberries or blackberries. If seeds bother you, blend longer or strain only when needed.
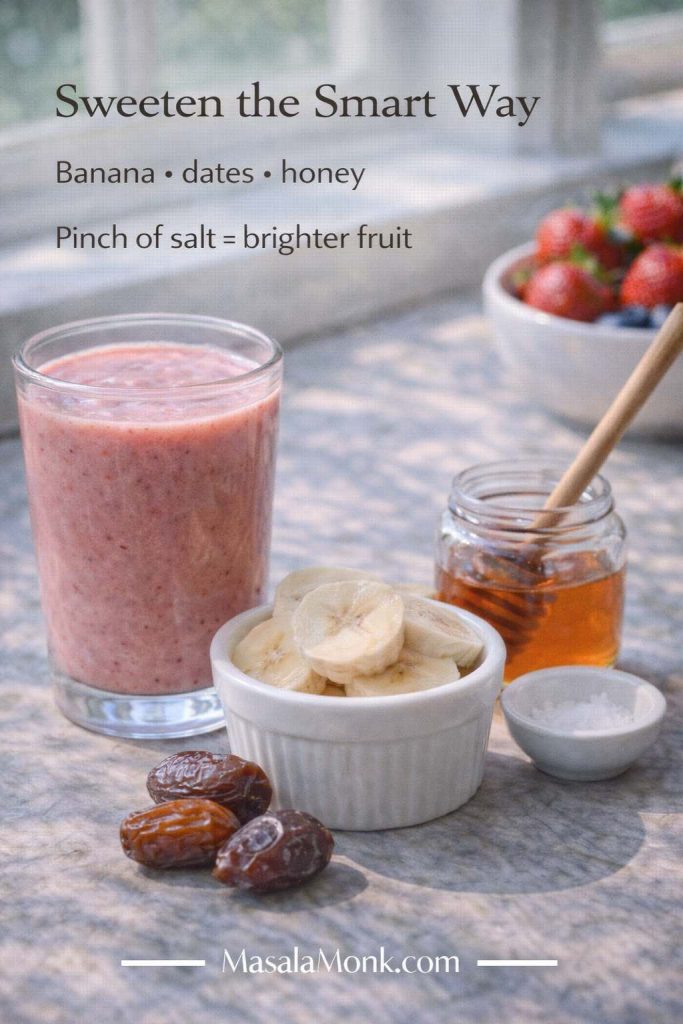
Taste before adding sweetener if your blend has plenty of strawberries or banana. For gentle sweetness, try banana or vanilla first. If the smoothie is still sharp, add a date, honey, or maple syrup. Use juice only when you want a sweeter, fruit-drink style smoothie.
For kids or anyone who prefers a softer, sweeter smoothie, use a strawberry-heavy berry mix, vanilla yogurt, or a small splash of apple or orange juice.
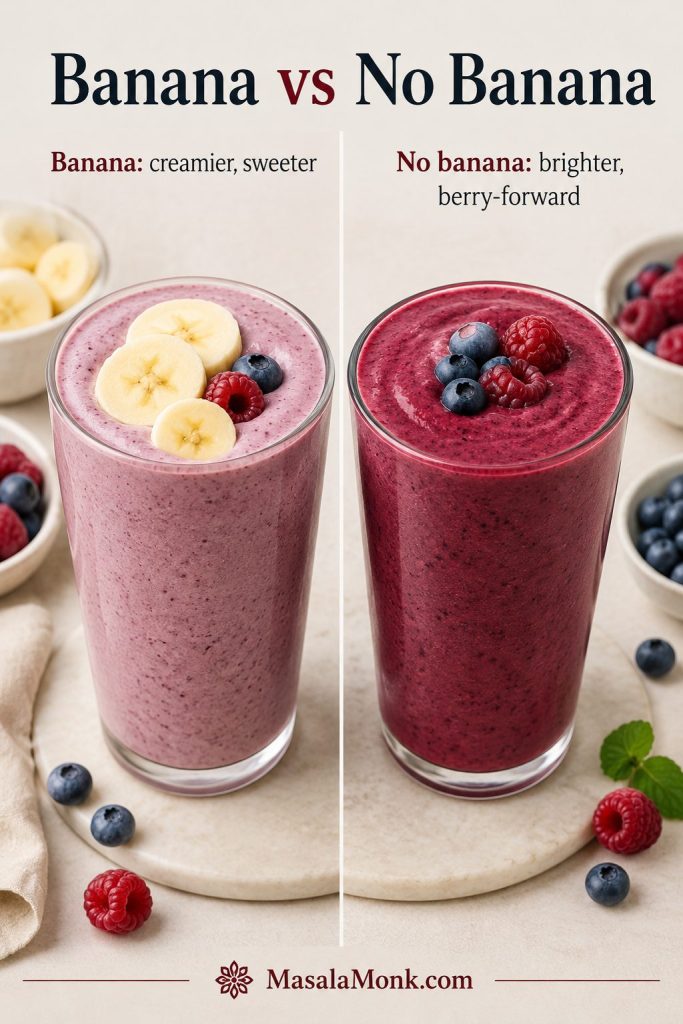
Banana or No Banana
Banana adds natural sweetness and a creamy texture. Half a banana is enough for balance; a full banana makes the drink sweeter, thicker, and more banana-forward.
If you want the smoothie to taste mostly like berries, stay closer to half a banana. Skip it completely when you want a brighter color, sharper berry flavor, or no banana taste at all. To keep a no-banana smoothie creamy, use Greek yogurt, coconut yogurt, avocado, almond butter, oats, chia, or extra frozen berries.
Banana makes a berry smoothie sweeter and creamier, but it can take over quickly. For a brighter berry smoothie without banana, use yogurt, oats, chia, or extra frozen fruit.
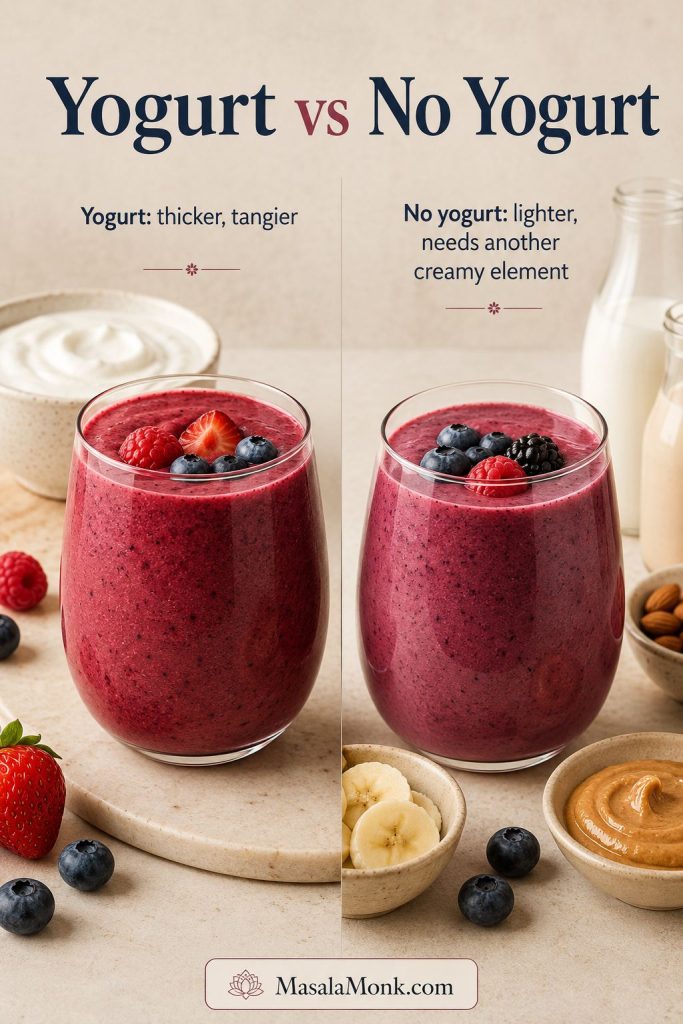
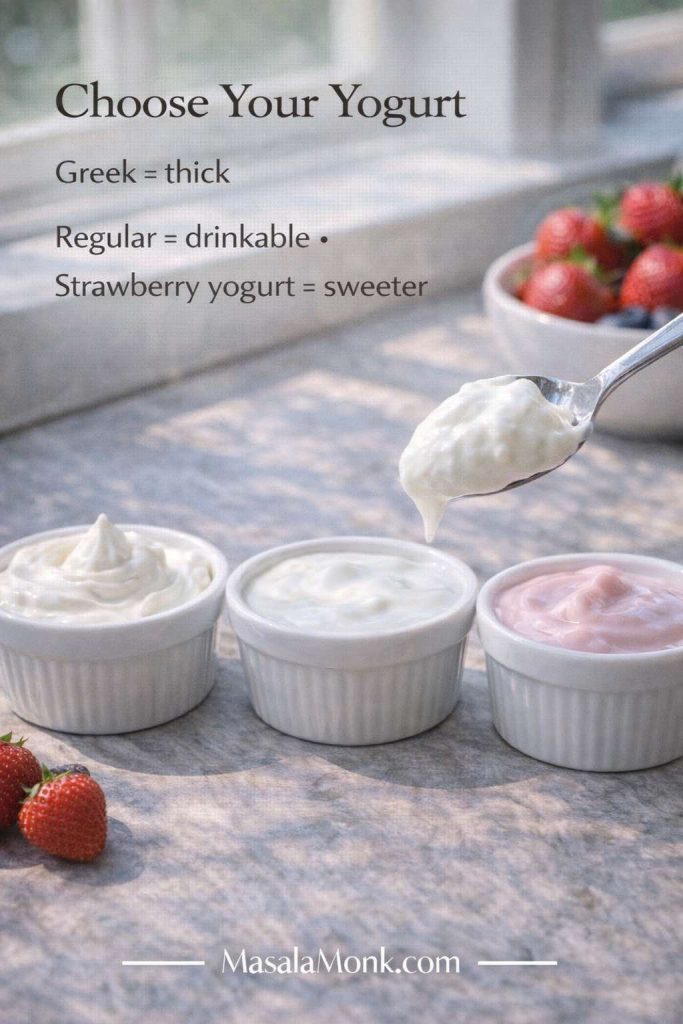
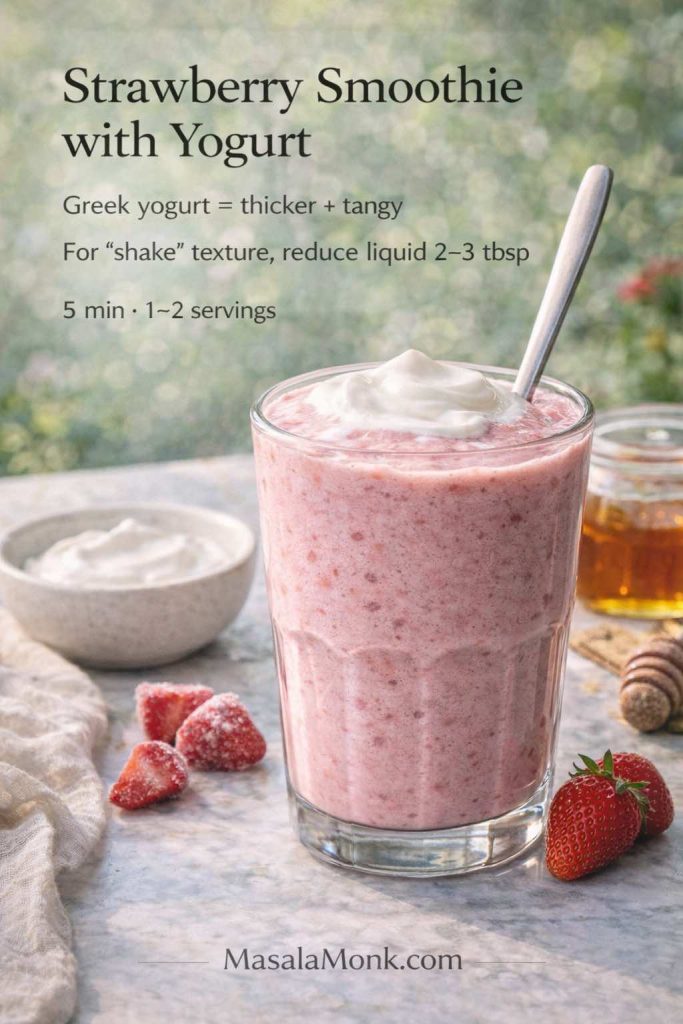
Yogurt or No Yogurt
Greek yogurt is the easiest route to a thick, creamy smoothie with a little extra staying power. Regular yogurt works too, but it is looser, so you may need slightly less liquid. Plain yogurt keeps the flavor breakfast-like; vanilla yogurt makes it softer and sweeter.
If you are using homemade curd, choose a thick, well-set curd and start with slightly less liquid. If the curd is loose or watery, strain it for 15–20 minutes or reduce the milk by 2–3 tablespoons.
Without yogurt, use banana, almond butter, oats, chia, coconut yogurt, avocado, coconut milk, or extra frozen fruit so the drink does not taste like berries blended with thin milk.
Yogurt gives a berry smoothie easy thickness and tang. However, a berry smoothie without yogurt can still work when banana, oats, chia, nut butter, or coconut yogurt replace the creaminess.
Should You Add Ice?
Use frozen berries instead of ice whenever possible. Frozen berries chill the smoothie while keeping the flavor full. Ice can help when you are using fresh fruit, but too much can make the drink taste diluted.
Add ice only when you are using fresh berries and need the smoothie to be colder or thicker. Start with a small handful, not a full cup.
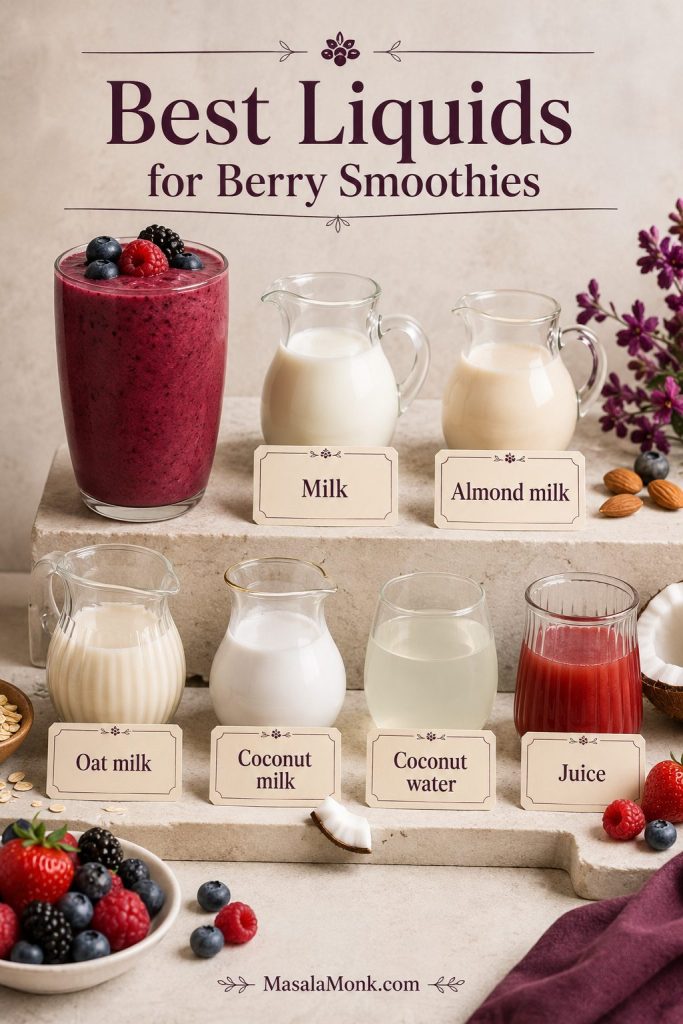
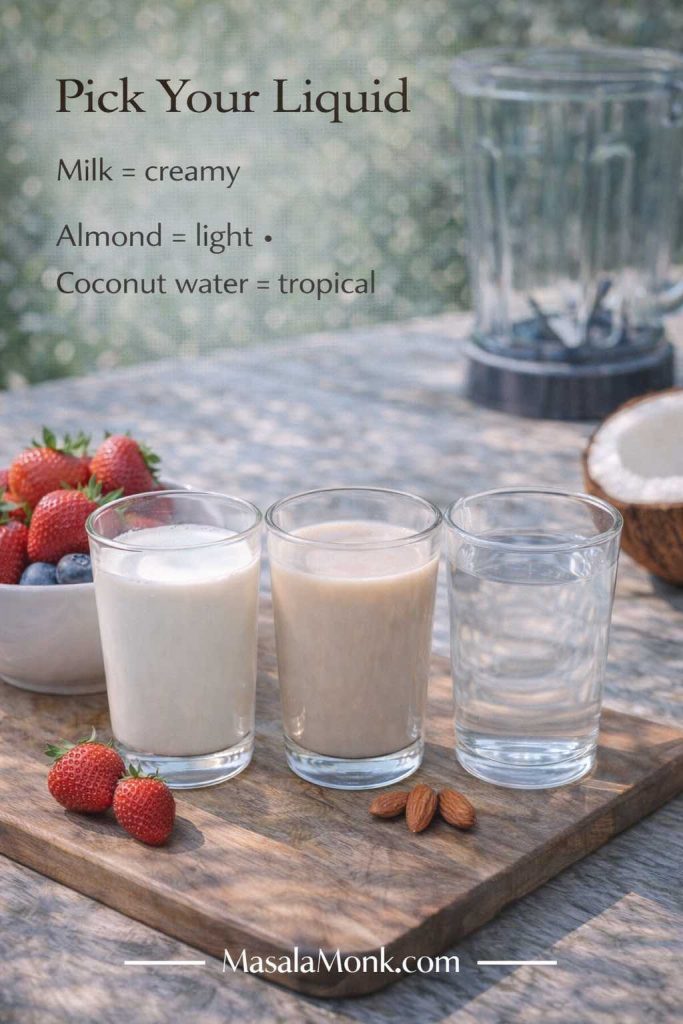
Best Liquids to Use
Your liquid sets the mood of the glass. Milk and oat milk make the smoothie rounder, almond milk keeps it lighter, coconut water feels more refreshing, and juice pushes it sweeter.
The liquid changes the whole smoothie. Milk and oat milk taste creamier, almond milk stays lighter, coconut water feels refreshing, and juice makes the blend sweeter.
Liquid
Best For
Watch Out For
Milk
Creamy classic berry smoothie
Can feel heavier with yogurt
Almond milk
Light dairy-free smoothie
Less creamy than dairy milk
Oat milk
Creamier dairy-free smoothie
Can soften the bright berry flavor
Coconut milk
Rich dairy-free smoothie
Can taste coconut-forward
Coconut water
Refreshing lighter smoothie
Thinner, less creamy texture
Orange or apple juice
Sweeter fruit smoothie
Can become too sweet quickly
Cranberry juice
Tart berry-forward smoothie
May need banana or honey
Water
Emergency low-calorie option
Can taste thin or flat
If you are unsure, start with milk for creaminess or almond milk for a lighter dairy-free version. Use juice only when the berries are very tart, because it can quickly push the smoothie into sweeter, dessert-like territory. If coconut milk is your usual smoothie base, this guide to coconut milk nutrition and glycemic impact is a useful deeper read.
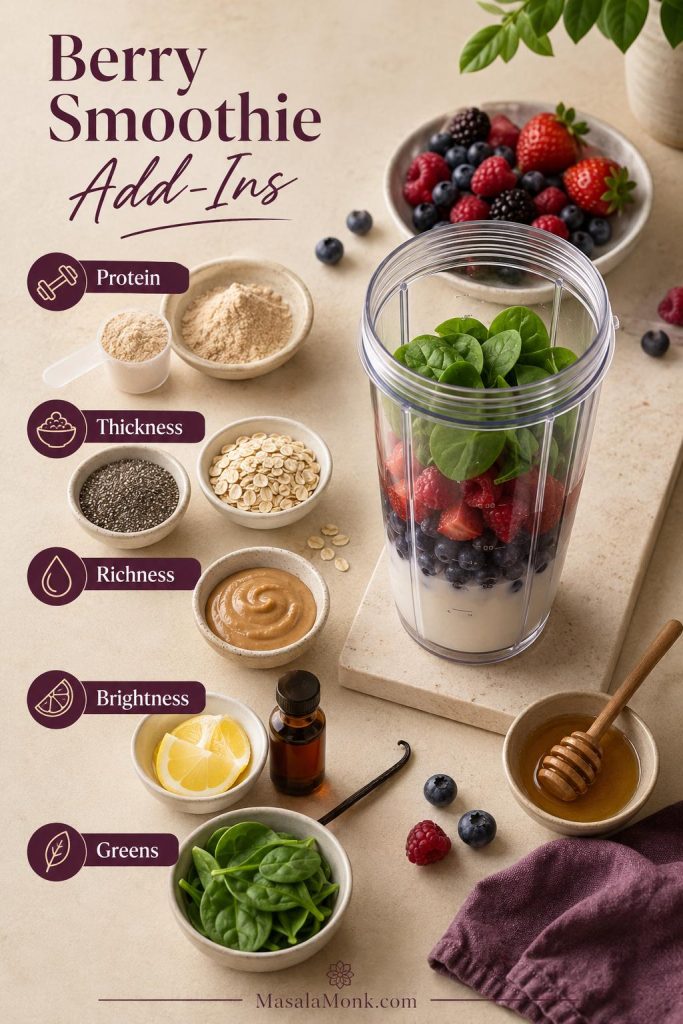
Optional Add-Ins
Think of these as small levers, not a shopping list. Add one or two at a time so the berries still taste like the main event.
Add-ins should solve a problem, not clutter the blender. Use chia or oats for thickness, protein powder for fullness, lemon for brightness, and nut butter for richness.
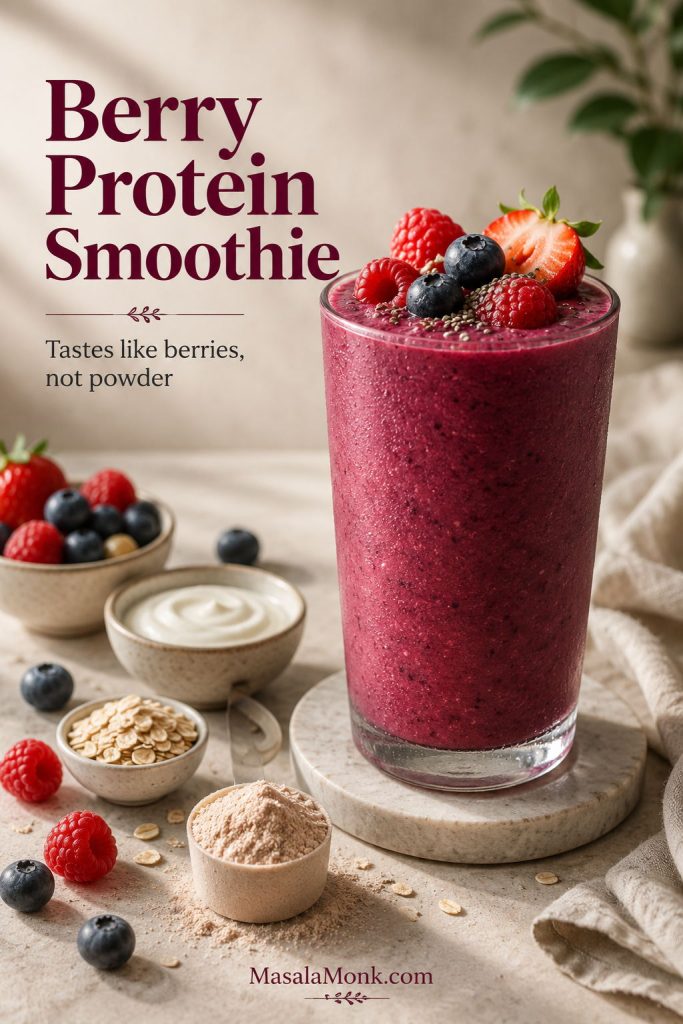
Protein powder: use 1 scoop and add extra liquid if needed.
Chia seeds: add 1 teaspoon to 1 tablespoon for thickness and texture.
Oats: add 1 to 2 tablespoons for a breakfast smoothie feel. If you are choosing between rolled, quick, instant, or steel-cut oats, this guide to oats types, nutrition, and differences explains how each one behaves.
Nut butter: add 1 tablespoon for richness. For more nut-based smoothie ideas, these nut-infused smoothie recipes are a natural next read.
Spinach: add 1 cup baby spinach for a smoothie that still tastes mostly like berries.
Lemon juice: add 1 teaspoon to brighten a dull smoothie.
Vanilla: add 1/4 teaspoon for a softer, dessert-like flavor.
Honey, maple syrup, or dates: use only if the berries are tart.
Tiny pinch of salt: useful when the smoothie tastes flat rather than fruity.
Start with the base smoothie, then add one thing for the job you need: oats for breakfast fullness, chia for thickness, nut butter for richness, or protein powder for a more filling drink.
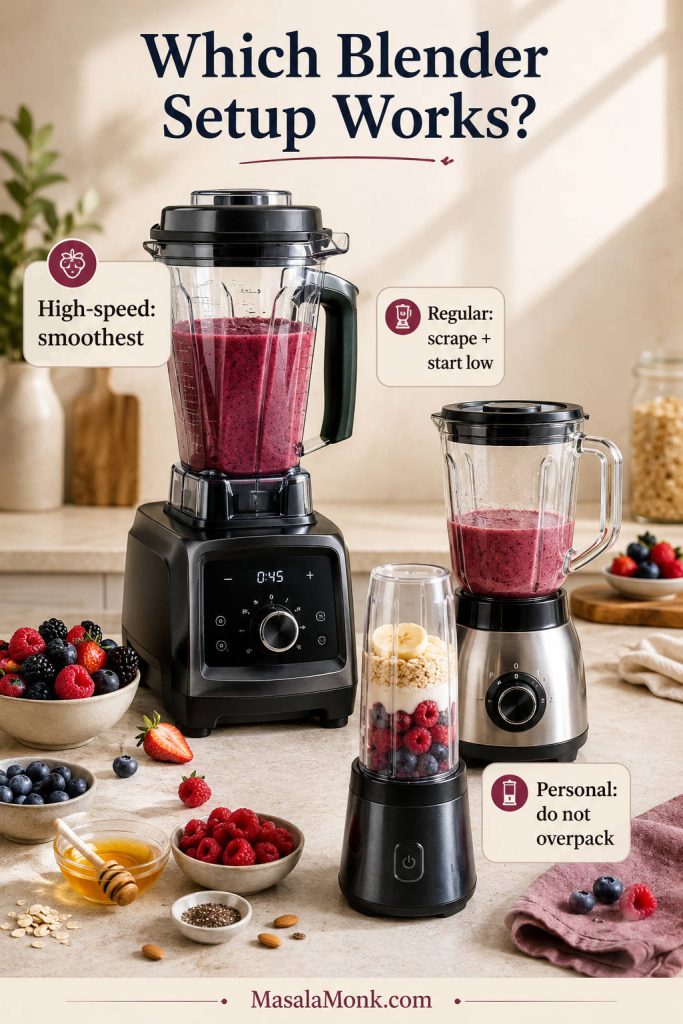
Equipment
You do not need complicated equipment, but the blender and ingredient order matter more than people think.
A high-speed blender makes the smoothest berry smoothie, but a regular or personal blender can still work well when you load it carefully and avoid overpacking.
Blender: A high-speed blender gives the smoothest texture, especially with frozen berries and frozen banana.
Regular blender: Works well if you add liquid first, use sliced banana, pause to scrape, and add liquid slowly.
Personal blender: Good for single servings, but avoid overfilling the cup with frozen fruit.
Spatula: Helpful for thick frozen blends and smoothie bowls.
Tamper: Useful for smoothie bowls because they use very little liquid.
Measuring cups and spoons: Helpful because smoothies are ratio-sensitive.
A regular blender can still make a good smoothie. Add the liquid first, avoid overpacking the jar with frozen fruit, and pause to scrape before adding extra liquid.
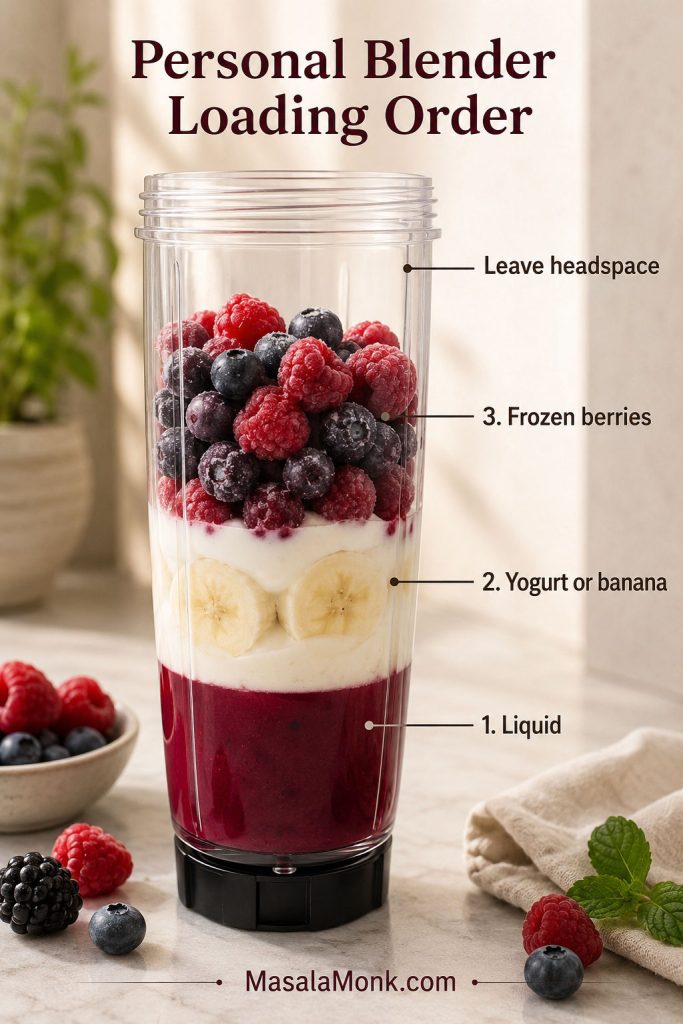
For a personal blender, do not pack the cup too tightly with frozen fruit. Add liquid first, then yogurt or banana, then berries, and leave enough headspace for the mixture to move.
Use this loading order when you are making a single-serving smoothie in a cup-style blender.
A personal blender works best when the blades can pull softer ingredients through the frozen fruit. Leave space at the top so the mixture can actually circulate.
How to Make a Berry Smoothie
The method is simple, but this is where most watery smoothies are either prevented or created: the order and the liquid amount matter.
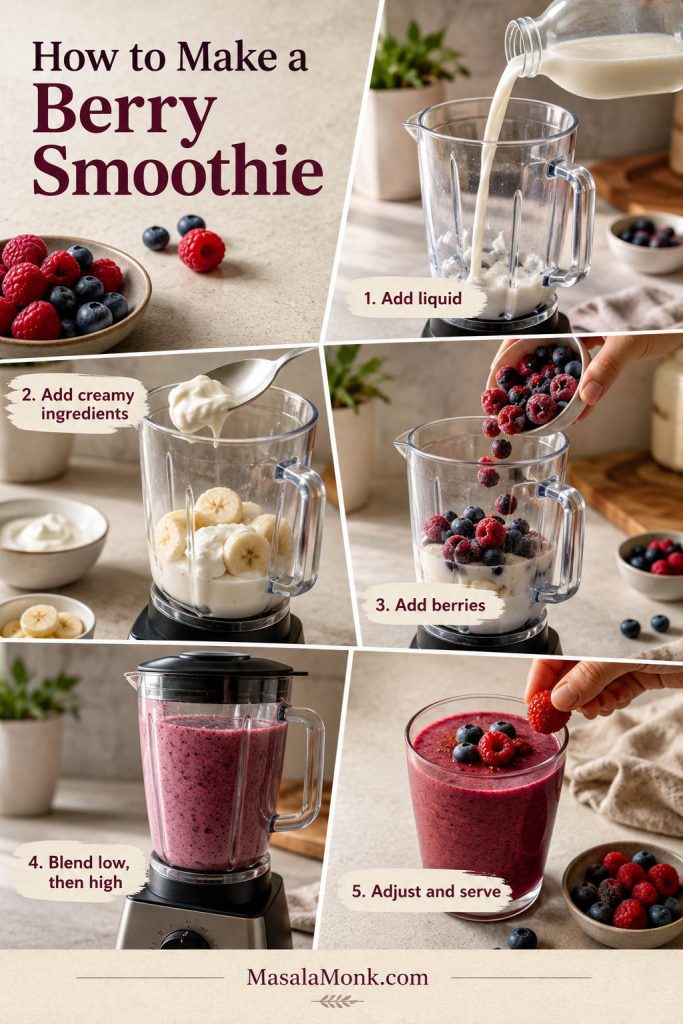
A smoother blend starts before you press the button. Build the jar from easy-to-move ingredients to frozen fruit so the smoothie thickens without stalling.
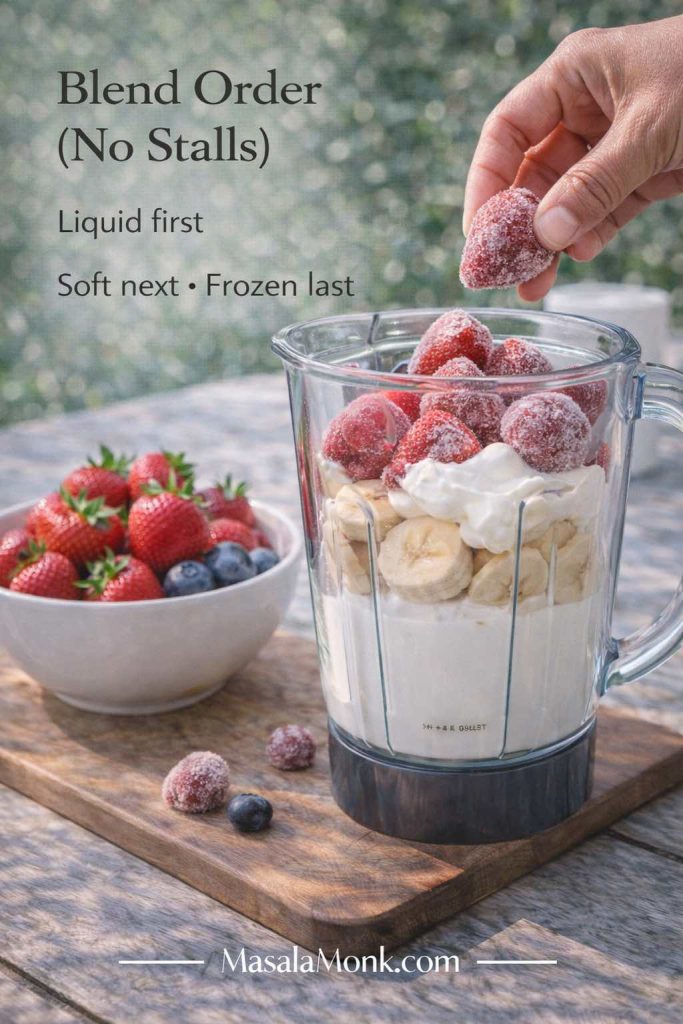
Add the liquid first. Pour milk, almond milk, oat milk, coconut water, or juice into the blender jar.
Add the creamy ingredients. Add yogurt, banana, nut butter, oats, chia, or protein powder.
Add the berries last. Frozen berries should sit on top so the blender can pull liquid through the softer ingredients first.
Blend low, then high. Start on low speed to break up the frozen fruit, then increase to high until smooth.
Adjust slowly. If the blender stalls, add more liquid 1 tablespoon / 15 ml at a time.
Serve right away. Berry smoothies are best cold, thick, and freshly blended.
Regular blender tip: If the blender struggles, stop and scrape before adding more liquid. Add just enough liquid to get the blades moving, then let the blender do the work.
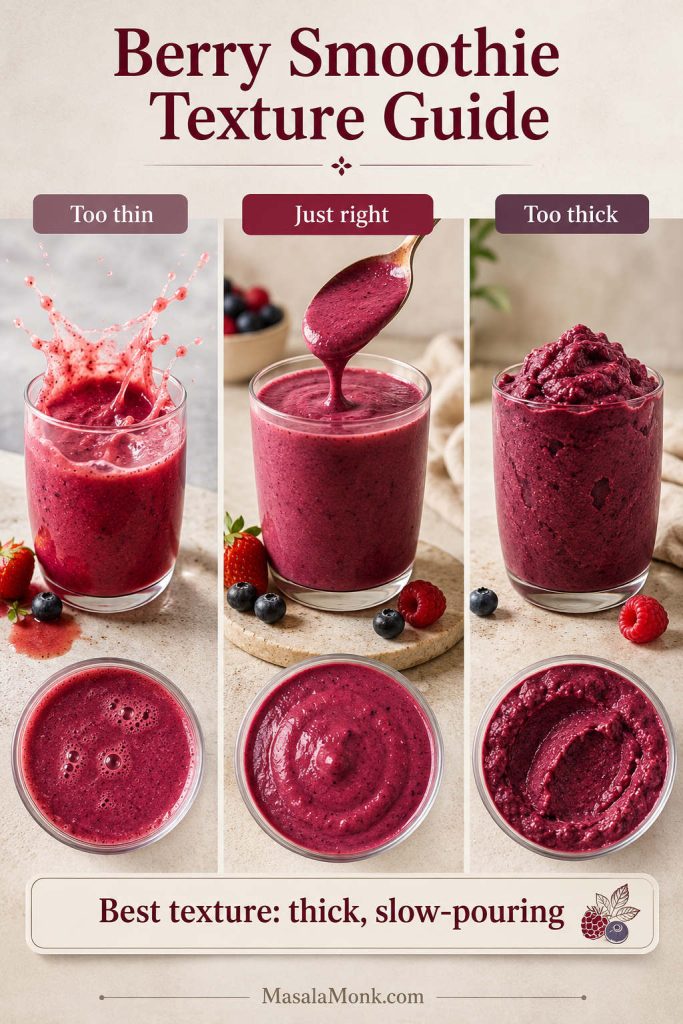
Berry Smoothie Texture Guide
Use this visual checkpoint before changing the recipe. First decide whether the smoothie is too thin, just right, or too thick to blend.
Texture tells you what to fix. A thin smoothie needs more frozen fruit, while a stuck smoothie needs liquid added slowly until it becomes thick and pourable.
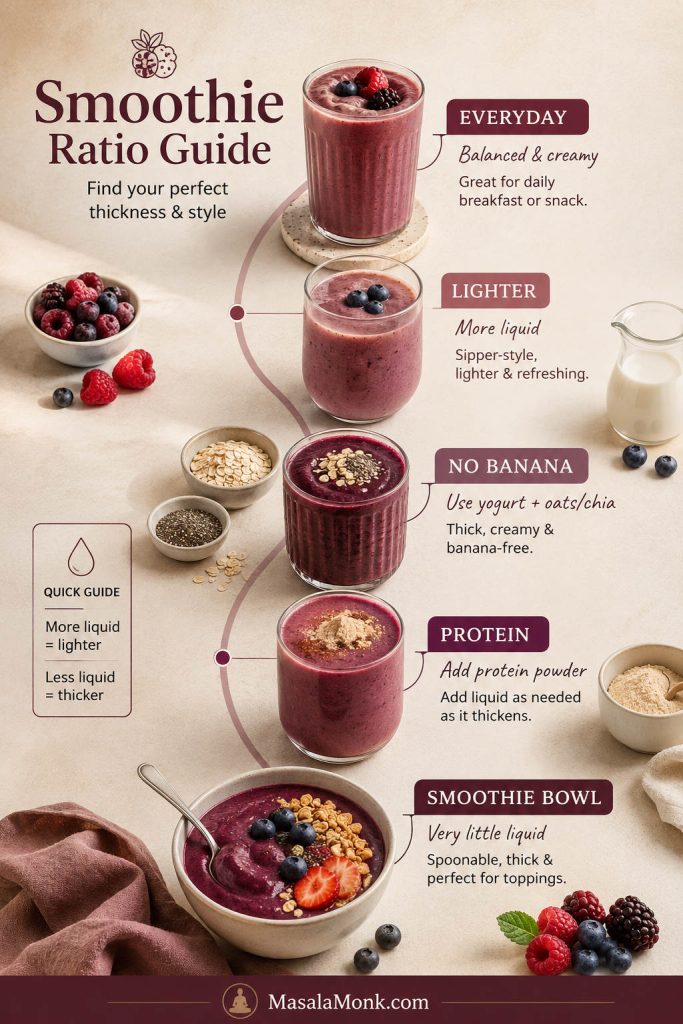
Smoothie Ratio Guide
Use this guide when you know the texture you want but are not sure how much liquid, fruit, or creaminess to use. A drinkable smoothie needs more liquid than a smoothie bowl. A protein smoothie often needs extra liquid because powder, oats, and chia thicken as they blend.
Choose Your Smoothie Texture
Start by deciding whether you want a lighter sip, a thick drinkable smoothie, a protein version, or a spoonable bowl. That choice tells you whether to loosen the blend or keep the liquid low.
The same berry base can shift into different smoothie styles. More liquid makes it lighter, less liquid makes it thicker, and extra creamy ingredients help no-banana or protein versions work.
Berry Smoothie Ratios by Style
Use the table as a practical starting point, then adjust after the first blend.
Style
Berries
Creamy Ingredient
Liquid
Best For
Thick drinkable smoothie
1 1/2 cups / 225 g frozen berries
1/2 banana + 1/2 cup / 120 g yogurt
1/2 cup / 120 ml to start
Best everyday version
Lighter smoothie
1 cup / 150 g berries
1/4 to 1/2 cup yogurt
3/4 to 1 cup / 180–240 ml
Thinner, easier to sip
No-banana smoothie
1 1/2 cups / 225 g frozen berries
1/2 cup / 120 g Greek yogurt + oats or chia
1/2 to 3/4 cup / 120–180 ml
Berry-forward flavor
No-yogurt smoothie
1 1/2 cups / 225 g frozen berries
1 medium banana or 1 tbsp almond butter
1/2 to 3/4 cup / 120–180 ml
Dairy-free option
No banana + no yogurt
1 1/2 cups / 225 g frozen berries
1 tbsp almond butter + 1 tbsp oats or chia
1/2 to 3/4 cup / 120–180 ml
Vegan-style berry smoothie
Protein smoothie
1 to 1 1/2 cups berries
Greek yogurt or 1 scoop protein powder
3/4 to 1 cup / 180–240 ml
Breakfast or post-workout
Smoothie bowl
1 heaping cup frozen berries
1 frozen banana
2 to 5 tbsp / 30–75 ml
Thick spoonable bowl
Think of this as a starting point, not a rulebook. Your berries, blender, and yogurt will vary a little, so the first blend is just the beginning. Blend once, taste once, then make one small adjustment at a time.
Once you know the texture you want, jump to the recipe card or check the quick smoothie fixes if your first blend needs adjusting.
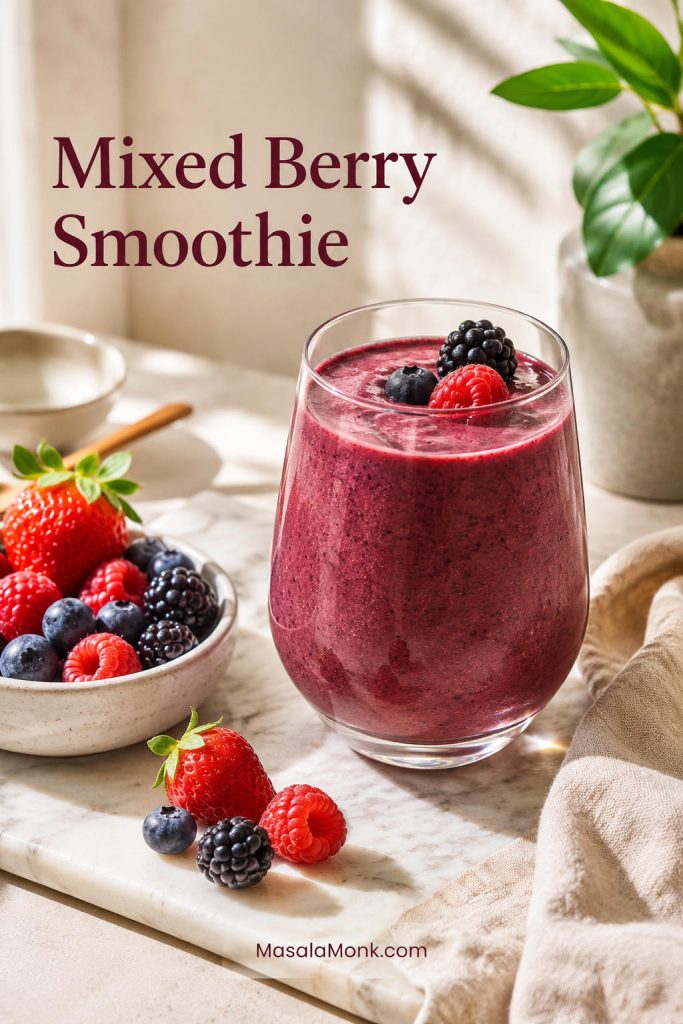
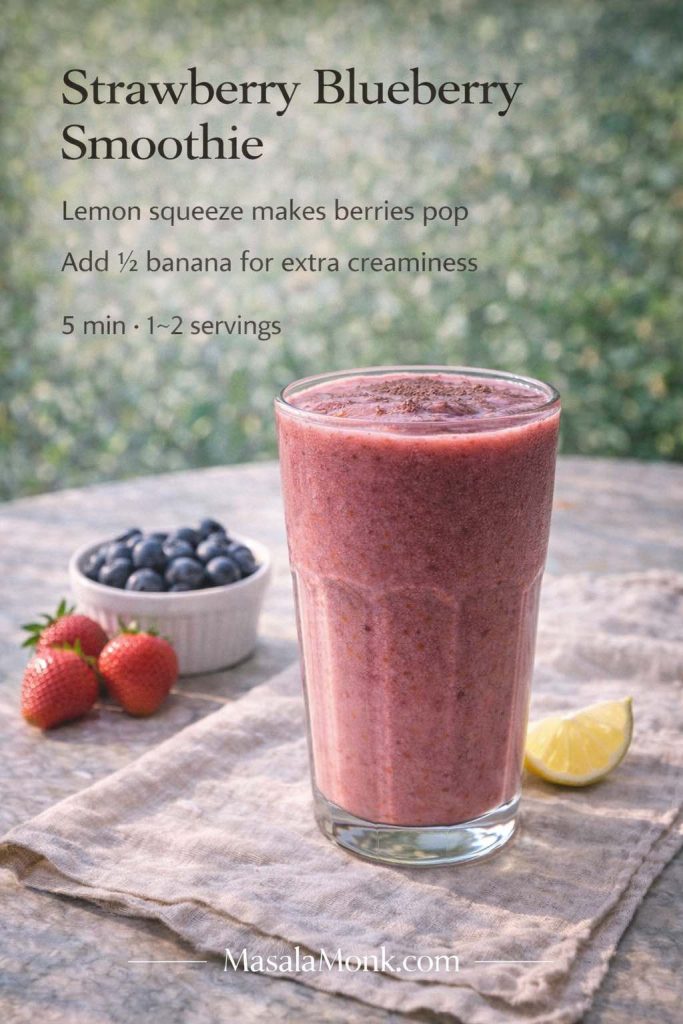
Mixed Berry Smoothie
A mixed berry smoothie is the easiest “open the freezer and make something good” version because a frozen berry bag already gives you sweetness, tartness, color, and aroma. Strawberries add body, blueberries soften the flavor, raspberries brighten it, and blackberries make it deeper.
A mixed berry smoothie is the easiest everyday version because one frozen berry blend gives sweetness, tartness, color, and depth without needing extra steps.
1 1/2 cups frozen mixed berries, about 225 g / 8 oz
1/2 banana, about 55–60 g
1/2 cup Greek yogurt or plain yogurt, about 120 g / 4 oz
1/2 cup milk or almond milk, 120 ml / 4 fl oz
1 teaspoon honey or maple syrup, only if needed
It is the easiest everyday blend for breakfast, snack time, or a quick cold drink when you want the berries to do most of the work.
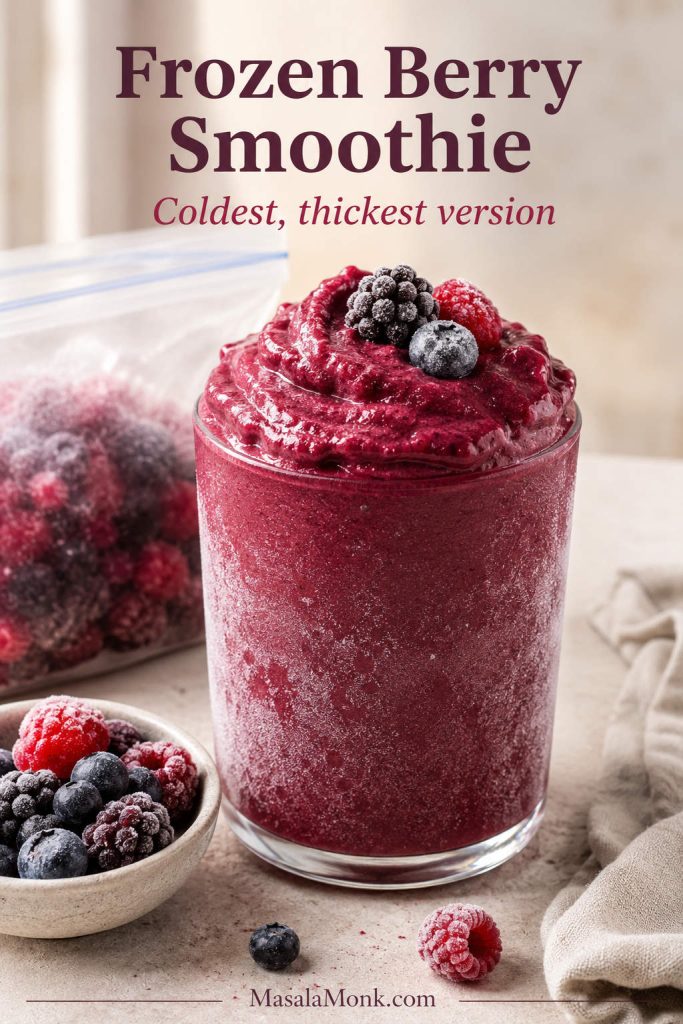
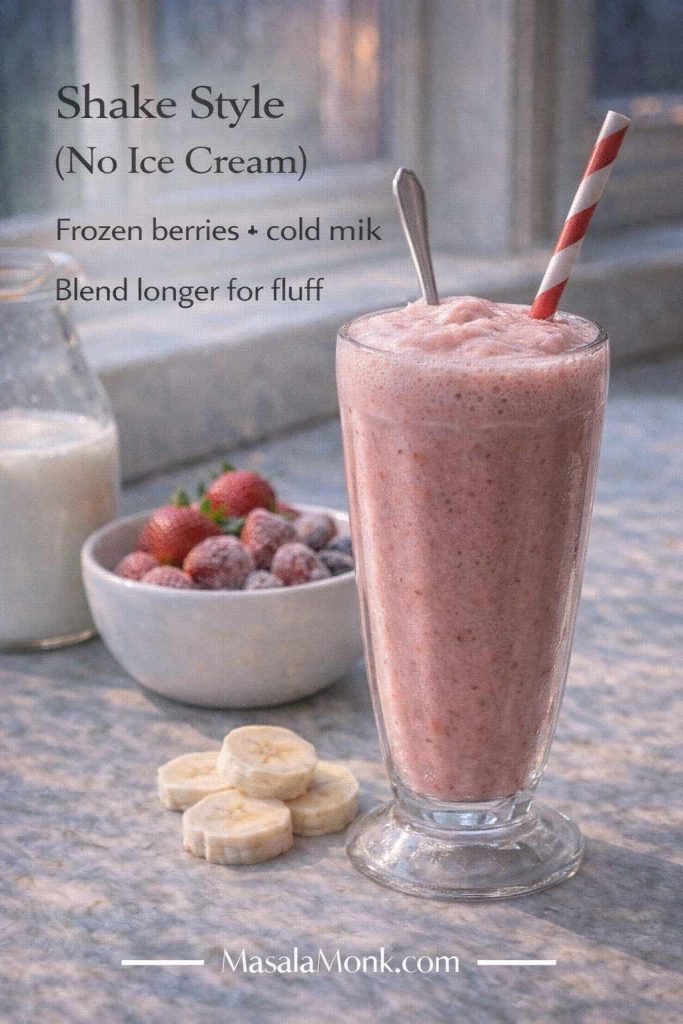
Frozen Berry Smoothie
This is the freezer-bag version for the coldest, thickest smoothie without adding ice. Use the berries straight from the freezer so the drink stays frosty and berry-forward instead of thin and diluted.
This is the freezer-bag version for maximum cold texture. Because the berries are already frozen, you get a frosty smoothie without leaning on extra ice.
For 1 1/2 cups / 225 g frozen berries, 1/2 cup / 120 ml liquid gives you a thick, slow-pouring start. Scrape once before loosening the blend.
Texture rule: More frozen fruit makes the smoothie thicker. More liquid makes it thinner. Start thick, then loosen it slowly.
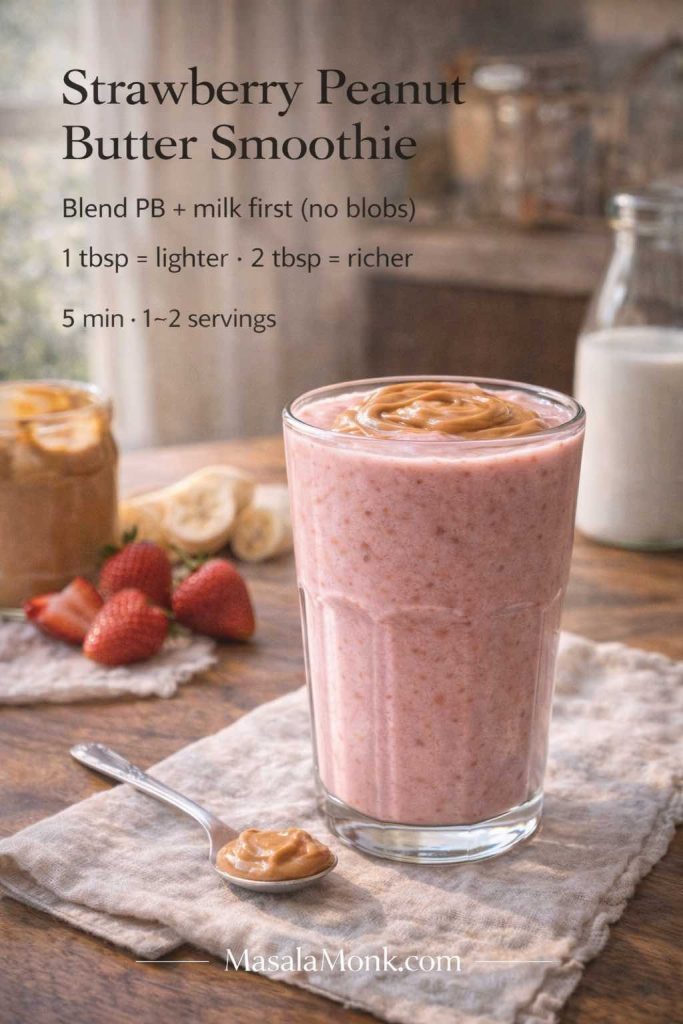
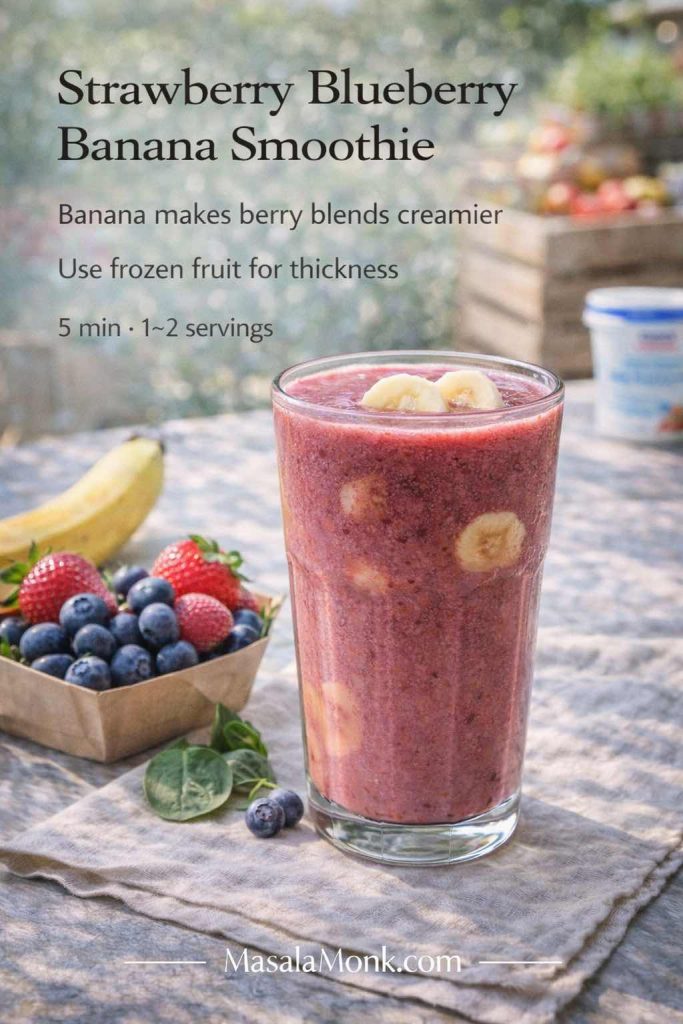
Strawberry Banana Berry Smoothie
Strawberry banana is the classic smoothie flavor because banana makes strawberries taste sweeter and creamier. To keep it berry-forward, use more strawberries than banana and add a small handful of mixed berries for depth.
Strawberry banana tastes soft and familiar, but extra berries keep the smoothie from becoming too banana-heavy. That balance gives you creaminess and real berry flavor together.
1 cup frozen strawberries, about 150 g
1/2 cup mixed berries, about 75 g
1 small banana or 1/2 large banana, about 100–120 g peeled
1/2 cup yogurt, about 120 g / 4 oz
1/2 to 3/4 cup milk or almond milk, 120–180 ml
If you are leaning more toward strawberries than mixed berries, our strawberry smoothie recipes give you more ways to build that flavor.
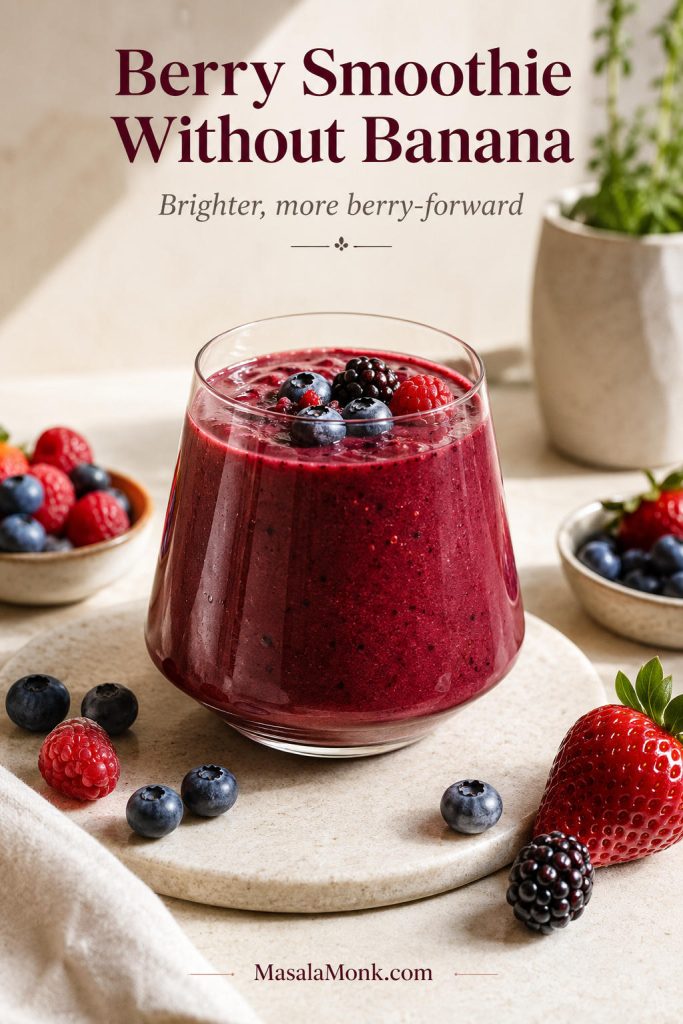
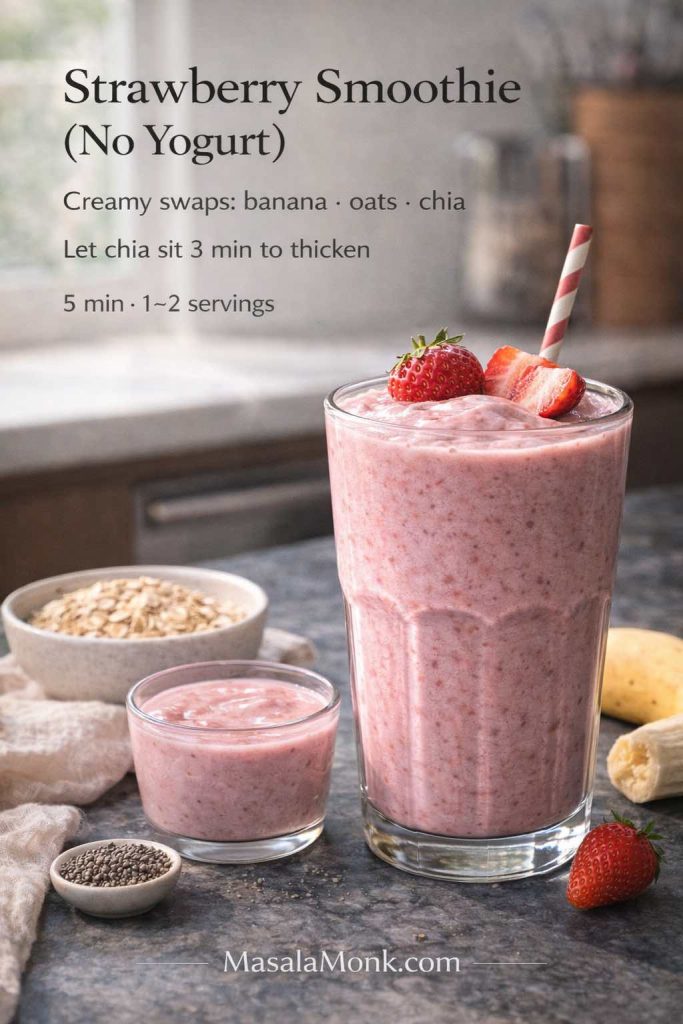
Berry Smoothie Without Banana
You can make a thick smoothie without banana. This is the better version if you have ever made a berry smoothie and wondered why it mostly tasted like banana.
When you want the berries to stay sharp, bright, and clearly in charge, blend:
For a berry smoothie without banana, build creaminess another way. Greek yogurt, oats, chia, nut butter, avocado, or extra frozen berries help keep the texture full.
1 1/2 cups frozen berries, about 225 g / 8 oz
1/2 cup Greek yogurt or coconut yogurt, about 120 g / 4 oz
1 tablespoon almond butter, about 15–16 g, or 1 to 2 tablespoons oats
1/2 to 3/4 cup milk, almond milk, or oat milk, 120–180 ml
1 teaspoon honey or maple syrup, optional
The result is brighter, cleaner, and more berry-forward. It is especially good with sweet blueberries, strawberries, or a mixed berry blend that leans heavily on strawberries.
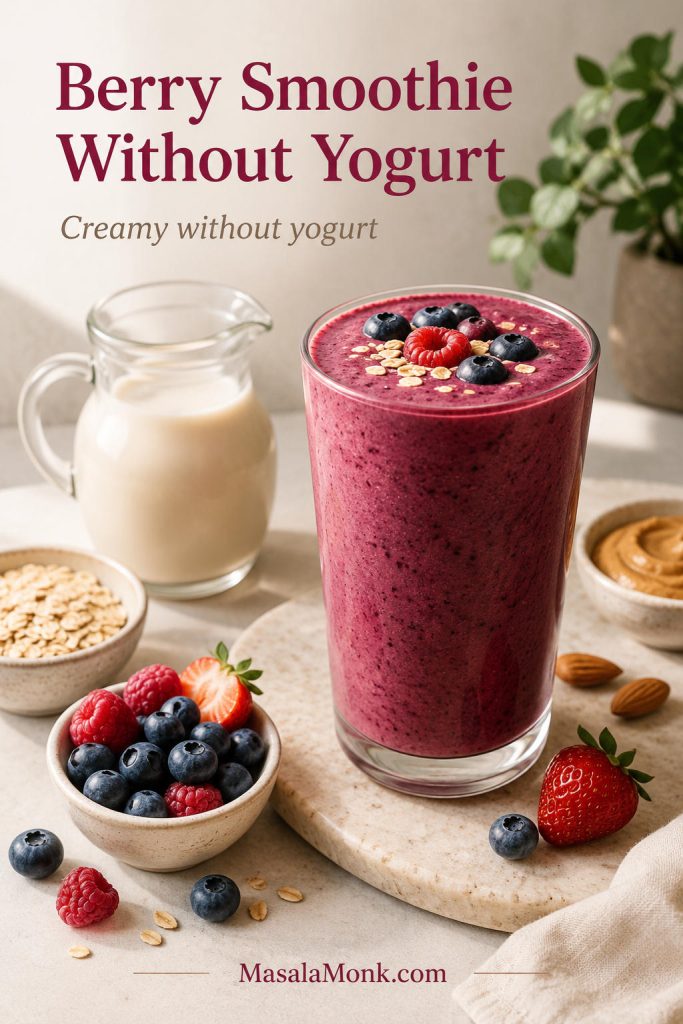
No yogurt in the fridge is not a problem. The goal is still creamy, not thin — just without the tang of yogurt.
A berry smoothie without yogurt should still feel creamy, not thin. Instead of yogurt, use banana, oats, chia, nut butter, avocado, or a creamier dairy-free milk.
1 1/2 cups frozen berries, about 225 g / 8 oz
1 medium banana, about 100–120 g peeled
1/2 cup almond milk, oat milk, coconut milk, or dairy milk, 120 ml / 4 fl oz
1 tablespoon chia, oats, or almond butter if you want more fullness
1 teaspoon lemon juice, optional
For a dairy-free version, use almond milk, oat milk, or coconut milk. Coconut yogurt also works if you want the thickness of yogurt without dairy.
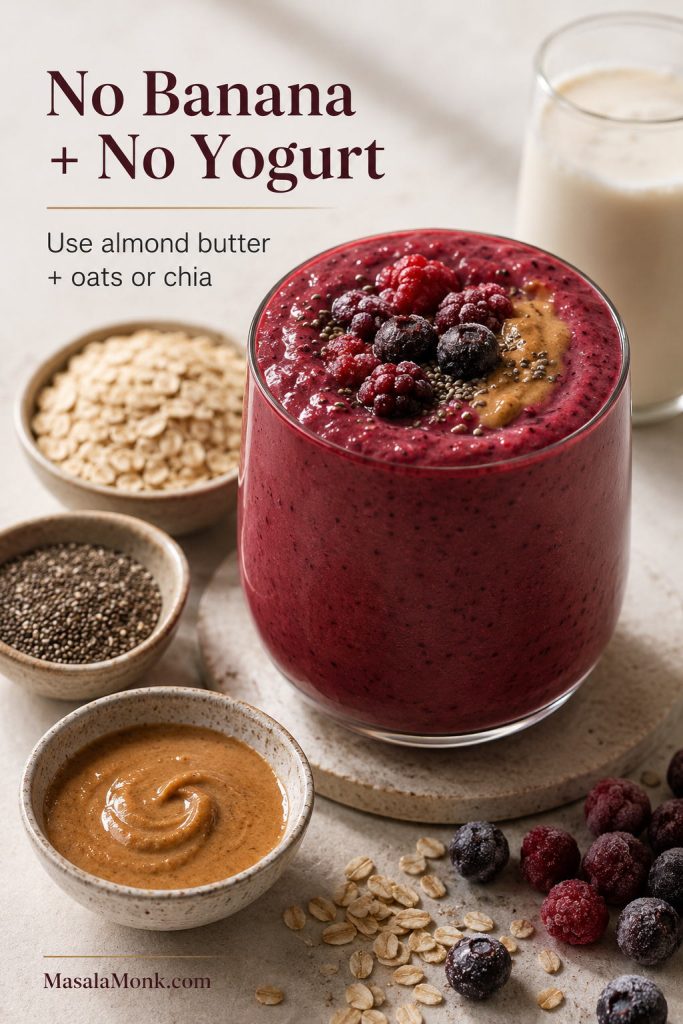
This is the trickiest version because you are removing the two ingredients that usually make a berry smoothie soft and creamy. Almond butter gives richness, while oats or chia help the drink feel fuller without pushing the berries into the background.
Removing both banana and yogurt makes texture trickier. Almond butter adds richness, while oats or chia help this berry smoothie stay creamy without hiding the fruit.
1 1/2 cups frozen berries, about 225 g / 8 oz
1/2 to 3/4 cup almond milk or oat milk, 120–180 ml
1 tablespoon almond butter, about 15–16 g
1 tablespoon oats or chia seeds, about 6–12 g depending on which you use
1 teaspoon honey, maple syrup, or 1 soft date, optional
If it tastes sharp instead of fruity, add a little more almond butter, a date, or a splash of sweeter liquid.
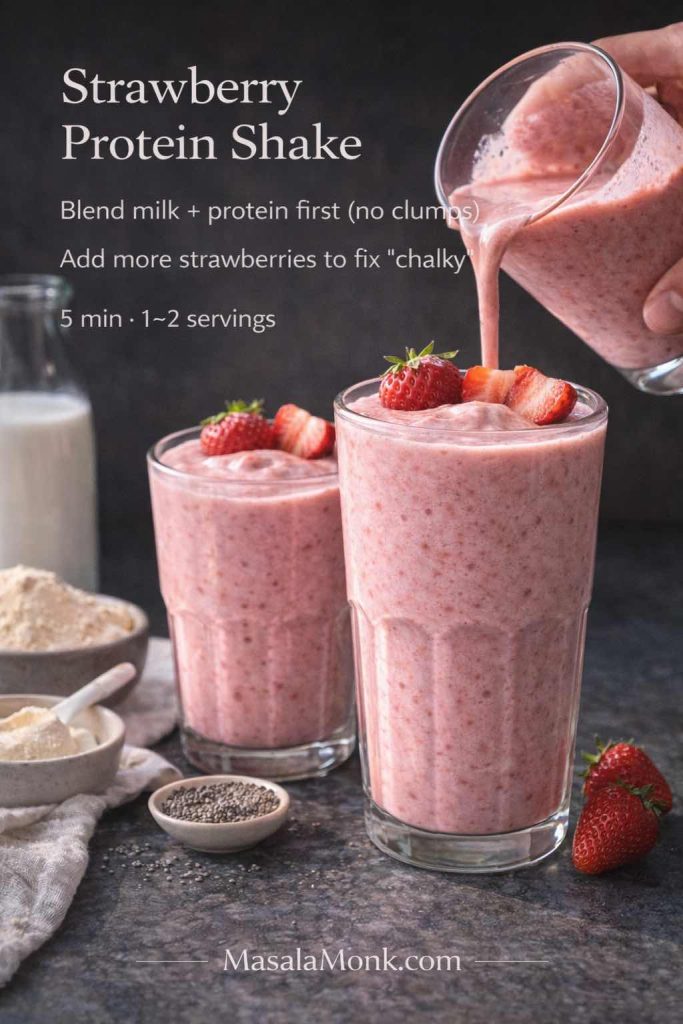
Berry Protein Smoothie
The best berry protein smoothie should still taste like berries, not like protein powder with fruit added to hide it. Greek yogurt, protein powder, milk, chia, and oats can all help, but the flavor should stay berry-first.
A berry protein smoothie should still taste like berries first. To avoid chalkiness, blend protein powder with enough liquid, yogurt, berries, or other creamy ingredients.
Protein Style
Use This
Liquid Adjustment
Greek yogurt protein smoothie
1/2 to 3/4 cup Greek yogurt
Start with 1/2 cup milk
Protein powder smoothie
1 scoop vanilla or unflavored protein powder
Use 3/4 cup liquid to start
High-fiber protein smoothie
Greek yogurt + chia or oats
Add liquid slowly because chia and oats thicken
No-powder protein smoothie
Greek yogurt + milk + chia
Keep texture creamy, not chalky
For a balanced berry protein smoothie, blend 1 1/2 cups / 225 g frozen berries, 1/2 banana / 55–60 g, 1/2 cup / 120 g Greek yogurt or 1 scoop protein powder, and 3/4 cup / 180 ml milk or almond milk.
Protein powder scoop sizes vary, so use the serving size on your package. Vanilla protein powder gives a softer, dessert-style flavor. Unflavored protein keeps the berries more noticeable, but it can taste chalkier if the smoothie is too thick. If that happens, loosen it with a little milk, then add a few extra berries or a spoon of yogurt to bring the flavor back.
For mornings when you want protein but prefer a warm spoonable breakfast, this high-protein oatmeal guide uses oats, yogurt, protein powder, seeds, and nut butter in a more filling bowl format.
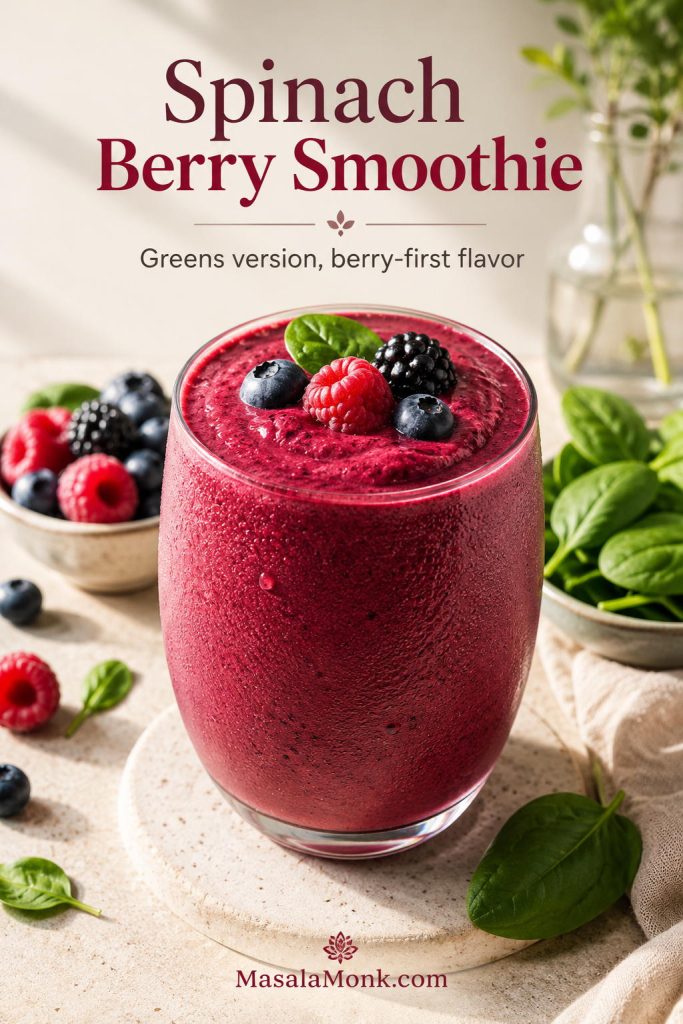
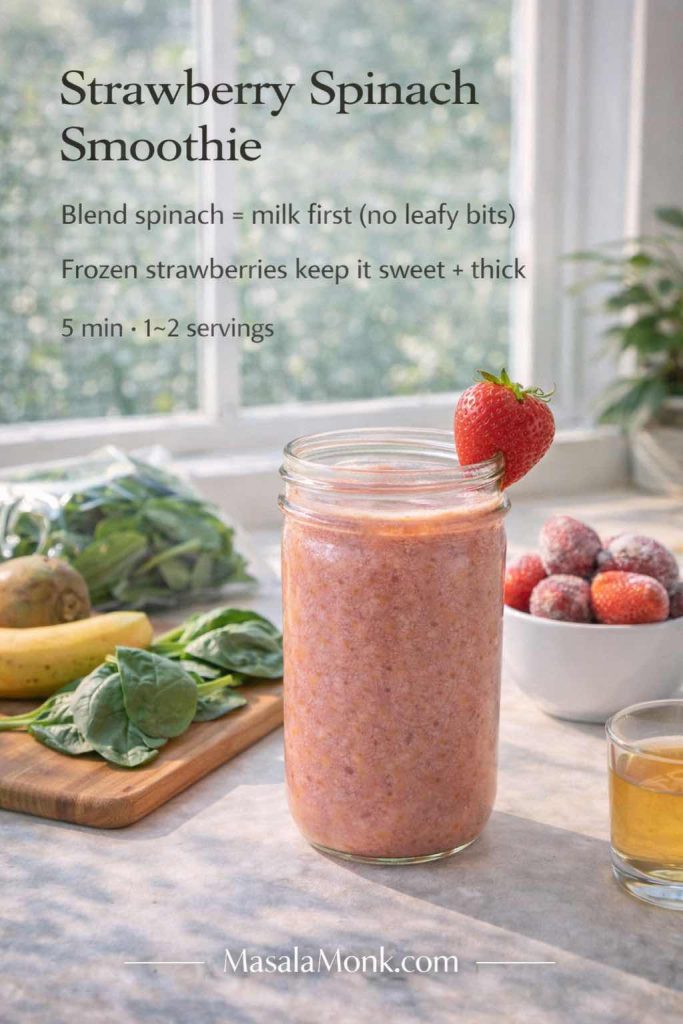
Spinach Berry Smoothie
This is the greens version for people who still want the smoothie to taste like berries. Baby spinach is milder than kale and blends more smoothly.
Baby spinach works best when it supports the smoothie instead of taking over. Blend it with liquid first, then add berries so the flavor stays berry-led.
With enough berries, spinach should disappear into the background. Blend the spinach with the liquid first, then add the berries, banana or yogurt, and any add-ins.
1 cup baby spinach, about 30 g
1/2 to 3/4 cup milk or almond milk, 120–180 ml
1 1/2 cups frozen berries, about 225 g / 8 oz
1/2 banana / 55–60 g or 1/2 cup Greek yogurt / about 120 g
1 teaspoon honey or maple syrup, optional
The berries should stay in charge of the flavor. If the smoothie tastes too green, add a little lemon juice, more berries, or half a banana.
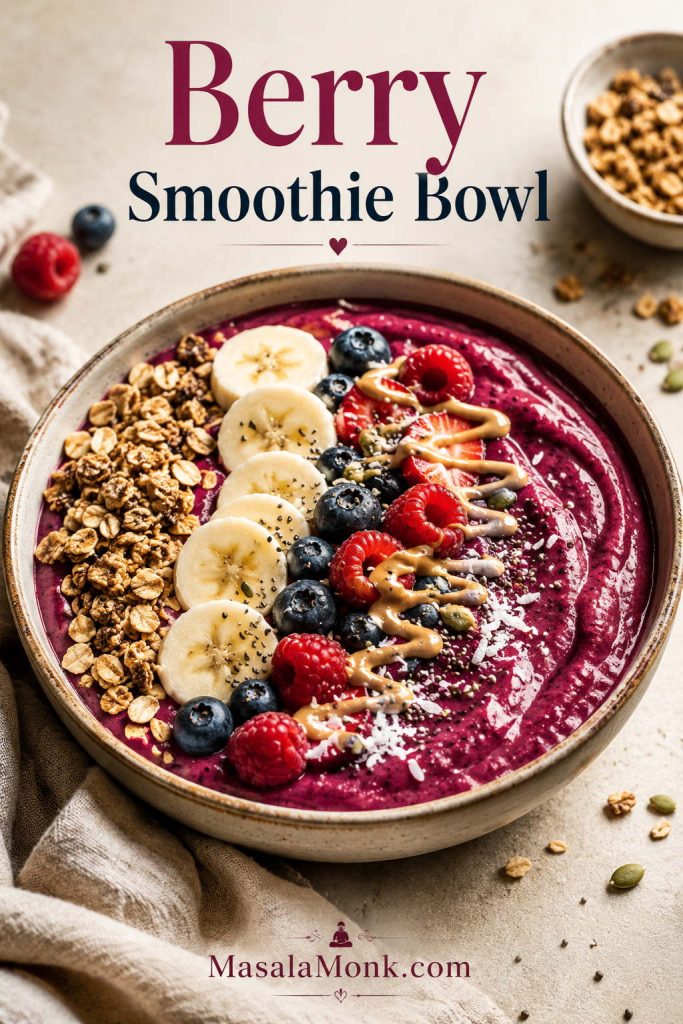
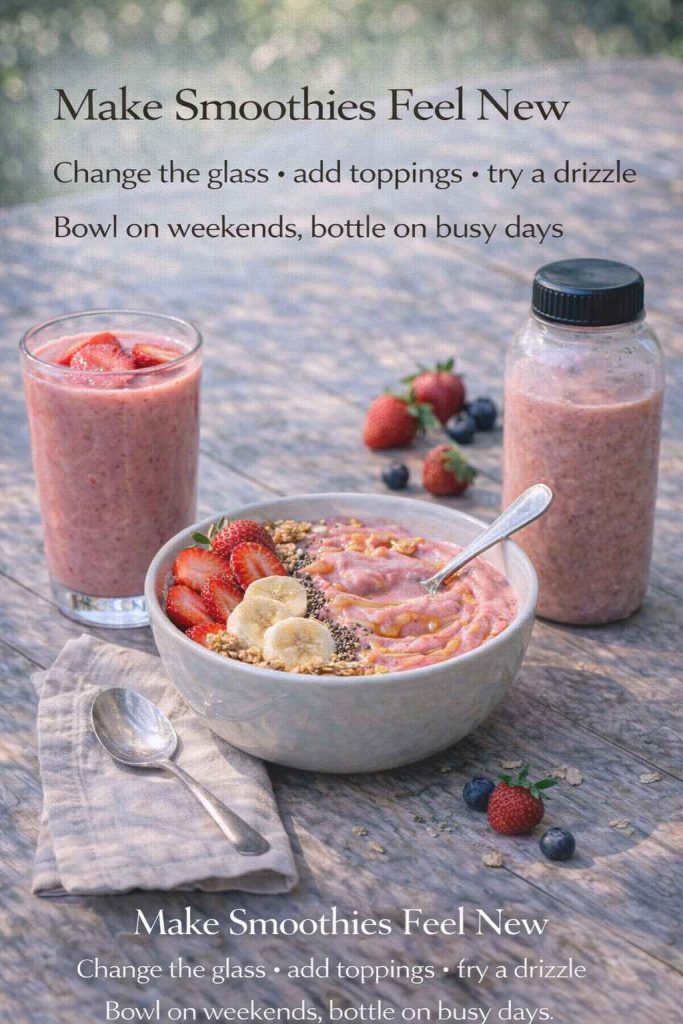
Berry Smoothie Bowl
This is the version for mornings when you want a spoon, toppings, and something cold that still feels like breakfast. A berry smoothie bowl uses only a few tablespoons of liquid, so the texture lands closer to soft serve than a drink.
A smoothie bowl should eat more like soft serve than a drink. When the base holds a spoon trail, it is ready for granola, berries, and seeds.
1 heaping cup frozen berries, about 150–180 g
1 frozen banana, about 100–120 g peeled
2 to 5 tablespoons milk, almond milk, or oat milk, 30–75 ml
Optional: 1/2 scoop protein powder
Start with 2 tablespoons liquid and blend slowly, scraping down the sides as needed. The bowl is ready when it mounds on a spoon and the granola sits on top instead of sinking. If it pours like a drink, blend in more frozen fruit.
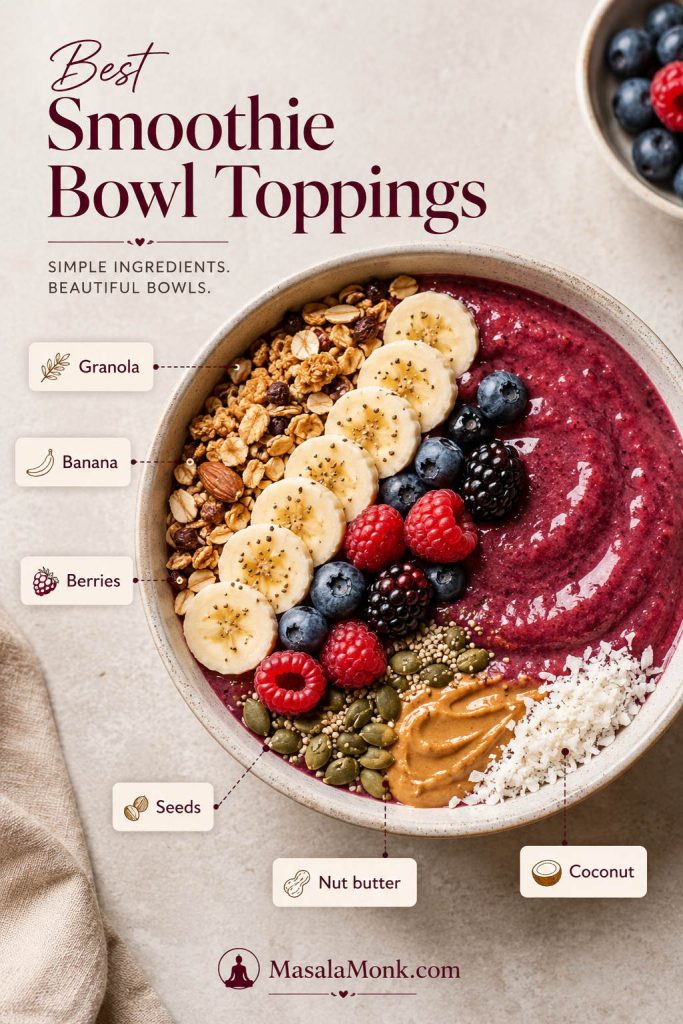
Best Smoothie Bowl Toppings
For crunch, add granola, coconut, chopped nuts, cacao nibs, or toasted seeds. A spoonful of homemade granola works especially well because it gives a thick smoothie bowl contrast instead of disappearing into the fruit. For freshness, add sliced banana or extra berries. For staying power, add chia, hemp seeds, peanut butter, almond butter, or a spoonful of Greek yogurt.
Smoothie bowl toppings should add more than decoration. Granola brings crunch, fruit adds freshness, seeds add texture, and nut butter makes the bowl more satisfying.
If you like brighter fruit smoothies, this berry base also pairs naturally with a mango smoothie recipe.
Berry Smoothie vs Smoothie Bowl vs Açai Bowl
A berry smoothie is built to sip from a glass. A smoothie bowl uses similar ingredients with much less liquid, so it becomes thick enough for a spoon.
An açai bowl is related, but it is a separate recipe. It usually starts with frozen açai puree or a frozen açai packet, frozen fruit, and very little liquid. If you want that deeper açai flavor with toppings like granola, banana, berries, coconut, and nut butter, follow an açai bowl recipe rather than simply adding more liquid to a smoothie.
A berry smoothie is made to sip, a smoothie bowl is thick enough for a spoon, and an açai bowl starts with an açai base before the toppings go on.
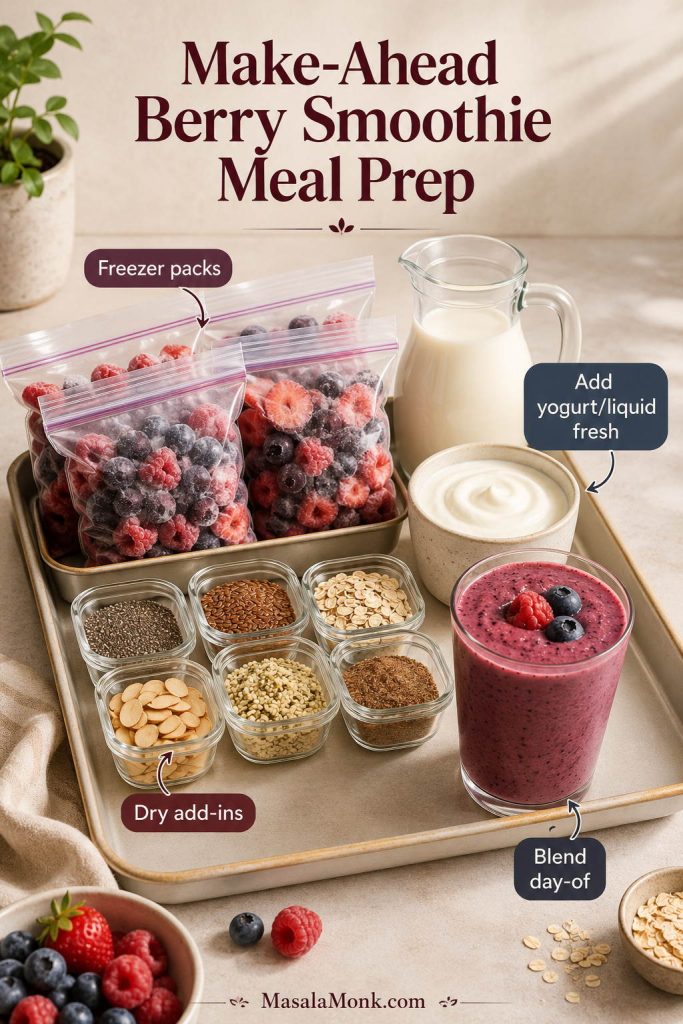
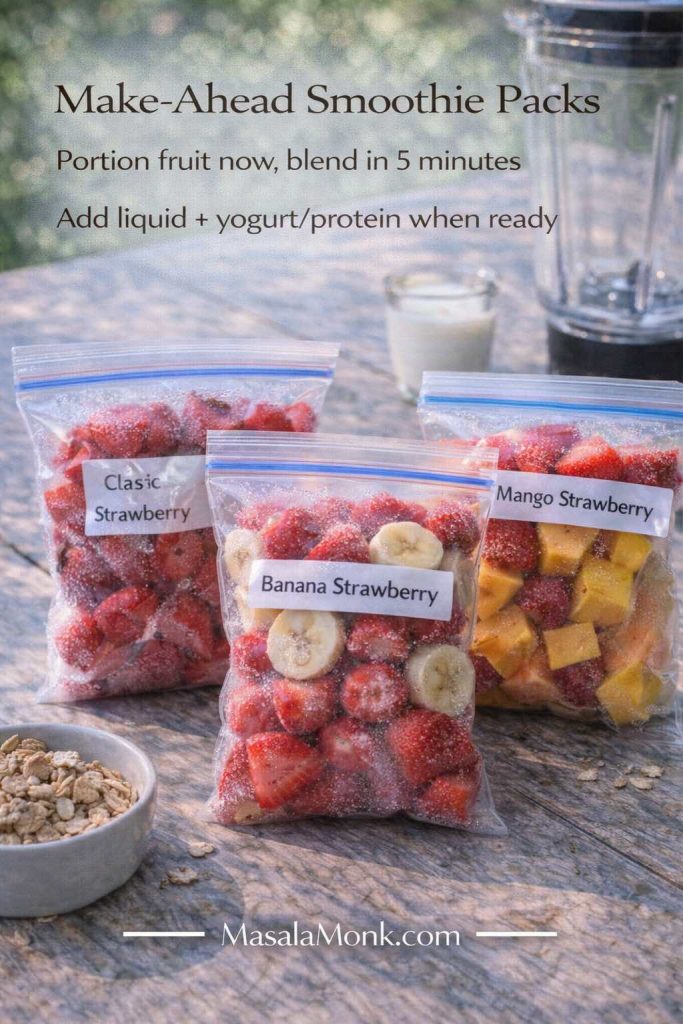
Make-Ahead Berry Smoothies and Freezer Packs
This smoothie tastes best right after blending, while it is still cold and thick. However, rushed mornings are real, so the best make-ahead move is not storing a finished smoothie. It is making freezer packs so the fresh blend still takes less than a minute.
Good smoothie meal prep is about separating what freezes well from what tastes better fresh. That keeps the final blend colder, thicker, and cleaner.
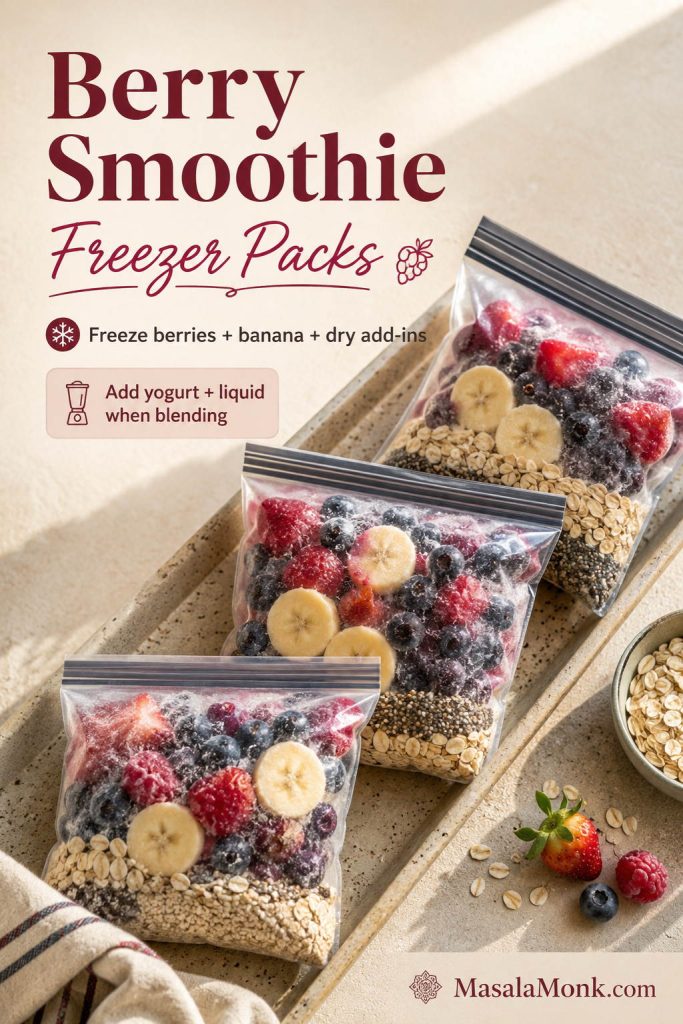
Freezer Smoothie Packs
Add the berries, banana, and any dry add-ins like oats, chia, or protein powder to a freezer-safe bag or container. When ready to blend, add the frozen pack to the blender with yogurt and liquid.
Freezer packs are best for the ingredients that can wait: berries, banana, oats, chia, or protein powder. Save the yogurt and liquid for blending day.
1 1/2 cups frozen berries, about 225 g / 8 oz
1/2 sliced banana, about 55–60 g
1 tablespoon oats or chia, optional
1 scoop protein powder, optional
When blending, add 1/2 cup / 120 g yogurt and 1/2 cup / 120 ml milk or almond milk. Add more liquid only if needed.
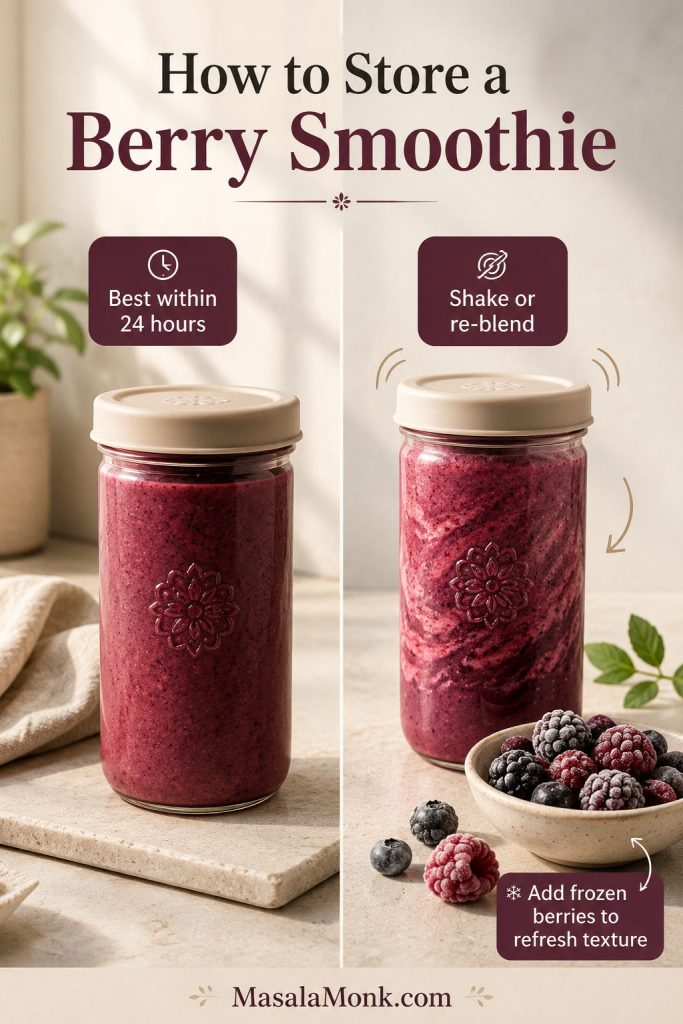
If you need to store a blended smoothie, keep it covered in the fridge and drink it within 24 hours. It may separate or thin out, so shake or re-blend before serving. For better texture, add a few frozen berries before re-blending.
A blended smoothie is best fresh, but short fridge storage can work. Before drinking, shake or re-blend it, then add frozen berries if the texture has thinned.
If you want a no-blender breakfast that follows the same ratio-and-texture logic, this overnight oats recipe is another make-ahead option built around creamy texture, storage, and easy fixes.
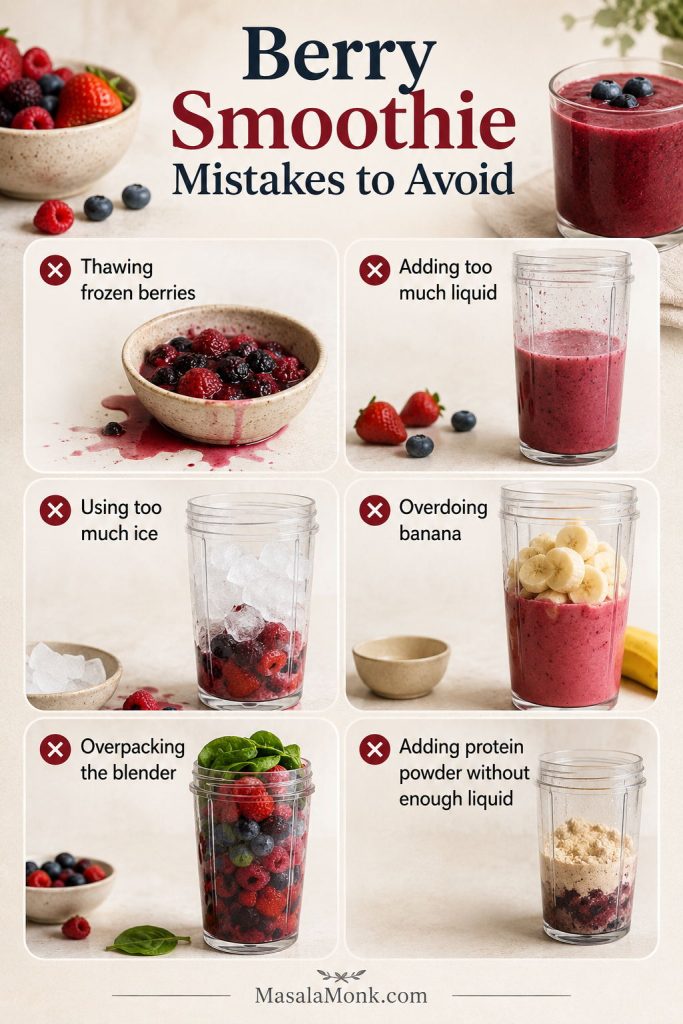
Troubleshooting: Too Thin, Too Tart, or Too Thick
This is where a smoothie goes from random to reliable. If the first blend is too thin, too tart, too seedy, or too thick to move, you almost never need to start over. You just need the right fix.
Do not add lots of ice to rescue a smoothie that has been sitting too long. Ice can make the flavor watery. Re-blend with frozen berries or frozen banana instead.
Many berry smoothie mistakes happen before blending starts. Keep frozen fruit frozen, add liquid carefully, avoid too much ice, and leave room for the blender to move.
Quick Smoothie Fixes
Use this quick guide when the smoothie is already in the blender and you need to decide what to change next.
Most berry smoothie problems are fixable once you identify the issue. Adjust texture, sweetness, creaminess, seediness, or dilution one step at a time.
Problem
Why It Happens
How to Fix It
Too watery
Too much liquid or thawed berries
Add frozen berries, frozen banana, Greek yogurt, oats, or chia
Too thick to blend
Not enough liquid for the blender
Add liquid 1 tablespoon / 15 ml at a time
Too tart
Berries are sour or yogurt is tangy
Add banana, vanilla, honey, maple syrup, dates, or sweeter juice
Too sweet
Too much banana, juice, or sweetened yogurt
Add lemon juice, plain yogurt, or more tart berries
Bland or flat
Too much liquid or mild berries
Add lemon juice, vanilla, a tiny pinch of salt, or more berries
Too seedy
Raspberries or blackberries are seed-heavy
Blend longer, use more blueberries/strawberries, or strain if needed
Too icy
Too much ice or not enough creamy ingredient
Use frozen fruit instead of ice; add banana, yogurt, or nut butter
Not creamy
Berries + liquid only
Add banana, Greek yogurt, avocado, oats, chia, or almond butter
Green bits from spinach
Spinach added with everything at once
Blend spinach with liquid first, then add fruit
Tastes like banana, not berries
Too much banana for the berry amount
Use 1/2 banana instead of a full banana and add more berries
Protein smoothie tastes chalky
Too much powder or not enough liquid/creaminess
Add yogurt, extra berries, or more liquid 1 tablespoon at a time
How to Fix a Thin or Thick Berry Smoothie
If the texture is the only problem, use this focused repair guide before changing the flavor.
Think of texture as a two-way dial. Frozen fruit moves a loose smoothie thicker, while small splashes of liquid help a stuck blend loosen without washing it out.
How to Fix a Sour or Dull Berry Smoothie
If the texture is right but the flavor feels sharp or flat, adjust sweetness and brightness instead of adding more liquid.
Tart berries need soft sweetness from banana, dates, honey, or vanilla. Meanwhile, a flat smoothie often needs brightness from lemon, extra berries, or a tiny pinch of salt.
Best Rescue Move
Most smoothie problems are fixable in the blender. The only real mistake is adding a lot of liquid before you know what the texture needs.
Once you get the texture right, the flavor feels cleaner too: colder berries, less dilution, and a smoothie that tastes like fruit instead of sweet milk.
Berry Smoothie Recipe Card
Save this base berry smoothie recipe as your starting point. Then, once the texture works, adjust it for protein, no banana, no yogurt, or a smoothie bowl.
Classic Berry Smoothie
This is the reliable base version: thick, creamy, berry-forward, and easy to adjust with or without banana, yogurt, protein powder, or greens.
Prep Time
5 minutes
Cook Time
0 minutes
Total Time
5 minutes
Yield
1 large 16 oz / 475 ml smoothie or 2 small 8 oz smoothies
Ingredients
1 1/2 cups frozen mixed berries, about 225 g / 8 oz
1/2 medium banana, about 55–60 g / 2 oz
1/2 cup Greek yogurt or plain yogurt, about 120 g / 4 oz
1/2 cup milk or almond milk, 120 ml / 4 fl oz, plus more as needed
1 to 2 teaspoons honey or maple syrup, optional
1 teaspoon lemon juice, optional
1/4 teaspoon vanilla extract, optional
Instructions
Add the milk or almond milk to the blender first.
Add the yogurt, banana, honey or maple syrup, lemon juice, and vanilla if using.
Add the frozen berries last.
Blend on low speed to start, then increase to high until thick and creamy.
If the blender stalls, add more liquid 1 tablespoon / 15 ml at a time.
Taste and adjust. Add lemon juice if it tastes flat, sweetener if it is too tart, or more frozen berries if it is too thin.
Pour into a glass and serve immediately.
Notes
Dairy-free: use almond milk, oat milk, coconut milk, or coconut yogurt.
No banana: use yogurt, oats, chia, avocado, almond butter, or extra frozen berries.
No yogurt: use banana, nut butter, oats, chia, avocado, or coconut milk.
Protein: add 1 scoop protein powder and start with 3/4 cup liquid.
Smoothie bowl: use only 2 to 5 tablespoons liquid and scrape as you blend.
FAQs
Can I use frozen mixed berries straight from the bag?
Yes. Use them straight from the freezer for the thickest texture. Do not thaw them unless your blender cannot handle frozen fruit.
Frozen berries or fresh berries: which works better?
Frozen berries are better for thickness. Fresh berries taste best in season, but usually need frozen banana, yogurt, or a little ice to avoid a thinner drink.
Can I use curd instead of Greek yogurt?
Yes. Use thick, well-set curd and reduce the milk slightly. Loose curd can make the smoothie thinner and tangier.
Why does my berry smoothie taste sour?
Your berry mix may be heavy on raspberries, blackberries, or cranberries. Add banana, vanilla, a date, honey, maple syrup, or a sweeter liquid.
Milk or yogurt: what gives the best texture?
Milk makes the smoothie easier to drink; yogurt makes it thicker and creamier. For balance, use 1/2 cup yogurt with 1/2 cup milk or almond milk.
What can replace yogurt in a berry smoothie?
Use banana, almond butter, oats, chia, coconut yogurt, avocado, or extra frozen berries. The goal is to replace yogurt’s creaminess, not just remove it.
What can replace banana in a berry smoothie?
Use Greek yogurt, coconut yogurt, avocado, oats, chia, almond butter, or extra frozen berries. Replace both banana’s sweetness and its creamy texture.
What works if I want no banana and no yogurt?
Use frozen berries, almond milk or oat milk, almond butter, and oats or chia seeds. Almond butter adds richness; oats or chia add thickness.
Why did my smoothie turn watery?
Usually, there is too much liquid, thawed fruit, or not enough frozen fruit. Add frozen berries, frozen banana, Greek yogurt, oats, or chia.
Can I make this in a personal blender?
Yes. Add liquid first, then yogurt or banana, then frozen berries. Do not pack the cup too tightly; leave room for the mixture to move.
Is ice necessary, or are frozen berries enough?
Frozen berries are usually enough. They chill and thicken the smoothie without diluting the flavor. Use ice only with fresh berries when you need extra chill.
How much protein powder should I add?
Use 1 scoop of vanilla or unflavored protein powder. Since powder thickens the smoothie, start with 3/4 cup liquid and adjust after blending.
What makes a smoothie bowl thick enough for toppings?
Use very little liquid. Blend frozen berries, frozen banana, and 2 to 5 tablespoons milk or almond milk until thick enough to spoon.
What is the best way to prep berry smoothies ahead?
Make freezer smoothie packs instead of storing finished smoothies. Freeze berries, banana, and dry add-ins together, then blend with yogurt and liquid.
Some desserts ask you to measure, mix, bake, cool, frost, and pray nothing cracks. Banana pudding doesn’t demand that kind of ceremony. Instead, it leans into a simpler rhythm: slice bananas, whip something creamy, stack it with cookies, and let the fridge do the patient work. By the time you come back, the layers have transformed—cookies soften into cake-like sheets, bananas mellow into perfume, and the pudding turns thicker, silkier, and somehow more “finished” than it had any right to be.
That’s the heart of banana pudding (no bake). It’s comforting without being fussy, familiar without feeling boring, and flexible enough to match whatever your pantry—and mood—happen to be today. You can keep it classic with vanilla wafers and pudding mix, push it richer with sweetened condensed milk, go fully homemade with a stovetop custard (still no oven required), or make a dairy-free version that doesn’t taste like a compromise.
If you’re building a no-oven dessert lineup, you can round out the table with something bright and tangy like this no-bake blueberry cheesecake or something spiced and crunchy like these Lotus Biscoff dessert cups. Still, banana pudding is the one that disappears first—because it feels like home in a bowl.
No-bake banana pudding, five recipes (pick the vibe before you start)
Before you pull out a dish, decide what you want your banana pudding to be: airy and light, thick and tangy, extra creamy, old-fashioned, or plant-based. Once you choose, everything else—milk amount, cookie choice, chill time—falls neatly into place.
Not sure which no-bake banana pudding to make? Start here—pick your base (classic, condensed milk, cream cheese, custard, or vegan) and the rest falls into place. Scroll down & get the full step-by-step options in this blog post.
The classic (light, fluffy banana pudding, reliably set)
This is the “banana pudding recipe” most people picture: instant vanilla pudding, whipped cream, bananas, and vanilla wafers. It’s easy, and it still tastes like a celebration.
The condensed milk version (extra creamy banana pudding, no-cook)
If you love a richer spoon and a dessert that holds up longer at gatherings, banana pudding with sweetened condensed milk is the move. It’s no-bake, no oven, and still feels indulgent.
The cream cheese banana pudding recipe (thick, tangy, cheesecake-style)
Cream cheese makes the layers sturdier and adds a gentle tang that keeps the sweetness from feeling heavy. It also nods toward a banana pudding cheesecake no bake style without turning the whole thing into a separate dessert.
The from-scratch custard (homemade, old-fashioned, no oven required)
This one tastes the most “made.” You’ll cook a simple stovetop custard, chill it, then layer as usual. The payoff is deeper vanilla flavor and a silkier texture that feels unmistakably homemade.
The vegan/dairy-free banana pudding (still creamy, still classic recipe)
A well-made vegan banana pudding can be every bit as satisfying. The secret is a pudding base that sets firmly, plus a chill long enough to knit the layers together.
If your no-bake banana pudding ever turns watery at the bottom, this is the fix: start with a cookie layer, then build upward so the crumbs absorb slowly instead of collapsing fast. Keep bananas tucked under pudding, chill long enough for everything to set, and you’ll get thick, scoopable layers that taste richer and look far more “finished” when you serve.
The ingredients that matter (and why each one changes the texture)
Banana pudding can look like a simple list on paper, yet a few small choices decide whether you end up with clean, scoopable layers or a soft, slumped bowl of sweetness. Luckily, the fixes are straightforward.
Bananas: ripe, but not collapsing
Aim for bananas that are yellow with light freckles—fragrant, sweet, and tender without being watery. If they’re very ripe (lots of brown), they’ll still taste great; however, they can release more moisture as they sit. In that case, you’ll want a thicker pudding base and a little more chill time.
The easiest way to keep no-bake banana pudding thick (not watery) is choosing the right banana. Yellow with light freckles gives the cleanest layers, while extra-freckled bananas taste sweeter but benefit from a longer chill. Very brown bananas can release more moisture—so if you use them, keep your pudding base thicker and don’t rush the fridge time. Slice bananas last, then cover the layer fully with pudding to slow browning and keep the bottom from “swimming.”
Creamy base: pudding mix, custard, or condensed milk
Instant pudding mix gives a consistent set and keeps the method truly no-cook.
Stovetop custard brings the “homemade banana pudding” depth, and it still stays no oven required.
Condensed milk adds body and richness, which helps the pudding stay thick even after hours in the fridge.
Cream: optional, but it changes everything
Whipped cream folded into the pudding base makes the texture lighter, almost mousse-like. It also softens the sweetness so each bite feels more balanced. If you’ve ever wondered about the difference between heavy cream and whipping cream for desserts, this quick explainer on heavy cream is a helpful reference—especially when you’re deciding what will whip most reliably.
Cookies: the quiet backbone of the whole dessert
Cookies aren’t just garnish here. They’re structure. They’re sponge. And then they’re the reason banana pudding becomes cohesive instead of just “bananas with pudding.”
Cookies for banana pudding (vanilla wafers, plus the best swaps)
If you want the most classic finish, vanilla wafers are hard to beat. They soften into tidy layers rather than dissolving instantly, and their gentle vanilla flavor keeps the dessert focused on bananas and cream.
Cookies are the backbone of banana pudding. Vanilla wafers give the most classic, tidy layers, while butter cookies make it taste more bakery-rich. Graham crackers are great in wider dishes, shortbread holds up best with a thicker pudding base, and spiced cookies turn jars into cozy dessert cups. If your layers ever go too soft, it’s usually not “your fault”—it’s a cookie thickness + chill-time mismatch.
Banana pudding with vanilla wafers (the classic layering cookie)
Vanilla wafers create that signature texture: soft, cake-like, and spoonable, yet still layered. They also look beautiful through glass if you serve banana pudding in jars.
Vanilla wafer alternatives that still behave well in banana pudding
Sometimes you want a different cookie, either for flavor or because you’re working with what you have.
Butter cookies or tea biscuits: richer, more “bakery” tasting
Graham crackers: slightly honeyed; great for wide dishes and jars
Shortbread: dense and buttery; best paired with a thicker pudding base
Spiced cookies: cozy, dramatic, and excellent in dessert cups
If you lean toward delicate cookies, keep your pudding thicker and don’t rush the chill. Otherwise, the layers can turn too soft before serving.
This is the version to make when you want the most reliable outcome with the least effort. It also gives you the cleanest foundation for variations later.
Cold milk (use the amount on the box as your starting point)
250–350 ml whipping cream, chilled
1–2 teaspoons vanilla extract (optional)
Vanilla wafers (or your cookie choice)
A small pinch of salt (optional, but surprisingly important)
This is the most reliable no-bake banana pudding—classic vanilla wafers, fluffy whipped pudding, and clean layers that hold. The quick 6-step card makes it easy to build: whisk, fold, layer, then let the fridge do the magic (overnight = bakery-level texture). If you’ve ever had a soggy bottom, the one change that fixes it is right here: start with cookies.
Method
Make the pudding base. Whisk pudding mix with cold milk until it thickens, then let it stand for a few minutes so it sets properly.
Whip the cream. Beat chilled cream until soft peaks. Add vanilla if you want a warmer, dessert-shop aroma.
Fold gently. Fold whipped cream into the pudding base until it looks airy and uniform. Don’t stir aggressively; instead, turn the mixture over itself so you keep the lift.
Slice bananas at the last moment. This keeps them fresher and helps reduce browning.
Layer. In a dish: cookies → pudding → bananas. Repeat until you run out, finishing with pudding on top.
Chill. Refrigerate for at least 4 hours. Overnight is even better because the cookies soften evenly and the pudding tightens into a more cohesive slice-and-scoop texture.
A small finishing move that changes the whole dessert
Right before serving, crumble a handful of cookies over the top. The contrast—soft layers underneath, crunchy crumb on top—makes each bite feel more alive.
If you want banana pudding to feel more “finished” without adding new ingredients, this is the move: a fresh cookie crumble right before serving. Crushing wafers into a mix of fine crumbs and a few bigger chunks gives you contrast—soft cake-y layers underneath, crisp texture on top. It also makes the dessert look bakery-made in seconds. If you’re storing leftovers, keep a small bowl of crumble aside and add it at serving time; it brings Day 2 (and even Day 3) right back to life.
If you enjoy layered puddings and want another “simple but elegant” idea, this savoiardi chocolate vanilla pudding has a similarly satisfying spoon texture, just with a more dramatic chocolate-and-cream vibe.
No-cook banana pudding with sweetened condensed milk (extra creamy, no oven required)
When you want banana pudding that tastes richer and holds up longer—especially if it’s sitting out for a while at a gathering—condensed milk is the shortcut that feels like a secret.
This variation also makes it easier to keep the pudding thick even after chilling, which is helpful if you’re using cookies that soften quickly.
Cold milk (start with slightly less than the box suggests)
Whipped cream (optional but recommended)
Bananas
Vanilla wafers or other cookies
If you want banana pudding that tastes richer and holds its shape longer, this sweetened condensed milk version is the upgrade. The condensed milk adds body, which helps the layers stay thick after chilling—especially useful if your cookies soften quickly. One small move makes it even more reliable: start with slightly less milk than your pudding box suggests, then let it rest overnight so the wafers turn cake-y without the bottom getting watery.
Method
Whisk condensed milk and cold milk until smooth and glossy.
Add the pudding mix and whisk until thickened.
Fold in whipped cream if you want a lighter finish.
Layer cookies, bananas, pudding, repeating until the dish is full.
Chill longer than the classic—aim for 6 hours or overnight—so the layers become neatly sliceable.
If you’re the type who loves make-ahead fridge sweets, you might also enjoy peanut butter fudge. It’s a different texture entirely, yet it hits that same “chill, slice, share” convenience.
Cream cheese changes the personality of banana pudding. The dessert becomes thicker and slightly tangy, with a richer mouthfeel that feels closer to a cheesecake filling. It’s a wonderful choice if you like desserts that scoop cleanly and don’t slump.
Ingredients (serves 8–10)
225 g cream cheese, softened
1 box instant vanilla pudding mix
Cold milk (use a little less to keep it thick)
250–350 ml whipping cream, whipped to soft peaks
Optional: 1 can sweetened condensed milk for extra richness
Bananas
Cookies (vanilla wafers are perfect here)
This is the banana pudding to make when you want thick, scoop-clean layers with a gentle cheesecake tang. Cream cheese adds structure, so the dessert slumps less and holds up better on a table. The only non-negotiable is texture: beat the cream cheese until completely smooth before anything else goes in—once lumps hide in the base, they’re hard to fix. After an overnight chill, the layers tighten, the wafers turn cake-y, and every spoonful stays creamy instead of runny.
Method
Beat the cream cheese until completely smooth. Take your time—lumps are stubborn once you add everything else.
Blend in condensed milk if using, until creamy and glossy.
Whisk pudding mix with cold milk separately until thick, then fold or beat it into the cream cheese mixture.
Fold in whipped cream to lighten the base.
Layer with bananas and cookies, then chill overnight for the best structure.
If you want to lean into the cheesecake mood, serve this version alongside no-bake blueberry cheesecake for a dessert table that feels intentional rather than accidental.
Homemade banana pudding from scratch (stovetop custard, still no oven needed)
This is the method that turns banana pudding into something you might proudly bring to a holiday dinner. It tastes deeper, it feels silkier, and it carries a quiet confidence that instant mix can’t quite replicate.
Even so, it’s still simple. You’re making a vanilla custard thickened with egg yolks and cornstarch, then chilling it until cold and spoonable. After that, you layer it exactly the same way.
For a dependable reference on how stovetop pudding thickens, King Arthur’s simple stovetop vanilla pudding is a useful baseline. If you enjoy understanding the “why” behind the method, Serious Eats has a clear explanation in their guide to vanilla pastry cream, which shares many of the same principles.
If you want banana pudding that tastes unmistakably homemade, the stovetop custard is the difference—and it’s easier than it sounds once you see the rhythm. This quick guide covers the two make-or-break moments: tempering (so yolks don’t scramble) and steady whisking on low heat (so the custard thickens smoothly instead of turning lumpy). Finish by chilling with wrap pressed directly on the surface to prevent a skin, then layer with bananas and wafers once it’s fully cold for the cleanest, most “old-fashioned” texture.
Ingredients (serves 8–10)
500 ml milk (2 cups)
90–120 g sugar (adjust to taste)
3 egg yolks
20–25 g cornstarch (about 3 tablespoons)
Pinch of salt
2 teaspoons vanilla extract
25–30 g butter (optional, for extra silkiness)
Bananas
Vanilla wafers (or cookie of choice)
Method
Whisk the yolks, sugar, cornstarch, and salt until smooth and slightly thickened. This mixture should look pale and glossy.
Warm the milk in a saucepan until steaming. Do not boil—you want it hot enough to temper the eggs, not hot enough to scramble them.
Temper slowly. Whisk a little warm milk into the yolk mixture, then a little more, building the temperature gradually.
Return to the pan and cook. Pour the tempered mixture back into the saucepan and cook on medium heat, whisking constantly. In a few minutes, it will shift from thin to thick. Keep whisking until it’s pudding-like and coats the back of a spoon.
Finish off the heat. Remove the pan from the heat and stir in butter (if using) and vanilla.
Cool correctly. Press a sheet of plastic wrap directly onto the surface so a skin doesn’t form. Let it cool to room temperature, then refrigerate until fully cold.
Layer and chill again. Once the custard is cold and thick, layer cookies, bananas, and custard. Chill at least 4–6 hours, ideally overnight.
To make it “old fashioned” banana pudding without an oven
Keep the custard thicker and skip folding in whipped cream. The result is dense, silky, and unmistakably homemade—very much the old-fashioned homemade banana pudding feeling, while still staying no oven required.
Vegan and dairy-free banana pudding (no-bake, no oven, still satisfying)
A dairy-free banana pudding shouldn’t feel like a side quest. It should taste like banana pudding—fragrant bananas, vanilla warmth, and a creamy base that sets properly.
The key is choosing a plant milk that thickens well (oat and soy are excellent), then cooking a quick pudding base with cornstarch. After that, you chill it fully before layering.
If you like fridge-set desserts, you might also enjoy the textures in this collection of chia pudding recipes. The flavors differ, yet the “make it, chill it, enjoy it” rhythm is beautifully similar.
Ingredients (serves 6–8)
500 ml plant milk (oat or soy recommended)
50–70 g sugar (adjust to taste)
20–25 g cornstarch (about 3 tablespoons)
Pinch of salt
2 teaspoons vanilla extract
1–2 tablespoons vegan butter (optional)
Bananas
Vegan-friendly cookies (vanilla-style if possible)
A dairy-free banana pudding only feels “compromised” when the base doesn’t set. This version fixes that by cooking a quick cornstarch pudding until it turns thick and glossy, then chilling it fully before you build the layers. Oat or soy milk tends to set more reliably than thinner plant milks, and the overnight rest does double duty: it firms the pudding and softens the cookies into that classic cake-y texture. Assemble once, chill, and you’ll get clean scoops that still taste like real banana pudding.
Method
Make a slurry. Whisk cornstarch, sugar, and salt with a splash of the plant milk until smooth.
Add the remaining milk and cook in a saucepan on medium heat, whisking constantly.
Cook until thick. Once it turns glossy and pudding-like, remove from the heat.
Stir in vanilla and vegan butter if using.
Cool with wrap on the surface, then refrigerate until cold and set.
Layer with bananas and cookies, then chill overnight so the cookie layers soften and the pudding becomes cohesive.
Banana pudding cheesecake no-bake style (a variation without changing the whole plan)
If you love cheesecake desserts but still want the nostalgic banana pudding texture, you can build a banana pudding cheesecake no bake variation by combining the cream cheese base with a crumb layer.
Crush cookies and press them into the bottom of your dish (a little melted butter helps, though it’s optional if your cookie crumbs are already buttery).
Add a thick cream cheese pudding layer, then bananas, then more pudding, then cookies.
Chill overnight so it slices cleanly.
For another easy, fruit-forward no-bake dessert that feels “party ready,” keep no-bake blueberry cheesecake in your back pocket—it complements banana pudding beautifully without competing for the same flavor space.
How to layer no-bake banana pudding so it turns cake-y, not soggy
Layering seems obvious until you scoop and realize the cookies dissolved too fast or the bananas slid around like they were on ice. A few simple habits fix that.
This quick no-bake banana pudding layer map is the difference between neat, cake-y layers and a soggy bottom. Start with cookies, seal the bananas under pudding (slice them last), then repeat until the dish is full. Finish with a fresh cookie crumble right before serving, and give it a long chill (overnight is the real upgrade) so every scoop stays thick, creamy, and clean.
Start with cookies, not pudding
Cookies at the base give the dessert structure. They also absorb moisture from the pudding gradually, which helps the bottom layer set rather than swim.
Keep banana slices medium-thick
Thin slices vanish into the pudding; thick slices can feel slippery. Aim for coins that hold their identity without taking over.
Seal bananas under pudding
Bananas brown when exposed to air. Covering them with pudding slows that down while keeping the layers tidy.
Layer order matters, but layer thickness is what keeps banana pudding from turning soft and messy. Think of pudding as a “seal”: it should be thick enough to fully cover the bananas so they don’t brown quickly or leak moisture into the cookie base. Keep banana slices to a single coin layer (no stacking), then repeat and finish with pudding so the top stays smooth. Save the cookie crumble for serving time—this one step gives you that perfect contrast between cake-y layers underneath and a crisp finish on top.
Chill longer than you think you need
Four hours works. Overnight is better. The difference isn’t subtle: cookies soften evenly, the pudding firms, and the flavors knit into a single, harmonious spoonful.
If you’re serving in jars, build thinner layers. That way, every bite picks up banana, cookie, and pudding together.
No-bake banana pudding in jars (dessert cups that look as good as they taste)
Banana pudding served in a dish feels nostalgic. Banana pudding served in jars feels modern and intentional—especially if you’re bringing dessert to a gathering or setting up a dessert table.
Jars make banana pudding feel instantly more “party-ready,” and they also protect the layers so each serving stays neat. Use this simple jar layer order—crumbs/cookies → pudding → bananas → pudding → crumble (serve)—and you’ll get the best texture in every bite. Two small details matter most: slice bananas right before assembling (so they stay fresher) and save the final crumble for the last minute so the top stays crisp instead of turning soft in the fridge.
Why jars work so well
They protect the layers so the pudding stays neat
They’re easy to portion and transport
They look beautiful through the glass
If you love the “dessert cup” presentation, you’ll also like the vibe of these Lotus Biscoff dessert cups. They’re different in flavor, yet they share the same layered, chilled charm.
Jar layering rhythm
Cookies (or crumbs) → pudding → bananas → pudding → cookie crumble on top. Then chill. Just before serving, add fresh crumble again so the top stays crisp.
Make-ahead timing (how to plan banana pudding without stress)
Banana pudding is at its best when it has time to rest, which makes it a natural make-ahead dessert. Still, timing matters—especially if you want bananas to look good and layers to hold.
Banana pudding is one of those desserts that actually improves with a little planning. The simplest win is assembling it the night before: the pudding firms, the cookies soften into that cake-y layer, and the whole dish scoops more cleanly. If you need to make it farther ahead, treat bananas as the variable—either add them closer to serving or keep them fully covered under a thicker pudding layer to reduce browning and excess moisture. Right before serving, add a fresh crumble on top so the finish stays crisp.
The sweet spot: assemble the night before
When you assemble banana pudding the evening before, you get the best of everything: the cookies soften, the pudding sets, and the bananas mellow without turning watery.
If you need to assemble earlier
If you’re making it more than a day in advance, consider one small adjustment: assemble the pudding and cookies first, then add bananas closer to serving time. Alternatively, you can keep bananas protected under thicker pudding layers so air exposure stays minimal.
Food safety basics for fridge desserts
Since banana pudding contains dairy—and sometimes eggs, if you make custard—good refrigeration habits matter. The general guidance on keeping perishable foods safe (including cooling and refrigeration) from FoodSafety.gov is a solid reference to follow. For egg-based custards in particular, the FDA’s overview of egg safety is worth a quick read if you want extra peace of mind.
For leftovers, the USDA’s advice on leftovers and food safety is a reliable guide for how long chilled desserts typically stay safe in the fridge.
Storage (how to keep banana pudding tasting fresh)
Cover it tightly
Banana pudding absorbs fridge odors easily. A tight lid or well-sealed wrap keeps the flavor clean and keeps the top from drying out.
Banana pudding changes as it sits, and that’s normal—not a mistake. On day one, the layers are the most distinct and the contrast is strongest. By day two, the cookies soften further and everything tastes more blended (often the sweet spot). By day three, it’s still delicious, just much softer overall. The easiest way to keep it tasting “fresh” is sealing it tightly so it doesn’t pick up fridge odors—and saving a little cookie crumble to sprinkle right before serving for a crisp finish.
Keep it cold, consistently
Avoid leaving the pudding out for long stretches, especially in warm rooms. Serve what you need, then return the dish to the fridge.
Expect the texture to evolve
On day one, layers are distinct. By day two, the cookies soften further. By day three, it’s still delicious—just more uniformly soft. If you like a bit of crunch, save extra cookie crumble to add at the end.
Serving ideas that make banana pudding feel “new” again
Banana pudding is classic for a reason, yet it also welcomes a few thoughtful finishing touches.
Banana pudding is rich and soft, so it shines brightest next to something that adds contrast—either bitterness, chill, or a different texture. Coffee (iced coffee or cappuccino) cuts the sweetness and makes dessert feel café-like. A chilled cake such as tres leches turns the table into a “real dessert spread” without extra work. If you want something sliceable and giftable, peanut butter fudge is a great partner. And if you’re keeping the theme cozy, peach cobbler pudding gives a warm-spiced counterpoint while staying in the same spoon-dessert lane.
A light drizzle (without turning it into a chocolate dessert)
A small drizzle can make the surface look glossy and special, particularly when you’re serving guests. This 3-minute chocolate syrup works beautifully if you keep it subtle—just enough to accent the bananas and vanilla, not drown them.
A cookie “snow” finish
Crumble cookies over the top right before serving. It’s simple, yet it adds crunch and makes the presentation more inviting.
A dessert table that feels balanced
If you’re putting together multiple sweets, pair banana pudding with something that contrasts its creamy softness:
Another pudding-style dessert with a different flavor profile, like this peach cobbler pudding
For even more ideas in the same cozy category, this Pudding Palooza dessert roundup is a fun way to keep the theme going without repeating the same flavors.
Pair it with coffee (cold or foamy)
Banana pudding loves coffee. The sweetness and vanilla play nicely against roasted notes, especially after a meal.
If you want something refreshing, browse these iced coffee recipes and pick a cold brew or latte-style option.
If you’d rather keep it warm and classic, a homemade cappuccino makes the whole dessert moment feel café-like.
Troubleshooting (so your banana pudding turns out thick, creamy, and layered)
Even a simple dessert can misbehave. Fortunately, banana pudding is forgiving, and the fixes are usually quick.
Most banana pudding “problems” come down to two things: moisture and air. If you see liquid pooling at the bottom, it usually means the bananas were very ripe or the pudding base was a bit thin—starting with a cookie layer and using a thicker base (often just slightly less milk) helps the dessert set into clean, scoopable layers. If bananas turn brown, it’s simply exposure: slice them right before layering and keep them fully covered under pudding so air can’t reach the fruit. A tiny brush of lemon juice is optional, but keep it subtle so the pudding still tastes purely vanilla-banana.
If the pudding feels runny
Most often, it’s too much milk or not enough time in the fridge. Next time, reduce the milk slightly. For now, chill it longer—covered—so it can finish setting properly.
If a watery layer appears at the bottom
Overripe bananas can release moisture, and thin pudding can’t hold it. Use slightly firmer ripe bananas and make a thicker pudding base, especially if you’re layering with delicate cookies.
If the cookies dissolved into mush
That’s usually a thickness issue. Thicker pudding slows down cookie breakdown. Vanilla wafers, butter cookies, and shortbread also hold up better than delicate biscuits.
Runny banana pudding is almost always a ratio + chill-time problem—not a failure. Start with slightly less milk, then give it a proper fridge rest (overnight is the real glow-up). If you want a thicker, cleaner scoop, pick one base booster: condensed milk for body, cream cheese for thick + tangy, whipped cream for lighter stability, or a simple custard for the firmest set. (Perfect for the Troubleshooting section when your layers feel too soft.)
If the bananas browned
Slice bananas right before layering, then cover them with pudding so air can’t reach them. If you need extra protection, a very light brush of lemon juice can help; keep it subtle so the pudding doesn’t taste citrusy.
If your from-scratch custard turned lumpy
Heat was likely too high, or whisking paused. You can strain the custard through a fine sieve, then return it to gentle heat briefly while whisking to smooth it out. After that, chill as usual.
A few variations that keep the banana pudding recipe feeling fresh
Once you’ve made banana pudding once, it becomes dangerously easy to make it again—so it helps to rotate small changes that make it feel new.
Once you know the basic layering rhythm, banana pudding becomes a template you can remix. This quick variation board helps you choose a direction without rewriting the whole recipe: swap cookies for Biscoff, Oreo, Chessman, or Nutter Butter; add a strawberry layer for a fruitier twist; or go lighter with a protein-friendly version using Greek yogurt and less sugar. If you’re serving guests, a small chocolate drizzle or jar-cup presentation makes the same pudding feel brand new—without changing the method that keeps it thick and reliable.
Make it more “vanilla-forward”
Use a little extra vanilla extract, and add a pinch of salt to sharpen the flavor. It’s still banana pudding, just brighter and more aromatic.
Make it more “cookie-forward”
Double down on the cookie layers and finish with a generous crumble on top. You’ll get more contrast between soft and crisp.
Make it richer without adding fuss
Use sweetened condensed milk in the base. It adds richness and a thicker finish without requiring custard-making.
Make it more homemade (without using an oven)
Go the stovetop custard route. It takes a little longer, yet the flavor payoff is worth it—especially when you want a truly homemade banana pudding from scratch feeling.
Make it plant-based
Use a thick dairy-free pudding base and vegan-friendly cookies. Given enough chill time, the dessert becomes cohesive and satisfying.
Bringing it all together (the no-oven dessert you’ll make again and again)
No-bake banana pudding is one of those desserts that meets you where you are. It can be a quick weeknight treat made from a banana pudding mix and a box of wafers. Then can be a party-ready dish made with sweetened condensed milk for extra creaminess. And it can even be an old-fashioned, homemade banana pudding from scratch with stovetop custard—still no oven required, still wonderfully simple once you learn the rhythm.
Most importantly, it’s the kind of dessert that invites seconds without demanding perfection. So make it classic, make it creamy, make it tangy, or make it dairy-free. Either way, give it time in the fridge, spoon it generously, and let the layers do what they do best: turn a few humble ingredients into something that feels like comfort you can share.
1) Can I make banana pudding with no oven required?
Yes. Banana pudding is naturally a no-oven dessert because the pudding sets in the fridge. Whether you use instant pudding mix, a no-cook condensed milk base, or a stovetop custard, you can still finish the entire dish without turning on the oven.
2) What’s the difference between no-bake banana pudding and no-cook banana pudding?
No-bake banana pudding simply means you don’t bake it. Meanwhile, no-cook banana pudding usually means you also skip stovetop cooking—so you rely on instant pudding mix (and sometimes sweetened condensed milk) to thicken everything.
3) How long does banana pudding need to chill to set properly?
In most cases, banana pudding needs at least 4 hours to set; however, overnight chilling gives the best texture. As it rests, the pudding firms up and the cookies soften into a cake-like layer.
4) How do I keep bananas from turning brown in banana pudding?
First, slice bananas right before layering. Next, cover the banana layer completely with pudding so less air reaches the fruit. If you want extra protection, lightly brushing banana slices with a tiny amount of lemon juice can help—just use it sparingly so the pudding doesn’t taste citrusy.
5) What are the best bananas for banana pudding?
Choose bananas that are yellow with a few brown freckles. They’re sweet and aromatic, yet still firm enough to hold their shape. On the other hand, bananas that are very brown can release more moisture, which may thin the layers.
6) What are the best cookies for banana pudding?
Vanilla wafers are the classic choice because they soften evenly and keep the layers structured. That said, butter cookies, graham crackers, and shortbread also work well—especially if you prefer a richer, more buttery base.
7) Can I make banana pudding with vanilla wafers and still keep it from getting soggy?
Absolutely. Use a thicker pudding base, layer cookies evenly, and chill long enough so the moisture absorbs gradually rather than flooding the cookies. Additionally, adding a fresh cookie crumble on top right before serving brings back a crisp contrast.
8) Can I make banana pudding with sweetened condensed milk?
Yes, and it’s one of the creamiest no-oven options. Sweetened condensed milk adds richness and body, so the pudding holds its shape more reliably. Even so, it’s best to chill it longer—ideally 6 hours or overnight—for the cleanest scoops.
9) Can I make banana pudding from scratch without baking?
You can. Instead of baking, you cook a quick stovetop custard (milk, sugar, egg yolks, and cornstarch), then chill it until thick. After that, you layer it with bananas and cookies just like any banana pudding (no bake) version.
10) Why is my banana pudding runny?
Usually, it comes down to one of three things: too much milk, not enough chill time, or a pudding base that didn’t fully thicken before layering. To fix it next time, reduce the milk slightly and let the pudding stand a few minutes before assembling.
11) Why does banana pudding get watery at the bottom?
Most often, very ripe bananas release liquid as they sit. Similarly, a thinner pudding base can’t “hold” that moisture. Therefore, using slightly firmer ripe bananas and a thicker pudding base helps keep the layers stable.
12) Can I make banana pudding ahead of time?
Yes—banana pudding is one of the best make-ahead desserts. In fact, making it the night before usually improves the texture because the cookies soften evenly and the flavors meld.
13) How long does banana pudding last in the fridge?
Typically, banana pudding tastes best within 24–48 hours. After that, it’s still enjoyable, though the cookies can become very soft and the bananas may darken slightly. Keep it tightly covered to maintain freshness.
14) Can I freeze banana pudding?
Freezing isn’t ideal. Although it may be safe, the texture often suffers because pudding can separate when thawed, and bananas can become mushy. Instead, it’s better to refrigerate and enjoy within a couple of days.
15) How do I make banana pudding thicker without changing the flavor?
Start by using a little less milk, then chill longer. Moreover, folding in whipped cream after the pudding thickens can help the dessert feel thicker and more stable. For an even denser option, try the cream cheese variation.
16) Can I make banana pudding with cream cheese?
Yes. Cream cheese makes banana pudding thicker, slightly tangy, and more “cheesecake-like.” As a result, it holds its shape well and scoops cleanly, especially after an overnight chill.
17) What’s the easiest banana pudding recipe for beginners?
A classic no-bake banana pudding using instant vanilla pudding mix, milk, whipped cream, bananas, and vanilla wafers is the easiest. Since it’s no-cook and no oven required, it’s also the most forgiving.
18) Can I make vegan banana pudding that still tastes creamy?
Yes. A dairy-free banana pudding can be creamy if the pudding base is thickened properly (often with cornstarch) and chilled until fully set. Also, choosing a vanilla-style vegan cookie keeps the flavor closer to traditional banana pudding.
19) Can I make banana pudding without vanilla wafers?
Definitely. You can use butter cookies, graham crackers, shortbread, or similar crisp cookies. Just keep in mind that thinner cookies soften faster, so a thicker pudding base and a longer chill can make a big difference.
20) How do I layer banana pudding so every scoop has all the layers?
Use evenly spaced cookie layers, slice bananas to a similar thickness, and spread pudding all the way to the edges each time. Finally, let it chill long enough so the layers settle—then scoop straight down to capture cookie, banana, and pudding in one bite.
A strawberry smoothie recipe can be as simple as fruit and milk—sweet, cold, and comforting in the way only strawberries manage. Still, it can also be the kind of drink that feels a little more intentional: thicker, creamier, packed with protein, or bright and tropical depending on what you toss into the blender. That’s the charm. You can keep it basic on a sleepy morning, then lean into something spoonable and extra on the weekend.
Even if you start with one strawberry smoothie recipe, the variations open up fast. Add banana and you’ve got a strawberry banana smoothie that tastes like a classic diner treat. Stir in yogurt and it turns into a strawberry smoothie with yogurt—tangy, creamy, and quietly luxurious. Blend in protein powder and you’re suddenly in strawberry protein shake territory, where the smoothie stops being “just a drink” and starts pulling real weight as breakfast or post-workout fuel. Push the texture thicker and you’ve stepped into strawberry smoothie bowl land, with toppings and crunch and the satisfaction of eating your smoothie with a spoon.
Before any of that, though, it’s worth doing two quick things that make every version better.
First, wash fresh strawberries properly. The FDA’s guidance on handling produce is practical and straightforward in their page on selecting and serving produce safely. Second, if you ever like checking nutrition basics for ingredients you use often, the USDA FoodData Central strawberry listings are a dependable reference.
Now that you’ve got clean berries and a blender, let’s make smoothies that taste like strawberries—whether you want them light and drinkable, thick and creamy, or bold enough to count as a full meal.
The small details that make smoothies taste smoother, richer, and more “finished”
Start with the fruit: fresh strawberries vs frozen strawberries
Fresh strawberries taste vivid and perfumed when they’re in season. Frozen strawberries, on the other hand, are the secret to texture. If you’re chasing that thick café-style consistency, a strawberry smoothie made with frozen strawberries is hard to beat.
Fresh vs Frozen Strawberries: Use fresh berries when you want the most fragrant strawberry flavor—use frozen berries when you want thickness and a frosty smoothie without watering it down with ice.
When you use frozen fruit, you’re essentially replacing ice with flavor. That’s why the “smoothie frozen fruit” approach works so well: you get frost and thickness without watering down the fruit. The same logic applies to any recipe for smoothie with frozen fruit—frozen berries, frozen mango, frozen pineapple—because cold fruit behaves like a built-in thickener.
If your blender is strong, you can go fully frozen. If it struggles, you can use half frozen and half fresh, then adjust.
A simple ratio that keeps you out of watery territory
A lot of disappointment comes from one thing: too much liquid too soon. Instead, begin conservatively and add more only when the blender needs it.
A reliable starting point for most drinkable smoothies:
2 cups fruit (more if you want it extra thick)
¾ cup liquid (milk, almond milk, coconut water, juice)
½ cup creamy element (yogurt, banana, oats, nut butter)
The No-Watery Smoothie Ratio: Start thick on purpose—use plenty of fruit and add liquid only as needed. It’s the easiest way to avoid a bland, watery smoothie without adding ice.
For thicker blends, especially smoothie bowls:
2½ to 3 cups frozen fruit
¼ to ½ cup liquid (start low)
Optional yogurt, but don’t lean on it too heavily unless you like a tang-forward bowl
Once you get comfortable with this, you can improvise endlessly—banana strawberry fruit smoothie one day, strawberry mango smoothie the next—without thinking too hard about measurements.
Choosing the liquid sets the vibe
The liquid you choose isn’t just “what makes the blender spin.” It decides the flavor direction and the mouthfeel.
Pick Your Liquid: Milk gives the creamiest strawberry smoothie, almond milk keeps it lighter, and coconut water makes fruit taste brighter—choose based on whether you want “milkshake” comfort or a refreshing finish.
Milk makes a classic strawberry smoothie with milk: creamy, mild, and familiar.
Almond milk keeps things lighter and slightly nutty, which is perfect for an almond milk strawberry smoothie or a banana strawberry smoothie almond milk version.
Yogurt-based liquids (like kefir or drinkable yogurt) create a tangy, thicker “strawberry smoothie drink” feel.
Coconut water brightens tropical smoothies. If you like that clean, refreshing finish, MasalaMonk’s coconut water smoothie ideas are a great source of flavor combinations.
Yogurt: regular, Greek, or strawberry yogurt?
Yogurt is one of the easiest ways to turn “nice” into “wow.”
Choose Your Yogurt: Want a thick, café-style strawberry smoothie? Go Greek. Prefer a lighter sip? Use regular yogurt. Want extra sweetness without adding honey? Strawberry yogurt does the job.
Greek yogurt makes thick smoothies and supports the kind of creamy texture people want when they look up smoothie recipes with Greek yogurt.
Regular yogurt is softer and more drinkable; it’s ideal for strawberry fruit smoothie recipes with yogurt that feel light but still creamy.
Strawberry yogurt adds extra sweetness and a dessert-like flavor. It’s also handy if you want a strawberry smoothie with strawberry yogurt and you don’t feel like adding a sweetener.
If you like the idea of a strawberry yogurt shake recipe that feels like a treat without ice cream, yogurt is the cleanest path.
Blend order matters more than you think
If your blender ever stalls, it’s usually because frozen fruit got stuck around the blades. The fix is simple: blend in layers.
Blend Order (No Stalls): Putting liquid in first helps the blades catch—then add soft ingredients, and finish with frozen fruit so everything blends smooth without getting stuck.
Liquid first
Soft ingredients next (yogurt, banana, nut butter, protein powder)
Frozen fruit last
With leafy greens, blend greens with liquid first, then add fruit. You’ll see why when we get to the strawberry spinach smoothie.
Sweetness: aim for balance, not sugar
Strawberries can be sweet or tart depending on the batch. Instead of reaching straight for sugar, you can sweeten through ingredients:
ripe banana
dates
honey or maple
a splash of orange juice (especially good with pineapple)
Sweeten the Smart Way: If your strawberries are tart, sweeten with banana, dates, or a little honey—then add a tiny pinch of salt to make the fruit flavor pop without making the smoothie taste “salty.”
A tiny pinch of salt can also make fruit taste brighter. It won’t taste salty; it just rounds out the flavor.
A note on “shake” style smoothies (without ice cream)
When someone wants a strawberry shake recipe, they often mean a smoothie that feels like a milkshake—thicker, creamier, a little frothy—without adding ice cream.
Shake Style (No Ice Cream): Skip the ice cream and the ice—use cold milk plus frozen strawberries, then blend a little longer to whip in air for that milkshake-like fluff.
To get that strawberry milkshake without ice cream feel:
use cold milk
use frozen strawberries
include banana or yogurt for thickness
blend a little longer for fluff
That’s it. You’ll get a strawberry shake without ice cream that still feels indulgent.
Recipe 1: Strawberry Smoothie (Classic, flexible, and dependable)
This is the foundational strawberry smoothie recipe you can return to anytime. It’s simple enough to memorize, yet it’s also the base that supports dozens of strawberry fruit smoothie recipes.
Ingredients for Strawberry Smoothie Recipe
2 cups strawberries (fresh or frozen)
¾ cup milk (or almond milk)
½ cup yogurt (optional)
1–2 teaspoons honey or maple (optional)
Ice (only if using fresh strawberries and you want it extra cold)
Classic Strawberry Smoothie: For a thicker café-style blend, use frozen strawberries instead of ice and add liquid gradually—start low, then loosen only if the blender needs it.
Method
Add the liquid to the blender first, followed by strawberries. Blend until smooth. If you’re using yogurt, add it after the berries break down, then blend again. Taste and adjust.
Make it three different ways (without changing the spirit)
Strawberry smoothie with yogurt Add ½ cup Greek yogurt for a creamy, thick finish. This is the version that often feels like the best strawberry smoothie recipe when you want something satisfying.
Strawberry smoothie recipe without yogurt Skip yogurt and add ½ banana, or 2 tablespoons oats, or 1 tablespoon chia. Each makes it creamy in a different way.
Strawberry smoothie with milk Use cold milk and frozen strawberries for a smooth, classic drink. If you want it extra thick, reduce the milk slightly and add more frozen strawberries instead.
If you’re ever unsure what to do with a batch of berries, this is the “good strawberry smoothie recipe” you can make without thinking.
Recipe 2: Strawberry Banana Smoothie (the classic everyone loves)
A strawberry banana smoothie is sweet, creamy, and forgiving. It’s also the smoothie that most people associate with the phrase “fruit smoothie.” Whether you call it banana and strawberries smoothie or banana strawberry fruit smoothie, the goal is the same: smooth texture, bright berry flavor, and a sweetness that feels natural.
Ingredients for Strawberry Banana Smoothie Recipe
2 cups strawberries (frozen is ideal)
1 banana (fresh or frozen)
¾ cup milk (or almond milk)
½ cup yogurt (optional)
Pinch of salt (optional)
Strawberry Banana Smoothie: Freeze the banana for built-in creaminess, then add milk slowly—thickness comes from fruit, not extra liquid.
Method
Blend milk and strawberries first. Once the strawberries break down, add banana and yogurt (if using), then blend until creamy.
Variation options you’ll actually use
Strawberry banana smoothie with yogurt Use Greek yogurt for extra thickness. If you’re building smoothie recipes with yogurt and strawberries into your routine, this is a great staple.
Strawberry banana smoothie with milk Keep it simple: cold milk + frozen strawberries + banana. It feels like a strawberry banana drink, especially if you blend it until slightly frothy.
Strawberry banana smoothie without yogurt Frozen banana does the heavy lifting. Use slightly less liquid and you’ll still get a thick smoothie.
If you enjoy comparing techniques, Serious Eats has a clear, straightforward strawberry banana smoothie method that’s easy to read alongside your own version.
And if you ever want a more filling, nutty twist, MasalaMonk’s nut-infused smoothie recipes are a great way to borrow ideas—like adding walnuts for richness without making the smoothie taste heavy.
Recipe 3: Strawberry Smoothie With Yogurt (extra creamy, lightly tangy)
Sometimes the “best strawberry smoothie” isn’t the simplest one—it’s the one with that lush, creamy texture that tastes like it came from a café. Yogurt is the easiest way to get there.
This recipe also naturally fits smoothie recipes with Greek yogurt, strawberry smoothie recipe with yogurt, and even the idea of a strawberry yogurt milk smoothie if you prefer a thinner pour.
Ingredients for Strawberry Smoothie With Yogurt Recipe
2 cups frozen strawberries
½ cup Greek yogurt
¾ cup milk (or almond milk)
1 teaspoon honey (optional)
½ teaspoon vanilla (optional)
Strawberry Smoothie with Yogurt: Greek yogurt gives you that café-thick texture—if it feels too pourable, reduce the liquid by a couple tablespoons instead of adding ice.
Method
Blend milk and yogurt first until smooth. Then add strawberries and blend until thick and creamy. Taste; sweeten lightly if needed.
Two directions to take it
If you want something closer to a strawberry yogurt shake recipe, use cold whole milk and blend longer so it becomes a little airy. On the other hand, if you prefer a brighter, lighter smoothie, use regular yogurt and almond milk.
Either way, you’ll get a strawberry smoothie drink that feels creamy without being heavy.
Recipe 4: Strawberry Smoothie Without Yogurt (still creamy, still satisfying)
If yogurt isn’t your thing—or you simply ran out—you can still make a strawberry smoothie that’s thick and silky. The trick is replacing yogurt with something that brings body.
Ingredients for Strawberry Smoothie Recipe Without Yogurt
2 cups frozen strawberries
¾ cup milk or almond milk
One creamy option:
½ banana, or
2 tablespoons oats, or
1 tablespoon chia (let it sit for a few minutes after blending), or
¼ avocado
Optional sweetener if your berries are tart
Strawberry Smoothie Without Yogurt: If it tastes great but feels thin, thicken with fruit or fiber—banana for sweetness, oats for a breakfast-like body, or chia (rest 3 minutes) for a naturally thicker finish.
Method
Blend liquid and your creamy option first. Add frozen strawberries and blend until smooth.
What it tastes like
With banana, the smoothie leans sweet and classic—almost like a strawberry banana smoothie but lighter. When making it with oats, it becomes more breakfast-like, especially if you let it sit briefly so it thickens. And with avocado, it feels plush and rich, yet it still tastes like strawberries.
This is a simple strawberry smoothie solution that feels complete even without yogurt.
Recipe 5: Strawberry Protein Shake (filling, fast, and surprisingly delicious)
A strawberry protein shake should still taste like fruit, not like a supplement. The best versions are creamy, balanced, and easy to drink even when you’re not in the mood for something heavy.
It’s also a natural fit for strawberry protein drink, strawberry protein smoothie, and strawberry protein shake powder type blends.
Ingredients for Strawberry Protein Shake Recipe
2 cups frozen strawberries
1 cup milk (or almond milk)
1 scoop vanilla protein powder
½ banana or 1 date (optional)
1 tablespoon chia or ground flax (optional)
Strawberry Protein Shake: For a smooth, non-chalky shake, blend your liquid with protein powder first, then add frozen strawberries—extra fruit fixes texture and flavor better than extra sweetener.
Method
Blend the milk and protein powder first. Next, add strawberries and blend until thick. If you’re using chia, pulse it in at the end.
Make it more satisfying in a clean way
A spoonful of nut butter adds richness and makes the smoothie feel like a meal. Hemp seeds work well too; MasalaMonk’s hemp seed smoothie ideas include combinations that pair nicely with berries.
If you’re in a season where you want higher-calorie blends, MasalaMonk’s high calorie protein shakes can inspire how to build a thicker, more substantial shake while keeping your own version strawberry-forward.
Recipe 6: Strawberry Banana Protein Smoothie (breakfast + gym-friendly)
This is what happens when a strawberry banana smoothie grows up. It’s still sweet and familiar, yet it carries you further thanks to protein.
It also naturally matches phrases like strawberry banana protein smoothie, banana and strawberry protein shake, and protein banana strawberry smoothie.
Ingredients for Strawberry Banana Protein Smoothie Recipe
1½ cups frozen strawberries
1 banana
1 cup milk or almond milk
1 scoop protein powder
½ cup yogurt (optional)
Strawberry Banana Protein Smoothie: Use frozen banana for creaminess, then decide your texture—skip yogurt for a lighter shake, or add a little Greek yogurt when you want it extra thick and filling.
Method
Blend milk and protein powder until smooth. Add strawberries and banana, then blend until creamy.
Two easy adjustments
If you want it lighter, skip the yogurt and rely on frozen banana for creaminess. Conversely, if you want it extra thick, add yogurt and reduce the milk slightly.
If you’re using almond milk, you’ll end up close to a strawberry banana smoothie with almond milk—just with more staying power.
A smoothie bowl is all about texture. Instead of “drinkable,” you’re aiming for thick enough to hold toppings without everything sinking.
This covers strawberry banana smoothie bowl, smoothie bowl strawberry banana, and strawberry smoothie bowl recipe style blends naturally—without turning it into a project.
Ingredients for Strawberry Banana Smoothie Bowl Recipe
2 cups frozen strawberries
1 frozen banana (sliced before freezing)
¼ to ⅓ cup milk or almond milk (start small)
Optional: ¼ cup yogurt for tang
Strawberry Banana Smoothie Bowl: Bowl thickness comes from frozen fruit, not extra yogurt—start with very little liquid, then pulse and scrape until it turns spoonable enough to hold toppings.
Method
Add frozen fruit to the blender first. Then add the smallest amount of liquid to help it catch. Blend, stop, scrape, blend again until thick. Spoon into a bowl.
Toppings that work every time
Granola + sliced strawberries
Banana coins + nut butter drizzle
Coconut flakes + pineapple chunks
Chia seeds + cacao nibs
Bowl Thickness (Spoonable): Smoothie bowls should be blended “thick first”—start with very little liquid, then correct texture by adding more frozen fruit (not more yogurt or milk) if it turns runny.
If you want a quick visual reference for thickness, Bakerita’s strawberry banana smoothie bowl shows a classic approach. Meanwhile, Minimalist Baker’s smoothie bowl method explains the key principle: minimal liquid and patience in the blender.
For a make-ahead angle, MasalaMonk’s meal prepping with strawberries is a great companion read, especially if you like prepping frozen fruit packs for quick blending.
Recipe 8: Strawberry Peanut Butter Smoothie (comforting, rich, and balanced)
Strawberries and peanut butter sound unusual until you taste them together. The berries keep it bright; the peanut butter adds depth. The result feels like dessert while still being breakfast-friendly.
This naturally fits strawberry peanut butter smoothie, peanut butter and strawberry smoothie, and strawberry banana peanut butter smoothie variations.
Ingredients for Strawberry Peanut Butter Smoothie Recipe
2 cups frozen strawberries
1 banana
1–2 tablespoons peanut butter
¾ cup milk or almond milk
Optional: pinch of cinnamon, pinch of salt, splash of vanilla
Strawberry Peanut Butter Smoothie: For a smooth, creamy blend, emulsify peanut butter with milk first—then choose your richness: 1 tablespoon keeps it light, 2 tablespoons makes it dessert-like.
Method
Blend milk and peanut butter first so it emulsifies. Add strawberries and banana and blend until thick and creamy.
A few ways to change the mood
If you want something lighter, use almond milk and stick to 1 tablespoon peanut butter. If you want it more like a strawberry shake without ice cream, use cold milk and blend longer so it becomes airy.
Either direction, you’ll have a smoothie that feels indulgent without being heavy.
Recipe 9: Chocolate Strawberry Smoothie (cocoa-forward, not syrupy)
Chocolate and strawberry is a classic pairing, although it can become overly sweet if you lean on syrups. Cocoa powder keeps things grounded while frozen strawberries keep it bright.
This is a natural fit for chocolate strawberry smoothie, chocolate and strawberry smoothie, and cocoa strawberry smoothie versions.
Ingredients for Chocolate Strawberry Smoothie Recipe
2 cups frozen strawberries
1 banana (or 2 dates)
1 tablespoon cocoa powder
1 cup milk (or almond milk)
Optional: ½ cup yogurt for extra creaminess
Chocolate Strawberry Smoothie: To avoid gritty cocoa, dissolve it into the milk first—then keep it to about 1 tablespoon so the chocolate supports the strawberries instead of overpowering them.
Method
Blend cocoa powder with milk first so it dissolves smoothly. Add strawberries and banana, then blend until creamy.
A protein-friendly approach
If you like the idea of a strawberry banana chocolate protein smoothie, you can add vanilla or chocolate protein powder and keep the cocoa modest. That way, the smoothie stays fruit-forward rather than tasting like a protein bar in liquid form.
If you’re curious about adding seeds for extra richness, MasalaMonk’s hemp seed smoothie ideas include combinations that pair beautifully with cocoa.
Recipe 10: Strawberry Mango Smoothie (sunny, tropical, and silky)
Strawberry mango smoothie blends are bright, cheerful, and naturally creamy—even without much dairy. Mango has a way of smoothing everything out, so the texture feels “finished” with very little effort.
This fits strawberry mango smoothie, mango and strawberry smoothie, mango and strawberry smoothie recipe, and smoothie strawberry mango phrasing naturally.
Ingredients
1½ cups frozen strawberries
1 cup frozen mango
¾ cup coconut milk beverage or milk
Optional: ½ banana or 1 date
Optional: 1 tablespoon chia
Strawberry Mango Smoothie: Mango gives you a naturally silky blend—choose coconut milk when you want it creamy, or coconut water when you want a lighter, more refreshing tropical finish.
Method
Blend liquid and fruit until smooth. If you’re using chia, pulse it in at the end.
An easy twist if you like “shake” style blends
If you enjoy mango drinks beyond smoothies, MasalaMonk’s mango shake guide offers variations that translate well—especially if you want a dairy-free or lower-sugar direction.
Recipe 11: Strawberry Blueberry Smoothie (berry-forward, vibrant, and satisfying)
A strawberry blueberry smoothie tastes like berries—not just sweetness. It’s also endlessly flexible, because you can keep it lean and bright or make it creamy and thick depending on your mood.
This naturally covers strawberry blueberry smoothie, strawberry and blueberry smoothie, strawberry blueberry smoothie recipe, and smoothie strawberry and blueberry phrasing.
Ingredients
1½ cups frozen strawberries
1 cup frozen blueberries
¾ to 1 cup milk or almond milk
Optional: ½ cup yogurt
Optional: sweetener only if needed
Strawberry Blueberry Smoothie: Berries taste brighter with a tiny squeeze of lemon—then add half a banana only if you want a smoother, creamier finish (especially with frozen fruit).
Method
Blend liquid and berries until smooth. Add yogurt if using, then blend again until creamy.
Triple-fruit variation (banana blueberry and strawberry smoothie)
Add ½ banana. You’ll end up with a strawberry blueberry banana smoothie that tastes rounder and creamier, and it also aligns beautifully with the classic banana blueberry and strawberry smoothie style.
Strawberry Blueberry Banana Smoothie: When berry smoothies taste too sharp, half a banana rounds them out—use frozen fruit for thickness and a smoother, creamier finish without extra dairy.
If you enjoy berry blends in general, you can also push this into “berry smoothies” territory by adding raspberries or blackberries—just keep your liquid modest so it stays thick.
Pineapple brings a tropical sharpness that makes strawberries taste even sweeter. If you like a smoothie that feels light and energizing, strawberry pineapple smoothie blends are a great choice.
This naturally fits pineapple and strawberry smoothie and smoothie with strawberries and pineapple versions.
Ingredients
1½ cups frozen strawberries
1 cup pineapple chunks (fresh or frozen)
¾ cup coconut water or milk
Optional: ½ banana for sweetness
Strawberry Pineapple Smoothie: For a bright, refreshing tropical blend, use frozen pineapple to keep it thick and frosty—then choose coconut water for a lighter finish or milk when you want it creamy.
Method
Blend coconut water and pineapple first until smooth. Add strawberries and blend until frosty.
If you enjoy the clean, refreshing finish of coconut water, MasalaMonk’s coconut water smoothie ideas pair naturally with this style.
And if you like the idea of “tropical” but want more structure, MasalaMonk’s meal prepping with strawberries includes a tropical bowl direction that’s easy to adapt using strawberry, pineapple, mango, and banana.
Bonus: Strawberry Kiwi Smoothie (zippy, bright, and a little fancy recipe)
This one isn’t part of the numbered list above, but it deserves a spot in your rotation. Strawberry kiwi smoothies taste like a fruit salad that decided to become a drink—bright, juicy, and refreshing.
It also naturally matches strawberry kiwi smoothie, kiwi and strawberry smoothie, and smoothie with kiwi and strawberry phrasing.
Ingredients
2 cups strawberries (frozen works best)
1–2 kiwis, peeled
¾ cup apple juice or milk
Optional: ½ banana if you want it sweeter
Strawberry Kiwi Smoothie: Kiwi tastes brightest when it’s blended briefly—add it at the end, then choose apple juice for a crisp, fresh smoothie or milk when you want it creamier.
Method
Blend strawberries with your liquid first. Add kiwi and blend briefly until smooth.
Kiwi can get slightly bitter if over-blended in some machines, so keeping it quick helps the flavor stay clean.
Bonus: Strawberry Spinach Smoothie Recipe (green, but still tastes like strawberries)
If you want greens without sacrificing flavor, this is the one. Strawberry spinach smoothie blends are at their best when they taste like fruit first, spinach second.
This naturally covers smoothie with spinach and strawberries and strawberry smoothie with spinach variations.
Ingredients
2 cups frozen strawberries
1 banana
1–2 packed cups baby spinach
¾ to 1 cup milk or almond milk
Optional: chia or flax for extra body
Strawberry Spinach Smoothie: For a smooth, fruit-forward green smoothie, blend spinach with your liquid first until completely silky—then add frozen strawberries and banana for sweetness and thickness.
Method
Blend milk and spinach first until completely smooth. Then add strawberries and banana and blend until thick and creamy.
If you’re interested in iron-friendly directions, MasalaMonk’s high-iron smoothies and shakes includes ideas in the same spirit—greens plus vitamin C–rich fruits—without turning the smoothie into something that tastes medicinal.
How to build your own “mix and match” variations without overthinking it
Once you’ve made a few of these, you’ll start noticing patterns. From there, you can spin off new combinations easily—whether you’re craving smoothie strawberry ingredients that feel light, or something thicker and more filling.
If you want a smoothie recipe without strawberries
Sometimes you land here even though you’re not in a strawberry mood. In that case, you can swap strawberries for another frozen fruit and keep the same method. Mango, blueberries, pineapple, and mixed berries all work beautifully. The blending logic stays exactly the same as any recipe for smoothie with frozen fruit.
If you want smoothie ideas with strawberries but not banana
Banana is popular, although not everyone loves it. If you want a strawberry smoothie no banana or strawberry smoothie without banana direction, try one of these as your “creamy element” instead:
Greek yogurt
oats
chia (let it rest briefly after blending)
avocado (use a small amount)
That’s how you get a creamy strawberry smoothie without banana, without needing special ingredients.
If you want a strawberry smoothie recipe no banana and no yogurt
Use frozen strawberries, almond milk, and oats or chia. It turns into a simple strawberry smoothie that’s creamy enough to satisfy, yet still light.
If you want a strawberry fruit shake feel
Lean on cold milk, frozen strawberries, and an extra banana slice or two. Blend longer until the texture looks fluffy. You’ll end up with a strawberry fruit shake that feels like a treat, especially if you add a splash of vanilla.
Make-ahead smoothie packs (the easiest way to drink smoothies more often)
If you’ve ever bought frozen strawberries and bananas with good intentions, only to watch the bananas over-ripen on the counter, smoothie packs are the answer.
They also make mornings smoother because you’re not measuring fruit while half awake.
What to do
Portion fruit into freezer bags or containers. Then, when you want a smoothie, dump a pack into the blender and add liquid plus any creamy element you like.
Make-Ahead Smoothie Packs: Pre-portion frozen fruit once, then smoothies become a 5-minute habit—just dump a pack into the blender and add your liquid (plus yogurt or protein) when you’re ready.
Packs to try (easy, practical, and delicious)
Classic Strawberry pack
2 cups strawberries This one works with milk, almond milk, or yogurt. It’s the base for most strawberry smoothie recipes.
BananaStrawberry pack
1½ cups strawberries
1 banana, sliced This is your go-to for a strawberry banana smoothie recipe whenever you want it.
MangoStrawberry pack
1½ cups strawberries
1 cup mango Add coconut milk beverage for the smoothest, sunniest result.
BlueberryStrawberry pack
1½ cups strawberries
1 cup blueberries Great with milk, almond milk, or yogurt, depending on whether you want it bright or creamy.
Strawberry pineapple pack
1½ cups strawberries
1 cup pineapple Try coconut water for a fresh finish, especially on hot days.
Turning packs into smoothie bowls
If you want a smoothie bowl, use the same packs—but cut your liquid down dramatically. Instead of ¾ cup, start with ¼ cup, then increase only if the blender needs it.
A few serving ideas that make smoothies feel less repetitive
It’s easy to love smoothies for a week and then get bored. A small change in presentation can keep them interesting.
Serving ideas: Keep smoothies from getting boring by changing the format—glass for a classic sip, bowl for weekend toppings, and a bottle when you need something grab-and-go.
Pour your strawberry smoothie with milk into a chilled glass and add a few sliced strawberries on top. It feels more “finished.”
Turn a strawberry banana smoothie into a smoothie bowl on weekends and add crunchy toppings.
Make a chocolate strawberry smoothie when you’re craving dessert, then add a spoonful of yogurt to keep it creamy and satisfying.
Blend a strawberry protein smoothie after workouts, then sprinkle chia on top for a little texture.
Small shifts keep the routine enjoyable, which is often the real secret to sticking with it.
1. What’s the easiest strawberry smoothie recipe for beginners?
To keep it simple, start with strawberries + milk and blend until smooth. For an easy strawberry smoothie recipe that’s consistently creamy, use frozen berries and begin with less liquid than you think you need. Afterward, adjust: add a splash more milk if it’s too thick, or add more frozen strawberries if it’s too thin. That approach turns a basic strawberry smoothie into a good strawberry smoothie recipe you can repeat without measuring perfectly every time.
2. What are the best strawberry smoothie ingredients for a creamy texture?
In practice, creaminess comes from a combination of frozen fruit and one “softener.” Strawberries provide flavor; banana, yogurt, oats, chia, or nut butter provide body. For a classic strawberry smoothie recipe, frozen strawberries + milk + yogurt is hard to beat. Alternatively, if you prefer fewer ingredients, frozen strawberries + milk + banana creates a thick, smooth result with a naturally sweet finish.
3. Can I make a strawberry smoothie with yogurt, and what yogurt works best?
Absolutely—strawberry smoothie with yogurt is one of the creamiest versions. Greek yogurt yields a thicker, tangier blend, while regular yogurt makes it lighter and more drinkable. As it happens, flavored strawberry yogurt can also work when you want extra sweetness without adding honey. If your goal is a strawberry smoothie recipe with yogurt that feels like a treat, choose a thicker yogurt and keep the liquid modest.
4. How do I make a strawberry smoothie recipe without yogurt that’s still creamy?
For that reason, you’ll want a substitute that adds body. A ripe banana is the easiest swap; it thickens and sweetens at the same time. Otherwise, oats (2 tablespoons) add a breakfast-like texture, while chia seeds thicken after blending if you let the smoothie rest briefly. In a pinch, a small piece of avocado can create a velvety mouthfeel without overpowering the strawberry flavor.
5. What’s a simple strawberry smoothie recipe with only 3 ingredients?
A simple strawberry smoothie recipe can be as straightforward as: frozen strawberries, milk, and banana. That combination also doubles as an easy strawberry smoothie recipe when you don’t want yogurt. By the same token, you can swap banana for yogurt if you prefer tang over sweetness. Either way, keeping the ingredient list short tends to make the strawberry flavor stand out more.
6. How do I make a strawberry smoothie with milk that doesn’t taste watery?
All things considered, wateriness comes from too much liquid or too much ice. Use frozen strawberries rather than ice, and start with about ¾ cup milk for 2 cups fruit. Next, blend thoroughly so the fruit fully breaks down—under-blended smoothies can taste thin even when they aren’t. If it still feels light, add more frozen strawberries instead of adding more milk.
7. What’s the best strawberry banana smoothie recipe for a thick, creamy result?
A reliable strawberry banana smoothie recipe uses frozen strawberries and a ripe banana, plus just enough milk to get the blender moving. At the same time, blending the milk with strawberries first can prevent clumps, especially if your berries are very icy. If you want a richer strawberry and banana smoothie recipe, add yogurt; if you’d rather keep it simpler, rely on the banana for creaminess and reduce the liquid slightly.
8. How do I make a strawberry banana smoothie with yogurt?
In contrast to the no-yogurt version, a strawberry banana smoothie with yogurt has more tang and a thicker texture. Add yogurt after the fruit begins to blend—this helps the blender stay smooth and prevents the mixture from getting stuck. Subsequently, tweak consistency with frozen fruit rather than extra liquid. If you want a more dessert-like finish, a dash of vanilla makes the flavor feel rounder.
9. How do I make a strawberry banana smoothie with milk that tastes like a shake?
To get that “strawberry shake recipe” vibe, use cold milk, frozen strawberries, and a ripe banana, then blend a little longer to introduce air. In addition, skip ice whenever possible—ice can dull the flavor and thin the texture as it melts. For a strawberry shake without ice cream, a spoonful of yogurt can mimic milkshake creaminess without making it heavy.
10. What’s the easiest way to use frozen fruit in smoothies?
In practice, the best smoothie frozen fruit method is to treat frozen fruit as your thickener. Start with frozen strawberries (or a frozen fruit mix), add liquid gradually, and blend in stages. If you’re following a recipe for smoothie with frozen fruit, begin with less liquid than suggested and increase only if the blender stalls. That strategy keeps the smoothie thick and prevents the “watery aftertaste” that can happen when you over-pour liquid.
11. How do I make a frozen strawberry smoothie that’s smooth, not icy?
A frozen strawberry smoothie turns silky when you blend long enough and use a creamy element. Yogurt, banana, or a spoonful of nut butter helps prevent an icy texture. Moreover, letting frozen fruit sit for 2–3 minutes before blending can reduce harsh ice crystals. If your blender struggles, blend the liquid with softer ingredients first, then add the frozen strawberries gradually.
12. Can I make a strawberry smoothie bowl recipe if I only have a regular blender?
Yes—strawberry smoothie bowl recipes are doable in most blenders with one adjustment: use far less liquid. Begin with frozen strawberries and frozen banana, add only a small splash of milk, and stop to scrape down the sides. In the same vein, pulsing can help the blades catch. If it becomes too thick to blend, add liquid a tablespoon at a time rather than pouring freely.
13. How do I thicken a strawberry banana smoothie bowl if it turns runny?
In that situation, add more frozen fruit first—frozen strawberries or frozen banana fixes texture quickly. Alternatively, a spoonful of oats or chia can thicken the bowl if you let it sit a couple of minutes. Avoid adding extra yogurt once it’s already runny, because yogurt can add moisture. For a reliable strawberry banana smoothie bowl, starting with minimal liquid is the best prevention.
14. What’s a good strawberry protein shake that still tastes like fruit?
A strawberry protein shake works best when protein supports the flavor rather than taking over. Blend your liquid with protein powder first to prevent clumps, then add frozen strawberries. Next, consider adding a banana or yogurt to keep the texture creamy and the taste balanced. If you want a strawberry protein smoothie that feels more like dessert, a small pinch of cocoa or vanilla can round out the flavor without burying the strawberries.
15. How do I make a strawberry banana protein smoothie without it tasting chalky?
To reduce chalkiness, use less powder than you think you need and build creaminess with banana or yogurt instead. Additionally, blending the powder with liquid first makes a smoother base. If the flavor still feels strong, add more strawberries rather than more sweetener—extra fruit softens the protein taste while keeping the smoothie bright. That approach usually produces a better strawberry protein drink overall.
16. Can I make a strawberry smoothie no banana that’s still thick?
Certainly—strawberry smoothie without banana is easy if you replace banana’s thickening role. Greek yogurt is the simplest option; oats and chia also work well. In particular, chia thickens after blending, so a short rest can transform texture. If you need a strawberry smoothie recipe no banana and no yogurt, use oats or chia with frozen strawberries and start with minimal liquid.
17. How do I make a non dairy strawberry smoothie or an almond milk strawberry smoothie?
A non dairy strawberry smoothie works beautifully with almond milk, oat milk, or coconut milk beverage. For an almond milk strawberry smoothie, blend frozen strawberries with almond milk and add a creamy element like banana, oats, or nut butter. In addition, skip ice and rely on frozen fruit for thickness. If you’re aiming to make smoothie without milk entirely, coconut water can be used, although it’ll taste lighter and more refreshing.
18. How do I make a strawberry shake without ice cream?
A strawberry shake without ice cream comes down to cold milk, frozen strawberries, and one thickener. Banana creates a classic milkshake-style sweetness; yogurt adds tang and creaminess. After that, blend longer than usual to make it slightly frothy. If you’re after a strawberry milkshake without ice cream that feels extra rich, add a small spoonful of nut butter and a pinch of salt.
19. What’s the best way to add strawberry puree for smoothies?
Strawberry puree for smoothies works best as a flavor booster rather than the main thickener. Use puree when you want a strong strawberry taste from fresh berries, then add frozen fruit (or a banana/yogurt) to build texture. Likewise, puree is handy in smoothie bowls if your blender needs help catching—use a little puree as the base, then blend in frozen fruit for thickness.
20. Can I prep frozen strawberries and bananas ahead for quick smoothies?
Yes—frozen strawberries and bananas are one of the easiest make-ahead combos. Slice bananas before freezing so they blend smoothly. Then, portion frozen fruit into packs so you can dump and blend. For a drinkable smoothie, add milk or almond milk; for a thicker bowl, add only a small splash. As a result, you’ll make strawberry banana smoothie recipes far more often because the hardest part is already done.
21. What if I’m using frozen smoothie mixes or strawberry smoothie mix packets?
Frozen smoothie mixes can be convenient, although flavor varies. To make them taste fresher, add extra frozen strawberries and keep sweeteners minimal. If you’re working with a strawberry smoothie mix or strawberry smoothie powder, use it lightly and let real fruit lead. In general, blending the mix with milk or almond milk and adding a banana improves both texture and taste.
22. What can I make if I want a smoothie recipe without strawberries?
A smoothie recipe without strawberries can follow the same structure—frozen fruit + liquid + a creamy element. Mango, pineapple, blueberries, and mixed berries all work well. Consequently, you can still keep a thick, creamy texture by relying on frozen fruit instead of ice. If you like tropical flavors, mango and pineapple blends are naturally smooth; if you prefer a deeper berry taste, blueberries make a rich base.