Posted on Leave a comment

Lemon Curd Recipe: Silky, Tart, Easy & Perfect for Cakes, Tarts and Desserts

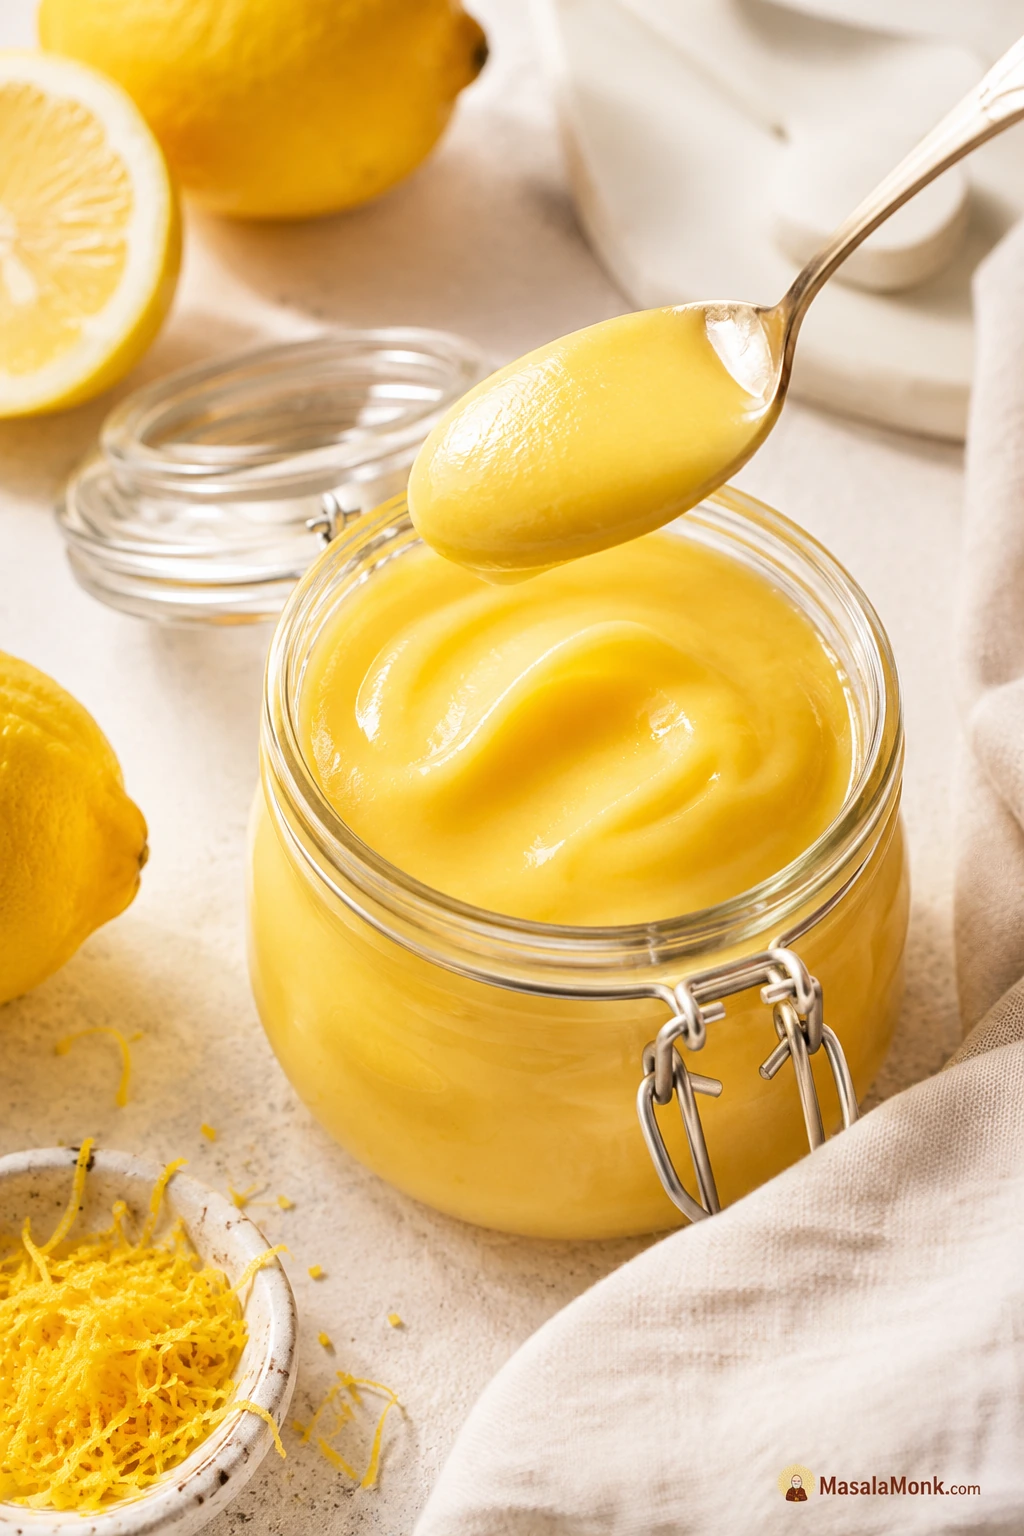
A glass jar of glossy homemade lemon curd with fresh lemons, lemon zest, and a spoonful lifted above the jar.

Lemon curd looks fancy, but the whole trick is gentle heat and knowing when to stop. When it works, it is glossy, buttery, tart-sweet, and bright enough to make cakes, tarts, toast, cheesecake, cookies, yogurt, pancakes, scones, and quick desserts feel finished.

It can feel risky because the same few ingredients can turn silky or stressful depending on heat and timing. This recipe is built around the real questions that come up at the stove: why is it runny, will the eggs scramble, is it thick enough, and can it actually work as a cake filling or tart filling?

The goal is not just to make lemon curd. It is to know whether your jar is soft enough for scones, thick enough for tarts, and stable enough for the cake, cookie, or dessert you actually want to make.

Quick Answer: How to Make Lemon Curd

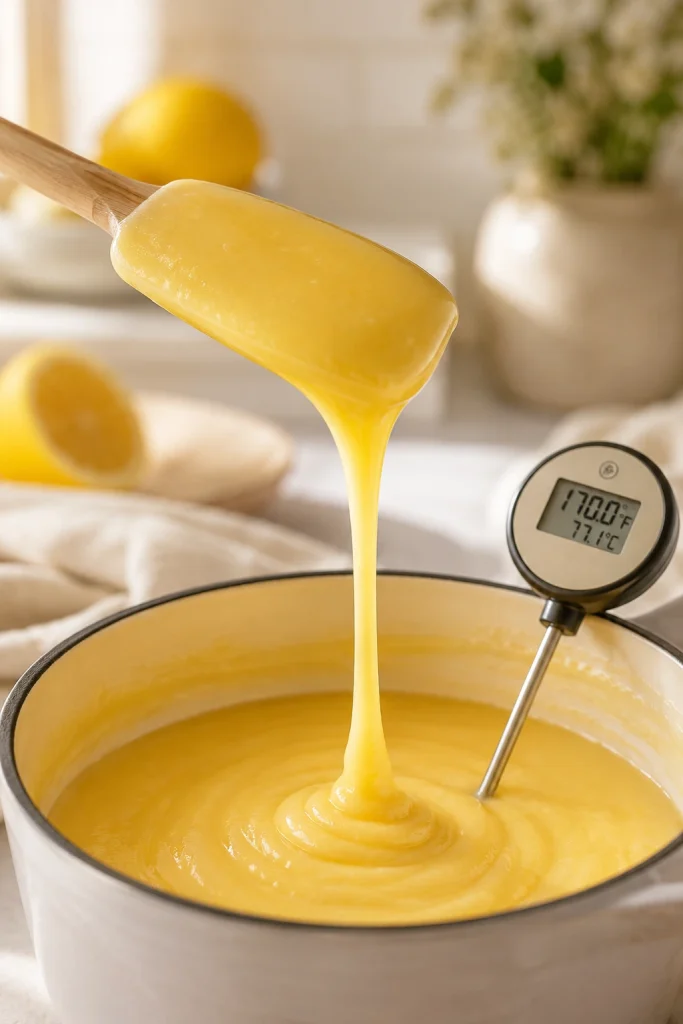
Lemon curd is a smooth lemon custard-style spread made with lemon juice, lemon zest, sugar, eggs, and butter. Whisk everything together before heating, cook gently over low to medium-low heat until it coats the back of a spoon or reaches about 170°F / 77°C, then strain and chill until thick and glossy.

For tarts, mini tarts, cookies, or simple cake filling, cook a little closer to 175°F / 79–80°C without letting the mixture boil. It always looks softer while warm, so judge the final texture after it has cooled properly.

The flavor lands bright and lemony, but not harsh: tart enough to cut through cream and cake, smooth enough to spoon over scones or pancakes.

Recipe at a Glance

DetailBest answer
YieldAbout 1 1/4 cups / 20 tablespoons
Main methodStovetop, low heat, constant whisking
Best temperatureAbout 170°F / 77°C
Thicker target175°F / 79–80°C, without boiling
Active timeAbout 20 minutes
Chill time2 hours minimum
Make-ahead timingMake 1 day ahead for cakes, tarts, cookies, and neat dessert layers
Lemons neededUsually 2 to 3 medium lemons for 1/2 cup / 120 ml juice
Egg ratio1 large whole egg + 3 large egg yolks
Finished textureGlossy, spoon-coating, thick after chilling

Recipe Card

Recipe type: Dessert spread, filling, and sauce

Yield: About 1 1/4 cups / 20 tablespoons lemon curd

Prep time: 10 minutes
Cook time: 8 to 10 minutes
Chill time: 2 hours minimum
Total time: About 2 hours 20 minutes, including chilling

Best for: toast, scones, tarts, mini tarts, cake filling, cupcakes, cookies, cheesecake, yogurt, pancakes, crepes, pavlova, ice cream, and quick desserts

Ingredients

IngredientAmount
Fresh lemon juice1/2 cup / 120 ml / 4 fl oz
Finely grated lemon zest1 tablespoon, from about 2 lemons
Granulated sugar1/2 cup / 100 g for tart curd, or 2/3 cup / 135 g for sweeter curd
Large whole egg1
Large egg yolks3
Unsalted butter, cold and cubed6 tablespoons / 85 g / 3 oz
Fine salt1/8 teaspoon

Lemon note: You will usually need 2 to 3 medium lemons for 1/2 cup / 120 ml juice. Zest the lemons before juicing them.

Sugar note: Choose the lower amount if the curd will be paired with frosting, cream, meringue, or sweet cake. Go higher if you want a softer, sweeter spread for toast, scones, or pancakes.

Method

  1. Zest the lemons first, then juice them. Measure out 1/2 cup / 120 ml lemon juice.
  2. Add the zest and sugar to a small heavy-bottom saucepan. Rub them together with your fingertips for about 30 seconds, until the sugar smells fragrant and lemony.
  3. Whisk in the whole egg, egg yolks, lemon juice, and salt before turning on the heat.
  4. Place the pan over low to medium-low heat. Cook while whisking constantly, scraping the base and corners of the pan.
  5. Continue for 8 to 10 minutes, until the mixture coats the back of a spoon. Aim for about 170°F / 77°C, or closer to 175°F / 79–80°C for a thicker curd. Do not boil.
  6. Remove from the heat. Whisk in the cold cubed butter, a few pieces at a time, until glossy and smooth.
  7. Strain through a fine mesh sieve into a heatproof bowl or jar.
  8. Press parchment or plastic wrap directly onto the surface. Cool slightly, then refrigerate for at least 2 hours, or until thick.

Recipe note: The pan gets the curd most of the way there, but the refrigerator finishes the texture. Judge the final thickness after chilling.

Visual cue: A balanced batch starts with fresh lemon juice, fragrant zest, rich yolks, butter, sugar, and salt.
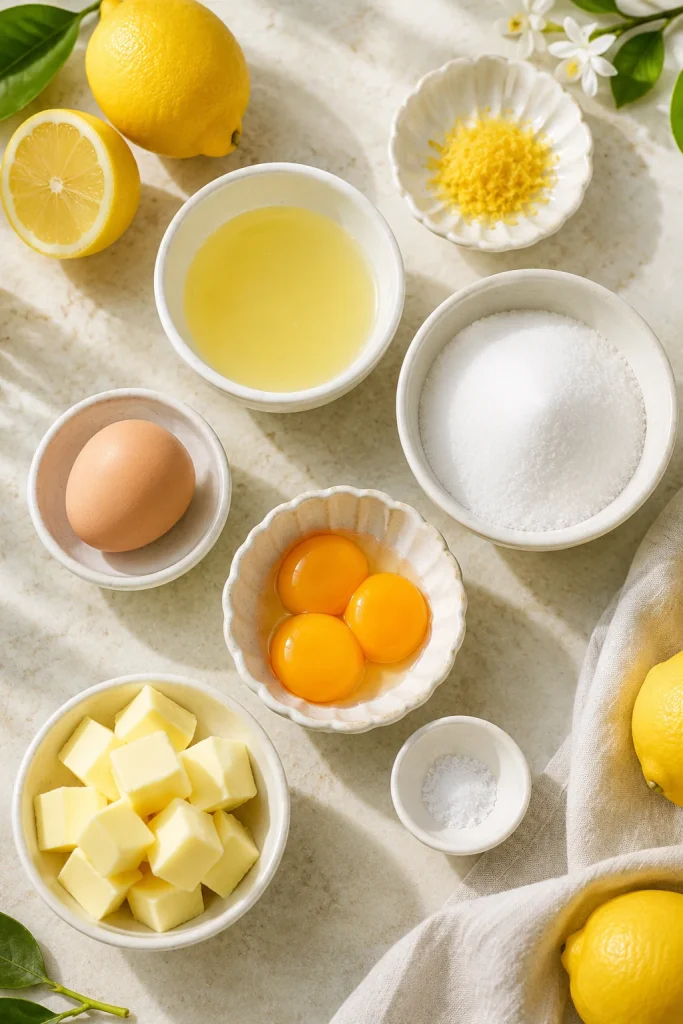
Measured lemon curd ingredients arranged in bowls, including lemon juice, lemon zest, sugar, one whole egg, egg yolks, butter, and salt.
A short ingredient list leaves nowhere for weak flavor to hide, so fresh lemon juice, fragrant zest, rich yolks, butter, sugar, and salt all matter.

Cooking now? Check doneness cues · choose the right texture · fix common problems

After chilling, the finished curd mounds softly on a spoon, shines on top, and tastes bright first, then buttery and smooth at the end.

Most Useful Sections

Why This Works

This recipe uses one whole egg plus three yolks. The whole egg gives structure, while the extra yolks make the texture rich, smooth, and thick enough for more than just spreading on toast.

Fresh lemon juice gives sharp brightness, but zest gives the deeper citrus aroma that makes the flavor pop. Rubbing zest into sugar releases lemon oils before the mixture reaches the stove.

The 170°F / 77°C target gives the eggs enough heat to thicken the curd without pushing the mixture into boiling or scrambling. Cold butter added off the heat makes it glossy, and straining catches zest, tiny egg bits, or any uneven texture so the finished batch tastes silky.

Ingredients and Why They Matter

Fresh Lemon Juice

This is one of those recipes where fresh lemons really earn their place. Bottled lemon juice can taste flat, bitter, or harsh because there is nowhere for that flavor to hide.

Measure the juice after squeezing. Lemons vary in size and sharpness, and too much juice can make the batch loose or overly sour.

Lemon Zest

The zest is where the curd gets its real lemon perfume. Grate only the yellow outer skin and avoid the white pith underneath, which can taste bitter.

Always zest before juicing. Then rub the zest into the sugar so the fragrant oils spread through the whole batch.

Sugar

Sugar balances the acidity of the lemons and helps the eggs cook into a smooth custard-like texture. Choose the lower amount for a sharper curd and the higher amount for a sweeter dessert-style spread.

Whole Egg and Egg Yolks

Eggs thicken the mixture. The whole egg gives structure, while the yolks give richness, color, and a smoother set. Large eggs work best here; smaller eggs can make the finished batch set a little softer.

Butter

Butter turns the sharp lemon custard into something glossy, rounded, and spoonable. Add it cold and cubed after the pan comes off the heat so it melts in smoothly.

Salt

You should not notice the salt; it simply makes the lemon taste cleaner and more complete.

Whole Eggs vs Yolks in Lemon Curd

Different recipes use different egg ratios. The right choice depends on whether you want a soft spread, a rich tart filling, or an all-purpose curd that can do both.

Egg choiceTextureBest for
Whole eggs onlyLighter, softer, slightly looserToast, scones, yogurt, pancakes
Egg yolks onlyRicher, thicker, more custardyTarts, fillings, layered desserts
Whole egg + yolksBalanced, silky, stableBest all-purpose lemon curd

The whole egg plus yolk combination gives this recipe its useful texture: rich enough for desserts, but still soft enough to spread after chilling.

Helpful equipment: A fine zester, citrus juicer, heavy-bottom saucepan, whisk, silicone spatula, fine mesh sieve, and heatproof bowl or jar make the process easier. An instant-read thermometer is optional, but helpful for precise doneness.

Choose a nonreactive pan, such as stainless steel or enamel-coated cookware. Avoid uncoated aluminum or copper, which can react with acidic lemon juice and affect the flavor.

Stovetop vs Double Boiler

A double boiler is the gentlest method because the bowl is heated by steam instead of direct contact with the burner. It is helpful if you are nervous about scrambling the eggs, but it is slower.

A heavy-bottom saucepan is faster and works well when the heat stays low and the whisk keeps moving. This recipe uses the saucepan method because it is practical, quick, and reliable once you know the doneness cues.

MethodBest forWatch out for
Heavy-bottom saucepanFast, everyday lemon curdNeeds low heat and constant whisking
Double boilerBeginners, nervous cooks, gentle cookingTakes longer to thicken
MicrowaveSmall quick batchesUneven heat; higher risk of curdling if rushed

How to Make Lemon Curd

1. Zest and Juice the Lemons

Zest the lemons before cutting them. Once lemons are juiced, they become harder to hold and zest cleanly. Use a fine grater and stop as soon as you reach the white pith.

After juicing, measure out 1/2 cup / 120 ml juice. Measuring matters because extra juice can make the curd too loose or too sharp.

2. Rub the Zest Into the Sugar

Add the zest and sugar to the saucepan. Use your fingertips to rub them together until the sugar smells strongly of lemon. This takes less than a minute and makes the final flavor brighter.

Visual cue: Rub the zest into the sugar before heating so the citrus oils flavor the whole batch.
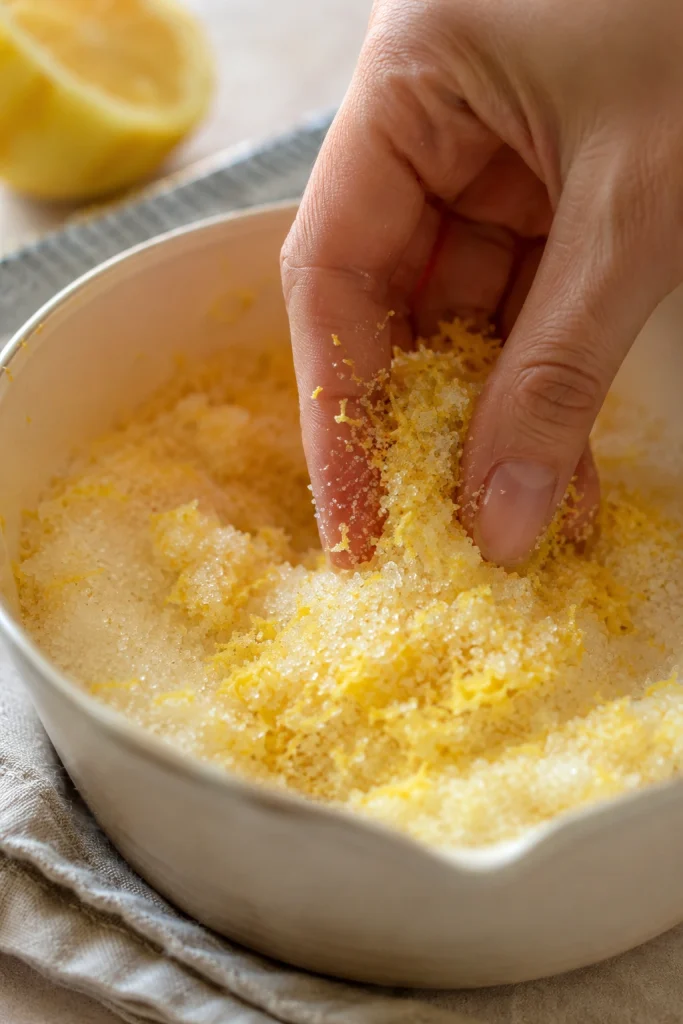
Fingers rubbing finely grated lemon zest into sugar in a bowl before making lemon curd.
Rubbing lemon zest into sugar wakes up the citrus oils and gives homemade lemon curd a fuller aroma before any heat is added.

3. Whisk Before Heating

Add the whole egg, egg yolks, lemon juice, and salt. Mix until smooth before the pan goes on the stove. Starting with an even mixture helps the eggs cook evenly.

Visual cue: Whisk the mixture smooth before it goes on the stove.
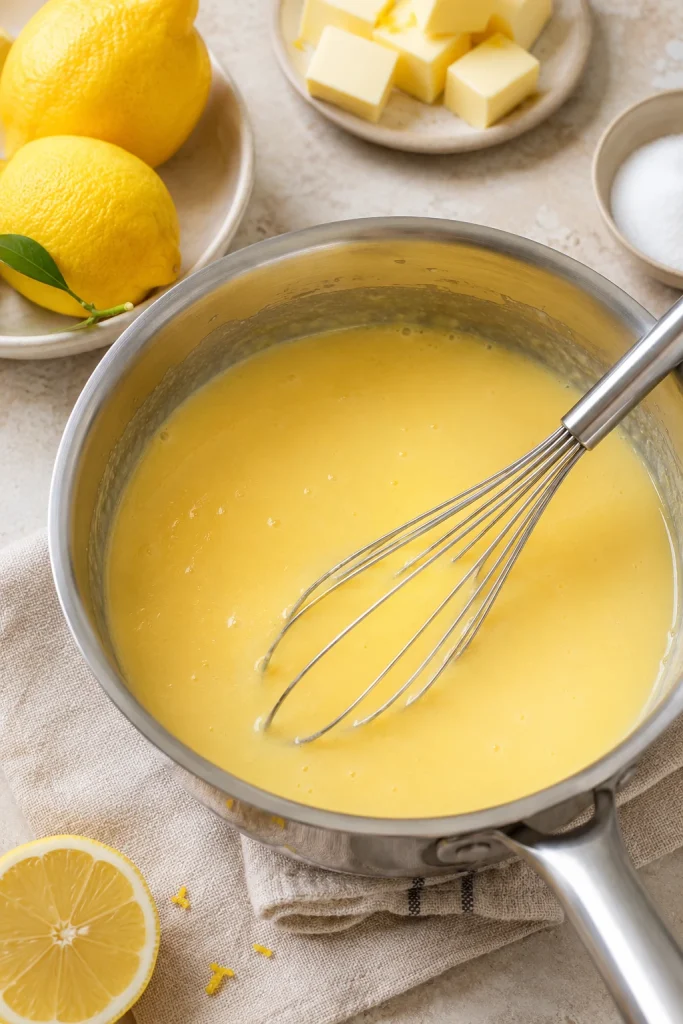
Lemon curd ingredients whisked smooth in a stainless steel saucepan before cooking.
Whisk before heating so the eggs thicken evenly instead of forming streaks or small cooked bits.

4. Cook Low and Slow

Place the pan over low to medium-low heat. Whisk constantly, making sure to reach the edges and bottom of the pan. At first, the mixture will look thin and loose.

Visual cue: The pan should look calm, not boiling; steady whisking is what thickens the curd safely.
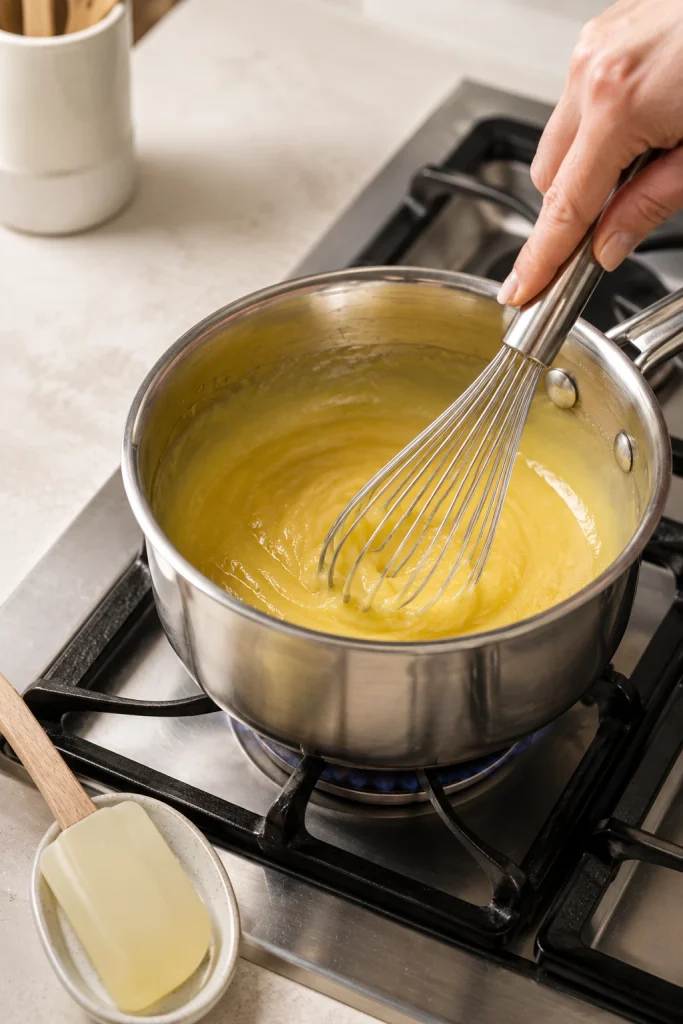
Lemon curd being whisked in a saucepan on a stovetop over gentle heat.
Gentle heat is your safety net: slow cooking gives the eggs time to thicken the lemon curd without scrambling.

Do not worry if it feels like nothing is happening for the first few minutes. That is normal. The change usually comes near the end, when the mixture turns glossier, feels heavier on the whisk, and starts leaving soft trails.

Visual cue: Watch the curd turn from loose and thin to glossy with soft whisk trails.
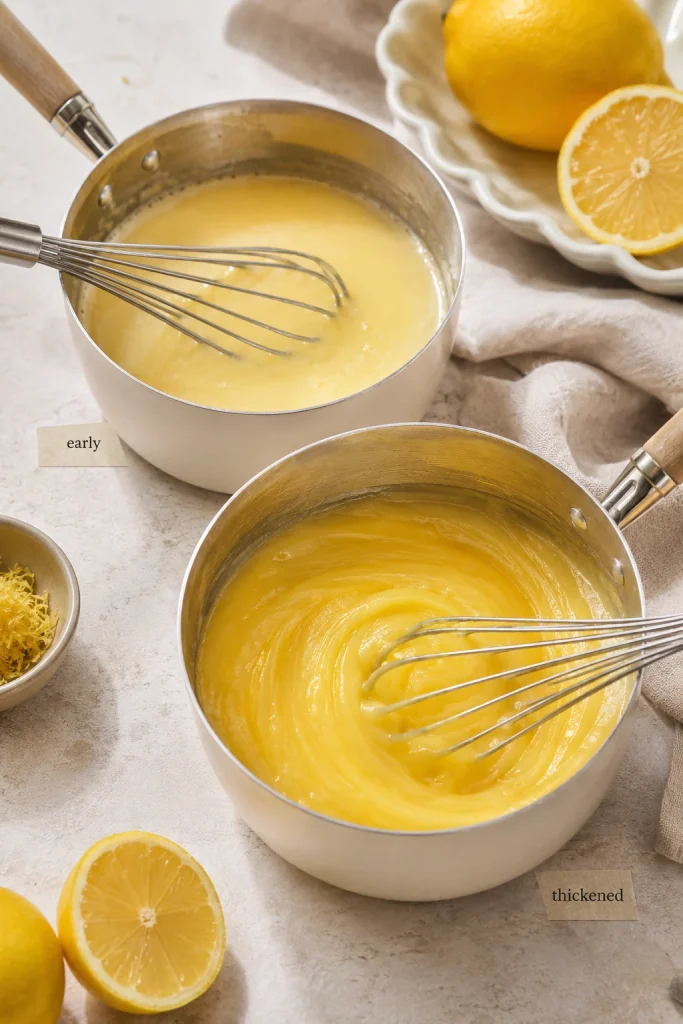
Two pans of lemon curd showing an early thin mixture beside a thicker glossy curd with whisk trails.
Watch the body of the mixture, not just the clock: it moves from loose and thin to glossy, heavier, and able to leave soft whisk trails.

This is the moment to slow down, not turn up the heat. If the curd looks almost right but not quite there, give it another minute over gentle heat.

5. Stop at the Right Texture

The curd is ready when it coats the back of a spoon and holds a clean line when you run a finger through it. If you are using a thermometer, aim for about 170°F / 77°C.

What the spoon test should show
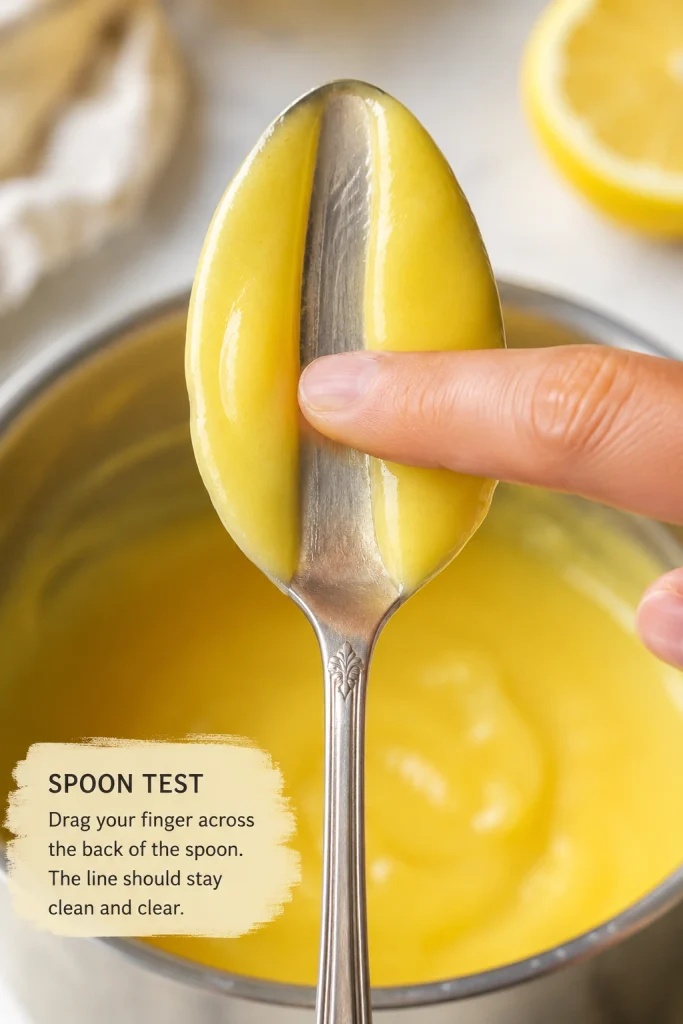
A finger dragging through lemon curd on the back of a spoon, leaving a clean line that holds.
Use the spoon test when the curd is close; if the path stays open, it has enough body to finish setting as it cools.

For tart shells, mini tarts, cookies, or simple cake filling, you can cook it a little closer to 175°F / 79–80°C. Keep the heat gentle and do not let it boil.

The thermometer is a guide, not the only test. If the mixture has reached temperature but still looks watery, keep it over gentle heat a little longer until it coats the spoon.

6. Add Butter Off the Heat

Remove the pan from the heat. Whisk in the cold butter cubes a few pieces at a time. The curd turns glossy, smooth, and slightly richer as the butter melts in.

7. Strain the Lemon Curd

Pour the warm curd through a fine mesh sieve into a clean heatproof bowl or jar. The sieve is your safety net: it catches zest, tiny egg bits, and any uneven texture so the finished batch still tastes silky.

Texture cue: Straining while warm catches zest and tiny cooked bits before the curd goes into jars.
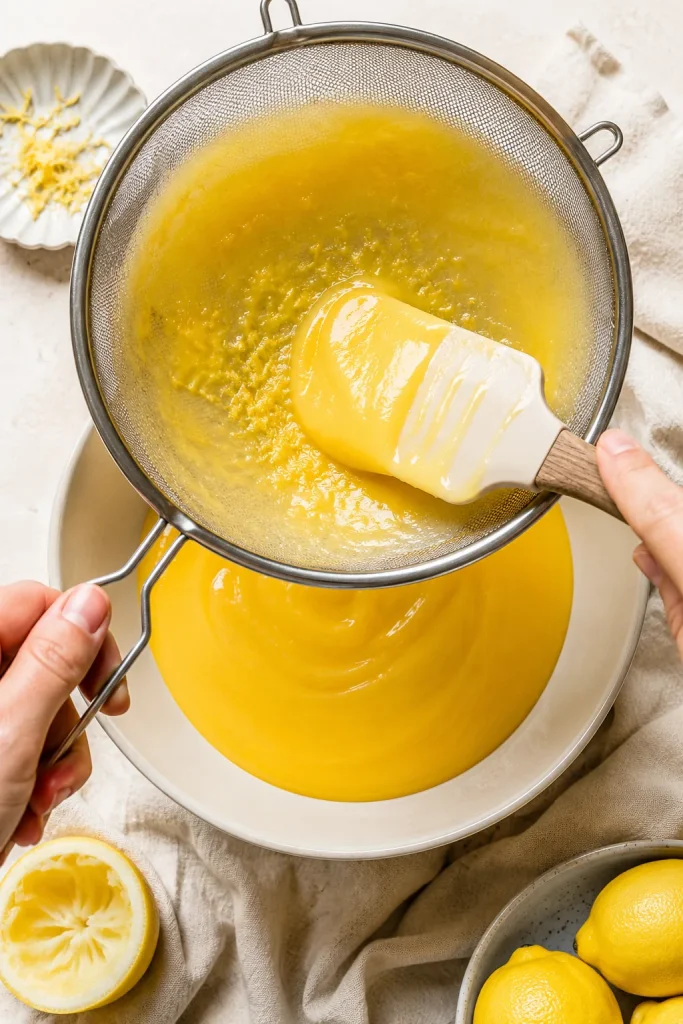
Warm lemon curd being pushed through a fine mesh sieve into a bowl, with small bits caught in the sieve.
The sieve is final texture insurance, catching zest and tiny cooked bits before the curd goes into cakes, tarts, or jars.

8. Cover and Chill

Press parchment or plastic wrap directly against the surface so a skin does not form. Chill for at least 2 hours before judging the final thickness.

Visual cue: The cover should touch the surface so a skin does not form as the curd cools.
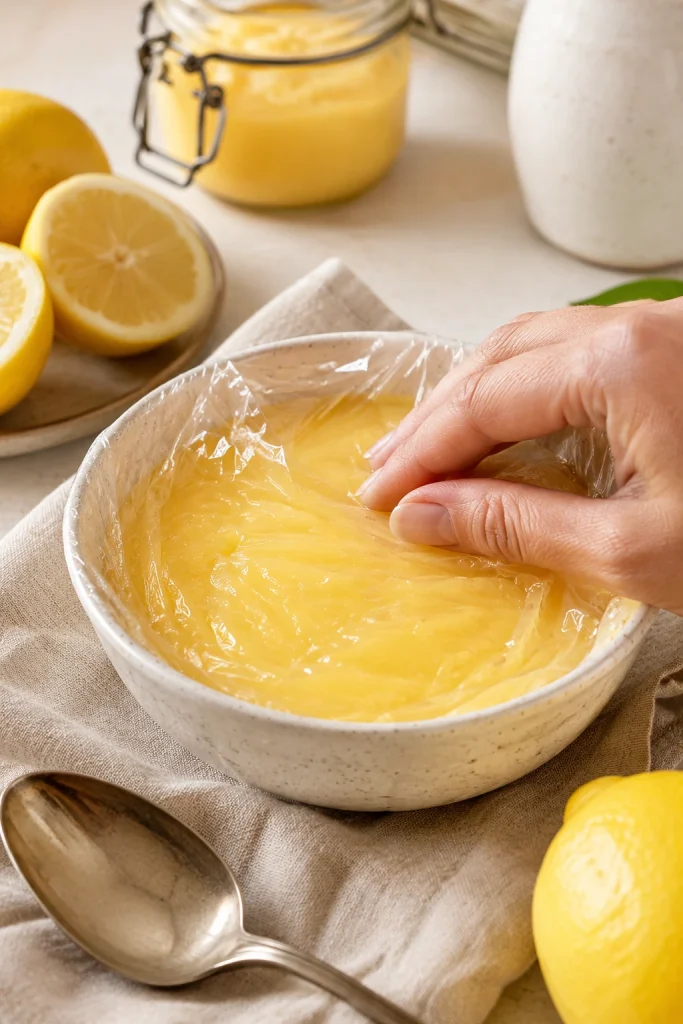
Fresh lemon curd in a bowl covered with plastic wrap pressed directly against the surface.
Protect the surface while it cools; direct contact keeps the top smooth, especially when the curd will be used as a filling or topping.

How to Know It Is Done

Doneness is the part that makes lemon curd feel risky. Look for texture first: it should coat a spoon, fall in a thick ribbon, and move like warm loose pudding when you tilt the pan.

Doneness cueWhat to look for
Spoon testIt coats the back of a spoon and holds a clean line when you run a finger through it.
Whisk trailThe whisk briefly leaves trails before the mixture settles back in.
TextureGlossy, slightly heavier on the whisk, and no longer watery.
TemperatureAbout 170°F / 77°C for smooth curd; up to 175°F / 79–80°C for thicker curd.
After chillingIt mounds softly before slowly relaxing.

How to use temperature with texture

Thick lemon curd falling in a ribbon from a spatula while a thermometer in the curd reads about 170 degrees Fahrenheit.
Pair temperature with texture: near 170°F is helpful, but the curd should also fall in a slow, glossy ribbon.

Underdone curd looks shiny but thin and slips off the spoon quickly. Overheated curd may bubble hard, smell eggy, or show tiny cooked-egg specks.

How to tell runny curd from thick curd
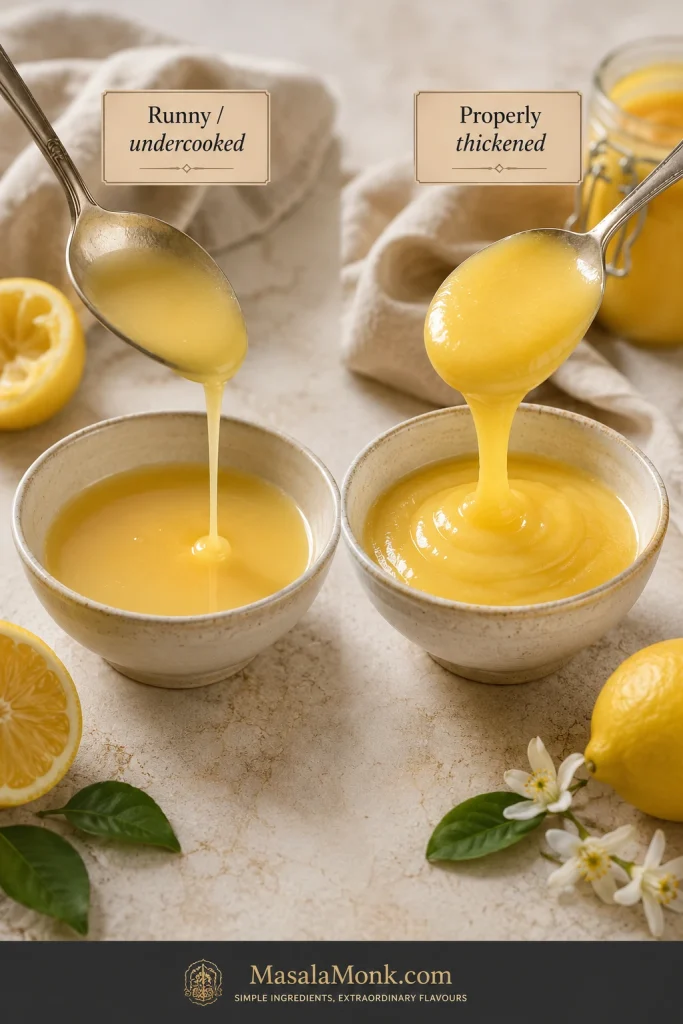
A comparison of runny undercooked lemon curd and properly thickened lemon curd dripping from spoons into bowls.
If lemon curd seems runny, watch how it moves: thin curd races off the spoon, while properly cooked curd drops slowly and settles into soft folds.

This is the point where many people stop too early. Give it the extra minute it needs, but keep the heat gentle.

7 Rules That Prevent Lemon Curd Failure

  • Keep the heat gentle; high heat can scramble the eggs before the mixture thickens.
  • Do not let it boil. Hard bubbling is a sign to lower the heat.
  • Measure the lemon juice so the balance stays right.
  • Trust texture as much as temperature.
  • Let the refrigerator finish the set before judging thickness.
  • Use a thin layer inside a frosting dam for cakes.
  • Treat homemade curd as a refrigerator recipe, not a shelf-stable preserve.

Not sure where the curd is going? Match thickness to use · use it in cake · fix runny or lumpy curd

Once the curd is cooked and chilled, the next question is where it is going. Cakes, tarts, cookies, and spoonable desserts all need slightly different handling.

How Thick Should Lemon Curd Be?

Warm lemon curd is ready when it coats a spoon and looks glossy; after chilling, it thickens into a soft mound. Before you judge the batch, decide where it is going: a soft curd is perfect for toast, scones, and yogurt, while cakes, tart shells, cookies, and clean slices need a curd that sets thicker after chilling.

Which lemon curd texture works for which use
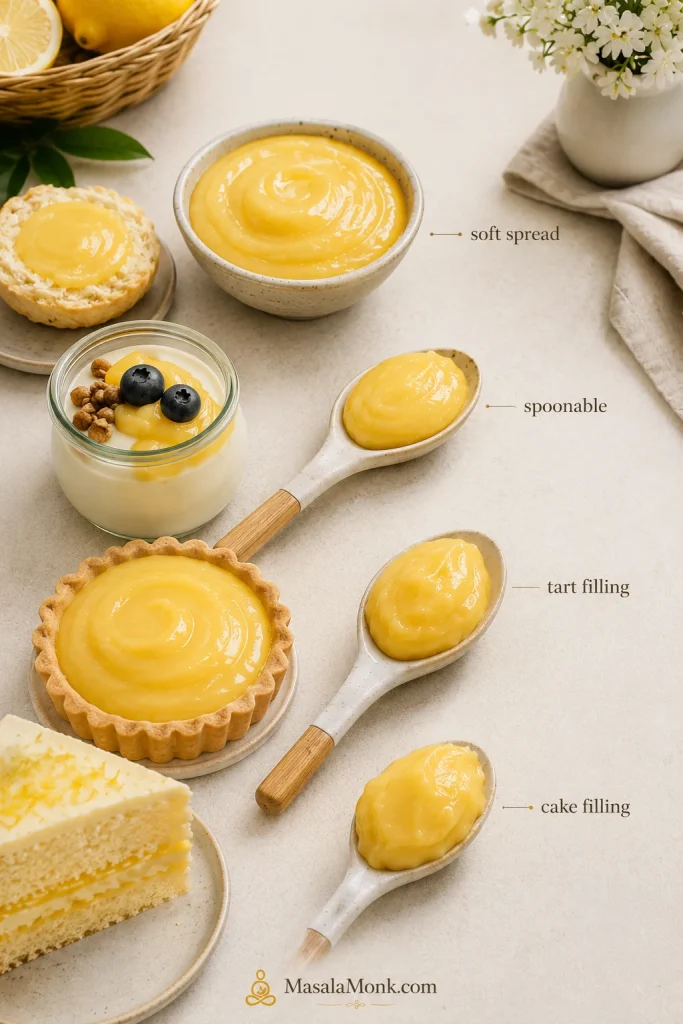
A lemon curd texture guide showing soft spread, spoonable topping, tart filling, and cake filling textures with bowls, spoons, and dessert examples.
The right lemon curd texture depends on the job: looser for spreading, spoonable for toppings, thicker for tarts, and cold and stable for cake filling.
UseBest textureWhat to do
Toast, scones, pancakesSoft and spreadableThe standard recipe works well once chilled.
Yogurt or ice creamGlossy and spoonableStir before spooning over.
Tart shellsSmooth and sliceableCook slightly thicker and strain well.
Mini tartsThick and neatFill once the curd has set.
Cake fillingThick, cold, stableMake ahead, then use inside a frosting dam.
CupcakesSpoonable but not runnyFill only after cupcakes are completely cool.
CookiesThick and jammyA set, spoonable batch works best for thumbprints or sandwich cookies.
Cheesecake toppingSmooth and spreadableStir gently before spreading.

For a classic tea-table pairing, a soft spoonful belongs beside easy English scones, where the tender crumb gives the tart filling somewhere to settle without turning heavy.

Visual cue: A softer lemon curd is ideal for scones, toast, pancakes, and yogurt.
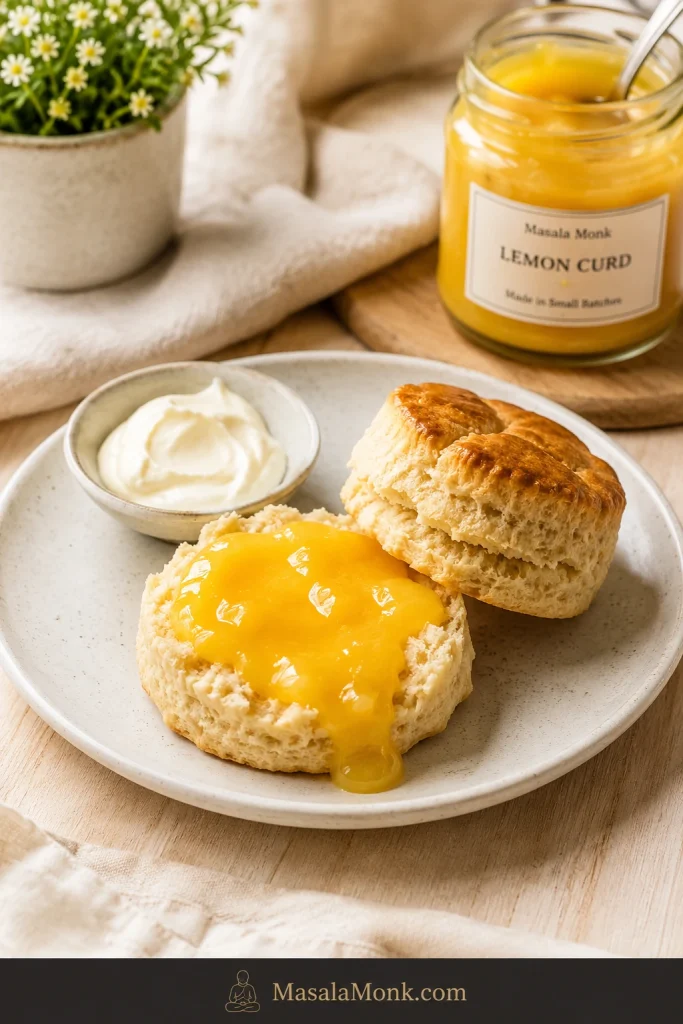
A split English scone topped with soft lemon curd, with cream and a jar of curd nearby.
On scones and toast, softness is a strength; this spreadable lemon curd gives bright flavor without needing the firmness required for tarts or cake layers.

Choose your dessert path: cake filling · tarts and mini tarts · cheesecake, cookies, and quick desserts

Lemon Curd Cake Filling

Cake is where lemon curd needs the most boundaries. Spread thinly, it is beautiful. Treated like frosting, it can slide.

Yes, lemon curd works as cake filling when it is fully chilled, spread thinly, and held inside a frosting dam.

This curd works well with vanilla cake, lemon cake, coconut cake, almond cake, sponge cake, white chocolate frosting, cream cheese frosting, or buttercream frosting. The rule is simple: keep it cold, keep the layer thin, and keep it inside the frosting border.

Pipe a ring of buttercream, cream cheese frosting, or whipped ganache around the edge of the cake layer. Spread the curd inside that border. This keeps the filling from squeezing out when the cake is stacked.

How to hold lemon curd inside cake layers
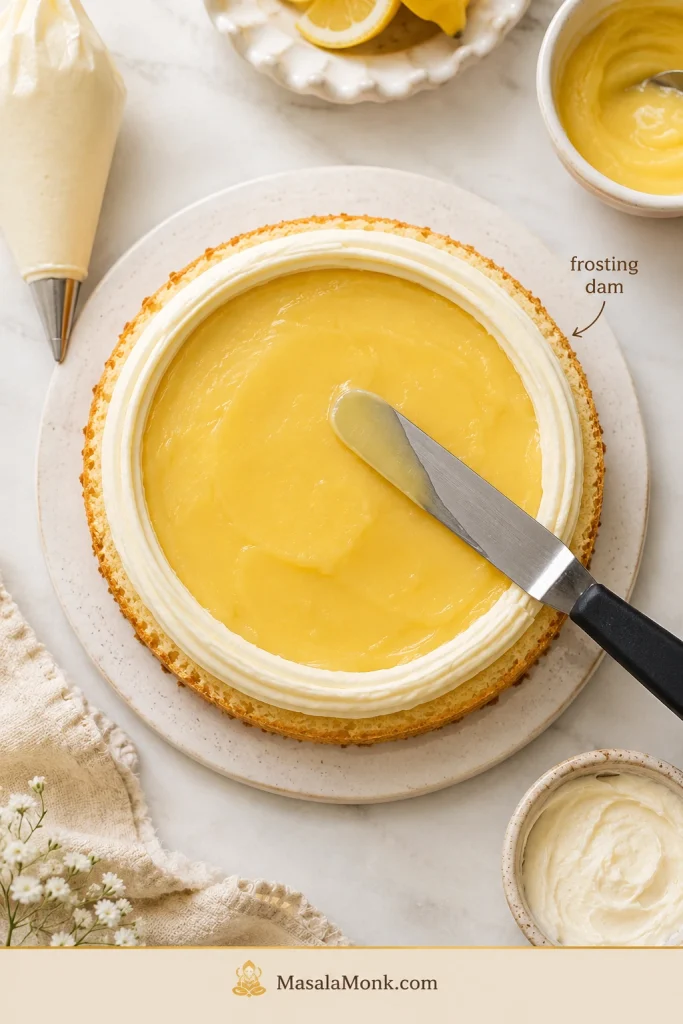
A cake layer filled with lemon curd inside a piped frosting dam, with an offset spatula smoothing the curd.
Inside a layer cake, remember the visual rule: frosting around the edge, curd inside the border, and only a thin layer between cake layers.

If the cake has more than two layers, soft frosting, warm weather, or a long travel time, treat lemon curd as a flavor layer, not the structural filling. When lemon needs to be the main support in a tall cake, use a dedicated lemon filling instead.

How Much to Use in Cake

Cake sizeApproximate amount per filling layerNote
6-inch cake1/4 to 1/3 cupUse a thin layer inside a frosting dam.
8-inch cake1/3 to 1/2 cupKeep the layer even and away from the edge.
9-inch cakeAbout 1/2 cupBest with a sturdy frosting border.
Cupcakes1 to 2 teaspoons eachFill only after the cupcakes are fully cool.

These amounts are guides, not strict rules. Softer cakes and softer frostings need a thinner layer.

Visual cue: In cake, a thin chilled layer gives flavor without making slices slide.

A slice of layer cake with white frosting and a thin yellow lemon curd layer between the cake layers.
A clean cake slice shows why restraint matters: a thin chilled layer adds lemon flavor while cake and frosting keep the structure.

Lemon Curd vs Lemon Filling

Lemon curd is a buttery egg-thickened lemon custard; lemon filling is usually thicker, more stable, and often starch-thickened. The difference matters most when you need structure.

If you need a pipeable filling, a tall cake filling, or a dessert that must sit out longer, choose a starch-stabilized lemon filling instead of classic curd.

NeedBetter choiceWhy
Toast, scones, yogurt, pancakesLemon curdSoft, glossy, and spreadable
Tart shellsThicker lemon curdBright flavor with a smooth, sliceable texture
CupcakesChilled curd or lemon fillingBoth can work if the texture is thick enough
Layer cakeThick curd inside a frosting damWorks when used cold and not overfilled
Tall celebration cakeStable lemon fillingBetter structure for height and clean slices
Warm-weather cakeStable lemon fillingLess likely to soften or slide
Pipeable bakery-style fillingLemon fillingUsually thicker and more controlled

When to use curd and when to use filling
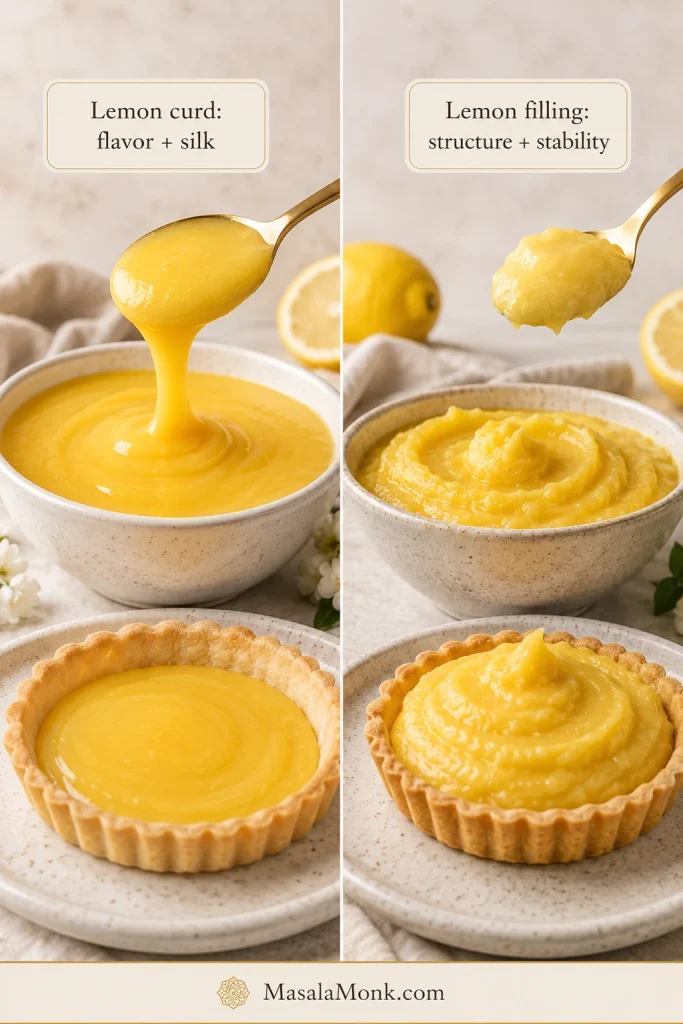
A side-by-side guide comparing smooth lemon curd with thicker lemon filling in bowls and tart shells.
Choose by function: lemon curd brings buttery brightness, while lemon filling is better when height, travel, or sharp slices matter.

Think of curd as flavor and silk; think of filling as structure. In a simple home cake, chilled curd can work beautifully inside a frosting dam. For a tall cake, wedding-style cake, or dessert that needs very sharp slices, use a dedicated lemon filling instead.

Using It in Tarts and Mini Tarts

Lemon curd is excellent in tart shells because it gives you a bright, creamy filling without making a separate pastry cream. Strain it well for the glossiest finish.

Start with fully baked and fully cooled tart shells. Fill them while the curd is cooled but still spreadable, or spoon in chilled curd and smooth the top with an offset spatula.

Mini tarts work best once the filling has set because it spoons or pipes more neatly. For a tart that slices cleanly, cook the curd slightly thicker and chill the filled tart before serving.

Visual cue: A slightly thicker, fully chilled curd gives cleaner tart tops and slices.

Mini lemon curd tarts and a clean slice of lemon tart with glossy yellow filling on a light stone surface.
In lemon tarts and mini tarts, the curd needs more set than a breakfast spread; that thicker chill gives neat tops and cleaner slices.

If you are comfortable with simple tart assembly, the same crisp-base thinking appears in this apple tart recipe: keep the pastry base crisp, the filling controlled, and the final texture clean.

Pie, Cheesecake, Cookies and Desserts

Once the texture is right, lemon curd can become a layer, topping, swirl, filling, or quick dessert shortcut.

Pie

Use lemon curd as a tart-sweet layer in cream pies, no-bake pies, or layered desserts. It works beautifully as a flavor layer, but a classic lemon meringue pie usually needs a dedicated pie filling because it has to slice cleanly and hold under meringue.

Cheesecake

Spread it over cheesecake as a topping, swirl it lightly into the filling, or use it as a thin layer between cheesecake and whipped cream. It works especially well with a no bake cheesecake, where the bright curd cuts through the creamy filling and keeps each bite from feeling too heavy.

Cookies

For thumbprint cookies, sandwich cookies, or shortbread cookies, use a thicker batch. Filled cookies look cleanest when the curd is added after baking unless the cookie recipe is designed to bake with a filling. For a gluten-free cookie base, almond flour cookies are a natural direction because their tender, nutty texture pairs well with sharp lemon.

Quick Desserts

Spoon it into yogurt parfaits, fold a little into homemade whipped cream, layer it with crushed cookies, drizzle it over pound cake, or serve it with pavlova and berries. A small amount adds brightness, creaminess, and that sharp lemon finish.

What to Make With Lemon Curd

Once the jar is chilled, it becomes a shortcut to brightness: breakfast, cake, cream, cookies, and simple desserts all get a sharper finish.

CategoryIdeas
BreakfastToast, scones, pancakes, waffles, yogurt, crepes
CakesLayer cake, lemon cake, vanilla cake, cupcakes, loaf cake, sponge cake
Tarts and piesMini tarts, tart shells, lemon tart, cream pie layers
CookiesThumbprint cookies, sandwich cookies, shortbread bars
No-bake dessertsParfaits, cheesecake topping, whipped cream layers, ice cream topping
Plated dessertsPavlova, pound cake, angel food cake, crepes, meringues

Visual cue: One chilled jar can brighten cheesecakes, cookies, parfaits, pancakes, yogurt, and whipped cream.

Lemon curd served with cheesecake, thumbprint cookies, a whipped cream parfait, pancakes, and yogurt.
Once chilled, one jar can work across desserts: sharpen cheesecake, fill cookies, layer parfaits, brighten pancakes, swirl yogurt, or lift whipped cream.

For a fruit-and-cream dessert, borrow the same assemble-at-serving idea used in classic strawberry shortcake: keep the base, fruit, cream, and curd separate until the last minute so nothing turns soggy.

With breakfast, a spoonful of chilled curd is excellent over almond flour pancakes, especially when you want something brighter than syrup.

Microwave Lemon Curd Shortcut

The stovetop method gives the best control, especially the first time you make lemon curd. The microwave can work for a quick small batch, but it asks for patience in short bursts.

Microwave timing varies by wattage, so texture matters more than exact minutes. Use the spoon test instead of trusting the clock alone.

  1. Start with a large microwave-safe glass bowl because the mixture can rise as it heats.
  2. Whisk the lemon juice, zest, sugar, eggs, and salt together until smooth.
  3. Microwave in 30-second bursts, whisking well after each burst.
  4. Once the mixture begins to thicken, switch to 10 to 15-second bursts.
  5. Stop when it coats a spoon. Do not let it boil over or scramble.
  6. Whisk in the butter, strain through a fine mesh sieve, then chill.

The microwave method is fast, but less forgiving because the heat is uneven. For the smoothest, most controlled result, use the stovetop method.

Vegan, Eggless, Dairy-Free and Gluten-Free Notes

Classic lemon curd is made with eggs and butter, so vegan and eggless versions need a different method. They are not just a simple egg swap.

  • Dairy-free: plant-based butter can work, but flavor and texture may change depending on the brand.
  • Eggless: usually needs cornstarch or another thickener to replace the eggs.
  • Vegan: usually uses lemon juice, zest, sugar, plant milk, starch, and plant butter or coconut-based fat.
  • Gluten-free: classic curd is usually naturally gluten-free, but check all ingredients and avoid cross-contact if needed.
  • Sugar-free or keto: needs separate testing because sweeteners behave differently from sugar.

If you need a vegan or egg-free version, choose a recipe designed for that method. The texture, thickening system, and cooking behavior are different from classic curd.

Troubleshooting Lemon Curd

Most lemon curd problems look worse than they are. The fix depends on whether the batch is undercooked, overheated, or simply not chilled yet.

How to diagnose lemon curd problems
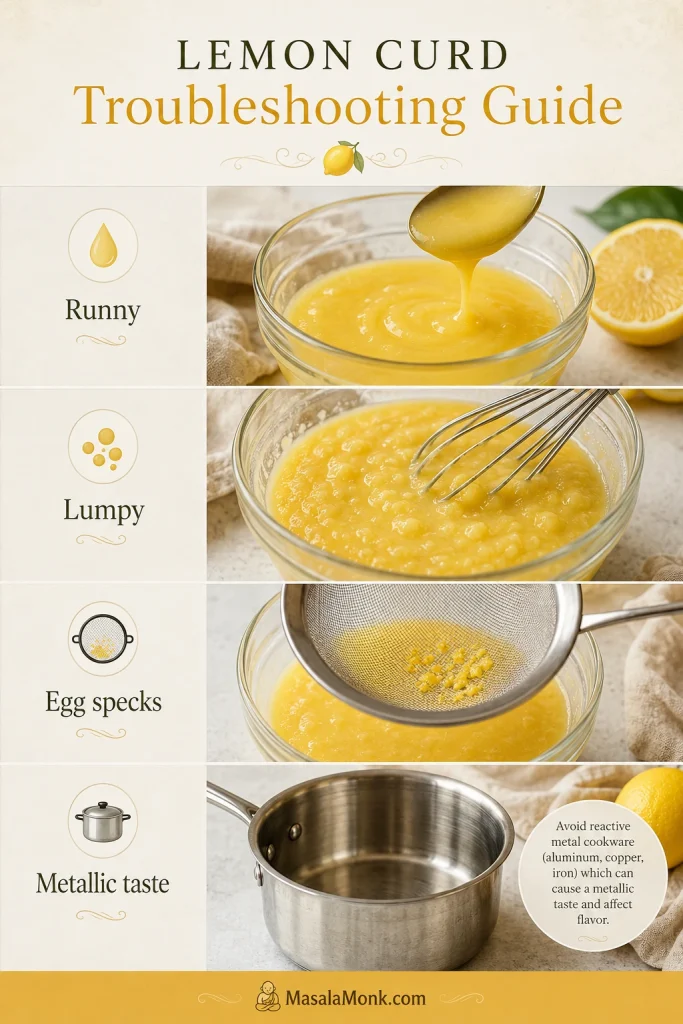
A lemon curd troubleshooting guide showing runny curd, lumpy curd, egg specks in a sieve, and a stainless steel pan for avoiding metallic taste.
Most lemon curd problems point back to heat, timing, chilling, or cookware, so diagnose the texture before giving up on the batch.

Fix Texture Problems First

ProblemWhy it happenedWhat to do
Runny curdIt was undercooked or has not chilled long enough.Reheat gently and cook until it coats a spoon or reaches about 170°F / 77°C. Chill fully.
Runny after chillingIt was undercooked, even if it looked slightly thick while warm.Reheat gently, cook to spoon-coating texture, then chill again.
Lumpy textureThe eggs cooked too quickly or the heat was too high.Strain immediately through a fine mesh sieve. Use lower heat next time.
Eggy tasteThe eggs overheated or cooked too aggressively.Strain well. Next time, cook lower and whisk constantly.
Grainy textureThe sugar did not dissolve evenly or the heat was uneven.Rub zest into sugar, whisk well before heating, cook gently, and strain after cooking.
Split curdThe heat was too high or the butter did not emulsify smoothly.Whisk vigorously off heat, then strain. Next time, add butter gradually off heat.

Fix Flavor, Skin, and Cookware Issues

ProblemWhy it happenedWhat to do
Too tartThe lemons were very sharp or the lower sugar amount was used.Use the sweeter sugar amount next time. Serve this batch with cream, yogurt, cake, or meringue.
Too sweetThe lemons were mild or the higher sugar amount was used.Add more zest next time for stronger lemon flavor instead of adding too much extra juice.
Skin on topIt cooled uncovered.Press parchment or plastic wrap directly onto the surface while cooling.
Metallic tasteA reactive pan or bowl may have affected the flavor.Use stainless steel, enamel-coated cookware, or heatproof glass.

Even if the batch is not perfect, do not throw it away too quickly. A slightly thin curd can often be cooked a little longer, and a slightly lumpy one can often be rescued with a sieve.

Batch rescued? Recheck doneness cues · store the finished curd · return to the recipe card

Storage and Freezing

Homemade lemon curd is a refrigerator recipe, not a shelf-stable preserve. Store it in a clean airtight jar or container and keep it chilled.

Think of it like a chilled custard-style spread: clean jar, cold fridge, clean spoon.

How to store lemon curd safely
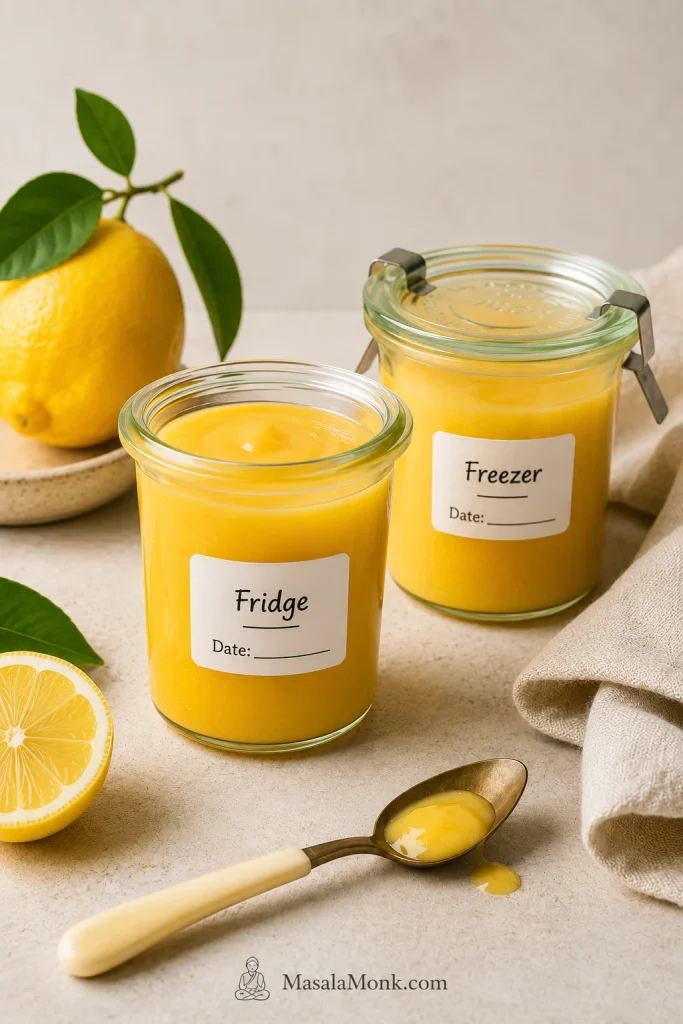
Two jars of homemade lemon curd labeled fridge and freezer, with blank date lines, a lemon, linen, and a spoon nearby.
Date the jar and keep it cold; homemade lemon curd behaves like a custard-style spread, so clean handling matters as much as flavor.

If you want tested preservation guidance, the National Center for Home Food Preservation has specific lemon curd freezing and canning guidance.

  • Refrigerator: keep for about 1 to 2 weeks, depending on freshness and handling.
  • Freezer: freeze in an airtight freezer-safe container for longer storage.
  • Thawing: thaw overnight in the refrigerator.
  • After thawing: stir gently before using.
  • Serving: always use a clean spoon so the curd stays fresh longer.

Let the curd cool slightly before sealing the jar fully, so condensation does not collect inside. For food-safety storage temperatures, use a refrigerator at 40°F / 4°C or below; FoodSafety.gov’s cold food storage chart uses that same refrigerator temperature benchmark.

Keep it chilled until serving, especially because it contains eggs and butter.

FAQ

Why did my lemon curd turn runny?

It was probably undercooked or not chilled long enough. Reheat gently until it coats a spoon, then chill again.

How do you thicken lemon curd?

Cook it gently until it coats the back of a spoon. For a thicker texture, cook closer to 175°F / 79–80°C without boiling, then chill until fully set.

What temperature should lemon curd reach?

A good target is about 170°F / 77°C. For tarts or cake filling, cook closer to 175°F / 79–80°C without letting it boil.

How many lemons do you need?

Usually 2 to 3 medium lemons for 1/2 cup / 120 ml juice. Zest them before juicing so they are easier to handle.

Do you need a double boiler?

No. A double boiler gives extra protection, but a heavy-bottom saucepan works well with low heat and constant whisking.

Whole eggs or egg yolks: which is better?

Use whole eggs for a lighter curd and yolks for a richer, thicker one. This recipe uses both for a balanced all-purpose texture.

Should lemon curd be strained?

Yes. Straining while warm is the easiest way to remove zest, tiny egg bits, and uneven texture.

How long does homemade lemon curd last?

It usually keeps for about 1 to 2 weeks in the refrigerator in a clean airtight container.

Can you freeze lemon curd?

Yes. Freeze it in an airtight freezer-safe container, thaw overnight in the refrigerator, then stir gently before using.

Is lemon curd the same as lemon filling?

Not always. Lemon curd is buttery and custard-like, while lemon filling is often thicker, more stable, or starch-thickened.

Does lemon curd work as cake filling?

Yes, if it is cold, thick, and used thinly inside a frosting dam. For tall cakes or very clean slices, use a more stable lemon filling.

Why does lemon curd taste metallic?

A metallic taste can come from reactive cookware. Use stainless steel, enamel-coated cookware, or heatproof glass.

Final Tips for Smooth Lemon Curd

  • Zest before juicing.
  • Measure the lemon juice.
  • Rub zest into sugar for stronger lemon flavor.
  • Cook gently and whisk constantly.
  • Stop when it coats a spoon and looks glossy.
  • Use temperature as a guide, not the only test.
  • Strain warm, then chill before using as filling.

Good lemon curd should taste bright, smooth, and alive with lemon. Keep the heat gentle, trust the spoon test, and let the refrigerator finish the texture. Once you know what properly thickened curd looks and feels like, it stops being fussy and becomes one of the easiest ways to make toast, cakes, pancakes, cookies, whipped cream, and simple desserts taste finished.

Make it now: jump back to the recipe card · back to top

Posted on Leave a comment

Lemon Pepper Chicken Recipe: Juicy, Easy, Skillet & Oven Friendly

Golden lemon pepper chicken cutlets in a dark skillet with lemon butter sauce, parsley, cracked black pepper, and lemon wedges.

Lemon pepper chicken should feel easy before you even start cooking: golden chicken, fresh lemon, cracked pepper, and a buttery pan sauce you can spoon over rice, potatoes, pasta, or vegetables. It should taste lively without being sour, peppery without being harsh, and tender enough that chicken breast does not feel like the boring part of dinner.

The usual problems are familiar: thick chicken dries out, bottled lemon pepper can be salty, and too much juice can make the sauce sharp. This version keeps the chicken thin, the seasoning flexible, and the lemon butter balanced.

It is especially useful when you have two chicken breasts, a bottle of lemon pepper seasoning, and no patience for another dry weeknight chicken dinner. When the skillet is right, the chicken picks up a light golden crust, the lemon zest smells fresh before the juice ever hits the pan, and the butter pulls the browned bits into a sauce that tastes bigger than the short ingredient list.

Quick Answer

Lemon pepper chicken is made by seasoning thin chicken breast cutlets with lemon pepper seasoning, searing them until golden, and finishing them in a lemon butter pan sauce. The key is to use lemon zest for flavor, lemon juice for brightness, and cook chicken breast to 165°F / 74°C in the thickest part.

For the skillet version, slice 2 large chicken breasts into 4 thin cutlets, season them with lemon pepper seasoning, garlic powder, salt only as needed, and a light flour coating, then sear for about 3–5 minutes per side. The pan sauce comes together in the same skillet with butter, broth, lemon zest, and fresh lemon juice.

This recipe is built around the three fixes that matter most: thin chicken so it stays juicy, flexible salt because lemon pepper blends vary, and fresh zest so the lemon flavor tastes bright instead of sour. The point is not to make chicken fancy; it is to make it reliable: juicy, bright, buttery, and easy to serve with whatever is already in the kitchen.

Before You Start: 5 Details That Matter

A few small choices decide whether this tastes bright and tender or just like seasoned chicken.

Chicken2 large breasts, sliced into 4 thin cutlets
ThicknessAbout 1.25 cm / 1/2 inch
SaltDepends on your lemon pepper blend
LemonZest for flavor, juice near the end
Doneness165°F / 74°C in the thickest part
Overhead guide showing thin chicken, lemon pepper seasoning, lemon zest, lemon juice, and a thermometer marked 165°F / 74°C.
Before cooking, check the details that prevent most mistakes: thin cutlets, restrained salt, zest for aroma, juice near the end, and a final 165°F / 74°C temperature.

If you only remember one thing before cooking, remember this: thin chicken gives you room to get color without drying out the center.

Use the seasoning you already have; just taste or check the label before adding extra salt. Some bottled blends are mostly pepper and lemon. Others are salty enough that the chicken barely needs any added salt at all.

Lemon Pepper Chicken Recipe Card

Start here when dinner needs to happen now. This is the skillet version to make first: thin chicken cutlets, lemon pepper seasoning, a light flour coating, and a quick lemon butter finish made in the same pan.

Recipe nameLemon Pepper Chicken
Prep time10 minutes
Cook time15 minutes
Total time25 minutes
Servings4
Yield4 thin chicken cutlets
Main methodSkillet
Internal temperature165°F / 74°C for chicken breast

Equipment

You need a large 10–12 inch skillet, tongs, a shallow plate for coating, a fine grater for zest, and ideally an instant-read thermometer. A meat mallet or rolling pin helps even out thick spots.

Ingredients

IngredientAmount
Boneless skinless chicken breasts2 large, about 550–650 g / 1.2–1.4 lb total
All-purpose flour3 tablespoons / 24 g
Lemon pepper seasoning2 teaspoons / about 5–6 g, depending on brand
Garlic powder1/2 teaspoon
Fine salt1/4 to 1/2 teaspoon, depending on seasoning
Olive oil or neutral oil1 1/2 tablespoons / about 22 ml
Unsalted butter3 tablespoons / 42 g
Chicken broth or stock1/2 cup / 120 ml
Fresh lemon juice1 to 2 tablespoons / 15–30 ml
Lemon zest1 to 2 teaspoons
Fresh parsley, chopped1 to 2 tablespoons
Fresh garlic, optional1 clove, minced

Before adding salt: Taste or check your lemon pepper seasoning. If it already tastes salty, start with 1/4 teaspoon extra salt or skip the added salt until the pan sauce is finished. Let the skillet juices do the balancing before you reach for more salt.

Instructions

  1. Slice the chicken. Place each breast flat on a board and slice horizontally into 2 thinner cutlets. Pound uneven spots to about 1.25 cm / 1/2 inch thick.
  2. Pat it dry. Use paper towels to remove surface moisture so the chicken browns better and holds seasoning evenly.
  3. Season the flour. In a shallow bowl or plate, mix the flour, lemon pepper seasoning, garlic powder, and salt.
  4. Coat lightly. Dredge each cutlet and shake off the excess. The coating should look thin and dusty, not thick or caked on.
  5. Sear until golden. Heat oil in a large skillet over medium to medium-high heat. Cook the cutlets in one layer for 3–5 minutes per side, until golden. Lower the heat if the coating colors too fast.
  6. Check the temperature. Test the thickest part before removing the chicken, or right after transferring it to a plate. It should read 165°F / 74°C.
  7. Start the pan finish. Lower the heat to medium, add butter, and stir in garlic, when using, for 20–30 seconds.
  8. Add broth and lemon. Pour in the broth, scrape up the browned bits, then stir in 1 tablespoon lemon juice and the zest. Simmer for 2–4 minutes, until glossy.
  9. Return the chicken. Add the cutlets back and spoon the lemon butter over the top. Warm gently instead of boiling hard.
  10. Finish and serve. Taste, then add more lemon juice, pepper, or salt only as needed. Sprinkle with parsley and serve warm.

Recipe Notes

  • Large chicken breasts cook better when sliced into cutlets instead of cooked whole.
  • Fresh lemon zest gives stronger lemon flavor than lemon juice alone.
  • Use 1 tablespoon lemon juice for a softer sauce and 2 tablespoons for a sharper lemon finish.
  • Broth and butter are the best way to bring a strong-tasting sauce back into balance.
  • For a gluten-free version, use a light gluten-free flour blend.
  • For a thinner coating, use 1 1/2 tablespoons cornstarch instead of flour, or skip the coating and reduce the sauce slightly longer.

Choosing another method? Jump to the oven, air fryer, thighs, and meal-prep options.

What Good Lemon Pepper Chicken Should Taste Like

Good lemon pepper chicken should taste lemony before it tastes sour, peppery before it tastes hot, and buttery without feeling heavy. Ideally, the cutlets are golden outside, tender in the center, and lightly coated rather than buried under sauce.

A little lemon butter should remain in the pan for rice, potatoes, pasta, or vegetables. The best bite makes the side dish better too, as if it caught the same bright, buttery finish.

Sliced lemon pepper chicken served with mashed potatoes, green vegetables, lemon butter sauce, parsley, and a lemon wedge.
A good side should catch the lemon-butter juices, not compete with them. That is why mashed potatoes, rice, pasta, and simple vegetables all work well here.

When the first bite tastes mostly salty, the bottled blend was probably too aggressive. A flat bite usually needs zest or a final squeeze of lemon. Sharpness, though, is better fixed with butter and broth than with more juice.

4 Small Details That Make or Break It

The recipe is simple, but these four choices decide whether it tastes bright and juicy or flat, salty, and dry.

Educational board showing thin cutlets, salt control, lemon zest and juice, and pan sauce for lemon pepper chicken.
Four details decide the final result: thin cutlets for even cooking, salt control for balance, zest and juice for lemon flavor, and a skillet finish for depth.
DetailWhat Can HappenHow This Recipe Handles It
Chicken thicknessThick pieces cook unevenly.Slice into thin cutlets and check the internal temperature.
Seasoning strengthBottled lemon pepper seasoning may already contain salt.Add salt carefully and adjust after the sauce is made.
Lemon balanceToo much lemon juice can taste sharp.Use zest for flavor and juice near the end.
Pan finishSeasoned chicken can still feel plain.Make a quick lemon butter pan sauce with broth and butter.

Why This Recipe Works

This recipe treats the dish as a balance problem, not just a seasoning problem.

Cutting the chicken into thin cutlets gives you more surface area for browning and shortens the cooking time. The outside can turn golden before the inside dries out. A thin coating of seasoned flour helps the breast meat brown and gives the skillet juices just enough body to cling lightly.

Zest brings the lemon aroma, juice brings the bright finish, butter rounds out the pepper, and broth lifts the browned bits from the skillet. When the finish is right, it tastes peppery first, buttery in the middle, and fresh at the end.

By the time it turns glossy and the chicken goes back in, dinner should smell like lemon, browned butter, and pepper — not like a complicated project.

Choose Your Version

If this is your first time making it, stay with the skillet. It gives you the golden crust, the full lemon-butter finish, and the best pan flavor. Once you know that version, you can bend the same flavor toward the oven, air fryer, grill, or slow cooker depending on the night.

Method guide showing lemon pepper chicken options for skillet, oven, air fryer, thighs, meal prep, and wings.
Choose the method based on what you need. Skillet lemon pepper chicken gives the strongest pan flavor, while oven, air fryer, thighs, meal prep, and wings offer easier variations.
VersionBest ForKey Tip
Skillet lemon pepper chickenFastest saucy dinnerUse thin cutlets and finish with lemon butter sauce.
Oven lemon pepper chickenHands-off cookingUse evenly thick pieces and spoon sauce over after baking.
Air fryer lemon pepper chickenQuick, low-mess cookingOil lightly so the coating does not stay floury.
Lemon pepper chicken breastLean weeknight dinnerSlice or pound evenly so the breast stays tender.
Lemon pepper chicken thighsJuicier, more forgiving chickenCook a little longer for softer texture.
Grilled lemon pepper chickenSmoky summer flavorUse zest and oil in the marinade, then add lemon after cooking.
Slow cooker lemon pepper chickenMeal prep, bowls, wraps, or shreddingUse less liquid than expected and brighten at the end.
Lemon pepper wingsCrispy party-style wingsUse a separate wings method for crisp skin.

Looking for crispy lemon pepper wings instead of skillet chicken? Wings need a different method for crisp skin and a dry or wet wing sauce. Use this lemon pepper chicken wings recipe when wings are the plan.

Ingredients You Need

The ingredient list is short, and each item has a job, which makes substitutions easier.

Chicken

Boneless skinless chicken breasts are quick, lean, and familiar. The key is to turn 2 large breasts into 4 thinner cutlets so they cook quickly and stay tender in the center.

Boneless thighs, bone-in thighs, or tenders also work. Thighs are juicier and more forgiving, while tenders are good for bowls, wraps, or kid-friendly dinners.

Lemon Pepper Seasoning

Lemon pepper seasoning gives the recipe its familiar flavor. Some blends are lemony and peppery with very little salt. Others are salty enough that you barely need any extra salt at all.

The bottle gives you the shortcut; the fresh zest makes it taste alive.

Fresh Lemon

Fresh lemon makes bottled seasoning taste brighter. The zest gives the strongest lemon aroma, while the juice adds tang to the pan finish. Avoid adding too much juice too early; it can turn sharp when it cooks down hard.

Butter, Broth, and Flour

Butter softens the pepper and acidity. Broth keeps the sauce spoonable and pulls flavor from the skillet. Flour gives the chicken a light coating, helps with browning, and gently thickens the pan sauce. Shake off the excess before cooking.

Salt-Control Guide

This is where many lemon pepper recipes go wrong. The label matters more than the measuring spoon because lemon pepper seasoning is not standardized. One brand may taste mostly like lemon peel and black pepper, while another may taste salty before it ever touches the chicken.

Salt-control guide with lemon pepper seasoning, salt, lemon zest, broth, butter, and labels about tasting the blend first.
Lemon pepper seasoning can be mild, salty, or sharp depending on the blend. Taste it first, then add salt only after you know what the chicken needs.
Your Seasoning Tastes…What to Do
Very saltySkip the added salt in the coating. Adjust only after the sauce is finished.
Mild but saltedUse 1/4 teaspoon salt for 550–650 g chicken.
Salt-freeUse 1/2 teaspoon salt in the coating, then taste the sauce.
Sour or citricUse less lemon juice and more lemon zest.
Weak or flatAdd fresh lemon zest and a little extra black pepper.
Very pepperyUse the lower amount of seasoning and soften the sauce with butter.

Start with less salt when unsure. It is much easier to add a little salt to the finished sauce than to rescue chicken that is already too salty. Avoid adding more lemon as the first fix because acidity can make salt taste sharper.

Once the salt is under control, the lemon tastes brighter, the butter tastes rounder, and the chicken finally tastes like dinner instead of seasoning.

Seasoning already tastes too strong? Go to troubleshooting or check zest vs juice.

Bottled Seasoning or Homemade?

Bottled lemon pepper seasoning is completely fine for a weeknight. This recipe is written to work with bottled seasoning, not to shame it. The only catch is that every brand behaves a little differently, especially around salt and citric sharpness.

  • Bottled lemon pepper seasoning: Fastest and easiest, but check the salt level.
  • Salt-free lemon pepper: Gives more control, but you need to add salt separately.
  • Homemade lemon pepper: Freshest lemon flavor, especially with fresh zest and cracked pepper.
  • Lemon pepper marinade: Better for grilled or baked chicken than for the skillet cutlet method.
  • Lemon butter pan sauce: The best finish for this skillet version.

Quick Homemade Lemon Pepper Blend

No bottled seasoning on hand? Mix a quick fresh blend for this recipe. It is not a shelf-stable pantry mix.

  • 1 tablespoon fresh lemon zest
  • 1 1/2 teaspoons cracked black pepper
  • 1 teaspoon garlic powder
  • 1/2 teaspoon fine salt
  • 1/4 teaspoon onion powder, optional
  • A tiny pinch of sugar, optional, to soften the lemon edge

This blend tastes fresher than many bottled seasonings, but the salt level depends on how much salt you add. Taste the sauce at the end and adjust from there.

Lemon Zest vs Lemon Juice

The simplest way to understand this recipe is this: use zest for lemon flavor and juice for brightness.

Lemon zest carries the fragrant oils from the outside of the lemon. It gives the chicken a strong lemon aroma without adding much acidity. Lemon juice gives the sauce its tang, but too much can make the dish sharp.

Hands zesting a lemon and squeezing lemon juice with labels for zest as flavor, juice as brightness, and yellow zest only.
Lemon zest and lemon juice do different jobs. Zest brings aroma without extra sourness, while juice adds brightness near the end of cooking.
  • Zest: Gives strong lemon aroma without extra sourness.
  • Juice: Adds a fresh, tangy finish to the pan sauce.
  • Lemon slices: Look good as garnish, but can turn mildly bitter if cooked too long.
  • Bottled lemon juice: Works in a pinch, although fresh lemon tastes cleaner.

When zesting a lemon, remove only the yellow part. The white pith underneath can taste bitter. A microplane or fine grater makes this easier.

How to Keep Chicken Breast Juicy

Once the lemon flavor is balanced, the next job is texture. Chicken breast only tastes good here if it stays tender.

  • Slice large breasts into cutlets. Thinner pieces cook faster.
  • Pound uneven spots. Even thickness helps the whole piece finish at the same time.
  • Pat the chicken dry. Dry chicken browns better than wet chicken.
  • Use enough heat. A properly heated skillet gives color before the chicken overcooks.
  • Do not crowd the pan. Crowding traps steam and makes the chicken pale.
  • Use a thermometer. Pull chicken breast when it reaches 165°F / 74°C.
  • Rest before slicing. Even a short rest helps the juices settle.
  • Spoon lemon butter over the chicken. The glossy finish protects the meat and makes every bite feel moist.

What Juicy Lemon Pepper Chicken Looks Like

The best visual cue is in the sliced center. Look for meat that is still moist, with a golden outside and just enough gloss to carry flavor.

Close-up of sliced lemon pepper chicken with a moist interior, golden crust, lemon butter sauce, black pepper, and parsley.
Use the sliced center as your doneness cue. The sliced center should look moist, the crust should look golden, and the surface should be lightly glossed rather than soaked.

The goal is chicken that slices cleanly and still looks moist, not chicken you have to hide under sauce.

That is the difference between chicken you eat because it is there and chicken people drag through the last spoonful of sauce.

Chicken breast giving you trouble in general? This baked chicken breast recipe goes deeper into thickness, timing, resting, and doneness so the meat stays juicy instead of chalky.

Ready for the pan? Jump to the cooking cues or check the time and temperature guide.

Step-by-Step Cooking Cues

The recipe card gives the steps. These are the little pan cues that tell you things are going right.

1. Cut the Chicken Into Thin Pieces

Place each chicken breast flat on a cutting board and slice it horizontally into two thinner cutlets. Pound thicker spots gently until the piece is even. The chicken does not need to be paper-thin; it just needs to cook evenly.

Raw chicken breast being sliced horizontally into thin cutlets on a wooden board with lemon and seasoning nearby.
Thin cutlets cook evenly, so the edges can brown before the center dries out.

2. Season and Coat Lightly

Mix the flour, lemon pepper seasoning, garlic powder, and salt in a shallow bowl. Coat the chicken lightly and shake off the extra flour. The coating should look like a light dusting, not a batter.

Chicken cutlet lightly coated in seasoned flour with lemon pepper seasoning and garlic powder on a shallow plate.
The flour coating should look light, not packed on. That thin layer helps the cutlet brown while keeping the finished bite tender instead of bready.

3. Sear Until Golden

A steady sizzle is the goal. If the pan is too quiet, the chicken may steam; if it smokes hard, the coating can brown before the center finishes. Let the underside release easily before flipping, and lower the heat if the cutlets color too quickly.

Lemon pepper chicken cutlets searing in a skillet with space between the pieces, golden edges, pepper flecks, and light pan juices.
Give the cutlets enough space to sear. Otherwise, trapped moisture turns the pan steamy and leaves the chicken pale instead of golden.

When to Flip Lemon Pepper Chicken

The first side is done when it lifts cleanly with tongs and shows a golden underside. If it still sticks, give the crust another minute before turning.

Tongs lifting the edge of a lemon pepper chicken cutlet to show the golden underside before flipping.
The first side is ready when the cutlet releases without tearing. If it still sticks, wait briefly so the crust can finish forming.

4. Make the Lemon Butter Pan Sauce

After the chicken comes out, let the pan calm down for a few seconds, then add butter. Stir in garlic when using, then add broth, lemon juice, and lemon zest. Scrape the bottom so the browned bits melt into the sauce.

Spoon dragging through glossy lemon butter pan sauce with browned bits, lemon zest, black pepper, and herbs in a skillet.
Aim for a loose, glossy lemon butter sauce rather than a thick gravy. That texture lets it spoon easily over chicken and flow into rice, potatoes, pasta, or vegetables.

5. Return the Chicken Gently

Add the chicken back to the skillet and spoon the sauce over the top. Taste before adding more lemon or salt. Boiling the cooked chicken hard can tighten the breast and take away tenderness.

Lemon butter sauce being spooned over sliced golden lemon pepper chicken with parsley, cracked pepper, and lemon zest.
Spoon the lemon butter over cooked chicken, not boiling-hard chicken, so the breast meat stays tender and glossy.

Need exact timing? Use the time and temperature guide before switching methods.

Time and Temperature Guide

Use this table as a starting point, not a promise. Chicken thickness always wins over the clock. The clock helps, but the thermometer is what saves dinner. For the simplest food-safety rule, cook chicken to 165°F / 74°C in the thickest part.

Instant-read thermometer inserted into cooked lemon pepper chicken in a skillet, showing 165°F.
Check the thickest part of the chicken, not the pan juices. For chicken breast, 165°F / 74°C is the safe internal temperature that still protects tenderness.
MethodBest CutTemperatureApprox TimeInternal Temp
Skillet cutletsBreast cutlets, about 1.25 cm thickMedium to medium-high3–5 min per side165°F / 74°C
Skillet thicker breastThicker breast piecesMedium5–6 min per side, then check165°F / 74°C
Oven thin cutletsThin breast cutlets400°F / 204°C15–18 min165°F / 74°C
Oven medium breasts6–8 oz / 170–225 g breasts425°F / 218°C18–22 min165°F / 74°C
Oven large breasts9–10 oz / 255–285 g breasts425°F / 218°C22–26 min165°F / 74°C
Boneless thighsChicken thighsSkillet or 400°F / 204°C oven22–28 min in oven165°F / 74°C safe, 175°F / 79°C for softer texture
Air fryer cutletsThin breast pieces375°F / 190°C10–14 min165°F / 74°C
Grilled breastChicken breastMedium-high grill6–8 min per side165°F / 74°C

Once you understand the skillet version, the rest is just choosing the method that fits your night. The next sections are quick adaptations, not separate full recipes.

Cooking another way? Jump to oven, air fryer, or chicken thighs.

Oven-Baked Lemon Pepper Chicken

Use the oven when you want the same flavor with less stove time. This is the oven version of the same recipe, not a separate full ingredient list. Thin cutlets usually take 15–18 minutes at 400°F / 204°C, while larger breasts usually take 18–26 minutes at 425°F / 218°C.

The oven cooks the chicken; a small pan makes the sauce. Bake the seasoned chicken until the thickest part reaches 165°F / 74°C, then spoon lemon butter sauce over the top after baking.

Oven-baked lemon pepper chicken cutlets in a metal baking dish with lemon wedges, parsley, black pepper, and pan juices.
Bake the cutlets until just done, then add the lemon-butter finish so the flavor stays bright instead of harsh.
Chicken PieceOven TempApprox Time
Thin breast cutlets400°F / 204°C15–18 minutes
Medium breasts, 6–8 oz / 170–225 g425°F / 218°C18–22 minutes
Large breasts, 9–10 oz / 255–285 g425°F / 218°C22–26 minutes
Boneless thighs400°F / 204°C22–28 minutes
Bone-in skin-on thighs400°F / 204°C35–45 minutes

Air Fryer Lemon Pepper Chicken

Use the air fryer when you want quick cutlets with less cleanup. Thin chicken breast pieces usually take 10–14 minutes at 375°F / 190°C. Tenders may cook faster, while thighs need a little more time.

Lightly oil the chicken, season it, and arrange it in a single layer. If using the flour coating, mist or brush the surface lightly with oil so no dry flour patches remain. Cook the chicken first, then spoon the sauce over it after it comes out.

Air fryer basket with browned lemon pepper chicken cutlets, parsley, black pepper, and a lemon wedge.
For air fryer lemon pepper chicken, coat the surface lightly with oil before cooking. Otherwise, the seasoned flour can stay pale, dry, and dusty.
CutAir Fryer TempApprox Time
Thin chicken breast cutlets375°F / 190°C10–14 minutes
Chicken tenders375°F / 190°C8–12 minutes
Boneless thighs380°F / 193°C14–18 minutes
Bone-in thighs380°F / 193°C20–24 minutes

Using Chicken Thighs

Chicken thighs are the more forgiving choice. They have more fat than chicken breasts, so they stay moist even when they cook a little longer.

Boneless thighs work well in a skillet or oven. Bone-in, skin-on thighs are better when you want crisp skin and deeper flavor. Chicken thighs are safe at 165°F / 74°C, but many cooks prefer the texture closer to 175°F / 79°C.

Lemon pepper chicken thighs with golden browned skin, lemon butter pan juices, black pepper, parsley, and lemon slices.
Lemon pepper chicken thighs are more forgiving than breast meat. Let them cook a little longer for richer texture, then finish with lemon so the flavor stays fresh.

Using Tenders, Drumsticks, and Other Cuts

The seasoning can travel; the cooking method just has to fit the cut. This is useful when the chicken in your fridge is not the exact cut in the recipe.

Chicken CutBest ApproachQuick Tip
Chicken tendersSkillet or air fryerCook like small breast pieces and check early.
Chicken stripsSkillet or air fryerSeason lightly and add sauce after cooking.
DrumsticksOven or air fryerTurn during cooking so the skin browns evenly.
Bone-in legsOvenCheck temperature near the bone, not just the surface.
WingsAir fryer, oven, or fried wing methodUse a separate wings recipe for crisp skin.

Grilled Lemon Pepper Chicken

Grilling takes this in a lighter, smokier direction. Skip the flour coating and use a marinade instead: oil, lemon zest, lemon pepper seasoning, garlic, and a small amount of lemon juice.

Grill chicken breast over medium-high heat for about 6–8 minutes per side, depending on thickness, until it reaches 165°F / 74°C. Finish with a little butter, lemon zest, or fresh lemon juice so the flavor tastes lifted rather than flat.

Slow Cooker Lemon Pepper Chicken

The slow cooker is for meal prep days, not for the golden skillet finish. Use thighs when possible because they stay softer and shred more easily.

Add lemon pepper seasoning, a small amount of broth, garlic, and butter. Start checking around 3–4 hours on low for breasts and 4–5 hours for thighs. Add fresh lemon juice and zest near the end, and reduce watery sauce in a pan before serving. For more slow-cooker chicken ideas, use these crock pot chicken breast recipes as a meal-prep starting point.

Lemon Pepper Chicken Marinade

You do not need a marinade for the skillet recipe. Use this only when the chicken is going on the grill, into the oven, or into the air fryer.

For 550–650 g / 1.2–1.4 lb chicken, start with 3 tablespoons / 45 ml olive oil, 1–2 teaspoons lemon zest, 1–2 tablespoons / 15–30 ml lemon juice, and 2 teaspoons lemon pepper seasoning. Add 1–2 minced garlic cloves, then add salt only when your seasoning needs it. One teaspoon honey is optional for better browning and a rounder finish.

Chicken CutMarinating Time
Boneless chicken breast30 minutes to 2 hours
Boneless thighs1 to 4 hours
Bone-in pieces2 to 8 hours
Very lemon-heavy marinadeAvoid overnight marinating

Longer marinating works better with more zest, oil, garlic, and seasoning, and less lemon juice. Marinate chicken in the refrigerator, never on the counter. For safety, USDA FSIS notes poultry can be refrigerated in marinade for up to 2 days, but this lemon-heavy version tastes better with the shorter times above. See the USDA poultry marinating guidance for the safety side.

Lemon Butter Sauce for Chicken

The pan sauce is what turns this from seasoned chicken into dinner. Without it, the chicken can taste dry, salty, or one-dimensional. With it, the chicken becomes glossy, fresh, and easy to serve with almost anything.

  • Butter: 3 tablespoons / 42 g, to round out the lemon and pepper.
  • Chicken broth: 1/2 cup / 120 ml, to lift the browned bits and keep the sauce spoonable.
  • Lemon juice: 1–2 tablespoons / 15–30 ml, for brightness.
  • Lemon zest: 1–2 teaspoons, for clean lemon aroma.
  • Parsley: 1–2 tablespoons, for freshness and color.

The sauce should taste peppery first, buttery in the middle, and fresh at the end. Add an extra tablespoon of butter for a richer finish. For a creamy version, stir in 2–3 tablespoons cream after the broth reduces, then keep the heat gentle.

What to Serve on the Side

Because the sauce is bright and buttery, it plays well with almost anything that can catch a spoonful.

  • Easy dinner: rice, roasted potatoes, or a simple salad.
  • Comfort plate: mashed potatoes, pasta, buttered noodles, or garlic bread.
  • Lighter side: green beans, asparagus, zucchini, broccoli, or cauliflower rice.
  • Meal prep: rice bowls, couscous, roasted vegetables, or wraps.

For a fresh, sharp side, a crisp cucumber salad recipe works especially well because the vinegar, dill, and onion cut through the buttery lemon sauce.

Serving potatoes? Creamy garlic mashed potatoes are one of the best ways to catch the lemon butter without making the plate feel too heavy.

Make It a Rice Bowl, Pasta, Salad, or Wrap

This is the kind of chicken that makes plain rice, pasta, or bowls feel intentional. Use the pan sauce as the bridge between the chicken and the rest of the plate.

Lemon pepper chicken rice bowl with sliced chicken, rice, broccoli, carrots, lemon wedge, sauce, and a leftover container behind it.
Leftovers work better with extra pan juices. Spoon them over rice bowls, wraps, pasta, or meal-prep containers so the chicken stays moist the next day.
  • Rice bowl: Spoon extra sauce over rice, then top with sliced chicken and parsley.
  • Pasta: Toss noodles with extra sauce, a splash of broth, and a little pasta water.
  • Chicken bowl: Add rice, roasted vegetables, sliced chicken, and a little extra lemon butter.
  • Salad: Serve sliced chicken over crisp greens with a lemony dressing.
  • Wrap: Use sliced chicken, lettuce, cucumber, and a little creamy sauce or yogurt dressing.

Making pasta often? The same loose-sauce habit matters in this chicken pesto pasta recipe too, where pasta water keeps the dish glossy instead of dry.

For a colder, crunchier salad plate, a wedge salad recipe works better as a full dinner side than a small garnish.

Storage and Reheating

Leftovers are best when the extra pan juices stay with the chicken.

  • Refrigerator: Store leftovers in an airtight container for 3–4 days.
  • Freezer: Freeze cooked chicken for up to 2 months. The sauce may look slightly different after thawing, but the flavor will still be good.
  • Skillet reheating: Reheat gently with a splash of broth or water until warmed through.
  • Microwave reheating: Cover and reheat at lower power in short bursts so the chicken does not dry out.
  • Best tip: Store the pan juices in the same container so the chicken stays moist.

Avoid overheating chicken breast when reheating. It is already cooked, so the goal is to warm it gently, not cook it again.

Leftover sliced chicken also works well in wraps and sandwiches. For more ways to turn cooked chicken into lunch, these chicken sandwich recipes give you BBQ, buffalo, Caesar, pesto, and quick café-style ideas.

Troubleshooting Dry, Salty, or Sharp Chicken

Most problems here have simple fixes once you know what went wrong.

Troubleshooting board showing dry chicken fixed with thin cutlets and temperature, salty seasoning balanced with broth and butter, and sharp lemon corrected with zest and less juice.
Most dry, salty, or sharp results come from thickness, salt, or lemon balance. Fix the cause directly with thinner cutlets, gentler seasoning, broth and butter, or more zest with less juice.
ProblemWhy It HappenedFix
Chicken is dryThe breast was too thick or overcookedSlice into cutlets, pound evenly, and use a thermometer.
Chicken tastes too saltyThe lemon pepper seasoning already had saltReduce added salt and balance with broth or butter.
Lemon tastes harshToo much lemon juice was added too earlyUse zest for flavor and add juice near the end.
Sauce is wateryToo much broth or not enough reducing timeSimmer for 2–4 minutes longer.
Sauce is too sharpToo much lemon juiceAdd butter or a splash of broth.
Coating falls offThe chicken was wet or the pan was not hotPat chicken dry and preheat the skillet.
Chicken is paleThe pan was crowdedCook in batches so the chicken sears instead of steams.
Air fryer chicken is dryThe pieces were small or cooked too longCheck early and add sauce after cooking.
Thighs are chewyThey were pulled too early for best textureCook thighs a little longer, closer to 175°F / 79°C.

A salty sauce usually needs dilution and fat, not more acid. Add broth and butter first, then taste again before reaching for more lemon.

If the sauce tastes a little too sharp, butter and broth fix that faster than more lemon.

This is not fussy chicken. It is the better kind of weeknight chicken: fast, bright, buttery, and useful with whatever side is already in your kitchen.

FAQs

What is lemon pepper chicken made of?

It is usually made with chicken breast or thighs, lemon pepper seasoning, garlic, fresh lemon, and butter or oil. This skillet version uses thin chicken cutlets and finishes them in a lemon-butter pan sauce.

How do you keep lemon pepper chicken from drying out?

Slice large chicken breasts into thin cutlets, pound uneven spots, cook only until the thickest part reaches 165°F / 74°C, and spoon sauce over the chicken before serving. Thick chicken breast and overcooking are the most common reasons it turns dry.

What temperature should lemon pepper chicken reach?

Chicken breast should reach 165°F / 74°C in the thickest part. Thighs are also safe at 165°F / 74°C, but they often taste more tender when cooked closer to 175°F / 79°C.

How long does lemon pepper chicken take?

This skillet dinner takes about 25 minutes total: 10 minutes to prep and about 15 minutes to cook. Thin chicken breast cutlets usually need 3–5 minutes per side. Oven versions usually take 15–26 minutes depending on thickness.

Do you use fresh lemon or lemon pepper seasoning?

Use both when possible. Lemon pepper seasoning gives the familiar peppery flavor, while fresh lemon zest and juice make it taste livelier. Bottled seasoning alone can taste flat or too salty depending on the brand.

Why does it taste too salty?

The seasoning blend probably already contained salt. Taste the seasoning before adding extra salt, and soften a salty sauce with broth and butter before adding more lemon.

Is it better with breasts or thighs?

Chicken breasts are lean, quick, and classic. Thighs are juicier and more forgiving. If breast meat often turns dry for you, thighs are the easier option.

Does lemon pepper chicken need to marinate?

No, the skillet version does not need to marinate. The seasoned coating and lemon butter sauce give plenty of flavor. Marinade is more useful for grilled, baked, or air fryer chicken.

How do you reheat it without drying it out?

Reheat it gently with a splash of broth or water. A skillet over low heat works well. In the microwave, cover the chicken and heat it in short bursts at lower power. Avoid cooking it a second time.

Why is my lemon pepper chicken bitter?

Bitterness usually comes from too much white pith in the lemon zest, lemon slices cooked too long, or a seasoning blend with a harsh citric taste. Zest only the yellow part of the lemon, use juice near the end, and balance sharpness with butter or broth.

Final Thoughts

This skillet dinner works best when it stays simple: thin chicken, smart seasoning, fresh lemon, and enough butter sauce to make the plate feel finished. That is what turns two plain chicken breasts into dinner you actually want to eat.

Keep this version for the nights when chicken needs to be fast but not boring, bright but not sour, buttery but not heavy. A little zest, a steady skillet, and one spoonful of pan sauce can do more than a long ingredient list.

That is the real win: chicken that tastes fresh, peppery, buttery, and complete without turning a simple dinner into a project.

Posted on Leave a comment

Orange Marmalade Recipe: Easy, Bright, No Boxed Pectin

Clear glass jar of homemade orange marmalade with visible peel, a spoon lifting marmalade, buttered toast, and fresh oranges on a warm kitchen surface.

Orange marmalade sounds simple until you make it for the first time. Then the questions arrive all at once: how much peel should stay in, why does it taste bitter, does it need pectin, how do you know it has set, and what happens if it is still runny after cooling?

But a good batch is worth the small bit of patience. It makes the kitchen smell like orange peel and warm sugar, turns plain toast into something golden and deliberate, and gives you a jar that can brighten cakes, glazes, yogurt, cheese boards, and sauces for weeks.

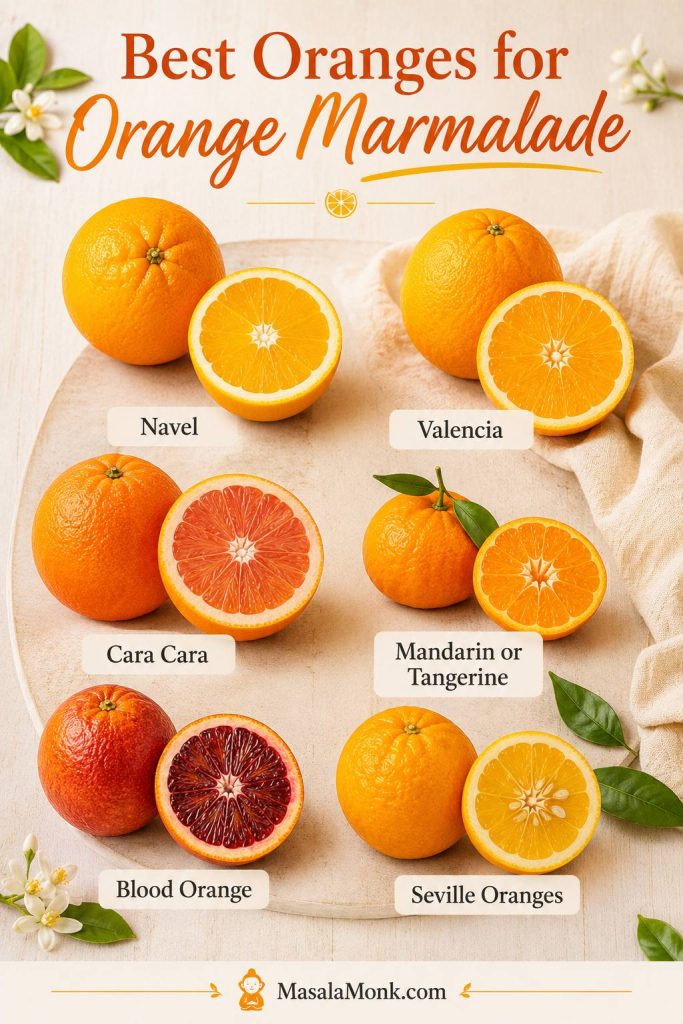
This is not a giant traditional Seville marmalade project. It is a practical orange marmalade recipe for regular sweet oranges: real orange peel that softens instead of turning chewy, balanced bitterness, no boxed pectin, and a soft fridge/freezer set you can actually use.

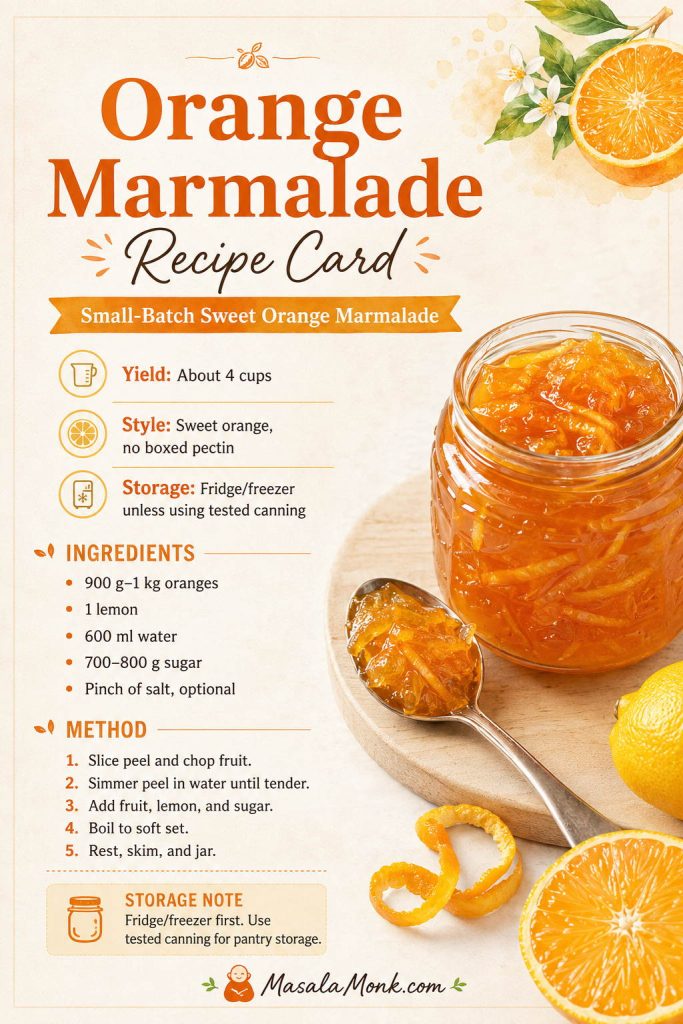
The method is built for the kind of jar you want to open again: bright citrus, delicate peel, enough bittersweet edge to taste like marmalade, and a set that spreads instead of bouncing like jelly. The working formula is 900 g to 1 kg oranges, 1 lemon, 600 ml water, and 700 to 800 g sugar for about 4 cups of fridge/freezer marmalade.

Quick Answer: How Do You Make Orange Marmalade?

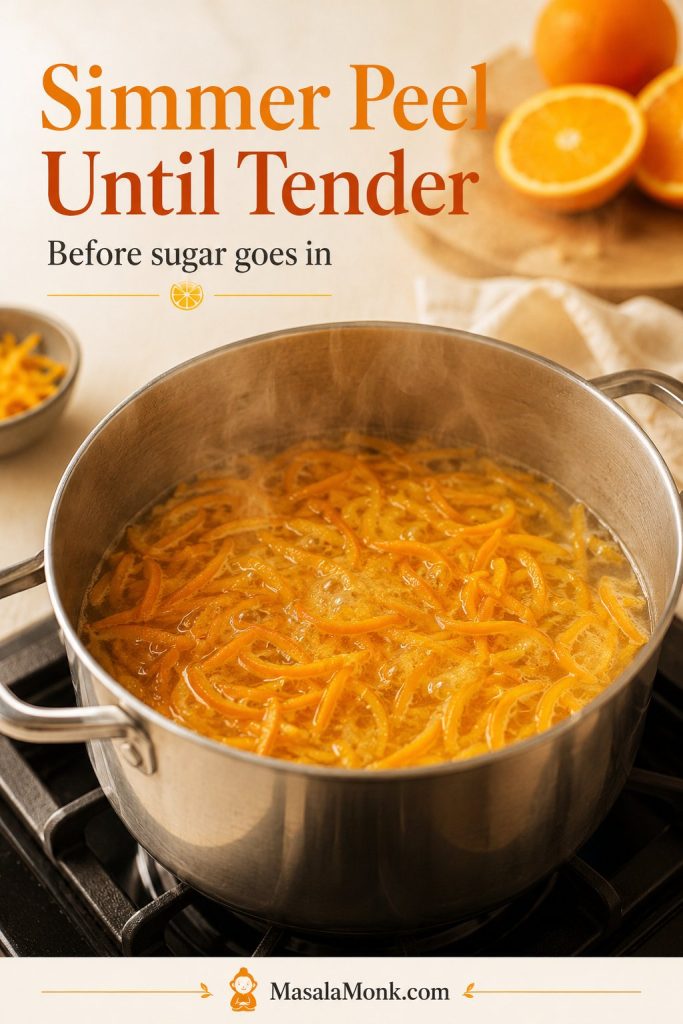
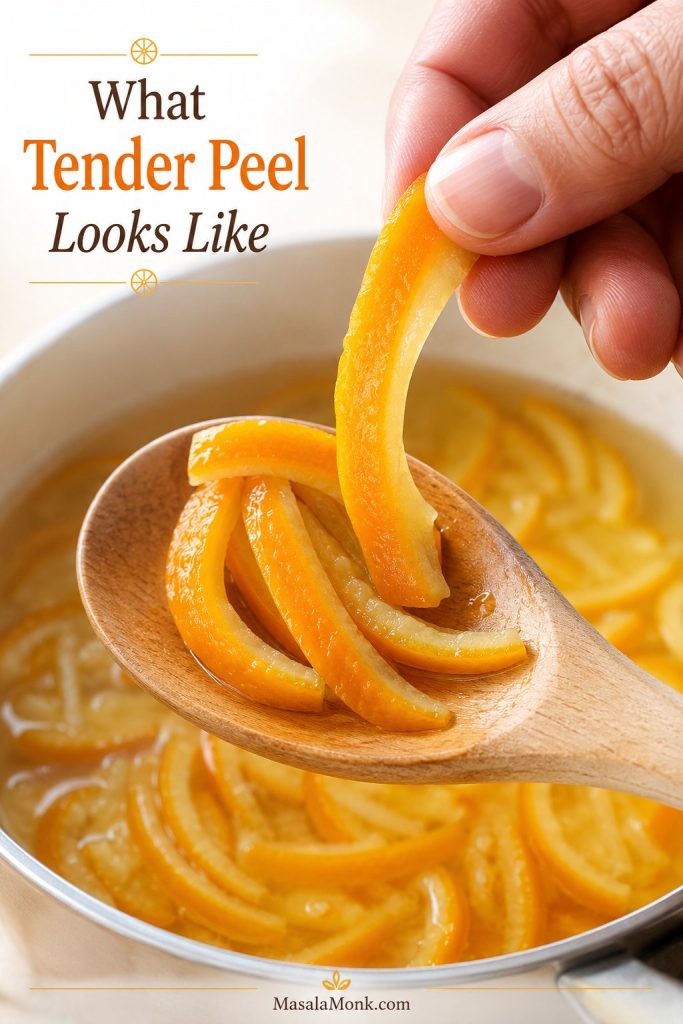
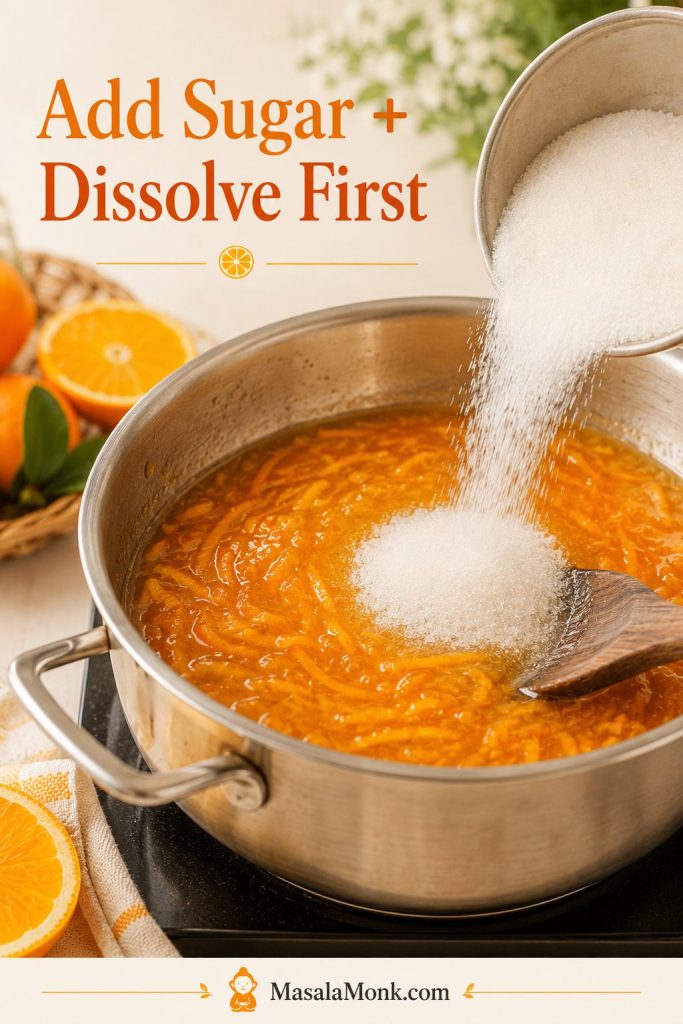
To make orange marmalade, scrub the oranges, slice the peel, simmer the peel in water until it gives easily, then add chopped orange flesh, lemon juice, and sugar. Boil the mixture at an active bubble until the syrup turns glossy and thick enough to pass the cold-plate test.

This is an orange peel marmalade, not a smooth orange jam: the peel is sliced, softened, and suspended in the final jar. You still get real marmalade texture, but the peel is cooked gently first so it tastes balanced instead of harsh.

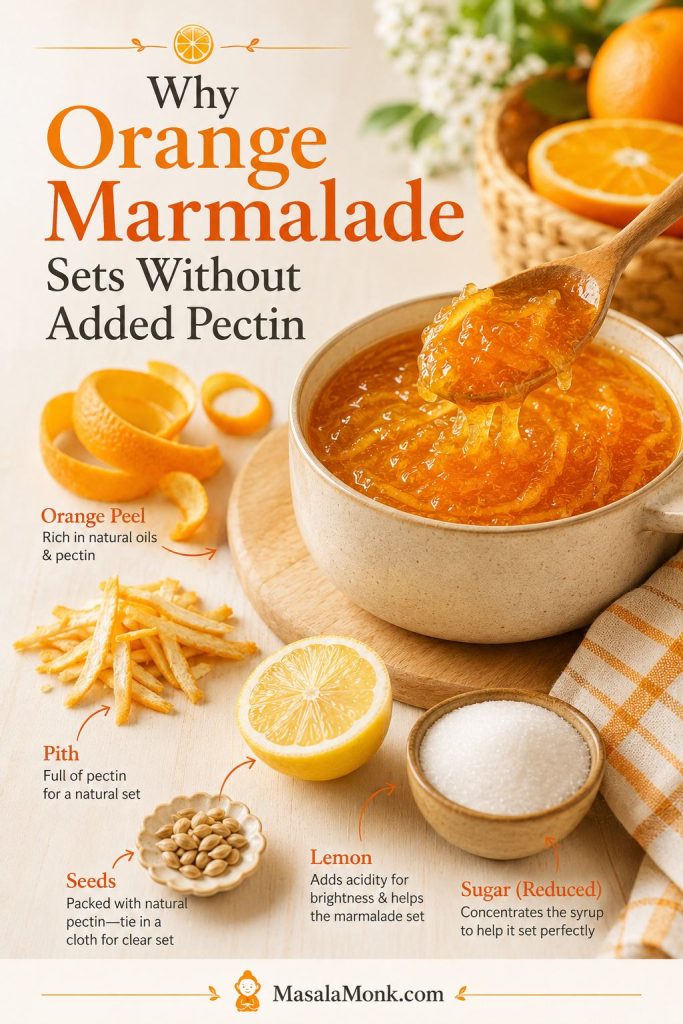
No added pectin is required. The set comes from citrus peel, lemon, sugar, and reduction, with the cold plate showing you when the hot syrup will cool into a soft spread.

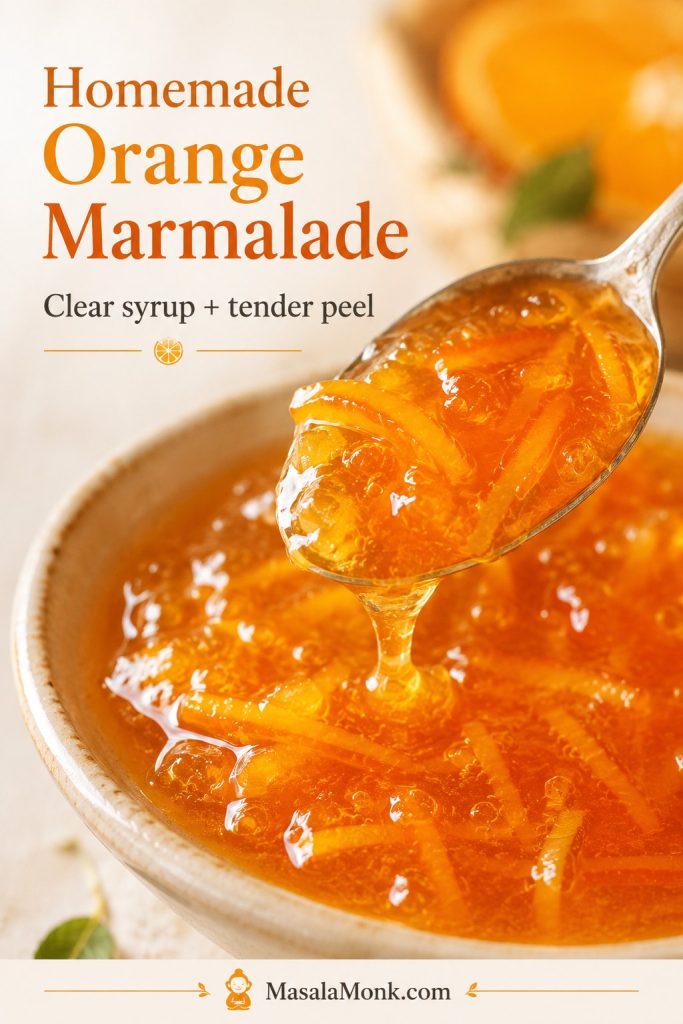
What Good Orange Marmalade Texture Looks Like

Use this visual before the first batch: it shows the difference between a loose orange syrup and a preserve with peel held through the body of the marmalade.

Close-up spoonful of orange marmalade showing clear amber syrup, tender orange peel strips, and a glossy spoonable texture.
Before you cook, notice the texture target. Good orange marmalade should look clear and glossy, with tender peel suspended through the syrup instead of floating in watery liquid.

At a Glance

Best forBeginners who want tender peel, bright citrus, and a soft set
Batch styleFridge/freezer marmalade, about 4 cups
Main fruitRegular sweet oranges, preferably thin-skinned
PectinNo added pectin in the main recipe
TextureSpoonable, glossy, with tender orange peel
Best testCold-plate wrinkle test
StorageRefrigerator or freezer by default
CanningUse a preservation-tested method for shelf-stable jars

This Recipe Is Best If…

Choose this version if you want one manageable fridge/freezer batch made with regular sweet oranges, real peel, no boxed pectin, and a soft set that spreads easily. For pantry canning, sugar-free marmalade, Seville-only marmalade, or smooth orange jam, use a method written for that style.

What Is Orange Marmalade?

Orange marmalade is a citrus preserve made with orange peel, orange pulp or juice, sugar, and water. The peel is the personality of marmalade: it brings texture, bitterness, aroma, and natural pectin support.

A good jar should be sweet, bright, glossy, and a little bitter. It should spread easily, but it should not run off toast like syrup. Orange juice alone makes more of a jelly-style base; marmalade needs peel to feel like marmalade.

At the table, it should make breakfast feel less automatic: bitter enough to wake up the butter, bright enough to cut through cream, and soft enough to drag across toast without tearing it.

Orange Marmalade vs Orange Jam

The simplest difference is peel. Orange marmalade includes citrus peel, while orange jam is usually smoother, sweeter, and less peel-forward. If you remove almost all the peel or blend the mixture until completely smooth, the result may still taste delicious, but it will feel closer to orange jam than classic marmalade.

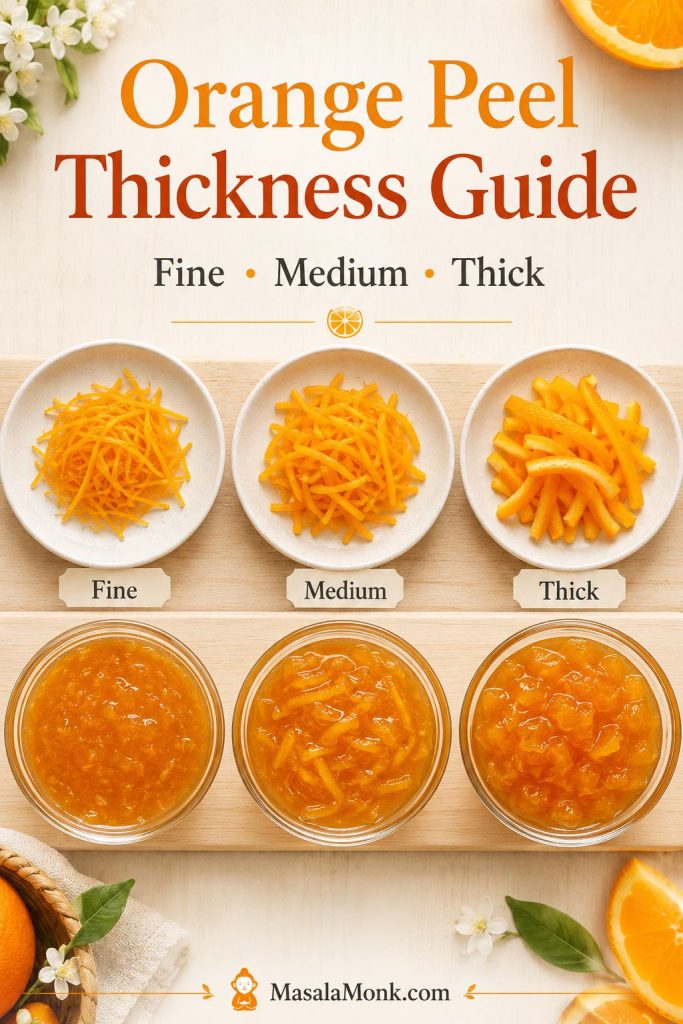
If peel is the reason you avoid marmalade, do not start with thick-cut. Start with a fine shred. You may find you like marmalade more when the peel is tender, delicate, and spreadable rather than chunky and chewy.

Ingredients and Equipment for Homemade Orange Marmalade

Core Ingredients and What They Do

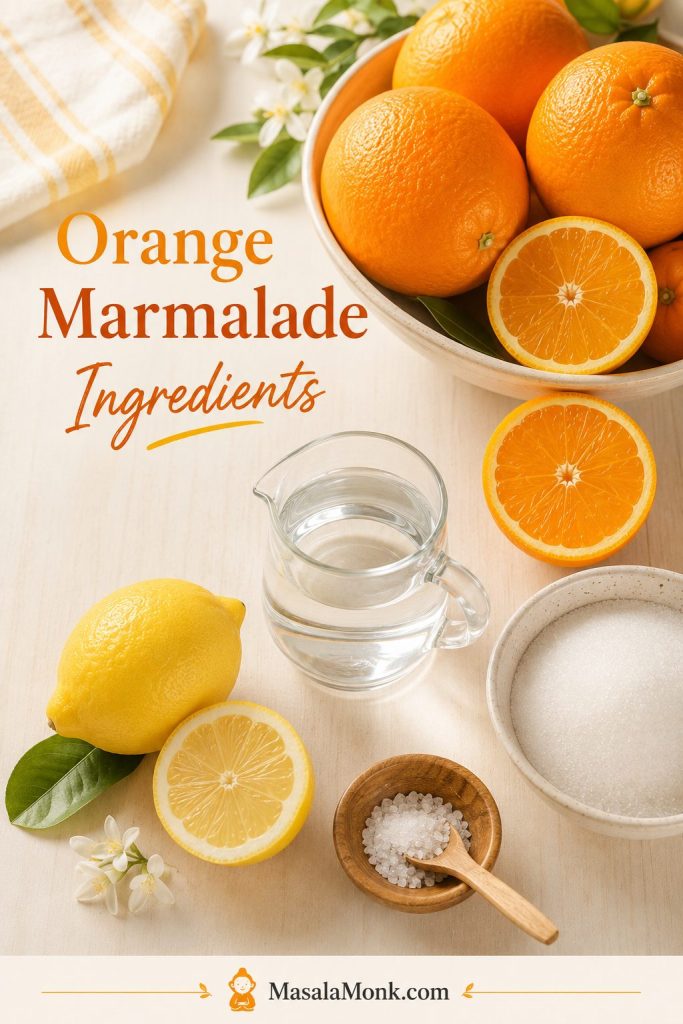
Start here if you want the recipe to make sense before you cook. These few ingredients control flavor, peel tenderness, natural set, and storage style.

Oranges, lemon, sugar, water, and a small bowl of salt arranged on a light surface for making orange marmalade.
Because this orange marmalade recipe uses only a few ingredients, each one matters: oranges bring peel and flavor, lemon supports acidity, and sugar gives the preserve body.

Marmalade does not hide behind many ingredients. If the oranges are fragrant, the lemon is bright, and the peel is soft before the sugar goes in, the jar tastes alive.

The oranges bring flavor, peel, juice, and natural citrus pectin. Lemon is not just for flavor; its acidity helps that pectin work. Sugar gives the marmalade body, gloss, and keeping power. Water buys the peel time to soften before the syrup starts tightening.

IngredientAmount for this recipeWhy it matters
Regular sweet oranges900 g to 1 kg / about 2 to 2.2 lbProvide the citrus flavor, peel texture, juice, and natural pectin base.
Lemon1 medium lemon, juiced, about 2 to 3 tablespoons / 30 to 45 mlAdds brightness and acidity, which helps the natural pectin work.
Water600 ml / 2 1/2 cups, plus more if neededSoftens the peel before sugar is added and prevents scorching early on.
Sugar700 to 800 g / about 3 1/2 to 4 cupsSweetens, supports set, gives gloss, and improves keeping quality.
SaltA tiny pinch, optionalRounds the sweetness and makes the citrus taste brighter.

Sugar, Set, and Low-Sugar Boundaries

Which sugar amount should you choose? Use 700 g for a brighter, softer refrigerator marmalade. Use 800 g for a firmer, more classic set. If you reduce the sugar heavily in this natural-pectin recipe, expect a softer, shorter-keeping marmalade.

Sugar substitutes do not behave like sugar in regular marmalade. They may sweeten the fruit, but they do not provide the same set, gloss, or preservation. For very low-sugar or sugar-free marmalade, use a method designed for that style rather than simply swapping the sugar here.

Equipment You’ll Need

You do not need a professional preserving setup for this refrigerator marmalade. A few basics are enough: a digital scale, a large deep non-reactive pot, a sharp knife and board, two small freezer-safe plates for the cold-plate set test, and clean jars. A thermometer is helpful but optional; cheesecloth or muslin is only needed if you want to simmer seeds for extra natural pectin support.

For pantry storage, use proper water-bath canning equipment and a preservation-tested recipe. This main recipe is written first as a refrigerator or freezer marmalade.

Which Oranges Should You Use?

Best Sweet Oranges for a First Batch

Use this guide before you shop: the orange variety changes sweetness, bitterness, color, and how beginner-friendly the finished jar feels.

Labeled guide showing navel, Valencia, Cara Cara, mandarin or tangerine, blood orange, and Seville oranges for marmalade.
The best oranges for marmalade depend on the flavor you want. Sweet oranges make a gentler beginner-friendly jar, while Seville oranges create a more traditional bitter-orange marmalade.

Choose oranges with fresh, fragrant peel. Thin-skinned fruit is easiest because it gives you delicate shreds without too much thick, bitter white pith.

Navel oranges are the simplest choice for most kitchens. Valencia oranges give a bright, juicy flavor. Cara Cara oranges make a softer, sweeter-tasting marmalade with a rosy citrus note. Mandarins and tangerines can work too, especially for a sweeter preserve, but they behave slightly differently because their peel is thinner and their flavor is less bitter.

Seville, Mandarins, and Other Marmalade Styles

Small sour oranges or calamondins make a sharper preserve. MasalaMonk also has a calamondin orange marmalade recipe for that more intense citrus style.

For most sweet-orange variations, keep the fruit weight the same and adjust by the set test rather than by the clock.

Orange typeFlavor and textureBest use
Navel orangesSweet, easy to find, usually seedlessBest beginner choice
Valencia orangesJuicy, bright, classic orange flavorSweet orange marmalade
Cara Cara orangesSweeter, softer, gently floralMilder marmalade
Mandarins or tangerinesThin peel, sweeter flavor, softer textureSmall-batch marmalade or jam-style spreads
Blood orangesDeep color, berry-like citrus noteSeasonal variation
Seville orangesBitter, aromatic, traditionalClassic bitter marmalade

This main recipe uses sweet oranges because they are easy to find and mild enough for a first batch. Seville oranges make a more traditional, bitter, aromatic jar, so treat them as a focused variation rather than a required ingredient.

The peel is going into the jar, so treat the outside of the orange like an ingredient. Remove stickers, rinse the fruit under running water, and scrub the peel well. Unwaxed or organic oranges are ideal if you can get them, but regular oranges can still work if they are washed thoroughly. Avoid bruised, moldy, or damaged fruit because marmalade concentrates the flavor of the whole orange.

How Thin Should You Cut the Orange Peel?

The peel is the personality of marmalade. Thin shreds feel delicate and spread easily. Medium shreds taste more classic. Thick-cut peel gives a stronger bitter bite and a more traditional feel, but it needs more time to soften.

Texture target: Choose the peel cut before you cook; the thinner the shred, the gentler and more spreadable the jar will feel.

Guide showing fine, medium, and thick orange peel strips with matching marmalade texture samples underneath.
Peel thickness changes the whole jar. Fine peel gives a softer breakfast-style marmalade, while thicker peel creates a stronger, more traditional bite.
Peel styleResultBest for
Fine shredTender, easy to spread, less chewyBeginners, toast, scones, yogurt
Medium shredClassic marmalade textureAll-purpose jars
Thick cutStronger bite, more bitterness, more chewTraditional marmalade lovers
Food processorRustic, quick, less elegantShortcut marmalade
Low-peelSweeter, softer, more jam-likePeople afraid of bitterness

Tender peel is where good marmalade begins. Simmer the peel until it gives easily before adding sugar. Once sugar enters the pot, the peel is much less willing to soften. This is the difference between delicate shreds and chewy strips.

Can You Use a Food Processor?

Yes, but use it carefully. A food processor can save time, especially if you like a rustic marmalade, but it can also chop the peel unevenly or turn the fruit too pulpy. Pulse in short bursts and stop before the mixture becomes a puree.

A food processor version will taste good, but it may feel closer to orange jam if the peel disappears into the spread. Whole-orange methods are faster, but this separated-peel method gives you better control over bitterness, pith, and final texture. If your oranges have very thick pith, separating the peel is the safer choice.

Why This Method Works

This method is built around the places small-batch marmalade usually goes wrong: peel that stays chewy, syrup that refuses to set, and a pot that can move from bright citrus to overcooked sugar faster than expected.

What you doWhy it works
Soften the peel before adding sugarSugar slows further softening, so this prevents tough, chewy peel.
Add lemonAcidity helps natural citrus pectin work and keeps the flavor bright.
Dissolve sugar before boiling hardThis lowers the risk of graininess and scorching.
Boil after the peel is tenderWater evaporates, sugar concentrates, and the syrup gains body.
Test on a cold plateHot marmalade looks loose; the chilled test shows the final set more clearly.

Optional seed bag: If your oranges or lemon have seeds, you can tie the seeds and membranes in cheesecloth and simmer the bag with the fruit. Skip this for the simplest version; the marmalade can still set with peel, lemon, sugar, and proper cooking.

How to Make Orange Marmalade

The method below focuses on the cues that matter most: soft peel, syrupy body, and a set that holds after cooling. Aim for a jar with peel suspended through the syrup and a texture that spoons easily once cooled. If it bounces like jelly, it has gone too far. If it runs like syrup, it needs more cooking.

Your first batch does not need to be perfect to be useful. If it sets softly, spreads easily, and tastes bright once cooled, it is a successful jar.

Before You Start: 5 Small Safeguards

  • Let the peel soften before sugar goes in.
  • Use a deep pot because marmalade rises as it boils.
  • Judge the set from a chilled sample, not the hot pot.
  • Keep enough sugar if you want a classic set.
  • Treat this as fridge/freezer marmalade unless you follow tested canning guidance.

What you should see: first the peel softens; then the syrup looks thin and loose; later the bubbles slow, the spoonful lands heavier, and the peel starts to sit inside the syrup instead of floating in watery liquid.

Step 1: Prepare the fruit

Wash and scrub the oranges and lemon. Slice off the hard ends. Remove the orange peel in wide strips, then cut the peel into fine or medium shreds. Chop the orange flesh and save as much juice as possible. Remove seeds so they do not end up in the jar; save them only if you plan to use the optional seed bag.

Before you chop: This is where the marmalade gets its final texture, so keep the peel intentional instead of chopping everything into a pulp.

Hands cutting oranges on a wooden board with sliced peel strips, chopped orange flesh, and peeled fruit separated for marmalade.
Separating the peel from the fruit gives you more control over bitterness, texture, and tenderness, especially when making orange marmalade without boxed pectin.

Rustic shortcut: Instead of separating peel and flesh, you can slice the whole oranges very thinly and remove seeds as you go. This is faster, but the final texture is more rustic and may taste more bitter if the fruit has thick pith.

Step 2: Simmer the peel until tender

Put the sliced peel into a large heavy non-reactive saucepan with the water. Bring it to a boil, then reduce to a steady simmer. Simmer partly covered if the water is evaporating too fast; uncover once you start reducing after the sugar goes in. Cook until the peel is soft enough to squash between your fingers or cut against the side of the pot with a spoon. Depending on peel thickness, this may take 20 to 35 minutes.

Before sugar: At this point you are cooking the peel, not setting the marmalade. Give the strips time to relax before the syrup tightens.

Orange peel strips simmering in water inside a saucepan on the stovetop before sugar is added.
This is the quiet step that decides peel texture. If the strips still feel firm now, they will stay chewy in the finished orange marmalade.

This stage can feel slow, but it is where good marmalade is made. By the time the peel is ready, there should still be some liquid in the pot. If the pan is nearly dry, add a splash more water. If it looks very watery, simmer uncovered for a few extra minutes before adding sugar.

Look for this: Move on only when the peel gives easily. Sugar will sweeten the pot, but it will not magically soften chewy strips later.

Fingers bending a softened orange peel strip over a wooden spoon above a pot of simmered peel.
The peel is ready when it bends easily instead of snapping or feeling chewy. This small cue helps prevent tough peel in the finished marmalade.

Step 3: Add fruit, lemon, and sugar

Add the chopped orange flesh, saved orange juice, lemon juice, and optional pinch of salt. If you are using a seed bag, add it now too. Stir in the sugar over medium heat until it dissolves fully. Letting the sugar disappear into the liquid before the hard boil helps prevent graininess and scorching.

Once sugar goes in: The mixture behaves more like syrup, so dissolve it fully before turning up the heat.

Sugar being poured into a pot of orange marmalade mixture with visible orange peel and a wooden spoon.
Once sugar enters the pot, the cooking changes quickly. Dissolving it fully first gives the marmalade a smoother syrup and lowers the risk of scorching.

Step 4: Boil until glossy and spoonable

Once the sugar has dissolved, increase the heat and cook the marmalade at a steady, active bubble rather than a violent boil. Use a pot with enough room because the mixture rises and spatters as it cooks. Stir often enough to prevent sticking, and stir more often near the end when the syrup thickens and the peel can catch on the bottom.

This is the point where marmalade can test your patience. It looks loose, the bubbles keep changing, and the urge to keep boiling is strong. Watch the texture instead: early bubbles are thin and watery; later, the syrup looks heavier, the peel turns more translucent, and the spoonful starts to cling lightly instead of splashing thinly.

Watch the bubbles: The bubbles are your early warning system. They move from thin and splashy to slower, heavier, and glossier as the syrup concentrates.

Three-stage guide showing orange marmalade at early watery bubbles, thicker reduction bubbles, and glossy near-set bubbles.
As the marmalade reduces, the bubbles change from light and watery to thicker and glossier. Watching that shift is often more useful than watching the clock.

After the sugar goes in, the boiling stage usually takes 20 to 35 minutes, depending on pot width, orange juiciness, and heat level. Wide pans reduce faster; narrower pots may take longer. Start testing before you think it is done, because hot marmalade always looks looser than cooled marmalade.

Stop when the chilled sample wrinkles softly, not when the pot looks stiff. If the syrup starts smelling deeply caramelized or darkens quickly, it is moving away from bright citrus and into cooked sugar.

Step 5: Rest and jar

If you used a seed bag, lift it out carefully just before jarring. Press it gently against the side of the pot with a spoon, using tongs if needed, then discard it. When the marmalade passes the cold-plate test, take it off the heat and let it rest for 5 to 10 minutes so the peel distributes more evenly.

If you jar immediately while the mixture is very fluid, the peel can float toward the top. That short rest helps the syrup settle just enough to hold the peel more evenly.

Foam is normal and does not mean the batch has failed. It is mostly trapped air from boiling. Skim it for a clearer jar, or leave a little if you do not mind a rustic finish. Spoon the marmalade into clean jars. Let refrigerator jars cool, then chill them. If you plan to freeze the marmalade, leave headspace so the preserve can expand. Pantry storage needs a reliable water-bath canning process from a tested source.

Before filling jars: A short rest before filling helps the peel stay more evenly distributed, especially in a soft-set fridge marmalade.

Spoon skimming foam from a pot of finished orange marmalade with a jar and funnel nearby for filling.
After boiling, let the marmalade settle briefly, skim excess foam, and then jar it. This helps the peel distribute more evenly and keeps the jars cleaner.

How to Know Orange Marmalade Has Set

Set is not a timer. It is a texture.

This is the moment people usually panic, but the cold plate is your calm button. Marmalade does not look fully set while it is still boiling. The pot will almost always look looser than you expect; that is why you test a cooled spoonful instead of arguing with the boiling syrup.

The Cold-Plate Test

Before you start cooking, put two small plates in the freezer. When the marmalade looks clear and slightly thickened, spoon a little onto a cold plate. Wait about one minute, then push the edge with your finger. If the surface wrinkles softly and does not run back like syrup, the marmalade is ready.

Set check: The sample should wrinkle softly after chilling. If it snaps firm or feels rubbery, the batch has gone past the soft-set stage.

Finger pushing a spoonful of orange marmalade on a small white plate to check for a soft wrinkle.
The cold-plate test shows how hot marmalade will behave after cooling. Look for a soft wrinkle, not a rubbery or stiff set.

If it runs freely, cook for a few more minutes and test again. Use a clean cold plate each time if possible. Taste only after the marmalade cools a little; hot marmalade can taste sharper and sweeter in a way that does not represent the final jar.

Marmalade Setting Temperature: When to Stop Boiling

At sea level, many marmalades set near 220°F / 104.4°C, but the exact number shifts with altitude, batch size, fruit, and pot shape. Treat the thermometer as a cue, not the final judge. At higher elevations, trust the cold-plate test more than the number on the thermometer.

Thermometer check: Use the thermometer as a checkpoint, then confirm with a cooled sample so you do not overshoot a soft spreadable set.

Candy thermometer clipped into a pot of bubbling orange marmalade with visible peel and temperature guidance above.
A thermometer can guide you toward the set point, but it should not work alone. Pair the temperature reading with the cold-plate or spoon test for better judgment.
Temperature cueLikely texture
217°F / 103°CBrighter and looser; may still be runny depending on fruit and pot shape.
219°F / 104°CSoft-set range for many home batches; confirm with the cold-plate test.
220–221°F / 104.4–105°CFirmer, more classic set; watch closely so it does not become stiff.
Past this rangeHigher risk of dark flavor, chewy peel, or a set that is too firm.

Spoon Test: What Marmalade Looks Like When It Is Ready

Near the set point, the syrup looks more polished and falls from the spoon in heavier drops rather than thin streams. The peel also looks suspended in the syrup instead of floating in watery liquid.

Spoon check: Use this when the cold plate is not enough. Heavier drops and clinging peel tell you the syrup is gaining body.

Spoon lifted above a pot of orange marmalade with thick glossy syrup and orange peel dripping slowly back into the pot.
The spoon test helps you read the syrup while it is still hot. Near the set point, the marmalade falls more slowly and the peel clings to the spoon.

Small-batch warning: fridge/freezer batches and wide pans can over-reduce quickly. Start testing early, especially once the mixture looks syrupy and thickened. It is easier to cook runny marmalade a little more than to rescue a jar that has gone too stiff.

What Runny, Just Right, and Too Stiff Look Like

Use this visual before troubleshooting. It helps you compare your jar to the texture you actually want, not just to a timer or temperature number.

Three bowls and spoons comparing runny orange marmalade, softly set marmalade, and overly stiff marmalade.
This texture guide helps you judge your own batch. Runny marmalade needs more cooking, just-right marmalade mounds softly, and too-stiff marmalade can be hard to spread.

Why This Orange Marmalade Sets Naturally

There is no added pectin in this recipe. Pectin is the fruit’s natural setting helper, and citrus keeps much of it in the peel, pith, seeds, and membranes. Think of the peel, pith, and seeds as the structure; the lemon as the acidity; and the sugar reduction as the syrup that lets everything hold together.

Natural set check: This recipe still has structure; it simply uses the fruit’s own pectin instead of a boxed packet.

Kitchen explainer showing orange peel and pith, lemon, sugar, boiling marmalade, and a finished jar to explain natural marmalade set.
No added pectin does not mean no structure. Orange peel, pith, lemon, sugar, boiling, and cooling all work together to create a soft marmalade set.

If you remove almost all the peel and pith, reduce the sugar heavily, or stop cooking too early, the marmalade may stay loose. Sugar also matters: it does not only sweeten the preserve; it helps the syrup thicken as water evaporates. If you enjoy this kind of small-batch preserve logic, MasalaMonk’s fig jam recipe also shows how fruit, sugar, and testing work together without making the process feel complicated.

How to Make Orange Marmalade Less Bitter

A little bitterness is the point; harsh bitterness is the problem. The right bitterness should make the orange taste deeper, not make the peel taste harsh or medicinal. For a milder jar, start with sweet oranges, slice the peel thinly, and avoid using too much thick white pith.

Flavor balance: Aim for orange depth, not harsh peel. The choices you make before boiling decide most of that balance.

Guide showing sweet oranges, thin orange peel strips, trimmed white pith, and blanching tips for less bitter orange marmalade.
Bitterness is part of marmalade, but it should not take over. Use sweeter oranges, thinner peel, and less thick white pith for a brighter, gentler jar.

The most important step is simmering the peel until it gives easily. This mellows the sharp edge and prevents chewy strips in the finished jar. Very bitter peel can be blanched once: cover it with water, boil for 2 minutes, drain, then continue with the recipe using fresh water.

Leave some pith for structure, though. Removing every trace of pith can make the marmalade sweeter, but it can also weaken the set. The goal is balance: trim thick, spongy excess pith when needed, but leave enough citrus structure for the marmalade to set. Judge bitterness after the marmalade cools; hot syrup can taste sharper than the final jar.

Orange Marmalade Troubleshooting

Marmalade is forgiving in a way that does not seem obvious while it is boiling. A loose jar can become sauce, a bitter jar can become glaze, and a firm jar can often be warmed back into usefulness. If something looks wrong, do not assume the batch is ruined; it usually tells you what it needs: more cooking, less heat, softer peel, or a different use for a jar that set too firmly.

Quick Fixes Before You Reboil

Fast fixes: runny marmalade can be cooked again, stiff marmalade can be loosened with a little hot water, bitter marmalade is best used in glazes or baking, and tough peel is mostly a next-time fix.

Common Marmalade Problems and Fixes

ProblemLikely reasonFix nowNext time
Marmalade is runnyUndercooked, too much water, low sugar, or weak pectinReturn it to the pot, boil again, and retest on a cold plateCook to a soft wrinkle and avoid reducing sugar too much
Marmalade is too stiffOvercooked or boiled past the set pointWarm gently with a spoonful or two of hot water until looserStop when the cold-plate test shows a soft wrinkle, not a firm rubbery set
Peel is toughSugar was added before the peel softenedUse the batch in glazes or sauces where texture matters lessSimmer peel until tender before adding sugar
Marmalade is too bitterToo much pith, bitter oranges, thick peel, or overcookingUse it in savory glazes, salad dressings, or bakingUse sweeter oranges, slice peel thinner, or blanch peel once
Sugar crystallizedSugar was not fully dissolved before boiling hardRewarm gently and stir; add a small splash of water if neededLet sugar dissolve over medium heat before a rolling boil
Marmalade darkened too muchCooked too long or heat was too high near the endUse darker marmalade in glazes, cheese boards, or baking if it tastes caramelized but not burntStart testing earlier and reduce heat slightly as it thickens
Peel floated to the topMarmalade was jarred immediately while very hot and looseStir the jar after partial cooling if using as fridge marmaladeLet marmalade rest 5 to 10 minutes before jarring

Once you understand this kind of cold-plate testing, the same logic helps with other small-batch preserves, like MasalaMonk’s cape gooseberry and mint jam.

Low-Sugar Orange Marmalade: What You Can and Cannot Reduce

A slightly softer, lower-sugar fridge jar can still be lovely; it just needs to be treated as a different kind of marmalade. Think of it as a spoonable citrus spread rather than a classic pantry marmalade. You can reduce sugar a little for refrigerator storage if you accept a softer set, but it should not be treated like a traditional pantry preserve.

Lower-sugar reminder: Softer texture is not failure here; it is the expected tradeoff when you move away from classic marmalade sugar levels.

Two jars comparing regular-set orange marmalade and lower-sugar softer-set marmalade with a fridge or freezer storage reminder.
For lower-sugar marmalade, expect a softer spoonable texture rather than a firm classic set. Treat it as a fridge or freezer preserve unless using a tested method.

Very low-sugar marmalade is a separate style, not a simple subtraction. A very low-sugar or sugar-free orange marmalade usually needs special low/no-sugar pectin or a different method. For very low-sugar or sugar-free fruit spreads, the NCHFP reduced-sugar fruit spread guidance is a safer starting point than simply swapping sugar in a regular marmalade recipe.

For shelf-stable low-sugar jars, use a tested low-sugar canning recipe. Sugar substitutes do not give the same set or preservation as sugar in a regular marmalade recipe.

How to Store Orange Marmalade: Fridge, Freezer, and Safe Canning Notes

Fridge jar and pantry jar are not the same thing. This recipe is written first as a refrigerator or freezer orange marmalade, which keeps the method approachable and avoids pretending that every homemade jar is automatically shelf-stable.

Storage reminder: Choose the storage method before you fill the jars, because fridge, freezer, and pantry storage are not interchangeable.

Three jars of orange marmalade showing fridge storage, freezer storage with headspace, and tested canning-only pantry storage.
Fridge and freezer storage are simple for this small-batch marmalade. Pantry storage is a different process and needs tested canning instructions.

Refrigerator storage

Spoon the hot marmalade into clean jars, let it cool, then refrigerate. Use clean spoons when serving, and avoid leaving the jar out at room temperature for long stretches. For best quality, use refrigerated marmalade within 3 to 4 weeks, sooner if you reduced the sugar. Discard it if you see mold, bubbles, fermentation, or notice an off smell.

Freezer storage

Orange marmalade freezes well. Use freezer-safe jars or containers and leave headspace because the marmalade can expand as it freezes. Thaw in the refrigerator before using.

Shelf-stable canning

For shelf-stable marmalade, you need a tested formula, hot jars, correct headspace, proper lids, and the right boiling-water processing time for your jar size and elevation. The National Center for Home Food Preservation citrus marmalade guidance is a good authority to consult for jar preparation, headspace, and processing.

If you want pantry storage, use a proper water-bath canning method from the start.

Ways to Use Orange Marmalade

Orange marmalade is not only for toast, although toast with butter is still its natural home. The best marmalade is not just sweet orange spread; it is a ready-made balance of citrus oil, sugar, bitterness, and peel. That is why one spoonful can do the work of zest, juice, syrup, and glaze.

A good jar earns its space in the fridge because it keeps solving small problems: breakfast needs brightness, cake needs a bittersweet seam, chicken needs a glaze, and cheese needs contrast.

Use-it-up idea: Think of marmalade as citrus, sweetness, bitterness, and peel in one spoonful, then use it wherever a dish needs brightness and gloss.

Orange marmalade served with scones, cake glaze, savory glazed chicken, salad dressing, cheese, crackers, and a central jar.
A good jar of orange marmalade is useful far beyond toast. Try it as a cake glaze, savory glaze, salad dressing base, or cheese board pairing.

Quick orange marmalade formulas

  • Quick glaze: 2 tablespoons marmalade + 1 teaspoon mustard + a splash of vinegar.
  • Savory glaze: 2 tablespoons marmalade + 1 teaspoon soy sauce + 1 teaspoon vinegar + a pinch of chili or ginger.
  • Salad dressing: 1 tablespoon marmalade + 1 tablespoon vinegar + 2 tablespoons olive oil.
  • Cake glaze: warm marmalade with a splash of water or lemon juice until brushable.
  • Cheese board pairing: marmalade + sharp cheese + roasted nuts + crackers.

Breakfast ideas

Spread orange marmalade on toast, croissants, English muffins, pancakes, waffles, and biscuits. It is especially good with warm easy English scones, where the citrus peel cuts through butter, cream, or clotted cream.

For a weekend breakfast plate, use a smaller spoonful with almond flour pancakes, where the almond flavor pairs naturally with orange.

Baking ideas

Use it as a cake filling, loaf cake glaze, thumbprint cookie center, bread pudding accent, or tart layer. It works especially well with almond, chocolate, vanilla, and warm spices.

For a citrus-on-citrus dessert, try it with an orange olive oil cake. For a nutty pairing, add a thin glossy layer to an almond cake.

Savory glazes and sauces

Warm orange marmalade with mustard, vinegar, soy sauce, chili, garlic, or ginger to make a quick glaze for chicken, duck, pork, ham, salmon, carrots, or roasted vegetables. The sweet-bitter citrus flavor works beautifully with rich meats. For a classic citrus-meat pairing, MasalaMonk’s orange sauce for duck shows how orange, acidity, stock, and a little sweetness can stay savory rather than sticky.

Holiday, drinks, and cheese boards

Stir a spoonful into cranberry sauce for peel, gloss, and citrus depth; this cranberry sauce with orange juice is a natural pairing.

Marmalade can also sweeten cocktails, mocktails, hot tea, and sparkling citrus drinks. For drinks, treat it like a citrus syrup: shake or stir it well with lemon, orange juice, or soda so the peel and sugar dissolve into the drink instead of sitting at the bottom.

For a cheese board, serve marmalade with soft cheese, sharp cheddar, blue cheese, crackers, roasted nuts, and dried fruit. A slightly bitter jar is especially good here because it cuts through richness instead of making the board taste too sweet.

Orange Marmalade Variations

Once you understand the base method, the variation depends on what you want to change: sweetness, bitterness, color, spice, or gifting value.

Choose Your Marmalade Style

  • Mild breakfast marmalade: sweet oranges, fine peel, and 700 g sugar.
  • Firmer classic set: sweet oranges or mixed citrus, medium peel, and 800 g sugar.
  • More bitter traditional flavor: Seville oranges or a Seville blend.
  • Sweeter soft spread: mandarins or tangerines.
  • Glaze or cheese-board jar: slightly stronger bitterness and medium peel.

Choose a style: Choose the version by mood and use: breakfast-soft, classic-bitter, ginger-warm, spiced-holiday, or low-peel sweet.

Multiple jars of orange marmalade variations labeled mild breakfast, classic bitter, mandarin, blood orange, ginger, spiced, whiskey, and low-peel sweet.
Once the base orange marmalade method makes sense, you can adjust the style toward sweeter, bitter, spiced, ginger, blood orange, or gifting-friendly versions.

Mandarin orange marmalade

Mandarins and tangerines are best when you want a softer, sunnier breakfast jar. Their peel is thinner and their flavor is naturally gentler, so the final marmalade feels less bitter than a classic Seville-style version.

Seville orange marmalade

Seville is for people who love marmalade’s bitter backbone: sharp, aromatic, and traditional. These oranges usually need enough sugar and careful use of seeds or membranes for natural pectin, so it is worth treating them as their own focused recipe.

Blood orange marmalade

Blood oranges are the dramatic color route: deeper, rosier, and lightly berry-like, but easier to over-darken if you cook them too far.

Orange ginger marmalade

Ginger pushes the jar toward toast, tea, winter baking, and savory glazes. Add finely grated fresh ginger or thin matchsticks of ginger during the final cooking stage.

Whiskey orange marmalade

Whiskey turns marmalade into a warmer gifting jar. Stir in a small splash after the marmalade comes off the heat. Keep it subtle: the goal is aroma and warmth, not a harsh alcohol taste.

Spiced orange marmalade

Spices make sense for holiday toast and cheese boards. Add a small piece of cinnamon, a few cloves, or a little star anise while the marmalade cooks, then remove the spices before jarring. Use a light hand so the spices support the orange instead of overpowering it.

Orange marmalade without peel

A low-peel version is better for a sweeter, softer spread, but it will be closer to orange jam than classic marmalade. Because peel and pith help with natural pectin, a no-peel version may need longer cooking, added pectin, or a softer-set expectation.

Orange Marmalade Recipe

If you remember only three things, remember these: soften the peel first, dissolve the sugar before the hard boil, and test the set on a cold plate.

The finished marmalade should be loose enough to spoon, with peel suspended in a clear, syrupy set. It will thicken more as it cools.

Small-Batch Sweet Orange Marmalade, No Boxed Pectin

This orange marmalade recipe uses regular sweet oranges, lemon, sugar, and water for a bittersweet, spoonable preserve with tender peel. It is written as a refrigerator or freezer marmalade, with separate canning safety notes if you want shelf-stable jars.

Prep time
20 to 25 minutes
Cook time
45 to 70 minutes
Total time
About 1 hour 10 minutes to 1 hour 35 minutes
Yield
About 4 cups

Before you start: Place two small plates in the freezer for testing, choose a large deep pot because marmalade bubbles up, and have clean jars ready.

Ingredients

  • 900 g to 1 kg regular sweet oranges, preferably thin-skinned, about 2 to 2.2 lb
  • 1 medium lemon, juiced, about 2 to 3 tablespoons / 30 to 45 ml
  • 600 ml water, about 2 1/2 cups, plus more if needed
  • 700 to 800 g sugar, about 3 1/2 to 4 cups
  • Tiny pinch of salt, optional

Method

Prepare and Soften the Peel
  1. Wash and prepare. Scrub the oranges and lemon well. Slice off the hard ends. Remove the orange peel in strips and cut it into fine or medium shreds. Fine peel gives the easiest spread; medium peel gives the most classic marmalade feel. Chop the orange flesh and save the juice. Remove seeds so they do not end up in the jar; save them only if you plan to use the optional seed bag.
  2. Simmer the peel. Add the sliced peel and water to a large heavy non-reactive saucepan. Bring to a boil, then simmer partly covered if the water is evaporating too quickly. Cook until the peel is soft enough to pinch or cut against the side of the pot with a spoon, about 20 to 35 minutes. Do not add sugar before this point.
  3. Check the liquid. When the peel is tender, there should still be some liquid in the pot. If it is nearly dry, add a splash more water. If it looks very watery, simmer uncovered for a few minutes before adding sugar.
  4. Add fruit and lemon. Add the chopped orange flesh, saved juice, lemon juice, and optional salt. If you are using a seed bag for extra natural pectin, add it now.
Boil, Test, Rest, and Store
  1. Dissolve the sugar. Stir in the sugar over medium heat until fully dissolved. Use 700 g for a softer fridge marmalade or 800 g for a firmer set.
  2. Boil to set. Increase the heat and cook at a steady, active bubble in a large deep pot, stirring often. Stir more often near the end as the syrup thickens. Start testing before it looks fully done, especially in a wide pan.
  3. Use the cold-plate test. Spoon a little marmalade onto a chilled plate, wait 1 minute, then push it gently. If it wrinkles softly, it is ready. Hot marmalade looks looser than cooled marmalade, so judge the chilled sample rather than the pot.
  4. Rest and jar. If using a seed bag, lift it out carefully, press it gently against the side of the pot, and discard. Remove the marmalade from heat and let it rest for 5 to 10 minutes. Skim foam if needed, then spoon into clean jars.
  5. Store safely. Spoon into clean jars, let cool at room temperature until no longer hot, then refrigerate. For freezing, leave headspace. Do not store this fridge/freezer version in the pantry unless you follow a tested water-bath canning method.

Recipe Notes

  • For a milder marmalade, use fine shreds of peel and sweet, thin-skinned oranges.
  • For a stronger, more traditional flavor, use some Seville orange or thicker peel.
  • If the peel tastes very bitter, blanch it once for 2 minutes, drain, then continue with the recipe.
  • If your fruit has seeds, you can simmer them in a small cheesecloth bag for extra natural pectin, but this is optional.
  • Yield can vary slightly depending on orange juiciness, pot width, and how far you reduce the syrup.
  • For pantry jars, follow tested canning guidance.

Saveable Orange Marmalade Recipe Card

Use the written recipe card above while cooking; this image is the quick visual version to save for your next batch.

Saveable orange marmalade recipe card with a jar of marmalade, ingredients, short method, yield, and fridge or freezer storage note.
Keep this recipe card handy when cooking. It brings the sweet-orange formula, soft-set method, and fridge/freezer storage reminder into one quick reference.

FAQs About Orange Marmalade

What is the difference between orange marmalade and orange jam?

Orange marmalade includes citrus peel, which gives it texture and a bittersweet edge. Orange jam is usually smoother, sweeter, and less peel-forward. If you blend the mixture completely or remove most of the peel, it will feel more like jam.

Do you need pectin for orange marmalade?

No boxed pectin is needed. Citrus naturally carries pectin in the peel, pith, seeds, and membranes; lemon, sugar, and cooking time help that pectin create a soft set. Low-sugar or no-peel versions may need extra pectin support.

Why did my orange marmalade not set?

It may be undercooked, too watery, too low in sugar, or short on natural pectin from peel and pith. Reboil it for a few minutes, then test again on a cold plate.

How do you fix runny marmalade?

Pour it back into a pot and bring it to a steady boil. Cook briefly, then test on a chilled plate. Stop when the cooled sample wrinkles softly.

Why is my marmalade bitter?

A little bitterness is normal; harsh bitterness is the problem. Too much thick pith, bitter fruit, thick-cut peel, or overcooking can make the jar taste too sharp.

How do you make marmalade less bitter?

Use sweet oranges, fine peel shreds, and only trim the thickest pith. Simmer the peel fully before sugar goes in. If the peel is very bitter, blanch it once for 2 minutes, drain, and continue with fresh water.

Which oranges are best for orange marmalade?

For beginner-friendly marmalade, use sweet, thin-skinned oranges such as navel, Valencia, or Cara Cara. Seville oranges are best for traditional bitter marmalade, while mandarins and tangerines make a sweeter, softer preserve.

Do I have to use Seville oranges?

No. Seville oranges are traditional, but this recipe is designed for regular sweet oranges. The result is milder, easier to shop for, and still properly marmalade-like.

Why is the peel in my marmalade tough?

Tough peel almost always means the sugar arrived too early. Simmer the peel until tender before adding sugar, because sugar slows further softening.

How long does homemade orange marmalade last?

Refrigerator marmalade is best used within 3 to 4 weeks, sooner if you reduced the sugar. Freezer marmalade lasts longer when packed with headspace in freezer-safe containers.

Is this orange marmalade safe for canning?

This fridge/freezer version should not be treated as pantry-safe by default. Orange marmalade can be canned when you use a tested formula and proper boiling-water processing, but do not simply jar this version and store it at room temperature.

What can I make with orange marmalade?

Use it on toast, scones, croissants, pancakes, yogurt, and oatmeal. It also works in cake fillings, thumbprint cookies, salad dressings, cheese boards, and savory glazes for chicken, duck, pork, ham, salmon, or roasted vegetables.

Can I make marmalade with less sugar?

You can reduce sugar slightly for a softer refrigerator jar. Very low-sugar or sugar-free marmalade needs a different method, often with special pectin, and should not be canned unless you use tested low-sugar canning guidance.

The first batch teaches you the rhythm: soften the peel, watch the bubbles slow, trust the cold plate, and stop before the jar gets stiff. After that, marmalade stops feeling fussy and starts feeling like one of those quiet kitchen skills that pays you back every time you open the fridge.

Back to top ↑

Posted on Leave a comment

Beet Juice Recipe

Chilled glass of ruby-red homemade beet juice with ice, a small bottle of juice, and fresh beetroot, carrots, apple, lemon, ginger, and cucumber on a light kitchen surface.

Beet juice can go one of two ways. Made carelessly, it tastes earthy, heavy, and a little too close to drinking a glass of soil. Made with the right balance, it turns into a chilled, ruby-red juice that tastes lively, lightly sweet, tart, and just spicy enough from ginger.

This beet juice recipe is for that second version. It uses raw beetroot for color and depth, carrot and apple for natural sweetness, lemon for brightness, ginger for lift, and optional cucumber to make the whole glass easier to sip. The first taste should feel clear and awake, not muddy.

This is not straight beetroot juice. It is a balanced beet-carrot-apple juice designed to taste cool, tart, lightly sweet, and easy to finish.

You can make this beetroot juice recipe in a juicer for the smoothest texture, or in a blender if you do not own a juicer. The blender version needs water and proper straining, but it still works beautifully when you know what the mixture should look and feel like. It is especially helpful if you are making it for the first time, dislike plain beetroot juice, or want a balanced glass without added sugar.

No juicer at home? Skip to the blender method. Already ready to make it? Jump to the full recipe card.

Start with the quick recipe, then come back to the sections below when you want to adjust the flavor, make it without a juicer, store it safely, or understand what the health claims actually mean.

Beet Juice Recipe Guide

Use this as a quick recipe first, then as a troubleshooting guide whenever you want a smoother blender batch, a less earthy glass, or a safer way to store leftovers.

Quick Answer: How to Make Beet Juice

To make beet juice, juice or blend raw beetroot with carrot, apple, lemon, ginger, and optional cucumber. If using a juicer, feed the produce through the machine, then stir in the lemon juice and serve over ice. If using a blender, add cold water, blend until smooth, then strain through a nut milk bag, cheesecloth, or fine mesh strainer.

This beetroot juice recipe makes about 16–18 oz / 475–530 ml, enough for 2 standard 8 oz / 240 ml glasses or 3 smaller 5 oz / 150 ml servings. It takes about 10 minutes, uses no added sugar, and tastes brightest right after making. Here, beet juice and beetroot juice mean fresh juice made from raw red beetroot, not pickled beet brine, canned beet liquid, or beet powder mixed into water.

At-a-glance beet juice recipe graphic showing a glass of beet juice, 10 minutes, 16–18 ounces, two glasses, and no added sugar.
Since this fresh beet juice takes about 10 minutes and makes two glasses, it works best as a quick just-made drink rather than a big storage batch.

Easiest first glass: if your first memory of beet juice is something thick, muddy, or aggressively earthy, do not start with straight beetroot. Make the apple-beet-carrot version first, serve it over ice, then adjust lemon, cucumber, or ginger after tasting.

Split image comparing a darker straight beetroot juice with a brighter beginner-friendly apple, beet, carrot, lemon, ginger, and cucumber juice over ice.
When plain beetroot juice tastes too earthy, apple and carrot make the first glass gentler; then lemon, ginger, cucumber, and ice help it feel refreshing.

Still worried about the earthy flavor? See the taste fixes before you make your first batch.

Quick Beet Juice Formula

  • Base: 1 medium-large beetroot or 2 small beets, about 225–250 g / 8–9 oz
  • Balance: 2 carrots and 1 large apple for natural sweetness
  • Brightness: ½ lemon, about 15–20 ml juice
  • Lift: ½–1 inch fresh ginger, about 5–10 g
  • Lightness: ½ cucumber, optional, about 75–100 g / 3–4 oz
  • Blender only: ½–1 cup / 120–240 ml cold water
  • Serve: over ice, right after making

The 10-Minute Version

Juice or blend 1 beetroot, 2 carrots, 1 apple, ½ lemon, ½–1 inch ginger, and optional cucumber. If blending, add ½ cup / 120 ml cold water, blend for 45–60 seconds, strain well, and serve over ice. Add more water only if the blender needs help.

Serve it with breakfast, as an afternoon caffeine-free drink, or as a small pre-workout glass after you know how your body handles it.

Why This Beet Juice Recipe Works

The trick is not hiding the beetroot. It is balancing it. Beetroot gives the drink its deep color, earthy sweetness, and unmistakable flavor, but it needs the right supporting ingredients so the glass does not taste flat or muddy.

Carrot is the quiet helper here: it softens beetroot’s rooty edge without making the glass taste like fruit punch. Apple makes the drink more beginner-friendly. Lemon is the difference between a dull beet juice and one that tastes like it belongs in a glass with ice. Ginger adds a bright, spicy finish. Cucumber is the ingredient to add when the juice feels a little too serious, dense, or beet-forward.

For a beginner-friendly glass, keep beetroot to roughly one-third of the total produce volume and let carrot, apple, cucumber, and citrus do the balancing. If your batch tastes too rooty or heavy, it usually does not need sugar first. It needs acid, coldness, dilution, or a better mix.

Temperature matters too. Room-temperature juice tastes flatter and heavier than a chilled glass, so use refrigerated produce when possible or serve the finished glass over plenty of ice. The final drink should pour easily, taste lightly sweet and tart, and finish with gentle ginger warmth.

What Does Beet Juice Taste Like?

The drink tastes earthy, lightly sweet, mineral-like, and bold. That rooty note is the part people either love or struggle with. Straight beetroot juice can feel intense, especially if you are new to it.

The first sip of this version should be cool and lightly tart, with apple-carrot sweetness in the middle and gentle ginger warmth at the end. Juicer beet juice will feel thinner and clearer. The blender version, even after straining, may feel slightly fuller. Both should still pour like juice, not spoon like a smoothie.

Best beginner version: Use 1 small beet, 2 carrots, 1 apple, ½ lemon, ½ inch ginger, and ½ cucumber. This keeps the beet flavor present but not overpowering.

Once you like the base, adjust one thing at a time: more lemon for tartness, more apple for sweetness, more cucumber for lightness, or more ginger for heat.

Ingredients for the Best Beet Juice

The best glass needs contrast. You want enough beetroot for color and flavor, enough natural sweetness to soften the mineral notes, enough citrus to keep it crisp, and enough chill or cucumber to make it easy to sip.

Overhead layout of beet juice ingredients including cut beetroot, carrots, apple, lemon, ginger, cucumber, ice, and water for the blender method.
Each ingredient has a purpose: beetroot adds depth, carrot and apple soften the flavor, lemon lifts it, and ginger gives the juice a cleaner finish.
IngredientAmountWhy it matters
Raw red beetroot1 medium-large or 2 small beets, about 225–250 g / 8–9 ozThe base of the juice; gives color, earthy sweetness, and the classic beet flavor.
Carrots2 medium, about 120–150 g / 4–5 ozAdds natural sweetness and helps round out beetroot’s deeper edge.
Apple1 large, about 170–200 g / 6–7 ozMakes the juice more beginner-friendly and naturally sweet without added sugar.
Lemon½ lemon, about 15–20 ml juiceBrightens the juice and keeps the beet flavor from tasting flat.
Fresh ginger½–1 inch, about 5–10 gAdds warmth, sharpness, and a lively finish.
Cucumber, optional½ small cucumber, about 75–100 g / 3–4 ozLightens the flavor and makes the juice more refreshing.
Cold water½–1 cup / 120–240 ml, blender method onlyHelps the blender move and controls thickness. Do not add it when using a juicer.
IceAs neededMakes the finished glass more refreshing.

Juice yield varies by beet size, carrot freshness, apple variety, juicer type, and how firmly you press the pulp in the blender method. The amounts above usually make about 16–18 oz / 475–530 ml strained juice. A juicer usually gives the clearest yield without added water, while the blender version may make a little more volume because of the water, but with a slightly softer flavor.

Beetroot

Use raw red beets for the brightest color and crispest flavor. Scrub them well because beets grow in soil and often carry grit around the root end. Peeling is optional if the beets are tender-skinned and scrubbed well, but peel them if the skin is rough, bitter, waxed, or hard to clean.

How to Choose Beets for Juice

Choose firm, heavy beets with smooth skin and no soft, wrinkled, moldy, or badly bruised spots. Small to medium beets often taste sweeter and less woody than very large ones. If the beets come with greens attached, trim the greens off before storing, then scrub the roots well before peeling or cutting.

Produce guide showing firm fresh beets for juicing next to softer or wrinkled beets to avoid, with beet greens trimmed nearby.
Better beetroot juice starts before you juice anything, so choose firm, heavy, smooth roots and skip soft or wrinkled beets that can taste woody.

If your beets come with greens, save the tender leaves for cooking rather than adding a large handful to this juice. Beet greens can make the drink taste more grassy and bitter.

Carrot

Carrot is one of the easiest ways to make this drink taste better. It brings mellow sweetness without turning the glass into a fruit-heavy juice, and it also works beautifully in apple beet carrot juice, often called ABC juice. MasalaMonk’s guide to vitamins in carrots goes deeper into carrot juice, raw carrots, cooked carrots, and their key nutrients.

Apple

A crisp sweet-tart apple is ideal. Gala, Fuji, Honeycrisp, Pink Lady, or any good eating apple will work. Green apple gives a sharper, less sweet result. Red apple gives a softer, sweeter glass.

Lemon or Lime

Citrus makes the beet taste awake. Stir lemon juice in at the end if you are using a juicer, or peel the lemon and blend it with the produce if you are using a blender. Avoid blending too much white pith because it can make the drink bitter.

Ginger

Fresh ginger makes the flavor lighter and less heavy. Start with ½ inch if you are sensitive to heat. Use the full inch if you want a stronger beet ginger juice with a spicy finish.

Cucumber or Celery

Cucumber is optional, but it is one of the most useful ways to make the glass easier to drink. It increases the yield, cools the flavor, and gives the juice a more refreshing finish. Celery works too, though it tastes more savory and slightly salty. If you like the cucumber-lemon-ginger side of this recipe but want something lighter than juice, MasalaMonk’s guide to cucumber, lemon, and ginger water is a good companion.

Raw Beets vs Cooked Beets for Juice

Use raw beets for the most refreshing beet juice. Raw beetroot gives the drink a crisp, earthy-sweet flavor. Cooked beets are softer and sweeter, but they make the drink taste more like cooked beet puree than just-made juice.

Comparison image showing raw beets with bright beet juice and cooked beets with a softer, thicker blended beet drink.
Raw beets make the crispest beet juice, whereas cooked beets create a softer blended drink that tastes closer to beet puree.

If you only have cooked beets, you can blend them with apple, lemon, ginger, and cold water, then strain the mixture. However, cooked beets do not work well in most juicers, and they will not give the same lively flavor as raw beetroot.

Avoid pickled beets for this recipe unless you specifically want a vinegar-heavy drink. Pickled beet juice has a completely different flavor profile because it usually contains vinegar, salt, and sometimes sugar.

How to Make Beet Juice in a Juicer

The juicer method is the fastest way to make a smooth, clear glass. It gives you the crispest flavor because you do not need to dilute the produce with water.

Step-by-step juicer method showing beets and carrots being washed, chopped produce, beetroot going into a juicer, lemon added to juice, and beet juice served over ice.
Because the juicer presses the produce directly, this method gives a smoother, more concentrated glass without needing blender water.
  1. Wash and scrub the produce. Pay special attention to the beetroot and carrots.
  2. Trim the beetroot. Cut off the root end and any rough top area.
  3. Peel if needed. Peeling is optional for tender-skinned beets that have been scrubbed well. Peel rough, waxed, or dirty beets.
  4. Cut everything to fit the juicer chute. Do not force oversized beet chunks through the machine.
  5. Juice the beet, carrots, apple, cucumber, and ginger. Alternate hard and softer produce so the juicer runs smoothly.
  6. Stir in lemon juice. Adding lemon at the end keeps the citrus flavor lively.
  7. Serve over ice. Drink right away for the brightest taste.

The finished juice should pour easily and look deep ruby-red, not thick like puree. Fresh juice naturally separates as it sits, so stir or shake it before drinking. If the flavor tastes flat, add a little more lemon. If it feels too heavy, pour it over extra ice or add cucumber next time.

How to Make Beet Juice in a Blender Without a Juicer

If you came here wondering how to make beetroot juice without a juicer, the blender method is the easiest place to start. It asks for one extra step — straining — but that step is what turns a thick beet puree into something you actually want to sip.

Step-by-step blender method showing chopped beetroot, carrot, apple, cucumber, and ginger, water added to a blender, blended beet puree, straining, and a final glass of juice.
For the no-juicer method, the goal is not a thick smoothie; use just enough water to blend, then strain until the juice pours cleanly.

Still deciding between tools? Compare juicer vs blender beet juice before choosing your method.

  1. Chop the produce smaller than you would for a juicer. Dice the beetroot, carrot, apple, cucumber, and ginger so the blender can handle them.
  2. Add ½ cup / 120 ml cold water first. This helps the blades move without making the juice weak.
  3. Blend on high for 45–60 seconds. The mixture should look like a smooth, thick ruby puree.
  4. Add more water only if needed. If the blender stalls or groans, pause, scrape down the sides, and add water 2 tablespoons / 30 ml at a time, up to 1 cup / 240 ml total.
  5. Strain the mixture. Pour it into a nut milk bag, cheesecloth-lined strainer, or fine mesh strainer set over a bowl or jug.
  6. Let it sit briefly, then squeeze. Give it 2–5 minutes to drain, then press or squeeze to extract as much juice as possible.
  7. Serve over ice. Drink while the flavor is still lively.

How to Strain Beet Juice Smoothly

For blender beet juice, the straining step is where the texture changes from thick puree to a lighter drink. Give the pulp a few minutes to drain before squeezing, especially if you are using a nut milk bag.

Close-up of hands straining blended beet juice through a nut milk bag or fine mesh strainer into a bowl.
Straining is the step that turns blended beet puree into a lighter, smoother glass of drinkable beet juice.

Blender note: If your first batch looks more like a thick smoothie than juice, you have not failed. It just needs better straining, smaller beet pieces, or a little more patience while the pulp drains. If your blender is not very powerful, use the full 1 cup / 240 ml water and blend in two rounds if needed.

For a little more yield, add 2–3 tablespoons / 30–45 ml cold water to the squeezed pulp, stir or briefly blend again, then strain once more. Skip this second press if you want the strongest flavor.

If your batch is already too thick, watery, or sharp, jump to the troubleshooting guide.

Equipment Needed

Beet juice is simple, but it is not tidy. A little setup saves you from pink fingers, stained towels, and a blender that refuses to move. A juicer gives the smoothest glass, while a blender works well as long as you give it enough liquid and strain properly.

Kitchen counter with beet juice equipment including a juicer, blender, strainer, knife, cutting board, vegetable brush, glass bottle, towel, and fresh produce.
Set up the juicer or blender, strainer, cutting board, and bottle before you start; as a result, beet juice prep stays cleaner and faster.
  • Juicer: best for thin, smooth juice with no added water.
  • Blender: useful if you do not own a juicer; you will need water and a strainer.
  • Nut milk bag, cheesecloth, or fine mesh strainer: needed for the blender method.
  • Vegetable brush: helpful for scrubbing raw beets and carrots.
  • Washable cutting board and knife: important because beet juice stains.
  • Glass bottle or jar: useful if refrigerating leftovers.

Stain warning: Beet juice is beautiful in the glass and ruthless on white towels. Wipe spills quickly, rinse tools right away, and use gloves if you do not want pink fingers.

Juicer vs Blender: Which Method Is Better?

Both methods work, but they do not produce exactly the same drink. A juicer gives you a clearer, lighter result. A blender gives you more flexibility if you do not own a juicer, but you need water and straining.

Side-by-side comparison of beet juice made in a juicer and beet juice made in a blender with a strainer nearby.
Choose the juicer when you want the clearest texture, or use the blender when accessibility matters more than a perfectly light finish.
MethodBest forTextureProsCons
JuicerSmooth beet juiceThin, smooth, brightFast, no added water, smoothest juice textureRequires a juicer
Blender + strainerNo-juicer homesSlightly thicker but still juice-likeAccessible, flexible, works with common equipmentNeeds water and straining
Blender, unstrainedThicker blended drinkPulpy, smoothie-likeKeeps more fiber, less wasteNot a true clear juice
Beet powderConvenienceDepends on brand and mixingFast, shelf-stableNot the same flavor or texture as fresh beet juice

If you are deciding whether to buy a juicer, a cold press juicer is often preferred for fresh juice quality, while centrifugal juicers are usually faster and more affordable. MasalaMonk’s guide to cold press vs centrifugal juicers explains the difference in more detail.

Common Beet Juice Mistakes to Avoid

Most disappointing batches come from a few simple mistakes. Before you start, avoid these and the drink becomes much easier to love.

Four-panel beet juice mistakes graphic showing too much beet, too much water, skipping straining, and too much ginger.
Most disappointing batches come from balance issues: too much beet, water, pulp, or ginger can make the glass taste heavy, weak, thick, or harsh.
  • Using only beetroot as a beginner: a pure beetroot batch can taste too intense. Start with apple, carrot, lemon, and ginger.
  • Adding too much blender water: begin with ½ cup / 120 ml and add more only if the blender needs help.
  • Skipping the strainer: unstrained blender juice will be thick and pulpy, closer to a smoothie.
  • Overdoing sharp ingredients: too much ginger or citrus pith can make the juice harsh or bitter, so start small and use lemon juice or peeled citrus.

How to Make Beet Juice Taste Better

The main reason people give up on this drink is not the color or the effort. It is the taste. Beetroot is naturally earthy, so it needs brightness, sweetness, chill, or dilution to feel balanced.

Beet juice taste-fix graphic with lemon, cucumber, apple, and ice around a glass of beet juice.
A strong beet flavor usually needs contrast, not sugar; citrus, cucumber, apple, or ice can shift the drink from heavy to refreshing.
ProblemFix
Too earthyAdd more apple, orange, lemon, cucumber, or carrot.
Too sweetAdd lemon or lime, cucumber, celery, or a little extra ginger.
Too sharp from gingerUse ½ inch ginger instead of 1 inch next time. Dilute this batch with more apple, carrot, or cucumber juice.
Too thickUse a nut milk bag or cheesecloth and squeeze well. Add a little cold water if needed.
Too wateryUse less water next time. Start with ½ cup / 120 ml for blender juice and add only as needed.
Too bitterPeel citrus fully and avoid blending too much white pith.
Too strong for beginnersUse half a beet and increase the carrot or apple.
Not refreshingServe over ice or chill the juice before drinking.

The easiest beginner version is beetroot with both apple and carrot. The crispest version adds cucumber and lemon. The punchiest version leans on ginger and citrus. If the glass tastes flat, it almost always needs lemon. If it tastes heavy, it needs cucumber, ice, or less beet next time.

Remember this flavor rule: lemon fixes dullness, cucumber fixes heaviness, apple fixes harshness, and ice fixes almost everything.

Once the basic glass tastes right, the variations become much easier. You are not guessing anymore; you are choosing whether you want the drink sweeter, sharper, lighter, or stronger.

For the gentlest first variation, try the apple beet carrot juice version.

Best Beet Juice Variations

Once you know the base formula, this juice is easy to adjust. Use these variations as mini-recipes. The juicer method works as written. For the blender method, add ½–1 cup / 120–240 ml cold water and strain unless the variation says it is a smoothie.

Easy Beet Juice Combinations

VariationMini formulaBest for
Apple Beet Carrot Juice / ABC Juice1 beet + 1 apple + 2 carrots + ½ lemon + optional ½ inch gingerBeginner-friendly sweetness and a softer beet flavor
Beet Ginger Lemon Juice1 beet + 1 apple + ½ lemon + 5–10 g ginger + optional cucumberA sharper, livelier juice
Beet Orange Juice1 beet + 1 peeled orange + 1 carrot + 5 g gingerA citrusy breakfast-style glass
Beet Pineapple Juice1 beet + 1 cup pineapple chunks + ½ cucumber + ½ lemonA sweeter tropical version
Beet Pomegranate Juice1 beet + ½–¾ cup unsweetened pomegranate juice + ½ lemonA tart, deep red juice
Low-Sugar Beet Juice½–1 beet + ½ cucumber + 1 celery stalk + ½ lemon + ½ inch gingerA lighter vegetable-forward version
Beet Turmeric Ginger Juice1 beet + ½ inch ginger + small piece fresh turmeric or ¼ tsp ground turmeric + ½ lemonA strong, spicy flavor
Beet Juice ShotBeet + lemon + ginger + small apple piece if neededSmall 2–3 oz / 60–90 ml servings
Beet Juice SmoothieBeet juice or blended beet + banana or berries + yogurt or plant milkA thicker, more filling drink

Apple Beet Carrot Juice / ABC Juice

This is the safest first version if beetroot usually tastes too strong to you. Use a sweet apple for a softer drink or green apple for a sharper one. The carrot keeps the juice mellow, so the beet still shows up without taking over the glass. For more beetroot drink ideas, including beet-ginger-turmeric and ABC-style combinations, see MasalaMonk’s guide to the power of beetroot and beet juice.

Glass of apple beet carrot juice with fresh apple, beetroot, and carrots on a bright breakfast-style kitchen surface.
Apple beet carrot juice, often called ABC juice, is the gentlest variation because carrot and apple mellow beetroot’s earthy edge.

Beet Ginger Lemon Juice

This version is sharper and less sweet. It is the one to make when you want beet ginger juice with a brighter, spicier finish. Start with less ginger unless you already know you like the heat.

Glass of beet ginger lemon juice with fresh lemon wedges, lemon half, ginger slices, and beetroot nearby.
Beet ginger lemon juice is the sharper variation, so it works well when you want more citrus brightness and a warmer ginger finish.

Beet Orange Juice

Orange makes the drink rounder and more breakfast-friendly. Peel the orange well so the white pith does not make it bitter. This is a good choice when you want something sweeter than lemon but brighter than apple alone.

Beet Pineapple Juice

Pineapple gives this variation tropical sweetness that helps soften the deep beet flavor. Cucumber keeps the drink from becoming too syrupy. This is especially useful when you want the juice to taste more fruity and less vegetable-heavy.

Beet Pomegranate Juice

Pomegranate makes the juice tart, deep, and bold. For the easiest version, use unsweetened pomegranate juice. If using fresh pomegranate arils, blend gently and strain very well, or juice them only if your juicer handles pomegranate arils cleanly.

Low-Sugar Beet Juice

This version skips most of the fruit and uses cucumber, celery, lemon, and ginger for a cleaner vegetable-forward flavor. It will not taste as sweet as the apple-carrot version, but it is lighter and more refreshing.

Glass of low-sugar beet juice with beetroot, cucumber, celery, lemon, ginger, and a small green apple in a light kitchen scene.
For low-sugar beet juice, lean on cucumber, celery, lemon, and ginger; that way, the drink stays vegetable-forward without tasting flat.

Beet Turmeric Ginger Juice

This has a strong, spicy flavor. Use turmeric carefully because it can dominate the drink. Add black pepper only if you already like that taste; it is not needed for the recipe to work.

Beet Juice Shot

A beet shot is stronger and smaller than a full glass. Keep the beet, lemon, and ginger more concentrated, then use just enough apple to soften the edge if needed. Serve 2–3 oz / 60–90 ml at a time.

Beet Juice Smoothie

To turn this into a smoothie, do not strain the blended mixture. Add banana, berries, yogurt or plant milk, and a little ginger. A smoothie keeps more pulp and fiber, so it will be thicker and more filling than strained beet juice. For more smoothie-style ideas, MasalaMonk’s guide to high-iron smoothies and shakes includes beetroot-friendly combinations that lean more filling than juiced.

Flavor comes first. Once the drink is something you actually enjoy, then it makes sense to talk about where it fits in a routine.

Beet Juice Benefits, Without the Hype

Once the flavor is right, the next question is usually what this drink actually does for you. The honest answer is that beet juice can be useful, but it works best when you treat it as food, not as a miracle shot.

Think of this as a bright vegetable drink with a few smart use cases: a small pre-workout serving, a lower-sugar vegetable-forward version, or an occasional way to enjoy beets when you do not feel like eating them.

Calm beet juice benefits graphic with a glass of beet juice, beetroot, and cards reading food-first, no miracle shot, and start small.
Beet juice can fit into a healthy routine, although it is still best treated as a food-first drink rather than a miracle wellness shortcut.

Planning to drink it often? Read the safety notes before making beet juice a daily habit.

Beetroot is naturally colorful, plant-rich, and known for dietary nitrates. Much of the research interest comes from those nitrates and their possible effects on cardiovascular markers. You can read more about that research background on PubMed.

At the same time, juice is not the same as eating whole beets. When you juice and strain beets, carrots, and apples, you remove much of the fiber. That makes the drink lighter and easier to sip, but it also means it is less filling than whole vegetables or a smoothie.

If you care about…Best way to use this juice
Blood pressure interestKeep servings moderate and check with a qualified professional if you take medication or tend to run low.
Workout useTry a small strained serving first, not a huge pulpy glass right before training.
Weight-conscious drinkingUse cucumber, celery, lemon, ginger, less fruit, and no added sugar.
Daily nutritionRotate it with whole vegetables, smoothies, meals, and other drinks instead of making it your only “healthy” habit.
Detox-style flavorUse cucumber, celery, lemon, and ginger for a crisp, light glass without treating it as a cleanse.

For a broader look at whole beets beyond juice, MasalaMonk’s guide to what beets are good for covers beetroot as a food, not just as a drink.

Is Beet Juice Good for Weight Loss?

For weight-conscious readers, the most useful approach is a moderate, vegetable-forward drink — especially when you keep fruit lower and skip added sugar. It is not a fat-loss shortcut, but it can fit into a balanced routine when the portion and ingredients make sense.

The same idea applies to other “weight loss drink” combinations too. MasalaMonk’s article on pineapple, cucumber, and ginger for weight loss separates useful habits from miracle claims without treating the drink as a shortcut.

Lighter Beet Juice Formula

  • ½–1 beetroot
  • ½ cucumber
  • 1 celery stalk
  • ½ lemon
  • ½ inch ginger
  • Optional: ½ green apple if you need a little sweetness

This version is less sweet and more vegetable-forward. For more fullness, choose an unstrained beet smoothie instead of strained juice because the smoothie keeps more fiber.

Beet Juice and Blood Pressure

Beetroot contains dietary nitrates, which is why this drink often comes up in blood pressure conversations. Still, drinking it once in a while is different from turning it into a daily habit; regular use matters more if you already take medication or tend to run low.

Beetroot’s dietary nitrates can be converted in the body into nitric oxide, a compound involved in blood-vessel relaxation and blood flow, which is why beet juice appears in blood pressure research.

Educational graphic showing beet juice, beetroot, dietary nitrates converting to nitric oxide, and a simple blood-flow research cue.
The blood-pressure conversation around beetroot juice starts with dietary nitrates, so this is a research-aware food habit rather than a cure claim.

Any blood-pressure effect can vary by person, serving size, timing, and overall diet, so treat this as a food habit to discuss if it overlaps with medication or a medical condition.

If you have low blood pressure, take blood pressure medication, have kidney concerns, or manage a medical condition, treat regular beet juice as something to discuss with your healthcare professional rather than a casual daily habit.

For the broader caution list, see side effects and safety notes.

MasalaMonk has a deeper article on beets and blood pressure if you want a more focused discussion of fresh, canned, pickled, and juiced beets.

Is Beet Juice a Detox or Liver Cleanse?

If you like the word “detox” because you mean light, cold, vegetable-forward, and refreshing, beet juice can fit that mood. If you mean a drink that cleanses the liver, flushes toxins, or resets the body, it does not work that way.

Your liver and kidneys already do the work of filtering and processing waste. A glass of beet juice can be colorful and refreshing, but it should not be treated as a liver cleanse or cure.

For a detox-style flavor without the misleading promise, use beetroot, cucumber, celery, lemon, and ginger. It will taste crisp and clean, but it is still just a drink.

Beet Juice for Energy or Pre-Workout

Runners, cyclists, and workout-focused readers often pay attention to beet juice because of beetroot’s natural nitrate content. If you want to try it before exercise, start with a small serving first. Some people tolerate it easily; others find that a large or pulpy drink feels too heavy before movement.

Small glass of beet juice near running shoes, a water bottle, a workout mat, and fresh beetroot in natural morning light.
Before using beet juice as a pre-workout drink, try a small strained serving first so you can see how your stomach handles it.

For a pre-workout style version, keep the flavor bright and the texture light: beetroot, orange or apple, lemon, and ginger works well. If you are using the blender method, strain it thoroughly so the drink is easier to sip before exercise.

For performance use, many beetroot juice studies focus on nitrate dose and timing rather than casual sipping, so treat a small pre-workout glass as an experiment, not a guaranteed effect.

When to Drink Beet Juice and How Much to Start With

There is no single perfect time to drink beet juice. Choose the moment that fits how you want to use it and how your body responds. If you are new to this drink, start with a smaller serving because the flavor, color, and digestive effect can surprise people, especially if the glass is strong or ginger-heavy.

Timing and serving-size guide for beet juice with morning, afternoon, pre-workout cues and 5 ounce, 8 ounce, and 2–3 ounce serving sizes.
Start with 5 oz of beet juice, then adjust the timing and portion based on your routine, taste, digestion, and reason for drinking it.
  • Morning: a simple option with or after breakfast, especially if raw juice bothers your stomach on its own.
  • Afternoon: useful when you want something cool, colorful, and caffeine-free.
  • Before a workout: try a small strained serving first; avoid a large pulpy glass right before training.
  • Night: fine for many people, but skip it late if it bothers your digestion or makes you wake up to use the bathroom.
  • Daily: keep portions reasonable and rotate with whole vegetables, fruits, smoothies, meals, and other drinks.
  • Small serving: 5 oz / 150 ml
  • Standard serving: 8 oz / 240 ml
  • This recipe yield: about 16–18 oz / 475–530 ml
  • Beet shot: 2–3 oz / 60–90 ml

You do not need to turn beet juice into a daily project to enjoy it; a good glass now and then still counts. Occasional beet juice and daily beet juice are not the same decision, especially if you have blood pressure, kidney-stone, digestive, or blood sugar concerns.

After drinking beet juice, some people notice pink or red urine or stool. This is often called beeturia and can happen after eating or drinking beets. It is usually harmless, but if you are unsure whether the color is from beets or something else, or if you have pain or unusual symptoms, seek medical advice.

The sections below cover storage and safety because homemade beet juice is raw, deeply pigmented, and more concentrated than eating a few slices of beetroot.

Fresh Beets vs Canned Beets vs Beet Powder

Fresh raw beetroot gives the best glass: brighter color, clearer flavor, and a more refreshing finish. Canned, cooked, pickled, and powdered beets can help in a pinch, but they each move the drink away from that just-made taste.

Comparison of fresh beets with beet juice, canned beets in a can and bowl, and beet powder in a jar and wooden spoon.
Fresh beets give homemade beet juice the brightest flavor; however, canned beets and beet powder can still work when convenience matters more.
OptionCan you use it?Best use
Fresh raw beetsYes, best choiceMain beet juice recipe
Cooked beetsYes, blender onlyEmergency shortcut, softer flavor
Canned beetsPossibleBlended shortcut; check salt, sugar, and additives
Pickled beetsNot idealOnly if you want a vinegar-style drink
Beet powderDifferent productConvenience drink, not the same as fresh juice

If you use canned beets, drain them well and check the label. Some canned beets contain added salt or sugar, and pickled beets contain vinegar that will completely change the flavor. If you use beet powder, treat it as a separate convenience drink rather than a true fresh beet juice recipe.

What to Do With Beet Juice Pulp

Beet pulp is not glamorous, but it does not have to go straight into the bin. If you use a juicer or strain the blender mixture, you will have pulp left behind. It is fibrous and deeply colored, so use it in small amounts where the color and earthiness make sense. Think of it as a small add-in, not the main event.

  • Add small amounts to veggie patties or fritters.
  • Stir into soups or stews where the color makes sense.
  • Mix into muffins, quick breads, or pancakes.
  • Blend into hummus or bean dips.
  • Freeze in small portions for later cooking.
  • Compost it if you do not want to cook with it.

Remember that beet pulp stains. If the pulp includes ginger and lemon, use it in recipes where those flavors will not feel out of place.

How to Store Beet Juice

Just-made beet juice loses its sparkle quickly, so treat leftovers gently. It tastes best right after making, when the lemon is sharp, the ginger still tastes lively, and the beet flavor has not dulled. Because homemade raw juice is not pasteurized, it also needs careful storage if you are not drinking it right away.

Storage guide showing beet juice in a sealed glass bottle with a date label beside a glass of juice near an open refrigerator.
Since homemade raw juice is not pasteurized, the safest flavor window is short: chill it quickly, seal it well, and drink it soon.
  • Best flavor: drink immediately.
  • Best refrigerated quality: within 24 hours.
  • Maximum practical home storage: 24–48 hours in a clean airtight glass bottle in the refrigerator.
  • Room temperature: do not leave fresh juice out for more than 2 hours.
  • Refrigerator temperature: keep chilled at 40°F / 4°C or colder.
  • Serving after storage: shake or stir before drinking.
  • Discard if: it smells sour, fizzy, fermented, moldy, or off.

You can wash and chop the beetroot, carrot, apple, and cucumber a few hours ahead and refrigerate them in a covered container. Juice or blend just before serving for the liveliest flavor.

The FDA has a useful overview of fresh juice safety, especially because homemade raw juice is not pasteurized.

You can freeze beet juice in ice cube trays or small containers, but the flavor and texture will be less crisp after thawing. Frozen beet juice cubes are better for smoothies than for drinking plain.

Side Effects and Who Should Be Careful

For most people, a moderate glass is simply a colorful way to enjoy beetroot. Still, start small the first time, especially if you plan to drink it often. Beet juice has a strong color, strong flavor, and for some people, a strong digestive effect too.

Beet juice side effects graphic with a glass of beet juice and safety cards for start small, beeturia, oxalates, and blood pressure caution.
Start with a modest serving if beet juice is new to you, especially if oxalates, digestion, beeturia, or blood pressure changes are concerns.
  • Red or pink urine/stool: Beet juice can cause beeturia, a temporary red or pink color change after eating or drinking beets.
  • Kidney-stone concerns: Beets contain oxalates, so people prone to certain kidney stones should be cautious.
  • Low blood pressure or medication: If you take blood pressure medication or have low blood pressure, ask a healthcare professional before drinking beet juice regularly.
  • Digestive sensitivity: Start with a smaller serving if raw juices bother your stomach.
  • Blood sugar management: If you manage blood sugar, fruit-heavy beet juices may need smaller portions or more vegetable-forward formulas.

For more detail on oxalates and beetroot, see MasalaMonk’s guide to beetroot and kidney health.

Beet Juice Troubleshooting

Beet juice is forgiving if you know what to adjust. If the batch did not taste the way you expected, do not throw it out yet. Most problems are fixable with lemon, cucumber, ice, apple, or another pass through the strainer.

Troubleshooting guide for beet juice with panels for too earthy, too thick, too watery, and too sharp, plus lemon, cucumber, apple, and strainer cues.
A failed batch is usually adjustable: sharpen a dull glass, lighten a heavy one, dilute harsh ginger, or strain again for smoother texture.
IssueWhy it happenedFix nowFix next time
Too earthyToo much beet or not enough acid/sweetnessAdd lemon, orange, apple, or cucumber juiceUse less beet and more carrot/apple
Too thickBlender juice was not strained enoughStrain again through cheesecloth or a nut milk bagChop smaller, blend smoother, and squeeze pulp well
Too wateryToo much water in the blenderAdd lemon, ginger, or a little more fresh juiceStart with ½ cup / 120 ml water only
Too sharpToo much ginger or lemonDilute with apple, carrot, cucumber, or iceStart with ½ inch ginger
Too sweetToo much apple, orange, pineapple, or pomegranateAdd lemon, cucumber, celery, or gingerUse the low-sugar variation
Separates in the glassFresh juice naturally separatesStir or shakeThis is normal

FAQs About Beet Juice

These are the small questions that usually come up after the first batch.

Juicer or blender: which is better for beet juice?

A juicer makes lighter, smoother juice without added water. A blender works well if you do not own a juicer, but the juice needs water and straining.

How much water do you add when making beet juice in a blender?

Start with ½ cup / 120 ml cold water. Add more only if the blender needs help, up to 1 cup / 240 ml total. Too much water makes the juice taste thin.

How do you make beet juice without a juicer?

Blend chopped beetroot, carrot, apple, lemon, ginger, and cold water until smooth. Then strain through a nut milk bag, cheesecloth, or fine mesh strainer and squeeze the pulp well.

Should you use raw or cooked beets for juice?

Raw beets are best for fresh juice. Cooked beets can be blended in a pinch, but they taste softer and less crisp. They are not ideal for juicing.

Do you need to peel beetroot before juicing?

Peeling is optional if the beetroot is fresh, tender-skinned, and scrubbed very well. Peel it if the skin is rough, dirty, waxed, or bitter.

How many beets make one glass of juice?

One medium-large beet, about 225–250 g / 8–9 oz, combined with carrot, apple, lemon, and ginger usually makes about two standard glasses of mixed beet juice. A medium beet on its own may give roughly ⅓–½ cup juice in many home juicers, though freshness, size, and machine efficiency can change that noticeably.

Why does beet juice taste earthy?

Beetroot naturally has an earthy, mineral-like flavor. Apple, carrot, lemon, ginger, cucumber, orange, and pineapple all help balance that flavor.

How do you make beet juice sweeter without sugar?

Add apple, carrot, orange, pineapple, or pomegranate. Apple and carrot are the easiest everyday choices because they sweeten the drink without overpowering the beetroot.

Is it okay to drink beet juice every day?

You can drink it regularly if it suits you, but you do not need to make it a daily habit to enjoy the recipe. Keep portions moderate, especially if you have kidney-stone risk, low blood pressure, digestive sensitivity, blood sugar concerns, or take blood pressure medication.

What is the best time to drink beet juice?

Morning is simple, afternoon works when you want something cool and caffeine-free, and pre-workout use is best tested with a small strained serving before you make it a routine.

Why does beet juice turn urine or stool red?

Beets can turn urine or stool pink or red. This is common after eating or drinking beetroot. If you are unsure whether the color is from beets, or if you have pain or unusual symptoms, seek medical advice.

What should you know about beet juice and blood pressure?

Beetroot contains dietary nitrates, so occasional juice is one thing; a daily habit is worth discussing with your healthcare professional if you take blood pressure medication or tend to run low.

How long does homemade beet juice keep?

Homemade beet juice tastes best immediately. Refrigerate it in a clean airtight bottle and drink within 24 hours for best flavor, or within 24–48 hours at most.

Can you use canned beets in beet juice?

You can blend canned beets with water, apple, lemon, and ginger in a pinch, but the flavor will be softer and less fresh than raw beetroot. Check the can for added salt, sugar, or vinegar.

How do you turn this recipe into a beet juice shot?

For a beet shot, use less apple and cucumber, keep the beet, lemon, and ginger more concentrated, and serve just 2–3 oz / 60–90 ml at a time. Beet shots are intense, so start small.

Tried it with apple, orange, cucumber, or ginger? Share which version finally made beet juice work for you — the best fixes often come from small adjustments.

Beet Juice Recipe

This is the balanced base version: beetroot for color, carrot and apple for sweetness, lemon for brightness, ginger for lift, and cucumber if you want a cooler, easier sip.

Make it in a juicer for crisp, smooth juice, or use a blender and strain it. Once you like the base, adjust lemon, apple, cucumber, or ginger to make the glass sharper, sweeter, lighter, or spicier.

The finished juice should pour easily, taste sweet-earthy and tart, and finish with gentle ginger warmth.

Saveable beet juice recipe card with a glass of beet juice, beetroot, carrot, apple, lemon, ginger, 10 minutes, 16–18 ounce yield, and juicer or blender method.
Save this beet juice recipe formula for the essentials: beetroot, carrot, apple, lemon, and ginger, made in either a juicer or a blender.
Prep Time10 minutes
Total Time10 minutes
Servings2 glasses
YieldAbout 16–18 oz / 475–530 ml

Estimated nutrition: One 8 oz / 240 ml serving is roughly 135–150 calories, with about 32–36 g carbohydrates depending on produce size and juicing method. Most sweetness comes naturally from the apple, carrot, and beetroot. Strained juice has much less fiber than whole produce or an unstrained smoothie.

Equipment: juicer or blender, fine mesh strainer or nut milk bag, knife, cutting board, and a clean bottle or jar if storing.

Ingredients

  • 1 medium-large raw beetroot or 2 small beets, about 225–250 g / 8–9 oz
  • 2 medium carrots, about 120–150 g / 4–5 oz
  • 1 large apple, about 170–200 g / 6–7 oz
  • ½ lemon, about 15–20 ml juice
  • ½–1 inch fresh ginger, about 5–10 g
  • ½ small cucumber, optional, about 75–100 g / 3–4 oz
  • ½–1 cup cold water, blender method only, 120–240 ml
  • Ice, to serve

Juicer Method

  1. Wash and scrub the beetroot, carrots, apple, cucumber, lemon, and ginger.
  2. Trim the beetroot and peel it if the skin is rough, waxed, or not fully clean.
  3. Cut the beetroot, carrots, apple, cucumber, and ginger to fit your juicer chute.
  4. Juice the beetroot, carrots, apple, cucumber, and ginger, alternating hard and soft produce as needed.
  5. Stir in the lemon juice.
  6. Pour over ice and drink immediately.

Blender Method

  1. Chop the beetroot, carrots, apple, cucumber, and ginger into small pieces.
  2. Add them to a blender with ½ cup / 120 ml cold water and the lemon juice.
  3. Blend on high for 45–60 seconds, until smooth. Add more water only if needed, up to 1 cup / 240 ml total.
  4. Pour the mixture through a nut milk bag, cheesecloth-lined strainer, or fine mesh strainer.
  5. Let it drain for 2–5 minutes, then press or squeeze the pulp to extract the juice.
  6. Optional: add 2–3 tablespoons / 30–45 ml cold water to the squeezed pulp, stir or briefly blend, then strain once more for a little extra yield.
  7. Serve over ice.

Notes

  • For a milder glass, use half a beet and increase the apple or carrot.
  • Use green apple for a sharper juice or red apple for a sweeter one.
  • For a lighter flavor, add cucumber.
  • For a sharper flavor, use the full inch of ginger and extra lemon.
  • If using a blender, strain the mixture for true beet juice. Unstrained beet juice will be thicker and smoothie-like.
  • Drink immediately for best flavor, or refrigerate in a clean airtight glass bottle for 24–48 hours.
  • For regular use or medical concerns, read the safety section above.

Once the recipe is made, serve the juice cold, taste before adjusting, and keep the glass balanced enough that it feels like a drink you chose — not a health chore.

Hand placing a glass of homemade beet juice on a kitchen counter with a bottle of juice, beetroot, apple slices, ginger, and herbs nearby.
A good homemade beet juice should taste balanced enough to sip slowly, not like something you have to force down for health reasons.

Back to top
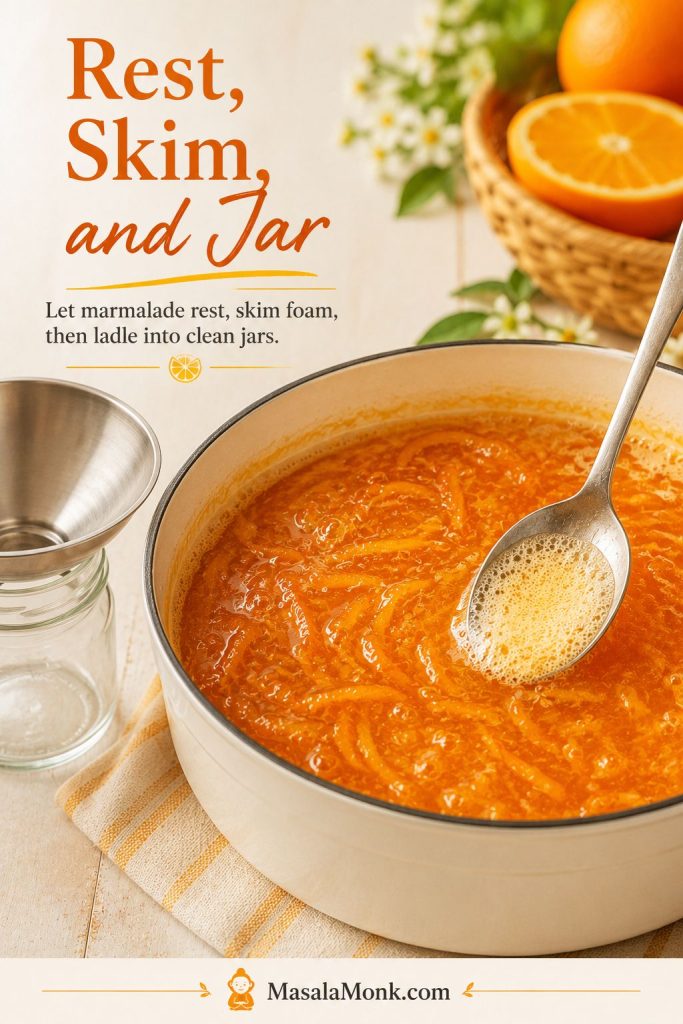
Posted on Leave a comment

Tartar Sauce Recipe: Easy Homemade Sauce for Fish and Chips

Bowl of thick homemade tartar sauce with pickle and herb flecks served beside crispy fish, chips, lemon, and fresh herbs

The best tartar sauce recipe makes hot fried fish taste better, not heavier. It should be creamy enough to cling, loose enough to spoon, and full of tiny pickle-and-caper bites so every forkful gets a little crunch, lemon, salt, and freshness.

This no-cook homemade tartar sauce is built for fish and chips, fish sticks, crab cakes, salmon cakes, shrimp, fries, and fried fish sandwiches. Start with the classic dill pickle version when you want the best match for fish and chips, use the quick relish version when dinner is moving fast, and use the substitution notes when the fridge is missing relish, pickles, capers, lemon, or mayo.

Quick Answer: How to Make Tartar Sauce

To make tartar sauce, stir mayonnaise with finely chopped dill pickles or relish, lemon juice, capers, Dijon mustard, herbs, and black pepper. Chill it for 15 to 30 minutes if you have time. For fish and chips, start with dill pickles, gherkins, or cornichons; for fish sticks or soft fish sandwiches, sweet relish gives a milder diner-style sauce.

Best default ratio: For every 1 cup of mayo, use about ⅓ cup finely chopped dill pickles or relish, 1 tablespoon lemon juice, 1 tablespoon capers, 1 teaspoon Dijon, and 1 tablespoon chopped herbs. Make it before you start frying, and the sauce will be cold, rested, and ready when the fish hits the plate.

Formula board showing mayonnaise, chopped dill pickles or relish, lemon juice, capers, Dijon mustard, herbs, chill time, and finished tartar sauce
Use this formula as the starting point, then taste after chilling; the pickles, capers, lemon, and herbs settle as they rest.

Not sure which version fits your meal? Use the style guide below before you start mixing.

Homemade Tartar Sauce at a Glance

Prep time10 minutes
Cook time0 minutes
Rest time15–30 minutes recommended; 1 hour if using raw onion or shallot
YieldAbout 1¼ cups / 300 ml
Serving size2 tablespoons / 30 ml
Servings8–10
Best withFish and chips, fried fish, fish sticks, seafood cakes, shrimp, fries, and fish sandwiches
Main textureThick, spoonable, lightly chunky, and easy to dip
StorageMayo-based sauce: best quality within 4–7 days; Greek yogurt sauce: 2–3 days
FreezingNot recommended

Start with this bowl when dinner is moving fast; the notes below are there for texture choices, missing ingredients, lighter bases, and different seafood plates.

Homemade Tartar Sauce Recipe for Fish and Chips

This no-cook sauce is thick enough to sit on hot fish without sliding off, but still loose enough to spoon. The key is fine chopping: the pickles and capers should show up in every bite without turning the sauce into a bowl of relish.

Make the bowl before the fish goes in the oil, and the sauce will taste more settled by the time dinner is ready.

Prep10 minutes
Cook0 minutes
Rest15–30 minutes
Yield1¼ cups / 300 ml

Ingredients

  • 1 cup mayonnaise, about 225 g / 240 ml / 8 fl oz
  • ⅓ cup finely chopped dill pickles, gherkins, or cornichons, about 55–65 g
  • 1 tablespoon capers, drained and chopped, about 9–10 g
  • 1 tablespoon fresh lemon juice, 15 ml
  • 1–2 teaspoons pickle juice, optional, for extra tang or to loosen the sauce
  • 1 teaspoon Dijon mustard, 5 ml
  • 1 tablespoon chopped fresh dill or parsley, about 2–4 g
  • 1 tablespoon finely minced shallot or onion, optional
  • ½ teaspoon Worcestershire sauce, optional
  • ¼ teaspoon black pepper
  • Salt, only if needed

Method

  1. Chop the mix-ins finely. Finely chop the pickles, capers, herbs, and optional shallot or onion. Smaller pieces give the sauce better texture and more even flavor. If one bite tastes like plain mayo and the next tastes like a pickle jar, the pieces are too big.
  2. Mix the base. Add the mayonnaise, lemon juice, Dijon mustard, and black pepper to a bowl. Stir until smooth.
  3. Fold in the flavor. Add the chopped pickles, capers, herbs, optional pickle juice, and optional onion or shallot. Stir until evenly combined.
  4. Taste before salting. Pickles and capers are salty, so add salt only after tasting.
  5. Rest if possible. Cover and refrigerate for 15–30 minutes. The sauce works immediately, but resting lets the chopped ingredients season the mayo.
  6. Adjust and serve cold. Stir once more before serving. Add lemon for lift, pickle juice for tang, mayo for softness, or capers for a saltier seafood edge.

Finished taste cue: The sauce should taste creamy first, then pickle-crunchy and lemony, with a light finish. If it feels heavy, add lemon or pickle juice. If it bites too hard, soften it with another spoonful of mayo.

Recipe Notes

  • Want it sweeter? Swap the chopped dill pickles for sweet pickle relish.
  • Serving fried fish? Use dill pickles, capers, lemon, and herbs.
  • Prefer a smoother sandwich sauce? Mince the pickles and capers very finely or pulse once or twice.
  • Making it vegan? Choose vegan mayo and skip Worcestershire sauce unless you are using a vegan one.
  • Want it lighter? Replace half or all of the mayo with plain Greek yogurt.
  • Keeping it keto? Choose full-fat mayo, dill pickles, capers, lemon, herbs, and no sweet relish or sugar.
  • Yield note: Yield varies slightly depending on how finely the pickles are chopped and whether you add pickle juice.

For more swaps and missing-ingredient fixes, see the substitution guide.

Choose Your Tartar Sauce Style

Use this table when you already know what is on the plate. It keeps the sauce matched to the meal without overthinking the bowl.

You are servingUse this style
Fish and chipsDill pickles or gherkins, capers, lemon, and herbs
Fish sticksSweet relish, mayo, and lemon juice
Fried fish sandwichFinely minced relish or pickles, a little onion, and a smoother texture
Crab cakesLemon, capers, dill, and a little extra pepper or cayenne
Salmon cakesExtra dill, lemon zest, and a thicker mayo base
No picklesCapers, shallot, lemon juice, and Dijon
Lighter sauceHalf mayo and half Greek yogurt
Keto or low-carb mealFull-fat mayo, dill pickles, capers, lemon, and no sweet relish
Guide showing tartar sauce styles for fish and chips, fish sticks, fried fish sandwiches, crab cakes, salmon cakes, lighter sauce, no-pickle sauce, and low-carb meals
The best bowl depends on the meal: sharper for crisp seafood, smoother for sandwiches, and lighter when the plate needs a fresher finish.

Why This Tartar Sauce Recipe Works

This sauce works because it balances fat, acid, salt, crunch, and rest time. Mayo gives the sauce body, while lemon and pickle juice cut through the mayo’s richness. Pickles bring texture, capers add small salty pops, and a short chill lets the chopped ingredients season the mayo instead of sitting in it separately.

That is why finely chopping matters. Large pickle pieces make some bites taste plain and others taste too sharp. Smaller pieces spread flavor through the bowl, so each spoonful lands the same way.

What Is Tartar Sauce Made Of?

Tartar sauce, also called tartare sauce in the UK and some other regions, is a creamy sauce usually made with mayonnaise, pickles or relish, lemon juice, herbs, and salty ingredients such as capers. It is most often served with fried fish, fish and chips, fish sticks, crab cakes, shrimp, and seafood sandwiches.

The creamy base can be as simple as store-bought mayo, but if you want to build the sauce from scratch, MasalaMonk’s mayo recipe walks through classic, eggless, vegan, garlic, spicy, and herb mayo options.

Tartar sauce ingredients on a light surface, including mayonnaise, dill pickles, capers, lemon, Dijon mustard, herbs, black pepper, and shallot
This small ingredient list works because every part has a job: mayo gives body, pickles add crunch, capers bring salt, and lemon keeps the sauce awake.
IngredientWhat it doesCan you skip or swap it?
MayonnaiseCreates the thick, creamy base.Swap in vegan mayo, Greek yogurt, sour cream, or a half-mayo, half-yogurt mix.
Dill pickles, gherkins, or cornichonsAdd crunch, acidity, and pickle flavor.Sweet relish works for a sweeter sauce; capers help if you have no pickles.
CapersAdd small salty pops that suit seafood.Optional, but worth using. Replace with extra pickles or pickle juice.
Lemon juiceLifts the mayo and cuts through fried food.Pickle juice, white vinegar, or apple cider vinegar can stand in.
Dijon mustardAdds gentle sharpness and depth.Yellow mustard, a little vinegar, or no mustard at all will still work.
Dill, parsley, chives, or tarragonAdd freshness and color.Dried dill works in a pinch; otherwise, leave herbs out.
Shallot or onionAdds savory bite.Optional. Onion powder gives a milder pantry-style flavor.
Worcestershire sauceAdds a deeper savory note.Optional. Skip for vegetarian or vegan tartar sauce unless using a vegetarian or vegan Worcestershire.

The Only Equipment Detail That Matters: Chop Size

No blender is needed. A bowl, spoon, knife, cutting board, and storage jar are enough. The important part is chop size: pickles and capers should be small enough to spread through the mayo, but not so tiny that the sauce loses texture.

Comparison of coarse, fine, and very fine chopped pickles and capers with tartar sauce texture samples
Chop size is the quiet difference between homemade tartar sauce that tastes balanced and a bowl where one bite is plain while the next is all pickle.

Use a small food processor only when you want a smoother sandwich-style sauce. For dipping fish and chips, a knife gives better control.

After chopping, check the finished texture target so the sauce clings without turning stiff or runny.

How to Make Tartar Sauce Step by Step

1. Chop the Pickles and Capers Finely

The sauce should not feel like chopped pickles held together with mayo. Chop the pickles, capers, herbs, and optional onion finely so every spoonful tastes balanced. If the pieces are too large, some bites taste salty and others taste plain.

2. Mix the Mayo, Lemon, and Mustard First

Add the mayonnaise to a small bowl, then stir in the lemon juice, Dijon mustard, and black pepper. This loosens the mayo slightly and helps the sharper ingredients spread evenly before the chunky ingredients go in.

3. Fold in the Pickles, Capers, and Herbs

Add the chopped pickles, capers, herbs, and optional onion or shallot. Stir until everything is evenly coated. The sauce should look creamy and speckled, with small bits of pickle, caper, and herbs in every spoonful.

4. Taste Before Adding Salt

Pickles, relish, capers, mustard, and Worcestershire sauce can all bring salt. Taste before adding more. If the bowl feels dull, it may need lemon juice, pickle juice, capers, or mustard before it needs salt.

5. Chill, Then Adjust

You can serve it immediately, but 15–30 minutes in the fridge improves the flavor. Stir once more before serving. Add lemon for lift, pickle juice for tang, mayo for softness, or capers for a saltier seafood edge.

Here is the full stir-and-chill sequence at a glance.

Step-by-step tartar sauce process showing chopped mix-ins, mayonnaise base, pickles, capers, herbs, tasting, chilling, and finished sauce
Even though tartar sauce is no-cook, sequence still matters: chop small, season the base, fold gently, taste late, and chill before serving.

Texture Target: Chunky Dip or Smooth Sandwich Sauce

The sauce should be thick enough to sit on a piece of fish without sliding off, but loose enough to spoon easily. For dip texture, keep the pickles and capers finely chopped but visible. For sandwich texture, mince everything smaller or pulse once or twice.

Texture guide showing tartar sauce that is too thick, just right, too thin, chunky for dipping, and smoother for sandwiches
Aim for a sauce that holds on a spoon without feeling stiff. Keep dip versions chunkier and sandwich versions finer.

If the sauce looks stiff, loosen it with pickle juice, lemon juice, or a teaspoon of water. If it looks runny, add a spoonful of mayo and chill it for 15–30 minutes. A good bowl should cling, not puddle.

If the sauce has already gone too thick, thin, sweet, or salty, use the troubleshooting guide before making bigger changes.

3-Ingredient Tartar Sauce

When you need the fastest bowl, you only need mayonnaise, pickles or relish, and lemon juice or pickle juice. This quick pantry sauce is not as layered as the full recipe, but it is exactly right for fish sticks, quick fried fish, frozen seafood, sandwiches, and busy weeknight dinners.

In a hurry, use relish and the sauce is closer to 5 minutes. For the best fish-and-chips texture, finely chopping pickles, capers, and herbs is worth the extra few minutes.

Sweet Relish 3-Ingredient Tartar Sauce

  • 1 cup mayonnaise
  • ⅓ to ½ cup sweet pickle relish
  • 1 teaspoon lemon juice

Dill Pickle 3-Ingredient Tartar Sauce

  • 1 cup mayonnaise
  • ⅓ cup finely chopped dill pickles
  • 1–2 tablespoons pickle juice or lemon juice

Stir, taste, and chill if possible. More pickle juice makes the bowl tangier; another spoonful of mayo softens it.

Two three-ingredient tartar sauces made with mayonnaise, sweet relish or dill pickles, and lemon juice or pickle juice
Three ingredients can still make a useful quick tartar sauce: relish gives a softer finish, while dill pickles give a sharper one.

If one of those ingredients is missing, the substitution section below will help you rebuild the bowl.

Sweet Relish vs Dill Pickles: Which Is Better?

Team dill pickle for fish and chips, team sweet relish for fish sticks — both have a place, but they are not the same sauce. Dill pickles, gherkins, and cornichons give you a more direct pickle bite. Sweet relish gives you a softer, sweeter, more diner-style sauce.

Beside crisp battered fish, dill pickles or gherkins are the better default. If you want both directions in one bowl, use half dill pickle and half sweet relish.

Side-by-side comparison of sweet relish tartar sauce and dill pickle tartar sauce with serving cues for sandwiches and fish and chips
Sweet relish and dill pickles both belong in tartar sauce, but they solve different cravings: soft and familiar versus crisp and pickle-bright.

For the full fried-fish version, jump to the fish-and-chips sauce section.

Best Tartar Sauce for Fish and Chips

The best tartar sauce for fish and chips should be thick, cold, pickle-forward, and lemony enough to wake up the batter. Make it first, then let it chill while the fish cooks and the chips finish.

Crispy battered fish being dipped into thick homemade tartar sauce with chips and lemon nearby
Mix the tartar sauce before frying, because a short chill makes the sauce taste settled by the time the fish is hot and crisp.

If you are making the full meal, pair this sauce with MasalaMonk’s fish and chips recipe. While the sauce rests, you can prep the batter from MasalaMonk’s fish batter recipe so the cold sauce and hot coating are ready at the same time.

The goal is not fancy. It is that second bite where the fish still feels crisp and the sauce makes it easier to keep going.

What to Serve with Tartar Sauce

Once the basic sauce is made, adjust the texture or seasoning for the food beside it instead of repeating the whole recipe.

Serve withSmall adjustment
Fries or chipsLoosen slightly with pickle juice so it dips easily.
Crab cakesAdd extra lemon, capers, and a pinch of cayenne.
Salmon cakesAdd more dill and a little lemon zest.
ShrimpKeep it lighter with parsley, lemon, and less onion.
Fried fish sandwichMince everything smaller so the sauce spreads cleanly.
CatfishAdd hot sauce, Cajun seasoning, or Old Bay-style seafood seasoning.
Serving guide showing tartar sauce with fries, crab cakes, salmon cakes, shrimp, a fried fish sandwich, and catfish
After the base is ready, adjust by the plate: loosen it for fries, add lemon for seafood cakes, or mince it finer for a sandwich spread.

That same cold, lemony contrast works beside MasalaMonk’s fish cakes, especially against crisp potato and flaky white fish. It is just as useful with salmon croquettes, where the capers and dill echo the flavors already working in the patties.

For a fry-night plate, MasalaMonk’s battered fries give the sauce exactly what it wants: something hot, crisp, and salty to cut through.

Homemade vs Store-Bought Tartar Sauce

Store-bought tartar sauce is convenient, but homemade gives you control over the three things bottled sauces often get wrong: sweetness, acidity, and crunch. Some jars taste sugary. Others taste flat, heavy, or short on pickle texture.

Homemade tartar sauce with visible chopped pickles and herbs compared with smoother store-bought tartar sauce in an unbranded jar
Bottled sauce is convenient, but homemade tartar sauce lets you decide how sweet, sharp, chunky, or herb-forward the final bowl should be.

Homemade wins when you want a livelier lemon-and-pickle finish and better chop texture. Bottled wins when convenience matters more. That is the whole comparison.

Tartar Sauce Substitutions: No Relish, No Pickles, No Mayo, No Capers, No Lemon

This is the kind of sauce that forgives a half-empty fridge. If you have mayo and something pickled, you are already close. Use the table below to choose the best swap without pushing the sauce too thin, too sweet, or too sour.

MissingBestOkayBe careful with
RelishFinely chopped dill pickles, gherkins, or cornichonsCapers plus a little pickle juiceAdding sugar too early
PicklesCapers, shallot, lemon juice, herbs, and DijonSweet relish if you want a softer saucePlain mayo with no briny ingredient
MayoVegan mayoGreek yogurt, sour cream, or half yogurt and half mayoThin milk-based bases
CapersExtra chopped pickles or cornichonsPickle juiceAdding salt before tasting
LemonPickle juiceWhite vinegar or apple cider vinegarToo much vinegar at once
DillParsley, chives, or tarragonA pinch of dried dillToo much dried herb
Substitution guide for tartar sauce showing swaps for missing relish, pickles, mayonnaise, capers, lemon, and dill
Missing relish, lemon, capers, or mayo does not have to stop dinner; instead, choose swaps that keep the sauce creamy, seasoned, and balanced.
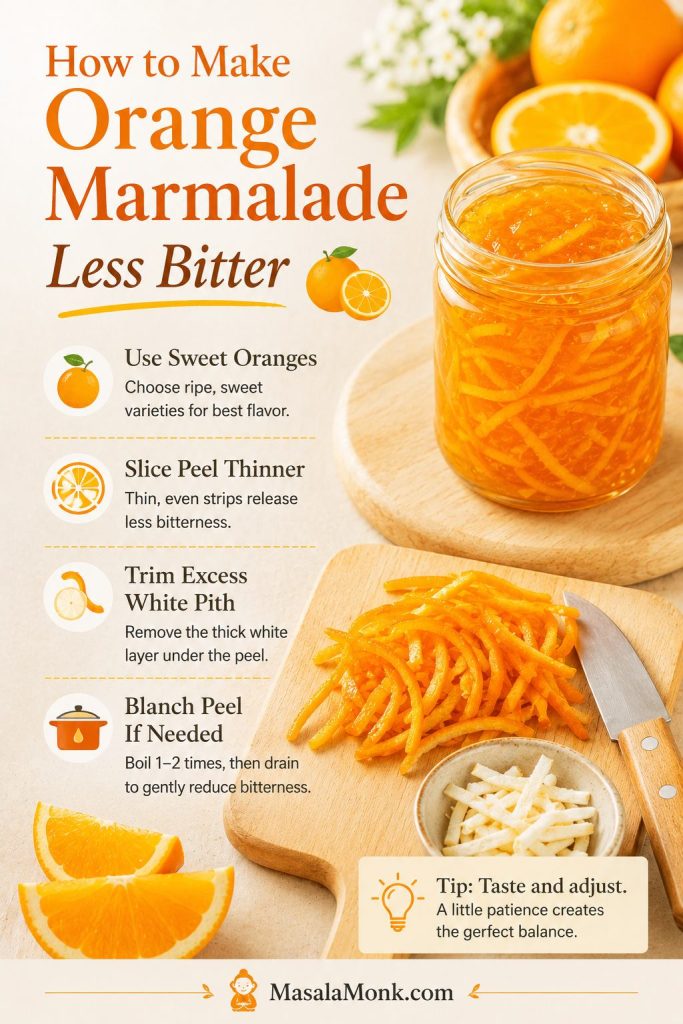
Tartar Sauce Without Relish

You do not need relish. Finely chopped dill pickles, gherkins, or cornichons often give better texture for fish and chips. If you still want sweetness, add a tiny pinch of sugar at the end.

Tartar Sauce Without Pickles

No pickles or relish is not ideal, but the sauce is saveable. Capers bring salt, lemon brings lift, Dijon adds sharpness, and a little minced shallot gives the base something savory to hold onto.

Tartar Sauce Without Mayo

For a no-mayo bowl, choose vegan mayo, Greek yogurt, or sour cream. Vegan mayo gives the closest classic texture. Greek yogurt makes it lighter and tangier, while sour cream makes it softer and richer.

Tartar Sauce Without Capers

Add extra chopped pickles for crunch, a spoonful of relish for sweetness, or a splash of pickle juice if the bowl tastes flat. Taste before adding salt because pickles may already bring enough.

Tartar Sauce Without Lemon Juice

Pickle juice is the easiest lemon swap because it brings tang and seasoning at the same time. Vinegar also works, but add it slowly so the sauce does not turn harsh.

Vegan, Dairy-Free, Low-Calorie, Keto, and Low-Carb Tartar Sauce

Once you know the balance, you can change the base without losing the sauce. The base can be mayo, vegan mayo, Greek yogurt, or sour cream; the rest of the bowl still needs pickle, acid, salt, and texture.

If you are choosing the base carefully, MasalaMonk’s eggless mayonnaise recipe explains the difference between egg-free mayo and fully vegan mayo.

NeedBest adjustment
Vegan or egg-freeChoose vegan mayo, then keep the same pickle, lemon, caper, herb, and Dijon balance.
Dairy-freeMayo-based tartar sauce is usually dairy-free, but not egg-free. Check labels, especially for flavored mayo or Worcestershire sauce.
Low-calorie or no-mayoChoose Greek yogurt, or use half yogurt and half mayo for a lighter sauce that still tastes creamy.
Keto, low-carb, or sugar-freeChoose full-fat mayo and dill pickles. Avoid sweet relish, added sugar, and sweetened sauces.
Low-sodiumUse fewer capers and pickles, then lean on lemon juice, herbs, black pepper, and a small amount of mustard.
Three tartar sauce bowls made with vegan mayonnaise, Greek yogurt, and sour cream as mayonnaise alternatives
A no-mayo tartar sauce still needs body, so vegan mayo gives the closest classic texture while Greek yogurt brings a lighter tang.

Fish Sandwich / Filet-O-Fish-Style Tartar Sauce

A fish sandwich-style sauce is smoother, sweeter, and more oniony. It makes more sense on a soft fish sandwich than beside a plate of crisp battered fish. Finely minced pickles or relish work better here than chunky pickle pieces, and a short chill helps the onion flavor settle into the mayo.

Fried fish sandwich with smooth tartar sauce spread, a crisp fish fillet, pickle flecks, herbs, and a soft bun
For a fried fish sandwich, finer chopping helps tartar sauce spread evenly instead of slipping out in large pickle-heavy bites.

This is a flavor direction, not an exact restaurant copy. Use dill relish or very finely minced pickles, add 1–2 teaspoons minced onion, add a tiny pinch of sugar if needed, and chill for at least 1 hour.

Flavor Variations

Think of the base sauce as the calm version. Lemon makes it livelier, Dijon makes it rounder, cayenne makes it warmer, and herbs make it fresher.

VariationHow to adjust 1 cup mayoBest with
Lemon-dillAdd ½ teaspoon lemon zest, 1 extra teaspoon lemon juice, and another tablespoon chopped dill.Salmon cakes, shrimp, lighter fish
Caper-forwardIncrease capers to 2 tablespoons and use cornichons or gherkins.Crab cakes, fried seafood, richer fish
SpicyAdd ½ teaspoon hot sauce or 1 teaspoon minced jalapeño, then taste after resting.Catfish, fried fish sandwiches, shrimp
Old Bay or CajunAdd ¼ teaspoon seasoning, then taste before adding salt.Seafood platters, shrimp, catfish
UK-style tartareUse gherkins or cornichons, capers, parsley, chives, and optional tarragon.Fried cod, haddock, thick chips
Five tartar sauce flavor variations labeled lemon-dill, caper-forward, spicy, Cajun-style, and UK-style tartare
Once the base sauce tastes balanced, keep flavor changes small: extra dill, more capers, gentle heat, seafood seasoning, or fresh herbs.

For a homemade heat option, MasalaMonk’s pepper sauce guide can help you choose a vinegar-forward hot sauce style.

Troubleshooting Homemade Tartar Sauce

Fix the bowl slowly. A teaspoon of lemon juice, pickle juice, mayo, or capers can change everything, so stir, taste, and adjust again before adding more.

ProblemFix nowPrevent next time
Too thickStir in lemon juice, pickle juice, or 1 teaspoon water at a time.Do not drain the pickles completely dry if you want a looser dip.
Too thinAdd more mayo and chill for 30 minutes.Add pickle juice slowly and drain watery relish before mixing.
Too sweetAdd lemon juice, chopped dill pickles, capers, Dijon, or herbs.Start with ⅓ cup relish, or use half dill pickle and half relish.
Too sourSoften with more mayo or a tiny pinch of sugar.Add vinegar or lemon in teaspoons, not tablespoons.
Too saltyAdd more mayo, Greek yogurt, or sour cream.Taste before salting because capers and pickles already season the sauce.
Too blandAdd capers, pickle juice, Dijon, lemon juice, pepper, or Worcestershire sauce.Use at least one pickled or salty ingredient, not mayo alone.
Too chunkyPulse briefly or chop the mix-ins finer.Use smaller dice for sandwich sauce and slightly larger dice for dip.
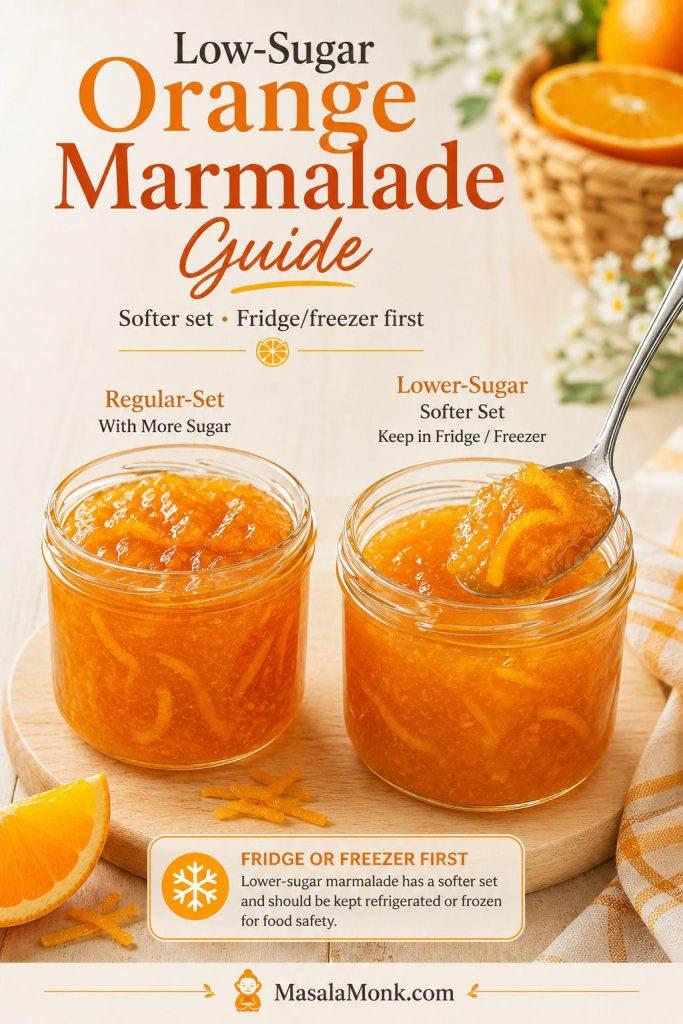
Watery after storageStir well and add a spoonful of mayo if needed.Drain relish better and avoid over-loosening before chilling.
Troubleshooting guide for tartar sauce that is too thick, too thin, too sweet, too salty, too chunky, or watery after storage
Fix tartar sauce in teaspoons, not big swings; a little pickle juice, mayo, lemon, or finer chopping can bring the whole bowl back into balance.

How to Store Tartar Sauce

Store the sauce in an airtight container in the refrigerator. A clean glass jar works well because it keeps the sauce covered and easy to stir before serving.

  • Mayo-based tartar sauce: best quality within 4–7 days when kept cold in a clean, airtight container.
  • Greek yogurt or no-mayo tartar sauce: best within 2–3 days because the texture loosens faster.
  • Homemade mayo, fresh onion, or yogurt sauces: use the shorter storage window.
  • Make-ahead: make it up to 1 day ahead for better flavor.
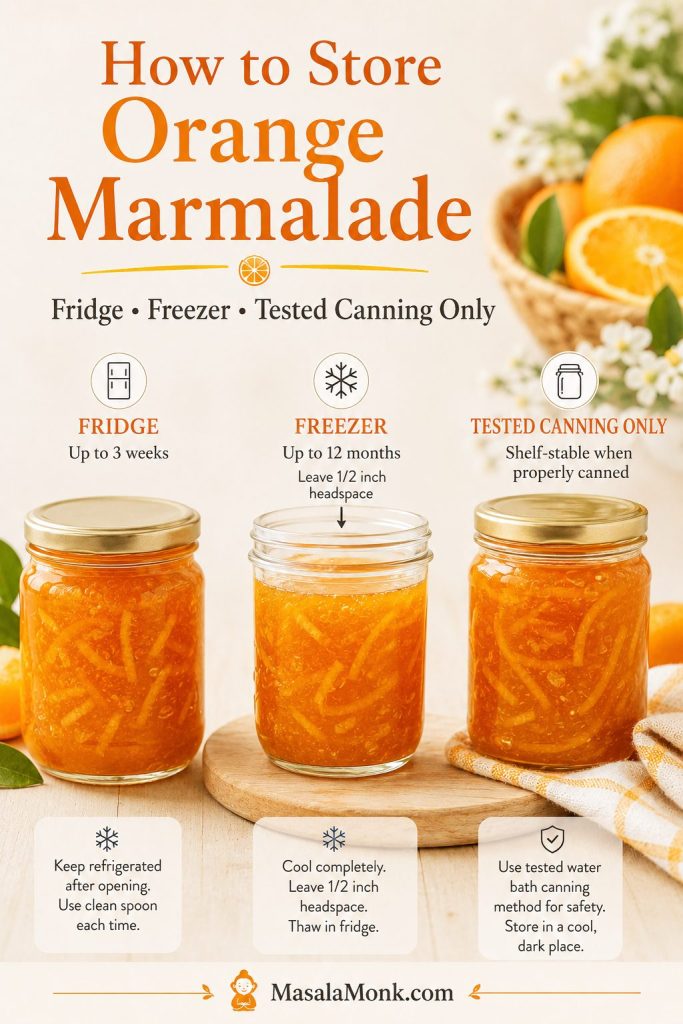
  • Long meals: return the sauce to the fridge when possible instead of leaving it out for hours.
  • Freezing: not recommended because mayo and yogurt-based sauces can split, turn watery, or lose their creamy texture.
Glass jar of homemade tartar sauce in the refrigerator with storage notes for mayo-based sauce, yogurt sauce, and freezing
Keep tartar sauce cold, stir it before serving, and avoid freezing so the creamy texture stays spoonable for the next fish-and-chips night.

If the sauce turns watery after chilling, use the troubleshooting guide before serving.

For mayo- or yogurt-based sauces, follow the general two-hour rule for perishable foods: do not leave them out through a long meal before returning them to the fridge.

If the sauce smells off, tastes sour in an unpleasant way, or has been left out too long, discard it.

Frequently Asked Questions

Is tartar sauce the same as tartare sauce?

Yes. In most recipe contexts, tartar sauce and tartare sauce mean the same creamy pickle-based sauce for fish and seafood. “Tartare sauce” is more common in the UK and some other regions.

What is the best pickle for tartar sauce?

Dill pickles, gherkins, and cornichons are best for a fish-and-chips sauce. Sweet pickle relish is better for a sweeter diner-style or fast-food-style sauce.

Does tartar sauce need capers?

No. It can be made without capers, but they add small salty pops that work especially well with seafood. If you skip them, add extra chopped pickle, relish, or pickle juice.

How long should tartar sauce chill before serving?

It can be served immediately, but 15–30 minutes in the fridge improves the flavor. If you added raw onion or shallot, 1 hour is better because the bite softens as it rests.

Can tartar sauce be made ahead?

Yes. Make it a few hours ahead or up to 1 day ahead, then stir and taste before serving. Add a little lemon juice or pickle juice if it needs freshening up.

Is tartar sauce dairy-free?

Many mayo-based tartar sauces are dairy-free, but check the mayonnaise and optional sauces you use. Greek yogurt, sour cream, buttermilk, and crème fraîche sauces are not dairy-free. For a dairy-free and egg-free bowl, use vegan mayo.

What makes homemade tartar sauce taste better than bottled?

Fresh lemon juice, chopped pickles, herbs, and adjustable sweetness make it taste fresher than most bottled sauces. You can push it sharper, sweeter, smoother, or lighter depending on the meal.

What is the best tartar sauce for fish and chips?

Use the dill-pickle version in the recipe card: mayo, dill pickles or gherkins, capers, lemon, herbs, Dijon, and black pepper. Keep it chilled until serving.

Can tartar sauce be frozen?

Freezing is not recommended. Mayo and yogurt-based sauces can split after thawing, leaving the sauce watery, grainy, or oily.

What is the difference between tartar sauce and remoulade?

Tartar sauce is usually a simpler mayo, pickle, lemon, caper, and herb sauce for fish and seafood. Remoulade is more seasoned and can include mustard, garlic, paprika, hot sauce, horseradish, spices, or seafood seasoning.

Final Sauce Notes

A good tartar sauce should not steal the plate. It should sit beside the fish, cling when you dip, and make the next hot bite easier to enjoy — which is exactly why a small bowl made before frying can change the whole meal.

Back to top