Open your pantry or your bathroom cabinet—there’s a good chance you’ll find palm oil somewhere. It’s in cookies, margarine, instant noodles, ice cream, peanut butter, lipstick, shampoo, and even soap. But is it a health hazard lurking in your food and beauty products? Or just another victim of online misinformation?
Let’s dig into the facts, the controversies, and—most importantly—what it means for you.
What Is Palm Oil, and Why Is It Everywhere?
Palm oil comes from the fruit of the oil palm tree (Elaeis guineensis), mostly grown in Indonesia and Malaysia. It’s cheap, versatile, and shelf-stable—all reasons it’s beloved by food manufacturers. It’s also incredibly high-yield, making it more land-efficient than almost any other oil crop.
But all this popularity comes with questions about health, ethics, and sustainability.
Palm Oil’s Nutritional Profile: What’s In It?
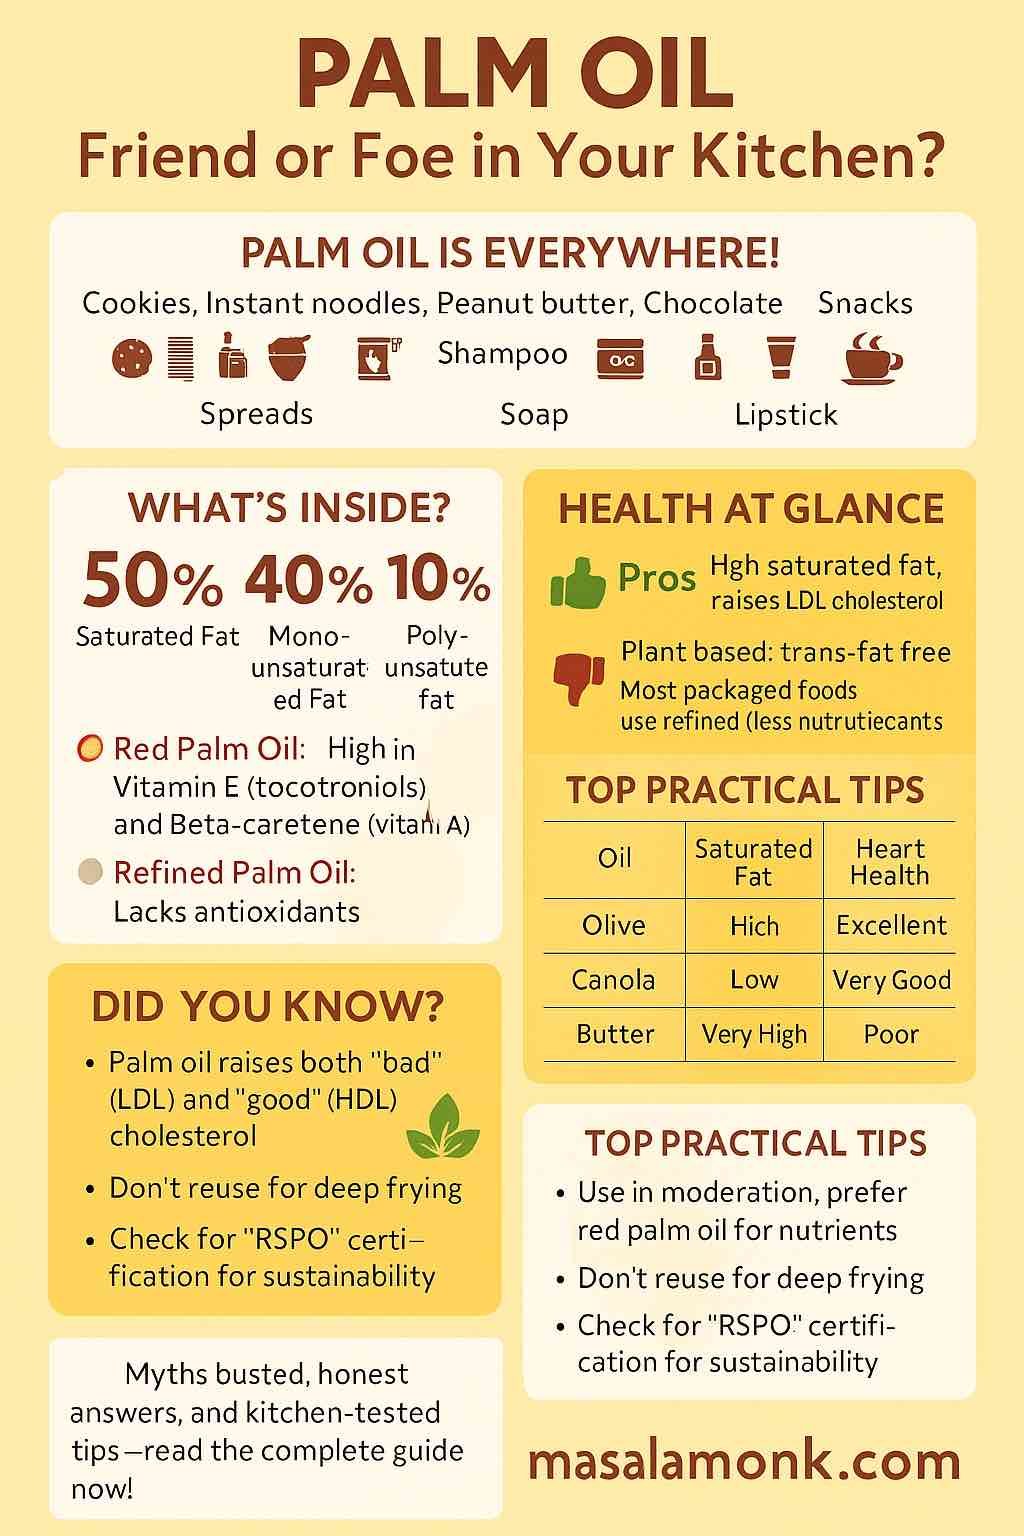
- Fat Content: Roughly 50% saturated fat (mostly palmitic acid), 40% unsaturated fat, and 10% polyunsaturated fat.
- Unrefined (“Red”) Palm Oil: Rich in carotenoids (pro-vitamin A) and tocotrienols (a powerful form of vitamin E).
- Refined Palm Oil: The most common type in processed foods—lacks the vivid red color and much of the original antioxidants.
Is Palm Oil Bad for Your Heart?
This is the big question, and here’s what the science says:
1. Saturated Fat and Cholesterol
Palm oil is high in saturated fat, and saturated fat can raise your LDL (“bad”) cholesterol.
But it’s not black and white:
- Studies show palm oil raises LDL less than animal fats (like butter or lard), but more than heart-healthy oils (olive, canola).
- Palm oil also raises HDL (“good”) cholesterol, somewhat offsetting its impact.
Key takeaway:
Replacing trans fats or animal fats with palm oil is likely neutral or even beneficial. But if you swap olive oil for palm oil, your heart might not thank you.
2. Red Palm Oil: The Antioxidant Angle
Unrefined red palm oil is a different story. It contains:
- Tocotrienols: These rare vitamin E forms are linked to lower cholesterol, brain protection, and reduced inflammation.
- Carotenoids: Precursors to vitamin A, vital for vision and immunity.
Caveat: Most palm oil in processed foods is refined—it’s missing these benefits.
3. Population and Meta-Analysis Data
- Ecological studies (large population data) show a small increase in heart disease risk in countries with high palm oil consumption—but this risk is far smaller than that posed by animal fats.
- Recent meta-analyses confirm: Moderation is key. Palm oil is not a “superfood,” but it’s not the villain it’s sometimes made out to be.
Processing Matters: Contaminants and Frying Dangers
Here’s where things get nuanced:
- Refined palm oil (the kind in most packaged foods) can contain heat-derived contaminants like glycidyl esters and 3-MCPD—possible carcinogens in high doses, especially concerning for infants.
- Repeated heating (like deep-frying oil used again and again) forms more of these contaminants and oxidative products, which may promote inflammation and other chronic diseases.
Takeaway:
Fresh, unrefined, or lightly processed palm oil is far safer than repeatedly heated or heavily processed versions.
How Does Palm Oil Compare to Other Oils?
| Oil Type | Saturated Fat | Antioxidants | Impact on Heart Health |
|---|---|---|---|
| Palm Oil | High (~50%) | Medium (if unrefined) | Neutral/moderate risk |
| Olive Oil | Low | High | Best for heart health |
| Canola/Soybean Oil | Low | Medium | Heart healthy |
| Coconut Oil | Very High | Low/Medium | Worse than palm oil for heart |
| Butter | Very High | Low | Increases heart risk |
| Margarine (old) | Trans fats | Low | Worst (now mostly replaced) |
So, Should You Avoid Palm Oil?
Let’s make it practical:
- If you eat a balanced diet, palm oil in moderation is not a major concern—especially compared to animal fats or trans fats.
- If you use red palm oil (unrefined), you get a bonus of antioxidants and vitamin A.
- If you deep fry with palm oil, limit how many times you reuse it.
- If you have high cholesterol or heart disease, favor olive oil, canola, or other unsaturated oils for daily cooking.
- If you’re shopping for packaged foods, check labels—not just for palm oil, but for total saturated fat content.
Ethical and Environmental Footnote
It’s impossible to discuss palm oil without mentioning deforestation, habitat loss, and endangered wildlife. If you care about the planet:
- Look for RSPO-certified (Roundtable on Sustainable Palm Oil) or similar sustainable certifications.
- Favor brands transparent about sourcing.
Practical Tips: How to Live with Palm Oil
- Rotate your oils: Use a variety of fats—olive oil for salad and low-heat cooking, canola for baking, a bit of red palm oil for flavor and nutrients.
- Read your labels: Many “healthy” snack foods are still high in palm oil and saturated fat.
- Don’t panic over a cookie: Occasional consumption in a balanced diet is fine.
- If you supplement with tocotrienols: Seek out high-quality, tested products—research is promising but still evolving.
Conclusion: Not a Supervillain, Not a Superfood
Palm oil is neither a nutritional demon nor a miracle ingredient. Like most things in nutrition, context and moderation matter most. If you’re mindful about your total saturated fat intake, balance your fats, and choose unrefined or sustainably sourced palm oil when possible, you’re doing just fine.
Want to keep your heart healthy?
Prioritize unsaturated fats, lots of plants, and whole foods. Let palm oil be a supporting actor—not the star.
Further Reading
- Is palm oil bad for you? – Medical News Today
- Palm Oil—Health Effects to Know – Verywell Health
- By the way, doctor, is palm oil good for you? – Harvard Health
- The Evidence Behind Seed Oils’ Health Effects – JHU
Have a question or want to learn more about specific oils, antioxidants, or label reading? Drop it in the comments!
10 FAQs About Palm Oil and Your Health
1. Is palm oil safe to eat every day?
Answer:
Yes, in moderation. For most healthy people, occasional consumption as part of a balanced diet is not a problem. However, try to keep overall saturated fat intake within health guidelines by rotating oils.
2. Is there a difference between red palm oil and regular palm oil?
Answer:
Absolutely! Red (unrefined) palm oil is high in antioxidants (like carotenoids and vitamin E tocotrienols), giving it a reddish color and more nutrients. Refined palm oil is pale and lacks most of these antioxidants.
3. Does palm oil really raise cholesterol?
Answer:
Palm oil contains about 50% saturated fat, which can raise LDL (“bad”) cholesterol, but also raises HDL (“good”) cholesterol. Its effect is less than butter or ghee, but more than olive or canola oil.
4. Can I use palm oil for deep frying?
Answer:
Yes, palm oil is stable at high temperatures, making it suitable for frying. However, avoid reusing oil multiple times to minimize harmful byproducts.
5. Is palm oil safe for children and infants?
Answer:
Small amounts are safe. Most infant formulas are regulated for palm oil contaminants. Focus on a varied diet for children and avoid excessive intake.
6. Is palm oil vegan or vegetarian friendly?
Answer:
Yes, palm oil is plant-based. But some vegetarians and vegans avoid it for environmental reasons—check for RSPO or other sustainable certifications if that’s important to you.
7. What health benefits does red palm oil offer?
Answer:
Red palm oil is a good source of vitamin A (from carotenoids) and vitamin E (from tocotrienols), which support vision, immunity, and antioxidant defenses.
8. How do I know if palm oil is in my food?
Answer:
Check ingredient lists for “palm oil,” “palmolein,” “palmitate,” or “vegetable oil (palm).” Many processed snacks, baked goods, and spreads contain it.
9. Does palm oil have any cancer risk?
Answer:
The oil itself isn’t carcinogenic, but when overheated or heavily processed, it can produce contaminants like glycidyl esters. Avoid reusing palm oil and opt for reputable brands.
10. How can I choose sustainable palm oil?
Answer:
Look for RSPO (Roundtable on Sustainable Palm Oil) or “certified sustainable” on labels. These products are produced with more attention to environmental impact.