There’s a particular moment in pizza making that feels like magic: you slide a raw, slightly wobbly round of dough into a hot oven, and within minutes it turns into something alive—edges lifting, bubbles forming, the bottom taking on color, the whole kitchen smelling like toasted wheat and caramelized cheese. When that dough is sourdough pizza dough, the magic gets a little deeper. The crust tastes fuller. The aroma is richer. Even a simple topping combo feels more “finished,” as if the base itself is seasoning the pizza.
At the same time, sourdough pizza dough can feel intimidating if you’ve only made quick yeast dough before. Starter timing, fermentation windows, sticky dough, shaping fears—there are a lot of ways to overthink it. So this post is built for real life: one reliable sourdough pizza dough recipe, clear steps that don’t require fancy equipment, and enough flexibility to handle a same-day bake or a cold ferment when you have time.
Along the way, you’ll also see natural variations—thin and crisp, chewier and thicker, or even a pan-friendly version—because one good sourdough pizza base should carry you through many pizza nights. When you want extra support, you can jump to MasalaMonk’s beginner-friendly sourdough starter recipe to tighten up feeding and starter strength, or browse the broader sourdough lineup in Sourdough Bread Recipes if you’re in the mood to bake beyond pizza.
And because pizza night is never only about the crust, you’ll also find an easy way to expand your topping and sauce options using MasalaMonk’s pizza sauce recipes and pesto recipe guide, plus a few cocktail pairings that make a homemade pie feel like a proper plan.
Let’s get into it.
Why sourdough pizza dough tastes better (and how to keep it easy)
Sourdough pizza has a flavor advantage that’s hard to miss: more depth, more aroma, a little tang, and a longer finish. The reason isn’t mysterious. Fermentation changes the dough. Over time, flour and water become something else—more fragrant, more elastic, and more flavorful.
Still, flavor alone doesn’t guarantee a great crust. A sourdough pizza crust can be pale, tough, or oddly dense if the bake setup is weak or if the dough never develops enough structure. That’s why this method is built around three practical goals:
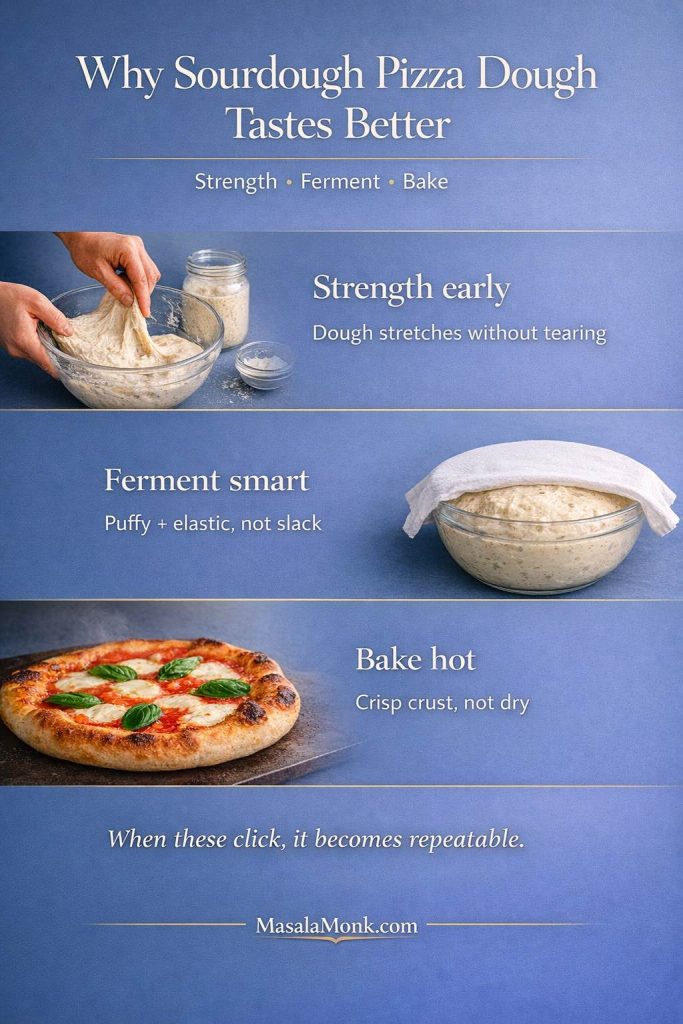
First, develop strength early so the dough stretches into a pizza base without tearing.
Second, ferment until the dough is lively but not collapsed, so you get lift instead of flatness.
Third, bake with enough heat that the crust sets quickly, which keeps it crisp rather than dry.
Once those three pieces click, sourdough pizza dough becomes repeatable. You’re no longer gambling on vibes—you’re steering the process.
If you want your starter to feel dependable before you begin, the day-by-day routine in MasalaMonk’s sourdough starter recipe is a solid foundation. It’s especially helpful if your starter tends to be sluggish, overly sour, or inconsistent from week to week.
Also Read: Balti Paneer Gravy (Restaurant-Style, Creamy + Bold Recipe)
Ingredients for sourdough pizza dough
A reliable sourdough pizza dough recipe doesn’t need an ingredient parade. In fact, fewer ingredients usually means fewer surprises.
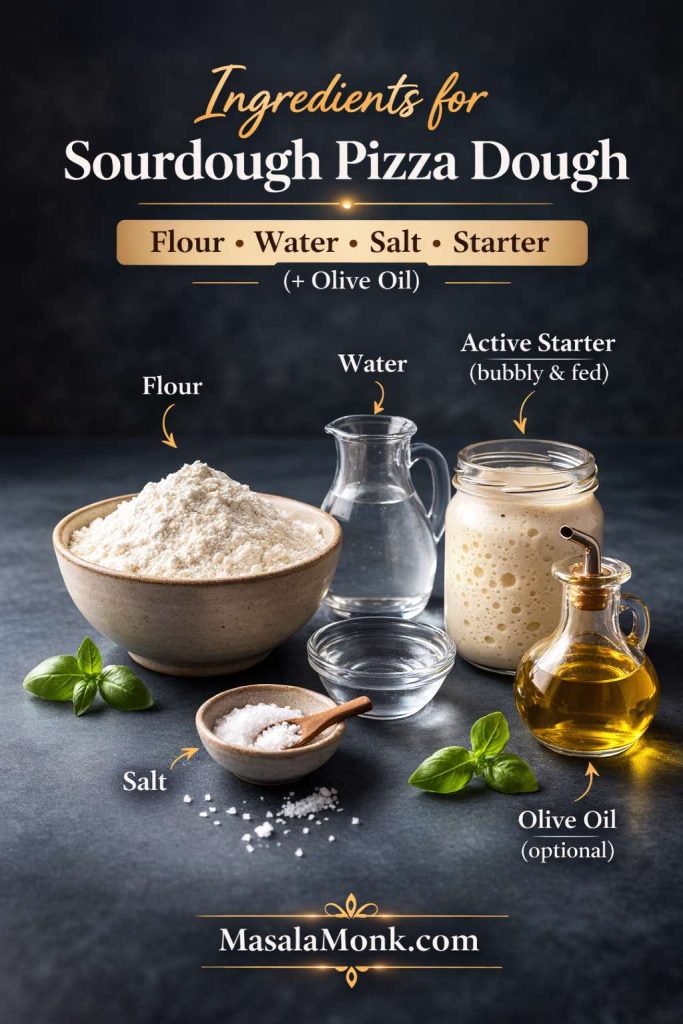
What you need
- Flour: bread flour works beautifully; “00” flour is also excellent; a blend is ideal if you like
- Water: room temperature for most kitchens
- Salt: essential for flavor and dough strength
- Active sourdough starter: bubbly and recently fed
- Olive oil (optional): helpful for tenderness in a home oven and makes handling easier
That’s it. Everything else—sugar, honey, malt, milk—can come later if you want to experiment. For now, this base method covers the core “pizza dough with sourdough starter” approach and gives you a crust that can go thin and crisp or thicker and chewier depending on how you shape it.
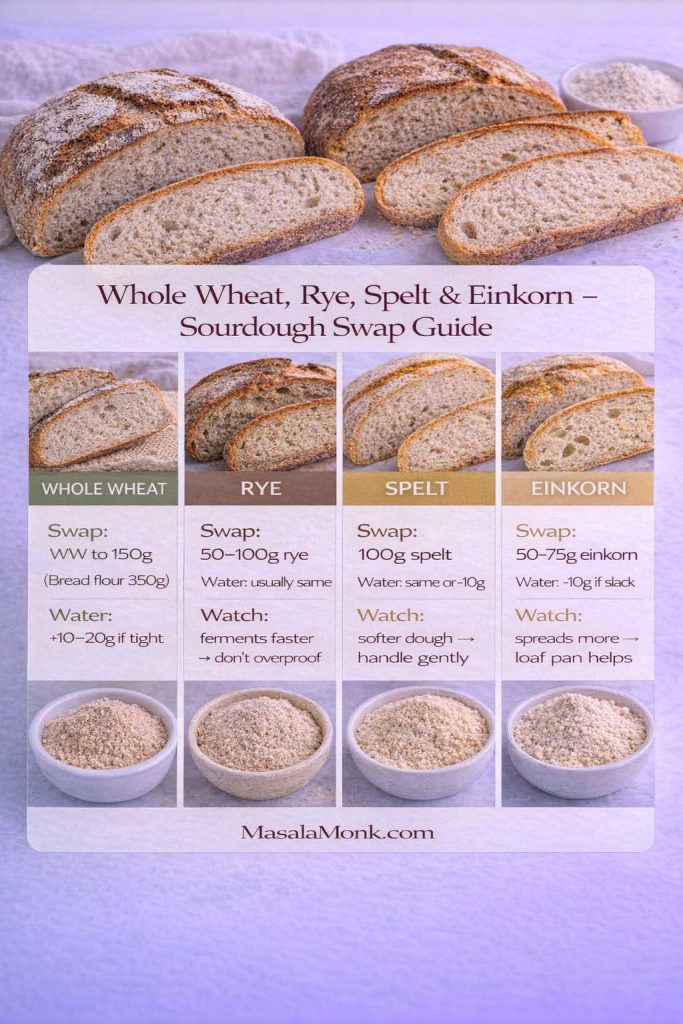
About the flour choice (simple, useful guidance)
If you already have bread flour, use it. Bread flour tends to make shaping easier because it’s naturally stronger. If you have “00” flour, it can produce a beautifully tender yet crisp crust, especially in hotter bakes. If you want the best of both worlds, blend them: part bread flour for strength, part “00” for tenderness.
Meanwhile, if you only have all-purpose flour, you can still make sourdough pizza dough. You may simply need a slightly gentler hand during stretching and a little more attention to dough strength early on.
Also Read: Mojito Recipe (Classic) + Ratios, Pitcher, Mocktail & Easy Variations
Active starter vs discard for sourdough pizza
This matters, and the good news is that it’s not complicated.
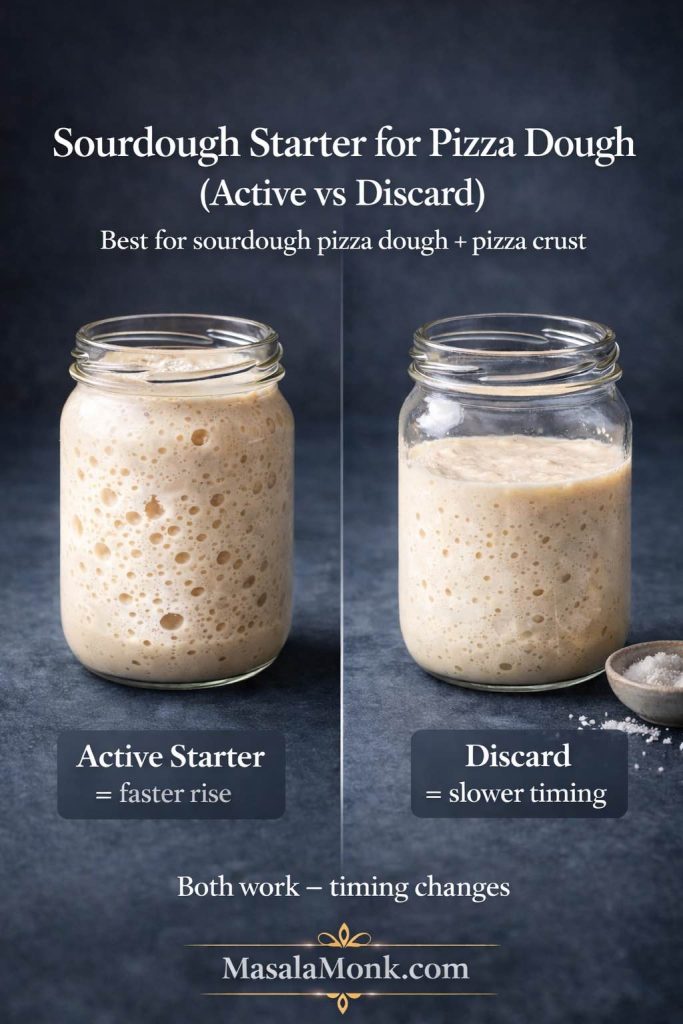
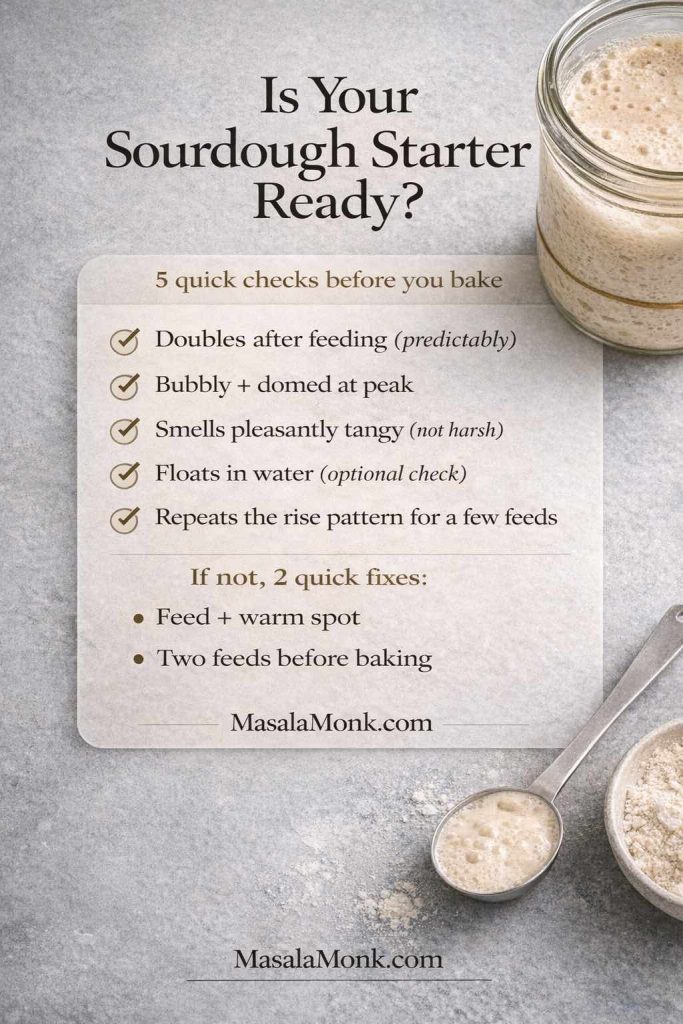
Active starter = predictable rise, cleaner timing
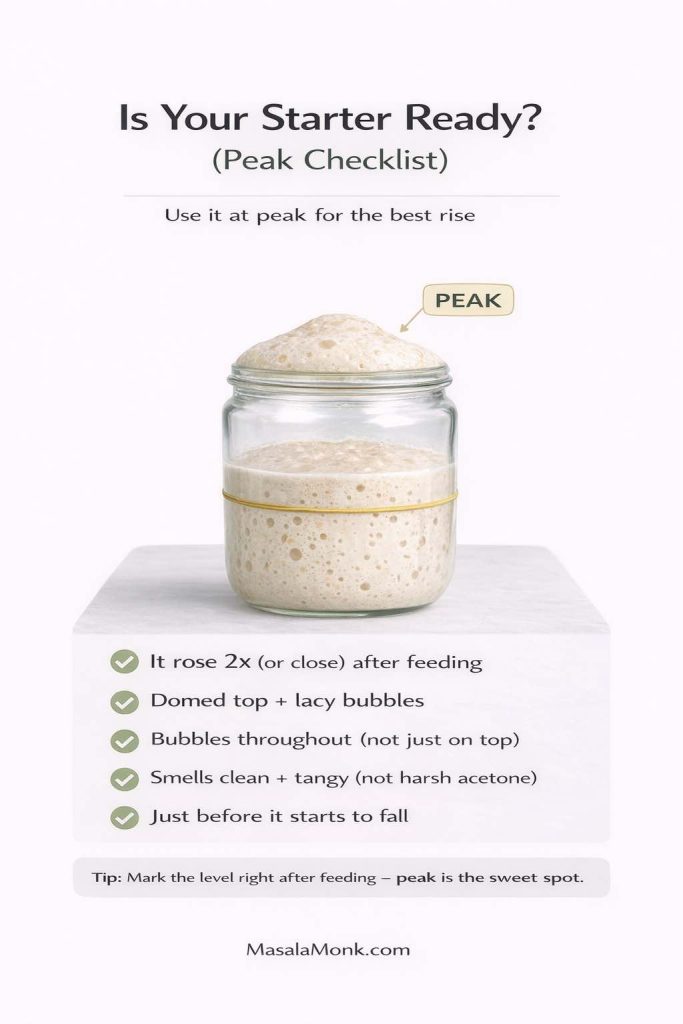
For the main sourdough pizza dough recipe below, an active starter is your best friend. A starter that has been fed and is bubbling well will ferment dough in a more predictable window and usually gives better lift.
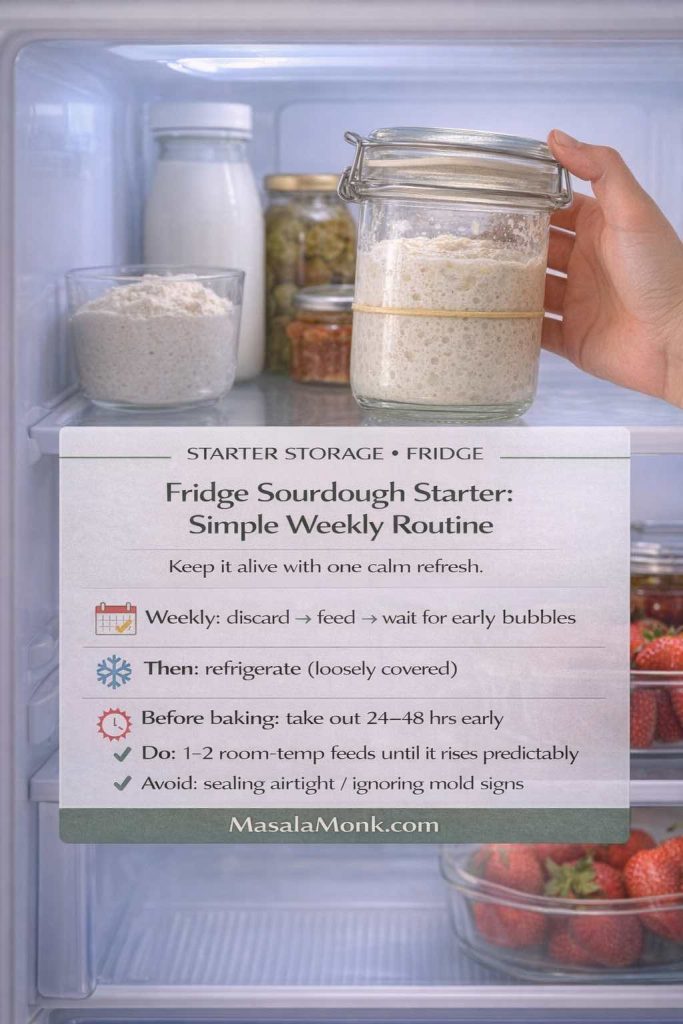
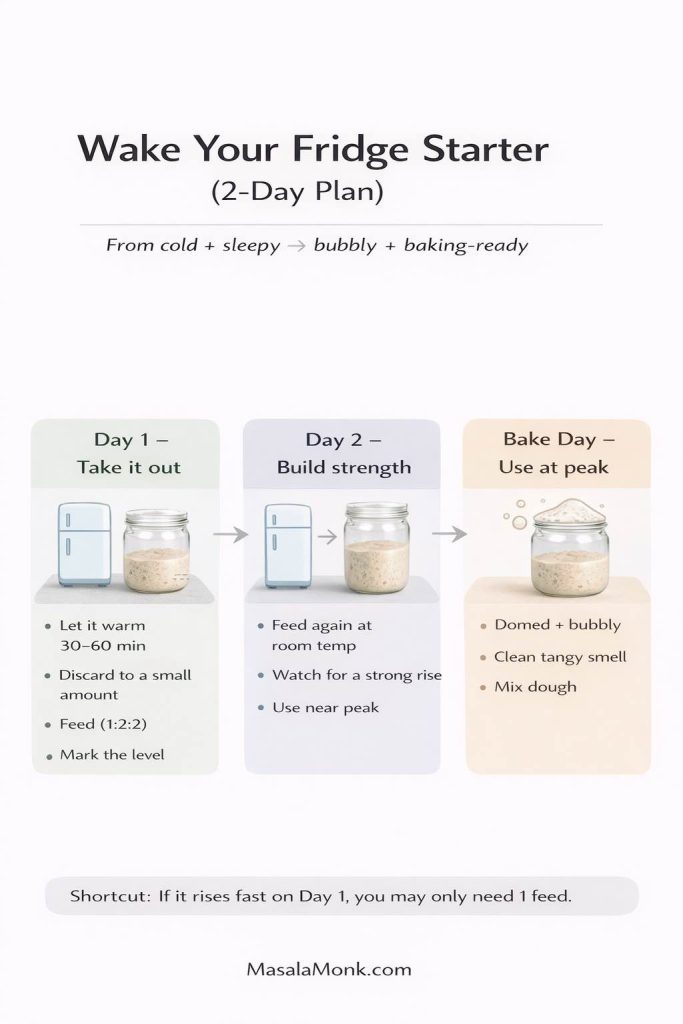
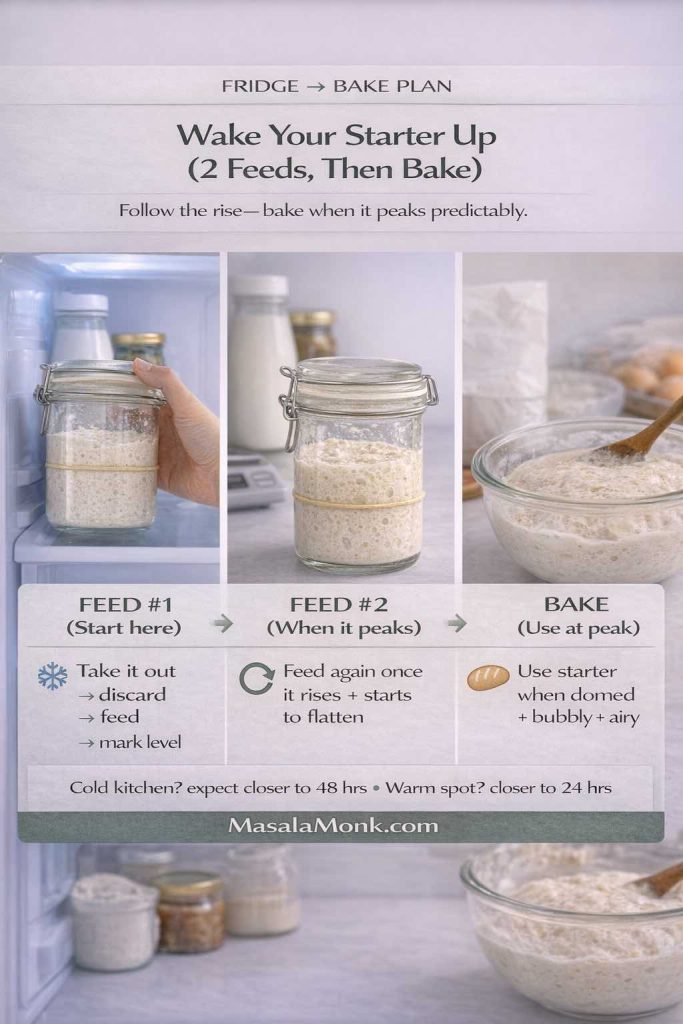
If you’re unsure whether your starter is “ready,” the quick-read approach is simple: it should look airy, smell pleasantly tangy (not harsh), and show visible activity. If it’s been in the fridge, give it a feed or two at room temperature until it behaves consistently again. The troubleshooting steps in the sourdough starter recipe guide are especially useful for this.
Discard can work too, but it’s a different lane
Sourdough discard pizza can be fantastic, particularly for bolder toppings and deeper flavor. However, discard-based dough behaves differently and often needs adjustments. If you want a dedicated discard approach, King Arthur’s sourdough discard pizza crust recipe is a trustworthy reference and a nice option when your starter is unfed but you still want pizza tonight.
For this post, though, we’ll build the primary dough with active starter, then you can branch out once you’ve nailed the method.
Also Read: Paloma Recipe: 12 Paloma Cocktail Drinks
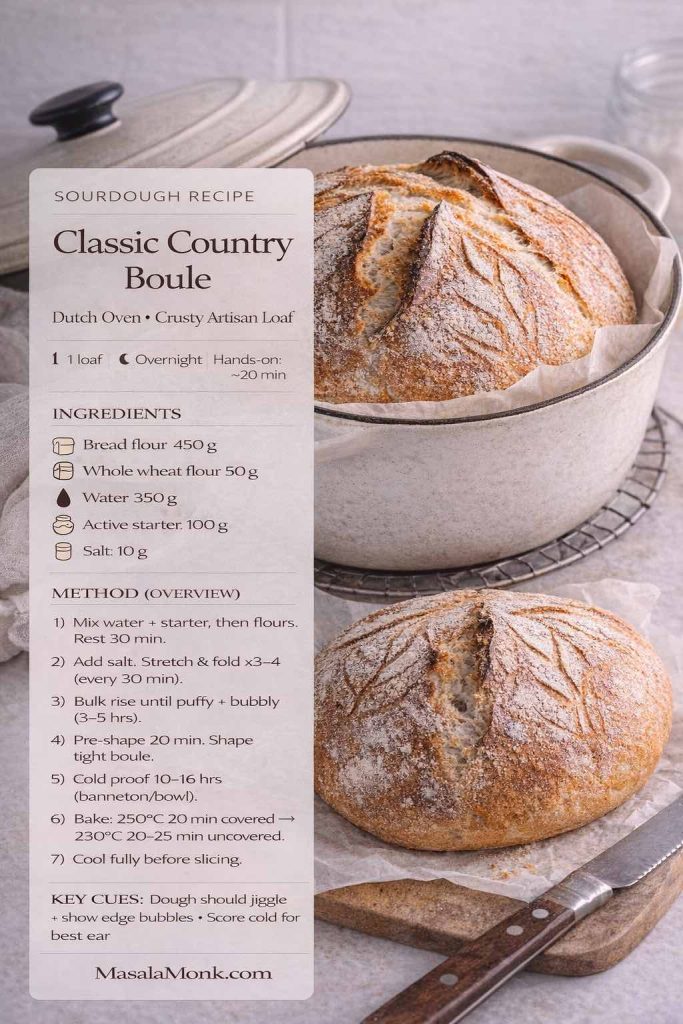
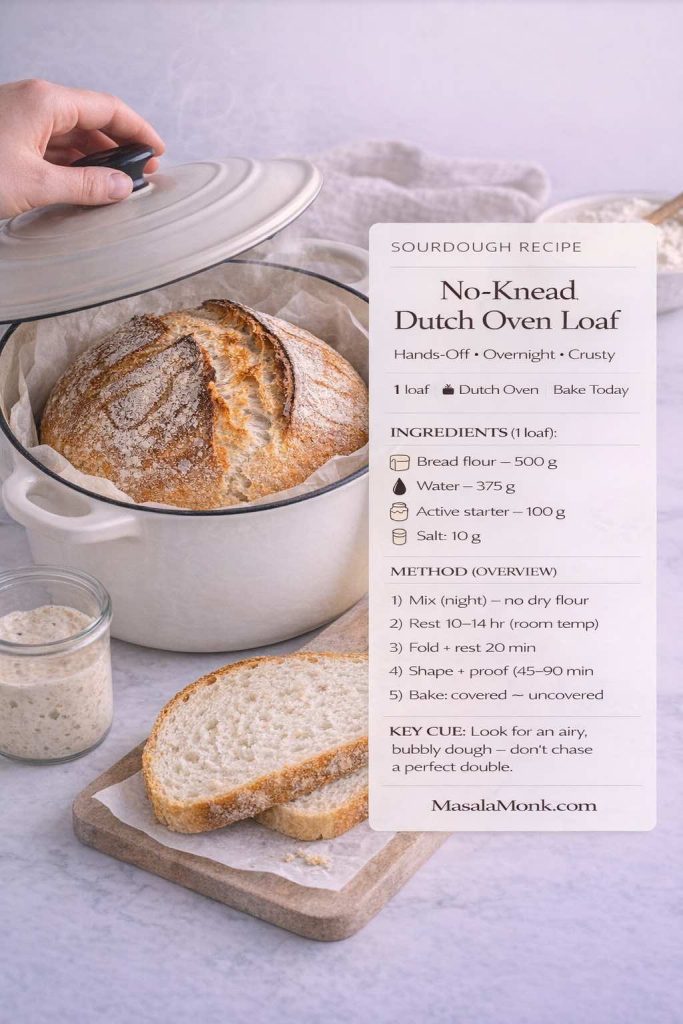
The sourdough pizza dough recipe (makes 2 large pizzas or 3 medium)
This recipe is designed to be flexible. You can bake the same day, or you can cold ferment for deeper flavor and easier shaping.
Dough formula (grams)
- 500 g flour (bread flour, “00,” or a blend)
- 350 g water (70% hydration; adjust slightly if needed)
- 100 g active sourdough starter (100% hydration starter)
- 10 g salt
- 15–20 g olive oil (optional)

This yields about 960 g total dough, which is perfect for:
- 2 x ~480 g dough balls (two large pies, roughly 12–14 inch depending on thickness)
- or 3 x ~320 g dough balls (three medium pies)
If you want thinner crust, make smaller dough balls. If you want thicker, go larger. Your dough ball weight has a bigger impact on the final sourdough pizza crust than most people expect.
Also Read: Air Fryer Donuts Recipe (2 Ways): Glazed Homemade Donuts + Biscuit Donuts
How to make sourdough pizza dough step by step
1) Mix the dough (and make it easy on yourself)
In a large bowl, add the water and sourdough starter. Stir until the starter loosens into the water. It doesn’t have to dissolve perfectly—just break it up enough that it’s mostly distributed.
Next, add the flour and mix until you don’t see dry patches. At this stage the dough will look shaggy and uneven, which is exactly right.
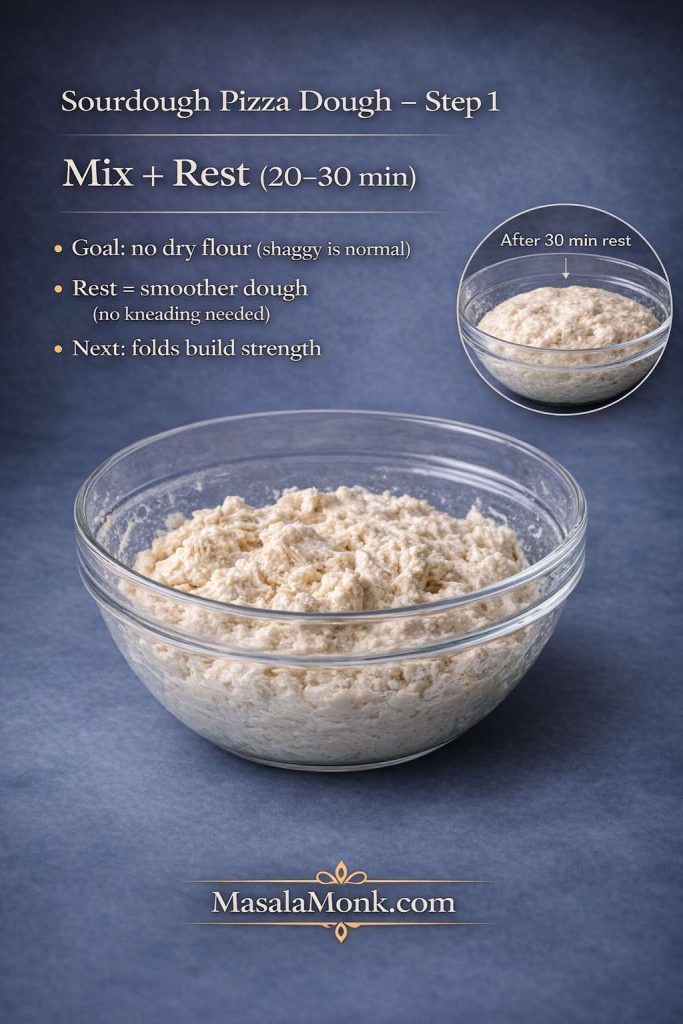
Now pause. Let the dough rest for 20–30 minutes.
That rest matters because it hydrates the flour and starts gluten development without effort. Later on, you’ll find that the dough becomes smoother and stronger with much less work.
After the rest, sprinkle in the salt. If you’re using olive oil, add it now as well. Then mix until the salt is fully incorporated.
At first, the dough may feel slippery or messy. Keep going anyway; it comes together faster than you think.
2) Build dough strength without beating it up
Sourdough pizza dough can be strong without being overworked. Instead of kneading for a long time, use a short sequence of gentle strength-building.
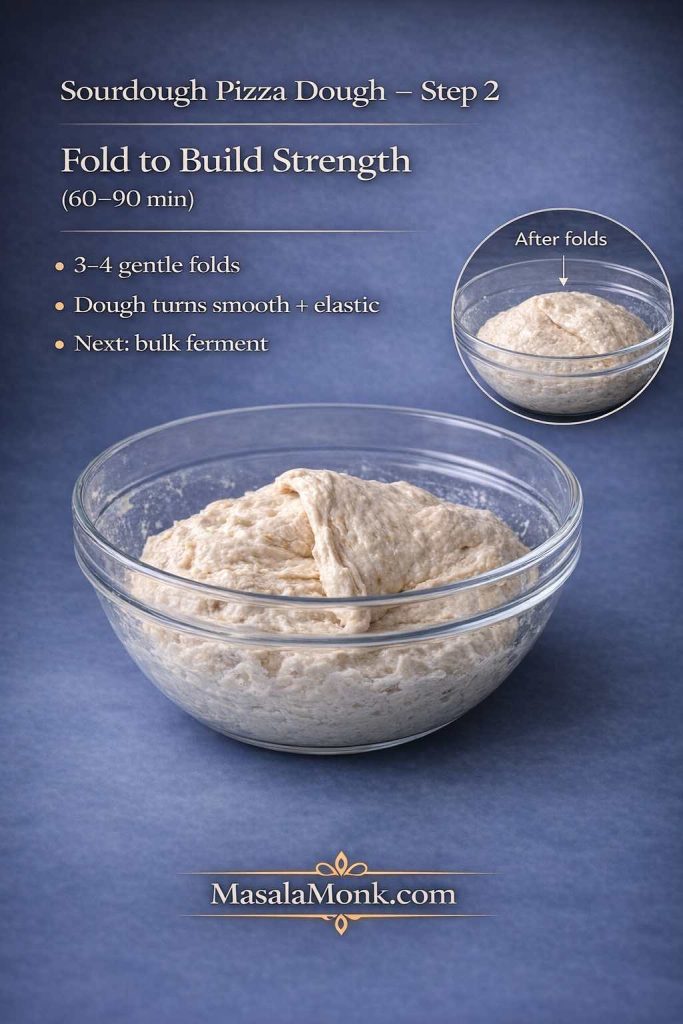
Over the next 60–90 minutes, do 3–4 rounds of stretch-and-folds:
- Wet your hand lightly.
- Lift one side of the dough, stretch upward, fold it over the center.
- Rotate the bowl and repeat a few times until the dough tightens into a smoother mound.
Between rounds, cover the bowl and let the dough relax.
With each round, you’ll notice the dough becoming more elastic and cohesive. That’s exactly what you want: a dough that will stretch into a sourdough pizza base without turning into a fragile sheet.
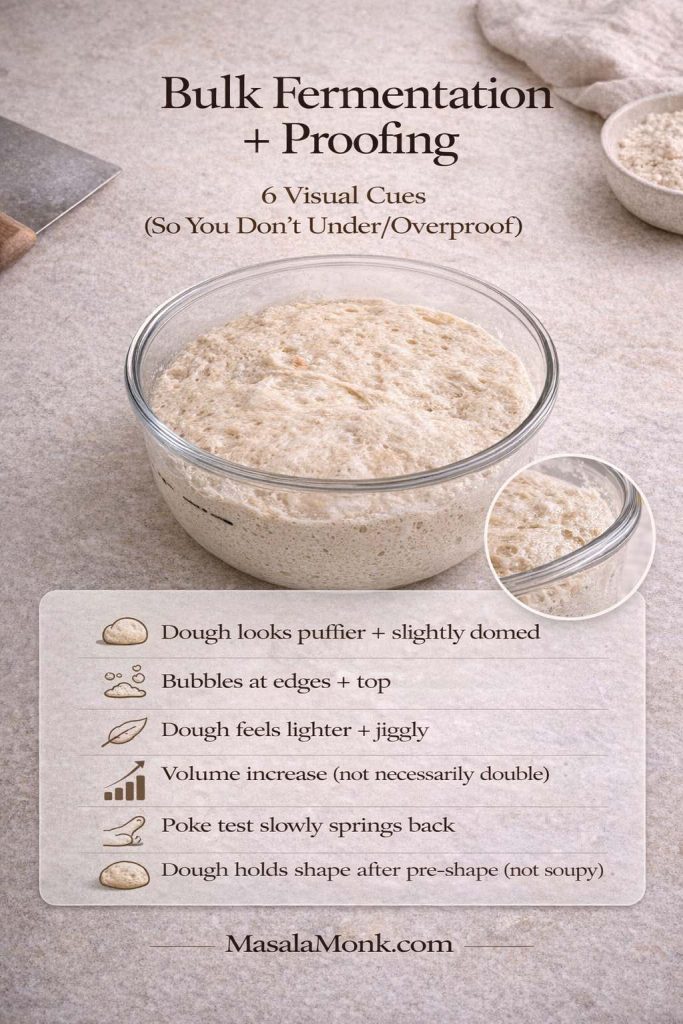
3) Bulk ferment until the dough is airy, not exhausted
After the final fold, cover the dough and let it rise at room temperature until it looks slightly puffed, smoother, and more alive—often 3–5 hours, depending on your kitchen and starter strength.
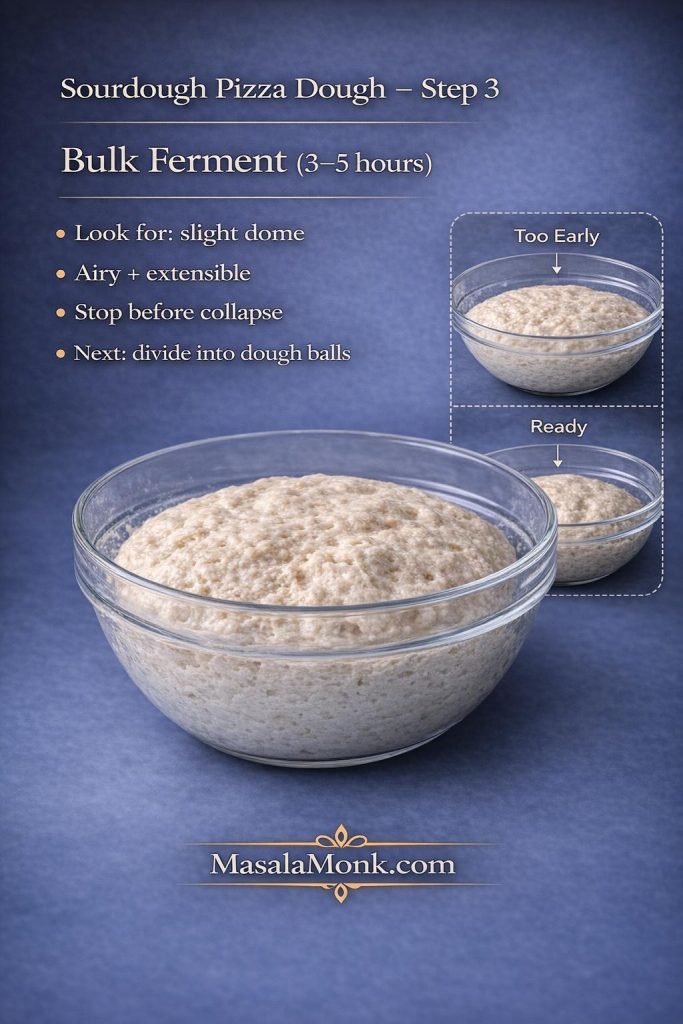
Instead of chasing a clock, watch for clues:
- the dough looks more rounded and airy
- the surface feels slightly domed rather than flat
- the dough jiggles a little when you move the bowl
If your kitchen runs warm, this stage will move faster. If it’s cooler, it may take longer. Either way, your goal is fermentation that builds flavor and gas, not fermentation that collapses.
When bulk fermentation is done, the dough should feel extensible and lightly airy. If it’s already very bubbly and slack, don’t push it too far—move on to dividing.
4) Divide into sourdough pizza dough balls
Turn the dough onto a lightly floured counter. Divide into your preferred sizes.
For two larger pizzas: 2 dough balls (~480 g each).
For three medium pizzas: 3 dough balls (~320 g each).

Shape each portion into a tight ball:
- Fold edges into the center until the surface tightens.
- Turn seam-side down.
- Cup your hands around the dough and rotate gently to seal.
Set the dough balls into lightly oiled containers (or a covered tray) so they don’t stick.
From here, you choose your schedule: same-day baking or cold fermentation.
Also Read: Tapas Recipe With a Twist: 5 Indian-Inspired Small Plates
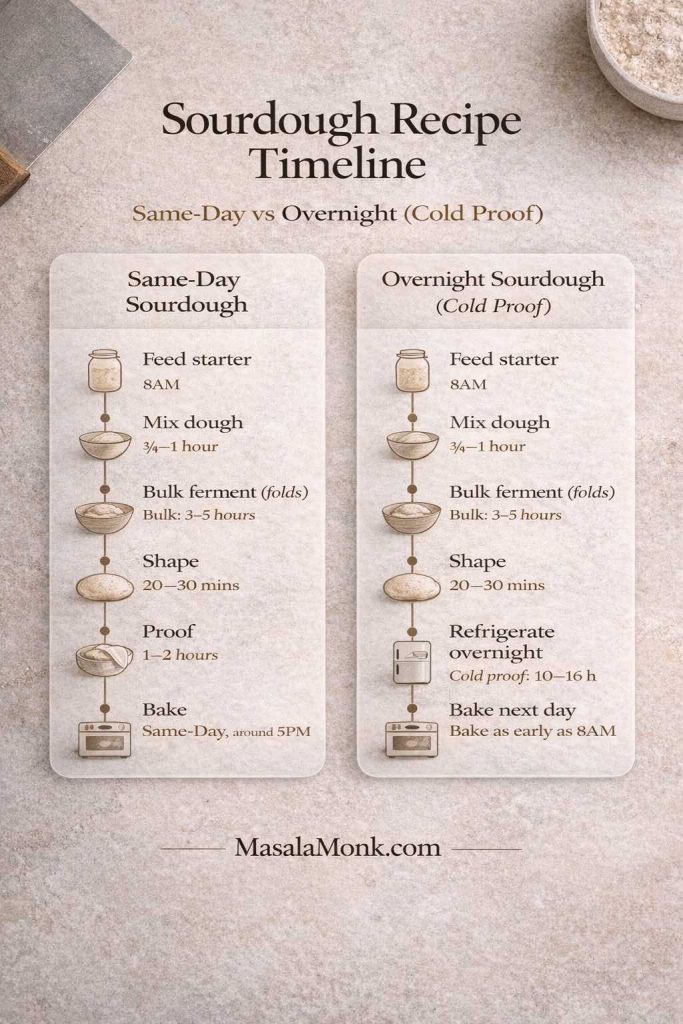
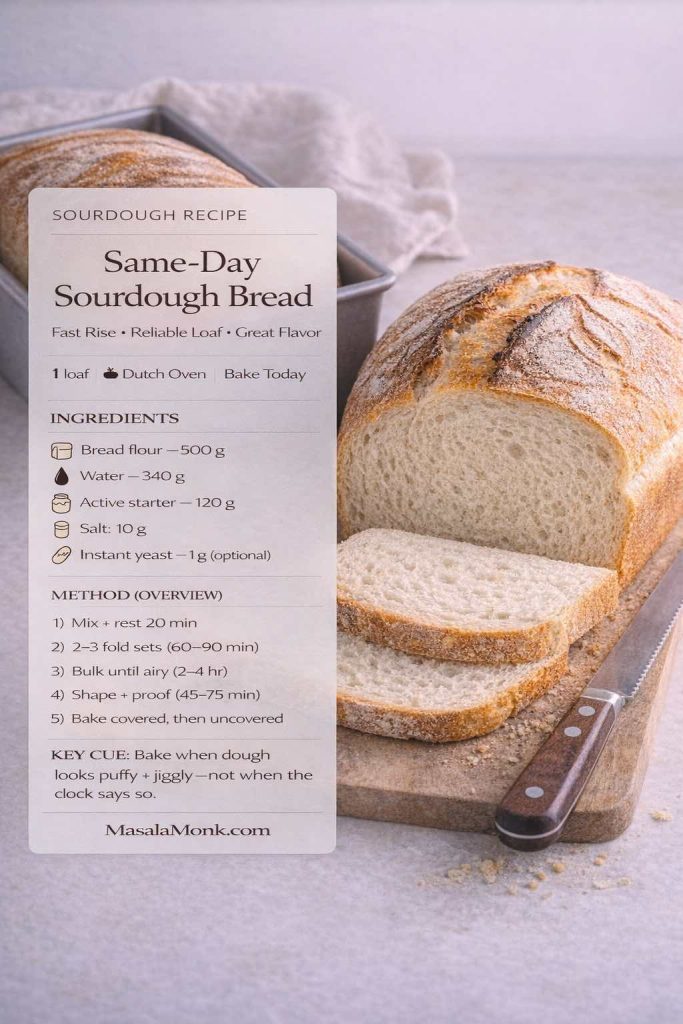
Same-day sourdough pizza dough (quick schedule that still works)
Sometimes you want a quick sourdough pizza dough that’s still made with starter, not commercial yeast. While sourdough naturally benefits from time, you can absolutely make a same-day version when your starter is strong and your kitchen is reasonably warm.
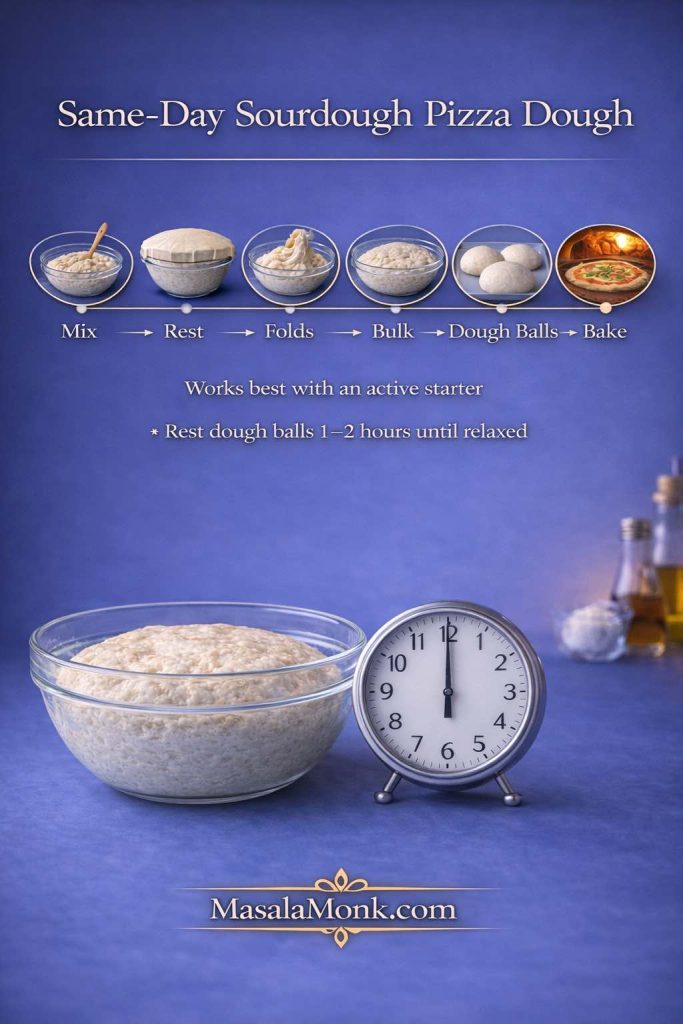
Here’s the rhythm:
- Mix + rest + folds as written
- Bulk ferment until lightly airy (don’t force huge rise)
- Divide into dough balls
- Let the dough balls rest at room temp until relaxed and slightly puffy, usually 1–2 hours
When the dough balls feel soft, supple, and easy to stretch, you’re ready to shape.
This “sourdough pizza dough same day” approach is about practicality. It won’t taste identical to a 24-hour cold ferment, yet it still delivers a flavorful sourdough pizza crust with great texture if you bake hot enough.
If you want more depth, shift to cold fermentation.
Also Read: Air Fryer Salmon Recipe (Time, Temp, and Tips for Perfect Fillets)
Cold ferment sourdough pizza dough (for better flavor and easier shaping)
Cold fermentation is where sourdough pizza dough starts feeling effortless. The dough relaxes. The flavor deepens. Stretching becomes smoother, and the crust often bakes more evenly.
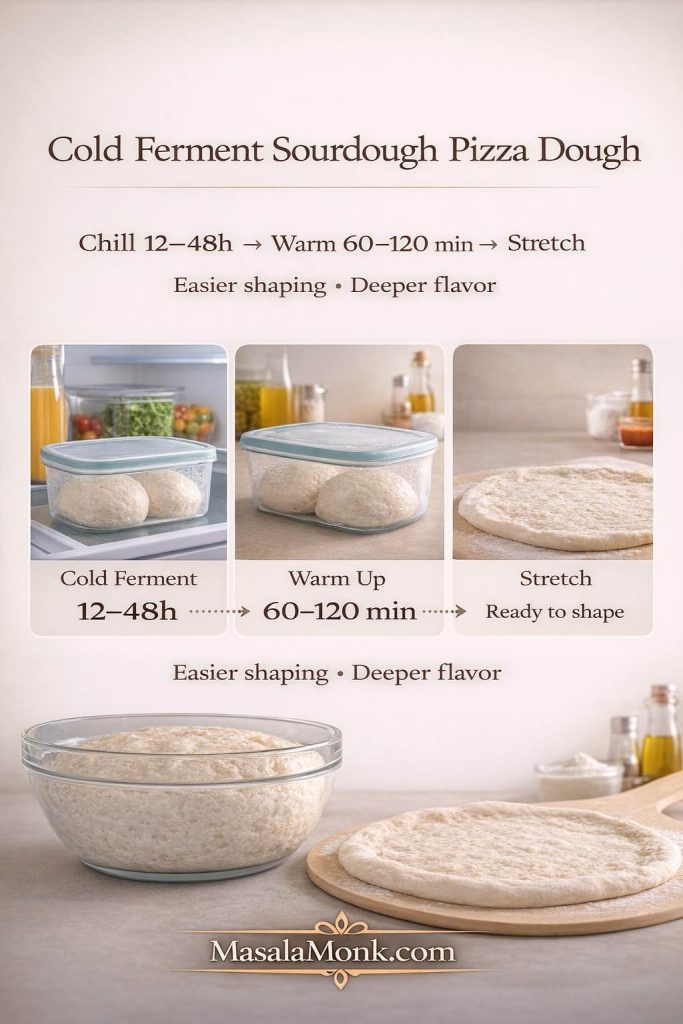
After you’ve shaped dough balls, cover them and refrigerate.
A common sweet spot is 12–48 hours. King Arthur’s sourdough pizza crust recipe leans into a chilled window for exactly these reasons, and it’s a great confirmation that cold time helps both schedule and results.
When you’re ready to bake:
- remove dough balls from the fridge
- let them sit covered at room temperature until they feel relaxed, usually 60–120 minutes
Cold dough tears easily. Warmed dough stretches willingly. So give it time to wake up.
Also Read: Masterclass in Chai: How to Make the Perfect Masala Chai (Recipe)
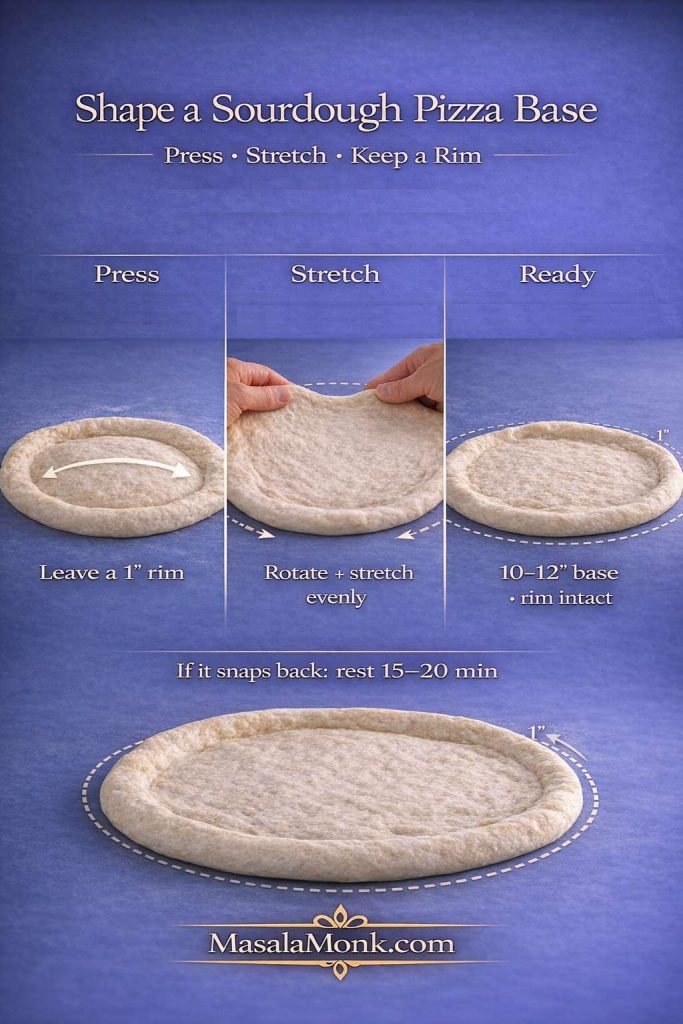
How to shape a sourdough pizza base without tearing
Shaping is where sourdough pizza dough goes from “maybe” to “yes.” It’s also where most frustration happens—usually because the dough is too cold, too tight, or simply handled too aggressively.
Start with a relaxed dough ball
If the dough snaps back, it’s not a failure. It’s a signal.
Cover it and let it rest another 15–20 minutes. Then try again. Often, that one pause changes everything.
Press, then stretch—don’t yank
Dust the counter lightly with flour. Place the dough ball down and press from the center outward, leaving a thicker rim.
Once you’ve formed a rough disk, lift and stretch gently with your hands. Move around the edge in small steps rather than pulling hard in one spot.
If the center starts thinning too much, set the dough down and let it relax for a minute. Then continue.
Rolling pins: when they help and when they hurt
A rolling pin can be useful if you want a flatter base. However, it also pushes out gases that help the rim puff. If your dream crust includes a lively edge, skip the pin. If you’re aiming for a thinner, crisper sourdough pizza crust, a pin can be acceptable.
Either way, the dough should still feel elastic, not fragile. If it’s fragile, it’s likely under-strengthened or under-rested.
Also Read: 10 Low Carb Chia Pudding Recipes for Weight Loss (Keto, High-Protein, Dairy-Free)
How to bake sourdough pizza for a crisp crust
Your oven setup matters more than your topping choices. Even the best sourdough pizza dough recipe can bake pale and soft if the oven isn’t truly hot.

Preheat longer than you think
Set your oven as hot as it safely goes—often 260°C / 500°F or higher if possible.
Place a pizza steel or stone inside while preheating. Then preheat for at least 45 minutes.
That long preheat isn’t extra. It’s the difference between:
- a crust that springs and sets quickly
- and a crust that dries out slowly while trying to color
Steel vs stone vs tray
- Steel: strong bottom color, fast baking, excellent for crisp crust
- Stone: great results, slightly gentler bottom heat
- Heavy tray: workable if preheated; best for moderate thickness

If you’re baking with a dedicated pizza oven, timing shifts dramatically. For that environment, Ooni’s recipe page is a useful reference because it’s built for higher heat and faster bakes.
Keep toppings balanced so the base stays crisp
This is the quiet secret behind many “why is my pizza soggy?” problems. Even a great sourdough pizza base can suffer under too much sauce, too much cheese, or wet toppings.
Instead:
- use a thin layer of sauce
- choose low-moisture cheese when possible
- pre-cook watery vegetables if needed
- keep the topping load lighter for thinner crust

You can still make a generous pizza. You’re just aiming for balance, so the crust can crisp before the center turns heavy.
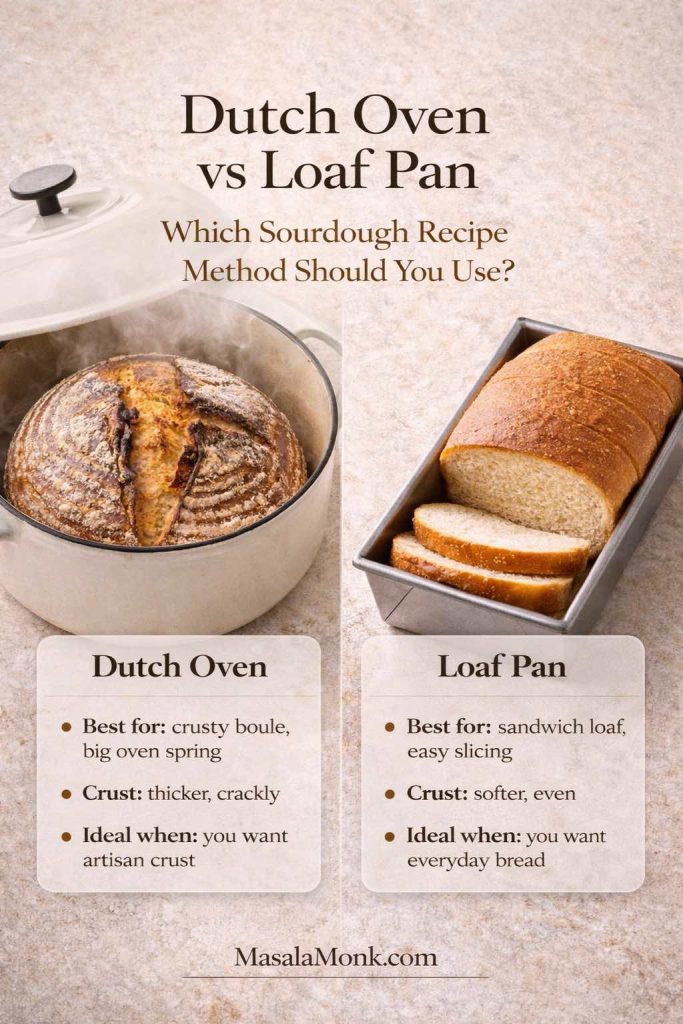
Pan-style option when you want a thicker, forgiving crust
If you want a thicker base with crisp edges, pan pizza is a beautiful direction. Even though it’s not sourdough-specific, Serious Eats’ foolproof pan pizza recipe is a great model for pan technique—how oil affects crispness, how the pan bakes the sides, and why thicker dough benefits from that environment.

For sourdough, the idea is the same: slightly thicker dough, a well-oiled pan, and a hot bake that crisps the bottom and edges.
Also Read: Keto Hot Chocolate Recipe (Sugar-Free Hot Cocoa) + Best Homemade Mix
Sauce and topping ideas that make sourdough pizza shine
Sourdough pizza already brings flavor, so your toppings don’t need to shout. In fact, simpler combinations often taste more “complete” because the crust contributes so much.
That said, variety is what makes pizza night fun. If you want easy ways to change the mood without reinventing the whole plan, start with sauces.

Sauce ideas (and a way to build options fast)
A sourdough pizza recipe becomes ten recipes when you swap the sauce. That’s why MasalaMonk’s pizza sauce recipes is such a useful read: marinara, white garlic, Alfredo, buffalo, BBQ, vodka, ranch—seven directions from the same base.
Meanwhile, if you want a bright, herby route, MasalaMonk’s pesto recipe guide gives you classic basil pesto plus variations that pair beautifully with mushrooms, roasted vegetables, or even a simple mozzarella-and-tomato topping.
Topping combos that work especially well with sourdough pizza crust
Here are a few combinations that tend to harmonize with the crust rather than compete with it:

- Marinara + mozzarella + basil
Classic, clean, and the sourdough flavor reads clearly. - White garlic sauce + mushrooms + mozzarella
Earthy toppings pair beautifully with tangy crust. - Pesto + mozzarella + roasted vegetables
Bright, herby, and flavorful without heaviness. - Vodka sauce + mozzarella + chili flakes
A richer sauce that still bakes cleanly if used lightly. - BBQ sauce + onion + chicken (light topping load)
Best on a slightly thicker base, especially if your oven isn’t extremely hot.
If you prefer bold toppings, sourdough can take them. Just keep one thing in mind: bold topping choices often taste best when the crust is crisp enough to provide contrast.
Also Read: Dirty Martini Recipe (Classic, Extra Dirty, No Vermouth, Spicy, Blue Cheese, Tequila + Batched)
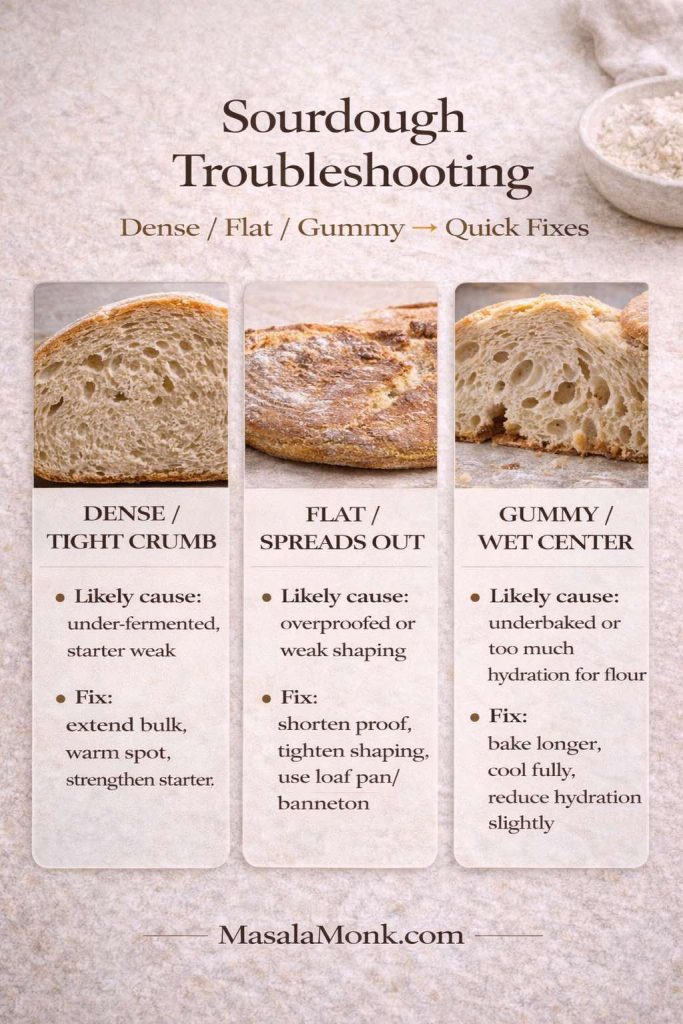
Troubleshooting sourdough pizza dough and crust (the fixes that matter)
Even with a dependable method, dough will occasionally misbehave. Instead of starting over, it’s more useful to diagnose what’s happening.
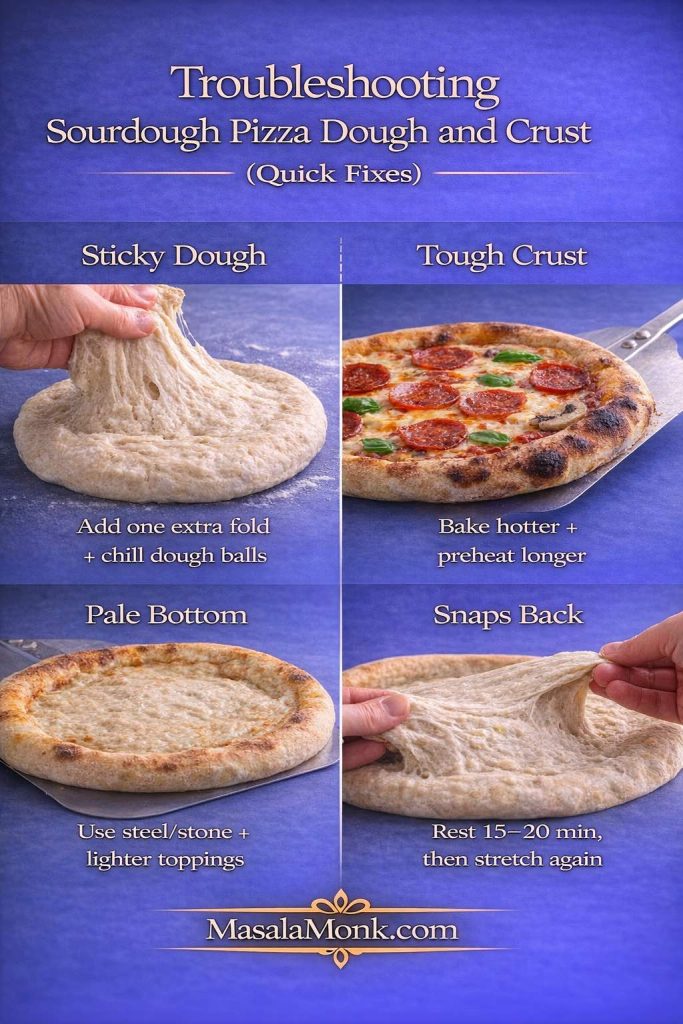
My sourdough pizza dough is sticky—what now?
Sticky dough often comes from one of these:
- hydration is high for your flour
- the dough didn’t develop enough strength early
- the dough got too warm during fermentation
- shaping started before the dough fully relaxed
Rather than dumping flour into the dough at the end, make two small adjustments next time:
- build a little more strength with one extra fold early on
- chill dough balls for a short cold ferment, then bring them back to room temp before shaping
In the moment, use light flour on the bench, keep your hands calm, and avoid forcing thinness too quickly.
My sourdough pizza crust is tough
A tough crust is often a bake problem, not a dough problem. It usually happens when:
- the oven wasn’t hot enough
- the baking surface wasn’t fully preheated
- the pizza baked too long trying to brown
A better strategy is higher heat and faster bake. Preheat longer, use steel if you have it, and keep toppings lighter so the crust sets quickly.
The pizza base is pale and soft underneath
This almost always points to insufficient bottom heat.
Try:
- longer preheat
- moving the baking surface higher or lower depending on your oven’s heat pattern
- using a steel if possible
- par-baking the base briefly if you’re making a thicker pizza base
King Arthur also discusses how sourdough crusts can behave differently in browning and suggests practical fixes for thicker crust styles in their sourdough pizza resources, which can be reassuring when your crust looks lighter than expected but still bakes through.
The dough snaps back while stretching
Snapping back means the dough is tight. Tight dough needs time.
Cover it. Walk away for 15 minutes. Come back and stretch again.
Often, that small rest is the whole solution. If this happens frequently, a longer cold ferment usually improves extensibility dramatically.
Also Read: Fish and Chips Reimagined: 5 Indian Twists (Recipe + Method)
Pizza night pairings: cocktails that actually match sourdough pizza
When pizza is homemade, drinks become part of the atmosphere. You don’t need anything complicated—just something that plays nicely with cheese, tomato, and a toasty crust.

Here are a few of our blog posts that pair naturally with sourdough pizza night:
- Fresh, fizzy, and bright: a classic Moscow Mule is hard to beat when your toppings lean spicy or rich.
- Party-friendly pitcher option: rum punch fits perfectly when you’re feeding a crowd and want something easy to pour.
- Savory pairing for olive-forward or salty toppings: a briny dirty martini can feel surprisingly right with mushrooms, olives, or deeply savory pizzas.
- After-dinner move: if pizza night turns into dessert night, an espresso martini is a fun, coffee-forward finish.
You can keep it simple: pick one drink direction, make the pizza, and suddenly the whole evening feels intentional.
Also Read: Ravioli Recipe Reinvented: 5 Indian-Inspired Twists on the Italian Classic
Storing and reheating sourdough pizza (so it still tastes good tomorrow)
Leftover pizza is only disappointing when it’s handled roughly. Sourdough pizza can reheat beautifully—especially because the crust has structure—if you warm it in a way that respects the crust.
Storing leftovers safely
Let the pizza cool, then refrigerate it promptly in a covered container.
For timing and safe handling, FoodSafety.gov’s cold storage chart specifically lists pizza storage guidance, including fridge and freezer windows. It’s a helpful reference when you’re deciding whether a slice is still within a safe range. (Cold Food Storage Chart)
When reheating, the USDA recommends reheating leftovers to 165°F for safety. Their leftovers guidance is straightforward and worth keeping in mind when you’re reheating more than just a slice or two. (Leftovers and Food Safety)

Best ways to reheat sourdough pizza
Skillet method (best for crisp bottom):
Warm a skillet over medium heat, place the slice in, and cover loosely. The bottom crisps, while the cover helps the top warm without drying out.
Oven method (best for multiple slices):
Heat the oven and warm slices on a tray until the cheese softens and the crust crisps again.
Air fryer method (quick and crisp):
A short reheat in the air fryer works well, particularly for restoring texture.
Whichever method you use, aim for “hot and revived,” not “cooked again.” The goal is to bring the crust back to life, not to dry it out.
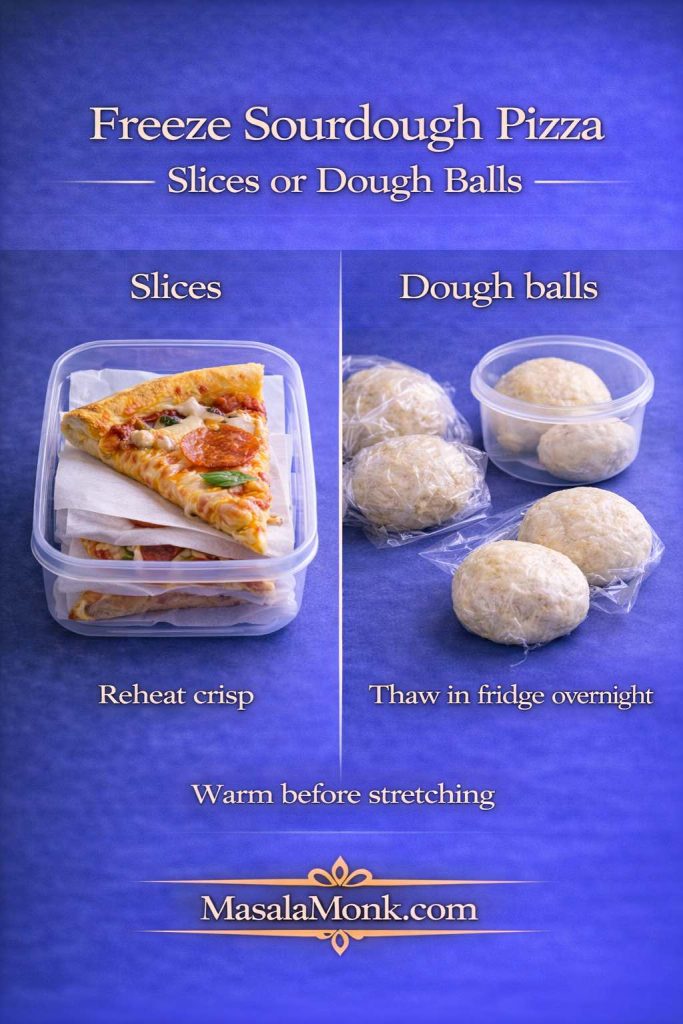
Freezing pizza and freezing dough balls
If you want future pizza nights to be easier, freezing helps.
- Freeze baked slices for quick lunches or fast dinners.
- Freeze dough balls if you want fresh-baked pizza later without starting from scratch.
For dough balls, freeze after fermentation, wrap well, and thaw in the fridge overnight. Then let the dough come back toward room temperature before stretching. Cold dough is tight; warmer dough is cooperative.
Also Read: Croquettes Recipe: One Master Method + 10 Popular Variations
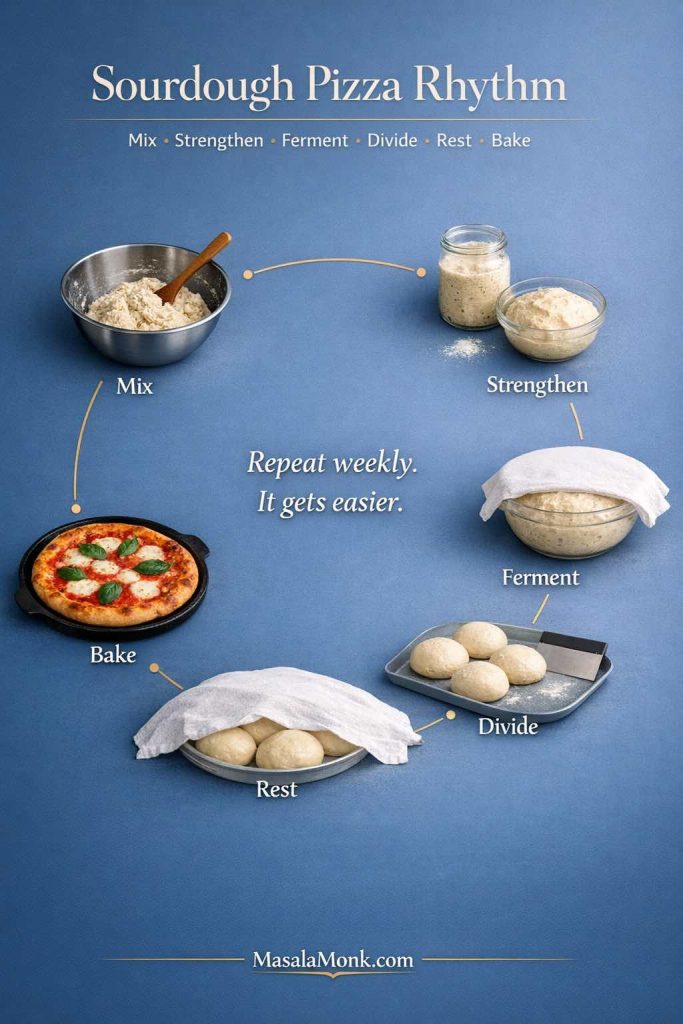
A calm, repeatable workflow for sourdough pizza at home
If sourdough pizza feels like a “special occasion” thing right now, here’s the shift: treat it like a rhythm, not a performance. The more familiar you get with the stages—mix, strengthen, ferment, divide, rest, bake—the less dramatic it becomes.
One week you might do a same-day sourdough pizza dough for a spontaneous dinner. Another week you might plan a cold ferment because you want deeper flavor and a smoother shaping experience. Either way, you’re building the same foundation: a sourdough pizza base that supports whatever toppings you love and bakes into a crust that tastes like you meant it.
And when you want to expand without reinventing the wheel, here are some blog posts that keep pizza night interesting:
- strengthen starter confidence with the sourdough starter recipe
- change flavors through sauces in the pizza sauce recipes collection
- pivot into green, herby pizzas using the pesto recipe guide
- make it a full evening with a Moscow Mule or a crowd-friendly rum punch
From there, it’s simply repetition. Each bake teaches your hands what the dough should feel like. Each pizza shows you how your oven behaves. Before long, “sourdough pizza dough recipe” stops being an intimidating phrase and becomes a reliable plan.
Also Read: How to Make a Flax Egg (Recipe & Ratio for Vegan Baking)
FAQ: Sourdough Pizza Dough, Crust, and Base
1. What is the difference between sourdough pizza dough, sourdough pizza crust, and sourdough pizza base?
They usually refer to different stages of the same thing. Sourdough pizza dough is the raw dough before shaping, sourdough pizza base is the shaped round before toppings, and sourdough pizza crust often means the baked result. Even so, many recipes use the terms interchangeably, so the method is typically the same.
2. Can I make sourdough pizza dough the same day?
Yes, you can make sourdough pizza dough the same day if your starter is active and your kitchen is warm enough. In that case, give the dough enough time to bulk ferment, then let the dough balls rest until they feel soft and easy to stretch. That said, a cold ferment usually improves flavor and handling.
3. How long should I ferment sourdough pizza dough for the best flavor?
For the best balance of flavor and texture, many home bakers ferment sourdough pizza dough overnight in the fridge after dividing it into dough balls. However, a same-day sourdough pizza recipe can still work well. If you have more time, a longer cold ferment often gives a better sourdough pizza crust with easier stretching.
4. Can I use sourdough discard for pizza dough?
Yes, sourdough discard pizza dough is possible, although it behaves differently from dough made with active starter. For example, discard may ferment more slowly and produce a slightly denser result unless the recipe is designed for it. Therefore, if you use discard, expect to adjust timing and texture a little.
5. Why is my sourdough pizza dough sticky?
Most often, sticky sourdough pizza dough comes from high hydration, weak gluten development, or warm dough. In contrast, a dough with enough strength and a short rest between steps feels much easier to shape. To fix it, build more strength early, chill the dough if needed, and use only a light dusting of flour while shaping.
6. Why does my sourdough pizza dough snap back when I stretch it?
Usually, the dough is too tight or not rested enough. Instead of forcing it, let it sit covered for 10 to 20 minutes and try again. Afterward, it should stretch more easily into a sourdough pizza base without tearing.
7. What is the best flour for sourdough pizza dough?
Bread flour is a strong choice because it gives structure and makes shaping easier. Meanwhile, 00 flour can produce a tender, crisp sourdough pizza crust, especially in high-heat baking. Many bakers prefer a blend of both for a balanced result.
8. How do I get a crispy sourdough pizza crust at home?
To get a crispy sourdough pizza crust, preheat your oven longer, use a hot baking surface, and avoid overloading the pizza with sauce or toppings. In addition, a thinner stretch and a well-heated steel or stone help the base set quickly. As a result, the crust crisps before it dries out.
9. Why is my sourdough pizza base soft in the center?
A soft center usually means the dough did not get enough bottom heat or the toppings were too wet. For instance, too much sauce, fresh mozzarella, or watery vegetables can slow down browning. To improve it, preheat longer, use fewer wet toppings, and stretch the dough a little thinner.
10. What size should sourdough pizza dough balls be?
It depends on the pizza style you want. Smaller sourdough pizza dough balls make thinner, crisper pizzas, while larger dough balls create a thicker, chewier crust. As a general guide, medium dough balls work best when you want an easy-to-handle sourdough pizza recipe for a home oven.
11. Can I freeze sourdough pizza dough balls?
Yes, sourdough pizza dough balls freeze well and make future pizza nights much easier. Ideally, freeze them after fermentation, wrap them well, and thaw them in the fridge before using. Then let the dough rest at room temperature so the pizza base stretches without fighting back.
12. Can I freeze baked sourdough pizza?
Yes, baked sourdough pizza freezes well, especially if you cool the slices before storing. Later, reheat the slices in an oven, skillet, or air fryer to bring back some crispness in the crust. This way, leftover sourdough pizza still tastes good instead of turning chewy or dry.
13. Is sourdough pizza healthier than regular pizza?
Sourdough pizza can be easier for some people to digest because of the longer fermentation, and many people also prefer the flavor. Still, the overall nutrition depends on your flour, toppings, cheese, and portion size. In other words, sourdough improves the base, but the full pizza still depends on what you build on top.
14. What is the best hydration for sourdough pizza dough?
A moderate hydration is usually the easiest starting point for home bakers because it balances stretchability and control. Higher hydration can give a more open, airy crust, but it also makes shaping harder. Accordingly, if you are new to sourdough pizza dough, start in the middle and adjust after a few bakes.
15. Can I make a sourdough pizza base without a pizza stone or steel?
Absolutely. You can bake a sourdough pizza base on a preheated tray or pan and still get great results. Although a steel or stone helps with bottom heat, a hot oven and lighter toppings matter just as much. Therefore, don’t wait for perfect equipment before making your sourdough pizza recipe.
16. How do I keep the rim puffy on a sourdough pizza crust?
Leave a border when pressing the dough, and avoid flattening that edge with a rolling pin. Likewise, don’t overload the rim with sauce or cheese. Once baked, that untouched edge has room to puff and brown, which gives you a more attractive sourdough pizza crust.
17. Why does my sourdough pizza crust turn tough after reheating?
Usually, it is being reheated too long or at too high a heat without enough moisture control. Instead, warm it just until hot, then stop. A skillet method often works especially well because it re-crisps the bottom while keeping the rest of the slice from drying out.
18. Can I use this sourdough pizza dough recipe for thin crust and thick crust?
Yes, the same sourdough pizza dough recipe can produce both styles. The difference comes from dough ball size, shaping thickness, and bake method. For thin crust, stretch more and top lightly; for a thicker pizza base, use a larger dough ball and give it a little more structure during shaping.