Posted on — 2 Comments

Fermented Garlic Honey: Benefits, Safety, and How to Use This Ancient Remedy

Fermented garlic honey in a glass jar with garlic cloves, natural remedy for immunity, cough relief, and heart health.

Introduction: The Jar That Keeps Showing Up

A jar of fermented garlic honey doesn’t look like much at first glance. Cloves of garlic float in amber syrup, shifting slowly as bubbles rise to the surface. Yet this unassuming mixture has traveled through centuries and across cultures, passed quietly from healer to healer, grandmother to grandchild.

Today, it sits in two worlds at once: the old one, where food was medicine by default, and the new, where wellness trends sweep through TikTok and Instagram. People keep jars on countertops not only because they’re beautiful to watch — garlic softening into translucence, honey loosening into liquid gold — but because they work. A spoonful eases coughs, a clove softens a sore throat, and the flavor itself can transform a recipe.

It is more than a honey garlic remedy. It is survival wisdom, dressed in sweetness.


What Is Fermented Garlic Honey?

At heart, fermented garlic honey is just two ingredients: raw garlic and raw honey. But when you leave them together, something extraordinary happens. Honey draws water from the garlic, lowering its thickness just enough to allow fermentation. Slowly, day by day, the mixture becomes alive.

  • Garlic sheds its sharp edge, turning mellow and almost buttery.
  • Honey loosens, fizzing gently, and develops a tangy, savory undertone.
  • The jar itself begins to smell like a conversation between opposites — sweet, pungent, earthy, floral.

Unlike kombucha or sourdough, there’s no starter to maintain, no strict temperature to hold. You don’t need to be an expert fermenter. Instead, you need patience, curiosity, and the willingness to let nature do its quiet work.

And although the name sounds modern, the practice is ancient. Egyptians gave garlic to laborers for stamina. Greeks trusted it before athletic competitions. Chinese medicine prescribed it for clearing phlegm. Honey, meanwhile, was wound healer, throat soother, energy restorer. Inevitably, the two were combined. What we call “fermented garlic honey” today is simply a rediscovery of something humans have always known: these ingredients are stronger together.


The Benefits of Fermented Garlic Honey

The magic of fermented garlic honey lies not only in what it does inside the body, but also in how it fits into daily life. It is remedy and ritual, food and comfort. Below are the layers of benefit — scientific, practical, and cultural.

Fermented Garlic Honey as a Winter Shield

When cold winds arrive and the first sniffles spread, people reach instinctively for jars like this one. Garlic contributes compounds with antimicrobial properties, while honey brings soothing sweetness and antibacterial enzymes. In India, home remedies like honey-infused garlic (Recipe) are still trusted to ease coughs and boost immunity. Together, they feel like a shield during cold and flu season — a point echoed in MasalaMonk’s guide to garlic and honey as a dynamic duo for health.

Research backs this up. In fact, both garlic and honey show strong antibacterial activity on their own, and lab studies suggest the combination may inhibit pathogens like Streptococcus pneumoniae and Staphylococcus aureus even more effectively (Healthline, Taste of Home).

But immunity isn’t just chemistry. There’s also the ritual: stirring a spoonful of garlic in raw honey into warm lemon water on a frosty morning, or swallowing a clove when you feel a tickle in your throat. It’s a habit that makes the body feel protected and the mind reassured.

  • Garlic: antimicrobial compounds.
  • Honey: enzymes + soothing sweetness.
  • Together: a ritual that feels protective.

A Honey Garlic Remedy for Coughs and Sore Throats

Modern studies have shown honey to be more effective than many over-the-counter cough syrups. Add garlic, softened by weeks of fermentation, and you have a remedy that soothes in two ways: sweetness coating the throat, savory warmth lingering after.

The Cleveland Clinic notes, however, that while honey and garlic are each well-studied, there’s little direct research on fermented garlic honey itself — meaning most evidence comes from their individual benefits (Cleveland Clinic).

Parents especially prize this approach. It feels safer than chemical syrups and connects them to generations of tradition.

  • A spoonful before bed → calm nights.
  • A clove stirred into tea → warmth with depth.
  • Gentle enough for children (over one year old).

A spoonful of fermented garlic honey stirred into lemon tea for cough and cold relief.
Fermented garlic honey offers gentle cough and sore throat relief when stirred into warm lemon water.

Antioxidant and Anti-Inflammatory Support

Science tells us garlic and honey carry antioxidants — compounds that protect cells from damage — and anti-inflammatory agents that reduce internal stress. Tradition tells us the same story in different words: garlic as a cleanser, honey as a balancer.

What matters most is how people feel. Some notice easier digestion; others say seasonal allergies feel lighter. For many, it’s simply the steadying comfort of a daily dose that tastes good and feels good.

A 2020 review in the Journal of Nutrition linked garlic consumption to reduced risks of atherosclerosis, hypertension, and diabetes, crediting its antioxidant and anti-inflammatory power (PMC Review).

Garlic bulb and honey drop with molecular graphics representing antioxidants and antimicrobial benefits.
Science confirms fermented garlic honey carries antioxidants, antimicrobials, and heart-health benefits.

Fermented Garlic and Honey Benefits for the Heart

Garlic’s role in supporting circulation is centuries old. Modern studies link it to cholesterol and blood pressure benefits. A related MasalaMonk feature on garlic water benefits for high blood pressure shows just how potent these compounds can be, even in simple preparations. Honey contributes minerals like potassium and magnesium and is kinder to blood sugar than refined sweeteners.

The result isn’t a miracle cure — instead, it’s a daily nudge toward balance, a quiet support for cardiovascular health woven into the diet.

Recent clinical work goes further: a 2022 randomized controlled trial found that fermented garlic extract improved blood flow, nitric oxide levels, and blood pressure markers in healthy adults (PubMed Study).


A Daily Tonic That’s Actually a Pleasure

Unlike raw garlic swallowed whole or pungent herbal tonics forced down, fermented garlic honey is something people want to take. Its flavor makes consistency possible. And in wellness, consistency is everything.


Rooted in Tradition, Resonating Today

Ayurvedic practitioners called garlic warming and honey harmonizing. In Traditional Chinese Medicine, garlic moved stagnant qi while honey nourished the lungs. In Egypt, honey sealed wounds while garlic gave strength to workers.

These weren’t separate threads — they were part of a global recognition that some ingredients belong together. Today, when someone posts a jar of fermented honey and garlic on TikTok, they’re unknowingly participating in that long lineage.


Fermented Garlic Honey Safety: Clearing the Botulism Myth

Every time fermented garlic honey trends online, so does a wave of worry. The word botulism pops up in comments, often shouted louder than the remedy itself. Fear spreads faster than facts — so let’s pause and examine safety with clarity.

Botulism is a serious illness caused by the bacterium Clostridium botulinum. It thrives in low-acid, oxygen-poor environments. On paper, garlic and honey in a jar might look like an invitation. Yet reality is more nuanced.

Nutritionists interviewed by Parents.com acknowledge the popularity of fermented garlic honey online but emphasize that while the risk of botulism is extremely low, it has not been formally studied in depth. Their advice: enjoy it safely, but don’t use it as a replacement for medical treatment if symptoms are severe (Parents.com).

  • Honey is naturally low in water and highly resistant to botulism spores.
  • Garlic does introduce moisture, but fermentation gradually increases acidity, creating conditions that are unfriendly to harmful bacteria.
  • Generations of practice back this up: herbalists, homesteaders, and healers across cultures have kept jars of garlic in honey safely for centuries.
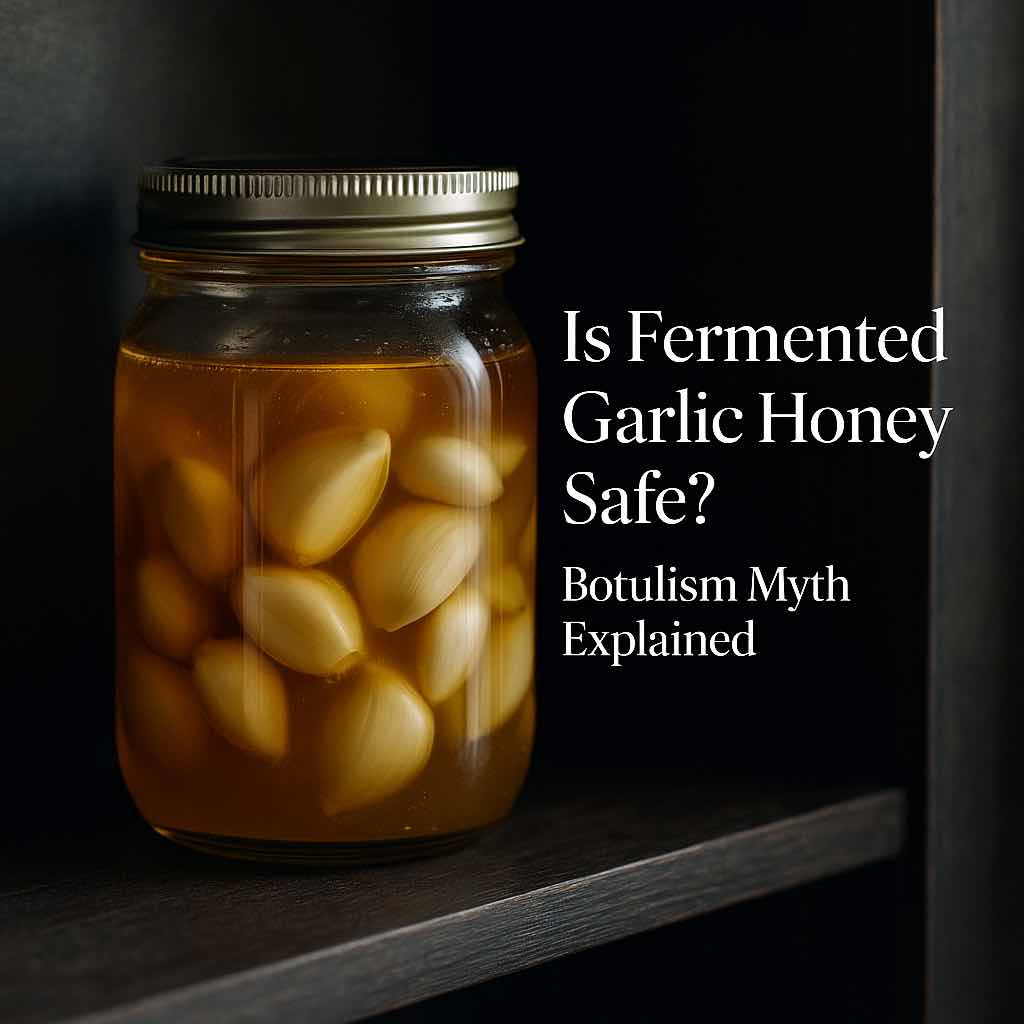
Jar of fermented garlic honey stored safely in a pantry, illustrating botulism myth explained.
Fermented garlic honey is safe when prepared correctly — follow simple best practices for storage and fermentation.

Ultimately, a jar of fermented honey and garlic is a living system. It doesn’t need fussing, but it does need attention — the same way you’d watch a sourdough starter or sauerkraut crock.

Best Practices for Safe Fermentation

To keep your jar both effective and safe, follow these common-sense guidelines:

  • Use raw honey → pasteurized honey won’t ferment.
  • Choose fresh garlic → firm cloves, free of mold or sprouts.
  • Keep garlic submerged → honey should always cover the cloves.
  • Release gas in the first week → burp the jar daily to avoid pressure buildup.
  • Store cool and dark → a pantry is better than a sunny counter.
  • Trust your senses → if you ever see mold or smell something unpleasant, discard and start again.

And one final note: no honey, fermented or not, should ever be given to infants under one year of age. Their immune systems aren’t ready.

Handled with this ordinary care, fermented garlic honey is considered safe for healthy adults. The risks are no greater than those of any kitchen ferment — and the benefits are far more rewarding.

If you prefer quicker remedies, MasalaMonk shares DIY natural cough syrups that deliver some of the same benefits in just a few days.


How to Make Fermented Garlic Honey at Home

There is a quiet pleasure in making your own jar. The process is simple, but the act itself feels almost ceremonial.

Picture a small pile of garlic cloves on the counter. You peel them one by one, skins flaking like paper. Each clove gets a light crush, just enough to release its juices. You drop them into a glass jar, where they clink softly against the glass.

Then comes the honey. Thick and golden, it pours slowly, folding over the garlic, trapping tiny air bubbles that shimmer before rising. You tilt the jar, making sure every clove is coated, suspended in amber.

The lid goes on — loose, not tight — because this jar will breathe. Over the first week, you’ll notice bubbles form. You’ll open it daily, just briefly, to let the gases sigh out. Slowly the honey thins, the garlic turns translucent, and the aroma becomes layered: sweet, tangy, savory.

There’s no single day when it’s “done.” Some people taste after three weeks, others wait six. Each jar is slightly different, and that’s part of the beauty. You’re not following strict steps so much as entering a relationship with garlic, honey, and time.
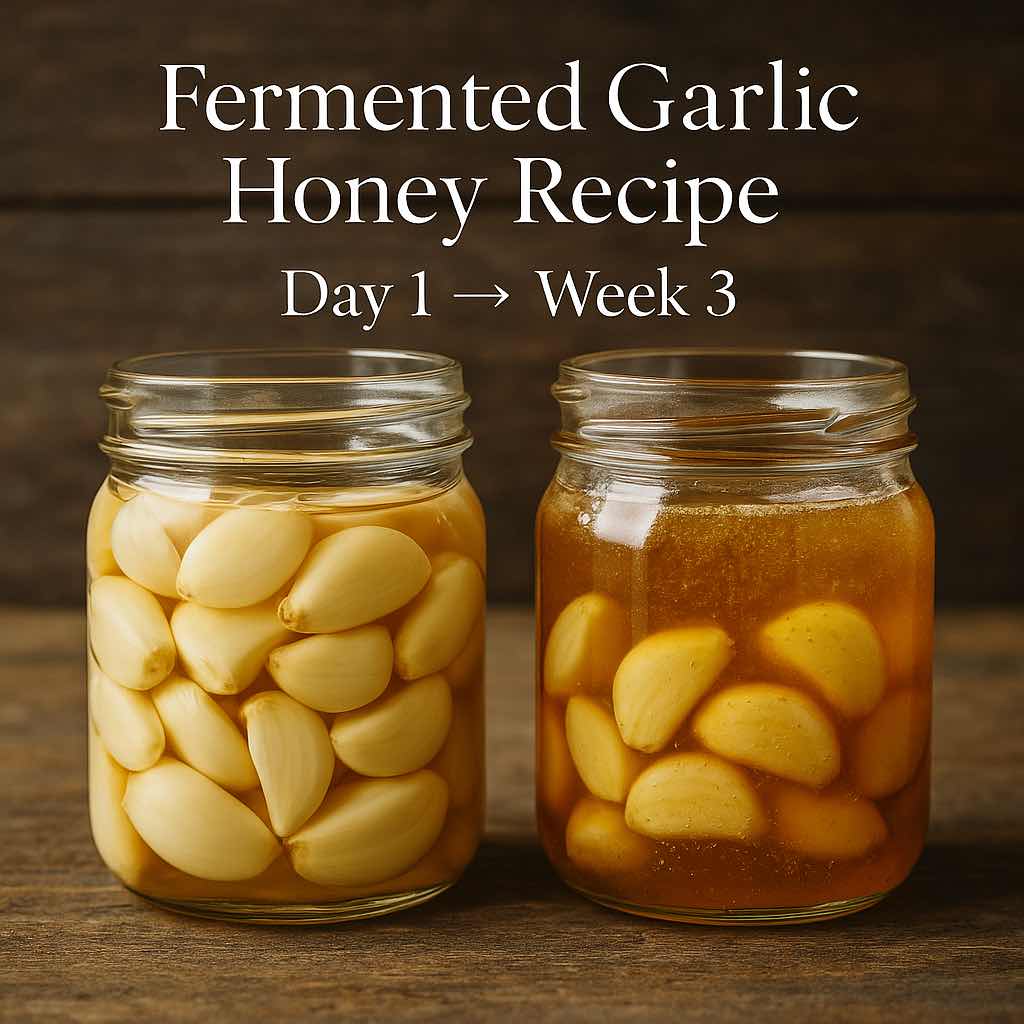
Fermented garlic honey recipe showing jars on Day 1 and after 3 weeks, garlic cloves turning translucent and honey bubbling.
Fermentation transforms garlic and honey from pungent to mellow, bubbly, and tangy.

Wellness experts like Joy Bauer have shared approachable versions of this recipe, sometimes suggesting a splash of vinegar to increase acidity for extra safety assurance (EatingWell).

The Process in Brief

  • Peel and lightly crush fresh garlic cloves.
  • Place them in a clean glass jar.
  • Pour raw honey until the cloves are submerged.
  • Cover loosely and leave at room temperature.
  • Burp the jar daily during the first week.
  • Taste after 3–4 weeks; let it age longer for deeper flavor.

The result is not just food, not just medicine. It is a jar that connects you to tradition, patience, and the quiet transformation of simple things.


How to Use Fermented Garlic Honey

The real magic of fermented garlic honey is its versatility. A single jar can live in the medicine cabinet, the kitchen, and the morning wellness ritual — shifting roles as easily as honey itself slips from spoon to cup.

As a Natural Remedy

It’s midnight, and a cough won’t let you sleep. Instead of reaching for a neon-colored syrup, you open a jar and let a spoonful of garlic-rich honey coat your throat. The sweetness soothes instantly; the mellow garlic heat lingers like a quiet ember.

Parents especially appreciate this gentle approach. It feels safer than chemical syrups, ties them to tradition, and tastes good enough that children over one year old will accept it without fuss.

Quick ways to use it as a remedy:

  • A teaspoon swallowed slowly for sore throats.
  • Stirred into warm lemon water for cough relief.
  • A daily spoonful in winter as an immune-support ritual.

In the Kitchen

Cooks have embraced fermented honey and garlic for its culinary depth. A chef might brush it over salmon before roasting, where it caramelizes into a glaze both sweet and savory. Another drizzles it across roasted carrots, where earthy roots meet golden tang.

At home, it appears on cheese boards, spooned over goat cheese and bread, transforming a simple snack into something elegant. Guests pause, surprised: “What is this?” It’s both familiar and entirely new.

Chef brushing fermented garlic honey glaze onto salmon fillets before roasting.
Fermented garlic honey caramelizes beautifully when used as a glaze for salmon, chicken, or roasted vegetables.

Culinary inspirations:

  • Glaze for chicken, salmon, or roasted vegetables.
  • Drizzle over cheeses, breads, or flatbreads.
  • Whisk into vinaigrettes or marinades.
  • Blend into sauces for shrimp, tofu, or grilled meats.

As a Daily Wellness Ritual

Morning routines are personal — some brew coffee, others meditate. For many, a teaspoon of fermented garlic honey stirred into warm lemon water has become a ritual. Others take it further, blending it into immunity shots like this Flu Bomb recipe with ginger, lemon, and apple cider vinegar. Paired with apple cider vinegar, it creates a bracing tonic that wakes the body gently.

Some prefer it at night: a spoonful before bed, a comfort that signals the day’s end. It is both small and profound — the kind of act that keeps wellness woven into ordinary life.

Ideas for daily practice:

  • Morning tonic: garlic honey + lemon + apple cider vinegar.
  • Evening comfort: a spoonful straight from the jar.
  • Seasonal support: daily teaspoon during flu season.

Why Fermented Garlic Honey Resonates Today

Why now? Why does this simple jar of garlic in raw honey capture imaginations in 2025 as much as it did centuries ago?

Part of the answer is trust. People are weary of pills, syrups, and supplements wrapped in marketing. A jar you make yourself feels tangible, honest. You can see the garlic, taste the honey, watch the bubbles rise. Wellness becomes something visible and real.

It also resonates because it belongs to two worlds at once:

  • Ancient: Egyptians feeding garlic to workers, Ayurveda blending honey into tonics, Chinese medicine using both to balance the body.
  • Modern: wellness influencers filming bubbling jars, chefs experimenting with glazes, scientists publishing studies on antioxidants and allicin.

Even mainstream lifestyle outlets like Vogue have covered its rise, noting that while science is still catching up, the cultural appeal of a jar you can make yourself — and actually enjoy taking — is undeniable (Vogue).

We crave stories, and fermented garlic honey gives us one. Watching a jar transform over weeks is an antidote to instant gratification. Sharing it with a friend or online community turns food into connection. Even its quiet fizzing is a reminder that life is always in motion, even in something as humble as garlic and honey.

Beyond the kitchen, MasalaMonk even explores garlic’s benefits for skin, showing how versatile this ingredient has always been.


Conclusion: A Golden Habit Worth Keeping

Fermented garlic honey is not a miracle cure. It won’t erase every cough or guarantee immunity. But it doesn’t need to. Its value lies in something deeper: the way it makes caring for yourself feel nourishing, simple, and connected to tradition.

One spoonful soothes a sore throat. Another brightens a recipe. A clove shared connects you to generations who trusted the same golden mixture.

So peel the cloves. Pour the honey. Let the jar sit and change. What you’ll have is more than a remedy or an ingredient — it’s a golden companion, alive with sweetness, savor, and the quiet reassurance that sometimes the oldest wisdom is still the best.

Jar of fermented garlic honey on rustic table with bread and cheese, daily wellness habit.
A golden habit worth keeping — fermented garlic honey for both wellness and the kitchen table.

FAQs

1. What is fermented garlic honey?

Fermented garlic honey is made by submerging fresh garlic cloves in raw honey and allowing them to ferment naturally. The honey becomes thinner and tangy, while the garlic softens and sweetens, creating a living remedy that doubles as a versatile kitchen ingredient.


2. How long does fermented garlic honey take to make?

It usually takes 3–4 weeks before it’s ready to taste. By then, the honey loosens and bubbles appear. The flavor deepens over time, so some people enjoy it young and mild, while others prefer letting it ferment for several months.


3. Is fermented garlic honey safe?

Yes — when prepared correctly, fermented garlic honey is safe for healthy adults. Use raw honey, fresh garlic, and make sure the cloves stay submerged. Burp the jar during the first week to release gases. The main caution: never give honey, fermented or not, to infants under one year old.


4. What are the health benefits of fermented garlic honey?

The combination offers:

  • Immune support during cold and flu season.
  • Cough and sore throat relief, thanks to honey’s soothing effect.
  • Antioxidants and anti-inflammatory compounds that support overall health.
  • Cardiovascular benefits, as garlic may help with circulation and cholesterol.

5. How should I use fermented garlic honey?

There are countless ways to enjoy it:

  • Take a teaspoon daily as a tonic.
  • Stir into warm tea or lemon water.
  • Brush onto salmon, chicken, or roasted vegetables.
  • Drizzle over cheeses, breads, or flatbreads.

6. Can I make fermented garlic honey with store-bought honey?

Only if the honey is raw and unpasteurized. Most supermarket honey is pasteurized, which kills the enzymes and microbes needed for fermentation. Look for raw honey from local beekeepers or natural food stores.


7. How long does fermented garlic honey last?

When stored in a sealed jar in a cool, dark place, it can last for many months — even over a year. Its flavor evolves over time but generally stays safe as long as there’s no mold or off odors.


8. Should fermented garlic honey be refrigerated?

No, it doesn’t need refrigeration. In fact, cold temperatures may slow or halt fermentation. A pantry or cupboard is ideal, away from direct sunlight and heat sources.


9. What if my garlic turns green or blue?

Sometimes garlic develops a blue or green tint during fermentation. This is a natural reaction between garlic’s sulfur compounds and trace minerals. It looks surprising but is safe to eat.


10. Do I eat the garlic cloves or just the honey?

Both! The cloves become soft, mellow, and slightly sweet, while the honey is rich and tangy. Many people eat the cloves whole as medicine or chop them into dishes, while using the honey as a syrup or glaze.


11. Can fermented garlic honey cause botulism?

The risk is extremely low when made properly. Honey itself is inhospitable to botulism spores, and fermentation increases acidity, which makes conditions even less favorable. Following best practices — raw honey, fresh garlic, full submersion, and regular burping — keeps your jar safe.


12. Can I cook with fermented garlic honey?

Yes. Cooking will destroy some probiotic activity, but the flavor remains incredible. It’s excellent in marinades, glazes, stir-fries, and salad dressings. Many people keep one jar for remedies and another for cooking.


13. Can I add other ingredients to fermented garlic honey?

Yes. Ginger, lemon peel, chili peppers, and apple cider vinegar are popular additions. Each creates a new variation — spicy, citrusy, or more medicinal. Just make sure added ingredients are fresh and fully covered in honey.


14. Why is my honey crystallizing?

Raw honey naturally crystallizes over time. This doesn’t mean it’s spoiled. You can gently warm the jar in your hands or place it in warm (not boiling) water to re-liquify it without harming the ferment.


15. Can children take fermented garlic honey?

Yes — but only if they are over one year old. Children under twelve months should never be given honey due to the risk of infant botulism. For older children, a small spoonful can be a safe and soothing remedy.

Posted on — Leave a comment

Fermented Carrots Recipe: Crunchy, Tangy Lacto-Fermented Carrots

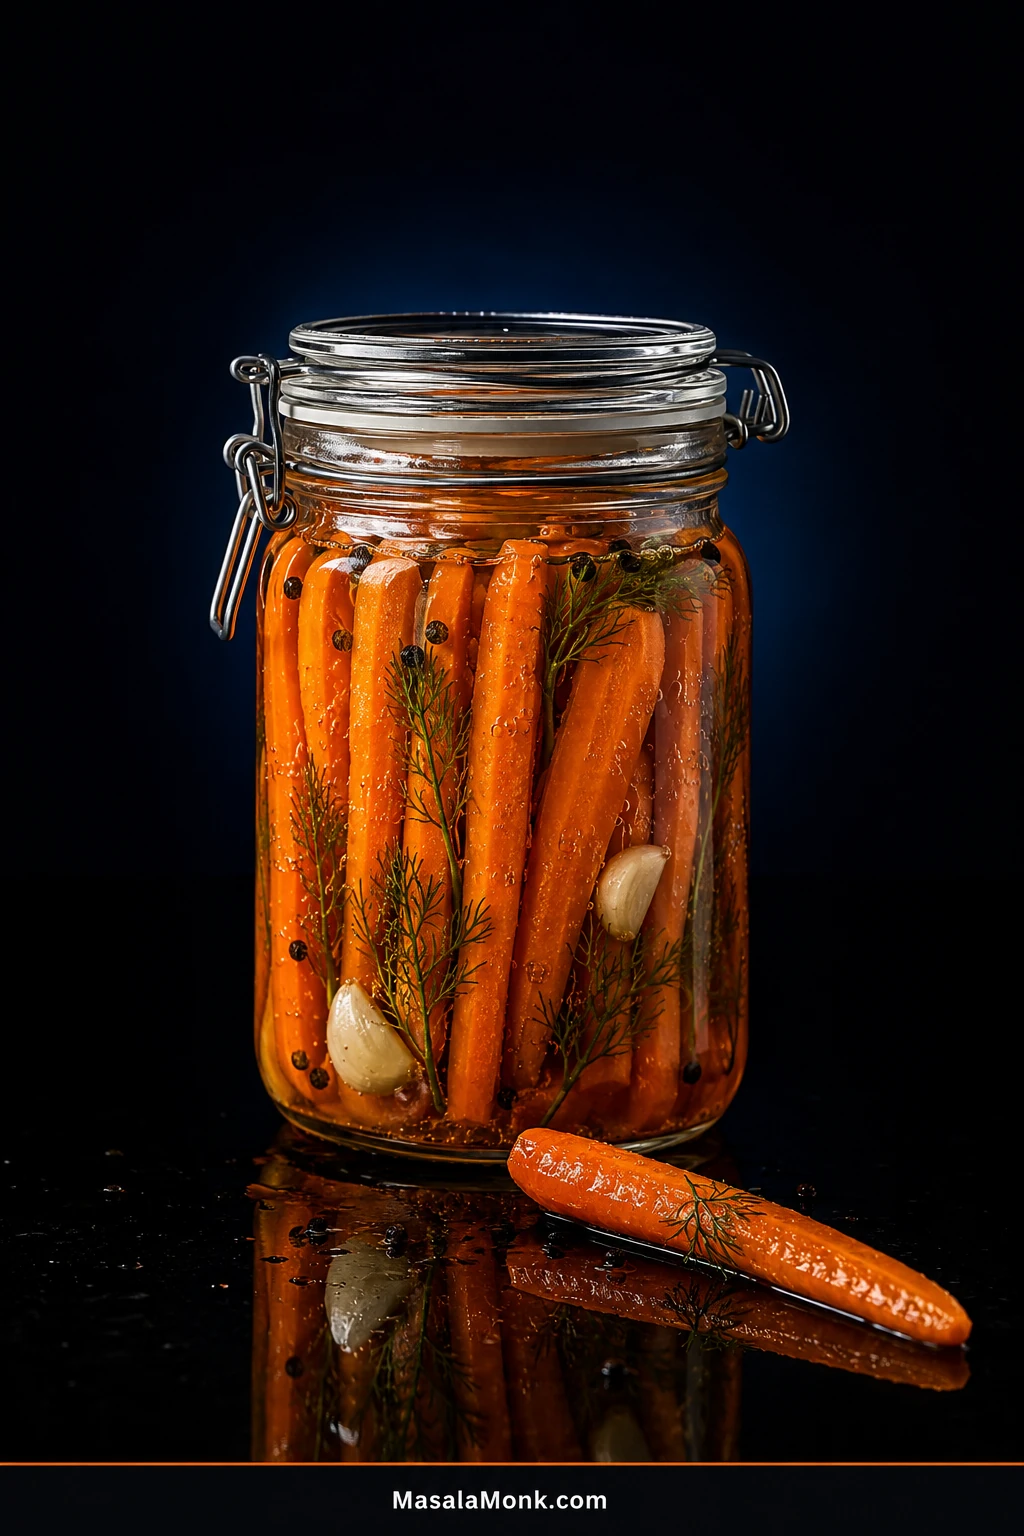
Jar of dill-garlic fermented carrots in brine with carrot sticks, fresh dill, garlic cloves and black peppercorns.

This post was last updated on:

Fresh carrots are almost built for fermentation: firm, naturally sweet, and sturdy enough to keep their snap while salt and time turn them pleasantly sour.

The hands-on work takes only about 15–20 minutes. The unfamiliar part comes afterward. Clear brine turns cloudy. Tiny bubbles gather between the carrots. Sediment appears. A few days in, you may find yourself staring through the glass wondering whether you have made a very good pickle or ruined a perfectly good bag of carrots.

The recipe itself is short. The rest of this guide is here for the days afterward—when the brine clouds, the bubbles slow, a carrot starts floating, or the jar suddenly looks different from the one you packed.

Get the setup right at the beginning and those changes become much easier to read. Measure the salt, keep every solid beneath the brine, give the ferment a stable place away from excess heat, and learn the handful of cues that matter.

Quick Answer

Pack about 450 g / 1 lb carrots into a 1-litre / roughly 1-quart jar and cover them with water. Weigh the carrots, seasonings, and water together, then add salt equal to 2.5% of that pre-salt weight. If the food and water weigh 850 g, use 21.25 g salt.

Keep every solid submerged and aim for about 20–22°C / 68–72°F. Use a food pH meter to check acidification and look for a brine pH of 4.6 or lower. Once active bubbling has stopped and the ferment otherwise looks and smells sound, taste a carrot. If the sourness and texture are where you want them, refrigerate the carrots in their brine.

Fermented Carrots Recipe

Start with this dill-garlic version. It is familiar enough for a first jar, but restrained enough that the finished carrot still tastes like carrot.

No vinegar, whey, probiotic capsule, commercial starter culture, or brine from an older ferment is required. These are refrigerated fermented carrots, not a shelf-stable canned product.

Yield1 litre / roughly 1 quart
CarrotsAbout 450 g / 1 lb, or enough to pack the jar snugly
Salt2.5% of the pre-salt carrot + seasoning + water weight
Hands-on timeAbout 15–20 minutes
Ideal temperature20–22°C / 68–72°F
Start watching closelyDuring the first week; warmer ferments move faster
pH checkBrine pH 4.6 or lower
After fermentationRefrigerate in the brine

Equipment

  • 1 clean 1-litre / roughly 1-quart glass jar
  • digital kitchen scale
  • fermentation weight
  • airlock or suitable fermentation lid
  • food pH meter
  • knife and cutting board

That list looks more technical than the actual job. The scale replaces salt guesswork. The weight deals with floating food. An airlock lets gas escape without repeatedly opening the jar. And the pH meter answers the question bubbles cannot: has the brine actually become acidic enough?

Fermentation equipment for carrots: glass jar, kitchen scale, fermentation weight, airlock, pH meter and knife.

Ingredients

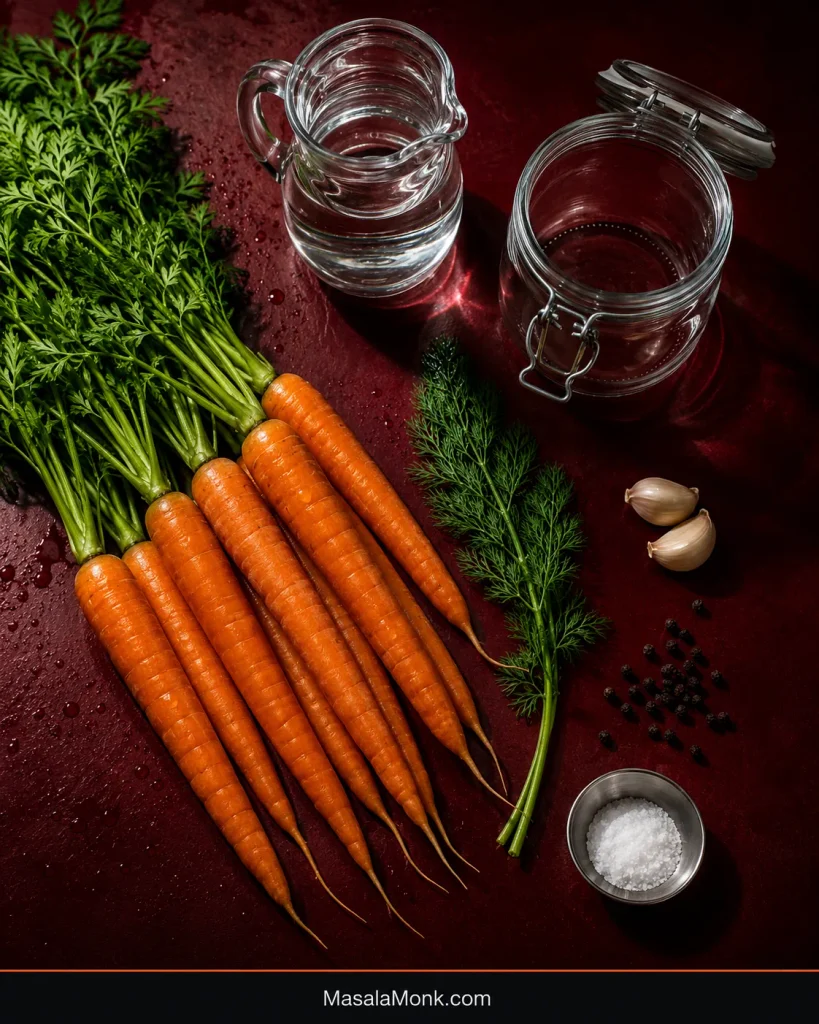
Ingredients for one jar of dill-garlic fermented carrots: carrots, water, salt, two garlic cloves, dill and black peppercorns.
  • About 450 g / 1 lb fresh, firm carrots, or enough evenly cut sticks to pack the jar snugly
  • Potable water, enough to cover the carrots; soft, distilled, or suitably filtered water is useful if your local supply is very hard or heavily treated
  • Pickling or canning salt, equal to 2.5% of the combined carrots + seasonings + water weight before salt is added
  • 2 garlic cloves, lightly crushed
  • 1 large fresh dill sprig
  • ½ teaspoon whole black peppercorns

Pickling or canning salt is the simplest choice because it is predictable and free of ingredients that can complicate fermentation. If you substitute another plain salt, weigh it in grams rather than matching tablespoons; coarse crystals and fine crystals occupy a spoon very differently.

Potable tap water can work. When the local supply is heavily treated or very hard, suitably filtered, soft, or distilled water removes another variable from the first batch.

How to Make Fermented Carrots

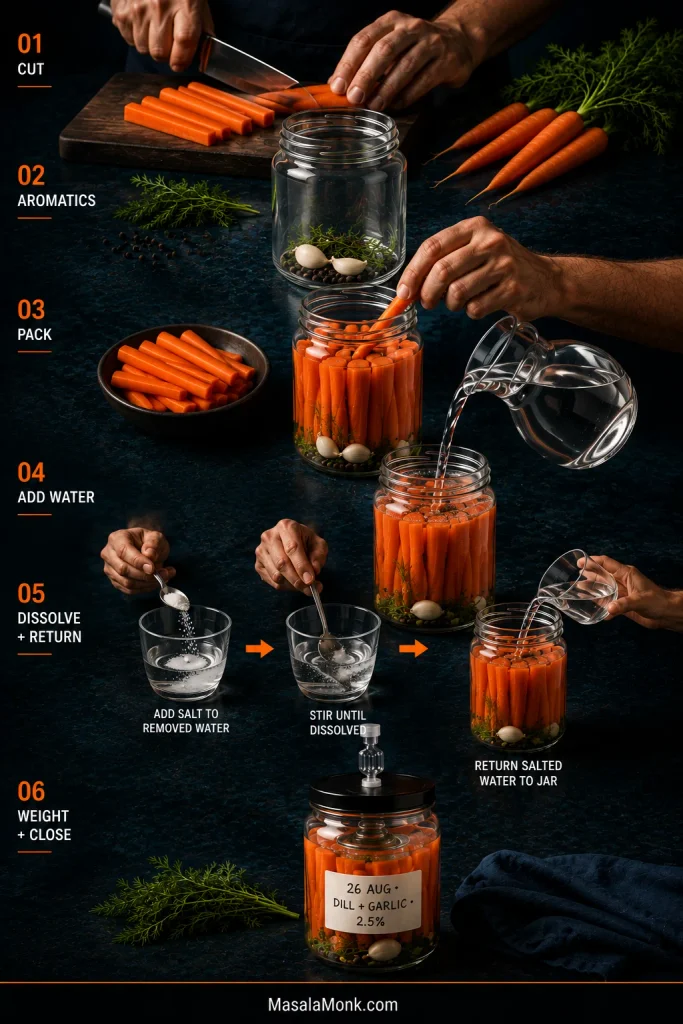
Six-step fermented carrots process: cut carrots, add aromatics, pack the jar, add water, dissolve and return the salt, then add the fermentation weight and airlock.
The salt joins the ferment as a dissolved solution, not as dry crystals scattered over the carrots; only after that does the fermentation weight go in and the jar close.

Clean the Equipment

Wash the jar, lid, fermentation weight, knife, cutting board, and anything else that will touch the food with hot soapy water, then rinse well. Sanitize the jar and weight using a food-safe method appropriate for the material; boiling is one option for heat-safe glass.

Weigh the Empty Jar

Place the empty jar on the scale and record its weight. You will subtract that number later so the glass never becomes part of the salt calculation.

Cut the Carrots

Rinse the carrots under cool running water, trim the ends, and remove damaged areas. Peeling is optional for sound, fresh carrots.

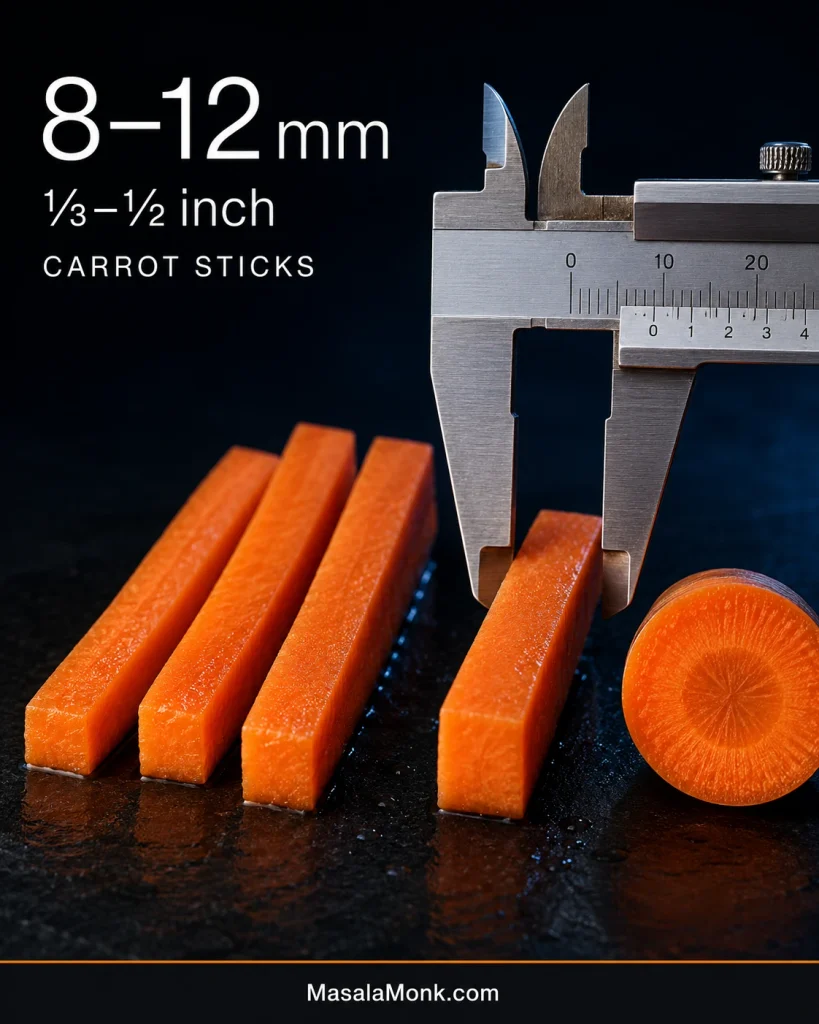
Cut them into fairly even sticks about 8–12 mm / ⅓–½ inch thick. At this size they have enough cut surface to ferment well while keeping some resistance through the centre.

Pack the Jar and Add Water

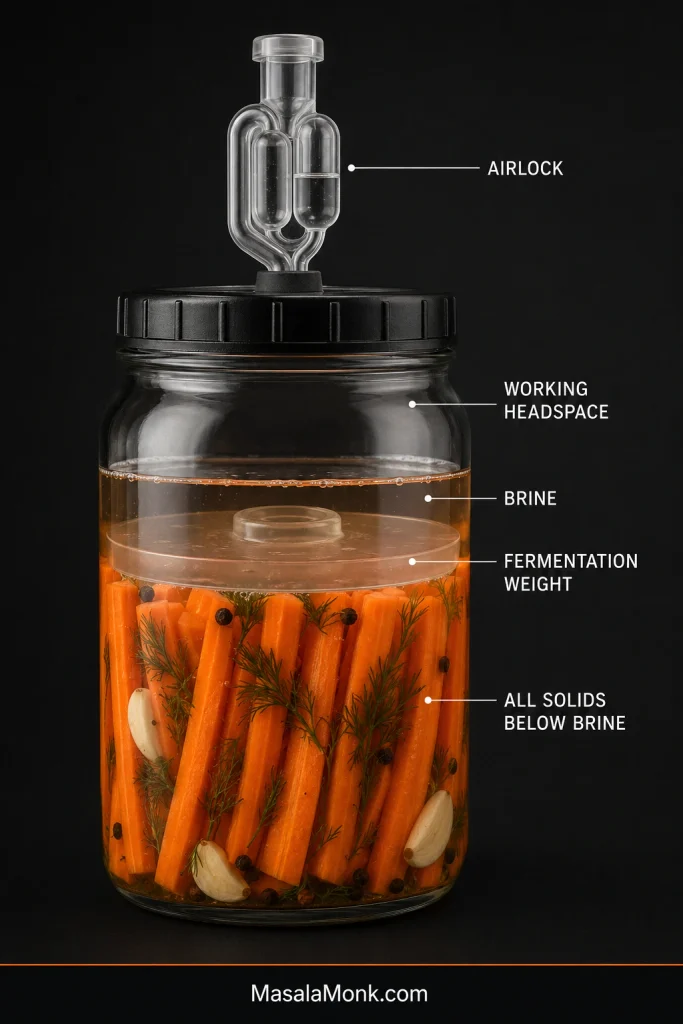
Put the garlic, dill, and peppercorns in first, then pack the carrot sticks snugly around them. Add enough water to cover everything while leaving room for the fermentation weight and some working headspace beneath the lid.

The jar should already look like something worth waiting for: bright orange sticks close together, dill and garlic tucked below the surface, the weight seated above them, and nothing poking through the brine.

Calculate the Salt

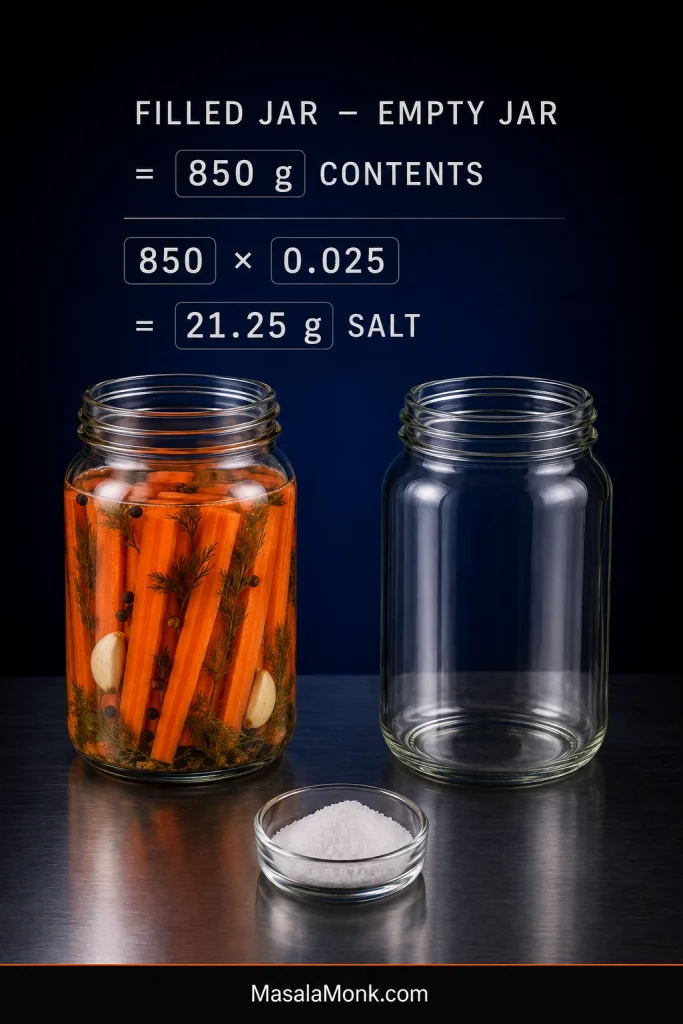
Weigh the filled jar and subtract the empty-jar weight. Multiply the weight of the carrots, seasonings, and water by 0.025.

For example, if the contents weigh 850 g:

850 × 0.025 = 21.25 g salt

That is the only calculation you need for any size jar. No tablespoons to compare, no separate brine chart, and no guessing how much water disappeared between tightly packed carrot sticks.

Fermented carrot salt calculation showing filled jar minus empty jar to get 850 g contents, then 850 × 0.025 = 21.25 g salt.
A total-content salt calculation automatically responds to the jar you actually packed: tightly packed carrots leave room for less water, and the final weight accounts for that before the 2.5% is calculated.

Once the salt is measured, the fiddly part is over. From here, most of the job is keeping the carrots submerged and watching them change.

Dissolve, Weight and Close

Pour a little of the jar water into a clean cup, dissolve the measured salt in it, and return it to the carrots. Set the fermentation weight in place, check that every solid ingredient sits below the brine, then fit the airlock or fermentation lid.

Label the jar with the start date, “2.5% pre-salt total weight,” and the flavoring. A week later, when two jars are behaving differently, you will be glad you did.

Put the jar on a small plate or tray in case an energetic ferment pushes a little liquid upward.

Let the Carrots Ferment

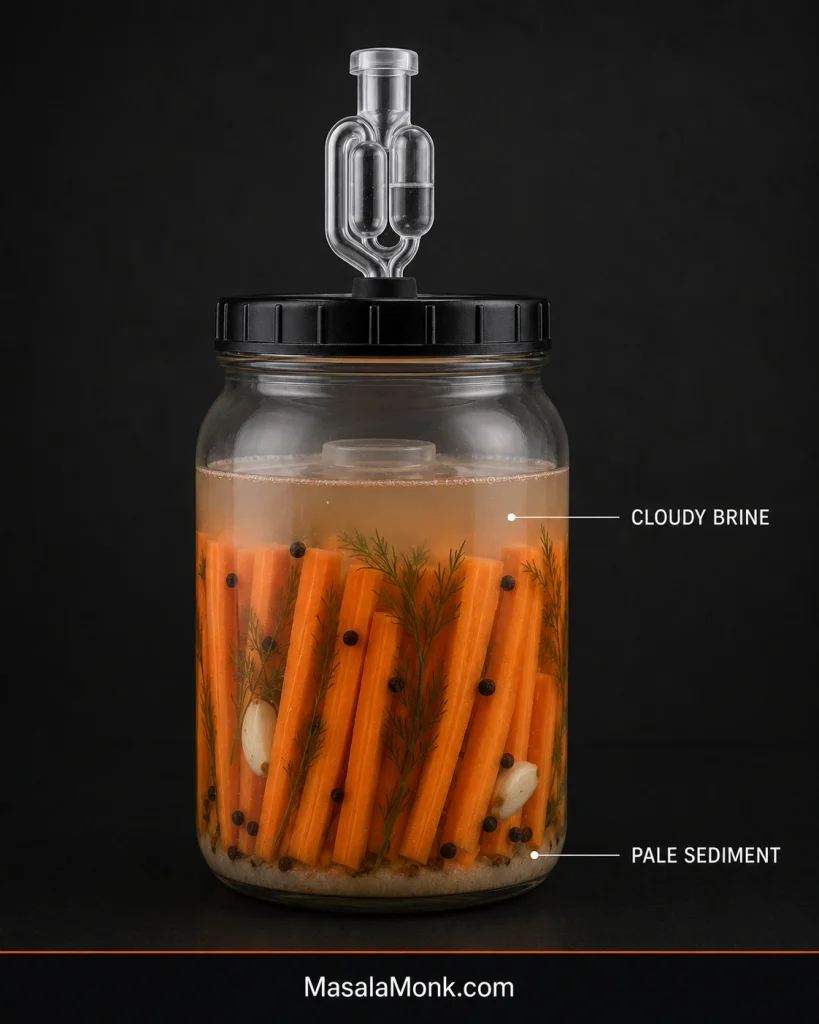
Keep the batch in a dark or well-shaded place, away from direct sunlight and excess heat. Over the next several days the brine may cloud, bubbles may move between the sticks, and pale sediment may appear at the bottom. The smell should gradually shift from raw carrot and salty water toward something tart and pickle-like.

Use the date to know when to pay closer attention, not as a promise that the carrots will be ready on a particular day. Once the brine has reached pH 4.6 or lower, active bubbling has stopped, and the jar otherwise looks and smells normal, taste one carrot with a clean utensil. If the sourness and texture are where you want them, refrigerate the carrots in their brine.

Once chilled, they are ready to eat straight from the jar or beside something creamy such as extra-creamy hummus.

Your Carrots Are Packed—What Happens Next?

You can leave the jar alone and return here when you need it. These are the sections most worth bookmarking for the days ahead:

One Salt Formula for Any Jar

For this recipe, weigh what is in the jar before adding salt and multiply by 0.025. Small jar, large jar, tightly packed carrots, oddly shaped carrots—the calculation stays the same.

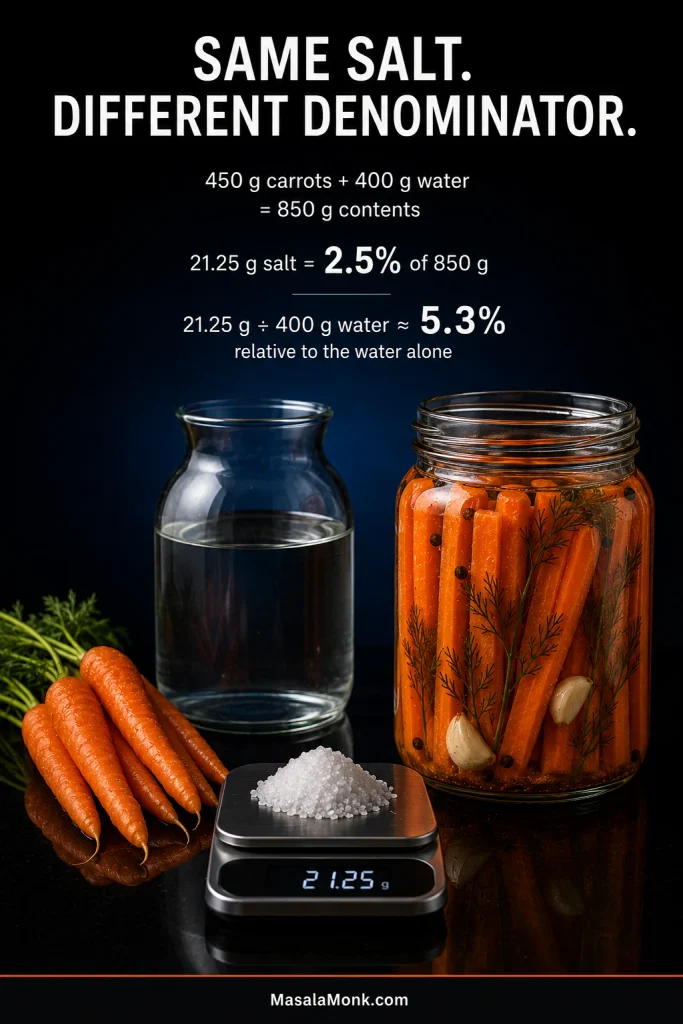
Fermentation recipes can look contradictory because their percentages are not always measuring the same thing. Some calculate salt against the water alone. Here, the salt amount equals 2.5% of the carrots, seasonings, and water before salt is added.

Take a jar with 450 g carrots and 400 g water. The combined weight is 850 g, so this method uses 21.25 g salt. Compared only with those 400 g of water, that same amount of salt is a little over 5%.

Salt percentage comparison showing 21.25 g salt as 2.5% of 850 g total contents and about 5.3% relative to 400 g water alone.
When two fermentation recipes quote very different salt percentages, first ask what each percentage is measured against; compare the denominator before comparing the number.

This 2.5% calculation is the salt method used for this recipe. If you follow a different tested fermentation recipe, stick with its salt amount and timing rather than mixing the two approaches.

A smaller jar needs no new formula. For a 500 ml / roughly 1-pint batch, pack the carrots, add the water, subtract the empty-jar weight, and multiply the food-and-water weight by 0.025. A little jar is often an excellent first ferment: enough to watch the brine change and find the texture you like without committing much produce.

Cut, Pack & Keep Everything Under the Brine

Start With Carrots That Still Snap

Hard, fresh carrots give you the best chance of ending with crisp fermented carrots. Slightly limp but otherwise sound ones may firm up after a short soak in very cold water, but genuinely soft or deteriorating carrots are a poor starting point.

You can leave the peel on. Wash the carrots well, trim the ends, remove damaged areas, and peel only when the skin is tough, bitter, or simply not something you want in the jar.

For sticks, aim for roughly 8–12 mm / ⅓–½ inch thick. Thick coins can also be wet-brined. Very thin matchsticks soften more quickly, while shredded carrots are better suited to a dry-salted, sauerkraut-style ferment.

Carrot sticks measured with a ruler and caliper at 8–12 mm (⅓–½ inch) thickness.
Evenness matters as much as thickness: similarly sized 8–12 mm / ⅓–½ inch carrot sticks tend to move through fermentation at a more similar pace, so one piece is less likely to soften far ahead of another.

Pack Beneath the Brine

The fermentation weight is there to keep food away from the air—including the dill frond slipping around the side, the floating peppercorn, and the little piece of garlic trying to escape.

Pack larger seasonings lower in the jar where possible. Leave enough headspace for fermentation activity without choosing a vessel so large that the carrots sit beneath an unnecessarily big pocket of air.

Labeled fermented carrot jar showing the airlock, working headspace, fermentation weight, brine and all solids below the brine.
Think of the brine surface as the critical boundary: food and the fermentation weight belong below it, while working headspace belongs above it.

Airlocks, Pressure & Burping

An airlock makes a beginner ferment easier to manage. Carbon dioxide can escape while the jar stays closed, so you do not have to keep opening it simply to release pressure.

With a functioning airlock, routine burping is unnecessary. Other fermentation lids should be used according to their instructions. A suitable non-venting lid needs brief pressure release as gas builds, then it should be closed again promptly.

Fermentation Time & Temperature

“Room temperature” sounds precise until one kitchen is 19°C and another is 31°C.

A very useful target is 20–22°C / 68–72°F. At that temperature the carrots can acidify steadily while their texture remains easier to manage. University of Minnesota Extension’s vegetable-fermentation guidance uses the same ideal temperature range.

Kitchen temperatureWhat you may notice
Below 16°C / 60°FToo cool for reliable progress; move the jar somewhere warmer.
16–19°C / 60–67°FSlower than the ideal range and likely to need more time.
20–22°C / 68–72°FIdeal for steady fermentation and easier texture control.
23–25°C / 73–77°FWarmer and faster; watch texture and activity more closely.
26°C / 79°F and aboveOver-fermentation, softening, and spoilage become greater concerns.
Fermented carrot jars shown at cool, ideal and warm temperature ranges, with 20–22°C (68–72°F) marked as the sweet spot.
A thermometer turns vague “room temperature” advice into something usable; the same fermented-carrot jar behaves very differently at 18°C, 21°C and 26°C.

Fermenting Carrots in a Hot Kitchen

A Delhi kitchen in peak summer and a cool northern-European kitchen are not running the same fermentation schedule.

When the room regularly sits around 28–32°C / 82–90°F, use the coolest stable spot available. An air-conditioned room can be more useful than a cupboard beside the stove. Keep the ferment away from direct sun, hot appliances, and refrigerator exhaust.

Warmth speeds more than sourness. The carrots can soften sooner, gas production can become vigorous, and garlic, chilli, onion, or peppercorns can dominate before the carrot itself has developed much sourness.

For these brined carrot sticks, choose shade and a stable temperature. Gajar kanji follows its own fermentation tradition and uses a different method.

Fermented carrot jar moved from a 31°C hot kitchen to a shaded 21°C stable spot in the same home.
In a hot kitchen, correct the environment rather than the recipe: move the jar to the coolest stable shaded location instead of changing the salt ratio mid-ferment.

When Should You Start Checking?

Carrot-specific home recipes often show noticeable fermentation during the first week, while broader Extension produce-fermentation protocols can run for several weeks. Their salt ratios and complete methods differ too, so one timeline should not simply be dropped into another recipe.

Use the first week as a cue to start watching more closely. Early on, the carrot holds more of its raw sweetness and rigid bite. As fermentation develops, the aroma becomes distinctly pickle-like, sourness moves further through the stick, and the texture becomes a little more yielding. A deeper ferment usually tastes more assertively sour and bends more easily.

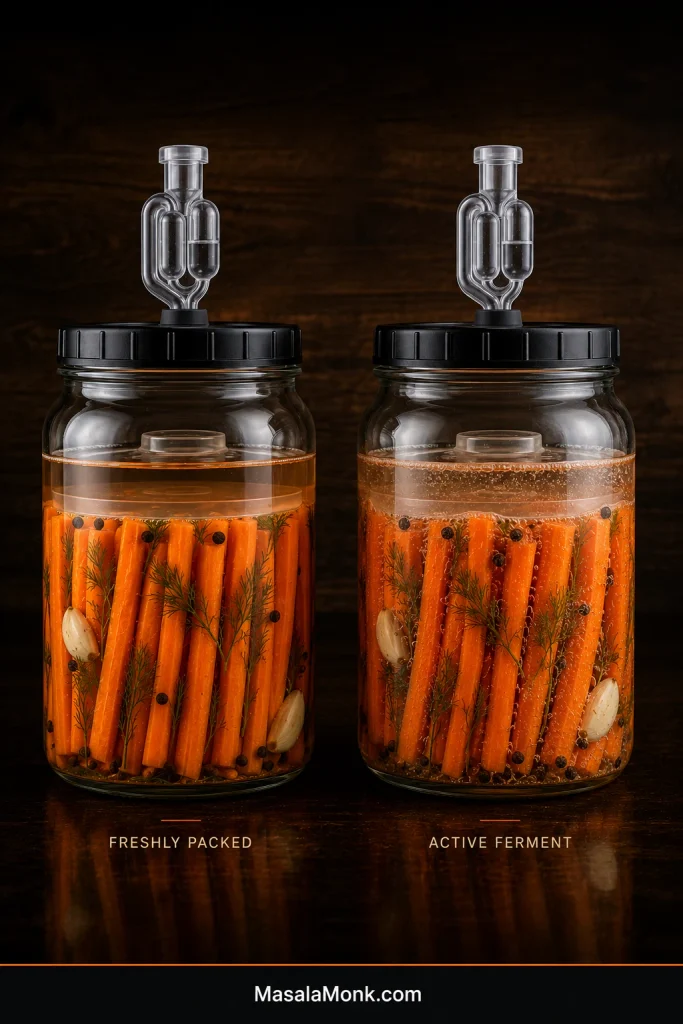
Side-by-side jars of freshly packed fermented carrots with clear brine and an active ferment with bubbles and cloudier brine.
“Active” is a stage, not a finish line: visible gas tells you fermentation is happening, whereas pH, aroma and texture answer different questions about readiness.

Once the brine is at pH 4.6 or lower and active bubbling has run its course, taste decides which finished texture you prefer. That first properly chilled bite is often the clearest comparison: carrot sweetness still underneath, sourness around it, then the snap.

Next: See the normal signs of fermentation or jump straight to pH and readiness.

What Normal Fermentation Looks Like

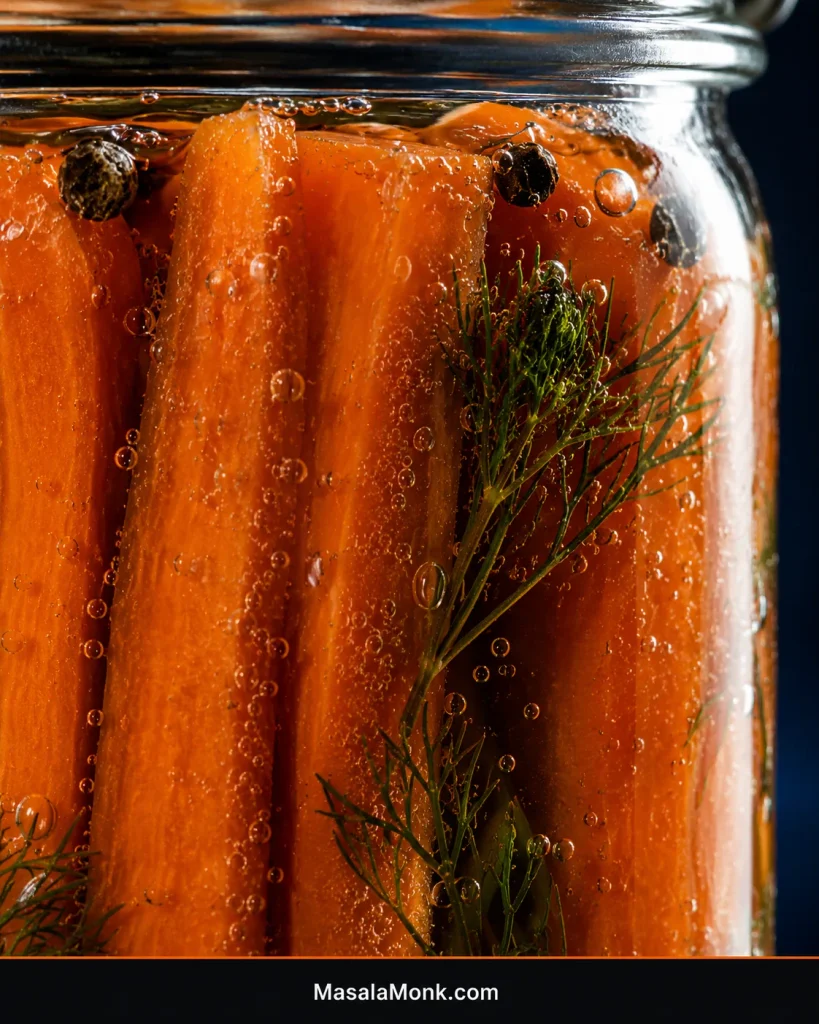
A freshly packed jar can be almost boring: orange carrots, clear brine, no bubbles. Then little pockets of gas may gather along the sticks. The liquid can turn hazy or milky. Pale sediment may collect near the bottom. None of these changes has to arrive on a particular day.

Macro view of tiny fermentation bubbles clinging to carrot sticks and glass inside a brine-filled jar.

You may walk past a quiet-looking jar in the morning and find bubbles clinging to the carrots by evening. Fermentation rarely performs on command.

Cloudiness worries many first-time fermenters because clear water suddenly stops looking “clean.” In vegetable fermentation, cloudy brine can be part of a perfectly ordinary progression.

Jar of fermented carrots with cloudy brine and a pale sediment layer settled at the bottom.
Cloudiness stays suspended through the brine; sediment settles. That simple visual distinction is more useful than judging a ferment by whether the liquid still looks “clean.”

The aroma changes too. Raw carrot and salty water gradually give way to something brighter and more pickle-like. Visible activity often becomes quieter later even while acidity continues developing.

Some batches fizz enthusiastically and others barely put on a show. Very little visible bubbling by itself does not tell you the ferment has failed.

Checking pH & Readiness

Calibrate the pH meter according to its instructions. With a clean spoon, transfer a small sample of brine to a clean cup, measure it, and discard the sample afterward rather than pouring it back into the jar.

Look for a brine pH of 4.6 or lower. That tells you the ferment has become sufficiently acidic; it does not cancel obvious trouble elsewhere in the jar.

Food pH meter reading 4.4 in a separate sample of fermented carrot brine, with 4.6 or lower marked as the checkpoint.
A quiet jar can still be acidifying, which is why fermented-carrot pH tells you something bubble count cannot: whether the brine has actually crossed the acidification checkpoint.

At the finish there are really two questions: has the ferment progressed properly, and do you actually want to eat the carrot? Once active bubbling has stopped and the jar otherwise looks and smells normal, a good finished stick should still taste unmistakably of carrot—some sweetness through the centre, a rounded lactic sourness around it, and enough resistance that the bite feels satisfying.

Prefer to ferment without measuring pH? Choose one complete tested method designed to work that way and follow it from start to finish. Mixing the salt from one recipe with the timing from another makes the result much harder to judge.

Keeping Fermented Carrots Crunchy

Carrots begin with a texture advantage. Fresh produce, fairly even sticks, measured salt, and moderate fermentation temperature do most of the work. A hotter or longer ferment moves them more quickly from rigid to flexible and eventually soft.

A carrot that bends much more than it did raw but still snaps when pushed far enough may simply be further along the texture spectrum. Flexibility by itself does not tell you that the batch has failed.

Three carrot texture stages shown together: rigid, bendy but still snapping, and too soft.
Test two things together—bend and resistance. A fermented carrot that flexes but still pushes back and snaps is in a different state from one that folds limply without structure.

Tannin-rich leaves or tea are sometimes added to fermented vegetables for texture. Treat them as an optional tweak, not a safety control or a requirement for crisp carrots. Freshness, time, temperature, and the basic fermentation setup deserve attention first.

Fermented Carrots Troubleshooting: Is My Jar Okay?

Most jars will never give you every problem below. This section is here so that when something odd does appear, you do not have to diagnose it from one blurry photograph and five contradictory forum replies.

The table begins with changes that are commonly ordinary, moves into things that need attention, and ends with clear reasons to discard.

What you noticeWhat it may meanWhat to do
Cloudy brineCommon fermentation changeKeep the food submerged and continue watching the batch.
Pale sediment at bottomCommon fermentation sedimentUsually continue monitoring.
Tiny bubbles or fizzNormal gas productionLet the ferment continue.
Very little visible bubblingA quieter fermentUse temperature and pH instead of bubble count.
Carrot, herb, or spice floatingFood exposed at the surfaceRestore complete submersion promptly.
Carrots becoming more flexibleOften a texture changeCheck whether they still snap and look for other signs of trouble before judging flexibility alone.
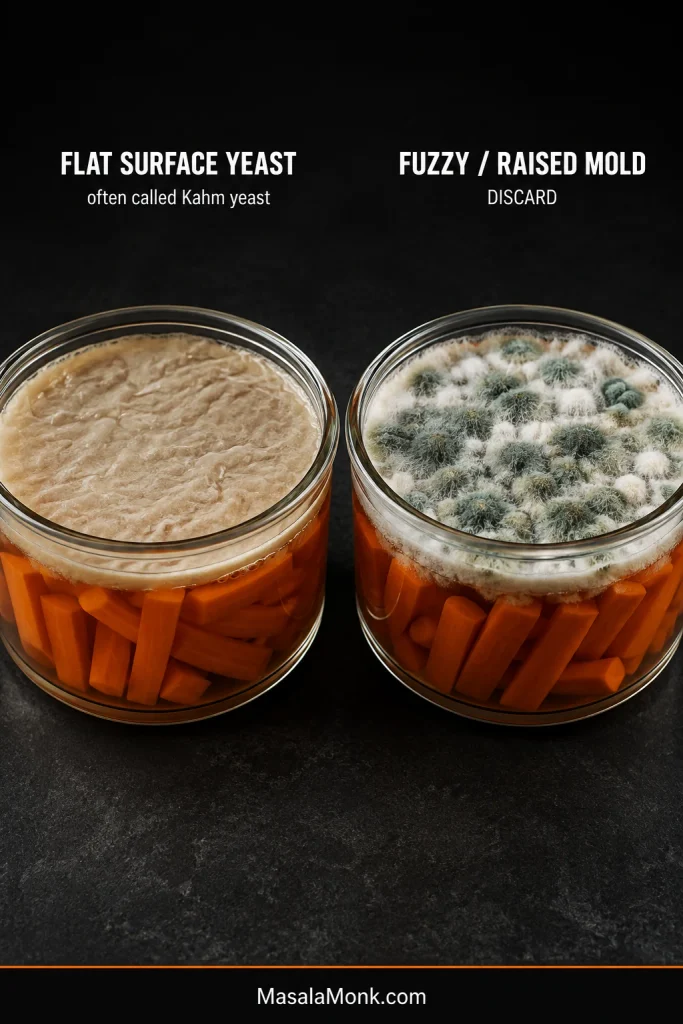
Thin, flat pale surface filmPossible surface yeastCompare with the guidance below. Confirmed surface yeast can be removed; uncertain growth should be discarded.
Fuzzy or clearly mold-like growthMoldDiscard the batch.
Ropey, stringy, mucus-like brineAbnormal deteriorationDiscard the batch.
Strong putrid or rotten odorSpoilageDiscard the batch.

White Film or Mold?

A pale film stretched flat across the brine can look alarming the first time you see it. A flat surface yeast film—often called Kahm yeast by home fermenters—and mold are different problems, and color alone will not reliably tell you which one you have.

Fuzzy, raised, or clearly mold-like colonies mean the batch goes. Confirmed mold should not be scraped from the top while the vegetables underneath are kept for eating. UC Davis’s fermented-fruit-and-vegetable troubleshooting guidance likewise advises discarding a ferment when mold is confirmed.

If you are confident the surface growth is a flat yeast film rather than mold, remove it cleanly, restore good submersion, close the jar again, and continue watching the ferment. Heavy or repeatedly returning yeast can hurt flavor, texture, and acidity.

When you genuinely cannot tell what is growing at the surface, a jar of carrots is not worth gambling on.

Side-by-side fermented carrot surfaces showing flat wrinkled surface yeast and raised fuzzy mold.
Look at structure before color: a flat surface film stays low and sheet-like, whereas mold develops raised, dimensional or fuzzy growth.

Cloudy, Sediment or Slimy?

Cloudiness, sediment, and slime can look surprisingly similar through glass, but they behave very differently. Cloudy brine is hazy or milky while still pouring freely. Sediment settles at the bottom. Both are common sights in vegetable ferments.

A little cloudiness—or even a brine that seems to have slightly more body than plain water—is not the same thing as true ropeiness. The concerning change is obvious viscosity: liquid that pulls into strings, coats the carrots with mucus-like slime, or pours with a distinctly ropey texture. Discard a batch that has reached that point.

Comparison of cloudy fermented carrot brine that pours freely and ropey brine that stretches into stringy slime.
Cloudy is an appearance; ropey is a behavior. Cloudy brine still runs freely, whereas genuinely ropey brine stretches into persistent strings.

When the Carrots Turn Soft

Texture moves gradually from rigid to slightly yielding, then bendy-but-snappy, soft, and eventually mushy. A properly acidified batch that smells good and has simply become softer than you prefer may have fermented warmer or longer than your ideal.

Softness alongside slime, mold, putrid odor, or failed acidification tells a different story. Discard that batch.

Floaters, Overflow & Lost Brine

An active ferment can push brine through the airlock and onto the plate underneath. What matters most is the liquid level left inside.

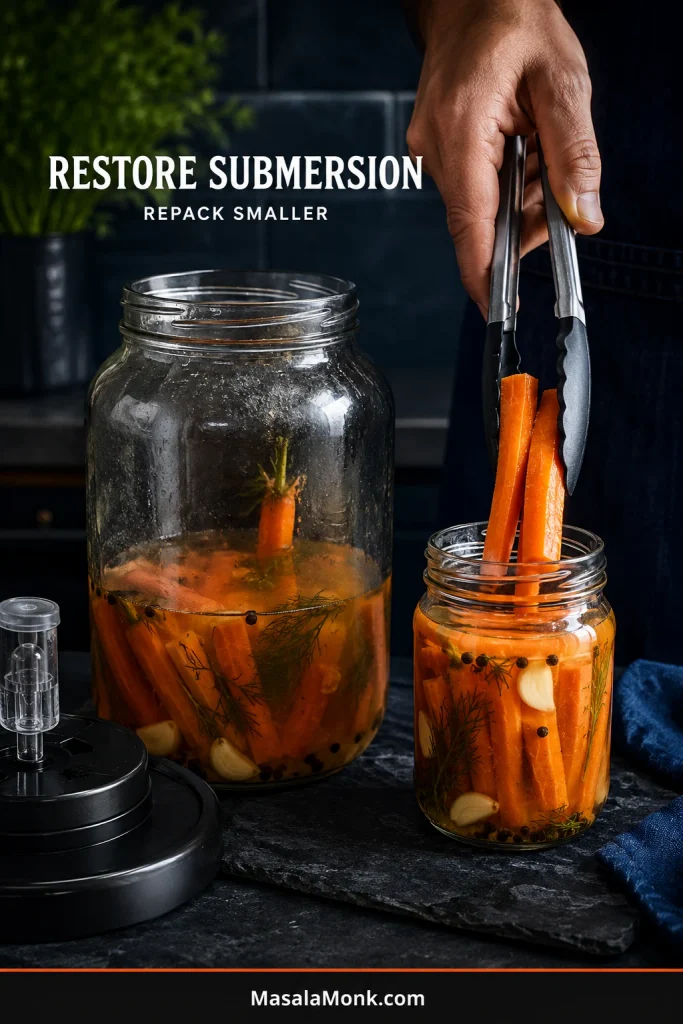
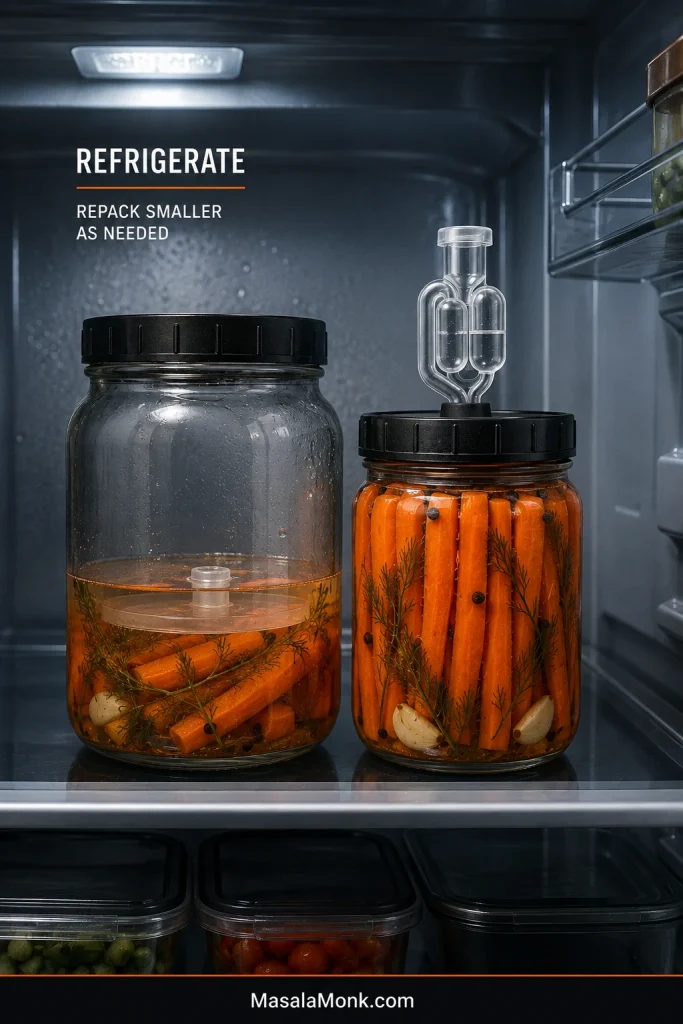
Restore complete submersion promptly when food becomes exposed. If the carrots will fit, moving them into a slightly smaller clean jar is often the simplest fix because the remaining brine rises around them without changing the recipe.

If so much brine has been lost that you cannot restore coverage without substantially rebuilding the ferment, restarting is more predictable than improvising with plain water or an unrelated brine percentage.

Fermented carrots being repacked from a larger low-brine jar into a smaller jar so the same brine covers the food.
Changing the vessel can preserve the original salt balance: a smaller jar raises the same remaining brine around the carrots without introducing an uncalculated top-up.

Yeasty, Alcoholic, Solvent-Like or Rotten Smells

A good carrot ferment should move toward a pleasantly sour pickle aroma. Strongly wine-like or alcoholic smells suggest more yeast activity than you want, so take a closer look at the surface, temperature, and pH.

A strong nail-polish-remover or solvent smell is outside the expected profile. So are distinctly vomit-like, rancid-butter-like, putrid, or rotten odors. When the jar smells unmistakably spoiled, discard it without tasting it to investigate further.

When the Carrots Taste Too Salty

Check the calculation first. Common errors include accidentally counting the jar’s weight, measuring salt by spoon instead of grams, or adding extra salt out of caution.

A properly finished batch may also simply taste saltier than you enjoy as a large standalone snack. Chop a few pieces into otherwise lightly seasoned food and make sure the next jar follows the intended calculation.

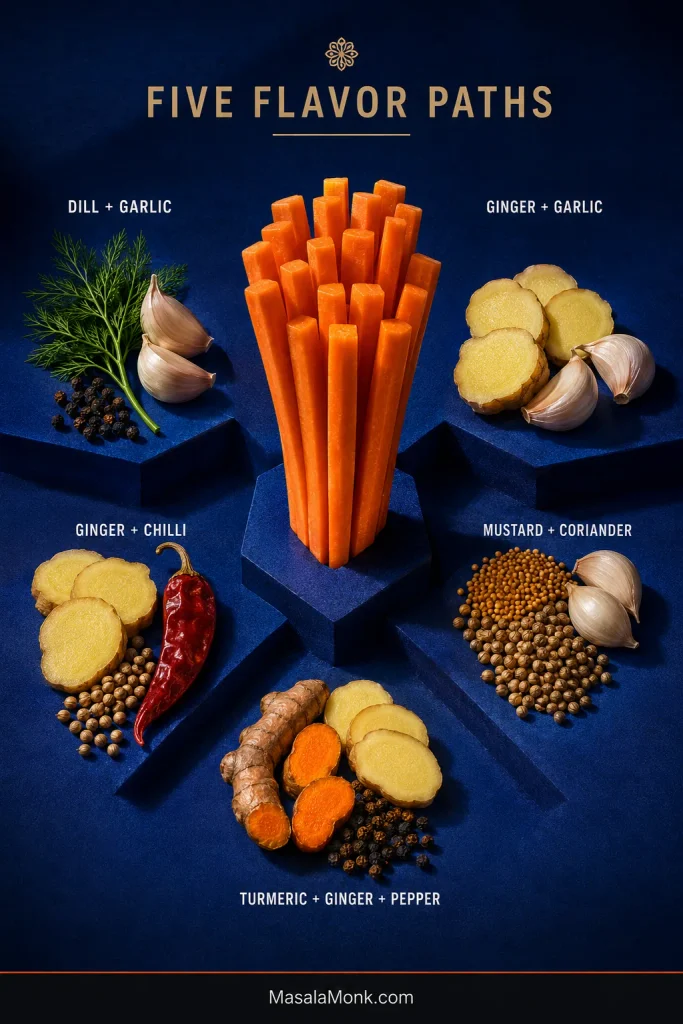
Five Fermented Carrot Flavor Variations

For a first jar, one or two aromatics are enough. It is easier to learn what fermented carrot actually tastes like before you start layering in lots of spices.

Keep the carrots, water, and salt calculation the same. The quantities below are for one 1-litre / roughly 1-quart batch.

Five fermented carrot flavor combinations arranged around carrot sticks: dill-garlic, ginger-garlic, ginger-chilli, mustard-coriander, and turmeric-ginger-pepper.

Dill + Garlic

  • 2 garlic cloves, lightly crushed
  • 1 large fresh dill sprig
  • ½ teaspoon black peppercorns

The familiar pickle-like version: fresh dill on the nose, garlic underneath, and enough carrot sweetness left to keep the whole thing from tasting one-note. It is especially good beside crisp homemade falafel, pita, and tahini.

Ginger + Garlic

  • 10–15 g / about ½ oz fresh ginger, sliced
  • 2 garlic cloves, lightly crushed

Fresh ginger gives the carrot a warm, citrusy edge. Garlic stays in the background and the carrot remains clearly recognizable underneath.

Ginger + Chilli

  • 10 g fresh ginger, sliced
  • 1 small dried chilli, adjusted for heat
  • ½ teaspoon coriander seeds

Brighter and hotter. Start cautiously with chilli, especially in a warm kitchen where strong spice flavor can move into the brine quickly.

Mustard + Coriander

  • ½ teaspoon mustard seeds
  • ½ teaspoon coriander seeds
  • 2 garlic cloves

Mustard brings bite; coriander rounds it out with citrusy warmth. The combination feels naturally at home beside Indian food while still tasting unmistakably like fermented carrots.

Turmeric + Ginger + Black Pepper

  • 10 g fresh ginger, sliced
  • 5–8 g fresh turmeric, thinly sliced
  • 6–8 whole black peppercorns

Earthy, fragrant, vividly orange—and quite capable of turning your cutting board the same color.

The flavorings should support the vegetable instead of burying it. The first thing you taste should still be carrot.

How to Eat Fermented Carrots

Think of them as cold crunch, acidity, and salt. That combination earns its place anywhere a meal feels rich, creamy, warm, or a little too soft.

Eat them straight from the refrigerator, put them beside eggs or cheese, tuck them into sandwiches and wraps, or chop them over grain bowls and tacos.

A bowl of dal tadka and rice rarely objects to something cold, sour, and crunchy at the edge of the plate.

Bowl of dal tadka and basmati rice served with cold fermented carrot sticks.

They also work beside grilled chicken, tofu, or paneer, where the acidity cuts through a richer main dish and resets the palate for the next bite.

Using the brine: a spoonful from a successful batch can sharpen a dressing or sauce. It works particularly well anywhere you already need both acidity and salt, including the creamy dressing in a bowl of coleslaw. Taste before adding more seasoning. Use the brine because it tastes useful; there is no need to turn drinking it into a wellness assignment.

Fermented carrot brine being used in a glossy salad dressing.

Refrigeration, Storage & Shelf Life

Once fermentation has finished, refrigerate the carrots in their brine. Cold storage slows further change and helps preserve the balance of sourness and crunch you stopped for.

You can remove the fermentation weight once refrigerated if the carrots remain comfortably covered. If they keep rising above the liquid, leaving the weight in is still useful.

Use clean utensils and close the lid between servings. As you eat through the jar, less food is left to displace the brine, so remaining carrots can gradually begin poking above the liquid even though everything was submerged when the jar was full. Moving them into a smaller clean jar is often easier than adding more liquid.

Fermented carrots stored in a refrigerator in a larger partly eaten jar and a smaller jar with the remaining carrots submerged.

Fermentation slows dramatically in the refrigerator, but a long-stored sealed jar can still hold some pressure. Open it cautiously, particularly after it has been sitting untouched for a while.

Properly fermented vegetables can keep refrigerated for months, but maximum storage time is a poor target for something you made because you wanted it crisp. Eat the carrots while their flavor and texture are still at their best. Mold, genuine slime, or a putrid smell overrides whatever date is written on the lid.

Fermented Carrots vs Vinegar-Pickled Carrots

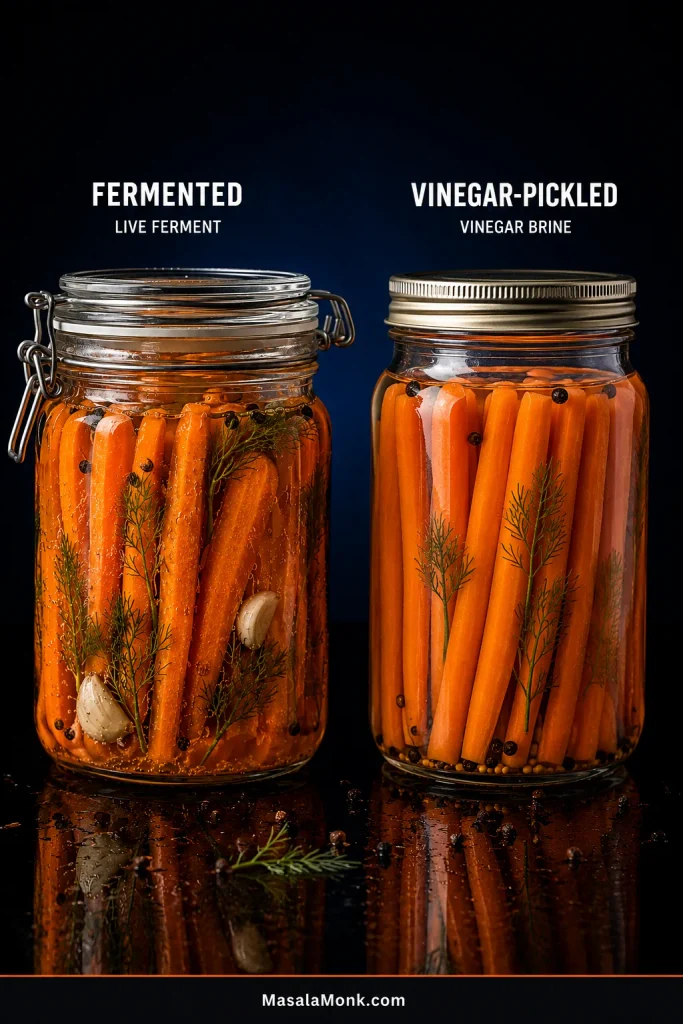
Both give you crisp vegetables with acidity, but they get there differently. Vinegar pickles begin with the acid already present. Fermented carrots begin with salt and water, and microbial activity creates the acidity as the batch develops.

Fermentation tends to build a rounder, evolving sourness and may leave live microbes in the food when it is kept unheated. Vinegar pickling is faster and more immediately predictable.

Two jars comparing fermented carrots with slightly cloudy brine and vinegar-pickled carrots with clear vinegar brine.
Fermented vs vinegar-pickled carrots are defined by how acidity gets there—not simply by whether one jar looks cloudy and the other clear. Fermentation develops acid; vinegar pickling supplies it at the start.

When you want cold, vinegar-sharp crunch today, something like a cucumber salad with vinegar and dill gets there quickly. Fermented carrots are the slower project.

Are Fermented Carrots Probiotic?

Unheated fermented vegetables can contain live microbial cultures, including lactic acid bacteria. “Probiotic” makes a more specific scientific claim.

A probiotic is a characterized live microorganism shown to provide a health benefit when consumed in an appropriate amount. A spontaneous home ferment contains a changing microbial community, so it cannot be assigned the specific clinical claims of a known probiotic strain and dose.

What fermentation adds most obviously is a different food. A sweet raw carrot becomes tart, salty, aromatic, and pickle-like while still holding onto the character of the vegetable itself. You are also still eating carrots with their fiber and carotenoid-rich plant material.

A homemade ferment does not come with the identified strain and clinical dose needed for specific probiotic treatment claims. It is better understood simply as fermented food.

The carrots don’t need to be medicine to be worth making.

Frequently Asked Questions

Does “Lacto-Fermented” Mean Dairy?

No. “Lacto” refers to lactic acid fermentation, not lactose or milk. No dairy is required for these carrots.

Can I Use Baby Carrots?

Baby-cut carrots can be fermented, but fresh full-size carrots are the better default for a first jar because you control the freshness, thickness, and packing more precisely. Whichever you use, follow the same salt calculation and keep every piece submerged.

Why Did the Garlic Turn Blue or Green?

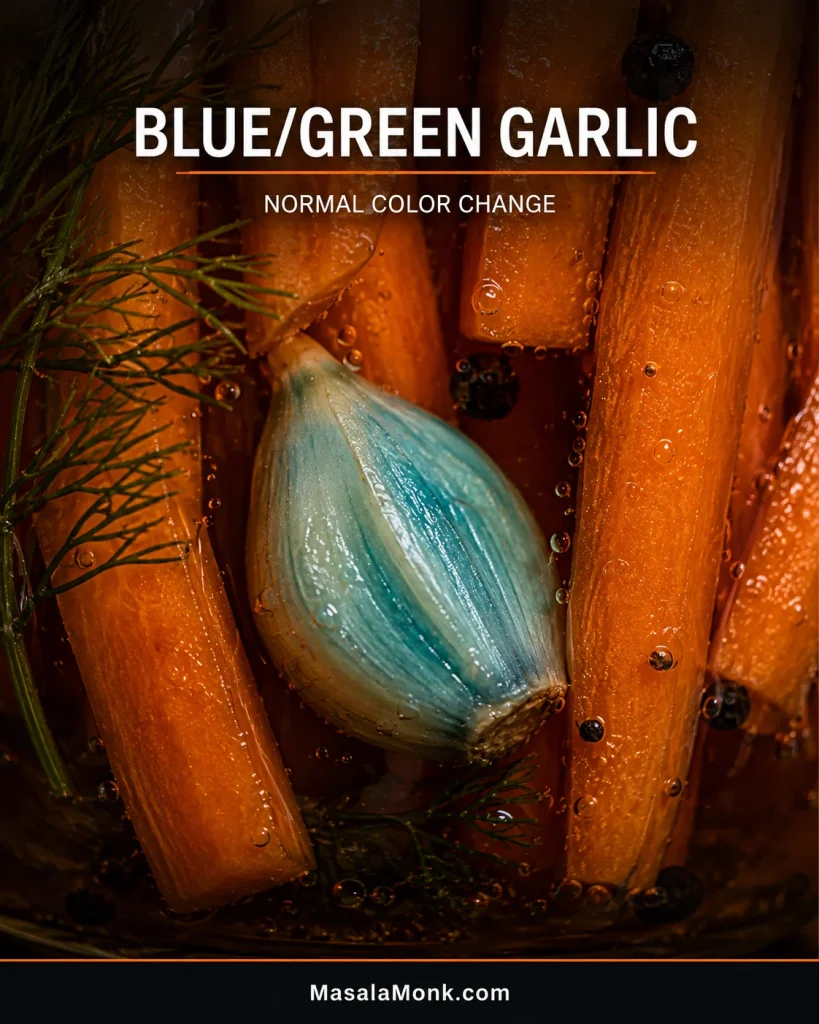
Garlic can develop blue or green pigment in acidic conditions because of reactions involving compounds naturally present in the clove. A smooth color change within the garlic is different from fuzzy mold growing across the surface.

Close-up of a blue-green garlic clove submerged with fermented carrot sticks in brine, without fuzzy mold.
The useful clue is where the change lives: blue-green pigment develops within the garlic tissue, while mold is growth on the surface. Color alone is not a fermentation verdict.

Garlic that stays cream-colored is perfectly ordinary too. Color change—or the lack of it—is not a fermentation test.

Seeing growth rather than a color change? Compare the White Film or Mold guidance.

Can I Ferment Carrots With Other Vegetables?

Yes, but a carrot-only batch is easier to learn from. Mixed vegetables differ in density, texture, and fermentation behavior. Once the cues in a successful carrot ferment feel familiar, mixed jars become easier to interpret.

Can I Reuse Brine From an Older Ferment?

You don’t need to. Fresh water and freshly calculated salt keep the method reproducible and make troubleshooting easier because you know exactly what went into the new jar.

I Left Carrots Sitting in Plain Water. Did They Ferment?

Carrots sitting accidentally in plain water are not the controlled salt-brine fermentation described here. Bubbles or an unusual smell do not turn an unmeasured soak into this recipe.

Once You Know the Jar, Fermentation Feels Much Simpler

The physical work is small: cut carrots, add water, weigh the contents, calculate the salt, and keep everything underneath the brine.

The unfamiliar part is watching the batch change and learning which changes deserve attention.

After one successful ferment, cloudy brine, tiny bubbles, and a little sediment stop looking mysterious. They become cues.

And then the best part is much less technical: opening the refrigerator, pulling out a cold carrot stick, and hearing it snap.

Posted on — 1 Comment

The Art of Fermented Fruit Juices: 5 DIY Recipes to Try at Home

fermented fruit juices, home fermentation, probiotic drinks, lactic acid bacteria, water kefir, tepache, kanji, fruit kvass, gut health, DIY fermentation, fermented beverages, kombucha alternatives, natural probiotics, food preservation, fermentation recipes

Fermenting fruit juices is both an ancient craft and a modern wellness trend. By harnessing the natural power of beneficial microbes, you can create flavorful, probiotic-rich beverages right in your kitchen. These fermented drinks are not only delicious but also offer numerous health benefits — from improved digestion to a stronger immune system. In this guide, we’ll explore the science behind fermentation and share 5 detailed, practical recipes you can start today.


🧬 The Science of Fermentation — Simplified

At its core, fermentation is a natural process where microorganisms such as bacteria and yeast consume sugars and convert them into acids, gases, and sometimes alcohol.

  • Lactic Acid Bacteria (LAB) – produce lactic acid, enhancing the sour taste and providing probiotics.
  • Yeasts – produce alcohol and carbonation, adding complexity to the flavor.
  • Wild Microbes – naturally present on fruits and in the environment, contribute unique flavors and textures.

Key benefits of fermented fruit juices:

  • Increased bioavailability of nutrients
  • Enhanced antioxidant levels
  • Gut-friendly probiotics
  • Natural preservation
  • Unique and complex flavors

⚠️ Basic Safety Rules for Home Fermentation

Before we dive into recipes, remember these crucial safety tips:

  • Sanitize all jars, utensils, and surfaces.
  • Use clean, fresh produce — preferably organic.
  • Always use non-chlorinated, filtered water.
  • Ferment at room temperature (68–75°F / 20–24°C).
  • Monitor for off-smells or visible mold; discard if found.
  • If in doubt, trust your senses — fermented juices should smell pleasantly sour or fruity, never rotten or foul.

🧪 5 DIY Fermented Fruit Juice Recipes to Try at Home


1️⃣ Water Kefir with Fruit Juice — Dairy-Free Probiotic Delight

Why this works:
Water kefir grains (Tibicos) contain a symbiotic culture of bacteria and yeast that ferment sugars into a lightly fizzy, probiotic-rich beverage.

You’ll need:

  • ¼ cup water kefir grains
  • ¼ cup organic sugar (cane or raw sugar works best)
  • 1 quart filtered water
  • 1–2 cups fruit juice (apple, grape, pomegranate, or orange)

Instructions:

First Ferment:

  1. Dissolve sugar in filtered water.
  2. Add water kefir grains to the sugar water.
  3. Cover with a breathable cloth and ferment for 24–48 hours at room temperature.

Second Ferment (Flavoring Stage):
4. Strain out kefir grains (reuse for next batch).
5. Add your choice of fruit juice to the strained liquid.
6. Pour into bottles with tight-fitting lids.
7. Ferment an additional 24 hours at room temperature for carbonation.
8. Refrigerate and enjoy chilled.

Tip:
Always open bottles carefully — pressure can build up!


2️⃣ Pineapple Tepache — Wild Ferment with Tropical Vibes

Why this works:
Pineapple skin naturally hosts wild yeasts and LAB, making tepache one of the easiest ferments for beginners.

You’ll need:

  • 1 ripe pineapple (peels and core)
  • ¾ to 1 cup brown sugar or piloncillo
  • 6–8 cups filtered water
  • Optional: 1 cinnamon stick, 3–4 cloves

Instructions:

  1. Rinse pineapple gently to remove dirt but keep natural microbes intact.
  2. Slice off skin and core, place in large glass jar.
  3. Dissolve sugar in water, pour over pineapple.
  4. Add spices if desired.
  5. Cover jar with cloth or coffee filter secured with rubber band.
  6. Ferment for 2–5 days at room temperature.
  7. Taste daily: when tangy with light fizz, strain and refrigerate.

Tip:
The longer you ferment, the tangier and slightly more alcoholic (~1-2% ABV) it becomes.


3️⃣ Indian Beetroot Kanji — Fermented Root Juice

Why this works:
Beets and carrots naturally ferment with salt and mustard seeds, producing a vibrant probiotic drink loaded with antioxidants.

You’ll need:

  • 3 medium beets, peeled and chopped
  • 2 carrots, peeled and chopped
  • 1 tbsp black mustard seeds
  • 1½ tbsp sea salt
  • 8 cups filtered water

Instructions:

  1. Combine all ingredients in a large glass jar.
  2. Stir until salt dissolves.
  3. Cover with cloth, ferment at room temperature for 5–7 days.
  4. Stir daily and taste; once pleasantly tangy, strain and refrigerate.

Tip:
Serve chilled with meals to aid digestion.


4️⃣ Fruit Kvass — Quick Lactic Acid Ferment

Why this works:
Using whey or probiotic capsules introduces LAB directly into the juice, speeding up fermentation.

You’ll need:

  • 2 cups chopped fruit (berries, apples, mango, etc.)
  • 2 tbsp sugar (optional)
  • 1 quart filtered water
  • 2 tbsp whey (from yogurt) or 1 probiotic capsule (Lactobacillus strains)

Instructions:

  1. Place fruit in a sanitized jar.
  2. Add sugar and water, stir to dissolve.
  3. Add whey or probiotic powder.
  4. Cover loosely with lid or cloth.
  5. Ferment 2–4 days at room temp.
  6. Taste daily; once tart and slightly fizzy, refrigerate.

Tip:
Kvass is very forgiving and can be flavored endlessly.


5️⃣ Instant Probiotic Fruit Juice — No Fermentation Needed

Why this works:
Scientific studies show that adding probiotic powder to fresh juice can deliver immediate benefits without waiting for fermentation.

You’ll need:

  • 1 cup fresh fruit juice (orange, pomegranate, or berry mix)
  • 1 probiotic capsule (10+ billion CFUs, Lactobacillus and Bifidobacteria)
  • Optional: 1 tsp inulin or fiber powder

Instructions:

  1. Mix juice, probiotic powder, and fiber thoroughly.
  2. Consume immediately or refrigerate for up to 24 hours.

Tip:
Perfect for those new to fermentation who want quick probiotic benefits.


🏅 Health Benefits Backed by Science

  • Digestive support: Probiotics balance gut flora.
  • Antioxidant boost: Fermentation enhances bioactive compounds.
  • Immune modulation: LAB strains can support immune function.
  • Mood improvement: Emerging studies link gut health to better mood and sleep.

Studies from 2024 confirm that fermented juices deliver live probiotic counts above 10⁷ CFU/mL and increase antioxidant activity dramatically.


🧭 Troubleshooting Common Fermentation Issues

ProblemCauseSolution
MoldContaminationSanitize equipment; discard batch
Rotten smellUndesirable bacteriaUse fresher produce, better sanitation
No bubblesToo cold, no sugarMove to warmer area, add more sugar
Too sourOverfermentedShorten fermentation time

🧰 Basic Fermentation Gear for Home

  • Glass jars (32 oz or larger)
  • Plastic or wooden stirring spoons
  • Coffee filters or cloth for covers
  • Rubber bands
  • Fine mesh strainer
  • pH strips (optional for safety)

🌎 Why Ferment at Home?

Home fermentation is empowering. You:

  • Control ingredients (no preservatives or additives)
  • Customize flavors
  • Save money compared to store-bought probiotics
  • Connect to ancient culinary traditions

🎯 In Conclusion

Fermenting fruit juices at home is accessible, rewarding, and deeply rooted in both tradition and modern science. Whether you prefer wild ferments like tepache, controlled probiotic kvass, or the instant convenience of probiotic powders, you’re unlocking a world of flavor and wellness with every batch.

🔎 FAQs: The Art of Fermented Fruit Juices


1️⃣ Is it safe to ferment fruit juices at home?

Yes, if you follow proper sanitation and use clean equipment, fresh ingredients, and non-chlorinated water. Monitor your ferment daily, and if you see mold, smell rot, or notice unusual colors (besides the natural changes), discard the batch.


2️⃣ Can fermented fruit juices turn alcoholic?

Mild fermentation (2–5 days) produces very low alcohol (typically <0.5–2% ABV). Longer ferments or wild ferments (like tepache) may develop slightly higher alcohol but are still far below traditional wine or cider levels.


3️⃣ How long do fermented fruit juices last in the fridge?

Properly fermented and refrigerated juices last about 2–3 weeks. Always smell and taste before drinking. Over time, flavors may become more sour or fizzy.


4️⃣ Do I need special equipment to start?

No. Basic home fermentation needs only sanitized glass jars, clean utensils, breathable covers (cloth or coffee filters), and sometimes bottles for second fermentation. Optional: pH strips for extra safety.


5️⃣ Which fruits are best for fermentation?

Fruits with moderate sugar content work best: apples, grapes, berries, mangoes, pineapples, and pomegranates. Avoid citrus as the acidity can inhibit some microbes unless using specialized cultures.


6️⃣ What starter cultures can I use?

  • Water kefir grains (for kefir-style ferment)
  • SCOBY (for kombucha-style ferment)
  • Whey or probiotic capsules (for kvass-style ferment)
  • Wild fermentation (no starter needed for tepache, kanji)

7️⃣ Can I use store-bought juice?

Yes, but choose 100% pure juice without preservatives like potassium sorbate or sodium benzoate, as these inhibit fermentation. Fresh-pressed juice is ideal.


8️⃣ How do I know if fermentation is working?

You’ll see small bubbles, light fizz, or slight cloudiness as microbial activity increases. The taste becomes tangy or lightly sour, and the aroma is pleasantly fruity or yeasty.


9️⃣ Can children drink fermented fruit juices?

Yes, most short ferments (2–3 days) are suitable for kids as alcohol levels remain very low. However, monitor batches carefully and consult a healthcare professional if in doubt, especially for very young children.


🔟 Can I flavor fermented juices after fermentation?

Absolutely. After primary fermentation, you can infuse with herbs, spices, or extra fruit during a second ferment for added complexity and carbonation.