When cold and flu season rolls around, many of us look for natural ways to give our immune system an extra edge. One option that’s grown in popularity is the immunity wellness shot — a small, concentrated drink that packs in fresh ingredients known for their immune-supportive benefits.
But do these shots really work? While no single drink can prevent illness, research suggests that certain foods — like turmeric, ginger, garlic, citrus, and elderberry — may help reduce inflammation, improve antioxidant defenses, and even shorten the duration of colds and flu. Spices have long been part of traditional immunity remedies—discover the power of Indian spices for immunity in our in-depth guide.
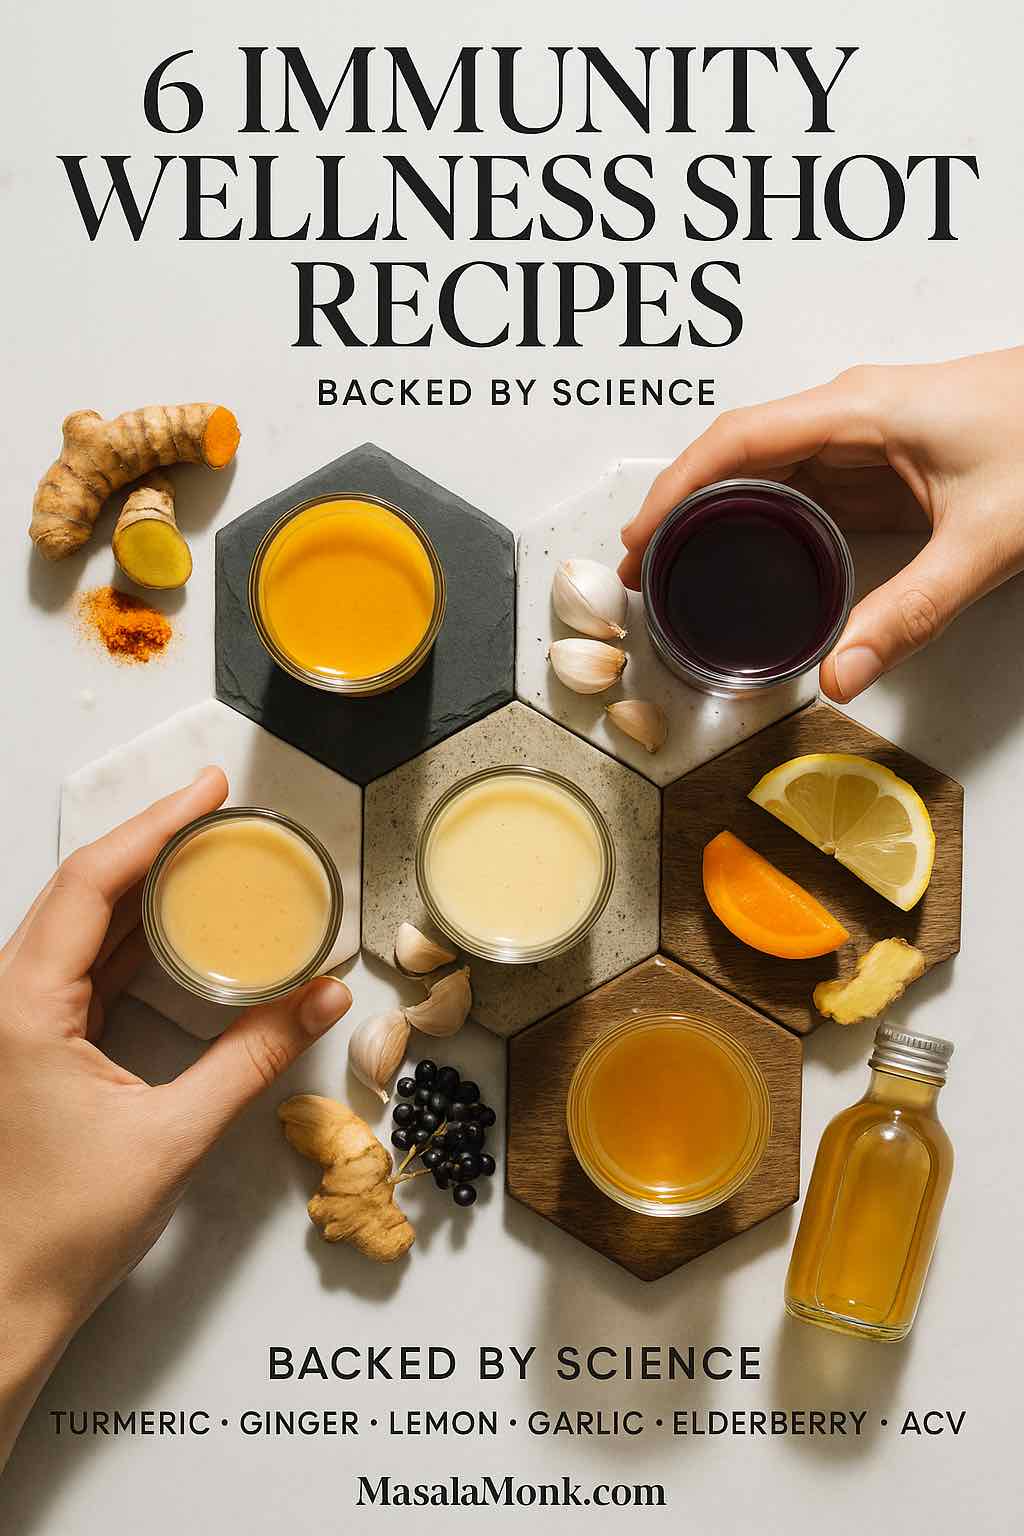
In this article, you’ll discover 6 immunity wellness shot recipes, each explained in detail with the science behind why these ingredients are recommended.
What Are Immunity Wellness Shots?
Immunity wellness shots are small (1–3 ounce) juice blends taken in a single sip. They’re made with concentrated fresh ingredients like roots, herbs, and citrus, and are designed to provide a quick hit of vitamins, antioxidants, and bioactive compounds.
Typical ingredients include:
- Turmeric — contains curcumin, a compound known for anti-inflammatory and antioxidant effects. According to Harvard Health, curcumin has been studied for its ability to modulate immune responses.
- Ginger — rich in gingerols and shogaols, which have antioxidant and antimicrobial activity. A review summarized by Healthline notes that ginger has long been used to help with colds and inflammation.
- Citrus fruits — oranges, lemons, and limes provide vitamin C, which the NIH reports can slightly shorten the length of colds in regular users.
- Garlic — contains allicin, which was linked to fewer colds in a randomized human trial published in the Advances in Therapy journal (PubMed study).
- Elderberry — meta-analyses show elderberry extract reduces flu symptom duration and severity (NCBI meta-analysis).
- Apple cider vinegar (ACV) — though not studied as much as other ingredients, ACV is a fermented food, and fermented foods are strongly tied to gut and immune health (Harvard Health on fermented foods).
Benefits of Immunity Wellness Shots
So why combine these ingredients into small shots? Research highlights several potential benefits:
- Inflammation control — Chronic inflammation weakens immunity. Compounds in turmeric (curcumin) and ginger (gingerols) help reduce inflammatory markers such as IL-6 and TNF-α (NCBI research on curcumin).
- Antioxidant protection — Vitamin C, curcumin, and gingerols protect immune cells from oxidative stress caused by free radicals.
- Antimicrobial action — Garlic and ginger show antimicrobial activity in lab studies, and elderberry may directly inhibit flu viruses.
- Gut health support — Fermented foods like apple cider vinegar encourage a healthy microbiome, which plays a central role in immune function.
6 Best Immunity Wellness Shot Recipes
When it comes to building resilience, variety matters. That’s why we’ve gathered six different immunity wellness shots, each with its own flavor profile, nutrient strengths, and cultural background. From fiery ginger to soothing honey, from vibrant turmeric to tangy elderberry, these recipes are simple, quick, and can be made with ingredients you likely already have in your kitchen.
Before we dive into the step-by-step recipes, remember: these shots aren’t meant to replace a balanced diet or medical treatment. Instead, think of them as daily allies—little boosts you can integrate into your wellness routine to keep your immune system strong and supported.
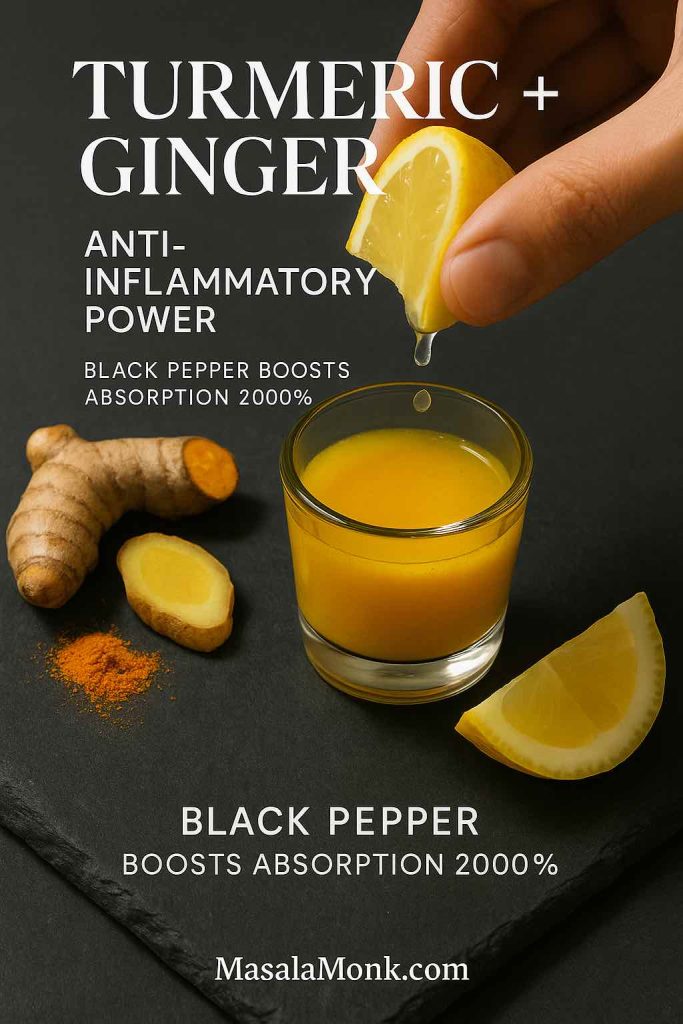
🟠 1. Turmeric Ginger Immunity Shot
There’s a reason turmeric and ginger are the poster children of natural remedies. Bright, golden, and fiery, this little shot has been used for centuries in Ayurvedic traditions to fight off seasonal sniffles and morning sluggishness. If you’re looking for an easy way to start your day with a burst of warmth and antioxidants, this is it.
Ingredients
- 1-inch fresh turmeric root (or ½ tsp turmeric powder)
- 1-inch fresh ginger root
- Juice of ½ lemon
- Pinch of black pepper
- ½ cup water
Instructions (step-by-step)
- First, peel and chop the turmeric and ginger into small pieces.
- Next, add them to a blender along with lemon juice and water.
- Then, blend until smooth.
- After blending, strain the liquid through a fine sieve if you prefer a smoother shot.
- Finally, sprinkle a pinch of black pepper on top and enjoy right away.
👉 Why it works: Turmeric’s curcumin has powerful anti-inflammatory benefits, and black pepper makes it more bioavailable. Ginger adds antioxidants, while lemon brings in vitamin C.
To see how this synergy works in another recipe, try Turmeric, Ginger & Black Pepper Tea for Well-Being.
Why we recommend it:
Turmeric’s active compound curcumin has been widely studied for its anti-inflammatory and immune-modulating effects. On its own, it’s poorly absorbed, but a study in Planta Medica found that combining it with black pepper (piperine) increases absorption by nearly 2,000% (PubMed study on piperine). Ginger provides additional antioxidants, and lemon adds vitamin C.
💡 Pro Tip: If the flavor feels too strong, add a splash of fresh orange juice for sweetness and an extra vitamin C kick.
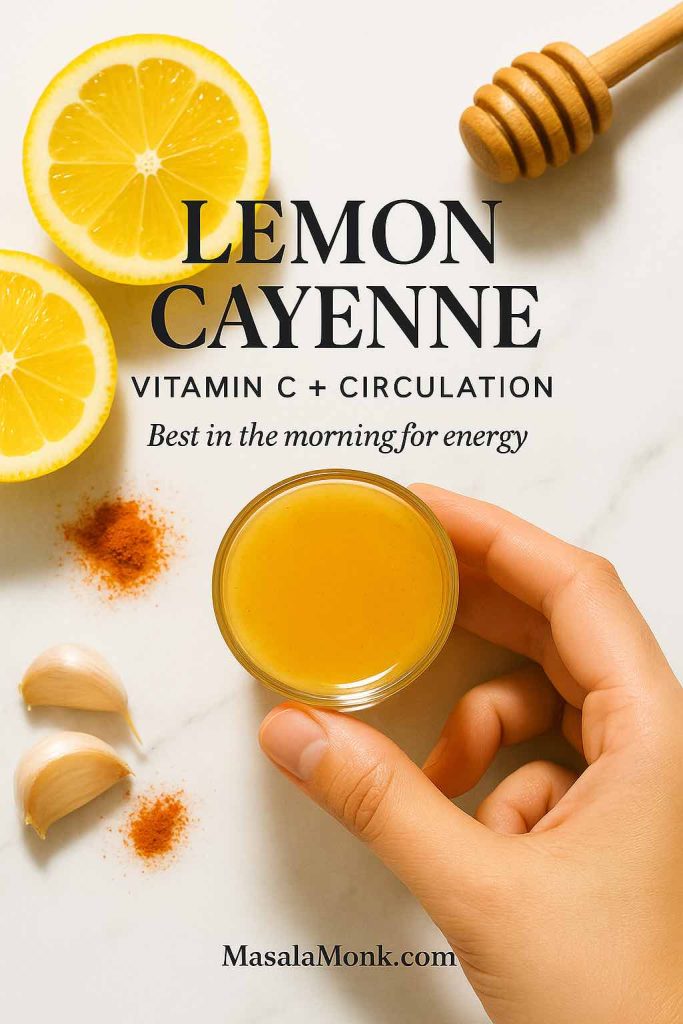
🟠 2. Lemon Cayenne Immune Shot
Sharp, spicy, and invigorating — this shot is like sunshine in liquid form. Perfect for sluggish mornings or when you feel a cold creeping in, it gives you a quick kick of vitamin C and natural heat that wakes up your circulation.
Ingredients
- Juice of 1 lemon
- ¼ tsp cayenne pepper
- 1 tsp honey (optional)
- ½ cup warm water
Instructions
- Begin by squeezing the juice of one lemon into a glass.
- Next, pour in the warm (not hot) water.
- Then, stir in cayenne pepper and honey until well combined.
- Lastly, sip slowly if you’re sensitive to spice—or take it as a quick shot for a fiery boost.
👉 Why it works: Lemons provide vitamin C, cayenne boosts circulation, and honey soothes the throat while adding antibacterial support.
Also Read: Cayenne Pepper for Weight Loss: Spicing Up Your Diet Plan! 🌶️
Why we recommend it:
Lemons provide vitamin C, which according to a Cochrane review summarized by the NIH, may shorten the duration of colds in regular users. Cayenne contains capsaicin, which shows anti-inflammatory potential in animal and human studies (NCBI on capsaicin). Honey has antimicrobial properties and is recommended as a cough soother by the Mayo Clinic.
💡 Pro Tip: To balance the heat, mix in a few drops of fresh ginger juice or dilute with extra water for beginners.
🟠 3. Garlic Honey Wellness Shot
This is the strong one — and yes, it works. For generations, raw garlic and honey have been combined as a natural immunity booster. The taste is bold, but the payoff is worth it: garlic’s allicin has been studied for cold prevention, while honey brings natural antibacterial sweetness.
Ingredients
- 1 small raw garlic clove (crushed)
- 1 tsp raw honey
- Juice of ½ lemon
- ¼ cup water
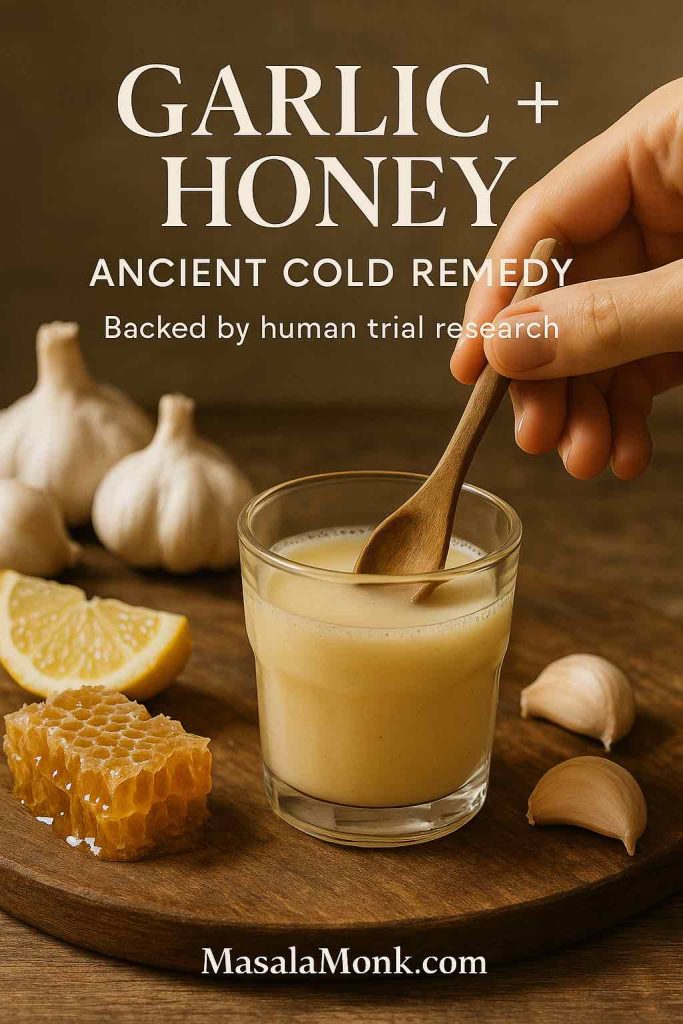
Instructions
- First, crush the garlic with the side of a knife to release allicin.
- Let it rest for 5 minutes to maximize its potency.
- Next, combine garlic with lemon juice, water, and honey in a blender or cup.
- Finally, drink immediately for the strongest effect.
👉 Why it works: Garlic is backed by human studies showing fewer colds, while honey and lemon add both flavor and immune-friendly nutrients.
This combo has been around for centuries—explore our honey infused garlic ancient remedy for a traditional take.
Why we recommend it:
Garlic is one of the few foods tested in human trials for cold prevention. In a 12-week randomized trial, participants who took garlic supplements had significantly fewer colds than those taking placebo (PubMed study). Honey provides antibacterial and antioxidant effects, while lemon juice adds vitamin C.
💡 Pro Tip: If the taste is too intense, chase it with a slice of apple or cucumber for a quick palate cleanse.
🟠 4. Elderberry Ginger Immunity Shot
Sweet and tangy with a spicy twist, this shot tastes almost like a health tonic you’d want to sip slowly. Elderberries have been shown to reduce flu symptoms, and pairing them with ginger and lemon makes this immunity wellness shot recipe a flu-season favorite.
Ingredients
- 2 tbsp elderberry syrup (homemade or store-bought)
- 1-inch fresh ginger root
- Juice of ½ lemon

Instructions
- Grate or finely slice the ginger.
- Next, blend the ginger with elderberry syrup and lemon juice.
- Then, strain if desired for a smoother consistency.
- Serve chilled for a refreshing immune boost.
👉 Why it works: Elderberry shortens flu duration, ginger brings warming anti-inflammatory support, and lemon adds vitamin C.
For more on natural immune boosters, see how the ginger, garlic & lemon immunity trio can help.
Why we recommend it:
A 2019 meta-analysis of randomized controlled trials concluded that elderberry supplementation reduced upper respiratory symptoms and shortened flu duration (PubMed meta-analysis). Ginger and lemon provide additional anti-inflammatory and antioxidant benefits.
💡 Pro Tip: Store-bought elderberry syrup often contains sweeteners—opt for unsweetened if you prefer a lower-sugar option.
🟠 5. Carrot Turmeric Citrus Shot
Bright orange, slightly sweet, and refreshing — this shot feels more like a mini juice than medicine. It’s packed with beta-carotene from carrots and vitamin C from oranges, making it a great daily wellness choice.
Ingredients
- 1 medium carrot (juiced)
- 1-inch turmeric root
- Juice of 1 orange
- Pinch black pepper
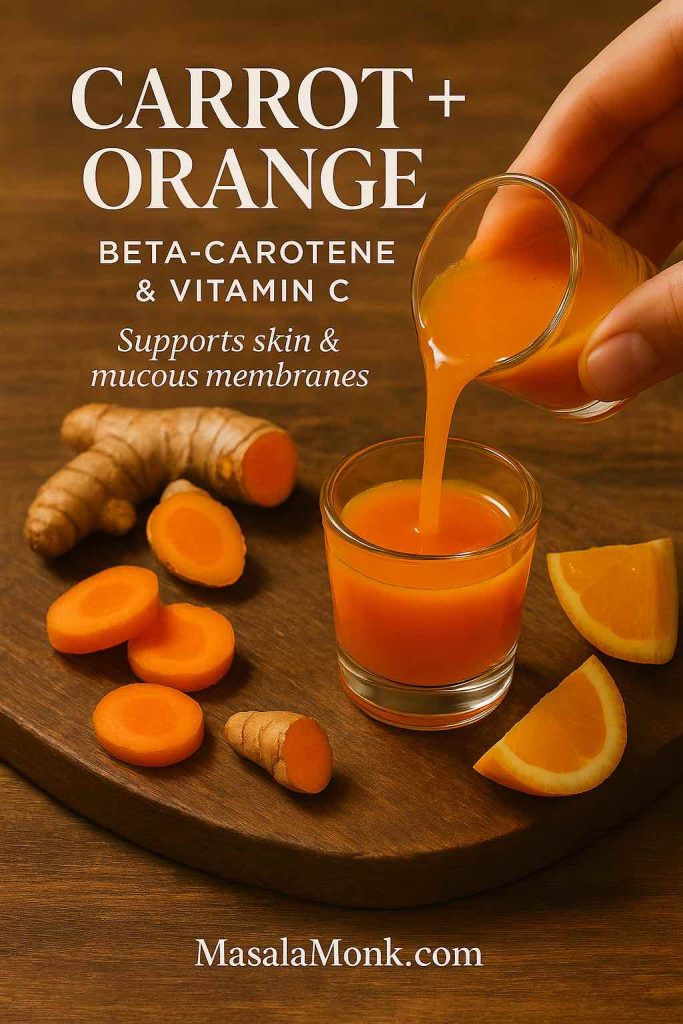
Instructions
- Juice the carrot and turmeric root. (If you don’t have a juicer, blend with water and strain.)
- Next, stir in the fresh orange juice.
- Add a pinch of black pepper.
- Finally, drink immediately while it’s fresh and bright.
👉 Why it works: Carrots support mucous membrane defenses, oranges bring immune-boosting vitamin C, and turmeric + pepper fight inflammation.
Why we recommend it:
Carrots provide beta-carotene, which the NIH highlights as essential for maintaining the integrity of mucous membranes, the body’s first line of defense against pathogens. Oranges add vitamin C, while turmeric and pepper enhance anti-inflammatory activity.
💡 Pro Tip: Add a squeeze of lime for extra tang and to balance the earthy turmeric flavor.
🟠 6. Apple Cider Vinegar Immune Wellness Shot
This one is tangy, zesty, and surprisingly refreshing when balanced with honey. ACV has long been used in folk medicine for digestion and gut health, and when combined with ginger and lemon, it makes a powerhouse immune tonic.
Ingredients
- 1 tbsp apple cider vinegar (with the “mother”)
- ½ inch fresh ginger root
- Juice of ½ lemon
- ½ tsp honey
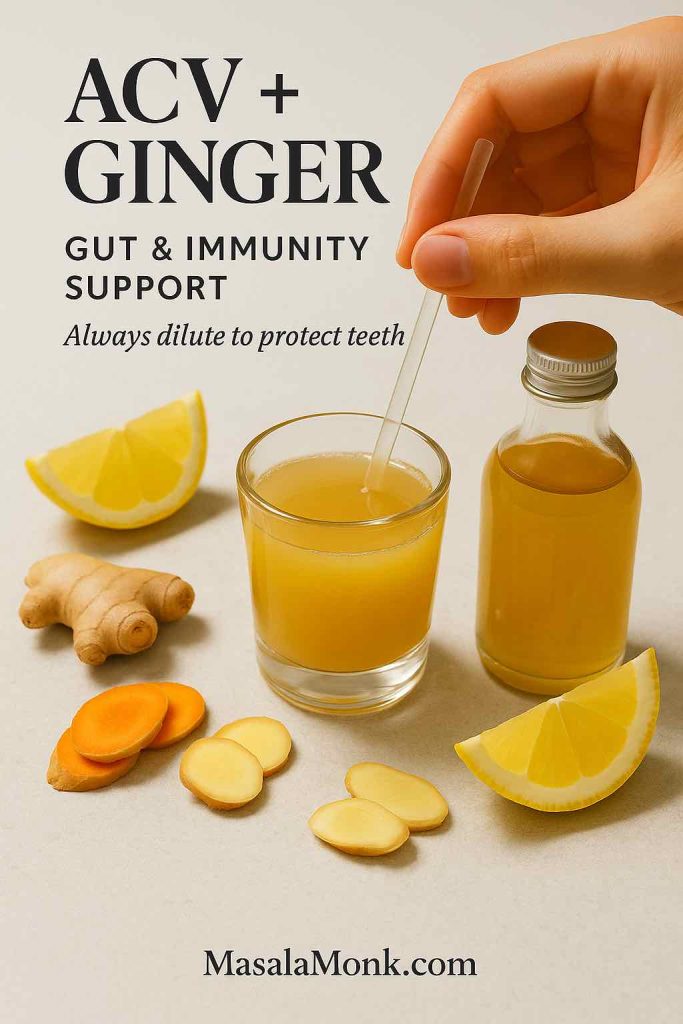
Instructions
- Grate or mince the ginger.
- Add it to a glass with ACV, lemon juice, and honey.
- Stir thoroughly until the honey dissolves.
- Drink as a quick shot, or dilute with extra water if it feels too strong.
👉 Why it works: ACV supports gut health (linked to immunity), ginger reduces inflammation, and honey balances both flavor and function.
Learn more about the role of apple cider vinegar for wellness in boosting health and metabolism.
Why we recommend it:
Apple cider vinegar hasn’t been studied directly for immunity, but as a fermented food it may support a healthy microbiome, which plays a critical role in immune system regulation (Harvard Health on fermented foods). Ginger and lemon bring additional immune-friendly antioxidants, and honey balances the sharp flavor.
💡 Pro Tip: Always use a straw to protect your teeth from the acidity, and rinse your mouth with water afterward.
How Often Should You Drink Immunity Shots?
For most people, one immunity wellness shot per day is enough. Morning is a popular choice, since many ingredients are energizing on an empty stomach.
That said, moderation is important:
- Turmeric and ginger may cause digestive upset in large amounts.
- Garlic can irritate digestion or interact with blood-thinning medications.
- Apple cider vinegar should always be diluted to protect your teeth and stomach lining.
Rotating between different recipes helps you get a wider range of nutrients while avoiding excess.
Final Thoughts
These 6 immunity wellness shot recipes combine some of the most research-supported natural ingredients for immune health. From turmeric and ginger’s anti-inflammatory power, to garlic’s cold-fighting allicin, to elderberry’s flu symptom relief, each shot delivers a potent burst of support in just a few ounces.
They aren’t miracle cures, but as part of a balanced lifestyle with good sleep, exercise, and nutrition, they can be a refreshing, health-promoting ritual.
Why not try one of these recipes tomorrow morning and give your immune system a natural boost?
If you enjoyed these shots, you might also love our anti-inflammatory drinks for wellness collection.
❓ Frequently Asked Questions
1. Can I really make immunity wellness shots at home?
Absolutely! The beauty of these recipes is that they’re simple, quick, and use everyday ingredients. Instead of buying expensive bottled shots, you can blend turmeric, ginger, lemon, or garlic in just a few minutes and enjoy them fresh.
2. How often should I drink immunity wellness shots?
Most people do well with just one shot a day, usually in the morning. However, it’s best to rotate between different recipes throughout the week. This way, you get a variety of nutrients while keeping things balanced.
3. Do immunity shots actually work?
While no shot can guarantee you won’t get sick, research shows that ingredients like garlic, elderberry, and vitamin C can help reduce the severity and duration of colds and flu. Think of them as a natural support system, not a miracle cure.
4. Can I store these shots in advance?
Yes, but freshness is key. Most recipes can be stored in the fridge for up to 2–3 days in an airtight container. However, shots with garlic or lemon taste best when consumed immediately, as their active compounds fade quickly.
5. What’s the best time of day to take a wellness shot?
Morning is ideal, since the ingredients can be energizing and are absorbed well on an empty stomach. That said, if your stomach is sensitive, you might prefer to take them after a light meal.
6. Can kids drink immunity shots too?
Yes, but with some adjustments. Skip the cayenne pepper for children, and use smaller portions of ginger or garlic. Always dilute the shot a little more, and consult your pediatrician if your child has health conditions.
7. Are there any side effects of taking immunity wellness shots?
Since these are concentrated drinks, too much can cause issues. For example, turmeric and ginger may irritate sensitive stomachs, garlic can interact with blood-thinners, and apple cider vinegar should always be diluted to protect teeth and digestion. Moderation is key.
8. Do I need a juicer to make these immunity wellness shot recipes?
Not at all! A blender works just fine. Simply blend the ingredients with water, then strain with a fine sieve or cheesecloth if you prefer a smoother consistency. A juicer can make the process easier, but it’s not required.
9. Can I add other ingredients to the recipes?
Definitely! These shots are flexible. You can add a pinch of cinnamon for warmth, fresh mint for freshness, or even a splash of orange juice for sweetness. Just remember: the more colorful your ingredients, the more antioxidants you’ll likely get.
10. Which immunity wellness shot is the most powerful?
That really depends on your body and taste. Many people swear by the turmeric ginger shot for daily wellness, while others love the elderberry shot during flu season. The best approach is to try them all and notice how your body responds.