Posted on — Leave a comment

Orange Chicken Recipe: Crispy Homemade Chicken with Easy Orange Sauce

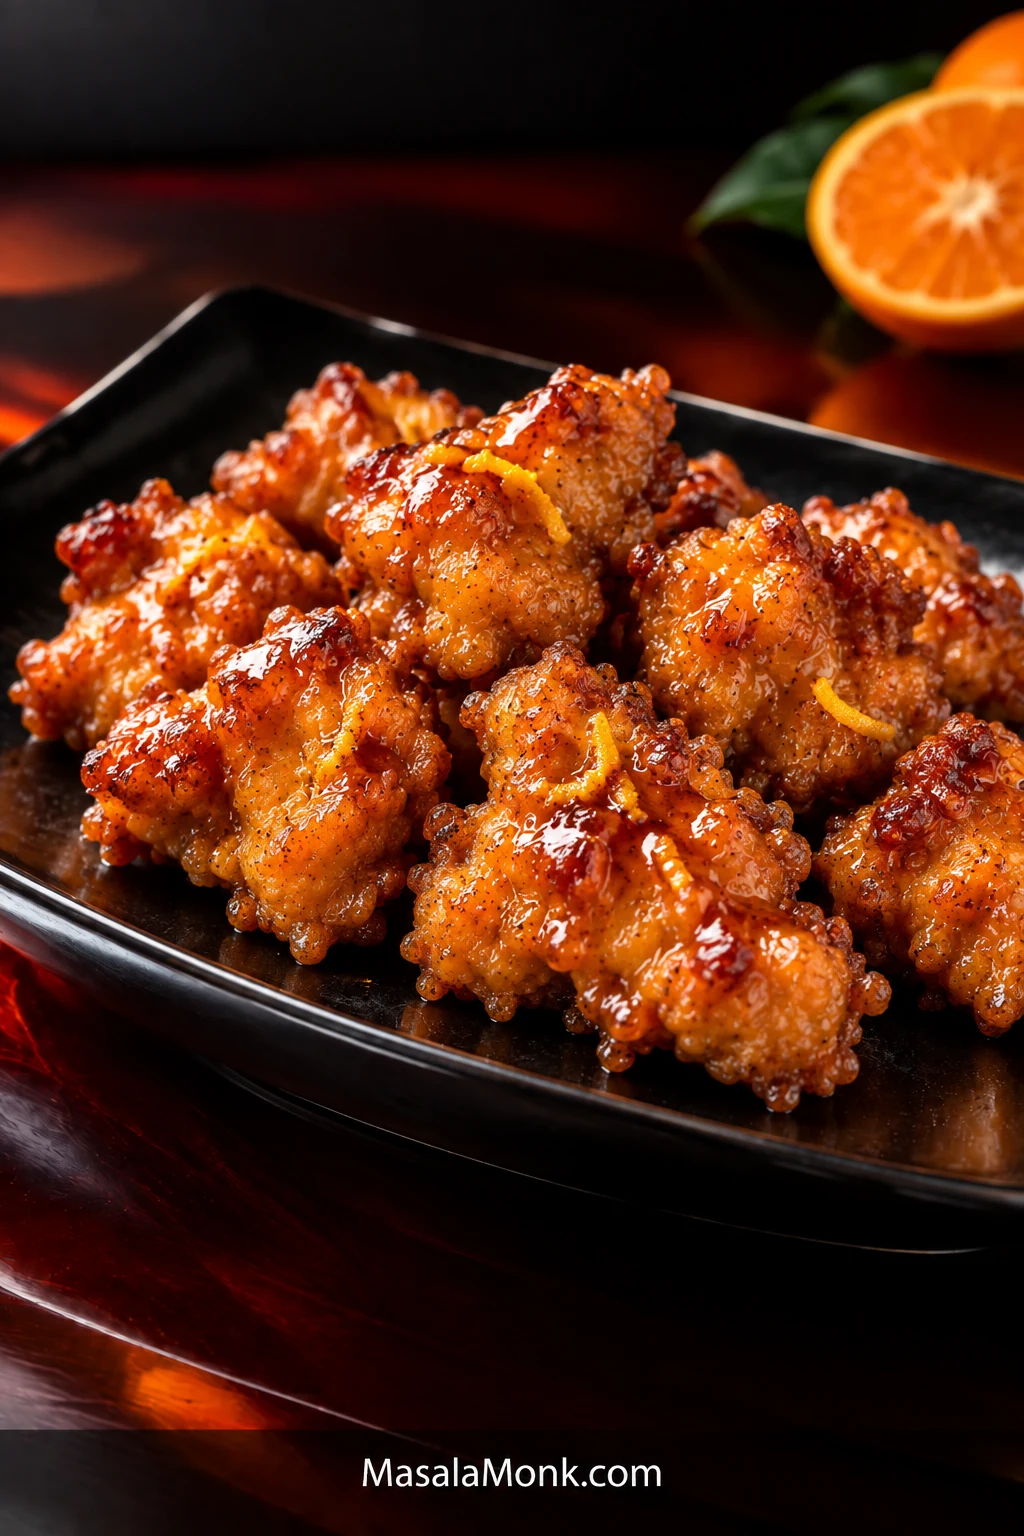
Glossy orange chicken piled on a black rectangular plate, topped with thin orange-peel strips, with a halved orange behind the plate.

Orange chicken has a built-in problem: the sauce needs to reach every crisp ridge, but the moment that wet glaze touches the crust, the crust starts to soften.

When it lands properly, though, the first bite still has a crisp edge under the glaze, the chicken stays juicy inside, and the orange arrives before the sweetness does. That bright citrus smell matters just as much as the sticky finish.

This is Chinese-American takeout-style orange chicken, but it isn’t built as a restaurant copycat. The goal is fresh orange, a manageable shallow fry and just enough glossy sauce to coat the crust.

Coat
Tacky chicken, pressed starch, shaggy surface.

Fry
Hot oil, roomy batches, rack between batches.

Glaze
Thicken first, coat lightly, toss 15–20 seconds.

Crispy Homemade Orange Chicken Recipe

Crisp first. Glaze last. Keep the fried chicken and finished orange sauce apart until serving.

Yield
4 generous servings

Prep
About 25 minutes

Cook
About 25 minutes

Total
About 50 minutes

Equipment: 12-inch / 30 cm heavy skillet, wok or similar wide pan; wire rack set over a tray; fine grater or zester; instant-read thermometer if available; heatproof container for used oil if reusing the frying pan.

Chicken

  • 1½ lb / 680 g boneless skinless chicken thighs
  • 1 tbsp / 15 ml regular or light soy sauce, not dark or sweet soy
  • 1 tbsp / 15 ml Shaoxing wine or dry sherry
  • ¼ tsp ground white pepper

Crisp Coating

  • ¾ cup plus 2 tbsp cornstarch / about 105 g total, divided
  • Neutral high-heat frying oil, enough for about ¼ inch / 5–6 mm depth in the pan

Fresh Orange Sauce

  • About 3 medium oranges, or enough to yield ¾ cup / 180 ml fresh orange juice
  • 2 tbsp / 30 ml water
  • ⅓ cup / about 65 g granulated sugar
  • 2 tbsp / 30 ml regular or light soy sauce
  • 2 tbsp / 30 ml unseasoned rice vinegar
  • ¼–½ tsp red pepper flakes, or omit for mild
  • 2 tsp neutral oil, if using a clean pan for the sauce
  • 3 garlic cloves / about 9 g, finely minced
  • 2 tsp / about 4–5 g finely grated fresh ginger
  • 2 tsp packed / about 4–5 g finely grated orange zest, colored skin only
  • ½ tsp / 2.5 ml toasted sesame oil, optional

Cornstarch Slurry

  • 1½ tbsp / about 12 g cornstarch
  • 2 tbsp / 30 ml cold water

Optional Finish

  • Thinly sliced scallions
  • Sesame seeds

1. Season the chicken

Cut the thighs into fairly even 1 to 1¼-inch / 2.5–3 cm pieces. Toss with 1 tablespoon soy sauce, the Shaoxing wine and white pepper. Leave for 15 minutes while you prepare the sauce ingredients.

You’re looking for moist chicken with no puddle at the bottom of the bowl. Drain off any obvious excess before coating.

2. Mix the sauce and slurry

Zest the oranges before juicing them. Then squeeze enough juice to measure ¾ cup / 180 ml.

Whisk the orange juice with the water, sugar, 2 tablespoons soy sauce, rice vinegar and red pepper flakes. Keep the measured zest and optional sesame oil aside.

In a second bowl, stir the cornstarch into the cold water. Mix the sauce now, but wait until the chicken is fried before cooking and thickening it.

Before you start frying, have the sauce mixture, slurry, zest, wire rack and serving plate ready. Once the chicken is done, the rest moves quickly.

3. Coat the chicken

Add 2 tablespoons cornstarch directly to the seasoned chicken and toss until the surface feels lightly tacky.

Put the remaining ¾ cup / about 90 g cornstarch in a wide bowl or shallow dish. Press each piece firmly into the starch, then shake away whatever does not stick.

A good coating looks rough, dry and a little shaggy. Fry it once the oil is ready.

4. Shallow-fry in batches

Pour about ¼ inch / 5–6 mm neutral oil into a 12-inch / 30 cm heavy skillet, wok or similar wide pan. Heat to roughly 350–360°F / about 175–180°C.

Lower each piece into the oil away from you and leave visible space between the pieces. A high-sided pan helps contain splatter; a splatter screen is useful if you have one. Listen for a steady, lively sizzle. A suddenly quiet pan means it is time to stop adding chicken and let the oil recover.

Let the first side cook undisturbed until the crust has set before turning. If it still feels soft or wants to cling to the pan, give it a few more seconds. Fry in 2–3 batches; each batch will usually need about 3½–5 minutes total, until crisp and cooked through.

Check one of the larger pieces: poultry should reach 165°F / 74°C in the center. Move each batch to a wire rack rather than piling it into a bowl.

Finish all the frying before you cook the sauce. The chicken can wait on the rack for those few minutes.

The crust should now feel dry, set and crisp under the tongs instead of dusty or soft. At this point, it should already be crisp enough to make you want to steal a piece. That’s a good sign.

For extra crunch: Once every piece has completed the first fry, raise the oil to about 375°F / 190°C and fry the chicken again for 45–90 seconds. Stop once the crust looks drier and feels more brittle. Allow about 5 extra minutes for this optional step.

5. Cook the orange sauce

Using a clean pan? Heat 2 teaspoons neutral oil over medium. Reusing the frying pan? Carefully transfer the excess frying oil to a heatproof container, leaving about 2 teaspoons in the pan, and remove any loose dark starch bits. Never pour frying oil down the sink.

Add the garlic and ginger and cook for 20–30 seconds, until fragrant. A little color is fine; burnt garlic is not.

Stir the orange-juice mixture, pour it in and bring it to a lively simmer for 1–2 minutes. Taste it now. Orange should lead, sweetness should sit behind it, and enough acidity and soy should remain to keep the sauce from tasting like candy.

Stir the slurry again and start with about two-thirds. Let it bubble for a few seconds and look at the sauce before adding more. Still thin? Add a little more. You may not need the rest.

The glaze should coat the back of a spoon or spatula in a thin shiny film. Drag the spatula through the pan as a second check: the trail should stay visible for about one second before closing.

Turn off the heat and stir in the orange zest. Almost immediately, the sauce should smell fresher and unmistakably more orange. Add the optional sesame oil if you want a faint toasted note.

If the glaze tightens before you’re ready to toss the chicken, loosen it over low heat with 1 tablespoon water. Nothing is ruined.

6. Glaze and serve

If there is visibly more sauce in the pan than you need for a thin coating, spoon a little out now and save it for rice. The chicken needs a lacquer, not a bath.

Add the fried chicken and toss for only 15–20 seconds, just until glossy. Plate immediately and finish with scallions and sesame seeds, if using.

Recipe Notes

  • Chicken breast: works, but it dries faster than thigh, so start checking it earlier.
  • Soy sauce: use regular/light soy rather than dark or sweet soy, which can overpower the citrus and darken the glaze.

Cooking now? You can stop here. The rest of the guide is for the moments when the coating falls off, the oil cools down, or the sauce somehow still does not taste orange enough.

The finished bite is the test for everything above: a thin crisp shell should still give way to juicy chicken underneath, even after the glaze has reached the crust.
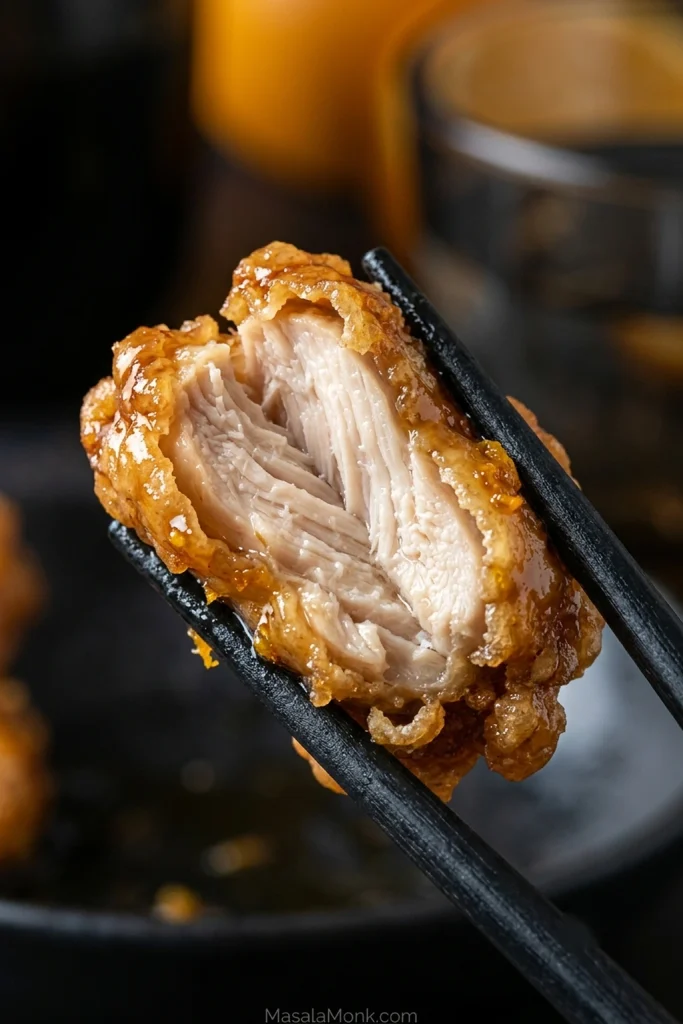
Close-up of a glazed piece of orange chicken held in black chopsticks and cut open to reveal juicy chicken inside a thin golden crust.
The best bite keeps both textures in play: crisp coating around the edges and juicy chicken at the center, with neither one overwhelming the other.

Before the Oil: Make the Coating Stay Put

Your coating can start failing before the chicken ever reaches the oil. Too much surface liquid weakens the starch layer and gives it less to hold onto.

Keep the pieces around 1 to 1¼ inches / 2.5–3 cm. That gives you plenty of crisp surface without shrinking the chicken into tiny nuggets that dry out too quickly.
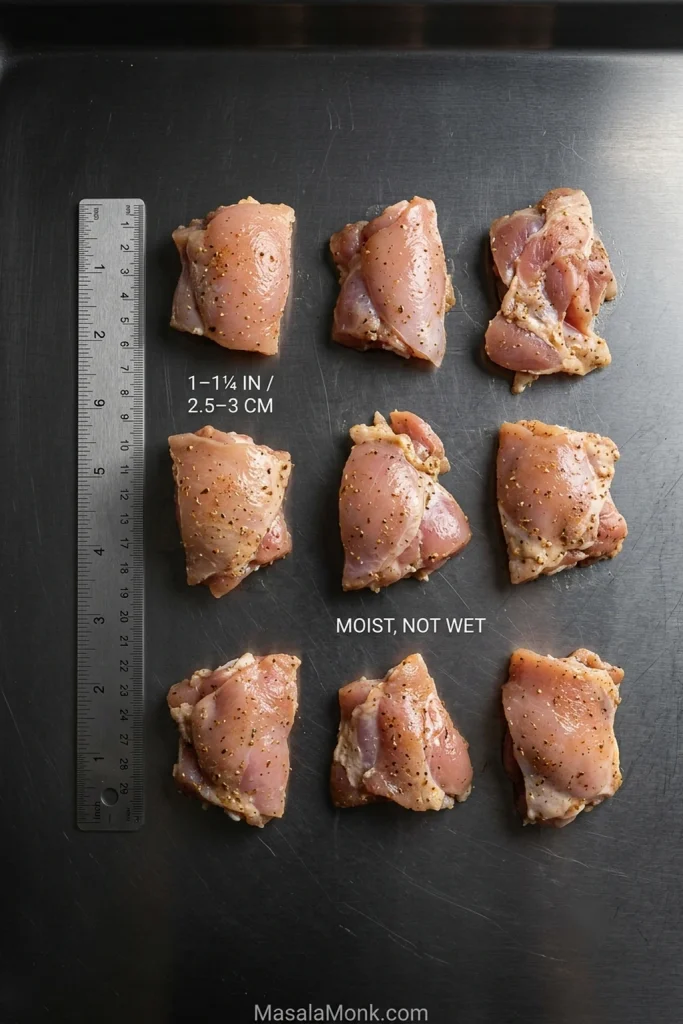
Raw seasoned chicken thigh pieces arranged beside a ruler, with a size guide of 1–1¼ inches / 2.5–3 cm and a note that the surface should be moist, not wet.
Uniform pieces are easier to fry well than a mix of large and small ones; similar sizing helps the centers finish together while the outside turns crisp.

Season first, but don’t soak the surface

The short soy, Shaoxing and white-pepper rest gives the meat some flavor of its own. Liquid collecting at the bottom of the bowl is your cue to drain it before the starch goes on.

Why cornstarch?

A pressed-on starch coating fries into a thin, crisp crust. The first small addition of cornstarch makes the seasoned chicken tacky; the remaining starch then has something to hold onto.

A heavier flour-and-starch dredge, like our hot honey chicken tenders use, creates a much craggier crust. For this shallow-fry method, keep the starch shell lighter.

Look before you fry. The starch should sit in little rough patches that stay put when you lift a piece. Shake away any powder that showers off. Once the coating looks shaggy rather than snowy, you’re there. Those rough ridges are exactly where the glaze will catch later.
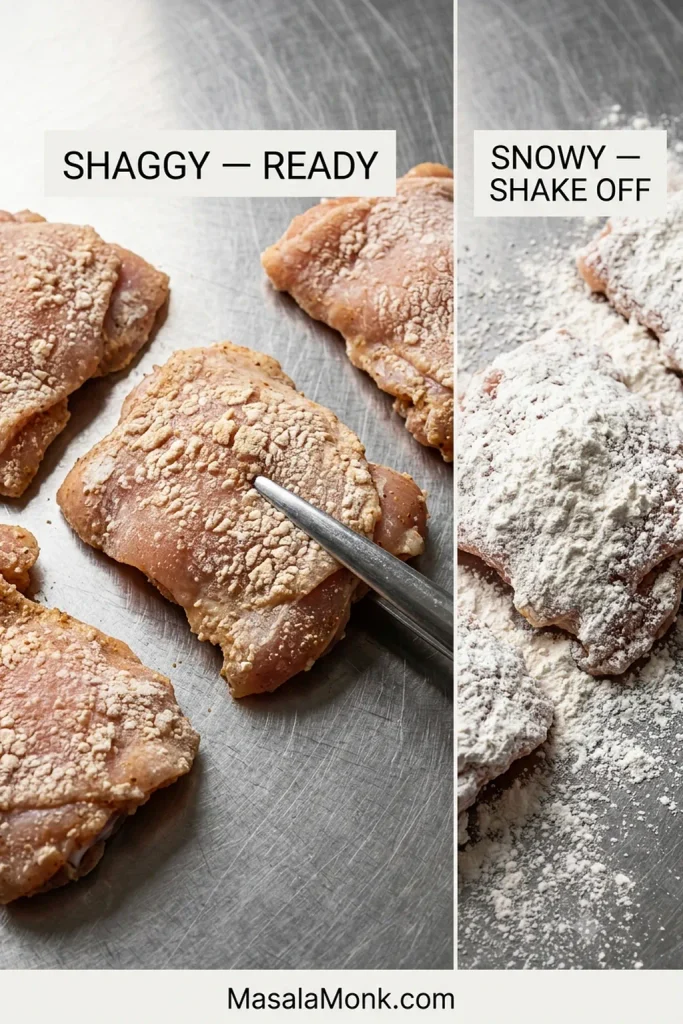
Side-by-side chicken pieces comparing a rough, attached cornstarch coating labeled “shaggy — ready” with a heavily powdered coating labeled “snowy — shake off.”
More loose cornstarch does not mean more crunch. What matters is the starch that actually clings, because attached rough patches become the crust instead of falling away in the oil.

In the Oil: Control the Heat

How do you keep orange chicken crispy? Fry in small batches, let the crust set before turning, drain the chicken on a rack, and finish the sauce before the final toss.

A wide high-sided skillet gives you room for batches and some protection from splatter. A wok or Dutch oven works too.

The sound gives you an early warning before a thermometer does. When the steady sizzle fades sharply, check the oil; once it drops much below about 325°F / 165°C, pause before adding more chicken and let the heat recover.
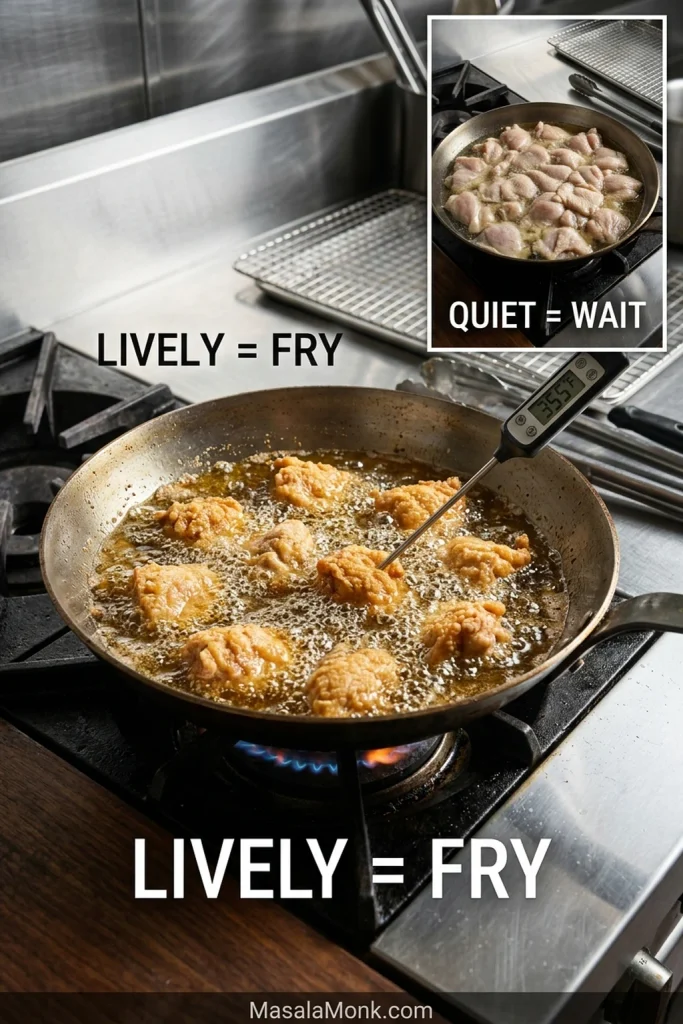
Chicken frying vigorously in a skillet beside an oil thermometer, with a comparison showing a lively frying pan and a quieter pan that needs time to recover.
A fading sizzle is also a batch-size warning: give the pan room and time to regain heat before adding more chicken.

Move each batch straight to a wire rack. Hot chicken keeps giving off steam, and a bowl traps that moisture against the crust.

When is a second fry worth it?

For orange chicken that is going straight from pan to plate, one good fry is usually enough. Use the optional second fry for maximum crunch or when the fried chicken needs to sit longer than the few minutes it takes to finish the sauce.

The second fry drives off a little more surface moisture, leaving the coating harder, drier and noticeably more brittle.
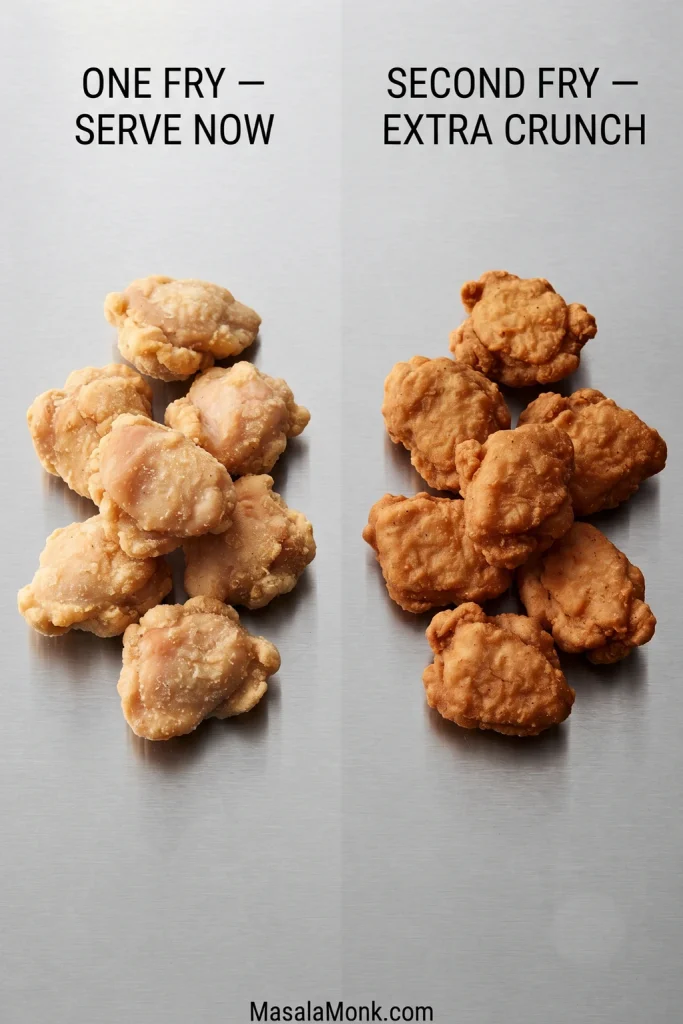
Two groups of fried chicken compared side by side, with one labeled “one fry — serve now” and the crisper second group labeled “second fry — extra crunch.”
The second fry earns its keep when the chicken must wait—the drier crust buys you a little more resistance to steam and sauce.

Check the Crust Before You Move On

Break open one larger piece if you want a final pre-sauce check. The coating should be thin and crisp, while the chicken inside stays juicy. Once that contrast is there, the slow part is behind you. Now build the sauce.

Build an Orange Sauce, Not an Orange-Juice Sauce

More juice does not always make a sauce taste more orange. Once the sauce is already loose enough, another splash can dilute it faster than it improves the aroma.

Orange juice brings sweetness, acidity and the base citrus flavor. Fresh zest supplies the concentrated aromatic oils that make the finished glaze smell unmistakably orange.
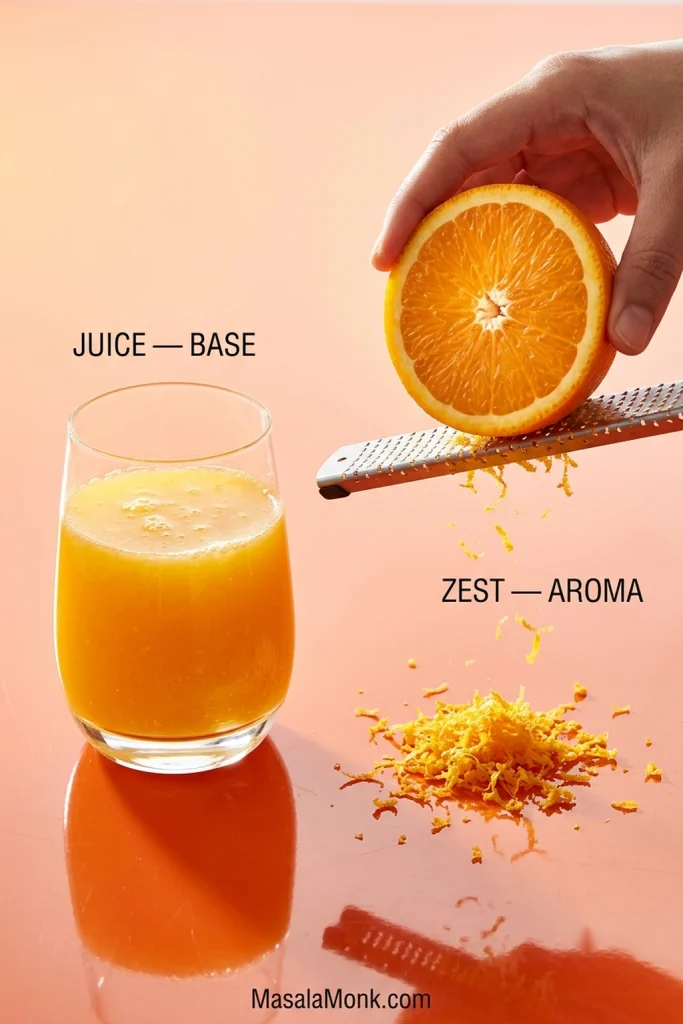
A glass of fresh orange juice beside a halved orange being grated, with loose orange zest and labels identifying juice as the sauce base and zest as the aroma.
If the sauce already has enough sweetness and liquid but still smells muted, add zest before reaching for more juice—the missing piece may be aroma, not orange volume.

Taste before you thicken

Balance the sauce while it is still fluid. Once it is thickened, adding water, vinegar or soy also changes its texture, so settle the sweet-sour-savory balance first. If something still tastes off, fix the flavor before thickening.

Fix the Flavor Before the Chicken Goes In

Small corrections are enough.

If the sauce tastes…Try this
Too sweetAdd unseasoned rice vinegar, 1 tsp at a time, then taste again.
Too sharpAdd 1 tsp sugar, dissolve it, then taste again.
Too saltyAdd warm water, 1 tbsp at a time, then taste again. Thicken only after the balance is right.
Flat or one-noteTry ½ tsp soy plus ½ tsp rice vinegar, then taste again.
Sweet but not orange enoughFinish thickening first. Once the heat is off, add extra zest ¼ tsp at a time until the aroma lifts.

Once the balance tastes right, check the glaze thickness before the chicken goes in.

How Thick Should Orange Chicken Sauce Be?

Thickness matters most once the sauce reaches the crust.

Too thin: it runs straight off the crust and gathers underneath, carrying more water into the coating.

Right: it still moves easily in the pan but leaves a translucent, glossy layer across the rough surface of the chicken.

Too thick: it begins sitting on the chicken in sticky blobs instead of flowing over the ridges, and the glaze can turn gummy as it cools.
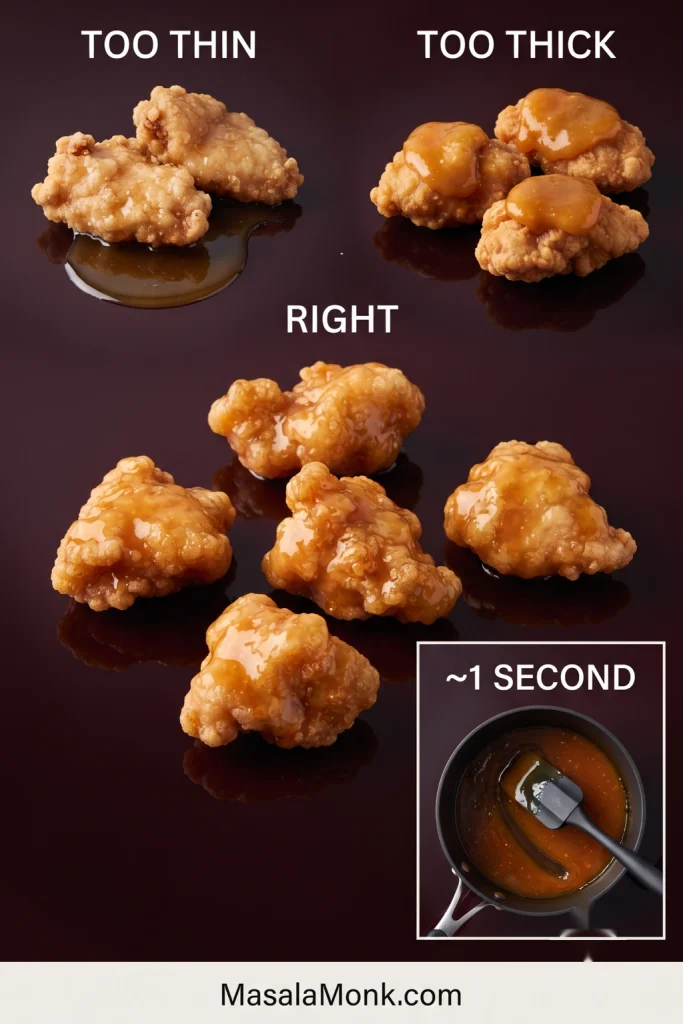
Three-way comparison of orange chicken coated with sauce labeled too thin, too thick and right, with an inset showing a short trail through properly thickened sauce.
Judge the glaze by how it moves: too thin brings extra moisture to the crust, while too thick sits heavily on it. The sweet spot is glossy, fluid and clingy.

The exact amount of slurry can vary because pan width, simmer intensity and reduction time change how much liquid cooks off. Start with most of it, then let the texture in the pan decide whether the rest is needed.

Once the glaze is where you want it, turn off the heat and stir in the orange zest. The aroma should brighten almost immediately. Add the optional sesame oil now if you want a faint toasted note.
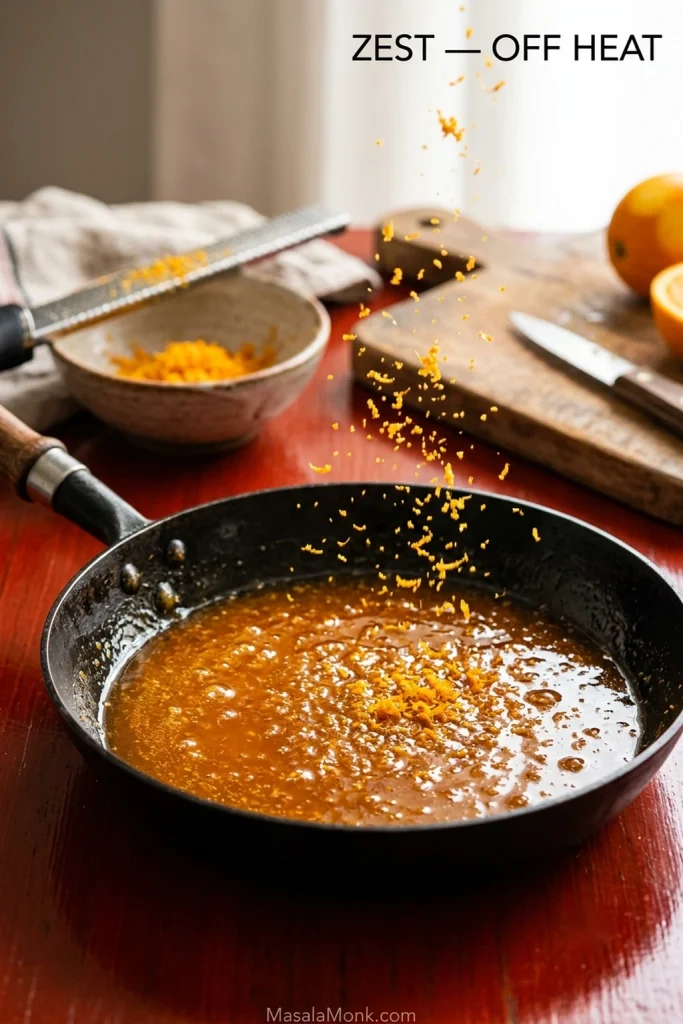
Fresh orange zest falling into a pan of glossy orange sauce, with a grater and a small bowl of zest beside the pan.
Late zest is less about making the sauce more sour and more about restoring the fresh orange aroma lost during simmering.

Glaze ready? Go to the final toss.

The 15–20 Second Window

By now the chicken is crisp and the sauce is finished. Nothing needs more cooking.

Add only enough glaze to coat the chicken thinly and toss for about 15–20 seconds. Then get it onto the plate.
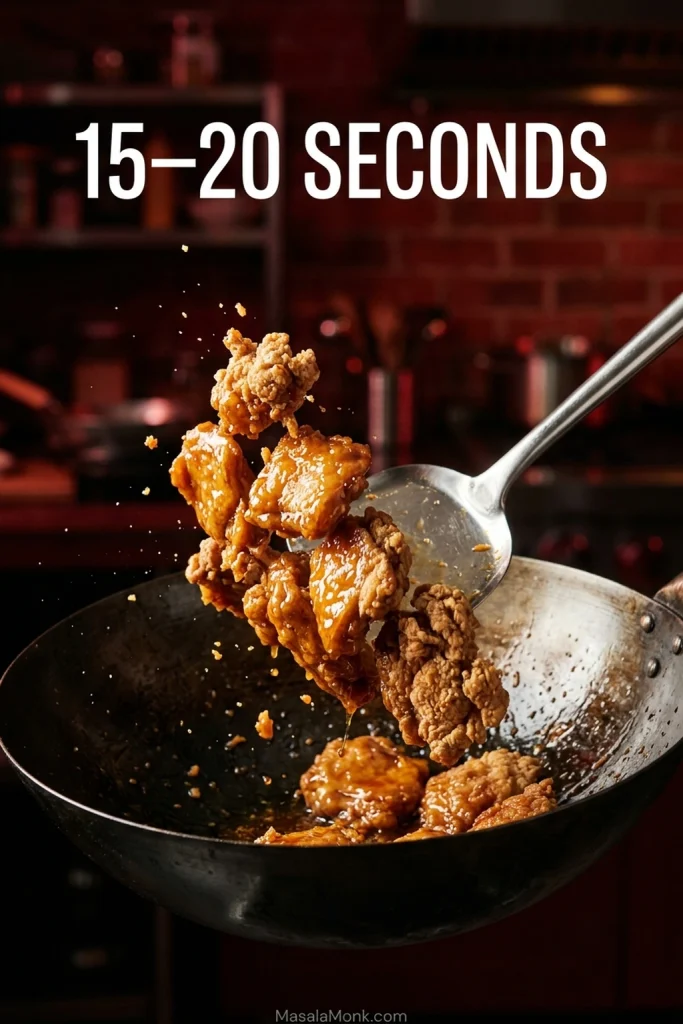
A spoon lifting glossy orange chicken from a wok during the final sauce toss, with “15–20 seconds” displayed above the pan.
The final toss is for coverage, not cooking. Once the glossy sauce has reached the rough surfaces, get the chicken out of the pan before the crust absorbs more moisture.

A wet glaze will eventually soften any starch crust, so those first few minutes are the reward: crisp edges beneath a thin sticky coating, juicy chicken inside, and fresh orange aroma still sitting above the sweetness.
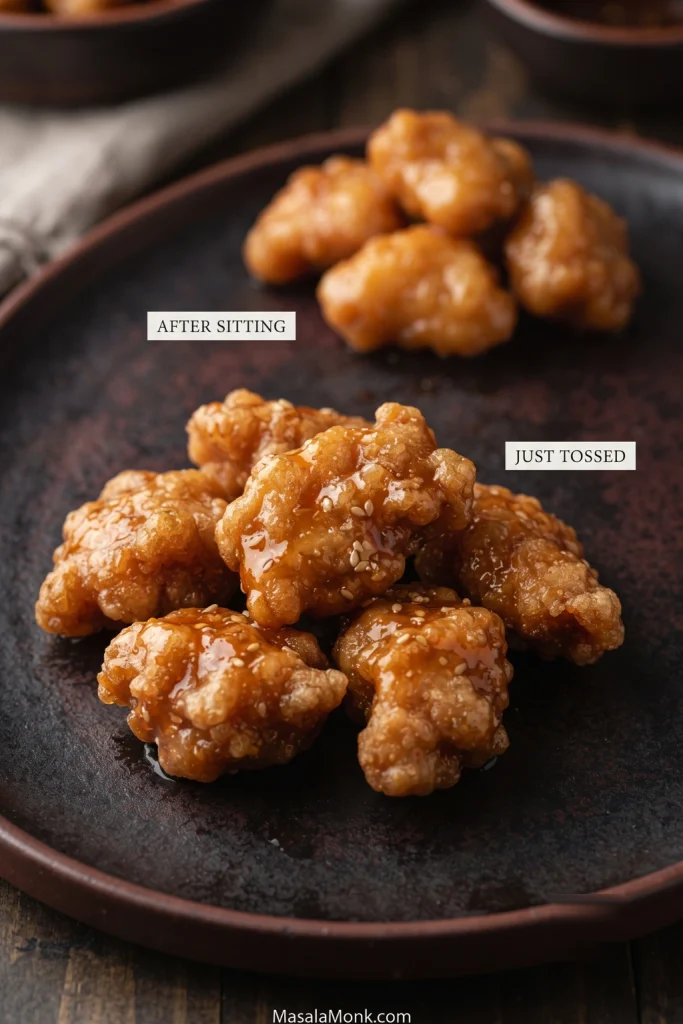
Two portions of glazed orange chicken compared on a dark plate, with crisp pieces labeled “just tossed” and softer-looking pieces labeled “after sitting.”
Crispness starts changing as soon as sauce meets starch. The freshly tossed batch has the strongest contrast between sticky glaze and brittle edges.

Need the quantities or numbered method again? Back to the recipe card.

Orange Chicken Troubleshooting

If a batch goes sideways, don’t change everything at once. Think back to the first moment it looked wrong. That usually tells you what to fix.

Chicken and Coating Problems

ProblemLikely causeWhat to do
Coating looks wet and pastyToo much surface liquidDrain obvious liquid before coating. If the starch is already pasty, press on more dry starch until the surface looks rough rather than wet.
Loose starch keeps falling offCoating is not firmly attachedPress it on, then shake away the excess.
Coating falls off in the oilMoisture, weak adhesion or turning too earlyLet the crust set before turning, handle the pieces gently, and revisit the coating cues if the starch never attached well.
Chicken is pale or greasyOil stayed too coolReduce the batch size and let the oil recover before adding more chicken; see the frying-oil cues.
Outside darkens too fastOil too hot or pieces too largeLower the heat slightly and keep the pieces close to the recipe size.

Sauce, Glaze and Serving Problems

ProblemLikely causeWhat to do
Sauce stays wateryNot enough simmering or slurryBring it back to a simmer and add a little more freshly stirred slurry, using the sauce-thickness cues as your target.
Sauce turns gummyToo much starch or too much reductionWhisk in warm water, 1 tbsp at a time, until it flows again; compare it with the correct glaze consistency.
Sauce tastes bitterToo much white pith or scorched aromaticsMild pith bitterness may soften with a little water and sugar. If the garlic or ginger is genuinely burnt and acrid, remake the sauce.
Chicken loses its crispness too quicklyToo much sauce, sauce too thin or toss too longUse less glaze, finish thickening it first and keep the final toss brief.
Chicken is dry insideIt cooked too longCheck the larger pieces earlier and stop once they reach 165°F / 74°C. Breast has less margin than thigh.

Once you’ve fixed the problem, return to the recipe card and pick up from the step you need.

Swaps That Work Here

Chicken and coating

Chicken breast can replace thigh; start checking it earlier. Potato starch is also a good coating alternative if you already have it, with a slightly more brittle finished crust.

Sauce ingredients

Dry sherry is the easiest substitute for Shaoxing wine; if you have neither, leave it out. Unsweetened bottled orange juice can work, although fresh zest still matters. Orange marmalade brings sugar, peel and pectin together, so it needs its own balanced sauce rather than a straight swap for fresh juice. For more heat, add extra red pepper flakes or a little chile paste.

Air Fryer and Unbreaded Options

For an unbreaded version, brown seasoned bite-size chicken in a lightly oiled skillet and finish it with the orange sauce. Our hibachi chicken recipe goes deeper into pan-browning chicken without a coating.

For an air-fryer adaptation, use the same cornstarch-coated chicken and coat the surface thoroughly but lightly with oil so dry starch does not remain chalky. Arrange the pieces in a single layer and air fry at 400°F / 205°C, turning halfway.

Start checking around 10 minutes; exact timing varies with the air fryer and piece size. Cook until the edges look crisp and the largest pieces reach 165°F / 74°C. Finish the sauce separately and toss only at the end. Expect the crust to be lighter and a little less evenly craggy than the shallow-fried version.
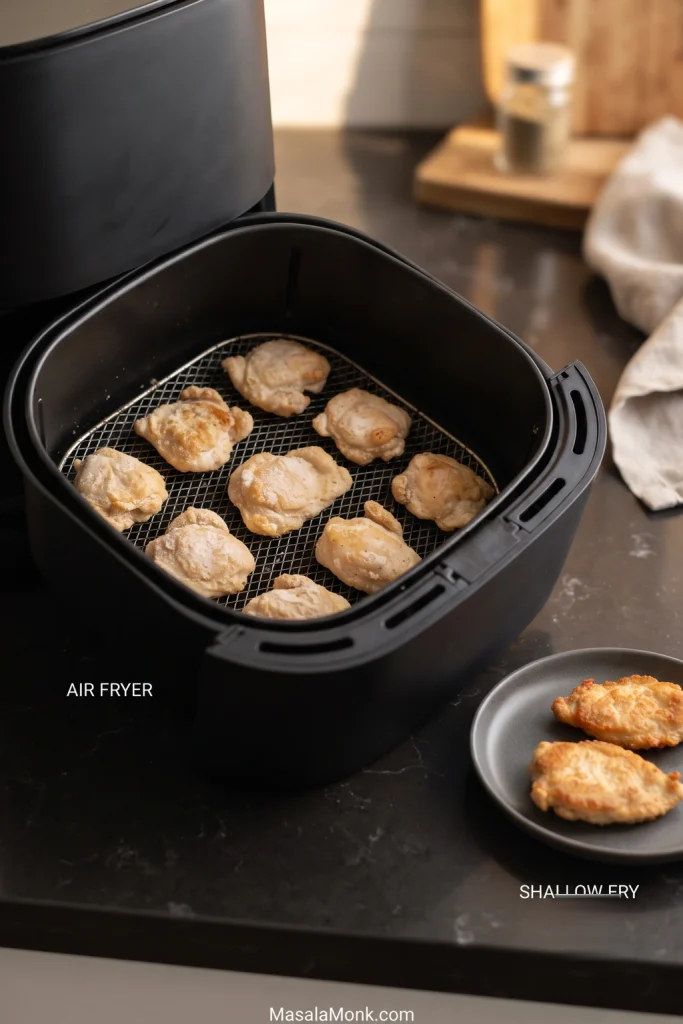
Cornstarch-coated chicken in an open air-fryer basket beside a plate of shallow-fried chicken, with labels identifying the two cooking methods.
With air-fried orange chicken, watch for chalky white starch rather than chasing the darker color of shallow frying; exposed dry patches need a light coating of oil.

What to Serve with Orange Chicken

Because the chicken is sticky, sweet and rich, plain rice and something green are usually all it needs.
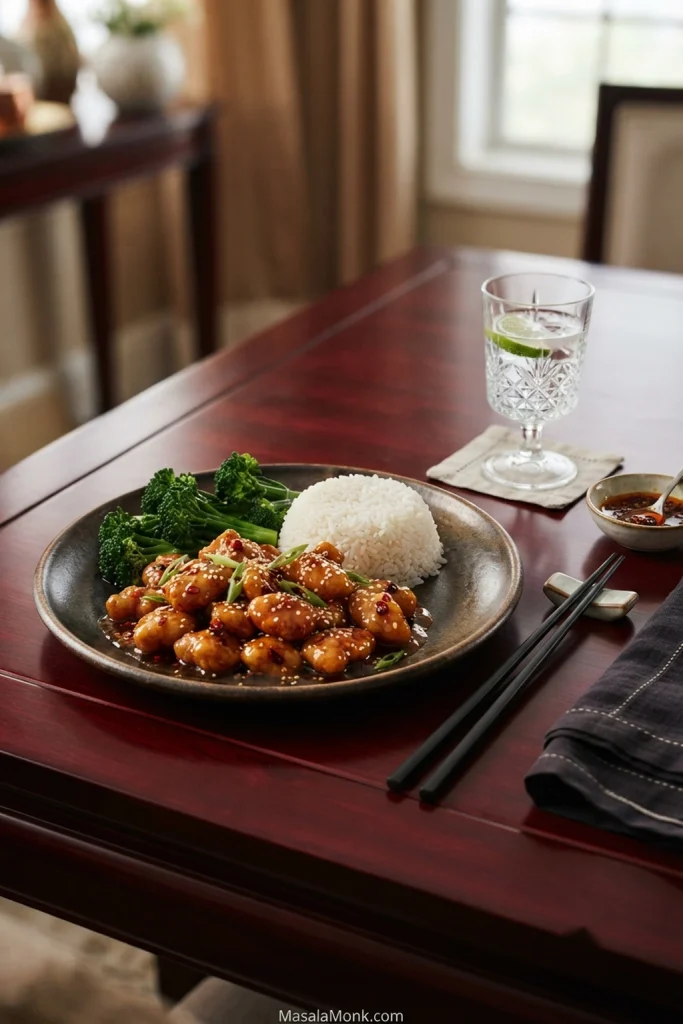
Glazed orange chicken served with white rice and green vegetables on a plate set on a wooden dining table.
Plain rice gives stray glaze somewhere to go, while broccoli or another green vegetable brings freshness against the sweet, rich orange chicken.
  • Steamed jasmine rice: simple and excellent for catching the little bit of glaze left on the plate. Our guide to cooking jasmine and other white rice has stovetop ratios and texture cues if rice is the part you tend to second-guess.
  • Broccoli, bok choy or stir-fried greens: something fresh and slightly bitter works well against the sweet citrus glaze.
  • Fried rice: good when you want a fuller takeout-style meal; keep its seasoning relatively restrained so the orange chicken remains the main event.

If you want the same contrast of crisp chicken and glossy sauce with a toasted-sesame profile, our sesame chicken takes it in that direction.

Store, Freeze and Reheat Orange Chicken

If you expect leftovers, leave the portion you will not serve immediately unsauced and keep the chicken and sauce separate. That gives the crust a much better chance of coming back later.
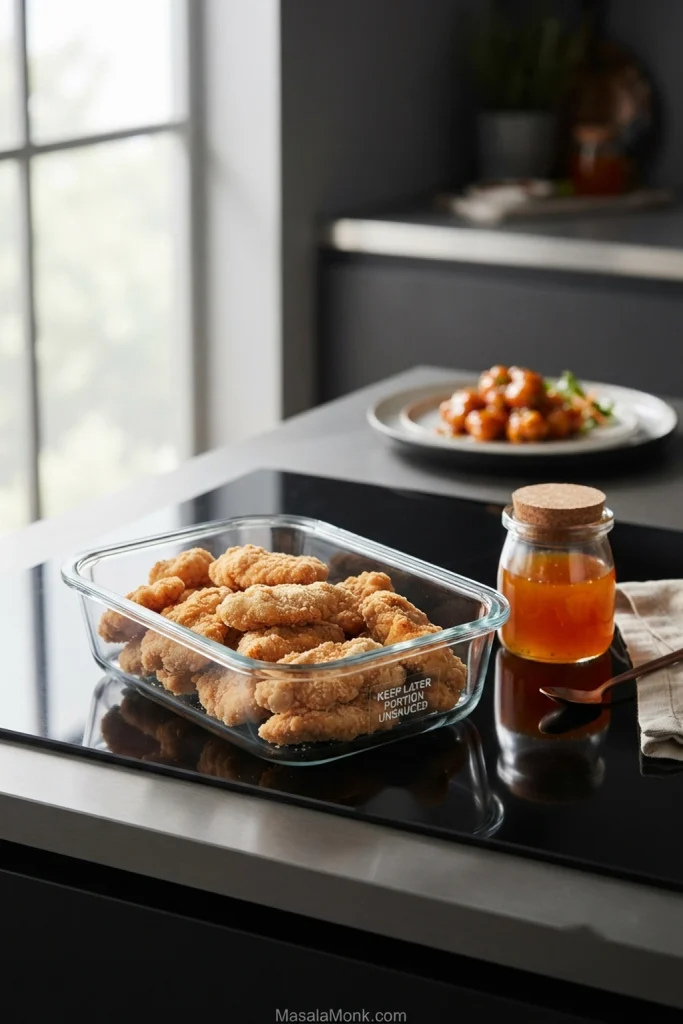
Glass container filled with unsauced fried chicken beside a separate jar of orange sauce, with a plated serving of orange chicken in the background.
Set aside tomorrow’s portion before glazing the whole batch. An unsauced crust responds far better to dry reheating than chicken that has already spent hours absorbing sauce.

For make-ahead cooking, mix the sauce ingredients in advance but keep the zest and slurry separate. Cut the chicken ahead if needed, then coat it close to frying time.

Refrigerate leftovers promptly, within 2 hours of cooking. Store them in shallow covered containers and use refrigerated leftovers within 3–4 days.

For longer storage, keep the chicken and sauce in separate shallow containers and chill them promptly. For best quality, freeze for up to 3 months. Reheat the chicken until hot and crisp again, warm the sauce separately, and toss only when you’re ready to eat.

An oven or air fryer gives the crust the best chance to dry out again. A skillet works for smaller portions. The microwave is fastest, and sometimes that’s what works tonight—just expect a softer coating. Reheat leftovers thoroughly to 165°F / 74°C.

Back to the recipe card · Back to top

When it is time to eat, the finished plate should still look like fried chicken underneath the sauce: glossy enough to catch the light, but textured enough that the crust has not disappeared.
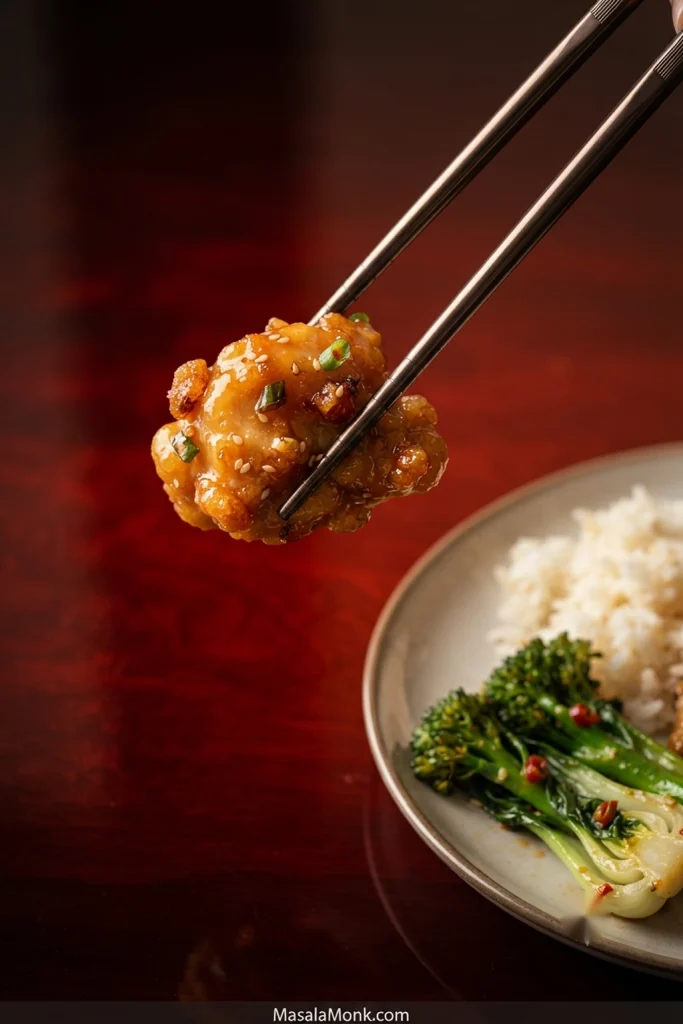
Black chopsticks holding a glossy piece of orange chicken above a plate containing white rice, orange chicken and green vegetables.
A thin sheen is enough. If the fried ridges are still visible beneath the glaze, the sauce is coating the chicken rather than burying it.

The sauce should taste unmistakably orange, cling in a thin glossy layer and leave very little liquid behind in the pan. Once the chicken is crisp and the glaze is there, don’t linger. Toss, plate and eat.
Posted on — Leave a comment

Kung Pao Chicken Recipe: Easy Takeout or Authentic Sichuan

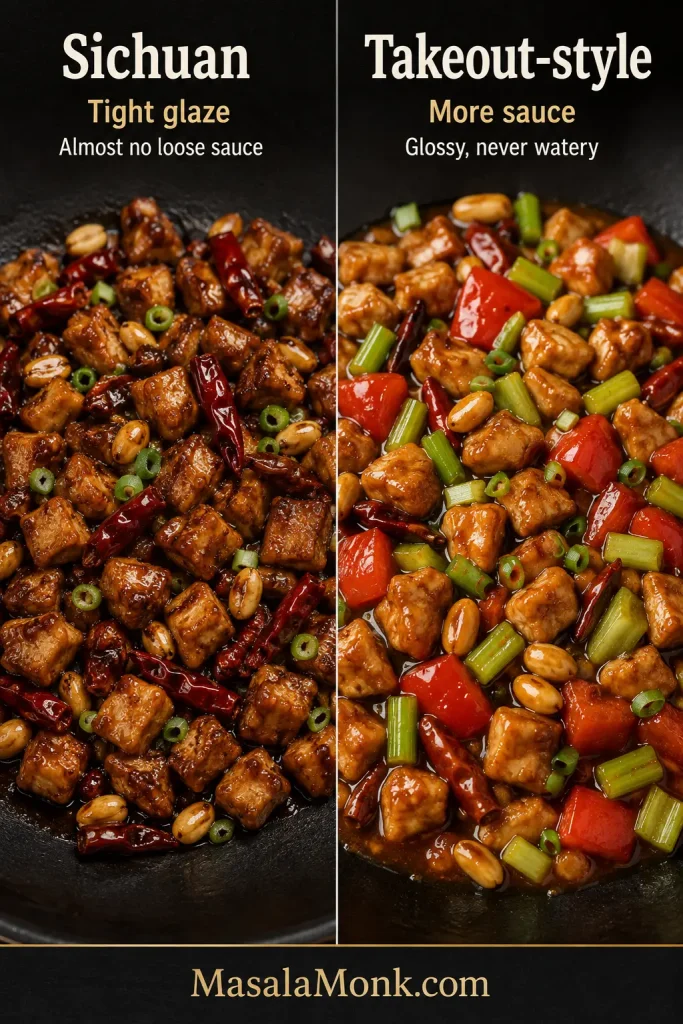
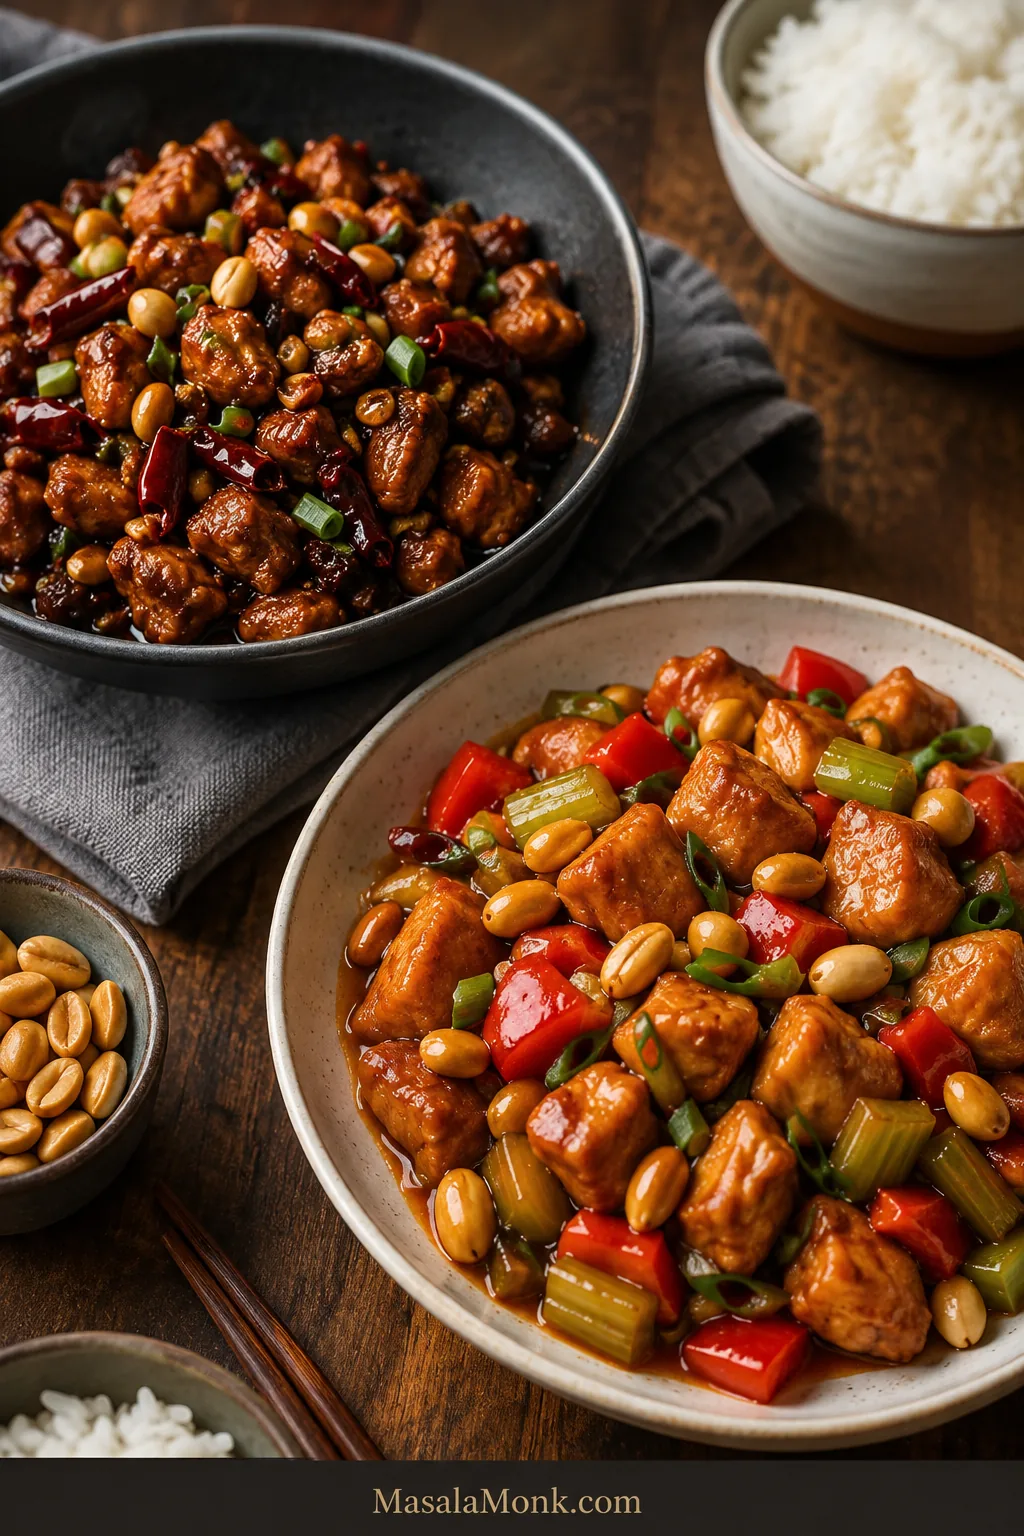
Sichuan Kung Pao chicken with dark glaze beside a saucier takeout-style version with red bell pepper and celery.

Kung Pao chicken can mean two very different dinners.

You may be looking for the dark, tangy Sichuan dish with dried chillies, black vinegar and a citrusy peppercorn tingle. Or perhaps you are craving the sweeter, saucier takeout version with bell pepper, celery and enough sauce for rice.

Both can be delicious. They are simply not the same dinner.

Either way, the pleasure arrives quickly once the pan is hot: tender chicken turns glossy, ginger and garlic meet the toasted chillies, and crisp peanuts crack between softer bites.

This page gives you two complete recipes instead of forcing both preparations into one method. Choose the dinner you want, follow that recipe from top to bottom and cook it in a wok or an ordinary wide skillet.

Quick answer

Kung Pao chicken is a stir-fry of diced chicken, dried chillies, peanuts and a balanced sweet-sour-savoury sauce. The Sichuan recipe below takes about 35–40 minutes. The vegetable-filled takeout-style recipe takes about 40–45 minutes. Both work in a wide skillet when the chicken is cooked in batches.

Choose Sichuan for a tight black-vinegar glaze and a clear Sichuan-pepper tingle. Choose takeout-style for gentler heat, crisp vegetables and a more generous sauce.

The rule: Pick the plate first, keep the pan hot and stop when the sauce clings.

Which Kung Pao Chicken Do You Want?

Choose by the flavour, heat and amount of sauce you want beside your rice.

DecisionSichuan Kung PaoTakeout-style Kung Pao
FlavourTangier, chilli-fragrant and lightly numbingSlightly sweeter, milder and familiar
SauceA thin glaze with almost no loose liquidA more generous glossy coating
HeatDried chillies plus a clear Sichuan-pepper tingleAdjustable chilli heat; peppercorn is optional
VegetablesScallions and aromaticsBell pepper and celery
Best whenYou want black-vinegar tang and Sichuan characterYou want a saucier restaurant-style rice dinner

Choose Sichuan

Black-vinegar tang, peppercorn tingle and a thin glaze with no bulky vegetables.

Go to the Sichuan recipe →

Choose takeout-style

More sauce, gentler heat, crisp bell pepper and celery.

Go to the takeout-style recipe →

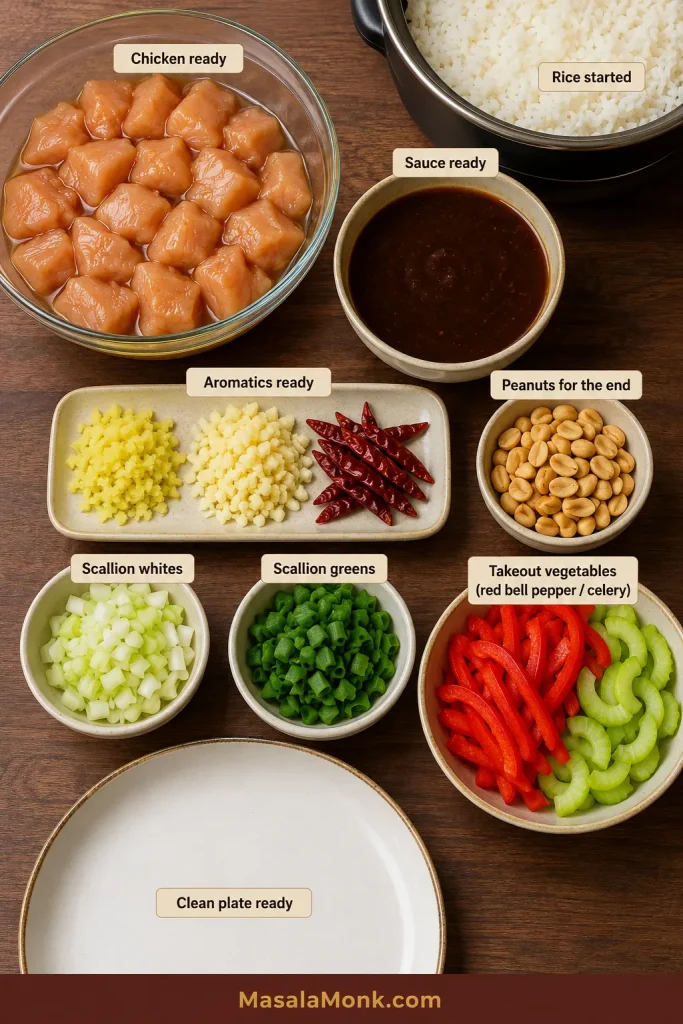
Set up before the pan gets hot. Once you have chosen a version, arrange every ingredient in the order it will enter the wok or skillet.

Prepared Kung Pao cooking station with marinated chicken, sauce, aromatics, peanuts and rice, plus red bell pepper and celery clearly labelled as takeout vegetables.
Arrange the station in pan-entry order, not merely by ingredient type. That small habit makes it much harder to add peanuts too early or leave garlic waiting while you search for the sauce.

Sichuan Kung Pao Chicken

This is the tighter, tangier preparation: diced chicken, black vinegar, dried chillies, Sichuan peppercorn, scallions and roasted peanuts, with almost no loose sauce left in the pan.

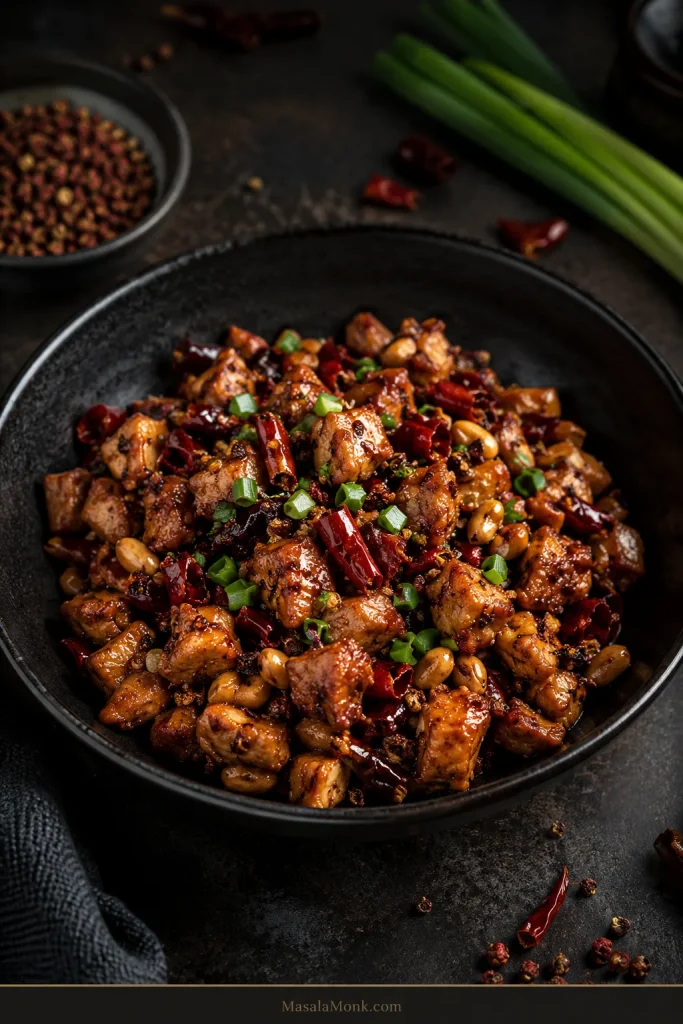
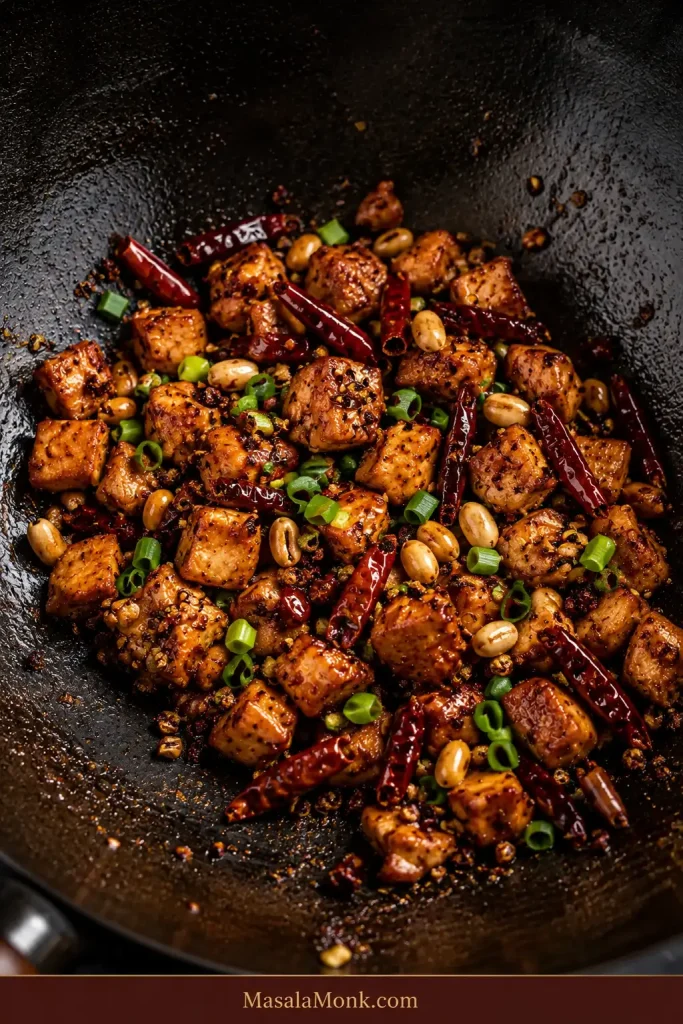
Finished Sichuan Kung Pao chicken with dried red chillies, peanuts and scallions under a dark glossy glaze.
Look at the finish beyond the sauce: peanuts should still appear dry-crisp and scallion greens fresh. If both are heavily lacquered, they probably spent too long simmering in the glaze.

Prep
25 minutes, including marinade

Cook
10–12 minutes

Total
About 35–40 minutes

Yield
4 main servings

Equipment: Use a 14-inch or 35-centimetre flat-bottomed wok, or a wide 12-inch or 30-centimetre skillet. Turn on the exhaust fan before heating the pan, especially when using opened dried chillies.

Carbon steel, stainless steel and cast iron suit sustained high heat. Don’t aggressively preheat an empty nonstick skillet; follow the manufacturer’s heat guidance instead.
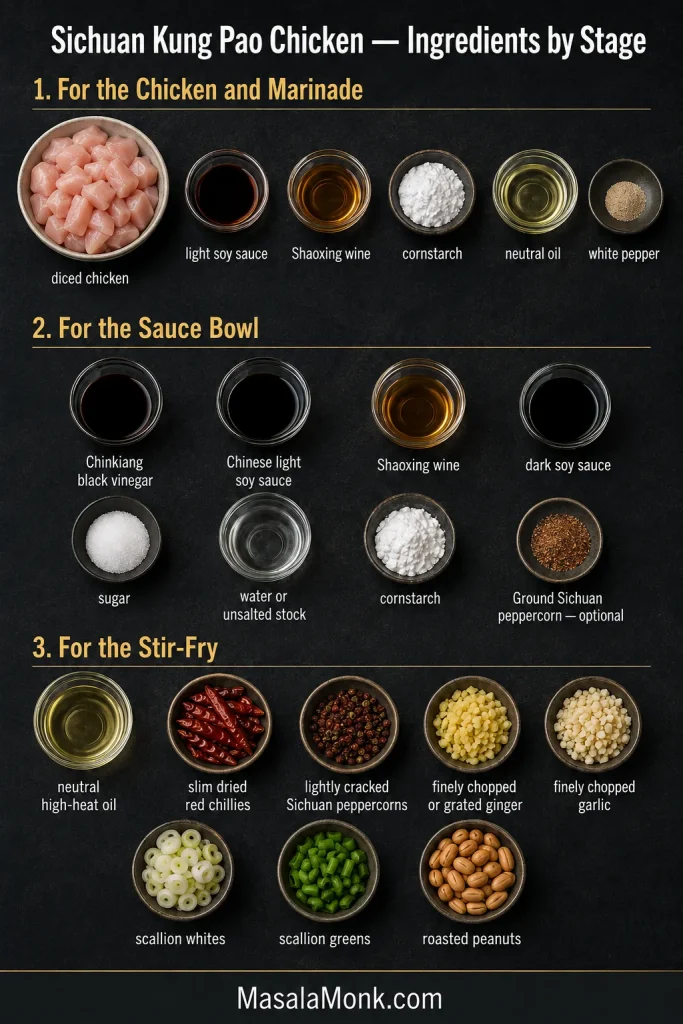
Sichuan ingredients by stage

Sichuan Kung Pao ingredients organised into chicken marinade, sauce bowl and stir-fry groups.
Keep the marinade, sauce-bowl ingredients and stir-fry ingredients in separate groups. Once the wok is hot, you should not need to stop and sort anything.

For the chicken and marinade

  • 1¼ pounds boneless, skinless chicken breast or thigh, 570 grams, cut into ¾-inch or 2-centimetre pieces
  • 1 tablespoon Chinese light soy sauce or regular soy sauce, 15 millilitres
  • 1 tablespoon Shaoxing wine or dry sherry, 15 millilitres
  • 2 teaspoons cornstarch, called cornflour in India and the UK, about 6 grams
  • 1 teaspoon neutral high-heat oil, 5 millilitres
  • ¼ teaspoon ground white pepper

For the sauce bowl

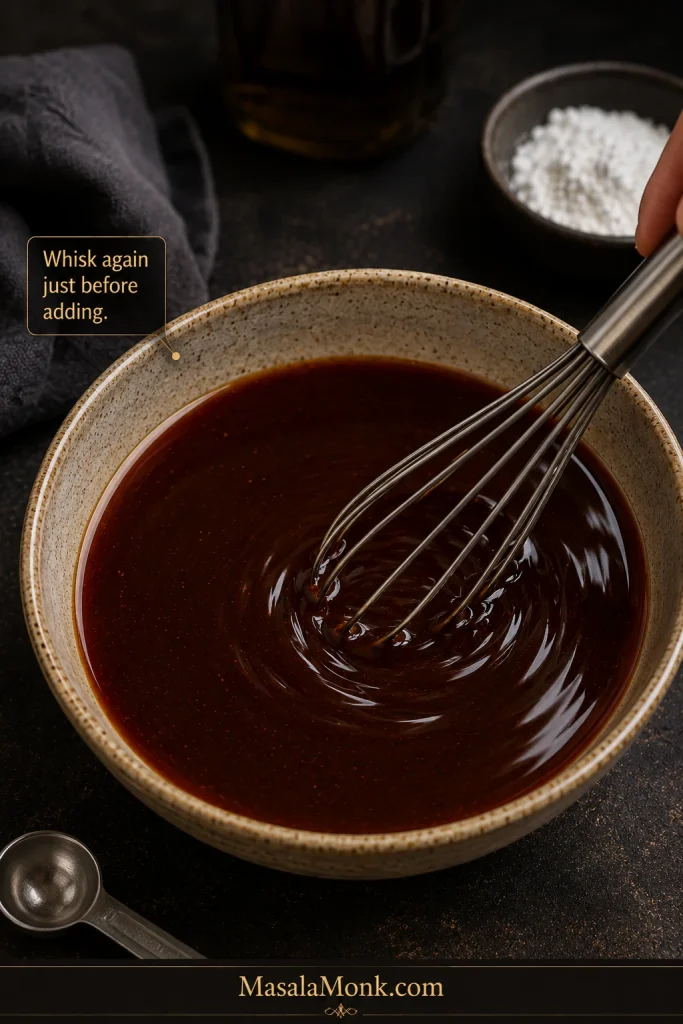
Thin dark Sichuan Kung Pao sauce being whisked in a bowl before cooking.
Before cooking, the sauce should run easily from the whisk in a thin stream. If it already drops like a thick syrup, something is off before the wok ever gets involved.
  • 2 tablespoons Chinkiang black vinegar, 30 millilitres
  • 1 tablespoon Chinese light soy sauce, 15 millilitres
  • 1 tablespoon Shaoxing wine, 15 millilitres
  • 1 teaspoon dark soy sauce, 5 millilitres
  • 2 teaspoons sugar, about 8 grams
  • 2 tablespoons water or unsalted chicken stock, 30 millilitres
  • 1 teaspoon cornstarch, about 3 grams
  • ¼ teaspoon finely ground Sichuan peppercorn, only when using ground rather than lightly cracked peppercorns

For the stir-fry

  • 2½ tablespoons neutral high-heat cooking oil, divided
  • 6–8 slim dried red chillies, stemmed and left whole or snipped open for more heat
  • ¾ teaspoon Sichuan peppercorns, lightly cracked, only when using these rather than ground peppercorn
  • 2 tablespoons finely chopped or grated ginger, about 15 grams
  • 4 medium garlic cloves, finely chopped, about 12 grams
  • 6 scallions or spring onions, cut into 1-inch or 2.5-centimetre pieces, whites and greens separated
  • ½ cup roasted unsalted peanuts, about 70 grams

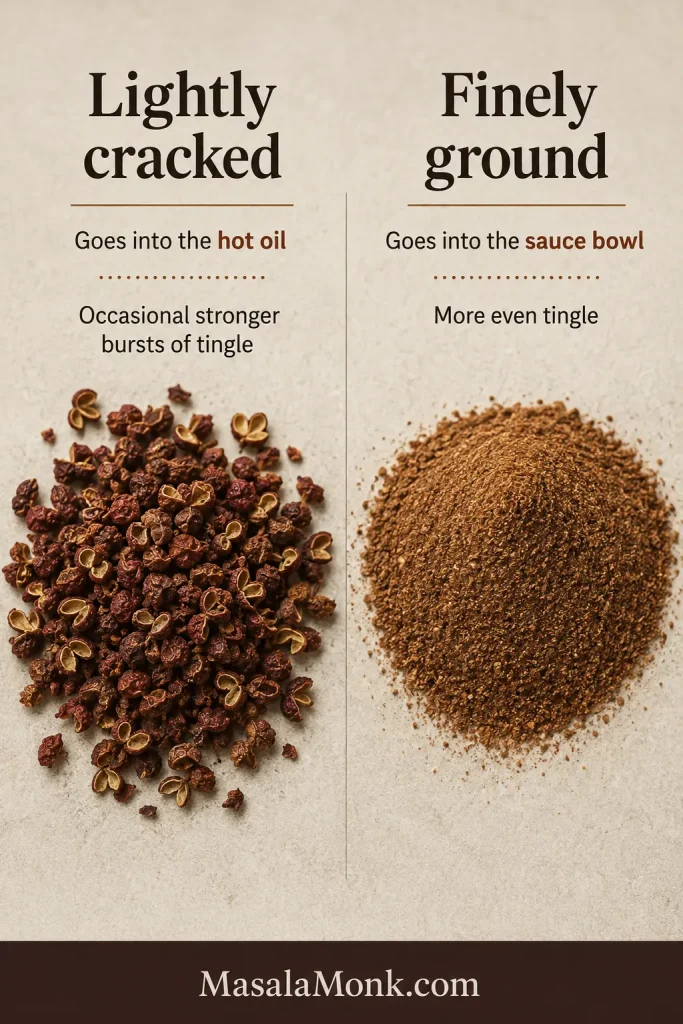
Lightly cracked or ground peppercorn? Lightly cracked peppercorns remain in the dish and create occasional stronger bursts of tingle. Use finely ground peppercorn in the sauce bowl for a more even sensation without larger pieces.

Salt: Do not add extra salt before tasting the finished dish. Soy sauces vary considerably by brand.

Method

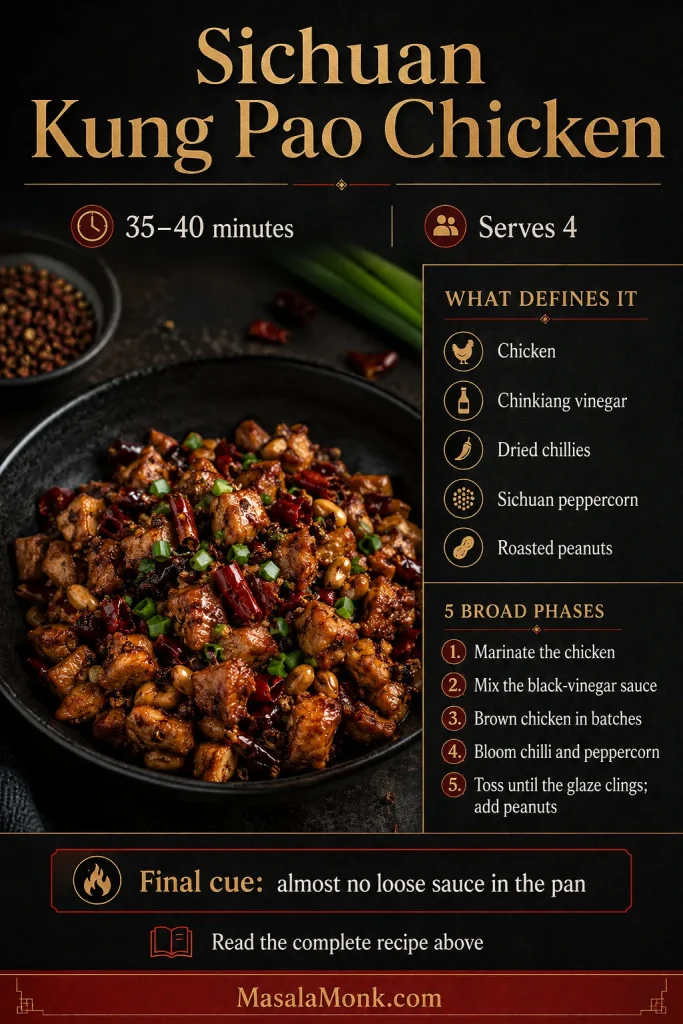
Summary card for Sichuan Kung Pao chicken showing defining ingredients, cooking phases, time and serving yield.
Keep this beside the stove as a sequence reminder after everything is measured. Use the full recipe for quantities; use the card to avoid losing your place once cooking speeds up.

Prep before the wok

  1. Marinate the chicken. Mix the chicken with the soy sauce, Shaoxing wine, cornstarch, oil and white pepper. The pieces should remain separate under a thin coating rather than sitting in a thick paste. Rest for 15–20 minutes while preparing the sauce and aromatics. For advance preparation, cover and refrigerate the chicken for a few hours, then keep it chilled until cooking.
  2. Make the sauce. Whisk together everything listed under “For the sauce bowl.” Keep it beside the stove and whisk again immediately before adding it because the cornstarch settles quickly.
  3. Set up the meal. Start the rice before heating the pan and have any cold side ready. Separate the scallion whites from the greens, place every stir-fry ingredient within reach and put a clean plate beside the stove for the partly cooked chicken.

Brown the chicken

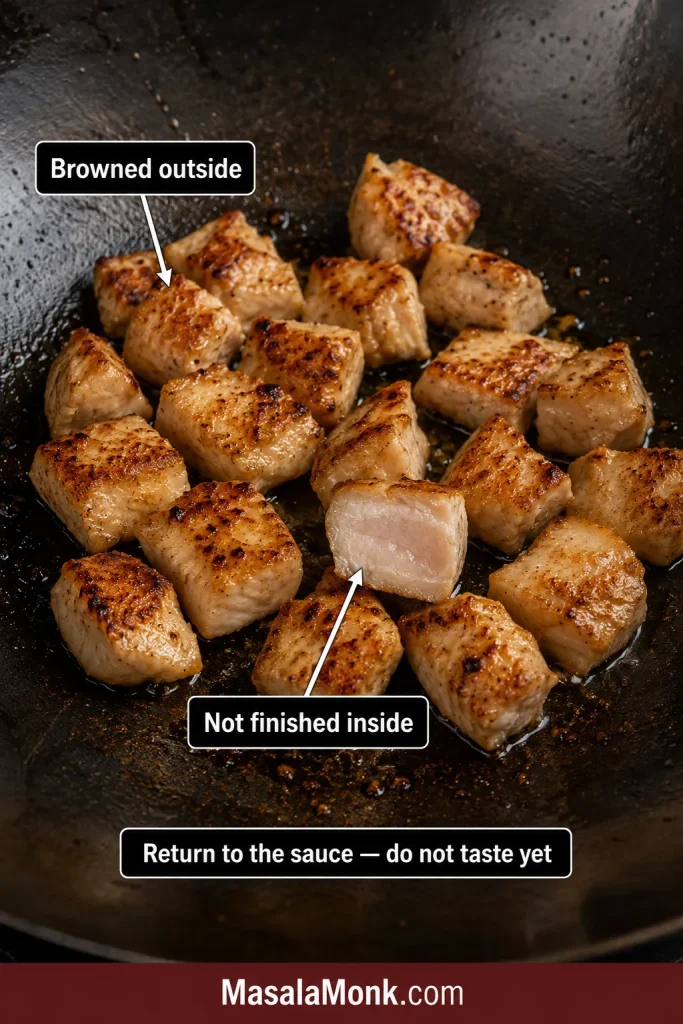
  1. Cook the first chicken batch. Heat the empty wok or suitable skillet over high or medium-high heat. Add 1 tablespoon oil. When it shimmers, add no more than 10–12 ounces or 280–340 grams chicken in one layer. Leave it undisturbed for 45–60 seconds, then stir-fry for another 1–2 minutes.
  2. Cook the second batch. Transfer the first batch to the clean plate. Add 1 teaspoon oil, then let the pan heat again until the oil shimmers. Repeat with the remaining chicken. The exterior should be browned while the centre remains just shy of fully opaque. Do not taste it yet; it finishes immediately when returned to the bubbling sauce.
Browned chicken pieces after the first sear, with one cut piece showing a centre not yet fully cooked.
Use the largest piece as your reference. Smaller cubes colour and firm sooner, so checking only them can make the batch look further along than it is.

Bloom, glaze and finish

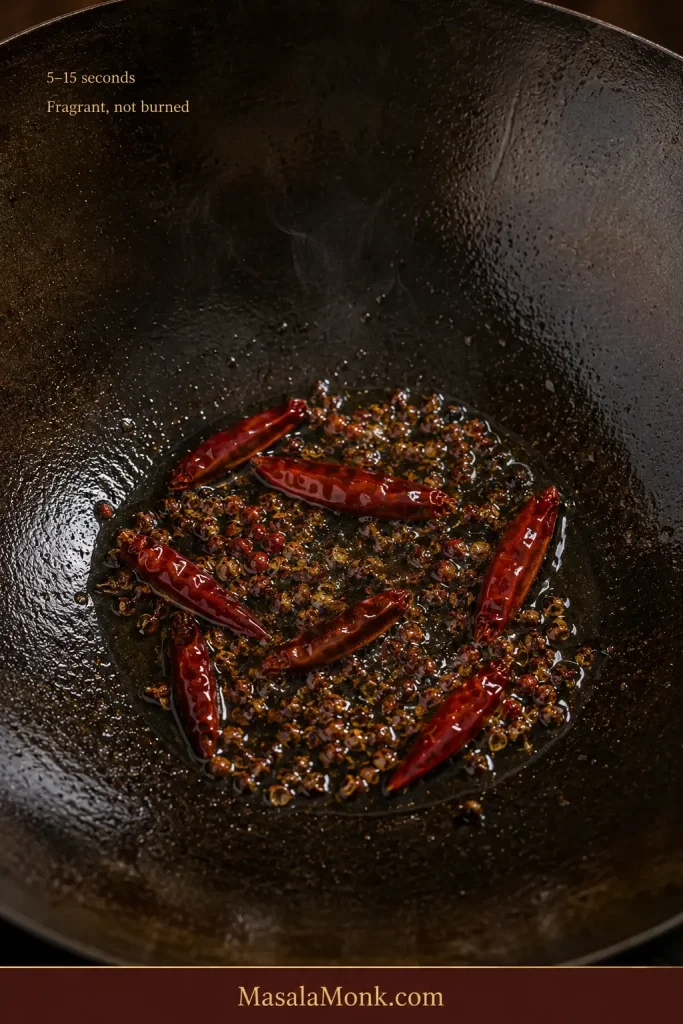
Bloom the chillies and peppercorns first; add the wetter aromatics only after they smell fragrant.
Dried red chillies and lightly cracked Sichuan peppercorn sizzling briefly in oil in a carbon-steel wok.
Light twitching or popping is normal. Move on while the aroma is toasted and floral, before the chillies develop blackened edges.
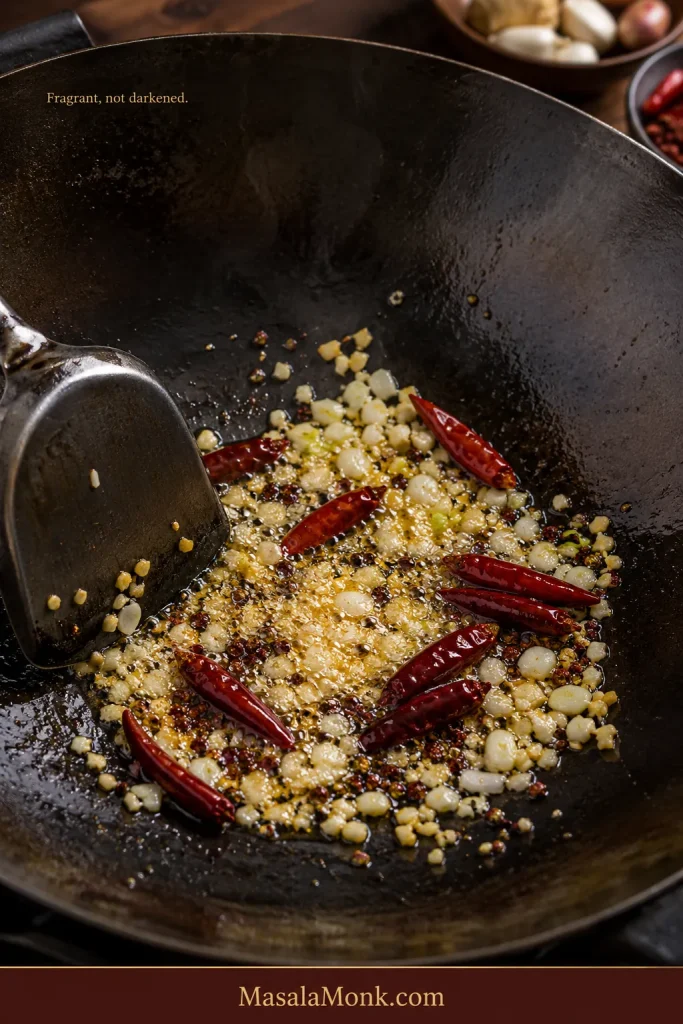
  1. Bloom the chillies and peppercorns. Add the remaining 1 tablespoon plus ½ teaspoon oil. Add the lightly cracked peppercorns, when using, and the dried chillies. Stir for 5–15 seconds, just until fragrant. Add the ginger, garlic and scallion whites before the chillies darken, then stir for about 10 seconds.
Dried red chillies, Sichuan peppercorn, finely chopped ginger, garlic and scallion whites sizzling in a carbon-steel wok.
Once ginger, garlic and scallion whites go in, watch the garlic edges. Move on as soon as they begin to colour.
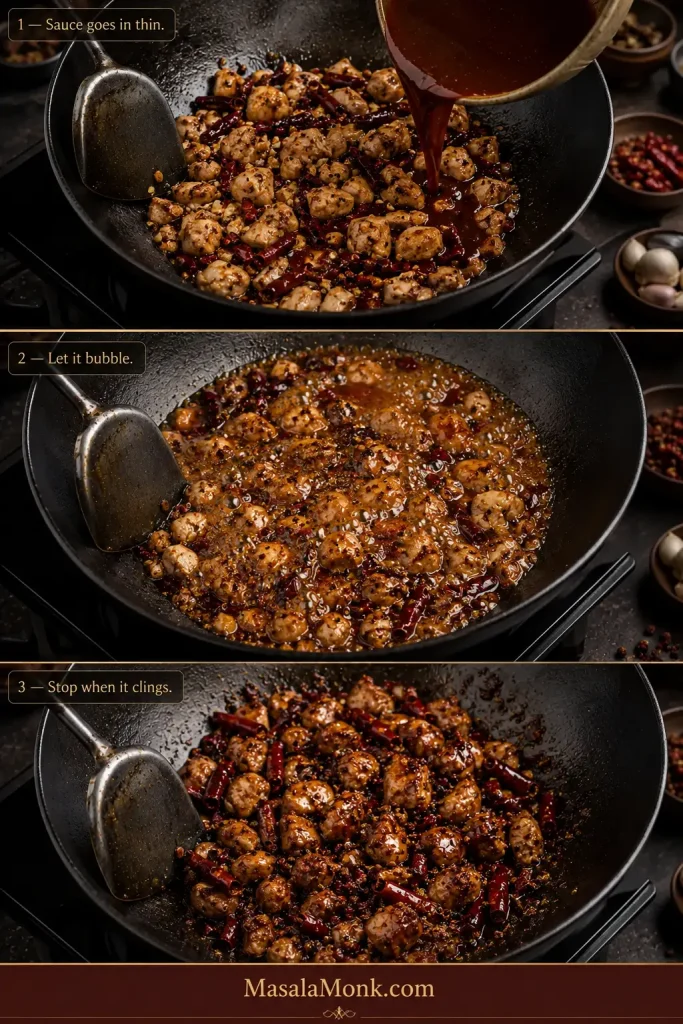
  1. Bring it together. Return the chicken. Whisk the sauce, pour it into the pan and toss immediately. The loose liquid should bubble and turn glossy within 20–45 seconds, coating the chicken in a thin glaze.
Three stages showing thin Sichuan Kung Pao sauce entering the wok, bubbling, then clinging tightly to chicken.
Try the tilt test: finished glaze moves with the chicken instead of racing independently to the low side of the wok. That is often easier to judge than counting seconds.
  1. Finish and serve. Fold in the peanuts and scallion greens for the final 10–15 seconds. Remove the pan from the heat. The largest chicken piece should be opaque throughout and reach 165°F or 74°C. Serve immediately; the glaze should cling tightly, with almost nothing pooling in the pan.
Finished Sichuan Kung Pao chicken in a wok with peanuts, dried chillies and scallions and almost no loose sauce.
Drag a spatula briefly across the wok bottom. At the right endpoint, the trail stays mostly clear instead of immediately filling with loose sauce.

Made the Sichuan recipe? Skip the second recipe and continue to why the method works, or go directly to troubleshooting.

Takeout-Style Kung Pao Chicken

This is the familiar saucier dish with juicy chicken, crisp bell pepper and celery, roasted peanuts and a sweet-savoury coating made for rice.

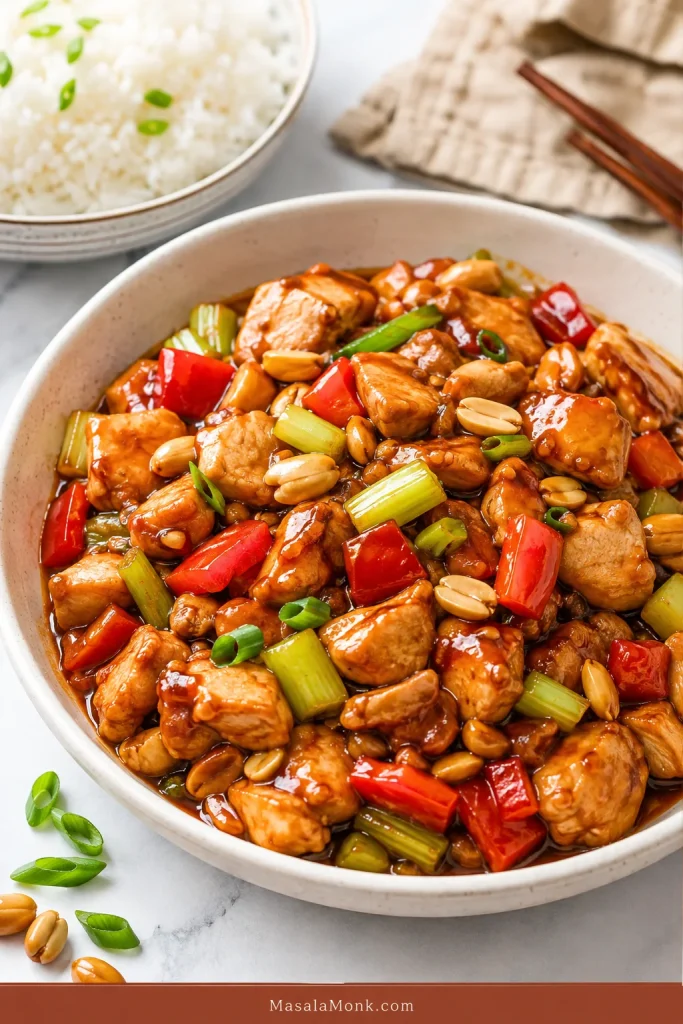
Takeout-style Kung Pao chicken with red bell pepper, celery, dried chillies, peanuts and glossy brown sauce.
A useful visual check is the vegetables: red pepper should stay bright and celery should still hold its shape. Dull, collapsed vegetables usually mean the stir-fry stayed together too long.

Prep
25–28 minutes, including marinade

Cook
14–17 minutes

Total
About 40–45 minutes

Yield
4 main servings

Equipment: Use a wide 12-inch or 30-centimetre skillet, or a 14-inch or 35-centimetre flat-bottomed wok. Turn on the exhaust fan before heating the pan.

Carbon steel, stainless steel and cast iron suit sustained high heat. Don’t aggressively preheat an empty nonstick skillet; follow the manufacturer’s heat guidance instead.

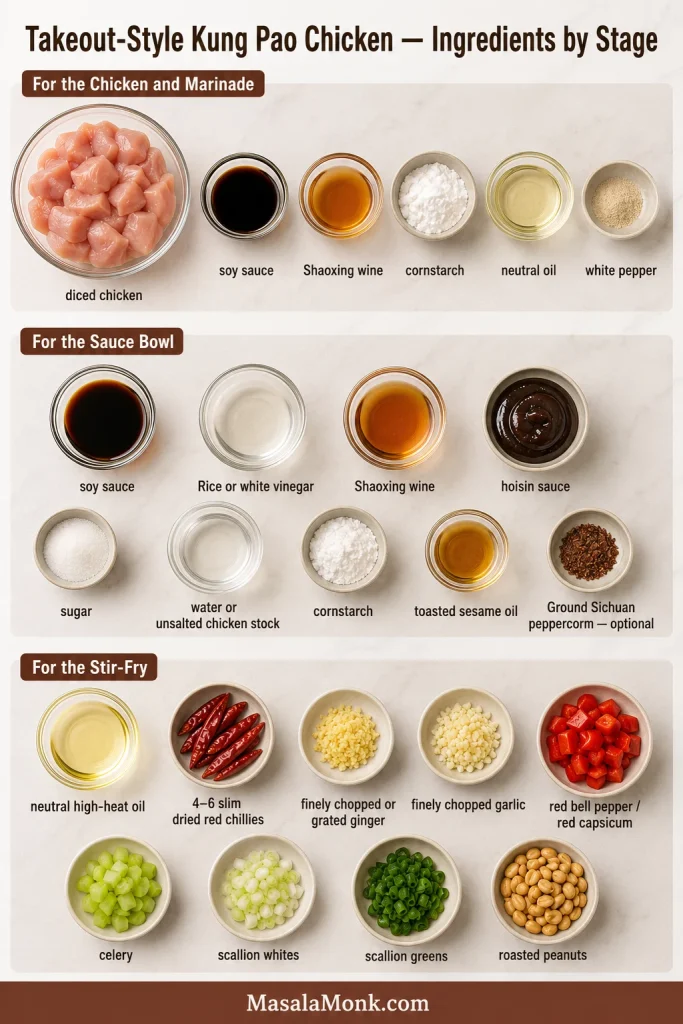
Takeout-style ingredients by stage

Takeout-style Kung Pao ingredients grouped into chicken marinade, sauce bowl and stir-fry components with red bell pepper and celery.
Bell pepper and celery are not aromatics. Cooking them separately protects their crunch and keeps their released moisture out of the chicken-browning stage.

For the chicken and marinade

  • 1¼ pounds boneless, skinless chicken thigh or breast, 570 grams, cut into ¾-inch or 2-centimetre pieces
  • 1 tablespoon soy sauce, 15 millilitres
  • 1 tablespoon Shaoxing wine or dry sherry, 15 millilitres
  • 2 teaspoons cornstarch, called cornflour in India and the UK, about 6 grams
  • 1 teaspoon neutral high-heat oil, 5 millilitres
  • ¼ teaspoon ground white pepper

For the sauce bowl

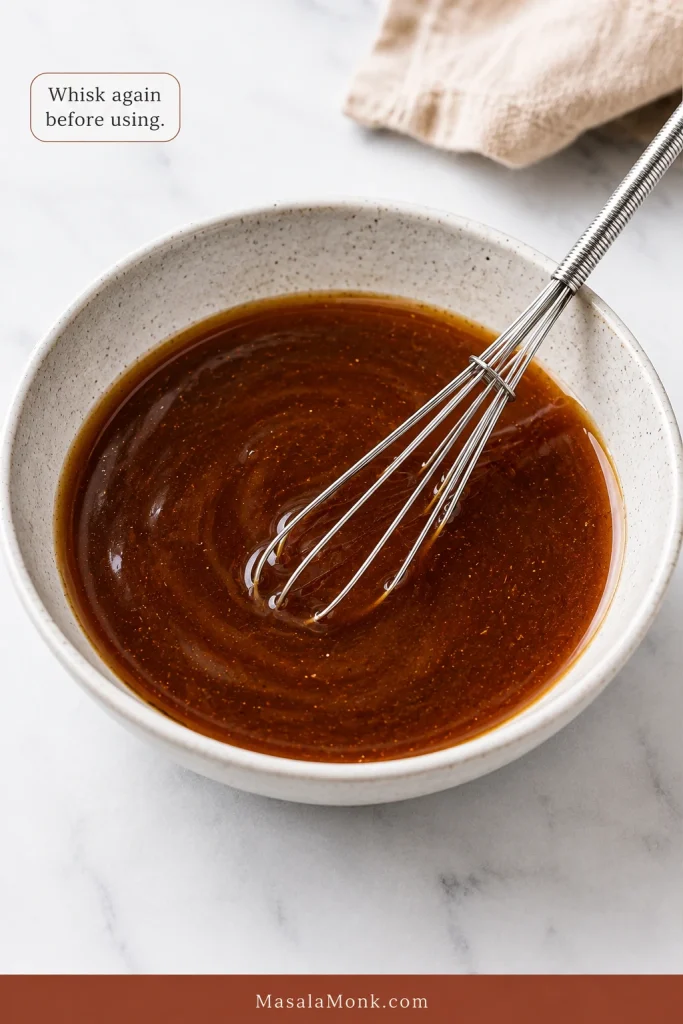
Thin brown takeout-style Kung Pao sauce being whisked in a pale bowl.
Hoisin makes the mixture look richer, so judge it by movement: the sauce can ribbon briefly from the whisk, but it should level out quickly rather than fall in heavy blobs.
  • 2 tablespoons soy sauce, preferably reduced-sodium if your hoisin is salty, 30 millilitres
  • 1 tablespoon unseasoned rice vinegar or distilled white vinegar, 15 millilitres
  • 1 tablespoon Shaoxing wine or dry sherry, 15 millilitres
  • 1 tablespoon hoisin sauce, 15 millilitres
  • 1 tablespoon sugar, about 12 grams
  • ⅓ cup water or unsalted chicken stock, 80 millilitres
  • 2 teaspoons cornstarch, about 6 grams
  • 1 teaspoon toasted sesame oil, 5 millilitres
  • ¼ teaspoon finely ground Sichuan peppercorn, optional

For the stir-fry

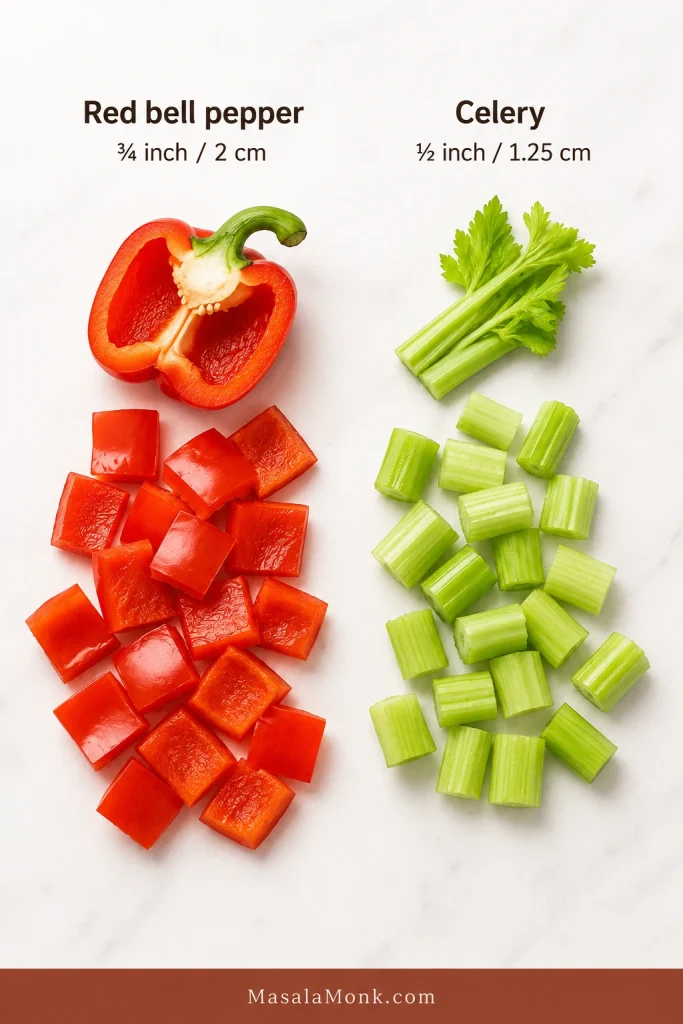
Red bell pepper cut into about 2-centimetre pieces beside celery cut into smaller 1.25-centimetre pieces.
Different cuts help the vegetables finish together: larger pepper pieces resist collapse, while smaller celery pieces heat through without losing their characteristic snap.
  • 3 tablespoons neutral high-heat cooking oil, divided
  • 4–6 slim dried red chillies, stemmed and mostly left whole
  • 2 tablespoons finely chopped or grated ginger, about 15 grams
  • 4 medium garlic cloves, finely chopped, about 12 grams
  • 1 medium red bell pepper or red capsicum, cut into ¾-inch or 2-centimetre pieces, about 150 grams
  • 2 celery stalks, cut into ½-inch or roughly 1.25-centimetre pieces, about 100 grams
  • 4 scallions or spring onions, cut into 1-inch or 2.5-centimetre pieces, whites and greens separated
  • ½ cup roasted unsalted peanuts, about 70 grams

Choose the vinegar: Rice vinegar gives the sauce a softer, rounder tang. Distilled white vinegar gives it the sharper edge associated with many takeout-style sauces.

Salt: Do not add extra salt before tasting the finished dish. Soy sauce and hoisin vary substantially by brand.

Method

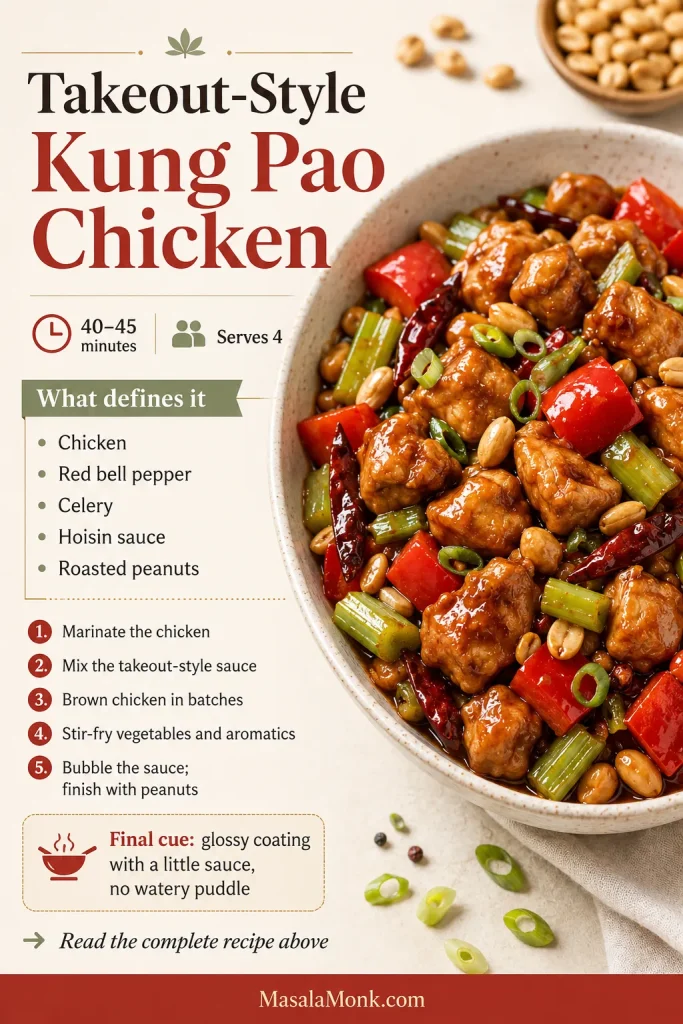
Takeout-style Kung Pao chicken summary card with defining ingredients, five cooking phases, time and serving yield.
Use this card to protect the order of operations. The biggest shortcut to avoid is combining chicken, vegetables and aromatics in one long cook, which sacrifices both browning and crunch.

Prep before the skillet

  1. Marinate the chicken. Mix the chicken with the soy sauce, Shaoxing wine, cornstarch, oil and white pepper. The coating should remain thin. Rest for 15–20 minutes while preparing the vegetables and sauce. For advance preparation, cover and refrigerate the chicken for a few hours, then keep it chilled until cooking.
  2. Make the sauce. Whisk together everything listed under “For the sauce bowl.” Keep it beside the stove and whisk again immediately before using it because the cornstarch settles quickly.
  3. Set up the meal. Start the rice before heating the pan and have any cold side ready. Keep the chicken, vegetables, aromatics, peanuts and sauce within reach. Put a clean plate beside the stove.

Brown the chicken

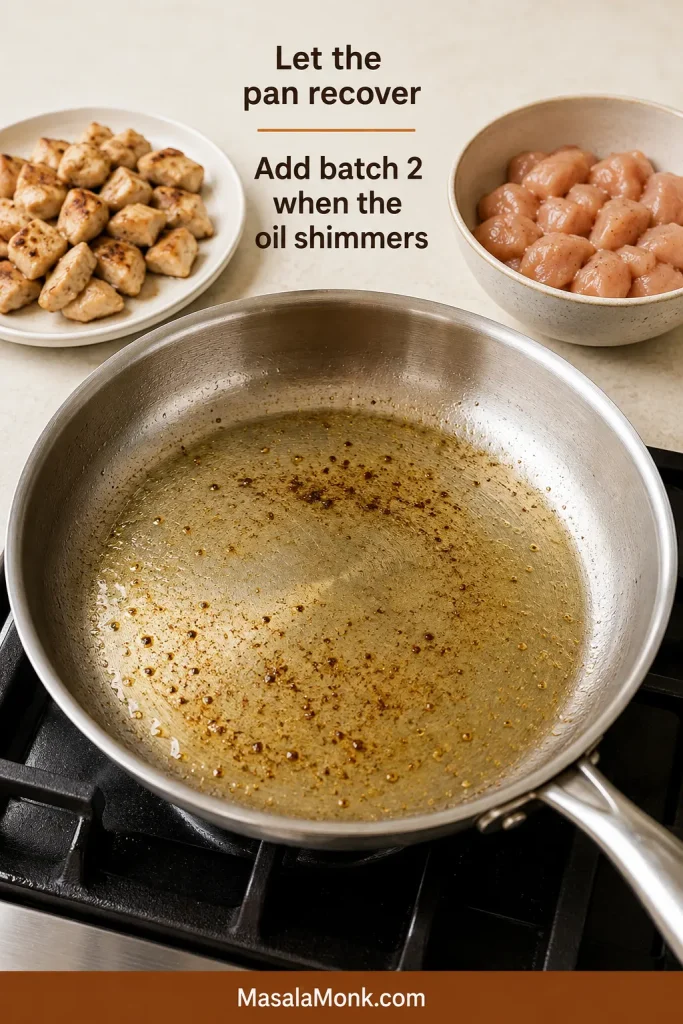
  1. Cook the first chicken batch. Heat the empty wok or suitable skillet over high or medium-high heat. Add 1 tablespoon oil. When it shimmers, add no more than 10–12 ounces or 280–340 grams chicken in one layer. Leave it undisturbed for 45–60 seconds, then stir-fry for another 1–2 minutes and transfer it to the clean plate.
Empty stainless-steel skillet reheating between chicken batches, with browned chicken removed and raw chicken waiting nearby.
There is no fixed recovery timer. Wait until wet-looking fond dries, fresh oil spreads easily and its surface begins to shimmer before the next chicken batch goes in.
  1. Cook the second batch. Add 2 teaspoons oil and let the pan recover until the oil shimmers again. Add the remaining chicken and repeat. The exterior should be browned while the centre remains just shy of fully opaque. Do not taste it yet; it finishes later in the bubbling sauce.

Cook the vegetables and aromatics

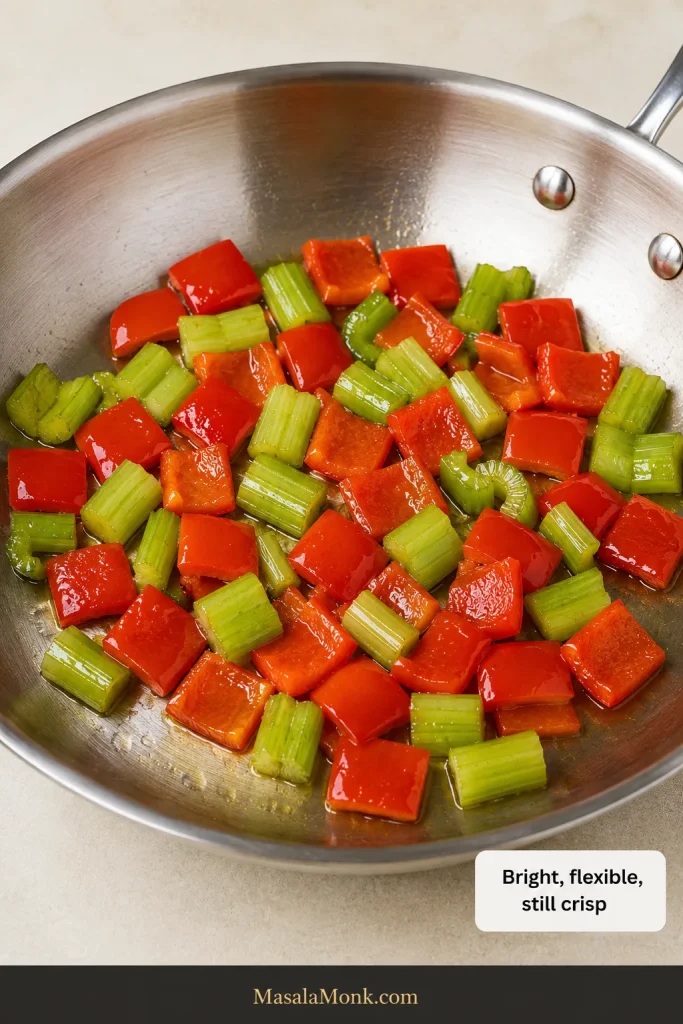
  1. Cook the vegetables. Add 2 teaspoons oil. Stir-fry the bell pepper and celery for 3–4 minutes, until bright and crisp-tender. The celery should bend slightly while retaining a clear snap. Transfer the vegetables to the plate with the chicken.
Bright red bell pepper and green celery stir-frying in a stainless-steel skillet while still crisp and structured.
Celery is the better doneness gauge. Bend one piece: it should flex slightly but still resist and snap. The softer bell pepper is less reliable for judging the pair.
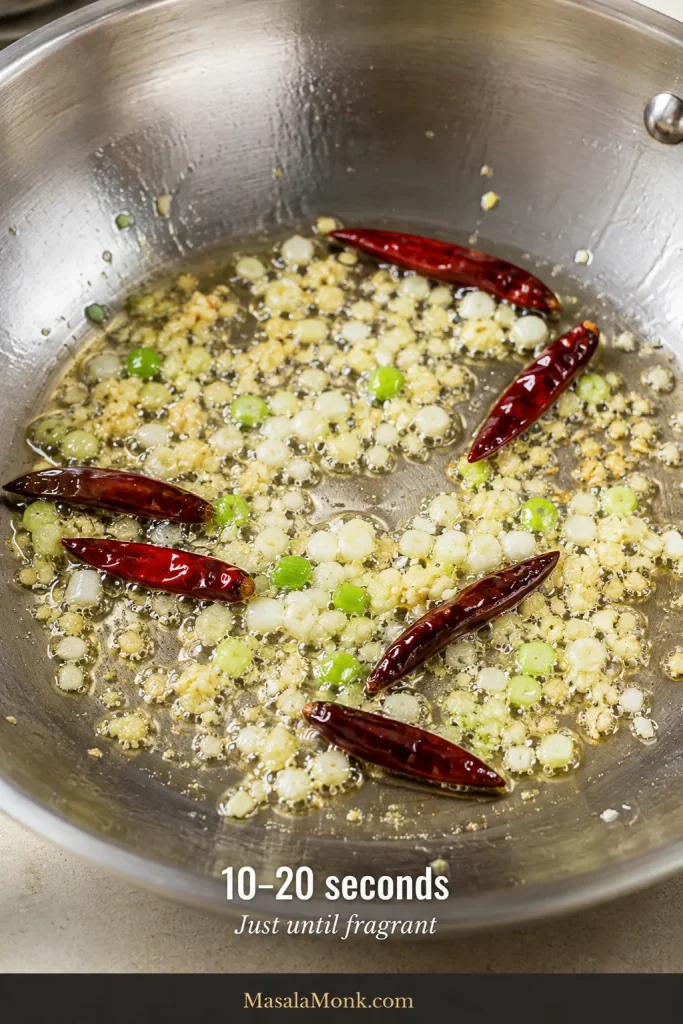
  1. Cook the aromatics. Add the remaining 2 teaspoons oil, followed by the dried chillies, ginger, garlic and scallion whites. Stir for 10–20 seconds, just until fragrant.
Dried red chillies, finely chopped ginger, garlic and scallion whites sizzling briefly in a thin layer of oil.
Garlic is the limiting ingredient here. Once its smallest edges begin turning gold, the next ingredient needs to go in immediately even if the chillies could tolerate more time.

Bubble, finish and serve

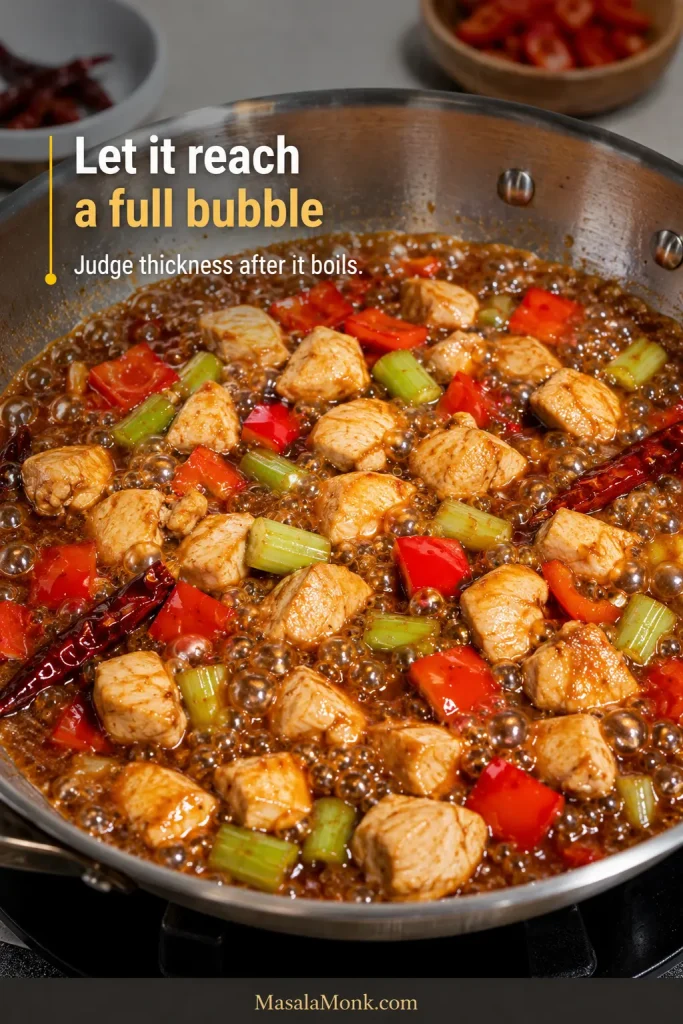
  1. Bring it together. Return the chicken and vegetables. Whisk the sauce, pour it into the pan and toss immediately. Let it reach a full bubble, then toss for 30–60 seconds. The loose sauce will become glossy and coat the chicken and vegetables.
Takeout-style Kung Pao chicken, red pepper and celery in actively bubbling brown sauce before it fully thickens.
Look for bubbles across the whole pan, not only around the rim. An edge simmer can leave the centre too cool for the starch to thicken the sauce evenly.
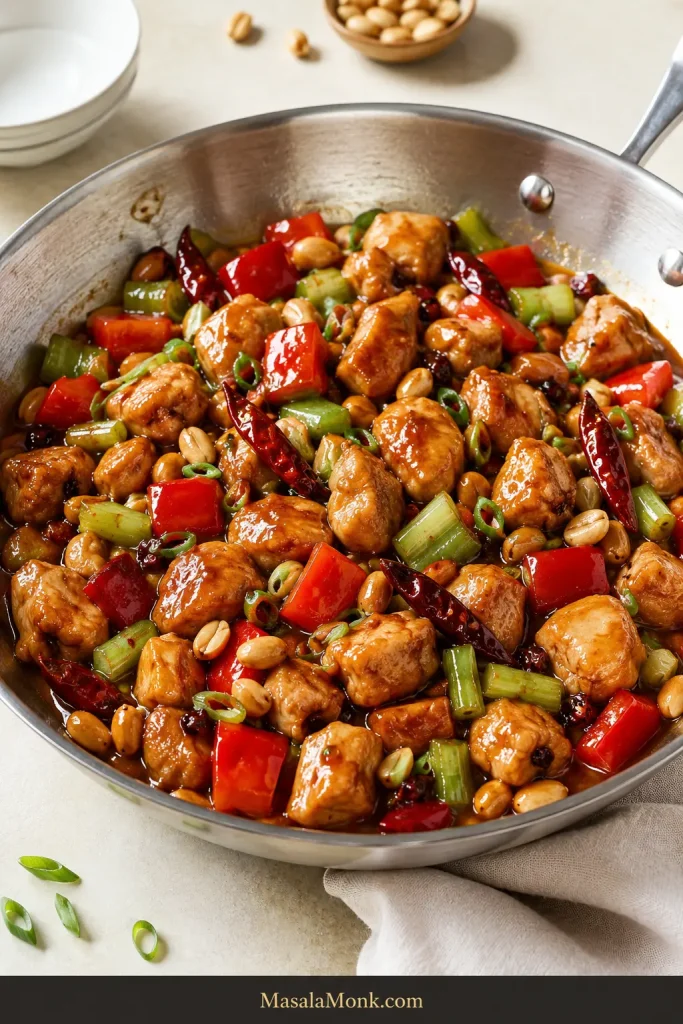
  1. Finish and serve. Fold in the peanuts and scallion greens, then remove the pan from the heat. The largest chicken piece should be opaque throughout and reach 165°F or 74°C. Serve immediately with a modest amount of sauce remaining around the food, but no watery puddle.
Finished takeout-style Kung Pao chicken with red pepper, celery, peanuts, chillies and scallions in glossy brown sauce.
Pull a spatula through the skillet. The sauce may creep slowly back into the trail, but it should not flood it immediately; meanwhile, the vegetables should still stand rather than slump.

Made the takeout-style recipe? Continue to why the method works, or go directly to troubleshooting.

When the sauce hits the hot pan, the separate ingredients begin looking like dinner almost at once. It bubbles, tightens around the chicken and is ready for the peanuts within seconds.

Why This Method Works in a Home Kitchen

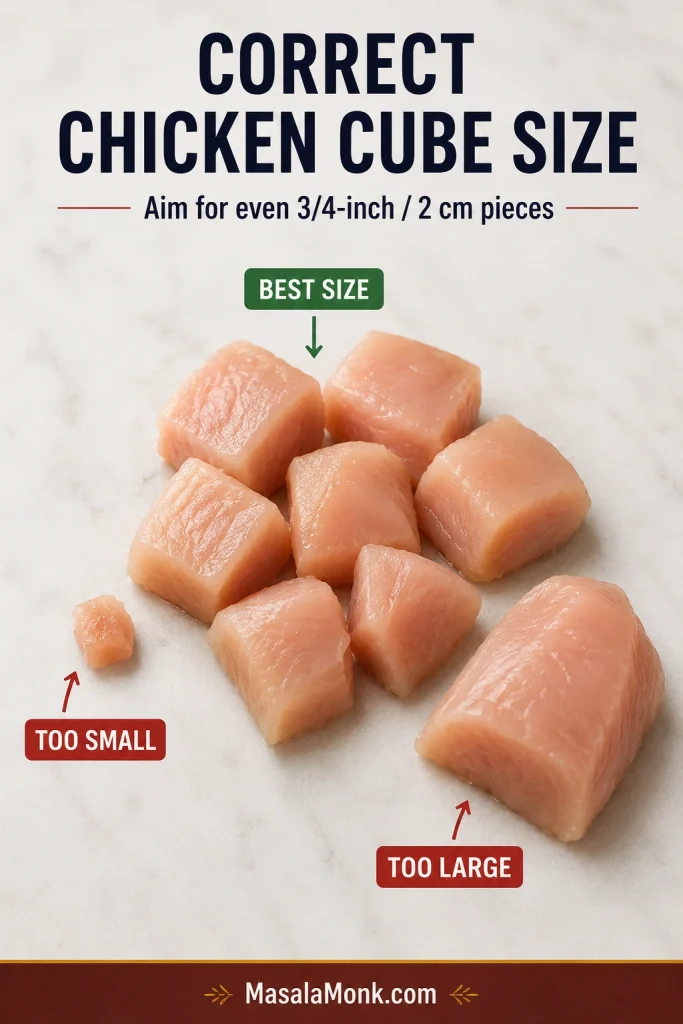
Even ¾-inch pieces keep the cooking window manageable. Smaller pieces can dry before they colour, while much larger pieces may remain raw inside when the sauce is ready.

Comparison of too-small, correct and too-large chicken pieces for Kung Pao chicken, with the correct pieces about 2 centimetres.
Exact millimetres matter less than consistency. Cut one good reference piece first, then match the rest to it so the batch reaches the same browning and doneness window together.

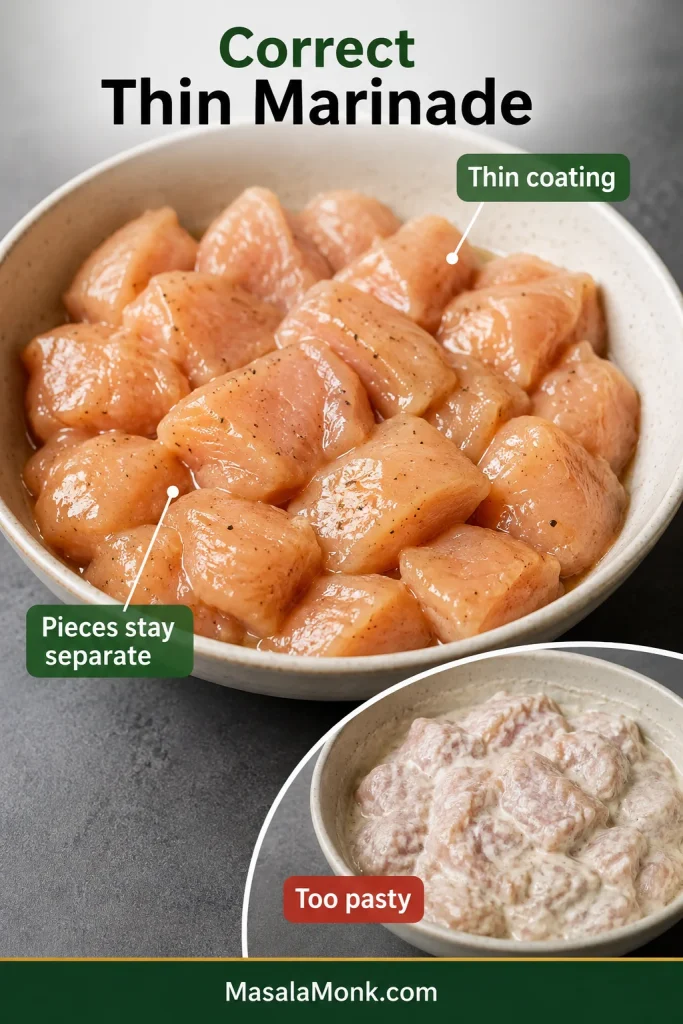
A thin cornstarch marinade protects without breading. It helps the chicken stay tender through the first sear and gives the sauce a surface to hold onto.

Kung Pao chicken pieces under a thin marinade compared with an overly thick, pasty coating.
After mixing, the bowl should not contain a puddle of liquid or a paste of starch. A quick retoss should restore an even film without adding more cornstarch.

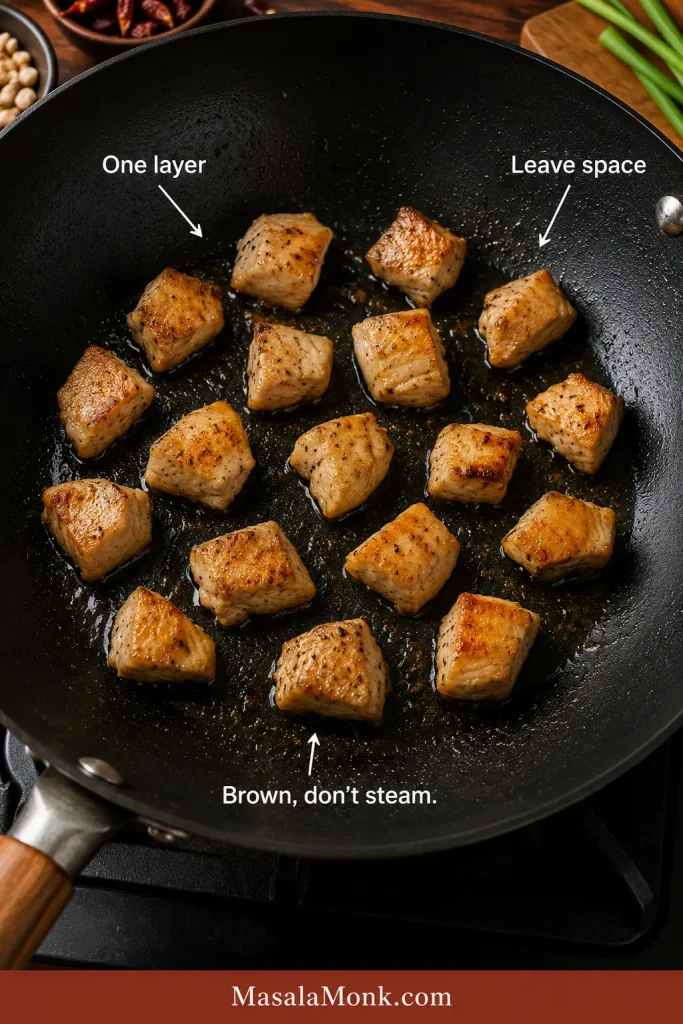
Cooking in stages protects the pan’s heat. Chicken browns in batches, the takeout vegetables cook separately and the aromatics get only the few seconds they need.

Chicken pieces browning in one layer with visible space between them in a hot pan.
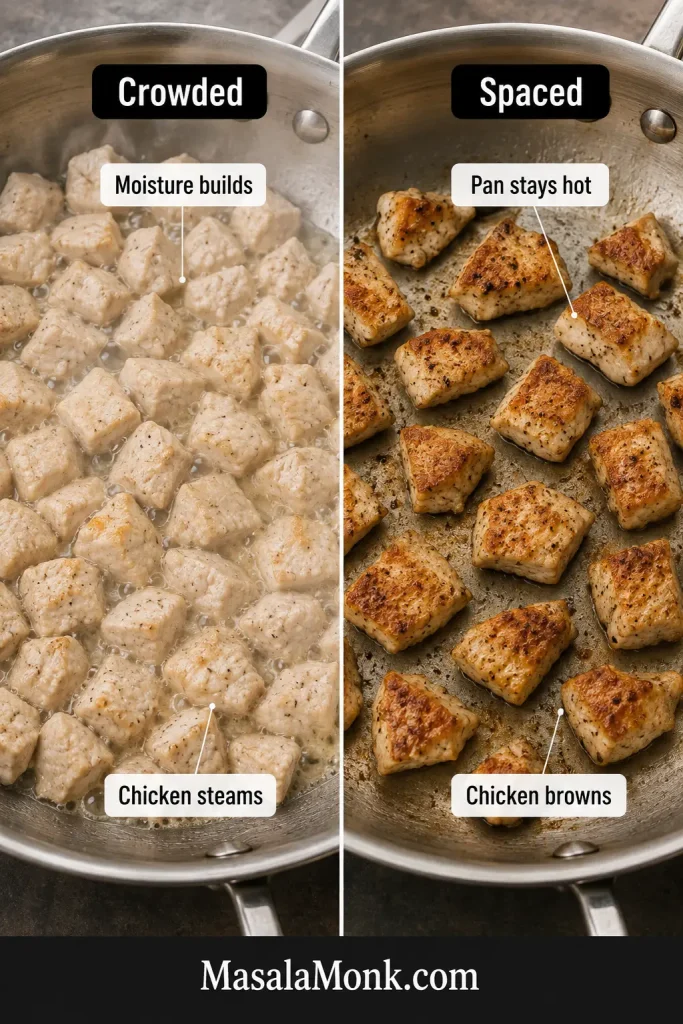
Listen as well as look: a strong sizzle signals direct frying; a wet hiss with liquid gathering around the chicken signals steaming. Stop adding pieces when that sound changes.

Finally, add the sauce and peanuts. That timing lets the sauce coat quickly while the peanuts retain their clean crunch.

Ingredients and Practical Substitutions

Buying black vinegar or Sichuan peppercorn for one dinner can feel like a commitment. Knowing what each ingredient contributes makes it easier to decide which bottles are worth bringing into your kitchen.

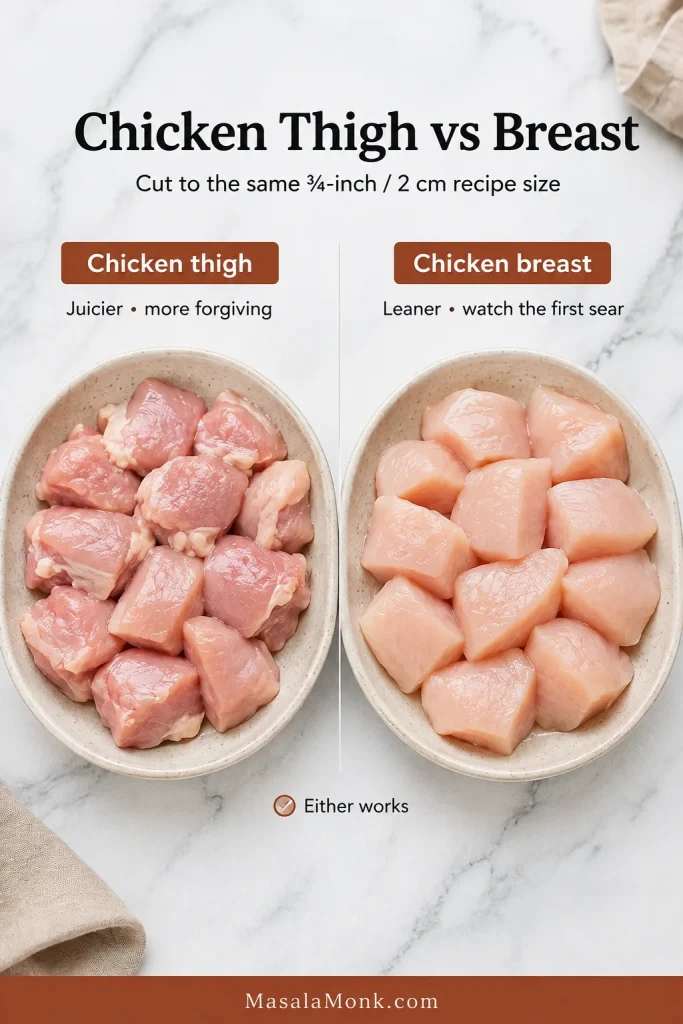
Chicken thigh or breast?

Thigh stays juicier and gives you more margin during a fast stir-fry. Breast is leaner and slightly firmer, and works especially well when you stop the first sear before the centre is fully cooked. Either is a good choice; for the most even batch, use one cut throughout rather than mixing thigh and breast in the same pan.

Equal portions of diced chicken thigh and chicken breast shown side by side for Kung Pao chicken.
Keep the cube size consistent with either cut. That keeps the choice about texture and richness rather than uneven cooking caused by different-sized pieces.

The bottles that shape the sauce

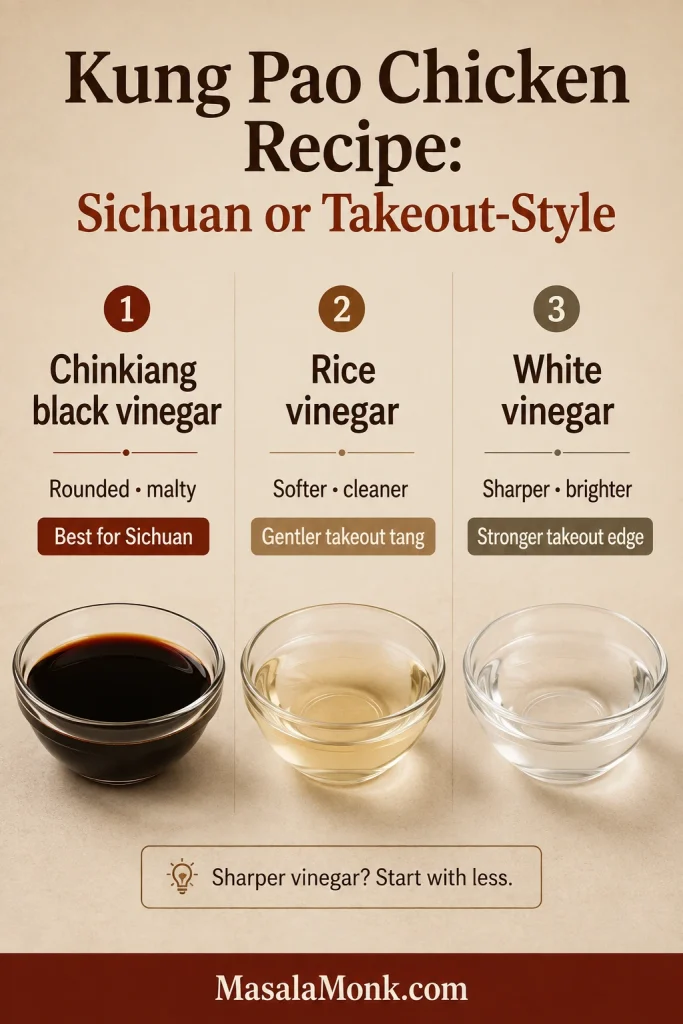
Soy supplies the savoury base, vinegar keeps the flavour bright and Shaoxing wine adds a deeper fermented note beneath them. Chinkiang black vinegar tastes rounded and slightly malty; rice vinegar is cleaner and softer; distilled white vinegar is sharper.

Dark Chinkiang vinegar, pale rice vinegar and clear distilled white vinegar shown side by side with flavour descriptions.
Colour is not a measure of acidic strength. Dark Chinkiang vinegar can taste rounder than clear distilled white vinegar, so choose substitutions by flavour and sharpness rather than appearance.

Chinese light soy is the thin, salty everyday style. Dark soy is thicker and used here mainly for colour. Reduced-sodium soy is a separate product and can help when your hoisin is particularly salty.

Sichuan peppercorn and dried chillies

Sichuan peppercorn brings a floral, citrusy tingle rather than ordinary chilli burn. Dried chillies vary enormously in size and heat: leaving them whole keeps most of the membrane enclosed, while snipping them open releases more heat into the oil.

Lightly cracked reddish Sichuan peppercorn husks beside finely ground Sichuan peppercorn powder.
Ground peppercorn exposes far more surface area, which is one reason it works well dispersed through liquid rather than sitting directly in very hot oil, where fine particles can scorch quickly.

Chile de árbol can be substantially hotter than many Chinese dried chillies, so begin with fewer pods when substituting it.

Substitution guide

Original ingredientPractical replacementStarting quantity and change
2 tablespoons Chinkiang black vinegarUnseasoned rice vinegarUse the same amount for lighter, cleaner acidity.
2 tablespoons Chinkiang black vinegarDistilled white vinegarBegin with 1½ tablespoons; add more only after tasting. The acidity is sharper.
Shaoxing wineDry sherryUse the same amount for a similar fermented warmth.
Shaoxing wineWater or unsalted stockUse the same amount. The result will be less aromatic but alcohol-free.
Chinese dried chilliesChile de árbolBegin with roughly half as many pods because the heat may be much stronger.
Sichuan peppercornOmit itThe floral, numbing character disappears, but the sweet-sour chilli balance still works.
PeanutsCashewsUse the same volume for a richer flavour and slightly softer crunch.
Most replacements are one-for-one unless a sharper vinegar or hotter chilli is specifically noted.

Substitution is not failure; it simply changes the dish.

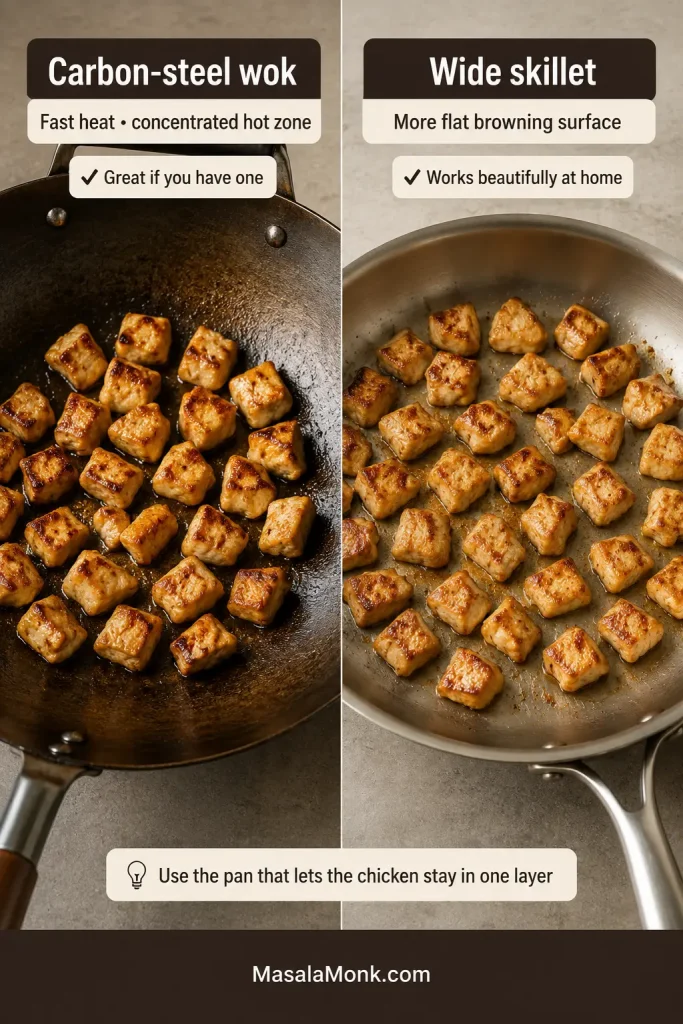
Wok or Skillet?

Fast stir-fries can make a careful cook feel behind before anything has actually gone wrong. Cooking in batches slows the decisions down enough for you to see the chicken brown, smell the chillies and judge the sauce separately.

Browned chicken cooking in a carbon-steel wok beside an equally browned batch in a wide stainless-steel skillet.
Judge cookware by usable hot surface relative to your batch, not by reputation. A wide skillet can actually expose more chicken to direct metal at once than a wok with a small hot base.

With a flat-bottomed wok, preheat it thoroughly, spread the chicken across the hot lower surface and work in separate rounds when scaling the recipe.

With a wide skillet, cook the chicken in two batches, allow the pan to regain heat between them and cook the takeout vegetables separately.

A skillet does not ruin Kung Pao chicken. Crowding it does.

Crowded skillet with pale steaming chicken beside a spaced batch with browned chicken and visible gaps.
Crowding cools the skillet because released moisture accumulates faster than it can evaporate. Smaller batches keep more chicken directly against hot metal, producing browning instead of pale steamed surfaces.

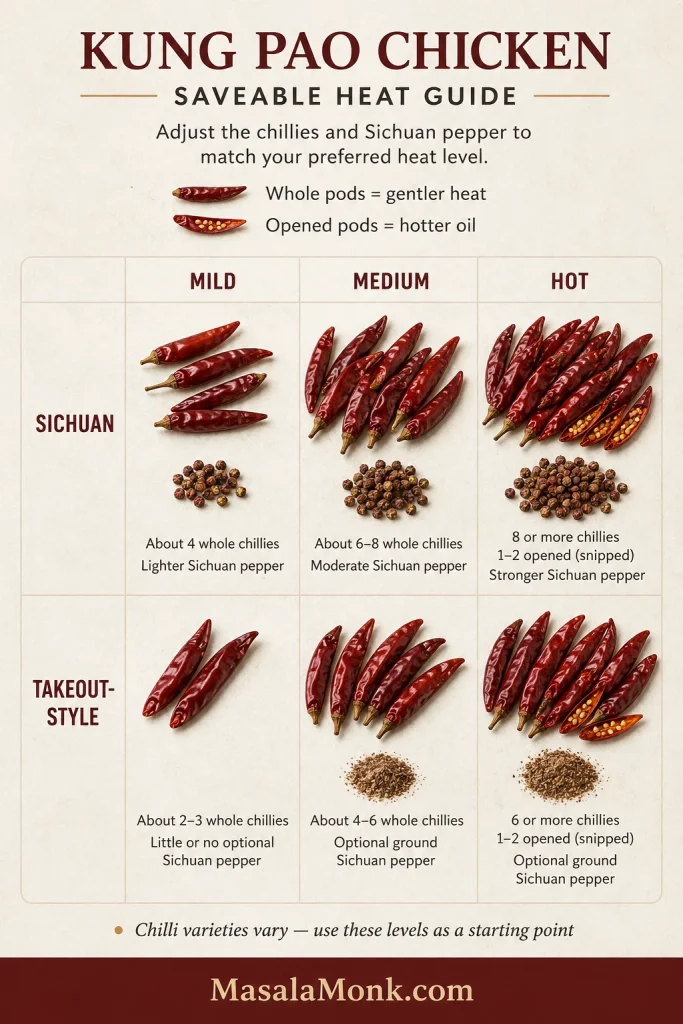
Make It Mild, Medium or Hot

The hot pan browns the chicken. Dried chillies bring the burn, while Sichuan peppercorn creates a separate citrusy buzz around the lips.

Heat guide comparing mild, medium and hot chilli levels for Sichuan and takeout-style Kung Pao chicken.
Treat chilli burn and peppercorn tingle as separate controls. Change one deliberately at a time; otherwise a hotter batch tells you very little about which adjustment actually caused it.

These ranges assume moderately hot Chinese dried chillies. Begin with fewer pods when using chile de árbol or another especially hot variety.

For Sichuan Kung Pao:

Mild but fragrant: Use 4–6 mostly whole chillies with ½ teaspoon lightly cracked peppercorn, or ⅛ teaspoon finely ground.

Medium—the recipe default: Use 6–8 chillies with ¾ teaspoon lightly cracked peppercorn, or ¼ teaspoon finely ground.

Hot: Use 8–10 chillies with several snipped open and up to 1 teaspoon lightly cracked peppercorn, or ⅓ teaspoon finely ground.

For takeout-style Kung Pao: Use 2–4 mostly whole chillies for mild heat, 4–6 for medium, or 6–8 with one or two snipped open for hotter heat. Keep the ground Sichuan peppercorn optional.

When cooking for a mixed table, begin modestly and offer chilli oil separately.

How to Tell When It Is Done

Timers help, but the chicken and the pan should agree before you stop.

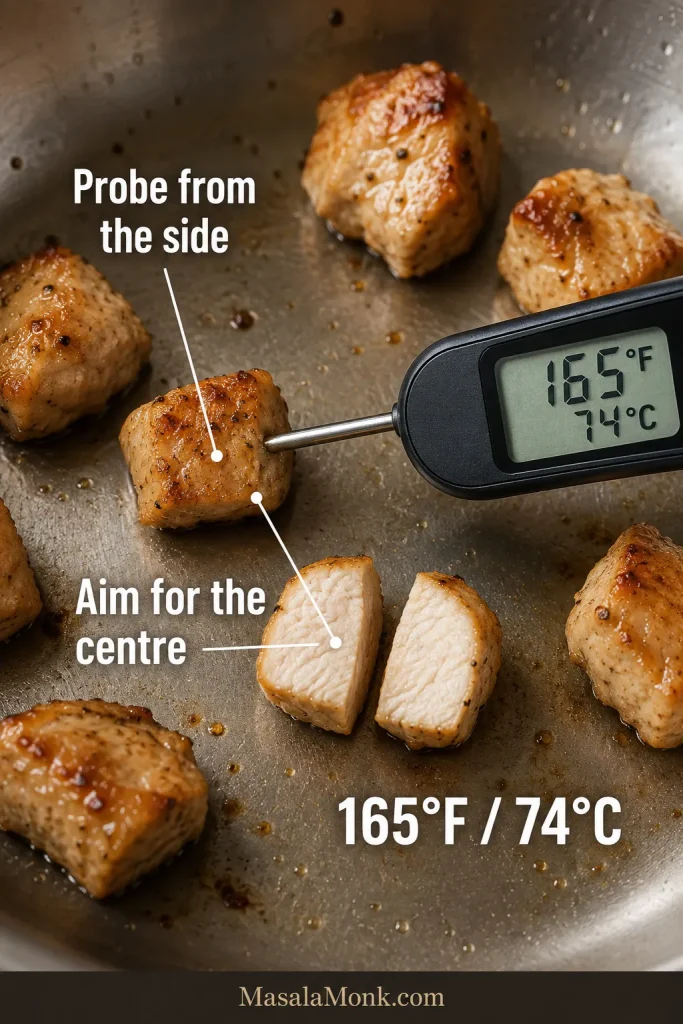
Check the chicken. The largest piece should be opaque throughout, firm but still yielding, and free from a glossy raw centre. Insert a thin thermometer probe sideways into the thickest piece when checking small cubes; it should reach 165°F or 74°C.

Small browned chicken piece checked from the side with a digital thermometer reading 165 degrees Fahrenheit and 74 degrees Celsius.
Enter from the side so the probe tip stays inside the centre of a small chicken cube.

This follows the USDA safe minimum internal-temperature guidance for poultry.

Check the pan. The chillies should smell toasted rather than acrid. The sauce should bubble across the surface, coat the food evenly and remain glossy without tightening into a stiff gel.

Troubleshooting

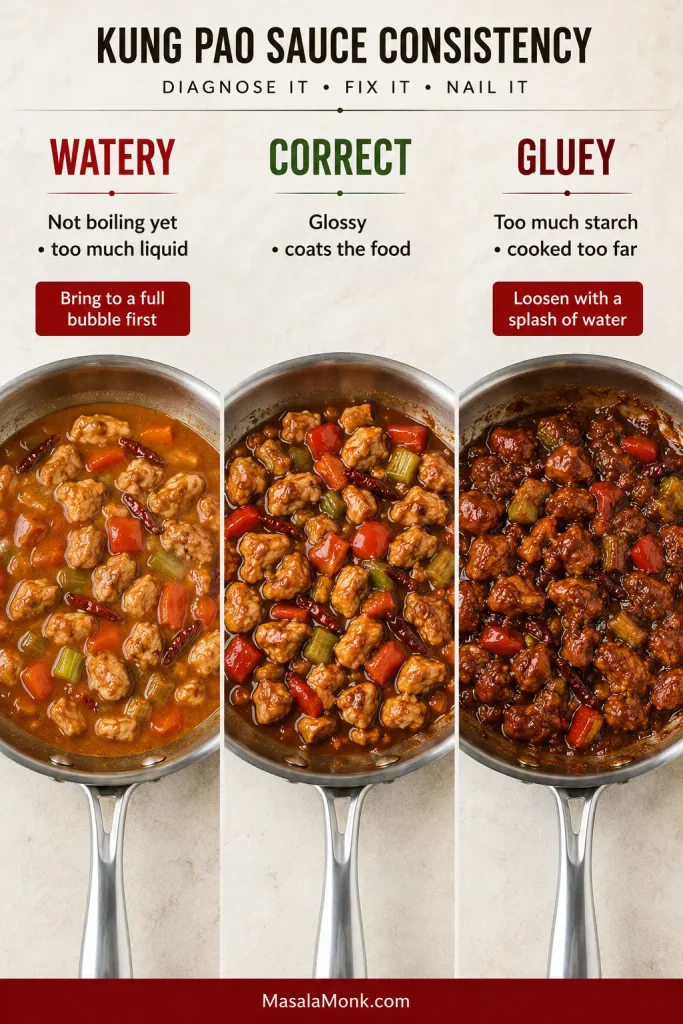
Is the sauce watery, gluey or simply out of balance? Most final-minute problems are still recoverable once you identify what you are seeing or tasting.

Sauce texture and balance problems

Three skillets showing watery Kung Pao sauce, correctly glossy sauce and overly thick gluey sauce.
Use a spatula trail as a viscosity test: watery sauce closes the path immediately, correct sauce leaves a brief glossy trail, and gluey sauce holds ridges instead of flowing naturally.
ProblemLikely causeWhat to do
Watery sauceThe pan was cool, the chicken was crowded or the cornstarch settled.Let the sauce reach a full bubble first. If it remains watery and the chicken is already cooked through, transfer the solids and reduce the liquid briefly before returning everything to the pan.
Gluey sauceToo much starch or too much time after boiling.Add hot water or unsalted stock, one tablespoon at a time, while tossing.
Too saltyStrong soy sauce or excessive reduction.Add water or unsalted stock, then restore brightness with a few drops of vinegar.
Too sweetToo much sugar or hoisin.Add vinegar gradually, tasting after each small addition.
Too sourThe vinegar balance is too sharp.Add sugar in small pinches.
Flat flavourToo little acidity or insufficient savoury depth.Add a few drops of vinegar, toss and taste. Add a small amount of soy only if it still lacks savoury depth.
On a phone, swipe sideways to see the full troubleshooting table.

Chicken, peanuts and burned chillies

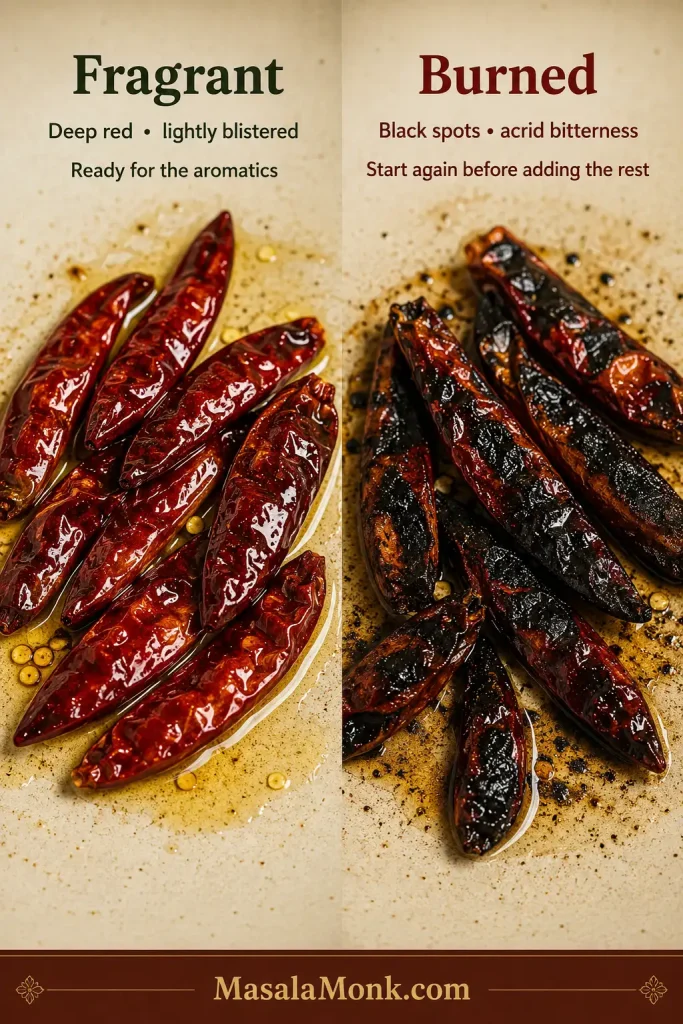
Deep-red lightly blistered dried chillies compared with scorched chillies showing blackened spots and burned edges.
Watch the chilli tips, seams and thinnest edges first. Those spots darken before the whole pod, giving you an earlier warning than waiting for the entire chilli to turn black.
ProblemLikely causeWhat to do
Dry chickenThe pieces were too small or fully cooked before returning to the pan.Shorten the first cooking stage and let the chicken finish in the sauce.
Soft peanutsThey entered too early.Add a fresh handful after cooking and reserve some for serving.
Bitter chilliesThey burned in the oil.Remove them and wipe out the pan if they are blackened. Badly burned chilli or garlic is the one flavour worth starting over for.

Most of these problems are small. A spoonful of water can loosen a tight sauce, a short boil can concentrate a thin one and fresh peanuts can restore lost crunch.

Sichuan recipe · Takeout-style recipe · Back to the top ↑

Why Sichuan and Takeout Kung Pao Taste Different

Kung Pao chicken—also written as Kung Po chicken and known as Gong Bao Ji Ding—began as a Sichuan dish of diced chicken, dried chillies, peanuts and aromatics. Black vinegar, Shaoxing wine and Sichuan peppercorn give it its sharp, fragrant flavour, although exact ratios vary among cooks and restaurants.

Chinese-American restaurants developed a sweeter, saucier preparation that often includes bell pepper, celery, zucchini or onion. It is different in practice, but it has become a familiar dish in its own right—and may be exactly the one you remember.

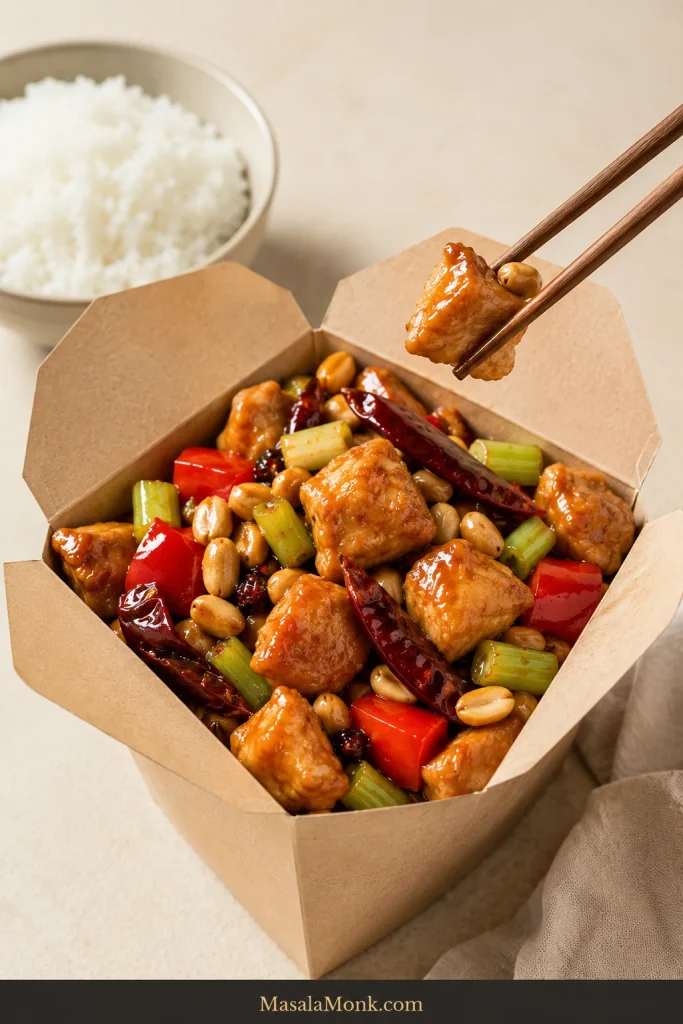
Takeout-style Kung Pao chicken with red pepper, celery and peanuts served in a plain paper takeout carton beside rice.
Bell pepper, celery and a little more sauce are familiar cues of the Chinese-American takeout version; they are not requirements of the Sichuan preparation.

Sichuan cooking is broader than chilli heat alone. This introduction to Sichuan cuisine provides useful context for the region’s wider range of flavours.

How the sauce finish changes

Sichuan Kung Pao with a tight glaze beside takeout-style Kung Pao with a more generous glossy sauce.
A simple plating test: Sichuan Kung Pao should leave almost no sauce ring behind, while takeout-style can leave a small glossy trace for the rice to pick up.

Peanut-Free and Other Adaptations

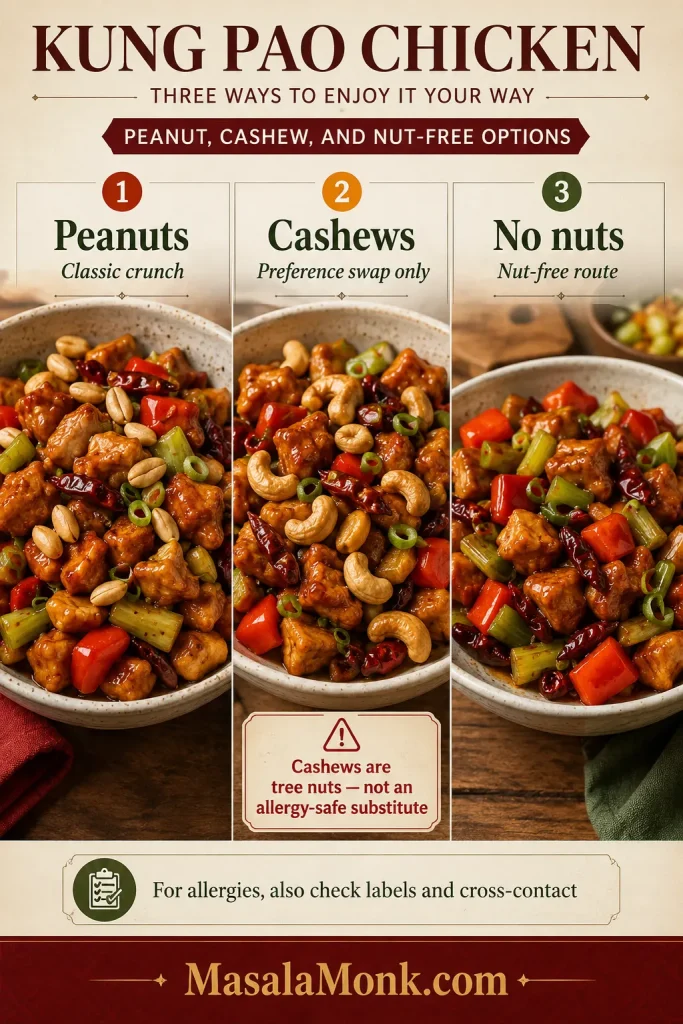
If you simply prefer another nut, cashews provide a richer, slightly softer crunch.

For a peanut allergy, omit the peanuts completely and check the labels on bottled sauces and chilli oils. The Sichuan dish will lose its nutty crunch but remain balanced; bell pepper and celery provide some of the missing contrast in the takeout recipe.

Kung Pao chicken shown with peanuts, with cashews, and without nuts in three separate serving options.
Without nuts, the Sichuan version loses some of its crisp contrast. In the takeout version, keeping the celery genuinely crisp-tender helps replace part of that texture.

A gluten-free preparation needs certified gluten-free tamari and hoisin, plus a dry sherry or cooking-wine substitute that is clearly labelled gluten-free. Check every bottled label rather than assuming a sauce is safe.

When using bottled Kung Pao sauce, taste it before adding soy, sugar or cornstarch because many commercial sauces already contain all three. Cook the chicken and vegetables with the same staged method, then add only enough sauce to coat them.

For a flexible sauce you can use across other dishes, see this stir-fry sauce guide.

What to Serve With Kung Pao Chicken

This is a dish that wants rice nearby. The Sichuan glaze needs only a modest spoonful; the takeout sauce gives the grains more to catch.

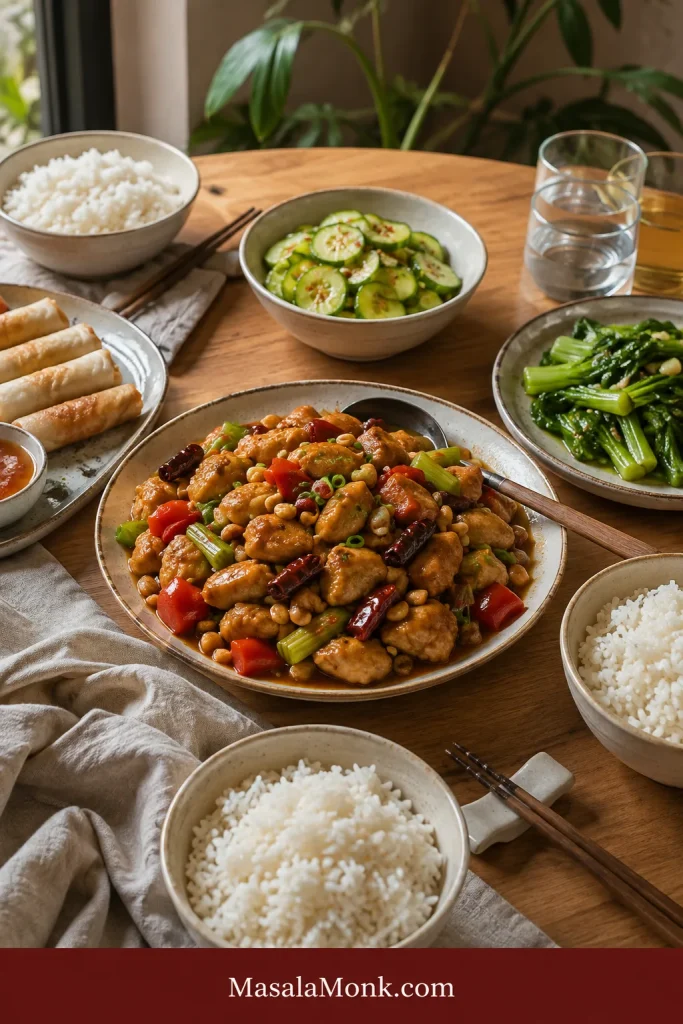
Kung Pao chicken served family-style with steamed rice, cucumber salad, spring rolls and green vegetables.
Time the meal around the stir-fry: rice and cold cucumber salad can wait, while Kung Pao chicken should be the last item to hit the table because its gloss and crunch fade fastest.

The hotter dish is especially good beside this crisp cucumber salad. Its cold crunch and light acidity reset the palate between bites.

  • Steamed jasmine rice: the easiest choice for either recipe.
  • Plain long-grain rice: neutral, practical and widely available.
  • Fried rice: add shrimp fried rice for a fuller takeout-style spread, keeping the Kung Pao coating on the lighter side so the meal does not become too saucy.
  • Garlicky greens: a simple way to add vegetables without crowding the stir-fry pan.
  • Crispy spring rolls: prepare these vegetable spring rolls first, then cook the Kung Pao chicken last.

Spoon the chicken over rice and put something cold and crisp beside it. The contrast is enough; the meal does not need another heavy sauce.

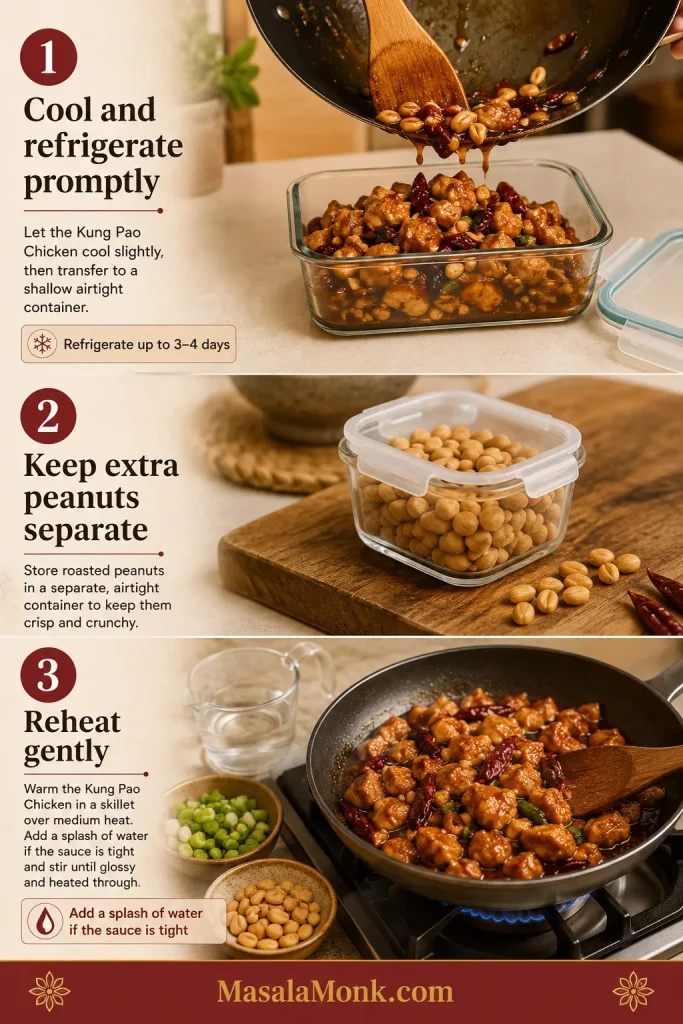
Make Ahead, Storage, Freezing and Reheating

Prepare ahead: Mix either sauce up to two days in advance. Fifteen to twenty minutes is enough for the marinade, though the chicken can be covered and refrigerated for a few hours earlier the same day. Cut vegetables and aromatics one day ahead and keep the peanuts sealed separately.

Store leftovers: Refrigerate within two hours in a covered container and use within three to four days. The sauce thickens as it chills, while the vegetables and peanuts gradually soften.

Three-step guide showing Kung Pao chicken stored in a glass container, peanuts kept separate and leftovers reheated in a skillet.
A shallow container cools leftovers more evenly than a deep bowl, which is why its shape matters before refrigeration even begins—not merely how tightly the lid closes.

Freeze with realistic expectations: The chicken and sauce can be frozen, but cornstarch-thickened sauce may loosen and the vegetables will lose much of their snap. For a better result, freeze the chicken and sauce without the vegetables or peanuts, then add freshly cooked vegetables and roasted peanuts after reheating.

Reheat gently: Warm the chicken in a wide skillet over medium heat with one or two spoonfuls of water or unsalted stock, or microwave it in short intervals. Reheat leftovers to 165°F or 74°C, then add fresh scallion greens and reserved peanuts.

Frequently Asked Questions

Is Kung Pao chicken fried or stir-fried?

Classic Kung Pao chicken is stir-fried. The chicken receives a thin cornstarch marinade rather than a thick coating for deep-frying.

Do you eat the dried chillies and peppercorns?

The dried chillies flavour the oil, but most diners leave the large whole pieces on the plate. Lightly cracked Sichuan peppercorns are edible and remain in the Sichuan recipe, though using finely ground peppercorn gives a more even tingle without larger pieces.

What is Kung Pao sauce made of?

Kung Pao sauce balances soy sauce, vinegar, sugar, Shaoxing wine and cornstarch. The Sichuan recipe uses black vinegar and less liquid for a tight glaze, while the takeout recipe adds hoisin and more stock or water for a saucier coating.

Can I double the recipe?

Double the ingredients, but cook the chicken, vegetables and sauce in separate rounds. Doubling everything in one pan lowers the heat and creates a watery result.

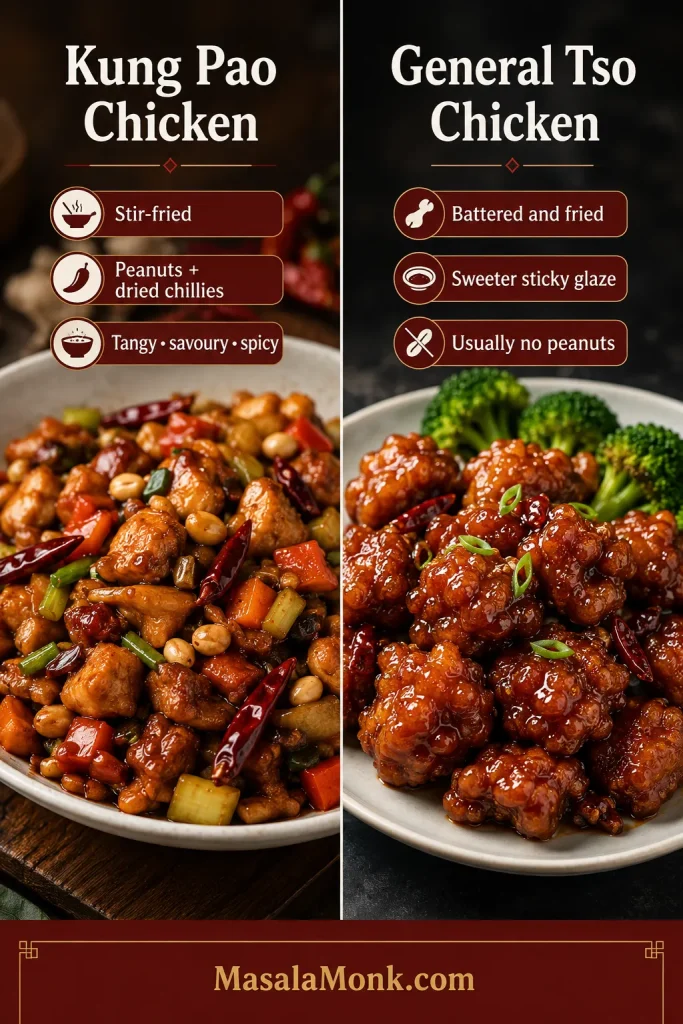
What is the difference between Kung Pao and General Tso chicken?

Kung Pao chicken is a stir-fry built around diced chicken, dried chillies, peanuts and a tangy sauce. General Tso chicken is generally coated or battered, fried and finished in a sweeter, stickier glaze.

Stir-fried Kung Pao chicken with peanuts and dried chillies beside battered General Tso chicken in sticky sauce.
Visual shortcut when ordering: craggy battered chicken under a sticky glaze points toward General Tso; exposed stir-fried chicken with dried chillies and peanuts points toward Kung Pao.

What is the difference between Kung Pao and Szechuan chicken?

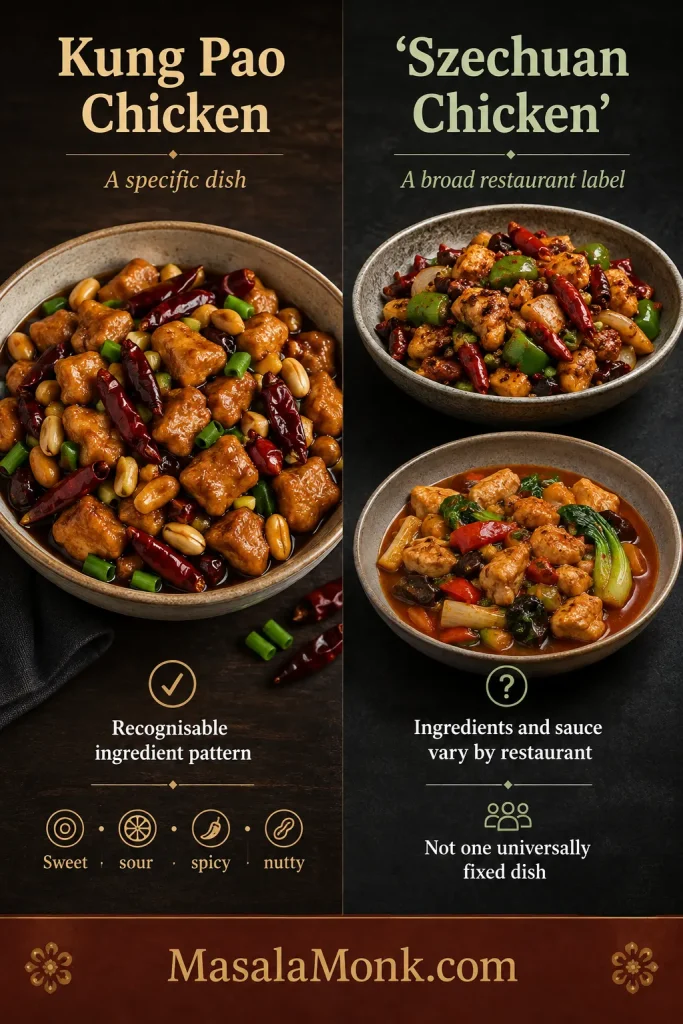
Kung Pao chicken is a specific Sichuan dish with peanuts, dried chillies and a balanced sweet-sour sauce. “Szechuan chicken” is a broader restaurant label that may describe several spicy chicken stir-fries, often with more vegetables and a different sauce.

Defined Kung Pao chicken dish beside two different restaurant-style examples labeled Szechuan chicken.
On a restaurant menu, read the ingredient description instead of relying on “Szechuan chicken” alone. Kung Pao gives you a much more predictable clue about the dish that will arrive.

Serve as soon as the chicken is cooked through and the sauce clings lightly to every piece.

A good first bite should bring tender chicken, tangy sauce, toasted chilli fragrance and a piece of crisp peanut.

Whether you chose the tighter Sichuan dish or the saucier takeout dinner, it should taste like the Kung Pao chicken you meant to make.

Back to the top ↑