Cream cheese pie should be cold, creamy, tangy, and soft enough to feel lighter than cheesecake — but firm enough to cut into a real slice. It is the kind of pie that looks simple in the pan, then feels special when the first chilled wedge lifts out cleanly.
This is the dessert that shows up at potlucks and family dinners, then disappears faster than the showier sweets: a buttery crumb crust, a cool creamy middle, and a glossy fruit topping everyone recognizes before the first slice is cut.
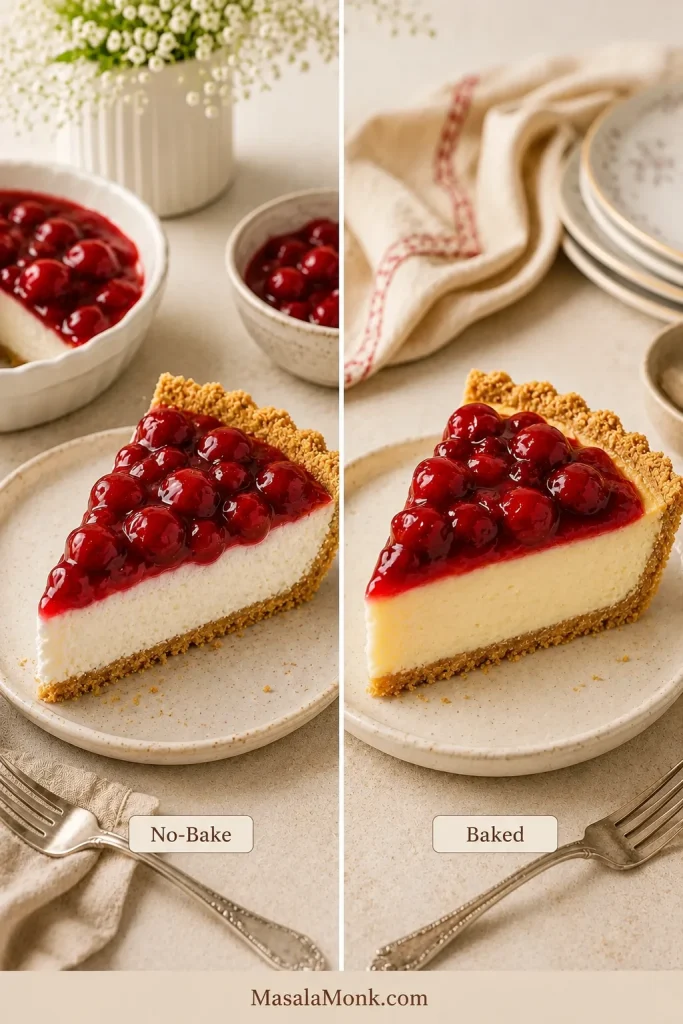
The tricky part is that the name can mean a few different desserts. Some cream cheese pies are no-bake and made with sweetened condensed milk. Others are fluffy with Cool Whip. The baked style uses eggs and sour cream, closer to a shallow cheesecake pie.
This recipe starts with the classic no-bake version: full-fat cream cheese, sweetened condensed milk, lemon juice, vanilla, a graham cracker crust, and optional cherry topping. From there, you can adjust the filling for a baked pie, a lighter whipped topping version, a fresh fruit topping, or a firmer cheesecake-style texture.
The goal is simple: a smooth cream cheese pie that sets properly, slices cleanly, and does not turn runny, lumpy, too sweet, or soggy under the topping.
Quick jump:
Jump to recipe Choose your version Fix runny pie Chill time FAQ
Quick Answer: What Is Cream Cheese Pie?
Cream cheese pie is a creamy pie made with sweetened cream cheese filling in a graham cracker crust or pie crust. It can be no-bake and served chilled like an icebox pie, or baked like a lighter, shallower cheesecake pie.
For a taller chilled dessert with a thicker cheesecake-style set, try this no-bake cheesecake recipe instead.
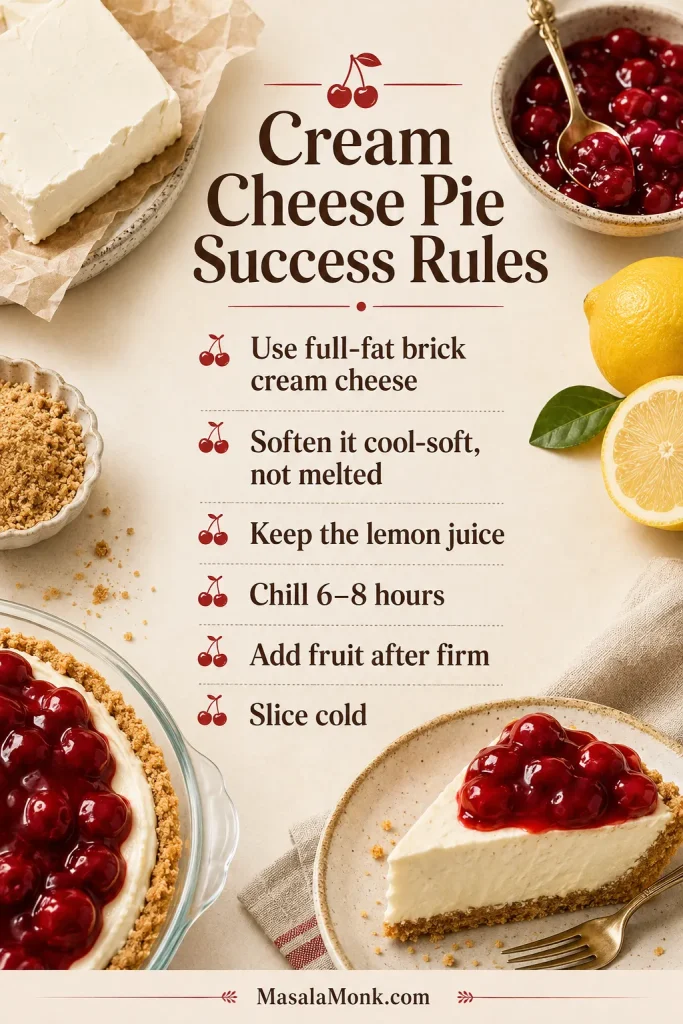
The save-this rule: use full-fat brick cream cheese, soften it until smooth but still cool, keep the lemon juice, chill the pie for 6 to 8 hours, and wait to add fruit until the filling is firm.
Make This When
This is a good pie for the day before company comes, because the fridge does most of the work while you move on with the rest of the meal.
- Cheesecake flavor sounds good, but a full cheesecake feels like too much work.
- A make-ahead dessert would make the meal easier.
- Dessert needs to happen without turning on the oven.
- An old-fashioned cherry-topped pie fits the potluck, holiday, or Sunday dinner table.
- One reliable base should work with cherry, strawberry, blueberry, lemon, or pineapple topping.
Start Here Before You Mix
Quick Basics
Make the Pie
Choose & Fix
Cream Cheese Pie at a Glance
| Main style | No-bake condensed milk cream cheese pie |
|---|---|
| Pan | 9-inch / 23 cm pie crust |
| Filling | 4 ingredients: cream cheese, condensed milk, lemon juice, vanilla |
| Cream cheese | Full-fat brick cream cheese |
| Chill time | 6 to 8 hours; overnight is best |
| Best topping | Cherry pie filling added after the chilled base is firm |
| Texture | Creamy, tangy, sliceable, softer than baked cheesecake |
| Best make-ahead plan | Chill the plain pie overnight; top it before serving |
No-Bake Cream Cheese Pie Recipe
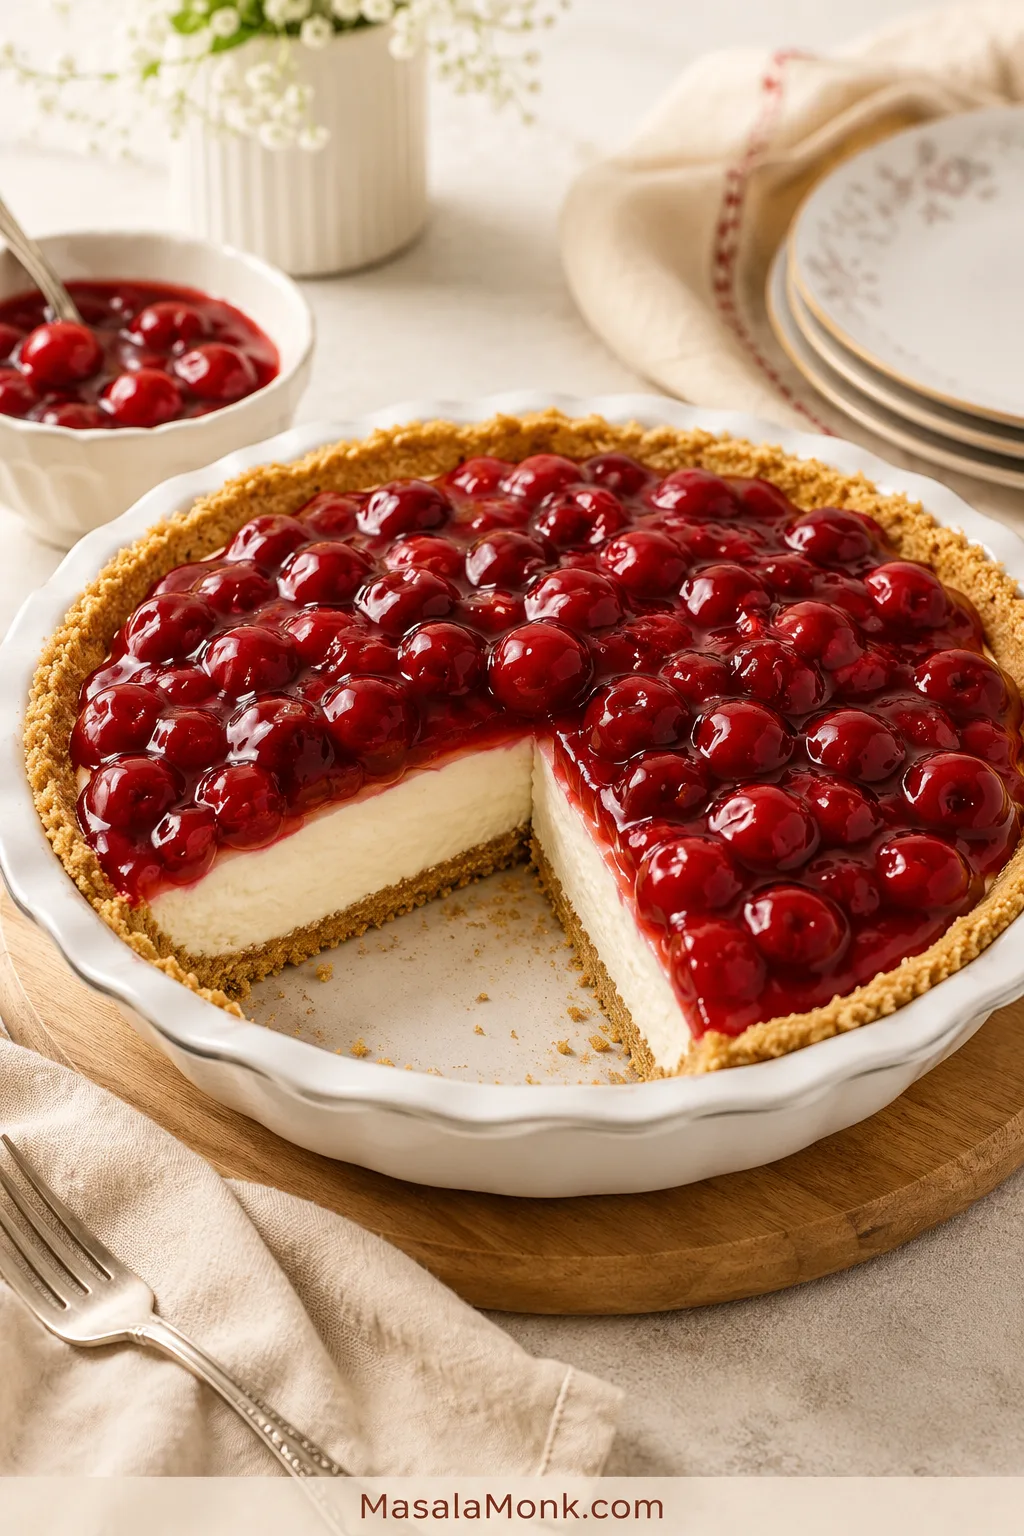
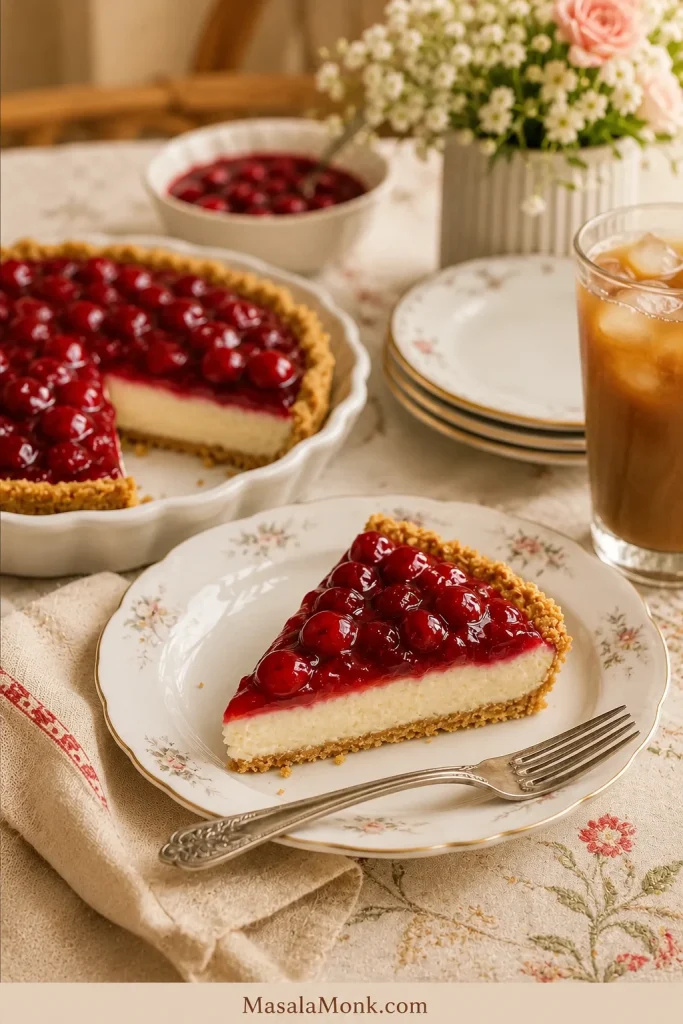
This is the easy chilled pie: a 4-ingredient cream cheese filling in a graham cracker crust, finished with cherry pie filling when you want the old-fashioned fruit-topped style. The cherry version is the one many people remember from family tables: cool white filling, glossy red topping, and a buttery graham crust that somehow tastes even better the next day.
- Yield: 8 slices
- Prep time: 10 minutes
- Chill time: 6 to 8 hours
- Total time: 6 hours 10 minutes minimum
- Pan: 9-inch / 23 cm pie crust
- Method: No-bake
- Best for: make-ahead holidays, potlucks, Sunday dinners, and no-bake summer desserts
- Texture: creamy, tangy, smooth, and sliceable; softer than baked cheesecake
Before you start: for the safest first try, use the condensed milk filling, soften the cream cheese until cool-soft, chill the pie overnight, and add cherry topping only after the filling sets. In most kitchens, 30 to 45 minutes at room temperature softens cream cheese enough; in a hot kitchen, check sooner so it does not melt.
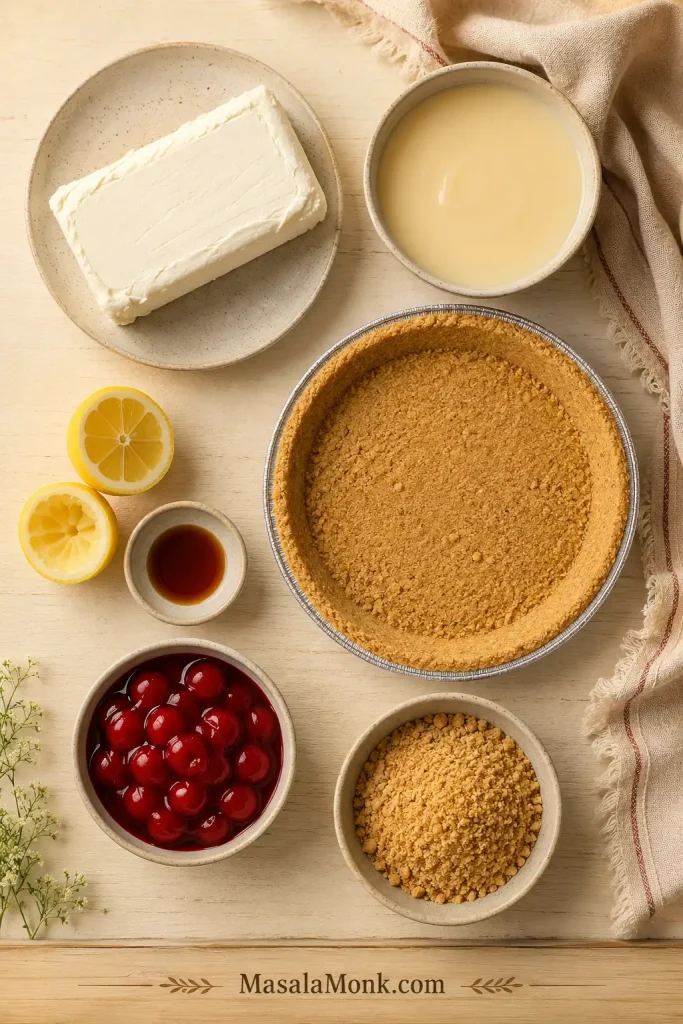
Ingredients
| Ingredient | Amount | Notes |
|---|---|---|
| Full-fat brick cream cheese | 8 oz / 226 g | Softened but still cool |
| Sweetened condensed milk | 14 oz / 397 g | One standard can; do not use evaporated milk |
| Fresh lemon juice | ⅓ cup / 80 ml | Balances sweetness and helps the filling thicken |
| Vanilla extract | 1 tsp / 5 ml | Adds warmth |
| Prepared graham cracker crust | 1 9-inch / 23 cm crust | Store-bought or homemade |
| Cherry pie filling, optional | 20 to 21 oz / 565 to 595 g | Use enough to cover the top without weighing down the filling |
Instructions
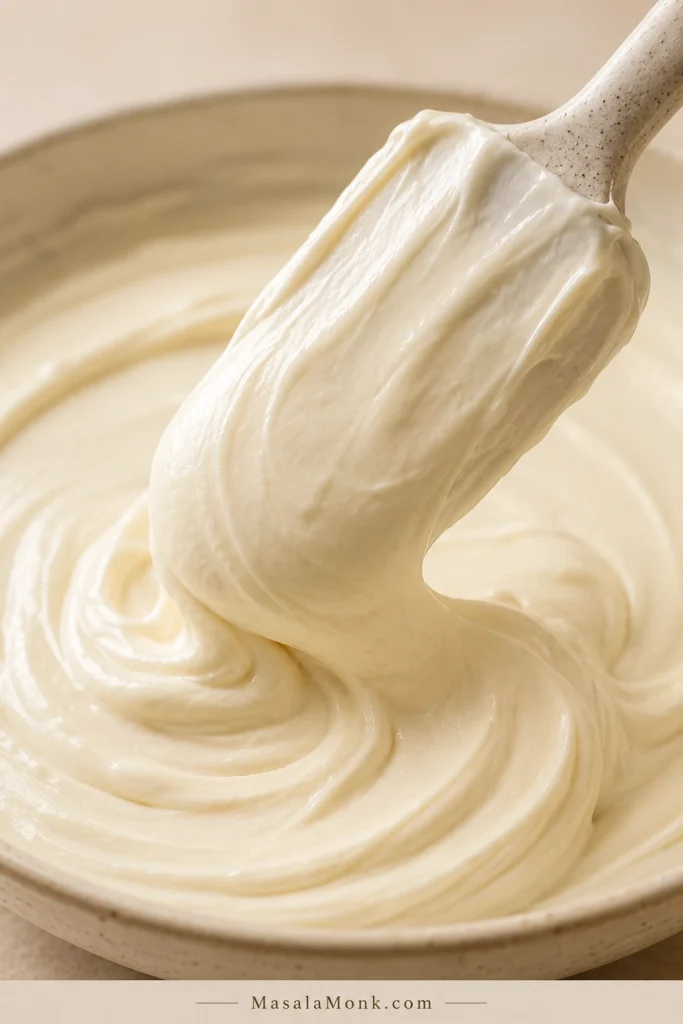
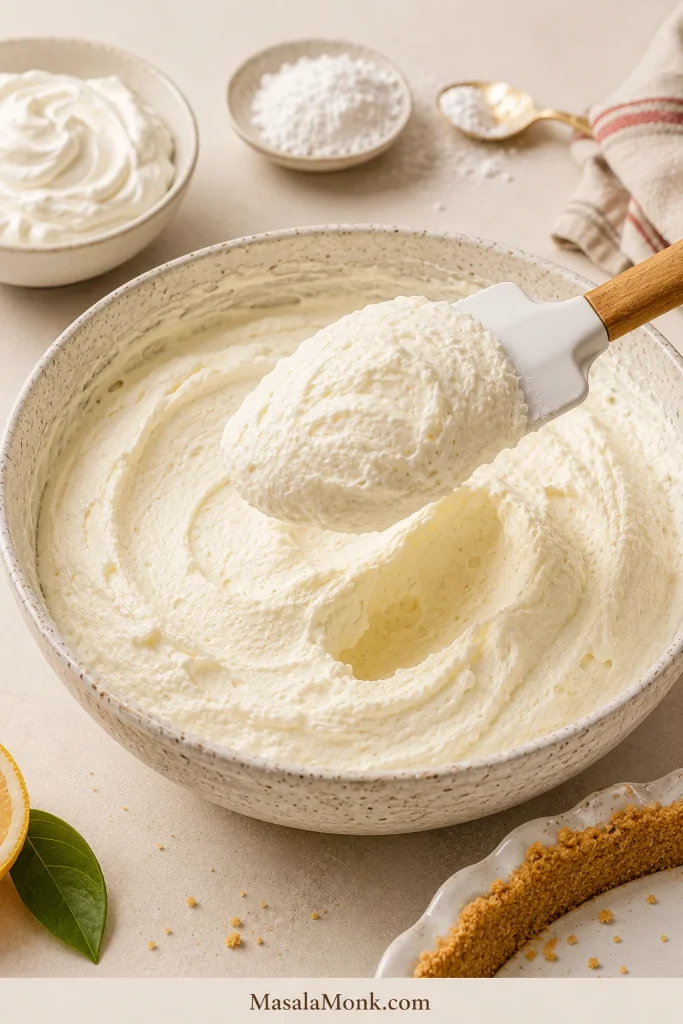
- Beat the cream cheese first. Add the softened but still cool cream cheese to a mixing bowl. Beat until smooth and creamy, scraping the sides and bottom of the bowl so no firm pieces remain.
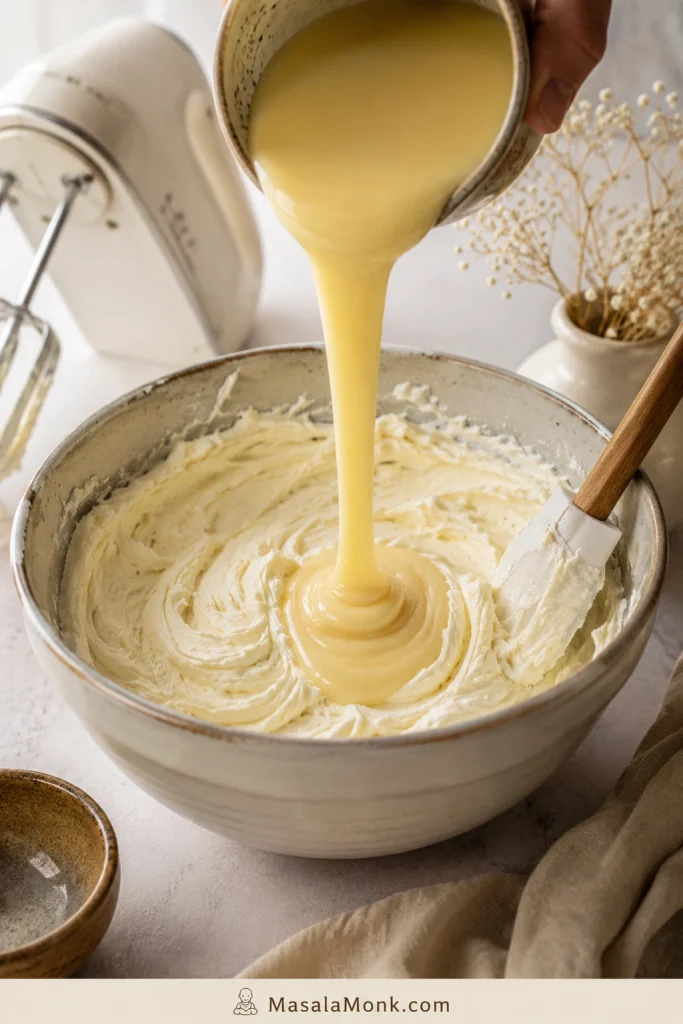
- Add the condensed milk slowly. Pour in the sweetened condensed milk gradually while mixing on low to medium speed. Scrape the bowl again.
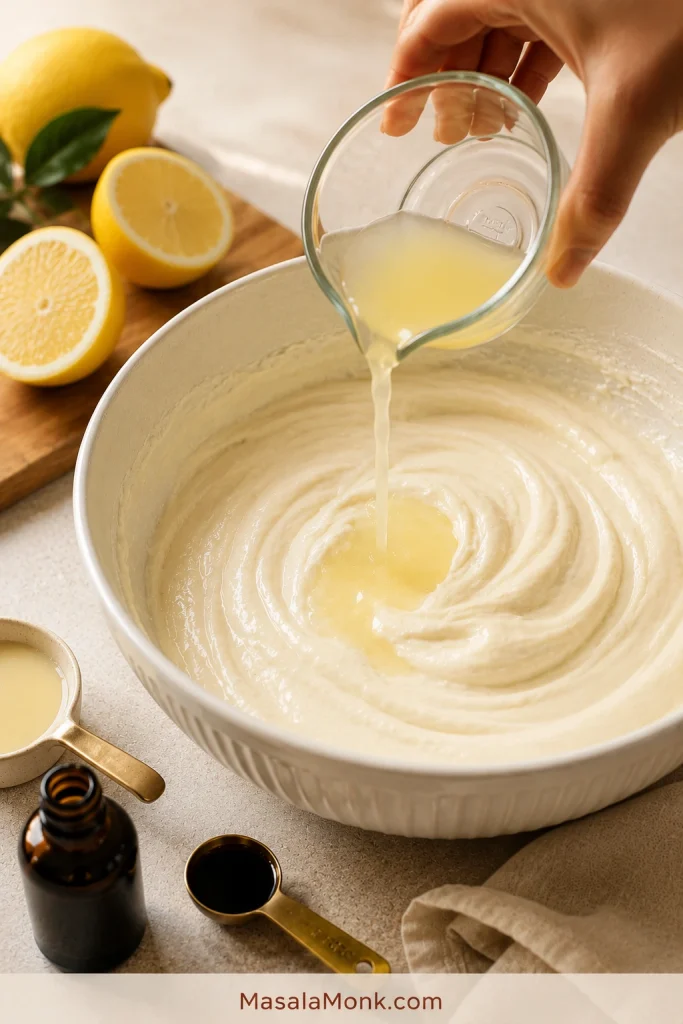
- Mix in lemon juice and vanilla. Add the lemon juice and vanilla. Mix only until the cream layer is smooth and combined.
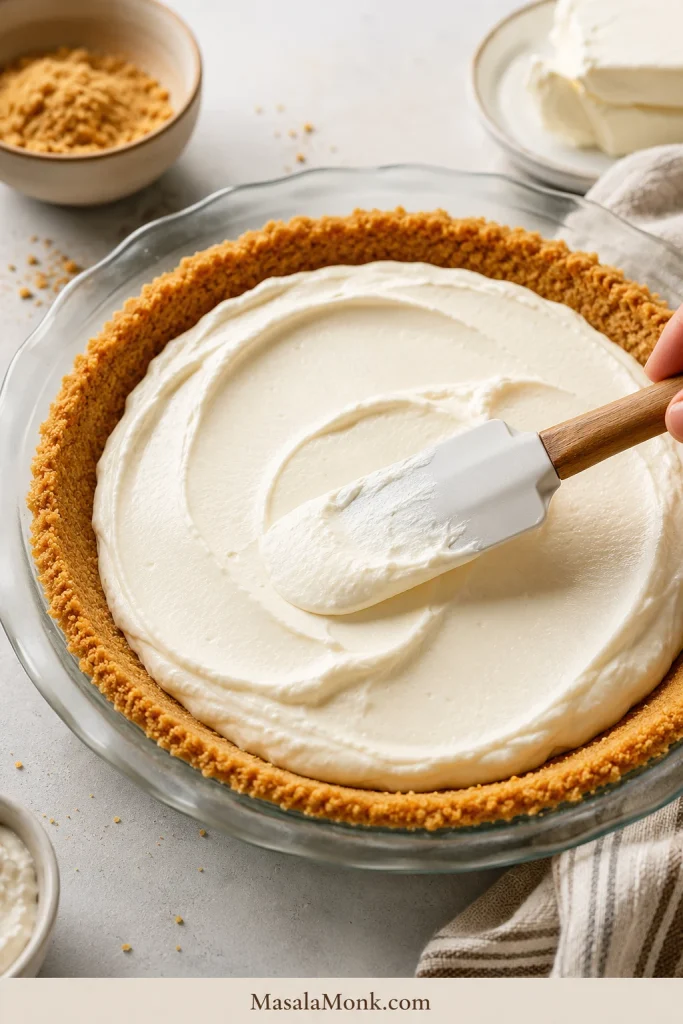
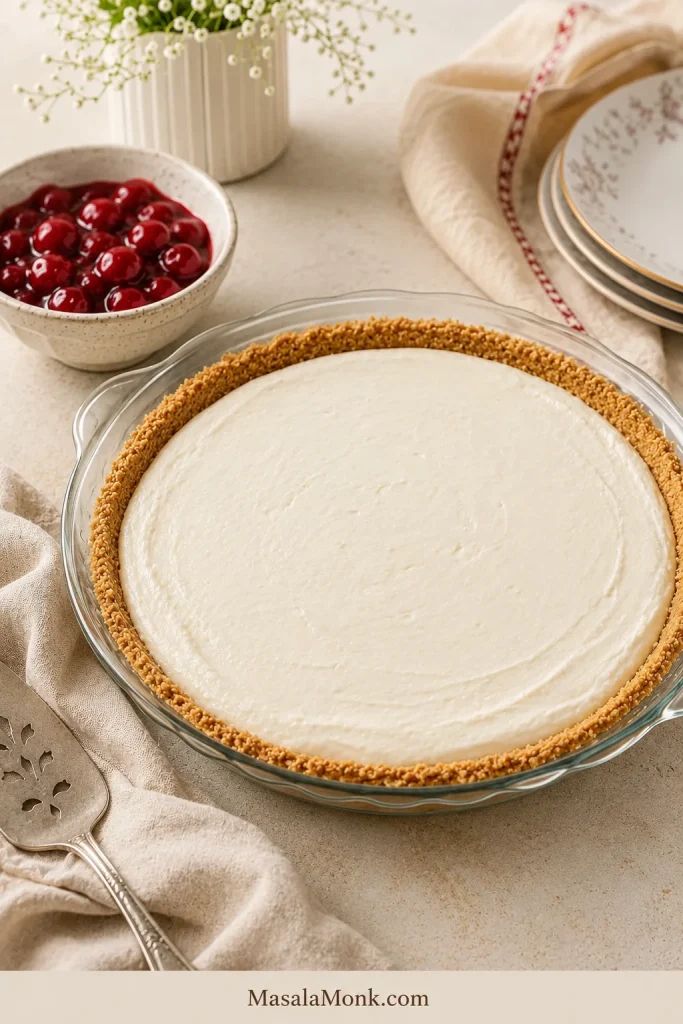
- Fill the crust. Spoon the mixture into the graham cracker crust and smooth the top.
- Chill until set. Cover and refrigerate for at least 6 hours, preferably overnight, until the center is firm enough to slice.
- Add the topping. Spread cherry pie filling over the chilled base after it has set. For the cleanest look, add it 1 to 2 hours before serving.
- Slice cold. Cut with a clean, sharp knife while the pie is cold. Wipe the knife between slices for neater wedges.
Recipe Notes
- Use full-fat brick cream cheese, not whipped cream cheese or spreadable tub cream cheese.
- Lemon juice helps the condensed milk mixture thicken, but chill time and full-fat cream cheese still matter.
- If your topping is very sweet, keep the filling as written and do not add extra sugar.
- Two to four hours may give you a soft set; 6 to 8 hours gives cleaner slices.
- Add fruit topping after the creamy center is firm, especially for a clean white layer under the fruit.
- Keep the pie cold until serving.
Before the detailed tips begin, this is the finished texture you are aiming for: a cold, creamy slice that holds together without feeling as dense as baked cheesecake.

Equipment You’ll Need
You do not need a springform pan, water bath, or special dessert tools. A bowl, mixer, spatula, and pie crust are enough — the important part is getting the cream cheese smooth before anything thinner goes in.
- 9-inch / 23 cm pie plate or prepared graham cracker crust
- Mixing bowl
- Hand mixer or stand mixer
- Rubber spatula
- Measuring cups and spoons
- Sharp knife for slicing
- Small saucepan, only for a cooked strawberry or blueberry topping
Do This, Not That
This is still an easy pie. A few small choices simply make the difference between neat chilled wedges and a softer spoonable dessert.
| Do This | Not This | Why It Matters |
|---|---|---|
| Use full-fat brick cream cheese | Use spreadable tub cream cheese | Brick cream cheese gives the filling better body |
| Soften cream cheese until cool-soft | Use it fridge-hard or warm and greasy | Too cold causes lumps; too warm can make the mixture loose |
| Beat cream cheese before adding condensed milk | Add everything at once | Smoothing the cream cheese first prevents hidden lumps |
| Use lemon juice in the condensed milk filling | Skip it and expect the same texture | Lemon balances sweetness and helps the filling thicken |
| Chill 6 to 8 hours | Rush it after 2 hours | The center needs time to firm up all the way through |
| Add fruit topping after the filling sets | Add watery topping before chilling | This keeps the white layer clean and helps protect the crust |
| Slice the pie cold | Let it sit warm before cutting | The filling softens at room temperature |
Here is the visual checklist after the rule table: smooth the cream cheese first, keep the lemon juice, chill fully, and add fruit only after the filling firms.
Why This Recipe Works
Cream cheese gives the pie tang, richness, and body. Sweetened condensed milk adds sweetness and a thick, smooth base. Lemon juice cuts through the richness and helps the condensed milk mixture firm up as it chills. Vanilla rounds out the flavor so the filling tastes creamy, not flat.
The refrigerator finishes the job. Once the filling sits cold for long enough, the center catches up with the edges and the pie becomes sliceable. Overnight chilling is not just a waiting step; it is when the pie becomes itself.
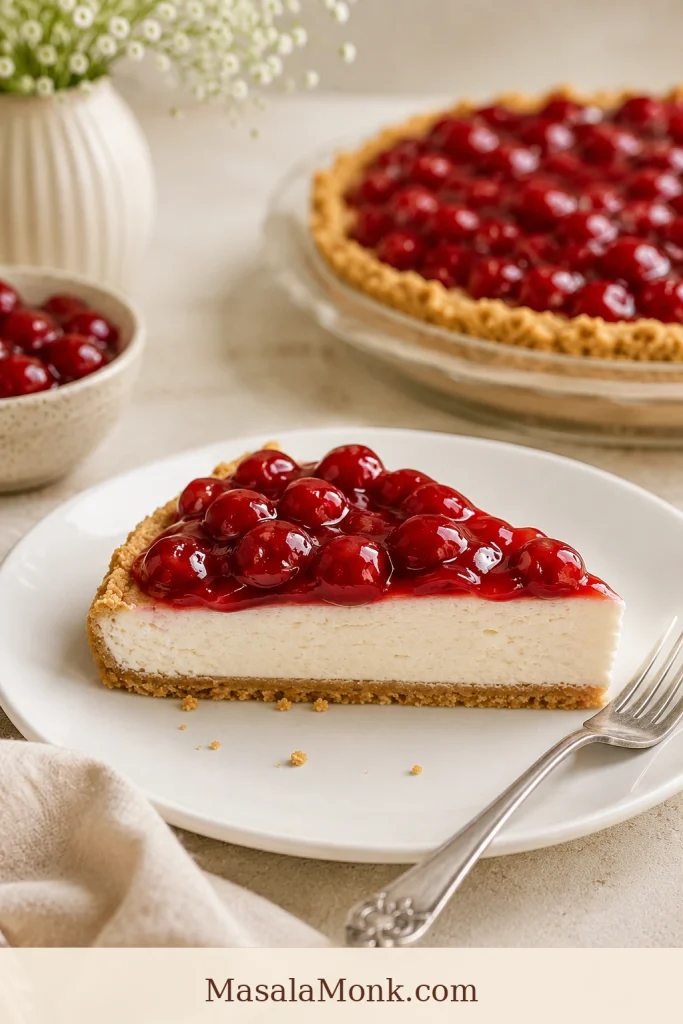
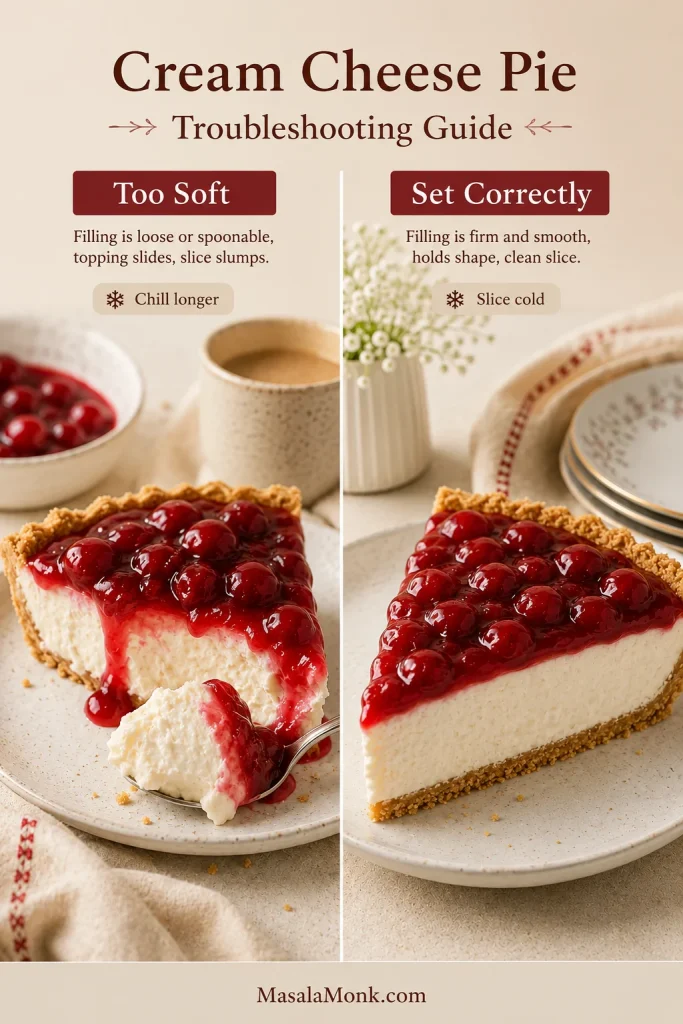
What a Good Slice Should Look Like
A good slice should stand on the plate without slumping. Look for a smooth white cream layer, a topping that sits mostly on top, and a crust that cuts cleanly instead of turning into wet crumbs.
Before chilling, the mixture should look glossy and thick enough to hold soft waves from the spatula. After chilling, the center should feel firm when gently touched.
Choose Your Version
If you have opened a few cream cheese pie recipes and they all look different, this is why: the same name can point to several different styles. Choose the one you actually want before you start mixing.
This is where the recipe becomes flexible instead of one fixed formula.
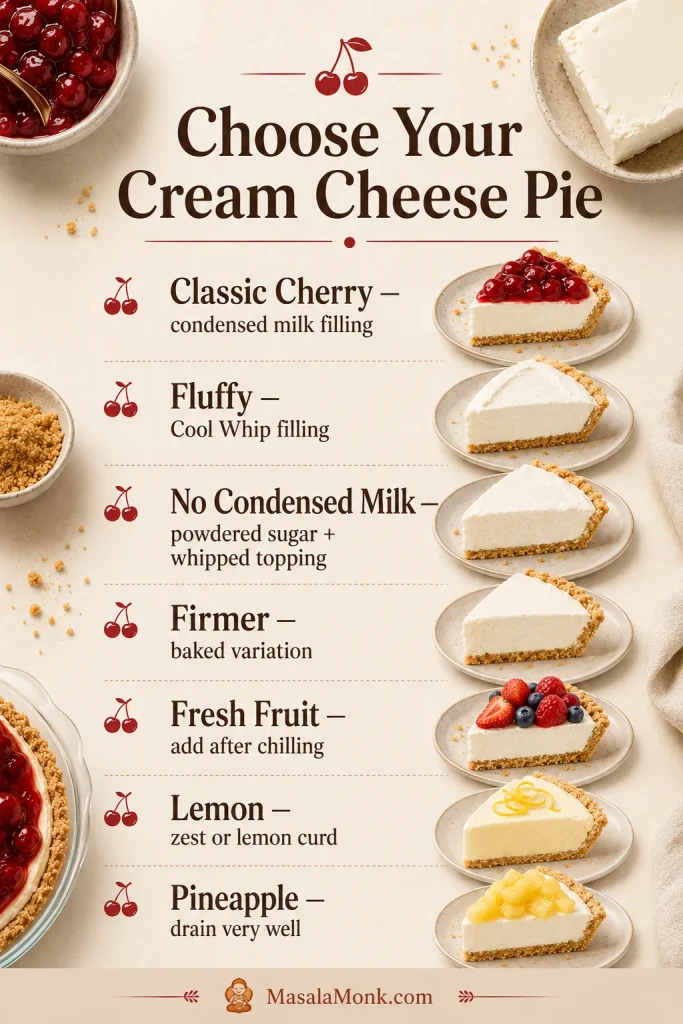
| You Want… | Make This Style | What to Expect |
|---|---|---|
| Classic cherry cream cheese pie | No-bake condensed milk filling | Smooth, tangy, sweet, nostalgic |
| A lighter, fluffier pie | Cool Whip filling | Softer and mousse-like |
| No condensed milk | Cool Whip + powdered sugar filling | Still creamy, less dense |
| Firmer cheesecake-style pie | Baked cream cheese pie | Richer, firmer, custard-like |
| Fresh strawberry or blueberry pie | No-bake base + cooled fruit topping | Brighter and more seasonal |
| Pineapple cream cheese pie | No-bake base + very well-drained pineapple | Retro, tropical, softer if fruit is wet |
| Lemon cream cheese pie | No-bake base with more lemon zest or lemon curd topping | Brighter and tangier |
For a first attempt, start with the no-bake condensed milk filling. It gives the familiar flavor and is the easiest to get right when it chills long enough.
No-Bake vs Baked
The no-bake pie is softer, colder, and more like an icebox dessert. Baked cream cheese pie is firmer and closer to cheesecake. Choose no-bake for the easiest cherry-topped dessert; choose baked when you want eggs, sour cream, and a more custard-like center.
For a full baked cheesecake with a crumb crust and denser texture, this salted caramel cheesecake recipe goes completely in that direction.
Ingredients You’ll Need
Once you know the style you want, the ingredients are simple. The main thing is using the right kind of cream cheese and giving the filling enough time to rest cold.
Cream Cheese
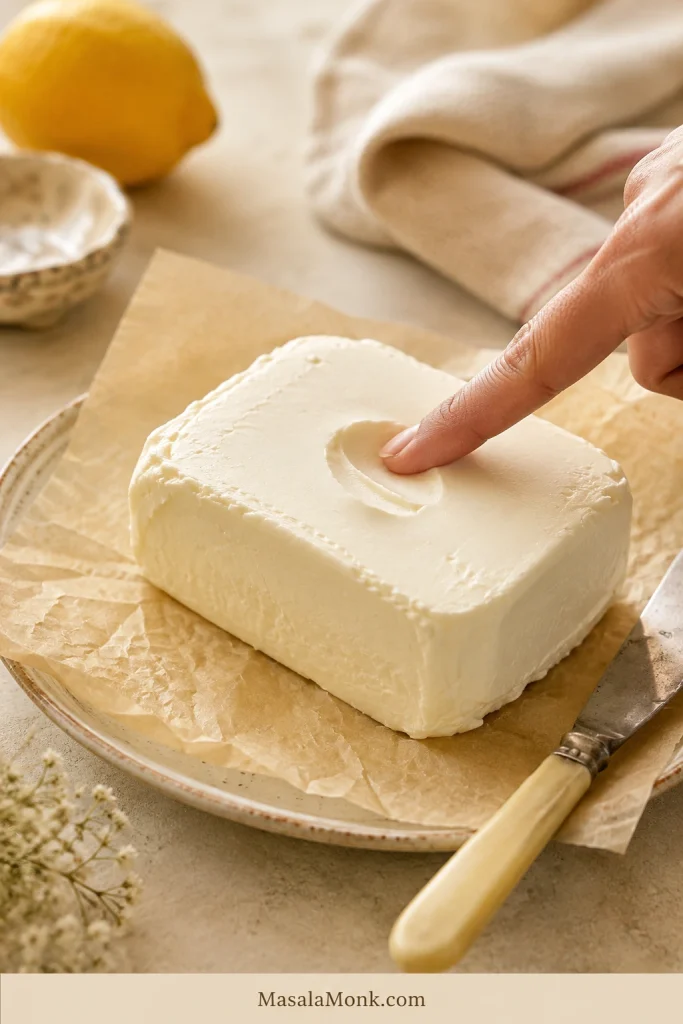
Use full-fat brick cream cheese for the best structure. Spreadable cream cheese from a tub is softer and can make the filling loose. Whipped cream cheese changes the density too, so it is better saved for spreading, not setting a pie.
The cream cheese should be softened but still cool. If it is too cold, it can leave lumps. When it gets too warm, it can become greasy and thin. Your finger should press into it easily, but the block should still hold its shape.
Sweetened Condensed Milk
Sweetened condensed milk gives the filling sweetness, body, and that familiar no-bake texture. Use one standard 14 oz / 397 g can.
Do not replace it with evaporated milk. Evaporated milk is unsweetened, thinner, and will not give the same structure.
Lemon Juice
Lemon juice balances the sweetness of the condensed milk and helps the filling thicken as it chills. Fresh lemon juice gives the cleanest flavor, but bottled lemon juice can work when that is what you have.
The finished pie should not taste sharply lemony. Lemon is there to brighten the filling, not to turn the whole dessert into lemon pie. For a dessert that leans fully into tart citrus, this key lime pie recipe is the brighter direction.
Vanilla Extract
Vanilla rounds out the tangy cream cheese and makes the filling taste fuller. It is a small ingredient, but the pie tastes flatter without it.
Graham Cracker Crust
Graham cracker crust is the usual choice for a no-bake cream cheese pie. Store-bought crust keeps the recipe fast, while a homemade crust gives more flavor and a firmer bite when you pre-bake it.
Cherry Pie Filling
Cherry pie filling is optional, but it is the most familiar topping for this style of pie. Add it after the creamy base has set so the red topping stays distinct from the white filling.
You may not need the entire can. Use enough to cover the top without making the pie feel heavy. If you prefer homemade topping, this cherry pie filling recipe works well here; just cool it fully before spreading it over the chilled filling.
Choose the Right Filling
Most of the confusion with cream cheese pie starts with the filling. Condensed milk gives a smooth, tangy, sliceable pie. Cool Whip makes it lighter and softer. Homemade whipped cream tastes fresher but needs a gentle hand. Baked fillings use eggs and sour cream for a firmer texture.
Now that the finished style is clear, here is what changes inside the bowl.
| Filling Style | Uses | Result | Watch-Out |
|---|---|---|---|
| Cream cheese + condensed milk + lemon juice | Classic no-bake pie | Smooth, tangy, sweet, sliceable | Needs proper chill time |
| Cream cheese + Cool Whip + powdered sugar | No-condensed-milk style | Light, fluffy, softer | Less rich and less tangy |
| Cream cheese + homemade whipped cream | More homemade fluffy filling | Creamy, airy, less processed | Must be folded gently so it stays light |
| Cream cheese + eggs + sour cream | Baked cream cheese pie | Firmer and cheesecake-like | Needs baking, cooling, and chilling |
| Cream cheese + pudding or gelatin mix | Shortcut pie variations | Sweeter and more stable | More processed flavor |
Cool Whip Filling Without Condensed Milk
Use this route for a lighter no-bake filling or for the days when there is no sweetened condensed milk in the pantry.
| Ingredient | Amount |
|---|---|
| Full-fat brick cream cheese | 8 oz / 226 g |
| Powdered sugar | ½ cup / about 60 to 65 g |
| Vanilla extract | 1 tsp / 5 ml |
| Lemon juice | 1 tbsp / 15 ml, optional |
| Cool Whip or whipped topping | 1½ to 2 cups |
| Graham cracker crust | 1 9-inch / 23 cm crust |
Beat the cream cheese, powdered sugar, vanilla, and lemon juice until smooth. Fold in the whipped topping gently, spoon the filling into the crust, and chill until set. It feels lighter than the condensed milk pie, but it still needs a long cold rest for neat slices.
Start with ½ cup powdered sugar. Add more only if you want a sweeter, dessert-dip-style filling.
Homemade Whipped Cream Filling
Homemade whipped cream also works in place of Cool Whip. Beat cold heavy cream to medium-stiff peaks, then fold it gently into the sweetened cream cheese mixture. Do not beat aggressively after the whipped cream goes in.
For the right peak stage, this homemade whipped cream recipe shows when to stop while the cream still looks glossy and soft, not dry or grainy.
This filling tastes fresher than whipped topping, but it can be slightly less stable when the whipped cream is too soft. Chill it well and slice it cold.
How to Make No-Bake Cream Cheese Pie
With the filling style chosen, the method is straightforward. The main trick is beating the cream cheese smooth before adding the thinner ingredients.
1. Beat the Cream Cheese First
Add the cream cheese to a mixing bowl and beat it before adding anything else. Once the condensed milk goes in, hidden lumps are harder to smooth out.
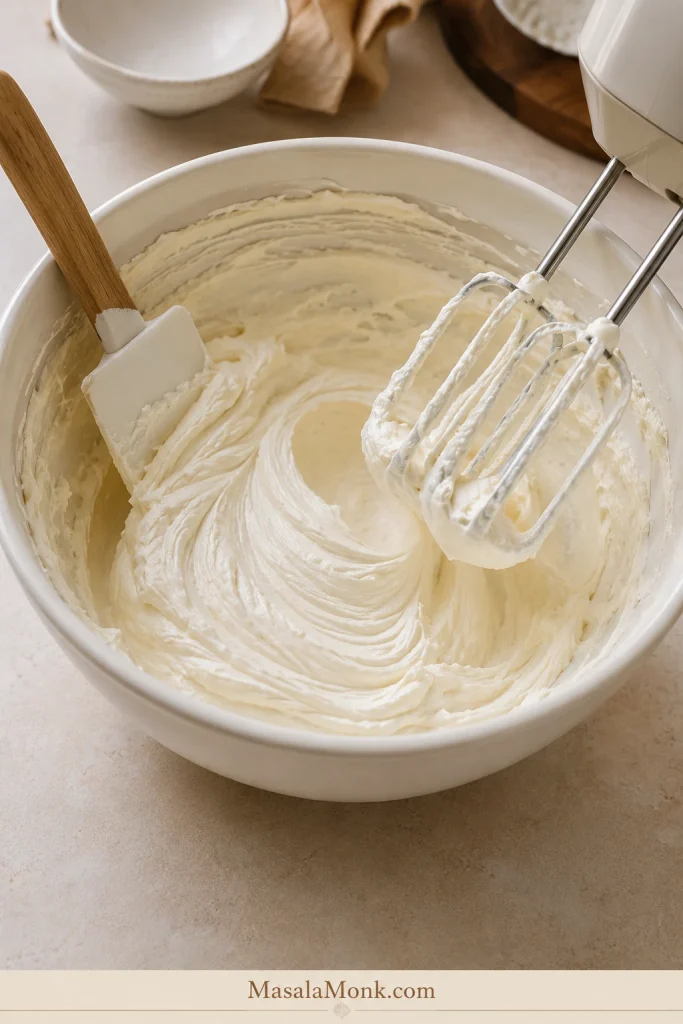
Scrape the sides and bottom of the bowl with a spatula. Cream cheese often hides there in small firm patches, and those patches can show up later in the finished pie.
2. Add the Condensed Milk Slowly
Pour in the sweetened condensed milk gradually and mix until the filling looks smooth and glossy. Keep the mixer on low to medium speed. Smooth is the goal, not overbeaten.
3. Add Lemon Juice and Vanilla Last
Add the lemon juice and vanilla after the cream cheese and condensed milk are already smooth. Mix just until combined. The mixture may thicken slightly as the lemon juice blends in.
4. Fill the Crust
Spoon the filling into the graham cracker crust and smooth the top with a spatula. For the cleanest white layer, wait to add fruit topping until after the pie has chilled.
5. Chill Until the Center Is Firm
Cover the pie and refrigerate it for at least 6 hours. Overnight is even better. The center needs time to catch up with the edges.
6. Add the Topping and Slice Cold
Spread cherry pie filling or another topping over the chilled base. Slice while cold, using a clean, sharp knife. For neat wedges, wipe the knife between cuts.
Chill Time for Clean Slices
Give the pie enough refrigerator time for the center, not just the edges, to firm up. It may taste good after a shorter chill, but it will not always lift out in neat wedges.
| Chill Time | Result | Use It When |
|---|---|---|
| 2 to 4 hours | Soft set | You do not mind softer slices |
| 6 to 8 hours | Cleaner slices | You want the pie to hold its shape |
| Overnight | Best texture | You are serving guests or making it ahead |
Here is the saveable chill-time recap: soft set is fine for spooning, but clean cream cheese pie slices need 6 to 8 hours or overnight.
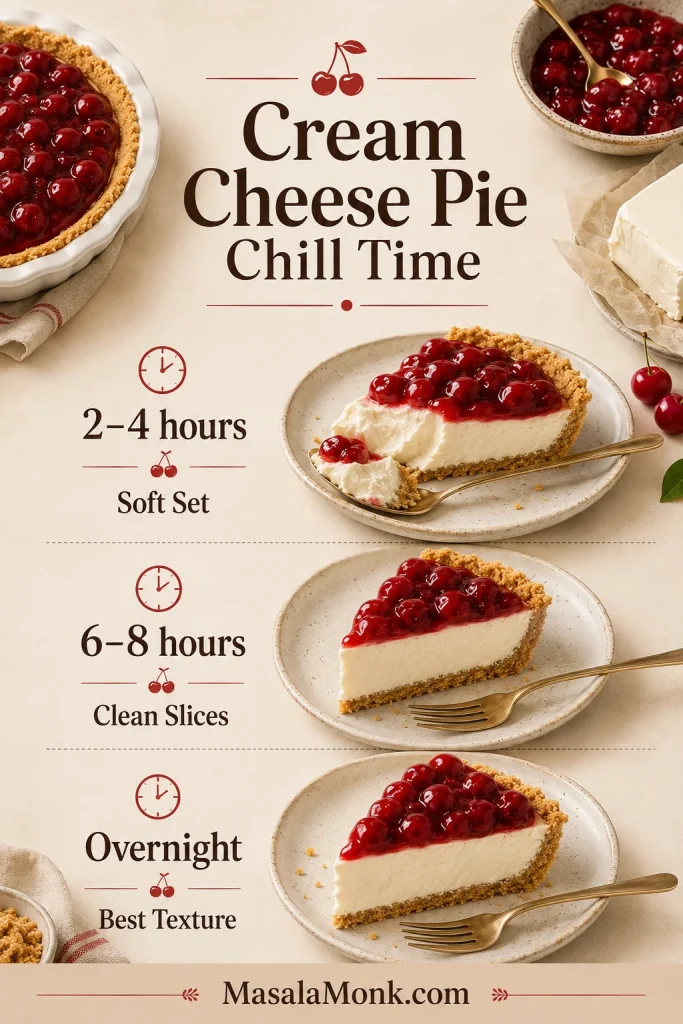
For gatherings, overnight chilling is the easiest insurance. The first slice is the test; the second is usually cleaner once the knife has opened the pie.
A short freezer rest can help in an emergency, but it is not a perfect shortcut. Too much freezer time can make the texture icy or change the way the filling softens later.
How to Get a Filling That Sets
If you want the cleanest slices, focus on a few things: full-fat brick cream cheese, lemon juice, enough refrigerator time, and toppings that are not watery.
- Beat the cream cheese smooth first. This prevents hidden lumps before thinner ingredients go in.
- Keep it cool-soft, not warm. Warm cream cheese can make the mixture loose and greasy.
- Use the lemon juice. It balances the sweetness and helps the condensed milk filling thicken.
- Let the center chill through. The edges firm first; the middle needs more time.
- Keep wet toppings for later. Add cherry topping, berries, or pineapple after the creamy base is firm.
Clean-slice cue: the pie is ready when the center feels firm to a gentle touch and a knife can cut through without dragging loose cream into the crust.
Graham Cracker Crust, Pie Crust, or Cream Cheese Pie Crust?
After the filling, the crust is where texture can change most. Graham cracker crust is the easiest and most traditional choice for this recipe. It pairs well with the tangy filling and does not need a long bake.
One phrase can be confusing: “cream cheese pie” usually means a pie with cream cheese in the filling. “Cream cheese pie crust” is different. That is a pastry dough made with cream cheese. It can be delicious, but it is not the same thing as this no-bake dessert.
If you were looking for pastry dough made with cream cheese, that is a different recipe; this page focuses on the creamy pie-filling style.
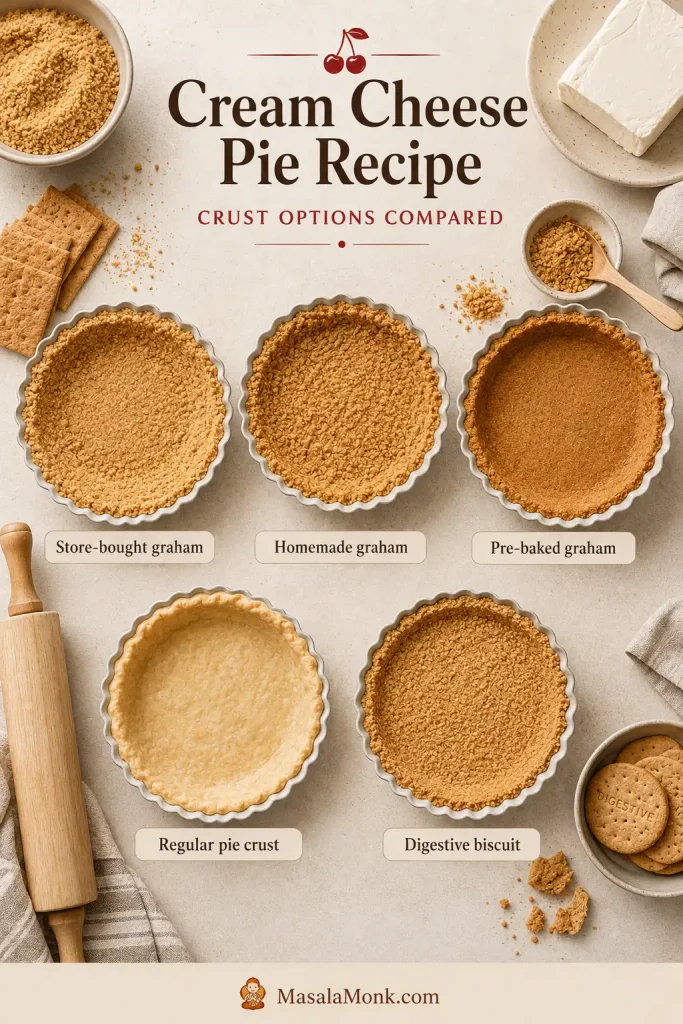
| Crust | Best For | Notes |
|---|---|---|
| Store-bought graham cracker crust | Fastest no-bake pie | Easy, classic, and convenient |
| Homemade chilled graham crust | No-bake homemade version | Softer than pre-baked but flavorful |
| Pre-baked graham cracker crust | Cleaner slices | Bake 10 minutes at 350°F / 177°C, then cool fully |
| Regular pie crust | Baked cream cheese pie | Blind bake if the filling recipe needs a pre-baked shell |
| Digestive biscuit crust | Graham cracker substitute | Useful where graham crackers are not common |
Simple Homemade Graham Cracker Crust
A simple homemade graham crust only needs:
- 1½ cups / about 170 to 180 g graham cracker crumbs
- 2 to 4 tbsp sugar, depending on how sweet you like the crust
- 6 to 7 tbsp / 85 to 100 g melted butter
Press the crumbs into a 9-inch / 23 cm pie plate. Chill the crust for a no-bake version, or bake it at 350°F / 177°C for about 10 minutes and cool completely before adding the cream cheese filling.
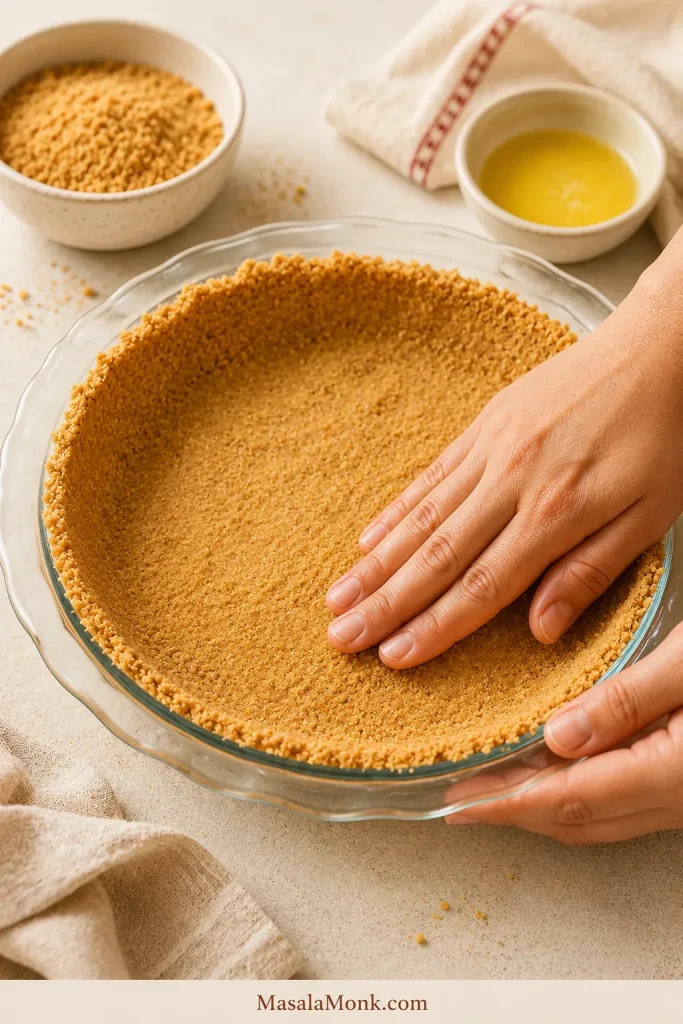
Do not pack the crust rock-hard. Press it firmly enough to hold together, but not so tightly that it becomes dense and difficult to cut. For more detail on crumb crusts, King Arthur Baking has a helpful graham cracker crust guide.
Another easy no-bake pie with a crumb crust is this banoffee pie recipe, a chilled make-ahead dessert with banana, toffee, and cream.
Cherry, Strawberry, Blueberry, Lemon, and Pineapple Toppings
After the filling and crust are settled, the topping is where the pie becomes personal. Cherry feels old-fashioned, strawberry and blueberry feel fresh and summery, lemon keeps it bright, and pineapple turns it retro and tropical.
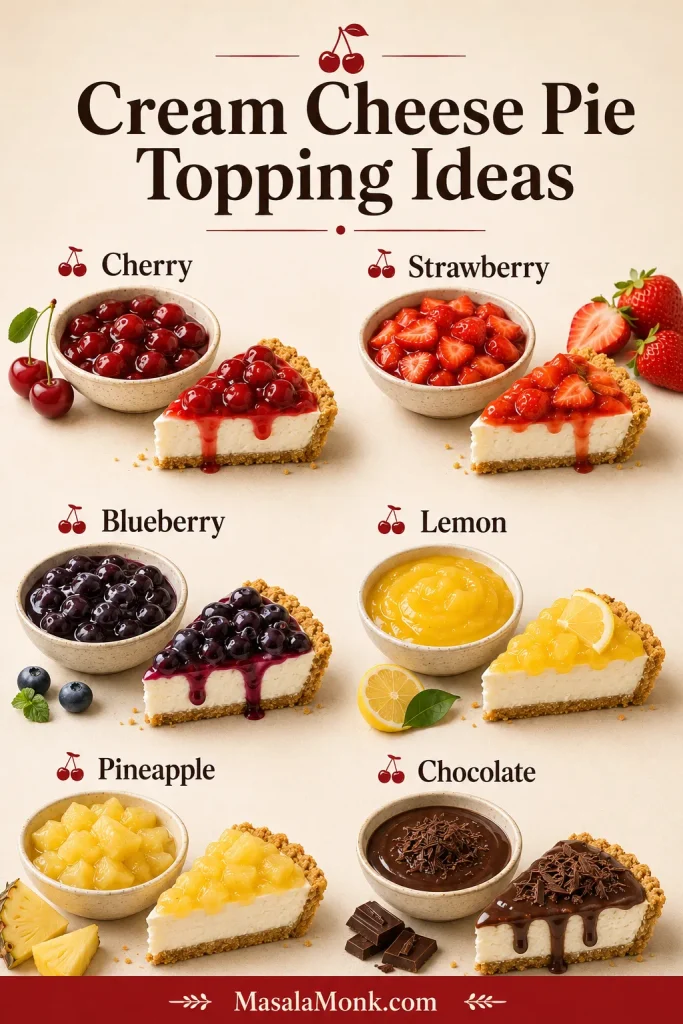
| Topping | How to Use It | Best Note |
|---|---|---|
| Cherry pie filling | Spread over the chilled filling | The familiar old-fashioned topping |
| Strawberry topping | Use fresh sliced strawberries or a cooked strawberry glaze | Best for spring and summer |
| Blueberry topping | Use cooked blueberry sauce, cooled before adding | Excellent with a little lemon zest |
| Lemon curd | Spread a thin layer over the set pie | Bright, tangy, and less heavy |
| Pineapple | Drain very well before using | Too much liquid can loosen the filling or soften the crust |
| Chocolate or Oreo | Use cookie crumbs, ganache, or chocolate drizzle | Best when you want a richer, sweeter pie |
| Pumpkin | Use as a fall cheesecake-pie style variation | Best for fall or holiday baking |
When to Add Cherry Pie Filling
For the cleanest look, chill the creamy base first and add cherry pie filling 1 to 2 hours before serving. This keeps the white layer distinct and prevents the topping from bleeding into the filling too much.
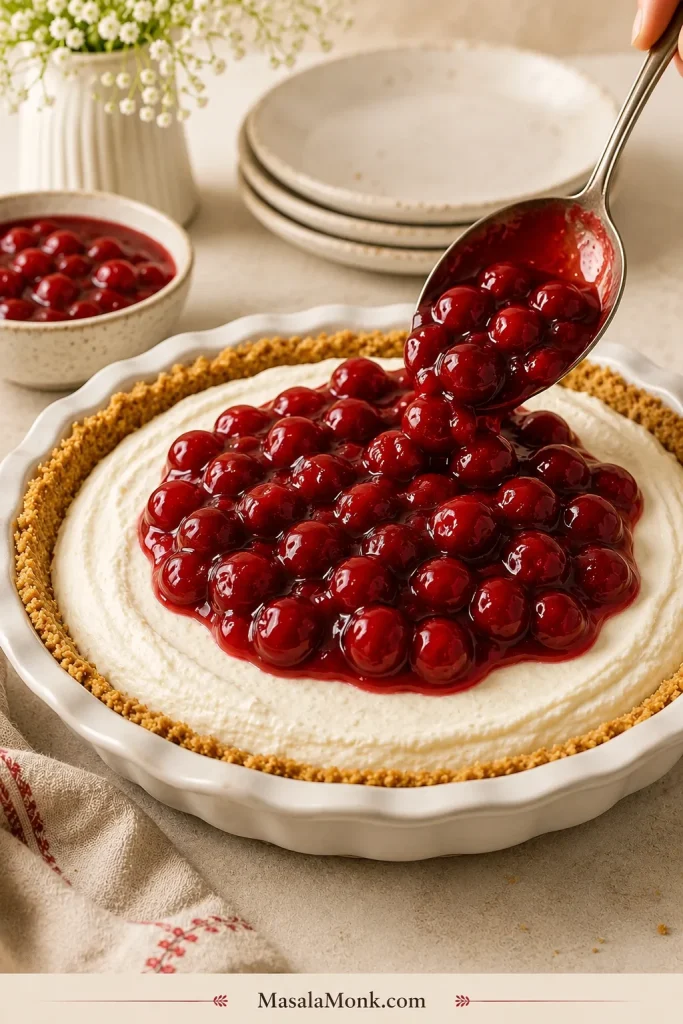
For convenience, the cherry topping can go on earlier and the whole pie can be refrigerated. It will still taste good, but the topping may stain the cream cheese layer slightly.
A baked fruit pie is a different dessert altogether. This cherry pie recipe that sets is the fuller baked-pie route when you want deep ruby filling inside a flaky crust.
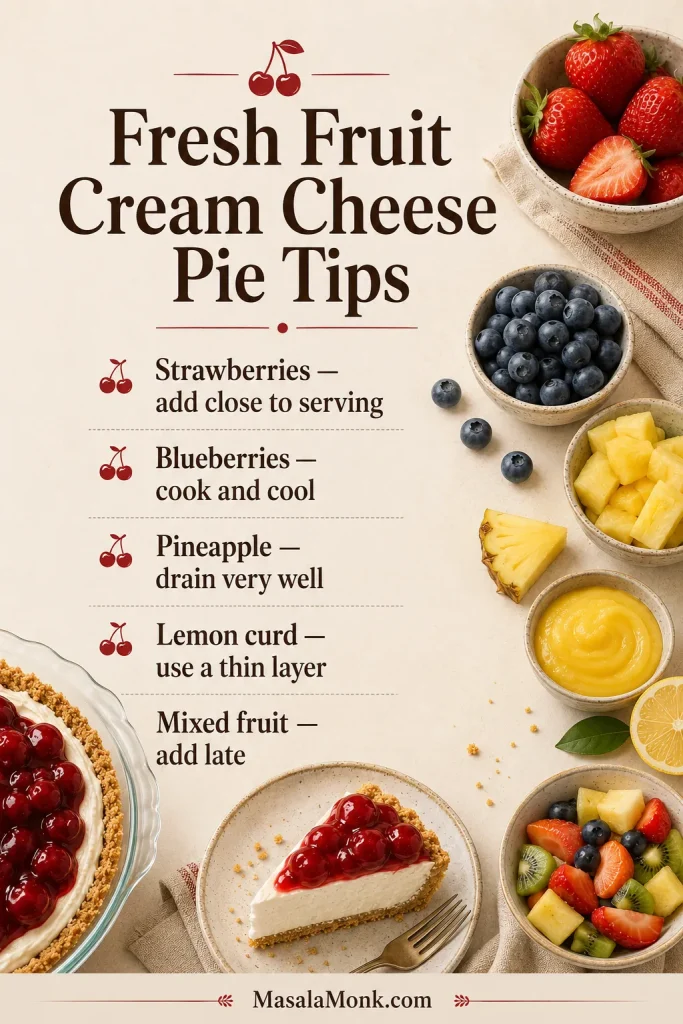
How to Use Fresh Fruit Without Making the Pie Watery
Fresh fruit gives the pie a brighter, more seasonal feel; it just needs better timing because berries and pineapple release juice as they sit.
- Strawberries: add sliced fresh berries close to serving, or cook part of the berries into a thicker glaze and cool it completely before adding.
- Blueberries: use a cooked topping with a little lemon juice and cornstarch because it holds better than loose fresh berries.
- Pineapple: drain it extremely well, and press out extra liquid when needed.
- Lemon curd: use a thin layer so it brightens the pie without overpowering the cream cheese.
- Mixed fruit: add it close to serving unless it has been cooked into a thicker topping.
For another fresh-strawberry dessert where timing matters, this strawberry shortcake recipe keeps the berries and cream separate until serving so the texture stays fresh.
No matter which topping you use, let the filling firm first. Cold filling underneath and cooled topping on top give the cleanest slice.
Baked Cream Cheese Pie Variation
Choose this baked route for a firmer old-fashioned pie that tastes closer to cheesecake. It uses eggs and sour cream for a richer, custard-like texture.
Baked Version Ingredients
| Ingredient | Amount |
|---|---|
| Full-fat brick cream cheese | 16 oz / 452 g |
| Granulated sugar | ½ cup / 100 g |
| Sour cream | ¼ cup / 60 g |
| Large eggs | 2 |
| Vanilla extract | 1 tsp / 5 ml |
| Lemon juice | 1 tsp / 5 ml |
| Graham cracker crust | 1 9-inch / 23 cm crust |
How to Bake It
- Pre-bake the graham cracker crust at 350°F / 177°C for about 10 minutes. Cool slightly.
- Lower the oven to 325°F / 163°C.
- Beat the cream cheese and sugar until smooth.
- Mix in sour cream, vanilla, and lemon juice.
- Add the eggs one at a time, mixing gently after each addition.
- Pour the filling into the crust.
- Bake for about 30 to 35 minutes, or until the edges are set and the center has a gentle wobble.
- Cool at room temperature for 1 hour.
- Refrigerate for at least 2 hours, preferably longer, before slicing.
The center should wobble slightly, not ripple like liquid. It will firm more as it cools and chills.
For a retro sour cream topping, spread a thin sweetened sour cream layer over the baked pie near the end of baking or after the filling has set, depending on the style you prefer. Keep the layer light so it complements the cream cheese instead of overwhelming it.
Texture Cues at Every Stage
Use this as a visual check before serving. The filling changes as it chills, so do not judge the pie by the first hour in the fridge.
| Stage | What You See | What It Means |
|---|---|---|
| Before chilling | Smooth, glossy filling with soft spatula waves | Good. It should spread easily but not look watery. |
| Before chilling | Loose, pourable filling | It may be too warm, overmixed, or made with the wrong ingredient. |
| After a short chill | Edges are firmer but center is still soft | Normal. Give it more time before expecting clean slices. |
| After a full chill | Center feels cold and firm to a gentle touch | Ready to slice while cold. |
| After topping | Fruit sits mostly on top | Good. The creamy base was firm before topping. |
| After topping | Red streaks or watery edges | Topping may have been added too early, too warm, or too wet. |
Troubleshooting
Most cream cheese pie problems are easy to read once you know what stage caused them. If your pie is softer than expected, do not panic; it may need more time, colder filling, or a different serving plan.
Why Is My Cream Cheese Pie Runny?
The most common reason is not enough chill time. After a couple of hours, the top may look set while the center is still too soft to slice.
Other possible causes are cream cheese that was too warm, low-fat or spreadable cream cheese, not enough lemon juice in the condensed milk filling, overmixing, or adding a watery fruit topping too early.
What to do now: when the pie is only slightly soft, refrigerate it longer. When it is very loose, serve it as an icebox-style dessert with extra graham crumbs and fruit instead of forcing neat slices.
Why Is My Filling Lumpy?
The cream cheese was probably too cold or not beaten smooth before the condensed milk was added. Beat the cream cheese first, scrape the bowl well, and only then add the thinner ingredients.
Why Did My Crust Get Soggy?
The topping may have been too wet, added too early, or left on the pie for too long. Homemade graham crust can also become soft when it was not pressed firmly enough or did not chill or bake long enough before filling.
Can I Freeze Cream Cheese Pie to Make It Set Faster?
In an emergency, a short freezer rest can help, but it is not a full replacement for refrigerator chilling. If the filling is loose because of ingredient balance, freezing only hides the problem temporarily.
Why Does the Slice Collapse?
The pie probably needs more chill time, or it sat at room temperature too long before slicing. Slice it cold and keep it refrigerated until shortly before serving.
Can I Fix a Pie That Did Not Set?
When the filling is only a little soft, give it more refrigerator time. Very loose filling is better served as a soft icebox dessert with fruit and crumbs rather than forced into neat wedges.
Make Ahead, Storage, and Freezing
This is one of those desserts that rewards patience, which is why making it ahead is usually the better plan.
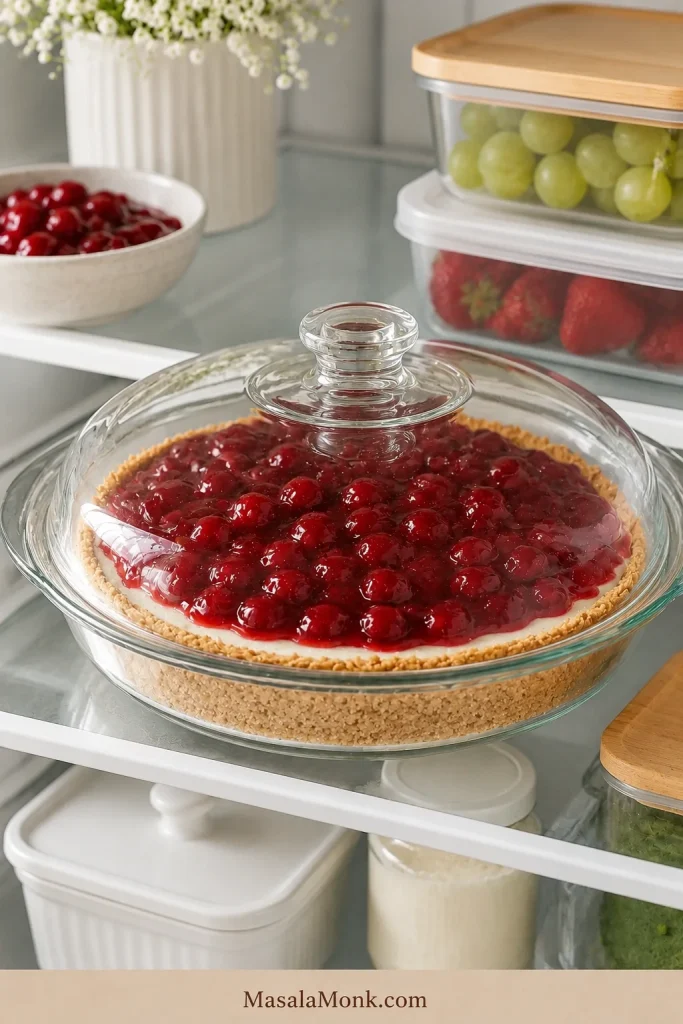
Best Make-Ahead Timing
Prepare the cream cheese layer the day before, then add the topping closer to serving for the cleanest look. This gives the pie time to firm up while keeping the fruit layer fresh.
How Long It Keeps in the Fridge
Store the pie covered in the refrigerator for 3 to 4 days. During the first day or two, the crust will be firmest, especially when fruit topping is added later.
Freezing: What Happens to the Texture?
Freeze the pie preferably without the fruit topping. Wrap it well, freeze until firm, and thaw in the refrigerator before serving. The texture may be slightly softer after thawing, but it will still taste good.
How Long It Can Sit Out
Because this pie contains cream cheese, keep it chilled until serving. For food safety, follow the general FoodSafety.gov guidance for perishable foods: do not leave cream cheese desserts out for more than 2 hours, or 1 hour in very hot weather. Return leftovers to the refrigerator promptly.
What to Serve With Cream Cheese Pie
Serve cream cheese pie with coffee after dinner, iced tea for a summer meal, or fresh berries when you are keeping the topping simple. A little lemon zest is especially good with blueberry topping, while a spoonful of whipped cream works best when the pie is plain, lemon-topped, or lightly fruited.
If a pie turns out softer than planned, serve it in small bowls or cups with extra graham cracker crumbs and fruit. It will feel intentional instead of like a failed slice.
On a dessert table, this pie works best beside sharper fruit desserts, chocolate bakes, or something crisp, because its own texture is cool and creamy.
FAQ
Cream Cheese Pie vs Cheesecake: What Is the Difference?
Cream cheese pie is usually easier, shallower, and softer than cheesecake. The no-bake version is chilled in a pie crust, while cheesecake is usually denser and often baked in a springform pan.
Baked or No-Bake: Which One Should I Make?
Choose the no-bake pie for the easiest chilled dessert. Make the baked pie when you want a firmer, more cheesecake-like texture.
What Kind of Cream Cheese Is Best?
Full-fat brick cream cheese is best. Spreadable tub cream cheese, whipped cream cheese, and low-fat versions can make the pie softer and less stable.
Why Lemon Juice Matters
In the condensed milk filling, lemon juice balances the sweetness and helps the mixture thicken as it chills. The pie should taste bright, not sharply lemony.
Can I Make Cream Cheese Pie Without Lemon Juice?
You can, but the condensed milk version may taste sweeter and set less firmly. If you skip lemon juice, use a Cool Whip-style filling or another recipe designed without it.
How Long Does It Take to Set?
Give it at least 6 hours for clean slices. Overnight is best. A 2 to 4 hour chill usually gives a softer set.
Best Substitute for Sweetened Condensed Milk
Use the Cool Whip filling with cream cheese, powdered sugar, vanilla, optional lemon juice, and whipped topping. It will be lighter and fluffier than the condensed milk version.
Does Cool Whip Work?
Yes. Cool Whip makes a lighter, fluffier no-bake filling. Fold it in gently after beating the cream cheese with powdered sugar and flavorings.
Best Time to Add Cherry Pie Filling
Add cherry pie filling after the pie has chilled and the filling is firm. For the cleanest look, add it 1 to 2 hours before serving.
Fresh Fruit or Canned Pie Filling: Which Is Better?
Canned pie filling is easier and more stable. Fresh fruit tastes brighter, but it can release juice, so add it close to serving or cook it into a thicker topping first.
Can I Use a Store-Bought Graham Cracker Crust?
Yes. A store-bought graham cracker crust works well for no-bake cream cheese pie and keeps the recipe fast. For a firmer crust, use a homemade crust and pre-bake it before adding the filling.
Graham Cracker Crust or Regular Pie Crust?
Graham cracker crust is the traditional choice for no-bake cream cheese pie. Regular pie crust works better for baked cream cheese pie or a more pastry-style dessert.
Making It the Day Before
Making the pie the day before is ideal. Chill the plain pie overnight, then add fruit topping closer to serving.
Does It Freeze Well?
It can be frozen, especially without topping. Thaw it in the refrigerator and expect a slightly softer texture after thawing.
Final Thoughts
The best cream cheese pie does not need to be fancy. It just needs to be cold, smooth, lightly tangy, and firm enough that the slice holds together on the plate.
Make the no-bake condensed milk pie when you want something easy and nostalgic, use the Cool Whip filling when you want it lighter, or bake the old-fashioned variation when you want a firmer cheesecake-style dessert. However you top it, the goal is the same: a cold, creamy slice that disappears quickly once it reaches the table.
It is humble in the best way: a crumb crust, a cold creamy middle, and a topping that makes the whole table notice. Try the classic cherry topping first, then change the fruit the next time. This is one of those pies that becomes a house version quickly.


