
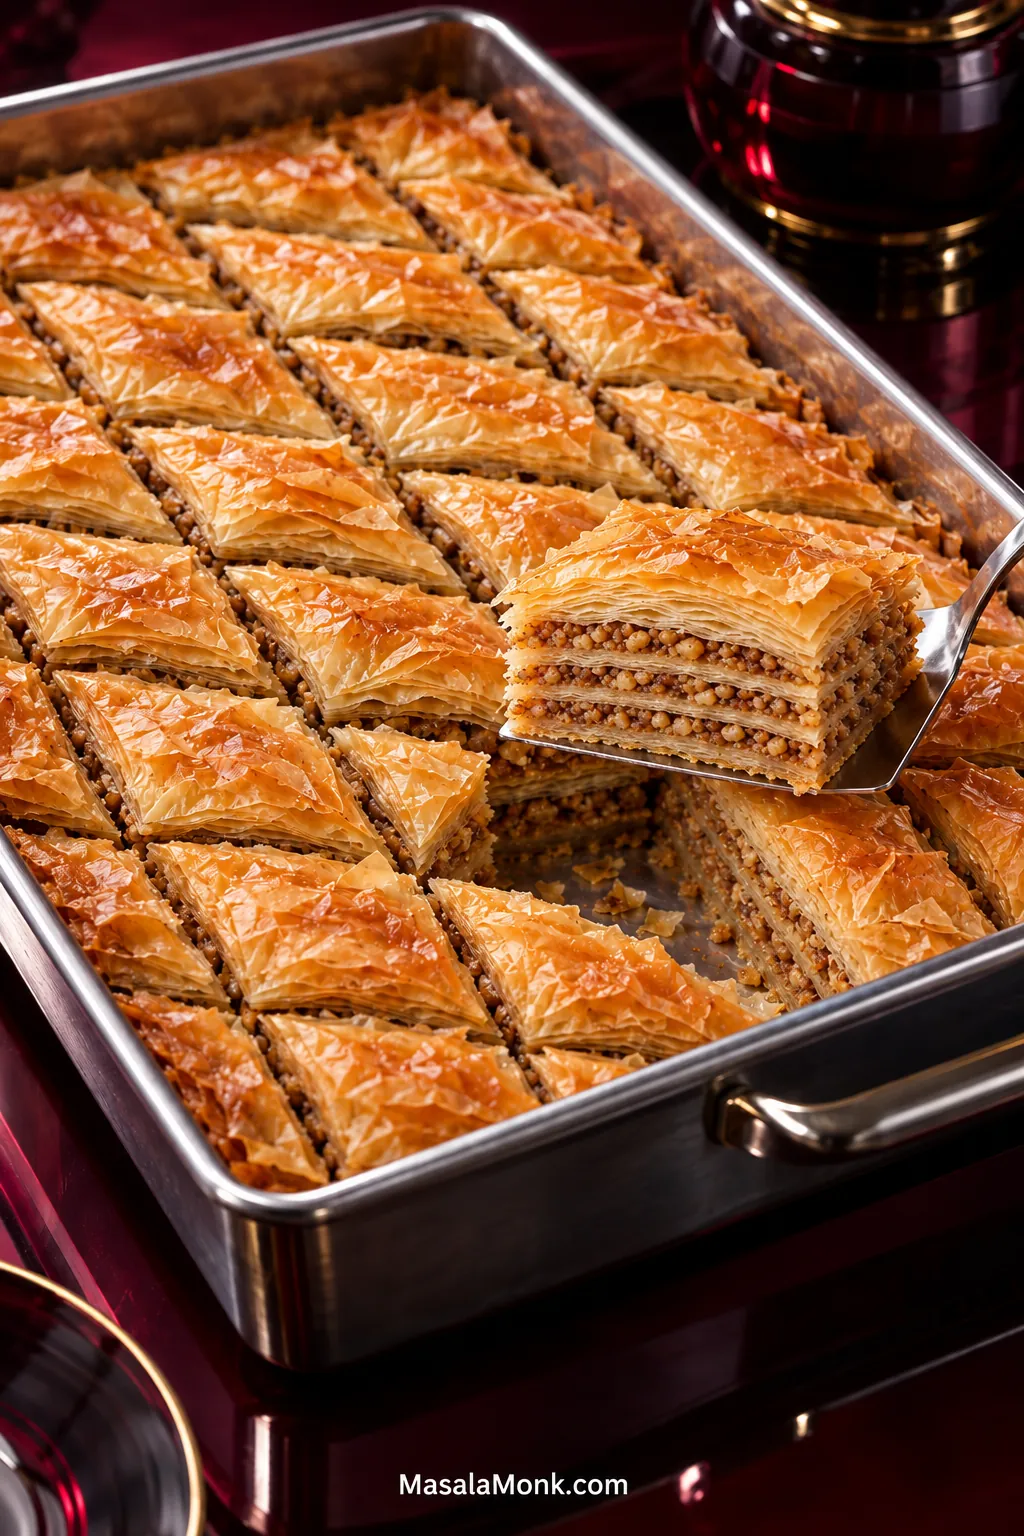
Good baklava should crackle when you bite through the top, then turn tender and syruped around the walnut layers underneath. The edges stay crisp and flaky, the filling tastes buttery and warmly spiced, and the honey-lemon syrup soaks through without leaving the bottom swimming in sweetness.
Baklava layers paper-thin phyllo with chopped nuts, then finishes the baked pastry with syrup. This is a Greek-style version with walnuts, cinnamon, butter, and honey-lemon syrup.
What matters most are a few small decisions: keeping the phyllo flexible, brushing the layers lightly, baking the center as thoroughly as the top, and giving the finished tray enough time to rest.
The assembly is repetitive more than difficult. Once the pan, nuts, butter, and phyllo are ready, you fall into a rhythm. Then the oven does the drying and crisping—and after the syrup goes on, patience does the rest.
If you just want to bake, the recipe card below is enough. For the reasoning behind each stage, the deeper guide explains why the layers work, how to read the bake, and what to do when the phyllo or syrup behaves differently than expected.
Baklava Recipe
Layers of crisp phyllo, cinnamon-spiced walnuts, and honey-lemon syrup with a flaky top and tender, syruped middle.
Equipment
- 9 × 13-inch / 23 × 33-cm straight-sided, solid-bottom baking pan; uncoated metal preferred for even browning and crispness
- 2–3-quart / 2–3-liter saucepan
- Food processor or sharp chef’s knife
- Soft pastry brush
- Long, sharp non-serrated knife
- Plastic wrap and a clean kitchen towel
Pan note: avoid a springform pan; syrup can leak through the seam. Glass can work, but judge doneness visually rather than by time alone. Cut carefully in nonstick pans to avoid gouging the coating.
For the Honey-Lemon Syrup
- 1 cup + 2 tablespoons / 225 g granulated sugar
- ¾ cup + 2 tablespoons / 210 ml water
- 2 tablespoons / 30 ml fresh lemon juice
- ⅓ cup / 115 g honey — use one you enjoy the flavor of
For the Walnut Filling
- 16 oz / 450 g unsalted walnuts
- 2 teaspoons ground cinnamon
- ⅛ teaspoon ground cloves
- ¼ teaspoon fine sea salt
For the Phyllo Layers
- Regular paper-thin phyllo/filo pastry: 1 package, about 16 oz / 450 g, fully thawed
- Unsalted butter: 1 cup + 2 tablespoons / 9 oz / 255 g, melted and warm, not piping hot
- Extra butter: 1–2 tablespoons available if your particular sheets need it
Do not substitute thick or country-style filo here; its thickness, sheet count, and baking behavior differ.
Instructions
Prep the Syrup, Nuts and Pan
- Make the syrup. Combine the sugar, water, and lemon juice in a roomy saucepan. Heat over medium heat, stirring until the sugar dissolves. Once dissolved, stop stirring. Bring to a gentle simmer and cook for about 5 minutes; the syrup should remain smooth, glossy, fluid, and only lightly thickened. Remove from the heat, stir in the honey until smooth, and leave the syrup to cool completely.
- Prepare the walnuts. Pulse in short bursts until most of the nuts are small pieces with a little finer crumb mixed through. Stop before they become powdery or oily. Mix in the cinnamon, cloves, and salt, then divide the filling into four roughly equal portions.
- Heat the oven and prepare the pan. Set the oven to 325°F / 165°C conventional or about 300°F / 150°C fan, with a rack in the lower-middle position. Lightly butter the base and sides of the pan.
Layer, Butter and Cut
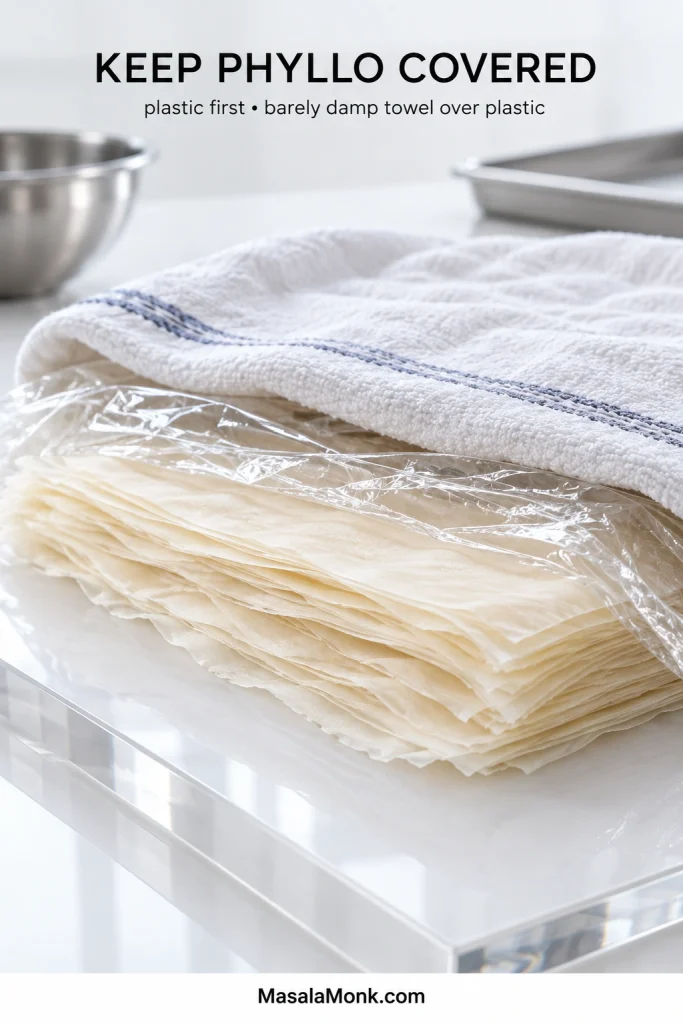
- Set up the phyllo. Have the filling, melted butter, brush, and pan ready before opening the package. Open the phyllo only when it is fully thawed and flexible. Trim it to fit if needed, save useful scraps for the middle, and keep the unused stack beneath plastic wrap with a barely damp kitchen towel over the plastic. Reserve your neatest sheets for the top.
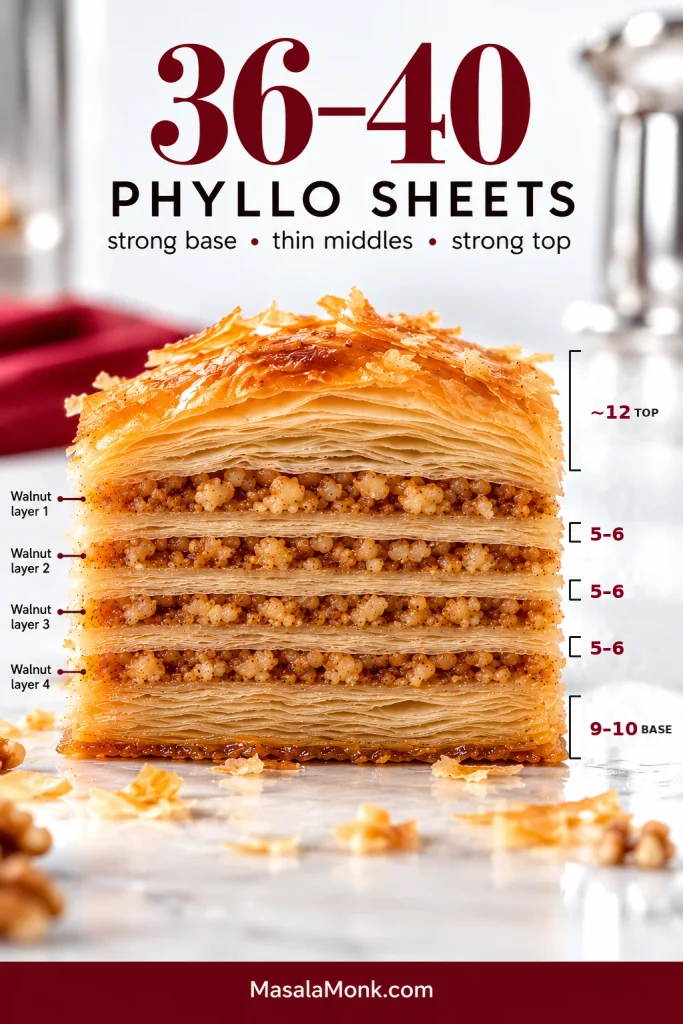
- Plan the layers. With about 36–40 sheets, use 9–10 sheets on the bottom, 5–6 sheets in each of the three middle stacks, and about 12 sheets on top. If your package has another count but is still regular paper-thin phyllo and weighs close to 450 g, use about one-quarter underneath, a generous quarter on top, and divide the rest between the three middle stacks.
- Build the base. Add the 9–10 bottom sheets one at a time, dabbing and lightly sweeping each with melted butter. A thin coating is enough.
- Add the walnuts and middle stacks. Scatter one-quarter of the filling evenly over the base. Add 5–6 lightly buttered sheets, then another quarter of the walnuts. Repeat until you have four walnut layers separated by three thinner phyllo stacks.
- Finish the top. Add the remaining substantial stack—about 12 sheets—brushing lightly as you go. Finish with your neatest sheets and a light coating of butter.
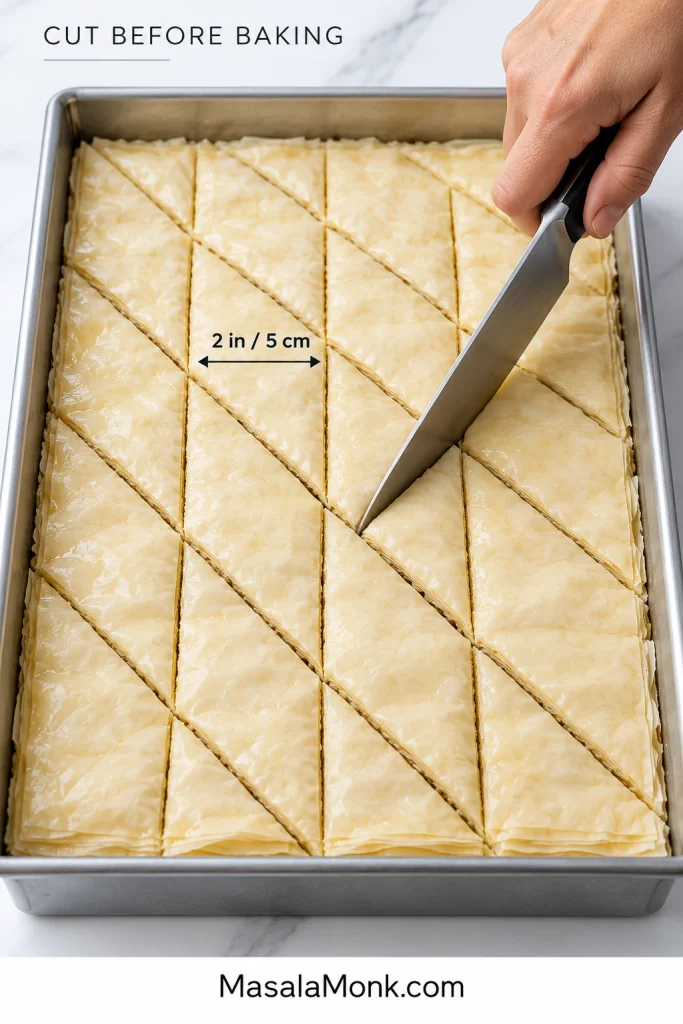
- Chill if needed, then cut. If the upper sheets slide, refrigerate the assembled tray for 10–15 minutes. Cut all the way to the bottom with a sharp non-serrated knife. For diamonds, make parallel cuts about 2 inches / 5 cm apart, then cut diagonally across them at roughly the same spacing; for squares, make perpendicular cross-cuts instead.
Bake, Syrup, Rest and Serve
- Bake until the center is ready too. Plan on about 65–80 minutes. The top should be deep honey-gold, the edges visibly crisp, and the phyllo inside the cuts golden and separated. If the surface darkens early, loosely shield it with foil while the center continues baking.
- Add the syrup. For this recipe, cooled syrup goes over hot, just-baked baklava. Start around the edges and along the cut lines, make a light pass over the top, pause briefly, then finish over spots that still look drier. Use the full measured batch for this pan and phyllo quantity. Wait until after the full rest before deciding whether the finished baklava needs any additional syrup.
- Let it rest. Cool uncovered and leave the pieces in the tray for at least 4 hours. Six hours is better; overnight is excellent. If it will rest overnight, cover the tray once the baklava is completely cool.
- Serve. Bring the baklava to room temperature before serving. Run the knife through the existing cuts again only if needed, then lift out the pieces with a small spatula.
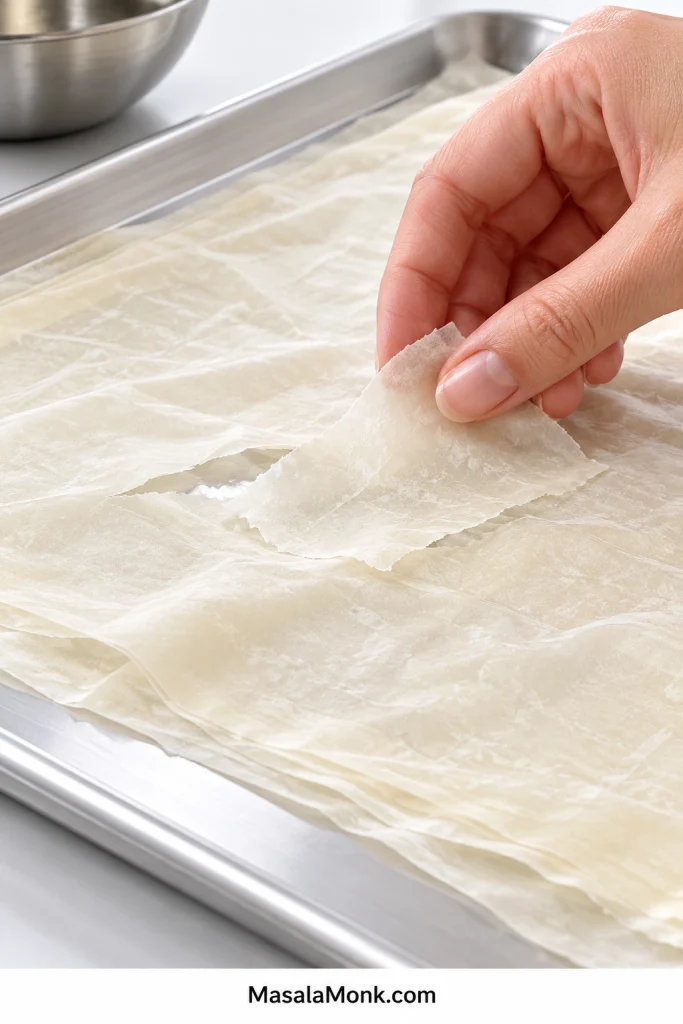
Torn inner sheets are fine. Patch any large gaps and keep going.
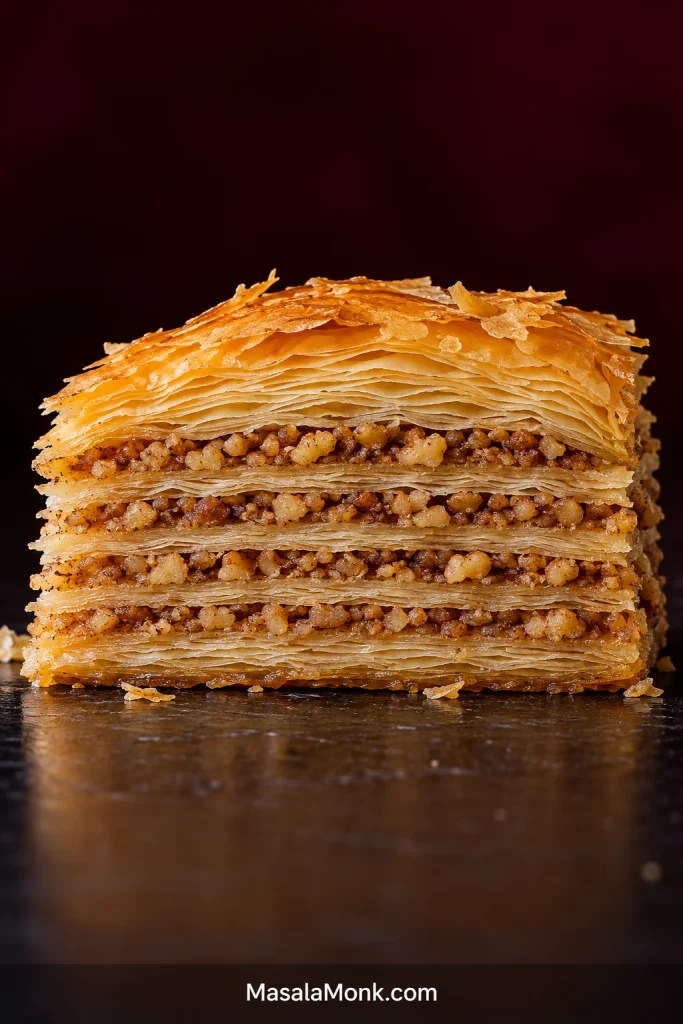
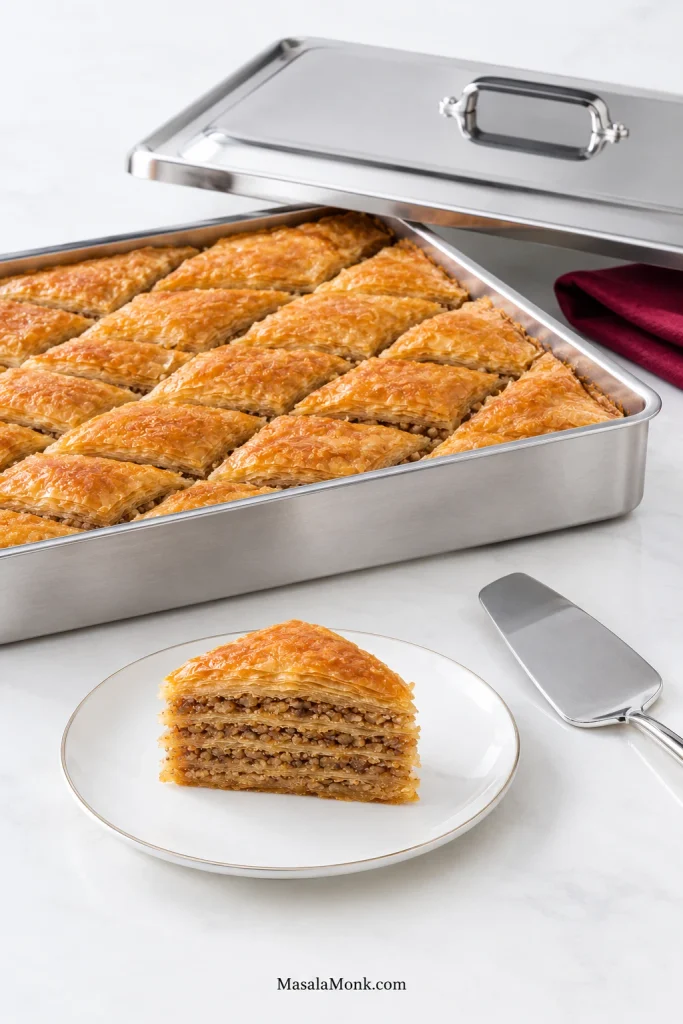
The finished piece is the reference point for everything that follows. As you move through phyllo handling, layering, baking, syrup and rest, keep this clean, distinct structure in mind.
The Baklava Guide
Working With Phyllo Without Fighting It
Phyllo and filo are two spellings for the same paper-thin pastry. Frozen store-bought phyllo is exactly what you want here. Thin sheets give baklava its crisp, delicate layering.
How to Thaw Phyllo So the Sheets Stay Flexible
Brands vary, so start with the directions on your box. A common approach is to move the sealed package to the refrigerator the day before, then let it sit unopened at room temperature until the pastry is fully thawed and flexible. Depending on the brand, that final room-temperature stage can take a couple of hours.
Phyllo feels far more fragile in the package than it does once you get into the rhythm of layering it. Open it too cold and the folds may crack; too much condensation can make the sheets cling together.
Keep Air Out and Excess Moisture Away
Once exposed, phyllo dries quickly. Keep the unused stack under plastic wrap with a barely damp kitchen towel over the plastic. The Athens Foods phyllo handling guide gives similar practical advice for keeping opened sheets workable.
What to Do With Torn Phyllo
Torn sheets are not failed sheets. After the first few layers, the process usually starts to feel much less precious. Patch larger gaps, use clean scraps in the middle, and keep going. The finished tray hides far more imperfections than the raw phyllo suggests.
The same forgiving approach works in our Spanakopita Recipe: patched inner phyllo disappears once everything is layered and baked.
Save the neatest sheets for the top. The hidden layers can be patched, overlapped, and imperfect.
Why Phyllo Sheet Counts Vary by Brand
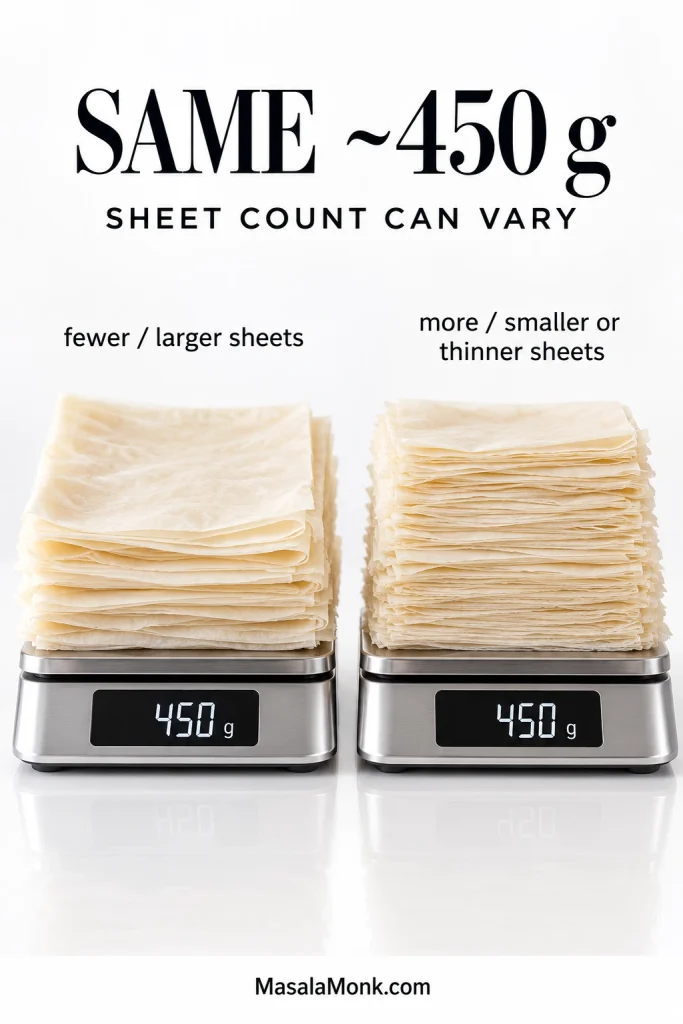
Two packages with about the same 16-ounce / 450 g weight can contain different numbers of sheets because sheet size and thickness vary. Fewer sheets do not necessarily mean less pastry.
If the package is still regular paper-thin phyllo and weighs close to 450 g, keep the recipe quantities. A substantial base, three thinner middle stacks, and another substantial top matter more than matching somebody else’s exact sheet count.
Puff pastry is not a direct substitute here. Baklava depends on many separate paper-thin phyllo layers crisping around the nut filling.
Build a Strong Bottom, Thin Middles and a Strong Top
A sturdy base gives the finished pieces support. Thin middle stacks spread the walnuts through the pastry, and another generous stack on top creates the flaky surface that shatters under the fork.
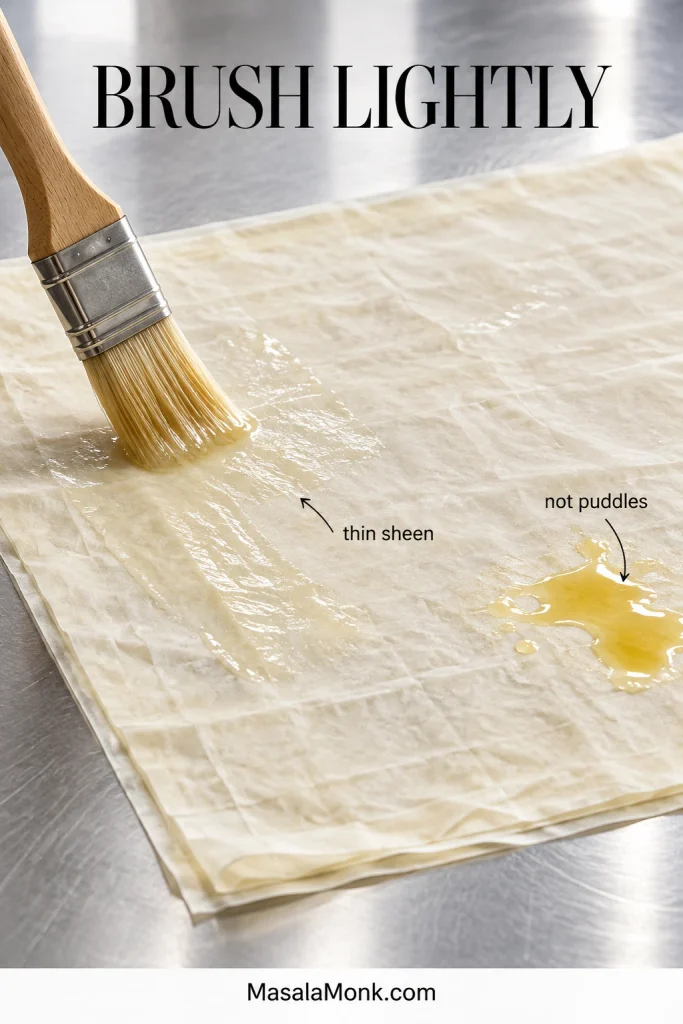
Brush with a light hand. A few quick dabs and sweeps of butter are enough for each sheet; puddles make the finished layers heavier. If the butter starts to turn cloudy or thicken while you work, warm it gently until fluid again.
The walnut layers should look scattered through the stack rather than packed into thick bands. If the first phyllo sheet over a walnut layer keeps skating around, butter one side on the work surface and place that side directly against the filling so it grips.
Walnuts and the Right Nut Texture
Aim for distinct little walnut pieces—not large chunks and not walnut meal. That gives the filling enough texture without creating bulky layers that push the phyllo apart.
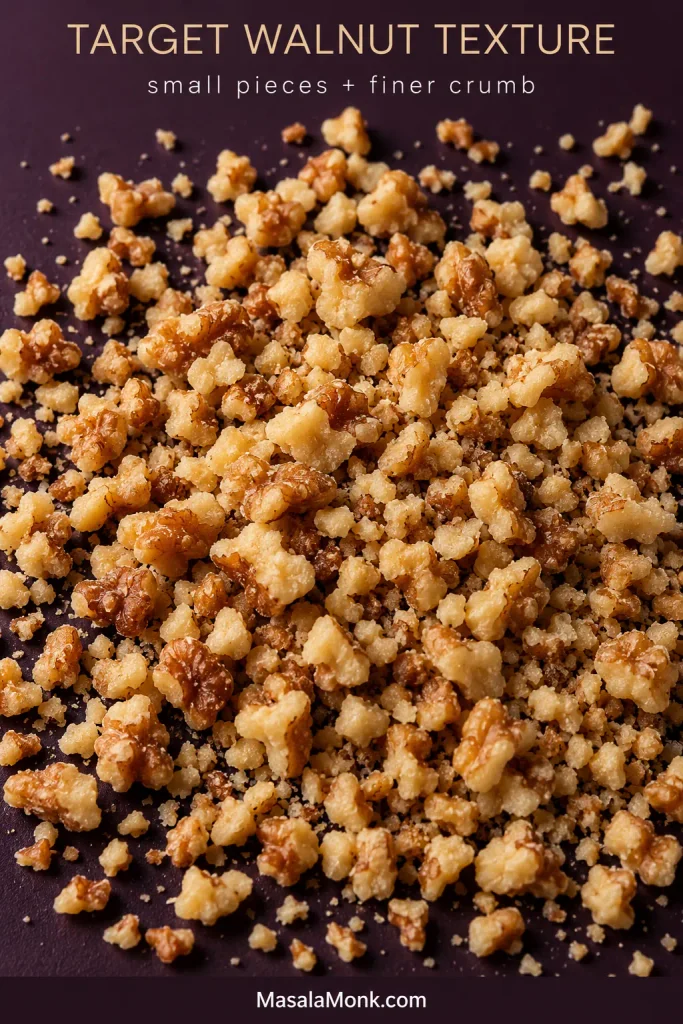
Take the walnuts too far in a food processor and the released oil begins making the filling heavy. The same short-pulse approach helps in our Muhammara Recipe, where over-processing walnuts can make the texture pasty.
Light toasting is optional. If you toast the walnuts first, let them cool completely before they go between the phyllo layers.
How to Cut Baklava Before Baking
Cutting before baking is easier than trying to slice through fully crisp phyllo afterward. Those same channels become useful twice more: they help you check whether the center has baked through, then give the syrup a direct path into the layers.
If the upper sheets slide under the knife, a 10–15 minute chill firms the butter enough to make cutting easier. The exact diamond or square pattern is up to you; cuts about 2 inches / 5 cm apart give roughly 30–36 pieces in this pan.
Read the Bake Through the Cut Lines
A deeply golden top is not enough if the phyllo inside the cuts is still pale. Use the cut channels as your best view into the center.
- Top: deep honey-gold.
- Edges: crisp and visibly layered.
- Inside the cuts: golden, dry-looking phyllo rather than pale or doughy layers.
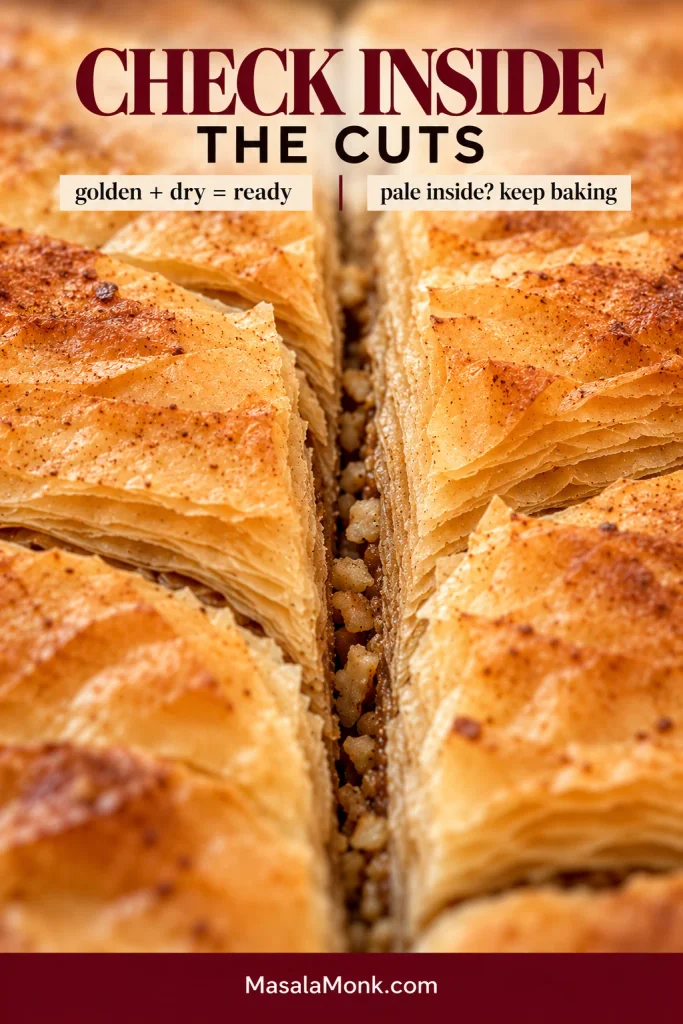
A little melted butter in the cut channels is normal. However, a large pool of pale liquid butter is only a secondary warning; the color and dryness of the inner phyllo are more reliable doneness cues.
As the tray gets close, the kitchen should smell strongly of toasted walnuts, butter, and cinnamon. If the surface has already reached the right color, tent it loosely with foil while the cut channels continue drying. If the top is already golden while the center stays pale, see Baklava Troubleshooting and Rescue.
Syrup the Baklava, Don’t Flood It
For this recipe, cooled syrup goes over hot, just-baked baklava. Other established baklava methods use different syrup-and-pastry temperature combinations, but this is the sequence to follow here.
Stop While the Syrup Still Pours Easily
While warm, the syrup should still pour easily rather than falling from the spoon in thick, sticky ribbons. It will thicken further as it cools.
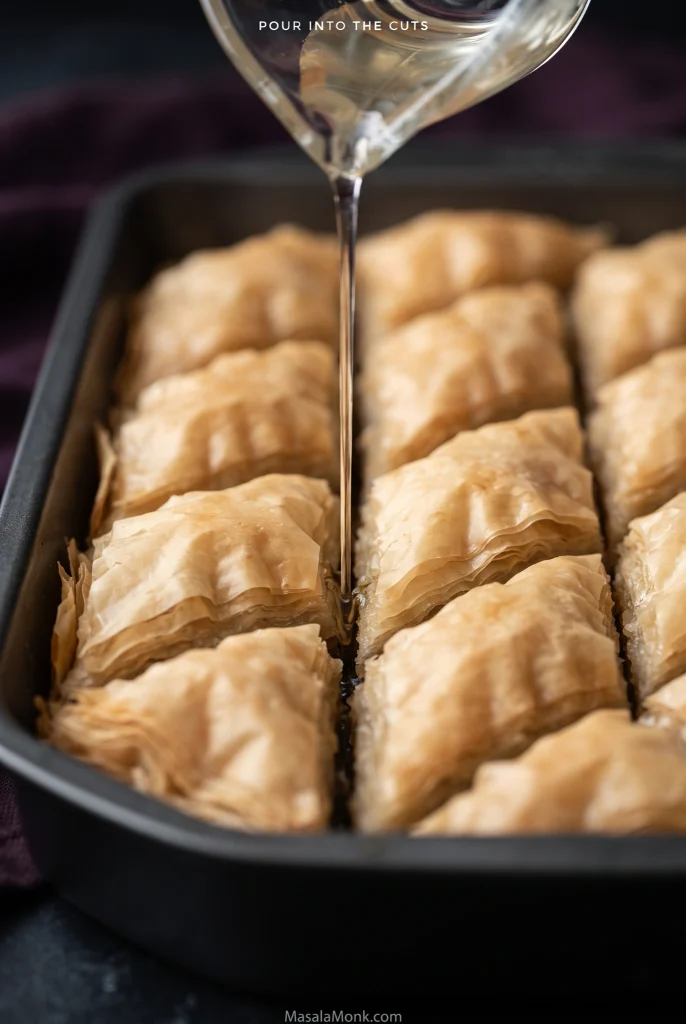
Lemon brightens the rich honey-butter flavor, while its acidity also helps discourage the syrup from crystallizing.
Pour in Stages
Start around the perimeter and along the cuts, then make a light pass over the surface. Pause for a moment before finishing over the drier-looking spots. You may hear a soft hiss as the cool syrup reaches the hot phyllo.
The measured syrup is meant for the 9 × 13-inch tray and roughly 450 g of phyllo used here.
Let the Baklava Rest After the Syrup
Leave the pieces in the tray and give the syrup time to move through the cuts and inner layers. Wait before deciding that the surface looks too dry; warm baklava has not yet reached its final texture.
After several hours, the walnuts settle into the layers and the pieces hold together more cleanly. By the next day, the syrup should have worked through the inner layers while the top still crackles. That first clean piece is the payoff for all those thin layers.
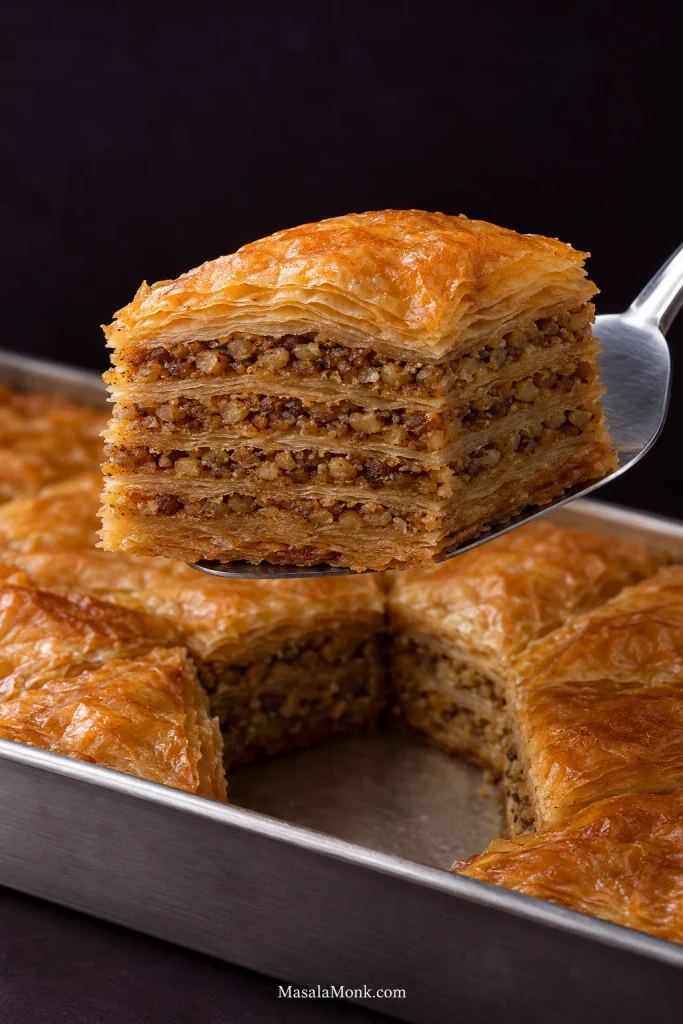
Planning to serve it later? The make-ahead and storage section covers when to cover the tray, how long it keeps, and what changes in the refrigerator or freezer.
Baklava Troubleshooting and Rescue
Before the Syrup
Sheets cracking? Cover the unused stack again. Phyllo that is still too cold or has dried in the air becomes brittle, but torn inner sheets can simply be patched.
Sheets sticking together? Condensation is often the culprit. Uncover them briefly, separate the sheets gently, then protect the stack again under plastic.
Top sheets sliding? A short chill usually fixes it. When the first sheet over the walnuts is the problem, put its lightly buttered side against the filling.
Golden on top, pale in the cuts? The center is not finished, regardless of the surface color. Tent the top with foil and keep baking until the inner phyllo looks golden and dry.
Syrup turned grainy or candy-thick? It may have crystallized or cooked too far. Rewarm very thick syrup gently; a tiny splash of hot water can loosen it if needed.
After the Syrup
A lot of syrup at the bottom? Give the tray time before judging it. If the pastry was underbaked or received too much syrup, there is no clean way to pull that liquid back out; cooling uncovered is your best move.
Still dry after a full rest? Only then consider a small amount of extra syrup through the existing cuts. A full second batch would be far too much.
Chewy middle? It probably needed more oven time. Greasy layers? Use a lighter hand with the butter next time.
Walnuts spilling out when you serve a piece? Chop them a little finer, make the filling layers thinner, and give the finished tray enough time to rest before serving. The walnut texture section shows the target chop.
Why Does Another Baklava Recipe Look So Different?
Not every difference between two trays means one of them is wrong. Baklava does not have one universal formula. Other baklava styles may use pistachios, clarified butter, floral syrups, different layering patterns, or different syrup-and-pastry temperatures.
Those differences reflect a broad family of layered pastries across Greek, Turkish, Balkan, Levantine, and neighboring traditions. The Smithsonian’s history of baklava is a useful introduction to that wider story. So avoid mixing instructions from several recipes halfway through; choose one method and follow its ratios, temperatures, and layering sequence from start to finish.
If you want to vary this version deliberately rather than mixing methods accidentally, a few swaps fit especially cleanly.
Useful Baklava Variations
Pistachios or almonds. Use pistachios to replace some or all of the walnuts by weight, giving the filling a greener color and slightly sweeter flavor. Almonds bring a firmer crunch and also work well mixed with walnuts. If you combine nuts with very different hardness, chop them separately before mixing.
Ghee or clarified butter. Both contain much less water than whole butter and can give especially crisp layers. Brush lightly and have enough available to finish the tray; do not assume you need to match the 255 g of whole butter gram for gram.
Rose water or orange blossom water. For this honey-lemon syrup, start with about ½ teaspoon culinary rose water or 1 teaspoon culinary orange blossom water, stirred in after the syrup comes off the heat. These amounts assume culinary floral water, not concentrated extract or essence. Brands vary in strength, so taste the cooled syrup before adding more.
Make Ahead and Storage
For the easiest make-ahead plan, bake and syrup the baklava the day before you want to serve it. Let it rest uncovered until completely cool, then cover the tray and leave it at room temperature while the syrup finishes moving through the layers.
How to Store Baklava
- Room temperature: once completely cool, keep covered in a cool, dry place and enjoy within about 4–5 days for the crispest texture.
- Refrigerator: keep well covered or in an airtight container for up to about 2 weeks. The phyllo gradually becomes softer and chewier.
- Freezer: wrap completely cooled pieces tightly and freeze for best quality within about 2 months. Thaw at room temperature.
Serve baklava at room temperature, when the crisp top still crackles against the settled, syruped layers underneath. The center should be tender without feeling wet, with enough structure for each piece to hold together.








