Some cravings don’t show up as hunger. They arrive as mood, as temperature, as memory—and that’s exactly why keto hot chocolate can feel like such a small, perfect reset.
One minute you’re fine, and the next you want a warm mug in your hands—something chocolatey, soothing, and faintly indulgent. Not a sad substitute. Not a watery brown drink that tastes like “diet.” You want the kind of hot cocoa that feels like it belongs to your evening.
That’s where keto hot chocolate earns its place. When it’s made with the right method, it’s smooth and glossy, the chocolate flavor is deep, and the sweetness is dialed in instead of screaming. Even better, the same base can become a keto hot chocolate mix, a keto protein hot chocolate, a dairy free keto hot chocolate, a bulletproof keto hot chocolate, or a cozy Mexican hot chocolate—without turning your kitchen into a science project.
Why most “low carb hot cocoa” disappoints
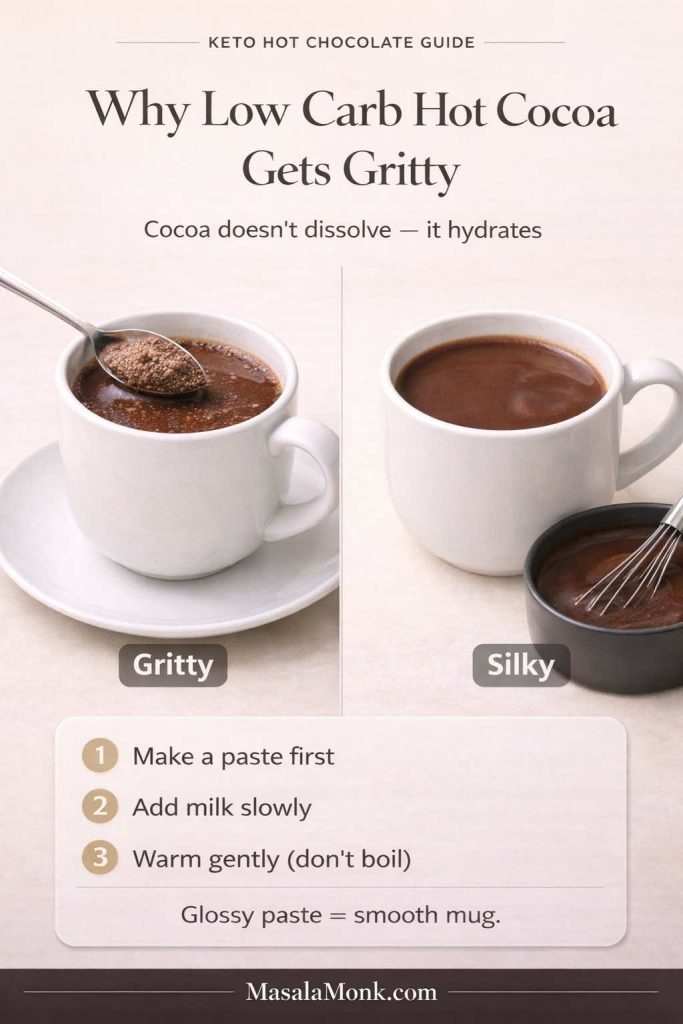
Before we get into variations, it helps to name the real enemy: grit. Almost every disappointing mug of low carb hot cocoa fails because the cocoa never truly dissolves and the cup never gets body. The fix is surprisingly simple, and once you learn it, you’ll stop thinking of this as a “keto recipe” and start thinking of it as your new default.
Along the way, we’ll keep things grounded in what matters: ingredients, technique, and comfort. We’ll also sprinkle in a few credible references where they genuinely help—like what cocoa is, why labels can be confusing, and where carb counts come from—using sources such as the USDA nutrition database and straightforward label guidance from the FDA. For a broader cocoa primer, you can also check MasalaMonk’s guide to cacao vs chocolate vs dark chocolate.
What you’re really building here is a ritual you can repeat. The first time you make it, you might measure. The second time, you’ll start adjusting by instinct. By the third or fourth mug, you’ll know exactly how rich you like it, what sweetener tastes best to you, and which “finish” makes the whole thing feel like a treat rather than just a warm drink.
Also, it’s worth saying out loud: hot chocolate doesn’t have to be loud to be good. A perfectly balanced cup can be subtle—deep cocoa, gentle sweetness, and enough creaminess to feel comforting without becoming heavy. That kind of cup is often the one you keep coming back to, especially when you want something warming but still want to sleep well afterward.
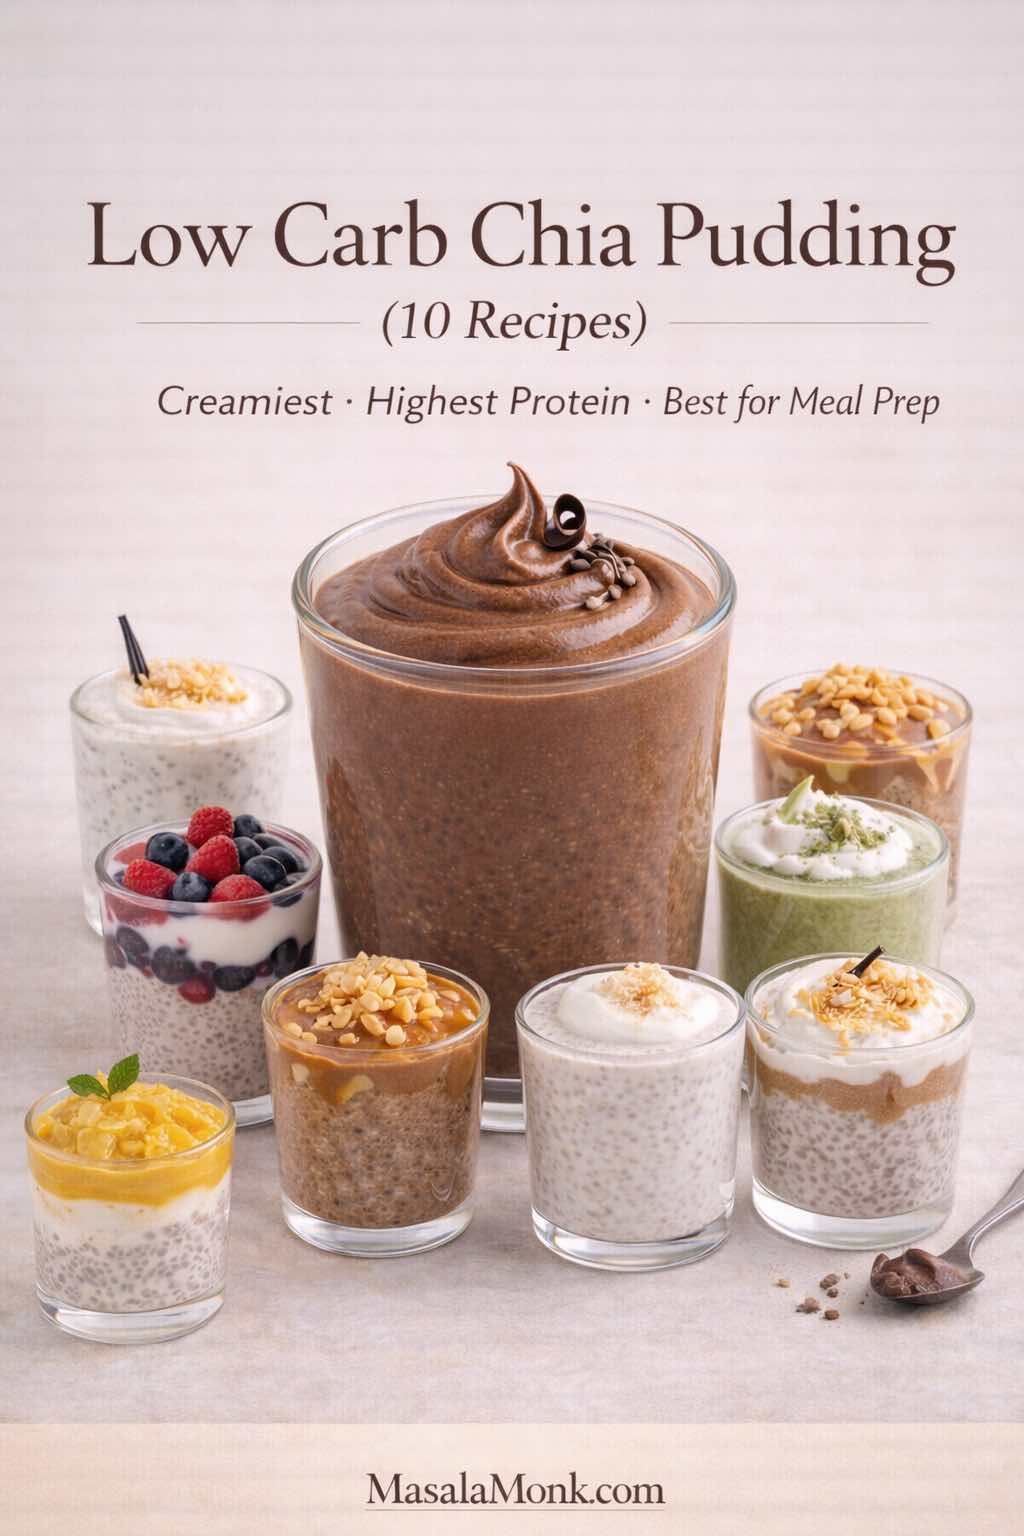
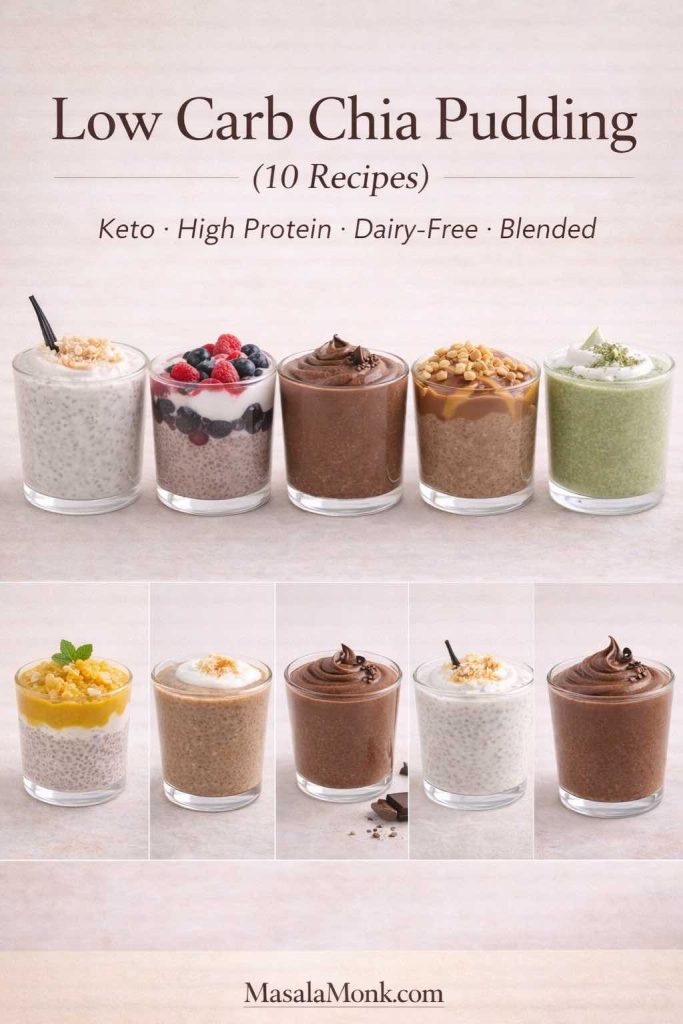
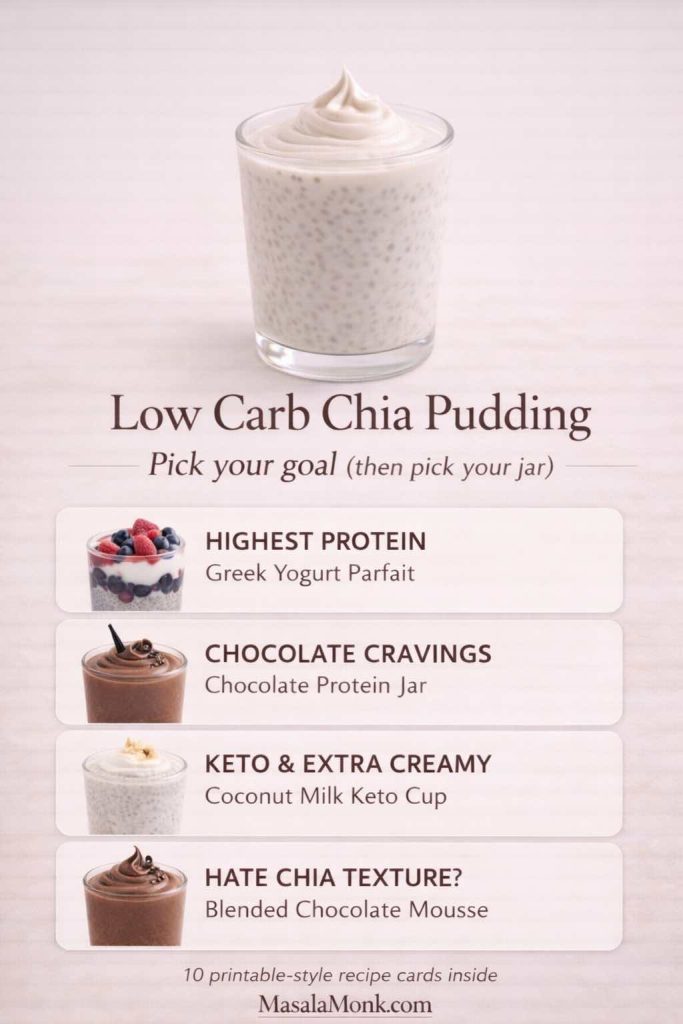
Also Read: 10 Low Carb Chia Pudding Recipes for Weight Loss (Keto, High-Protein, Dairy-Free)
Keto Hot Chocolate: The “No-Grit” Recipe That Changes Everything
Let’s start with the mug you’ll make most often: classic keto hot chocolate (or keto hot cocoa, if you grew up calling it that). The goal is a creamy, sugar free hot chocolate that feels like the real thing—because it is, just built differently.
There are two small moves that make a big difference:
- Make a cocoa paste first.
- Add body on purpose, not by accident.
When cocoa hits liquid the wrong way, it forms dry floating clumps that never truly disappear. You can whisk forever and still end up with that sandy finish at the bottom of the mug. On the other hand, when you hydrate cocoa into a paste before adding your milk, the drink turns silky almost immediately. It’s a small step, yet it’s the reason some cups taste café-level and others taste like regret.
Here’s the other subtle win: once the cocoa is hydrated properly, you can use less sweetener and still feel satisfied. That’s because the flavor reads fuller. In contrast, a gritty cup almost demands extra sweetness to “cover” the bitterness—yet it rarely works. So the paste method doesn’t just improve texture; it also makes the whole drink easier to balance.
Another quiet detail: the temperature you serve it at matters. Too hot, and you’ll taste bitterness and sweetener edges more sharply. Slightly cooler—still steaming, still cozy—and the chocolate tastes rounder. It’s a small shift, yet it’s one of those things you notice once you’ve had a truly good cup.
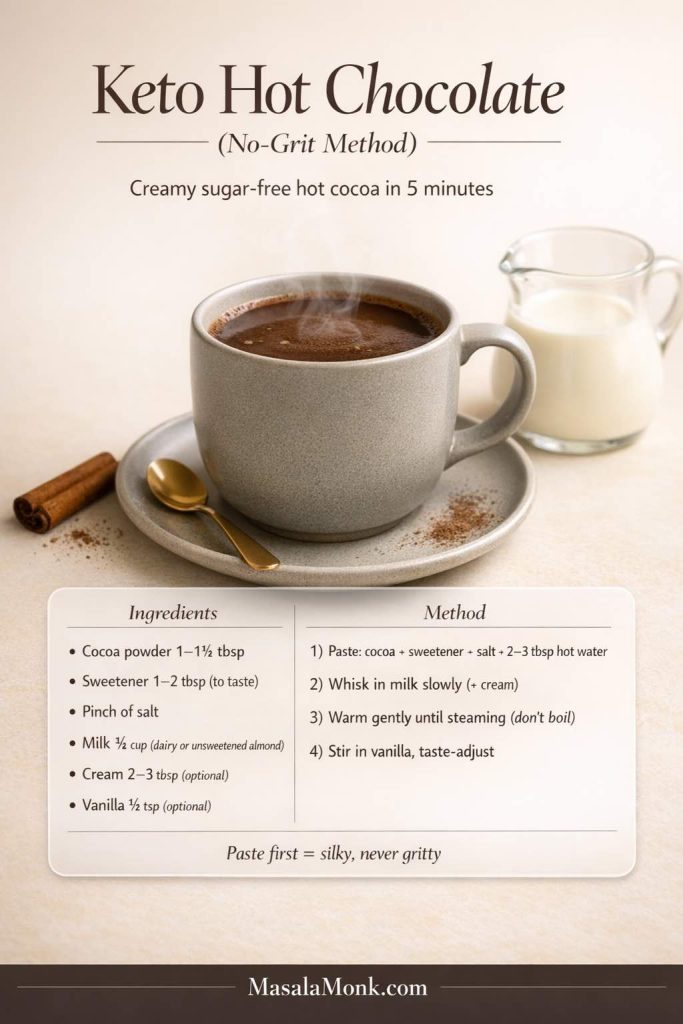
Ingredients for Keto Hot Cocoa (1 big mug)
You can keep this simple or customize it. Start with the basics:
- 1 to 1½ tablespoons unsweetened cocoa powder
- sweetener of choice (powdered blends dissolve the smoothest)
- a pinch of salt
- milk of choice (dairy or unsweetened almond milk are common)
- optional: a little heavy cream or coconut cream for richness
- optional: vanilla for a finished flavor
If you’re someone who likes tight carb math, the simplest approach is to track the cocoa and any dairy you use. For a reliable reference point, the USDA FoodData Central database is a solid baseline for cocoa powder nutrition and similar staples.
Now, let’s talk taste. Cocoa can read bitter if sweetness isn’t shaped, and sweetener can read “sharp” if cocoa isn’t supported. The little pinch of salt is what makes it taste like hot chocolate instead of chocolate water. It doesn’t make it salty; it makes it complete.
To make this even more forgiving, think of your ingredients in three roles:
- Cocoa = the backbone. This is your “chocolate identity.”
- Sweetener = the contour. It doesn’t have to dominate; it just smooths the edges.
- Fat/creaminess = the body. This is what turns cocoa into cocoa.
Once you see it that way, you can tweak without fear. If your cup tastes thin, it’s usually body, not cocoa. If your cup tastes harsh, it’s often salt, vanilla, or the sweetener choice—not that you “did it wrong.”
A quick note on cocoa powder choices: natural cocoa tends to be brighter and sometimes fruitier, while Dutch-process often reads smoother and deeper. Either can be perfect. The “best” one is whichever makes you want a second sip.
Also Read: Keto Chips: Best Low-Carb Snacks (For Salsa, Dips & Nachos)
How to Make Keto Hot Chocolate (Step-by-Step Recipe)
Step 1: Make the cocoa paste (this is the whole secret)
Add cocoa powder, sweetener, and a pinch of salt to a small saucepan. Then pour in 2–3 tablespoons of hot water (or hot milk) and whisk until you get a smooth, glossy paste.
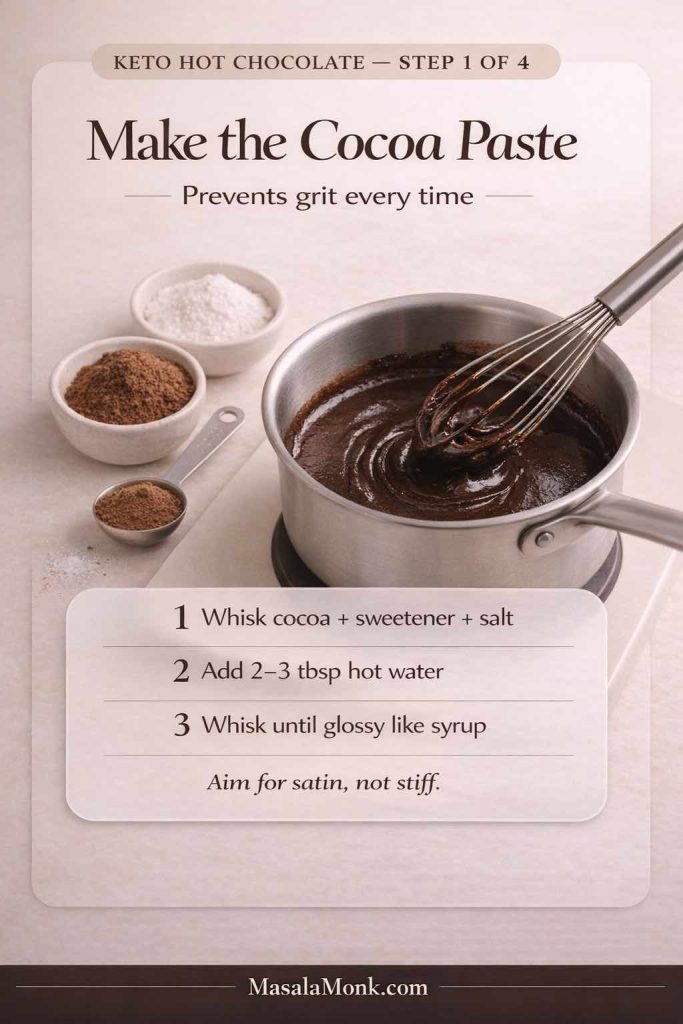
You’re looking for a texture that resembles chocolate syrup—thick, shiny, and uniform. This step matters because cocoa doesn’t “dissolve” the way sugar does; it needs to be hydrated. When you turn it into a paste first, you prevent the floating cocoa clumps that make low carb hot cocoa taste gritty.
If the paste feels stubborn at the start, keep going. Cocoa often takes a few extra seconds to fully drink in the liquid. If needed, add one teaspoon more hot water and whisk again. The goal is something that moves like satin, not something stiff like dough.
Step 2: Loosen the paste with a splash of milk
Once the paste is smooth, add a small splash of milk while whisking constantly. This step bridges the gap between thick paste and silky drink. When you do it slowly, the cocoa stays emulsified, and the texture stays uniform.
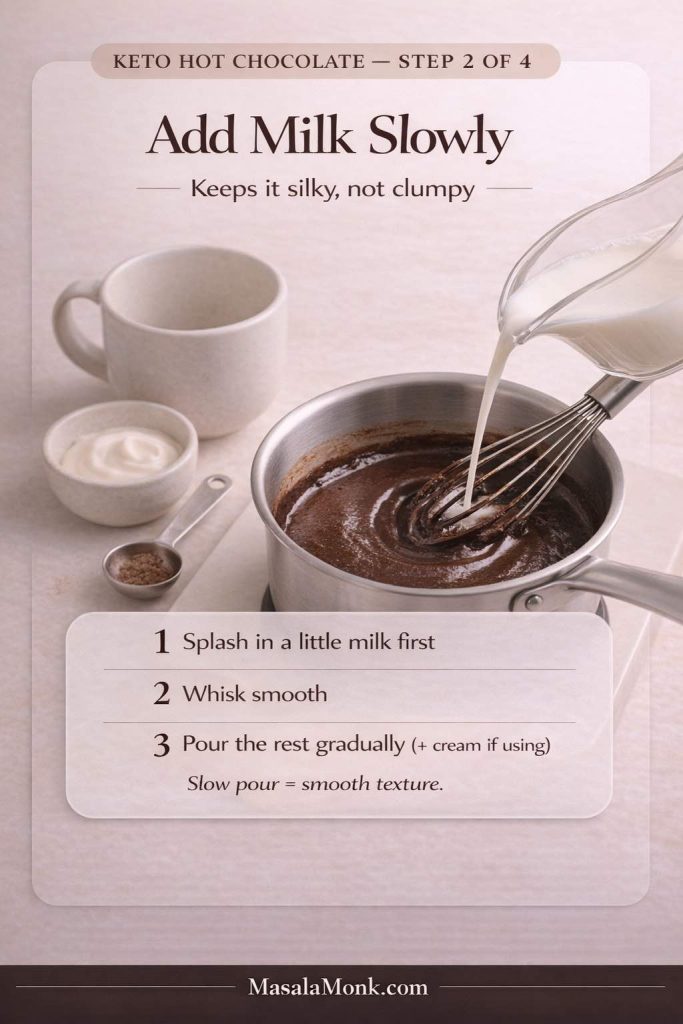
After that first splash, add the rest of the milk in a steady stream. If you’re using cream or coconut cream for extra body, add it here as well so it warms through and blends in.
At this point, you can choose the mood of your cup:
- For a richer, more “drinking chocolate” feel, go heavier on cream.
- For a lighter, more sippable mug, use more milk and skip extra fat.
Both versions can still be keto hot chocolate; they simply land differently.
Step 3: Warm gently until steaming (never boiling)
Place the saucepan over low to medium heat and warm the mixture until it’s steaming and completely smooth. Keep whisking occasionally, especially around the edges, where cocoa can cling.
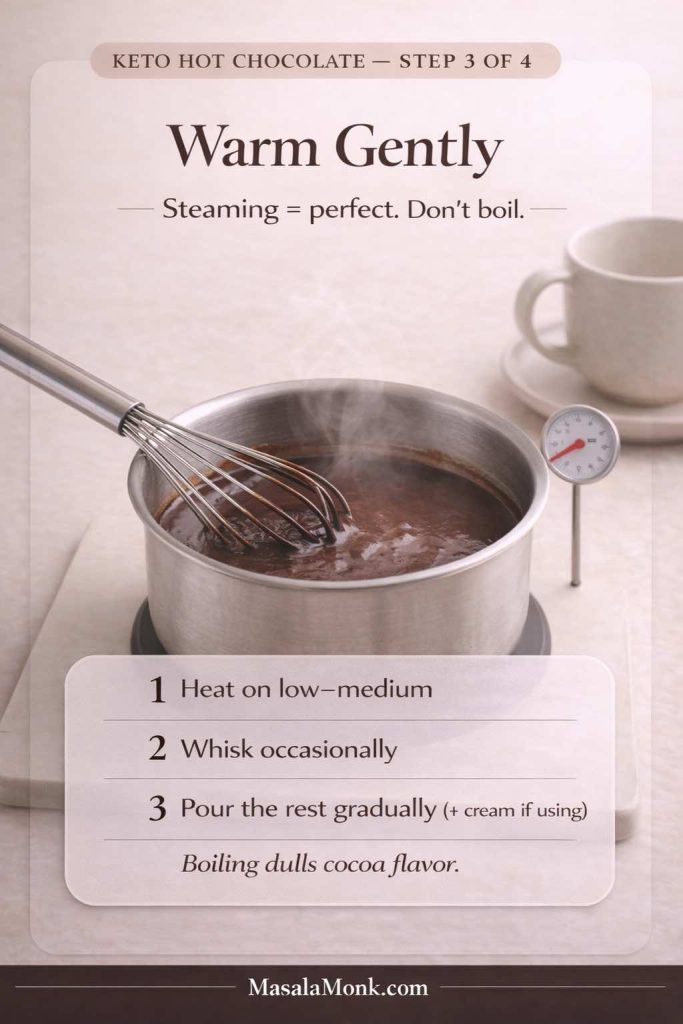
Avoid boiling. Boiling can flatten the chocolate aroma and make certain sweeteners taste sharper than they should. Moreover, gentle heat keeps dairy tasting fresh instead of “cooked,” which is especially noticeable in a simple sugar free hot chocolate where there’s nowhere for off-flavors to hide.
As it warms, you’ll see the texture change—first thinner, then suddenly velvety once everything is fully integrated. That’s your cue that the cup is ready.
Step 4: Finish, taste, and adjust with intent
Turn off the heat and stir in vanilla (if you’re using it). Then taste immediately, while it’s still warm, because sweetness and bitterness show up differently as the drink cools.
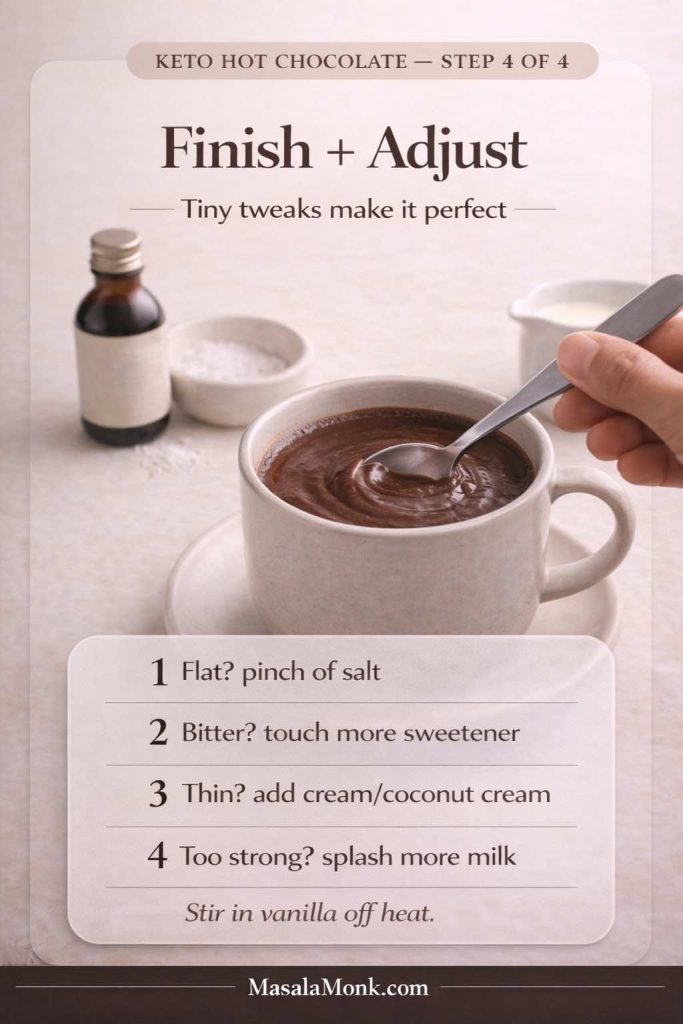
Use these small, targeted fixes rather than big swings:
- If it tastes flat: add a tiny extra pinch of salt.
- If it tastes too bitter: add a touch more sweetener.
- If it’s too thin: add a spoon of cream or coconut cream and whisk smooth.
- If it’s too intense: add a splash more milk to soften it.
Once it tastes right, that’s your foundation. From here, the drink moves into “best keto hot chocolate” territory—not by piling on more cocoa, but by polishing the cup with aroma and structure.
Make it feel “finished” (then add a tiny flourish)
This is the moment to decide what kind of hot cocoa you want to drink tonight. If you want it darker and more intense, keep it simple and cocoa-forward. Then if you want it softer and more dessert-like, add a whisper of vanilla or a little extra cream. And if you want it to feel like a café mug, focus on texture—whisk a bit longer, or froth it briefly. That tiny choice—intense vs cozy, clean vs creamy—changes the experience more than any complicated ingredient ever will.
Once it tastes right, add a finishing touch that feels luxurious without changing the whole drink: a light dusting of cinnamon on top, a few drops of vanilla stirred in at the very end, or a small swirl of cream poured in last so it ribbons through the mug. It’s not about making it fancy; it’s about making it feel like yours.
A small note for cocoa lovers: darker chocolate products tend to be richer in cocoa solids than milk chocolate versions. If you enjoy a quick overview of why dark chocolate is typically the “stronger cocoa” choice, Harvard’s nutrition news has a readable explainer on dark chocolate and cocoa compounds.
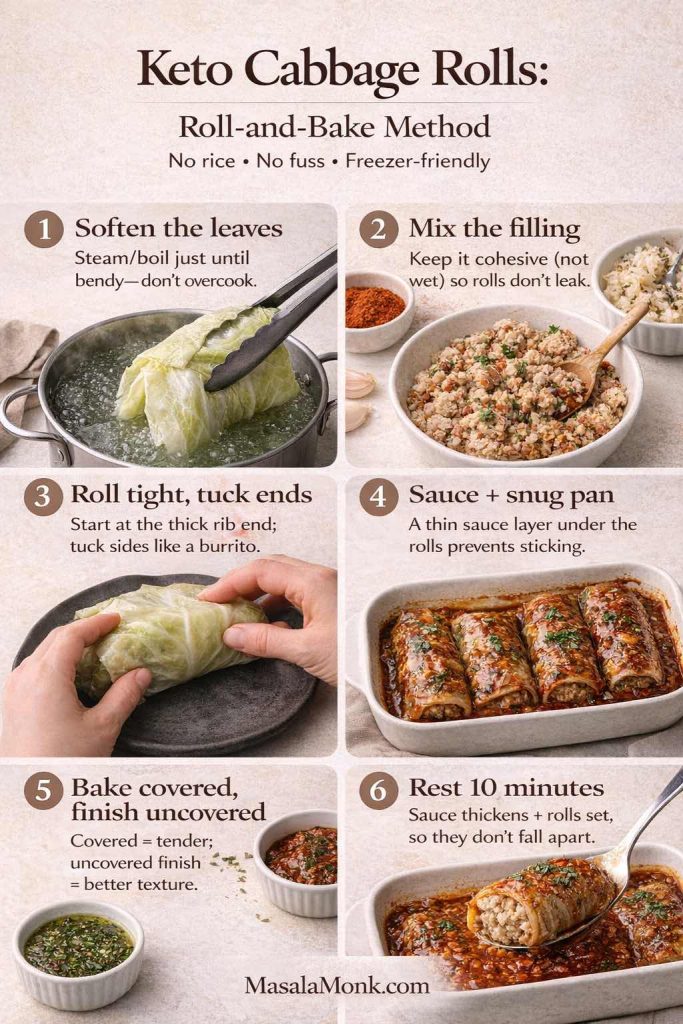
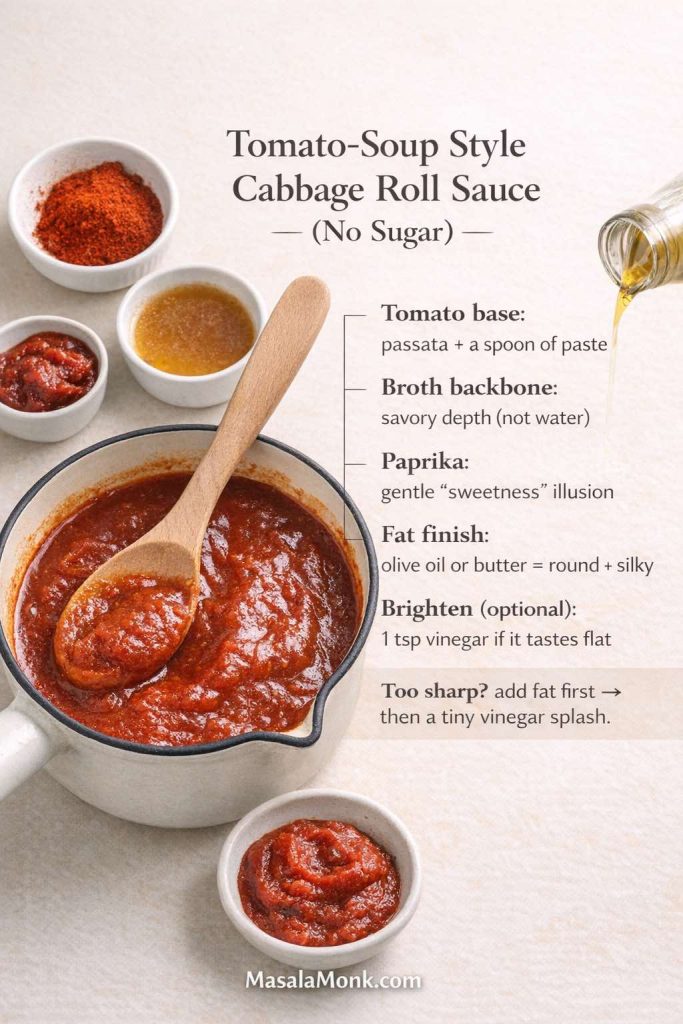
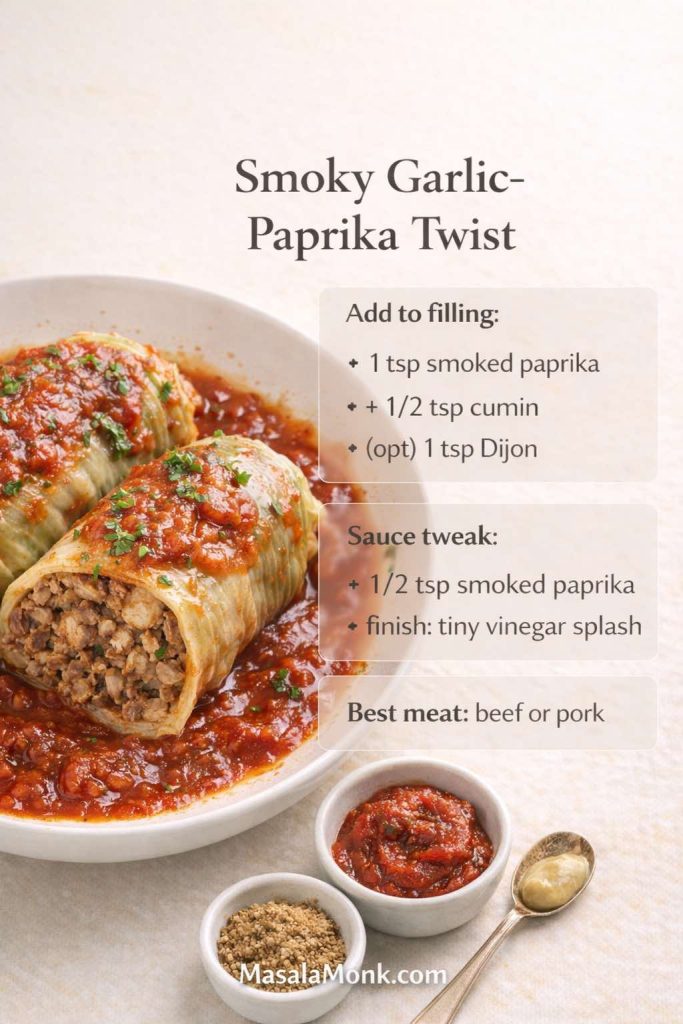
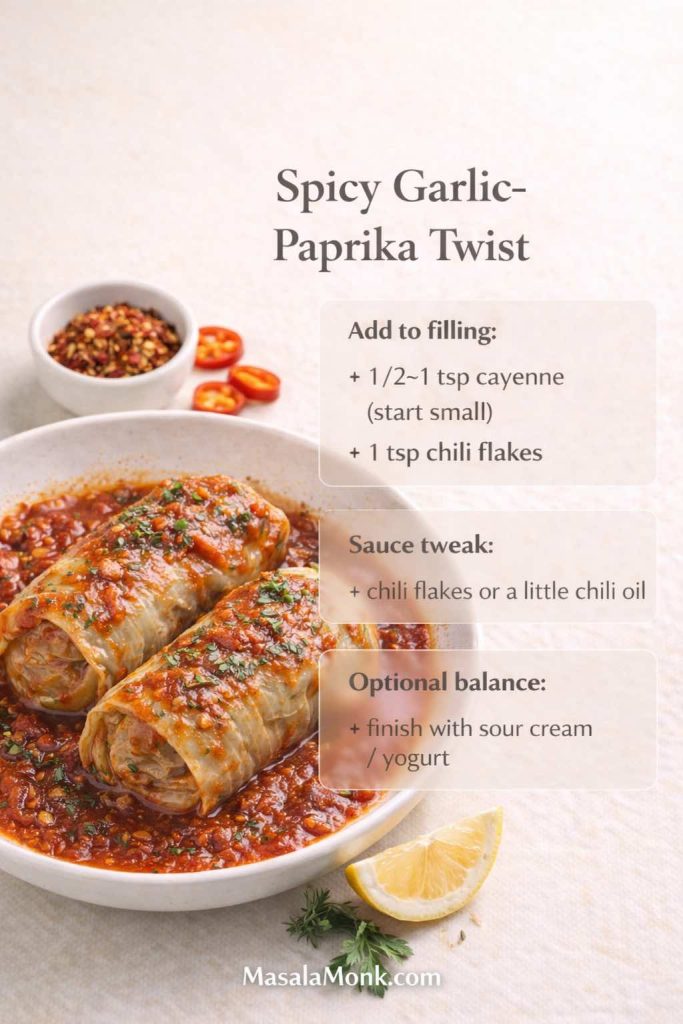
Also Read: Garlic & Paprika Cabbage Rolls (Keto-Friendly Recipes) – 5 Bold Savory Twists
Sweetness Without the Weird Aftertaste (Monk Fruit, Allulose, and Friends)
A lot of people land on monk fruit because they want a sugar free keto hot chocolate that doesn’t feel like compromise. Monk fruit can work beautifully—especially in blends—but the experience depends on what it’s paired with.
Here’s the practical truth: some sweeteners dissolve better, and some sweeteners taste better. Occasionally, the one that dissolves beautifully tastes slightly different than what you expect. That’s not failure; it’s just chemistry and palate.
In practice, you’re aiming for a sweetness that feels like warmth, not candy. If your cup tastes sweet but not comforting, it’s often missing vanilla, salt, or body. On the flip side, if your cup tastes rich but a little too bitter, a smaller adjustment to sweetener can fix it without needing to rebuild the whole drink.
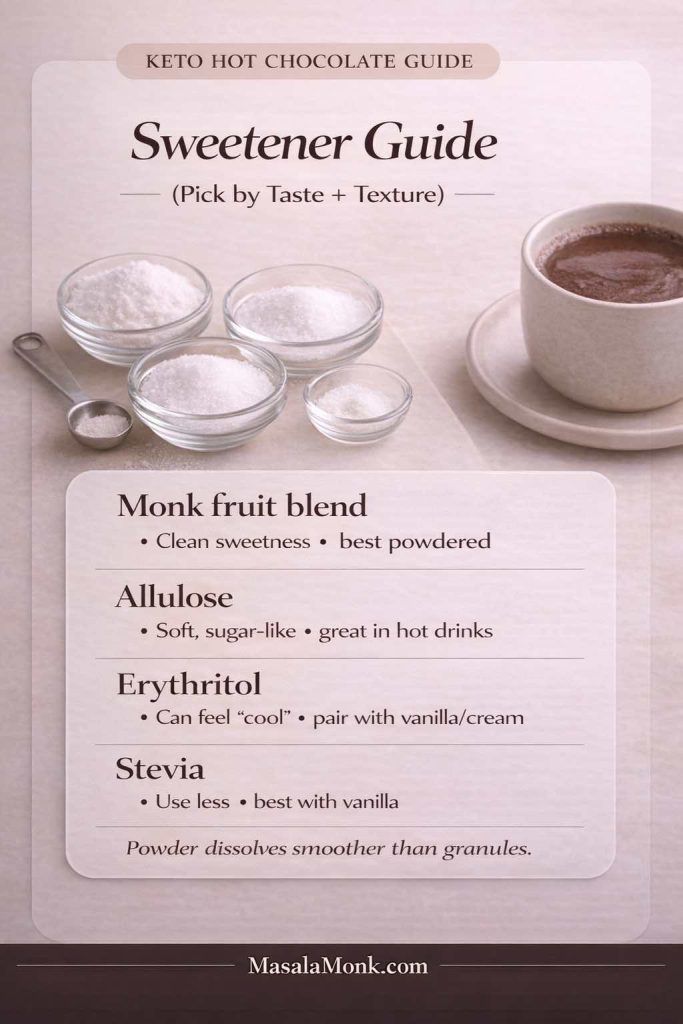
Hot Chocolate With Monk Fruit: How to Make It Taste Natural
If you’re using monk fruit, choose a powdered blend if possible. Powder dissolves quickly, while granulated sweeteners can leave a faint texture. If your monk fruit blend includes erythritol, it may cool slightly on the tongue. That cooling effect can be minimized by:
- warming gently instead of boiling,
- adding vanilla,
- rounding the cup with a spoon of cream or coconut cream,
- and using the cocoa paste method so the drink is smooth to begin with.
Allulose is another option that can give a softer sweetness and a more “classic” hot cocoa vibe. Meanwhile, stevia can work, though it usually benefits from vanilla and a richer base.
If you’re experimenting, do it in small changes. Add half the sweetener you think you need, taste, then decide. Because once cocoa is balanced, the cup often needs less sweetness than you expect.
Instead of chasing “perfect,” build the cup you want: a cozy low carb hot chocolate that tastes like chocolate first and sweet second.
Also Read: 10 Low Carb Chia Pudding Recipes for Weight Loss (Keto, High-Protein, Dairy-Free)
Keto Hot Chocolate Mix: A Homemade Powder You’ll Actually Keep on Hand
Now for the part that makes this feel easy: the jar. A homemade keto hot chocolate mix (or low carb cocoa mix) turns a craving into a one-minute ritual.
This approach is also ideal if you like the idea of hot chocolate packets, but you want something cleaner and more customizable. It’s the same comfort, just made at home and adjusted to your taste.
The real joy here is that you can build a mix that matches your personality:
- a darker, less-sweet mix you use most nights,
- a “holiday” mix with cinnamon and vanilla,
- or a richer blend for weekends when you want the mug to feel like dessert.

Homemade Keto Hot Chocolate Mix (Recipe for 10–20 Servings)
In a bowl, whisk together:
- 1 cup unsweetened cocoa powder
- ¾ to 1 cup powdered sweetener (adjust to preference)
- 1½ teaspoons fine salt
- optional: cinnamon, instant espresso, vanilla powder
- optional for extra body: collagen peptides
Once it’s evenly mixed, pour it into a dry jar with a tight lid.
If you want the jar to feel extra “instant,” you can split your mix into two layers: a base cocoa blend and a second “finishing” blend (like vanilla powder and cinnamon). Then you can scoop either one depending on what mood you’re in. It’s a small move, yet it keeps the ritual fun.
How Much Keto Hot Cocoa Mix Per Mug?
Start with 2 tablespoons per mug. Then adjust:
- 1½ tablespoons for a lighter cup
- 2½ to 3 tablespoons for a richer cup
To keep it silky, use the same trick as the fresh version: stir the mix with a splash of hot water to form a paste, then add hot milk.
If you prefer a lighter drink, use more milk and less mix. If you prefer a deeper “drinking chocolate” feeling, use more mix and a slightly richer base. Either way, the paste step keeps the experience smooth.
When You Want “No Carb Hot Chocolate Mix” Results
People often say “no carb hot chocolate” or “zero carb hot chocolate,” yet cocoa itself contains carbohydrates. The realistic aim is “very low net carbs,” not literal zero.
That said, you can keep it extremely low by:
- using water + a bit of cream (instead of a full mug of milk),
- choosing a sweetener that works for you,
- and using cocoa strategically rather than excessively.
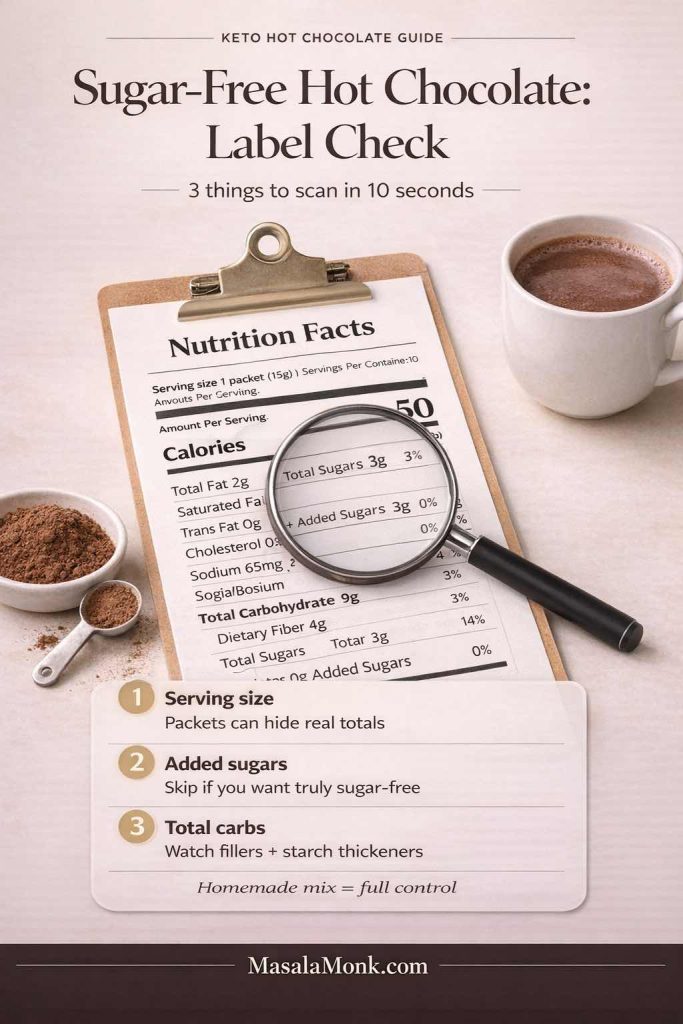
When labels get confusing, it helps to understand how “added sugars” appear on packaging. The FDA has a clear explanation of added sugars on the Nutrition Facts label. Even if you mostly make your own mix, that knowledge helps when you’re comparing store options.
Also Read: Keto Flour: Guide to Low-Carb Flours That Bakes Like the Real Thing
Low Carb Hot Chocolate That Feels Thick and Luxurious (Without Cornstarch)
Traditional hot chocolate mixes often rely on starches for body. Keto versions usually don’t. That’s why some cups taste thin.
If you want a low carb low sugar hot chocolate that feels like dessert in a mug, add thickness intentionally. Here are a few easy paths:
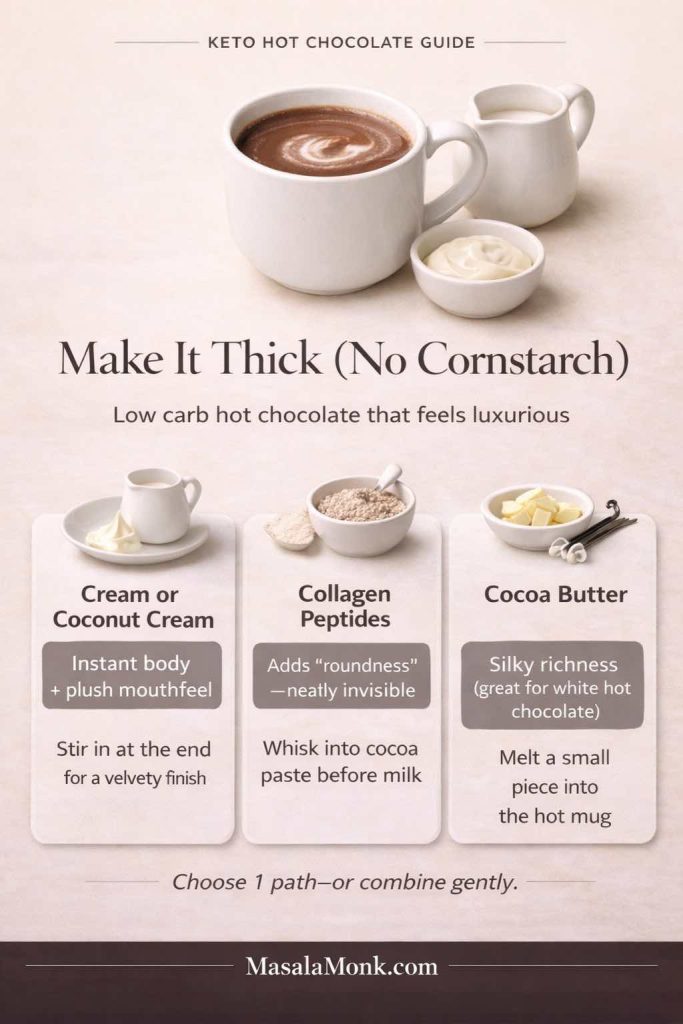
1) Cream or Coconut Cream
A spoonful of cream makes a dramatic difference. Coconut cream does the same for dairy-free cups.
If you like your cup extra velvety, add the cream at the end rather than at the beginning. That way the flavor stays bright and the texture feels plush without tasting overly “cooked.”
2) Collagen Peptides
Collagen is nearly invisible in hot cocoa and adds a subtle “roundness” without making it chalky. It’s also an easy bridge into a high protein low carb hot chocolate.
To make collagen blend smoothly, stir it into your cocoa paste before the milk goes in. That way it’s hydrated and hidden within the chocolate base.
3) Cocoa Butter (Especially for White Hot Chocolate)
Cocoa butter adds richness and a smooth mouthfeel. It’s especially helpful when you’re chasing a sugar free white hot chocolate that tastes like a real white cocoa instead of vanilla milk.
A little goes a long way. Even a small amount can shift the drink from “nice” to “silky.”
Also Read: Almond Flour Pancakes (Easy Recipes) Fluffy, High-Protein, Keto & More
Keto Protein Hot Chocolate (High-Protein, Low-Carb, and Still Cozy)
If you’ve ever tried to stir protein powder into hot liquid and watched it turn into a lumpy mess, you’re not alone. Protein hot chocolate can be fantastic, but it needs a gentler approach.
The goal is a keto protein hot chocolate that’s warm, filling, and smooth—almost like a mug you could have after dinner when you want something comforting but also want to stay on track.
You can also choose the vibe here. If you want it to feel more like a dessert, increase richness and keep sweetness moderate. If you want it to feel more like a post-workout drink, keep it lighter and focus on smooth mixing.
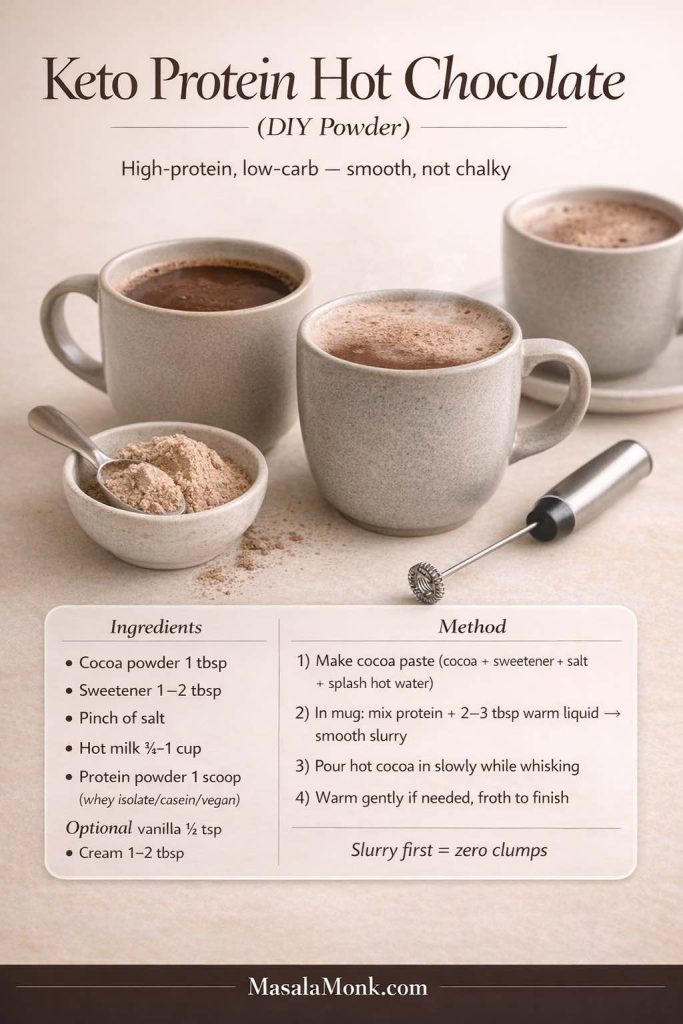
The Easy Anti-Clump Method
Instead of adding protein directly to hot cocoa, do this:
- Add your protein powder to a mug.
- Stir in a small splash of warm liquid to form a smooth slurry.
- Then pour the hot chocolate in slowly while whisking.
This works for whey isolate, casein, and many vegan blends.
If your protein powder tends to taste “plain,” vanilla matters even more here. A touch of vanilla makes chocolate read more chocolatey and makes sweetener taste less sharp. Additionally, a pinch of salt can make protein flavors taste smoother, especially in chocolate drinks.
If you like the idea of building a high-protein morning routine, pairing a warm protein cocoa with something prep-friendly can feel surprisingly satisfying. For example, MasalaMonk’s high protein overnight oats can work as a broader “macro” companion, even if you personally keep the oats version for higher-carb days.
Also Read: Keto pancakes that actually taste like pancakes
Dairy Free Keto Hot Chocolate (Almond Milk and Beyond)
Dairy-free doesn’t have to mean disappointing. In fact, a dairy free keto hot chocolate can be one of the smoothest versions—especially if you build body thoughtfully.
If you’ve ever made almond milk hot cocoa and thought, “It’s good, but it feels a bit thin,” you’re not imagining it. Almond milk is naturally lighter. Once you know that, you can compensate in a way that still tastes clean.
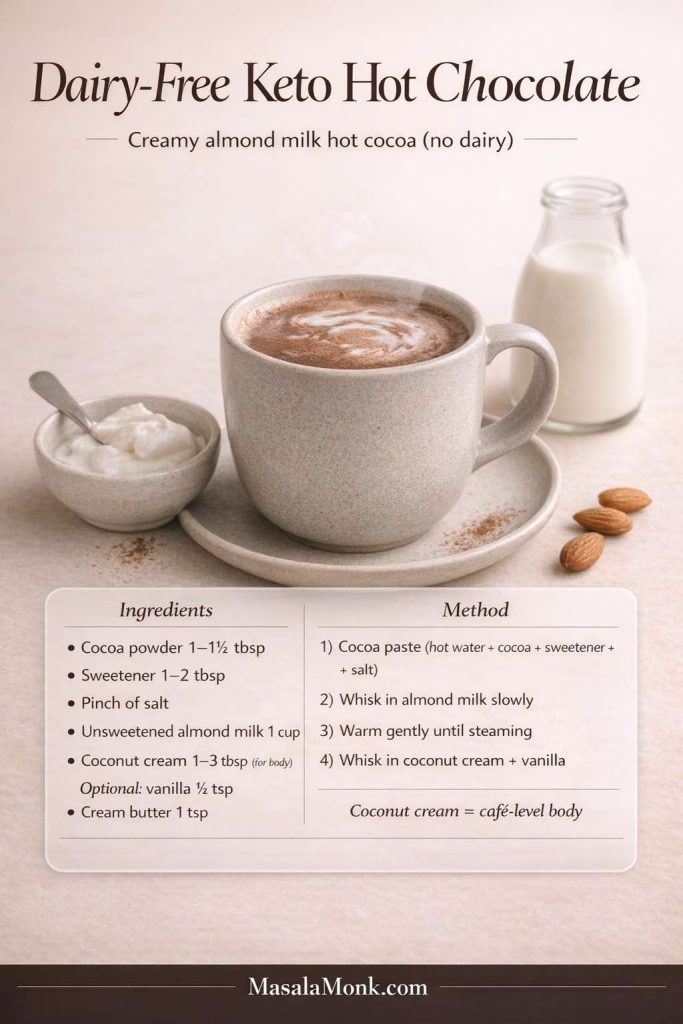
Almond Milk Hot Chocolate Keto Style
Unsweetened almond milk is a common base because it’s light and easy to find. However, almond milk alone can taste thin in hot cocoa. To fix that:
- add coconut cream,
- or add a touch of cocoa butter,
- or blend briefly to create a richer mouthfeel.
For an especially smooth dairy-free cup, warm your almond milk gently and avoid boiling. Almond milk can taste slightly “toasted” if overheated, which can make cocoa taste harsher.
Macadamia milk can be wonderfully creamy as well, and coconut milk beverage offers a naturally fuller texture.
For plant-forward dessert direction that still feels aligned with this cozy theme, you might also enjoy a gentle internal hop into something like MasalaMonk’s keto vegan dessert ideas—especially if you’re leaning into coconut-based sweets and warm spices.
Also Read: Eggless Yorkshire Pudding (No Milk) Recipe
Bulletproof Keto Hot Chocolate (Frothy, Filling, and Surprisingly Comforting Recipe)
Sometimes you don’t just want hot cocoa—you want something that sticks with you. Bulletproof hot chocolate is that version.
It’s still keto hot chocolate, but it leans into satiety and warmth. It’s the mug you make when you want a steady, cozy feeling, not a sugar spike.
This version also tends to feel more “luxurious” than you expect because blending creates a café-style foam. When it’s done well, the texture is almost like a hot chocolate latte.
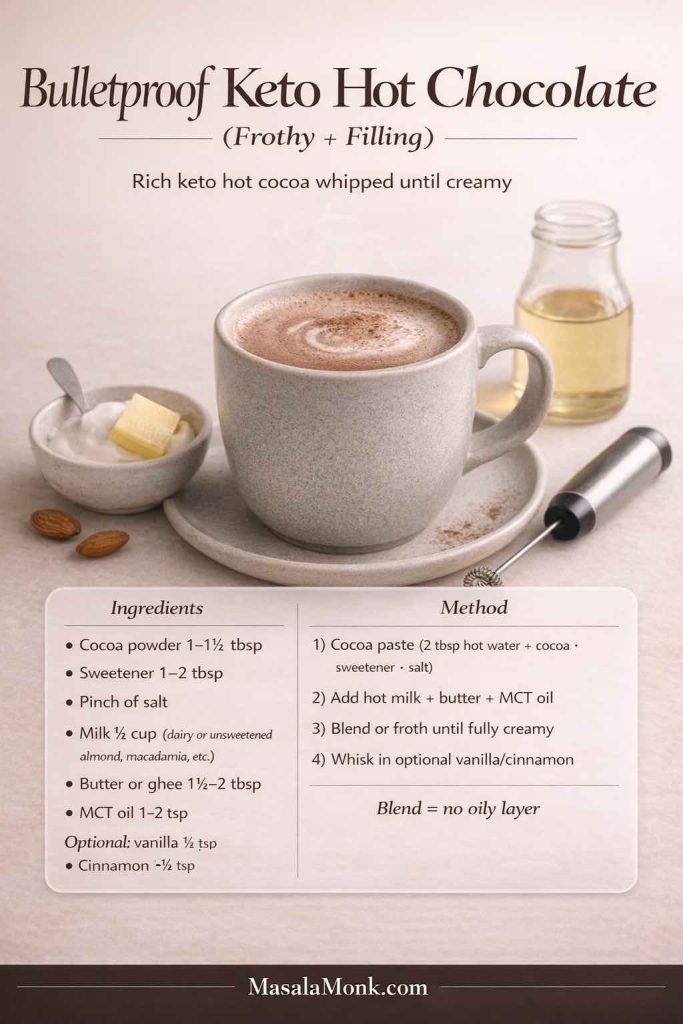
Bulletproof Hot Chocolate Formula (One Mug)
Start with a slightly stronger base (so it doesn’t get diluted by fat):
- make keto hot cocoa using water plus a splash of milk,
- then add butter or ghee,
- optionally add a small amount of MCT oil,
- blend until frothy.
Blending is the key. Otherwise, you’ll get an oil slick that feels unpleasant.
A helpful trick: start small with fats, especially MCT oil. You can always add more next time. The most satisfying cup is often the one that feels creamy and stable rather than overly rich.
When you blend it for even 10–15 seconds, the drink becomes foamy and luxurious—almost like a café drink that happens to be low carb.
Also Read: Crock Pot Chicken Breast Recipes: 10 Easy Slow Cooker Dinners (Juicy Every Time)
Keto Mexican Hot Chocolate (Warm Spice, Deep Cocoa, Zero Fuss)
Mexican hot chocolate isn’t about heat for heat’s sake. It’s about warmth and aroma. The spice should feel like a soft glow behind the cocoa.
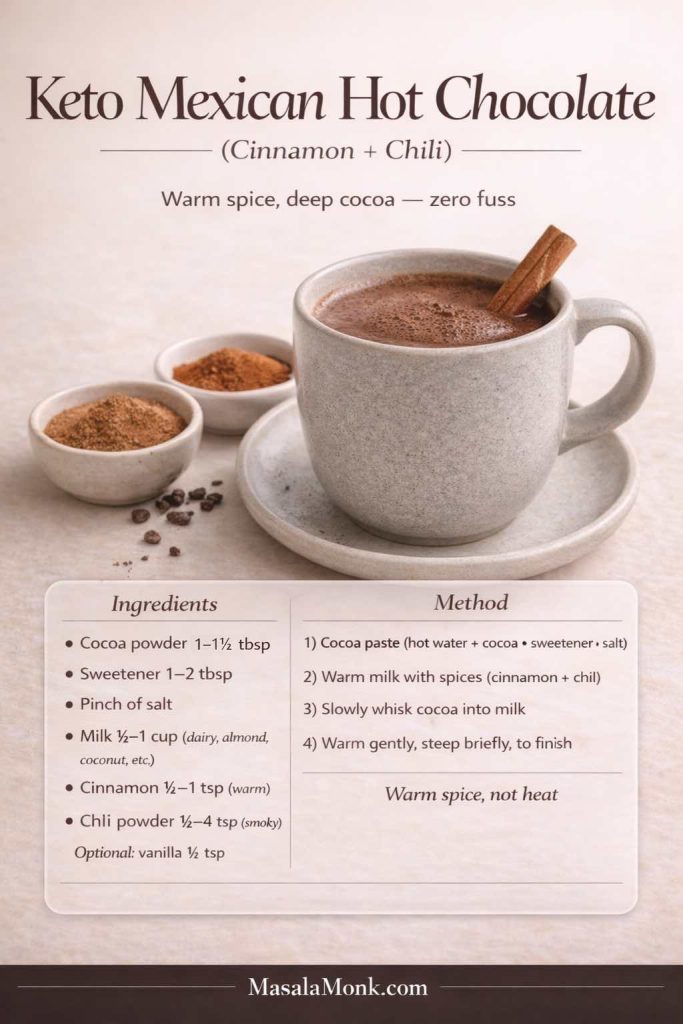
To make keto Mexican hot chocolate, add:
- cinnamon
- a tiny pinch of chili or cayenne
- vanilla
- optionally a tiny pinch of nutmeg
You can also add these to your jar mix and create a second flavor jar for easy variety.
If you want the spice to feel more rounded, cinnamon plus vanilla is the core. Chili is optional, and it should be used with restraint. One tiny pinch can be enough to make the cocoa taste deeper without tasting “spicy.”
This version is especially good on nights when you want something different but don’t want to think too hard.
Also Read: Sourdough Starter Recipe: Make, Feed, Store & Fix Your Starter (Beginner Guide)
White Hot Chocolate Sugar Free (The Cozy Vanilla-Chocolate Recipe)
White hot chocolate is a special case. It doesn’t rely on cocoa powder. Instead, it relies on cocoa butter and milk solids in traditional versions.
A sugar free white hot chocolate aims to mimic that creamy, vanilla-forward richness without sugar.
Because it’s not cocoa-powder-based, it tastes softer and more fragrant. It’s the mug you make when you want comfort but don’t necessarily want “dark chocolate energy.”
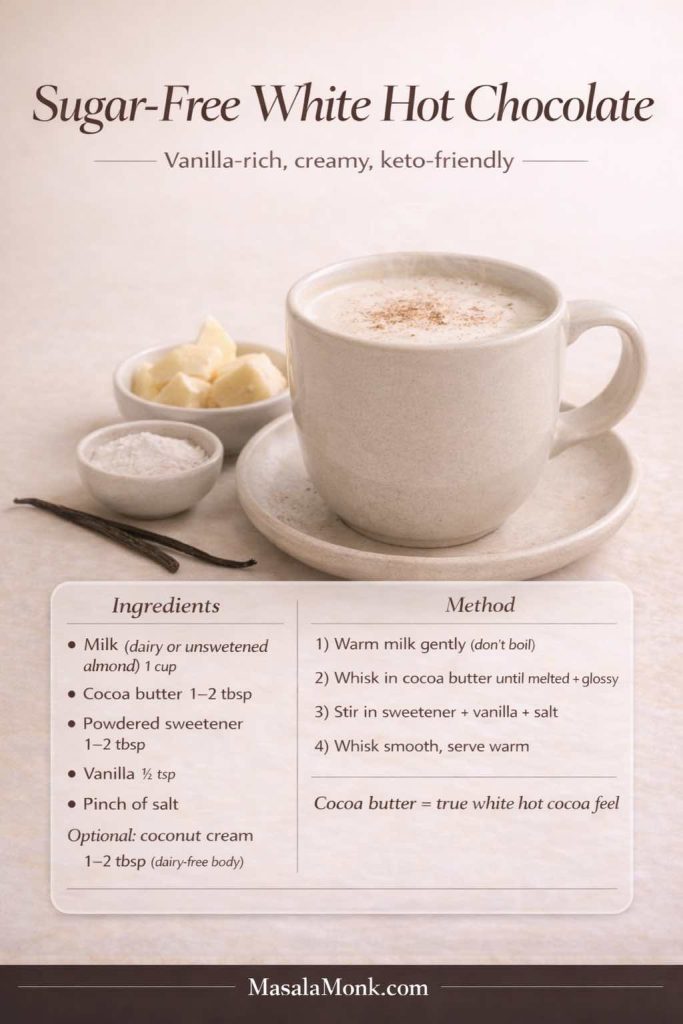
Simple Sugar-Free White Hot Chocolate (One Mug)
- warm milk (dairy or unsweetened almond milk)
- melt in cocoa butter
- sweeten to taste
- add vanilla and a pinch of salt
- whisk until glossy
If you’re going dairy-free, coconut cream can help bring the richness back.
This is also one of the moments where “labels” matter if you’re buying cocoa butter chips or similar ingredients. Even when something says sugar free, it’s worth understanding how sugars are listed and what’s being used for bulk. The FDA’s guidance on added sugars can be surprisingly clarifying.
Also Read: Peanut Butter Fudge: Recipes & Guide (8 Methods + Easy Variations)
Low Glycemic Hot Chocolate: What That Actually Means in Practice
“Low glycemic” can mean different things depending on who’s using the phrase. If you’re looking for a low glycemic hot chocolate, what you’re often trying to do is avoid ingredients that behave like quick sugar in the body.
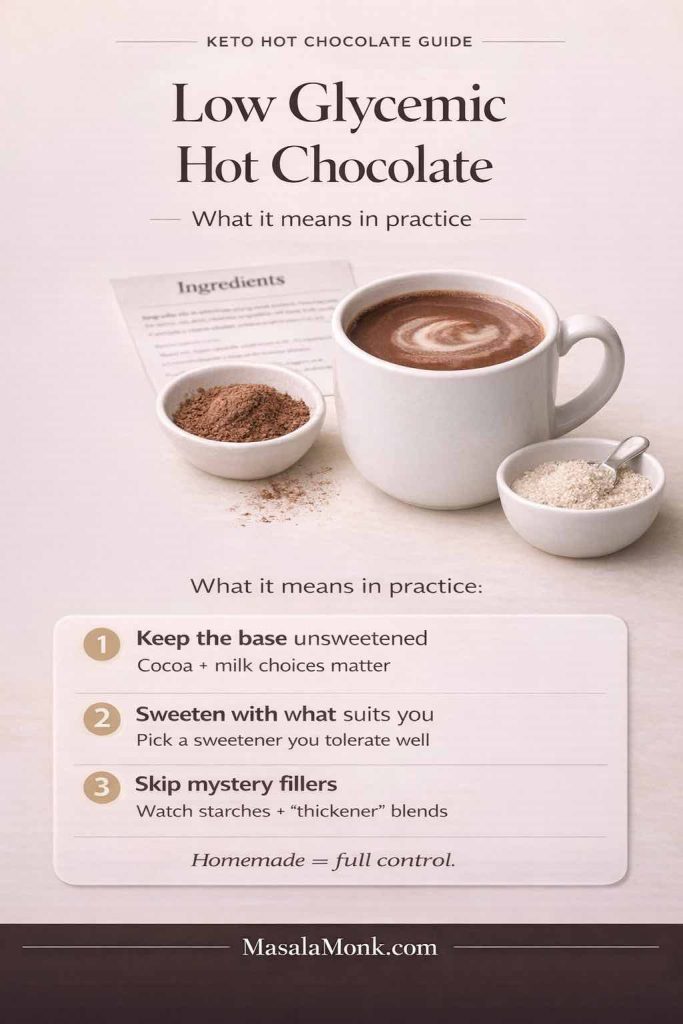
Instead of turning this into a lecture, it’s enough to understand two basics:
- Glycemic index refers to how carbohydrate-containing foods affect blood sugar.
- Glycemic load considers portion size as well.
If you want a clear, neutral explanation, Oregon State’s Linus Pauling Institute offers a helpful overview of glycemic index and glycemic load.
For a printable reference that can support your broader meal planning, MasalaMonk also has a low glycemic index foods list. It’s a handy resource if your “warm drink” habit tends to connect with snack choices afterward.
In daily life, “low glycemic hot cocoa” usually comes down to three practical choices:
- keep your base unsweetened (cocoa and milk choices matter),
- sweeten with something that suits your body and preferences,
- and avoid mystery fillers that can sneak into packaged mixes.
Homemade versions make this easy because you control the whole story.
Also Read: Manhattan Cocktail Recipe (Classic + 6 Variations)
When You’re Craving Chocolate but Don’t Want a “Dessert Spiral”
This is where keto hot chocolate becomes more than a recipe. It becomes a tool.
Sometimes you want chocolate because you’re tired, bored, cold, or simply craving comfort. A warm mug can satisfy that desire in a way that a random snack often can’t. Still, what you pair it with matters. Not in a perfectionist way—just in a “how do I want to feel after this?” way.
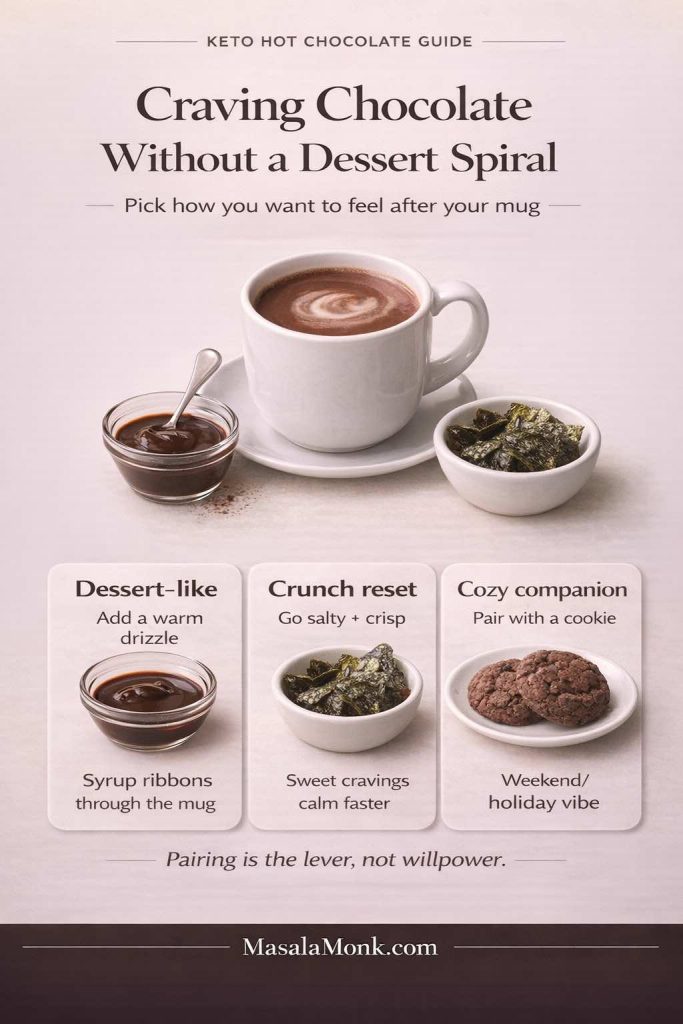
If you want something truly dessert-like
A drizzle can turn the mug into a café drink. If you enjoy that idea, MasalaMonk’s 3-minute homemade chocolate syrup is a useful technique reference for getting a smooth, glossy chocolate finish. Even if you adapt the sweetener to suit your style, the method itself is gold.
If you want to take it one step further without making it fussy, warm the syrup slightly before drizzling. That way it ribbons through the mug instead of sinking. It’s a small sensory upgrade that makes the drink feel intentional.
If you want something crunchy to balance the sweetness
A savory bite can be the reset button. It sounds odd until you try it. Something like MasalaMonk’s guide to seaweed snacks as a keto-friendly option can offer a surprisingly satisfying contrast after a warm, chocolatey drink.
The contrast works because it changes the direction of your palate. Sweetness can spark more sweetness cravings; salt and crunch often calm them.
If you want something warm-and-cozy that stays in the chocolate lane
A cookie pairing is classic. If you want a chocolate-on-chocolate moment without repeating the same flavor in the mug, MasalaMonk’s double chocolate cookie variations can be a fun companion for weekends or holidays.
Also Read: Baked Ziti Recipe Collection: 15 Easy Variations
Turning Keto Hot Chocolate Into a “Make-Once, Use-All-Week” Ritual
One reason hot cocoa habits stick is repetition: the same comfort, night after night. That’s why the jar mix is so useful. Still, you can make it even easier by deciding on two or three “default versions” ahead of time.
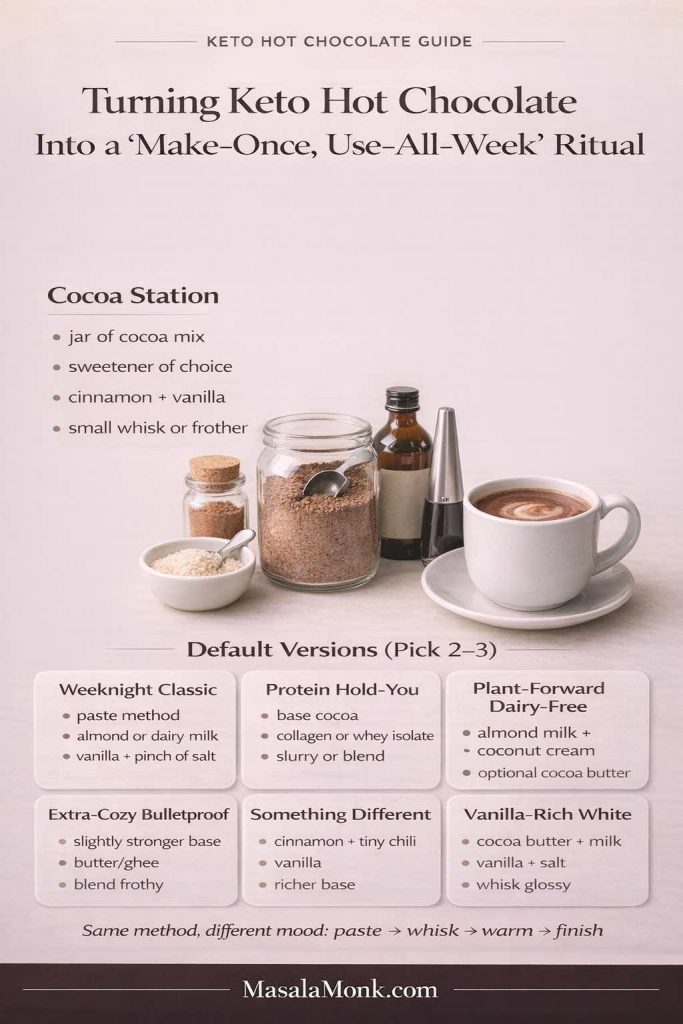
Here are a few combinations that feel distinct without requiring extra work:
1) Classic Keto Hot Cocoa (Weeknight Default)
- cocoa paste method
- almond milk or dairy milk
- vanilla + pinch of salt
2) Keto Protein Hot Chocolate (When You Want It to Hold You)
- base cocoa
- collagen or whey isolate
- blend or slurry method
3) Dairy Free Keto Hot Chocolate (Plant-Forward Comfort)
- almond milk + coconut cream
- cinnamon + vanilla
- optional cocoa butter for richness
4) Bulletproof Hot Chocolate (When You Want Extra Cozy)
- slightly strong base
- butter/ghee
- blend until frothy
5) Keto Mexican Hot Chocolate (When You Want Something Different)
- cinnamon + tiny pinch chili
- vanilla
- slightly richer base
6) White Hot Chocolate Sugar Free (When You Want Vanilla-Rich Comfort)
- cocoa butter + milk
- vanilla + salt
- whisk until glossy
Once you’ve made these once or twice, they feel automatic. Moreover, because the method is the same—paste, whisk, warm, finish—you don’t need to “learn” six separate recipes. You’re just nudging the mug in a different direction.
If you want to make the routine even smoother, set up your pantry like a tiny cocoa station:
- a jar of cocoa mix,
- your preferred sweetener,
- cinnamon and vanilla,
- and a small whisk or frother.
That way the “decision fatigue” disappears. When you want a low carb hot drink, it’s just a few familiar motions.
Also Read: Cranberry Moscow Mule Recipe: A Festive Holiday Cocktail With Easy Variations
A Small Cocoa Reality Check (Because It Helps You Choose Better)
If you’ve ever wondered why one cocoa powder tastes rich and another tastes thin, it often comes down to cocoa solids, processing, and personal preference. Darker cocoa products tend to bring stronger flavor, and that’s why many people prefer them for hot cocoa.
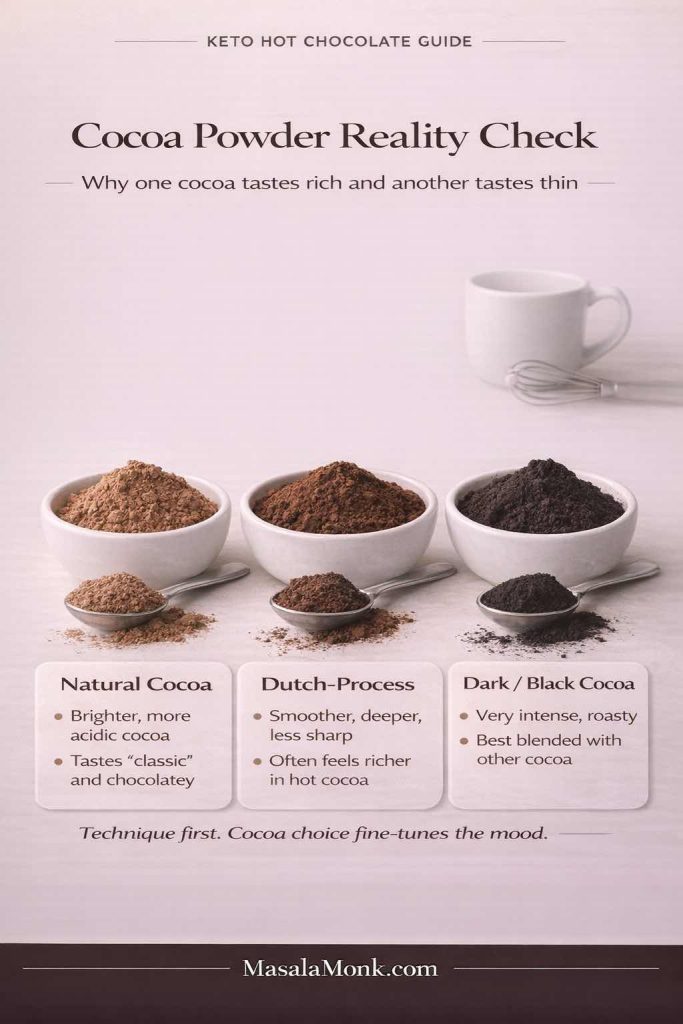
Harvard’s overview on dark chocolate and cocoa flavonoids is a readable reference if you enjoy the “why” behind your ingredients. Meanwhile, for strict numbers, the USDA FoodData Central database is a useful baseline for cocoa powder nutrition data.
The point isn’t to chase the “perfect” cocoa powder. The point is to understand that your ingredients shape your mug, and once your technique is right, your cup becomes reliably good.
If you’re curious about how cacao differs from cocoa and chocolate in everyday use, MasalaMonk’s breakdown of cacao vs chocolate vs dark chocolate is a helpful rabbit hole—especially if you like knowing what you’re actually tasting.
Making a Low Carb Hot Drink Feel Like a Treat (Even When It’s Simple)
A hot keto drink doesn’t need a dozen ingredients to feel special. Often, it’s one small detail that creates the “treat” feeling:
- a dusting of cinnamon on top
- a tiny pinch of salt that unlocks the cocoa
- a splash of vanilla that makes it taste finished
- a frothy blend that feels café-level
- or a richer base that makes it feel like dessert
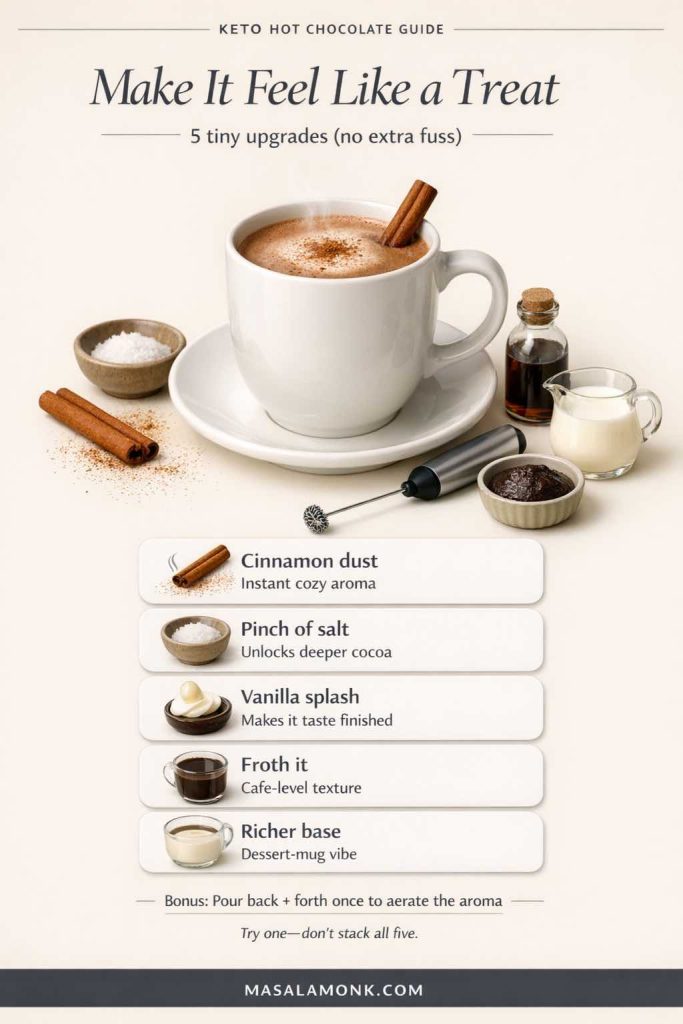
That’s also why this ritual can work even if you don’t drink it every day. You can reserve it for the moments when you want comfort and you want it without the after-feel of sugar.
If you’re in a phase where you’re exploring more low carb drinks beyond hot cocoa, MasalaMonk’s keto mocktails can be a fun branch-off for weekends—different vibe, same “drink that feels like an event” energy.
And if you ever want your mug to feel like it came from a café without changing ingredients at all, try this: pour it back and forth once between mug and measuring cup. It aerates the drink slightly and wakes up the aroma. It’s not necessary, yet it adds a little softness to the experience.
Also Read: Iced Coffee: 15 Drink Recipes—Latte, Cold Brew, Frappe & More
A Cozy Way to Use Leftover Cocoa Mix (So Nothing Goes Stale)
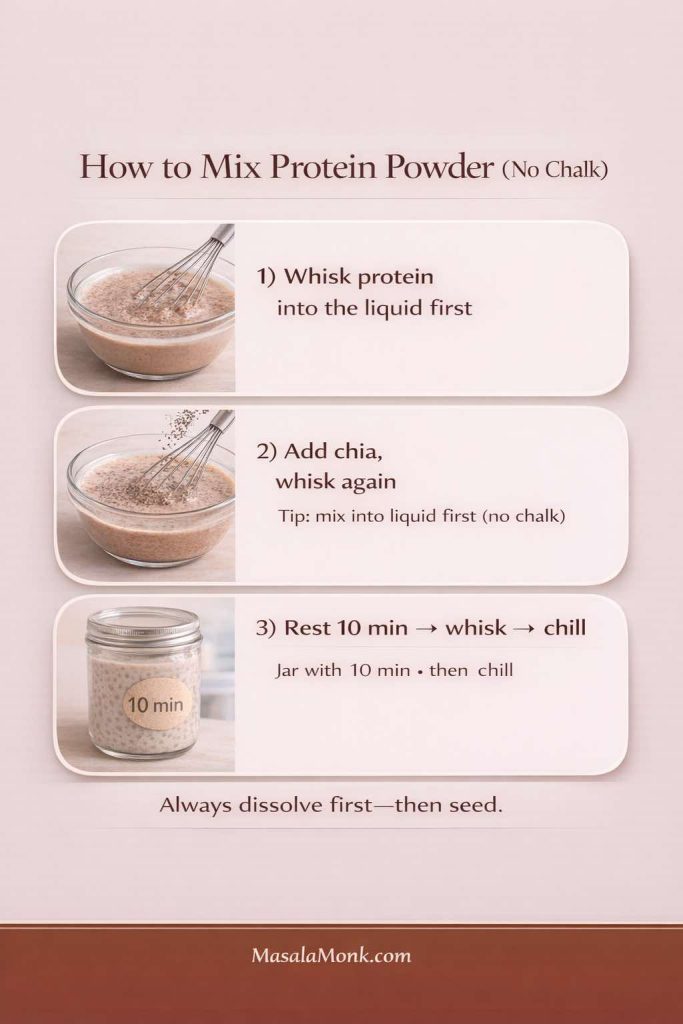
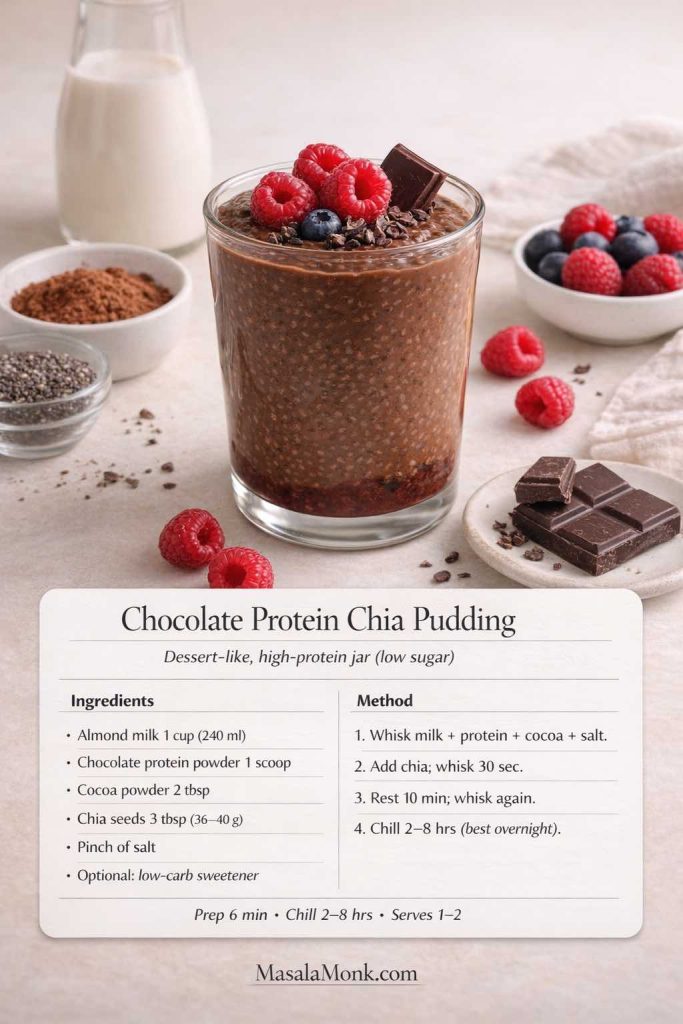
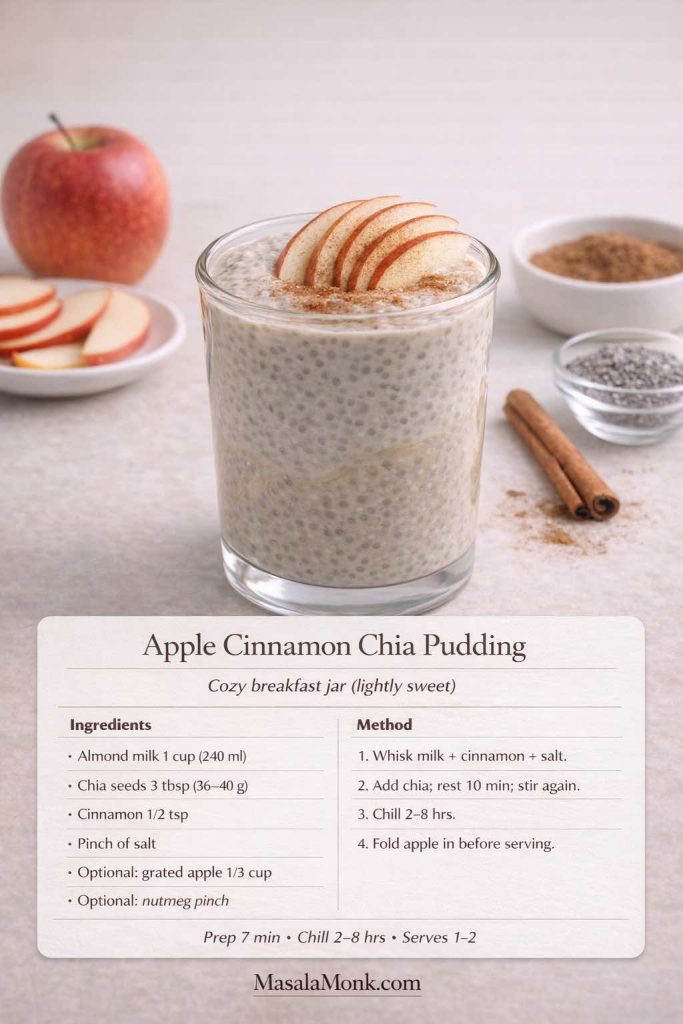
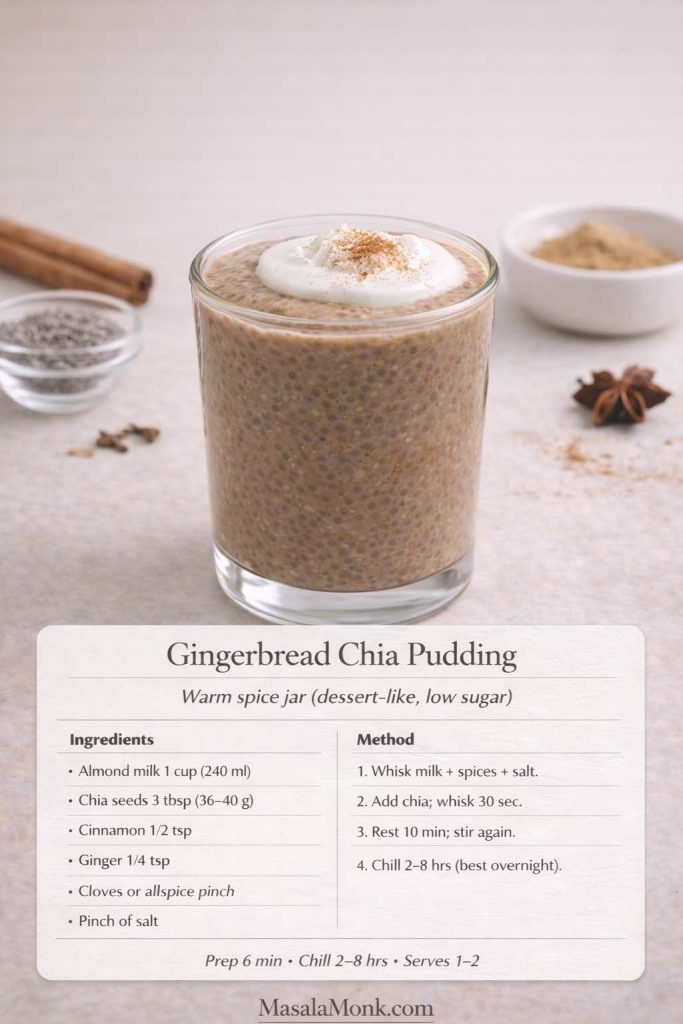
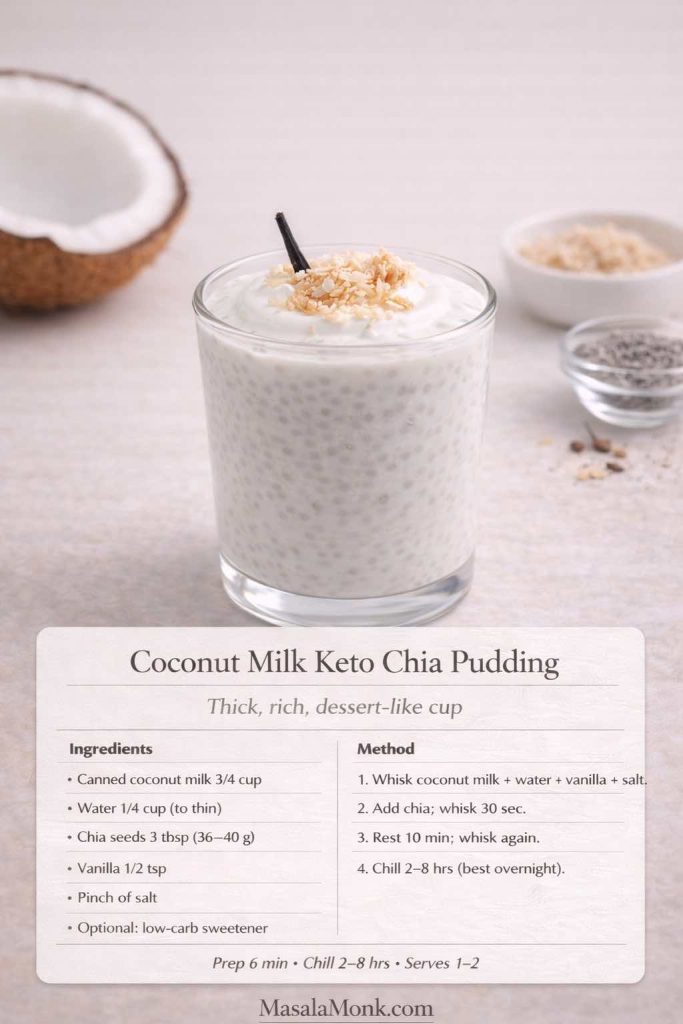
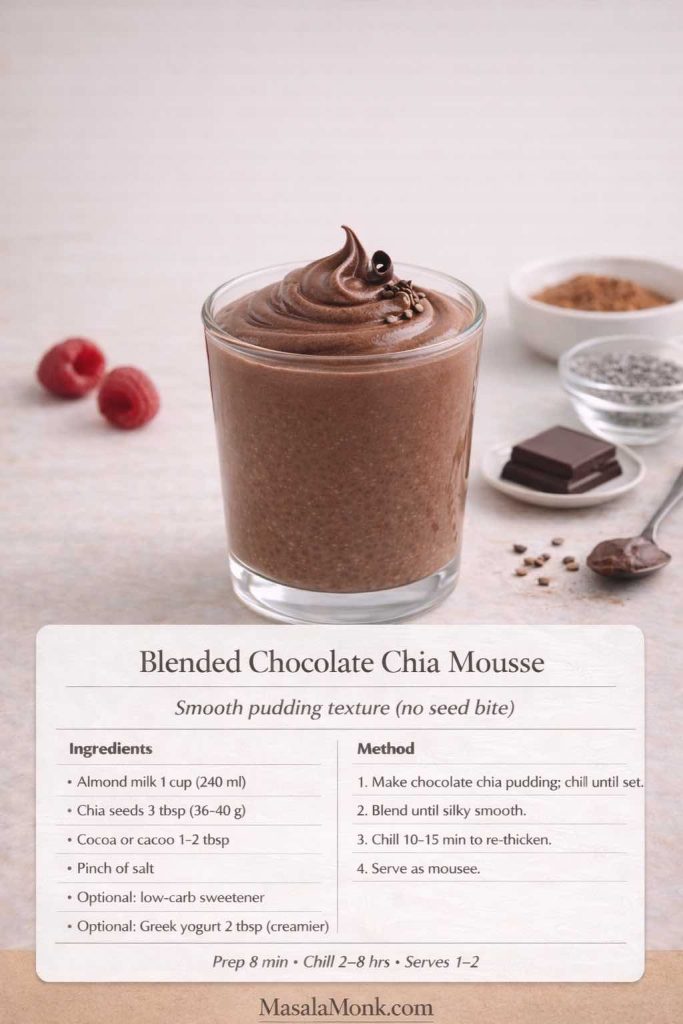
If you make a jar of keto hot chocolate mix and it’s sitting there, you can use it beyond mugs. One gentle, low-effort idea is turning it into a chilled dessert cup.
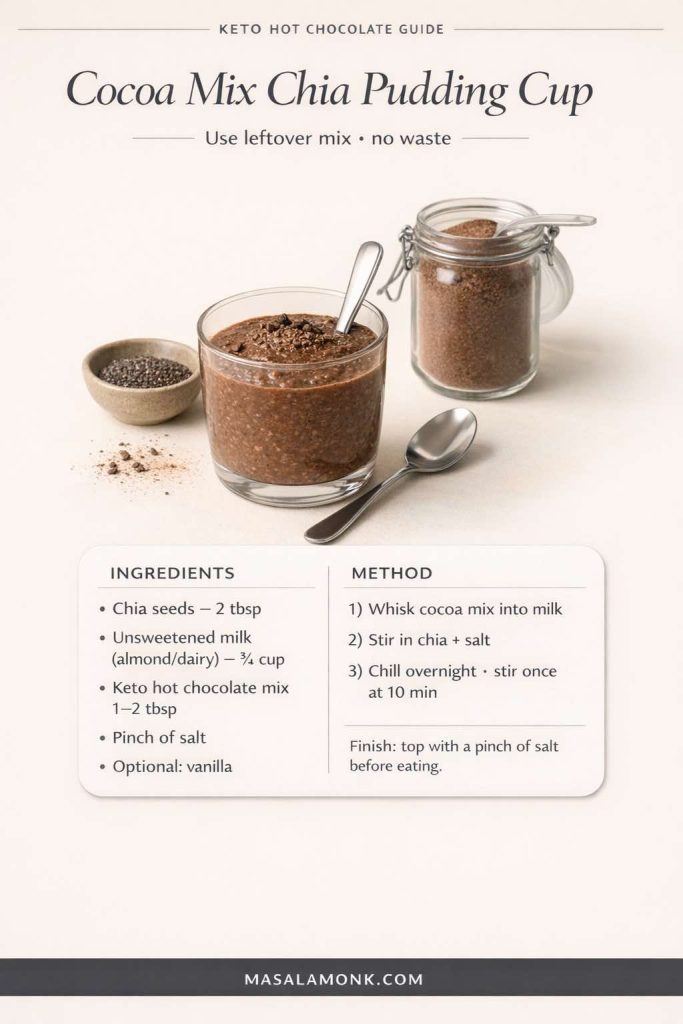
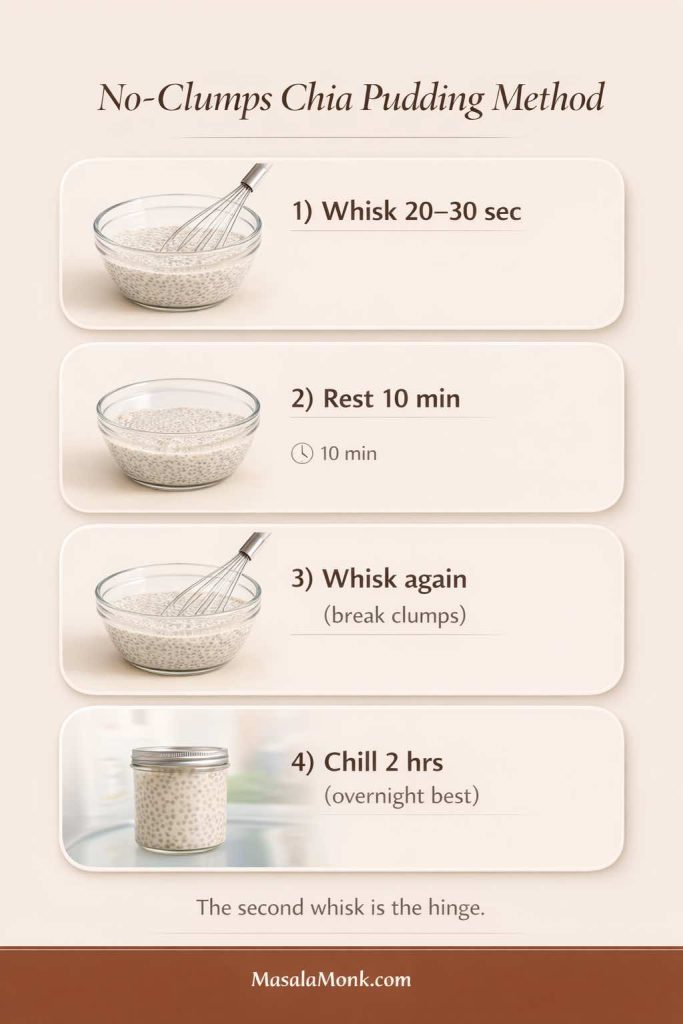
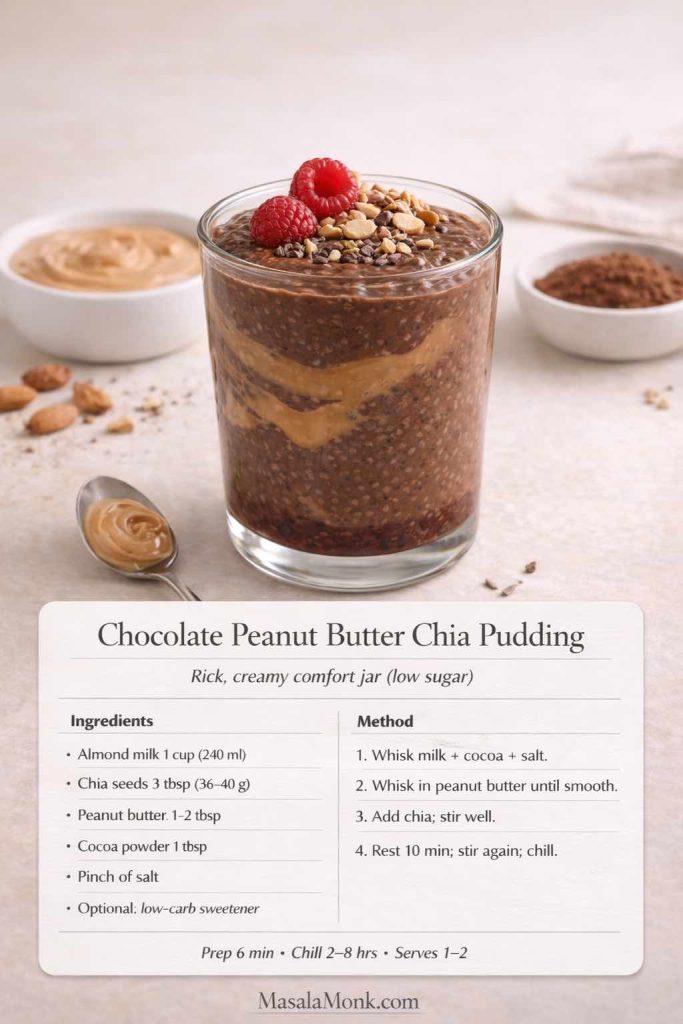
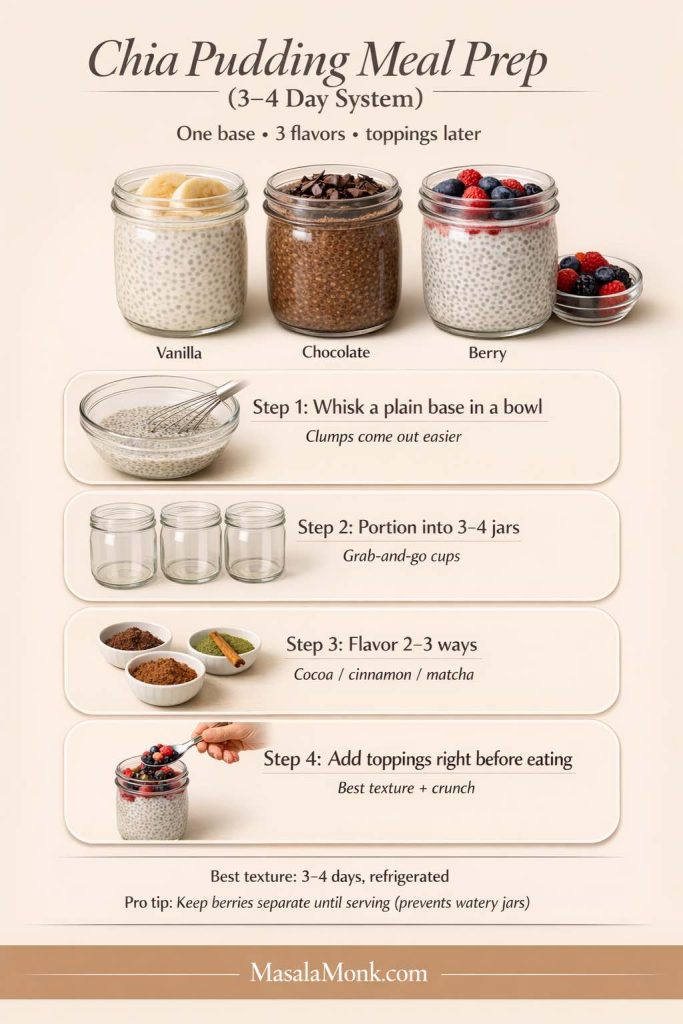
Chia pudding is especially friendly to cocoa flavors. You can stir a spoonful of cocoa mix into your liquid before adding chia, then let it set overnight. If you want a broader inspiration lane, MasalaMonk has a versatile roundup of chia pudding recipes. It’s a simple way to keep the chocolate comfort going without always making a hot drink.
If you’re doing this in a more keto-leaning way, keep the liquid unsweetened and let the cocoa mix provide the sweetness. Then finish with a little pinch of salt on top right before eating. That pinch makes “chocolate pudding” flavor pop in exactly the same way it does in hot cocoa.
Also Read: Kahlua Drinks: 10 Easy Cocktail Recipes (Milk, Vodka, Coffee)
Why This Works So Well When You’re Staying Low Sugar
One of the sneakiest parts of cutting sugar is realizing how much “comfort” you used to outsource to it. Dessert wasn’t just dessert; it was punctuation. It was a pause. It was a way to turn the day off.
A creamy sugar free hot chocolate gives you a gentle replacement that still feels like care. It’s warm. It’s sensory. And it’s slow enough that your brain gets the message. Meanwhile, because you’re building the sweetness and richness on purpose, you’re not stuck in the cycle of “not enough flavor → add more → want more.”
If you’re ever unsure about how “sugar free” products define themselves, it’s worth understanding the basics of what labels mean. The FDA’s explanation of added sugars on the nutrition label is surprisingly useful, even if you mostly make your own drinks.
Also, there’s something quietly powerful about making the mug the “event.” When the drink tastes good and feels complete, you don’t need to keep grazing afterward. That’s often the difference between feeling deprived and feeling satisfied.
Also Read: 19 Essential Kitchen Tools That Make Cooking Easier
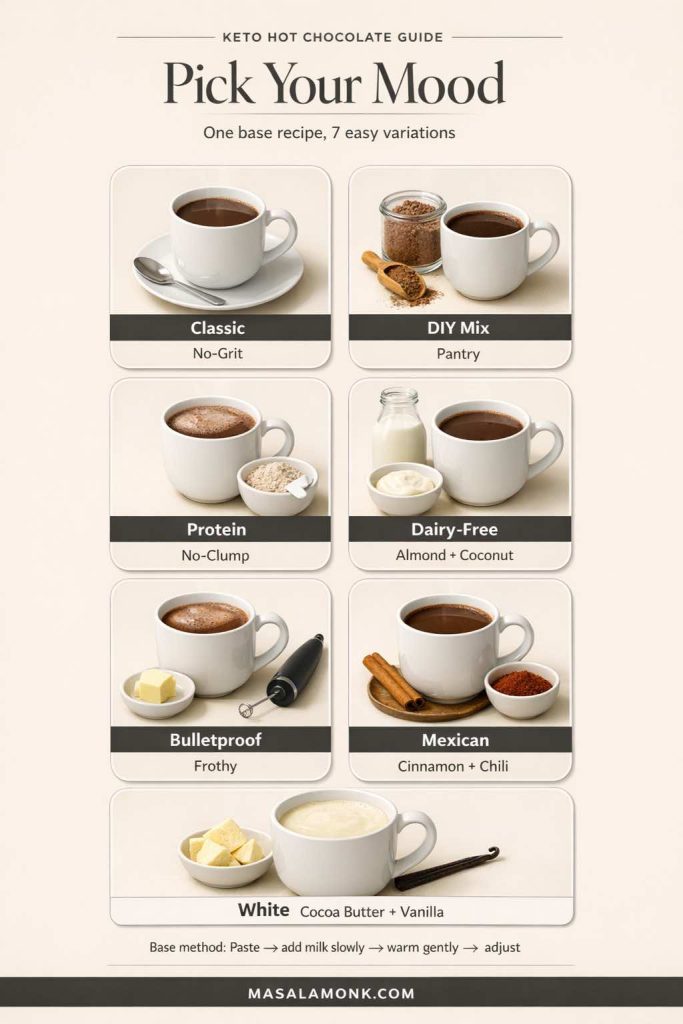
Your “Pick-a-Mood” Shortcut: Choose Your Keto Hot Chocolate Style Tonight
If you want the simplest decision tree imaginable, use this:
- Want the classic? Make keto hot cocoa with the paste method and finish with vanilla.
- Want it to keep you full? Make keto protein hot chocolate and use the slurry method.
- Want it dairy-free? Use almond milk and add coconut cream for body.
- Want it extra cozy? Make bulletproof keto hot chocolate and blend it frothy.
- Want it spicy-warm? Make keto Mexican hot chocolate with cinnamon and a whisper of chili.
- Want vanilla-rich comfort? Make sugar free white hot chocolate with cocoa butter.
None of these require more time than the others once you’ve done them once. In fact, after a week, it starts to feel like brewing tea: you know what you like, you know what the mug needs, and you stop thinking about it.
If you want one more option that fits neatly inside the same framework, try a “mint night” version: stir in a tiny drop of peppermint extract at the very end (seriously, tiny). It turns the mug into a wintery treat without pushing it into toothpaste territory. Paired with a cookie or enjoyed alone, it can feel like a holiday mug on a random Tuesday.
Also Read: How to Cook Tortellini (Fresh, Frozen, Dried) + Easy Dinner Ideas
A Final Note: Comfort Doesn’t Need to Be Loud
A good mug doesn’t announce itself. It just changes your evening.
That’s the quiet power of a well-made keto hot chocolate. It’s not trying to be a substitute. It’s just a better habit: warm, chocolatey, low carb, and tailored to the way you actually live.
So make the cocoa paste. Add the pinch of salt. Choose your milk. Pick your mood. Then take the first sip slowly—because that’s the whole point.

FAQs
1) Is keto hot chocolate actually keto-friendly?
Yes—when you build it with unsweetened cocoa (or cacao), a keto-approved sweetener, and a low-carb liquid like unsweetened almond milk or a measured amount of dairy. The biggest swing factor is usually the milk choice and any add-ins, so keeping those intentional is what makes a mug reliably keto-friendly.
2) What’s the difference between keto hot chocolate and keto hot cocoa?
In everyday use, they’re the same idea: a low carb, sugar free hot chocolate-style drink. Some people use “hot cocoa” to mean cocoa powder-based, while “hot chocolate” can imply melted chocolate. On keto, both can work—the cocoa powder version is simpler, and the melted-chocolate version can taste richer if you’re using low carb baking chocolate or keto-friendly chocolate chips.
3) How do I make sugar free keto hot chocolate taste like the real thing?
Focus on three things: fully hydrating the cocoa (the paste method), adding a pinch of salt, and giving the cup some body (a little cream, coconut cream, or cocoa butter). After that, vanilla and gentle heat do the rest—because when the drink is smooth and balanced, it automatically tastes more “classic.”
4) Why does my low carb hot cocoa turn out gritty or chalky?
Most grit comes from cocoa not being hydrated properly. Start by whisking cocoa, sweetener, and salt with a small splash of hot water to form a glossy paste, then add milk gradually. Chalkiness can also come from certain sweeteners or protein powders, so switching to a powdered sweetener blend—or mixing protein as a slurry first—usually fixes it.
5) What sweetener works best for hot chocolate with monk fruit?
Monk fruit blends are popular because they can taste clean and sweet, but the best results usually come from powdered versions that dissolve quickly. If your blend includes erythritol and you notice cooling, adding vanilla and a bit of creaminess can round it out. Alternatively, allulose often gives a softer sweetness that feels more like traditional hot cocoa.
6) Can I make keto hot chocolate with almond milk?
Absolutely. Almond milk keto hot chocolate is one of the easiest versions to keep low carb. Still, almond milk is naturally lighter, so adding a tablespoon or two of cream (or coconut cream for dairy-free) helps it feel fuller and more satisfying.
7) How do I make dairy free keto hot chocolate creamy, not thin?
Choose a richer plant milk if you like, then add body with coconut cream or a small amount of cocoa butter. Another option is blending briefly to emulsify everything, which creates a smoother texture that feels more like a café drink.
8) What is keto hot chocolate mix, and how is it different from the drink?
Keto hot chocolate mix is the dry, pantry-ready version—basically your cocoa powder, sweetener, and salt pre-combined so you can make a mug fast. The drink is what you get after you mix it with hot liquid. In practice, the mix saves time, while the “from scratch” version lets you adjust more precisely in the moment.
9) How many tablespoons of keto hot chocolate powder should I use per mug?
Usually 2 tablespoons per mug is a strong starting point. However, if you want a lighter low carb drinking chocolate, use 1½ tablespoons; conversely, if you want something closer to a deep cocoa, try 2½ to 3 tablespoons and add a richer liquid.
10) Can I make keto hot chocolate packets at home?
Yes. If you make a dry keto hot cocoa mix, you can portion it into small containers or pouches for grab-and-go convenience. Just keep it dry, and include a note for yourself on how much liquid to add per serving.
11) What’s the best keto hot chocolate recipe for a really rich, “dessert” mug?
Use the cocoa paste method, then build richness with cream (or coconut cream), plus vanilla and a pinch of salt. If you want it extra luxurious, add a tiny bit of cocoa butter, or blend the finished drink for a foamy, café-style texture.
12) How do I make high protein low carb hot chocolate without clumps?
Instead of dumping protein powder into hot liquid, make a slurry first: mix the protein with a few tablespoons of warm liquid until smooth, then pour in the hot cocoa while whisking. This approach works for keto protein hot chocolate with whey isolate, casein, collagen, and many vegan blends.
13) Is bulletproof keto hot chocolate the same as regular keto hot cocoa?
It starts the same, then adds fat (usually butter or ghee, sometimes MCT oil) and gets blended until frothy. As a result, bulletproof hot chocolate keto-style tends to feel more filling and can replace a snack for some people.
14) How do I keep bulletproof hot chocolate from getting oily on top?
Blending is the difference. Use a blender, stick blender, or frother so the fat emulsifies into the drink. Also, start with smaller amounts of butter/MCT and increase only if you love the texture.
15) What is keto Mexican hot chocolate?
It’s a spiced version of keto hot chocolate, typically with cinnamon and a tiny pinch of chili or cayenne, plus vanilla. The idea is warmth and depth, not intense heat—so the spice stays in the background and makes the cocoa taste richer.
16) How do I make white hot chocolate sugar free?
White hot chocolate is usually cocoa butter-based rather than cocoa-powder-based. For sugar free white hot chocolate, melt cocoa butter into warm milk (dairy or almond milk), then add sweetener, vanilla, and a pinch of salt. For a fuller texture, a spoon of cream or coconut cream helps.
17) What does “low glycemic hot chocolate” mean?
Typically it means using unsweetened cocoa and choosing sweeteners and liquids that don’t behave like fast sugar for you. That might involve avoiding added sugars and starchy thickeners, then focusing on a balanced recipe that’s still satisfying.
18) Why do some mixes claim “0 carb hot chocolate” or “no carb hot cocoa”?
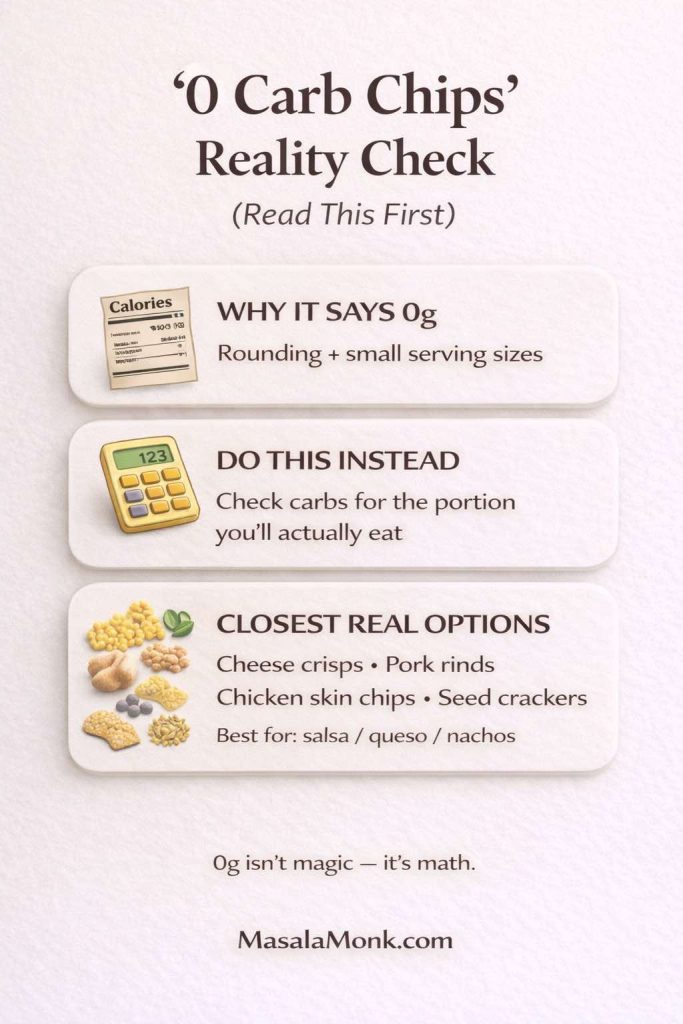
Often it’s a mix of serving sizes, rounding rules, and how labels handle sugar alcohols or fiber. In real kitchens, cocoa itself contains some carbs, so “very low carb” is usually the more realistic expectation. If you’re strict, measure your ingredients and calculate based on the exact products you use.
19) How can I make a lower calorie low carb hot cocoa recipe?
Use unsweetened almond milk (or a lighter dairy option), keep added fats minimal, and rely on cocoa, vanilla, and salt for satisfaction rather than extra cream. Even so, you can still make it feel indulgent by blending it frothy or adding a spice note like cinnamon.
20) Can I make keto hot chocolate ahead of time?
Yes. You can prep the dry keto hot chocolate mix for instant mugs all week, or you can make the drink itself and reheat gently. If reheating, warm it slowly and whisk as it heats so the cocoa stays smooth and the texture stays consistent.