A great chicken salad sandwich doesn’t need a special occasion. It’s the kind of food that fits into real life: busy weekdays, lazy weekends, long road trips, quick work lunches, picnic baskets, and “I’ve got cooked chicken—now what?” moments. Better still, once you’ve nailed a reliable chicken salad sandwich recipe, you can spin it into dozens of variations without feeling like you’re repeating yourself.
That’s exactly what this article is for. You’ll start with one dependable master filling—the kind that tastes balanced rather than bland—and then you’ll shift gears into versions people genuinely love to eat: classic and old fashioned, healthy and lighter, rotisserie-fast, pantry-friendly with canned chicken, crunchy pickle-forward, sweet-savory with grapes or cranberries, bakery-style on a croissant, party-ready for tea sandwiches, bold curry versions, and Caesar-inspired builds that taste like a full meal inside bread. Along the way, you’ll also get an egg section (including an egg salad sandwich recipe with relish) and a chickpea spread for anyone who wants a plant-based option that still feels hearty.
If you’re in the mood to explore beyond chicken salad once you’re done, you might also enjoy this companion round-up of chicken sandwich recipes—it’s a handy way to keep lunch interesting without overcomplicating your week.
The master chicken salad spread (the one you’ll keep coming back to)
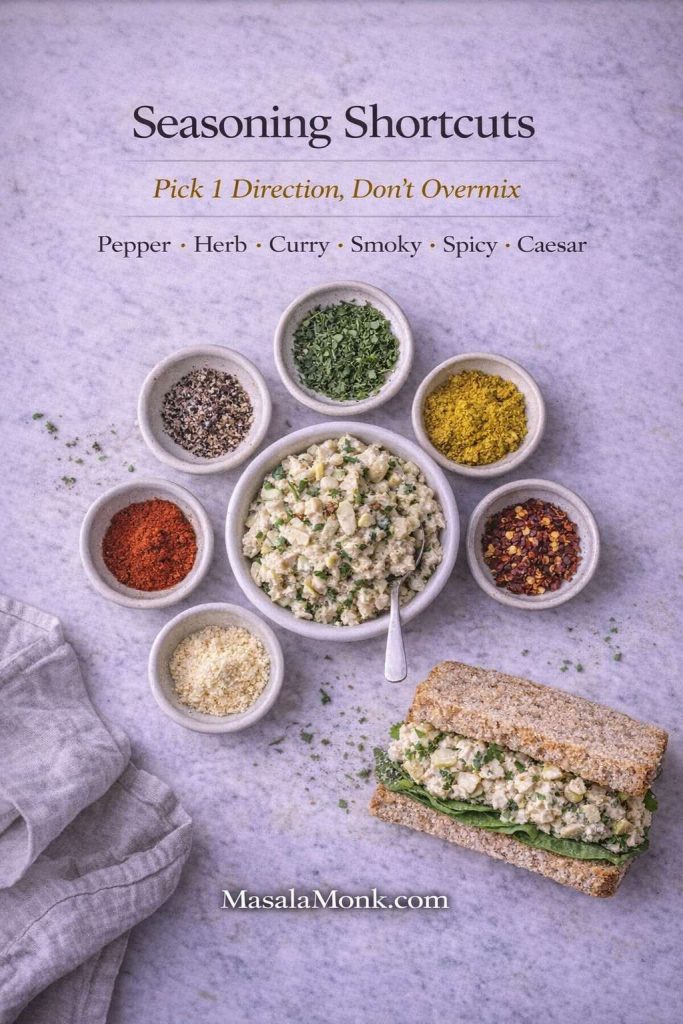
If chicken salad has ever tasted flat, the problem usually isn’t the chicken. More often, it’s that the filling is missing contrast. Creamy needs tang. Soft needs crunch. Mild needs a little edge. When those pieces click, even a simple bowl of chicken and mayo becomes something you actually look forward to.
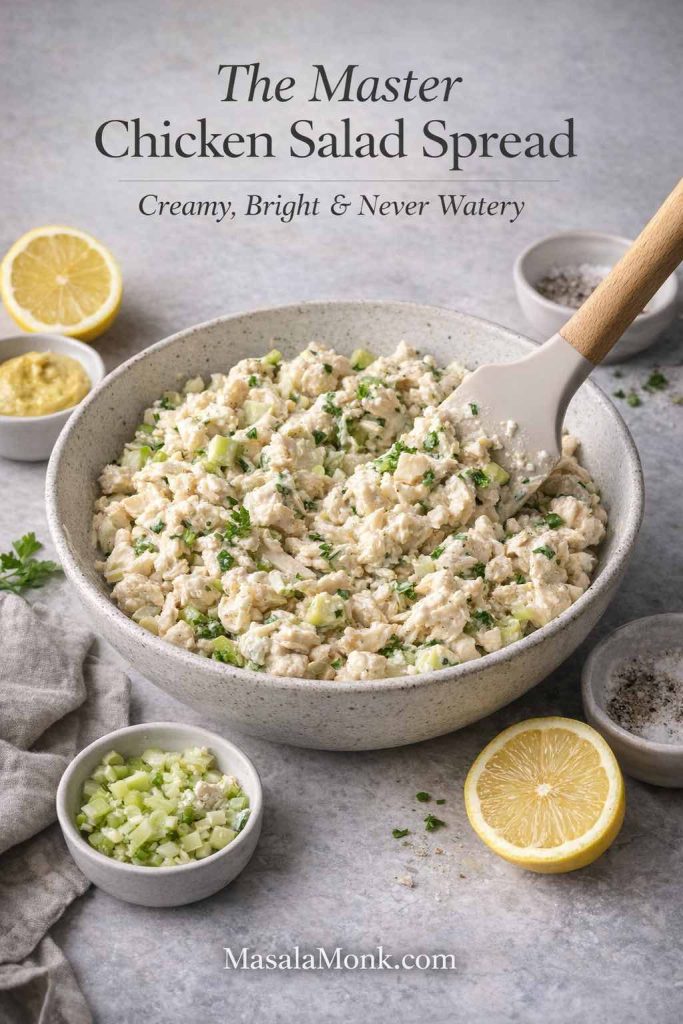
Master chicken salad sandwich mix (makes 3–4 sandwiches)
Chicken
- 2 packed cups cooked chicken, chopped or shredded (roughly 300–350 g)
Creamy base
- 1/3 cup mayonnaise (about 80 g)
If you like making things from scratch, you can use a homemade base such as this homemade mayo guide. On the other hand, if you need an egg-free option for dietary reasons, egg free mayo works well. Likewise, for plant-based households, this vegan mayo recipe can substitute smoothly.
Tang + savor
- 1–2 teaspoons mustard (Dijon is classic, but any mild mustard works)
- 2 teaspoons lemon juice or mild vinegar
Alternatively: 1 tablespoon pickle brine for a punchier, deli-style bite - 1/2 teaspoon salt, then adjust
- Freshly ground black pepper to taste
Crunch (choose one, or mix two)
- 1/3 cup finely diced celery
- 1/3 cup seeded, finely diced cucumber
- 1/3 cup finely diced bell pepper/capsicum
- 2–3 tablespoons finely chopped pickles
Optional upgrades (choose what you like)
- 1–2 tablespoons chopped herbs (parsley, dill, chives)
- 1 small garlic clove, grated (go easy—it’s strong)
- A pinch of paprika or chili flakes
- 2–3 tablespoons finely chopped onion or spring onion
Method (simple, but it matters)
- Decide your chicken texture first.
Chop for a cleaner, café-style bite; shred for a softer, creamier filling. If you’re using leftover roast chicken, trim any rubbery skin and keep the good bits. - Mix the dressing before the chicken goes in.
Stir mayo, mustard, lemon/vinegar (or pickle brine), salt, and pepper until smooth. This tiny step is what keeps chicken salad from turning patchy or overmixed. - Fold in crunch and aromatics.
Add celery/cucumber/pepper/pickles and any herbs or onion. Taste the dressing again—if it’s lively now, the final chicken salad will be lively too. - Add chicken gently.
Fold, don’t beat. If it looks dry, add a spoon of mayo; if it looks loose, give it a few minutes in the fridge to tighten. - Taste and correct with purpose.
- Too bland? Add salt or mustard.
- Too heavy? Add lemon.
- Too sharp? Add a touch more mayo.
- Too soft? Add crunch (or add it later during assembly).
That’s your base chicken salad sandwich recipe—solid enough to stand alone, flexible enough to become anything.
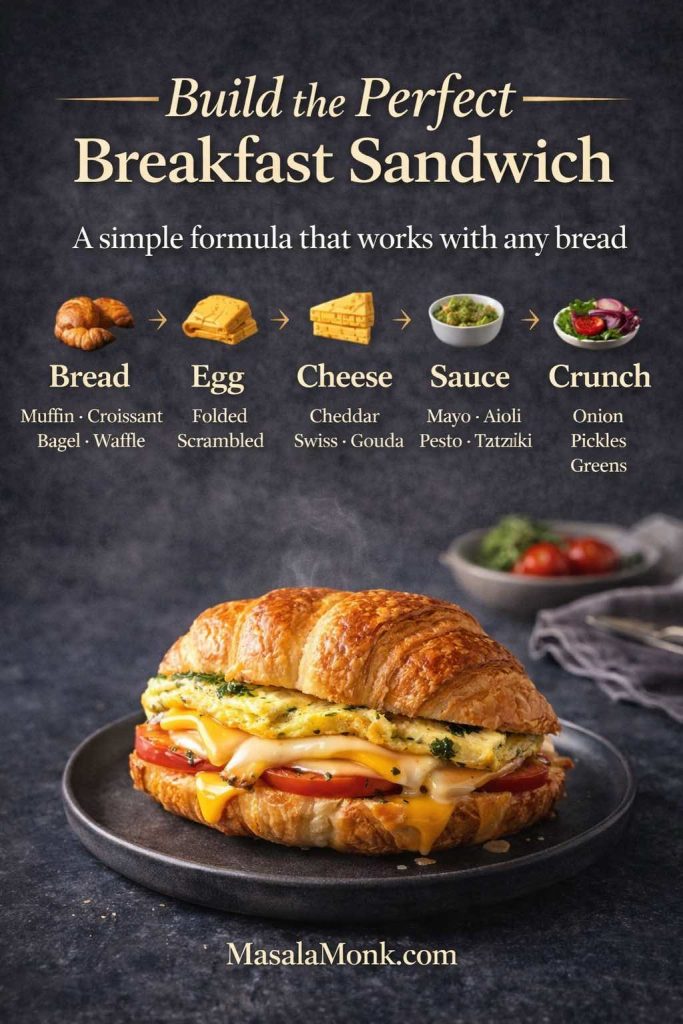
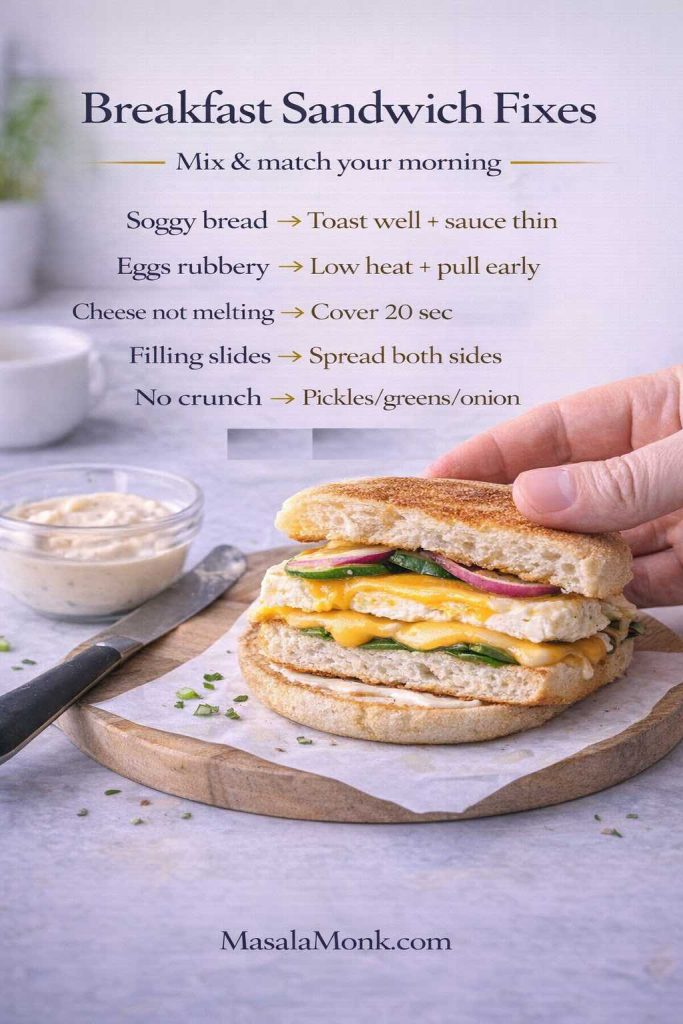
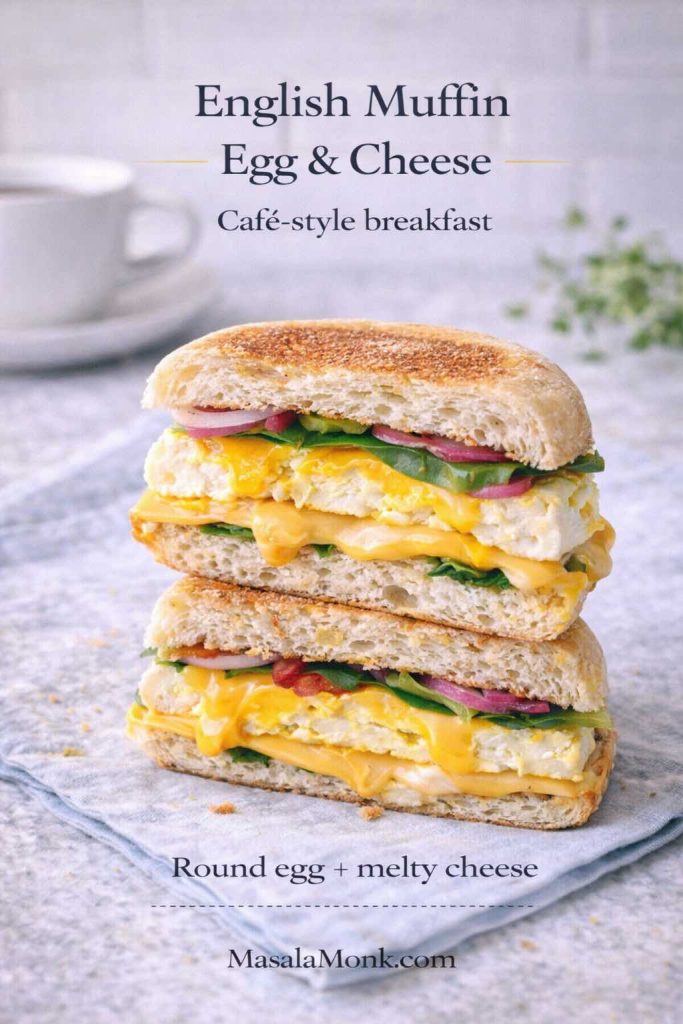
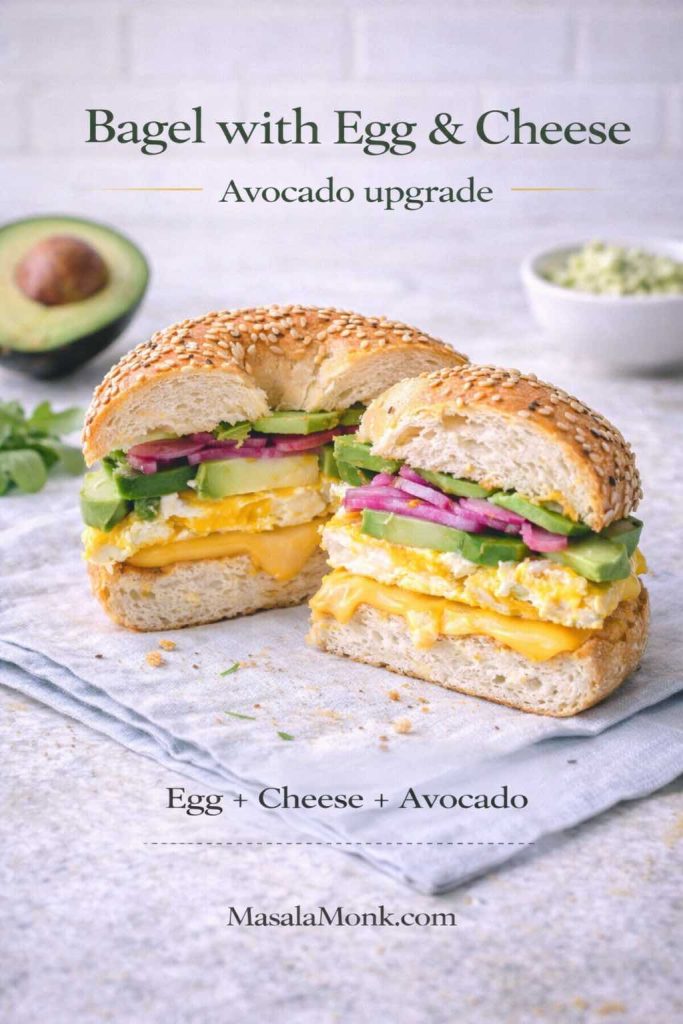
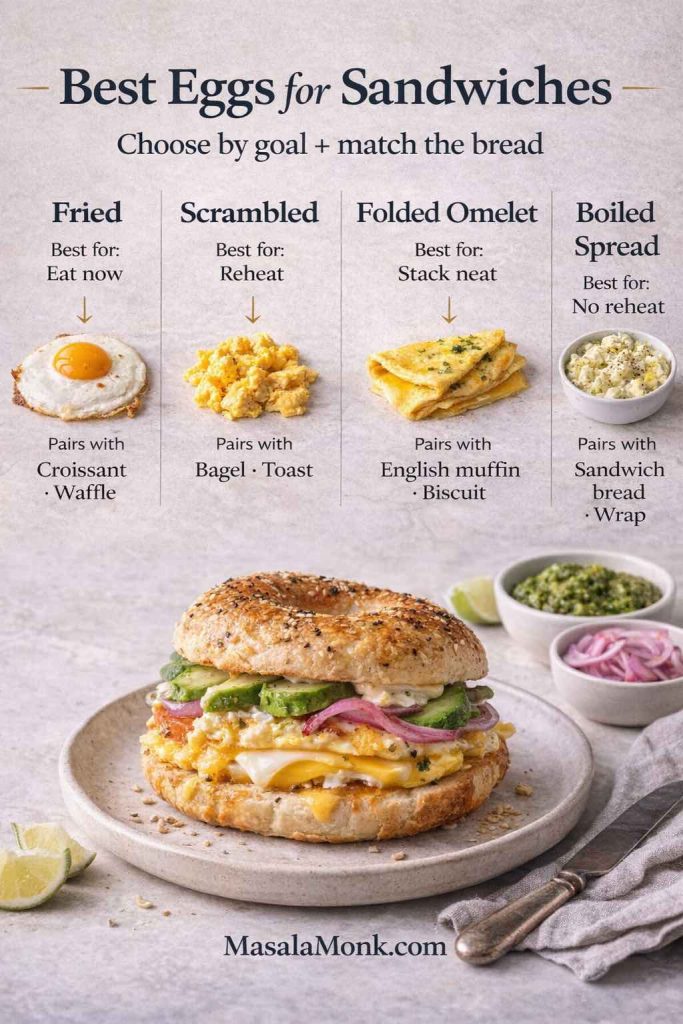
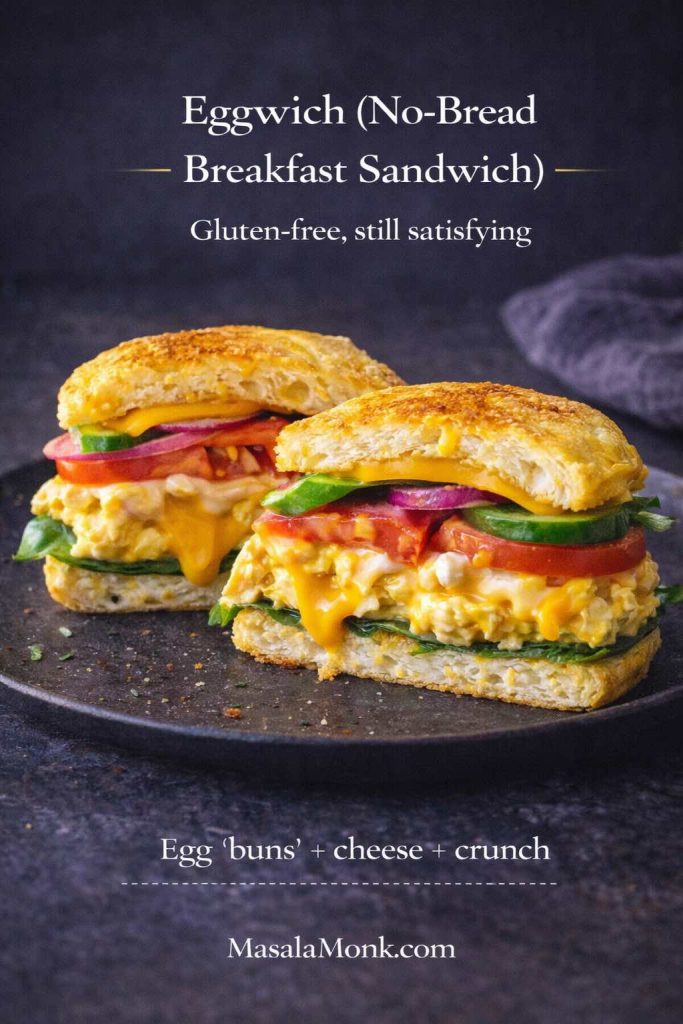
Also Read: Sandwich for Breakfast: Breakfast Sandwich Recipe + 10 Variations
Building a chicken salad sandwich that doesn’t go soggy
Before we start customizing flavors, it’s worth getting the structure right. Otherwise, even a great filling can turn into a slippery mess.
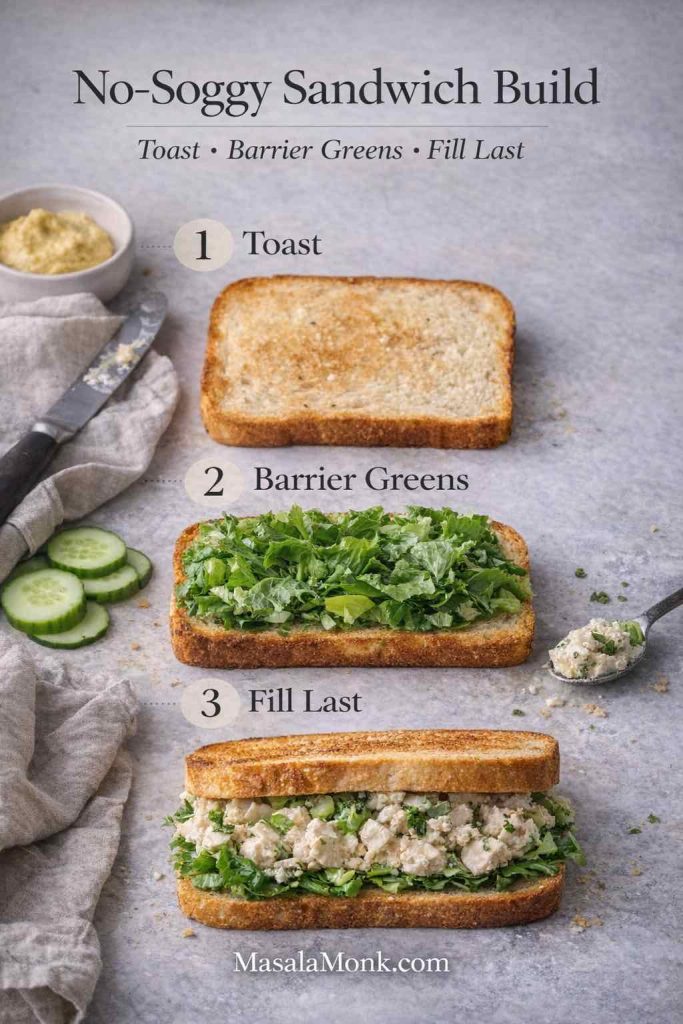
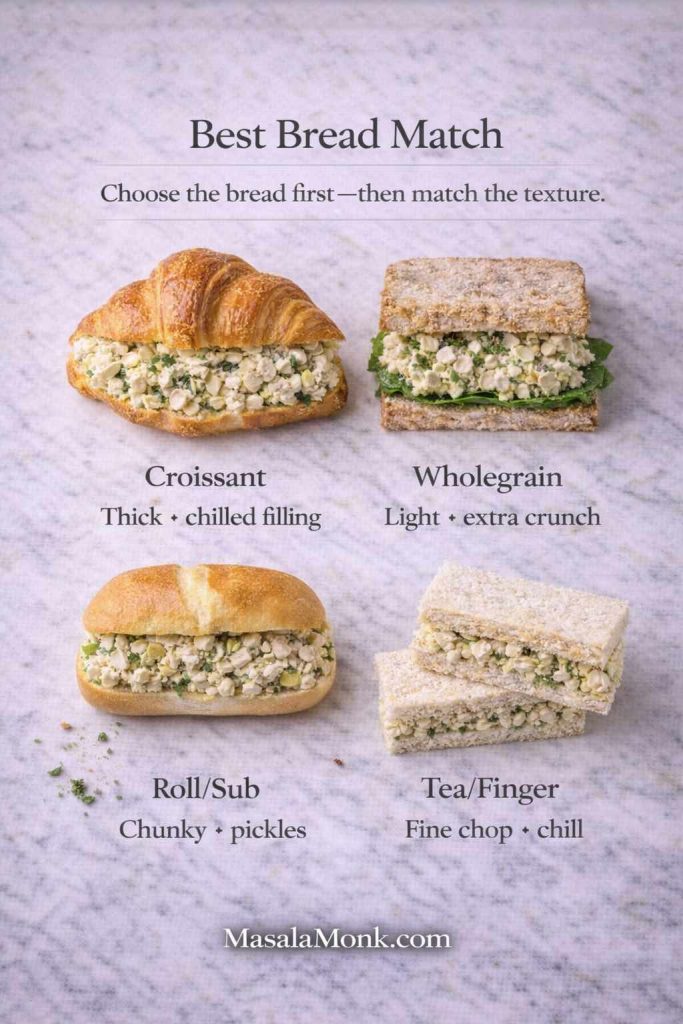
First, choose a bread that suits the texture you want:
- Soft sandwich bread is classic and gentle.
- Wholegrain adds bite and a nutty backbone.
- A crusty roll makes it feel like a deli lunch.
- A croissant makes it feel like a bakery treat.
- Wraps keep things tidy for travel.
Next, use a barrier. Lettuce, spinach, cheese, or even a thin swipe of mayo on the bread can protect it from moisture. Then, add chicken salad in the center rather than smashing it to the edges. Finally, close the sandwich and give it a minute before slicing; surprisingly, that short pause helps it set.
If you enjoy simple technique-driven sandwiches, MasalaMonk’s mushroom cheese sandwich is a fun example of how small choices—like toast level and filling consistency—change the entire experience.
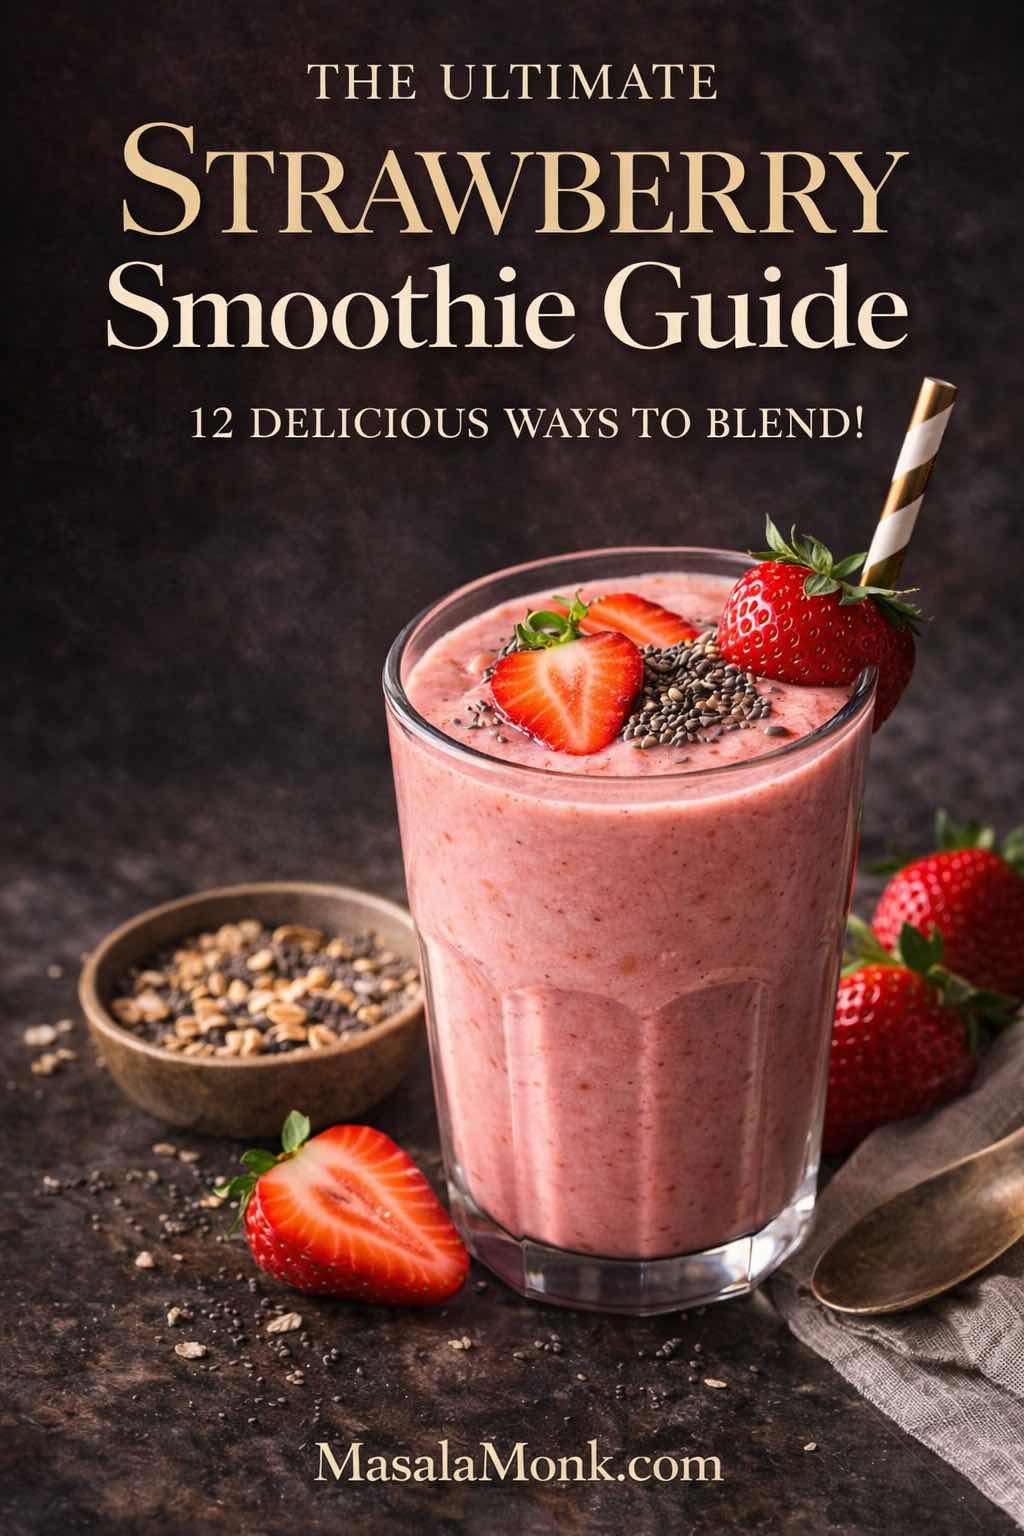
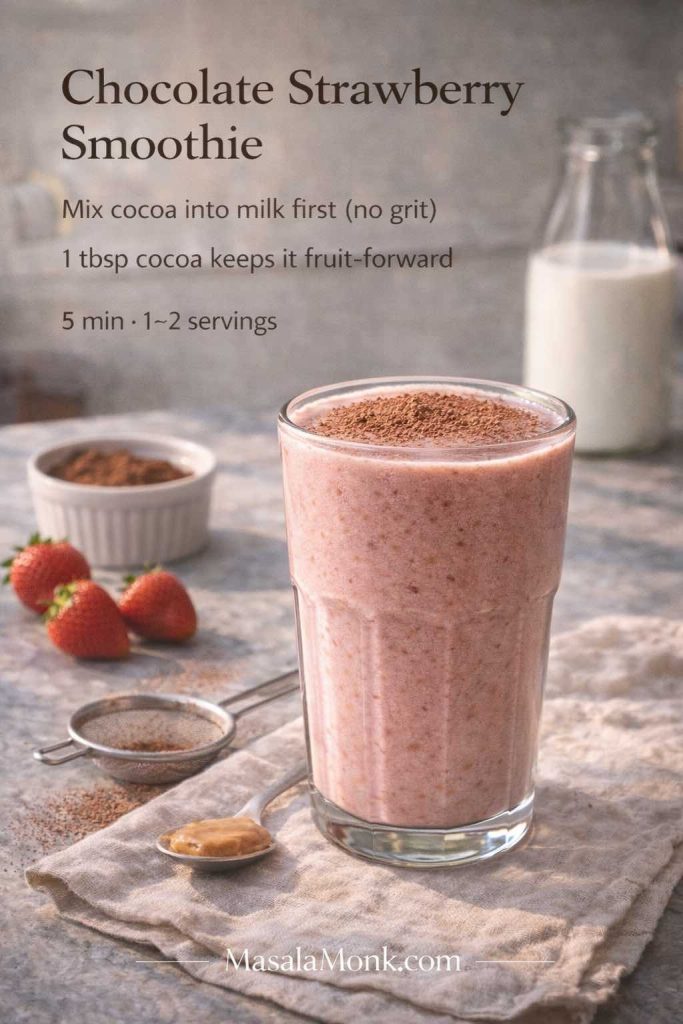
Also Read: Strawberry Smoothie Recipes (12 Easy Blends + Bowls & Protein Shakes)

Classic chicken salad sandwich (old fashioned, comforting, reliable)
When most people picture a traditional chicken salad sandwich, they imagine something creamy with gentle crunch, lightly seasoned, and easy to eat. It’s familiar for a reason: it works.
Classic version (based on the master mix)
- Use celery as your main crunch
- Keep mustard moderate (1 teaspoon is often enough)
- Add herbs if you like, but don’t overpower the chicken
For an especially “old fashioned chicken salad sandwich recipe” feel, add:
- 1 tablespoon very finely chopped onion (or skip it for a softer profile)
- A tiny pinch of sugar or honey if your chicken is very lean and the salad feels sharp
How to assemble it
Spread a thin layer of mayo (or butter) on each slice, add crisp lettuce, pile on chicken salad, then add a few cucumber slices if you want extra freshness. From there, slice cleanly and serve immediately, or wrap tightly for later.
Also Read: Classic Rum Punch + 9 Recipes (Pitcher & Party-Friendly)
Healthy chicken salad sandwich (lighter, brighter, still satisfying)
Healthy chicken salad sandwich recipes can go wrong when “healthy” is treated like “flavorless.” Fortunately, you don’t need to sacrifice comfort to lighten things up. Instead, you shift the balance: more tang, more texture, and a creamy base that doesn’t rely entirely on mayo.
Lighter binder options
- Half mayo + half thick yogurt: keeps creaminess while adding tang
- Mostly yogurt with a splash of olive oil: feels fresh and bright
- Mashed avocado + lemon: creamy and satisfying, with a clean finish
If you like yogurt-based spreads, there’s a lot of inspiration in a good tzatziki—this Greek tzatziki recipe collection shows how cucumber, garlic, herbs, and lemon can create a dressing that tastes “finished” rather than improvised. Fold a spoonful into chicken salad and the result feels lighter without feeling thin.
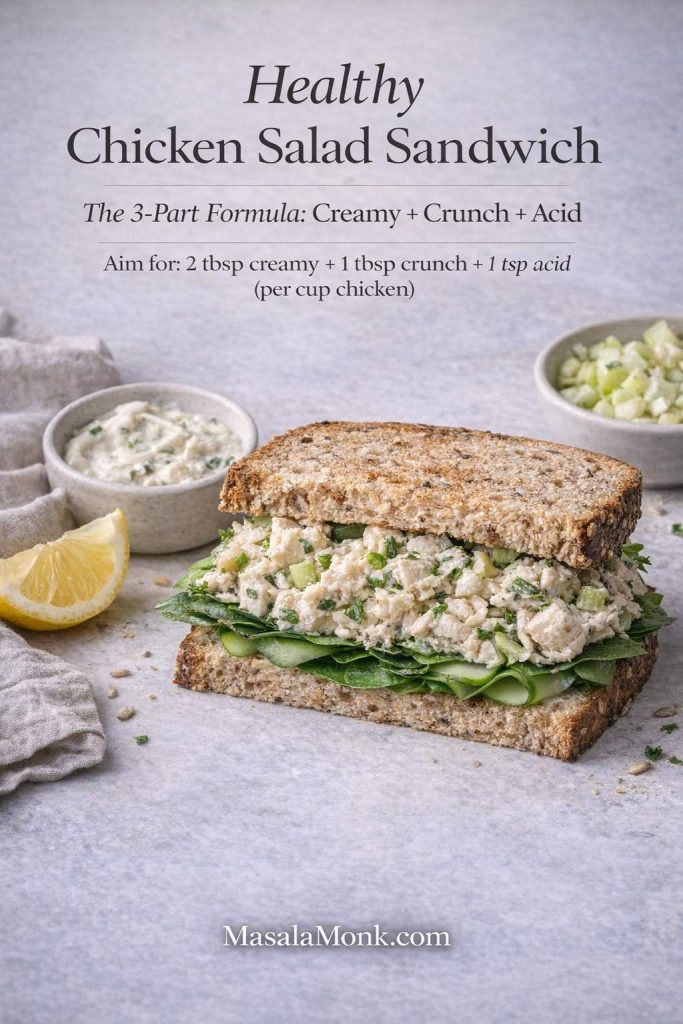
Add-ins that make it feel like a meal
- Chopped cucumber and bell pepper for crunch
- Grated carrot for sweetness
- Fresh herbs for brightness
- A handful of toasted seeds for extra staying power
Now choose a bread that matches your goal. Wholegrain and seeded bread help create a chicken salad sandwich healthy enough for everyday lunches, while still tasting like real food.
For more sandwich ideas that lean into satisfying nutrition, you can also browse MasalaMonk’s guide to fiber-rich sandwiches. Even if you’re not counting anything, the “more plants, more crunch” approach tends to make chicken salad better.
Also Read: 7 Pizza Sauce Recipes | Marinara, White Garlic, Alfredo, Buffalo, BBQ, Vodka & Ranch
Rotisserie chicken salad sandwich (fast, flavorful, and hard to mess up)
A rotisserie chicken salad sandwich is one of the easiest ways to make lunch taste like you tried. Rotisserie chicken brings built-in seasoning and a good mix of textures—especially if you use both breast and thigh meat.
How to make rotisserie chicken salad taste fresher
Because rotisserie chicken can be rich, lean into brightness:
- Add lemon juice or a splash of vinegar
- Add cucumber or bell pepper for crunch
- Use herbs generously (parsley and dill work beautifully)
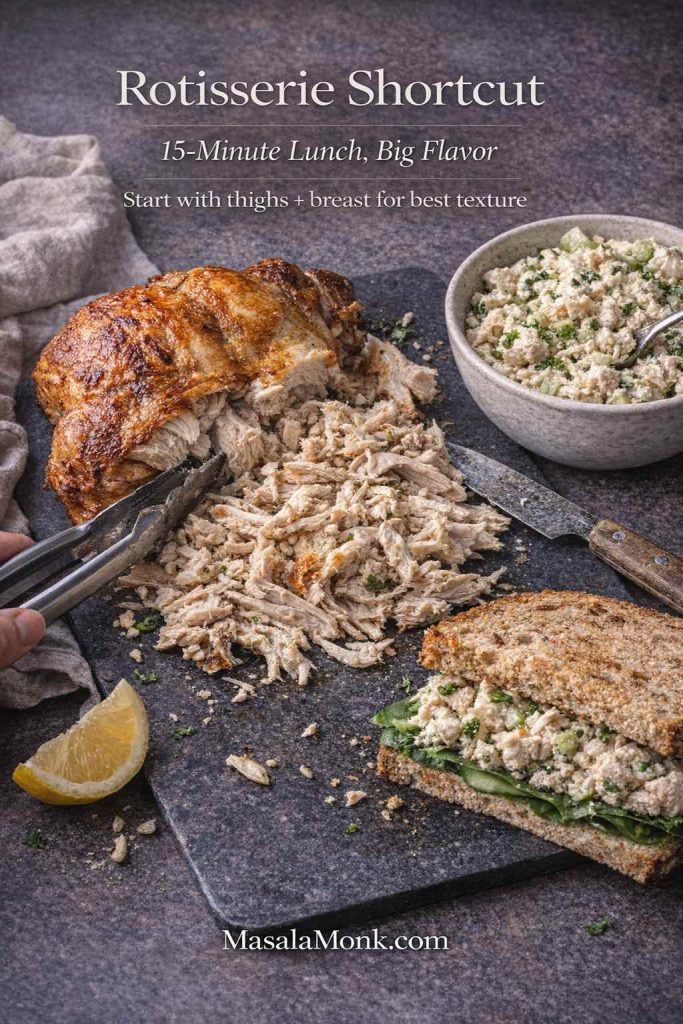
A simple rotisserie variation: lemon-herb
Start with the master mix, then add:
- 1 teaspoon lemon zest
- 1 tablespoon chopped dill or parsley
- Extra black pepper
As a result, you get a rotisserie chicken salad sandwich that feels lively rather than heavy.
Also Read: Vodka Pasta (Penne alla Vodka) + Spicy Rigatoni, Chicken, and Gigi Recipes
Chicken salad sandwich recipe using canned chicken (pantry-friendly and surprisingly good)
Canned chicken has a reputation for being dull, but you can turn it into a genuinely satisfying sandwich if you treat it properly. The secret is moisture control and stronger seasoning.
Step one: fix the texture
Drain thoroughly, then press the chicken gently with a spoon. After that, flake it with a fork. This keeps the final spread from tasting watery.
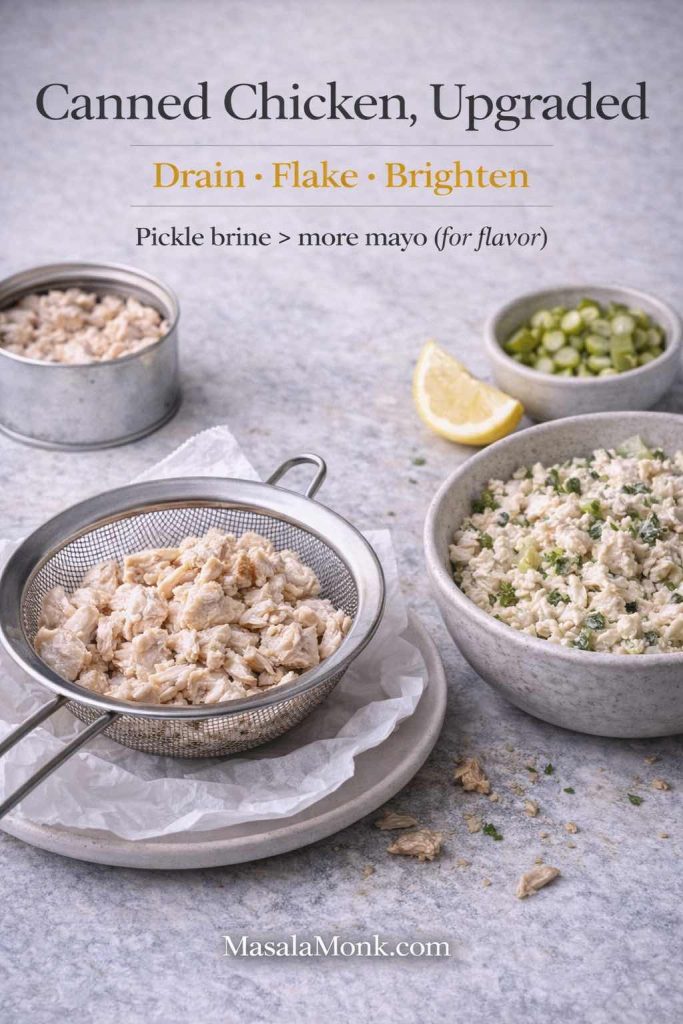
Pantry chicken salad sandwich mix
Use the master recipe, then add at least one of these:
- Chopped pickles + a splash of pickle brine
- Extra mustard
- Spring onion
- A pinch of paprika or chili flakes
This approach makes a chicken salad sandwich recipe canned chicken readers can actually repeat, not just tolerate.
Also Read: Moscow Mule Recipe (Vodka Mule): The Master Formula + 9 Variations
Chicken salad sandwich without celery (crunch swaps that work everywhere)
Not everyone likes celery. Moreover, celery isn’t always great year-round. Luckily, you can still create snap and freshness without it.
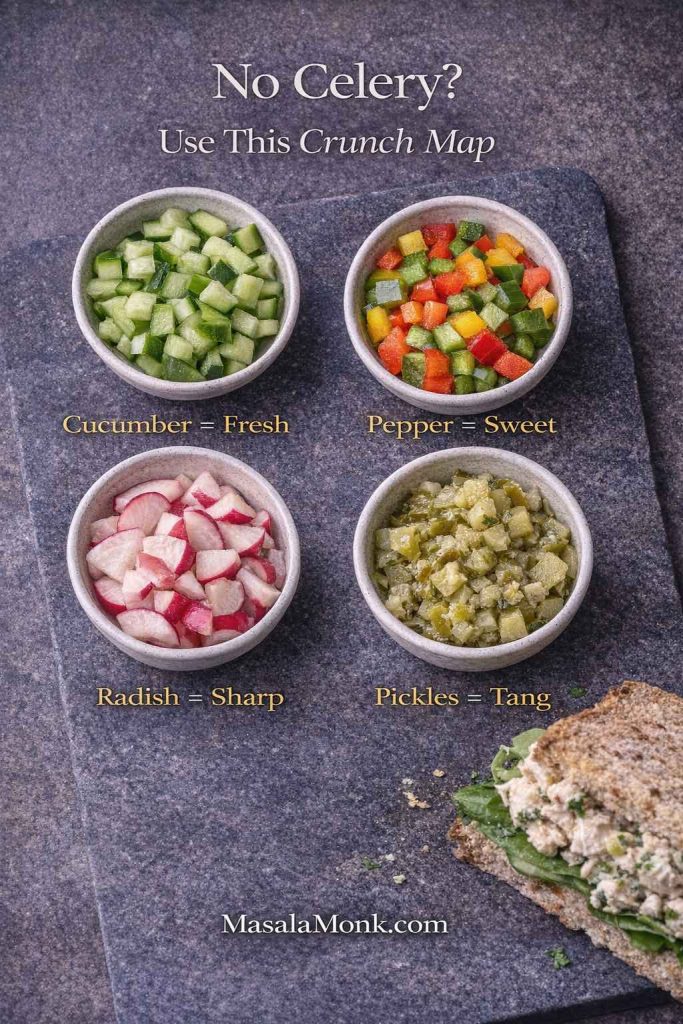
Choose one crunch option:
- Seeded cucumber (dice small)
- Bell pepper/capsicum
- Radish
- Apple
- Toasted nuts
Then season confidently. In contrast to celery, cucumber and bell pepper are milder, so you may want a touch more mustard or pepper to keep the flavor lively.
Also Read: Marinara Sauce Recipe: Classic Homemade Marinara
Chicken salad sandwich with pickles (tangy, deli-style, addictive)
If you like chicken salad that wakes your palate up, add pickles. They bring acidity and crunch in one move.
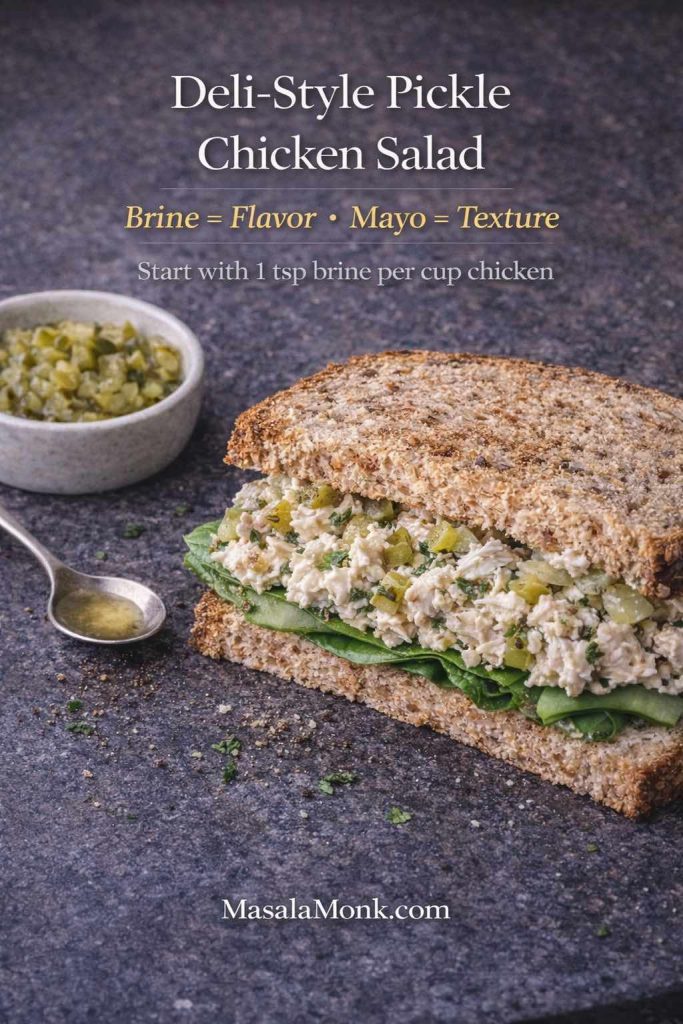
Pickle-forward version
- Add 2–3 tablespoons finely chopped pickles
- Swap lemon juice for 1 tablespoon pickle brine
- Add a little extra black pepper
- Keep onion minimal so the pickle flavor shines
This variation is also a great answer when someone asks for a punchier dressing for chicken salad sandwich filling. It tastes “complete” without needing many extra ingredients.
Also Read: Oat Pancakes Recipe (Healthy Oatmeal Pancakes)
Chicken salad croissant (bakery-style comfort at home)
A chicken salad croissant is indulgent in the best way: cool, creamy filling against flaky, buttery pastry. However, croissants are delicate, which means your filling needs to be thicker and your assembly needs a small amount of care.
Croissant-friendly chicken salad
- Chop chicken smaller than usual
- Use slightly less acid to keep it from loosening
- Add nuts or celery for texture
- Chill the filling for 20–30 minutes if possible
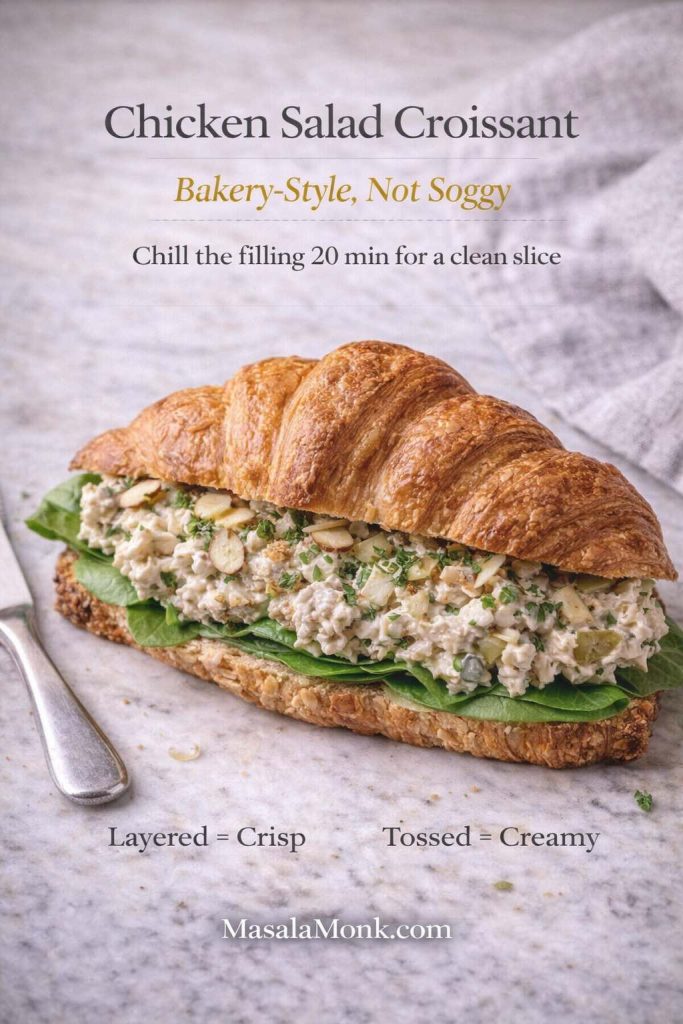
Assemble it like a bakery
Slice the croissant, add lettuce as a barrier, spoon in chicken salad, then add thin cucumber slices if you like. Finally, press gently rather than squashing.
This same method also works for a chicken salad croissant sandwich recipe meant for a brunch spread: just make the filling thicker and build right before serving.
Also Read: Bolognese Sauce Recipe: Real Ragù & Easy Spag Bol
Chicken salad for tea sandwiches, finger sandwiches, and party trays
Tea sandwiches and party sandwiches are small, but they’re not “simple.” The texture needs to be smooth enough to slice neatly, while still tasting like chicken rather than paste.
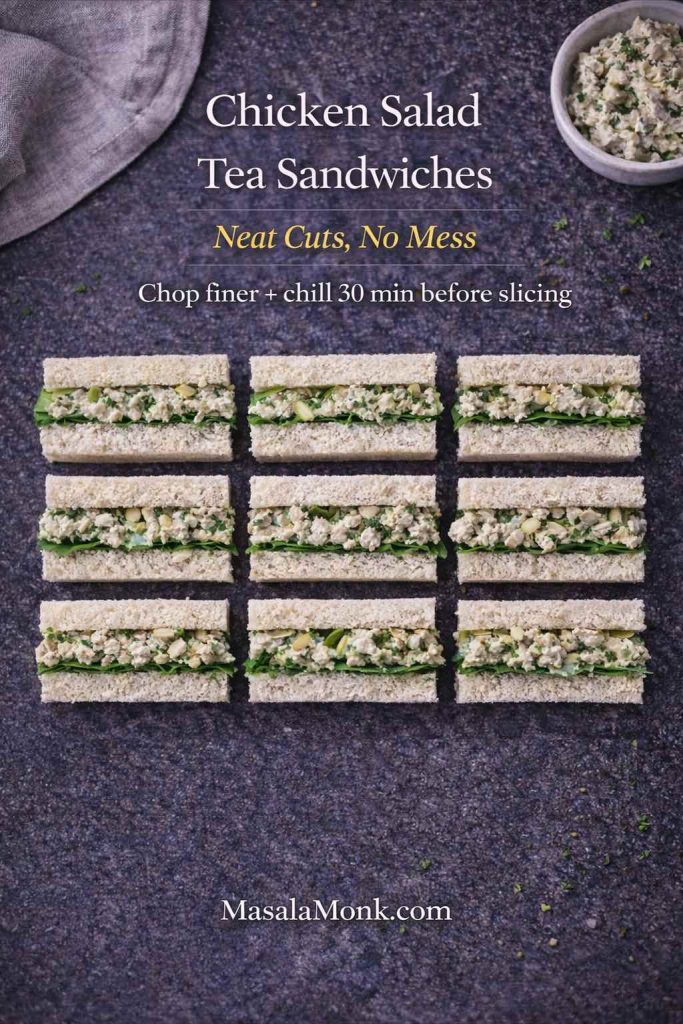
Tea-sandwich chicken salad recipe
Start with the master mix, then adjust:
- Chop chicken very finely
- Add 1–2 extra tablespoons mayo (or a spoon of yogurt for tang)
- Keep crunchy add-ins minimal and finely diced
- Skip watery vegetables
Use soft bread, trim crusts, and cut into fingers or triangles. Consequently, you’ll get clean edges and a filling that stays put.
If you’re building an entire spread, it’s also worth pairing sandwiches with something scoopable and satisfying. MasalaMonk’s potato salad recipes are a natural side—comforting, familiar, and easy to make ahead.
Also Read: One-Pot Chicken Bacon Ranch Pasta (Easy & Creamy Recipe)
Sweet-savory café styles: grapes, cranberries, apples, nuts
Some of the most-loved chicken salad sandwich ideas lean sweet-savory: juicy fruit, crunchy nuts, creamy dressing, and a little pepper. It’s the kind of filling that tastes like a café lunch even when you make it at home.
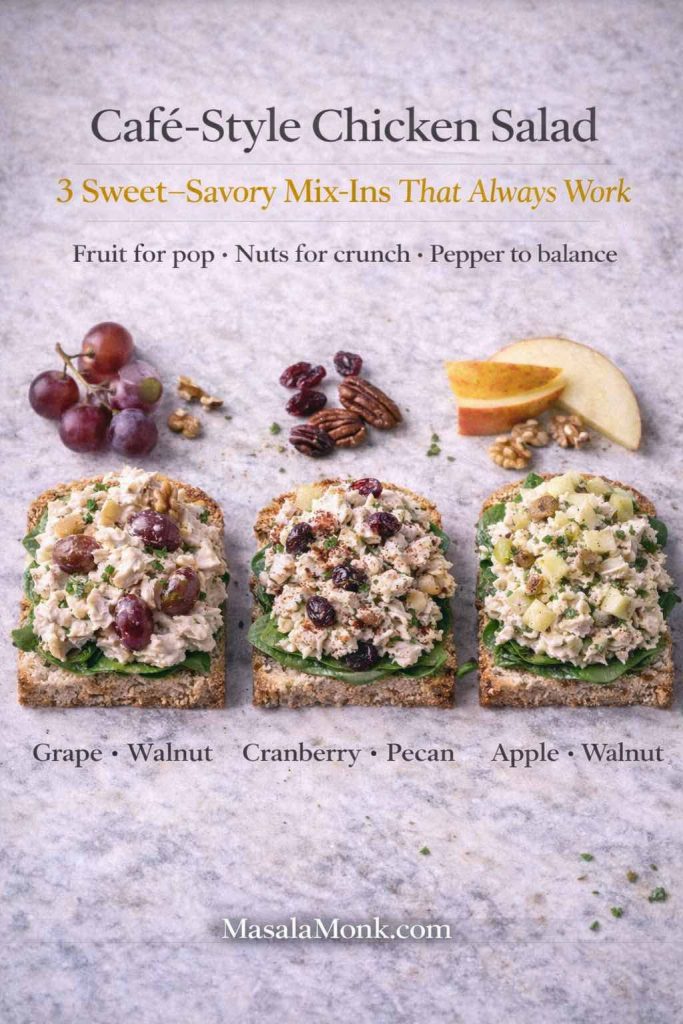
Chicken salad sandwich recipe with grapes
Start with the master mix, then add:
- 1/2 cup halved grapes
- 1/4 cup toasted walnuts or almonds
- Extra black pepper
The grapes add burst, while the nuts add richness. Meanwhile, the pepper keeps it from tasting dessert-like.
Chicken cranberry salad sandwich (or craisin chicken salad)
Start with the master mix, then add:
- 1/3 cup dried cranberries/craisins
- 1/4 cup toasted pecans or almonds
- Optional: a little orange zest for brightness
This version works beautifully on wholegrain bread or as a chicken salad croissant. It’s also a crowd-pleaser for party sandwiches because it tastes festive without being fussy.
Apple walnut chicken salad sandwich (Waldorf-inspired)
Start with the master mix, then add:
- 1/2 cup diced apple
- 1/4 cup toasted walnuts
- Optional: a pinch of cinnamon (very small) or just more black pepper
This is a good direction when you want crisp, fresh texture and a cleaner finish.
Also Read: Whiskey Sour Recipe: Classic Cocktail, Best Whiskey & Easy Twists
Curry chicken salad sandwich (warm spice, creamy comfort)
Curry chicken salad sits in a wonderful middle ground: familiar enough for everyday lunches, yet distinctive enough to feel special. In addition, curry spice tends to pair beautifully with raisins, toasted nuts, and a squeeze of lemon.
Easy curry chicken salad sandwich recipe
Start with the master mix, then add:
- 1–2 teaspoons mild curry powder
- 1 tablespoon chopped raisins or sultanas (optional)
- 2 tablespoons toasted almonds (optional)
- Extra lemon juice
The result is creamy, aromatic, and deeply satisfying. If you’d like an external reference for a classic version of this style, BBC Good Food’s coronation chicken captures the traditional “curried creamy chicken” idea that’s been popular for decades.
Also Read: Classic Rum Punch + 9 Recipes (Pitcher & Party-Friendly)
Chicken caesar sandwich and Caesar chicken salad sandwich (two ways to do it)
Caesar flavor works brilliantly in sandwich form because it’s designed around contrast: creamy, tangy, garlicky, and savory, with crunch from romaine and croutons. There are two particularly good ways to bring it into your lunch rotation.
Option 1: Chicken Caesar sandwich (layered and crisp)
This version feels like a handheld Caesar salad with protein:
- Use sliced grilled or roasted chicken
- Toss romaine lightly with Caesar dressing
- Add Parmesan shavings
- Add crushed croutons for crunch
Choose a sturdy bread: ciabatta, baguette, or a roll. Then build it so the romaine stays crisp. A light touch is key; too much dressing can make it slide.
For Caesar reference and technique, you can look at Bon Appétit’s classic Caesar salad, which lays out the flavor elements clearly.
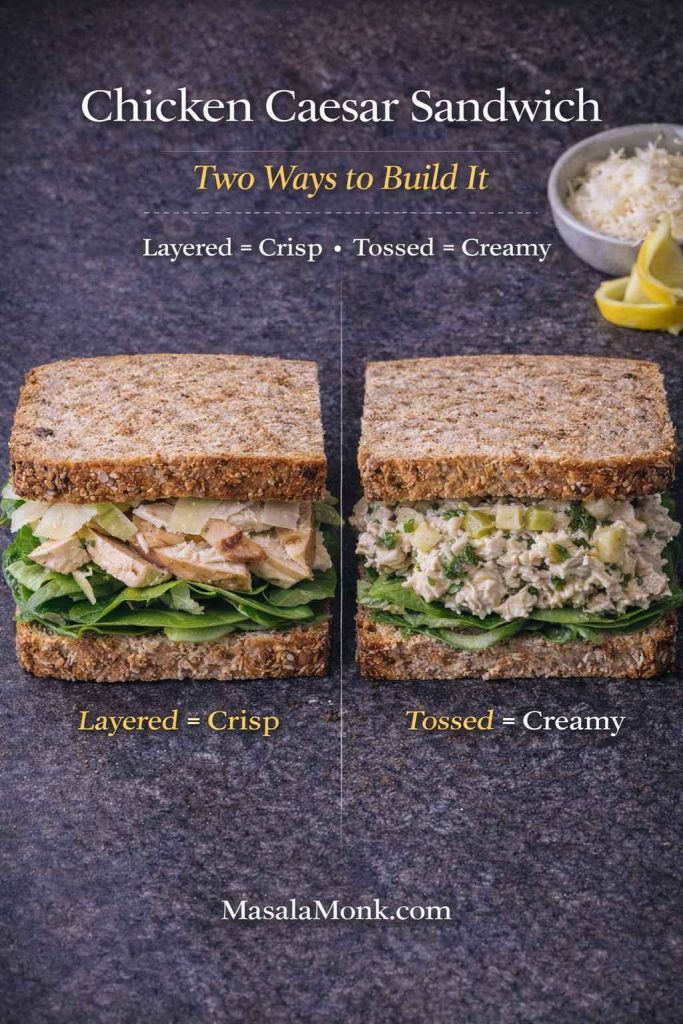
Option 2: Caesar chicken salad sandwich (creamy salad-spread style)
This is closer to a chicken salad sandwich recipe, just with Caesar DNA.
Caesar-style binder
- 1/4 cup mayo
- 1–2 teaspoons lemon juice
- 1 small garlic clove, grated
- 2–3 tablespoons finely grated Parmesan
- Black pepper, generous
- Optional: a little anchovy paste if you like the classic depth
Then fold in:
- 2 cups chopped chicken
- 1 cup finely chopped romaine
- A handful of crushed croutons
If you want a deeper dive into Caesar dressing itself, Serious Eats’ Caesar dressing is a solid external reference.
Either way, you end up with a sandwich that feels bold, savory, and complete.
Also Read: Baked Jalapeño Poppers (Oven) — Time, Temp & Bacon Tips
Chicken salad sub and chicken sandwich wrap (same filling, different format)
Sometimes you don’t want sliced bread. Perhaps you’re packing lunch for travel, or you simply prefer a bigger bite. Fortunately, chicken salad adapts easily.
Chicken salad sub
Use a crusty roll or hoagie-style bread. Add lettuce first to protect the bread, then chicken salad in the center, then pickles or onions on top. This keeps structure intact and prevents the dreaded soggy bottom.
Chicken sandwich wrap
Spread the filling in a line across the center, add crunchy vegetables (cucumber, lettuce, peppers), then roll tightly. After that, let it rest for a minute before slicing; it holds together better and looks cleaner.
If you like exploring other wrap-friendly spreads, the layering logic in this hummus veggie sandwich translates beautifully to wraps too.
Also Read: Homemade & DIY Coffee Creamer: 16 Flavor Recipes (French Vanilla, Pumpkin Spice & More)
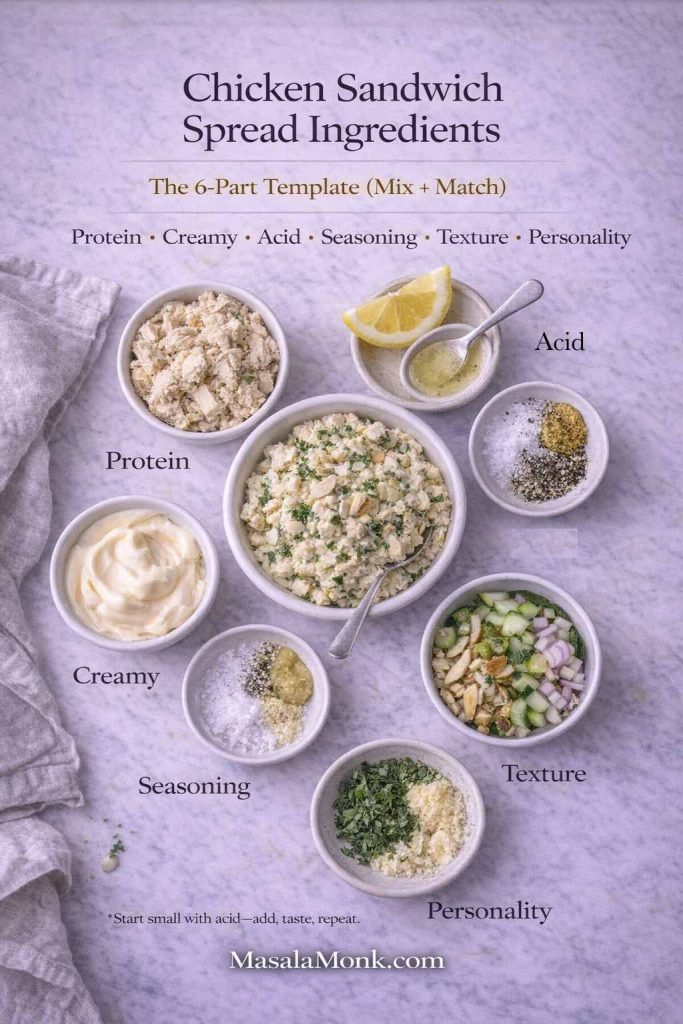
Chicken sandwich spread ingredients (so you can improvise confidently)
It’s helpful to have a mental template, especially when you’re working with whatever is available that day. Here’s the simplest way to think about chicken sandwich spread ingredients:
- Protein: cooked chicken (leftover, rotisserie, or canned)
- Creamy binder: mayo, egg free mayo, vegan mayo, yogurt, avocado
- Acid: lemon, vinegar, pickle brine
- Seasoning: salt, pepper, mustard
- Texture: celery, cucumber, peppers, onion, nuts, fruit
- Personality: herbs, curry powder, hot sauce, Parmesan, garlic
From there, you’re free. For example, you can shift toward herb-forward flavors with pesto variations, or you can go spicy with guidance from the pepper sauce collection. Alternatively, if you want something bright and green that tastes like summer, chimichurri can transform plain chicken salad into something that feels fresh off the grill.
Sandwich recipe with egg (quick, comforting, universally loved)
Egg sandwiches are popular everywhere for a reason: minimal ingredients, maximal comfort. They also pair naturally with chicken salad, whether you keep them separate or combine them.
Egg salad sandwich recipe with relish
To get a classic deli-style egg salad:
- 4 hard-boiled eggs, chopped
- 3 tablespoons mayo (or egg free mayo / vegan mayo)
- 1–2 tablespoons relish (or finely chopped pickles)
- 1 teaspoon mustard
- Salt and black pepper to taste
Stir gently, taste, then add a little more pepper than you think you need. Afterward, build it with lettuce for crunch.
If you want an easy method for cooking eggs, MasalaMonk’s air fryer hard boiled eggs is a useful reference.
For flavor variety, MasalaMonk’s egg seasoning ideas can help you move beyond “salt and pepper only,” especially when you want a sharper or more aromatic egg salad.
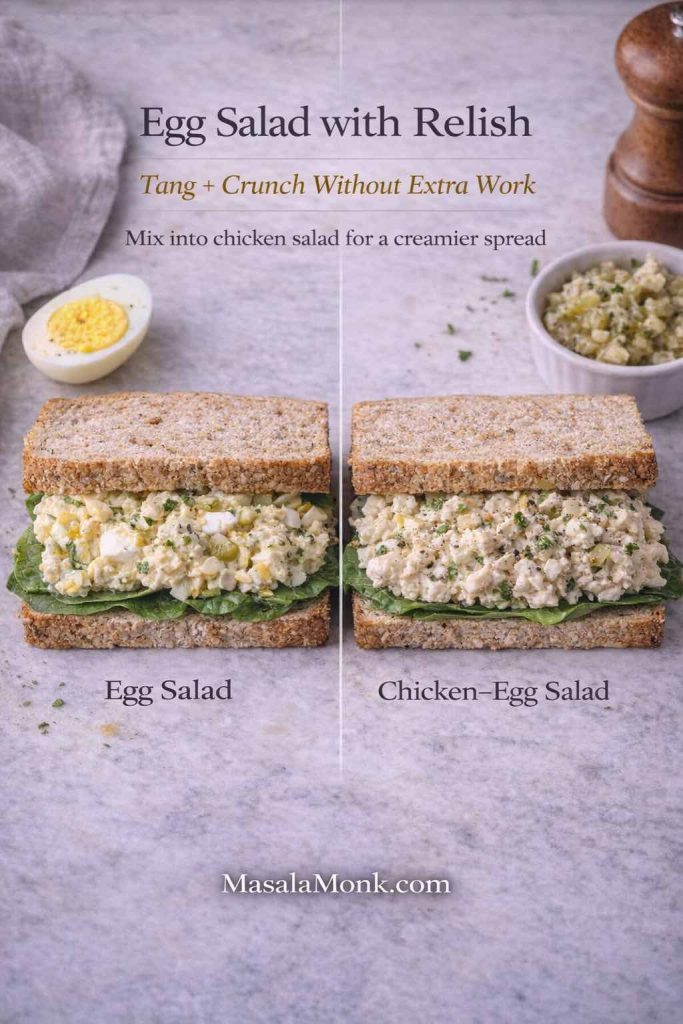
Chicken and egg salad sandwich (the hybrid)
Sometimes you want the richness of egg salad and the heartiness of chicken salad at the same time. Combine them:
- 1 1/2 cups chopped chicken
- 2 hard-boiled eggs, chopped
- 1/4 cup mayo (start here)
- Mustard + lemon + salt + pepper
Fold gently. The eggs soften the texture while the chicken keeps it satisfying. As a result, you get a filling that feels extra creamy without being heavy.
Also Read: Healthy Pumpkin Spice Latte (Low Cal, Real Pumpkin)
Chick pea salad sandwich (plant-based, creamy, and genuinely filling)
A chick pea salad sandwich is the plant-based cousin of chicken salad: creamy binder, bright acid, crunch, and seasoning. It’s also a great option when you want something that travels well.
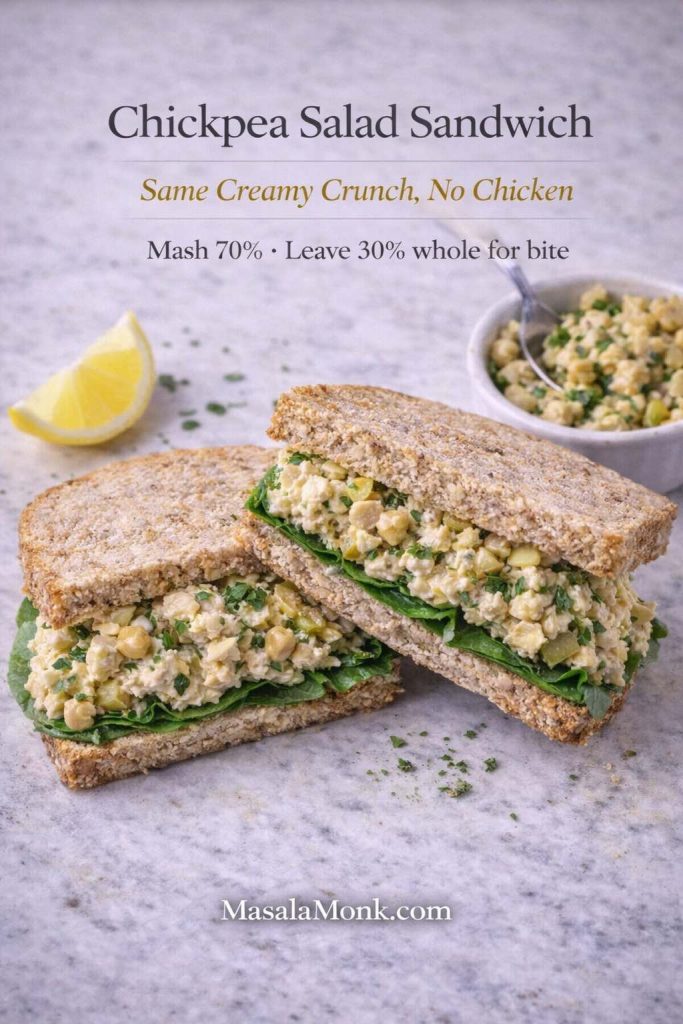
A well-known external version is the Love & Lemons chickpea salad sandwich, which uses a balanced, flavorful approach. If you’d rather freestyle, you can still follow the same structure:
- Mash chickpeas roughly (leave some texture)
- Add vegan mayo or tahini
- Add lemon and mustard
- Add chopped pickles or capers
- Add onion, celery, or cucumber for crunch
- Season with salt and pepper
Build it on wholegrain bread with lettuce and cucumber, and it becomes a lunch that feels complete rather than “just a substitute.”
Also Read: How to Make Churros (Authentic + Easy Recipe)
Salad and sandwich pairing: what to serve alongside
A chicken salad sandwich can stand alone, yet it often feels even more satisfying with something crisp or fresh on the side. That doesn’t have to mean a complicated salad; sometimes it’s as simple as sliced cucumbers and tomatoes with lemon and salt.
If you want more structured options, MasalaMonk’s healthy tuna salad recipes can offer side-dish inspiration too—many of those ideas translate into quick bowls that pair well with sandwiches. Meanwhile, a classic potato salad or a tangier version from the potato salad guide can turn sandwiches into a picnic-style meal.
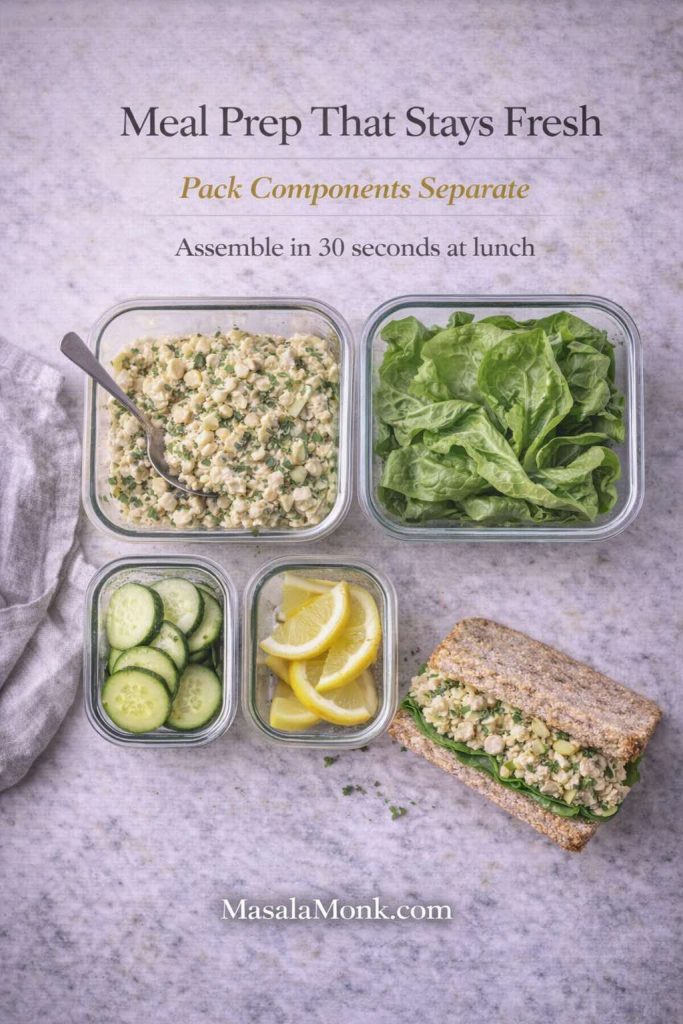
Keeping it safe and fresh (especially for packed lunches)
Chicken salad, egg salad, and similar spreads are best when kept cold. If you’re packing them for later, aim to refrigerate promptly and transport with an ice pack when possible.
For widely used food-safety guidance, the CDC recommends keeping perishables out at room temperature for no more than about two hours (and less in very hot conditions). You can read more in the CDC prevention guidance. Similarly, the USDA’s overview on leftovers and food safety is a helpful baseline for storage times. In the UK context, the Food Standards Agency’s advice on chilling, freezing, and defrosting offers additional practical guidance, including fridge temperature ranges.
Also Read: How to turn Leftover Rice into Gourmet Arancini Balls
Bringing it all together
Chicken salad sandwiches are popular because they’re forgiving. You can be precise, or you can be casual. Then you can make it classic, or you can make it bold. Also, you can go bakery-style on a croissant, deli-style with pickles, café-style with grapes and nuts, or salad-bar style with Caesar flavors and romaine crunch. Then, when you’re ready for a change, you can pivot into a sandwich recipe with egg, an egg salad sandwich recipe with relish, or a chickpea salad sandwich that satisfies in the same creamy, tangy way.
Most importantly, once you understand the structure—creamy + tangy + crunchy + seasoned—you’ll always be able to make a chicken salad sandwich that tastes like more than the sum of its parts.
Also Read: French Toast Sticks (Air Fryer + Oven Recipe) — Crispy Outside, Custardy Inside
FAQs
1) What is the best chicken salad sandwich recipe for beginners?
The best starting point is a classic chicken salad sandwich recipe with cooked chicken, a creamy binder, a little mustard, lemon (or vinegar), salt, pepper, and one crunchy ingredient. From there, you can personalize it with herbs, pickles, grapes, or nuts—so you still get a reliable chicken salad sandwich every time.
2) What ingredients do I need for a chicken salad sandwich?
At minimum, chicken, a creamy base (mayo, yogurt, or a dairy-free option), acid (lemon, vinegar, or pickle brine), salt, pepper, and something crunchy. Afterward, extras like mustard, herbs, onions, pickles, grapes, apples, cranberries, or nuts can turn basic chicken salad spread into a standout filling.
3) How do I make chicken salad spread thicker for sandwiches?
To thicken chicken salad spread, start by draining or drying the chicken well, then add the dressing gradually instead of all at once. Additionally, chopping chicken smaller, chilling the mixture, or stirring in a thicker binder (Greek yogurt, strained yogurt, or avocado) can help the chicken salad sandwich filling hold together.
4) How can I stop a chicken salad sandwich from getting soggy?
First, use a sturdy bread or lightly toast it. Next, add a barrier layer such as lettuce, spinach, or a thin swipe of spread on both bread slices. Finally, keep juicy ingredients—like tomatoes—away from the bread until just before eating.
5) Can I make a healthy chicken salad sandwich without mayo?
Yes. A healthy chicken salad sandwich can be made with thick yogurt, mashed avocado, or a dairy-free creamy option. Moreover, increasing crunchy vegetables and using bold seasoning keeps the healthy chicken salad sandwich recipe flavorful rather than bland.
6) How do I make a chicken salad sandwich without celery?
For a chicken salad sandwich without celery, swap in diced cucumber, bell pepper, radish, apple, or even chopped pickles. Alternatively, toasted nuts can add crunch while also making the chicken salad sandwich more filling.
7) What’s the easiest rotisserie chicken salad sandwich?
The simplest rotisserie chicken salad sandwich uses shredded rotisserie chicken, mayo (or yogurt), lemon, mustard, salt, pepper, and a crunchy add-in like cucumber or celery. Then, adjust with herbs or pickles to make the rotisserie chicken salad sandwich taste brighter and fresher.
8) Can I make a chicken salad sandwich recipe using canned chicken?
Absolutely. For a chicken salad sandwich recipe using canned chicken, drain the chicken thoroughly, flake it, then mix with a tangy dressing (mayo + mustard + lemon or pickle brine). In addition, pickles, spring onions, or herbs help canned chicken salad recipes for sandwiches taste more “fresh-made.”
9) What bread is best for a chicken salad sandwich?
Soft sandwich bread is classic, wholegrain adds texture, and a crusty roll works well for a chicken salad sub. Meanwhile, a croissant turns it into a chicken salad croissant sandwich that feels more special—just make sure the filling is thick enough.
10) How do I make a chicken salad croissant that doesn’t fall apart?
For chicken salad croissant success, use chilled filling, chop the chicken smaller, and add a dry layer like lettuce inside the croissant. Also, keep the dressing slightly thicker so the chicken salad croissant sandwich stays neat.
11) What’s the difference between chicken salad and chicken Caesar salad sandwich styles?
A chicken salad sandwich is usually mayo- or yogurt-based with optional crunch and mix-ins. By contrast, a chicken Caesar sandwich leans on Caesar flavors—garlic, lemon, Parmesan, black pepper, and romaine—sometimes built as a creamy Caesar chicken salad sandwich, and other times layered like a Caesar salad sandwich with sliced chicken.
12) How do I make a Caesar chicken salad sandwich at home?
Use cooked chicken, a creamy base, lemon, garlic, Parmesan, black pepper, and chopped romaine. Then, add crushed croutons for crunch. As a result, you get a chicken Caesar salad sandwich that tastes like a full meal rather than just a spread.
13) What are the best add-ins for chicken salad sandwich ideas?
Popular add-ins include grapes, dried cranberries (or craisins), diced apples, walnuts, pecans, almonds, chopped pickles, onions, herbs, curry spice, and hot sauce. Likewise, you can change the vibe simply by switching the crunch or the seasoning.
14) How do I make chicken salad sandwich with grapes taste balanced?
Use grapes for sweetness, then balance with lemon, mustard, and black pepper. Additionally, walnuts or almonds help the chicken salad sandwich recipe with grapes feel richer and less one-note.
15) How do I make a chicken cranberry salad sandwich?
Start with classic chicken salad spread, then add dried cranberries (or craisins), toasted nuts, and extra lemon or a mild vinegar. Consequently, the chicken cranberry salad sandwich becomes bright, sweet-savory, and ideal for wraps or croissants too.
16) How do I make an apple walnut chicken salad sandwich?
Combine diced apple, toasted walnuts, and a lightly tangy dressing with cooked chicken. After that, add black pepper and a pinch of salt until the flavors pop. This apple walnut chicken salad sandwich is especially good on wholegrain bread.
17) What is a chicken waldorf sandwich?
A chicken waldorf sandwich is a chicken salad sandwich variation that usually includes apples, nuts (often walnuts), and a creamy dressing. Sometimes it also includes grapes or raisins, which adds another layer of sweet-savory contrast.
18) How do I make a curry chicken salad sandwich recipe that isn’t too strong?
Use a mild curry powder and start with a small amount, then add more gradually. Furthermore, lemon juice and a creamy binder soften the spice, while raisins or almonds can round out the flavor in a curry chicken salad sandwich recipe.
19) What is the best way to make chicken salad for tea sandwiches?
For chicken salad for tea sandwiches, chop the chicken very finely, keep the filling thick, and avoid watery vegetables. Then, spread evenly on soft bread and cut into small triangles or finger shapes so the chicken salad finger sandwich holds together cleanly.
20) How do I make a chicken salad sub that tastes like a deli sandwich?
Use a sturdy roll, add lettuce first, and keep the chicken salad sandwich spread thick. Afterward, layer pickles or onions for bite. In turn, the chicken salad sub stays crisp and flavorful instead of soft and heavy.
21) Can I turn chicken salad into a chicken sandwich wrap?
Yes—use a thicker chicken salad sandwich filling, add crunchy vegetables, then roll tightly. Also, letting the wrap rest briefly before slicing helps the chicken sandwich wrap stay secure.
22) What’s a simple sandwich recipe with egg that pairs well with chicken salad?
A straightforward option is an egg salad sandwich recipe with relish. Still, if you want one filling that combines both, you can make a chicken and egg salad sandwich by mixing chopped eggs into your chicken salad sandwich recipe for extra creaminess.
23) How do I make an egg salad sandwich recipe with relish?
Chop hard-boiled eggs, then mix with mayo, relish (or chopped pickles), mustard, salt, and pepper. After mixing, taste and adjust—especially the pepper—so the egg salad sandwich doesn’t taste flat.
24) What is chicken egg salad?
Chicken egg salad is a blended sandwich filling made from cooked chicken and chopped hard-boiled eggs bound with a creamy dressing and seasoning. As such, chicken egg salad creates a softer, richer texture than a standard chicken salad sandwich.
25) What is a chick pea salad sandwich and how is it different?
A chick pea salad sandwich uses mashed chickpeas instead of chicken, usually with a creamy binder, lemon, mustard, and crunchy add-ins. In comparison, a chickpea salad sandwich recipe is plant-based yet still delivers the same creamy, tangy “sandwich spread” feel as chicken salad spread.
26) How long does chicken salad sandwich filling last in the fridge?
Typically, chicken salad sandwich filling is best within 3–4 days when stored cold in a sealed container. However, if it’s been left out for extended periods, it’s safer to discard it rather than risk foodborne illness.
27) Can I freeze chicken salad spread?
Freezing chicken salad spread can change the texture, especially if it contains mayo or watery vegetables. Instead, freeze plain cooked chicken, then make the chicken salad sandwich recipe fresh when you’re ready to eat.
28) What can I serve with a chicken salad sandwich?
Common pairings include a light green salad, soup, roasted vegetables, fruit, or crunchy vegetables. Likewise, a simple side can make a chicken salad sandwich feel like a complete meal without turning lunch into a big project.