Posted on Leave a comment

6 Types of Rest Everyone Needs

In today’s fast-paced world where we work like a robot rest is often undervalued. However, understanding the different types of rest and incorporating them into our daily routines is essential for maintaining overall well-being. Let’s explore the six types of rest that everyone needs to lead a balanced and healthy life.

Mental rest involves giving your brain a break from continuous thinking and cognitive activities. It’s about pausing the constant stream of thoughts, plans, and worries that often clutter our minds.

How to achieve mental rest:

Meditation: Spend a few minutes each day meditating. This can help clear your mind and reduce stress.

Quiet Walk: Take a leisurely walk in a quiet place, away from the hustle and bustle of daily life. This can help you reset and recharge mentally.

Physical rest is about allowing your body to recover and rejuvenate. It’s essential for maintaining physical health and energy levels.

How to achieve physical rest:

Sleep: Ensure you get enough sleep each night. Quality sleep is crucial for physical recovery.

Stretching and Gentle Exercise: Incorporate light stretching or gentle exercises like yoga into your routine to relax your muscles.

Relaxation: Take time to relax, whether it’s lounging in a comfortable chair, taking a warm bath, or simply lying down and resting.

Emotional rest is about being true to your feelings and allowing yourself to express them. It’s important to recognize and address your emotions rather than suppressing them.

How to achieve emotional rest:

Be Honest: Be honest with yourself and others about how you feel. Don’t hide your emotions.

Say NO: Learn to say no when you’re tired or overwhelmed. It’s okay to prioritize your emotional well-being.

Social rest involves finding a balance between social interactions and solitude. It’s important to recharge alone or with close friends who uplift and support you.

How to achieve social rest:

Alone Time: Spend time alone to recharge and reflect.

Close Friends: Engage with close friends who make you feel comfortable and happy. Avoid large gatherings if they drain your energy.

Spiritual rest is about finding meaning and purpose in life. It involves connecting with something greater than yourself, whether it’s through religion, spirituality, or nature.

How to achieve spiritual rest:

Mindfulness: Practice mindfulness or meditation to connect with your inner self.

Nature: Spend time in nature, appreciating its beauty and tranquility. This can help you feel more grounded and connected.

Sensory rest is about reducing sensory overload and giving your senses a break. This is particularly important in our digital age, where screens and constant notifications can overwhelm our senses.

How to achieve sensory rest:

Unplug: Take regular breaks from screens, including phones, computers, and TVs.

Quiet Time: Spend some time in a quiet environment, free from loud noises and distractions.

Conclusion

Incorporating these six types of rest into your life can significantly improve your overall well-being. It’s about recognizing the different ways our bodies and minds need to rest and taking proactive steps to fulfill those needs. By doing so, you can lead a more balanced, healthy, and fulfilling life.

Call to Action

Try integrating these types of rest into your daily routine and notice the positive changes they bring. Share your experiences and feedback in the comments below. Which type of rest do you find most challenging to incorporate, and why? Let’s support each other in our journey towards better rest and overall well-being.

Posted on 5 Comments

Chia Pudding – Steel Cut Oats, Mango, Chia Seeds, Fox Nuts

Lately, I’ve developed a deep affection for steel-cut oats. It’s surprising how quickly they’ve become a comfort food for me—something I genuinely look forward to eating, unlike many so-called ‘healthy’ alternatives. Of course, ‘healthy’ is subjective and should be defined by individual needs and preferences. Here is something that my git finds to be extremely healthy maybe something you might want to try as well.

Why Steel-Cut Oats?

Steel-cut oats offer a wholesome bowl of nourishment, combining whole, natural foods with a delicious taste. Their texture, fiber, and smoothness are simply amazing. Steel-cut oats are a fantastic source of fiber and essential nutrients, which can support digestion and overall wellness. If you haven’t tried them yet, I highly recommend giving them a go.

My Go-To Recipe

Here’s a basic recipe that I follow:

  1. Roast the Oats: Start by roasting the steel-cut oats to enhance their flavor.
  2. Cook the Oats: Boil the roasted oats in a pressure cooker until they are tender.
  3. Add Milk: Once the oats are cooked, stir in some milk and refrigerate them to chill. I usually let them sit overnight to allow the milk and flavors to meld together.

Flavor Boost: Mango Magic

A major reason I’ve fallen for this dish is the mango season. I add a mango or two, chopped into bits. The natural sweetness of the mangoes is so satisfying that I skip any added sugar or sweeteners. Instead, I let the mangoes infuse their sweetness into the oats as they soak overnight.

Nutritional Enhancements

To add more texture and nutritional value, I also include:

  • Chia Seeds: About a tablespoon or two.
  • Fox Nuts (Makhane): Or other nuts, berries, or seeds.

This combination works wonderfully and provides a super prebiotic boost for my system. After experimenting with different ingredients, I found that chia seeds and makhane made a significant difference, prompting me to share this recipe.

Serving Suggestions

For an extra touch of flavor, consider adding:

  • Roohafza: A splash on top.
  • Cinnamon: A sprinkle for added warmth.

Feel free to experiment with different fruits, like berries or apples, depending on the season.

Personal Note

When I mention the ‘result,’ I’m not only referring to the taste but also how it makes my stomach feel the next day. The combination of steel-cut oats, mangoes, chia seeds, and makhane seems to act as a super prebiotic for my system, which is probably complemented by a kombucha tasting session later in the day. This dish fits perfectly into my daily routine, providing a satisfying and nutritious start to my day.

Posted on Leave a comment

A Taste of Nostalgia: Recipe to Make Khatta Meetha aur Imly Aam Papad

From my childhood and even now, I have always loved to eat this tasty, delicious, and mouth-watering aam papad in different flavors. Whether it’s meetha (sweet), khatta (sour), or the spicy tangy imly aam papad, each bite takes me back to childhood days. I craved for this aam papad way too much during my pregnancy days, and I am sure many of you must have gone through the same. You can read more about Aam Papad during Pregnancy : Cravings, Nutrition & Side Affects.

During such precious times, it’s crucial to ensure the food we consume is hygienic and made with care. That’s why I encourage all expecting mothers to try this aam papad recipe at home. If you don’t want to get into the hustle, you can buy this delicious treat from our website, knowing it’s made with the highest standards of hygiene and love. Enjoy the taste of nostalgia and take care of your health and your little one’s!

I am excited to share with you an easy recipe to make aam papad at home, covering all three variants. So let’s get started.

Ingredients:

  • 6-8 ripe mangoes (preferably Alphonso or Safeda)
  • 1 cup sugar (adjust according to the sweetness of the mangoes)
  • 1 tablespoon lemon juice

For Khatta Aam Papad:

  • 1 tablespoon tamarind pulp

For Spicy Tangy Imly Aam Papad:

  • 1 tablespoon tamarind pulp
  • 1 teaspoon red chili powder
  • 1/2 teaspoon black salt

Method:

Prepare the Mango Puree:

Peel and chop the ripe mangoes. Blend them into a smooth puree. Pass the puree through a sieve to remove any fibrous parts, ensuring a smooth texture.

In a heavy-bottomed pan, add the mango puree and sugar. Cook on low heat, stirring continuously until the mixture thickens and reduces to a jam-like consistency. This can take around 30-40 minutes. Add lemon juice and mix well.

Prepare for Different Flavors:

For Meetha Aam Papad: Spread a portion of the cooked mango mixture evenly on a greased tray or a baking sheet lined with parchment paper.

For Khatta Aam Papad: Add tamarind pulp to a portion of the cooked mango mixture, mix well, and spread it on another tray.

For Spicy Tangy Imly Aam Papad: Add tamarind pulp, red chili powder, and black salt to the remaining mango mixture. Mix well and spread it on a separate tray.

tangi imli aam papad masala monk

Allow the spread mixtures to cool completely. Once cooled, place the trays in a warm, dry place or under the sun to dry. This can take 2-3 days, depending on the weather. The aam papad is ready when it is firm and no longer sticky to the touch. Once dried, cut the aam papad into desired shapes using a knife or pizza cutter. Roll them up or store them flat in an airtight container.

Making aam papad at home is not only a fun but also a way to recreate those cherished childhood memories. You can make your own aam papad or if you are looking for a homemade, preservative free and authentic experience, without getting into hassle of making your own, you can always explore Masala Monk’s Meetha Aam Papad , Khatta Aam Papad and Spicy and Tangy Imli Aam Papad which ships all over India.

Enjoy the meetha, khatta, and spicy tangy imly aam papad with your loved ones. Do try this recipe and share your feedback in the comments below!

Happy snacking!

Posted on Leave a comment

Advice to Senior Citizens – By Khushwant Singh

In this heartfelt reflection, Khushwant Singh, a renowned Indian author, shares his insights on longevity and coping with old age. At 98 years old, he offers practical advice based on his personal experiences and observations. His wisdom is not just about living longer, but living well and finding peace and satisfaction in the later years of life.


Khushwant Singh’s Reflections on Longevity and Coping with Old Age

By Khushwant Singh @ age 98

Coming on to 98 and still earning more than I did in my younger days, people ask me how I manage to do it. They regard me as an expert on longevity.

Also Read: 30-Minute Chair Yoga for Seniors and Elderly

Earlier I had written that longevity is in one’s genes. This did not happen in my own family. My parents, who died at 90 and 94, had five children. The first to go was the youngest of the siblings. Next went my sister who was the fourth. My elder brother, who was three years older than me, went a couple of years ago. Two of us remain: I, who will soon be 98, and my younger brother, a retired Brigadier three years younger than me and in much better health.

More important than analyzing longevity is to cope with old age and make terms with it. As we grow older, we are less able to exercise our limbs. Right into my mid-eighties, I played tennis every morning, did rounds of Lodhi gardens in winter, and swam for an hour in summer. I am unable to do this anymore. Now I take a good massage by powerful hands going all over my body from the skull to the toes. I have this done at least once a day or at times twice a day. I am convinced that this has kept me going for so long.

Equally important is the need to cut down drastically one’s intake of food and drink. I start my mornings with guava juice. My breakfast is one scrambled egg on toast. My lunch is usually patli kichri with dahi or a vegetable. I skip afternoon tea. In the evening, I take a peg of single malt whisky. Before I eat supper, I say to myself, “Do not eat too much.” I also believe that a meal should have just one kind of vegetable or meat followed by a pinch of chooran. It is best to eat alone and in silence. Talking while eating does not do justice to the food and you swallow a lot of it. For me, no more Punjabi or Mughlai food. I find South Indian idli, sambhar, and grated coconut easier to digest and healthier.

Also Read: Eggs and Daily Consumption: Unscrambling the Facts

Never allow yourself to be constipated. *The stomach is a storehouse of all kinds of ailments. Our sedentary life tends to make us constipated. Keep your bowels clean. Impose strict discipline on your daily routine of eating and exercise.

Try to develop peace of mind. For this, you must have a healthy bank account. Shortage of money can be very demoralizing. It does not have to be in crores, but enough for your future needs and the possibility of falling ill. Never lose your temper, it takes a heavy toll and jangles one’s nerves.

Give generously. Remember you can’t take it with you. You may give to your children, servants, or charity. You will feel better. There is joy in giving. Drive out envy of those who have done better than you in life. Do not conform to the tradition of old people spending time in prayer and long hours in places of worship. That amounts to conceding defeat. Instead, take up a hobby like gardening, growing bonsai, or helping children in your neighborhood with their homework.

Recommended Recipe: Fermented RAGI (Finger Millet) IDLIS- Gluten Free | Gut Friendly | Breakfast Recipe

A practice which I have found very effective is to fix my gaze on the flame of a candle, empty my mind of everything, but in my mind repeat Waheguru, Waheguru, Waheguru Aum Shanti, Aum Shanti, Aum Shanti. It does work. I am at peace with the world.

We can’t all be Fauja Singh who at 100 runs a marathon race, but we can equal him in longevity and creativity. I wish all my readers long, healthy lives full of happiness.

Khushwant Singh

It’s sad that Khushwant Singh couldn’t complete a century. He left this world shortly after completing 99. This is probably the best ever advice to senior citizens that I have read! 🌹🙏

Found this note on internet, credited to the illustrious writer, hopefully it is being rightly attributed, otherwise still sounds like a good advice, regardless of the source it is coming from. Do share the same with someone in your friends and family – with someone to whose life this could make a difference.

Got more advice to share or thoughts to add – fireaway in the comments below.

Posted on 1 Comment

Good Morning Yoga Routine: A Beginner’s Guide

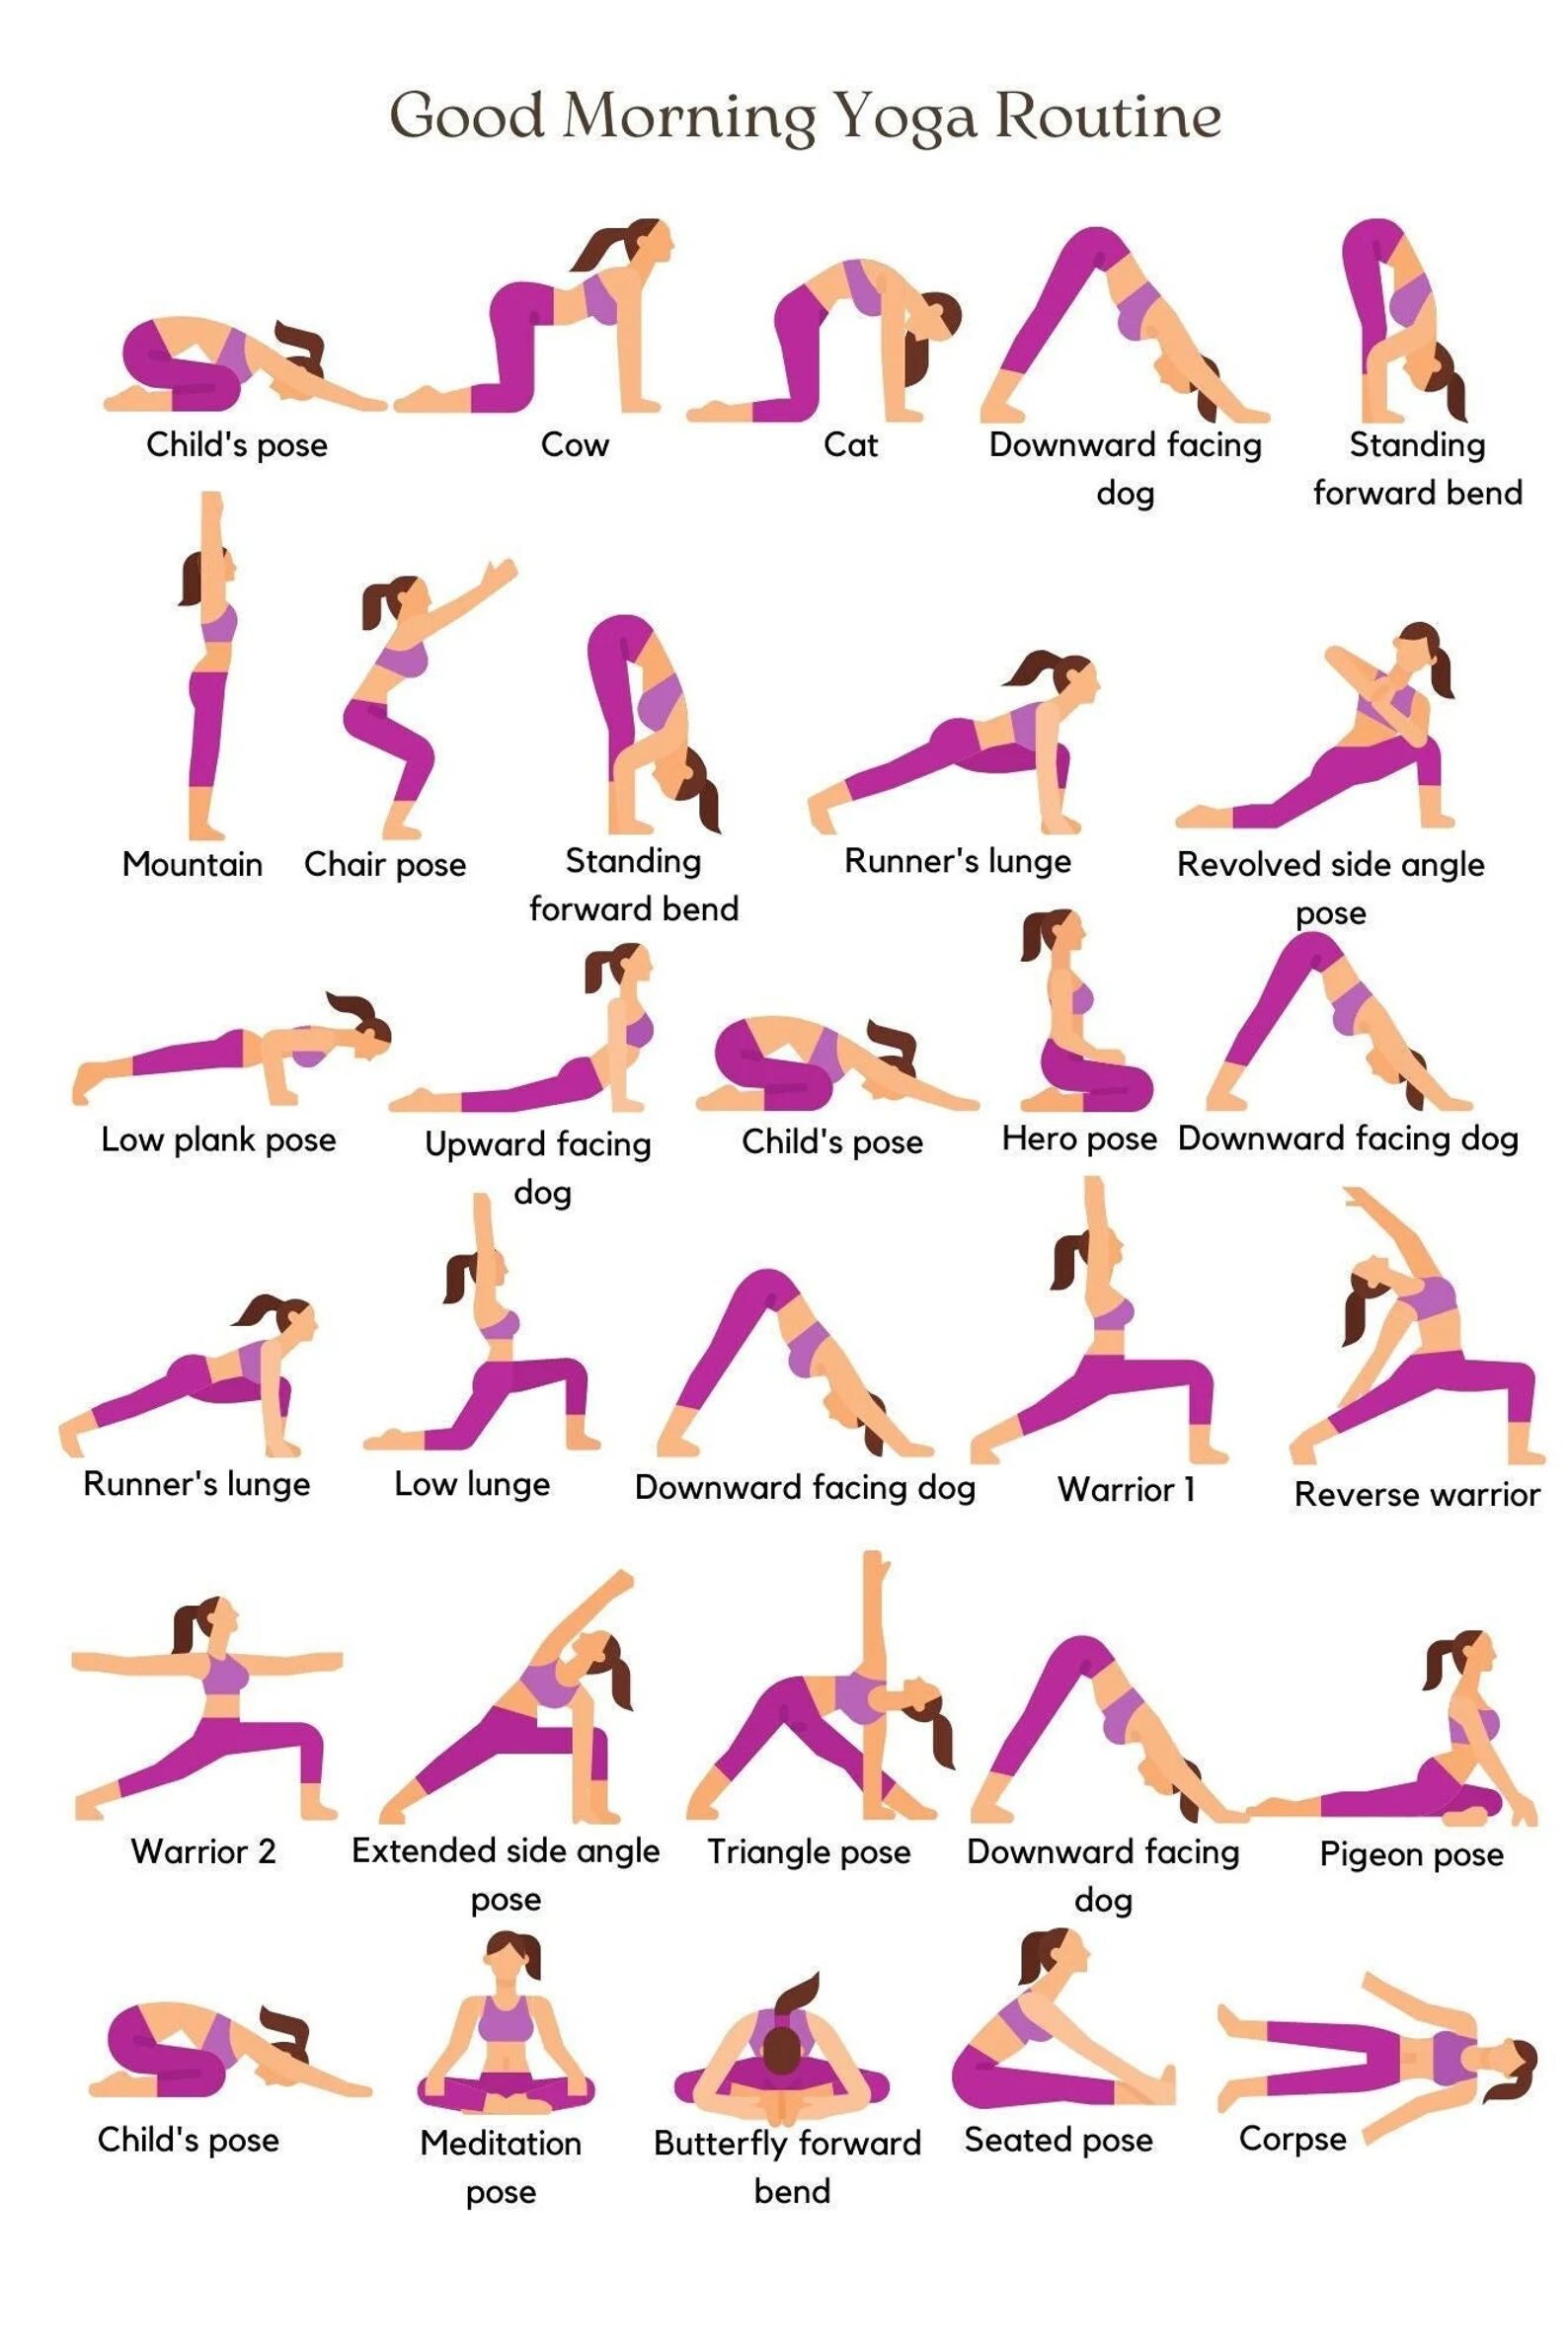
Starting your day with yoga can set a positive tone and energize your body and mind. A morning yoga routine helps to increase flexibility, build strength, and cultivate a sense of calm that lasts throughout the day. In this guide, we’ll walk you through a detailed morning yoga routine that you can easily follow at home. Each pose is designed to wake up your muscles, improve your mood, and enhance your overall well-being.

A free PDF is embedded and available to download, save, or print at the end of this post.

1. Child’s Pose (Balasana)

Begin in a kneeling position, sit back on your heels, and extend your arms forward, resting your forehead on the mat. This pose gently stretches your back and calms the mind.

  • Benefits: Relieves back and neck pain, reduces stress, and calms the brain.
  • How to: Kneel on the mat with your big toes touching and knees apart. Sit back on your heels and stretch your arms forward, lowering your torso between your thighs. Rest your forehead on the mat.

2. Cow Pose (Bitilasana)

Transition to an all-fours position. Inhale, arch your back, and lift your head and tailbone towards the ceiling. This pose warms up your spine and improves posture.

  • Benefits: Stretches the front torso and neck, gently massages the spine.
  • How to: Position yourself on your hands and knees, ensuring your wrists are directly under your shoulders and knees under your hips. Inhale deeply, arch your back, and lift your tailbone and head towards the sky.

3. Cat Pose (Marjaryasana)

Exhale, round your spine, and tuck your chin to your chest, moving into the cat pose. Alternate between cow and cat poses to release tension in the back.

  • Benefits: Stretches the back torso and neck, gently massages the spine.
  • How to: From the cow pose, exhale and round your spine towards the ceiling, tucking your tailbone and drawing your chin to your chest. Repeat the cow-cat sequence several times.

4. Downward Facing Dog (Adho Mukha Svanasana)

From all fours, lift your hips up and back, straightening your legs and forming an inverted V shape. This pose stretches the hamstrings, calves, and shoulders.

  • Benefits: Strengthens arms and legs, stretches the shoulders, hamstrings, calves, and feet.
  • How to: From your hands and knees, lift your hips towards the ceiling, straightening your legs as much as possible without locking your knees. Press your heels towards the floor and your hands into the mat, spreading your fingers wide.

5. Standing Forward Bend (Uttanasana)

Step forward and fold your upper body over your legs, allowing your head to hang down. This pose helps to relieve stress and stretch the hamstrings.

  • Benefits: Stretches the hamstrings, calves, and hips; strengthens the thighs and knees; relieves stress.
  • How to: From the downward facing dog, step your feet forward to meet your hands. Keep your knees slightly bent if needed, and let your upper body hang over your legs.

6. Mountain Pose (Tadasana)

Stand up tall with feet together, grounding through your feet. Reach your arms overhead, lengthening your spine. This pose improves posture and balance.

  • Benefits: Improves posture, strengthens thighs, knees, and ankles, firms abdomen and buttocks.
  • How to: Stand with your feet together, arms at your sides. Distribute your weight evenly across both feet, lift your kneecaps, and engage your thighs. Inhale and reach your arms overhead, lengthening through your spine.

7. Chair Pose (Utkatasana)

From mountain pose, bend your knees and lower your hips as if sitting in an invisible chair. Extend your arms overhead, engaging your core and leg muscles.

  • Benefits: Strengthens the thighs, calves, and spine, stretches the chest and shoulders, stimulates the heart and diaphragm.
  • How to: From mountain pose, bend your knees deeply, trying to keep your thighs as parallel to the floor as possible. Reach your arms overhead, with your biceps next to your ears.

8. Standing Forward Bend (Uttanasana)

Fold forward again from the hips, releasing any tension in your back and legs.

  • Benefits: Stretches the hamstrings, calves, and hips; strengthens the thighs and knees; relieves stress.
  • How to: Bend forward from the hips, allowing your torso to hang over your legs. Keep your knees slightly bent if needed, and hold your elbows with opposite hands for a deeper stretch.

9. Runner’s Lunge (Ardha Mandalasana)

Step one foot back into a deep lunge, aligning your knee over your ankle. This pose stretches the hip flexors and strengthens the legs.

  • Benefits: Stretches the hips, groin, and legs; strengthens the thighs and ankles; improves balance.
  • How to: From a standing position, step one foot back into a deep lunge, keeping your front knee over your ankle. Lower your hips and extend your back leg straight behind you.

10. Revolved Side Angle Pose (Parivrtta Parsvakonasana)

From the runner’s lunge, twist your torso towards the bent knee, extending your opposite arm up and over. This pose improves balance and detoxifies the organs.

  • Benefits: Stretches and strengthens the legs, knees, and ankles; improves digestion and detoxifies the organs.
  • How to: From runner’s lunge, place your opposite elbow on the outside of your bent knee. Twist your torso, extending your top arm overhead, and gaze towards your top hand.

11. Low Plank Pose (Chaturanga Dandasana)

Lower your body into a plank position with elbows bent, keeping your body in a straight line. This pose builds core and arm strength.

  • Benefits: Strengthens the arms, shoulders, and core; improves balance.
  • How to: From a high plank position, lower your body until your elbows are at a 90-degree angle, keeping your body in a straight line from head to heels.

12. Upward Facing Dog (Urdhva Mukha Svanasana)

From the low plank, roll over your toes and lift your chest upwards, keeping your legs straight and thighs off the ground. This pose opens the chest and strengthens the arms.

  • Benefits: Strengthens the spine, arms, and wrists; stretches the chest, shoulders, and abdomen.
  • How to: From low plank, roll over your toes, lift your chest, and straighten your arms. Keep your thighs off the ground and press your shoulders back.

13. Child’s Pose (Balasana)

Return to child’s pose for a moment of rest and relaxation.

  • Benefits: Relieves back and neck pain, reduces stress, and calms the brain.
  • How to: Sit back on your heels and extend your arms forward, resting your forehead on the mat.

14. Hero Pose (Virasana)

Sit back on your heels with knees bent and hands resting on your thighs. This pose promotes relaxation and improves digestion.

  • Benefits: Stretches the thighs, knees, and ankles; improves digestion and relieves gas.
  • How to: Kneel on the mat, with your knees together and feet slightly apart. Sit back between your heels, keeping your back straight and hands on your thighs.

15. Warrior 1 (Virabhadrasana I)

Step one foot forward and bend the knee, keeping the back leg straight. Raise your arms overhead. This pose builds strength and stability.

  • Benefits: Strengthens the legs, ankles, and arms; stretches the chest, shoulders, and groin; improves balance.
  • How to: From a standing position, step one foot back and bend your front knee. Raise your arms overhead and gaze forward.

16. Reverse Warrior (Viparita Virabhadrasana)

From warrior 1, lean back and reach one arm overhead, stretching the side body.

  • Benefits: Stretches the side body, strengthens the legs and arms, improves flexibility.
  • How to: From warrior 1, reach your back hand down your leg and extend your top arm overhead, leaning back slightly.

17. Warrior 2 (Virabhadrasana II)

Turn your back foot slightly and open your hips to the side, extending your arms parallel to the ground. This pose strengthens the legs and improves concentration.

  • Benefits: Strengthens the legs, ankles, and arms; stretches the hips and groin; improves concentration and balance.
  • How to: From warrior 1, open your hips to the side and extend your arms parallel to the ground, gazing over your front hand.

18. Extended Side Angle Pose (Utthita Parsvakonasana)

From warrior 2, lower your front hand to the ground or a block and extend your top arm over your ear. This pose stretches the sides and strengthens the legs.

  • Benefits: Stretches the sides, hips, and hamstrings; strengthens the legs and ankles.
  • How to: From warrior 2, lower your front hand to the ground or a block, and extend your top arm over your ear, creating a long line from your back foot to your fingertips.

19. Triangle Pose (Trikonasana)

Straighten your front leg, extend your front arm to the ground or a block, and reach your top arm towards the ceiling. This pose improves flexibility and balance.

  • Benefits: Stretches the legs, hips, and spine; strengthens the legs and ankles; improves flexibility and balance.
  • How to: From warrior 2, straighten your front leg and reach your front hand to the ground or a block. Extend your top arm towards the ceiling and gaze upwards.

20. Pigeon Pose (Kapotasana)

From downward facing dog, bring one knee forward and extend the opposite leg back, lowering your hips. This pose deeply stretches the hips and relieves lower back pain.

  • Benefits: Stretches the hips, thighs, and groin; relieves lower back pain.
  • How to: From downward facing dog, bring one knee forward and lower your hips, extending your back leg straight behind you. Keep your hips square and fold forward over your front leg.

21. Meditation Pose (Sukhasana)

Sit comfortably with your legs crossed and hands resting on your knees. Close your eyes and focus on your breath, calming your mind and body.

  • Benefits: Calms the mind, reduces stress, improves focus.
  • How to: Sit with your legs crossed and your back straight. Rest your hands on your knees, close your eyes, and take deep breaths.

22. Butterfly Forward Bend (Baddha Konasana)

Bring the soles of your feet together and fold forward over your legs, gently stretching your inner thighs and groin.

  • Benefits: Stretches the inner thighs, groin, and knees; improves flexibility.
  • How to: Sit with your legs bent and the soles of your feet together. Hold your feet with your hands and gently fold forward, keeping your back straight.

23. Seated Pose (Dandasana)

Sit with your legs extended straight in front of you, engaging your core and sitting tall. This pose improves posture and stretches the legs.

  • Benefits: Strengthens the back muscles, improves posture, stretches the legs.
  • How to: Sit with your legs extended straight in front of you. Flex your feet, engage your core, and sit up tall, with your hands resting on the mat beside you.

24. Corpse Pose (Savasana)

Lie down on your back with arms at your sides and legs slightly apart. Close your eyes and relax completely, allowing your body to absorb the benefits of your practice.

  • Benefits: Relaxes the body, reduces stress, promotes overall well-being.
  • How to: Lie on your back with your legs slightly apart and your arms at your sides, palms facing up. Close your eyes and take deep breaths, allowing your body to fully relax.

You can download / save / print this basic FREE PDF with 25 poses to get you started.

Conclusion

Incorporating this morning yoga routine into your daily schedule can bring numerous physical and mental benefits. Whether you’re new to yoga or a seasoned practitioner, these poses are designed to help you start your day with a sense of calm and vitality. Remember to move at your own pace, listen to your body, and enjoy the process.

Tags: Morning Yoga, Yoga Routine, Daily Yoga Practice, Yoga for Beginners, Yoga Poses, Wellness

FAQs:

Q: How long should I hold each pose? A: Aim to hold each pose for 3-5 breaths, adjusting the duration based on your comfort and experience level.

Q: Can I do this routine if I’m new to yoga? A: Yes, this routine includes beginner-friendly poses. Feel free to modify the poses as needed and use props for support.

Q: What are the benefits of a morning yoga routine? A: Morning yoga can improve flexibility, increase energy, reduce stress, and enhance mental clarity throughout the day.