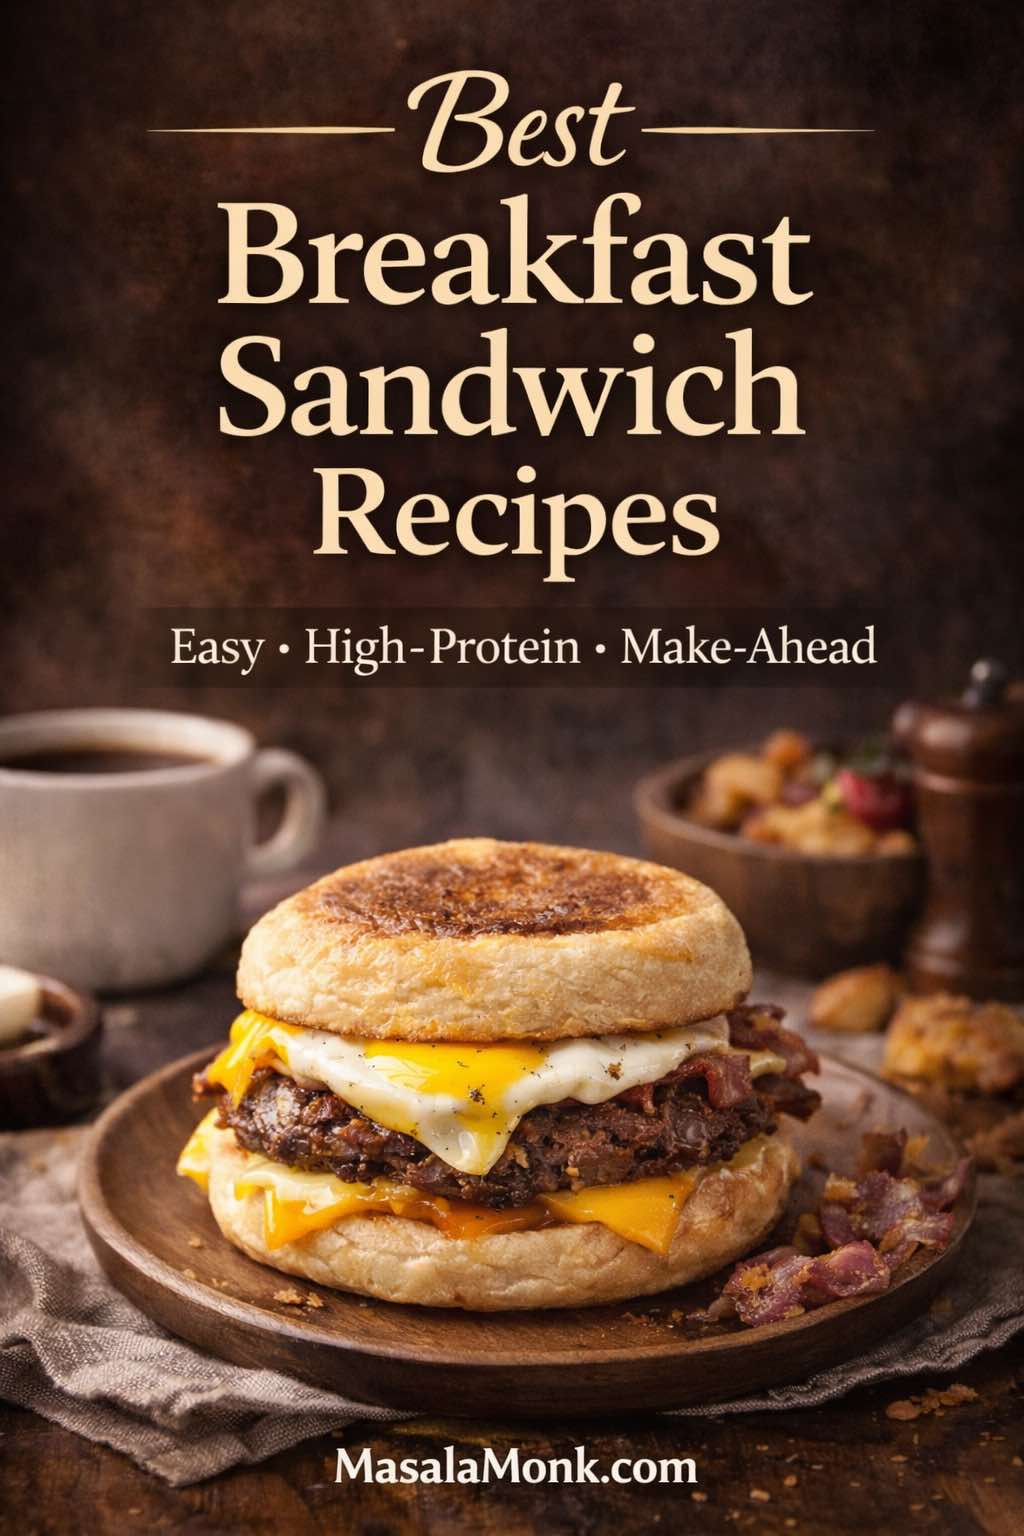
A really good breakfast sandwich does two things at once. First, it tastes like you treated yourself—melty cheese, a warm egg, something crisp, something creamy. Then, almost secretly, it makes your morning easier because you can build it with whatever bread you already have: an English muffin, a croissant, a bagel, even waffles.
That’s the heart of this breakfast sandwich recipe. Instead of giving you one rigid version, we’ll start with a simple master build you can repeat, and then we’ll branch into the most-loved styles people actually search for and crave: egg and cheese, English muffin breakfast sandwich, breakfast croissant, croissant sandwiches, bagel with egg and cheese, scrambled egg sandwich, fried egg sandwich, high protein breakfast sandwich, vegetarian breakfast sandwich, gluten free breakfast sandwich, plus make-ahead frozen breakfast sandwiches for meal prep.
Along the way, we’ll lean on sauces and spreads that make a sandwich feel “finished” without being fussy—like a quick homemade mayo, a punchy pepper sauce, a bright pesto, or a thick tzatziki-style yogurt sauce—so every bite stays balanced instead of flat.
Breakfast sandwich: the master formula that works every time
Before we get into variations, it helps to have a dependable “base.” Think of it as a choose-your-own-adventure breakfast sandwich where each layer has a job.
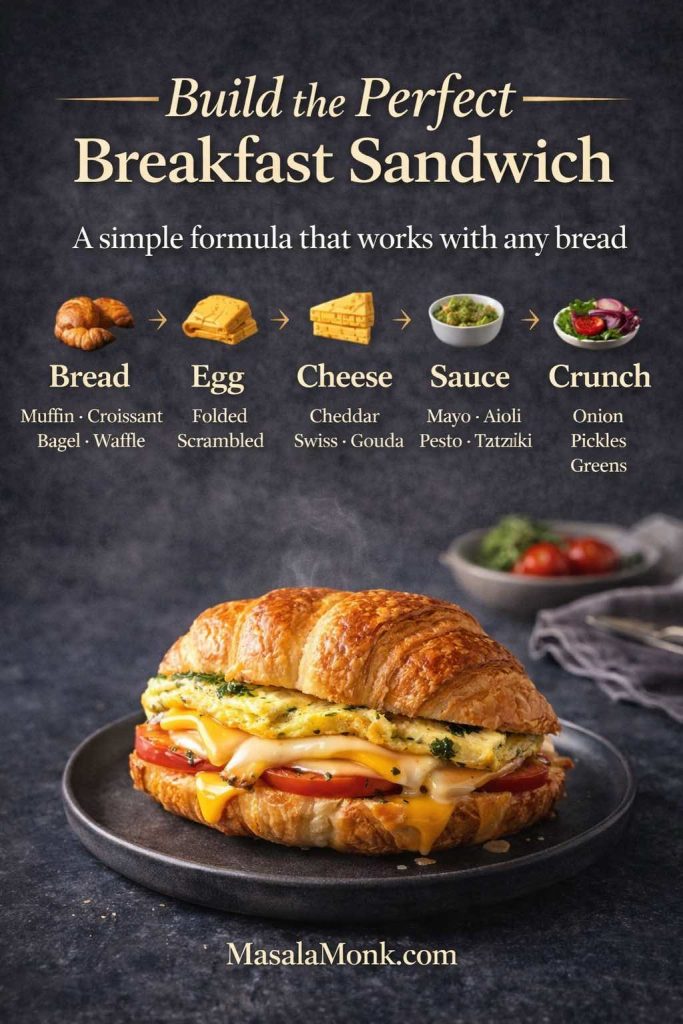
The five layers
- Bread (or bread substitute)
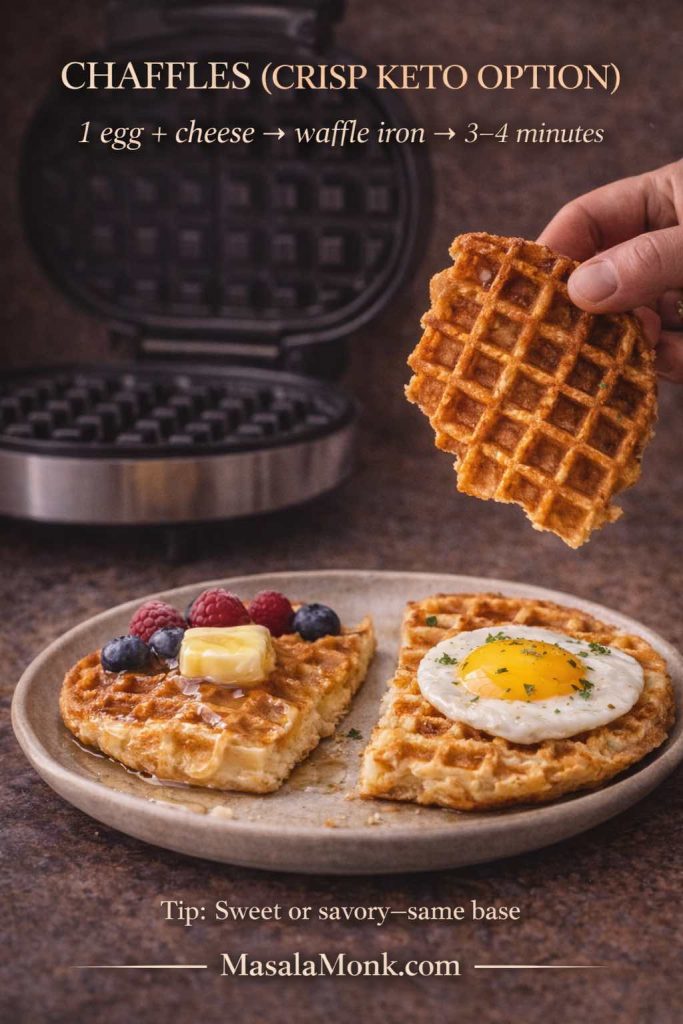
English muffin, croissant, bagel, biscuit, sliced bread, waffles, or an egg-based “eggwich.” - Eggs for sandwiches (the engine)
Fried egg, scrambled egg, folded omelet, baked egg patty, or boiled eggs turned into a spread. - Cheese (the glue)
Cheddar, mozzarella, gouda, pepper jack, or whatever melts well. - Sauce or spread (the comfort layer)
Mayo, eggless mayo, vegan mayo, pesto, tzatziki, or a quick chili-mayo. - Texture + freshness (the wake-up layer)
Crisp veggies, pickles, herbs, peppery greens, onions, tomatoes, even a little crunchy spice mix.
Once you understand those roles, breakfast sandwich ideas become effortless: swap the bread, switch the egg style, keep the sauce, change the crunch—suddenly you have a new breakfast without starting over.
Also Read: 10 Best Chicken Sandwich Recipes (BBQ, Parm, Buffalo & More)
Breakfast sandwich recipe: the base method (one sandwich)
Ingredients (flexible, not fussy)
- Bread of choice (English muffin / croissant / bagel / waffles / 2 slices bread)
- 1–2 eggs
- 1 slice cheese (or a small handful grated)
- 1–2 tablespoons spread or sauce
- Salt and pepper
- Optional add-ons: tomato, onion, spinach, cucumber, avocado, herbs, hot sauce, pickles
Method
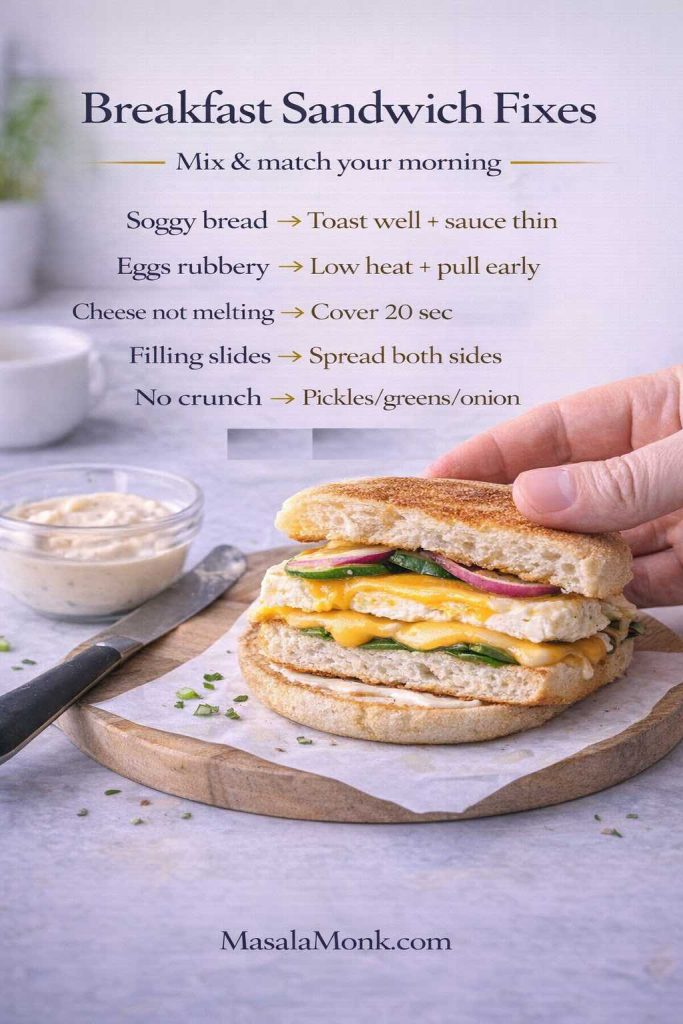
First, toast or warm your bread. You’re not just adding crunch—you’re building a barrier so the sandwich doesn’t go soggy.
Next, cook your eggs in the style you want (fried or scrambled sections are coming up). While they’re still hot, add cheese and let it melt.
Then, spread sauce on the bread while it’s warm. That small detail matters: warm bread helps spreads cling instead of sliding.
After that, stack egg + cheese, add your texture layer, close the sandwich, and press gently for a few seconds so everything holds together.
If you like checking food safety temps (especially when you’re batch-cooking), egg dishes are commonly cooked to 160°F / 71°C, and leftovers reheated to 165°F / 74°C—guidance you can see on the USDA safe temperature chart and on FoodSafety.gov’s chart.
Also Read: Food for Constipation Relief & Gut Health : 6 High-Fiber Sandwiches
Egg and cheese: the classic egg & cheese breakfast sandwich
Sometimes you don’t want a “creative” breakfast. You want the one that always works: egg and cheese, warm bread, a little seasoning, done.
Fried egg sandwich recipe (crispy edges, runny or set yolk)
Heat a pan, add butter or oil, crack in an egg, season it. Let the edges crisp; cover briefly if you want the top to set faster. Once it’s nearly where you want it, lay cheese on top and cover for 20–30 seconds so it melts smoothly.
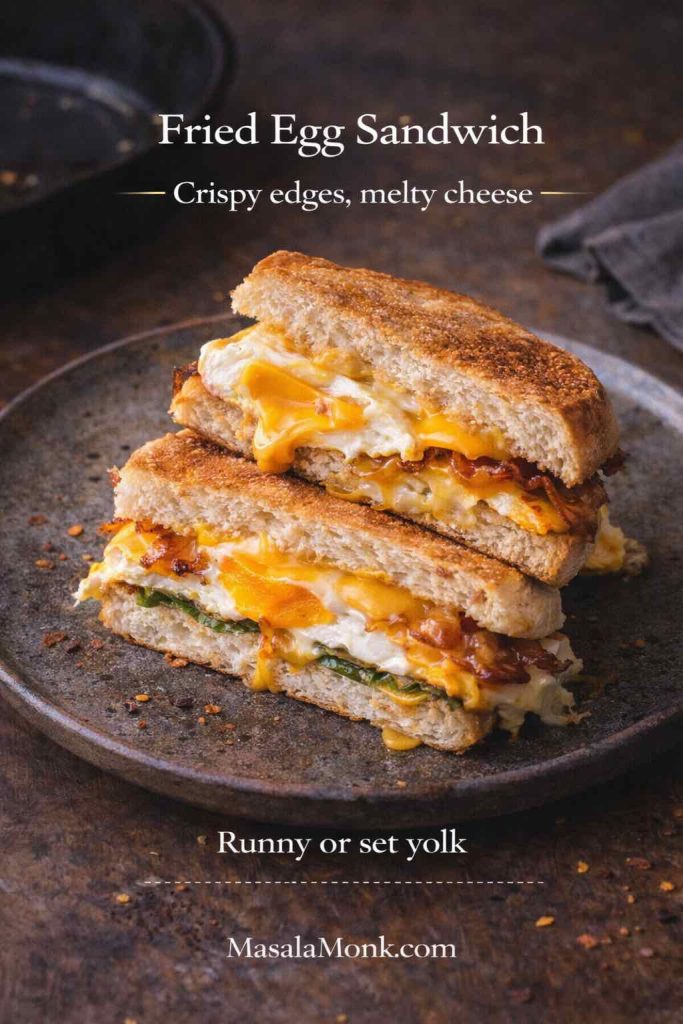
This version is ideal when you want a clean, structured bite—especially on an English muffin or bagel.
Scrambled egg sandwich (soft, fluffy, and forgiving)
Whisk 2 eggs with salt and pepper. Cook on low heat, stirring slowly. Pull the eggs off the heat while they’re still slightly glossy; the residual heat finishes them.
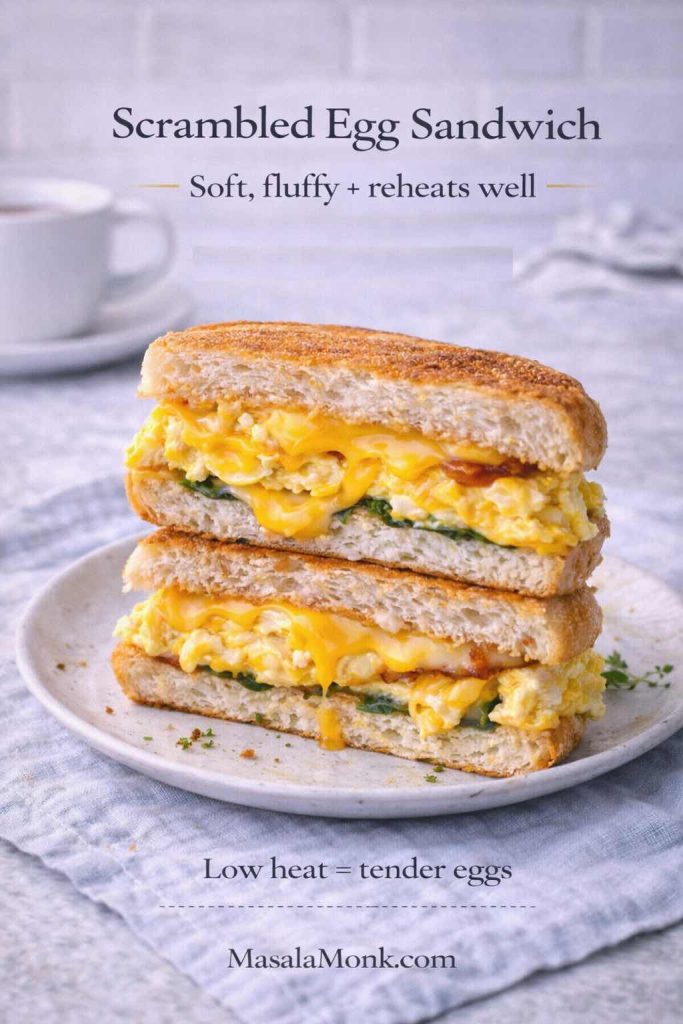
Scrambled egg sandwiches are particularly good when you’re packing breakfast for later, because the eggs stay tender instead of turning rubbery.
Also Read: Cottage Cheese Lasagna Recipe | Chicken, Spinach, & Ricotta
Choose Your Bread Base for the Perfect Breakfast Sandwich
Before you cook a single egg, pick the bread. It decides almost everything: how tidy the sandwich feels, how rich the bite is, and whether it holds up for meal prep or needs to be eaten right away. Once the base is locked in, the “best” egg and sauce choices become obvious—so you’re not building a great filling on the wrong foundation.

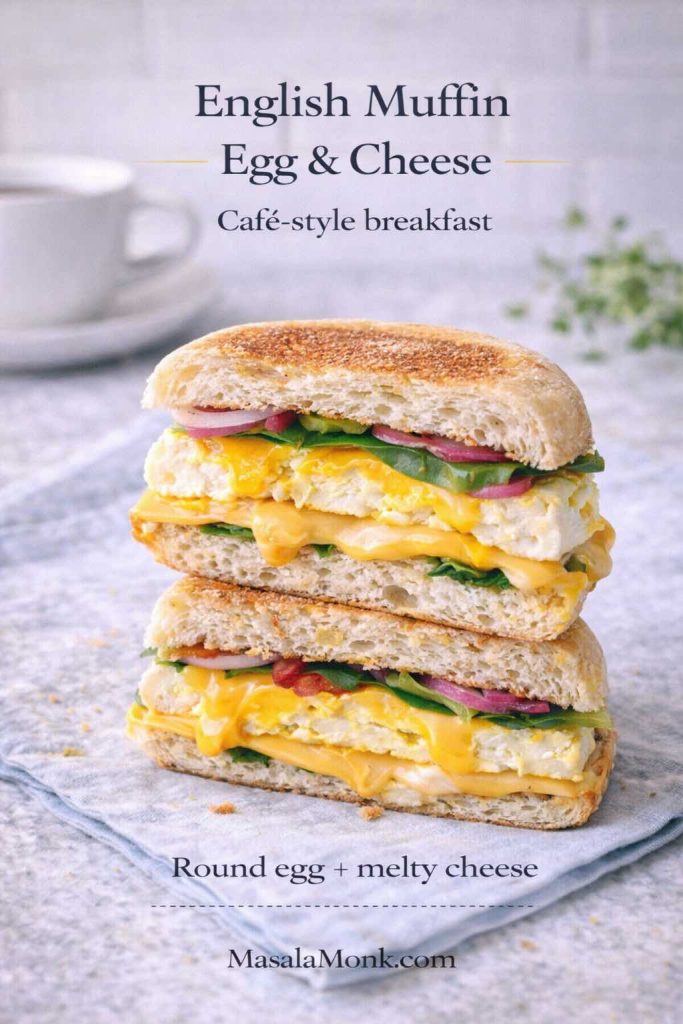
English muffin: the neat, classic breakfast sandwich
If you want a café-style breakfast sandwich that’s easy to hold and doesn’t slide around, the English muffin is the safest bet. It toasts beautifully, stays sturdy under egg and cheese, and naturally supports the “stacked” look most people want in an English muffin breakfast sandwich.
Croissant: the premium, flaky breakfast croissant
A croissant makes breakfast feel like a treat. It’s buttery and delicate, so it works best when your fillings are bold but not watery. Choose it when you want croissant sandwiches with a “bakery morning” vibe—just keep sauces and fresh veggies controlled so it doesn’t turn soft.
Bagel: the hearty breakfast bagel sandwich
Bagels are dense and satisfying, which is why a bagel with egg and cheese can feel like a full meal. They shine when you want contrast—soft egg, melty cheese, plus something bright and crunchy like onion, cucumber, or pickles. If you’re hungry-hungry, this is the base that delivers.
Waffles: sweet-savory waffle breakfast sandwich energy
Waffles turn the same ingredients into brunch. Because waffles carry a gentle sweetness, they pair especially well with salty cheese, peppery sauces, and savory fillings. Pick this base when you want a waffle breakfast sandwich that feels fun, dramatic, and very shareable.
Quick rule to decide in 5 seconds
For a tidy, classic bite, choose an English muffin. For luxury and flaky layers, reach for a croissant. When you want something big and seriously filling, go with a bagel. And if you’re craving brunch-style sweet-savory energy, waffles are the move.
English muffin breakfast sandwich (café-style, sturdy, and easy to hold)
The English muffin breakfast sandwich is popular for a reason: it’s compact, it toasts beautifully, and it doesn’t fall apart mid-commute.
How to make round eggs for breakfast sandwiches (without special gear)
If you want that neat “egg patty” look, you don’t need a fancy ring. A wide mason jar lid ring, a cleaned metal cookie cutter, or even a DIY foil ring works.
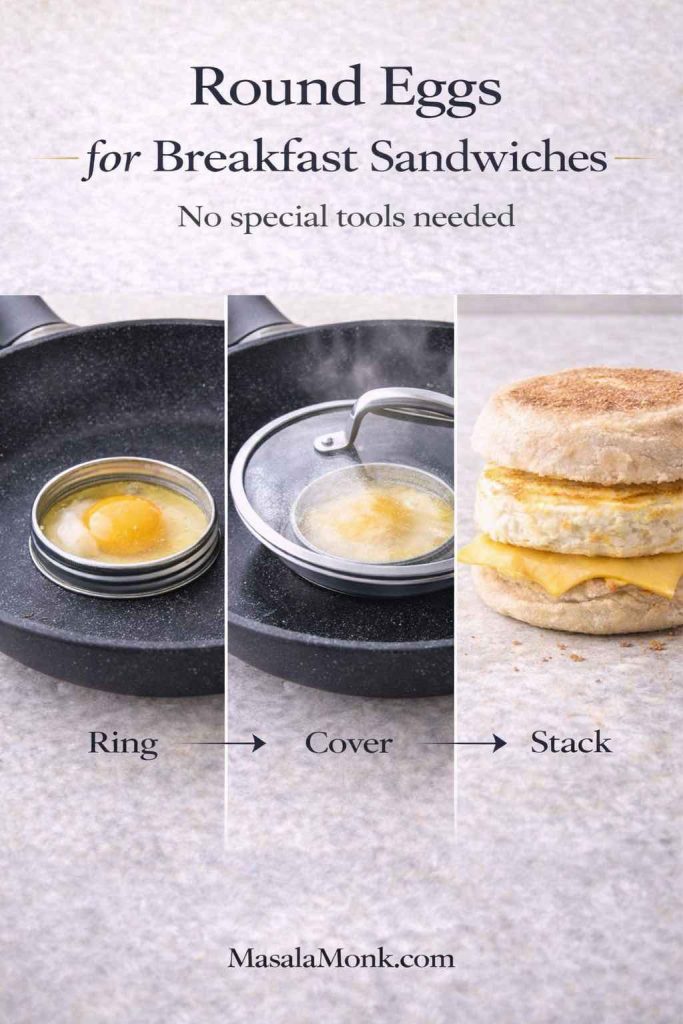
Warm the ring in the pan, grease it lightly, crack in the egg, and cover. As the egg sets, it becomes the perfect shape for English muffins.
Build: egg and cheese on English muffin
- Toast muffin halves until crisp
- Spread sauce on both sides
- Add egg + cheese
- Add one crisp layer (thin onion, tomato slice, spinach, or pickles)
- Close, press gently, eat
For a creamy base that can swing classic or spicy, a simple homemade mayo is hard to beat. If you want a versatile one with a lot of variations you can reuse for other sandwiches too, this guide is handy: homemade mayonnaise with 15+ easy variations.
If you’re feeding a mixed crowd—some people avoiding eggs in spreads or preferring egg-free condiments—you can also keep a jar of eggless mayonnaise or a fully dairy-free vegan mayo in rotation.
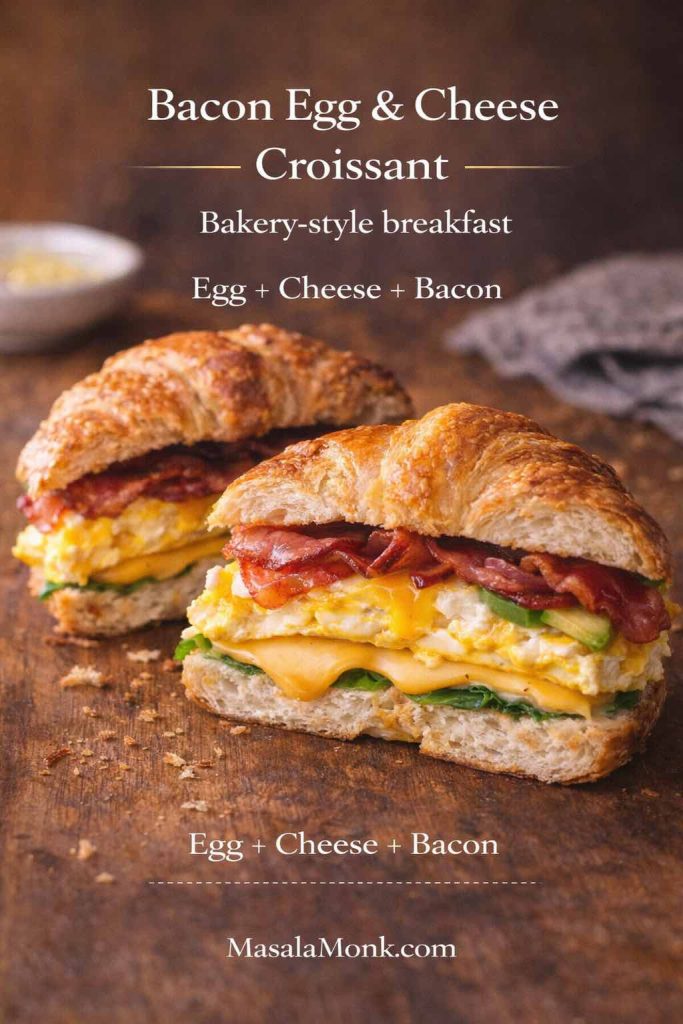
Breakfast croissant: when you want croissant sandwiches that feel like a treat
A breakfast croissant sandwich is the “I went out for breakfast” vibe—without leaving home. Because croissants are rich and flaky, the best versions keep fillings bold but not watery.
Croissant egg and cheese (the simple starter)
- Warm the croissant (don’t over-toast—just warm and lightly crisp)
- Add a soft scrambled egg layer
- Add cheese while eggs are hot
- Finish with pepper or chili flakes
Bacon egg and cheese croissant
Crisp bacon, melt cheese onto the egg, then add something fresh so it doesn’t feel heavy: a thin tomato slice, peppery greens, or even quick-pickled onions.
Sausage egg and cheese croissant
Sausage + egg + cheese is a classic breakfast sandwich trio for a reason. The croissant turns it into a weekend-level meal. If your sausage is strongly seasoned, keep the sauce simple—mayo or a yogurt-based spread—so it doesn’t clash.
Ham egg and cheese croissant
Ham loves mustard-mayo or herby mayo. Even a thin swipe makes the whole sandwich taste “designed,” not accidental.
If you want a sandwich spread that’s creamy yet tangy, Greek yogurt-style sauces are perfect on croissants too. This Greek tzatziki sauce recipe with variations gives you a thick, garlicky option that stays put instead of leaking out the sides.
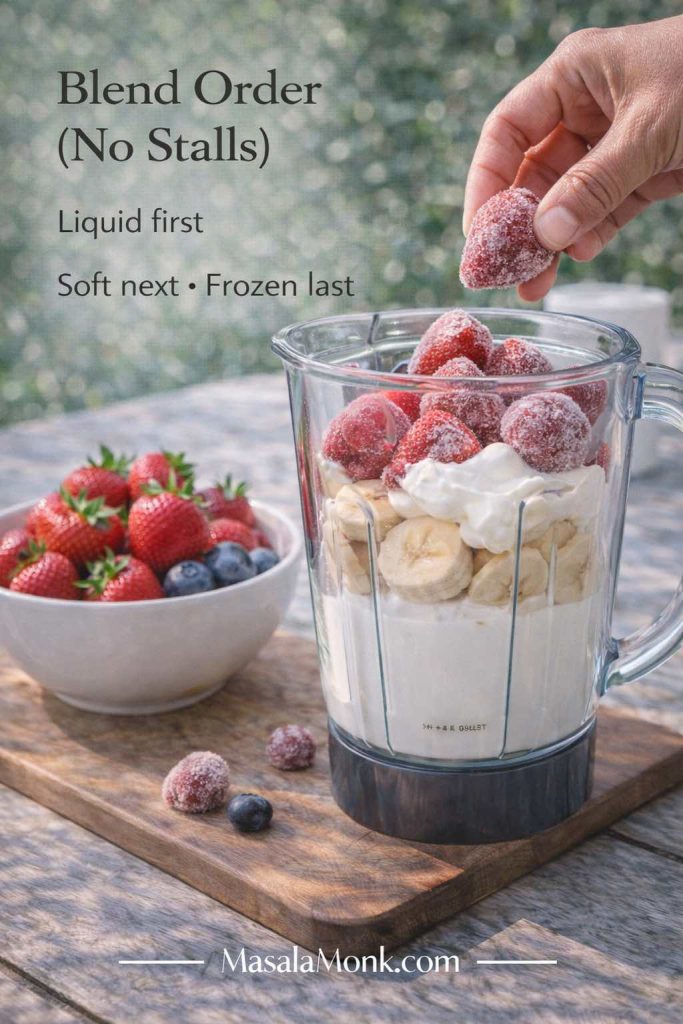
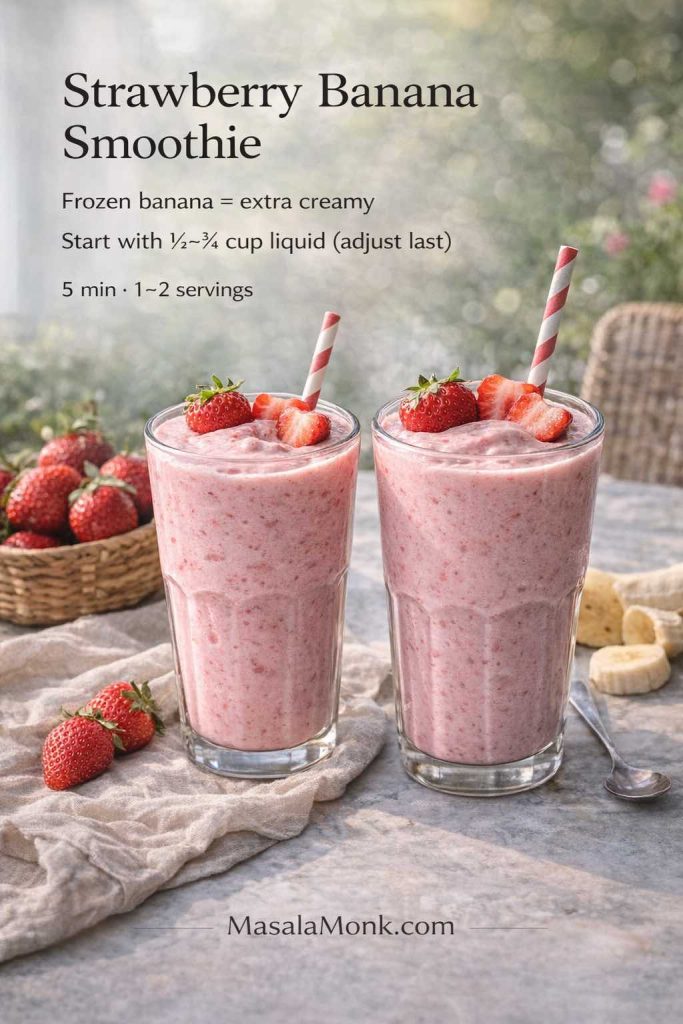
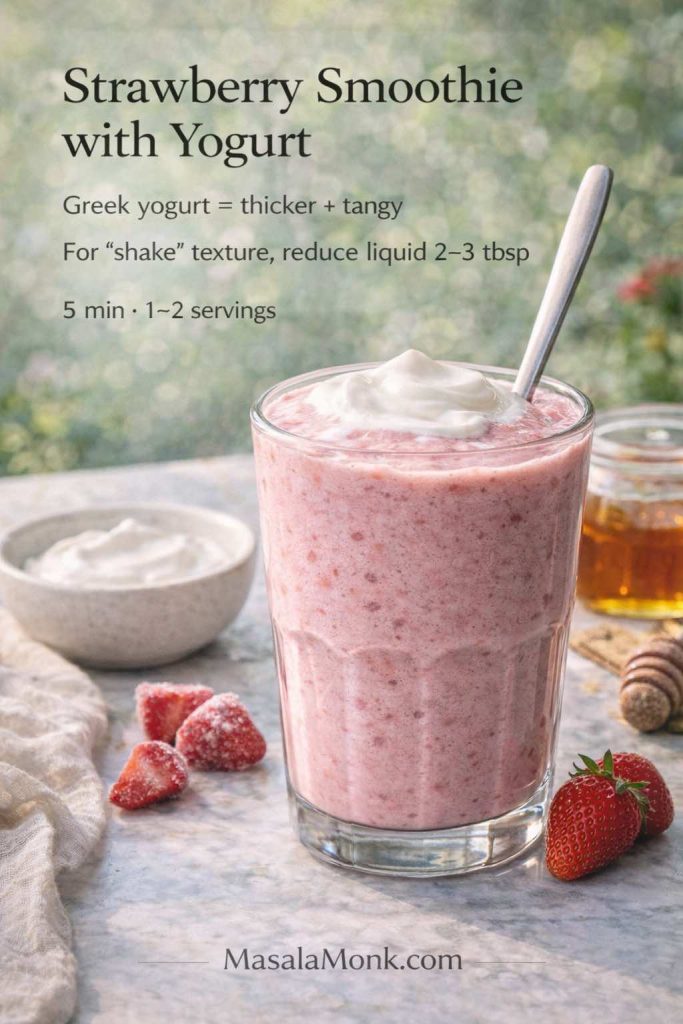
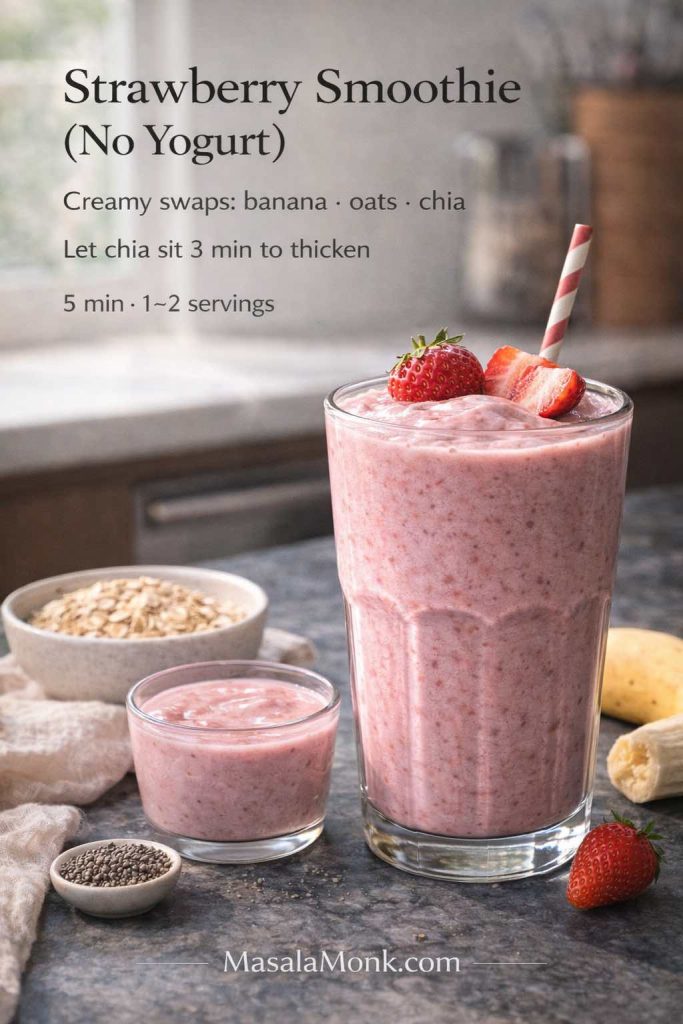
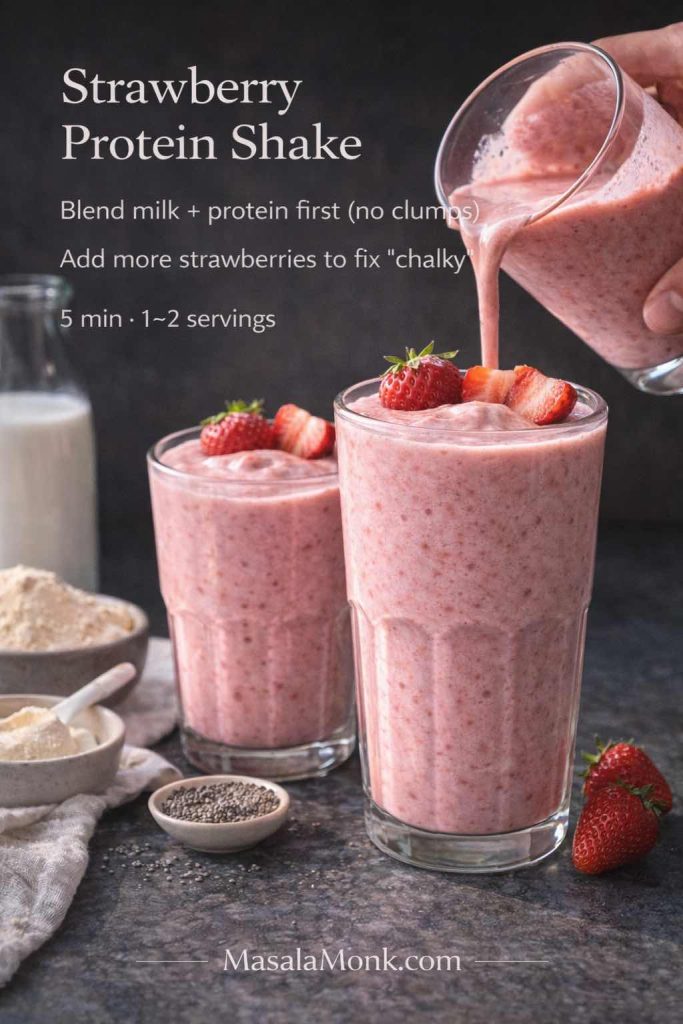
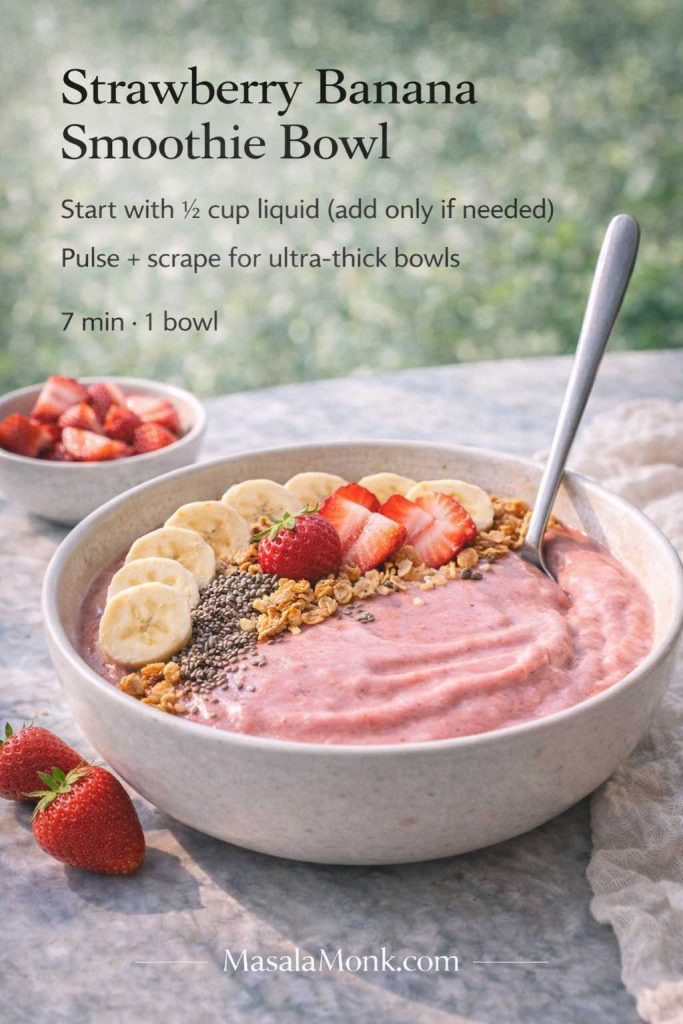
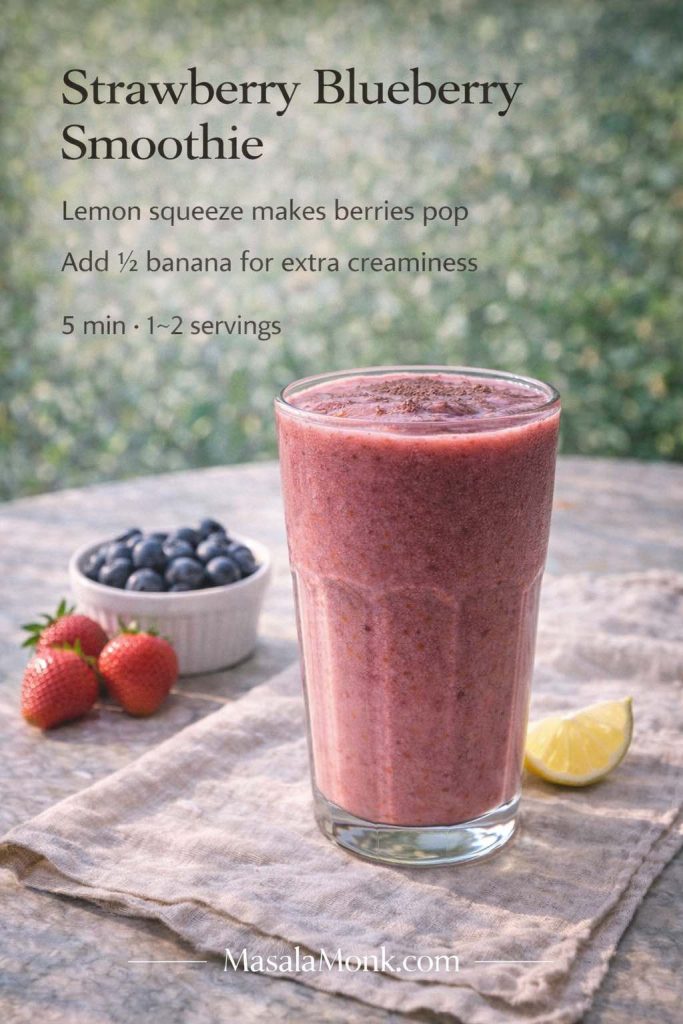
Also Read: Strawberry Smoothie Recipes (12 Easy Blends + Bowls & Protein Shakes)
Bagel with egg and cheese: the breakfast bagel sandwich that actually feels balanced
A bagel with egg and cheese is dense and satisfying, so it helps to build contrast—soft + crisp, rich + fresh, salty + bright.
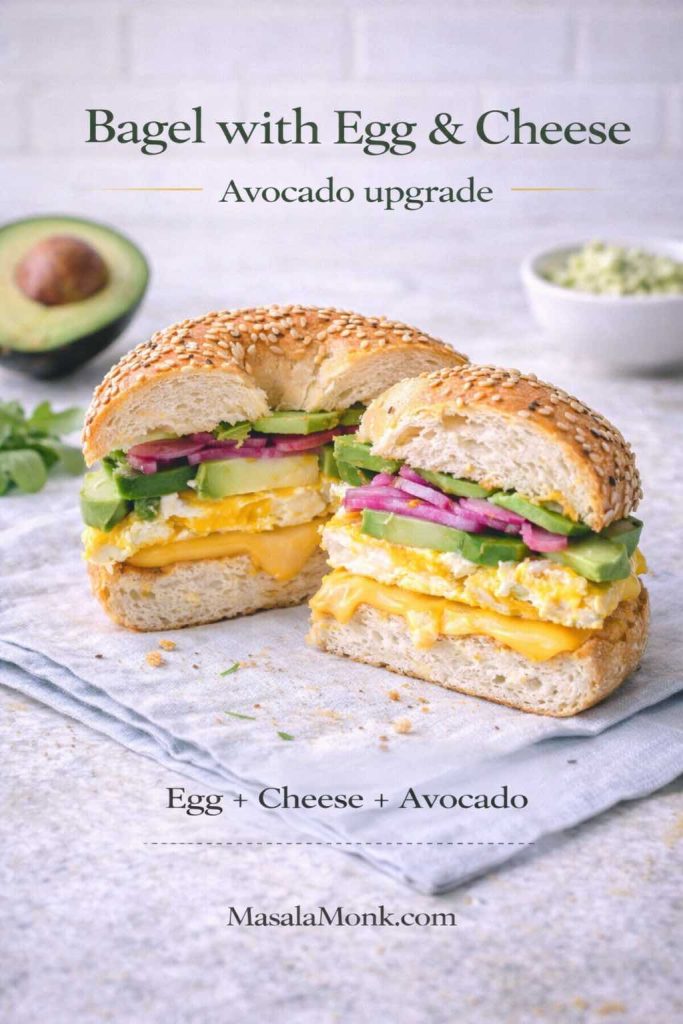
Bagel with egg and cheese (the core build)
Toast the bagel cut sides well. Spread sauce on both halves. Add egg + cheese, then add one “fresh” element: tomato, cucumber, avocado, or herbs.
Avocado egg sandwich on a bagel
Avocado and egg are a natural pair. Add black pepper, a squeeze of lemon, and something crunchy (onion or cucumber). The result feels like a healthy breakfast sandwich, even though it’s still comforting.
For a flavor blueprint you can borrow directly, this one is built for mornings: avocado, basil, and grilled tomato sandwich. You can adapt the same idea onto a bagel and add egg + cheese to turn it into a bigger breakfast.
Egg sandwich spread for bagels (when you want it creamy)
Instead of a whole egg, use a spreadable egg layer (egg mayo / egg salad style). It’s easier to eat, especially if you’re walking out the door.
We’ll do that properly in the egg mayo sandwich recipe section below.
Also Read: Classic Deviled Eggs (Easy) + 8 Flavorful Variations
Breakfast muffin sandwich: egg, cheese, and a sturdy base
“Breakfast muffin sandwich” can mean an English muffin sandwich, or it can mean a muffin-shaped bread base you toast and fill. Either way, the goal is the same: structure.
Egg and cheese muffin-style sandwich
Toast the base, add a folded omelet or egg patty, add cheese, then add a little sauce. Because this style is compact, it’s great for meal prep breakfast sandwiches as well.
If you’re making eggs in bulk for this, an easy workflow is to cook and peel a batch of eggs quickly. An air fryer is surprisingly effective for that—here’s a reliable method: air fryer hard boiled eggs.
Also Read: How to Make Pineapple Chia Pudding: A Refreshing Low-Carb Breakfast Option
Waffle breakfast sandwich: sweet-savory brunch energy
A waffle breakfast sandwich is where brunch gets playful. The key is using waffles that are crisp enough to hold fillings.
If you want to make waffles that stay golden and crisp even without dairy, this is a solid base: waffle recipe without milk. For more adventurous directions (including Indian twists that still feel natural), this is fun inspiration: Belgian waffle recipe + Indian twists.
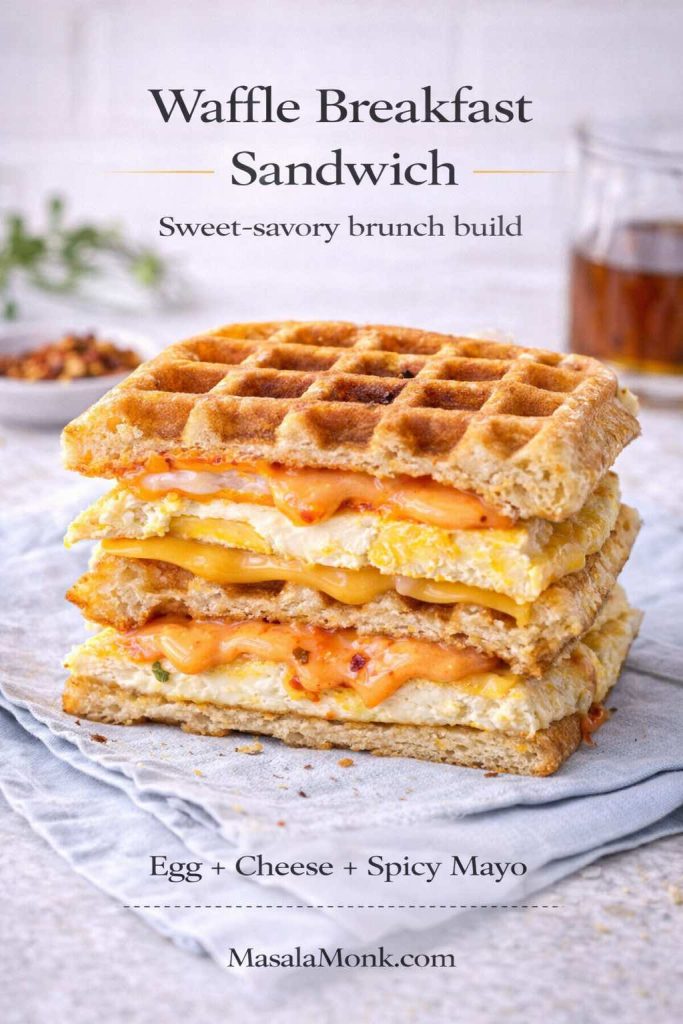
Waffle sandwich build ideas
- Egg + cheese + spicy mayo
- Scrambled egg + herbs + pepper sauce
- Egg + cheese + avocado for a more “healthy breakfast sandwich” feel
Because waffles lean slightly sweet, a bright sauce works especially well. If you like heat, a pepper sauce can turn waffles and eggs into something unforgettable. This is a deep rabbit hole if you want options: pepper sauce recipe guide.
Egg sandwiches recipes: choosing the egg style that matches your morning
It’s easy to treat eggs like “one ingredient,” yet the cooking method changes the entire sandwich. So, instead of guessing, pick based on the kind of morning you’re having.
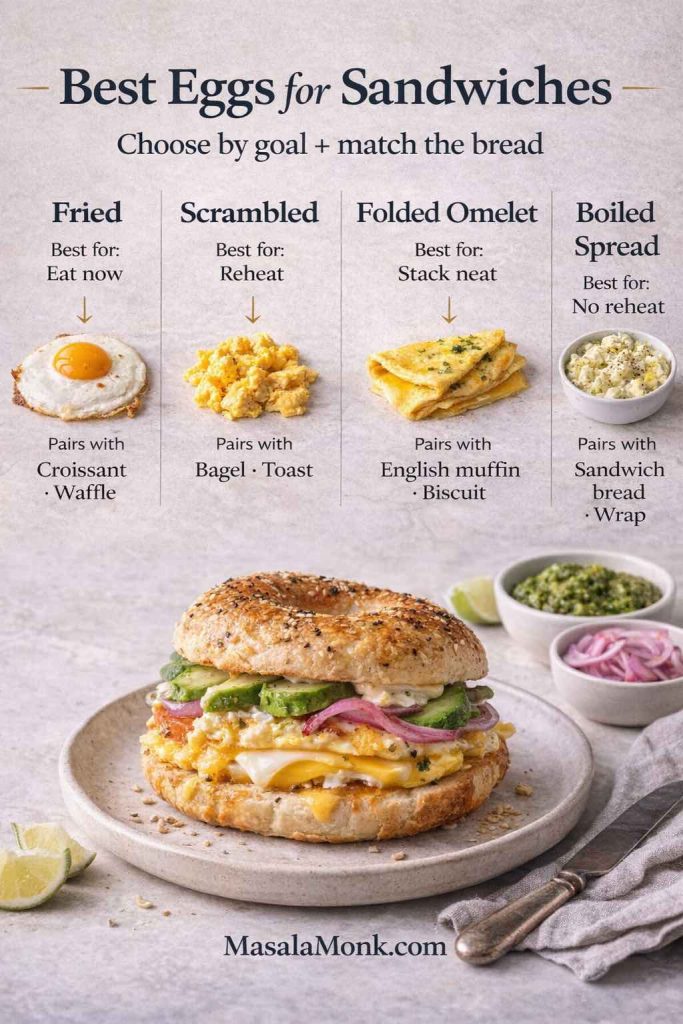
Fried egg sandwich (best for immediate eating)
Fried eggs are at their peak right out of the pan. That’s when the edges stay crisp and the yolk is still luscious. Consequently, this version shines for weekends or slow mornings.
Scrambled egg sandwich (best for reheating)
Scrambled eggs hold better than fried eggs in the fridge and reheat more evenly. Therefore, if you’re thinking meal prep, scrambled is your friend.
Folded omelet-style egg (best for neat layers)
Beat eggs, cook into a thin sheet, fold into a rectangle. This makes a tidy “egg patty” without tools. It’s also ideal for breakfast slider sandwiches because the pieces cut cleanly.
Boiled eggs for sandwiches (best for cold breakfast)
Boiled eggs can become a spread, which means you can eat your breakfast sandwich cold and still enjoy it. This is where egg mayo sandwich recipes, egg salad sandwiches, and even tuna egg sandwich variations come in.
If you want a broader set of ideas for using small egg counts creatively, this list can spark options: egg dishes with 2 eggs.
Also Read: Top 10 Foods for Gut Health (+ Pre/Probiotics, Best Drinks, Gut-Reset Plan)
Egg mayo sandwich recipe: creamy, fast, and surprisingly breakfast-friendly
Egg mayo often gets treated as “lunch food,” yet it’s one of the best solutions for busy mornings. It’s fast, it’s filling, and it turns into a portable sandwich without needing to reheat anything.
Ingredients (2 sandwiches)
- 2 hard-boiled eggs, chopped
- 2–3 tablespoons mayo
(or use eggless mayo or vegan mayo if that fits your needs) - Salt and pepper
- Optional: chopped onion, dill, cucumber, chili flakes, a squeeze of lemon

Method
Mash the eggs lightly, stir in mayo, season, then adjust texture. If you want it looser, add a tiny splash of milk or lemon. If you want it thicker, add more egg or a little grated cheese.
Turn egg mayo into egg salad sandwich recipe territory
If you want the “egg salad” vibe, fold in crunch: finely chopped celery (if you like), onion, pickles, or cucumber. Add a pinch of curry powder for a curried egg sandwich direction, or add paprika for a classic style.
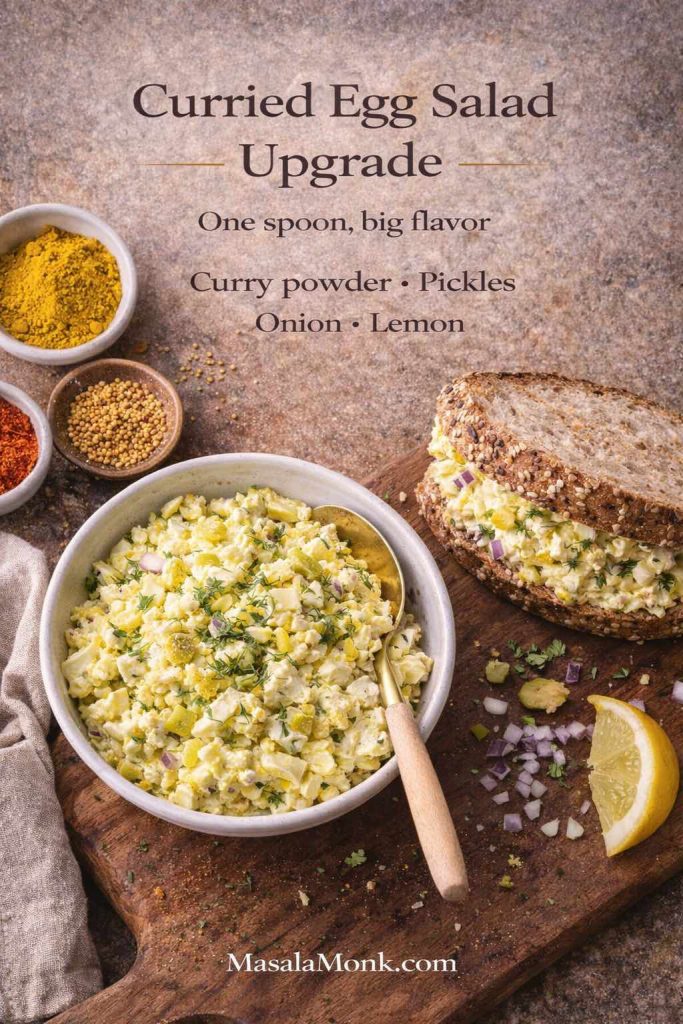
Egg salad with greek yogurt (lighter, tangier)
Instead of all mayo, use thick yogurt or hung curd for part of the spread. It stays creamy, tastes fresher, and feels closer to a healthy breakfast sandwich.
If you like the flavor logic of yogurt-based fillings, this is a great reference point: healthy hung curd spinach cheese sandwich.
Also Read: Vodka Pasta (Penne alla Vodka) + Spicy Rigatoni, Chicken, and Gigi Recipes
Breakfast sandwich ideas that borrow from “real sandwich culture”
A breakfast sandwich doesn’t have to be only egg + cheese + meat. It can borrow from classic sandwich styles and still feel totally breakfast-appropriate.
The Bombay-inspired breakfast sandwich
If you’ve ever loved a spicy, chutney-forward sandwich, you can bring that energy to breakfast: toast bread, add green chutney or herby mayo, add egg + cheese, then add thin-sliced onion and tomato.
For a full flavor blueprint, this is the classic: authentic grilled Bombay sandwich recipe. Use the same “layering logic,” then make the egg the star.
The mushroom-and-cheese breakfast upgrade
Sauté mushrooms, add pepper, add cheese, then add egg. It turns basic egg sandwiches into something deeper and more savory.
If you want the mushroom direction fully mapped out, this is a great base: mushroom cheese sandwich recipe.
The hummus-and-veg morning sandwich (egg optional)
Some mornings you want breakfast without eggs. A hummus-based sandwich gives you protein and staying power while keeping things fresh.
Here’s a straightforward build to borrow: hummus veggie sandwich. Add a fried egg if you want it heartier, or keep it egg-free for a vegetarian breakfast sandwich that still satisfies.
Also Read: Protein Oatmeal: Turn Plain Oats into a High-Protein Meal
Healthy breakfast sandwich and high protein breakfast sandwich variations
“Healthy” can mean a lot of things. For some people it means higher protein; for others it means lighter sauces; for many it means fewer ultra-processed ingredients. Thankfully, breakfast sandwiches can adapt without losing their comfort-food soul.
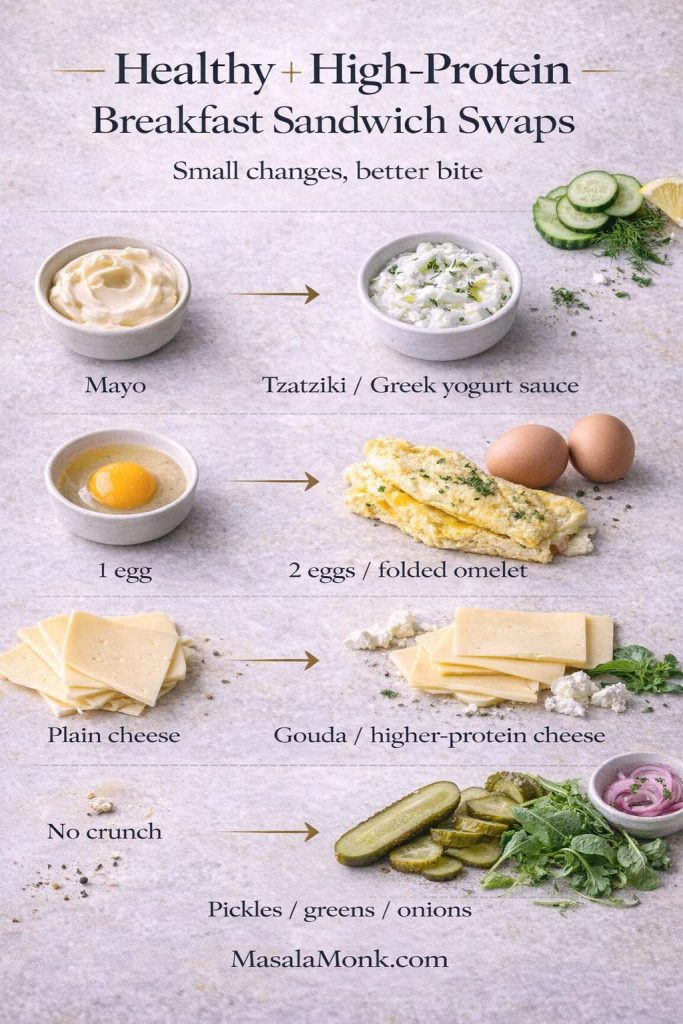
High protein breakfast sandwich (simple ways to level up)
- Use 2 eggs instead of 1
- Add an extra slice of cheese or use a higher-protein cheese
- Add thick yogurt-based sauce (like tzatziki)
- Add paneer or tofu as an additional filling
If you’re curious about egg protein numbers, this breakdown is a useful reference: how much protein in two boiled eggs.
Healthy breakfast sandwich (lighter sauces that still taste rich)
Instead of drowning the sandwich in mayo, try:
- A thin layer of pesto
- Thick yogurt sauce
- A small swipe of mayo plus lemon juice for brightness
For pesto options you can tweak to your taste, this is a strong starting point: pesto recipe guide with variations. If you want a specific dairy-free pesto, this one is fast and flavorful: fresh basil pesto vegan recipe.
Vegetarian breakfast sandwich: options that don’t feel like “second place”
A vegetarian breakfast sandwich can be just as craveable as any meat-based version—provided you build for texture and seasoning.
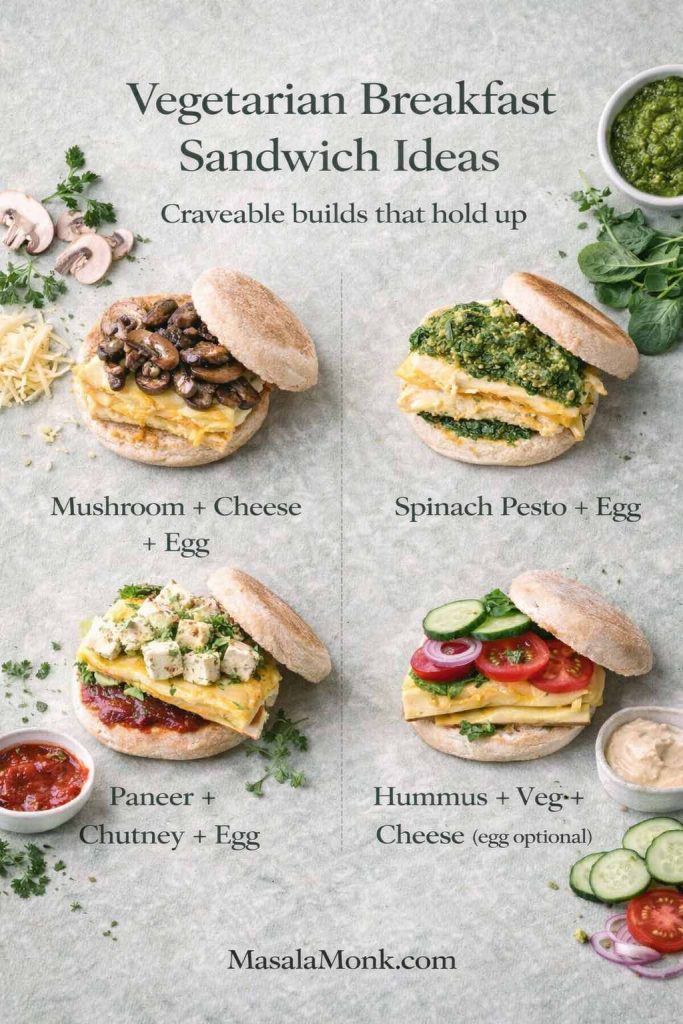
Vegetarian breakfast sandwich (easy templates)
- Egg + cheese + mushrooms + pepper sauce
- Egg + cheese + spinach + pesto
- Hummus + veggies + cheese (egg optional)
- Paneer + egg + chutney (if you like a bigger, spiced bite)
If you want a leftover-friendly option that turns dinner into breakfast, this is a smart template: paneer sabji sandwich recipe. Add a fried egg and it becomes a powerful breakfast sandwich meal prep option.
Also Read: Classic Rum Punch + 9 Recipes (Pitcher & Party-Friendly)
Gluten free breakfast sandwich: easy swaps that still feel satisfying
Going gluten free doesn’t mean giving up the breakfast sandwich experience. It simply means switching the base while keeping the same layers.
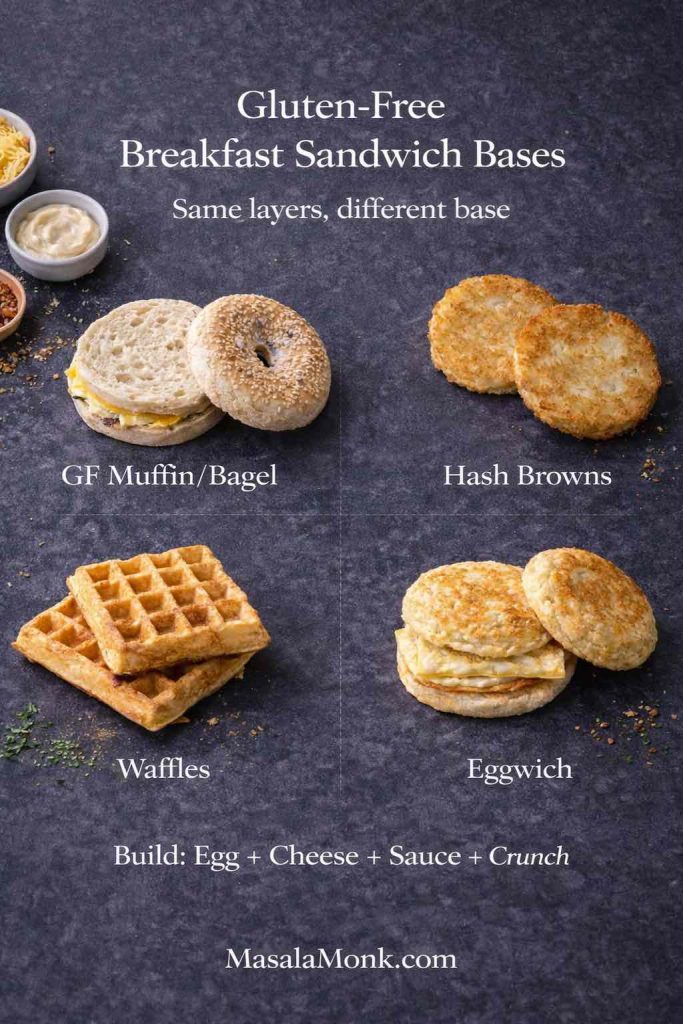
Gluten free breakfast sandwich bases
- Gluten-free English muffins or bagels
- Hash brown “buns” (crispy potato rounds)
- Waffles made with a gluten-free mix
- Egg “buns” (eggwich style)
Once you pick the base, the rest is identical: egg + cheese + sauce + crunch. In other words, you’re not learning a new recipe—you’re just changing the vehicle.
Also Read: Moscow Mule Recipe (Vodka Mule): The Master Formula + 9 Variations
Eggwich: a breakfast sandwich without bread
An eggwich is essentially an egg sandwich where eggs replace bread. If you want a lower-carb or gluten-free breakfast sandwich that still feels indulgent, this is a strong move.
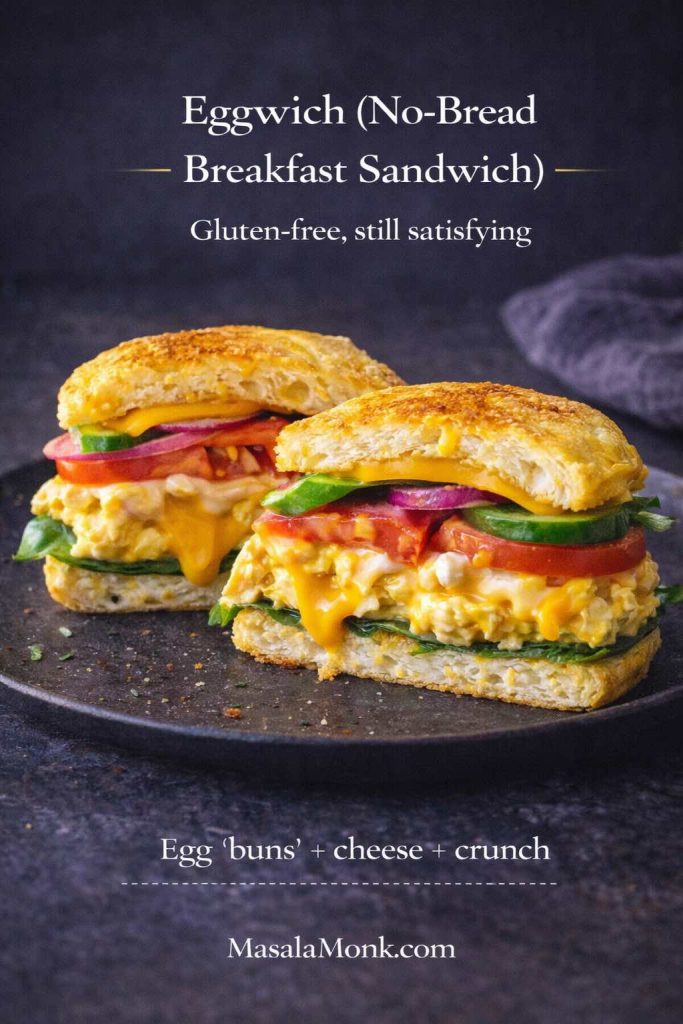
How to build it
Cook two thin omelet “rounds,” let them cool slightly so they firm up, then use them as top and bottom. Add cheese, add filling, add sauce, press gently, and eat with a napkin because it’s joyfully messy.
Also Read: 7 Pizza Sauce Recipes | Marinara, White Garlic, Alfredo, Buffalo, BBQ, Vodka & Ranch
Breakfast sandwich homemade sauces that make everything taste intentional
A sandwich can have perfect eggs and still taste “unfinished” without a good spread. Sauce isn’t extra; it’s the layer that ties everything together.
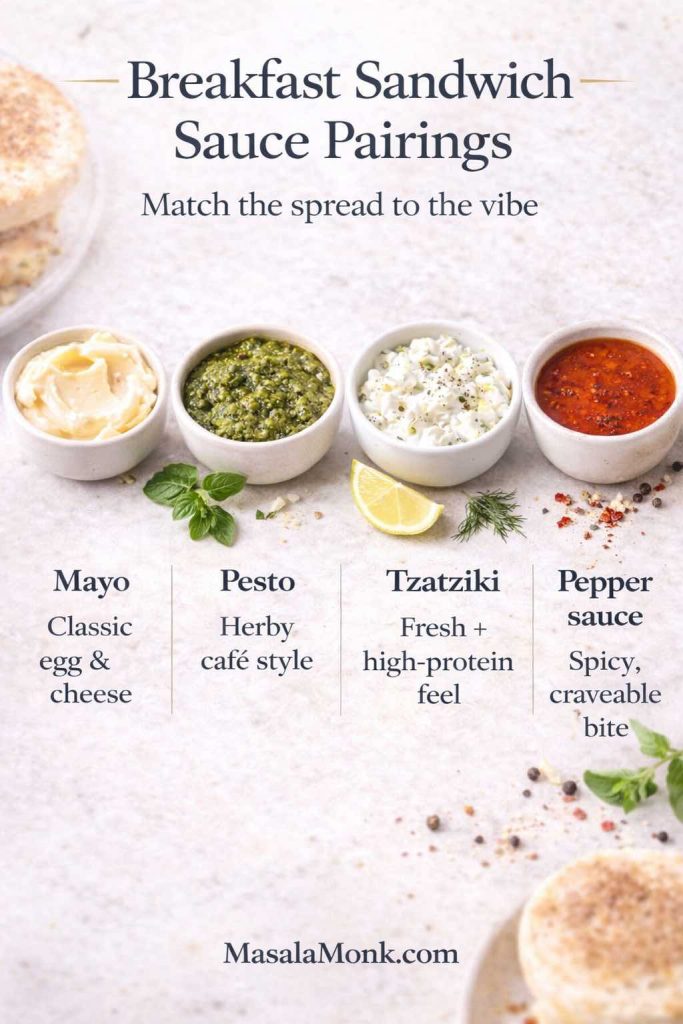
Mayo: classic, versatile, and endlessly adaptable
If you want one foundational sauce that can become spicy mayo, garlic mayo, herby mayo, and more, start here: homemade mayonnaise with 15+ variations.
Eggless mayo and vegan mayo: inclusive options without compromise
If you’d rather avoid raw eggs in homemade spreads, or you’re serving someone who prefers egg-free condiments, these are useful:
If you’re cooking for pregnancy or generally avoiding raw-egg preparations, the FDA’s guidance for higher-risk groups is worth reading: Food Safety for Moms-to-Be.
Pepper sauce: the fastest way to make breakfast taste exciting
A little heat transforms egg and cheese into something you crave instead of something you tolerate. If you want options ranging from tangy vinegar hot sauces to creamy peppercorn-style sauces, this is a complete guide: pepper sauce recipe guide.
Tzatziki: cooling, thick, and perfect for breakfast sandwiches
Yogurt-based sauces are especially good when you’re building a healthy breakfast sandwich. They add creaminess without feeling heavy, and they pair beautifully with herbs and cucumbers: Greek tzatziki sauce recipe with variations.
Also Read: Pesto Recipe: Classic Basil Pesto Sauce & 10 Variations
Frozen breakfast sandwiches: make-ahead meal prep you’ll actually use
Frozen breakfast sandwiches have one job: save your morning when you have no time. The secret is building them in a way that reheats well. That means slightly drier eggs, sturdy bread, and sauces added after reheating.
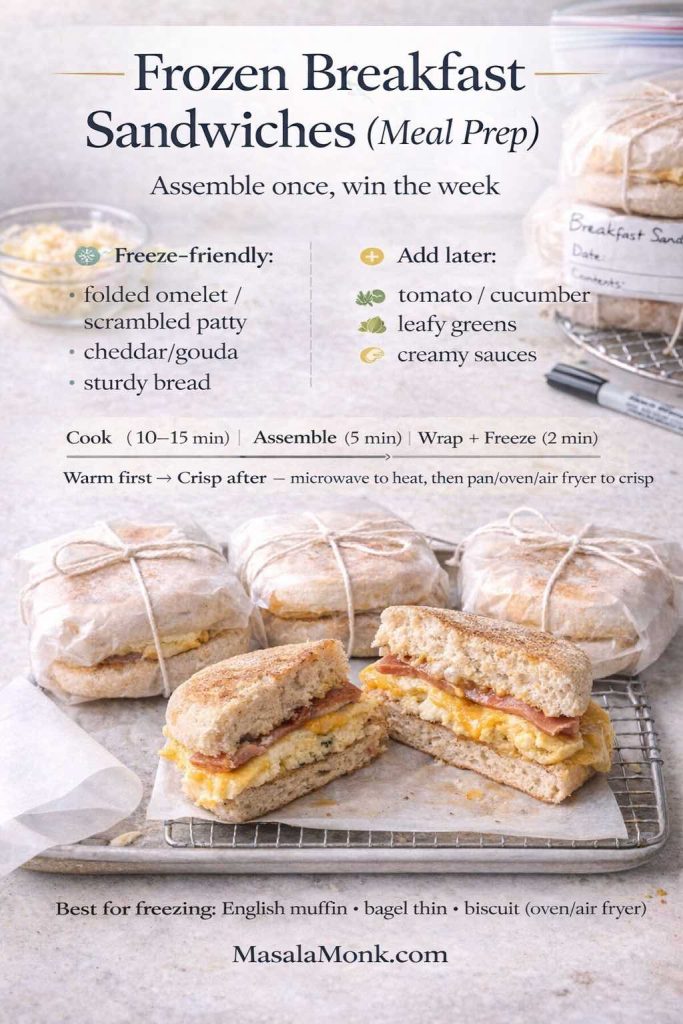
What freezes well
- English muffin breakfast sandwich builds
- Bagel breakfast sandwich builds (slice thin so it reheats faster)
- Biscuit-style builds (best reheated in oven/air fryer)
- Folded omelet egg layers (they hold shape beautifully)
What to add later
Fresh tomato, cucumber, lettuce, delicate herbs, and most creamy sauces are better after reheating. Otherwise, you risk soggy bread or watery textures.
How to assemble frozen breakfast sandwiches
Cook eggs (scrambled patties or folded omelets work best). Melt cheese onto the eggs. Assemble on toasted bread. Wrap tightly. Freeze.
How to reheat
- Microwave for speed, then finish in a pan or toaster oven for texture
- Oven/toaster oven for the best overall result
- Air fryer for crisp edges (especially on biscuits and croissants)

If you ever want a quick reference on storage timelines beyond “it seems fine,” the FoodKeeper app is a practical tool developed with USDA FSIS partners to help with fridge/freezer guidance.
For egg-specific safety basics, USFDA’s guidelines are clear and straightforward, including: methods for cooking eggs safely.
Also Read: Oat Pancakes Recipe (Healthy Oatmeal Pancakes)
Meal prep breakfast sandwiches: a one-hour batch that changes your week
If you’re doing sandwich meal prep, it helps to commit to a single batch session. The goal isn’t perfection—it’s making weekday mornings almost automatic.
A simple batch plan
- Toast a stack of English muffins or bagels
- Cook eggs as folded omelets (fast, neat, scalable)
- Melt cheese on top of eggs in the pan
- Assemble and wrap
- Freeze what you won’t eat within a day or two
If you like a broader framework for planning and portioning without stress, this guide is a solid foundation: Mastering Meal Prep: a beginner’s guide.
Breakfast sandwiches for a crowd: the easiest way to feed everyone without chaos
Sometimes you’re not making one breakfast sandwich. You’re making breakfast sandwiches—plural—because family is hungry, guests are over, or you want leftovers that actually feel useful.
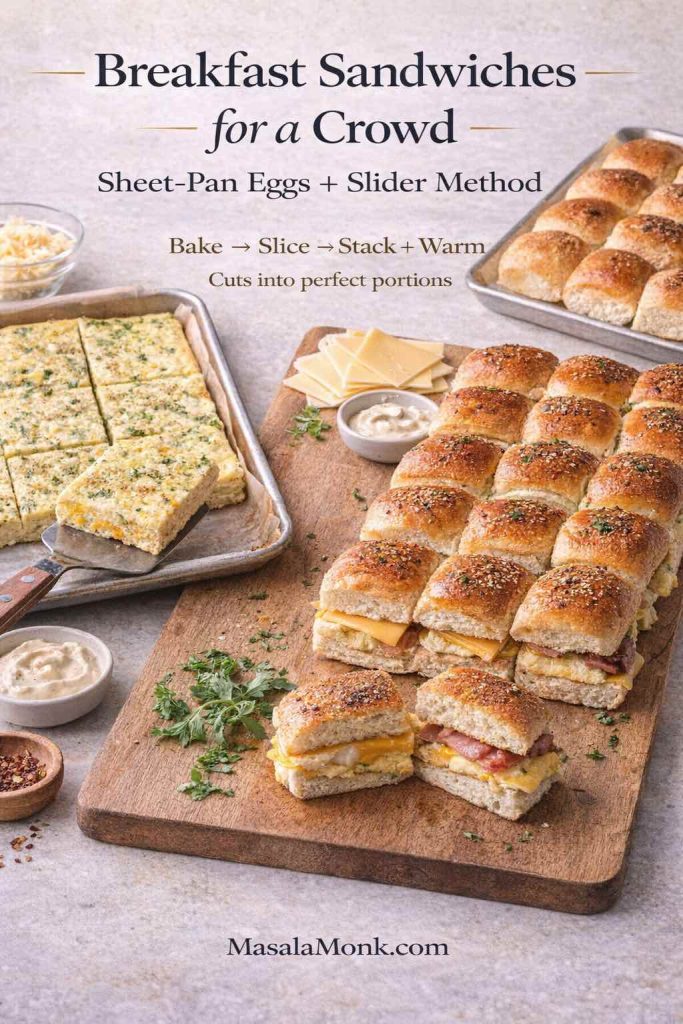
Breakfast slider sandwiches (the party-friendly move)
Use a sheet of rolls, slice horizontally, layer eggs and cheese across the whole surface, add fillings, close, and bake until warm.

Sheet pan eggs for sandwiches (the cleanest bulk method)
Whisk eggs, season, pour into a sheet pan, bake until set, then cut into squares. This gives you uniform pieces that stack easily into every sandwich format: croissants, bagels, English muffins, and even waffles.
Also Read: Mimosa Recipe: 10 Easy Versions from Classic to Caramel Apple
Bringing it all together
The reason breakfast sandwiches stay popular isn’t just convenience. It’s the way they adapt. On a slow day, you can make a fried egg sandwich with crisp edges and melty cheese. On a packed morning, you can grab a frozen breakfast sandwich, reheat it, and still feel like you ate something real. When you’re trying to eat lighter, you can pivot to yogurt sauces and veggie layers. When you’re craving comfort, you can go full breakfast croissant mode and lean into it.
If you take only one thing from this: build your breakfast sandwich recipe around layers with purpose—bread for structure, eggs for richness, cheese for glue, sauce for harmony, and crunch for contrast. Once that clicks, the rest becomes a rotation you can enjoy all year.
Also Read: 10 Best Espresso Martini Recipe Variations (Bar-Tested)
FAQs about Sandwich for Breakfast
1) What is the best breakfast sandwich recipe for beginners?
The best breakfast sandwich recipe for beginners is a simple egg and cheese sandwich on toasted bread. Start with one fried or scrambled egg, add a slice of cheese while the egg is still hot, and finish with a light spread so the sandwich stays moist without turning soggy.
2) How do I make egg sandwiches that don’t fall apart?
To keep egg sandwiches from falling apart, toast the bread well, use cheese as a “glue” layer, and avoid overfilling with watery ingredients. If you’re adding tomato or cucumber, blot them first and keep the slices thin so the sandwich holds its shape.
3) What’s the easiest way to make round eggs for an English muffin breakfast sandwich?
For an English muffin breakfast sandwich, crack an egg into a lightly greased ring (a mason jar ring or cookie cutter works) and cover the pan so the top sets quickly. In this way, the egg cooks into a neat patty that matches the muffin size.
4) Which egg style works best for a breakfast sandwich: fried egg or scrambled egg?
A fried egg sandwich is ideal when you’re eating right away and want crisp edges or a runny yolk. By contrast, a scrambled egg sandwich is better for reheating and meal prep because the texture stays softer after warming.
5) Can I use boiled eggs for sandwiches?
Yes—boiled eggs for sandwiches are great when you want a no-reheat option. Simply chop or mash the eggs and mix with a spread to make an egg sandwich filling that’s easy to pack and quick to assemble.
6) What is an eggwich, and how is it different from an egg sandwich?
An eggwich is a breakfast sandwich made without bread, where eggs act as the “bun.” In other words, it’s a gluten free breakfast sandwich option that still includes classic fillings like cheese, veggies, and a sauce layer.
7) How do I make a high protein breakfast sandwich without changing the flavor too much?
A high protein breakfast sandwich can be made by using two eggs instead of one, adding an extra slice of cheese, or including a protein-forward filling like paneer or a thick yogurt-based spread. As a result, you get more staying power while keeping the taste familiar.
8) What’s the best bread for a breakfast sandwich?
The best bread depends on the texture you want. English muffins create a tidy breakfast muffin sandwich feel, croissants make a rich breakfast croissant, bagels give a chewy bite for a breakfast bagel sandwich, and waffles create a crisp-sweet waffle breakfast sandwich.
9) How do I keep croissant sandwiches from getting soggy?
Because croissants are delicate, warm them lightly, avoid watery fillings, and keep spreads thin. Additionally, add fresh items like tomato only right before eating so the layers stay flaky instead of soft.
10) What’s the simplest bagel with egg and cheese build?
Toast the bagel cut sides, spread a small amount of sauce, add egg and cheese, then finish with one fresh layer like tomato, cucumber, or avocado. Consequently, you get a bagel breakfast sandwich that feels balanced rather than heavy.
11) How can I make a healthy breakfast sandwich that still tastes satisfying?
A healthy breakfast sandwich can stay satisfying by focusing on texture and seasoning rather than extra fat. For example, use toasted bread, a well-seasoned egg, plenty of crunchy veggies, and a tangy spread such as yogurt-style sauce or a lighter mayo blend.
12) What are easy vegetarian breakfast sandwich options?
Vegetarian breakfast sandwich options include egg and cheese with sautéed mushrooms, egg with spinach and herbs, hummus with veggies (with or without egg), or paneer with onions and spices. Likewise, adding a crisp layer keeps it lively.
13) How do I make a gluten free breakfast sandwich at home?
For a gluten free breakfast sandwich, use gluten-free bread, a gluten-free bagel, or swap bread entirely by making an eggwich. Alternatively, you can use waffles made with a gluten-free mix for a sturdier base.
14) What are the best breakfast sandwich ideas when I’m bored of egg and cheese?
If you’re bored of egg and cheese, switch just one layer: try pesto instead of mayo, add mushrooms instead of bacon, use a croissant instead of an English muffin, or add avocado for a creamy contrast. Similarly, a peppery sauce can change the flavor without changing the structure.
15) Can I make frozen breakfast sandwiches for busy mornings?
Yes—frozen breakfast sandwiches are one of the easiest meal prep wins. Assemble sandwiches with egg and cheese, skip watery vegetables, wrap tightly, and freeze. Then reheat and add fresh toppings afterward for better texture.
16) What’s the best method for meal prep breakfast sandwiches that reheat well?
For meal prep breakfast sandwiches, use scrambled eggs or a folded omelet layer because they reheat evenly. Furthermore, toast the bread first, keep sauce minimal before freezing, and wrap each sandwich tightly to reduce freezer burn.
17) How long do frozen breakfast sandwiches last in the freezer?
Frozen breakfast sandwiches typically keep their best quality for about 1–2 months, although they can remain safe longer if stored properly. Even so, using airtight wrapping helps prevent dry edges and off flavors.
18) How do I reheat frozen breakfast sandwiches without making the bread rubbery?
To avoid rubbery bread, thaw slightly, microwave briefly to warm the center, then finish in a pan, toaster oven, or air fryer to crisp the outside. In short, heat for speed first, then crisp for texture.
19) What’s the difference between breakfast sandwich ideas and breakfast sandwich recipes?
Breakfast sandwich ideas are quick combinations or swaps you can try, whereas breakfast sandwich recipes include clear steps, timings, and a method you can repeat. Consequently, recipes are better when you want consistent results.
20) How do I make breakfast sandwiches for a crowd?
To make breakfast sandwiches for a crowd, cook eggs in a larger batch (scrambled or sheet-pan style), lay out bread bases, and assemble an assembly line. Afterwards, keep sandwiches warm in a low oven so everyone can eat together.