
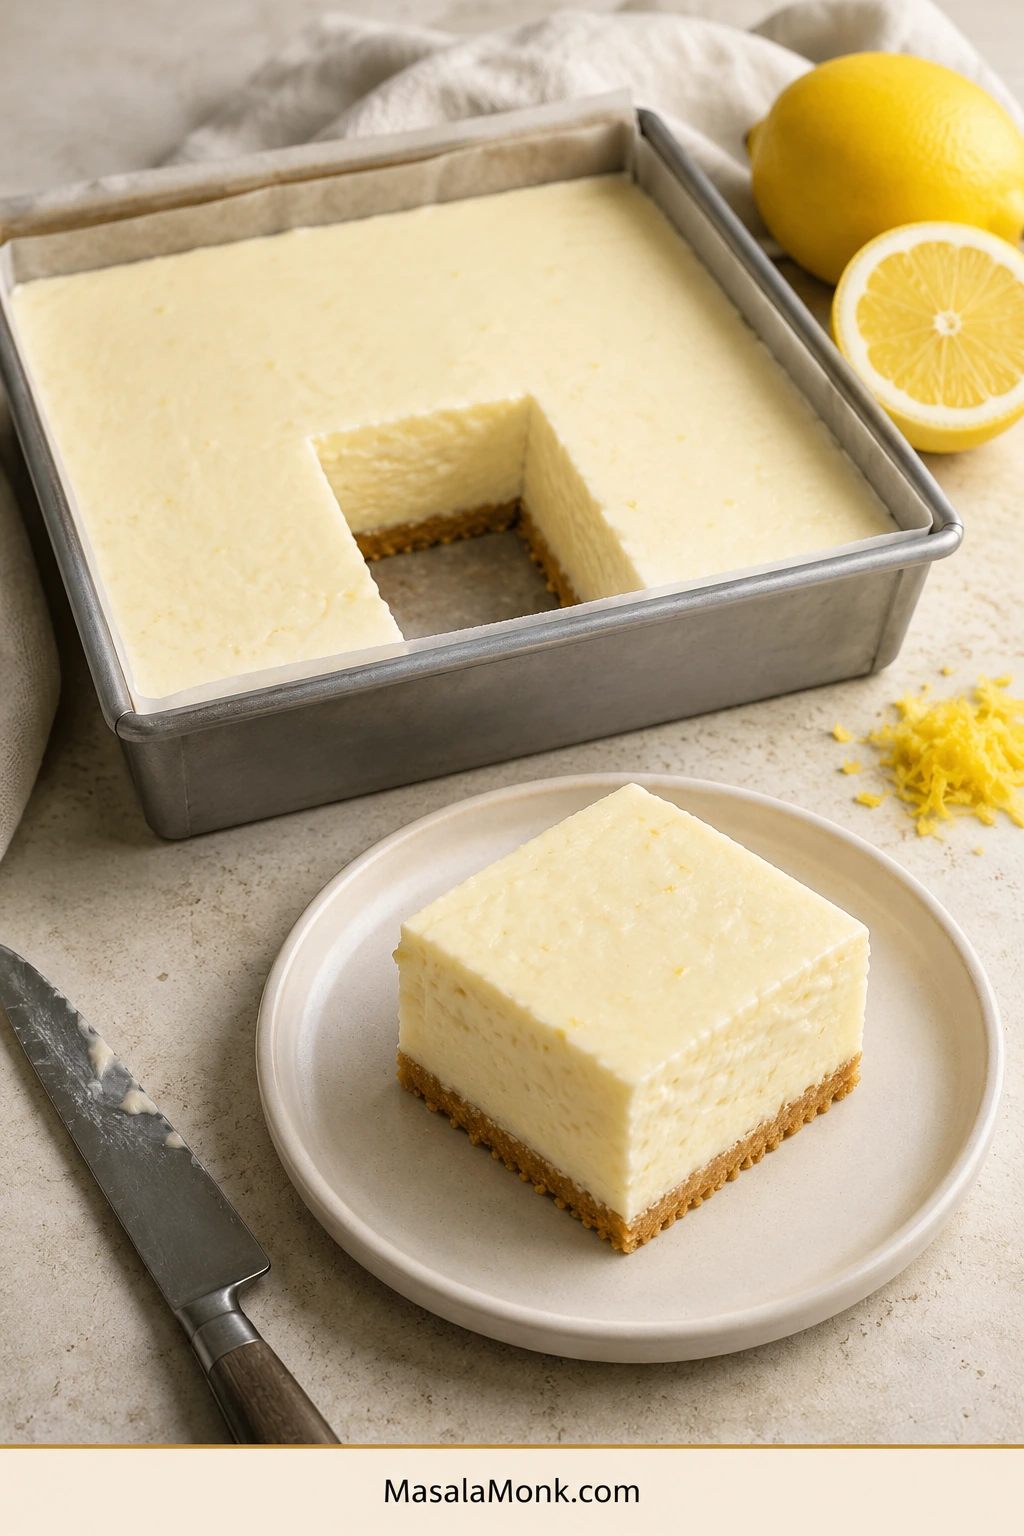
The first centre cut tells the truth. A no-bake lemon filling can taste bright and creamy in the bowl, yet still slump when the parchment lifts and the knife reaches the middle.
These easy no-bake lemon bars stay creamy while holding their shape. Cold and silky, the filling carries the fragrance of fresh zest and melts into the buttery crumbs underneath. Fresh lemon arrives first, so the condensed milk never tastes as heavy as it might sound.
Classic lemon bars can mean baking a shortbread crust, whisking an egg-based filling and waiting for a hot pan to cool. Here, six main ingredients plus salt come together in about 25 minutes of hands-on work. The bars set fully in the refrigerator without cream cheese or gelatin. A brief freezer chill is only an optional aid when extra-sharp edges matter.
The Masala Monk rule is simple: let the lemon thicken the condensed milk; let the refrigerator finish the set.
Quick answer
How to make no-bake lemon bars that hold their shape
Press the crumb mixture firmly into an 8-inch square pan and chill it. Whisk one standard can of sweetened condensed milk with ½ cup fresh lemon juice, finely grated zest and a little salt until the mixture falls from the whisk in a heavier ribbon.
Whip the cream until the peaks stand firmly and the surface still looks glossy. Fold it into the lemon mixture, spread the filling over the chilled crust and refrigerate for about 6 hours. A longer chill makes lifting and cutting even easier.
The finished bars are lighter than no-bake cheesecake, firmer than spoonable lemon mousse and softer than traditional baked lemon bars. Serve them straight from the refrigerator, while the filling still holds a clean edge.
Choose this version when you want the lightness of lemon mousse with enough structure for proper bars—without cream cheese, gelatin or a frozen filling.
Make it now
No-bake lemon bars recipe
A buttery graham-cracker crust topped with a fresh lemon filling made from condensed milk and whipped cream. The only stage that asks for close attention is whipping the cream; everything else can be done at an unhurried pace.
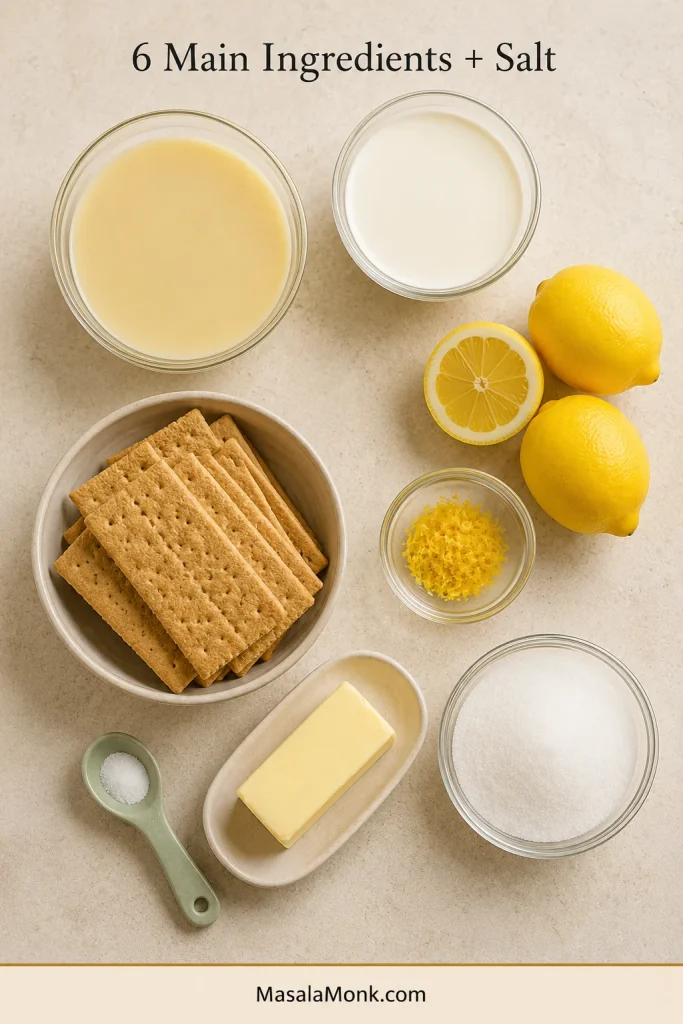
| Pan and yield | 8 × 8-inch / 20 × 20 cm square pan; 16 regular bars or 12 generous bars |
|---|---|
| Prep time | About 25 minutes |
| Earliest check | 4 hours |
| Recommended chill | About 6 hours |
| Best for clean cuts | Overnight |
| Total time | About 6 hours 25 minutes |
| Texture and dietary note | Cold, creamy and sliceable; the filling is egg-free and gelatin-free |
What you need
- 8 × 8-inch / 20 × 20 cm square pan and parchment paper
- Food processor, or a rolling pin and sturdy food bag
- Electric hand mixer or stand mixer
- Fine zester and flexible spatula
- Large straight-edged knife
Ingredients
For the no-bake graham-cracker crust
- About 1½ cups graham-cracker crumbs (180 g / 6.3 oz); the number of sheets varies by brand
- 6 tablespoons unsalted butter (85 g / 3 oz)
- 1 tablespoon granulated sugar (13 g / about ½ oz)
- ¼ teaspoon fine salt
For the lemon filling
- One 14-ounce / 397 g can full-fat sweetened condensed milk, or one 400 g can
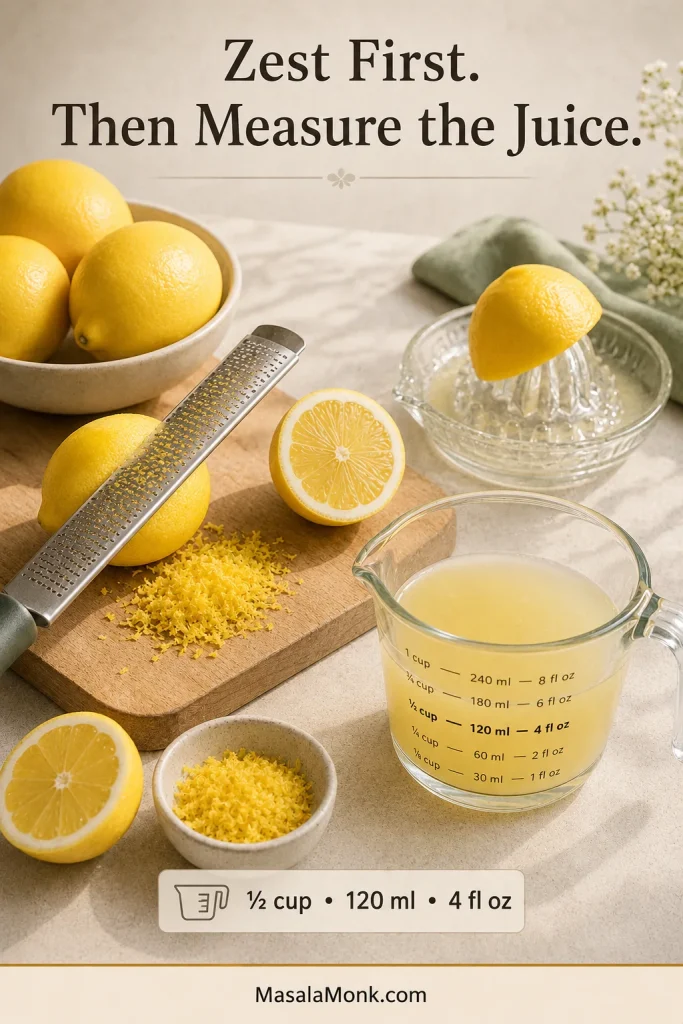
- ½ cup fresh lemon juice (120 ml / 4 fl oz)
- 2 tablespoons finely grated lemon zest, loosely packed
- ¼ teaspoon fine salt
- 1½ cups cold whipping cream (355 ml / 12 fl oz), ideally 35% milk fat or higher
Optional finish
- Fresh lemon zest
- A few reserved biscuit crumbs
- Fresh blueberries or raspberries, added shortly before serving
- Up to 2 tablespoons homemade lemon curd for a light surface swirl, or about ½ teaspoon per bar
Buying lemons: four or five medium lemons should provide enough measured juice and zest. Lemon yield varies considerably, so measure the juice rather than relying on fruit count alone.
Cream note: use a product specifically labelled for whipping. Some regular fresh or table creams sold in India and elsewhere contain too little fat to whip properly. British double cream works well but thickens quickly, so reduce the mixer speed early.
Instructions
Prepare the pan and crust
- Line the pan. Lay two strips of parchment across the pan in opposite directions, leaving enough overhang to lift the chilled slab later.
- Make the crust. Process the graham crackers until evenly fine. Melt the butter briefly in the microwave or in a small pan, then mix it with the crumbs, sugar and salt. A firmly squeezed handful should hold together without releasing visible butter.
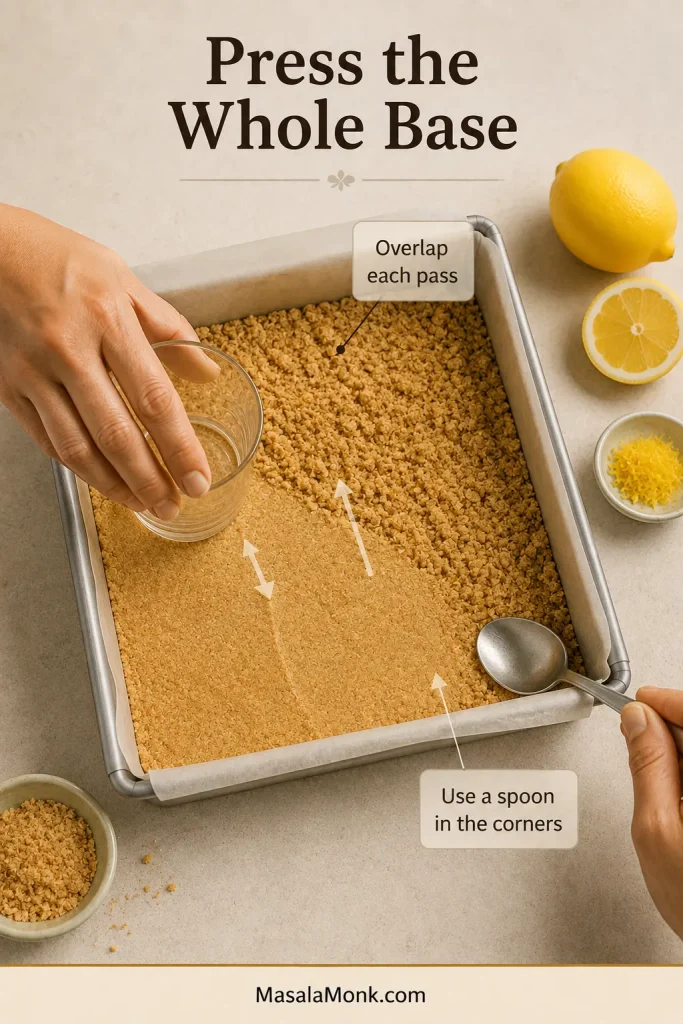
- Press and chill. Spread the crumbs evenly, compact them with the flat bottom of a cup and finish the corners with the back of a spoon. Freeze for 15 minutes or refrigerate for about 30 minutes.
Build the lemon filling
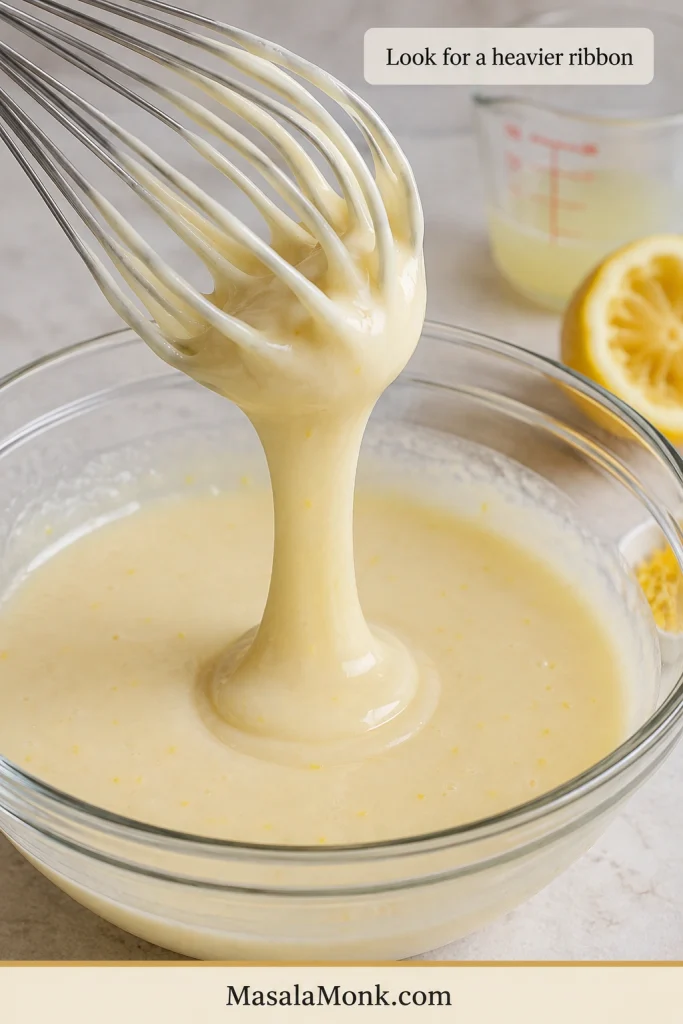
- Make the lemon base. Zest the lemons before cutting and juicing them. In a glass or stainless-steel bowl, whisk the condensed milk, measured lemon juice, zest and salt for 1–2 minutes. The mixture is ready when it falls from the whisk in a heavier ribbon. Set it aside while you whip the cream.
Visual cue
Watch the lemon base change: after a minute or two with the juice, it should feel more resistant and fall from the whisk in a brief, heavier ribbon. It will still look softer than the finished filling.
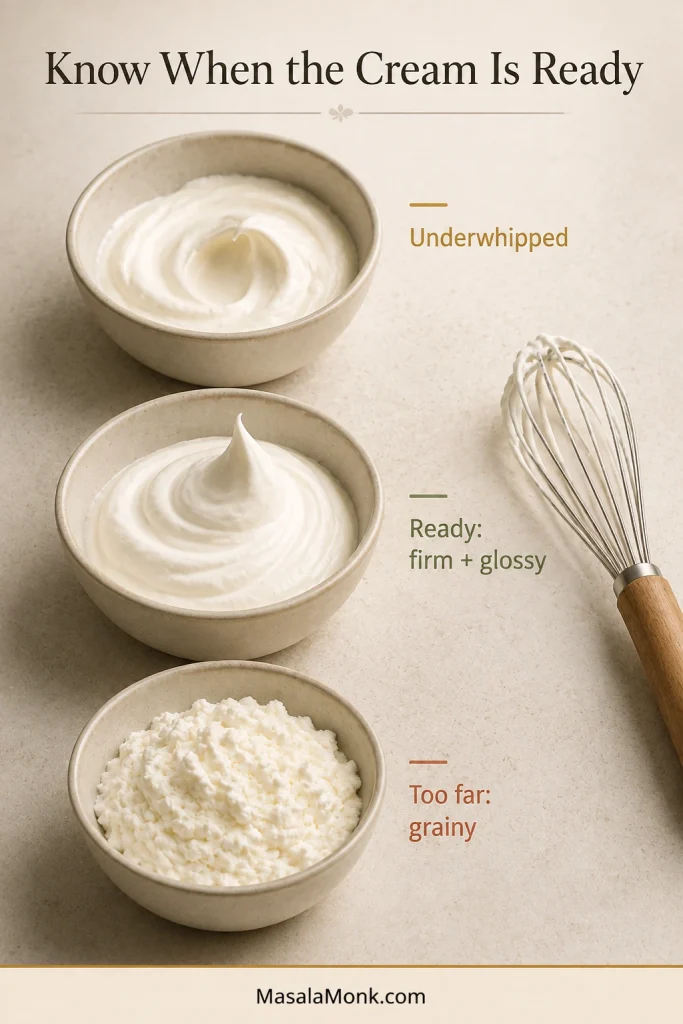
- Whip the cream. Beat to firm-to-stiff peaks; the tip may bend slightly, but the peak should not collapse.
Visual cue
Stop at a firm, glossy peak: once the whisk leaves deep tracks, reduce the speed. The peak may bend slightly at the tip, but it should not collapse or look rough and grainy. For every stage, see the whipped cream peak guide.
- Fold the filling. Start by folding about one-third of the cream into the lemon base to loosen it. Add the rest in two portions, using broad movements only until no large white streaks remain.
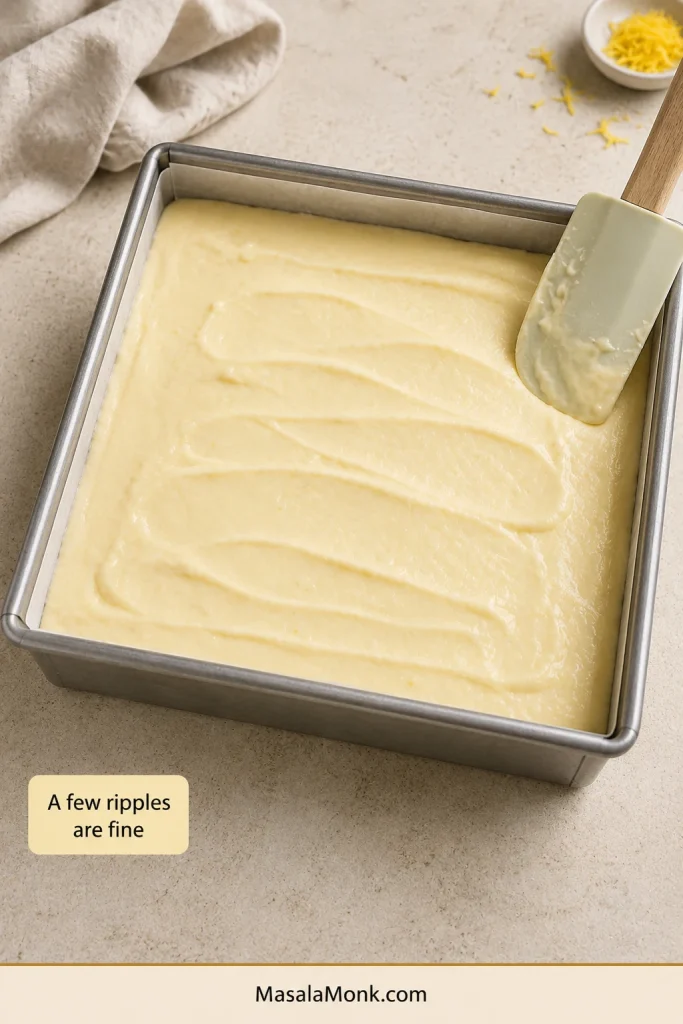
- Fill the pan. Spoon the filling across the chilled crust in several mounds, ease it into the corners and level the top. Once the corners are filled, stop smoothing. A few gentle ripples will not affect the set.
Chill, check and serve
- Cover and chill. Tent foil or plastic wrap loosely over the pan. A fitted lid works too, provided it does not touch the filling. Refrigerate for about 6 hours, or until the middle moves with the pan rather than rippling on its own.
- Check the middle. The surface should look set rather than wet. For especially neat cuts, give the fully chilled slab a 20–30-minute freezer chill.
- Lift, cut and serve. Use the parchment to lift the slab. Heat a large straight-edged knife in hot water, dry it completely and press straight down. Clean and reheat the blade between cuts. Serve straight from the refrigerator.
Recipe notes
- No oven is needed. The only heat required is enough to melt the butter.
- Salted butter works. Omit the added salt from the crust or reduce it to a small pinch.
- Use sweetened condensed milk, not evaporated milk. Condensed milk provides both sweetness and body.
- A metal pan chills fastest. Glass or ceramic works, but the filling may need additional time.
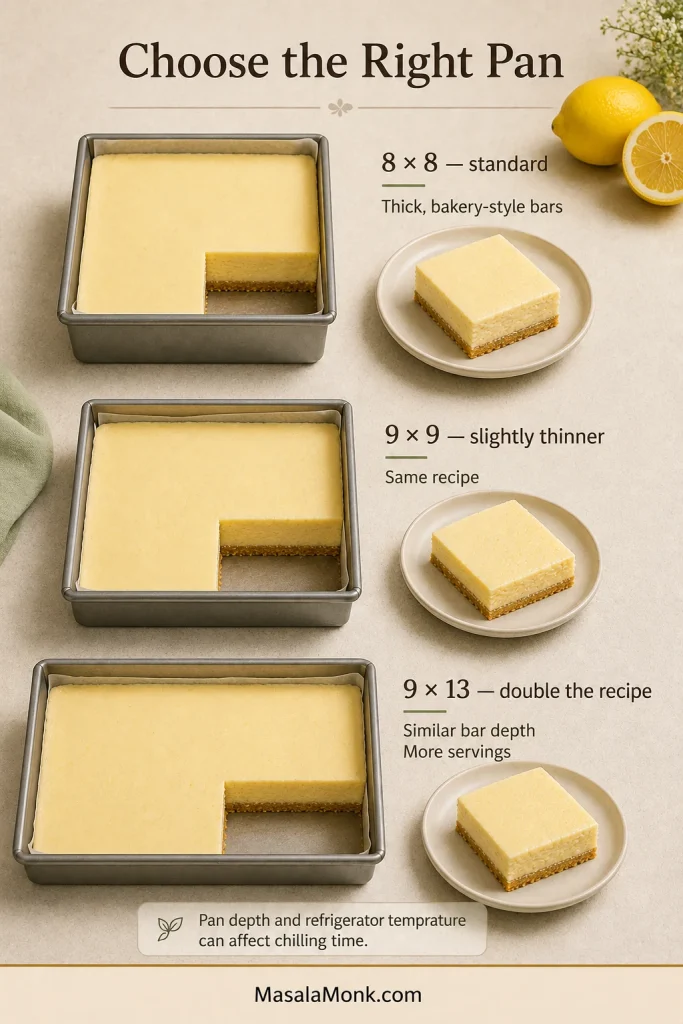
- A 9-inch square pan makes slightly thinner bars. Double the recipe for a 9 × 13-inch pan when you want a similar filling depth.
- The filling is egg-free. Check the biscuit label and omit egg-based lemon curd if the entire dessert must be egg-free.
Pan-size guide
Choose the pan before scaling: changing the surface area alters filling depth, chilling speed and the crust-to-cream balance.
Need help before starting? Set and cut cleanlyChoose your crustFix a problem
You can stop at the recipe and start making the bars. Still deciding whether this is the style you want? The comparison below separates it from cheesecake bars, icebox squares, frozen bars and Australian-style lemon slice.
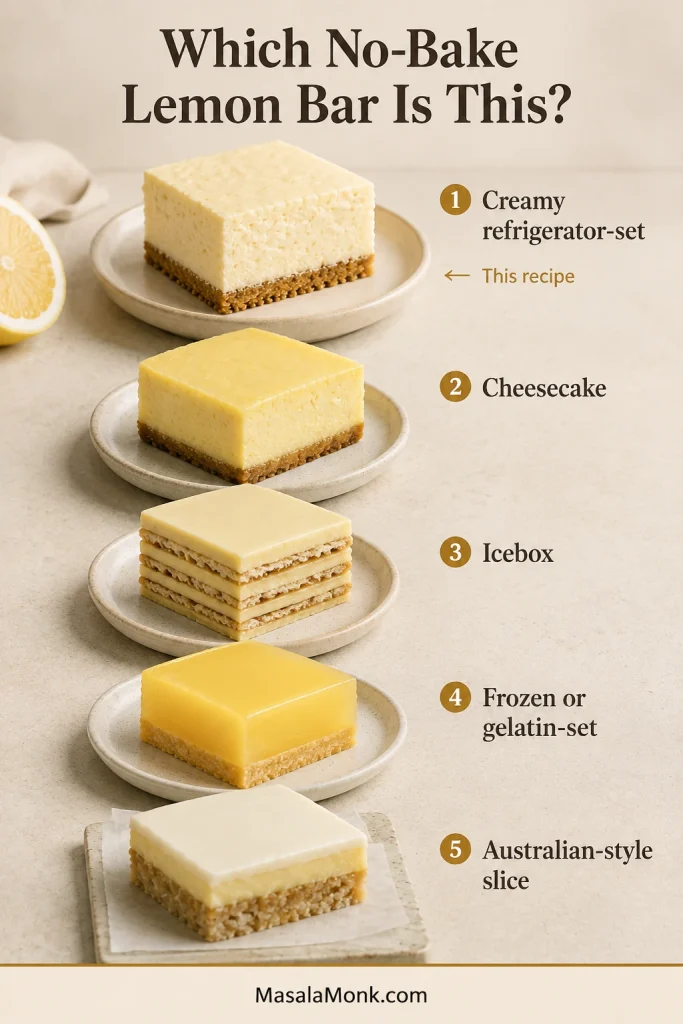
Visual comparison
How this version differs from other no-bake lemon bars
Start with the texture you want. The visual gives the quick distinction; the table beneath explains how each style is built.
| Style | How it is made | Result |
|---|---|---|
| Creamy lemon bars | Condensed milk, fresh lemon and whipped cream over a pressed crumb crust | Light, creamy and softly sliceable when cold |
| Lemon cheesecake bars | Use a cream-cheese-based no-bake cheesecake filling | Richer, tangier and substantially denser |
| Icebox lemon squares | Layer lemon filling with whole crackers, much like the softened cookie layers in no-bake banana pudding | Soft and cake-like after resting |
| Frozen or gelatin-set bars | Use a frozen cream filling or lemon gelatin | Firmer, colder or more elastic |
| Australian-style lemon slice | Make a biscuit-and-coconut base topped with lemon icing | Dense and chewy rather than creamy |
This is the sort of dessert that earns its place on a hot afternoon: make it before anyone arrives, leave it in the refrigerator and bring it out only when the table is ready.
No-bake lemon bar guide
Build the bars
What success tastes like
Cold lemon cream over tender buttery crumbs
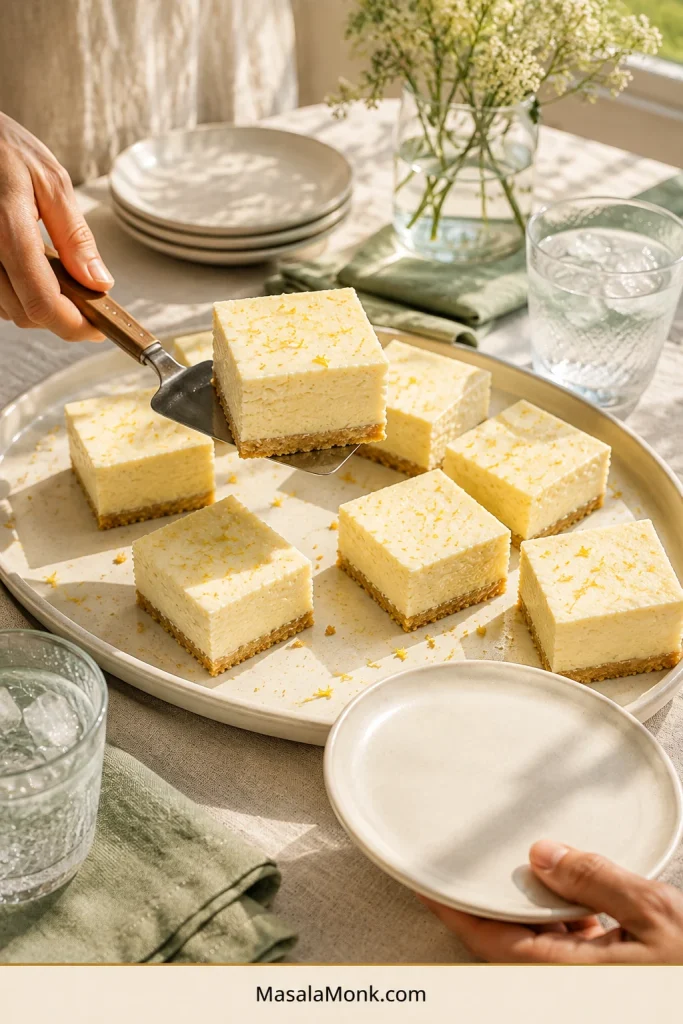
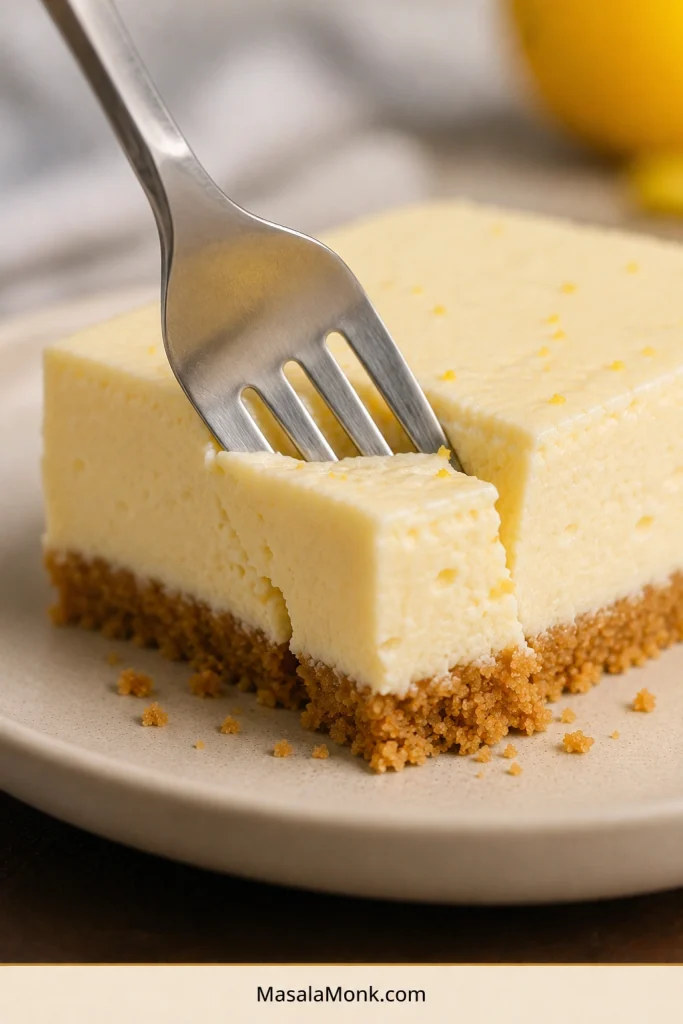
Cold from the refrigerator, the filling feels airy at first and then melts into smooth lemon cream. Fresh zest gives it a fragrant lift, while the buttery, lightly salted crumbs keep the sweetness grounded.
Each square is soft enough for a fork to pass through easily, but substantial enough to lift and serve neatly.
Visual timing guide
How long to chill—and how to cut clean squares
Allow about 6 hours for dependable slices. For the most even set and easiest cuts, chill the pan overnight.
Four hours may be enough in a very cold refrigerator, especially with a metal pan. Six hours gives more margin for warmer refrigerators, glass or ceramic pans and a centre that chills slowly.
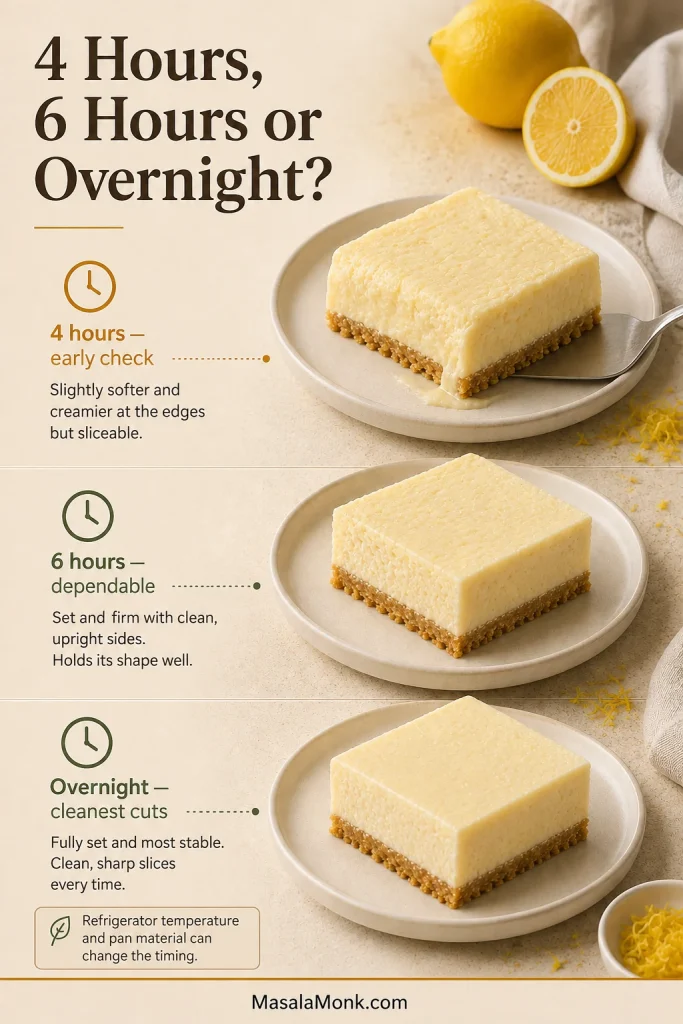
| Chilling time | What to expect |
|---|---|
| 4 hours | An early checkpoint when the bars are needed urgently; the middle may still be delicate |
| About 6 hours | A dependable point for lifting and cutting in a properly cold refrigerator |
| Overnight | The most even set and easiest cuts |
| Plus 20–30 minutes in the freezer | Sharper edges for photographs, parties or warm-weather transport |
A crowded refrigerator or a door that keeps opening can slow the middle down. If it still looks soft, more refrigerator time is usually the best fix.
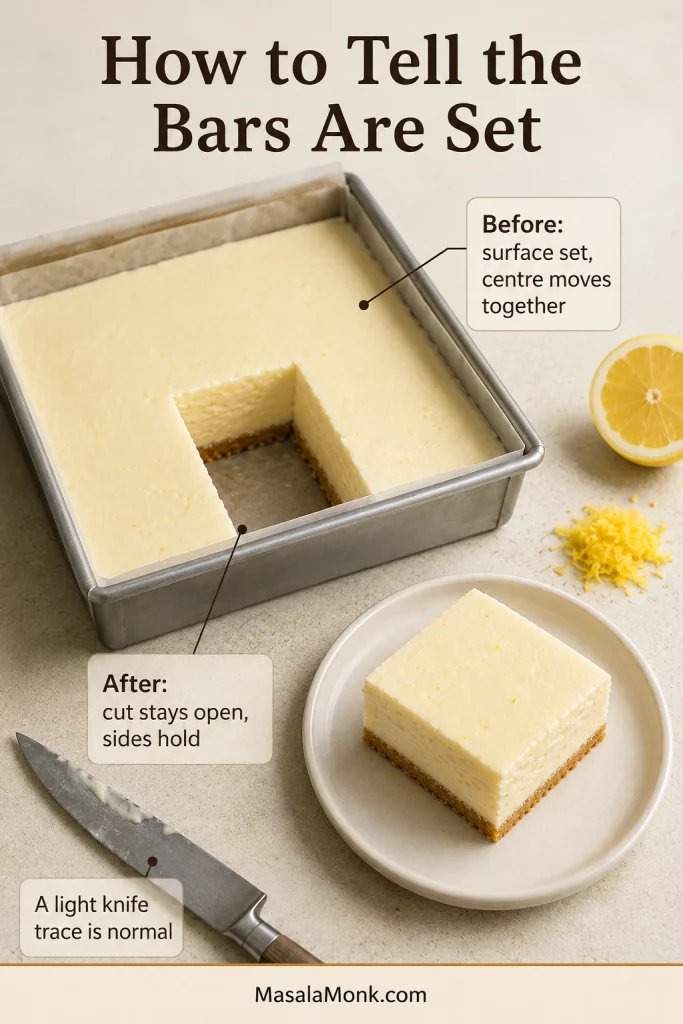
Before lifting or cutting
- Surface looks set rather than wet
- Centre moves with the pan instead of rippling on its own
After the first cut
- Cut stays open instead of closing behind the knife
- Exposed sides hold their shape instead of slowly spreading
- A light, creamy trace on the blade is normal
The first square does not have to be the prettiest. Use it to judge the set, then clean the blade and continue.
How to get clean lemon-bar squares
- Chill the slab fully and give it the optional freezer chill when especially neat edges matter.
- Lift the slab onto a stable board with the parchment.
- Heat a large straight-edged knife in hot water and dry it completely.
- Press straight down without sawing.
- Wipe, reheat and dry the blade between cuts.
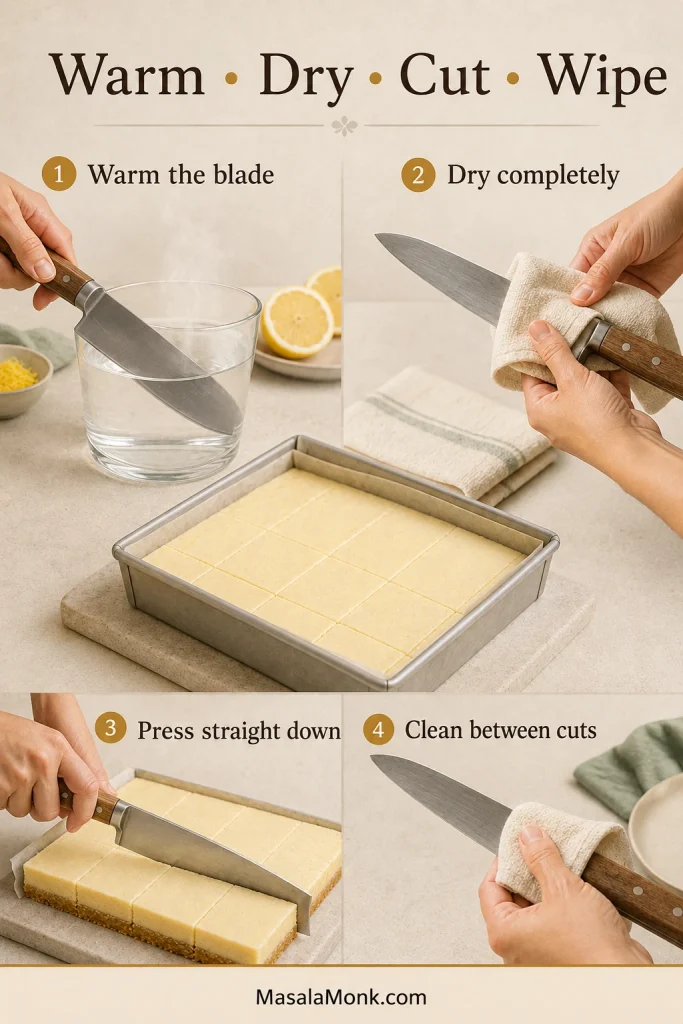
Cut the slab 4 × 4 for 16 regular bars or 3 × 4 for 12 generous portions. For a dessert tray, a 5 × 5 grid makes 25 small bites.
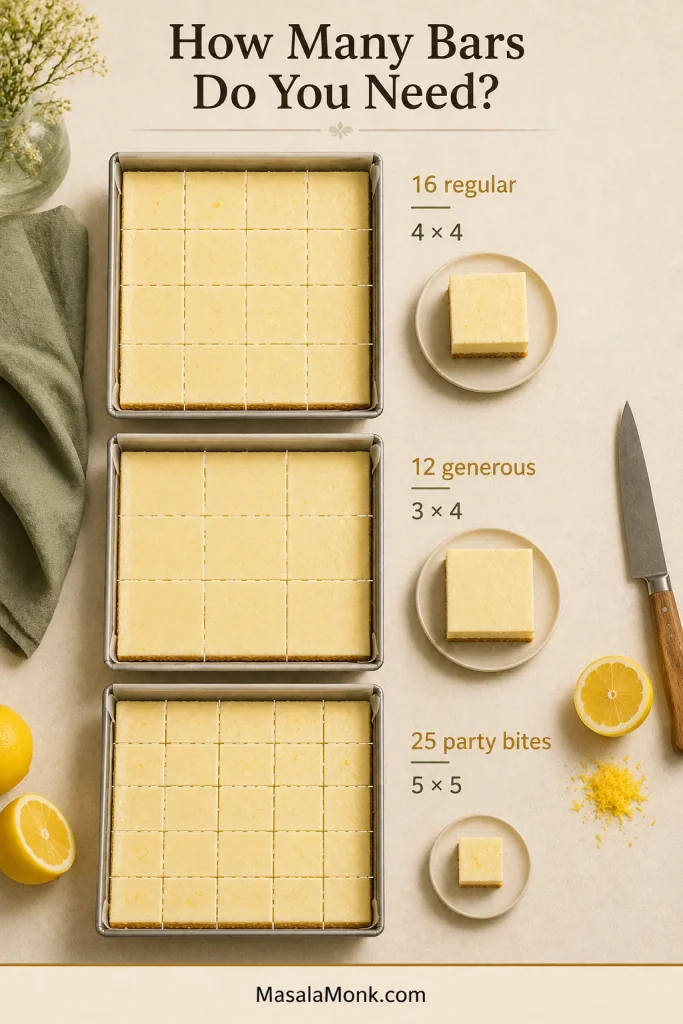
Remove the bars only when you are ready to serve them. In a warm room, return the remaining slab to the refrigerator between servings. Trimming the edges is optional; for everyday serving, keep them.
Back to recipeChoose your crustBack to top ↑
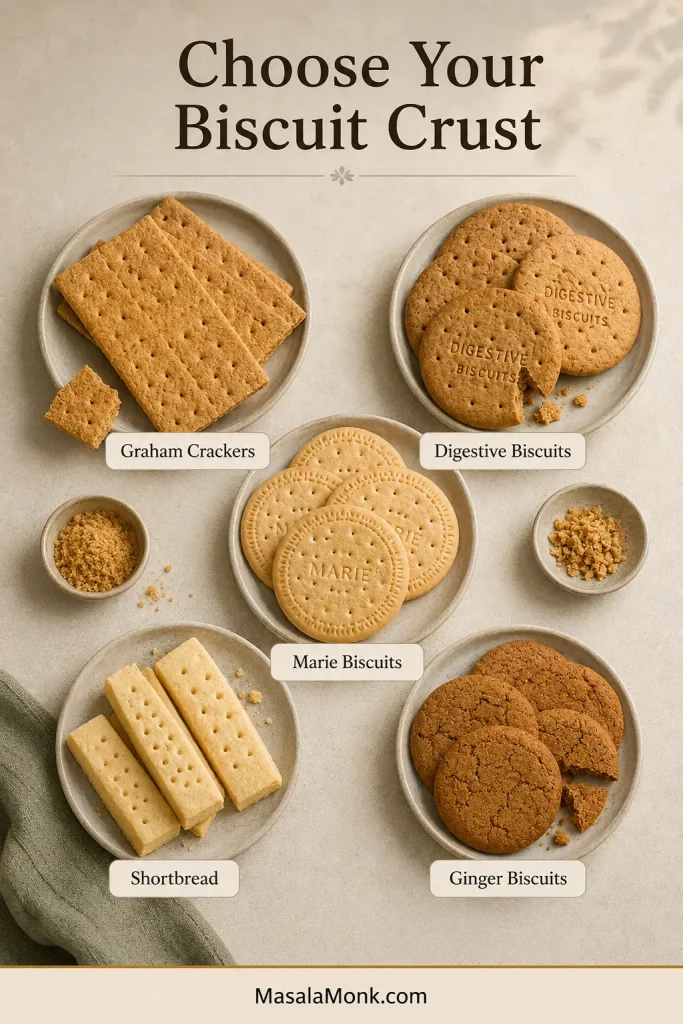
Graham crackers, digestives, Marie biscuits or shortbread?
Crumb crusts can feel annoyingly vague because every biscuit absorbs butter differently. The figures below are practical starting ranges, not universal ratios. Biscuit fat, sugar and dryness vary by brand, so reserve a little butter and let the squeeze test make the final decision.
The same principle keeps the biscuit base in Banoffee Pie from becoming either sandy or greasy.
Starting-point guide
Starting butter ratios by biscuit
Biscuit richness changes how much butter the crumbs need. Begin conservatively, then confirm the mixture with the squeeze test.
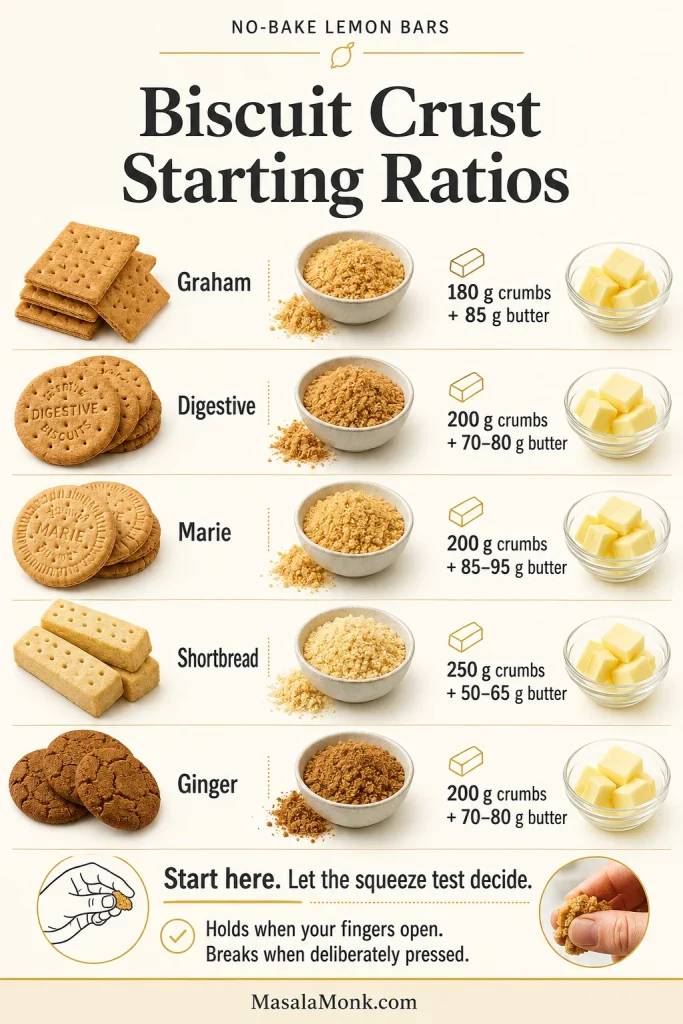
| Biscuit | Start with | Result | What to watch |
|---|---|---|---|
| Graham crackers | 180 g crumbs + 85 g butter + 13 g sugar | Light, mildly sweet and easy to cut when cold | A very lean brand may need another teaspoon or two of butter |
| Digestive biscuits | 200 g crumbs + 70–80 g butter | Deeper, toastier and less sweet | Usually omit added sugar |
| Marie biscuits | 200 g crumbs + 85–95 g butter | Mild and relatively lean | Add the final butter gradually |
| Shortbread cookies | 250 g crumbs + 50–65 g butter | Rich and closest to classic lemon-bar flavour | Too much butter quickly makes it greasy or hard |
| Ginger biscuits | 200 g crumbs + 70–80 g butter | Warm, spiced and excellent with lemon | Usually needs no added sugar |
| Gluten-free biscuits | Begin with the closest matching biscuit above | Depends strongly on the brand | Let the squeeze test decide the final butter amount |
Let the squeeze test decide
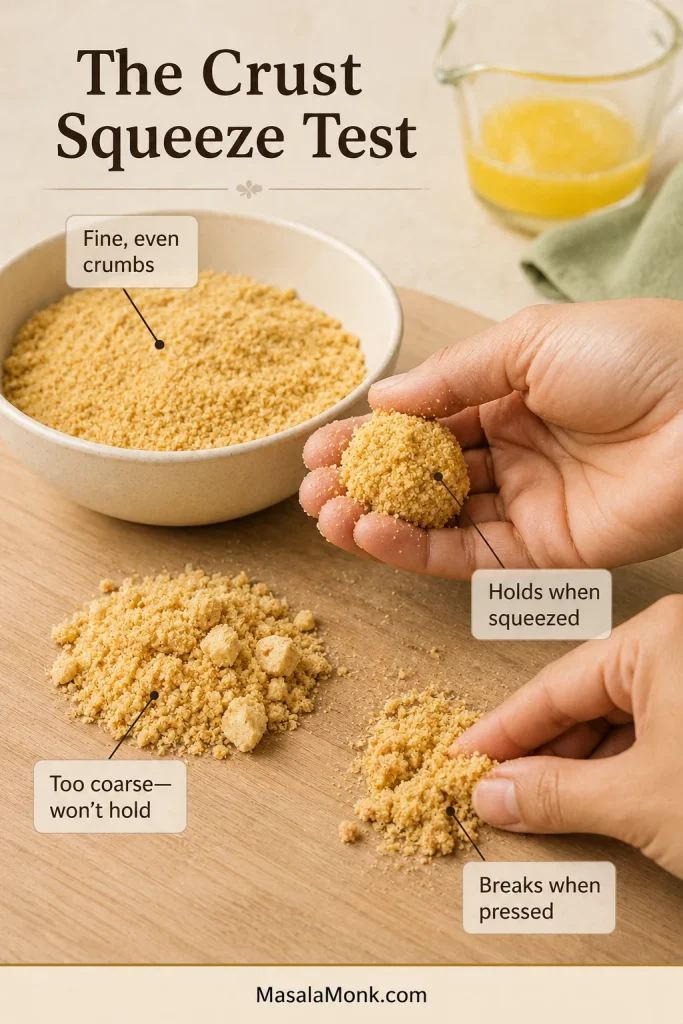
The crumb mixture is ready when every crumb looks moistened and a firmly squeezed handful holds together. It should hold when your fingers open, then break apart when you press it deliberately.
- Loose and sandy: add melted butter one teaspoon at a time.
- Wet or butter-releasing: add more crumbs one tablespoon at a time.
- Using shortbread: stop earlier because the cookie already carries plenty of fat.
Because this base is chilled rather than baked, it will be firm enough to lift but slightly softer than an oven-baked crust—especially on the second or third day.
Graham crackers keep the lemon in front. Digestives bring a deeper, toastier base. Shortbread makes each square richer, while ginger biscuits leave a warm finish after the lemon fades.
Small details that make the bars reliable
Press through the whole crust
A crust can look smooth on top while remaining loose underneath. Press in overlapping passes across the whole base rather than polishing only the surface. Crumbs may resist the corners at first; the back of a spoon usually reaches them more easily than a round cup.
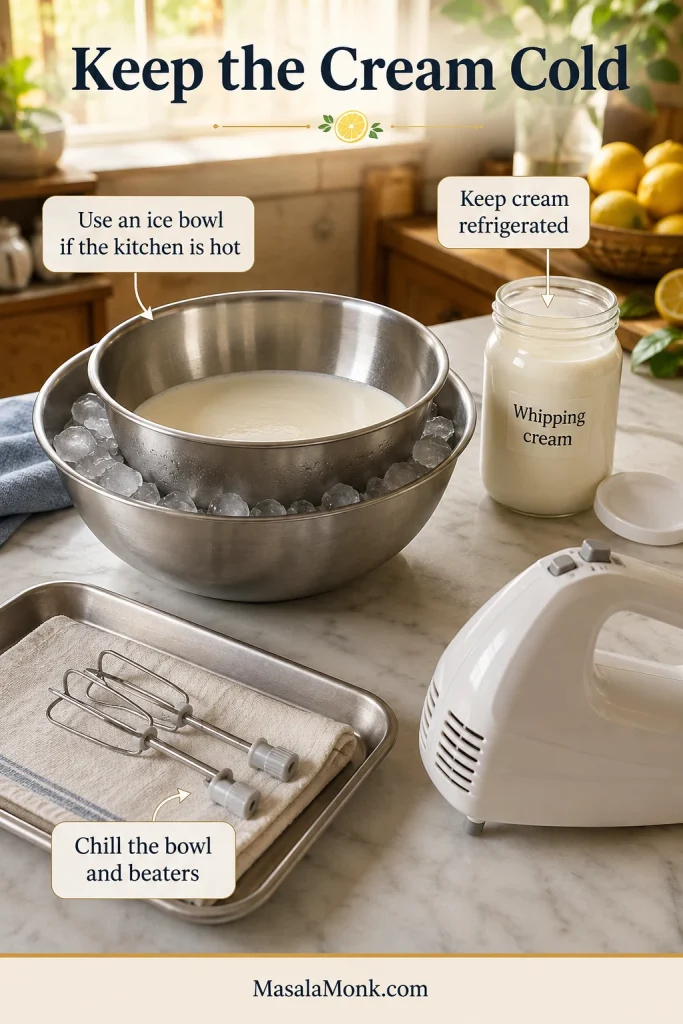
Hot-kitchen note: refrigerate the bowl and beaters for 10–15 minutes, keep the cream cold until the last moment and set the mixing bowl over a larger bowl of ice when necessary. An electric mixer makes it much easier to stop at the right stage.
Fold and finish without overworking
Fold the first third of the cream more confidently to loosen the lemon base. Once the mixture feels lighter, use slower, broader movements for the remaining cream.
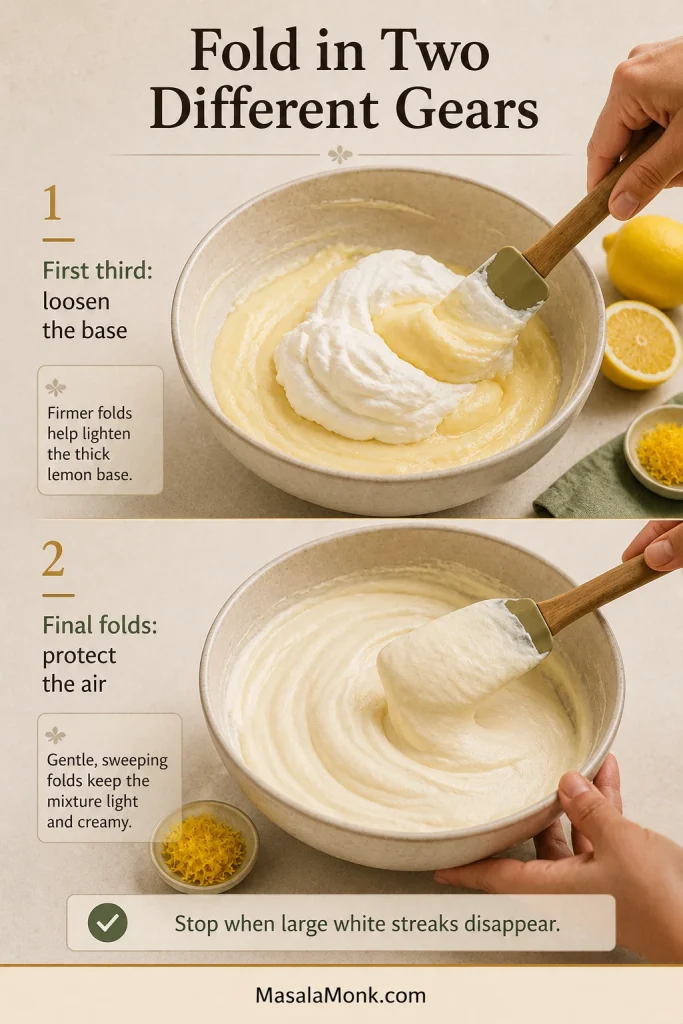
Everything else in the bowl is sturdy; the air in the cream is not. Stop once no large white streaks remain, spread the filling gently and leave a few harmless ripples on top.
Illustrated structure guide
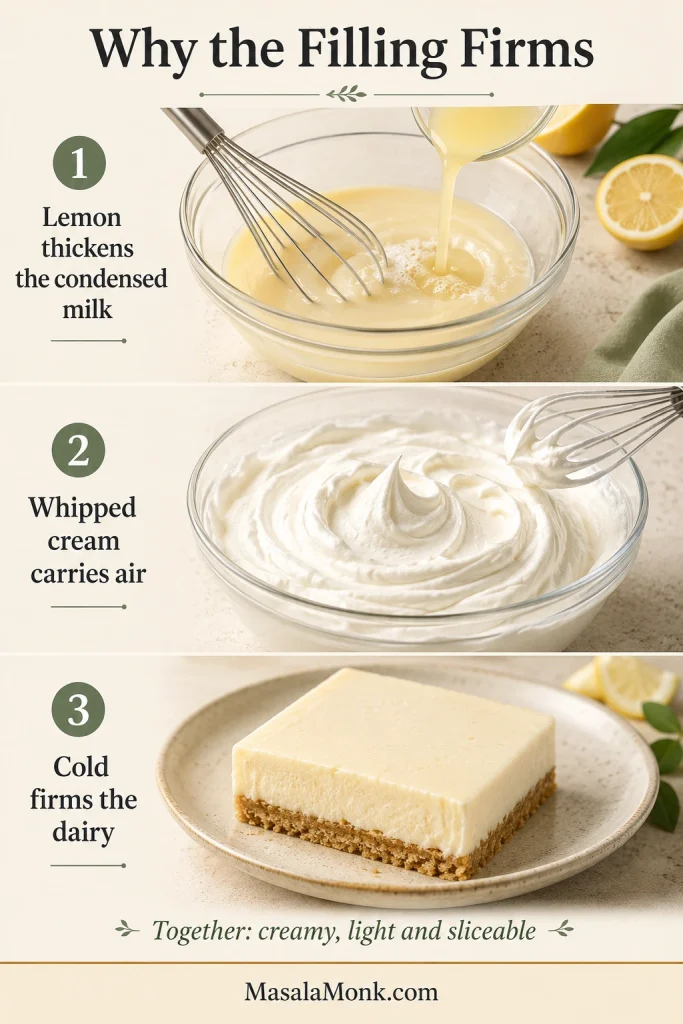
Why this filling firms up in the refrigerator
Lemon thickens the condensed milk, whipped cream carries air through the mixture, and refrigeration firms the dairy. Together, they give the filling enough body to slice without making it dense.
Lemon works on condensed milk in much the same way lime juice does in key lime pie. Here, the whipped cream keeps the texture lighter, while the refrigerator completes the set.
What each ingredient contributes
Condensed milk supplies sweetness, concentrated dairy flavour and most of the filling’s body. Either a 397 g or 400 g can works.
Lemon juice balances the condensed milk and helps thicken it. Measure ½ cup / 120 ml / 4 fl oz after squeezing rather than relying on a fruit count.
Lemon zest carries the fragrant oils that make the bars smell unmistakably citrusy without loosening the filling. Grate only the yellow skin; white pith can taste bitter.
Whipping cream introduces the air that keeps the filling light, while its fat firms as it chills.
Salt makes the lemon taste brighter and keeps the second bite as appealing as the first.
Evaporated milk, regular milk and ordinary pouring cream are much thinner. None will thicken and set the filling in the same way as condensed milk.
No-bake lemon bar troubleshooting
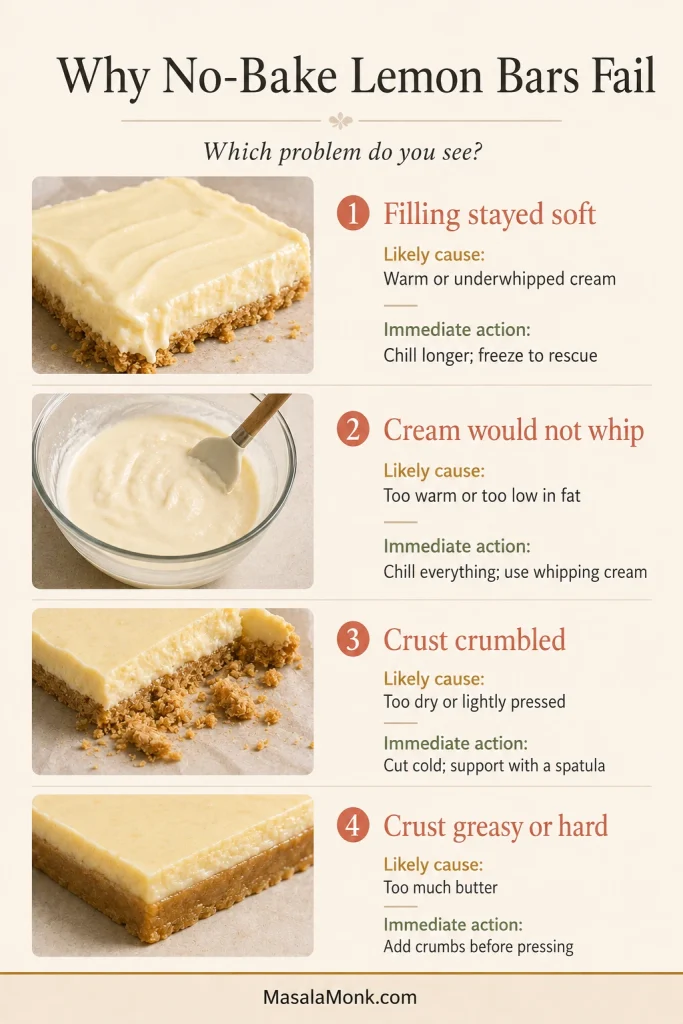
Visual troubleshooting guide
Use the symptom to choose the fix: soft filling, cream that will not whip, a crumbly crust and a greasy or hard crust each need a different response.
Filling and cream problems
| Problem | Why it happened and what to do |
|---|---|
| Filling looks loose before chilling | The cream may be warm or underwhipped, or too much air was lost during folding. Refrigerate the pan promptly; the filling should mound softly rather than pour. |
| Bars remain soft after 6 hours | The refrigerator may be warmer or busier than expected. Leave the pan overnight and use a brief freezer chill before cutting when needed. |
| Bars remain spoon-soft after chilling overnight | The cream may have been too low in fat, underwhipped or deflated during folding. Freeze the pan and serve the bars as frozen lemon cream squares. |
| Cream will not whip | The cream may be too warm, too low in fat or intended only for pouring. Chill the cream, bowl and beaters before starting. |
| Cream became grainy | When it is only slightly rough, fold in 1–2 tablespoons fresh cold cream. Once liquid begins separating, start again; the cream will not fold back into a smooth filling. |
Crust and flavour problems
| Problem | Why it happened and what to do |
|---|---|
| Crust falls apart | The crumbs may have been coarse, under-buttered, lightly pressed or insufficiently chilled. Cut very cold and support each piece with a wide spatula. Next time, press the crumb mixture more evenly. |
| Crust is greasy or hard | Mix in more crumbs when the mixture looks greasy before pressing. When the finished crust is hard, let the slab stand at cool room temperature for about 5 minutes. Next time, use less butter with rich cookies. |
| Filling tastes too sweet | For the current batch, add fresh zest and serve the bars with tart raspberries. Next time, keep the salt and choose digestives or another less-sweet biscuit. |
| Lemon flavour is weak or bitter | Add fresh yellow zest at serving time when the flavour is weak. Bitterness usually means pith or crushed seeds entered the filling; avoid both in the next batch. |
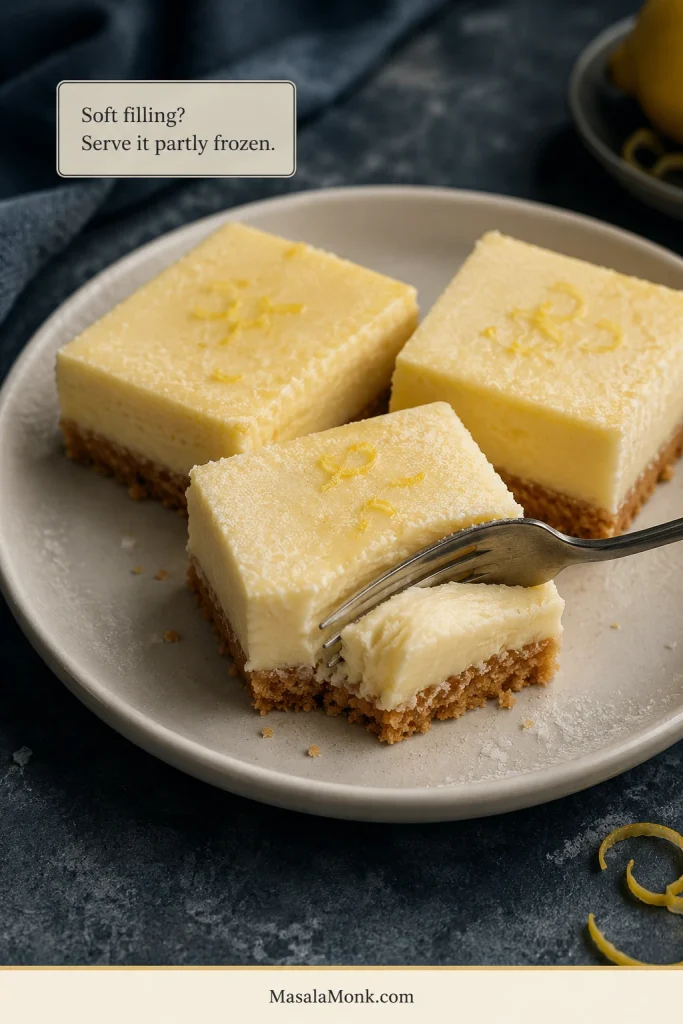
When the filling stays soft: if the flavour is good, the pan is not lost. Freeze it, cut it cold and serve it as frozen lemon cream bars. The texture changes, but dessert survives.
Back to recipeTry a variationStorage and freezingBack to top ↑
Ways to change the flavour without softening the filling
Choose berries for tartness, ginger or coconut for a more distinctive crust, lemon curd for stronger citrus, or serve the bars partly frozen when the weather is especially hot.
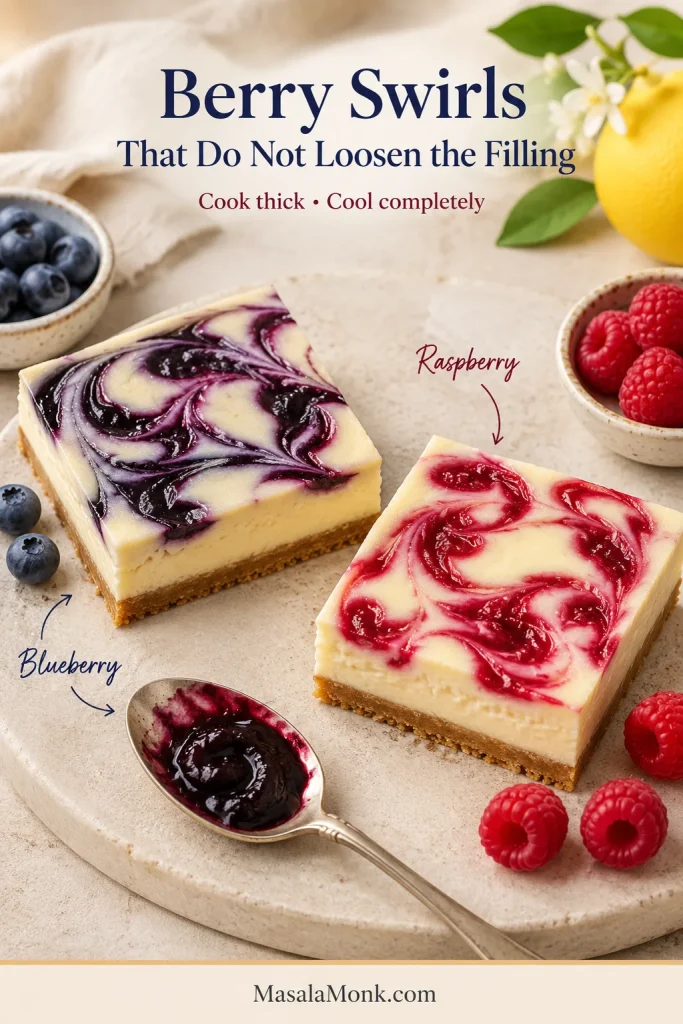
Berry swirls
Blueberry: simmer ½ cup blueberries (70 g / 2½ oz) with 1 teaspoon sugar until thick and jammy. Cool completely, then dot 2–3 tablespoons over the filling and make a few shallow swirls.
Raspberry: simmer ½ cup raspberries (65–70 g / about 2½ oz) with 1 teaspoon sugar until thick. Strain if desired, cool completely and use 2–3 tablespoons.
For any fruit swirl: reduce the fruit until thick and cool it completely. Raw purée can loosen a chilled filling; the no-bake mango cheesecake guide explains why thicker fruit preparations behave better.
Crust variations
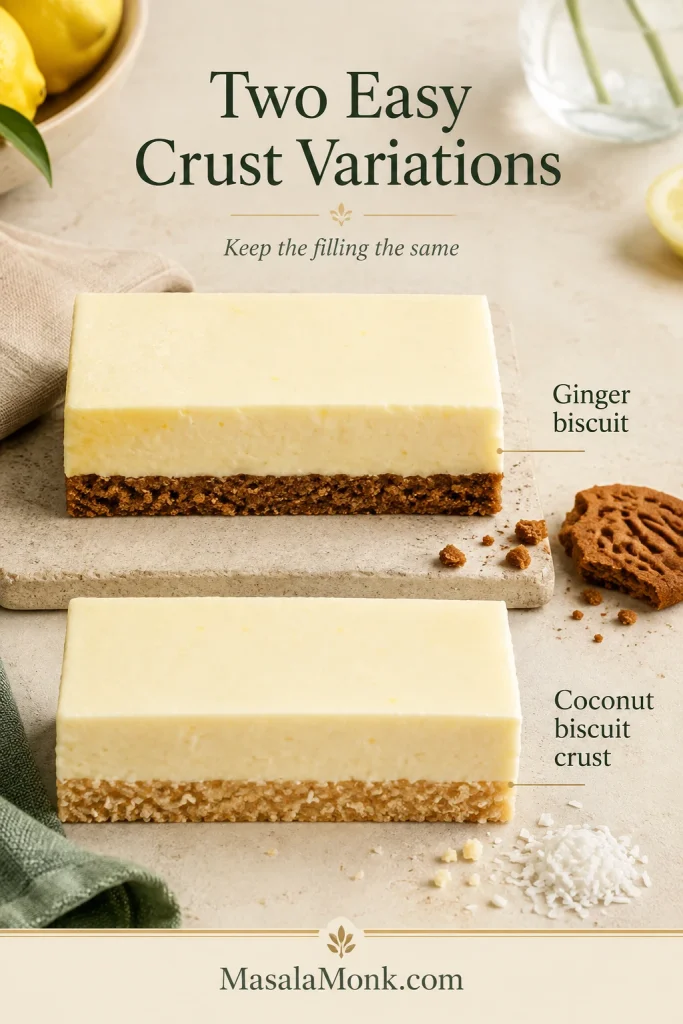
Ginger biscuits: replace the graham crackers with crisp ginger biscuits. Omit the sugar and begin with less butter because many brands are already rich.
Coconut: replace ¾–1 oz / 20–30 g of biscuit crumbs with fine desiccated coconut. Keep the quantity modest so the crust still packs tightly.
Extra lemon or a frozen finish
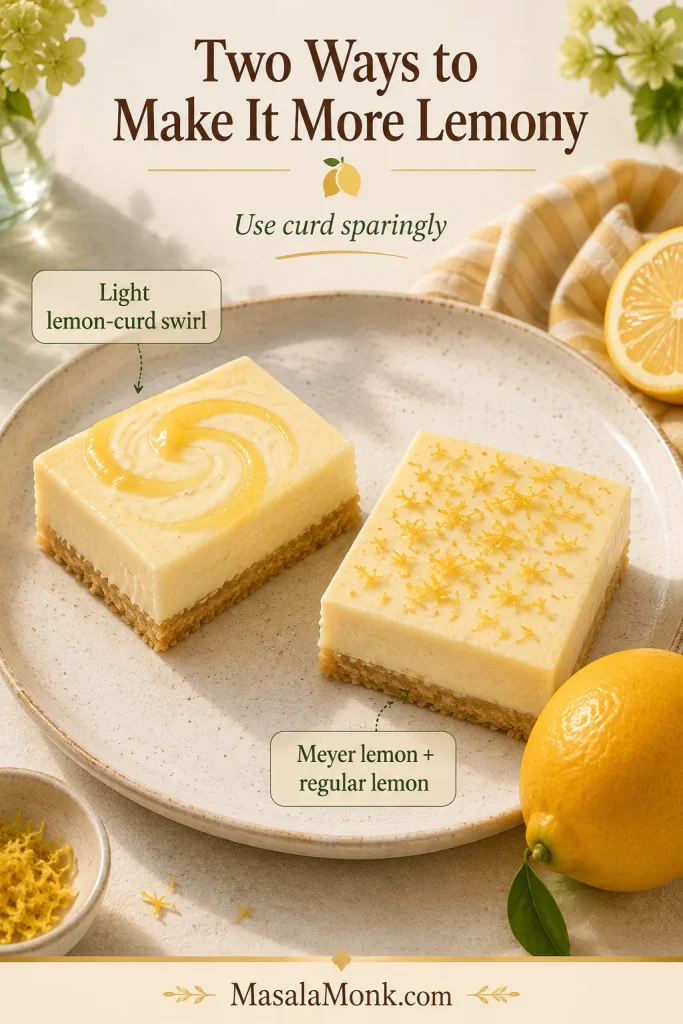
Lemon curd: swirl up to 2 tablespoons lightly over the surface, or add about ½ teaspoon to each bar just before serving.
Meyer lemon: use half Meyer lemon juice and half regular lemon juice, then use Meyer zest for the aroma. The Masala Monk guide to lemon varieties explains how their flavours differ.
Partly frozen: freeze the completed slab until firm, then let each bar soften for 5–10 minutes before eating. The bars eat more like lemon ice cream and are especially welcome in very hot weather.
Easy swaps—and changes that need another recipe
Easy swaps
- Digestives for graham crackers: use the starting range in the crust table and omit the sugar.
- Shortbread for graham crackers: reduce the added butter substantially.
- Gluten-free biscuits: use a crisp biscuit and let the squeeze test determine the final butter quantity.
- Lime for lemon: replace the juice and zest measure for measure for a no-bake lime version.
- Prepared whipped topping: replace the whipped cream with about 3 cups thawed whipped topping (225 g / 8 oz). The bars will be sweeter and less fresh-tasting.
Changes that need another recipe
Evaporated milk, regular milk, low-fat pouring cream, yoghurt and liquid sweeteners cannot replace condensed milk or whipping cream in equal quantities. They change both the water content and the way the filling sets.
Coconut milk, cashews and agar need a separate recipe designed around those ingredients.
A low-carb version also needs a different filling and crust because condensed milk supplies both sweetness and body. Use the keto cheesecake recipe as a starting formula rather than swapping in a low-carb sweetener alone.
Make-ahead, storage and freezing
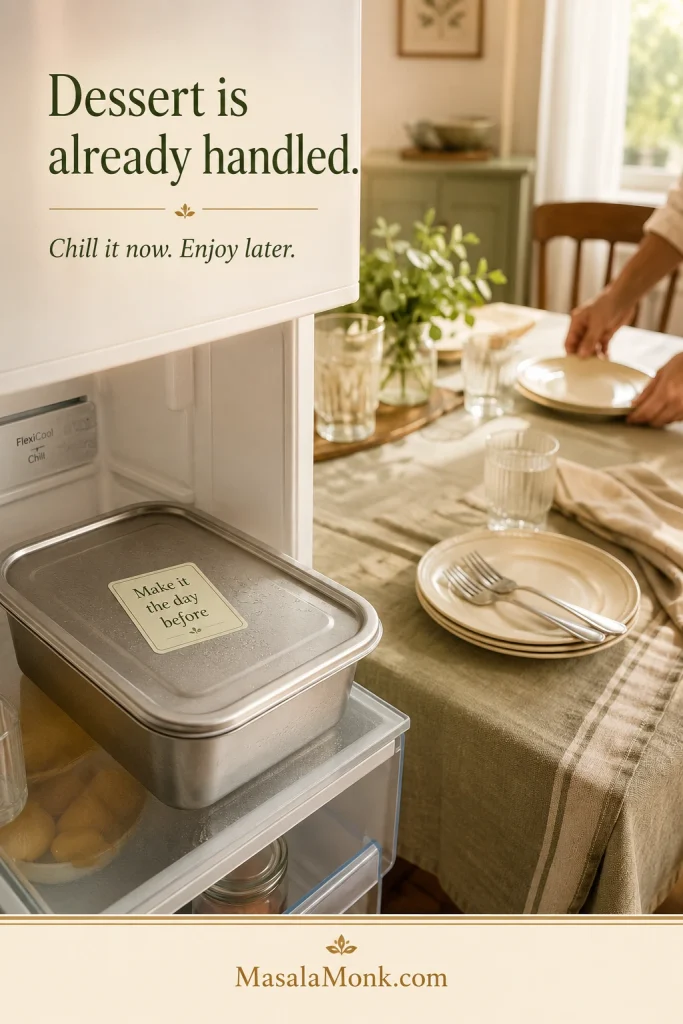
Make them one day ahead
Make the pan the day before and dessert is already handled. It can stay cold while dinner happens, guests arrive and everything else asks for your attention.
Add fresh fruit, extra zest or delicate toppings shortly before serving so they remain bright and do not release moisture onto the surface.
Refrigerator storage
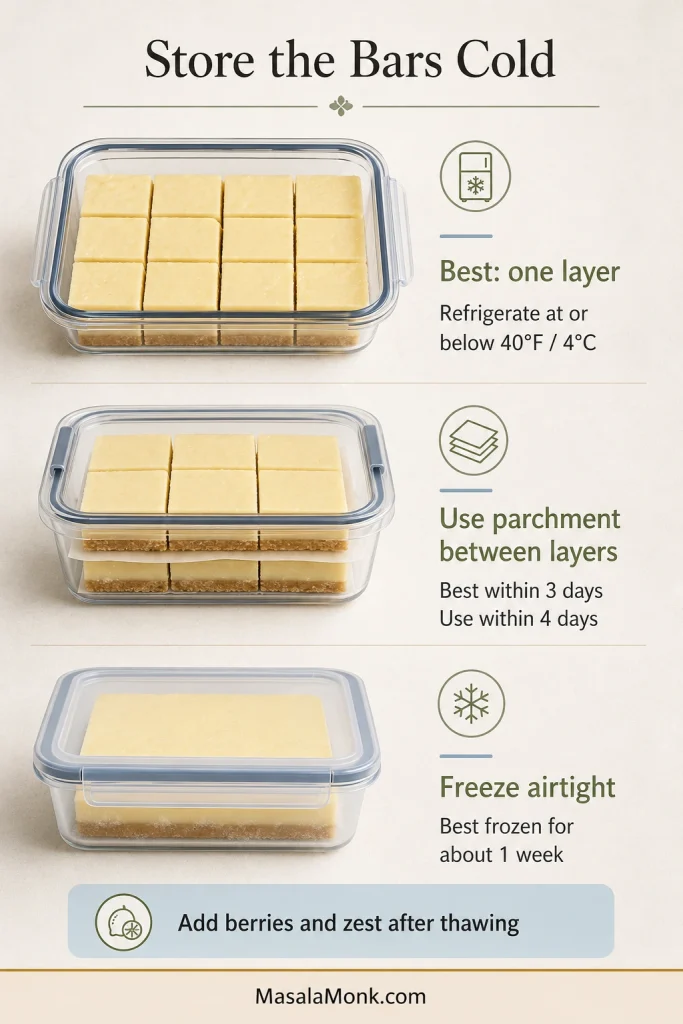
For the best texture, eat the bars within about three days. Keep any remaining bars continuously refrigerated at or below 40°F / 4°C and use them promptly.
A single layer is preferable. When stacking cannot be avoided, place parchment between layers and keep the container very cold.
Freezing
Freeze only for short-term storage; the texture is best when the bars are used within roughly one week. Store the uncut slab or individual bars in an airtight container and protect them from freezer odours and surface ice.
Thaw in the refrigerator. The filling may feel slightly denser after freezing, but it should remain creamy. Add berries and fresh zest after thawing.
Taking the bars elsewhere? Continue to the hot-weather transport setup so the slab stays cold and level.
Transporting no-bake lemon bars in hot weather
- Chill the pan fully before travelling.
- Give it a 20–30-minute freezer chill before departure.
- Transport the bars in the original pan or a rigid single-layer container.
- Keep the container level inside an insulated cooler with frozen ice packs.
- Refrigerate immediately on arrival.
- Add fruit garnish after transport.
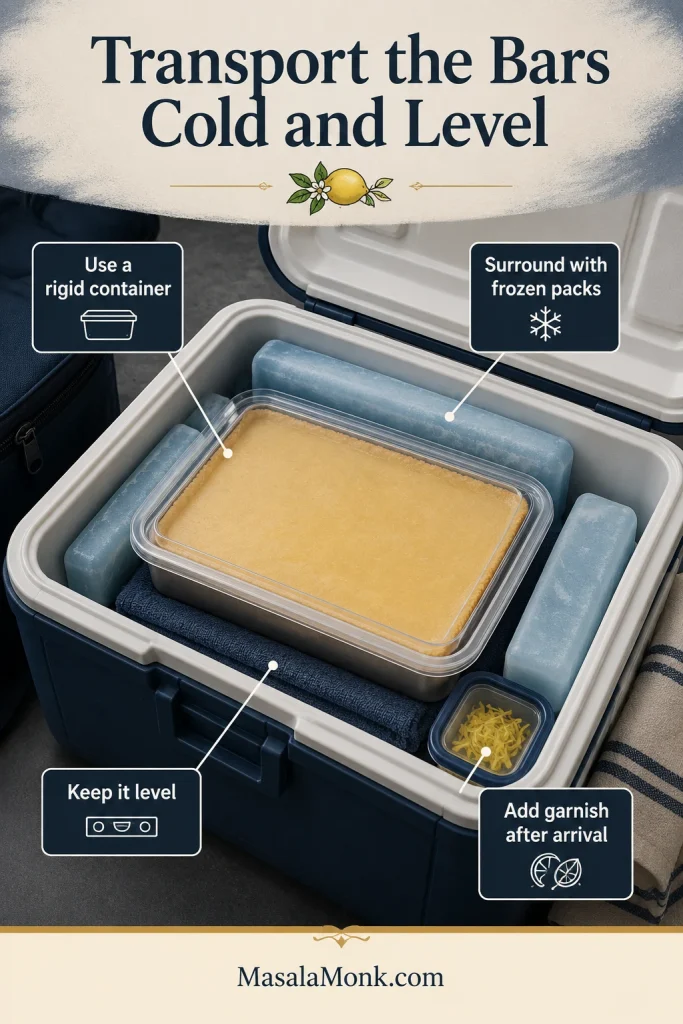
Keep these chilled dairy bars at or below 40°F / 4°C. Do not leave them unrefrigerated for more than two hours—or more than one hour when the surrounding temperature is above 90°F / 32°C. The USDA cold-food safety guidance explains the same limits in more detail.
Frequently asked questions
Do no-bake lemon bars need gelatin or cream cheese?
No. Lemon-thickened condensed milk, whipped cream and refrigeration provide the structure. Cream cheese makes a denser dessert, closer to a no-bake cream cheese pie, while gelatin creates a firmer, more elastic set.
Can I make them without condensed milk?
Not with this formula. Condensed milk supplies sweetness, dairy solids and much of the filling’s body. A version without it needs a separate base built around ingredients such as cream cheese, gelatin, agar, coconut cream or cashews.
Can I use bottled lemon juice?
It may provide enough acidity, but fresh juice tastes cleaner. When bottled juice is the only option, use the same ½ cup / 120 ml / 4 fl oz measure and include fresh zest for aroma.
Why have my lemon bars not set?
They may simply need longer. Leave the pan overnight before assuming the filling has failed. If it remains spoon-soft, the cream was probably too warm, too low in fat, underwhipped or deflated during folding; the troubleshooting guide above shows how to rescue it.
Do these bars taste strongly of condensed milk?
Fresh juice, zest and salt keep the flavour from tasting flat or purely milky. Serve the bars cold, when the citrus tastes brightest and the sweetness feels more restrained.
Final texture
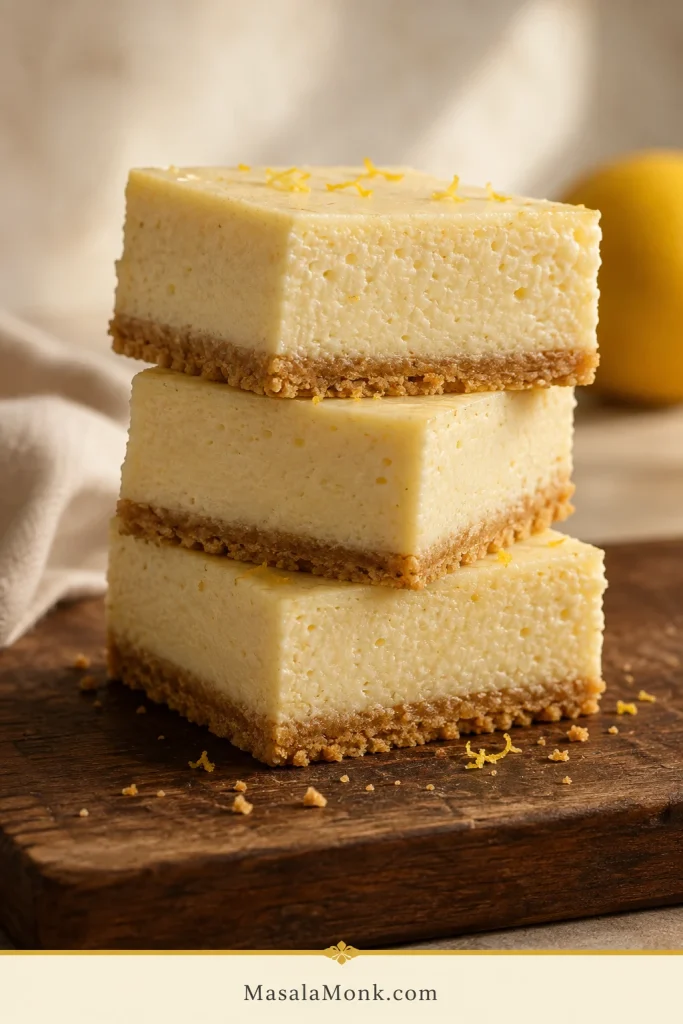
The centre cut is worth the wait
The hands-on work ends quickly: press the crust, whisk the lemon base, fold in the cream and level the pan. Then comes the quiet part, when the refrigerator turns a soft filling into a dessert you can lift.
Give the refrigerator its time. Heat and dry the knife. Make one clean downward cut.
Under the fork, the crust gives gently. The filling stays cold and creamy. Then the lemon arrives before the sweetness has a chance to feel heavy.








