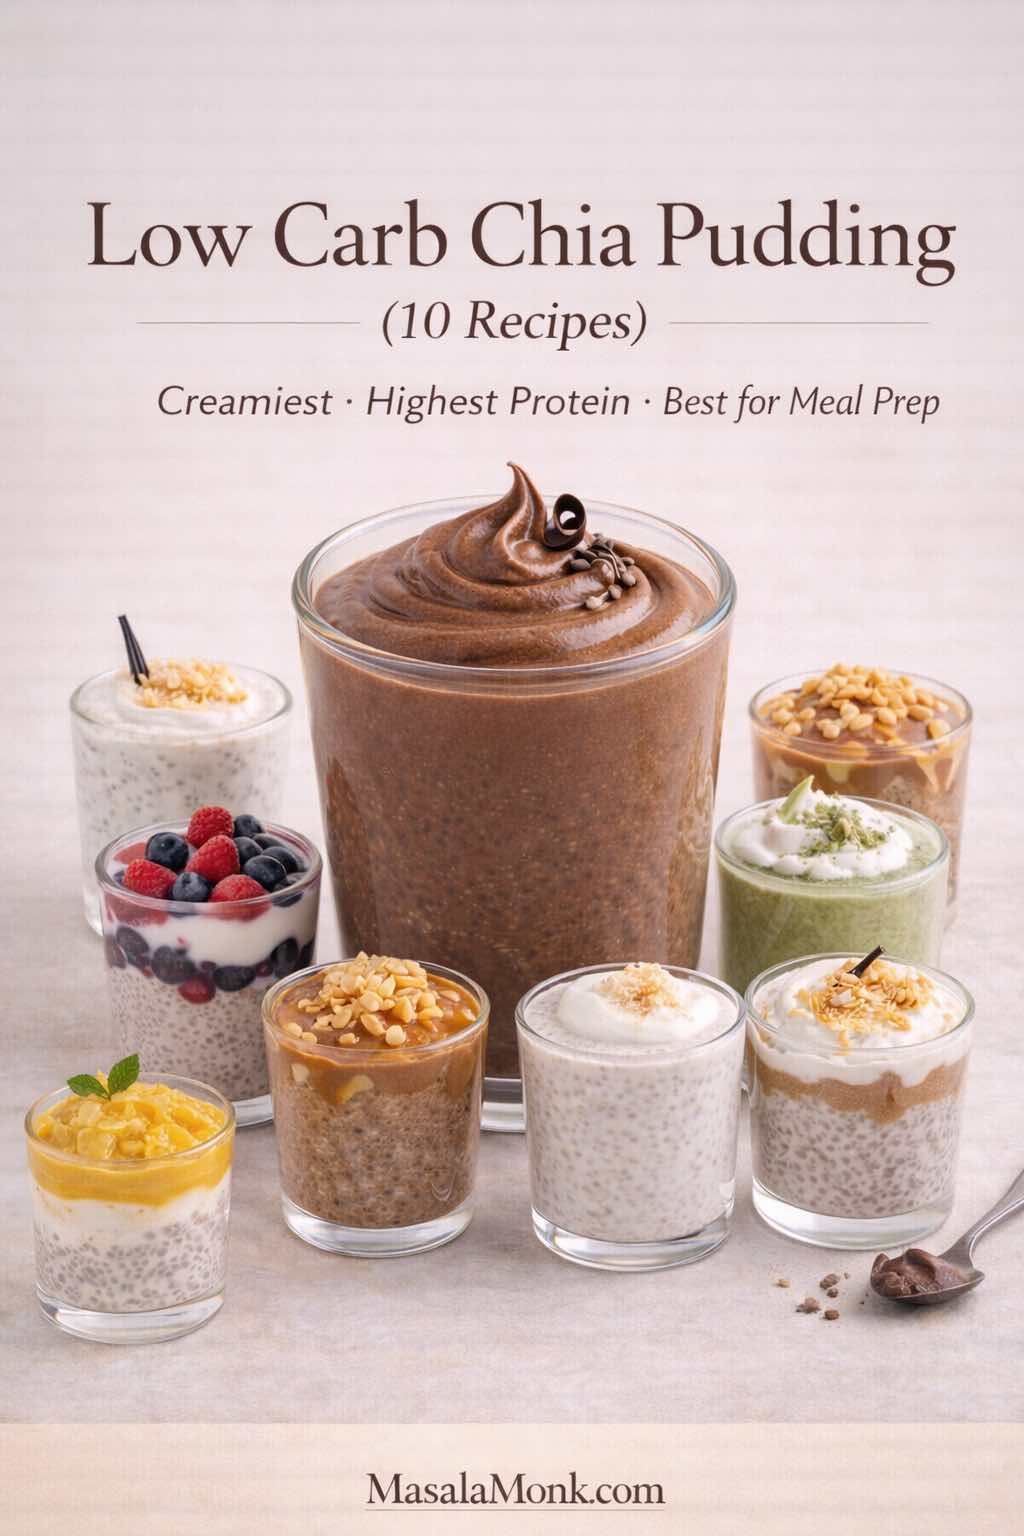
Chia pudding has a way of sneaking into your routine and then refusing to leave. At first, it feels like a clever trick—stir a few spoonfuls of tiny seeds into milk, refrigerate, and wake up to a spoonable pudding. Before long, though, you realize a simple jar of low carb chia pudding can be more than a trend: it’s a dependable breakfast that doesn’t demand morning effort, a snack that travels well, and a dessert-like bowl that still fits a lighter day.
Why chia pudding works as breakfast, snack, and “healthy dessert”
What makes it especially useful is how easily you can shape it around your cravings. Some mornings you’ll want something light and clean—pudding with almond milk, a little vanilla, and berries. Other times, you’ll prefer a thick, creamy version that leans on Greek yogurt and tastes closer to cheesecake filling. And when your sweet tooth shows up, chocolate chia pudding, cacao chia pudding, or chocolate peanut butter chia seed pudding can feel genuinely comforting without tipping into a sugar spiral.
Equally important, chia pudding adapts to different eating styles without forcing you into one “right” way. If you’re leaning keto, coconut milk makes a rich keto pudding base while sweetness stays minimal. If you’re aiming for a paleo-friendly bowl, you can skip dairy and still get a creamy texture with coconut milk or almond milk plus nut butter. Meanwhile, if you’re chasing a higher-protein breakfast, chia pudding with protein powder—or a low carb chia pudding with Greek yogurt—turns the jar into something that feels like a real meal.
If you want a deeper foundation on how chia fits into weight-loss habits—portions, consistency, and simple ways to keep it effortless—this companion guide is worth a read: The Ultimate Guide to Chia Pudding for Weight Loss.
Now, before we jump into the ten best variations, let’s lock in the base. Once you get the ratio and texture right, every flavor becomes easier, smoother, and more repeatable.
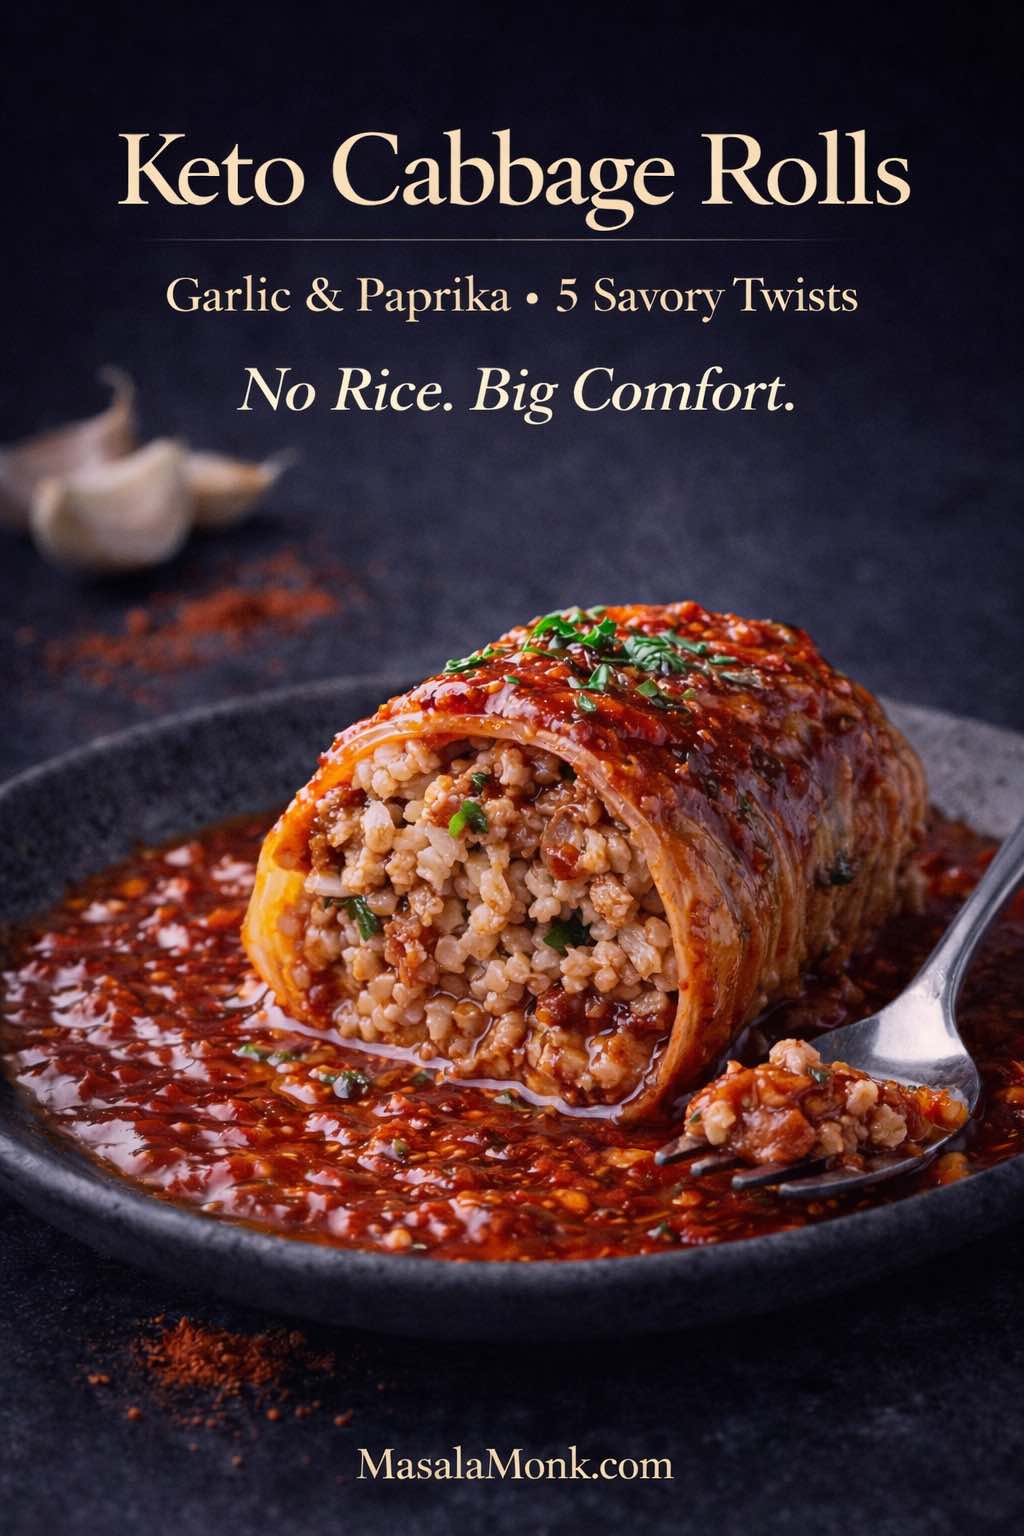
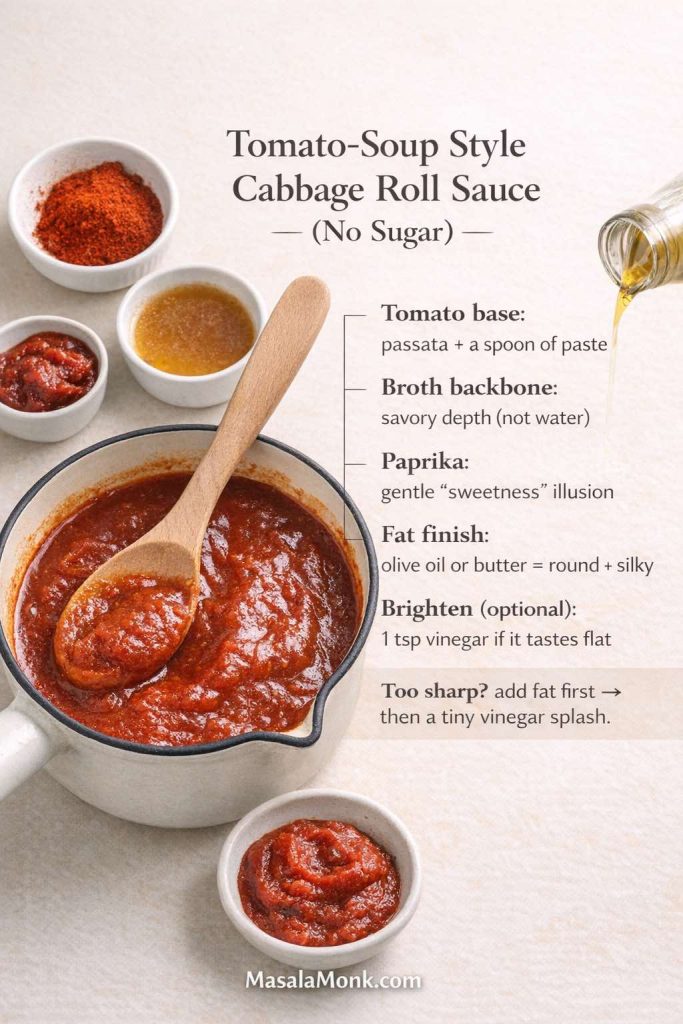
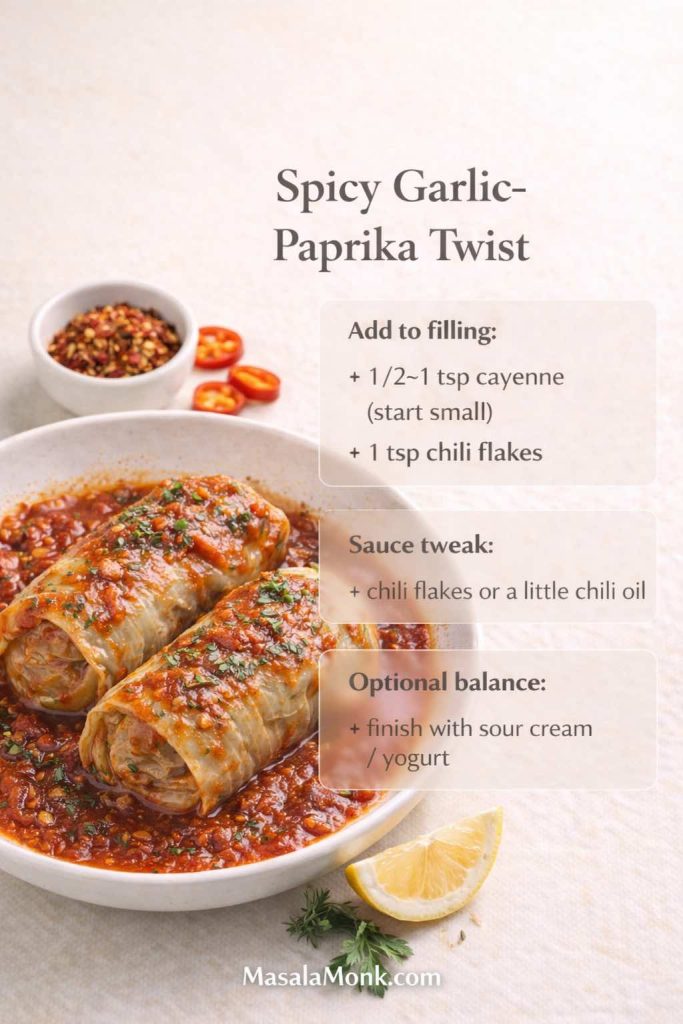
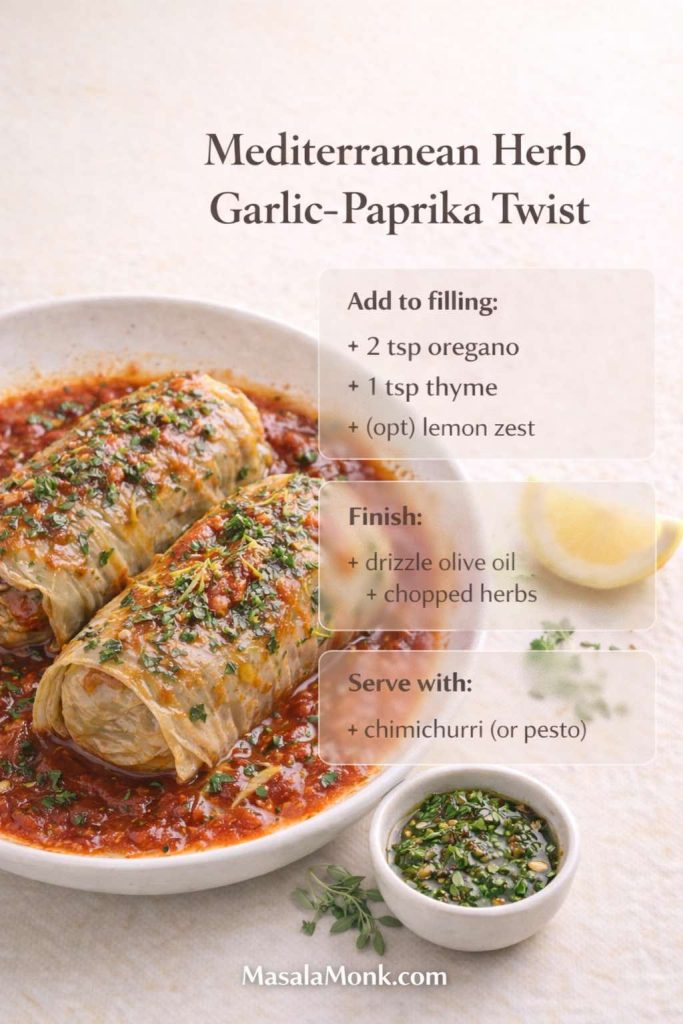
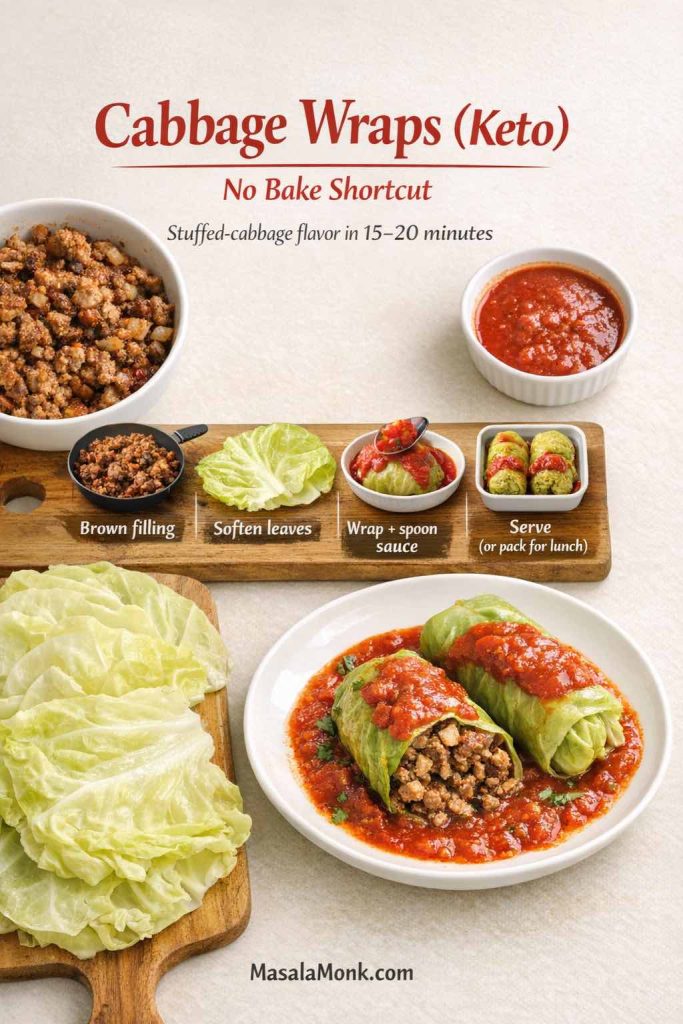
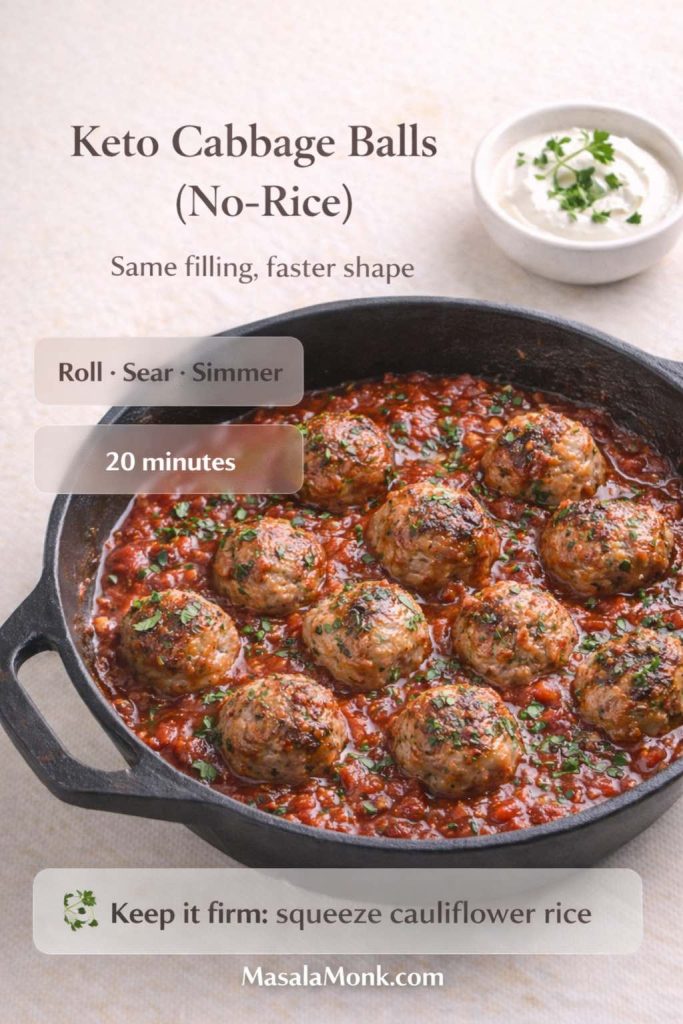
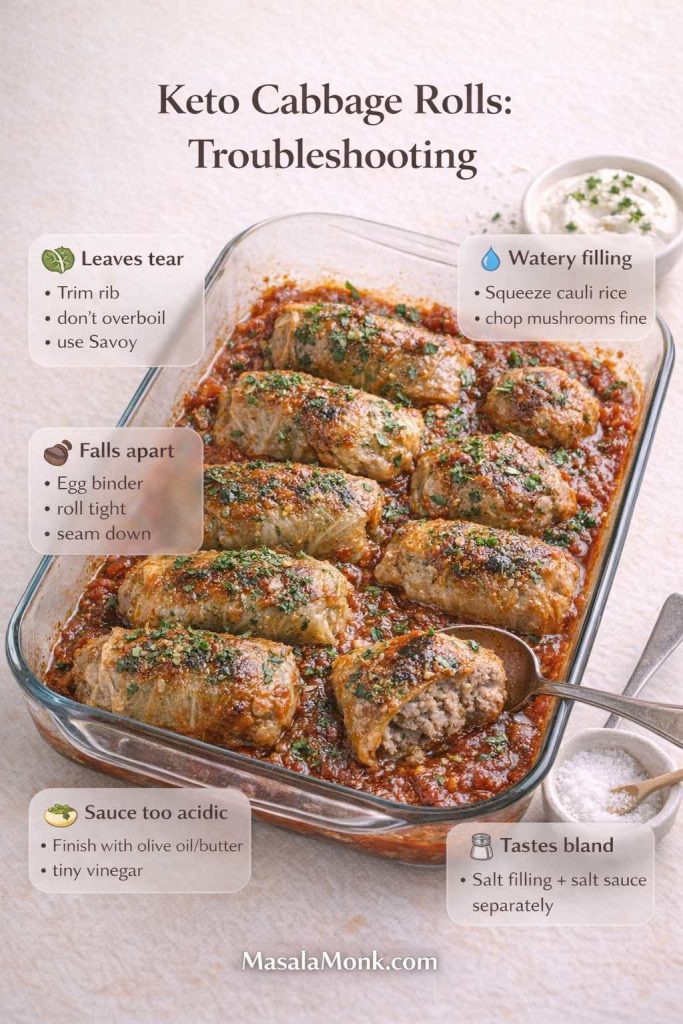
Also Read: Garlic & Paprika Cabbage Rolls (Keto-Friendly Recipes) – 5 Bold Savory Twists
Low Carb Chia Pudding for Weight Loss: Why It Works So Well
For weight loss, the best breakfasts explain themselves later—when you realize you didn’t spend the whole morning thinking about snacks. That’s exactly where low carb chia pudding shines: it’s simple, satisfying, and surprisingly good at keeping your appetite calm between meals.
Why chia pudding keeps you full longer
Chia helps in a very practical way: when it hydrates, it turns your milk into a thick, spoonable gel. Because of that texture, you naturally eat more slowly, and the jar tends to feel more substantial than it looks—especially compared to breakfasts that disappear in three bites.
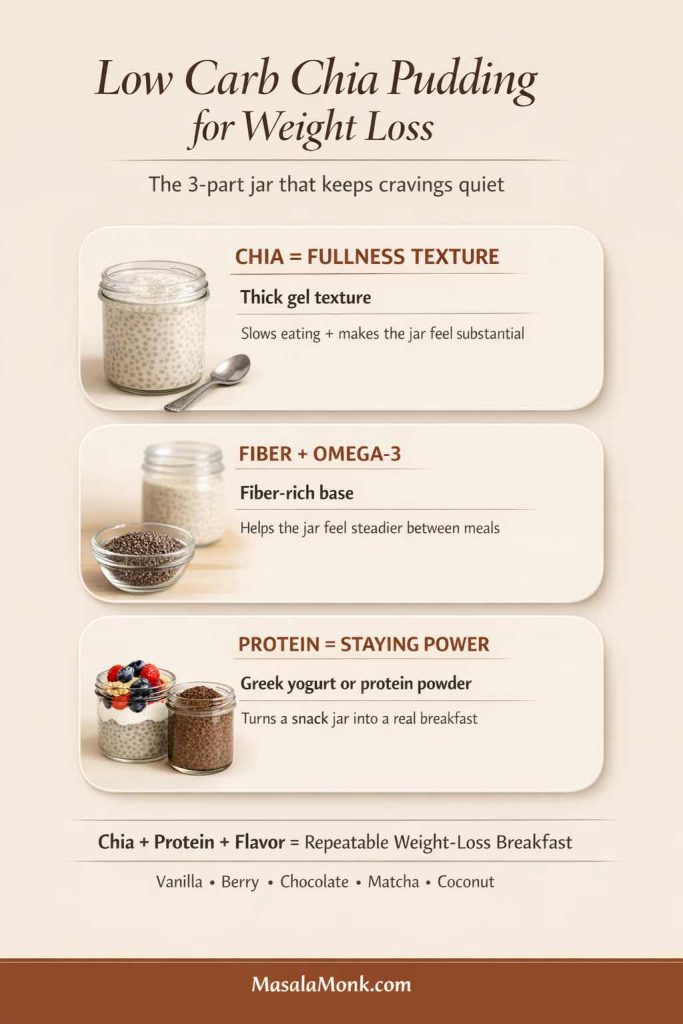
At the same time, chia is naturally fiber-rich and contains omega-3 fats, which is part of why it’s such a popular base for a steady “grab-and-go” breakfast. If you want a clean, evidence-based overview, Harvard’s Nutrition Source has a helpful summary on chia seeds nutrition (fiber + omega-3). Then, if you like checking calories, macros, or serving-size details, you can cross-reference with the USDA chia seed nutrition data.
The real upgrade is protein
Still, satisfaction isn’t only about chia. Protein is the piece that makes a jar feel like a meal—which is why “pudding and Greek yogurt,” “chia seed and Greek yogurt pudding,” and “chia pudding with protein powder” are such common staples. When your breakfast includes a solid protein anchor, it tends to feel steadier and more complete, so you’re less likely to start grazing out of habit.
If your mornings often end with cravings, switching to a high protein & low carb chia pudding is one of the easiest upgrades: keep the chia base, then build in protein with Greek yogurt (thick and creamy) or protein powder (especially in chocolate versions). For a broader framework that pairs perfectly with a chia routine, this guide is a strong companion: how to eat 100 grams of protein a day.
So yes—chia helps. Even better, the best results usually come from the combination: chia for texture and fiber, protein for staying power, and flavor choices you genuinely look forward to eating.
Also Read: Eggless Yorkshire Pudding (No Milk) Recipe
Low Carb Chia Pudding Base Recipe (Perfect Ratio, No Clumps)
Everything starts here. Whether you’re making keto chia pudding, chia pudding paleo, dairy free chia pudding, or a blended chia pudding mousse, the base method stays the same.
The basic chia pudding ratio (and how to adjust it)
For a classic, spoonable base:
- 3 tablespoons chia seeds (about 36–40 g)
- 1 cup / 240 ml liquid (almond milk, coconut milk, dairy milk, oat milk, etc.)
- A pinch of salt
- Optional: ½ teaspoon vanilla
- Optional: sweetener to taste

That ratio gives you a thick, pudding-like texture—great for low carb chia pudding cups, a chia pudding glass, or a single serve chia pudding jar. If you prefer it thinner, drop to 2½ tablespoons chia per cup of liquid. Conversely, if you like a dense, custardy texture, keep 3 tablespoons and use a richer liquid like canned coconut milk.
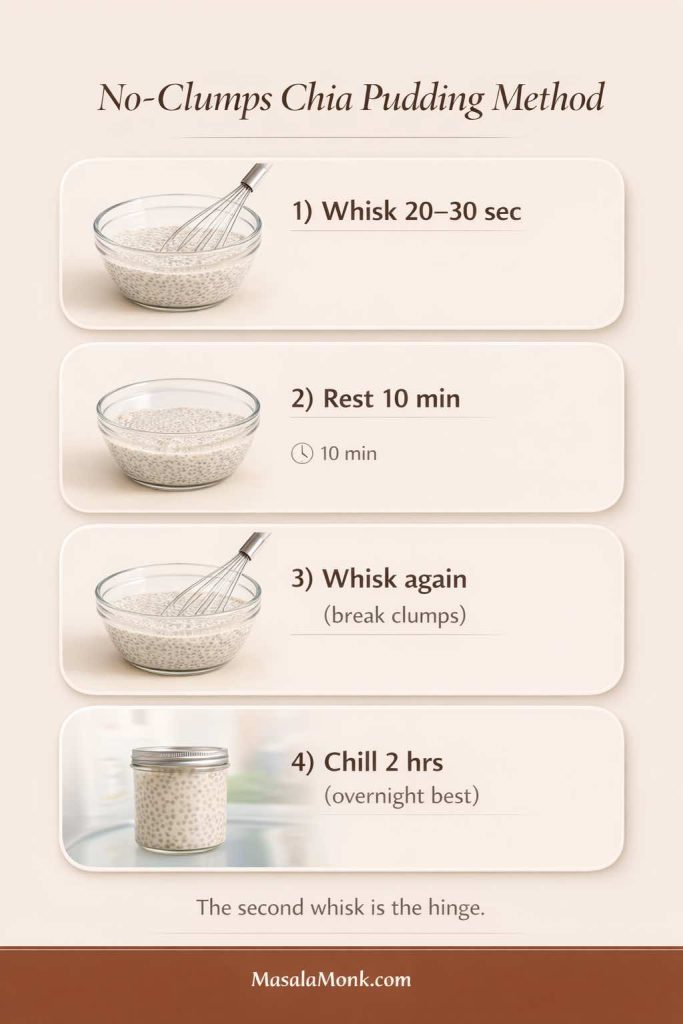
The mixing pattern that prevents clumps
This is the method that makes the difference between “silky” and “why is it lumpy?”
- Add chia seeds to the liquid, plus salt and vanilla (and sweetener, if using).
- Whisk vigorously for 20–30 seconds.
- Let it sit for 10 minutes.
- Whisk again, thoroughly.
- Cover and refrigerate at least 2 hours; overnight is even better.
That second whisk is the hinge. It’s the moment when the seeds have started to hydrate but haven’t fully set yet, which means you can break up clumps before they lock in.
Quick chia pudding vs “instant” chia pudding
Chia needs time to hydrate, so it’s never truly instant in the way instant oats are. Still, you can make a quick low carb chia seed pudding when you’re pressed for time.
Use the same ratio, whisk well, do the 10-minute stir, and refrigerate for 30–45 minutes. It will be softer than overnight, yet it’s still spoonable—especially if you make it as chia pudding with yogurt or add protein powder.
Why soaking matters
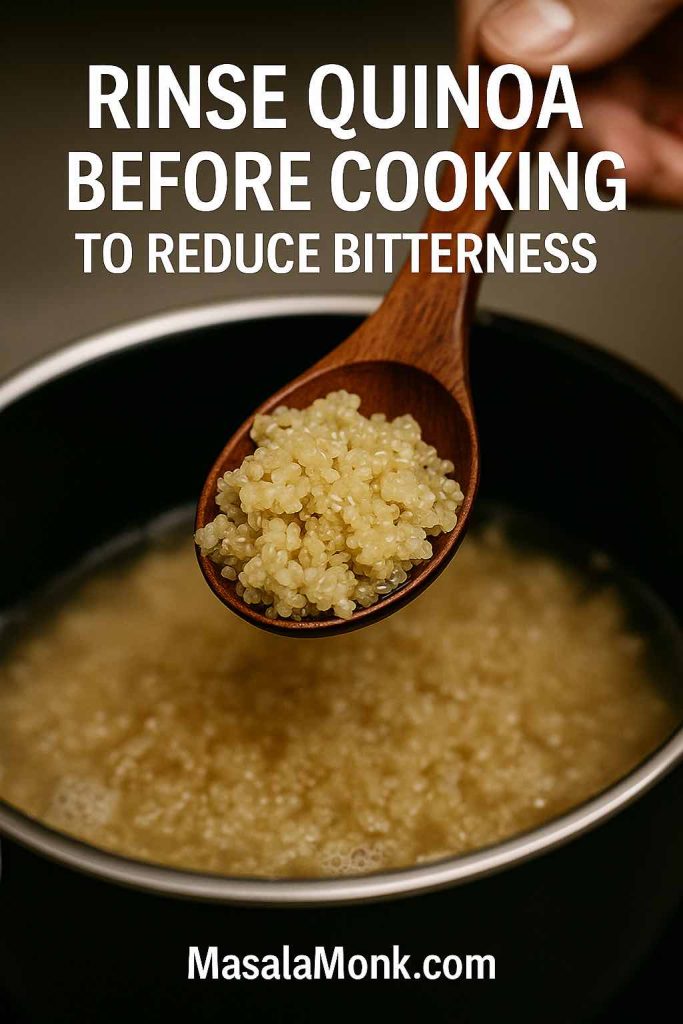
Chia expands dramatically when it absorbs liquid. Because of that, it’s best eaten soaked rather than dry. If you want the reason in plain terms, this clinical case report shows what can happen when dry chia is swallowed without enough liquid: why chia should be soaked first.
Also Read: Crock Pot Chicken Breast Recipes: 10 Easy Slow Cooker Dinners (Juicy Every Time)
Choosing Your Liquid: Almond Milk, Coconut Milk, Oat Milk, and More
Liquid is the secret “ingredient” that decides whether your pudding tastes light, rich, tropical, or dairy-creamy. It’s also the easiest lever to pull depending on whether you’re going for keto pudding, paleo chia seed pudding, or a more classic breakfast pudding recipe.
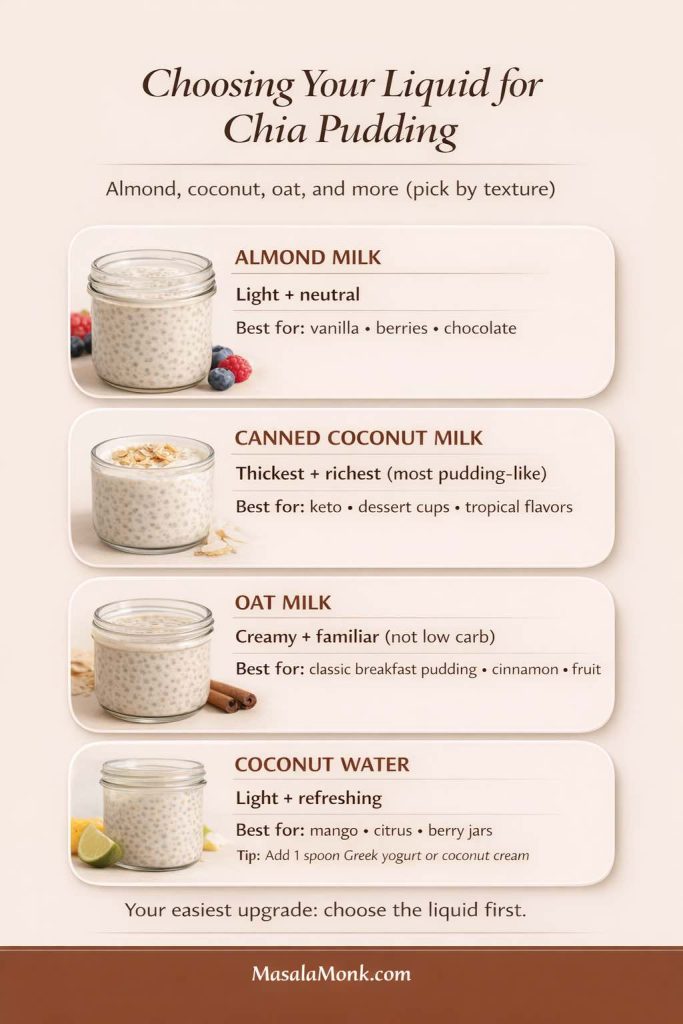
Pudding with almond milk (clean, light, versatile)
Chia pudding with almond milk is a classic because it’s neutral and easy to customize. It’s also a natural base for low carb chia pudding and many keto-friendly variations. If you want a dedicated keto version built around almond milk, this is a strong reference recipe: keto chia pudding with almond milk.
Coconut milk for chia pudding (thickest texture, richest feel)
If you want your chia pudding to taste like real pudding, use canned coconut milk. It’s also a favorite for keto chia pudding coconut milk versions because the fat content naturally boosts satisfaction. For a paleo chia seed pudding approach, coconut milk is equally useful.
A small detail helps a lot here: canned coconut milk varies. Some are thin; others are thick. If yours pours like cream, whisk in a little water so it hydrates evenly. That way you avoid dense, under-hydrated pockets.
Oat milk chia pudding (not keto, but creamy and familiar)
Oat milk makes a gentle, classic pudding flavor. It’s not low carb, so it’s best as an optional variation for non-keto readers who still want a healthy breakfast pudding.
Chia pudding with coconut water (light, refreshing, fruit-friendly)
Coconut water makes a lighter gel. It’s lovely with mango, citrus, and berries; however, it won’t feel as creamy. For a richer texture, add a spoon of Greek yogurt or a spoon of coconut cream before serving.
Homemade vs Premade Chia Pudding (Cups, Mixes, and Convenience Options)
Sometimes you want the easiest option. That’s why premade chia pudding and premade chia seed pudding cups have become common grab-and-go items. A chia pudding cup can be a decent choice, especially if it keeps your day from derailing into ultra-processed snacks.
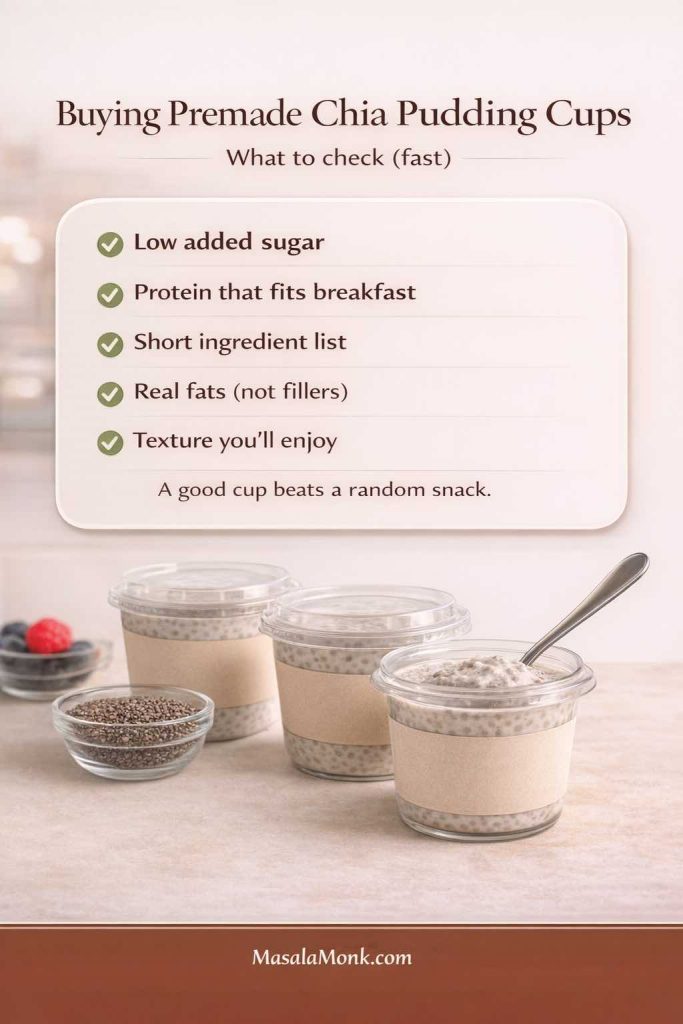
If you’re choosing store-bought chia seed pudding cups, prioritize:
- low or no added sugar,
- a protein amount that makes sense for breakfast (if you want it to act like breakfast),
- a short ingredient list,
- and a texture you actually enjoy.
If you prefer to keep things homemade but fast, a chia pudding mix can work too. Some mixes are simply chia plus flavoring; others include sweeteners and thickeners. Even then, the most repeatable path is often a simple base batch plus flavor add-ins—cocoa, cinnamon, matcha, vanilla, fruit—so you can make multiple chia seed pudding cups in one go.
Also Read: Sourdough Starter Recipe: Make, Feed, Store & Fix Your Starter (Beginner Guide)
High Protein Chia Pudding: Greek Yogurt, Protein Powder, and Collagen
When people talk about protein chia pudding, they usually mean one of three styles:
- chia pudding with Greek yogurt
- chia pudding with protein powder
- chia collagen add-ins (often paired with yogurt)
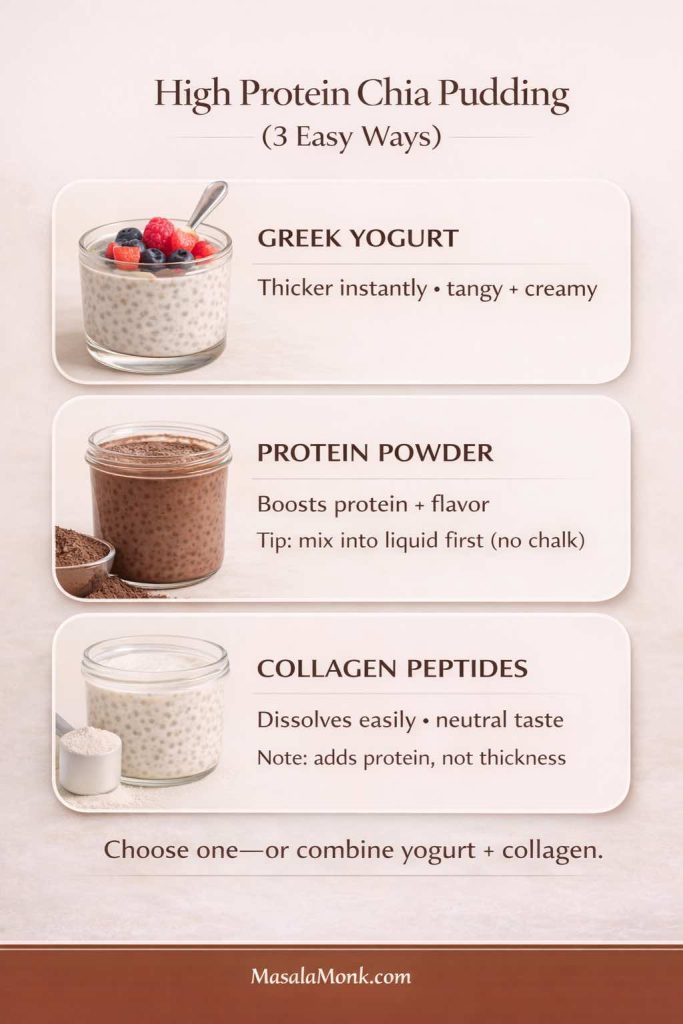
Greek yogurt thickens pudding instantly and adds a tang that makes chocolate, berries, vanilla, and peanut butter taste richer. Protein powder boosts protein and flavor, but it can turn chalky if it isn’t mixed properly. Collagen peptides dissolve easily and tend to be neutral, although they don’t thicken the same way chia does.
If you like a measured, realistic overview of collagen claims, this one is balanced: what collagen supplements can (and can’t) do.
If you want a complementary “drinkable breakfast” option that fits the same protein-forward routine, this is a natural companion: Greek yogurt shake recipes for a protein-packed breakfast.
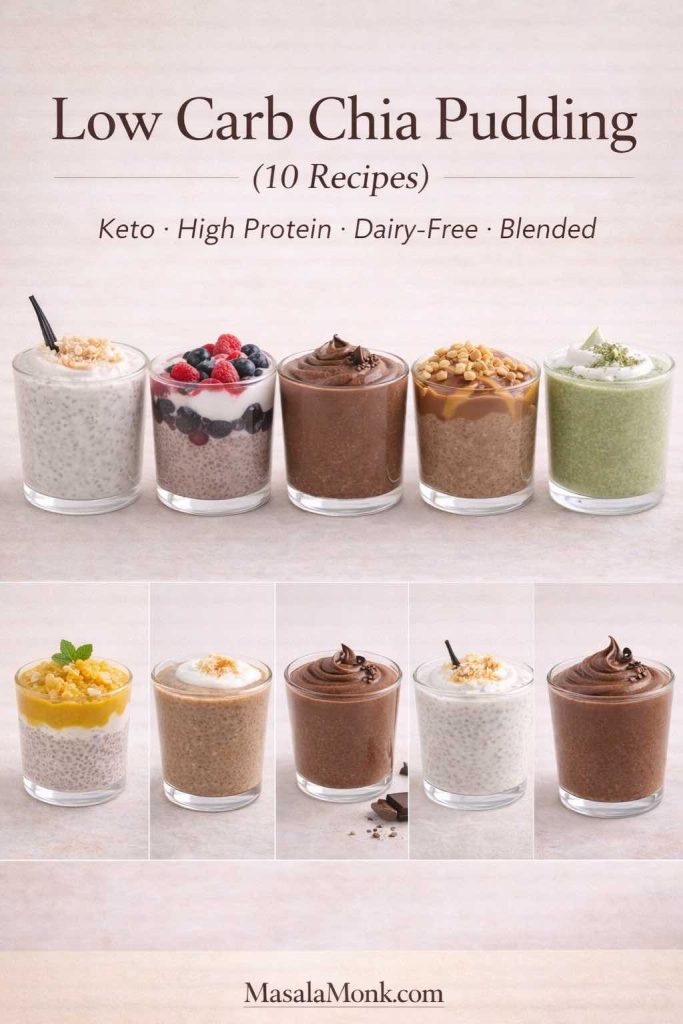
10 Low Carb Chia Pudding Recipes (Keto, Paleo, Protein, Blended, Fruit)
Each recipe below makes 1–2 servings depending on appetite. For meal prep, multiply ingredients, then portion into chia pudding cups or jars. Meanwhile, if you’re building variety without extra work, make two or three bases at once: one almond milk jar, one coconut milk jar, and one Greek yogurt jar. That way, you’re never stuck eating the same flavor five days in a row.
1) Keto Chia Pudding with Almond Milk (Vanilla Base That Never Fails)
This is the everyday low carb chia pudding that works as breakfast, snack, or a simple dessert. It’s also the best “starter” jar because it takes flavors well.
Ingredients (1–2 servings)
- 3 tablespoons chia seeds
- 1 cup unsweetened almond milk
- ½ teaspoon vanilla extract
- Pinch of salt
- Optional sweetener: monk fruit/erythritol/stevia, to taste
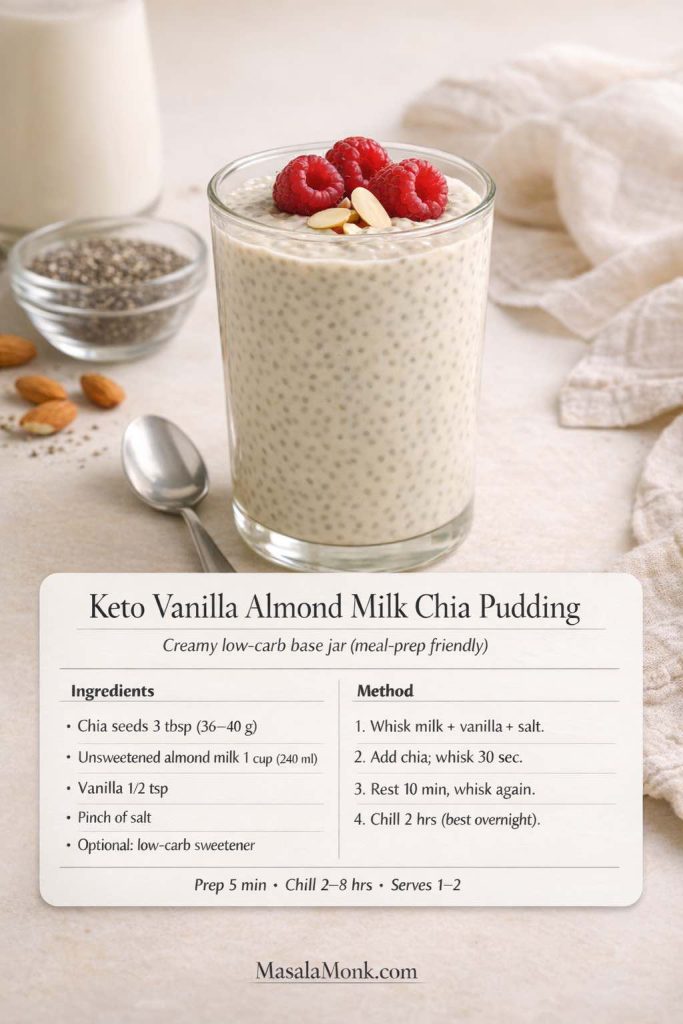
Method
- In a bowl or jar, whisk almond milk, vanilla, salt, and sweetener (if using).
- Stir in chia seeds and whisk vigorously for 20–30 seconds.
- Let it rest 10 minutes, then whisk again until no clumps remain.
- Cover and refrigerate 2 hours or overnight.
Flavor variations
- Add ½ teaspoon cinnamon for a warm “vanilla-cinnamon pudding” base.
- Add a tablespoon of shredded coconut for coconut puddings recipes energy without needing extra sweetness.
- Stir in 1–2 tablespoons of Greek yogurt right before serving for a creamier finish.
Toppings that keep it low carb
Chopped nuts, cacao nibs, a small handful of berries, or a spoon of nut butter.
If you want a dedicated keto version with extra detail, this internal recipe fits perfectly: keto chia pudding with almond milk.
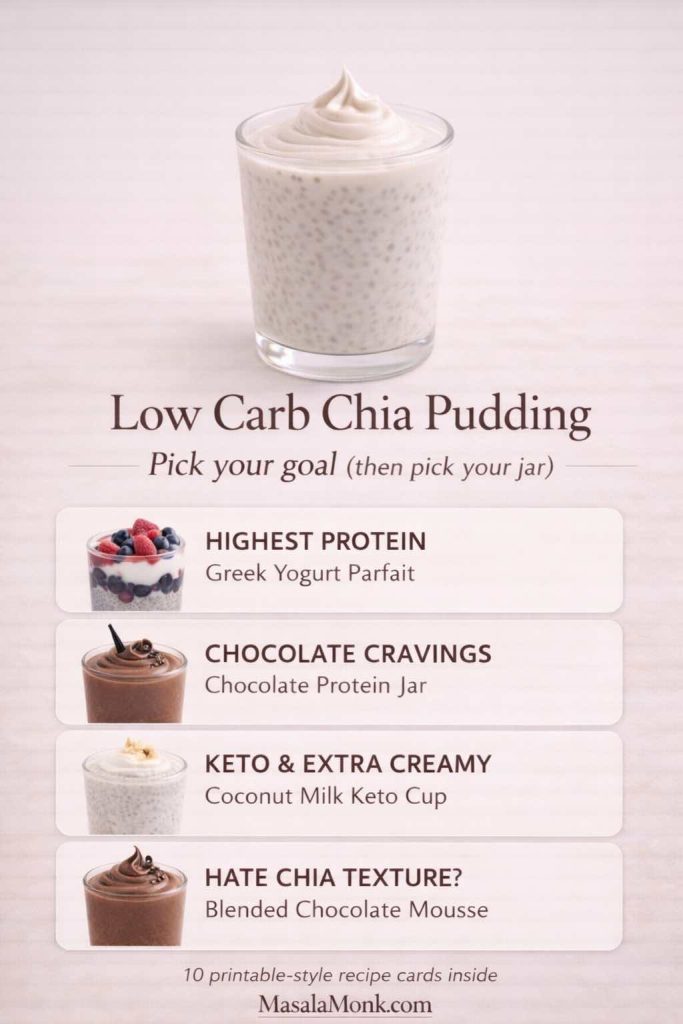
2) Chia Pudding with Greek Yogurt (High Protein, Ultra Creamy)
If you like pudding with Greek yogurt, this version can feel like cheesecake in a jar. It also adapts well: vanilla, chocolate, berry, citrus, even coffee flavors.
Ingredients (1–2 servings)
- ¾ cup Greek yogurt (plain works best)
- 3 tablespoons chia seeds
- 2–4 tablespoons water or almond milk (to loosen)
- ½ teaspoon vanilla
- Pinch of salt
- Optional sweetener, to taste
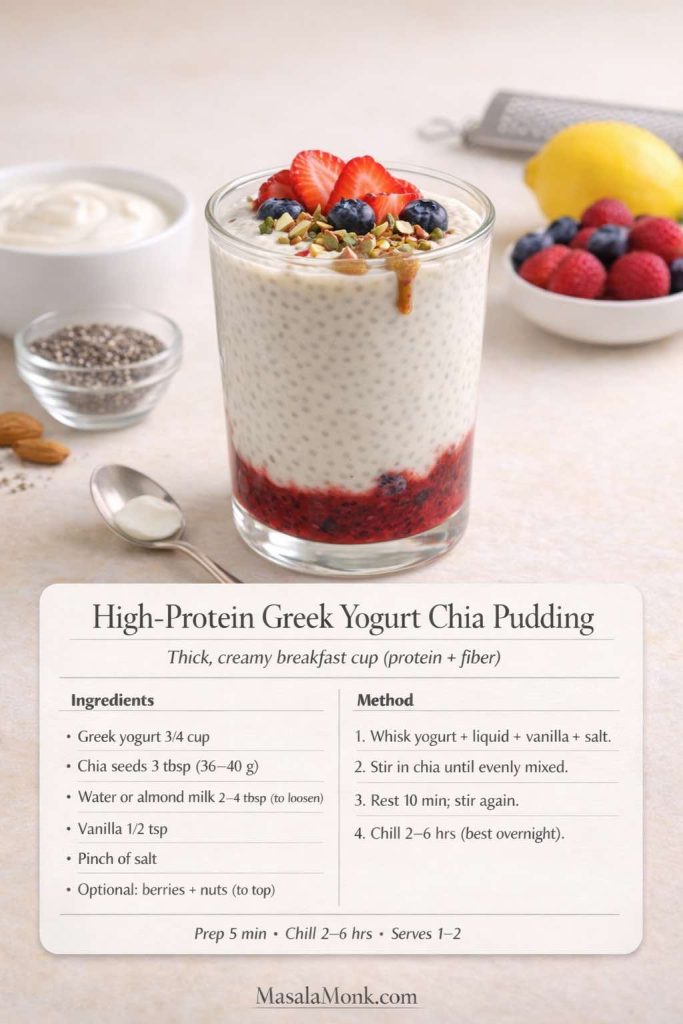
Method
- Whisk Greek yogurt, vanilla, salt, and 2 tablespoons water (or almond milk) until smooth.
- Stir in chia seeds and mix thoroughly.
- Rest 10 minutes, then stir again to redistribute the seeds evenly.
- Refrigerate at least 2 hours.
Texture tuning
- Too thick? Add a splash of water or almond milk and stir.
- Too thin? Add 1 tablespoon chia, stir, and chill 30–60 minutes.
Toppings that make it feel like dessert
Berries, chopped nuts, cocoa powder dusted on top, or a spoon of peanut butter.
If you want a similar high-protein breakfast base that isn’t yogurt, this link fits naturally as an alternative: cottage cheese for breakfast.
3) Chocolate Protein Chia Pudding (Protein Powder + Cocoa)
This jar is for the days you want pudding chia chocolate flavor without the “diet” vibe. Done right, it tastes like a rich chocolate pudding.
Ingredients (1–2 servings)
- 1 cup unsweetened almond milk (or dairy milk)
- 1 scoop protein powder (chocolate, or vanilla plus cocoa)
- 2 tablespoons cocoa powder or cacao powder
- 3 tablespoons chia seeds
- Pinch of salt
- Optional sweetener, to taste
- Optional: 1 tablespoon Greek yogurt (for extra creaminess)
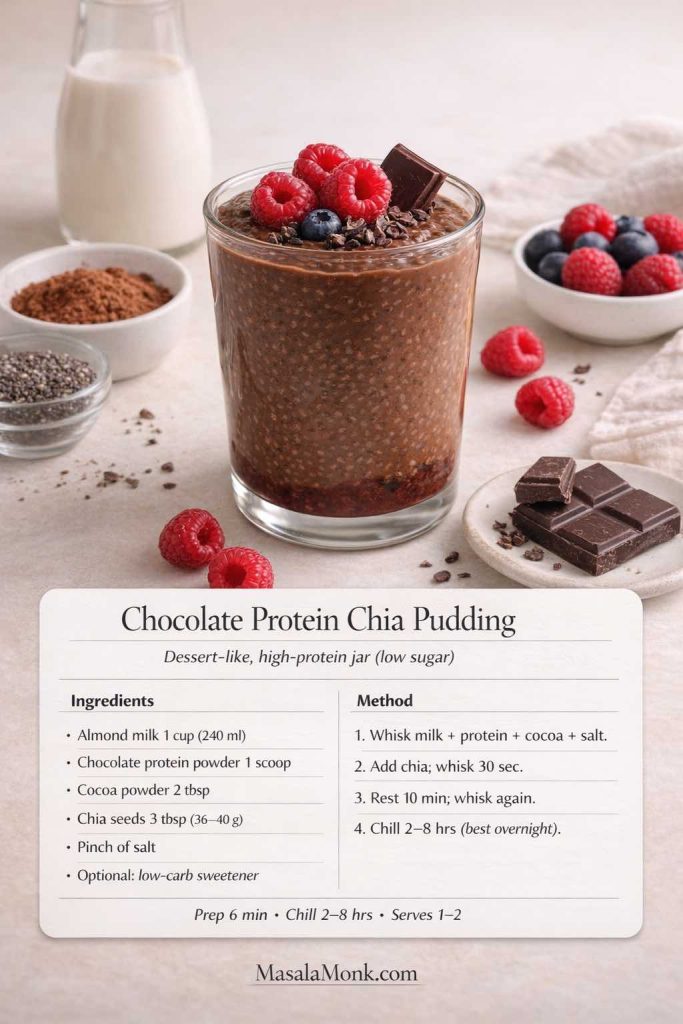
Method
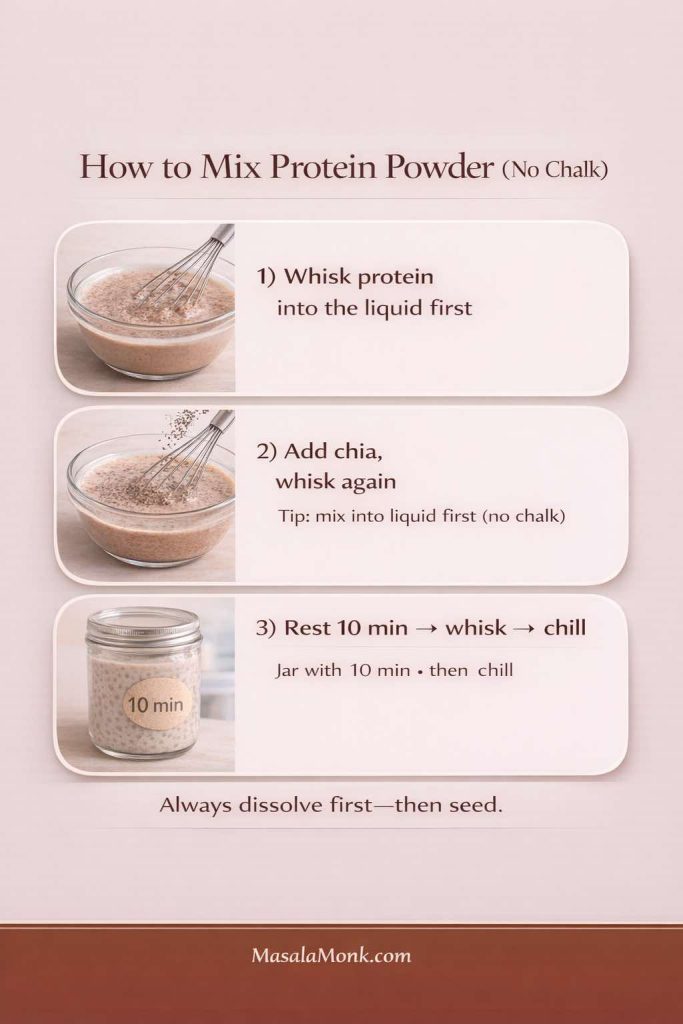
- Whisk almond milk, protein powder, cocoa/cacao, salt, and sweetener until completely smooth.
- Stir in chia seeds and whisk again.
- Rest 10 minutes; whisk a second time to prevent clumps.
- Refrigerate overnight for the best set.
How to keep it smooth
If your protein powder tends to clump, whisk it into a small amount of milk first to make a smooth paste, then add the rest of the milk.
Topping ideas
A spoon of whipped Greek yogurt, crushed nuts, cacao nibs, or a few berries.
Also Read: How to make No-Bake Banana Pudding: No Oven Required Recipe
4) Chocolate Peanut Butter Chia Seed Pudding (Classic, Comforting, Satisfying)
This is the jar that feels like a treat. Chocolate and peanut butter do most of the work, so you can keep sweetness low and still love it.
Ingredients (1–2 servings)
- 1 cup almond milk (or dairy milk)
- 3 tablespoons chia seeds
- 1–2 tablespoons peanut butter
- 1 tablespoon cocoa powder
- Pinch of salt
- Optional sweetener
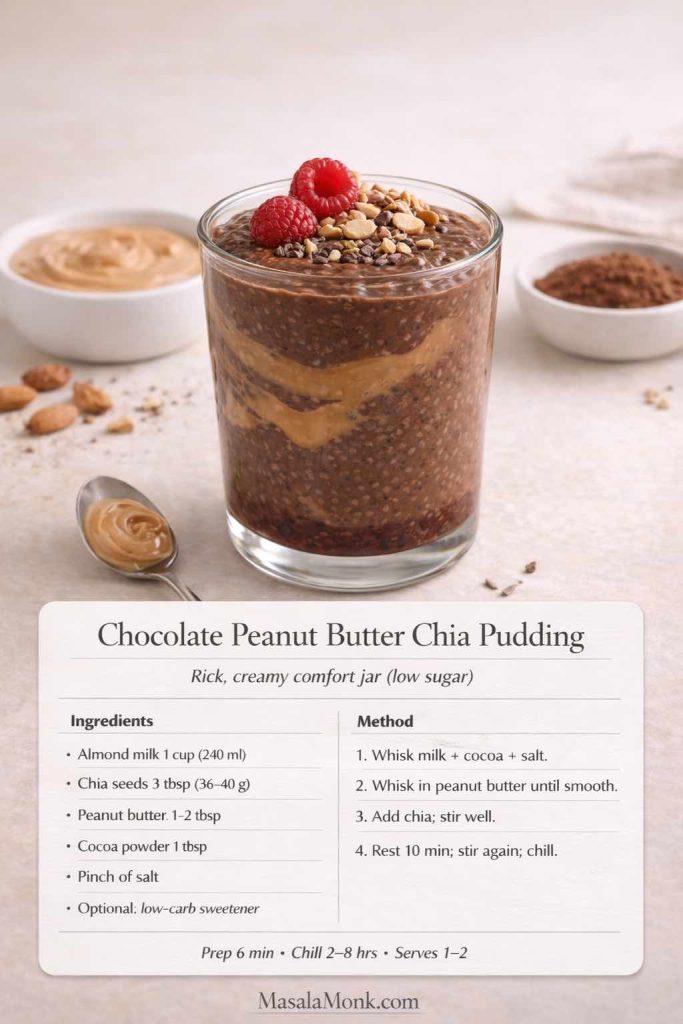
Method
- Whisk milk, cocoa, salt, and sweetener until smooth.
- Whisk in peanut butter until fully dissolved.
- Stir in chia seeds, rest 10 minutes, stir again, then refrigerate.
Make it even better
Add a tiny splash of vanilla, or a pinch of cinnamon. Surprisingly, cinnamon makes chocolate taste deeper.
Topping ideas
Strawberries, raspberries, chopped roasted nuts, or a light sprinkle of shredded coconut.
Also Read: Chicken Adobo — Step-by-Step Recipe — Classic Filipino Adobong Manok
5) Matcha Chia Pudding (Green Tea Latte Style)
Matcha and chia seeds are a surprisingly good match. The flavor is clean and slightly bitter, which is exactly why a touch of vanilla and a pinch of salt can make it taste more rounded.
Ingredients (1–2 servings)
- 1 cup almond milk (or a light coconut milk beverage)
- 3 tablespoons chia seeds
- 1–2 teaspoons matcha powder
- ½ teaspoon vanilla
- Pinch of salt
- Optional sweetener
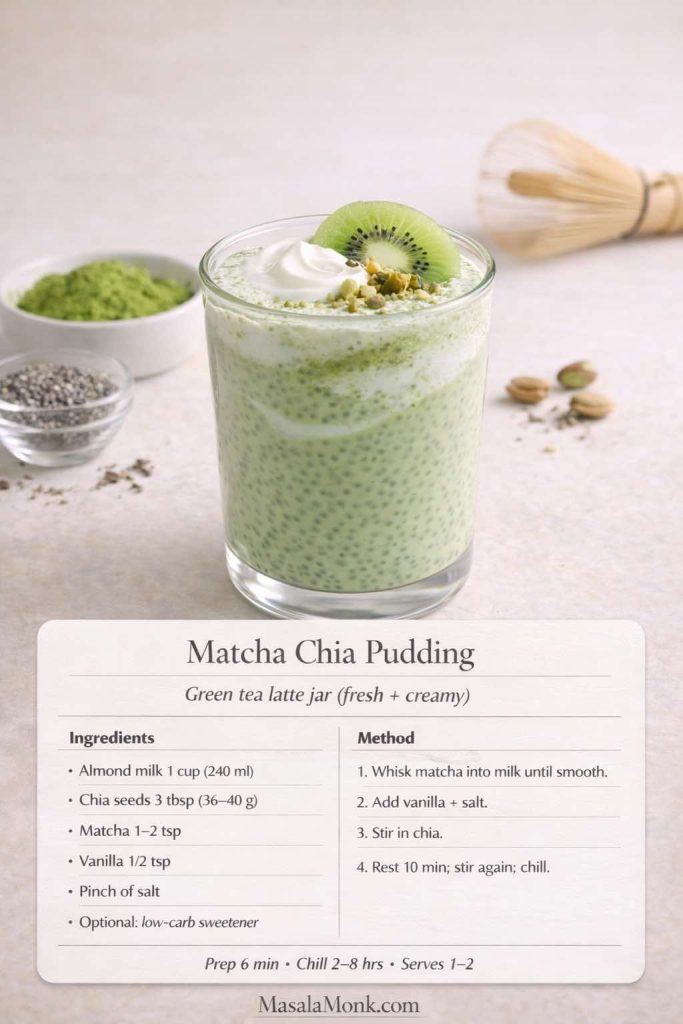
Method
- Sift matcha into the milk (or whisk it in slowly) until smooth.
- Add vanilla, salt, and sweetener if using.
- Stir in chia, rest 10 minutes, stir again, then refrigerate.
How to avoid matcha clumps
If matcha is stubborn, whisk it with 1–2 tablespoons warm water first to create a smooth paste, then whisk that into the milk.
Caffeine note
If you’re sensitive to caffeine, keep matcha closer to 1 teaspoon and enjoy earlier in the day. For general guidance, Mayo Clinic’s overview is useful: daily caffeine guidance.
If you like matcha as part of a calmer routine, this supportive read fits naturally: tea and cortisol.
6) Mango Chia Pudding (Bright, Tropical, Meal Prep Friendly)
Mango chia pudding tastes like a dessert jar, yet you can keep it controlled by using a smaller mango portion and leaning on lime and salt to amplify flavor.
Ingredients (1–2 servings)
- 1 cup almond milk or coconut milk beverage
- 3 tablespoons chia seeds
- ⅓ cup mango puree (or finely diced mango)
- Pinch of salt
- Optional: squeeze of lime
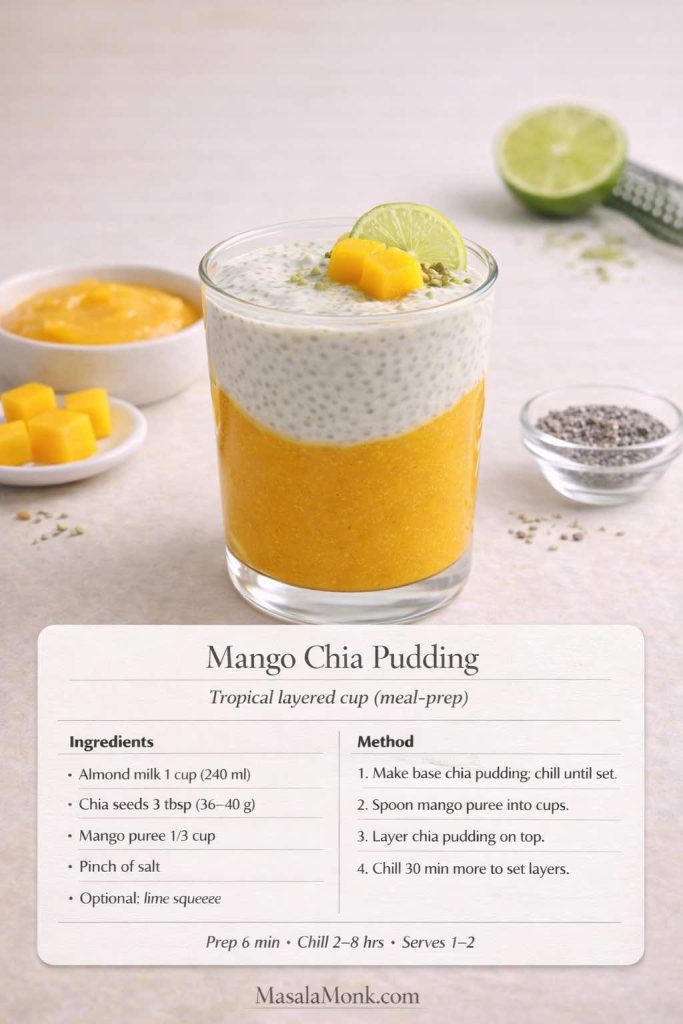
Method
- Make a plain chia base with milk, chia, and salt.
- Chill until set.
- Fold in mango puree right before eating, or layer mango at the bottom of your cup and spoon chia on top.
How to keep it low carb
Use mango as a flavor accent rather than the entire bowl. You’ll still get the tropical hit, especially with lime.
More mango inspiration
These fit beautifully as follow-ons: How to Make Mango Chia Pudding: 5 Creative Ideas and Chia Pudding for Lunch: 5 Ways to Add More Mango to It.
7) Apple Cinnamon Chia Pudding (Cozy, Filling, Great for Breakfast)
Apple cinnamon chia pudding is comfort in a jar. Depending on how strict your carbs are, you can either use a small amount of apple or skip it and let cinnamon do the heavy lifting.
Ingredients (1–2 servings)
- 1 cup unsweetened almond milk
- 3 tablespoons chia seeds
- ½ teaspoon cinnamon
- Pinch of salt
- Optional: ⅓ cup grated apple
- Optional: pinch of nutmeg
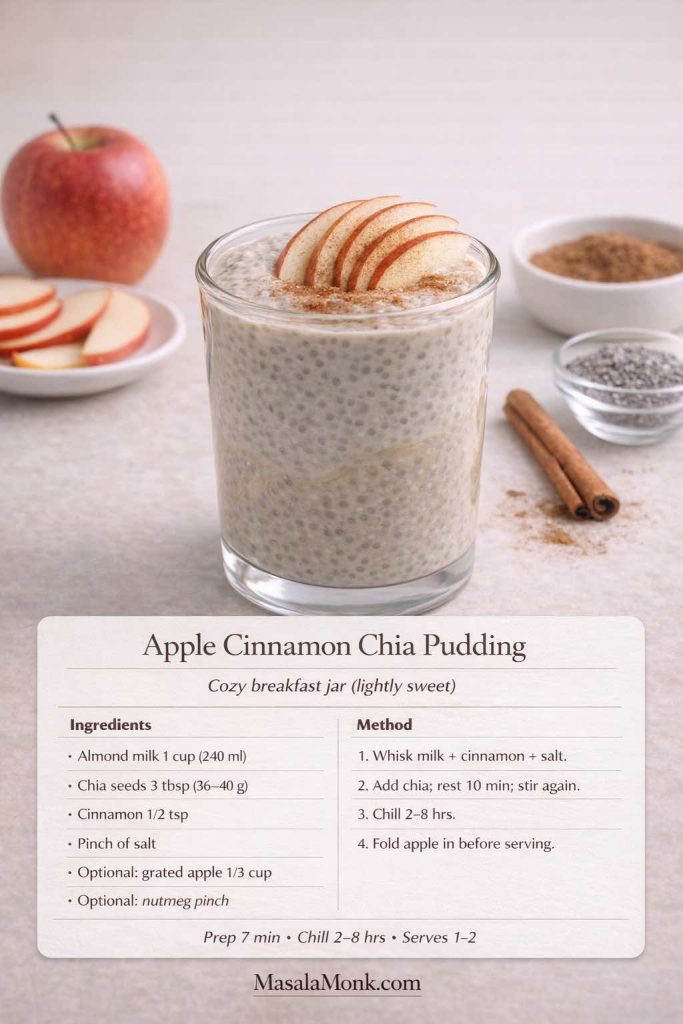
Method
- Whisk milk, cinnamon, salt, and nutmeg if using.
- Stir in chia, rest 10 minutes, stir again, then chill.
- Fold in grated apple right before serving (it stays fresher that way).
Keto-friendly variation
Skip apple. Add chopped pecans and a drop of vanilla instead for a low carb cinnamon-pecan pudding.
Also Read: Sweetened Condensed Milk Fudge: 10 Easy Recipes
8) Gingerbread Chia Pudding (Warm Spices, Dessert Energy)
This gingerbread chia pudding is perfect when you want something cozy without needing a baked dessert. It also fits nicely under a broader “anti inflammatory” vibe because of the warming spices—without turning into a medical lecture.
Ingredients (1–2 servings)
- 1 cup almond milk or coconut milk beverage
- 3 tablespoons chia seeds
- ½ teaspoon cinnamon
- ¼ teaspoon ginger
- Pinch of cloves or allspice
- Pinch of salt
- Optional sweetener
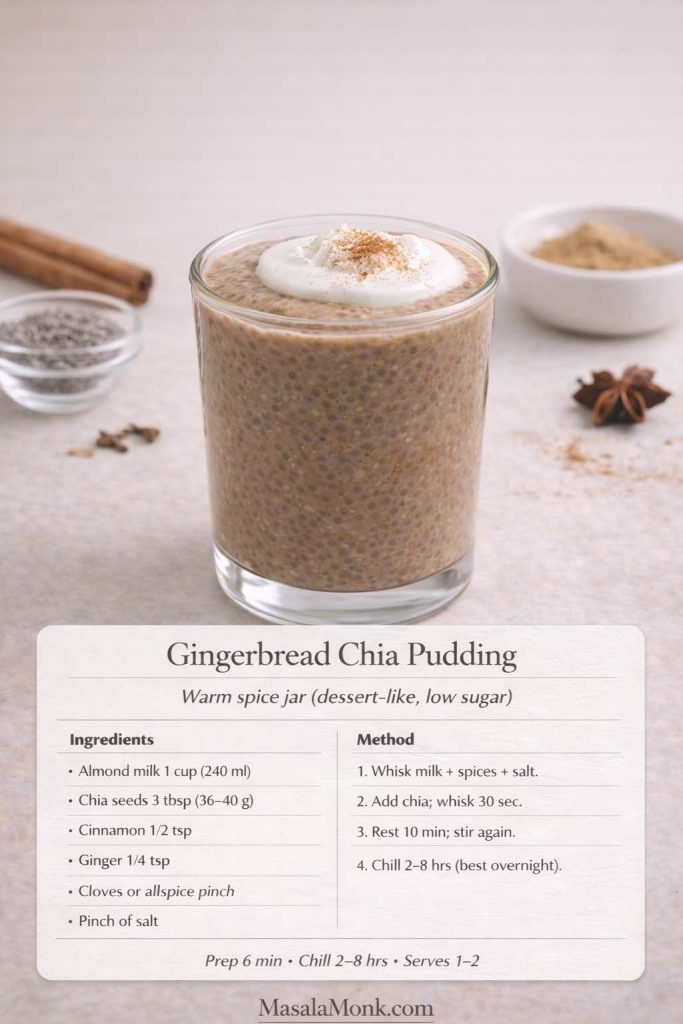
Method
- Whisk spices, salt, and sweetener into the milk.
- Stir in chia, rest 10 minutes, stir again, then refrigerate.
- Serve with crushed nuts or a spoon of yogurt.
Dessert bridge
If you want more warm-spice keto dessert ideas, this fits naturally: keto vegan dessert recipes with ginger.
9) Keto Chia Pudding with Coconut Milk (Ultra Creamy)
This is the thickest, most “real pudding” keto chia pudding option. If you’ve ever felt chia was too watery, this changes everything.
Ingredients (1–2 servings)
- 3 tablespoons chia seeds
- ¾ cup canned coconut milk
- ¼ cup water (adjust to pourable)
- Pinch of salt
- ½ teaspoon vanilla
- Optional sweetener
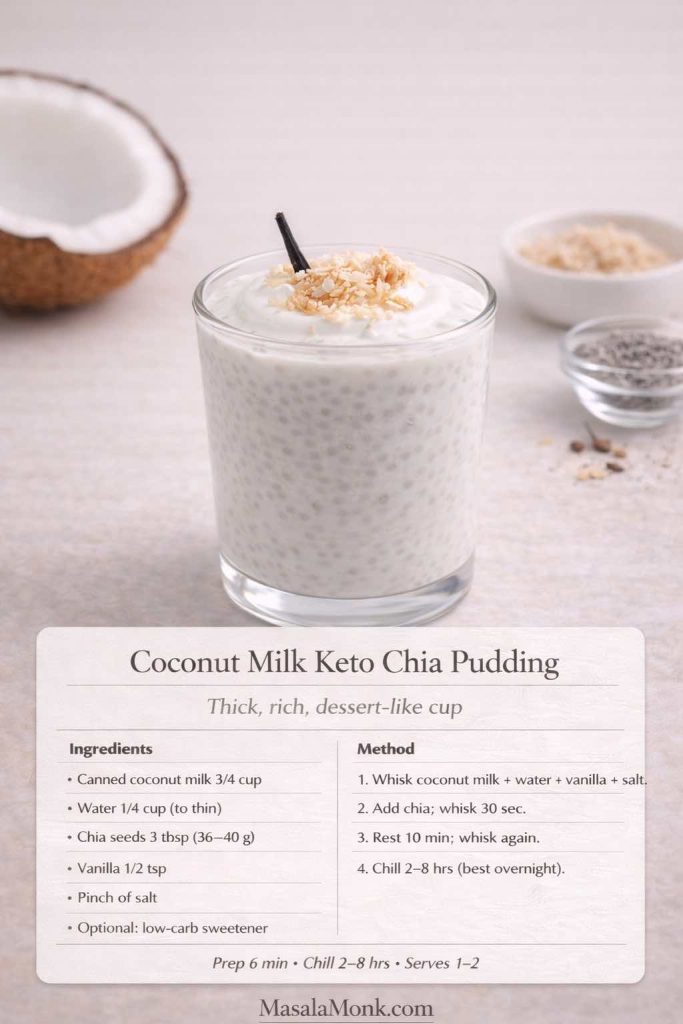
Method
- Whisk coconut milk, water, vanilla, salt, and sweetener until smooth.
- Stir in chia, rest 10 minutes, stir again, then refrigerate.
Texture tip
If it sets extremely thick overnight, loosen with a splash of water before serving and stir well.
If you love mango + coconut together, this is a nice complementary read: mango with coconut milk.
10) Blended Chia Pudding (Smooth Chocolate Mousse)
Blended chia pudding is for anyone who dislikes the “seed” texture. Once blended, it becomes silky—almost like a classic pudding cup.
Ingredients (1–2 servings)
- 1 cup almond milk (or dairy milk)
- 3 tablespoons chia seeds
- 1–2 tablespoons cocoa powder or cacao powder
- Pinch of salt
- Optional sweetener
- Optional: 1 tablespoon peanut butter or 2 tablespoons Greek yogurt
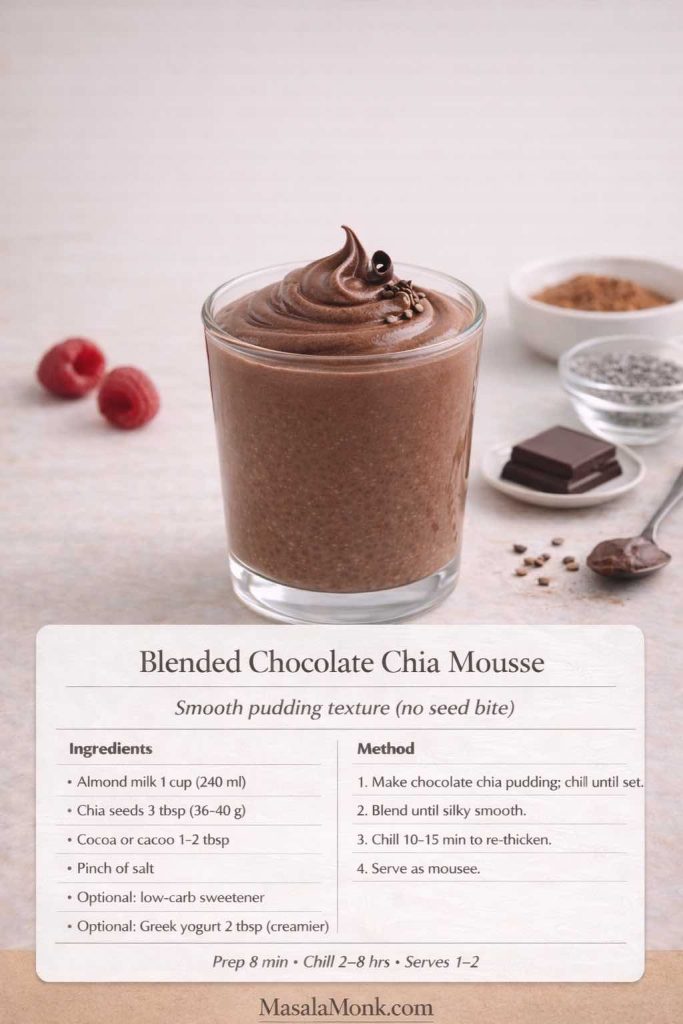
Method
- Make a standard chocolate chia pudding and refrigerate until set (2+ hours).
- Blend until completely smooth and glossy.
- Chill 10–15 minutes so it thickens again.
Why it’s worth doing
This is one of the best ways to create a creamy chia pudding texture without the “frog egg” feel. It’s also a smart method for protein powder: blend it in after setting to avoid chalky pockets.
Also Read: Sourdough Recipe: 10 Easy Bread Bakes (Loaves, Rolls & Bagels)
Making Chia Pudding Easy to Keep Up With (Meal Prep + Storage)
If you’re making chia seed pudding cups for the week, a simple rhythm helps:
- Make a plain base batch in a bowl so you can whisk clumps out easily.
- Portion into jars or cups.
- Flavor them in two or three different directions so you don’t get bored.
- Add fresh toppings right before eating.
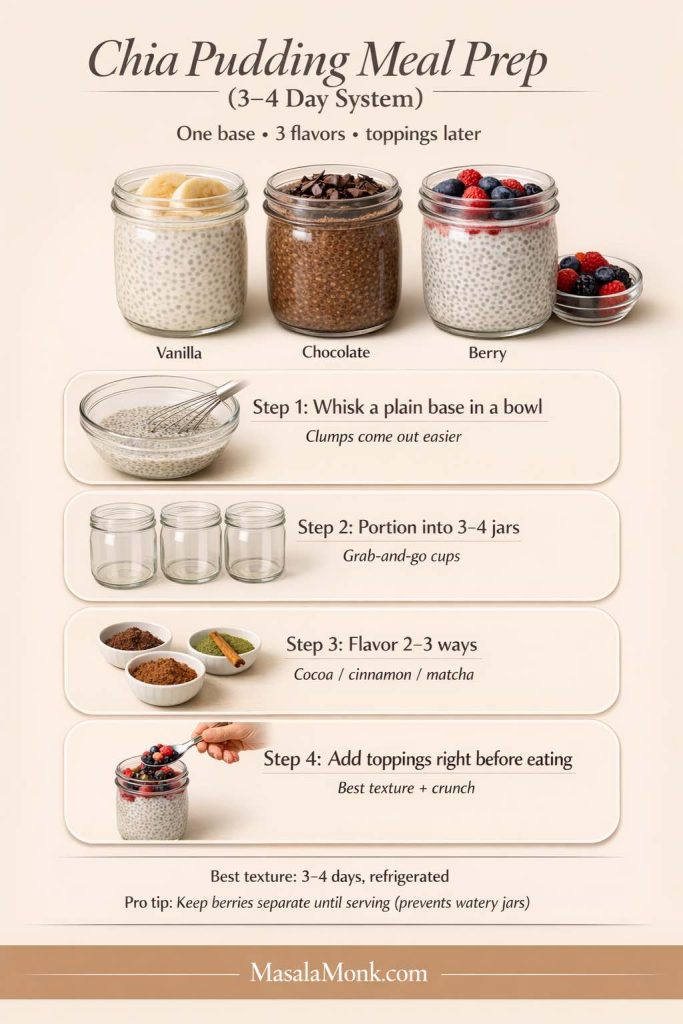
For storage time, most people prefer the taste and texture within three to four days. And for general refrigerated leftovers guidance, USDA FSIS is the standard reference: leftovers food-safety storage times.
One subtle trick: if you’re using fruit, especially berries, keep it separate until serving. That way your “chia pudding cups” don’t turn watery, and the flavors stay bright.
Also Read: Peanut Butter Fudge: Recipes & Guide (8 Methods + Easy Variations)
A simple note on keto and chia
Chia can fit into many keto and low carb patterns because it’s easy to portion and pairs well with higher-fat liquids like coconut milk. That’s part of why keto chia seed pudding recipe variations are so common—especially when combined with Greek yogurt or protein powder. If you want a deeper internal explainer focused on chia and keto specifically, this is a natural follow-on: Chia Seeds and the Ketogenic Diet.
The best way to make chia pudding taste like something you crave
A lot of people try chia once, don’t love it, and assume they’re not a “chia person.” Most of the time, it’s not the chia. It’s the flavor balance.
Here’s what tends to make a jar of low carb chia pudding feel genuinely delicious:
- A pinch of salt, always
- Vanilla or cinnamon to round out the flavor
- Cocoa powder when you want depth
- Something creamy (Greek yogurt, coconut milk, or a spoon of nut butter)
- A topping that adds contrast—berries, chopped nuts, cacao nibs
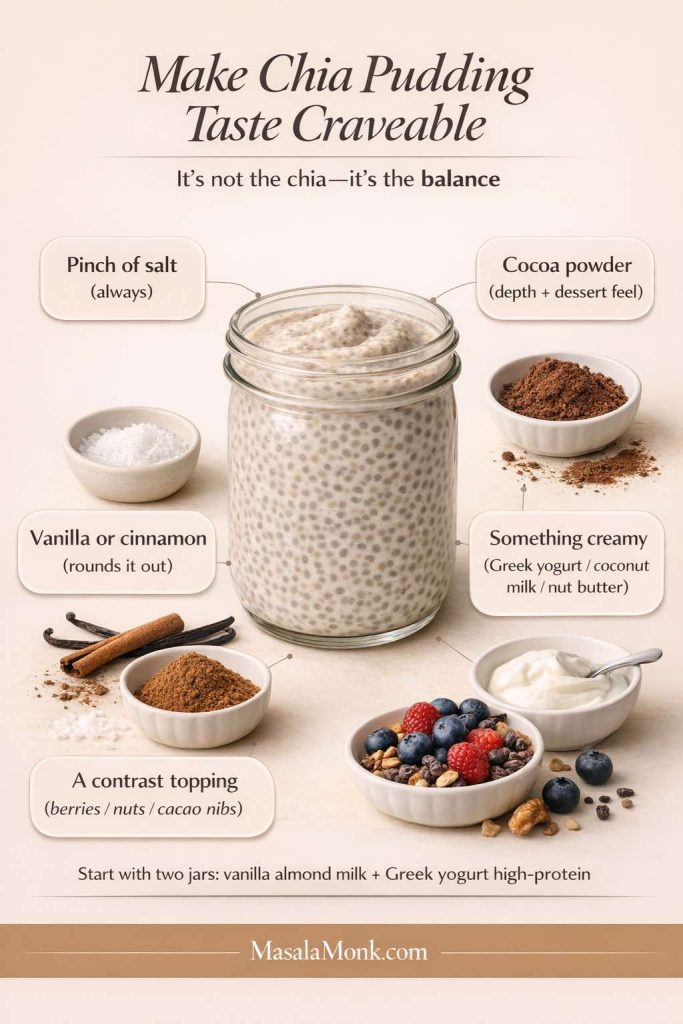
Once you dial that in, low carb chia pudding becomes less of a “health chore” and more of a flexible treat you can keep in rotation. Some weeks you’ll lean into matcha and coconut milk. Other weeks you’ll be in a chocolate peanut butter phase. Then, when you want brightness, mango or berries bring everything to life.
If you make one of these this week, start with two jars: one vanilla almond milk base and one high-protein Greek yogurt version. That way you get variety immediately—light and clean on one side, thick and filling on the other—without creating extra work.
And if you want even more structure for turning chia into a consistent weight-loss habit, revisit the companion guide here: chia pudding for weight loss tips, benefits, and recipes.
FAQs
1) What’s the best low carb chia pudding ratio?
A reliable starting point is 3 tablespoons chia seeds to 1 cup liquid for a thick, spoonable chia seed pudding. If you prefer a lighter texture, use 2½ tablespoons per cup. Conversely, if you want a denser keto pudding feel, keep 3 tablespoons and choose a richer liquid like coconut milk.
2) How long does chia pudding need in the fridge?
Most jars set well in 2–3 hours, although overnight chia pudding usually turns out smoother and more consistent. If you’re meal-prepping chia seed pudding cups, overnight is often the easiest path because the texture stabilizes by morning.
3) Why is my chia seed pudding watery or runny?
Typically, runny chia pudding comes from one of three things: too much liquid, not enough time, or not stirring twice early on. Add 1 teaspoon chia at a time, stir, then refrigerate 30–60 minutes. Also, do a second stir around the 10-minute mark to prevent clumps and uneven hydration.
4) Why did my chia pudding turn too thick?
This happens when chia absorbs more than expected—especially with thick liquids like canned coconut milk. To fix it, stir in a splash of water, almond milk, or coconut milk until it loosens into a creamy chia pudding consistency.
5) Can I make instant chia pudding or quick chia pudding?
You can make a quick chia pudding by whisking thoroughly, stirring again after 10 minutes, and chilling 30–45 minutes. Even so, the best chia pudding texture usually comes from a longer chill. If time is tight, adding Greek yogurt can help it feel thicker sooner.
6) Is chia pudding keto-friendly?
Chia seeds can fit many keto approaches because they’re portionable and pair well with higher-fat liquids. For keto chia pudding, use unsweetened almond milk or coconut milk, keep sweeteners minimal, and choose toppings like nuts, cacao nibs, or unsweetened coconut.
7) What are the best chia seeds for keto or low carb chia pudding?
Both black and white chia seeds work similarly for chia seed pudding low carb recipes. What matters more is freshness and how you store them. If the seeds smell stale or oily, the pudding can taste “off,” even if your recipe is perfect.
8) Can I make chia pudding with almond milk?
Yes—chia pudding with almond milk is one of the most common bases because the flavor is neutral and the texture sets reliably. For extra creaminess, add a spoon of Greek yogurt, coconut cream, or nut butter once it’s set.
9) Can I make chia pudding with coconut milk?
Absolutely. Chia pudding coconut milk versions are often the creamiest and feel closest to a traditional pudding. If you’re using canned coconut milk, thin it slightly with water so the chia hydrates evenly.
10) Can I make chia pudding with oat milk?
Yes, chia pudding with oat milk is popular because it tastes mild and comforting. However, oat milk is not typically low carb, so it’s better for a general “healthy pudding” routine rather than a strict keto plan.
11) Can I make chia pudding with yogurt instead of milk?
You can, and it’s a great way to create a high protein chia pudding. For chia pudding with yogurt no milk, whisk yogurt with a little water to loosen it, then stir in chia. The result is thick, tangy, and very filling.
12) What’s the difference between chia pudding with Greek yogurt vs regular yogurt?
Greek yogurt is thicker and higher in protein, so chia pudding Greek yogurt versions tend to set firmer and feel more like a meal. Regular yogurt can work too, although you may need a bit more chia or a longer chill to reach the same texture.
13) Can I add protein powder to chia pudding?
Yes—chia pudding with protein powder is an easy way to boost protein. For the smoothest result, dissolve the protein powder into the milk first, then add chia. If you add powder directly to a set pudding, it can clump.
14) How do I make chocolate chia protein pudding taste better?
Use cocoa or cacao plus a pinch of salt to deepen the flavor. Then, choose a chocolate protein powder you actually enjoy. A small spoon of peanut butter or Greek yogurt can also make chocolate protein chia pudding taste richer and less “thin.”
15) Can I make blended chia pudding?
Yes. Blended chia pudding is ideal if you dislike the texture of whole chia seeds. First, let the pudding set; afterward, blend until smooth. You’ll get a creamy chia pudding that feels like mousse, especially with cocoa or nut butter.
16) Can I grind or blend chia seeds before soaking?
You can, but it changes the texture quickly and may thicken faster. Ground chia pudding tends to set more like a gel. If you prefer a smoother mouthfeel, blending after soaking often tastes better than blending dry seeds first.
17) What’s the best way to sweeten chia pudding without sugar?
Many people keep it simple with vanilla, cinnamon, cocoa, or fruit. If you want sweetener, choose an option you tolerate well and use a small amount. Often, adding a spoon of peanut butter or coconut milk richness reduces how much sweetness you need.
18) Is chia pudding paleo?
Chia pudding paleo versions usually use almond milk, coconut milk, or coconut water instead of dairy. For a richer bowl, add nut butter, coconut cream, or fruit. If you use yogurt, choose a version that matches your approach.
19) What is anti inflammatory chia pudding?
In practice, it’s chia pudding flavored with ingredients often used in “anti-inflammatory” eating patterns—ginger, cinnamon, cacao, berries, and sometimes turmeric. A ginger chia pudding or gingerbread chia pudding can fit this style while still tasting like dessert.
20) Can I add collagen to chia pudding?
Yes. Chia collagen add-ins are usually easiest because collagen peptides dissolve smoothly. Since collagen doesn’t thicken much, you’ll still rely on chia (and optionally yogurt) for the pudding texture.
21) What toppings work best for chia pudding for weight loss?
For a more weight-loss friendly bowl, focus on toppings that add texture without a big sugar hit: nuts, seeds, unsweetened coconut, cacao nibs, and a measured amount of berries. If you want fruit-forward flavors like mango chia pudding, keep the portion modest and balance it with protein.
22) How do I make strawberry chia seed pudding or berry chia pudding?
Make a plain base first, then fold in mashed strawberries or mixed berries after it sets. Alternatively, layer berries at the bottom of the cup for a “chia pudding with strawberries” effect. If you add watery fruit too early, the pudding can loosen.
23) How do I make mango chia pudding without making it too sweet?
Use mango as a flavor accent: a few tablespoons of puree can be enough. Add lime and a pinch of salt to amplify the tropical flavor, then keep the base unsweetened so the mango stands out naturally.
24) How do I make apple cinnamon chia pudding taste like dessert?
Use cinnamon, vanilla, and a pinch of salt as the backbone. If you’re not strict keto, a small amount of grated apple adds aroma and sweetness. Otherwise, chopped pecans plus cinnamon can mimic an apple-pie vibe without the fruit.
25) How long does chia seed pudding last, and can I meal prep it?
Chia pudding is popular for meal prep because it holds well in the fridge. Many people prep single serve chia pudding cups for several days at a time. For the best texture, keep toppings separate and stir before eating.
26) Why does my chia pudding taste bland?
Usually it needs salt, vanilla, or a stronger flavor base. Cocoa, matcha, cinnamon, and nut butter all make a big difference. Also, richer liquids—like coconut milk—often improve flavor even when sweetness is minimal.
27) What’s the easiest 3 ingredient chia pudding?
A classic 3 ingredient chia pudding is chia seeds + almond milk + vanilla (or chia + coconut milk + cocoa). If you want it sweeter, add a fourth ingredient: your preferred sweetener or a small amount of fruit.
28) Can I make chia seed pudding with regular milk or whole milk?
Yes. Chia seed pudding with milk (including whole milk) sets well and tastes creamy. If your goal is low carb chia pudding, watch the carbs from dairy milk and adjust based on your overall plan.
29) What’s better: chia pudding in a jar, glass, or cups?
Any container works. Chia pudding cups are great for grab-and-go; a chia pudding glass looks nice for serving; a jar is convenient for shaking and stirring. What matters most is leaving enough room to stir well before it sets.
30) Are premade chia pudding cups worth it?
They can be convenient, especially when you need a ready-to-eat snack. Still, homemade lets you control sweetness, protein, and texture. If you like the convenience of premade chia pudding, you can mimic it by prepping chia seed pudding cups in advance with two or three flavors.