Posted on Leave a comment

Balti Paneer Gravy (Restaurant-Style, Creamy + Bold Recipe)

Macro close-up of Balti Paneer Gravy with soft paneer cubes in a silky hung-curd sauce, speckled with kasoori methi, with text overlay and recipe credit to Dr. Aman Singh Kahlon.

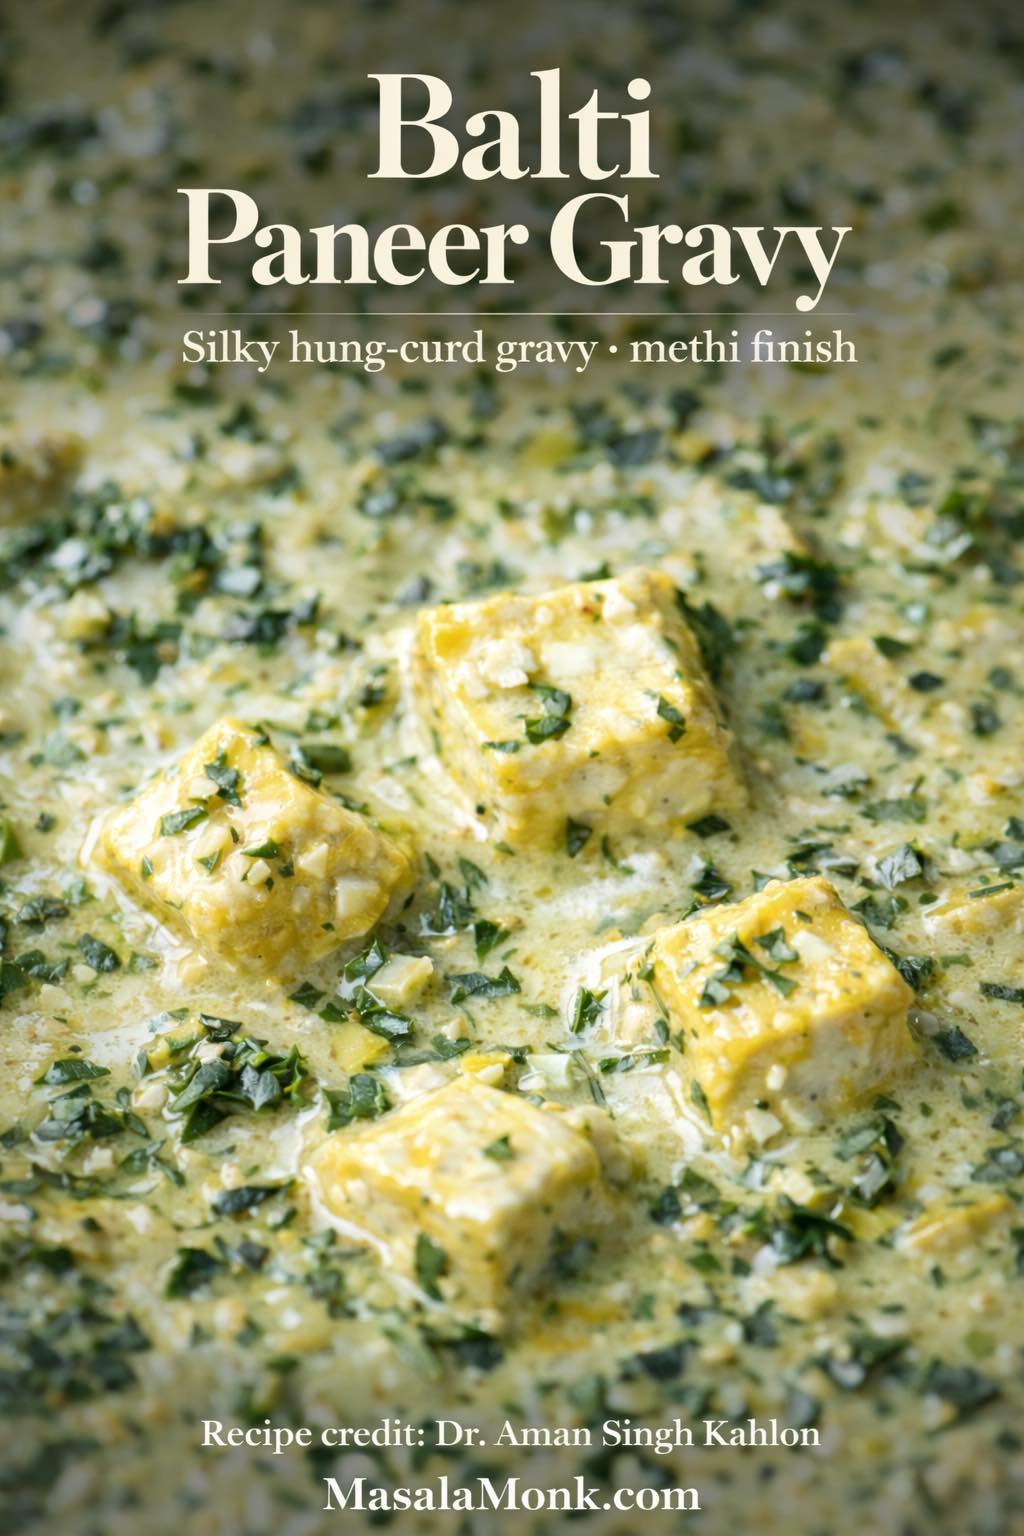
There are certain paneer gravies that feel comforting in a familiar way, and then there are the ones that taste like they came straight off a restaurant menu—glossy, aromatic, and strangely addictive. This Balti Paneer Gravy belongs firmly in the second group. From the first spoonful, it’s clear you’re not dealing with a thin, hurried curry. Instead, you get a sauce that’s rich without being heavy, spicy without being harsh, and creamy without turning sweet.

What makes it especially satisfying is the balance: onions browned to the right shade, nuts blended into silk, hung curd adding body and tang, and a final creamy finish that rounds everything out. Even better, the paneer itself stays tender because the method respects it. It’s marinated briefly, sautéed just enough, and then soaked so it doesn’t go rubbery the moment it meets heat again.

This recipe is shared with due credit to Dr. Aman Singh Kahlon, who originally posted it on Facebook after it became a small hit in a restaurant context. A friend wanted new vegetarian gravies for his menu, and this balti-style paneer was suggested alongside another paneer gravy. Both did remarkably well for months, and the balti version in particular earned that rare compliment people reserve for truly satisfying curries: finger-licking good. I’ve only refined the wording and formatted it for a smooth home-cook flow—ingredients and method remain faithful to the original.

If you love restaurant-style paneer gravies, you may also enjoy the peppery, elegant comfort of Kali Mirch Paneer (Black Pepper Paneer), which sits in a different lane yet scratches a similar itch.


Balti Paneer Gravy — what “balti” means here

“Balti” has an interesting identity because it’s often defined more by approach than by a rigid list of ingredients. Historically, balti is closely linked to Birmingham and the idea of fast-cooked curry served in the same wok-like steel bowl. If you’re curious about how that story took shape, this piece on the origins of balti in Birmingham gives a clear, readable overview, while this deeper look at how balti is method-first (quick, hot, oil-driven) is also worth a skim: Birmingham balti and why it’s disappearing.

Infographic explaining what “balti” means using Balti Paneer Gravy: cooked on high heat, fast-cooked, and served in the same balti bowl with handles, shown with simple icons.
“Balti” is more method than ingredient: it’s cooked hot and fast, then served in the same handled balti bowl. This quick visual helps you understand the style before you start cooking Balti Paneer Gravy.

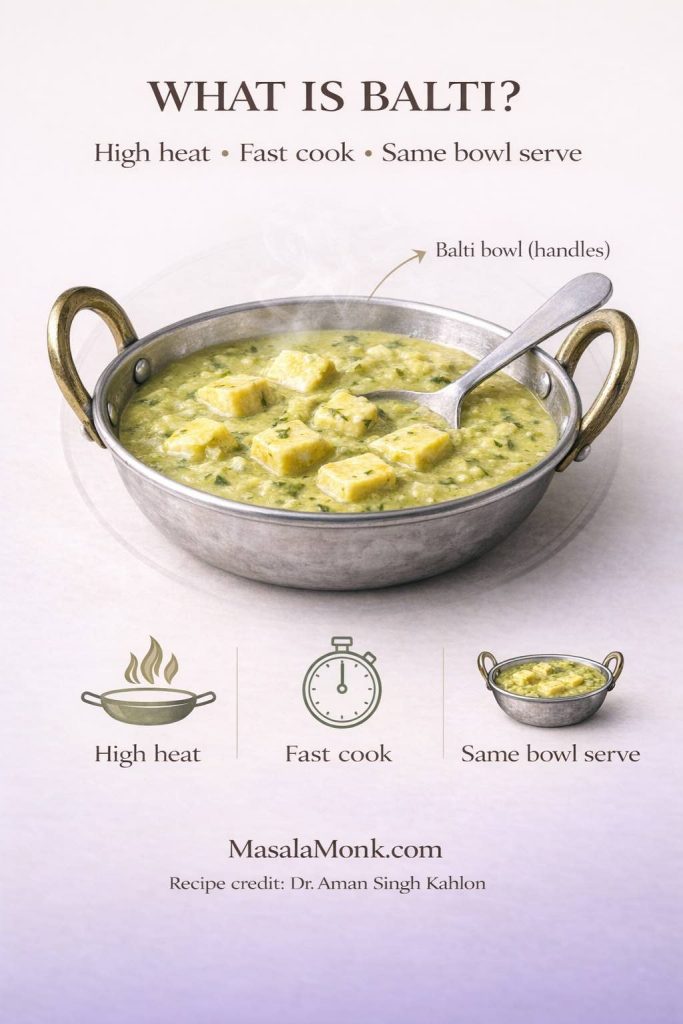
Now, in real-world Indian kitchens (and plenty of restaurant kitchens), “balti paneer” can also mean something slightly broader: a curry that’s brisk, bold, fragrant, and finished in a way that feels immediate—like it was cooked with intention rather than assembled. That’s the spirit this recipe captures.

What you’ll notice in this balti paneer gravy is that it’s not trying to imitate paneer butter masala, nor is it leaning fully into the tomato-forward snap of kadai paneer. Instead, it lands in a confident middle: onion depth, nutty silk, gentle tang from hung curd, a capsicum note that lifts the aroma, and a finishing creaminess that makes it taste “complete.”

Also Read: Mojito Recipe (Classic) + Ratios, Pitcher, Mocktail & Easy Variations


Paneer marination for Balti Paneer Gravy

Marination here isn’t about turning paneer or indian cottage cheese into tikka. Instead, it’s a quick flavor primer that prevents the cubes from tasting plain once they hit a rich sauce.

Paneer marination card for Balti Paneer Gravy showing paneer cubes lightly coated with ginger-garlic paste and red chilli powder, with quick amounts and a 10–15 minute resting time.
This quick paneer marination is a flavor primer, not tikka: a light coat of ginger-garlic paste and red chilli powder gives the cubes warmth and aroma so they taste seasoned even after they simmer in the rich Balti Paneer Gravy.

You’ll need

  • 200 g paneer, cut into 1.5-inch cubes
  • 1 tbsp ginger-garlic paste, fine
  • ½ tsp red chilli powder

Toss the paneer (indian cottage cheese) with ginger-garlic paste and chilli powder until each cube is lightly coated. Then set it aside while you prepare your pan.

Although the marinade is short and simple, it matters. Ginger-garlic starts building the “cooked curry” aroma early, while chilli powder gives the paneer a faint warmth that carries into the final bite rather than staying trapped in the gravy.

Also Read: Paloma Recipe: 12 Paloma Cocktail Drinks


Ingredients for Balti Paneer Gravy (hung curd + nuts + aromatics)

This gravy gets its restaurant-style texture from a combination of browned onions, nuts, and hung curd. Each element contributes something different, and together they build that velvety mouthfeel you expect from a serious paneer curry.

Everything you need for Balti Paneer Gravy in one glance: hung curd for a silky base, cashews and almonds for richness, kasoori methi for the restaurant aroma, and a final cream finish for that glossy, spoon-coating gravy.

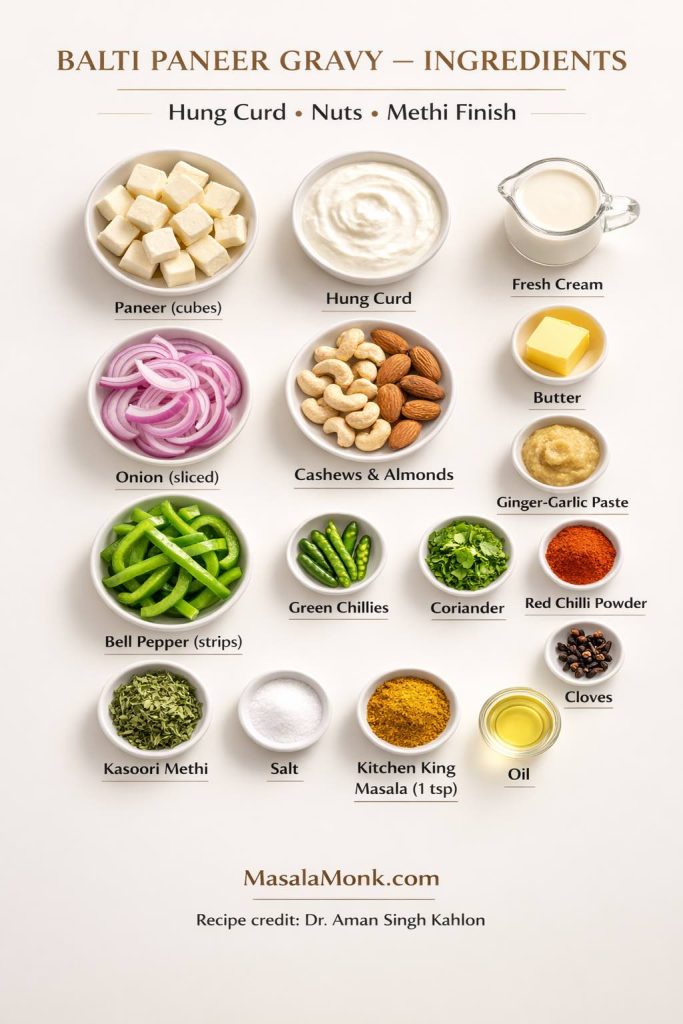
Gravy base ingredients

  • 2 onions, finely sliced
  • 8 cashews
  • 8 almonds
  • 3–4 green chillies
  • A handful of coriander leaves, chopped
  • 2 tbsp kasoori methi
  • 4 whole cloves
  • 1 yellow or red bell pepper, sliced
  • 1 tsp Kitchen King masala (any brand)
  • 4 tbsp hung curd (thick, hung overnight)
  • Butter, for finishing the paste in the pan
  • 2 tbsp fresh cream, to finish

Kasoori methi is one of those ingredients that seems small until you leave it out, and then the whole gravy feels slightly incomplete. If you’ve ever wondered what it actually does and how to use it without turning a dish bitter, this guide on kasuri methi and how to use it explains it in a way that’s easy to apply.

Also Read: Air Fryer Donuts Recipe (2 Ways): Glazed Homemade Donuts + Biscuit Donuts


How to make Balti Paneer Gravy (step-by-step)

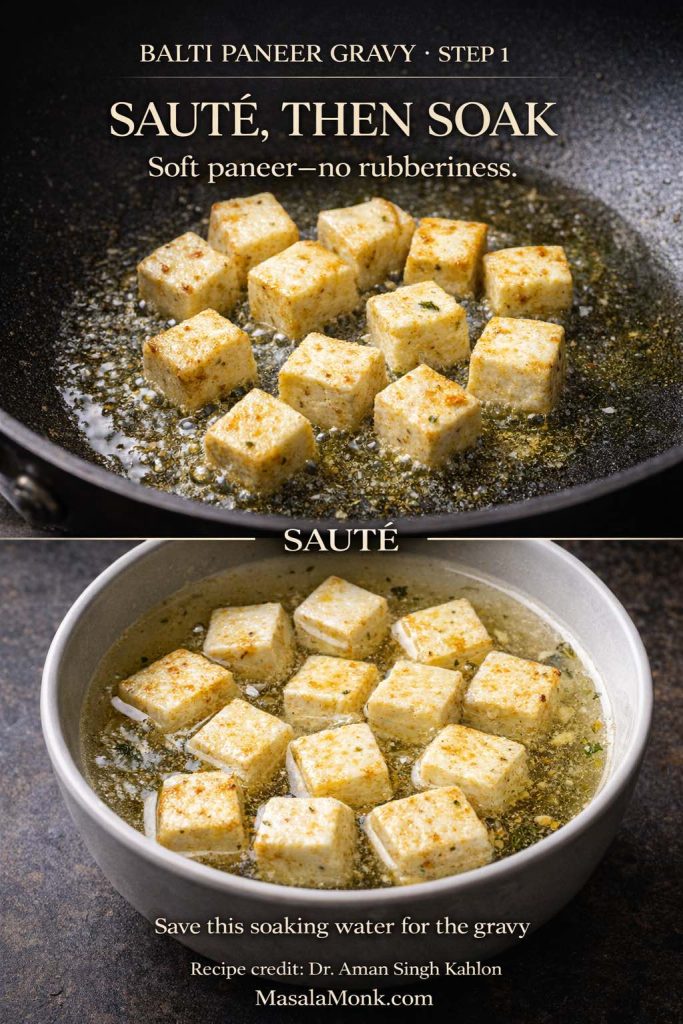
Step 1: Sauté the paneer briefly, then soak it

Heat a non-stick pan and add a little oil. Once the pan is warm, add the marinated paneer cubes and sauté them gently. You’re not aiming for a hard crust; rather, you want a light sear and a slight change in surface color.

As soon as the paneer looks lightly sautéed, remove it into a bowl and add enough water so the cubes are fully submerged.

Important: do not discard this soaking water. You will add it back into the gravy later.

This step looks modest, yet it has a real payoff. Many people soak paneer in water and hope for softness, but the combination of light frying and soaking works better because it creates tiny pathways inside the paneer that let it reabsorb moisture quickly. Serious Eats breaks down exactly why this works so well for store-bought paneer in their guide to softening store-bought paneer. Even if you never read another technique article, that one is genuinely useful.

Step 1 of Balti Paneer Gravy: paneer cubes lightly sautéed, then soaked in water to keep them soft and prevent rubbery paneer; soaking water is saved for the gravy.
Step 1 is your soft-paneer insurance: lightly sauté the marinated paneer, then soak it so the cubes stay tender in the gravy. Don’t discard the soaking water—it’s a small detail that adds flavor back into the sauce.

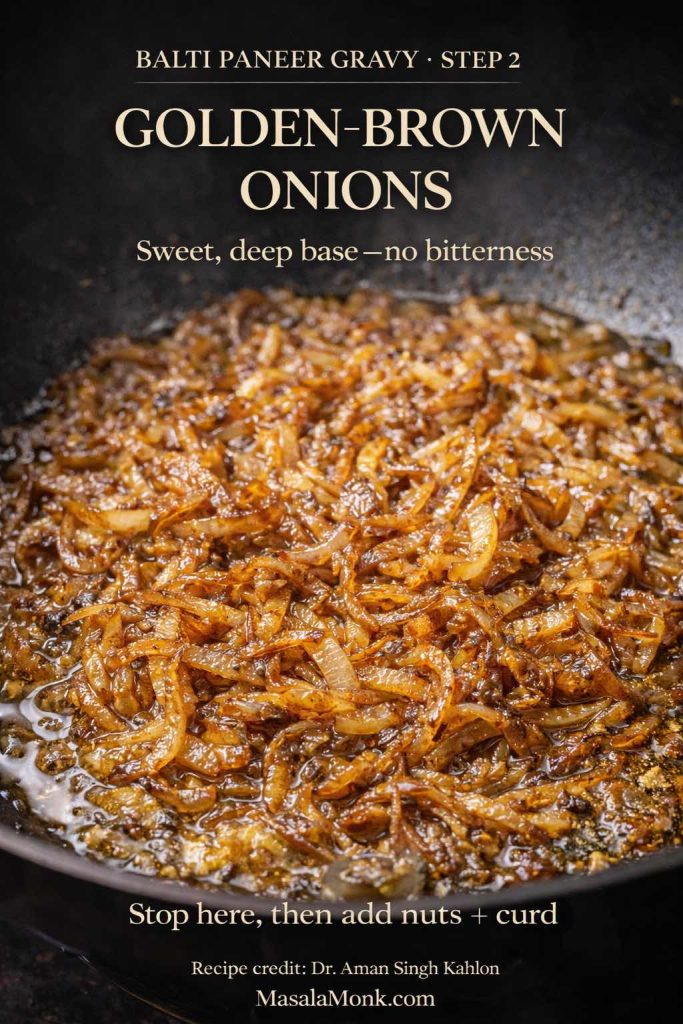
Step 2: Fry onions until golden brown

In the same pan, using the same fat, add a little more ghee or oil if needed. Add the finely sliced onions and fry them until golden brown.

This stage sets the base tone of your curry. If the onions are pale, the gravy can taste thin. On the other hand, if they’re burnt, the bitterness shows up later and refuses to leave. Aim for a confident golden-brown, where the onions smell sweet and deep rather than sharp.

Step 2 sets the entire gravy’s flavor: cook the onions until they’re evenly golden-brown and glossy. Too pale tastes flat; too dark turns bitter—this is the sweet spot that makes Balti Paneer Gravy taste restaurant-style.

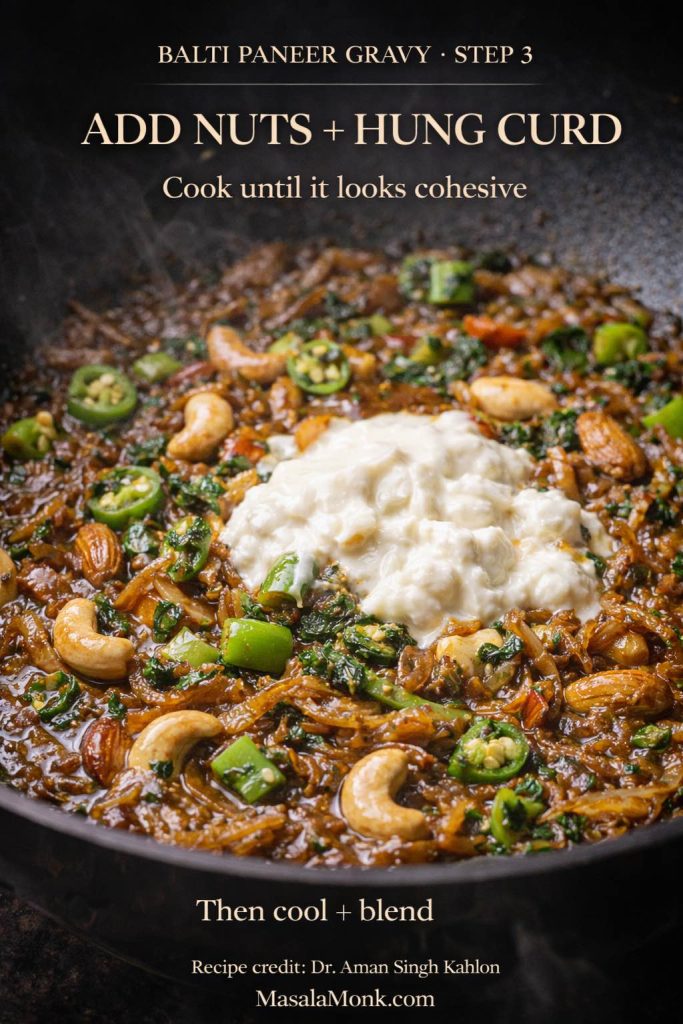
Step 3: Add the aromatics and build the balti-style masala

Once the onions are golden, add:

  • cashews
  • almonds
  • green chillies
  • coriander leaves
  • kasoori methi
  • cloves
  • sliced bell pepper
  • Kitchen King masala
  • hung curd

Now cook this mixture for a few minutes, stirring steadily. The goal is to “bhuno” it—let it cook until the raw smell disappears and the mixture looks cohesive.

At first, the curd may look like it’s just sitting in the pan. However, as it warms and meets the onion base, it starts to integrate. Meanwhile, the nuts toast slightly, the cloves bloom, and the capsicum releases that sweet aroma that makes the whole kitchen smell like a curry section in a restaurant.

Once it’s aromatic and unified, remove the pan from heat and let the mixture cool.

Step 3 is where the gravy’s signature texture starts: nuts and hung curd melt into the golden onions and aromatics. Cook until everything looks cohesive—once it comes together like this, you’re ready to cool and blend for a silky restaurant-style base.

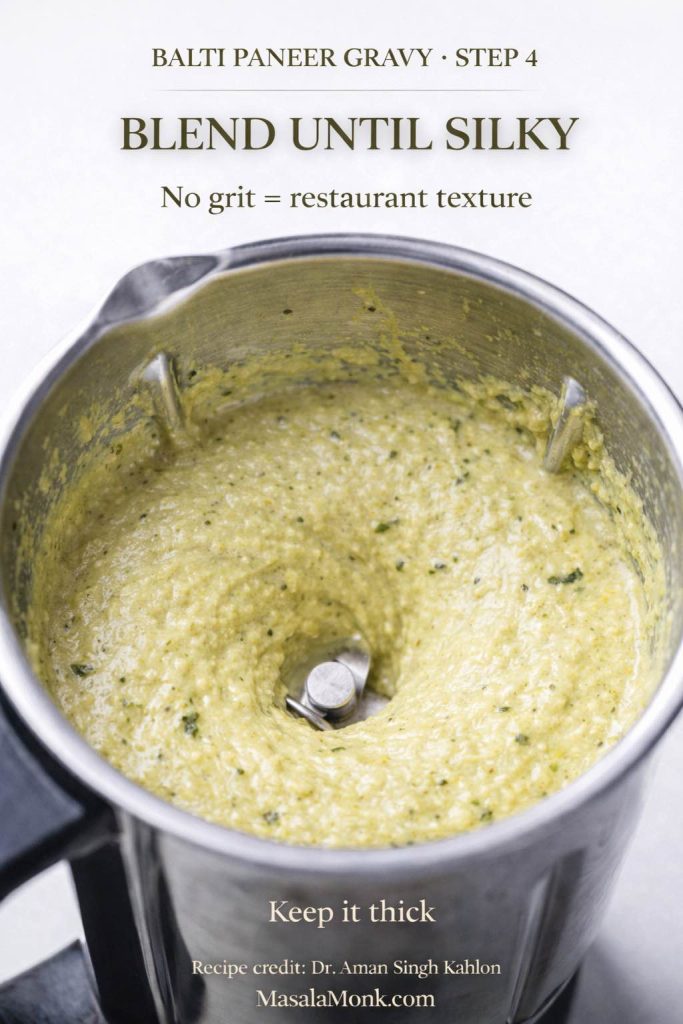
Step 4: Blend into a smooth paste

Transfer the cooled mixture to a blender and blend it into a smooth paste. If needed, add a tiny splash of water to help it move, but keep it thick. The richness comes from concentration, so you don’t want to dilute it too early.

Set the paste aside.

Step 4 of Balti Paneer Gravy showing the cooled onion, nuts, herbs, and hung curd mixture blended into a thick, pale creamy paste with methi flecks for a silky, restaurant-style gravy base.
Step 4 is your “silky gravy” guarantee: blend the cooled base until it’s thick and completely smooth. When the paste looks pale, creamy, and flecked with herbs like this, your Balti Paneer Gravy will finish glossy—not grainy.

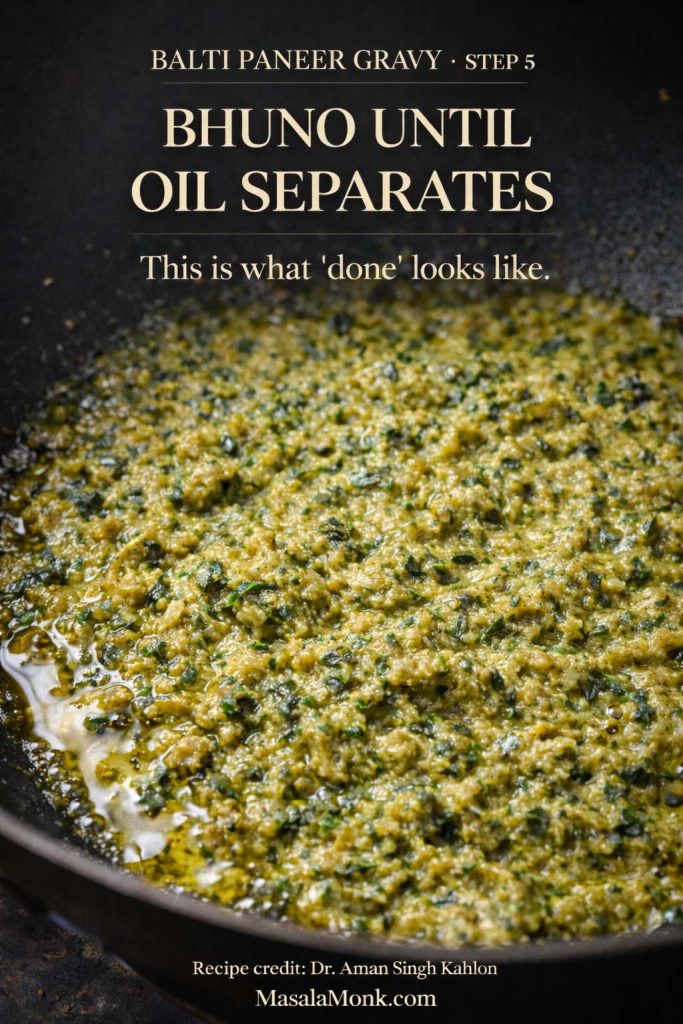
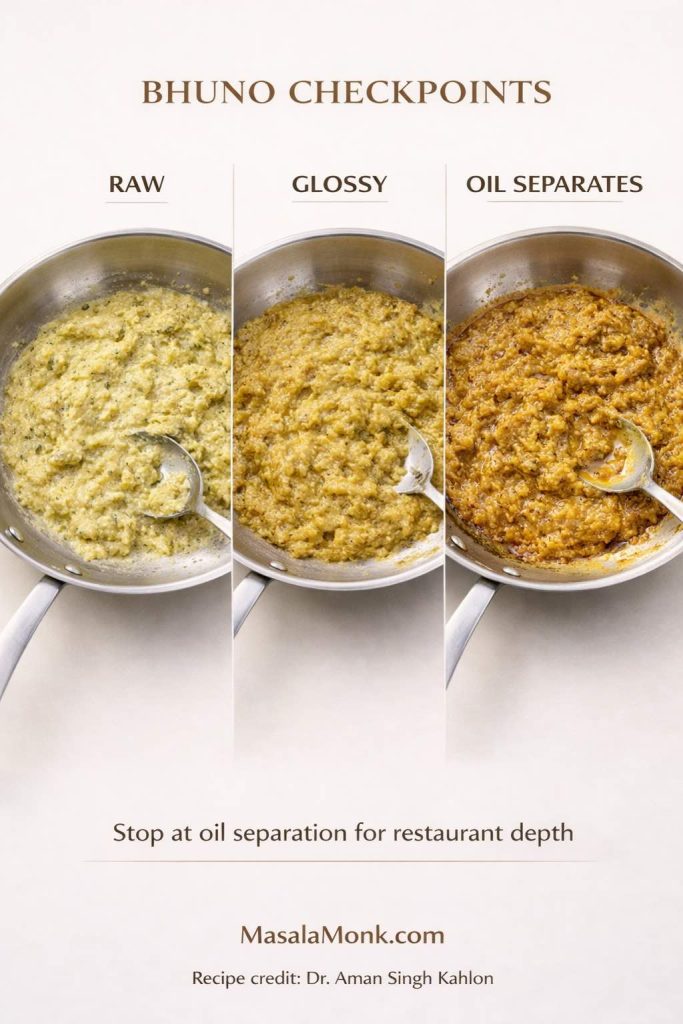
Step 5: Cook the paste again until the oil separates

Return the pan to medium heat and add a little butter. Once the butter melts, add the blended paste and cook it again.

This second bhuno is where the dish begins to taste like restaurant style balti paneer rather than “homemade curry paste.” Stir patiently until the paste thickens and you see oil separating at the edges.

This stage also smooths out any roughness from onion or curd. Gradually, the paste becomes glossy, darker, and more rounded.

Step 5 of Balti Paneer Gravy showing the masala paste being bhuno-cooked until oil separates at the edges, the key restaurant-style doneness cue.
Step 5 is the make-or-break moment: bhuno the blended masala until you see oil separating at the edges. That glossy separation is what removes raw onion/curd taste and gives Balti Paneer Gravy its restaurant-style depth.

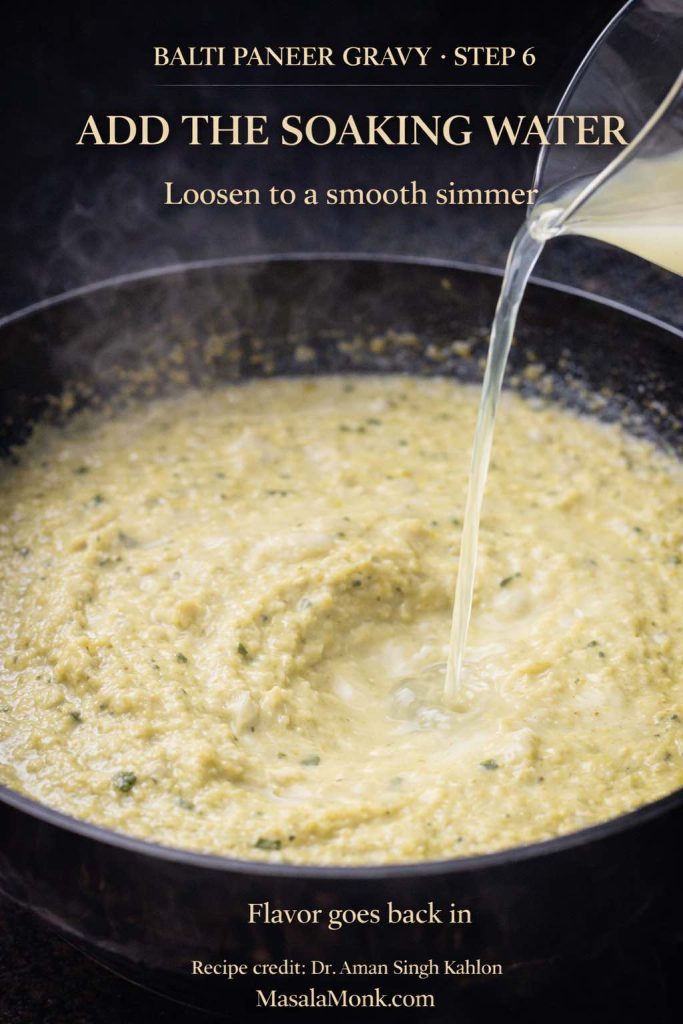
Step 6: Loosen with the paneer soaking water, then simmer

Now add the water you used to soak the paneer. Start with a moderate amount and stir well. Bring the gravy to a boil.

Because the soaking water already carries a little flavor from the paneer and marinade, it folds into the gravy naturally. It’s a small detail, but it makes the final sauce taste cohesive rather than “diluted.”

Once the gravy is boiling, add the paneer cubes and simmer for a few minutes.

Step 6 of Balti Paneer Gravy showing paneer soaking water being poured into the pale, blended masala to loosen it into a smooth simmering gravy with visible kasoori methi flecks.
Step 6 is where the paste becomes a proper gravy: pour in the reserved paneer-soaking water little by little and stir until it loosens into a smooth simmer. This keeps the flavor concentrated while letting you control the final consistency.

Step 7: Finish with cream, then rest

Stir in 2 tbsp fresh cream, then turn off the heat.

Finally, let the balti paneer gravy rest for about 10 minutes before serving.

Step 7 of Balti Paneer Gravy showing fresh cream being poured into the pale, methi-flecked gravy with paneer cubes, then rested to become glossy and cohesive.
Step 7 is the restaurant finish: add fresh cream at the end, switch off the heat, and rest the gravy for 10 minutes. That short rest is what turns Balti Paneer Gravy glossy, smooth, and perfectly cohesive.

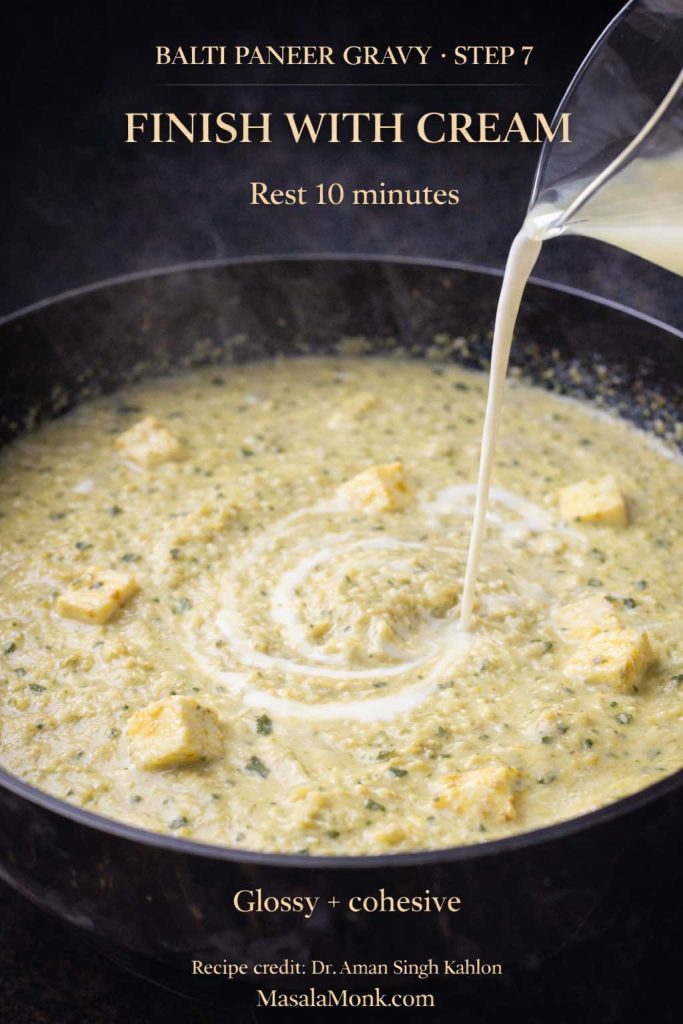
That resting time is where everything settles into place. The gravy thickens slightly, the flavor edges soften, and the paneer absorbs a little of the sauce without turning tough. If you’ve ever had a curry that tasted better after sitting, this is the reason: fats emulsify, spices relax, and the whole dish becomes more harmonious.

Also Read: Tapas Recipe With a Twist: 5 Indian-Inspired Small Plates


Balti Paneer Gravy texture: what you should see and smell

A lot of paneer gravies taste “almost right,” yet they miss that last 10% that makes a dish feel restaurant-level. Here, the final texture is your best clue.

You want a gravy that:

  • coats the back of a spoon without feeling like paste
  • looks glossy rather than chalky
  • smells layered—onion sweetness, spice warmth, methi perfume—without one ingredient shouting over the others
Texture check for Balti Paneer Gravy showing a side-by-side comparison of glossy gravy versus chalky gravy, with visual cues and simple fixes like bhuno longer, add hot water, and rest 10 minutes.
Quick texture check: glossy Balti Paneer Gravy should look smooth, shiny, and spoon-coating. If it looks chalky or dull, bhuno a little longer, loosen with a splash of hot water, and rest 10 minutes to bring back that restaurant-style finish.

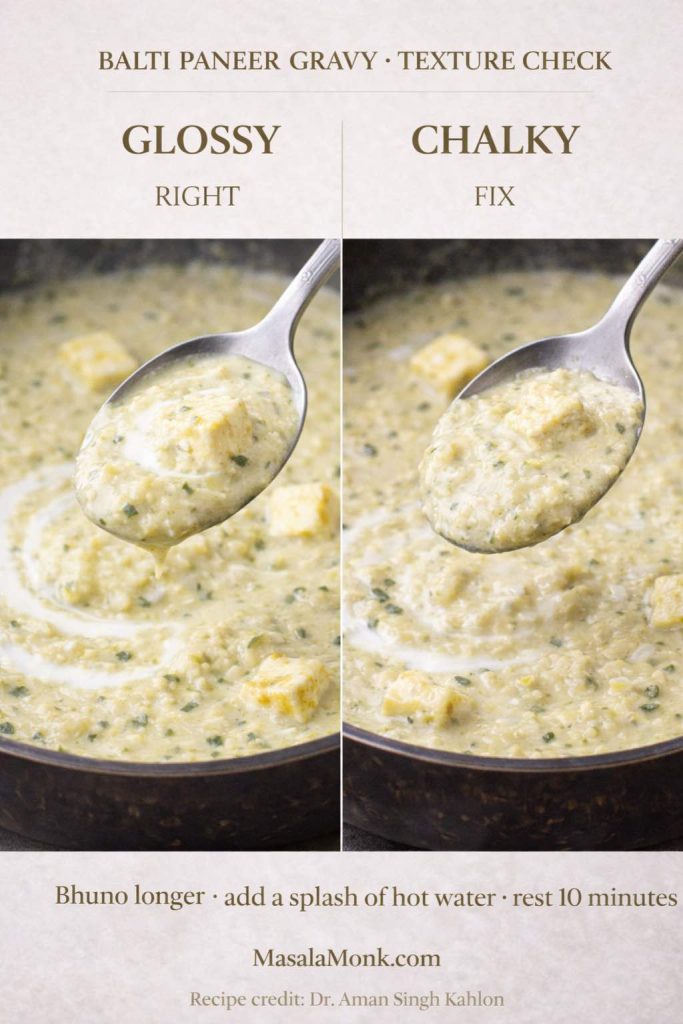
If it looks slightly too thick, add a splash of hot water and simmer gently for a minute or two. Conversely, if it looks thin, cook it uncovered a little longer and allow the moisture to evaporate. Because nuts and curd provide body, it will thicken naturally as it cooks.

Also Read: Air Fryer Salmon Recipe (Time, Temp, and Tips for Perfect Fillets)


Balti paneer gravy vs kadai paneer vs paneer butter masala

Sometimes the easiest way to understand a curry is to see what it’s not.
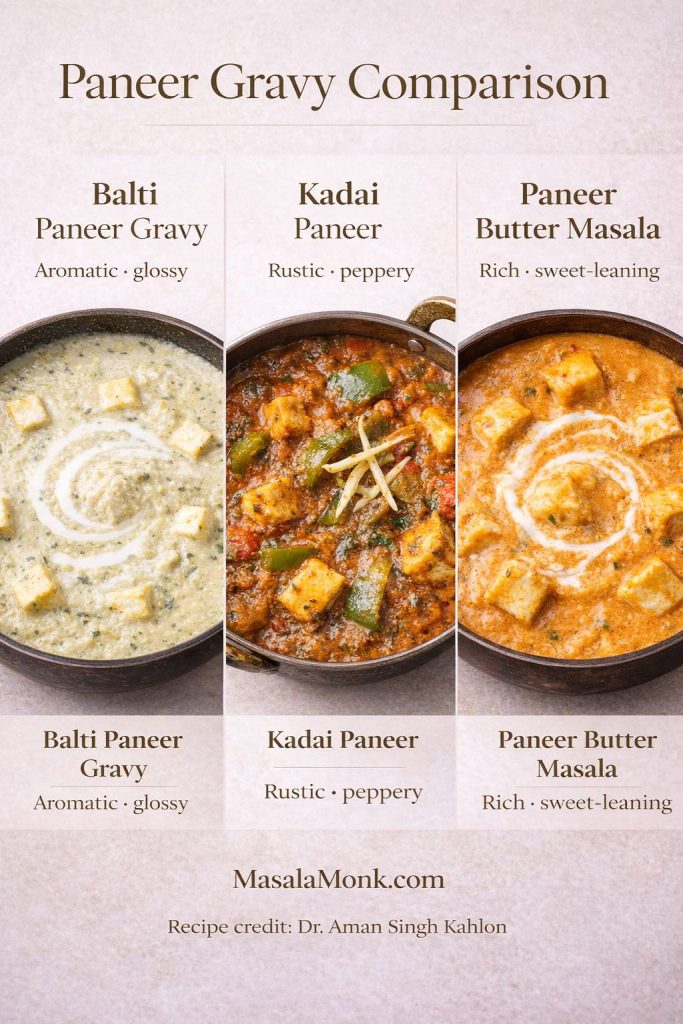
Not all paneer gravies taste the same: Balti Paneer Gravy is aromatic and glossy, Kadai Paneer is rustic and capsicum-forward, and Paneer Butter Masala is richer and sweeter-leaning. Use this comparison to pick the style that matches your mood.

Balti paneer gravy

This version is bold, aromatic, and bhuno-driven. It has richness from nuts and cream, yet it stays lively because capsicum, methi, and green chilli keep it bright.

Kadai paneer

Kadai paneer often leans into a tomato-and-capsicum base with kadai masala notes—more direct, more rustic, and typically sharper.

Paneer butter masala

Paneer butter masala usually goes smoother and sweeter, with tomato richness, butter, and cream taking center stage.

So, if you want the silkiness of a creamy gravy but still prefer a curry that feels punchy and restaurant-like, paneer balti is a satisfying lane to cook in.

Also Read: Masterclass in Chai: How to Make the Perfect Masala Chai (Recipe)


Hung curd: why it works so well in Balti Paneer Gravy

Hung curd is one of the quiet heroes here. It adds:

  • thickness without needing flour or heavy cream upfront
  • tang that keeps the gravy from tasting flat
  • a “cooked dairy” richness that feels more complex than plain cream
Two-panel guide showing hung curd (thick yogurt) being strained in muslin and the finished thick, spoonable curd used to make Balti Paneer Gravy silky and restaurant-style.
Hung curd is the texture secret: strain yogurt until it turns thick and spoonable (not pourable). That thickness helps Balti Paneer Gravy stay creamy, glossy, and stable instead of watery or dull.

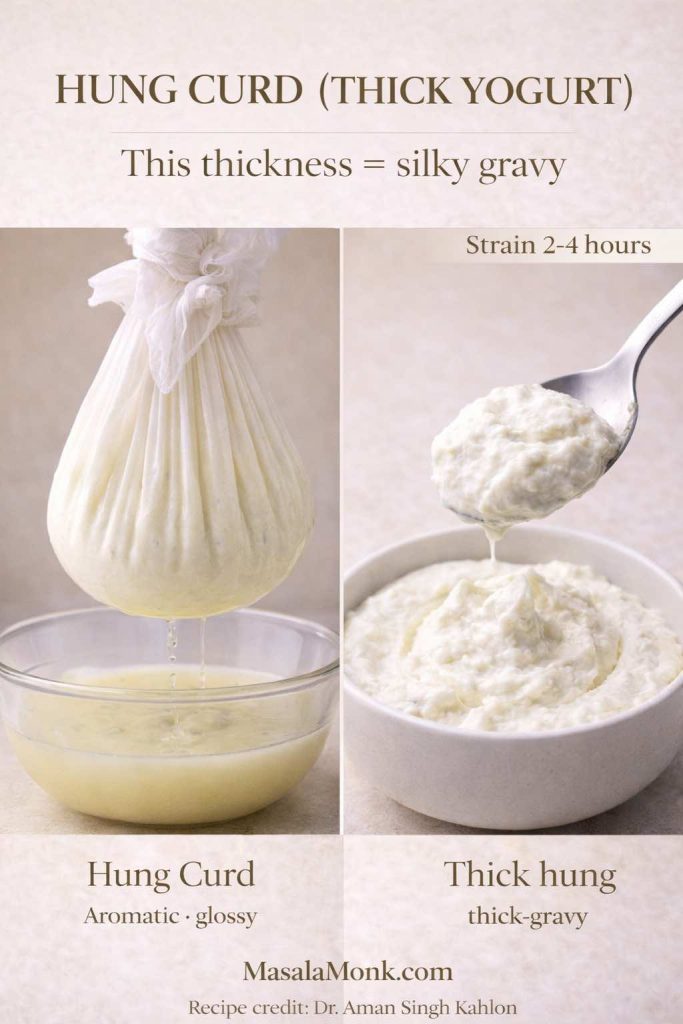
If you don’t have hung curd, you can thicken regular curd by straining it for a couple of hours in a cloth. Another option is to use thick Greek yogurt, although the flavor will be slightly different.

Because this recipe already relies on a nut base, you don’t need to overdo substitutions. As long as your dairy is thick and your bhuno stage is patient, the gravy holds.

Also Read: Keto Mocktails: 10 Low Carb, Sugar Free Recipes


Paneer softness: how this method prevents rubbery cubes

Paneer becomes rubbery for two common reasons:

  1. it’s cooked too long at high heat
  2. it’s added to the gravy too early and left boiling
Paneer texture check for Balti Paneer Gravy showing soft paneer cubes coated in silky gravy versus rubbery paneer cubes, with the fix: sauté briefly, soak in water, and add paneer at the end.
Soft paneer is the whole point of this gravy: it should stay tender and let the sauce cling. If your paneer turns rubbery, sauté briefly, soak in water, and add it near the end so it warms through without overcooking.

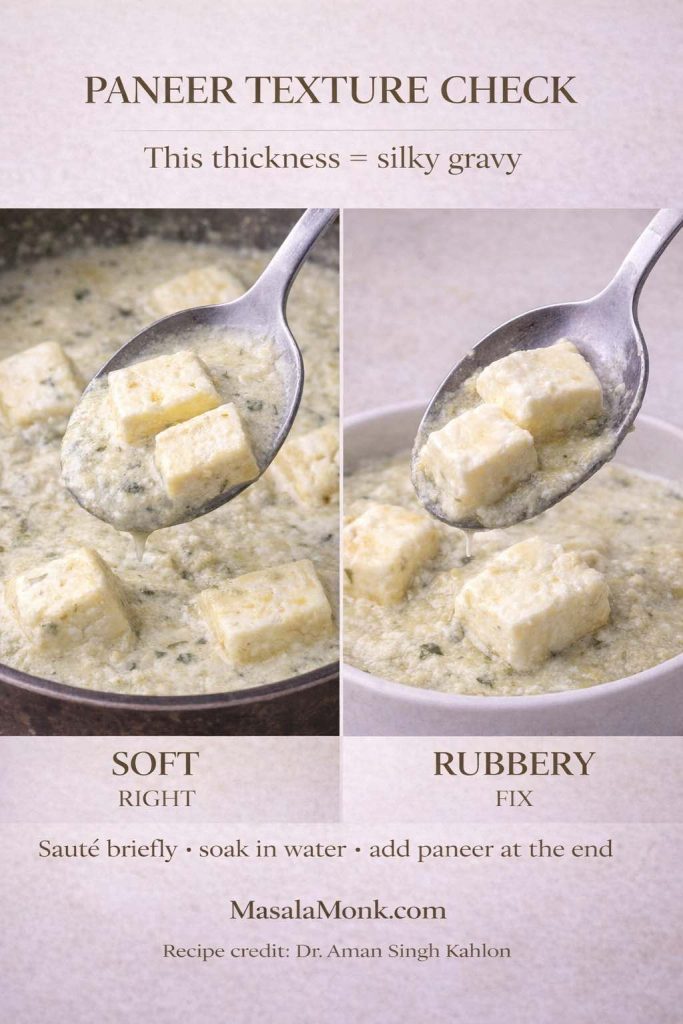
This method sidesteps both problems. First, the paneer is lightly sautéed rather than aggressively fried. Then it’s soaked so it rehydrates. Finally, it’s simmered briefly at the end and allowed to rest off heat.

If you’re using very firm paneer, you can also soak it in warm water for a few minutes before marinating, then proceed as written. Still, the fry-then-soak approach remains one of the most reliable ways to fix store-bought texture, as explained in this guide on softening paneer effectively.

If you ever feel like making paneer from scratch for a special dinner, BBC Good Food’s method for how to make paneer at home is clear and approachable. Fresh paneer tends to be softer and milkier, which makes a creamy gravy taste even more luxurious.

Also Read: Crock Pot Pork Chops and Sauerkraut (No Dry Chops Recipe)


Kitchen King masala in paneer balti recipe: what it adds

Kitchen King masala is used in many Indian restaurant kitchens because it’s a “shortcut” blend that gives you immediate complexity—warm spices, slight sweetness, and a familiar curry-house aroma. In this paneer balti recipe, it plays well with onion sweetness, nuts, and dairy.

Kitchen King masala adds that restaurant-style depth to Balti Paneer Gravy with just 1 teaspoon. If you don’t have it, garam masala works as a straightforward substitute—your gravy will still taste rich and aromatic.

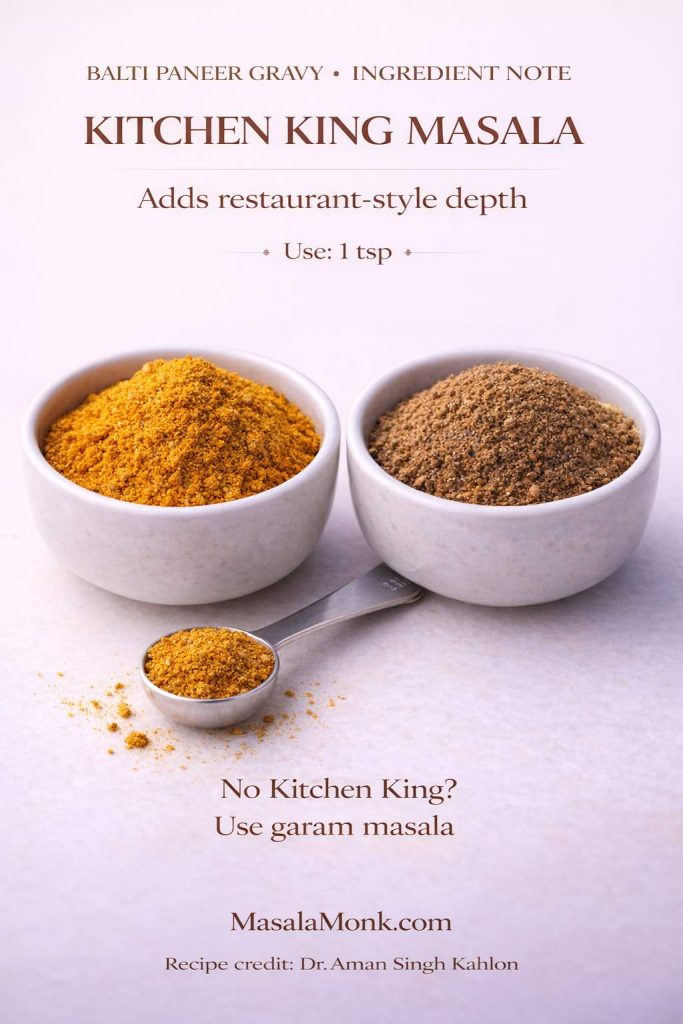
If you don’t have it, you can substitute a balanced garam masala. That said, the dish will shift slightly. Kitchen King tends to push the flavor toward that classic restaurant palate, which is exactly what this recipe aims for.

Also Read: Slow Cooker Pork Tenderloin (Crock Pot Recipe) — 3 Easy Ways


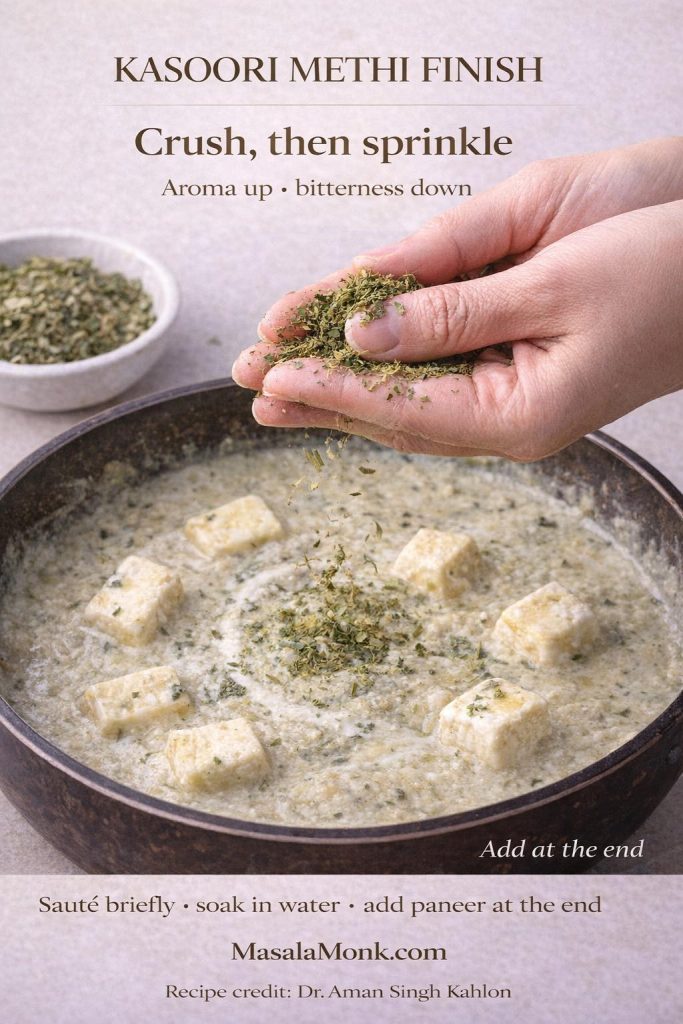
Kasoori methi: the finish that makes it smell like a menu dish

Kasoori methi (dried fenugreek leaves) is one of those ingredients that feels almost invisible until it’s missing. It adds a fragrant, slightly bitter edge that keeps creamy gravies from tasting one-dimensional.

To use it well:

  • rub it between your palms before adding, so it releases aroma
  • keep the amount controlled
  • treat it like a finishing herb rather than a bulk ingredient
Kasoori methi finish for Balti Paneer Gravy showing dried fenugreek leaves crushed between fingers and sprinkled into the pale, creamy paneer gravy to boost aroma and prevent bitterness.
Kasoori methi is the final “restaurant aroma” step—crush it in your fingers first, then sprinkle it in right at the end. You’ll get a stronger fragrance with less bitterness, and the gravy tastes instantly more menu-style.

If you want a simple explanation of what it is, what it tastes like, and how to avoid bitterness, this guide to kasuri methi uses and substitutes is genuinely practical.

Also Read: Chicken Pesto Pasta (Easy Base Recipe + Creamy, One-Pot, Baked & More)


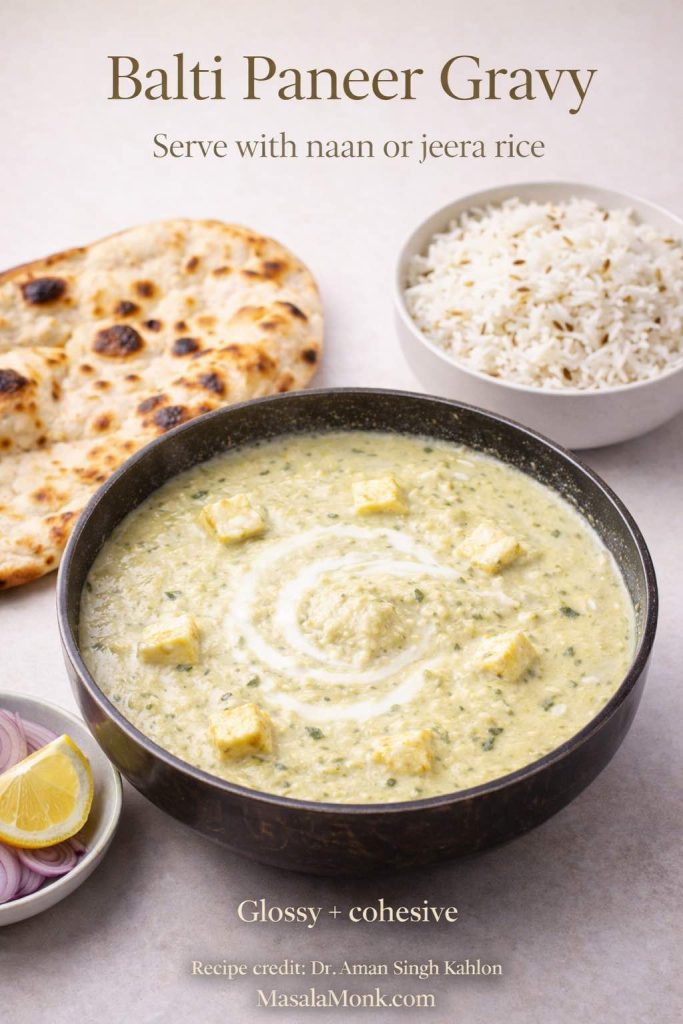
Serving ideas: what to eat with Balti Paneer Gravy

This is the kind of gravy that makes bread feel like a necessary tool rather than a side option. Even so, it also works beautifully with rice.

Balti Paneer Gravy served in a bowl with a cream swirl, alongside naan and jeera rice, with lemon and onion salad for a complete restaurant-style vegetarian meal.
Serve Balti Paneer Gravy the restaurant way: scoop it with naan, pair it with jeera rice, and add lemon + onion on the side to cut through the creamy, methi-flecked gravy.

Best bread pairings

  • butter naan
  • tandoori roti
  • kulcha
  • laccha paratha

Because the gravy is creamy and glossy, breads that have a bit of chew or char give the best contrast.

Rice pairings

  • jeera rice
  • simple basmati
  • light pulao

If you want to build a full, satisfying vegetarian meal around it, you can pair it with Authentic Punjabi Style Rajma Curry for a comforting, menu-like spread, or keep things lighter with Easy Aloo Gobi.

For a different style of comfort altogether—subtler spices, coconut fragrance, and a soothing pour-over feel—this Kerala Style Coconut Vegetable Stew is a lovely counterpoint on another day.

Also Read: Eggless Yorkshire Pudding (No Milk) Recipe


Restaurant-style Balti Paneer Gravy at home: small choices that change everything

A curry like this isn’t complicated, yet it rewards attention. The difference between “good” and “why does this taste like a restaurant?” often comes down to a few practical choices.

Bhuno checkpoints guide for Balti Paneer Gravy showing three stages of the masala paste in a pan—raw, glossy, and oil separates—so cooks can stop at oil separation for restaurant-style depth.
Bhuno isn’t a vague instruction—it has clear stages. Cook the paste until it turns glossy, then keep going until oil separates at the edges. That final checkpoint is what gives Balti Paneer Gravy its deep, restaurant-style flavor.

Let the onions earn their color

Golden onions are the backbone. If you rush this stage, the gravy can taste hollow later, even if your spice levels are perfect.

Toast the nuts in the masala

Cashews and almonds don’t just thicken; they add sweetness and roundness. When they warm and toast slightly in the onion base, the flavor becomes deeper and more integrated.

Cook the blended paste again

This is the step many people skip when they’re tired. Nevertheless, the second bhuno is where the sauce develops its restaurant-style finish. As the paste cooks, it becomes glossy, loses raw edges, and turns cohesive.

Rest before serving

Serving immediately is tempting, yet the 10-minute rest transforms the gravy. The spice settles, the cream integrates more smoothly, and the whole dish becomes calmer and richer at the same time.

Also Read: Garlic & Paprika Cabbage Rolls (Keto-Friendly Recipes) – 5 Bold Savory Twists


Variations that still feel like balti paneer

Once you’ve made the base recipe once, it becomes easy to adjust to your mood without losing the core identity of the dish.

Make this Balti Paneer Gravy your way: go Spicy with extra green chilli and black pepper, push it Dhaba-style by browning onions deeper and bhuno longer, or keep it Lighter by reducing cream and relying on hung curd + nuts for silk.

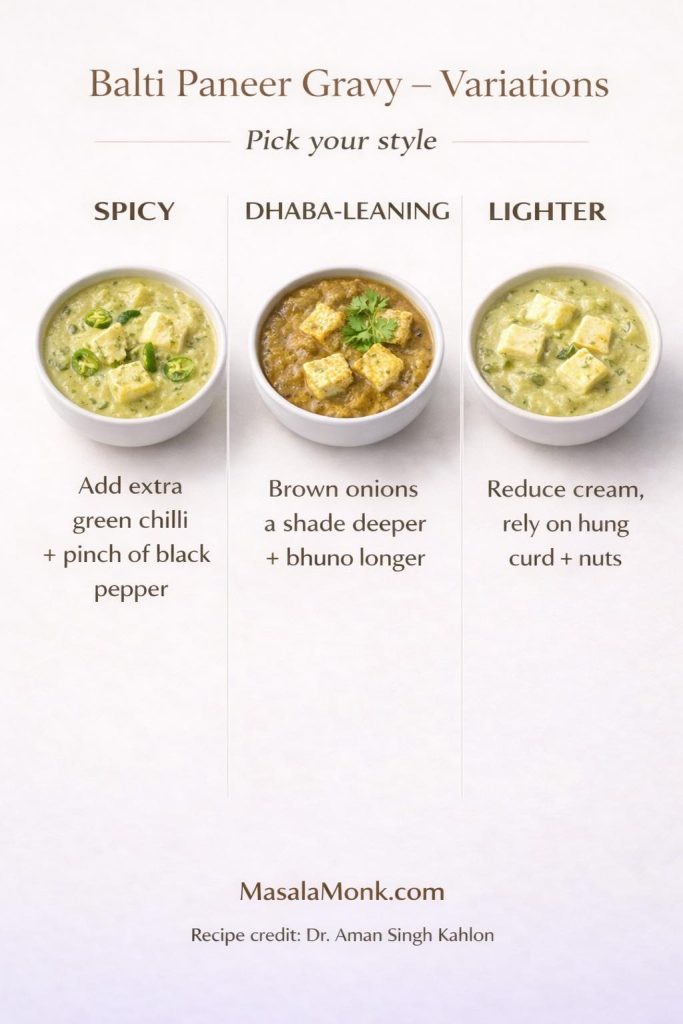
Spicier balti paneer gravy

If you want more heat, increase green chillies or add a little extra red chilli powder to the paneer marinade. You can also finish with a pinch of crushed black pepper for a sharper kick.

Dhaba-leaning paneer balti

For a more dhaba-style push, keep the onions slightly more browned and let the gravy cook a touch longer after adding the soaking water. That deeper “fried masala” tone comes through more strongly.

Slightly lighter, still restaurant-like

Use a little less cream at the end, and rely on the nuts and hung curd for richness. The gravy will still feel silky, just less indulgent.

Party starter pairing

If you’re planning a menu night and want a snack that matches the same “rich, spiced, restaurant” mood, these Cheese Balls with Indian-inspired variations make a fun companion—especially because they also use thick yogurt and spice in a way that feels familiar.

Also Read: 10 Low Carb Chia Pudding Recipes for Weight Loss (Keto, High-Protein, Dairy-Free)


Storage, reheating, and leftovers (Balti Paneer Gravy gets even better)

This curry is one of those rare gravies that often tastes better the next day. The spices have time to settle, the sauce thickens slightly, and the overall flavor becomes more rounded.

Balti Paneer Gravy storage and reheating guide showing Day 1 fresh gravy versus Day 2 chilled thicker gravy, plus the reheating fix: add a splash of hot water, warm on low heat, and rest 5 minutes.
Balti Paneer Gravy is a great make-ahead curry: it thickens after chilling, then turns silky again with a splash of hot water and gentle reheating. Resting for 5 minutes at the end brings back that glossy, restaurant-style texture.

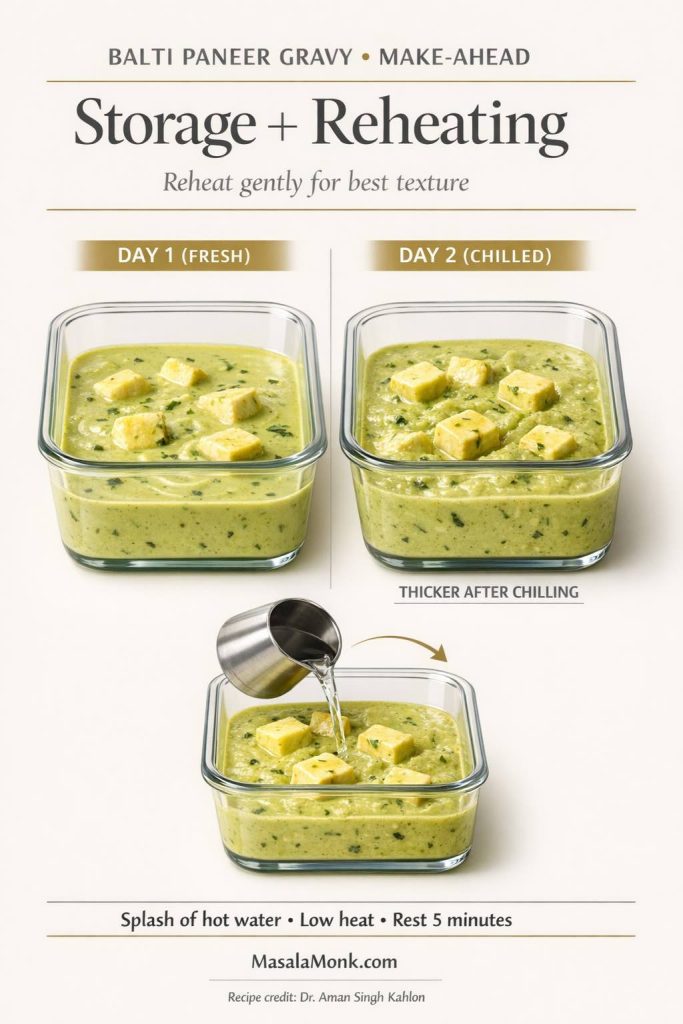
Cool it down, refrigerate it, and reheat gently on the stove. If it thickens too much overnight, add a splash of water and stir patiently.

For general safety guidance on how long cooked leftovers keep in the refrigerator, USDA FSIS provides a clear reference in their official page on leftovers and food safety. That’s especially useful if you’re meal-prepping or cooking for guests and want a reliable baseline.

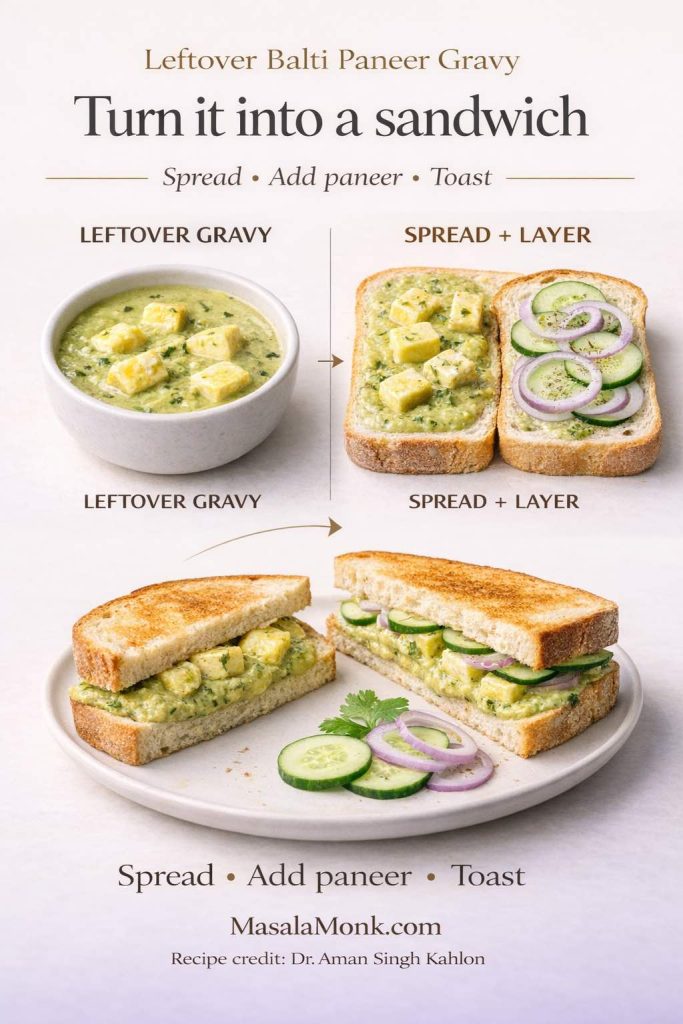
Leftovers can also become something entirely new. If you have paneer gravy or a dry-ish paneer sabji left over, you can turn it into an unexpectedly satisfying lunch—this Paneer Sabji Sandwich idea is a simple way to stretch the dish into the next day without feeling like you’re repeating dinner.

Step-by-step collage showing how to turn leftover Balti Paneer Gravy into a toasted paneer sandwich: spread leftover gravy, add paneer and sliced cucumber/onion, then toast and serve.
Leftover Balti Paneer Gravy makes an unreal sandwich: spread the thick gravy on bread, add paneer cubes (and cucumber/onion if you like), then toast until golden. It’s an easy next-day lunch that tastes like a fresh dish, not leftovers.

If you’re building a week that leans protein-forward, you may also enjoy this collection of vegetarian high-protein Indian meal prep ideas, which complements this gravy nicely in the same “cook once, enjoy twice” rhythm.


A short note on the “balti” story (for the curious cook)

Even if you’re cooking this as a straightforward home curry, it’s fun to know that balti carries a real cultural thread. It’s widely associated with Birmingham and the Pakistani community’s influence on British curry culture, where speed, high heat, and serving-in-the-same-bowl helped balti become iconic. If that background interests you, the National Geographic piece on the story behind balti is a great starting point, and Adventure.com’s write-up on balti as a method-first curry adds more detail.

That history doesn’t change your dinner, of course, but it does make the word “balti” feel less like a label and more like a living style of cooking—fast, aromatic, and satisfying.

Also Read: How to Make a Flax Egg (Recipe & Ratio for Vegan Baking)


Balti Paneer Gravy — final serve and closing

When you finally bring the pot to the table, this gravy has a particular kind of charm: it looks rich, it smells layered, and it has enough depth to make a simple meal feel celebratory. Whether you scoop it with naan, spoon it over jeera rice, or serve it as part of a bigger vegetarian spread, it holds its own without demanding extra fuss.

Most of all, it’s the kind of curry that makes people pause mid-bite and say, “Wait—what’s in this?” Not because it’s strange, but because it tastes thoughtfully built.

Recipe credit, with gratitude: This Balti Paneer Gravy is shared with due credit to Dr. Aman Singh Kahlon (originally shared on Facebook). The recipe became popular in a restaurant setting and has been enjoyed by many; it’s shared here so more home cooks can bring that same restaurant-style comfort to their own tables.

Also Read: Dirty Martini Recipe (Classic, Extra Dirty, No Vermouth, Spicy, Blue Cheese, Tequila + Batched)

FAQs

1) What is Balti Paneer Gravy?

Balti Paneer Gravy is a bold, restaurant-style paneer curry where the sauce is cooked “fast and fragrant” with a bhuno-style base. In practice, it’s a glossy paneer gravy with deep onion flavor, warm spices, and a creamy finish—often brighter and more aromatic than heavier paneer curries.

2) Is Balti Paneer the same as Paneer Balti?

Yes—most people use “Balti Paneer” and “Paneer Balti” interchangeably. Both refer to a balti-style paneer curry, and the wording usually depends on regional preference rather than a meaningful recipe difference.

3) Balti Paneer Gravy vs Kadai Paneer—what’s the difference?

Balti paneer gravy is typically smoother and more sauce-forward, with a rounded spice profile and a glossy finish. Kadai paneer, in contrast, leans more rustic and capsicum-heavy, often with a sharper, kadai-masala character and a more textured gravy.

4) Balti Paneer Gravy vs Paneer Butter Masala—what should I expect?

Balti paneer gravy usually tastes more aromatic and spice-led, while paneer butter masala is generally richer, sweeter, and more buttery. If you want a creamy paneer curry that still feels punchy and restaurant-like, balti paneer is a great middle path.

5) How spicy is this paneer balti recipe?

It can be mild to medium, depending on the number of green chillies and the chilli powder used. If you prefer a gentler curry, reduce the green chillies and use a mild chilli powder; the gravy will still taste full-bodied because the base carries plenty of flavor.

6) Why do you marinate paneer for balti paneer gravy?

Marinating paneer helps it taste seasoned all the way through, rather than relying only on the sauce. Even a short marinade with ginger-garlic and chilli makes the cubes more flavorful once they simmer in the gravy.

7) How do I keep paneer soft in restaurant style balti paneer?

To keep paneer tender, avoid over-frying it and don’t boil it aggressively in the sauce. Brief sautéing followed by soaking (then a short simmer at the end) helps maintain a softer texture and prevents rubbery cubes.

8) Can I skip the nuts in balti paneer gravy?

You can, although the gravy will be less silky and less restaurant-like. If you need a substitute, use a bit more thick curd or finish with slightly more cream; however, the nutty depth and smooth body will be reduced.

9) What can I use instead of hung curd?

If hung curd isn’t available, strain regular curd for a couple of hours to thicken it. Greek yogurt can also work, provided it’s thick and not overly tangy. Either way, gentle heat helps keep the gravy smooth.

10) How do I prevent curd from splitting in balti paneer gravy?

Use thick curd, keep the heat moderate, and cook the base patiently. Additionally, once the blended paste returns to the pan, bhuno it steadily rather than rushing—this encourages a more stable, cohesive sauce.

11) What is the best “balti paneer masala” substitute for Kitchen King masala?

A balanced garam masala is the simplest substitute. For a closer restaurant-style effect, you can combine garam masala with a small pinch of cumin-coriander powder; still, the final flavor will shift slightly.

12) Can I make balti paneer gravy without cream?

Certainly. The gravy can still be rich from nuts and thick curd alone. If you skip cream, let the curry rest a little longer so the sauce settles and tastes rounded.

13) Can I make this balti paneer recipe ahead of time?

Absolutely. In fact, the gravy often tastes even better after it sits because the spices mellow and integrate. Make the sauce in advance, then add paneer close to serving so the cubes stay soft.

14) How long does balti paneer gravy last in the fridge?

Typically, it keeps well for 2–3 days when stored properly in a sealed container. Reheat gently and add a splash of water if the gravy thickens after chilling.

15) Can I freeze balti paneer gravy?

You can freeze the gravy base, although paneer texture may change after thawing. For best results, freeze only the sauce, then add fresh paneer when reheating and finishing the dish.

16) What should I serve with Balti Paneer Gravy?

It pairs beautifully with naan, tandoori roti, kulcha, or jeera rice. For a complete meal, add a crisp onion salad, lemon wedges, and a simple raita on the side.

17) Why does my balti paneer gravy taste bitter?

Bitterness usually comes from over-browned onions, too much kasoori methi, or spices cooked too aggressively. Next time, aim for golden onions (not dark), keep methi measured, and cook the paste patiently over steady heat.

18) Why is my balti paneer gravy too thick or too thin?

If it’s too thick, loosen it gradually with hot water and simmer briefly. If it’s too thin, cook it uncovered until it reduces; since the base contains nuts and dairy, it will naturally thicken as moisture evaporates.

19) Can I make a vegan balti-style tofu gravy using this method?

Yes. Replace paneer with firm tofu and use plant-based yogurt and cream alternatives. While the flavor profile will shift slightly, the same bhuno-and-finish approach still delivers a rich, balti-inspired gravy.

20) What makes this a restaurant style balti paneer gravy at home?

It’s the combination of a properly cooked onion base, the nut-and-curd body, and the second bhuno after blending—plus a short rest at the end. Together, those steps create the glossy texture and layered flavor people associate with restaurant paneer gravies.

Posted on 5 Comments

Indian Inspired Alfredo Pasta: 5 Indian Twists on Creamy Alfredo

Magazine-style cover featuring a bowl of creamy Indian-inspired Alfredo pasta topped with charred paneer tikka. Text overlay reads “Indian-Inspired Alfredo Pasta” and “5 Indian Twists on Creamy Alfredo,” listing masala, paneer tikka, korma, spinach paneer, and coconut curry, plus “one-pot + baked options included,” with MasalaMonk.com in the footer.

Creamy Alfredo has a certain pull—soft, glossy, and comforting in a way that makes a normal weeknight feel oddly luxurious. At the same time, the classic bowl can start to feel predictable once you’ve made it a few times. That’s exactly why Indian inspired Alfredo pasta works so well: it keeps everything you love about Alfredo—the cling, the richness, the peppery warmth—while letting you steer the flavor somewhere exciting.

Sometimes that means a masala bloom in ghee that perfumes the whole pan. Other times, it’s smoky paneer tikka folded into cream so the char and the sauce play off each other. On quieter evenings, a korma-style nuttiness turns Alfredo mellow and restaurant-like. And when you want something that tastes rich yet feels balanced, spinach paneer Alfredo delivers a green, velvety comfort that’s hard to stop eating. Finally, coconut curry Alfredo brings coastal warmth that’s ridiculously good with shrimp.

Even better, these aren’t “one-off” novelty ideas. Each twist below reads as a complete, standalone recipe you can cook tonight—yet everything is built on a shared base so you’re not learning five totally different methods. Along the way, you’ll also get an easy jar-sauce upgrade, a one pot Alfredo approach, and a baked Alfredo pasta approach (ziti, penne, tortellini) so you can match the mood of the day.

If you want the deeper technique story behind classic Alfredo, you can also read Classic vs. Authentic Alfredo: 5 Essential Recipes—it’s a great companion when you’re in the “I want the why, not just the what” mood.


Indian Inspired Alfredo Pasta Base: A Creamy Alfredo Sauce That Stays Silky

Alfredo is at its best when it behaves like a sauce rather than a thick dairy blanket. The ideal version is glossy and cohesive—fat, cheese, and starch held together in a smooth emulsion so every strand of pasta looks lacquered. That’s why gentle heat and starchy pasta water matter so much. When you build the sauce in the pan and finish the pasta in it, the results feel restaurant-level without requiring restaurant tools. The mechanics are beautifully explained in Serious Eats’ fettuccine Alfredo method, and once you understand the approach, the Indian twists become easy choices instead of stressful experiments.

Dark luxe recipe card for Indian inspired Alfredo pasta base showing creamy Alfredo pasta, ingredients, step-by-step method, and “Silky Rules” tips to prevent splitting and keep the sauce glossy.
Indian inspired Alfredo pasta starts here: a silky, glossy Alfredo base that won’t split (plus the “Silky Rules” that make it foolproof). Save this recipe card, then scroll for 5 Indian twists—masala, paneer tikka, korma, spinach paneer, and coconut curry.

Alfredo base (serves 4)

  • 300–350 g pasta (fettuccine, penne, fusilli, ziti; or tortellini if you want a faster “wow” bowl)
  • 2 tbsp butter (or ghee if you like a warmer, rounder finish)
  • 3–5 garlic cloves, finely grated (optional, but very good)
  • 1 to 1¼ cups cream (or cooking cream)
  • ¾ cup finely grated parmesan (or a parmesan-style hard cheese)
  • ½ to 1 cup reserved pasta water (you’ll add it gradually)
  • ½ tsp freshly ground black pepper (plus more to finish)
  • Salt, to taste (go light until cheese is in)

The method (steady, reliable, forgiving)

  1. Bring a big pot of water to a boil. Salt it generously. Cook pasta until just al dente. Before draining, reserve at least ½ cup pasta water (a full cup is safer).
  2. Meanwhile, melt butter (or ghee) in a wide pan over medium-low heat. If using garlic, add it and warm gently until fragrant—soften it, don’t scorch it.
  3. Lower the heat. Add cream and warm until steaming. Avoid a rolling boil; high heat encourages separation.
  4. Add grated cheese in small handfuls, whisking constantly so it melts smoothly.
  5. Now, adjust with pasta water: add a splash, whisk, and watch the sauce loosen into a glossy, clingy texture. Repeat until it coats the back of a spoon.
  6. Add pasta to the pan and toss well so the sauce grips every strand.

That final step—tossing pasta in the sauce instead of pouring sauce over pasta—makes a real difference. If you enjoy the technique, Serious Eats’ guidance on saucing pasta the right way is worth reading.

Dark luxe infographic explaining why Alfredo sauce splits, turns grainy, or gets too thick, with quick fixes: lower heat, whisk in warm pasta water, and add finely grated cheese slowly.
Why does Alfredo split or turn grainy? This quick rescue guide fixes 3 common problems—split/oily, grainy, and too thick—using low heat, warm pasta water, and slow-added fine cheese for a glossy emulsion. Save this, then use it with any Indian inspired Alfredo pasta twist in the post.

Best cheese for fettuccine Alfredo (and practical substitutes)

A finely grated hard cheese melts more evenly and emulsifies more easily. The shape of the cheese matters too; fine, snowy shreds melt into the cream without clumping, especially when the heat is low, as described in Serious Eats’ Alfredo guide.

If parmesan is expensive or hard to find, use what’s available: a parmesan-style hard cheese for flavor plus a small amount of melt-friendly cheese if you need a smoother texture. Still, keep the melt cheese in check so it doesn’t overwhelm the sauce. Alfredo should taste creamy and peppery, not like generic cheese sauce.

Also Read: Chicken Pesto Pasta (Easy Base Recipe + Creamy, One-Pot, Baked & More)


Alfredo Pasta With an Indian Twist: Choosing the Right Pasta Shape

Different shapes change the entire experience.

  • Fettuccine Alfredo pasta feels classic and indulgent because broad noodles wear the sauce like satin.
  • Penne Alfredo and alfredo penne pasta feel “bitey” and complete because sauce hides inside the tubes.
  • Ziti with Alfredo sauce (alfredo ziti) is tailor-made for baking—saucy inside, bubbly on top.
  • Tortellini in Alfredo sauce feels restaurant-level fast because stuffed pasta adds richness without extra work.
  • Fusilli Alfredo catches sauce in the spirals, which is especially satisfying for thicker versions like spinach paneer Alfredo.
Dark luxe infographic showing the best pasta shapes for Alfredo sauce—fettuccine, penne, ziti, tortellini, and fusilli—with quick notes on which shapes coat best, hold sauce inside, work for baked Alfredo, or suit thicker sauces like spinach paneer Alfredo.
Choosing the right pasta shape makes Alfredo instantly better. Use this quick guide for Indian inspired Alfredo pasta: fettuccine for silky coating, penne for sauce-in-every-bite, ziti for baked Alfredo, tortellini for fast “restaurant wow,” and fusilli for thicker sauces like spinach paneer Alfredo. Save this, then pick your twist below.

If you’re using tortellini and want timing confidence, How to cook tortellini (fresh, frozen, dried) is a helpful companion.

Also Read: Pork Tenderloin in Oven (Juicy, Easy, 350°F or 400°F) Recipe


How to Make Easy Alfredo Pasta With Jar Sauce Taste Homemade (Without Overdoing It)

Some nights you want the comfort without the extra steps. Easy Alfredo pasta with jar sauce can absolutely work—as long as you treat jar Alfredo like a base rather than the final answer.

Dark luxe infographic showing how to upgrade jar Alfredo sauce to taste homemade in 5 minutes using reserved pasta water, black pepper, a small squeeze of lemon or lime, and optional butter, with a “twist it into” list for masala, spinach paneer, coconut curry, or tikka-style versions.
Easy Alfredo pasta with jar sauce can taste homemade—fast. This 5-minute jar Alfredo upgrade uses pasta water for silkiness, pepper for warmth, and a squeeze of lemon/lime for lift (plus optional butter for gloss). Save this shortcut, then turn it into Indian inspired Alfredo pasta: masala, spinach paneer, coconut curry, or tikka-style protein.

The fastest jar Alfredo upgrade (serves 4)

  • 1 jar Alfredo sauce (about 400–500 g)
  • ¼–½ cup reserved pasta water
  • 1 tbsp butter (optional, for gloss)
  • Black pepper
  • 1 small squeeze of lemon or lime

Warm the jar sauce on low heat. Whisk in pasta water until it loosens and turns silky. Add butter if you want extra shine. Finish with black pepper and a squeeze of citrus.

From here, you can steer it toward any twist in this post by adding the spice bloom, spinach puree, coconut milk, or tikka-style protein.

If you like shortcut-friendly creamy pasta nights, Chicken Alfredo Pasta, 5 Ways is a natural companion—plenty of weeknight structure and add-in ideas without losing the comfort.

Also Read: How to Make a Flax Egg (Recipe & Ratio for Vegan Baking)


Indian Inspired Alfredo Pasta: 5 Indian Twists You’ll Keep Coming Back To

Each recipe below is written as a complete “recipe card” section—ingredients, method, timing, and the small sensory details that make the bowl feel special. Even so, the flow stays simple: cook pasta, build sauce, add twist, toss, finish.


1) Masala Alfredo Pasta (Warm, Spicy, Comforting)

Masala Alfredo pasta tastes like a familiar cream sauce took a confident step toward Indian flavors. The aroma hits first: cumin and coriander blooming in ghee, then a warm red chili note that feels inviting rather than aggressive. Finally, a little kasuri methi and lemon add a restaurant-style lift that keeps the sauce from tasting heavy.

Pasta choice: fettuccine for classic comfort, penne for a heartier bite, or fusilli for maximum sauce-catching.

Dark luxe recipe card for Masala Alfredo Pasta (Indian inspired Alfredo) showing creamy pasta with lemon and kasuri methi, plus an ingredients list and step-by-step method including blooming cumin and coriander, adding cream and parmesan, and loosening with pasta water for a glossy sauce.
Masala Alfredo pasta = creamy comfort with warm Indian spice. This recipe card walks you through blooming cumin + coriander in ghee, building a silky parmesan sauce, then finishing with kasuri methi and lemon for that restaurant-style lift. Save this pin, then try the other Indian inspired Alfredo pasta twists in the post.

Ingredients (serves 4)

For the pasta

  • 300–350 g pasta
  • Salt for boiling water

For the masala Alfredo sauce

  • 2 tbsp butter or ghee (ghee is excellent here)
  • 4 garlic cloves, finely grated (optional but highly recommended)
  • 1 to 1¼ cups cream
  • ¾ cup finely grated parmesan (or hard cheese)
  • ½ to 1 cup reserved pasta water
  • 1 tsp cumin
  • 1 tsp coriander
  • ½ to 1 tsp Kashmiri chili powder (adjust to your heat preference)
  • ¼ to ½ tsp garam masala (optional)
  • ½ tsp black pepper (plus more to finish)
  • ½ tsp crushed kasuri methi (optional, but magic)
  • Lemon wedge to finish
  • Salt, to taste

Method

  1. Boil pasta in salted water until just al dente. Reserve 1 cup pasta water, then drain.
  2. In a wide pan, warm ghee (or butter) over medium-low heat. Add garlic and let it soften until fragrant.
  3. Add cumin and coriander. Let them bloom for about 10–15 seconds—just enough to smell nutty and warm.
  4. Add Kashmiri chili powder and stir quickly; don’t let it burn.
  5. Lower heat. Add cream and warm gently.
  6. Whisk in cheese in small handfuls until smooth.
  7. Add pasta water a splash at a time until the sauce turns glossy and coats a spoon.
  8. Toss pasta in the sauce until every piece looks lacquered.
  9. Finish with black pepper, crushed kasuri methi, and a squeeze of lemon.

Kasuri methi is one of those small additions that changes the impression of the entire dish. If you want to understand why it works so well, NDTV’s guide on using kasuri methi explains its flavor boost clearly.

Variations (choose one)

  • Chicken broccoli Alfredo: sauté 300 g chicken until golden; blanch 2 cups broccoli florets for 60–90 seconds; fold both in at the end. This gives you the comfort of chicken alfredo pasta with broccoli while keeping the spice profile interesting.
  • Alfredo mushroom pasta: brown 250 g mushrooms deeply first (don’t rush this). Fold into sauce for savory depth.
  • Sausage Alfredo pasta: brown sliced sausage or spiced mince; fold in for a hearty bowl that feels weeknight-friendly and indulgent.

If you enjoy Italian classics reimagined with Indian flavors, you’ll likely also love Ravioli reinvented with Indian-inspired twists—same spirit, different pasta format.

Also Read: Croquettes Recipe: One Master Method + 10 Popular Variations


2) Paneer Tikka Alfredo (Smoky, Charred, Crowd-Pleasing)

Paneer tikka Alfredo is what you make when you want creamy pasta that still has drama. The charred edges of paneer are essential here: smoky, slightly crisp, and bold enough to stand up to the richness of Alfredo. In every bite, you get creamy sauce followed by a pop of spice and a whisper of tandoor-like flavor.

Pasta choice: penne or fusilli—both catch sauce and hold paneer pieces beautifully.

Dark luxe recipe card for Paneer Tikka Alfredo pasta showing creamy penne Alfredo topped with smoky, charred paneer tikka cubes, plus a paneer tikka marinade list, Alfredo sauce ingredients, and step-by-step method including searing paneer in batches and loosening sauce with pasta water.
Paneer Tikka Alfredo is creamy pasta with real smoky drama—charred paneer cubes folded into a silky Alfredo sauce. This recipe card includes the quick tikka marinade, the “sear in batches (don’t steam)” tip, and the easy method for glossy sauce using pasta water. Save it, then try the other Indian inspired Alfredo pasta twists in the post.

Ingredients (serves 4)

For the pasta

  • 300–350 g penne or fusilli
  • Salt for boiling water

What you need for paneer tikka

  • 300 g paneer, cut into bite-size cubes
  • ⅓ cup thick yogurt (hung curd works brilliantly)
  • 1 tbsp ginger-garlic paste
  • 1 tsp Kashmiri chili powder (or mild red chili powder)
  • ½ tsp turmeric
  • 1 tsp garam masala (or tikka masala blend)
  • ½ tsp cumin
  • 1 tbsp lemon juice
  • 1 tbsp oil (for searing)
  • Salt, to taste

For Alfredo sauce

  • 2 tbsp butter
  • 1 to 1¼ cups cream
  • ¾ cup finely grated parmesan (or hard cheese)
  • ½ to 1 cup reserved pasta water
  • Black pepper

To finish

  • Chopped coriander
  • Lime wedge

If you want a reliable reference for the paneer tikka method and marinade structure, Hebbar’s paneer tikka recipe is a solid baseline.

Method

  1. Boil pasta until al dente. Reserve 1 cup pasta water, then drain.
  2. Marinate paneer in yogurt, spices, lemon, and salt for at least 15–20 minutes (longer is great, but not required).
  3. Heat a pan until hot. Add oil and sear paneer cubes in batches so they char instead of steaming. Turn gently until multiple sides develop dark, smoky spots.
  4. In a separate wide pan, melt butter over low heat. Add cream and warm.
  5. Whisk in cheese gradually until smooth.
  6. Add pasta water to loosen into a silky sauce.
  7. Toss pasta in the sauce, then fold in paneer tikka.
  8. Finish with black pepper, coriander, and a squeeze of lime.

Variations (choose your mood)

  • Easy spinach Alfredo pasta: wilt a couple of handfuls of spinach and fold in right before serving. The green bitterness balances cream.
  • Chicken tikka Alfredo: swap paneer for cooked chicken tikka pieces.
  • Baked paneer tikka Alfredo: pour into a baking dish, top with mozzarella, and bake until bubbly—crispy edges, creamy center.

When you want more baked pasta inspiration in the same comfort lane, Baked ziti variations is a natural next click.

Also Read: Fish and Chips Reimagined: 5 Indian Twists (Recipe + Method)


3) Chicken Korma Alfredo (Mellow, Nutty, Restaurant-Style)

Chicken korma Alfredo is creamy comfort turned elegant. Instead of heat-forward spice, you get warm aromatics, gentle sweetness from onion, and that unmistakable nutty richness that makes the sauce taste “finished.” It’s the kind of bowl that feels special without being loud.

Pasta choice: fettuccine for a classic luxurious feel, or penne for a family-friendly, scoopable version.

Dark luxe recipe card for Chicken Korma Alfredo pasta showing creamy pale-gold Alfredo with juicy chicken, plus ingredients for a korma-style base (onion, ginger-garlic, cashew paste, warm spices) and a step-by-step method to keep the sauce silky using low heat and pasta water, finished with lemon and optional saffron.
Chicken Korma Alfredo is creamy comfort with a mellow, nutty, restaurant-style finish. This recipe card shows the korma-style base (onion + cashew paste + warm spices), then the silky Alfredo method with pasta water for a glossy sauce—finished with lemon (and optional saffron). Save this, then try the other Indian inspired Alfredo pasta twists in the post.

Ingredients (serves 4)

For the pasta

  • 300–350 g pasta
  • Salt for boiling water

What you need for the chicken korma component

  • 350–400 g boneless chicken (thighs stay juicy; breast works too)
  • 1 medium onion, finely grated or minced
  • 1 tbsp ginger-garlic paste
  • 2 tbsp butter or ghee
  • 2 tbsp cashew paste (blend ¼ cup cashews with a few tbsp water)
  • ½ tsp ground cardamom (or 3 green cardamoms, crushed)
  • Pinch of cinnamon
  • ½ tsp cumin
  • ½ tsp coriander
  • ¼ tsp turmeric
  • Salt, to taste

For Alfredo sauce

  • 1 to 1¼ cups cream
  • ¾ cup finely grated parmesan (or hard cheese)
  • ½ to 1 cup reserved pasta water
  • Black pepper

To finish

  • Lemon wedge
  • Optional: a few saffron strands soaked in warm milk

For a reference point on korma-style flavor structure, Sanjeev Kapoor’s chicken korma recipe is a helpful baseline.

Method

  1. Boil pasta to al dente. Reserve 1 cup pasta water and drain.
  2. In a wide pan, warm butter or ghee. Add onion and cook on low heat until soft and lightly golden. This step creates the mellow sweetness that makes korma taste luxurious.
  3. Add ginger-garlic paste and cook until fragrant.
  4. Add chicken and cook until nearly done.
  5. Stir in spices and cashew paste. Add a small splash of water if it looks too thick, then simmer briefly so everything becomes cohesive.
  6. Lower heat. Add cream and warm gently.
  7. Whisk in cheese gradually until smooth.
  8. Add pasta water to loosen into a silky sauce.
  9. Toss pasta in the sauce, finish with black pepper and lemon.

Variations and add-ins

  • Chicken and broccoli penne Alfredo: add blanched broccoli at the end; it brightens the bowl and balances richness.
  • Chicken and mushroom Alfredo pasta: fold in browned mushrooms for deeper savoriness.
  • Crock pot direction: if you love creamy comfort meals in slower formats, it’s easy to stay in the same mood with Crock pot lasagna soup—different format, similar coziness.

Also Read: Dirty Martini Recipe (Classic, Extra Dirty, No Vermouth, Spicy, Blue Cheese, Tequila + Batched)


4) Spinach Paneer Alfredo (Green, Creamy, Balanced)

Spinach paneer Alfredo is for people who want creamy pasta that doesn’t feel heavy. The spinach brings freshness and a gentle earthiness; paneer adds soft richness without overwhelming the sauce. The result feels comforting yet surprisingly lively, especially with lemon and black pepper to finish.

Pasta choice: fusilli or penne for sauce-catching, or fettuccine for a smooth, green-sauce luxury.

Dark luxe recipe card for Spinach Paneer Alfredo pasta showing creamy green spinach Alfredo with paneer cubes and lemon, plus ingredients and step-by-step method for blending spinach puree, keeping heat low, adding parmesan slowly, and loosening with pasta water for a silky sauce.
Spinach Paneer Alfredo is the “creamy but balanced” bowl—vibrant green sauce, soft paneer, black pepper warmth, and a lemon finish that keeps it lively. This recipe card shows the spinach-puree trick and the low-heat method for a smooth, glossy Alfredo. Save it, then try the other Indian inspired Alfredo pasta twists in the post.

Ingredients (serves 4)

Needed for the pasta

  • 300–350 g pasta
  • Salt for boiling water

For spinach paneer

  • 200–250 g paneer, cubed (or lightly crumbled)
  • 200 g spinach (roughly 5–6 packed cups)
  • 2 tbsp butter
  • 1 tbsp garlic, grated or minced (optional)
  • 1 to 1¼ cups cream
  • ¾ cup finely grated parmesan (or hard cheese)
  • ½ to 1 cup reserved pasta water
  • ½ tsp black pepper
  • 1 small green chili (optional)
  • Salt, to taste
  • Lemon wedge to finish

Method

  1. Boil pasta until al dente. Reserve 1 cup pasta water and drain.
  2. Wilt spinach in a pan with a splash of water. Once it collapses, blend into a smooth puree. Add green chili if you want a gentle kick.
  3. In a wide pan, melt butter over low heat. Add garlic if using and warm gently.
  4. Add cream and warm. Whisk in cheese gradually until smooth.
  5. Whisk in spinach puree. Keep heat low so the sauce stays smooth and vibrant.
  6. Add pasta water to adjust consistency.
  7. Toss pasta in sauce and fold in paneer.
  8. Finish with black pepper and lemon.

Herb-forward “basil Alfredo” option

If you want alfredo with basil vibes without turning the dish into a different pasta category, fold in chopped basil off heat or swirl in a spoon of pesto at the end. For pesto ideas that work well in Indian kitchens, Pesto recipe variations is a reliable companion. If you want to stay within the “Indian twist pasta” universe, Pesto pasta with Indian twists fits naturally.

Also Read: Keto Hot Chocolate Recipe (Sugar-Free Hot Cocoa) + Best Homemade Mix


5) Coconut Curry Alfredo (Coastal, Fragrant, Perfect With Shrimp)

Coconut curry Alfredo is the twist that surprises people, then immediately converts them. Coconut milk brings silk; curry spices bring warmth; Alfredo keeps the creamy comfort intact. With shrimp, the bowl feels special. With spinach, it feels balanced. And with tortellini, it feels like restaurant food in sweatpants.

Pasta choice: fettuccine for a luxurious coating, or tortellini for a fast “wow.”

Dark luxe recipe card for Coconut Curry Alfredo pasta with shrimp, showing creamy coconut-cream Alfredo with curry spices, lime, and coriander, plus ingredients and step-by-step method for keeping the sauce silky using low heat and pasta water and adding shrimp at the end to prevent overcooking.
Coconut Curry Alfredo is coastal comfort in a creamy bowl—silky coconut-cream sauce, warm spices, and shrimp finished with lime and coriander. This recipe card keeps it foolproof (low heat + pasta water = glossy sauce, shrimp added at the end). Save it, then explore the other Indian inspired Alfredo pasta twists in the post.

Ingredients (serves 4)

What you need for the Pasta

  • 300–350 g pasta (or 500 g tortellini)
  • Salt for boiling water

For coconut curry Alfredo

  • 2 tbsp butter
  • 1 tbsp ginger-garlic paste (optional)
  • ¾ cup coconut milk (adjust for richness)
  • 1 cup cream (you can reduce a bit if using more coconut milk)
  • ¾ cup finely grated parmesan (or hard cheese; keep slightly lighter if you want coconut-forward flavor)
  • ½ to 1 cup reserved pasta water
  • ½ tsp turmeric
  • 1 tsp cumin
  • 1 tsp coriander
  • Curry leaves (optional, but exceptional)
  • Black pepper
  • Salt, to taste

Shrimp option

  • 250–300 g shrimp, peeled and deveined
  • 1 tbsp butter or oil
  • Salt and pepper
  • Optional: a pinch of chili

To finish

  • Lime juice
  • Chopped coriander

Method

  1. Boil pasta until al dente. Reserve 1 cup pasta water. Drain.
  2. If using shrimp, sauté quickly in butter or oil until just pink and curled. Remove and set aside.
  3. In a wide pan, melt butter. Add curry leaves (if using) and ginger-garlic paste. Warm until fragrant.
  4. Add turmeric, cumin, coriander, and stir briefly.
  5. Pour in coconut milk and cream. Warm gently.
  6. Whisk in cheese gradually until smooth.
  7. Add pasta water to reach a glossy, clingy consistency.
  8. Toss pasta in sauce and fold in shrimp.
  9. Finish with lime and coriander.

Variations

  • Shrimp fettuccine Alfredo with spinach: wilt spinach and fold in right at the end for a bright, balanced bowl.
  • Shrimp Alfredo tortellini: use tortellini as the base; it becomes rich and special very quickly.
  • Plant-based alternative: tofu works beautifully, and if you want a seafood-like swap, this guide to vegan shrimp substitutes keeps the idea accessible without pulling you out of the comfort-food mood.

Also Read: 10 Low Carb Chia Pudding Recipes for Weight Loss (Keto, High-Protein, Dairy-Free)


One Pot Indian Inspired Alfredo Pasta (Creamy, Fast, Minimal Dishes)

One pot Alfredo pasta is the weeknight hero when you want fewer dishes and still want sauce that coats properly. The key is concentrated starch: cook pasta in less water so the starchy liquid left in the pot becomes a tool for emulsifying the sauce. Serious Eats’ lighter Alfredo approach explains how that concentrated pasta water changes everything.

Dark luxe infographic showing a one pot Indian inspired Alfredo pasta method with three steps: cook pasta in minimal water, lower heat and add butter/cream/cheese without boiling, then finish with a twist like masala, tikka, korma, spinach, or coconut; includes a tip to keep starchy liquid for a glossy sauce and a warning to avoid boiling after cheese.
One pot Indian inspired Alfredo pasta = creamy comfort with minimal dishes. This no-split method keeps sauce silky by using concentrated starchy pasta water, then adding butter, cream, and cheese on low heat (no boiling). Save this cheat sheet, then choose your twist—masala, tikka, korma, spinach paneer, or coconut curry.

One pot method (serves 4)

  • 300–350 g pasta
  • Water or broth, just enough to barely cover pasta
  • 2 tbsp butter
  • 1 to 1¼ cups cream (or jar Alfredo + cream)
  • ¾ cup grated cheese
  • Black pepper
  • Your chosen twist add-ins (masala bloom, spinach puree, paneer tikka, korma chicken, coconut curry)

Cook pasta with minimal water, stirring often. When pasta is nearly done and there’s starchy liquid left, lower heat and add butter, cream, and cheese. Stir until glossy. Then add your twist components and finish with citrus or herbs.

If you like creamy one-pot dinners beyond Alfredo, One pot chicken bacon ranch pasta sits close to this vibe—comforty, saucy, weeknight-friendly.

Also Read: Garlic & Paprika Cabbage Rolls (Keto-Friendly Recipes) – 5 Bold Savory Twists


Baked Alfredo Pasta (Ziti, Penne, Tortellini) That Doesn’t Turn Dry

Baked Alfredo pasta is its own category of comfort: bubbling cheese, crisp edges, creamy center. However, it can also turn dry if you bake it too long or start with a sauce that’s too thick. The solution is simple: keep the sauce a touch looser than stovetop Alfredo and bake just until hot and bubbly.

Dark luxe infographic showing how to make baked Alfredo pasta that stays creamy (not dry) for ziti, penne, or tortellini: keep sauce looser with extra pasta water, undercook pasta by 2 minutes, and bake only until bubbly; includes notes to cover most of the bake and uncover briefly to brown.
Baked Alfredo pasta doesn’t have to turn dry. This bake-plan card shows the 3 rules that keep it creamy: loosen the sauce with extra pasta water, undercook pasta by 2 minutes, and bake only until bubbly (cover most of the bake, uncover briefly to brown). Save this for ziti, penne, or tortellini nights—then use any Indian inspired Alfredo twist from the post.

Baked ziti Alfredo sauce pasta plan (serves 6)

  • 450–500 g ziti or penne
  • Your chosen Alfredo twist sauce (make it slightly looser with extra pasta water)
  • 1½ cups mozzarella (or a melt-friendly cheese)
  • Add-ins: chicken, broccoli, mushrooms, paneer tikka, spinach paneer, or shrimp (shrimp is best added near the end)

Cook pasta slightly under al dente. Mix with sauce. Pour into a baking dish. Top with cheese. Bake until bubbly and lightly golden.

For more baked pasta inspiration in the same comfort lane, Baked ziti variations is an easy next step.

Baked tortellini with Alfredo sauce (fastest bake)

Tortellini cooks quickly, so it’s ideal for a weeknight baked dish. Warm sauce, fold in tortellini, top with cheese, bake until bubbling—then stop. If you’re unsure about timing differences between fresh and frozen tortellini, How to cook tortellini keeps it simple.

Also Read: Eggless Yorkshire Pudding (No Milk) Recipe


Flavor Directions That Work With Any Twist: Lemon, Basil, Cajun-Style Heat, and Truffle-Style Umami

Even within these five recipes, small changes keep dinner from feeling repetitive.

Want Indian inspired Alfredo pasta to taste “restaurant-level” fast? Use one finishing move: black pepper bloom, lemon at the end for brightness, basil/pesto off heat, paprika + chili for a smoky Cajun-ish lane, or browned mushrooms for truffle-style umami. Save this guide and use it with any twist in the post—masala, paneer tikka, korma, spinach paneer, or coconut curry.

Lemon Alfredo

Lemon Alfredo is the quickest way to brighten a rich sauce. Add zest and juice at the end with black pepper. It’s especially good with chicken, shrimp, broccoli, and mushrooms because it keeps everything tasting alive.

Alfredo with basil

Fold in chopped basil off heat, or swirl pesto into the bowl right before serving. For pesto ideas that fit Indian kitchens, Pesto recipe variations helps you keep it fresh.

Cajun chicken Alfredo (Indian-friendly)

You don’t need a strict Cajun mix. Black pepper, paprika, garlic, and chili create a similar direction, while a tandoori-style rub can hit the same smoky lane. If you’re using jar Alfredo, this becomes a particularly easy weeknight version.

Truffle Alfredo (truffle-style mood without chasing ingredients)

Deeply browned mushrooms, extra black pepper, and gentle garlic create that “truffle-style” feeling—earthy, aromatic, luxurious—without relying on specialty products.

Also Read: Crock Pot Chicken Breast Recipes: 10 Easy Slow Cooker Dinners (Juicy Every Time)


Dairy-Free, Lactose-Free, Low Carb, and Keto Directions (Without Losing the Comfort)

Creamy pasta can still work for different needs; the foundation simply shifts.

Dark infographic titled “Creamy Alfredo for Every Diet” showing four Alfredo options: lactose-free Alfredo (lactose-free cream, low heat, pasta water), dairy-free Alfredo (cashew or oat cooking cream with nutritional yeast), low carb Alfredo (zucchini noodles or cabbage ribbons with salt-and-drain tip), and keto Alfredo (shirataki noodles rinsed and dry-panned or roasted spaghetti squash), with a golden rule about low heat and gradual liquid for a glossy sauce.
Creamy Alfredo can still work for different needs—lactose-free, dairy-free, low carb, or keto—without losing that glossy comfort. This chart shows the best base swaps (zoodles, cabbage ribbons, shirataki, spaghetti squash) plus the key sauce rule: keep heat low and add liquid gradually for a silky emulsion. Save this, then use it with any Indian inspired Alfredo pasta twist in the full post.

Lactose-free Alfredo

Use lactose-free cream and keep heat low. Add pasta water gradually to maintain a smooth emulsion.

Dairy-free Alfredo / non dairy fettuccine Alfredo

Cashew cream or oat cooking cream can create a satisfying sauce. Nutritional yeast adds savory depth. The result won’t be identical to parmesan Alfredo, yet it can still be glossy, rich, and comforting.

Dark luxe infographic titled “Dairy-Free Alfredo (Still Glossy)” showing a creamy dairy-free Alfredo pasta bowl and a side-by-side comparison of cashew cream versus oat cooking cream, plus an umami boost strip with nutritional yeast, garlic and black pepper, lemon added at the end, and pasta water for emulsifying; includes a low-heat rule and MasalaMonk.com footer.
Making dairy-free Alfredo that still feels rich is all about the base + umami. Choose cashew cream for the closest “classic” vibe or oat cooking cream for an easy weeknight version, then level it up with nutritional yeast, garlic + black pepper, lemon at the end, and pasta water for a glossy sauce. Save this guide and use it with any Indian inspired Alfredo twist in the full post.

Low carb Alfredo Pasta and keto-friendly options

The sauce can stay creamy while the base changes:

  • zucchini noodles
  • spaghetti squash
  • sautéed cabbage ribbons
  • shirataki noodles (well rinsed and dried)
Dark luxe infographic titled “Low-Carb Alfredo Bases (No Watery Sauce)” with a 2×2 grid showing zucchini noodles (salt 10 min then squeeze dry), spaghetti squash (roast cut-side down then fluff), cabbage ribbons (quick sauté 2–3 min to wilt), and shirataki noodles (rinse then dry-pan 5–7 min), plus a note to finish with Alfredo on low heat and a MasalaMonk.com footer.
Doing low carb or keto Alfredo? The base matters as much as the sauce. This cheat sheet shows the prep step that prevents watery pasta: salt + squeeze zoodles, roast spaghetti squash, quick-sauté cabbage ribbons, and dry-pan shirataki after rinsing. Save this for weeknights, then use your favorite Indian inspired Alfredo twist from the full post.

If you like the smart-carb pasta angle, Lentil pasta for weight loss (nutrition + recipes) is a helpful post that would allow you to move through a cohesive pasta ecosystem.

Also Read: Mozzarella Sticks Recipe (Air Fryer, Oven, or Fried): String Cheese, Shredded Cheese, and Every Crunchy Variation


A White Sauce Detour That Makes Sense in Indian Kitchens

Many Indian home cooks already know white sauce from baked pasta nights. Alfredo and béchamel aren’t identical, yet they share a creamy logic that makes the comparison useful. If you want an Indian-friendly explanation of white sauce for baking, Tarla Dalal’s white sauce guide is a helpful reference. For a strong internal companion, Béchamel sauce for lasagna fits naturally if you’re building a small collection of creamy, bake-ready sauces.


What to Serve With Indian Inspired Alfredo Pasta

Because Alfredo is rich, the best sides bring contrast—crunch, brightness, or both.

  • A lemony salad
  • Roasted vegetables
  • Sautéed greens
  • Garlic bread that makes everyone suspiciously cheerful

For a side that pairs with any Alfredo variation, Homemade garlic bread loaf is a perfect companion.

If you want another creamy pasta “cousin” that keeps you in the comfort lane without repeating Alfredo, try Vodka pasta recipe—it’s the same glossy, restaurant-style comfort, but with a totally different flavor direction.

Also Read: Sourdough Starter Recipe: Make, Feed, Store & Fix Your Starter (Beginner Guide)


Bringing It All Together: A Simple Way to Choose Your Next Bowl

If you want bold and warming, go Masala Alfredo pasta. If you want smoky and festive, paneer tikka Alfredo is the answer. Then if you want mellow and luxurious, chicken korma Alfredo hits perfectly. For those who want green and balanced, spinach paneer Alfredo stays creamy while feeling fresh. And if you want coastal comfort, coconut curry Alfredo belongs on your table—especially with shrimp.

Dark luxe decision-map infographic titled “Choose Your Alfredo Twist” with a central Alfredo Base badge and five connected cards: Masala Alfredo (bold), Paneer Tikka Alfredo (smoky), Chicken Korma Alfredo (mellow), Spinach Paneer Alfredo (green), and Coconut Curry Alfredo with shrimp (coastal), each listing the best pasta shapes; includes a bottom line suggesting formats like one pot, baked, tortellini, or classic fettuccine.
Not sure which Indian inspired Alfredo pasta to make tonight? Use this quick “pick by mood” map: Masala for bold comfort, Paneer Tikka for smoky drama, Korma for mellow nuttiness, Spinach Paneer for a green balanced bowl, or Coconut Curry (shrimp) for coastal warmth. Save this pin, then jump into the full post for the exact recipe cards + one-pot and baked options.

From there, pick the format: classic fettuccine Alfredo pasta when you want silky comfort, one pot Alfredo when you want fewer dishes, baked Alfredo pasta when you want bubbling edges, tortellini Alfredo when you want fast restaurant energy, or ziti with Alfredo sauce when you want a casserole you can share.

Once you’ve made one or two of these, you’ll start noticing something satisfying: you’re not repeating the same dinner—you’re rotating a creamy pasta universe. The base stays familiar, while the flavor moves. And that’s exactly what makes Indian inspired Alfredo pasta such a keeper.

Also Read: Peanut Butter Fudge: Recipes & Guide (8 Methods + Easy Variations)

FAQs: Indian Inspired Alfredo Pasta

1) What is Indian inspired Alfredo pasta?

Indian inspired Alfredo pasta is a creamy Alfredo-style pasta that’s finished with Indian flavors such as cumin, coriander, garam masala, kasuri methi, paneer tikka-style spice, spinach-paneer notes, or coconut curry warmth. In other words, the sauce stays rich and silky, yet the flavor shifts into an Indian-leaning comfort zone.

2) Can I make Alfredo pasta with an Indian twist using jar Alfredo sauce?

Yes. Start by warming the Alfredo pasta sauce jar on low heat, then loosen it with a splash of reserved pasta water (or warm milk) until it turns smooth and glossy. After that, fold in your Indian twist—masala bloom, tikka seasoning, spinach puree, or coconut curry base—so it tastes layered rather than flat.

3) What’s the best cheese for fettuccine Alfredo pasta?

Traditionally, a finely grated hard cheese gives the cleanest melt and the smoothest texture. Because Alfredo is simple, the cheese choice matters: it should taste nutty and savory without turning the sauce heavy or grainy. If you’re experimenting, combine a hard cheese for flavor with a small amount of melt-friendly cheese for extra creaminess.

4) Why does my Alfredo sauce turn grainy or split?

Most often, Alfredo splits because the heat is too high or the cheese is added too quickly. Similarly, graininess can happen when the sauce boils or when pre-shredded cheese doesn’t melt smoothly. To fix it, reduce the heat, whisk steadily, and add small splashes of pasta water until the sauce comes back together.

5) How do I fix Alfredo sauce that’s too thick?

Add warm pasta water a tablespoon at a time while stirring until the sauce loosens and coats the pasta evenly. If you don’t have pasta water, warm milk or cream can help; however, pasta water usually creates the most “clingy” texture.

6) How do I make one pot Alfredo pasta without it turning gummy?

Use just enough water to barely cover the pasta and stir frequently so it doesn’t stick. When the pasta is nearly done, you should still have a little starchy liquid left—this helps the sauce bind. Then lower the heat before adding dairy and cheese so the sauce stays smooth rather than gluey.

7) Is one pot Alfredo pasta with jar sauce a good idea?

It can be, especially on busy nights. The key is gentle heat and enough liquid to keep the sauce silky. If the jar sauce seems overly thick, thin it gradually with pasta water. Afterward, add your chosen twist—masala, basil-aligned herbs, lemon, spinach, or coconut curry—so it tastes intentional.

8) Which pasta shape is best for Alfredo: fettuccine, penne, or ziti?

Fettuccine Alfredo pasta feels classic because wide noodles carry sauce beautifully. Meanwhile, penne Alfredo holds sauce inside the tubes, so each bite tastes richer. Ziti with Alfredo sauce is ideal when you’re planning a bake because it stays sturdy and doesn’t collapse.

9) Can I make Alfredo ziti or baked Alfredo pasta ahead of time?

Yes. For baked Alfredo pasta, slightly undercook the pasta, keep the sauce a little looser than usual, and assemble everything in a dish. Then bake just until hot and bubbly. If it sits too long in the oven, it can dry out, so aim for “bubbly and done,” not “baked forever.”

10) How do I make baked fettuccine Alfredo with jar sauce without drying it out?

First, loosen the jar sauce with pasta water or milk so it’s silky before mixing it with pasta. Next, cover the dish for most of the bake, then uncover briefly at the end for a golden top. Finally, avoid overbaking—Alfredo stays best when it’s heated through rather than aggressively reduced.

11) How do I make chicken broccoli and ziti Alfredo taste better?

Season each part. Brown the chicken well for flavor, blanch the broccoli briefly so it stays bright, and keep the sauce smooth with pasta water. Then combine everything and bake only until bubbly. As a result, you get a creamy chicken broccoli ziti Alfredo that tastes layered instead of bland.

12) What’s the easiest way to make chicken Alfredo penne with jar sauce?

Cook penne until al dente. Warm jar Alfredo on low heat, thin it with pasta water, and add black pepper. Then stir in cooked chicken and toss everything together. If you want an Alfredo pasta with an Indian twist, finish with a quick masala bloom or tikka-style seasoning.

13) How do I keep shrimp from turning rubbery in shrimp Alfredo pasta?

Cook shrimp separately and briefly—just until pink and curled. Then add it to the sauce at the end so it warms through without overcooking. This approach works especially well for shrimp fettuccine Alfredo with spinach or shrimp Alfredo tortellini.

14) Can I make shrimp and tortellini Alfredo?

Absolutely. Tortellini cooks quickly and feels extra hearty in Alfredo. Keep the sauce smooth, add shrimp at the end, and finish with lemon or black pepper. If you like, add spinach for a shrimp spinach Alfredo variation that tastes brighter.

15) How do I make Alfredo mushroom pasta taste richer?

Brown mushrooms deeply first so they develop a roasted, savory flavor. Then fold them into the sauce. In particular, mushroom Alfredo becomes even more satisfying with extra black pepper and a small squeeze of lemon to lift the richness.

16) How do I make basil Alfredo or Alfredo with basil without it tasting flat?

Add basil at the end, off the heat, so it stays fragrant. Also, balance it with black pepper and a little citrus. If you want more depth, a small spoon of herb paste or pesto-style basil mixture can intensify the flavor without overpowering the sauce.

17) What is lemon Alfredo, and when should I add the lemon?

Lemon Alfredo is Alfredo finished with lemon zest and juice for brightness. Add lemon at the very end so it stays fresh and doesn’t curdle the dairy. It’s especially good with chicken, shrimp, broccoli, and spinach.

18) Can I make Cajun chicken Alfredo using this Indian-inspired approach?

Yes. You can build a Cajun-style direction with black pepper, paprika, garlic, and a bit of chili. Then, if you want it to feel more Indian-leaning, add a pinch of cumin or garam masala and finish with lime. That way, the flavor stays bold while still fitting the Indian inspired Alfredo pasta theme.

19) How do I make Alfredo pasta with Italian sausage (or sausage Alfredo pasta) without making it too heavy?

Use browned sausage for flavor, then keep the sauce slightly looser with pasta water. Additionally, finish with black pepper and lemon so the bowl tastes lively instead of heavy. You can also add broccoli or spinach for balance.

20) Can I make Alfredo pasta with tuna or ham?

Yes—both tuna Alfredo pasta and ham Alfredo pasta are common quick options. Add the tuna or ham toward the end so it warms through gently. Then finish with lemon and pepper to brighten the sauce.

21) Is there a lactose-free fettuccine Alfredo option?

Yes. Use lactose-free cream (or lactose-free milk with a thickener), then choose a hard cheese that melts smoothly. Keep the heat low and rely on pasta water to help the sauce bind so it stays silky.

22) How do I make dairy free fettuccine Alfredo or non dairy Alfredo sauce?

Use cashew cream, oat cooking cream, or another creamy plant base. Then add savory depth with nutritional yeast, garlic, and black pepper. After that, use pasta water to create a cohesive, glossy texture so it still feels like Alfredo.

23) What’s a good low carb fettuccine sauce or keto Alfredo sauce option?

For keto fettuccine Alfredo sauce, keep the sauce creamy and swap the base: zucchini noodles, spaghetti squash, sautéed cabbage ribbons, or well-prepped shirataki. That way, you keep the comfort while cutting the carbs.

24) How long does Alfredo pasta last in the fridge, and what’s the best way to reheat it?

Typically, Alfredo pasta keeps well for a few days when stored properly in the fridge. When reheating, do it gently on low heat with a splash of milk, cream, or water to loosen the sauce. If you microwave it, stir halfway through so it warms evenly and doesn’t separate.

25) Why does my Alfredo sauce taste bland, and how do I fix it quickly?

Usually it needs salt, black pepper, and a bright finish. Add pepper, a tiny pinch of salt, and a squeeze of lemon. For an Alfredo pasta with Indian twist, add crushed kasuri methi or a quick masala bloom—those small touches often transform the flavor immediately.

Alfredo Pasta Reinvented: 5 Indian-Inspired Twists