
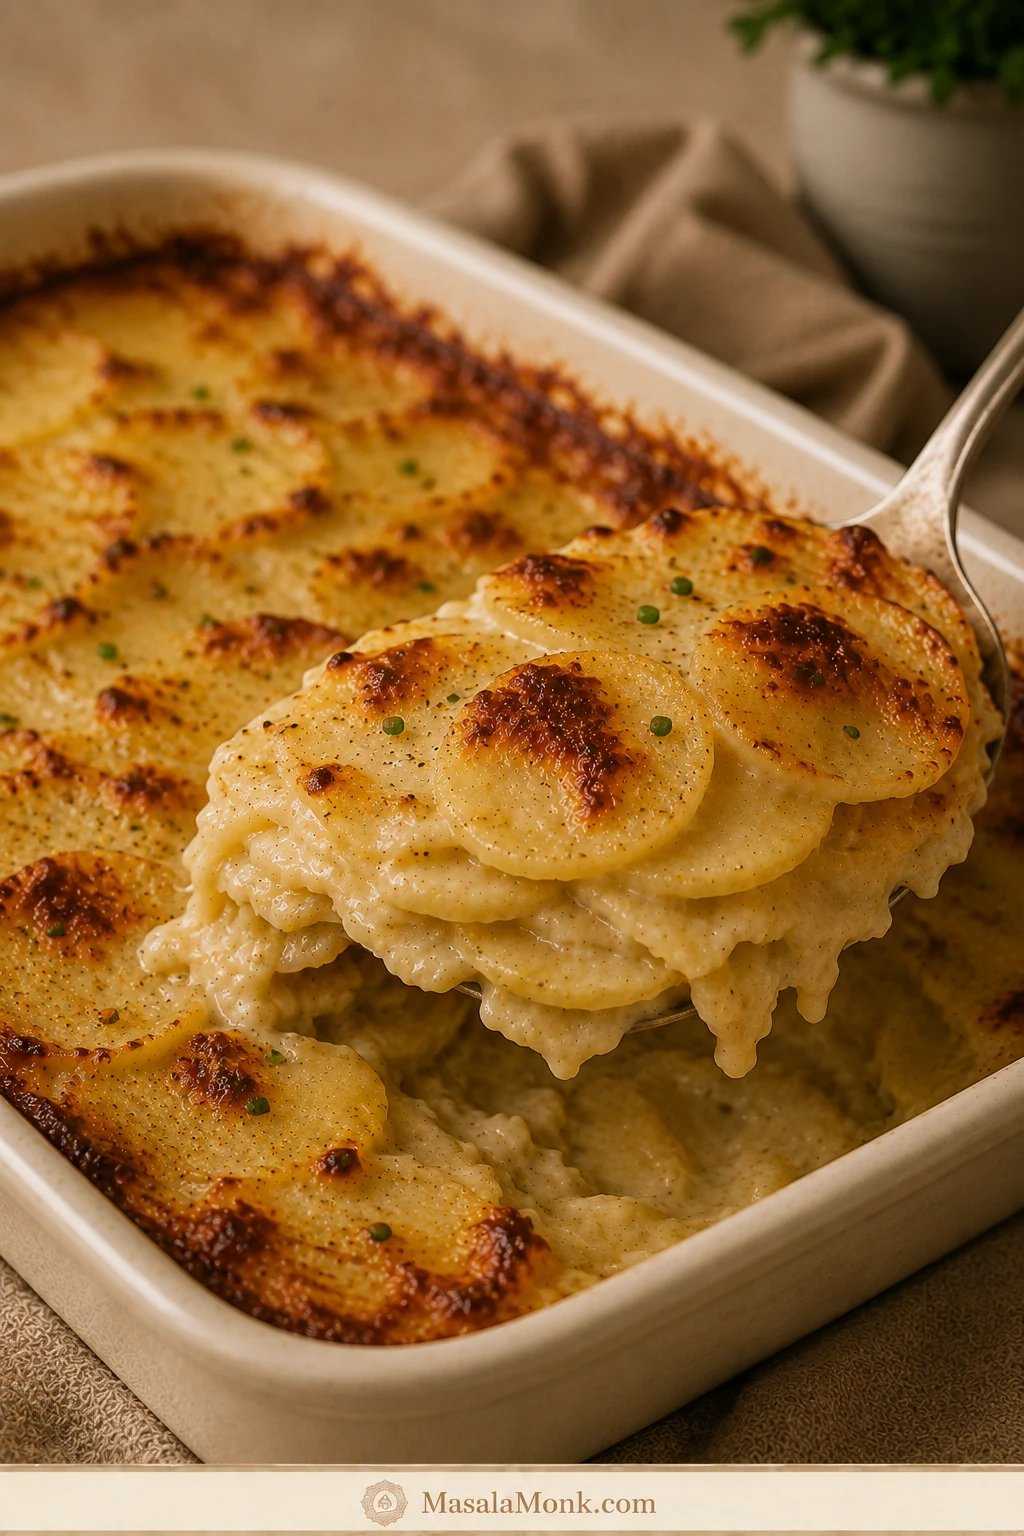
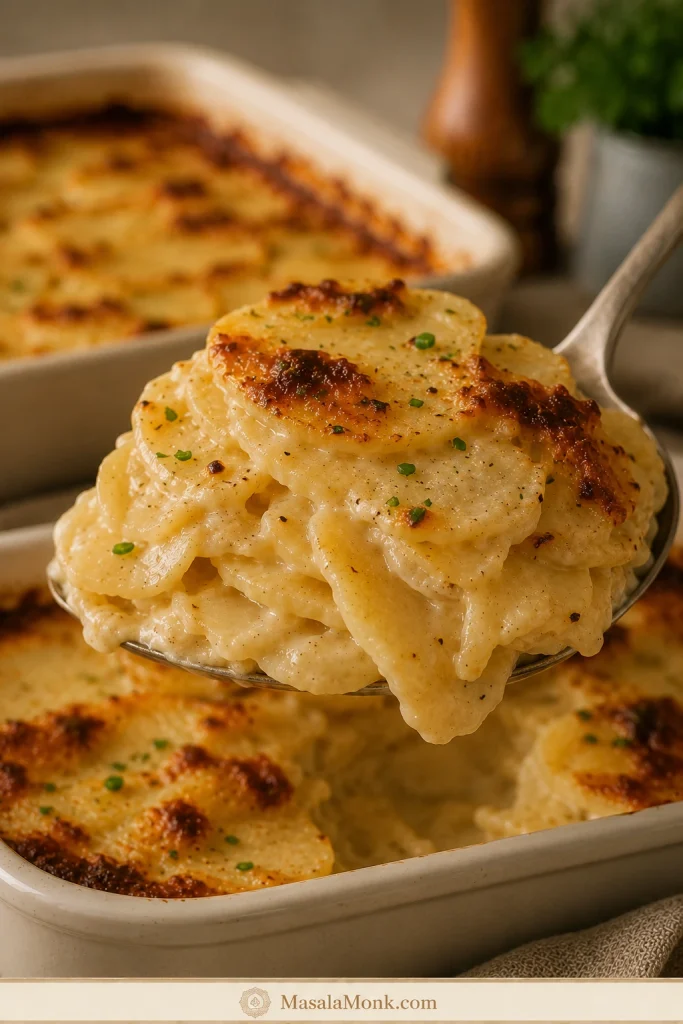
The best scalloped potatoes slump softly under the serving spoon. The slices are tender all the way through but still visible as layers, mellow onion and garlic run through the creamy sauce, and the browned edges give you the richest bites in the pan.
Scalloped potatoes aren’t difficult, but they can be frustrating when they go wrong because most problems reveal themselves late. After more than an hour in the oven, nobody wants to discover a firm layer hiding beneath a beautifully browned top—or thin sauce pooling underneath the first serving.
This version is made from scratch with Russet potatoes and a buttery whole-milk white sauce seasoned with softened onion, garlic, black pepper and an optional whisper of nutmeg. You don’t need canned soup, heavy cream or cheese to make it rich and satisfying.
Quick answer
How to Make Creamy Scalloped Potatoes Without a Watery Sauce
Slice 3 lb (1.36 kg) Russet potatoes about ⅛ inch (3 mm) thick. Layer them with a lightly thickened whole-milk white sauce in a shallow 9 × 13-inch (23 × 33-cm) baking dish.
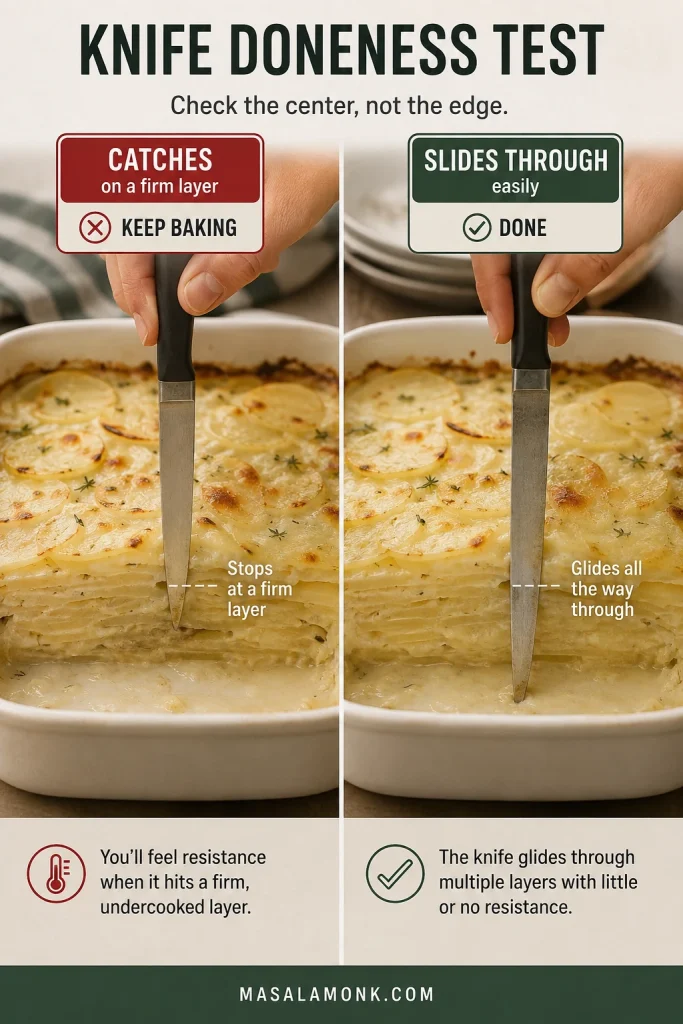
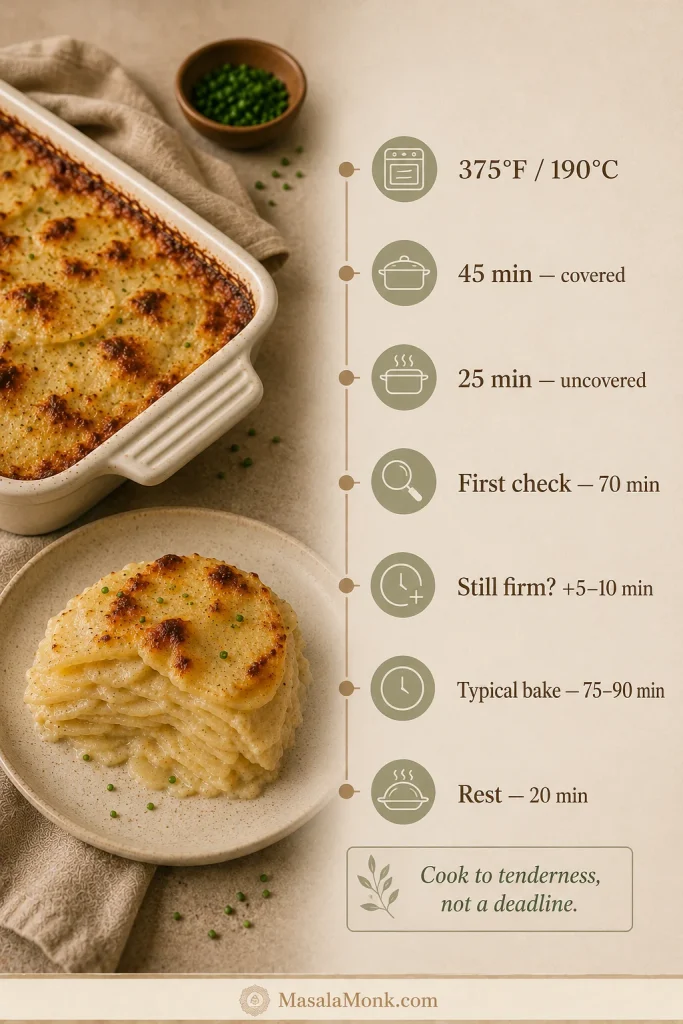
Bake at 375°F (190°C) for 45 minutes covered, then uncover and bake another 25 minutes. Start checking at the 70-minute mark. A thin knife should pass all the way through without catching on a firm layer. Most pans finish in the 75–90 minute range.
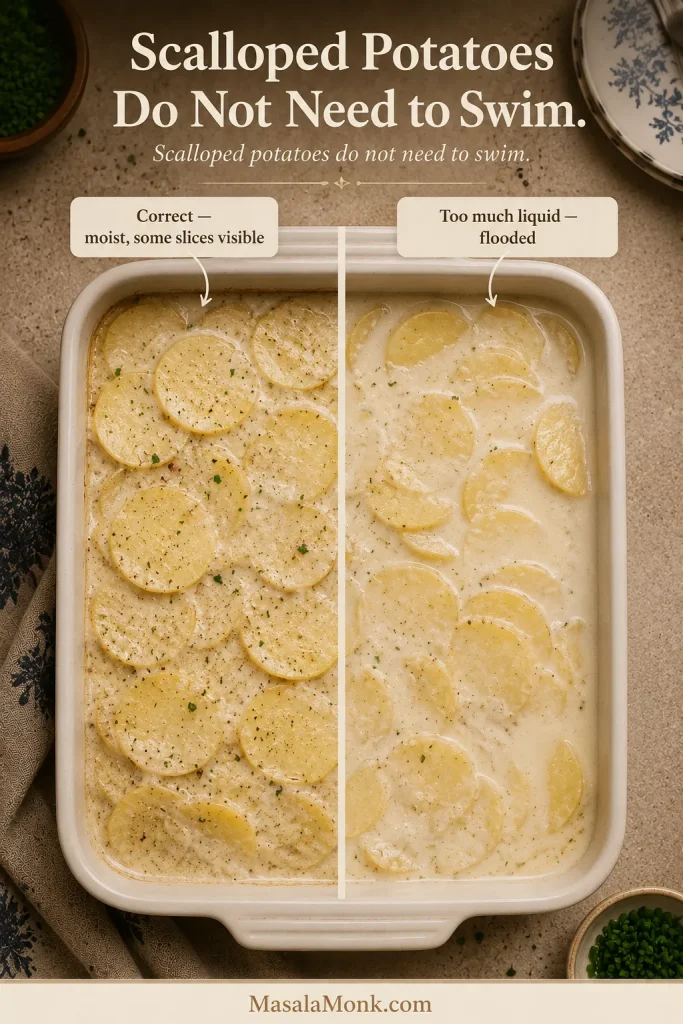
Rest the potatoes for 20 minutes before serving. And don’t worry if some slices remain visible above the sauce before baking. Scalloped potatoes do not need to swim.
Make it now
Scalloped Potatoes Recipe
These easy scalloped potatoes pair thin Russet slices with a savory onion-and-garlic white sauce that stays creamy without relying on heavy cream or cheese.
Recipe at a Glance
- Yield: 8 side-dish servings
- Prep: 25 minutes
- First check: 70-minute mark
- Typical bake: 75–90 minutes
- Rest: 20 minutes
- Total: 2 hours to 2 hours 15 minutes
- Oven: 375°F (190°C)
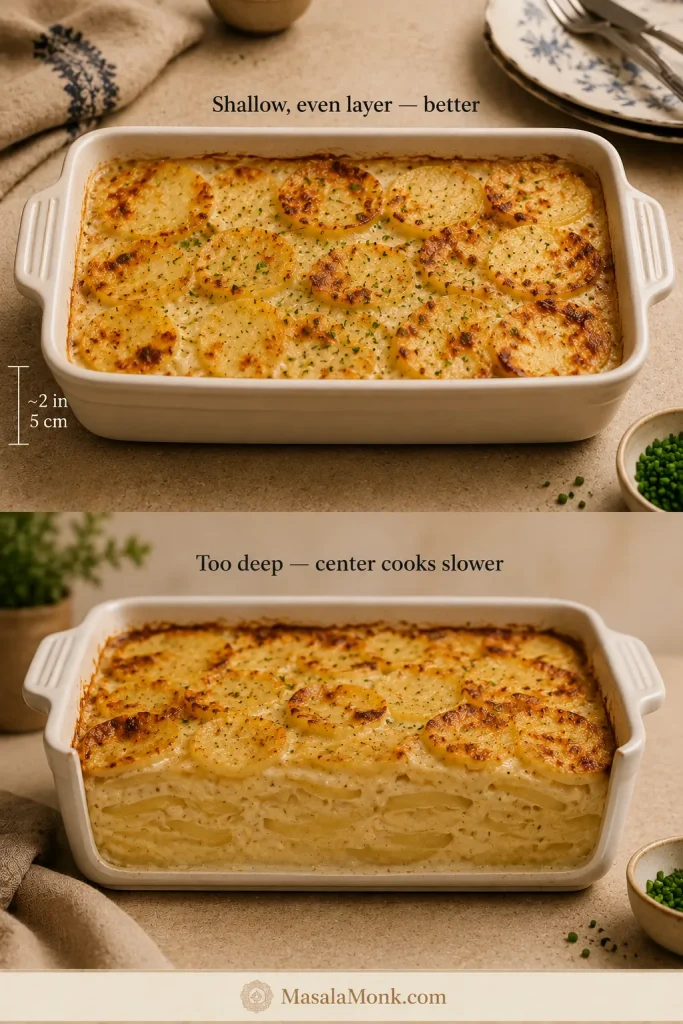
- Dish: shallow 9 × 13 inches (23 × 33 cm), about 2 inches (5 cm) deep
Equipment
- Shallow 9 × 13-inch (23 × 33-cm) baking dish
- Medium saucepan
- Whisk
- Mandoline with hand guard or sharp chef’s knife
- Aluminum foil
A similarly sized shallow dish works too. A deeper dish stacks the potatoes into a thicker layer, so heat takes longer to reach and soften the slices in the middle.
Planning to finish the top under the broiler? Use a baking dish rated for broiler heat.
Ingredients
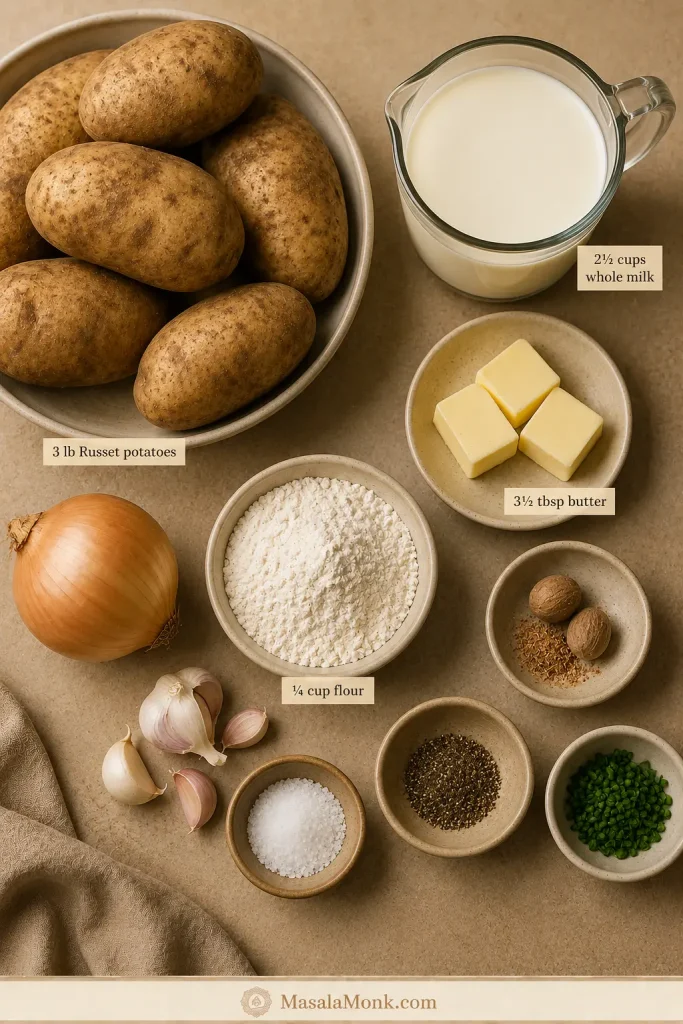
- 3 lb (1.36 kg) Russet potatoes, weighed before peeling
- 3½ tablespoons (50 g) unsalted butter, plus more for the dish
- 1 medium yellow onion, about 5 oz (140 g), finely diced
- 2 medium garlic cloves, about 6 g, finely minced
- ¼ cup (30 g) all-purpose flour
- 2½ cups (590 ml) whole milk
- 2 teaspoons fine sea salt (about 11 g), divided
- ¾ teaspoon freshly ground black pepper
- ⅛ teaspoon ground nutmeg, optional
- Chopped chives, parsley or a few thyme leaves, optional for serving
Instructions
Prep the Sauce and Potatoes
- Heat the oven and prepare the dish. Set a rack in the center, heat the oven to 375°F (190°C), and lightly butter the baking dish.
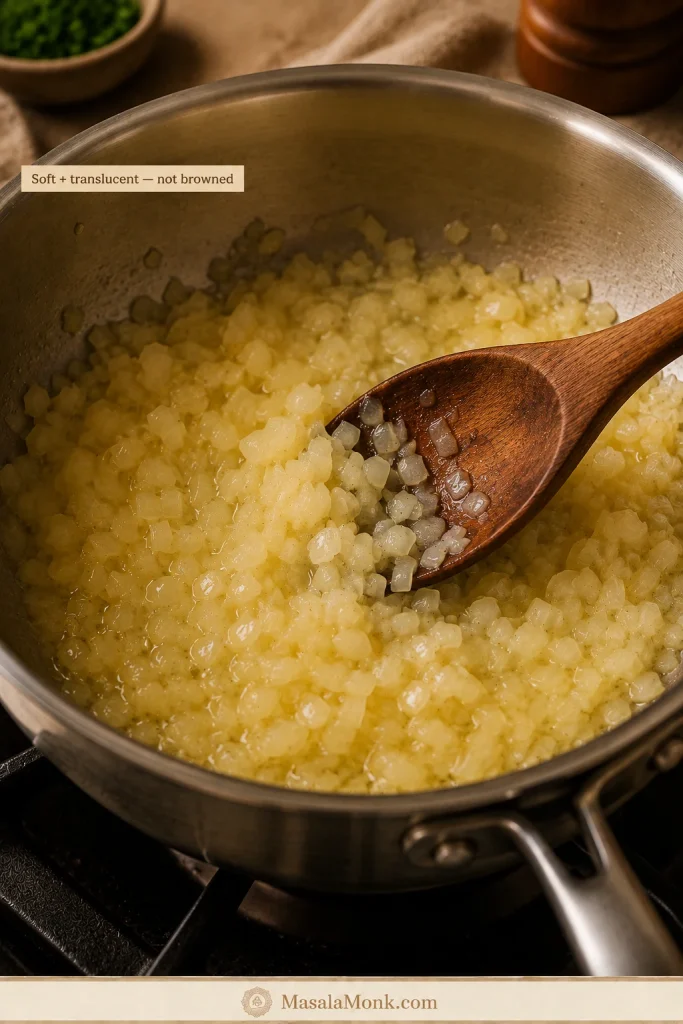
- Soften the onion and garlic. Melt the butter in a medium saucepan over medium heat. Cook the onion for 5–7 minutes, stirring occasionally, until soft and translucent. Add the garlic and cook for another 30 seconds, just until fragrant.
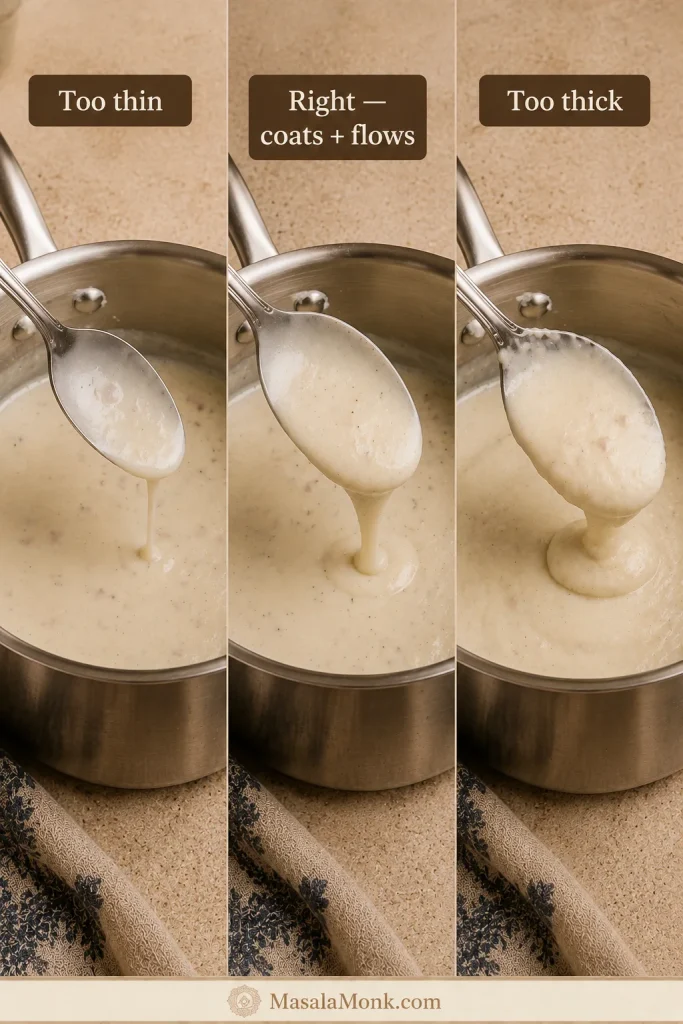
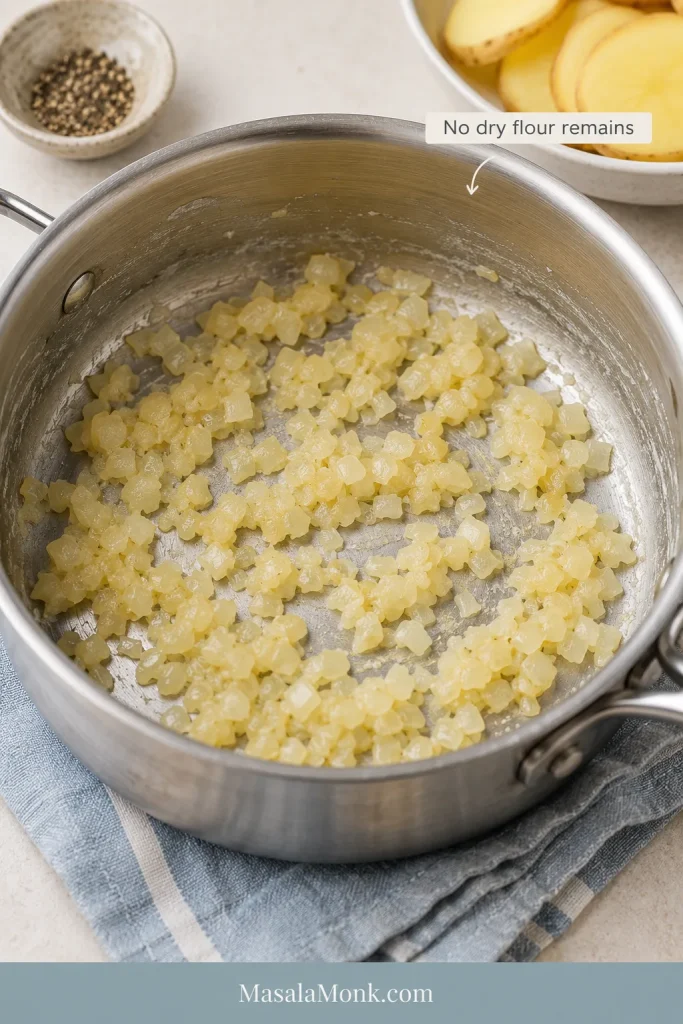
- Make the white sauce. Stir in the flour and cook for 1 minute, until no dry flour remains. Gradually whisk in the milk in several additions, followed by 1½ teaspoons (about 8 g) salt, the pepper and optional nutmeg. Cook over medium to medium-low heat, whisking regularly, until the sauce lightly coats the back of a spoon but still pours easily. Once all the milk is incorporated, this usually takes 4–6 minutes. Remove from the heat.
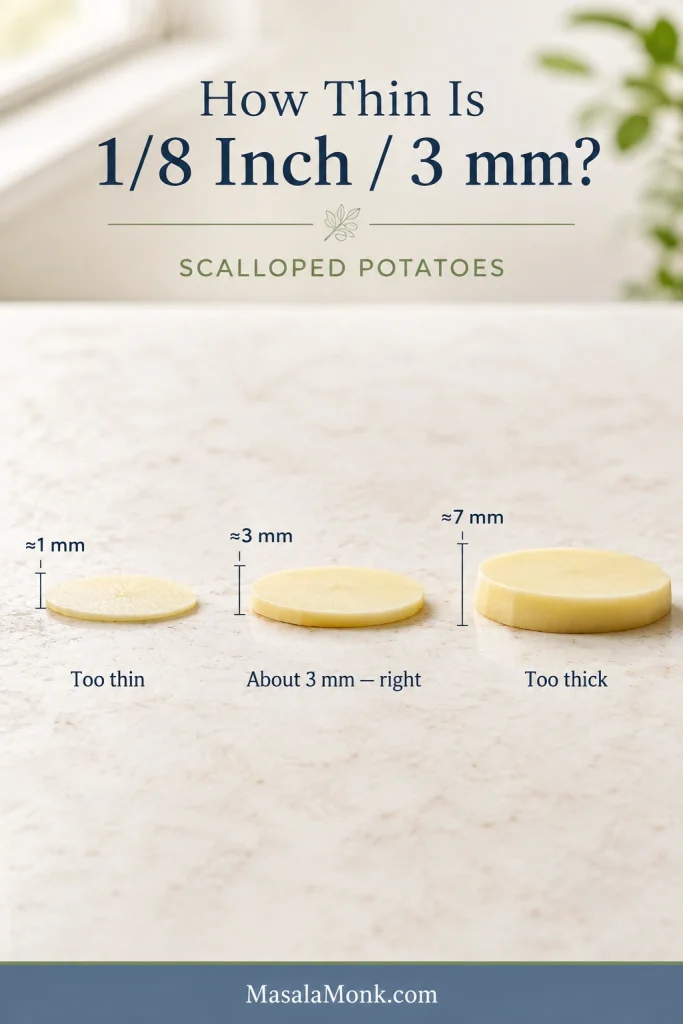
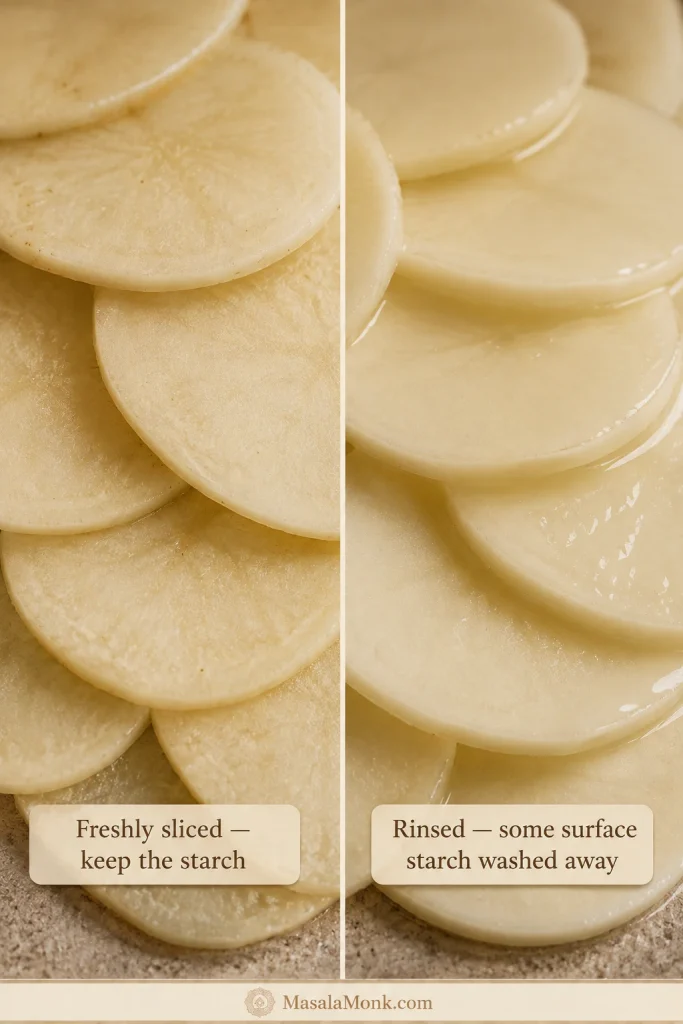
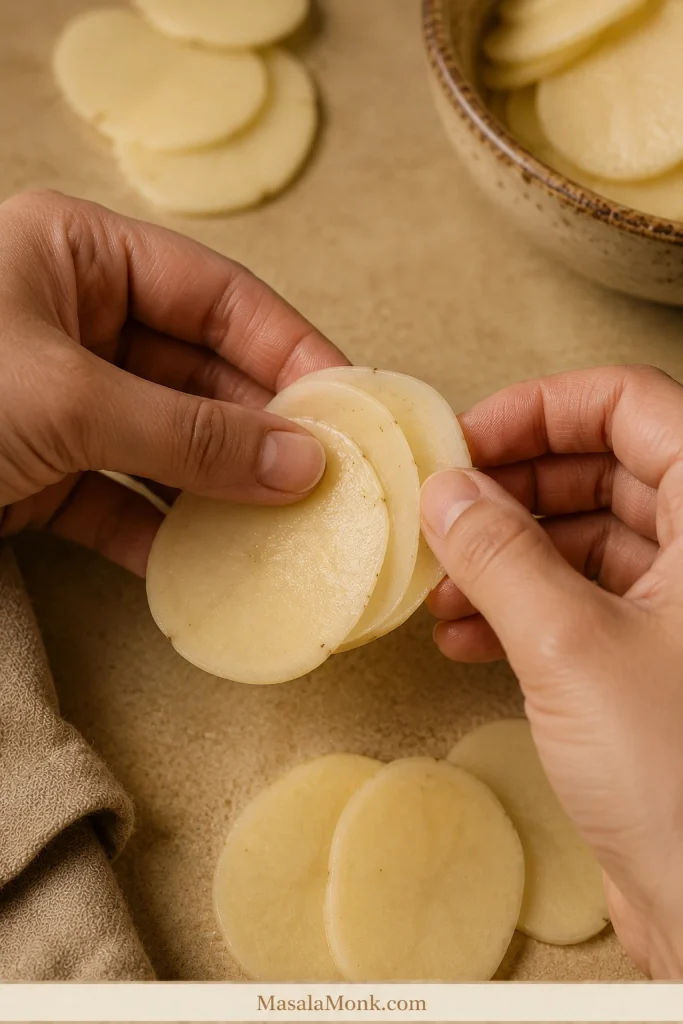
- Scrub, peel and slice the potatoes. Cut the Russets into even rounds about ⅛ inch (3 mm) thick. Keep the starch on the cut surfaces; don’t rinse or soak the slices. Separate any rounds that cling together.
- Check the sauce. It may thicken while you’re slicing the potatoes. Warm it gently and whisk until it pours easily again, adding a small splash of milk only when needed.
Layer and Bake
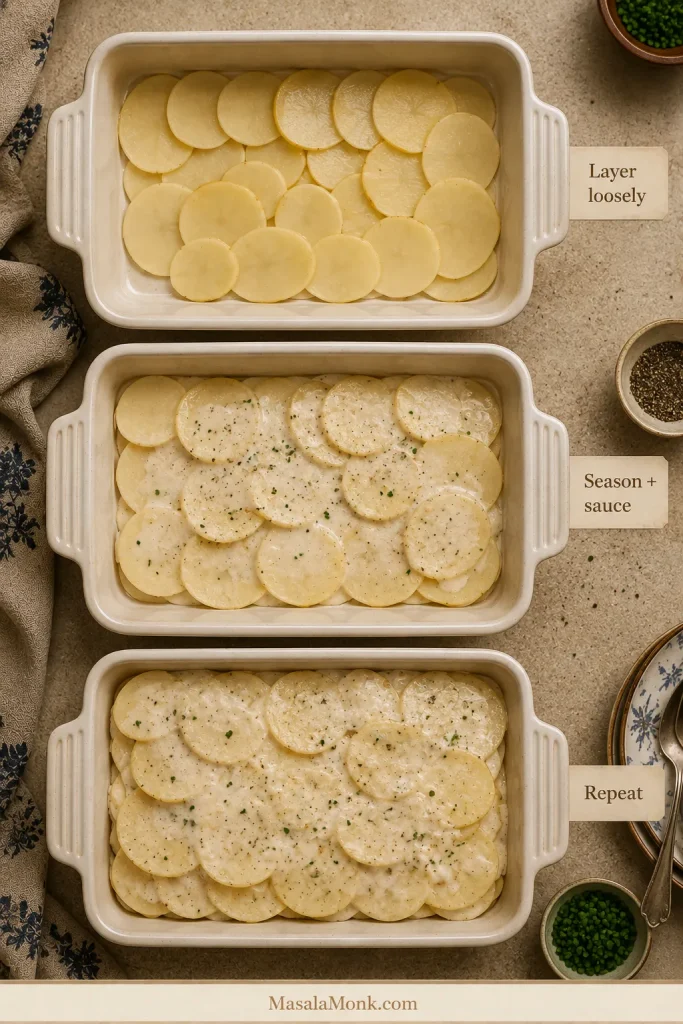
- Layer the potatoes. Spread one-third across the dish, overlapping loosely and avoiding dense stacks. Sprinkle with one-third of the remaining ½ teaspoon (about 3 g) salt, then spoon over one-third of the sauce. Repeat twice, finishing with sauce across the top.
- Cover and bake for 45 minutes. Seal the dish tightly with foil. The trapped steam gives the stacked slices time to soften before the exposed top gets too dark.
- Uncover and bake another 25 minutes. Rotate the dish now if your oven browns unevenly. You should see steady bubbling around the edges and smell mellow onion, garlic and butter. The top can still be fairly pale, and some potato may still feel firm. This is usually the point when the pan starts looking like dinner.
- Start checking at the 70-minute mark. Push a thin knife all the way through the potatoes. Clear resistance means they need more time, so continue uncovered in 5–10 minute stretches. Most pans finish between 75 and 90 minutes. Another 10 minutes is not a problem; give the final firm layer time to cook.
Finish and Serve
- Take the pan out when the potatoes are tender all the way through. The knife should move through the stacked slices with very little resistance.
- Brown the top only if it needs it. Once the potatoes are cooked through, a long extra bake can dry them out. A brief broil gives the top deeper browned flavor. Use a broiler-safe pan and watch closely.
- Rest for 20 minutes. The hard bubbling will calm and the sauce will settle around the potato layers. Finish with chives, parsley or thyme if you want a little freshness against the creamy sauce.
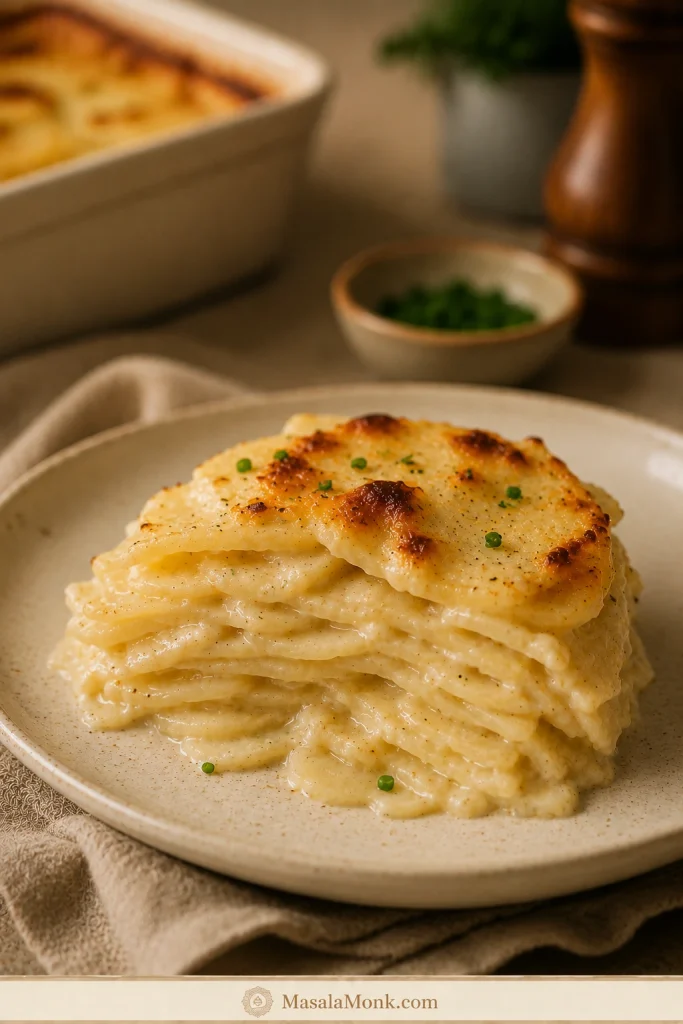
If you’re cooking right now, you can stop here. Once the potatoes are tender and the pan has had its 20-minute rest, dinner is ready. Everything below is optional help for choosing ingredients, fixing problems, planning ahead and serving the dish.
More Help With Scalloped Potatoes
Plan & Serve
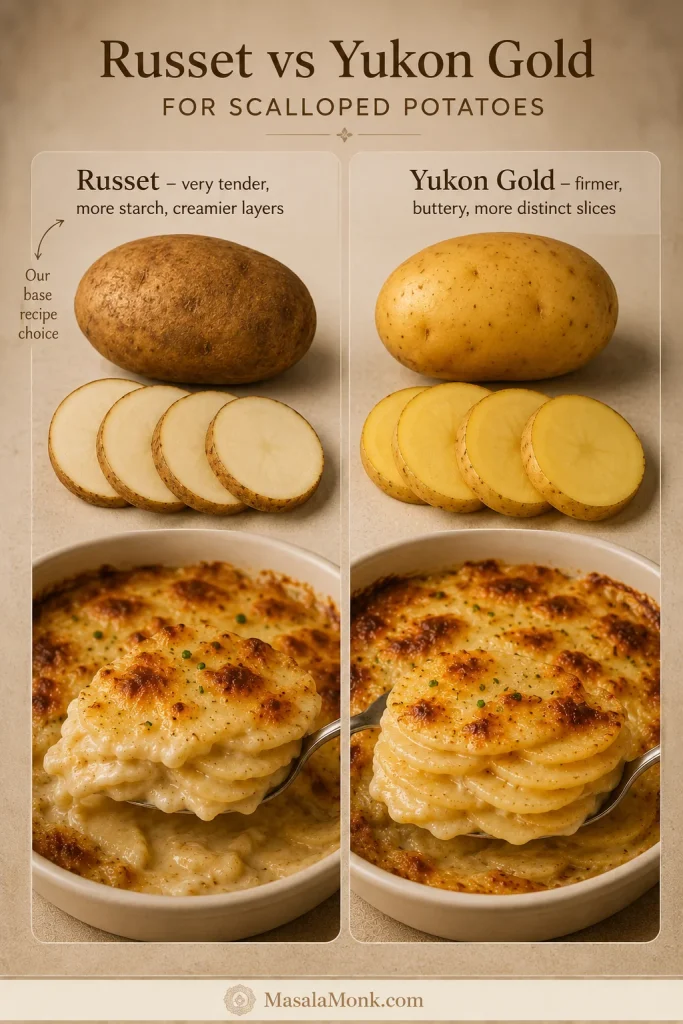
Best Potatoes: Russet or Yukon Gold?
Both work. Russets give you especially tender, creamy layers; Yukon Golds stay a little firmer and more defined.
| Potato | Finished texture | What happens to the sauce | Best when you want |
|---|---|---|---|
| Russet | Very tender and yielding | Releases more starch | Maximum creaminess |
| Yukon Gold | Firmer, tidier slices | Releases less starch | Buttery flavor with more distinct layers |
How to Prep Russets or Yukon Golds
Russets suit this version because some of their starch moves into the sauce as they cook, helping it cling between the slices. Their thicker skins can stand out in such thin layers, so peeling is worth the few extra minutes.
Yukon Golds are a good swap when you prefer the potatoes to keep their shape more clearly. Use the same weight and slice thickness. Their thinner skins are less noticeable, so leaving them on becomes mostly a matter of preference.
The same texture difference shows up in mashed potatoes: Russets lean lighter and fluffier, while Yukon Golds make a naturally buttery, creamier mash.
Whichever potato you choose, keep the starch clinging to the freshly cut slices. Make the sauce first, cut the potatoes afterward, and assemble the dish right away.
Milk, Cream and the White Sauce
Cook the onion until it is soft and translucent, not browned. At that point its flavor is sweet and mellow; garlic and black pepper round out the sauce, while optional nutmeg should stay quietly in the background.
The sauce is essentially a simple béchamel-style white sauce: butter and flour give the milk some body before it goes into the oven, then potato starch thickens it further as the layers bake.
Dairy Choices for Scalloped Potatoes
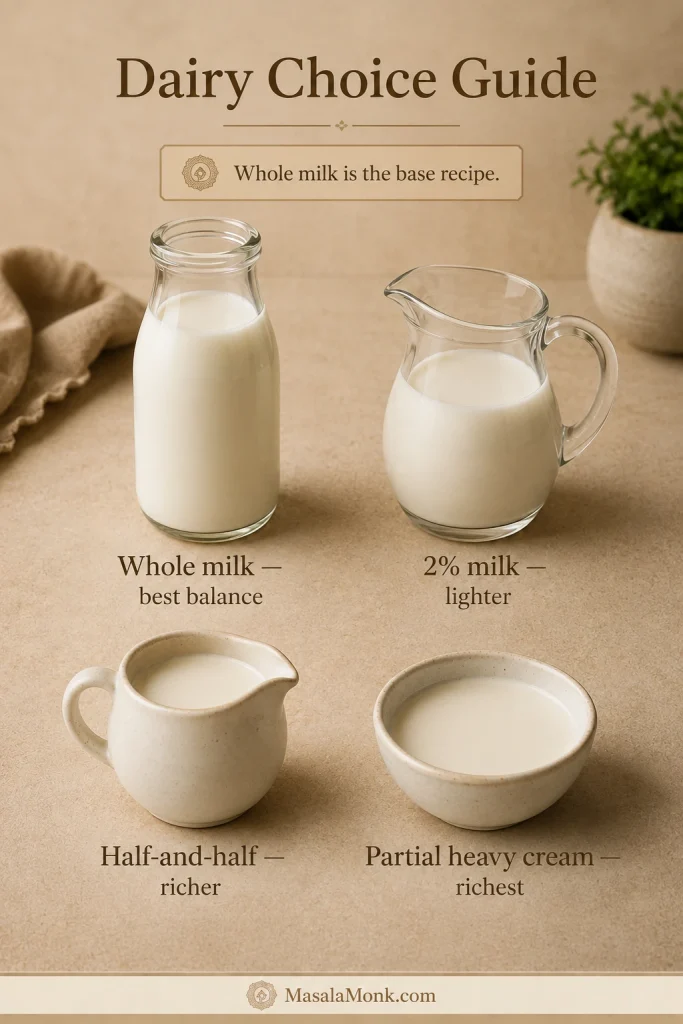
Whole milk gives the best balance here—rich enough to feel creamy without overwhelming the potatoes.
Half-and-half makes a richer version. Heavy cream can replace roughly one-third to one-half of the milk when you want something more luxurious. 2% milk gives you a lighter sauce. Skim milk produces a leaner result and isn’t the best choice when creaminess is the goal.
What the Sauce Should Look Like
The sauce should tell you when it is ready. Almost milk-thin? Give it another minute. Thick enough to sit heavily on the spoon? Loosen it before layering. The sweet spot is a light coating on the spoon that still flows easily.
Scalloped Potatoes vs Au Gratin
The names overlap in modern recipes, but traditionally scalloped potatoes are built around sliced potatoes and a creamy sauce. In potatoes au gratin, cheese usually plays a defining role.
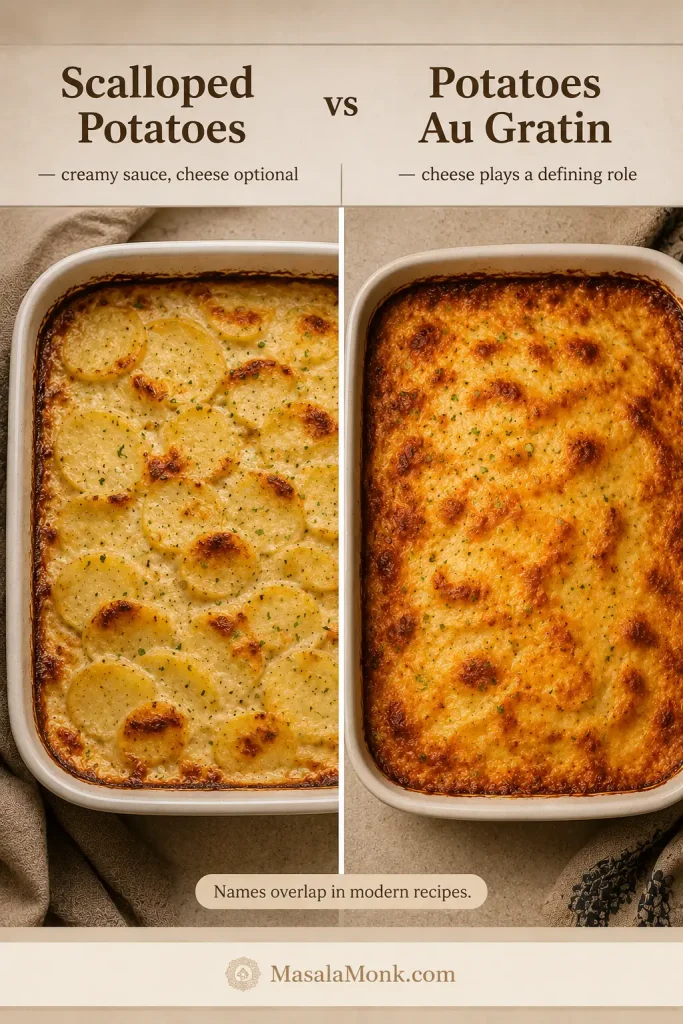
Cheese is optional here. Add up to 4 oz (115 g) finely grated sharp cheddar or Gruyère if you want it, either over the top when the foil comes off or stirred into the warm sauce away from direct heat.
If the scalloped potatoes you grew up with started with a can of cream-of-mushroom soup, that’s another very familiar branch of the dish. Condensed soup replaces the homemade white sauce; it isn’t something to pour on top of the recipe as written because it already brings its own starch, salt and flavor.
The same homemade-sauce-versus-canned-soup choice comes up in our green bean casserole.
Troubleshooting a thin sauce? See why they turn watery →
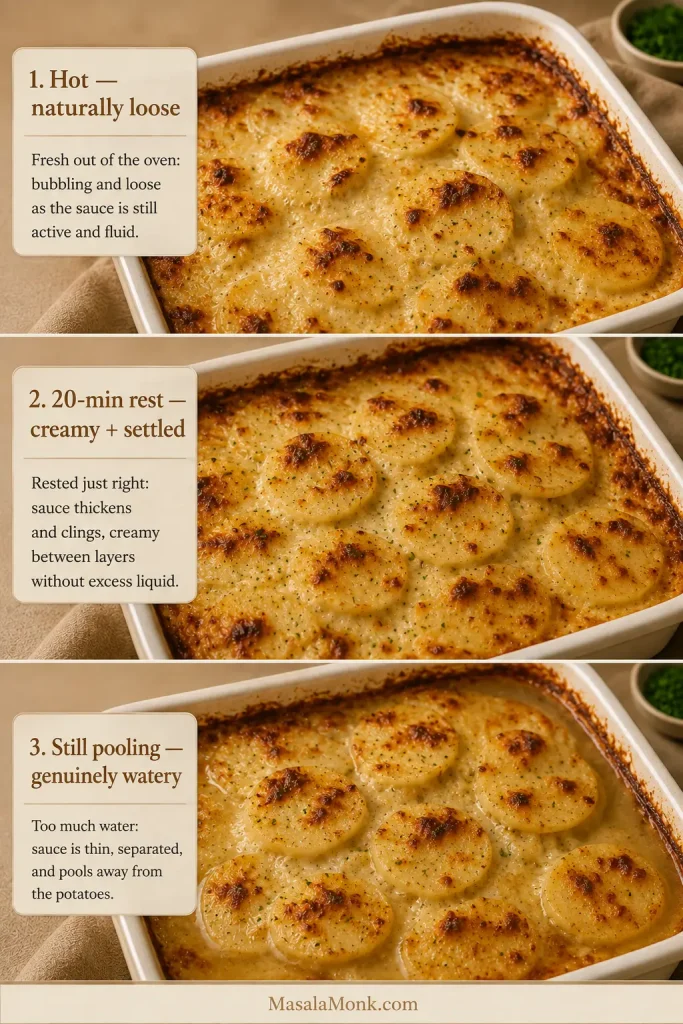
What the Potatoes Should Look Like at Three Stages
Use the clock as a checkpoint, then let the pan confirm what happens next. The visual changes matter most as the casserole moves from covered to uncovered to rested.
Before baking
The sauce should flow easily between the slices, and the potato depth should stay reasonably even. Perfect rows are optional; loose overlap matters much more.
Some upper slices can stay visible before baking. The sauce should reach through the layers without leaving the potatoes sitting in a pool of liquid.
When the foil comes off
Look for steady bubbling around the perimeter and a surface that may still be fairly pale. The upper slices will have begun to yield, while the potatoes lower in the pan can still need more time. The butter, onion and garlic should be noticeably fragrant by now.
When they’re done
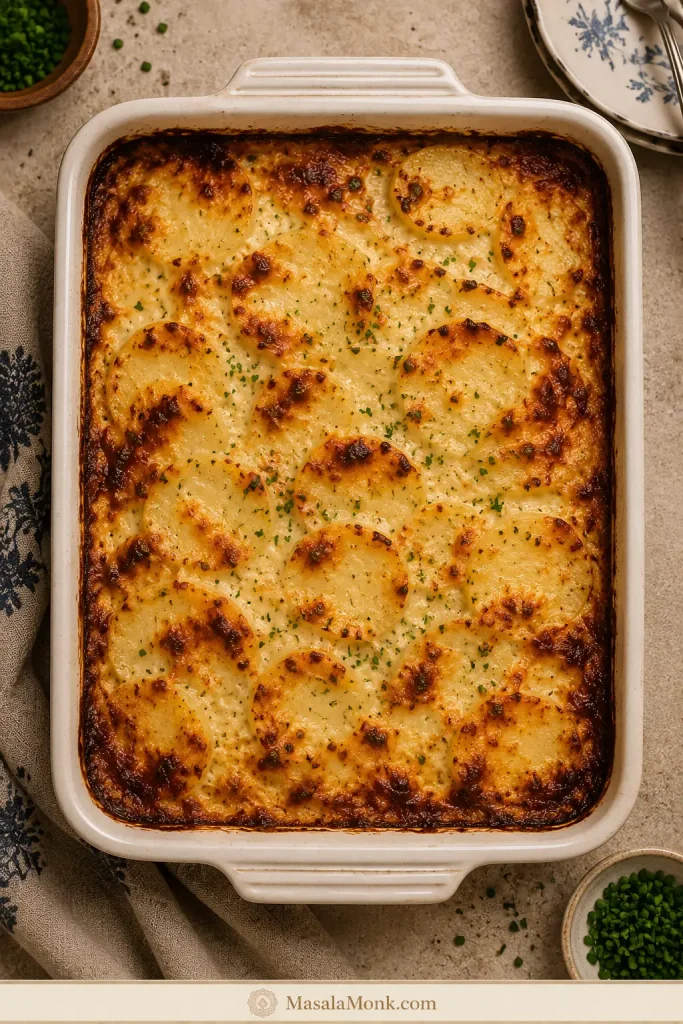
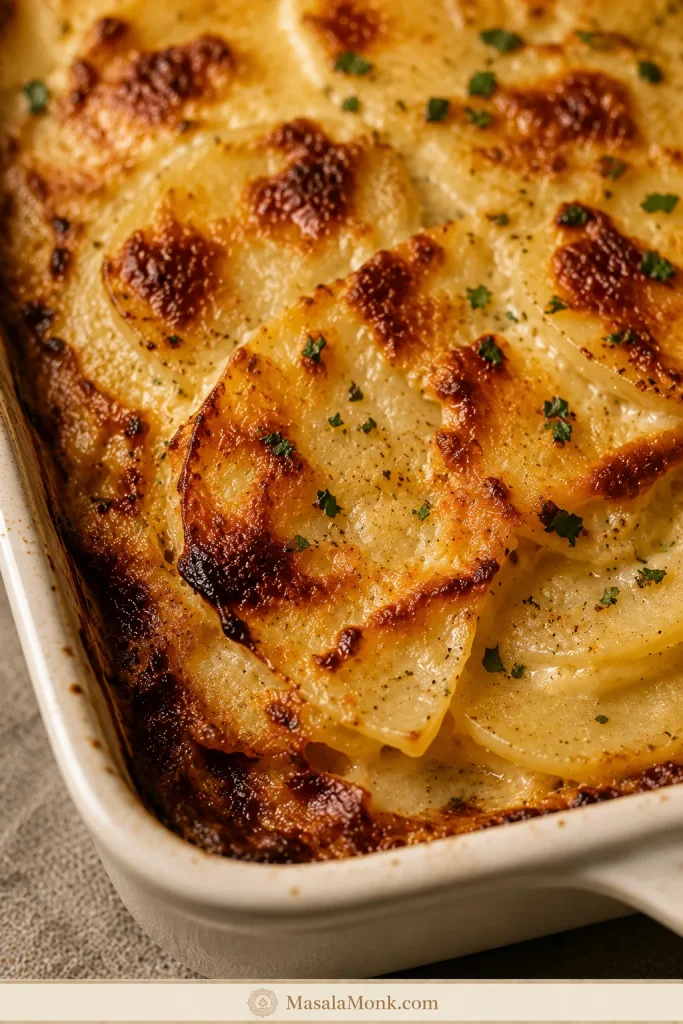
At the finish, the potatoes are tender all the way through and the edges have picked up some color. The sauce bubbles with more body than it had earlier in the bake. After resting, it clings around the slices instead of running across the plate.
Why They Turn Watery
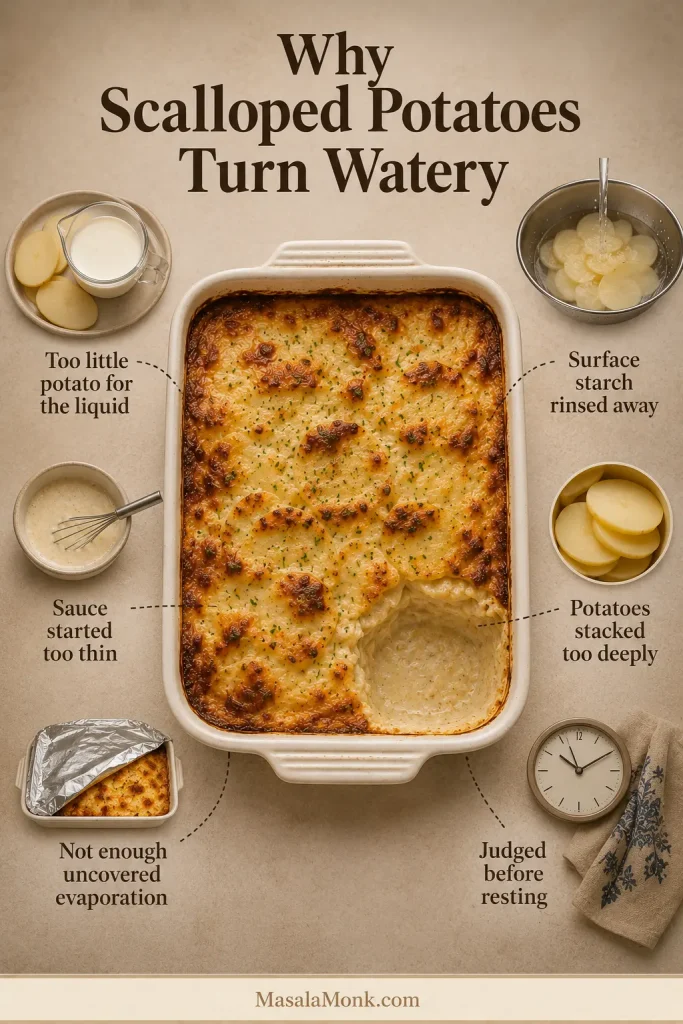
Watery scalloped potatoes rarely come down to one mistake. Potato quantity, surface starch, sauce consistency, pan depth, the covered and uncovered stages, and the final rest all affect what reaches the plate.
How to Prevent Watery Scalloped Potatoes
- Use the full potato quantity. The 2½ cups (590 ml) milk are balanced around 3 lb (1.36 kg) potatoes.
- Keep the surface starch. Rinsing the slices removes starch that otherwise helps the sauce gain body.
- Give the milk a head start. Lightly thickening it before assembly means the potatoes aren’t beginning their bake in plain liquid.
- Keep the potato layer reasonably shallow. A thicker vertical stack needs more time for heat to work through it evenly.
- Let the covered stage work first. The potatoes need moisture while they soften. Once the foil comes off, evaporation can concentrate the sauce and the exposed edges can begin to brown.
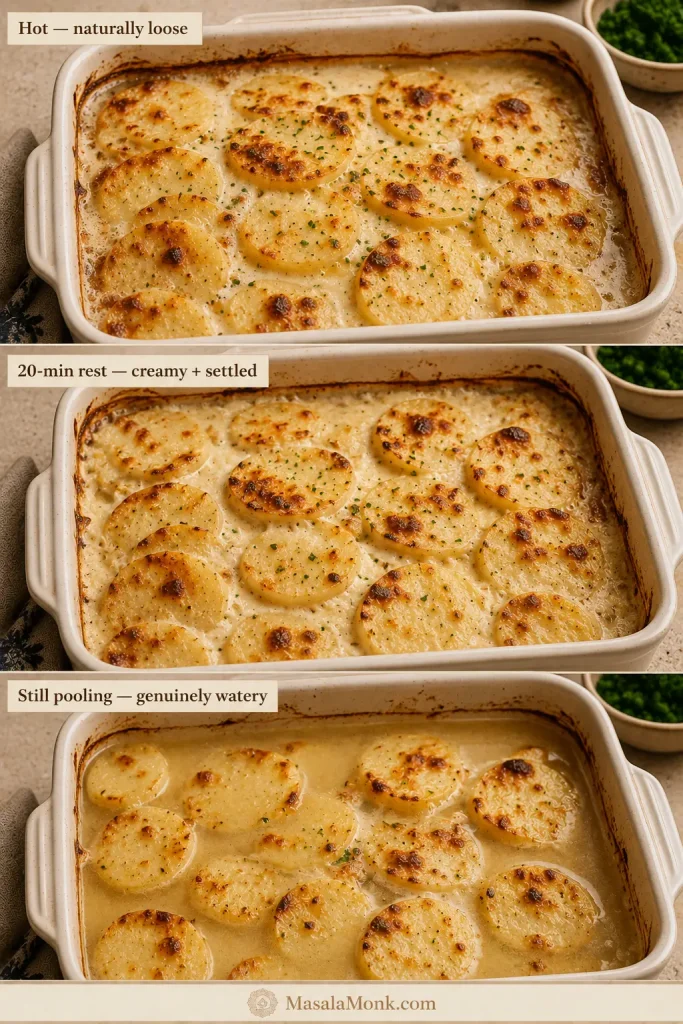
- Rest before deciding the sauce is too thin. It is naturally at its loosest while everything is still bubbling hard.
Loose isn’t automatically watery. A pan straight from the oven can look looser than it will 20 minutes later. Give it the rest first. Only then decide whether there is genuinely too much thin liquid.
Troubleshooting
Start with what you can see and feel. Most problems have a straightforward next move, and some apparent problems need nothing more than patience.
| What you see | What to do |
|---|---|
| Loose sauce straight from the oven | Rest for 20 minutes before judging it |
| Thin liquid still pooling after the rest | When the potatoes are fully tender, return the pan uncovered for 5–10 minutes, then let it settle again |
| Whole middle still firm | Cover again if the top is already dark and continue baking in 5–10 minute stretches |
| Only random slices stay firm | Keep this batch cooking; next time watch for thicker rounds or slices stuck together |
| White sauce has flour lumps before layering | Whisk firmly while warm and press obvious lumps against the side of the saucepan; add milk more gradually next time |
| Sauce is too thick before layering | Warm gently and whisk until pourable, adding a small splash of milk only as needed |
| Potatoes are tender but the top is pale | Use a brief broiler finish in a broiler-safe dish |
| Finished potatoes seem dry | Stop the regular bake as soon as the potatoes are cooked through; use brief high heat for extra browning |
The sauce still looks watery after resting
Visible thin liquid after the 20-minute rest is different from the normal looseness of a piping-hot pan. When the potatoes are already tender, return the dish to the oven uncovered for another 5–10 minutes. Watch closely: once the excess liquid is gone, creamy can turn dry surprisingly quickly.
The potatoes are cooking unevenly
A firm layer through the whole middle simply needs more time. Cover the dish again when the top is already sufficiently browned and keep baking until the potatoes are cooked through.
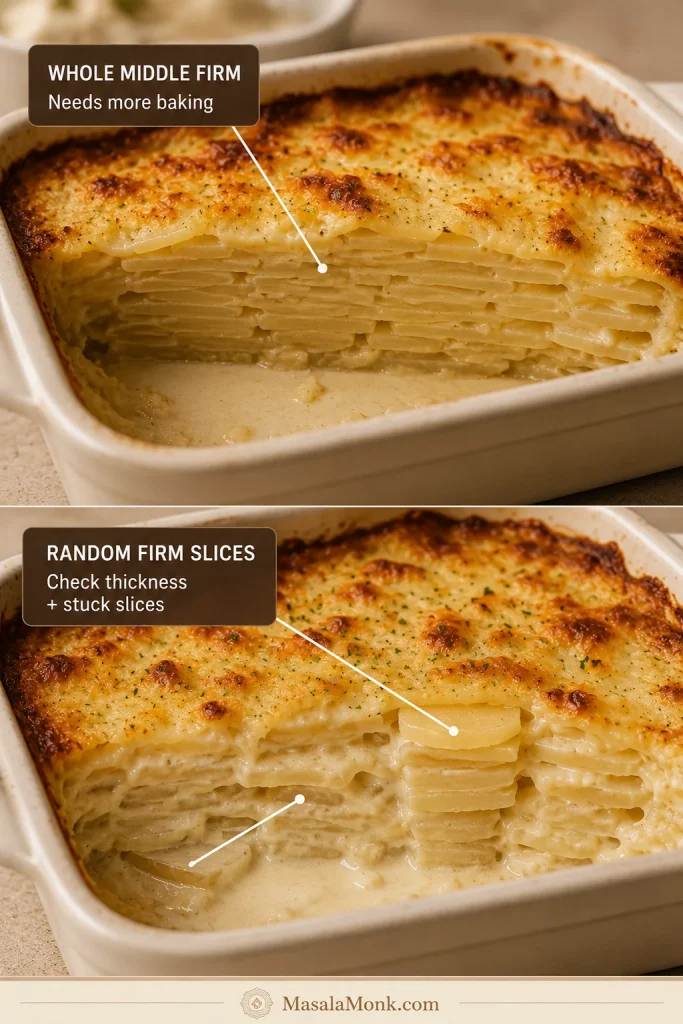
Random firm slices point to something different: thickness or stacking. A few thicker rounds, or several slices pressed tightly together, can lag behind everything around them.
The white sauce looks too thick or lumpy
Deal with this before layering. Sauce that has simply thickened while waiting usually needs gentle heat and whisking, perhaps with a small splash of milk. Flour lumps are easier to correct while the sauce is still in the saucepan: whisk firmly and press stubborn lumps against the side until they break down.
Once the potatoes are cooked through and the rested sauce clings around the slices, stop fixing things. They’re ready to eat.
Return to recipe · Back to top ↑
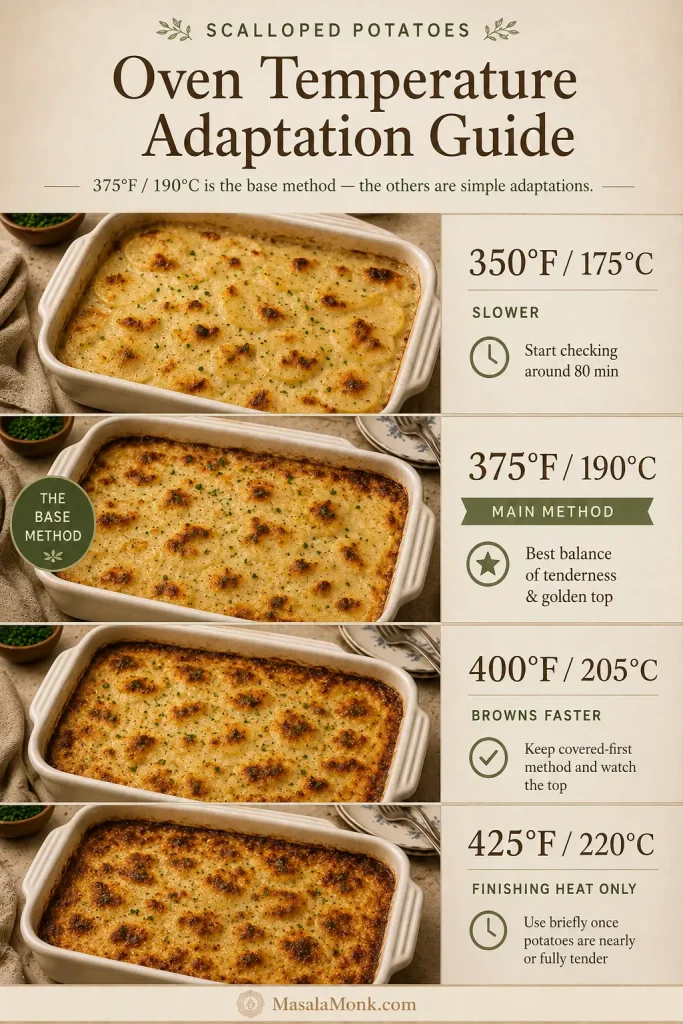
What If Your Oven Is at 350°F, 400°F or 425°F?
350°F (175°C): the potatoes will cook more slowly. Begin checking around the 80-minute mark and continue until no firm layer remains.
375°F (190°C): use the main method. This temperature gives a comfortable balance between steady cooking and controlled browning.
400°F (205°C): the exposed top will color faster, so don’t let browning convince you the potatoes underneath are finished. Keep the covered-first method.
During the uncovered stage, check the potatoes themselves. Once the top has enough color, loosely cover it again if the layers underneath still need more time.
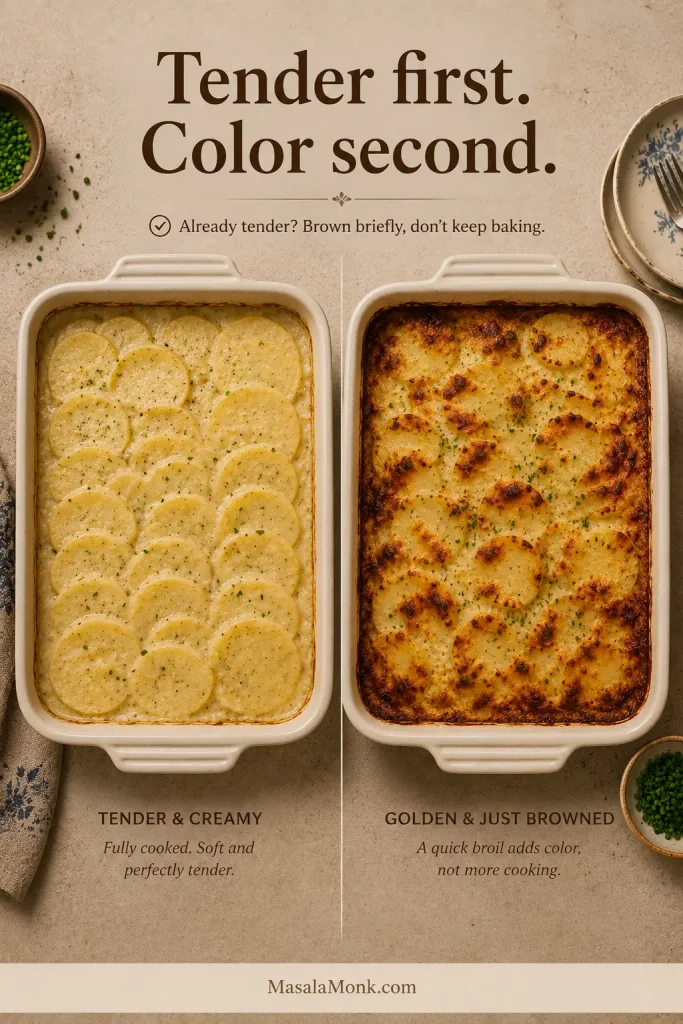
425°F (220°C): save this temperature for the finish. Once the potatoes are nearly or completely cooked, a short burst of higher heat can deepen the color. A full bake at 425°F risks dark edges long before the stacked slices are ready.
Make-Ahead Options
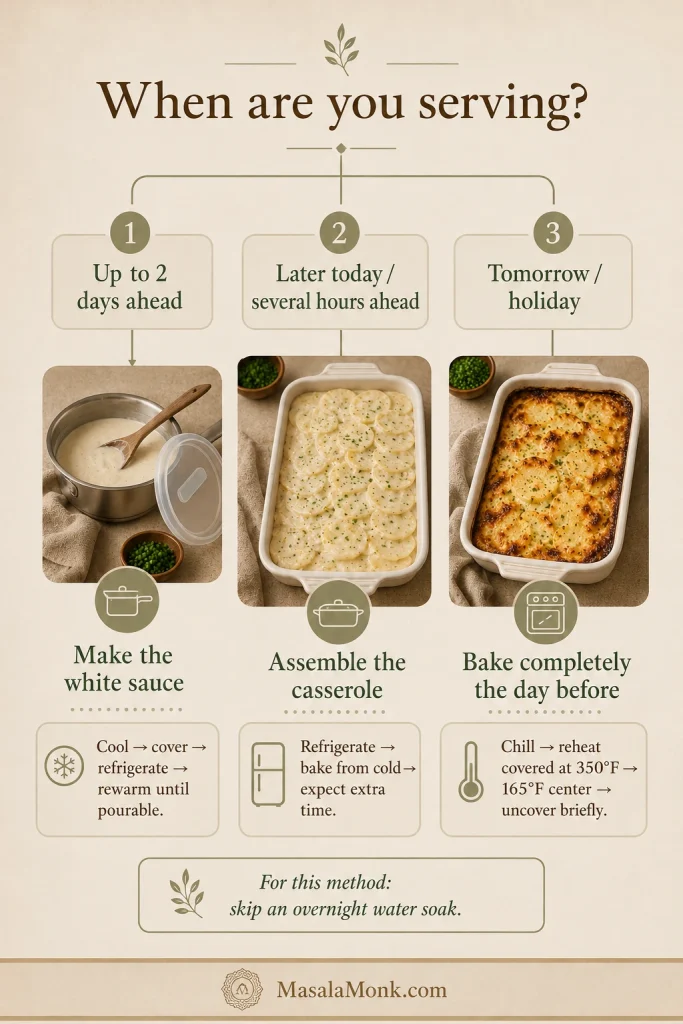
The white sauce can be made up to 2 days ahead, cooled, covered and refrigerated. Rewarm it gently until pourable before assembling the potatoes. That removes a useful chunk of work without leaving raw slices sitting around overnight.
You can also assemble the whole dish several hours in advance, cover it tightly and refrigerate. A cold pan will take longer to bake, and the delay varies with the baking dish and how thoroughly chilled everything is.
Don’t simply tack a fixed 10 minutes onto the recipe. Keep the dish covered while the potatoes warm and begin to soften, then use their texture to decide when they’re ready for the final uncovered stage.
For this method, skip the overnight water soak. Soaking prevents sliced potatoes from browning, but it also washes away some of the surface starch we’re deliberately keeping to help the sauce.
For a holiday, bake it the day before
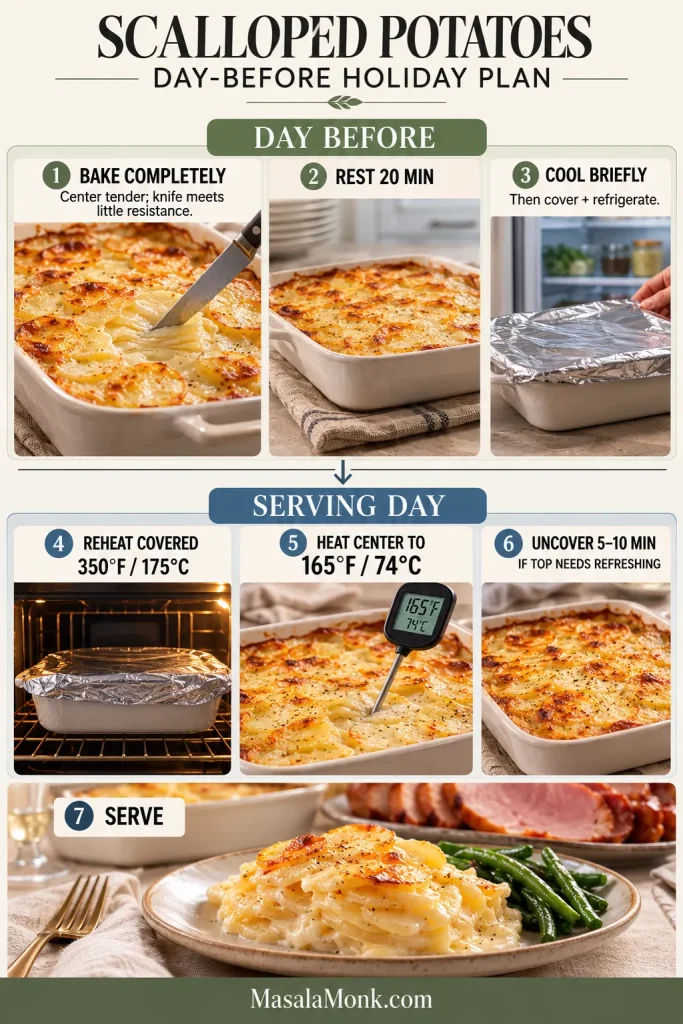
On a holiday, predictability is worth more than doing everything at the last minute. If the ham is warming, vegetables are waiting and somebody needs the oven for rolls, scalloped potatoes are a terrible thing to discover still have a hard center.
Fully baking them a day ahead removes that gamble. It is especially useful beside a honey glazed ham, which has its own warming and glazing schedule.
- Bake the potatoes normally and let them rest.
- Cool briefly, then cover and refrigerate the pan within 2 hours.
- Reheat covered at 350°F (175°C) until the center reaches 165°F (74°C).
- Uncover near the end when the surface needs refreshing.
Another way to ease holiday oven traffic is to move the main elsewhere: a slow cooker whole chicken leaves the oven almost entirely to the potatoes.
Return to recipe · Back to top ↑
For Two, Eight or a Crowd
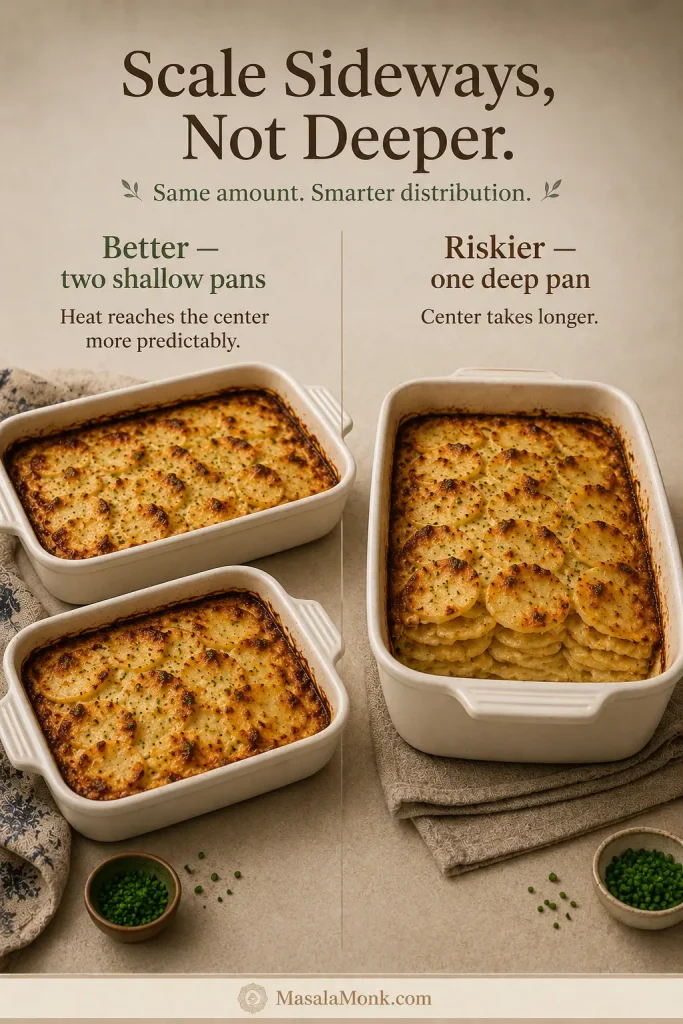
Changing the quantity is straightforward. Keeping roughly the same depth in the baking dish matters more than keeping exactly the same footprint.
Scale sideways, not deeper. Two shallow pans cook more predictably than one giant dish piled twice as high.
Pan Sizes and Serving Amounts
| Batch | Side servings | Potatoes | Dish | Timing |
|---|---|---|---|---|
| Half | 4 | 1½ lb (680 g) | 8 × 8-inch (20 × 20-cm) shallow dish | Start checking a little before the standard batch; similar depth means the total cooking time may remain fairly close |
| Standard | 8 | 3 lb (1.36 kg) | 9 × 13-inch (23 × 33-cm) dish | First check at 70 minutes |
| Double | 16 | 6 lb (2.72 kg) | Two 9 × 13-inch dishes | Allow extra time when both pans share the oven |
| Large crowd | Multiply standard batches | As needed | Several shallow pans | Judge each pan separately |
The standard recipe uses roughly 6 oz (170 g) raw potato per side serving. That’s comfortable when several other dishes are on the table; make more when the potatoes are likely to be one of the stars.
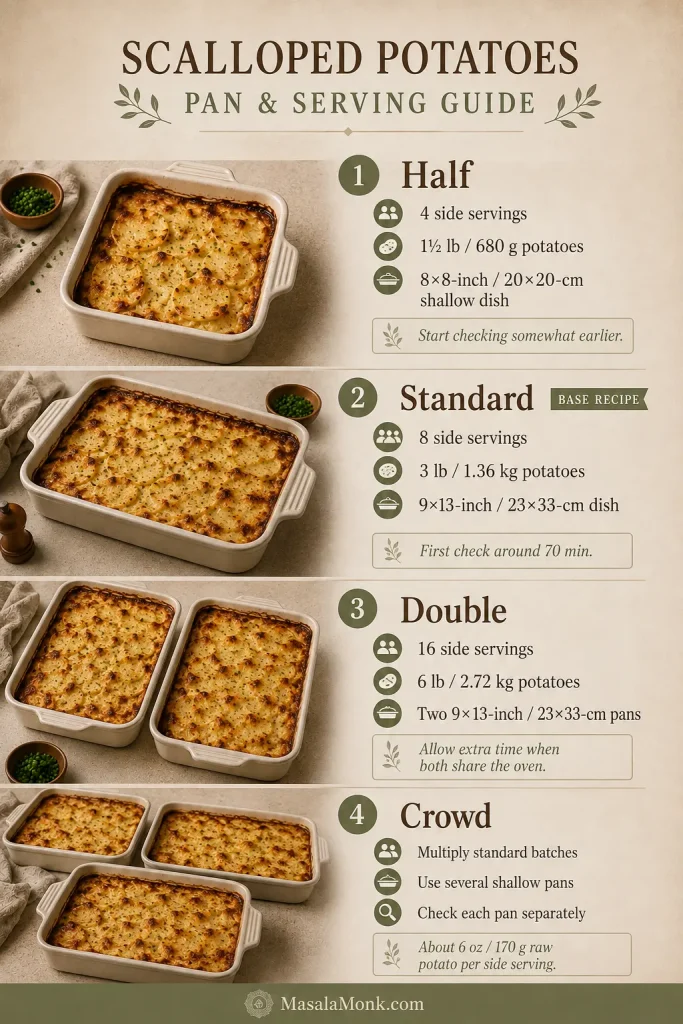
For two people, halve the recipe and use an 8 × 8-inch (20 × 20-cm) shallow dish. You’ll get about four side portions, so there should be enough for dinner and leftovers.
For a family roast-style meal, the standard pan fits naturally beside a slow cooker brisket with onion gravy. The slow cooker handles the beef while the potatoes get the oven.
For a Holiday Crowd
For Thanksgiving, Christmas or Easter, use two ordinary 9 × 13-inch pans instead of crowding 6 lb (2.72 kg) potatoes into one deep dish. Rotate them when your oven has obvious hot spots. You may need a little extra time—and you get twice as many browned corner pieces, which is hardly a downside.
What to Serve With Scalloped Potatoes
Scalloped potatoes already bring richness, tenderness and plenty of creaminess. The rest of the plate benefits from browned meat or fish, something green, and enough freshness or acidity to keep everything lively.
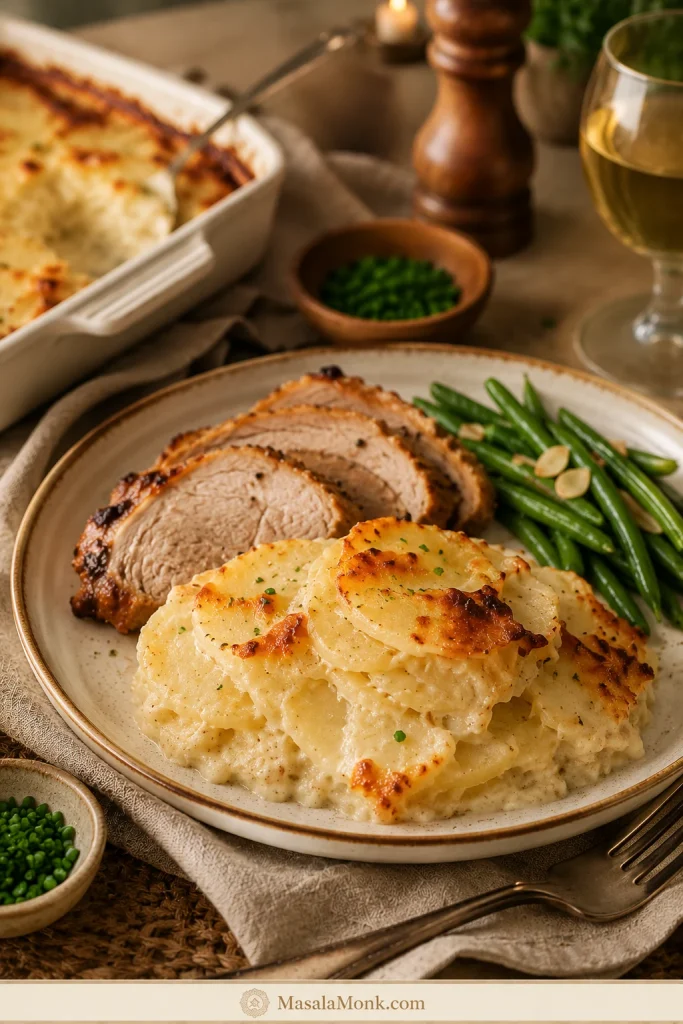
With pork: the browned edges and sticky sweet-savory glaze on honey garlic pork chops are especially good against a spoonful of creamy potatoes. Add broccoli, green beans or a sharp salad and dinner is done.
On a holiday table: ham, turkey and roast beef all work beautifully. For something brighter alongside them, roasted carrots bring caramelized edges, color and just enough sweetness to wake up a rich plate.
With fish: honey garlic salmon has enough browned, garlicky glaze to stand beside the potatoes without needing another heavy side.
Storage, Reheating and Freezing
Cover and refrigerate leftovers within 2 hours. The USDA leftovers guidance recommends using refrigerated leftovers within 3–4 days and reheating them to 165°F (74°C). Use that temperature as the target whichever reheating method you choose.
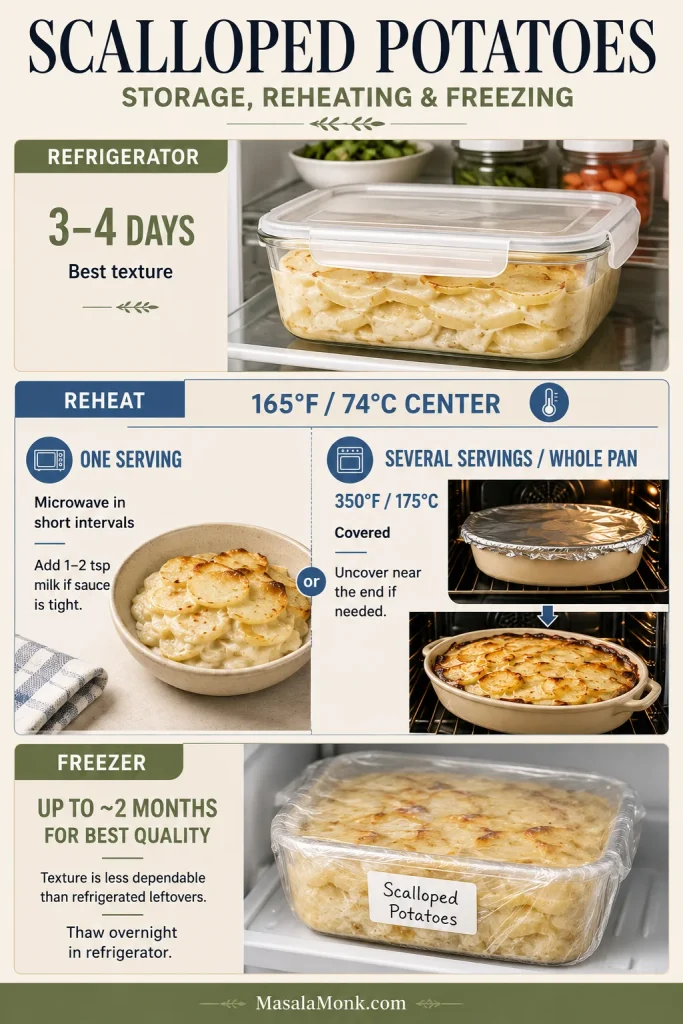
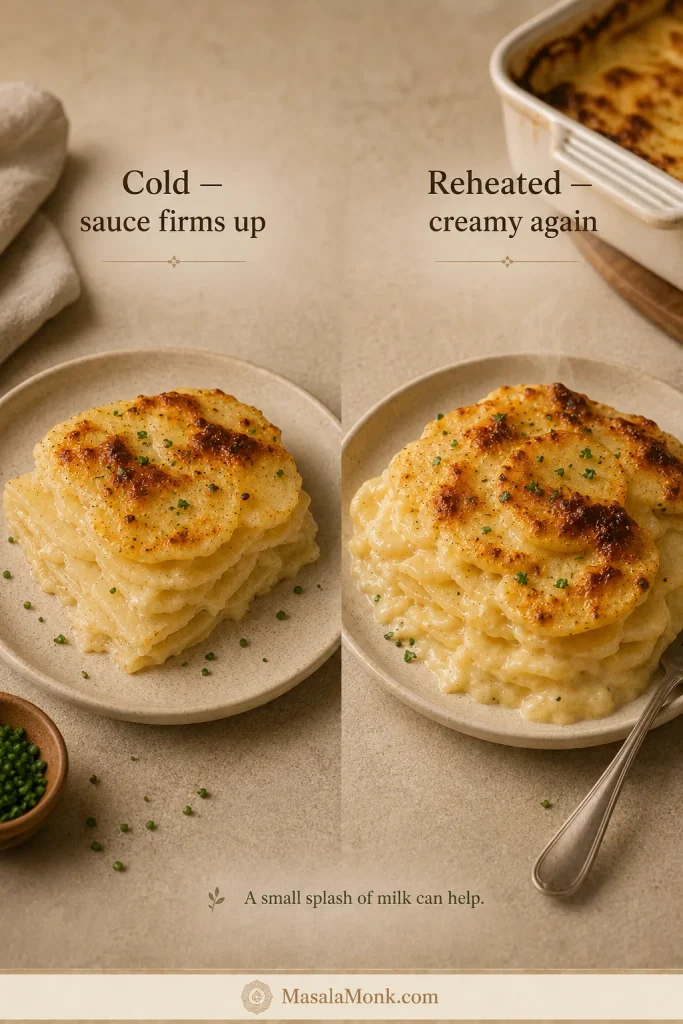
One serving: cover loosely and microwave in short intervals until the middle reaches 165°F (74°C). A teaspoon or two of milk around the serving can loosen sauce that has tightened in the refrigerator.
Several servings: cover and reheat at 350°F (175°C). Start checking after about 20 minutes and continue until the potatoes reach 165°F (74°C) in the middle.
A whole pan from the refrigerator: cover and reheat at 350°F (175°C). Begin checking after about 30 minutes and continue until the center reaches 165°F (74°C). Uncover for the final 5–10 minutes when the top needs refreshing.
Can you freeze scalloped potatoes?
You can, although refrigeration preserves the texture better. Potatoes can become slightly mealier after freezing and thawing, and the dairy sauce may not return quite as smoothly.
If you do freeze them, once the potatoes are chilled, portion them into airtight containers and freeze for up to 2 months for best quality. Thaw overnight in the refrigerator and reheat gently. A small splash of milk can help when the sauce has tightened.
Return to recipe · Back to top ↑
A good pan of scalloped potatoes doesn’t need to stand rigidly on the plate. Spoon into it and you should find tender layers, browned edges, mellow onion and garlic, and enough creamy sauce clinging between the slices to make the corner pieces especially hard to resist.
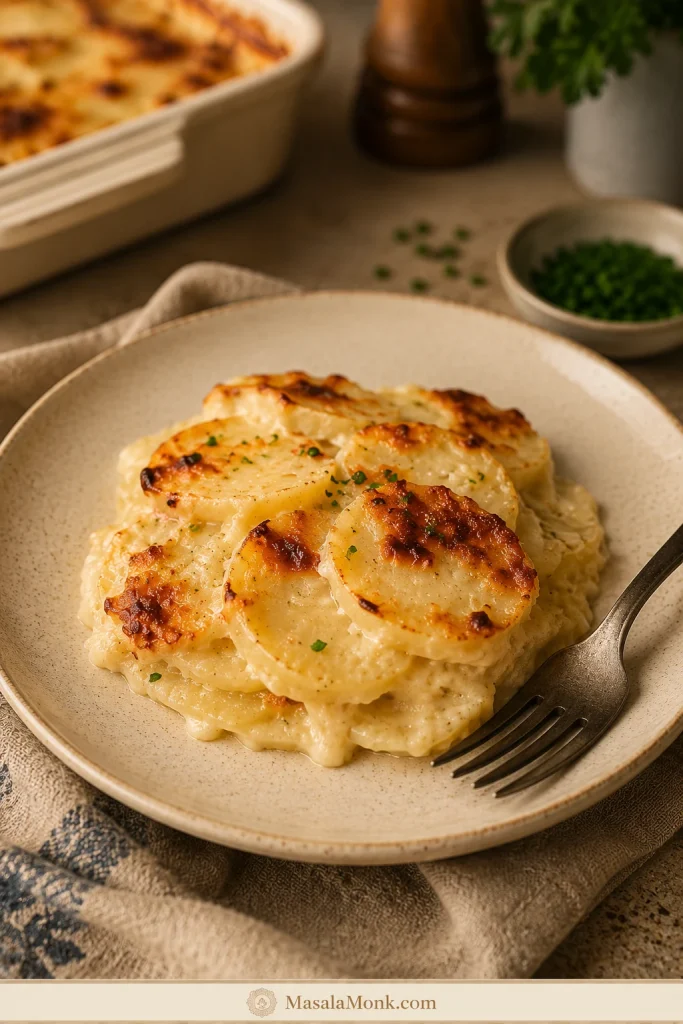
Give the potatoes that last bit of resting time, then bring the pan to the table while the edges are still warm and browned. That’s when scalloped potatoes are at their best.








