Posted on Leave a comment

Greek Tzatziki Sauce Recipe (1 Master Sauce + 10 Easy Variations)

Greek tzatziki sauce recipe served in a black bowl at the center of a mezze platter, with a hand dipping warm pita into the creamy yogurt and cucumber dip surrounded by grilled chicken, olives, tomatoes, cucumber and lemon wedges.

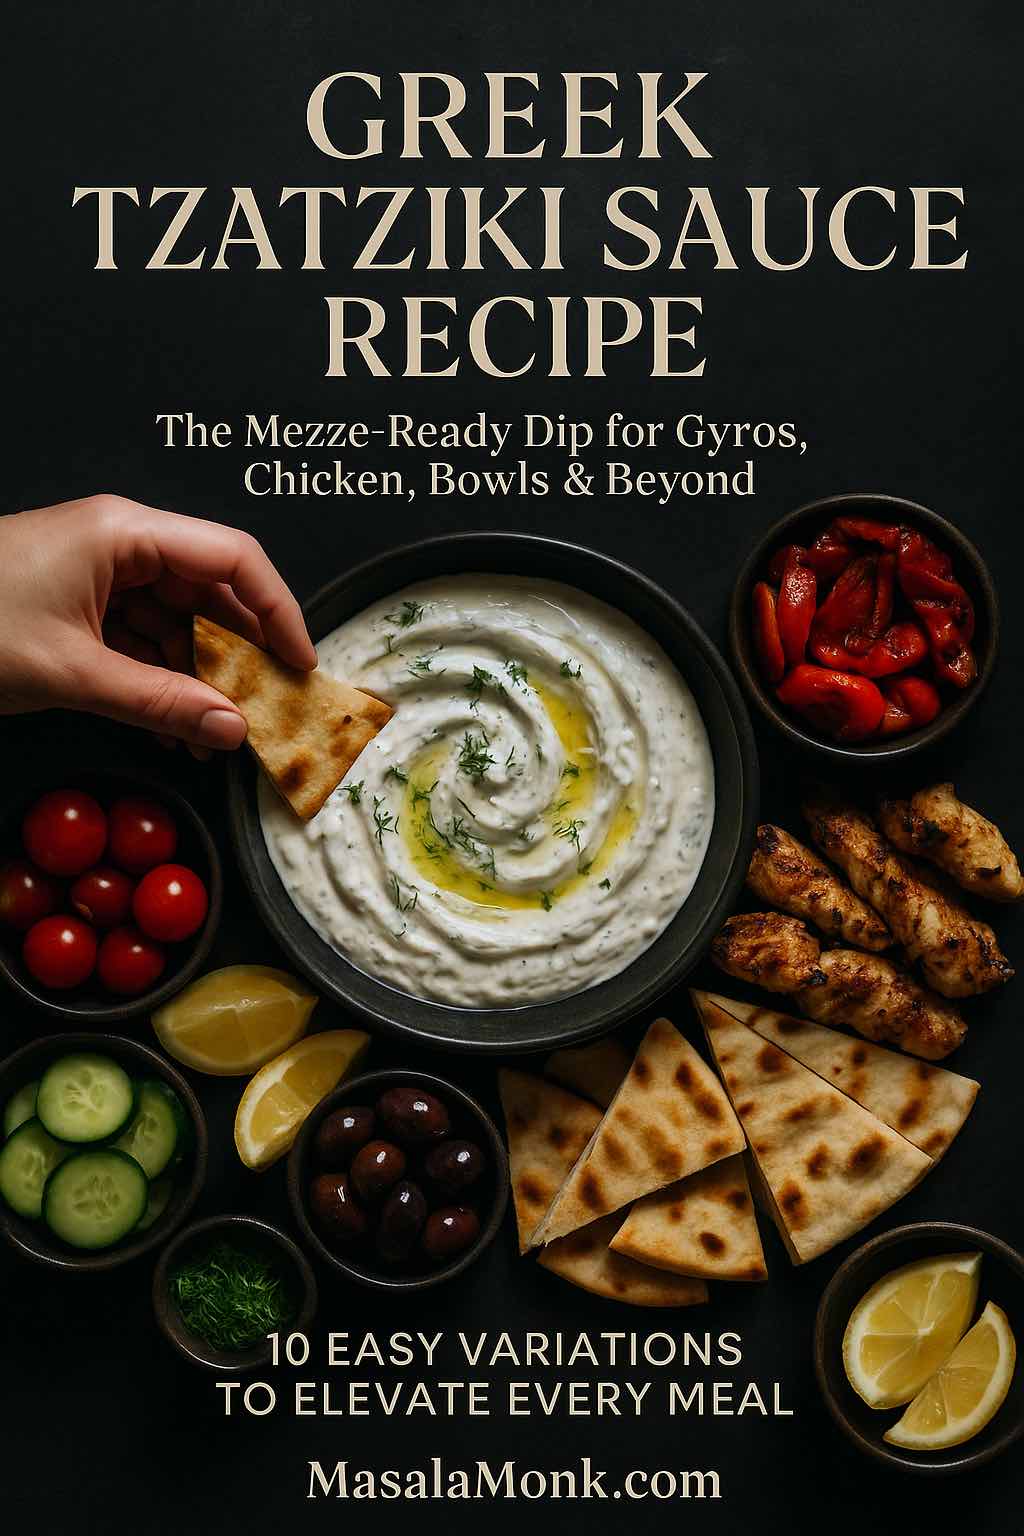
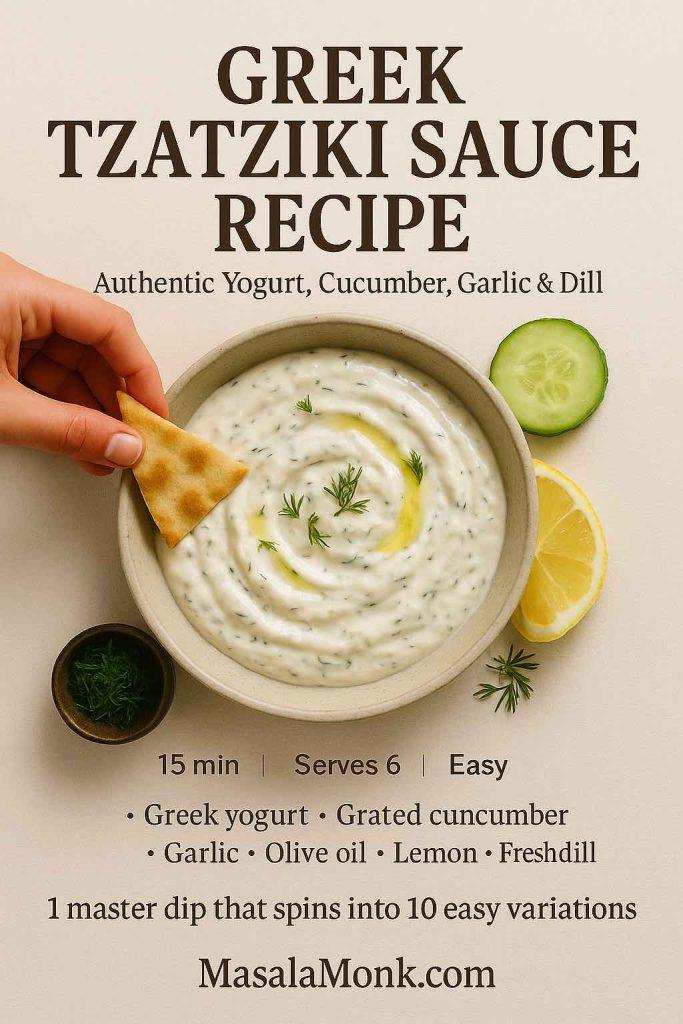
There are recipes you make once, and then there are recipes that quietly move into your weekly rhythm. A good Greek tzatziki sauce recipe almost always falls into the second category. It’s cool and creamy, yet bright and garlicky; simple to stir together, but endlessly useful. One bowl can turn raw vegetables into a snack, plain chicken into dinner, or a random collection of leftovers into a mezze-style feast.

In this long guide, you’ll walk through:

  • What tzatziki actually is (and what makes it “Greek”)
  • A master Greek tzatziki sauce recipe you can rely on
  • Ingredient notes so your sauce tastes restaurant-good, not just “fine”
  • Ten easy variations built off that master bowl
  • Ideas for turning tzatziki into full meals, from mezze boards to brunch
  • Practical notes on storage and making it fit a Mediterranean-style way of eating

All of it is meant to be cooked and eaten, not just admired on a screen.


What Is Tzatziki?

Tzatziki is a chilled yogurt and cucumber sauce that shows up all over Greek and Eastern Mediterranean tables. Read more about it on Wikipedia. At its core, it’s simply:

  • Thick strained yogurt
  • Grated cucumber
  • Garlic
  • Olive oil
  • A little acid (lemon or vinegar)
  • Herbs like dill or mint
  • Salt and pepper

Most traditional versions of a Greek tzatziki sauce recipe follow the same pattern. You grate the cucumber, salt it and squeeze out the water; stir it into thick yogurt with garlic, olive oil and herbs; and let everything chill so the flavors settle and mellow. This basic method pops up again and again in classic Greek and Mediterranean recipes.

Although every family and restaurant has its own tweaks—some go heavy on mint, others prefer all dill, and some include a splash of red wine vinegar instead of lemon—the balance is always the same: refreshing, tangy, garlicky and creamy without being heavy.

At the same time, tzatziki sits naturally inside a broader Mediterranean way of eating. That style emphasizes vegetables, legumes, whole grains, nuts, olive oil and modest amounts of animal protein, with fermented dairy like yogurt appearing in small but regular amounts. Large reviews and long-term studies link this overall pattern with better heart health, improved blood sugar control and even longer life.

So when you stir together a bowl of tzatziki, you’re not just making “a dip for pita.” You’re putting together a flexible, lighter-feeling sauce that pairs effortlessly with vegetables, grains and lean proteins—exactly the kind of food many people are trying to eat more of anyway.

Also Read: How to Make Churros (Authentic + Easy Recipe)


Ingredients for the Master Greek Tzatziki Sauce Recipe

Before you start grating and whisking, it helps to spend a moment on the ingredients themselves. The list is short, so each piece matters.

Greek Yogurt

A true Greek tzatziki sauce recipe needs thick, strained yogurt. That’s where Greek yogurt comes in. Because it’s been strained to remove much of the whey, Greek yogurt is denser and naturally higher in protein than regular yogurt. Nutrition guides repeatedly point out that this straining concentrates protein, calcium and probiotics into each spoonful.

A few practical notes:

  • Choose plain, unsweetened Greek yogurt. Any sweetness will clash with the garlic and cucumber.
  • Full-fat gives the most luxurious texture, but 2% still works beautifully and feels a bit lighter.
  • If you can’t find Greek yogurt, you can strain regular yogurt in a cheesecloth-lined strainer for a couple of hours in the fridge.

If Greek yogurt is already part of your routine—maybe in breakfasts like high protein overnight oats—tzatziki is simply another way to make the same staple pull double duty.

Cucumber

Cucumber brings that signature freshness and bite. You can use:

  • English (seedless) cucumbers, which have thin skins and fewer seeds
  • Or regular cucumbers, peeled if the skin is thick or waxed

What matters more than the variety is how you treat it. Grating releases water, and unless you squeeze that water out, your Greek tzatziki sauce recipe will start thick and end up runny. Salting and squeezing the cucumber is the small step that turns “good enough” tzatziki into the kind you keep going back to.

Garlic

Fresh garlic is non-negotiable. It’s what stops tzatziki from tasting like plain cucumber yogurt. Mince it very finely, or grate it on a microplane so there are no sharp bits. Raw garlic is strong—especially as it sits in the fridge and infuses the yogurt—so starting with a little less than you think you need is usually wise. You can always add more next time.

Olive Oil

Extra-virgin olive oil adds depth, body and that lovely sheen on top of the finished sauce. It also reminds your palate that you’re in Mediterranean territory. A couple of tablespoons are enough; you want richness, not an oil slick.

Lemon Juice or Vinegar

Acid lifts the flavor. Lemon juice is the most common choice, though wine vinegar or even a mild apple cider vinegar can be used. Add it gradually and taste as you go. You’re looking for bright and tangy, not sour.

Herbs: Dill and Mint

Fresh dill is the classic herb in a Greek tzatziki sauce recipe, although many cooks add mint or swap it in completely. Dill reads as savory and grassy; mint adds a cool, almost sweet edge. Either works. You can even use a mix, especially if you’re serving the sauce with grilled lamb, chicken or eggplant.

Salt and Pepper

Salt is what knits all these pieces together. It seasons the yogurt, pulls moisture from the cucumber and softens the sharp edges of the garlic. Freshly ground black pepper isn’t mandatory, but a small pinch adds a gentle warmth.

Also Read: Béchamel Sauce for Lasagna: Classic, Vegan & Ricotta Sauce Recipe


Master Greek Tzatziki Sauce Recipe (Step by Step)

This is the anchor recipe you can make with your eyes closed once you’ve done it a few times. Every variation later on will start from this bowl.

Ingredients (Makes About 1½ Cups)

  • 1 cup full-fat plain Greek yogurt
  • ½ large cucumber (or 1 small), coarsely grated
  • 2–3 cloves garlic, very finely minced or grated
  • 2 tbsp extra virgin olive oil
  • 1–2 tbsp fresh lemon juice, to taste
  • 2 tbsp finely chopped fresh dill (or 1 tbsp dill + 1 tbsp mint)
  • ½ tsp fine sea salt, plus more to taste
  • A pinch of freshly ground black pepper
  • 1–2 tbsp cold water or reserved cucumber juice, if needed
Recipe card showing a bowl of authentic Greek tzatziki sauce made with Greek yogurt, grated cucumber, garlic, olive oil, lemon and dill, with a hand dipping warm pita into the creamy dip on a beige background.
Authentic Greek tzatziki sauce recipe in one glance – thick Greek yogurt, grated cucumber, garlic, lemon, olive oil and fresh dill, ready in 15 minutes and perfect as the master dip for all ten variations.

Step 1: Grate and Salt the Cucumber

Start by grating the cucumber on the large holes of a box grater. If you’re using a thick-skinned or waxed cucumber, peel it first; otherwise, leave the skin on for extra color and nutrients.

Once it’s grated:

  1. Toss the cucumber with a pinch of salt.
  2. Place it in a fine-mesh strainer over a bowl.
  3. Let it sit for 5–10 minutes, then squeeze it firmly with your hands or a clean towel until it feels quite dry.

It’s tempting to rush this step, but taking an extra minute here pays off later. Think of how well-drained spinach makes a better spinach dip; cucumber behaves the same way.

Step 1 of a Greek tzatziki sauce recipe showing a hand grating cucumber on a box grater and sprinkling salt over a pile of grated cucumber on a board with a fine-mesh strainer ready for draining.
Step 1 – Grate and salt the cucumber: use the large holes of a box grater, sprinkle the shreds with salt and let them sit before squeezing out the excess water so your Greek tzatziki sauce stays thick and creamy instead of watery.

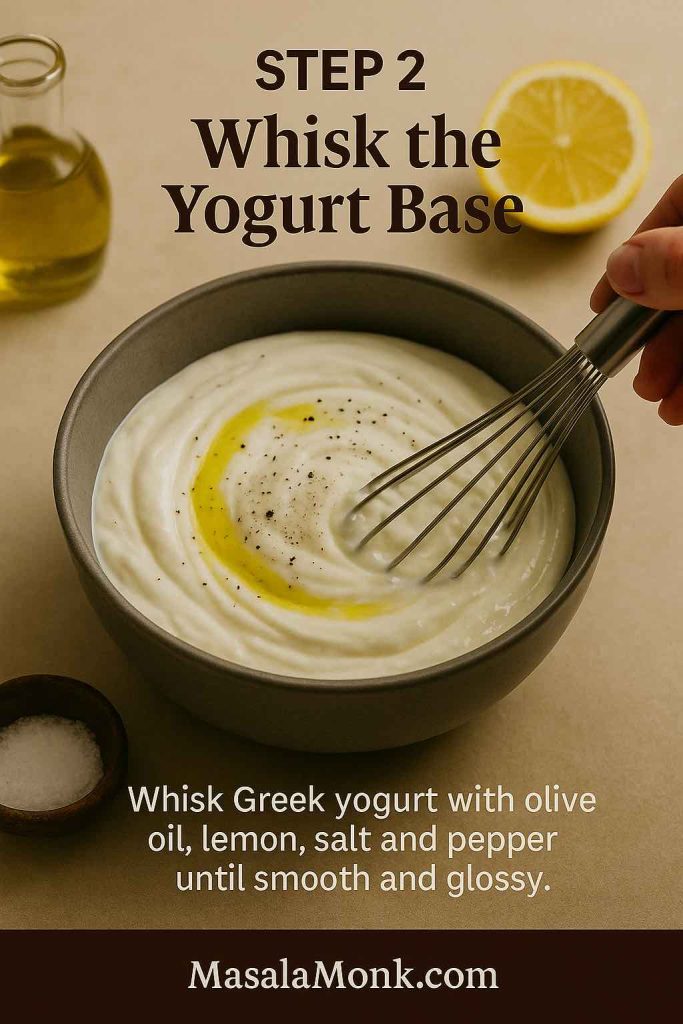
Step 2: Build the Yogurt Base

In a medium bowl, whisk together:

  • The Greek yogurt
  • Olive oil
  • 1 tablespoon of lemon juice
  • The ½ teaspoon of salt
  • A pinch of black pepper

Whisk until the mixture is smooth and glossy. The olive oil will loosen the yogurt slightly and give it a silky finish.

Step 2 of a Greek tzatziki sauce recipe showing a hand whisking Greek yogurt with olive oil, lemon juice, salt and pepper in a gray bowl, with a lemon half, olive oil bottle and salt dish in the background.
Step 2 – Whisk the yogurt base: combine Greek yogurt with olive oil, lemon juice, salt and pepper and whisk until the mixture looks smooth, glossy and ready for cucumber, garlic and fresh herbs.

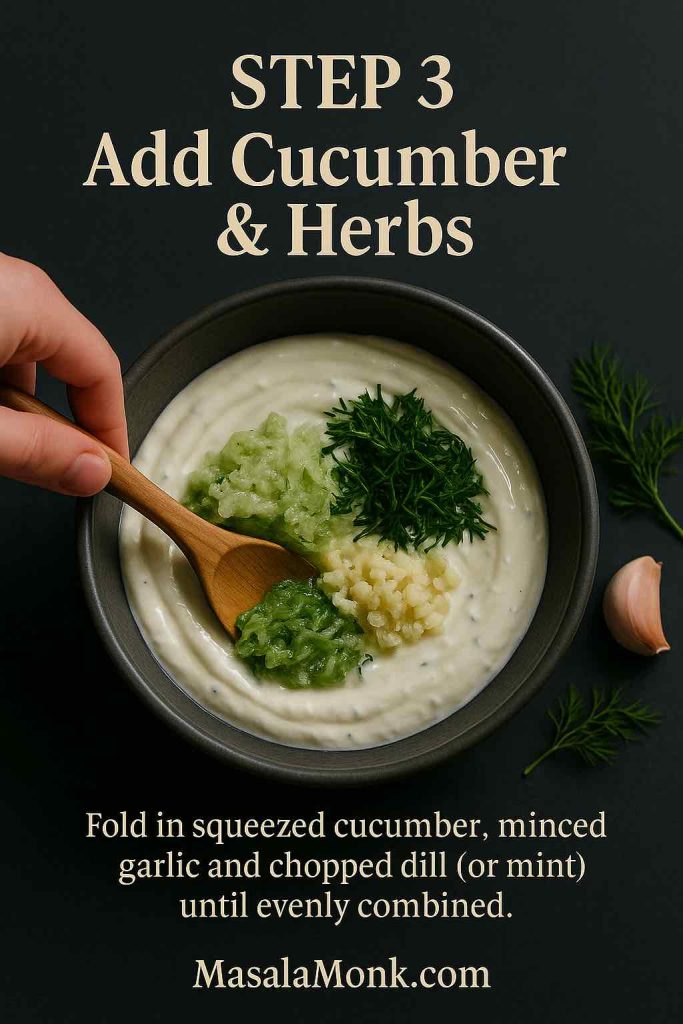
Step 3: Add Garlic, Cucumber and Herbs

Fold in:

  • The squeezed, grated cucumber
  • Minced or grated garlic
  • Chopped dill (and mint, if using)

Stir gently until everything is evenly distributed. At this point, your Greek tzatziki sauce recipe will already smell garlicky and fresh.

Taste a small spoonful and start adjusting:

  • Add more lemon juice for brightness
  • Sprinkle in a little extra salt if the flavors feel muted
  • Stir in another spoonful of dill if you want it more herb-forward

Raw garlic becomes more pronounced as it sits, so what tastes subtle now may taste just right after chilling.

Step 3 of a Greek tzatziki sauce recipe showing a hand using a spatula to fold squeezed grated cucumber, minced garlic and chopped dill into a bowl of smooth Greek yogurt.
Step 3 – Add cucumber and herbs: fold the squeezed grated cucumber, minced garlic and fresh dill (or mint) into the creamy yogurt base until everything is evenly combined and the tzatziki looks speckled with green.

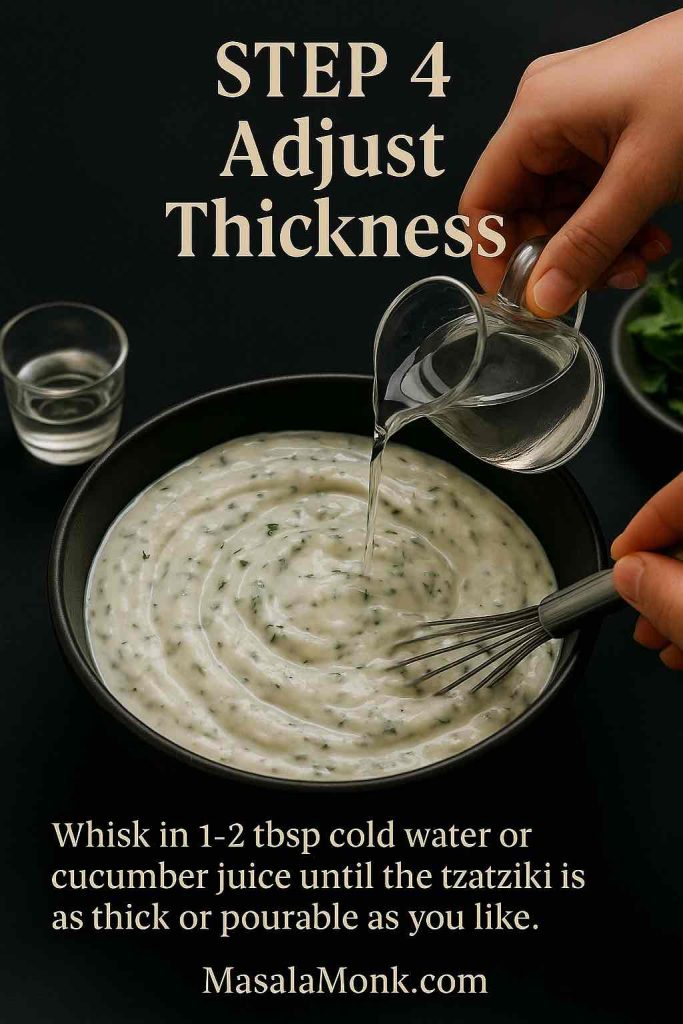
Step 4: Adjust the Thickness

Decide how you plan to use the sauce:

  • For dipping and gyros, keep it thick.
  • For drizzling over salads or bowls, add 1–2 tablespoons of cold water (or a little of the salty cucumber juice you squeezed out earlier) and whisk again until it flows smoothly.

The beauty of this Greek tzatziki sauce recipe is that you can shift the texture without changing the flavor.
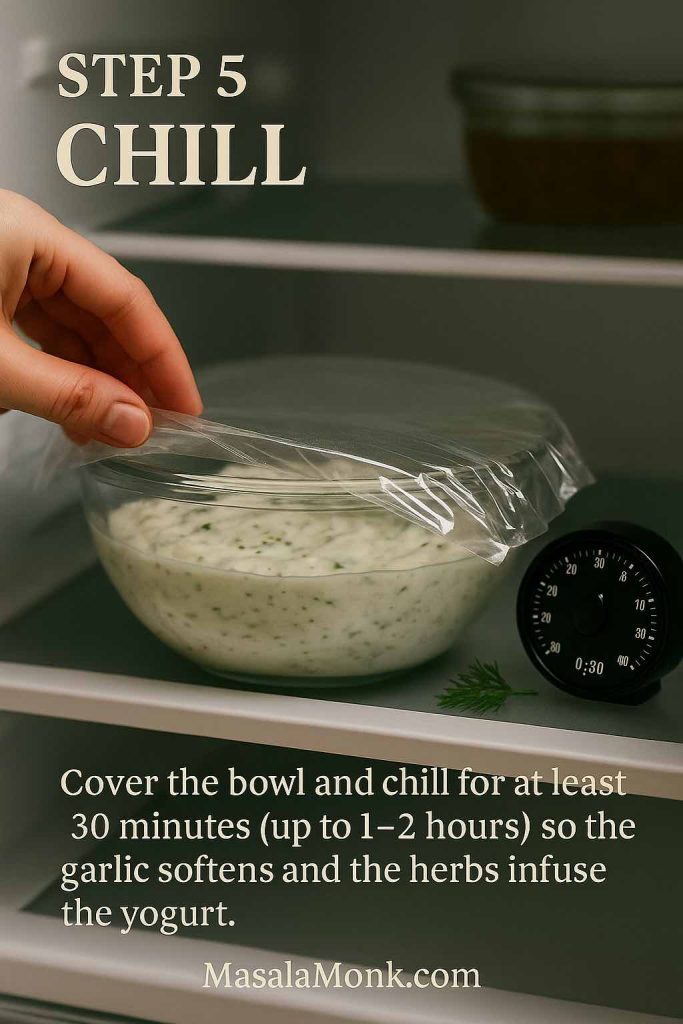
Step 4 of a Greek tzatziki sauce recipe showing a hand pouring a small stream of water or cucumber juice from a jug into a bowl of thick tzatziki while another hand stirs, adjusting the sauce to the desired consistency.
Step 4 – Adjust the thickness: whisk in a spoon or two of cold water or reserved cucumber juice until your Greek tzatziki sauce is as thick for dipping or as pourable for drizzling as you like.

Step 5: Chill

Cover the bowl and refrigerate for at least 30 minutes, and ideally for 1–2 hours. During this time, the garlic softens, the herbs perfume the yogurt and the cucumber flavor moves from individual bits into the whole sauce.

Tzatziki eaten immediately is good; tzatziki that has rested a bit is noticeably better.

Step 5 of a Greek tzatziki sauce recipe showing a hand covering a glass bowl of tzatziki with plastic wrap on a refrigerator shelf, next to a kitchen timer set to 30 minutes.
Step 5 – Chill: cover the bowl and refrigerate the tzatziki for at least 30 minutes (up to 1–2 hours) so the garlic softens, the herbs perfume the yogurt and the cucumber flavor spreads through the whole sauce.

Step 6: Serve

Just before serving:

  • Spoon the tzatziki into a shallow bowl.
  • Swirl the surface with the back of a spoon.
  • Drizzle a little extra olive oil on top.
  • Scatter a pinch of chopped dill or a few tiny mint leaves over everything.
Step 6 of a Greek tzatziki sauce recipe showing a shallow bowl of creamy tzatziki swirled and drizzled with olive oil, garnished with fresh dill, with a hand dipping a pita wedge into the sauce and cucumber slices and carrot sticks arranged around the bowl.
Step 6 – Serve: spoon the chilled tzatziki into a shallow bowl, swirl the top, drizzle with olive oil, scatter fresh dill or mint and bring it to the table with warm pita, crunchy vegetables or grilled meats.

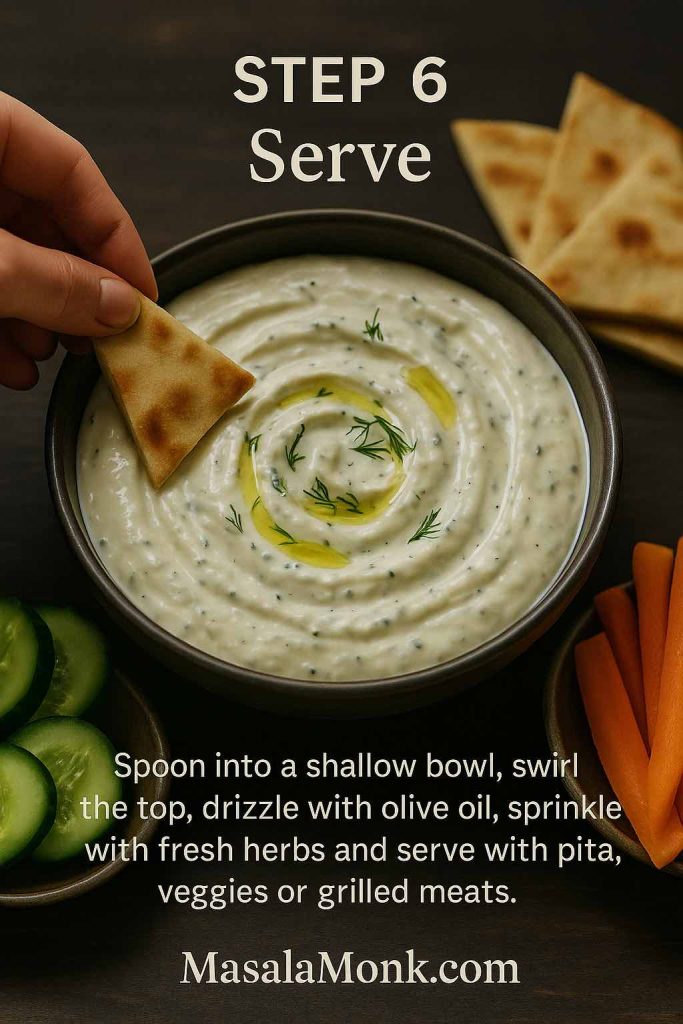
Now it’s ready to set down next to warm pita, grilled meats, roasted vegetables or simply a plate of sliced cucumber and carrots.

Also Read: Tres Leches – Mexican 3 Milk Cake Recipe


Why This Greek Tzatziki Sauce Recipe Fits a Mediterranean Way of Eating

Beyond taste, tzatziki has a few qualities that make it particularly useful if you’re leaning toward more Mediterranean-style meals.

First, Greek yogurt itself is a nutrient-dense ingredient. Because it’s strained, it usually carries more protein and less lactose than regular yogurt, all while keeping a good amount of calcium and live cultures. Many health-focused articles note that this combination supports satiety, bone health and gut health, especially when yogurt is eaten regularly as part of an overall balanced diet.

Second, the rest of the ingredients are simple and whole: cucumber, garlic, olive oil, herbs and lemon. These match up perfectly with the foods emphasized in Mediterranean-style patterns—lots of vegetables, herbs, quality fats and minimal processing. Long-term research has repeatedly associated those patterns with lower risk of heart disease, stroke and type 2 diabetes.

Finally, tzatziki is intense in flavor, so you only need a modest amount to make simple food appealing. A spoonful or two over a plate of grilled vegetables and lentils can be the difference between “virtuous but dull” and “I’d happily eat this again tomorrow.”

If you’re already building meals from other Mediterranean-leaning ideas—such as quinoa-based meal prep bowls or big, colorful salads inspired by a deep dive into daily salad habits—tzatziki slides right into that rhythm.


Ten Greek Tzatziki Sauce Recipes from One Master Bowl

Once you’re comfortable making the master version, small changes create a whole family of variations. You don’t need totally new recipes; you need a handful of smart tweaks.

Below are ten ways to adapt this Greek tzatziki sauce recipe, along with ideas on where each one shines.

1. Everyday Five-Minute Tzatziki

Some nights, the idea of salting, draining and squeezing cucumber is enough to send you toward bottled dressing. For those moments, a streamlined version helps.

Top-down photo of a bowl of 5-minute Greek tzatziki sauce on a wooden board, with a hand sprinkling dried dill over the creamy yogurt and cucumber dip surrounded by cucumber slices, garlic, lemon and a spoon.
Quick 5-minute Greek tzatziki sauce made with Greek yogurt, grated cucumber, garlic, dried dill and lemon – a weeknight-friendly dip for last-minute gyros, wraps and veggie plates.
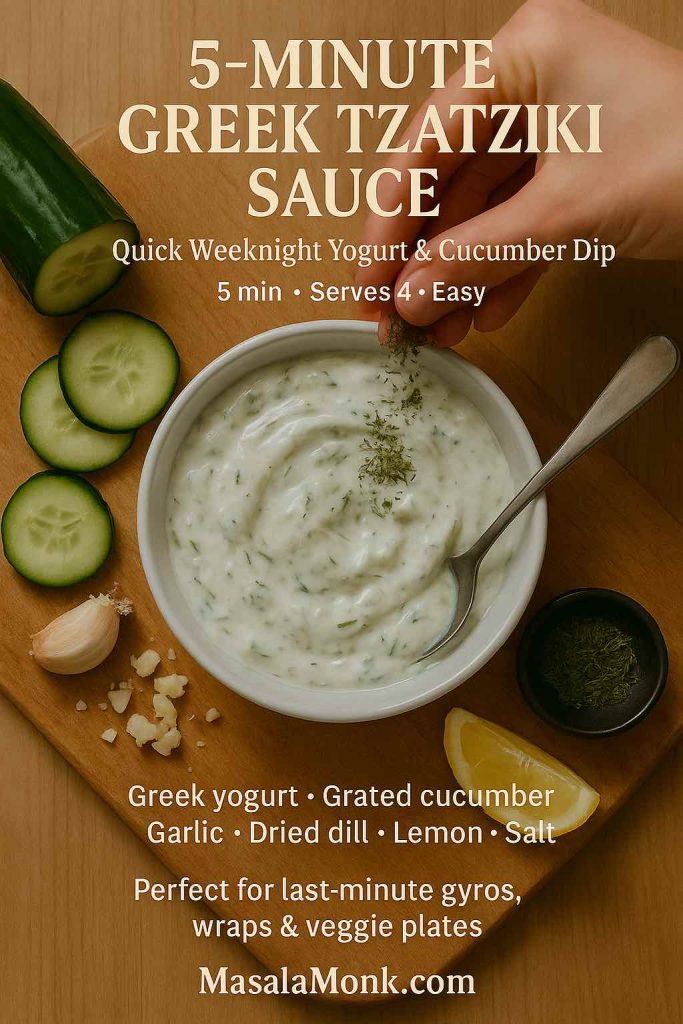
  • Grate the cucumber and squeeze it gently in paper towels without salting or resting.
  • Use just 1 clove of garlic plus ½ teaspoon garlic powder for an easier, less intense bite.
  • Swap fresh dill for 1–2 teaspoons dried dill weed if you don’t have fresh herbs on hand.

The flavor won’t be as layered as the full version, and the sauce may loosen a little as it sits, yet it still tastes like a proper Greek tzatziki sauce recipe—cool, garlicky and satisfying. It’s perfect for quick pita sandwiches, simple grilled chicken or as a last-minute dip for vegetable sticks.

Also Read: Simple Bloody Mary Recipe – Classic, Bloody Maria, Virgin & More

2. Recipe of Low-Calorie, High-Protein Tzatziki Greek Sauce

When you want a sauce that feels especially light but still comforting, you can nudge the recipe in that direction without losing its character.
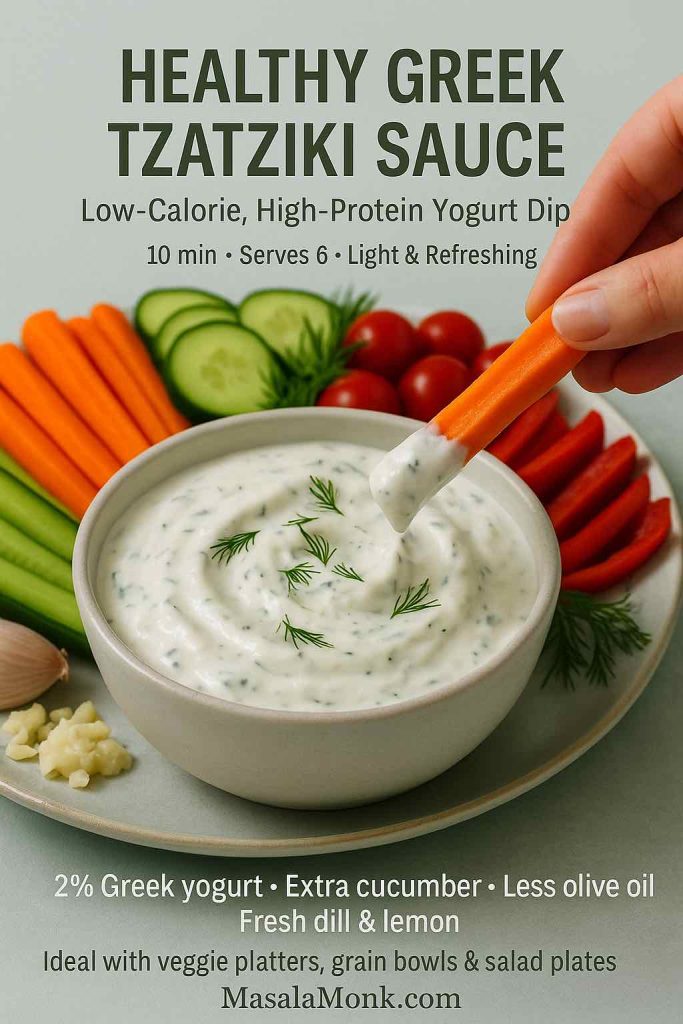
Side view of a bowl of healthy Greek tzatziki sauce made with 2 percent Greek yogurt, extra cucumber and fresh dill, with a hand dipping a carrot stick into the creamy dip, surrounded by cucumber slices, cherry tomatoes and pepper strips on a light plate.
Healthy Greek tzatziki sauce made with 2% Greek yogurt, extra cucumber and less olive oil for a low-calorie, high-protein dip that’s perfect with veggie platters, grain bowls and salad plates.

Try this approach:

  • Use 2% Greek yogurt instead of full-fat.
  • Reduce olive oil to 1 tablespoon.
  • Increase the grated cucumber slightly and add a bit more fresh dill for volume and freshness.

Because Greek yogurt is naturally higher in protein than regular yogurt, this variation still feels substantial. Comparison articles and nutrition breakdowns point out that Greek yogurt often delivers nearly double the protein of traditional yogurt per cup.

This version works beautifully on top of grilled fish, baked chicken, roasted vegetables or as a dressing for grain bowls. It also pairs nicely with lighter mains like a ladle of crock pot lasagna soup or a square of cottage cheese lasagna when you want a mixture of cozy and fresh on the same plate.

3. Dairy-Free / Vegan Recipe for Greek Tzatziki-Style Sauce

For guests who avoid dairy—or for days when you’re simply experimenting with plant-based cooking—you can mimic the feel of tzatziki with a few swaps.
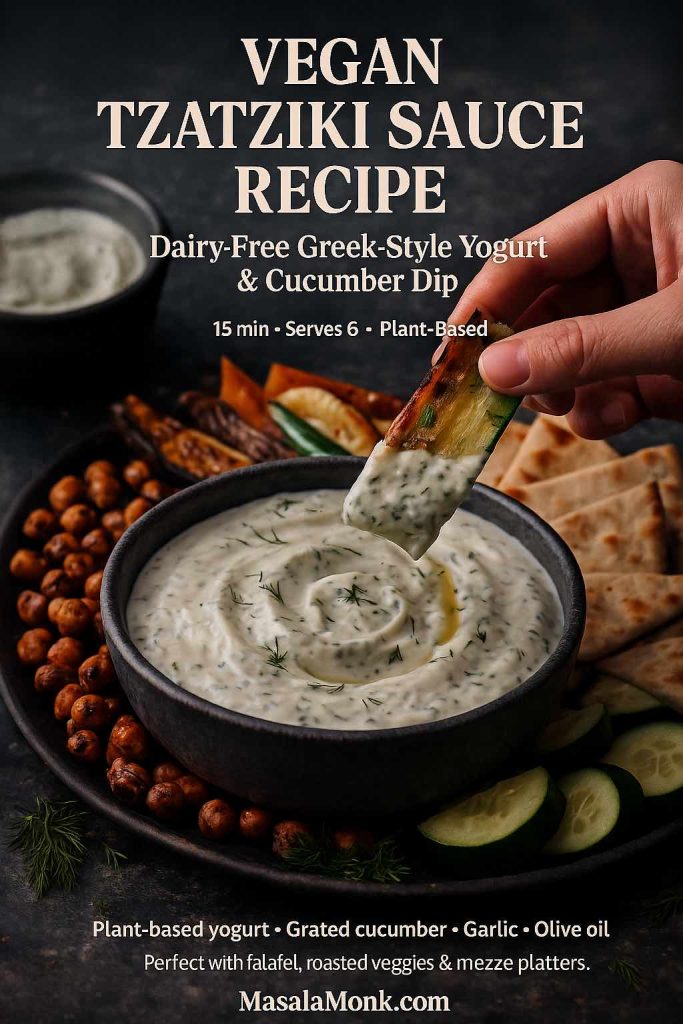
Close-up of a bowl of vegan tzatziki sauce made with plant-based yogurt, grated cucumber, garlic, lemon, dill and olive oil, with a hand dipping a roasted zucchini slice into the creamy dip, surrounded by roasted chickpeas, pita wedges and cucumber on a dark mezze platter.
Vegan tzatziki sauce recipe made with plant-based yogurt, grated cucumber, garlic, lemon and dill – a creamy dairy-free dip that shines on falafel plates, roasted veggie mezze boards and meatless Mediterranean dinners.

Use this pattern:

  • Choose a thick, unsweetened plant-based yogurt made from soy, coconut or almonds.
  • Add 1 extra tablespoon of olive oil to bring back some of the richness you’d get from full-fat dairy.
  • Keep the garlic, lemon and dill generous to ensure a bright, savory flavor.

This dairy-free twist is lovely with roasted vegetables, falafel, lentil patties or Mediterranean-style quinoa bowls similar to those in plant-based meal prep ideas.

You can also thin it down a little and use it as a sauce over roasted chickpeas, baked sweet potato wedges or stuffed peppers.

4. Recipe for Thick Greek Tzatziki Sauce for Gyros

When the sauce needs to stay tucked into bread, it should lean thicker and punchier.

High-resolution photo of a gyro wrap cut in half and stacked, filled with seasoned meat, tomato and red onion, with thick Greek tzatziki sauce visible inside, a hand holding the top half and a small ramekin of extra tzatziki on the side.
Thick, extra-garlicky Greek tzatziki sauce made to stay put inside gyros, wraps and stuffed pitas – rich Greek yogurt, grated cucumber and plenty of garlic with less lemon and no added water for the perfect street-style bite.

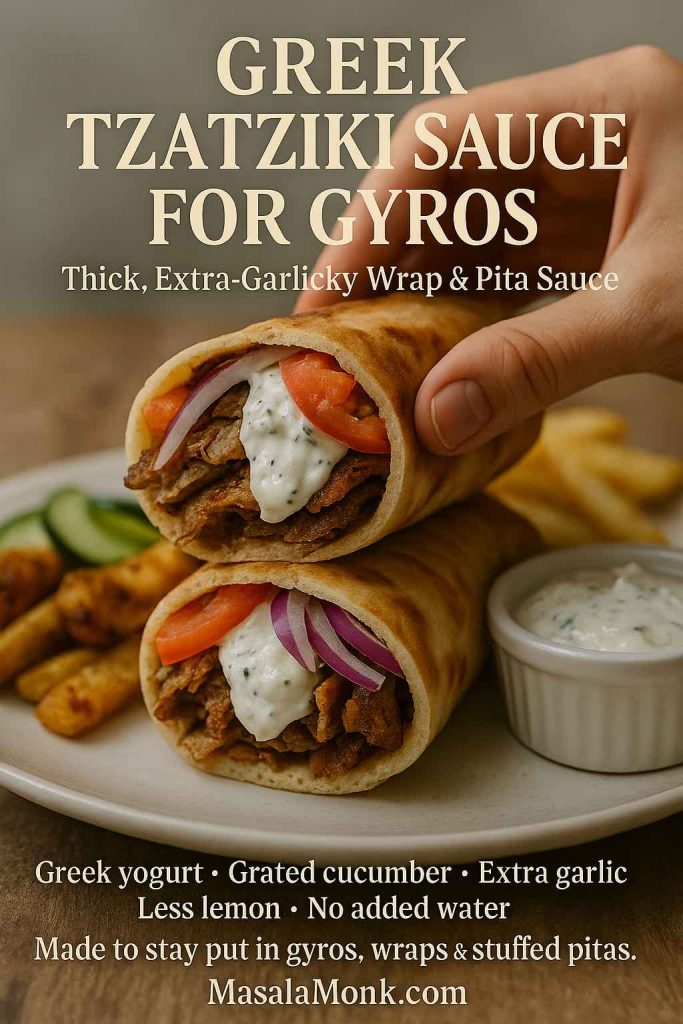
Make these adjustments:

  • Squeeze the cucumber extra thoroughly so almost no liquid remains.
  • Skip adding water entirely; let the sauce stay dense.
  • Use the full 3 cloves of garlic and keep lemon to the lower end (around 1 tablespoon) so it doesn’t get runny.

Spread this thick tzatziki down the center of warm pita, add slices of grilled or roasted meat, tuck in tomatoes and onions, then fold everything up. It’s the sauce that ties the sandwich together and keeps it moist, much like the role sauces play in the best chicken sandwich recipes.

You can also use this version as a spread inside flatbread wraps, shawarma-style sandwiches or even on burgers topped with feta and grilled vegetables.

5. Chicken Gyro Bowls with Tzatziki

Instead of wrapping everything in bread, you can turn the same components into a bowl that’s easier to portion and reheat.

High-resolution photo of a chicken gyro bowl with tzatziki, featuring sliced grilled chicken, rice, cucumber, tomatoes, olives, lettuce and a dollop of Greek yogurt sauce in a white bowl, with a hand holding a fork and a meal prep container in the background.
Chicken gyro bowl with tzatziki – marinated grilled chicken, grains, crunchy cucumber and tomato, olives and greens, all tied together with a big spoonful of Greek yogurt sauce for easy Mediterranean meal prep lunches and weeknight dinners.

Here’s one way to do it:

  1. Marinate chicken thighs or breast strips in olive oil, lemon juice, crushed garlic, dried oregano, salt and pepper.
  2. Grill or roast until the edges are charred and the center is juicy.
  3. Build bowls with a base of rice, quinoa or bulgur, then add chopped cucumber, tomato, red onion, lettuce and olives.
  4. Finish with a generous spoonful of the master Greek tzatziki sauce recipe on top.

Between the yogurt sauce and the chicken, you get a protein-rich meal that still feels fresh. This style of bowl sits in the same category as high protein overnight oats—different time of day, same idea of using yogurt to make food more filling without feeling heavy.

These bowls also pack well for lunch: keep the warm elements and the tzatziki separate, then combine them when you’re ready to eat.

6. Greek Tzatziki Salad Dressing

Sometimes salads need more than a vinaigrette to feel satisfying. That’s where a pourable version of tzatziki comes in.

High-resolution photo of tzatziki salad dressing being poured from a glass jug over a colorful Greek salad with lettuce, cucumber, cherry tomatoes, red onion, Kalamata olives and grilled chicken in a beige bowl.
Tzatziki salad dressing – a pourable Greek yogurt version of classic tzatziki that drapes over salads, grain bowls and roasted vegetables with cool, garlicky, herb-fresh flavor.

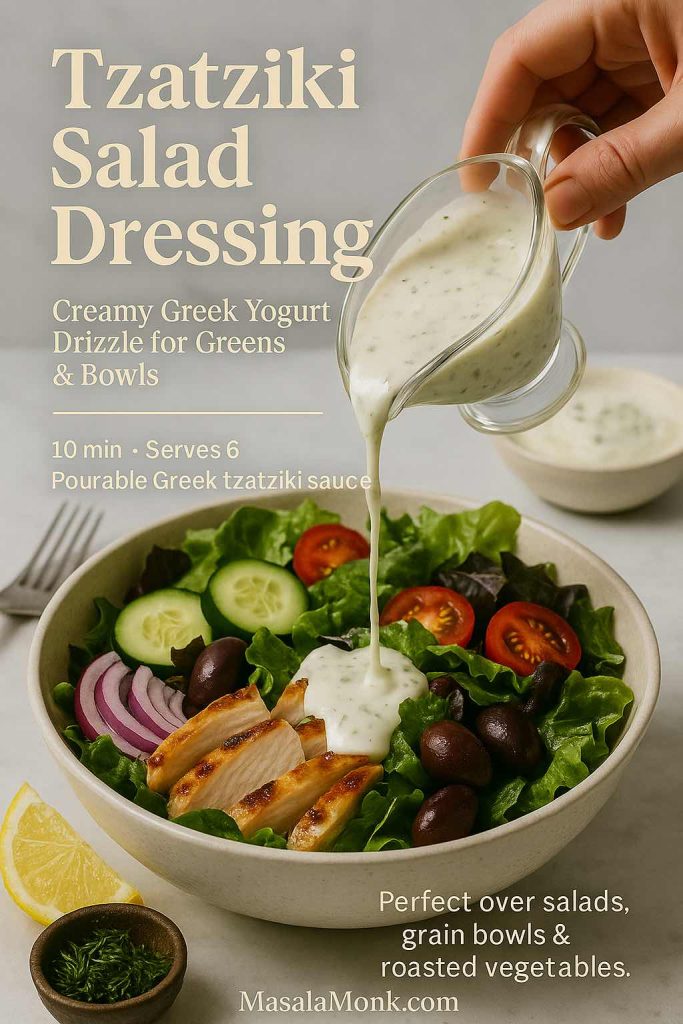
To turn your sauce into a dressing:

  • Whisk 2–4 tablespoons of cold water into 1 cup of tzatziki until it reaches a smooth, drizzly consistency.
  • Add an extra teaspoon or two of lemon juice.
  • Taste and adjust salt; greens can handle slightly stronger seasoning than raw vegetables served alone.

This dressing is excellent over chopped cucumber–tomato salads, crunchy romaine, simple mixed greens or roasted vegetable platters. It fits neatly with the kind of salads encouraged in a comprehensive look at daily salad habits, where the emphasis is on making vegetables truly enjoyable, not a chore.

You can also drizzle this thinner Greek tzatziki sauce recipe over grain bowls, roasted potatoes or even leftover roasted vegetables to give them new life.

7. Chunky Mezze Tzatziki

When you’re assembling a mezze-style spread for guests, a chunkier, more textural tzatziki feels especially inviting on the table.

Top-down mezze platter with a large shallow bowl of chunky Greek tzatziki dip in the center, surrounded by pita wedges, olives, cherry tomatoes, grilled peppers, cucumber and carrot sticks, with several hands reaching in to scoop from the dip.
Chunky mezze tzatziki dip – thick Greek yogurt, diced cucumber, garlic, olive oil, dill and mint served in a shallow bowl at the center of a colorful mezze platter, made for parties, grazing tables and easy Greek-style entertaining.

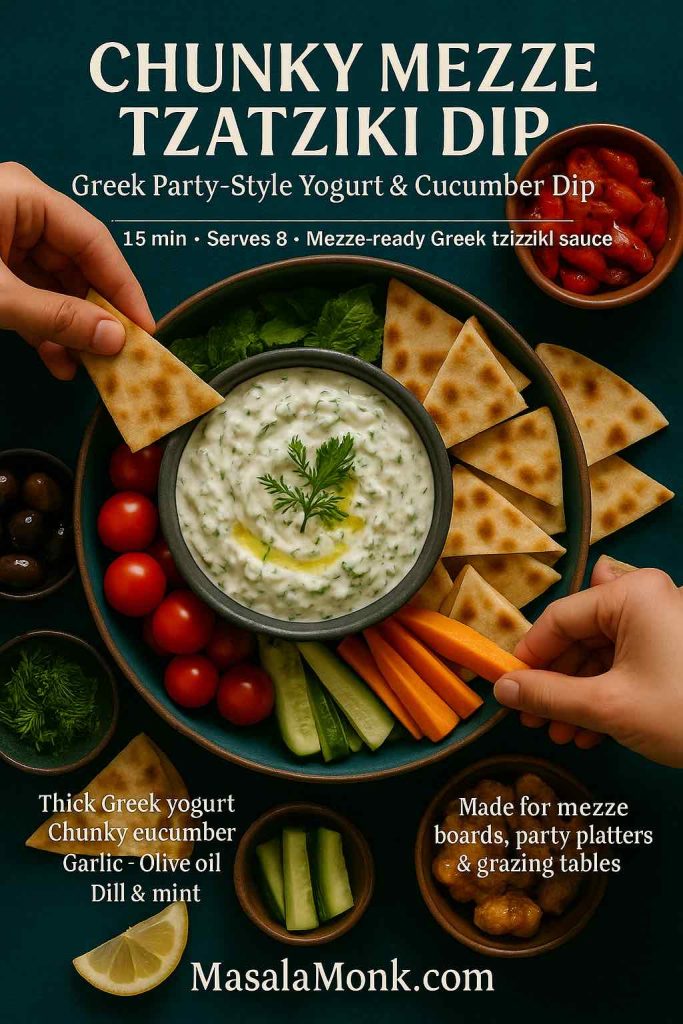
To create that version:

  • Prepare the master recipe as usual, keeping it fairly thick.
  • Dice an extra handful of cucumber into tiny cubes and fold them in after chilling.
  • Increase dill and mint slightly for a more herb-packed bite.
  • Finish the surface with olive oil and a dusting of sumac or smoked paprika.

Serve this bowl alongside warm pita, crunchy vegetables and one or two companion dips inspired by spinach dip recipes.

For extra protein and variety, add air fryer hard-boiled eggs to the board. They’re easy to peel and make a satisfying combination with cool tzatziki and warm bread.

8. Sour-Cream-Enriched Tzatziki (or No-Cucumber Version)

On some days, you might find a tub of sour cream in the fridge and no cucumber in sight. Even then, you can produce something in the spirit of this Greek tzatziki sauce recipe.
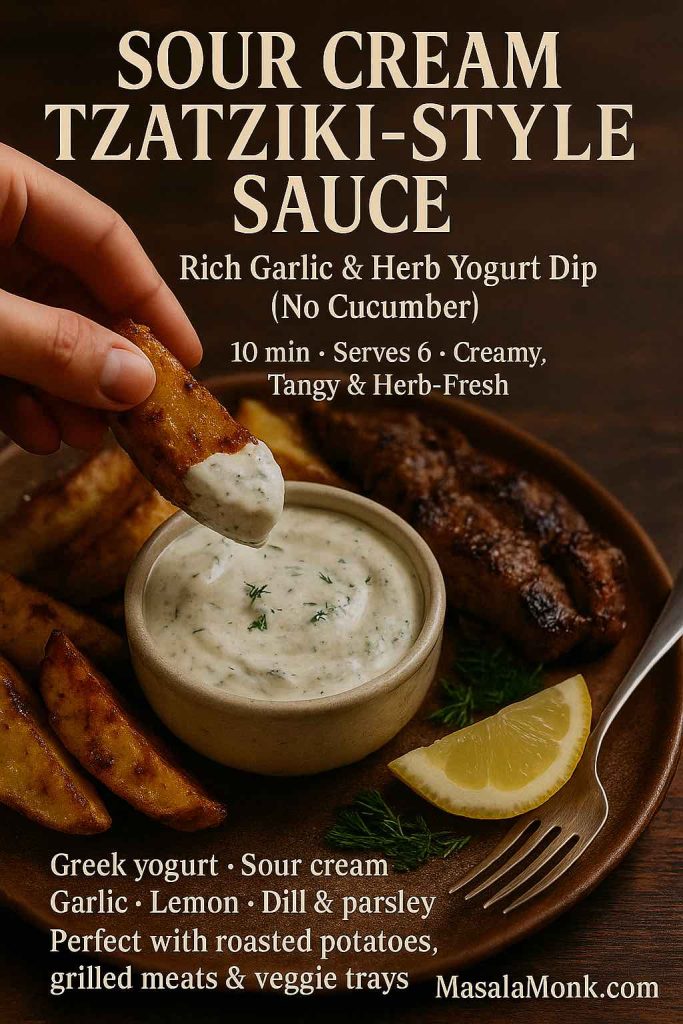
Side-angle photo of a bowl of sour cream tzatziki-style sauce made with Greek yogurt, sour cream, garlic, lemon and herbs, with a hand dipping a crispy roasted potato wedge into the creamy white dip on a rustic wooden table next to roasted potatoes and grilled meat.
Sour cream tzatziki-style sauce – a rich, cucumber-free garlic and herb dip made with Greek yogurt and sour cream, perfect alongside roasted potatoes, grilled meats or hearty veggie trays when you want all the tzatziki flavor in a more indulgent, cozy format.

Try this variation:

  • Use ½ cup Greek yogurt and ½ cup sour cream.
  • Skip the cucumber or replace it with a small handful of finely chopped, seeded tomato for freshness.
  • Keep garlic, lemon and herbs generous so the sauce stays bright instead of heavy.

The result is more like a garlicky herb cream, yet it plays a similar role on the plate. Spoon it over roasted potatoes, grilled steak, baked salmon, steamed vegetables or even next to a cozy dish like green bean casserole when you want something cool and tangy on the side.

9. Salmon with Greek Tzatziki Sauce Recipe

Fish and yogurt might not sound like an obvious pairing at first, but the combination works beautifully—especially with oily fish like salmon.

Plated salmon with Greek tzatziki sauce, showing a seared salmon fillet on a light plate with a spoonful of creamy yogurt and cucumber sauce, fresh herbs, lemon wedge and a simple green side, with a hand holding a fork ready to take a bite.
Salmon with Greek tzatziki sauce – a simple Mediterranean weeknight dinner of seared salmon, cool garlicky yogurt and cucumber sauce, lemon and light greens that comes together fast but feels restaurant-level on the plate.

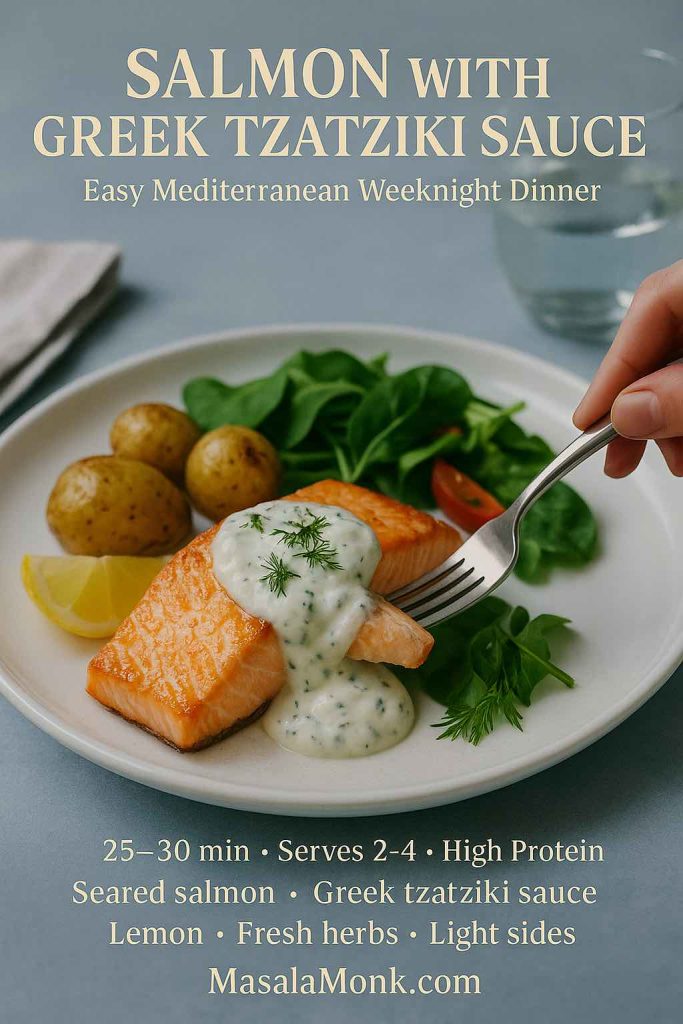
A simple way to bring them together:

  1. Rub salmon fillets with olive oil, salt, pepper and a squeeze of lemon.
  2. Roast or pan-sear until just cooked through and beginning to flake.
  3. Serve with a generous spoonful of chilled tzatziki either on top or alongside.
  4. Add a green salad, roasted vegetables or simple potatoes to round out the plate.

This kind of meal—fish, vegetables, olive oil and a small amount of fermented dairy—mirrors classic Mediterranean patterns that many studies highlight as beneficial for long-term heart health.

You can easily swap in cod, haddock or trout; just adjust cooking times and keep the serving of tzatziki the same.

Also Read: Whiskey Sour Recipe: Classic Cocktail, Best Whiskey & Easy Twists

10. Brunch and Breakfast with Tzatziki

Finally, tzatziki doesn’t need to stay confined to lunch and dinner. It also has a comfortable place in brunch spreads and weekend breakfasts, especially for people who enjoy savory options.

High-resolution photo of a Mediterranean brunch board with a central bowl of Greek tzatziki sauce surrounded by roasted potatoes, soft-boiled eggs, pita wedges, grilled vegetables and fresh greens on a wooden table, with a hand reaching in to take a bite.
Mediterranean brunch board built around Greek tzatziki sauce – roasted potatoes, jammy eggs, pita, grilled vegetables and fresh greens for a savory weekend spread that turns one simple yogurt and cucumber dip into a complete breakfast feast.

Consider a few ideas:

  • Put together a savory brunch board with roasted potatoes, grilled vegetables, olives, slices of cheese, air fryer hard-boiled eggs and a big bowl of tzatziki in the center for dipping.
  • Balance a sweet tray of pancakes or French toast sticks with a plate of warm pita, tomatoes, cucumbers and tzatziki so guests can build both sweet and savory bites.
  • Offer both tzatziki and high protein overnight oats so Greek yogurt shows up in two completely different forms at the same meal.

If you enjoy brunch cocktails, a light, bubbly drink such as a French 75 or one of the twists from a mimosa recipe collection pairs nicely without overwhelming the herbs and garlic.


Building Meals Around Tzatziki

Once there’s a bowl of tzatziki in your fridge, the way you think about meals starts to shift. Instead of beginning with a complicated main dish, you can start with the sauce and assemble around it.

Mezze Nights

One of the easiest ways to use a Greek tzatziki sauce recipe is in a mezze-style spread—essentially a table filled with small plates so everyone can pick and choose. For instance, you might set out:

  • Tzatziki and one or two other dips, perhaps a spinach-based dip inspired by spinach dip recipes
  • Warm pita or flatbreads
  • Sliced cucumbers, carrots, radishes and bell peppers
  • A simple tomato and onion salad
  • Olives, pickled peppers and small cubes of cheese
  • A plate of air fryer hard-boiled eggs or grilled chicken pieces for protein

Everyone can build little bites: a piece of bread with tzatziki and tomato, a slice of egg dipped into the sauce, or raw vegetables dragged through a small puddle of yogurt and herbs. It feels relaxed, social and abundant without requiring hours at the stove.

Comfort Main + Fresh Sauce

On cooler evenings, you might crave something heartier—lasagna, rich soups or baked casseroles. Tzatziki can still play a role there, not as the star, but as the fresh sidekick.

Imagine:

  • A bowl of crock pot lasagna soup with a green salad and a small dish of tzatziki nearby so people can add a spoonful to their bowls if they like.
  • A slice of cottage cheese lasagna alongside a cold, crisp cucumber salad dressed with a thinner Greek tzatziki sauce recipe.
  • A holiday-style plate with green bean casserole, roasted potatoes and grilled chicken, brightened with a spoonful of tzatziki instead of another heavy gravy.

This mix of cozy and fresh keeps comfort food from feeling one-note.

Quick Weeknight Plates

On busy nights, tzatziki can turn very simple components into a complete-feeling meal:

  • Roast a tray of chicken pieces and potatoes with olive oil, salt and herbs. Serve everything with a bowl of tzatziki and a quick side salad.
  • Pan-fry or bake fish fillets, add lemon, then spoon tzatziki on top right at the table.
  • Warm pita or flatbreads, stuff them with leftover roasted vegetables or meat, and slather tzatziki inside as the main sauce.

Because the sauce is already waiting in the fridge, these meals feel fast without reading as “thrown together.”

Also Read: Peanut Butter Cookies (Classic Recipe & 3 Variations)


Storing and Making Ahead Greek Tzatziki Sauce Recipe

A fresh Greek tzatziki sauce recipe keeps nicely in the fridge, though it does change subtly over time.

Here are a few practical points:

  • Container: A clean, lidded glass or plastic container keeps the flavors focused and prevents stray fridge smells from sneaking in.
  • Timeframe: For the best texture and flavor, try to eat tzatziki within 3–4 days. After that, the cucumber can soften a bit too much and the garlic may become a little sharper.
  • Separation: If a bit of liquid pools on top, just stir it back in. If it seems a little thin, folding in a spoonful of fresh Greek yogurt right before serving can restore some body.
  • Serving hygiene: If you’re putting tzatziki out for a gathering, spoon a portion into a smaller bowl instead of letting everyone dip directly into the storage container. That way, any double-dipping or stray crumbs don’t affect the whole batch.

For especially busy weeks, one useful trick is to make the base ahead—yogurt, olive oil, garlic, lemon, salt and herbs—then grate and squeeze the cucumber on the day you want to serve. That gives the yogurt time to develop flavor while keeping the cucumber at its freshest and crispest.

Freezing isn’t recommended; the texture of yogurt and cucumber suffers too much after thawing.

Also Read: Homemade Hot Chocolate with Cocoa Powder Recipe


Tzatziki, the greek sauce recipe in a bigger picture

It’s easy to think of tzatziki as “just a sauce.” Yet looked at another way, a reliable Greek tzatziki sauce recipe is a quiet tool for shaping how you cook and eat:

  • It gives raw vegetables a destination besides plain hummus or ranch.
  • It gives leftover grains, beans or roasted vegetables an easy way to feel new again.
  • It provides a creamy element for meals that still lean on vegetables, legumes, whole grains and fish—exactly the kind of pattern associated with the Mediterranean diet and its long list of possible health benefits.

You don’t have to change everything at once. Simply get comfortable making this sauce, keep a bowl in your fridge when you can, and see where it naturally ends up: next to roasted vegetables, on top of salmon, tucked into sandwiches, or drizzled onto salads. Over time, you may notice that your plates look a little more colorful, a bit more vegetable-forward and—perhaps most importantly—much more fun to eat.

FAQs on Greek Tzatziki Sauce Recipe

1. What is a classic Greek tzatziki sauce recipe made of?

A classic Greek tzatziki sauce recipe usually includes thick Greek yogurt, grated and well-squeezed cucumber, fresh garlic, extra virgin olive oil, lemon juice (or a mild vinegar), salt, black pepper and plenty of fresh dill or a mix of dill and mint. Altogether, these ingredients create a cool, tangy and garlicky cucumber yogurt sauce that works as both a dip and a dressing. For the best texture, the yogurt should be strained and the cucumber should be salted and squeezed so the sauce stays thick and creamy instead of watery.


2. How do I make an easy Greek tzatziki sauce recipe for beginners?

For a simple version, start with plain Greek yogurt in a bowl, then stir in finely grated cucumber (pressed dry in a paper towel), minced garlic, a spoon of olive oil, a squeeze of lemon, salt, pepper and dried or fresh dill. Mix everything until smooth and taste to adjust the lemon and salt. Even though the sauce improves after resting in the fridge, it still tastes delicious right away, which makes this easy tzatziki sauce a great option for busy weeknights or last-minute guests.


3. Which yogurt is best for a Greek tzatziki sauce recipe: Greek or regular?

Generally, Greek yogurt is preferred because it is thicker and richer than regular yogurt, so the tzatziki holds its shape and clings nicely to bread, meat and vegetables. Regular yogurt contains more whey, so it tends to be runnier and can make the sauce feel thin. However, if regular yogurt is all you have, you can strain it through a fine cloth or coffee filter for a couple of hours in the fridge; once it thickens, it behaves much more like Greek yogurt in a tzatziki sauce recipe.


4. Can I make a Greek tzatziki sauce recipe without cucumber?

Yes, you can still prepare a tasty garlic yogurt sauce even if you have no cucumber. In that case, simply leave the cucumber out and increase the herbs, garlic and lemon slightly so the flavor stays bright. Alternatively, very finely chopped, seeded tomatoes or a small amount of grated zucchini can bring a bit of freshness and texture. While it won’t be a textbook tzatziki, this no-cucumber version still works wonderfully as a dip for vegetables, a topping for grilled meats or a spread for wraps.


5. Is a Greek tzatziki sauce recipe healthy?

Most of the time, tzatziki is considered a lighter, nutrient-dense sauce. It is built on strained yogurt, which typically provides protein, calcium and live cultures, along with cucumber, olive oil, garlic, herbs and lemon. Compared with many cream-based or mayonnaise-heavy sauces, a Greek tzatziki sauce recipe usually contains less saturated fat and often more protein per spoonful. Naturally, the overall healthiness still depends on what you eat it with and how large the portions are, but as a way to make vegetables and lean proteins more appealing, tzatziki fits very comfortably into a balanced pattern of eating.


6. How can I make a low-calorie or low-fat Greek tzatziki sauce recipe?

To lighten the sauce, try using 2% or low-fat Greek yogurt instead of full-fat, keep the olive oil to a tablespoon or less, and add extra cucumber and herbs for volume. In addition, you can skip any extra oil drizzled on top when serving. The texture remains creamy because Greek yogurt is naturally thick, while the cucumber and dill keep the flavor refreshing. This kind of healthier tzatziki works especially well with grilled chicken, baked fish, grain bowls and big salads where you want a creamy element that doesn’t overshadow the rest of the meal.


7. Can I make a dairy-free or vegan Greek tzatziki sauce recipe?

Absolutely. For a dairy-free or vegan tzatziki, use a thick, unsweetened plant-based yogurt made from soy, coconut, almond or oat instead of Greek yogurt. Then add grated, squeezed cucumber, garlic, herbs, olive oil, lemon, salt and pepper just as you would in a traditional recipe. Because some non-dairy yogurts can be quite mild, you may want a little extra lemon and garlic to keep the flavor bright. This vegan tzatziki is excellent with falafel, roasted vegetables, grain bowls and wraps, and it fills the same role as a classic Greek tzatziki sauce recipe on the plate.


8. What is the difference between tzatziki and gyro sauce?

In many cases, they are essentially the same thing: a thick Greek tzatziki sauce recipe used as the sauce for gyros. However, gyro sauce is often made a little thicker and more garlicky so it stays inside the pita and stands up to heavily seasoned meat and onions. Sometimes, restaurants use a sour-cream-based garlic sauce or a yogurt-mayo mix and still call it “gyro sauce.” If you specifically want the Greek cucumber yogurt sauce, choose a tzatziki recipe built on Greek yogurt, cucumber, garlic, olive oil, lemon and dill, and then simply keep it extra thick for gyros.


9. Can I use sour cream instead of Greek yogurt in a Greek tzatziki sauce recipe?

You can, although the result will be slightly richer and tangier. Sour cream is thicker than regular yogurt but usually a bit looser than Greek yogurt, so the sauce may turn out softer unless you reduce other liquids. One popular option is to use half Greek yogurt and half sour cream to get the best of both: protein and density from the yogurt, plus silkier texture from the sour cream. This hybrid works nicely for baked potatoes, roasted vegetables and grilled meats, particularly when you want a more indulgent twist on standard tzatziki.


10. How long does homemade Greek tzatziki sauce last in the fridge?

Generally, homemade tzatziki keeps well for about 3 to 4 days in a sealed container in the refrigerator. Over time, the cucumber softens and releases a little extra liquid, and the garlic flavor can intensify. If a bit of liquid collects on top, simply stir it back in; if the sauce becomes too thin for your liking, you can fold in a spoonful of fresh Greek yogurt to thicken it again. Once it smells or tastes off, or if the surface looks discolored, it’s best to discard it and make a fresh batch.


11. Can I freeze a Greek tzatziki sauce recipe?

Freezing isn’t recommended. When yogurt and cucumber thaw, the texture often turns grainy and watery, and the fresh, clean flavor that makes tzatziki so appealing is mostly lost. The cucumber can become mushy, and the yogurt may separate. Instead of freezing, it’s better to make smaller batches more often or prepare the yogurt base ahead of time without cucumber, then stir in freshly grated, squeezed cucumber on the day you plan to serve the sauce.


12. How can I turn a Greek tzatziki sauce recipe into a salad dressing?

Turning tzatziki into a salad dressing is straightforward. Start with the sauce in a bowl, then whisk in cold water, milk or a little extra lemon juice a tablespoon at a time until it reaches a pourable consistency. Taste and add a pinch more salt or herbs if the flavor feels diluted. This thinner version works wonderfully over chopped cucumber-tomato salads, mixed greens, roasted vegetable bowls and even grain-based salads. In this way, one Greek tzatziki sauce recipe can cover both dips and dressings, making it an especially versatile staple to keep in your kitchen.

Posted on 2 Comments

Food for Constipation Relief & Gut Health : 6 High-Fiber Sandwiches

High-fiber sandwich on whole-grain bread with hummus, spinach, kiwi and carrot sticks; chia seeds and a water glass suggest hydration for digestion.

Constipation is exhausting, but lunch can actually help. These high-fiber sandwiches are built the way your gut prefers: sturdy whole-grain bread for gentle bulk, creamy legume spreads for steady fiber, seed “gel boosters” for softness, and juicy produce for moisture. Moreover, they’re practical—quick to assemble, easy to repeat, and sized to deliver meaningful fiber without feeling heavy.

Now, how much fiber do most adults need? A realistic daily target sits around 25–38 g. However, jumping there overnight can backfire. Instead, increase gradually—about 5 g extra per day each week—and pair each meal with fluids so fiber can actually hold water and move comfortably (see this concise intake overview and NIDDK hydration guidance). Meanwhile, short habits matter: drink a glass of water with your sandwich, then take a 10–15-minute walk. Little by little, those simple moves add up to relief.

Because details determine outcomes, every recipe below was designed with fiber grams, moisture, and texture in mind. In other words, the builds aren’t random—they’re engineered for comfort, regularity, and flavor you’ll actually crave tomorrow.

Also Read: Hemorrhoids High Fiber Diet: Best Foods, What to Avoid, and a 7-Day Plan


How much fiber these sandwiches deliver & of what kinds?

First, how much: each sandwich aims to contribute roughly 12–20 g of fiber toward your day. Which means, two thoughtfully built high-fiber sandwiches can cover most of what you need, leaving breakfast and snacks to top you up gently.

Second, which kinds: not all fibers behave the same, so the layers do different jobs.

  • Viscous, soluble fibers make a soft gel that holds water in the stool, which often makes passing easier. You’ll get these from oats and barley (thanks to β-glucans), plus chia and ground flax (rich in mucilage). we have used oat/barley-leaning breads, avocado-chia mixes, and flax-boosted hummus throughout. If you’re curious about the mechanics, here’s a clear look at β-glucans and stool-softening and a friendly explainer on chia’s mucilage-rich fiber.
  • Insoluble fibers—from bran, leafy greens, and vegetable skins—add gentle bulk and help speed transit. As a result, grated carrots, greens, and crunchy slaws live inside the sandwich, not just on the side, so every bite pulls its weight.
  • Moisture is the multiplier. Because fiber needs water to work, spreads are creamy, fillings are juicy, and sauces are built in rather than left out. Additionally, we suggest sipping water with the meal, since fluids help fiber function.

Finally, how the recipes are structured: each sandwich states its intent (relief or maintenance), lists realistic portions, and includes make-ahead notes, smart swaps, and small finishing touches. Therefore, you can choose what fits today—and repeat it tomorrow—without turning lunch into a project.

Also Read: Prune Juice & Prunes for Constipation: What Works, How Much, and When to Seek Help


Why High-Fiber Sandwiches help (and how to build them)

Put simply, sandwiches make fiber doable. They bundle the right textures (soft + crisp), the right moisture (creamy + juicy), and the right amounts (measured slices and scoops) into a meal you can repeat tomorrow. Moreover, the format nudges consistency—arguably the most important factor for regularity.

They’re effortless to measure—and easy to stick with

Whole-grain slices are pre-portioned, spreads are spoonable, and veg layers are visible. Making it easy for you to assemble, eat, and actually hit useful daily fiber targets with minimal guesswork. If you like to prep once and assemble fast, this MasalaMonk idea for lentil meal-prep (as a sandwich filling) shows how a single batch can anchor multiple sandwiches during the week.

Moisture is built in by design

Dry, dense meals can backfire. We have ensured, each of these high-fiber sandwiches are built in a way that anchors moisture inside the bread: creamy hummus or yogurt-tahini underlayers, avocado folded with seeds, and juicy produce (carrot, greens, citrus segments) on top. That layering keeps bites slick rather than pasty, which, in turn, supports comfortable stool texture. If you like dairy or dairy-free yogurt as a base, a quick example is this hung curd spinach sandwich—the same idea powers our “Green Goddess” stack.

Layer order actually helps transit

Then start with a creamy spread to “seal” the crumb; next, add your fiber engine (chickpeas, lentils, or black beans) so it clings; in the end, finish with watery produce for slip. Additionally, a squeeze of lemon or a spoon of salsa adds acidity and fluid without heaviness. Small choices like these often determine whether a sandwich just sits—or genuinely supports movement.

Seeds add gentle gel—without bulky portions

A teaspoon of chia or finely ground flax disappears into spreads yet changes texture meaningfully after a glass of water. In brief, chia’s soluble, mucilage-rich fiber is well-documented (concise overview, open-access review; see also a broader nutrient profile in this MDPI review of chia’s composition: open access). For flax specifics you can use in everyday cooking, here’s a MasalaMonk primer: flax seeds for strong digestion.

The hand-held format supports satiety and travel

Because each of these high-fiber sandwiches pairs intact grains with legumes and produce, you get slower digestion and steadier fullness; which means, you’re less likely to graze later. For a clear big-picture explainer on fiber’s roles (beyond “roughage”), Harvard’s Nutrition Source summarizes the two fiber types and their effects.

Gentle routines amplify the effect

Right after eating, your body’s gastrocolic reflex naturally increases colon motility—so a brief 10–15-minute walk can nudge momentum in the right direction. For a plain-language primer, see Cleveland Clinic’s overview of the gastrocolic reflex. Moreover, even light movement supports regularity; their constipation guide underscores that exercise can stimulate the intestines. If symptoms persist despite these habits, the NIDDK’s constipation page outlines when to speak with a clinician.

Build template (at a glance)

  • Bread (2 slices): 100% whole-grain or sprouted; look for ≥3–4 g fiber per slice.
  • Spread (2–4 tbsp): hummus, white-bean mash, or yogurt-tahini; optionally stir in 1 tsp chia or ground flax.
  • Engine (⅓–½ cup): chickpeas, lentils, or black beans; lightly mash so it anchors.
  • Produce (heaped): grated carrot + leafy greens + a juicy element (cucumber, tomato, or citrus).
  • Finish: lemon or vinegar splash; herbs; pepper. Additionally, sip water and, if possible, take a short walk afterward.

For background reading that ties food choices to gut comfort more broadly (in case you want to deepen the “why”), this MasalaMonk primer on gut inflammation and digestive health connects everyday plant foods with a calmer baseline—useful context for readers who like understanding the bigger picture.

Also Read: Teas for Digestion, Bloating, and Gut Health.


How to Use These High-Fiber Sandwiches

When constipation drags on, lunch is often the easiest place to add high fiber foods for constipation relief—without cooking an entire pot of anything. In practice, plant based foods high in fiber (beans, chickpeas, lentils, leafy greens) plus high fiber fruits and vegetables for constipation (kiwi, pear, apple, carrots) work together; as a result, you get both moisture and bulk. Along the way, foods rich in soluble fiber—like oats, barley, chia, and ground flax—form a gentle gel that supports softer stools and calmer bellies. Because you asked for a high fiber plant based diet approach, every sandwich below is fully plant-forward, practical for weekdays, and aligned with high fiber foods for gut health, colon health, and everyday digestive health. For hydration cues that make this even easier, see NIDDK’s diet & constipation guidance; for grain choices that add viscous fiber, here’s a friendly β-glucan overview.

Format you’ll see below: brief “why,” a clear ingredient list, step-by-step method, fiber-forward upgrades, and make-ahead tips—so these fiber rich foods for bowel movement become an easy habit, not homework.


1) Hummus–Kiwi–Greens “Softener” — flagship of High-Fiber Sandwiches (Relief)

Estimated fiber: ~17 g • Taste & texture: cool, fresh, silky
When to choose it: stools feel dry; you want gentle moisture without heaviness

Why it works (quickly yet gently)
This is a purpose-built combo of foods that are rich in soluble fiber and high fiber fruits for constipation. Specifically, creamy hummus (legumes = plant based foods high in fiber) and a teaspoon of ground flax (mucilage) create a moist base; then, thin-sliced kiwi and a mound of grated carrot supply juicy volume. Resulting in every bite that stays soft, which supports easier bowel movements and overall gut health. If you’d like a plain-English primer on adding flax safely, skim flax seeds for strong digestion; if you prefer the science on chia/flax-style gels, here’s a concise chia fiber review for later.

Infographic of a high-fiber hummus–kiwi–spinach sandwich for constipation relief, with step-by-step method, 17g fiber badge, hydration reminder, and MasalaMonk.com footer.
Moist hummus + ground flax soften; kiwi and grated carrot add fluid; whole-grain bread supplies gentle bulk. Aim for ~17 g fiber here and drink water with the meal for best effect.

Ingredients (serves 1)

  • 2 slices 100% whole-grain bread (≥3–4 g fiber/slice; oats or barley in the mix add foods rich in soluble fiber)
  • Hummus, 4 tbsp (legume base = high fiber foods for digestive health)
  • Ground flaxseed, 1 tsp (stirred into the spread)
  • Kiwi, 1 medium, thin-sliced (one of the most convenient high fiber fruits for constipation)
  • Baby spinach, big handful (leafy greens = fiber rich foods for gut health)
  • Carrot, finely grated, ½ cup (insoluble lift for bowel movement comfort)
  • Lemon juice, black pepper, tiny pinch of salt

Method

  1. In a small bowl, whisk lemon into the hummus; then stir in ground flax until creamy.
  2. Spread the mixture edge-to-edge on both slices; afterwards, pile on spinach, layer kiwi, and shower with grated carrot.
  3. Season with pepper and a pinch of salt; and then, close gently and press once with your palm.

Fiber-forward upgrades (choose 1–2, not all)

  • Add 2–3 tbsp chickpeas into the hummus; which will make you push the legume count higher for a plant based high fiber diet day.
  • Scatter 1 tsp chia over the carrot before closing; helping you nudge the soluble fiber profile without adding bulk.
  • Swap bread for a dense oat-bran or barley loaf to increase β-glucans (i.e., foods rich in soluble fiber)—see β-glucan basics.

Make-ahead & serving

  • Grate carrot the night before; store sealed so it stays juicy.
  • Assemble within 10 minutes of eating (kiwi looks and tastes brightest right away).
  • Serve with a full glass of water; thus, the high fiber foods to ease constipation you just ate can actually hold fluid as intended.
  • On very sensitive days, replace raw spinach with tender arugula for similar benefits and gentler texture.

Why it fits the brief
This sandwich champions high fiber foods for constipation relief without heaviness—because moisture, viscosity, and volume are layered on purpose. In turn, you’ll notice comfort during the afternoon rather than bloat

Also Read: Peppermint Tea for IBS and Bloating: Natural Relief Backed by Tradition


2) Lentil “Sloppy-Joe” Toastie — cozy High-Fiber Sandwich (Relief with staying power)

Estimated fiber: ~19–20 g • Taste & texture: warm, savory, cohesive
When to choose it: you need relief and long-lasting satiety

Why it works (comfort + momentum)
Here you combine two plant based foods high in fiber—a white-bean mash and saucy lentils—with a crunchy layer of broccoli slaw. Which helps you get soluble-leaning moisture from tomato-braised lentils and insoluble lift from brassica shreds. Because the filling is warm and glossy, this tastes indulgent; nevertheless, it is textbook high fiber foods for bowel movements, colon health, and all-day digestive health. Prefer batch cooking? This lentil meal-prep filling anchors several sandwiches across the week—convenient for a high fiber plant based diet.

Infographic of a Lentil ‘Sloppy-Joe’ Toastie high-fiber sandwich for constipation relief and satiety—white-bean mash base, tomato-braised lentils, broccoli slaw, step-by-step method, and 19–20 g fiber badge.
Warm, saucy lentils + creamy white-bean mash keep the filling moist, while broccoli slaw adds insoluble lift. Press 2–3 min/side for a cohesive, ~19–20 g fiber sandwich—drink water with the meal to help the soluble fibers gel.

Ingredients (serves 1)

  • 2 slices sprouted-grain bread (≥3–4 g fiber/slice; excellent high fiber foods for gut health)
  • White-bean mash, 3 tbsp (blend white beans + lemon + olive oil + pinch salt)
  • Cooked lentils, ½ cup (core legume in any plant based high fiber diet)
  • Broccoli slaw, ½ cup (insoluble crunch from stems + a little prebiotic fiber)
  • Tomato paste, onion, garlic, smoked paprika, olive oil, splash vinegar (for sauce)

Method

  1. Warm a small pan; sauté onion and garlic until tender; then add tomato paste and smoked paprika.
  2. Stir in lentils with 2–3 tbsp water and a splash of vinegar; simmer 3–4 minutes until thick, glossy, and spoonable.
  3. Spread white-bean mash on both bread slices; afterwards, pile on the lentils; then crown with broccoli slaw.
  4. Press in a grill pan or sandwich press 2–3 minutes per side until toasty outside and steamy inside.

Fiber-forward upgrades (pick what fits your day)

  • Fold 1 tsp ground flax into the bean mash; in practice, you add foods that are rich in soluble fiber without changing flavor.
  • Replace one slice with an oat-bran slice for extra β-glucans (again, high fiber foods for colon health).
  • Add 2 tbsp grated carrot to the slaw for more insoluble volume (i.e., fiber rich fruits and vegetables for constipation in practice).

Make-ahead & serving

  • Simmer a bigger batch of lentils on Sunday; cool quickly and refrigerate up to 4 days (or freeze flat in bags).
  • Keep slaw dry until assembly so it stays crisp; alternatively, dress slaw lightly with lemon just before toasting.
  • Serve with a sliced apple or pear (skin on): those are easy fiber rich fruits for constipation that travel well.
  • Hydrate alongside; that helps the sandwich’s foods rich in soluble fiber can do their gel-forming job.

Why it fits the brief
Because it layers legumes two ways, this toastie moves from “filling” to truly high fiber foods to ease constipation. Moreover, it stays moist, which many readers find is the missing piece in at-home “healthy” & high-fiber sandwiches.

Also read: The Ultimate Guide to Lentils: Types, Benefits, and Recipes


3) Barley–Chickpea “Salad” Sandwich — herby High-Fiber Sandwich (Maintenance)

Estimated fiber: ~17 g • Taste & texture: cool, herby, packable
When to choose it: you want balance, not “power relief,” especially on workdays

On days you want reliability rather than “power relief,” this build blends foods rich in soluble fiber (barley’s β-glucans) with legume bulk from chickpeas. Consequently, you get a gentle gel plus comfortable volume—exactly what high fiber foods for digestive health should deliver. If you’re curious about the science behind β-glucans and softness, here’s a clear overview.

Infographic of a Barley–Chickpea ‘Salad’ Sandwich for maintenance: mashed avocado–chia base with chickpeas, cooked barley, celery and dill on whole-grain bread; 3-step method, 17 g fiber badge, and hydration reminder.
Balanced, packable fiber: barley’s β-glucans for gentle softness, chickpeas for comfortable bulk, and an avocado–chia base to keep moisture. Spread thickly on rye/whole-grain (3–4 g fiber/slice) and sip water to help soluble fibers work.

Ingredients (serves 1)

  • 2 slices rye or 100% whole-grain bread (≥3–4 g fiber/slice; supports high fiber foods for gut health)
  • Avocado, ¼ fruit, mashed (creamy base for moisture)
  • Chia seeds, 1 tsp (disappears into the mash; classic foods rich in soluble fiber) — background: chia’s mucilage review
  • Cooked chickpeas, ⅓ cup (plant based foods high in fiber)
  • Cooked barley, ¼ cup (β-glucans for stool comfort)
  • Celery (finely diced), dill, lemon, pepper, small pinch salt

Method

  1. Mash avocado with lemon; then stir in chia and chopped dill until glossy.
  2. Fold in chickpeas, barley, and celery; afterwards, season to taste.
  3. Spread thickly; after that, close and press lightly for a tidy, travel-worthy sandwich.

Fiber-forward upgrades

  • Add 2 tbsp grated carrot for extra insoluble lift—useful among high fiber fruits and vegetables for constipation.
  • Swap one slice for an oat-bran slice to nudge β-glucans (again, foods rich in soluble fiber).
  • For herb lovers, a handful of parsley adds polyphenols without changing fiber math.

Make-ahead & serving

  • Mix the filling up to 48 hours ahead; which means, weekday assembly takes 2 minutes.
  • Serve with apple slices (skin on) for simple fiber rich fruits for constipation and satisfying crunch.
  • Sip water alongside; therefore, the sandwich’s soluble fibers can actually do their job.

Why it fits the brief
This is a dependable high fiber plant based diet lunch: creamy, not dry; hearty, not heavy; and quietly supportive for bowel movements, colon health, and long-term gut health.

Also Read: Chickpeas’ Instead of ‘Sardines’: 5 High Protein Plant-Based Meal Prep Ideas


4) Pear–Walnut “Green Goddess” Stack — bright High-Fiber Sandwich (Gentle maintenance)

Estimated fiber: ~12–13 g • Taste & texture: juicy, herb-bright, light
When to choose it: you want support without heaviness

Why it works (light yet helpful)
Some days you want a lift without intensity. Here, juicy pear (skin on) brings pectin, leafy greens add volume, and a yogurt-tahini herb sauce keeps everything moist. Ultimately you get high fiber foods for constipation relief that feel bright rather than dense—ideal for easy digestive health.

Infographic of a Pear–Walnut ‘Green Goddess’ high-fiber sandwich for gentle maintenance—yogurt-tahini herb sauce, thin-sliced pear (skin on), arugula, and walnuts; 3-step method with a 12–13 g fiber badge.
Light yet effective: pear pectin provides soft, juicy fiber; greens add comfortable volume; yogurt-tahini keeps moisture so bites stay bright—not heavy. Aim for ~12–13 g fiber here and sip water to help soluble fibers do their job.

Ingredients (serves 1)

  • 2 slices oat-bran or whole-grain bread (≥3–4 g fiber/slice)
  • Yogurt-tahini-herb sauce (yogurt + tahini + lemon + herbs)
  • ½ pear, thin-sliced, skin on (simple high fiber fruits for constipation)
  • Arugula or spinach, big handful (fiber rich foods for gut health)
  • Walnuts, 1 tbsp (pleasant crunch)
  • Lemon zest, black pepper

Method

  1. Whisk yogurt, tahini, herbs, and lemon until creamy; then spread generously.
  2. Layer pear, greens, and walnuts; afterwards, finish with zest and pepper.
  3. Close gently; press once to set the layers.

Fiber-forward upgrades

  • Add thin cucumber or tomato slices for extra juiciness (i.e., high fiber fruits and vegetables for constipation that also boost moisture).
  • Stir 1 tsp ground flax into the sauce to tilt toward foods rich in soluble fiber—basic primer: flax for digestion.
  • Prefer curd? The texture tactic mirrors this hung curd spinach sandwich.

Make-ahead & serving

  • The sauce keeps 3–4 days; making weekday builds stay fast.
  • Serve with a small bowl of berries for additional fiber rich fruits for constipation that don’t weigh you down.
  • Drink water; subsequently, the pectin and seed gels work more comfortably.

Why it fits the brief
Although gentle, the stack still qualifies as high fiber foods for bowel movements, and, importantly, it supports colon health without the heaviness that sometimes derails weekday lunches.

Also Read: Bananas for Constipation: Ripe vs Green, Timing & What Works


5) Black Bean–Avocado Salsa Melt — cozy High-Fiber Sandwich (Relief + comfort)

Estimated fiber: ~18.5–19 g • Taste & texture: warm, saucy, satisfying
When to choose it: you need soothing relief and an easy win at dinner

Why it works (warm, saucy, effective)
This is comfort food with a purpose. Black beans (core to any plant based high fiber diet) supply both soluble and insoluble fiber; avocado keeps things lush; and fresh salsa provides juicy acidity so the sandwich never feels dry. Meaning, you get high fiber foods to ease constipation that also satisfy.

Infographic of a Black Bean–Avocado Salsa Melt for constipation relief—sprouted-grain bread with mashed avocado, black beans, fresh salsa and optional cheese; 3-step method, 18.5–19 g fiber badge.
Warm, saucy relief: black beans deliver soluble + insoluble fiber, avocado keeps bites lush, and salsa adds juicy acidity so the sandwich never eats dry. Toast until just melty; aim for ~18.5–19 g fiber and sip water to help fiber work comfortably.

Ingredients (serves 1)

  • 2 slices sprouted-grain bread (≥3–4 g fiber/slice; great for high fiber foods for gut health)
  • Avocado, ¼ fruit, mashed
  • Black beans, ½ cup (lightly mashed so they cling)
  • Fresh tomato-onion salsa, ¼ cup (or tomato-lime if onion-sensitive)
  • Optional: thin slice cheddar or plant cheese
  • Lime, cumin, pinch salt

Method

  1. Mash avocado with lime and a pinch of cumin; spread from edge to edge.
  2. Spoon on black beans; then add salsa; top with cheese if using.
  3. Toast or grill until warmed through and a little melty.

Fiber-forward upgrades

  • Stir 1 tsp ground flax into the avocado to lean toward foods rich in soluble fiber.
  • Add 2 tbsp grated carrot for extra insoluble support (a staple among high fiber fruits and vegetables for constipation).
  • Swap one slice for oat-bran bread to increase β-glucans.

Make-ahead & serving

  • Beans keep 3–4 days; meanwhile, mash just before assembly for best texture.
  • Serve with orange segments or cucumber spears; which makes you add fluid and crunch that amplify results.
  • Hydrate; in turn, these fiber rich foods for bowel movement do their job more comfortably.

Why it fits the brief
It’s a weeknight win: cozy, fast, and firmly in the lane of high fiber foods for colon health and everyday digestive health.

Also Read: 10 Creative Chia Pudding Recipes for Every Taste


6) Tempeh–Kimchi Gut-Health Reuben — tangy High-Fiber Sandwich (Maintenance + microbiome)

Estimated fiber: ~14 g • Taste & texture: savory-tangy, deli-style
When to choose it: things are moving, and you want to keep the gut ecosystem happy

Why it works (tangy and sustaining)
Once things are moving, pairing plant based foods high in fiber with fermented vegetables is a smart way to maintain momentum. Tempeh offers satisfying protein and fiber; kimchi or sauerkraut adds acidity, moisture, and live cultures; as a result, you get high fiber foods for gut health in a deli-style package. For more combinations, browse Probiotic-Rich Sandwiches.

Infographic of a Tempeh–Kimchi Gut-Health Reuben: whole-grain rye with sautéed tempeh, kimchi (or sauerkraut), spinach, and yogurt-mustard; 3 simple steps, 14 g fiber badge, hydration cue.
Steady maintenance, deli-style: fiber-rich tempeh plus fermented kimchi/kraut bring moisture, acidity, and live cultures; rye adds whole-grain fiber. Grill lightly to meld. Tip—stir 1 tsp chia into the sauce or add tomato slices for extra softness and juiciness; sip water alongside.

Ingredients (serves 1)

  • 2 slices whole-grain rye (≥3–4 g fiber/slice)
  • Tempeh, ~100 g, sliced and sautéed
  • Kimchi or sauerkraut, ¼ cup
  • Spinach, big handful
  • Yogurt-mustard (or a dairy-free version)

Method

  1. Sear tempeh in a thin film of oil until browned; then set aside.
  2. Spread yogurt-mustard on bread; afterwards, layer tempeh → kimchi → spinach.
  3. Grill lightly to warm and meld the layers.

Fiber-forward upgrades

  • Add thin tomato slices for juicy slip (handy within high fiber fruits and vegetables for constipation).
  • Stir 1 tsp chia into the yogurt-mustard for a small soluble nudge (again, foods that are rich in soluble fiber).
  • Prefer milder ferments? Use kraut and a dab of pickle brine for acidity without heat.

Make-ahead & serving

  • Cook tempeh 2–3 days ahead; consequently, weekday assembly is trivial.
  • Serve with carrot sticks and apple wedges (skin on) for easy fiber rich fruits for constipation and crunch.
  • Water alongside, then a brief walk; helping the meal support predictable bowel movements.

Why it fits the brief
This one keeps the momentum you’ve built—supporting colon health and digestive health while staying firmly in the high fiber plant based diet lane.

Also Read: Optimize Digestion with These 5 Fruit Juice Recipes


Sidekicks that make High-Fiber Sandwiches even more effective

Kiwifruit (1–2/day)—slice one into Sandwich #1 and enjoy the second on the side. Trials show kiwi improves bowel movements and overall comfort (kiwi RCT overview; gold-kiwi RCT).

Prunes or prune juice—start with 4–6 prunes or ½–1 cup prune juice alongside lunch or dinner. Practical “how much/when” is covered here: prune juice & prunes for constipation. For clinical context, review the trial where prunes beat psyllium in mild–moderate cases.

Chia or ground flax add-ins—a teaspoon whisked into spreads boosts softness without heaviness. Chia’s mucilage is well documented (chia fiber review), and flax blends easily into hummus or avocado (see flax seeds for strong digestion).

Hydration reminder—fluids help fiber function; thus, pair every High-Fiber Sandwich with water or herbal tea (NIDDK guidance).

Also Read: Psyllium Husk (Isabgol/Ispaghula) Side Effects: Risks, Benefits & How to Take It Safely


A day that shows how High-Fiber Sandwiches fit together

Breakfast
Oat-bran toast with avocado + ground flax; sliced kiwi on the side. (Fluids help fiber work—keep a glass of water nearby: NIDDK guidance.)

Lunch
Hummus–Kiwi–Greens “Softener.”

Snack
Whole-grain pita with hummus and grated carrot; sip water.

Dinner
Black Bean–Avocado Salsa Melt.

After meals
A 10–15-minute walk—especially helpful after dinner.

Weekly rotation

  • Power relief days: Lentil Toastie (#2) + Hummus–Kiwi (#1).
  • Steady maintenance days: Barley–Chickpea (#3) + Pear–Walnut (#4).
  • Microbiome-minded days: Tempeh–Kimchi (#6) with a side of berries.

Because the builds repeat cleanly, you’ll hit helpful fiber totals consistently without chasing supplements.

Also Read: Hummus Veggie Sandwich: A Nutritious and Delicious Delight


Shopping once, eating well all week (repeatable High-Fiber Sandwiches)

These staples keep a high fiber plant-based diet effortless across the week.

Breads & grains

  • 100% whole-grain or sprouted sandwich bread (≥3–4 g fiber/slice)
  • Rye; oat-bran loaves
  • Barley (pearled or hulled)

Legumes & spreads

  • Hummus; canned or cooked chickpeas, lentils, black beans; white beans for mash

Seeds & flavor

  • Chia; ground flaxseed; tahini; plain yogurt (dairy or plant-based)
  • Lemons, dill, cumin, smoked paprika, black pepper, olive oil, vinegar

Produce

  • Kiwifruit, pears, apples, oranges, berries, prunes
  • Spinach/greens, carrots, broccoli slaw, cucumbers, tomatoes, onions
  • Kimchi or sauerkraut

Batch tips

  • Cook barley on Sunday; chill and portion for quick fold-ins.
  • Freeze cooked beans flat in bags; they thaw in minutes.
  • Keep a tiny “fiber station” (chia, ground flax) in reach so you never forget the add-ins.
  • Pre-shred carrots and wash greens to make assembly truly five minutes.

Also Read: The Best Greens for Gut Health and Digestive Wellness


Gentle ramp-up (comfort matters with High-Fiber Sandwiches)

If you’re coming from a low-fiber baseline, jumping to 30+ grams immediately can feel rough. Therefore, increase gradually—about 5 g per day each week—and keep fluids steady. On a day that feels gassy, reduce raw brassicas, emphasize oats, barley, chia/flax, and use ripe pears or kiwi for a softer profile; subsequently, bring the extra crunch back as comfort improves. For a neutral reference on intake ranges, most adults do well around 25–38 g/day (scale up gradually: concise intake overview).

Also Read: Top 10 Foods for Gut Health


Put it all together (and keep repeating)

Ultimately, relief comes from meals that are moist, fibrous, and easy to repeat. These six High-Fiber Sandwiches were engineered for exactly that: whole-grain bread for steady bulk, legume spreads for satisfying depth, chia or ground flax for gentle gel, and fruit-veg add-inskiwi, pear, apple, carrots, greens—for softness and volume. Add water, take a short walk, and give it a few consistent days. Consequently, your gut will notice; meanwhile, your schedule won’t suffer; and, importantly, your lunches will finally pull their weight.

For quick reference when you need an extra nudge, bookmark prune juice & prunes for constipation; for fermented add-ins that pair well with High-Fiber Sandwiches, explore probiotic-rich sandwiches.

FAQs

1) What makes these High-Fiber Sandwiches good for constipation relief?

Because they combine foods rich in soluble fiber (oats, barley, chia, ground flax) with insoluble sources (bran, leafy greens, vegetable skins), they add moisture and gentle bulk together. Consequently, stools hold water, bowel movements become easier, and overall digestive health feels steadier. Meanwhile, the format is practical—so you actually repeat it.

2) How many grams of fiber should I aim for with a high fiber plant based diet?

Most adults do well around 25–38 g per day. That said, increase gradually. For example, add about 5 g per day each week and space it across meals. In practice, two High-Fiber Sandwiches can provide a big share, while breakfast and snacks top up the rest.

3) Which ingredients are the best high fiber foods for constipation relief inside a sandwich?

Start with plant based foods high in fiber: chickpeas, lentils, and black beans. Then, add foods that are rich in soluble fiber—chia, ground flax, oats, and barley—for gel-forming softness. Finally, tuck in high fiber fruits and vegetables for constipation like kiwi, pear, apple (skin on), carrots, and leafy greens for comfortable volume.

4) Are there specific fiber rich fruits for constipation that work especially well between bread?

Yes—pears and apples (with the skin), berries, and kiwi slot neatly into layers. Moreover, citrus segments and grated carrot add juiciness without heaviness. In turn, those choices support bowel movements while keeping sandwiches fresh and bright.

5) What bread should I pick for high fiber foods for gut health?

Choose 100% whole-grain or sprouted loaves that list whole grain first and give at least 3–4 g fiber per slice. Better yet, rotate rye, oat-bran, and barley-forward breads to keep textures interesting and to boost foods rich in soluble fiber via β-glucans.

6) I feel gassy when I jump into a plant based high fiber diet. What should I tweak?

First, slow the ramp—add fiber gradually. Next, emphasize moist builds with foods that are rich in soluble fiber (chia, ground flax, oats, barley) and slightly reduce raw brassicas for a few days. Subsequently, bring crunch back as comfort improves. Hydration and a brief walk after meals often help.

7) How can I hydrate wisely so high fiber foods to ease constipation actually work?

Pair each sandwich with a full glass of water. Additionally, use juicy layers—tomato, cucumber, citrus segments—to keep bites moist. Consequently, soluble fibers can form the soft gel that supports smoother bowel movements.

8) What are smart add-ins for high fiber foods for colon health?

Sprinkle 1 teaspoon of chia or finely ground flax into spreads; fold beans into hummus; or add a spoon of barley or oat-bran to legume salads. Therefore, you raise soluble fiber without making the sandwich bulky or dry.

9) Can I keep these High-Fiber Sandwiches fully vegan?

Absolutely. In fact, a high fiber plant based diet is the default here. Use hummus, white-bean mash, avocado-chia spreads, and yogurt-style dairy-free sauces. Meanwhile, tempeh, kimchi, and sauerkraut bring plant-forward protein and tang that support gut health.

10) What are easy meal-prep moves so my high fiber foods for digestive health stick all week?

Batch-cook lentils and chickpeas; chill barley; pre-grate carrots; wash greens; and keep ground flax and chia within arm’s reach. Consequently, assembly takes five minutes, and you’ll actually repeat the habit.

11) How do I balance high fiber foods for bowel movements with a sensitive stomach?

Begin with softer, moist builds: creamy spreads, thin-sliced fruit, and tender greens. Moreover, keep portions moderate, chew thoroughly, and add a short post-meal walk. On balance, that trio supports comfort while still moving fiber intake upward.

12) Are raw veggies mandatory, or can I still get high fiber foods for constipation relief with gentler textures?

You can. Lightly sautéed onions/peppers, roasted carrots, or softened greens still count. In practice, you’ll retain fiber while improving tolerance. Therefore, choose textures your gut likes and keep moisture high.

13) Which spreads quietly raise foods rich in soluble fiber without changing flavor?

Hummus mixed with 1 tsp ground flax, avocado blended with 1 tsp chia, or yogurt-tahini whisked with oat-bran. Subsequently, you’ll notice creamier bites and better stool softness—without extra weight.

14) Do I need fruit at every meal to hit high fiber foods for gut health targets?

Not necessarily, but it helps. For instance, one high fiber fruits for constipation choice (pear, apple, berries, or kiwi) inside or beside a sandwich boosts totals and adds moisture. Meanwhile, legumes and whole-grain bread carry the rest.

15) What’s the simplest “starter” High-Fiber Sandwich if I’m brand-new to this?

Begin with whole-grain bread, hummus + 1 tsp ground flax, thin-sliced pear or apple, and a handful of spinach. Therefore, you’ll get foods rich in soluble fiber plus gentle bulk in a mild, friendly package.

16) How do I keep high fiber foods for colon health from feeling dry or dense?

Layer moisture at every step: creamy spread, juicy produce, and a quick acidity hit (lemon, vinegar, salsa). Consequently, the sandwich eats soft, not stodgy—and your bowel movements tend to follow suit.

17) Are there kid-friendly options that still count as plant based foods high in fiber?

Yes: mashed black beans with mild salsa and avocado on soft whole-grain bread; chickpea “salad” with finely diced cucumber; or thin pear slices with yogurt-tahini. Moreover, cutting sandwiches into small squares improves traction with picky eaters.

18) How can I vary flavors yet stay within high fiber foods for digestive health?

Rotate breads (rye, oat-bran, sprouted), spreads (hummus, white-bean, avocado-chia), and high fiber fruits and vegetables for constipation (pear, apple, kiwi, carrot, greens). In turn, you’ll keep taste buds happy while the fiber keeps working.

19) Do these ideas help if I’m focused on high fiber foods for gut health beyond constipation?

Generally, yes. While everyone’s different, a steady mix of soluble and insoluble fiber plus plant diversity often supports gut health and overall comfort. Nevertheless, adjust portions and textures to your tolerance.

20) What’s a quick checklist before I make any High-Fiber Sandwiches?

Whole-grain bread (3–4 g fiber/slice) ✅
Legume base (⅓–½ cup) ✅
Seed booster (1 tsp chia or ground flax) ✅
Juicy produce (heaped) ✅
Water alongside + brief walk ✅
Therefore, you’ve covered high fiber foods for constipation relief and set up a predictable, comfortable day.

Posted on 3 Comments

Chia Pudding – Steel Cut Oats, Mango, Chia Seeds, Fox Nuts

Lately, I’ve developed a deep affection for steel-cut oats. It’s surprising how quickly they’ve become a comfort food for me—something I genuinely look forward to eating, unlike many so-called ‘healthy’ alternatives. Of course, ‘healthy’ is subjective and should be defined by individual needs and preferences. Here is something that my git finds to be extremely healthy maybe something you might want to try as well.

Why Steel-Cut Oats?

Steel-cut oats offer a wholesome bowl of nourishment, combining whole, natural foods with a delicious taste. Their texture, fiber, and smoothness are simply amazing. Steel-cut oats are a fantastic source of fiber and essential nutrients, which can support digestion and overall wellness. If you haven’t tried them yet, I highly recommend giving them a go.

My Go-To Recipe

Here’s a basic recipe that I follow:

  1. Roast the Oats: Start by roasting the steel-cut oats to enhance their flavor.
  2. Cook the Oats: Boil the roasted oats in a pressure cooker until they are tender.
  3. Add Milk: Once the oats are cooked, stir in some milk and refrigerate them to chill. I usually let them sit overnight to allow the milk and flavors to meld together.

Flavor Boost: Mango Magic

A major reason I’ve fallen for this dish is the mango season. I add a mango or two, chopped into bits. The natural sweetness of the mangoes is so satisfying that I skip any added sugar or sweeteners. Instead, I let the mangoes infuse their sweetness into the oats as they soak overnight.

Nutritional Enhancements

To add more texture and nutritional value, I also include:

  • Chia Seeds: About a tablespoon or two.
  • Fox Nuts (Makhane): Or other nuts, berries, or seeds.

This combination works wonderfully and provides a super prebiotic boost for my system. After experimenting with different ingredients, I found that chia seeds and makhane made a significant difference, prompting me to share this recipe.

Serving Suggestions

For an extra touch of flavor, consider adding:

  • Roohafza: A splash on top.
  • Cinnamon: A sprinkle for added warmth.

Feel free to experiment with different fruits, like berries or apples, depending on the season.

Personal Note

When I mention the ‘result,’ I’m not only referring to the taste but also how it makes my stomach feel the next day. The combination of steel-cut oats, mangoes, chia seeds, and makhane seems to act as a super prebiotic for my system, which is probably complemented by a kombucha tasting session later in the day. This dish fits perfectly into my daily routine, providing a satisfying and nutritious start to my day.

Posted on 1 Comment

5 Apple Cider Vinegar Dressing Recipes for Expectant Mothers

Navigating through the myriad of dietary choices during pregnancy can be overwhelming. It’s essential to find foods that are not only safe and nutritious but also delightful to the palate. One often overlooked aspect of a healthy pregnancy diet is the choice of salad dressings. Store-bought dressings can be laden with preservatives and unwanted additives, but homemade dressings, especially those made with apple cider vinegar (ACV), can be both delicious and beneficial. Here are five ACV dressing recipes designed with pregnant ladies in mind, offering a balance of safety, nutrition, and tantalizing flavors.

1. Classic Apple Cider Vinaigrette

  • Ingredients:
    • 1/4 cup pasteurized apple cider vinegar
    • 3/4 cup extra virgin olive oil
    • 1 teaspoon Dijon mustard
    • 1 tablespoon honey
    • Salt and freshly ground black pepper, to taste
  • Preparation: In a small bowl, whisk together the apple cider vinegar, mustard, and honey. Gradually whisk in the olive oil until the dressing is emulsified. Season with salt and pepper. This vinaigrette strikes a perfect balance between tangy and sweet, making it a versatile choice.
  • Pairing: This classic dressing pairs wonderfully with a mixed green salad, adding a bright note to the fresh leaves. It can also be used as a delightful marinade for grilled vegetables, infusing them with a subtle tang.

2. Creamy Avocado ACV Dressing

  • Ingredients:
    • 1 ripe avocado
    • 1 clove garlic, minced
    • Juice of 1 lime
    • A handful of fresh cilantro
    • 2 tablespoons olive oil
    • 1 tablespoon pasteurized apple cider vinegar
    • 1 teaspoon honey
    • Salt and pepper, to taste
  • Preparation: In a blender, combine all the ingredients and blend until smooth. If the dressing is too thick, add a little water to reach your desired consistency. This dressing brings a creamy, luxurious texture without the use of dairy.
  • Pairing: It’s perfect for drizzling over a taco salad, adding a creamy zest without overwhelming the other flavors. It also serves as an excellent dip for fresh vegetable sticks, offering a healthier alternative to store-bought dips.

3. Herb-Infused ACV Dressing

  • Ingredients:
    • 3 tablespoons pasteurized apple cider vinegar
    • 5 tablespoons olive oil
    • 1 tablespoon chopped fresh basil
    • 1 tablespoon chopped fresh parsley
    • 1 teaspoon fresh thyme leaves
    • 1 clove garlic, minced
    • 1 teaspoon honey
    • Salt and freshly ground black pepper, to taste
  • Preparation: Whisk together the apple cider vinegar, olive oil, honey, and minced garlic. Stir in the chopped herbs and season with salt and pepper. The fresh herbs not only add vibrant flavor but also offer nutritional benefits.
  • Pairing: This herb-infused dressing is delightful on a quinoa salad, where it complements the nuttiness of the grains. It also enhances a simple cucumber and tomato salad, adding depth and freshness.

4. Honey Mustard ACV Dressing

  • Ingredients:
    • 2 tablespoons pasteurized apple cider vinegar
    • 2 tablespoons Dijon mustard
    • 2 tablespoons honey
    • 4 tablespoons olive oil
    • Juice of 1/2 a lemon
    • Freshly ground black pepper, to taste
  • Preparation: In a bowl, combine the apple cider vinegar, mustard, and honey. While whisking, slowly add the olive oil and lemon juice to create a smooth, emulsified dressing. Season with black pepper. This dressing offers a perfect blend of sweet, tangy, and sharp flavors.
  • Pairing: It’s excellent with a spinach and strawberry salad, where the dressing’s acidity beautifully balances the sweetness of the strawberries. It’s also great drizzled over roasted root vegetables, giving them a delightful zing.

5. Ginger-Sesame ACV Dressing

  • Ingredients:
    • 3 tablespoons pasteurized apple cider vinegar
    • 1 teaspoon grated fresh ginger
    • 1 tablespoon sesame oil
    • 1 teaspoon soy sauce
    • 1 teaspoon honey
    • A sprinkle of sesame seeds
  • Preparation: Whisk together the apple cider vinegar, grated ginger, sesame oil, soy sauce, and honey. Finish by stirring in the sesame seeds. This Asian-inspired dressing is both flavorful and aromatic, with a subtle kick from the fresh ginger.
  • Pairing: It pairs exceptionally well with an Asian-style slaw or a noodle salad, adding a burst of flavor that complements the crunchy vegetables and smooth noodles.

Conclusion

These apple cider vinegar dressing recipes are designed to bring joy and health to your pregnancy diet. They are easy to prepare and can be customized to your taste preferences. Each recipe focuses on using pasteurized apple cider vinegar to ensure safety during pregnancy, combined with ingredients that boost flavor and nutritional value. Enjoy these dressings on your favorite salads or as creative additions to other dishes, and relish the blend of flavors they bring to your pregnancy meals. Remember, a healthy diet is a cornerstone of a healthy pregnancy, and these dressings are a step in the right direction!

10 FAQs for Apple Cider Vinegar Dressings During Pregnancy

  1. Is apple cider vinegar safe during pregnancy?
    • Yes, when pasteurized, apple cider vinegar is safe during pregnancy. It should be used in moderation and preferably diluted in dressings.
  2. Can apple cider vinegar help with pregnancy-related digestion issues?
    • Some women find that apple cider vinegar can aid digestion. However, its high acidity may not suit everyone, especially those with acid reflux.
  3. How do I make a pregnancy-safe apple cider vinegar dressing?
    • Combine pasteurized apple cider vinegar with a healthy oil like olive oil, add a natural sweetener for balance, and incorporate herbs for flavor. Avoid raw eggs or unpasteurized ingredients.
  4. What are the best salads to pair with apple cider vinegar dressings during pregnancy?
    • Light green salads, grain-based salads, and fruit salads work well. The dressing’s acidity complements a variety of ingredients.
  5. Can I use store-bought apple cider vinegar for homemade dressings?
    • Yes, as long as it’s pasteurized. Always check the label before purchasing.
  6. How long can homemade apple cider vinegar dressings be stored?
    • They can typically be stored in the refrigerator in an airtight container for up to a week.
  7. Are these dressings safe for everyone in the family?
    • Yes, these dressings are nutritious and safe for all, making them perfect for shared family meals.
  8. Can I create a creamy apple cider vinegar dressing?
    • Absolutely! Blend in ingredients like Greek yogurt or avocado to achieve a creamy texture.
  9. What if I find the taste of apple cider vinegar too strong?
    • You can reduce the vinegar quantity or balance it with more sweetener or oil to suit your taste preferences.
  10. Are there any ingredients I should avoid adding to these dressings during pregnancy?
  • Avoid raw or unpasteurized ingredients, and be cautious with ingredients that might cause allergies or are not recommended during pregnancy.

Blog Tags

pregnancy nutrition, apple cider vinegar, healthy salads, homemade dressings, maternity diet, easy recipes, nutritious meals, DIY salad dressings, pregnancy health, family-friendly meals

Posted on 1 Comment

Safe Apple Cider Vinegar Salad Dressing for Expecting Moms

Introduction:

Pregnancy is a journey of transformation and discovery, a time when the body’s needs and cravings take a front seat, steering dietary choices towards health, safety, and nourishment. Among the myriad of nutritional advice and dietary do’s and don’ts, one simple yet significant aspect often overlooked is the choice of salad dressing. Enter the world of apple cider vinegar (ACV) – a culinary staple revered not just for its tangy zest but for its myriad of health benefits. But, when you’re eating for two, is apple cider vinegar just as wonderful? And how can you incorporate it safely and deliciously into your diet?

ACV has long been celebrated in the wellness world for its potential health benefits. From aiding digestion to possibly helping with blood sugar regulation, it’s a versatile ingredient that adds not just flavor but a punch of goodness to your meals. But, for expectant mothers, the narrative takes a slightly different turn – it’s not just about the benefits but also about ensuring safety and moderation.

As we embark on this flavorful exploration, we’ll dive into the heart of what makes ACV a great choice for pregnant women, how to use it safely, and most importantly, we’ll unveil an exclusive recipe for a homemade apple cider vinegar salad dressing that’s not just safe but an absolute delight for your taste buds. So, whether you’re a salad enthusiast or just looking to add a healthy twist to your pregnancy diet, this guide is tailored to add that extra zing to your meals while keeping you and your little one’s well-being in mind. Let’s whisk together health, safety, and flavor in a bottle of homemade dressing, shall we?

The Essence and Safety of Apple Cider Vinegar During Pregnancy

Understanding Apple Cider Vinegar

Apple cider vinegar, a household name in the world of natural health remedies, is made from fermented apple juice. Its key ingredient, acetic acid, imparts a distinctive sour taste and aroma. Beyond its culinary use as a salad dressing and a flavor enhancer, ACV is often touted for its health benefits, including aiding digestion, managing blood sugar levels, and even contributing to weight management strategies.

Pregnancy and Apple Cider Vinegar: A Safe Combination?

When it comes to pregnancy, every ingredient in your diet is scrutinized for its safety and benefit. The primary concern with ACV during pregnancy revolves around its acidity and potential bacterial content, especially in unpasteurized forms. Pasteurized apple cider vinegar, however, undergoes a process that eliminates harmful bacteria, making it a safer choice for expectant mothers. Despite the safety profile of pasteurized ACV, moderation remains key. Its high acidity can sometimes cause or exacerbate digestive discomfort, a common issue during pregnancy.

Balancing the Acidity

One of the fundamental ways to enjoy ACV safely during pregnancy is by balancing its acidity. This is particularly important for women who experience heightened sensitivity to acidic foods or have a history of gastric issues. Diluting ACV with water or incorporating it into recipes can mitigate its acidic nature, making it more palatable and stomach-friendly.

Nutritional Profile of Apple Cider Vinegar

ACV is not just about tang and flavor; it brings along a modest nutritional footprint. It contains small amounts of potassium, amino acids, and antioxidants. These components contribute to its health-promoting properties. While ACV isn’t a significant source of vitamins or minerals, its value lies in its potential to enhance the nutritional quality of foods it’s paired with, such as salads rich in vegetables and greens.

Crafting the Perfect Pregnancy-Safe Apple Cider Vinegar Dressing

Recipe Philosophy: Simple, Safe, Savory

The beauty of homemade salad dressings lies in their simplicity and the ability to control ingredients. For a pregnancy-safe ACV dressing, the focus is on using pasteurized vinegar and complementing it with ingredients that are both nutritious and gentle on the stomach.

Ingredients: Choosing Quality and Flavor

  • Base: Pasteurized apple cider vinegar serves as the foundation. Its robust flavor profile sets the stage for a delightful dressing.
  • Oil: A good quality oil like extra virgin olive oil not only balances the acidity of vinegar but also adds a smooth texture and healthy fats to the dressing.
  • Sweetness: To counter the sharpness of ACV, a natural sweetener like honey or maple syrup can be added. This not only enhances the flavor but also contributes a touch of natural sweetness without overpowering the dressing.
  • Herbs and Spices: Fresh herbs like basil or parsley add a burst of freshness and color, while spices like garlic powder, mustard, and a hint of salt and pepper round off the flavor profile, making the dressing a delightful concoction of flavors.

Method: Simplicity in Preparation

The method of preparing this dressing is as straightforward as its ingredients. It involves whisking together the vinegar and oil in a preferred ratio, then gently blending in the sweetener and spices. For an even consistency and thorough mixing, using a blender can be effective, especially when emulsifying the oil and vinegar.

Personalization: Adjusting to Taste

The joy of homemade dressings is in their versatility. You can adjust the quantities of ingredients to suit your taste preferences. If you prefer a milder dressing, increase the oil ratio. For more sweetness or herbaceousness, adjust the sweetener and herbs accordingly. The recipe is forgiving and encourages experimentation.

Creating your apple cider vinegar salad dressing during pregnancy is not just about eating safely; it’s about indulging in flavors that delight your palate while nourishing your body. This simple, adaptable recipe offers a way to enjoy the benefits of ACV while ensuring that you and your baby are consuming something that is both safe and delicious. Each ingredient has been chosen for its safety profile, nutritional value, and ability to create a harmonious blend of flavors that elevate your meals from ordinary to extraordinary.

Enhancing Your Salad with the Perfect Dressing

The Art of Salad Making During Pregnancy

Salads, often a staple in a health-conscious diet, especially during pregnancy, are more than just a mix of greens and vegetables. They are a canvas for culinary creativity, a way to combine a myriad of textures, flavors, and nutrients in one bowl. The dressing, in this context, is not just a flavor enhancer; it’s a vital component that binds these elements together, adding depth and richness to the salad.

Pairing Dressings with Salads

  • Green and Leafy Salads: For salads dominated by greens like spinach, kale, or arugula, the apple cider vinegar dressing adds a bright, tangy contrast that highlights the freshness of the leaves.
  • Grain-Based Salads: If you’re incorporating grains like quinoa, farro, or bulgur, the dressing can provide a necessary acidic balance, cutting through the earthiness of the grains.
  • Fruit and Nut Salads: For salads that feature fruits and nuts, the dressing’s sweetness and acidity can enhance the natural flavors of the fruits while complementing the crunch of the nuts.

Customizing Your Salad Dressing

  • Adjusting Consistency: Depending on the salad, you may prefer a thinner or thicker dressing. Adjust the oil and vinegar ratio for a lighter or richer texture.
  • Experimenting with Herbs and Spices: Herbs like dill, cilantro, or mint can offer a refreshing twist. Spices like crushed red pepper or cumin can introduce a new flavor dimension.
  • Adding Creaminess: For a creamy variant, consider blending in a small amount of Greek yogurt or avocado, ensuring they align with your dietary preferences during pregnancy.

Nutritional Considerations for Pregnant Women

When crafting salads and dressings during pregnancy, the focus is not just on flavor but also on nutritional value.

  • Folate-Rich Greens: Opt for greens like spinach or kale, known for their high folate content, crucial during pregnancy.
  • Protein Addition: Add a source of protein such as grilled chicken, boiled eggs, or beans to make the salad more filling and nutritionally balanced.
  • Healthy Fats: The inclusion of olive oil in the dressing, along with ingredients like avocados or nuts in the salad, ensures a healthy dose of essential fats that are beneficial for both the mother and the developing baby.

Serving and Storage Tips

  • Dressing the Salad: It’s best to dress the salad just before serving to maintain the freshness and crispness of the ingredients.
  • Storing the Dressing: If there’s leftover dressing, store it in an airtight container in the refrigerator. Homemade dressings, without preservatives, generally keep well for up to a week.

Engaging the Senses

Remember, eating during pregnancy is as much about nourishment as it is about enjoyment. Each bite of your salad, coated in the homemade apple cider vinegar dressing, should be a delightful experience that engages the senses. The aroma of the fresh herbs, the tanginess of the vinegar, the richness of the oil, and the subtle sweetness all come together to create a symphony of flavors that make eating healthy an enjoyable endeavor.

In conclusion, this journey into creating a pregnancy-safe apple cider vinegar salad dressing goes beyond just mixing ingredients. It’s about understanding and respecting the needs of your body during this special time, about bringing together flavors and textures in a way that delights and satisfies, and about making every meal an opportunity to nourish both you and your baby with love, care, and flavor. As you drizzle this dressing over your next salad, take a moment to appreciate the simple joys of eating well, for it’s these little things that make the journey of motherhood even more beautiful.

Embracing a Healthy Pregnancy Lifestyle Through Salad Dressings

The Role of Diet in Pregnancy Wellness

Pregnancy is a transformative period where diet plays a pivotal role in the health of both the mother and the developing baby. It’s a time to focus on nutrient-rich foods that provide the essential vitamins and minerals needed for fetal growth and maternal well-being. In this context, salads dressed in homemade apple cider vinegar dressing emerge not just as a dietary choice, but as a commitment to a healthier lifestyle.

Beyond the Bowl: The Impact of What You Eat

  • Mental and Emotional Well-being: Eating well-balanced, flavorful meals like a well-dressed salad can uplift your mood and contribute to overall emotional well-being. The act of preparing and enjoying a nutritious meal can be incredibly satisfying and empowering during pregnancy.
  • Physical Health Benefits: The combination of leafy greens, fresh vegetables, wholesome grains, and a dressing rich in healthy fats and probiotics can have a positive impact on physical health. This includes better digestion, improved energy levels, and essential nutritional intake.

Salad Dressings: A Gateway to Diverse Nutrients

  • Micro-nutrient Diversity: The versatility of salad dressings allows for the incorporation of various ingredients like citrus juices, different types of vinegar, herbs, and spices, each bringing its unique set of nutrients.
  • Flavor and Appetite: Pregnancy can sometimes bring changes in appetite and taste preferences. A delicious salad dressing can make nutritious foods more appealing, ensuring that you’re more likely to consume the nutrients needed.

The Joy of Cooking: An Emotional Journey

  • Connecting with Your Pregnancy: Cooking during pregnancy can be a way to connect with the journey you are on. Preparing a meal becomes more than just a routine; it’s a nurturing act of love for the child you are waiting to meet.
  • Sharing with Family: This period is also about sharing experiences with your partner or family. Cooking and enjoying meals together can be a bonding experience, fostering a supportive environment.

Mindful Eating: Listening to Your Body

  • Understanding Cravings and Needs: Pregnancy is a time to tune into your body’s signals. Cravings might indicate a need for certain nutrients. By preparing your meals, like a salad with a homemade dressing, you can address these cravings healthily.
  • Balance and Moderation: Mindful eating also involves understanding and practicing moderation and balance. While it’s important to indulge occasionally, maintaining a balanced diet is key for the health of both mother and baby.

Closing Thoughts: Nourishing the Future

As you embark on this journey of pregnancy, remember that every food choice you make has the potential to affect your health and that of your baby. A simple act like preparing an apple cider vinegar salad dressing becomes symbolic – it’s about taking charge of your health, indulging in the joys of eating well, and nurturing the new life within. Let each salad dressed in your homemade concoction be a reminder of the love, care, and thoughtfulness you’re pouring into your pregnancy journey.

In the end, it’s not just about eating; it’s about celebrating life, embracing health, and preparing for the joyous journey of motherhood. So, as you whisk together the ingredients of your dressing, envision the positive impact this small act has in the grand narrative of your pregnancy, a story of health, happiness, and the anticipation of new beginnings.

10 FAQs for Apple Cider Vinegar Salad Dressings During Pregnancy

  1. Is apple cider vinegar safe to consume during pregnancy?
    • Yes, apple cider vinegar is safe during pregnancy if it’s pasteurized. It’s important to use it in moderation and dilute it to reduce its acidity.
  2. Can apple cider vinegar dressings help with pregnancy symptoms?
    • Anecdotally, apple cider vinegar may help alleviate symptoms like morning sickness and heartburn, but it’s best to consult your healthcare provider for personalized advice.
  3. How do I make a pregnancy-safe apple cider vinegar dressing?
    • Combine pasteurized apple cider vinegar with a healthy oil like olive oil, add a natural sweetener like honey, and season with fresh herbs and spices.
  4. What salads go well with apple cider vinegar dressing during pregnancy?
    • Leafy green salads, grain-based salads, and even fruit and nut salads pair wonderfully with apple cider vinegar dressing.
  5. Can I use any type of apple cider vinegar for my dressing?
    • It’s recommended to use pasteurized apple cider vinegar to ensure it’s free from harmful bacteria.
  6. How long can homemade apple cider vinegar dressing be stored?
    • Store it in an airtight container in the refrigerator for up to a week.
  7. What are the benefits of making my own salad dressing during pregnancy?
    • Homemade dressings allow you to control the ingredients, ensuring they are safe and healthy for pregnancy.
  8. Can I add creamy elements to my apple cider vinegar dressing?
    • Yes, you can blend in Greek yogurt or avocado for a creamy texture, but make sure these additions align with your dietary needs during pregnancy.
  9. Are there any ingredients I should avoid in salad dressings while pregnant?
    • Avoid unpasteurized ingredients and excessive use of strong herbs and spices that might not be recommended during pregnancy.
  10. Can I make the dressing less acidic?
  • Yes, you can adjust the oil-to-vinegar ratio or add a bit more sweetener to balance the acidity to your liking.

Blog Tags for the Post

pregnancy nutrition, healthy eating, homemade dressings, apple cider vinegar, pregnancy-safe recipes, salad ideas, cooking during pregnancy, nutritious meals, DIY dressings, wholesome ingredients