Whether you know it as coriander or dhania, this humble spice has been a staple in kitchens and traditional medicine cabinets for centuries. But beyond adding flavor to curries and pickles, coriander seeds are emerging as a functional food—offering impressive benefits for blood sugar control, heart health, digestion, and even brain function.
In this post, we’ll unpack 10 research-backed health benefits of coriander seeds, explore how to use them practically, and understand what science (and your grandmother) have long known.
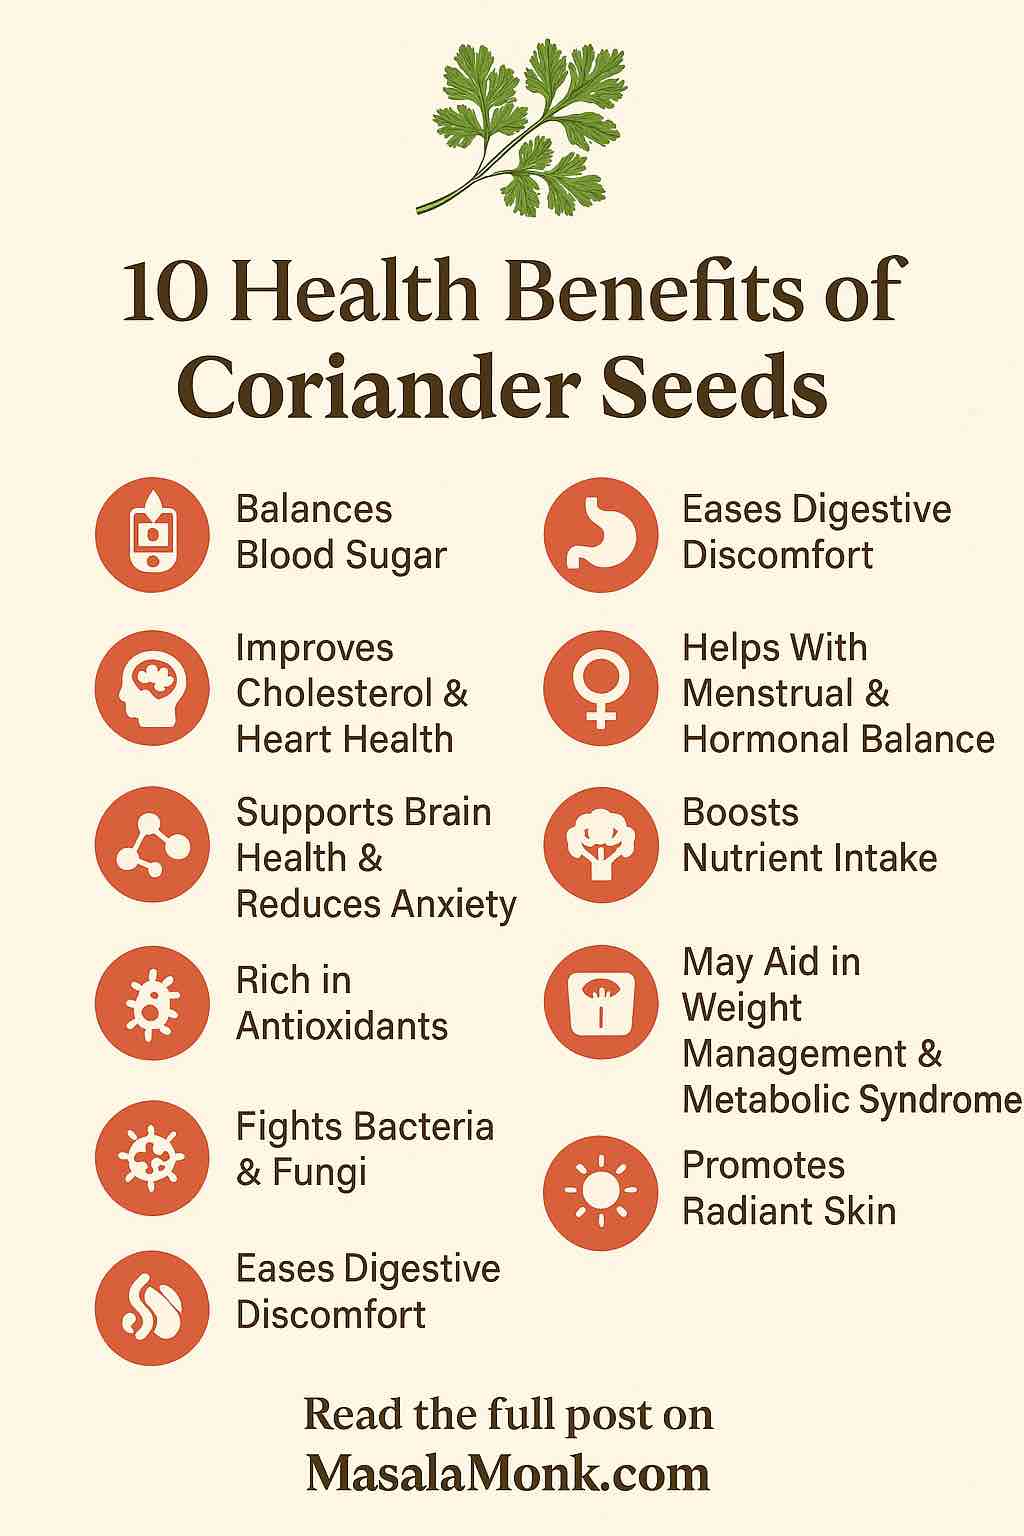
🧬 1. Balances Blood Sugar Naturally
Why it matters: Blood sugar spikes are at the heart of diabetes, energy crashes, and inflammation.
What research shows:
- Animal studies repeatedly show coriander seed extract lowers fasting blood glucose and improves insulin release.
- One early human study indicated better glycemic control in type 2 diabetes patients taking coriander supplements—but larger trials are needed.
- The active compounds, like linalool, appear to stimulate insulin secretion and inhibit carbohydrate breakdown enzymes.
📝 Tip: Soak 1 teaspoon of coriander seeds overnight and drink the water in the morning. Anecdotally known to help regulate blood sugar—especially when combined with exercise and a low-GI diet.
❤️ 2. Improves Cholesterol & Heart Health
Why it matters: Elevated cholesterol and high blood pressure are silent killers.
What research shows:
- In rats, coriander seed powder reduced LDL (bad cholesterol) and triglycerides while boosting HDL (good cholesterol).
- It may also act as a mild diuretic, helping to lower blood pressure by flushing excess sodium.
📝 Tip: Mix coriander seed powder with ground flaxseed and sprinkle on oatmeal or smoothies for a heart-smart breakfast.
🧠 3. Supports Brain Health & Reduces Anxiety
Why it matters: Mental clarity and emotional calm are priceless.
What research shows:
- Coriander seed extracts demonstrated anti-anxiety effects in animal models, comparable to diazepam.
- Linalool, its major essential oil component, may also reduce brain inflammation and oxidative damage linked to cognitive decline.
📝 Tip: A warm coriander tea before bed may ease anxiety and promote restful sleep.
🌱 4. Rich in Antioxidants
Why it matters: Antioxidants neutralize free radicals that accelerate aging and disease.
What research shows:
- Coriander seeds contain quercetin, tocopherols, terpinene, and linalool, all of which scavenge harmful oxidative molecules.
- These compounds may reduce cancer risk, support skin health, and protect internal organs.
📝 Tip: Toasting coriander seeds releases more antioxidants—grind them fresh and use as a finishing spice on roasted veggies or grains.
🦠 5. Fights Bacteria & Fungi
Why it matters: With rising antibiotic resistance, natural antimicrobials are gaining attention.
What research shows:
- Coriander seed oil shows antimicrobial activity against Salmonella, Staphylococcus aureus, and even Candida albicans.
- This makes it a potential candidate in natural preservatives or even infection-prevention routines.
📝 Tip: Coriander essential oil diluted with a carrier oil can be used as a natural surface spray or antimicrobial mouth rinse (check concentrations carefully).
🌿 6. Eases Digestive Discomfort
Why it matters: Digestion issues are common but often under-addressed.
What research shows:
- Coriander improves enzyme secretion and motility in the gut, reduces gas, bloating, and stomach cramps.
- A randomized trial on IBS patients showed a statistically significant reduction in abdominal pain and discomfort after coriander oil use.
📝 Tip: Sip coriander tea or chew roasted seeds after meals to promote smoother digestion.
👩⚕️ 7. Helps With Menstrual & Hormonal Balance
Why it matters: Many women seek natural ways to ease PMS or irregular cycles.
What research shows:
- Traditional medicine uses coriander seeds to regulate periods and reduce excessive menstrual bleeding.
- While formal studies are limited, anecdotal and Ayurvedic use is long-established.
📝 Tip: Combine coriander seed decoction with fennel for a soothing PMS tea.
🧂 8. Boosts Nutrient Intake
Why it matters: Even small foods can pack a nutrient punch.
What research shows:
- Coriander seeds are rich in magnesium, manganese, iron, calcium, and fiber—all essential for energy, immunity, and bone health.
- Just 1 tablespoon provides a meaningful dose of trace minerals and plant protein.
📝 Tip: Include ground coriander in salad dressings or lentil soups to subtly boost nutrition.
🧘 9. May Aid in Weight Management & Metabolic Syndrome
Why it matters: Metabolic syndrome includes belly fat, insulin resistance, and inflammation.
What research shows:
- Coriander seed extract in high-fat diet models led to significant weight reduction, lower inflammation, and improved cholesterol levels.
- These effects are likely due to improved lipid metabolism and reduced oxidative stress.
📝 Tip: Drink coriander detox water mid-morning to gently support metabolism and satiety.
🌞 10. Promotes Radiant Skin
Why it matters: Skin reflects internal health—and is prone to oxidative and inflammatory damage.
What research shows:
- Antioxidants in coriander seeds reduce UV damage and may soothe skin inflammation.
- Some cultures use coriander seed paste to treat acne or rashes.
📝 Tip: Use coriander seed infusion as a facial rinse or toner for clear, refreshed skin.
🧪 But What About Side Effects?
While coriander seeds are generally safe in culinary amounts:
- May lower blood sugar too much — monitor if diabetic.
- Could interact with blood pressure meds — consult your physician.
- Allergies are rare but possible, especially in those with celery or carrot allergies.
📝 Tip: Start with ½ tsp daily and observe your body’s response.
🔬 Final Thoughts: Ancient Spice, Modern Power
Coriander seeds are more than just a spice—they’re a natural pharmacy in seed form. From regulating blood sugar and lipids to soothing digestion and skin, their holistic impact is both time-tested and science-supported.
While we await more robust human clinical trials, there’s enough evidence to comfortably incorporate coriander seeds into a health-conscious lifestyle today.
📌 Quick-Start Guide: How to Use Coriander Seeds Daily
| Method | Use |
|---|---|
| 🌅 Coriander water | Soak 1 tsp overnight, strain, and drink on an empty stomach |
| 🍲 Powdered spice | Add to soups, curries, or tea blends |
| 🌿 Herbal infusion | Boil 1 tsp seeds in water for 5–10 mins |
| 🍪 Mix in flour | Add ground seeds to flatbread or pancake batter |
| 🌼 Topical use | Use coriander oil (diluted) for skin or antimicrobial needs |
📚 10 Frequently Asked Questions About Coriander Seeds
1. Can coriander seeds really lower blood sugar?
Yes, studies in animals and a few small human trials show that coriander seeds may reduce blood sugar levels by boosting insulin activity and slowing carbohydrate digestion. However, if you’re on diabetes medication, consult your doctor to avoid hypoglycemia.
2. What’s the best way to consume coriander seeds for health benefits?
The most common methods include:
- Soaking 1 tsp of seeds overnight and drinking the water in the morning
- Boiling them to make herbal tea
- Grinding into powder to add to food
- Using coriander oil capsules (consult a healthcare provider)
3. Can I take coriander seeds daily?
Yes, coriander seeds are generally safe in moderate daily doses (½ to 1 tsp). However, large or medicinal doses should be discussed with a healthcare professional—especially if you’re managing blood sugar or blood pressure.
4. Do coriander seeds help with weight loss?
They may support weight loss indirectly by improving digestion, metabolism, and insulin sensitivity. While not a miracle solution, they can be part of a weight-friendly diet when paired with exercise and healthy eating.
5. Are there any side effects of coriander seeds?
Coriander seeds are safe for most people. Rare side effects include:
- Allergic reactions (especially if allergic to celery or fennel)
- Dizziness or low blood pressure (if overused)
- Hypoglycemia when combined with diabetic medications
6. What’s the difference between coriander seeds and cilantro?
Cilantro refers to the fresh leaves of the Coriandrum sativum plant, while coriander seeds come from the dried fruit. Both have different flavors and benefits: seeds are warming and nutty; leaves are fresh and citrusy.
7. Can I use coriander seed oil on my skin?
Yes, diluted coriander essential oil can be applied topically. It’s antimicrobial and may help with acne or irritation. Always dilute with a carrier oil and patch-test first.
8. How long should I soak coriander seeds for drinking water?
Soak 1 teaspoon of coriander seeds in a glass of water for 6 to 8 hours or overnight. Strain and drink on an empty stomach for best results.
9. Can coriander seeds help with bloating and gas?
Yes, coriander is a natural carminative—it relaxes intestinal muscles, helps move gas, and eases bloating. A coriander tea after meals can be highly effective.
10. Is there a best time of day to consume coriander seeds?
Morning is ideal—especially in the form of soaked water or tea—to jumpstart metabolism, digestion, and hydration. Powdered seeds can be used throughout the day in meals.