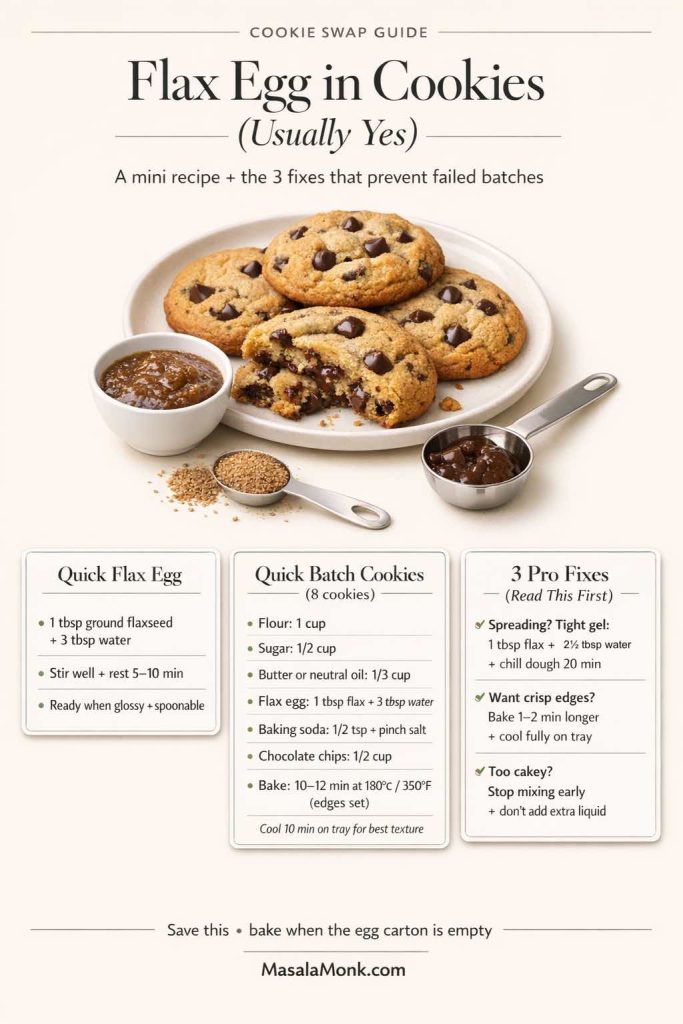
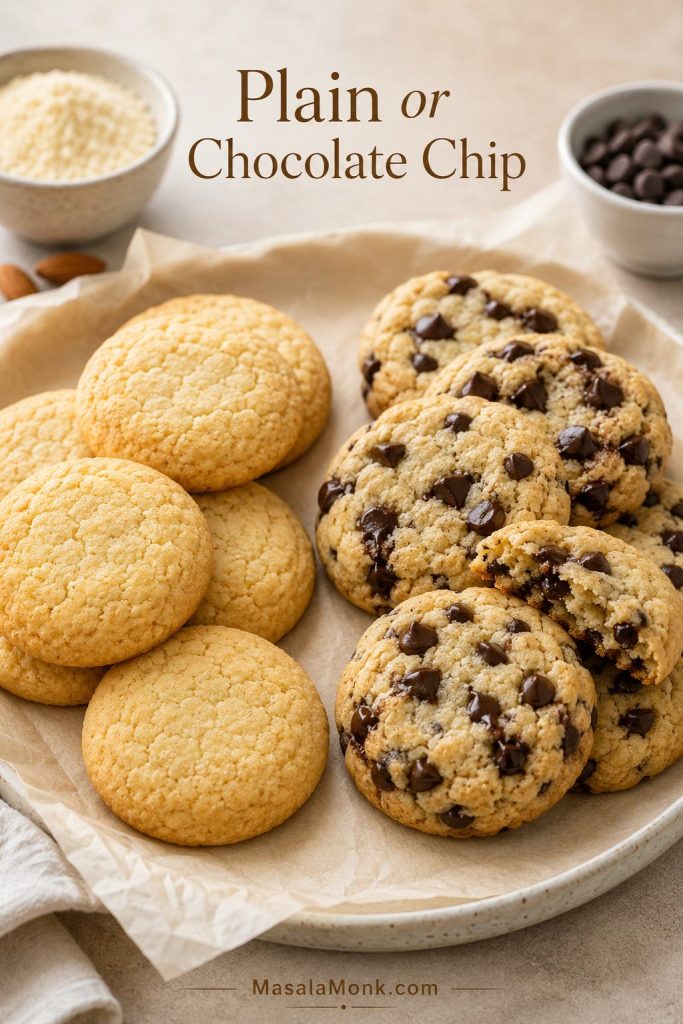
The payoff is a batch of cookies that smell warm and buttery, break softly once cooled, and feel just as welcome with coffee in the afternoon as they do with a few extra chocolate chips after dinner.
The main recipe is the one to start with when you want cookies that hold together, taste smooth instead of gritty, and still feel soft in the center. It is built for the almond-flour problems readers run into most often: oily dough, low spread, fragile cookies, and centers that need time to set.
Use the main recipe first if you want the most reliable batch. Then use the variation notes for 3-ingredient, vegan, keto-style, chocolate chip, and crispier cookies once you know how the dough should feel.
Almond Flour Cookies at a Glance
- Active time: about 12 minutes
- Bake time: 10–12 minutes for soft cookies, 13–14 minutes for firmer edges
- Dough rest: 10 minutes while the oven heats
- Tray set time: 10–15 minutes before moving
- No long chill: chill only if the dough feels greasy, sticky, or too soft
- Yield: about 16 cookies, plain or with chocolate chips
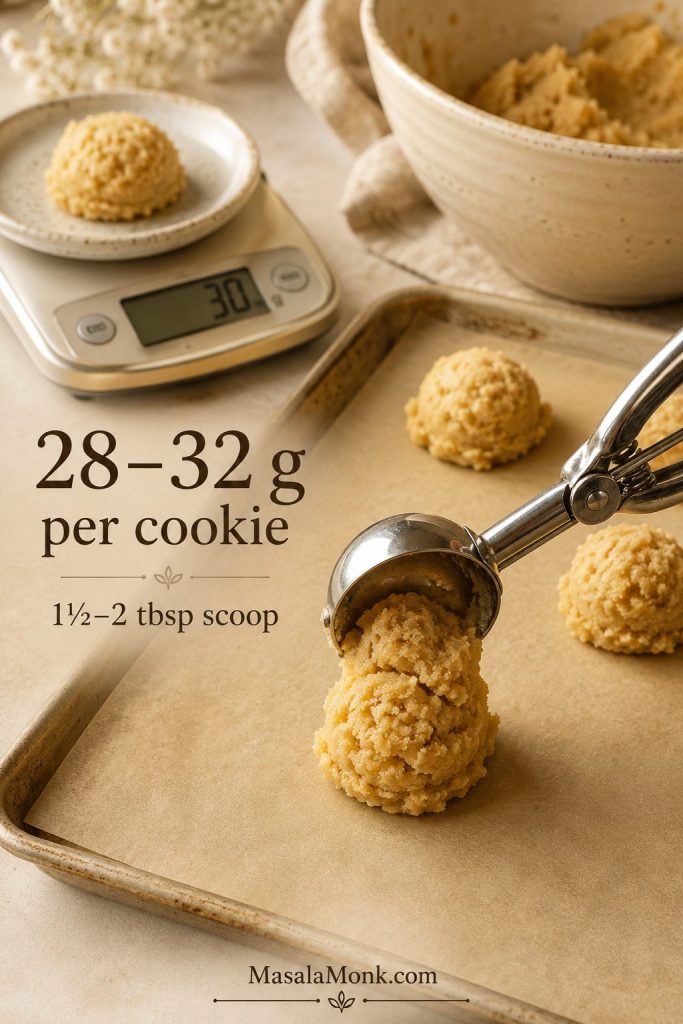
- Scoop size: 1 1/2 to 2 tablespoons, about 28–32 g dough per cookie
- Best flour: fine blanched almond flour, not coarse almond meal
- Most important step: shape before baking, then let the cookies set on the warm tray before lifting
Table of Contents
Quick Answer: How to Make Almond Flour Cookies
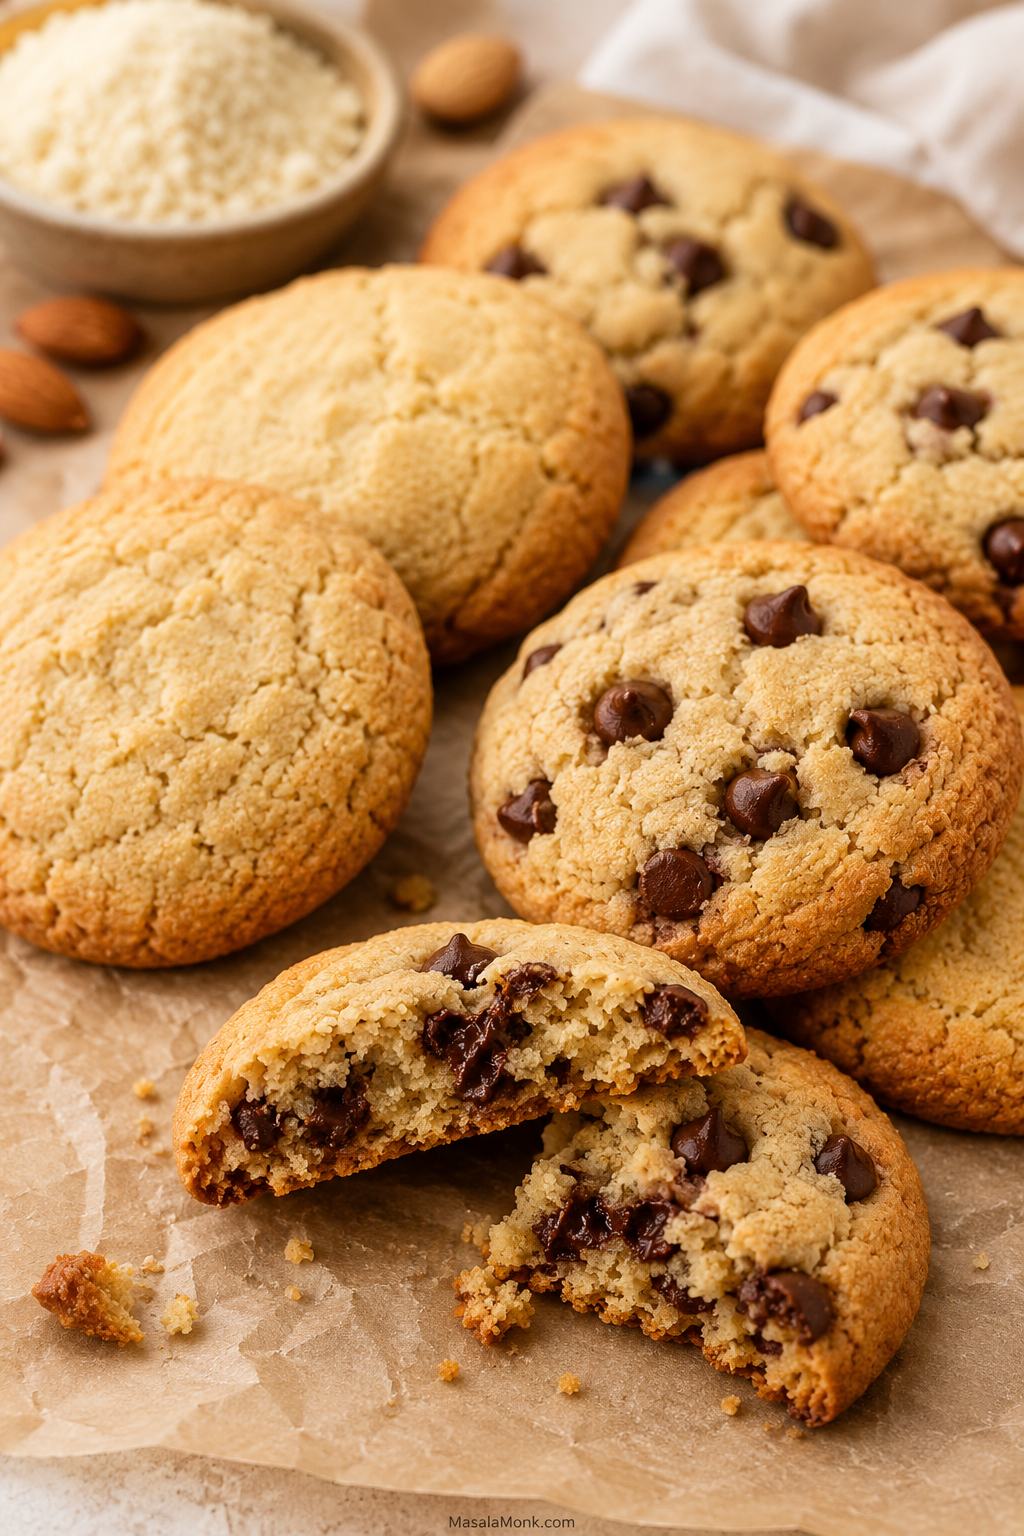
To make almond flour cookies, mix fine blanched almond flour with brown sugar, melted butter, egg, vanilla, baking soda, salt, and a little cornstarch or arrowroot if you want a softer, thicker cookie. Fold in chocolate chips for the most familiar bakery-style version, or leave the dough plain for a warmer almond-vanilla cookie. Scoop, press each mound into a thick disc, and bake at 350°F / 175°C for 10–12 minutes, until the edges look lightly golden and the centers still look tender.
The two steps that matter most are simple: shape the cookies before baking and let them set on the baking sheet before moving them. This dough does not spread as much as regular cookie dough, and the baked cookies are delicate while hot. Once they cool, they firm up into soft, tender cookies that lift cleanly from the tray.
If this style of cookie has disappointed you before, this recipe is designed to take the guesswork out of the tray. The dough is supposed to feel softer than regular cookie dough, the centers are supposed to look slightly tender when they come out of the oven, and the cookies are supposed to finish setting as they cool. Once you know those cues, the recipe becomes much easier.
If you need quick fixes while baking, jump to the troubleshooting section; if you are ready to mix, go straight to the recipe card.
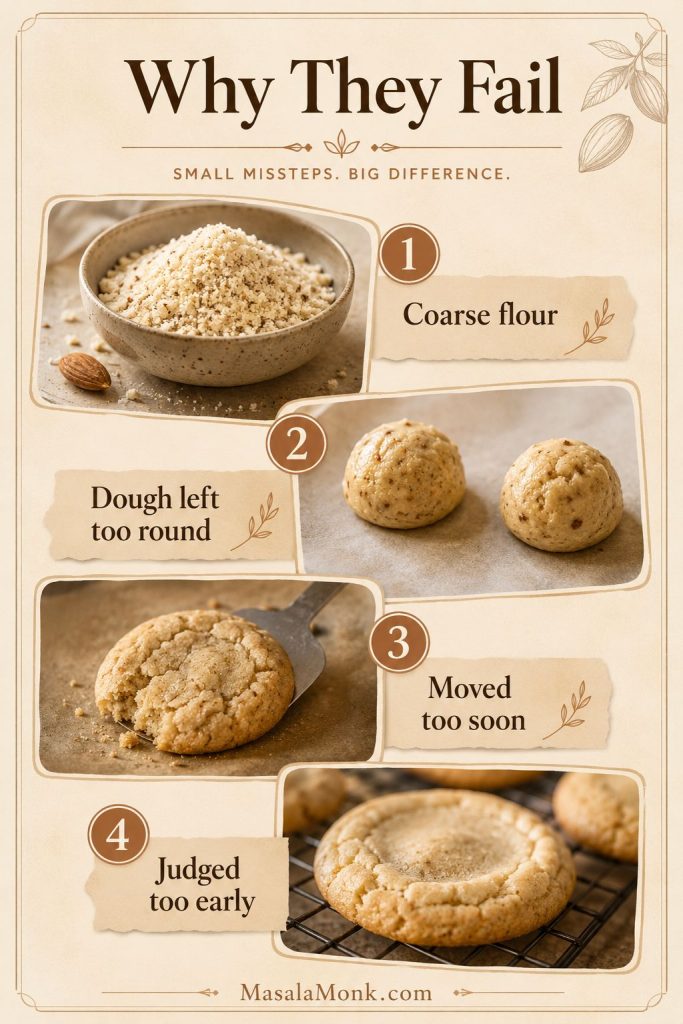
Why almond flour cookies fail
Most failed batches come down to four things: coarse almond meal, dough left too round before baking, cookies moved while hot, or centers judged before they had time to set. This recipe builds those fixes into the method, so the cookies lift cleanly and taste tender instead of gritty or crumbly.
For step-by-step help, use the method cues first, then check the troubleshooting table if the dough or baked cookies still seem off.
Why You’ll Like This Batch
- It feels like a real cookie: soft middle, golden edge, and rich almond-vanilla flavor.
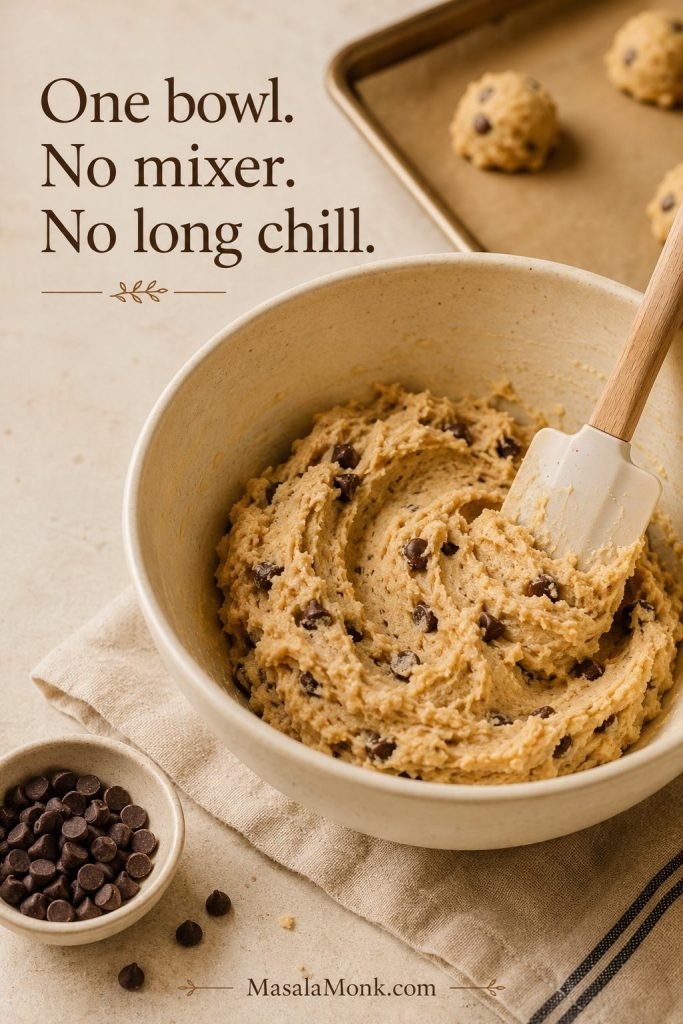
- It is easy enough for a weeknight: one bowl, no mixer, and no long chill.
- It is flexible: bake them plain, add chocolate chips, or try the 3-ingredient version later.
- It is built for almond flour: the recipe tells you when to shape, when to pull the tray, and when the cookies are sturdy enough to move.
Why This Almond Flour Cookies Recipe Works
Most problems with this dough do not come from flavor. Almond flour already tastes rich, nutty, and buttery. The challenge is helping the cookies hold together, bake evenly, and set without becoming gritty, oily, or too soft.
The fix starts with fine blanched almond flour, then a few small choices that help the cookies bake up tender instead of sandy or fragile: one egg for lift, brown sugar for a gentle chew, a short dough rest for better hydration, and optional cornstarch or arrowroot for a softer, thicker bite.
The biggest difference is not a complicated technique. The best batches come from dough that is pressed before baking, pulled while the centers still look slightly soft, and left alone long enough for the bottoms to firm on the tray.
- Fine blanched almond flour keeps the bite smoother and less gritty.
- Brown sugar gives more familiar chew than dry sweeteners alone.
- One egg helps the cookies lift cleanly from the tray once cooled.
- A short rest makes the dough easier to scoop and shape.
- Gentle handling keeps the cookies intact while they finish setting.
Best first-batch version
For the most reliable first tray, use fine blanched almond flour, brown sugar, butter, the egg, and the cornstarch or arrowroot. This version gives the best balance of tenderness, browning, and cookies that lift cleanly after cooling. Try the 3-ingredient, keto, or vegan variations after you know how the base dough should feel.
The one habit that changes the batch
Treat almond flour cookies gently while they are hot. Give them a few quiet minutes on the tray, and they go from fragile to tender, sturdy, and easy to lift.
Before You Start: 5 Almond Flour Cookie Rules
This dough is easy, but it does not behave like regular cookie dough. Keep these rules in mind before you mix the bowl, especially if this is your first batch.
- Use fine almond flour. Coarse almond meal can make the cookies gritty and fragile.
- Press the dough before baking. The shape you make is close to the shape you get.
- Mix gently. Almond flour has natural fat, so overmixing can make the dough oily.
- Move them only after they set. Hot cookies are delicate; cooled cookies lift cleanly.
- Judge texture after cooling. Warm centers can seem too soft even when baked correctly.
What These Almond Flour Cookies Taste Like
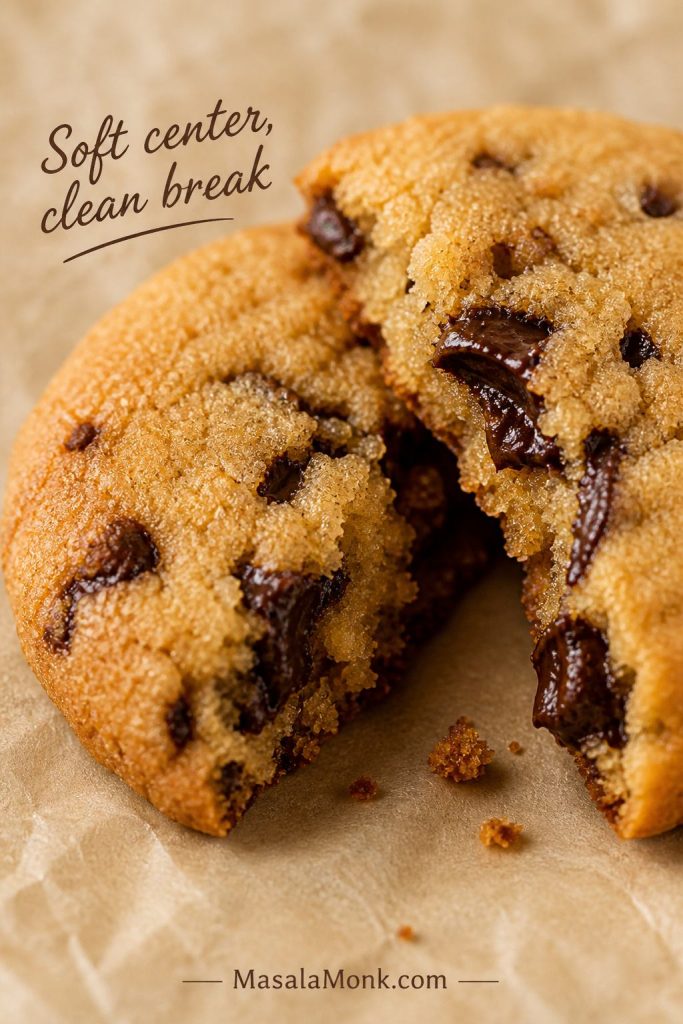
These almond flour cookies have a warm vanilla-almond flavor, buttery edges, and a soft, tender bite. They are not meant to be stretchy like wheat-flour chocolate chip cookies. Instead, they break softly, taste rich from the almond flour, and become sturdy enough to lift once fully cooled.
Chocolate chips make them feel more classic and dessert-like, while the plain version lets the almond flavor come through more clearly. Either way, the goal is a cookie that feels homemade and satisfying, not dry, sandy, or like a gluten-free compromise.
For crispier edges, press the dough a little flatter and bake the cookies until the edges are deeper golden. For softer centers, keep the dough slightly thicker and avoid overbaking.
Ingredients You Need
This recipe keeps the ingredient list simple, but every ingredient has a job. You want a tender cookie that tastes warm and satisfying, not like a dry gluten-free compromise. If you plan to change sweeteners, fat, eggs, or flour, check the substitution guide before mixing.
Fine blanched almond flour
Use fine blanched almond flour for the softest texture. It gives the cookies a pale golden color, tender crumb, and smoother bite. Coarse almond meal can work in a pinch, but the batch may taste grainier, darker, and more fragile.
Brown sugar or coconut sugar
Brown sugar gives these cookies a softer, chewier feel and a warmer flavor. Coconut sugar also works, but it weighs a little differently and gives a deeper, more caramel-like taste. For keto-style cookies, use the notes in the variation section because low-carb sweeteners change browning, spread, and chew.
Butter
Melted butter gives the cookies classic flavor and helps the dough come together easily. Let it cool slightly before mixing so it does not scramble the egg or make the dough oily. For a dairy-free version, coconut oil can work, but the cookies will taste a little different and may be slightly softer.
Egg
One egg helps the cookies lift cleanly from the tray after cooling. Egg-free versions are possible, but they need a different formula because almond flour has no gluten to help the dough hold together.
Vanilla, baking soda, and salt
Vanilla is not just background here. It rounds the almond flavor and makes the cookies taste warmer. Baking soda gives a little lift and helps the edges brown, while salt keeps the sweetness from tasting flat.
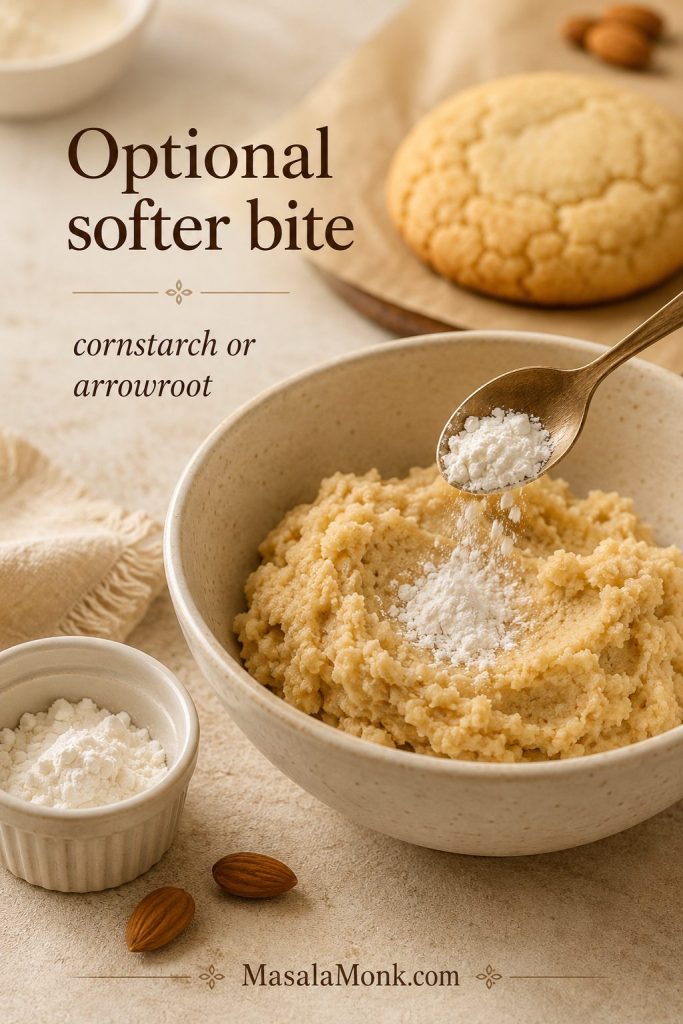
Recommended starch for softer cookies
A tablespoon of cornstarch or arrowroot helps the cookies bake softer, thicker, and a little less fragile. Use cornstarch for the most familiar cookie texture, arrowroot if you prefer a grain-free option, or skip it for keto-style cookies. Without it, the cookies still work, but they will be slightly more delicate.
Chocolate chips
Chocolate chips are optional, but they turn this base dough into an easy chocolate chip version. Mini chocolate chips distribute especially well through the dough, while regular chips give bigger pockets of chocolate.
A note on strict gluten-free baking
Almond flour is naturally gluten-free, but if you are baking for someone who needs strict gluten-free food, use almond flour, chocolate chips, and starch that are labeled gluten-free. The FDA’s gluten-free labeling rule sets a clear standard for foods that carry a gluten-free claim.
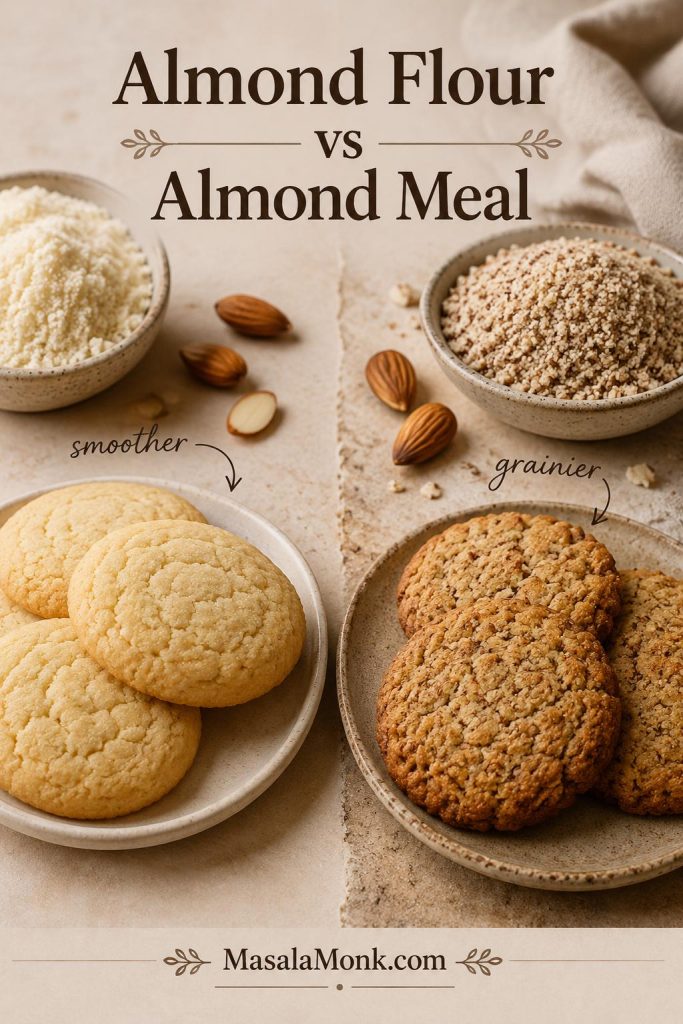
Almond Flour vs Almond Meal for Cookies
For the best texture, use fine blanched almond flour. It is usually made from almonds without their skins, so the texture is finer and the color is lighter. This helps the cookies bake up soft, even, and tender.
Almond meal is usually coarser and may include almond skins. It can make cookies darker, grainier, and more rustic. That is not always bad, but it is not ideal when you want a soft, smooth cookie that holds together neatly.
| Ingredient | Best for Cookies? | What to Expect |
|---|---|---|
| Fine blanched almond flour | Best choice | Soft, even texture with less grittiness and a cleaner bite. |
| Almond meal | Works, with tradeoffs | Darker, grainier cookies that may feel more delicate. |
| Coarse homemade almond flour | Risky | Can make the dough uneven, oily, or gritty if the grind is too coarse. |
For a deeper baking-focused explanation of almond flour texture and grind, King Arthur Baking has a helpful almond flour guide that explains how finely ground almond flour behaves in baked goods.
If you want to see almond flour behaving in a batter instead of a dough, our almond flour pancakes guide shows why almond-based recipes brown quickly and feel more delicate than wheat-flour versions.
Once you have the right flour, the next important cue is what the dough should look like before baking.
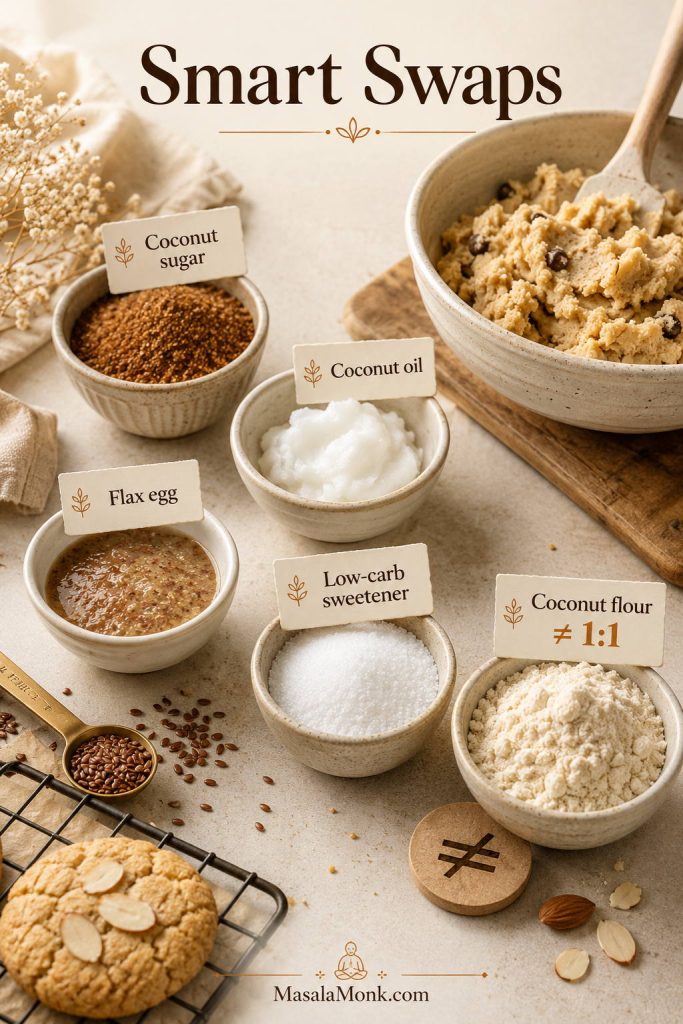
Ingredient Substitutions and What Changes
Substitutions can work, but they are not all equal. Because almond flour has no gluten and contains natural fat, small changes can affect how the cookies spread, brown, and set.
| Swap | Will It Work? | What Changes |
|---|---|---|
| Almond meal instead of almond flour | Yes, with tradeoffs | Cookies may be darker, grainier, and more fragile. |
| Coconut oil instead of butter | Yes | Good for dairy-free cookies, but the flavor is less classic and the texture can be softer. |
| Coconut sugar instead of brown sugar | Yes | Use 1/2 cup, about 95 g. It gives a deeper flavor and slightly less classic chew. |
| Maple syrup instead of sugar | Not as a direct swap | It adds liquid and changes the dough. Use the 3-ingredient variation instead. |
| Low-carb sweetener instead of sugar | Yes, with texture changes | Use a 1:1 granular baking sweetener. The cookies may brown less, spread less, and feel less chewy. |
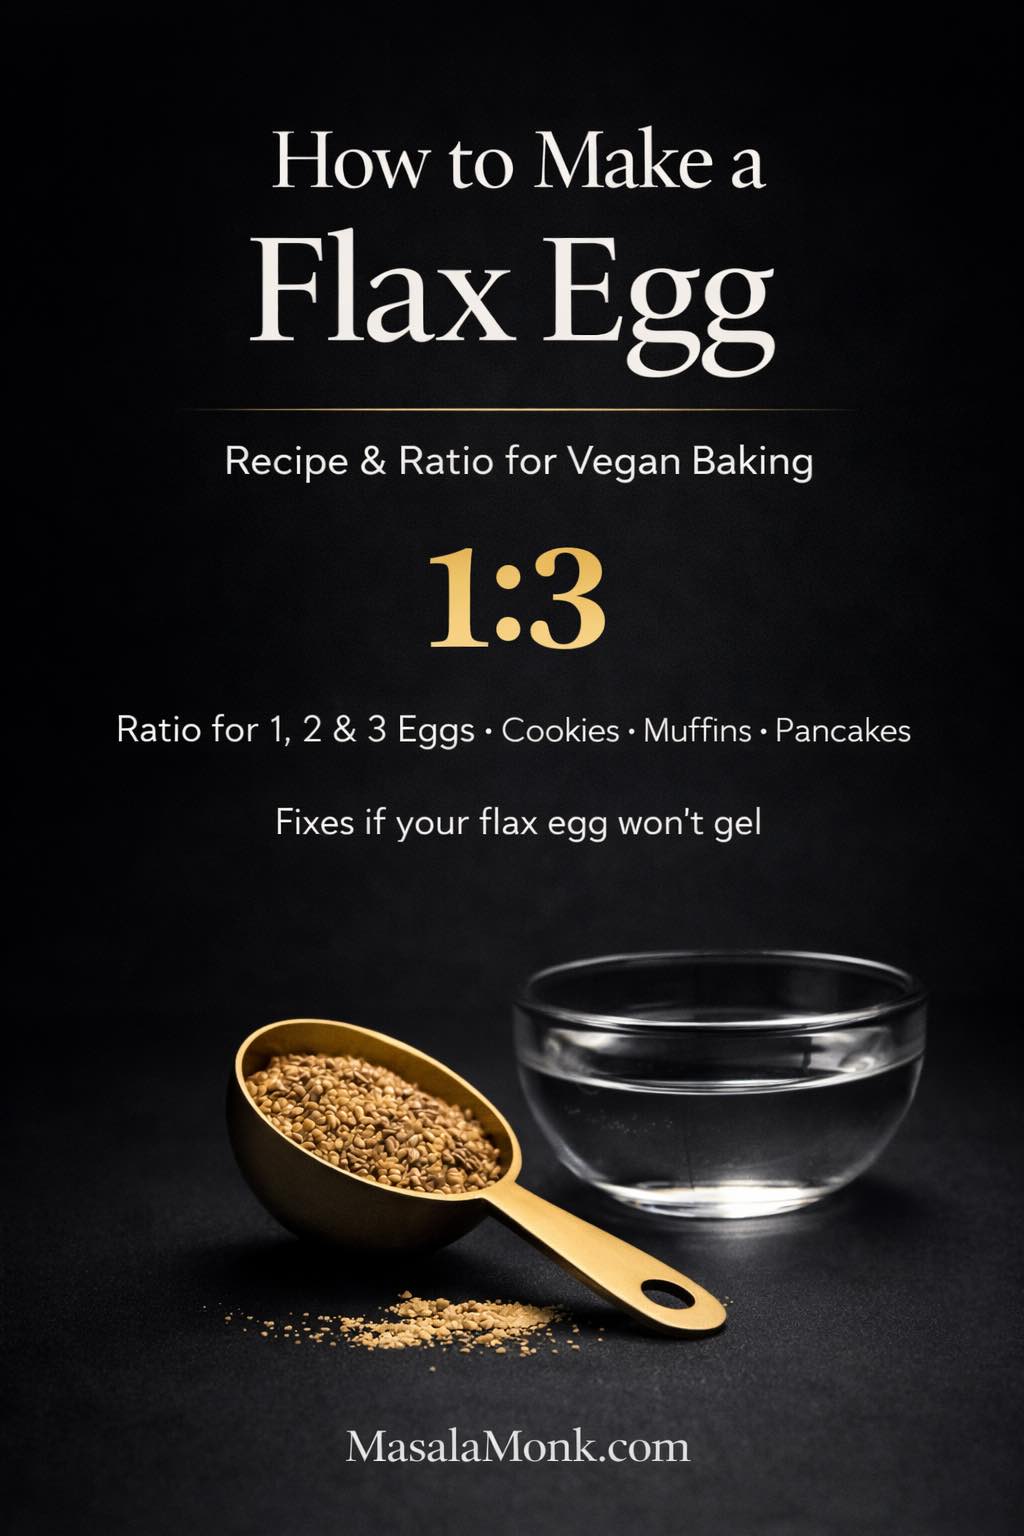
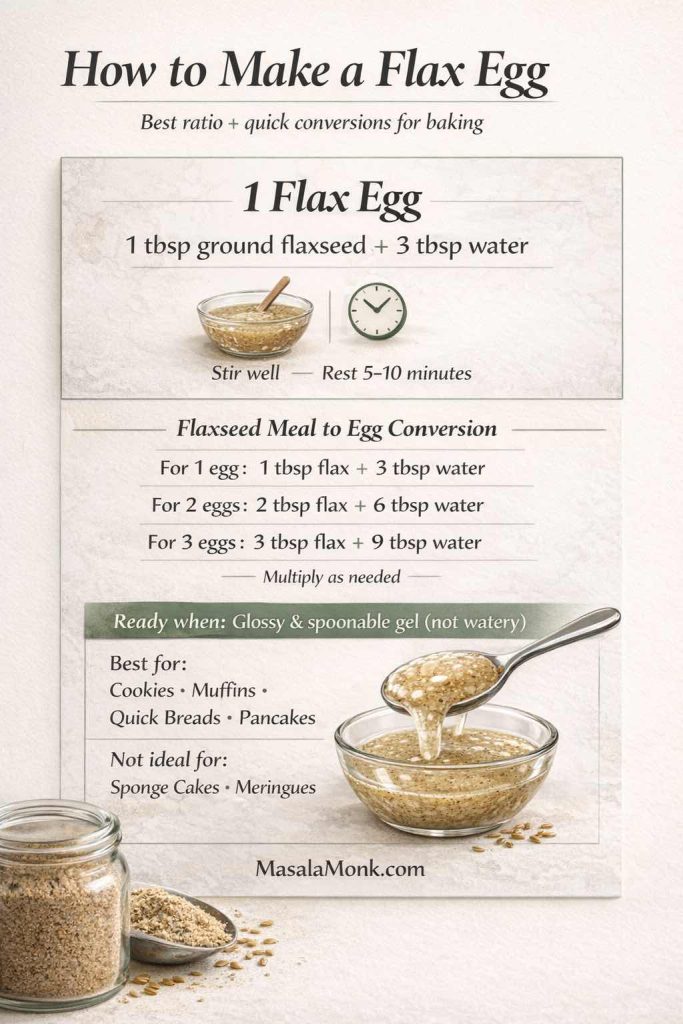
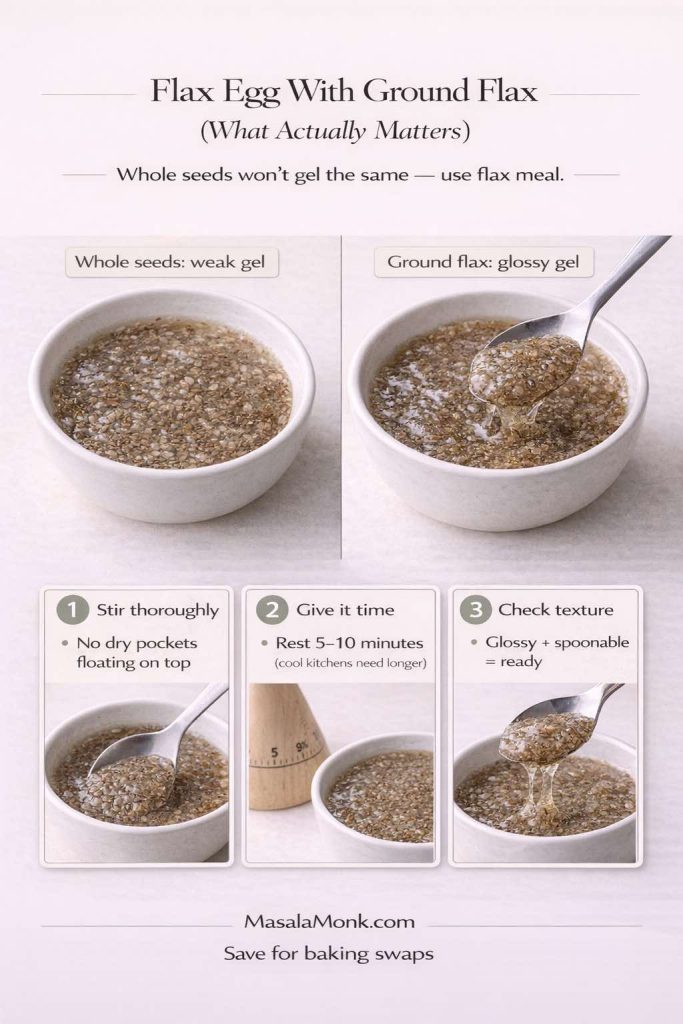
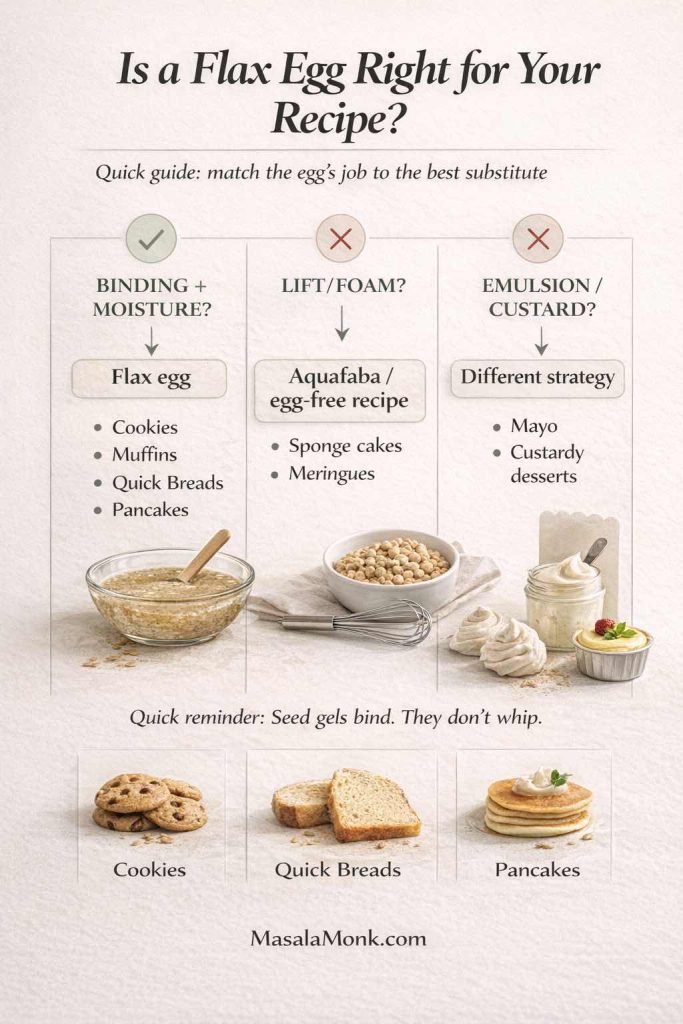
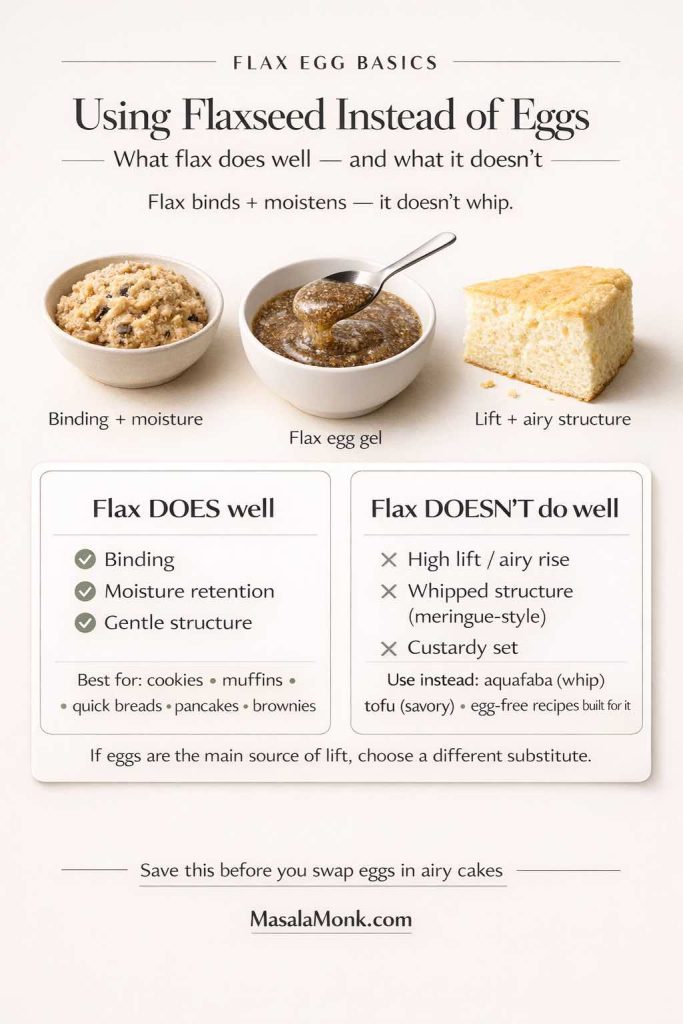
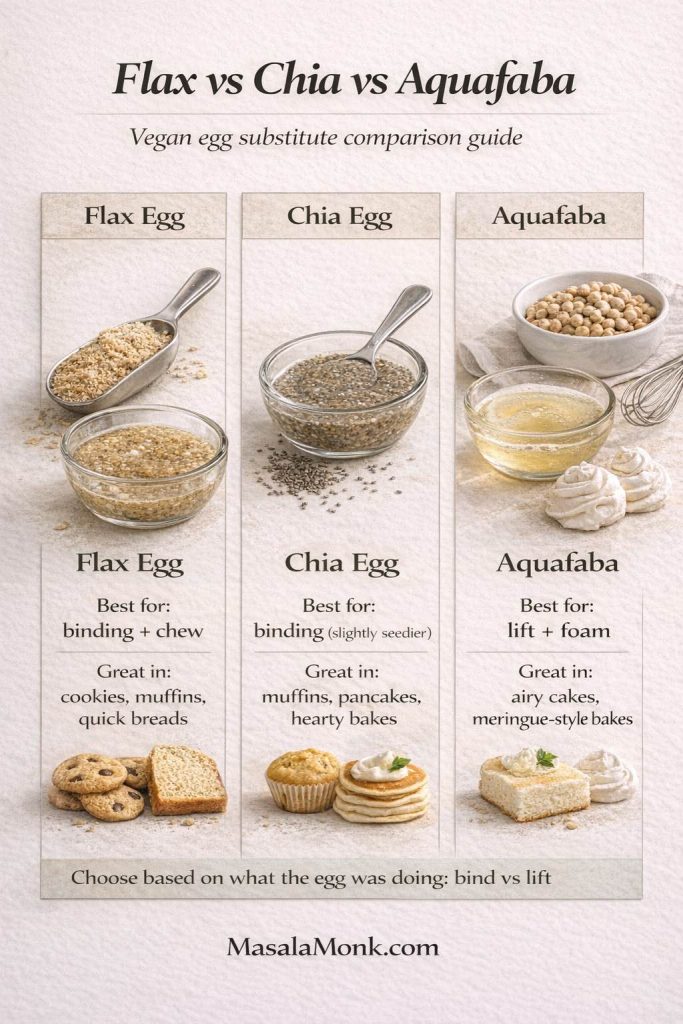
| Flax egg instead of egg | Sometimes | The cookies become softer and more delicate. The vegan variation is the safer starting point. |
| Coconut flour instead of almond flour | No | Coconut flour absorbs much more liquid and cannot be swapped 1:1. |
| All-purpose flour instead of almond flour | No | This recipe is balanced for almond flour’s fat and moisture behavior. |
| Gluten-free flour blend instead of almond flour | No, not directly | Most blends behave more like wheat flour and need a different cookie formula. |
For the first batch, stay close to the main recipe. Once you know how the dough should feel, it is much easier to adjust sweeteners, fats, or add-ins without losing the soft, tender texture. Then compare the almond flour cookie variations to choose the best next batch.
This recipe is built for almond flour
Other flours need their own formulas. Coconut flour, oat flour, all-purpose flour, and gluten-free flour blends absorb liquid and fat differently, so they cannot replace almond flour directly in this recipe.
Equipment You Need
You do not need a mixer or special equipment. A bowl, spatula, baking sheet, parchment paper, and a cookie scoop are enough for this one-bowl dough.
- Baking sheet: one large sheet pan or two smaller trays.
- Parchment paper: best for clean release and even browning.
- Mixing bowl and spatula: enough for this no-mixer, one-bowl dough.
- Cookie scoop: a 1 1/2 to 2 tablespoon scoop keeps the cookies even.
- Wire rack: useful after the cookies set on the tray.
- Kitchen scale, optional: best for measuring almond flour accurately.
Parchment paper gives the cleanest release and slightly better browning. A silicone baking mat also works, but the bottoms may brown a little less.
How to Make Almond Flour Cookies
This is a one-bowl style cookie dough. The method is simple, but a few small cues make the difference between cookies that lift cleanly and cookies that crumble when you pick them up. If you already know the dough basics, you can skip ahead to doneness or the texture guide.
1. Mix the wet ingredients
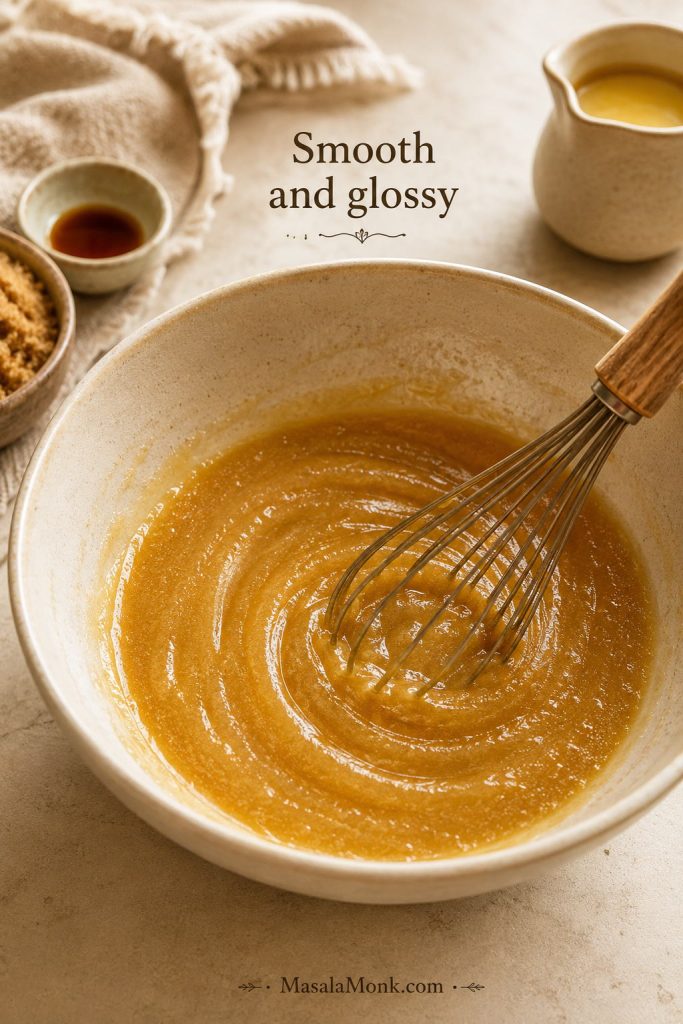
In a large bowl, whisk the melted butter, brown sugar, egg, and vanilla until smooth and glossy. The butter should be melted but not hot. If it feels hot to the touch, let it cool for a few minutes before adding the egg.
2. Add the dry ingredients
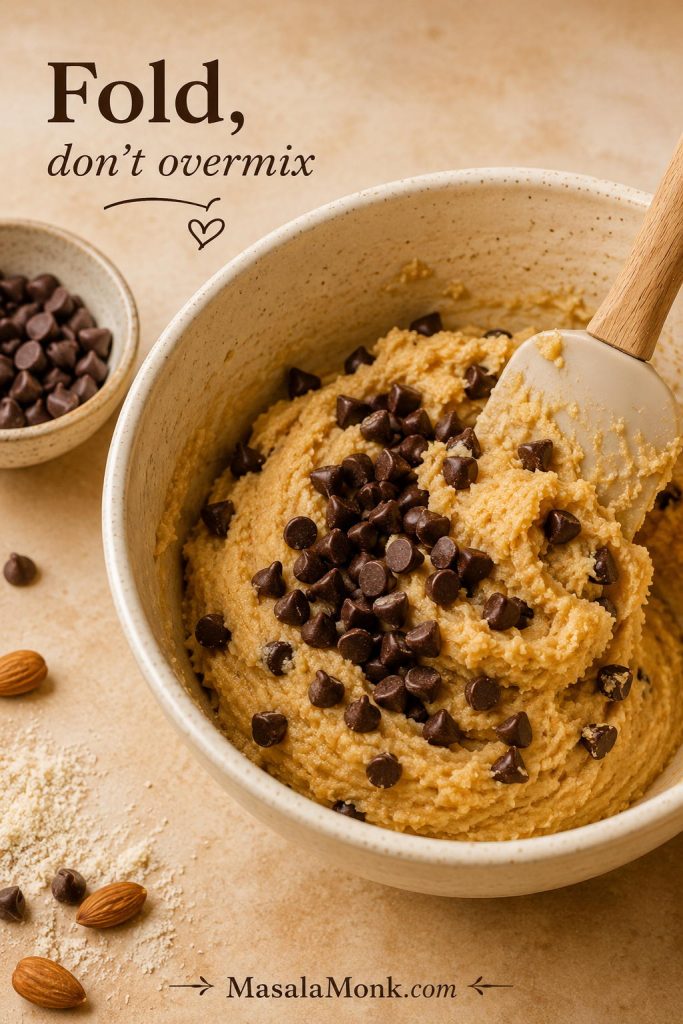
3. Fold in chocolate chips, if using
For a chocolate chip version, fold in the chocolate chips now. For a prettier finish, save a few chips and press them onto the tops of the dough before baking.
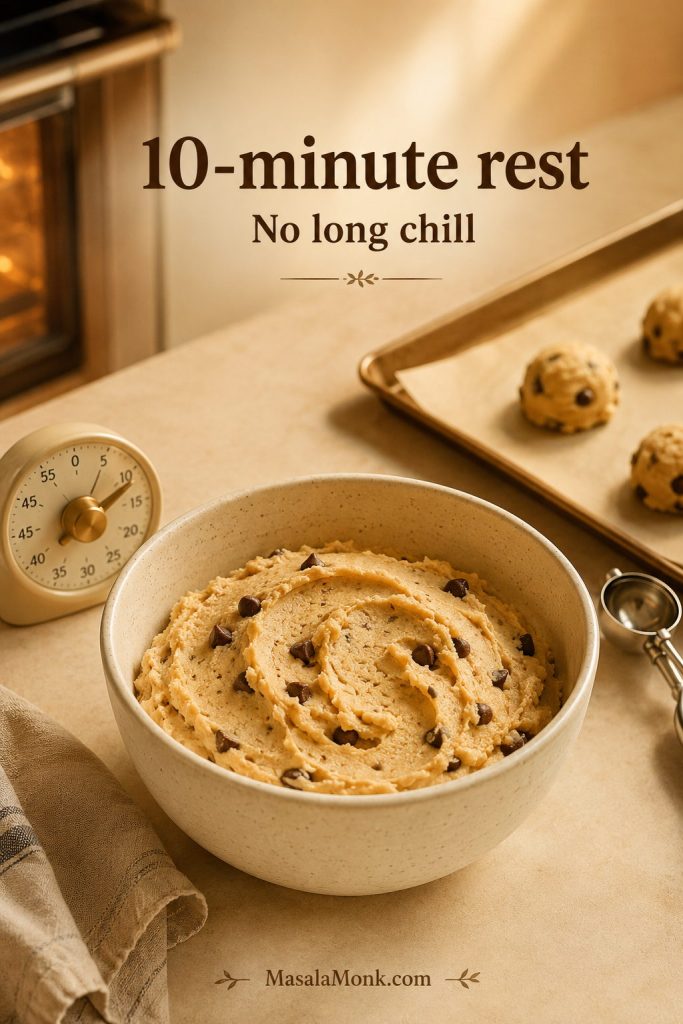
4. Rest the dough briefly
Let the dough sit for about 10 minutes while the oven heats. This short rest helps the almond flour absorb moisture and makes the dough easier to scoop. If your kitchen is warm and the bowl feels very soft, chill it for 15–20 minutes.
5. Scoop and shape

Use one large baking sheet or divide the dough between two sheets. For the most even baking, bake one tray at a time in the center of the oven.
6. Bake until the edges are lightly golden
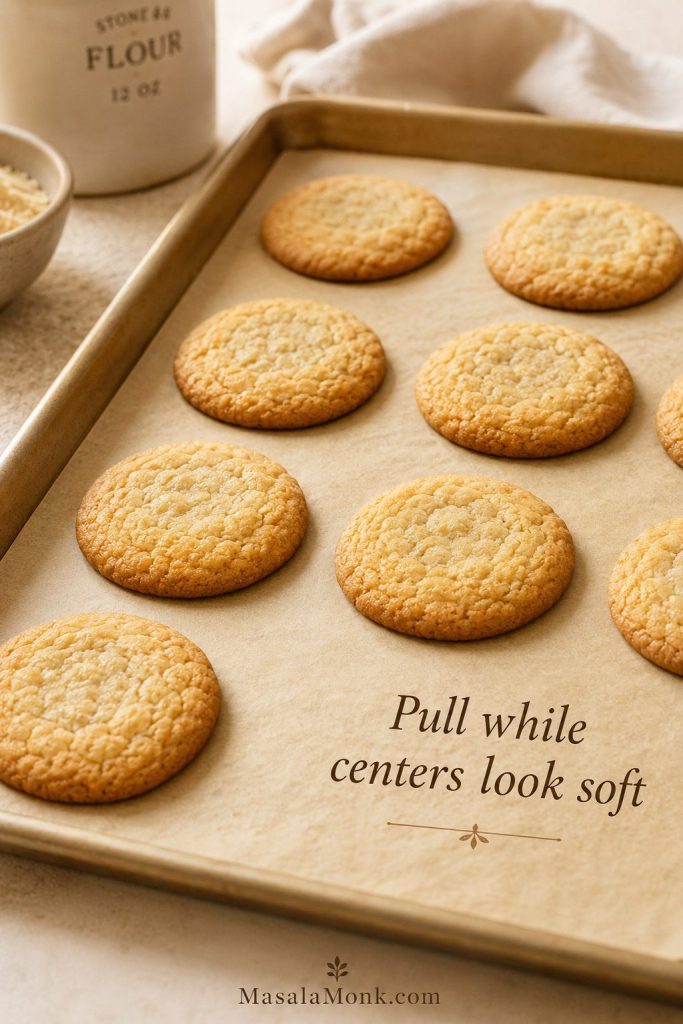
Bake at 350°F / 175°C, or about 160°C fan, for 10–12 minutes. The edges should look lightly golden, but the centers should still look soft. If your oven runs hot, check at 9 minutes because almond flour can brown quickly at the edges.
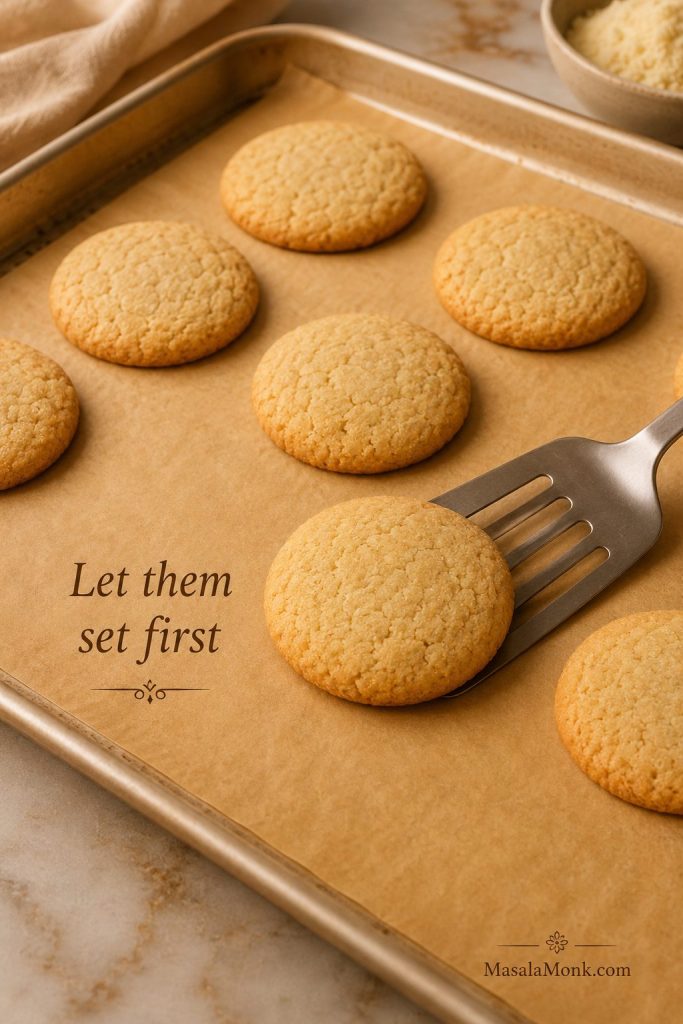
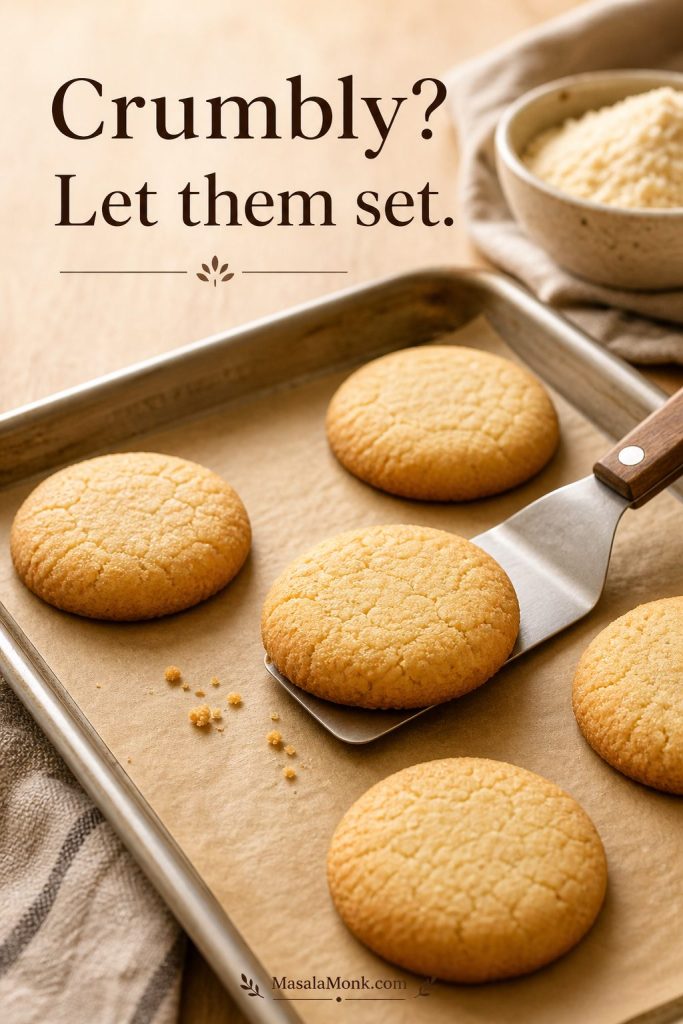
7. Let the cookies set on the tray
Let the cookies cool on the baking sheet for at least 10 minutes before moving them. They are delicate when hot, but they firm as they cool. After that, transfer them to a wire rack and let them cool completely.
The cookies may look a little softer than you expect when they first come out. That is normal. The edges should be set, but the centers finish firming as the tray cools.
Do You Need to Chill Almond Flour Cookie Dough?
You do not need a long chill for this dough. A 10-minute rest is enough for most batches because it gives the almond flour time to absorb moisture and makes the dough easier to scoop.
Chill the dough for 15–20 minutes only if it feels sticky, greasy, or too soft to shape. This usually happens when the butter is too warm, the kitchen is hot, or the almond flour is very fine and fresh. Even after chilling, press the dough into discs before baking so the cookies do not stay too thick.
How to Know When Almond Flour Cookies Are Done
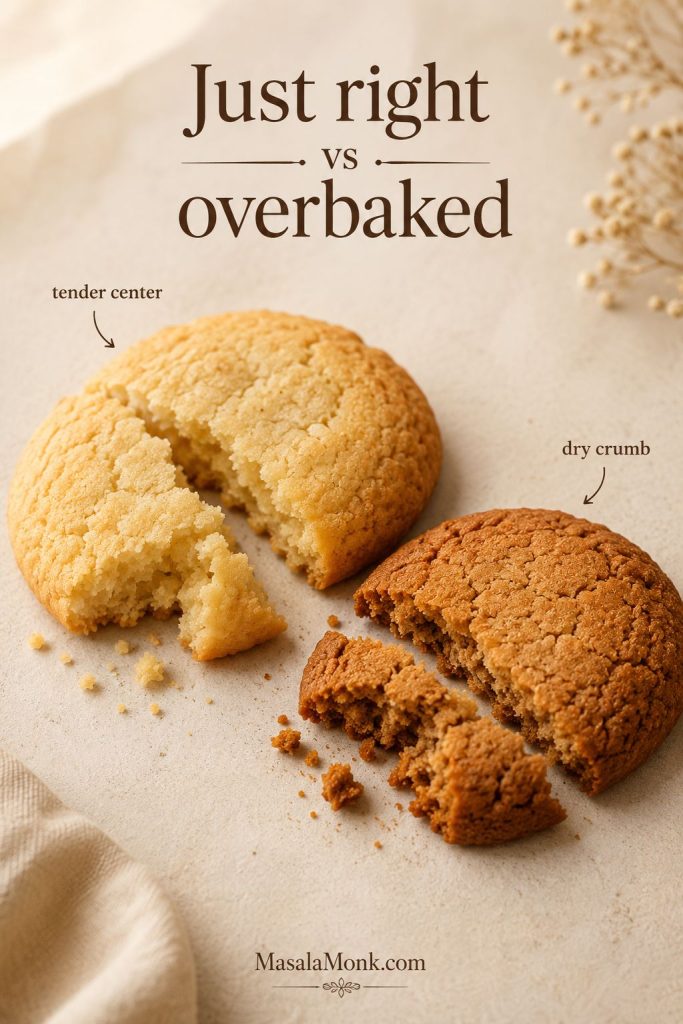
The cookies are done when the edges look lightly golden and set, but the centers still look a little soft. Do not wait for the centers to look firm in the oven, or the cookies may turn dry after cooling.
When in doubt, pull the tray when the edges are set and the centers still look slightly soft. Overbaked almond flour cookies can taste dry once cooled.
What a successful batch looks like
The cookies should look lightly golden at the edges, soft in the center, and slightly fragile when they first come out. After 10–15 minutes on the tray, they should lift cleanly with a spatula and break softly when you bite into them.
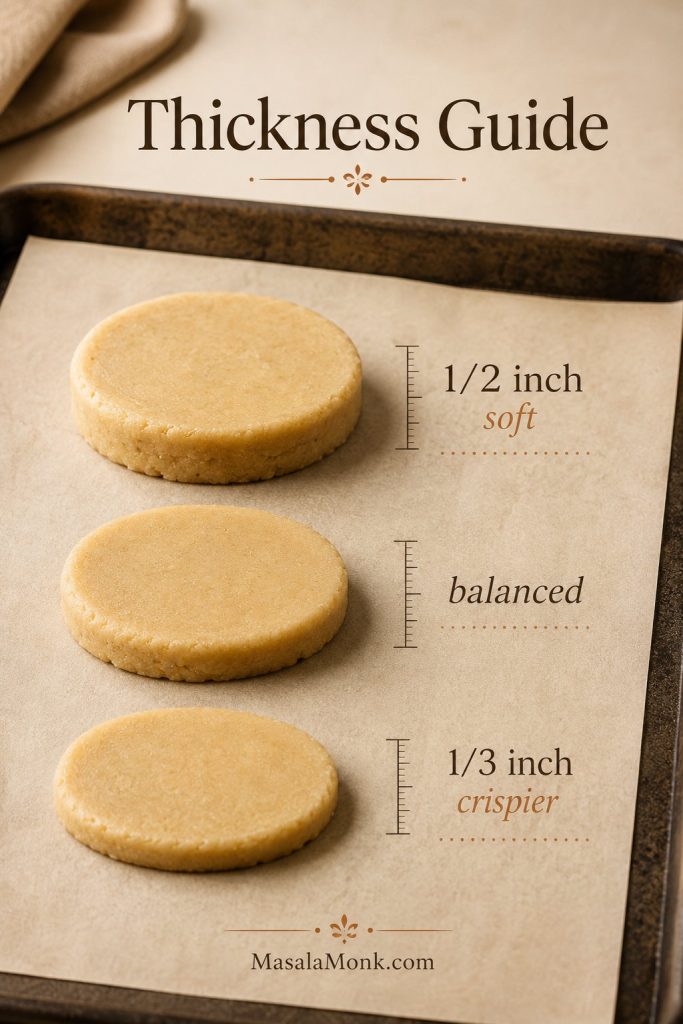
Soft, Chewy, or Crispy Almond Flour Cookies
Before you bake, decide what kind of cookie you want. A thicker cookie gives you the softest center. A slightly flatter cookie gives you more golden edge. The recipe is flexible, but the shape you choose before baking matters.
| Texture Goal | How to Shape | Bake Time | Best Cue |
|---|---|---|---|
| Soft almond flour cookies | Keep thicker, about 1/2 inch | 10–11 minutes | Edges barely golden, centers soft |
| Chewy almond flour cookies | Flatten slightly, but not thin | 11–12 minutes | Light golden edges, tender centers |
| Crispier almond flour cookies | Flatten more, about 1/3 inch | 13–14 minutes | Deeper golden edges, fully cooled before serving |

Almond Flour Cookie Variations
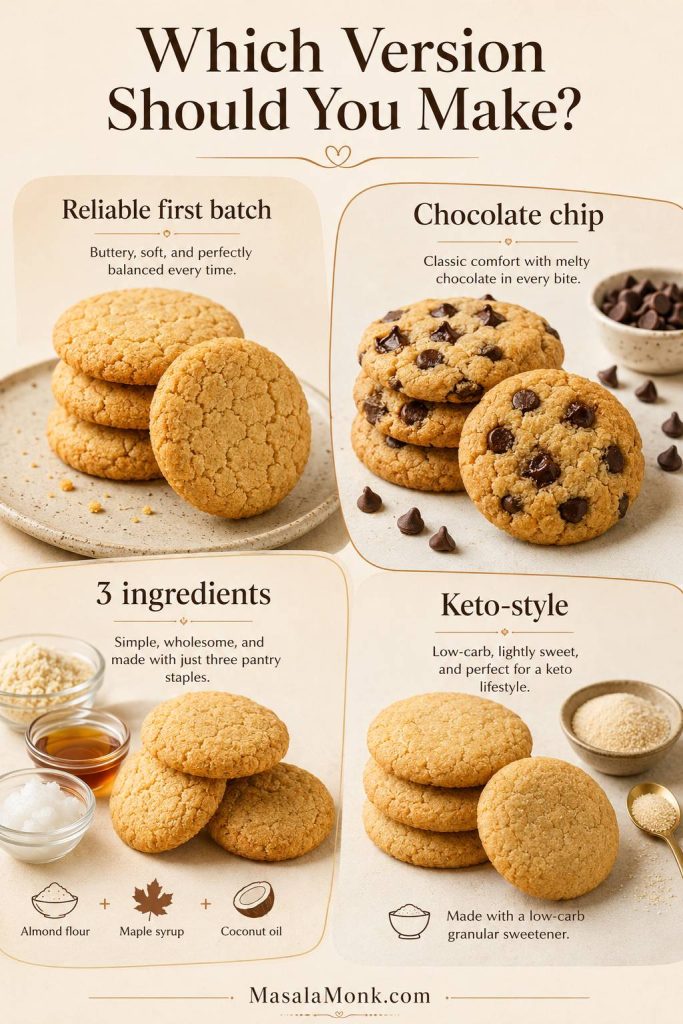
Think of the base recipe as the dependable version. Once you know how the dough behaves, the variations below let you move toward simpler, richer, lower-carb, dairy-free, or more chocolate-forward cookies without starting from scratch. Need the base formula first? Use the recipe card, then come back here to choose a version.
| If You Want… | Make This Version | Why |
|---|---|---|
| The most reliable first batch | Main recipe with egg and starch | Best balance of softness, browning, and cookies that lift cleanly. |
| The most familiar cookie | Chocolate chip version | Classic flavor, melty pockets, and broadest appeal. |
| The simplest egg-free cookie | 3-ingredient version | Quick, small-batch, and dairy-free if you use coconut oil. |
| Lower sugar | Keto-style version | Works with a 1:1 granular low-carb baking sweetener, but browns less. |
If you are baking for people who do not usually choose gluten-free cookies, start with the chocolate chip version. It feels familiar first, then quietly happens to be almond-flour based.
If you want something simpler with coffee or tea, keep them plain. If you need egg-free or dairy-free cookies, use the 3-ingredient version as its own small-batch formula rather than forcing swaps into the main dough.
3 Ingredient Almond Flour Cookies
Choose the 3-ingredient version when you want a quick, simple, egg-free cookie with very little prep. It will be softer and more delicate than the main recipe, but it works well for a snack-style cookie when you keep the cookies small, shape them before baking, and let them cool fully on the tray.

For a small batch of about 8 small cookies, mix 1 cup fine almond flour, 3 tablespoons maple syrup, and 2 tablespoons melted coconut oil or butter. Add a pinch of salt if possible. Scoop into small 1-tablespoon portions, press into discs, and bake at 350°F / 175°C for 8–10 minutes, or closer to 10–12 minutes if you make them larger. Let them set fully on the tray before moving.
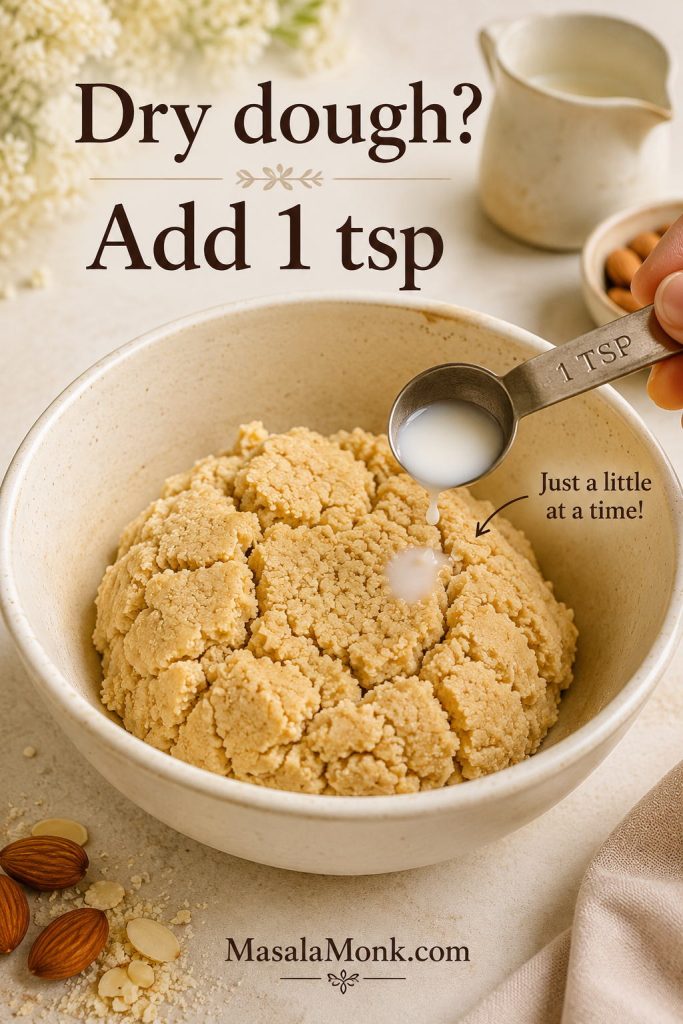
If the 3-ingredient dough feels dry or cracks heavily, add water or milk 1 teaspoon at a time. If it feels sticky, let it rest for 5–10 minutes before shaping.
Choose the 3-ingredient version for speed and simplicity. Choose the main recipe when you want more classic browning, chew, and lift.
Chocolate Chip Almond Flour Cookies
For a chocolate chip version, add 1/2 cup / 85 g chocolate chips to the main dough. Mini chocolate chips spread through the dough evenly, while regular chips give bigger pockets of chocolate. Press a few extra chips on top before baking for a bakery-style finish.
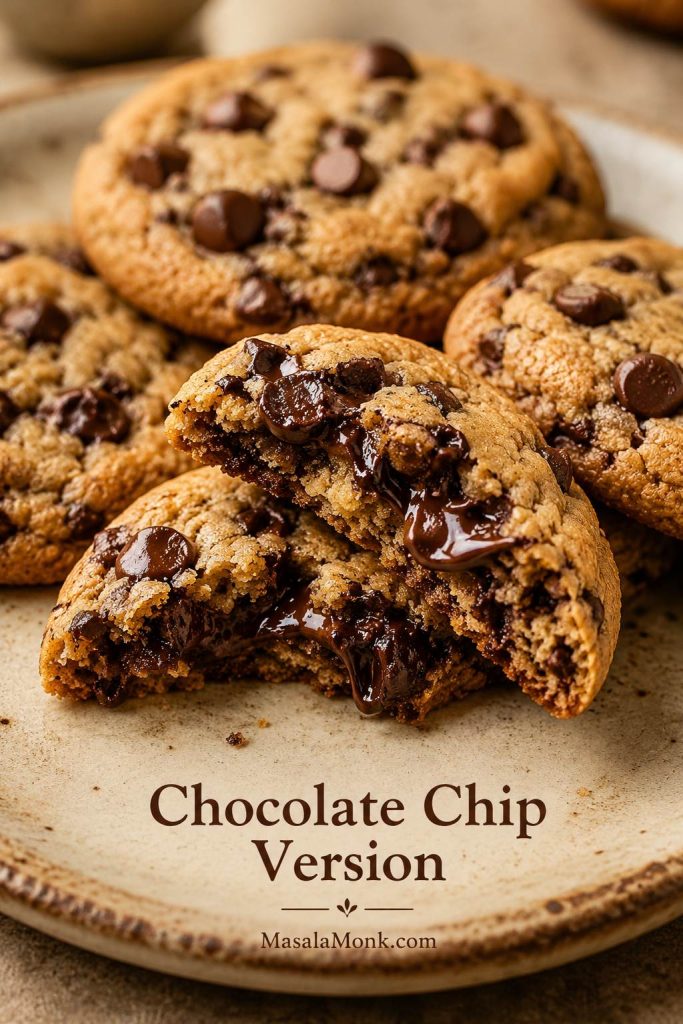
If you like deep chocolate cookies, you can also visit our double chocolate chip cookies for a richer chocolate-cookie direction.
More Wholesome Almond Flour Cookies
For a more wholesome version, use coconut sugar, dark chocolate chips, and keep the cookies slightly thicker so they stay tender. They are still cookies, but this version leans less sweet and lets the almond flavor come through more clearly.
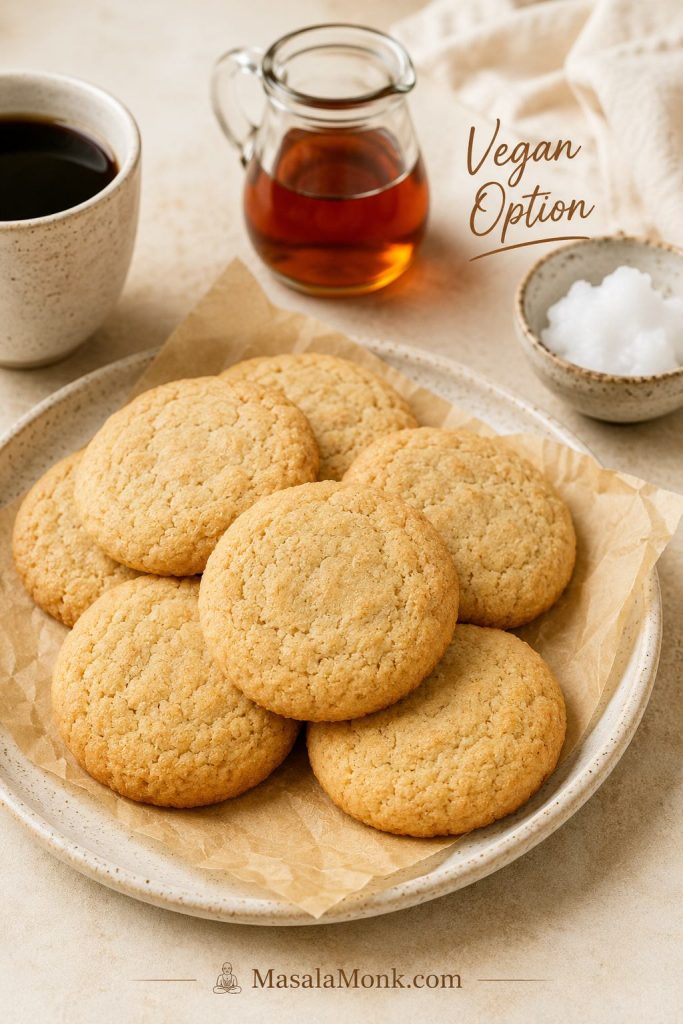
Vegan Almond Flour Cookies
For vegan almond flour cookies, start with the 3-ingredient version: almond flour, maple syrup, and coconut oil. It gives you a softer, simpler cookie without needing an egg replacer. A flax egg can work in some almond flour doughs, but it often makes the cookies more delicate, so cool the cookies completely before moving them.
Keto Almond Flour Cookies
Choose the keto-style version when lower sugar matters more than classic brown-sugar chew. Use a 1:1 granular low-carb baking sweetener, not pure stevia or a liquid sweetener. Skip the cornstarch, shape the dough before baking, and expect cookies that brown less and spread less than the brown-sugar version.

If you are doing more low-carb baking, our keto-friendly flours guide explains how almond flour behaves compared with other low-carb flours.
Peanut Butter Almond Flour Cookies
For a light peanut butter direction, replace 2 tablespoons of the butter with creamy peanut butter and add a pinch more salt. This gives the base cookie a nutty peanut-butter note, but a true almond flour peanut butter cookie works best as its own formula because peanut butter changes the dough’s fat and moisture balance.
A full peanut-butter-first cookie is better handled as its own recipe. See our peanut butter cookies recipe, which includes classic, 3-ingredient, chocolate chip, and oatmeal versions.
Almond Flour Shortbread Cookies
For a shortbread-style cookie, skip the egg and use almond flour, softened butter, powdered sugar, vanilla, and salt. Shape the cookies flatter and bake until the edges are deeper golden. This style is more delicate, so tray cooling matters even more.
Almond Flour Oatmeal or Sugar Cookies
Oatmeal and sugar-cookie versions are better as their own formulas because oats, extra sugar, and decorating needs all change the dough. From this base, you can experiment with a small handful of oats, but keep sugar-cookie versions as drop cookies rather than cut-out cookies unless you are using a recipe built for rolling.
Why Did My Almond Flour Cookies Crumble?
If a batch does not come out perfectly, do not throw the recipe away. This dough is sensitive to flour texture, measuring, shaping, and cooling time, so one small change can make a big difference in the next tray. Most problems are easy to fix once you know what caused them.

| Problem | Likely Cause | Fix |
|---|---|---|
| Crumbling when lifted | The cookies had not set yet | Let them cool on the baking sheet for 10–15 minutes before moving. |
| Gritty texture | Almond meal or coarse almond flour | Use fine blanched almond flour for the smoothest texture. |
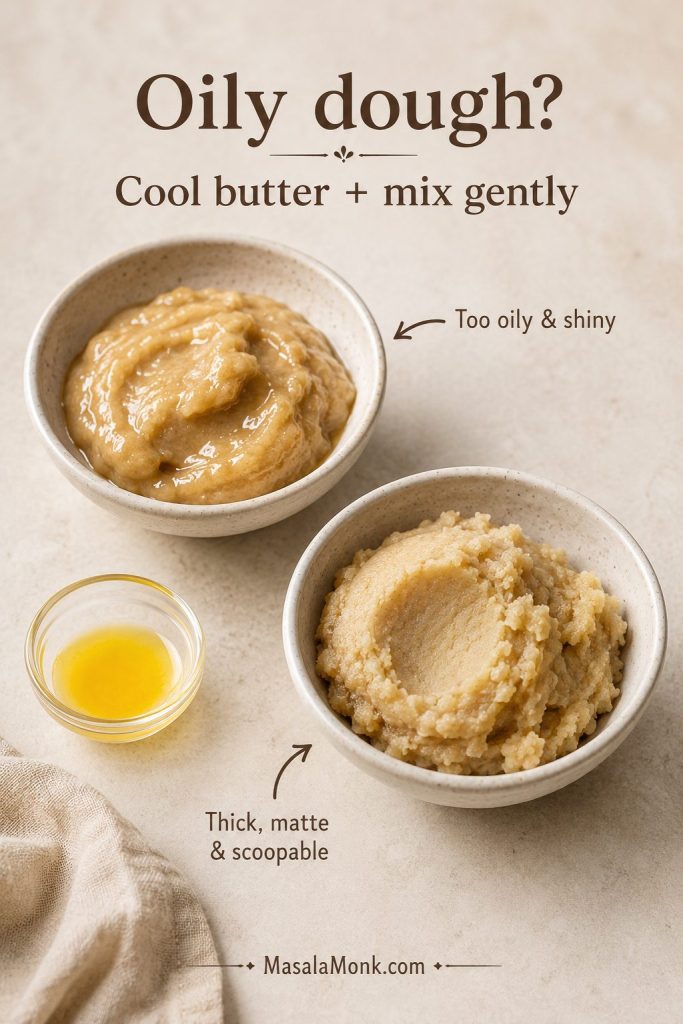
| Oily-feeling cookies | Too much fat, hot butter, or heavy mixing | Cool melted butter slightly and mix only until the dough comes together. |
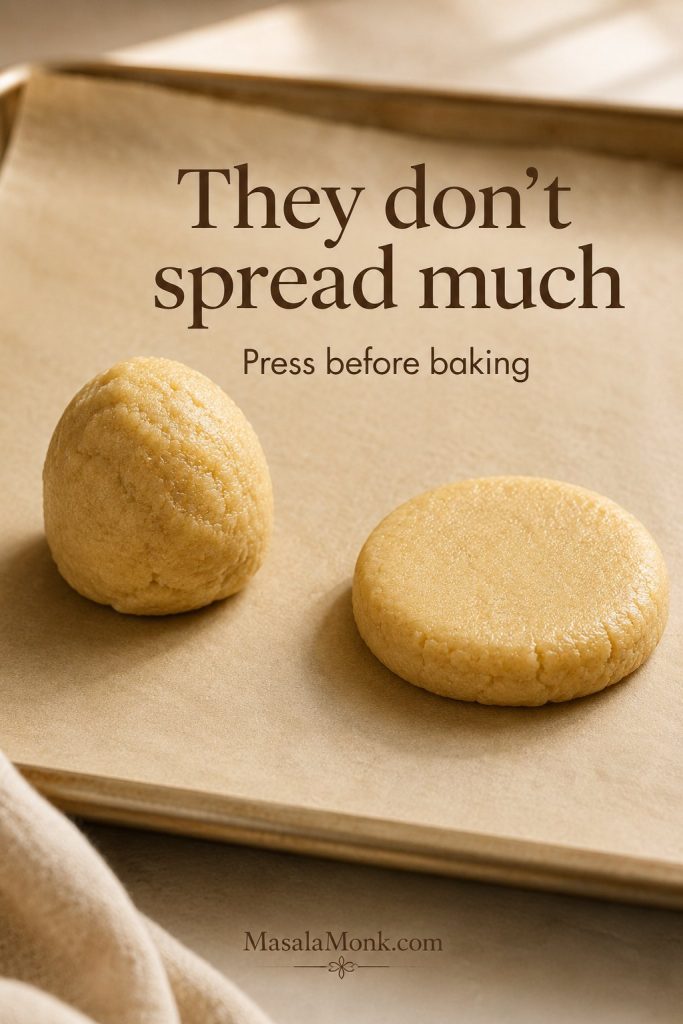
| No spreading in the oven | This dough spreads less than wheat-flour dough | Press the dough into discs before baking. |
| Centers too soft | The centers need more time to set | Bake 1–2 minutes longer next time and cool fully before serving. |
| Dry or sandy cookies | Flour may have been packed, or the cookies baked too long | Weigh the almond flour or spoon and level it; reduce bake time slightly. |
| Sticky dough | Warm kitchen or warm butter | Rest the dough for 10 minutes or chill for 15–20 minutes. |
| Dough cracks badly when pressed | The almond flour is dry or the dough needs a little moisture | Add 1 teaspoon water or milk and mix gently. |
| Cakey texture | Too much egg, too much leavening, or cookies shaped too thick | Flatten slightly more next time and bake until the edges are more golden. |
| Pale cookies | Low-carb sweetener or underbaking | Bake 1–2 minutes longer and rely on edge color, not center firmness. |
Fix crumbly almond flour cookies
If the cookies break when you lift them, let the tray sit longer before moving the next batch. A clean spatula lift usually means the bottoms have set enough.
Fix oily almond flour cookie dough
If the dough looks shiny or greasy, pause before scooping. Slightly cooled butter and gentle mixing usually give you a thicker, more scoopable dough.
Fix almond flour cookies that do not spread
If the dough stays in tall mounds, press each portion into a thick disc before baking. That one shaping step gives the cookies a better final form.
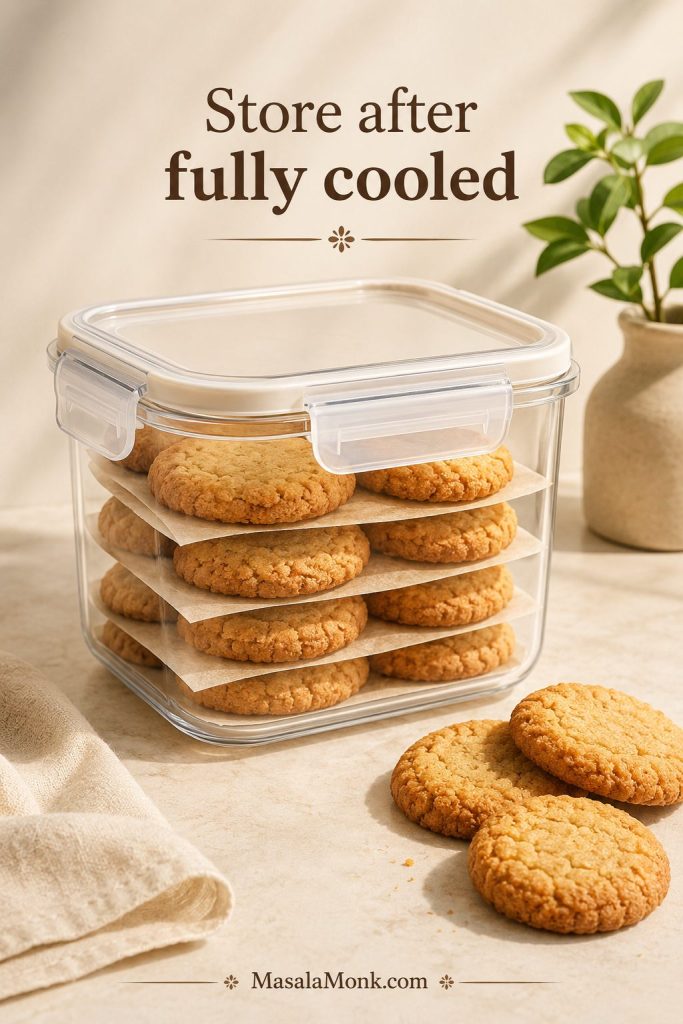
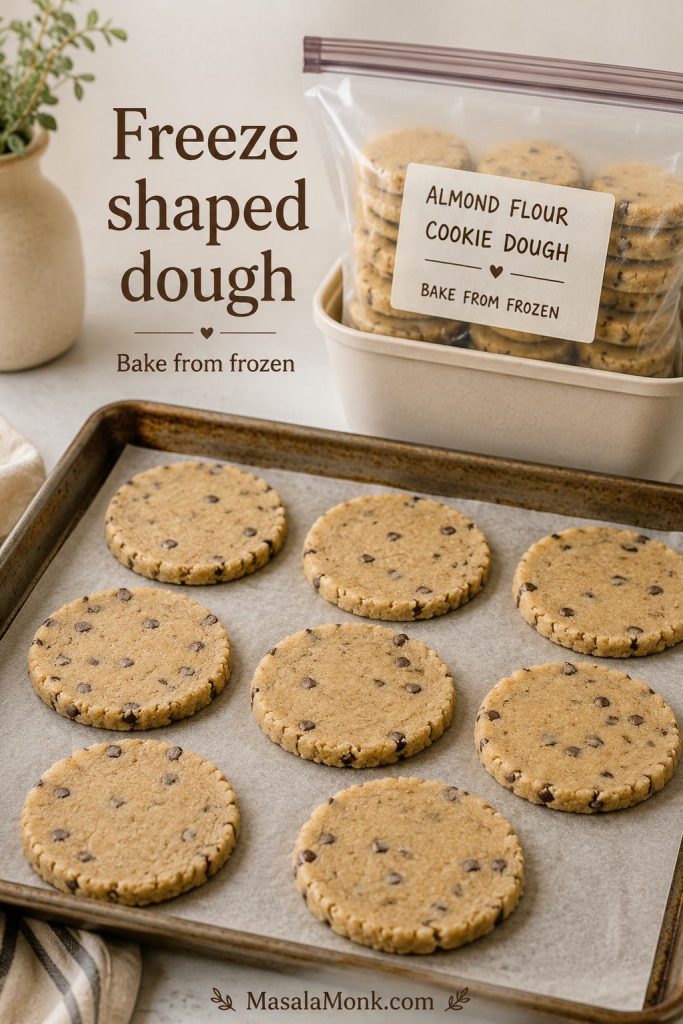
How to Store and Freeze Almond Flour Cookies
| Storage Method | How Long | Best Tip |
|---|---|---|
| Room temperature | 3–4 days | Store airtight after cookies are completely cool. |
| Refrigerator | Up to 1 week | Let cookies come closer to room temperature before serving. |
| Freezer, baked cookies | 2–3 months | Freeze in a single layer first, then transfer to a freezer bag. |
| Freezer, dough portions | 2–3 months | Shape and flatten before freezing; bake from frozen with 1–2 extra minutes. |
Once cooled, the cookies should lift cleanly, bend slightly before they break, and taste rich enough that no one has to think about them as a gluten-free substitute. That is the batch you are aiming for.
Almond Flour Cookies Recipe Card
Almond Flour Cookies Recipe
Soft, tender almond flour cookies with lightly golden edges, a gentle chew, and a warm vanilla-almond flavor. Keep them plain, add chocolate chips, or bake them a little longer for crispier edges.
Active Time: about 12 minutes
Bake + Rest Time: about 20–22 minutes before tray cooling
Ready to Move: about 35–40 minutes, including dough rest and tray set time
Yield: about 16 cookies, plain or with chocolate chips
Ingredients
- 2 cups fine blanched almond flour, 200 g / about 7 oz
- 1/2 cup packed light brown sugar, 110 g / about 3.9 oz, or 1/2 cup coconut sugar, about 95 g
- 1/4 cup unsalted butter, melted and slightly cooled, 56 g / 2 oz
- 1 large egg
- 1 teaspoon vanilla extract, 5 ml
- 1/2 teaspoon baking soda
- 1/4 teaspoon fine salt
- 1 tablespoon cornstarch or arrowroot starch, about 8 g, recommended for softer, thicker cookies; optional, and skip for keto-style cookies
- 1/2 cup chocolate chips, 85 g / 3 oz, optional
Instructions
- Preheat the oven to 350°F / 175°C, or about 160°C fan. Line a baking sheet with parchment paper.
- In a large bowl, whisk together the melted butter, brown sugar, egg, and vanilla until smooth.
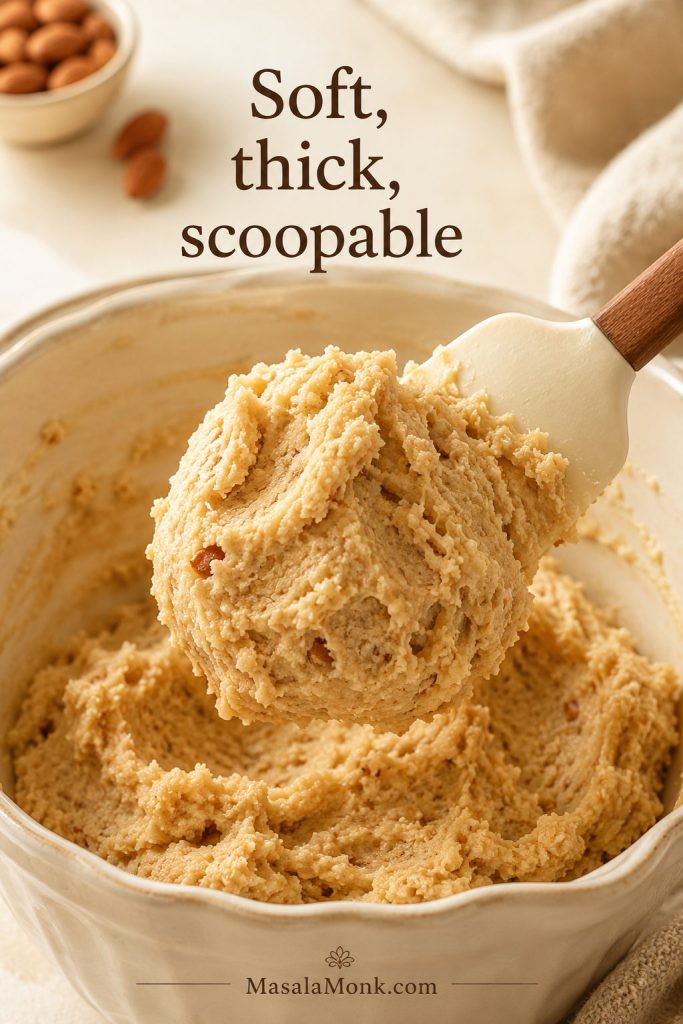
- Add the almond flour, baking soda, salt, and cornstarch or arrowroot, if using. Stir until a soft, scoopable cookie dough forms.
- The dough should look moist and thick, not runny. If it cracks badly when pressed, add 1 teaspoon water or milk and mix gently.
- Fold in the chocolate chips, if using.
- Let the dough rest for 10 minutes while the oven heats. If it feels very sticky, greasy, or too soft to scoop after resting, chill it for 15–20 minutes.
- Scoop into 1 1/2 to 2 tablespoon portions, about 28–32 g each, and place on the prepared baking sheet, leaving about 2 inches between cookies.
- Press each mound gently into a thick disc. This dough does not spread much, so shape it before baking.
- Bake for 10–12 minutes, until the edges are lightly golden and the centers still look soft. For firmer edges, bake 1–2 minutes longer.
- Cool on the baking sheet for 10–15 minutes before moving. Transfer to a wire rack and cool completely.
Notes
- Use fine blanched almond flour, not coarse almond meal, for the smoothest texture.
- If measuring by cups, spoon the almond flour into the cup and level it off. Do not pack it tightly.
- The dough should be soft but scoopable. If it looks shiny or greasy, chill it briefly before baking.
- Flatten cookies to about 1/2 inch for soft cookies or closer to 1/3 inch for crispier edges.
- The centers should look slightly soft when the cookies come out of the oven. They finish setting as they cool.
- Let the cookies rest on the tray before transferring; they are fragile while hot.
- You can skip the starch, but the cookies will be slightly more delicate.
- For a dairy-free version, use melted coconut oil instead of butter.
- For chocolate chip almond flour cookies, use 1/2 cup / 85 g chocolate chips.
What to Bake Next with Almond Flour
Once you are comfortable with this dough, almond flour becomes much easier to bake with. The next best cookie recipes to build are the ones with stronger identities — peanut butter, oatmeal, shortbread, sugar cookies, and chocolate chip — because each one needs its own balance of fat, sweetness, moisture, and structure.
- Richer direction: build a dedicated peanut butter almond flour cookie.
- Heartier option: try an almond flour oatmeal cookie with the right oat-to-flour balance.
- Best for gifting: shortbread-style almond flour cookies are the better direction.
- Decorating route: almond flour sugar cookies need a dough made for shaping, chilling, or dropping.
For no-bake cookie-style desserts, you can also see our edible cookie dough and protein cookie dough recipes.
FAQs About Almond Flour Cookies
Can I use almond meal instead of almond flour?
Almond meal works in a pinch, but it changes the cookie. Because it is usually coarser and may include almond skins, the cookies can bake darker, taste grainier, and feel more fragile than cookies made with fine blanched almond flour.
Do almond flour cookies spread?
They spread less than wheat-flour cookies, so press the dough into the shape you want before baking. Thicker discs stay softer; flatter discs bake with more golden edge.
Why did my almond flour cookies fall apart?
They were probably moved too soon. Almond flour cookies are delicate when hot and firm as they cool, so wait at least 10 minutes before lifting them from the baking sheet.
Why are my almond flour cookies greasy?
Greasy cookies usually come from too much added fat, butter that was too hot, or dough that was mixed too heavily. Use slightly cooled melted butter and stop mixing once the dough comes together.
Should I chill almond flour cookie dough?
A long chill is not needed for this recipe. A 10-minute rest is usually enough. Chill the dough for 15–20 minutes only if it feels very soft, sticky, or greasy.
Can I make almond flour cookies without eggs?
Egg-free versions work best when the formula is designed for them. The 3-ingredient variation with almond flour, maple syrup, and coconut oil is a good starting point. It makes a softer, more delicate cookie than the main recipe.
Can I make almond flour cookies with maple syrup?
Maple syrup works best in a recipe designed around it, such as the 3-ingredient variation. In the main recipe, swapping it directly for brown sugar adds extra liquid and can make the centers too soft.
How do I make almond flour cookies crispy?
Press the dough flatter and bake for 13–14 minutes, until the edges are deeper golden. Cool fully before serving, because the cookies firm more as they sit.
Can I make almond flour cookies keto?
Keto-style cookies need a 1:1 granular low-carb sweetener made for baking. Skip the cornstarch, avoid liquid sweeteners, and expect cookies that brown less and feel less chewy than brown-sugar cookies.
Is almond flour a 1:1 replacement for all-purpose flour in cookies?
A direct 1:1 swap usually does not work well. Almond flour has no gluten and more natural fat than wheat flour, so it needs a recipe built around its own texture and moisture behavior.
Will coconut flour work in this recipe?
Coconut flour absorbs far more liquid than almond flour, so it cannot replace almond flour in this recipe. Use a cookie recipe written specifically for coconut flour instead.
Are almond flour cookies gluten-free?
Almond flour is naturally gluten-free, but check labels if you are baking for someone who needs strict gluten-free food. Some almond flour, chocolate chips, or starches may be processed in facilities that also handle wheat.
Can I freeze almond flour cookie dough?
Yes. Scoop and shape the dough first, then freeze the portions on a tray. Once firm, transfer them to a freezer bag. Bake from frozen at 350°F / 175°C, adding 1–2 extra minutes as needed.