Chicken liver has a reputation problem. Cooked badly, it can be bitter, dry, and hard to love. Cooked with a little care, it turns soft, savory, and deeply comforting — the kind of simple skillet dish where sweet onions, garlic, lemon, and a little butter do most of the work.
The method is simple: clean the livers, take away the bitter bits, dry them well, cook the onions until sweet, then sear the livers quickly and finish with garlic, lemon, and butter. Nothing fancy — just the few steps that make liver taste good.
This chicken liver recipe is for the nervous first-timer as much as the person who already loves liver. Most of the time is in the onions and prep; once the pan is hot, the livers themselves cook in about 5 to 7 minutes.
Good first plate: Use this section when you want chicken liver to feel milder, softer, and less intimidating.
Quick Answer: How to Cook Chicken Liver
Trim away white connective tissue, fatty bits, dark clots, and any green or yellow-stained areas. Soak the livers in milk or lemon water if you want a milder flavor, then drain and pat them very dry.
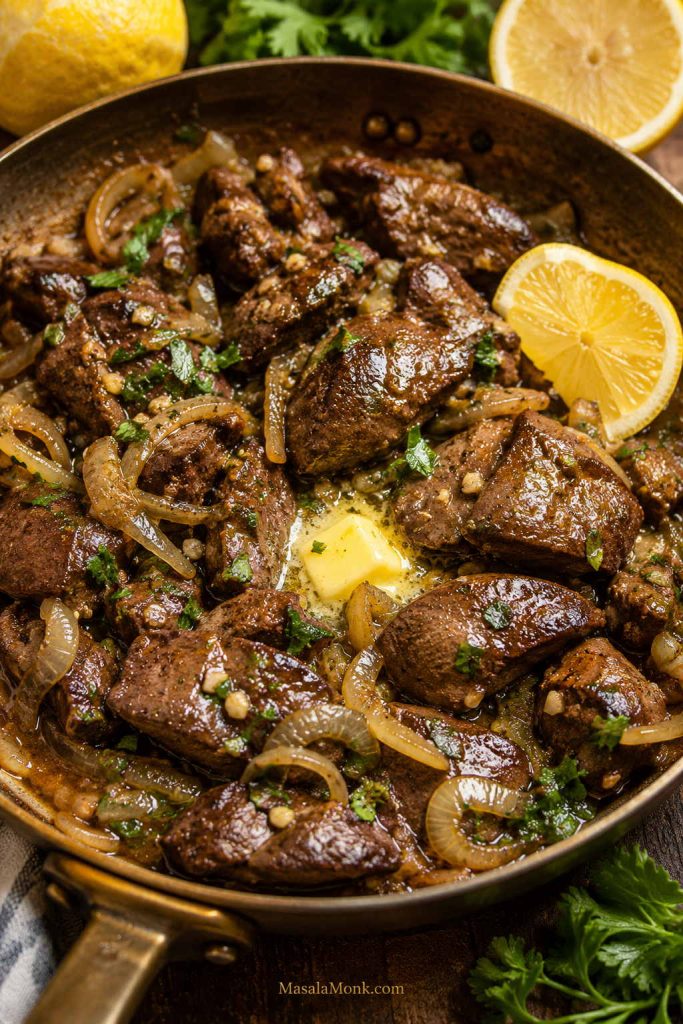
Cook sliced onions first until soft and lightly golden, move them to a plate, then sear the livers in one layer for about 2 to 3 minutes per side. Use the largest piece as your guide and cook to 165°F / 74°C. Return the onions to the pan, add butter, garlic, lemon juice, herbs, and final seasoning, then serve warm.
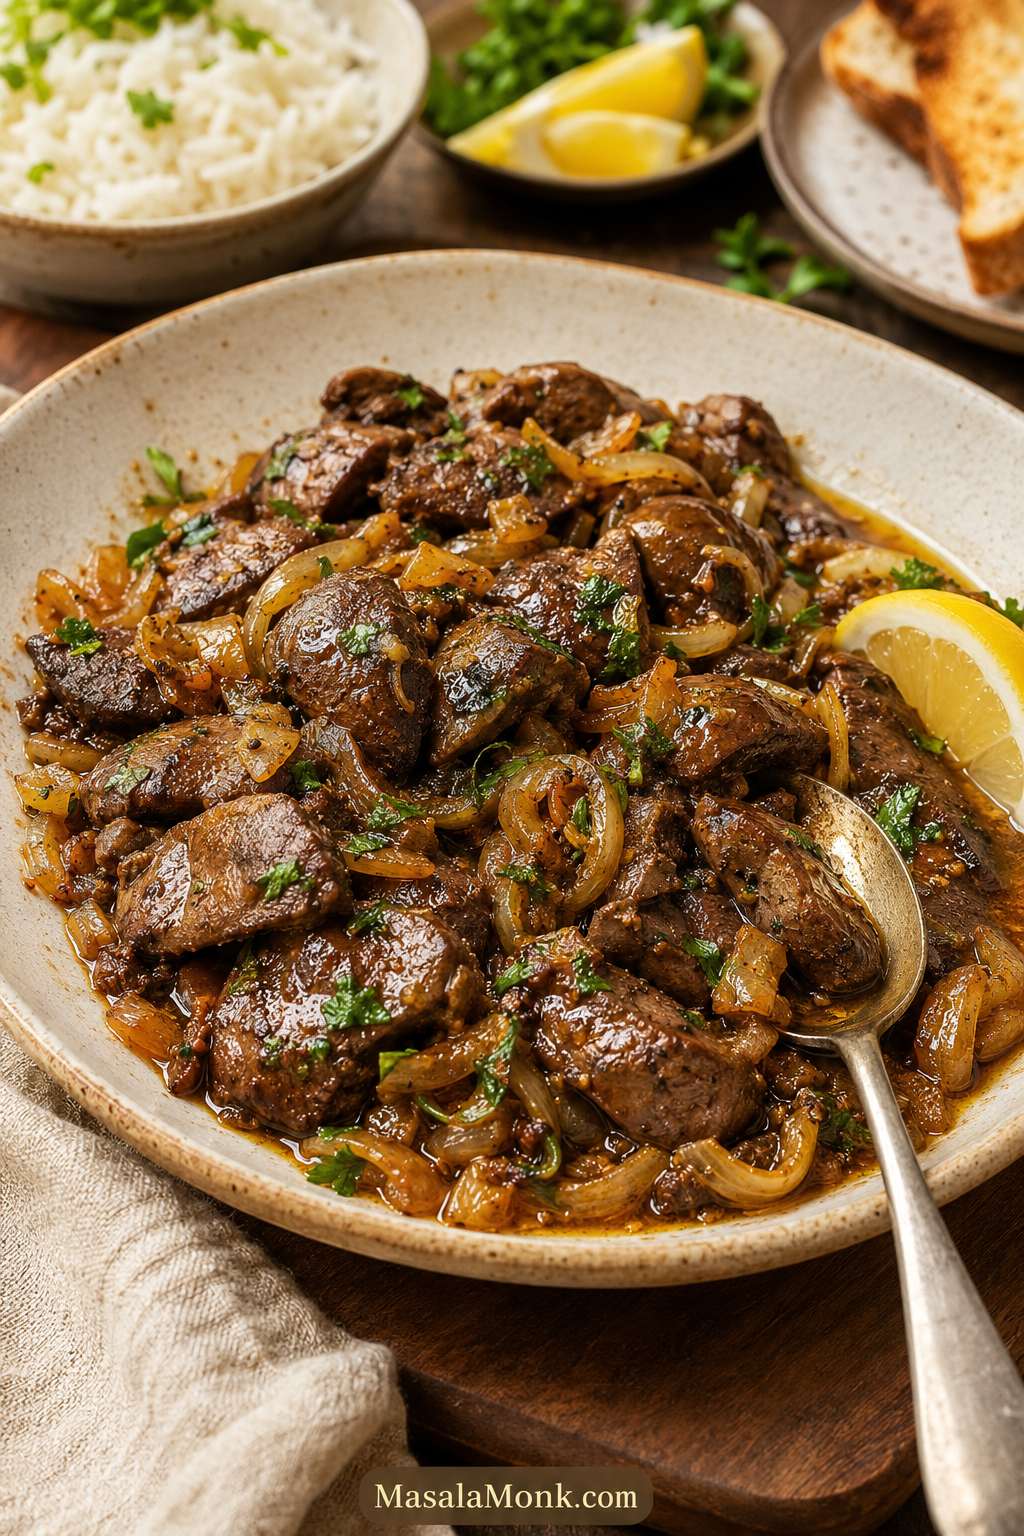
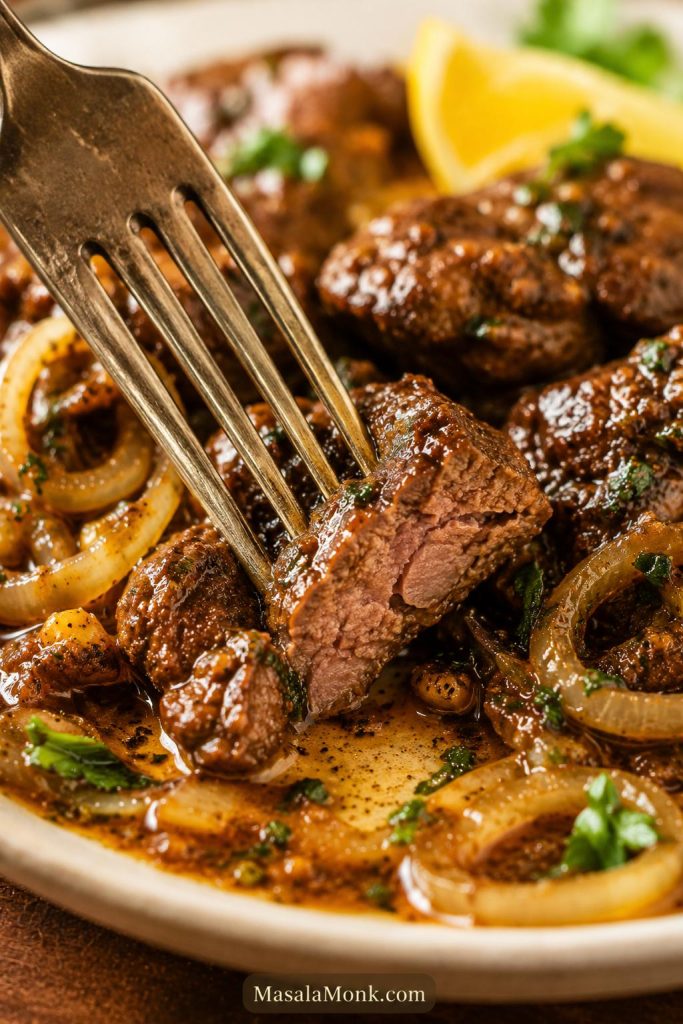
Done right, the onions are glossy, the lemon brightens the pan, and the livers stay soft enough to cut with a fork.
Before you cook: if doneness makes you nervous, read the safe temperature rule. If you are ready to start, go straight to the step-by-step method.
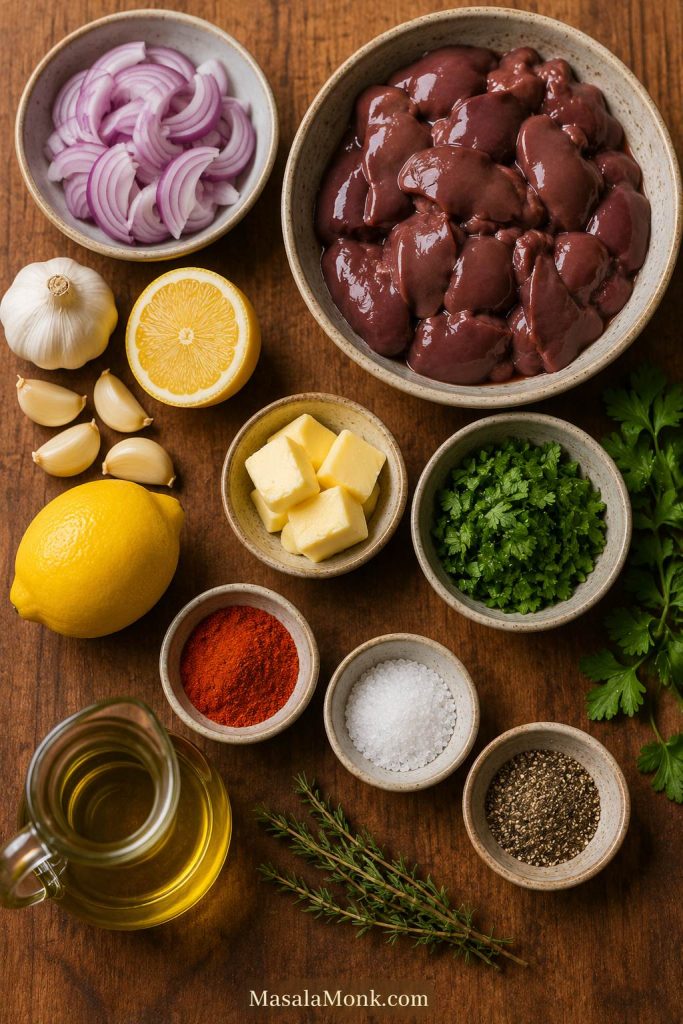
Quick setup: Get the livers, onions, garlic, lemon, herbs, and seasoning ready before the skillet starts moving fast.
Recipe Card
Tender Chicken Liver with Onions, Garlic, and Lemon
A simple skillet method for tender chicken livers with glossy onions, garlic, lemon, and buttery pan juices. Use the optional soak if you want a milder first bite.
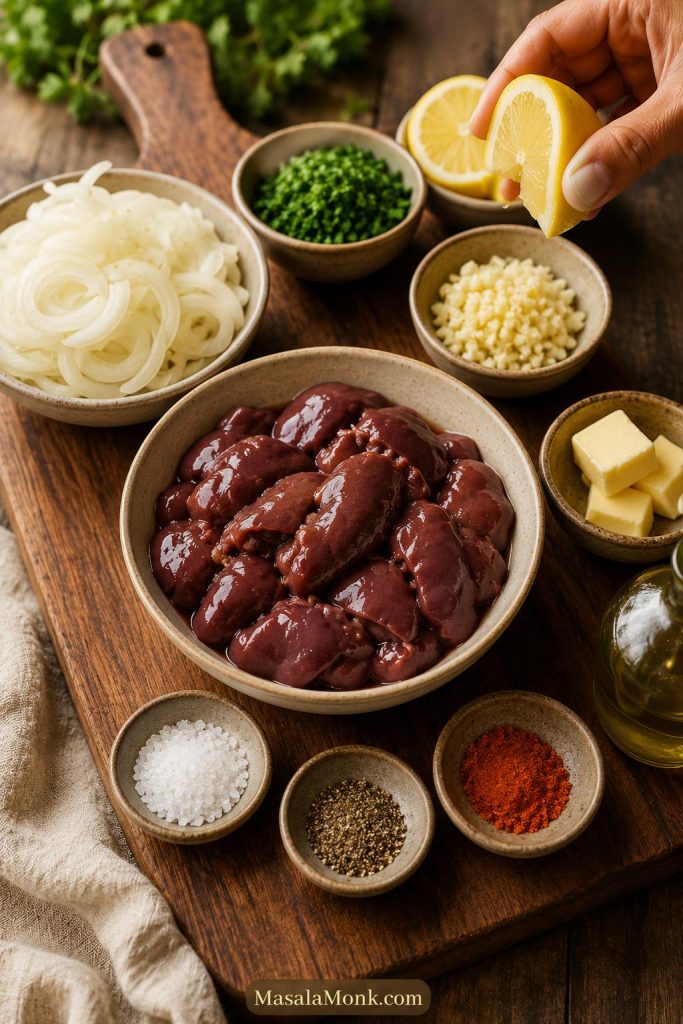
Ingredients
- 1 lb / 450 to 500 g fresh chicken livers
- 1 large onion, thinly sliced
- 2 tbsp / 30 ml olive oil or neutral oil, divided
- 1 tbsp / 14 g butter, optional
- 3 garlic cloves, minced
- ½ tsp fine salt, divided, plus more to taste
- ¼ to ½ tsp black pepper
- ½ tsp paprika, optional
- 2 tsp / 10 ml lemon juice, plus more to taste
- 2 tbsp chopped parsley or coriander
Optional Soak
- ½ to 1 cup / 120 to 240 ml milk, just enough to mostly cover
- Or ½ to 1 cup / 120 to 240 ml water mixed with 1 tbsp lemon juice
Optional Light Crust
- 2 to 3 tbsp flour or cornstarch, for a very light dusting
Instructions
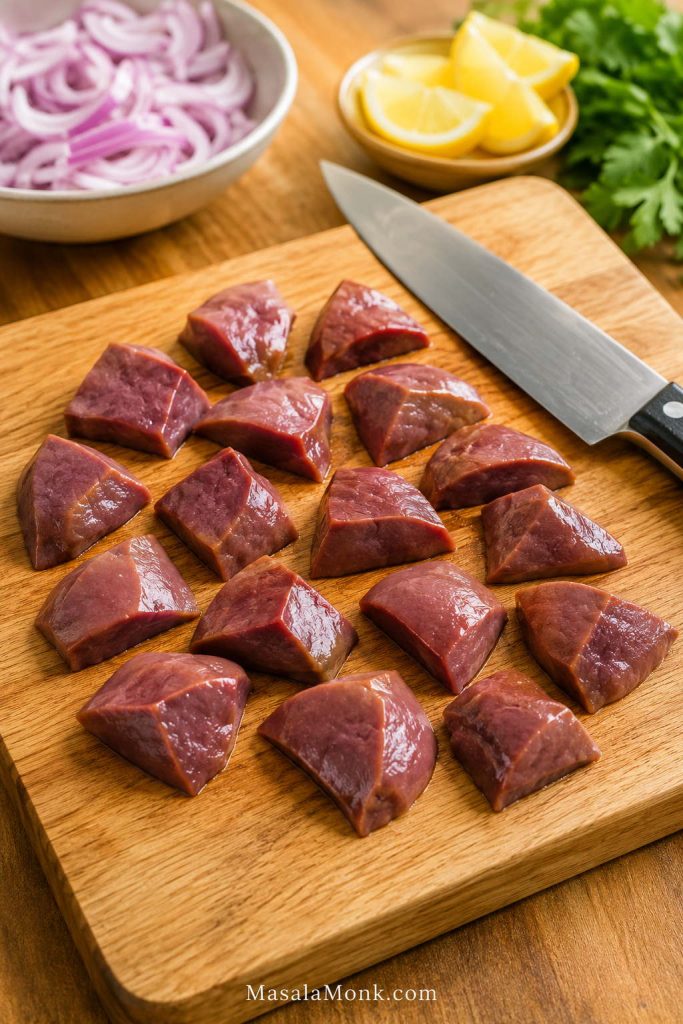
- Trim the livers. Remove white connective tissue, excess fat, stringy bits, dark clots, and any green or yellow-stained areas. Cut large pieces to about 1 to 1½ inches / 2.5 to 4 cm.
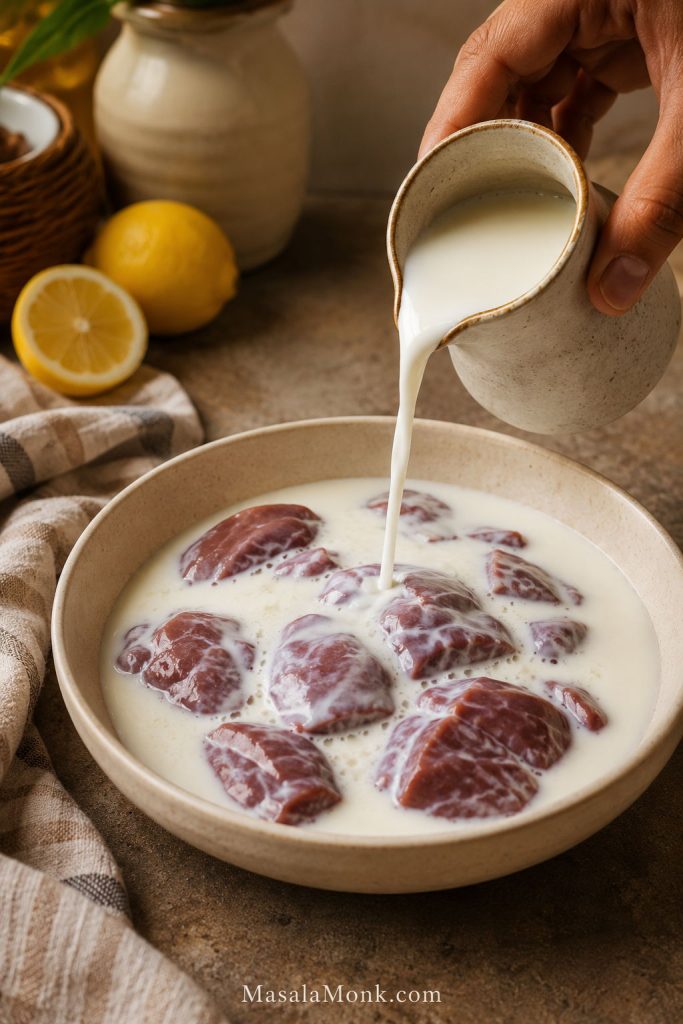
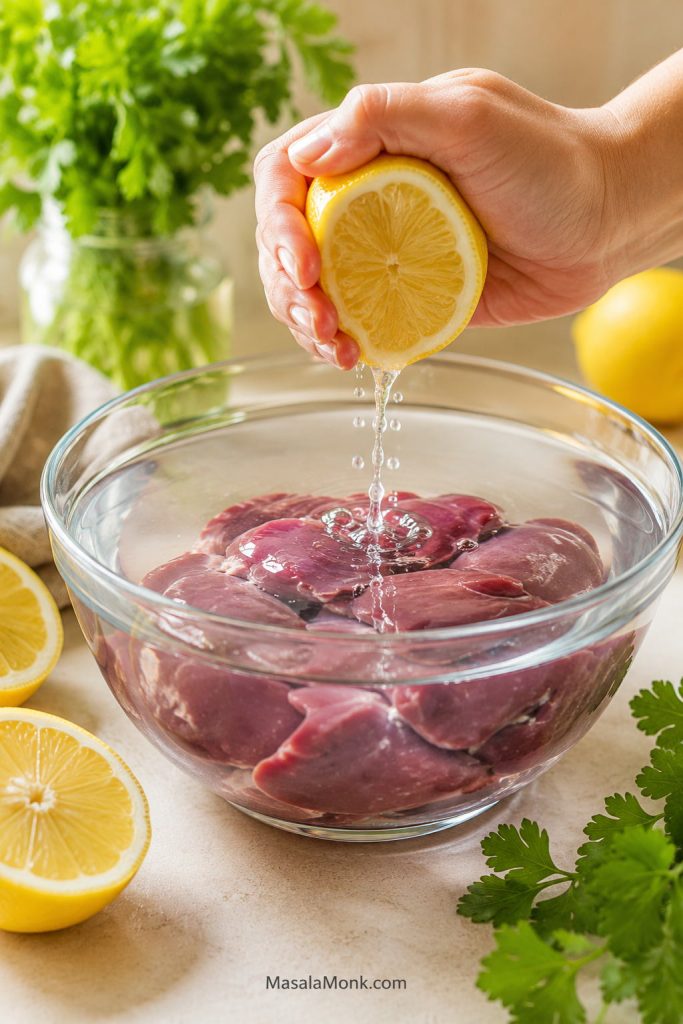
- Soak if desired. Use milk for 10 to 30 minutes, or lemon water for about 10 minutes. Drain well.
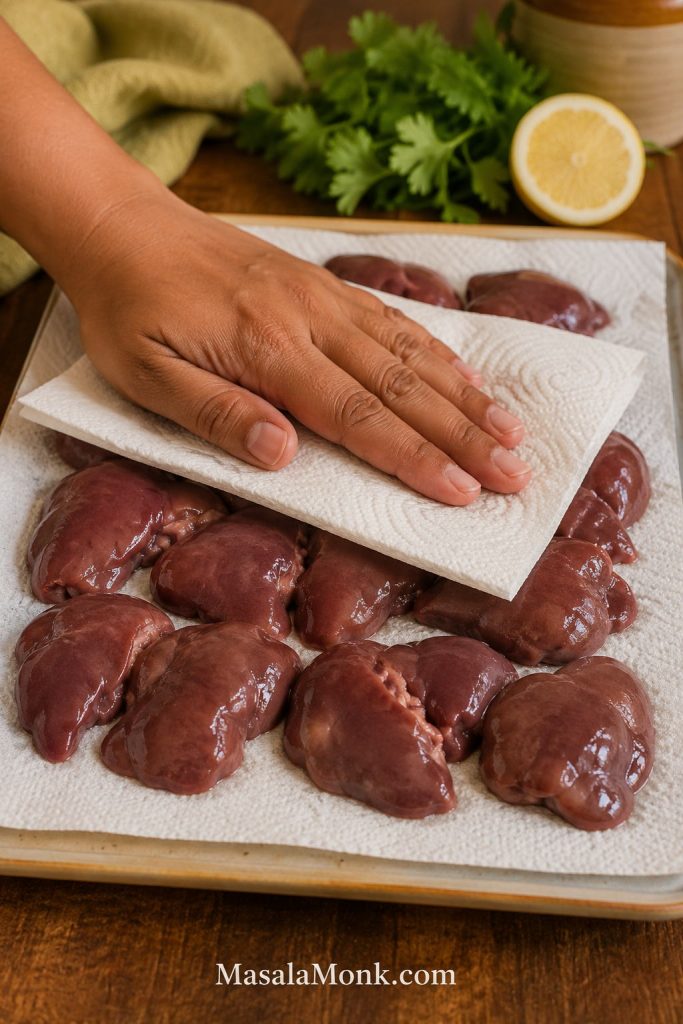
- Pat the livers very dry with paper towels.
- Heat 1 tbsp oil in a large skillet over medium heat. Add onion and a pinch of salt. Cook for 8 to 12 minutes, until soft, lightly golden, and sweet-smelling. Move to a plate.
- Season the livers with the remaining salt, pepper, and paprika if using. Dust very lightly with flour or cornstarch if using.
- Add the remaining 1 tbsp oil to the skillet. Increase heat to medium-high. Add livers in one layer; the pan should sizzle, not flood.
- Cook for 2 to 3 minutes on the first side. Flip gently and cook for another 2 to 3 minutes.
- Check the largest piece with an instant-read thermometer. Cook to 165°F / 74°C.
- Lower the heat. Return onions to the pan. Add butter if using and let it melt into the pan juices, then add garlic. Cook for 30 to 45 seconds. Add lemon juice and herbs. Taste and adjust seasoning.
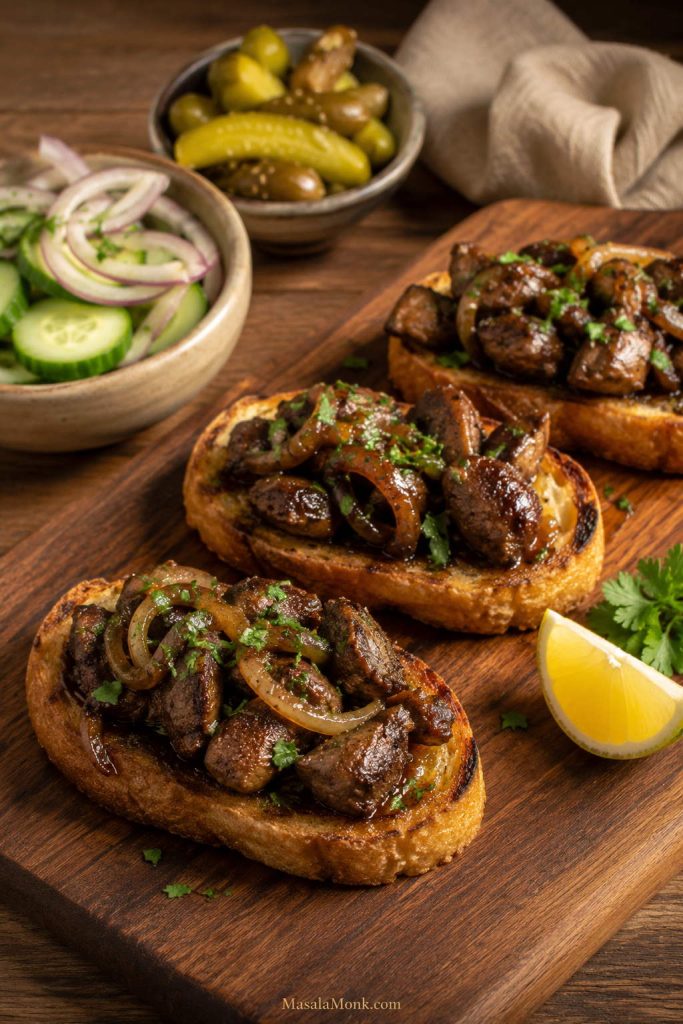
- Serve warm with toast, rice, potatoes, roti, salad, or crusty bread.
Notes
- Soaking is optional. It mellows flavor but does not replace proper trimming.
- Always remove green or yellow-stained pieces.
- Cook in batches if the pan is small.
- Dry the livers thoroughly before cooking.
- Use a thermometer instead of judging doneness by color alone.
- If you used lemon water for soaking, start with less lemon juice at the end.
- Reheat only until warm; extra heat makes the texture firm.
Finished-skillet reference: The livers should look glossy, the onions coated, and the pan juices loose enough to spoon over a side.
What Chicken Liver Should Taste Like
The flavor is deep, savory, and slightly earthy. It is stronger than regular chicken meat, but usually milder than beef, lamb, mutton, or calf liver. Properly cooked, it is soft and full-flavored, almost like a warm, savory bite of pâté, but served whole instead of blended.
A good batch should be soft, savory, and clean-tasting. The main things that get in the way are poor trimming, too much moisture, a crowded pan, and extra minutes on the heat.
Texture check: This is a visual doneness cue, not a color test.
If you have only had dry, bitter liver before, this version may feel like a different dish. Keep the first batch simple, serve it with something familiar, and let the onions and lemon do some of the heavy lifting.
Onions make the flavor sweeter. Garlic makes it more savory. Lemon makes it brighter. Butter rounds the edges. Black pepper and paprika add warmth without making the dish complicated.
Bright finish: This cue belongs after cooking, when lemon and herbs can lift the dish without turning harsh.
Why This Method Works
The method works because it solves the three problems that make liver hard to love: bitter bits, surface moisture, and extra time on the heat.
- Trim well so the flavor stays clean and the harsh pieces never reach the pan.
- Dry and spread out so the pieces brown instead of steam.
- Finish quickly with onions, garlic, lemon, butter, and a thermometer check.
Method memory: Think of this as the whole recipe in one view: prep cleanly, dry well, then finish fast.
At a Glance: Choose Your Best Path
| What you want | Best choice |
|---|---|
| Nervous about the flavor | Use the milk soak, cook the onions until sweet, and finish with lemon. |
| Fastest dinner | Skip the soak, dry the livers well, and use the basic skillet method. |
| Indian-style kaleji | Use the masala variation with onion, ginger-garlic, tomato, coriander, cumin, chilli, and garam masala. |
| Strong liver smell | Use fresh livers, trim carefully, dry well, cook with onions, and finish with lemon. |
| Comfort food | Use extra onions, butter, and serve with mashed potatoes, rice, toast, or roti. |
Serving path: Choose the side by the mood you want from the meal.
Safe but Tender: The Doneness Rule
Because chicken liver cooks so quickly, safety and tenderness come down to the same habit: check the largest piece and stop at the right time. The goal is not to cook liver forever; it is to cook it accurately.
Chicken liver should be cooked to 165°F / 74°C in the center. Color can fool you here, so let the thermometer make the decision. CDC guidance says the same thing in practice: use a thermometer, because you cannot tell by looking.
A useful rule keeps the section simple: cook it to the safe temperature, then stop. Best texture comes from stopping as soon as the center is done, while the pieces are still soft and delicate. USDA FSIS chicken liver guidance also gives 165°F / 73.9°C as the safe-temperature target for chicken liver dishes.
Doneness checkpoint: This is the safety step that protects tenderness too.

Ingredients You Need
Before the pan gets hot, the most important work happens on the cutting board. Once the livers are trimmed and dry, the ingredient list is simple.
Main ingredients and why they matter
| Ingredient | Amount | Why it matters |
|---|---|---|
| Chicken livers | 1 lb / 450 to 500 g | The right amount for 4 servings with sides. |
| Large onion, thinly sliced | 1 large / 160 to 200 g | Adds sweetness and moisture. |
| Olive oil or neutral oil | 2 tbsp / 30 ml | For cooking the onions and searing without burning. |
| Butter | 1 tbsp / 14 g, optional | Melts into the onions at the end and makes the pan juices taste rounder. |
| Garlic | 3 cloves / 12 to 15 g, minced | Adds savory depth; it burns if added too early. |
| Fine salt | ½ tsp, divided, plus more to taste | Use a pinch for the onions and the rest for the livers. |
| Black pepper | ¼ to ½ tsp | Balances the deeper flavor. |
| Paprika | ½ tsp, optional | Adds color and mild warmth, not much heat. |
| Lemon juice | 2 tsp / 10 ml, plus more to taste | Cuts the mineral edge and brightens the finish. |
| Parsley or coriander | 2 tbsp chopped | Adds freshness at the end. |
Ingredient logic: A short list works when every ingredient has a clear job.
For an optional soak, use enough milk to mostly cover the trimmed livers, or use water with 1 tbsp lemon juice. The full soak guidance is below.
Ingredients ready? The next choice is whether to soak the chicken livers or move straight to cooking.
A Note on Fresh and Frozen Livers
Fresh chicken livers are easiest to cook well. Frozen livers can work too, but thaw them fully in the refrigerator, drain them well, and dry them thoroughly before cooking. Frozen livers often release more liquid, so give them extra attention before they hit the pan.
Fresh livers can smell lightly mineral or iron-rich, but they should not smell sour, rotten, ammonia-like, or rancid. They should look moist, not slimy, grey, or dried at the edges. If the smell is unpleasant in a spoiled way, discard them.
Frozen-liver checkpoint: Drain first, then trim, season, and sear.
Best Pan to Use
Cast iron, stainless steel, and nonstick can all work. Cast iron and stainless steel give better browning when the livers are dry and the pan is hot enough. Nonstick is easier for beginners and gentler when flipping delicate pieces.
Choose the pan that lets you stay calm at the stove. The real secret is not the pan brand — it is dry livers, enough space, and a steady sizzle without smoking.
Pan setup: Room and steady heat matter more than the pan brand.
How to Clean and Trim Chicken Livers
This is the one prep step worth slowing down for. A minute of careful trimming does more for flavor than any spice mix can.
What to remove first
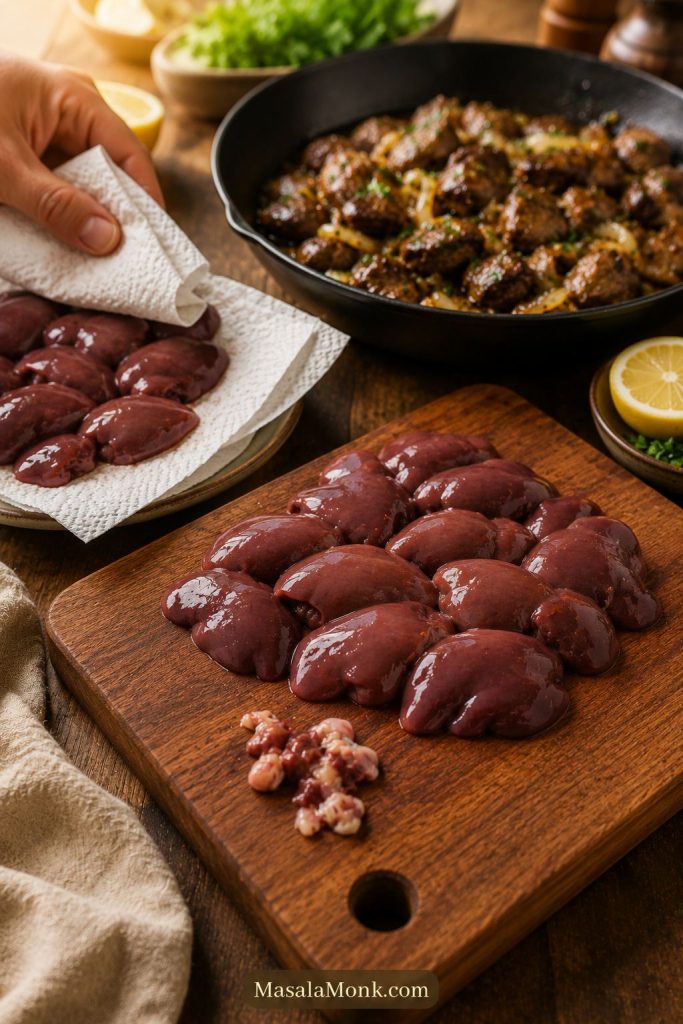
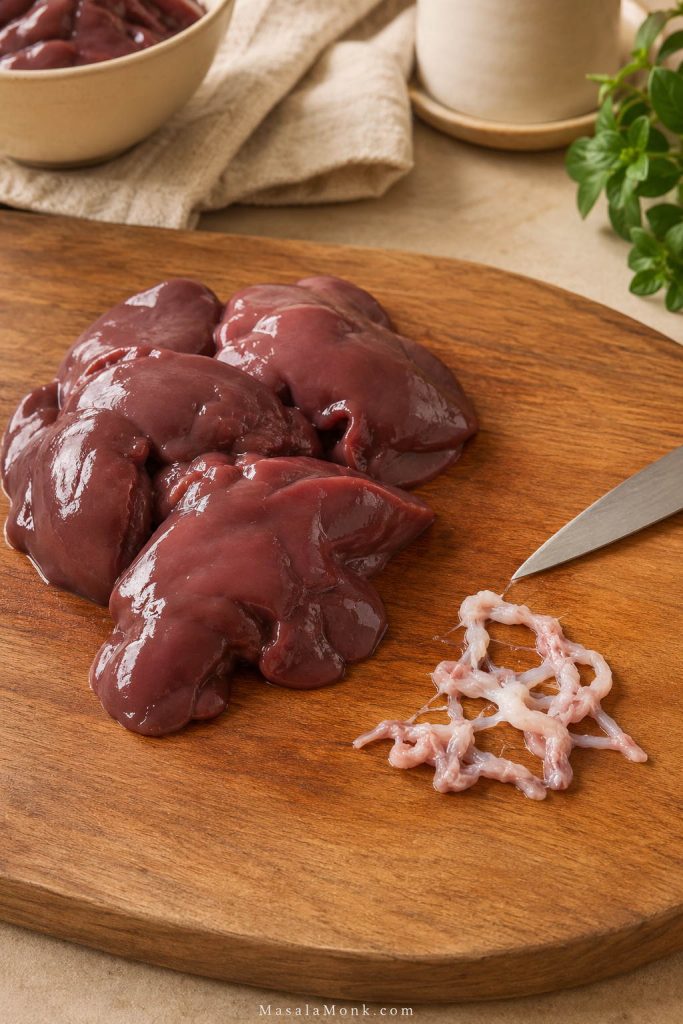
Place the livers on a cutting board or large plate. Separate any large lobes so the pieces are easier to inspect. They often come in uneven pieces, so take a minute to look through them before seasoning.
Trim away white connective tissue, stringy bits, tough membranes, excess fat, dark clots if present, and any green or yellow-stained areas. The stained parts are the most important to remove because they can taste unpleasantly bitter.
Trimming checkpoint: This is where bitterness prevention starts.
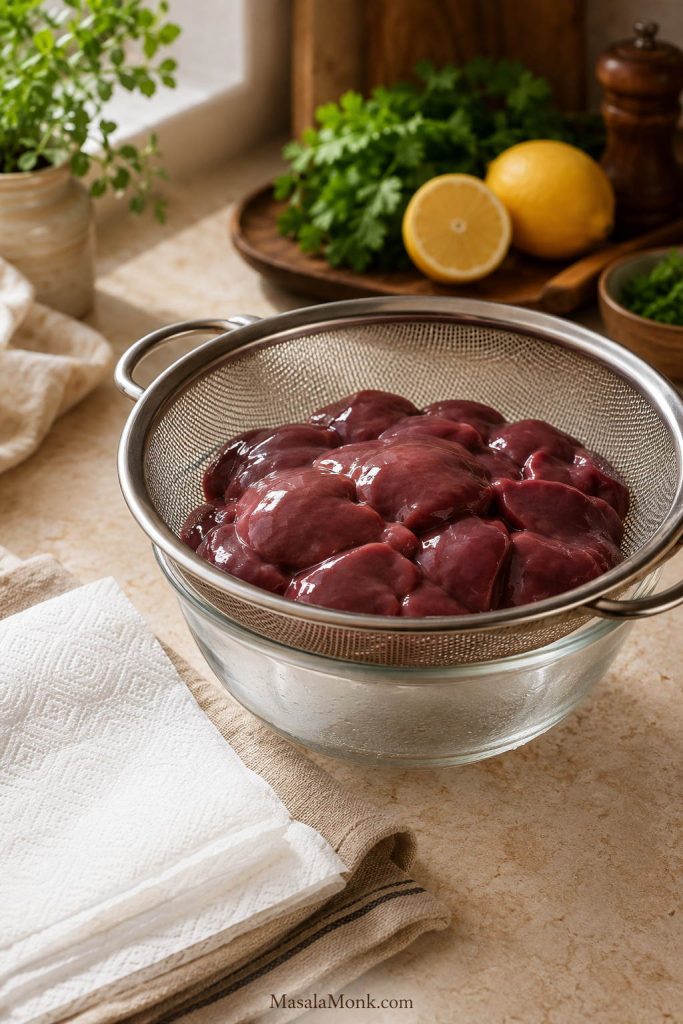
Cut, rinse only if needed, and dry well
Cut very large pieces in half so they are roughly similar in size. Aim for pieces about 1 to 1½ inches / 2.5 to 4 cm. They do not need to be perfect, but they should be close enough that they cook at the same speed.
Cut-size checkpoint: Similar pieces make timing and doneness easier.
Rinsing is optional. If the livers look especially wet or messy, you can rinse them briefly, but dry them very thoroughly afterward.
Drying checkpoint: This is the bridge between prep and browning.
Since these are raw poultry livers, treat the prep board like you would for raw chicken: wash your hands, clean the knife and board, and keep salads or cooked sides away from the raw-liver area.
Should You Soak Chicken Liver?
Fresh, well-trimmed livers can go straight to the pan; the soak is there when you want a gentler first bite. Chicken liver is usually milder than beef or mutton liver, so soaking is helpful but not required.
Use a short soak when you want the first bite to feel gentler, especially for someone still deciding whether they like liver. It can mellow the natural flavor and make the dish more approachable without changing the basic method.
Milk soak, lemon-water soak, or no soak
| Soak choice | Time | Use it when |
|---|---|---|
| No soak | None | The livers are fresh and you like a deeper liver flavor. |
| Milk soak | 10 to 30 minutes | You want a milder, softer flavor. Use ½ to 1 cup / 120 to 240 ml, just enough to mostly cover. |
| Lemon-water soak | About 10 minutes | You want a brighter, cleaner finish. Use ½ to 1 cup / 120 to 240 ml water with 1 tbsp lemon juice. |
Milk-soak cue: Use this optional soak when you want the chicken liver flavor to feel milder for hesitant eaters.
After soaking, dry before cooking
After soaking, drain the livers and pat them very dry. If you used lemon water, start with only 1 tsp lemon juice at the end of cooking, then add more only if the dish needs it.
Lemon-water option: Use this when you want a cleaner, brighter start.
Choose the version that fits your table
- Mildest: milk soak, onions, butter, lemon, and parsley.
- Brightest: lemon-water soak, garlic, a little extra lemon, and coriander.
- Boldest: no soak, black pepper, paprika, and the masala-style spice option.
- Most comforting: extra onions, butter, and mashed potatoes or rice.
Choose-your-version guide: The base method can move mild, bright, bold, or comforting.
After soaking or skipping it, drain and dry the livers well, then move to how to cook them step by step.
How to Cook It Step by Step
The skillet moves quickly here. Once the livers go in, the small things — dry surface, space, gentle flipping, and a quick finish — show up fast.
1. Cook the onions first
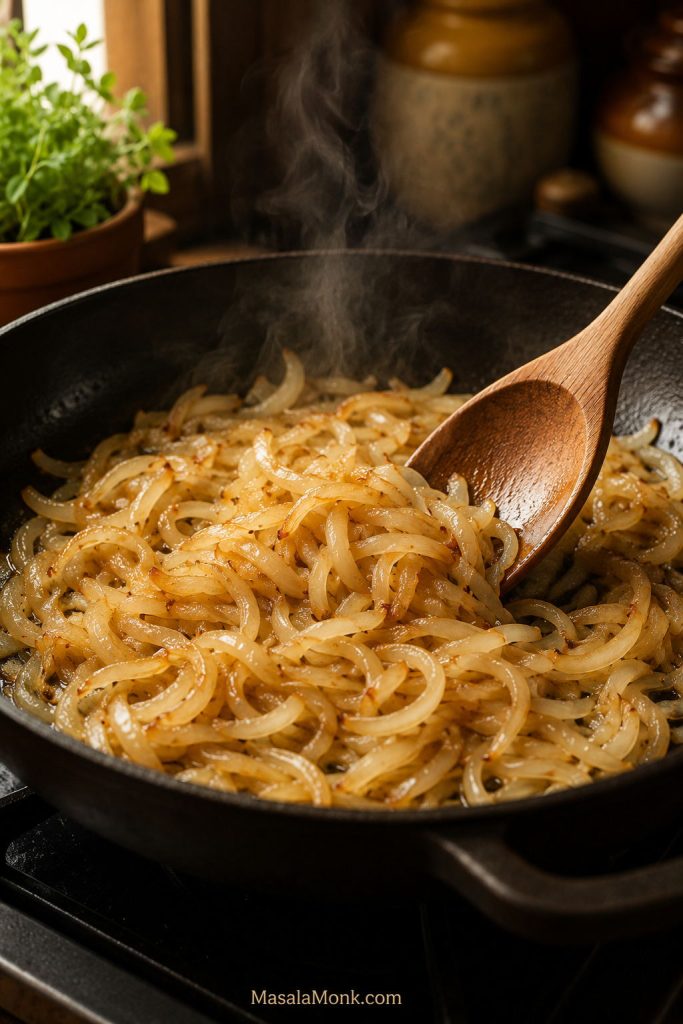
Heat 1 tbsp oil in a large skillet over medium heat. Add the sliced onion and a pinch of the salt. Cook for 8 to 12 minutes, stirring occasionally, until the onion is soft, lightly golden, and sweet-smelling. Move the onions to a plate.
The onions should smell sweet before the liver goes in. If they still smell sharp, give them another minute or two so they can soften properly. If the onions and liver go in together, the onions may stay sharp or the liver may overcook while you wait.
Onion-first step: Build sweetness before the delicate livers enter the pan.
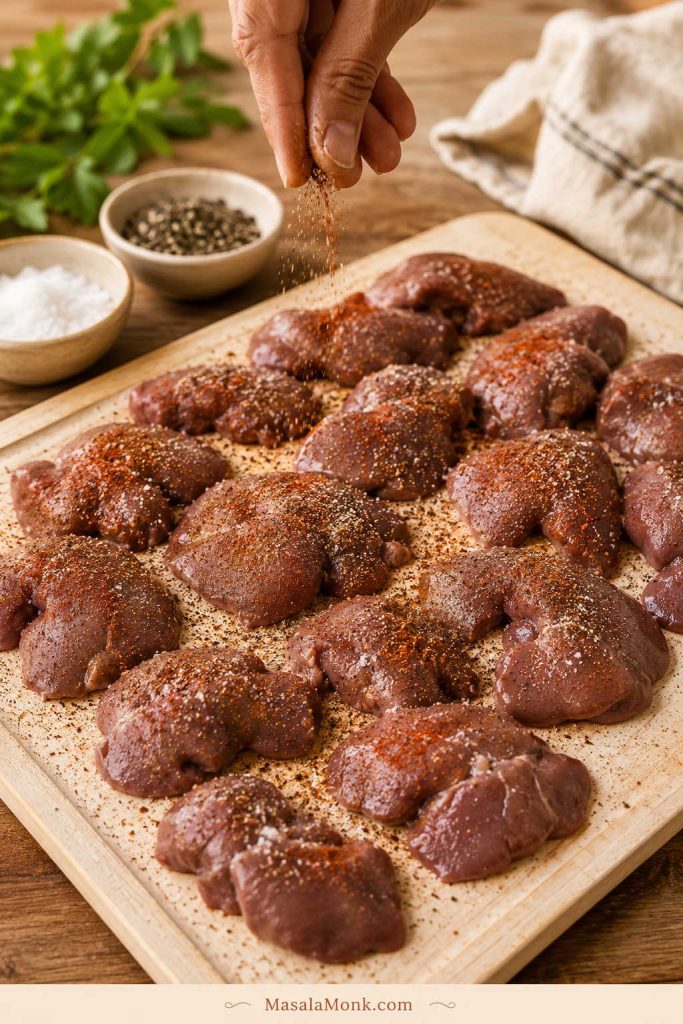
2. Season the livers
Season the dried livers with the remaining salt, black pepper, and paprika if using. You do not need to bring them fully to room temperature, but avoid cooking them icy-cold or wet from the fridge. Let them sit for a few minutes while the onions cook.
If you want a little more browning, dust them very lightly with 2 to 3 tbsp flour or cornstarch and shake off the excess. Flour gives a softer browned coating; cornstarch gives a slightly lighter edge. Use either one lightly.
Seasoning step: Season after drying, then keep any coating light.
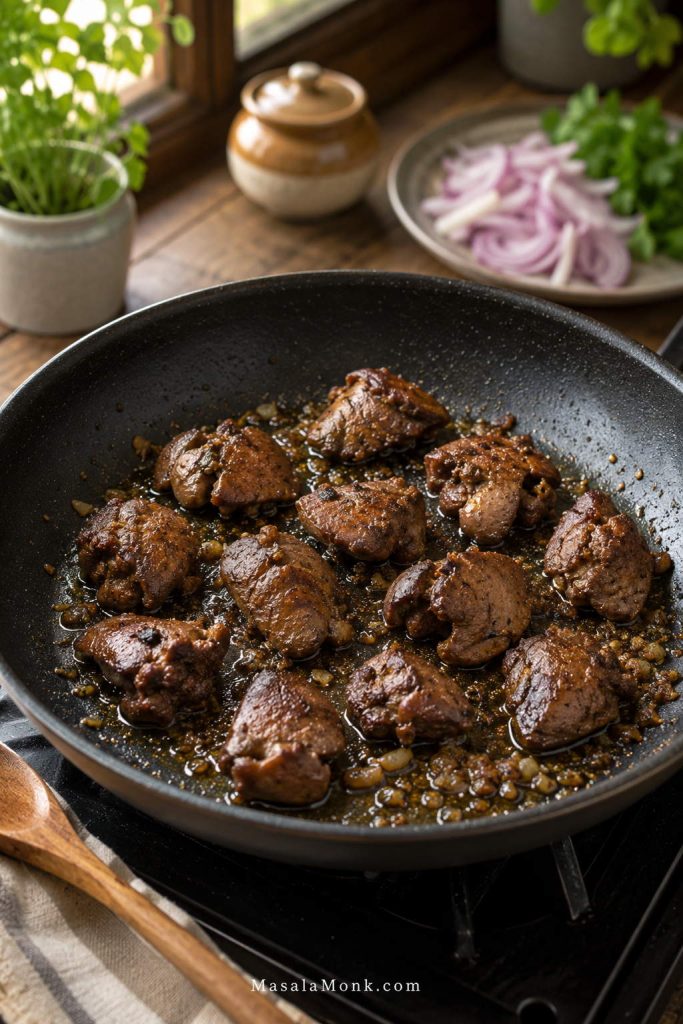
3. Sear in one layer
Add the remaining 1 tbsp oil to the skillet and increase the heat to medium-high. Save the butter for the finish so it tastes sweet and rounded instead of browned or burnt. The pan is ready when a piece of liver sizzles immediately, but the oil is not smoking.
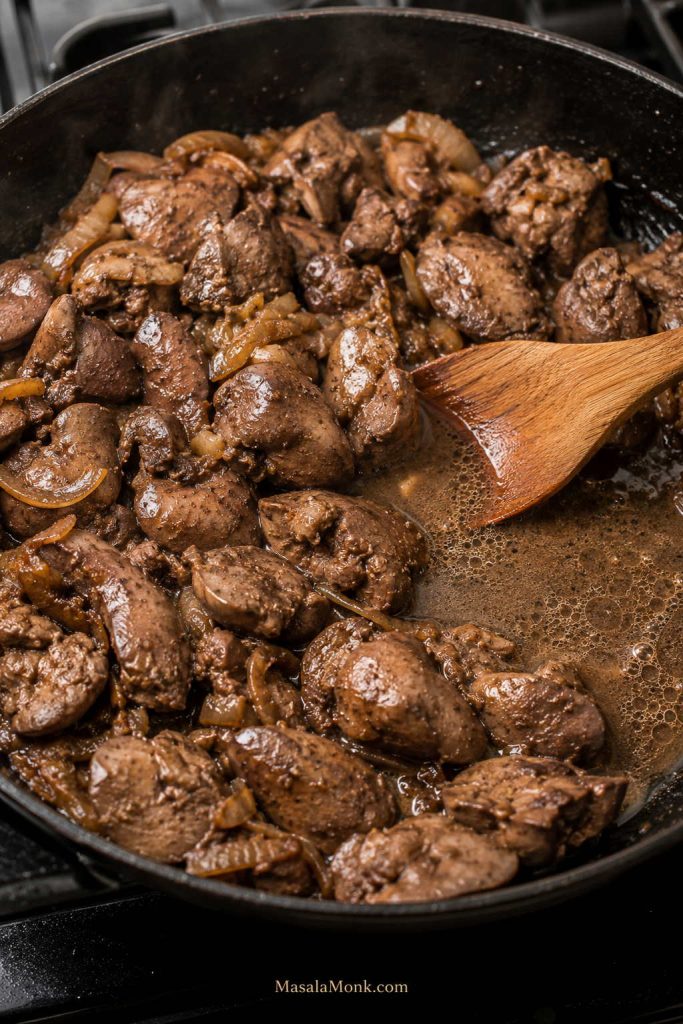
Add the livers in one layer. The pan should sizzle, not flood. Cook for 2 to 3 minutes on the first side without moving them too much, then flip gently and cook for another 2 to 3 minutes.
Sizzle check: Look for active bubbling and space, not a pan full of liquid.
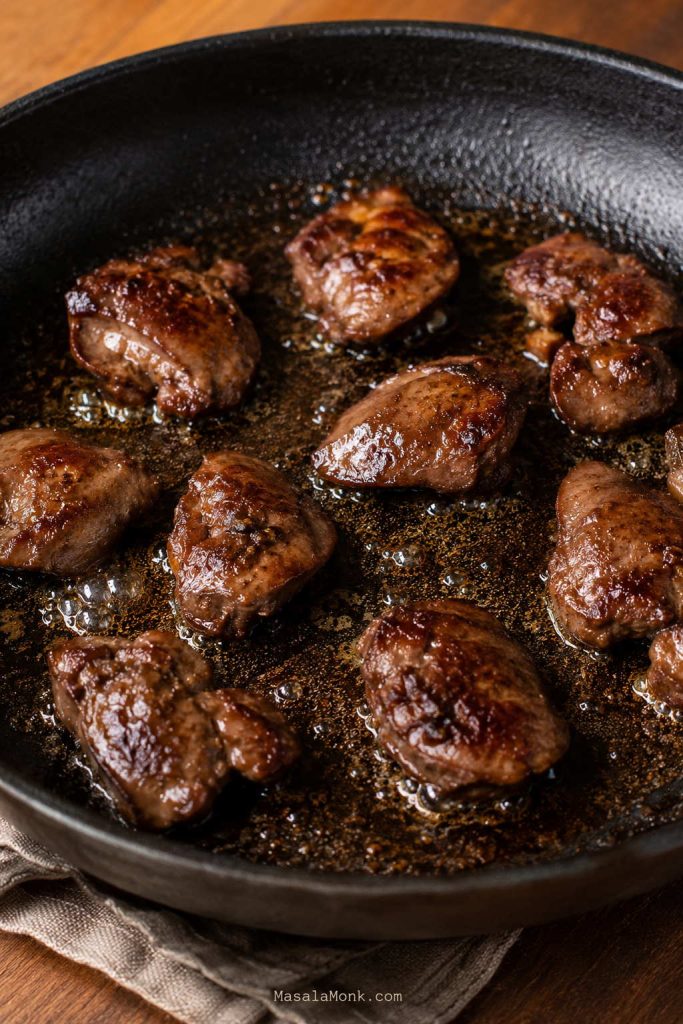
Flip step: Turn the pieces carefully once the first side has browned.

When liquid appears, let it bubble off. A flooded pan usually means the livers were too wet or crowded; move some liquid out, give the next batch more space, and add a teaspoon more oil if the pan looks dry.
When the pan starts filling with liquid, jump to troubleshooting before the next batch.
4. Check the largest piece
Use an instant-read thermometer to check the largest piece. Insert the thermometer from the side into the center instead of straight down into the pan. Cook to 165°F / 74°C. Smaller pieces may be ready quickly, while larger lobes may need another minute or two.
Once the center reaches temperature, pull the pan off the heat or lower the heat right away. That is how you keep the texture tender.
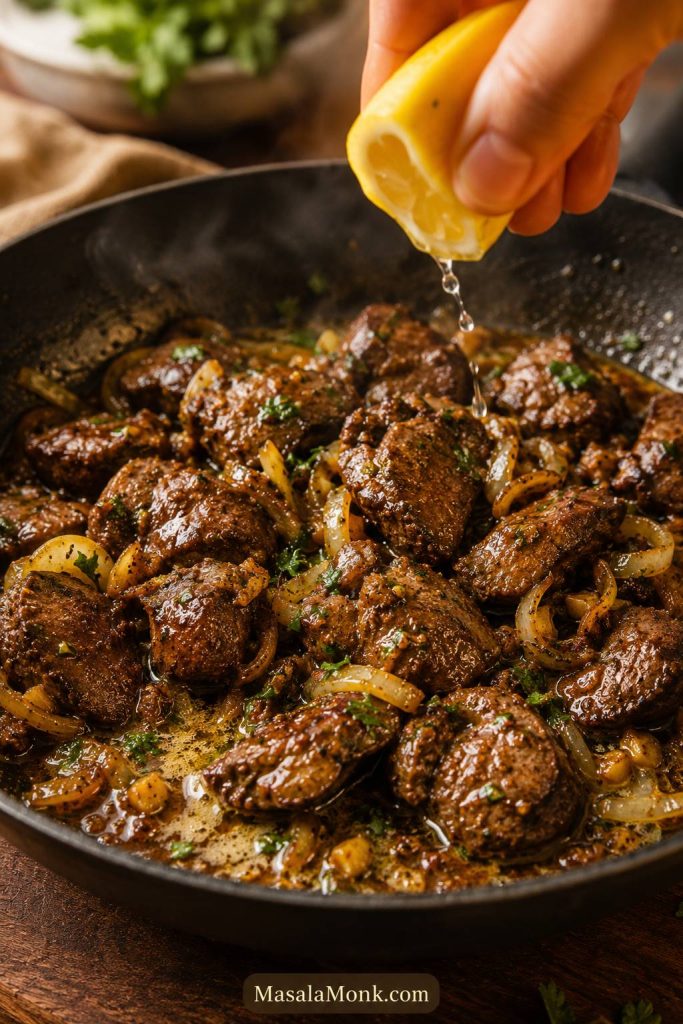
5. Finish with butter, garlic, lemon, onions, and herbs
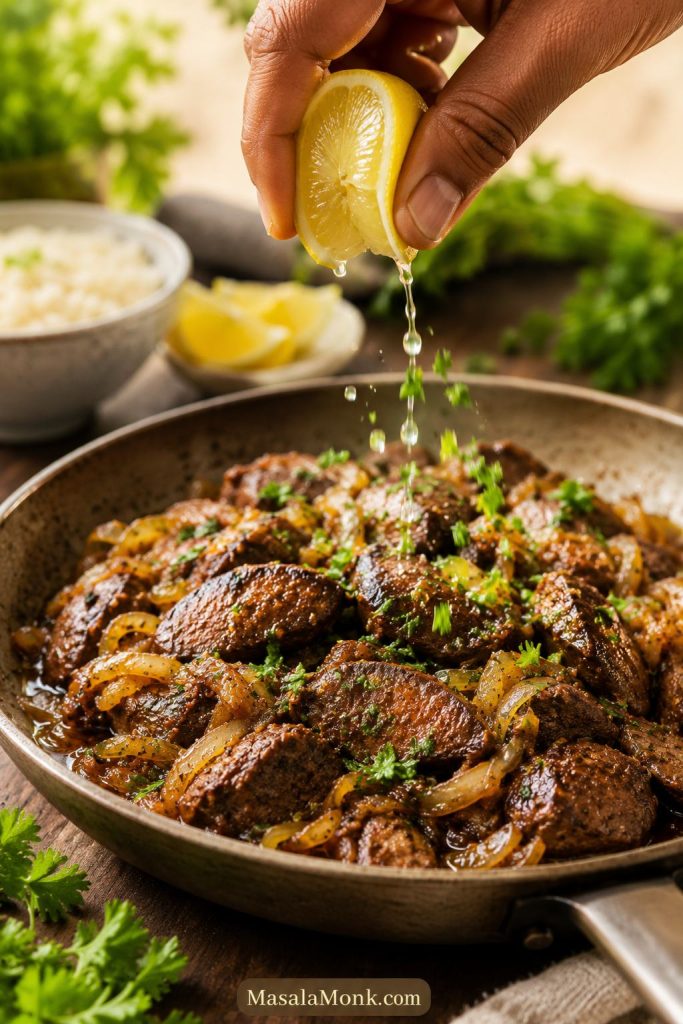
Lower the heat. Return the cooked onions to the pan. Add the butter if using and let it melt into the pan juices, then add the minced garlic and stir for 30 to 45 seconds, just until fragrant. Add lemon juice and toss gently so the pan smells brighter and the onions pick up the buttery juices.
Taste after the lemon and onions go back in. Liver often needs its final seasoning after the acidity is added, not before. Adjust salt and pepper, then finish with chopped parsley or coriander.
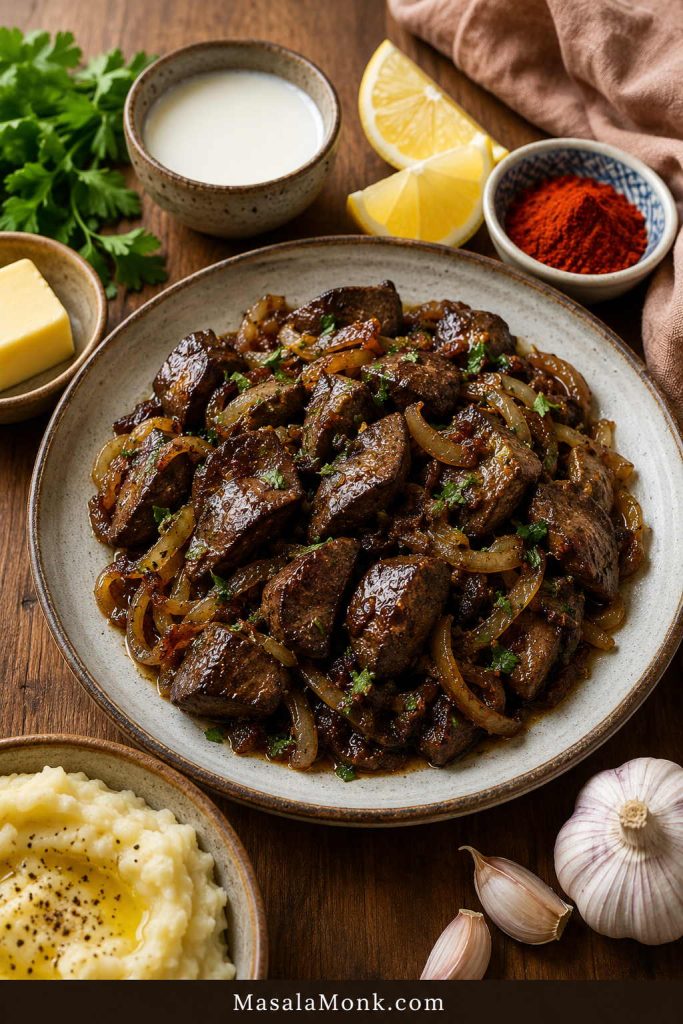
At the end, the onions should be soft and coated in pan juices, the livers should cut easily, and the finished dish should smell bright from lemon, not heavy or metallic. Serve warm, while the texture is still soft and delicate.
Final finish: Lower heat here so garlic perfumes the pan instead of burning.
When it works, the dish feels simple in the best way: soft livers, sweet onions, a little buttery pan juice, and enough lemon to make the whole plate feel lighter.
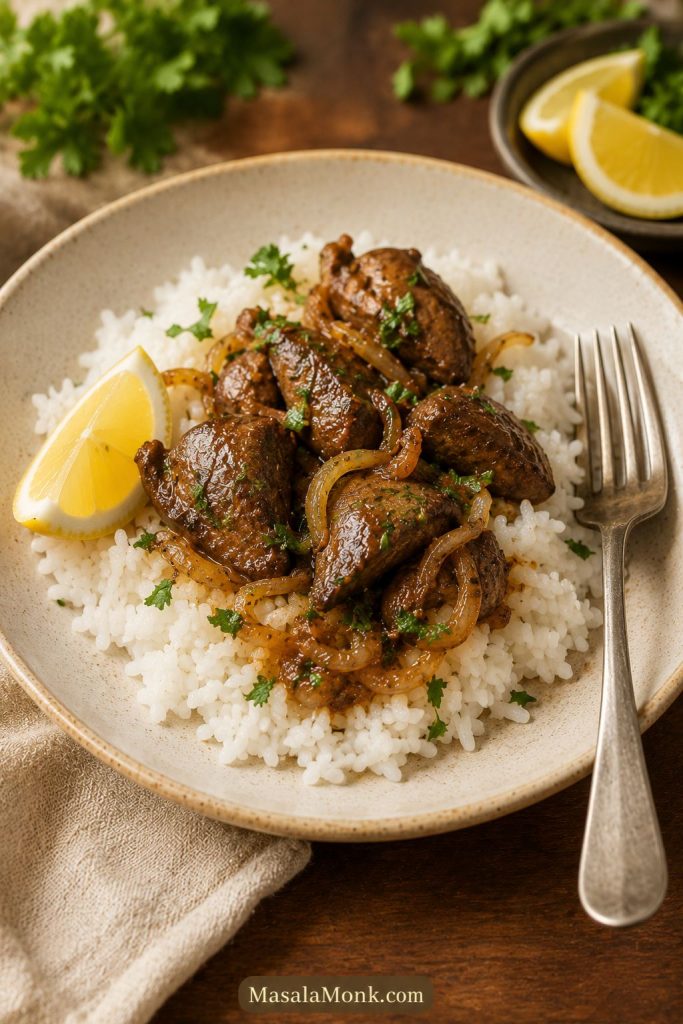
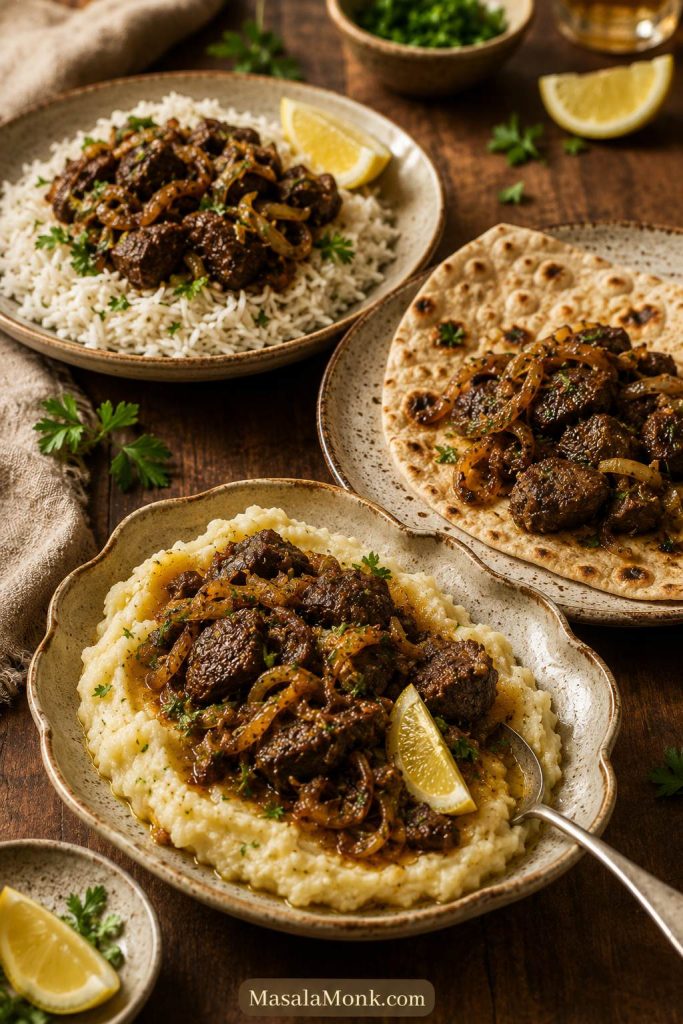
Now build the plate: see what to serve with chicken liver for rice, toast, roti, mashed potatoes, and salad ideas.
How Long to Cook Chicken Liver
The actual cooking is quick. The exact time depends on the size of the pieces, how wet they are, how crowded the pan is, and how hot your skillet runs.
| Step or situation | Approximate time | What to watch for |
|---|---|---|
| Onions first | 8 to 12 minutes | Soft, lightly golden, sweet-smelling onions. |
| Medium liver pieces | 5 to 7 minutes total | Lightly browned outside and safe temperature in the largest piece. |
| Smaller pieces | 4 to 5 minutes total | They may finish first, so do not wait for every piece to look identical. |
| Larger lobes | 7 to 9 minutes total | Use the biggest piece as your guide. |
| Lightly flour-dusted pieces | Usually about 1 extra minute | Coating should brown lightly, not burn. |
| Oven version | 30 to 35 minutes | Softer texture; still check the largest pieces. |
Time is a guide. The biggest piece gives you the real answer.
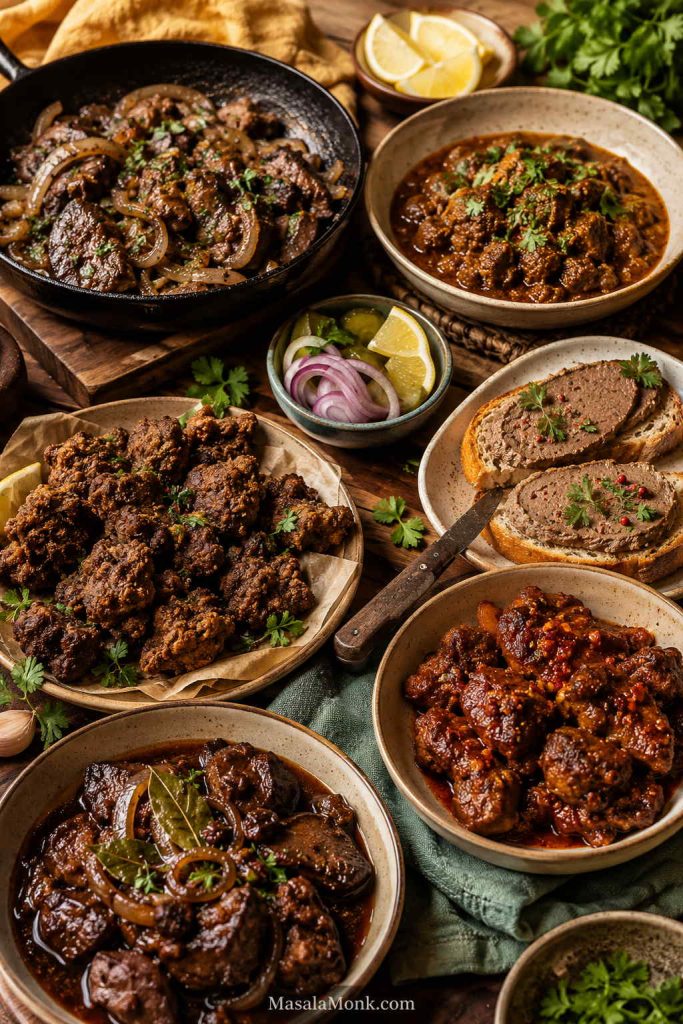
Variations
This is the base skillet method. Once you understand it, you can shift the flavor without changing the core rules: trim well, dry well, cook in one layer, and avoid overcooking.
Looking beyond the basic skillet? Try the kaleji direction below, or compare more ways to cook chicken liver.
Chicken Liver with Onions
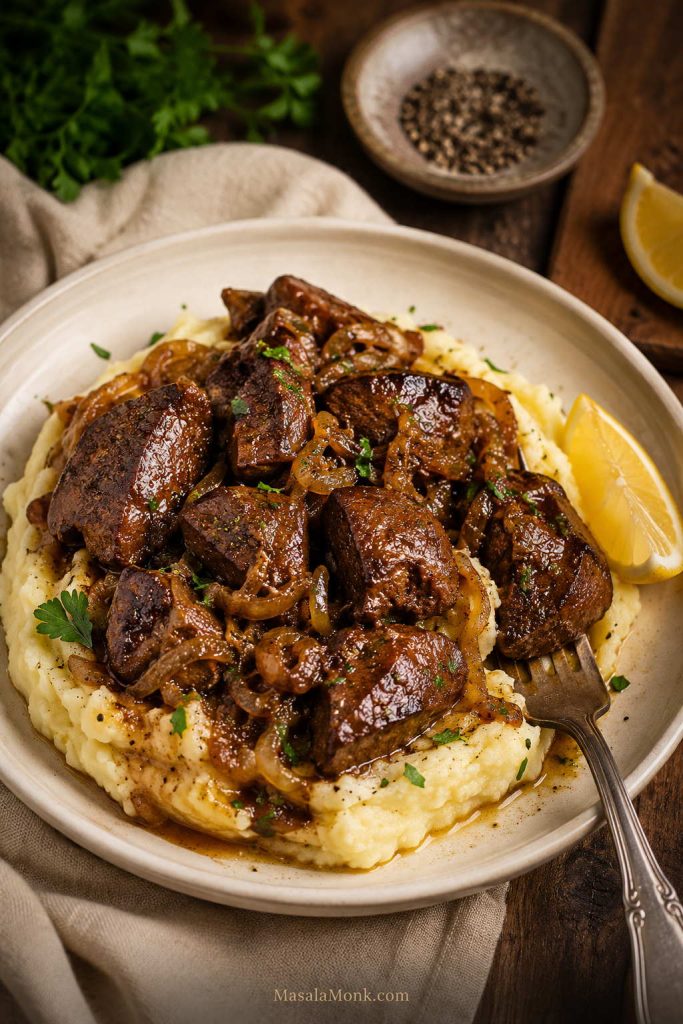
The main recipe already uses onions, but you can make them more central. Cook the onions a little longer, until deeply golden and jammy. After the liver is done, return the onions to the pan with a small splash of water, stock, or lemon juice to loosen the browned bits. Finish with butter and black pepper, then spoon everything over toast, rice, or creamy garlic mashed potatoes.
Comfort serving: Use this direction when you want chicken liver and onions to feel softer and more filling.
Garlic Butter Lemon Livers
For a brighter, more rounded version, finish the cooked livers with 1 tbsp butter, extra garlic, 1 tbsp lemon juice, black pepper, and chopped parsley or coriander. Add the garlic only at the end so it stays fragrant.
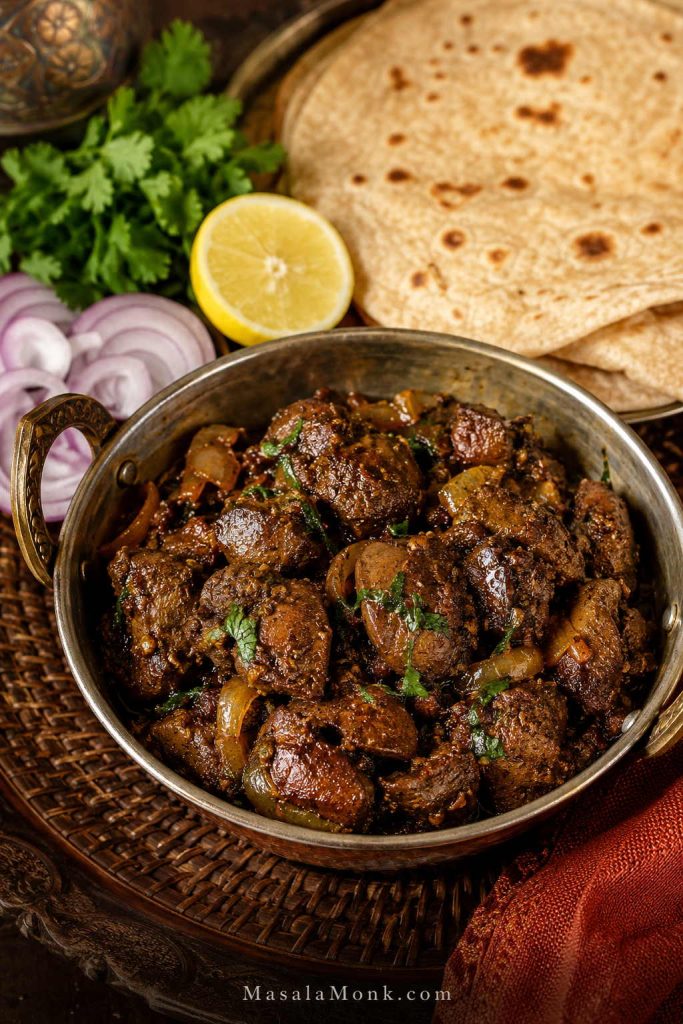
Quick Chicken Kaleji-Style Masala
For a masala-style variation, season the livers with ½ tsp turmeric, 1 tsp coriander powder, ½ tsp cumin powder, ½ tsp red chilli powder, ½ tsp black pepper, and a little garam masala. Cook the onions as usual, add ginger-garlic paste if you like, then cook the livers in the spiced oil. A small chopped tomato can be added after the onions; cook it down until jammy before adding the livers so the masala does not turn watery. Finish with lemon juice and fresh coriander.
This is a quick masala-style direction, not the only way chicken kaleji is made. Use it when you want the same basic skillet method with warmer spices.
Kaleji direction: This is the spiced path with roti, coriander, onions, and lemon.
Oven Version
For less splatter, spread trimmed and dried livers in a single layer with sliced onions, about 1 tbsp oil, salt, pepper, garlic powder, and paprika in a baking dish. Garlic powder works better than fresh garlic here because fresh garlic can catch and turn bitter. Cover with foil and bake at 350°F / 175°C for about 20 minutes. Uncover, stir gently, and bake for another 10 to 15 minutes, or until the largest pieces reach 165°F / 74°C.
Baking gives a softer texture than pan-searing, but it is useful when you want a more hands-off method.
When to Use a Different Method
Use this skillet method when you want a quick warm meal. Choose a different method if you want a crisp coating, a smooth pâté, a creamy peri-peri-style sauce, a quick pan gravy, or a saucy adobo-style dish. Those versions use different techniques, so this recipe keeps the focus on the simplest skillet method first.
What to Serve with Chicken Liver
Because the flavor is deep and savory, the plate needs something fresh, starchy, or acidic beside it. You want the sides to balance the liver, not fight it.
| Style | Serving ideas |
|---|---|
| Simple dinner | Rice, toast, mashed potatoes, roasted potatoes, buttered noodles |
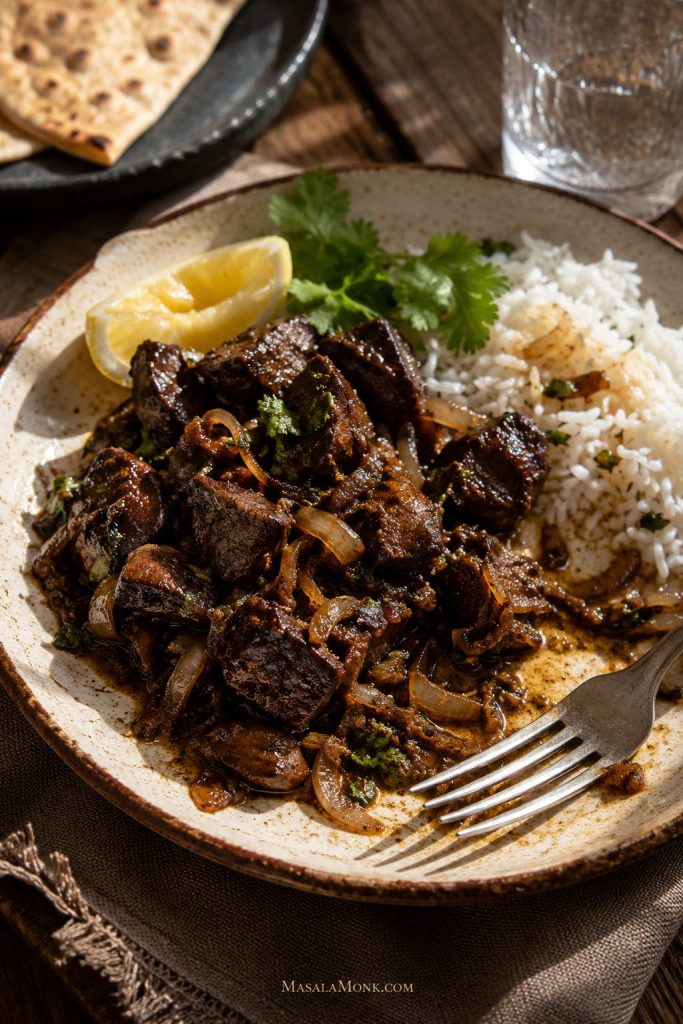
| Indian-style | Jowar bajra roti, paratha, dal-rice, onion salad, lemon wedges |
| Fresh and light | Cucumber salad, sautéed greens, pickled onions, lemony salad |
| Comfort-food style | Mashed potatoes, pan juices, deeply cooked onions, crusty bread |
| Appetizer-style | Toast, small bread slices, pickles, sharp salad, lemon wedges, or a chilled potato salad |
Toast catches the buttery juices, rice softens the intensity, and a lemony salad keeps the plate from feeling heavy. If you are serving someone unsure about liver, keep the pieces smaller and serve them with something familiar: rice, toast, potatoes, roti, or a fresh salad with lemon.
Rice dinner: Use this serving when you want the pan juices to become part of the meal.
Toast serving: Use this for a smaller plate with crisp contrast.
Storage and Reheating
This dish is at its best straight from the skillet. The longer it sits, the more that soft texture fades. For leftovers, let the livers stop steaming, then refrigerate them in an airtight container within 2 hours of cooking. Store them with the onions and pan juices if possible; they help the livers reheat more gently. Use within 2 days for the best texture.
To reheat, warm gently in a skillet over low heat with a splash of water, stock, or lemon juice. You can add a small knob of butter to loosen the pan juices. The microwave works in a hurry, but use short bursts and stop as soon as the livers are warm.
Avoid long reheating. Once overcooked, the texture turns rubbery and dry quickly.
Troubleshooting: What Went Wrong?
If your first batch was not perfect, that is normal. Chicken liver gives very clear feedback, and most problems are easy to trace. Start with trimming, moisture, crowding, heat, and timing.
Common problems and the next-batch fix
| Problem | Likely cause | Fix |
|---|---|---|
| Bitter liver | Green/yellow bits, poor trimming, burnt garlic, or overcooking | Trim carefully, add garlic late, use onion and lemon, and avoid extra cooking time. |
| Metallic taste | Strong natural liver flavor or not enough acidity | Use an optional soak, garlic, onion, lemon juice, herbs, and black pepper. |
| Rubbery texture | Overcooking | Cook in one layer and stop once the largest piece reaches the safe temperature. |
| Dry or grainy texture | Cooked too long after doneness | Use medium-high heat for a shorter cook and check earlier. |
| Steamed instead of browned | Wet livers or crowded pan | Pat dry thoroughly and cook in batches. |
| Too much splatter | Surface moisture hitting hot oil | Dry well, lower heat slightly, and use a splatter screen. |
| Strong smell | Old liver, poor trimming, steaming in a crowded pan, or normal liver aroma that feels too intense | Use fresh liver, trim well, cook with onions, garlic, and lemon, and discard anything sour or rancid. |
| Lots of liquid in the pan | Frozen livers, wet livers, or overcrowding | Thaw fully, drain well, pat dry, and cook in one layer. |
| Livers fell apart | Pieces were too small, too wet, or stirred too aggressively | Keep medium pieces, dry well, and flip gently. |
| Unsure if done | Relying on color or timing only | Use a thermometer on the largest piece. |
Watery-pan fix: This visual explains why wet or crowded livers steam instead of brown.
More Ways to Cook Chicken Liver
Once you know the base skillet method, you can take the same trimming, drying, and doneness skills in a few different directions.
| Version | Best for | Key change |
|---|---|---|
| Skillet liver and onions | A quick warm dinner | Cook the onions first, then sear the livers quickly. |
| Crispy fried chicken livers | Crunchy appetizer-style serving | Bread or batter the pieces and fry separately. |
| Chicken liver pâté | Toast, crackers, and make-ahead spreads | Cook gently, then blend with butter and aromatics. |
| Chicken kaleji masala | A spiced Indian-style meal | Use onion, ginger-garlic, tomato, coriander, cumin, chilli, and garam masala. |
| Peri-peri chicken livers | Saucy, spicy, restaurant-style flavor | Add chilli, garlic, lemon or vinegar, and a sauce base. |
| Chicken liver adobo | A tangy, savory Filipino-style dish | Simmer briefly with soy, vinegar, garlic, and aromatics. |
More methods: After the base skillet technique, these are the next flavor directions.
A Small Note on Nutrition
A small serving goes a long way: the flavor is bold, the texture is dense, and the nutrition is concentrated. Chicken liver is commonly eaten for iron, B vitamins, protein, and its deep savory taste. For a broader food-first look at iron, MasalaMonk’s guide to iron-rich foods explains how animal and plant sources differ.
For B12 context, MasalaMonk’s guide to Vitamin B12 rich foods also covers meat and organ-meat sources. Enjoy chicken liver as food first. For personal medical questions about organ meats, follow professional guidance.
And if you arrived through liver-health or cleanse searches, keep the line clear: this is dinner, not a detox.
FAQs
Do you need to soak chicken liver before cooking?
No. If the livers are fresh and well trimmed, you can go straight to the pan. Use the soak when you want a gentler first bite, especially for someone still deciding whether they like liver.
How do you make chicken liver taste less bitter?
Start with trimming. Remove green or yellow-stained areas, white connective tissue, and tough bits. Then use onions, garlic, lemon juice, butter, black pepper, paprika, or spices to balance the flavor.
How long should chicken liver be cooked?
It usually takes about 5 to 7 minutes in a hot skillet after the onions are cooked. Smaller pieces may cook faster, and larger pieces may need longer. The biggest piece gives you the real answer, so check it with a thermometer.
Can chicken liver be pink inside?
Color can fool you here. Chicken liver should be cooked to 165°F / 74°C in the center. A thermometer is the best way to know it is done safely without cooking it longer than needed.
How do I keep chicken liver from smelling too strong?
Use fresh livers, trim them well, dry them properly, and cook them with onions, garlic, and lemon. Give the pieces space in the pan too; steaming makes the smell stronger. If the raw livers smell sour, rotten, ammonia-like, or rancid, discard them.
Why is my chicken liver rubbery?
It is almost always overcooked. Chicken liver does not forgive extra minutes the way chicken thighs do, so stop as soon as the largest piece is done.
Why did my chicken liver release so much liquid?
The pieces were probably too wet, previously frozen, or crowded in the pan. Thaw fully, drain well, pat dry with paper towels, and cook in batches if needed. You want a steady sizzle, not a pan full of liquid.
Can I use frozen chicken livers?
Yes. Thaw them fully in the refrigerator, drain them well, trim them, and pat them very dry before cooking. Frozen livers often release more liquid, so dryness and pan space matter even more.
How do I know if chicken livers are fresh?
They can smell lightly mineral or iron-rich, but they should not smell sour, rotten, ammonia-like, or rancid. They should look moist, not slimy, grey, or dried at the edges.
Can I make chicken liver spicy?
Yes. Add red chilli powder, cayenne, black pepper, peri-peri seasoning, or the quick kaleji-style spice mix. Add heat gradually because liver has a strong flavor of its own and does not need heavy seasoning to taste good.
Is chicken liver the same as chicken kaleji?
Yes. Kaleji is the Hindi/Urdu word commonly used for liver. Chicken kaleji usually refers to chicken liver cooked with onions, spices, ginger-garlic, and sometimes tomato.
Is chicken liver healthy?
Chicken liver is nutrient-dense and rich in flavor. It is commonly eaten for iron, B vitamins, and protein. Because it is an organ meat and very rich, portion size and personal health context matter.
Can I bake chicken liver?
Yes. Bake trimmed chicken livers with onions and seasoning at 350°F / 175°C until the largest pieces reach 165°F / 74°C. Baking is softer and less browned than skillet cooking, but it reduces splatter.
Can I make crispy fried chicken livers with this recipe?
This recipe is for skillet chicken liver, not Southern-style crispy fried chicken livers. For a light crust, you can dust the livers with flour or cornstarch before searing. Fully crispy fried chicken livers need a separate breading and frying method.
Can I make chicken liver pâté with this recipe?
Chicken liver pâté uses a different method. The livers are cooked gently, then blended with butter and other flavorings until smooth. This skillet recipe is better for serving warm as a meal.
Final Notes
If you remember only four things, remember these: trim the stained bits, dry the livers well, cook them in one layer, and let the biggest piece guide the doneness.
Final plate: This is the warm, finished meal the post is building toward.
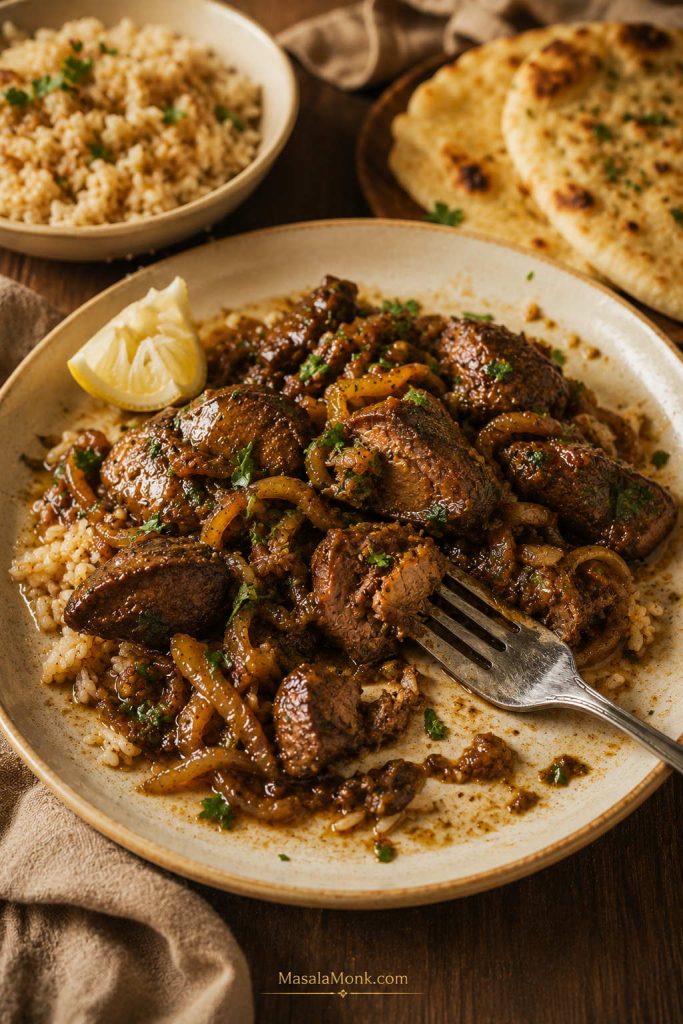
Do that, and the plate feels warmer and simpler: tender pieces, sweet onions, bright lemon, and enough pan juice for rice or toast. One good batch can change how liver feels at the table. Start with the onion-garlic-lemon version; from there, the same base can go toward masala, extra onions, or a brighter garlic-butter finish.


