Posted on — 4 Comments

Baked Chicken Breast Recipe

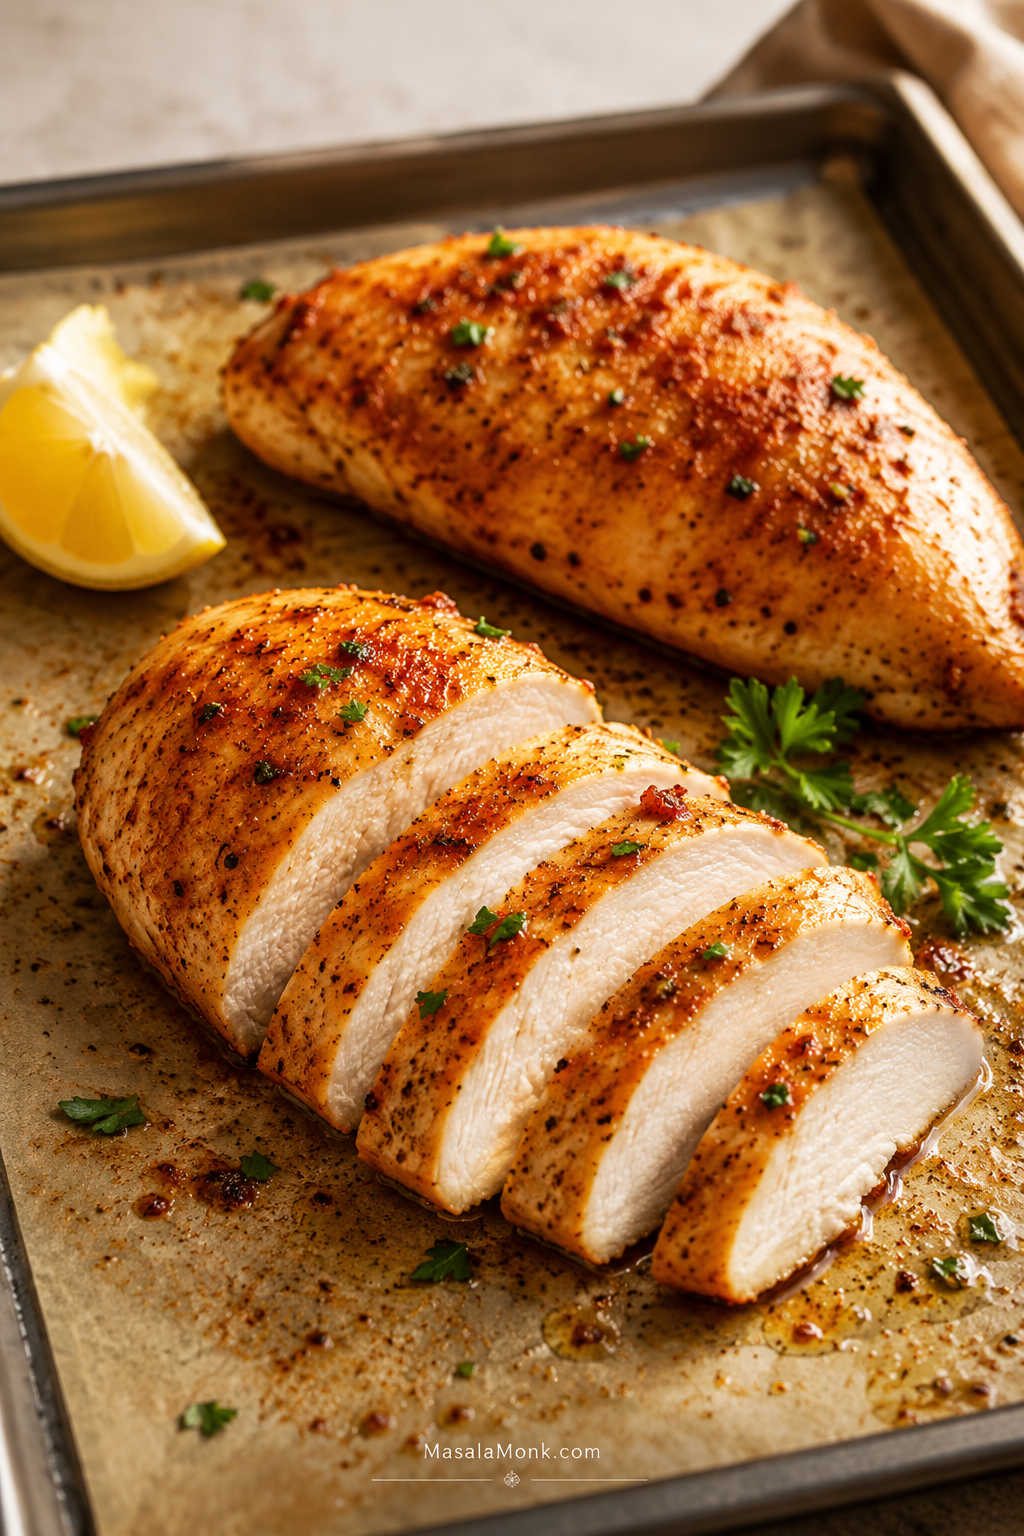
Sliced golden baked chicken breast with pan juices, lemon, parsley, potatoes, and green beans on a plate.

This baked chicken breast recipe is for anyone who has pulled a tray of chicken from the oven and wondered why it turned out dry, bland, rubbery, or unevenly cooked. Chicken breast is not hard to cook, but it is unforgiving: a few extra minutes can turn tender slices into dry, chalky pieces.

The fix is simple and specific. First, pound the thick end, then coat the chicken with oil and seasoning, bake it hot, check the center, and rest before slicing. Most dry chicken breast is not a marinade problem; instead, it is usually a thickness, timing, or resting problem.
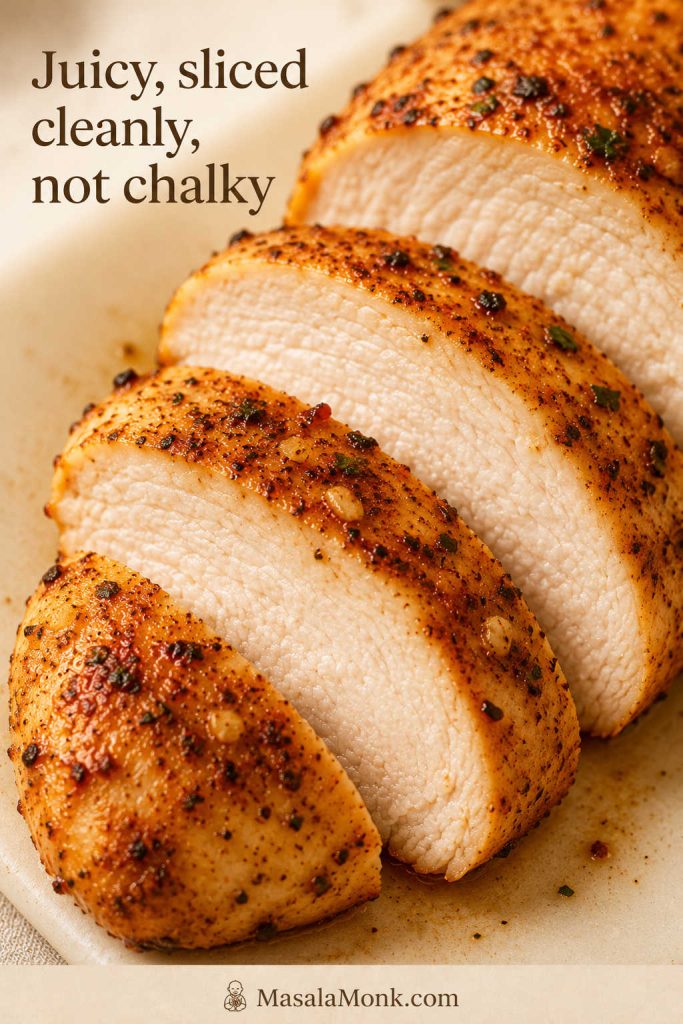
Close-up of sliced baked chicken breast showing a moist white interior and browned seasoned edges.
When chicken breast is cooked well, the slices look clean, tender, and moist enough to serve without hiding them under sauce.

The MasalaMonk rule for chicken breast is simple: make it even, bake it hot, check the center, and rest before slicing. No single timer can understand the chicken breast in front of you, especially when one piece is thick, another is thin, and the pack is uneven.

When the thickness and timing are right, the chicken slices cleanly, tastes seasoned across the surface, and stays useful enough for dinner tonight and lunches later.
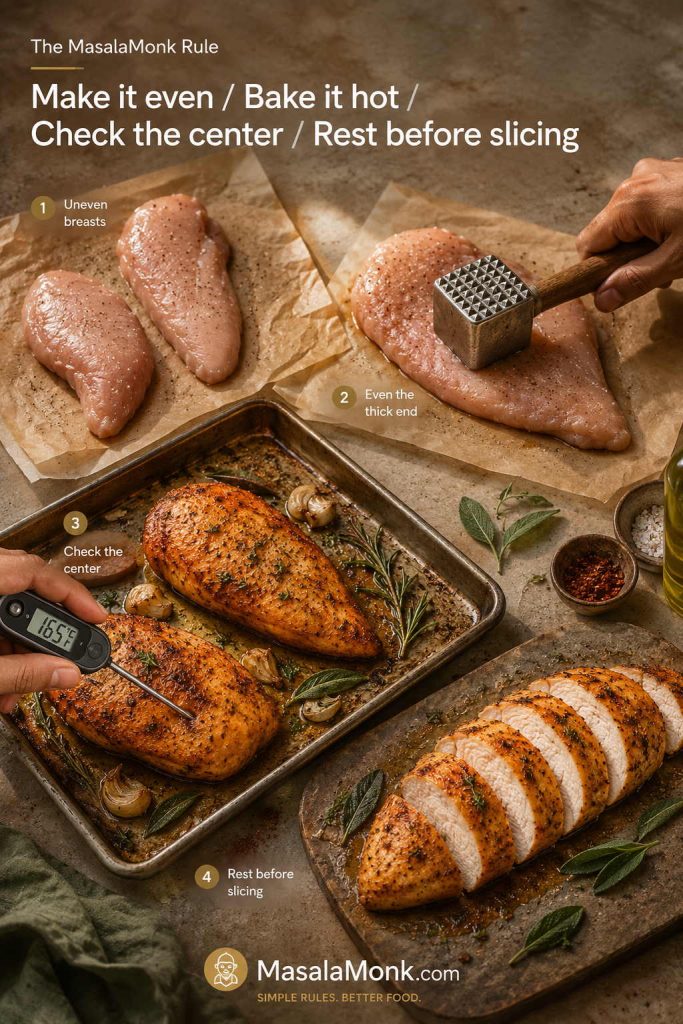
MasalaMonk rule graphic showing baked chicken breast steps: make it even, bake it hot, check the center, and rest before slicing.
Once the chicken is even in thickness, the oven can work more predictably; after that, temperature and resting protect the texture.

The main method uses 425°F / 220°C for tender, lightly browned boneless skinless chicken breast, with clear timing for 350°F, 375°F, 400°F, 425°F, and 450°F. You will also get help for thin chicken, large pieces, bone-in chicken, frozen chicken, meal prep, storage, reheating, and dry-chicken fixes.

Quick Answer: How to Bake Chicken Breast

For juicy baked chicken breast, pound the thick end so the pieces cook evenly, rub the chicken with oil and seasoning, then bake uncovered at 425°F / 220°C until the center of the thickest piece reaches 165°F / 74°C. Rest for at least 5 minutes before slicing.

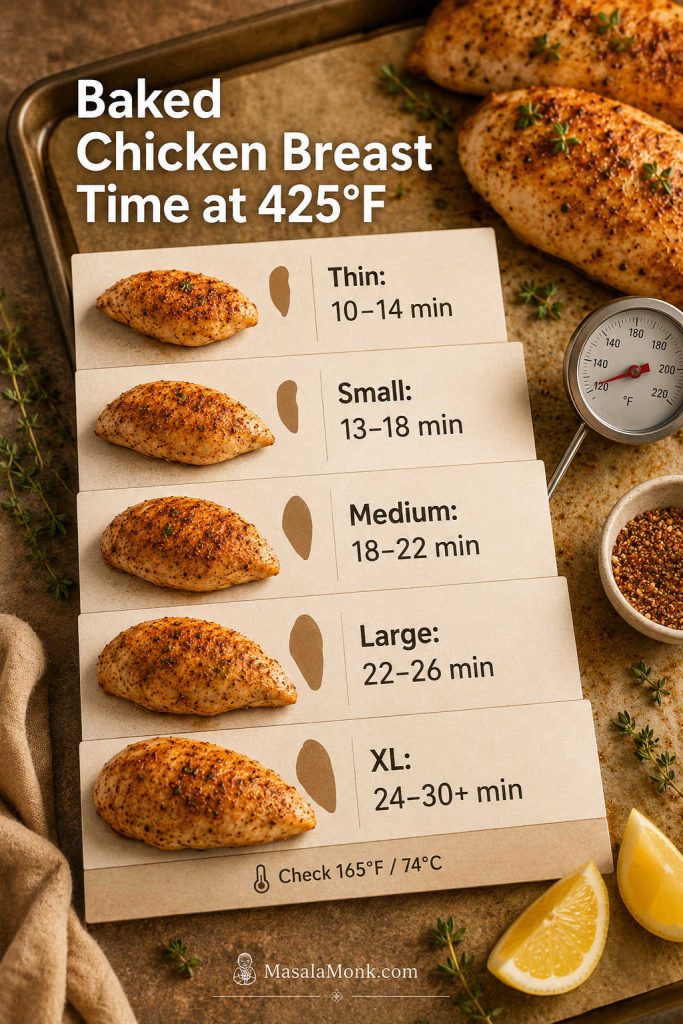
At 425°F / 220°C, medium boneless skinless chicken breasts usually take 18 to 22 minutes. Thin pieces may finish in 10 to 14 minutes, while very large or thick breasts can need 24 to 30 minutes or more. The clock gives you a window; the thermometer gives you the answer.

Use this baked chicken breast recipe as the base method, then adjust the timing based on the size, thickness, and cut of chicken you have.

Need to compare thin, medium, large, or extra-large pieces? Go straight to the bake time chart.

Baked Chicken Breast at a Glance

Question Best answer
Best oven temperature 425°F / 220°C for tender, lightly browned chicken breast
Fan or convection oven 400°F / 200°C fan, or reduce by about 25°F and check early
Normal bake time 18–22 minutes for medium breasts at 425°F
Wider timing range 16–25 minutes for most boneless breasts, depending on size and thickness
Safe internal temperature 165°F / 74°C in the center of the thickest piece
Best cut Boneless skinless chicken breasts, close in size
Best thickness Even thickness, ideally about 3/4–1 inch / 2–2.5 cm for average breasts
Rest time At least 5 minutes before slicing
Best tool Instant-read thermometer

Average-size, thawed, boneless chicken breasts that are close in thickness can follow the main recipe directly. Use the extra charts when your chicken is thin, very large, bone-in, frozen, or when your oven is already set to a different temperature.
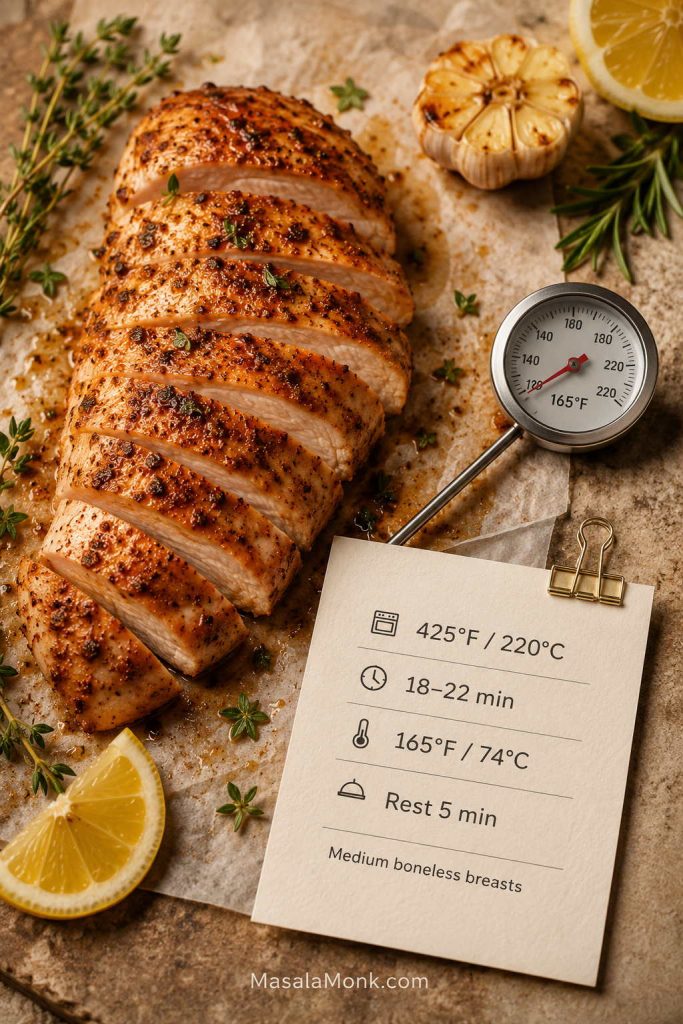
Baked chicken breast at-a-glance guide showing 425°F, 18 to 22 minutes, 165°F internal temperature, and 5 minutes rest.
These numbers are a strong starting point, but once the tray goes into the oven, thickness and internal temperature matter more than the timer.

Working with thin cutlets, extra-large pieces, or a different oven temperature? The thin vs thick chicken guide and oven temperature chart will be more useful than one fixed timer.

The Simple Method in Practice

In practice, this comes down to a few moves: pound the thick end so the chicken cooks evenly, oil the surface so the seasoning sticks, season all sides, bake hot, check the thickest piece, and rest before slicing.

Once you understand what the chicken in front of you needs — thinner timing, thicker prep, or a little more rest — the recipe becomes much less stressful.

Ingredients for Baked Chicken Breast

The seasoning here is built from pantry basics, so the chicken tastes good on its own. At the same time, it still fits into salads, bowls, wraps, pasta, sandwiches, and meal-prep boxes.
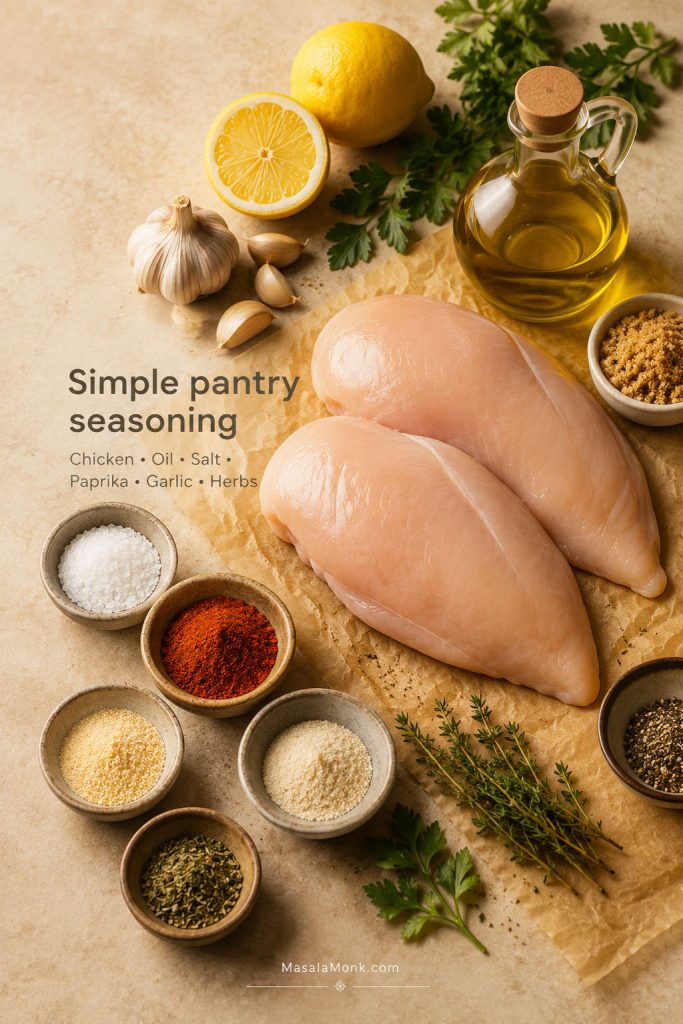
Ingredients for baked chicken breast including raw chicken, olive oil, paprika, garlic powder, herbs, salt, pepper, lemon, and parsley.
Simple pantry seasoning works because oil helps the spices cling to the chicken, so every slice tastes seasoned instead of flat.
Ingredient US amount Metric amount Why it matters
Boneless skinless chicken breasts 4 medium breasts, 5–8 oz each 600–900g total The main cut for fast, easy oven baked chicken breast
Olive oil or avocado oil 1 1/2 tbsp 22 ml Helps seasoning stick and protects the surface
Fine salt 1 tsp About 6g Seasons the chicken properly, not just the outside
Paprika or smoked paprika 1 tsp 2–3g Adds color, warmth, and gentle flavor
Garlic powder 1 tsp About 3g Gives the chicken a savory base
Onion powder 1/2 tsp 1–2g Rounds out the seasoning
Black pepper 1/2 tsp About 1g Adds mild heat
Italian seasoning, oregano, or thyme 1 tsp About 1g Adds herby flavor without needing a marinade
Brown sugar, optional 1–2 tsp 4–8g Helps browning, especially if you are not broiling
Lemon wedges or parsley, optional For serving For serving Adds freshness at the end

Best Chicken Breast to Use

Use boneless skinless chicken breasts that are close in size. Most supermarket packs are uneven: one breast may be thick enough to need pounding, while another may already be thin enough to overcook early.
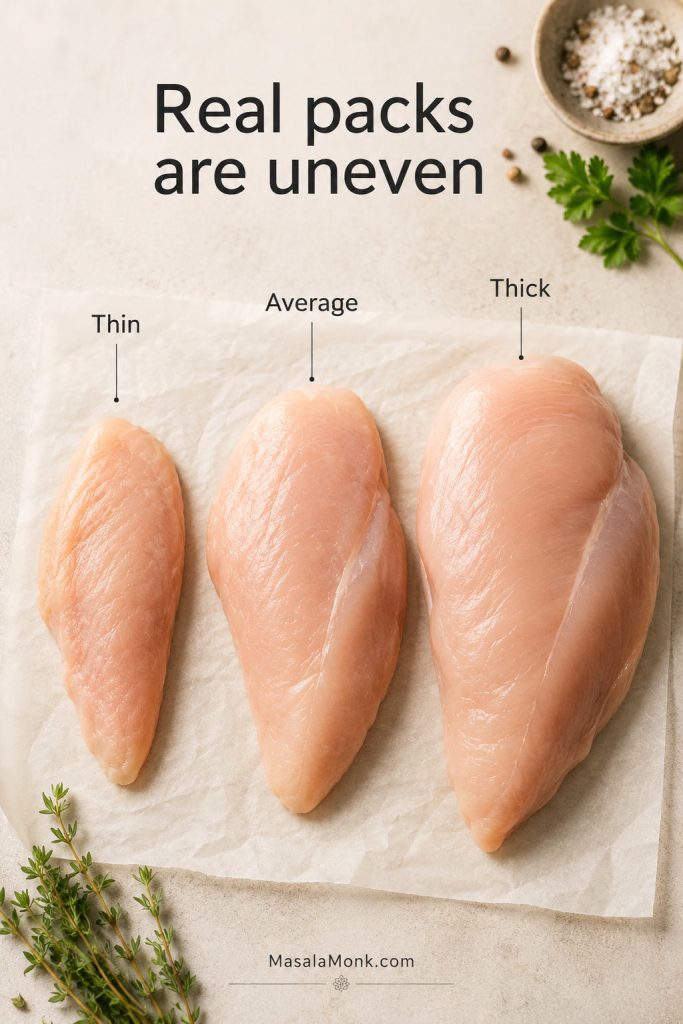
Three raw chicken breasts of different thicknesses labeled thin, average, and thick on parchment.
Since most supermarket packs are uneven, checking thickness before baking is more useful than treating every piece like it needs the same time.

For this method, similar-size pieces matter more than buying perfectly shaped chicken. As a result, the closer the pieces are in thickness, the easier it is to avoid dry edges and undercooked centers.

Very large chicken breasts are often thick at one end and thin at the other. For the best texture, pound only the bulky end until the piece is closer to one thickness, or slice extra-large breasts horizontally into two thinner pieces. That one step does more for tenderness than adding another sauce or spice.

Best Seasoning for Baked Chicken Breast

The best seasoning for baked chicken breast gives salt, savoriness, color, and aroma without requiring a long marinade. Salt, paprika, garlic powder, onion powder, black pepper, and herbs are enough for a reliable everyday version.

The seasoning should look like a real coating, not a few dusty patches. Because chicken breast is mild, it needs enough salt and spice across the whole surface. If the top looks barely seasoned before baking, the finished chicken will probably taste flat.

Raw chicken breast being coated with paprika garlic seasoning before baking.
A visible coating matters because chicken breast is mild; without enough seasoning on the surface, the finished slices can taste plain.

The brown sugar is optional, but useful. Although it does not make the chicken taste sweet, it helps the paprika-garlic coating brown faster, especially because boneless skinless chicken breast has no skin to crisp.

Salt note: This recipe uses fine salt. If you use kosher salt, you may need a little more by volume because the crystals are larger. Seasoning should taste balanced, not harshly salty.

Oil or Butter?

Oil is the easiest choice for high-heat baking because it coats the chicken evenly and handles the oven well. Butter tastes great, but it can brown faster, so it is often better as a finishing sauce with garlic, lemon, herbs, or pan juices.

Equipment You Need

You do not need special equipment, but a thermometer makes a huge difference. Without one, baked chicken breast often goes dry because the cook is guessing by time, color, or juices instead of checking the center of the thickest piece.
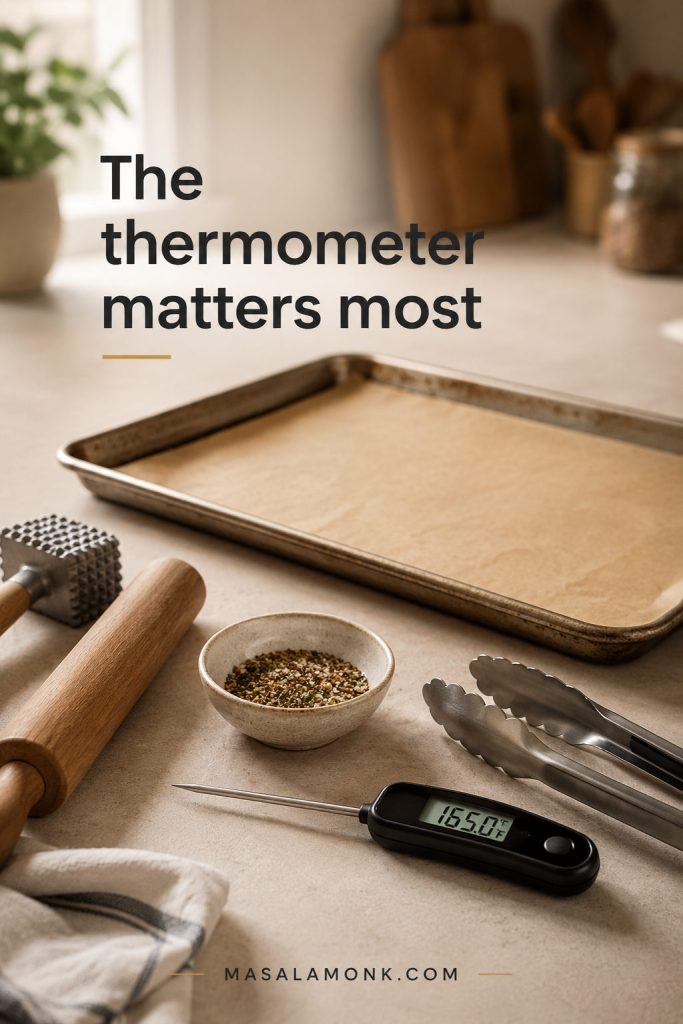
Equipment for baked chicken breast including an instant-read thermometer, sheet pan, parchment, tongs, and a meat mallet.
A thermometer and a way to even the thick end do more for juicy baked chicken breast than a long list of special tools.

No thermometer yet? Read what to do if you do not have one, but a thermometer is still the most reliable way to avoid dry chicken.

  • Instant-read thermometer: the most important tool for tender, safe chicken.
  • Rimmed sheet pan or metal baking dish: good for high heat and even cooking.
  • Parchment paper or foil: useful for cleanup and to prevent sticking.
  • Meat mallet or rolling pin: helps even out thick chicken breasts.
  • Small bowl: for mixing the seasoning.
  • Tongs: for handling seasoned chicken neatly.
  • Cutting board: for resting and slicing after baking.
Pan note: For very high heat, a rimmed sheet pan or metal baking dish is more predictable than glass. If you use a glass baking dish, check the manufacturer’s temperature limit and avoid sudden temperature changes.

How to Make Baked Chicken Breast

This method uses a plain, reliable oven approach: boneless skinless chicken breasts, baked uncovered, with enough seasoning to taste good on their own and enough flexibility to use later in other meals.
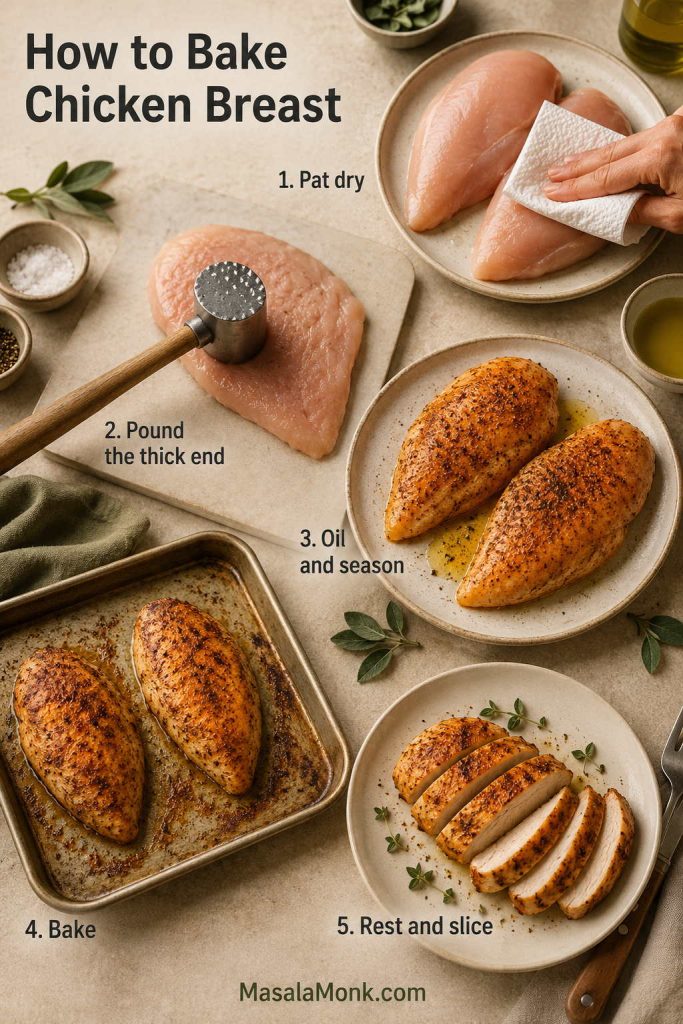
Step-by-step guide for baking chicken breast showing drying, pounding, seasoning, baking, and resting.
Each step solves a different problem: moisture on the surface, uneven thickness, weak seasoning, uncertain doneness, or slicing too soon.

1. Preheat the oven

Preheat the oven to 425°F / 220°C. Use the middle rack so the chicken cooks evenly. For a fan or convection oven, use 400°F / 200°C fan and start checking a few minutes early.

Fan and convection ovens move hot air more aggressively, so chicken can cook faster and brown sooner. Reduce the temperature by about 25°F / 15–20°C and start checking a few minutes before the chart says.

2. Pat the chicken dry

Pat the chicken breasts dry with paper towels. A dry surface helps the oil and seasoning cling better. Otherwise, very wet chicken can steam in the pan and release more liquid.

3. Pound the thick end

When the thick end is much taller than the thin end, gently pound only the bulky part with a meat mallet or rolling pin. Aim for an even piece, roughly 3/4 inch to 1 inch / 2 to 2.5 cm thick for average chicken breasts.
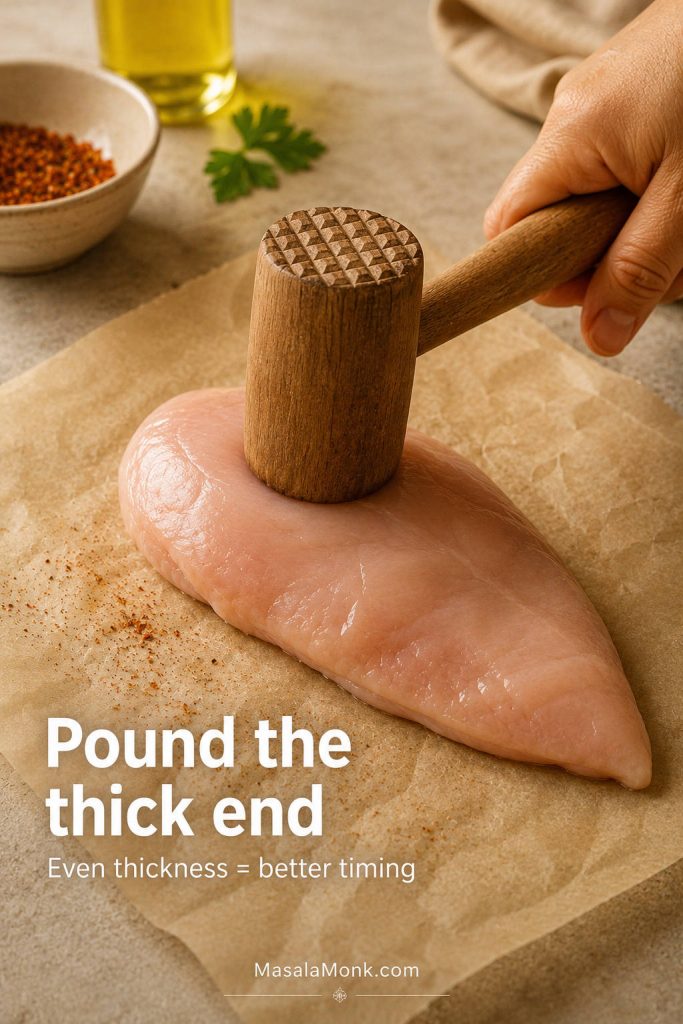
Raw chicken breast being pounded at the thick end to create a more even thickness before baking.
Pounding the thick end helps the center and edges finish closer together, so you are not waiting on one bulky section while the rest dries.

When to Slice Large Chicken Breasts Horizontally

Extra-large chicken breasts usually need a different move: slice them horizontally into thinner pieces instead of forcing one thick piece to cook evenly. This makes the timing more predictable and, more importantly, helps avoid a dry outside with an undercooked center.
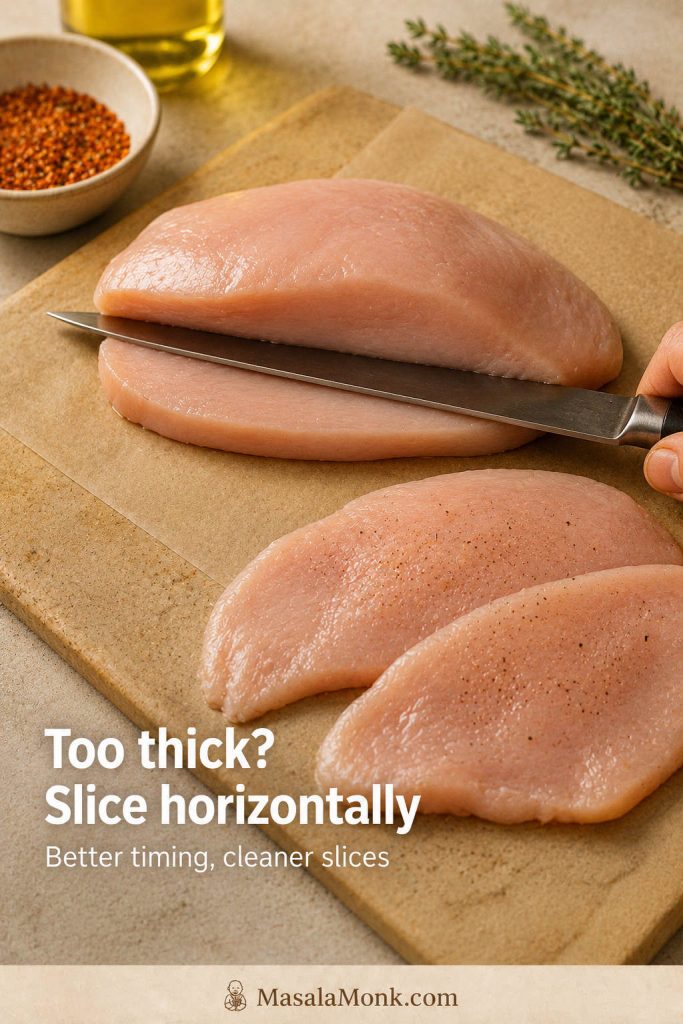
Extra-large raw chicken breast being sliced horizontally into thinner pieces before baking.
For extra-large chicken breasts, slicing horizontally creates thinner pieces that season better, cook faster, and finish more evenly.

4. Season the chicken

Mix the salt, paprika, garlic powder, onion powder, black pepper, herbs, and optional brown sugar in a small bowl. Then rub the chicken with oil and coat both sides with the seasoning. Season all sides, not just the top.

5. Bake uncovered

Arrange the chicken in a single layer with a little space between pieces. Place the smoother side up if you want the best presentation. Bake on the middle rack, uncovered, until each piece reaches the safe temperature.
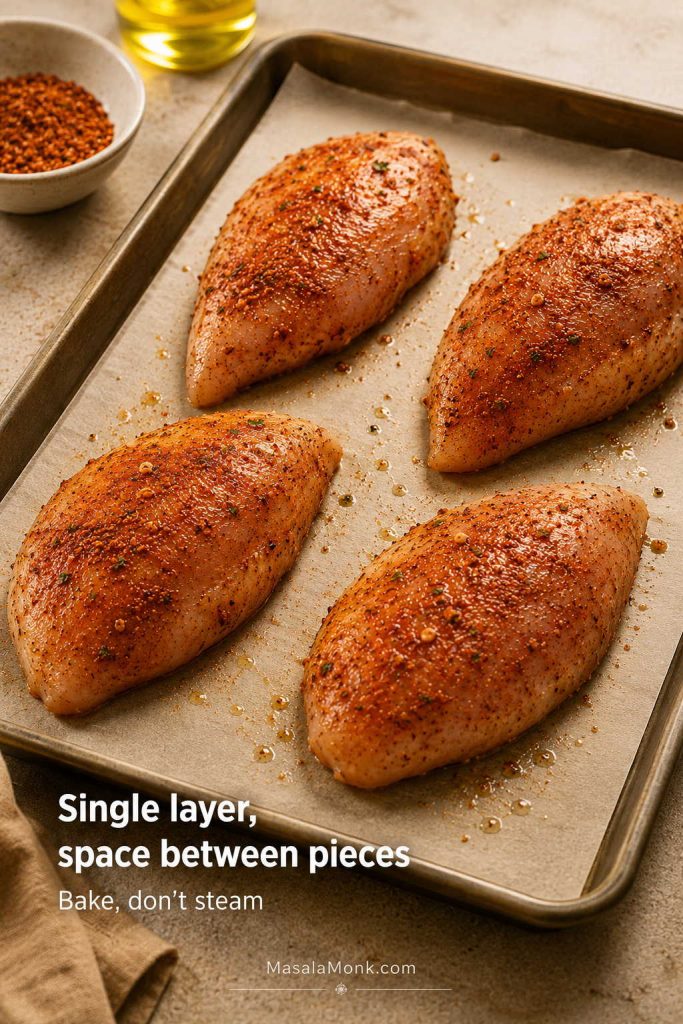
Seasoned chicken breasts spaced apart in a single layer on a parchment-lined sheet pan before baking.
Before baking, the tray should look organized: seasoned pieces in one layer, with enough room for heat to move around them.

Smaller or thinner pieces should come out early. Waiting for the largest breast is how the smaller one turns dry.

What the Chicken Should Look Like After Baking

When the chicken comes out of the oven, look for a lightly browned surface, seasoning that still clings, and a small amount of pan juice rather than a watery tray.
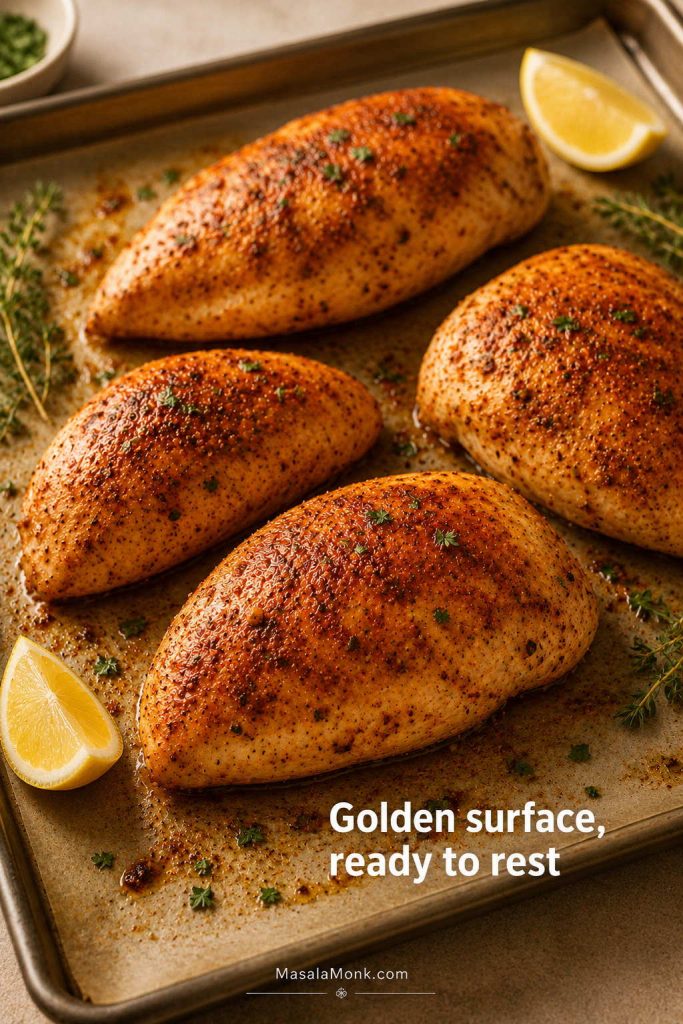
Golden baked chicken breasts on a sheet pan with herbs, lemon, browned bits, and light pan juices.
Look for light browning, seasoning clinging to the surface, and a small amount of pan juice—not a tray full of liquid.

For a full tray dinner instead of plain baked chicken breast, this Sheet Pan Chicken Fajitas recipe uses the same oven-friendly logic with sliced chicken, peppers, onions, and smoky seasoning.

6. Rest before slicing

Move the chicken to a cutting board and rest for at least 5 minutes. Then slice against the grain for the most tender texture. For meal prep, let the chicken cool before packing it into containers.
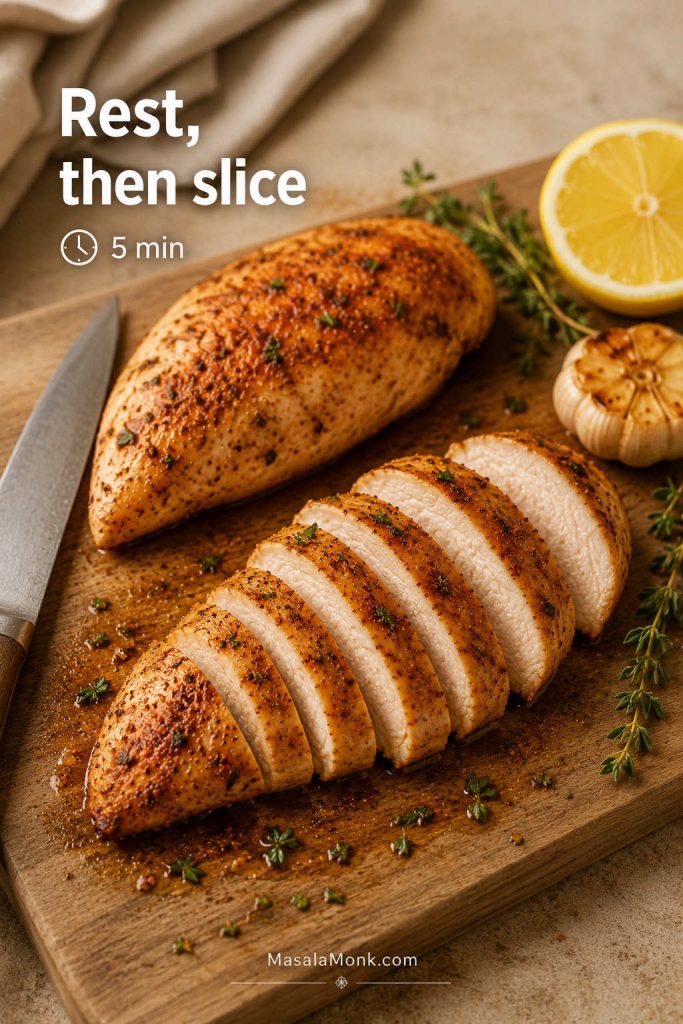
Baked chicken breast resting and sliced on a cutting board with herbs and lemon.
After baking, resting first and slicing second helps the chicken hold its texture instead of losing juices immediately on the board.

Should You Cover Chicken Breast While Baking?

For this recipe, bake the chicken uncovered. Covering traps steam and can make the surface wetter instead of lightly browned. However, covered baking can work well for saucy or casserole-style chicken recipes.

Do You Need to Flip Chicken Breast?

No, not for this method. Chicken arranged in a single layer on a sheet pan or shallow baking dish can bake without flipping. A wet pan or uneven oven may make flipping once useful, but it is not required.

What Good Baked Chicken Breast Looks Like

Good baked chicken breast should have a lightly browned, seasoned surface and a center that slices cleanly without looking wet, raw, chalky, or stringy. When you cut it after resting, you may see a little juice, but the board should not flood immediately.

The slices should bend slightly instead of crumbling, and the cut surface should still look moist enough to eat without hiding it under sauce. A breast that looks dry around the edges but underdone in the center was probably too thick or uneven before it went into the oven. Next time, pound the thick end or slice the breast horizontally before baking.
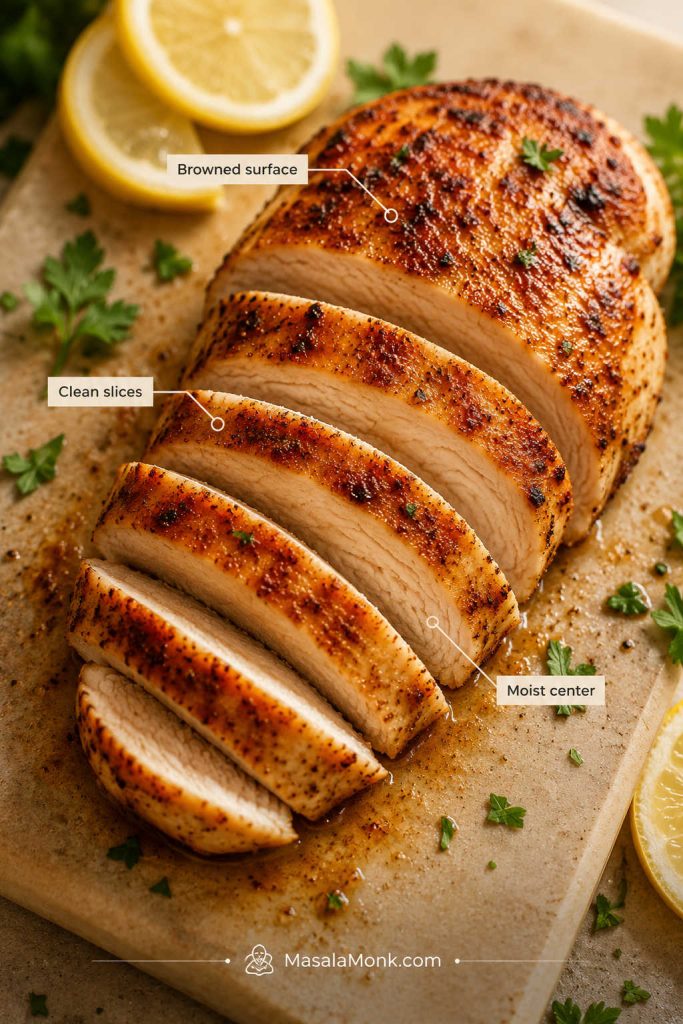
Sliced baked chicken breast labeled with browned surface, clean slices, and moist center.
Good baked chicken breast should look seasoned, slice cleanly, and stay moist without needing sauce to hide the texture.

How Long to Bake Chicken Breast

With this method, medium boneless chicken breast usually takes 18 to 22 minutes at 425°F / 220°C. Thin pieces can finish in 10 to 14 minutes, while large thick breasts may need 24 to 30 minutes or more.

Use 18 to 22 minutes as the normal starting point for medium chicken breasts. However, the wider 16 to 25 minute range covers smaller, thinner, larger, or uneven pieces. There is no single perfect timer setting because two pieces from the same pack can cook differently.

As a general rule, thin chicken breast cooks fast and dries fast. Thick chicken breast needs either more time or better prep, such as pounding or slicing horizontally. Smaller pieces may finish several minutes before larger ones, so remove them as they are done.

Baked Chicken Breast Time at 425°F / 220°C

Chicken breast size Approx weight Thickness guide Approx bake time at 425°F / 220°C
Thin-sliced breast or cutlet 3–5 oz About 1/2 inch / 1.25 cm 10–14 minutes
Small breast 5–6 oz / 150–180g 0.6–0.8 inch / 1.5–2 cm 13–18 minutes
Medium breast 7–8 oz / 200–225g 3/4–1 inch / 2–2.5 cm 18–22 minutes
Large breast 9–10 oz / 255–285g About 1 inch / 2.5 cm 22–26 minutes
Extra-large breast 11–12 oz / 310–340g Usually thick unless split or pounded 24–30+ minutes
The thermometer decides. These times are estimates. Once the center of the thickest piece reaches 165°F / 74°C, the chicken is ready to rest.
Baked chicken breast time chart at 425°F with timing for thin, small, medium, large, and extra-large pieces.
Use this bake-time chart as a starting point; then, check the thickest part because thickness can change the timing by several minutes.

Using 350°F, 375°F, 400°F, or 450°F instead? Use the oven temperature chart next.

Best Oven Temperature for Baked Chicken Breast

The best oven temperature for most boneless skinless chicken breasts is 425°F / 220°C. It is hot enough to cook quickly and brown lightly, but still manageable if you check early and use similar-size pieces.

That said, 425°F is not the only correct temperature. A 400°F / 200°C oven is better when you want a slightly gentler bake or have larger pieces. When the breasts are even in thickness, 425°F gives faster cooking with better surface color.
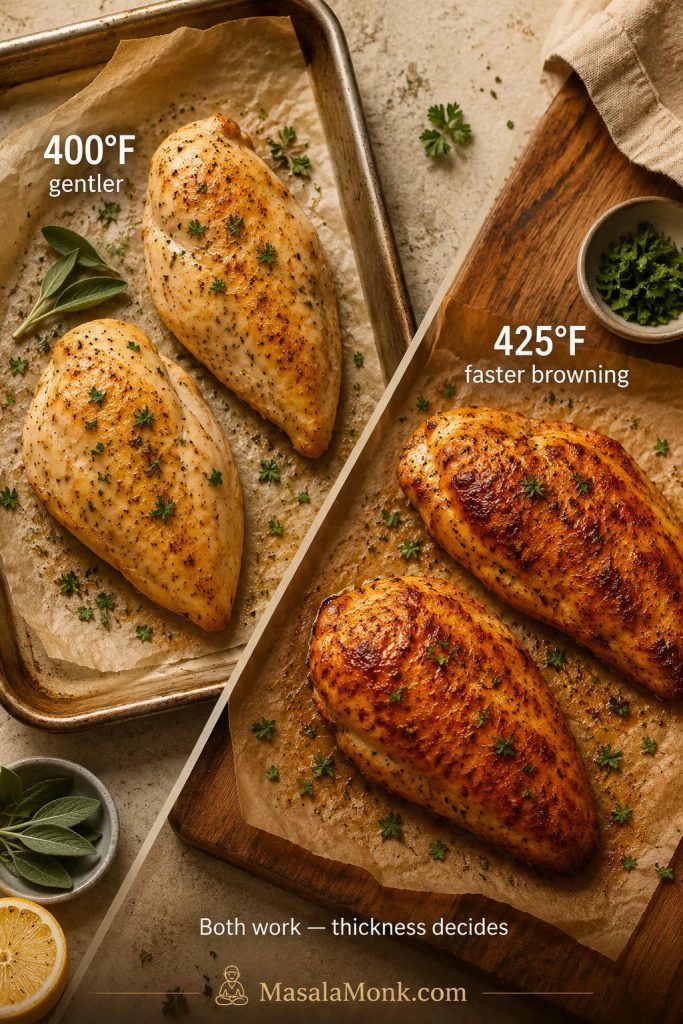
Comparison of baked chicken breast at 400°F and 425°F with gentler baking and faster browning notes.
For larger or less even pieces, 400°F gives you more margin; for even breasts, 425°F helps the surface brown before the meat dries out.

Chicken Breast Oven Temperature Chart

Use this chart when your oven is already set to a different temperature, your chicken is larger than average, or you simply feel more comfortable with a gentler bake. The timing changes, but the final check stays the same.

Oven temperature Best for Approx time for medium boneless breast
350°F / 175°C Gentle bake, less browning, slower cooking 25–35 minutes
375°F / 190°C Larger or thicker breasts, gentler cooking 22–30 minutes
400°F / 200°C Balanced weeknight bake 18–26 minutes
425°F / 220°C Best default for tender, lightly browned chicken 16–25 minutes
450°F / 232°C Fastest bake, best for thinner/even pieces, less forgiving 15–22 minutes

If you are unsure, choose 425°F for plain seasoned chicken breast, 400°F for a slightly gentler middle ground, and 375°F for very large pieces or saucier recipes. Lower heat is not automatically juicier; it just gives the chicken more time in the oven, so temperature checking still matters.
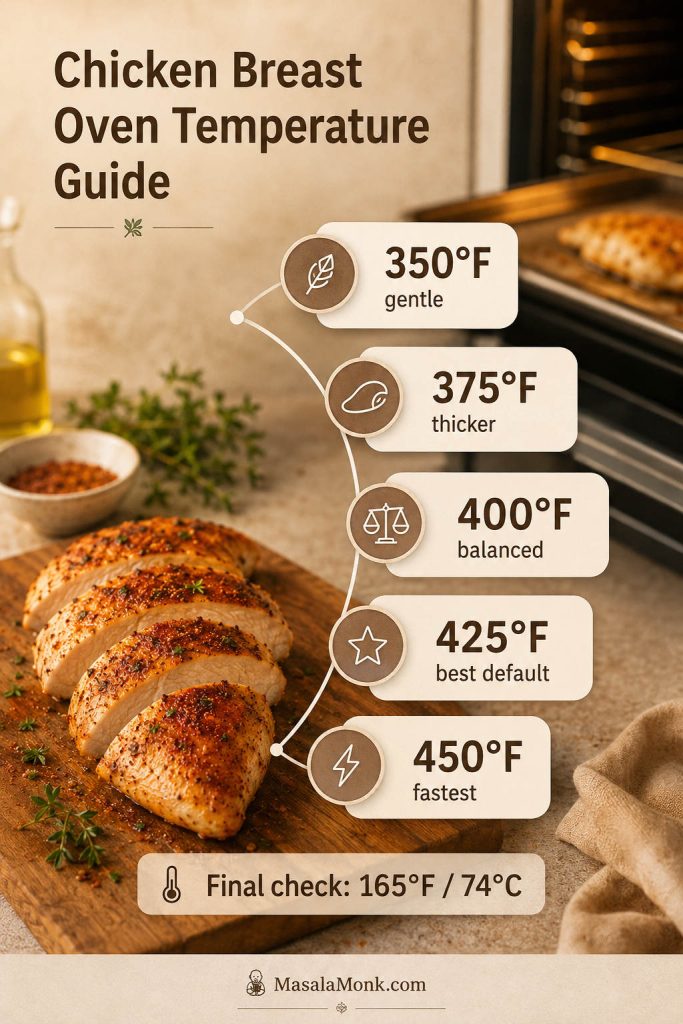
Chicken breast oven temperature guide showing 350°F, 375°F, 400°F, 425°F, and 450°F options.
Lower oven temperatures are gentler, while higher temperatures brown faster; however, every version still needs the same 165°F / 74°C doneness check.

Whichever oven temperature you choose, finish with the internal temperature check instead of relying only on time.

How Long to Bake Chicken Breast at 350°F

At 350°F / 175°C, medium boneless chicken breasts usually take about 25 to 35 minutes. This temperature is gentle, but it gives less browning and can dry the chicken if it stays in the oven too long.

How Long to Bake Chicken Breast at 375°F

At 375°F / 190°C, medium boneless chicken breasts usually take about 22 to 30 minutes. This is a good option for thicker pieces or recipes with a wetter marinade or sauce.

How Long to Bake Chicken Breast at 400°F

At 400°F / 200°C, medium boneless chicken breasts usually take about 18 to 26 minutes. This is a balanced middle temperature if you do not want to bake as hot as 425°F.

How Long to Bake Chicken Breast at 425°F

At 425°F / 220°C, medium boneless chicken breasts usually take about 16 to 25 minutes, depending on thickness. This is the default temperature for the main recipe because it gives the best balance of speed, tenderness, and light browning.

How Long to Bake Chicken Breast at 450°F

At 450°F / 232°C, chicken breast cooks fast, often in about 15 to 22 minutes. This temperature can work well for even pieces, but it is less forgiving. Check early, and avoid using bakeware that is not rated for high heat.

Internal Temperature for Baked Chicken Breast

The safe internal temperature for baked chicken breast is 165°F / 74°C in the center of the thickest piece. Use an instant-read thermometer and measure the largest breast first. Do not rely only on color, juices, or the outside texture.

You can use the FoodSafety.gov safe minimum internal temperature chart as the authority for poultry doneness. It lists chicken, turkey, and other poultry at 165°F / 74°C.
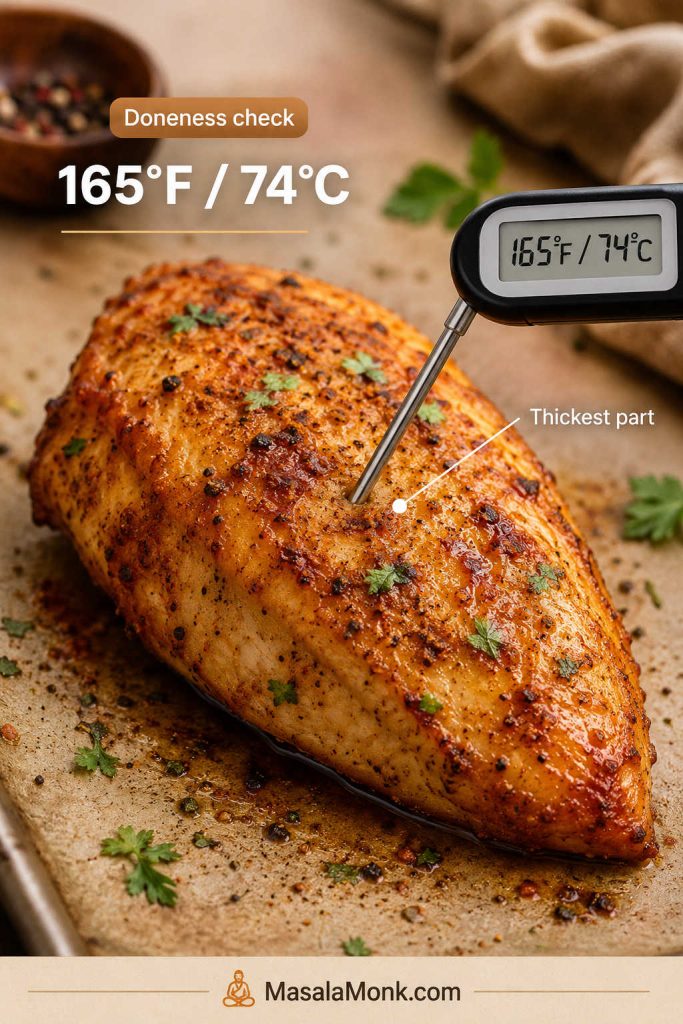
Instant-read thermometer inserted into the thickest part of baked chicken breast showing 165°F / 74°C.
The timer can only estimate doneness; the thermometer tells you when the thickest part has reached 165°F / 74°C.

When checking the temperature, avoid touching the pan. For bone-in chicken breast, insert the thermometer near the deepest part of the meat without touching bone.

Can You Pull Chicken Breast at 160°F?

The simplest safety rule is to cook chicken breast until the thickest part reaches 165°F / 74°C. Some experienced cooks remove chicken around 160°F and let carryover heat finish the last few degrees while it rests, but that only makes sense if you are using an accurate thermometer and the chicken continues rising to 165°F. If you want the clearest beginner-friendly target, use 165°F.

What If You Do Not Have a Thermometer?

A thermometer is the only reliable way to know chicken has reached 165°F / 74°C without overcooking it. Without one, use the timing chart only as an estimate and cut into the thickest piece to check that it is no longer pink. Color and juices are less reliable than temperature, so an instant-read thermometer is worth buying if you cook chicken often.

Thin vs Thick Chicken Breast

Thickness matters more than the number on the timer. A thick 6 oz chicken breast can take longer than a flatter 8 oz chicken breast because heat has to reach the center.

For thin-sliced chicken breast or cutlets, start testing around 8 to 10 minutes at 425°F / 220°C. Thin pieces dry out quickly, so do not wait for the same timing you would use for a full chicken breast.
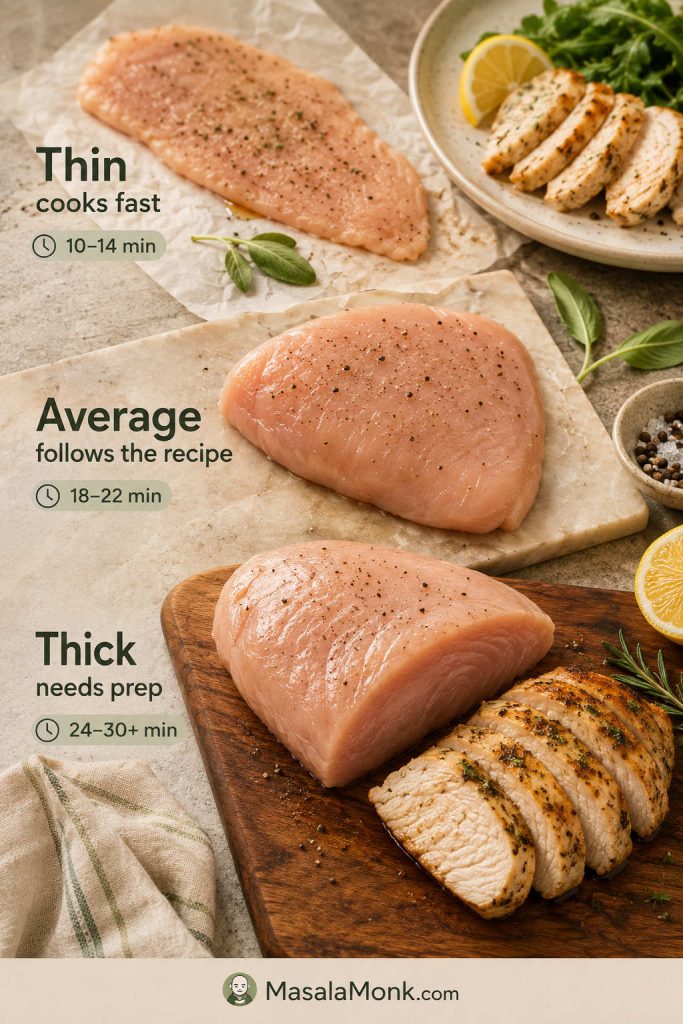
Thin, average, and thick chicken breasts with bake-time cues for each size.
Thin pieces need speed, average pieces follow the recipe more closely, and thick chicken breasts usually need prep before timing becomes reliable.
Type What to do Timing note
Thin-sliced chicken breast Season lightly, bake fast, check early Often 10–14 minutes at 425°F
Average chicken breast Use the main recipe method Usually 18–22 minutes at 425°F
Large thick chicken breast Pound, butterfly, or slice horizontally Can take 24–30+ minutes if left thick
Uneven pieces Sort by size or remove smaller pieces early Do not force every piece to finish at the same time

Why Large Chicken Breasts Cook Unevenly

Large chicken breasts can look done at the edges before the center is ready. That is why thick pieces need either a gentler bake, more time, or better prep before they go into the oven.
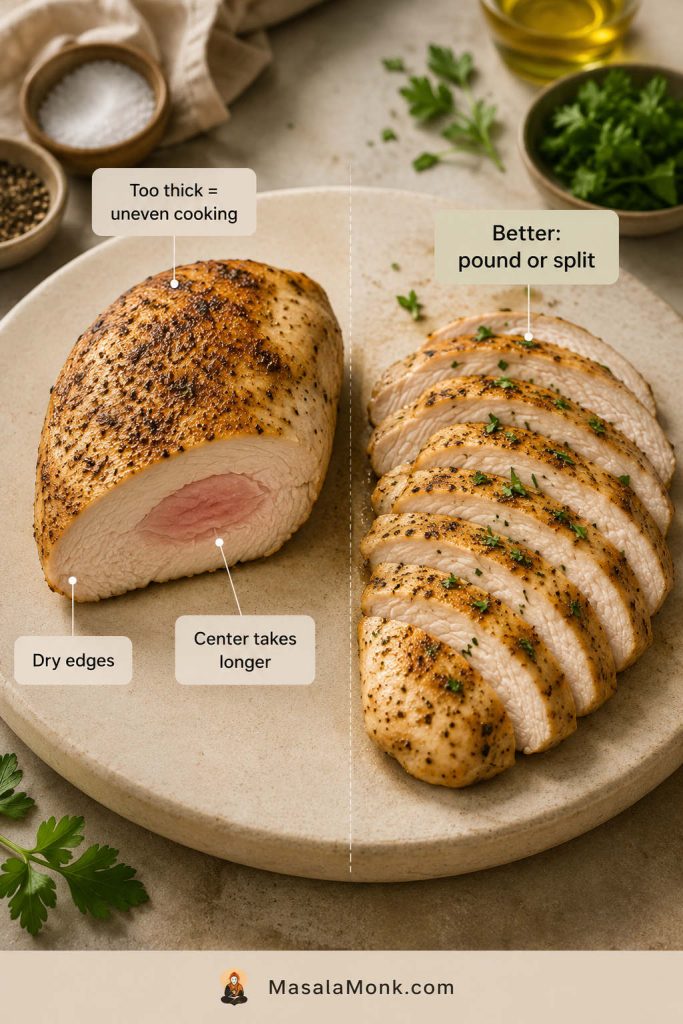
Large thick baked chicken breast showing dry edges and a center that takes longer, compared with better pounded or split chicken.
A thick chicken breast can dry around the edges while the center lags behind, which is why pounding or splitting changes the result.

Boneless Skinless vs Bone-In Chicken Breast

This recipe is written for boneless skinless chicken breast because it is the most common choice for quick dinners and meal prep. Bone-in skin-on chicken breast, also called split chicken breast, is juicier and more flavorful, but it takes longer.
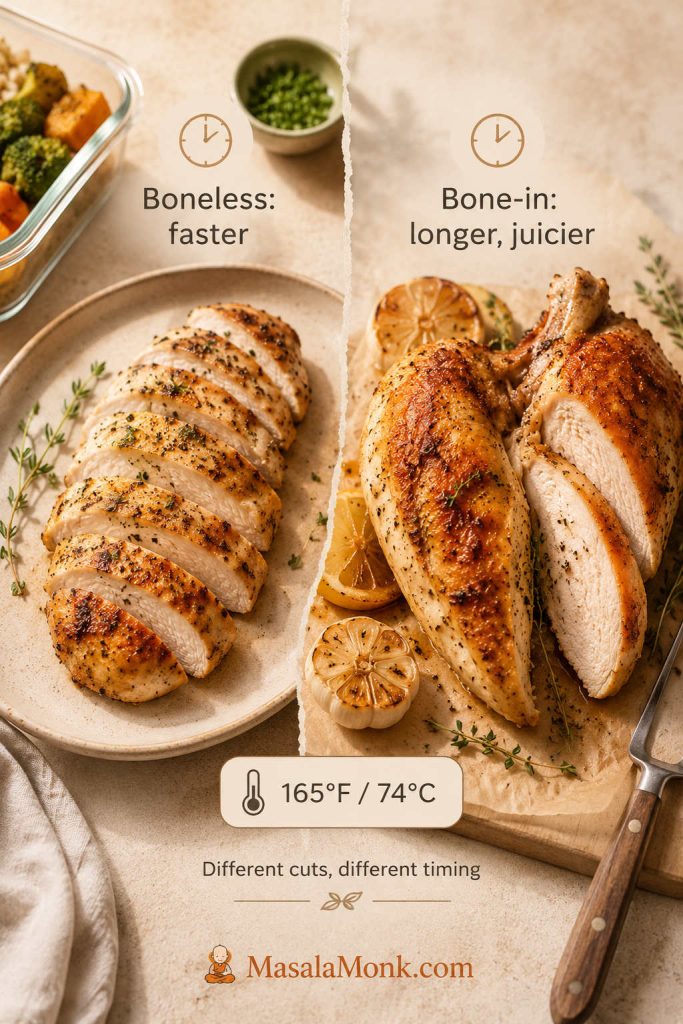
Boneless sliced chicken breast compared with bone-in split chicken breast, with 165°F / 74°C doneness cue.
Boneless chicken breast is faster for weeknight cooking, while bone-in split breast takes longer and gives you a little more forgiveness.
  • Boneless skinless chicken breast: fastest, leanest, easiest for salads, bowls, wraps, pasta, and sandwiches.
  • Bone-in skin-on chicken breast: more flavorful and forgiving, but slower to bake.
  • Do not use the same bake time for both. Bone-in chicken breast needs more time, and the thermometer should go near the thickest part without touching bone.

As a rough guide, bone-in split chicken breasts often need closer to 35 to 45 minutes at 400°F / 200°C, depending on size. However, the thermometer still decides, so check the thickest part of the meat without touching bone.

Why This Method Keeps Chicken Breast Juicy

Chicken breast usually gets dry for one of three reasons: the pieces are uneven, the chicken is baked too long, or it is sliced before the juices settle. Seasoning can make chicken taste better, but it cannot fully rescue meat that has been overcooked.

This method fixes those problems directly. Pound the thick end, coat the surface with oil and seasoning, bake hot, measure the thickest piece, and rest before slicing. Once you stop treating the timer as a guarantee, baked chicken breast becomes much easier to repeat.

  • Use similar-size pieces. Chicken breasts of the same size cook more evenly.
  • Pound the thick end. This prevents the thin end from drying out while the center finishes.
  • Do not skip the oil. Oil helps protect the surface and carries flavor.
  • Bake hot and uncovered. A hot oven cooks the chicken efficiently and gives better color.
  • Let temperature decide. Overcooking is the main reason chicken breast gets dry.
  • Remove smaller pieces early. If one breast is thinner, it may finish before the others.
  • Rest before slicing. Give the juices a few minutes to settle.
  • Slice against the grain. This makes the chicken feel more tender.

If your chicken breast keeps turning out dry, it probably does not mean you are bad at cooking chicken. It usually means the pieces needed a little prep before they went into the oven.

Should You Brine Chicken Breast Before Baking?

You do not need to brine chicken breast for this recipe. If the chicken is even in thickness and you use a thermometer, it can still come out tender and moist. However, a quick brine can help if your chicken breasts are very large, very lean, or often turn out dry.

If dinner is in 30 minutes, skip the brine and focus on the bigger wins: even thickness, oil, seasoning, hot oven, and a reliable doneness check.

Quick Chicken Breast Brine

  • 4 cups / 950 ml cold water
  • 2 tbsp kosher salt, or 1 tbsp fine salt
  • Brine for 15–30 minutes
  • Pat very dry before seasoning
  • Use less salt in the seasoning after brining
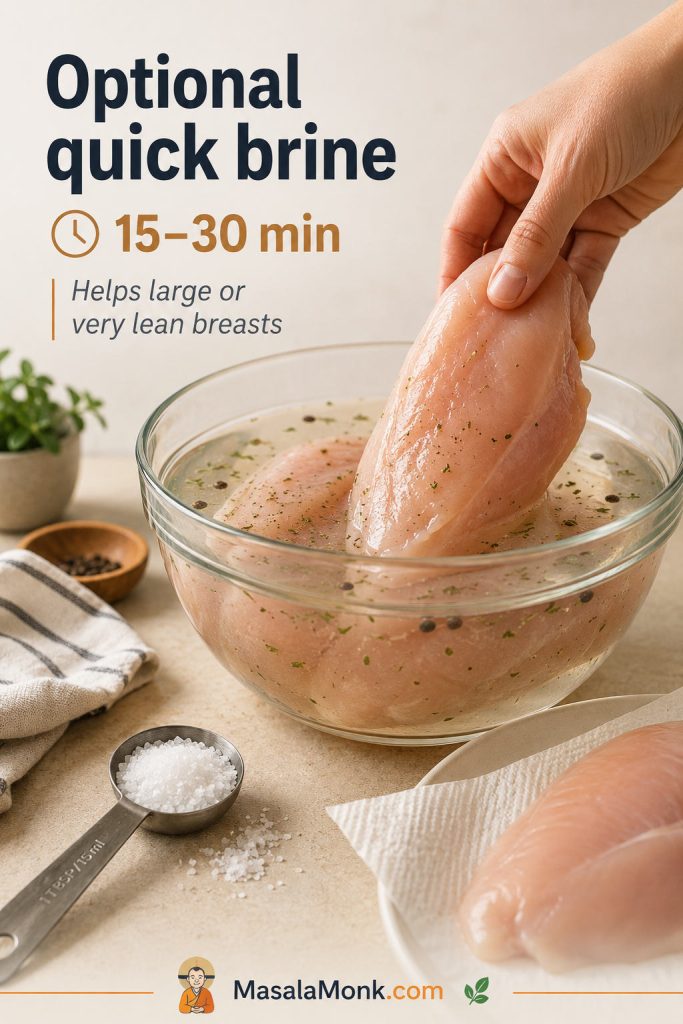
Raw chicken breast being placed in a glass bowl of saltwater brine with salt and herbs nearby.
A quick brine can help large or very lean chicken breasts, although it still cannot replace even thickness or a proper temperature check.
Salt note: Different salts have different crystal sizes. A tablespoon of fine salt is not the same as a tablespoon of flaky kosher salt. If you are unsure, brine lightly and reduce the salt in the seasoning rub.

Can You Marinate Chicken Breast Before Baking?

Yes, you can marinate chicken breast before baking. A short marinade of 30 minutes can add flavor, while a longer marinade can help with meal prep. However, very acidic marinades can change the texture if the chicken sits too long.

If the chicken has been sitting in a wet marinade, do not pour all of that liquid into the pan. Let excess drip off first and pat the surface lightly if needed. A little moisture is fine, but too much liquid makes the chicken steam instead of bake, which reduces browning and can create watery pan juices.
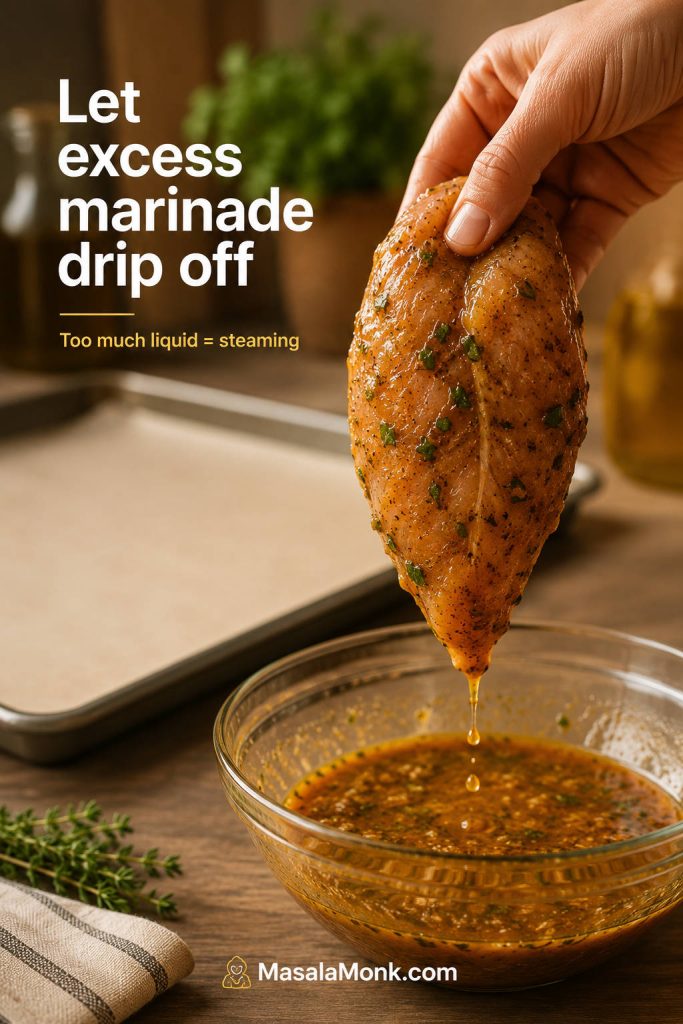
Marinated chicken breast being lifted from a bowl so excess marinade can drip off before baking.
Let excess marinade drip off before baking, because too much liquid in the pan makes the chicken steam instead of brown.

Can You Bake Frozen Chicken Breast?

For best results, thaw chicken breast before baking. Thawed chicken seasons more evenly, cooks more predictably, and is easier to pound before it goes into the oven.

If baking from frozen, make sure the pieces are separated, not frozen together in a block. As a rough guide, frozen chicken breast can take about 1.5 times as long as thawed chicken, especially if the pieces are thick. Check the thickest piece carefully because the chicken still needs to reach 165°F / 74°C.
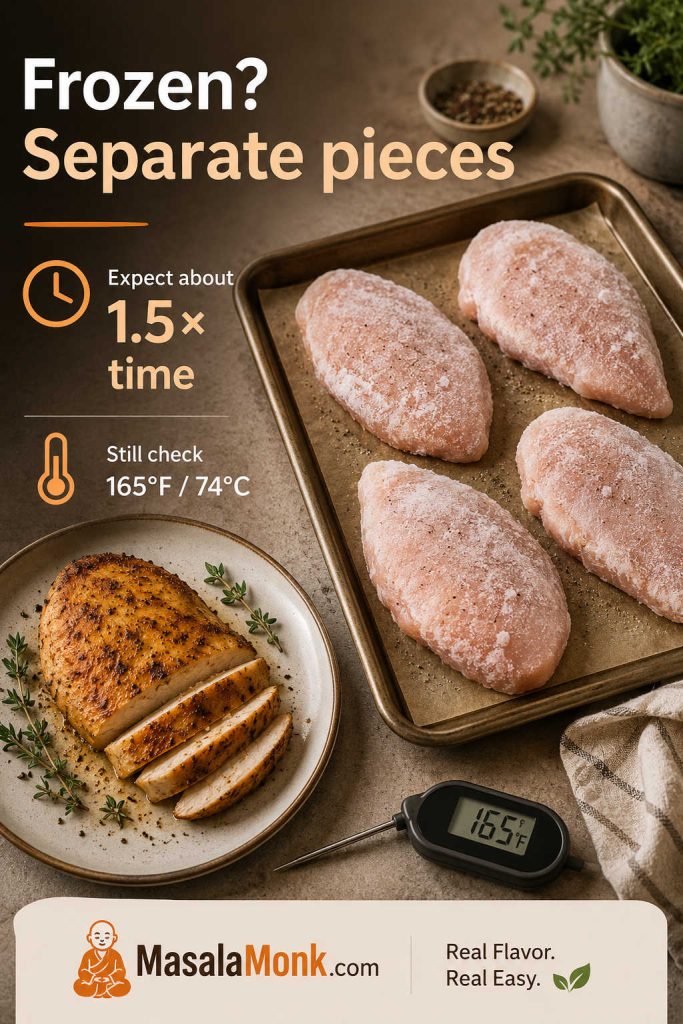
Separated frozen chicken breasts on a sheet pan with timing and 165°F internal temperature guidance.
Separated frozen chicken breasts cook more predictably than a frozen block, although the thermometer still matters more than the clock.

Because frozen chicken needs longer, use timing as a rough guide and finish with the internal temperature check.

Do not thaw chicken on the counter. Refrigerator thawing is the easiest safe method; cold-water and microwave thawing are faster, but the chicken should be cooked right away afterward. For a deeper safety reference on thawing chicken and cooking from frozen, the USDA FSIS Chicken from Farm to Table guide explains safe thawing methods and cooking guidance.

Baked Chicken Breast Variations

Once the method is working, the flavor can change easily. Keep the same oven temperature and doneness target, then adjust the seasoning or sauce.

For sweet sauces like BBQ or honey mustard, bake the chicken almost all the way first, then brush on the sauce during the final few minutes. This gives flavor without burning the sugars.

Six Baked Chicken Breast Flavor Directions
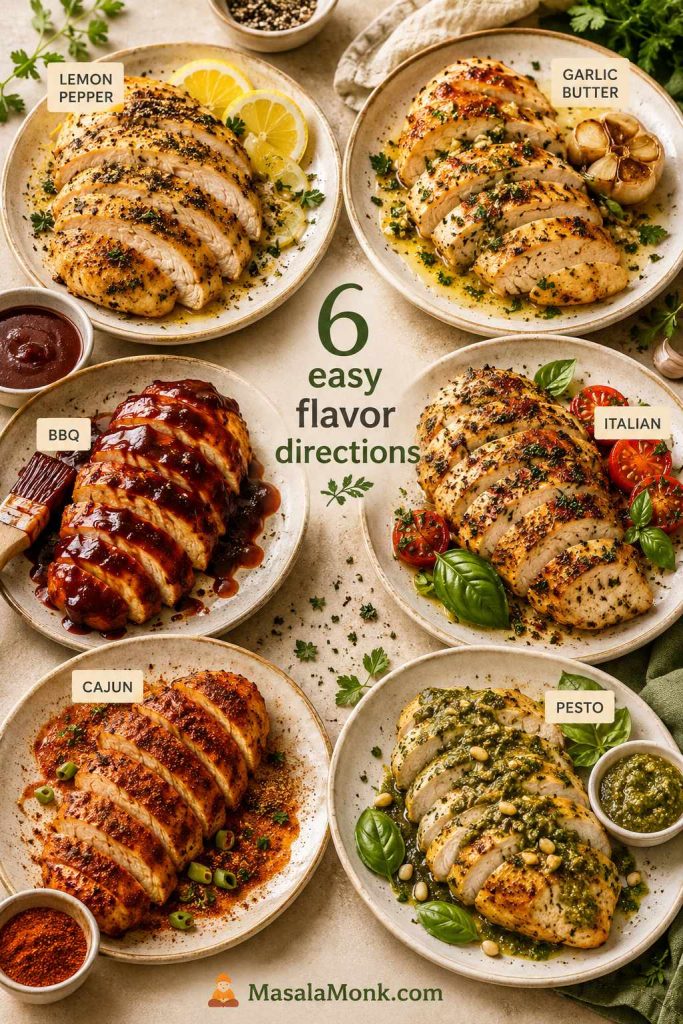
Six baked chicken breast flavor variations including lemon pepper, garlic butter, BBQ, Italian, Cajun, and pesto.
Once the base method works, lemon pepper, BBQ, Cajun, pesto, and other flavor directions can change the meal while keeping the same doneness target.
  • Lemon pepper baked chicken breast: use lemon pepper, garlic powder, and a squeeze of fresh lemon after baking.
  • Garlic butter baked chicken breast: finish with melted butter, minced garlic, parsley, and pan juices.
  • BBQ baked chicken breast: bake most of the way, brush with barbecue sauce near the end, and return to the oven briefly.
  • Italian baked chicken breast: use Italian seasoning, garlic, paprika, and a little parmesan after baking.
  • Cajun baked chicken breast: use Cajun seasoning and serve with rice, salad, or pasta. If you want a creamier pasta dinner, this Cajun Chicken Pasta is a natural next recipe.
  • Honey mustard baked chicken breast: brush with honey mustard near the end so the sugars do not burn.
  • Pesto baked chicken breast: spoon pesto over the chicken after baking, or add it during the final few minutes. Leftover sliced chicken also works well in Chicken Pesto Pasta.
  • Spicy chili-lime chicken breast: use chili powder, paprika, garlic, lime juice, and a little oil.

When to Use Another Chicken Method

Use another method when the result changes. This recipe is best for simple seasoned chicken breast. For saucy shredded chicken, these Crock Pot Chicken Breast Recipes are better for pull-apart chicken that stays moist in its cooking juices. For creamy pasta or a complete tray meal, use a recipe built for that result instead of forcing this plain baked method to do everything.

Sauces and Serving Ideas

The nice thing about simple baked chicken breast is that it does not trap you into one meal. When you are serving it as a main dish, a quick sauce makes it feel more complete without changing the basic method.

Easy Sauces for Baked Chicken Breast
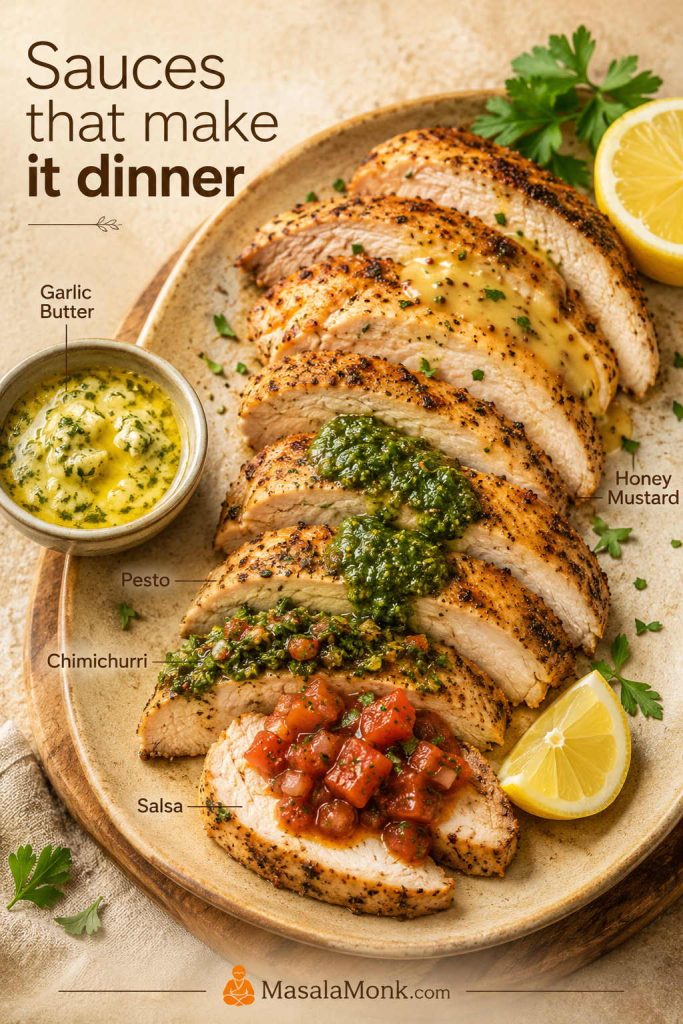
Sliced baked chicken breast served with garlic butter, pesto, chimichurri, honey mustard, and salsa.
A sauce gives baked chicken breast a second life at the table; garlic butter, pesto, chimichurri, honey mustard, or salsa can change the whole meal.
  • Garlic butter
  • Lemon pan juices
  • Honey mustard
  • Barbecue sauce
  • Pesto
  • Salsa
  • Mushroom cream sauce
  • Yogurt herb sauce
  • Hot sauce and butter

For a fresh herb sauce that makes plain baked chicken breast taste brighter, try spooning over homemade chimichurri. It works especially well when the chicken is sliced for rice bowls, potatoes, vegetables, or next-day lunches.

What to Serve with Baked Chicken Breast
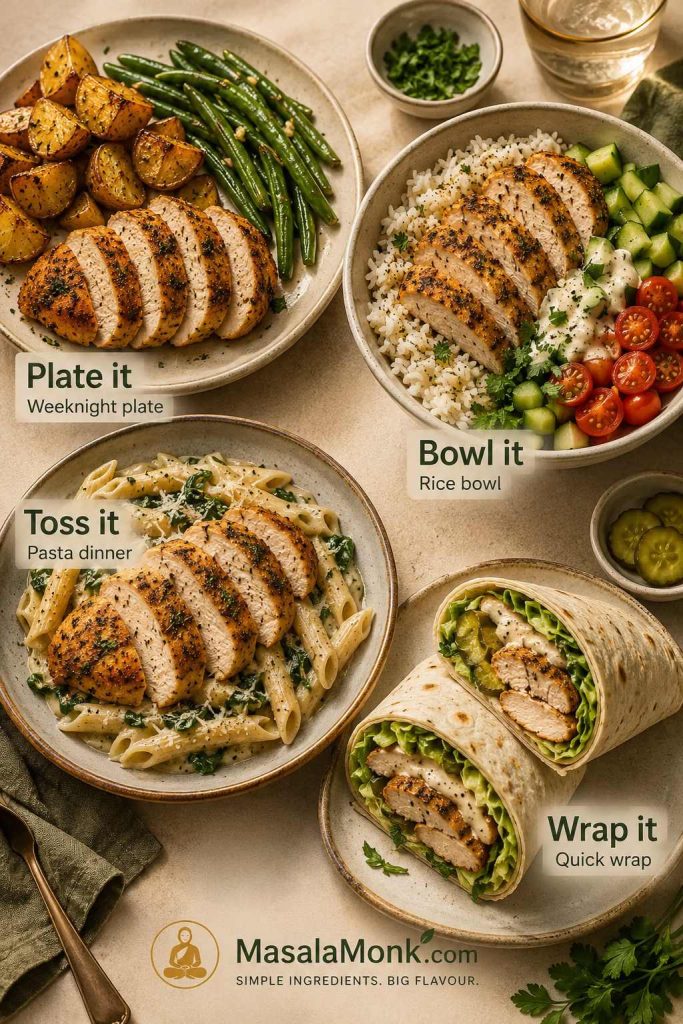
Four serving ideas for baked chicken breast including a weeknight plate, rice bowl, pasta dinner, and wrap.
Pairing chicken with potatoes, rice, pasta, or wraps turns it into a complete meal instead of just plain protein on a plate.
  • Weeknight plate: sliced chicken, roasted potatoes, green beans, and garlic butter or pan juices.
  • Rice bowl: chicken, rice, cucumber, tomatoes, herbs, and chimichurri or yogurt sauce.
  • Meal-prep lunch: cold sliced chicken, potato salad, greens, and a lemony dressing.
  • Pasta dinner: cubed chicken, pesto or Cajun cream sauce, and a simple salad.
  • Quick wrap: sliced chicken, lettuce, sauce, pickles or onions, and a soft tortilla.
  • Soup or noodle bowl: sliced chicken added at the end so it warms through without drying out.

For a make-ahead side that works with cold sliced chicken, wraps, or picnic-style plates, this Potato Salad recipe guide gives you classic, lighter, and variation-friendly options.

Baked Chicken Breast for Meal Prep

This recipe works well for meal prep because the chicken can be sliced, cubed, or shredded after cooking. Keep the seasoning simple if you want to use it in several meals during the week, then save stronger sauces for the day you serve it.

The point of baked chicken breast is not just tonight’s dinner. It is tomorrow’s salad, the wrap you can make in five minutes, the pasta that needs protein, and the lunch that does not feel like punishment. When the chicken is cooked gently and stored well, it becomes useful instead of dry meal-prep filler.
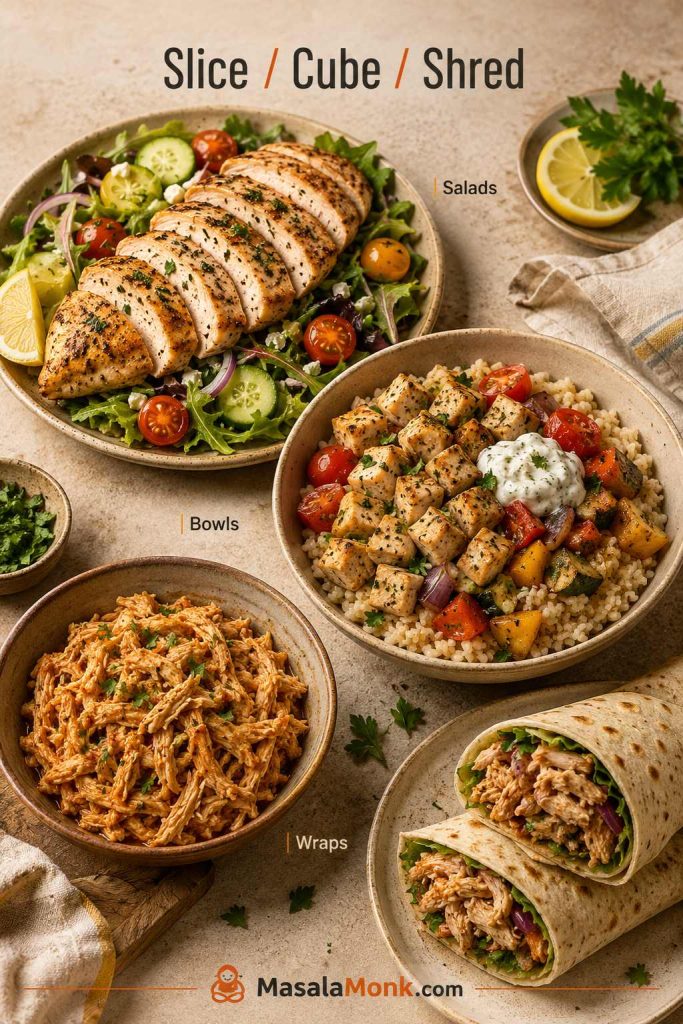
Baked chicken breast prepared three ways for meal prep: sliced for salad, cubed for bowls, and shredded for wraps.
For meal prep, slice some chicken for salads, cube some for bowls, and shred some for wraps or saucy lunches later.
  • Cool the chicken before storing.
  • Slice it for salads, bowls, wraps, and sandwiches.
  • Cube it for pasta, rice bowls, and quick skillets.
  • Shred it for tacos, soups, and saucy meals.
  • Keep sauces separate until serving when possible.

How Much Cooked Chicken Does This Make?

Four medium chicken breasts usually give enough cooked chicken for 4 dinner portions or several meal-prep portions once sliced, cubed, or shredded. For salads, wraps, or bowls, slice the chicken after resting and store it in portions so it is easy to use during the week.

For lunch prep, leftover baked chicken breast can also become sandwiches. Start with these chicken sandwich recipes if you want BBQ, Buffalo, chicken salad, pesto, or quick café-style ideas.

Storage, Freezing, and Reheating

The main reheating mistake is blasting lean chicken breast until it dries out. Instead, reheat gently and add a little moisture if the chicken has already been sliced.

Task Best method
Refrigerate Store cooled chicken in an airtight container for 3–4 days.
Freeze Cool first, wrap well, and freeze for up to 2–3 months.
Reheat in microwave Add a splash of water, broth, or sauce; cover loosely and heat gently.
Reheat on stovetop Warm sliced chicken with a little broth, sauce, or pan juices over low heat.
Avoid Overheating lean chicken breast until it becomes dry and rubbery.

For salads, wraps, and sandwiches, safely stored baked chicken breast can be used cold straight from the fridge. For a hot plate, reheat only until warmed through; lean chicken breast gets dry when it is blasted a second time.
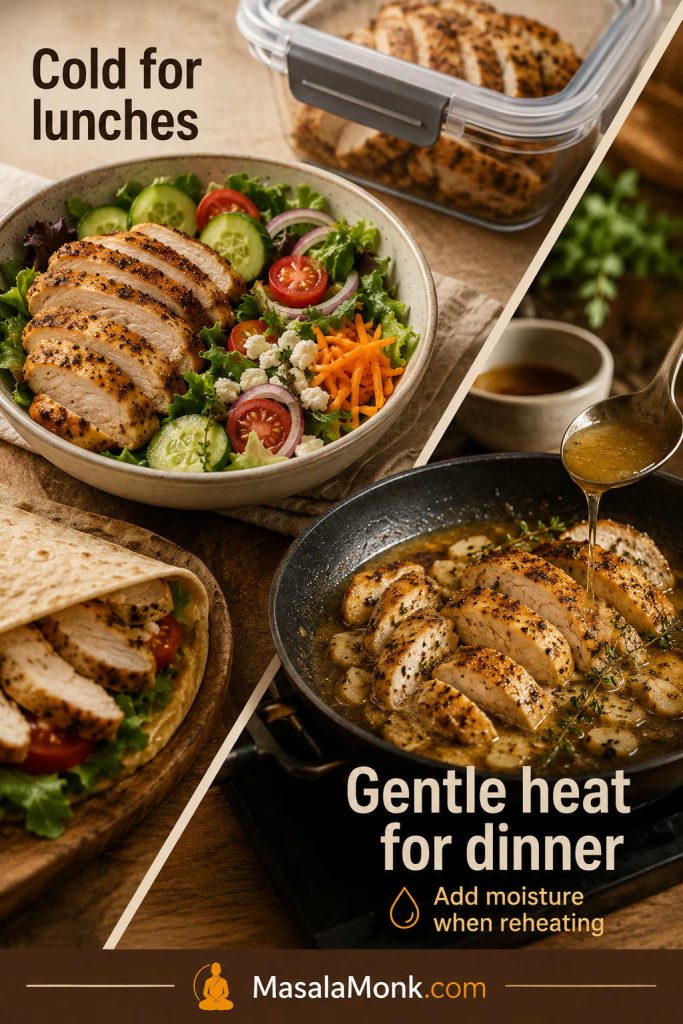
Baked chicken breast used cold in salad and wraps, plus sliced chicken reheated gently with moisture in a pan.
Safely stored chicken works cold for lunches; however, hot leftovers need gentle heat and a little moisture to stay pleasant.

Chopped or shredded leftovers are often better in moisture-rich lunches than reheated as plain slices. Fold them into chicken salad, tuck them into wraps, or mix them with a little sauce before reheating. This chicken salad sandwich recipe is a natural next step when you want leftover cooked chicken to taste intentional instead of leftover.

If the chicken already feels dry after reheating, jump to how to fix dry chicken breast instead of serving it plain.

Troubleshooting Baked Chicken Breast

Most baked chicken breast problems come from thickness, temperature, timing, or seasoning. Find the problem you had last time, then fix that one thing first.
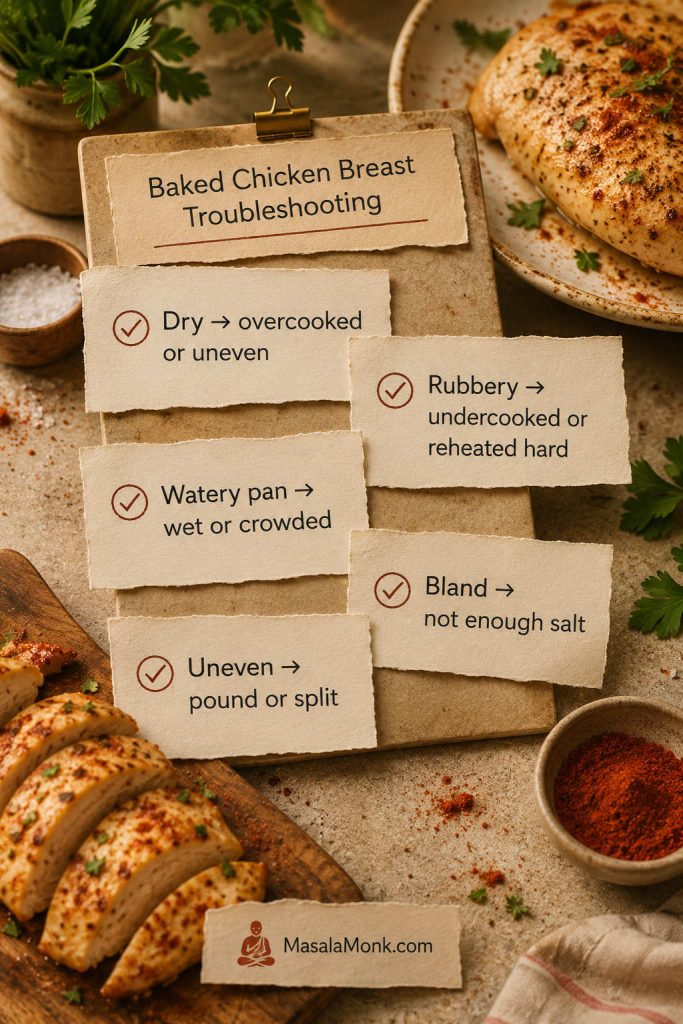
Troubleshooting guide for baked chicken breast with fixes for dry, rubbery, watery, bland, and uneven chicken.
When chicken breast turns out dry, bland, watery, rubbery, or uneven, the fix usually starts with thickness, seasoning, heat, or moisture.
Problem Likely cause Fix
Dry chicken Overcooked, uneven thickness, or sliced too soon Pound the thick end, use a thermometer, and rest before slicing.
Rubbery chicken Undercooked, cooked too low and slow, or reheated too aggressively Check the thickest part and reheat gently with moisture.
Bland chicken Not enough salt or seasoning Season all sides and use enough salt for the amount of chicken.
Watery pan juices Chicken was very wet, crowded, or heavily marinated Pat dry, avoid overcrowding, and use a rimmed sheet pan.
Outside dry, inside undercooked Chicken breast was too thick Butterfly, slice horizontally, or pound before baking.
Chicken cooked unevenly Pieces were different sizes or thicknesses Sort by size, pound thick pieces, and remove smaller pieces early.
Seasoning burned Too much sugar, broiler too long, or pan too close to heat Use less sugar, skip the broiler, or check earlier.
Chicken stuck to pan Not enough oil or no liner Use parchment or lightly oil the pan.

How to Fix Dry Chicken Breast After Baking

You cannot fully undo overcooked chicken breast, but you can make it much better. Slice it thinly across the grain and add moisture: pan juices, garlic butter, yogurt herb sauce, salsa, pesto, broth, gravy, or a creamy dressing. Dry baked chicken breast is often better chopped into chicken salad, folded into pasta, tucked into wraps, or simmered briefly in sauce than served as a plain whole breast.
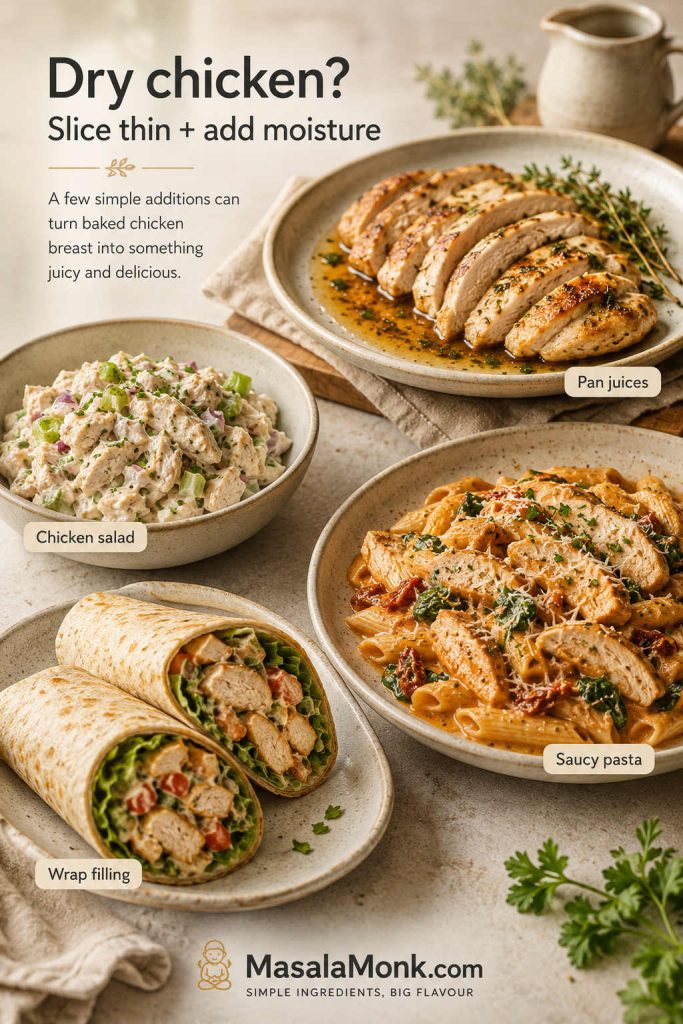
Dry baked chicken breast rescue ideas including pan juices, chicken salad, saucy pasta, and wrap filling.
Dry chicken cannot be uncooked, but slicing it thin and adding moisture can make it useful again in salads, pasta, wraps, or pan juices.
Help other readers with real timing: Chicken breast timing changes by size, thickness, oven, and pan. If you make this recipe, share your oven temperature, approximate chicken size or thickness, and how long it took to reach 165°F. Your note may help someone else avoid dry chicken.

Once you know what went wrong, return to the recipe card and adjust the thickness, timing, or temperature next time.

Common Mistakes to Avoid

  • Baking uneven pieces together without checking early: smaller pieces may finish before larger ones.
  • Skipping the oil: chicken breast is lean, so the surface needs a little fat to carry seasoning and protect texture.
  • Using the timer as a guarantee: time gets you close, but thickness and temperature decide.
  • Slicing immediately: give the chicken at least 5 minutes so the juices do not run out on the board.
  • Adding sauce too early: sweet sauces can burn at high heat, so brush them on near the end.
  • Cooking all pieces until the largest one is done: remove thinner pieces as they finish.

Baked Chicken Breast Recipe Card
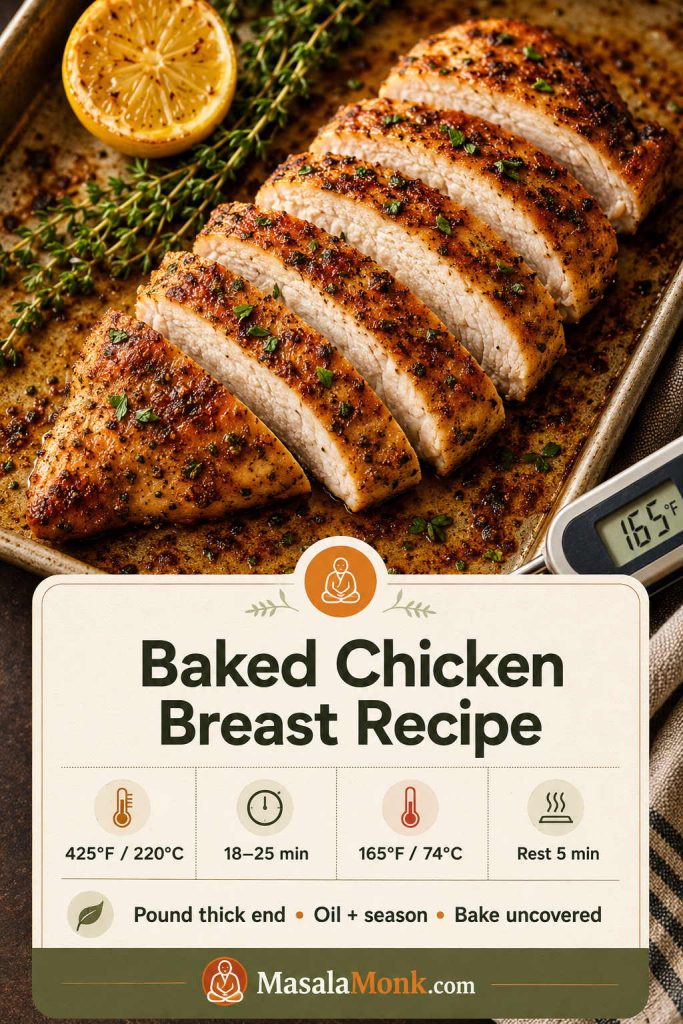
Saveable baked chicken breast recipe card with 425°F oven temperature, 18 to 25 minutes bake time, 165°F internal temperature, and 5 minute rest.
Save the core method: even the thick end, coat the surface, bake uncovered, check the internal temperature, and rest before slicing.

Baked Chicken Breast Recipe

This easy baked chicken breast recipe uses even thickness, a paprika-garlic seasoning, high oven heat, and a short rest for chicken that slices cleanly and stays useful for dinner or meal prep.

Prep Time10 minutes
Cook Time18–25 minutes
Rest Time5 minutes
Servings4

Ingredients

  • 4 boneless skinless chicken breasts, 5–8 oz / 150–225g each
  • 1 1/2 tbsp / 22 ml olive oil or avocado oil
  • 1 tsp fine salt, or to taste
  • 1 tsp paprika or smoked paprika
  • 1 tsp garlic powder
  • 1/2 tsp onion powder
  • 1/2 tsp black pepper
  • 1 tsp Italian seasoning, oregano, or thyme
  • 1–2 tsp brown sugar, optional, for better browning
  • Lemon wedges or chopped parsley, optional, for serving

Instructions

  1. Preheat the oven. Heat the oven to 425°F / 220°C. For fan or convection, use 400°F / 200°C fan and check early.
  2. Prep the chicken. Pat the chicken dry. Pound the thick end until the pieces are more even, or slice very large breasts horizontally.
  3. Mix the seasoning. In a small bowl, combine salt, paprika, garlic powder, onion powder, pepper, herbs, and optional brown sugar.
  4. Season. Rub the chicken with oil, then coat both sides evenly with the seasoning blend.
  5. Bake. Arrange in a single layer on a parchment-lined rimmed sheet pan or lightly oiled metal baking dish. Bake uncovered for 18–25 minutes, depending on size and thickness.
  6. Check doneness. Start checking smaller or thinner pieces early. Chicken breast is done when the center of the thickest part reaches 165°F / 74°C.
  7. Rest and serve. Rest for at least 5 minutes, then slice against the grain and serve with pan juices, lemon, parsley, sauce, salad, rice, potatoes, or vegetables.

Notes

  • No timer works for every chicken breast. Thickness, not just weight, changes the bake time, so check thin pieces early.
  • The seasoning should coat the surface evenly. If it looks patchy before baking, the finished chicken may taste uneven.
  • For a wet marinade, pat off excess before baking so the chicken browns better.
  • After brining, reduce the salt in the seasoning blend.
  • Smaller pieces should come out early instead of waiting for the largest piece.
  • For meal prep, cool before storing and reheat gently with a splash of broth, water, or sauce.

FAQs About Baked Chicken Breast

What is the best temperature to bake chicken breast?

For most boneless skinless chicken breasts, 425°F / 220°C is the best default. It cooks quickly, gives light browning, and works well when the pieces are similar in size. Use 400°F / 200°C if you want a gentler first try.

How long does chicken breast take in the oven?

At 425°F / 220°C, medium boneless chicken breast usually takes 18–22 minutes. Thin pieces may finish in 10–14 minutes, while large thick breasts can need 24–30 minutes or more. The safest answer still comes from checking the thickest piece, not just watching the clock.

How do I know baked chicken breast is done?

Measure the center of the thickest piece with an instant-read thermometer. Once it reaches 165°F / 74°C, the chicken is ready to rest. Color and juices can help you notice problems, but temperature is the reliable check.

Why is my baked chicken breast dry?

Usually because the chicken stayed in the oven too long, cooked unevenly, or was sliced too soon. Pound the thick end, use the thermometer, and rest before slicing. If it is already dry, slice it thin and use it with sauce, chicken salad, pasta, wraps, or rice bowls.

Should I cover chicken breast while baking?

For this recipe, bake chicken breast uncovered. Covering traps steam and can make the surface wet instead of lightly browned. Covered baking is better for saucy chicken or casserole-style recipes.

Is it better to bake chicken breast at 400°F or 425°F?

Both work. Use 400°F / 200°C when you want a slightly gentler bake or have larger pieces. Use 425°F / 220°C when the breasts are even in thickness and you want faster cooking with better surface color. Either way, use the thermometer instead of relying only on the timer.

How do I bake thin chicken breast?

Thin chicken breast cooks quickly. At 425°F / 220°C, thin-sliced chicken breast or cutlets may take only 10–14 minutes, so start checking early. Removing thin pieces on time matters more than following the timing for a full chicken breast.

What seasoning is best for baked chicken breast?

A simple mix of salt, paprika, garlic powder, onion powder, black pepper, and herbs works well for everyday baked chicken breast. Make sure it coats the surface evenly before baking so the finished chicken tastes seasoned, not patchy.

Can baked chicken breast be made ahead?

Yes. Let it cool, store it in an airtight container, and slice, cube, or shred it for salads, bowls, wraps, sandwiches, pasta, and quick dinners. Keep sauces separate when possible so the chicken stays flexible for different meals.

How do I reheat baked chicken breast without drying it out?

Reheat it gently with a splash of broth, water, sauce, or pan juices. Cover loosely and warm only until heated through. For salads, wraps, and sandwiches, safely stored chicken can also be used cold.

Can I use bone-in chicken breast?

Yes, but bone-in chicken breast takes longer than boneless chicken breast. Check near the thickest part without touching the bone, and do not use the boneless timing chart as the final guide.

The Takeaway
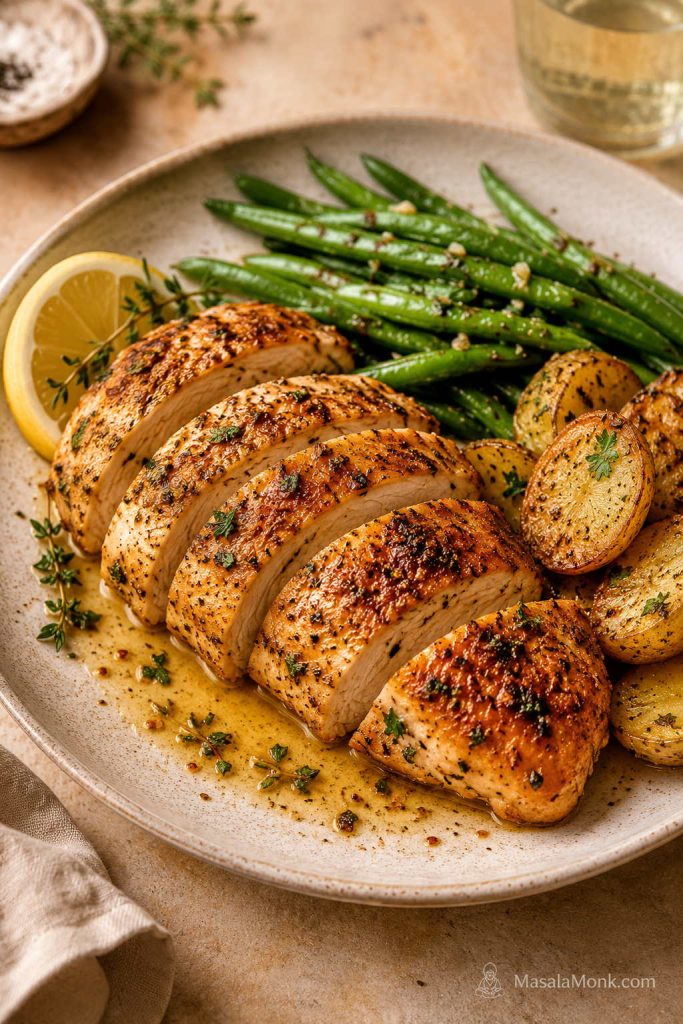
Finished baked chicken breast sliced and served with roasted potatoes, green beans, lemon, herbs, and pan juices.
When the timing and thickness are right, baked chicken breast becomes a dependable dinner protein instead of the dry part of the plate.

This baked chicken breast recipe gets easier once you stop treating the timer as the recipe. Start with the chicken in front of you: make uneven pieces more even, season them properly, bake hot, let temperature decide, and rest before slicing. Once you do that a few times, chicken breast stops feeling like the dry part of dinner and becomes one of the most useful proteins in your weeknight rotation.
Back to top

Posted on — Leave a comment

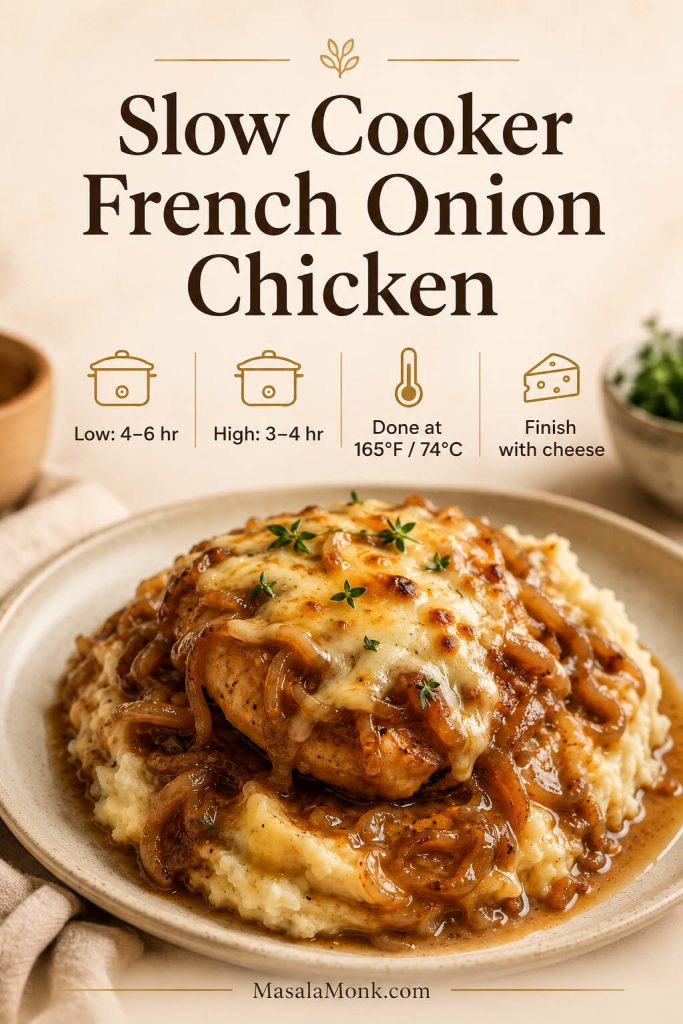
Slow Cooker French Onion Chicken

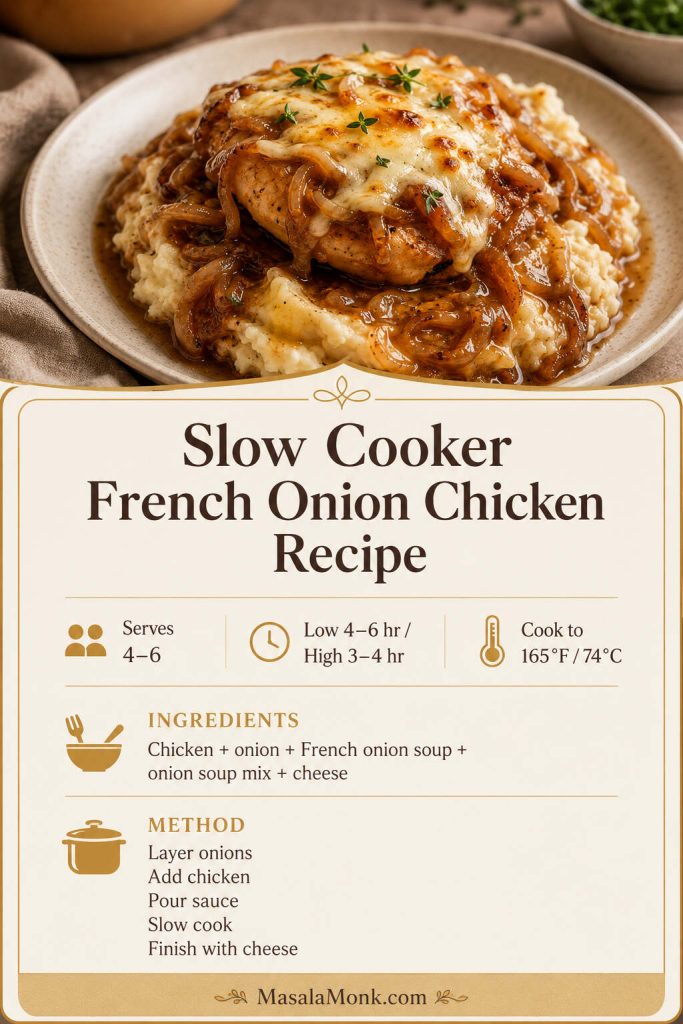
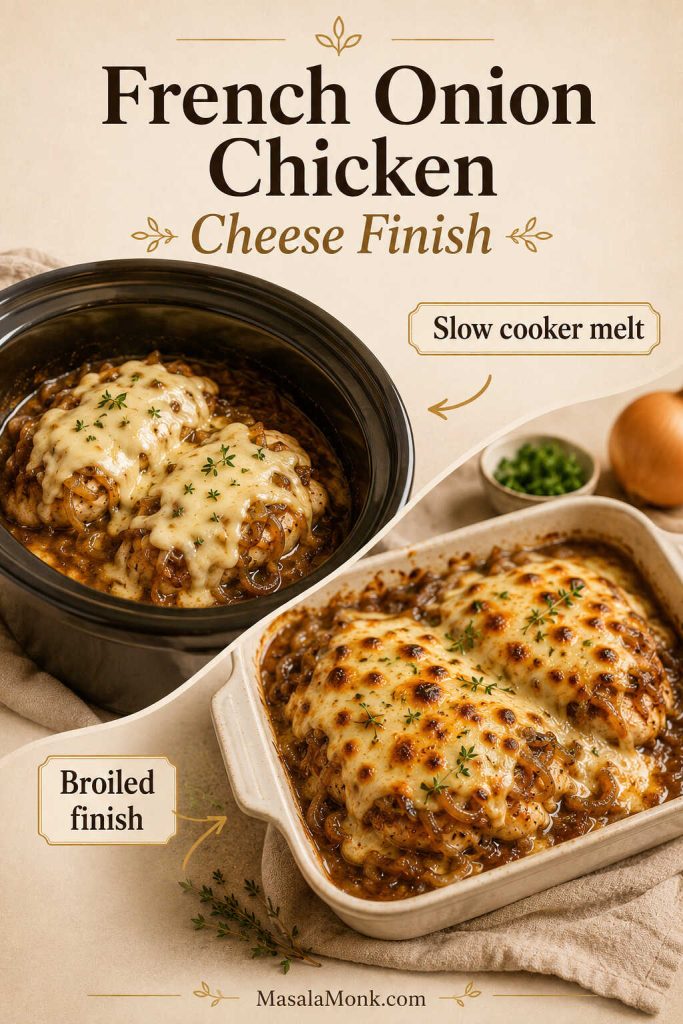
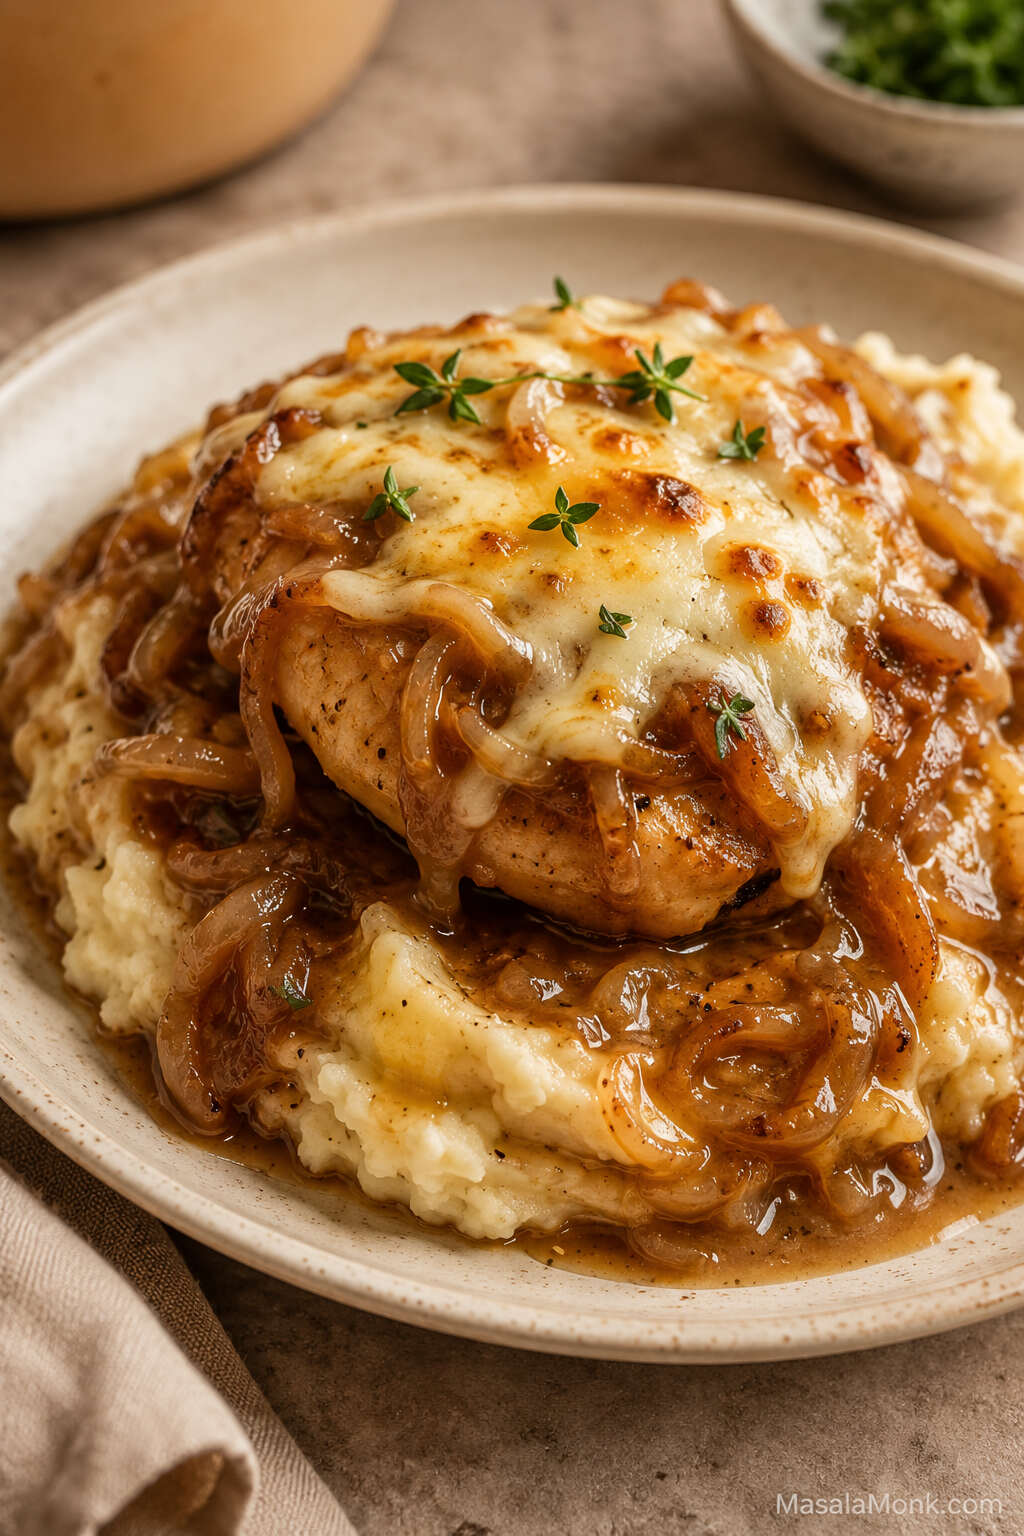
Slow cooker French onion chicken with melted cheese, soft onions, and onion gravy served over creamy mashed potatoes.

Slow Cooker French Onion Chicken is what you make when you want the comfort of French onion soup but need it to feel like dinner: tender chicken, soft onions, savory gravy, and melted cheese spooned over mashed potatoes, rice, egg noodles, or toasted bread.

The base version is a true shortcut dinner: chicken, sliced onion, condensed French onion soup, dry onion soup mix, a little broth, and cheese at the end. It is simple enough for a busy day, but a few small choices keep the chicken tender and the onion gravy balanced instead of watery, harsh, or too salty.

When you lift the lid, you want soft onions, a savory gravy smell, chicken that still tastes juicy, and cheese that melts over the top instead of disappearing into the sauce. That is why this guide covers cook times, chicken breasts vs thighs, onion soup mix balance, gravy thickening, and the best way to finish the cheese.

The main recipe uses condensed French onion soup and dry onion soup mix, but you can also make it creamy, use thighs instead of breasts, broil the cheese, add mushrooms, or use the no-canned-soup version when you want a more homemade onion sauce.

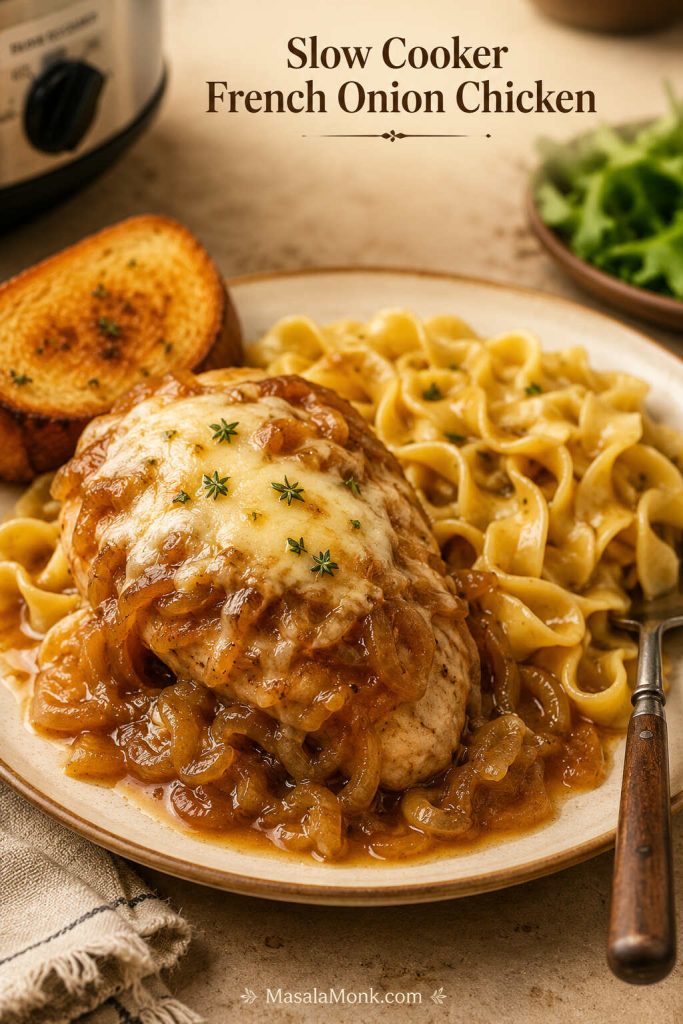
Before the timing details, this is the result to aim for: a full dinner plate with tender chicken, softened onions, glossy onion gravy, and something underneath to catch the sauce.

Finished slow cooker French onion chicken served over egg noodles with melted cheese, onion gravy, and toasted bread nearby.
Because the onion gravy needs something to catch it, noodles, potatoes, rice, or toast help turn the chicken into a complete comfort-food dinner.

Quick Answer: How Long to Cook Slow Cooker French Onion Chicken

Cook slow cooker French onion chicken on low for 4–6 hours or on high for 3–4 hours, depending on the thickness of the chicken and whether you want sliceable or shreddable meat. Thin chicken breasts may be ready closer to 3–4 hours on low. Boneless thighs can usually handle a little longer and stay juicier.

The chicken is done when the thickest piece reaches 165°F / 74°C on an instant-read thermometer. Add the cheese only after the chicken is cooked through, then cover the slow cooker until the cheese melts, or transfer the chicken to a broiler-safe dish for a browned, bubbling top.

Quick answer guide for slow cooker French onion chicken with low and high cook times, 165°F doneness, and cheese finish note.
Start with the cook time, but trust the thermometer: the thickest piece of chicken should reach 165°F / 74°C before the cheese goes on.

For food safety, use thawed chicken rather than frozen chicken in the slow cooker. FoodSafety.gov lists 165°F / 74°C as the safe minimum internal temperature for poultry, and USDA slow-cooker guidance recommends thawing meat or poultry before adding it to a slow cooker. FoodSafety.gov’s temperature chart and USDA/FSIS slow-cooker guidance are useful references if you want the safety details.

For more detail by chicken cut and thickness, use the low vs high cook-time guide below.

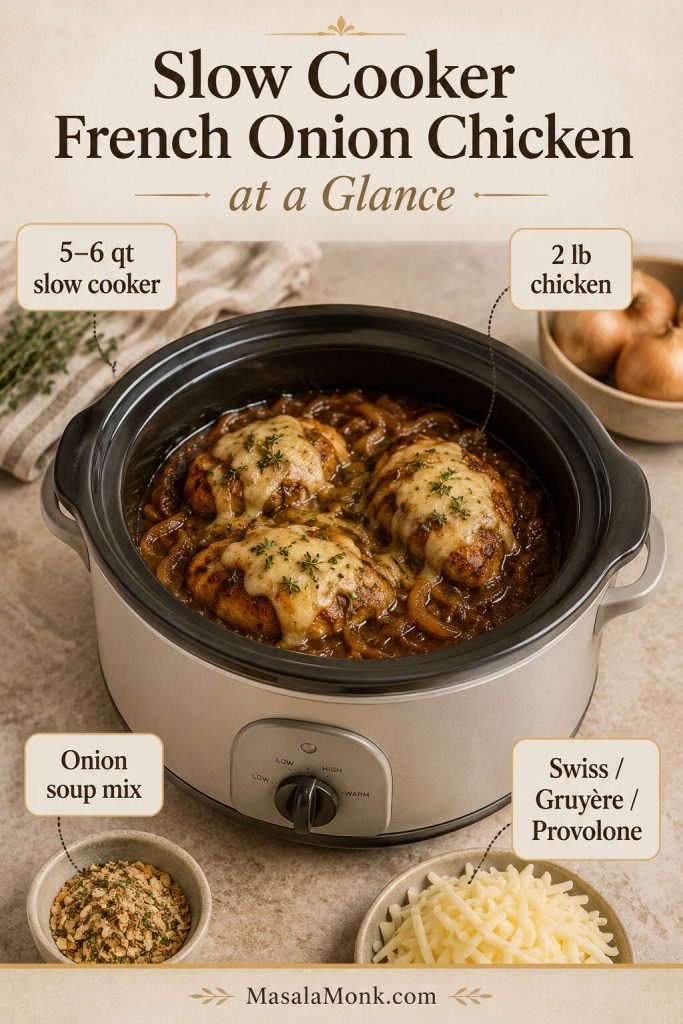
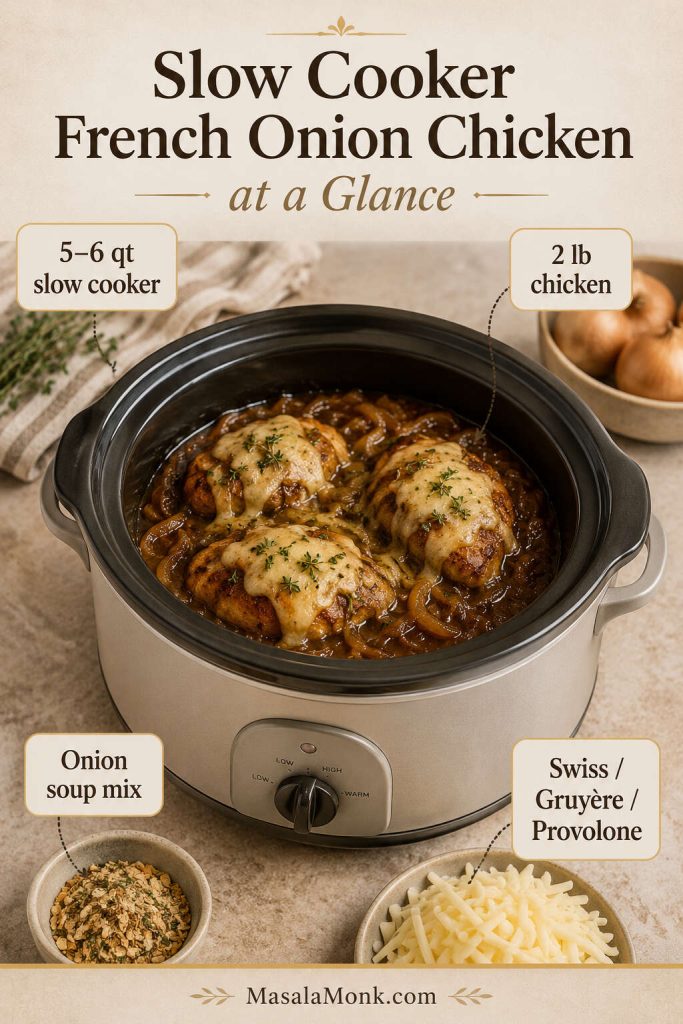
Slow Cooker French Onion Chicken at a Glance

Best slow cooker size 5- to 6-quart slow cooker for about 2 lb / 900 g chicken
Best chicken Boneless skinless breasts for a leaner, sliceable dinner; boneless thighs for juicier, more forgiving meat
Cook time Low 4–6 hours or high 3–4 hours, checking to 165°F / 74°C
Flavor base Condensed French onion soup, dry onion soup mix, sliced onions, low-sodium beef broth, Worcestershire, thyme, and cheese
Best cheese Gruyère for classic French onion flavor, Swiss for budget-friendly comfort, provolone for smooth melting
Best serving ideas Mashed potatoes, rice, egg noodles, pasta, toasted bread, roasted vegetables, or sandwich rolls
At-a-glance guide for slow cooker French onion chicken showing slow cooker size, chicken amount, onion soup mix, and cheese options.
A 5- to 6-quart slow cooker keeps the chicken mostly in one layer, helping the onions, broth, soup mix, and cheese cook more evenly around it.

Use the table as your baseline, then choose the texture you want: sliceable chicken for plates, shredded chicken for bowls and sandwiches, or a creamier sauce for noodles and rice.

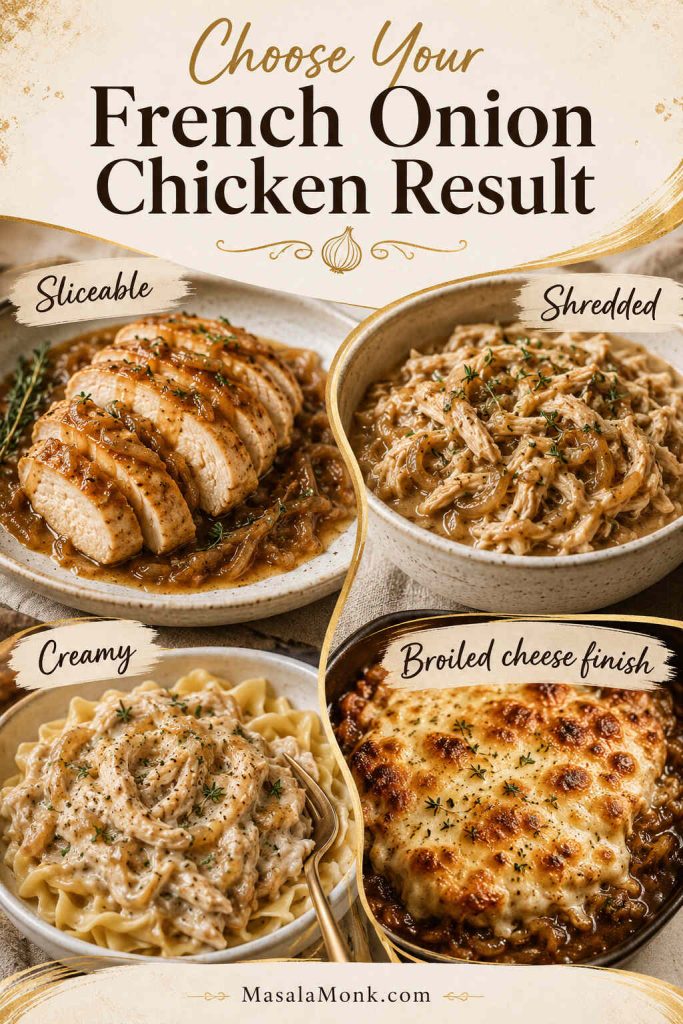
Choose Your Result: Sliceable, Shredded, Creamy, or Extra Cheesy

The best version depends on how you want to serve it. For a plated dinner, keep the chicken sliceable. For rice, noodles, mashed potatoes, or sandwiches, let it go softer and shred it into the onion gravy.

Slow cooker French onion chicken result guide with sliceable, shredded, creamy, and broiled cheese finish options.
Choose the result before you cook: sliceable chicken for plates, shredded chicken for bowls, creamy sauce for noodles, or broiled cheese for a deeper finish.
What you want Use Best method
Sliceable chicken Thin or evenly pounded chicken breasts Check early, around 3–4 hours on low
Shredded chicken and gravy Breasts or thighs Cook longer, then shred into the onion sauce
Juiciest version Boneless chicken thighs Cook low and slow; thighs are more forgiving
Creamy version Sour cream, Greek yogurt, cream cheese, or heavy cream Stir in at the end, after cooking
French onion soup-style finish Swiss, Gruyère, or provolone Broil the cheese for 2–5 minutes after slow cooking

Slow Cooker French Onion Chicken Recipe

This slow cooker French onion chicken cooks tender chicken in a savory onion gravy, then finishes with melted Swiss, provolone, or Gruyère cheese. Keep it simple with condensed French onion soup and onion soup mix, or use the notes below for thicker gravy, a broiled cheese finish, chicken thighs, creamy sauce, or a no-canned-soup version.

Prep Time10 minutes
Cook Time3–4 hours high or 4–6 hours low
Total TimeAbout 3 hr 10 min–6 hr 10 min
Servings4–6

Equipment

  • 5- to 6-quart slow cooker
  • Instant-read thermometer
  • Medium mixing bowl
  • Tongs
  • Optional broiler-safe dish for browning the cheese

Ingredients

  • 2 lb / 900 g boneless skinless chicken breasts or thighs
  • 1 large yellow or sweet onion, thinly sliced, about 200–250 g
  • 1 can condensed French onion soup, 10.5 oz / about 298 g, undiluted
  • 1 packet dry onion soup mix, 1 oz / 28 g
  • ½ cup / 120 ml low-sodium beef broth, plus more if needed
  • 1 tbsp / 15 ml Worcestershire sauce
  • 1 tsp Dijon mustard or 2 tsp balsamic vinegar, optional
  • ½ tsp black pepper
  • ½ tsp dried thyme or 2–3 fresh thyme sprigs
  • 4–6 slices Swiss, provolone, or Gruyère, or 1 cup / 100–115 g shredded cheese
  • Optional for thickening: 1 tbsp cornstarch + 1 tbsp cold water

Instructions

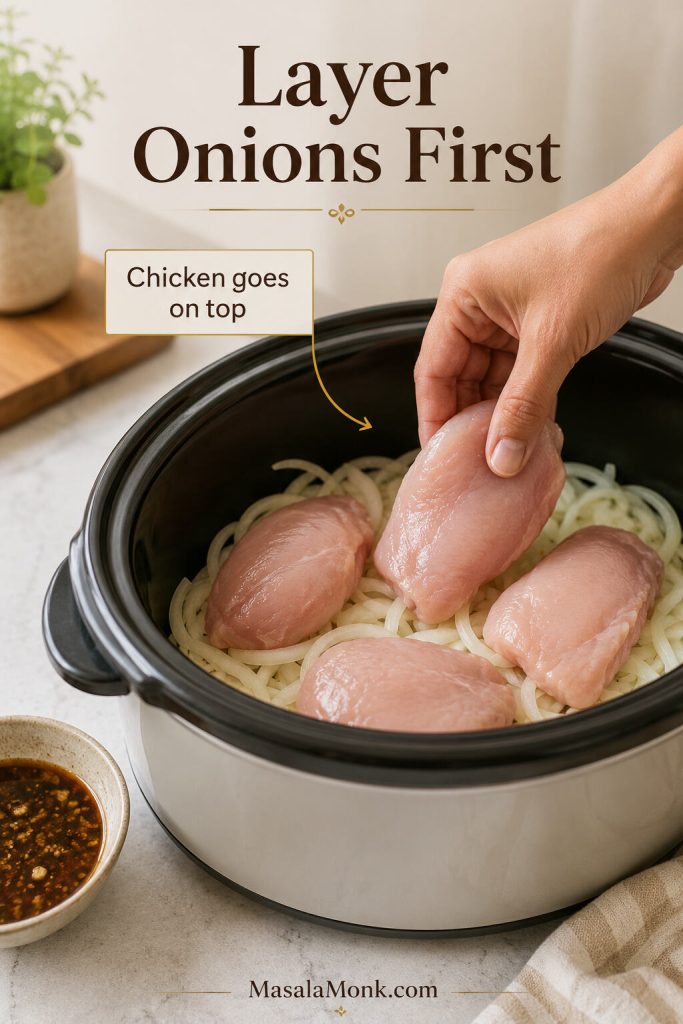
  1. Add the sliced onions to the bottom of a 5- to 6-quart slow cooker.
  2. Place the chicken over the onions in a mostly even layer.
  3. In a bowl, stir together the undiluted condensed French onion soup, dry onion soup mix, beef broth, Worcestershire sauce, Dijon or balsamic if using, black pepper, and thyme.
  4. Pour the sauce mixture over the chicken.
  5. Cover and cook on high for 3–4 hours or on low for 4–6 hours, until the thickest piece of chicken reaches 165°F / 74°C.
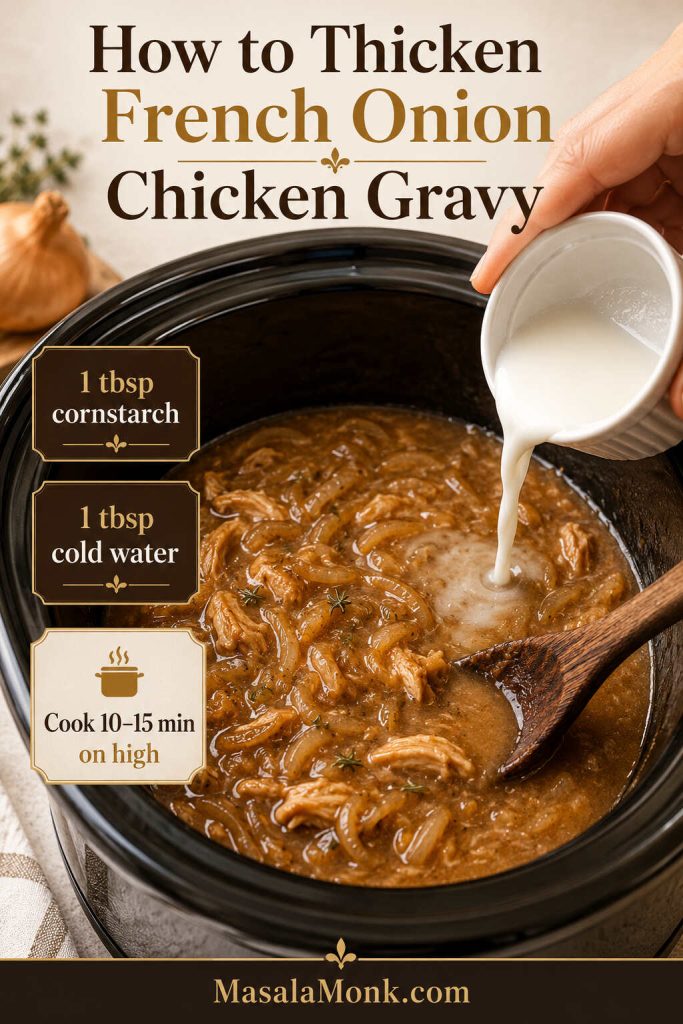
  6. If you want thicker gravy, remove the chicken to a plate. Stir together cornstarch and cold water, then stir the slurry into the slow-cooker sauce. Cover and cook on high for 10–15 minutes, until slightly thickened.
  7. Return the chicken to the sauce. Top with cheese, cover, and cook 10–30 minutes until melted.
  8. For a browned cheese finish, transfer the cooked chicken and some sauce to a broiler-safe dish, top with cheese, and broil for 2–5 minutes, watching closely.
  9. Serve over mashed potatoes, rice, egg noodles, pasta, toasted bread, or vegetables.

Notes

  • Use low-sodium broth because condensed soup, onion soup mix, and cheese already season the gravy.
  • If you prefer a milder onion gravy, start with ½ packet onion soup mix and add more only after tasting.
  • For sliceable chicken breasts, check early and avoid cooking much past 165°F / 74°C.
  • For shredded chicken, cook until very tender, shred into the sauce, then add cheese.
  • For a creamier sauce, stir in sour cream, Greek yogurt, cream cheese, or heavy cream at the end, once the slow cooker is on warm or the sauce is no longer bubbling hard.
Saveable slow cooker French onion chicken recipe card with servings, cook time, main ingredients, method, and 165°F doneness cue.
Keep the basic build simple, then use the extra notes when you want thicker gravy, a browned cheese top, or a no-canned-soup version.

Why This Recipe Works

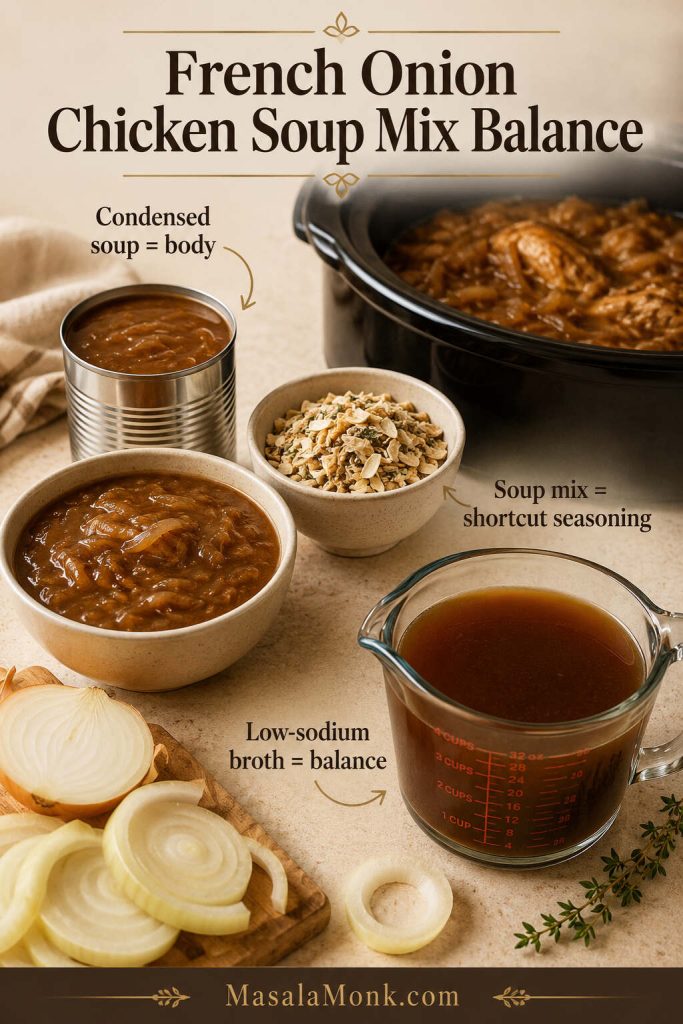
This recipe works because the onion flavor comes from three places: sliced onions for sweetness, condensed French onion soup for body, and dry onion soup mix for shortcut seasoning. Low-sodium broth loosens the sauce without diluting it, while Worcestershire, thyme, and a little Dijon or balsamic keep the flavor from tasting flat.

The cheese waits until the end because it has a job: it should sit on top like a French onion soup finish. Melt it in the slow cooker for the easiest version, or broil it for browned edges and a deeper, toastier flavor.

What the Finished Chicken Should Be Like

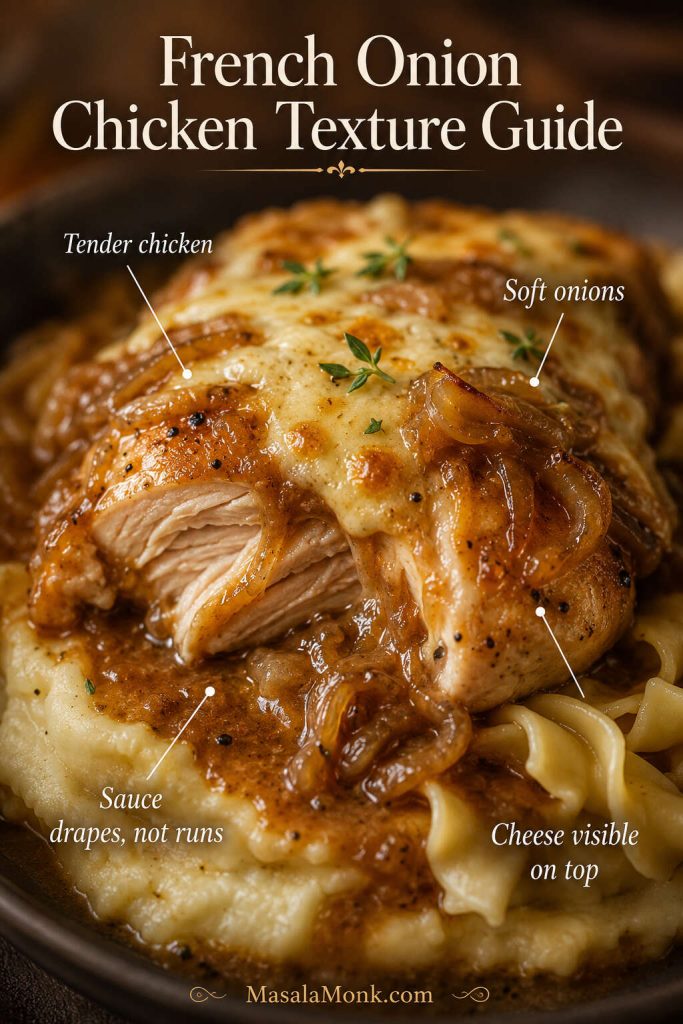
When this dish is right, the chicken should be tender enough to cut with a fork but not dry around the edges. The onions should be soft and tucked into the gravy, not sitting on top as sharp raw slices. You want a sauce that drapes over potatoes or noodles, not one that runs straight to the edge of the plate.

At the finish, the cheese should stay visible and melty instead of blending into the gravy. If you broil it, look for browned spots, bubbling edges, and that French onion soup feeling when the cheese pulls slightly as you serve it.

French onion chicken texture guide showing tender chicken, soft onions, melted cheese, and gravy draping over the food.
The best onion gravy should drape instead of run, so it coats potatoes, noodles, or rice without turning watery or paste-thick.

Ingredients You Need

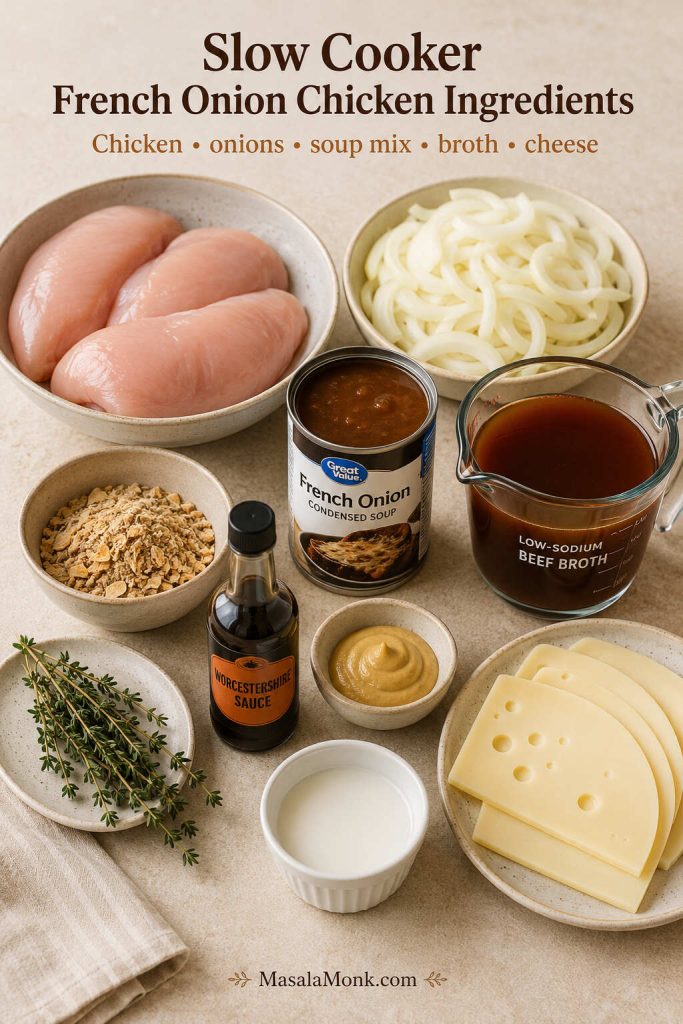
The ingredient list is short, but each part has a job: onions for sweetness, soup mix for shortcut flavor, broth for a spoonable base, and cheese for the French onion finish. Amounts are written in both US and metric measurements where useful.

Ingredients for slow cooker French onion chicken including chicken, sliced onions, onion soup mix, broth, thyme, cheese, and cornstarch slurry.
Although the ingredient list is short, the balance matters: soup mix seasons, broth loosens, onions sweeten, and cheese gives the French onion finish.

Chicken

The chicken is the only part of this recipe that can really punish you if it overcooks. Use 2 lb / 900 g boneless skinless chicken breasts or thighs. Breasts give you a leaner, more sliceable dinner, while thighs stay juicier and are more forgiving if you want shredded chicken in the sauce.

Chicken Breast Thickness and Doneness

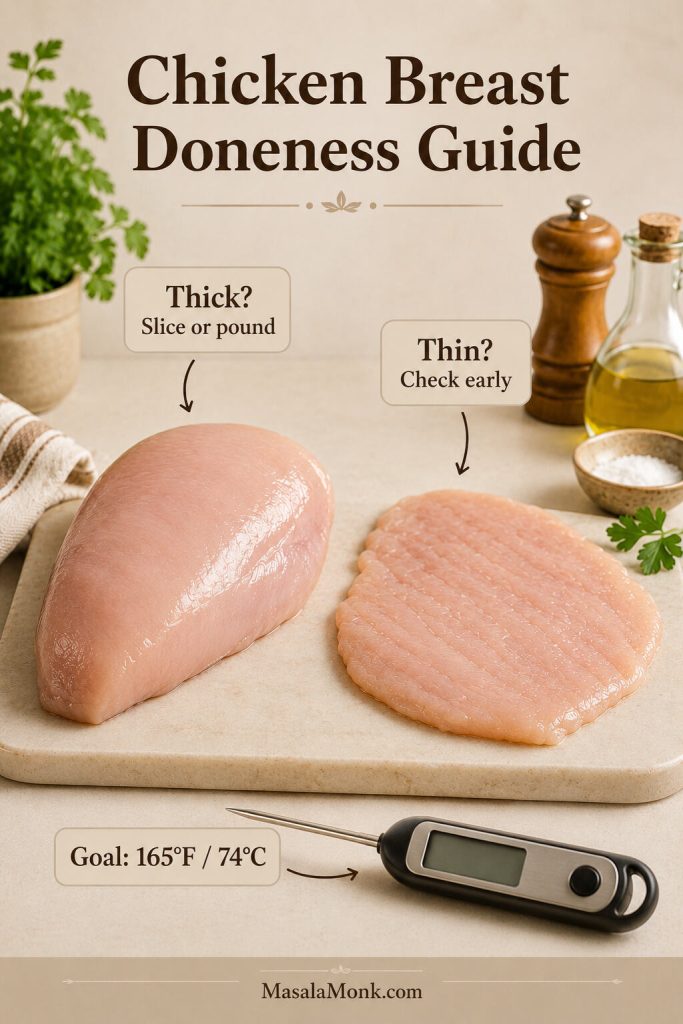
If your chicken breasts are very thick, slice them horizontally or pound them to a more even thickness. This helps them cook evenly and reduces the chance of dry edges before the center is done. For exact timing by cut, use the cook-time table.

Chicken breast doneness guide with thick chicken breast, thinner chicken pieces, and a 165°F target temperature.
Even thickness helps chicken breasts cook predictably. Slice or pound thick pieces, and start checking thin pieces early.

If you want more slow-cooker ideas built around lean chicken, these crock pot chicken breast recipes are helpful for keeping chicken breast tender instead of dry.

For a different dinner built around a whole bird instead of boneless pieces, this whole chicken in crock pot guide is the better match.

Onions

Use 1 large yellow or sweet onion, thinly sliced. This is usually about 200–250 g, or roughly 2 cups sliced onion. Yellow onions give classic savory-sweet flavor. Sweet onions make the sauce softer and slightly sweeter.

For a more onion-heavy, French onion soup-style sauce, add a second onion. On busy nights, 1 large onion is still enough because the soup base and onion soup mix bring plenty of onion flavor too.

Condensed French Onion Soup

The shortcut base is 1 can condensed French onion soup, usually 10.5 oz / about 298 g. Use it straight from the can; do not prepare it with water first. The condensed soup brings savory onion flavor, body, and seasoning.

Dry Onion Soup Mix

Use 1 packet dry onion soup mix, usually 1 oz / 28 g. Any standard dry onion soup mix works. Because the mix already seasons the sauce, the rest of the recipe uses low-sodium broth and waits until the end for final adjustments.

For a better-balanced gravy: use low-sodium broth and wait to add extra salt until the end. Condensed soup, onion soup mix, and cheese already season the sauce, so you may not need much more.

Beef Broth or Beef Consommé

Use ½ cup / 120 ml low-sodium beef broth for a saucier version. Beef consommé can also work when you want a deeper, more concentrated flavor, but it is often richer and saltier than broth. Taste the sauce before adjusting the seasoning.

Worcestershire, Dijon, Balsamic, and Thyme

Worcestershire gives the sauce a deeper savory edge, while Dijon or balsamic keeps the onion sweetness from feeling flat. Thyme brings it closer to the flavor of French onion soup.

Use 1 tbsp / 15 ml Worcestershire sauce, plus either 1 tsp Dijon mustard or 2 tsp balsamic vinegar. Add ½ tsp dried thyme or a few fresh thyme sprigs.

Cheese

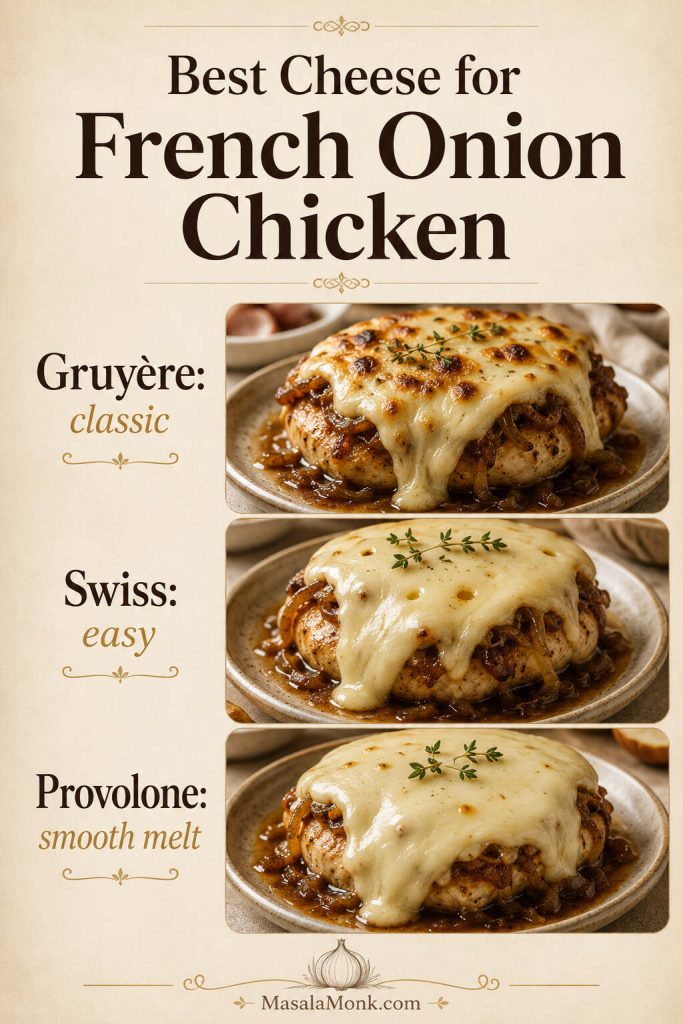
Use 4–6 slices Swiss, provolone, or Gruyère, or about 1 cup / 100–115 g shredded cheese. Gruyère gives the most classic French onion soup flavor. Swiss is easy to find and budget-friendly. Provolone melts smoothly and is mild enough for kids or picky eaters.

Best cheese for French onion chicken guide showing Gruyère, Swiss, and provolone melted over chicken.
Gruyère gives the most classic French onion flavor, Swiss keeps it easy and budget-friendly, and provolone melts into a smooth, mild topping.

Slow Cooker French Onion Chicken with Onion Soup Mix

Dry onion soup mix is what gives this crock pot French onion chicken its easiest shortcut flavor. One standard packet, usually 1 oz / 28 g, is enough for the main recipe because the condensed French onion soup and cheese also season the gravy.

Onion Soup Mix Balance

If you prefer a milder gravy, start with half the packet, use low-sodium beef broth, and taste the sauce before adding any extra seasoning. Two packets can work in some creamy onion soup mix chicken recipes, but for this French onion chicken, one packet usually gives a better balance.

French onion chicken soup mix balance guide with condensed soup, dry onion soup mix, broth, onions, and slow cooker chicken.
Condensed French onion soup gives body, dry onion soup mix adds seasoning, and low-sodium broth helps keep the gravy savory instead of harsh.

For a creamier onion soup mix chicken variation, use the main recipe as written, then stir in sour cream, Greek yogurt, cream cheese, or heavy cream after the chicken has finished cooking. Keep the creamy ingredient out of the slow cooker during the long cook so the sauce stays smoother.

If you want the same comfort-food idea without condensed soup or dry soup mix, jump to the no-canned-soup French onion chicken version.

Best shortcut balance: use 1 can condensed French onion soup, 1 packet dry onion soup mix, ½ cup / 120 ml low-sodium beef broth, and cheese at the end. That gives you a rich onion gravy without making the sauce harsh.

Chicken Breasts vs Thighs

Both work, but they give different results. If you want tidy, sliceable pieces, use chicken breasts and check them early. If you want juicy, pull-apart chicken in onion gravy, use thighs.

Chicken breasts versus thighs comparison for French onion chicken showing sliced chicken breast and saucier thigh-style chicken.
Breasts work best for cleaner slices, while thighs stay juicier and more forgiving if you want pull-apart French onion chicken in gravy.
Chicken cut Best for What to watch
Boneless skinless breasts Lean, sliceable French onion chicken Can dry out if cooked too long; check early
Thin-sliced breasts Faster, more even cooking May be done closer to 3–4 hours on low
Boneless skinless thighs Juicier, richer, more forgiving chicken Best if you like shredded or very tender meat
Bone-in thighs Deeper flavor Less convenient to serve; check around the bone

If you are making this for the first time, boneless thighs are the most forgiving. If you prefer chicken breasts, keep the pieces even and start checking before the longest listed cook time.

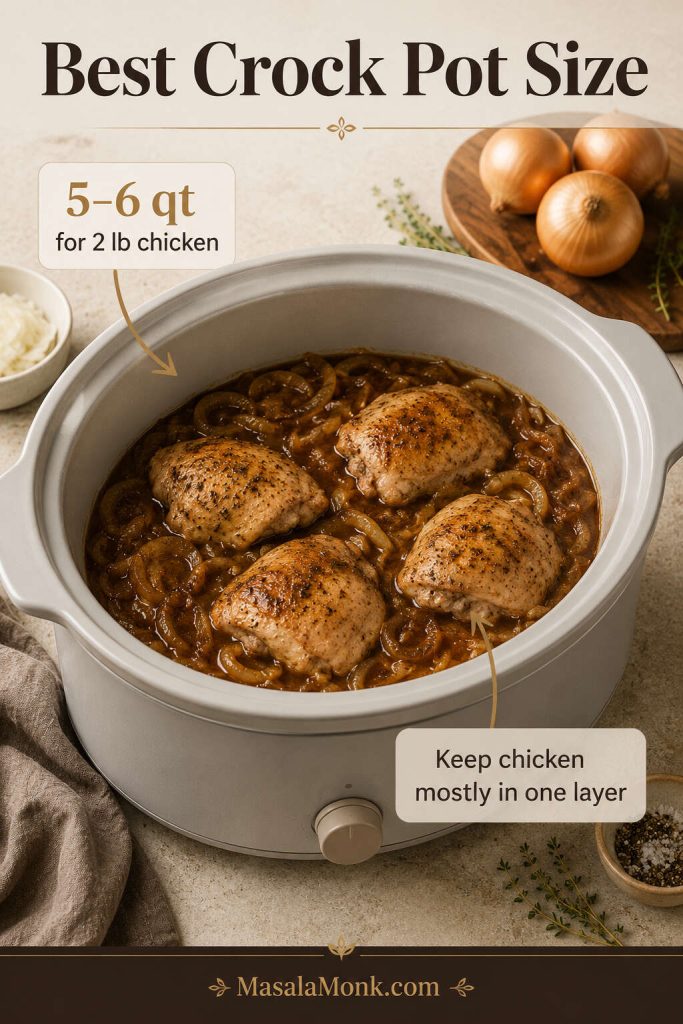
Best Crock Pot Size for French Onion Chicken

A 5- to 6-quart slow cooker is the best size for about 2 lb / 900 g chicken. It gives the chicken enough room to sit in a mostly even layer while still keeping the onions and sauce close around it.

Best crock pot size guide showing chicken pieces arranged in one layer in a slow cooker with onions and sauce.
Keeping the chicken mostly in one layer helps it cook evenly while the onions stay close enough to soften into the slow-cooker sauce.

A very large slow cooker can let the sauce spread thin and cook down faster. A small one may stack thick chicken breasts and cook them unevenly. Whenever possible, keep the chicken in one layer.

How to Make Crock Pot French Onion Chicken

The method is simple, but the order matters: onions underneath, chicken in an even layer, sauce over the top, and cheese only once the chicken is cooked.

Do not let the extra notes make the recipe feel complicated. The basic version is still simple: layer the onions, add the chicken, pour over the sauce, cook until done, then finish with cheese. For more detail, use the cook-time guide or the gravy-thickening section.

Step-by-step board for slow cooker French onion chicken showing onions, chicken, sauce, slow cooking, thickening, and cheese finish.
Once the onions and chicken are layered, the slow cooker does most of the work; the final texture depends on doneness, gravy thickness, and cheese timing.

1. Layer the onions

Add the sliced onions to the bottom of a 5- to 6-quart slow cooker. Spreading the onions underneath the chicken helps them soften into the sauce instead of sitting raw on top.

Hand placing chicken pieces over sliced onions in a slow cooker for French onion chicken.
Layer the onions underneath the chicken so they soften into the sauce rather than sitting on top with a sharp, raw bite.

2. Add the chicken

Place the chicken in a single layer over the onions. A little overlap is fine, but try not to stack thick chicken breasts directly on top of one another.

3. Mix the sauce

In a bowl, stir together the undiluted condensed French onion soup, dry onion soup mix, low-sodium beef broth, Worcestershire sauce, Dijon or balsamic if using, black pepper, and thyme. Pour this mixture over the chicken.

4. Slow cook until done

Cook on low for 4–6 hours or on high for 3–4 hours, until the thickest piece of chicken reaches 165°F / 74°C.

5. Thicken the gravy if needed

If the sauce is thinner than you like, remove the chicken to a plate. Stir together 1 tbsp cornstarch and 1 tbsp cold water, then stir the slurry into the sauce. Cover and cook on high for 10–15 minutes, until the sauce thickens slightly.

6. Add cheese

Place the chicken back into the sauce, top with cheese, and cover until melted. For a browned French onion finish, transfer the chicken and some sauce to a broiler-safe dish, add cheese, and broil for 2–5 minutes, watching closely.

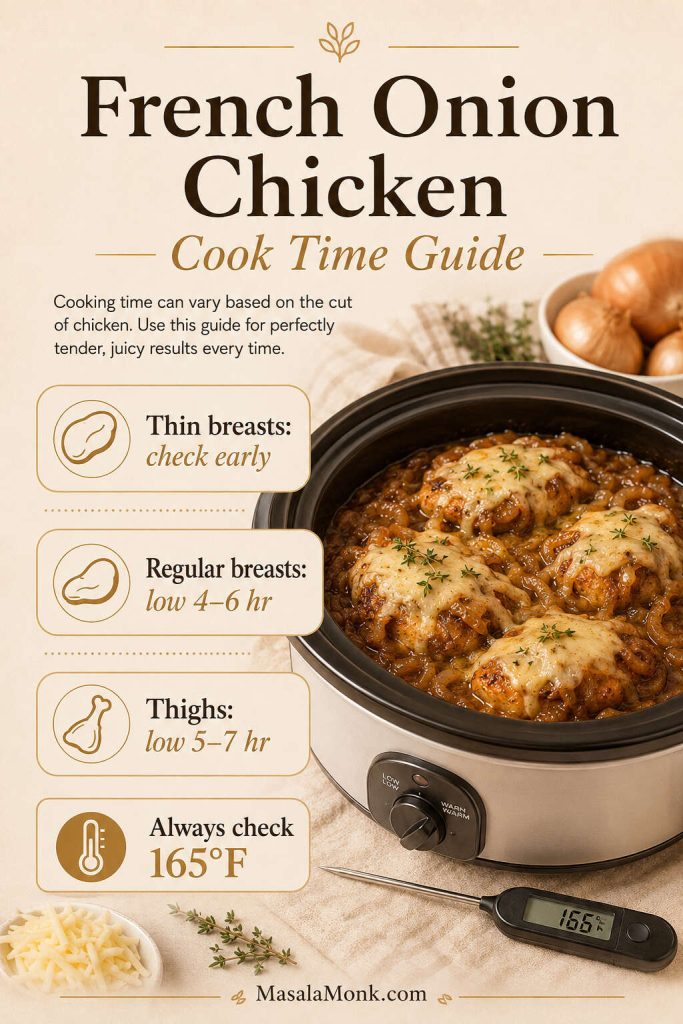
Cooking Time: Low vs High

Slow cookers vary, and chicken thickness matters. Use the times below as a guide, then trust the thermometer.

French onion chicken cook time guide showing thin breasts, regular breasts, thighs, and 165°F doneness.
Cook time changes with cut and thickness, so check thin breasts early and use 165°F as the final doneness cue.
Chicken style Low setting High setting Best result
Thin or lightly pounded chicken breasts 3–4 hours 2–3 hours Sliceable, tender chicken
Regular boneless chicken breasts 4–6 hours 3–4 hours Tender chicken that can be sliced or lightly shredded
Boneless chicken thighs 5–7 hours 3–4 hours Juicy, saucy, more forgiving meat
Shredded French onion chicken 5–6 hours 3–4 hours Pull-apart chicken mixed into the gravy
Frozen chicken Not recommended Not recommended Thaw first before slow cooking
Chicken breast tip: if your slow cooker runs hot or your chicken breasts are thin, start checking around 3 hours on low. The goal is tender chicken at 165°F / 74°C, not chicken that stays in the pot until the longest possible time.

The same “check by temperature, not just time” idea matters with other lean slow-cooker meats too. This slow cooker pork loin recipe uses that same approach to keep lean pork sliceable and juicy.

How to Make the Onion Gravy Spoonable, Not Watery

The sauce should thicken enough to coat chicken, potatoes, or noodles. If your slow cooker releases a lot of liquid from the chicken and onions, thicken the sauce at the end instead of adding more soup mix.

For a simple thickener, stir together 1 tbsp cornstarch with 1 tbsp cold water. Remove the chicken, stir the slurry into the sauce, cover, and cook on high for 10–15 minutes. Add the chicken back once the sauce has thickened.

Cornstarch slurry being poured into French onion chicken gravy in a slow cooker.
When the slow-cooker liquid looks thin, a cornstarch slurry helps turn it into onion gravy that coats the chicken instead of pooling underneath.

When the sauce tastes strong rather than thin, use the troubleshooting table instead of adding more soup mix.

For another slow-cooker dinner with a proper spoonable sauce, this slow cooker sausage casserole recipe has the same cozy, gravy-friendly feel.

For a thicker gravy from the start, use only ½ cup / 120 ml broth. And for more sauce to spoon over rice, noodles, or mashed potatoes, use up to 1 cup / 240 ml broth and thicken at the end.

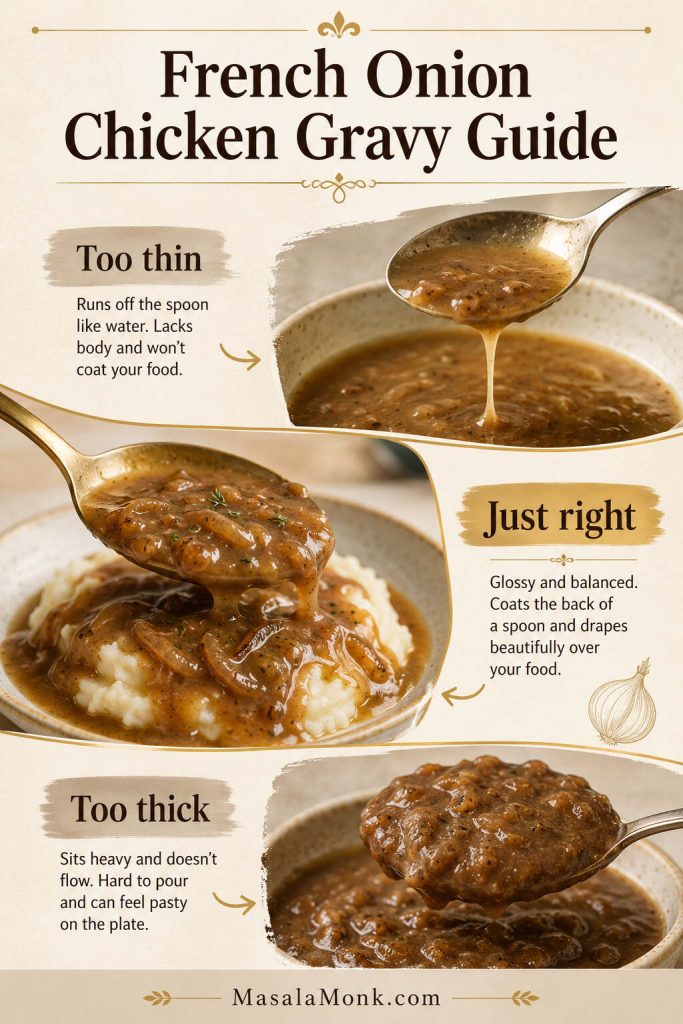
French Onion Chicken Gravy Thickness Guide

The goal is not a stiff gravy or a watery sauce. You want the middle texture: glossy, spoonable, and thick enough to cling to whatever you serve underneath.

French onion chicken gravy guide showing too thin, just right, and too thick gravy textures.
Aim for the middle texture: glossy enough to flow, yet thick enough to coat a spoon and cling to potatoes, noodles, or rice.

Melt the Cheese in the Slow Cooker or Broil It Until Bubbly

You have two good options for the cheese. The easiest is to melt it right in the slow cooker. The most French onion soup-like finish is to broil it briefly.

If you are still choosing the topping, see the best cheese options before deciding between a slow-cooker melt and a broiled finish.

French onion chicken cheese finish comparison showing slow cooker melted cheese and browned broiled cheese.
The slow-cooker melt keeps dinner easy; the broiled finish adds browned, bubbling cheese for a more French onion soup-style result.
Finish How to do it Best for
Slow cooker melt Top the cooked chicken with cheese, cover, and cook 10–30 minutes until melted Easy weeknight dinners, no extra dishes
Broiled cheese finish Transfer chicken and sauce to a broiler-safe dish, add cheese, and broil 2–5 minutes Browned, bubbling, French onion soup-style cheese

The slow cooker melt is easiest. The broiled finish is best if you want this dish to feel closer to French onion soup. Transfer the cooked chicken and onion gravy to a broiler-safe dish, add Swiss, Gruyère, or provolone, and broil until the cheese is bubbling and browned in spots.

Watch closely under the broiler; the cheese can move from beautifully browned to burnt quickly.

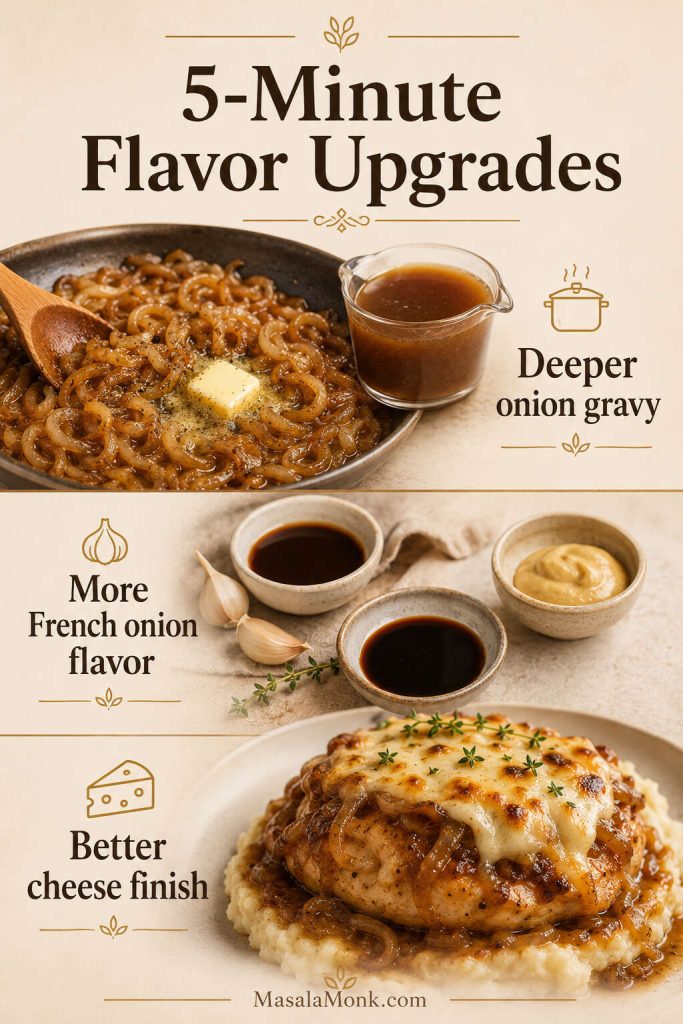
Optional 5-Minute Upgrade for Deeper Onion Gravy

The easy version works well as written. But if you have five extra minutes, this is where the dish starts to taste less like a shortcut and more like slow-cooked French onion gravy.

Five-minute flavor upgrades for French onion chicken with sautéed onions, broth, seasonings, and browned cheese finish.
Small upgrades can make a big difference: sautéed onions, garlic, deeper broth, and a browned cheese finish all build more layered French onion flavor.
  • Sauté the onions first: cook them in butter for 5–8 minutes before adding them to the crock pot.
  • Add garlic: one or two minced cloves make the gravy taste less flat.
  • Use beef consommé: it gives a richer flavor than regular broth, but taste before adjusting the seasoning.
  • Add Worcestershire and Dijon or balsamic: this balances the sweetness of the onions.
  • Broil the cheese: the browned top gives the dish a more classic French onion soup finish.

Variations

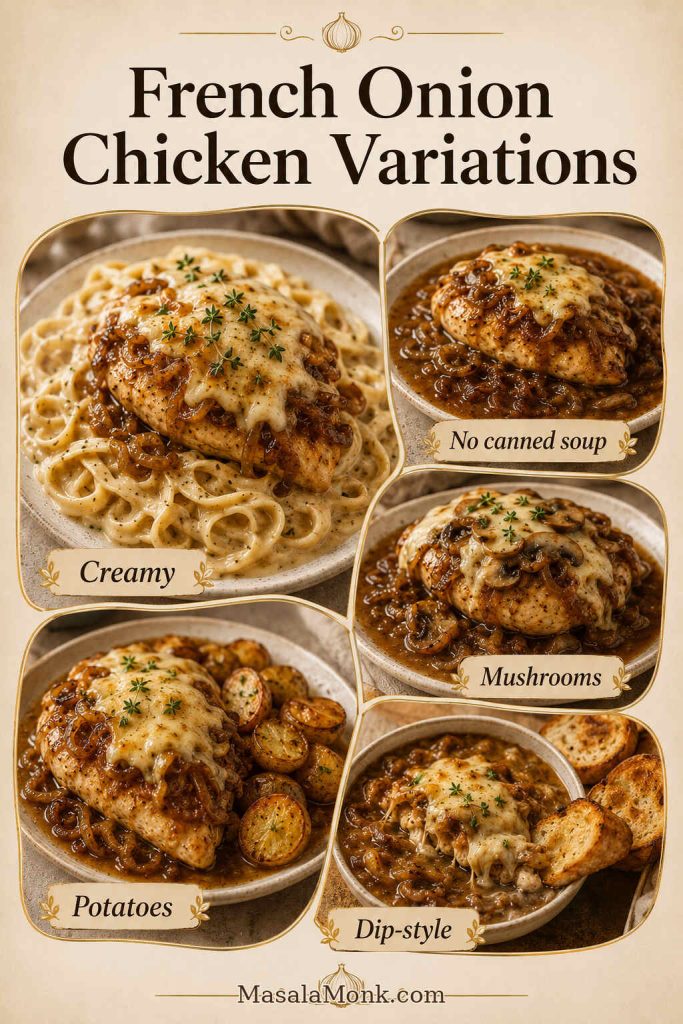
Once you have made the basic version, the recipe is easy to bend toward what you have: thighs instead of breasts, mushrooms in the sauce, a creamy finish, or a broth-based gravy when you do not want canned soup.

This is also where the recipe becomes more personal: some people want it creamy, some want it onion-heavy, and some just want the easiest version with the cheese browned on top.

French onion chicken variations board showing creamy, no-canned-soup, mushroom, potato, and dip-style versions.
Once the base recipe works, you can make it creamier, more homemade, mushroom-rich, potato-friendly, or thicker and dip-style for toast.

Creamy French Onion Chicken

For a creamy version, stir in ¼–½ cup sour cream, Greek yogurt, cream cheese, or heavy cream at the end. This makes the gravy softer and richer, especially if you are serving the chicken over rice, mashed potatoes, or noodles.

Add the creamy ingredient after the chicken is cooked and the slow cooker is on warm or no longer bubbling hard. This keeps the sauce smoother and reduces the chance of splitting.

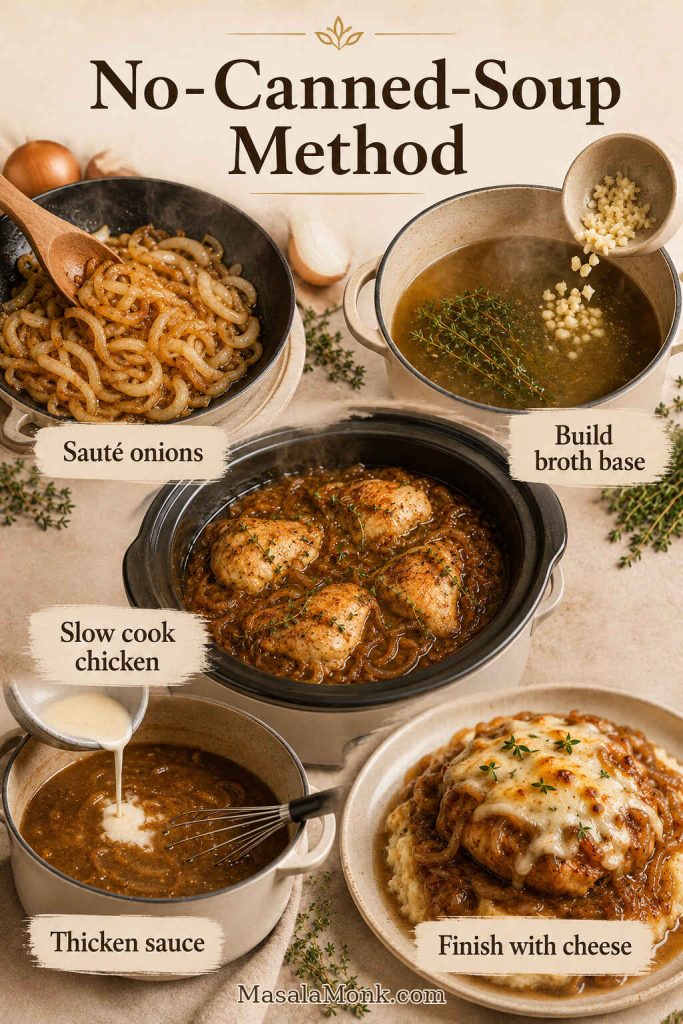
No Canned Soup French Onion Chicken

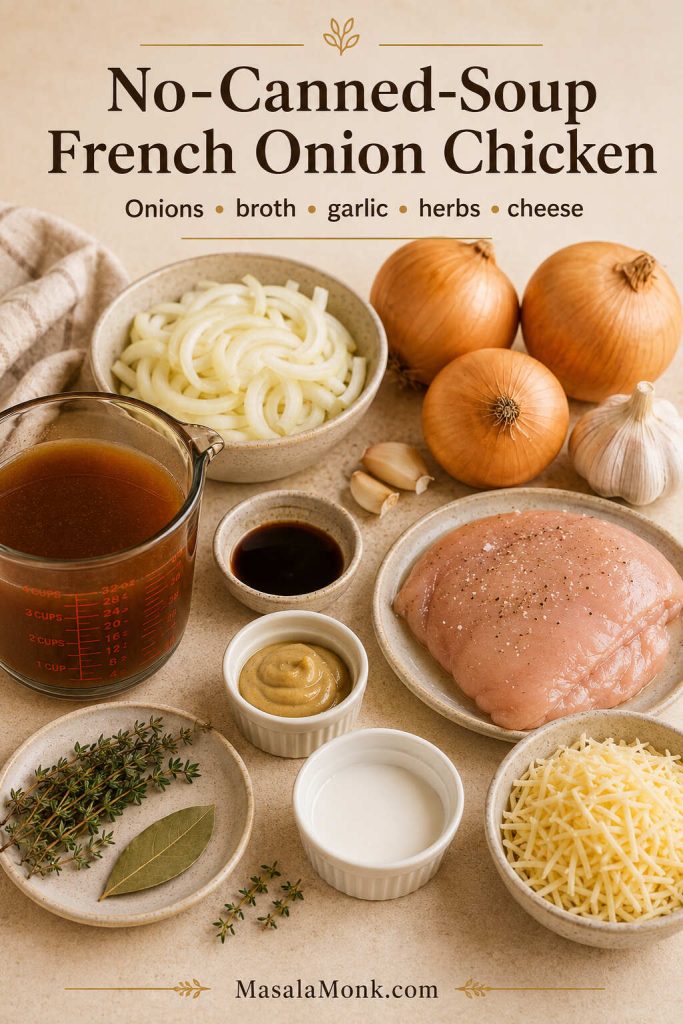
For a no-canned-soup version, use a broth-based onion gravy instead of condensed soup and dry onion soup mix. It tastes less salty and more homemade, but it needs either sautéed onions or a slurry at the end for body.

No-canned-soup French onion chicken ingredients with onions, broth, garlic, herbs, slurry, chicken, and cheese.
Instead of canned soup, this version builds flavor from onions, broth, garlic, herbs, and a simple slurry for a more homemade French onion chicken.

Choose this version when you want the dish to taste more like slow-cooked onions and broth than a pantry shortcut. It takes a little more effort, but the flavor is softer, deeper, and easier to adjust.

If you make the no-canned-soup version, the biggest choice is how onion-forward you want it. Two onions keep it balanced; three onions push it closer to French onion soup.

Use the same 2 lb / 900 g chicken and the same cheese finish from the main recipe; only the soup base changes.

  • 2–3 yellow or sweet onions, thinly sliced
  • 1 tbsp butter or oil for sautéing the onions, optional but helpful
  • 1½ cups / 360 ml low-sodium beef broth
  • 2 cloves garlic, minced
  • 1 tbsp / 15 ml Worcestershire sauce
  • 1 tbsp balsamic vinegar or 1 tsp Dijon mustard
  • ½ tsp dried thyme or 2–3 fresh thyme sprigs
  • 1 bay leaf, optional
  • 1 tbsp cornstarch + 1 tbsp cold water, added at the end

No-Canned-Soup Method

For best flavor, sauté the onions in butter for 8–10 minutes before adding them to the slow cooker. Cook the chicken in the broth mixture, then thicken the sauce at the end and finish with Swiss, Gruyère, or provolone.

No-canned-soup French onion chicken method board showing sautéed onions, broth base, slow cooking, thickening, and cheese finish.
Sautéing the onions first gives the no-canned-soup version a deeper base before the broth, chicken, thickener, and cheese finish come together.

Chicken Thighs and Potatoes

For a one-pot comfort dinner, use boneless chicken thighs and add halved baby potatoes under or around the chicken. Potatoes need enough time to soften, so keep them in small pieces and cook on low until both the potatoes are tender and the chicken reaches 165°F / 74°C.

French Onion Chicken with Mushrooms

Add 8 oz / 225 g sliced mushrooms with the onions. Mushrooms make the sauce deeper and more savory, especially if you are serving the chicken over egg noodles or mashed potatoes.

French Onion Dip-Style Chicken

For a richer dip-style version, reduce the added broth, then stir in sour cream or cream cheese at the end. This variation is thicker, creamier, and especially good served with toasted bread, rice, or roasted potatoes.

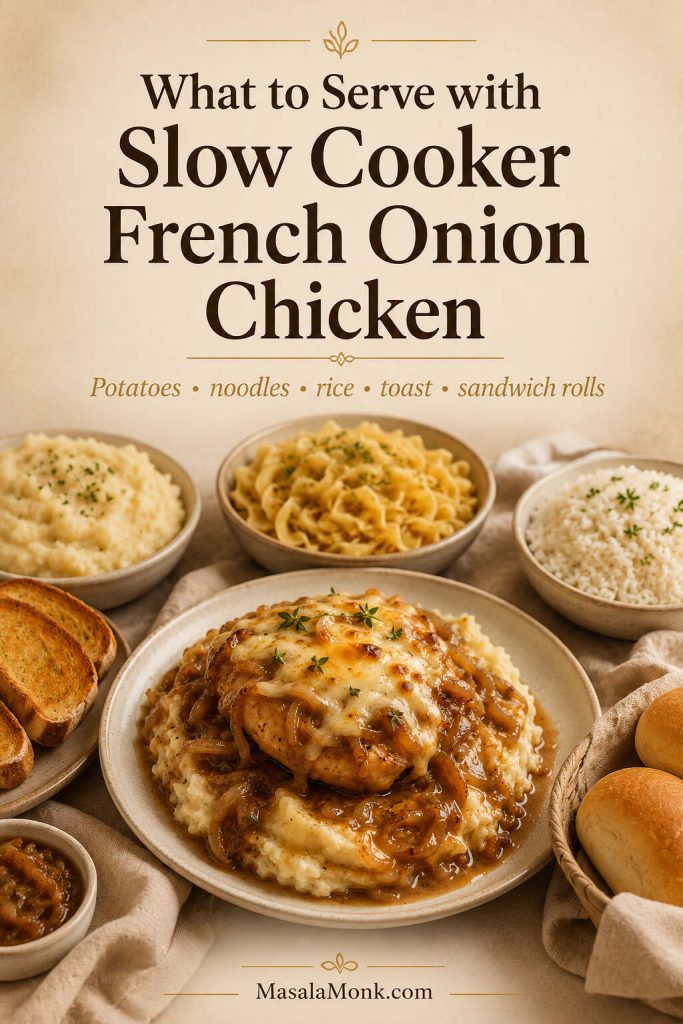
What to Serve with Slow Cooker French Onion Chicken

Spoon it over mashed potatoes for the coziest plate, pile it onto egg noodles for a weeknight dinner, or shred the leftovers into sandwich rolls with extra cheese.

This is not a recipe that wants to sit alone on a plate. It wants something soft underneath it — potatoes, noodles, rice, or toasted bread — so the onion gravy and melted cheese become part of the whole dinner.

Serving ideas for slow cooker French onion chicken with mashed potatoes, noodles, rice, toast, and sandwich rolls.
Mashed potatoes, noodles, rice, toast, and rolls all give the onion gravy somewhere to go, so the dish feels like a full dinner.
  • Mashed potatoes: the best comfort-food pairing.
  • Egg noodles: easy, cozy, and great for shredded chicken.
  • Rice: simple and practical for weeknights.
  • Toasted bread: gives the dish a French onion soup feel.
  • Pasta: works well if you keep the sauce loose enough.
  • Roasted vegetables: a good lighter side with the rich sauce.
  • Sandwich rolls: shred the chicken, spoon it into rolls, add cheese, and broil.

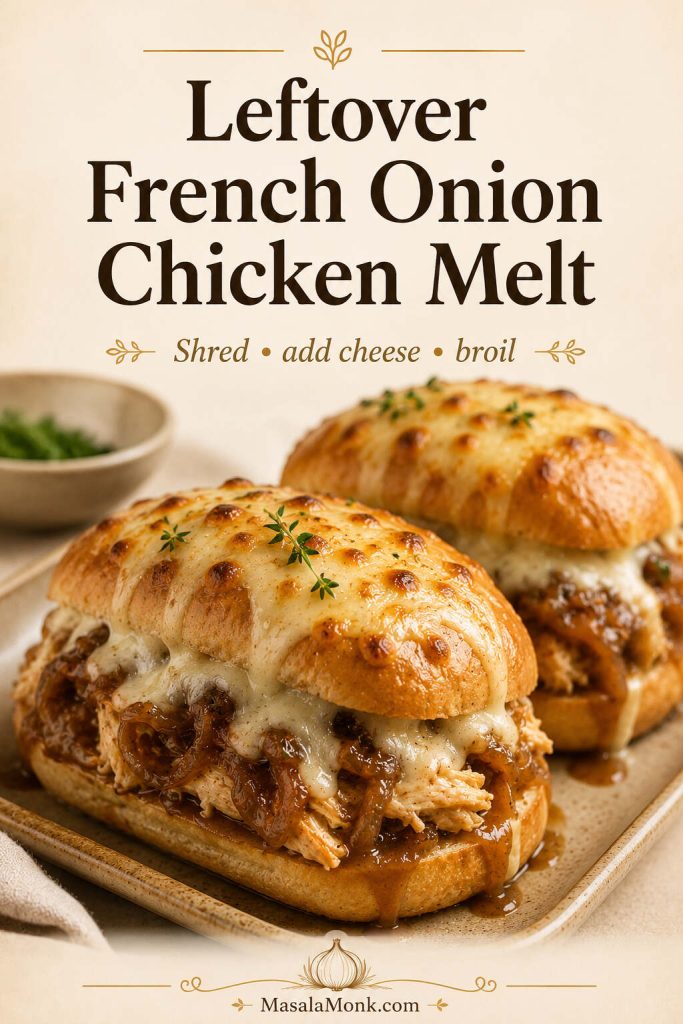
Leftover French Onion Chicken Melt

If you are making this for a family dinner, mashed potatoes or egg noodles make it feel the coziest. For leftovers, shred the chicken into the onion gravy, tuck it into sandwich rolls, add extra cheese, and broil until the top looks like a French onion melt.

Leftover French onion chicken sandwich melt with shredded chicken, onion gravy, rolls, and melted browned cheese.
For leftovers, the gravy does the work: shredded chicken, rolls, and melted cheese turn yesterday’s slow-cooker dinner into a French onion melt.

Because the chicken is rich, salty-savory, and cheesy, a crisp side helps. This cucumber salad recipe gives you a fresh, tangy contrast without adding much work.

Make-Ahead and Freezer Meal Tips

You can slice the onions and mix the sauce ingredients a day ahead, then keep them covered in the refrigerator until you are ready to cook. Keep the raw chicken separate until it goes into the slow cooker.

For a freezer meal, combine the chicken, sliced onions, undiluted condensed soup, onion soup mix, broth, Worcestershire, thyme, and pepper in a freezer-safe bag. Freeze without the cheese. Thaw overnight in the refrigerator before cooking, then add the cheese at the end.

Storage, Freezing, and Reheating

Store leftovers in an airtight container in the refrigerator for up to 3–4 days. Reheat gently on the stove, in the microwave, or in the slow cooker on low until hot. Add a splash of broth if the sauce has thickened too much.

You can freeze the cooked chicken and sauce for up to 2–3 months. For best texture, freeze the chicken and gravy without the cheese, then add fresh cheese when reheating and serving.

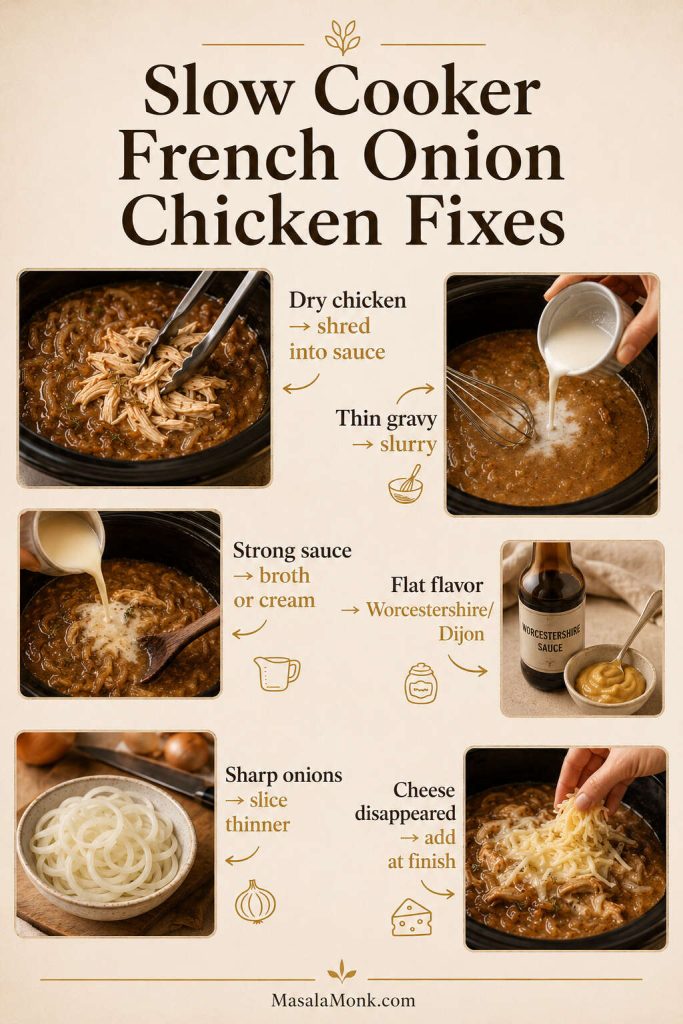
Small Mistakes That Can Change the Result

  • Adding cheese too early: it can melt into the sauce and disappear instead of giving you that French onion-style finish.
  • Salting before tasting: condensed soup, soup mix, broth, and cheese may already season the gravy enough.
  • Cooking thin chicken breasts all day: check early if you want sliceable chicken instead of shredded chicken.
  • Adding regular pasta at the beginning: it can turn mushy in the slow cooker, so serve the chicken over cooked pasta instead.

Troubleshooting Slow Cooker French Onion Chicken

Most issues are easy to fix at the end. The chicken can be shredded back into the sauce, thin gravy can be thickened, and a strong sauce can be softened with broth, cream, or a plain side.

If your main issue is thin sauce, start with the gravy-thickening method. If the problem is dry chicken, strong sauce, sharp onions, or disappearing cheese, use the fixes below.

Troubleshooting board for slow cooker French onion chicken with fixes for dry chicken, thin gravy, strong sauce, flat flavor, sharp onions, and disappeared cheese.
Most fixes are simple: add moisture to dry chicken, thicken thin gravy with slurry, and soften a strong sauce with broth or cream.
Problem Why it happened How to fix it
Chicken is dry Breasts cooked too long or pieces were too thin Shred the chicken into the sauce and add a splash of broth or cream
Sauce is too thin Chicken and onions released more liquid than expected Use a cornstarch slurry and cook on high for 10–15 minutes
Sauce is too strong Condensed soup, soup mix, broth, and cheese all season the gravy Add unsalted broth, cream, sour cream, or Greek yogurt; serve over potatoes, rice, or noodles
Sauce is too thick Not enough broth or too much thickener Add ¼ cup / 60 ml broth at a time until spoonable
Flavor tastes flat Needs acidity or savory depth Add Worcestershire, Dijon, balsamic, black pepper, or thyme
Cheese disappeared into the sauce Cheese was added too early Add cheese only after the chicken is cooked, or broil it separately
Onions are still sharp Onions were too thick or did not cook long enough Slice thinly next time; for this batch, cook a little longer if the chicken can handle it, or remove chicken while sauce continues cooking

FAQs

Frozen chicken in the slow cooker: safe or not?

Use thawed chicken for this recipe. USDA slow-cooker guidance recommends thawing meat or poultry before adding it to a slow cooker. Frozen chicken may take too long to heat evenly in the slow cooker.

Chicken breasts or thighs: which is better?

For sliceable pieces, chicken breasts are leaner and cleaner on the plate. Thighs are juicier, more forgiving, and better when you want shreddable chicken in a rich onion gravy.

Best cheese for French onion chicken

Gruyère is the most classic choice because it echoes French onion soup. Swiss is easier to find and usually cheaper. Provolone melts smoothly and gives a milder finish.

How to make French onion chicken without canned soup

Use extra sliced onions, low-sodium beef broth, Worcestershire sauce, Dijon or balsamic, garlic, thyme, and a cornstarch slurry at the end. Sautéing the onions first gives the best flavor, but you can still make a simpler no-canned-soup slow-cooker version.

Can I use French onion dip instead of condensed soup?

You can use French onion dip for a creamier, thicker version, but it will taste different from classic French onion soup-style chicken. Use less added broth, cook the chicken until done, then stir the dip in near the end so the sauce stays smoother.

How to balance a strong onion gravy

If the sauce tastes stronger than you like, it is usually from stacked seasoning in the condensed soup, dry onion soup mix, broth, and cheese. Use low-sodium broth next time, taste before adding salt, and soften the current batch with a splash of unsalted broth, cream, sour cream, Greek yogurt, or a plain side like mashed potatoes, rice, or noodles.

How to make the French onion gravy thicker

Remove the chicken, stir 1 tbsp cornstarch with 1 tbsp cold water, then stir that slurry into the sauce. Cover and cook on high for 10–15 minutes until the sauce thickens.

Rice or pasta in the crock pot: what works?

For this recipe, it is better to serve the chicken over cooked rice, noodles, or pasta instead of adding them at the beginning. Regular pasta can turn mushy in the slow cooker, and rice needs a recipe built specifically around rice timing and liquid ratios. If you want a chicken-and-pasta dinner instead, this Cajun chicken pasta guide uses a better method: cook the pasta separately, then fold it into the sauce.

How to make creamy French onion chicken without splitting the sauce

Stir in sour cream, Greek yogurt, cream cheese, or heavy cream at the end, after the chicken is cooked. Add it gently and avoid boiling the sauce hard after the dairy goes in.

Best sides for slow cooker French onion chicken

Mashed potatoes, rice, egg noodles, pasta, toasted bread, roasted vegetables, or sandwich rolls all work well. Anything that catches the onion gravy will make the dish feel more complete.

If you try this with thighs, mushrooms, or the broiled cheese finish, that is the kind of variation other readers will want to know about too.

Final Thoughts

Slow Cooker French Onion Chicken is at its best when it stays easy without tasting careless. Keep the chicken from overcooking, let the onions soften into the sauce, and finish it in a way that feels generous. Then serve it over potatoes, noodles, rice, or toasted bread — the kind of simple dinner that feels bigger than the effort it took.

Back to top