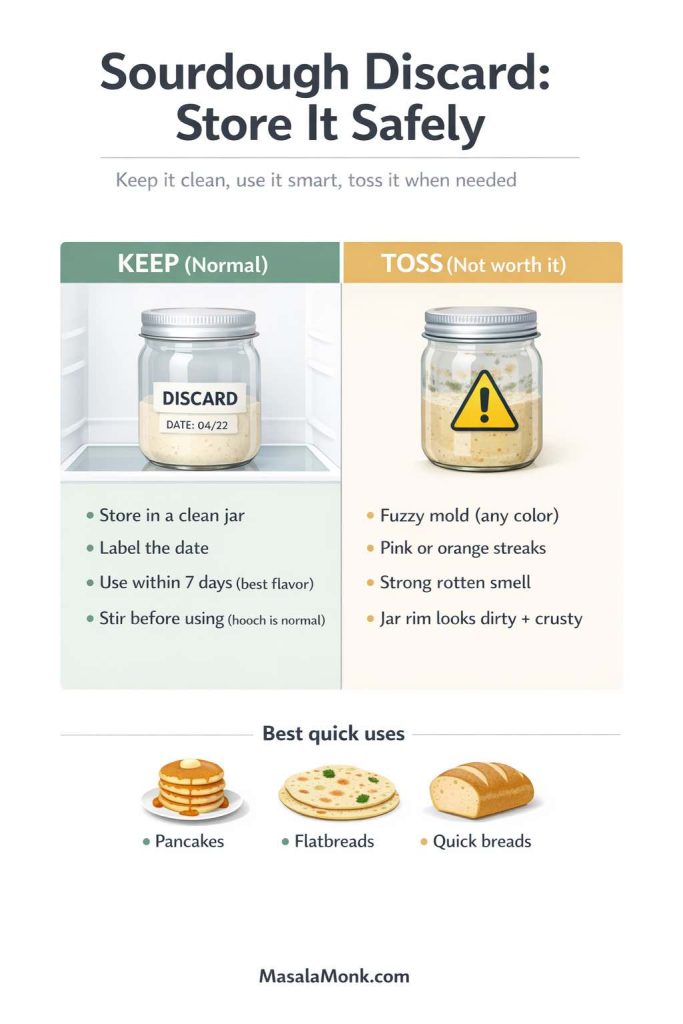
There’s a particular kind of relief that comes from putting dinner in motion early—then letting the evening unfold without hovering over a stove. A crock pot is built for that. It turns a handful of ingredients into something warm and comforting, while you do everything else life asks for—and crock pot chicken breast is one of the easiest ways to make that happen.
Crock Pot Chicken Breast: The Simple Rules That Keep It Juicy
Chicken breast, though, has a reputation. It’s lean, which is exactly why it can dry out when it’s cooked too long. Even so, slow cooker chicken breast doesn’t have to be bland or overdone. With the right approach—enough moisture, steady timing, and a finishing touch that brightens flavor—you can get tender chicken breast in a crock pot that tastes like you actually tried.
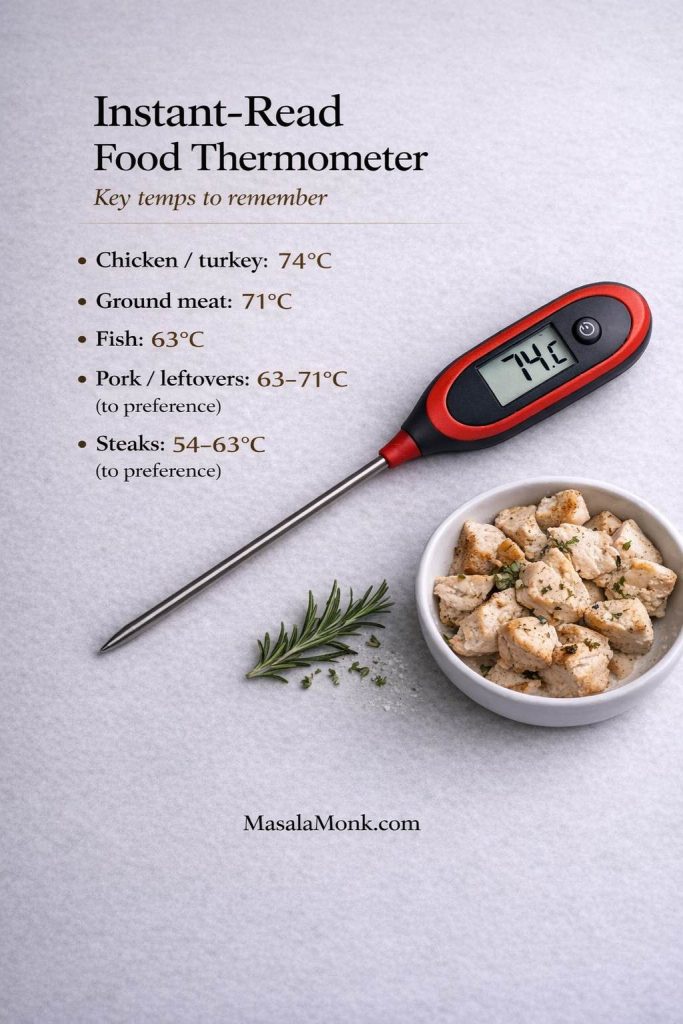
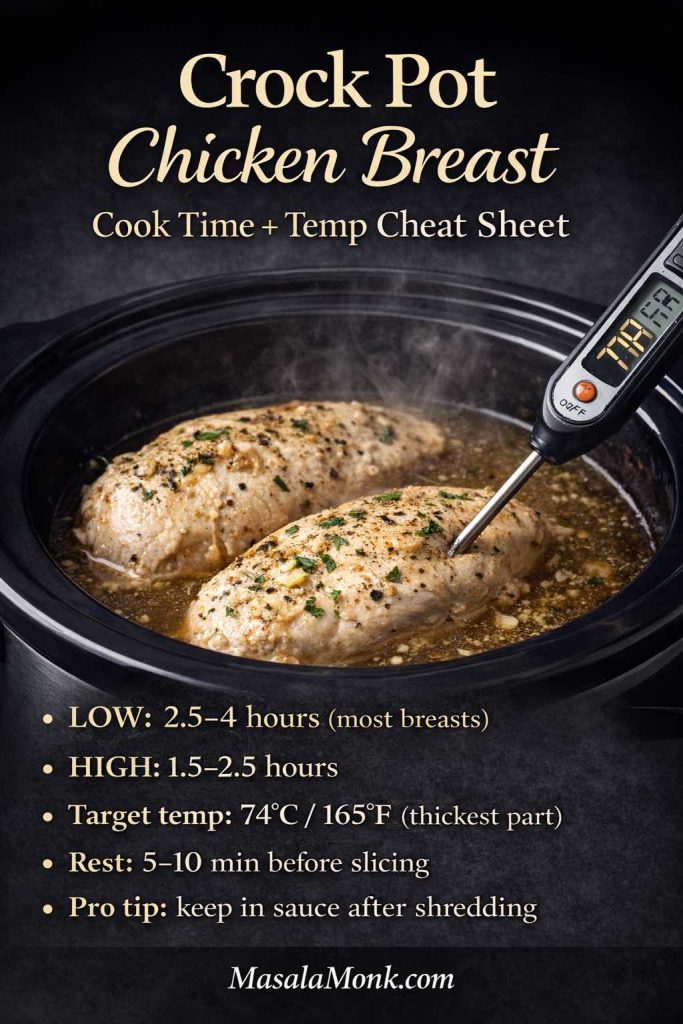
To keep things consistent, it helps to anchor your cooking to one simple target: chicken is done when it reaches 165°F / 74°C in the thickest part. After that, the next step matters just as much—pull it on time, then let it rest before slicing or shredding. That short pause is what keeps the juices where you want them: in the chicken, not on the cutting board.
At the same time, starting with thawed chicken makes the whole process more predictable. Since slow cookers warm food gradually, thawed pieces cook more evenly, which means fewer dry edges and fewer “is this done yet?” moments. As a result, you get better texture with less fuss.
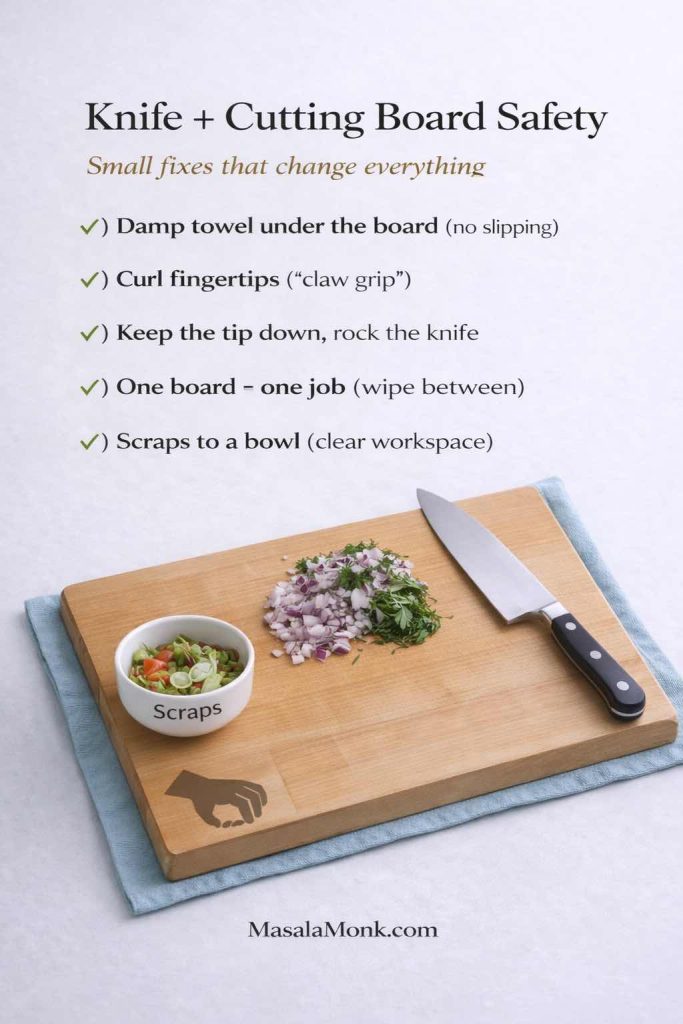
One more thing keeps prep calmer: skip washing raw chicken. Instead, go straight from package to pot, then wash hands and surfaces well. Not only is it simpler, it also avoids spreading raw chicken juices around the sink and countertop.
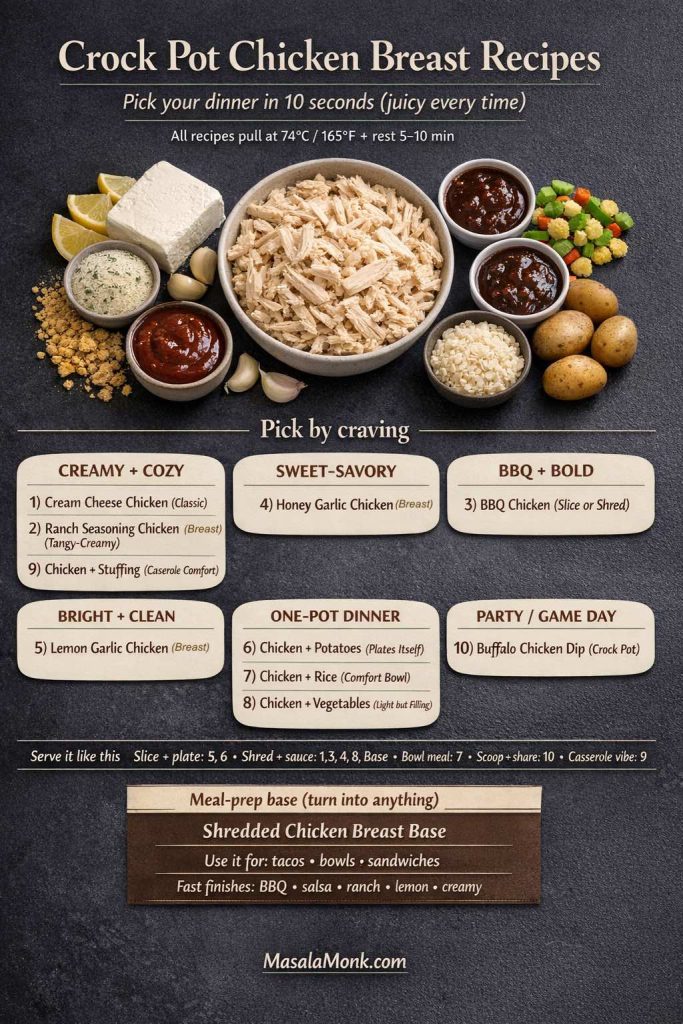
With those basics in place, everything else becomes easier. From here, you can choose a direction based on what you’re craving: creamy and cozy, tangy and ranchy, sweet-smoky BBQ, bright lemon-garlic, spicy buffalo, or hearty bowls with rice and potatoes. In other words, these ten slow cooker chicken breast dinner recipes aren’t just different—they’re built to rotate nicely, so you can keep dinner interesting without reinventing the wheel every week.
How to Cook Chicken Breast in a Crock Pot Without Drying It Out
Chicken breast becomes “juicy” in the slow cooker for one reason: it finishes at the right temperature and stays surrounded by moisture. Everything else—seasonings, sauces, sides—builds on that foundation.
Timing that works in real kitchens
Slow cookers run differently, so time is a guide rather than a guarantee. Still, these ranges are a good starting point for boneless, skinless chicken breasts (roughly 2–3 cm thick):
- LOW: 2.5 to 4 hours
- HIGH: 1.5 to 2.5 hours
And if you are doing 1–1.5 cm chicken cutlets/tenders, then check early, while for 3.5+ cm thick breasts, expect the long end of the above time range (or slice horizontally).
Tenderloins, thin cutlets, and bone-in chicken breasts in the crock pot
These cuts follow the same rule—cook to 74°C / 165°F—but the timing window changes fast. The key is simple: check early, then pull as soon as you hit temperature.
- Chicken tenderloins / tenders: usually finish sooner than whole breasts. Start checking around LOW 1.5–2.5 hours or HIGH 1–1.5 hours.
- Thin-sliced breasts / cutlets: quickest to overcook. Treat them like a short cook, keep them in sauce, and start checking at the early end (similar to tenderloins).
- Bone-in chicken breast: takes longer because the bone slows heat transfer. Expect a longer cook (often LOW 4–6 hours), but temperature is still the real finish line.
Consistency hack: Keep pieces similar in thickness, cook in a single layer when possible, and avoid lifting the lid. If you’re shredding, do it in the cooking liquid and let it sit a few minutes to soak.
In other words, these cuts aren’t harder—just faster or slower. Start checking early, pull at 74°C / 165°F, and then rest briefly. Finally, if you’re shredding, do it in the cooking liquid and let it sit for a few minutes so the chicken reabsorbs moisture and flavor.
One-pot layering rules (potatoes, vegetables, and rice)
Quick rule card: firm veg on the bottom, chicken on top, and rice goes in late (or gets checked early) to avoid mush.
When you want a true one-pot slow cooker dinner, ingredients can’t all be treated the same. Instead, you’ll get better results by arranging the crock pot based on how quickly each component cooks—and how easily chicken breast can overdo.
For potatoes and firm vegetables (the “bottom first” rule):
Potatoes, carrots, and similar sturdy vegetables need more direct heat. Therefore, place them on the bottom, closest to the heat source. Next, lay the chicken on top so it cooks gently while the vegetables catch up. In addition, keep potato chunks fairly large (around 3 cm) so they soften at the same pace instead of turning grainy or falling apart.
For softer vegetables (the “late add” rule):
Zucchini, bell peppers, and mushrooms cook faster and can go limp if they sit too long. Consequently, add them later when possible—especially if your slow cooker runs hot. If you do cook them from the start, keep the slices thicker so they hold their shape.
For rice (the “don’t let it idle” rule):
Rice is delicious in the slow cooker, yet it’s also the easiest to overdo. Once rice is tender, it keeps absorbing liquid; which means, it can drift from fluffy to mushy if it sits too long. To avoid that:
- Use long-grain rice for better separation.
- Start with hot stock so the rice moves toward tenderness sooner and spends less time lingering.
- Begin checking early and stop as soon as the rice is done.
- If your cooker tends to run strong, consider adding rice later (often the final 60–90 minutes on LOW) so chicken doesn’t have to wait around on heat.
In short, the layout and timing do the heavy lifting—so the chicken stays juicy and the “side” stays the right texture.
Why chicken breast turns dry in a slow cooker or crock pot
Dry crock pot chicken breast usually comes from one of these:
- It stayed on heat long after reaching temperature.
- It cooked without enough liquid or sauce to protect moisture.
- Pieces cooked unevenly because some were much thicker than others.
- The lid came off repeatedly, causing temperature swings and longer cooking.
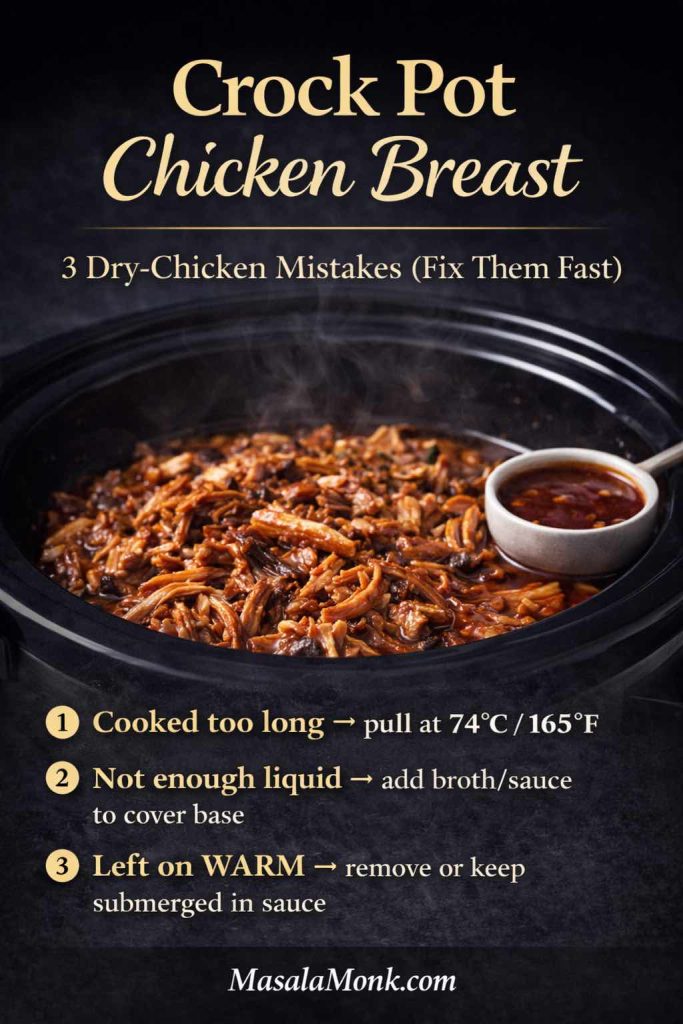
Instead, keep chicken in one layer when possible, build a saucy environment, and avoid constant lifting of the lid. Meanwhile, if the breasts are thick, slicing them horizontally into thinner fillets can be the difference between tender and overdone.
About frozen chicken breast in a crock pot or slow cooker
It’s tempting to lean on “crock pot frozen boneless chicken breast recipes,” especially on hectic days. Still, thawed chicken is the easiest path to consistent tenderness and safety, and it follows USDA guidance on slow cooker use. If you want the details, the USDA addresses this directly in its Q&A on frozen foods in a slow cooker.
If you’re stuck with frozen chicken, a practical workaround is to partially thaw in the microwave just until pieces separate, then start cooking immediately in a sauce-heavy recipe and check temperature early. All the same, thawed will taste better.
The simple “rest, then slice” rule
Once chicken reaches temperature, let it rest 5–10 minutes before slicing. Resting keeps juices from running out on the cutting board. Afterward, slice across the grain for tenderness.
Shredding that stays moist
If you want shredded chicken breast slow cooker style, shred it in the cooking juices, then let it sit for a few minutes so it reabsorbs sauce. From there, leftovers can become wraps, bowls, soups, or sandwiches. For lunch ideas, MasalaMonk’s Chicken Salad Sandwich is a great direction when you want something creamy and bright without a lot of work.
Also Read: Double Chocolate Chip Cookies – Easy Recipe with 7 Variations
The 10 Crock Pot Chicken Breast Recipes
Each recipe below is written as a fully developed “card” with metric weights, clear steps, serving ideas, and multiple variations. You’ll also see options that naturally fit different needs—few-ingredient nights, low fat dinners, gluten free swaps, low carb tweaks, and bold flavors like salsa chicken and spicy slow cooker chicken.
If you want ultra-minimal ingredient options, jump to the 3-ingredient dump-and-go formulas towards the end of this post.
Pick by goal (healthy, low carb, gluten free)
Sometimes you’re not choosing dinner by mood—you’re choosing by the kind of week you’re having. With that in mind, here’s a quick way to match the recipes below to common goals without overthinking it.
- Low calorie / low fat:
#5 Lemon Garlic Chicken Breast (bright, broth-based) and #8 Chicken Breast and Vegetables (lighter, filling, meal-prep friendly). Both stay satisfying as the flavor comes from aromatics and acidity rather than heavy dairy. - Low carb / keto-ish:
#3 BBQ Chicken Breast (use a no-sugar-added BBQ sauce), #2 Ranch Seasoning Chicken (finish with Greek yogurt instead of richer dairy), and #5 Lemon Garlic (naturally lower carb). Together, they give variety while keeping the plate simpler. - Gluten free:
#4 Honey Garlic Chicken (use tamari), #5 Lemon Garlic, #8 Chicken + Vegetables, and #10 Buffalo Chicken Dip—just double-check the labels on hot sauce, dressing, and seasoning blends since those are the usual hidden sources.
Finally, no matter which direction you pick, the same juicy rule still applies: pull the chicken at 74°C / 165°F, rest briefly, then keep it in sauce so leftovers stay tender.
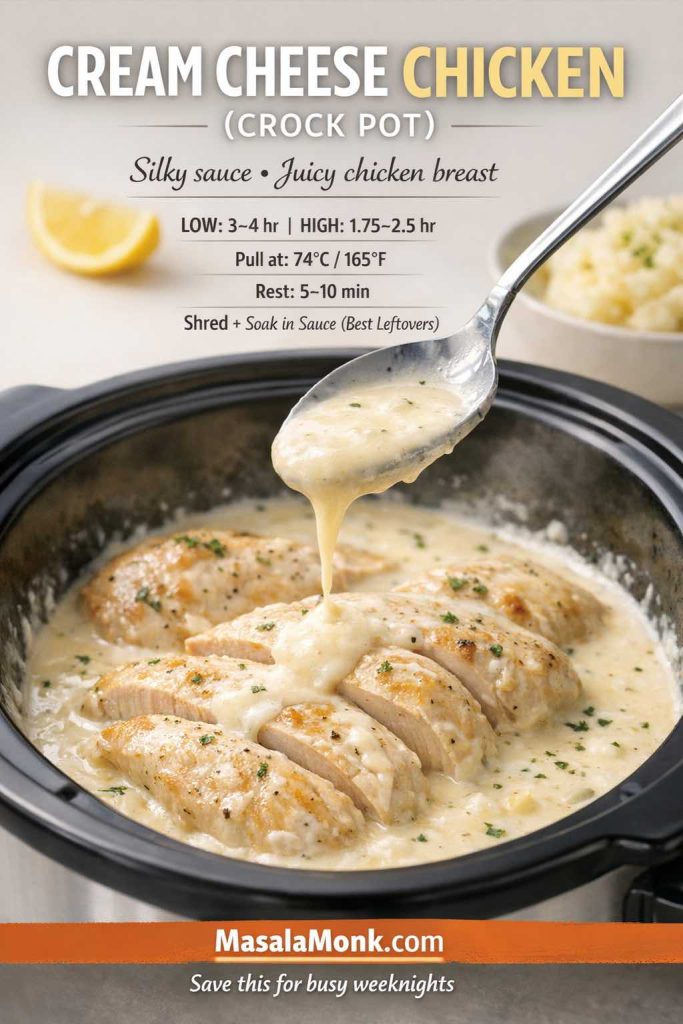
1) Cream Cheese Chicken Breast (Crock Pot Creamy Classic)
Creamy chicken breast in a crock pot can feel like a cheat code: it tastes rich, yet it’s built from everyday ingredients. The sauce turns silky, the chicken stays tender, and the leftovers reheat surprisingly well when you keep them saucy.
This version has a subtle lemon lift that keeps the creaminess from feeling heavy. Still, it’s flexible—add mushrooms for deeper savoriness, stir in spinach for a greener finish, or turn it into a cozy casserole-style dinner with a soup swap. Given that it’s a foundational creamy recipe, it also becomes the base for several variations people love: cream cheese ranch chicken, cream-of-mushroom versions, cream-of-chicken versions, and even a stuffed chicken breast approach if you want something a little more dramatic.
Serves: 4
Prep: 10 minutes
Cook: 3–4 hours on LOW (or 1.75–2.5 hours on HIGH)
Slow cooker size: 4–6 qt / 4–5.5 L
Ingredients
- 700 g boneless, skinless chicken breasts
- 200 g cream cheese
- 180 ml chicken stock
- 12 g garlic, minced
- 8 g onion powder
- 6 g fine salt
- 2 g black pepper
- 5 g smoked paprika (optional)
- 15 ml lemon juice
- Optional thickener: 10 g cornstarch + 15 ml water
- Optional add-ins: 150 g mushrooms (sliced), 60–80 g baby spinach
Method or Recipe for Cream Cheese Chicken Breast in a Crock Pot
- Add chicken stock, garlic, onion powder, salt, pepper, paprika, and lemon juice to the slow cooker. Stir to combine.
- Add chicken breasts in a single layer if possible.
- Scatter cream cheese in chunks over the chicken.
- Cook until chicken reaches 165°F / 74°C internally, following the guidance on the safe temperature chart.
- Rest chicken 5–10 minutes. Then slice or shred.
- Stir the sauce until smooth. If you want it thicker, whisk in cornstarch slurry, cover, and cook on HIGH for 10–15 minutes, stirring once.
What it tastes like
Creamy, gently tangy, savory, and comforting. The lemon keeps the sauce lively rather than flat.
Best sides
This sauce loves starch. It’s fantastic over rice, pasta, or mashed potatoes. For a classic pairing, MasalaMonk’s perfect mashed potatoes fits beautifully.
Variations (pick what matches your mood)
- Cream of mushroom soup version: replace stock + seasonings with 300 g condensed cream of mushroom soup + 120 ml stock; keep garlic and black pepper.
- Cream of chicken soup version: same swap, different soup.
- Half-and-half split: use 150 g cream of mushroom + 150 g cream of chicken for deeper flavor.
- Spicy creamy chicken: add 10–15 g chili paste or 2–3 g cayenne to the liquid before cooking.
- Salsa chicken creamy finish: stir in 200–250 g salsa after cooking, then taste and adjust salt.
- Stuffed chicken breast in a crock pot (spinach-cream cheese): butterfly the breasts, season lightly, fill with a mixture of 120 g cream cheese + 80 g chopped spinach + 1 g garlic powder, secure with toothpicks, then cook in the sauce as written. Slice to reveal the filling.
Storage and reheating
Cool leftovers promptly and refrigerate. Reheat gently (low heat on the stove or a lower-power microwave) so the sauce stays smooth. For general chicken handling and safety basics, the CDC’s chicken food safety guidance is a solid reference.
Also Read: How to Cook Tortellini (Fresh, Frozen, Dried) + Easy Dinner Ideas
2) Ranch Seasoning Chicken Breast (Crock Pot Tangy + Creamy)
Ranch seasoning and slow cooker chicken breast is a combination that just works. It’s savory, herb-forward, and comforting in a familiar way. Unlike some creamy crock pot chicken breast recipes, this one can go lighter or richer depending on how you finish it—Greek yogurt for a brighter, lower-fat version, or cream cheese for a thicker, more luxurious sauce.
It’s also a great “few ingredients” dinner: chicken, broth, ranch seasoning, and one creamy finish. Then, if you want, you can add mushrooms or vegetables without changing the method.
Serves: 4
Prep: 10 minutes
Cook: 3–4 hours on LOW (or 1.75–2.5 hours on HIGH)

Ingredients
- 700 g boneless, skinless chicken breasts
- 240 ml chicken stock
- 20 g ranch seasoning mix
- 10 g garlic, minced
- 30 ml lemon juice (optional, brightens)
- 2 g black pepper
- Finish (choose one):
- 120 g sour cream
- or 150 g thick Greek yogurt
- or 100–120 g cream cheese
Method or Recipe for Ranch Crock Pot Seasoning Chicken Breast
- Whisk stock, ranch seasoning, garlic, lemon juice, and pepper in the slow cooker.
- Add chicken. Spoon liquid over the top.
- Cook until chicken reaches 74°C internally, using the safe temperature chart.
- Rest briefly, then shred or slice.
- Stir in sour cream, yogurt, or cream cheese until smooth.
Serving ideas
Ranch chicken is great with potatoes, rice, or wraps. For a cool contrast, a yogurt-based sauce is surprisingly good alongside ranchy flavors—MasalaMonk’s tzatziki sauce guide has several variations worth trying.
Variations
- Cracked-style creamy ranch: add 100 g cream cheese at the start, then stir in 120 g shredded cheddar at the end until melted. Detailed instructions are given below.
- Ranch + vegetables crock pot dinner: add 150 g mushrooms + 120 g sliced onion at the start; stir in spinach at the end.
- Ranch pasta night later: if you love this flavor family, the One-Pot Chicken Bacon Ranch Pasta is a fun change of pace.
Cracked Chicken (Crock Pot Ranch + Cream Cheese + Cheddar)
If ranch chicken is the cozy classic, cracked chicken is the indulgent upgrade. It keeps the same easy slow-cooker recipe; however, it finishes richer, cheesier, and more “scoopable,” which is why people with slow cooker look it up so often—and why the method matters.
To make it, start with the Recipe #2 base (ranch seasoning + stock + chicken), then follow these tweaks:
- Add cream cheese early for body: drop in 100–120 g cream cheese in chunks at the beginning (or during the last hour on LOW if you prefer a cleaner melt). As it softens, it turns the cooking liquid into a thicker, clingier sauce.
- Cook as usual, but shred in the juices: once the thickest part hits 74°C / 165°F, rest briefly, then shred directly in the ranchy sauce. That way, the chicken stays moist instead of stringy.
- Finish with cheddar for the “cracked” texture: stir in 120 g shredded cheddar until it melts and looks glossy. At this point, the flavor becomes deeper and the texture turns properly creamy.
- Optional, but popular: add crumbled cooked bacon at the end. It brings salt and crunch, so the dip-like vibe becomes even more pronounced.
As a result, you get a dish that feels like comfort food without changing your workflow—just a smarter finish.
Also Read: Whole Chicken in Crock Pot Recipe (Slow Cooker “Roast” Chicken with Veggies)
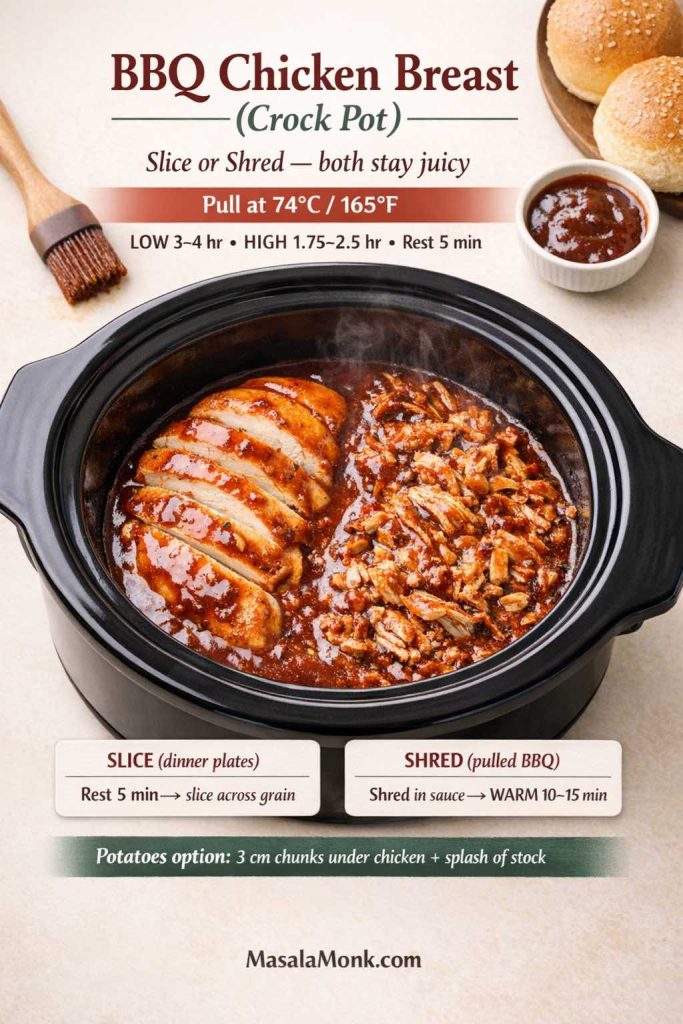
3) BBQ Chicken Breast (Crock Pot, Slice or Shred)
BBQ chicken breast in a crock pot is one of those meals that feels like it belongs at a weekend cookout—even when it’s a Tuesday. It’s bold, saucy, and forgiving. As the sauce surrounds the chicken, it stays moist as long as you don’t overcook it. Later, leftovers become sandwiches, rice bowls, nachos, or a quick loaded baked potato situation.
This recipe can be served sliced for dinner plates, or shredded for pulled chicken breast in the crock pot. Either way, it’s deeply useful.
Serves: 4–5
Prep: 10 minutes
Cook: 3–4 hours on LOW (or 1.75–2.5 hours on HIGH)
Ingredients
- 800 g boneless, skinless chicken breasts
- 240 g BBQ sauce
- 120 ml chicken stock
- 15 ml apple cider vinegar
- 6 g salt
- 2 g smoked paprika
- 2 g garlic powder
- Optional sweetness: 12 g brown sugar (skip if you prefer)
Method or Recipe of BBQ Chicken Breast in a Slow Cooker
- Stir BBQ sauce, stock, vinegar, salt, paprika, and garlic powder in the slow cooker.
- Add chicken and coat well.
- Cook until chicken reaches 74°C, referencing the safe temperature chart.
- Rest 5 minutes. Slice for plates, or shred directly in the sauce for pulled chicken.
- Leave on WARM 10–15 minutes so the chicken absorbs sauce.
Best sides
For a hearty comfort pairing, try it with MasalaMonk’s Red Beans and Rice. For something crisp and salty, homemade fries are always a win—MasalaMonk’s homemade French fries is a great reference if you want to go all-in.
Variations
- Low carb BBQ: use a no-sugar-added BBQ sauce and skip brown sugar.
- Spicy BBQ: add 10–15 g hot sauce or 2 g chili flakes.
- Honey BBQ: add 20 g honey for shine.
- BBQ chicken breast and potatoes slow cooker dinner: add 500–600 g potato chunks under the chicken and increase stock to 180 ml.
If you like turning leftovers into lunch, MasalaMonk’s chicken sandwich recipes is a great place to find a new direction.
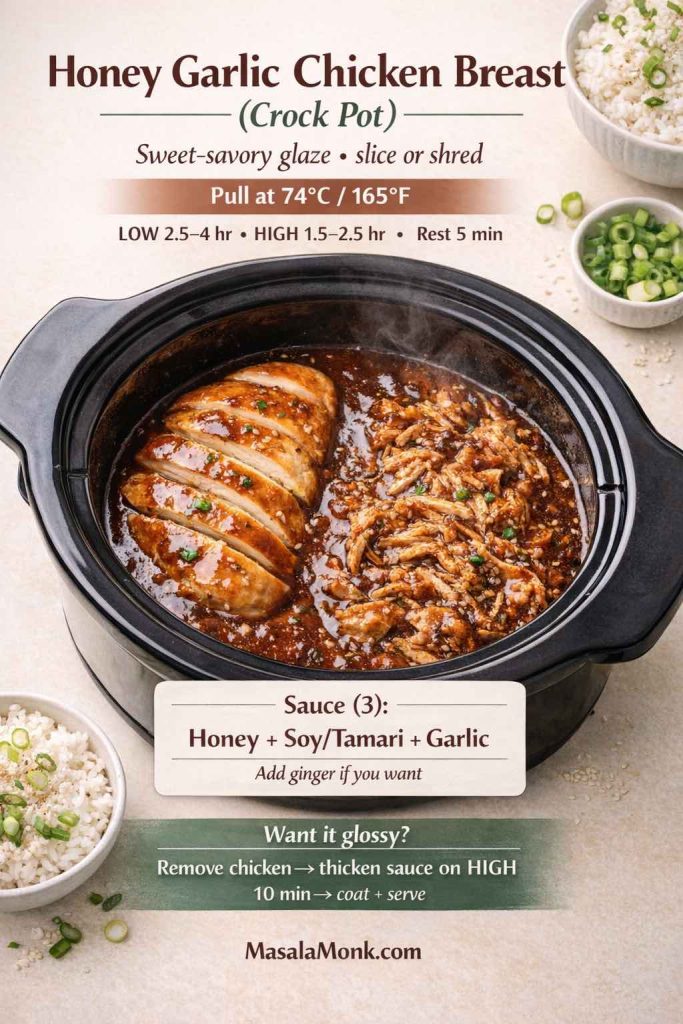
4) Honey Garlic Chicken Breast (Crock Pot Sweet-Savory)
Honey garlic chicken breast is weeknight-friendly in the best way: the ingredient list is short, the sauce tastes balanced, and the final plate feels like something you’d happily eat twice. The vinegar keeps sweetness in check, while garlic does the heavy lifting. If you add ginger, it becomes even more fragrant.
Since the sauce is glossy and strong, you can pair it with simple sides and still feel like dinner has personality. Moreover, it reheats well, which makes it ideal for meal prep.
Serves: 4
Prep: 10 minutes
Cook: 2.5–4 hours on LOW (or 1.5–2.5 hours on HIGH)
Ingredients
- 700 g chicken breasts
- 90 g honey
- 60 ml soy sauce (or tamari for gluten free)
- 30 ml rice vinegar (or apple cider vinegar)
- 12 g garlic, minced
- 10 g fresh ginger, grated (optional)
- 15 ml water
- Optional thickener: 12 g cornstarch + 15 ml water
Method or Recipe for Slow Cooker Honey Garlic Chicken Breast
- Whisk honey, soy sauce, vinegar, garlic, ginger, and water in the slow cooker.
- Add chicken and coat.
- Cook until chicken reaches 74°C.
- Remove chicken to a plate. If you want thicker sauce, stir in cornstarch slurry and cook on HIGH 10 minutes.
- Return chicken, coat, then slice to serve.
Serving ideas
Rice is the obvious partner. If rice texture ever drives you crazy, MasalaMonk’s how to cook rice is a steady guide.
Variations
- Spicy honey garlic: add 10 g chili paste or 2 g chili flakes.
- Orange-honey twist: add 60 ml orange juice and reduce water accordingly.
- Teriyaki night: swap the sauce direction entirely using MasalaMonk’s teriyaki sauce as your base.
Also Read: How to Cook Perfect Rice Every Time (Recipe)
5) Lemon Garlic Chicken Breast (Crock Pot Bright + Clean)
After a stretch of creamy dinners, lemon garlic chicken is refreshing. It’s light yet satisfying, and the broth becomes a simple sauce you can ladle over everything. The key is balance: lemon juice for brightness, stock for depth, and herbs for aroma.
This is also one of those slow cooker chicken breast recipes that fits a low fat dinner comfortably, especially when paired with vegetables or rice.
Serves: 4
Prep: 10 minutes
Cook: 2.5–4 hours on LOW (or 1.5–2.5 hours on HIGH)
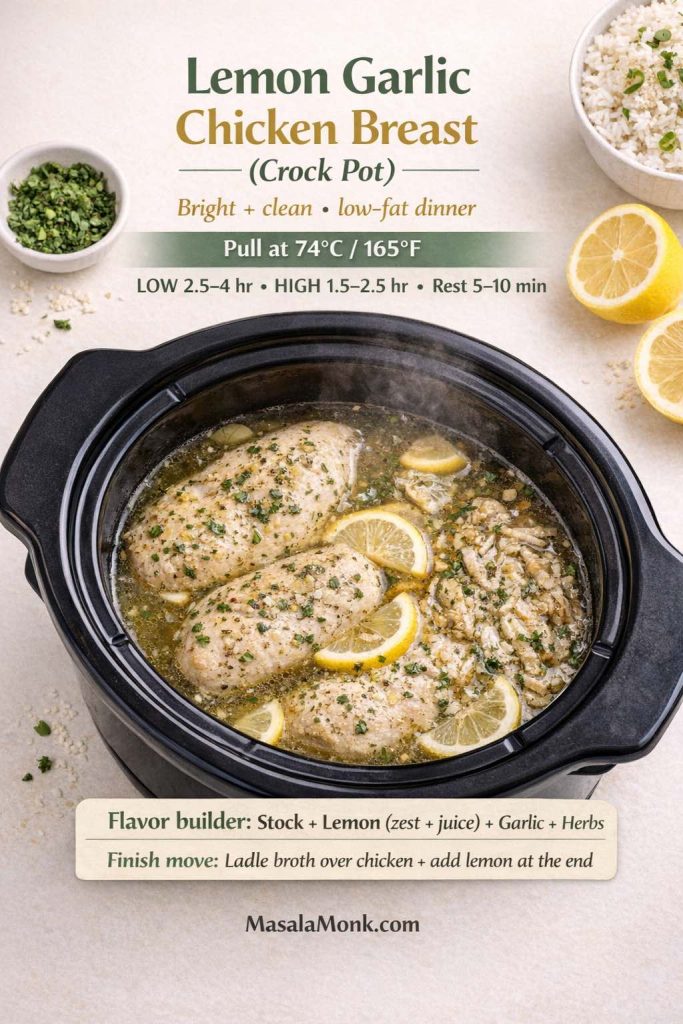
Ingredients
- 700 g chicken breasts
- 240 ml chicken stock
- 2 g lemon zest
- 45 ml lemon juice
- 18 g garlic, minced
- 15 ml olive oil
- 6 g salt
- 2 g black pepper
- 5 g oregano (or Italian herb mix)
- Optional: 120 g sliced onion
Method or Recipe for Lemon Garlic Chicken Breast in a Slow Cooker
- Add stock, zest, lemon juice, garlic, olive oil, salt, pepper, and herbs to the slow cooker. Stir.
- Add chicken and spoon liquid over.
- Cook until chicken reaches 74°C, using the safe temperature chart.
- Rest, slice, then ladle broth over the chicken.
Best sides
This chicken loves rice, potatoes, or a crisp salad. If you want a herb-forward finish, pesto stirred in at the end is excellent—MasalaMonk’s pesto recipes offer plenty of directions.
Variations
- Spicy lemon chicken: add 2 g cayenne or 10 g chili paste.
- Creamy lemon: stir in 120 g Greek yogurt at the end (off heat) for a tangy creamy sauce.
- Mediterranean-style: add 100 g olives and 150 g cherry tomatoes in the last 30 minutes.
Also Read: Peanut Butter Cookies (Classic Recipe & 3 Variations)
6) Chicken Breast and Potatoes (Crock Pot Dinner That Plates Itself)
Chicken breast and potatoes in the crock pot is comfort with built-in convenience. Potatoes soak up seasoning, the broth turns into a quick gravy, and dinner is basically ready the moment you lift the lid. This is especially useful when you want a complete meal without a second pot of sides.
As potatoes can take longer than chicken, the most dependable approach is to keep potato pieces chunky and start checking chicken for doneness before the potatoes are fully done. Then, if needed, chicken can rest while potatoes finish.
Serves: 4
Prep: 15 minutes
Cook: 3.5–5 hours on LOW
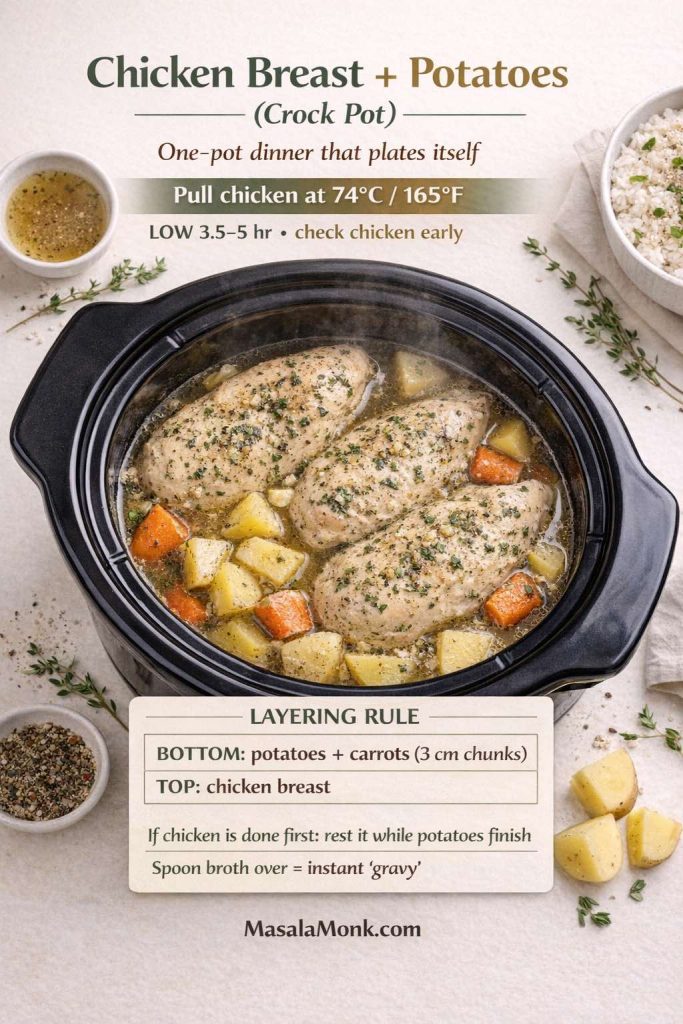
Ingredients
- 700 g chicken breasts
- 600 g potatoes, cut into 3 cm chunks
- 120 g carrots, cut thick (optional)
- 120 g onion, sliced (optional)
- 240 ml chicken stock
- 20 ml olive oil
- 8 g salt
- 2 g black pepper
- 5 g paprika
- 3 g dried thyme
Method or Recipe for Crock Pot Chicken Breast and Potatoes
- Toss potatoes (and carrots) with olive oil, paprika, thyme, and half the salt.
- Add vegetables to the slow cooker first. Pour in stock.
- Place chicken on top and season with remaining salt and pepper.
- Cook until chicken reaches 74°C and potatoes are tender.
- Rest chicken. Slice and serve with potatoes and broth.
Cozy companion idea
If you love the “big payoff, minimal effort” slow cooker vibe, MasalaMonk’s Whole Chicken in Crock Pot is a great batch-cooking follow-up.
Variations
- BBQ chicken breast and potatoes: add 200 g BBQ sauce and reduce stock to 120 ml.
- Creamy potatoes finish: stir in 80–100 g cream cheese at the end.
- Spicy potatoes: add 2 g cayenne and 3 g cumin to the seasoning mix.
Also Read: How to make the Best Peanut Butter at Home
7) Chicken Breast and Rice (Crock Pot Comfort Bowl)
Chicken breast and rice in a slow cooker is deeply satisfying when it works: one pot, balanced plate, cozy texture. The challenge is that rice can turn mushy if it sits too long after it’s done. The solution is straightforward: use hot stock, choose long-grain rice, and check earlier rather than later. If the chicken hits temp first, pull it to rest while the rice finishes—don’t keep the chicken hostage to the rice.
Once you dial this in, it becomes an easy dinner staple—especially if you like making rice bowls.
Serves: 4
Prep: 10 minutes
Cook: 2.5–3.5 hours on LOW
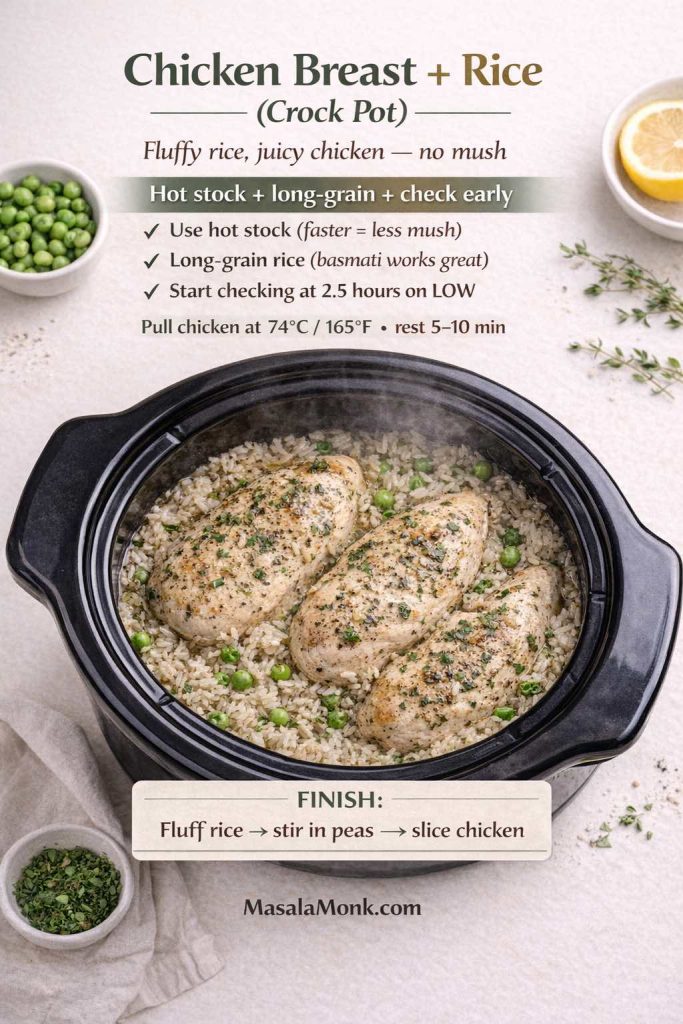
Ingredients
- 700 g chicken breasts
- 220 g long-grain rice (basmati works well)
- 600 ml hot chicken stock
- 120 g onion, finely chopped
- 10 g garlic, minced
- 6 g salt
- 2 g black pepper
- 5 g paprika
- 15 ml olive oil
- 120 g peas (stir in at end)
Method or Recipe for Chicken Breast and Rice in a Slow Cooker
- Add onion, garlic, rice, salt, pepper, paprika, and olive oil to the slow cooker.
- Pour in hot stock and stir.
- Lay chicken on top in a single layer.
- Cook until chicken reaches 74°C and rice is tender.
- Remove chicken to rest. Fluff rice, stir in peas, then slice chicken and serve.
Serving ideas
A bowl like this loves toppings: chopped herbs, lemon, yogurt drizzle, or a quick salad on the side. If you’re curious about making rice feel lighter, MasalaMonk’s guide to reducing the glycemic impact of rice is a useful read.
Variations
- Cheesy rice dinner: stir in 80–100 g cream cheese at the end, or try a comfort cousin recipe like Cheesy Chicken Broccoli Rice.
- Southwest rice bowl: add 200 g salsa and 150 g corn; finish with lime.
- Spicy chicken breast slow cooker version: add 10 g chili paste and top with green onions.
Also Read: How to make Mango Chia Pudding? 5 Creative Ideas
8) Chicken Breast and Vegetables (Healthy Crock Pot Dinner That Still Feels Filling)
Some nights you want dinner to feel lighter without feeling like you’re giving something up. This chicken breast and vegetables crock pot dinner does that beautifully: colorful vegetables, a simple broth-based sauce, and enough flavor to keep things satisfying.
It also fits meal prep well. Because the sauce is broth-based and lemon-bright, it reheats without the “heavy” feel that some creamy leftovers can develop.
Serves: 4
Prep: 15 minutes
Cook: 2.5–4 hours on LOW
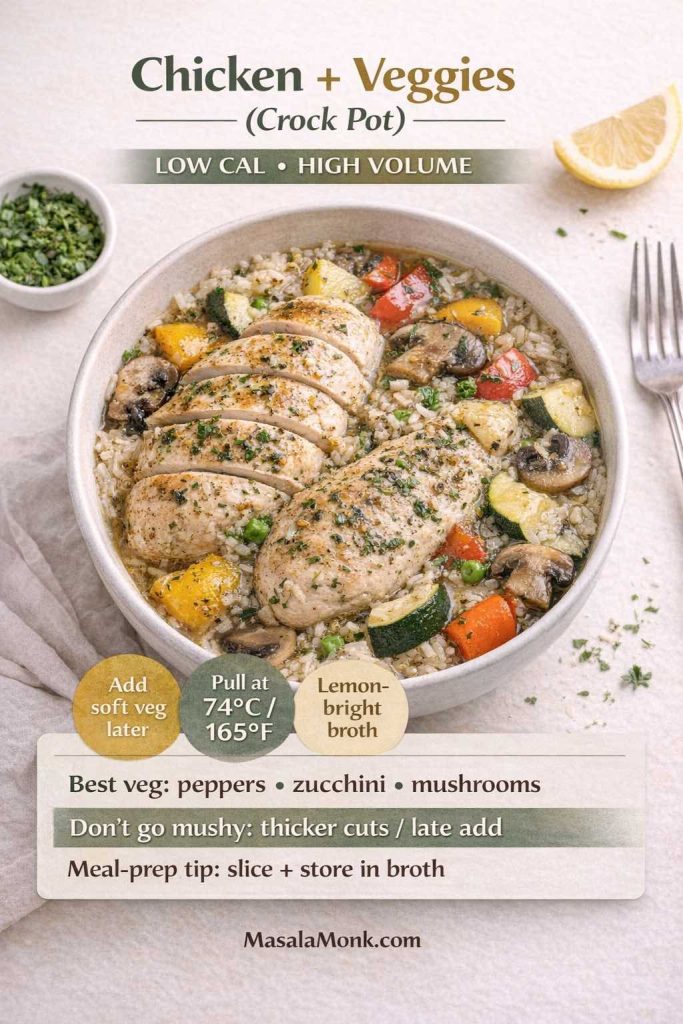
Ingredients
- 700 g chicken breasts
- 250 g bell peppers, sliced
- 200 g zucchini, thick half-moons
- 150 g mushrooms, sliced
- 150 g onion, sliced
- 240 ml chicken stock
- 30 ml lemon juice
- 15 ml olive oil
- 6 g salt
- 2 g black pepper
- 5 g Italian herb mix
Method or Recipe for Slow Cooker Chicken Breast and Vegetables
- Add vegetables, stock, lemon juice, olive oil, salt, pepper, and herbs to the slow cooker. Stir.
- Add chicken on top.
- Cook until chicken reaches 74°C, using the safe temperature chart.
- Slice chicken and serve with vegetables and broth.
Serving ideas
Serve over rice, potatoes, or with a crusty bread. If you want something fun alongside, crispy fries can turn it into a more “treat yourself” plate—MasalaMonk’s homemade French fries is a great reference.
Variations
- Southwest slow cooker chicken: add 200 g salsa, 150 g corn, and 2 g cumin; finish with lime.
- Salsa chicken meal prep: keep it simple with salsa + stock; shred at the end and serve in bowls.
- Spicy version: add chili paste or cayenne, then cool it down with a yogurt sauce. MasalaMonk’s tzatziki variations work surprisingly well here.
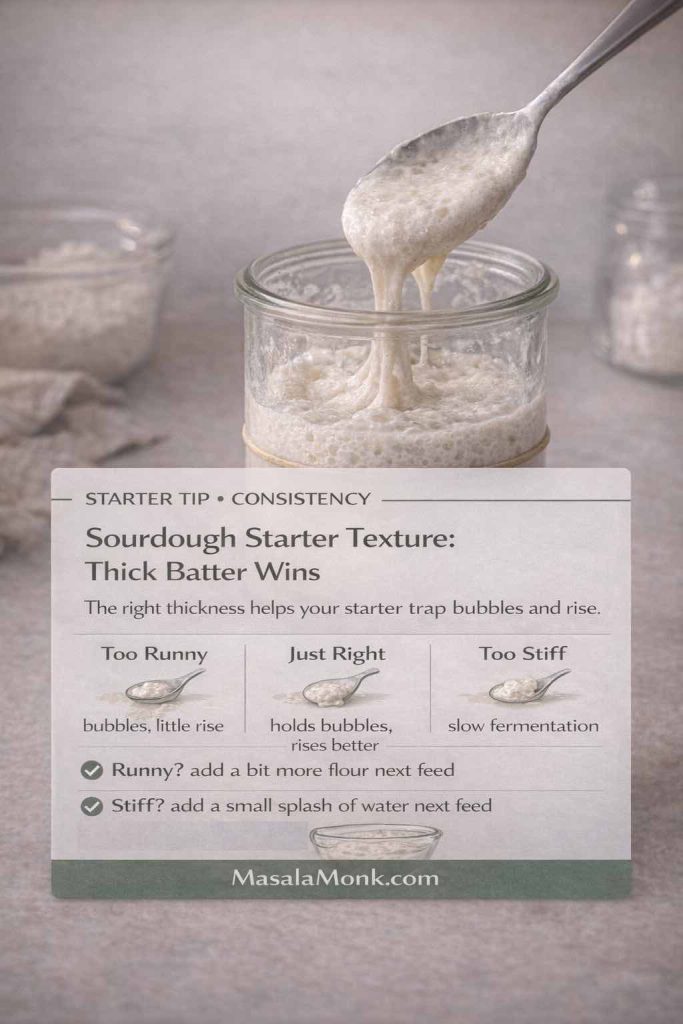
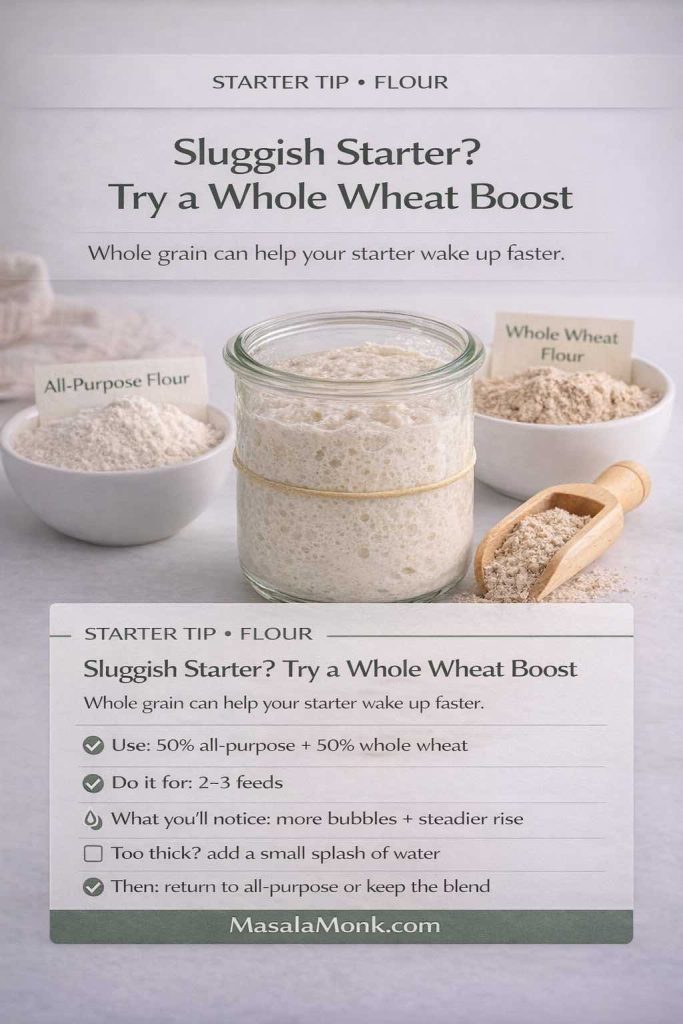
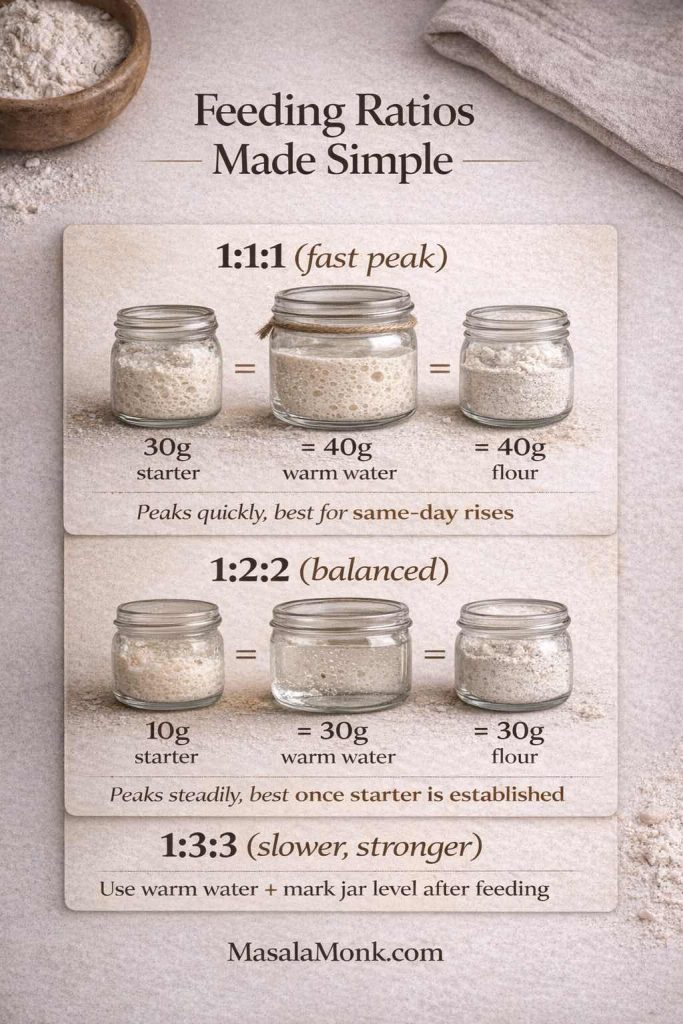
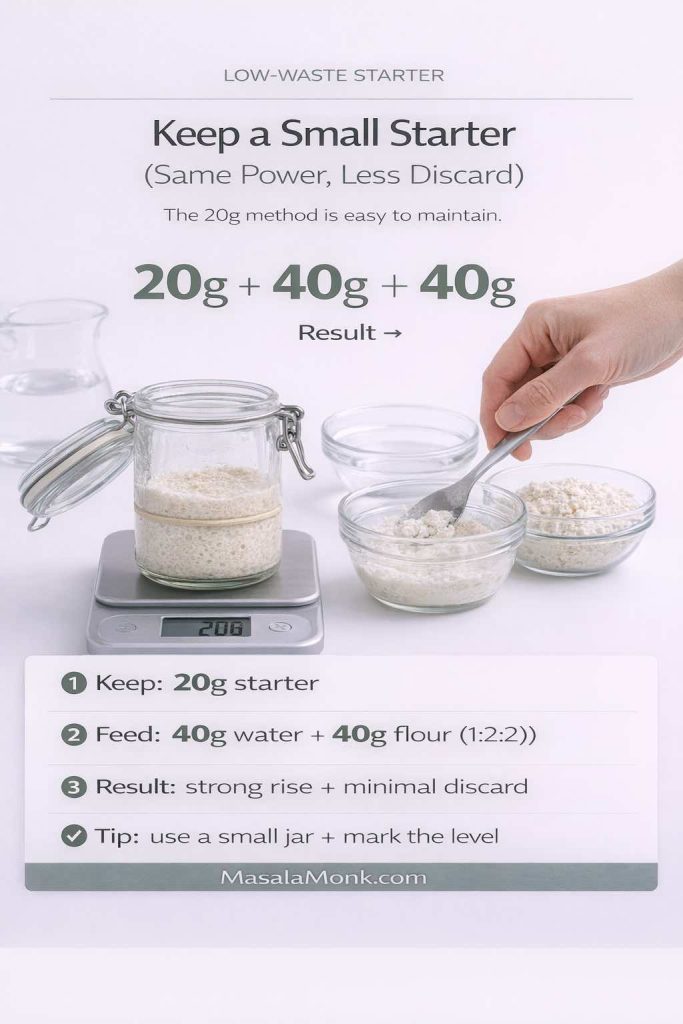
Also Read: Sourdough Starter Recipe: Make, Feed, Store & Fix Your Starter (Beginner Guide)
9) Chicken and Stuffing in a Crock Pot (Casserole Comfort, Minimal Effort)
This is the dinner that feels like a warm blanket. Chicken and stuffing in a slow cooker gives you tender chicken, savory gravy, and that buttery stuffing layer that makes everything feel like a holiday plate—even on a random weekday.
It’s also wonderfully practical: you stir the sauce, add the chicken, top with stuffing, then let the slow cooker do the rest. The leftovers reheat well, which makes it a good candidate for busy weeks.
Serves: 4–5
Prep: 10 minutes
Cook: 3–4 hours on LOW
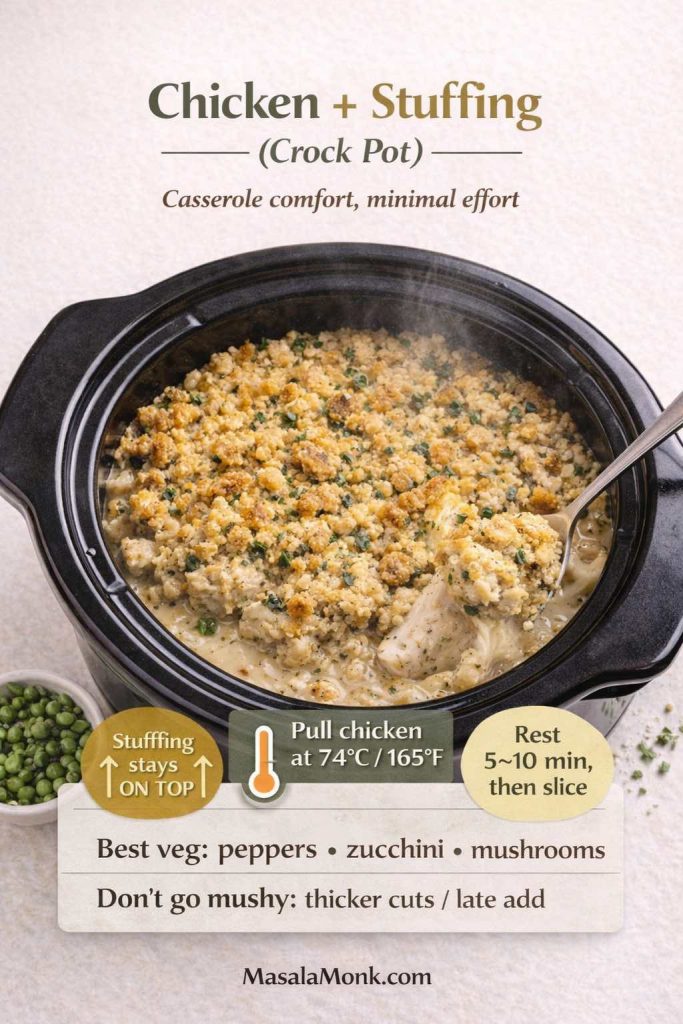
Ingredients
- 700 g chicken breasts
- 240 ml chicken stock
- 300 g condensed cream of chicken soup (or cream of mushroom soup)
- 200 g dry stuffing mix
- 60 g butter, melted
- 2 g black pepper
- Optional: 120 g onion, diced
- Optional finish: 120 g sour cream (stir in at end)
Method or Recipe for Slow Cooker Chicken Stuffing
- Whisk stock, condensed soup, and black pepper (and onion, if using) in the slow cooker.
- Add chicken and spoon sauce over the top.
- Mix stuffing with melted butter, then sprinkle evenly over the chicken. Keep it on top rather than stirring it in.
- Cook until chicken reaches 74°C.
- Rest chicken, then slice. If using sour cream, stir it into the sauce just before serving.
Cream-of-mushroom vs cream-of-chicken
Both work. Cream of chicken tastes classic and mild, while cream of mushroom adds deeper savory notes. If you can’t decide, a half-and-half split is a surprisingly good middle ground.
Pairing idea
For a cozy side, MasalaMonk’s green bean casserole ideas pair perfectly with this comfort style dinner.
Also Read: Chicken Adobo — Step-by-Step Recipe — Classic Filipino Adobong Manok
10) Buffalo Chicken Dip (Crock Pot + Chicken Breast, Party-Ready)
This one belongs on the list because it’s one of the most satisfying ways to use cooked chicken breast—especially if you’ve made shredded chicken earlier in the week. Buffalo chicken dip is creamy, spicy, salty, and extremely scoopable. It’s also flexible: more tang, more heat, more cheese, less cheese—whatever your crowd likes.
Serves: 8 as an appetizer
Prep: 10 minutes
Cook: 2–3 hours on LOW, then WARM
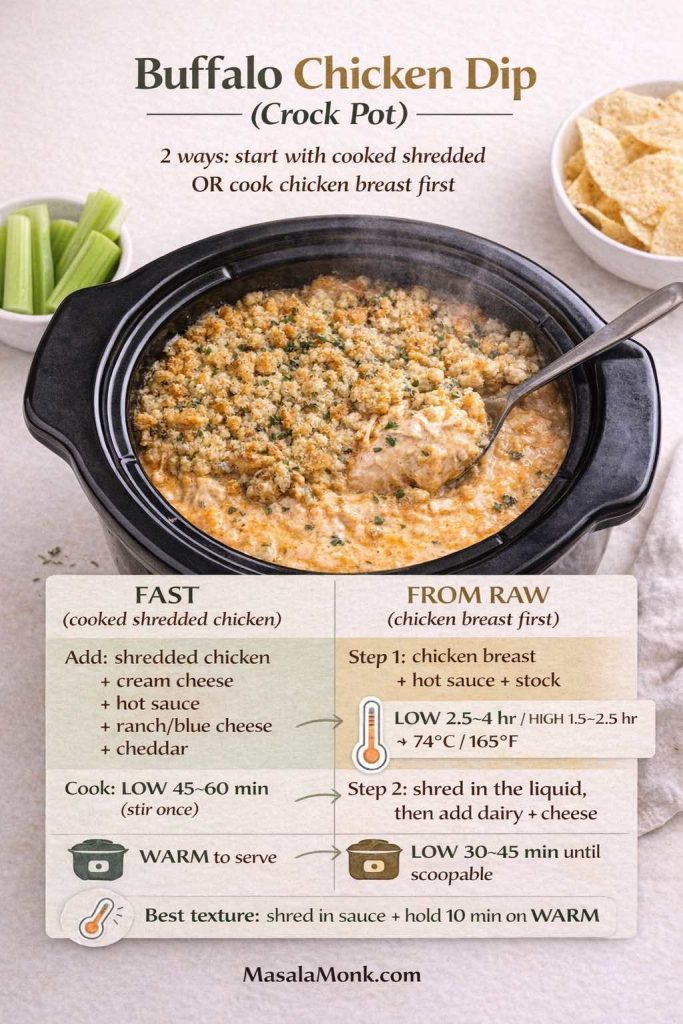
Ingredients
- 500 g cooked shredded chicken breast
- 200 g cream cheese
- 120 g Greek yogurt or sour cream
- 120 ml hot sauce (adjust to taste)
- 60 ml ranch or blue cheese dressing
- 120 g shredded cheddar
- Optional: 60 g shredded mozzarella
Method or Recipe for Buffalo Chicken Dip
- Add everything to the slow cooker and stir roughly.
- Cook until melted and smooth, stirring once or twice.
- Hold on WARM and serve with celery, carrots, chips, or toasted bread.
Starting with raw chicken breast (instead of cooked shredded chicken)
If you are looking specifically for “buffalo chicken dip crock pot with chicken breast,” this is the version you want. You cook the chicken breast first, shred it, then turn it into the dip—same slow cooker, same comfort, no extra pans.
Step 1 (cook + shred the chicken): Add 700 g boneless, skinless chicken breasts to the slow cooker with 120 ml hot sauce + 120 ml chicken stock (or water). Cook on LOW 2.5–4 hours (or HIGH 1.5–2.5 hours) until the thickest part hits 74°C / 165°F. Rest 5 minutes, then shred directly in the liquid.
Step 2 (turn it into dip): Stir in the remaining dip ingredients (cream cheese, yogurt/sour cream, dressing, cheddar, optional mozzarella). Cover and cook on LOW 30–45 minutes, stirring once or twice, until smooth and scoopable. Hold on WARM for serving.
Juicy tip: Keep the shredded chicken bathed in the buffalo liquid while the cheeses melt—this is what keeps the dip rich and not dry or stringy.
Serving extras
If you’re firmly on team blue cheese, MasalaMonk’s blue cheese dip guide is a great companion. For a full MasalaMonk take on this dish, including other methods, the Buffalo Chicken Dip recipe is worth bookmarking.
Also Read: Paper Plane Cocktail Recipe + Best Amaro Substitutes & Tips
Shredded Chicken Breast Base in Crock Pot (For Tacos, Bowls, and Sandwiches)
If you want a plain, dependable slow cooker chicken breast recipe that becomes anything, this is it. It’s the kind of cooked shredded chicken breast you can stretch across multiple meals—tacos tonight, rice bowls tomorrow, sandwiches the day after. Because the seasoning stays gentle, you can steer it toward BBQ, salsa, ranch, lemon garlic, or spicy flavors later without starting over.
Serves: 4–6
Prep: 5 minutes
Cook: 3–4 hours on LOW
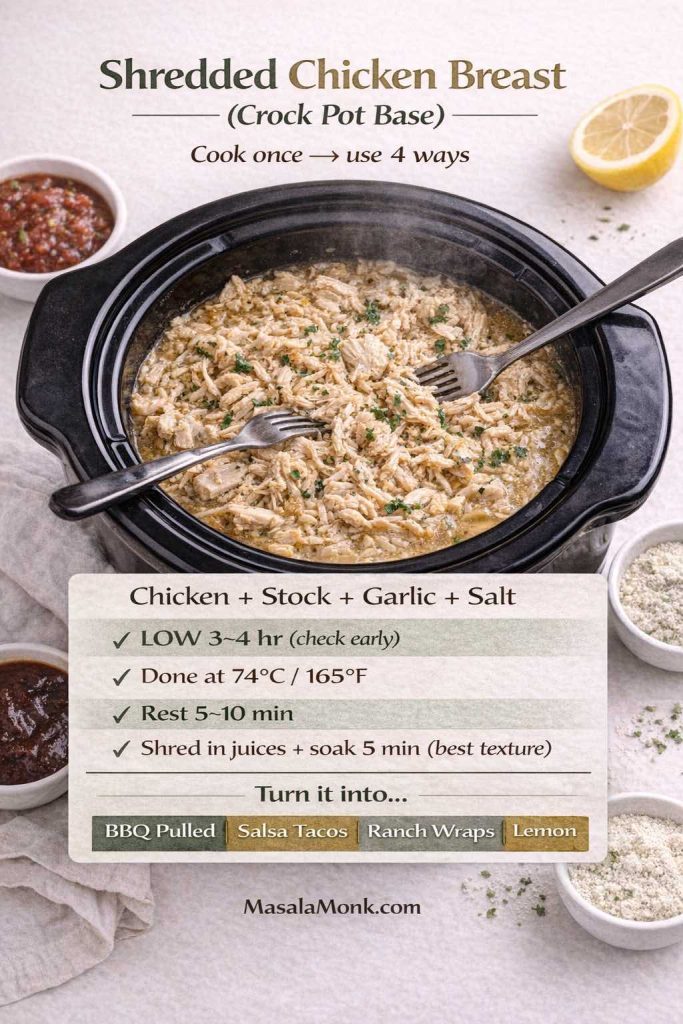
Ingredients
- 900 g chicken breasts
- 240 ml chicken stock
- 10 g garlic, minced
- 6 g salt
- 2 g black pepper
- Optional: 1 bay leaf
Method or Recipe for Shredded Chicken Breast Base in Crock Pot
- Add stock, garlic, salt, pepper (and bay leaf) to the slow cooker.
- Add chicken in a single layer.
- Cook until chicken reaches 74°C, then rest 5 minutes.
- Shred in the juices, then let it sit a few minutes so it absorbs flavor.
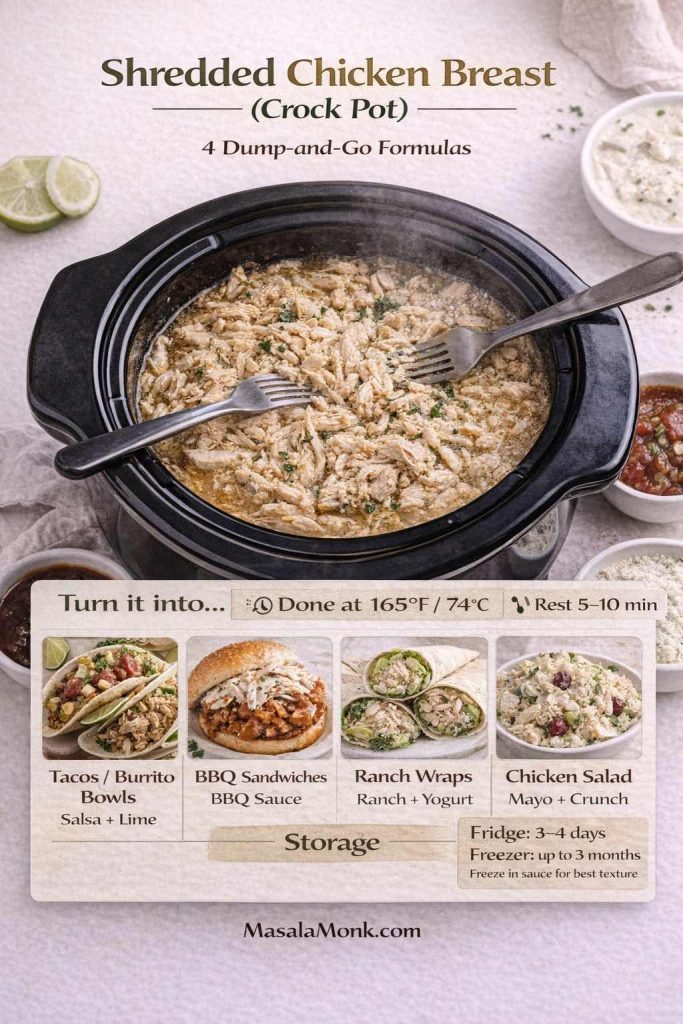
Easy “turn it into…” ideas
- Salsa chicken: stir in salsa + lime and serve with rice.
- Ranch shredded chicken: stir in ranch seasoning + a spoon of yogurt.
- BBQ pulled chicken: stir in BBQ sauce and simmer on WARM.
- Creamy chicken: stir in cream cheese until smooth.
- Chicken salad: mix with mayo, crunch, and herbs—MasalaMonk’s homemade mayo guide is a great base if you like making it from scratch.
Also Read: Authentic Punjabi Style Rajma Curry Recipe
3-Ingredient Crock Pot Chicken Breast (Fast Dump-and-Go Formulas)
There are nights when you don’t want “a recipe.” You want a reliable formula that works every time, tastes like you tried, and doesn’t create extra dishes. That’s what these are: four 3-ingredient crock pot chicken breast recipes built around the same juicy rule—cook to 74°C / 165°F, rest, then slice or shred in the sauce.
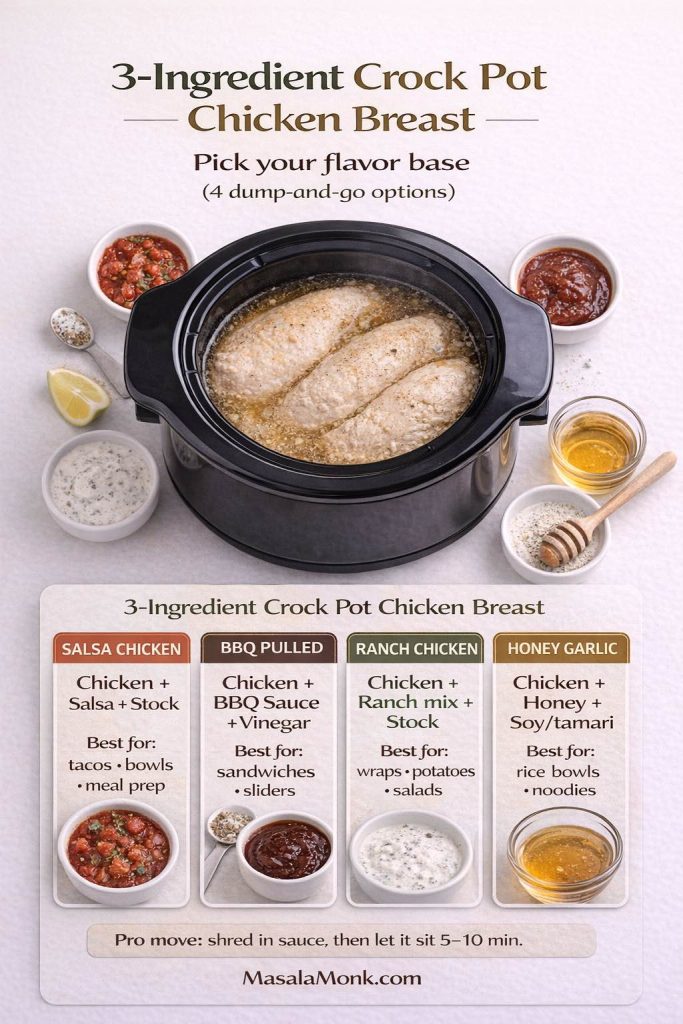
The base rules (use for all 4 recipes below)
- Chicken: 700 g boneless, skinless chicken breasts (best if similar thickness; single layer if possible)
- Cook: covered on LOW 2.5–4 hours or HIGH 1.5–2.5 hours
- Done = 74°C / 165°F in the thickest part
- Rest: 5–10 minutes before slicing
- If shredding: shred in the cooking liquid, then let it sit 5 minutes so it soaks flavor back in
Pro tip that saves texture: Don’t keep opening the lid. Every peek slows the cook and increases the chance you overcook the chicken at the end.
Salsa Chicken (Crock Pot) — tacos, bowls, and meal prep
This is the weeknight MVP: tangy, juicy, and built for shredding. It’s also one of the best “few ingredients” slow cooker chicken breast dinners because salsa does the seasoning work for you.
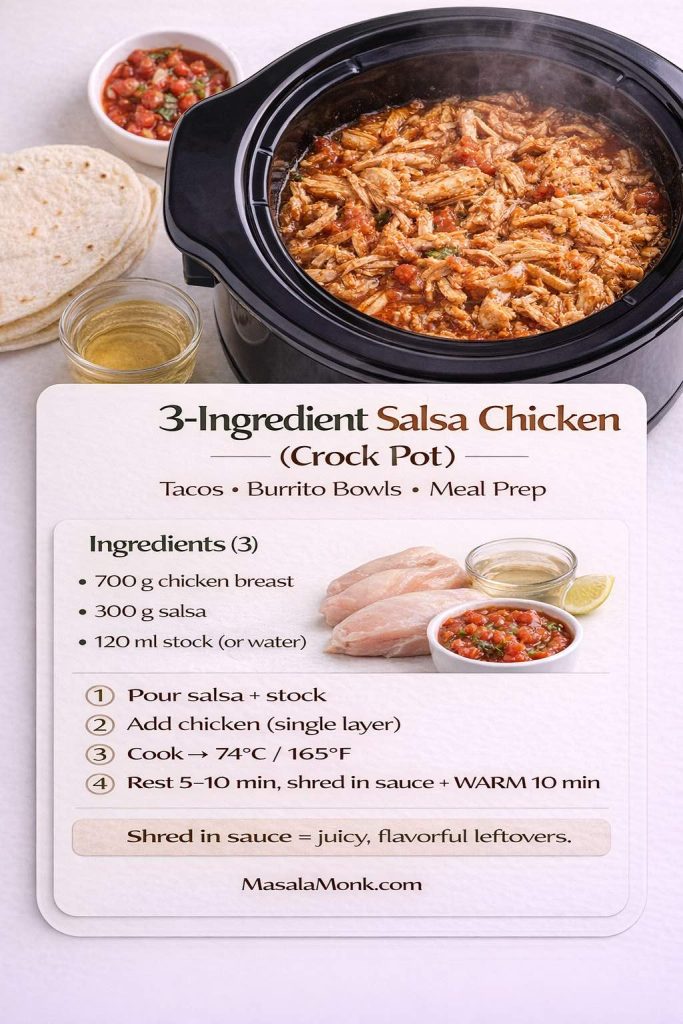
Ingredients (3):
- 700 g boneless, skinless chicken breasts
- 300 g salsa (any style you like)
- 120 ml chicken stock (or water)
Method:
- Pour salsa and stock into the slow cooker and stir.
- Add chicken in a single layer (or as close as you can). Spoon sauce over the top.
- Cook on LOW or HIGH until the chicken reaches 74°C / 165°F.
- Rest 5–10 minutes.
- For shredded salsa chicken: shred directly in the sauce, then leave on WARM 10 minutes so it absorbs flavor.
Serving ideas:
- Tacos, burrito bowls, quesadillas, nachos, salads, baked potatoes.
Easy upgrades (optional, not required):
- Add 10–15 ml lime juice at the end for brightness.
- Stir in chopped cilantro after shredding.
- Want it creamier? Add a spoon of Greek yogurt when serving (not while cooking).
BBQ Pulled Chicken Breast (Crock Pot) — sandwiches and sliders
If you want “pulled chicken” texture without it turning dry, the trick is simple: shred it in sauce, then give it a short soak on WARM so it goes glossy and tender.
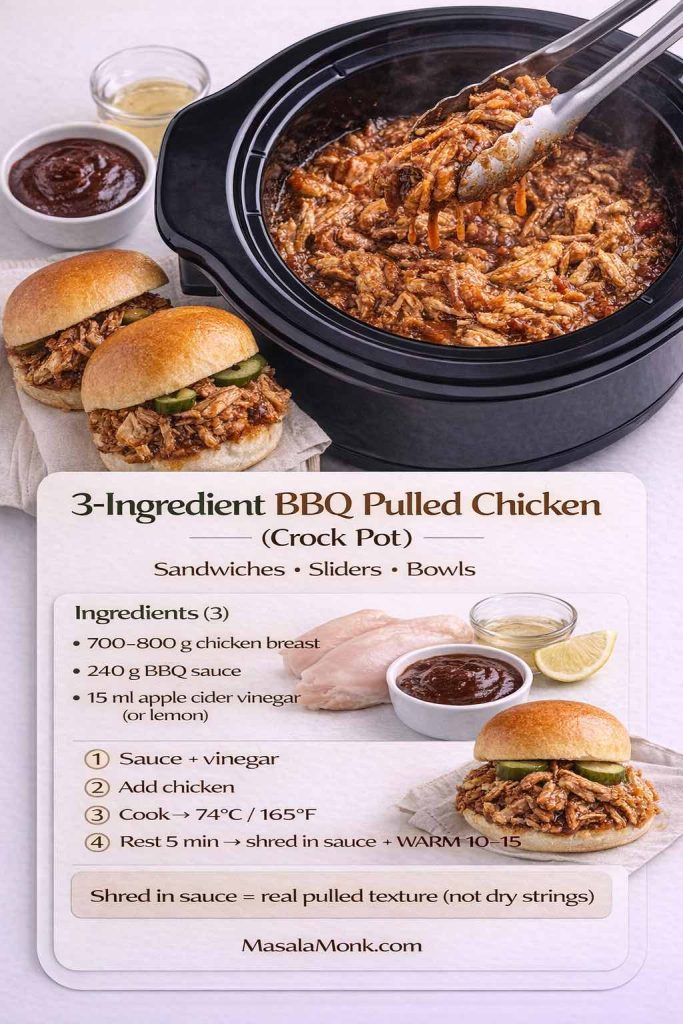
Ingredients (3):
- 700–800 g boneless, skinless chicken breasts
- 240 g BBQ sauce
- 15 ml apple cider vinegar (or lemon juice)
Method:
- Stir BBQ sauce + vinegar in the slow cooker.
- Add chicken and coat well.
- Cook on LOW or HIGH until the thickest part hits 74°C / 165°F.
- Rest 5 minutes.
- Shred in the sauce, then keep it on WARM 10–15 minutes for proper pulled texture.
Serving ideas:
- Sandwiches, sliders, rice bowls, loaded baked potatoes, wraps.
Easy upgrades (optional):
- Add a splash of stock (60–120 ml) if your BBQ sauce is very thick.
- Add chili flakes or hot sauce for spicy BBQ.
Ranch Seasoning Chicken (Crock Pot) — creamy finish, few ingredients
This one hits the “crock pot chicken breast recipes with ranch seasoning” intent perfectly. It’s also flexible: you can finish it lighter with yogurt or richer with cream cheese.
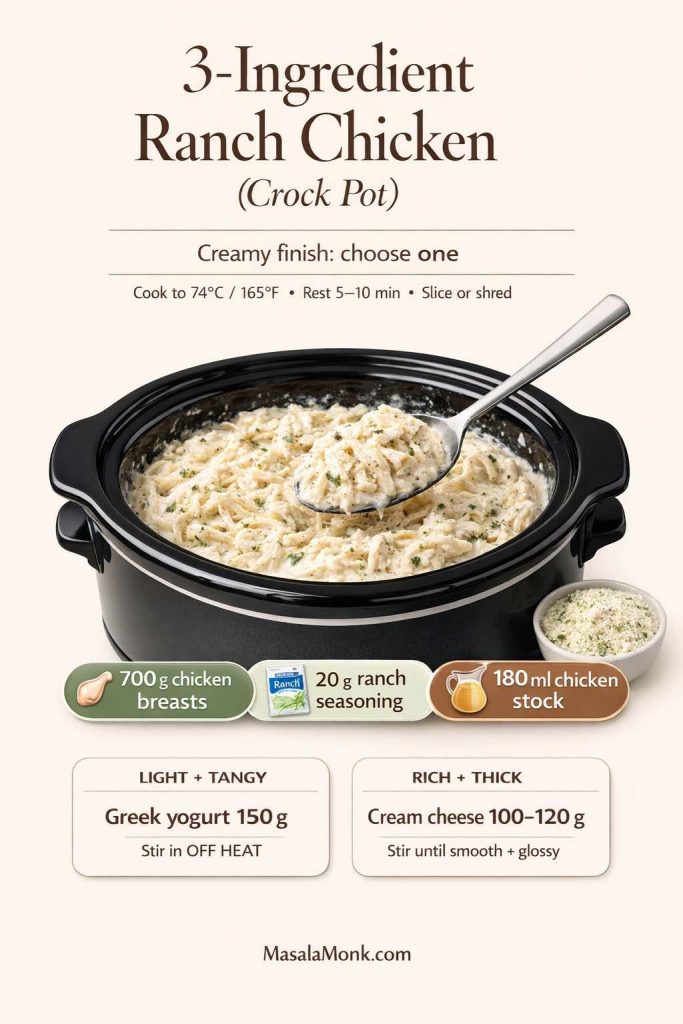
Ingredients (3):
- 700 g boneless, skinless chicken breasts
- 20 g ranch seasoning mix
- 180 ml chicken stock
Method:
- Whisk ranch seasoning into the stock in the slow cooker.
- Add chicken and spoon liquid over the top.
- Cook until chicken reaches 74°C / 165°F.
- Rest 5–10 minutes, then slice or shred in the ranchy juices.
- Creamy finish (choose one):
- Stir in 150 g thick Greek yogurt (lighter, tangier)
- OR stir in 100–120 g cream cheese (richer, thicker)
Serving ideas:
- Over rice, with potatoes, inside wraps, or on salads.
Important texture note: If you use yogurt, stir it in at the end (off high heat) so it stays smooth.
Honey Garlic Chicken Breast (Crock Pot) — sweet-savory plates or shredded bowls
This one tastes like a complete sauce even with only 3 ingredients. It’s excellent sliced for dinner plates, but it also shreds beautifully for meal prep.
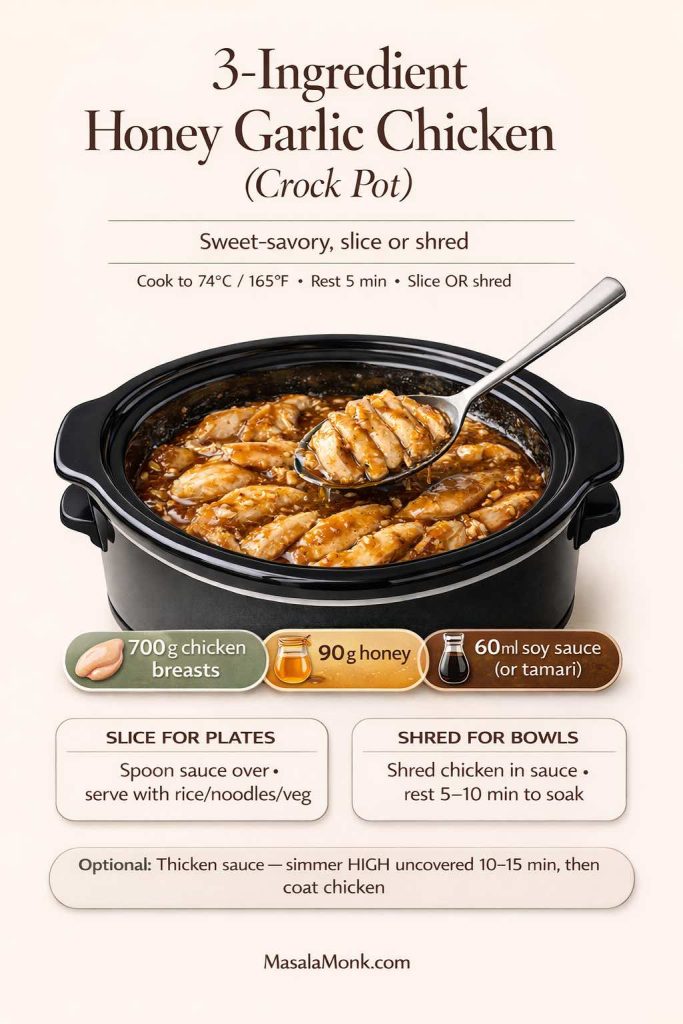
Ingredients (3):
- 700 g boneless, skinless chicken breasts
- 90 g honey
- 60 ml soy sauce (or tamari for gluten free)
Method:
- Whisk honey and soy sauce (or tamari) in the slow cooker.
- Add chicken and coat.
- Cook until chicken reaches 74°C / 165°F.
- Rest 5 minutes.
- Slice for plates, or shred in the sauce for bowls and sandwiches.
Serving ideas:
- With rice, noodles, stir-fried vegetables, lettuce wraps, or sandwiches.
Optional (if you want thicker sauce):
- Remove chicken, simmer sauce on HIGH uncovered 10–15 minutes, then return chicken to coat.
The “small rule” that makes all chicken recipes taste better
If you shred the chicken, don’t serve immediately. Let it sit in the sauce for 5–10 minutes (WARM is perfect). It reabsorbs flavor and stays moist—especially for leftovers.

Also Read: What to Mix with Jim Beam: Best Mixers & Easy Cocktails
Keeping the Rotation Fresh (Without Making Dinner Harder)
Even the best crock pot chicken breast recipes can start to feel similar if the finish never changes. Luckily, small swaps create big variety.
- A spoon of pesto at the end transforms lemon chicken into something herbaceous—MasalaMonk’s pesto recipes are full of ideas.
- A sauce swap changes the entire vibe; MasalaMonk’s pizza sauce recipes can spark smoky, spicy, or tangy directions that work with shredded chicken.
- A cozy slow cooker dinner doesn’t always have to be chicken; sometimes a comfort soup resets the week. MasalaMonk’s Crock Pot Lasagna Soup keeps the same ease while changing texture and flavor.
- When you want a non-slow-cooker night that’s still effortless, Sheet Pan Chicken Fajitas brings big flavor without another long cook.
Finally, if you ever want to double-check slow cooker basics (especially around timing and safety), the USDA’s page on slow cookers and food safety is a practical reference, and the CDC’s chicken food safety guidance is a helpful reminder for clean prep habits.
One more thing for juicy crock pot chicken breast
If your slow cooker chicken breast has ever come out dry, it usually wasn’t the recipe. It was timing. Pull it when it’s done, rest it, then keep it in sauce. After that, everything becomes easier: creamy chicken stays silky, BBQ chicken stays tender, rice bowls stay satisfying, and leftovers actually taste good.
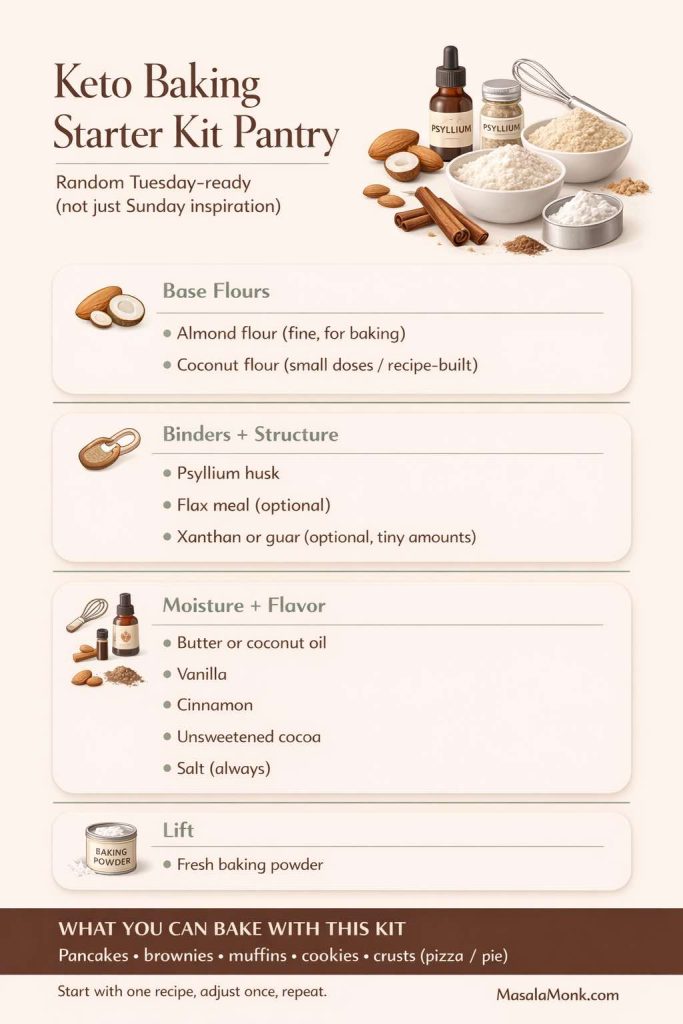
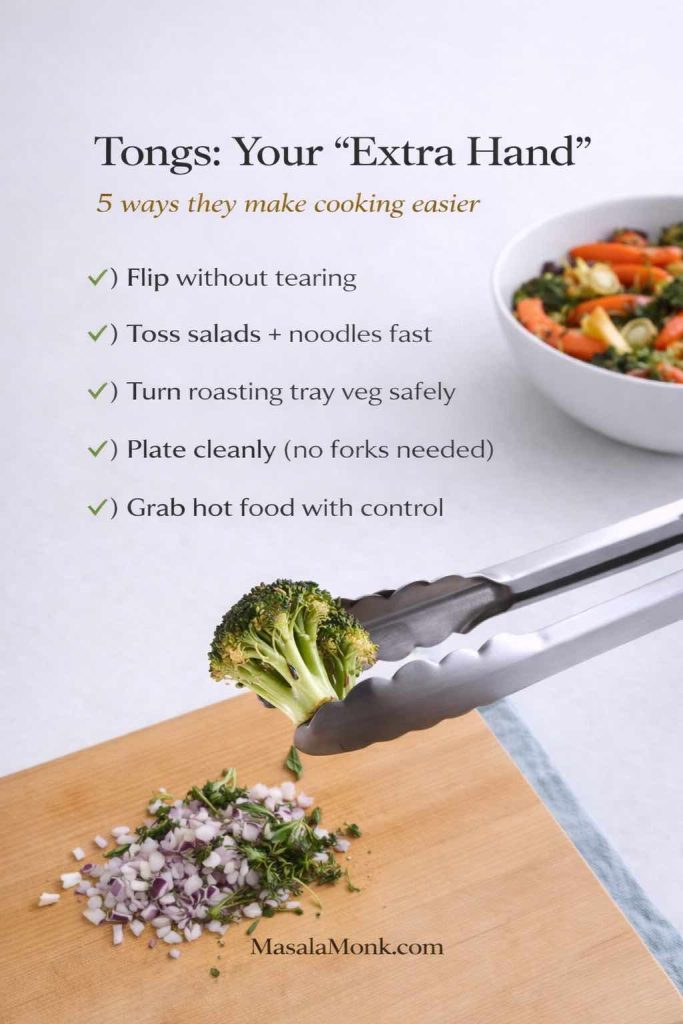
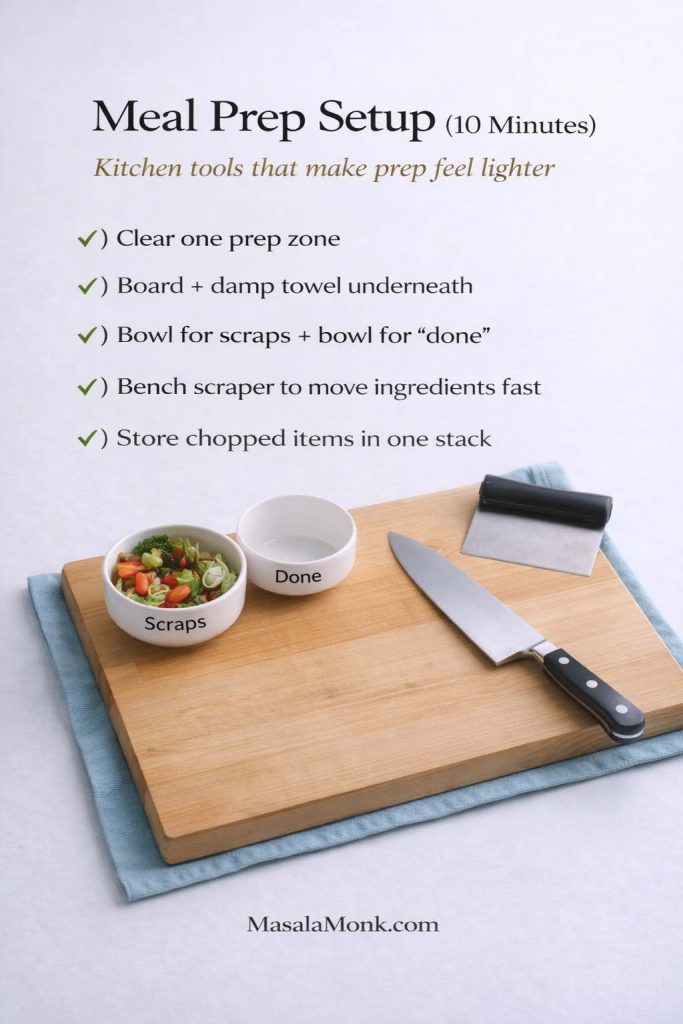
Also Read: 19 Essential Kitchen Tools That Make Cooking Easier
FAQs about making Chicken Breast in Crock Pot
1) How long should crock pot chicken breast cook on LOW?
Most boneless, skinless chicken breasts finish in 2.5 to 4 hours on LOW, depending on thickness and your slow cooker. In practice, the most reliable cue is doneness: pull the chicken as soon as the thickest part hits 74°C so it stays juicy.
2) How long should chicken breast cook in a crock pot on HIGH?
On HIGH, chicken breast typically takes 1.5 to 2.5 hours. Even so, thinner pieces can finish earlier, so start checking sooner rather than later.
3) What’s the best way to keep chicken breast moist in a crock pot?
First, use enough liquid or sauce to surround the chicken. Next, keep pieces similar in thickness so they cook evenly. Finally, stop cooking once it’s done and let it rest briefly before slicing or shredding—those small steps make a big difference.
4) Can I cook frozen chicken breast in the crock pot?
It’s possible, yet it’s not ideal. Because frozen chicken warms slowly, it may cook unevenly and turn stringy. Whenever you can, thaw first for better texture and more consistent results.
5) Why is my slow cooker chicken breast tough or rubbery?
Usually it’s overcooked, even if it doesn’t look dry. Chicken breast firms up the longer it stays hot. A better move is to aim for doneness, then switch to WARM or remove it and keep it in sauce.
6) Is it better to cook chicken breast in the crock pot with broth or with water?
Broth adds flavor immediately, whereas water stays neutral. If you’re keeping the recipe very simple, broth is the easier win. That said, water can work when you’re using bold seasonings or a strong sauce.
7) Can I cook thin sliced chicken breast in a crock pot?
Yes, although it cooks faster than whole breasts. Consequently, thin sliced chicken breast can go from perfect to dry quickly, so check early and avoid long “keep warm” time.
8) How do I cook chicken tenderloins in the crock pot?
Chicken tenderloins generally finish quicker than full breasts. For that reason, treat them like a shorter cook: keep them in sauce, begin checking around the early end of your time window, and pull as soon as they’re done.
9) What’s the easiest crock pot chicken breast recipe with few ingredients?
A simple combination is chicken breast + salsa, or chicken breast + BBQ sauce, or chicken breast + ranch seasoning with a splash of broth. In other words, pick one strong flavor base, then keep everything else minimal.
10) Can I make crock pot buffalo chicken dip with chicken breast?
Absolutely. You can cook the chicken breast first and shred it, then stir it into a slow cooker with cream cheese, hot sauce, and cheese. Alternatively, use already cooked shredded chicken to make it even faster.
11) What’s the best way to shred chicken breast for tacos in the slow cooker?
Cook chicken in a flavorful liquid, then shred it directly in the juices. Afterward, let it sit a few minutes so it soaks flavor back in. That extra minute makes the chicken taste fuller, not washed out.
12) Can I make chicken breast and potatoes in the slow cooker at the same time?
Yes—just keep potato chunks fairly large. Meanwhile, place potatoes underneath and chicken on top so the potatoes get direct heat. If the chicken finishes first, remove it to rest while the potatoes continue until tender.
13) Can I make chicken breast and rice in a slow cooker?
Yes, although rice texture depends on timing. Use long-grain rice for better separation, keep the liquid ratio steady, and check as soon as the rice turns tender so it doesn’t turn mushy.
14) What’s the best slow cooker chicken breast recipe for meal prep?
Saucy recipes tend to reheat better—think BBQ, honey garlic, ranch, or creamy versions. Moreover, shredding chicken into the sauce keeps it moist for later lunches.
15) How do I make creamy chicken breast in a crock pot without it getting watery?
First, don’t add too much broth. Next, add dairy at the right time: cream cheese is stable and can go in early, while sour cream or yogurt is better stirred in at the end. If you still want thicker sauce, a small cornstarch slurry can tighten it up quickly.
16) Can I use cream of mushroom soup in slow cooker chicken breast recipes?
Yes, and it adds deeper savory flavor. Similarly, cream of chicken soup works when you want something milder. If you want the best of both, a half-and-half mix gives a more rounded taste.
17) Is crock pot chicken breast healthy?
It can be, depending on the sauce. For a lighter option, choose broth-based recipes with vegetables, or use yogurt instead of heavier dairy. On the other hand, creamy recipes still fit if you balance the plate with vegetables and simpler sides.
18) How do I avoid bland slow cooker chicken breast?
Salt early, add aromatics like garlic/onion, and finish with something bright—lemon, vinegar, salsa, or a spoon of sauce stirred in at the end. In addition, letting shredded chicken sit in the cooking juices helps the flavor deepen.
19) Can I cook bone-in chicken breast in a crock pot?
Yes, although it generally takes longer than boneless. Also, it benefits from enough liquid to keep it moist. Once it’s done, remove the chicken and rest it briefly before serving.
20) What temperature should crock pot chicken breast be when it’s done?
Chicken breast is done at 165°F / 74°C in the thickest part. After that, rest it briefly; then slice or shred, and keep it in sauce to stay juicy.