Often relegated to the sidelines as just another seasoning, black pepper holds a secret power that goes unnoticed in our daily culinary routines. Imagine a world where this humble spice is not just an afterthought but a key player in enhancing wellness, particularly for women. Black pepper, with its sharp and distinctive flavor, is more than just a table condiment – it’s a metabolic booster in disguise.
This post is dedicated to uncovering the hidden potential of black pepper, a spice that’s been in our kitchens for ages but perhaps not in our wellness radar. Let’s delve into how this common spice can become an uncommon ally in a woman’s quest for health and vitality.
Section 1: The Mighty Black Pepper
The story of black pepper begins in the lush rainforests of Southern India, where it has been grown for thousands of years. Known as the ‘King of Spices’, it was once so valuable that it was used as currency. The ancient Ayurvedic texts lauded its health benefits, and it was a coveted commodity on the spice routes.
But black pepper is more than its historical richness. It contains piperine, the compound that gives it its pungency, and also its power to stimulate metabolism. As we rediscover black pepper through the lens of health and wellness, its role in our kitchens takes on a new significance.
Section 2: Black Pepper and Women’s Metabolism
For women, maintaining a healthy metabolism is often a balancing act, influenced by factors like diet, lifestyle, and hormonal changes. Black pepper emerges as a natural booster in this aspect. Piperine in black pepper enhances metabolic performance and encourages the body to break down fat cells.
Scientific studies have shed light on how piperine aids in the absorption of nutrients and increases thermogenesis – the process by which the body burns calories to produce heat. This property makes black pepper an invaluable spice for women looking to manage their weight and boost their metabolism naturally.
Section 3: Health Benefits Beyond Metabolism
Black pepper’s benefits extend far beyond just boosting metabolism. Its potent properties make it a versatile ally in various aspects of health, especially for women:
Digestive Health: Black pepper stimulates the digestive juices and enzymes, enhancing the digestive process without irritating the gut.
Nutrient Absorption: It increases the bioavailability of essential nutrients like vitamins A and C, selenium, and beta-carotene, ensuring that women get the most out of the foods they eat.
Antioxidant Properties: Rich in antioxidants, black pepper combats free radical damage, which is crucial for maintaining youthful skin and overall cellular health.
Immune System and Hormonal Balance: The spice’s anti-inflammatory and antibacterial properties support the immune system. Additionally, its positive impact on the endocrine system aids in hormonal balance.
Section 4: Incorporating Black Pepper into Everyday Diet
Incorporating black pepper into your daily diet is easier than you might think, and it can significantly impact your health:
Morning Routine: Start your day with a pinch of black pepper in your morning lemon water or smoothie to kickstart your metabolism.
Seasoning: Use freshly ground black pepper to season salads, soups, and main dishes. Its flavor enhances virtually any meal.
Healthy Snacking: Sprinkle black pepper on fruits like pineapple or mango for a spicy twist.
In Beverages: Add a dash of black pepper to your tea or turmeric milk to enhance absorption and add a warming effect.
Conclusion:
Black pepper, a spice that’s often taken for granted, is indeed a powerhouse of health benefits, particularly for women. Understanding and utilizing its metabolic-boosting and health-enhancing properties can make a significant difference in your wellness journey. As we reconsider the role of this powerful spice, it becomes clear that black pepper is not just a seasoning but a key to unlocking a healthier, more vibrant life.
Call to Action:
We’d love to hear how you use black pepper in your wellness routine. Share your favorite recipes or tips in the comments below, and let’s continue to discover the amazing benefits of everyday spices together!
What makes black pepper a metabolism booster for women? Black pepper contains piperine, a compound that enhances metabolic performance and stimulates the breakdown of fat cells, making it particularly beneficial for women’s metabolism.
Can black pepper aid in weight loss? Yes, by boosting metabolism and improving digestion, black pepper can be a useful addition to a weight loss diet. However, it should be combined with a healthy diet and regular exercise for best results.
How does black pepper benefit women’s hormonal health? Black pepper can positively impact hormonal balance due to its anti-inflammatory properties, which are beneficial in managing symptoms associated with hormonal fluctuations.
Are there any particular ways to include black pepper in a diet? Black pepper is versatile and can be added to various dishes. It can be sprinkled on salads, used in marinades, or even added to drinks like smoothies for an extra kick.
What are the other health benefits of black pepper? Beyond boosting metabolism, black pepper is known for its antioxidant properties, aiding digestion, enhancing nutrient absorption, and supporting the immune system.
Is there a recommended daily amount of black pepper for health benefits? While there’s no specific recommended daily amount, using black pepper moderately in your regular meals is generally sufficient to reap its benefits.
Can black pepper be harmful in any way? When consumed in culinary amounts, black pepper is generally safe. However, excessive consumption may lead to digestive discomfort for some individuals.
How does black pepper enhance the absorption of nutrients? Piperine in black pepper enhances the bioavailability of various nutrients, such as vitamins A and C, selenium, and beta-carotene, aiding in more effective absorption by the body.
Can black pepper improve skin health? Yes, the antioxidant properties of black pepper may contribute to better skin health by combating free radical damage.
Is black pepper suitable for all dietary needs? Black pepper is widely suitable for various dietary preferences, including vegan and gluten-free diets. However, individuals with specific allergies or digestive issues should consult a healthcare professional.
Blog Tags: Black Pepper, Women’s Metabolism, Weight Loss, Hormonal Health, Nutritional Absorption, Healthy Cooking, Natural Remedies, Wellness, Antioxidants, Dietary Tips
Every woman carries within her a world of strength and nurturing, a delicate balance that’s often challenged in the hustle of everyday life. In the midst of juggling careers, families, and personal ambitions, it’s easy to overlook one’s health and well-being. Enter Asafoetida – an ancient spice, often hidden in the shadows of more prominent flavors, yet holding secrets that resonate deeply with the essence of feminine vitality.
This post is more than just an exploration of a spice; it’s a tribute to every woman who strives for wellness amidst chaos. We’re about to unravel the mysteries of Asafoetida – how this unsung hero of the spice world can be a beacon of health for women. From digestive wellness to hormonal balance, let’s discover how incorporating this potent spice can transform your health narrative, adding not just flavor but vitality to your life.
Section 1: The History and Origin of Asafoetida
A pungent aroma fills the air whenever Asafoetida, also known as ‘Hing’, is added to a hot pan. This resinous gum, derived from the roots of Ferula plants, has been a staple in traditional medicine and cooking for centuries. Its use dates back to the ancient civilizations of Persia and India, where it was not only a culinary delight but also a revered remedy. Particularly in Ayurveda, Asafoetida was a cornerstone for treatments, especially for ailments affecting women, such as menstrual cramps and hormonal imbalances.
Legend has it that in some parts of ancient India, Asafoetida was considered a sacred herb, used by midwives to aid in childbirth and to cleanse the aura of newborns. Its strong odor, often compared to that of cooked onions and garlic, was believed to ward off evil spirits and is still a popular belief in some cultures.
While its smell might be overwhelming for some, Asafoetida’s nutritional profile is nothing short of impressive. It contains compounds like ferulic acid, which are known for their anti-inflammatory properties. For women, these properties are particularly beneficial. Inflammation is often a silent culprit behind many health issues women face, from hormonal fluctuations to skin conditions.
Moreover, Asafoetida is a rich source of antioxidants, vital in fighting oxidative stress, which can lead to premature aging and chronic diseases. Integrating Asafoetida into your diet can contribute to overall cellular health, keeping you feeling and looking youthful.
Section 3: Asafoetida and Digestive Health
One of the most celebrated benefits of Asafoetida is its impact on digestive health. It’s a natural antispasmodic, meaning it can help reduce bloating, gas, and other uncomfortable digestive issues. This is especially beneficial for women who often experience these symptoms due to hormonal changes throughout their menstrual cycle.
Adding a pinch of Asafoetida to lentil dishes or vegetable stir-fries can make a significant difference. Not only does it add a layer of flavor, but it also aids in the digestion of these sometimes heavy foods, ensuring that you feel lighter and more energetic.
Section 4: Hormonal Balance and Menstrual Health
In the intricate dance of hormones that occurs in a woman’s body, Asafoetida plays a subtle yet impactful role. It’s particularly beneficial for those who experience discomfort and mood swings during their menstrual cycle. Asafoetida’s natural compounds help in regulating hormonal activity, providing a sense of balance during those often turbulent days.
Women who have incorporated Asafoetida into their diet often report a noticeable decrease in menstrual cramps. The spice’s antispasmodic properties not only aid digestion but also help in relaxing the muscles, thereby alleviating cramps. A simple home remedy is to add a pinch of Asafoetida to a glass of warm water or to your evening tea during menstruation for some relief.
Section 5: Asafoetida in Modern Cooking
Bringing Asafoetida into the modern kitchen can be a delightful adventure. While it’s a staple in many traditional Indian recipes, its versatility makes it a perfect fit for contemporary fusion dishes. For example, a dash of Asafoetida can transform a simple pasta dish into a gut-friendly, aromatic delight. It pairs well with creamy sauces, lending them a subtle depth without being overpowering.
For those new to Asafoetida, the key is to start small. Just a pinch is enough to release its flavor and health benefits. It works beautifully in marinades or as a seasoning for roasted vegetables, adding an umami-like depth to plant-based dishes.
Section 6: Beyond the Kitchen – Other Uses of Asafoetida
Asafoetida’s benefits extend beyond culinary uses. It has been a part of traditional skincare and home remedies for centuries. A lesser-known use of Asafoetida is in the treatment of acne and skin blemishes. Its anti-inflammatory properties make it an excellent ingredient for homemade face masks, especially for oily skin.
Moreover, Asafoetida can be used in homemade hair masks to promote scalp health and prevent dandruff. Mixing a small amount of Asafoetida powder with your regular hair oil can enhance its effectiveness, leaving you with healthier, shinier hair.
Conclusion:
In weaving the rich tapestry of Asafoetida into the fabric of our daily lives, we don’t just add a spice to our pantry; we embrace a legacy of health and vitality. For the woman who balances the world on her shoulders, this humble spice is a whisper of nature’s care, a subtle yet powerful ally in her journey of wellness. As we close this chapter, remember that every sprinkle of Asafoetida is a nod to your health, a small yet significant step towards embracing a life of vitality and wellness.
Call to Action:
Have you tried incorporating Asafoetida into your lifestyle? We would love to hear your stories and experiences. Share your thoughts in the comments below, and let us know if there are other hidden gems in the spice world you’d like us to explore!
FAQs
What exactly is Asafoetida and where does it come from? Asafoetida, also known as Hing, is a resinous gum derived from the roots of Ferula plants, primarily found in Iran and Afghanistan. It’s a staple in many Indian and Middle Eastern cuisines due to its unique flavor and aroma.
How can Asafoetida benefit women’s health? Asafoetida is known for its anti-inflammatory properties and is particularly beneficial in regulating hormonal activity and menstrual health in women. It also aids in digestion and can help alleviate symptoms like bloating and cramps.
Can Asafoetida help in weight loss? Yes, Asafoetida can aid in weight loss. It boosts metabolism and aids digestion, which are key factors in maintaining a healthy weight. However, it should be used as part of a balanced diet and lifestyle.
Is Asafoetida safe during pregnancy? While Asafoetida is generally safe, it’s advised to use it in moderation during pregnancy. Due to its potent properties, pregnant women should consult with a healthcare provider before adding it to their diet.
Are there any side effects of using Asafoetida? Asafoetida is safe for most people when consumed in culinary amounts. However, in rare cases, it might cause certain digestive side effects or allergies. It’s recommended to start with small amounts to test tolerance.
How can I incorporate Asafoetida into my diet? Asafoetida can be easily added to soups, stews, curries, and lentil dishes. It pairs well with vegetables and is often used in tempering or seasoning dishes.
Does Asafoetida have any uses beyond cooking? Yes, Asafoetida is also used in traditional remedies for issues like toothache, bronchitis, and even as a component in skincare treatments, thanks to its anti-inflammatory properties.
What does Asafoetida taste like? Asafoetida has a unique taste, described as a blend between leek, garlic, and onion. It’s pungent when raw but delivers a smooth, savory flavor when cooked.
Can Asafoetida be a substitute for onion and garlic? Yes, in Indian cuisine, Asafoetida is often used as a substitute for onion and garlic, making it a great option for those who avoid these ingredients for dietary or religious reasons.
How should Asafoetida be stored for maximum potency? Asafoetida should be stored in an airtight container, away from moisture and light. This preserves its aroma and potency for a longer duration.
When it comes to weight loss, potatoes often get a bad rap. Commonly dismissed as ‘unhealthy’ or ‘fattening’, these humble tubers have been sidelined in many diets. But what if we’ve been underestimating the potential of potatoes in our weight loss journey? Contrary to popular belief, when prepared and consumed correctly, potatoes can indeed be a nutritious and weight-loss-friendly food choice.
In this post, we’re going to dig deeper into the world of potatoes. We’ll uncover the truth behind their nutritional value, debunk common myths, and explore how these versatile vegetables can be incorporated into a balanced diet for effective weight loss. From their impressive nutrient profile to innovative and healthy ways of preparation, we’re about to reveal why potatoes might just be the unsung heroes of your weight loss plan. So, before you write off potatoes as a diet no-go, let’s give them a chance to show their true colors in the realm of health and nutrition.
Stay tuned as we explore how the misunderstood potato can be a delicious and smart addition to your weight loss menu.
The Nutritional Powerhouse: Unveiling the Benefits of Potatoes
Often overshadowed by their starchy nature, potatoes are in fact a powerhouse of nutrition. They’re not just about carbs; they bring a lot more to the table. A medium-sized potato is an excellent source of vitamins C and B6, crucial for immune system support and energy metabolism, respectively. But that’s not all. Potatoes are rich in minerals like potassium, which is vital for heart health, and magnesium, essential for bone health and muscle function. Plus, they offer iron, an important component for blood health.
But perhaps one of the most significant benefits of potatoes is their fiber content, especially when eaten with the skin. Dietary fiber is a key player in weight management. It helps you feel fuller for longer, thereby reducing the overall calorie intake, which is essential in a weight loss diet. Additionally, fiber aids in digestion and helps maintain steady blood sugar levels, preventing those spikes and crashes that can lead to overeating.
And let’s not forget about antioxidants. Potatoes, especially colored varieties like purple and red, are packed with these compounds. Antioxidants play a role in reducing inflammation and combating oxidative stress, contributing to overall health and potentially aiding in weight management.
In the next section, we’ll break down how these nutritional attributes of potatoes can be harnessed in a weight loss plan, challenging the myth that potatoes are merely ’empty carbs’.
Potatoes in Weight Loss: Busting the Carb Myth
It’s time to bust a common myth: Carbohydrates, including those found in potatoes, are not the enemy of weight loss. In fact, when consumed as part of a balanced diet, potatoes can be a valuable ally in your weight loss journey. The key is understanding how to include them healthily and mindfully.
Firstly, potatoes’ high fiber content makes them exceptionally filling. This satiety factor is crucial for weight management, as it helps prevent overeating and snacking on less healthy options. A medium potato contains only about 130 to 165 calories, making it a low-calorie yet satisfying choice.
Moreover, potatoes offer a unique benefit: They have a high satiety index. This means they can make you feel full and satisfied, helping with portion control – a critical aspect of any weight loss strategy. When paired with a balanced mix of proteins and non-starchy vegetables, a potato can be part of a nutritious, calorie-controlled meal.
However, it’s important to be mindful of how potatoes are prepared. Opting for healthier cooking methods like baking, boiling, or roasting instead of frying can make a significant difference. Avoiding calorie-laden toppings like butter, cheese, and sour cream is also crucial. Instead, experimenting with flavorful yet healthy toppings can enhance the nutritional profile of your potato-based meal without adding excessive calories.
In the next section, we’ll delve into the impact of potatoes on blood sugar levels and how to manage it effectively as part of a weight loss diet.
Managing Blood Sugar: Potatoes and Glycemic Impact
A common concern about potatoes in a diet is their effect on blood sugar levels. Yes, potatoes are high in starch, and they rank relatively high on the glycemic index, meaning they can cause a rapid spike in blood sugar. However, this doesn’t mean they can’t be part of a weight loss and health-conscious diet.
The trick is in the balance and combination of foods. When you pair potatoes with foods that have a lower glycemic impact, like lean proteins or non-starchy vegetables, you can mitigate the rapid rise in blood sugar. For instance, a meal comprising a small portion of potato, steamed broccoli, and grilled chicken breast provides a balanced mix of carbohydrates, protein, and fiber. This combination can help stabilize blood sugar levels and provide sustained energy, which is essential in preventing the hunger pangs that can lead to overeating.
Another factor to consider is the variety of the potato. Different types, such as sweet potatoes, red, purple, or yellow varieties, can have different effects on blood sugar. Some of these, like sweet potatoes, have lower glycemic indices than others, making them a better choice for maintaining stable blood sugar levels.
For individuals with prediabetes or diabetes, it’s crucial to consult with a healthcare provider or dietitian to determine the appropriate amount and type of potatoes that can be included in their diet.
Integrating Potatoes into Your Intermittent Fasting Regimen
Intermittent fasting (IF) has gained popularity as a flexible approach to weight loss and health improvement. It typically involves periods of fasting alternated with periods of eating. Integrating potatoes into your intermittent fasting regimen can be advantageous, provided it’s done thoughtfully. Here’s how potatoes can complement your IF journey:
Breaking the Fast: When you break your fast, it’s important to start with foods that are gentle on your stomach yet nourishing. Potatoes can be an excellent choice. They are easy to digest and provide a good energy boost without overwhelming your digestive system. A simple boiled or baked potato with a sprinkle of herbs can be an ideal meal to start your eating window.
Nutrient-Dense Meals: During your eating periods, it’s crucial to consume nutrient-dense foods to compensate for the fasting period. Potatoes are rich in vitamins, minerals, and fiber, making them an excellent choice for ensuring you’re getting the nutrients you need. Including a moderate portion of potatoes in one of your meals can help meet these nutritional requirements.
Satiety and Portion Control: One of the challenges of intermittent fasting is managing hunger during fasting periods. The satiety factor of potatoes can be beneficial here. Eating a satisfying meal that includes potatoes during your eating window can help you feel fuller for longer, which can make fasting periods more manageable.
Balanced Meals: It’s essential to balance your meals with a combination of carbohydrates, proteins, and healthy fats. Potatoes can be the carbohydrate component of a balanced meal. Pair them with lean proteins like grilled chicken or fish and a serving of healthy fats like avocado or nuts for a complete and nutritious meal.
Post-Workout Nutrition: If you exercise during your eating window, potatoes can be a great post-workout meal component. They help replenish glycogen stores and provide essential nutrients for muscle recovery. A potato-based meal after your workout can aid in recovery and prepare you for the next fasting period.
Remember, while intermittent fasting, it’s not just about when you eat, but also what you eat. Potatoes can be a valuable addition to your IF plan, contributing to a balanced, nutritious diet that supports your weight loss and health goals.
Creative and Healthy Potato Preparations
Transforming the humble potato into a weight loss-friendly dish is all about creativity and healthy preparation techniques. Gone are the days of deep-fried and heavily buttered potatoes. Let’s explore some innovative ways to enjoy potatoes that are both delicious and conducive to your weight loss goals.
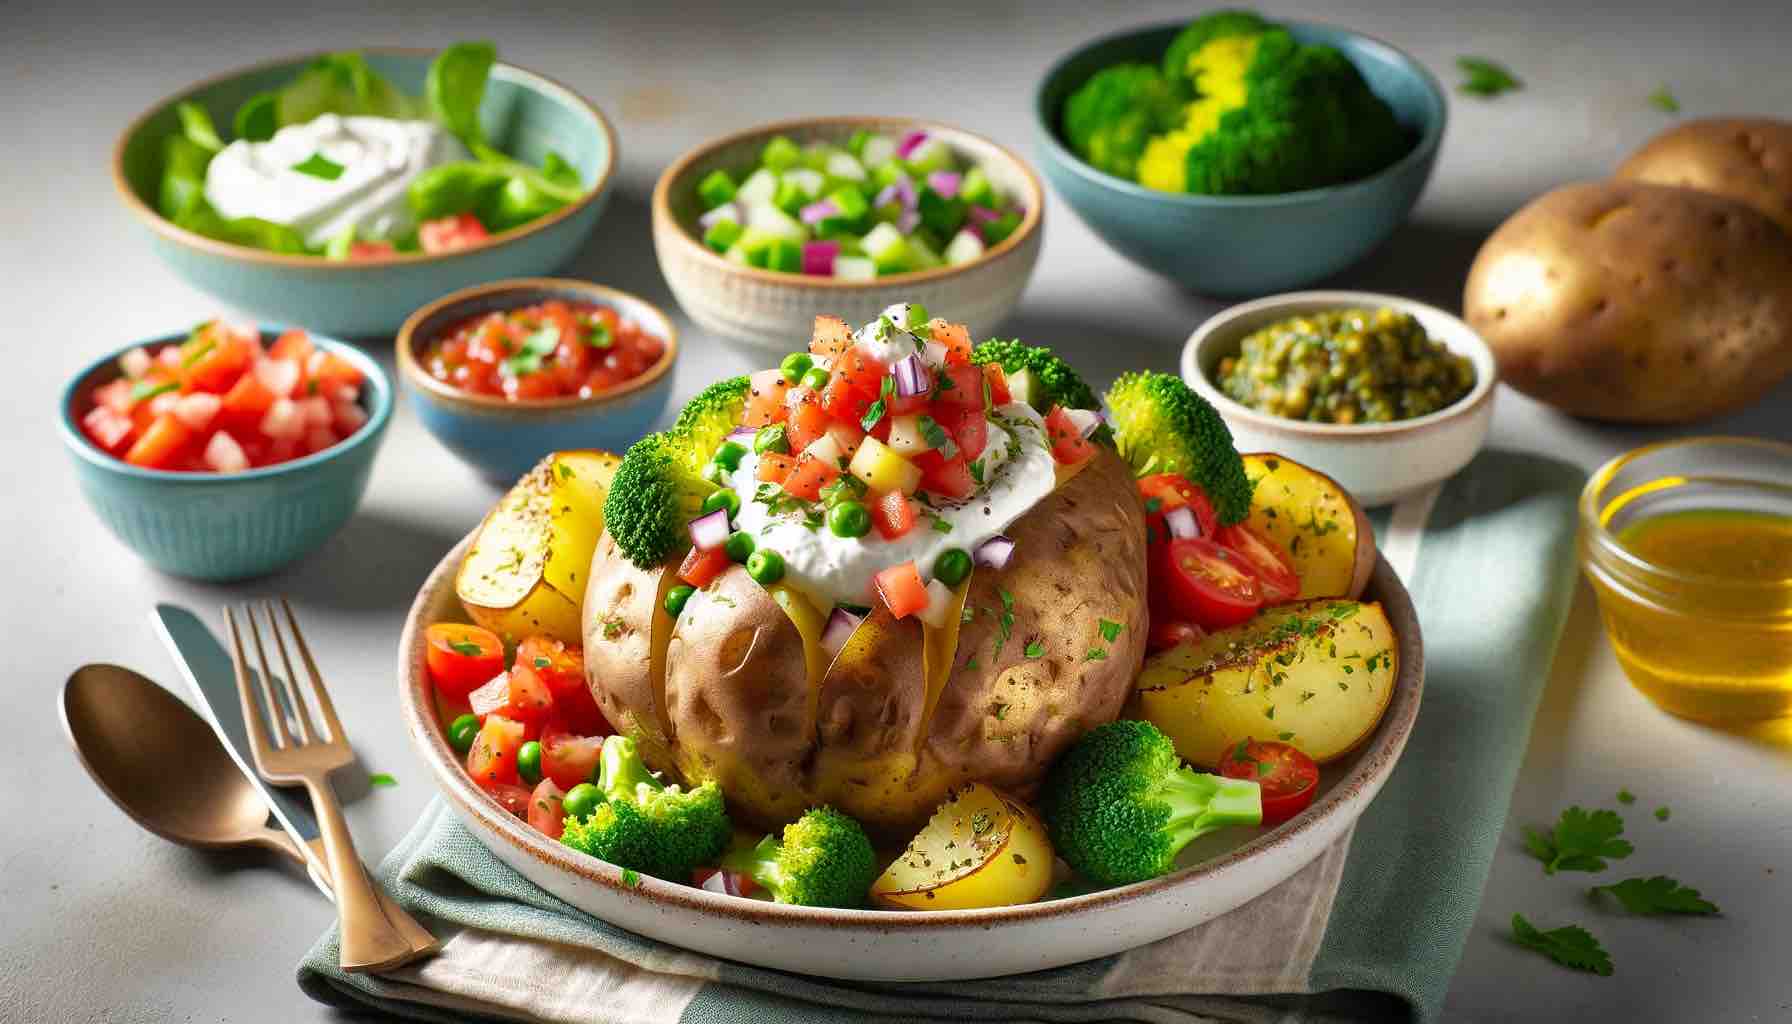
Baking and Roasting: One of the simplest and healthiest ways to cook potatoes is by baking or roasting them. This method preserves the natural flavors and nutrients of the potato without the need for excess oil or fat. Experiment with herbs and spices like rosemary, thyme, or paprika for an added flavor boost.
Boiling and Steaming: Boiled or steamed potatoes retain most of their nutrients and are low in calories. For a flavorful twist, try boiling potatoes with a clove of garlic or a sprig of dill. These methods are particularly good for making potato salads or mashed potatoes.
Healthy Toppings and Add-ons: Replace traditional high-calorie toppings like sour cream and cheese with healthier alternatives. Greek yogurt, salsa, or a sprinkle of herbs can add a lot of flavors without piling on the calories. Toppings like steamed broccoli, diced garlic, and a dash of olive oil can turn a simple baked potato into a nutritious and filling meal.
Experimenting with Potato Varieties: Don’t just stick to the traditional white potatoes. Explore the world of sweet potatoes, red, purple, and other varieties. Each type brings its unique nutritional profile and flavor, making your meals more interesting and healthful.
Portion Control: Remember, portion size matters. Enjoying potatoes as part of a balanced meal with a variety of other food groups is the best way to reap their benefits without overindulging.
In the following section, we’ll address some common myths and misconceptions about potatoes and weight loss, helping you make informed choices about including this versatile vegetable in your diet.
Debunking Potato Myths: Separating Fact from Fiction
Potatoes have been the subject of many myths and misconceptions, especially when it comes to weight loss and health. Let’s set the record straight and debunk some of these common potato myths:
Myth: Potatoes Are Fattening: The truth is, potatoes themselves are not fattening. It’s often the way they are prepared – think fried or loaded with butter and cheese – that adds excessive calories and fat. A plain, medium-sized potato is relatively low in calories and high in nutrients.
Myth: Potatoes Lack Nutritional Value: Contrary to this myth, potatoes are a nutrient-dense food. They are a good source of vitamins, minerals, and fiber. The key is to consume them in their whole form, particularly with their skins, to maximize their nutritional benefits.
Myth: All Potatoes Affect Blood Sugar in the Same Way: Different types of potatoes and cooking methods can affect how they impact your blood sugar. For example, boiling potatoes and letting them cool before eating can increase their resistant starch content, which has a lesser effect on blood sugar.
Myth: You Should Avoid Potatoes If You’re Trying to Lose Weight: Not necessarily. When eaten in moderation and as part of a balanced diet, potatoes can be included in a weight loss plan. Their high fiber content can help you feel full and satisfied, which can aid in weight management.
By understanding these truths about potatoes, you can enjoy them as part of a balanced and healthy diet without guilt or misinformation.
In our concluding section, we’ll summarize the key points and provide final thoughts on incorporating potatoes into a successful weight loss strategy.
Conclusion: Embracing Potatoes in Your Weight Loss Journey
In conclusion, potatoes can indeed play a positive role in a weight loss diet when consumed mindfully and prepared healthily. They are not just simple carbs but a source of essential nutrients that can contribute to a balanced and satisfying diet. By debunking common myths, understanding their nutritional profile, and adopting healthy cooking methods, you can enjoy potatoes without derailing your weight loss efforts.
Remember, the key is balance and moderation. Incorporating a variety of foods, including potatoes, ensures a nutrient-rich diet that supports sustainable weight loss. Be mindful of portion sizes and complement your potato dishes with a mix of proteins, healthy fats, and other vegetables for a well-rounded meal.
So, the next time you’re planning your meals, consider giving potatoes a spot on your plate. With their versatility, nutritional benefits, and ability to keep you full and satisfied, potatoes can be a delicious and smart addition to your weight loss menu.
We hope this guide has provided you with valuable insights and practical tips to integrate potatoes into your weight loss plan effectively. Happy, healthy eating!
Navigating Processed Potato Products: What to Know
In today’s fast-paced world, processed potato products are ubiquitous, ranging from frozen fries to instant mashed potatoes. While these products offer convenience, it’s crucial to understand their nutritional implications, especially when you’re focused on weight loss and healthy eating.
Nutritional Alterations in Processed Potatoes: Many processed potato products undergo significant alterations that can diminish their nutritional value. For example, instant mashed potatoes often contain added fats, salt, and preservatives, which can increase calorie content and reduce their overall healthfulness.
The Impact of Frying and Additives: Common processed potato products like fries and chips are typically high in unhealthy fats and salt due to their cooking methods and added flavorings. These can not only contribute to weight gain but also to other health issues like high blood pressure and heart disease.
Glycemic Index Considerations: Processing can affect the glycemic index of potatoes. Products like fries or chips have a higher glycemic index compared to whole, cooked potatoes, leading to quicker spikes in blood sugar levels. This is an important consideration for those managing diabetes or looking to maintain stable blood sugar levels.
Reading Labels for Informed Choices: When choosing processed potato products, it’s important to read the nutritional labels carefully. Look for products with lower sodium, no added sugars, and minimal preservatives. Also, pay attention to serving sizes to avoid unintentional overeating.
Opting for Healthier Alternatives: Whenever possible, choose whole, unprocessed potatoes. If you need convenience, look for frozen or pre-prepped potatoes that don’t contain added fats, salt, or preservatives. These options are closer to the natural state of the potato and retain more of their nutritional benefits.
Balancing Convenience and Nutrition: While it’s okay to enjoy processed potato products occasionally, they shouldn’t be a staple in a diet focused on weight loss and health. Balancing convenience with nutritional value is key. Incorporating a variety of whole foods, including unprocessed potatoes, ensures a more balanced and healthful diet.
In conclusion, while processed potato products are convenient and sometimes irresistible, being mindful of their nutritional content and frequency of consumption is crucial for maintaining a healthy and balanced diet, particularly when you are trying to lose weight.
Nutrients
Amount per 100g
Calories
77 kcal
Protein
2.0 g
Carbohydrates
17 g
Fiber
2.2 g
Fat
0.1 g
Vitamin C
19.7 mg
Vitamin B6
0.3 mg
Potassium
421 mg
Magnesium
23 mg
Iron
0.8 mg
This table provides a clear overview of the nutritional value of potatoes, highlighting both their macronutrient (calories, protein, carbohydrates, fiber, fat) and micronutrient (vitamins and minerals) content.
FAQs
What makes potatoes a good choice for weight loss diets?
Potatoes are high in dietary fiber, which helps in keeping you full for longer periods. This satiety factor is essential for controlling hunger and reducing overall calorie intake, making them a valuable inclusion in weight loss diets.
Can eating potatoes help maintain energy levels during dieting?
Absolutely! Potatoes are a great source of complex carbohydrates that provide sustained energy. This is especially beneficial in a weight loss diet where maintaining energy levels is crucial for staying active and avoiding fatigue.
How do potatoes impact blood sugar levels?
Potatoes have a high glycemic index, which means they can cause a rapid spike in blood sugar. However, pairing them with low-GI foods like lean proteins and non-starchy vegetables can balance this effect, making them suitable even in a weight loss diet.
Are all types of potatoes equally beneficial for weight loss?
Different potato varieties, such as sweet potatoes or colored potatoes like purple and red, have varying nutritional profiles. Some have lower glycemic indices than others, making them a better choice for maintaining stable blood sugar levels in a weight loss diet.
What are some healthy ways to prepare potatoes for weight loss?
Opt for baking, boiling, or roasting instead of frying. Use herbs and spices for flavor instead of high-calorie toppings like butter or cheese. Keeping the skin on maximizes fiber and nutrient intake.
Can I include potatoes in my diet if I have diabetes?
While potatoes can be part of a diabetic diet, it’s crucial to monitor portion sizes and the overall balance of the meal. Consulting with a healthcare provider or dietitian is recommended to determine the appropriate way to include them in your diet.
What are some creative, low-calorie toppings for baked potatoes?
Try toppings like Greek yogurt, salsa, steamed broccoli, diced garlic, and a dash of olive oil. These add flavor without excessive calories and can make your potato dish more nutritious and satisfying.
Do potatoes offer any other health benefits apart from aiding weight loss?
Yes, potatoes are rich in vitamins like C and B6, minerals like potassium and magnesium, and antioxidants. These nutrients contribute to overall health, including heart health, immune support, and reducing inflammation.
Is it better to eat potatoes with or without the skin for weight loss?
Eating potatoes with their skin is beneficial as it increases the fiber content, which is essential for satiety and digestive health. However, ensure the skin is cleaned properly before cooking.
How can I incorporate potatoes into a balanced meal for weight loss?
Combine a moderate portion of potatoes with a source of lean protein, such as chicken or fish, and a serving of non-starchy vegetables. This creates a balanced meal that is satisfying and conducive to weight loss.
Imagine a dish that combines the elegance of Western brunches with the vibrant zest of Indian cuisine. That’s what we’re diving into today! Welcome to our exploration of Eggs Benedict, a classic that has graced breakfast tables around the world, now ready to be infused with a delightful Indian twist.
Why Eggs Benedict?
Eggs Benedict, traditionally a symphony of English muffins, poached eggs, Canadian bacon, and Hollandaise sauce, has always been a symbol of indulgent mornings and leisurely brunches. But what if we add a dash of desi magic to it?
What’s in Store for You
In this post, we’re not just revisiting the classic recipe; we’re reinventing it! We’ll explore the top five Eggs Benedict recipes from renowned culinary sites and then, hold onto your taste buds, we’re going to Indianize them! Think tandoori chicken replacing Canadian bacon, naan instead of English muffins, and a Hollandaise sauce with a spicy twist. And then there is the contest, for those who enjoy cooking and sharing, read till the end!
Join the Culinary Adventure
So, whether you’re a seasoned chef or a curious foodie, this post is your ticket to creating a brunch that’s truly unforgettable. Let’s embark on this delicious journey together, blending the best of both worlds, one poached egg at a time!
Exploring the Classics: A Deep Dive into the Top 5 Eggs Benedict Recipes
1. The Quintessential Classic: Allrecipes’ Traditional Eggs Benedict
The Original Blueprint: Allrecipes’ traditional Eggs Benedict recipe is a homage to the classic version of this beloved brunch dish. It’s a comprehensive guide for those who value authenticity and want to recreate the timeless taste of Eggs Benedict.
What You’ll Learn: This recipe meticulously details each step, from toasting the English muffins to perfection, poaching eggs to just the right degree of runniness, layering the Canadian bacon, and finally, draping everything in a velvety Hollandaise sauce.
Why It’s a Must-Try: Perfect for culinary enthusiasts who appreciate the elegance of traditional cooking and are looking to master the foundational recipe of Eggs Benedict.
2. The Art of Precision: Simply Recipes’ Eggs Benedict
Culinary Choreography: The Simply Recipes version of Eggs Benedict focuses on the delicate balance and timing required to bring this dish to life. It’s a testament to the art of cooking, where every component must come together in perfect harmony.
Key Highlights: The recipe guides you through achieving crispy, yet not overdone bacon, butter-laden English muffins with just the right amount of crunch, eggs poached to a delicate tenderness, and a Hollandaise sauce that’s creamy and rich without being overpowering.
Ideal For: This recipe is a fantastic choice for those who love the intricacies of cooking and enjoy the challenge of juggling multiple elements to create a harmonious dish.
3. Mastering the Poached Egg: Allrecipes’ Detailed Guide
The Centerpiece of the Dish: The poached egg is arguably the star of Eggs Benedict, and the Allrecipes guide offers an in-depth tutorial on mastering this technique. It’s a deep dive into achieving that elusive perfect consistency.
What’s Inside: The guide covers everything from the right water temperature to the gentle swirling technique that ensures your eggs are beautifully encased in a delicate white cocoon, with yolks that are runny and rich.
For Whom: This guide is an invaluable resource for anyone who has struggled with poaching eggs or is keen to perfect this essential skill in their culinary repertoire.
4. The Homemade Touch: Tastes Better From Scratch’s Eggs Benedict
Bringing Brunch Home: Tastes Better From Scratch offers a recipe that brings the sophistication of a brunch restaurant into the comfort of your home. It’s about creating something extraordinary from everyday ingredients.
Recipe Highlights: The focus is on a homemade Hollandaise sauce that’s surprisingly simple yet incredibly flavorful, coupled with the classic components of Eggs Benedict, all prepared with a personal touch.
Why It’s Special: Ideal for home cooks who want to impress family and guests with a dish that looks as stunning as it tastes, this recipe is a testament to the joy of homemade culinary creations.
5. The Restaurant-Style Experience: NatashasKitchen’s Elegant Eggs Benedict
Elevating Breakfast to Fine Dining: NatashasKitchen’s Eggs Benedict recipe is all about recreating the finesse of a high-end brunch spot in your own kitchen. This recipe is a blend of visual appeal and exquisite taste.
What to Expect: The recipe walks you through creating a visually stunning and palate-pleasing dish, with tips on presentation and flavor enhancement that elevate the ordinary Eggs Benedict to something truly extraordinary.
Perfect For: Those who love to bring a touch of gourmet flair to their cooking, this recipe is a gateway to transforming a simple breakfast into a luxurious dining experience.
In this section, we’ve explored the top five Eggs Benedict recipes, each offering unique insights and techniques. These recipes provide a solid foundation for anyone looking to master this classic dish, setting the stage for creative adaptations and personal touches.
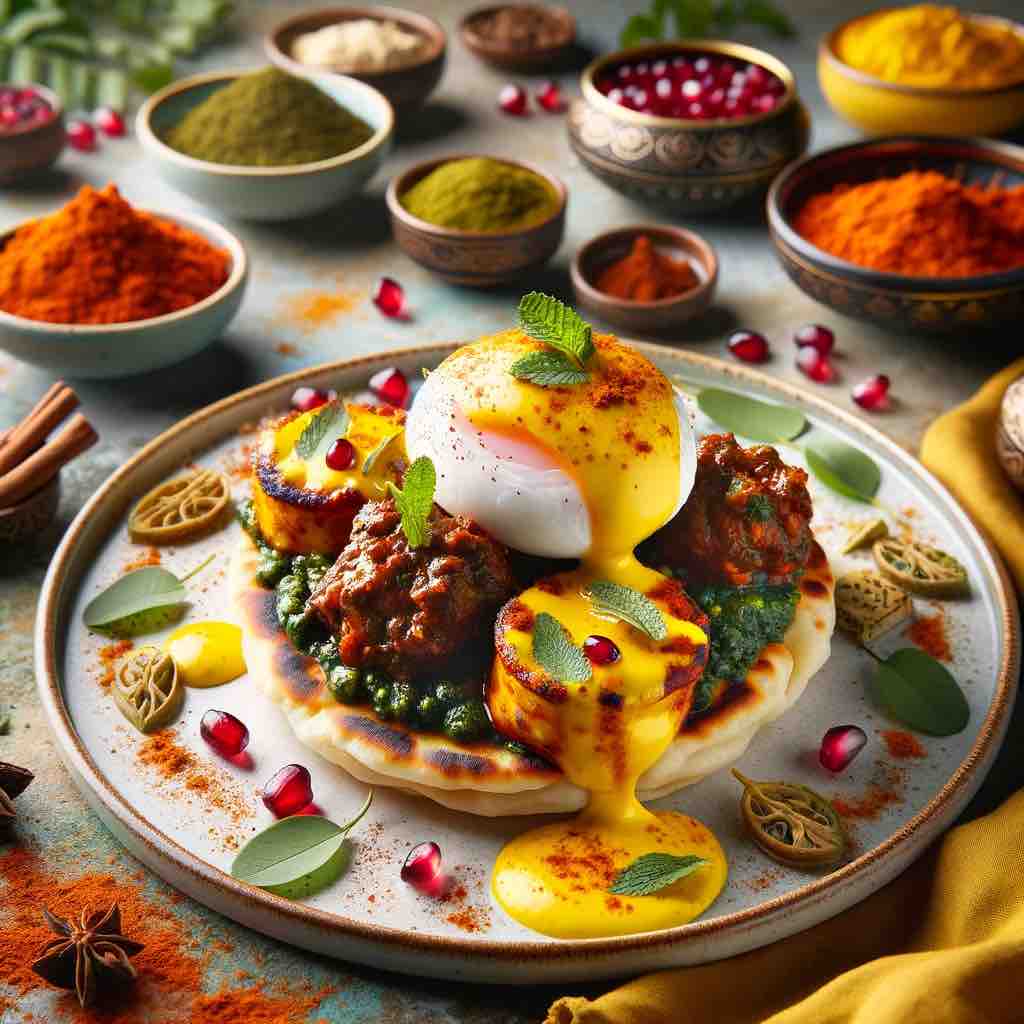
Eggs Benedict: A Diverse Indian Culinary Odyssey
Revolutionary Base Options:
Dhokla or Idli: Start with a light, airy dhokla or a soft, steamed idli. These traditional snacks offer a unique, spongy texture, perfect for soaking up flavors.
Ragi Dosa or Jowar Roti: For a healthier twist, consider a ragi (finger millet) dosa or a jowar (sorghum) roti. These grains are not only nutritious but also bring a nutty flavor to the base.
Bhatura or Puri: For a richer option, try a fluffy bhatura or a crispy puri. These deep-fried breads add a delightful crunch and indulgence to the dish.
Chettinad Chicken or Goan Prawn Balchão: Spice up the protein layer with a fiery Chettinad chicken or a tangy Goan prawn Balchão, both bursting with regional Indian flavors.
Masala Vada or Paneer Tikka: For vegetarians, a crunchy masala vada or a smoky paneer tikka can replace the traditional meat, adding a delightful texture and rich taste.
Amritsari Fish or Lamb Galouti Kebab: Experiment with Amritsari fish, known for its spicy batter, or a melt-in-the-mouth lamb Galouti kebab for a luxurious touch.
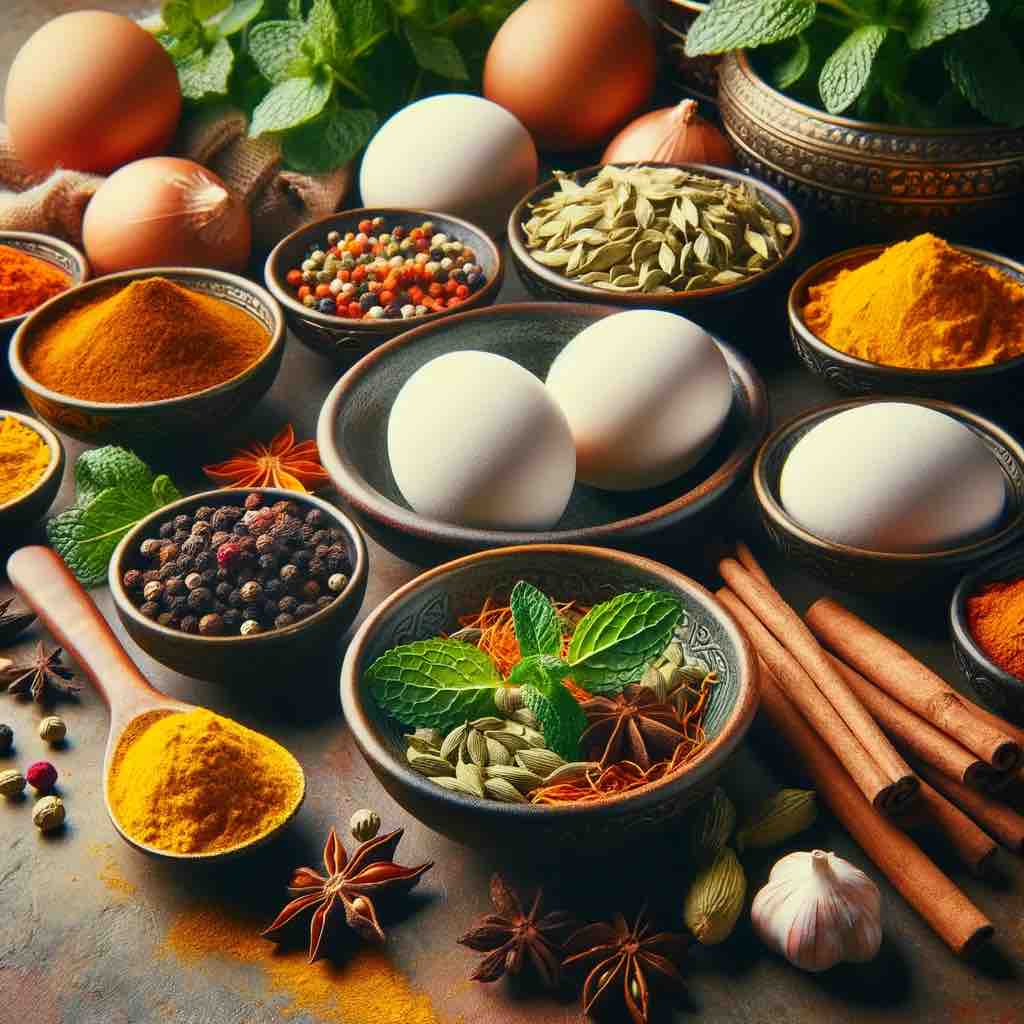
Eggs with an Indian Infusion:
Masala Poached Egg: Infuse the poaching liquid with a bouquet of Indian spices like star anise, cinnamon, and bay leaves for a subtly spiced egg.
Tandoori Egg: Marinate a soft-boiled egg in a tandoori masala and give it a quick char for a smoky, spiced exterior.
Egg Bhurji: Replace the poached egg with a spicy, scrambled egg bhurji, rich with onions, tomatoes, and a mix of Indian spices for a heartier option.
Innovative Sauces:
Mint-Coriander Hollandaise: Blend the classic Hollandaise with mint and coriander for a refreshing, herby twist.
Coconut-Tamarind Hollandaise: Combine coconut milk and tamarind paste for a sweet and sour version, adding a South Indian flair.
Tomato and Fenugreek Hollandaise: A tomato-based Hollandaise infused with dried fenugreek leaves can offer a tangy and aromatic alternative.
Fried Curry Leaves and Sliced Almonds: Add a crunch with fried curry leaves and a nutty flavor with sliced almonds.
Pomegranate Seeds and Sev: Sprinkle pomegranate seeds for a burst of sweetness and sev (crispy chickpea flour noodles) for an extra crunch.
Pickled Vegetables and Microgreens: Top with tangy pickled vegetables and fresh microgreens for a burst of freshness and a contrast in textures.
This reimagined Eggs Benedict is a journey through the vast and varied landscape of Indian cuisine. Each component offers a chance to explore different regional flavors and textures, encouraging culinary experimentation and creativity. It’s a dish that not only tantalizes the taste buds but also tells a story of India’s rich and diverse culinary heritage.
Join the Culinary Adventure: Share Your Creations with #MasalaMonk
We’ve embarked on a flavorful journey, reimagining the classic Eggs Benedict with a vibrant Indian twist. Now, it’s your turn to bring these ideas to life in your kitchen. We encourage you to experiment, mix and match, and create your own unique versions of this iconic dish. Whether you stick to the traditional roots or venture into uncharted culinary territories, we want to see your creativity shine!
Here’s How You Can Participate:
Create and Experiment: Use the ideas shared as a starting point and add your personal touch. Whether it’s a new base, a twist on the protein, an innovative sauce, or an unexpected garnish, let your culinary instincts lead the way.
Capture and Share: Once you’ve created your masterpiece, take a beautiful photo and share it on Instagram. Use the hashtag #MasalaMonk so we can find your creations easily. Don’t forget to tag us in your post!
Engage with the Community: After sharing your creation on Instagram, come back to this post and leave a comment. Share your experience, the recipe, or any tips you have for fellow food enthusiasts. This is a great way to connect with others who share your passion for cooking and Indian cuisine.
Exciting Rewards Await!
Get Featured: We’ll be keeping an eye out for the most interesting, innovative, and mouth-watering recipes. The best creations will be featured on our platform, showcasing your culinary talent to a wider audience.
Win MasalaMonk Goodies: As a token of appreciation, selected entries will receive special goodies worth Rs. 2100, from MasalaMonk.com. It’s our way of celebrating your culinary skills and encouraging you to keep experimenting.
This is more than just a cooking challenge; it’s a celebration of flavors, creativity, and community. So, put on your chef’s hat, get those spices ready, and start cooking! We can’t wait to see what amazing dishes you come up with. Happy cooking, and may the best Eggs Benedict win!
Further Reading: Exploring the Nutritional World of Eggs
For those of you who are as fascinated by the versatility and nutritional benefits of eggs as we are, we’ve compiled a list of insightful articles. These reads will not only deepen your understanding of the nutritional aspects of eggs but also inspire you with delicious egg-based recipes. Dive into these resources for a comprehensive look at eggs from various culinary and health perspectives:
Protein Powerhouse: Discover the impressive protein content in boiled eggs and explore their comprehensive nutritional profile, including calories, fats, vitamins, and minerals. Read more about the protein in two boiled eggs.
Yolk Wonders: Uncover the rich nutrient content of egg yolks, including proteins, vitamins, minerals, and fatty acids. This article is a must-read for understanding the health benefits and culinary uses of egg yolks. Explore the nutritional protein profile of egg yolks.
Egg Whites Unveiled: Learn about the low-calorie and high-protein profile of egg whites, their role in various diets, and their versatility in cooking. This piece is particularly useful for those interested in weight management and muscle building. Delve into the calories and nutrition in egg whites.
Scrambled Egg Nutrition: Gain insights into the protein-rich nature of scrambled eggs, including their caloric and fat content, along with tips for healthier preparation. Read about the protein in 3 scrambled eggs.
Creative Egg Dishes: Get inspired by ten delightful egg dishes prepared with just two eggs. This article offers a creative culinary perspective, expanding your options for incorporating eggs into your meals. Explore 10 examples of egg dishes with 2 eggs.
These articles collectively offer a well-rounded perspective on eggs, catering to fitness enthusiasts, health-conscious individuals, and culinary aficionados alike. Whether you’re exploring the protein-packed world of boiled eggs, delving into the nutrient-rich yolk, opting for the lean protein of egg whites, or enjoying the wholesome goodness of scrambled eggs, these posts provide valuable information to enhance your dietary choices and cooking repertoire.
FAQs for “Indian Fusion Eggs Benedict: A Culinary Adventure”
What makes Indian Fusion Eggs Benedict different from the traditional version?
Indian Fusion Eggs Benedict transforms the classic dish with bold Indian flavors. It incorporates elements like spiced kulcha or idli as the base, richly flavored proteins like lamb keema or paneer tikka, and innovative sauces such as mint-coriander hollandaise, offering a unique and vibrant culinary experience.
Can I make a vegetarian version of Indian Fusion Eggs Benedict?
Absolutely! A vegetarian version can include paneer bhurji or masala vada as the protein. You can also experiment with various vegetarian toppings like spiced tofu or vegetable kebabs to add your personal touch.
What are some healthy alternatives for the base in Indian Fusion Eggs Benedict?
For a healthier base, consider using ragi dosa, jowar roti, or a lightly toasted multigrain bread. These options provide a nutritious twist while maintaining the dish’s integrity and flavor.
How can I infuse Indian flavors into the Hollandaise sauce?
Infuse the Hollandaise sauce with Indian herbs and spices like mint, coriander, or a hint of garam masala. You can also experiment with coconut milk or tamarind for a unique South Indian twist.
What are some creative egg options for this dish?
Instead of the traditional poached egg, try a masala poached egg, a tandoori spiced soft-boiled egg, or even an egg bhurji for a heartier option. Each style adds a different texture and flavor to the dish.
Can I prepare Indian Fusion Eggs Benedict for a large group?
Yes, this dish can be scaled up for larger groups. Prepare components like the base and protein in advance, and assemble with freshly poached eggs and sauce when ready to serve.
Are there any quick and easy versions of this recipe?
For a quicker version, use pre-made components like store-bought naan or roti as the base, and simplify the toppings with readily available ingredients like pre-cooked meats or paneer.
What are some garnishing ideas to enhance the dish?
Garnish with crispy fried onions, fresh herbs like cilantro, and pomegranate seeds for a sweet crunch, or a sprinkle of chaat masala for an extra zing.
How can I make this dish vegan-friendly?
To make a vegan version, use a vegan bread base, tofu scramble or spiced chickpea mixture as the protein, and a cashew-based vegan hollandaise sauce. Replace the egg with a tomato or avocado slice for added freshness.
Where can I share my version of Indian Fusion Eggs Benedict?
Share your creation on Instagram using the hashtag #MasalaMonk. Don’t forget to come back and comment on our post with your experience and recipe. The most interesting recipes might get featured and win goodies from MasalaMonk.com!
Blog Tags for the Post
Indian cuisine, fusion recipes, Eggs Benedict, vegetarian options, healthy cooking, Indian spices, culinary creativity, home cooking, food experimentation, brunch ideas, gourmet dishes, international cuisine, cooking tips, recipe sharing, food photography, Masala Monk, culinary adventure, Indian flavors, innovative cooking, food blogging
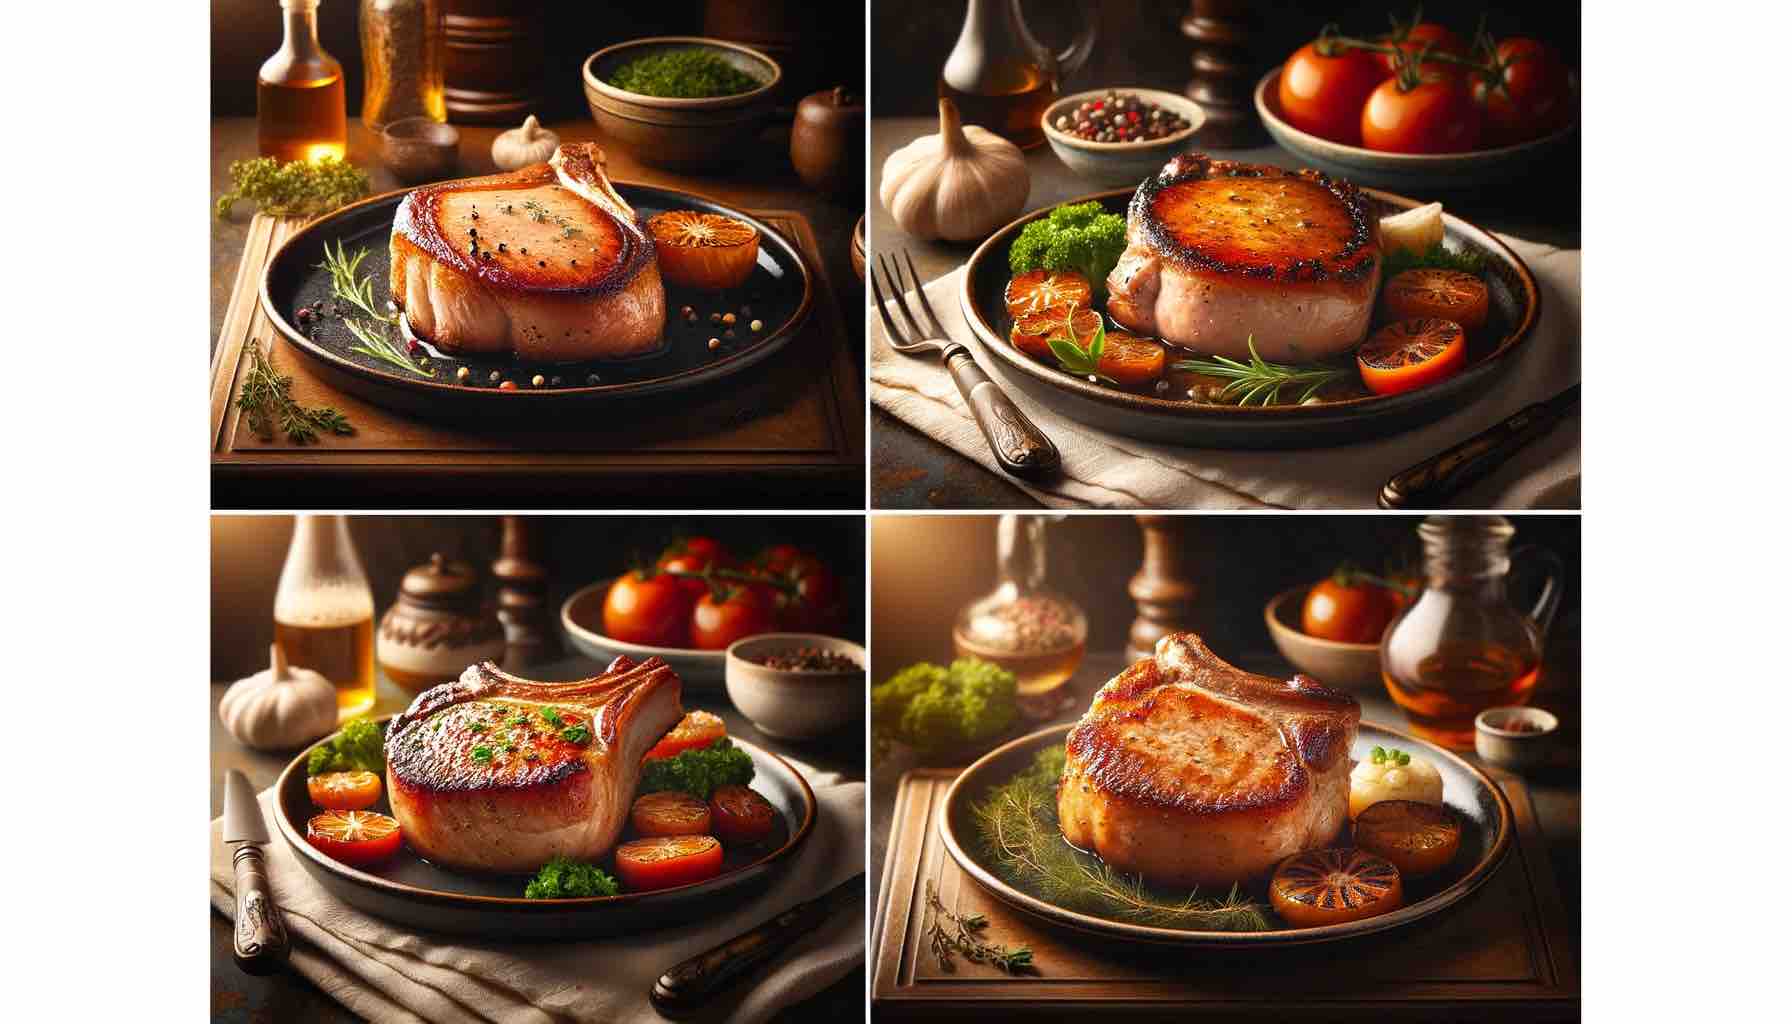
Pork chops are a staple in many diets around the world, known for their versatility and rich flavor. However, when it comes to nutrition, especially calories, there can be a lot of variation depending on how the pork chop is prepared and served. In this post, we will explore the calorie content and nutritional profile of pork chops, considering various cooking methods and serving sizes. This information will help you make informed choices about including pork chops in your diet, whether you’re watching your calorie intake, tracking macros, or just trying to eat healthier.
Caloric Content of Pork Chops
Standard Serving Sizes
Raw Pork Chop: The calories in a raw pork chop can vary significantly based on the cut and size. On average, a raw 3-ounce (85 grams) serving has about 170-200 calories.
Cooked Pork Chop: Cooking methods can alter the caloric content. For example, a grilled 3-ounce pork chop might contain slightly fewer calories than a fried one due to less added fat.
Variations by Preparation
Fried Pork Chop: Adding breading and frying increases the calorie count. A breaded, fried pork chop can have upwards of 300 calories or more for a 3-ounce serving.
Baked or Grilled Pork Chop: These methods typically result in fewer calories compared to frying, especially if minimal oil or butter is used.
Macronutrient Breakdown
Protein Content
High in Protein: Pork chops are an excellent source of protein, with a 3-ounce serving providing about 22-25 grams of protein.
Fat Content
Varies with Cut: Leaner cuts like loin chops have less fat, whereas rib chops have more. The fat content can range from 5 to 20 grams per 3-ounce serving.
Carbohydrates
Carb-Free: Pork chops contain no carbohydrates unless they are breaded or glazed with sugary sauces.
Additional Nutritional Information
Vitamins and Minerals
Pork chops are a good source of B vitamins, particularly vitamin B12, niacin, and thiamine. They also provide important minerals like zinc and selenium.
Cholesterol and Sodium
Cholesterol: Pork chops contain cholesterol, with amounts varying based on the cut and preparation.
Sodium: The sodium content can be high, especially in processed or marinated pork chops.
Considerations for Dietary Needs
Weight Management
Calorie-Dense: While pork chops are protein-rich, they can also be calorie-dense, especially when fried or served with rich sauces.
Low-Carb and Keto Diets
Suitable for Low-Carb Diets: Pork chops can fit into low-carb and ketogenic diets when prepared without breading or sugary glazes.
Heart Health
Lean Cuts: Opting for lean cuts and avoiding excessive salt can make pork chops a healthier choice for those concerned about heart health.
Cooking Tips for Healthier Pork Chops
Healthier Cooking Methods
Grilling and Baking: These methods can reduce the calorie content compared to frying.
Trimming Fat: Trimming visible fat can lower the calorie and fat content.
Portion Control
Moderation is Key: Be mindful of serving sizes, especially if you’re watching your calorie intake.
Conclusion
Pork chops can be a nutritious part of your diet, offering high-quality protein and essential nutrients. By being aware of the calorie content and choosing healthier cooking methods, you can enjoy pork chops in a way that aligns with your dietary goals and preferences.
10 FAQs for “Calories in a Pork Chop”
How many calories are in a typical pork chop? The calorie count in a pork chop varies based on its size and cooking method. A standard 3-ounce cooked pork chop has approximately 170-200 calories.
Does the cooking method affect the calorie count in pork chops? Yes, cooking methods can significantly impact the calorie content. For example, grilled or baked pork chops usually contain fewer calories than fried ones due to less added fat.
What is the protein content in a pork chop? Pork chops are rich in protein. A 3-ounce serving typically contains about 22-25 grams of protein, making them an excellent source for muscle building and repair.
Are pork chops suitable for a low-carb diet? Absolutely! Pork chops are carb-free unless they are breaded or glazed with a carbohydrate-rich sauce, making them suitable for low-carb diets like keto.
What amount of fat is in a pork chop? The fat content in pork chops can range from 5 to 20 grams per 3-ounce serving, depending on the cut and how it’s prepared.
Can eating pork chops help with weight loss? Pork chops can be part of a weight loss diet if prepared healthily (like grilling or baking) and consumed in moderation due to their high protein and moderate calorie content.
What are some healthy ways to cook pork chops? Grilling, baking, and sautéing with minimal oil are healthier cooking methods for pork chops. Trimming visible fat before cooking can also reduce calorie intake.
Do pork chops contain any vitamins or minerals? Yes, pork chops are a good source of B vitamins, particularly B12, niacin, and thiamine, as well as minerals like zinc and selenium.
How do bone-in and boneless pork chops differ nutritionally? Bone-in pork chops tend to have slightly more fat and calories compared to boneless ones, but the difference is not significant. The main variation comes from the cooking method used.
What portion size of pork chop is recommended for a balanced diet? A balanced portion size is typically around 3 to 4 ounces of cooked pork chop, which provides a good balance of protein and calories.