Posted on Leave a comment

Apple Cider Donuts Recipe: Classic Fried Donuts With Cinnamon Sugar

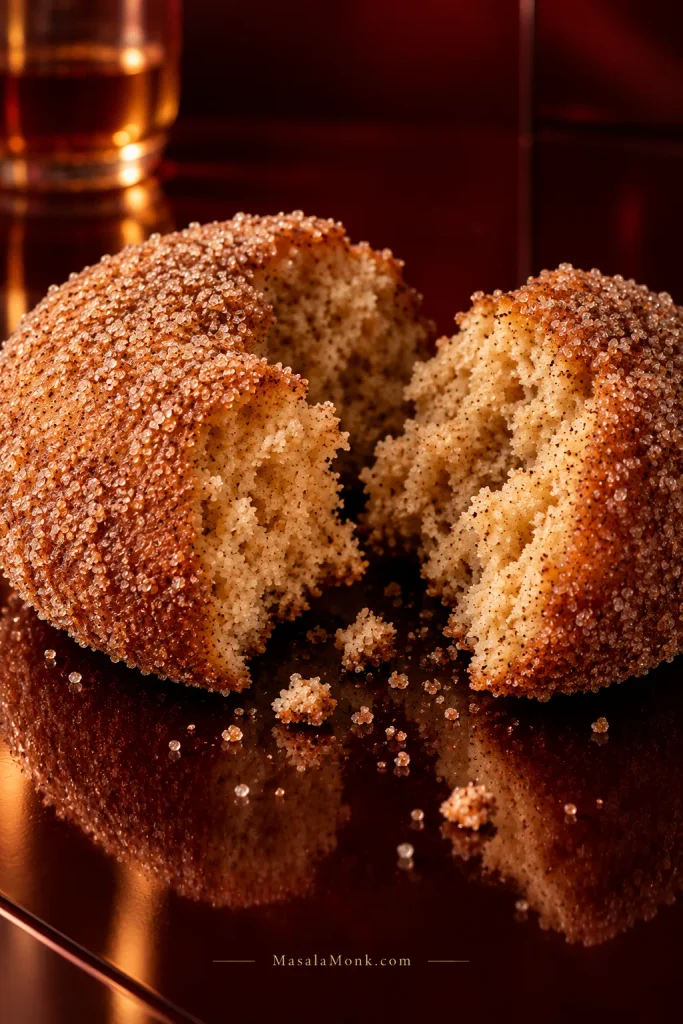
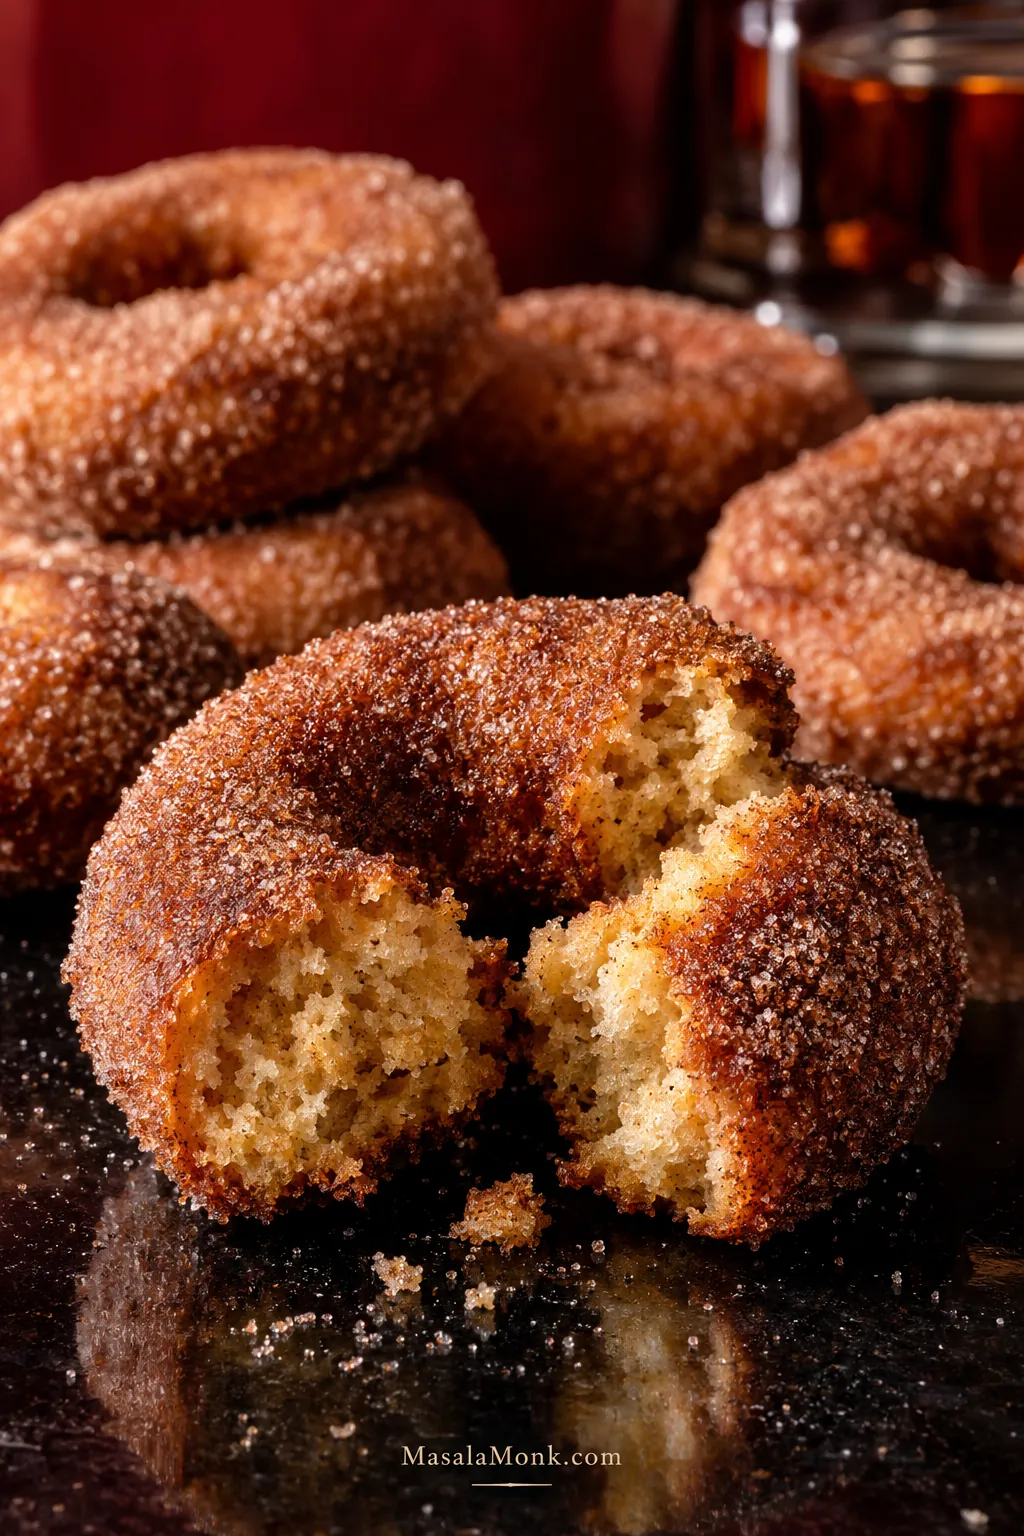
Broken cinnamon-sugar apple cider donut showing a moist cake crumb, with several whole donuts behind it.

A good apple cider donut should taste like cider before it simply tastes like cinnamon. We’re after the warm cider-mill kind: a tender cake-donut center, a thin fried crust and cinnamon sugar that clings to your fingertips.

The best ones barely seem worth saving for later. They are still warm enough that the whole bag smells of cider, fried dough and cinnamon, the sugar finds every little crack in the crust, and the first bite gives slightly at the edge before opening into soft cake underneath.

That is the version worth chasing at home. The recipe concentrates 3 cups / 710 ml cider down to ⅓ cup / 80 ml, then combines it with apple butter and sour cream for a tender cake center, a thin fried crust and enough apple flavor to stay noticeable beneath the cinnamon sugar.

Three things matter most: cider, dough and oil.

Cider

3 cups → ⅓ cup

710 ml → 80 ml. Trust the final amount more than the clock.

Dough

Cold + ½ in / 1.25 cm

Tacky is fine once a cut ring lifts cleanly.

Oil

350°F / 177°C

Let the oil recover before each new batch.

Classic Fried Apple Cider Donuts

These are cake donuts rather than yeast-raised donuts, so expect a moist crumb with a little more substance, not a fluffy, airy center. The goal is not the biggest or fluffiest donut. It is a cake donut with concentrated apple flavor, a delicate fried crust and a soft center.

If you need the same cider-donut idea without wheat flour, use our gluten-free apple cider donuts rather than swapping a gluten-free flour blend directly into this dough; the flour and moisture balance need their own formula.

Fried cake donuts with concentrated apple cider flavor, a soft center, thin lightly crisp crust and warm cinnamon sugar.

YieldAbout 12–16 donuts plus holes

Total timeAbout 3½–4 hours

Active timeAbout 1 hour

ChillAbout 2 hours

Dough½ in / 1.25 cm thick

OilAround 350°F / 177°C

Best textureSame day

Useful equipment: a heavy pot, deep-fry thermometer, 3-inch and 1-inch cutters, wire rack set over a sheet pan, and a spider or slotted spoon.

Ingredients

For the Donuts

  • 3 cups / 24 fl oz / 710 ml cloudy, nonalcoholic apple cider
    Cloudy or unfiltered apple juice is the closest substitute. Do not use apple cider vinegar.
  • 3½ cups / 420 g all-purpose flour, plus more only for handling
  • 2 tsp / 8 g baking powder
  • ½ tsp baking soda
  • ¾ tsp ground cinnamon
  • ¼ tsp ground or freshly grated nutmeg
  • 1 tsp / 5–6 g fine salt
  • ½ cup packed / 100 g light brown sugar
  • 2 tbsp / 25 g granulated sugar
  • 2 large eggs
  • scant ½ cup / 110 g full-fat sour cream
  • scant ¼ cup / 70 g apple butter
    Use thick apple butter rather than thin applesauce. If applesauce is what you have and want to bake with, our applesauce cake is formulated around that extra moisture.
  • 6 tbsp / 85 g unsalted butter, melted and cooled
  • Neutral high-heat oil, such as canola or vegetable oil, enough for 2–2½ inches / 5–6 cm depth

For the Cinnamon Sugar

  • 1 cup / 200 g granulated sugar
  • 1 tbsp / 8 g ground cinnamon
  • Small pinch fine salt, optional

Method

1. Reduce the Cider to ⅓ Cup

Reduce the 3 cups / 710 ml cider to ⅓ cup / 80 ml. Pour it into a wide saucepan or skillet, bring it to a lively simmer and cook until deeply concentrated. In a wide pan this often takes 20–30 minutes.
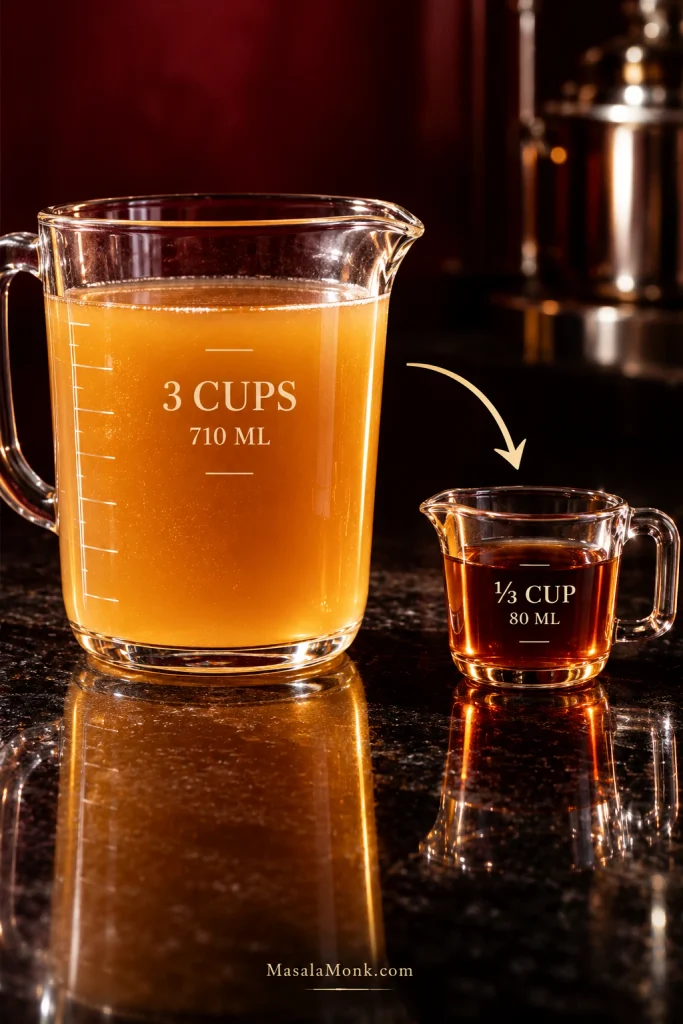
Large measuring jug with 3 cups of cloudy apple cider beside a small cup holding ⅓ cup of dark cider reduction.
Three cups becomes just ⅓ cup: that concentration brings cider flavor without flooding the dough with extra liquid.

The kitchen should smell much more intensely of apple as the water cooks away. By the time the cider reaches the final mark, the aroma should be closer to cooked apples than fresh apple juice.

Start measuring before it looks finished; the final stretch moves quickly. Overshot the mark by a spoonful? Add just enough cider or water to return it to 80 ml.

Your cider is ready when: it is darker, intensely appley and slightly syrupy but still easy to pour. Sticky like caramel or beginning to set as it cools means it has gone too far.
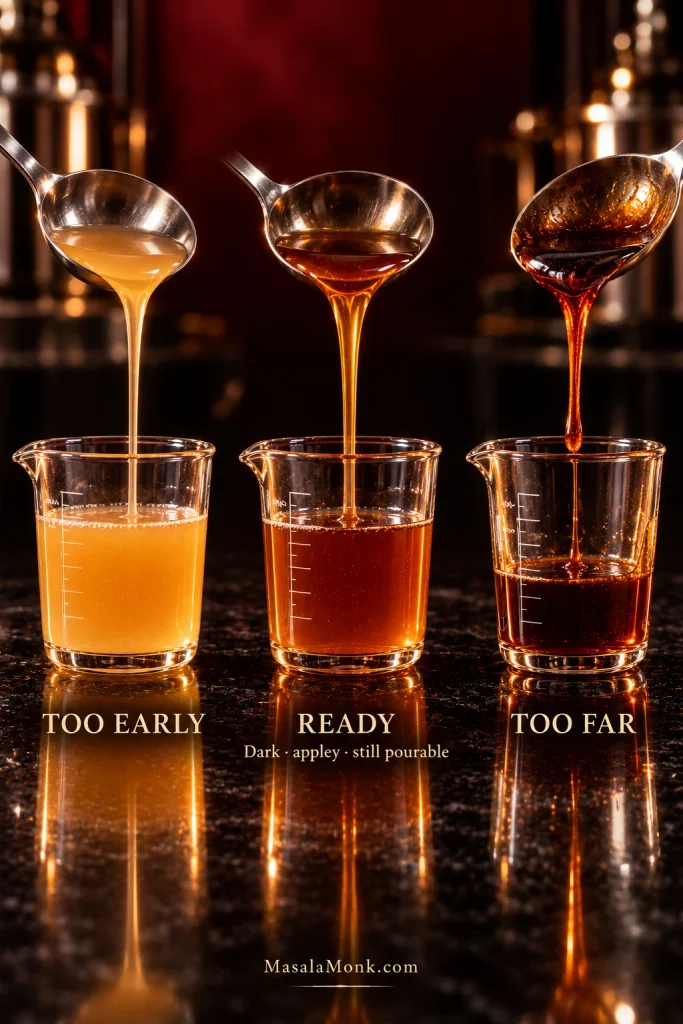
Three cider reduction stages labeled too early, ready, and too far, progressing from cloudy cider to darker, thicker reduction.
Watch the pour: the ready reduction is darker and slightly heavier, but still fluid rather than sticky.

Cool the reduction completely. This can be done a day ahead.

2. Mix the Dry Ingredients

Whisk the flour, baking powder, baking soda, cinnamon, nutmeg and salt together.

3. Mix the Wet Ingredients

Whisk the sugars and eggs, then add the sour cream, apple butter, cooled cider reduction and melted butter. The apple butter rounds out the concentrated cider with a deeper cooked-apple note.

4. Make the Dough

Fold the dry ingredients into the wet just until the last obvious streaks of flour disappear.

Fresh dough: very soft and sticky. That’s normal.
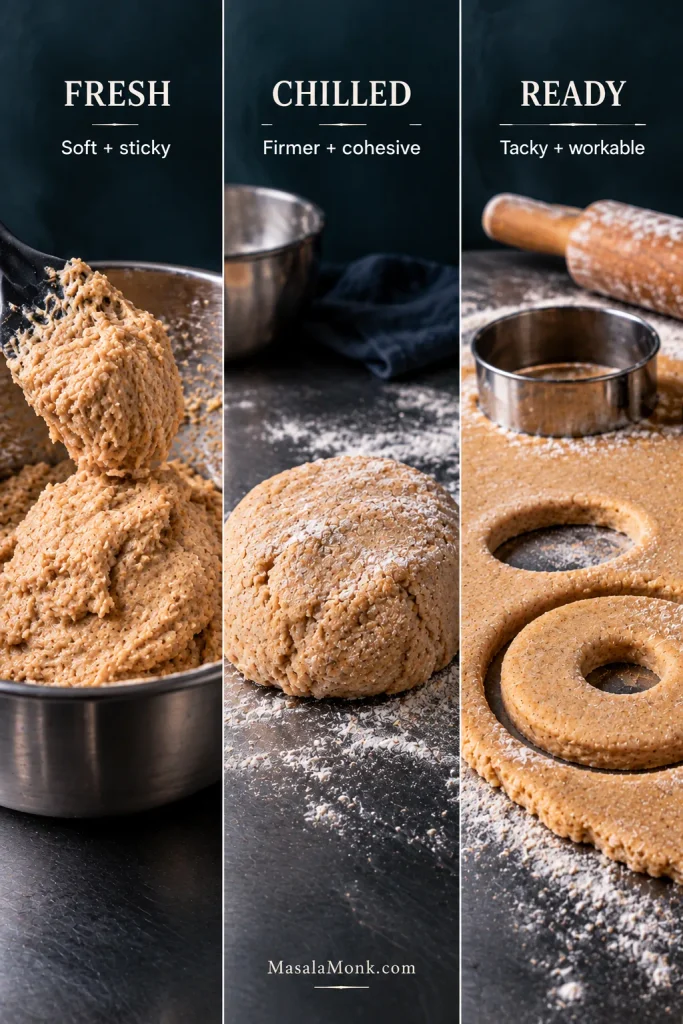
Three stages of apple cider donut dough: soft sticky fresh dough, firmer chilled dough, and rolled dough ready to cut.
Chilling should change the dough from soft and sticky to cohesive and rollable, not dry or stiff.

5. Chill Until the Dough Is Easy to Handle

Refrigerate for about 2 hours, or until thoroughly cold and firm enough to roll. Overnight is fine too.

Ready to roll: cold, soft, slightly tacky, and able to lift cleanly after cutting with a little bench flour.
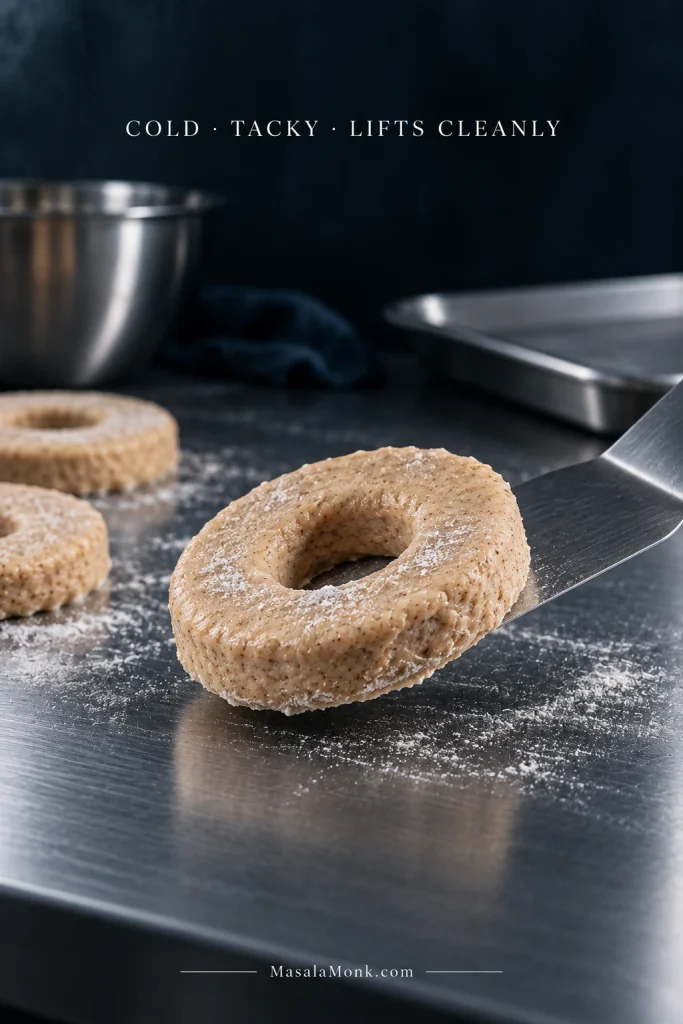
Raw apple cider donut ring being lifted from a lightly floured steel surface with a metal spatula.
If a cold cut ring lifts in one piece with slight tack, it is ready; stretching means it needs more chill.

Chill before you flour. Ten more minutes in the refrigerator is usually a much better bargain than another handful of flour.

Still too sticky? Use the sticky-dough guide.

6. Roll to ½ Inch and Cut the Rings

Roll the chilled dough to ½ inch / 1.25 cm thick. This thinner cut keeps the fried crust-to-cake ratio balanced and helps the center cook through before the outside gets too dark.

Lightly flour the work surface, dough and rolling pin as needed. Cut 3-inch / 7.5 cm rings with a 1-inch / 2.5 cm center. A drinking glass works for the outside; a small cutter, piping tip or clean bottle cap can make the hole.
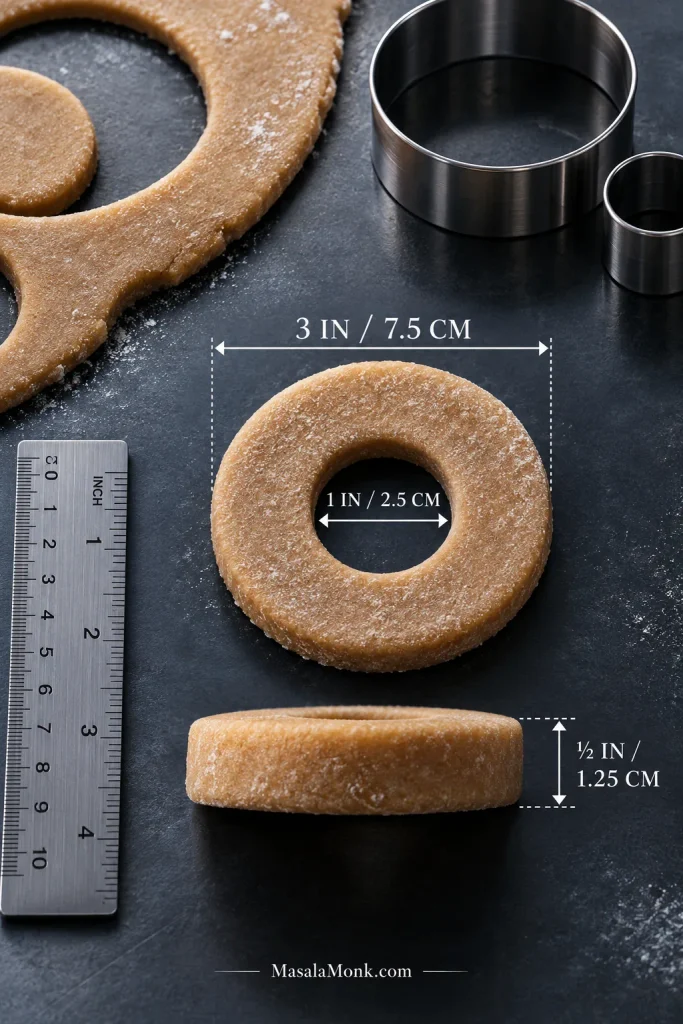
Raw donut ring and dough shown with measurements for ½-inch thickness, 3-inch outer diameter, and 1-inch center hole.
Keep the dough about ½ inch thick with a 3-inch ring and 1-inch center so the middle cooks evenly.

Rings that begin stretching have warmed up; refrigerate the tray for 10–20 minutes.

Gather the scraps gently and reroll once. The last odd pieces do not need another beauty treatment; fry them as little cider-donut bites.

Rustic is fine. Uneven circles, rough edges and the occasional wonky ring all fry perfectly well.
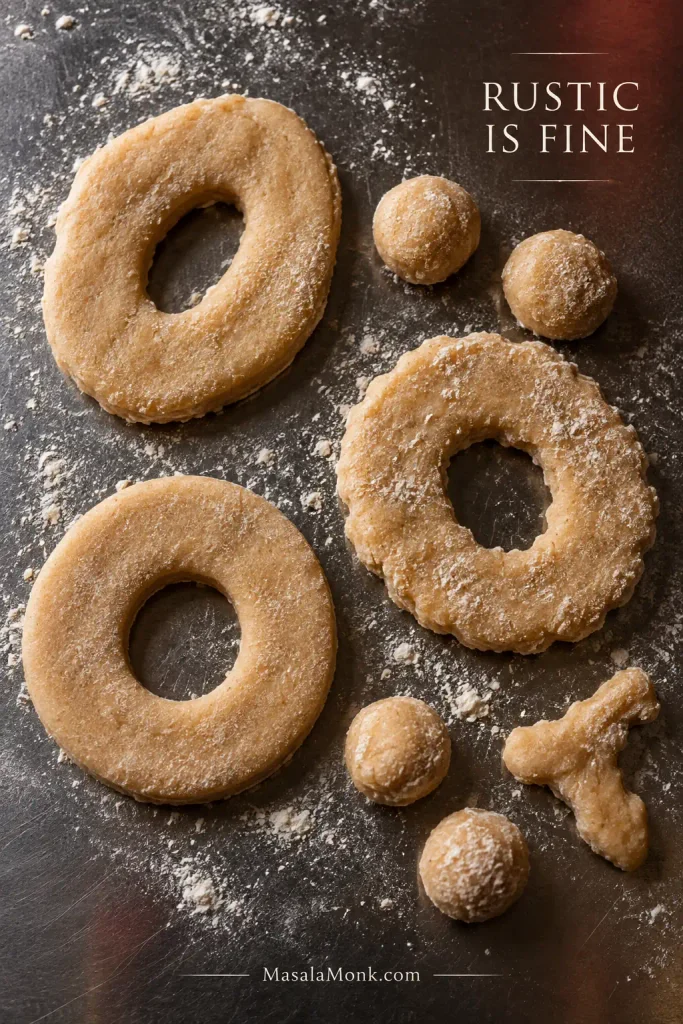
Several raw apple cider donut rings, donut holes, and a small dough scrap in varied handmade shapes on a floured steel surface.
Uneven outlines are fine. Keep thickness similar, and fry holes or scraps separately because smaller pieces finish sooner.

7. Heat the Frying Oil

Heat 2–2½ inches / 5–6 cm of neutral oil to about 355°F / 180°C. Leave plenty of empty space above the oil in the pot. Once chilled dough goes in, aim to fry near 350°F / 177°C.
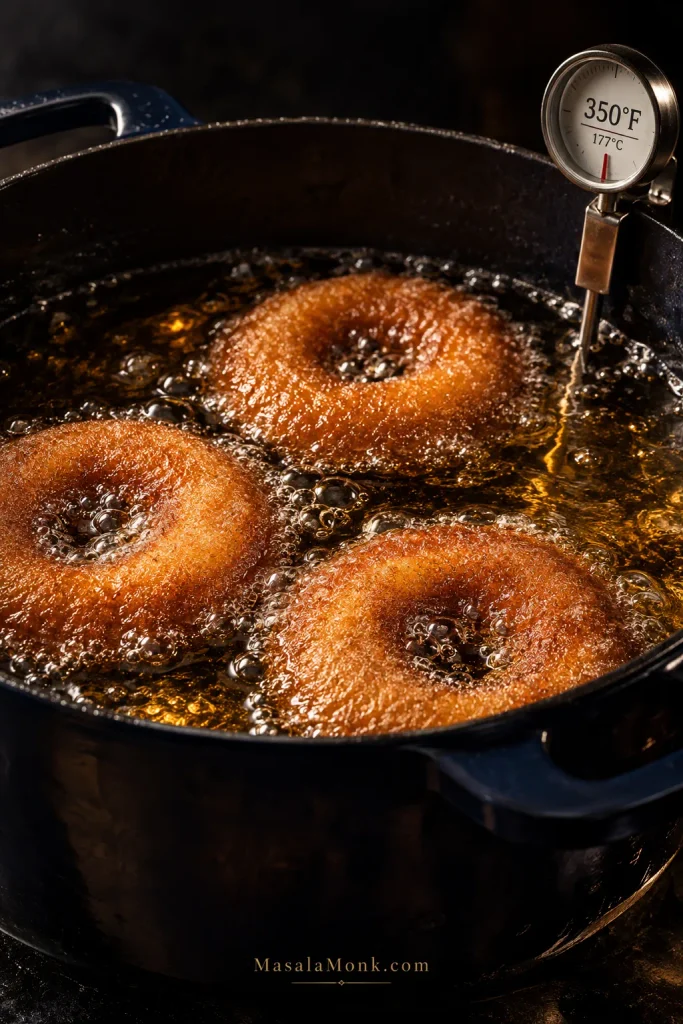
Three apple cider donut rings frying in bubbling oil with a thermometer reading 350°F / 177°C.
Let the oil recover near 350°F / 177°C before each new batch; the thermometer matters more between batches than at the first drop.

Frying safety: keep water away from the pot, lower the dough gently and stay beside the stove. Never pour water onto burning oil. For frying safety, see the USDA deep-frying guidance; for additional technique, King Arthur Baking’s guide to frying without fear is a useful companion. After frying, let used oil cool completely before straining or transferring it for disposal, and never pour frying oil down the sink.

Oil not holding steady? See why frying temperature keeps dropping.

8. Fry One Donut Hole First

The first donut hole calibrates the fryer. Drop one center piece into the oil before committing a full ring.
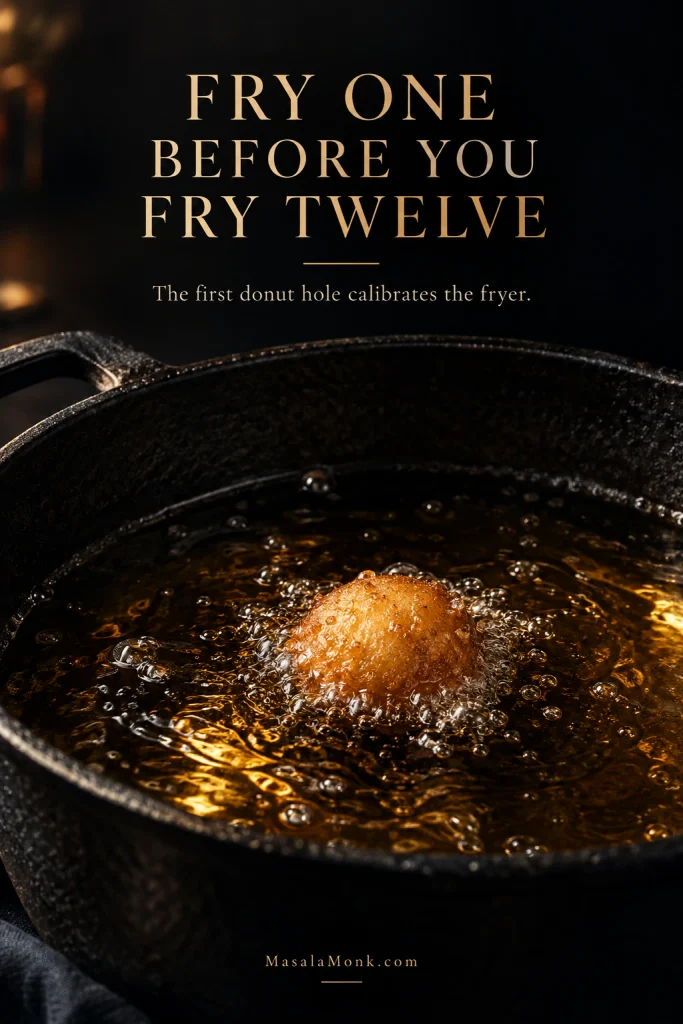
Single apple cider donut hole frying alone in bubbling oil with text explaining that the first donut hole calibrates the fryer.
Use the first donut hole to check browning, grease and cider flavor before committing the full batch.

It may dip briefly, then steady fizzing should gather around the edges as it rises and gradually browns. Fast darkening usually means the oil is too hot. A pale, heavy-looking hole usually means the oil needs to recover or come up in temperature.

Let it cool for about a minute and split it open. Look for a moist but fully set middle with no shiny gummy stripe. Taste a piece plain, then roll the rest in a little cinnamon sugar. Frying softens some of the raw cider aroma, but the apple should still be recognizable underneath the browned crust and spice.
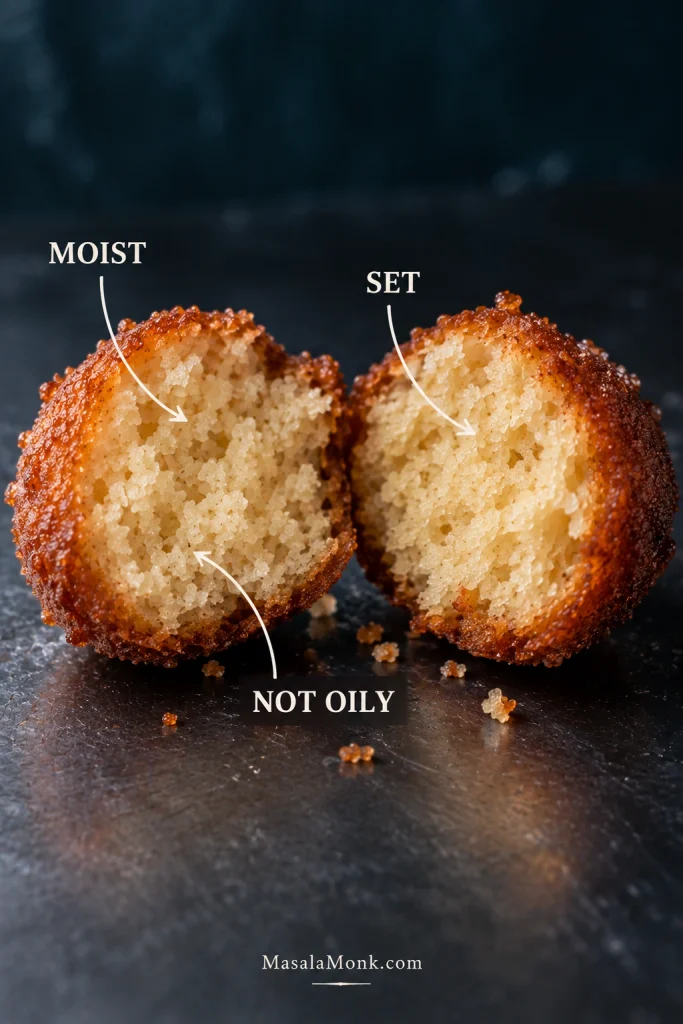
Split fried donut hole showing a moist, fully set cake-like crumb, with labels identifying set, moist, and not oily areas.
A cooked center should look moist and evenly set, without a shiny or compressed gummy band.

A good test hole: browns gradually, has a moist cake crumb instead of an oil-soaked one, and still tastes of cider after a little cinnamon sugar.

If that little test piece looks right and tastes right, the hardest uncertainty is over.

Test hole not right? Check the oil-temperature guide · Troubleshoot the batch

9. Fry the Rings in Small Batches

Fry 2–4 rings at a time for roughly 60–90 seconds per side. Leave enough room for each one to float freely.

Use that timing as a range, not an appointment. Look for gradual browning and a fully set center; thickness, oil recovery and the actual temperature in your pot matter more than the clock alone.

A finished donut is golden brown, with a few darker ridges and rough edges. Split one from an early batch if you are unsure. Inside, you want soft cake with no raw, wet or shiny line through the middle.
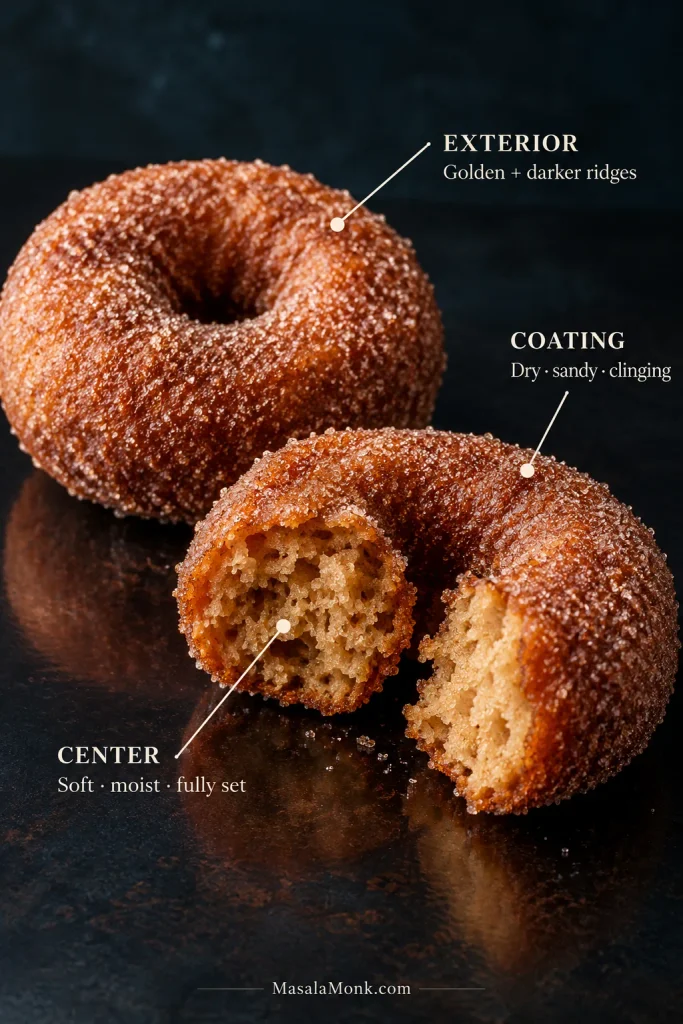
Whole and broken cinnamon-sugar apple cider donuts with callouts for the golden exterior, moist set center, and dry clinging coating.
Look for three cues together: browned ridges, a fully set soft center and a dry cinnamon-sugar coating.

After a few evenly browned rings, frying starts to feel much less mysterious.

Donut holes: the centers cook faster than full rings. Start checking around 45 seconds per side; many finish within 45–60 seconds per side. For an all-hole batch, keep the pieces roughly tablespoon-size and chilled until frying.

10. Drain Briefly and Coat While Warm

Transfer the donuts to a wire rack set over a sheet pan. Once the obvious dripping stops, toss them in cinnamon sugar while they are still warm.
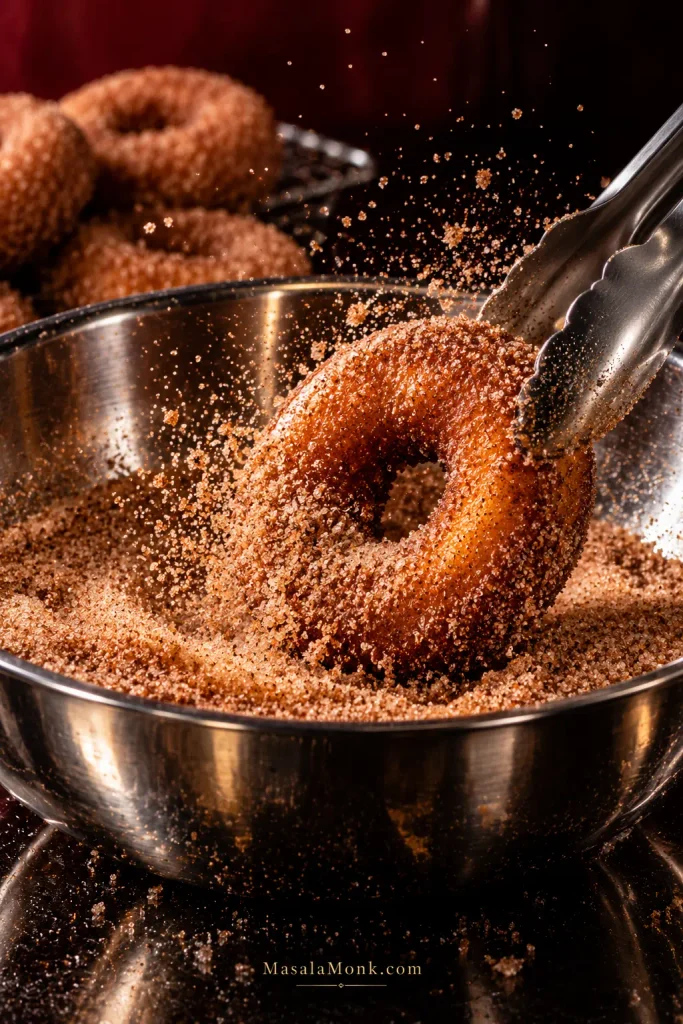
Warm apple cider donut being turned through cinnamon sugar in a stainless-steel bowl as sugar crystals scatter into the air.
Coat after the active dripping stops but while the donut is still warm; the cinnamon sugar should stay loose and sandy.

The sugar catches in the cracks and rough edges almost immediately. This is where the restrained spice in the dough pays off: cinnamon perfumes the crust without completely taking over the apple underneath.

Once the freshly fried rings hit the cinnamon sugar, the whole thing finally feels like cider donuts rather than a frying project.

Coating turning damp and oily after several donuts? Refresh the bowl. There are worse problems to have.

More Help With Apple Cider Donuts

If everything went smoothly, you can stop here and eat them. If something looked wrong along the way, the sections below are organized around the problem you saw.

Why Apple Cider Donuts Sometimes Barely Taste Like Cider

Cider can smell wonderfully strong in the raw dough and still fade once the donut is fried and coated. Flour, butter, browned crust and spice all compete with the fruit aroma.

That’s why the cider gets concentrated before it ever meets the dough. Apple butter reinforces the cooked-apple side of the flavor without adding much loose water.

I would not add chopped apples here. Fresh pieces bring extra moisture and make a soft roll-and-cut dough harder to handle. They belong more naturally in a batter designed around them, such as our apple cake recipe.

Apple Cider, Apple Juice or Apple Cider Vinegar?

Best: cloudy nonalcoholic cider. Good substitute: cloudy or unfiltered apple juice. Do not use: hard cider or apple cider vinegar.

Five glass vessels compare cloudy apple cider, unfiltered apple juice, clear apple juice, hard cider, and apple cider vinegar.
Use cloudy nonalcoholic cider for the strongest flavor; unfiltered apple juice is the closest substitute. Hard cider and apple cider vinegar are not direct substitutes here.

Here, apple cider means the cloudy, nonalcoholic kind commonly sold fresh or refrigerated in North America. Elsewhere, cloudy apple juice may be essentially the same thing under a different name.

What you haveUse it?What to expect
Cloudy nonalcoholic ciderBest choiceStrongest starting cider aroma
Cloudy or unfiltered apple juiceYesClosest substitute
Clear filtered apple juiceYesUsually milder
Hard ciderNoUse nonalcoholic cider or apple juice here
Apple cider vinegarNoSharp and far too acidic for this role

Why Is My Apple Cider Donut Dough So Sticky?

Sticky is normal. Unmanageable is not. Most sticky dough simply needs more cold, not more flour. Judge it after it is thoroughly chilled, not while it is still soft from mixing.
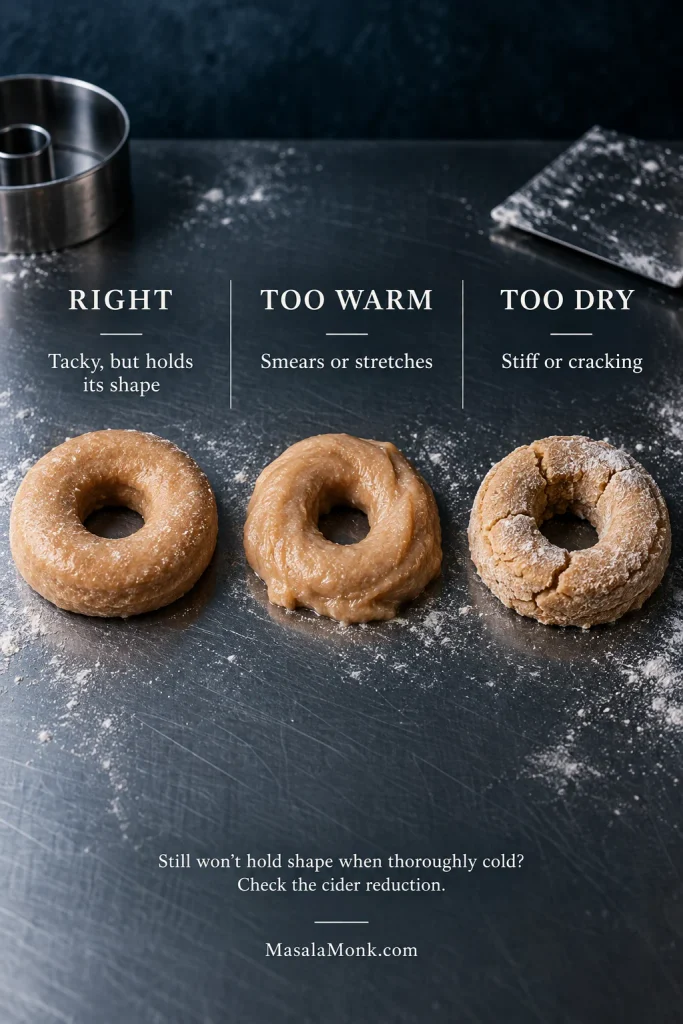
Three raw donut rings compare correct tacky dough, overly warm dough that smears, and dry dough with visible cracks.
Match the symptom first: tacky but stable is normal, smearing needs more chill, and cracking usually means too much flour.
Cold dough does thisWhat it meansWhat to do
Feels tacky but a ring lifts cleanlyNormalKeep going
Smears and stretches badlyStill too warmChill another 20 minutes
Will not hold a ring even when thoroughly coldProbably too wetCheck whether the cider was fully reduced
Feels stiff or cracksLikely too much flourDo not work in more

Bench flour is for handling, not for turning the dough dry. Once a chilled ring lifts cleanly, leave the dough alone.

Why Frying Oil Temperature Keeps Dropping

Fry around 350°F / 177°C. Starting near 355°F / 180°C gives the oil a little room to fall when chilled dough goes in.

Oil temperatureLikely result
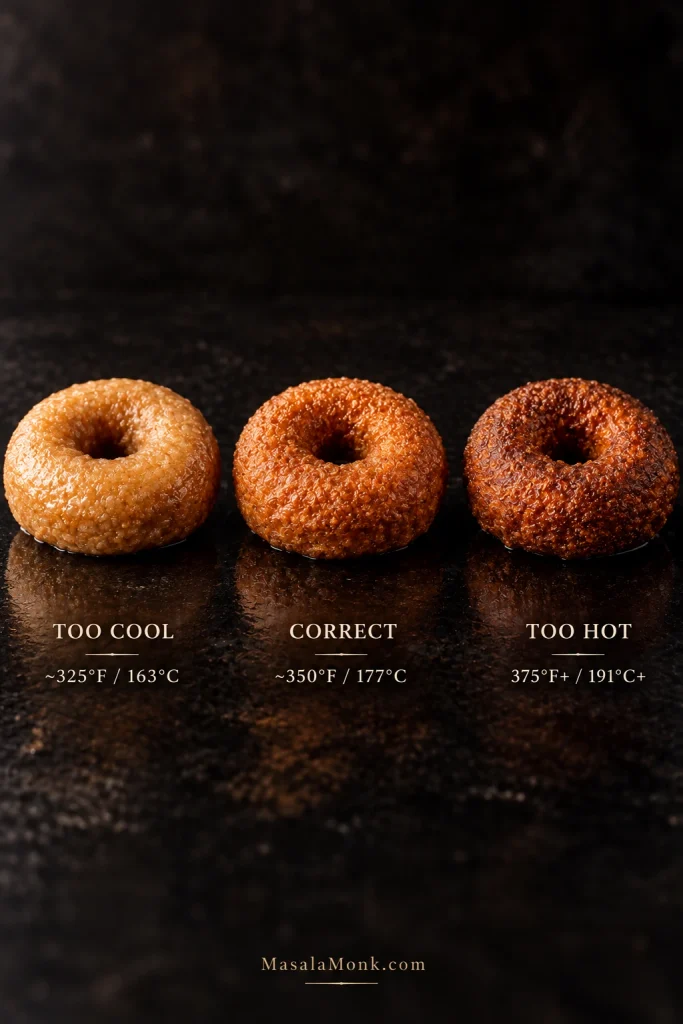
Around 325°F / 163°CSlower browning; greater chance of pale, oily donuts
Around 350°F / 177°CTarget range for this recipe
Around 375°F / 191°C+Outside may darken before the center cooks
Three uncoated donuts labeled too cool, correct, and too hot, showing progressively darker frying at 325°F, 350°F, and 375°F or higher.
Compare the surfaces: cool oil leaves a paler, heavier donut, while excess heat darkens the crust before the center catches up.

A good batch followed by a greasy one is a clue that the oil probably needs more recovery time. Let it move back toward 350°F / 177°C before the next batch goes in.

Cinnamon Sugar or Apple Cider Glaze?

Cinnamon sugar is the finish I would choose for the classic version. It stays dry and sandy on the freshly fried crust, while the restrained spice leaves more room for cider in the crumb.
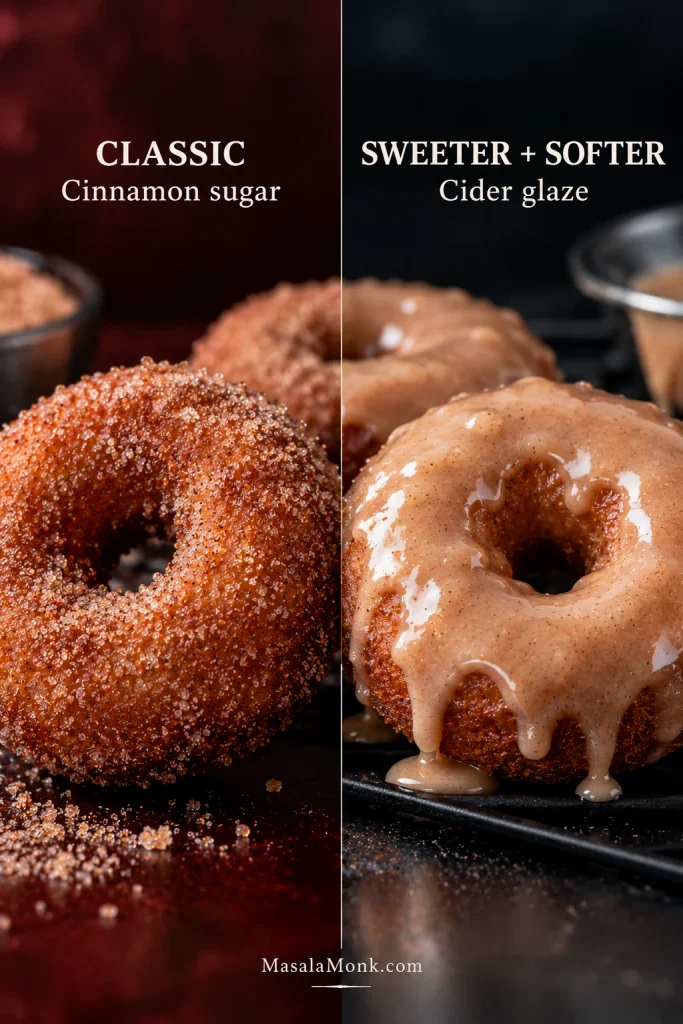
Side-by-side apple cider donuts with a crystalline cinnamon-sugar coating on the left and pale cider glaze on the right.
Cinnamon sugar keeps a drier, crisper surface; cider glaze gives a sweeter, softer finish.

If you want to adjust the warm-spice balance rather than simply adding more cinnamon, our apple pie spice recipe explains what cinnamon, nutmeg, ginger and allspice each contribute.

Cider glaze

  • ½ cup / 120 ml apple cider, reduced to about 2 tbsp / 30 ml
  • 1 cup / 113 g confectioners’ sugar
  • 1½ tbsp / 22 ml cooled cider reduction
  • Pinch fine salt

Whisk the sugar with 1½ tbsp / 22 ml reduction and the salt. Add more cider reduction or milk, a teaspoon at a time, only if needed for dipping consistency.

The glaze is sweeter, softer and more dessert-like. Cinnamon sugar keeps the donut closer to the classic cider-mill version.

Apple Cider Donut Troubleshooting

Most problems come back to the same three controls: cider concentration, dough temperature or oil temperature. Find the stage where the batch first looked wrong, then work from there.
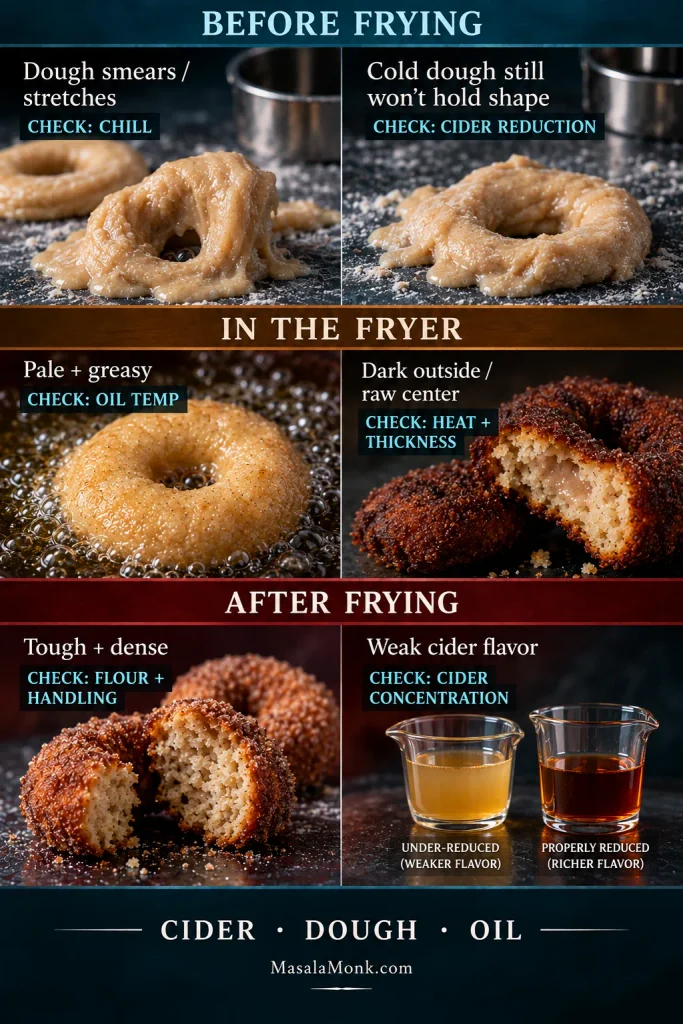
Troubleshooting board showing six apple cider donut problems before, during, and after frying, with the first thing to check for each problem.
Start with where the failure first appeared: before frying, in the oil or after cooling. That narrows the likely cause much faster.

Before Frying

What you seeLikely causeWhat to do
Cold dough still smears badlyToo warm or not fully chilled; excess moisture is less commonChill again first. If it is still unmanageable when thoroughly cold, check the cider reduction.
Cut rings stretch or collapseDough warmed during rollingRefrigerate the tray for 10–20 minutes.
Dough is stiff or crackingToo much incorporated flourHandle the remaining dough gently and avoid unnecessary rerolling.

In the Fryer

What you seeLikely causeWhat to do
Donut darkens almost immediatelyOil probably too hotLower the heat and test another hole.
Pale and greasyOil too cool or batch too crowdedPause and let the oil recover.
Dark outside, raw or gummy insideOil too hot or ring too thick; unusually wet dough is less commonCorrect the heat and check the dough thickness first.
Ring begins breaking apartDough usually too warm; excess moisture is another possibilityRechill before continuing.
Test hole sits heavily instead of puffing toward the surfaceOil may be too coolCheck the oil first. If the temperature is right and the problem persists, reassess the dough.

After Frying

What happenedLikely causeWhat to do
Crumb feels greasyOil ran cool or batch was crowded; dough moisture can also contributeLet the oil recover and use fewer rings.
Donuts are tough or denseToo much flour, overmixing or repeated rerollingHandle the remaining dough as little as possible.
Donuts are dryToo much flour or too long in the fryerShorten the next batch and watch the center.
Apple flavor is faintMild cider or weak reductionUse the cider glaze if you want a stronger apple impression; next time concentrate the cider fully.
Cinnamon takes overCoating overwhelms a mild cider flavorUse a lighter coating.
Sugar barely sticksDonuts cooled too farCoat the remaining rings sooner.
Sugar turns oily and clumpyDonuts were still drippingDrain briefly before coating and refresh the sugar if needed.
Coating becomes damp laterWarm donuts were enclosed or sat in humid airCool completely before storing.

Back to Recipe · Test Hole · Back to Top

Make It Tonight, Fry Tomorrow

Reduce the cider and mix the dough the night before, then cover and refrigerate. The next day, judge it by how it feels rather than by how many hours it has been cold.

For the cleanest shapes, I would keep the dough as one covered mass and cut the rings shortly before frying instead of leaving shaped pieces exposed overnight.

If the next-day frying step is exactly what you are trying to avoid, an apple crisp is a much easier make-ahead apple dessert: prepare the filling and topping separately, refrigerate them, then assemble before baking.

These Donuts Are a Same-Day Food

The first warm ring is the version storage never quite reproduces: a lightly crisp edge around soft cake, with cinnamon sugar still dry and sandy on the surface.
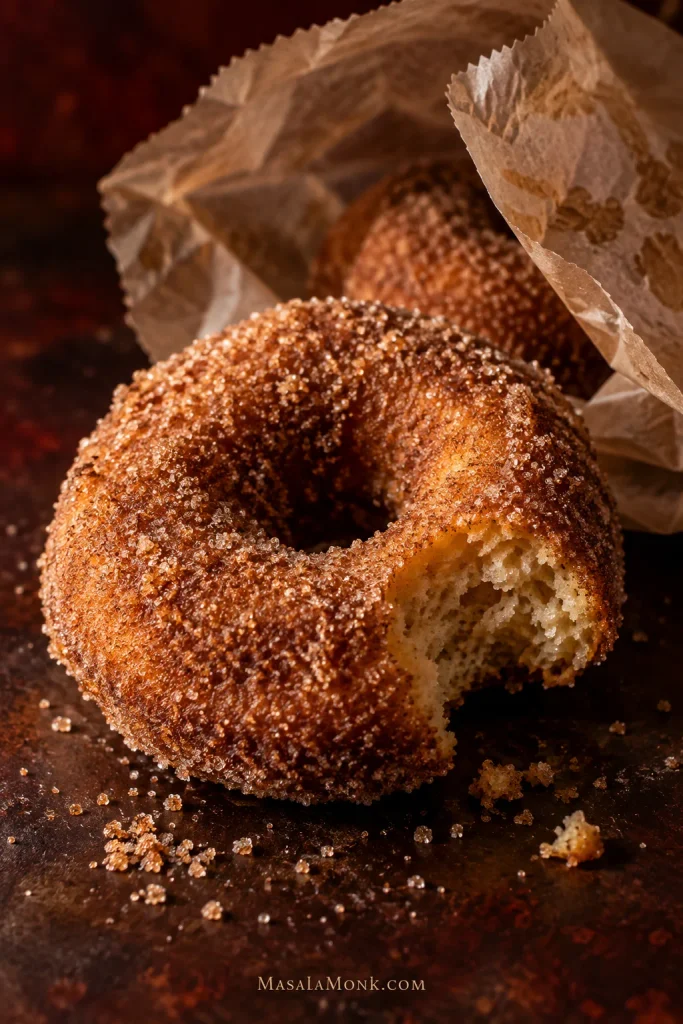
Cinnamon-sugar apple cider donut with a bite missing beside an open bakery paper bag containing another donut.
Let leftover apple cider donuts cool completely before covering them; trapped steam softens the crust and turns the cinnamon sugar damp.

Best quality: eat them within the first few hours if you can.

Room temperature: cool completely before covering and keep for up to about 2 days. Room temperature is better for texture than the refrigerator; refrigeration tends to firm the crumb and soften the coating.

Freezing

Freeze completely cooled donuts, preferably before coating, for up to about 3 months for best quality. Freezing is practical, but it will not recreate the texture of a donut eaten warm from the rack. Thaw before reheating and add fresh cinnamon sugar while warm.

Reheating

  • Oven or toaster oven: best for restoring some of the exterior texture. Heat at 325°F / 165°C for about 8 minutes.
  • Microwave: fastest, but the donut will be noticeably softer.
  • Air fryer: use a low setting and check early. Machines vary too much for one universal reheating time.

Fried vs Baked Apple Cider Donuts

This recipe is deliberately fried. That is how you get the thin browned crust and cinnamon-sugar exterior we’re chasing here.

Baked cider donuts deserve a batter formulated for the oven; I would not put this soft frying dough into a donut pan and expect the same texture. The same principle applies to dietary changes: gluten-free cider donuts need their own flour balance rather than a direct flour swap into this dough.

If your real goal is donuts without a pot of frying oil, our air fryer donuts are built for that cooking method instead of trying to convert this cider-donut dough.

Apple Cider Donut FAQ

1. Are Apple Cider Donuts Cake Donuts or Yeast Donuts?

They are usually cake-style donuts, lifted with baking powder and baking soda rather than yeast.

2. Can I Use Apple Juice Instead of Apple Cider?

Yes. Cloudy or unfiltered apple juice is the closest substitute; reduce it the same way as cider.

3. Can I Fry Apple Cider Donuts Without a Thermometer?

Yes, but a thermometer is much easier. Without one, use the first donut hole to judge browning, rise and doneness before frying the rings.

4. Can I Make the Dough the Night Before?

Yes. Cover and refrigerate overnight, then roll, cut and fry the next day once the dough feels cold, soft and easy to lift.

Homemade cider donuts do not need perfect geometry. Eat one while it is still warm, before the rest have even finished their cinnamon sugar. The crust should give a little, the crumb should still be soft, and underneath all that cinnamon, the cider should still be there.
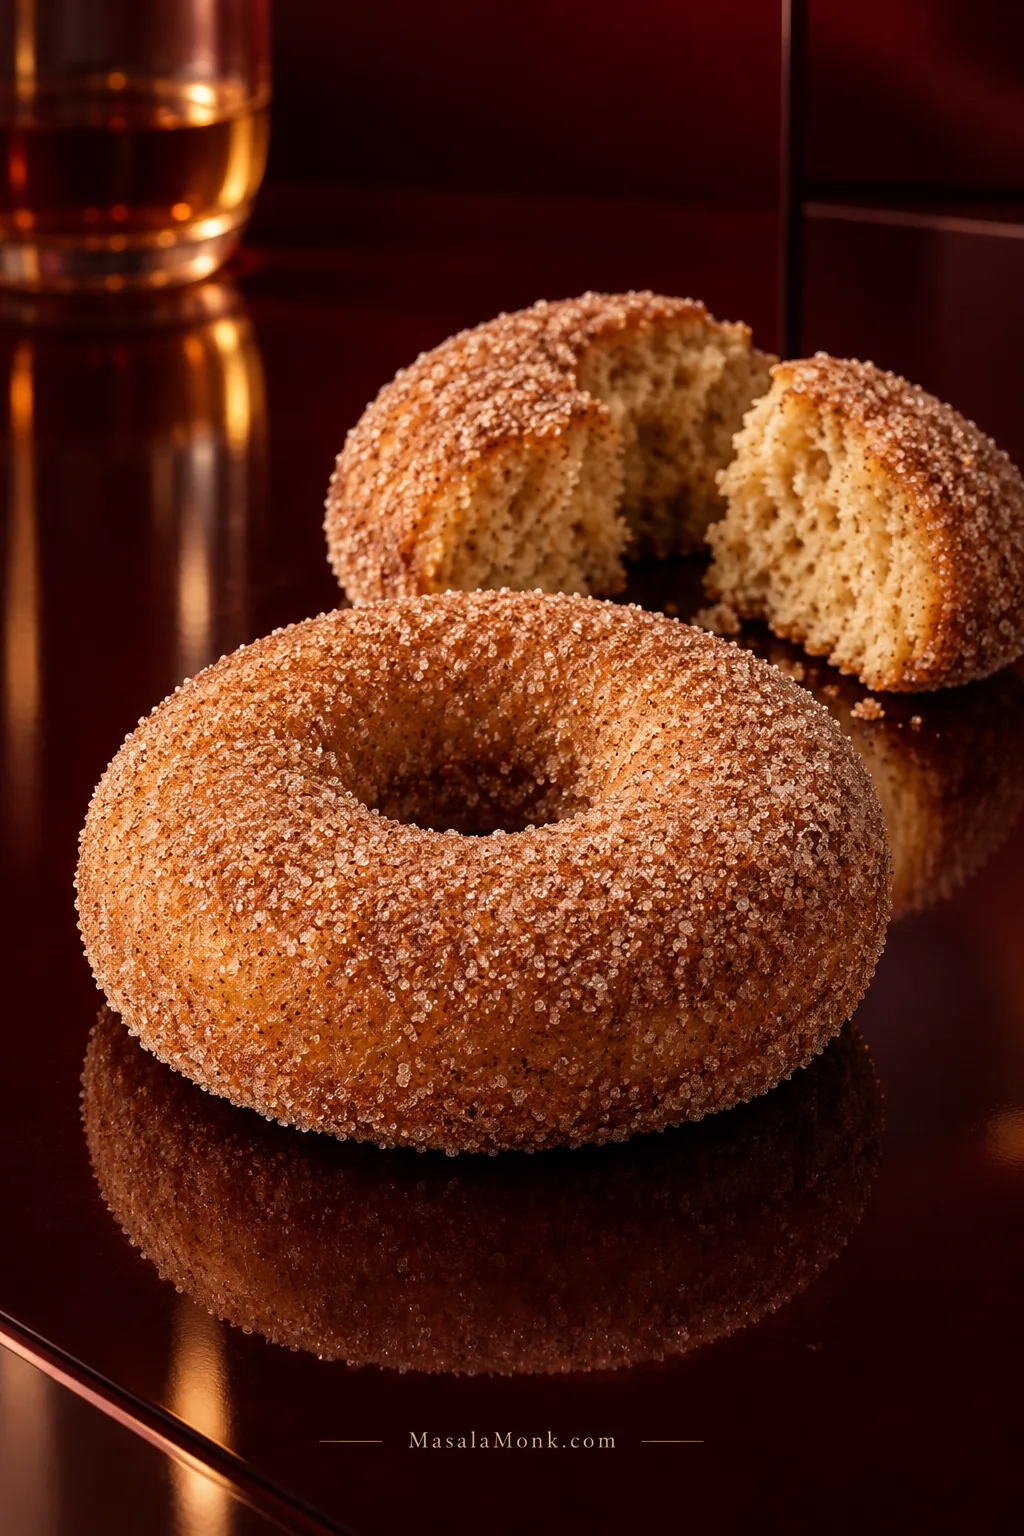
Back to Recipe · Troubleshooting · Back to Top

Posted on Leave a comment

Gluten-Free Apple Cider Donuts Recipe: Soft, Baked & Cinnamon-Sugar Coated

Two cinnamon-sugar baked apple cider donuts on deep burgundy lacquer, with one broken open to reveal the soft cake crumb.

Warm apple cider, cinnamon sugar on your fingers, and a soft cake-donut crumb with enough body to feel like a real donut: going gluten-free should not mean missing the best part of cider-donut season.

If fall usually means passing up the cider donuts at the orchard or bakery, getting the texture right matters just as much as making them gluten-free. The aim here is a good cider donut first, with the gluten-free flour doing its job quietly in the background.

These gluten free apple cider donuts are baked, tender and cider-forward, with a fine cake-donut crumb and a dry cinnamon-sugar finish. Reducing the cider first keeps the apple flavor clear instead of letting the spice do all the talking.

Because they’re baked, you get the familiar cider-donut shape and cinnamon-sugar finish without setting up a fryer or pot of hot oil. If you don’t need the gluten-free formula and want the traditional fried version instead, use our classic apple cider donuts recipe. This baked recipe makes about 12 donuts in roughly 50–60 minutes with two pans, with most of the flavor coming from concentrated cider rather than extra spice.

The batter is thick enough to pipe but loose enough to settle into the pan. Once baked, the donuts stay soft through the middle, lightly firm around the edges and sturdy enough to hold their cinnamon sugar.

Quick answer: These are baked, no-fry cider donuts that make about 12. Reduce 1½ cups (12 fl oz / 360 ml) apple cider to about 7 tablespoons (3½ fl oz / 105 ml) and let it cool. Mix with 250 g gluten-free 1:1 baking flour, two eggs, milk, oil and spices. Pipe into a greased donut pan and bake at 350°F / 175°C for about 10–14 minutes, until the tops spring back and the centers are set. Brush the warm donuts lightly with melted butter and coat with cinnamon sugar.

Make Them Now: Gluten-Free Apple Cider Donuts

You can make the full recipe from this section alone. The rest explains the texture cues, substitutions, troubleshooting and storage.

Yield: about 12 standard donuts
Prep: about 35–40 minutes, including reducing and cooling the cider
Bake: 10–14 minutes per batch
Total: about 50–60 minutes with two pans; longer with one 6-cavity pan
Oven: 350°F / 175°C conventional
Pan: Two standard 6-cavity donut pans, or one used in two rounds
Style: Baked gluten-free cake donut
Finish: Cinnamon sugar

Before You Mix

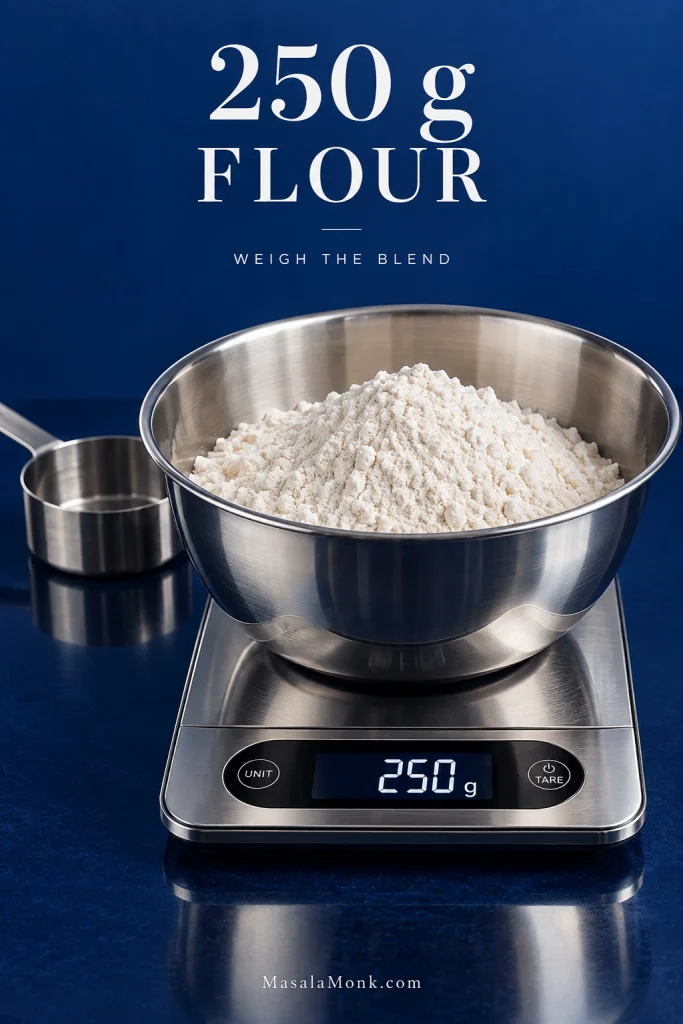
Use the 1:1 gluten-free baking blend you already trust for cakes or muffins, provided it contains xanthan gum or another suitable binder. Weigh 250 g for the most consistent result; cup volume varies between blends.

Reduce the cider first and let it cool to room temperature or until barely warm before it meets the eggs. Pouring the measured reduction into a small heatproof jug while you gather the other ingredients helps it cool faster.

Grease the donut pan well, including the center posts. Get the cider and batter right before filling the pan; both are easy to correct at that stage and much harder to rescue later.

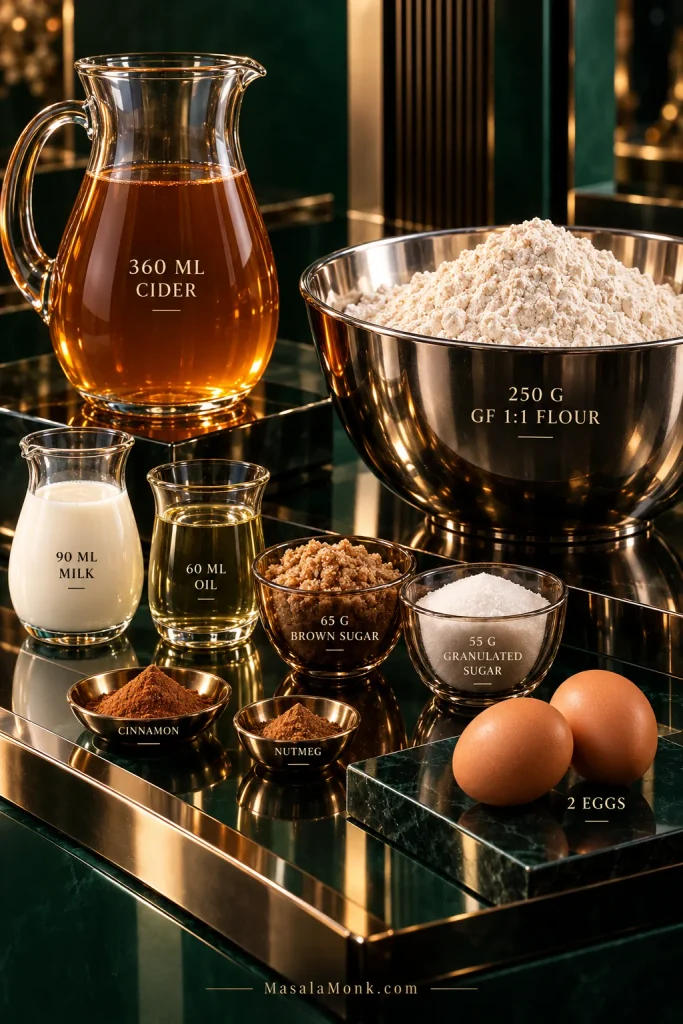
Apple cider, gluten-free baking flour, two eggs, milk, oil, sugars and spices arranged on an emerald and chrome set.
Cider brings apple flavor; eggs set structure; oil keeps the crumb tender; milk controls flow. Keep cinnamon and nutmeg in the background.

Ingredients

For the Donuts

  • 1½ cups (12 fl oz / 360 ml) nonalcoholic apple cider, meaning the cloudy pressed apple drink, not vinegar; reduce to about 7 tablespoons (3½ fl oz / 105 ml)
  • 250 g gluten-free 1:1 baking flour containing xanthan gum or another binder
  • 2 teaspoons (about 8 g) baking powder
  • 1 teaspoon ground cinnamon
  • ¼ teaspoon ground nutmeg
  • ½ teaspoon fine salt
  • 2 large eggs
  • 65 g light brown sugar, about ⅓ cup packed
  • 55 g granulated sugar, about ¼ cup
  • ¼ cup (2 fl oz / 60 ml) neutral oil
  • 6 tablespoons (3 fl oz / 90 ml) milk
  • 1½ teaspoons vanilla extract

For the Cinnamon Sugar

  • ¾ cup (150 g) granulated sugar
  • 2½ teaspoons ground cinnamon
  • 3 tablespoons (42 g) unsalted butter, melted; you may not need all of it

Method

  1. Reduce the cider. Pour 1½ cups / 360 ml apple cider into a saucepan and bring it to a steady, lively simmer. Reduce to about 7 tablespoons / 105 ml; depending on the pan and heat, this often takes around 15–25 minutes. Start measuring early rather than waiting for the clock. Pour the finished reduction into a small heatproof jug and let it cool to room temperature or until barely warm.
  2. Heat the oven and grease the pans. Heat the oven to 350°F / 175°C with a rack near the center. Grease about 12 standard donut cavities thoroughly, especially around the center posts.
  3. Mix the dry ingredients. Whisk together the gluten-free flour, baking powder, cinnamon, nutmeg and salt.
  4. Mix the wet ingredients. In a larger bowl, whisk the eggs with the brown sugar and granulated sugar. Add the oil, milk, vanilla and cooled cider and whisk again.
  5. Combine. Stir the dry ingredients into the wet mixture until no dry pockets remain. There is no need to keep mixing once the batter is even.
  6. Let the flour hydrate. Leave the batter for 5–10 minutes. It will usually thicken as it sits.

Finish the Batter, Bake & Coat

  1. Check the consistency. The batter should fall in a heavy ribbon and pipe cleanly. If it is genuinely too stiff after resting, add milk 1 tablespoon / 15 ml at a time.
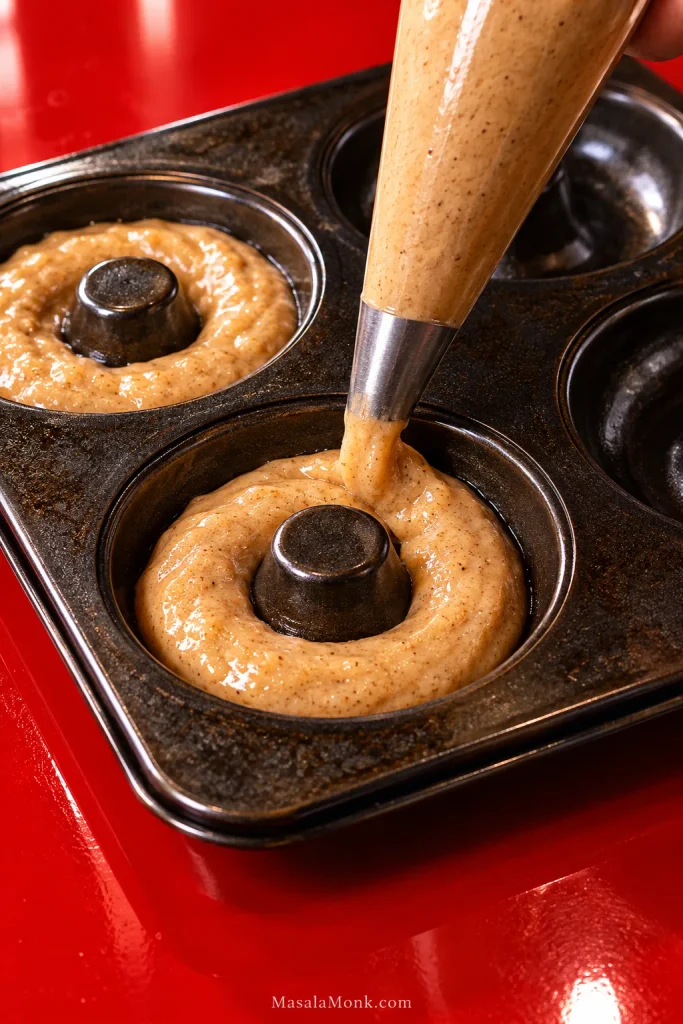
  2. Fill the pan. Transfer the batter to a piping bag or large zip-top bag and snip off a corner. Fill each cavity about three-quarters full, keeping the center post exposed. The rings do not need to look perfectly neat before they bake.
  3. Bake. Start looking at them around 10 minutes. Most standard donuts take roughly 10–14 minutes. The tops lose their wet shine and spring back when pressed lightly. A toothpick through the thickest part should come out without raw batter.
  4. Rest briefly. Leave the donuts in the pan for 3–5 minutes, then loosen them gently and move them to a rack.
  5. Brush and coat. Mix the sugar and cinnamon in a shallow bowl. Brush each warm donut with a thin film of melted butter, then turn it in the cinnamon sugar. The coating should stay sandy rather than glossy. For a lighter finish, coat only the top and outer edge.

Give the sugar a minute to cling, then eat the first one while the center is still warm.

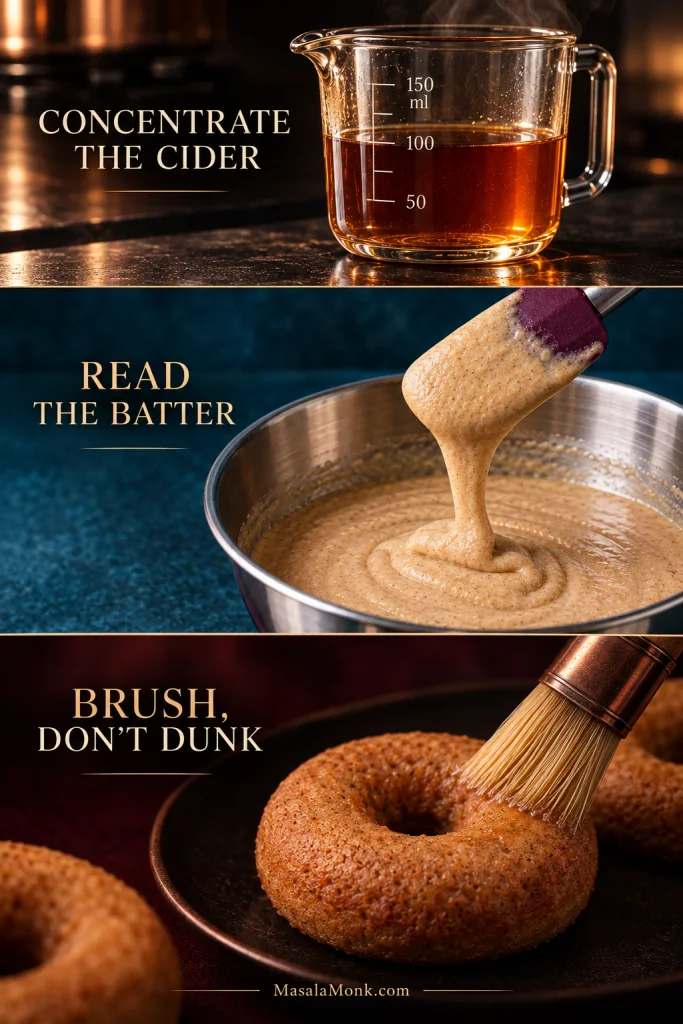
If you remember only three things: Concentrate the cider. Read the batter. Brush, don’t dunk.

Three photographic bands showing reduced cider, thick donut batter and a pastry brush applying a light coating to a baked donut.
Think flavor → structure → finish: concentrate the cider, read the batter, then use just enough butter for the sugar to cling.

Need help with the result? Check the batter · Check doneness · Troubleshoot a problem

What the Finished Donuts Should Be Like

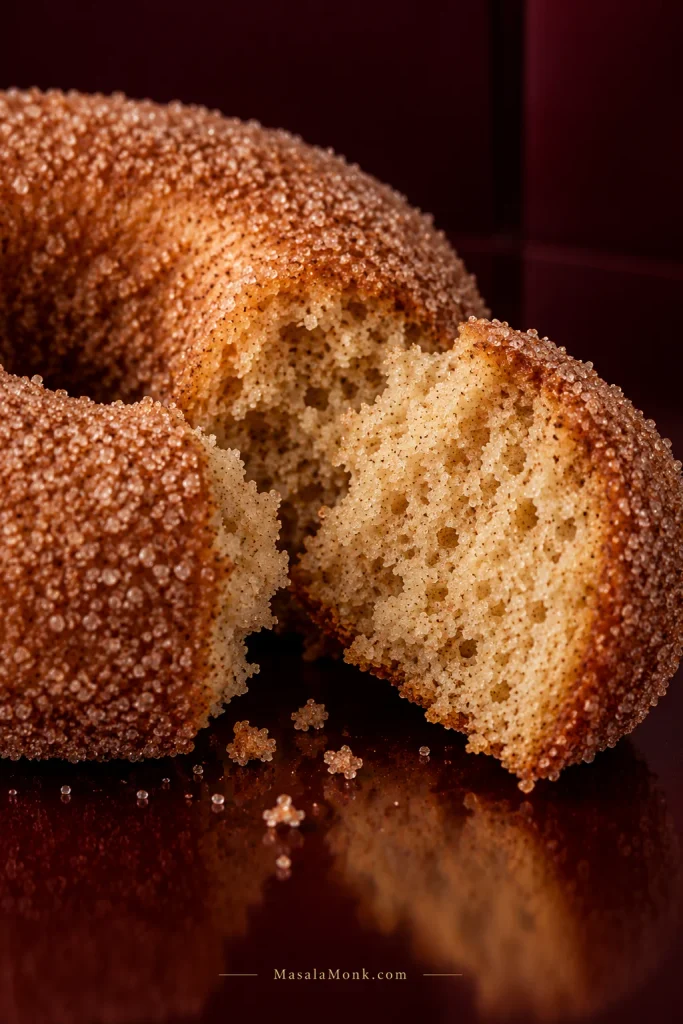
A good baked cider donut is soft but not fragile, cake-like without slipping into cupcake territory, and moist without feeling gummy. The crumb has fine, fairly even pores and holds together cleanly when you bite into it.

Break one open. The center should look evenly baked, without a wet or glossy streak through the middle. The outside will be slightly firmer than the center, especially from a metal pan.

Close-up of a broken cinnamon-sugar donut showing a fine, evenly baked cake crumb and golden outer edge.
A good baked cider donut tears cleanly and looks matte-set inside. Shiny, compressed patches matter more than an occasional larger air pocket.

The coating should stay dry enough for a faint sandy crunch before the soft crumb gives way. Underneath the cinnamon, the apple should still be there.
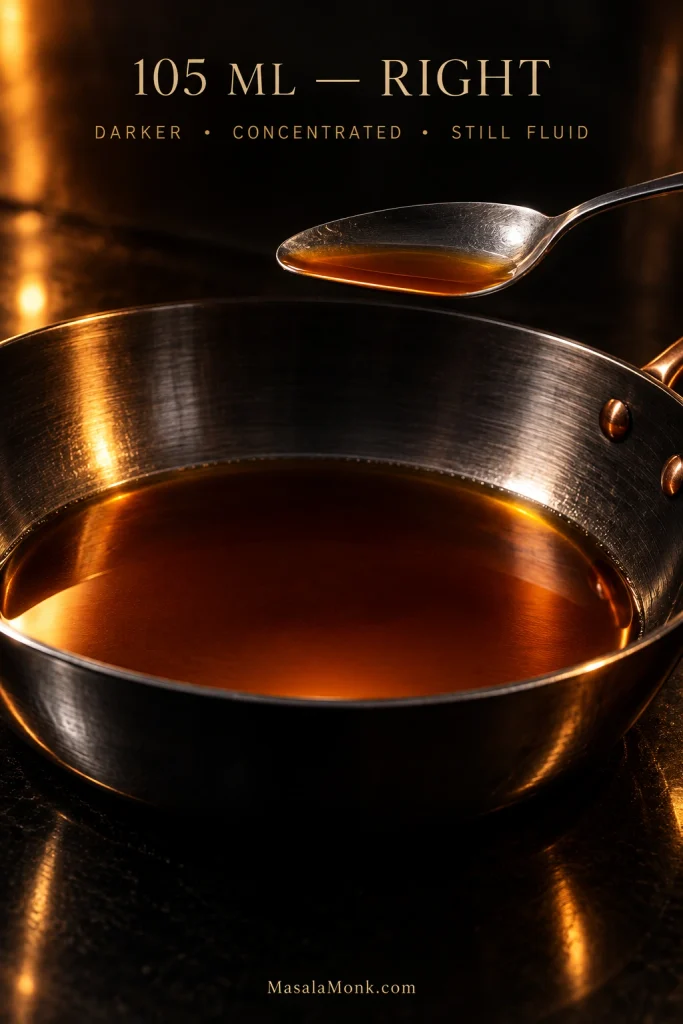
Reduce the Cider to About 105 ml

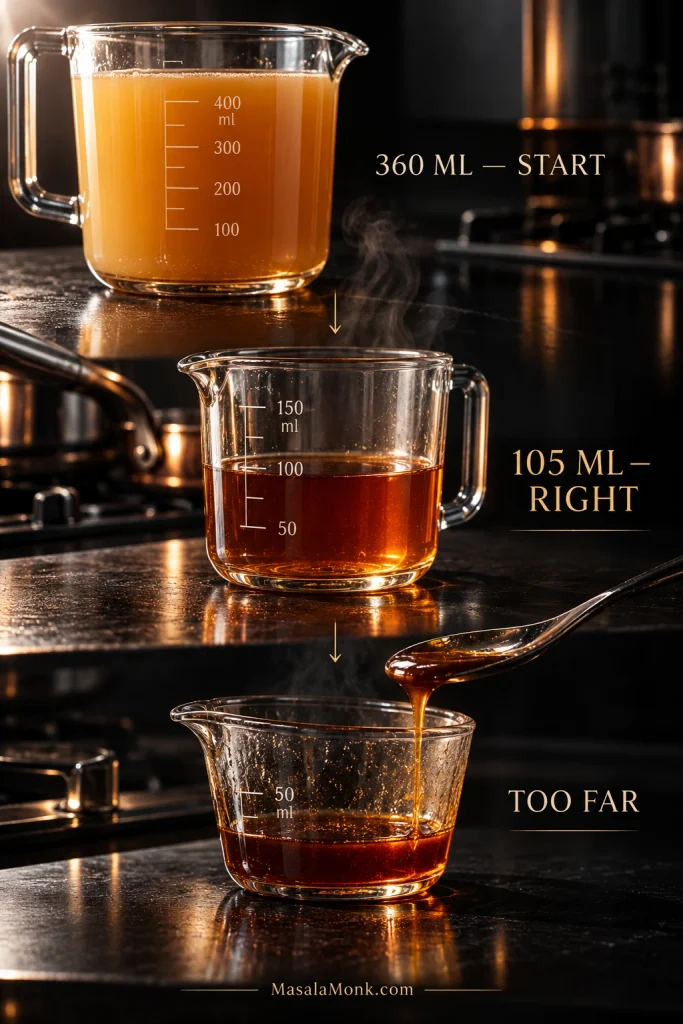
Start with 1½ cups / 360 ml cider and simmer until about 7 tablespoons / 105 ml remain. That’s the target; the clock is not.

Three stages of apple cider reduction labeled 360 milliliters start, 105 milliliters right, and too far, with the liquid becoming darker and thicker.
Reducing 360 ml to 105 ml concentrates apple flavor while removing enough water to keep the batter balanced.

Pan width and burner strength change the timing. Near the end, the cider darkens, smells intensely of apples and still pours easily. Honey-thick means it has gone farther than this batter needs.

Dark amber reduced apple cider coating a metal spoon above a shallow pan of fluid cider, labeled 105 milliliters right.
Correctly reduced cider should run quickly when the pan tilts. If it creeps or ropes, it has gone too far.

Reduced it too far? Add enough fresh cider to bring the amount back near 105 ml.

Commercial boiled cider is different. It is reduced much further and can become thick like honey, so it should not replace this homemade reduction measure-for-measure. King Arthur’s boiled-cider guide shows how concentrated it can become.

Choose the Right Gluten-Free Flour

Use a 1:1 blend intended for general baking and already containing xanthan gum or another suitable binder. The blend you already trust for cakes or muffins is a good place to start.

Stainless steel bowl of flour on a digital kitchen scale displaying 250 grams against a deep cobalt background.
Use 250 g as the fixed baseline. Then batter differences are more likely to come from the flour blend than the scoop.

What Different Blends Can Do

Finely milled rice-and-starch blends tend to work well here. Coarse rice flour can leave the crumb gritty, very starch-heavy blends may bake up tackier, and strongly bean-based blends can bring an earthy flavor. If your blend already contains xanthan, don’t add more.

A slightly thicker or softer batter is not automatically a problem; let it rest, then judge how it pipes.

Check Your Batter Before You Pipe It

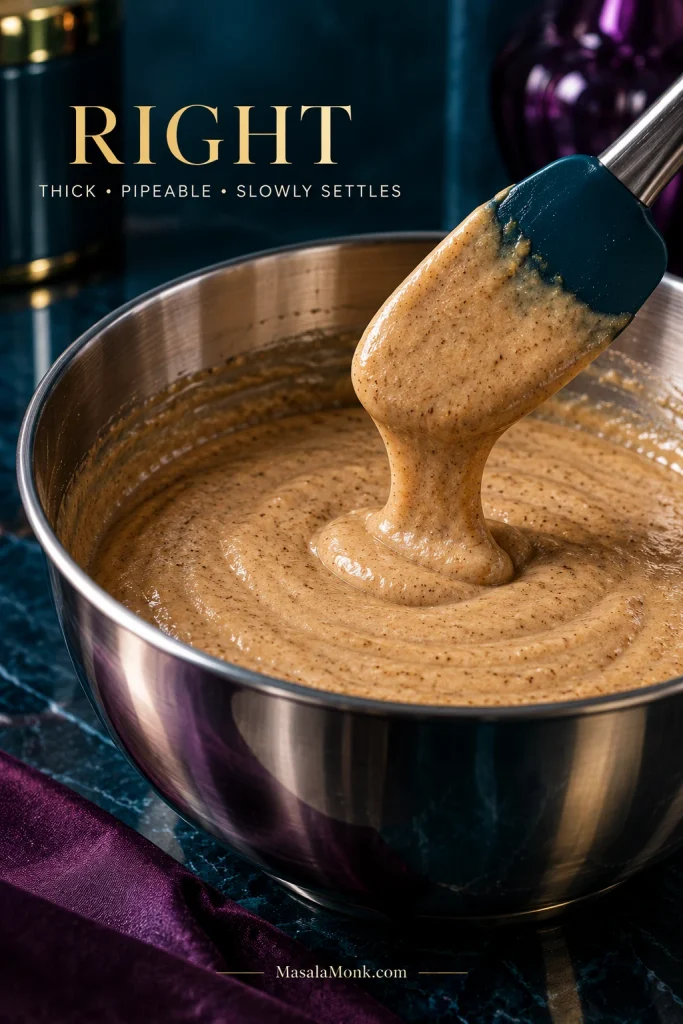
After the 5–10 minute rest, the batter should be thick, smooth and pipeable. Lift some with a spatula: it should fall in a heavy ribbon and leave a ridge that slowly softens. You’re looking for batter that holds its shape long enough to pipe, then gradually settles into the ring.

Thick speckled donut batter falling in a short ribbon from a spatula into a stainless steel bowl, labeled right and slowly settles.
After resting, judge batter by movement: it should pipe cleanly and relax gradually, even if it still feels a little sticky.

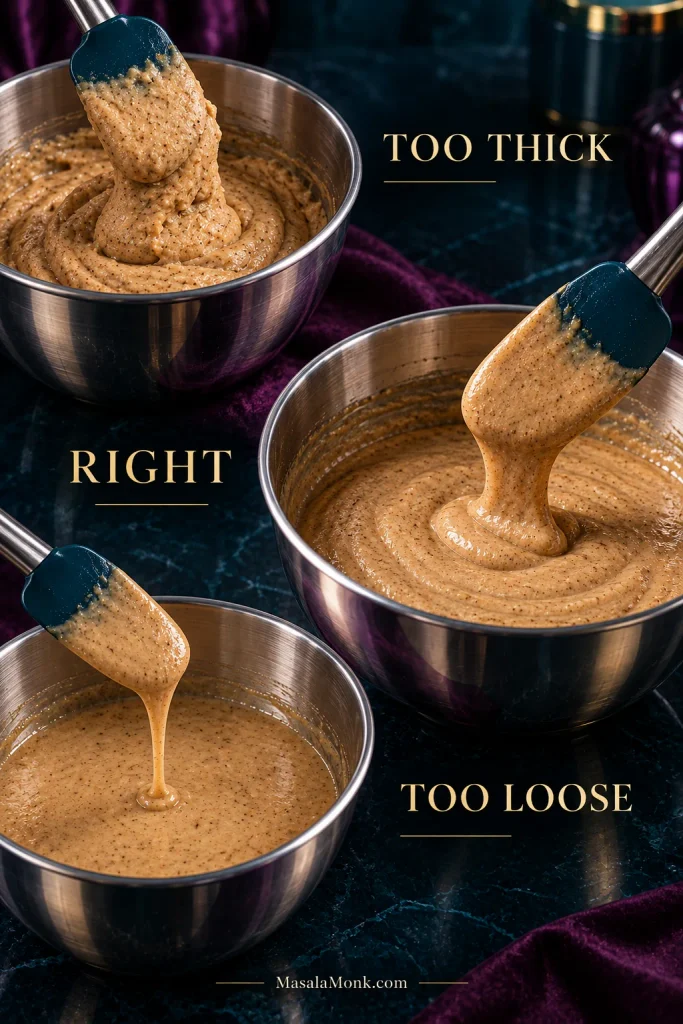
Batter Too Thick

If it is still too stiff to pipe after the full rest, add milk 1 tablespoon / 15 ml at a time. Stop as soon as it moves easily through the bag.

Batter Too Loose

If it still pours freely after resting, make sure the cider reached 105 ml. Only add flour after you have checked the cider reduction.

Three bowls of apple cider donut batter labeled too thick, right and too loose, showing progressively thinner consistency.
Stiff batter holds its ridge; correct batter slowly softens; loose batter levels quickly. Movement tells you more than surface smoothness.

Gritty Batter

A short rest can smooth out fine rice flour. If the finished donut still feels gritty, the blend itself is the likely culprit.

Don’t panic over a slightly sticky batter. If it pipes cleanly, you’re in the right neighborhood. Sticky batter, a gummy center and wet cinnamon sugar are three different problems.

Pipe and Fill the Pan

Once the batter is rested and pipeable, transfer it to a piping bag and work around each ring without covering the center post.

Piping bag filling a dark metal donut pan with thick speckled batter on a glossy red surface.
Keep the ring reasonably even; the batter will soften and settle as the pan heats.

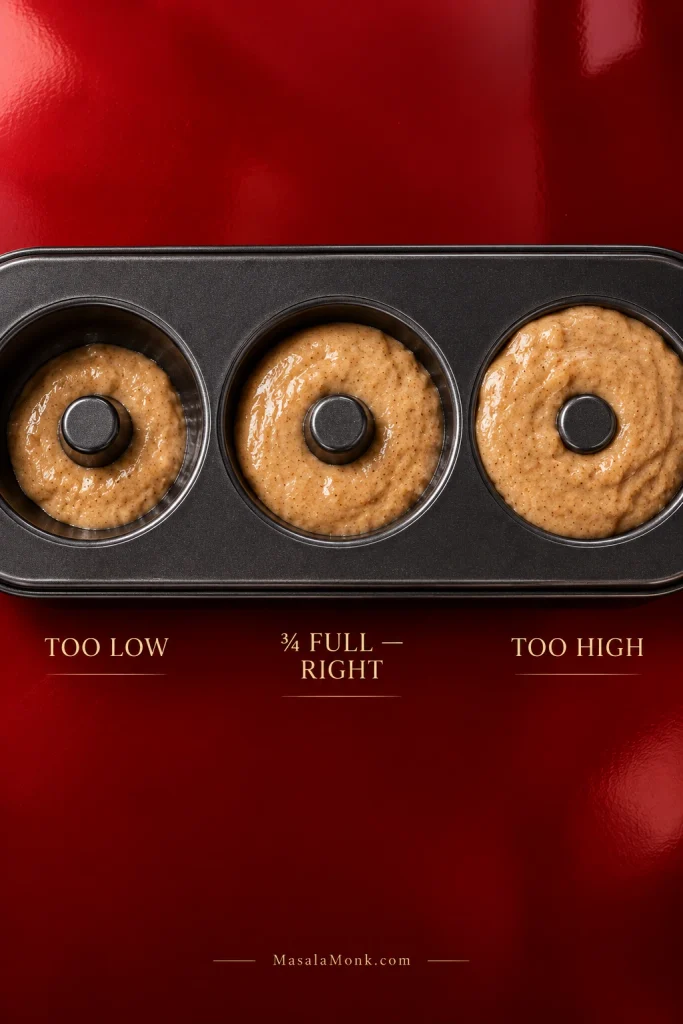
Before the pan goes into the oven, compare the batter height with the center post. About three-quarters full leaves enough room for the ring to rise without crowding the middle.

Three donut-pan cavities labeled too low, three-quarters full right, and too high, each containing a different amount of batter.
Use the center post as your gauge: about three-quarters full leaves room for the ring to rise cleanly.

How to Know When They’re Done

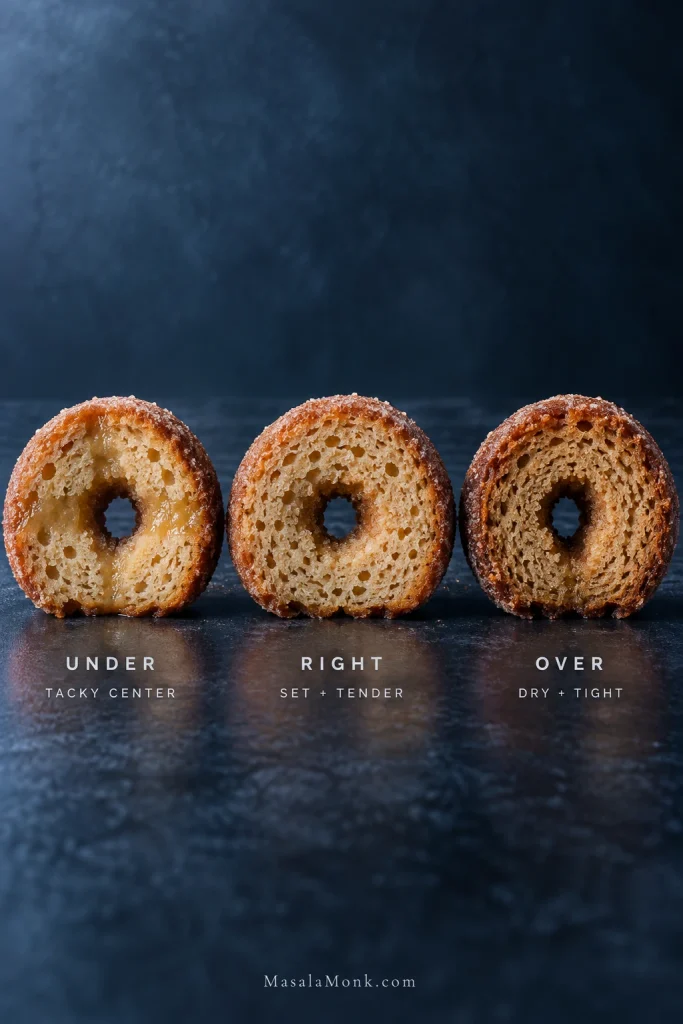
Start looking at the donuts around 10 minutes. Color is the least useful cue here.

Three cut apple cider donuts labeled under, right and over, showing tacky, tender and dry interior textures.
Similar exteriors can hide different centers. Use crumb set, spring-back and the toothpick together rather than waiting for one shade of brown.
  • The top has lost its wet shine.
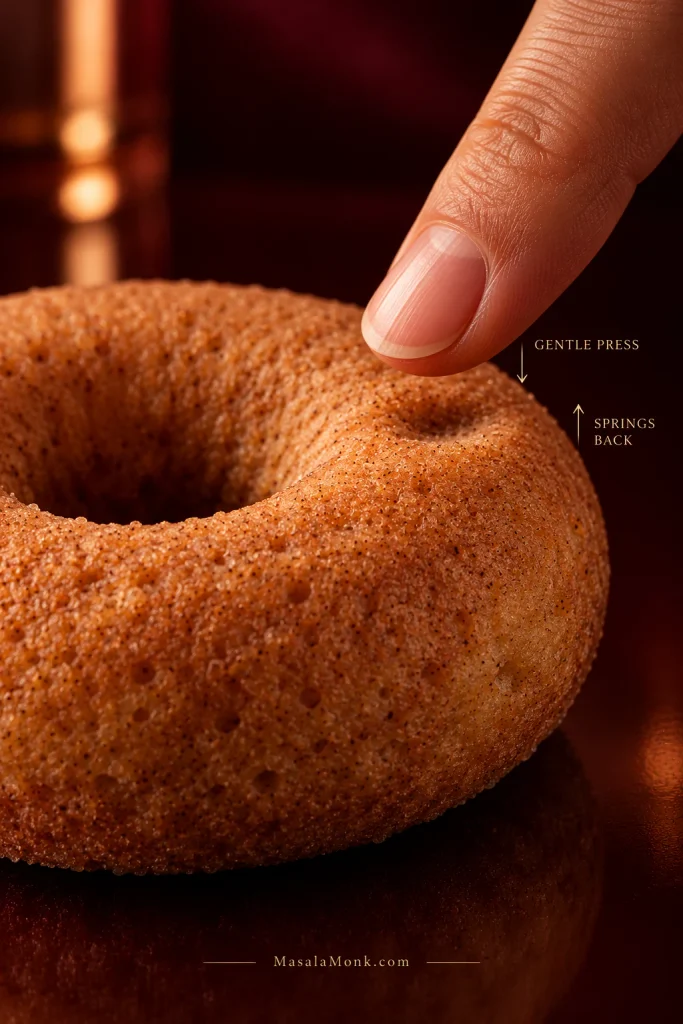
  • A gentle press springs back.
  • The edge may begin to release from the pan.
  • A toothpick through a thick section comes out without raw batter.
Fingertip gently pressing the surface of a plain baked donut, with arrows indicating gentle press and springs back.
Press the thickest part of the ring. Spring-back there tells you more about the center than pressing the firmer edge.

Silicone pans can stay pale even when the center is ready. A hot oven can do the opposite and brown the outside before the middle is fully set.

If the center springs back and the toothpick shows no raw batter, pull the pan. Don’t wait for extra color just because another oven needed more time.

No Donut Pan? Use Another Small Pan

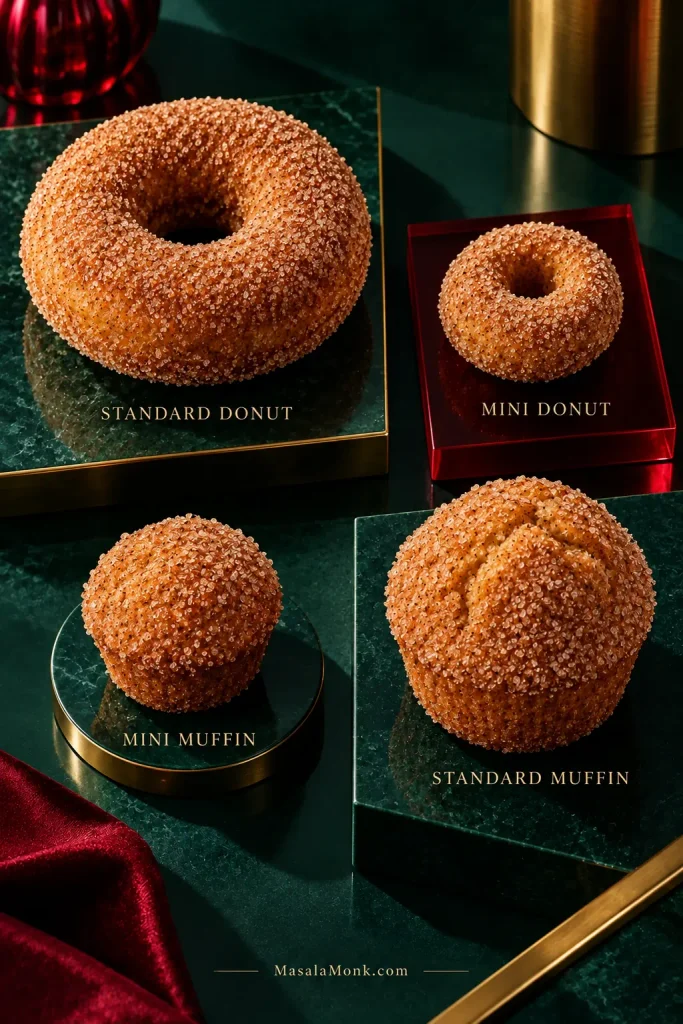
The batter also works in mini donut and muffin pans. The flavor stays the same; the shape obviously doesn’t. Deeper cavities simply take longer.

Standard donut, mini donut, mini muffin and regular muffin made from the same cinnamon-sugar batter, each labeled by shape.
Depth matters more than pan name: mini shapes bake faster, while a standard muffin needs longer for its deeper center.
PanHow FullFirst Check Around
Standard donut panAbout ¾ full10 minutes
Mini donut panKeep the center post exposed7 minutes
Mini muffin panAbout ⅔–¾ full8 minutes
Standard muffin panAbout ⅔ full14–15 minutes; deeper muffins may need closer to 18

Mini muffins make a handy bite-size option once coated. Treat the times above as checkpoints, not promises; the center still decides when they’re done.

Only One Six-Cavity Pan?

That’s fine. Bake the first six, let the pan cool until it is comfortable to handle, then grease it again before piping the second round. Keep the remaining batter covered at room temperature while the first batch bakes.

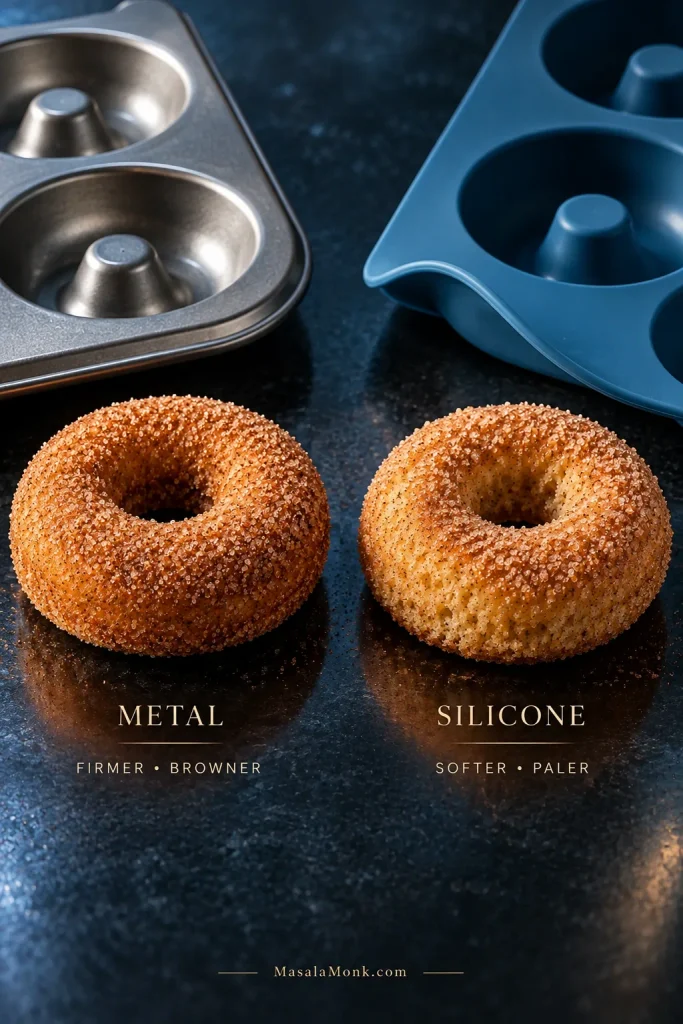
Metal or Silicone?

Metal gives the nicest crust here. Silicone molds usually leave the sides paler and softer and may need longer.

Baked donuts beside a metal donut pan and a blue silicone pan, labeled metal firmer and browner, silicone softer and paler.
Silicone can stay pale even when done; metal browns faster. Treat surface color as context and let the center decide.

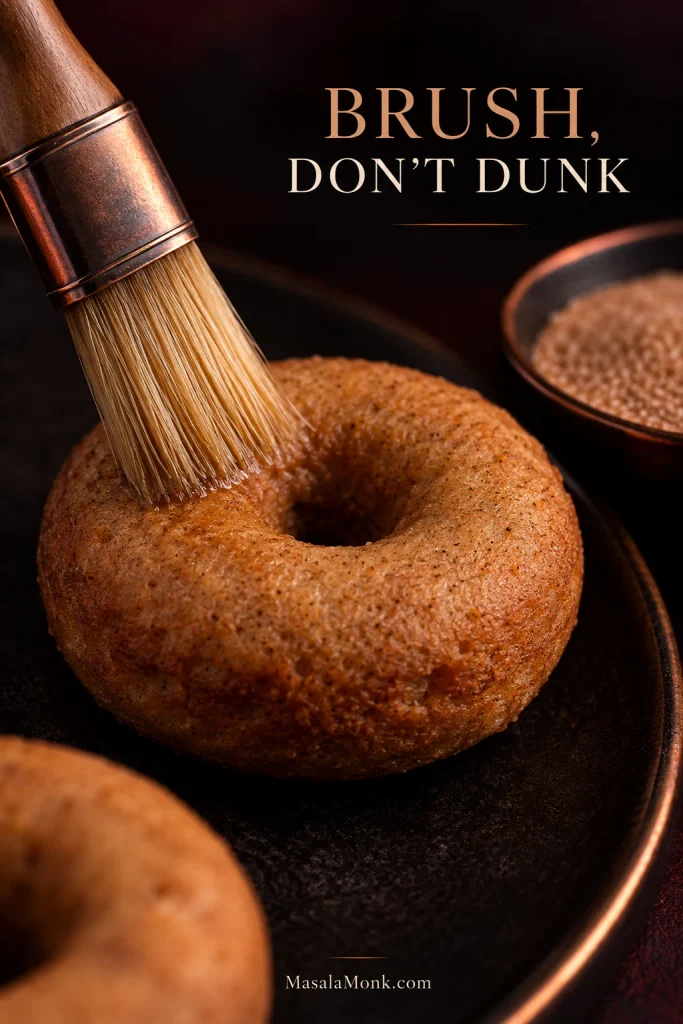
Brush, Don’t Dunk

Brush the butter on; don’t dunk the donut in it. The butter is there to make the cinnamon sugar stick. That’s all it needs to do.

Pastry brush applying a thin layer of butter to a plain baked donut, with a bowl of cinnamon sugar nearby.
Butter is adhesive here, not extra richness. A barely visible film is enough for cinnamon sugar to cling.

A thin film is enough. Too much butter disappears into the cake and leaves the sugar wet instead of sandy.

You should still be able to see and feel individual grains of sugar. That little crunch against the soft center is part of what makes the donut work.

For a Lighter Coating

Coat only the top and outer edge. You still get the cinnamon aroma and texture without a thick layer of sugar around the whole donut.

If the Sugar Turns Sticky

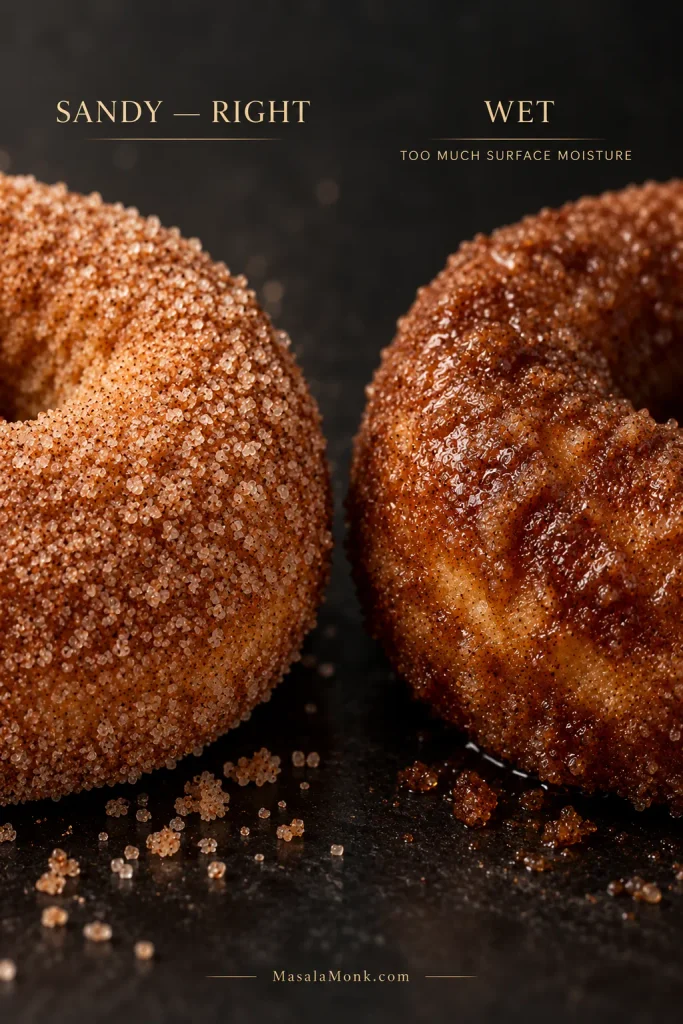
Humidity, too much butter and sealing the donuts before they are completely cool can soften the coating. Saving some for tomorrow? Leave those plain and coat them after reheating.

Two cinnamon-sugar donuts labeled sandy right and wet, with one dry and crystalline and the other glossy with partially dissolved sugar.
A glossy coating is a surface problem, not proof the crumb needs more oven time. Fix moisture and butter instead.

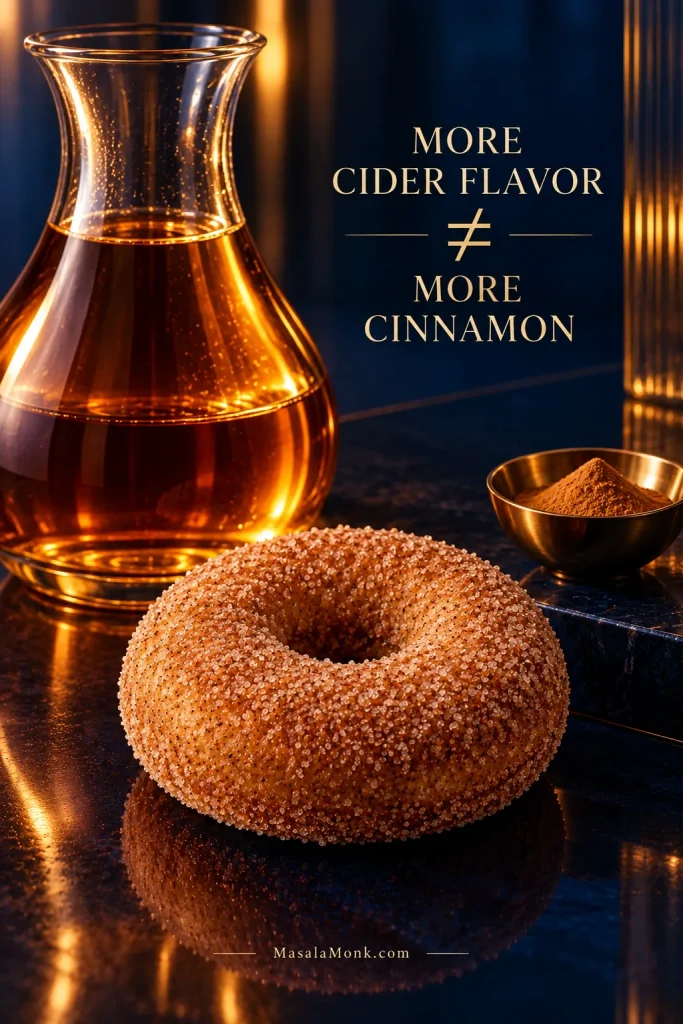
For More Cider Flavor, Start With the Cider

A donut can be intensely spiced and still barely taste of cider.

Use a flavorful cider and reduce it properly. Brown sugar brings some caramel depth, while cinnamon and nutmeg should sit behind the apple rather than bury it. A cider donut shouldn’t need a blast of cinnamon to taste like fall.

Glowing amber apple cider, a cinnamon-sugar donut and a small amount of ground cinnamon arranged on a deep cobalt set.
Build apple flavor first. Extra cinnamon can make the aroma stronger, but it cannot replace a weak cider base.

For a more layered spice profile, replace part of the cinnamon and nutmeg with a little homemade apple pie spice. Go easy with clove and allspice; both can take over quickly.

What You Can Substitute

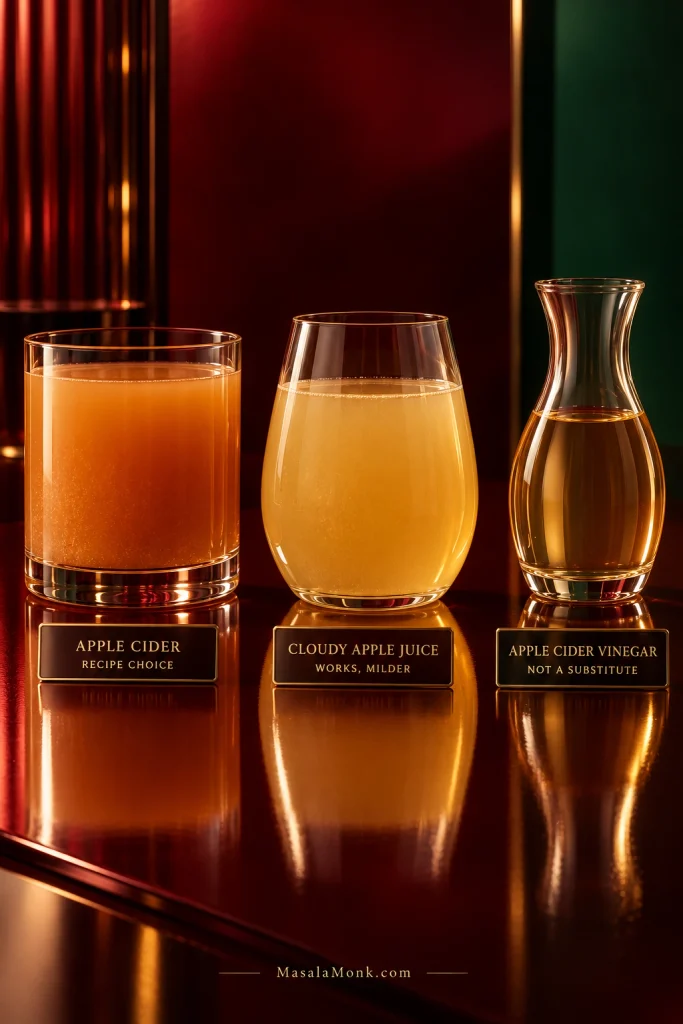
Start with the apple liquid: cider, cloudy apple juice and apple cider vinegar sound related, but they do not play the same role in this recipe.

Three glasses labeled apple cider, cloudy apple juice and apple cider vinegar, showing cloudy amber, lighter golden and clearer pale liquids.
Cloudy apple juice is the closest substitute for cider. Apple cider vinegar is not—it serves a completely different purpose.
IngredientWhat to Do
Dairy milkUse the same amount of unsweetened neutral plant milk.
Butter for coatingUse dairy-free butter if needed.
Apple ciderUnsweetened cloudy apple juice can be reduced to the same amount; the flavor will be milder.
Commercial boiled ciderUse a recipe or conversion designed for it because it is much more concentrated.
Almond flourDo not swap it gram-for-gram for the 1:1 blend; it needs a different formula.
EggsThere is no simple direct swap that gives the same texture.
Apple cider vinegarDo not use it in place of apple cider.

Don’t turn this into a flour experiment. Oat flour, coconut flour and other single flours behave differently enough that they need formulas built around them.

Vegan or Egg-Free

The eggs help the donuts rise and hold together. Applesauce, flax mixtures and commercial egg replacers all change the texture differently. For a reliable egg-free donut, start with a formula designed without eggs. If egg-free is the non-negotiable part and the donut shape is not, this apple crisp recipe keeps the apple-cinnamon direction and also includes gluten-free and dairy-free guidance.

Troubleshooting the Bake & Finished Donuts

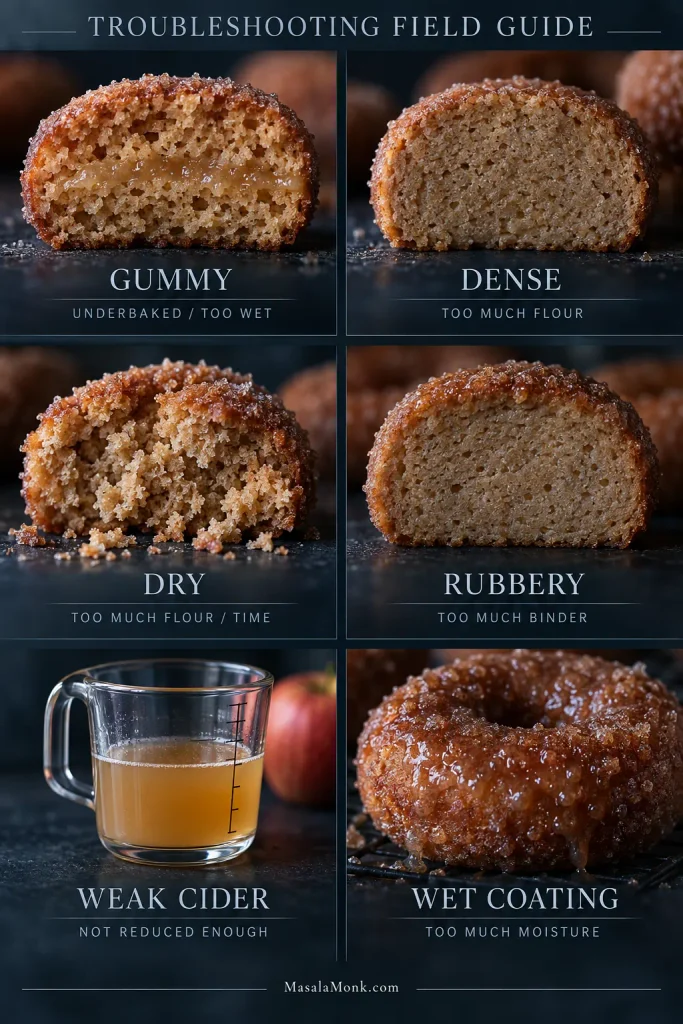
Six-panel donut troubleshooting guide showing gummy, dense, dry and rubbery crumb, weak unreduced cider and a wet cinnamon-sugar coating.
Change one variable at a time. Otherwise, you cannot tell whether flour, cider concentration or bake time actually fixed the problem.

As They Come Out of the Oven

What You SeeWhat It Usually MeansWhat to Do
Center hole has closedThe cavity was filled too highFill the next round lower.
Pale, soft sidesOften a silicone-pan effectJudge the center before adding more time.
Donut tears when liftedIt may be too hot, underbaked or stuckGive it the 3–5 minute pan rest and grease more thoroughly next time.
Center still looks wetIt needs more oven timeReturn it to the oven and look again after 1–2 minutes.

After the First Bite

Gummy Center

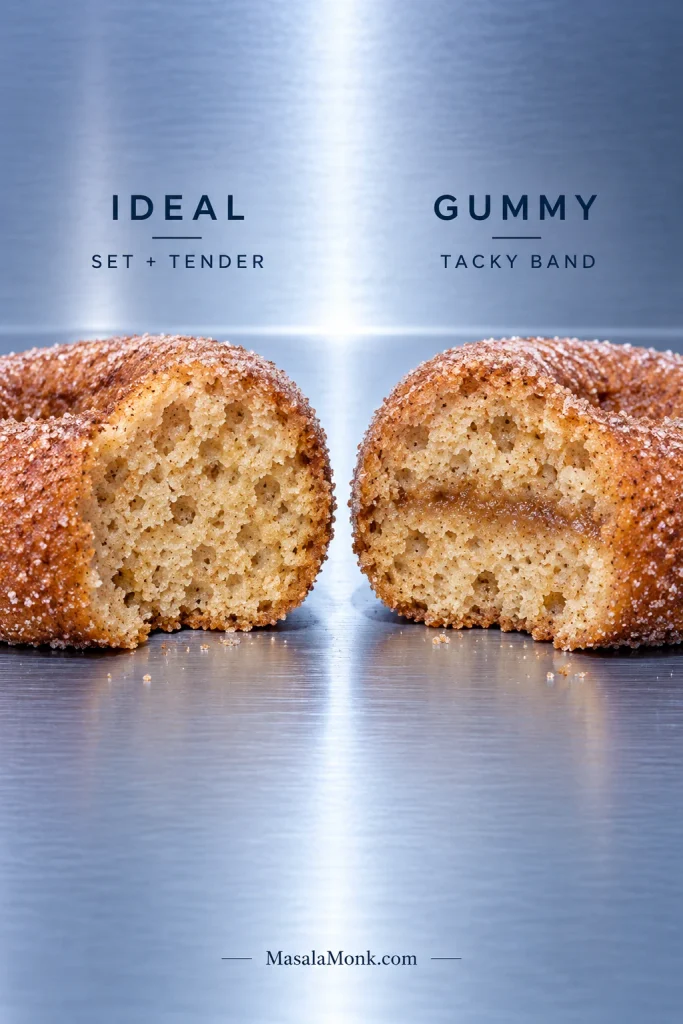
Let a very hot donut cool for a few minutes before judging it. Moist is welcome; a wet, tacky streak through the middle is not. If it stays gummy, start with the bake, then the cider amount and flour blend.

Two broken donuts labeled ideal and gummy, with the gummy donut showing a narrow tacky band through otherwise baked crumb.
A gummy center shows a compressed, tacky band through otherwise baked crumb—not the normal softness of a donut that is still hot.

Dense Crumb

Too much flour is the first place I’d look. A packed measuring cup can add considerably more than intended, which is why 250 g is the safer measure. An especially absorbent blend or old, inactive baking powder can also leave the crumb heavy.

Dry Donuts

Too much flour or too much oven time usually causes it. Look at the donuts around 10 minutes rather than treating 14 as the target.

Rubbery Crumb

The flour label is worth checking. A blend that already contains xanthan usually does not need more. Too much binder can make the crumb unusually elastic.

Weak Cider Flavor

Before adding more spice, go back to the cider. Mild cider gives a milder donut, and reducing it properly matters more than another spoonful of cinnamon.

Bitter or Odd Flavor

  • Bitter or metallic: the baking-powder quantity may be off, or it may not have been mixed evenly.
  • Earthy or bean-like: the flour blend may be contributing a strong flavor.
  • Perfumy or overly intense: pull back on strong spices such as clove, allspice or nutmeg.

The Next Day

Sticky cinnamon sugar usually means surface moisture, not a failed donut. Too much butter, humid air or sealing the donuts before they were cool can soften the coating.

If a donut feels dry the next morning, warm it briefly. That’s often all it needs.

Solved the problem? Back to the recipe · Storage & reheating · Back to top

Storage, Make-Ahead & Reheating

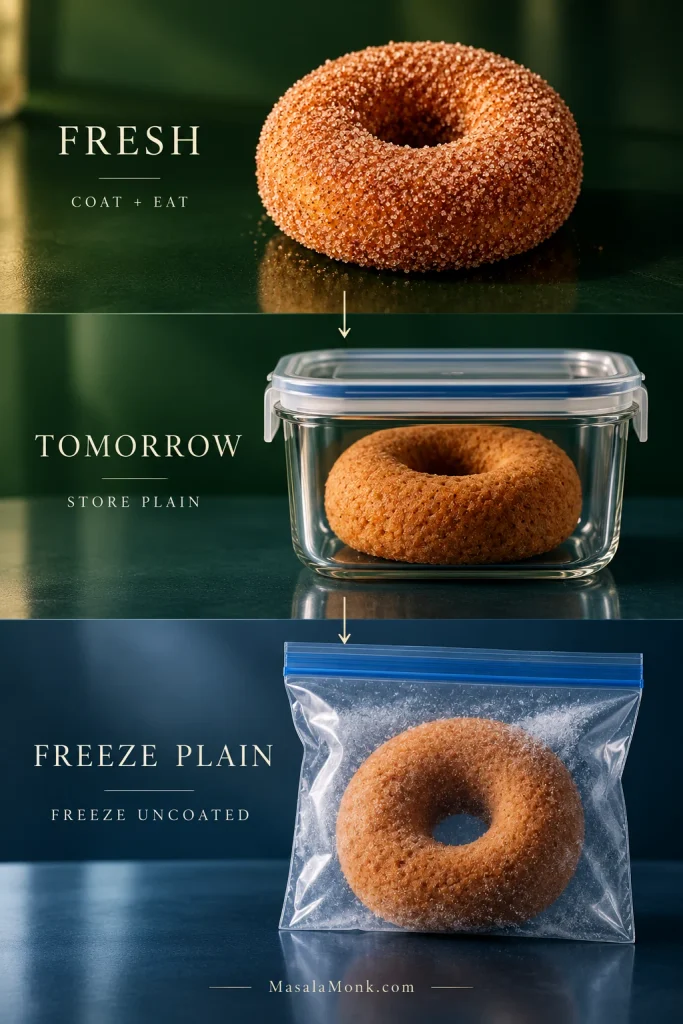
These donuts are best on day one, when the crumb is soft and the cinnamon sugar is dry and granular. For the best texture, let them cool completely, store them airtight at room temperature and use them within 2 days. Coated donuts will keep, but the sugar softens; for planned leftovers, store them plain and coat after reheating.

Three-stage storage guide showing a fresh coated donut, a plain donut stored for tomorrow and an uncoated donut prepared for freezing.
The crumb keeps better than the coating. Store planned leftovers plain so you can restore the cinnamon-sugar finish later.

Make Ahead

The reduced cider and dry ingredients can both be prepared up to 2 days ahead. Keep the cider refrigerated and the dry mix airtight at room temperature. Let the chilled cider reduction lose its chill before mixing, and make the complete batter shortly before baking.

If you are choosing a bake specifically because it needs to hold well until tomorrow, a moist applesauce cake is more forgiving overnight than a freshly coated cider donut.

Reheat One

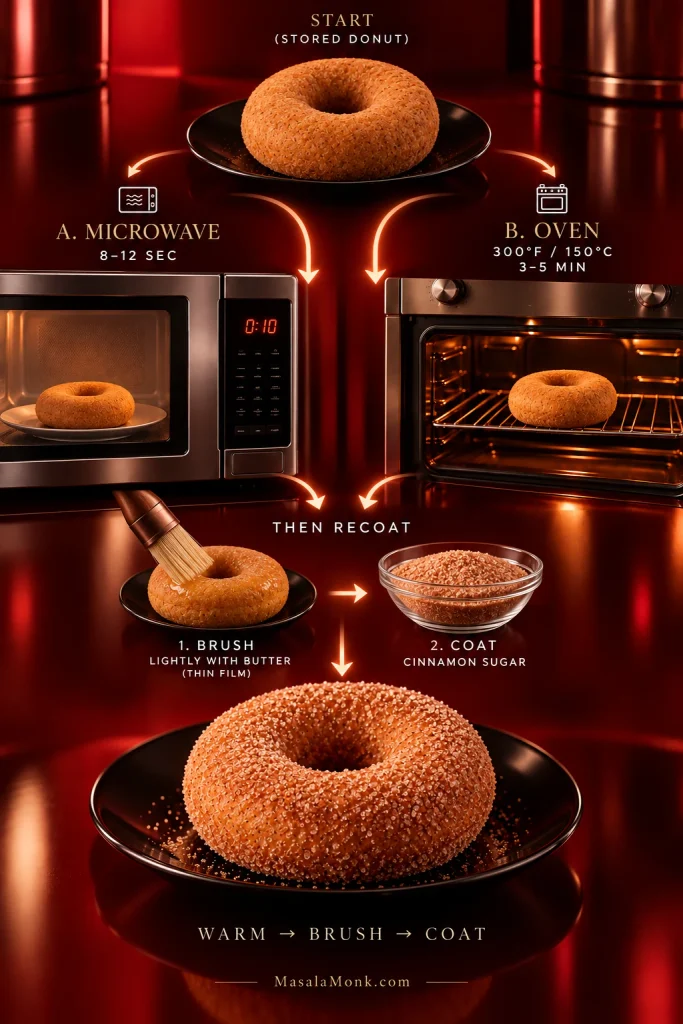
Microwave briefly—about 8–12 seconds in many microwaves—just until slightly warm, or use a 300°F / 150°C oven for 3–5 minutes for a firmer exterior. If the donut was stored plain, coat it after reheating.

Reheating guide showing a plain stored donut going to a microwave or oven, then being lightly brushed and coated with cinnamon sugar.
Microwave for a softer center; use a low oven for a firmer exterior. Warm first, then add fresh cinnamon sugar.

Freezing

They freeze well enough for leftovers, although the crumb is best fresh. Freeze uncoated for up to about 2 months for best quality, thaw at room temperature, warm briefly, then add the butter and cinnamon sugar.

Questions About Gluten-Free Apple Cider Donuts

1. Are apple cider donuts normally gluten-free?

No. Traditional cider donuts are usually made with wheat flour unless they are specifically made or sold as gluten-free.

2. What does “apple cider” mean here?

The sweet, nonalcoholic cloudy apple drink commonly sold as cider in North America. In places where “cider” usually means alcohol, look for cloudy pressed apple juice.

3. Is apple cider gluten-free?

Plain apple cider is naturally gluten-free, but packaged products can have their own labeling or cross-contact considerations. In the U.S., the FDA explains what a “gluten-free” label is required to mean.

4. Can I use apple cider vinegar?

No. Apple cider vinegar is vinegar and cannot replace the apple drink used in this recipe.

5. Can I use apple juice?

Yes. Reduce unsweetened cloudy apple juice to the same amount. The finished flavor will usually be milder.

6. Why are my gluten-free apple cider donuts gummy?

Gummy centers usually come from underbaking, excess moisture or a flour blend that behaves differently. Let the donuts cool briefly before judging them, then start with the bake, cider reduction and flour quantity.

7. Can I fry these instead of baking them?

Not with this batter. Fried cider donuts need a different dough and cooking method; this recipe is specifically for baking. If you don’t need a gluten-free formula and want a donut method that avoids deep-frying, these air fryer donuts are built for the air-fryer basket instead.

8. Can I make them vegan?

There is no simple egg swap that gives the same texture. For a reliable vegan version, start with a recipe formulated without eggs.

Eat the First One Warm

Coat the donuts while they are still a little warm and eat one before the sugar has had time to soften. That is when they are at their best.

Warm cinnamon-sugar apple cider donut torn open on a glossy burgundy surface, with loose crumbs and the soft interior exposed.
The best contrast is right after coating: warm, soft crumb against dry, granular cinnamon sugar.

Still in an apple-baking mood? For fresh apple pieces and a no-mixer cake, try this easy fresh apple cake.

Back to the recipe · Back to top