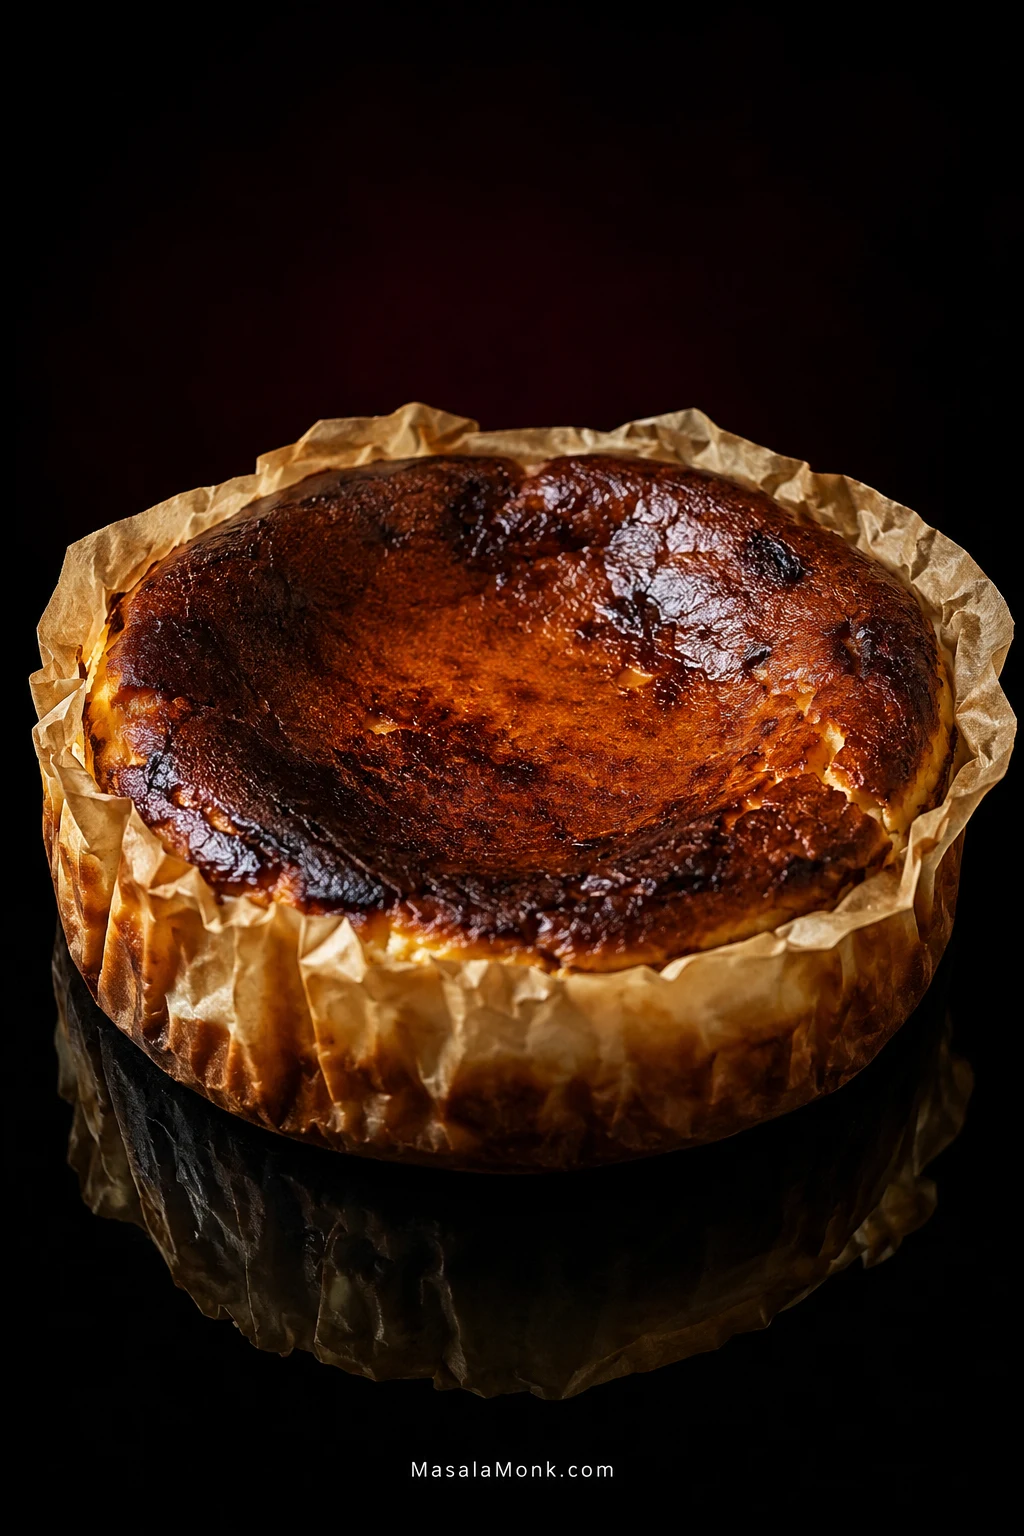
Basque cheesecake spends much of its time in the oven looking as though something has gone wrong. The top turns far darker than you would allow on an ordinary cheesecake. The batter climbs inside its wrinkled parchment collar, may crack across the surface, and then sinks again as it cools.
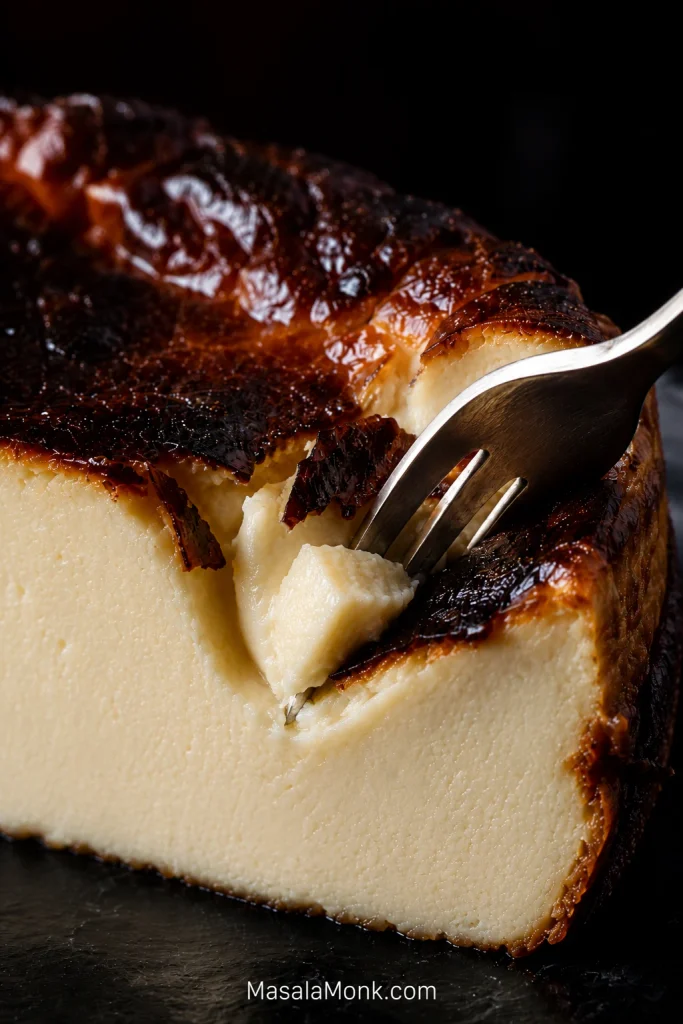
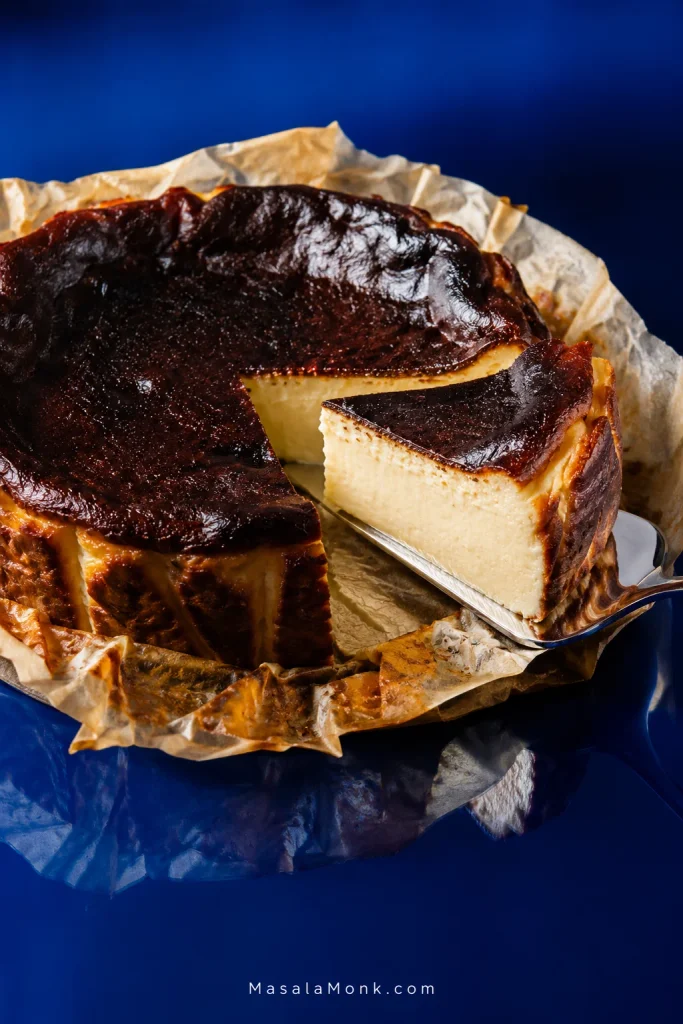
Cut through that dark top and the logic becomes clearer: a bittersweet, toasted-sugar surface over a rich, tangy cream-cheese filling that is still soft and silky.
This version sits between an almost molten restaurant-style Basque cheesecake and the dense, clean set you might expect from a New York cheesecake. The goal is a creamy, custard-like center that still holds a slice after chilling.
The mixing is straightforward. Reading the bake is the part worth understanding. The surface needs enough heat to become deeply caramelized while the center stays soft—and those two things do not always happen at exactly the same time.
Quick answer
Judge the top and the center separately.
Use a deep 8-inch/20 cm metal pan at least 2½ inches/6 cm high, full-fat cream cheese and a thoroughly preheated 425°F/220°C conventional or 390°F/200°C fan oven. Start checking at 40 minutes.
You’re looking for a deeply browned top and a center that still wobbles as one mass. If the middle is ready while the top is pale, treat that as a browning problem rather than simply baking the whole cheesecake much longer.
No crust. No water bath. Cracks, a dramatic rise and a sunken center after cooling are all normal territory here.
Creamy Burnt Basque Cheesecake Recipe
The goal isn’t a perfectly neat cheesecake. Aim for a deeply caramelized top over a tangy, creamy custard that still holds a slice after chilling. Wrinkles, cracks and a sunken middle are part of the style.
Ingredients
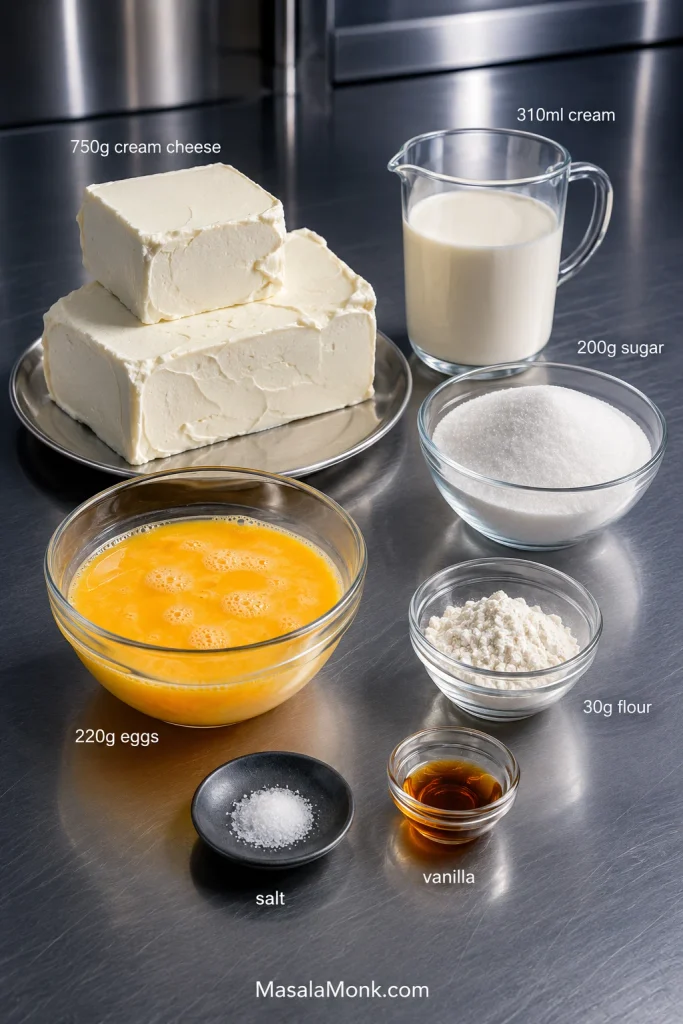
- 750 g full-fat cream cheese26.5 oz; softened. Block-style cream cheese gives the most reliable set.
- 200 g caster or superfine sugarAbout 1 US cup / 7 oz. Regular granulated sugar also works.
- 310 ml heavy or whipping creamAbout 1⅓ US cups; 35% milk fat or higher. Let it sit out for 15 minutes before mixing.
- 30 g all-purpose flourAbout ¼ US cup / 1.1 oz.
- 220 g lightly beaten eggs4–5 large eggs / 7.8 oz. Weigh without shells; bring to room temperature.
- ¼ teaspoon fine salt
- 1 teaspoon vanilla extract, optional
Scaling the recipe? Use the metric quantities; the cup measures are approximate.
Method
Prepare the pan and batter
- Preheat the oven. Set a rack in the middle and heat to 425°F/220°C conventional or 390°F/200°C fan/convection. Give the oven a full 30-minute preheat.
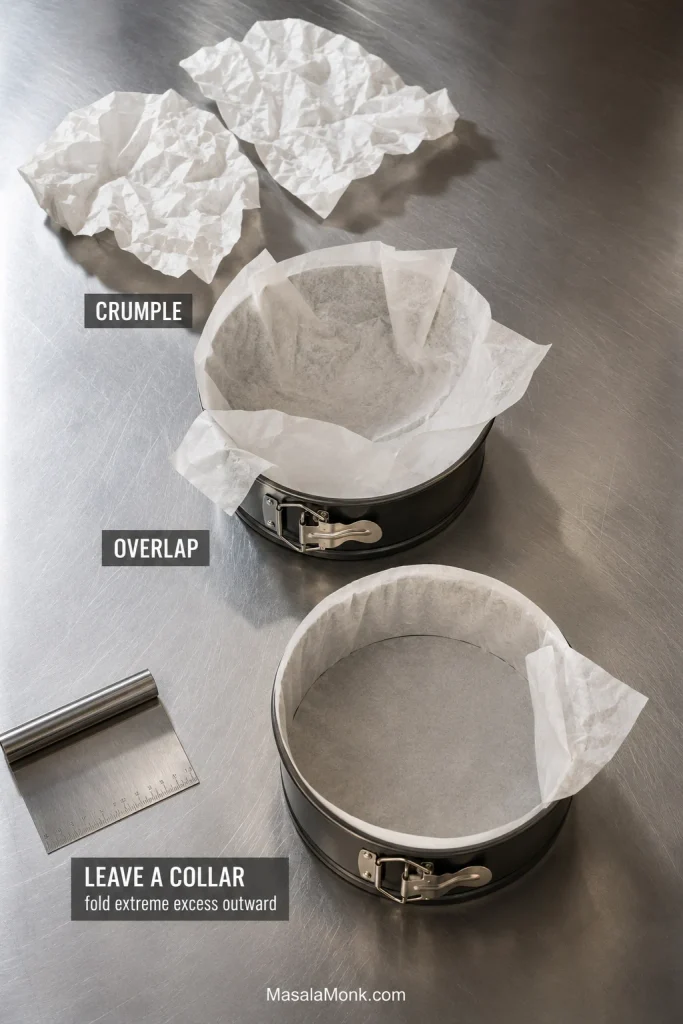
- Prepare the pan. Crumple two generous sheets of parchment, open them again and overlap them inside the springform. Leave enough paper above the rim to contain the rise, but fold extreme excess outward so it does not shade the top. No greasing needed. The folds can be messy.
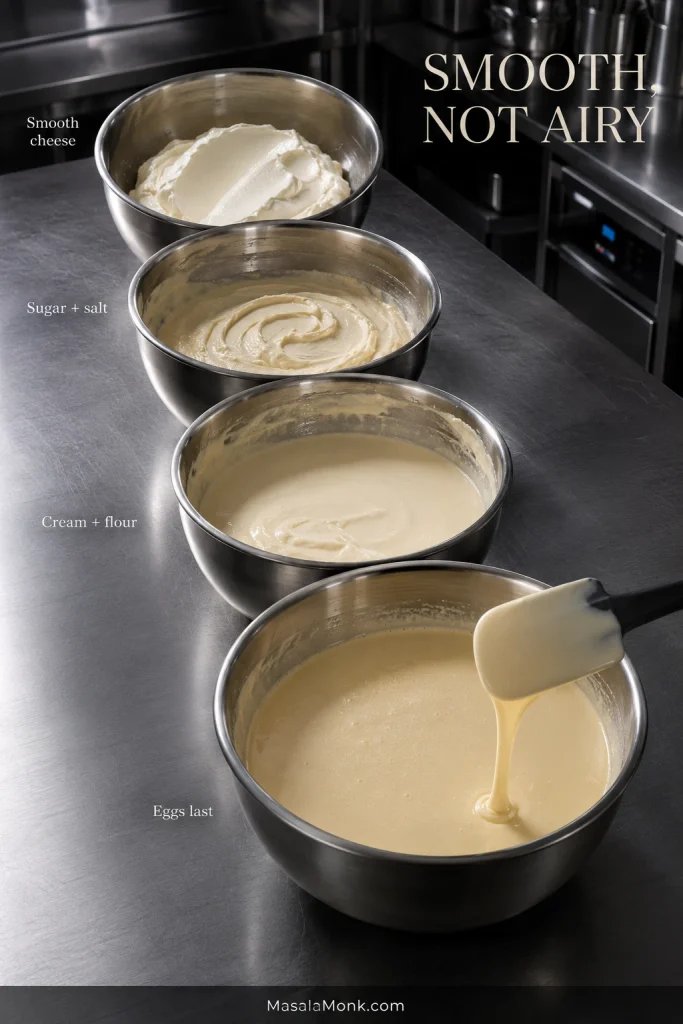
- Mix the cream cheese. Use the paddle attachment or standard hand-mixer beaters. Beat the softened cream cheese gently until smooth, then mix in the sugar and salt. This is the easiest point to fix any firm bits before the liquids thin the batter.
- Add the cream. Whisk the flour with a splash of cream to make a smooth paste. Then whisk in the remaining cream and vanilla before pouring this into the cream cheese. From here, keep the mixing gentle; the goal is a smooth batter, not an airy one.
- Eggs go in last. Add the beaten eggs gradually and stop mixing as soon as they are incorporated. Extra mixing only beats in more air.
- Pour the batter. A sieve is useful only if the batter is still visibly lumpy. Otherwise, pour it straight into the lined pan. Tap the pan a few times to release large trapped bubbles. Tiny bubbles are fine.
Bake, cool and serve
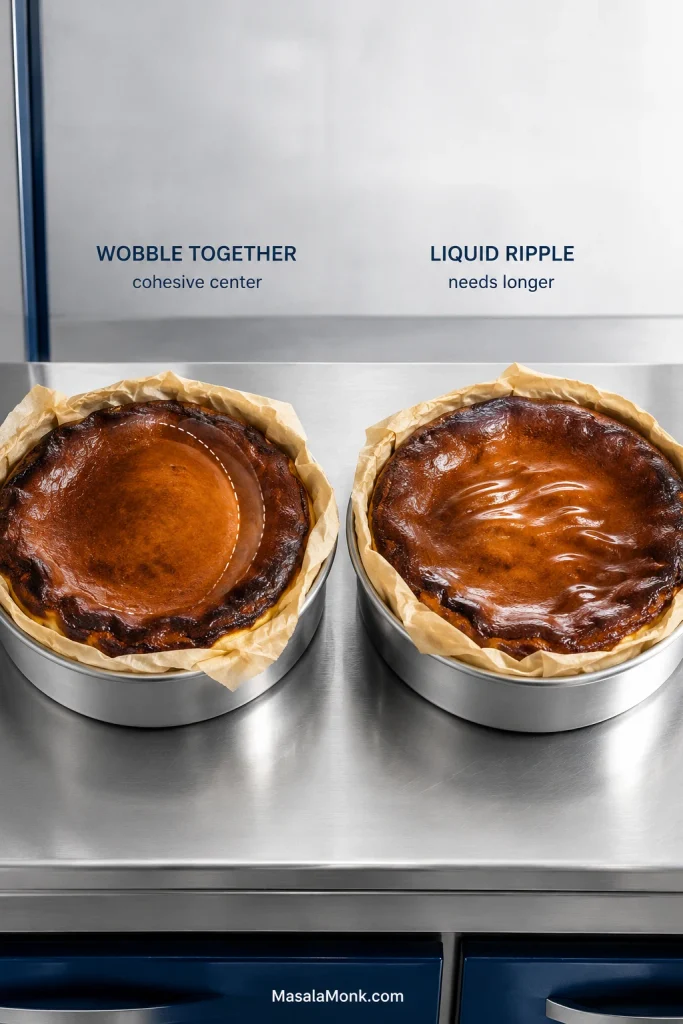
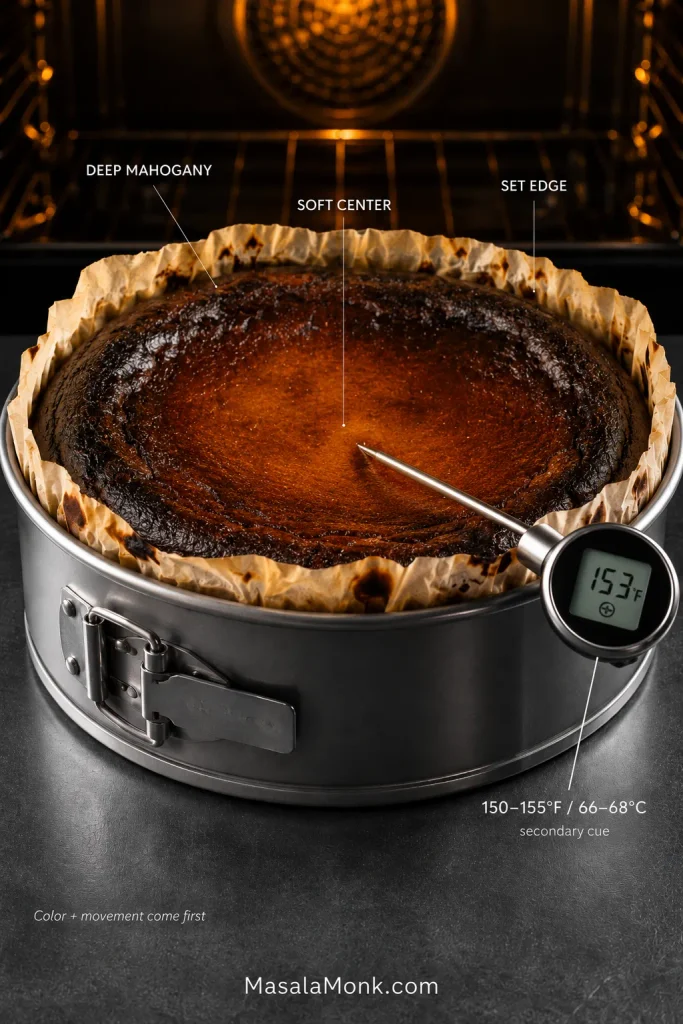
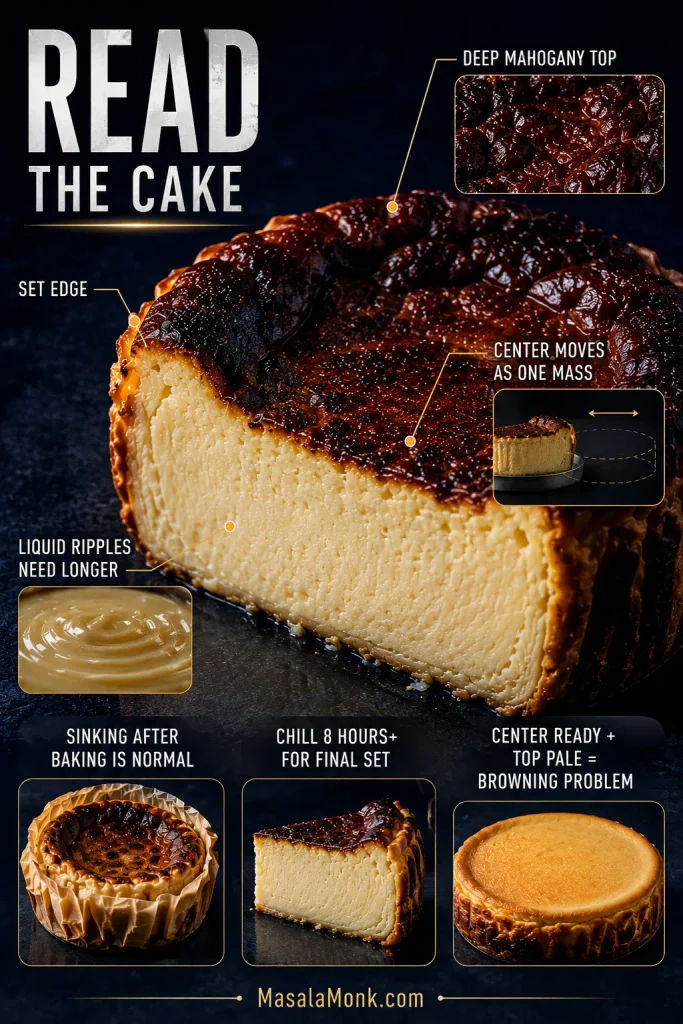
- Bake by what you see. Start checking at 40 minutes, but judge the cheesecake by color and movement rather than the clock. The top should be deep mahogany with darker patches, the outer edge should look set, and the center should still be visibly soft. Nudge the pan: the center should wobble as one mass rather than ripple like liquid. When the color and movement are both there, take it out.
Most ovens finish around 45–55 minutes, although some need closer to 65. If one side is browning much faster, rotate the pan once near the end.Using a thermometer? 150–155°F / 66–68°C at the actual center can be a useful secondary cue for this softer style. Color and movement remain the primary cues. See the food-safety note below for general egg-dish guidance and softer-center options.
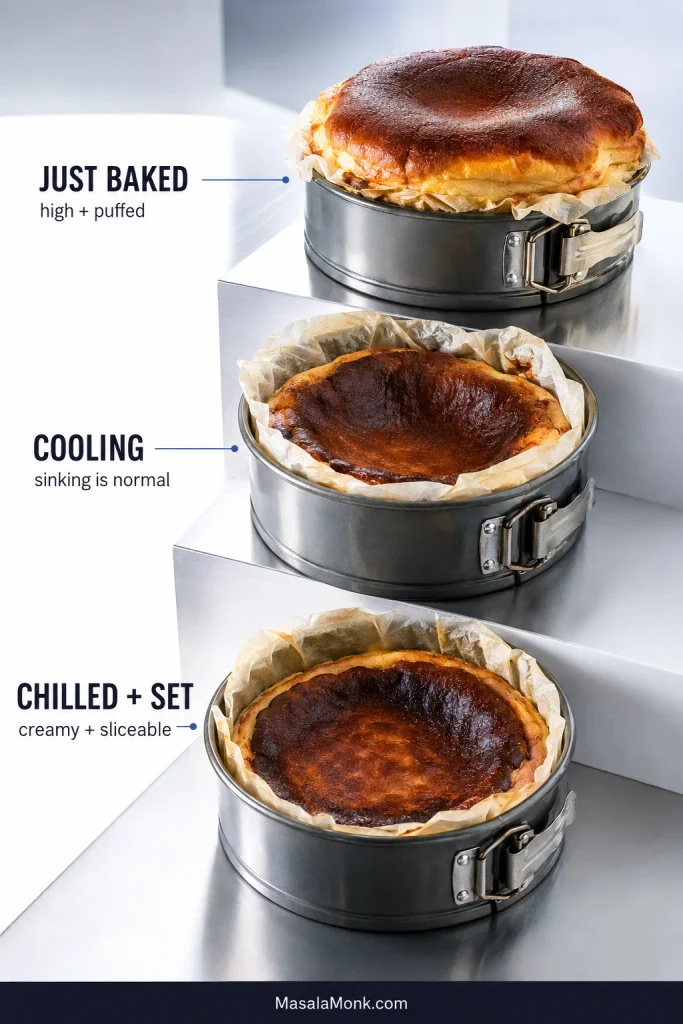
- Cool, then chill. Cool the cheesecake in its pan on a rack for 1½–2 hours. It will rise dramatically in the oven and sink again as it cools; that’s normal.
Refrigerate uncovered for at least 8 hours or overnight, then cover once cold. The chill finishes the set, turning the soft custard creamy but sliceable. - Before serving. Cold cheesecake cuts more firmly. Let it sit out for 20–45 minutes, depending on the room temperature. As the chill eases, the filling becomes softer and more custard-like, sharpening the contrast with the dark caramelized top.
Recipe basis: The core 8-inch formula, base mixing method, oven temperature and cooling/chilling framework are adapted from RecipeTin Eats’ Basque cheesecake. Metric quantities are used for scaling; US cup measures are conversions. The doneness model, texture targeting, pan and package scaling, substitution guidance and troubleshooting below are expanded for the creamy, sliceable endpoint used here.
In this Basque cheesecake guide
Why gentle mixing matters
The batter itself is simple. Gentle mixing is mostly about avoiding excess air: once the cream cheese is smooth, you are combining rather than whipping.
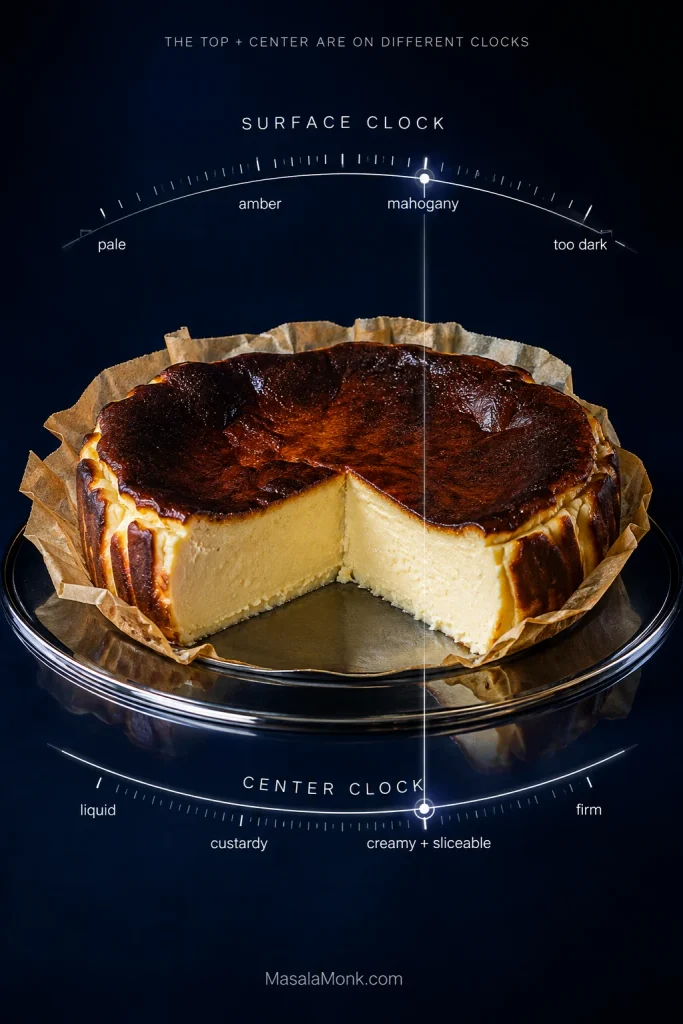
The top and the center are on different clocks
Basque cheesecake becomes easier to read when you stop asking only, “Is it done?” and look at the surface and middle separately.
The odd sweet spot is that the top can look almost too done while the center still looks almost too soft. That tension is exactly what gives the cheesecake its dark caramel edge and tender middle.
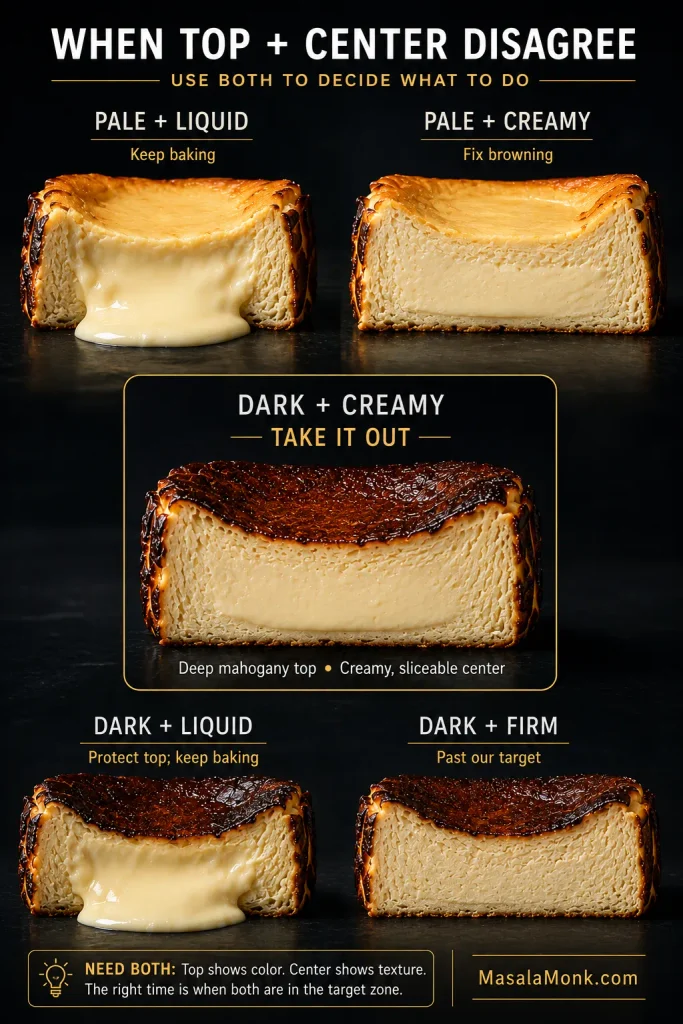
| What you see | What it means | What to do now |
|---|---|---|
| Pale top + liquid center | Both surface and middle need more time | Keep baking and check frequently |
| Pale top + cohesive, creamy center | The filling is ready while browning is behind | Finish the surface with closely watched top heat rather than extending the whole bake unnecessarily |
| Dark top + liquid center | The surface is racing ahead of the middle | Move the cake lower. If the top is already dark enough, loosely shield it with foil and continue in short intervals until the center moves cohesively. |
| Dark top + cohesive, creamy center | Target zone | Take it out |
| Dark top + firm or grainy center | The filling has cooked too far | Pull earlier next time |
Chasing a darker top with another ten or fifteen minutes of whole-cake baking is one of the easiest ways to lose the creamy center. The reverse matters too: a dark surface does not make a liquid middle ready.
What if the center is ready but the top is still pale?
Do not sacrifice the center just to chase color. If the movement is already right, look at the oven setup before giving the entire custard much more time.
- Did the oven get a full 30-minute preheat?
- Does an oven thermometer show that it is actually reaching the set temperature?
- Is the cheesecake sitting unusually low in the oven?
- Is a very tall parchment collar shading the surface?
- Did a wider or shallower pan make the middle cook faster?
A center that already has the movement you want can be finished with a brief, closely watched burst of top heat or the broiler.
Watch the parchment around direct top heat. Fold excessive paper safely away from the element and stay with the cake. Both parchment and surface color can change quickly.
How jiggly should Basque cheesecake be?
“Bake until jiggly” is not especially helpful when you have never seen the right jiggle.
Give the pan a small shake. The outside should look set while the center is still visibly soft.
Now watch the movement. A ready center wobbles together as one mass. Batter that sends loose ripples across the middle still needs more time.
The first can be exactly right. The second is still too loose.
Skip the clean-skewer test. This is a soft custard, not a sponge cake. Waiting for a toothpick or skewer to emerge clean can leave the chilled cheesecake much firmer than intended.
Pull it while the middle still looks soft. A center that looks almost fully set in the oven will become considerably firmer after cooling and chilling.
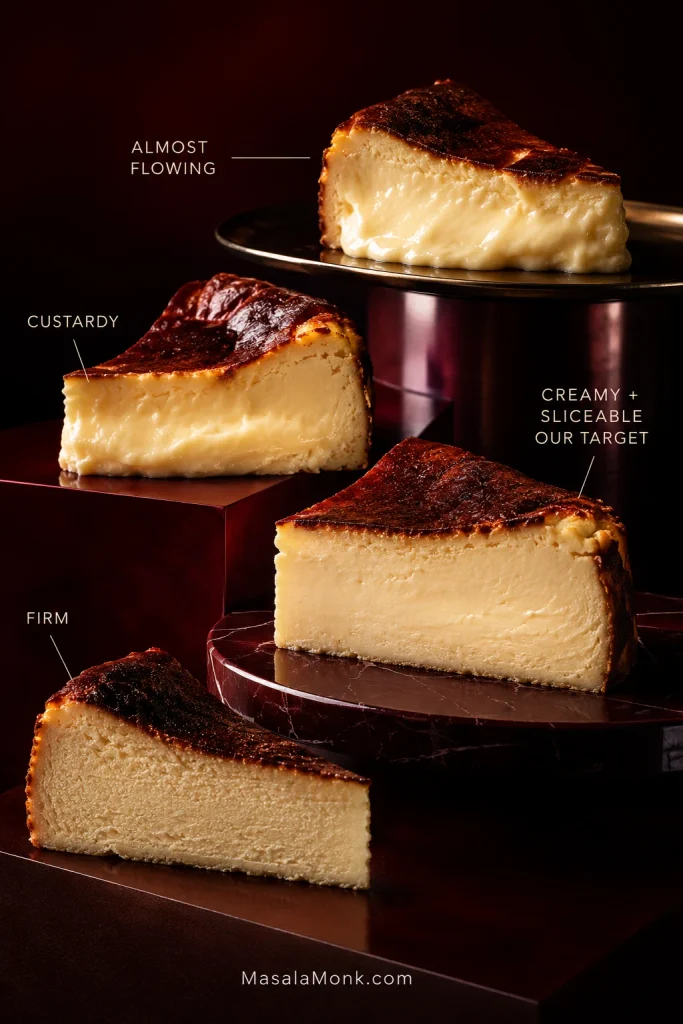
Choose the center texture you want
There is a whole range of good Basque-cheesecake centers. An earlier pull can leave the filling loose, oozy or almost spoonable; a little more baking moves it toward custardy, then creamy and sliceable. Keep going and it becomes firmer.
This recipe lands in the middle of that range: creamy and sliceable once thoroughly chilled, then noticeably softer as the fridge chill wears off.
If what you want is the almost-flowing center seen in some restaurant-style versions, that is a different endpoint rather than proof that every firmer slice was overbaked.
How dark should the top be?
Much darker than an ordinary cheesecake.
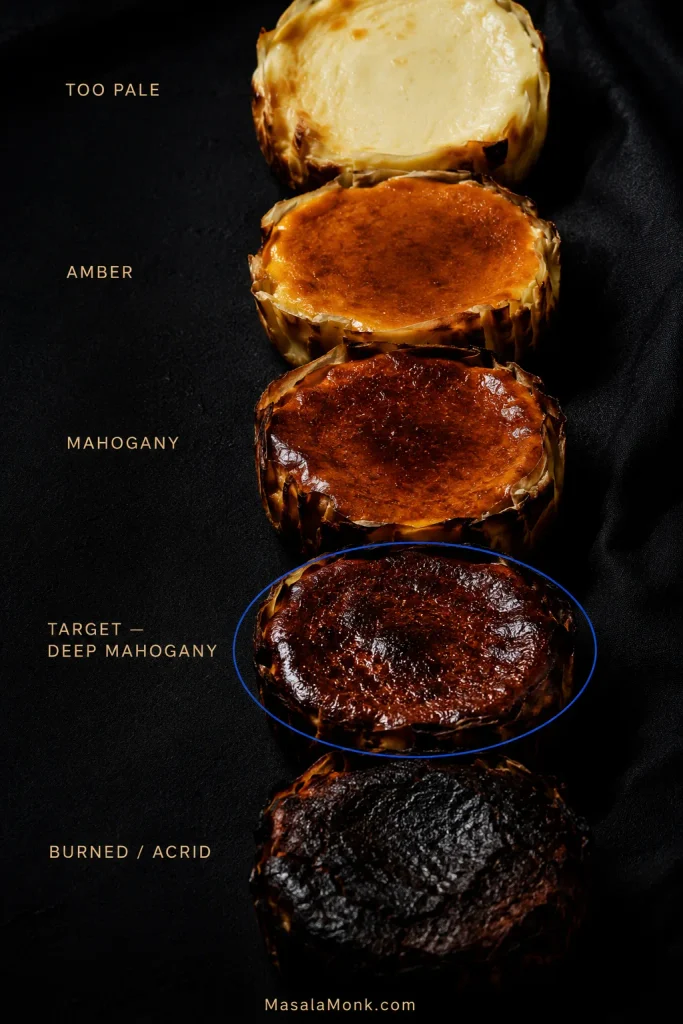
Look for deep amber through mahogany, with darker patches rather than a uniformly black surface. Those darkest areas bring toasted-sugar bitterness; underneath, the filling should still be pale, creamy and soft.
Flavor-wise, the cake should still taste unmistakably of cream cheese: mild tang, rich dairy and controlled sweetness under the caramelized top. The slight bitterness at the surface is useful—it keeps the filling from tasting simply rich and sweet. Vanilla, if you use it, rounds the edges rather than becoming the main flavor.
Those bittersweet caramel notes against soft custard are also why crème brûlée works so well, even though the cooking method is completely different.
A pale-golden surface misses some of that flavor. At the other extreme, a dry, acrid black crust has gone too far. “Burnt” is the style name; the goal is deep caramelization, not charcoal.
Using a thermometer without confusing yourself
You do not need a thermometer. It is simply another way to check yourself when the wobble still makes you nervous.
Probe the actual center. For the softer style used here, 150–155°F / 66–68°C can be a useful secondary cue.
The outside inch can be dramatically hotter at the same moment. That is why cheesecake temperatures quoted in different recipes can look wildly inconsistent when the probes are sitting in different places.
For this cake, color and movement come first. Temperature is optional.
Food safety: some soft-centered Basque cheesecakes are pulled below 160°F at the center for a softer texture. General U.S. FDA guidance for egg dishes uses 160°F / 71°C. For anyone at higher risk from foodborne illness, use pasteurized eggs for a softer center or bake to 160°F.
As the cheesecake approaches its endpoint, shorten the gaps between checks. The timer is only a cue to look; color, movement and the center texture still decide when the cake comes out.
The cheesecake is still changing after it leaves the oven
The cake that leaves the oven is not yet showing you its final center.
Heat keeps moving through the filling for a while, and the custard firms as it cools. Meanwhile the dramatic rise relaxes into the shallow crater that gives Basque cheesecake so much of its character.
Cool it at room temperature for about 1½–2 hours, then refrigerate uncovered for at least 8 hours or overnight. For the texture used here, the easiest plan is simply to bake it the day before you want to serve it.
The overnight chill is not just storage. It finishes the set. What looked almost worryingly soft when the cheesecake left the oven becomes creamy enough to slice without turning dense.
How serving temperature changes the texture
Fridge-cold slices are neat and firm. Give them a little time on the counter and the filling relaxes, the cream-cheese flavor becomes rounder, and the contrast with the bittersweet top becomes more obvious.
For a creamier, more custard-like slice, let the cheesecake stand for 20–45 minutes. Use the shorter end in a warm kitchen and the longer end in a cool room.
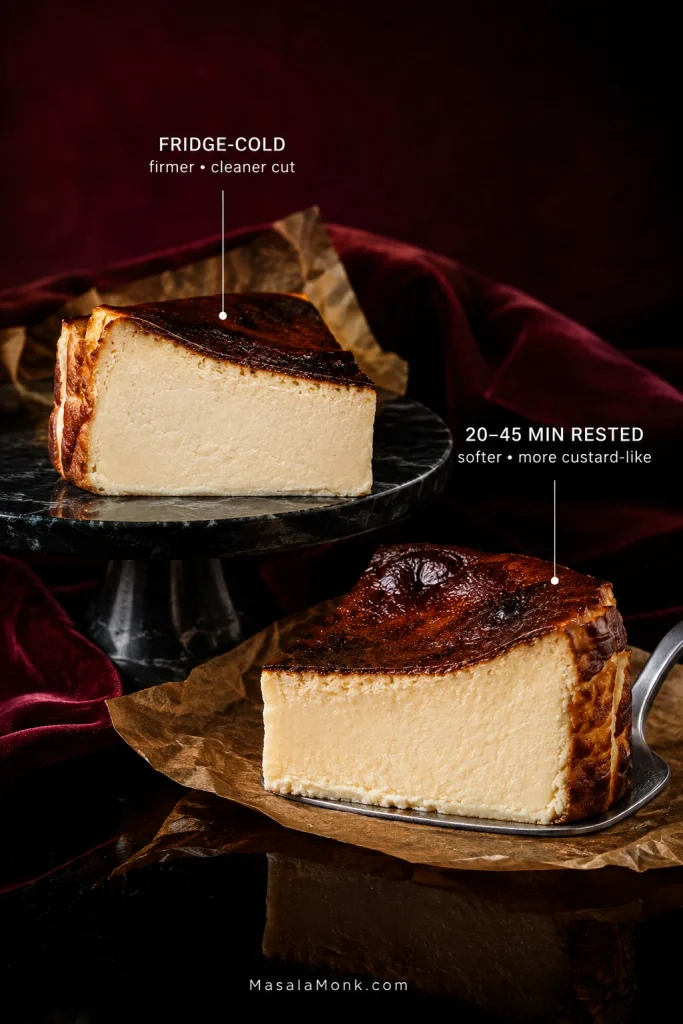
This is worth remembering with leftovers: a very cold slice can seem much firmer than the cake you remember cutting the day before.
What should you serve with it?
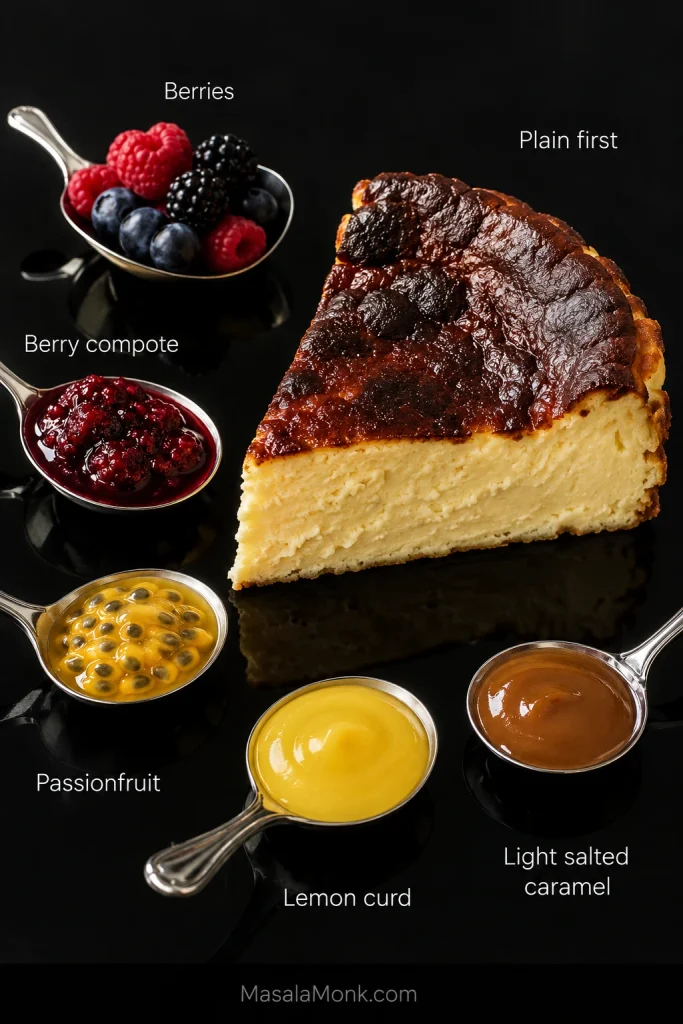
Try the first slice plain. The dark top, cream-cheese tang and soft dairy center already have plenty going on.
After that, acidity is usually more useful than another layer of sweetness. Fresh berries, raspberry or blackberry compote, macerated strawberries, passionfruit or a small spoonful of lemon curd all work beautifully. Salted caramel is good too; just use a light hand.
The pan changes the cheesecake
Same batter. Wider pan. Thinner cheesecake.
That changes more than its appearance. The exposed top and outer edge get intensely hot while the deeper middle warms more slowly. Spread the batter over a wider area and there is less protected center left to stay soft.
Use diameter, depth and batter quantity together
For the full recipe, use a deep 8-inch/20 cm metal pan at least 2½ inches/6 cm high. A pan closer to 3 inches/7.5 cm deep gives even more headroom for the rise. Roughly 2–2.5 liters capacity is the right neighborhood.
A springform is the easiest default. A deep fixed-sided cake pan works too when the parchment gives you enough to lift the chilled cheesecake out.
The full batch makes about 1.5 kg / 3.3 lb batter.
The jump from 8 inches to 9 inches is larger than it looks. A 9-inch pan gives the batter roughly 27% more surface area. With the same quantity of batter, the cake becomes noticeably shallower and the center warms sooner.
Keep batter depth in mind when changing pans. Split one batch between two shallow pans and the original bake time no longer tells you much.
Basque cheesecake depends on aggressive dry heat. Japanese cheesecake takes almost the opposite route, using gentler heat and a water bath to protect its airy texture.
Light, dark, glass or ceramic?
Light-colored metal is the easiest baseline. Very dark metal absorbs heat more aggressively, so the outer edge can get ahead of the middle sooner.
Glass and ceramic store and transfer heat differently. They can bake good desserts, but metal is easier to predict when you are deliberately trying to create a very dark top around a soft center.
The parchment can affect browning
Crumpled parchment gives Basque cheesecake its recognizable wrinkled sides and makes a round pan easy to line without careful cutting.
Leave enough above the rim to catch the rise. A towering paper collar, though, can shade the cheesecake from some of the heat you actually need. Loose parchment close to the upper element can scorch as well.
Equipment that actually helps: a digital scale, deep metal pan, parchment, large bowl, silicone spatula and either a stand mixer with the paddle attachment or a hand mixer with standard beaters. A sieve is useful for stubborn lumps, an instant-read thermometer gives you another doneness cue, and an oven thermometer helps when your cakes repeatedly finish pale or take much longer than expected.
Which cream cheese works best for Basque cheesecake?
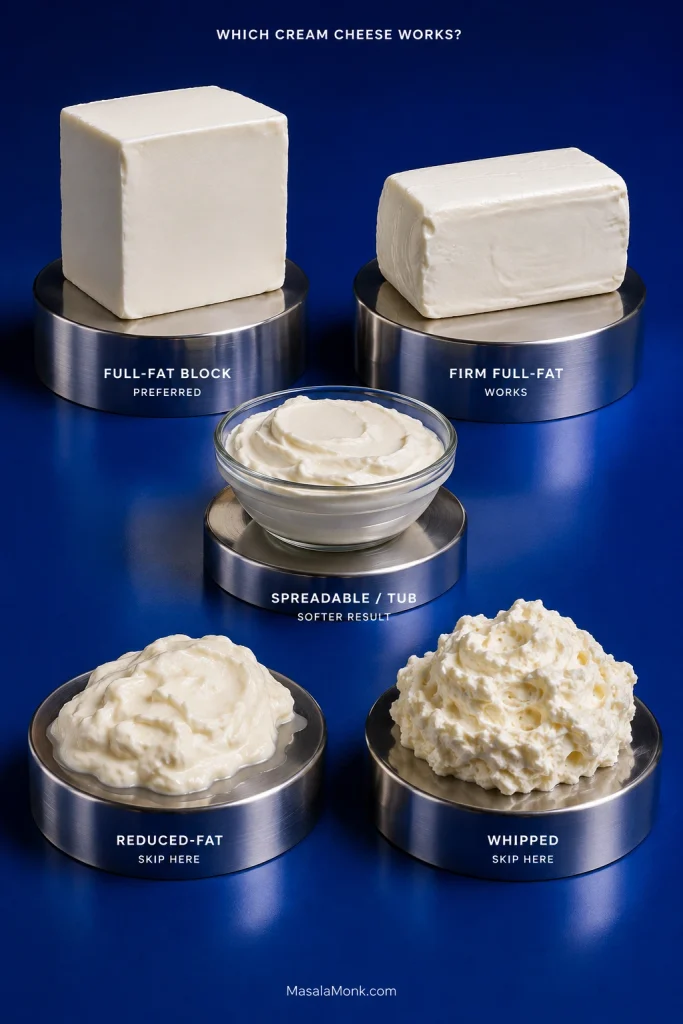
You do not need one magical brand. Full-fat block-style cream cheese gives the most reliable set.
Philadelphia is a useful reference because many established recipes are built around a similarly firm, full-fat cheese. Another brand with similar richness and moisture can work perfectly well.
| Type | Use it? | What to expect |
|---|---|---|
| Full-fat block cream cheese | Yes—preferred | Rich, firm and reliable |
| Another firm full-fat cream cheese | Usually | Good when its fat and moisture are similar |
| Full-fat tub/spreadable cream cheese | Possible | Often softer; moisture and stabilizers vary by brand and country |
| Reduced-fat cream cheese | Skip it here | Extra water and less fat can change the set noticeably |
| Whipped cream cheese | No | Its different density and incorporated air make the result harder to predict |
| Cheese already releasing obvious whey | Not ideal | That extra free liquid can make the filling looser |
Looking for something lighter or higher in protein? Cottage cheese cheesecake is a better starting point than trying to make reduced-fat cream cheese behave like the full-fat cheese used here.
Whatever brand you choose, soften it first. Firm cold pieces are easy to spot while the cheese is thick and much harder to deal with once cream and eggs have thinned the batter.
A smaller pan is not just a smaller recipe
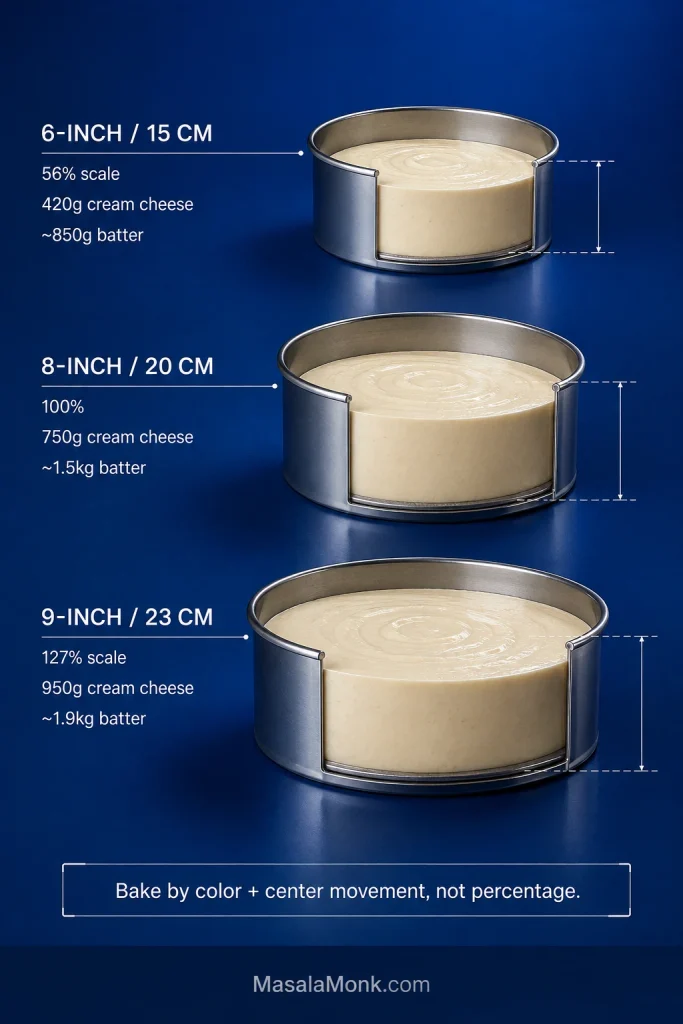
You do not need to do pan geometry every time you bake this. The useful rule is simply smaller batch, smaller pan; the numbers below do the arithmetic for you.
The percentages use pan area to keep the cakes reasonably close in depth. Baking time does not shrink by the same percentage, so let the cake tell you when it is ready.
Why the eggs are given in grams
The eggs are where small-batch arithmetic gets awkward.
“4–5 large eggs” is perfectly useful when you’re shopping for the full cake. In a 250 g cream-cheese batch, however, rounding 73 g of beaten egg up to two whole eggs changes the balance much more dramatically.
Weighing the beaten egg removes that guesswork.
| Pan | Amount of full recipe | Cream cheese | Approx. batter | How to approach the bake |
|---|---|---|---|---|
| 6-inch / 15 cm deep pan | About 56% | About 420 g | About 850 g | Start looking considerably earlier; the smaller center heats quickly |
| 8-inch / 20 cm deep pan | 100% | 750 g | About 1.5 kg | Full recipe; begin checking at 40 minutes |
| 9-inch / 23 cm deep pan | About 127% | About 950 g | About 1.9 kg | Use a genuinely deep pan and follow color and center movement |
Put half the batter into the original 8-inch pan and you have made a much thinner cheesecake with a center that will heat through sooner. Start watching small cakes early rather than trying to subtract a fixed number of minutes.
If you have a 250 g or 500 g pack of cream cheese
These smaller batches keep the same ingredient proportions as the full cake. Their pan and bake still need to change with them.
| Ingredient | 250 g cheese batch | 500 g cheese batch | 750 g full batch |
|---|---|---|---|
| Cream cheese | 250 g | 500 g | 750 g |
| Sugar | 67 g | 133 g | 200 g |
| Heavy/whipping cream | 103 ml | 207 ml | 310 ml |
| Flour | 10 g | 20 g | 30 g |
| Lightly beaten egg | 73 g | 147 g | 220 g |
| Approx. finished batter | About 500 g | About 1 kg | About 1.5 kg |
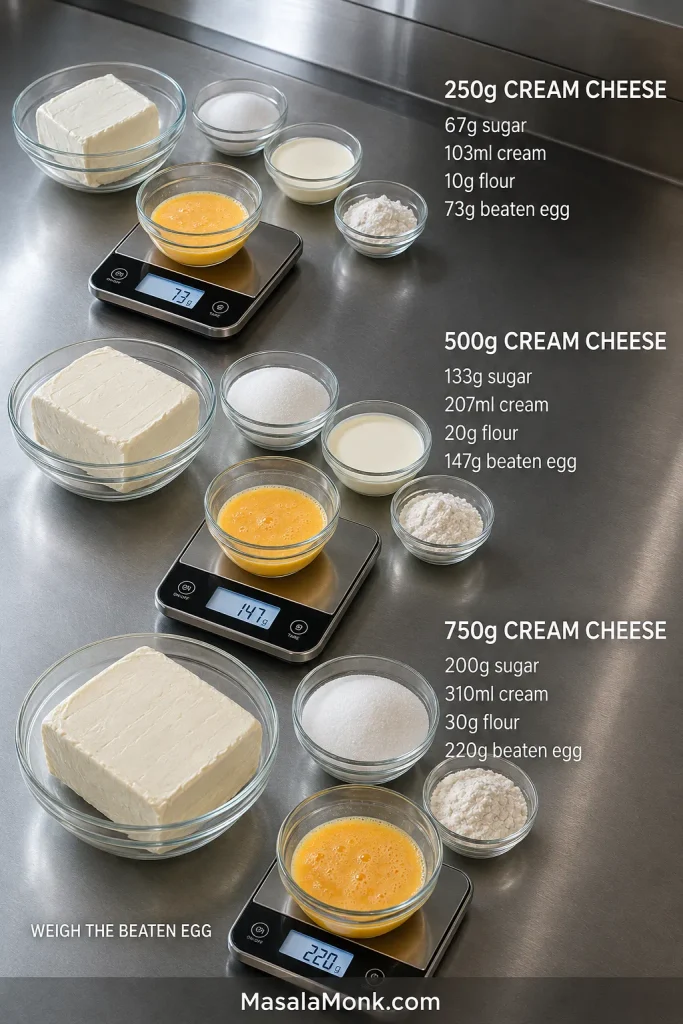
For a 250 g cream-cheese batch, use roughly a deep 4½–5-inch pan. Because a 5-inch cake is a touch shallower than a perfectly proportional scale-down, start watching it early.
With a 500 g batch, roughly a 6½-inch deep pan comes closest to the full cake’s depth. A 7-inch pan is practical too; expect a slightly shallower cheesecake.
Weigh the beaten egg for both smaller batches. Salt and vanilla matter far less to the set, so scaling those approximately is fine.
What you can change—and what is better left alone
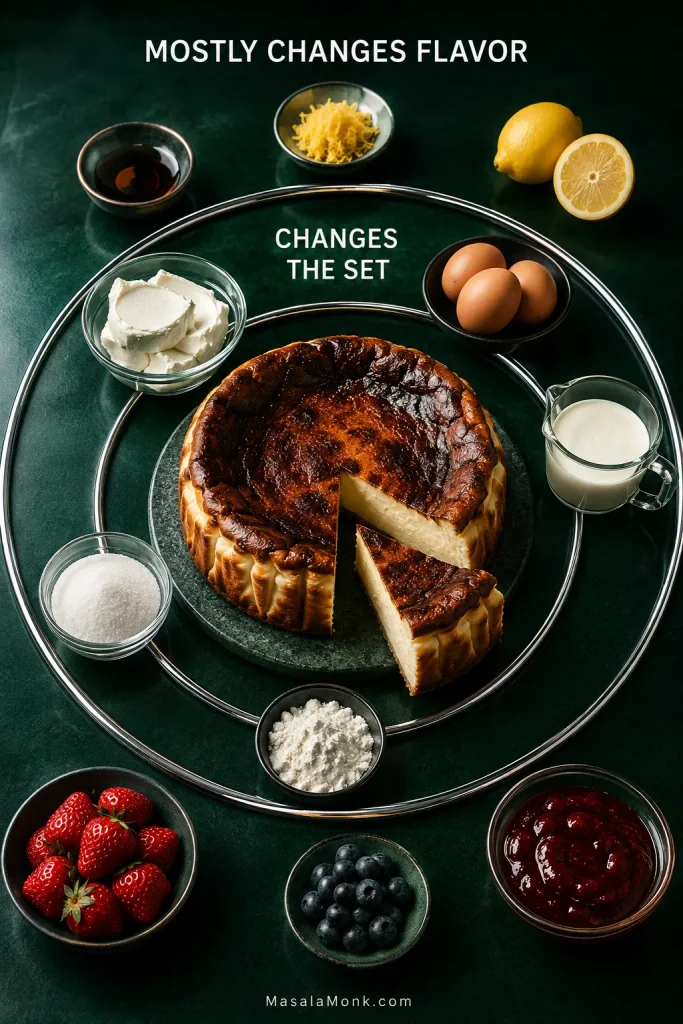
Vanilla is optional. Lemon or orange zest is easy to add. Fruit and sauce beside the cheesecake can change freely. Those choices mostly change flavor.
Cheese, eggs, cream, sugar and starch are different. Change one substantially and you change the balance of water, fat and protein that determines how the filling sets.
For a big swap, use a recipe built around it
Low-fat cream cheese, a complete mascarpone replacement, egg substitutes, coconut cream, yogurt or large amounts of liquid sweetener all deserve more than a one-line substitution. Starting with a recipe built around that ingredient is much more reliable.
Does Basque cheesecake need flour?
No—but flourless is not the same thing as traditional.
The published La Viña recipe contains a small amount of flour. Plenty of modern Basque cheesecakes leave it out entirely.
A little flour or starch gives the soft filling some extra support. Remove it and the cake can still be excellent, but the rest of the recipe should be built for that looser set.
Can you make Basque cheesecake without heavy cream?
Yes. There are versions specifically made without heavy cream.
The cream here contributes both fat and moisture, so simply omitting it changes the set. If the labels themselves are confusing, our guide to heavy cream and whipping cream explains the common names and fat levels used in different countries. For a genuinely cream-free version, start with a recipe formulated that way.
If the real goal is to skip the oven, a no-bake cheesecake is a much better starting point than trying to turn this high-heat custard into something it isn’t.
Basque cheesecake troubleshooting
Start with what the cake is actually showing you. “Wet,” “jiggly” and even “burnt” can mean very different things depending on what the rest of the cheesecake looks like.
Read the whole cake before diagnosing one symptom
| Problem | Likely explanation | What to do |
|---|---|---|
| Top pale, center creamy | Browning is behind the filling | Check oven heat, rack position and parchment before extending the whole bake |
| Top pale, center rippling like liquid | Genuinely underbaked | Continue baking and check frequently |
| Top very dark, center still liquid | Top heat is outrunning the middle | Move the cake lower and loosely shield a dark-enough top with foil while the center finishes |
| Dark top, grainy center | Often overbaked | Pull earlier next time |
| Too firm | Overbaked, too shallow or simply fridge-cold | Let a slice warm slightly before judging the bake |
| Still very loose after overnight chilling | The center may genuinely have been underbaked, or a substitution may have changed the set | Review the bake cues, pan depth and any dairy or egg substitutions |
| Wet parchment | Condensation or water squeezed from the filling | Look at the cheesecake itself before assuming it is raw |
| Visible oily liquid | The fat-and-water mixture may have separated | Review the dairy and any major substitutions |
| Lumpy batter | Cream cheese too cold or liquid added before it was smooth | Smooth the cheese completely while the mixture is thick |
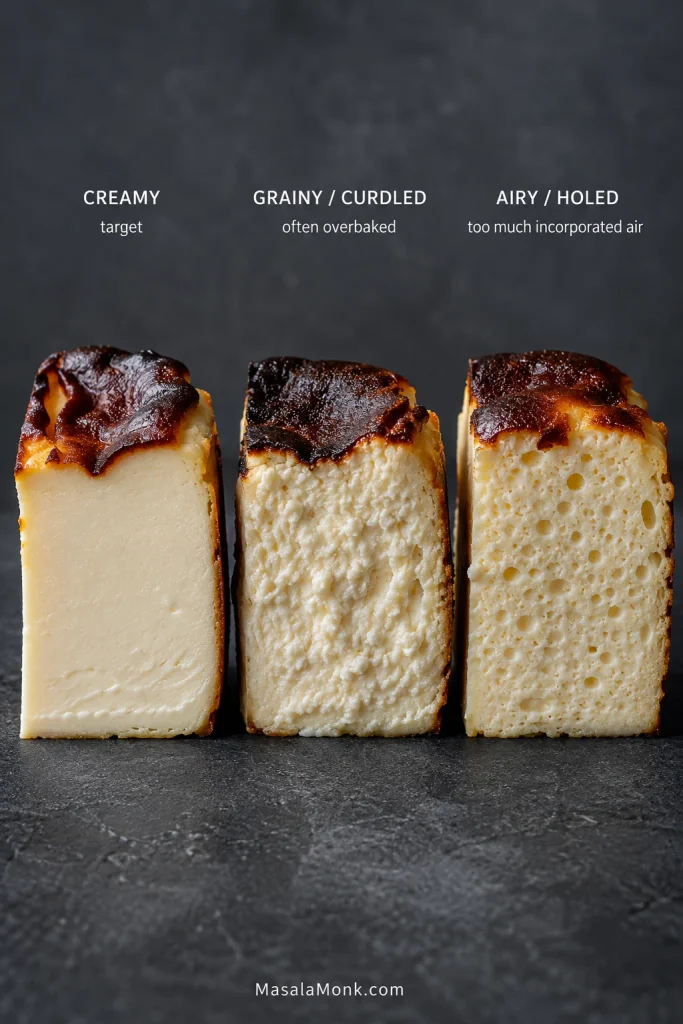
| Many holes / very airy texture | Too much air mixed into the batter | Mix more gently once the eggs enter |
| Rose dramatically then sank | Usually normal | Do nothing |
| Minor cracks | Usually normal | Do nothing |
Why is my cheesecake grainy or curdled?
Heat tightens the egg and dairy proteins that hold the filling together. Take them too far and a silky custard can turn coarse or almost scrambled-looking.
One common route to that texture is leaving the cheesecake in the oven after the center is ready because the top still looks too pale. A cake spread too shallowly can end up in the same place: the middle heats through before the surface has had enough time to develop its dark caramel color.
Why is liquid coming out of the cheesecake?
Wet does not automatically mean underbaked.
- Condensation: steam collected after a warm cheesecake was covered or chilled too quickly.
- Water squeezed from the custard: when the proteins tighten too much, they can push moisture back out. Bakers sometimes call this syneresis.
- High-moisture cream cheese: cheese already releasing visible whey brings more free water into the cake.
- Oily separation: visible fat pooling around a broken-looking filling suggests the fat and water have stopped holding together properly.
Damp parchment around an otherwise smooth cheesecake is very different from a puddle of oil around a visibly split filling. Look at both before deciding what failed.
Why is it too firm?
Give a cold slice 20 or 30 minutes before deciding. If it softens nicely, serving temperature was part of the problem. A center that stays dry or dense points more strongly toward too much baking, a cake that was too shallow, or simply a firmer style than the one you wanted.
Why does it taste eggy?
Egginess can come from the ingredient balance and often becomes more obvious when the cheesecake is cooked very firmly. Small batches make this particularly easy because rounding the egg changes the proportions quickly. Weighing the beaten egg removes most of that guesswork.
Why did it puff like a soufflé?
Some rise is completely normal. A very foamy batter and extreme ballooning suggest that more air went into the mixture than necessary. Once the eggs enter, mix only until everything comes together.
Change one big thing at a time. Halving the batch, changing the pan and swapping the cheese all at once makes a disappointing cheesecake almost impossible to diagnose.
Make ahead and storage
This is an especially good make-ahead dessert because the long chill is part of finishing the texture rather than an inconvenience added afterward.
- Best plan: bake the cheesecake the day before you want to serve it.
- Cool, then chill: after 1½–2 hours at room temperature, refrigerate uncovered for at least 8 hours or overnight. Once cold, cover it.
- Best quality: use within about 3–4 days.
- For a softer slice: take out only what you plan to serve and let it sit for 20–45 minutes depending on room temperature.
- Freezing: not my first choice for this soft-centered style; thawing can noticeably change the creamy texture.
Where La Viña fits in
Basque cheesecake became internationally associated with La Viña in San Sebastián, where Santiago Rivera’s crustless, dark-topped cheesecake developed a following far beyond Spain’s Basque Country.
San Sebastián’s official tourism site publishes the La Viña recipe as 1 kg cream cheese, 7 eggs, 400 g sugar, 500 ml cream and about 1½ tablespoons flour, baked at roughly 210°C / 410°F for about 40 minutes.
That is useful context because many recipes described online as “original” change those quantities substantially.
Modern versions also chase different textures. Some reduce the sugar, while others add a little more structure for cleaner slices. Others remove the flour or push the oven hotter to emphasize the contrast between the dark exterior and the soft middle.
So two good Basque cheesecakes can look surprisingly different when cut: one almost spoon-soft, another much neater and more stable. This recipe deliberately sits between those extremes.
Compared with the published La Viña formula, this version uses proportionally less sugar and cream and more flour, nudging the chilled texture toward a slightly more supported slice while keeping the center creamy.
How to read a Basque cheesecake: quick recap
If you remember one sequence, make it this: read the surface and center in the oven, expect sinking during cooling, and judge the final set only after the long chill.
A few final Basque cheesecake questions
Is Basque cheesecake supposed to taste burnt?
It should taste deeply caramelized, with a slight bittersweet edge in the darkest areas. Dry, acrid or charcoal-like flavors mean the surface went too far. The famous “burnt” name describes the unusually dark style; it is not a reason to bake the whole top to carbon-black.
Is Basque cheesecake the same as San Sebastián cheesecake?
In modern recipe usage, Basque cheesecake, burnt Basque cheesecake and San Sebastián cheesecake generally refer to the same broad crustless, dark-topped style associated with San Sebastián in Spain’s Basque Country.
Can Basque cheesecake be gluten-free?
Yes. Wheat flour is not a defining requirement of the style. Use a suitable gluten-free starch conversion or a recipe already designed without flour rather than assuming every Basque cheesecake is automatically flourless.
After the cheesecake has cooled and settled, its wrinkled paper collar and sunken middle can make it look even less polished than it did in the oven.
Then the knife breaks through the dark caramelized surface, meets that slightly resistant top, and moves into the cool, creamy filling underneath.
That contrast is the point: cook the outside boldly enough to become Basque cheesecake without cooking the middle until it stops being creamy.