Iron: Mineral for Vitality and Health is often described as the spark that keeps the body running, and for good reason. This essential mineral fuels your blood, muscles, brain, and immune system, working quietly behind the scenes to keep you energized and resilient. Without enough iron, the body begins to slow down — fatigue creeps in, concentration weakens, and even simple daily tasks start to feel exhausting.
On the other hand, when your diet consistently supplies adequate iron, the difference is remarkable. You feel more energetic, your focus sharpens, and your body functions at its best. Iron truly makes the difference between dragging through the day and living with strength and vitality.
In this article, we’ll explore why iron matters so much, how much you really need, what happens when levels drop too low, and most importantly, how you can keep your intake balanced through smart food choices and healthy habits.
What Is Iron and Why It Matters for Vitality and Health?
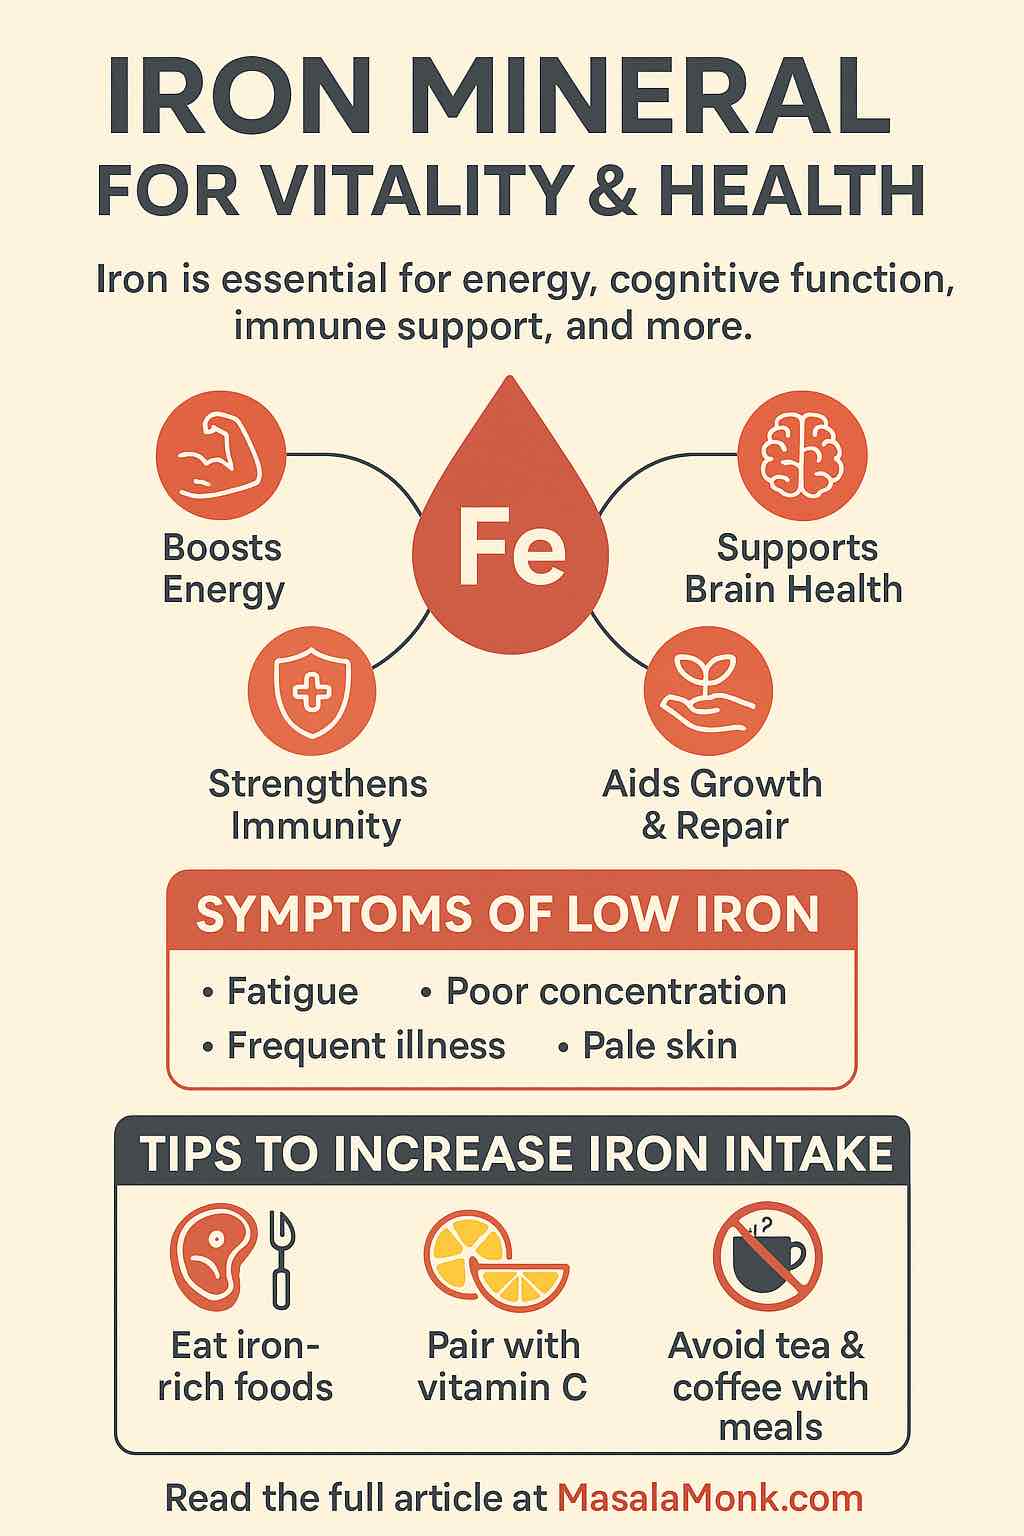
Iron may only be a trace mineral, but its impact on vitality and overall health is enormous. Even though you need it in small amounts compared to other nutrients, it is absolutely essential for survival. About two-thirds of all the iron in your body lives in hemoglobin, the protein inside red blood cells that carries oxygen from your lungs to every organ and tissue. Another significant portion is found in myoglobin, a protein in muscles that stores and delivers oxygen during physical activity. Without these two, your body would simply not have the fuel it needs to function.
However, oxygen transport is only part of iron’s story. This mineral has many other important responsibilities:
- Powering energy metabolism. Iron helps enzymes convert the food you eat into usable energy. Without it, even a nutrient-rich diet won’t fully translate into vitality.
- Supporting brain health. Adequate iron allows your brain to function at its peak. It supports memory, concentration, alertness, and even mood stability.
- Driving growth and repair. Iron plays a central role in DNA synthesis, which means your body needs it for cell renewal, healing, and healthy development.
- Strengthening immunity. White blood cells rely on iron to fight off infections effectively, making it a cornerstone of your immune defense system.
When your iron levels dip too low, all of these systems begin to slow down. The results often appear as fatigue, weakness, dizziness, and poor performance, whether that’s in the gym, at work, or even in day-to-day life. In short, iron is not just a mineral — it is the foundation that keeps your body strong, energized, and resilient.
Daily Iron Requirements: How Much Iron for Health and Energy?
The amount of iron your body needs isn’t the same for everyone. It changes depending on your age, sex, and stage of life. For example, men typically require less iron than women, while pregnant women need significantly more to support both their own health and the growth of their baby.
Here’s a breakdown of the recommended daily iron intake:
| Group | Daily Requirement | Why It Matters |
|---|---|---|
| Adult Men | ~8 mg | Meets everyday energy and oxygen needs |
| Women (19–50) | ~18 mg | Replaces iron lost during menstruation |
| Pregnant Women | ~27 mg | Supports baby’s development and higher blood volume |
| Women (50+) | ~8 mg | Needs decrease after menopause |
| Children (1–13) | 7–10 mg | Critical for growth, learning, and development |
As you can see, women of reproductive age need more than double the iron of men, and pregnancy increases the demand even further. Without careful attention to diet, it’s easy for women in these groups to fall short — which is one reason iron deficiency is so common.
If you are pregnant, have a look at 5 Iron-Enriched Smoothies for Pregnancy with Spinach and Apple.
👉 Vegetarians and vegans also need to pay extra attention. Plant-based foods provide non-heme iron, which isn’t absorbed as efficiently as the heme iron found in animal foods like red meat or poultry. In fact, the body may only absorb 2–20% of non-heme iron, compared to 15–35% of heme iron.
That doesn’t mean plant-based eaters can’t meet their needs — but it does mean they may require nearly double the recommended amounts. A smart strategy is to pair iron-rich plant foods with Vitamin C sources (such as citrus fruits, tomatoes, or bell peppers). This simple combination can dramatically boost absorption and help close the gap.
Benefits of Iron Mineral for Energy, Vitality, and Health
Meeting your daily iron needs is more than just avoiding deficiency — it’s about unlocking a cascade of health benefits. From higher energy and mental clarity to stronger immunity and healthy growth, this mineral is a true foundation of well-being. Let’s explore how iron supports vitality, energy, and long-term health in everyday life.
1. How the Iron Mineral Fuels Energy, Strength, and Vitality
Adequate dietary iron makes sure hemoglobin can carry oxygen efficiently to your cells, muscles, and organs. This constant supply of oxygen keeps you active throughout the day and fuels your stamina during physical activity. Instead of dragging yourself through daily tasks, healthy iron levels allow you to feel energized and resilient.
On the other hand, when iron runs low, even simple chores can feel exhausting. People often blame “just being tired,” but persistent fatigue is one of the most common signs of low iron intake. Iron is the mineral for vitality because it powers oxygen transport, which helps your body recover faster and gives you the strength to enjoy life more fully.
2. Iron and Brain Health: Supporting Mental Performance and Vitality
The brain thrives on oxygen-rich blood, and iron is the mineral that makes this possible. When your iron status is balanced, your memory, concentration, and decision-making all sharpen noticeably.
In contrast, poor iron intake clouds your thinking and slows mental function. Students facing exams, professionals managing demanding workloads, or anyone balancing a busy lifestyle all benefit from iron’s role in mental clarity and cognitive vitality. Balanced iron levels support both physical vitality and mental health.
3. Iron Mineral for Immunity, Healing, and Long-Term Health
A lesser-known but vital benefit of iron is its role in immune defense. White blood cells depend on iron to grow and attack harmful invaders effectively. With enough iron, your immune system responds quickly, helping you resist infections and heal more efficiently.
Without this support, people often notice they catch colds more frequently or struggle with slower recovery times. Keeping your iron intake steady is one of the simplest ways to strengthen immunity and safeguard your health.
4. Visible Benefits of Iron for Healthy Hair, Skin, and Nails
Iron drives cellular renewal, which is why its effects often show up in your outward appearance. Thinning hair, brittle nails, or pale skin are among the first visible signs of deficiency. In fact, dermatologists sometimes link unexplained hair loss directly to low iron levels.
When you nourish your body with iron-rich foods, your skin regains its natural glow, nails grow stronger, and hair looks fuller and healthier. This makes iron not only a nutrient for survival but also a mineral that enhances vitality from the inside out.
5. Why the Iron Mineral Is Essential During Pregnancy and Growth
Iron is especially crucial during periods of growth and development. For expecting mothers, sufficient iron reduces the risk of premature birth and supports healthy fetal brain development. It also helps mothers handle the increased blood volume that pregnancy demands.
Children and teens also rely on iron for their growth spurts, bone strength, and learning capacity. Without it, they may face developmental delays, weakened immunity, or poor school performance. That’s why healthcare providers emphasize iron as a cornerstone of health during pregnancy, childhood, and adolescence.
Read More: Iron Power: Essential Tips for a Healthy Pregnancy
Everyday Benefits of Iron Mineral for Vitality & Health
Iron is much more than a trace mineral — it’s the element that fuels energy, focus, resilience, and growth. Adequate intake means waking up with strength, thinking with clarity, recovering faster, and even looking healthier. In short, iron truly lives up to its reputation as the mineral for vitality and health.
Iron Deficiency: The World’s Most Common Threat to Vitality and Health
Deficiency of iron is not just common — it’s the most prevalent nutrient deficiency on the planet, affecting more than 1.6 billion people. This deficiency robs the body of vitality and health, when the body doesn’t get enough of this essential mineral, everything from your energy to your immunity suffers. It’s not only about feeling tired; it’s about how deeply this shortage impacts learning, productivity, and overall vitality.
Certain groups are more vulnerable than others. Women of reproductive age, due to monthly blood loss, are especially at risk. Infants and children, who need iron for rapid growth, also face higher risk. Vegetarians and vegans may struggle too, since plant-based iron (non-heme iron) is harder for the body to absorb compared to iron from animal foods (heme iron).
Warning Signs of Low Iron: How Deficiency Drains Vitality and Energy
When your iron reserves begin to run low, the body sends signals — though many people mistake them for everyday stress or fatigue. Watch out for:
- constant tiredness or weakness that doesn’t improve with rest,
- pale skin or a dull complexion,
- brittle nails or thinning hair,
- frequent dizziness or nagging headaches,
- shortness of breath after minimal activity,
- irritability or trouble concentrating.
These symptoms often creep in gradually, making them easy to ignore. But if left untreated, deficiency can progress into iron-deficiency anemia — a more serious condition that lowers your immunity, slows children’s growth, and makes pregnancy more complicated and risky.
👉 That’s why understanding iron as the mineral for vitality and health is so critical: spotting these signs early can help you restore balance before your well-being declines further.
Read More: Iron Deficiency Anemia Symptoms: 15 Signs You Are Iron Deficient
Too Much Iron Mineral: Finding the Right Balance for Health
While the iron mineral is essential for vitality and strength — too much iron — can also damage health. This happens most often due to a genetic condition called hemochromatosis, but it can also occur when people take iron supplements for too long without medical guidance. In both cases, excess iron begins to accumulate in vital organs.
Health Risks of Iron Overload
Over time, this overload may cause:
- liver damage, including cirrhosis or scarring,
- heart problems, such as arrhythmias or even heart failure,
- joint pain and stiffness that mimic arthritis,
- a higher lifetime risk of certain cancers.
The challenge with iron overload is that symptoms often develop slowly, making it easy to miss until real damage has occurred.
Finding the Right Balance with Iron
Because of these risks, iron supplements should never be taken casually. Medical supervision is key to avoid harm, especially since most people can meet their daily needs through a balanced diet rich in iron-containing foods.
In fact, focusing on whole foods not only reduces the risk of overload but also provides other essential nutrients that work hand in hand with iron to support vitality, energy, and resilience.
Best Dietary Sources of Iron Mineral for Vitality and Health
When it comes to nutrition, iron doesn’t come in just one form. It exists in two key types, each with its own characteristics:
- Heme iron – This form is present in animal-based foods such as red meat, poultry, and seafood. Your body absorbs heme iron more efficiently, making it a powerful way to maintain healthy levels.
- Non-heme iron – Found in plant-based foods like beans, lentils, tofu, spinach, and seeds. While absorption is lower compared to heme iron, non-heme iron still plays an essential role in overall intake, especially for those following vegetarian or vegan diets.
Iron-Rich Foods: Animal, Plant, and Fortified Sources for Vitality
To truly support vitality and health, it helps to know where to find the best natural sources of iron. Some standout options include:
- Animal-based sources of iron: beef, chicken liver, lamb, turkey, tuna, clams, and sardines. These foods provide heme iron, which the body absorbs easily.
- Plant-based sources of iron: lentils, kidney beans, chickpeas, black beans, pumpkin seeds, sunflower seeds, spinach, kale, quinoa, tofu, and fortified soy products. Though absorption is lower, they still make a significant contribution — especially when paired with smart eating habits.
- Fortified foods: many breakfast cereals, breads, and pastas are enriched with iron to help reduce deficiency risks, making them convenient options for busy lifestyles.
Improving Iron Absorption for Better Energy and Vitality
It’s not just about what you eat, but also how you combine foods. Non-heme iron (from plants) is more difficult for the body to use, but you can improve absorption significantly by pairing it with Vitamin C-rich foods. For example:
- Squeeze lemon juice over cooked spinach or kale.
- Add strawberries or orange slices to an iron-rich cereal.
- Enjoy a bean salad with tomatoes and bell peppers.
At the same time, be mindful that certain substances like coffee, tea, and excess calcium can reduce iron absorption if consumed at the same time as iron-rich meals. A little meal planning goes a long way in ensuring your body gets the most benefit.
Daily Habits to Improve Iron Absorption and Support Vitality
Eating iron-rich foods is only part of the equation — your body also needs to absorb iron effectively to fully benefit from it. Small everyday changes can make a big difference.
Practical Tips to Maximize Iron Intake
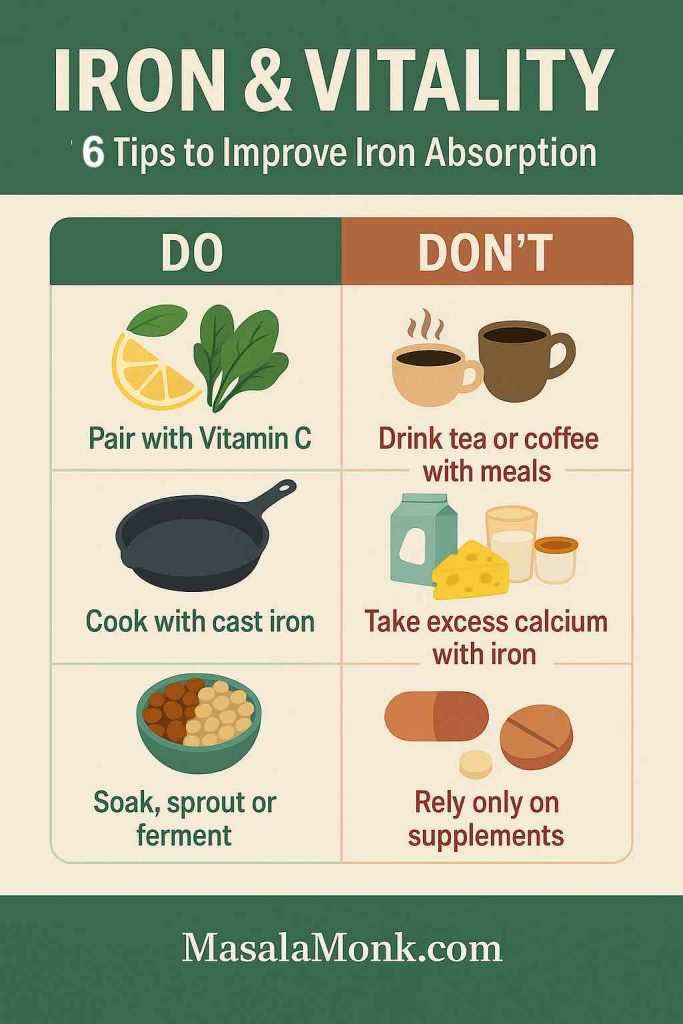
- Pair iron with Vitamin C for better results
Vitamin C transforms non-heme iron (from plant foods) into a form your body can use more easily. Try squeezing fresh lemon juice over spinach salad, adding bell peppers to bean dishes, or enjoying lentils with tomato-based sauces. - Cook with cast iron cookware
Preparing meals like tomato sauce or curry in a cast-iron pan allows tiny amounts of the mineral to seep into the food, naturally increasing your iron intake without supplements. - Be mindful of absorption blockers
Drinks such as tea and coffee, along with calcium-rich foods like milk, yogurt, or cheese, can reduce how much iron your body absorbs. If you enjoy them, consider having them between meals instead of with your iron-rich foods. - Soak, sprout, or ferment grains and legumes
Whole grains, beans, and seeds contain phytates — natural compounds that can limit iron absorption. Soaking overnight, sprouting, or fermenting reduces phytates, making the iron in these foods more bioavailable.
By adopting these simple habits, you give your body a much better chance of unlocking the full vitality-boosting benefits of iron from your diet.
Might like to read: Buying a Cast Iron Skillet? 5 Warnings Before You Invest
Iron and Public Health: Why This Mineral of Vitality Matters Globally
Iron deficiency isn’t just an individual concern — it’s a widespread public health issue that touches millions. According to the World Health Organization, nearly one-third of women of reproductive age worldwide live with anemia caused by low iron.
This condition does far more than sap energy. It quietly lowers productivity, reduces learning capacity in children, and heightens health risks for mothers and babies. In developing regions, it remains one of the leading causes of preventable illness.
Even in wealthier nations, iron deficiency often goes unnoticed. Many people attribute symptoms such as fatigue, pale skin, or poor focus to busy lifestyles or stress, when the underlying issue is actually low iron. Because the signs can be subtle, regular health check-ups and awareness about diet play a crucial role in prevention.
Conclusion: Iron as the Mineral of Vitality and Health
Iron is not just another nutrient tucked away on a food label — it is the mineral of vitality and health. By carrying oxygen through your blood, fueling energy production, supporting immunity, and sharpening your mind, iron quietly sustains nearly every system in your body.
When your iron stores run low, life feels heavier: fatigue lingers, focus fades, and resilience weakens. But when your levels are balanced, the difference is striking — you move through your day with more energy, greater strength, and a clearer mind.
The good news is that meeting your iron needs doesn’t require complicated changes. With mindful choices — such as including a variety of iron-rich foods in your meals, pairing them with Vitamin C for better absorption, and limiting inhibitors like coffee or excess calcium — you can naturally support your body’s iron balance.
Whether you are pregnant, following a vegetarian lifestyle, or simply striving to boost energy and well-being, understanding and optimizing your iron intake is one of the simplest, yet most powerful, steps toward better health.
In the end, iron truly lives up to its name: it is the steady foundation of vitality, strength, and long-term wellness.
Top 10 FAQs About Iron Mineral for Vitality and Health
1. What is iron and why is it essential for vitality and health?
Iron is often called the mineral of vitality and health because it powers oxygen transport in your body. Most of your iron is stored in hemoglobin (in red blood cells) and myoglobin (in muscles), allowing oxygen to fuel your energy, focus, and strength. Without enough iron, you feel drained, weak, and less resilient.
2. How much iron should I consume daily?
The daily requirement depends on age, sex, and life stage:
- Adult men: ~8 mg
- Women (19–50): ~18 mg
- Pregnant women: ~27 mg
- Women 50+: ~8 mg
- Children (1–13): 7–10 mg
👉 Vegetarians and vegans may need almost double, since plant-based iron (non-heme) is harder to absorb.
3. What are the first signs of iron deficiency?
Iron deficiency, the world’s most widespread nutritional gap, often begins subtly. Look out for:
- constant tiredness,
- pale skin or dull complexion,
- brittle nails or thinning hair,
- frequent dizziness or headaches,
- shortness of breath,
- irritability or poor focus.
If untreated, it can progress into iron-deficiency anemia, which harms immunity, growth, and pregnancy outcomes.
4. Can too much iron harm your health?
Yes. While the iron mineral is essential for vitality, excess iron leads to overload. Causes include:
- genetic conditions like hemochromatosis,
- long-term supplement misuse.
Over time, this can cause liver damage, heart problems, arthritis-like pain, and even increase cancer risk. Balance is key.
5. What foods are the richest sources of iron?
Iron comes in two main forms:
- Heme iron (animal foods, easily absorbed): beef, chicken liver, lamb, clams, tuna, turkey, sardines.
- Non-heme iron (plant foods, less absorbable): lentils, beans, tofu, quinoa, spinach, kale, pumpkin seeds, sunflower seeds.
- Fortified foods: cereals, breads, and pastas enriched with iron.
Combining plant-based iron with Vitamin C foods enhances absorption.
6. How can I improve iron absorption naturally?
To make the most of iron-rich foods:
- Pair iron with Vitamin C (e.g., spinach + lemon juice, beans + tomato salsa).
- Cook with cast iron pans to increase mineral content in food.
- Avoid coffee, tea, or excess calcium during meals.
- Soak, sprout, or ferment beans and grains to reduce phytates.
👉 Small tweaks make iron more bioavailable, fueling vitality and energy.
7. Who is most at risk of iron deficiency?
High-risk groups include:
- Women of reproductive age,
- Pregnant women,
- Infants and children,
- Vegetarians and vegans,
- People with digestive conditions (like celiac disease or IBD).
These groups should monitor diet closely and get regular check-ups.
8. Should I take an iron supplement?
Supplements help in certain cases, but medical guidance is crucial. Since both low iron and high iron carry risks, testing iron levels first is the safest option. Most people can maintain healthy levels through a balanced diet of iron-rich foods and absorption boosters.
9. Why is iron deficiency a public health concern?
Globally, iron deficiency affects 1.6+ billion people, making it the most common deficiency. It:
- reduces productivity,
- weakens immunity,
- hinders learning in children,
- increases maternal and child health risks.
Recognizing iron as the mineral for vitality and health is key not only for individuals but also for societies.
10. What is the simplest way to maintain healthy iron levels?
The easiest strategy is a balanced diet supported by smart habits:
- Eat a mix of heme and non-heme iron foods,
- Pair with Vitamin C to improve absorption,
- Avoid absorption blockers during meals,
- Get tested if you feel symptoms of low or high iron.
In short, mindful eating and awareness help you enjoy the full vitality-boosting benefits of iron.
📚 References & Further Reading on Iron, Vitality, and Health
- World Health Organization – Anaemia
The WHO provides extensive insights into anemia, its causes, and its impact on global health, particularly among women and children.
👉 Read more on WHO - Iron-Deficiency Anemia – Global Prevalence
An overview of how iron deficiency remains the most widespread nutritional deficiency worldwide, affecting over 1.6 billion people.
👉 Read more on Wikipedia - Iron and Human Nutrition
A deeper look at iron’s role in energy metabolism, brain health, and immunity, with comparisons between heme and non-heme absorption.
👉 Explore on Wikipedia - The Role of Vitamin C in Iron Absorption
Research published in the American Journal of Clinical Nutrition confirms that Vitamin C enhances non-heme iron absorption, especially important for vegetarians and vegans.
👉 Read the AJCN study - The Silent Deficiency in Women’s Health
Media reports highlight how iron deficiency often goes unnoticed and misdiagnosed, leaving many women fatigued, foggy, and struggling with unexplained symptoms.
👉 Read the Adelaide Now feature