Posted on Leave a comment

Fermented RAGI (Finger Millet) IDLIS- Gluten Free | Gut Friendly | Breakfast Recipe

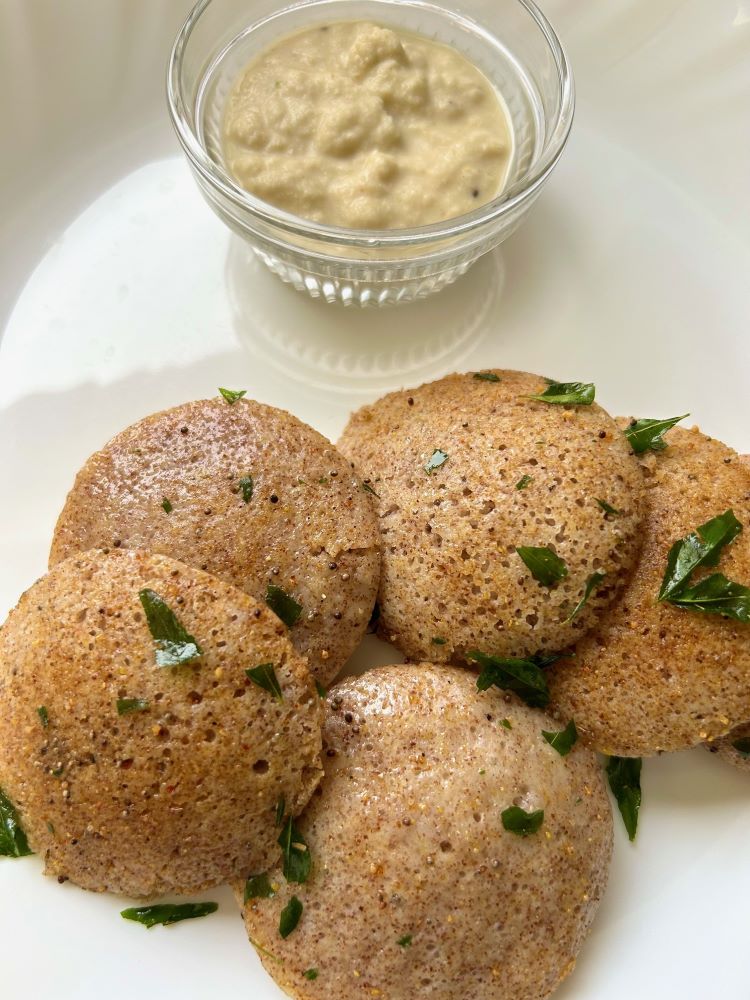
At home Idlis is our favourite breakfast. Ragi idli is a nutritious wholesome South Indian meal. They are light, easy on stomach and have tremendous health benefits. Idlis are like steamed cakes made with lentils and idli rice. Ragi idli is just another variation where ragi is replaced by rice. The batter of these ragi idlis will also be beneficial for making dosas the next day. I like to serve these millet idlis with Coconut Chutney or Kara Chutney.

Ragi idli is made using idli rice, flattened rice (poha), ragi flour, urad dal and fenugreek seeds. The ingredients are first soaked and then the batter is prepared by grinding the ingredients followed by fermentation, then the batter is steamed to make idlis. This batter yields consistent results. The idlis will always be pillowy soft and totally melt in mouth.

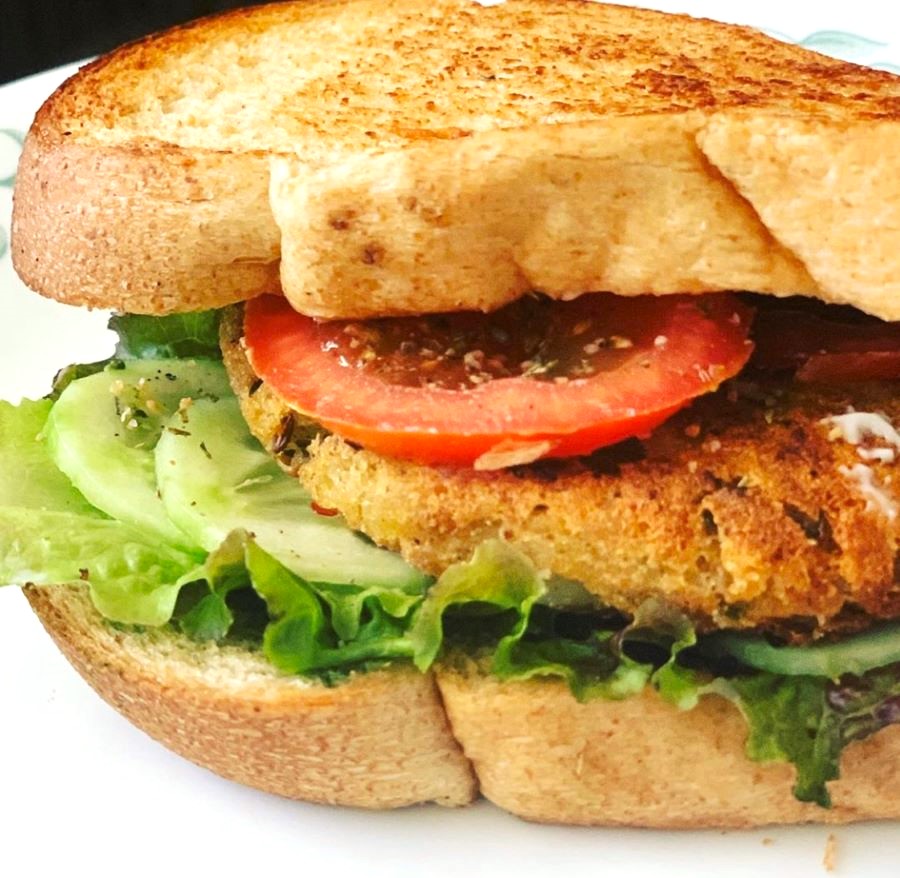
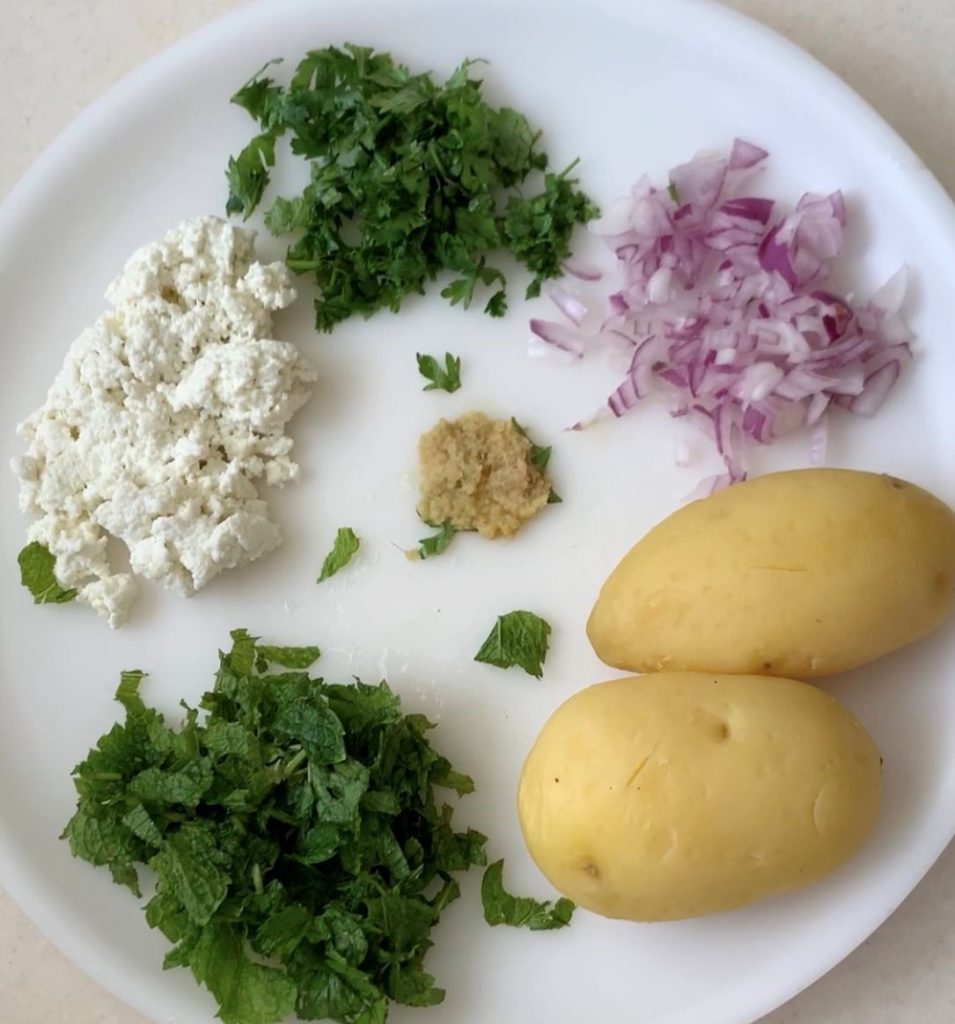
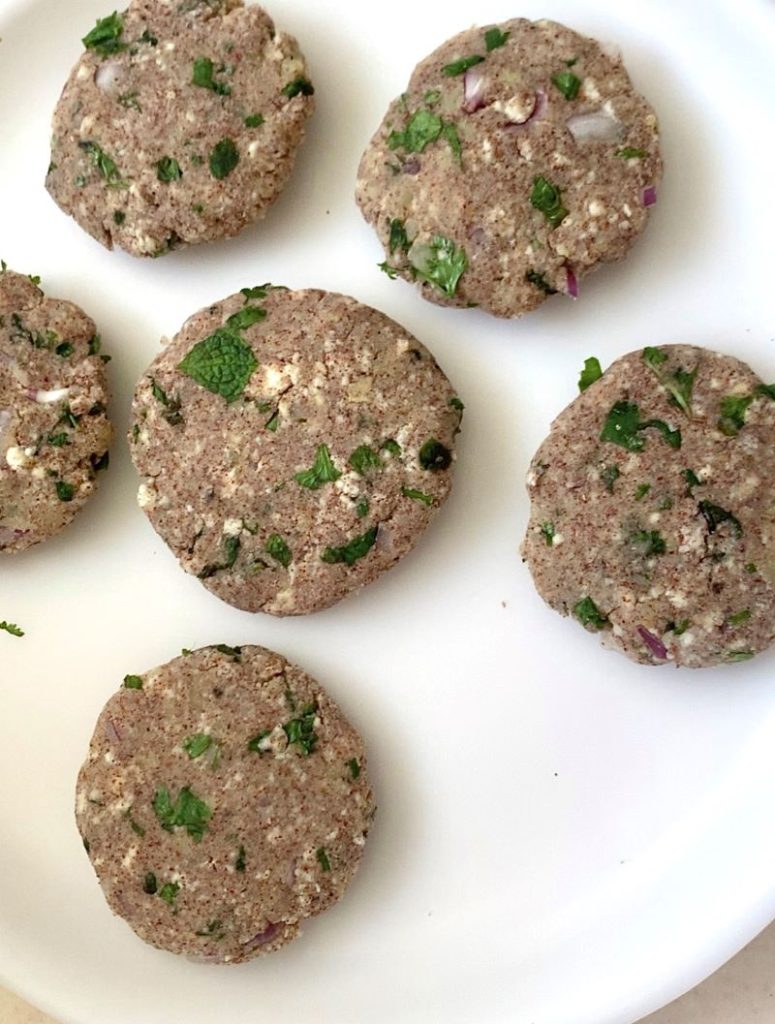
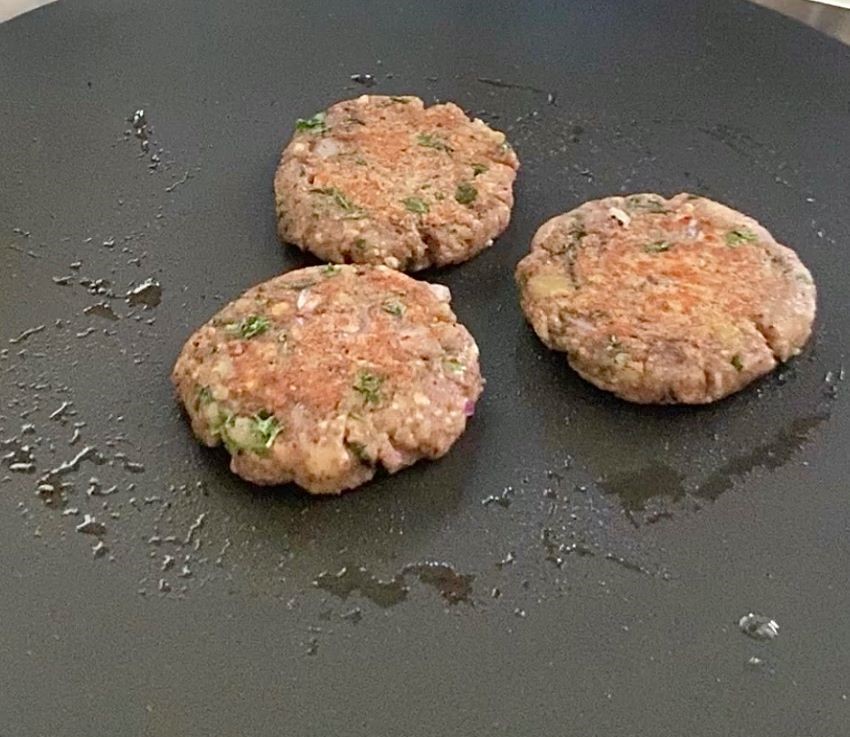
Not just Ragi idlis or dosas, if you are a pancake lover, you can also try these, Ragi Pancakes or these Millet Cutlets which you can easily make at home in 10 minutes using minimal oil. They come out absolutely delicious and are so healthy.

Given the health benefits of ragi, these steamed cakes become a superfood which not only has benefits of whole grains, but it is also fermented. 

Why fermented food is good for you? 

Fermented foods like idli, dhokla, dosa are a fabulous addition to your diet.

  • It helps in increasing immunity and improves digestion. 
  • It also increases the bio availability of minerals. It breaks down proteins, carbohydrates and other minerals in a way making it easily available to our body. 
  • Also a lot of good bacterias are at play when your food is fermenting. All fermented foods are natural probiotic. It’ll strengthen your immune system making you disease resistant.
  • The lactic acid bacteria which helps in fermentation also creates omega 3 fatty acids, essential for the immune system. It will help to remove toxins and helps your body build a healthy gut flora. 

Here are 5 excellent reasons why this millet should be in your diet.

  1. High fibre content: Ragi is high in dietary fibre which will help to promote proper digestion and keep your bowel movements in check. 
  2. Rich in Calcium: It is an ultimate non-dairy source of calcium. Just 100 grams of Ragi can give you 344 mg of calcium.
  3. Supports Gluten- Free Diet: Ragi is a great choice if you are on a gluten-free diet – it’s naturally gluten-free! No need to worry about hidden gluten as it’s a safe and delicious way to enjoy your meals.
  4. Child Nutrition: It helps to fulfil child’s nutritional needs. It is rich in protein, calcium, iron, zinc and other essential nutrients.
  5. Treats Anaemia: Since Ragi is an excellent source of iron too, which is essential for producing red blood cells, it helps to fight off anaemia.

With all such goodness and nutrition packed in this humble dish, let’s get to the recipe now

Recipe: serves 4

Ingredients: measuring cup size 250 ml

  1. Ragi flour: 1 cup
  2. Idli Rice/Parboiled Rice or Broken Rice: 1 cup
  3. White Split Urad dal: 1/2 cup
  4. Flattened Rice/Poha: 1/4th cup
  5. Fenugreek seeds/Methi dana: 1/4th tsp
  6. Rock Salt or any non-iodised salt: As per taste
  7. Oil/ghee for greasing
  8. Water as required for making batter and steaming 

Method: 

  • Wash rice and poha 3 to 4 times. Soak them in enough water for 5 hours. 
  • Wash urad dal and fenugreek seeds 3 to 4 times and soak for 5 hours. 
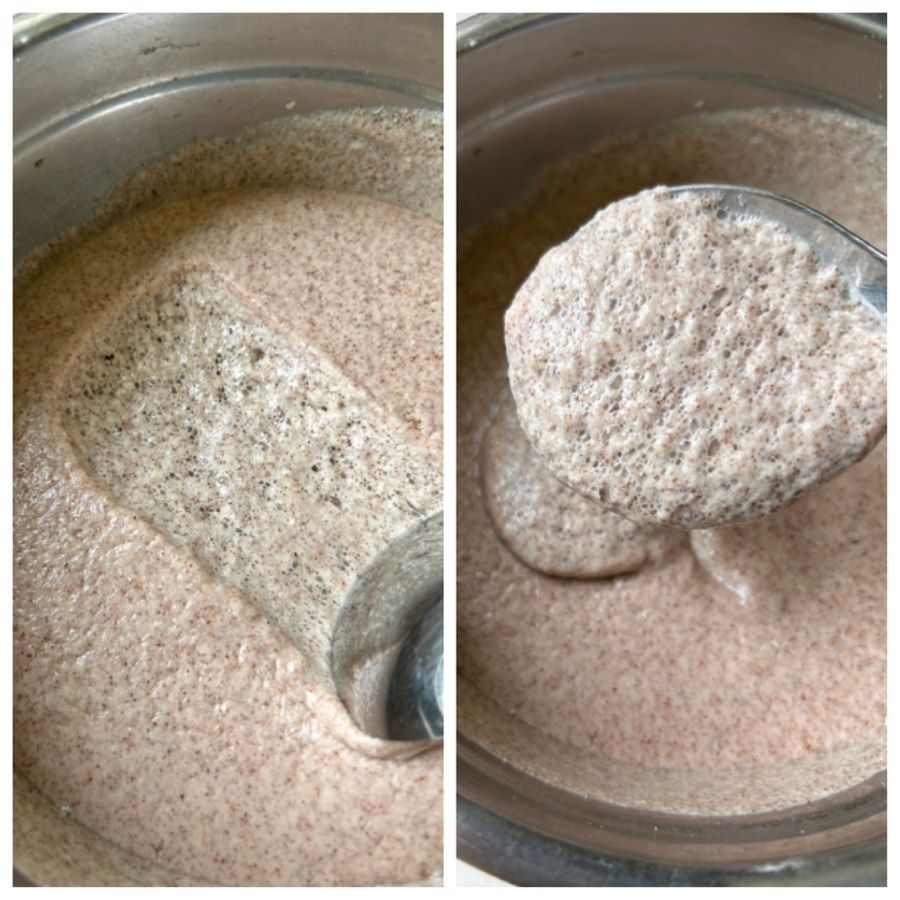
  • Drain the water from dal and rice. First grind urad dal to a smooth and fluffy batter. Add little water at a time to get a smooth paste. Do not add too much water in one go. 
  • Then grind rice and poha to a smooth batter using water as required. Again, don’t add too much water. Add little at a time. 
  • In large steel bowl, mix together both dal and rice batter. 
  • Add roughly 3/4th cup of water to ragi flour and make a smooth consistency batter. Make sure there are no lumps. 
  • Mix Ragi batter with rice and dal batter till it completely incorporates. 
  • Add rock salt as per taste. Cover the bowl with a lid and keep the batter in dark warm place for 9 hours or more. I had to keep it for 12 hours.
  • The batter will double and become fluffy and airy. Give a gentle mix before making the idlis. Do not mix rigorously or you will lose the airiness of the batter. 
  • In an idli maker, bring water (roughly 3″ above) to boil. Grease idli moulds with oil/ghee. Fill in the cavities with the batter.
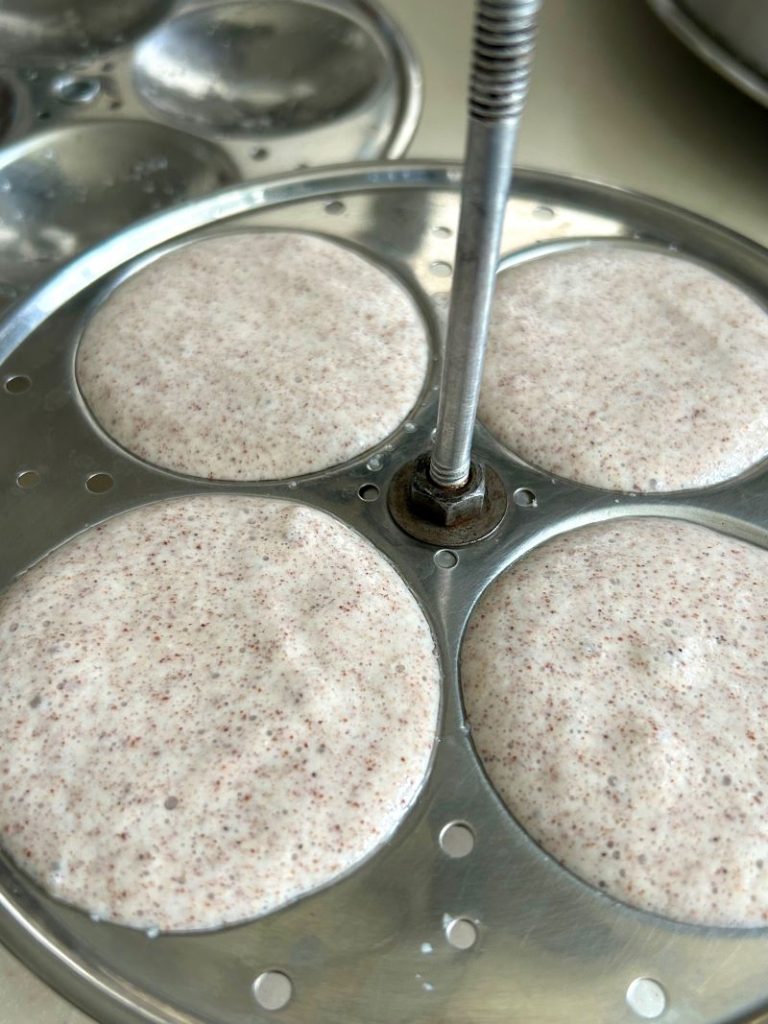
  • Now, steam the idlis in idli maker for 10 to 12 minutes or till toothpick inserted at the centre comes out clean. It shouldn’t be sticky.

Tips for fermentation: – 

  1. Add rock salt to the batter before fermenting. Salt helps in fermentation. Do not use iodised salt. 
  2. Do not skip Fenugreek seeds. It helps the batter to get bubble like texture. Also, it’s makes dosa crispier. 
  3. Add enough water while grinding dal and rice to get smooth and fluffy batter. Do not add water in one go. Keep adding little at a time. This will give you soft idlis. 
  4. Mix the final batter with your hands for a minute and then keep it at a warm place. The warmth in your hand will help in fermentation. 

I hope you enjoyed reading this recipe and will give it a try. Do let me know if you do. I would love to hear from you guys. Here’s to healthy eating! 🙂

Posted on Leave a comment

A perfect and foolproof Jowar Bajra Roti Recipe

When winter rolls around, or when I’m on a diet, there’s one recipe I always turn to: Jowar Bajra Paratha. This wholesome and nutritious paratha is incredibly satisfying and pairs beautifully with jaggery or any curry sabji. Not only is it a staple during colder months, but it’s also a fantastic option for those looking to incorporate more healthful grains into their diet. So lets see how to make perfect jowar bajra paratha.

Ingredients:

1 cup Jowar Flour

1 Cup Bjara Flour

Water as needed

Ghee for Cooking

Instruction:

In a mixing bowl, combine the jowar flour and bajra flour. Gradually add hot water to the flour mixture. Keep adding water until the mixture comes together to form a soft and pliable dough. Knead the dough for a few minutes until it becomes smooth. The hot water helps in binding the flours.

Divide the dough into equal-sized portions to make roti. Take a portion of the dough and dust some flour to prevent sticking. Roll out the ball into a round roti. Heat a tawa on medium-high heat. Place the rolled paratha on the hot tawa. Cook for a minute  Flip the paratha and cook the other side. Apply ghee on both sides for added flavor and to keep the roti moist.

Once both sides are cooked and crispy, remove the roti from the tawa. Serve hot with jaggery or a curry of your choice.

Enjoy your nutritious and wholesome Jowar Bajra Roti! 🌾🍽

Do try out this simple recipe. I am sure you guys will love it. Let me know what other kind of millet roti you make at home in the comments section. It will be great to know.

Posted on Leave a comment

Protein Packed Millet Cutlets- Easy Vegetarian Recipe

Cutlets originally was derived from the French favourite cotelette, which evolved into ‘cutlet’ in English. It referred to a thin slice of meat, typically taken from the leg or rib section of the animal. This meat was often breaded and fried, creating a crispy and a flavorful dish. 

Cutlets have had quite a history. It came to English shores around 1700s. During those times, dishes with potatoes were considered a novelty. It was introduced in India by the Britishers around 1800s. Thanks to their love for French cooks. When the British came to Bengal, Lord William Amherst started cultivation of potatoes in India. Around those times, the colonial cooks mashed up boiled potatoes and mixed up minced meat to make the neat cutlet.

For the initial years, cutlet remained the privy of the British occupied spaces. Gradually, it made its way to commercial places which even included railway towns and mining colonies. It became so common that even leftover sabjis found its way into becoming a cutlet. 

Among several cutlet recipes, this is the one I enjoy the most because, first of all, it is a fuss free recipe, its healthy, gluten free, a flavor bomb and most importantly they are not deep fried. This can be served as an evening snack or in breakfast. Since it is not deep fried and are gluten free, they are also light on you stomach. These are especially great for all the picky little eaters. My little one gobbled them in no time. 🙂

These can also be stuffed inside toasted bread slices. Use your favourite dressing, top it with lettuce, tomato and onions and enjoy a wholesome meal.

Recipe: makes 6 cutlets

Ingredients 

  • 2, boiled Potatoes
  • 1/2 cup Indian Cottage Cheese or Paneer
  • 2 tbsps, finely chopped Onion
  • Handful of Mint Leaves and Coriander Leaves
  • 1 tbsp grated, Ginger
  • 3 tbsps, Millet flour (I used Finger Millet/Ragi Flour)
  • 1 tsp, Dhania or Coriander powder 
  • A pinch, Garam Masala
  • 1/4th tsp Red Chilli powder (optional)
  • 1/2 tsp, Jeera or Roasted Cumin powder
  • 1/2 tsp Amchoor or Raw Mango powder
  • Salt to taste
  • Oil/Ghee to cook

Instructions

  • Mash boiled potatoes in a bowl. To it add grated paneer/cottage cheese, onions, mint and coriander leaves and ginger. These herbs give an amazing flavor.
  • Now, add all the spices- coriander powder, cumin powder, red chilli powder, raw mango powder, garam masala and salt.
  • In a pan, add millet flour and roast on low flame till it is fragrant. It should take you roughly 2-3 minutes. Keep stirring continuously. Once the flour has roasted well, add it to the potato mixture.
  • Mix everything very well and form a soft dough. If it feels sticky, you can add more flour. Check for seasoning. Once ok, give it a desired shape. Keep aside
  • Heat a griddle or tawa on a medium heat. Add a tbsp of oil/ghee. When the oil is hot, gently place the cutlets on the griddle or tawa.
  • Fry them for 2-3 minutes each side till it gets golden brown on both sides. Do that on a low flame, so that it cooks well from inside.
  • Serve it with green chutney or ketchup.

Enjoy!!

Protein Content:

  • Paneer: 10 grams
  • Potatoes (Large): 5 grams
  • Millet (Ragi flour): 5 grams

Total Protein: 20 grams

Notes:

  • You can also use poha/flattened rice flour in place of millets. Just grind raw and dry poha to a powder and use it in place of ragi. Just make sure the poha powder is fine, otherwise the mixture will turn crumbly.
  • Quantity of flour may change depending on the kind of potatoes or the moisture level in your cooked potatoes.
  • You can also add vegetables of your choice here, like, shredded carrots, cabbage, boiled peas, spinach.