Posted on Leave a comment

How to Make Ice Cream with a KitchenAid Mixer (With or Without the Attachment)

Premium cover image for how to make ice cream with a KitchenAid mixer, showing a red stand mixer with ice cream attachment churning vanilla ice cream in a frosty bowl, with a finished scoop in front and vanilla beans on a dark editorial background.

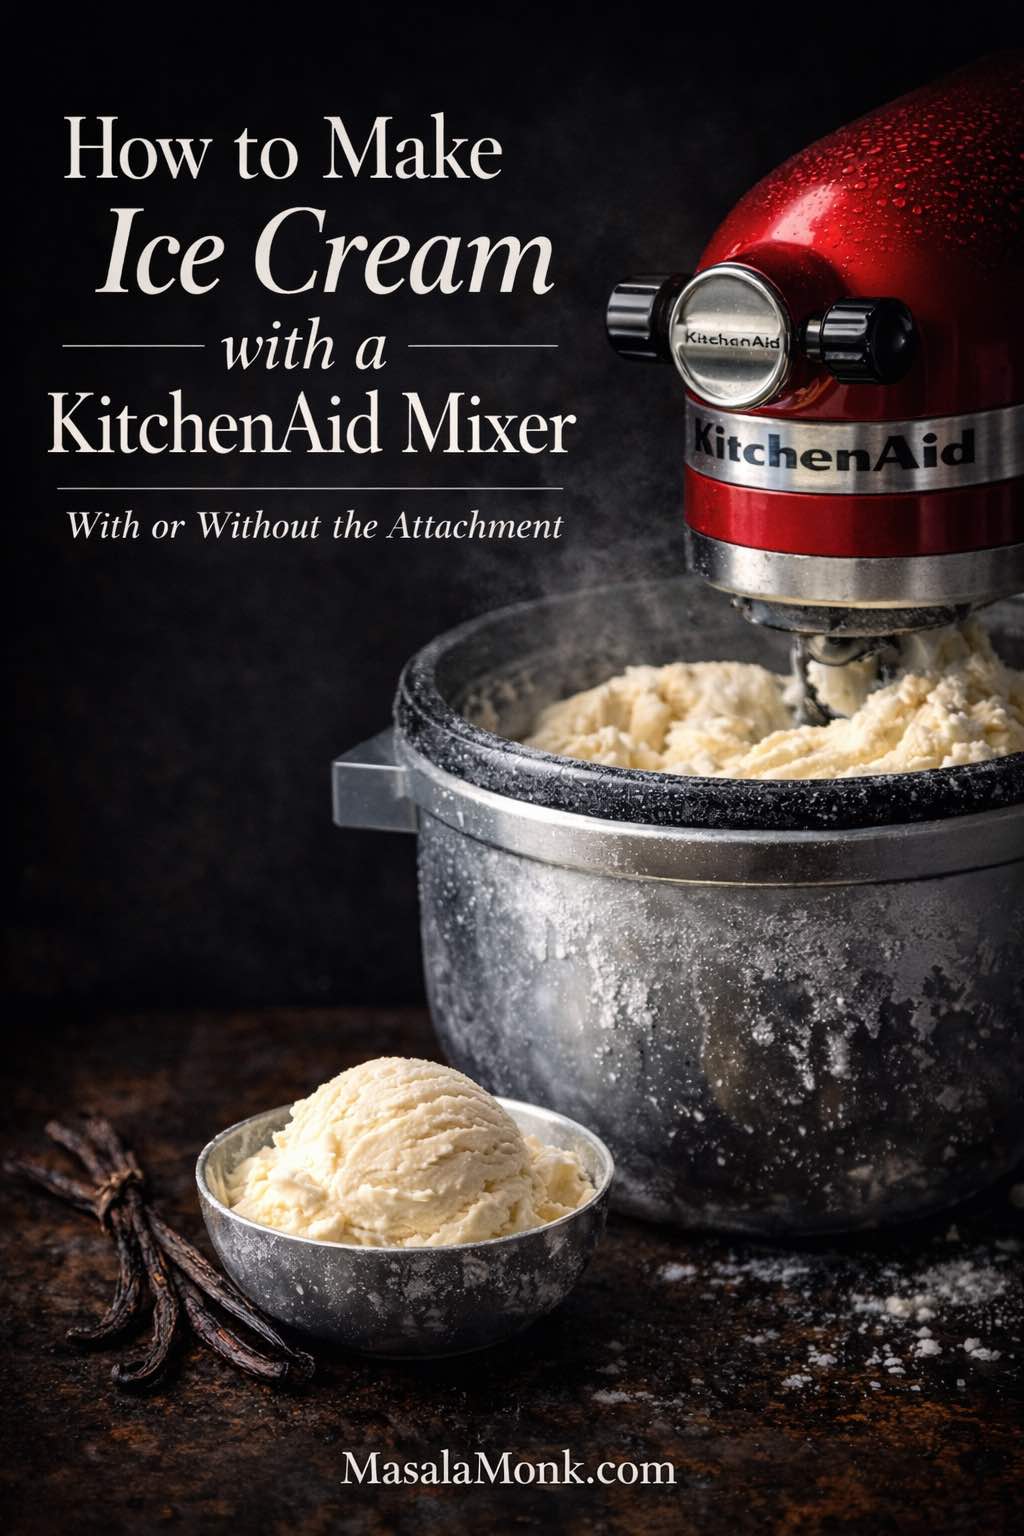
If you want to know how to make ice cream with a KitchenAid mixer, the process becomes much easier once you understand the rhythm. Freeze the bowl until it is deeply cold, chill the base until it is fully settled, churn until the mixture turns thick and airy like soft serve, then freeze it again until it becomes scoopable. That is the pattern. Once it clicks, homemade ice cream stops feeling fussy and starts feeling wonderfully doable.

Part of the confusion is that ice cream sounds more technical than it really is. There is so much talk of custards, freezer bowls, aging the base, mix-ins, and timing that the whole thing can seem harder than it needs to be. In practice, the best batches usually come down to a few simple things done well. The bowl needs to be properly frozen. The base needs to be fully chilled. The churn needs to stop at the right stage. After that, the freezer quietly finishes the work. KitchenAid’s own notes on the ice cream maker attachment reinforce just how much good texture depends on that cold-and-churn sequence.

What makes this method especially satisfying is the control it gives you over flavor and texture. You can keep it simple with an easy eggless vanilla base, or go richer with a custard-style version that tastes fuller and more luxurious. You can fold in cookie pieces, swirl through chocolate, blend in mango, or deepen it with coffee. The logic behind chilling the base well is explained beautifully by Serious Eats, and once that part makes sense, the rest feels far more natural.

Also Read: Peach Cobbler with Canned Peaches (Dessert Recipe)

Can you make ice cream with a KitchenAid mixer?

Yes, you absolutely can, and when everything is properly cold, a KitchenAid stand mixer can make excellent homemade ice cream. The classic route uses the frozen ice cream maker attachment, which chills the base while the dasher keeps it moving. That pairing matters because homemade ice cream is not just sweet dairy that happens to freeze. It is a base that freezes gradually while air is worked into it, which is what gives the finished scoop a lighter, smoother texture.

The stand mixer helps because it makes that motion steady. Rather than stirring by hand, pausing, and hoping for the best, you get a consistent churn that encourages a more even freeze. The frozen bowl does the cooling. The dasher keeps the mixture moving. The base thickens bit by bit instead of hardening all at once against the sides.

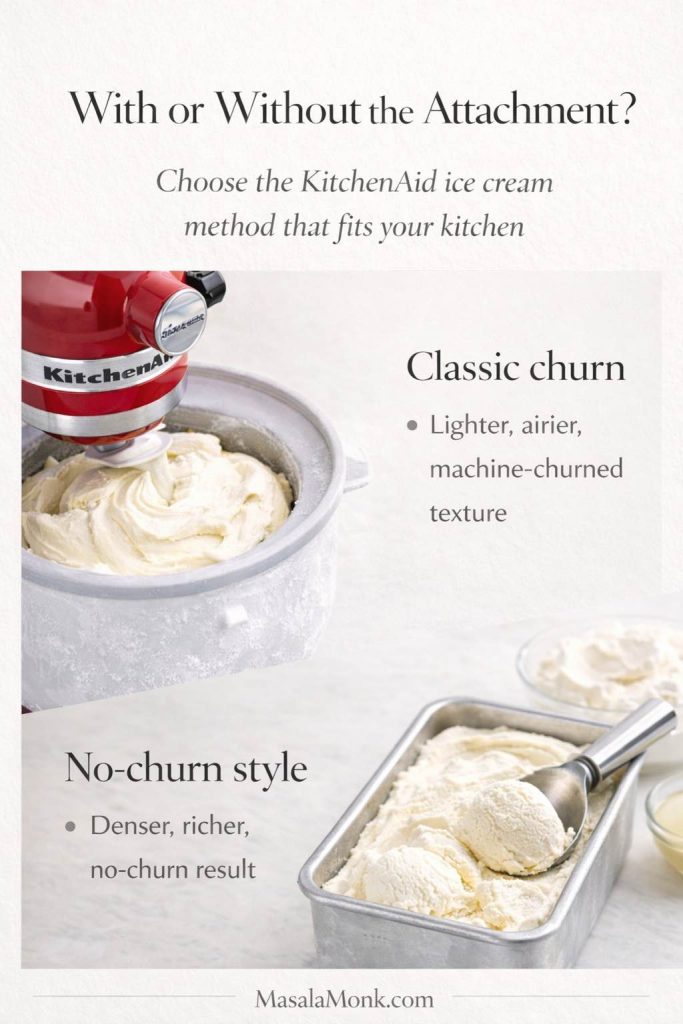
There is also a second path worth taking seriously. You can make ice cream in a stand mixer without the attachment by whipping structure into a rich base and letting the freezer finish the rest. That version is different rather than inferior. It is usually denser, a little less airy, and often richer-feeling when you first scoop it. Still, it can be excellent in its own right, especially for coffee, chocolate ripple, cookie-heavy, or condensed-milk-style versions.

So the honest answer is that a KitchenAid mixer can make two different kinds of frozen dessert. With the attachment, you get a more classic churned result. Without it, you get a simpler no-machine-style frozen dessert that can still be creamy, rich, and extremely satisfying.

Choosing between the attachment and no-attachment method comes down to the texture you want. Use the attachment for a lighter, more classic churned ice cream, or go without it when you want a simpler, richer no-churn style that still freezes beautifully at home.

Why the attachment method feels more like classic ice cream

The attachment method creates the texture most people are imagining when they picture homemade vanilla ice cream. It has more air, a lighter body, and a softer, more traditional churned finish once it sets. If your goal is the closest homemade version to classic scoop-shop texture, the attachment is the better route.

Why the no-attachment method is still worth making

The no-attachment version shines because it lowers the barrier. You do not need the frozen bowl. You do not need to time the churn in the same way. And thankfully, you still get a deeply enjoyable frozen dessert with very little stress. For many kitchens, that practicality matters just as much as perfect texture.

Also Read: Avocado Chocolate Mousse Recipe

What you need to make ice cream with a KitchenAid mixer

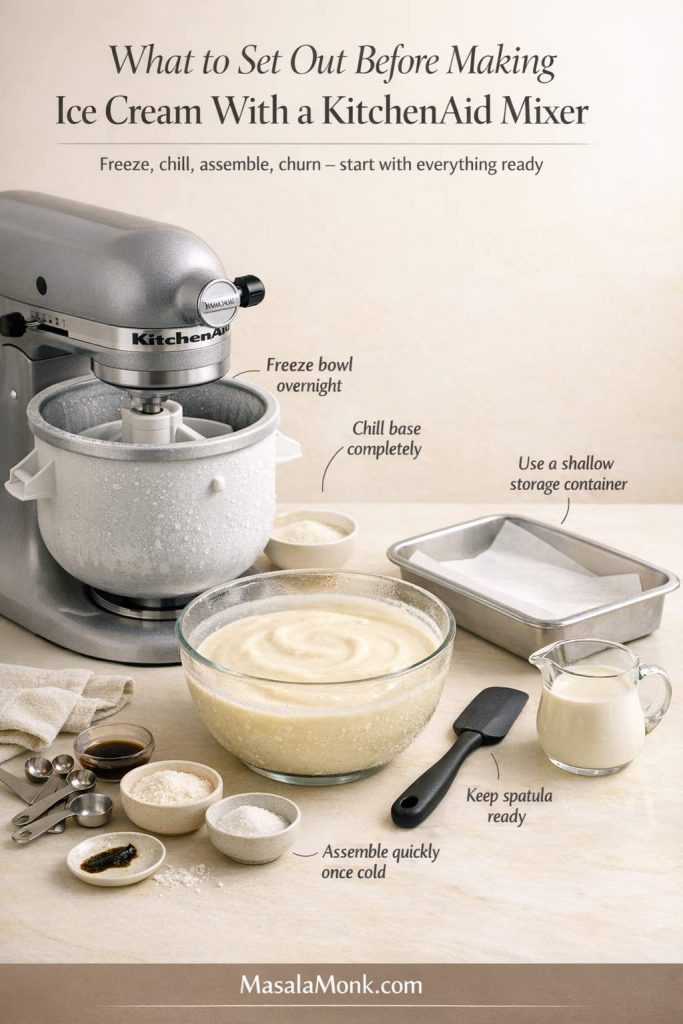
The process feels much calmer when you set everything out before you begin. Once the bowl comes out of the freezer, you do not want to waste precious cold while searching through drawers for a spatula or opening three cupboards looking for the right container.

KitchenAid ice cream setup guide showing a stand mixer with ice cream attachment, chilled vanilla base, spatula, measuring tools, and shallow storage container arranged before making homemade ice cream.
Before you start churning, set out the full KitchenAid ice cream station: a fully frozen attachment bowl, a thoroughly chilled base, the dasher, spatula, measuring tools, and a shallow freezer-safe container for the final set. This setup guide helps readers prep everything in advance so the bowl stays cold, the churn runs smoothly, and homemade ice cream thickens into a better soft-serve texture before freezing to scoopable.

KitchenAid stand mixer and ice cream maker attachment

For the classic method, you need the stand mixer, the freezer bowl, and the dasher. KitchenAid’s own guidance on the ice cream maker attachment is helpful because it reinforces the practical basics: freeze the bowl thoroughly, use a fully chilled base, start the mixer before pouring, and churn until the texture resembles soft serve.

Mixing bowls, whisk, spatula, and measuring cups

You will need a bowl for mixing the base, a whisk to combine it smoothly, measuring cups for consistency, and a spatula for transferring the churned ice cream. Those tools sound ordinary, yet they matter because the easier the setup feels, the more likely you are to stay calm and move quickly once the bowl is out of the freezer.

Freezer-safe container for the final set

A loaf pan works well if you want the batch to firm up quickly. An airtight tub works well if you care more about tidy storage. Either way, a proper freezer-safe container matters because homemade ice cream loses quality more quickly when it sits loosely covered or exposed to too much air.

Ingredients for a KitchenAid ice cream recipe

For most batches, you are looking at heavy cream, whole milk, sugar, vanilla, and salt. Egg yolks come into play if you want a richer custard base. Sweetened condensed milk becomes useful if you want to make ice cream in a stand mixer without the attachment.

Also Read: Falafel Recipe: Crispy Homemade, Air Fryer and Baked Falafel

How the KitchenAid ice cream attachment works

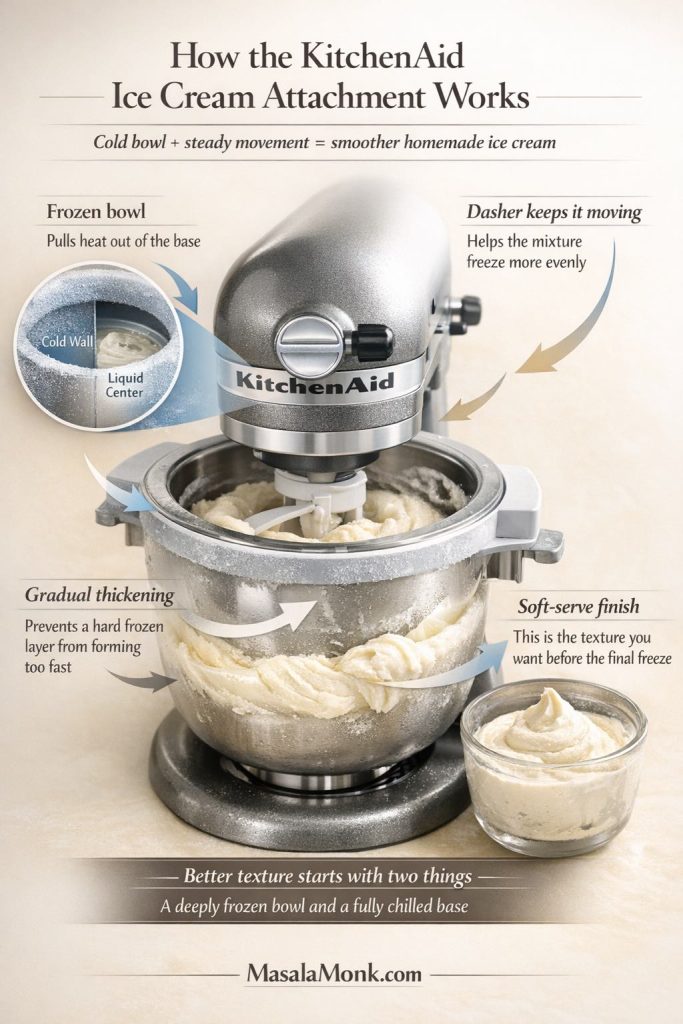
The attachment works because it handles cooling and movement at the same time. The frozen bowl removes heat from the base while the dasher keeps the mixture moving around the cold surface. That movement is what helps prevent the base from freezing into a stiff layer against the edge while the center stays too loose.

This is one of those kitchen details that becomes more obvious once you see it happen. In the early minutes, the base looks only slightly thicker. Then it begins to cling to the bowl more noticeably. Then it starts to look billowy and softly mounded. That gradual transformation is the result of cold and movement working together.

Mechanism explainer for a KitchenAid ice cream maker attachment showing a frozen bowl, moving dasher, gradual thickening of vanilla ice cream base, and the soft-serve texture reached before the final freeze.
Once you understand why the KitchenAid ice cream attachment works, the whole method feels far less intimidating. The frozen bowl pulls heat out of the base while the dasher keeps everything moving, which is exactly what helps homemade ice cream thicken gradually into a smoother, creamier soft-serve texture before the freezer finishes the job.

Why the bowl has to be deeply frozen

A partly frozen bowl causes more disappointment than almost anything else. If the bowl is not fully solid with cold, the base may stay slushy or loose long past the point where it should have thickened. Instead of building toward a soft-serve texture, it just spins and softens. That is why freezing the bowl thoroughly is not a suggestion. It is one of the central conditions of the whole method.

Why the base has to be fully chilled

The base matters just as much. A warm mixture instantly works against the bowl by melting away some of the freezing power you need for the churn. A fully chilled base, on the other hand, begins thickening more quickly and more cleanly. This is also why resting a base in the refrigerator for several hours, or even overnight, tends to improve results.

Why the setup can feel looser than expected

First-time users often expect the freezer bowl and dasher to feel more rigid than they actually do before the mixer starts moving. In reality, the setup can feel a little lighter or less “locked in” than people imagine. That is normal. Once the bowl is properly assembled, the mixer is running, and the base is going in slowly, the system behaves much more confidently.

Also Read: Mango Margarita Recipe (Frozen or On the Rocks)

How long to freeze and chill before you make ice cream with a KitchenAid mixer

Homemade ice cream becomes easier the moment you stop guessing about timing. When you know the usual windows, the process stops feeling uncertain and starts feeling manageable.

KitchenAid ice cream timing guide showing four stages for homemade ice cream: freeze the bowl for 15 to 24 hours, chill the base for several hours or overnight, churn in the mixer for 20 to 30 minutes until soft-serve texture, then freeze again for 2 to 4 hours until scoopable.
Homemade ice cream gets much easier once the timing stops feeling vague. This visual roadmap helps you understand the full KitchenAid rhythm, from freezing the bowl and chilling the base to churning at the right stage and giving the ice cream enough final freezer time to become properly scoopable.

How long to freeze the KitchenAid ice cream bowl

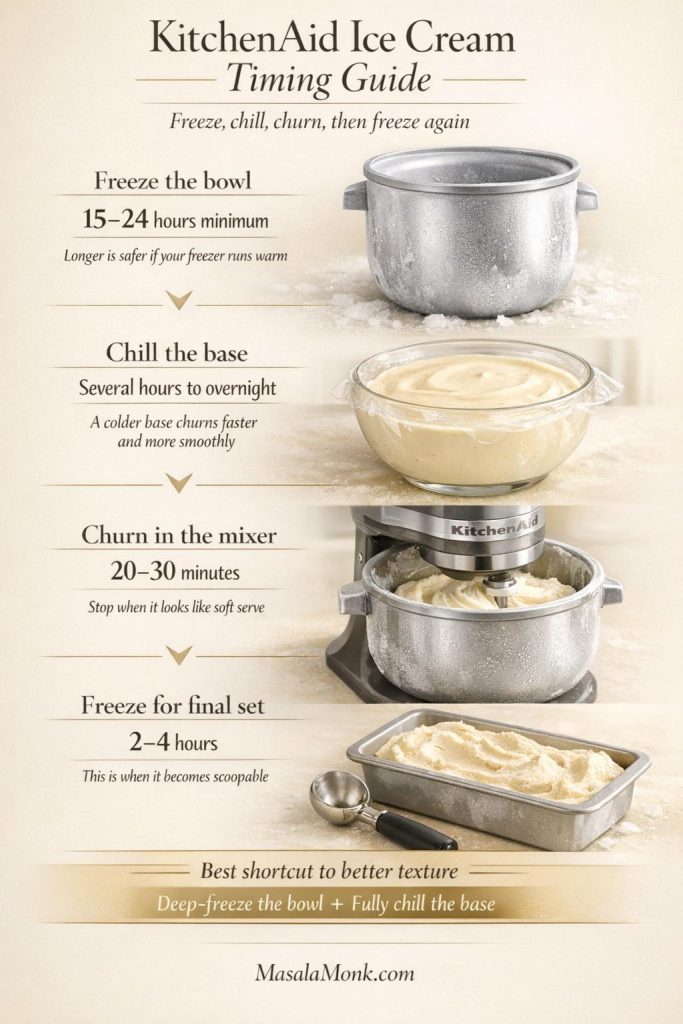
Freeze it overnight at minimum. Longer is usually safer, especially if your freezer gets opened often or tends to run warmer than ideal. The bowl needs deep, even cold, not just “it feels cold enough” cold.

How long to chill the base

For an eggless base, several hours in the refrigerator is a reasonable minimum. Overnight is even better. For a custard base, overnight chilling is especially valuable because the texture becomes more settled as well as colder. That extra time helps the churn behave more smoothly.

How long to churn in a KitchenAid mixer

Once the bowl and base are both properly cold, many batches reach soft-serve texture in about 20 to 30 minutes. If you find yourself waiting far beyond that while the base still looks loose, the issue is usually not a lack of patience. It is usually a temperature problem somewhere in the setup.

How long to freeze after churning

Freshly churned ice cream is typically soft, airy, and spoonable. If that is the texture you want, you can absolutely enjoy it right away. However, if you want a firmer, more scoopable result, it usually needs another 2 to 4 hours in the freezer.

Also Read: Sourdough Pizza Dough Recipe (Crispy Crust & Easy Pizza Base)

Best ingredients for a KitchenAid ice cream recipe

A good KitchenAid ice cream recipe is not just about the machine. It is also about balance. The ingredients determine whether the final texture feels creamy, too hard, too soft, icy, or dense.

Ingredient balance guide for a KitchenAid ice cream recipe showing heavy cream, whole milk, sugar, salt, vanilla extract or paste, and a smooth homemade ice cream base with notes on texture, flavor, and scoopability.
A good homemade ice cream base is really a balance question. Cream gives body, milk keeps the mixture from feeling too heavy, sugar helps the texture stay softer in the freezer, salt wakes up flavor, and vanilla shapes the whole character of the batch long before the churn even begins.

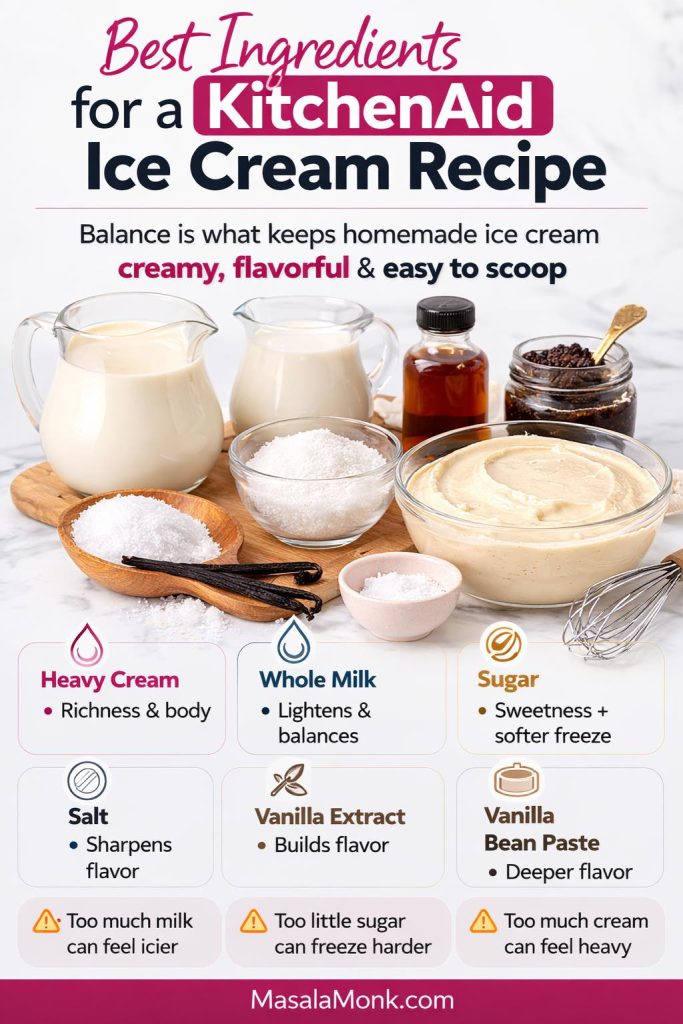
Heavy cream vs milk in homemade ice cream

Heavy cream brings richness, smoothness, and body. Whole milk lightens the base enough so it does not feel overly heavy or greasy. Together, they create the kind of balance most home cooks want. Too much milk can push the batch toward iciness. Too much cream can make it feel almost heavy rather than silky.

Why sugar matters for more than sweetness

Sugar does much more than make ice cream taste sweet. It also affects how the mixture freezes, which is why cutting it too aggressively can lead to ice cream that hardens too much or feels dry and stubborn to scoop.

Why a pinch of salt improves the whole batch

Salt is easy to underestimate. Yet a small pinch sharpens vanilla, deepens chocolate, rounds out caramel notes, and keeps the whole dessert from tasting flat. It does not announce itself. It just makes the rest of the flavors feel more awake.

Vanilla extract vs vanilla bean paste

Vanilla extract works beautifully and keeps things easy. And then vanilla bean paste adds a slightly richer aroma and a more luxurious feel, especially in a pure vanilla batch. If vanilla is the whole point, paste can make the result feel more special. If vanilla is simply the base for stronger mix-ins, extract is often all you need.

Also Read: Balti Paneer Gravy (Restaurant-Style, Creamy + Bold Recipe)

Easy vanilla ice cream with a KitchenAid mixer

Vanilla is the best place to begin because it lets the method stay visible. There is nothing distracting you from the texture, the timing, or the way the base changes during the churn.

Vanilla ice cream guide for a KitchenAid mixer showing the ice cream attachment, eggless vanilla base ingredients, and key success cues like freezing the bowl, chilling the base, and churning to soft-serve stage.
Vanilla is the best place to learn the KitchenAid method because it lets you focus on the cold-and-churn rhythm without extra distractions. Once the bowl is fully frozen, the base is thoroughly chilled, and the churn stops at the soft-serve stage, the freezer can take over and turn a simple base into a much smoother, more confident first batch.

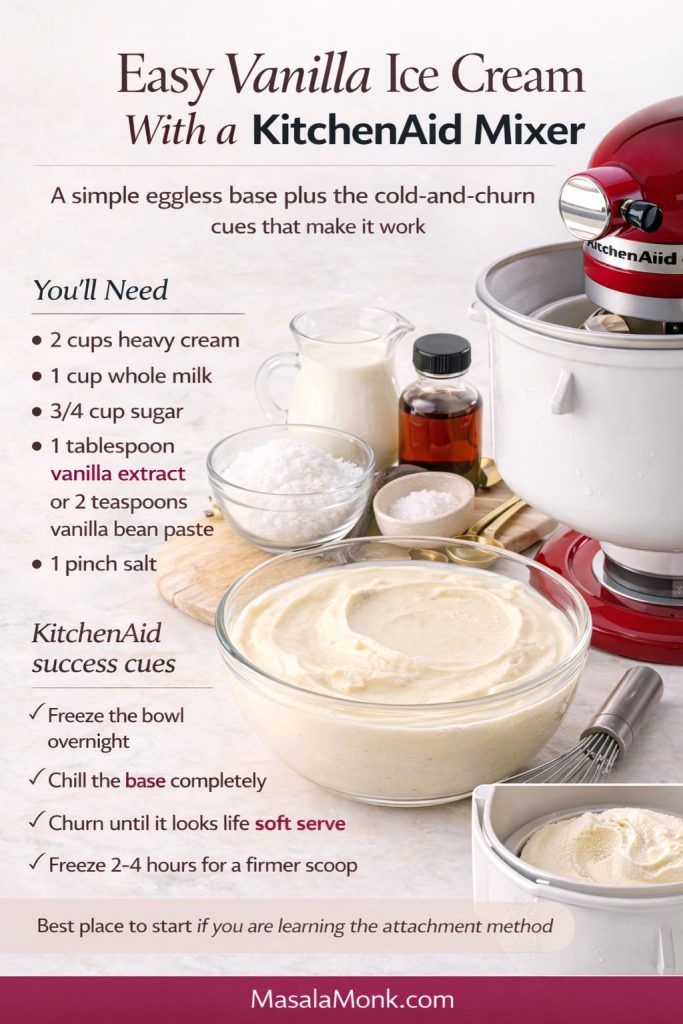
Eggless vanilla ice cream with a KitchenAid mixer

For an easy vanilla batch, use:

  • 2 cups heavy cream
  • 1 cup whole milk
  • 3/4 cup sugar
  • 1 tablespoon vanilla extract or 2 teaspoons vanilla bean paste
  • 1 pinch salt

Whisk the ingredients together until the sugar is mostly dissolved, then chill the mixture thoroughly. This is the simplest version to make and the easiest one to build on later with other flavors.

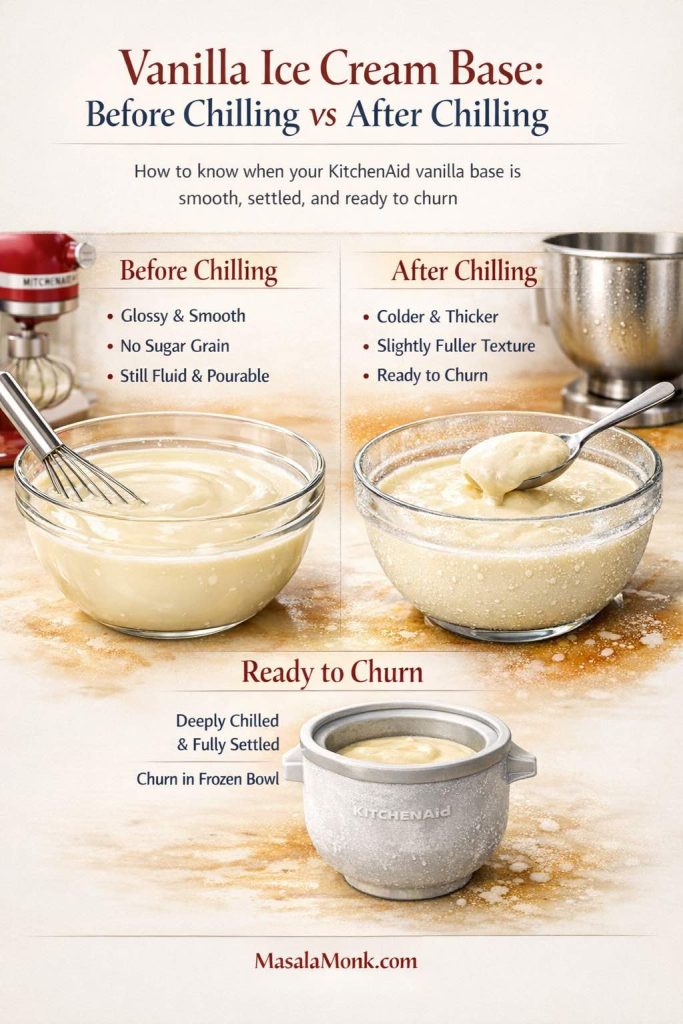
What the eggless base should look like before chilling

Before chilling, the mixture should look glossy, smooth, and fully combined. It should not look separated or visibly grainy. If you still see stubborn sugar crystals, keep whisking a bit longer.

What the eggless base should feel like after chilling

After chilling, the base should feel distinctly colder and a little fuller on the spoon, even though it is still liquid. It should smell clean and creamy rather than thin or flat. That cold, settled feeling is one of the signs that it is ready to churn properly.

Also Read: Mojito Recipe (Classic) + Ratios, Pitcher, Mocktail & Easy Variations

Custard-style vanilla ice cream with a KitchenAid mixer

If you want a richer batch with more body and a softer-feeling scoop, the custard route is worth the extra effort.

Custard-style vanilla ice cream guide for a KitchenAid mixer showing egg yolks, cream, milk, sugar, vanilla, a cooked custard base, and key cues for tempering, cooking, chilling, and churning.
The custard route adds a little more work, yet it rewards you with a fuller, silkier scoop that feels noticeably richer on the spoon. Gentle heat, slow tempering, and a properly chilled base matter here because the goal is not a thick pudding, but a smooth custard that churns into a softer, more luxurious ice cream.

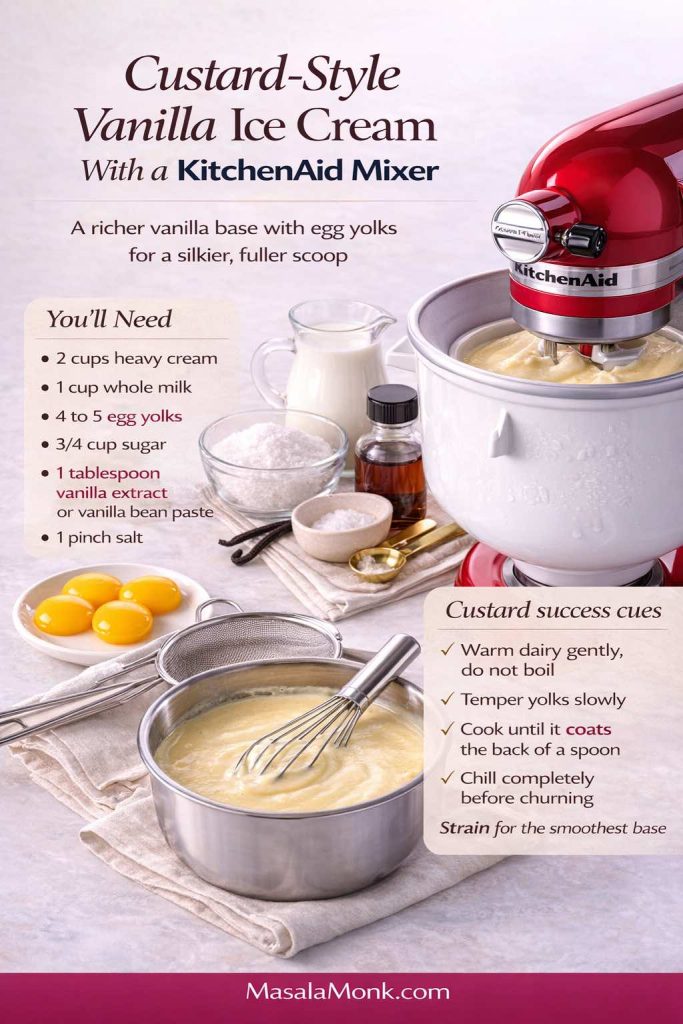
Custard-style vanilla ice cream ingredients

Use:

  • 2 cups heavy cream
  • 1 cup whole milk
  • 4 to 5 egg yolks
  • 3/4 cup sugar
  • 1 tablespoon vanilla extract or vanilla bean paste
  • 1 pinch salt

How to make the custard base

Warm the milk and cream gently until hot but not boiling. In another bowl, whisk the yolks and sugar until combined. Slowly pour in some of the warm dairy while whisking so the yolks temper rather than scramble. Then return everything to the pan and cook gently until the mixture thickens enough to coat the back of a spoon. Strain it, cool it, and then chill it thoroughly before churning.

What the custard base should feel like

A good custard base feels smooth, lightly thickened, and silky rather than heavy. Once chilled, it often feels more settled and richer than the eggless version. That extra richness carries through into the finished scoop.

Vanilla ice cream base guide showing before chilling, after chilling, and ready-to-churn texture cues for a KitchenAid mixer, including smooth glossy base, fuller chilled base, and a fully frozen attachment bowl.
One of the easiest ways to improve homemade ice cream is to stop guessing at the base stage. Before chilling, the mixture should look glossy, smooth, and fully combined. After chilling, it should feel colder, calmer, and slightly fuller, which is exactly what helps the KitchenAid churn start more cleanly and produce a better soft-serve texture.

Also Read: Ravioli Recipe Reinvented: 5 Indian-Inspired Twists on the Italian Classic

Eggless vs custard: which KitchenAid ice cream recipe should you choose?

The better choice depends on what kind of dessert you want rather than on some absolute hierarchy.

Comparison card for KitchenAid ice cream bases, showing eggless vanilla ice cream on one side and custard vanilla ice cream on the other, with visual cues for easier lighter texture versus richer silkier texture.
If you want the easiest path, start with the eggless base. If you want a richer, silkier scoop with a more classic dessert feel, the custard base is worth the extra step.

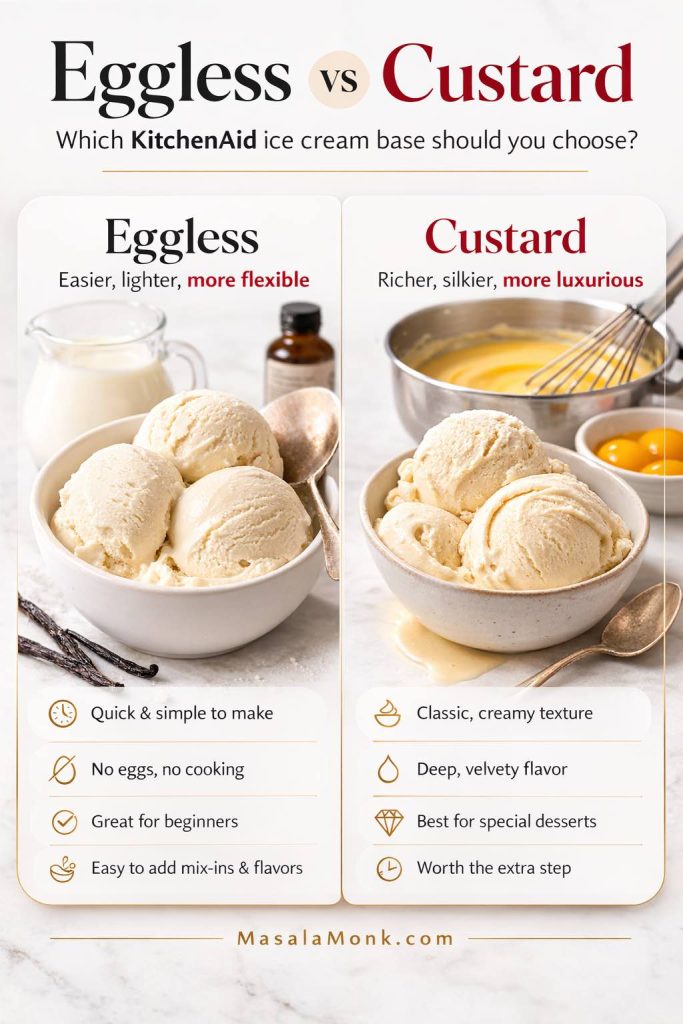
Choose the eggless version when you want ease

If you want something simple, flexible, and quick to prepare, the eggless base is ideal. It is especially good for batches where mix-ins, swirls, or syrups will provide much of the personality.

Choose the custard version when texture matters most

If you want a batch that feels more luxurious even before you add anything else, the custard route is the better fit. It gives the ice cream a rounder, fuller body and a more classic rich-dessert feel.

Neither version is a compromise

That distinction is important. The eggless version is not the “lesser” one. It is simply lighter, simpler, and often better for variation-heavy batches. The custard version is richer and more indulgent. They serve different moods.

If you enjoy creamy chilled desserts more generally, MasalaMonk’s no-bake banana pudding and mango shrikhand show how satisfying that richness can be in completely different formats.

Also Read: Croquettes Recipe: One Master Method + 10 Popular Variations

Before you churn: five habits that make a KitchenAid ice cream recipe work

The strongest batches are usually the product of a few simple habits rather than special tricks.

KitchenAid ice cream success checklist showing five habits for smoother homemade ice cream: freeze the bowl long enough, chill the base completely, do not overfill the bowl, start the mixer before pouring, and stop at the soft-serve stage.
Great homemade ice cream usually comes down to a few simple habits done well. This quick KitchenAid checklist helps you avoid the most common mistakes before and during churning, so the bowl stays cold, the base thickens more cleanly, and the finished texture turns out smoother and more dependable.

Freeze the bowl long enough

A partly frozen bowl weakens the whole churn. If there is one thing to overdo slightly, it is freezer time for the bowl.

Chill the base completely

A base that is merely cool instead of deeply cold often leads to a sloppier churn and a less confident final texture.

Do not overfill the bowl

The mixture needs room to move as it churns. Crowding the bowl slows down the freezing process and makes the texture less even.

Start the mixer before pouring the base

This helps the base begin freezing and moving at the same time rather than pooling in one place.

Stop at the soft-serve stage

This is one of the most important ideas in the entire method. Freshly churned ice cream should look like soft serve, not like a hard-packed freezer tub. The freezer finishes the job later.

Also Read: How to Make a Flax Egg (Recipe & Ratio for Vegan Baking)

Soft-serve stage vs scoop-ready stage

This distinction deserves extra attention because it solves one of the most common points of confusion.

Comparison guide for KitchenAid ice cream texture stages, showing soft-serve ice cream in the mixer attachment bowl on one side and scoopable vanilla ice cream in a loaf pan on the other, to explain what homemade ice cream should look like after churning and after freezing.
This KitchenAid ice cream texture guide shows the difference between soft-serve stage and scoopable stage, so you know when the churn is finished, when the freezer still needs to do the rest, and what a properly set homemade vanilla ice cream should look like.

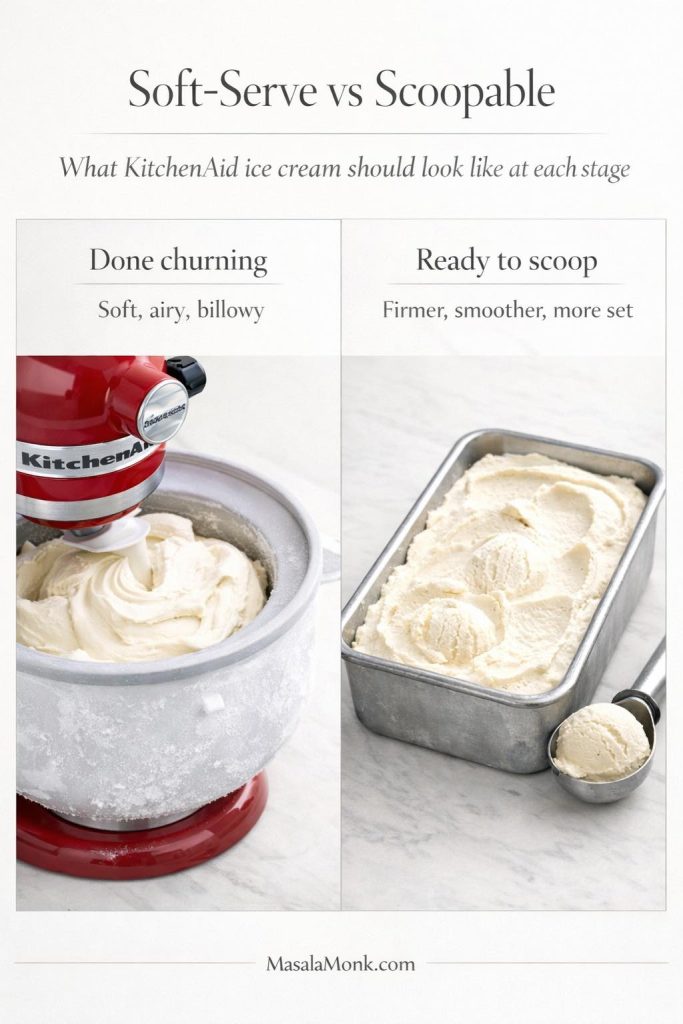
What done churning looks like

Done churning means the ice cream is airy, softly mounded, and able to hold visible lines from the dasher. It should still be soft. It should still look spoonable. And it should feel thick and creamy, not stiff.

What done churning does not look like

Done churning does not mean dense, hard, or fully scoop-ready. If you are waiting for the mixture to look like a freezer tub while it is still in the machine, you are asking the churn to do work that belongs to the post-churn freeze.

What scoop-ready looks like

Scoop-ready comes later. After a few hours in the freezer, the soft-serve texture settles into a firmer, calmer structure. The ice cream feels more stable, the scoop cuts more cleanly, and the shape holds better in the bowl.

Also Read: Pork Tenderloin in Oven (Juicy, Easy, 350°F or 400°F) Recipe

How to make ice cream with a KitchenAid mixer step by step

Once the prep is done, the actual method is refreshingly straightforward.

Step-by-step guide for how to make ice cream with a KitchenAid mixer, showing four stages: freezing the attachment bowl, chilling the vanilla ice cream base, churning to soft-serve in the mixer, and freezing again until scoop-able.
This step-by-step KitchenAid ice cream guide shows the full process at a glance: freeze the bowl, chill the base, churn to soft-serve, then freeze again until scoop-able for a smoother homemade vanilla ice cream texture.

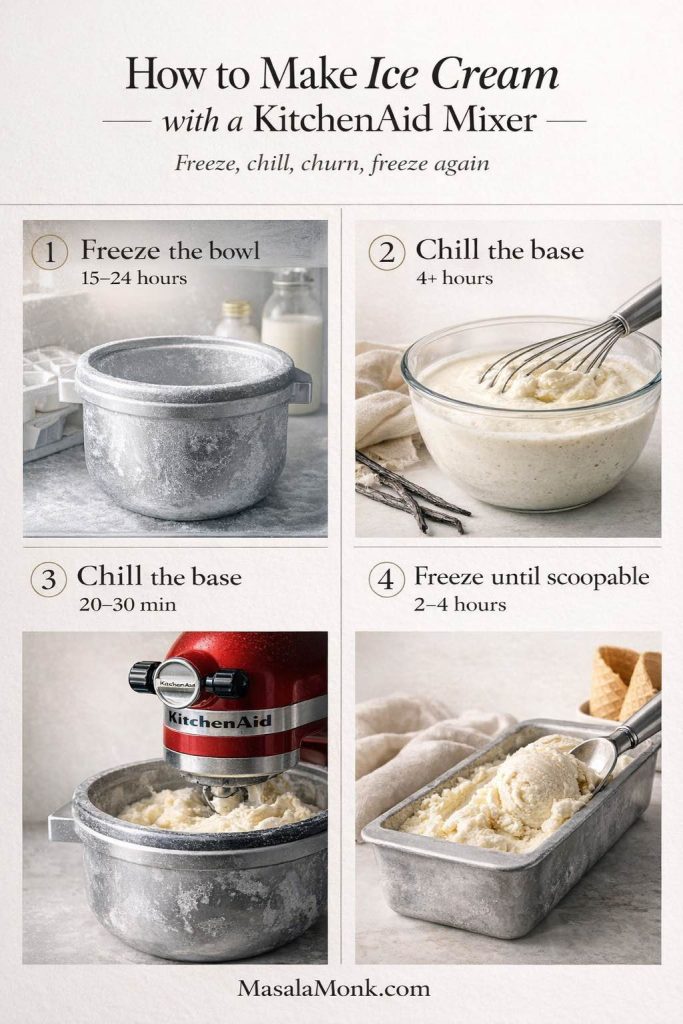
Step 1: Freeze the KitchenAid bowl

Place the bowl in the coldest part of your freezer and leave it there until fully solid.

Step 2: Make and chill the base

Prepare the eggless or custard base and chill it thoroughly. Do not rush this step.

Step 3: Assemble the KitchenAid ice cream attachment

Fit the frozen bowl and attach the dasher. Work with a little purpose so the bowl stays as cold as possible.

Step 4: Start the mixer and pour in the cold base

Turn the mixer to low and pour in the chilled base slowly. Let it churn until the mixture reaches soft-serve texture.

Step 5: Add mix-ins near the end

If you are using chopped cookies, nuts, chips, or brittle, add them only after the base has already thickened.

Step 6: Freeze for a firmer scoop

Transfer the churned batch to a chilled airtight container, cover it well, and freeze until scoopable.

Also Read: Chicken Pesto Pasta (Easy Base Recipe + Creamy, One-Pot, Baked & More)

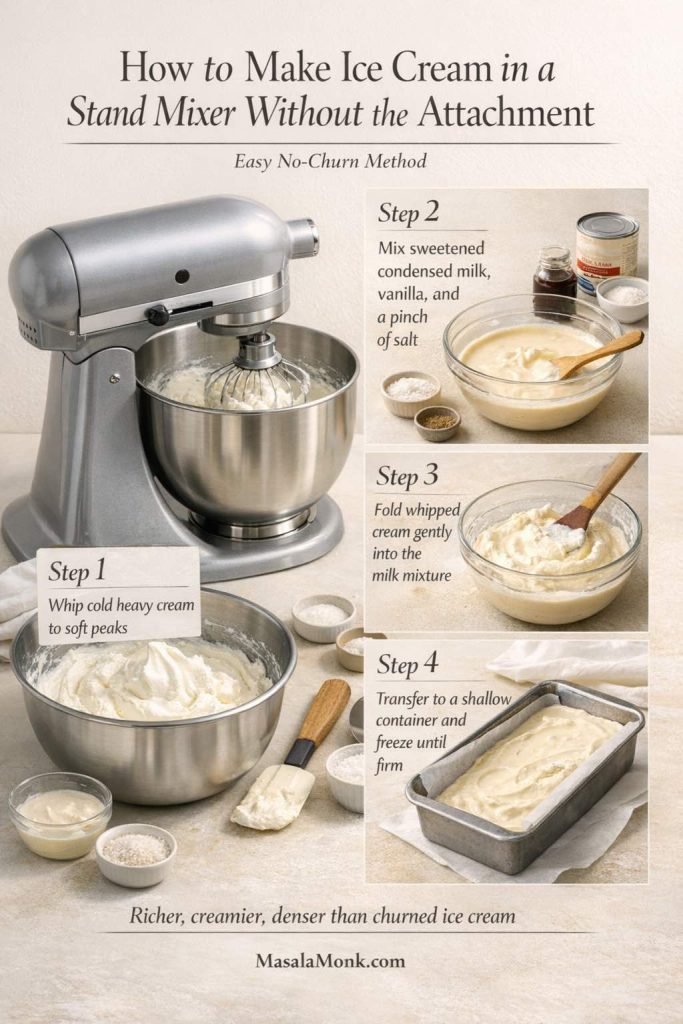
How to make ice cream in a stand mixer without the attachment

This version is not just a backup plan. In some kitchens, it is the more practical and more realistic route.

Step-by-step no-attachment stand mixer ice cream guide showing whipped cream, sweetened condensed milk mixture, gentle folding, and transfer to a shallow container to freeze until firm.
If your kitchen does not have the ice cream maker attachment, this fold-and-freeze method is the practical alternative to keep in your back pocket. It trades some airy churned texture for a richer, fuller body that works especially well with bold flavors and mix-ins.

Why the no-attachment version works

Instead of freezing the base while it churns, this method builds body first and freezes second. The mixer helps whip air into a rich base, and the freezer sets that structure into something creamy and sliceable or scoopable, depending on how long it rests.

A simple no-attachment method

Whip 2 cups of cold heavy cream to soft peaks. In a separate bowl, stir together 1 can of sweetened condensed milk, vanilla, and a pinch of salt. Fold the whipped cream gently into the condensed milk mixture in several additions. Then transfer everything to a loaf pan or airtight container and freeze until firm.

How to fold the mixture without deflating it

Use a spatula. Scoop from the bottom and fold the mixture over itself gently rather than stirring in circles. The goal is to keep the whipped cream airy while combining everything thoroughly.

Also Read: Slow Cooker Pork Tenderloin (Crock Pot Recipe) — 3 Easy Ways

Best flavors for no-attachment ice cream in a stand mixer

Some flavor directions fit the no-attachment method especially well.

Best and worst flavor directions for no-attachment ice cream, showing which flavors suit the richer fold-and-freeze method best, including coffee, cookies and cream, caramel, chocolate, and nutty swirls, plus less suitable options like delicate vanilla, watery fruit-heavy mixes, light floral flavors, and thin syrups.
Not every flavor behaves equally well in no-attachment ice cream. This guide shows which flavor directions work best with the richer, denser fold-and-freeze method and which ones can taste muted, icy, or less defined after freezing. Use it to choose bolder, more rewarding combinations such as coffee, cookies and cream, caramel swirls, chocolate, and nutty mix-ins when making homemade ice cream without the KitchenAid attachment.

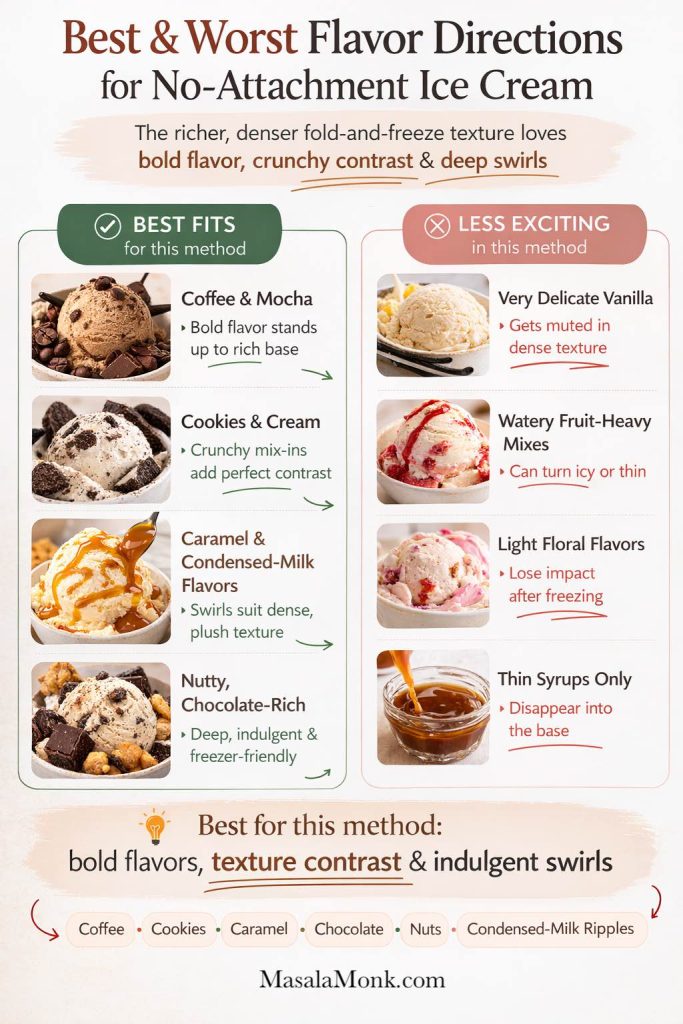
Coffee and mocha flavors

Espresso powder, coffee concentrate, and cocoa pair beautifully with the richer, denser feel of this style.

Cookie-heavy flavors

Cookies and cream, chocolate biscuit crumble, and other crumbly mix-ins work especially well because the base already leans indulgent.

Caramel and condensed-milk-friendly versions

Chocolate ripple, caramel swirl, and toasted nut additions all feel at home here.

Storage for no-attachment ice cream

Store it the same way you would churned ice cream: tightly covered in an airtight container. It also benefits from a short rest at room temperature before scooping. If condensed milk desserts appeal to you more broadly, MasalaMonk’s sweetened condensed milk fudge recipes are a fitting companion read.

Also Read: Keto Mocktails: 10 Low Carb, Sugar Free Recipes

What texture should homemade ice cream look like at each stage?

Learning to read the texture is one of the most useful parts of getting better at homemade ice cream with a stand mixer.
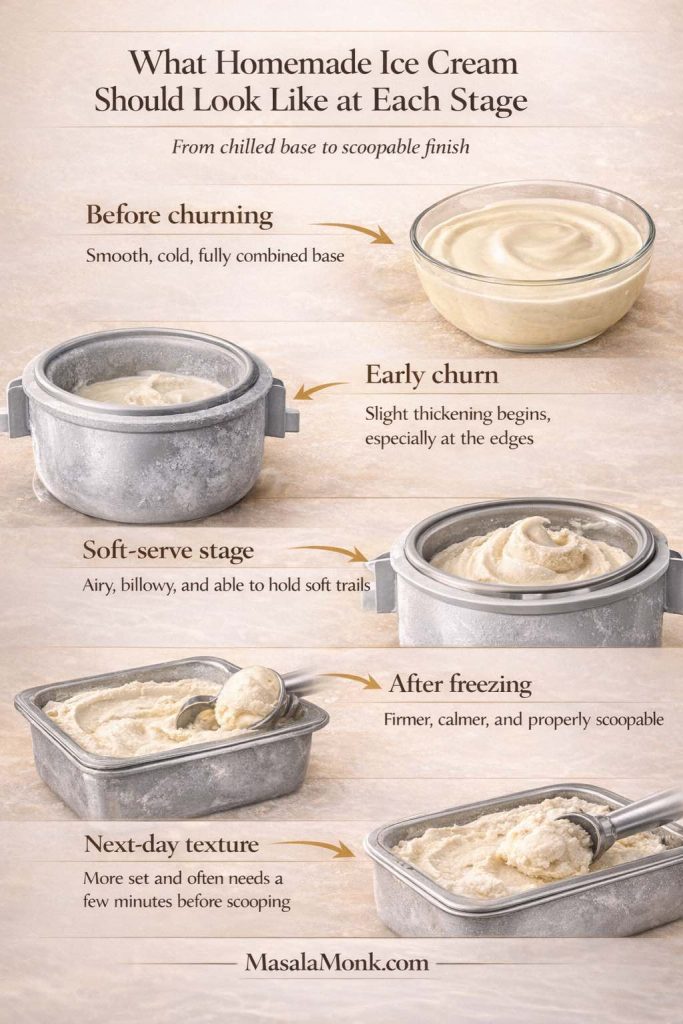
Homemade ice cream texture guide for a KitchenAid mixer showing five stages: smooth chilled base before churning, early churn thickening at the edges, soft-serve stage after churning, scoopable texture after freezing, and firmer next-day texture.
One of the easiest ways to make better homemade ice cream is to learn what the texture should look like at each stage. This visual KitchenAid guide helps you see the difference between a properly chilled base, early thickening during the churn, the soft-serve stage where the mixer should stop, and the firmer scoopable texture that develops after freezing.

Before churning

The base should be smooth, cold, and fully combined.

Early churn stage

The mixture only thickens slightly at first, especially around the edges. That is normal.

Soft-serve stage after churning

This is the key visual cue. The ice cream should look airy, billowy, and thick enough to hold trails.

Scoopable stage after freezing

After a few hours in the freezer, the texture should become firmer and easier to scoop.

Next-day texture

By the next day, homemade ice cream is often firmer than commercial tubs. That is normal. It usually just means it needs a few minutes at room temperature before serving.

Also Read: Keto Mocktails: 10 Low Carb, Sugar Free Recipes

When to add mix-ins to a KitchenAid ice cream recipe

Mix-ins are where the recipe becomes unmistakably yours.

Adding mix-ins at the right stage is one of the easiest ways to keep homemade ice cream creamy instead of muddy, clumpy, or uneven. This KitchenAid mix-ins guide helps you see which chunky additions belong near the end of churning, which delicate pieces should be folded in afterward, and which sauces or fruit swirls are best layered into the container for clearer ribbons and better texture.
Homemade ice cream mix-ins guide showing which additions go in during late churn, which should be folded in after churning, and which should be layered into the container for the best texture and swirl definition.

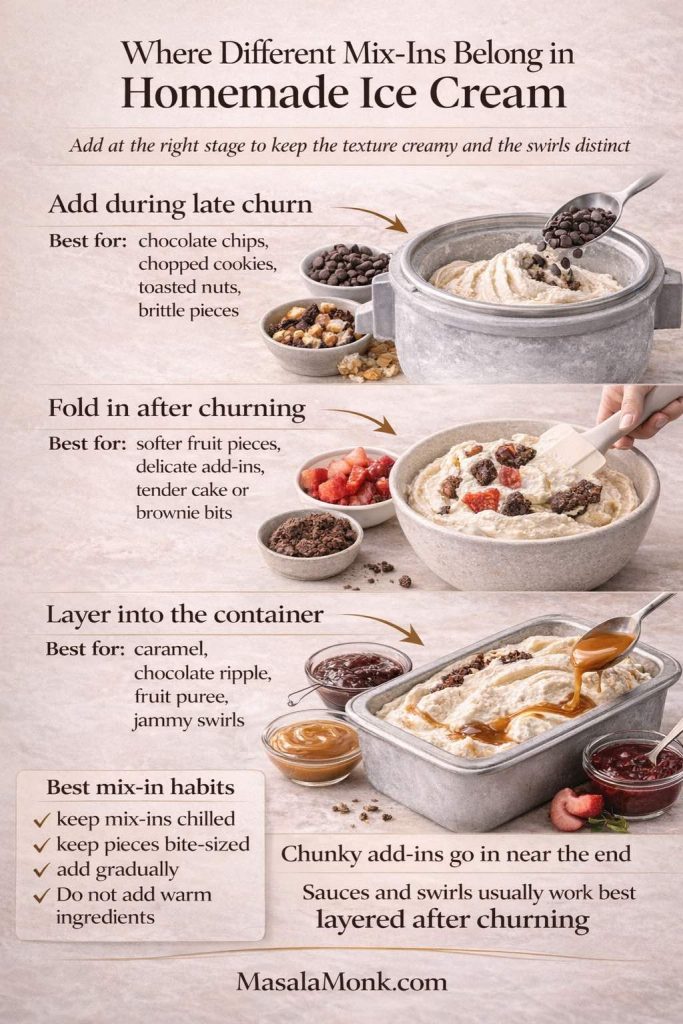
Chocolate chips, chopped cookies, and nuts

Add them near the end of the churn, once the base is already thick. For a richer cookies-and-cream direction, chopped pieces from MasalaMonk’s double chocolate chip cookies work beautifully.

Fruit swirls and puree ribbons

Fruit is better folded in at the end or layered into the container. That way, the ribbons stay distinct instead of disappearing into the whole batch.

Syrups, caramel, and chocolate ripples

Layer these into the container instead of fully mixing them through. A little homemade chocolate syrup can turn a simple chocolate or vanilla batch into something far more dessert-like.

How to keep mix-ins from clumping

Chill them first, keep them bite-sized, and add them gradually. Warm additions can soften the base and muddy the texture.

Also Read: Crock Pot Pork Chops and Sauerkraut (No Dry Chops Recipe)

KitchenAid ice cream troubleshooting

A good troubleshooting section can save your next batch even when it cannot save the current one.

When homemade ice cream misses the mark, the texture usually tells you what went wrong. Use this quick guide to spot whether your batch needs a colder bowl, a better-balanced base, more resting time before scooping, or a smaller and better-chilled churn.

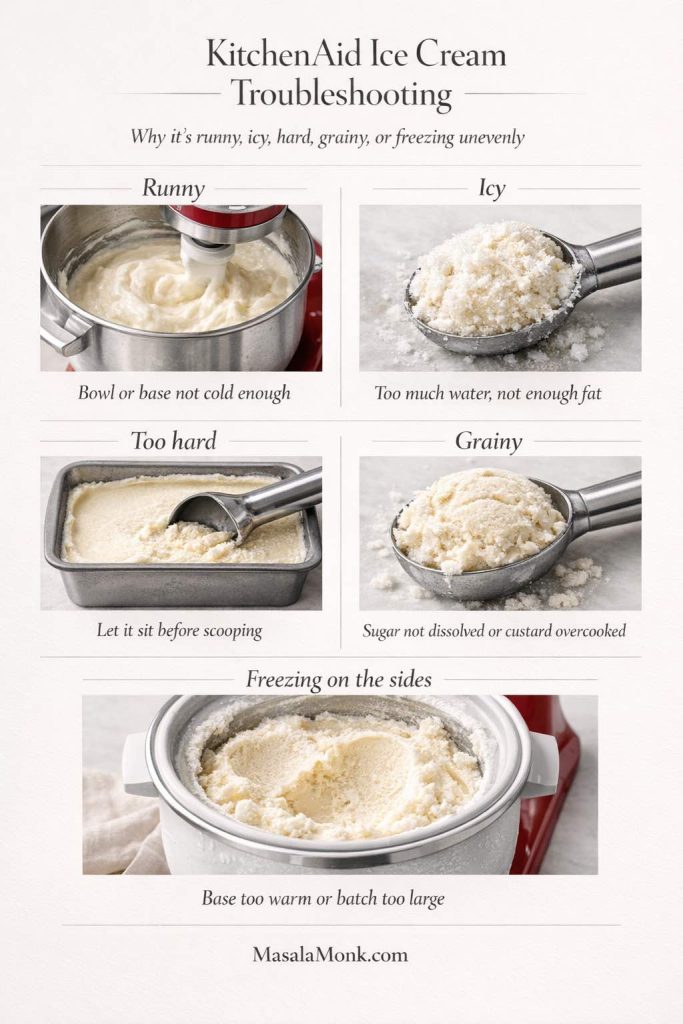
Why is my KitchenAid ice cream still runny?

Check the bowl freeze time first. Then check whether the base was fully chilled. After that, look at the batch size. If all of those seem right, consider whether the formula itself is too sugar-heavy or contains ingredients that soften the freeze too much.

Why did my homemade ice cream turn icy?

Look first at water-heavy ingredients, low fat content, and insufficient chilling. Fruit additions can also cause trouble if they bring too much moisture into the base without enough balance.

Why is homemade ice cream too hard after freezing?

Some firmness is normal. Let it sit out for 10 to 15 minutes before scooping. If every batch is rock hard, rethink the sugar and fat balance.

Why is my KitchenAid ice cream grainy or sandy?

Undissolved sugar can cause this. Overcooked custard can cause it too. So can poorly blended flavor additions.

KitchenAid ice cream troubleshooting guide showing common homemade ice cream problems including bowl thawing too fast, runny or icy texture, and rough or dense texture, with fixes related to bowl freeze time, base temperature, batch size, and churning.
When homemade ice cream goes wrong, the texture usually points to the cause. This KitchenAid troubleshooting guide helps you quickly spot whether the problem started with a bowl that was not cold enough, a base that needed more chilling, an overfilled churn, or timing that pushed the batch past its best soft-serve stage.

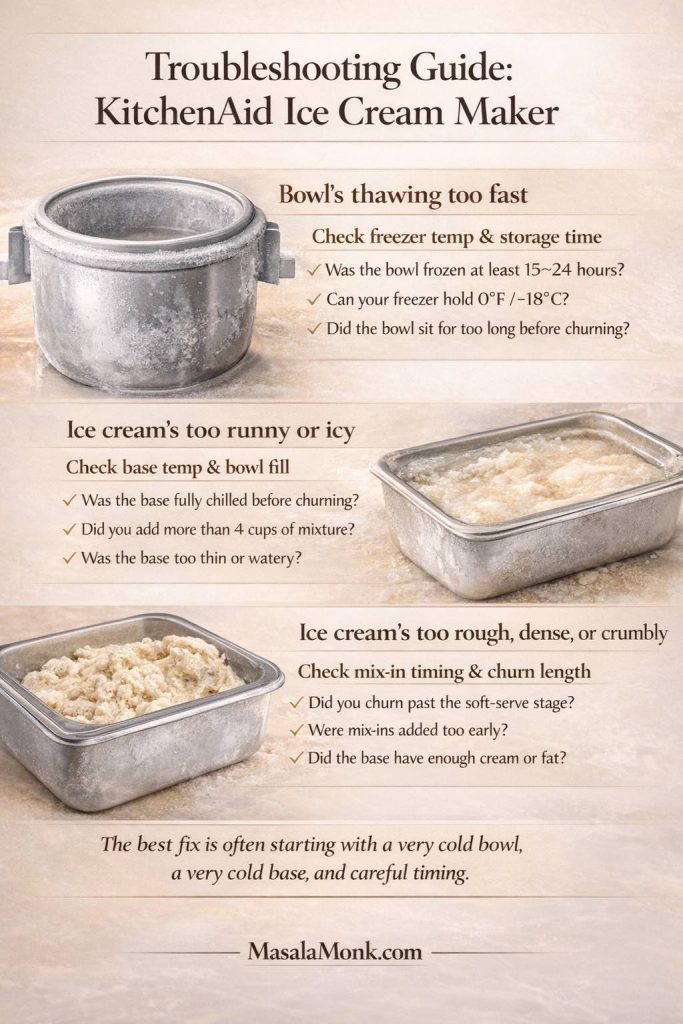
Why is it freezing at the sides but not in the middle?

That usually means the bowl is doing its job, but the base is too warm or too abundant for the churn to keep up.

Why does the ice cream feel buttery or greasy?

Over-churning or too much cream can push the texture away from creamy and toward buttery.

Why does the attachment click or feel awkward?

Sometimes a clicking or slipping sound means the churn is actually finished rather than broken. The mixture may simply have thickened as far as it should inside the bowl.

Also Read: Masterclass in Chai: How to Make the Perfect Masala Chai (Recipe)

How to store homemade ice cream made in a KitchenAid mixer

Storage changes the experience more than many people expect.

Storage guide for homemade ice cream, showing how to use a shallow freezer-safe container, cover the surface to reduce ice crystals, enjoy the best texture in the first few days, and let the ice cream rest briefly before scooping.
Good storage is what keeps homemade ice cream from turning needlessly hard or icy. A shallow container, surface cover, and a short rest before scooping all help preserve a smoother texture and a more enjoyable homemade scoop.

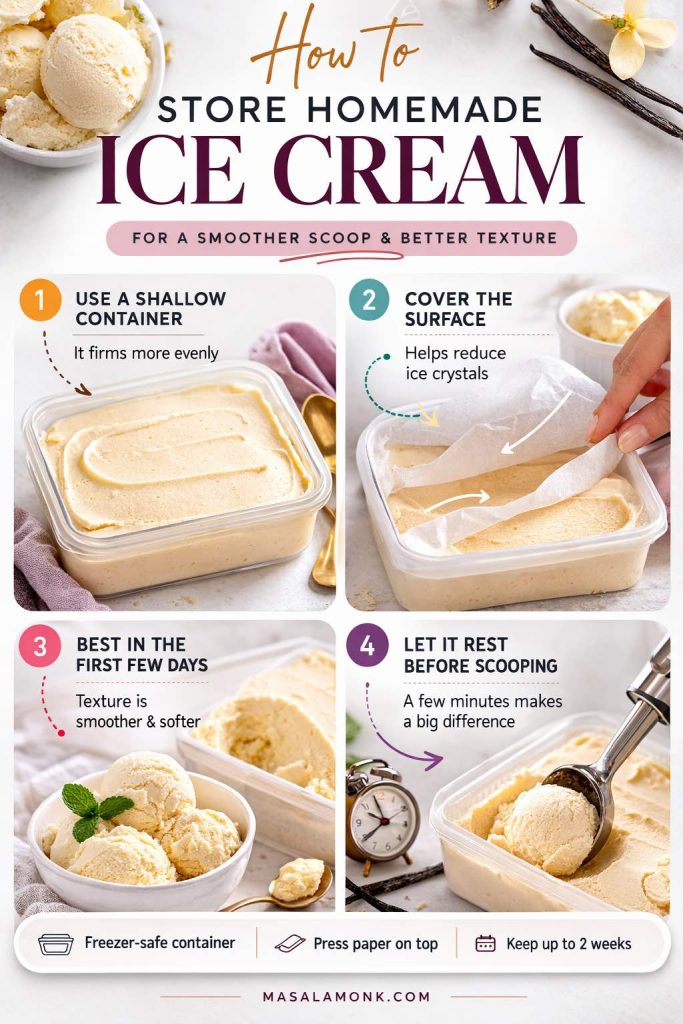
Best container for homemade ice cream

Use a shallow airtight container when possible. Pressing parchment or plastic wrap directly on the surface can help reduce ice crystals.

When the texture is at its best

Homemade ice cream is often most pleasant within the first few days, once it has set properly but before it has spent too long in the freezer.

Why homemade ice cream changes in storage

Without commercial stabilizers, it tends to become firmer and slightly drier over time.

How to soften it before scooping

Let it rest for a few minutes at room temperature before serving. That one habit can make a dramatic difference.

For more chilled dessert inspiration, MasalaMonk’s mango chia pudding ideas and no-bake banana pudding bring a different kind of make-ahead pleasure.

Also Read: Air Fryer Salmon Recipe (Time, Temp, and Tips for Perfect Fillets)

Best flavor variations for homemade ice cream with a stand mixer

Once you know how to make ice cream with a KitchenAid mixer, the base becomes a starting point rather than a finish line.

KitchenAid ice cream flavor guide showing how one vanilla base can become six homemade ice cream flavors: chocolate, mango, coffee, cookies and cream, chai, and caramel ripple.
Once the vanilla base makes sense, homemade ice cream opens up quickly. This KitchenAid flavor guide shows how one reliable base can branch into chocolate, mango, coffee, cookies and cream, chai, and caramel ripple, so you can start with the method once and then build a whole series of flavors from it.

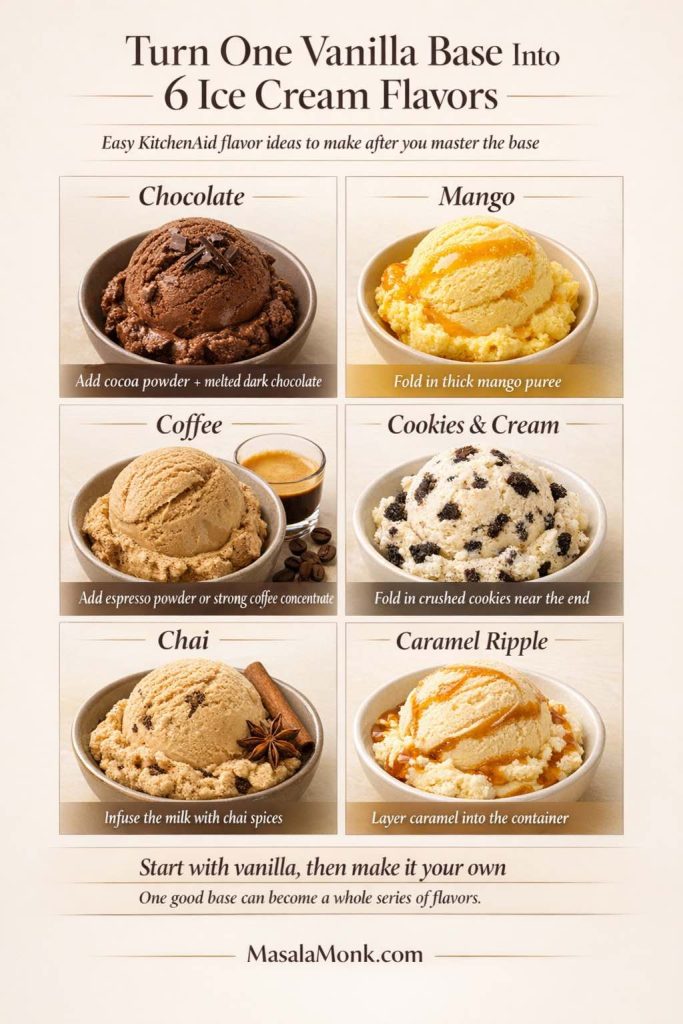
Chocolate ice cream with a KitchenAid mixer

Add cocoa powder and melted dark chocolate for a richer, deeper batch.

Mango ice cream with a KitchenAid mixer

Fold mango puree into the base for a fruit version that adds body as well as flavor. MasalaMonk’s mango dessert recipes are a lovely follow-on if you want to stay in that direction.

Coffee ice cream with a stand mixer

Espresso powder or strong coffee concentrate turns vanilla into an easy grown-up dessert. If you like the overlap between frozen desserts and coffee, MasalaMonk’s guide to cold brew, iced latte, frappe, and affogato pairs beautifully here.

Cookies and cream with a KitchenAid ice cream recipe

Crushed cookies folded in near the end remain one of the easiest crowd-pleasers.

Chai ice cream with a KitchenAid mixer

Infuse the milk with chai spices before making the base. For a stronger sense of spice balance, MasalaMonk’s masala chai masterclass is an excellent companion.

Also Read: Tapas Recipe With a Twist: 5 Indian-Inspired Small Plates

More ways to serve homemade ice cream with a stand mixer

A good batch deserves more than one way to be enjoyed.
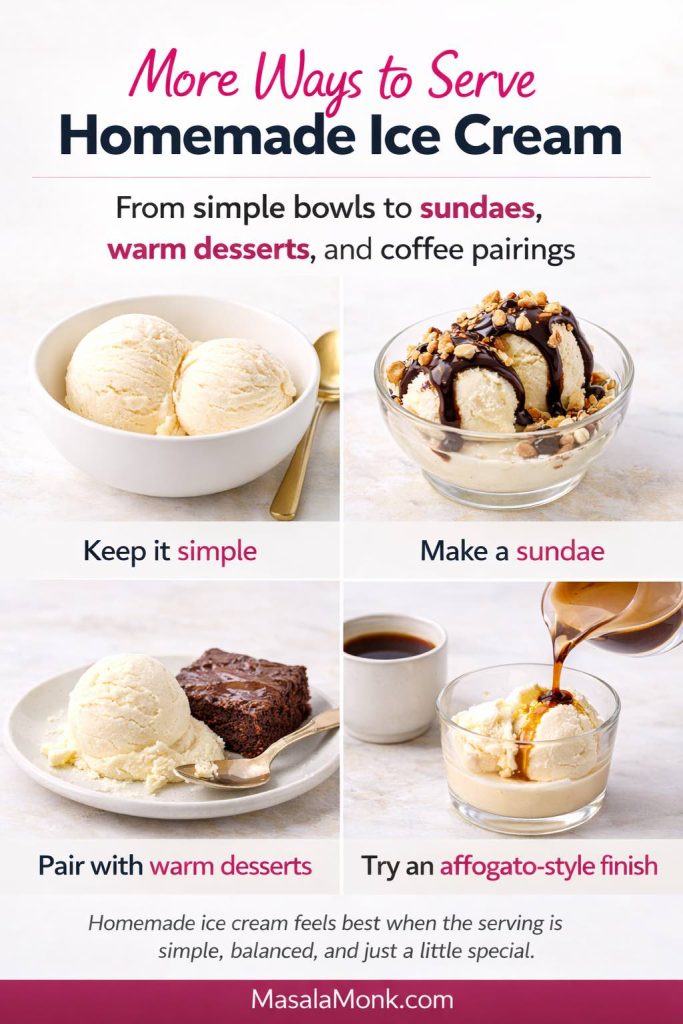
Serving ideas guide for homemade ice cream showing a simple bowl, a sundae, a scoop with warm brownie, and an affogato-style coffee pairing.
Once the batch is ready, the real fun is deciding how to serve it. A simple bowl lets the texture speak for itself, while sundaes, warm dessert pairings, and affogato-style coffee finishes turn the same homemade ice cream into something more generous, layered, and dinner-party worthy.

Serve it simply

A small bowl and a spoon are often enough, especially for the first taste when the texture is still the main thrill.

Turn it into a sundae

Chocolate syrup, toasted nuts, cookie crumbs, or a ripple of caramel can make the scoop feel much more abundant.

Pair it with warm desserts

Brownies, blondies, fruit crisps, and warm cookies all welcome a scoop of homemade ice cream beautifully.

Try coffee-dessert pairings

Vanilla or coffee ice cream served affogato-style can feel especially satisfying after dinner.

Also Read: Air Fryer Donuts Recipe (2 Ways): Glazed Homemade Donuts + Biscuit Donuts

A simple vanilla recipe summary

For the shortest version to return to often, whisk together:

  • 2 cups heavy cream
  • 1 cup whole milk
  • 3/4 cup sugar
  • 1 tablespoon vanilla extract
  • 1 pinch salt

Chill the base thoroughly. Freeze the bowl until fully solid. Assemble the attachment, start the mixer on low, and pour in the cold base. Churn until it looks like soft serve. Add mix-ins near the end if you like. Then freeze the mixture in a covered container until scoopable.

Final thoughts on how to make ice cream with a KitchenAid mixer

How to make ice cream with a KitchenAid mixer becomes much less mysterious once you understand the rhythm. Freeze the bowl thoroughly. Chill the base completely. Start the mixer before pouring. Churn to the soft-serve stage. Freeze for the final set. That is the pattern.

KitchenAid ice cream rhythm recap card showing the full homemade ice cream method: freeze the bowl, chill the base, start the mixer before pouring, churn to soft-serve stage, freeze for the final set, and turn the base into different flavors like chocolate, mango, coffee, cookies and cream, or chai.
Once the rhythm makes sense, homemade ice cream with a KitchenAid mixer feels far less complicated. This visual recap brings the full method together in one place, from freezing the bowl and chilling the base to churning at the right stage, freezing for the final set, and using the same base to branch into other flavors once the vanilla version feels familiar.

More importantly, learning how to make ice cream with a KitchenAid mixer gives you a method rather than just one dessert. The same base can become vanilla, chocolate, mango, coffee, cookies and cream, or chai. It can be eggless and easy or richer and custard-based. It can be churned with the attachment or adapted into a no-attachment frozen dessert when that is the version your kitchen allows.

That flexibility is part of the real pleasure. Homemade ice cream tastes fresher, feels more personal, and gives you more control over sweetness, richness, and texture than most store-bought tubs. Start with vanilla, let the first batch teach you the texture, and then come back for the variations. Once that first good scoop lands in a bowl, the whole process tends to feel much simpler and much more enjoyable than it ever sounded at the beginning.

Also Read: Paloma Recipe: 12 Paloma Cocktail Drinks

FAQs

1. Can you make ice cream with a KitchenAid mixer?

Yes, you can make ice cream with a KitchenAid mixer, and the easiest method uses the ice cream maker attachment with a fully frozen bowl and a thoroughly chilled base. Once the mixer starts churning, the base gradually thickens until it reaches a soft-serve texture, after which it needs extra freezer time for a firmer scoop. Even if you do not have the attachment, a no-attachment version is still possible with whipped cream and a sweetened base, although the texture will be denser and less airy.

2. How do you make ice cream with a KitchenAid mixer?

To make ice cream with a KitchenAid mixer, freeze the ice cream bowl until deeply cold, chill the ice cream base completely, assemble the attachment, start the mixer on low, and pour the base in slowly while the dasher is moving. Then churn until the mixture looks thick and airy like soft serve. Afterward, transfer it to a covered container and freeze it until scoopable. In most cases, the real key is not complexity but temperature. The colder the bowl and base, the better the result.

3. How long do you churn ice cream in a KitchenAid mixer?

Most homemade ice cream takes about 20 to 30 minutes to churn in a KitchenAid mixer when the bowl is fully frozen and the base is properly chilled. If the mixture is still very loose after that point, the problem is often that the bowl was not cold enough or the base went in too warm. By comparison, a well-chilled base in a deeply frozen bowl usually thickens much more confidently.

4. How long should you freeze the KitchenAid ice cream bowl?

The KitchenAid ice cream bowl should usually be frozen overnight at minimum. In many kitchens, longer is even better, especially if the freezer is opened often or runs a little warm. A bowl that is only partly frozen can lead to a runny or slushy batch, so it is better to give it more time rather than less.

5. Why is my KitchenAid ice cream not thickening?

If your KitchenAid ice cream is not thickening, the most common causes are a bowl that was not frozen long enough, a base that was not chilled completely, or a batch that was too large for the bowl to handle efficiently. Sometimes the formula can also be part of the problem, especially if it contains too much sugar or alcohol. Generally speaking, the first thing to check is temperature, since that is where most churning problems begin.

6. Why is my homemade ice cream runny after churning?

Freshly churned homemade ice cream should be soft, but it should not be pourable. If it is still runny, the bowl may have warmed up too quickly, the base may have gone in too warm, or the recipe may need better balance. On the other hand, if it resembles soft serve and holds soft mounds, that is normal. At that stage, it still needs freezer time before it becomes firm enough to scoop neatly.

7. Why is homemade ice cream hard after freezing?

Homemade ice cream often freezes harder than store-bought ice cream because it contains fewer stabilizers and commercial texture enhancers. Even so, that does not mean anything went wrong. Usually, it just needs a few minutes at room temperature before scooping. If it becomes rock hard every single time, however, the base may need a little more sugar or fat for better balance.

8. What should homemade ice cream look like when it is done churning?

When homemade ice cream is done churning, it should look like soft serve. It should be thick, airy, softly mounded, and able to hold visible lines from the dasher. By contrast, it should not look like a fully frozen tub straight from the freezer. That firmer, scoop-ready texture comes later, once the churned ice cream has rested in the freezer for a few more hours.

9. Can you make ice cream in a stand mixer without the ice cream attachment?

Yes, you can make ice cream in a stand mixer without the ice cream attachment, although the method is different. Instead of freezing while churning, you whip structure into the base first and then let the freezer finish the work. This version is often made with whipped cream and sweetened condensed milk. As a result, it tends to be denser than churned ice cream, yet it can still be very creamy and satisfying.

10. What is the best base for vanilla ice cream in a KitchenAid mixer?

The best base depends on what kind of result you want. An eggless base is easier, faster, and lighter, which makes it ideal for beginners and for batches with mix-ins. Meanwhile, a custard-style base made with egg yolks is richer, silkier, and more luxurious. Therefore, the better choice is not universal. It depends on whether you want convenience or a deeper dessert-style texture.

11. Can you make eggless ice cream with a KitchenAid mixer?

Yes, eggless ice cream works very well in a KitchenAid mixer. In fact, it is one of the easiest ways to start because the base is simple to prepare and still gives you a creamy result when the bowl and mixture are fully cold. Eggless vanilla ice cream is especially useful if you plan to add cookies, fruit, chocolate, coffee, or other strong flavor additions later.

12. When do you add mix-ins to a KitchenAid ice cream recipe?

Mix-ins are best added near the end of churning, once the ice cream base has already thickened. At that point, the texture is strong enough to hold chopped cookies, chocolate chips, nuts, or fruit pieces without losing too much structure. If you add them too early, they can sink, clump, or interfere with the freezing process before the base is ready.

13. How do you store homemade ice cream made in a KitchenAid mixer?

Homemade ice cream should be stored in a shallow, airtight container in the freezer. For even better protection, press parchment paper or plastic wrap directly onto the surface before sealing the lid. That helps reduce ice crystals and keeps the texture smoother. Then, before serving, let the ice cream sit out for a few minutes so it softens enough to scoop more easily.

14. What flavors work best when you make ice cream with a KitchenAid mixer?

Vanilla is the best place to begin because it teaches the method clearly, but once you know how to make ice cream with a KitchenAid mixer, many flavors work beautifully. Chocolate, coffee, mango, cookies and cream, chai, caramel, and fruit swirls are all excellent options. In particular, flavors with strong texture contrast or rich mix-ins tend to feel especially rewarding in homemade ice cream.

15. Is homemade ice cream better with a custard base or without eggs?

Both versions can be excellent, although they create slightly different results. A custard base made with egg yolks usually tastes richer and feels silkier, while an eggless base is cleaner, easier, and more flexible. Consequently, the choice depends on whether you want a more luxurious scoop or a more straightforward recipe that is easy to adapt.

16. Why does my KitchenAid ice cream freeze on the sides but stay soft in the middle?

This usually happens when the bowl is freezing the outer edge of the base but the mixture overall is too warm or too abundant for the churn to keep up. In that case, the solution is often to chill the base longer, use a slightly smaller batch, or freeze the bowl more thoroughly next time. Once those conditions improve, the freezing tends to become much more even.

17. Can you make chocolate ice cream with a KitchenAid mixer?

Yes, chocolate ice cream works beautifully in a KitchenAid mixer. You can make it by adding cocoa powder, melted chocolate, or both to the base. For a deeper result, using both often gives the best flavor because cocoa adds intensity while melted chocolate adds body. After that, the method stays almost exactly the same as vanilla: chill the base thoroughly, churn to soft-serve stage, and freeze until scoopable.

18. Is making ice cream in a KitchenAid mixer worth it?

Yes, making ice cream in a KitchenAid mixer is worth it if you enjoy homemade desserts and want more control over flavor, sweetness, richness, and texture. Once the method becomes familiar, it stops feeling complicated and starts feeling dependable. Besides that, it gives you the freedom to make flavors and mix-in combinations that are much harder to find in ready-made tubs.

Posted on 1 Comment

19 Essential Kitchen Tools That Make Cooking Easier

Photorealistic magazine-style cover showing premium kitchen tools on a dark stone surface: chef’s knife on a wooden cutting board with a microplane grater and bowl of flaky salt, titled “Kitchen Tools That Change Everything,” with MasalaMonk.com in the footer.

The fastest way to enjoy cooking more often isn’t a complicated recipe or a brand-new appliance—it’s having kitchen tools that remove friction from the moment you start. When the board stays put, the knife cuts cleanly, the pan heats predictably, and the utensils feel right in your hand, dinner stops feeling like a task you brace for. Instead, it becomes something you can begin without a deep breath first.

This guide is inspired by Joshua Weissman’s idea that the right tools make cooking smoother and more fun (his original “19 tools” video is here: 19 Tools To Make Cooking Easier). At the same time, what you’re reading is a fresh, independent list—built for real home kitchens, realistic storage, and tools you’ll actually use on a random Tuesday.

Along the way, you’ll also see how to choose between materials—stainless steel, silicone, wood—plus how to avoid the common trap of buying a huge utensil set that looks impressive but spends most of its life in a drawer.


Kitchen tools that earn their space every day

An “essential” isn’t just popular—it earns a permanent spot because it reliably does at least one of these things:

  • makes prep faster without making you rush
  • improves results in a way you can taste (or see)
  • reduces mess and cleanup
  • makes cooking safer by improving control
  • multitasks so you own fewer items overall
  • stays pleasant to use, even after months of washing
Infographic titled “Kitchen Tools: What to Buy First” on a dark countertop, listing a 5-step buying order (knife and cutting board; tongs, spatula, whisk; skillet, pot, sheet pan; thermometer and kitchen scale; microplane, box grater, salad spinner) with photoreal tools and MasalaMonk.com in the footer.
If you’re upgrading your kitchen tools slowly, this order gives the biggest impact first—without drawer clutter. Start with a great knife + stable cutting board, then add a few daily-use utensils, dependable cookware, and finally the accuracy tools (thermometer + kitchen scale) that make results repeatable. Save this checklist for the next time you’re tempted by a giant utensil set.

So, rather than collecting gadgets, this kitchen tools list focuses on workhorses—items that quietly lift everything you cook.

Also Read: Sourdough Starter Recipe: Make, Feed, Store & Fix Your Starter (Beginner Guide)


Kitchen tools list for prep: quicker chopping, cleaner counters, better flavor

1) A chef’s knife: kitchen tools that make prep feel effortless

A comfortable chef’s knife isRcy feels like an extension of your hand. Once you have that, chopping becomes calmer: onions are neater, herbs slice instead of bruising, and prep stops stealing your energy before cooking even begins.

If you want a practical reference for what makes a chef’s knife “worth it” (balance, handle comfort, blade shape), Epicurious has a helpful test-driven overview. The best chef’s knife (Epicurious)

2) A paring knife: kitchen tools for precise, small cuts

Even with a great chef’s knife, a paring knife is the tool that handles detail work without awkward angles—peeling ginger, trimming strawberries, coring tomatoes, cutting small garnishes, or cleaning up blemishes on produce.

It’s also the knife that helps you slow down and be precise when precision matters.

3) A cutting board: kitchen tools that keep prep stable and tidy

A big, stable cutting board makes prep feel organized. It gives you room to keep a “clean side” and a “scrap side,” and it prevents that cramped, messy feeling that happens when you’re constantly sweeping ingredients off the edge.

Infographic titled “Knife + Cutting Board Safety” listing five prep tips (damp towel under board, claw grip, keep tip down, one board one job, scraps to a bowl) with a chef’s knife on a wooden cutting board over a blue towel and a small “scraps” bowl, plus MasalaMonk.com in the footer.
These small knife and cutting board habits make prep faster, safer, and noticeably less messy. A damp towel stops slipping, the claw grip protects fingertips, and a scraps bowl keeps your workspace clear so cooking feels calmer from the first chop. Save this quick safety checklist—once it becomes routine, weeknight prep gets easier immediately.

If your board slides, add a damp towel underneath. That tiny change makes chopping more confident immediately.

4) Kitchen shears (cooking shears)

Kitchen shears are the underrated shortcut. You’ll reach for them for herbs, scallions, parchment, packaging, and quick trimming jobs that feel silly to do with a knife. They’re also useful for snipping bacon into pieces, cutting pizza, or trimming poultry skin.

If you’re comparing options, terms like “poultry shears,” “kitchen scissors,” and “kitchen shears” often point to the same category—what matters most is that they feel sturdy and easy to clean.

5) Bench scraper

A bench scraper is the tool that keeps your counter tidy while speeding up prep. Scoop chopped vegetables into a bowl in one clean motion. Scrape flour off the counter. Portion dough. Even if you don’t bake often, it turns “lots of tiny moves” into “one quick move.”

It’s one of those kitchen tools that feels minor until it becomes automatic.

6) Best vegetable peeler (for you)

A good peeler is smooth, fast, and predictable. With the right one, you peel carrots or potatoes without removing half the vegetable. It also makes quick ribbons for salads and garnishes with almost no effort.

You’ll see a few common styles—Y-peelers and swivel peelers are the big two. Whichever you choose, look for the same thing: a peeler that glides without chattering, feels secure in your hand, and doesn’t slip when the veggie is wet.

7) Best cheese grater (and why a box grater wins)

A box grater earns its spot because it does more than cheese. It shreds carrots for salads, potatoes for hash browns, chocolate for desserts, and even onion when you want it to melt into a sauce.

It’s also a reliable “texture tool”—it gives you consistent pieces that cook consistently, which often means better browning and more even seasoning.

8) Microplane / fine grater

If you want big flavor with minimal effort, this is the move. Citrus zest brightens everything. Garlic and ginger become smooth instead of chunky. Hard cheeses melt into dishes without gritty bits. Nutmeg becomes a soft, warm finish rather than a loud spice.

A microplane is one of those kitchen tools that quietly makes your cooking taste more intentional.

9) Best mandoline slicer (with safety first)

A mandoline slicer creates uniform slices quickly. Uniform slices cook at the same rate, which means fewer burnt edges and fewer undercooked centers—especially for potatoes, onions, cucumbers, and slaw vegetables.

Still, this tool has one rule: use the guard (or a cut-resistant glove) every time. Even if you’re careful, complacency is what catches people.

10) Salad spinner

A salad spinner is the difference between crisp salad and watery salad. Dry leaves hold dressing, so flavor clings instead of sliding off. It also helps with herbs: spin them dry, then chop—your cutting board stays cleaner, and your herbs stay brighter.

If you’re building a kitchen tools list that supports healthier, faster meals, this one surprisingly earns its place.

Also Read: How to make No-Bake Banana Pudding: No Oven Required Recipe


Kitchen tools for measuring and consistency: fewer guesses, better repeats

Not every meal needs precision. However, repeatable results—especially for sauces, baking, and “signature dishes”—often come from simple measuring tools.

11) Measuring cups

Measuring cups are foundational kitchen tools because they cover both dry and liquid measuring in everyday cooking. You might not measure everything, but you’ll measure often: rice, flour, sugar, milk, broth, and quick batters.

If you prefer a clean aesthetic, you’ll also notice options like white measuring cups or decorative sets. Style is fine—function matters more: easy to read, easy to wash, and comfortable to hold.

12) Measuring spoons

Measuring spoons control the “small but powerful” ingredients—salt, baking powder, vanilla, spices, vinegar, soy sauce. They’re also how you keep a dish balanced when you’re cooking without a recipe.

Once you get used to accurate spoons, you’ll be surprised how often they rescue a sauce from being too salty or too acidic.

13) Best kitchen scale for baking (and for cooking)

A digital kitchen scale makes baking easier because it removes the biggest variable: inconsistent measuring. Flour isn’t packed differently each time. Recipes are simpler to halve or double. Cleanup is lighter because you can weigh directly into one bowl.

Infographic titled “Kitchen Scale (Digital)” showing a digital kitchen scale with a glass bowl of flour and text listing three benefits: weigh flour for better bakes, scale sauces and marinades, and halve or double recipes easily, with MasalaMonk.com in the footer.
A digital kitchen scale is one of those kitchen tools that pays you back fast: more consistent baking, easier scaling for sauces and marinades, and effortless halving or doubling without guesswork. Save this as a reminder—once you start weighing flour, recipes get noticeably more reliable and cleanup often gets simpler too.

King Arthur has a clear explanation of why a scale changes the way baking feels. Why a digital kitchen scale matters (King Arthur Baking)

If you want a natural way to use a scale more often, bread is perfect for it. This internal guide pairs beautifully with a scale-first approach: Sourdough bread recipes

14) Instant read food thermometer (digital thermometer cooking)

A thermometer is the tool that removes the most anxiety per rupee. Chicken breast stays juicy because you stop guessing. Roasts get pulled at the right moment. Leftovers reheat more confidently. Even oil temperature becomes easier to manage.

Infographic titled “Instant-Read Food Thermometer” listing key internal cooking temperatures in °C (chicken/turkey 74°C, ground meat 71°C, fish 63°C, pork/leftovers 63–71°C, steaks 54–63°C) beside a digital instant-read thermometer on a light stone surface, with MasalaMonk.com in the footer.
An instant-read food thermometer is the fastest way to stop guessing and start getting repeatable results—juicy chicken, properly cooked ground meat, and fish that doesn’t dry out. This quick Celsius cheat sheet keeps the key temps in one place, so you can cook with confidence on busy weeknights. Save it for later (you’ll use it more than you expect).

For safe internal temperatures, keep a reliable chart bookmarked: USDA safe temperature chart or FoodSafety.gov internal temperature chart.

Also Read: Chicken Adobo — Step-by-Step Recipe — Classic Filipino Adobong Manok


Kitchen tools and equipment for cooking: buy workhorses, not clutter

Cookware can be the biggest source of frustration in a kitchen—especially when you have too many pieces that don’t do any one job well. Instead, choose a few dependable items and learn them deeply.

15) A skillet that matches how you cook

One great skillet outperforms five “okay” pans. The right choice depends on what you cook most often:

  • stainless steel for browning and pan sauces
  • cast iron or carbon steel for heat retention and long-term durability
  • nonstick for easy eggs and delicate food (with the understanding it’s a replaceable item over time)
Infographic titled “A Skillet That Matches How You Cook” comparing stainless steel, cast iron/carbon steel, and nonstick skillets, with notes on best uses (browning and pan sauces; searing and heat retention; eggs and delicate food) and MasalaMonk.com in the footer.
Not every skillet cooks the same. This quick guide helps you choose the right skillet for how you cook: stainless steel for browning and pan sauces, cast iron or carbon steel for searing and heat retention, and nonstick for eggs and delicate food. Save it so your next pan upgrade actually fits your weeknight routine—and your cookware lasts longer.

If you’re leaning toward cast iron, this internal post is a strong reality check before you buy: Buying a cast iron skillet? 5 warnings before you invest

If your decision is more about coatings, this breakdown helps: Ceramic vs Teflon (PTFE) cookware

16) A dependable pot (saucepan or Dutch oven)

A good pot is where “real food” happens: dal, rice, pasta, soups, curries, beans, braises, and big batches that turn into leftovers. It also makes sauces calmer because heat is more stable and the bottom is less prone to scorching.

Sauces are the easiest proof that a pot matters. For example: Tomato sauce from fresh tomatoes and Marinara sauce recipe both benefit from steady simmering and easy stirring.

17) Baking tray / rimmed sheet pan

A rimmed sheet pan is one of the most versatile kitchen tools and utensils “adjacent” items you can own. Roast vegetables. Crisp tofu. Bake chicken. Reheat leftovers without turning the stove into a mess. Cook multiple components at once.

If you want a simple one-pan dinner that proves why this tool matters, try: Sheet pan chicken fajitas

18) Mixing bowls (nesting set)

Mixing bowls are a daily-use item that makes everything tidier: toss salad, marinate meat, mix batters, coat vegetables, hold chopped ingredients, and keep your counter organized.

You’ll come across recommendations like “mixing bowls with lids” or “best mixing bowls” in a lot of buying guides. The general idea is the same: bowls that stack neatly, don’t slide around, and wash easily.

19) Wire rack

A wire rack helps food stay crisp by letting steam escape underneath. It also cools baked goods properly, which matters more than people expect—cookies stay snappy, breads don’t turn gummy, and fried foods don’t soften as quickly.

If you want a satisfying use-case, oven bacon is perfect for it: How to cook bacon in the oven


Kitchen tools and utensils you’ll reach for constantly

Cookware handles the heat. Meanwhile, these hand tools handle the workflow—stirring, flipping, scraping, plating, serving, and keeping things clean.

Tongs: the “extra hand”

Tongs are the tool you reach for when you want control without fuss. They flip, toss, grab, and plate without tearing food or poking holes. They’re also excellent for mixing salads, turning roasted vegetables, and serving pasta.

Infographic titled “Tongs: Your ‘Extra Hand’” listing five uses for kitchen tongs—flip without tearing, toss salads and noodles, turn roasting tray vegetables, plate cleanly, and grab hot food—shown with stainless steel tongs holding a broccoli floret on a cutting board, with MasalaMonk.com in the footer.
Good kitchen tongs feel like an extra hand: they flip without tearing, toss salads and noodles fast, handle hot sheet-pan veggies safely, and plate food neatly without juggling forks. Save this quick guide—once you keep a solid pair of tongs within reach, weeknight cooking gets smoother and less messy.

If you see variants like chef tongs, catering tongs, plating tongs, or mini serving tongs, they’re all in the same family. For everyday cooking, choose a pair that feels comfortable and springy, with ends that grip well.

Spatulas: the right one for the job

A spatula is not one thing, which is why kitchens end up with too many. A simpler approach works better:

  • a silicone spatula for scraping bowls and pots clean
  • a sturdy turner for flipping food confidently
Spatulas are where kitchens get cluttered fast—so keep it simple. A silicone scraper spatula handles bowls, batter, and sauces with almost zero waste, while a sturdy turner spatula makes flipping and lifting feel clean and confident. Save this pairing guide for your next kitchen tools upgrade (or the next time you’re tempted by a giant utensil set).

That second category includes slotted turner spatulas, fish spatulas, and thin metal spatulas. The shape matters less than the feeling: it should slide under food easily and feel stable when lifting.

If you cook with nonstick pans, keep a silicone tool for that surface. If you cook with cast iron or stainless steel, a sturdy metal turner can be a joy.

Whisk (including a balloon whisk)

A whisk is a sauce tool as much as it is a baking tool. It smooths gravies, fixes lumpy sauces, emulsifies dressings, and makes eggs more consistent. A balloon whisk is especially helpful when you want volume—whipped cream, airy eggs, or fluffy batters.

This is also where measuring spoons and a whisk pair beautifully: you can build a balanced dressing quickly without dirtying extra gadgets.

Ladle

A ladle is a small tool that instantly makes serving feel cleaner: soups, dal, curry, pasta sauce, stew. It reduces spills and makes portioning simpler, especially when you’re feeding family or serving guests.

Wood ladles, metal ladles, and stainless steel serving utensils all work—choose the material that fits your cookware and how you wash.

Also Read: Sweetened Condensed Milk Fudge: 10 Easy Recipes


Kitchen utensil set: stainless steel, silicone, or wooden cooking utensils?

A kitchen utensil set can be a smart buy, especially when you’re setting up a kitchen or replacing mismatched items. However, the material changes how you cook—and what cookware stays in good shape.

Infographic titled “Kitchen Utensil Set: Choose the Right Material” comparing stainless steel, silicone, and wood kitchen tools, with best uses and care tips, shown on a dark stone background with utensil photos and MasalaMonk.com in the footer.
Choosing a kitchen utensil set is easier when you match the material to your cookware. Stainless steel is ideal for stainless pans and cast iron, silicone protects nonstick and ceramic, and wooden cooking utensils stay comfortable for everyday stirring. Save this quick guide for your next upgrade so you buy the right tools once—and avoid scratches, flimsy spatulas, and clutter.

Stainless steel kitchen utensil set

A stainless steel utensil set is durable, easy to clean, and comfortable for high heat. It feels excellent on stainless steel and cast iron. It also looks “professional,” which is why you will often see people looking for high end kitchen utensils.

That said, stainless can scratch coatings, so if you cook mostly on nonstick, you’ll want to be gentle—or choose silicone for those pans.

Silicone kitchen utensils set

A silicone utensil set is kinder to coated pans and great for scraping thick sauces and batters. It’s also a good fit if you’re building toward “non toxic cooking utensils” and want tools that won’t chip, flake, or expose metal edges against delicate surfaces.

The key is sturdiness. A floppy spatula is frustrating, while a well-built silicone tool becomes a favorite.

Wooden utensil set (wooden kitchen utensil set / wooden cooking utensils set)

Wooden utensils feel warm and comfortable in the hand. They’re gentle on cookware, especially on nonstick or ceramic surfaces. They also stay cooler than metal during long stirring sessions.

If you’re shopping for a wooden utensil set—whether it’s a basic spatula-and-spoon combo or a nicer handmade set—aim for pieces that feel dense, smooth, and well-finished. Olive wood utensils and acacia wood utensils are popular because they’re sturdy, though any well-made wood can work if cared for properly.

Wood does ask for a little respect: wash and dry promptly, and don’t leave wooden spoons soaking in water.

If you want a broader cookware overview that connects tools to materials, this internal guide fits naturally here: How to choose the best cookware for your kitchen

Also Read: Peanut Butter Fudge: Recipes & Guide (8 Methods + Easy Variations)


Kitchen tools for healthier cooking and peace of mind

A lot of what people worry about with kitchen tools comes back to “health” and “safety”—non-toxic materials, coatings that hold up, and utensils that won’t chip, flake, or scratch cookware over time. While no single tool guarantees “healthy,” your choices can reduce common headaches.

Choose tools that don’t create avoidable problems

  • Use a thermometer so you don’t overcook lean proteins into dryness.
  • Use a scale for baking so you’re not adding extra flour and ending up with dense results.
  • Use cookware and utensils that fit your heat level, so you’re not accidentally stressing coatings.
  • Keep a scraping tool that doesn’t damage pans (silicone is helpful here).

If you want a simple anchor point for safe doneness, the USDA safe temperature chart is worth keeping handy.

Also Read: 10 Vegan Chocolate Cake Recipes (Easy, Moist, & Dairy-Free)


Kitchen tools list for cooking faster: how the right tools change weeknights

Kitchen tools matter most when you’re tired and hungry—when you want dinner without turning your kitchen into a disaster zone.

The sheet pan shortcut

A sheet pan makes “one tray, one timer” cooking possible. Roast vegetables while a protein cooks beside them. Reheat leftovers without babysitting the stove. Crisp things quickly.

If you want a simple starting point, Sheet pan chicken fajitas is a great “proof recipe” because it shows how a single pan can carry a full meal.

Infographic titled “The Sheet Pan Shortcut” showing a rimmed sheet pan with roasted chicken, broccoli, and peppers plus tongs and lemon wedges, with four steps for one-tray cooking and MasalaMonk.com in the footer.
This is the fastest way to make weeknight cooking feel easy: one sheet pan, one timer, and a simple order that actually works. Start the veggies first, add protein, then finish with sauce or lemon for big flavor without extra pots. Save this “sheet pan shortcut” for busy nights—and use it anytime you want dinner plus leftovers with minimal cleanup.

The skillet rhythm

A good skillet simplifies cooking because it’s predictable. Once you know how your pan browns onions, you can build meals quickly: sauté aromatics, add vegetables, season well, finish with a sauce or a squeeze of citrus.

Here’s an easy internal skillet example that makes good use of a sturdy pan and tongs: Skillet mushroom and zucchini stir fry

The sauce pot advantage

A dependable pot is what turns “ingredients” into “dinner.” It’s also what makes meal prep feel realistic—one big pot means multiple meals.

If you want sauces that become weekly staples, these internal links are natural fits:


Kitchen planning tools: when layout affects how you cook

Not all “kitchen tools” are handheld. Sometimes, the biggest improvement is planning how your kitchen works—especially if you’re moving into a new home, renovating, or simply reorganizing.

A kitchen planning tool or online kitchen design tool can help you visualize work zones so cooking flows naturally: prep near the sink, cooking near the stove, and storage where you actually need it. If you’ve ever walked across the room five times just to grab salt, you already know why layout matters.

People use different planners depending on region and store—Wickes kitchen planner, Wren kitchen planner, IKEA kitchen planner (including SEKTION), Howdens kitchen planner, and similar cabinet layout planner tools. The brand matters less than the principle: get the triangle (sink–stove–fridge) working, then keep daily tools within arm’s reach of where you use them.

Kitchen mood board: make your tools fit your space

A kitchen mood board sounds aesthetic—and it can be—but it also helps you choose finishes and storage that make your tools accessible. If you love wooden utensils, maybe you want a utensil crock. If you use stainless steel utensils, you might prefer a hanging rail. And if you’re building a clean look, you might choose stackable measuring cups and keep them in one drawer.

Even a small “plan” reduces clutter because you’re buying with intention rather than impulse.

Also Read: Kahlua Drinks: 10 Easy Cocktail Recipes (Milk, Vodka, Coffee)


Commercial stainless steel benches, prep tables, and food prep tables at home

It’s surprisingly common to see home cooks borrow ideas from commercial kitchens—stainless prep tables, workbenches, and simple food-prep stations—because they solve a real problem: easy cleanup and a durable surface for heavy chopping.

You don’t need a restaurant bench to benefit from the concept, though. The home version is simply this: create a dedicated prep surface that stays clear enough to use. Once you have a reliable place to chop, mix, and stage ingredients, cooking feels lighter.

Infographic titled “Meal Prep Setup (10 Minutes)” showing a cutting board on a damp towel with a chef’s knife, bench scraper, and two labeled bowls (“Scraps” and “Done”), plus a checklist of five steps for faster prep, with MasalaMonk.com in the footer.
Meal prep gets easier when your kitchen tools support the workflow. This 10-minute setup keeps prep clean and fast: one clear zone, a stable board, a scraps bowl, a “done” bowl, and a bench scraper to move ingredients in one sweep. Save this checklist for busy weeknights—once you try it, chopping feels calmer and cleanup feels lighter.

If you have space for a small prep table, it can be transformative. If you don’t, the alternative is a large cutting board that can temporarily turn any counter into a “prep station.”

Also Read: Hot Chocolate Coffee: 3 Easy Recipes (Cocoa, Mix, or Espresso)


Sharpening kitchen knives: the kitchen tool that protects your hands

A sharp knife is safer than a dull knife because you use less force and get more control. That’s why you’ll see so many different sharpening options mentioned—magnetic sharpeners, whetstones, stone sets, guided systems, and classic pull-through sharpeners. The names vary, but the goal is the same: a sharp edge you can maintain consistently.

There are many ways to sharpen. The most important habit is consistency: a little maintenance more often beats a dramatic rescue once a year.

If you want a practical baseline, aim for two habits:

  • hone regularly (if you use a honing rod)
  • sharpen periodically (stone, system, or professional service)

Once your knife is sharp, everything else becomes easier—especially prep.

Also Read: Cranberry Moscow Mule Recipe: A Festive Holiday Cocktail With Easy Variations


Kitchen tools for baking: simple tools that unlock a lot of recipes

Even if you don’t think of yourself as “a baker,” a few tools make baking approachable—especially if your goal is to make breakfast or desserts without stress.

Scale + bowls + spatula = baking that repeats well

A scale keeps batters consistent. Nesting bowls keep prep tidy. A silicone spatula prevents waste and helps cleanup.

If you’re leaning into breads, this is where a scale becomes addictive: Sourdough bread recipes

Measuring cups and spoons: the calm version of baking

When measuring tools are solid, you stop second-guessing. That matters for pancakes, muffins, quick breads, and cookies.

For a breakfast-friendly recipe set that naturally uses measuring cups, whisk, and a good pan, this internal link fits well: Blueberry pancakes recipes


Professional kitchen essentials at home: what actually translates

It’s tempting to chase “professional chef tools,” “chef recommended kitchen tools,” and “must have kitchen items for chefs.” Some of that is useful; some of it is just marketing.

What genuinely translates from professional kitchens to home kitchens is simplicity and durability:

  • fewer items, better items
  • predictable work surfaces
  • tools that wash easily
  • a workflow that doesn’t require ten gadgets

This is why “boring” tools like tongs, a whisk, a good knife, and a stable cutting board often outperform flashy gadgets.

If you want a broader outside reference for what belongs in a starter kitchen, Serious Eats has a solid, practical list. Basic starter kitchen equipment (Serious Eats)

Also Read: Cold Brew Espresso Martini: How to Make It (Step-by-Step Recipe)


Eco kitchen products and sustainable kitchen products: the parts that matter

A lot of home cooks are trying to make their kitchens a little less wasteful—buying fewer things overall, choosing tools that last, and skipping gadgets that end up in a drawer for a month and the trash a year later. The good news is you don’t need a “perfect” eco setup. You just need a few habits that steer your buying in the right direction.

A simple approach helps:

  • buy fewer tools (and buy them once)
  • choose durable materials
  • avoid disposable or single-use gadgets
  • pick items that can handle daily washing without warping, cracking, or peeling

Wooden utensils can be a sustainable choice when cared for properly—wash, dry, and don’t leave them soaking. Stainless steel is durable and long-lasting, especially for tools that take heat and pressure. Silicone can be practical for nonstick cookware and for scraping batters and sauces, as long as you choose sturdier pieces that won’t tear at the edges.

If your goal is to reduce waste, the best “eco upgrade” is usually replacing one frustrating, flimsy tool with one you’ll happily use for years—rather than buying a whole new set because it looks nice.

Also Read: Baked Ziti Recipe Collection: 15 Easy Variations


Kitchen tools list: what to buy first so you feel the difference immediately

If you’re upgrading gradually, this order gives the fastest improvement without overwhelming your kitchen.

First wave (instant improvement):

  1. chef’s knife + large cutting board
  2. skillet + dependable pot
  3. tongs + silicone spatula + whisk
  4. measuring cups + measuring spoons

Second wave (consistency and confidence):
5) instant-read thermometer
6) digital scale
7) sheet pan

Third wave (speed and finishing touches):
8) microplane
9) box grater
10) kitchen shears
11) bench scraper
12) salad spinner
13) mandoline slicer (if you’ll use it weekly)

Once you’ve built that foundation, buying becomes calmer because you’re filling real gaps rather than chasing trends.

Also Read: Sandwich for Breakfast: Breakfast Sandwich Recipe + 10 Variations


A few “skip for now” kitchen tools (unless you know you’ll use them)

A lot of kitchen gadget sets look helpful, yet they create clutter quickly. Unless you’re sure you’ll use them weekly, consider waiting on:

  • single-use slicers that only cut one shape
  • novelty spatulas that don’t feel good to use
  • oversized utensil sets where half the pieces never get touched
  • complicated can openers or grinders that are hard to clean

If you do need something specific—like an easy can opener for arthritis or a rechargeable salt and pepper grinder—buy it because it solves a real problem in your kitchen, not because it looks cool.

Also Read: Manhattan Cocktail Recipe (Classic + 6 Variations)


Closing thought: the best kitchen tools make you cook more

The “perfect” kitchen isn’t the one with the most stuff. It’s the one where you can start cooking without resistance—where the tools support you instead of slowing you down.

When your kitchen tools are right, you chop faster, season more confidently, cook with fewer surprises, and clean up without dread. As a result, cooking becomes something you do more often—simply because it’s easier to begin.

And once you’re cooking more often, everything else gets better too: sauces become second nature, weeknights feel lighter, and even simple meals start tasting like you meant them.

If you want a quick next step after this tools list, pick one recipe category that rewards good tools immediately:

FAQs

1) What kitchen tools do I need to start cooking at home?

If you’re starting from scratch, focus on kitchen tools that cover prep, heat, and serving. A chef’s knife, a stable cutting board, a skillet, a pot, measuring cups and measuring spoons, a spatula, tongs, and a whisk will handle most meals. After that, add a sheet pan, a kitchen scale, and an instant-read thermometer to improve consistency.

2) What are the most important kitchen tools for beginners?

Beginners benefit most from kitchen tools that reduce effort and mistakes. Start with a sharp knife, a large board, and one reliable pan. Next, add measuring tools for repeatable results. Finally, pick a few utensils that feel comfortable—tongs, a silicone spatula, and a whisk—so cooking stays simple rather than fussy.

3) Is it better to buy a kitchen utensil set or individual utensils?

It depends on your cookware and how you cook. A kitchen utensil set can be convenient when you’re setting up a new kitchen. However, buying individual pieces often gives better quality for the tools you’ll use daily. If you do choose a set, aim for sturdy essentials rather than a large bundle with lots of rarely used items.

4) Which kitchen tools and utensils are best for nonstick pans?

For nonstick cookware, choose kitchen tools made from silicone, wood, or nylon so you don’t scratch the coating. A silicone spatula, silicone spoon, and silicone tongs are especially useful. Even so, avoid sharp-edged metal turners on nonstick, because small scratches add up over time.

5) What are the best kitchen tools for stainless steel cookware?

Stainless steel cookware can handle tougher kitchen tools. Stainless steel utensils, a thin metal spatula or turner, and sturdy tongs work well. Since stainless is often used for browning, tools that scrape and flip confidently can be helpful, especially when you want good sear and clean release.

6) Are wooden cooking utensils a good choice?

Yes—wooden cooking utensils are comfortable, gentle on cookware, and great for stirring sauces and curries. Still, they need basic care: wash promptly, dry well, and don’t soak them. If you want a set, a wooden utensil set with a spoon, flat spatula, and ladle covers most needs.

7) Which is better: silicone kitchen utensils or wooden kitchen utensils?

Silicone kitchen utensils are excellent for scraping batters, stirring thick sauces, and protecting nonstick pans. Wooden kitchen utensils feel natural, stay cooler in the hand, and work well for long simmering dishes. Ultimately, many kitchens do best with both: silicone for scraping and wood for everyday stirring.

8) What kitchen tools are considered “non toxic” or safer for everyday cooking?

Many people choose stainless steel, wood, or high-quality silicone for everyday kitchen tools. Stainless steel is durable and stable, wood is simple and long-lasting with care, and silicone is useful for nonstick cookware. Rather than chasing a label, prioritize tools that don’t flake, chip, or degrade quickly under heat.

9) What’s the best kitchen knife set, or should I buy single knives?

If you cook often, buying a few excellent knives usually beats buying a large knife set. A chef’s knife plus a paring knife covers most tasks. If you prefer a knife set, choose one with fewer pieces and a reputation for comfort and durability, rather than a massive block with duplicates.

10) How do I sharpen kitchen knives at home?

There are several reliable methods: whetstone sharpening, guided sharpening systems, and quality pull-through sharpeners. Whichever method you choose, consistency matters more than complexity. Additionally, keeping knives dry and stored properly helps them stay sharp longer between sharpening sessions.

11) Do I really need a kitchen scale?

A kitchen scale isn’t mandatory, yet it quickly becomes one of the most useful kitchen tools—especially for baking. It helps you measure flour accurately, scale recipes without hassle, and repeat results more easily. Moreover, it can reduce dishes because you weigh ingredients into one bowl.

12) What’s the best instant-read thermometer for cooking?

The best instant-read thermometer is the one you’ll actually use—quick to read, easy to hold, and accurate. Look for a fast response time and a clear display. If you grill, a grill meat thermometer can be useful too, but an instant-read thermometer is still the everyday workhorse.

13) Do I need a mandoline slicer in my kitchen tools list?

A mandoline slicer is optional, but it’s very helpful if you make salads, slaws, chips, or layered bakes. It gives even slices quickly, which helps food cook evenly. That said, safety is non-negotiable—use the guard and slow down, because speed is not worth injuries.

14) What are the best kitchen tools for meal prep?

For meal prep, prioritize kitchen tools that speed up chopping and storage: a large cutting board, a sharp knife, mixing bowls, measuring cups, and sheet pans. Then add tools that reduce repetition, such as a salad spinner, bench scraper, and food storage containers that stack neatly.

15) Are mixing bowls with lids worth it?

Yes, especially if you meal prep or like keeping the counter tidy. Mixing bowls with lids help you store chopped ingredients, marinate without mess, and cover leftovers quickly. As a result, your workflow feels smoother and your fridge stays more organized.

16) What kitchen tools make the biggest difference for healthy cooking?

A few kitchen tools make healthier cooking easier: a sheet pan for roasting, a nonstick-friendly utensil set for quick eggs and vegetables, a thermometer to avoid overcooking lean proteins, and measuring tools to keep portions consistent. Meanwhile, a salad spinner makes it easier to eat more greens because salads taste better.

17) What are the best kitchen tools for small kitchens?

In small kitchens, choose kitchen tools that multitask and store easily: a nesting mixing bowl set, stackable measuring cups, a compact utensil crock, and one excellent skillet and pot. Also, tools like a bench scraper and microplane take very little space while adding a lot of usefulness.

18) Are commercial stainless steel benches or prep tables useful at home?

They can be, particularly if you bake often or do heavy meal prep. A food prep table provides a dedicated, easy-to-clean surface. However, many home cooks get similar benefits by keeping one counter zone clear and using a large cutting board as a portable prep station.

19) What’s the difference between cooking utensils and serving utensils?

Cooking utensils are designed for heat and stirring—spatulas, tongs, whisks, ladles. Serving utensils are designed for plating and presentation—serving spoons, salad tongs, pie servers, and larger ladles. Having both makes hosting easier, yet you can start with cooking tools and add serving pieces later.

20) Which kitchen tools are worth upgrading first?

If you want the fastest improvement, upgrade the tools you touch most: the knife, cutting board, skillet, and tongs. Next, add a kitchen scale and instant-read thermometer for consistency. After that, upgrade comfort tools like mixing bowls, a sturdy spatula, and a reliable peeler.

Posted on 1 Comment

Ceramic vs Teflon (PTFE) Cookware: Safety, Heat Limits, Durability & Which to Buy

Ceramic vs Teflon (PTFE) cookware cover—hand holding a PTFE pan with omelette, beige ceramic plate with tomatoes on a green background.

Choosing between ceramic vs Teflon (PTFE) cookware shouldn’t feel like a chemistry exam, yet it often does. From the first search—ceramic vs nonstick, is ceramic better than non stick, which is better: non stick or ceramic?—you meet a maze of claims, temperature myths, and durability debates. Let’s clear the air immediately: at everyday heat, PTFE delivers the slickest glide and usually lasts longer; meanwhile, ceramic-coated (sol-gel) provides a PFAS/PTFE-free surface that many cooks prefer, even if it needs replacing sooner. Either way, respect the basic rules: avoid empty preheats and keep the pan at or below 260 °C / 500 °F (see the Teflon™ safety guidance from Chemours for practical limits and care advice: safety page).


Plain-English Glossary: what we mean by “ceramic,” “PTFE,” and “PFAS”

Before we get deeper into this blog post, it’s important to clarify and explain a few terms which are often used in the industry.

Also Read: How to Choose The Best Cookware For Your Kitchen

PTFE (often marketed as Teflon™)

  • What it is: A fluoropolymer that creates the classic low-friction non-stick surface many people call “Teflon.” (“Teflon™” is a brand; the material is PTFE.)
  • What it feels like in use: Very slick, needs little oil, and—at sensible heat—keeps releasing food for a long time.
  • Care basics: Keep it ≤ 260 °C / 500 °F, don’t preheat empty, use soft tools, hand-wash. See the brand’s safety guidance on everyday use via the Teflon™ safety page (Chemours).
  • What it is not: PFOA (an older processing aid, now phased out by major U.S. producers under the EPA program). PTFE is the coating; PFOA was a past aid, not the cooking surface.

PFAS (the big chemical family)

  • What it is: An umbrella group of fluorinated chemicals with many members; PTFE is one of them. The term covers a wide range of substances, not just cookware coatings.
  • Why you see it on labels: Policy and consumer interest have pushed brands to declare whether a product’s coating contains any fluorinated chemistry.
  • Where to learn more: The ECHA PFAS hub gives a practical overview of the family and the EU’s restriction process.

PTFE-free non-stick (what many “ceramic” pans mean)

  • What it is: A non-stick coating that does not use PTFE. Most modern examples are ceramic-coated surfaces made with a silica-based sol-gel.
  • What it feels like in use: Glass-smooth when new; over time, it usually needs a little more oil as the film wears.
  • Why choose it: You want non-stick without a fluoropolymer coating.
  • What to check: Packaging should state “PTFE-free” or “no fluoropolymer coating.” If it only says “PFOA-free,” that doesn’t automatically mean it’s PTFE-free.

Ceramic-coated / sol-gel (not pottery)

  • What it is: A thin, glass-like film baked onto a metal pan (aluminum or steel). Think of it as a hard, slick clearcoat—not a clay pot.
  • How it cooks: Responsive and smooth at first; with repeated high heat or abrasive scrubbing, the surface can become less slippery sooner than PTFE.
  • Care basics: Moderate heat, soft tools, gentle cleaning. Treat it like a finish, not armor.
  • What it is not: Traditional ceramic cookware (stoneware, porcelain). Those are thick ceramic bodies; “ceramic-coated” skillets are metal with a thin coating.

Why this glossary matters:

  • When a label says “PFAS-free,” it claims no fluorinated chemicals in the coating.
  • When it says “PTFE-free,” it means no fluoropolymer coating—but other PFAS may or may not be present unless the brand states PFAS-free explicitly.
  • When it says “PFOA-free,” that tells you a past processing aid isn’t used, but it doesn’t tell you whether the pan’s coating is PTFE or ceramic. Read the spec sheet so you’re comparing like-for-like.

Ceramic vs Teflon: the quick picture you can cook with

Non stick should make food move on your terms. Ceramic pans vs nonstick (PTFE) cookware feel similar when new; both are smooth and forgiving. However, after months of breakfasts and hurried cleanups, differences show. Ceramic’s silica-based sol-gel film can lose slickness faster with repeated heat and abrasion. Conversely, PTFE’s ultra-low surface energy keeps eggs, dosas, and crêpes gliding with less oil—so long as you keep the heat sensible. Thus, for everyday breakfast duty and delicate fish, ceramic vs Teflon typically tilts toward PTFE for longevity.

Still, the difference between ceramic and non stick isn’t only performance. It’s also chemistry and comfort level. If you want to avoid PFAS entirely, ceramic makes that easier. If you care most about a low-friction glide that stays stable, PTFE is the pragmatic choice.

Also Read: Perfect Dosa Idly Batter: Your Guide to Fluffy Idlis and Crispy Dosas


What these coatings really are (and why that matters)

Ceramic vs nonstick: the materials story

Ceramic non stick isn’t pottery. It’s a thin sol-gel coating—think a glass-like network—applied over metal. Because it cures into a hard film, it feels crisp and clean out of the box. Even so, the film ages: repeated heating and scouring raise surface roughness, and the pan demands a touch more oil. That’s why you often hear ceramic frying pan vs non stick stories that begin with “amazing at first” and end with “fine, but less slippery.”

PTFE vs ceramic: the low-friction advantage

PTFE is a fluoropolymer known for exceptionally low surface energy. Consequently, food releases with minimal force and keeps doing so across many cycles. Respect its ceiling—260 °C / 500 °F—and never preheat empty. Follow those habits and a PTFE skillet usually retains slickness longer than a comparable ceramic pan. For brand-side clarity on limits and myths, see Teflon™ Myths & FAQ (here).

Also Read: The Copper Cookware Journey


Safety made plain: heat, PFOA, and what changed recently

Heat sanity check: Keep any non-stick at or below 260 °C / 500 °F. Don’t preheat empty. Use ventilation. Those three habits keep you well below temperatures where PTFE begins to fume and where any coating—PTFE or ceramic—ages fast.

Ceramic vs Teflon safety: first principles

Two points simplify the anxiety. First, PTFE ≠ PFOA. PTFE is the non stick coating; PFOA was a legacy processing aid. In the United States, major producers phased out PFOA under the EPA’s 2010/2015 PFOA Stewardship Program; the agency’s summary sits here: EPA fact sheet. Hence, modern branded PTFE cookware is generally made without PFOA.

Second, classification headlines need context. In December 2023, the International Agency for Research on Cancer (IARC) evaluated PFOA as carcinogenic to humans (Group 1) and PFOS as possibly carcinogenic (Group 2B). The 2025 Volume 135 page expands details (see IARC’s news note and Volume 135). That assessment addresses PFOA/PFOS exposure, not typical use of today’s PFOA-free PTFE pans.

Also Read: Buying a Cast Iron Skillet? 5 Warnings Before You Invest

Heat control: where ceramic vs non stick actually converges

In practice, both coatings demand moderate burners. Clinical and manufacturer sources align: PTFE can begin to fume near 260 °C / 500 °F; polymer-fume fever in people typically appears around 350 °C / 662 °F, and pyrolysis accelerates above ~400 °C / 752 °F. Therefore, cook low-to-medium, use your hood, and avoid empty preheats. A concise clinical summary lives on StatPearls / NCBI Bookshelf: polymer fume fever. Ceramic coatings, while PFAS-free, also suffer with sustained high heat; their film roughens and release declines. In short, ceramic vs non stick is less about “which survives abuse” than “which you treat kindly.”


Ceramic pans vs nonstick in real kitchens: how performance ages

Ceramic non stick vs non stick (PTFE): month-two and beyond

The first weeks often feel close. A ceramic pan vs non stick PTFE skillet both flip omelettes and glide pancakes. Gradually, though, ceramic’s sol-gel surface needs more fat to prevent micro-sticking. Meanwhile, PTFE keeps its advantage—provided you stick to the basics: ≤ 260 °C / 500 °F, soft tools, and hand-washing. That’s why ceramic nonstick vs regular nonstick discussions usually land on a simple conclusion: ceramic for PFAS-free, PTFE for long-term glide.

Ceramic coated pans vs Teflon: searing, saucing, and fond

What about dinner? Searing steaks or using a broiler is rough on any non stick. Here, ceramic cookware vs Teflon vs stainless steel becomes an easy triangle: stainless (or carbon steel) for the high-heat sear and fond, then PTFE (or ceramic) for sticky sauces and delicate finishes. Rather than forcing one pan to do everything, assign roles and watch the coatings last longer.


Substrate matchups: ceramic non stick vs stainless steel, aluminum, and more

Ceramic non stick pans vs stainless steel

Uncoated stainless excels at browning, Maillard depth, and pan sauces. It does not promise effortless release. Consequently, ceramic vs non stick cookware is really a choice between coated convenience and uncoated versatility. Many cooks keep both: a stainless sauté for fond and a PTFE skillet for eggs.

Ceramic non stick vs aluminum non stick (and vs stainless steel)

Bare aluminum spreads heat evenly but typically receives a coating to become non stick. Therefore, ceramic non stick vs aluminum non stick usually reduces to coating type (sol-gel vs PTFE) and quality. If you want a PFAS-free message, pick ceramic; if you want longevity, PTFE still tends to prevail—again, at sensible heat.

Also Read: Classic vs. Authentic Alfredo: 5 Essential Recipes


Air fryers, griddles, and specialty appliances

Ceramic vs Teflon air fryer: respect the hotspots

Air fryers introduce another variable: proximity to heating elements. Local hotspots can exceed your setting near the coil. Consequently, ceramic vs Teflon air fryer comparisons need caution. Choose PTFE for the slickest cleanup if you run conservative temps; choose ceramic for PFAS-free peace of mind. In both cases, stick to the appliance rating, avoid metal tools, and clean with non-abrasive pads.

Ceramic griddle vs nonstick griddle; ceramic vs non stick skillet

Flatbreads, pancakes, and sandwiches highlight small technique differences. A nonstick griddle with PTFE often keeps a wider comfort zone over months of use. A ceramic griddle works well early and still performs later with a bit more oil. Likewise, a ceramic vs non stick skillet shows the same arc: similar at first, diverging slowly as cycles accumulate.

Also Read: 12 Common Air Fryer Mistakes You Could Be Making


Marketing language, decoded without the hype

Ceramic coated cookware vs Teflon; ceramic vs Teflon vs granite; titanium and friends

Labels sound fancy. “Granite,” “diamond,” and “titanium” often refer to reinforcements or brand families—not necessarily different base chemistries. Hence, ceramic coated vs non stick is a structural question: Is this sol-gel ceramic or PTFE? Read the tech sheet, not just the box.

GreenPan vs Teflon; Greblon coating vs Teflon; George Foreman ceramic vs Teflon

Brand lines evolve across years and models. Some Greblon lines are PTFE; others are ceramic. Some “eco-ceramic” lines are sol-gel. Even George Foreman grills have used different finishes. Therefore, confirm the current coating on the exact model you plan to buy.

Ceramic coated vs ceramic cookware; ceramic vs ceramic coated cookware; ceramic vs non ceramic

Strictly speaking, “ceramic cookware” might mean pottery or stoneware. Most “ceramic non stick” skillets are metal pans with a ceramic-like sol-gel film. Meanwhile, ceramic vs non ceramic usually means “coated vs uncoated.” As a result, define your terms first, then compare like-for-like.


Heat habits that actually extend lifespan (for both coatings)

Because routine beats marketing, build a short ritual that protects either surface:

  1. Preheat briefly on low–medium, not full blast. Give the pan 10–20 seconds, then add fat and food.
  2. Respect the ceiling—≤ 260 °C / 500 °F. The figure appears in manufacturer guidance and plain-language explainers; see Teflon™ safety for the brand view (safety page).
  3. Cool before cleaning. Thermal shock fatigues both coating and base.
  4. Use soft tools. Wood, silicone, or nylon on the cooktop; non-abrasive pads in the sink.
  5. Retire damaged pans. Deep scratches, flaking, or rough patches signal the end of the line.

With those habits, ceramic vs Teflon becomes a calm, predictable choice rather than a noisy argument.

Also Read: 10 Examples of Egg Dishes, with 2 Eggs


Regulations in 2025: why labels keep shifting

Policy never flips your omelette, yet it shapes packaging and claims. In the European Union, a broad PFAS restriction continues to advance. The European Chemicals Agency (ECHA) announced a timeline in August 2025 and aims to complete the scientific evaluation by end-2026; track updates via the timeline announcement and the PFAS hot-topics hub.

In the United States, the federal anchor is the earlier PFOA phase-out, but states diverge. In October 2025, California’s governor vetoed a bill that would have broadly banned PFAS in cookware and several other product categories, citing concerns over affordability and scope. For coverage and reactions, see The Guardian’s reporting (story 1, story 2). Expect more “PFAS-free” claims, stricter documentation requests from retailers, and a steady shift in brand language.


Buying quickly, but wisely (without turning it into a spreadsheet)

Here’s a simple, narrative way to decide—no checkboxes, just honest alignment with how you cook:

  • If your day starts with eggs or crêpes, and you want results with little oil, PTFE is the path of least resistance. Months later, it still glides—assuming you respect heat.
  • If you value PFAS/PTFE-free cookware above all, ceramic fits your priorities. You’ll likely add a little more fat after a while and replace the pan sooner; nonetheless, you’ll feel good about the chemistry profile.
  • If you sear hard or broil often, neither coating is ideal for that step. Use uncoated cast iron or carbon steel for the high-heat moment, then move to PTFE vs ceramic for sticky sauces and gentle finishes.
  • If you love one-pan dinners, PTFE gives you the widest margin for error at moderate heat. Ceramic can do it too; it simply rewards a gentler burner and softer cleaning.
  • If you batch-cook on a griddle, a nonstick (PTFE) griddle tends to keep a forgiving surface across months of use. A ceramic griddle works well early and remains useful later with slightly more oil.

In short, the answer to is ceramic cookware better than nonstick or is ceramic better than Teflon becomes personal: do you prize chemistry or longevity?

Also Read: Top 10 Iron Rich Vegetables to Help Cure Anemia & Boost Hemoglobin


Final word: put your pan where it performs

After all the research, ceramic vs Teflon (PTFE) cookware comes down to how you cook, not just what the box promises. For the slickest glide and the longest non stick life at everyday heat, PTFE remains the practical winner. For a PFAS/PTFE-free option that shines on low–medium burners, ceramic delivers—just expect a shorter slickness window. Either way, technique beats hype. Preheat with patience. Ventilate. Use soft tools. Hand-wash. Retire tired pans. With that rhythm, ceramic vs non stick stops being a debate and becomes a calm, confident choice that fits your kitchen.


FAQs

1) Is ceramic cookware better than nonstick?

In short, it depends on what you value. Ceramic (sol-gel) is PTFE-free and feels glass-smooth when new; however, it usually loses slickness sooner. Traditional nonstick (PTFE) stays slippery longer at everyday heat; conversely, it isn’t ideal for very high-heat searing. Choose chemistry preference (ceramic) or longevity/slickness (PTFE).

2) Which is better: non stick or ceramic?

Generally, for eggs, crêpes, and delicate fish, PTFE wins on effortless release and lifespan. Ceramic still works beautifully at low–medium heat; nonetheless, expect to use a touch more oil as months pass.

3) Ceramic vs Teflon (PTFE) Cookware: what’s the real difference?

Ceramic uses a silica-based sol-gel film baked onto metal; Teflon (PTFE) is a fluoropolymer coating. Moreover, ceramic is PTFE-free; PTFE is the classic ultra-low-friction surface that tends to last longer when used within temperature limits.

4) Ceramic pans vs nonstick: which lasts longer?

Typically, PTFE lasts longer in day-to-day kitchens. Ceramic can still serve well; even so, repeated high heat and abrasive cleaning shorten its slickness window faster.

5) PTFE vs ceramic: which is safer?

Both are considered safe at normal cooking temperatures when used correctly. Therefore, keep heat moderate, avoid empty preheats, ventilate, and retire damaged pans. Safety hinges more on how you cook than on the logo.

6) Ceramic coated pans vs Teflon: do I need different care?

Yes—though there’s overlap. Use soft tools, hand-wash, and avoid harsh scourers. Additionally, keep either type at sensible heat; ceramic, especially, benefits from gentle burners and non-abrasive cleaning.

7) Are ceramic frying pans better than Teflon for breakfast?

Often not over time. PTFE’s lower sticking threshold helps omelettes glide with less oil month after month; ceramic works early on, yet gradually needs more fat. Consequently, many breakfast-heavy cooks prefer PTFE.

8) Ceramic cookware vs non stick: which handles searing?

Neither coating loves intense searing or broilers. Instead, use uncoated cast iron or carbon steel for high-heat tasks; then, return to ceramic or PTFE for sticky sauces and gentle finishes.

9) Does ceramic cookware have Teflon?

No—“ceramic-coated” typically means PTFE-free. Importantly, confirm you’re buying a ceramic (sol-gel) coating rather than a ceramic-sounding marketing name over PTFE.

10) Ceramic cookware vs Teflon vs stainless steel: when should I use each?

Think in roles. Stainless excels at browning and fond; PTFE rules easy release; ceramic offers a PTFE-free option for moderate heat. Ultimately, a mixed toolkit covers every job.

11) Ceramic frying pan vs non stick pan: which is more heat tolerant?

Marketing can imply high tolerance; however, real-world guidance for both is similar: moderate burners, no empty preheats, and avoid direct flames licking the sides. Exceeding limits ages any coating quickly.

12) Ceramic non stick vs aluminum non stick vs stainless steel—what’s the difference?

Aluminum is a great heat conductor but needs a coating (ceramic or PTFE) for release. Stainless is uncoated and excels at searing; similarly, it demands technique to prevent sticking. Consequently, pick based on recipe and cleanup needs.

13) Ceramic or non stick: which is better for low-oil cooking?

For sustained low-oil cooking, PTFE usually maintains glide with less fat. Ceramic can deliver low-oil results when new; nonetheless, a little extra oil may be needed as the coating ages.

14) Ceramic vs Teflon (PTFE) cookware: which coating is more durable with daily use?

PTFE generally resists sticking for longer under repeated cooking and gentle cleaning. Ceramic durability improves if you keep heat modest, avoid stacking scratches, and wash softly.

15) Ceramic nonstick vs regular nonstick: is there a taste or odor difference?

Usually no. However, overheating any coating can produce off-odors and faster wear. Therefore, stay within recommended temperatures for clean flavors and longer life.

16) Ceramic vs non stick skillet: what size and base should I buy?

Choose a flat, thick base for even heat—28–30 cm suits most homes. Additionally, ensure the base matches your cooktop (including induction if needed). A snug lid helps with gentle finishes on either coating.

17) Ceramic vs Teflon air fryer baskets: which cleans easier?

PTFE baskets often wipe clean with less effort, especially after months of use. Ceramic baskets clean well when new; even so, avoid abrasives and keep temps within the appliance rating to preserve slickness.

18) Ceramic coated cookware vs Teflon: will acidic foods damage them?

At moderate heat, tomato sauces and citrus are fine on both. Conversely, prolonged high heat is tougher on any coating—keep flames reasonable and stir often.

19) Is ceramic coating better than Teflon for health?

If your priority is avoiding fluoropolymer coatings altogether, ceramic aligns with that preference. Otherwise, at everyday temperatures and with good ventilation, both are considered safe when used as directed.

20) Ceramic vs non stick griddle: which is best for pancakes and dosa?

Over months, a PTFE griddle usually keeps a wider margin for error and needs less oil. Ceramic still works; nonetheless, expect to refresh with a light oil film as the surface ages.

21) Ceramic vs Teflon vs “granite” or “titanium”: are those different chemistries?

Often those words are brand lines or reinforcements, not a new base chemistry. Consequently, verify whether the pan uses PTFE or ceramic underneath the marketing term.

22) Ceramic coated vs ceramic cookware: are they the same?

No. “Ceramic-coated” skillets are metal pans with a thin glass-like film. “Ceramic cookware” can also mean pottery/stoneware. Different materials, different behavior.

23) Is ceramic non stick better than Teflon for beginners?

Beginners often find PTFE more forgiving because it releases with less oil and tolerates small timing errors. Even so, ceramic suits beginners who keep heat modest and clean gently.

24) Which lasts longer: ceramic non stick pan vs Teflon (PTFE) cookware pan?

All else equal, PTFE pans tend to outlast ceramic in non-stick performance at everyday heat. Therefore, if longevity is your top priority, PTFE is the safer bet.

25) Ceramic vs non stick cookware: what’s the smartest combo for a small kitchen?

Go with a PTFE skillet for breakfast and quick, sticky dishes; add one uncoated pan (stainless or cast iron) for searing and oven work. Meanwhile, if you want a PTFE-free option, keep a ceramic skillet for low–medium tasks. This trio covers nearly everything without clutter.


Further reading (already linked inline)

Posted on 6 Comments

12 Common Air Fryer Mistakes You Could Be Making

12 COMMON AIR FRYER MISTAKES YOU COULD BE MAKING

Air fryers have gone from trendy gadgets to everyday essentials in just a few short years. They promise the best of both worlds — crisp, golden fries and snacks with a fraction of the oil. Whether it’s fries, samosas, pakoras, or even roasted vegetables, the air fryer has become the go-to tool for anyone who wants indulgent flavors without the guilt of deep frying.

But here’s the reality check: owning an air fryer doesn’t automatically guarantee perfect results. Many first-time users — and even seasoned home cooks — find themselves frustrated. Instead of crunchy fries, they end up with soggy sticks. Instead of juicy chicken, they pull out pieces that are dry outside and raw inside. Sometimes the fryer smokes, smells odd, or just doesn’t deliver the promised magic.

Sound familiar? If so, you’re not alone. The truth is that air fryers aren’t foolproof. They’re powerful tools, but like any tool, they only shine when you use them correctly. The smallest mistakes can have a big impact — from overcrowding the basket to skipping the preheat, from choosing the wrong oils to ignoring safety basics.

The good news? These mistakes are easy to fix. With a little know-how, you’ll start producing crispy, delicious, healthy results every time. That’s why we’ve put together this guide: to walk you through the 12 most common air fryer mistakes and, more importantly, show you how to avoid them.

So let’s start by understanding how this kitchen wonder actually works.


🍳 Understanding Your Air Fryer: How It Works & Why Mistakes Happen

To get the best out of your air fryer, it helps to know what’s happening inside it. Unlike deep frying, where food is submerged in hot oil, or baking, where heat radiates slowly from oven walls, air fryers use a powerful heating element and a high-speed fan to push hot air around your food.

This process mimics frying by creating the Maillard reaction — the browning effect that gives fries their crunch and roasted chicken its golden color. The magic lies in air circulation. When food is surrounded by rapidly moving hot air, the surface crisps while the inside stays moist.

But this efficiency also makes air fryers less forgiving:

  • Airflow is everything. Block it, and food won’t crisp.
  • Moisture matters. Extra water leads to steaming, not frying.
  • Temperature precision is key. Air fryers heat fast, so even small mistakes can overcook food.
  • Surface contact counts. Oil, seasonings, and basket setup affect results.

Understanding these principles makes the common mistakes much clearer. Overcrowding stops airflow. Skipping preheating delays crisping. Using too much oil smothers food instead of helping it brown.

Now, let’s dive into the 12 biggest mistakes air fryer users make — and the simple fixes that will change your cooking game forever.


❌ Mistake #1: Overcrowding the Basket

The Problem: Many try to save time by piling food into the fryer basket.

The Consequence: Overcrowding blocks air circulation. Fries end up limp, chicken undercooked, and veggies taste steamed instead of roasted.

The Fix: Cook in smaller batches. Keep food in a single layer with space between pieces. If you need to cook a lot, it’s better to do two quick rounds than one disappointing big batch. Racks can help you layer food while keeping air flowing.

Pro Tip: Shake the basket halfway through to give every piece a chance at golden crispness.


❌ Mistake #2: Skipping the Preheat

The Problem: People assume air fryers don’t need preheating because they’re small.

The Consequence: Without preheating, food cooks unevenly. Fries go limp, breading won’t set, and meats release moisture before crisping.

The Fix: Preheat your fryer for 3–5 minutes before adding food. Many models have a preheat function; if not, run it empty at your target temperature.

Pro Tip: Preheating shortens cooking time and ensures consistent results.


❌ Mistake #3: Forgetting to Shake or Flip

The Problem: Air fryers push hot air from the top down, so the bottom layer cooks slower.

The Consequence: Food ends up browned on one side and pale on the other. Fries clump together, and proteins cook unevenly.

The Fix: Shake or flip food halfway through. Smaller foods like fries just need a quick shake; larger foods like chicken thighs need flipping with tongs.

Pro Tip: Use your fryer’s halfway timer beep (if it has one) as a reminder.


❌ Mistake #4: Using the Wrong Amount of Oil

The Problem: Some avoid oil entirely, while others overdo it.

The Consequence: No oil = dry, baked texture. Too much oil = soggy, greasy results that smoke.

The Fix: Use just 1–2 teaspoons per batch. Toss food in oil before cooking or mist with a refillable spray bottle for even coverage.

Pro Tip: Apply oil to the food, not the basket — it’s more effective.


❌ Mistake #5: Not Cleaning After Every Use

The Problem: People assume the fryer only needs occasional cleaning.

The Consequence: Grease and crumbs burn during the next use, causing smoke, bad smells, and bitter flavors. Over time, residue damages the coating.

The Fix: Clean after every session. Let it cool, then wash or wipe the basket and drawer. Do a deep clean weekly. Avoid metal scrubbers that scratch.

Pro Tip: Use parchment liners or silicone mats to make cleanup easier, but don’t skip cleaning.


❌ Mistake #6: Cooking at the Wrong Temperature

The Problem: Many crank the fryer to max heat or play it too safe with low temps.

The Consequence: Too hot burns the outside while leaving the inside raw. Too low makes food limp and chewy.

The Fix: Follow tested air fryer recipes. As a general rule, reduce oven temps by 20°C and cooking times by 20–25%. Use a thermometer for meat.

Pro Tip: Start hot for searing, then lower the temperature to finish cooking evenly.


❌ Mistake #7: Not Drying Food First

The Problem: Damp veggies, potatoes, or marinated meats go straight into the fryer.

The Consequence: Extra moisture turns to steam, preventing crisping. Fries taste boiled, meats go rubbery, veggies soften instead of roasting.

The Fix: Pat food dry before seasoning and cooking. For marinated items, let them rest so excess liquid drains.

Pro Tip: Dry food holds seasonings better, giving more flavor and crunch.


❌ Mistake #8: Using Aerosol Spray Cans

The Problem: Aerosol sprays like PAM are convenient but contain propellants.

The Consequence: These chemicals break down nonstick coatings, causing sticking and shortening your fryer’s life.

The Fix: Use a refillable oil mister with natural oils like olive, avocado, or ghee.

Pro Tip: Mist food lightly, not heavily — a thin coat is enough.


❌ Mistake #9: Ignoring Food Size & Cut

The Problem: Ingredients are cut into random shapes and sizes.

The Consequence: Thin pieces burn while thick pieces stay raw. Fries, for example, turn out uneven if sizes vary.

The Fix: Cut food into uniform sizes. Use slicers or cutters for consistency.

Pro Tip: Smaller, evenly cut pieces crisp faster — adjust time accordingly.


❌ Mistake #10: Limiting Yourself to Frozen Foods

The Problem: Many only use fryers for frozen fries or nuggets.

The Consequence: This limits the fryer’s true versatility. It can roast, bake, toast, and even dehydrate.

The Fix: Try new recipes — roasted veggies, chickpeas, paneer tikka, muffins, or reheating leftovers.

Pro Tip: Air fryers reheat pizza or parathas far better than a microwave — crisp, not soggy.


❌ Mistake #11: Neglecting Safety Setup

The Problem: Fryers are often placed against walls, under cabinets, or on unstable surfaces.

The Consequence: Poor ventilation risks overheating. Weak surfaces can warp or melt.

The Fix: Place on a flat, stable, heat-safe surface with 6 inches of clearance on all sides. Always unplug after use.

Pro Tip: Allow it to cool fully before cleaning or moving to prevent accidents.


❌ Mistake #12: Skipping Accessories

The Problem: Many stick to the basket alone.

The Consequence: Without racks, skewers, or liners, you miss out on layered cooking, kebabs, muffins, and easier cleanup.

The Fix: Invest in simple accessories. Racks let you cook more at once, liners keep things tidy, and silicone molds expand your options.

Pro Tip: Skewers make kebabs or veggie sticks effortless in the fryer.


⚡ Health Tips for Smarter Air Frying

  • Choose the right oils: Avocado, olive, mustard oil, or ghee work best for health and high smoke points.
  • Avoid over-relying on frozen foods: Whole foods like veggies, beans, and proteins give better nutrition.
  • Watch your portions: Air-fried food is lighter, but calories still add up. Balance with roasted vegetables or salads.

🔥 Safety Tips Every User Should Know

  • Leave 6 inches of clearance around the fryer.
  • Place it on a flat, heat-resistant surface.
  • Let it cool before cleaning.
  • Always unplug after use.

🚫 What NOT to Air Fry

  • Wet batters → they drip and burn.
  • Leafy greens → they blow around and scorch.
  • Uncoated cheese → melts into a mess.
  • Popcorn → cooks unevenly, risks burning.

🎯 Conclusion: Master Your Air Fryer

The air fryer is one of the most versatile tools in your kitchen — but only if you use it right. By avoiding these 12 common mistakes, following smart health tips, and respecting basic safety rules, you’ll transform soggy, disappointing batches into crispy, golden, healthy meals.

Air frying isn’t just about convenience — it’s about unlocking new possibilities. From snacks to mains to reheated leftovers, your fryer can do far more than you think. Once you master these basics, you’ll wonder how you ever lived without it.

So go ahead, preheat that basket, spread out those fries, and give your food the space and care it deserves. Perfect crunch is waiting.


❓ Frequently Asked Questions (FAQs) About Air Fryers

1. Do you need to preheat an air fryer every time?

Yes, most recipes benefit from preheating. It ensures the basket is hot before food goes in, which helps create a crispy outer layer and reduces cooking time. Skipping preheat often leads to soggy or uneven results.


2. Can you put aluminum foil or parchment paper in an air fryer?

Yes, but with care. Use perforated parchment paper or poke holes in foil so air can circulate freely. Avoid covering the entire basket surface, or you’ll block airflow and reduce crisping.


3. Why does my air fryer smoke?

Excess oil, greasy foods, or leftover crumbs from previous cooking are the usual culprits. Clean the basket regularly, avoid using too much oil, and choose oils with high smoke points like avocado or peanut oil.


4. Can you cook raw meat in an air fryer?

Absolutely. Chicken, fish, kebabs, and even steak can be cooked from raw in the fryer. Just ensure you use a food thermometer to check the internal temperature for safety.


5. Why are my fries soggy in the air fryer?

The most common reasons are overcrowding, skipping preheating, or not drying the potatoes before cooking. Always cut evenly, pat them dry, toss with a little oil, and spread them in a single layer for the crispiest fries.


6. What foods should not be cooked in an air fryer?

Avoid wet batters (like tempura), leafy greens (they fly around and burn), loose cheese, and popcorn. These either don’t cook well or can damage your fryer.


7. How much oil do you really need in an air fryer?

Usually 1–2 teaspoons per batch. A light misting or toss is enough to help food crisp without making it greasy. Too much oil creates smoke and soggy textures.


8. Can you bake in an air fryer?

Yes! Muffins, cupcakes, small cakes, and cookies all bake beautifully in air fryers. Use silicone molds or small pans that fit in the basket. Just remember, cooking time will usually be shorter than in an oven.


9. Do air fryers use a lot of electricity?

No, they’re energy efficient. Air fryers heat up quickly and cook faster than ovens, which means they generally use less power overall.


10. How often should you clean your air fryer?

Clean the basket and drawer after every use to prevent grease buildup. Do a deeper clean once a week, wiping down heating elements and the interior to keep it in top shape.

Posted on 2 Comments

Philips HD9200/90 Air Fryer Review

PHILIPS HD9200/90 AIR FRYER

If you’re looking for a compact, easy-to-use, and reliable air fryer for your Indian kitchen, the Philips HD9200/90 Air Fryer is one of the top-rated and best-selling choices on Amazon India. Is it worth the money? Let’s explore its real-world pros and cons, deep-dive into Indian recipes, address cleaning and maintenance, and reveal what everyday users think after months of use.


Philips HD9200/90 Air Fryer: Overview & Key Features

The Philips HD9200/90 Air Fryer is designed for small families and health-conscious individuals who want crispy snacks and meals with up to 90% less oil.
Here’s what stands out:

  • Capacity: 4.1 litres — enough for 2-3 people (about 8 samosas or 600g fries per batch)
  • Power: 1400W with Philips Rapid Air Technology for even cooking
  • Controls: Simple manual knobs for temperature (80–200°C) and timer (up to 60 min) with auto shut-off
  • Basket: Removable, non-stick, and dishwasher-safe
  • Cord: 1.8 meters for easy countertop placement
  • Warranty: 2 years (India-wide support)

Indian User Experiences: What Are Real Amazon Buyers Saying?

Highly Rated on Amazon India (4.3★, 6,000+ Ratings)

Best for Indian Snacks, Small Meals & Everyday Use

“This Philips HD9200/90 Air Fryer has become a staple in our kitchen for oil-free samosas, fries, and even chicken tikka. Quick and healthy!”
— Amazon Verified Purchase, April 2024

“You get perfectly crisp results with minimal oil. We made aloo tikki, paneer tikka, even reheated leftover pizza. It’s compact and fits well on a small counter.”
— Amazon Customer, Mumbai

Healthier Eating, Less Mess

“Kids love the fries and nuggets, and I love that I’m not deep-frying. Cleaning the basket is very easy—just a quick rinse or into the dishwasher.”
— Amazon Review, Bengaluru

Simple to Use, but Some Minor Gripes

“Manual knobs are basic but work fine. Markings are a bit small. Wish it had a pause function but for the price, it’s a steal.”
— Amazon Customer, Pune

“Perfect for a small family. If you have a big group, you’ll need to cook in batches. No oil smell in the kitchen, no greasy pans.”
— Amazon Review, Delhi


How the Philips HD9200/90 Air Fryer Performs for Indian Cooking

The Philips HD9200/90 Air Fryer is especially popular with Indian households because it handles a wide range of snacks and small meals, including:

  • Samosas & Pakoras: Get golden and crisp with just a brush or spray of oil. Pre-made frozen snacks cook beautifully.
  • Paneer Tikka & Tandoori Chicken: Marinated paneer or chicken turns out juicy inside and charred outside at 180-200°C.
  • French Fries & Potato Wedges: Soak, pat dry, toss with a spoon of oil, and you’ll get crispy fries every time.
  • Roasted Peanuts & Chana: 7-8 minutes at 180°C, stir once mid-way, and you get perfectly roasted munchies.
  • Reheating Parathas, Pizza, & Rolls: Far better than microwaving—restores the crunch!

Recipe Tip:

Always preheat the Philips HD9200/90 Air Fryer for 2-3 minutes for best results, especially with tikkis and fries. Don’t overcrowd the basket—single layer gives the best crunch.


Cleaning & Maintenance: Is It Easy?

This air fryer is designed for real Indian kitchens—where masalas, oil, and sticky batters are daily reality.

  • Basket is non-stick and dishwasher-safe.
  • Just wait 15-20 min after cooking, remove the basket, and wipe out any oil or crumbs.
  • If cooking heavily marinated items (like tandoori), wipe the heating coil area with a damp cloth once it’s cool.
  • Most users report it stays odor-free and grease-free with basic daily care.

“I just rinse the basket under water after every use—sometimes with a soft brush. Super easy, way easier than cleaning a kadhai or deep-fry pan.”
— Amazon User, Jaipur


Pros & Cons Table

ProsCons
Compact—perfect for 2-3 peopleManual timer/temperature controls only
Cooks Indian snacks, mains, and reheat dishesNo pause or alert mid-cycle
Up to 90% less oil—healthy, guilt-freeNot for large families or parties
Cleans easily—dishwasher safe and non-stick basketKnob markings are small for some users
2-year Philips India warranty, strong supportCan be noisy (timer “tick-tock” sound)
Highly rated—over 20,000+ reviews on Amazon IndiaBaking cakes/bread is possible but limited
Affordable compared to larger air fryer models
Pros and Cons of this Philips Air Fryer

Actionable Advice: How to Get the Most from Your Philips HD9200/90 Air Fryer

  1. Preheat for 2-3 minutes for best crispiness (especially with potatoes and tikkis).
  2. Toss or spray with a little oil for extra crunch—don’t overdo it, a teaspoon goes a long way!
  3. Don’t overcrowd—cook in a single layer for even browning.
  4. Flip or shake halfway—especially for paneer, fries, and nuggets. Just pull out the basket, shake, and continue.
  5. Wipe out any residue after each use—especially after cooking oily or marinated foods.
  6. Try new recipes! Many users have succeeded with roasted veggies, grilled fish, and even reheating rotis.

Who Should Buy the Philips HD9200/90 Air Fryer?

  • Perfect for: Students, working couples, health-conscious singles, or small families (2-3 people) who want fast, easy, and healthy snacks.
  • Not ideal for: Large families, party hosts, or those wanting digital controls and alerts.

Final Word: Why It’s a Best-Seller on Amazon India

With its compact design, healthy results, easy cleaning, and trusted brand backing, the Philips HD9200/90 Air Fryer is an excellent choice for most Indian households.
You can check hundreds of video reviews and recipe demos online—all pointing to the same verdict: it’s a genuine kitchen upgrade if you want to eat better, faster, and cleaner.

Ready to make the switch to oil-free, crispy snacking?
Buy the Philips HD9200/90 Air Fryer on Amazon India →


(Affiliate Disclosure: If you purchase through our link, we may earn a small commission at no extra cost to you—this helps us keep bringing you honest reviews and tips.)

Explore More Air Fryer Reviews You’ll Love:

FAQs for Philips HD9200/90 Air Fryer

1. What is the actual capacity of the Philips HD9200/90 Air Fryer?
It has a 4.1-litre basket, which is perfect for 2–3 people. You can cook about 8 samosas, a batch of fries, or several nuggets at once.


2. Can I make Indian snacks like samosas and paneer tikka in this air fryer?
Yes! The Philips HD9200/90 Air Fryer is well-loved for samosas, pakoras, paneer tikka, roasted peanuts, and more. Just use a light spray or brush of oil for best results.


3. Does the air fryer require preheating?
While not always necessary, a quick 2–3 minute preheat helps make snacks like tikkis, fries, and kebabs extra crisp.


4. Is the basket easy to clean?
Yes! The non-stick basket of the Philips HD9200/90 Air Fryer is dishwasher safe. Most users find it much easier to clean than a traditional kadhai or frying pan.


5. Can I bake cakes or bread in this model?
It’s mainly designed for snacks and roasting. Baking is possible for small cakes, but the manual controls and compact size make it less ideal for regular baking.


6. What kind of plug/outlet does it require?
It uses a standard Indian 16A power socket due to its 1400W rating. Avoid plugging into old or overloaded power strips.


7. Is there a pause button or digital display?
No, the Philips HD9200/90 Air Fryer uses manual knobs for time and temperature—simple, but without pause or alerts.


8. How do I avoid food sticking to the basket?
Use a little oil spray and don’t overcrowd the basket. For sticky batters, consider parchment paper or an air fryer liner.


9. Does it make noise or create a smell?
There’s a “tick-tock” sound from the timer, but it’s not very loud. No lingering oil smells if you clean regularly. Smoking only happens if grease builds up.


10. Is the Philips HD9200/90 Air Fryer worth it compared to cheaper brands?
Yes, if you want better durability, real warranty support, and trusted results. It’s a best-seller for a reason—most Indian users find it delivers healthy, tasty snacks with far less effort than traditional frying.